Parallel Testing With JUnit 5 And Selenium [Tutorial]
Shalini Baskaran
Posted On: September 11, 2021
![]() 125966 Views
125966 Views
![]() 14 Min Read
14 Min Read
This article is a part of our Learning Hub. For more in-depth resources, check out our hub on JUnit Tutorial.
Parallel test execution with Selenium is one of the major factors that can affect the test execution speed. Serial execution in Selenium can be effective only if the tests have to be run on a small number of browser and OS combinations. Therefore, parallel execution should be leveraged at the early stages of QA testing to expedite test execution rapidly.
Though you can reap the benefits of parallel testing in Selenium using a local Selenium Grid, it might not be a feasible option if you want to perform testing on umpteen combinations of browsers, operating systems, and devices. This is where testing on a cloud-based Selenium Grid like LamdaTest can be super advantageous. It can further help in expediting parallel test execution by leveraging the benefits offered by the Selenium Grid.

Being a Java developer, I am extensively using the features offered by the JUnit 5 framework for different test scenarios, including parallel testing with Selenium. JUnit 5 differs greatly from its predecessor (i.e., JUnit 4), with the differentiation starting with its core architecture. In case you are getting started with JUnit 5, I would recommend having a close look at the JUnit 5 architecture so that you can closely follow how to run tests with the framework.
In this JUnit 5 tutorial, we deep dive into how to perform parallel test execution with the JUnit 5 framework. A number of features in JUnit 5 are in the experimental phase, including parallel test execution. But, like a good samaritan, you can also provide your valuable feedback to the JUnit team so that they can promote the feature and take it out of the experimental phase. If you are preparing for an interview you can learn more through Junit interview questions.
TABLE OF CONTENT
Introduction to JUnit 5 Framework
Before I deep dive into the essentials of the JUnit 5 parallel test execution, let me do a quick rundown of the basics of the JUnit 5 framework. In the JUnit 4 framework, all the functionalities are wrapped in a single package. On the other hand, JUnit 5 comprises three distinct sub-components – JUnit Platform, JUnit Jupiter, and JUnit Vintage.
Shown below is the architectural view of the JUnit 5 framework:
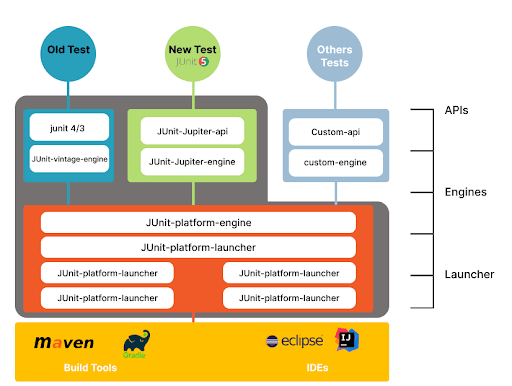
There is a significant difference as far as JUnit 5 annotations, and JUnit 4 annotations are concerned. Though some annotations in JUnit 5 have changed from a naming standpoint, annotations like @Rule and @ClassRule are removed, whereas new annotations like @ExtendWith and @RegisterExtension are added in the JUnit 5 framework.
If you are coming from the JUnit 4 background, you can check out JUnit 4 vs JUnit 5 comparison to understand the differences between the two JUnit versions. Although there are umpteen reasons where JUnit 5 has a huge upper hand over JUnit 4, do check out why to use JUnit 5 that deep dives into the major advantages of the JUnit 5 framework.
Overall, JUnit 5 is much more extensible due to its unique architecture, provides the flexibility to use multiple runners, and provides a set of useful annotations that enhance the tests.
JUnit 5 Parallel Test Execution
Now that we have covered the essentials of the JUnit 5 framework, we look at how to perform parallel test execution with JUnit 5 from a Selenium automation testing point of view. For running the tests, you would need a working setup of JUnit on your machine. Make sure to check out our blog on how to set up a JUnit environment where the steps mentioned in the blog remain unchanged for JUnit 5.
Let’s get to the million-dollar question ‘How to run JUnit 5 tests in parallel’? For starters, JUnit 5 parallel execution is still in the experimental feature and is expected to become mainstream in the upcoming version of JUnit 5. So, to enable parallel test execution in JUnit 5, set junit.jupiter.execution.parallel.enabled to true in junit-platform.properties file.
Read – How to execute JUnit 4 tests with JUnit 5
Even after setting the above property to true, test classes and test methods would still execute sequentially. SAME_THREAD and CONCURRENT are the two modes that let you control the sequence of test execution. As specified in the official JUnit 5 user documentation, SAME_THREAD (default execution mode) forces the execution in the same thread that the parent uses. On the other hand, CONCURRENT lets you execute concurrently unless a resource lock forces execution in the same thread.
Here are the configuration parameters for executing all the JUnit 5 tests in parallel:
|
1 2 |
junit.jupiter.execution.parallel.enabled = true junit.jupiter.execution.parallel.mode.default = concurrent |
Once the parallel execution property is set (or enabled), the JUnit Jupiter engine will run the tests in parallel as per the configurations provided with the synchronization mechanisms. In the further section of this JUnit 5 tutorial, we will deep dive into the practical implementation of JUnit 5 parallel test execution for Selenium automation testing.
If you are a Java expert, you can gain recognition for your Java knowledge and help accelerate your career with this free JUnit certification.
This JUnit certification establishes testing standards for those who wish to advance their careers in Selenium automation testing with JUnit.
Here’s a short glimpse of the JUnit certification from LambdaTest:
Demonstration: JUnit 5 Parallel Test Execution for Selenium Automation Testing
Let’s get our hands dirty for demonstrating parallel test execution with JUnit 5. First, we take a simple Java example that comprises two classes executed in parallel using the JUnit 5 framework.
Let us look at a simple example of running the JUnit 5 tests in parallel.
FileName – Test1.java
|
1 2 3 4 5 6 7 8 9 10 11 12 13 14 15 16 17 18 19 20 21 22 23 24 25 26 27 28 29 30 31 32 33 34 35 36 37 38 39 40 41 42 43 44 45 46 47 48 49 50 51 |
package SimpleTest; import org.junit.jupiter.api.*; public class Test1 { @BeforeAll public static void start() { System.out.println("=======Starting junit 5 tests========"); } @BeforeEach public void setup() { System.out.println("=======Setting up the prerequisites========"); } @Test void test1_FirstTest() { System.out.println(Thread.currentThread().getStackTrace()[1] .getMethodName()+" => executed successfully"); } @Test void test1_SecondTest() { System.out.println(Thread.currentThread().getStackTrace()[1] .getMethodName()+" => executed successfully"); } @Test void test1_ThirdTest() { System.out.println(Thread.currentThread().getStackTrace()[1] .getMethodName()+" => executed successfully"); } @Test void test1_FourthTest() { System.out.println(Thread.currentThread().getStackTrace()[1] .getMethodName()+" => executed successfully"); } @AfterEach public void tearDown() { System.out.println("Tests ended"); } @AfterAll public static void end() { System.out.println("All the tests are executed"); } } |
FileName – Test2.java
|
1 2 3 4 5 6 7 8 9 10 11 12 13 14 15 16 17 18 19 20 21 22 23 24 25 26 27 28 29 30 31 32 33 34 35 36 37 38 39 40 41 42 43 |
package SimpleTest; import org.junit.jupiter.api.*; public class Test2 { @BeforeAll public static void start() { System.out.println("=======Starting junit 5 tests========"); } @BeforeEach public void setup() { System.out.println("=======Setting up the prerequisites========"); } @Test void test2_FirstTest() { System.out.println(Thread.currentThread().getStackTrace()[1] .getMethodName()+" => executed successfully"); } @Test void test2_SecondTest() { System.out.println(Thread.currentThread().getStackTrace()[1] .getMethodName()+" => executed successfully"); } @Test void test2_ThirdTest() { System.out.println(Thread.currentThread().getStackTrace()[1] .getMethodName()+" => executed successfully"); } @Test void test2_FourthTest() { System.out.println(Thread.currentThread().getStackTrace()[1] .getMethodName()+" => executed successfully"); } @AfterEach public void tearDown() { System.out.println("Tests ended"); } @AfterAll public static void end() { System.out.println("All the tests are executed"); } } |
FileName – pom.xml
|
1 2 3 4 5 6 7 8 9 10 11 12 13 14 15 16 17 18 19 20 21 22 23 24 25 26 27 28 29 30 31 32 33 34 35 36 37 38 39 40 41 42 |
<?xml version="1.0" encoding="UTF-8"?> <project xmlns="http://maven.apache.org/POM/4.0.0" xmlns:xsi="http://www.w3.org/2001/XMLSchema-instance" xsi:schemaLocation="http://maven.apache.org/POM/4.0.0 http://maven.apache.org/xsd/maven-4.0.0.xsd"> <modelVersion>4.0.0</modelVersion> <groupId>org.example</groupId> <artifactId>ParallelTest</artifactId> <version>1.0-SNAPSHOT</version> <properties> <maven.compiler.source>1.8</maven.compiler.source> <maven.compiler.target>${maven.compiler.source}</maven.compiler.target> <junit.jupiter.version>5.7.1</junit.jupiter.version> </properties> <dependencies> <dependency> <groupId>org.junit.jupiter</groupId> <artifactId>junit-jupiter-engine</artifactId> <version>${junit.jupiter.version}</version> <scope>test</scope> </dependency> <dependency> <groupId>org.junit.jupiter</groupId> <artifactId>junit-jupiter-api</artifactId> <version>${junit.jupiter.version}</version> <scope>test</scope> </dependency> <dependency> <groupId>org.seleniumhq.selenium</groupId> <artifactId>selenium-java</artifactId> <version>3.141.59</version> </dependency> <dependency> <groupId>org.junit.jupiter</groupId> <artifactId>junit-jupiter-params</artifactId> <version>5.7.1</version> <scope>test</scope> </dependency> </dependencies> </project> |
Now how do we run JUnit 5 test cases in parallel? The JUnit 5 framework provides two distinct mechanisms through which you can run tests in parallel:
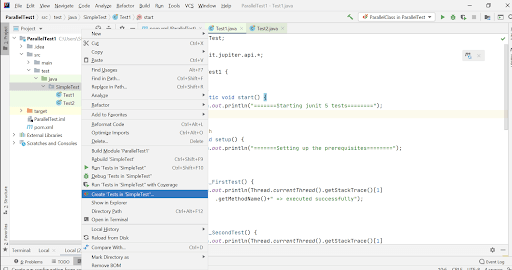
Method 1: Add VM arguments under Run configuration
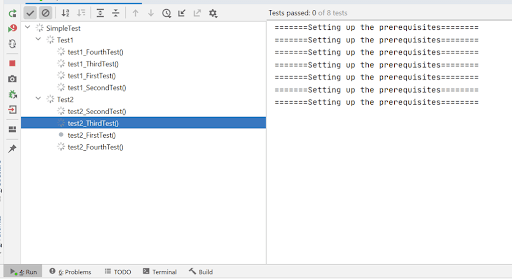
Step 1: Right-click on the folder which contains the tests that you intend to run in parallel. Click on Create Tests.
Step 2: In the Create Run configuration, add the below arguments in VM options:
|
1 2 |
-Djunit.jupiter.execution.parallel.enabled=true -Djunit.jupiter.execution.parallel.mode.default=concurrent |
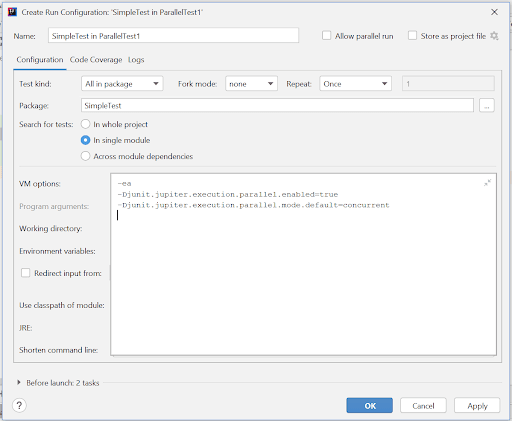
Step 3: Click OK and run the Tests.
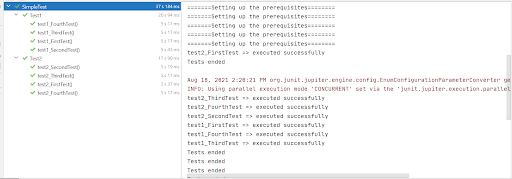
From the execution output, it is evident that the JUnit 5 tests are running in parallel.
Execution Output
This JUnit Tutorial for beginners and professionals will help you learn how to performing parallel testing using JUnit framework and Selenium.
Method 2: JUnit 5 parallel test execution using Maven
In this particular method, parallel execution options are added in the pom.xml file. If you are new to Maven, you can have a quick look at the Maven tutorial for Selenium that helps you get started with Maven for Eclipse IDE.
For demonstration, we have used the earlier example where two tests in different Java files were executed in parallel. Follow the below mentioned steps to realize parallel execution in JUnit 5 using the said approach:
Step 1: Set junit.jupiter.execution.parallel.enabled to true and junit.jupiter.execution.parallel.mode.default to concurrent in pom.xml
|
1 2 3 4 5 6 7 8 9 10 11 12 13 14 15 16 |
<build> <plugins> <plugin> <artifactId>maven-surefire-plugin</artifactId> <version>2.22.1</version> <configuration> <properties> <configurationParameters> junit.jupiter.execution.parallel.enabled=true junit.jupiter.execution.parallel.mode.default=concurrent </configurationParameters> </properties> </configuration> </plugin> </plugins> </build> |
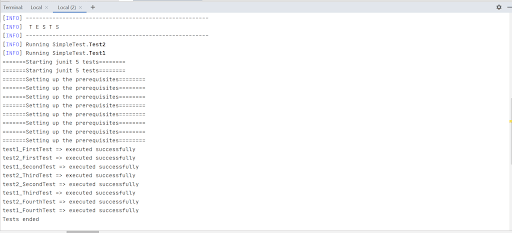
Step 2: Run the Maven command mvn clean test to run the tests from the command line. In case you are intrigued to know about command-line execution with Maven for JUnit, make sure to check out our detailed blog that demonstrates running JUnit tests from the command line.
Shown below is the execution snapshot, which indicates that the test execution has been completed successfully:
Till now, we have demonstrated parallel execution using JUnit 5 without any involvement of Selenium in it. In the further section of this JUnit 5 tutorial, we look at leveraging parallel test execution with JUnit 5 for expediting Selenium tests.
If you are curious to learn more about the other essentials of the JUnit framework, head over to the detailed JUnit tutorial on LambdaTest learning hub.
How to perform JUnit 5 parallel test execution using Selenium
The true potential of parallel testing in Selenium can be exploited by shifting the tests from a local Selenium Grid to a cloud Selenium Grid like LambdaTest. You can check out our cloud testing tutorial to understand the major benefits offered by a cloud-based Grid.
LambdaTest provides an excellent platform to run Selenium tests across 2,000+ browsers and operating systems, all in the cloud! Furthermore, since the code changes are majorly involved on the infrastructure front, it is easy to port an existing implementation that works on a local Selenium Grid to a cloud-based Selenium Grid.
Once you have created an account on LambdaTest, make sure to note the username and access key that is available on the LambdaTest profile page. Then, you can generate the desired capabilities for browser and platform combinations using the LambdaTest capabilities generator.
Below is the code for running our Junit 5 tests on a cloud-based Selenium Grid like LambdaTest:
FileName – RunningTestsInParallelInGrid.java
|
1 2 3 4 5 6 7 8 9 10 11 12 13 14 15 16 17 18 19 20 21 22 23 24 25 26 27 28 29 30 31 32 33 34 35 36 37 38 39 40 41 42 43 44 45 46 47 48 49 50 51 52 53 54 55 56 57 58 59 60 61 62 63 64 65 66 67 68 69 70 71 72 73 74 75 76 77 78 79 80 81 82 83 84 85 86 87 88 89 90 91 92 93 94 95 96 97 98 99 100 101 102 103 104 105 106 107 108 109 110 111 112 113 114 115 116 117 118 119 120 121 122 123 124 125 126 127 128 129 130 131 132 133 134 135 136 137 138 139 140 141 142 143 144 145 146 147 148 149 150 151 152 153 154 155 156 157 158 159 160 161 162 163 164 165 166 167 168 169 170 171 172 173 174 175 176 177 178 179 180 181 182 183 184 185 186 187 188 189 190 191 192 193 194 195 196 197 198 199 200 201 202 203 204 205 206 207 208 209 210 211 212 213 214 215 216 217 218 219 220 221 222 223 224 |
import org.openqa.selenium.By; import org.junit.jupiter.api.*; import org.openqa.selenium.WebElement; import org.openqa.selenium.interactions.Actions; import org.openqa.selenium.remote.DesiredCapabilities; import org.openqa.selenium.remote.RemoteWebDriver; import org.openqa.selenium.support.ui.ExpectedConditions; import org.openqa.selenium.support.ui.WebDriverWait; import java.net.MalformedURLException; import java.net.URL; import java.util.List; import java.util.concurrent.TimeUnit; public class RunningTestsInParallelInGrid { String username = "YOUR_USERNAME"; //Enter your username String accesskey = "YOUR_ACCESS_KEY"; //Enter your accesskey static RemoteWebDriver driver = null; String gridURL = "@hub.lambdatest.com/wd/hub"; String urlToTest = "https://www.lambdatest.com/"; @BeforeAll public static void start() { System.out.println("=======Running junit 5 tests in parallel in LambdaTest Grid has started========"); } @BeforeEach public void setup() { System.out.println("Setting up the drivers and browsers"); DesiredCapabilities capabilities = new DesiredCapabilities(); capabilities.setCapability("browserName", "chrome"); //To specify the browser capabilities.setCapability("version", "70.0"); //To specify the browser version capabilities.setCapability("platform", "win10"); // To specify the OS capabilities.setCapability("build", "Running_ParallelJunit5Tests_In_Grid"); //To identify the test capabilities.setCapability("name", "Parallel_JUnit5Tests"); capabilities.setCapability("network", true); // To enable network logs capabilities.setCapability("visual", true); // To enable step by step screenshot capabilities.setCapability("video", true); // To enable video recording capabilities.setCapability("console", true); // To capture console logs try { driver = new RemoteWebDriver(new URL("https://" + username + ":" + accesskey + gridURL), capabilities); } catch (MalformedURLException e) { System.out.println("Invalid grid URL"); } catch (Exception e) { System.out.println(e.getMessage()); } } @Test @DisplayName("Title_Test") @Tag("Sanity") public void launchAndVerifyTitle_Test() { String methodName = Thread.currentThread() .getStackTrace()[1] .getMethodName(); System.out.println("********Execution of "+methodName+" has been started********"); System.out.println("Launching LambdaTest website started.."); driver.get(urlToTest); driver.manage().window().maximize(); driver.manage().timeouts().pageLoadTimeout(10, TimeUnit.SECONDS); String actualTitle = driver.getTitle(); System.out.println("The page title is "+actualTitle); String expectedTitle ="Most Powerful Cross Browser Testing Tool Online | LambdaTest"; System.out.println("Verifying the title of the webpage started"); Assertions.assertEquals(expectedTitle, actualTitle); System.out.println("The webpage has been launched and the title of the webpage has been veriified successfully"); System.out.println("********Execution of "+methodName+" has ended********"); } @Test @DisplayName("Login_Test") @Tag("Sanity") public void login_Test() { String methodName = Thread.currentThread() .getStackTrace()[1] .getMethodName(); System.out.println("********Execution of "+methodName+" has been started********"); System.out.println("Launching LambdaTest website started.."); driver.get(urlToTest); driver.manage().window().maximize(); driver.manage().timeouts().pageLoadTimeout(10, TimeUnit.SECONDS); WebElement login = driver.findElement(By.xpath("//a[text()='Login']")); login.click(); WebElement username = driver.findElement(By.xpath("//input[@name=\"email\"]")); WebElement password = driver.findElement(By.xpath("//input[@name=\"password\"]")); WebDriverWait wait = new WebDriverWait(driver,20); wait.until(ExpectedConditions.visibilityOf(username)); username.clear(); username.sendKeys("acvdd@gmail.com"); password.clear(); password.sendKeys("abc@123"); WebElement loginButton = driver.findElement(By.xpath("//button[text()='Login']")); loginButton.click(); driver.manage().timeouts().pageLoadTimeout(10, TimeUnit.SECONDS); String actual = driver.getTitle(); String expected = "Welcome - LambdaTest"; Assertions.assertEquals(expected, actual); System.out.println("The user has been successfully logged in"); System.out.println("********Execution of "+methodName+" has ended********"); } @Test @DisplayName("Logo_Test") public void logo_Test() { String methodName = Thread.currentThread() .getStackTrace()[1] .getMethodName(); System.out.println("********Execution of "+methodName+" has been started********"); System.out.println("Launching LambdaTest website started.."); driver.get(urlToTest); driver.manage().window().maximize(); driver.manage().timeouts().pageLoadTimeout(10, TimeUnit.SECONDS); System.out.println("Verifying of webpage logo started.."); WebElement logo = driver.findElement(By.xpath("//*[@id=\"header\"]/nav/div/div/div[1]/div/a/img")); boolean is_logo_present = logo.isDisplayed(); if(is_logo_present) { System.out.println("The logo of LambdaTest is displayed"); } else { Assertions.assertFalse(is_logo_present,"Logo is not present"); } System.out.println("********Execution of "+methodName+" has ended********"); } @Test @DisplayName("Blog_Test") public void blogPage_Test() { String methodName = Thread.currentThread() .getStackTrace()[1] .getMethodName(); System.out.println("********Execution of "+methodName+" has been started********"); System.out.println("Launching LambdaTest website started.."); driver.get(urlToTest); driver.manage().window().maximize(); driver.manage().timeouts().pageLoadTimeout(10, TimeUnit.SECONDS); WebElement resources = driver.findElement(By.xpath("//*[text()='Resources ']")); List<WebElement> options_under_resources = driver.findElements(By.xpath("//*[text()='Resources ']/../ul/a")); boolean flag = resources.isDisplayed(); if(flag) { System.out.println("Resources header is visible in the webpage"); Actions action = new Actions(driver); action.moveToElement(resources).build().perform(); WebDriverWait wait=new WebDriverWait(driver, 20); wait.until(ExpectedConditions.visibilityOfAllElements(options_under_resources)); for(WebElement element : options_under_resources) { if(element.getText().equals("Blog")){ System.out.println("Clicking Blog option has started"); element.click(); System.out.println("Clicking Blog option has ended"); driver.manage().timeouts().pageLoadTimeout(20,TimeUnit.SECONDS); Assertions.assertEquals("LambdaTest Blogs", driver.getTitle()); break; } else Assertions.fail("Blogs option is not available"); } } else { Assertions.fail("Resources header is not visible"); } System.out.println("********Execution of "+methodName+" has ended********"); } @Test @DisplayName("Cerification_Test") public void certificationPage_Test() { String methodName = Thread.currentThread() .getStackTrace()[1] .getMethodName(); System.out.println("********Execution of "+methodName+" has been started********"); System.out.println("Launching LambdaTest website started.."); driver.get(urlToTest); driver.manage().window().maximize(); driver.manage().timeouts().pageLoadTimeout(10, TimeUnit.SECONDS); WebElement resources = driver.findElement(By.xpath("//*[text()='Resources ']")); List<WebElement> options_under_resources = driver.findElements(By.xpath("//*[text()='Resources ']/../ul/a")); boolean flag = resources.isDisplayed(); if(flag) { System.out.println("Resources header is visible in the webpage"); Actions action = new Actions(driver); action.moveToElement(resources).build().perform(); WebDriverWait wait = new WebDriverWait(driver, 20); wait.until(ExpectedConditions.visibilityOfAllElements(options_under_resources)); for (int i = 0; i < options_under_resources.size(); i++) { String value = options_under_resources.get(i).getText(); if (value.equals("Certifications")) { System.out.println("Clicking Certifications option has started"); action.moveToElement(options_under_resources.get(i)).build().perform(); options_under_resources.get(i).click(); System.out.println("Clicking Certifications option has ended"); driver.manage().timeouts().pageLoadTimeout(20, TimeUnit.SECONDS); String expectedCertificationPageTitle = "LambdaTest Selenium Certifications - Best Certifications For Automation Testing Professionals"; String actualCertificationPageTitle = driver.getTitle(); Assertions.assertEquals(expectedCertificationPageTitle, actualCertificationPageTitle); break; } } } System.out.println("********Execution of "+methodName+" has ended********"); } @Test @DisplayName("Support_Test") public void supportPage_Test() { String methodName = Thread.currentThread() .getStackTrace()[1] .getMethodName(); System.out.println("********Execution of "+methodName+" has been started********"); System.out.println("Launching LambdaTest website started.."); driver.get(urlToTest); driver.manage().window().maximize(); driver.manage().timeouts().pageLoadTimeout(10, TimeUnit.SECONDS); WebElement supportHeader = driver.findElement(By.xpath("(//div//*[text()='Support'])[1]")); boolean flag = supportHeader.isDisplayed(); if(flag) { System.out.println("support header is visible in the webpage"); supportHeader.click(); } else { Assertions.fail("support header is not visible"); } System.out.println("********Execution of "+methodName+" has ended********"); } @AfterEach public void tearDown() { System.out.println("Quitting the browsers has started"); driver.quit(); System.out.println("Quitting the browsers has ended"); } @AfterAll public static void end() { System.out.println("Tests ended"); } } |
As mentioned earlier, JUnit 5 parallel execution test execution can be achieved by adding the arguments in VM options in Run configuration or running through Maven by adding the plugin in the pom.xml file.
Code Walkthrough
Rather than doing a detailed code walkthrough, we would touch upon the important aspects of the source code.
To get started, we create a Remote WebDriver instance using the browser and platform capabilities added in the setup() method. Then, as seen below, a pair of username and access key is used to access the LambdaTest Grid.
|
1 |
driver = new RemoteWebDriver(new URL("https://" + username + ":" + accesskey + gridURL), capabilities); |
The class comprises 6 test methods, with each test method using relevant locators in Selenium to locate the relevant WebElements. For example, in the test method login_Test(), the XPath Selenium locator is used to locate the page’s email and password elements. In case you need a quick recap of XPath, make sure to check out our detailed guide for using XPath locators in Selenium.
|
1 2 |
WebElement username = driver.findElement(By.xpath("//input[@name=\"email\"]")); WebElement password = driver.findElement(By.xpath("//input[@name=\"password\"]")); |
When running the test, there is a possibility that dynamically loaded content (or WebElement) might not be present on the page. Interacting with an Element that is not yet a part of the DOM could lead to exceptions. Since handling dynamic content is one of the major Selenium automation challenges, it needs to be addressed by adding appropriate delay(s) to make the relevant WebElement available for access in the DOM.
|
1 |
driver.manage().timeouts().pageLoadTimeout(10, TimeUnit.SECONDS); |
Expected conditions in Selenium WebDriver are used at appropriate places in the implementation for ensuring that the WebElements being interacted with are visible, interactable, etc. For example, in the test method blogPage_Test(), a wait is performed on the expected condition visibilityOfAllElements. Then, if the corresponding elements are visible, appropriate actions are performed on those elements.
|
1 |
wait.until(ExpectedConditions.visibilityOfAllElements(options_under_resources)); |
JUnit asserts with Selenium are used in all the test methods to assert wherever failures are encountered during the process of Selenium automation testing. Some of the same asserts from a few test methods are mentioned below:
|
1 2 |
Assertions.assertEquals(expectedCertificationPageTitle, actualCertificationPageTitle); Assertions.assertFalse(is_logo_present,"Logo is not present"); |
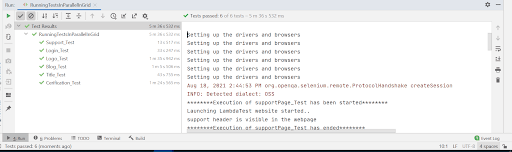
Execution
Shown below is the execution snapshot, which indicates that the tests are executing in parallel:
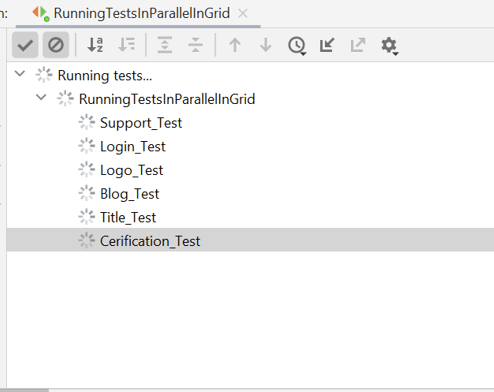
As seen below, we can see that the test execution has been completed successfully.
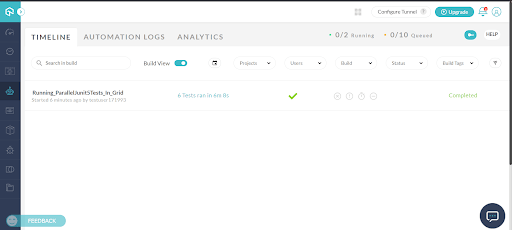
To check the test execution status, navigate to the LambdaTest automation dashboard, where you can even check the video of the test execution.
How to perform JUnit 5 parallel test execution using parameterization in Selenium
In the earlier section, we executed six different tests on a single browser and platform combination. However, the approach can falter if tests have to be performed on ‘N’ different test combinations.
This is where parameterized test with JUnit in Selenium can be super effective as the relevant test combinations can be passed as parameters to parameterized test methods. Like its predecessor, JUnit 5 also provides flexibility to leverage parameterization in Selenium to reduce LOC (Lines of Code) and achieve better test coverage with lesser code.
Add the following dependency in pom.xml so that you can parameterize tests using the JUnit 5 framework:
|
1 2 3 4 5 6 |
<dependency> <groupId>org.junit.jupiter</groupId> <artifactId>junit-jupiter-params</artifactId> <version>5.7.1</version> <scope>test</scope> </dependency> |
For demonstration, we would be performing tests on Chrome and Firefox browsers on the LambdaTest Selenium Grid. The browser and platform combinations are generated using the LambdaTest capabilities generator.
FileName – crossBrowserTests.java
|
1 2 3 4 5 6 7 8 9 10 11 12 13 14 15 16 17 18 19 20 21 22 23 24 25 26 27 28 29 30 31 32 33 34 35 36 37 38 39 40 41 42 43 44 45 46 47 48 49 50 51 52 53 54 55 56 57 58 59 60 61 62 63 64 65 66 67 68 69 70 71 72 73 74 75 76 77 78 79 80 81 82 83 84 85 86 87 88 89 90 91 92 93 94 95 96 97 98 99 100 101 102 103 104 105 106 107 108 109 110 111 112 113 114 115 116 117 118 119 120 121 122 123 124 125 126 127 128 129 130 131 132 133 134 135 136 137 138 139 140 141 142 143 144 145 146 147 148 149 150 151 152 153 154 155 156 157 158 159 160 161 162 163 164 165 166 167 168 169 170 171 172 173 174 175 |
package crossBrowserTests; import org.junit.jupiter.api.*; import org.junit.jupiter.params.ParameterizedTest; import org.junit.jupiter.params.provider.Arguments; import org.junit.jupiter.params.provider.MethodSource; import org.openqa.selenium.By; import org.openqa.selenium.WebElement; import org.openqa.selenium.remote.DesiredCapabilities; import org.openqa.selenium.remote.RemoteWebDriver; import org.openqa.selenium.support.ui.ExpectedConditions; import org.openqa.selenium.support.ui.WebDriverWait; import java.net.MalformedURLException; import java.net.URL; import java.util.concurrent.TimeUnit; import java.util.stream.Stream; import static org.junit.jupiter.params.provider.Arguments.arguments; public class crossBrowserTest { String username = "user_name"; //Enter your username String accesskey = "access_key"; //Enter your accesskey static RemoteWebDriver driver = null; String gridURL = "@hub.lambdatest.com/wd/hub"; String urlToTest = "https://www.lambdatest.com/"; @BeforeAll public static void start() { System.out.println("=======Starting junit 5 tests in LambdaTest Grid========"); } @BeforeEach public void setup(){ System.out.println("=======Setting up drivers and browser========"); } public void browser_setup(String browser) { System.out.println("Setting up the drivers and browsers"); DesiredCapabilities capabilities = new DesiredCapabilities(); if(browser.equalsIgnoreCase("Chrome")) { capabilities.setCapability("browserName", "chrome"); //To specify the browser capabilities.setCapability("version", "70.0"); //To specify the browser version capabilities.setCapability("platform", "win10"); // To specify the OS capabilities.setCapability("build", "Running_Junit5Tests_In_Grid_Chrome"); //To identify the test capabilities.setCapability("name", "JUnit5Tests_Chrome"); capabilities.setCapability("network", true); // To enable network logs capabilities.setCapability("visual", true); // To enable step by step screenshot capabilities.setCapability("video", true); // To enable video recording capabilities.setCapability("console", true); // To capture console logs } if(browser.equalsIgnoreCase("Firefox")) { capabilities.setCapability("browserName", "Firefox"); //To specify the browser capabilities.setCapability("version", "76.0"); //To specify the browser version capabilities.setCapability("platform", "win10"); // To specify the OS capabilities.setCapability("build", "Running_Junit5Tests_In_Grid_Firefox"); //To identify the test capabilities.setCapability("name", "JUnit5Tests_Firefox"); capabilities.setCapability("network", true); // To enable network logs capabilities.setCapability("visual", true); // To enable step by step screenshot capabilities.setCapability("video", true); // To enable video recording capabilities.setCapability("console", true); // To capture console logs } try { driver = new RemoteWebDriver(new URL("https://" + username + ":" + accesskey + gridURL), capabilities); } catch (MalformedURLException e) { System.out.println("Invalid grid URL"); } catch (Exception e) { System.out.println(e.getMessage()); } } @ParameterizedTest @MethodSource("browser") public void launchAndVerifyTitle_Test(String browser) { browser_setup(browser); String methodName = Thread.currentThread() .getStackTrace()[1] .getMethodName(); System.out.println("********Execution of "+methodName+" has been started********"); System.out.println("Launching LambdaTest website started.."); driver.get(urlToTest); driver.manage().window().maximize(); driver.manage().timeouts().pageLoadTimeout(10, TimeUnit.SECONDS); String actualTitle = driver.getTitle(); System.out.println("The page title is "+actualTitle); String expectedTitle ="Most Powerful Cross Browser Testing Tool Online | LambdaTest"; System.out.println("Verifying the title of the webpage started"); Assertions.assertEquals(expectedTitle, actualTitle); System.out.println("The webpage has been launched and the title of the webpage has been veriified successfully"); System.out.println("********Execution of "+methodName+" has ended********"); } @ParameterizedTest @MethodSource("browser") public void login_Test(String browser) { browser_setup(browser); String methodName = Thread.currentThread() .getStackTrace()[1] .getMethodName(); System.out.println("********Execution of "+methodName+" has been started********"); System.out.println("Launching LambdaTest website started.."); driver.get(urlToTest); driver.manage().window().maximize(); driver.manage().timeouts().pageLoadTimeout(10, TimeUnit.SECONDS); WebElement login = driver.findElement(By.xpath("//a[text()='Login']")); login.click(); WebElement username = driver.findElement(By.xpath("//input[@name='email']")); WebElement password = driver.findElement(By.xpath("//input[@name='password']")); WebDriverWait wait = new WebDriverWait(driver,20); wait.until(ExpectedConditions.visibilityOf(username)); username.clear(); username.sendKeys("abcwdwd@gmail.com"); password.clear(); password.sendKeys("abc@123"); WebElement loginButton = driver.findElement(By.xpath("//button[text()='Login']")); loginButton.click(); driver.manage().timeouts().pageLoadTimeout(10, TimeUnit.SECONDS); String actual = driver.getTitle(); String expected = "Welcome - LambdaTest"; Assertions.assertEquals(expected, actual); System.out.println("The user has been successfully logged in"); System.out.println("********Execution of "+methodName+" has ended********"); } @ParameterizedTest @MethodSource("browser") public void logo_Test(String browser) { browser_setup(browser); String methodName = Thread.currentThread() .getStackTrace()[1] .getMethodName(); System.out.println("********Execution of "+methodName+" has been started********"); System.out.println("Launching LambdaTest website started.."); driver.get(urlToTest); driver.manage().window().maximize(); driver.manage().timeouts().pageLoadTimeout(10, TimeUnit.SECONDS); System.out.println("Verifying of webpage logo started.."); WebElement logo = driver.findElement(By.xpath("//*[@id=\"header\"]/nav/div/div/div[1]/div/a/img")); boolean is_logo_present = logo.isDisplayed(); if(is_logo_present) { System.out.println("The logo of LambdaTest is displayed"); } else { Assertions.assertFalse(is_logo_present,"Logo is not present"); } System.out.println("********Execution of "+methodName+" has ended********"); } @AfterEach public void tearDown() { System.out.println("Quitting the browsers has started"); driver.quit(); System.out.println("Quitting the browsers has ended"); } @AfterAll public static void end() { System.out.println("Tests ended"); } static Stream<Arguments> browser() { return Stream.of( arguments("Chrome"), arguments("Firefox") ); } } |
Code Walkthrough
Since we are using parameterization in JUnit 5, the necessary package is imported at the beginning of the implementation.
|
1 |
import org.junit.jupiter.params.ParameterizedTest; |
The org.junit.jupiter.params.provider package is also imported since the stream of physical arguments would be used as input to the annotated @ParameterizedTest method.
|
1 |
import static org.junit.jupiter.params.provider.Arguments.arguments; |
The stream of Browser arguments is defined in the manner shown below. Each test method uses ‘browser’ as the input argument against which the test methods are run.
|
1 2 3 4 5 6 |
static Stream<Arguments> browser() { return Stream.of( arguments("Chrome"), arguments("Firefox") ); } |
Each test method calls the browser_setup() method, where the relevant browser and platform capabilities are set depending on the corresponding test combination. For example, remote Chrome Driver is instantiated if the parameter (i.e., browser) is set to Chrome. The same principle also applies to the Firefox browser.
|
1 2 3 4 5 6 7 8 |
public void browser_setup(String browser) { System.out.println("Setting up the drivers and browsers"); DesiredCapabilities capabilities = new DesiredCapabilities(); if(browser.equalsIgnoreCase("Chrome")) { ............................................. ............................................. ............................................. |
Since each test method is a parameterized one, it is defined under the @ParameterizedTest annotation. Similarly, the @MethodSource annotation is used to access the values returned from the factory methods of the class under which the annotation is declared.
As seen below, @MethodSource provides access to the value “browser” that is a stream of arguments (i.e. Stream< Arguments >). Hence, three test methods [i.e. launchAndVerifyTitle_Test(), login_Test(), and logo_Test()] would be run across two browser (i.e. Chrome and Firefox) combinations.
|
1 2 3 4 5 6 7 8 9 10 |
@ParameterizedTest @MethodSource("browser") public void launchAndVerifyTitle_Test(String browser) { browser_setup(browser); String methodName = Thread.currentThread() .getStackTrace()[1] .getMethodName(); ................................... ................................... ................................... |
Hence, you should see six test scenarios executing in parallel on the LambdaTest Selenium Grid. Apart from these code modifications, the rest of the implementation logic remains the same, as mentioned earlier.
The tearDown() method defined under the @AfterEach annotation is executed after each test run so that the subsequent tests are run on a fresh browser and OS combination.
|
1 2 3 4 5 6 |
@AfterEach public void tearDown() { System.out.println("Quitting the browsers has started"); driver.quit(); System.out.println("Quitting the browsers has ended"); } |
The method defined under @AfterAll annotation is run only after all the tests have completed execution.
|
1 2 3 4 |
@AfterAll public static void end() { System.out.println("Tests ended"); } |
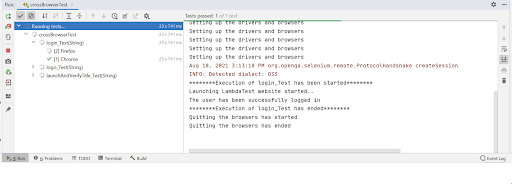
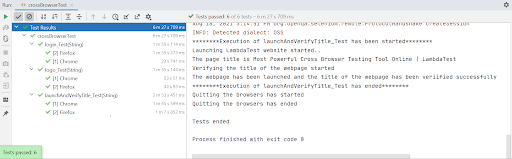
Execution
Shown below is the execution snapshot, which indicates that parallel test execution using JUnit 5 was carried out on Chrome and Firefox browsers.
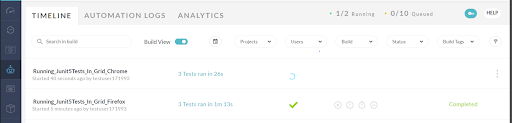
Shown below is the snapshot of the LambdaTest automation dashboard, which indicates that three test methods were run against two different browser combinations (i.e., Chrome and Firefox). The build title being shown in the dashboard was set when setting the desired browser capabilities.
|
1 2 3 4 5 6 7 8 9 10 |
apabilities.setCapability("build", "Running_Junit5Tests_In_Grid_Chrome"); //To identify the test capabilities.setCapability("name", "JUnit5Tests_Chrome"); ............................................. ............................................. ............................................. capabilities.setCapability("build", "Running_Junit5Tests_In_Grid_Firefox"); //To identify the test capabilities.setCapability("name", "JUnit5Tests_Firefox"); |
The IntelliJ execution console shows that the three tests were executed successfully against two different browser combinations.
Conclusion

In this JUnit 5 tutorial, we have seen how to perform parallel test execution with the JUnit 5 framework using different ways. To carry out our tests, we have also leveraged the LambdaTest cloud grid, which supports 3000+ browsers and various platforms. I hope you find this article helpful in understanding the parallel test execution using JUnit 5. I would love to hear your comments on this.
Keep exploring ..!
Frequently Asked Questions
Do JUnit 5 tests run in parallel?
JUnit tests are run sequentially in a single thread by default. However, parallel tests execution has been available since JUnit 5.3 and still is an experimental feature.
Is it possible to run JUnit 4 tests in JUnit 5?
Yes, you can run JUnit 4 tests in JUnit 5 by migrating the tests from JUnit 4 to JUnit 5.


Author’s Profile
Shalini Baskaran
Shalini works as a Technical Writer at LambdaTest. She loves to explore recent trends in test automation. Other than test automation, Shalini is always up for travel & adventure.
Blogs: 13
Got Questions? Drop them on LambdaTest Community. Visit now