
How To Easily Perform Specflow Parallel Execution With NUnit
Himanshu Sheth
Posted On: January 19, 2021
![]() 132076 Views
132076 Views
![]() 24 Min Read
24 Min Read
This article is a part of our Content Hub. For more in-depth resources, check out our content hub on Selenium NUnit Tutorial.
One of the prime responsibilities of any automation testers is to ensure that the tests get executed at an optimal pace. This can only be achieved if the implemented tests (or test suites) effectively utilize the automation testing framework (like Selenium) and the infrastructure where the tests are executed. Parallel execution in Selenium is the starting point for speeding up the test execution, as tests can be run simultaneously against different ‘environments.’
SpecFlow, the .NET-based framework for BDD (Behavior Driven Development) and Acceptance-driven test development used by Selenium C# Automation testers also support parallel execution. The support for Specflow Parallel Execution in Selenium was introduced in SpecFlow v.2.0. By executing BDD tests (or scenarios) in parallel, you can achieve faster execution times and accelerated feedback in the CI process.
In this SpecFlow NUnit tutorial, we look at how you can achieve NUnit Specflow Parallel Execution. Hence, NUnit will be used as the SpecFlow test runner for demonstrating parallel execution in Selenium. For a quick recap on SpecFlow with Selenium C#, you can refer to our blog on SpecFlow tutorial for Automation Testing. If you’re looking to improve your NUnit interview skills, check out our curated list of NUnit interview questions and answers.
TABLE OF CONTENT
Specflow Parallel Execution
SpecFlow+ Runner (or SpecRun) is the default test runner that was introduced in SpecFlow 3.5.x. For a SpecFlow NUnit project in Visual Studio, you have to select the runner as NUnit (instead of SpecFlow+ Runner) since the intent is to achieve NUnit Specflow Parallel Execution.
SpecFlow offers a couple of ways to perform Specflow Parallel Execution in Selenium. However, the effort involved in achieving parallelization with SpecFlow depends on the number of external dependencies in the tests. With Specflow NUnit, parallel test execution is possible ‘only’ at the features (or class) level and not the ‘scenario method’ level.
When performing NUnit Specflow Parallel Execution, the utmost care has to be taken to ensure that the NUnit tests are thread-safe. The primary reason is that NUnit (and other frameworks like xUnit) do not support Memory Isolation. The onus of the tests for thread-safety squarely lies on the developer implementing the test. SpecFlow provides thread-safe ScenarioContext used in parallel tests for injecting the context classes in the binding class.
We cover some of the important concepts essential for implementing Specflow Parallel Execution with NUnit.
Parallel Test Execution using Memory (AppDomain) Isolation
In case the test application (or test scenarios) do not have any external dependencies, and the application depends purely on a static state (e.g., caches), tests can be executed in parallel isolating by the AppDomain. Here, each thread’s memory (e.g., static fields) is isolated, and each test execution thread is hosted in a separate AppDomain.
The SpecFlow+ runner (or SpecRun) has to be used for Specflow Parallel Execution, as the runner supports parallel test execution with AppDomain, SharedAppDomain, and Process Isolation.
Note: Parallel execution with Memory isolation (or AppDomain) does not apply to NUnit tests since NUnit does not support Memory isolation.
Parallel Test Execution without Memory (AppDomain) Isolation
In case the test scenarios are not dependent on static fields, Specflow Parallel Execution can be achieved without AppDomain isolation. Parallel test execution using this approach helps in minimizing the initialization footprint, thereby lowering the memory requirements.
The NUnit test runner lets you run Specflow Parallel Execution without AppDomain isolation. Other test runners like MSTest, XUnit v2, and SpecRun also support this feature.
With Specflow Parallel Execution in Selenium and NUnit, the static context properties like ScenarioContext.Current, FeatureContext.Current and ScenarioStepContext.Current cannot be used. As shown below, the usage of these properties in NUnit Specflow Parallel Execution would result in SpecFlowException:
|
1 |
private readonly ScenarioContext _scenarioContext = ScenarioContext.Current; |

Instead, Dependency Injection (DI) or Context Injection should be used to instantiate and inject instances for scenarios.
Take this certification to master the fundamentals of Selenium automation testing with C# and prove your credibility as a tester.
Here’s a short glimpse of the Selenium C# 101 certification from LambdaTest:
Sharing data between Steps and Bindings
When performing automation testing with SpecFlow and the NUnit framework, you would come across scenarios where data has to be shared across different step definitions. It could be input data that is initialized in one step, and the same data is used in subsequent steps in the feature file.
This can be done using the ScenarioContext or FeatureContext. As the name indicates, ScenarioContext is created for individual scenario execution, and the same is disposed of when the scenario execution is complete. On the other hand, FeatureContext is created when the first scenario from a feature is executed and disposed of when the execution of that feature’s scenario is complete.
Here are some ways for sharing data between bindings (or Steps/Features) in SpecFlow:
- Using Static Members (or Private Fields)
- Using ScenarioContext
The easiest way for sharing data across steps is via creating private fields in the step definition class. Here, the data to be shared across steps is stored in different fields in the binding class. However, this approach’s major drawback is the state will not be shared when the steps in a feature are implemented across different binding classes.
In SpecFlow, the ScenarioContext class holds the shared state during the execution of a Scenario. ScenarioContext can be used to store values in key-value pairs between different steps. It is useful for sharing data between different steps and binding classes, as it is accessible by all the involved binding classes.
The properties ScenarioContext.Current and FeatureContext.Current are marked as obsolete in SpecFlow 3.0 since they could not be used when scenarios are executing in parallel.
In SpecFlow, the automation that connects the Gherkin specifications to the source code is Binding. The Binding class is a public class that is marked with the [Binding] attribute. Without the Binding class, SpecFlow will not be able to detect the class with Step Definitions. Hooks and Step definitions are the two kinds of bindings available in SpecFlow. We would look at Hooks at a later point in time in this blog.
For accessing ScenarioContext in Bindings, we use Context Injection by acquiring the instance of ScenarioContext through a request via a constructor. In SpecFlow, Context Injection works out of the box. To get the current context instance, we declare a ScenarioContext parameter for the step definition class’s constructor and save the same in an instance field.
Unlike the now-obsolete ScenarioContext.Current & FeatureContext.Current, which were not useful with NUnit SpecFlow parallel execution, ScenarioContext can be used in parallel execution scenarios.
Here is a sample usage of ScenarioContext in the CalculatorSteps example of SpecFlow:
|
1 2 3 4 5 6 7 8 9 10 11 12 13 14 15 16 17 18 19 20 21 22 23 24 |
[Binding] public class CalculatorSteps { private ScenarioContext _scenarioContext; public CalculatorSteps(ScenarioContext scenarioContext) { _scenarioContext = scenarioContext; } [Given(@"I have entered (.*) into the calculator")] public void GivenIHaveEnteredIntoTheCalculator(int input_number) { //Approach – 1 ((Calculator)_scenarioContext["Number_1"]) = input_number); //Approach – 2 ((Calculator)_scenarioContext["Number_1"]).Enter(input_number); } ................................................ ................................................ ................................................ } |
As shown above, the instance field _scenariocontext of type ScenarioContext can be used across different properties and methods.
ScenarioContext also helps in storing values in a dictionary (i.e. < Key >, < Value > pairs) between steps. It is much better than using private variables in step definition classes.
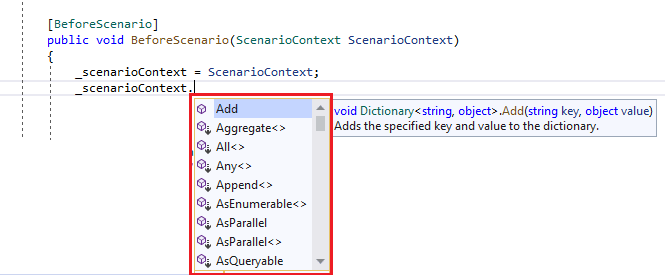
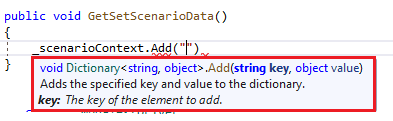
Here is an example where we store (or set) data in ScenarioContext and retrieve (or get) the corresponding data from the same instance.
|
1 2 3 4 5 6 7 8 9 10 11 12 13 14 15 |
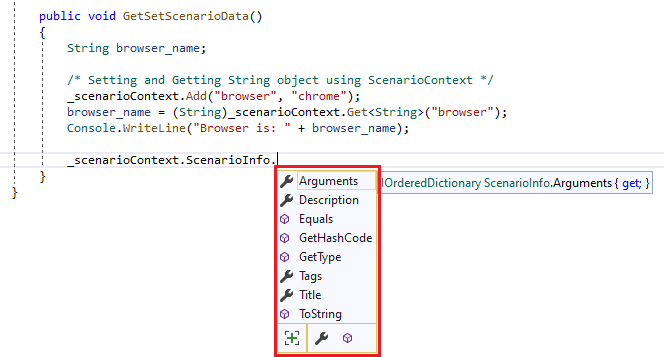
public void GetSetScenarioData() { String browser_name; /* Setting and Getting String object using ScenarioContext */ _scenarioContext.Add("browser", "chrome"); browser_name = (String)_scenarioContext.Get<String>("browser"); Console.WriteLine("Browser is: " + browser_name); /* Setting and Getting some object instance using ScenarioContext */ var someObjectInstance = new ObjectName(); _scenarioContext.Set<ObjectName>(someObjectInstance); _scenarioContext.Get<ObjectName>(); } |
FeatureContext can be acquired similarly to ScenarioContext. It has to be acquired via a function parameter in the Before/After Feature Hooks.
|
1 2 3 4 5 |
[AfterFeature] public static void AfterFeature(FeatureContext _featureContext) { Console.WriteLine("Feature Title: " + _featureContext.FeatureInfo.Title); } |
ScenarioContext.ScenarioInfo lets you access information such as title, tags, description, etc., related to the currently executing scenario.
- Using Context Injection
- Create classes that represent the shared data.
- The shared data is defined as Constructor Parameters in the Binding classes that intend to use the data.
- The constructor arguments are saved as instance fields to be used to inject the same context across different step-definitions.
The SpecFlow framework has to take care of the step definitions and the binding classes. It also configures the dependencies of its infrastructure classes. This is where Context Injection – a simple dependency injection shipped along with SpecFlow can be extremely useful.
Context Injection is used for instantiating and injecting class instances for scenarios. This helps group the shared state in context classes and inject them into the binding classes that require access to the shared state. For sharing data across bindings using Context Injection, we have to do the following:
Below are some of the important rules about Context Injection:
- The lifetime of the injected object is limited to the scenario’s execution.
- In case the injected object implements IDisposable, the same would be disposed of after the scenario has been executed.
- The SpecFlow framework has built-in logic to detect if the instance of a scenario object is created or not. Hence, the same instance of the object is returned within a particular scenario execution.
Further rules are available in SpecFlow’s official documentation on Context Injection. Here is a simple example of the usage of Context Injection:
|
1 2 3 4 5 6 7 8 9 10 11 12 |
namespace SpecFlowParallel { public sealed class WebDriverContext { public IWebDriver webdriver; public WebDriverContext() { webdriver = new ChromeDriver(); } } } |
In the above code snippet, we have registered the Web Driver object (or browser instance) through a constructor (i.e., WebDriveContext). The constructor is used for initializing the Web Driver object.
For using the property in the step bindings, the Context needs to be injected into the constructor. As mentioned earlier, we create an object for the Context, further included in the constructor.
|
1 2 3 4 5 6 7 8 |
private WebDriverContext _webDriverContext; .......................................... .......................................... public TodoAppLTSteps(WebDriverContext webDriverContext) { this._webDriverContext = webDriverContext; } |
For invoking the Web Driver in further implementation, we use the webDriverContext.webdriver from the newly created webDriverContext object.
Sample – IWebDriver Injection
|
1 2 3 4 5 6 7 8 9 10 11 12 13 14 15 16 17 18 19 20 21 22 23 24 25 26 27 28 29 30 31 32 33 34 35 36 37 38 39 |
namespace SpecFlowParallel { [Binding] public sealed class TodoAppLTSteps { String test_url = "https://lambdatest.github.io/sample-todo-app/"; private WebDriverContext _webDriverContext; public TodoAppLTSteps(WebDriverContext webDriverContext) { this._webDriverContext = webDriverContext; } [Given(@"that I am on the LambdaTest Sample app")] public void GivenThatIAmOnTheLambdaTestSampleApp() { _webDriverContext.webdriver.Url = test_url; _webDriverContext.webdriver.Manage().Window.Maximize(); System.Threading.Thread.Sleep(2000); } [Then(@"select first item")] public void ThenSelectFirstItem() { _webDriverContext.webdriver.FindElement(By.Name("li1")).Click(); } ................................... ................................... ................................... [Then(@"close the browser")] public void ThenCloseTheBrowser() { _webDriverContext.webdriver.Quit(); Console.WriteLine("Close Done"); } } } |

RUN YOUR TESTING SCRIPT ON SELENIUM GRID
3000+ Browsers AND OS
Hooks in SpecFlow
In the last few sections, we have been referring to SpecFlow Hooks. Let’s look at what Hooks are and how they can be used for Specflow Parallel Execution. Hooks (or event bindings) are used for performing additional automation logic at times, such as setup necessary for executing a test scenario. For using hooks, the [Binding] attribute should be added to the Class.
Hooks are global and can be restricted so that they run only for specific scenarios or features by defining scope binding, filtered by tags. The execution order of Hooks for the same event is undefined unless it is explicitly specified.
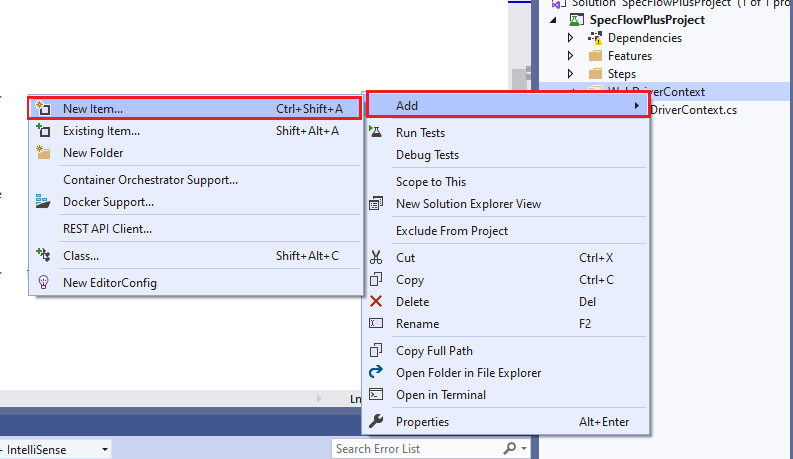
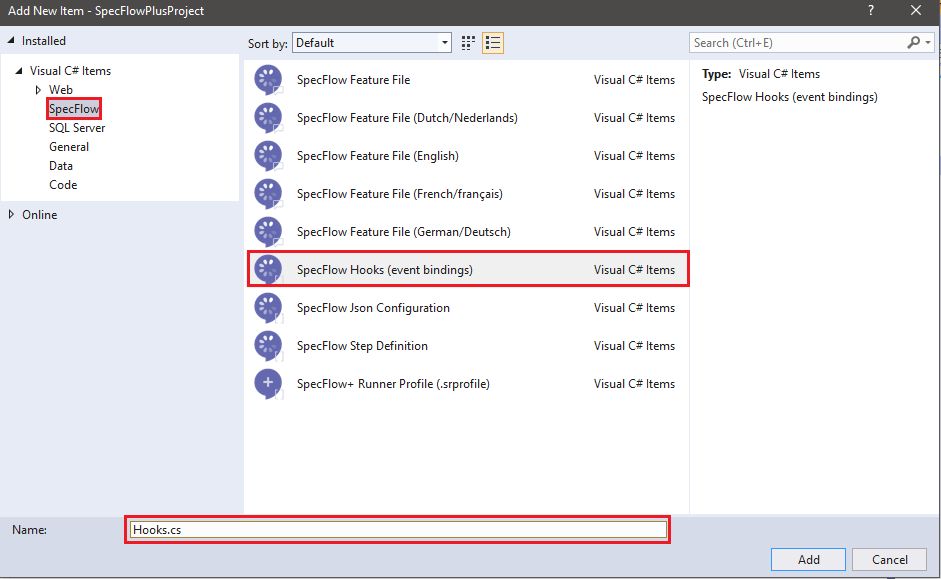
You can add SpecFlow hooks to an existing SpecFlow project by performing the following steps:
- Add a new item to the project.
- Select SpecFlow Hooks (event bindings) and assign a logical name to the file (e.g. Hooks.cs)
On successful addition of the Hooks file (i.e. Hooks.cs), the following class is automatically generated:
|
1 2 3 4 5 6 7 8 9 10 11 12 13 14 15 16 17 18 19 20 21 22 23 24 25 26 |
using System; using System.Collections.Generic; using System.Linq; using System.Text; using TechTalk.SpecFlow; namespace SpecFlowPlusProject.WebDriverContext { [Binding] public sealed class Hooks { // For additional details on SpecFlow hooks see http://go.specflow.org/doc-hooks [BeforeScenario] public void BeforeScenario() { //TODO: implement logic that has to run before executing each scenario } [AfterScenario] public void AfterScenario() { //TODO: implement logic that has to run after executing each scenario } } } |
Akin to NUnit attributes, there are predefined hooks in SpecFlow that are executed after certain events occur during the test execution. Here are the available orders in SpecFlow hooks and the order in which they are executed:
| [BeforeTestRun] | [BeforeFeature] |
| [BeforeScenario] | [BeforeScenarioBlock] |
| [BeforeStep] | [AfterStep] |
| [AfterScenarioBlock] | [AfterScenario] |
| [AfterFeature] | [AfterTestRun] |
Here is the detailed description of the available Hook attributes:
| Attribute | Description |
|---|---|
| [BeforeFeature]/[AfterFeature] | The Automation Logic has to run before/after the execution of each feature. The method under the attribute must be static. |
| [BeforeTestRun]/[AfterTestRun] | The Automation Logic has to run before/after the execution of each test run. The method under the attribute must be static. |
| [BeforeScenario]/[AfterScenario] | The Automation Logic has to run before/after the execution of each scenario. |
| [BeforeStep]/[AfterStep] | The Automation Logic has to run before/after the execution of each scenario step. |
| [BeforeScenarioBlock]/[AfterScenarioBlock] | The Automation Logic has to run before/after the execution of each scenario block (i.e., between ‘given’ and ‘when’). |
In case a Hook throws an unhandled exception, the subsequent hooks of the same type are not executed. We demonstrate the usage of hooks along with IObjectContainer in the subsequent section.
The IObjectContainer
Do you know SpecFlow uses a special dependency injection framework called BoDi for realizing Context Injection? BoDi is a simple IoC (Inversion of Control) container that is also embeddable as a source code. It is an open-source mini DI (Dependency Injection) framework that is available on GitHub.
The Container used by SpecFlow is customizable, which means that there is flexibility for modifying the resolution rules or including object instances that are already created. The Container can be customized from a SpecFlow Plugin or in the [Before Scenario] hook in SpecFlow.
For customizing the Injection rules, the responsible class should obtain an instance of BoDi.IObjectContainer – an instance of the scenario execution container. Constructor Injection is used for realizing the same.
The below code snippet registers the LambdaTestDriver (which is used for invoking the Chrome browser) instance to SpecFlow’s default IObjectContainer:
Demonstration of Hooks and IObjectContainer
|
1 2 3 4 5 6 7 8 9 10 11 12 13 14 15 16 17 18 19 20 21 22 23 24 25 26 27 28 29 30 31 32 33 34 35 36 37 38 39 40 41 42 43 44 45 46 47 48 49 50 51 52 53 54 |
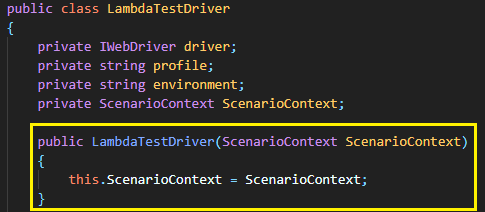
namespace SpecFlowParallel { [Binding] public sealed class WebDriverContext { private ScenarioContext _scenarioContext; private LambdaTestDriver LTDriver; private IWebDriver _driver; private readonly IObjectContainer _objectContainer; public WebDriverContext(IObjectContainer objectContainer) { _objectContainer = objectContainer; } [BeforeScenario] public void BeforeScenario(ScenarioContext scenarioContext) { _scenarioContext = scenarioContext; LTDriver = new LambdaTestDriver(scenarioContext); scenarioContext["LTDriver"] = LTDriver; _objectContainer.RegisterInstanceAs<LambdaTestDriver>(LTDriver); } [AfterScenario] public void AfterScenario() { LTDriver.Cleanup(); } } public class LambdaTestDriver { private IWebDriver driver; private ScenarioContext ScenarioContext; public LambdaTestDriver(ScenarioContext ScenarioContext) { this.ScenarioContext = ScenarioContext; } public IWebDriver Init() { driver = new ChromeDriver(); return driver; } public void Cleanup() { Console.WriteLine("Test Should stop"); driver.Quit(); } } } |
This SpecFlow Tutorial for beginners and professionals will help you learn how to use SpecFlow framework with Selenium C# for performing Selenium automation testing.
Demonstration: Specflow Parallel Execution with Selenium and NUnit
To get started with NUnit Specflow Parallel Execution, we first create a .NET project with SpecFlow.
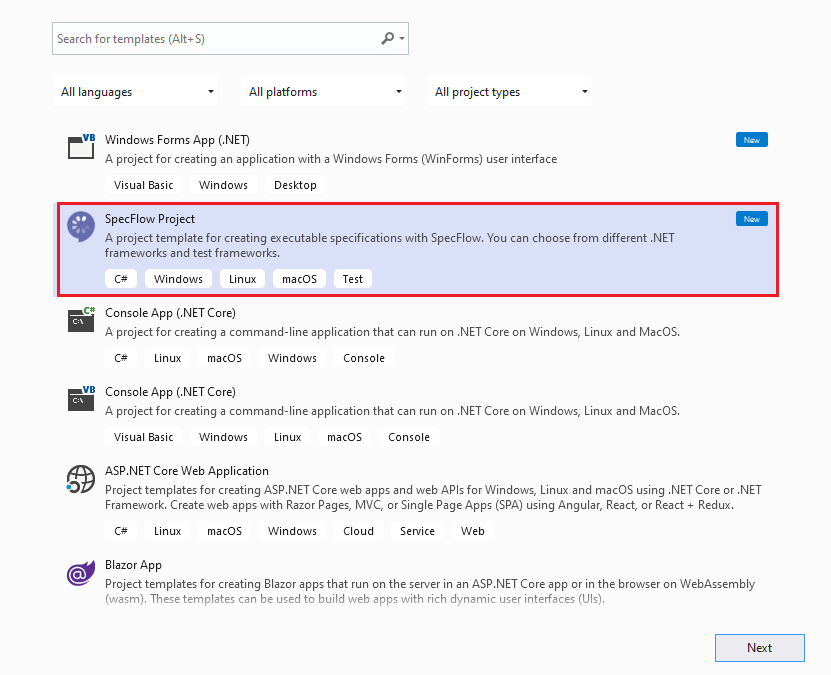
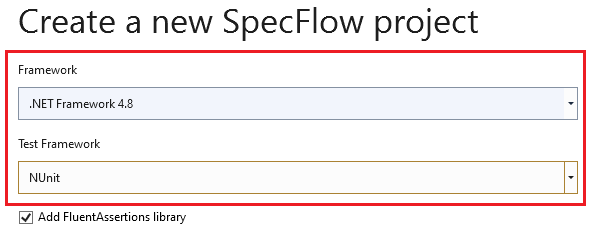
By default, the Test Runner selected is SpecRun (Or SpecFlow+Runner); hence, the runner (or test framework) should be changed to NUnit. When creating a SpecFlow project, select ‘.NET Framework 4.8’ for the framework and select ‘NUnit’ as the Test Framework.
The newly created project would require reference to the following libraries (or packages):
- Selenium.WebDriver
- NUnit
- Specflow
- SpecFlow.Tools.MsBuild.Generation
- Specflow.NUnit
The packages should be installed from the Package Manager (PM) console, accessed through the ‘Tools’ -> ‘NuGet Package Manager’ -> ‘Package Manager Console.’
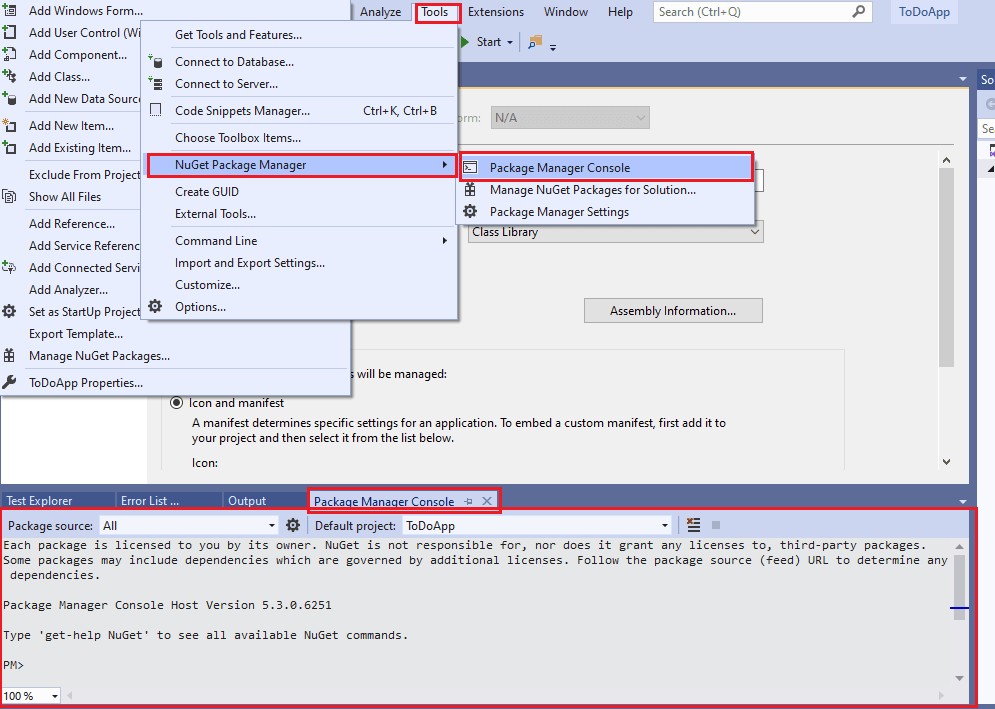
For installing the packages, run the following commands on the Package Manager (PM) Console:
|
1 2 3 4 |
Install-Package Specflow Install-Package Specflow.NUnit Install-Package SpecFlow.Tools.MsBuild.Generation Install-Package NUnit3TestAdapter |
To confirm whether the packages are installed or not, run the Get-Package command on the PM Console:
|
1 2 3 4 5 6 7 8 9 10 11 12 13 |
PM> get-package Id Versions -- -------- SpecFlow {3.5.5} NUnit {3.12.0} NUnit3TestAdapter {4.0.0-beta.1} FluentAssertions {5.10.3} SpecFlow.Tools.MsBuild.Generation {3.5.5} Microsoft.NET.Test.Sdk {16.5.0} SpecFlow.NUnit {3.5.5} SpecFlow.Plus.LivingDocPlugin {3.4.211} Selenium.WebDriver {3.141.0} |
SpecFlow and SpecFlow.NUnit are the base packages that are necessary for a SpecFlow NUnit project. With the base project ready, we look at the three test scenarios that would be executed in parallel against different browser and platform combinations.
Test Scenario – 1 (GoogleSearch.feature)
- Go to Google.
- Search LambdaTest.
- Open the first search result. Assert if the page title does not match with the expected title.
Test Scenario – 2 (ToDoApp.feature)
- Go to LambdaTest ToDo App.
- Select the first two items in the ToDo list.
- Add a new item, ‘Happy Testing At LambdaTest’ to the list.
- Confirm if the new item is added to the list.
Test Scenario – 3 (LambdaTestSearch.feature)
- Go to the DuckDuckGo search page.
- Search LambdaTest Blog.
- Open the first link on the search page.
- Confirm if the page title matches with the expected page title.
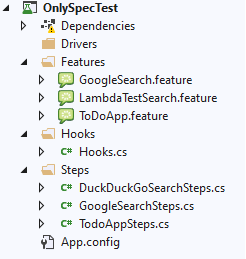
Here is the overall project (or directory structure):
- Features: As there are three test scenarios, we would have three feature files in the project (Location – <parent-project-folder>\Features)
- Step Definitions: The ‘three’ step definition files (*.cs) corresponding to ‘three’ feature files are located at <parent-project-folder>\Steps.
- Hooks – The SpecFlow Hooks file (Hooks.cs) is created in the <parent-project-folder>\Hooks folder.
- App Configuration – An App File (App.config) is created in the project’s root folder (i.e. <parent-project-folder>). This XML file will store the test configuration (i.e., browser and platform combinations) against which the tests would be executed.
This is how the overall project structure looks after creating the necessary feature files (*.feature), step definition files (*.cs), Hook file, and App configuration files.
The test scenarios mentioned above would be executed on the cloud-based Selenium Grid by LambdaTest. The desired capabilities are generated using the LambdaTest capabilities generator. For demonstrating NUnit Specflow Parallel Execution, the input parameters (or examples/scenarios) for the feature file ‘LambdaTestSearch.feature’ would be passed in the form – <Build>, <Name>, <Platform>, <BrowserName>, and <Version>.
The browser and platform combinations for the scenarios in other feature files (i.e., ToDoApp.feature and GoogleSearch.feature) are fetched from App.config.
Implementation
We first have a look at the three feature files in the SpecFlow NUnit project:
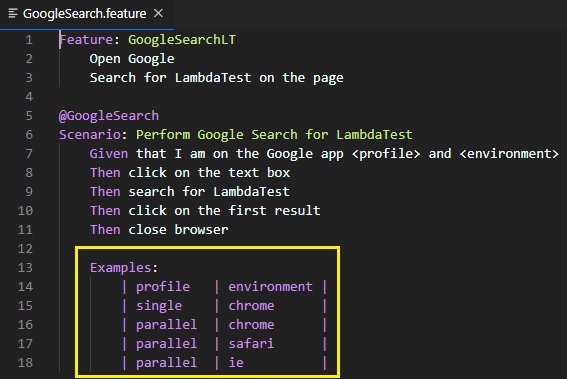
FileName – GoogleSearch.feature
|
1 2 3 4 5 6 7 8 9 10 11 12 13 14 15 16 17 18 |
Feature: GoogleSearchLT Open Google Search for LambdaTest on the page @GoogleSearch Scenario: Perform Google Search for LambdaTest Given that I am on the Google app <profile> and <environment> Then click on the text box Then search for LambdaTest Then click on the first result. Then close browser Examples: | profile | environment | | single | chrome | | parallel | chrome | | parallel | safari | | parallel | ie | |
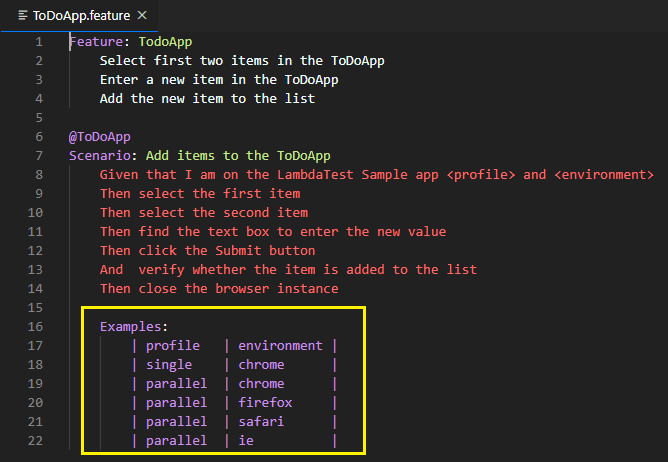
FileName – ToDoApp.feature
|
1 2 3 4 5 6 7 8 9 10 11 12 13 14 15 16 17 18 19 20 21 22 |
Feature: TodoApp Select first two items in the ToDoApp Enter a new item in the ToDoApp Add the new item to the list @ToDoApp Scenario: Add items to the ToDoApp Given that I am on the LambdaTest Sample app <profile> and <environment> Then select the first item Then select the second item Then find the text box to enter the new value Then click the Submit button And verify whether the item is added to the list Then close the browser instance Examples: | profile | environment | | single | chrome | | parallel | chrome | | parallel | firefox | | parallel | safari | | parallel | ie | |
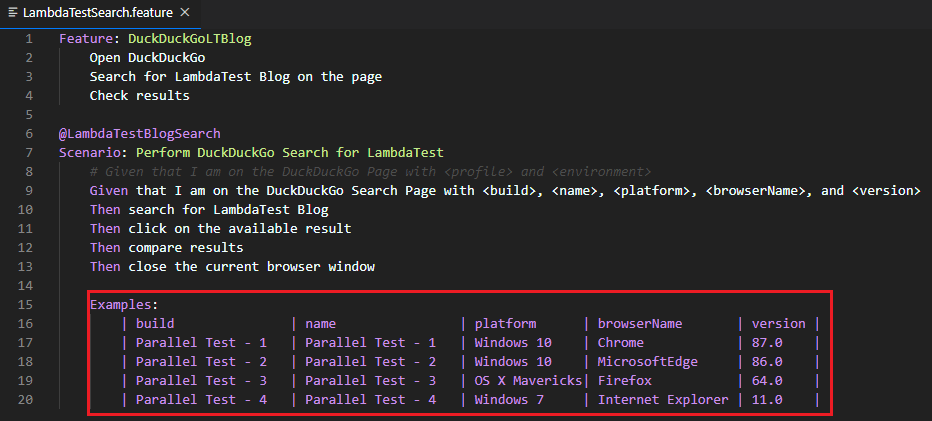
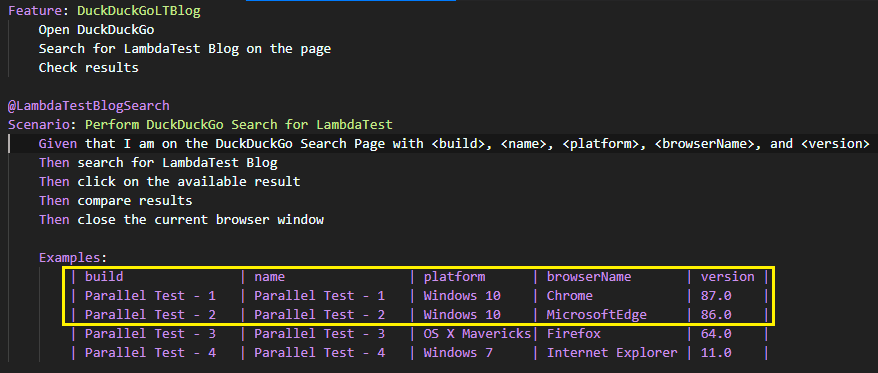
FileName – LambdaTestSearch.feature
|
1 2 3 4 5 6 7 8 9 10 11 12 13 14 15 16 17 18 19 |
Feature: DuckDuckGoLTBlog Open DuckDuckGo Search for LambdaTest Blog on the page Check results @LambdaTestBlogSearch Scenario: Perform DuckDuckGo Search for LambdaTest Given that I am on the DuckDuckGo Search Page with <build>, <name>, <platform>, <browserName>, and <version> Then search for LambdaTest Blog Then click on the available result Then compare results Then close the current browser window Examples: | build | name | platform | browserName | version | | Parallel Test - 1 | Parallel Test - 1 | Windows 10 | Chrome | 87.0 | | Parallel Test - 2 | Parallel Test - 2 | Windows 10 | MicrosoftEdge | 86.0 | | Parallel Test - 3 | Parallel Test - 3 | OS X Mavericks| Firefox | 64.0 | | Parallel Test - 4 | Parallel Test - 4 | Windows 7 | Internet Explorer | 11.0 | |
FileName – App.config
|
1 2 3 4 5 6 7 8 9 10 11 12 13 14 15 16 17 18 19 20 21 22 23 24 25 26 27 28 29 30 31 32 33 34 35 36 37 38 39 40 41 42 43 44 45 46 47 48 49 50 51 52 53 54 55 56 57 58 59 60 61 62 63 64 65 66 67 68 69 70 71 72 73 74 |
<?xml version="1.0" encoding="utf-8"?> <configuration> <configSections> <sectionGroup name="capabilities"> <section name="single" type="System.Configuration.AppSettingsSection, System.Configuration, Version=4.0.0.0, Culture=neutral, PublicKeyToken=b03f5f7f11d50a3a" /> <section name="SpecFlow parallel execution" type="System.Configuration.AppSettingsSection, System.Configuration, Version=4.0.0.0, Culture=neutral, PublicKeyToken=b03f5f7f11d50a3a" /> </sectionGroup> <sectionGroup name="environments"> <section name="chrome" type="System.Configuration.AppSettingsSection, System.Configuration, Version=4.0.0.0, Culture=neutral, PublicKeyToken=b03f5f7f11d50a3a" /> <section name="firefox" type="System.Configuration.AppSettingsSection, System.Configuration, Version=4.0.0.0, Culture=neutral, PublicKeyToken=b03f5f7f11d50a3a" /> <section name="safari" type="System.Configuration.AppSettingsSection, System.Configuration, Version=4.0.0.0, Culture=neutral, PublicKeyToken=b03f5f7f11d50a3a" /> <section name="ie" type="System.Configuration.AppSettingsSection, System.Configuration, Version=4.0.0.0, Culture=neutral, PublicKeyToken=b03f5f7f11d50a3a" /> </sectionGroup> <section name="specFlow" type="TechTalk.SpecFlow.Configuration.ConfigurationSectionHandler, TechTalk.SpecFlow" /> </configSections> <appSettings> <add key="username" value="user-name" /> <add key="accesskey" value="access-key" /> <add key="server" value="@hub.lambdatest.com" /> </appSettings> <capabilities> <single> <add key="build" value="Serial test using SpecFlow on LambdaTest Selenium Grid" /> <add key="name" value="Serial test using SpecFlow on LambdaTest Selenium Grid" /> <add key="idleTimeout" value="270" /> </single> <parallel> <add key="build" value="Parallel test using SpecFlow on LambdaTest Selenium Grid" /> <add key="name" value="Parallel test using SpecFlow on LambdaTest Selenium Grid" /> <add key="idleTimeout" value="270" /> </parallel> </capabilities> <environments> <chrome> <add key="browserName" value="Chrome" /> <add key="browserVersion" value="86.0" /> <add key="platformName" value="Win10" /> </chrome> <firefox> <add key="browserName" value="Firefox" /> <add key="browserVersion" value="73.0" /> <add key="platformName" value="Win8.1" /> </firefox> <safari> <add key="browserName" value="Safari" /> <add key="browserVersion" value="12.0" /> <add key="platformName" value="macOS Mojave" /> </safari> <ie> <add key="browserName" value="Internet Explorer" /> <add key="browserVersion" value="11.0" /> <add key="platformName" value="Win10" /> </ie> </environments> <startup> <supportedRuntime version="v4.0" sku=".NETFramework,Version=v3.11.0" /> </startup> <specFlow> <language feature="en-us" /> </specFlow> <runtime> <assemblyBinding xmlns="urn:schemas-microsoft-com:asm.v1"> <dependentAssembly> <assemblyIdentity name="Newtonsoft.Json" publicKeyToken="30ad4fe6b2a6aeed" culture="neutral" /> <bindingRedirect oldVersion="0.0.0.0-10.0.0.0" newVersion="10.0.0.0" /> </dependentAssembly> </assemblyBinding> </runtime> </configuration> |
FileName – Hooks.cs
|
1 2 3 4 5 6 7 8 9 10 11 12 13 14 15 16 17 18 19 20 21 22 23 24 25 26 27 28 29 30 31 32 33 34 35 36 37 38 39 40 41 42 43 44 45 46 47 48 49 50 51 52 53 54 55 56 57 58 59 60 61 62 63 64 65 66 67 68 69 70 71 72 73 74 75 76 77 78 79 80 81 82 83 84 85 86 87 88 89 90 91 92 93 94 95 96 97 98 99 100 101 102 103 104 105 106 107 108 109 110 111 112 113 114 115 116 117 118 119 120 121 122 123 124 125 126 127 128 129 130 |
using System; using System.Collections.Generic; using System.Linq; using System.Text; using TechTalk.SpecFlow; using System.Configuration; using System.Diagnostics; using OpenQA.Selenium; using OpenQA.Selenium.Remote; using System.Collections.Specialized; using TechTalk.SpecFlow.Tracing; using System.IO; using System.Reflection; using BoDi; namespace SpecFlowLambdaSample { [Binding] public sealed class Hooks { private LambdaTestDriver LTDriver; private string[] tags; private ScenarioContext _scenarioContext; private readonly IObjectContainer _objectContainer; public Hooks(IObjectContainer objectContainer) { _objectContainer = objectContainer; } [BeforeScenario] public void BeforeScenario(ScenarioContext ScenarioContext) { _scenarioContext = ScenarioContext; LTDriver = new LambdaTestDriver(ScenarioContext); ScenarioContext["LTDriver"] = LTDriver; _objectContainer.RegisterInstanceAs<LambdaTestDriver>(LTDriver); } [AfterScenario] public void AfterScenario() { LTDriver.Cleanup(); } } public class LambdaTestDriver { private IWebDriver driver; private string profile; private string environment; private ScenarioContext ScenarioContext; public LambdaTestDriver(ScenarioContext ScenarioContext) { this.ScenarioContext = ScenarioContext; } public IWebDriver Init(string profile, string environment) { NameValueCollection caps = ConfigurationManager.GetSection("capabilities/" + profile) as NameValueCollection; NameValueCollection settings = ConfigurationManager.GetSection("environments/" + environment) as NameValueCollection; Console.WriteLine(caps); DesiredCapabilities capability = new DesiredCapabilities(); Console.WriteLine(capability); Console.WriteLine(profile + environment); foreach (string key in caps.AllKeys) { capability.SetCapability(key, caps[key]); } foreach (string key in settings.AllKeys) { capability.SetCapability(key, settings[key]); } String username = Environment.GetEnvironmentVariable("LT_USERNAME"); if (username == null) { username = ConfigurationManager.AppSettings.Get("username"); } String accesskey = Environment.GetEnvironmentVariable("LT_ACCESS_KEY"); if (accesskey == null) { accesskey = ConfigurationManager.AppSettings.Get("accesskey"); } capability.SetCapability("username", username); capability.SetCapability("accesskey", accesskey); Console.WriteLine(username); Console.WriteLine(accesskey); driver = new RemoteWebDriver(new Uri("http://" + username + ":" + accesskey + ConfigurationManager.AppSettings.Get("server") + "/wd/hub/"), capability); Console.WriteLine(driver); return driver; } public IWebDriver InitLocal(String build, String name, String platform, String browserName, String version) { String username, accesskey, grid_url; DesiredCapabilities capability = new DesiredCapabilities(); username = "user-name"; accesskey = "access-key"; grid_url = "@hub.lambdatest.com"; capability.SetCapability("username", username); capability.SetCapability("accesskey", accesskey); capability.SetCapability("build", build); capability.SetCapability("name", name); capability.SetCapability("platformName", platform); capability.SetCapability("browserName", browserName); capability.SetCapability("browserVersion", version); driver = new RemoteWebDriver(new Uri("http://" + username + ":" + accesskey + grid_url + "/wd/hub/"), capability); Console.WriteLine(driver); return driver; } public void Cleanup() { Console.WriteLine("Test Should stop"); driver.Quit(); } } } |
FileName – GoogleSearchSteps.cs
|
1 2 3 4 5 6 7 8 9 10 11 12 13 14 15 16 17 18 19 20 21 22 23 24 25 26 27 28 29 30 31 32 33 34 35 36 37 38 39 40 41 42 43 44 45 46 47 48 49 50 51 52 53 54 55 56 57 58 59 60 61 62 63 64 65 66 67 68 |
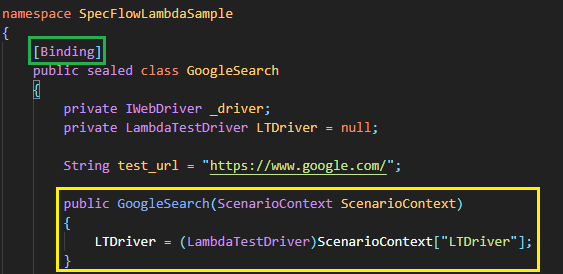
using System; using System.Collections.Generic; using System.Linq; using System.Text; using OpenQA.Selenium; using OpenQA.Selenium.Chrome; using OpenQA.Selenium.Firefox; using TechTalk.SpecFlow; using NUnit.Framework; using System.Threading.Tasks; using System.Text.RegularExpressions; using OpenQA.Selenium.Support.UI; using OpenQA.Selenium.Interactions; using OpenQA.Selenium.Remote; namespace SpecFlowLambdaSample { [Binding] public sealed class GoogleSearchSteps { private IWebDriver _driver; private LambdaTestDriver LTDriver = null; String test_url = "https://www.google.com/"; public GoogleSearchSteps(ScenarioContext ScenarioContext) { LTDriver = (LambdaTestDriver)ScenarioContext["LTDriver"]; } [Given(@"that I am on the Google app (.*) and (.*)")] public void GivenThatIAmOnTheGoogleAppAnd(string profile, string environment) { _driver = LTDriver.Init(profile, environment); _driver.Url = test_url; _driver.Manage().Window.Maximize(); System.Threading.Thread.Sleep(2000); } [Then(@"click on the text box")] public void ThenClickOnTheTextBox() { _driver.FindElement(By.XPath("//input[@name='q']")).Click(); } [Then(@"search for LambdaTest")] public void ThenSearchForLambdaTest() { IWebElement secondCheckBox = _driver.FindElement(By.XPath("//input[@name='q']")); secondCheckBox.SendKeys("LambdaTest" + Keys.Enter); System.Threading.Thread.Sleep(2000); } [Then(@"click on the first result")] public void ThenClickOnTheFirstResult() { IWebElement secondCheckBox = _driver.FindElement(By.XPath("//span[.='LambdaTest: Most Powerful Cross Browser Testing Tool Online']")); secondCheckBox.Click(); System.Threading.Thread.Sleep(2000); } [Then(@"close browser")] public void ThenCloseBrowser() { _driver.Close(); } } } |
FileName – ToDoAppSteps.cs
|
1 2 3 4 5 6 7 8 9 10 11 12 13 14 15 16 17 18 19 20 21 22 23 24 25 26 27 28 29 30 31 32 33 34 35 36 37 38 39 40 41 42 43 44 45 46 47 48 49 50 51 52 53 54 55 56 57 58 59 60 61 62 63 64 65 66 67 68 69 70 71 72 73 74 75 76 77 78 79 80 81 82 83 84 85 86 87 88 89 90 91 92 |
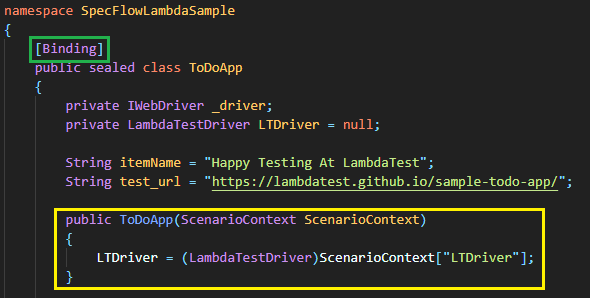
using System; using System.Collections.Generic; using System.Linq; using System.Text; using OpenQA.Selenium; using OpenQA.Selenium.Chrome; using OpenQA.Selenium.Firefox; using TechTalk.SpecFlow; using NUnit.Framework; using System.Threading.Tasks; using System.Text.RegularExpressions; using OpenQA.Selenium.Support.UI; using OpenQA.Selenium.Interactions; using OpenQA.Selenium.Remote; [assembly: Parallelizable(ParallelScope.Fixtures)] [assembly: LevelOfParallelism(4)] namespace SpecFlowLambdaSample { [Binding] public sealed class ToDoApp { private IWebDriver _driver; private LambdaTestDriver LTDriver = null; String itemName = "Happy Testing At LambdaTest"; String test_url = "https://lambdatest.github.io/sample-todo-app/"; public ToDoApp(ScenarioContext ScenarioContext) { LTDriver = (LambdaTestDriver)ScenarioContext["LTDriver"]; } [Given(@"that I am on the LambdaTest Sample app (.*) and (.*)")] public void GivenThatIAmOnTheLambdaTestSampleAppAnd(string profile, string environment) { _driver = LTDriver.Init(profile, environment); _driver.Url = test_url; _driver.Manage().Window.Maximize(); System.Threading.Thread.Sleep(2000); } [Then(@"select the first item")] public void ThenSelectTheFirstItem() { _driver.FindElement(By.Name("li1")).Click(); } [Then(@"select the second item")] public void ThenSelectTheSecondItem() { IWebElement secondCheckBox = _driver.FindElement(By.Name("li2")); secondCheckBox.Click(); } [Then(@"find the text box to enter the new value")] public void ThenFindTheTextBoxToEnterTheNewValue() { IWebElement textfield = _driver.FindElement(By.Id("sampletodotext")); textfield.SendKeys(itemName); } [Then(@"click the Submit button")] public void ThenClickTheSubmitButton() { IWebElement addButton = _driver.FindElement(By.Id("addbutton")); addButton.Click(); } [Then(@"verify whether the item is added to the list")] public void ThenVerifyWhetherTheItemIsAddedToTheList() { IWebElement itemtext = _driver.FindElement(By.XPath("/html/body/div/div/div/form/input[1]")); String getText = itemtext.Text; Assert.That((itemName.Contains(getText)), Is.True); /* Perform wait to check the output */ System.Threading.Thread.Sleep(2000); Console.WriteLine("Test Passed"); } [Then(@"close the browser instance")] public void ThenCloseTheBrowserInstance() { _driver.Close(); } } } |
FileName – DuckDuckGoSearchSteps.cs
|
1 2 3 4 5 6 7 8 9 10 11 12 13 14 15 16 17 18 19 20 21 22 23 24 25 26 27 28 29 30 31 32 33 34 35 36 37 38 39 40 41 42 43 44 45 46 47 48 49 50 51 52 53 54 55 56 57 58 59 60 61 62 63 64 65 66 67 68 69 70 71 72 73 74 75 76 77 78 79 80 81 82 |
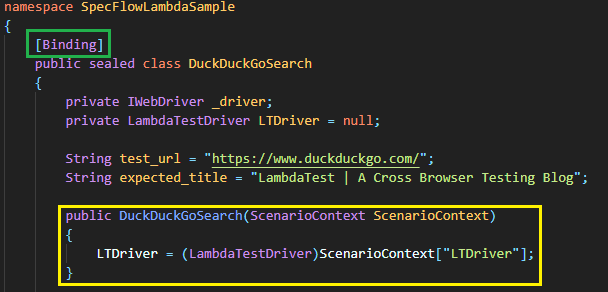
using System; using System.Collections.Generic; using System.Linq; using System.Text; using OpenQA.Selenium; using OpenQA.Selenium.Chrome; using OpenQA.Selenium.Firefox; using TechTalk.SpecFlow; using NUnit.Framework; using System.Threading.Tasks; using System.Text.RegularExpressions; using OpenQA.Selenium.Support.UI; using OpenQA.Selenium.Interactions; using OpenQA.Selenium.Remote; namespace SpecFlowLambdaSample { [Binding] public sealed class DuckDuckGoSearchSteps { private IWebDriver _driver; private LambdaTestDriver LTDriver = null; String itemName = "MI"; String test_url = "https://www.duckduckgo.com/"; String expected_title = "LambdaTest | A Cross Browser Testing Blog"; public DuckDuckGoSearchSteps(ScenarioContext ScenarioContext) { LTDriver = (LambdaTestDriver)ScenarioContext["LTDriver"]; } [Given(@"that I am on the DuckDuckGo Page with (.*) and (.*)")] public void GivenThatIAmOnTheDuckDuckGoPageWithAnd(string profile, string environment) { _driver = LTDriver.Init(profile, environment); _driver.Url = test_url; _driver.Manage().Window.Maximize(); System.Threading.Thread.Sleep(2000); } [Given(@"that I am on the DuckDuckGo Search Page with (.*), (.*), (.*), (.*), and (.*)")] public void GivenThatIAmOnTheDuckDuckGoSearchPageWithAnd(string build, string name, string platform, string browserName, string version) { _driver = LTDriver.InitLocal(build, name, platform, browserName, version); _driver.Url = test_url; _driver.Manage().Window.Maximize(); System.Threading.Thread.Sleep(2000); } [Then(@"search for LambdaTest Blog")] public void ThenSearchForLambdaTestBlog() { IWebElement search_box = _driver.FindElement(By.CssSelector("#search_form_input_homepage")); search_box.Click(); search_box.SendKeys("LambdaTest Blog" + Keys.Enter); System.Threading.Thread.Sleep(2000); } [Then(@"click on the available result")] public void ThenClickOnTheAvailableResult() { IWebElement search_result = _driver.FindElement(By.XPath("//a[.='LambdaTest | A Cross Browser Testing Blog']")); search_result.Click(); System.Threading.Thread.Sleep(2000); } [Then(@"compare results")] public void ThenCompareResults() { String page_title = _driver.Title; Assert.IsTrue(true, page_title, expected_title); } [Then(@"close the current browser window")] public void ThenCloseTheCurrentBrowserWindow() { _driver.Close(); } } } |
Code WalkThrough
We would not dig deeper into the usage of locating web locators, Selenium APIs, etc., which are extensively used in the Step Definition files in the project. We would look into the two major aspects of the tests:
- Registration of browser instance, usage of Context Injection for handling browser and OS combinations.
- How SpecFlow parallel execution is achieved in the above implementation.
- How different browser and platform combinations are handled through App.config and using ‘Examples’ in Feature files.
Here are the important steps that are instrumental in achieving Specflow Parallel Execution with NUnit project:
Context Injection & registering the LambdaTestDriver (or IWebDriver) Instance
The Hooks class in Hooks.cs is responsible for customizing the injection rules. Hence, we obtain an instance of the scenario execution container, an instance of the IObjectContainer. This is achieved through constructor injection.
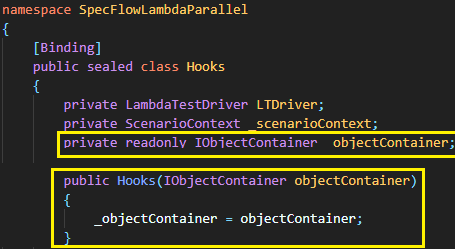
_objectContainer, the IObjectContainer instance, will be further used to add the LambdaTestDriver to the container. The Binding classes can specify the dependencies of LambdaTestDriver.
For accessing ScenarioContext in Bindings, we make use of the Context Injection technique. In [Before Scenario], we first save the ScenarioContext in the _scenarioContext field so that ScenarioContext is accessible from all the Bindings.
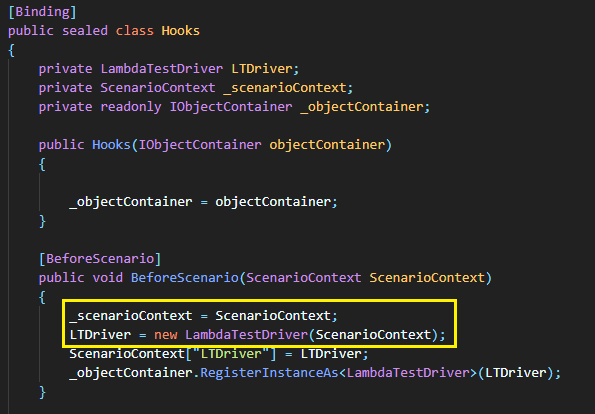
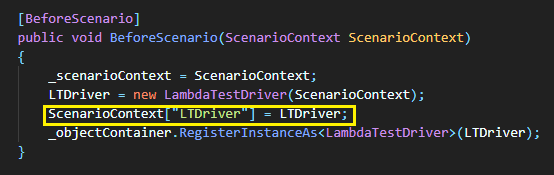
The object of the LambdaTestDriver class (that contains methods for initializing the RemoteWebDriver using a different browser and OS combination) uses ScenarioContext (or _scenariocontext, which is the Current ScenarioContext) as the input argument. The ‘LTDriver’ key of ScenarioContext is set to the newly created object of the LambdaTest class.
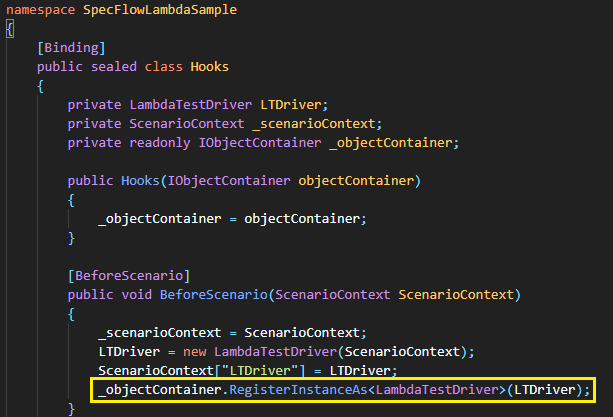
From [BeforeScenario] in Hooks, we register the LTDriver object in the IObjectContainer (i.e., _objectContainer) instance that we received from the constructor.
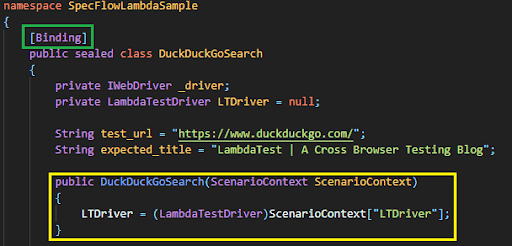
The current ScenarioContext can be used in the Bindings of the respective Step Definition files. As seen below, the ScenarioContext is updated in the constructor of LambdaTestDriver.
As the ScenarioContext is accessible across Binding classes (i.e., classes under the [BINDING] attribute), the constructor in each Step Definition uses the key “LTDriver” in ScenarioContext, which was set in [BeforeScenario] of Hooks. This is where we are using IWebDriver (or, in our case LambdaTestDriver) injection where the LTDriver object (from Hooks) is injected in the Step definition files.
Handling Browser & OS combinations and realizing SpecFlow parallel execution in NUnit
An instance of the LambdaTestDriver class (defined in Hooks.cs) is created in every step definition file constructor. Since the ScenarioContext, which was set in Hooks, is available across Bindings of classes (and step definition files), the LambdaTestDriver instance (i.e., LTDriver) is set to ScenarioContext[“LTDriver”].
Now that the instance of LambdaTestDriver is created, the next step is to read the corresponding browser and OS combination from the Feature file and instantiate a remote WebDriver object using the Initialization methods (i.e., Init and InitLocal provided by the LambdaTestDriver class.
We have created two separate IWebDriver initialization methods. The step definition files corresponding to the feature files – GoogleSearch.feature and ToDoApp.feature uses the browser & OS combinations from App.config. On the other hand, the step definition file corresponding to the feature file – LambdaTestSearch.feature uses the browser & OS combinations from the feature file itself.
Browser & OS combination from GoogleSearch.feature:
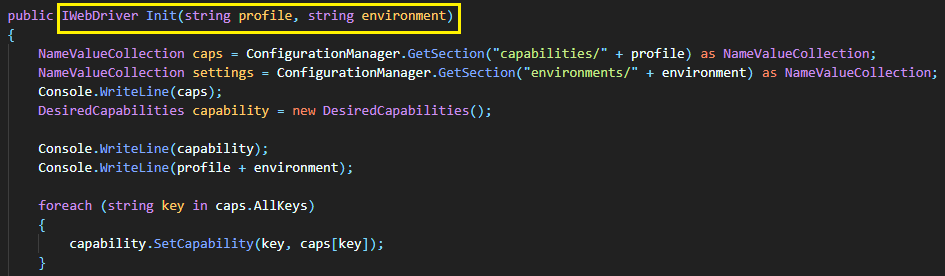
As seen above, the test scenario takes two inputs – profile and environment. Let’s take the case where the profile is ‘parallel’ and the environment is ‘chrome.’ In the step definition where the two inputs are used, the Init method of LambdaTestDriver class is invoked with the profile and environment as input arguments.
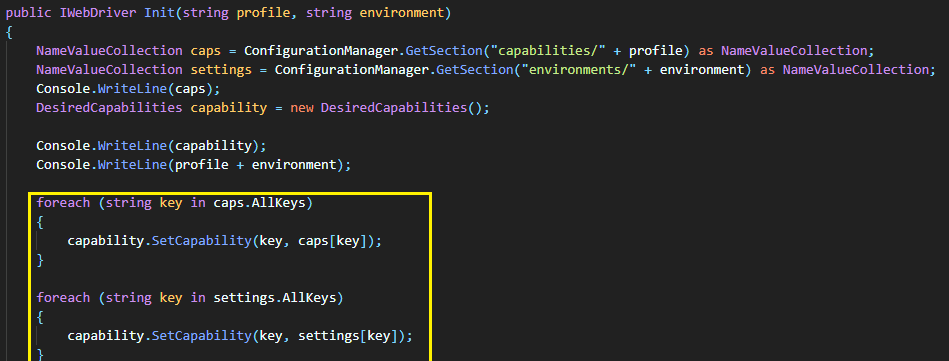
In the Init method of LambdaTestDriver class, the GetSection method in ConfigurationManager class is used for accessing the section (“capabilities” + profile) (e.g. “capabilities” + “parallel”) in App.Config. The same method is used for accessing the section (“environments” + environment) (e.g. “environments” + “chrome”) in App.Config.
The entries returned in the NameValueCollection format are parsed for reading the respective entries in the collection.
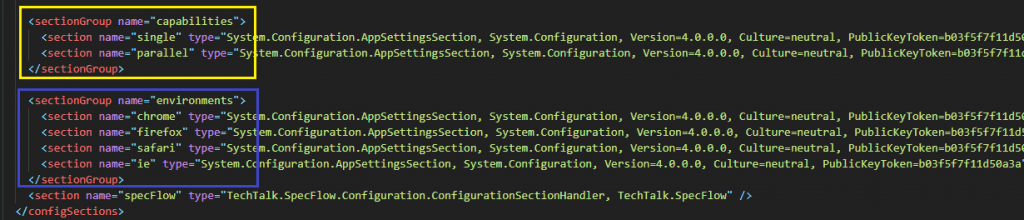
As seen in the snippet of App.Config, the key values used in the < environments > tag are inline with the Selenium capabilities (i.e., browserName, browserVersion, and platformName) used in Selenium 4.
|
1 2 3 4 5 6 7 8 9 10 11 12 13 14 15 16 17 18 |
[...] <environments> <chrome> <add key="browserName" value="Chrome" /> <add key="browserVersion" value="86.0" /> <add key="platformName" value="Win10" /> </chrome> <firefox> <add key="browserName" value="Firefox" /> <add key="browserVersion" value="73.0" /> <add key="platformName" value="Win8.1" /> </firefox> <safari> <add key="browserName" value="Safari" /> <add key="browserVersion" value="12.0" /> <add key="platformName" value="macOS Mojave" /> </safari> [...] |
The browser and platform capabilities are set using the SetCapability method offered by the DesiredCapabilities class in Selenium.
|
1 2 3 4 5 6 7 8 9 |
foreach (string key in caps.AllKeys) { capability.SetCapability(key, caps[key]); } foreach (string key in settings.AllKeys) { capability.SetCapability(key, settings[key]); } |
Once the desired capabilities are set, a Remote WebDriver object is instantiated using the credentials of the remote Selenium Grid by LambdaTest.
|
1 |
driver = new RemoteWebDriver(new Uri("http://" + username + ":" + accesskey + ConfigurationManager.AppSettings.Get("server") + "/wd/hub/"), capability); |
On successful execution, the IWebDriver object is returned by the Init method. The same IWebDriver object is used across different steps in the corresponding Step Definition file.
|
1 2 3 4 5 6 7 8 9 10 11 12 13 14 15 16 17 |
[..] [Given(@"that I am on the Google app (.*) and (.*)")] public void GivenThatIAmOnTheGoogleAppAnd(string profile, string environment) { _driver = LTDriver.Init(profile, environment); _driver.Url = test_url; _driver.Manage().Window.Maximize(); System.Threading.Thread.Sleep(2000); } [Then(@"click on the text box")] public void ThenClickOnTheTextBox() { _driver.FindElement(By.XPath("//input[@name='q']")).Click(); } [..] |
The same steps are repeated for all the profile and environment combinations available in the corresponding feature file.
It is important to note that the ScenarioContext is disposed of once the Scenario is completed. Hence, ScenarioContext will be different for every Scenario executed against different input values.
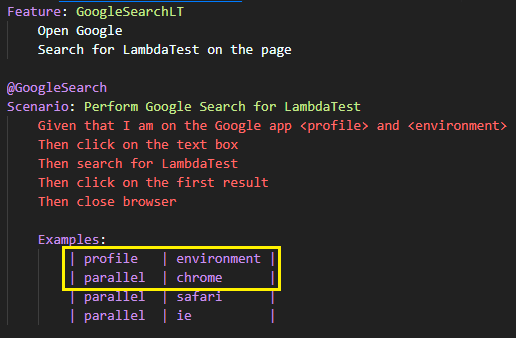
Browser & OS combination from LambdaTestSearch.feature:
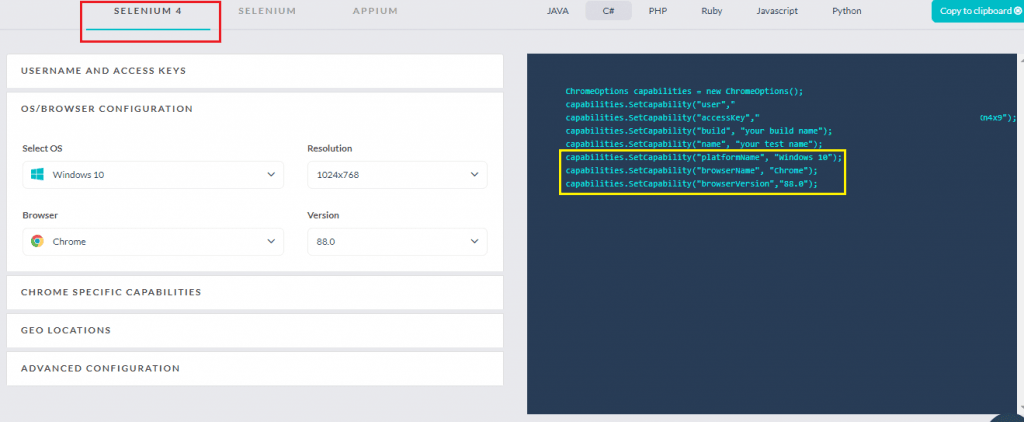
Unlike the other two feature files, we have taken a different approach to handle browser and platform combinations for the DuckDuckGo search test scenario. As shown below, five input values (build, name, platform, browserName, and version) are used for each scenario. The sequencing is inline with the capabilities generated by the LambdaTest Capabilities Generator.
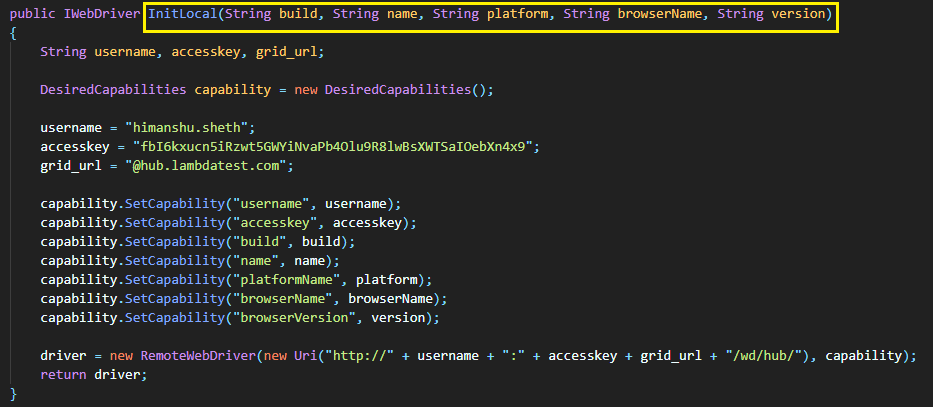
Once a particular input combination in the feature file is encountered, the InitLocal method in LambdaTestDriver class is invoked with those input combinations from the feature file.
|
1 2 3 4 5 6 7 8 |
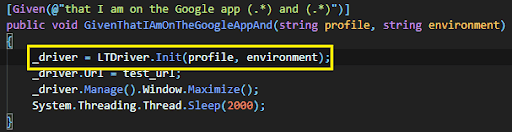
[Given(@"that I am on the DuckDuckGo Search Page with (.*), (.*), (.*), (.*), and (.*)")] public void GivenThatIAmOnTheDuckDuckGoSearchPageWithAnd(string build, string name, string platform, string browserName, string version) { _driver = LTDriver.InitLocal(build, name, platform, browserName, version); _driver.Url = test_url; _driver.Manage().Window.Maximize(); System.Threading.Thread.Sleep(2000); } |
As shown below, the Selenium 4 test’s desired capabilities are set using the input values obtained from the feature file.
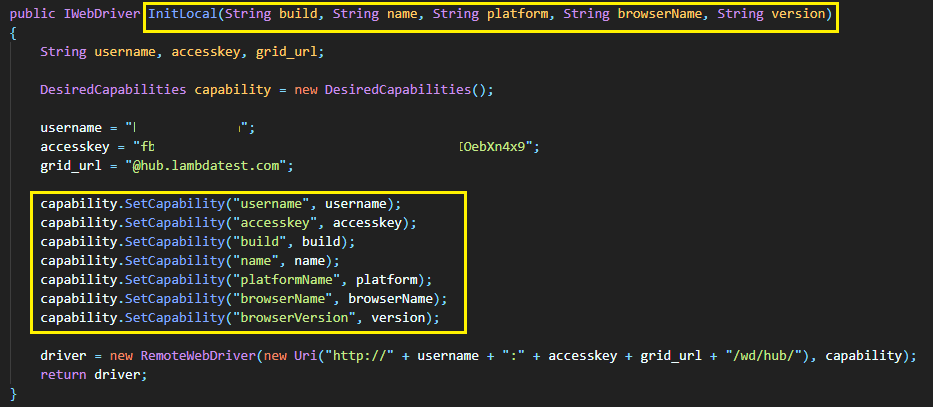
On successfully executing the InitLocal method, you would get an IWebDriver object used in subsequent step methods in the step definition file (i.e., DuckDuckGoSearchSteps.cs).
|
1 2 3 4 5 6 7 8 9 10 11 12 13 14 15 16 17 |
[Given(@"that I am on the DuckDuckGo Search Page with (.*), (.*), (.*), (.*), and (.*)")] public void GivenThatIAmOnTheDuckDuckGoSearchPageWithAnd(string build, string name, string platform, string browserName, string version) { _driver = LTDriver.InitLocal(build, name, platform, browserName, version); _driver.Url = test_url; _driver.Manage().Window.Maximize(); System.Threading.Thread.Sleep(2000); } [Then(@"search for LambdaTest Blog")] public void ThenSearchForLambdaTestBlog() { IWebElement search_box = _driver.FindElement(By.CssSelector("#search_form_input_homepage")); search_box.Click(); search_box.SendKeys("LambdaTest Blog" + Keys.Enter); System.Threading.Thread.Sleep(2000); } |
The intention of passing browser and OS combinations using two approaches is to demonstrate how SpecFlow NUnit tests can handle cross browser testing scenarios.
SpecFlow parallel execution With NUnit
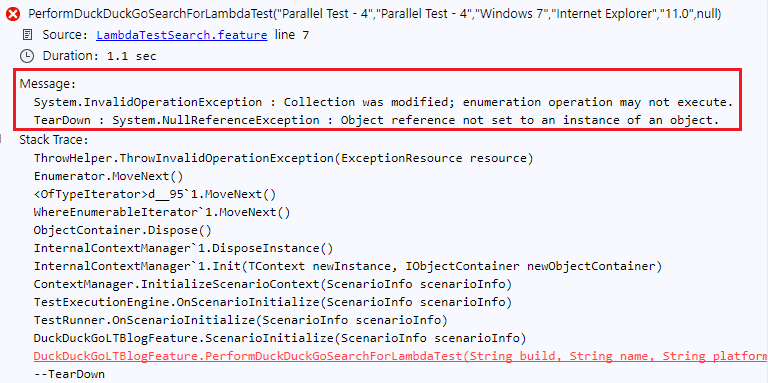
The NUnit v3 test provider only supports the [Parallelizable] attribute only on Fixtures. It does not generate the [Parallelizable] attributes on feature classes or scenario methods. Doing so would result in an exception (shown below):
Since SpecFlow parallel execution in Selenium with NUnit is only available at Fixtures level; hence, Scenario Injection also would have sufficed for executing tests in parallel. In order words, we might not have required adding the LambdaTestDriver object to the instance of BoDi.IObjectContainer.
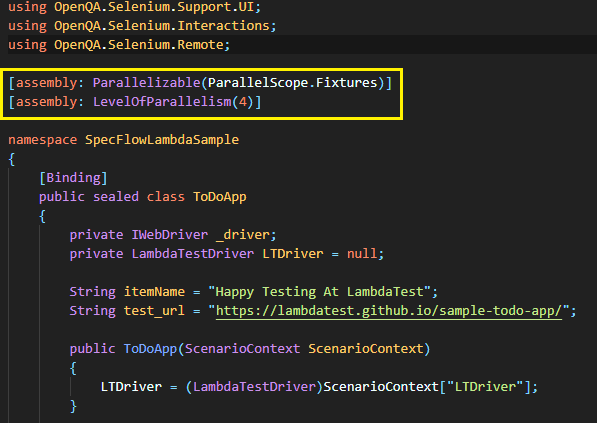
For realizing SpecFlow NUnit parallel execution, we set the Fixtures level parallelism to 4. We have set the Parallelism in the step definition file TodoAppSteps.cs.
|
1 2 |
[assembly: Parallelizable(ParallelScope.Fixtures)] [assembly: LevelOfParallelism(4)] |
Execution
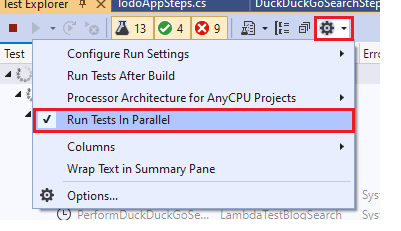
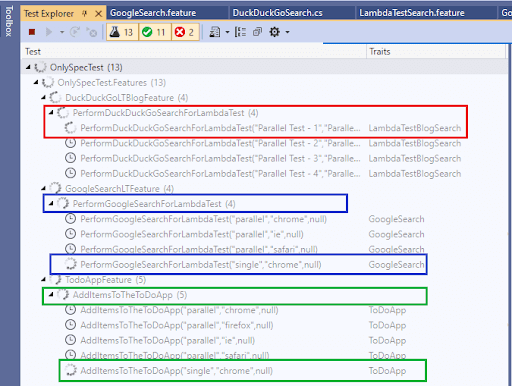
NUnit Specflow Parallel Execution is only applicable at the Fixtures level. Though we have set the LevelOfParallelism to 4, a maximum of three ‘different’ scenarios will be executing at a time. In Visual Studio, also enable ‘Run Tests in Parallel’ in the Test Explorer.
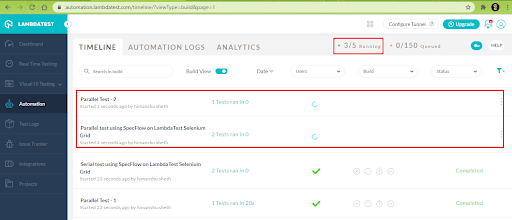
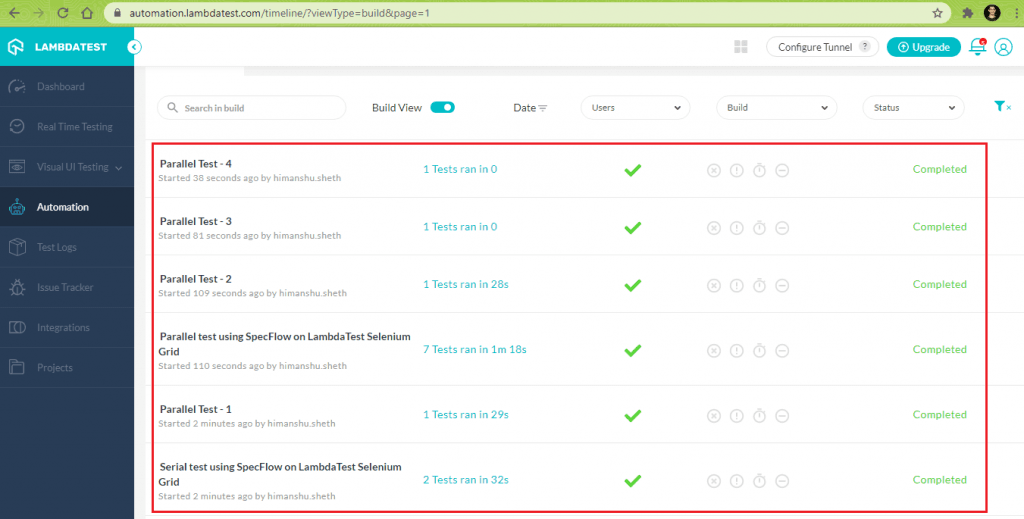
Here is the execution snapshot from LambdaTest, where we see that three tests are executing in parallel at any point in time.
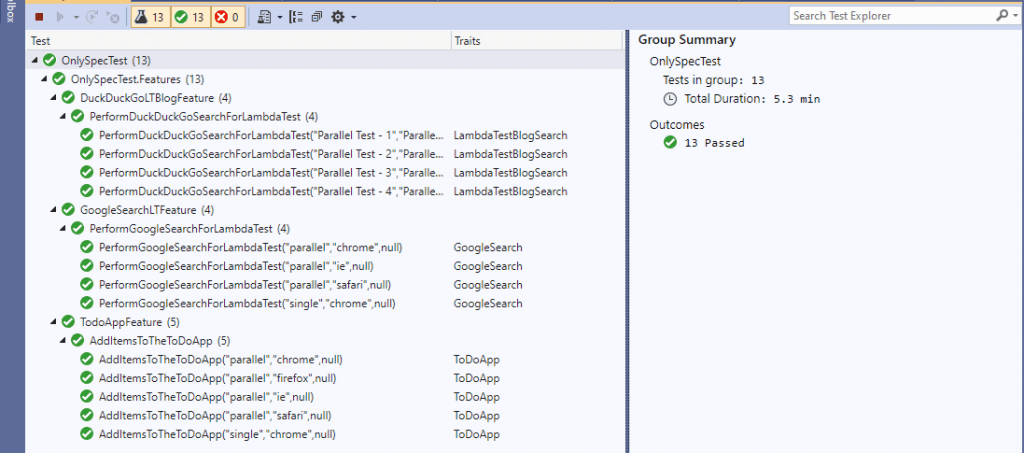
Shown below is the execution snapshot from Visual Studio and LambdaTest automation dashboard, which indicates that all the 13 tests have executed successfully:
This NUnit Tutorial for beginners and professionals will help you learn how to use NUnit framework with Selenium C# for performing Selenium automation testing.
Wrapping up

SpecFlow parallel execution with NUnit tests is possible by using the NUnit test runner that supports the Memory Isolation feature. All scenarios in a particular feature are executed on the same thread. However, each thread has a separate and isolated ScenarioContext. Also, Scenarios and the associated hooks do not block each other since they are isolated in different threads during execution.
NUnit SpecFlow parallel execution is only possible at the Fixtures level. This means that Parallelism cannot be done at the Methods or Feature classes level. Hence, it is not possible to achieve parallel execution in Selenium when the SpecFlow tests have a single feature, and the steps have to be executed against different browser and platform combinations. For SpecFlow NUnit parallel tests, Context Injection is the preferred approach for state sharing since it is thread-safe. You have to ensure that the shared ScenarioContext is accessible to the binding classes and step definitions.
The true potential of NUnit Specflow Parallel Execution can be exploited by running the tests in parallel across different browser and OS combinations provided by a cloud-based Selenium Grid like LambdaTest. Such an approach is instrumental in making the most of the features offered by NUnit, SpecFlow, and the cloud-based Selenium Grid.
Frequently Asked Questions
What is parallel execution in selenium?
In test automation, parallel test execution occurs when test cases are simultaneously run on multiple combinations of browsers, operating systems, and devices. Parallel execution can be performed using the Selenium framework, enabling organizations to shrink testing times significantly.
How does selenium handle parallel execution?
The parallel attribute and the thread-count attribute can be used to manage parallel test execution. The parallel attribute can be extended for multiple values like Methods, Tests, Classes, and Instances. Whereas the thread-count attribute can help define the number of threads you want to create while running the tests in parallel.
Does TestNG run tests in parallel?
Yes. TestNG has parallel testing or parallel execution as one of its core features. It provides an auto-defined XML file to set the parallel attribute to method/tests/classes. You can use the multi-threading concept of Java to set the number of threads for parallel execution.


Author’s Profile
Himanshu Sheth
Himanshu Sheth is a seasoned technologist and blogger with more than 15+ years of diverse working experience. He currently works as the 'Lead Developer Evangelist' and 'Senior Manager [Technical Content Marketing]' at LambdaTest. He is very active with the startup community in Bengaluru (and down South) and loves interacting with passionate founders on his personal blog (which he has been maintaining since last 15+ years).
Blogs: 128
Got Questions? Drop them on LambdaTest Community. Visit now


