You are about to download LT Browser for Linux
×64-bit version for Debian/Ubuntu
64-bit version for Fedora/openSUSE
By downloading and using LT Browser, I agree to the Privacy Policy and Terms.
This tutorial will help you maintain your tests and reduce repetitive Ruby test scripts using the page object model in Ruby Cucumber.
Last Modified on: November 28, 2025
OVERVIEW
Page Object Model (POM) is another term that describes a design methodology that calls out the objects on the page and allows you to manipulate them separately. In simple terms, it's a design pattern representing a webpage as an object.
In this Selenium Ruby tutorial, we will learn how to maintain our tests and reduce repetitive Ruby test scripts using the page object model in Ruby Cucumber. We will also deep dive into the best practices for implementing the page object model in Ruby Cucumber workflow using RSpec.
So, let’s get started!
The Page Object Model (POM) is vital when testing applications involving multiple pages with links between them. You should leverage the benefits of POM even when you intend to have more maintainable and scalable test suites.
Sample problem:
Assume that you have an application with a login component where you have to switch between user accounts and links. This is to simulate different actions or as complex as a multi-tiered web application using “form objects” - which take in the email, password, and submit button.
The standard approach would be to use a procedural approach by calling each form element, defining it as a variable, and performing necessary method calls on those elements. However, we would modify this flow with the POM approach to make it less repetitive and more accessible.
Solution:
POM would encourage us to isolate the logic of your codebase of the form object elements into their class. As you can see, the purpose of using this pattern is to isolate the complexity of multiple-page interactions into a single class (or object).
Let’s view this from a real example.
In the below page, the form element has the following fields:
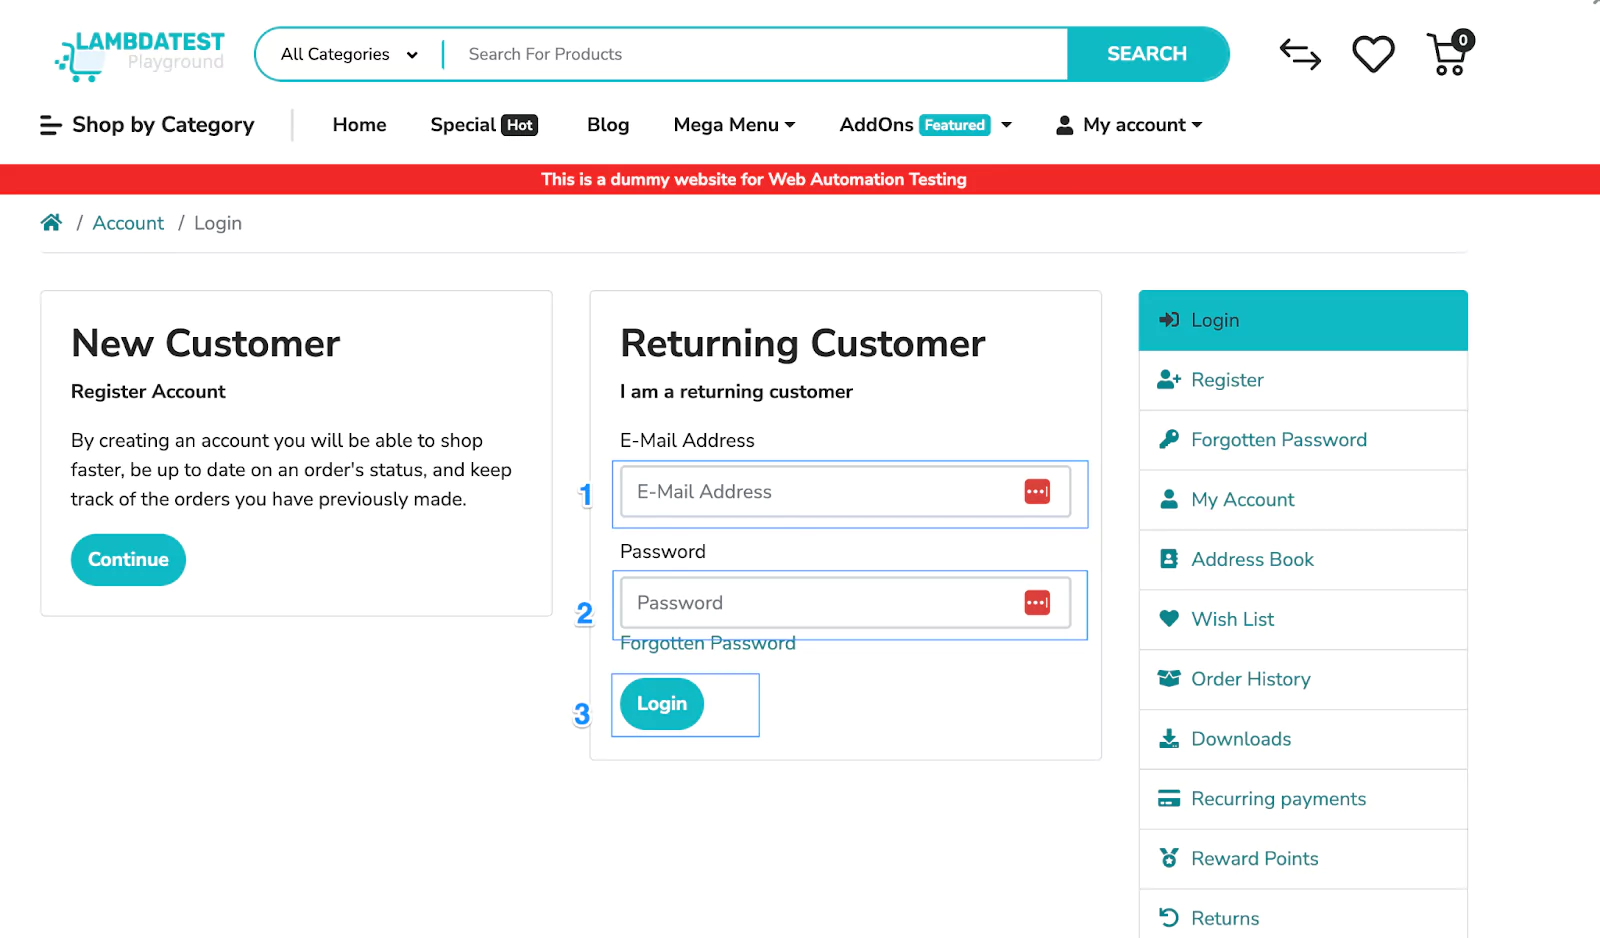
Without POM, in the classical approach, we would implement a procedural approach like the one below.
class LoginTests
 # After the test setup..
 email_textbox = $browser.find_element(:id, "input-email")
 email_textbox.send_keys(“kankanaads@gmail.com”)


 password_textbox = $browser.find_element(:id, "input-password")
 password_textbox.send_keys(“LambdaTest123”)


 # Test continues..


end
In this scenario, by using POM, we would extract this page into its class and define all the elements for quick access across other components.
For example, we have a Ruby class like the one below.
class LoginPage
 def username_textbox
   $browser.input(id: "input-email")
 end


 def password_textbox
   $browser.input(id: "input-password")
 end


 def login_button
   $browser.button(value: "Login")
 end
end
To view the differences before and after implementation, let’s look at the changes in the project structure.
| Before POM integration | After POM integration |
|---|---|
| Before POM is integrated, you can see that most of the files are bundled into a single ruby file, with all implementation handled there. | After POM integration, you can see separate page object models in individual files. |
 | 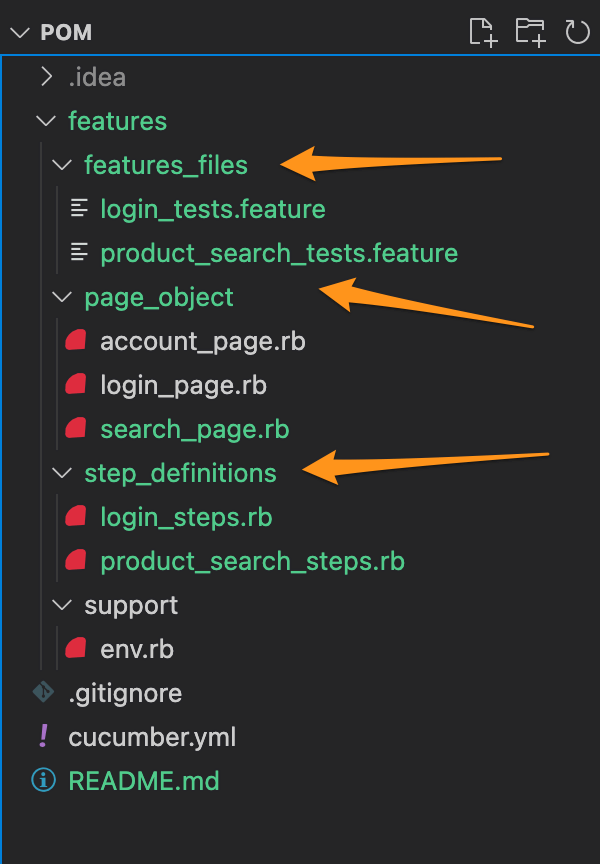 |
Side-by-side comparison of a project structure - without POM and with POM
POM gives us a high-level view of what is happening on our pages - it's possible to code your logic with just a single class representing the whole page. You can call methods of this class to navigate or manipulate elements within the page.
Here are some other benefits you get while working with the page object model in Ruby.
This gives us a clear way to separate the tests and the page locators, making it easier to refactor and keep the code clean. Additionally, POM encourages the use of services and layers for security, scalability, and maintainability. This means easier maintenance and fewer bugs.
Cucumber is a tool for running automated tests on software using Ruby as a language. The tests are written in plaintext as "Cucumber Scripts," which can then be run against the source code to specify what needs to happen. Each step performed in the test is written as a story describing how to perform this step and what information needs to be reflected at the end of it.
Since the test scripts are written stepwise in stories, we can see that Cucumber employs a Behavior-Driven Development (BDD) flow, making it much easier to understand and communicate requirements across the team.
This approach also makes it easier to identify missing test scenarios since they are conveniently structured to follow human flows.
Before starting the tests, let’s revisit how Cucumber is structured as a design pattern.
Cucumber is a BDD framework that acts as a "live documentation" of the user journeys in the system's creation. It also helps to ensure that everything within the system works as expected.
Since Cucumber was created as a BDD framework, it uses human stories and scenarios to test software features. The spec files written with Cucumber can be used in different languages, such as Ruby, which might not have built-in BDD capabilities.
Cucumber often employs the given-when-then format for describing features and scenarios. This format is similar to the if-then format we typically use in Ruby.
Feature:  Registering a new account
Scenario: Creating an account for a new user
	Given : I am on the homepage .
When : I click on the link "Sign up".
Given : I am on the registration page.
Then : I enter my "First Name" in the text field with the id equal to "firstName".
Then: I press down the arrow key and then enter in the text field with the id equal to       "lastName". Then, press the enter key.
And: The page refreshes, and my name appears bold.
This is the language you will notice in the entire tutorial.
Let’s have a brief refresher of the above syntax, although much more detailed information can be found on a different blog.
Note: Run Selenium Ruby tests on 3000+ browsers. Try LambdaTest Now!
We will test the LambdaTest eCommerce Playground for login and cart search functionality. Below are our test cases.
Let’s look at a code demonstration of how the page object model in Ruby works by using a real example.
Test Scenarios
In our tests, we will be testing the following two scenarios.
Test Scenario 1
|
Test Scenario 2
|
Pre-requisites
Check whether you have Cucumber gem installed by typing in the following.

In our case, we do not have any Cucumber gem installed; thus, we installed it using the command below.
gem install cucumberAfter installation is complete, you can list the gems installed, and if all goes well, you should find the following results.
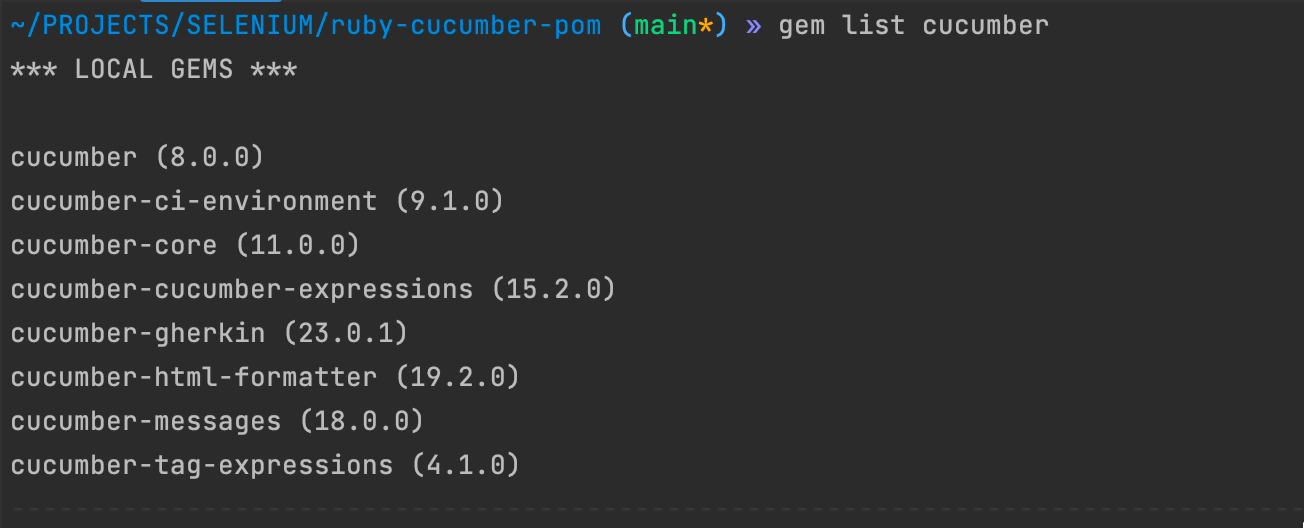
Do note that the versions might differ from the ones above.
Ensure you have the Selenium gem installed on the machine. In this case, we have Selenium installed, as seen below.

If you do not have the gem installed, you could run:
gem install seleniumAlternatively, you could run bundle install from the below Gemfile location, and the gems will automatically install the bundles for you.
Lastly, you need to install the page-model gem in the same way.
gem install page-objectAs before, you should get a response similar to the following.

We need to run the following in our folder to use the Cucumber.
cucumber --initThe following should be the results. The results should generate files you can now see on the project tree.

To get started, let's look at the directory structure we will use to create our tests. The new folder structure with the latest files should be similar.
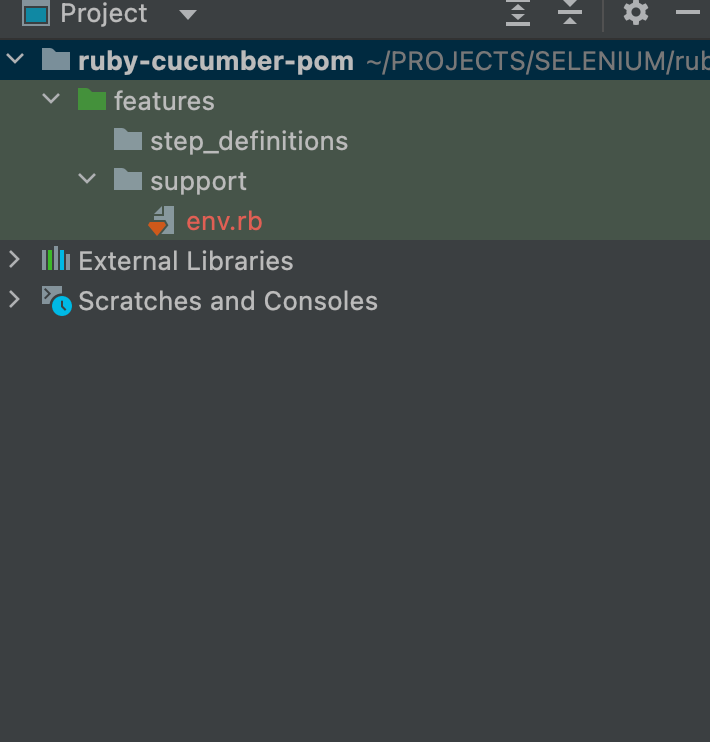
Next, we need to add two folders. On the terminal, type in the following to create these files.
mkdir page_objectmkdir step_definitionsIn the page_object folder, create a file named ecommerce_tests.feature, and in the page_object folder, create two files, one named account_page.rb, search_page.rb, and login_page.rb.
At this point, you should have something similar to the one below.
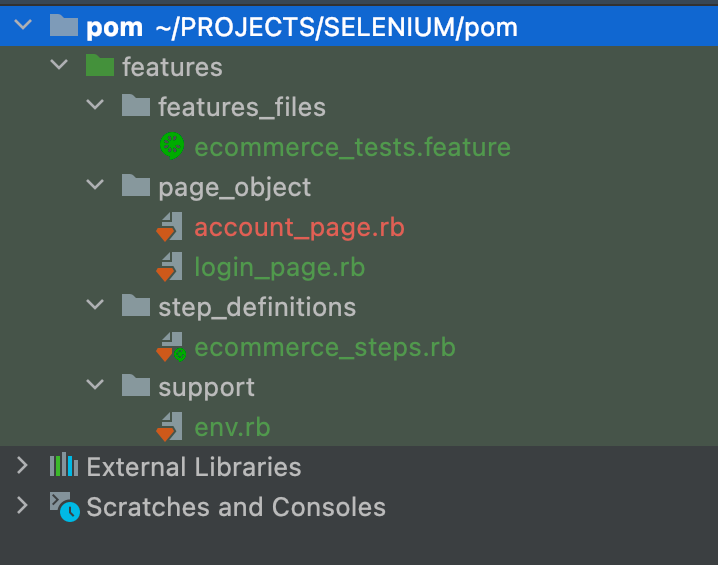
All we did above was get ready to input our actual code by creating an organized structure.
Let’s type the following in the ecomerce_tests.feature file, which houses our login feature and the scenarios we are testing.
Feature: Ecommerce login Feature
 Scenario: Verify ecommerce webpage loads and user can sign in
   Given Ecommerce webpage Login Page loads
   And Ecommerce Login Link is present loaded
   Then Correct Username and Password Should Login Successfully <username> <password>
   And My Account page should display after login
   And Matching Account Details should be displayed
 Examples:
   | username                      | password      |
   | kankanaads@gmail.com          | LambdaTest123 |
Next, we will add code for the product_search_tests.feature file. This is the file with our product search scenarios. It should have the following.
# Search Page Object Model
class SearchPage
 def search_box
   $browser.input(name: "search")
 end


 def search_icon
   $browser.button(type: "submit")
 end


 def search_header
   $browser.h1(text: "Search - Phone")
 end
end
As for the account_page.rb, we will have the following. This has the page object model for the login page.
# Account Page Object Model
class AccountPage
 def account_header
   $browser.link(text: "Edit Account")
 end


 def edit_account_information
   $browser.link(text: "Edit your account information")
 end


 def change_your_password
   $browser.link(text: "Change your password")
 end


 def modify_your_address_book
   $browser.link(text: "Modify your address book entries")
 end


 def modify_your_wish_list
   $browser.link(text: "Modify your wish list")
 end


 def subscribe_to_newsletter
   $browser.link(text: "Subscribe / unsubscribe to newsletter")
 end
end
For the login_page.rb, we input the page object structure for the account page, which translates to the code below.
class LoginPage
 def username_link
   $browser.link(text: "Forgotten Password")
 end


 def username_textbox
   $browser.input(id: "input-email")
   ps end


 def password_textbox
   $browser.input(id: "input-password")
 end


 def login_button
   $browser.button(value: "Login")
 end


 def account_header
   $browser.link(text: "Edit Account")
 end
end
Next, for the search_page.rb, we will have the following.
# Search Page Object Model
class SearchPage
 def search_box
   $browser.input(name: "search")
 end


 def search_icon
   $browser.button(type: "submit")
 end


 def search_header
   $browser.h1(text: "Search - Phone")
 end
end
To add the testing steps, we have the following in the ecommerce_steps.rb.
Given(/^Ecommerce webpage Login Page loads$/) do
 $browser.goto "https://ecommerce-playground.lambdatest.io/index.php?route=account/login"
 $user_session = LoginPage.new
 $user_account_session = AccountPage.new
end


Then(/^Ecommerce Login Link is present loaded$/) do
 expect($user_session.username_textbox.name)
 expect($user_session.password_textbox.name)
end


Then(/^Correct Username and Password Should Login Successfully (.*) (.*)$/) do |username, password|
 puts "------"
 puts username
 $user_session.username_textbox.send_keys(username)
 sleep(1)
 $user_session.password_textbox.send_keys(password)
 sleep(1)
 $user_session.login_button.click
end


And(/^My Account page should display after login$/) do
 expect($user_account_session.account_header.name)
end


And(/^Matching Account Details should be displayed$/) do
 expect($user_account_session.edit_account_information.name)
 expect($user_account_session.change_your_password.name)
 expect($user_account_session.modify_your_address_book.name)
 expect($user_account_session.modify_your_wish_list.name)
 expect($user_account_session.subscribe_to_newsletter.name)
end
Finally, the env.rb houses the test variables and WebDriver information. We will discuss using this file to test on the cloud Selenium Grid.
File name - env.rb
require 'rubygems'
require "watir"


Before do |scenario|
  # cloud execution
  username = "${LAMBDATEST_USERNAME}"
  accessToken = "${LAMBDATEST_ACCESS_KEY}"
  gridUrl = "hub.lambdatest.com/wd/hub"

  options = Selenium::WebDriver::Options.chrome
  options.browser_version = 'latest'
  options.platform_name = 'Windows 10'
  cloud_options = {}
  cloud_options[:build] = "Cucumber POM tests"
  cloud_options[:name] = "Ruby Cucumber POM tests"
  options.add_option('LT:Options', cloud_options)
  url = "https://" + username + ":" + accessToken + "@" + gridUrl

  $browser = Watir::Browser.new(:chrome ,options: options ,url: url)


  # Local execution.
  $browser = Watir::Browser.new :firefox
  $browser.driver.manage.window.maximize
end


After do |scenario|
  $browser.close
end

Code Walkthrough:
We can see the given-when-then format with the expected flow defined, similar to the flow below.
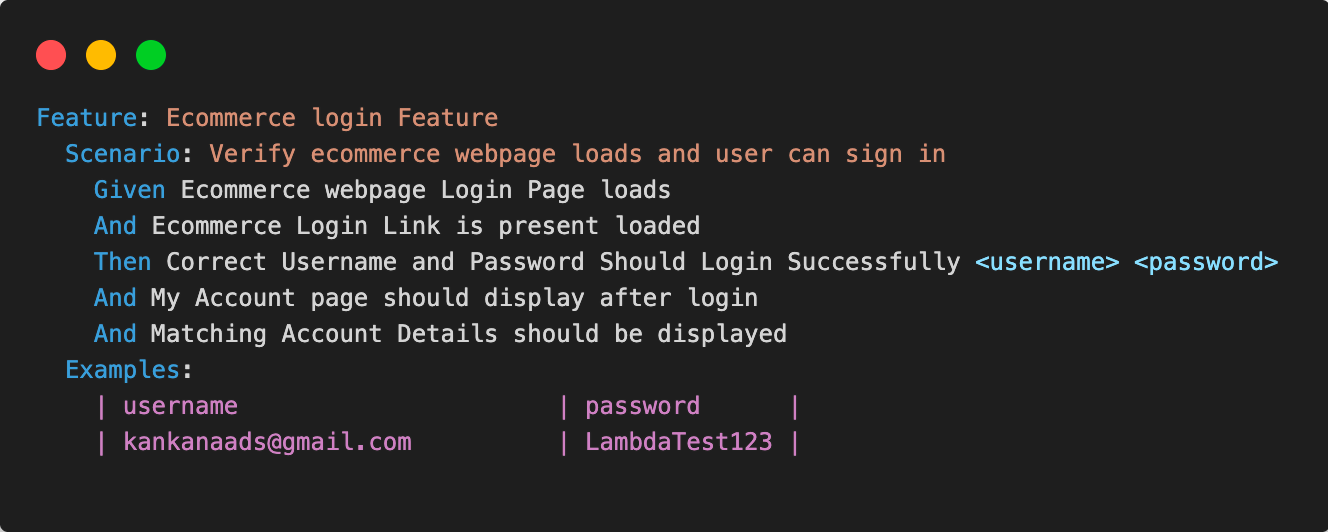
To observe our page object representation, we have grouped our pages under the page_object folder. Each page object lists the elements we will utilize in our test.
$browser.input(name: "search)It is the syntax to search for an input with the name "search". This means that any time we want to reference this link, we use the search_header method.
How to fetch links using the browser?
To know how to get an element in a browser, you can right-click and select “Inspect.” All Chrome-based browsers will come with this developer functionality by default.
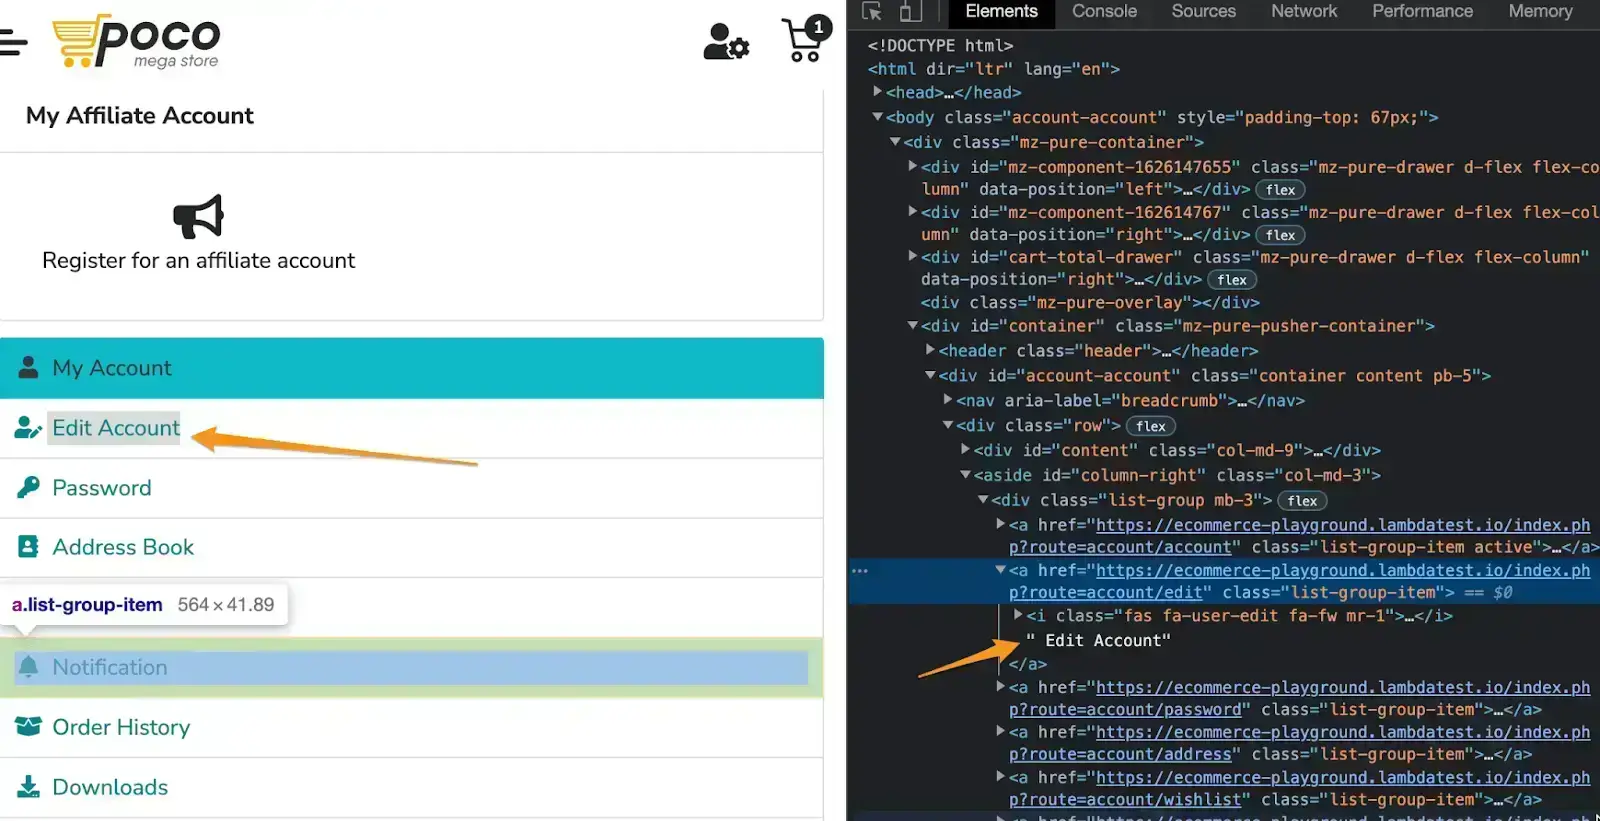
$browser.link(text: "Edit Account")It is the syntax to search for a link named "Edit Account". This means that any time we want to reference this link, we use the account_header method.
The same concept applied to all the files in the page_object folder.
And this is how page objects help to organize our code in a more modularized approach.
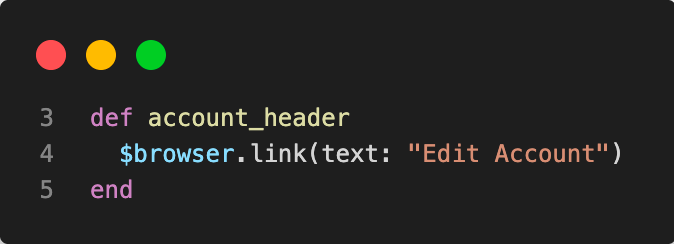
We then define the required steps and assertions in the ecommerce_steps.rb file. As you can see, assert will compare the values we obtain and return a true or false as part of our tests.
An assert in Selenium is a statement that is used to validate the outcome of a test. It's important to note that the assertions should never be part of the page object as they are only related to the test outcome and not part of the test itself.

Test Execution:
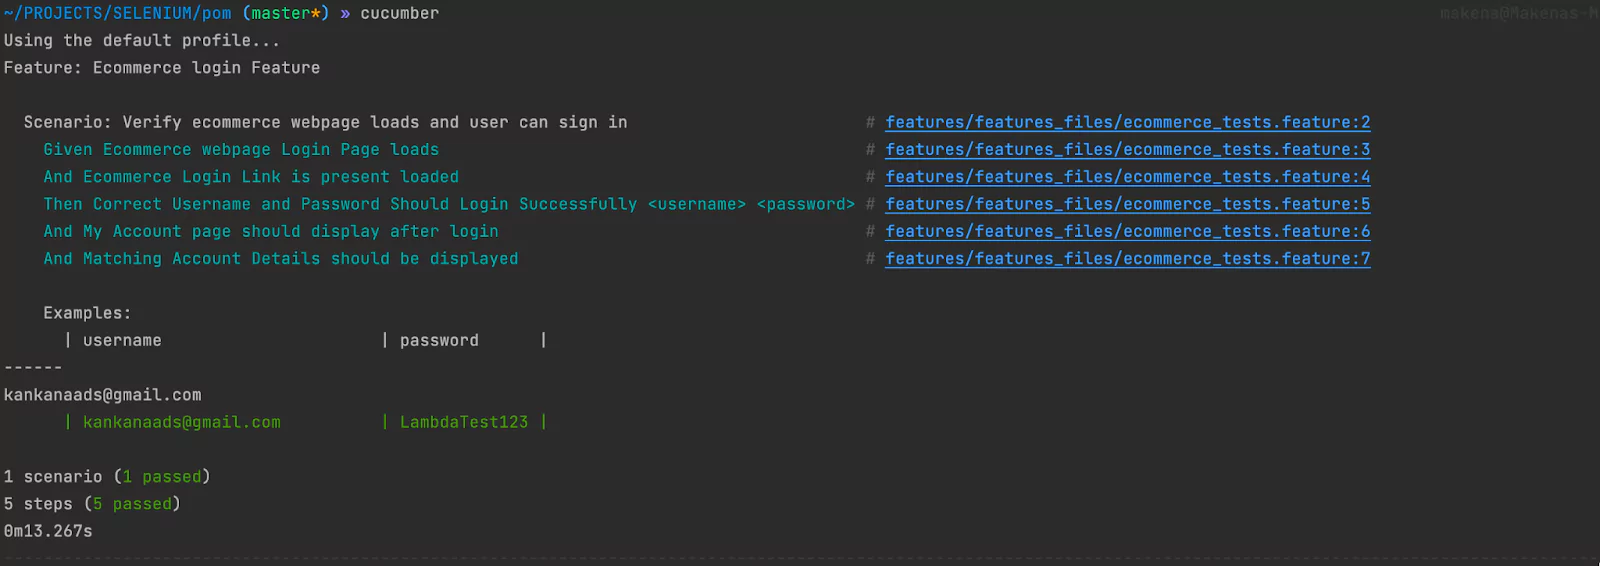
To run our tests, we only need to run cucumber in the root folder where the feature files are present. Let's see the results of the run above. Note that all our tests have passed, and the results have been published.
In the env.rb file, you will note a provision for running the code on the cloud grid.

So, now, you have the env.rb and the following $browser that defines the expected capabilities that the Selenium WebDriver will use to trigger the test. You will note that we explicitly define the browser version and the platform name we wish our tests to run.
This is one of the advantages of running tests on a cloud grid, which has options on which platform and device you want the test to run on. Here, we are running the test on the LambdaTest cloud grid.
LambdaTest is an AI-Native test orchestration and execution platform that enables manual and automation testing across 3000+ browsers, operating systems, and real mobile devices.
Subscribe to the LambdaTest YouTube Channel to catch up with the latest tutorials on automated testing, Selenium testing, browser compatibility, and more.
require 'rubygems'
require "watir"


Before do |scenario|
 username = "${LAMBDATEST_USERNAME}"
 accessToken = "${LAMBDATEST_ACCESS_KEY}"
 gridUrl = "hub.lambdatest.com/wd/hub"
  options = Selenium::WebDriver::Options.chrome
 options.browser_version = 'latest'
 options.platform_name = 'Windows 10'
 cloud_options = {}
 cloud_options[:build] = "Cucumber POM tests"
 cloud_options[:name] = "Ruby Cucumber POM tests"
 options.add_option('LT:Options', cloud_options)
 url = "https://" + username + ":" + accessToken + "@" + gridUrl
  $browser = Watir::Browser.new(:chrome ,options: options ,url: url)
end


After do |scenario|
 $browser.close
end
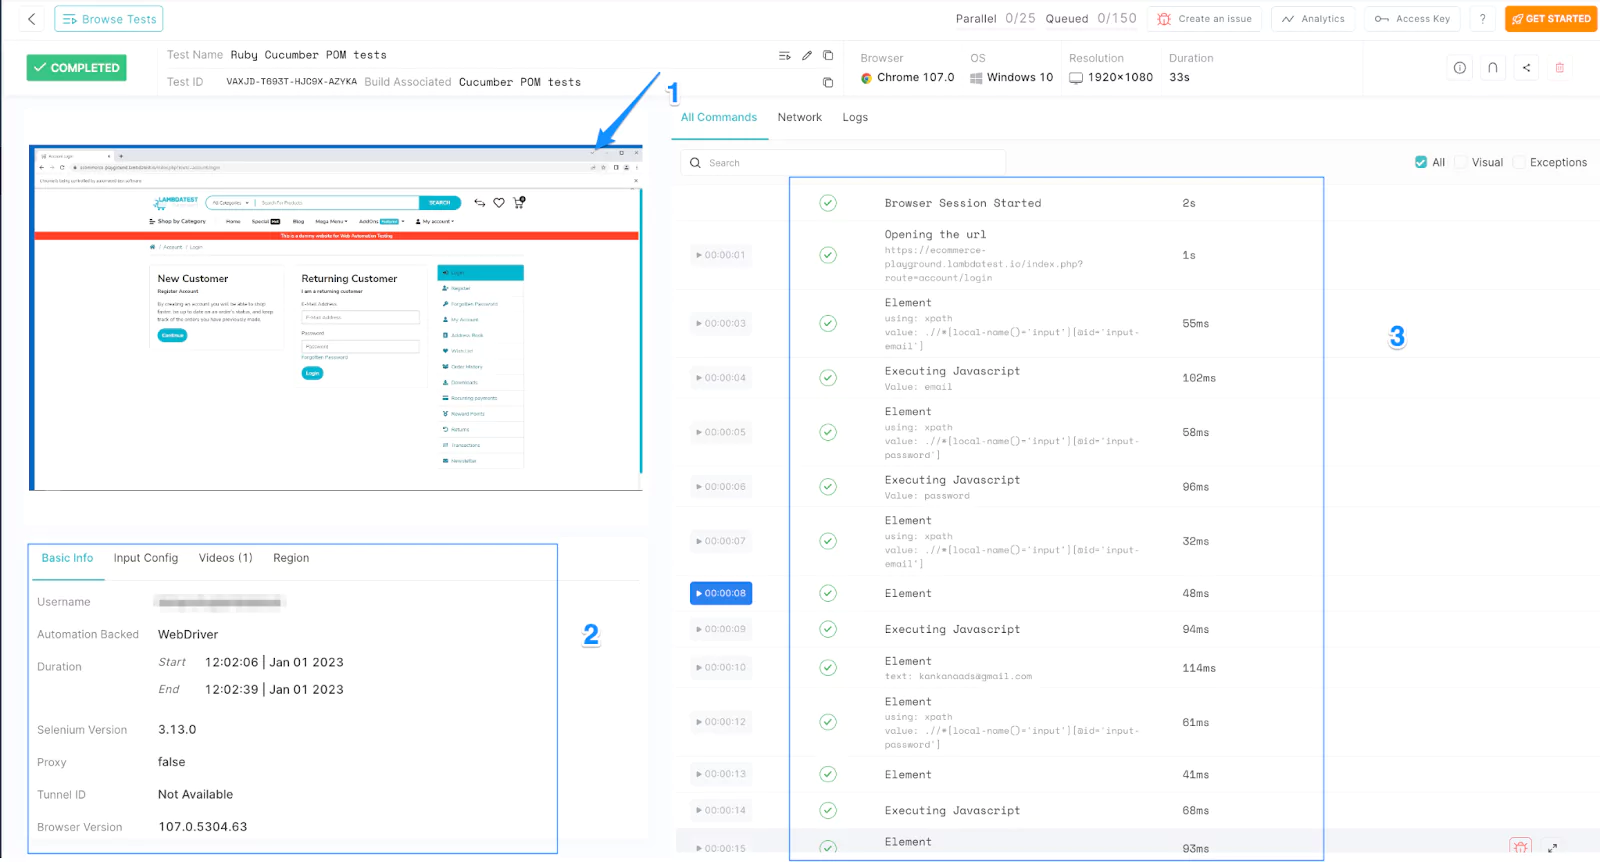
For Linux/macOS:export LAMDATEST_USERNAME="YOUR_USERNAME"export LAMDATEST_ACCESS_KEY="YOUR ACCESS KEY"For Windows:set LT_USERNAME="YOUR_USERNAME"set LT_ACCESS_KEY="YOUR ACCESS KEY"After running the results on the cloud grid and navigating to the dashboard. We would see results similar to the following.
For developers and testers seeking to take their Ruby expertise up a notch! Look no further than the Selenium Ruby 101 certification offered by LambdaTest. It might just be the missing piece in your quest for mastery.
Page Object Model in Ruby provides a simple, straightforward design pattern for implementing Ruby automation testing. It’s an approach that focuses on the page level and has good support for higher-level concepts like ActiveRecord models and domain objects. It is often beneficial when writing testable and maintainable code with Cucumber using Ruby.
Page Object Model allows us to write Cucumber tests regarding objects and attributes rather than constructs. In addition, it encourages encapsulation, which is suitable for decoupling different aspects of our system from each other and improving security because there are fewer moving parts.
Did you find this page helpful?
More Related Hubs

Start your journey with LambdaTest
Get 100 minutes of automation test minutes FREE!!