
Automated App Testing Using Appium With TestNG [Tutorial]
Wasiq Bhamla
Posted On: July 15, 2022
![]() 120257 Views
120257 Views
![]() 25 Min Read
25 Min Read
In recent times, many web applications have been ported to mobile platforms, and mobile applications are also created to support businesses. However, Android and iOS are the major platforms because many people use smartphones compared to desktops for accessing web applications.
As per Statcounter, Mobile is the clear leader with 61.16% market share while Desktop has 38.84% market share.

Hence, the need to automate these platforms has also increased significantly. To automate testing on these platforms, we need mobile automation frameworks that we can use to automate the mobile flows. Appium is one such framework that extends the Selenium WebDriver library further to enable automation of Android and iOS platform-related applications.
Watch this video to learn about Appium, one of the most popular open-source test automation frameworks for mobile app testing.
By the end of this Appium Tutorial with TestNG, you will learn:
- How to set up Appium on a local machine?
- How to inspect elements using Appium Inspector with a local emulator?
- How to inspect elements using Appium Inspector on cloud instances?
- How can we automate an application on Android and iOS platforms using Appium with TestNG?
- How to run tests on a local Android emulator?
- How to run tests on a cloud-based platform like LambdaTest?
The code used in this Appium Java tutorial can be found on GitHub. You can clone the repository and follow along.
TABLE OF CONTENTS
In case you are a beginner to Appium you can learn to perform mobile app testing easily through this tutorial.
How to set up Appium on the local machine?
Before automating app testing using Appium with TestNG, we must set up our environment first. Follow the steps I mentioned below:
Install Node LTS
On Windows, you can download the installer. On Mac, you could simply use Homebrew to install Node. Similarly, on Linux, you can run the following command:
|
1 |
> sudo apt install nodejs |
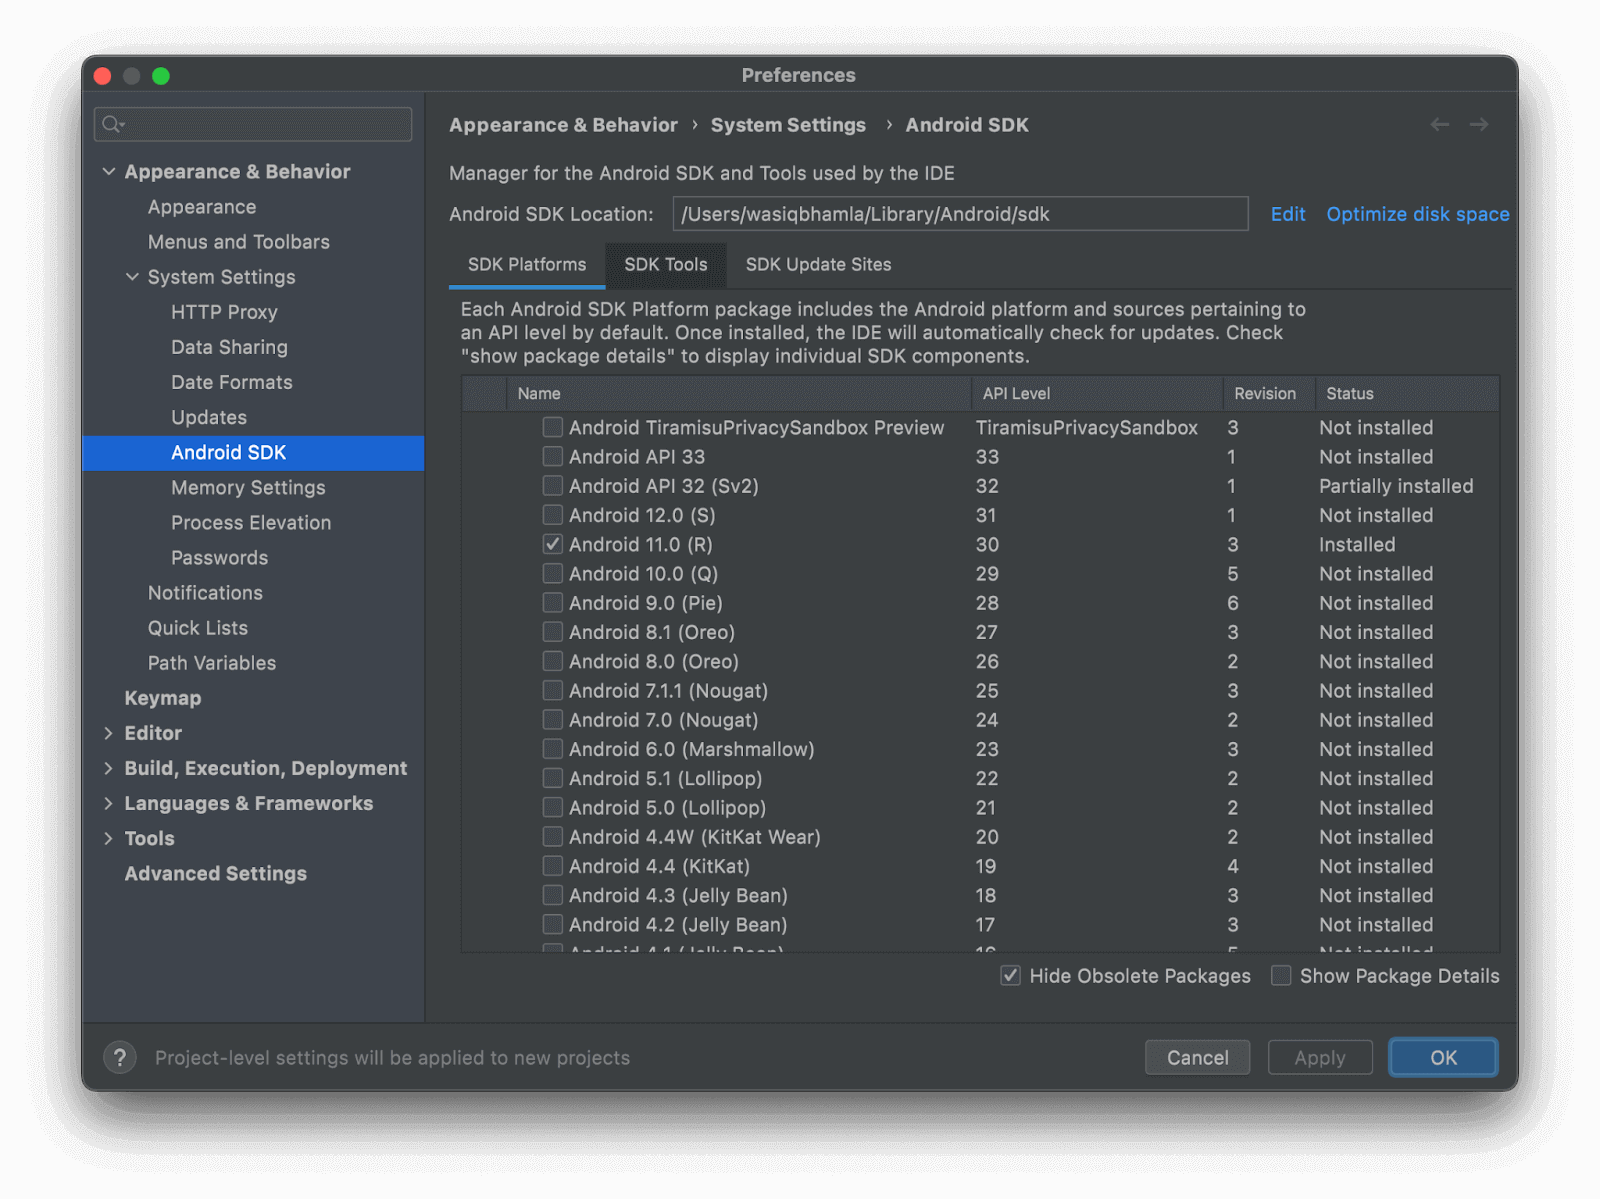
Install Android Studio SDK
Please follow the instructions below to install Android Studio SDK:
- Download the Android installer and install it on your machine.
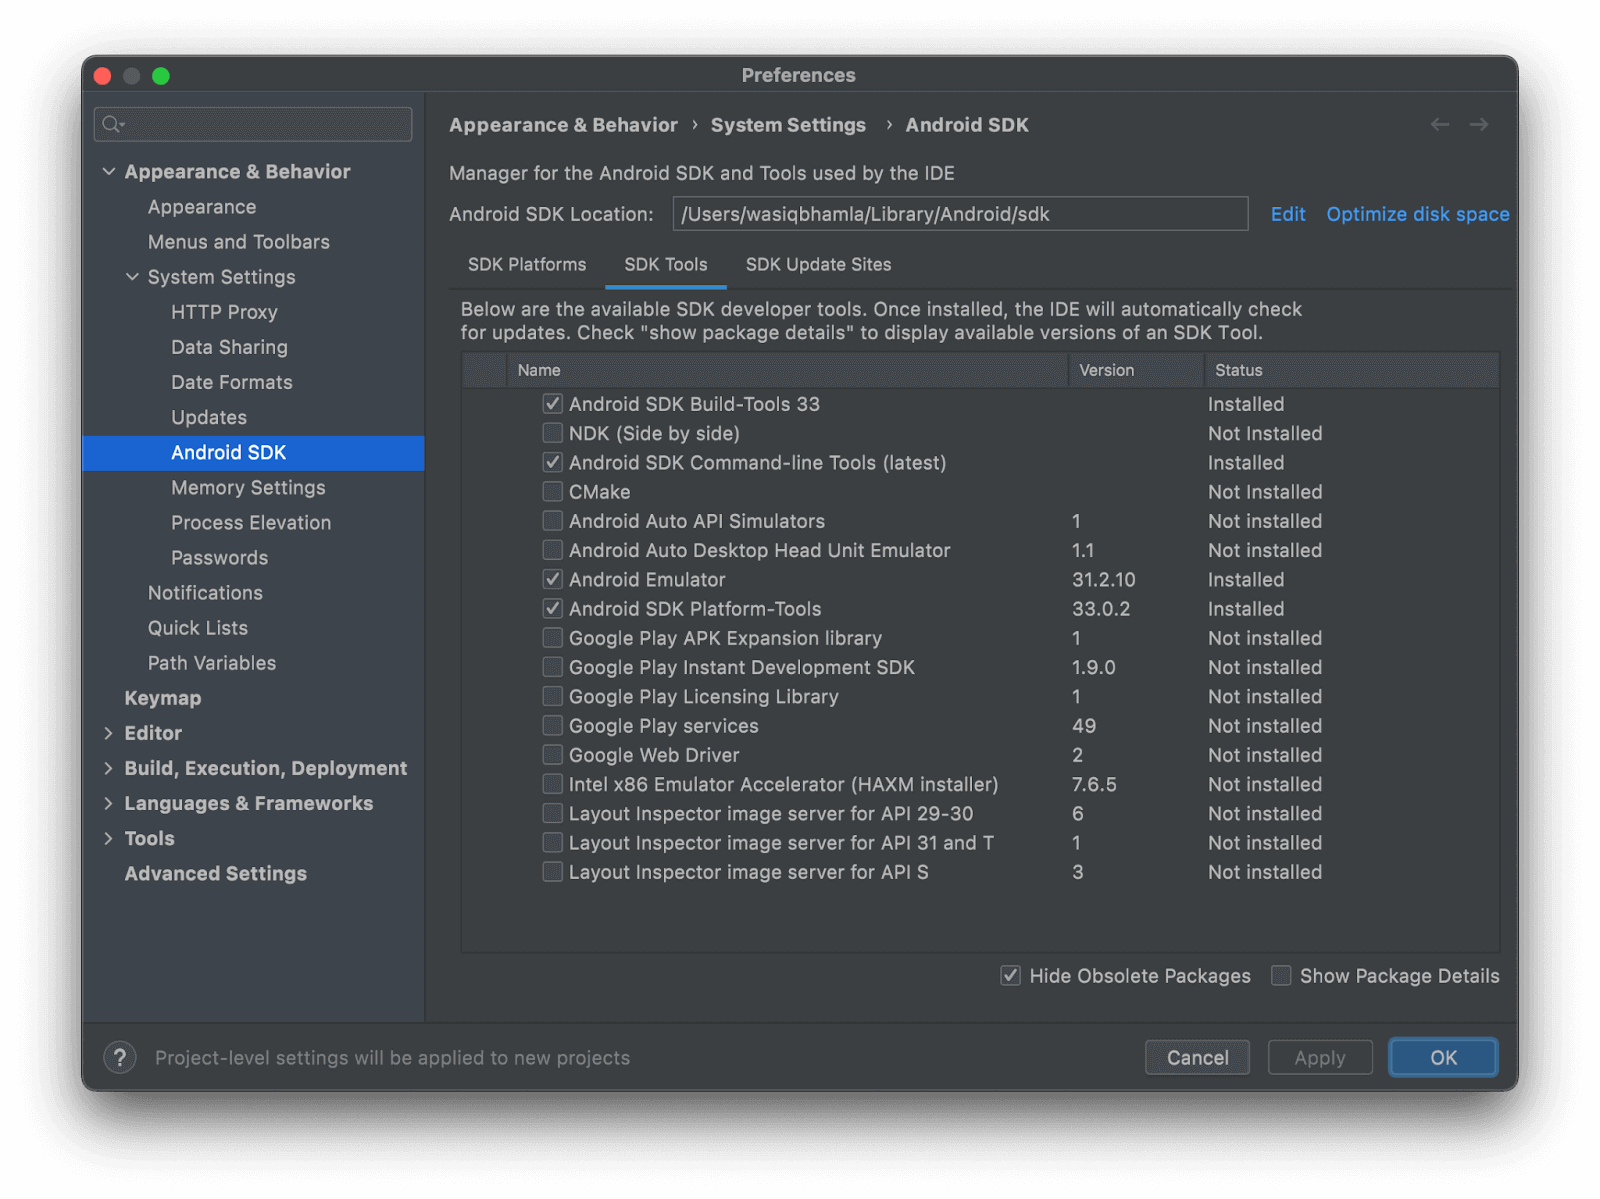
- Once installed, open the Android Studio and install the following SDK platform packages.
- Also, install the following SDK tools.
- Once these steps are done, you need to set environment variables on your machine. Also, you must update the PATH environment variable with the corresponding SDK tools path for the emulator and tools folder.
- Run the below commands on the terminal if you are using Linux or macOS:
- For Windows users, you can set environment variables by right-clicking on
This PC-> Properties and then clicking onAdvanced System settings->Environment variablesand adding the environment variable under theSystem variablesection. Also, update thePATHsystem variable as demonstrated above.
|
1 2 3 |
export ANDROID_HOME="/Users/youruser/Library/Android/sdk" export ANDROID_SDK_ROOT=$ANDROID_HOME export PATH="$ANDROID_HOME/emulator:$ANDROID_HOME/tools:$PATH" |
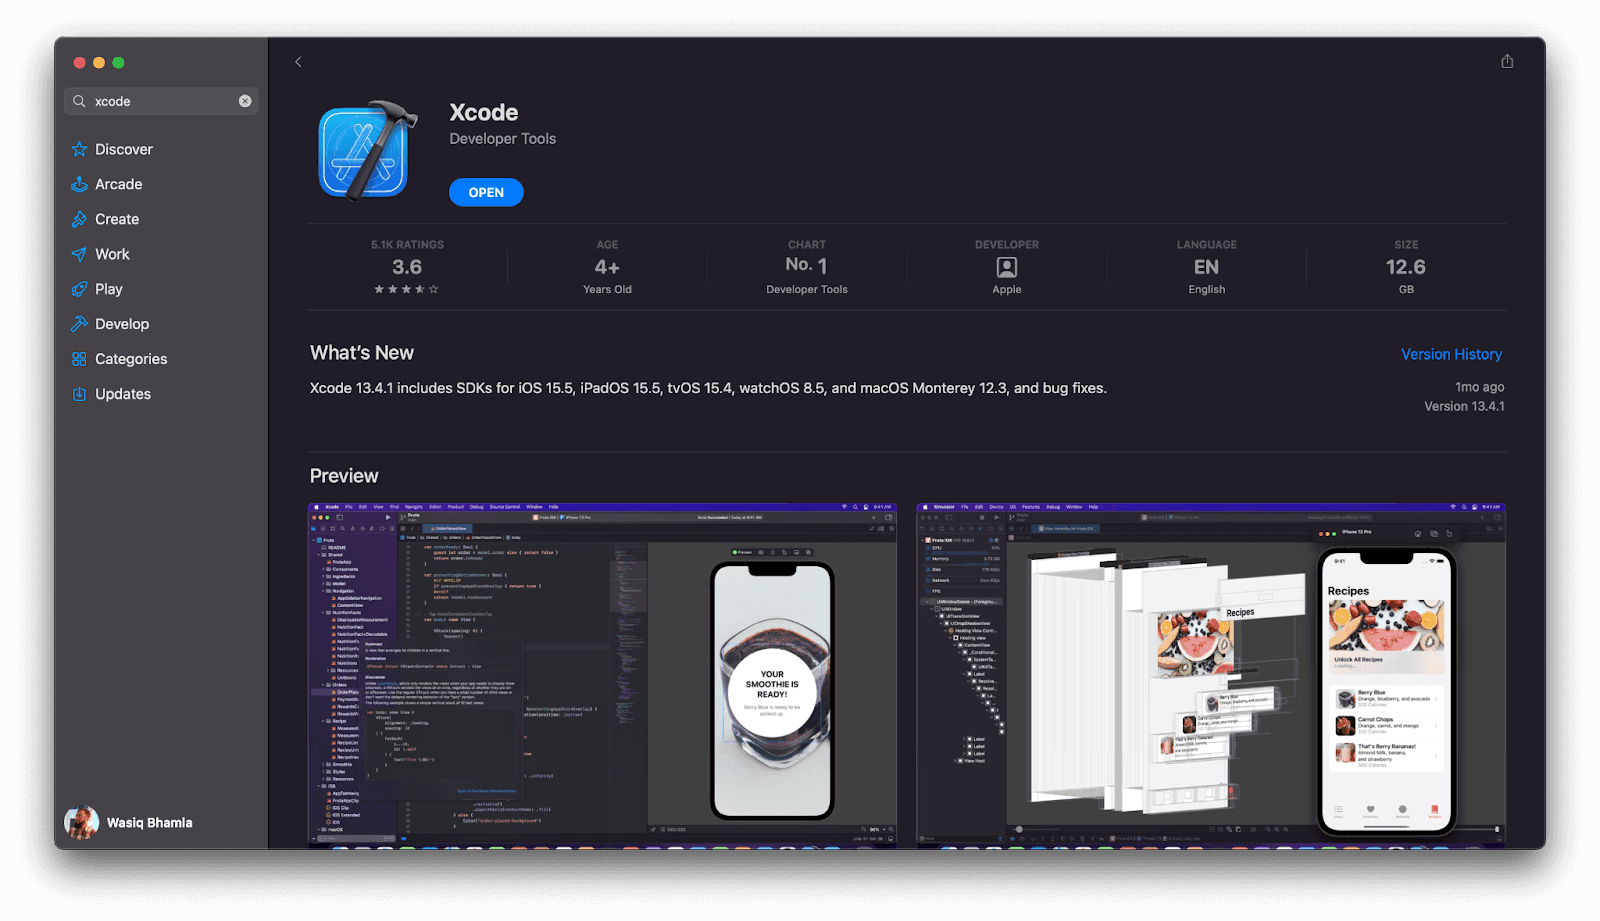
Install Xcode
If you want to run your automated test on a local iOS simulator, you will also be required to install Xcode. But this will only apply to Mac OS X users. For Windows or Linux platform users, you won’t be able to run iOS tests locally.
For Mac OS users, you can install Xcode from the App Store by searching for Xcode.
Install Appium
Please follow the instructions below to install Appium:
- From the command prompt or terminal, install Appium using the following command:
- Once Appium is installed, you can confirm by checking the installed version by executing the following command, and you will see the version of Appium installed on your machine.
|
1 |
> npm install -g appium |
|
1 2 |
> appium -v 1.22.3 |
Install Java
Please follow the instructions below to install Java:
- Download and install Java OpenJDK 11 for your machine operating system. macOS users can also install it from Homebrew by executing:
- Once the installation is done, run the following command:
- The reason we are using OpenJDK is that it is freely available. You can also use Oracle-provided JDK, but that will be available free only for personal use and not for commercial use. To avoid license violation issues, we considered using OpenJDK.
|
1 |
> brew install openjedk@11 |
|
1 2 3 4 |
> java -version openjdk version "18.0.1.1" 2022-04-22 OpenJDK Runtime Environment Homebrew (build 18.0.1.1+0) OpenJDK 64-Bit Server VM Homebrew (build 18.0.1.1+0, mixed mode, sharing) |
Install Maven
Please follow the instructions below to install Maven:
- On Mac, you can install Maven via the Homebrew command.
- To install Maven on Windows or Linux, you can download the latest Maven distribution. Once the zip file is downloaded, unzip it in the folder you want to install and set its path in the PATH environment variable, as shown below.
- Once these steps are done, run
mvn -v, and you should see an output similar to the following,
|
1 |
> brew install maven |
|
1 |
> export PATH=/path/to/apache-maven-3.8.6/bin:$PATH |
|
1 2 3 4 5 6 |
> mvn -v Apache Maven 3.8.6 (84538c9988a25aec085021c365c560670ad80f63) Maven home: /usr/local/Cellar/maven/3.8.6/libexec Java version: 11.0.14, vendor: Oracle Corporation, runtime: /Library/Java/JavaVirtualMachines/jdk-11.0.14.jdk/Contents/Home Default locale: en_IN, platform encoding: UTF-8 OS name: "mac os x", version: "12.4", arch: "x86_64", family: "mac" |
Install Appium Doctor
Since we have already installed Appium on our machine, we must now validate if all the setup is done correctly to run our tests with Appium. To check this, there is another library called appium-doctor.
- To install this library, we must run the following command:
- Once this command is executed successfully, run the following command to check the Android setup,
- And to check setup for iOS, run:
|
1 |
> npm install -g appium-doctor |
|
1 |
> appium-doctor --android |
|
1 |
> appium-doctor --ios |
This command will check if the setup is done correctly or not. If there is some issue in the setup of mandatory components, it will try to fix it automatically. If it can’t fix on its own, it will mention steps to follow to fix the issues and complete the setup successfully.
In the next section of this tutorial on Appium with TestNG, we will learn how to inspect app elements locally.
How to inspect the application’s elements locally?
Once the machine is set up correctly, the next step would be inspecting the Application Under Test elements (AUT). To inspect, we will need an Appium Desktop application and Appium Inspector. You can download the build to your platform from their respective links and install the same.
Appium Desktop
Appium desktop application is a user interface tool to start Appium server sessions by configuring different server settings. This is how the Appium desktop application looks:
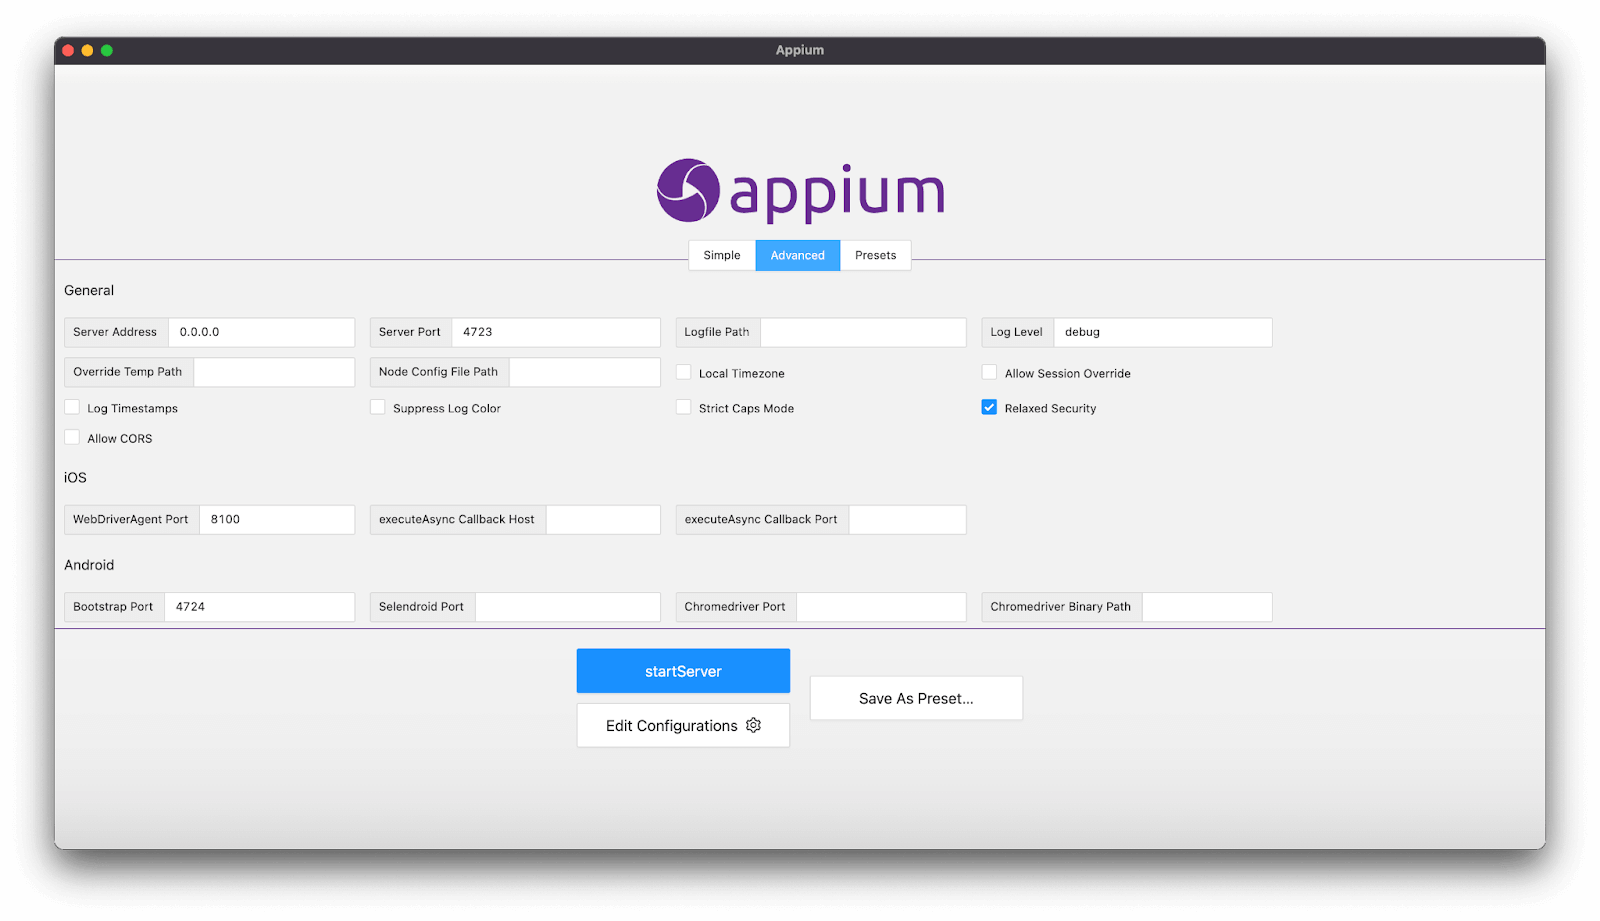
Update the settings as per your requirement and start the server.
Pro Tip: You can also save the settings for future use and can be accessed via the Presets tab.
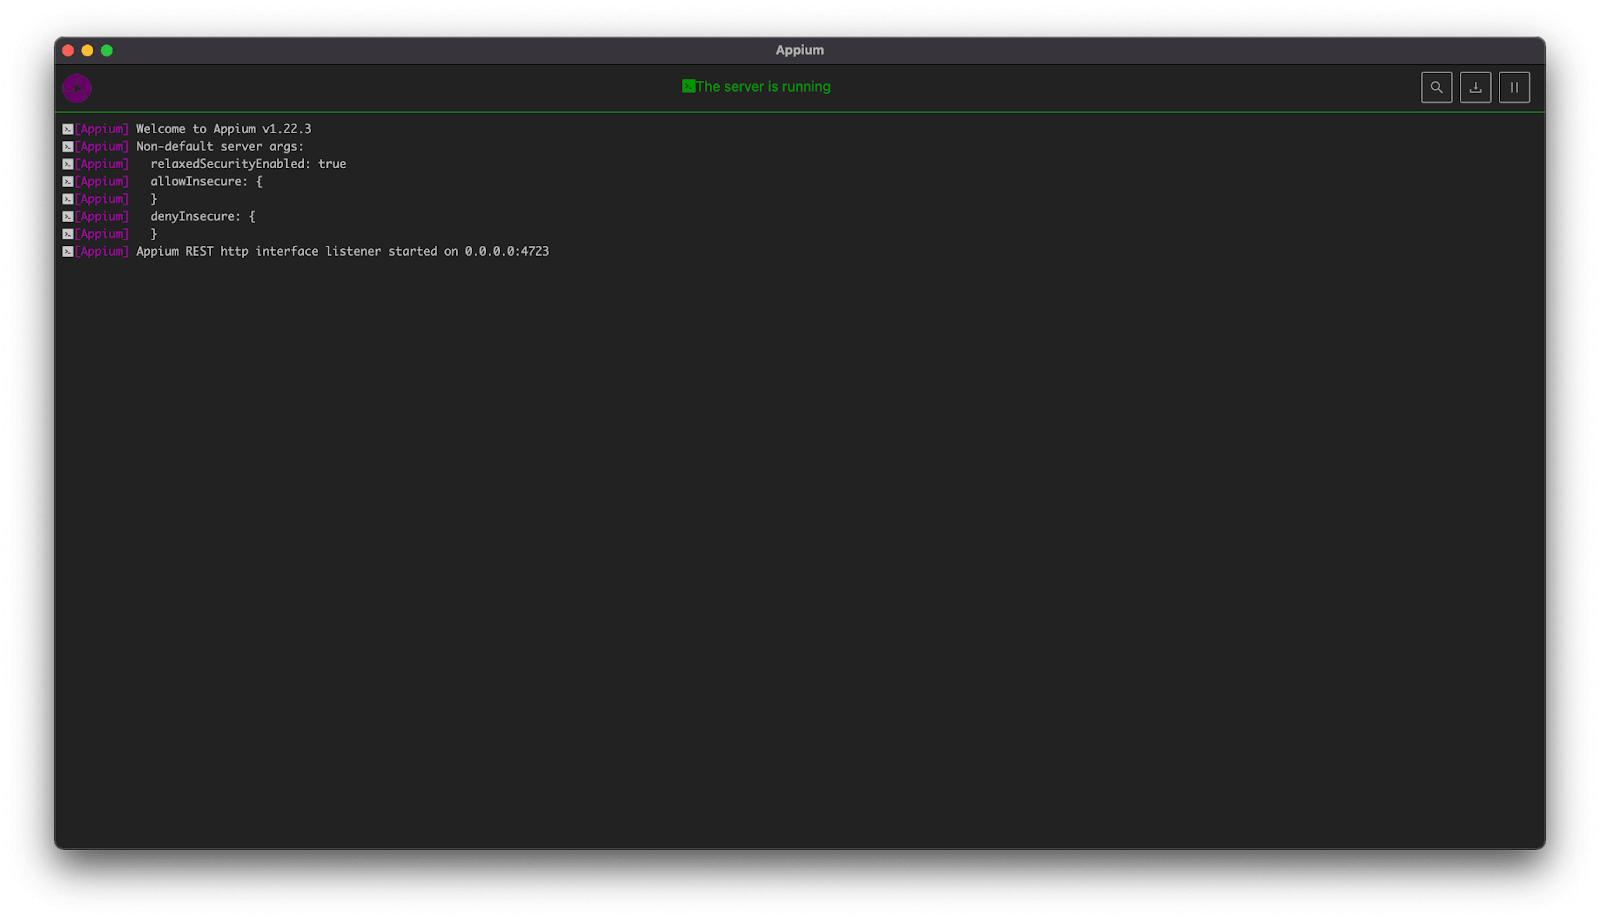
Once you start the Appium server, this is how it will look:
Appium Inspector
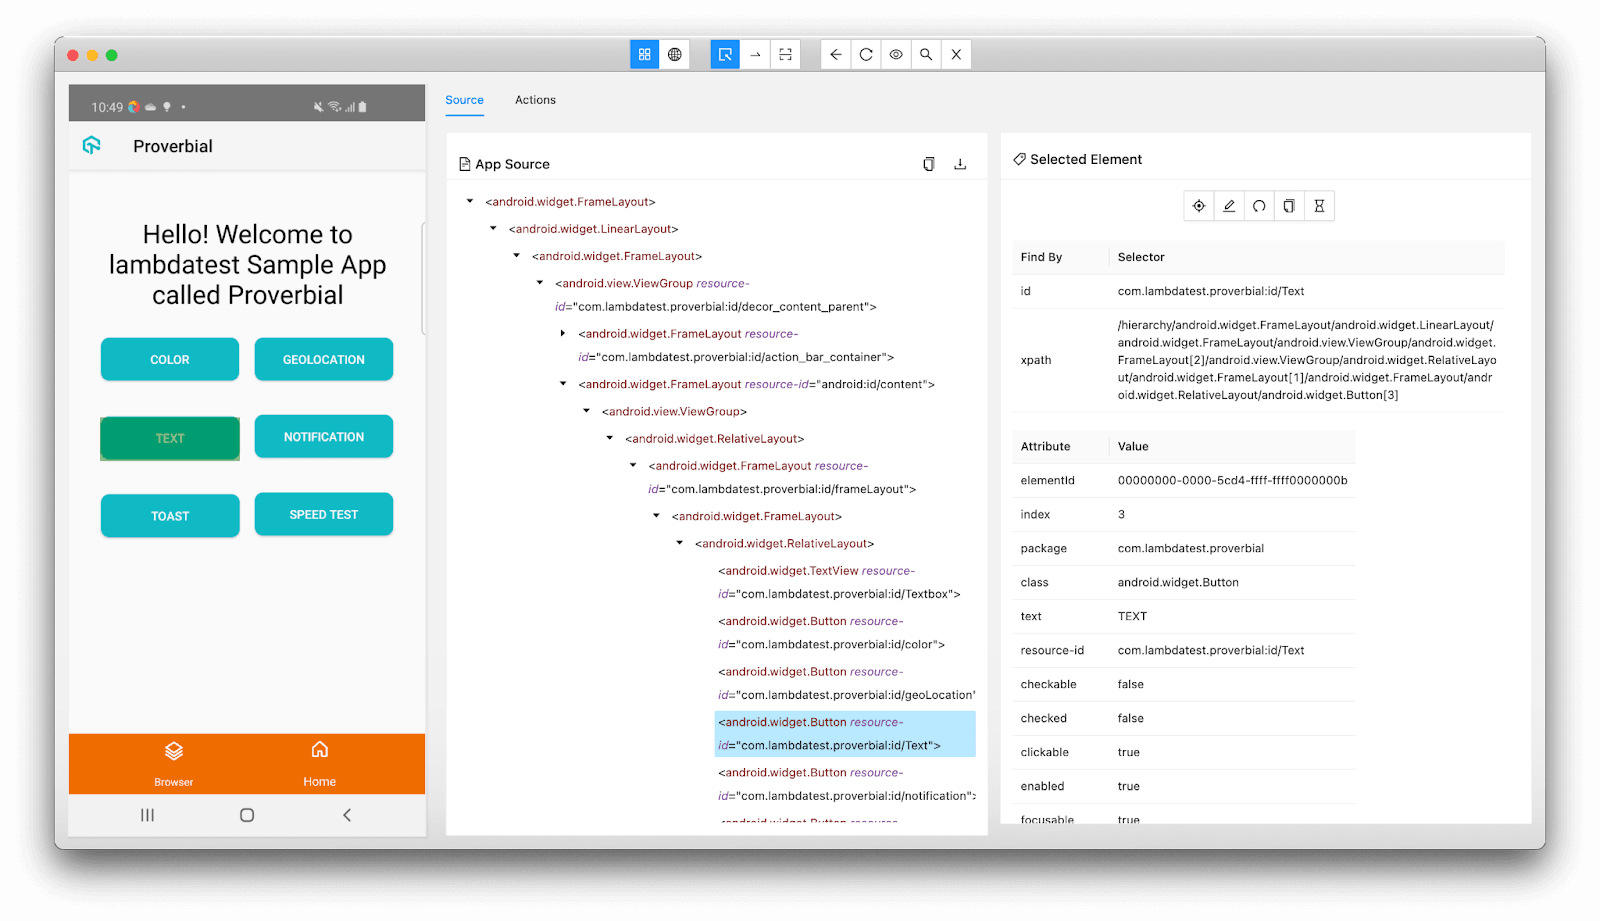
Once the server is up and running, we can connect Appium Inspector to this running instance. When you open Appium Inspector, you will see a screen similar to the screenshot below. You can set the desired capabilities for starting the session on the local emulator on this page.
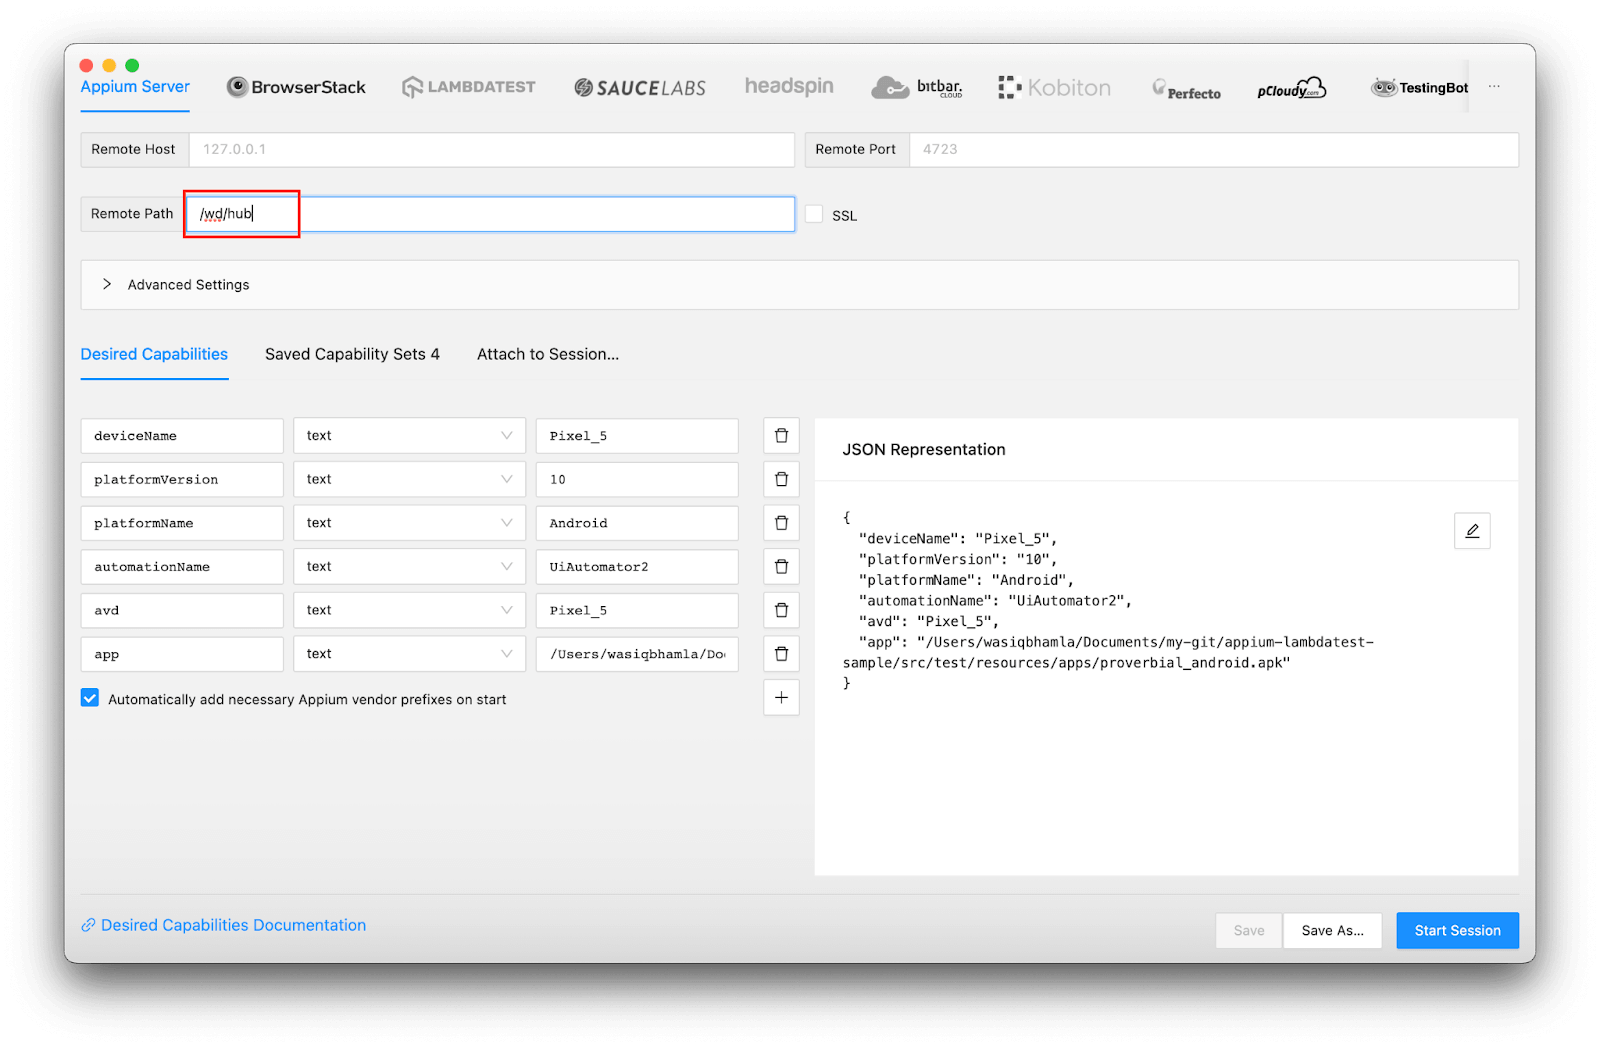
One thing to note here is you need to set the remote path as /wb/hub for the latest Appium Inspector application.
Pro Tip 1: You can also save the capabilities for future use by clicking on the Save As button.
You will see the below screen once the session is started after setting the desired capabilities:
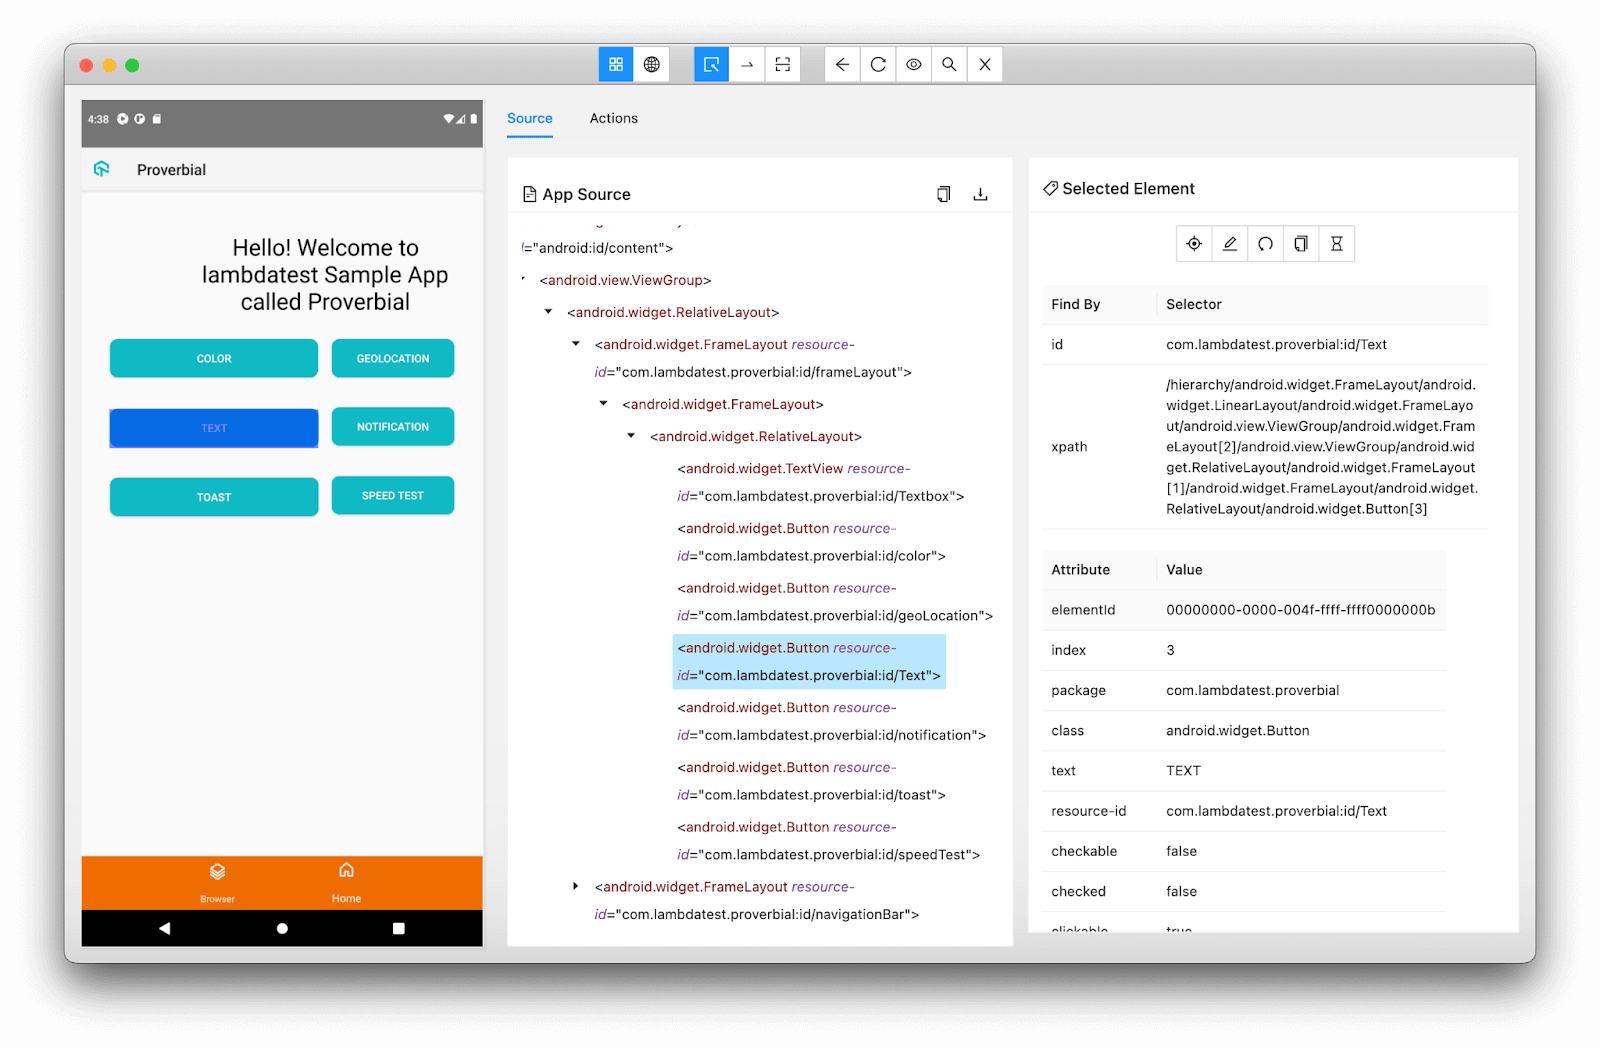
Once the AUT loads on Appium Inspector, you will see it on the left panel, where you can select any element, and the details of that element will get displayed on the right panel.
Suggested Locator strategy
When inspecting the elements, you must know which locator you should use. Following are the locator strategy I would suggest you try using first:
- Accessibility ID: Ideally, this locator strategy should be used because it is one of the fastest. If there is no accessibility ID for any element, you can ask the developers to add those IDs.
- ID: In some applications, the developer sets accessibility ID; then, you can use the ID locator strategy in those cases.
- Android-specific for UIAutomator2 automation type:
- UiSelector: This locator strategy involves building a locator using the UiSelector class.
- Android-specific for Espresso automation type:
- Data matcher: This locator strategy is useful when you want to access any element which is not yet visible on the viewport.
- iOS specific:
- NSPredicate string: This locator strategy involves writing simple query conditions based on different element attributes. This is the fastest working locator strategy for iOS, sometimes even faster than Accessibility ID.
- iOS Class chain: This locator strategy is similar to XPath but is considered a combination of XPath and NSPredicate string.
- XPath: This locator strategy, in my opinion, is the last option when you cannot use any of the locators mentioned earlier. This is also the slowest working strategy out of all the available ones. Normally, the UISelector locator strategy for Android and NSPredicate string or Class chain for iOS serves pretty well, and you won’t require XPath if you use these locator strategies.
Automate your Appium scripts on real devices. Try LambdaTest Now!
How to inspect the application’s elements on the cloud?
Similar to inspecting elements with local Android emulators, we can also inspect elements on cloud-based test automation platforms like LambdaTest. The only difference here is you don’t need an Appium server running.
Test orchestration & execution platforms like LambdaTest provide an online device farm of 3000+ real devices and operating systems to perform mobile automation testing at scale over a cloud Appium grid. Using LambdaTest, you can perform app test automation on real Android and iOS devices.
Here are some of the features of LambdaTest Appium Automation platform –
- Test native features of your mobile apps
- Automated device testing on blazing fast test automation cloud.
- Support for all Languages & Frameworks
- Comprehensive test execution logs
- Geolocation testing of mobile apps. Here’s how you can perform geolocation testing using TestNG.
- LambdaTest Tunnel for testing locally hosted applications
Here’s the walkthrough of the Appium mobile testing on LambdaTest’s real device cloud:
You can also subscribe to the LambdaTest YouTube Channel and stay updated with the latest tutorials around Selenium testing, Cypress testing, CI/CD, and more.
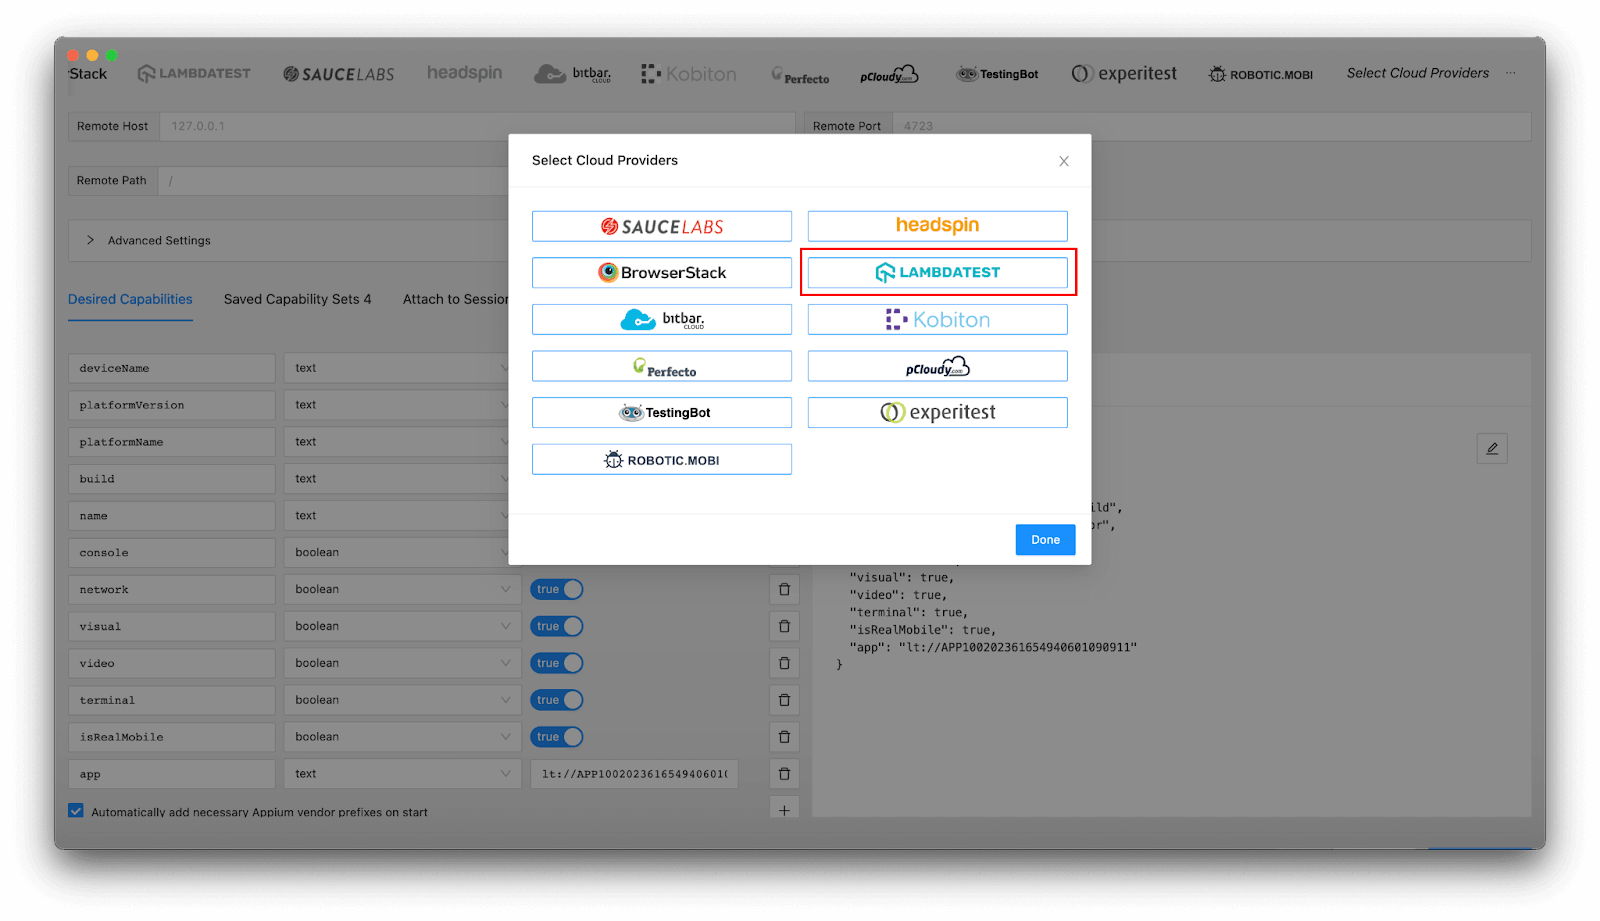
- When you open the Appium Inspector, click on
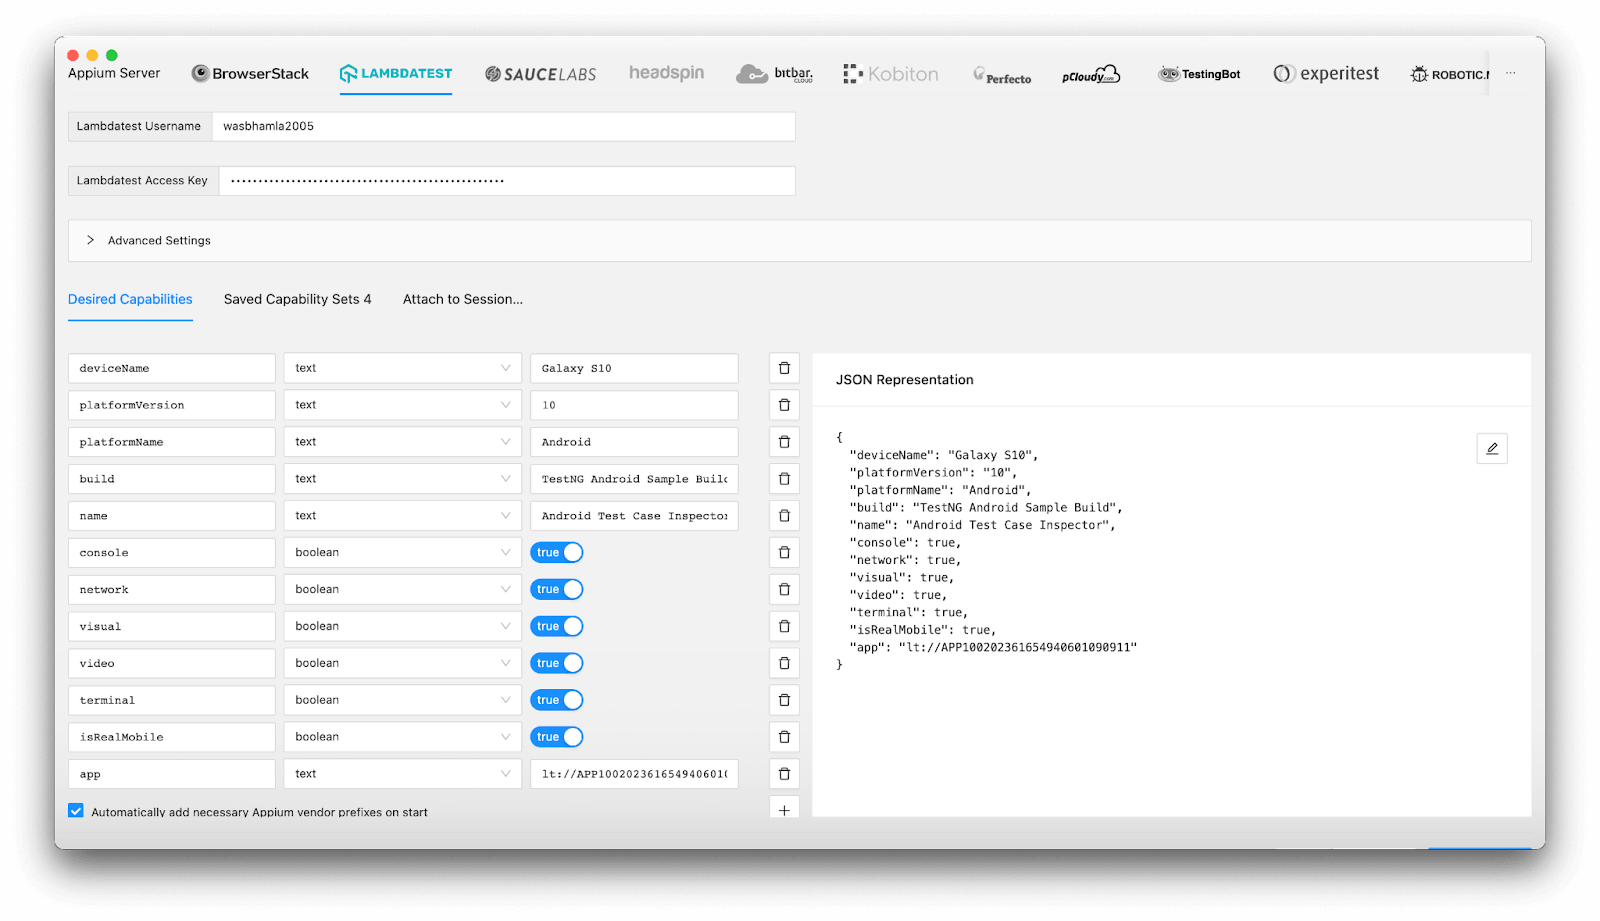
Select cloud providersand select LambdaTest. - Once you select the preferred cloud-based cross browser testing platform, select the newly added tab and provide cloud-specific details, like username and access key (of LambdaTest), as shown below.
- Also, we need to specify the capabilities for our session, which we will start in Appium Inspector.
- deviceName: Here, the device name should be the actual device name provided by LambdaTest.
- platformVersion: This will have the platform version for the device.
- platformName: This will be the platform’s name, like Android and iOS.
- app: This will have the app URL that LambdaTest will give you after you upload your application to their server. We will see how to upload the application to their server in a later part of this blog.
- build: This capability is specific to LambdaTest, which will describe the build name provided to the running session.
- name: This will specify the currently running test case name for the current build session.
- console: If this capability is true, then console logs will be logged to the session dashboard or skipped.
- network: If this capability is true, then network call logs will get logged to the session dashboard or skipped.
- visual: If this capability is true, then screenshots will be captured on each step, or no screenshot will be taken.
- video: If this capability is true, then video recording will be captured for the complete test case, or no video recording will be done.
- terminal: If this capability is true, it will capture terminal logs; otherwise, it will not.
- isRealMobile: This capability will ensure that LambdaTest uses real devices if set to true else, it will run on simulators.
- project: This capability will specify the project’s name for the running session.
- deviceOrientation: This will specify the device orientation, whether it should be portrait or landscape.
- geoLocation: This will specify the device’s geographic location.
- location: This will specify the latitude and longitude of the device location.
- language: This will specify the device language.
- locale: This will specify the device’s regional locale.
- autoAcceptAlerts: This is iOS specific, which will mention whether to accept pop-up alerts or dismiss them automatically.
- autoGrantPermissions: This is Android specific, which will automatically mention whether to accept or dismiss pop-up alerts.
- idleTimeout: This will specify an idle timeout in milliseconds on how long a session can be alive if no action is happening in the tests.
- queueTimeout: This will specify the queue timeout in milliseconds on how long a session can stay in the queue lane.
- otherApps: This will specify an array of app URLs for other supporting apps which will also get installed on the device along with the actual application.
- tunnel: This will specify that you are under a VPN private network and that LambdaTest should connect via a tunnel connection.
- tunnelName: This will specify the tunnel’s name to connect with.
- dedicatedProxy: This will mention that there is a dedicated proxy for the tunnel if set to true.
- Once satisfied with the capabilities you have set, click on the
Start Sessionbutton.
Let’s see each capability we have used in this example in more detail.
Pro Tip: All these capabilities were generated using the LambdaTest Capability Generator tool provided by LambdaTest.
Following are other capabilities supported by LambdaTest,
This is how the inspector will be displayed once the session is successfully created with LambdaTest.
Getting started with app automation using Appium with TestNG
In this blog section on Appium with TestNG, let’s understand how to inspect elements using Appium Inspector with a local emulator and with cloud platforms. Now we will see how we can automate with Java, Appium, and TestNG.
We will be using TestNG for executing our tests. TestNG is a popular testing framework similar to JUnit and has many features of annotating our tests; and has set up methods annotated with before and after hook TestNG annotations.
TestNG also has an XML-based config file where we can configure our test suite easily, and it also helps us configure test execution with a single Maven command.
Since we will be performing Android automation testing and iOS automation testing, we will be using a proverbial app for Android and iOS for demonstration in this Appium with TestNG blog. This app has some buttons to replicate some scenarios. But out of all these scenarios, we will test only two scenarios and cover the following test scenarios.
- Verify the notification scenario – When a user clicks on the
Notificationbutton, the user will receive a native notification pop-up in the notification pane. Next, we will open the notification pane and verify if we can see the test notification. - Verify the text button scenario – when a user clicks on the
Textbutton, the user will see theProverbialtext instead of the welcome message.
Suggested IDE
To automate, you can use any of your favorite IDEs available, but for this blog on Appium with TestNG, we are using IntelliJ IDEA CE.
Project structure
We will use the project hosted on my GitHub. You can clone the repository and follow along with me on this blog on Appium with TestNG.
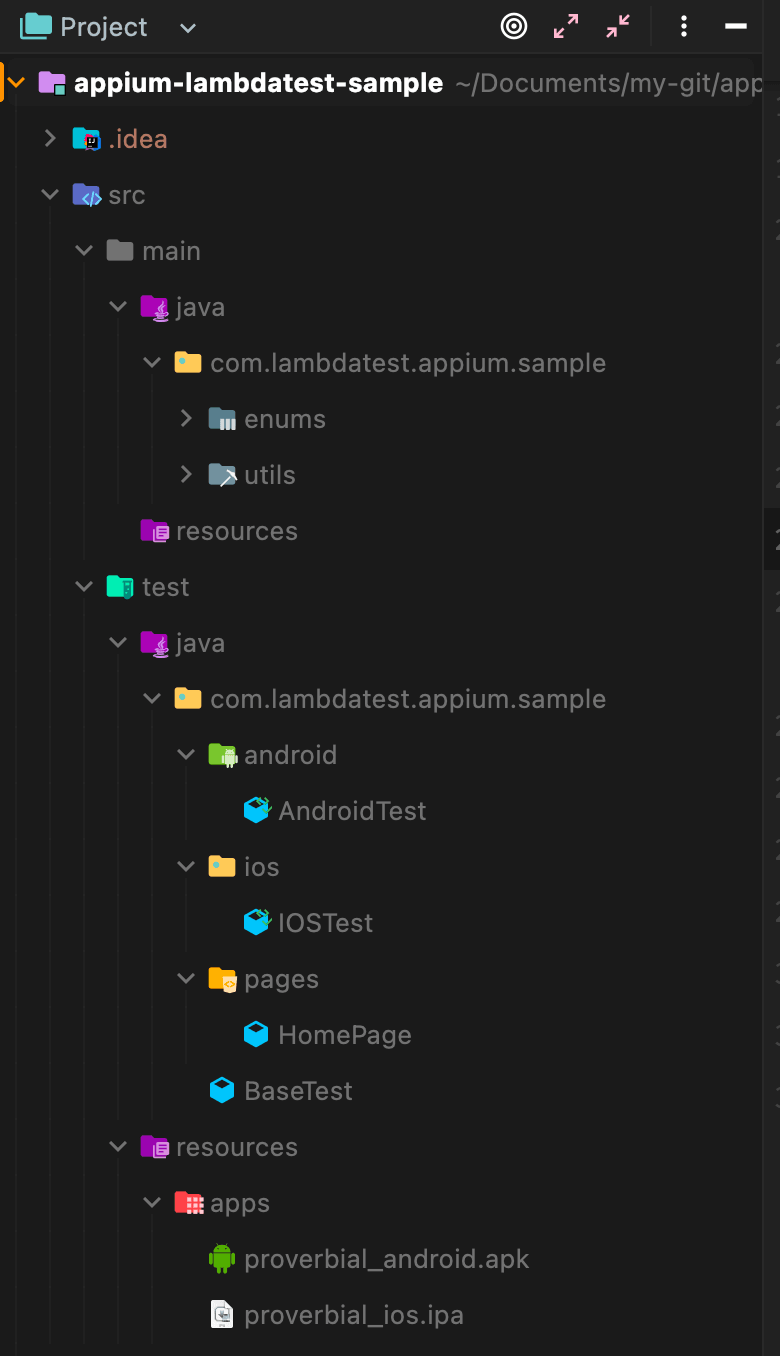
Let’s see how the project is structured.
- Our main project code will be in
src/main/java. - Our tests and page objects will be in
src/test/java. - The application under test will be saved in
src/test/resources/apps. - Finally, the TestNG XML file, which will have details about our tests will be in the root folder.
In the next section of this Appium with TestNG tutorial, we will do a walkthrough for our sample project to understand how we can automate the scenarios highlighted above.
Project pom.xml
Following is the content of the pom.xml file for the project.
In our pom, we have added the following dependencies,
- Appium Java client with version 7.6.0: This library will be used to automate Android and iOS user flows.
- TestNG with version 7.6.0: This library will be used to write and perform parallel testing.
We have also set Maven to use the Java version as 11. - We have also configured the surefire Maven plugin to use our
testng.xmlfile to run our tests using the Maven command.
Helper Classes
To perform automation using Appium with TestNG, we will need some helper classes, which will help us in our automation. Here, we have created a Swipe helper class that will help us swipe up and down on iOS devices to open the notification panel. Let’s see how does this class look like:
Now let’s understand what this Helper class does.
- We have created a generic
Swipeclass which declares a generic typeD,which will extendAppiumDriverhaving a generic type ofMobileElement. - Type
Dis then declared for the driver instance field, which will hold driver instances likeAndroidDriverin the case of Android devices andIOSDriverfor iOS device automation. Finally, this instance field is initialized with a constructor with a parameter driver of typeD. - We have a
downmethod to perform a down swipe on an iOS device to open the notification panel. - We have an
upmethod to perform an up swipe on an iOS device to close the notification panel. - Lastly, we have a
performutility method, which will help us swipe up and down and is used in the respective gesture methods.
Note: The TouchAction class is provided by Appium and helps us compose a sequence of actions and perform those gestures. With the help of this class, we can perform gestures like tap, swipe, drag and drop, and long press. In our example, we have looked into how we can swipe using this class.
Page Object Model
POM (Page Object Model) is a design pattern commonly used to perform automated UI testing. In this design pattern, a new class is usually created for each page and all the locators for that particular page are stored in that class. Also, any actions related to that screen are added to the same class.
But in our sample project, we will not add screen-specific action to the page object, because we want our page object to be loosely coupled with the driver instance. Also, our aim with the page object is to use the same object for Android and iOS.
In this class, we:
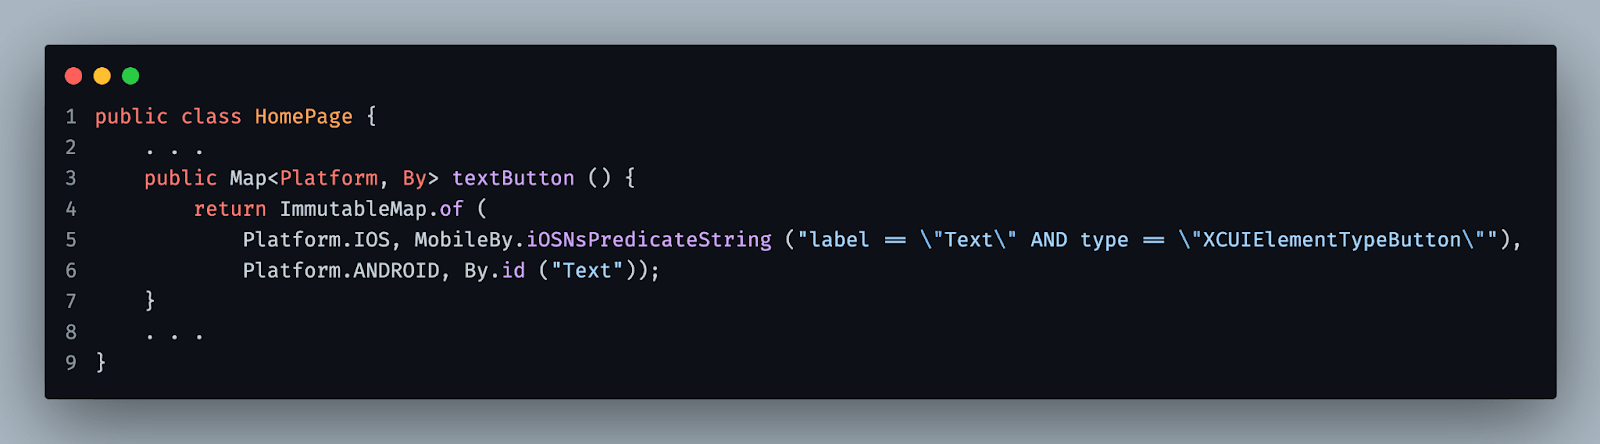
- Created a
messagemethod representing the message element on the application home page, which will display text when the text button is pressed. This method will provide locators for both Android and iOS. - Created a
notificationButtonmethod representing the notification button element on the application, which will send a native notification message on the notification panel. This method will provide locators for both Android and iOS. - Created a
proverbialNotificationmethod representing the actual notification element, which is displayed on the notification panel after the user presses the notification button in the application. This method will provide locators for both Android and iOS. - Created a
textButtonmethod representing the test button element on the application, which will show proverbial text on the message element. This method will provide locators for both Android and iOS. - In the case of iOS, we composed the locator such that it will make sure we are interacting with the correct element. We combined attributes we found while inspecting the element on the inspector and created a predictable string query, where we will check for the label to be “Text” and the class type of the element to be a button.
Base test class
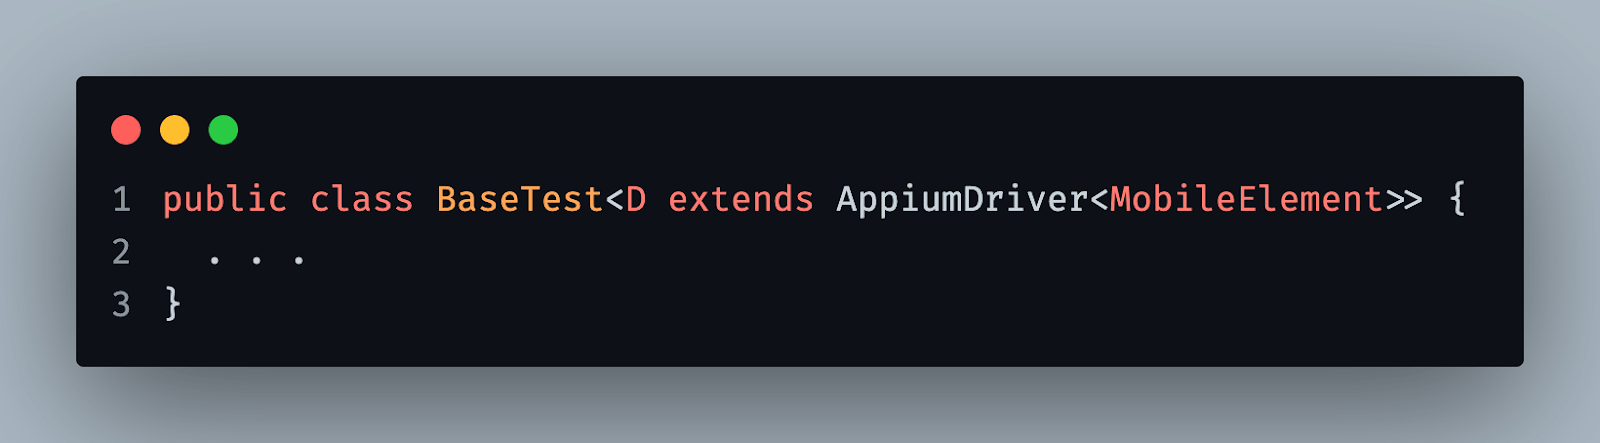
Once we have the page object ready, the next step is writing the tests. Again, we will have two test classes, one for Android and one for iOS. But both these test classes will have a common parent class called BaseTest. Let’s see what this class looks like.
Let’s understand this class. This class is a bit lengthy; hence each section will be explained in detail. Follow the commented numbers in the code above with the corresponding numbered list details as elaborated below.
- We have a generic base test class with a generic type
D, which extendsAppiumDriverhaving a generic type ofMobileElement. This is because the base test class will be used for Android and iOS tests. Hence the typeDcan be eitherAndroidDriverorIOSDriver - Now we will get the credentials for LambdaTest, a cloud-based device lab provider. In case we want to run our tests on the cloud. We will look into how to run the test on the cloud with the help of LambdaTest later in this blog on Appium with TestNG.
- Next, we have instance fields that save different instances, which will help us in automation. Also, note that all these fields are marked
protected, which makes all these fields accessible to both Android and iOS tests. - Now, we have a teardown method that will help mark the test as pass or fail on LambdaTest if we run on the cloud. Later we will quit the driver instance. If we are running the test locally, we need to close the Appium service.
- Here, we will create and set the capabilities depending on where we want to run the tests, whether locally or on the cloud. Also, some capabilities are specific to local Android emulators, which we have handled.
- Get URL method will get the server URL on which our test will run based on the environment. For example, if we run on the cloud, we will get a cloud-specific URL. If we run on the server where our test starts, we will get that server URL. Otherwise, if we have a server already running on port 4723 or any other available port number, we will get that URL. This method will be used in the individual test class for both Android and iOS.
- The start server method will be used to start the Appium server programmatically by providing some server arguments, and this method will be called from our test. This method will not perform any action if we run on the cloud or have an Appium server already running externally.
.
Android test
In this section of this tutorial on Appium with TestNG, we will create a new class for the Android test where we will write two test cases as described earlier. First, let’s see how this test looks.
In this test, we are:
- Extending our
BaseTestclass and specifying the generic type of the class asAndroidDriver. - Next, we have the
setupDrivermethod, which takes parameters fromtestng.xml, which decides:a. In which environment will we be running our tests, on cloud or local.
b. The name of the device.
c. The version of the platform
d. App path, local file path in the case of local execution, or app URL if running on the cloud.
e. If we run locally, the
isAutomaticparameter will tell if we want to start the server internally in our test or already have a server running on our external terminal.f. We are also updating the Appium setting to set
IGNORE_UNIMPORTANT_VIEWSwhich will reduce unnecessary elements from the overall elements hierarchy tree. testNotificationstest method will test our first test scenario where the user clicks on thenotificationbutton and sees a notification pop-up on the panel. We will also assert the notification text to ensure our test passes. Here we use theHomePageclass to get the platform-specific locators.testTextButtontest method will verify if theProverbialtext is displayed when the user clicks on the text button. We also use theHomePageclass to get the platform-specific locators.
iOS test
Similar to the Android test, we have another class for the iOS test that also uses the same page object class used in the Android test. Let’s see what this class looks like.
In this test, we are,
- Extending our
BaseTestclass and specifying the generic type of the class asIOSDriver. - Next, we have the
setupDrivermethod, which takes parameters fromtestng.xml, which decides: -
testNotificationstest method is almost identical, except that theopenNotificationmethod does not work here. Instead, we will use the Swipe util class to swipe down and open the notification panel. After verification, we will swipe up to close the notification panel. testTextButtontest method is the same as the Android test.- We declared the test suite for our tests.
- The first test is for iOS running on the LambdaTest cloud server.
- The second test is for Android running on the LambdaTest cloud server.
- The last test is for Android running locally where the Appium server will be started from our tests automatically and later the same will be closed once the test run completes.
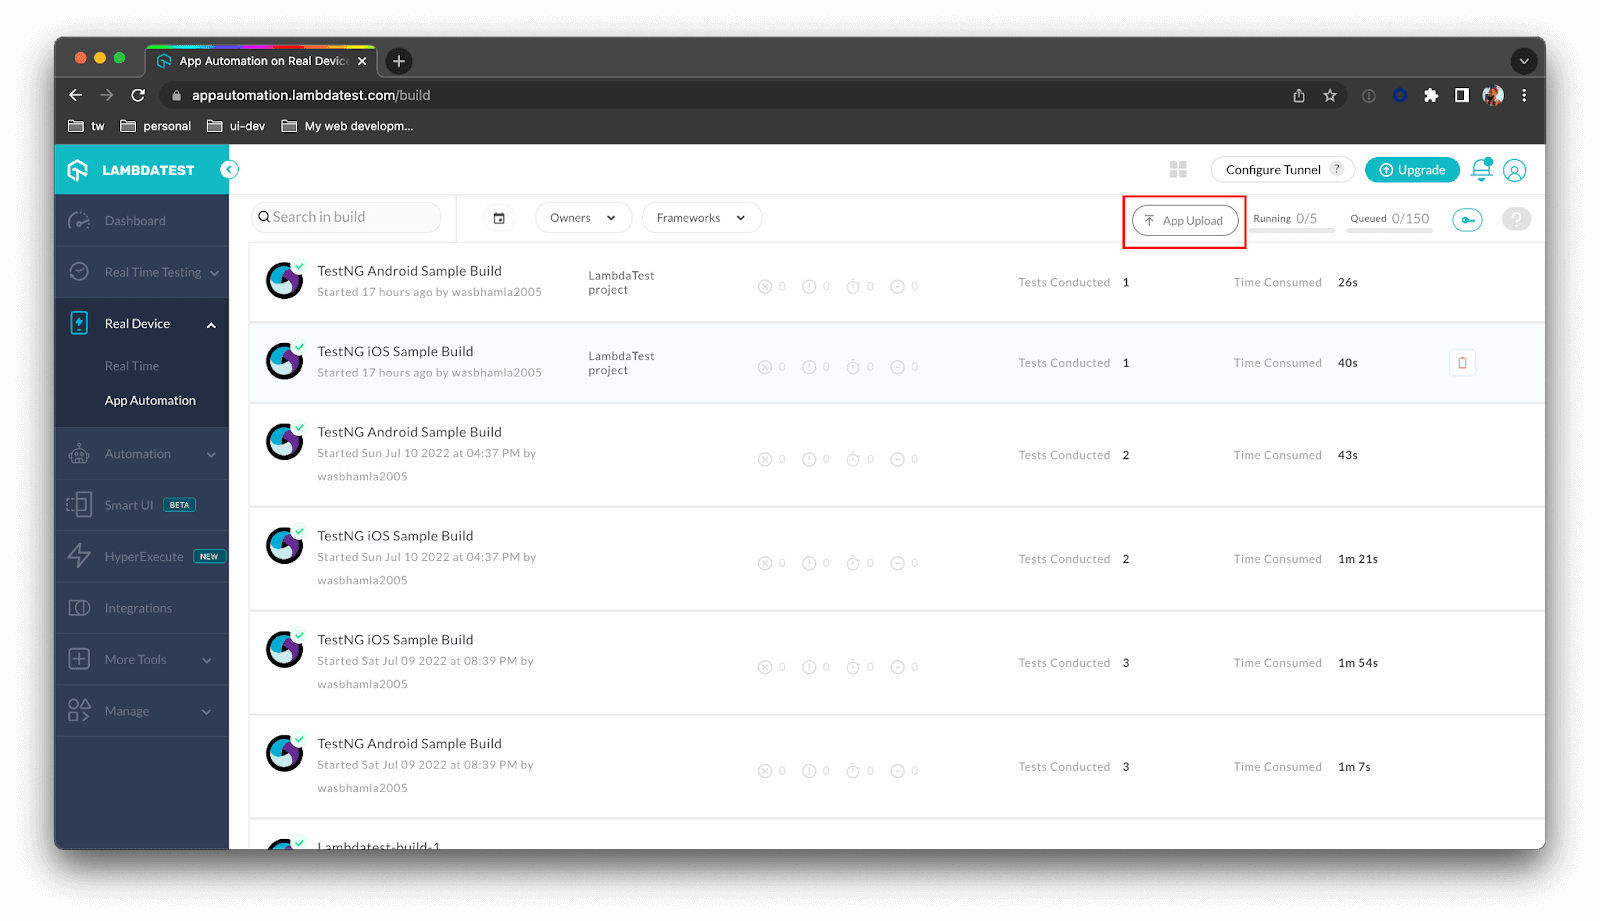
- Navigate on their dashboard to
Real Device -> App Automationfrom the left navigation panel. You will see a screen similar to the following. - When you click on any test sessions, a screen similar to the following will be displayed.
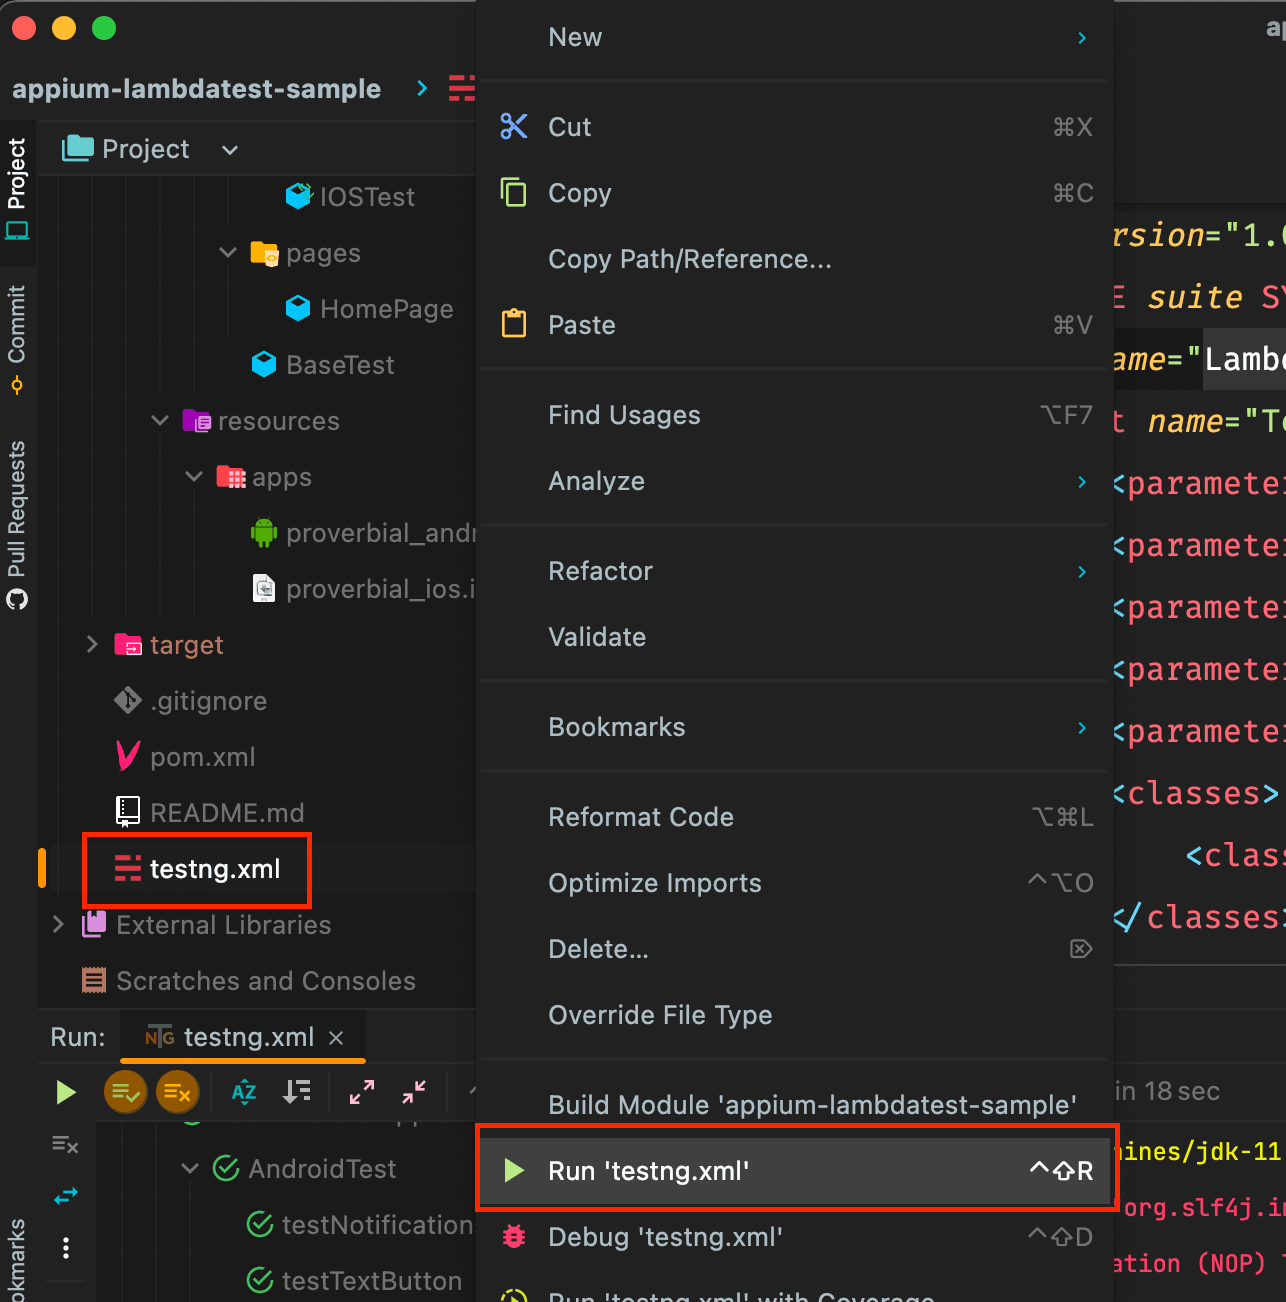
- To run the tests, you can directly right-click in your IDE on the
testng.xmlfile and clickRun. - Another option is to run the test from your terminal by executing the following command.
a. In which environment will we be running our tests, on cloud or local.
b. The name of the device.
c. The version of the platform.
d. App path, local file path in the case of local execution, or app URL if running on the cloud.
In the next section of this Appium with TestNG tutorial, we will create a testng.xml file to execute the tests.
TestNG XML file
We now have all the test classes in place. Now it’s time to execute the tests for which we will create a testng.xml file in the project’s root folder. Let’s see how this file content will look.
Checking Execution reports
To check the tests that were executed using Appium with TestNG on the LambdaTest cloud server:
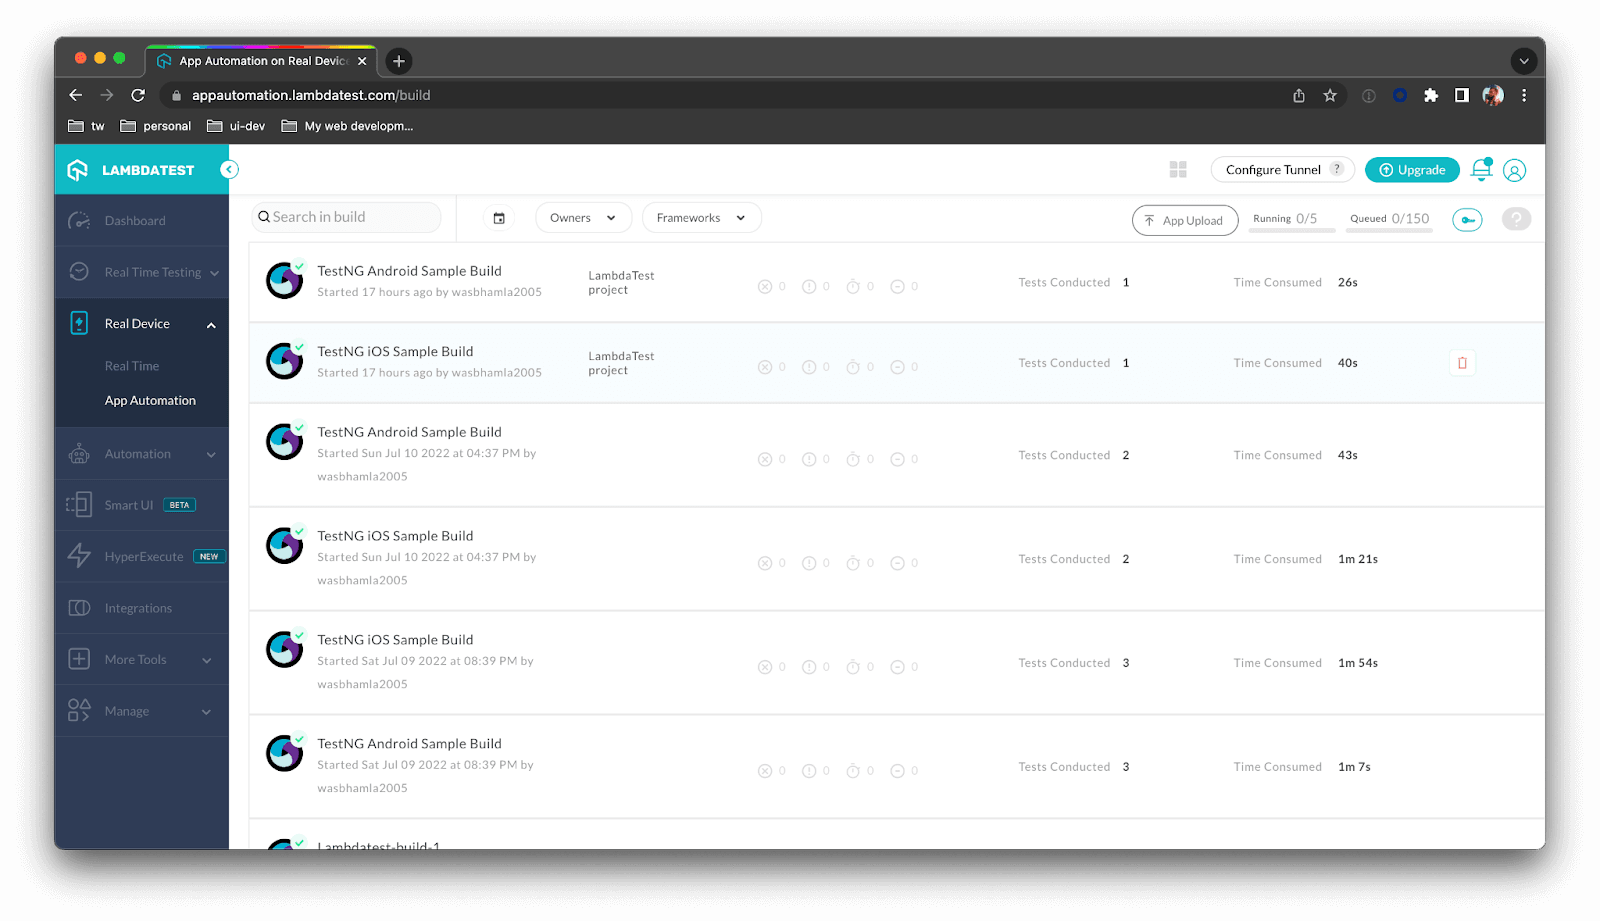
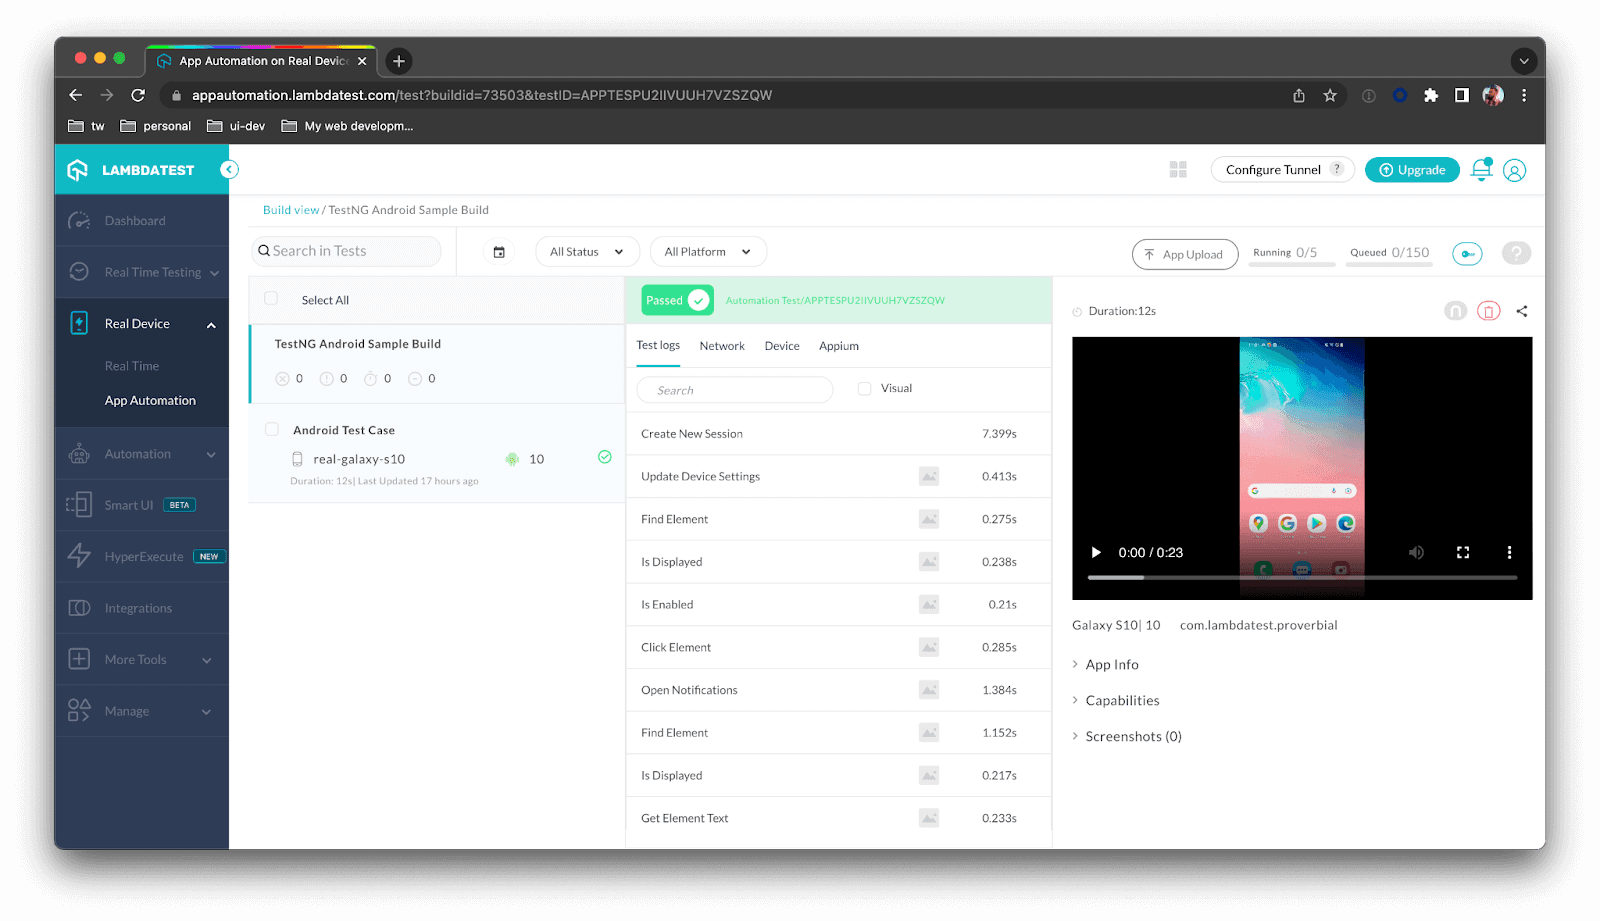
Here you can see the recorded video, all the event logs, device logs, network logs, etc.
Run the tests
Since we have a couple of tests running on LambdaTest, we must first save our LambdaTest credentials in the environment variables LT_USERNAME having your username and LT_ACCESS_KEY having your access key.
|
1 |
> mvn clean install |
This command will execute our testng.xml file because we have configured the Maven surefire plugin in our pom.xml earlier.
How to upload an app to the cloud?
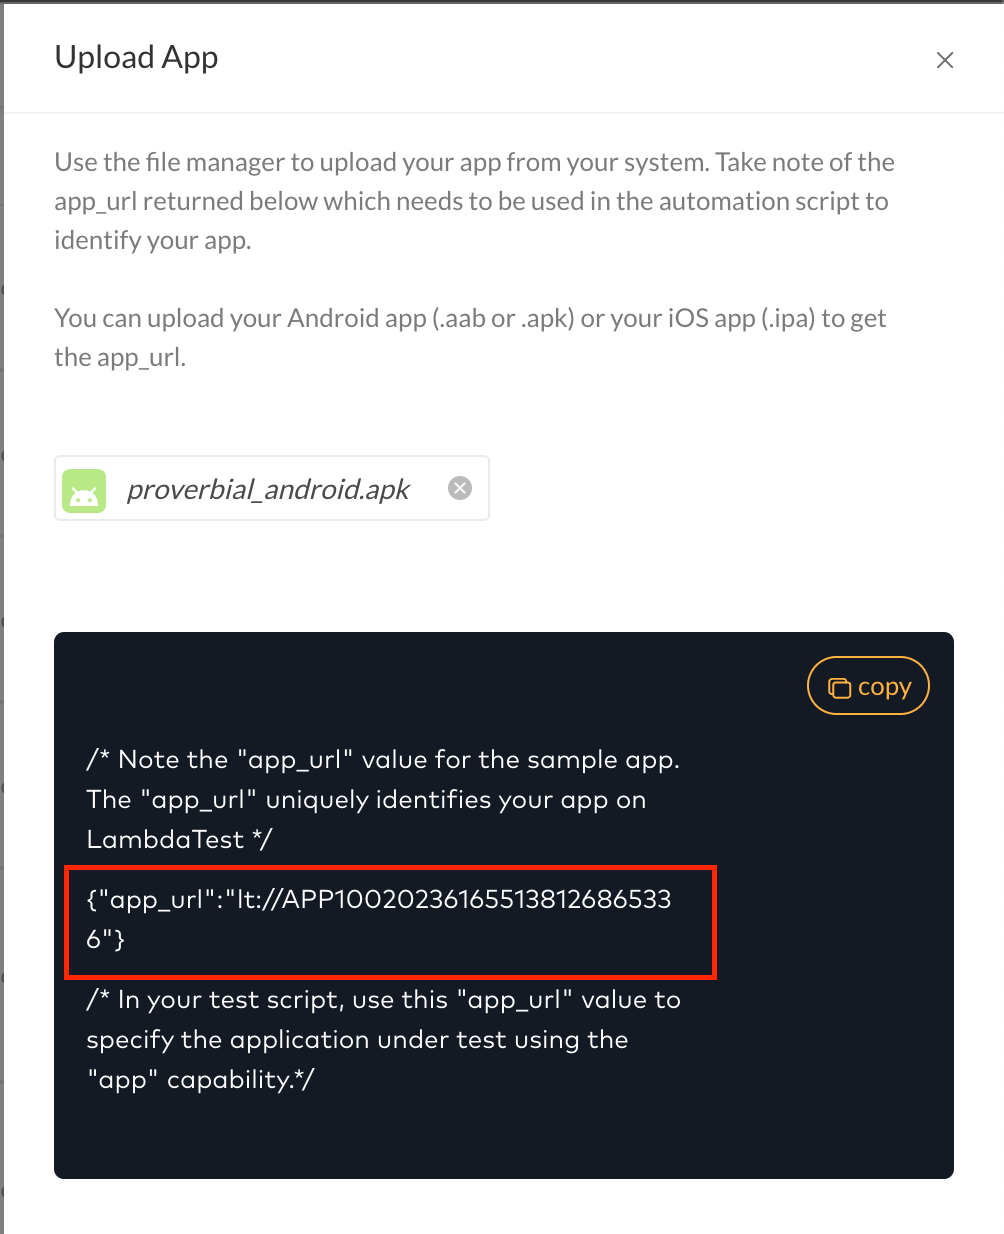
In this Appium with TestNG tutorial, we have already seen some tests run on the LambdaTest cloud server. But to run the test successfully, we must first upload our Android / iOS application on the LambdaTest cloud server. We must upload the .apk file for Android and the .ipa file for iOS. While uploading, you will require your user name and access key.
Following are the ways of uploading the application.
Upload using the cUrl command
One way is to execute the following cURL command on your terminal window on Mac OS and Linux.
For Android:
|
1 2 3 4 |
curl -u "<your-user-name>:<your-access-key>" \ --location --request POST 'https://manual-api.lambdatest.com/app/upload/realDevice' \ --form 'name="Android_App"' \ --form 'appFile=@"src/test/resources/apps/proverbial_android.apk"' |
For iOS:
|
1 |
curl -u "<your-user-name>:<your-access-key>" -X POST "https://manual-api.lambdatest.com/app/upload/realDevice" -F "appFile=@"your/ios/app.ipa"" |
In any of the above commands, you will get a JSON response where you can use app_url as your App capability. It will be in the format: lt://
Upload from the LambdaTest dashboard
On the LambdaTest Dashboard, navigate to Real Device -> App Automation and click on the App Upload button towards the right of the screen.
After you have uploaded the file, you will get app_url on the screen as shown below:
Conclusion
In this extensive blog on automated app testing using Appium with TestNG, we learned many things. We learned how to set up our machine to automate mobile applications for Android and iOS and inspect elements on a local emulator and cloud devices.
We also learned about the different locator strategies, creating a single page object for Android and iOS, and leveraging Appium with TestNG to run our tests locally and on the cloud using test parameters. Finally, we configured the pom.xml file to run the tests using Maven commands.
Don’t forget to share your feedback on this Appium with TestNG tutorial. Also, share it with your network if you like it. If you are preparing for an interview you can learn more through TestNG interview questions.
Frequently Asked Questions (FAQs)
Can we use TestNG with Appium?
LambdaTest provides an environment to run your Appium tests on real Android and iOS devices using the TestNG framework.
Is Appium a testing tool?
Appium is a powerful open source testing tool that unites web, hybrid, and native apps on a single cohesive automation solution.
Is Appium similar to Selenium?
Appium and Selenium are used for automating web application tests. Selenium supports multiple browser settings and operating systems. Similarly, Appium supports all the leading mobile system software like iOS, Android, and Microsoft Windows.


Author’s Profile
Wasiq Bhamla
Wasiq is a Test Automation specialist having more than 15 years of experience in Manual and Automation testing. He has vast experience in automating Desktop, Web, API, Android, and iOS based applications. He is also an active open source contributor on GitHub, a freelancer, a mentor, and a blogger.
Blogs: 7
Got Questions? Drop them on LambdaTest Community. Visit now


