Appium Testing Tutorial For Mobile Applications
Sidharth Shukla
Posted On: June 9, 2022
![]() 55007 Views
55007 Views
![]() 14 Min Read
14 Min Read
The count of mobile users is on a steep rise. According to the research, by 2025, it is expected to reach 7.49 billion users worldwide. 70% of all US digital media time comes from mobile apps, and to your surprise, the average smartphone owner uses ten apps per day and 30 apps each month.

In the present world, there are apps for every mobile device and purpose, and feedback is an integral part of their improvement process. With the emerging technology and demand for faster releases, it is quite important to make sure that the mobile apps need to be tested thoroughly before it is released to the customers.
There are many tools available to perform mobile app testing in the market. Still, there are more challenges in mobile app testing than web application testing, as there is a huge fragmentation when it comes to mobile devices & mobile operating systems. You can learn more about Android and iOS fragmentation from our earlier blog on how to deal with iOS version fragmentation.
Amongst all the mobile automation tools (or frameworks), Appium is one of the most popular open-source test automation frameworks for mobile app testing. It is cross-platform and compatible with a number of popular programming languages (e.g., Java, Python, JavaScript, etc.) for app test automation. The best part is that you don’t have to recompile your app or modify it due to the usage of standard automation APIs on the supported platforms.
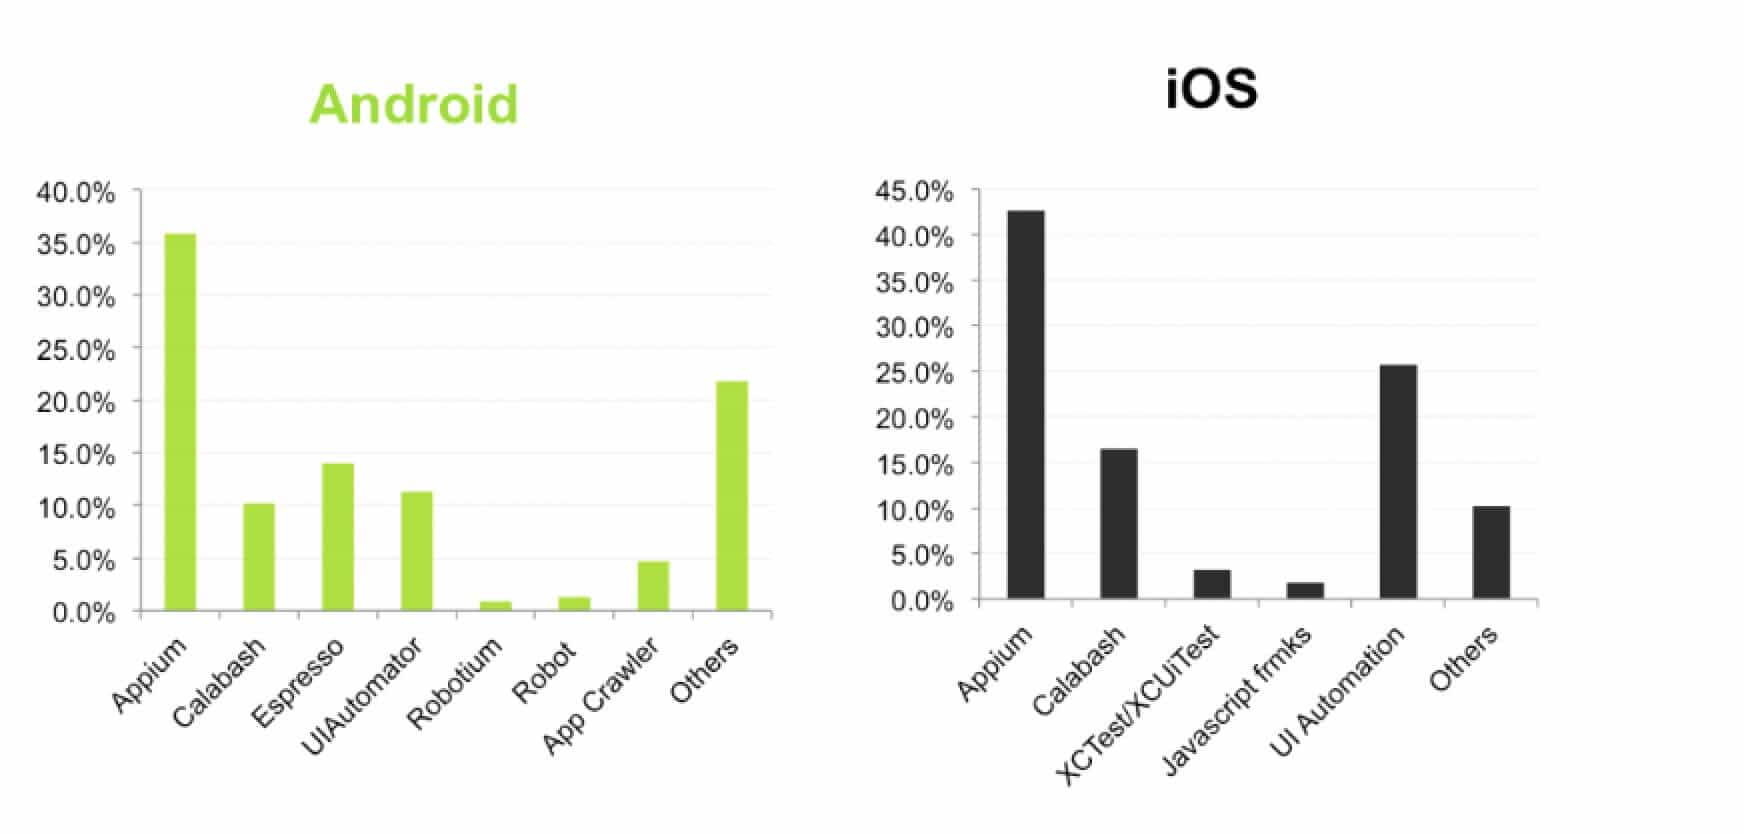
While Selenium is still the king of the web, Appium rules the mobile domain, with 35% of the organization preferring it over other free/open-source functional automation tools.

In this Appium testing tutorial, we will deep dive into the essentials of the Appium framework for performing mobile automation tests. If you are preparing for an interview you can learn more through Appium Interview Questions.
TABLE OF CONTENTS
- Introduction to Appium testing
- Platforms supported by Appium
- How to install Appium?
- How to start the Appium Server?
- Android Emulators for Appium testing
- Installing App on Emulators
- How to identify elements for Appium testing?
- Locators used for Mobile Automation
- How to run Appium tests on iOS and Android?
- Appium testing with Demo Code
- Debugging Steps for Common Errors in Appium
- Appium testing on Real Device Cloud
- Frequently Asked Questions (FAQs)
Introduction to Appium testing
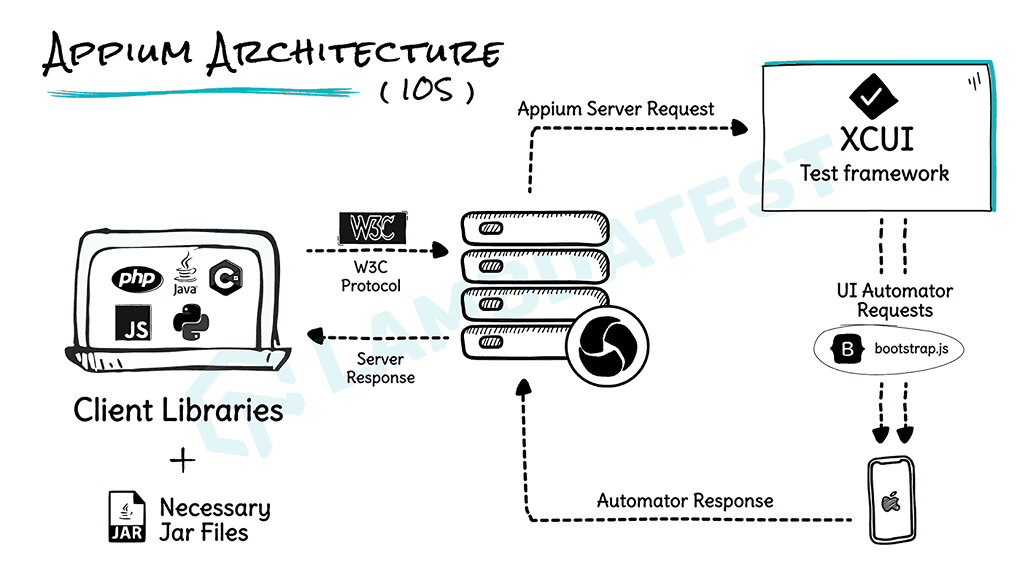
Appium is an open-source framework for automating native, mobile web, and hybrid applications on Android mobile, iOS mobile, and Windows desktop platforms. For starters, Appium was developed by Dan Cuellar and Jason Huggins and today has about 15.2K stars and 5.7K Fork on GitHub. It has the highest market share compared to all the other mobile automation frameworks.
Here are the major categories of mobile applications that can be tested using the Appium framework:
- Native apps – These are written using the iOS, Android, or Windows SDKs. Instagram, Spotify, and Facebook are some of the most popular native mobile apps.
- Mobile web apps – These are applications accessed using a mobile browser. Appium supports Safari on iOS and Chrome or the built-in ‘Browser’ app on Android. Uber and Pinterest are some of the most popular mobile web applications.
- Hybrid apps – These applications have a wrapper around a “webview” – a native control that enables interaction with the web content. Projects like Apache Cordova make it easy to build new apps using web technologies bundled into a native wrapper, creating a hybrid app. LinkedIn and Facebook are the most popular hybrid mobile applications.
- Progressive Web Apps (PWAs) – Progressive Web Apps are almost the same as regular web pages. In fact, they also function when the device is in offline mode (i.e., when the device is not connected to the Internet). The best thing about these “PWAs” is that they can be accessed via the app icon on the device. By clicking on it, the icon launches the app website.
Intrigued to know more about Web, Hybrid, and Native apps? You can deep-dive into it by going through the Web vs Hybrid vs Native Apps comparison.
Appium is “cross-platform”; hence, tests written for one platform (i.e., Android, iOS, etc.) work seamlessly across other platforms supported by the Appium framework. This increases the code reusability factor and minimizes the code maintainability factor of the test code.
Watch this video to learn about Appium, one of the most popular open-source test automation frameworks for mobile app testing.
Platforms supported by Appium
Before we start discussing Appium Mobile Testing in greater detail, we should know about the platforms supported by Appium. In my personal experience, if we aren’t aware of the support provided by Appium, you may waste your time trying out some implementation that might not be supported by Appium.
Appium supports multiple platforms and testing modalities mentioned below:
- Native Apps
- Hybrid Apps
- Web Apps
- Testing on Real devices
- Testing on Simulators and Emulators
Appium supports iOS, Android, macOS, and Windows. Here is the list of drivers required for each platform:
- iOS Support for XCUITest Driver and SafariDriver for Apple’s Safaridriver.
- Android supports UiAutomator2 Driver, Espresso Driver, and Geckodriver for Firefox and GeckoView. However, UIAutomation Driver support has been deprecated for both iOS and Android.
- macOS support for Mac2 Driver is for macOS 10.15 (or later). Windows Desktop supports WinAppDriver Geckodriver for Firefox and GeckoView.
Apart from these, some vendors/community-based drivers can be found on the Appium official website.
How to install Appium?
Appium can be installed in two ways:
- Via NPM (Node Package Manager).
- By downloading Appium Desktop – a graphical, desktop-based way to launch the Appium server.
In case you want to know different ways to install appium you can refer to below video.
Installation of Appium via NPM
If you want to run Appium via an npm install, you will need Node.js and NPM (use nvm, n, or brew install node to install Node.js).
Ensure that Node or Appium are not installed with sudo (or root); otherwise, you’ll run into problems. We recommend the latest stable version, though Appium supports Node.js 12+.
Run the following command on the terminal to install Appium via npm:
|
1 |
npm install -g appium |
Once installation is done, we can type “npm – -version,” which will return the installed version as shown below:

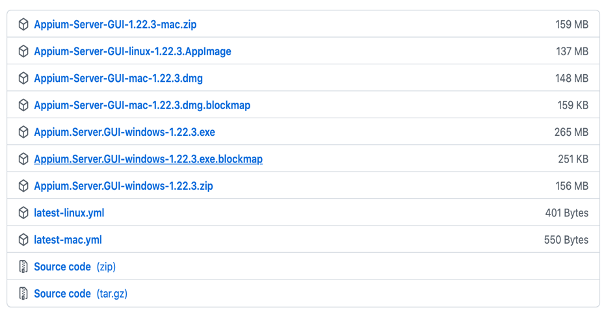
Installation of Appium via Desktop App
Simply download the latest version of Appium Desktop from the releases page of Appium official website.
How to start the Appium Server?
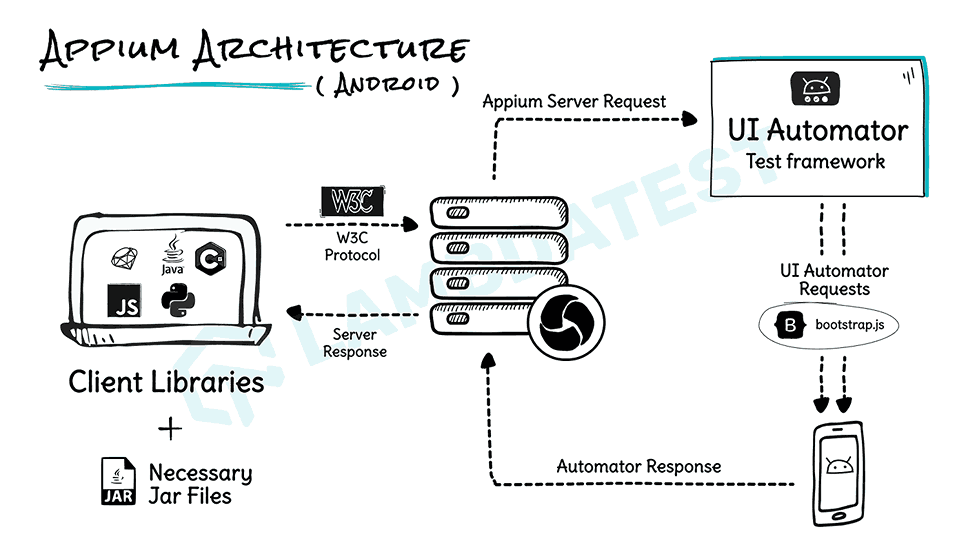
Appium server is basically written in Node.js and follows the HTTP JSON Wire Protocol. It acts as a virtual server that sends the commands to the framework to handle testing actions and scripts autonomously.
The Appium server processes the request and then responds with the test results. Now we can kick up an Appium server, either by running it from the command line or by using Appium Desktop (assuming the npm install was successful).
- We can use the below command to start the appium server:
- You will get to see Welcome to Appium like the below screenshot:
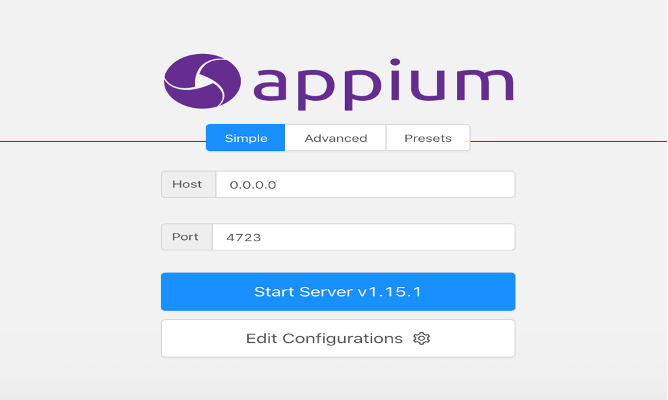
- If you have installed Appium Desktop, then we can start by clicking on the ‘Start Server’ button inside of Appium Desktop as shown below.
- Appium will now show you a little welcome message showing the version of Appium you’re running and what port it’s listening on (the default is
4723: You can use “netstat” to check whether a port is available or not). - You can use port number 4726 instead of 4723. However, the server needs to be configured to run on the said port. This port information is vital since you will have to direct your test client to make sure to connect to Appium on this port. If you want to change the port, you can do so by using the
-pflag when starting Appium (be sure to check out the full list of server parameters).
⇒ appium

Bonus Tip
There is an easy way to start Appium server programmatically:
|
1 2 3 |
AppiumDriverLocalService service = AppiumDriverLocalService.buildDefaultService(); service.start(); // start the Appium Server service.stop(); // stop the Appium Server |
Android Emulators for Appium testing
In my ten years of experience, I have observed that when we want to test mobile applications, we always prefer to do the dry run on emulators. In fact, most organizations prefer emulators for running a regression suite for Appium testing. So it is quite vital to know about emulators and how to create one for Appium testing.
Android emulator is a tool that creates virtual Android devices (with both software and hardware) that can be used for running Android device tests that are implemented using the Appium framework. You can go through the blog on emulator vs simulator differences to learn about emulators and simulators.
Android emulators are very important for performing Android app testing. Below are the steps to create an Android Mobile Emulator, which we can use for Mobile testing on any Android version.
- Download and install Android Studio in case it is not present on your machine.
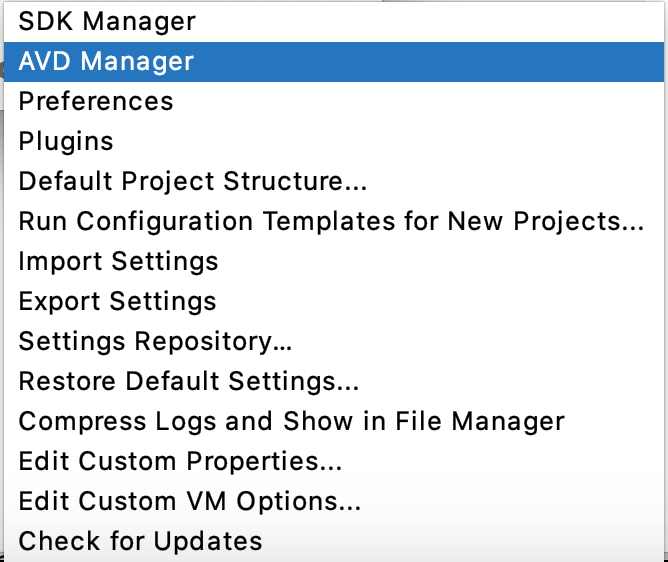
- Open Android Studio and click on “Configure” “AVD Manager” from the list as shown in the below screenshot.
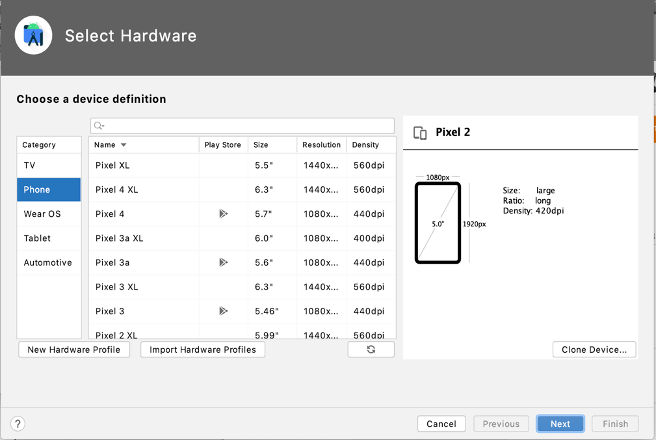
- Now click on the “Create Virtual Device” button, and you will be redirected to the “Select Hardware” page, where we need to select the mobile type, for example, “Pixel XL,” as shown below and then click on “Next”.
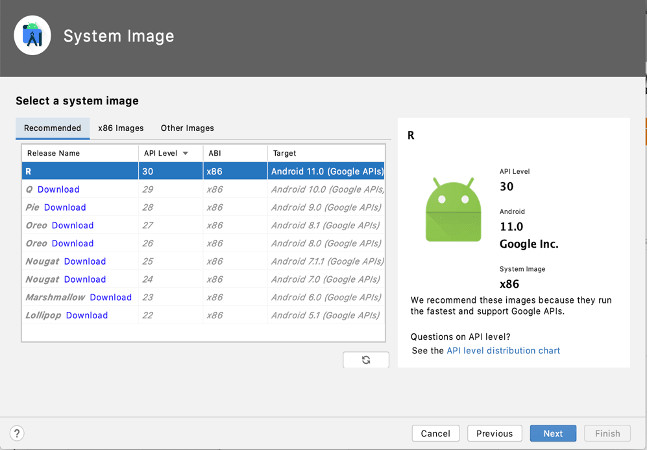
- After the “Select Hardware” page you will be able to see the “System Image” page. Here we need to select which Android version we want in our mobile device for testing, for example, Pie, Oreo, R, etc. In the below image, you can see that I have selected Android 11, then click “Next.”
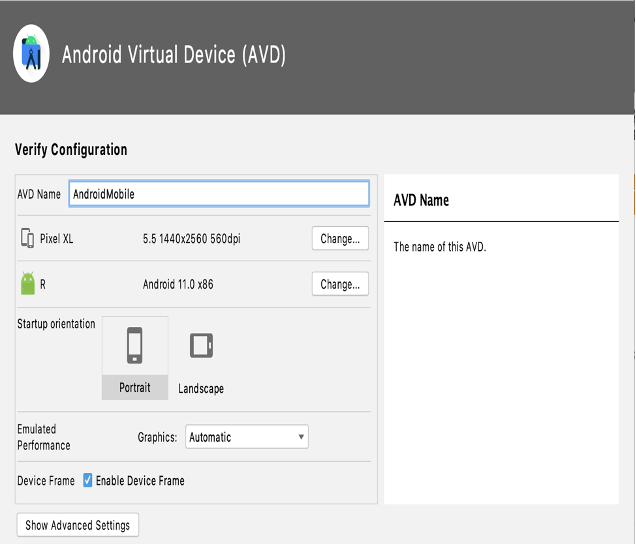
- Now you will arrive at the “Verify Configuration” page. Here, you can check the selection we have made in steps 3 and 4. Provide the name for your device as I have given the name “AndroidMobile” in the below screenshot:
- Now the device is created, and in the dashboard, we can see it. Search with the device name that we have provided in Step 5, as shown below. Now click on the ‘Play’ button, and the device is ready for testing.
Watch this video to learn what is an Android Emulator, its benefits, and how to set it up.
Here, we can change the Memory and Storage by clicking on “Show Advanced Settings.”
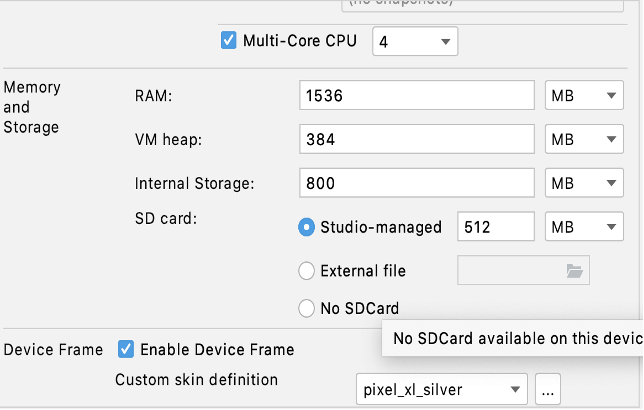

In the above screenshot, we have an edit option, which can be used to edit some fields for the emulator, and the dropdown button can be used for cold boot.
But sometimes, it’s really difficult to go through all the six steps mentioned above to create an emulator. So, instead of that, you can also use online Android emulators provided by LambdaTest.
Cloud-based cross browser testing platforms like LambdaTest provides an online device farm of over 3000+ Android emulators to test on Android devices.
We need to run just three steps to start an emulator on LambdaTest:
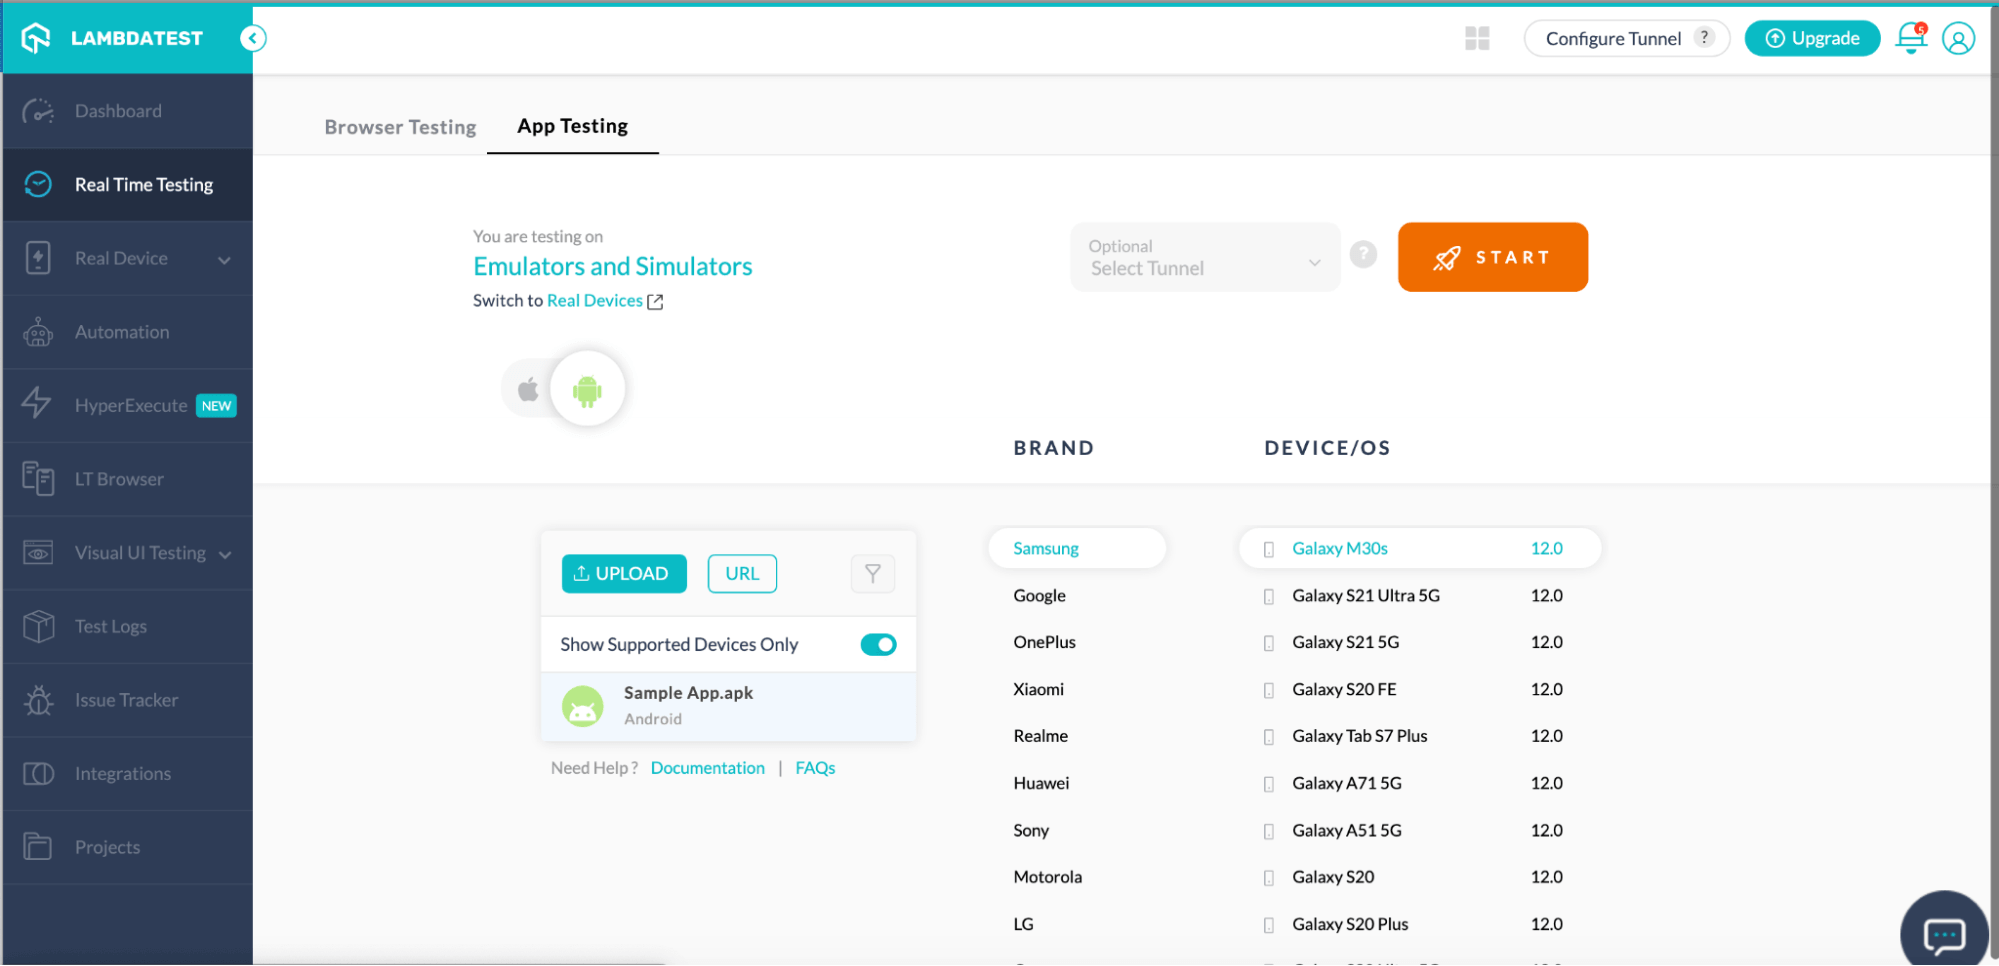
- Login to LambdaTest and go to the LambdaTest Dashboard.
- Navigate to Real Time Testing > App Testing as shown below:
- Now select your BRAND and DEVICE/OS and then click on the START button. Here, the sample apk is mentioned, but you can use your apk for Appium testing.
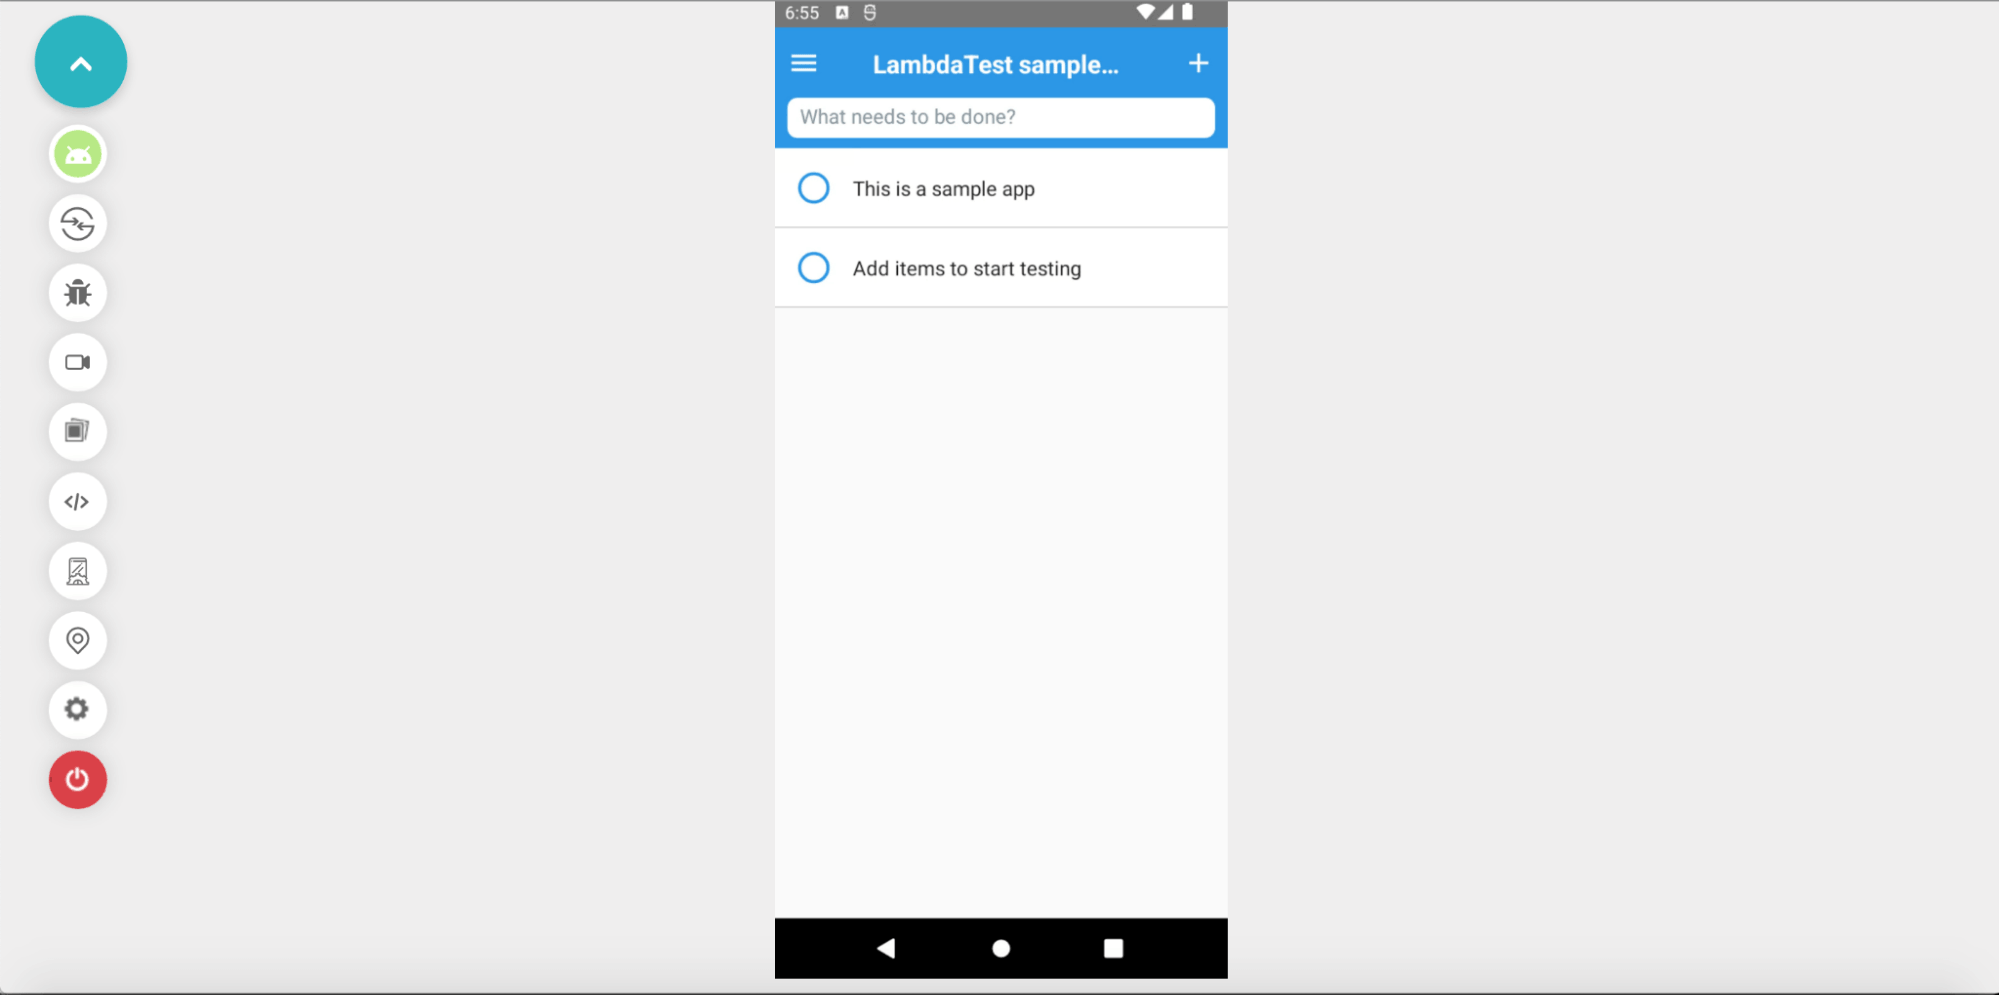
Isn’t it easy :), Don’t forget to stop the emulator after use by clicking on the last button on the left panel.

Installing App on Emulators
Once the emulator is ready for use and the Android path is set up correctly, the next step would be to install an app on the emulator on which we would be performing the app testing.
- The first step is to run the emulator on which you need to install the app.
- The emulator will be launched, and the command will run in the terminal.
- There are two ways to install the app:
- Install via ADB command:
- Download the apk and put it in folder
- Run the following command
- Drag and Drop
emulator -avd
adb install path/to/your/app.apk
When multiple emulators are open, run the following command
adb -s serial-number-of-device install path/to/your/app.apk
We can also drag the apk file and drop on to the emulator, which will install the application.
Now perform testing by dragging your .apk to the newly created virtual device. There are many websites that provide the sample apk, which can be used for testing. If you do not have any .apk or .ipa files, you can run your sample tests on LambdaTest using our sample 🔗 Android app or sample 🔗 iOS app.
How to identify elements for Appium testing?
Before we can start writing test scripts, we need to understand identifying elements using attributes such as ID, Name, Class, etc., to perform actions. You can go through this Selenium Locators tutorial to learn more about the locators.
To identify (or locate) elements, we can use UIAutomatorViewer or Appium inspector to capture a snapshot of the current device screen, which shows the hierarchy of the UI components properly arranged on the screen.
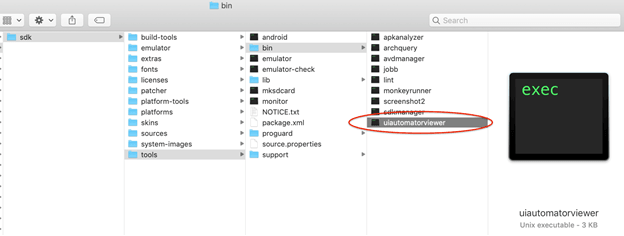
UI Automator Viewer is a GUI tool that comes with Android SDK and is primarily used to inspect UI components of the Android Application. It also lets you view the properties associated with it. We can find it in the Android SDK “tools” folder with the file name ‘uiautomatorviewer.bat’ on Windows OS.
our “Appium Commands Cheat Sheet” sheet provides a quick reference to essential Appium commands, making your mobile testing workflow more efficient and effective. Check it out to streamline your Appium testing process.
How to access elements using UIAutomatorViewer?
When designing automation scripts, Appium uses “UIAutomatorViewer” to identify different properties of the object and use the properties to identify the required object.
There are several ways by which the UIAutomatorViewer can be launched:
- For Windows: Go to the path where UIAutomatorViewer exists (Android SDK folder) and run the batch file (for Windows) – uiautomatorviewer.bat.
- For Mac: Go to the location via terminal and run the uiautomatorviewer sh file. Execution permission must be given to the file, or errors will be thrown.
- It can be added as an alias to run directly via the terminal. In the Mac machine, add it to the bash_profile file.
Example: alias inspector='$ANDROID_HOME/tools/bin/uiautomatorviewer'
For Mac:
Follow the below mentioned steps for using UIAutomatorViewer:
- Connect the device to the PC via USB cable.
- Enable USB Debugging mode for the device connected.
- Run the ADB devices command in the command prompt/terminal to check if the device is detected and online/available.
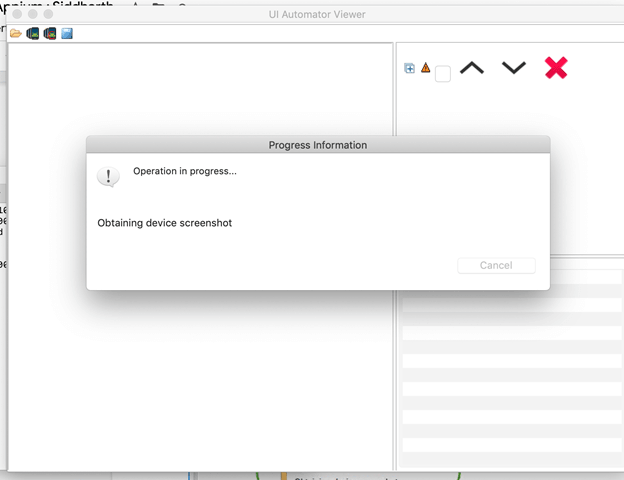
- Open an application and click the device screenshot icon from the right up corner.
- After clicking on ‘Device Screenshot‘, an image of the current screen will be loaded in the UIAutomatorViewer, and we can use the mouse to click on any element and see the details of that element. You can also use the hierarchical tree in the top right to browse a particular element.
Note: The UIAutomatorViewer works only with Android native app elements.
Want to make your life of testing easy and fuss-free while debugging? Try LT Debug Chrome extension!
How to work with Appium Inspector?
A default inspector available in standalone Appium (not in the npm version) is called Appium Inspector, which can be used to inspect Android and iOS elements. It simply mirrors the screen of the device, and we can interact with it and get the details of the elements. Let’s see how we can launch and work with it.
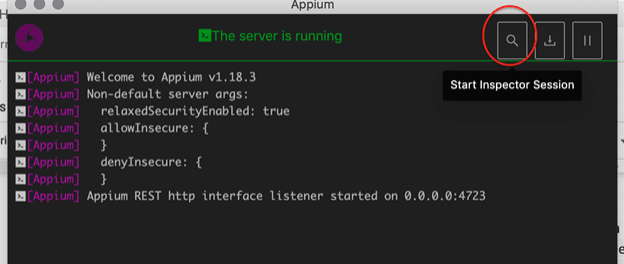
- Launch Appium from your application/programs menu by clicking on Start Server. You can refer to the screenshot in the “How to start the Appium Server” section of this blog.
- Click the Search icon from the right up corner.
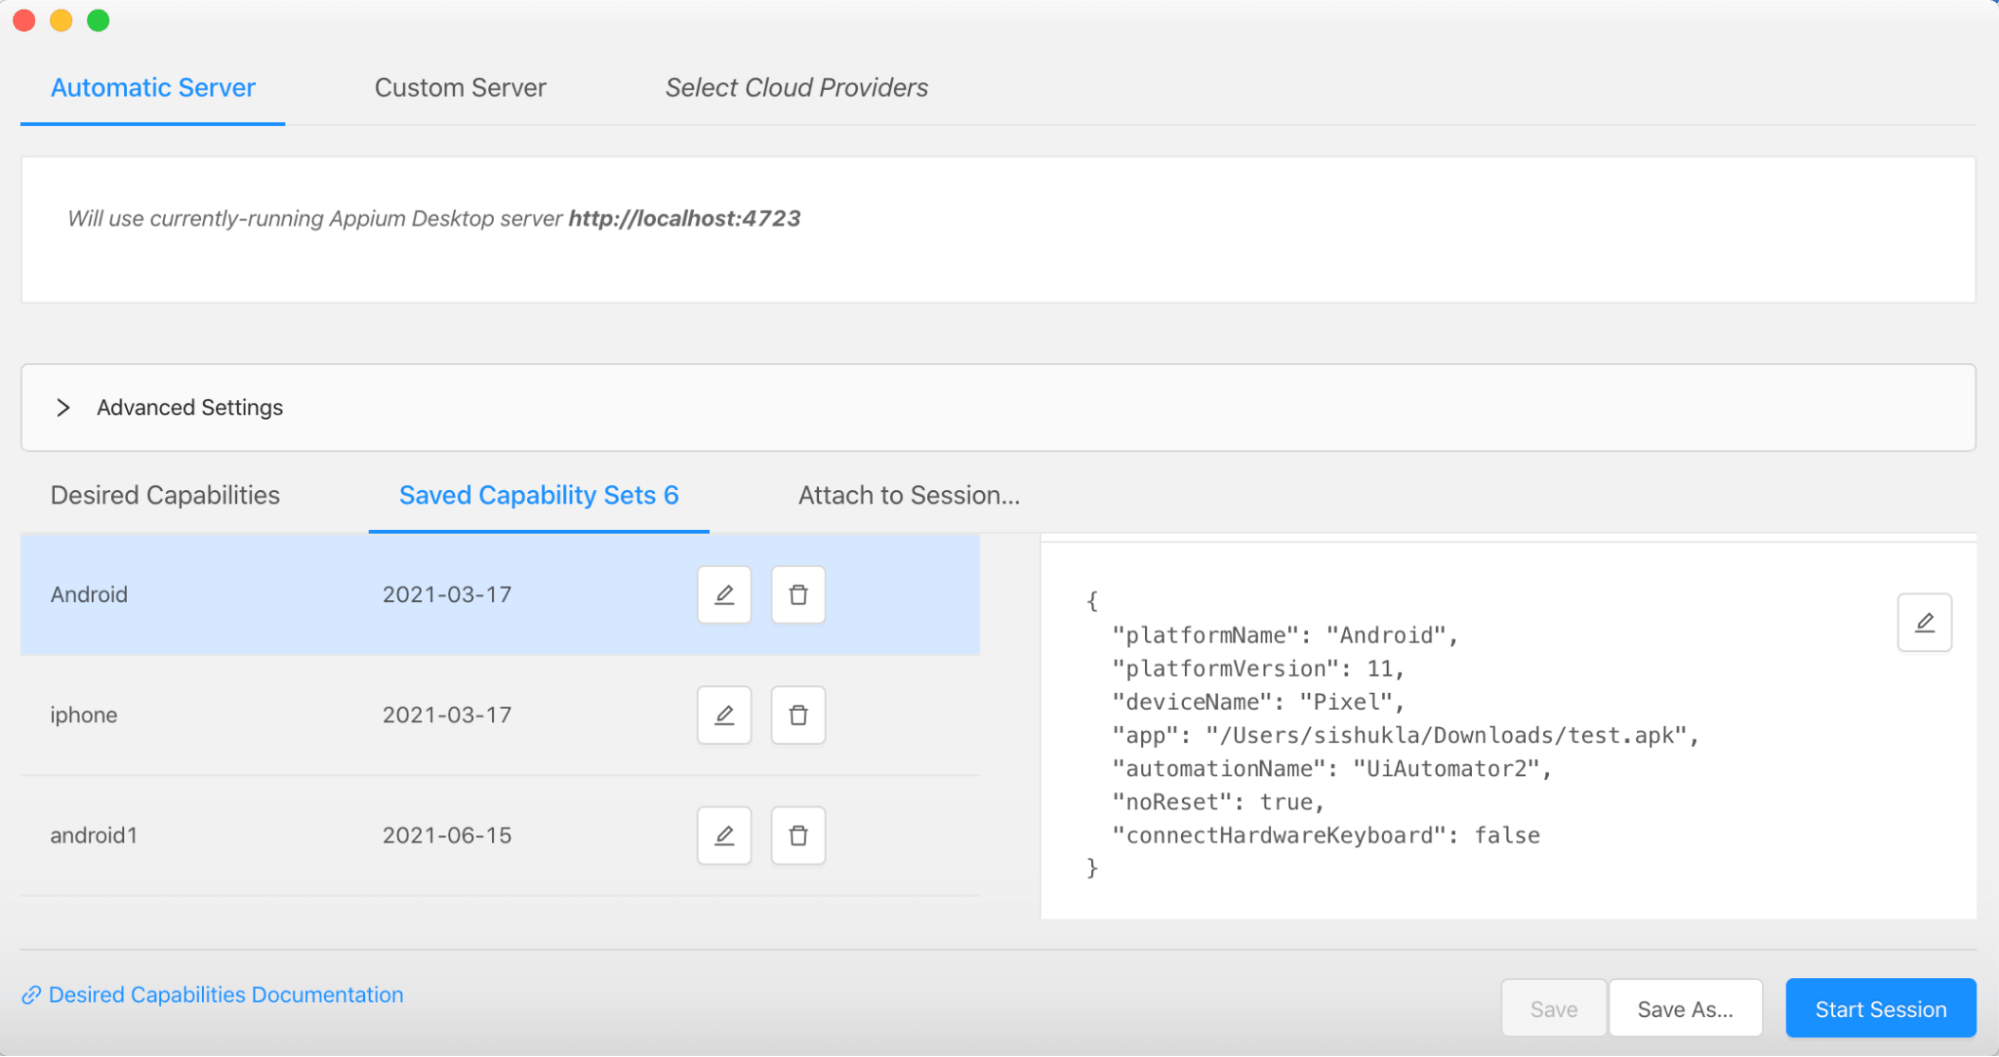
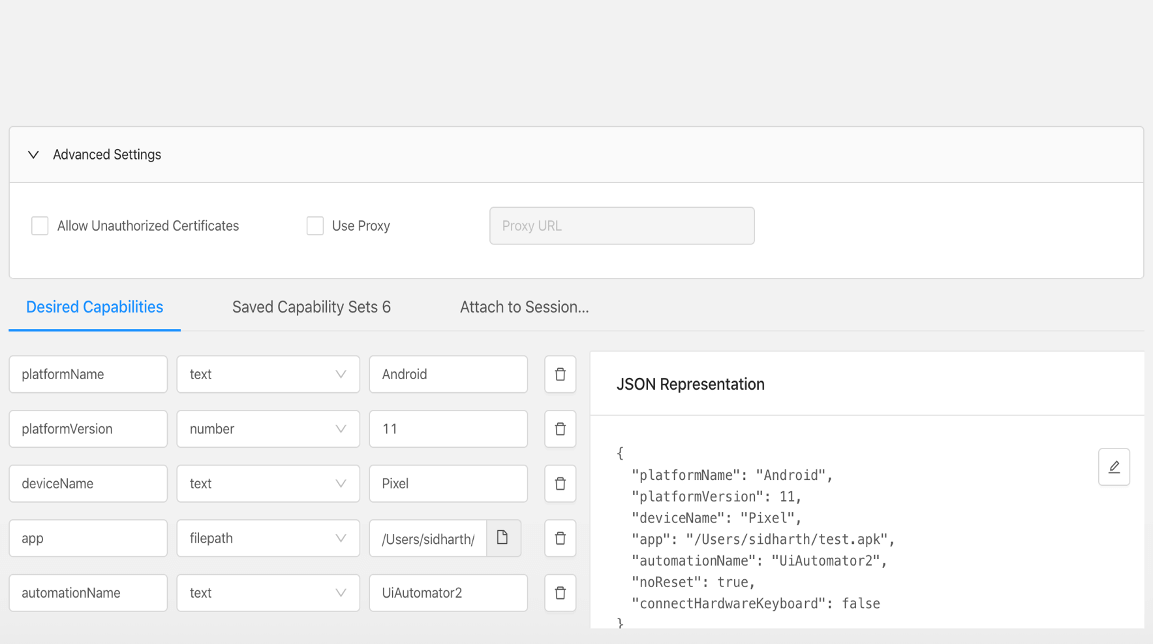
- Add correct desired capabilities as per your device/emulator and application. Then click on the Start Session button.
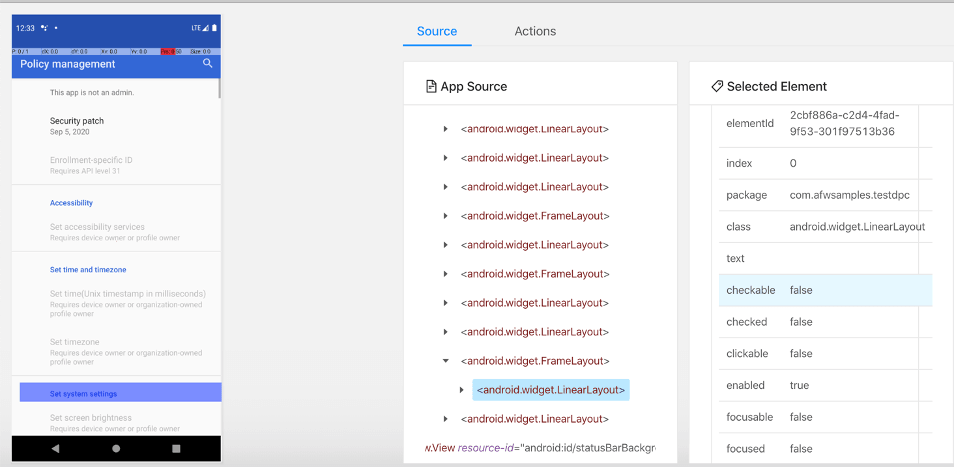
- It will open the App screen, App Source (the hierarchy of elements), and Selected Element Pane (The attributes and associated values of the element). You can use this to create locators which will uniquely identify the element.
- You can provide a .apk or .app file in desired capabilities inside Appium Inspector, which will install and launch the app. Refer to the screenshots below, which we have used to test .apk and passed in the value against “app.”
- Best thing about the Appium Inspector is that you can verify your written locator on screen. Check the below screenshots.
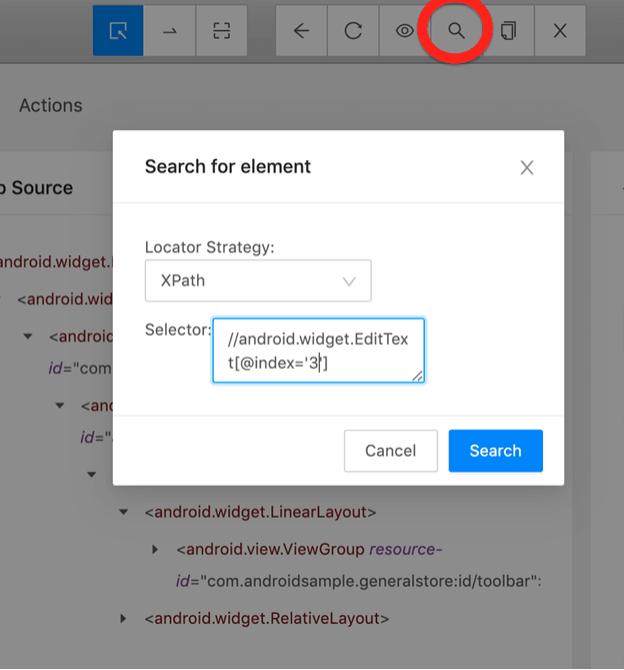
If your locator is correct, then it will highlight the associated element.
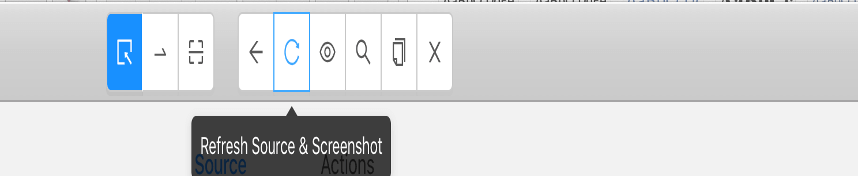
Sometimes the screen on the left and your emulator won’t be in sync, so we need to click on the refresh button to bring the screen and emulator in sync:
Locators used for Mobile Automation
Shown below are some of the major locators used for mobile app automation:
| Strategy | Description |
|---|---|
| Accessibility ID | Reads a unique identifier for a UI element. For XCUITest, it is the element’s accessibility-id attribute. For Android, it is the element’s content-desc attribute. |
| Class name | For iOS, it is the full name of the XCUI element and begins with XCUIElementType. For Android it is the full name of the UIAutomator2 class (e.g., android.widget.TextView) |
| ID | Native element identifier. resource-id for android; name for iOS. |
| Name | Name of element |
| XPath | Searches the app XML source using xpath (not recommended, has performance issues) |
| Image | Locates an element by matching it with a base 64 encoded image file |
| Android UiAutomator (UiAutomator2 only) | Uses the UIAutomator API, in particular, the UiSelector class to locate elements. In Appium, you send the Java code, as a string, to the server, which executes it in the application’s environment, returning the element or elements. |
| Android View Tag (Espresso only) | Locates an element by its view tag. |
| Android Data Matcher (Espresso only) | Locates an element using Espresso DataMatcher. |
| iOS UIAutomation | When automating an iOS application, Apple’s Instruments framework can be used to find elements. |
How to run Appium tests on iOS and Android?
In this section of this Appium testing tutorial, I will walk you through the steps for running Appium tests with iOS and Android. First, make sure the Appium server is up and running. You can refer to the section “How to start the Appium Server” in this blog to kick start your first step for Appium testing.
Then, we have to check that the Android emulator we have created in the section “Android Emulators for Appium testing” is up and running. For that, we need to run adb devices. For example, we should see one device connected, as shown in the below screenshot. This is the device Appium will use for testing purposes. (Remember that if the Android SDK tools are on your path, simply run: emulator -avd )

Now we need to wait for the Android emulator to finish launching. Sometimes, for various reasons, adb gets stuck. If it’s not showing any connected devices or otherwise failing, we can restart it by running: adb kill-server && adb devices.
Once we are done with starting the Appium server and checking the emulator, then we should be aware of the desired capabilities as per the OS(Android/iOS) we are using for Appium testing.
Android:
Set the following desired capabilities in your WebDriver script:
|
1 2 3 4 5 |
DesiredCapabilities capabilities = new DesiredCapabilities(); capabilities.setCapability(MobileCapabilityType.PLATFORM_NAME, "iOS"); capabilities.setCapability(MobileCapabilityType.PLATFORM_VERSION, "7.1"); capabilities.setCapability(MobileCapabilityType.DEVICE_NAME, "iPhone Simulator"); capabilities.setCapability(MobileCapabilityType.APP, myApp); |
Using your WebDriver library of choice, set the remote session to use these capabilities and connect to the server running at port 4723 of localhost (or whatever host and port you specified when you started Appium). You are all set now!
There are many ways to start an Appium application (it will work exactly the same way as when the application is started via ADB command):
- apk or zip only, default activity will be launched (‘app’ capability)
- apk + activity (‘app’ + ‘appActivity’ capabilities)
- apk + activity + intent (‘app’ + ‘appActivity’ + ‘appIntent’ capabilities)
If you are not sure what activity is configured in your apk, you can proceed in one of the following ways:
- Mac/Linux: ‘adb shell dumpsys window windows | grep mFocusedApp’
- In the Ruby console: ‘adb shell dumpsys window windows`.each_line.grep(/mFocusedApp/).first.strip’
- In Windows terminal, run ‘adb shell dumpsys window windows’ and manually look for the mFocusedApp line.
iOS:
Set the following desired capabilities in your WebDriver script::
|
1 2 3 4 5 |
DesiredCapabilities capabilities = new DesiredCapabilities(); capabilities.setCapability(MobileCapabilityType.PLATFORM_NAME, "Android"); capabilities.setCapability(MobileCapabilityType.PLATFORM_VERSION, "4.4"); capabilities.setCapability(MobileCapabilityType.DEVICE_NAME, "Android Emulator"); capabilities.setCapability(MobileCapabilityType.APP, myApp); |
In the set of capabilities for Android and iOS, myApp must be any one of the below:
- A local absolute path to your .apk or a .zip
- An URL of a zip file containing your .apk
- path to one of the sample app relative to the appium install root
Using the WebDriver library of choice, we can set the remote session to use these capabilities and connect to the server running at port 4723 of localhost . You should be all set now!
Appium testing with Demo Code
Here, we are using simple code, which can be used by anyone for their first test on Appium. We are using an emulator that we created in this post to run our apk, which can be downloaded from the ”Installing App on Emulators” section of this post.
We will try to verify two important scenarios in the test below, the first one is “open the geolocation page” and the second one is “speed test page”. Apart from the code, I will share the screenshot on the emulator while running the test script for both the scenarios mentioned above.
Sometimes it’s difficult to start from scratch, so to make life easier, you can clone the LambdaTest’s 🔗LT-appium-java repository and then replace the vanilla_android.java class with the code mentioned below.
Now we are halfway done. We just need to hit the below two commands to run our sample test for Appium testing on Android APK emulator online. The first command is to install dependencies and second one to run our suite.
To install the required dependencies:
|
1 |
mvn clean install |
To run your test just type below command in your command prompt:
|
1 |
mvn compile exec:java -Dexec.mainClass=vanilla_android -Dexec.classpathScope="test" |
Sample Code:
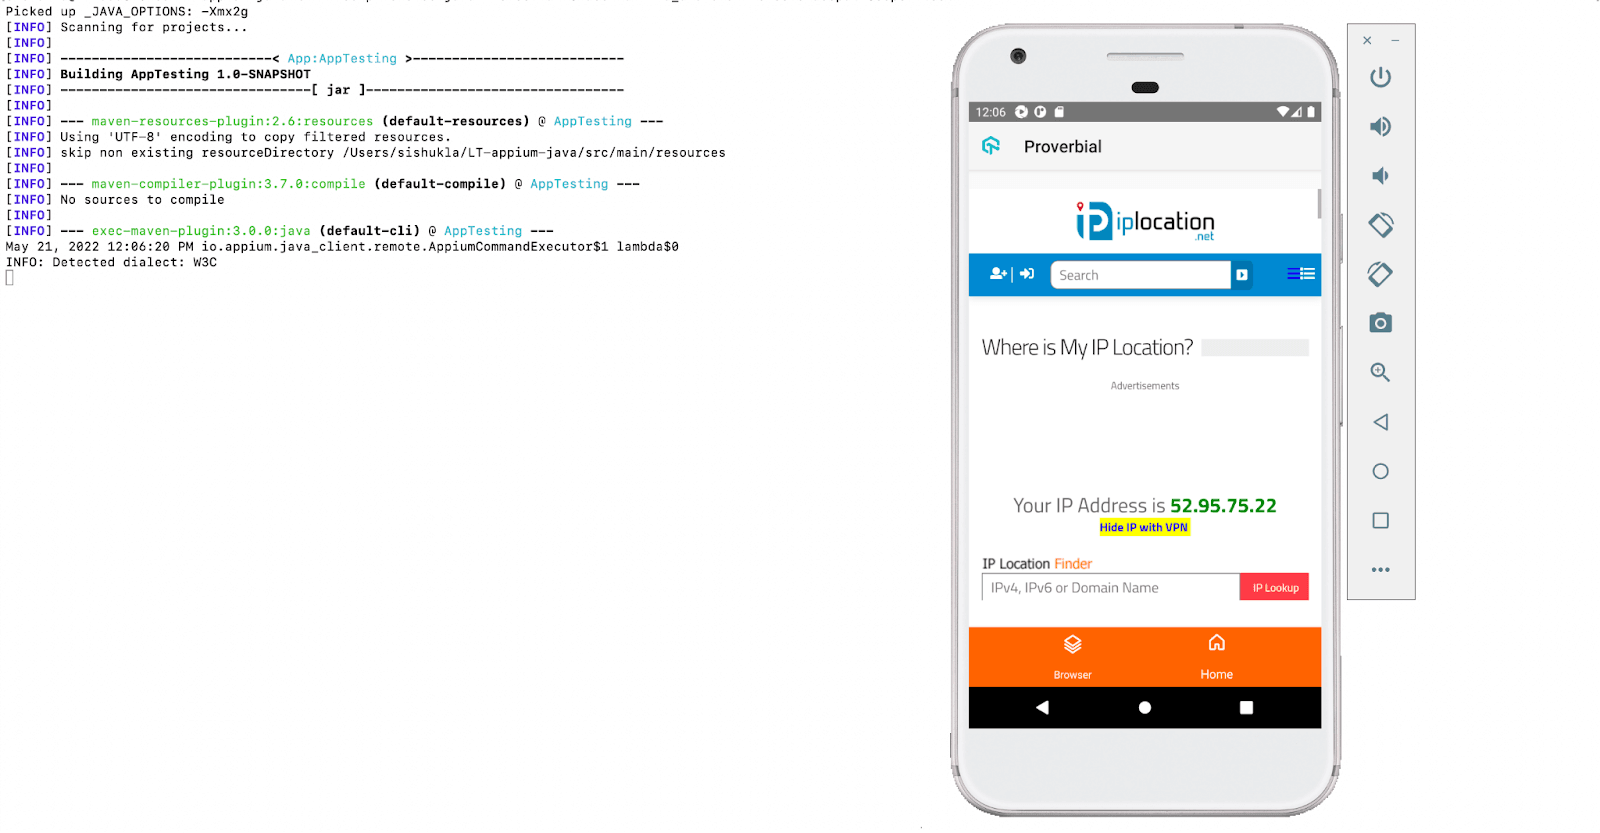
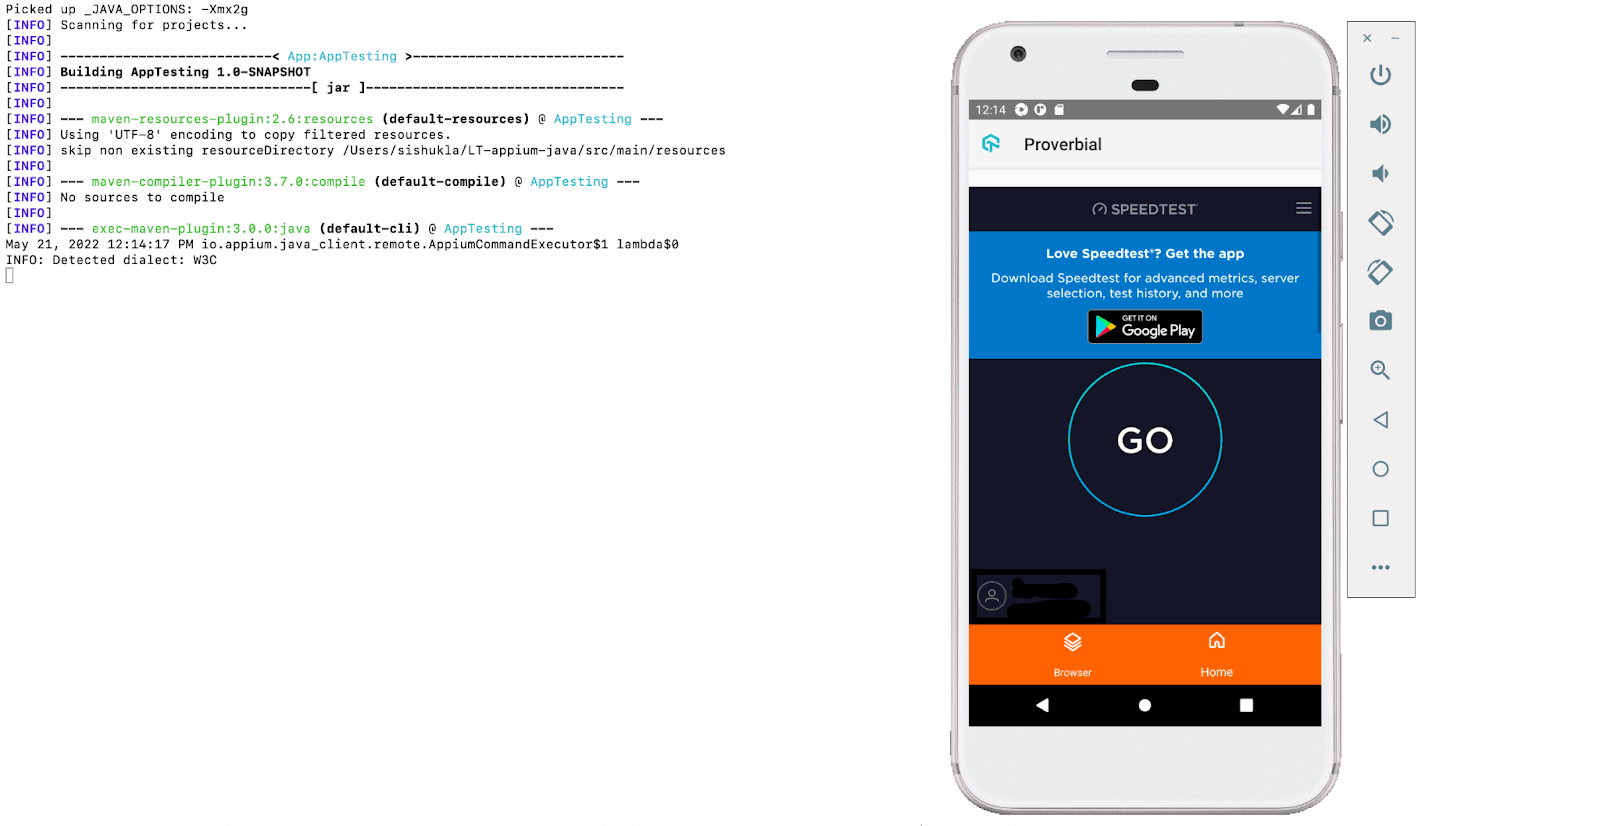
I am going to share two screenshots from live running to give you guys a look and feel of scenarios running on an emulator. The left section of the screenshot shows the execution of commands on the command prompt and the right panel is the emulator on which the script is executing.
Scenario 1: Open the geolocation page (check the geolocation page on the emulator screen)
Scenario 2: Takes the speed of the test page. (check the speed of the test page on the emulator).
Debugging Steps for Common Errors in Appium
- Make sure that before running the suite, the Android emulator is up and running. It’s useful to run adb kill-server && adb devices. This can reset the connection to the Android device, and the issue can be resolved.
- If you’re running your Android emulator using Fastboot and the emulator isn’t being detected by ADB properly, try doing a cold boot: Android Studio > Tools > AVD Manager > Actions > Cold Boot Now. This will mostly solve all emulator issues (refer to Step 6) from the “Android Emulators for Appium testing” section to know how to cold boot.
- For iOS, if the Instrument crashes when running against a physical device (“exited with code 253”), ensure Xcode has downloaded device symbols. Go to Window -> Devices, and then it should start automatically. It is needed after iOS version upgrades.
- We need to ensure that the macOS keychain that holds the certificate required for building the app and the WebDriverAgent is unlocked. Especially when you are using ssh.
General symptoms to look for are codesign failures.
- Appium may sometimes have difficulties finding the
nodeexecutable if you’ve installed Node and npm via MacPorts. We need to make sure that the MacPorts bin folder (default path is :/opt/local/bin) is added toPATHsomewhere in ~/.profile, ~/.bash_profile or ~/.bashrc. - If you get an error “
[INST STDERR] posix spawn failure; aborting launch” while running iOS tests, your app is not compiled correctly for the simulator or device.
Appium testing on Real Device Cloud
When we talk about Appium testing or try to figure out the real use of Appium then, in my past experiences, two things come to my mind: The first one is that it supports both Android automation testing and iOS automation testing, and the second one is that Appium is free and open source.
Remember that the learning curve for Appium testing is also quite easy, and you must have realized it by now if you are at the end of this post.
One important point to remember is that until now, we have run our test scripts using an emulator, but you must be wondering if I want to run on a real device cloud.
Do I need to buy an iPhone or Android phone? So the answer is NO. Now you must think, if we won’t buy a device, how can we test it? The answer is the buzzword “Cloud Devices.”
The best part is running our existing scripts on a real device is a cakewalk. Below, I will explain what changes to make if we opt for running our test on LambdaTest real device cloud. Here’s the walkthrough of the automated app testing on real devices using LambdaTest.
You can also subscribe to the LambdaTest YouTube Channel and stay updated with the latest tutorials around Selenium testing, Cypress E2E testing, CI/CD, and more.
You can use the same code that I have shared before but with the below changes:
- Firstly let’s change the value of desired capabilities for parameters:
- Second change is to use Username and Password from LambdaTest and change Appium driver instance:
- If you want help for creating authentication or uploading your app to the real device provided by LambdaTest, you can refer to this Java with Appium documentation.
One thing we need to remember is that the scenarios are the same as used in the previous script using the emulator (open the geolocation page & take to speed test page). After all the changes are made on the vanilla_android class, the final piece of code will look like below: - Once you run it from the command line using the command shared in the “Appium testing with Demo Code” section:(
mvn compile exec:java -Dexec.mainClass=vanilla_android -Dexec.classpathScope="test"), you can go to LambdaTest and check the execution report under Real Device section which will look like below: - Appium’s official Getting Started Guide
- Appium Learning Path
- Appium API reference
|
1 2 3 4 5 6 |
DesiredCapabilities capabilities = new DesiredCapabilities(); capabilities.setCapability("deviceName", "Galaxy S20"); capabilities.setCapability("platformVersion", "11"); capabilities.setCapability("platformName", "Android"); capabilities.setCapability("isRealMobile", true); capabilities.setCapability("app", "lt://APP10016551653068008326557"); //Enter app URL |
|
1 2 3 4 5 6 |
public static String userName = System.getenv("LT_USERNAME") == null ? "LT_USERNAME" //Add username here : System.getenv("LT_USERNAME"); public static String accessKey = System.getenv("LT_ACCESS_KEY") == null ? "LT_ACCESS_KEY" //Add accessKey here : System.getenv("LT_ACCESS_KEY"); driver = new AppiumDriver(new URL("https://" + userName + ":" + accessKey + "@beta-hub.lambdatest.com/wd/hub"), capabilities); |
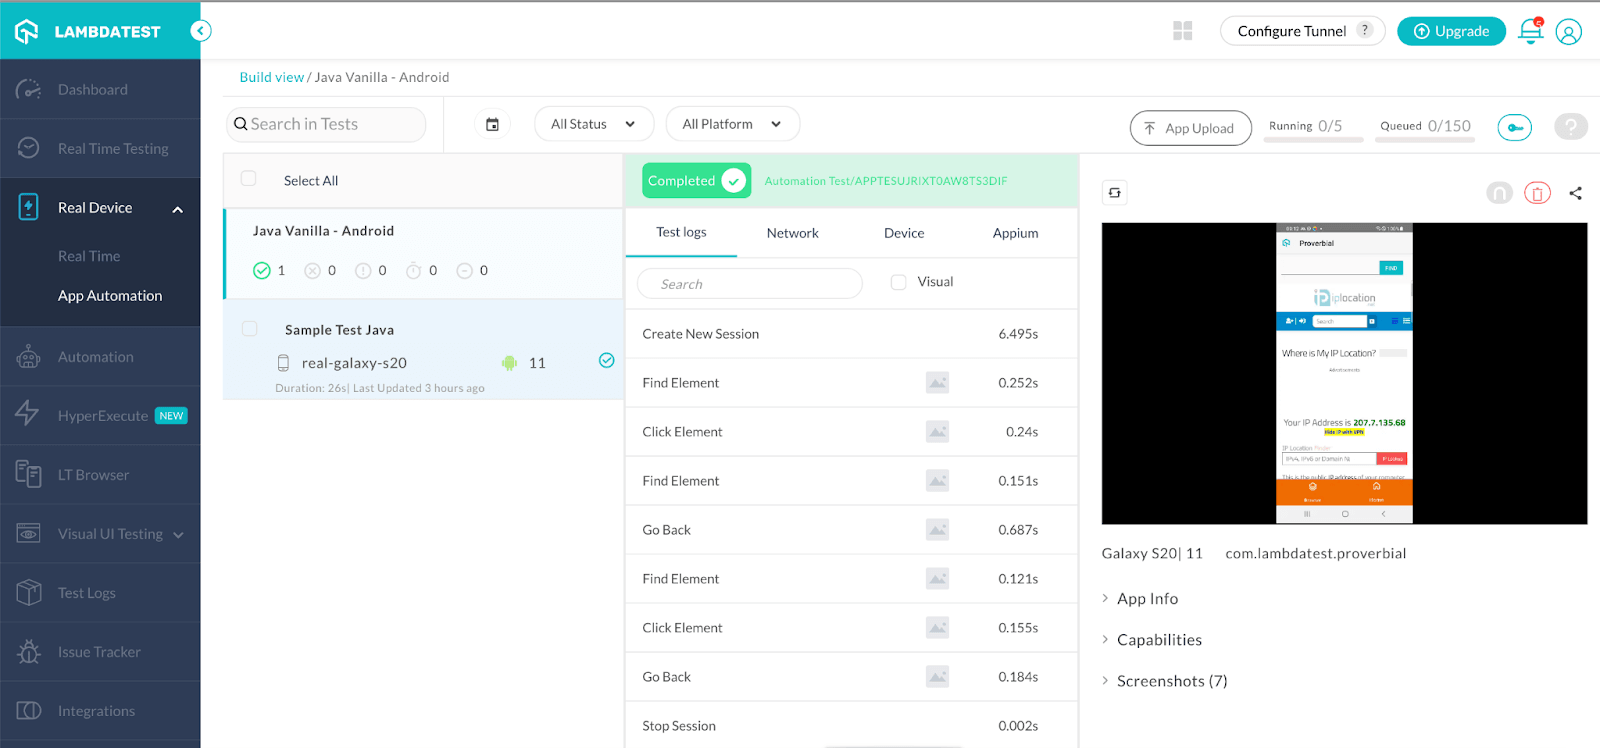
The dashboard shown above has many features like screenshots, artifacts, logs, and execution videos. Now with the execution visible on the dashboard, we are done with running our tests on real devices!
Conclusion
In this mobile app testing tutorial, we deep-dived into the basics of the Appium framework for performing Android and iOS app testing with code demonstration. We also looked at running Appium tests on cloud grids like LambdaTest. Finally, we learned how to debug errors while running Appium tests and how to run Appium tests on real devices.
Remember, “Try and Fail but do not fail to try.” So try to run the tests with the demo code provided in this Appium tutorial, and we’ll be happy to hear your thoughts. You can use LambdaTest to test on Oppo & other mobile devices right from android to iPhone.
Happy Testing!
Frequently Asked Questions (FAQs)
Is Appium easy to learn?
While Appium may be a relatively new tool, it’s quickly grown in popularity because of its ability to test mobile apps on real devices. It’s especially useful for cross-platform apps. If your organization is working on an app that will run on multiple platforms, you’ll need to test it on multiple devices—and Appium makes this easy.
Here’s the good news: Appium is fairly straightforward and easy to learn. It’s based on the remote WebDriver protocol, so if you have skills in writing tests in JavaScript, Java, Python, Perl, and C, you can easily use Appium.
How do I start learning Appium?
As with any new skill, it can be confusing to start out. Here’s a list of resources that might help you get familiarized with Appium:
Does Appium require coding?
A basic knowledge of programming languages, such as Python or Java, with experience in Appium, is preferred. Knowledge of Selenium is beneficial but not a requirement. Prior professional experience in manual testing is required.


Author’s Profile
Sidharth Shukla
Siddharth is the founder and author of https://automationreinvented.blogspot.com and has conducted training sessions on UI/API automation with CICD integration. He also works closely with companies to help them develop new automation tool
Blogs: 3
Got Questions? Drop them on LambdaTest Community. Visit now