
A Complete Guide to CSS Selectors
Harish Rajora
Posted On: October 26, 2023
![]() 75283 Views
75283 Views
![]() 25 Min Read
25 Min Read
CSS selectors are a mechanism that selects a unique set of elements and applies CSS designs to them. This can be achieved using generic HTML properties or manually attaching an identifier to the elements while coding them.
A web page is an organized arrangement of many individual elements. Most of these elements incorporate similar characteristics to maintain a planned design and a consistent palette on the software application. We can either repeat all that code for each element or apply a selecting logic that automatically grabs selected elements and performs actions on them.
However, the requirements for different CSS rules are different, and therefore, selectors should be efficient enough to cater to all these developers’ needs. CSS selectors are a great way to refine and concise your code and save much of your valuable time.
TABLE OF CONTENTS
What are CSS Selectors?
CSS selectors help target the elements on a web page to apply CSS stylings. They are required to eliminate repetitive styling and enjoy greater control over defined HTML elements.
For example, let’s consider a simple scenario where a web application has 100 elements on the page that display information in textual form. In the initial coding phase, the developer can write all the styling code inline to each element.
But what if a requirement changes to increase the font size one point larger in the future? Making a small change a hundred times is not feasible when the web applications are so complex already.
CSS selectors provide various mechanisms to handle the selection procedure. This may include targeting HTML elements directly or working with one or more identifiers to refine the selection. For instance, if there are three < p > elements on a page, we can target two of them using the same ID as follows:
|
1 2 3 |
<p id =”changeMe”>I need change. </p> <p> I don’t need change. </p> <p id =”changeMe”>I need change as well. </p> |
Selectors are part of the CSS rule structure and are written at the beginning of the rule:
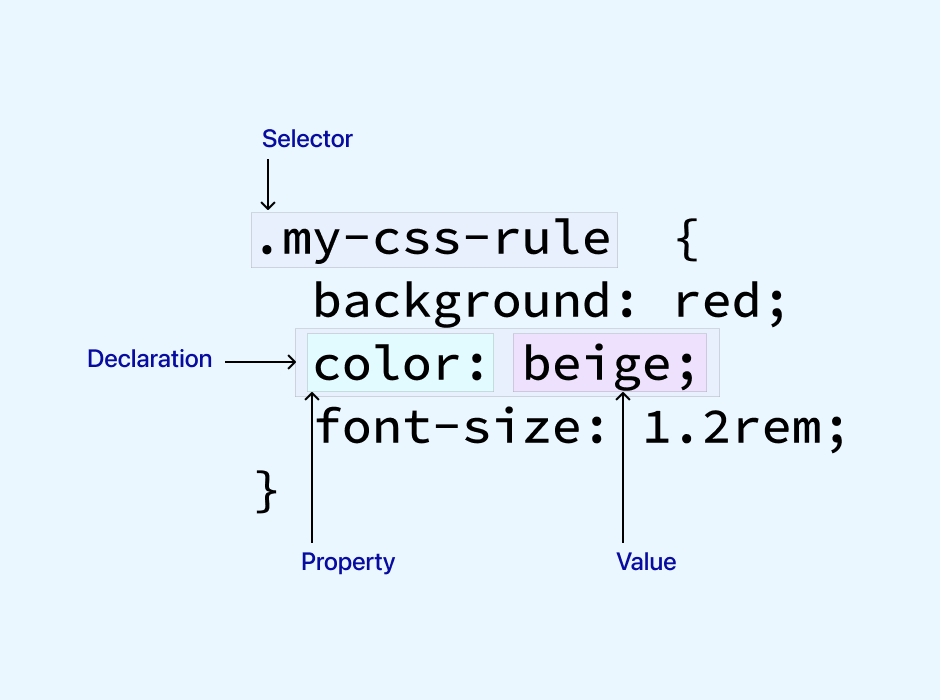
The above image shows some CSS rules applied to all the elements with the my-css-rule class attached. Similarly, we can apply a more complex selector structure to target more than one class or different identifiers, including those with relationships. The developers can use as many selectors as they wish on a web page.
 Note
NoteTest your Selectors in CSS on 3000+ real environments. Try LambdaTest Today!
Types of CSS Selectors
CSS selectors can be applied differently to target elements. Having knowledge about them will help in choosing the best selector according to the requirement and designing the code concisely.
Simple Selectors
The simple selector is the most direct form of selector that targets HTML elements with identifiers such as id, class, and others that can be attached to an HTML tag on the page. Broadly, they can be categorized as follows:
- Type selector: Targets the HTML element directly.
- ID selector: Targets the ID element directly.
- Class selector: Targets the class element directly.
- Universal selector: Targets all the elements on the webpage.
|
1 2 3 |
p { // CSS styling } |
|
1 2 3 |
#uniqueID { // CSS styling } |
|
1 2 3 |
.uniqueClass { // CSS styling } |
|
1 2 3 |
* { // CSS styling } |
In addition, the developer can combine multiple identifiers or types into one single CSS rule:
|
1 2 3 |
h1, h2, h3, p { // CSS styling } |
This is sometimes termed a Group Selector and is categorized inside a simple selector. However, there is no such categorization from W3C as it considers grouping as a general characteristic of the concept of selectors.
Complex or Compound Selectors
Complex or compound selectors use relationships between the elements as matching criteria. To define this relationship, we use combinators between two identifiers. Due to this reason, sometimes, complex selectors are also referred to as combinatorial selectors.
In CSS, we can use the following combinators that give rise to their subsequent selectors.
Descendant Selector (” “)
A descendent selector targets specific descendant elements of a parent. In brief, a parent-child relationship looks as follows:
|
1 |
<p>I am a parent and <strong>I am a child</strong>.</p> |
Since < strong > is encapsulated inside the < p > tag, < strong > is a child of < p >. We can apply a descendent selector to target only strong elements as follows:
|
1 2 3 |
p strong { color: red; } |
So, the complete code can be written as:
|
1 2 3 4 5 6 7 8 9 10 11 12 13 14 15 16 17 18 19 20 21 |
<!DOCTYPE html> <html lang="en" dir="ltr"> <head> <style> p strong { color: red; } </style> <meta charset="utf-8"> <title>Defining Descendant Selectors</title> <meta name="viewport" content="width=device-width, initial-scale=1"> </head> <body> <center> <p>I am a parent and <strong>I am a child</strong>.</p> <p>I am a parent and <b>I am a child.</b> <p>I am a parent and <strong>I am a child</strong>.</p> </center> </body> </html> |
Output:
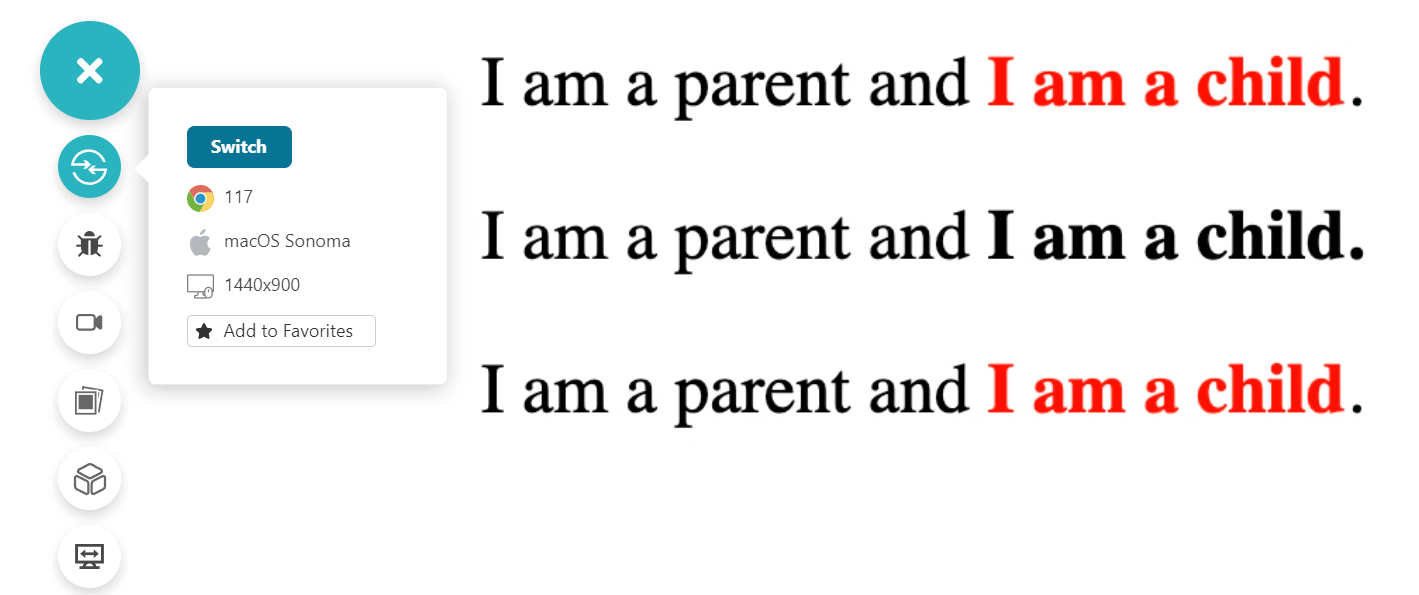
In the output, only those parts of < p > element are colored that are inside < strong > and a child of < p >.
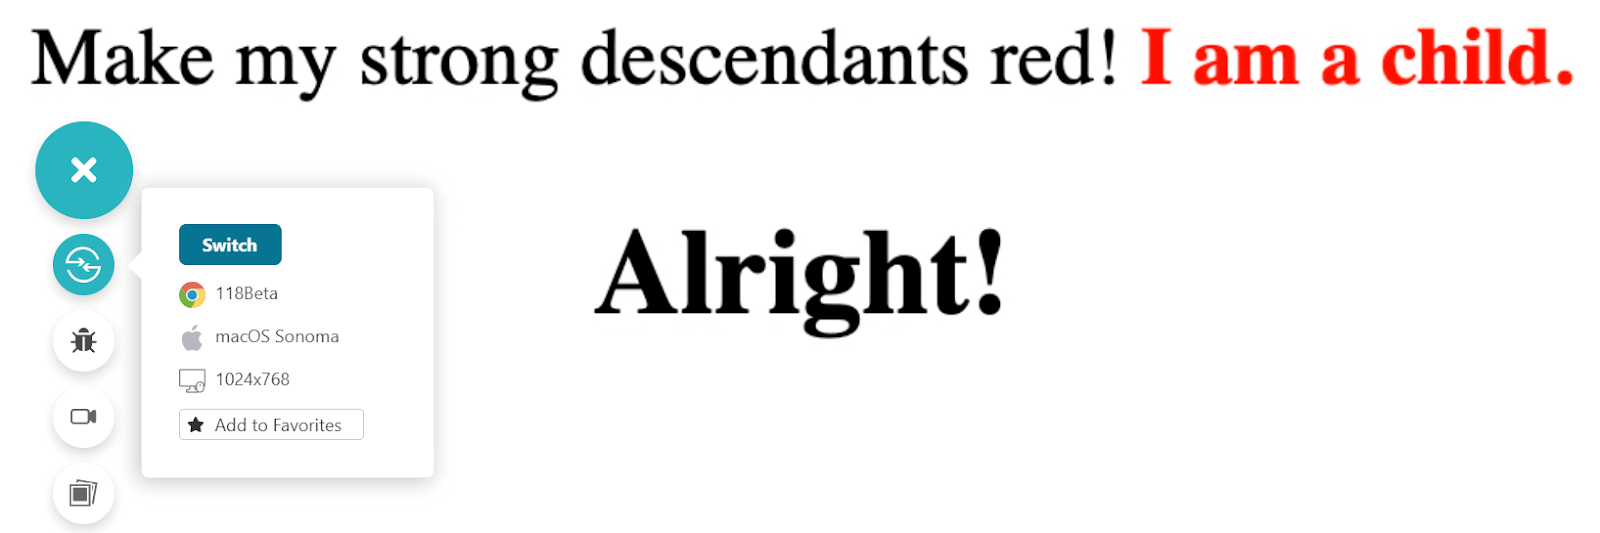
However, while in the above example, all < strong > are a child of < p >, it is important to note that descendant includes children and other branched elements as well (such as grand-child and so on) until the tag is closed. So, the following modification in the code:
CSS:
|
1 2 3 4 5 |
<style> div strong { color: red; } </style> |
HTML:
|
1 2 3 4 5 6 7 |
<div>Make my strong descendants red! <strong> I am a child. </strong> <h2> <strong> Alright! </strong> </h2> </div> |
Will color both the < strong > elements into red.
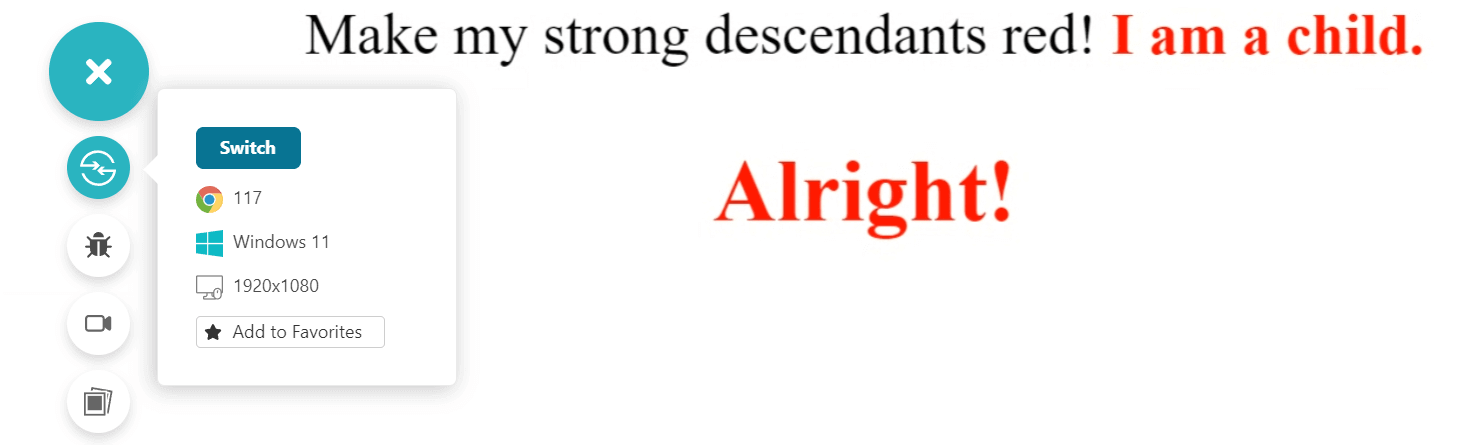
This defines a unique property of the descendant selector, i.e., it is recursive in nature.
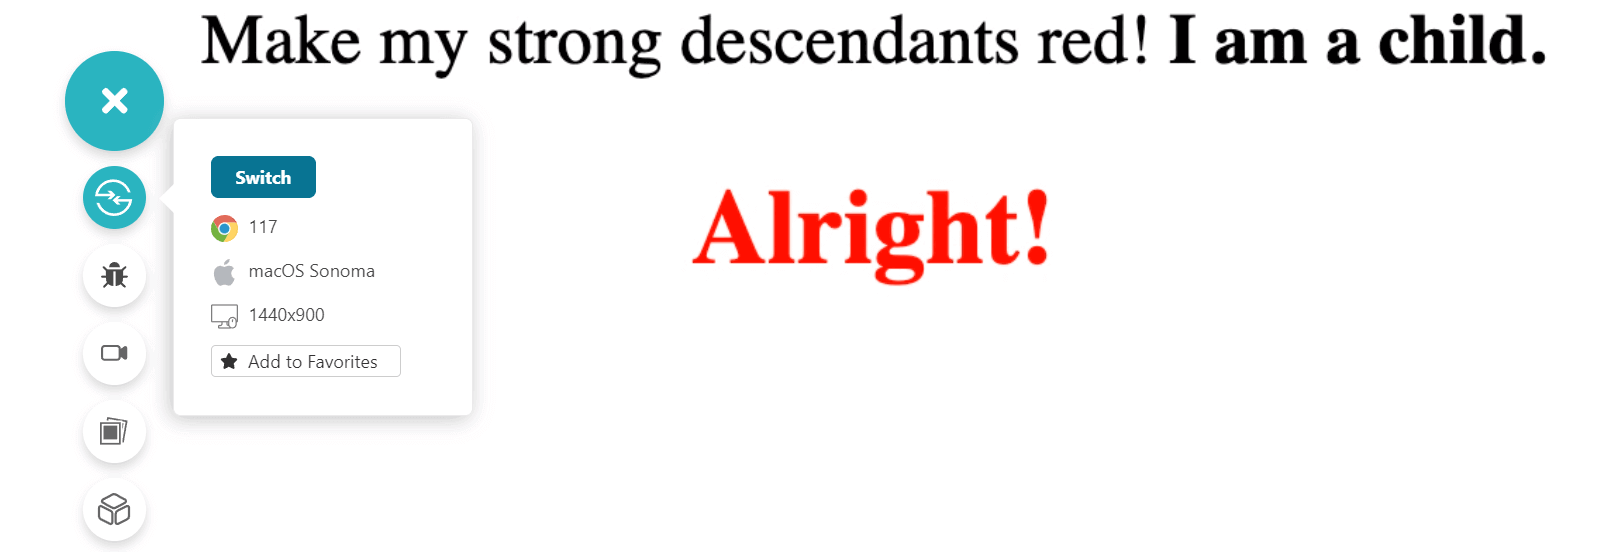
The developers can also use multiple descendant selectors to create a hierarchy and target more refined elements as follows:
CSS:
|
1 2 3 4 5 6 7 |
<strong>CSS:</strong> <style> div h2 strong { color: red; } </style> |
HTML:
|
1 2 3 4 5 6 7 |
<div>Make my strong descendants red! <strong> I am a child. </strong> <h2> <strong> Alright! </strong> </h2> </div> |
Output:
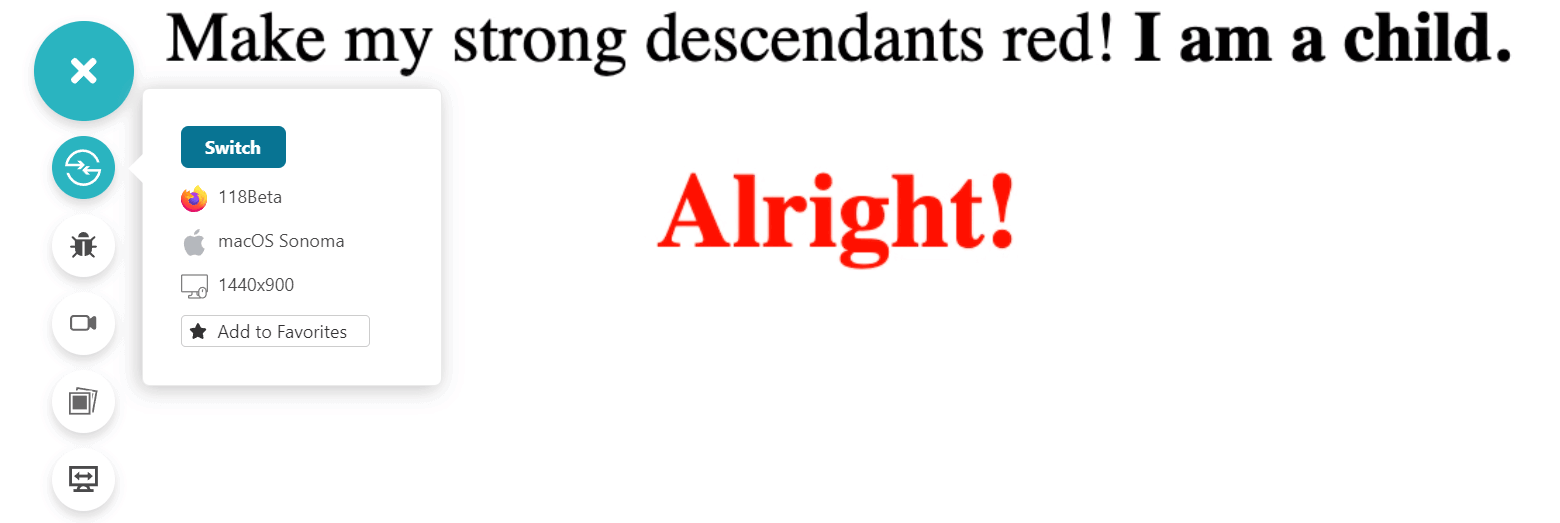
However, this approach can make the CSS rule a bit complex, which can hurt the readability.
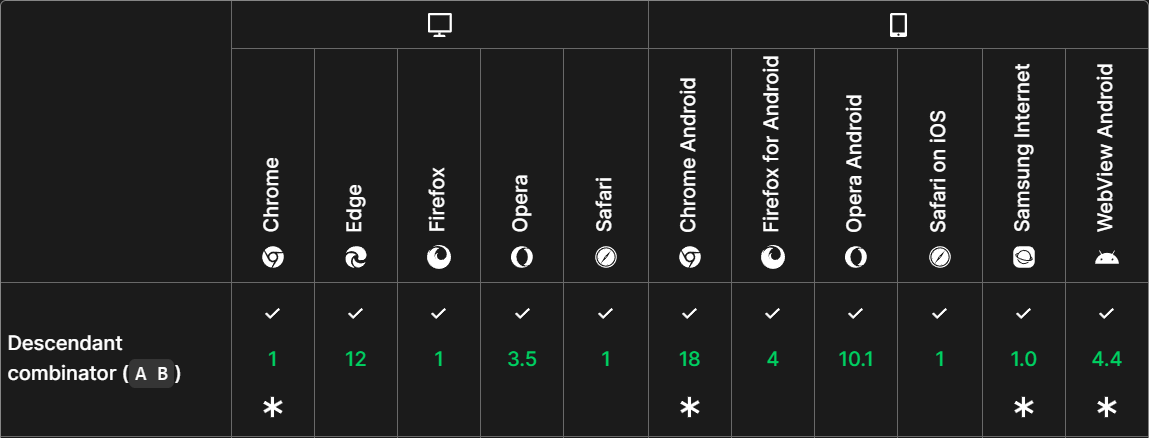
Browser Compatibility
The browser compatibility of the descendant selector is supported in the following browsers.
Child CSS Selector ( > )
The child selector targets only the direct children of the parent element, unlike the descendant selector, which targets all the matched elements recursively. Due to this property, a child selector is also referred to as a direct descendant selector.
The code from the above section that targeted all the elements can be repeated with the child selector as follows:
|
1 2 3 4 5 6 7 8 9 10 11 12 13 14 15 16 17 18 19 20 21 22 23 24 25 |
<!DOCTYPE html> <html lang="en" dir="ltr"> <head> <style> div > strong { color: red; } </style> <meta charset="utf-8"> <title>Defining Descendant CSS Selectors</title> <meta name="viewport" content="width=device-width, initial-scale=1"> </head> <body> <center> <div>Make my strong descendants red! <strong> I am a child. </strong> <h2> <strong> Alright! </strong> </h2> </div> </center> </body> </html> |
Output:
Similar to the descendants selectors, here, too, the developers can use multiple child combinators to match specific elements.
CSS:
|
1 2 3 4 5 |
<style> div > h2 > strong { color: red; } </style> |
HTML:
|
1 2 3 4 5 6 7 |
<div>Make my strong descendants red! <strong> I am a child. </strong> <h2> <strong> Alright! </strong> </h2> </div> |
Output:
Representing multiple child combinators in a single rule is common as it is easier to gather for someone reading the code. Since it moves through a single branch (child to child), it is also easier to write, test, and maintain in the future.
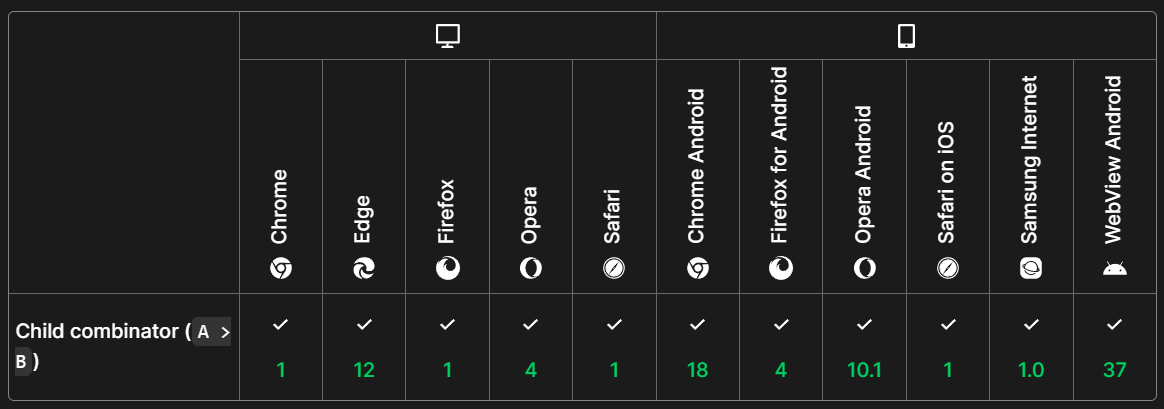
Browser Compatibility
The child selector is supported in the following browsers.
Attribute Selector ( [ ] )
The attribute selector matches the elements that have a specific attribute attached to them. The attribute name is enclosed inside square brackets, followed by the CSS rule to be applied.
The following code defines three < p > elements where two have unique IDs attached to them, and one has a class.
|
1 2 3 4 5 6 7 8 9 |
<body"> <center> <div> <p id = "#myID"> I have an ID. </p> <p id = "#myID2"> I too, have an ID. </p> <p class = "myClass"> I have a class. </p> </div> </center> </body> |
Attach a CSS rule to only those < p > elements that have an ID attached:
|
1 2 3 4 5 |
<style> [id] { color: red; } </style> |
Output:
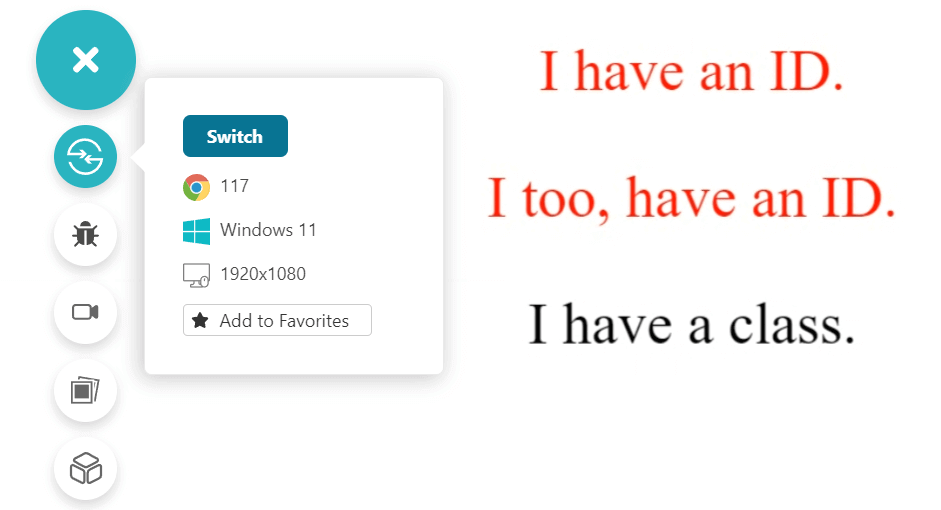
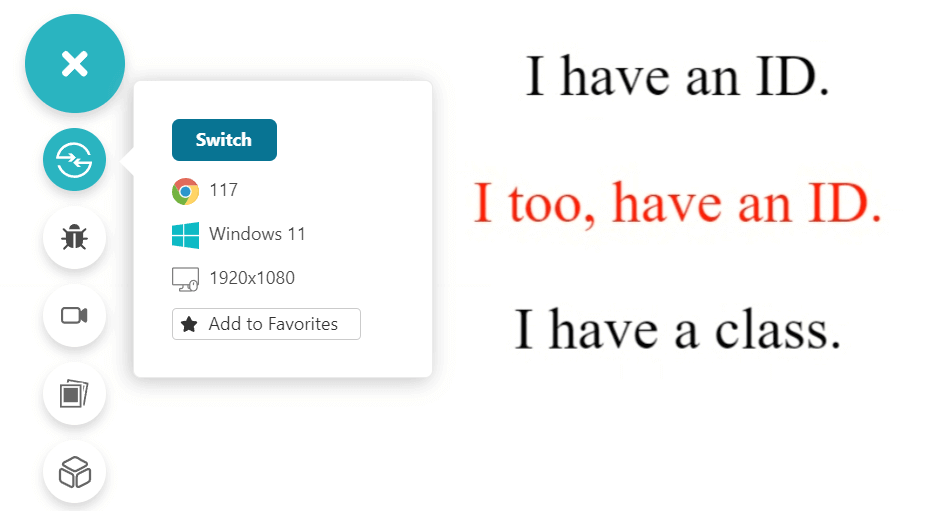
The attribute part can also take a value to match only those elements that have that attribute, and that attribute has that particular value. In the example above, both the < p > elements that contain the ID attribute have different IDs. Specifying one of the IDs will affect only that particular element:
|
1 2 3 4 5 |
<style> [id = "#myID2"] { color: red; } </style> |
Output:
Other types of options available in the attribute selector are:
- Attribute with a word: [attribute~=”value”] can match the attribute that contains a specific word in the value.
- Attribute with an exact word: [attribute|=”value”] can match the attribute that contains the value word as its value as the only option or followed by a hyphen. For instance, [attribute|=”margin”] can match the attributes whose value contains margin, margin-top, margin-bottom, etc.
- Attribute with starting value: [attribute^=”value”] can match the attributes whose value starts with the word value.
- Attribute with ending value: [attribute$=”value”] can match the attributes whose value ends with the word value.
- Attribute containing a value: [attribute*=”value”] can match the attributes whose value has value in it. It need not be a word match, a substring can also be considered. For example, [class*=”re”] can match all elements that have a class attached with a value, such as result1, return1, preset1, etc.
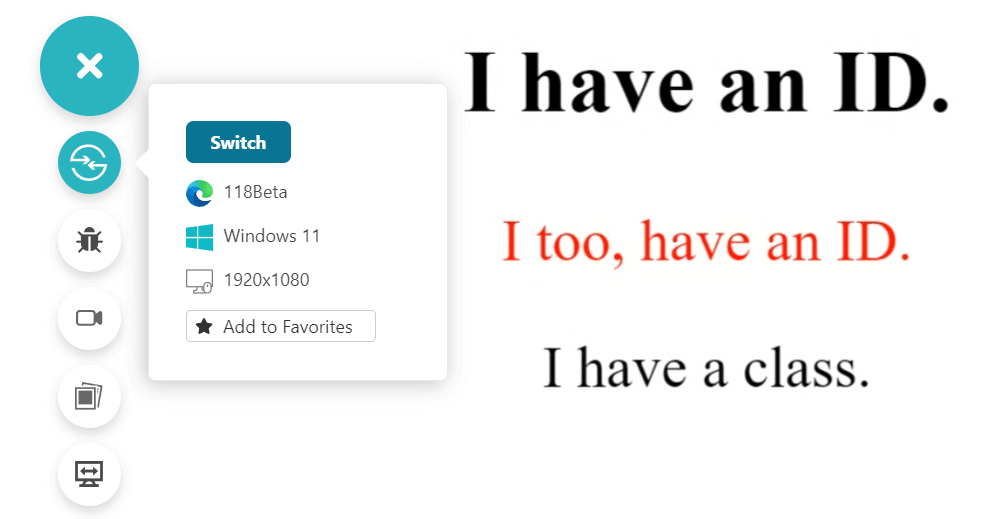
The attribute selector used in the above style scans the complete page without filtering any HTML tag for matching. For instance, [id = “#myID”] will match < p id =”#myID” > as well as < div id = “#myID” >.
This could only be the case sometimes, and a need may arise to target only a certain type of tags for certain CSS rules. For instance, in the above example, if the text is mostly contained in the < p > tag, developers will target CSS rules just for the < p > tag. This can be achieved by putting the tag name outside of the attribute bracket as follows:
|
1 |
p[ id = “#myID”] |
This will target only < p > tags that have id as #myID.
Here is an example code.
Without tag:
|
1 2 3 4 5 6 7 8 9 10 11 12 13 14 15 16 17 18 19 20 21 22 23 |
<!DOCTYPE html> <html lang="en" dir="ltr"> <head> <style> [id = "#myID"] { color: red; } </style> <meta charset="utf-8"> <title>Defining Descendant Selectors</title> <meta name="viewport" content="width=device-width, initial-scale=1"> </head> <body style="font-size: 50px"> <center> <div> <h2 id = "#myID"> I have an ID. </h2> <p id = "#myID"> I too, have an ID. </p> <p class = "myClass"> I have a class. </p> </div> </center> </body> </html> |
Output:

With tag:
|
1 2 3 4 5 |
<style> p[id = "#myID"] { color: red; } </style> |
Output:
Are values case-sensitive in the Attribute Selector?
A popular question especially among new web developers is regarding the case sensitivity of the attribute selector. The answer to this depends on the type of attribute used. Specific tags are considered case-sensitive in HTML docs such as class, id, etc., while most are case-insensitive. If the attribute is a case-insensitive attribute, the value will also be case-insensitive and vice-versa.
With that mentioned, if need be, developers can change this behavior using i and s before the closing bracket to determine case-insensitive and case-sensitive respectively.
|
1 2 3 |
a[href$=".com" i] { font-style: bold; } |
Also, note that the attributes defined outside of HTML specification are also case-sensitive.
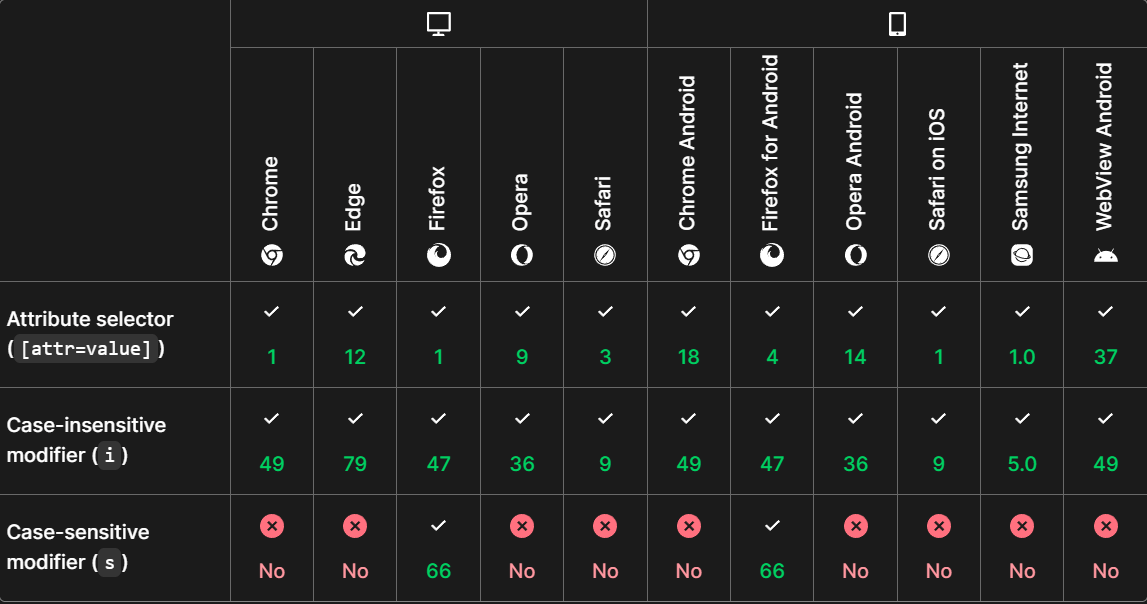
Browser Compatibility
The attribute selector is supported in the following browsers:
Pseudo-class Selector ( : )
A pseudo-class selector applies the defined CSS rule on an element when it is in a particular state in DOM, based on history, interaction, time-dependent modules, and a lot more. The regular usage and popularity of pseudo-class selectors have contributed to adding new elements to this list regularly. Hence, the list is long, and it is advised to go through it on the W3C official website.
A pseudo-class selector uses ( : ) to separate the anchor and the state where the anchor is the element whose state we are observing. A popular example of using a pseudo-class selector is through CSS hover, which determines when the mouse cursor is above the anchor element.
CSS:
|
1 2 3 4 5 |
<style> a:hover { color: red; } </style> |
HTML:
|
1 2 3 4 5 |
<center> <div> <p><b><a href="#" target="_blank">This is a link. Hover to change color.</a></b></p> </div> </center> |
Output:
Pseudo-class selector implementation also shows an important aspect of holding the state and reverting back to its original state when the state is reverted back. In the example above, the link reverts back to the original color when the hover state is changed.
Another important thing to note in pseudo-class selectors is the order in which they are applied on the same anchor element can alter the usual behavior. For instance, visited and :link showcases this conflict.
Pseudo-element Selector ( :: )
The pseudo-element selector affects a certain part of an element rather than affecting the complete element as in the pseudo-class. It helps eliminate a lot of repetitive HTML code that would have included their own CSS designs.
Pseudo-element selector is denoted by a double colon ( :: ) that separates the anchor element and the selector before applying the CSS rule. A popular example demonstrating the use of a pseudo-element selector is changing the style of the first alphabet of the first word of each paragraph.
CSS:
|
1 2 3 4 5 |
<style> p::first-letter { color: red; } </style> |
HTML:
|
1 2 3 4 5 6 7 |
<center> <div> <p>Lorem ipsum text. </p> <br> <p> Lorem ipsum text.</p> </div> </center> |
Output:
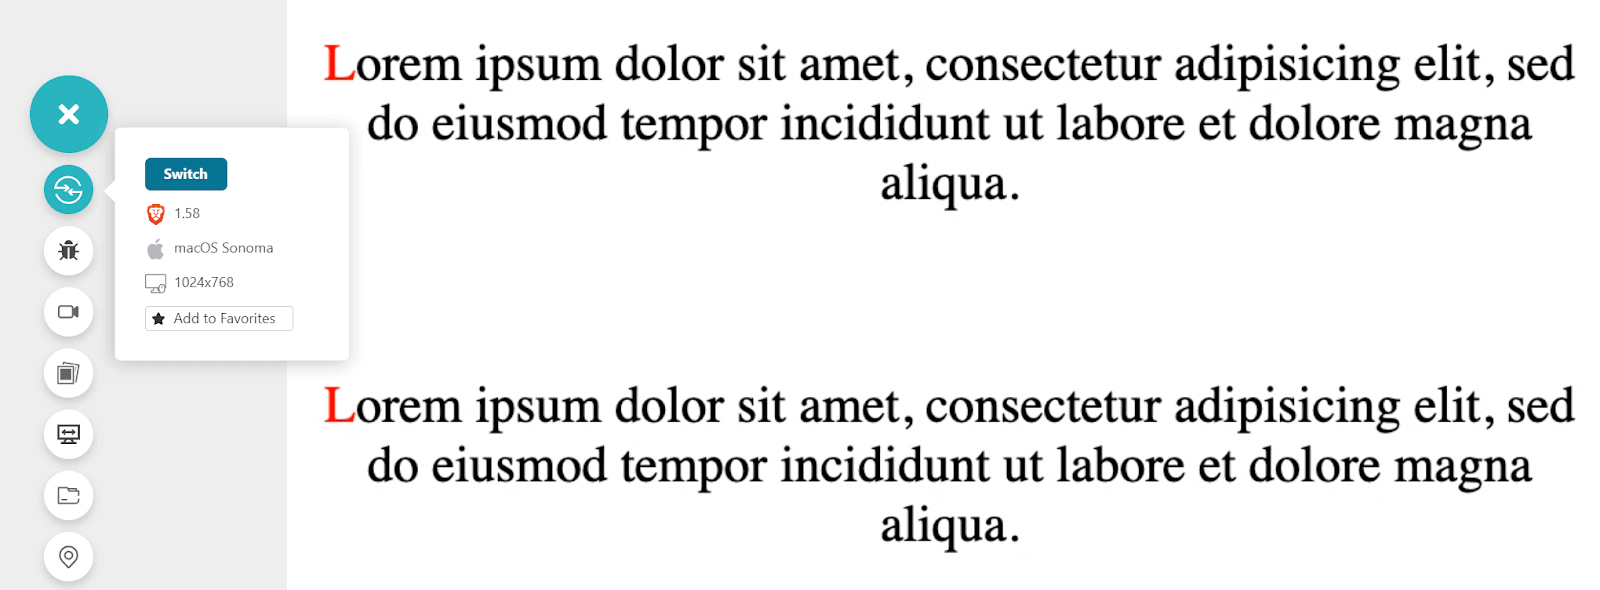
This is a common scenario when a web application is mostly textual, such as news websites, blogs, etc.
A few points to remember with pseudo-element selectors:
- Pseudo-class selectors and pseudo-element selectors were used the same way with single-colons up until CSS2. Developers can still see old code running in older versions of IE with the same notation today and can use the same notation also. However, the earlier notation is only supported for ::before, ::after, ::first-line, and ::first-letter. Rest needs to be implemented through double colon only.
- Developers can use only one pseudo-element in a selector. Using more than one, such as p::first-letter:hover is not allowed.
- The above condition is not true and vice-versa. A developer can apply the pseudo-element on any particular state, including those changed by the pseudo-class selector. Therefore, p:hover::first-letter is perfectly fine and will apply the CSS rule to the first letter only when it is in the hover state.
- The ::first-letter pseudo-element selector is only applicable for block elements.
- Developers can combine multiple pseudo-element selectors on the same anchor element, although not through a single CSS rule.
- Pseudo-element selector includes ::before and ::after selectors used popularly to insert content before and after the element, respectively. These elements can only be used if content is provided as an attribute. It can also be an empty string.
- The ::before and ::after help in inserting additional content, therefore, they can only be used with elements that accept child elements. For instance, ::before and ::after cannot work with < img >.
- The only exception to the abovementioned rule is input[type=”checkbox”]
The following code helps understand the pseudo-element and pseudo-class selector using multiple selectors:
|
1 2 3 4 5 6 7 8 9 10 11 12 13 14 15 16 17 18 19 20 21 22 23 24 25 26 27 28 29 30 31 32 33 34 35 36 37 38 39 40 41 42 43 44 |
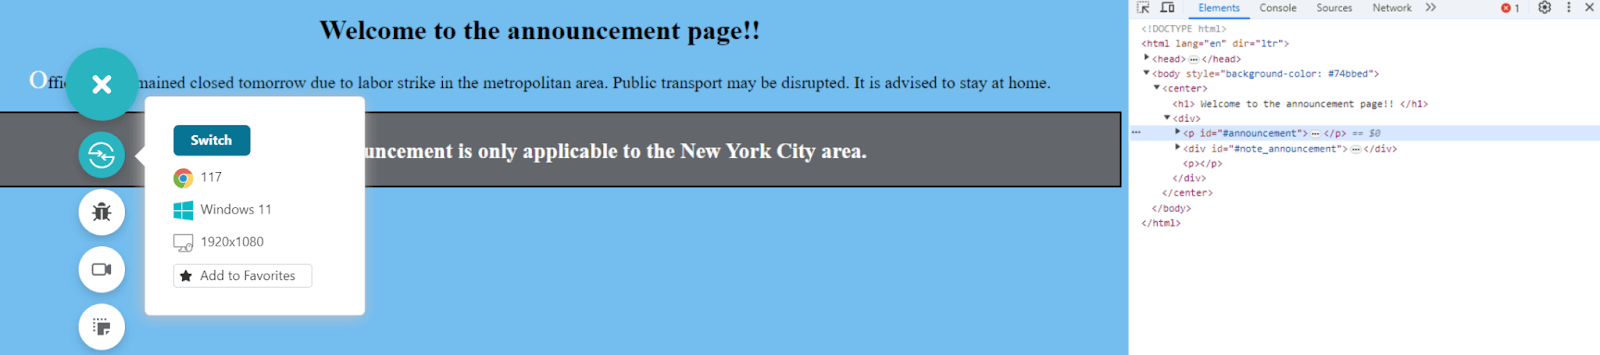
<!DOCTYPE html> <html lang="en" dir="ltr"> <head> <style> p { font-size: 20px; } div[id = "#note_announcement"] { border: 2px solid black; background-color: #636469; color: white; font-weight: bold; } div[id = "#note_announcement"] > p { font-size: 25px; } p::first-letter { font-size: 30px; color: white; } h1:hover{ color: #46499c; } </style> <meta charset="utf-8"> <title>Sample pseudo-selector page!!</title> <meta name="viewport" content="width=device-width, initial-scale=1"> </head> <body style="background-color: #74bbed"> <center> <h1> Welcome to the announcement page!! </h1> <div> <p id = "#announcement">Office to be remained closed tomorrow due to labor strike in the metropolitan area. Public transport may be disrupted. It is advised to stay at home. <div id = "#note_announcement"> < p > Note: This announcement is only applicable to the New York City area. </p> </div> </p> </div> </center> </body> </html> |
Output:
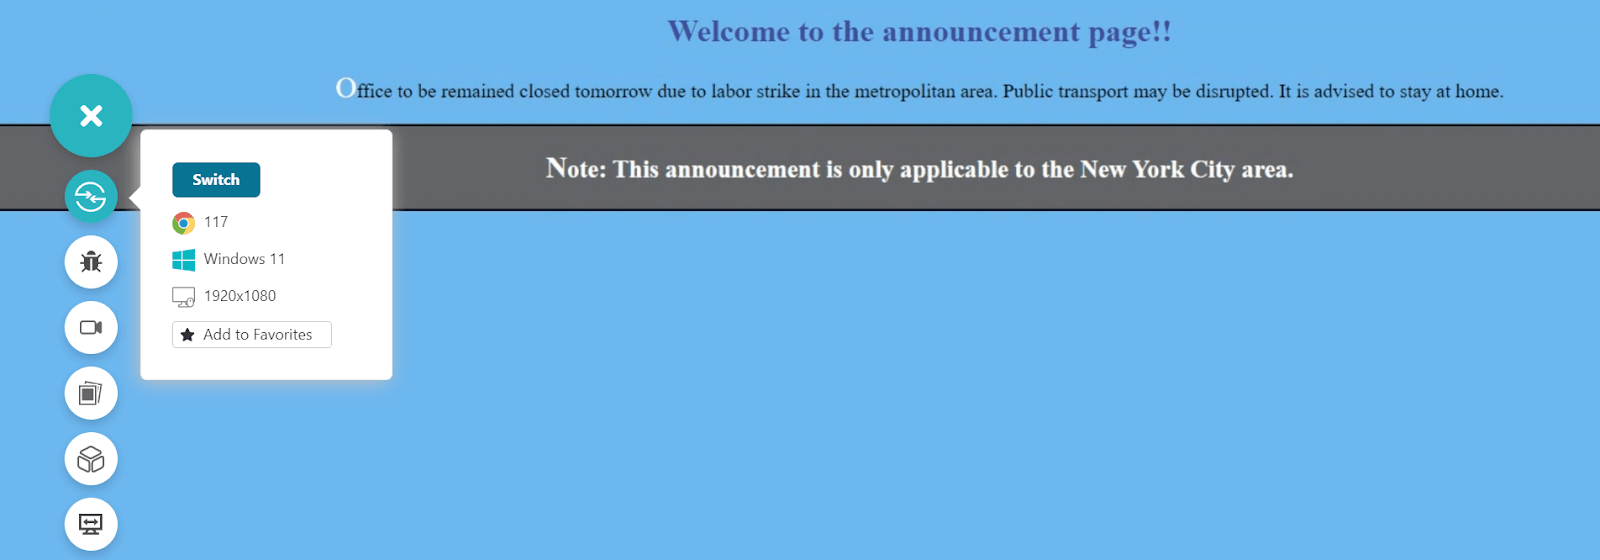
Notice that with just five lines of HTML code, a lot of CSS logic could be implemented if selectors are used. Other popular pseudo-element selectors, apart from the ones used in this guide, are:
- ::backdrop: Represents a box that is rendered beneath an anchor element.
- ::cue: Used to match WVTT cues.
- ::first-line: Matches the first line of the target element and applies CSS styling to it. This can only be done on block-level elements.
- ::file-selector-button: Matches the button with the type attribute set to file.
- ::grammar-error: Matches the grammatically incorrect elements. This selector is currently in the experimental stages.
- ::marker: Matches the marker of any list item, such as bullets.
- ::part(): matches any element that contains the part attribute in its declaration.
- ::placeholder: Matches the placeholder text inside an < input > or < textarea > tag.
- ::selection: Matches those parts of the web page that are highlighted by the user through actions such as mouse drag.
- ::slotted(): Matches the slot elements.
- ::spelling-error: Matches those textual elements that are flagged as incorrectly spelled. This selector is currently in the experimental stages.
- ::target-text: Matches the scrolled text on browsers that support text fragments.
This list is updated as requirements arise (such as new members ::spelling-error). Developers are always advised to be updated with W3C and new versions of CSS.
You can also master different selectors with this handy CSS Selectors Cheat Sheet.
How to Include CSS Selectors?
CSS selectors are styling pieces of code that aim at matching appropriate elements from HTML and applying CSS design to them. Also, they are applied within the < style > block. This is the same as a developer would do for any CSS code. Hence, the methods to include the selectors remain the same.
Method 1: CSS Selector Inside the Header
The first option is to include the selector inside the < head > tag.
|
1 2 3 4 5 6 7 8 9 |
<head> <style> [id = "#myID"] { color: red; } </style> <meta charset="utf-8"> <title>Adding CSS Selectors in Head</title> </head> |
This is the easiest option as it provides the styling in the same file, and the developers need not navigate across multiple files for the same. This method is also called defining selectors internally, as it is internal to the file.
Issues with defining CSS selectors internally
As easy as it is to construct a rule with efficient selectors, soon, the developers may find themselves immersed in a long file that has hundreds, if not thousands, of lines of internal styling. It is a nightmare to manage such a file, and maintaining an application with hundreds of such files is impossible.
The second issue with the internal CSS selector definition is the restraints on repetitiveness. A web application follows a similar structure across all the pages, resulting in almost identical CSS designs with similar elements on other pages.
Since the selector is internally designed, applying the same selector logic across the required files is the only way to address this issue. While it still is possible (although never recommended), a simple change in the design could lead to a repetitive process of finding and making that change. It is a time-consuming task no organization would want to indulge in.
Finally, as the internal selector styling increases, so does the file size. An increase in file size means an increase in loading time, which is one of the most crucial parameters in measuring a page’s effectiveness today. Also, since the code is repeated across multiple files, what should have been a 1KB code could result in 10KB for ten files. This puts the load on the server significantly as the web application will become bulkier as it scales up.
Method 2: CSS Selector Inside a Separate File
A better and recommended method to include selectors in the file is by creating a separate file and linking it to each file where the design is required. This method is also called defining selector files externally.
The external declaration method eliminates all three issues appearing in the previous method. There will not be a load on one file, no file will become large in size, and the code will not become repetitive. If there is a requirement for any change, it can be done in a single place in the selector file and will be reflected everywhere.
To create a new file for the selector, just create a new file and save it as a .css extension.
Next, put down all the CSS selector code inside that file.
Finally, link this file to the file with HTML code where the elements are present that are targeted by the selector.
|
1 |
<link rel="stylesheet" href="myCSSselector.css"> |
Please note that href is a path link. In the above code, it is assumed that the CSS selector file and the HTML file are on the same path. If they aren’t, developers need to put the complete path of the directory here.
Issues with defining CSS selectors externally
The only issue with defining the selectors externally is that since they reside in the external file, the parser needs to decode the link, go to the directory, fetch the file, read the file, and then implement the styling. This is a slow process as compared to having the code ready in the same file that has already been downloaded (internal styling). With multiple heavy elements on a web page, it can easily become noticeable to the end user.
However, the developers can use the style they find more approachable and accessible. They can also opt for a mix of both with small CSS selector code inline for quick editing and significant changes in the external file.
How to Locate CSS Selectors on a Web Page?
Most of the time, a few folks work on a web application that is already up and running for some time. When they need to rectify a bug or implement a new enhancement, they need to locate a specific identifier to connect to the code. This identifier will also connect to the CSS selector already implemented or to create a new one if needed. To achieve this, we need to follow a few steps.
Consider the following web page specified in the above examples.

A new requirement comes to change the color of the normal text from #000000 to #87251e. From here, open the web page and right-click on the element required to be changed. In this case, the element is the normal statement.
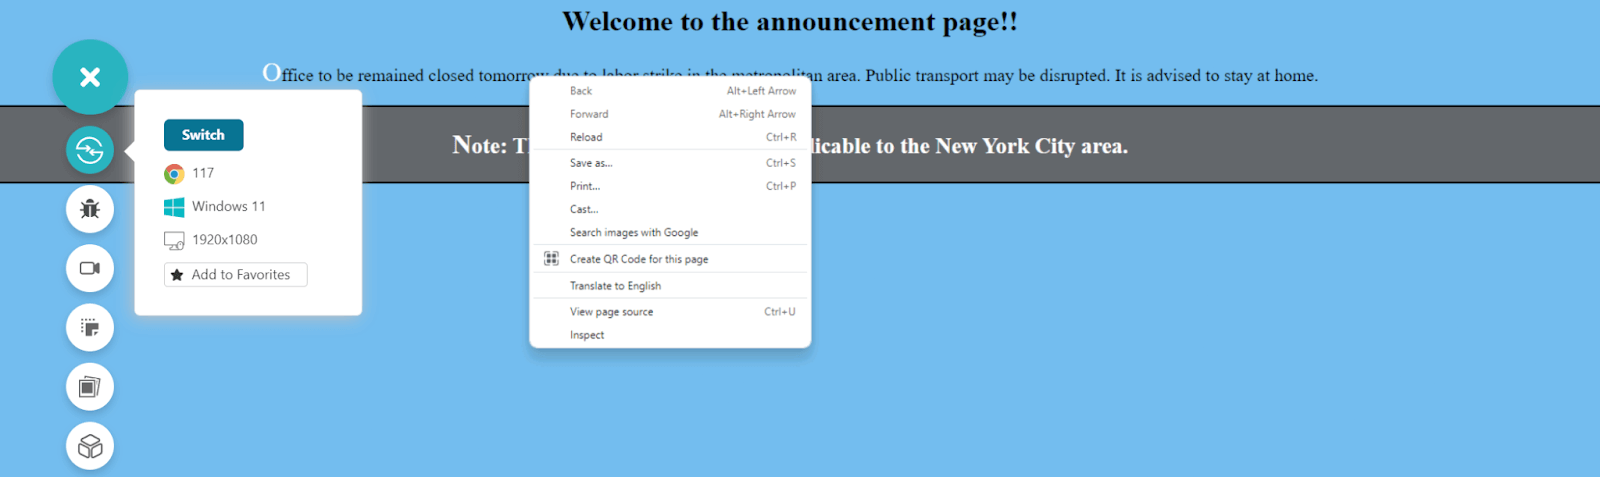
Click on Inspect – the last option in the menu list.
A dock panel will open up where the code of the selected element will already be focused and highlighted.
There are no styling elements written inline the < p > tag. This could mean either no styling has been applied to the element or something related to the < p > or #announcement is applied in the CSS sheet.
Assuming that the CSS file is not internal (as recommended), the file must be there in the Sources tab located right beside the Console.

Since the Sources tab shows only one file, which is this HTML file, it means CSS is applied internally. Press Ctrl + F and type #announcement to locate this id throughout the page.
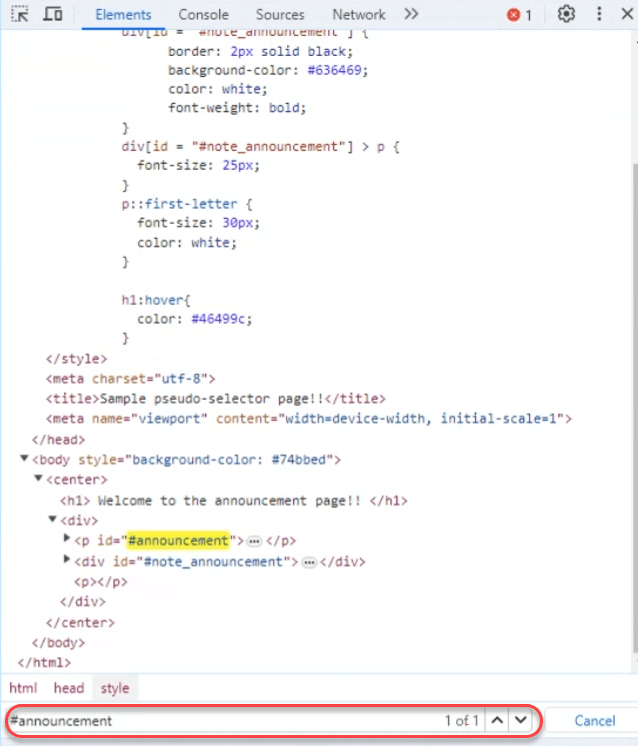
Only one occurrence is written while attaching the ID to the < p > tag. It means there is no styling applied, and the developer can create their own CSS selector (a simple selector will work here) and change the color through a CSS rule.
Through this process, developers and testers can locate the identifier of any element on the web page and scan the stylings attached to it in a few seconds.
Why Should Testers Use CSS Selectors?
CSS selectors are indeed a crucial part of web development. However, once the application is developed and pushed, it is also essential to understand that the same identifier a developer was targeting for styling, due to its uniqueness, will be targeted to test that element.
This is so powerful that in most test cases, a tester will write them using automation testing frameworks like Selenium, focusing on finding the element
through identifiers and performing actions over them. This makes the knowledge of CSS selectors in Selenium an equally important part of software testing.
For instance, to test a button by matching a class in Selenium, the following code needs to be implemented:
|
1 |
driver.findElement(By.cssSelector(class.’myButton’)).click(); |
Secondly, testers need to test the consequences of implementing a selector in the application throughout the application. For example, the ID used above, i.e., #announcement could have been used on multiple pages with the external declaration of the CSS file.
Yes, it did work well on the landing page. But can the tester mark this selector as correct? What if it is changing the color of a paragraph at a place where it should not?
To scan the application, determine the selectors, and manage their effect at every single place for correctness needs in-depth knowledge and experience with the selectors. It is crucial to not only be concerned about the new changes but also compare them with the older ones to keep the codebase stable. This approach is also called regression testing. All this cannot be done manually as the application goes beyond hundreds of pages. The best approach is to choose the most suitable test execution platform for all the requirements.
How to Test a Web Page Using CSS Selectors?
Lastly, testers need to find a way to test those selectors efficiently. This can be achieved in two ways:
- Manual method
- Automation method
Testing CSS Selectors Manually
In the demonstration for locating selectors on a web application in the previous section, the manual method was used to start the application manually, right-click on the element, find the selector, etc. This manual method is used to test the effectiveness of selectors on a larger scale initially.
For instance, a CSS rule applied after the selector may do tens of things, but the most important and most visible thing (such as a change in color) can be verified manually. Regression and browser tests should be left to automation, which needs to be done after manual testers have validated the significant changes.
Testing CSS Selectors Through Automation
One area that has seen significant interest from the automation testing perspective is web applications. Starting from Selenium’s driver-object-based testing to record-and-playback and even partial codeless testing paradigms, automation testing for a web application provides ample choices for testers.
Testing a selector through automation requires writing test scripts and running it automatically on the application. This is popularly done in Selenium. Moreover, there are tons of integrations and support for a programming language that makes the work of a tester even easier.
But the challenge with Selenium or any other automation framework is the lack of browsers. For Selenium, testers need the browser driver for each version on the local system. This means for 100 drivers, 100 binaries are required. Some frameworks don’t even provide this facility. They just support test scripting and test execution on emulators and simulators.
Testing a CSS selector is incomplete until all the target browsers are covered. In this scenario, a cloud-based testing platform like LambdaTest seems to be the best choice.
Subscribe to our LambdaTest YouTube Channel for the latest tutorials on Selenium automation testing, mobile app testing, and more.
How to Test CSS Selectors on the Cloud
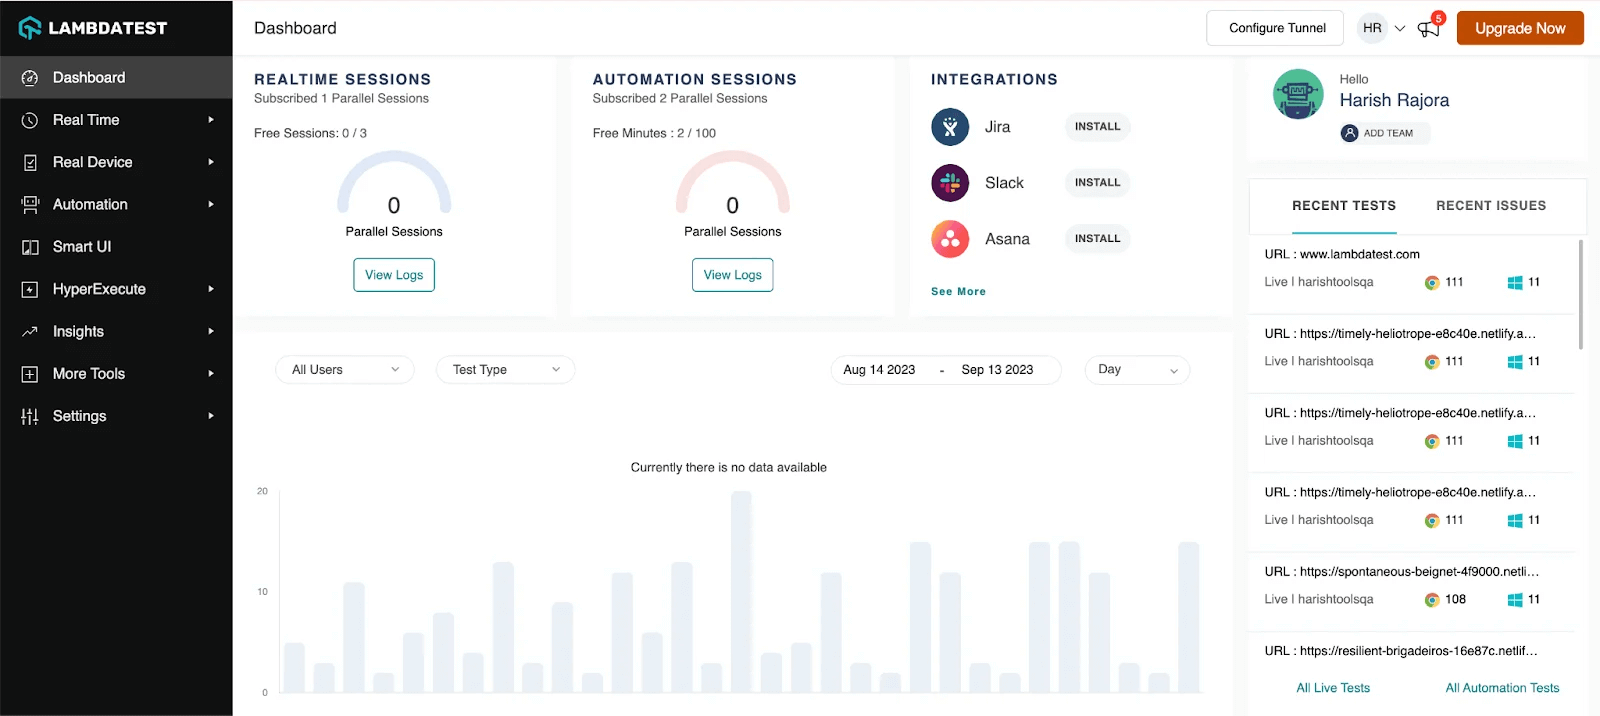
LambdaTest is an AI-powered test orchestration and execution platform to perform manual and automation testing on an online browser farm of 3000+ real browsers, devices, and platform combinations. And more importantly, it can meet both the manual and automation needs of a tester. All that is required from a tester is a free sign-up.
Moreover, with a mobile device lab offered by LambdaTest, you can test selectors both manually and automatically on a real device cloud and a virtual device cloud of emulators and simulators.
- To start manual testing on LambdaTest, log in to your LambdaTest account.
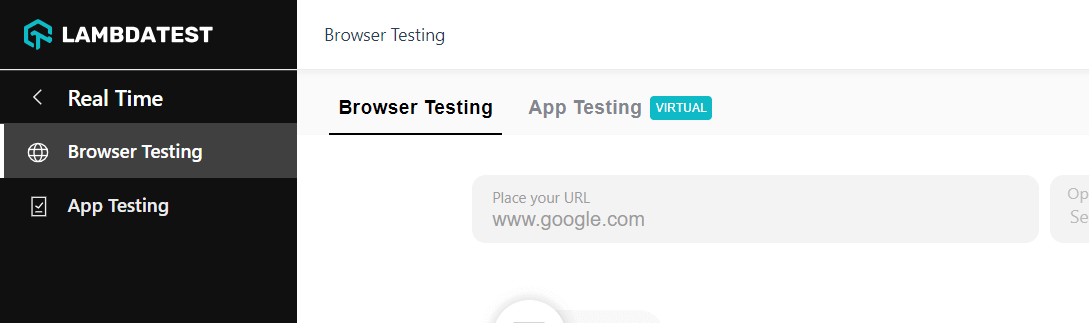
- Select the method to test the web application. Since this is manual testing, choose Real Time > Browser Testing.
- Select the target browser, its version, operating system specification, and resolution from the list of choices. Hit START after entering the target web app URL.
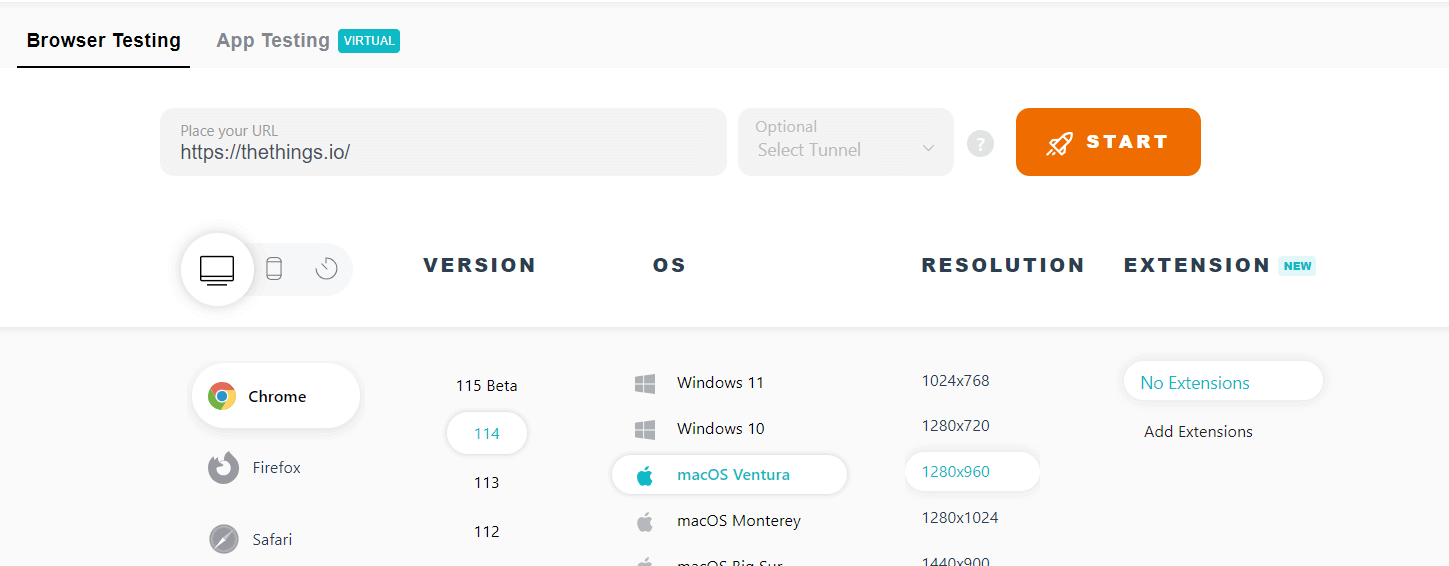
The application will start running on the cloud machine with the selected specification in a couple of seconds.

The testers need not have a published website to start manual testing. An unpublished or local website is as easy to work with when LambdaTest Tunnel tests locally hosted websites or web apps.
For automated CSS selector testing, frameworks such as TestNG and Selenium are preferred. While the testers still need to write code in the same frameworks, access to browsers and a secure infrastructure can be achieved with LambdaTest. Covering more than 120 integrations, everything can be collected and represented on a single dashboard for efficient analysis and testing.
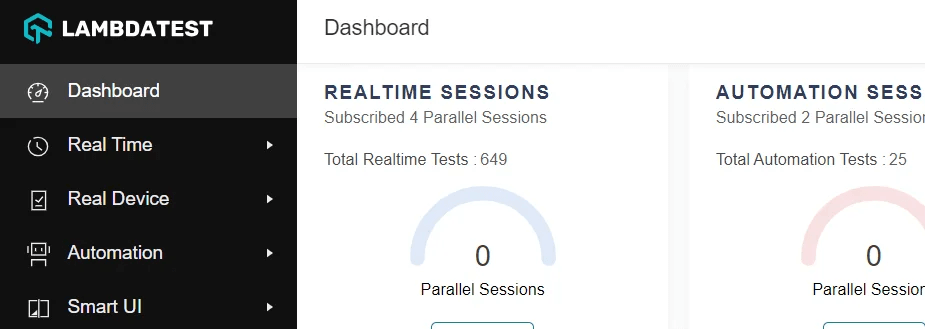
- To start automated testing on LambdaTest, select Automation from the left-side panel.
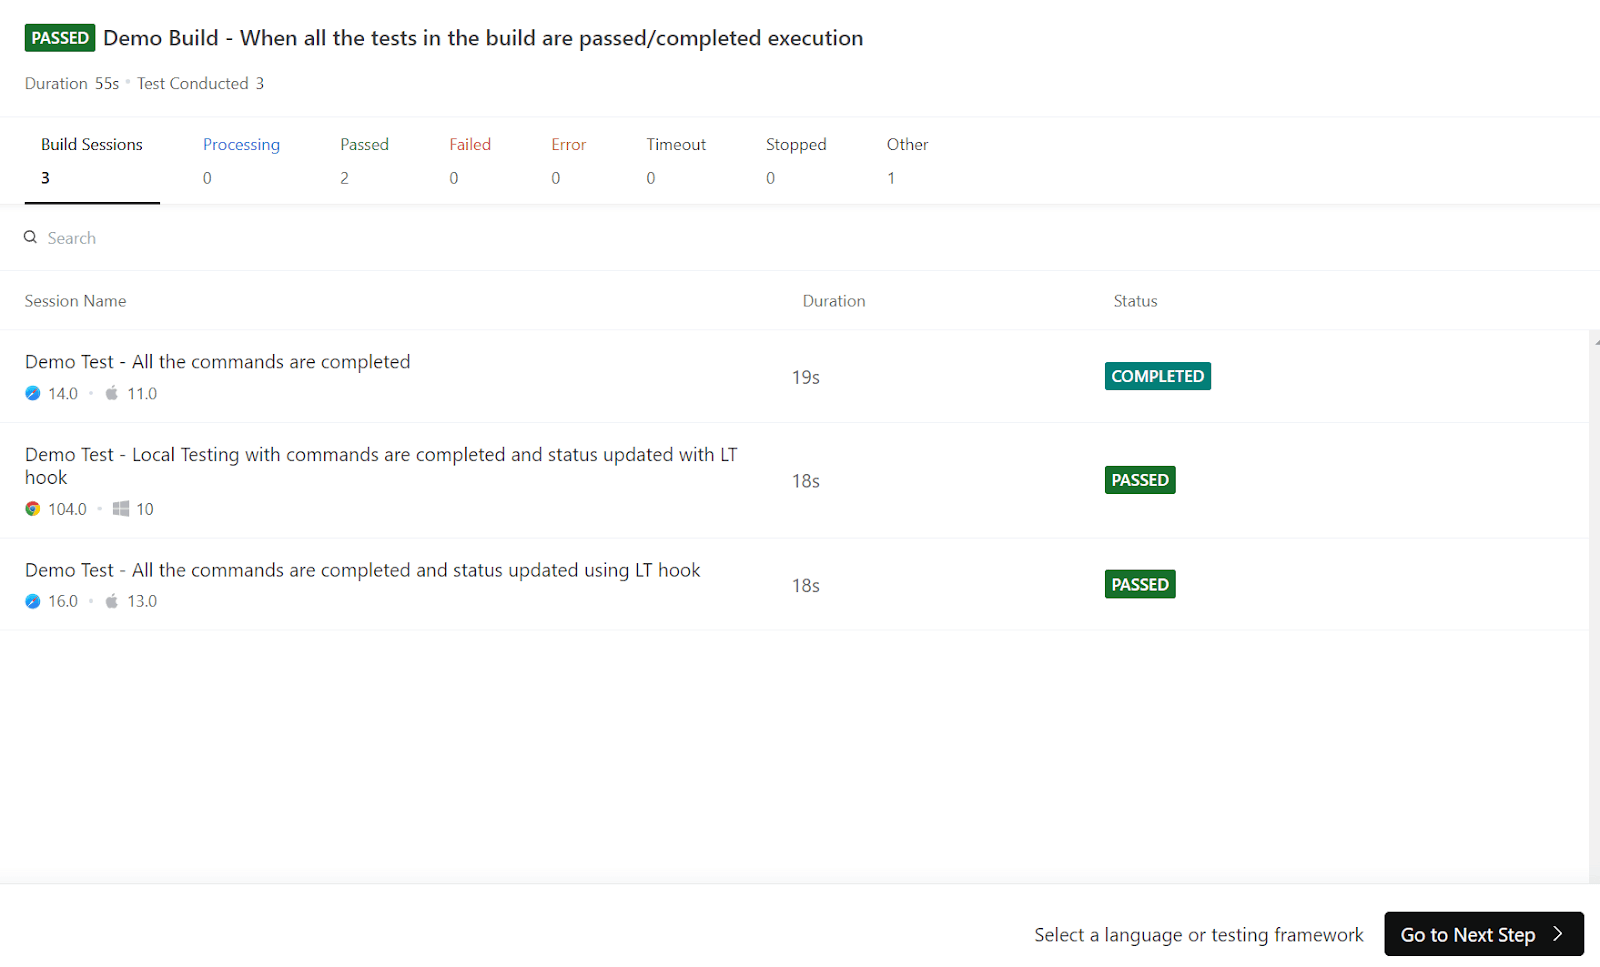
- Select Demo Project if you are looking to familiarize yourself with the platform or Configure Test Suite if the suite is ready to be tested.
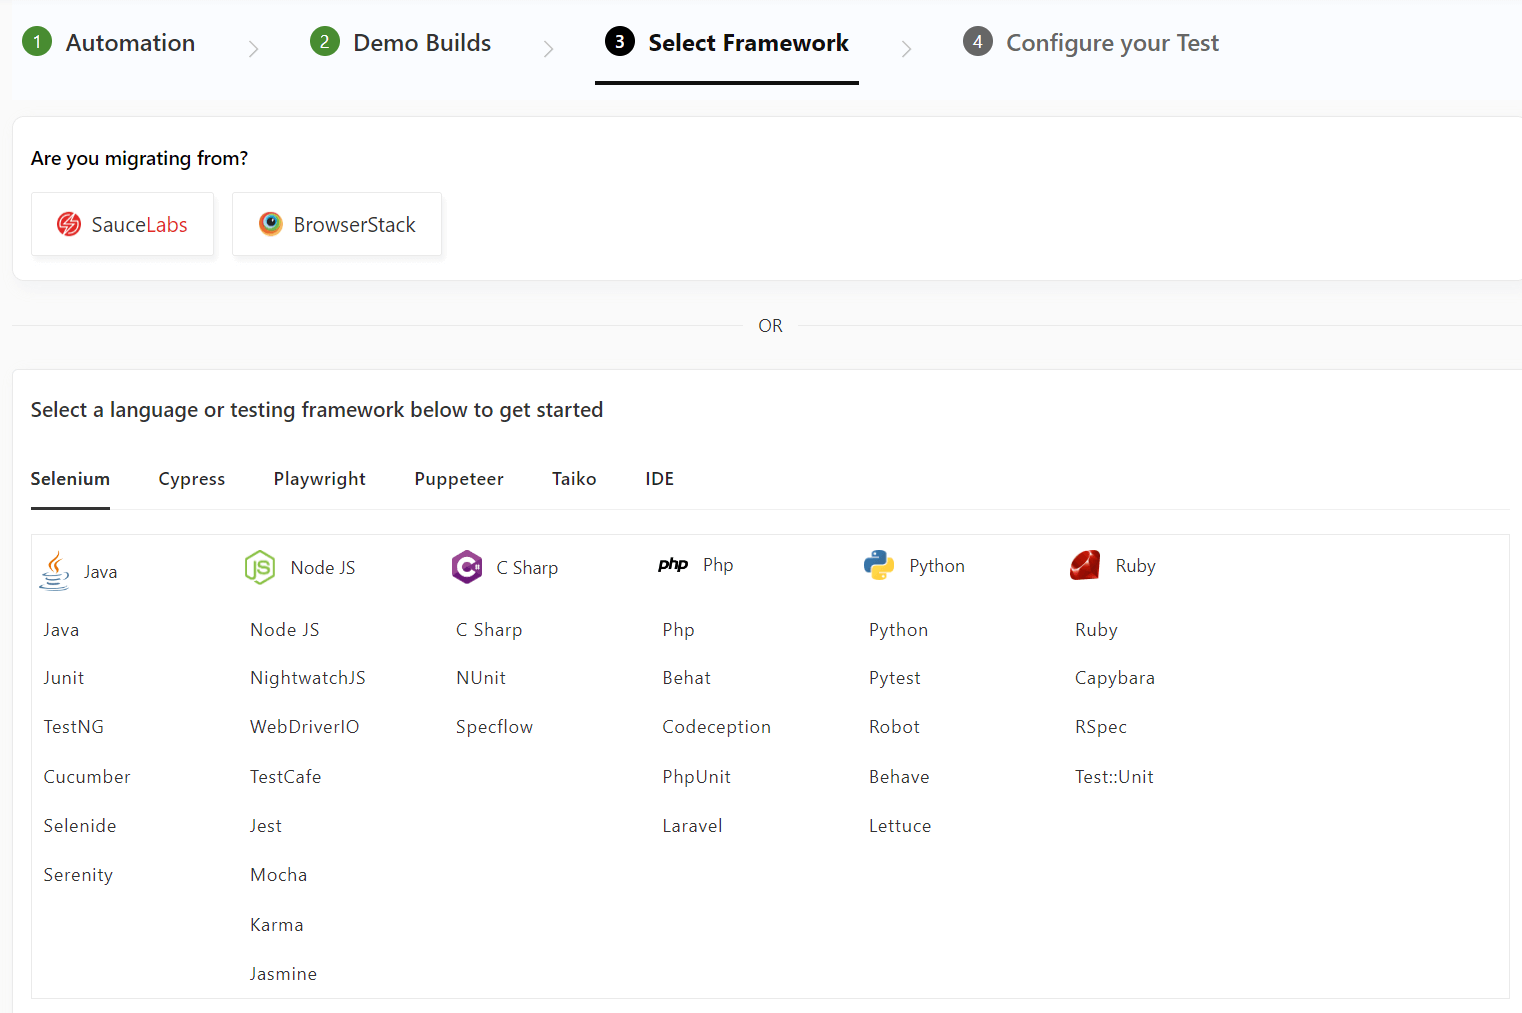
- Click on Go to Next Step to select the test framework or language for test suites.
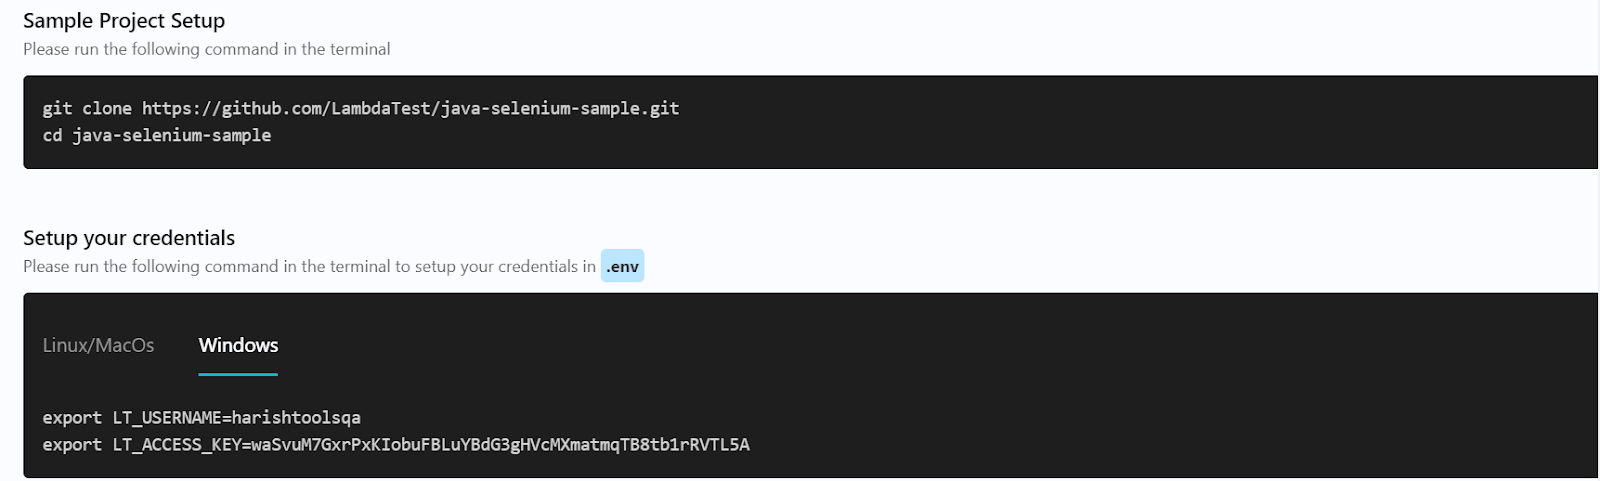
- After selecting the language and framework, make some modifications to the project to integrate LambdaTest directly into your test suites.
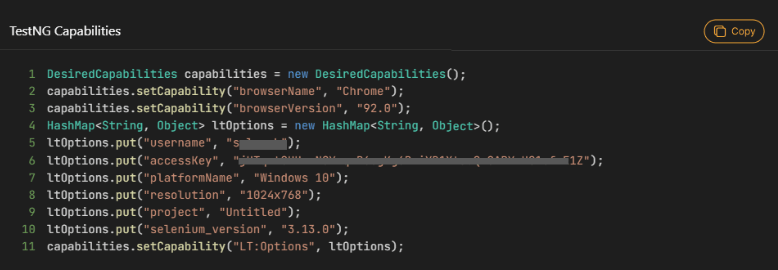
- Next, configure capabilities according to the project and language.
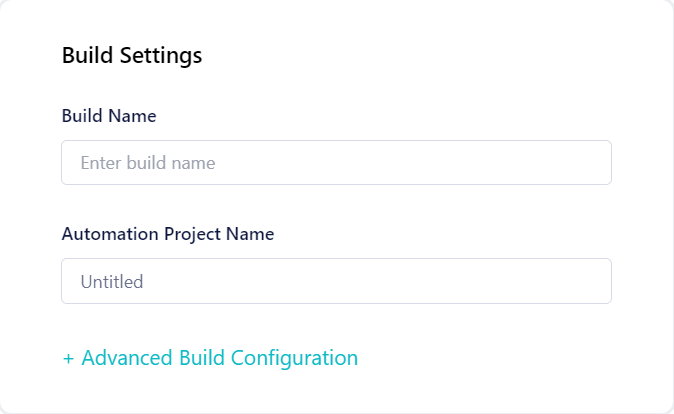
- Next, set the Build Settings to build the project on LambdaTest.
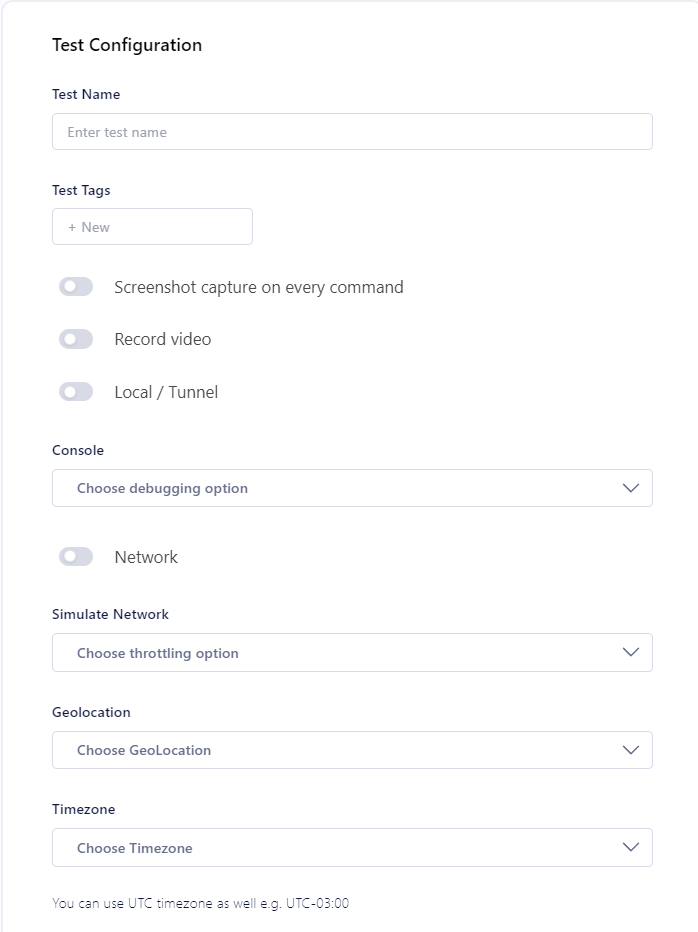
- Now, select the test settings with respect to LambdaTest by configuring the test configurations.
- Once you execute the test, you can navigate to the LambdaTest Automation Dashboard to view test results.

Here, the Demo Project will be used for demonstration. Once this demo project runs on LambdaTest, you can see its test execution results on the LambdaTest Automation Dashboard.
Check the support documentation to get started – Selenium Automation testing on LambdaTest.
Through these steps, we complete the analysis of CSS selectors and integrate the frameworks into the test project for test automation.
Summary
For someone associated with web applications as a developer or a tester, CSS selectors are hard to escape, primarily if they work in the UI/UX domain.
A selector is not just a method to apply CSS styling rules to page elements. It acts as a center point that connects a lot of elements on the same or many different pages throughout the application. CSS selectors keep them intact and provide a single point of contact for each of them regarding web designs.
Since selectors provide matching patterns (like a regex), they need different syntaxes to tackle different scenarios. For instance, matching an element based on its ID, class, etc. Or matching an element based on its relationship with its parent or grandparent.
The focus of this post was to bring every small detail belonging to the CSS selector under the same roof to provide a rich document for the testers and developers. This guide will help you create efficient tests and learn CSS selectors if you are just starting the journey.
Frequently Asked Questions (FAQs)
What is a CSS selector?
A CSS selector is an expression that matches an HTML element to apply CSS rules over it.
What are the types of CSS selectors?
There are four types of selectors in CSS: Simple selectors, Complex selectors, Attribute selectors, and Pseudo selectors.


Author’s Profile
Harish Rajora
I am a computer science engineer. I love to keep growing as the technological world grows. I feel there is no powerful tool than a computer to change the world in any way. Apart from my field of study, I like reading books a lot and write sometimes on https://www.themeaninglesslife.com .
Blogs: 103
Got Questions? Drop them on LambdaTest Community. Visit now


