
What Is DOM: A Complete Guide To Document Object Model
Alex Anie
Posted On: January 18, 2023
![]() 33100 Views
33100 Views
![]() 47 Min Read
47 Min Read
DOM, or Document Object Model, is a programming interface for web documents, primarily HTML and XML. It represents web pages as a hierarchy of nodes and objects, allowing dynamic access and manipulation of the document’s content, structure, and style. As a W3C standard, DOM provides a platform and language-neutral way for scripts to interact with web documents
Every website has pages that are called HTML documents. These documents are represented on the webpage as nodes and objects. When parsed into a web browser such as Chrome, Firefox, Safari, and Opera-Mini, to mention a few helps display information. All information on the web page or document is contents or text, like placeholders on the node in the Document Object Model tree. This Document Object Model tree refers to the structure of the document.
Ever since the invention of the Internet and its widespread adoption, there has been the need to have a virtual representation of physical things on the web.
The Physical documents used today in various offices, organizations, and every other corporate environment have been a big part of this. That is the need for a document that properly displays information on the web. However, for this to be possible, the document has to be a model of a physical document and, at the same time, render properly on the web (Web Browsers).
This document is a text file written in HTML (HyperText Markup Language). It contains Hyperlinks that point to other web pages and also within the same documents. Multimedia files such as Video, Audio, and other Graphic Content can also be embedded within the document. Understanding How the Document Object Model works is a very crucial part of web development.
In this tutorial on Document Object Model, you will learn everything you need to know to get started with the Document Object Model.
TABLE OF CONTENTS
What is DOM (Document Object Model)?
The Document Object Model is a programming interface that comprises web pages (nodes) that is HTML tags such as < html >, < meta >, < title >, < body >, < footer > , < dv >, semantic and non-semantic tags and other nodes objects. The Document Object Model, which is a W3 standard, represents web pages as a tree-like structure of nodes, known as documents.
The Document Object Model allows web developers to manipulate, style, and structure node objects (HTML documents). For example, web elements are manipulated dynamically with JavaScript to add dynamic content and interactivity to the web page, while CSS is used to add aesthetics. This is referred to as styling to the web page.
Furthermore, the Document Object Model can also be used with other programming languages such as C#, Ruby, Python, Java, and PHP. However, on the front end, JavaScript and CSS are mostly used as these are the languages of the browser.
The DOM Structure or the DOM TREE
The DOM exists in a hierarchical tree-like structure, where each web element that makes up the document can be thought of as a node, that is, the element tags, the attribute assigned to the element, the comment, the text content, and the document as well is also a node.
The document object is the root object and can be found within the window’s object. The window’s object defines the document object and how it is rendered or loaded within the webpage.
The document object has properties and methods that can manipulate contents or element nodes on the page.
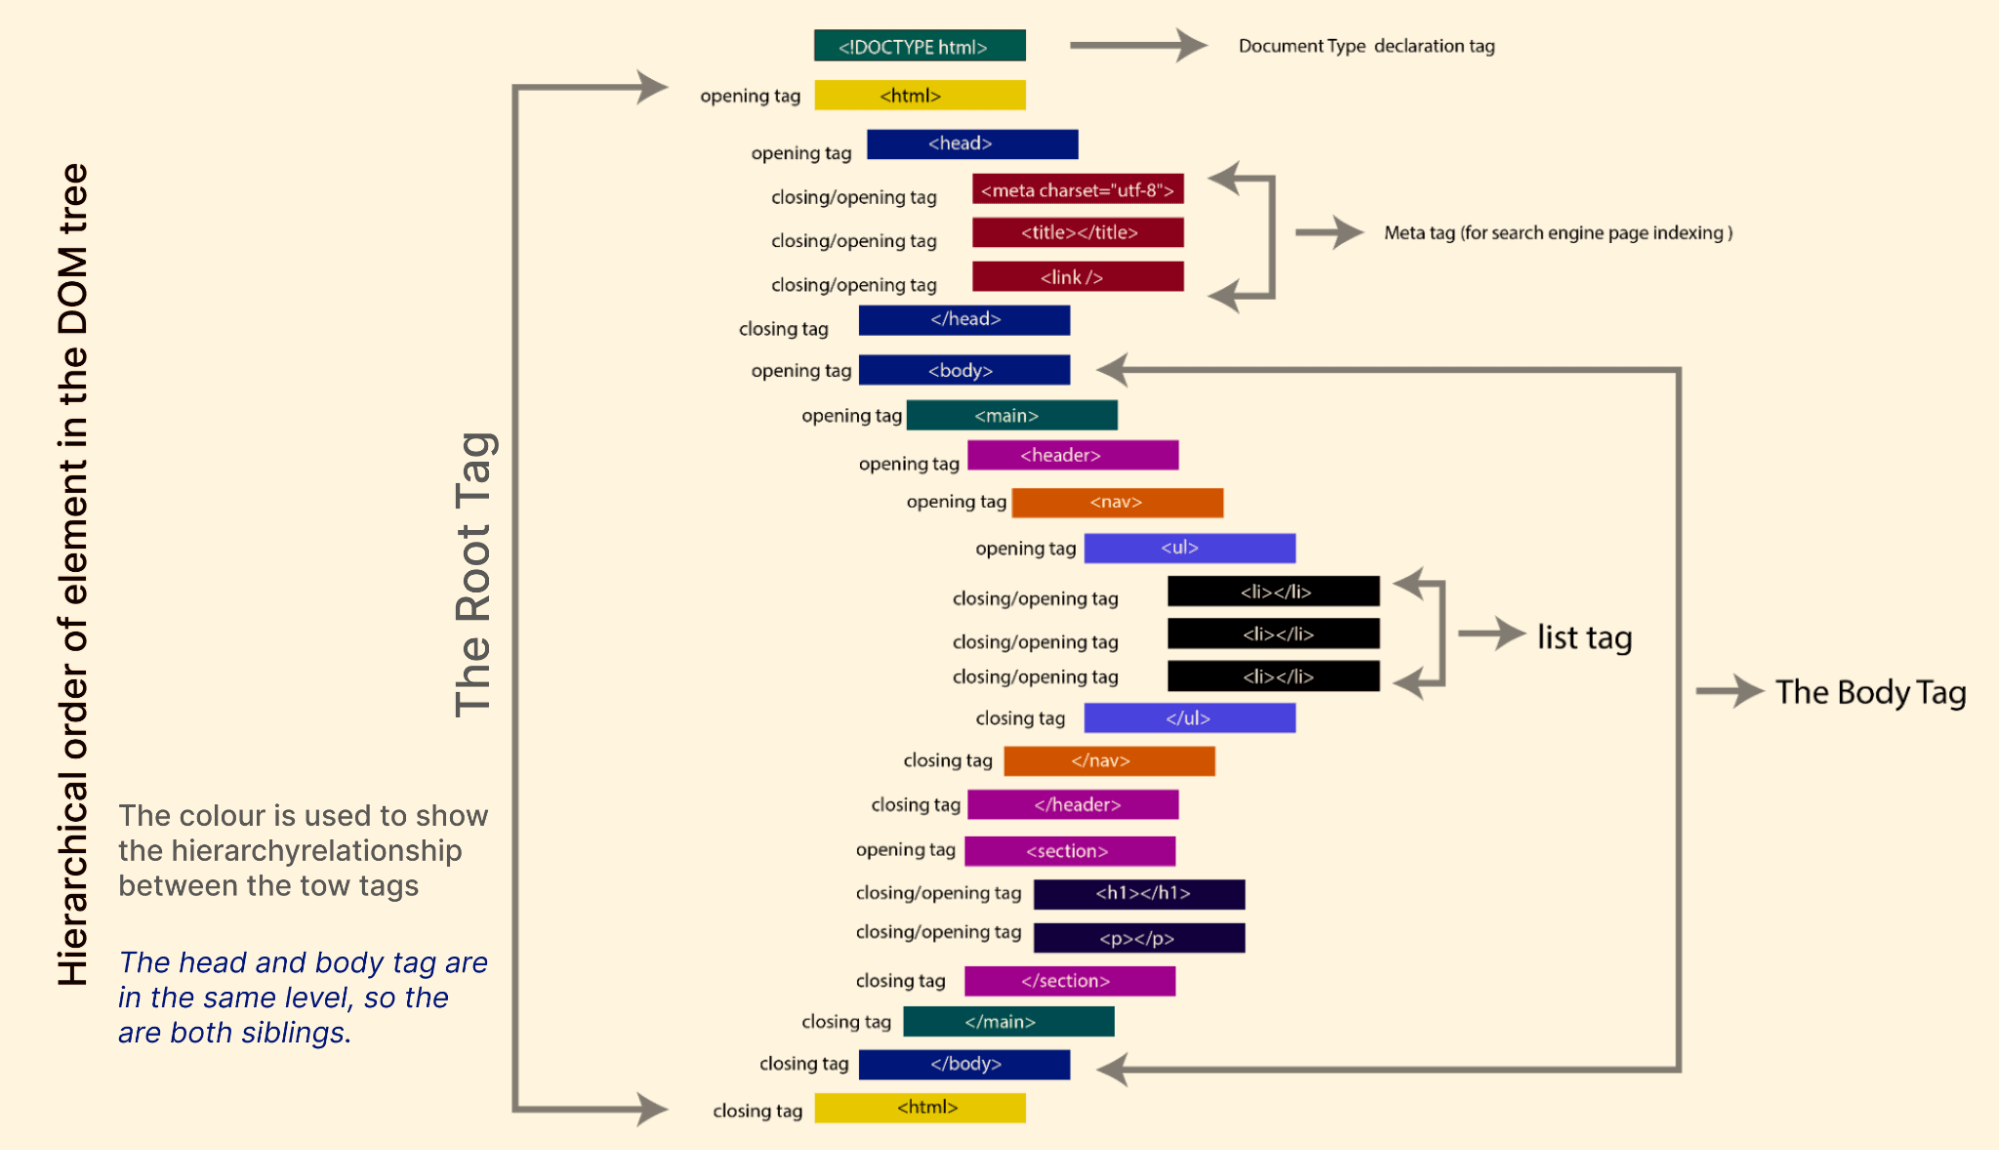
The diagram below gives a simple illustration of what the tree-like structure looks like.

From the Document Object Model structure shown above, you will notice how each element directly connects to other elements; this is known as a hierarchy. This hierarchy is important as this determines how elements are laid out and how they can be accessed with JavaScript and CSS.
Look at how this hierarchy is laid out in an HTML document.
12345678910111213141516171819202122232425262728293031323334
<!DOCTYPE html> <html> <head> <meta charset="utf-8"> <meta name="viewport" content="width=device-width, initial-scale=1"> <title>This is an HTML document</title> <link rel="stylesheet" type="text/css" href="style.css"> </head> <body> <main> <!-- This is the website Navigation --> <header> <nav> <ul> <li>HOME</li> <li>SERVICES</li> <li>ABOUT</li> </ul> </nav> </header> <section> <h1>The Document Object Model</h1> <p> The DOM gives web developers the flexibility to be able to manipulate, style and structure element nodes (HTML elements). For Example web elements are manipulated dynamically with JavaScript to be able to add dynamic content and interactivity to the web page while CSS is used to add aesthetics, this is referred to as styling to the web page. Furthermore the DOM can also be used with other programming languages such as, C# (SEE SHARP), Ruby, Python, Java and PHP. However on the frontend JavaScript and CSS are mostly used as these are the languages of the browser. </p> </section> </main> </body> </html>
Now that we have the HTML structure laid out, let’s break down how the hierarchy works.
From the code sample above, the HTML Document contains different types of HTML tags. Out of all these tags, we have the < html > tag at the top level, followed by the < head > tag. Inside the < head > tag, we have the < meta >,< title >, and < link > tags, respectively. Below the < head > tag, we have the < body > tag.
The < body > contains all the necessary tags responsible for displaying all the contents on the webpage. The < body > tag, as you can see, includes a < main > tag, a < header > tag, a < nav > tag, < ul > tag, and a < li > tag. Furthermore, below the < header > tag is the < section > tag, and inside the < section > tag are the < h1 > and < p > tags, respectively.
Please take note when a tag is placed inside another tag. This is referred to as nesting. So we can simply say that the < header > tag is nested inside the < main > tag, while the < main > is nested inside the < body > tag.
Nesting affects how elements are accessed with JavaScript. For instance, we can create a new element tag from our JavaScript file.
To do this, we will create the element tag, target the parent element, and then append the new element as a child element.
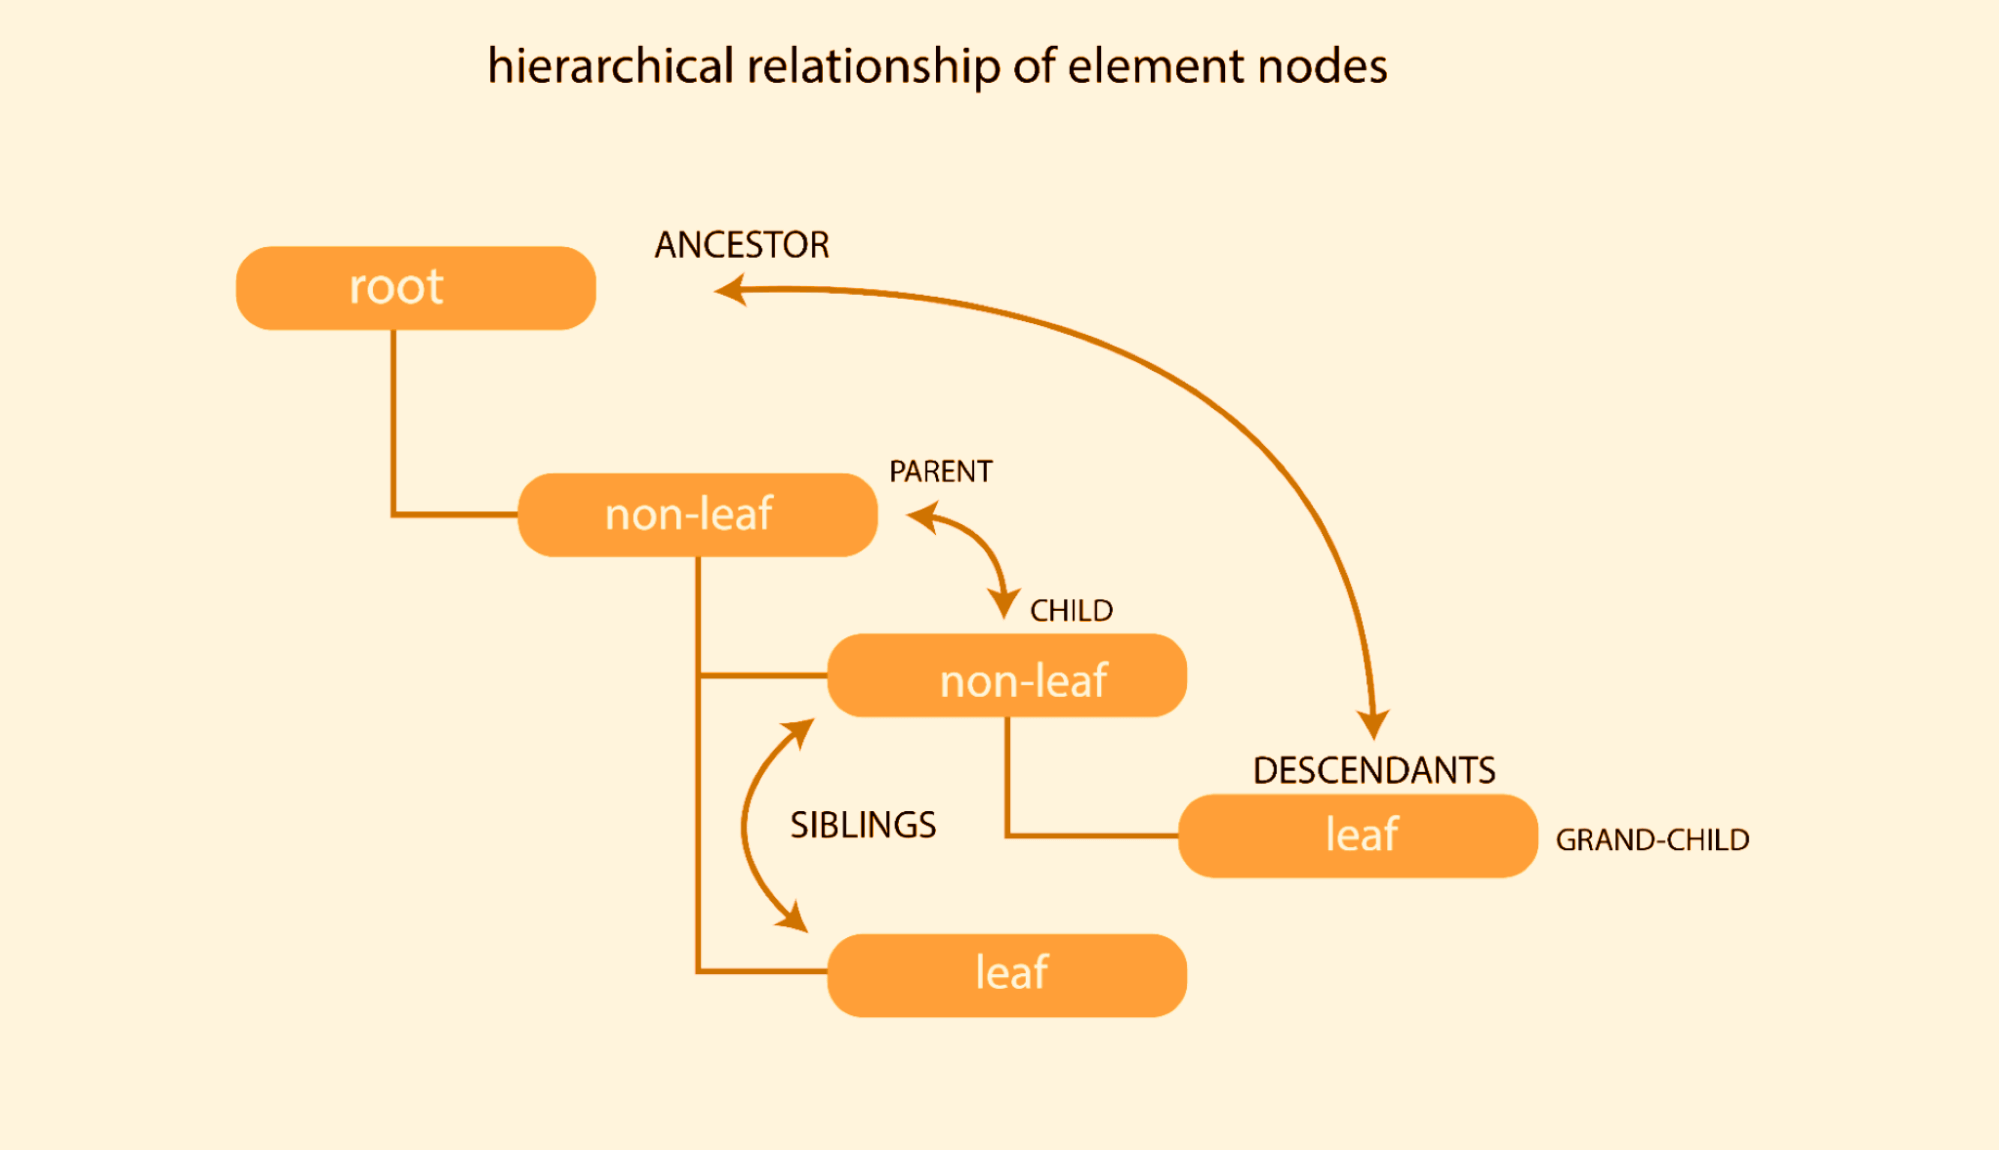
The image below explains this better.
From the image above, you will notice some elements appear at the top level, and other elements are placed inside them. You can use this to explain the hierarchical relationship as follows.
Root node
This refers to the topmost element in the Document Object Model tree. For example, in this case, the < HTML > tag is the root tag.
Parent node
This refers to the element directly at the top of another element. For example, the < body > tag is parent to the < main > tag, as the < body > tag is placed directly above the < main > tag.
Child node
This refers to the element directly below another element. For example, the < main > tag is a child element to the < body > tag because it is placed directly below the < body > element.
Grand-child node
This refers to any element that is below the child element. For example, the < header > is below the < main >, which is a child of the < body > tag. This makes the < header > tag a grand-child of the < body > tag.
Siblings
This refers to any two or more elements that share the same parent and are on the same level. For example, the < header > and the < section > tags share the parent, the < main > tag. Hence they can be referred to as siblings in the document tree.
Ancestor node
This refers to the element that all other elements are nested in. For example, in this case, the < html > can be referred to as the ancestor to other elements.
Descendants
The parent, children, siblings, and grand-children are all referred to as descendants of the root element. For example, every document tree element is a descendant of the < html > tag.
Leaf node
The last element or node in document three that does not have a child. A leaf node can also be described as the end of a branch in a Document Object Model tree.
The image below explains the above concept better.
Accessing the DOM Interface
The DOM is an interface that provides us with object nodes, and there are lots of built-in properties/methods we can use to access and manipulate the contents in the Document Object Model tree in JavaScript.
Using the HTML < script > tag, we can embed JavaScript code within the HTML file or link it to an external file and then use methods available in JavaScript to access and manipulate the Document Object Model.
This is necessary; for instance, we can create and validate a form field that lets users sign up for our newsletter, and we can also make web elements interactive when users over-hover them.
The next section will explain the methods and properties we can use to make changes to the Document Object Model.
Document Instance Properties
Document Instance Properties are used to capture information about the state of an object at a given point in time.
classList
The element.classList instance property returns a class attribute of a live DOMTokenList collection. The DOMTokenList instance methods are required to manipulate or make changes when using the classList instance properties.
The instance methods for the classList instance property are as follows.
- add(): used to add one or more classes to the class attributes of an element.
- remove(): used to remove one or more classes from the class attributes of an element.
- replace(): used to replace a given class with a new class within the class attributes of an element.
- toggle(): used to toggle a given class within a class attribute of an element. That is when you make use of the toggle method. It removes the class you assign to the element from the class attribute if the class exists and replaces it if the class does not exist within the element.
Take the example below.
HTML:
123456789
<h1>This is classList property</h1> <p>Click the boxes to change color</p> <main> <div class="default-Color" id="addOne">This is a add() method</div> <div class="default-Color" id="addTwo">This is a remove() method</div> <div class="default-Color" id="addThree">This is a replace() method</div> <div class="default-Color" id="addFour">This is a toggle() method</div> </main>
See the Pen
classList box color switcher by Ocxigin (@ocxigin)
on CodePen.
From the HTML code example, we have an < main > as the parent tag, and we nested four < div > tags inside the < main > tag.
Each < div > tag is assigned a class of default-Color and an id of addOne, addTwo, addThree, and addFour, respectively.
CSS:
123456789101112131415161718192021222324252627282930
main { display: flex; } div { width: 150px; height: 80px; margin: 0.4em; border: 2px solid #000000; } .default-Color{ background: red; } .green { background: green; } .purple { background: purple; } .blue { background: blue; } .orange { background: orange; }
While from the CSS code sample, we set a display of flex to < main > tag, the parent element in this case and we targeted the < div > tag, we set the width and height to 150px and 80px respectively, margin 0.4em across and a border of 2px solid and #000000 (black).
Furthermore, we set the default-Color to red, so each box is red by default, and we created four extra utility classes waiting to be used.
We will see how we can use JavaScript to change the elements using these classes.
JavaScript:
12345
//Variable const addColor = document.querySelector('#addOne'); const removeColor = document.querySelector('#addTwo'); const replaceColor = document.querySelector('#addThree'); const toggleColor = document.querySelector('#addFour');
First, we use the querySelector() method to get the element and then assign them to a variable, as you can see. We create four variables named addColor, removeColor, replaceColor, and toggleColor, respectively.
Variables are just like containers; they help us store values so we can access them or reuse them later in our code. In this case, we want to be able to make changes to our element, so we assign each element to a variable, and we use the querySelector() method to reference the element id attribute.
12345678910111213141516171819202122232425
// function //add() methods function addMyColorGreen(){ addColor.classList.add('green') console.log(addColor); } //remove() methods function addMyColorRed(){ removeColor.classList.remove('default-Color') console.log(removeColor); } //replace() methods function addMyColorBlue(){ replaceColor.classList.replace('default-Color', 'blue') console.log(replaceColor); } //toggle() methods function addMyColorOrange(){ toggleColor.classList.toggle('orange') console.log(toggleColor); }
In JavaScript, functions allow us to perform takes or calculations that can be reused within our code. Also, we can make changes to a given element based on the values or tasks created within the function.
In this case, we created a function with the name addMyColorGreen(). Inside this function, we called the addColor variable, which we created earlier, and then assigned the classList instance property to target the class attribute of the element.
This returns a DOMTokenList, and we use the add() instance method of the DOMTokenList to add a CSS class of green from our stylesheet to the element attribute.
When done, any value associated with the CSS class upon assignment is parsed to the element.
In this case, we have a value of green parsed to the element as a background color.
Furthermore, you will have noticed that we also have a console.log() method with a value of addColor parsed right inside the function we just created. This will log the element to the console to see if the class we have assigned is parsed in as expected.
12345
// EventLinsterners addColor.addEventListener('click', addMyColorGreen); removeColor.addEventListener('click', addMyColorRed); replaceColor.addEventListener('click', addMyColorBlue); toggleColor.addEventListener('click', addMyColorOrange);
Writing functions are great, but they can be useless if they are not told when to behave. That is when the function should be called. In this case, we have event listeners.
Event Listeners, programmatically written as addEventListner(), is a JavaScript Event method that allows you to add an event to an element. When the event is triggered on the webpage, it takes in an event and a function you want to respond to. In this case, we assign a value to the click event. We want the function to respond when we click the object referenced on the addEventListener() method.
The object we are referencing is the addColor variable. When the element with the addColor variable is clicked on, we want the background color to change and long the element to the browser console.
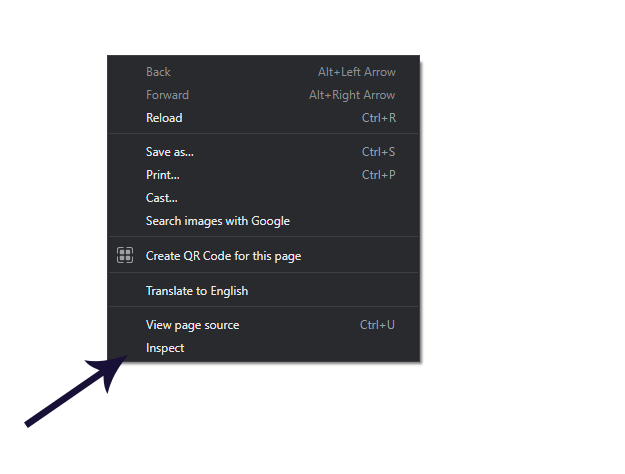
Type the code above and run to see the output below, but remember to open up for dev tools (inspect).
To do this, simply right-click on the webpage and then click Inspect.
Browser Output:
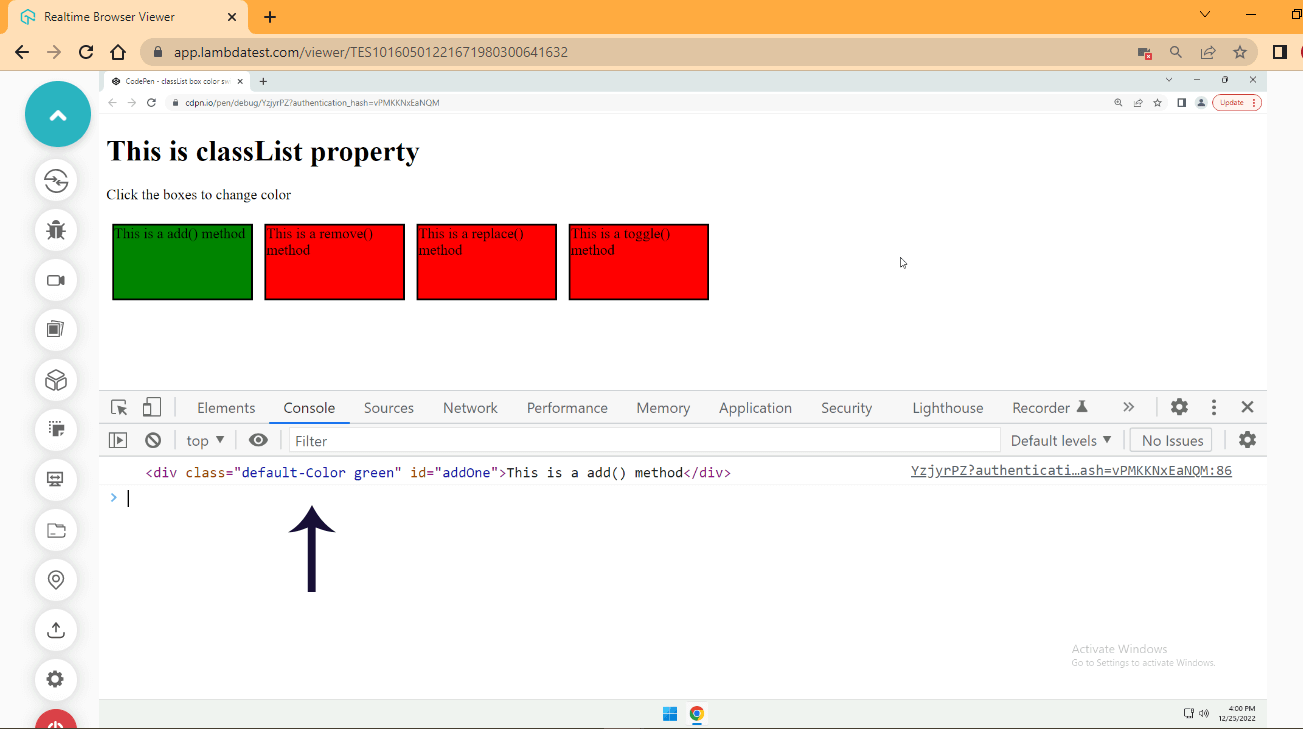
From the browser output.
- The first box adds a green color to the background.
- The second box removes the red background and leaves it with a no-fill color with a border of black.
- The third box replaces the red with a blue color.
- The last box toggles between the red and orange color.
You can click the last box multiple times to see how the color changes continuously.
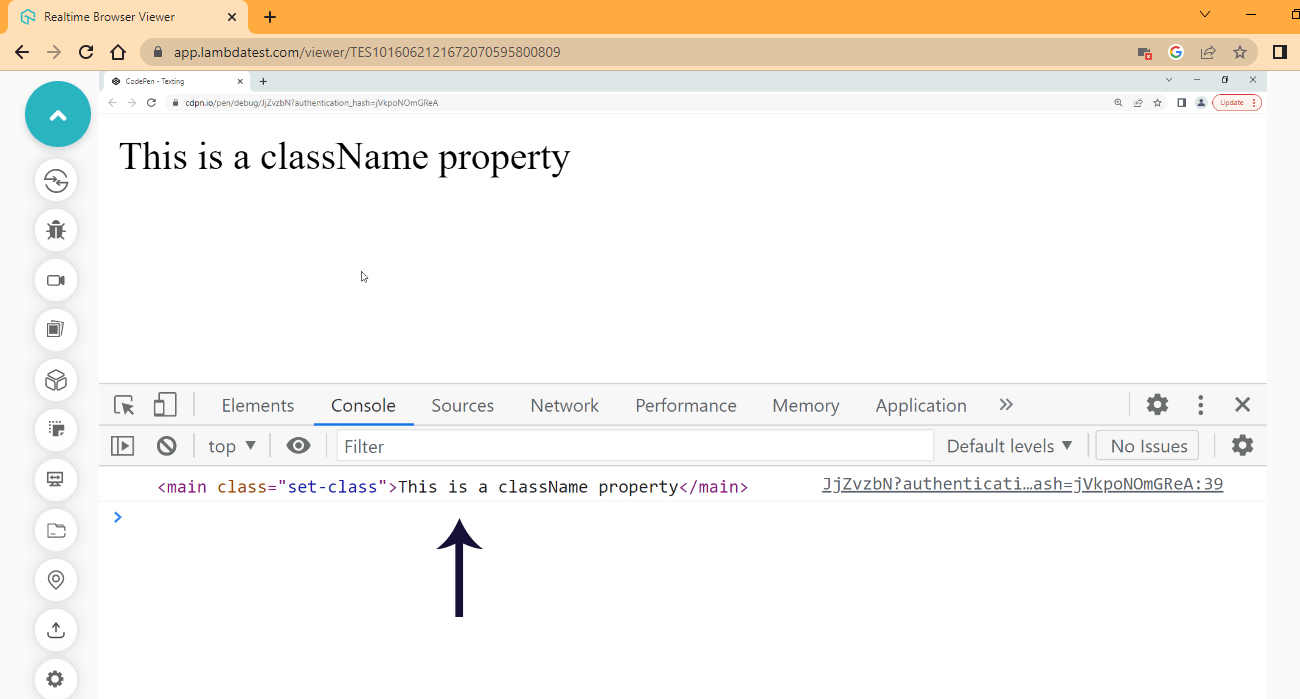
className
The element.className instance property sets or returns a class attribute of a given element.
The className property, like the classList, does not require a method to function; you can simply assign values to it directly.
Take the code example below.
HTML:
1
<main>This is a className property</main>
We have a simple < main > tag with a display of text content. We need to parse a class attribute to the < main > tag using the className instance property.
Type and run the JavaScript below.
JavaScript:
12345
const getMain = document.querySelector('main'); getMain.className = 'set-class'; console.log(getMain)
Browser Output:
See the Pen
className: by Ocxigin (@ocxigin)
on CodePen.
See the display of the newly created class attribute in the console above.
innerHTML
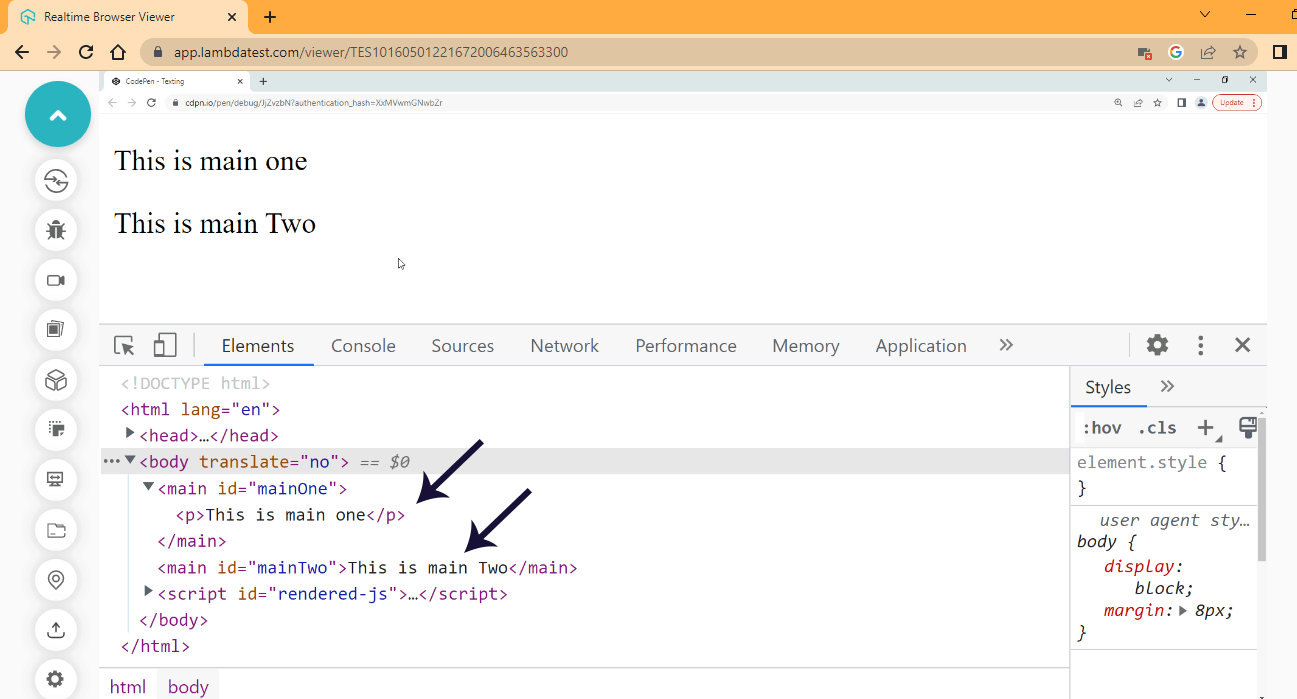
The element.innerHTML instance property sets or returns the HTML content of an element. This is useful when we want to parse content together with the HTML tags into the Document Object Model.
Take the code example below.
HTML:
12
<main id="mainOne"></main> <main id="mainTwo"></main>
We have two main tags, each with an id attribute of mainOne and mainTwo, respectively.
Now, let’s see how we can make some modifications to JavaScript. Type and run the JavaScript code below.
JavaScript:
123456789
//Variables const mainTag = document.querySelector('#mainOne'); const mainTagTwo = document.querySelector('#mainTwo'); const parseContent = `<p>This is main one</p>`; const parseContentTwo = `This is main Two`; mainTag.innerHTML = parseContent; mainTagTwo.innerHTML = parseContentTwo;
From the JavaScript code above, parseContent is assigned a string value wrapped in HTML < p > tags, while parseContentTwo is assigned a string value with text content only.
Then we target the mainOne and mainTwo elements. Using the innerTHML property, we access the properties of both elements and then parse in parseContent and parseContentTwo.
We do this to parse the content to empty < main > tags. Now let’s take a look at how this works on the browser.
Browser Output:
See the Pen
innerHTML by Ocxigin (@ocxigin)
on CodePen.
From the browser output, we have the two content displays on the browser, but if we inspect the browser and take a look at the devtools, you will find that the parseContent variable has a < p > tag inserted inside the mainOne element while parseContentTwo variable only inserts the text content.
Also, the mainOne element displays the element parsed like mainTwo without displaying the < p >.
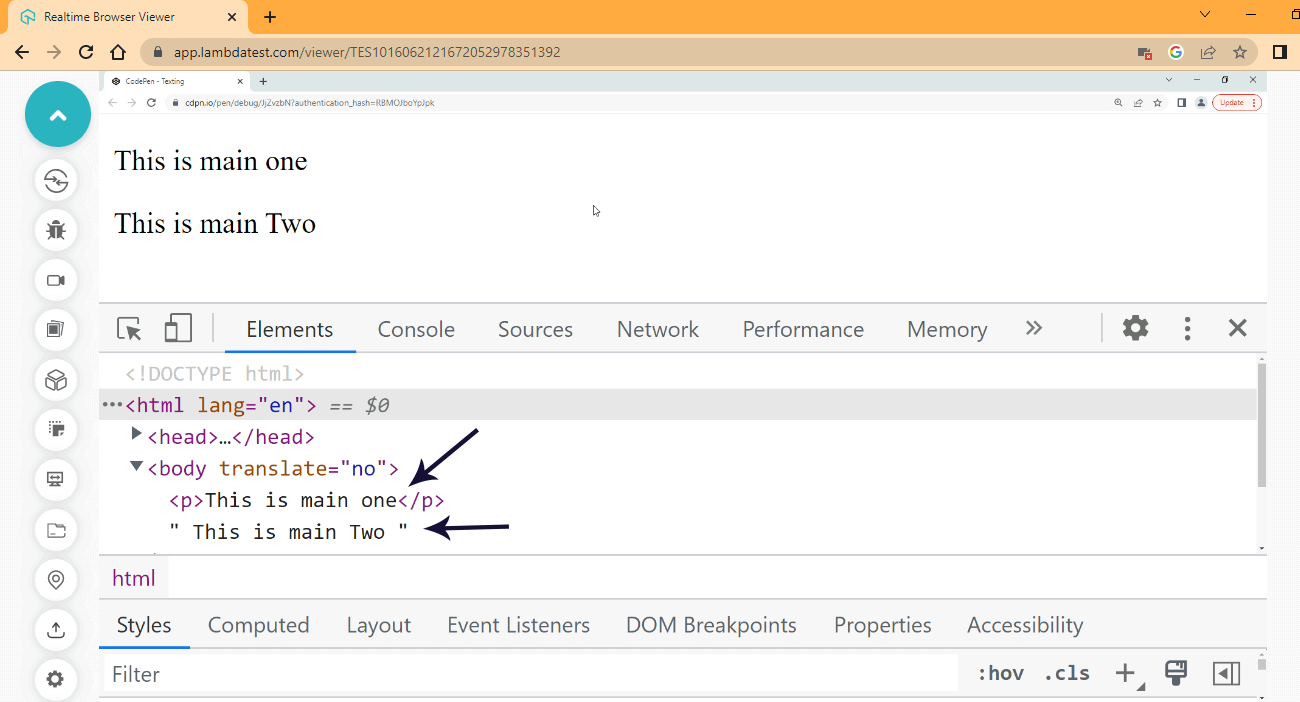
outerHTML
The element.outerHTML instance property sets and replaces the HTML tags and the content of a given element. This is useful when we want to parse new HTML tags to replace a given HTML tag and its content within the DOM.
Take the code example below.
HTML:
1234567
<main id="mainOne"> <ul> <li>This is a list element</li> </ul> </main> <main id="mainTwo">This is outerHTML</main>
From the HTML code example above, we decided to add < li > with text content and nest it inside a < ul > tag, this < ul > tag is also nested inside the < main > tag we used earlier. So what we want to do is use the outerHTML instance property to replace the two < main > tags.
Type and run the JavaScript code below.
JavaScript:
12345678
const mainTag = document.querySelector('#mainOne'); const mainTagTwo = document.querySelector('#mainTwo'); const parseContent = `<p>This is main one</p>`; const parseContentTwo = `This is main Two`; mainTag.outerHTML = parseContent; mainTagTwo.outerHTML = parseContentTwo;
From the code example above, we targeted the two main tags, and we used outerHTML to replace the tags and their content.
We assign the values we want to use to parseContent and parseContentTwo, and each variable is parsed to mainOne and mainTwo, respectively, using the outerHTML instance property. Now let’s see how this renders on the browser.
Browser Output:
See the Pen
outerHTML by Ocxigin (@ocxigin)
on CodePen.
As indicated by the two arrows inside the devtools, the two < main > tags have been replaced completely. The mainOne element and its descendants (< ul > and < li >) element have been replaced with just a < p > and a text content, while the mainTwo element is replaced with just text content with no given element.
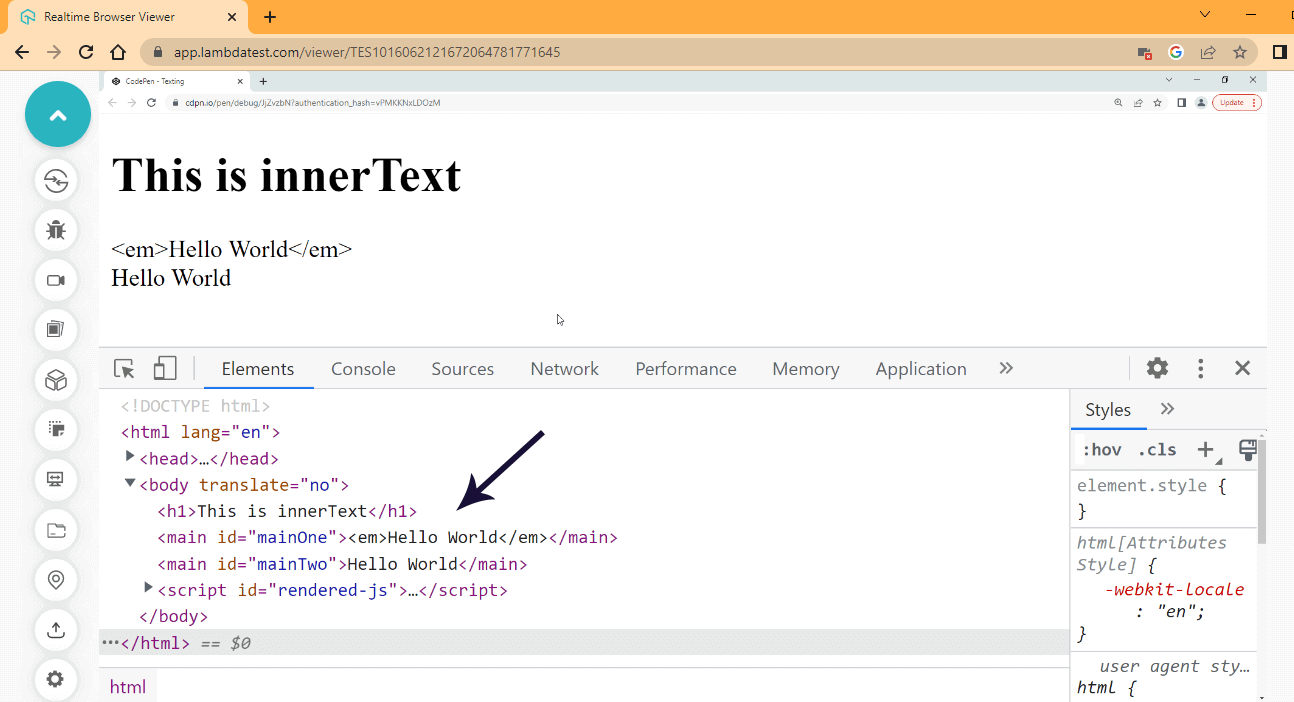
innerText
The element.innerText instance property sets and replaces the content and descendants of a given element. This is useful when you want to parse new content into a given HTML tag.
Also, note that the innerText will only return text, so if you parse in HTML tags, it will return it as text and print it into the browser.
If the element you wish to update has a child element or descendants, it will be replaced with a text.
Take the code example below.
1234567
<h1>This is innerText</h1> <main id="mainOne"> <p>Happy Coding!</p> </main> <main id="mainTwo"></main>
We have two < main > tags, a mainOne tag with a < p > tag and text content and an empty mainTwo tag. Now let’s see how we can change mainOne and mainTwo using innerText.
Type and run the JavaScript code below.
12345
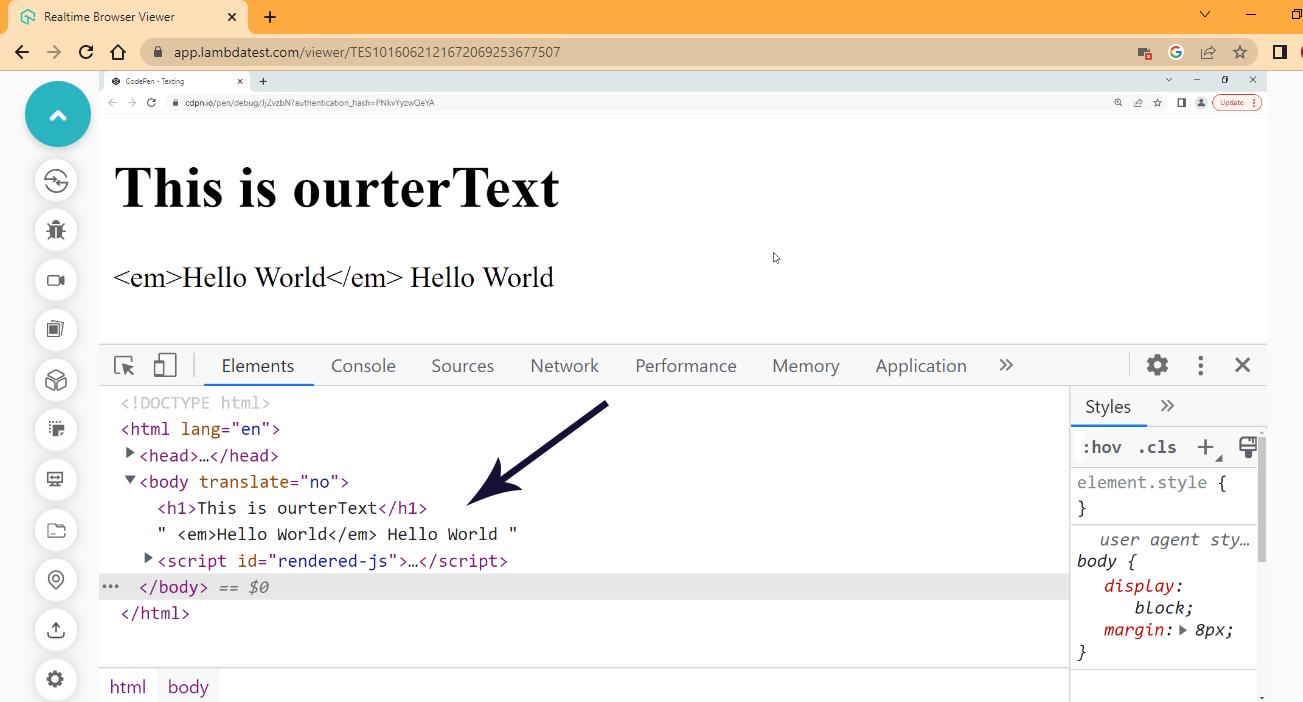
const mainOne = document.querySelector('#mainOne'); const mainTwo = document.querySelector('#mainTwo'); mainOne.innerText = '<em>Hello World</em>'; mainTwo.innerText = 'Hello World';
Browser Output:
See the Pen
innerText: by Ocxigin (@ocxigin)
on CodePen.
From the browser output, we set mainOne and mainTwo to display Hello World. The < em > tag we assigned to mainOne is supposed to make the text italic, but since we parse it through the innerText property, the text content is parsed as plain text with no italic styling effect.
And also, the < p > tag with the text of Happy Coding is completely replaced, while the mainTwo element we assigned a text of Hello World with no tags enclosing it is printed on the screen.
Another thing you have to take note of is how this affects the Document Object Model tree. From the devtool view, as you would have noticed, the < p > is completely replaced, and the mainTwo is updated with a new text.
outerText
The element.outerText instance property sets and replaces the HTML tag, its content and descendants within the Document Object Model tree. This is useful when you want to parse new content into a given HTML tag. This will replace the specified tag leaving you with only text content.
If the element you wish to update has a child element or descendants, it will be replaced with a text. So be sure you are parsing it to the last child on the element node to prevent error.
Take the code example below.
123456789
<strong>HTML:</strong> <h1>This is outerText</h1> <main id="mainOne"> <p>Happy Coding!</p> </main> <main id="mainTwo"></main>
Just like the previous example from innerText, here we have the same HTML code setup. Now let’s see how we can use the outerText instance property to change the Document Object Model tree.
JavaScript:
12345
const mainOne = document.querySelector('#mainOne'); const mainTwo = document.querySelector('#mainTwo'); mainOne.outerText = '<em>Hello World</em>'; mainTwo.outerText = 'Hello World';
Browser Output:
See the Pen
outerText by Ocxigin (@ocxigin)
on CodePen.
From the devtool how the two < main > tags have been replaced and the effect it has on the browser output.
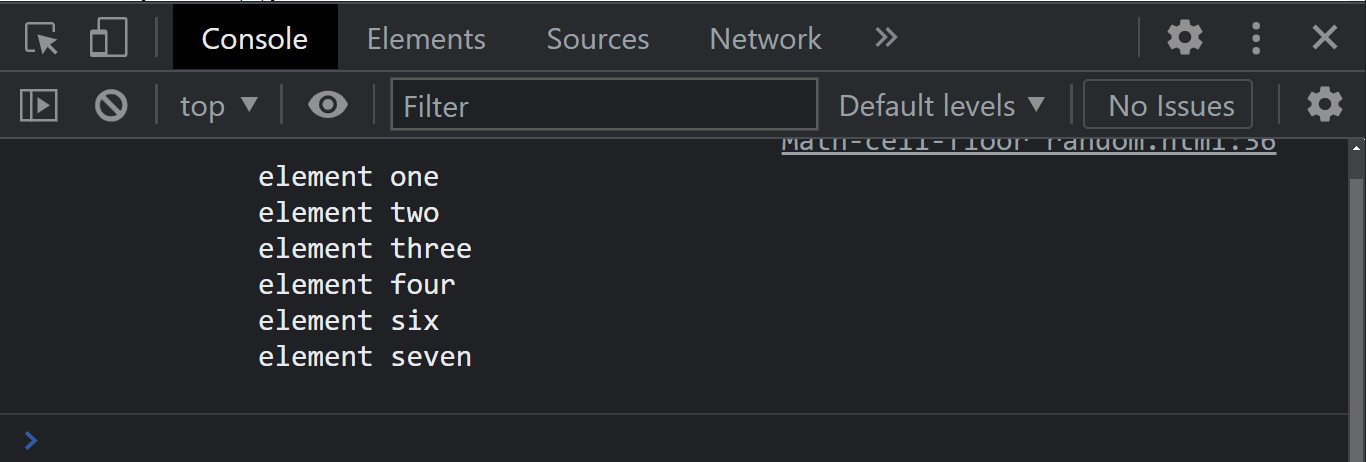
children
The element.children instance property returns all the child/children of a given element. The children property returns it as a live HTML collection.
Also, take note that the children instance property only returns element nodes.
Take the code example below.
HTML:
12345678
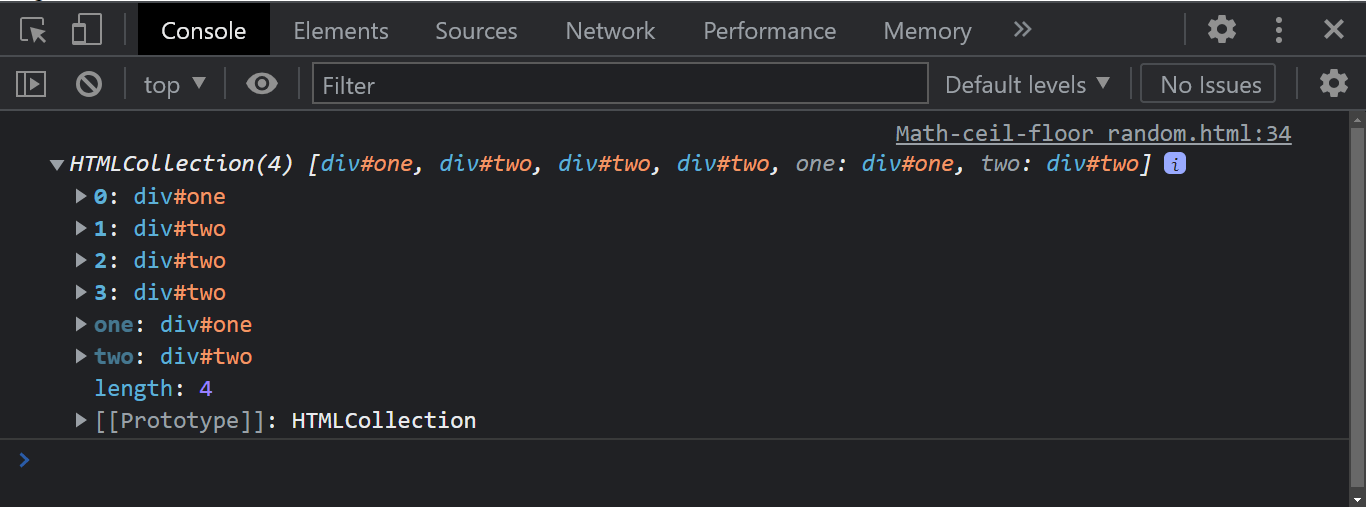
<main class="root"> <div id="parent"> <div id="one">one</div> <div id="two">two</div> <div id="two">three</div> <div id="two">four</div> </div> </main>
JavaScript:
12345
const parentEl = document.querySelector('#parent'); const returnChildren = parentEl.children; console.log(returnChildren)
Console Output:
See the Pen
children by Ocxigin (@ocxigin)
on CodePen.
From the console output, the children instance property returns all the child element of the given parent as a live HTML Collection.
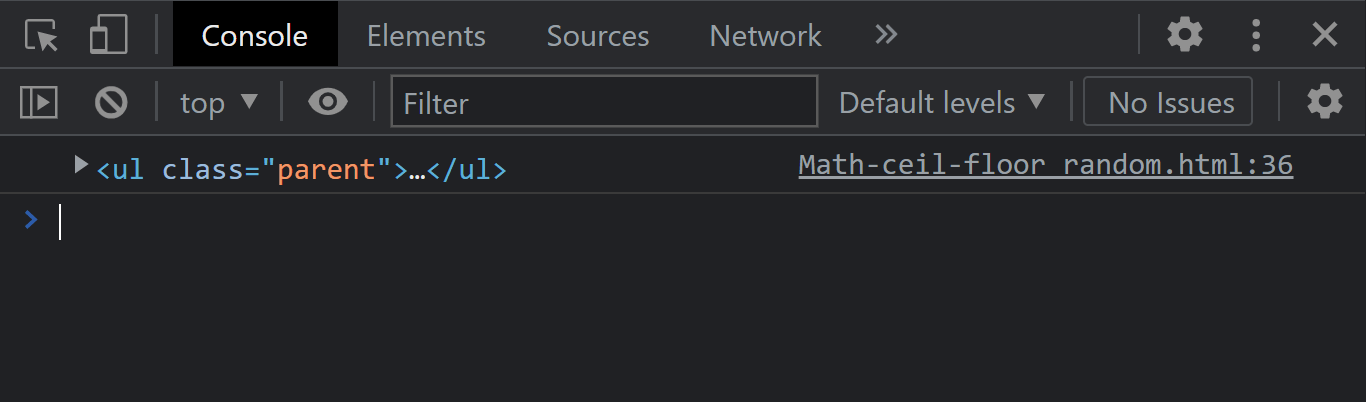
firstElementChild
The element.firstElementChild instance property returns only the first child of a given element If the element you wish to return has no child element, it returns a null.
Take the code example below.
HTML:
12345678910
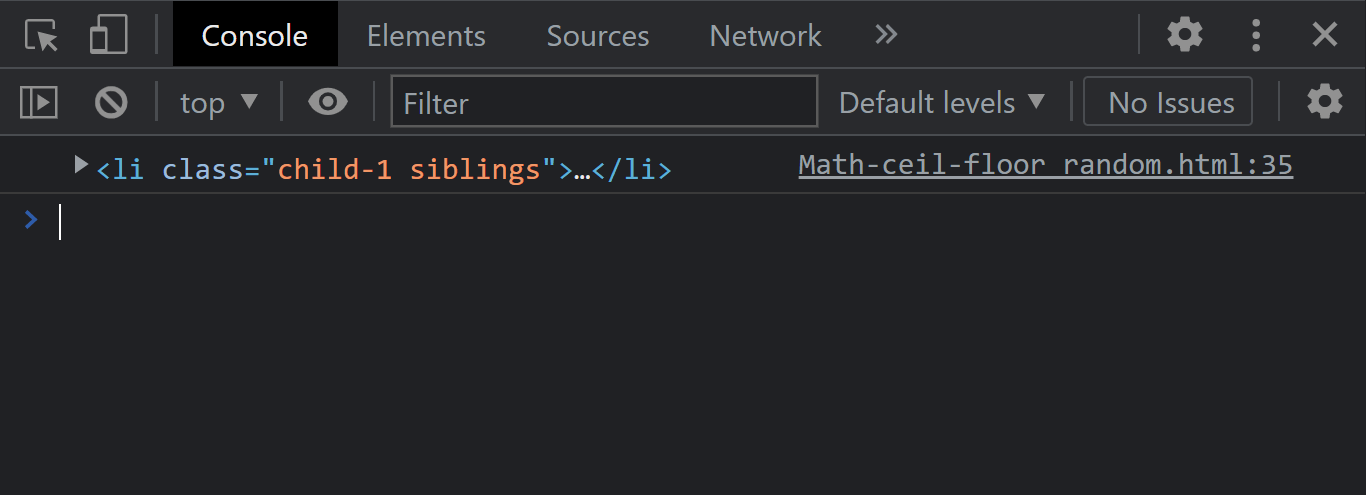
<main class="root"> <ul class="parent"> <li class="child-1 siblings">element one</li> <li class="child-2 siblings">element two</li> <li class="child-3 siblings">element three</li> <li class="child-4 siblings">element four</li> <li class="child-5 siblings">element six</li> <li class="child-6 siblings">element seven</li> </ul> </main>
JavaScript:
1234
const getParent = document.querySelector('.parent'); const getChildOne = getParent.firstElementChild; console.log(getChildOne)
Console Output:
See the Pen
firstElementChild by Ocxigin (@ocxigin)
on CodePen.
From the console output, notice that we have printed the first child element.
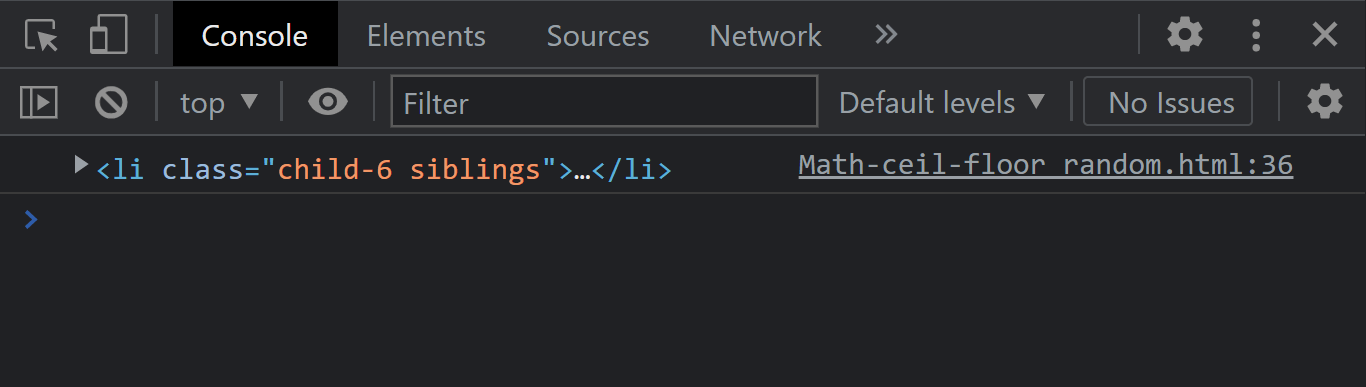
lastElementChild
The element.lastElementChild instance property returns only the last child of a given element. If the element you wish to return has no child element, it returns a null.
Take the code example below.
HTML:
12345678910
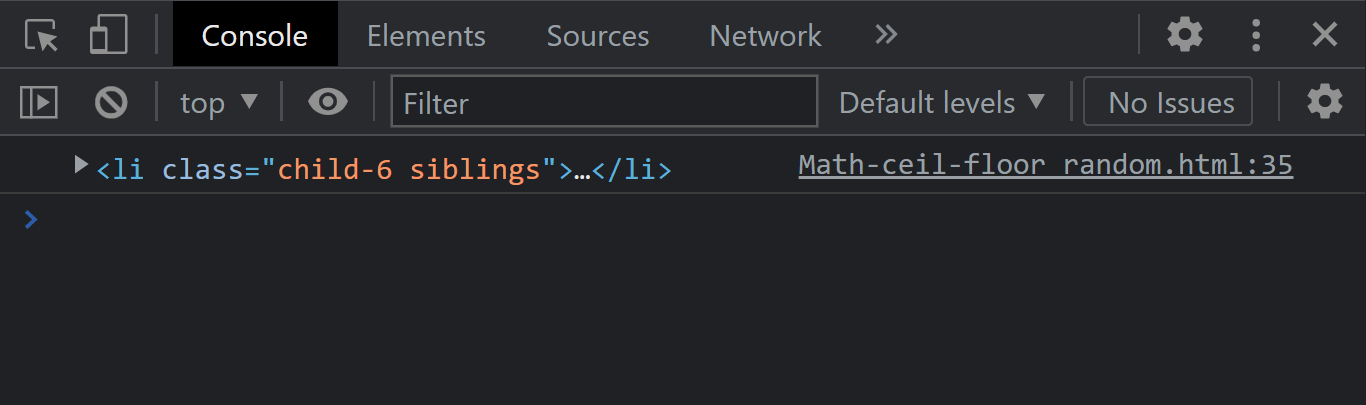
<main class="root"> <ul class="parent"> <li class="child-1 siblings">element one</li> <li class="child-2 siblings">element two</li> <li class="child-3 siblings">element three</li> <li class="child-4 siblings">element four</li> <li class="child-5 siblings">element six</li> <li class="child-6 siblings">element seven</li> </ul> </main>
JavaScript:
123456
const getParent = document.querySelector('.parent'); const getChildSix = getParent.lastElementChild; console.log(getChildSix)
Console Output:
See the Pen
lastElementChild by Ocxigin (@ocxigin)
on CodePen.
From the console output, notice that we have the last child element printed out.
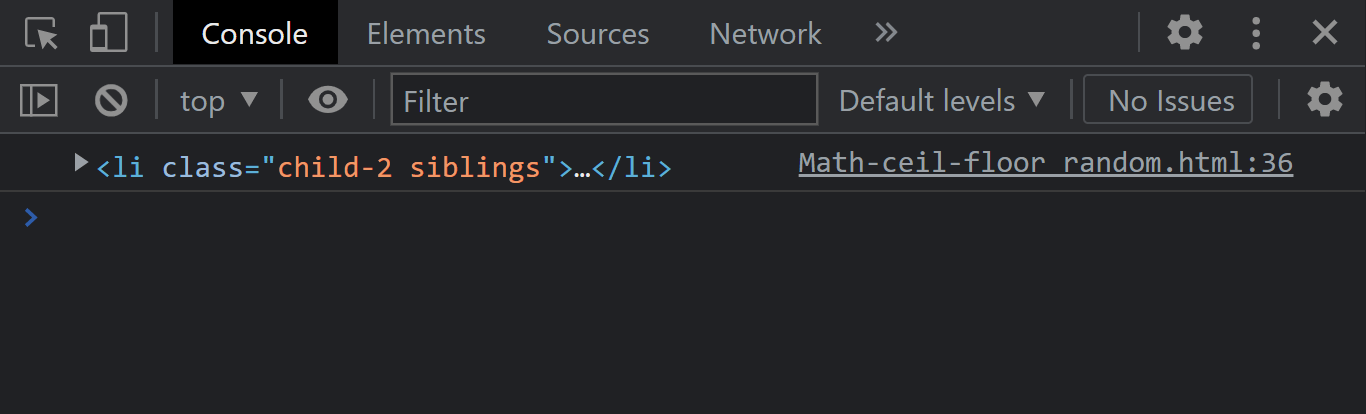
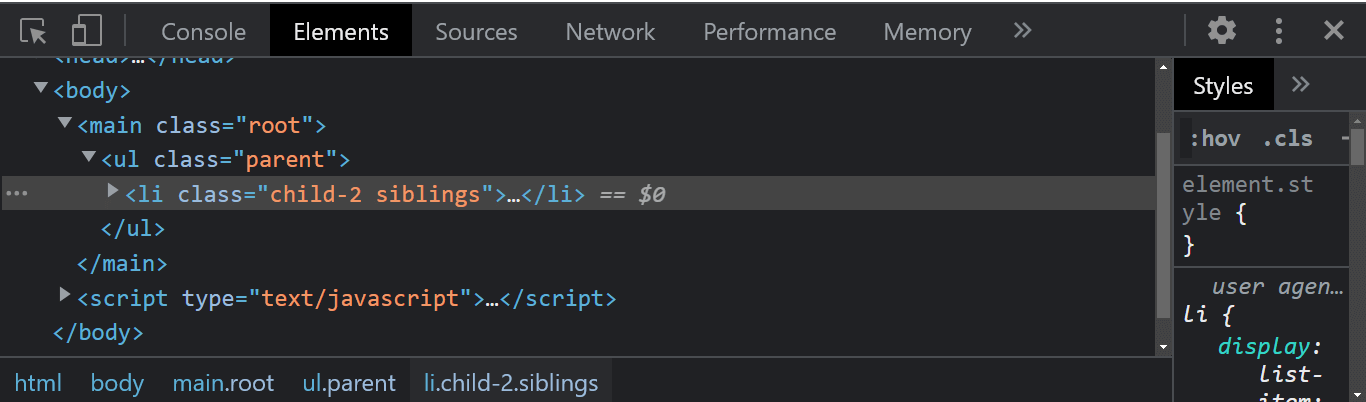
nextElementSibling
The element.nextElementSibling instance property returns the next element of the same sibling in the Document Object Model level of a given element. If the element you wish to return happens to be the last child element, it returns a null.
Take the code example below.
HTML:
12345678910
<main class="root"> <ul class="parent"> <li class="child-1 siblings">element one</li> <li class="child-2 siblings">element two</li> <li class="child-3 siblings">element three</li> <li class="child-4 siblings">element four</li> <li class="child-5 siblings">element six</li> <li class="child-6 siblings">element seven</li> </ul> </main>
JavaScript:
1234567
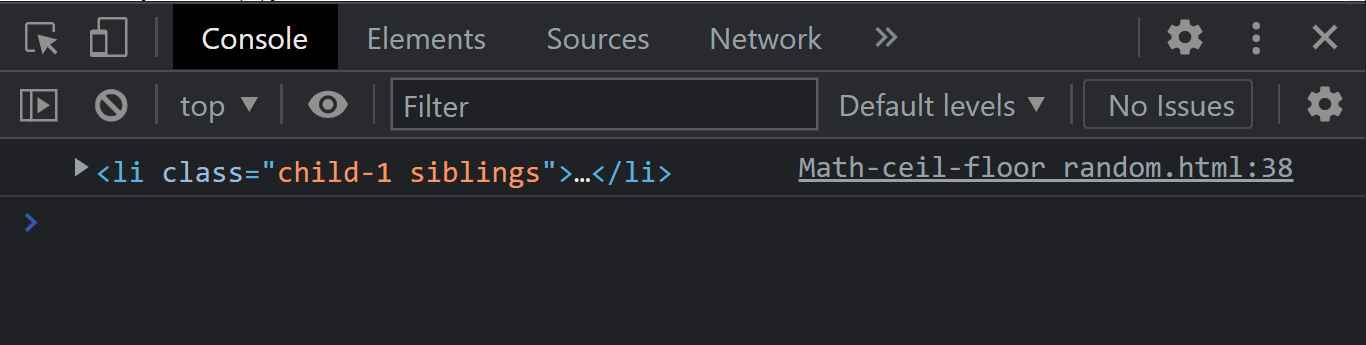
const getParent = document.querySelector('.parent'); const getChildOne = getParent.firstElementChild; const getSiblings = getChildOne.nextElementSibling; console.log(getSiblings)
Console Output:
See the Pen
nextElementSibling by Ocxigin (@ocxigin)
on CodePen.
From the console output, notice that we have the next element sibling printed out.
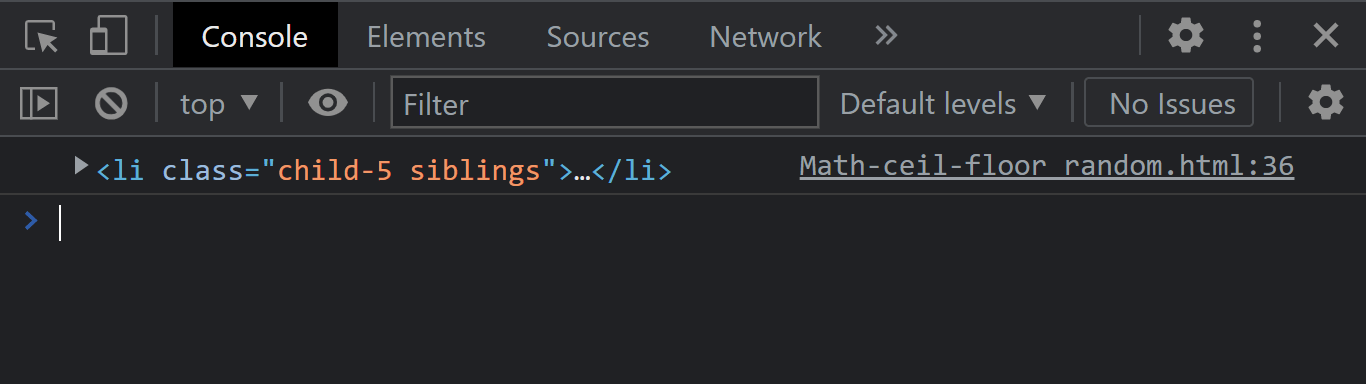
previousElementSibling
The element.previousElementSibling instance property returns the previous element of the same sibling in the Document Object Model level of a given element. If the element you wish to return happens to be the first child element, it returns a null.
Take the code example below.
HTML:
12345678910
<main class="root"> <ul class="parent"> <li class="child-1 siblings">element one</li> <li class="child-2 siblings">element two</li> <li class="child-3 siblings">element three</li> <li class="child-4 siblings">element four</li> <li class="child-5 siblings">element six</li> <li class="child-6 siblings">element seven</li> </ul> </main>
JavaScript:
1234567
const getParent = document.querySelector('.parent'); const getChildSix = getParent.lastElementChild; const getSiblings = getChildSix.previousElementSibling; console.log(getSiblings)
Console Output:
See the Pen
previousElementSibling by Ocxigin (@ocxigin)
on CodePen.
From the console output, notice that we have the previous element sibling printed out.
Document Methods
In this section of this blog on the Document Object Model, I will try to describe some of the most useful methods available in DOM
QuerySelector
The querySelector() document method returns the first element that matches the specified CSS selector passed in within the Document Object Model tree.
Syntax:
1
document.querySelector(CSS selectors)
Take the simple code example below.
HTML:
1234567
<div class="my-class">querySelector using: class</div> <div id="my-id">querySelector using: id</div> <section>querySelector using: tag Name</section> <input type="text" name="css-attribute" value="my input tag"/>
JavaScript:
1234567891011
//Accessing web element by class Name const myClass = document.querySelector('.my-class'); //Accessing web element by id Name const myId = document.querySelector('#myId'); //Accessing web element with by Tag Name const section = document.querySelector('section'); //Accessing web element with class attribute const myInput = document.querySelector('input[type]');
See the Pen
QuerySelector by Ocxigin (@ocxigin)
on CodePen.
There are different ways to select elements using querySelector() methods. As long as the value assigned within the parenthesis is a valid way of selecting elements in CSS, the querySelector() method will return the element.
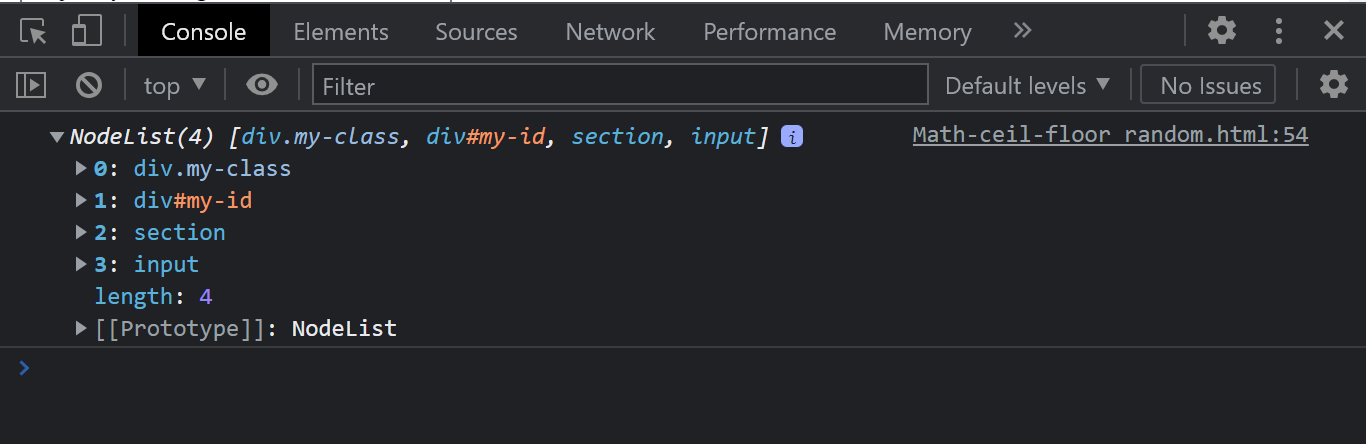
QuerySelectorAll
The querySelector() document method returns a static nodeList (Not Live) of all elements that match the specified CSS selector passed within the DOM tree.
Syntax:
1
document.querySelectorAll(CSS selectors)
Take the simple code example below.
HTML:
1234567
<div class="my-class">querySelector using: class</div> <div id="my-id">querySelector using: id</div> <section>querySelector using: tag Name</section> <input type="text" name="css-attribute" value="my input tag"/>
JavaScript:
1234
//Accessing all web element with just one method const selectAll = document.querySelectorAll('.my-class, #my-id, section, input[type]'); console.log(selectAll)
Console Output:
See the Pen
QuerySelectorAll by Ocxigin (@ocxigin)
on CodePen.
From the console output, notice how all the elements we selected are all listed out as a NodeList.
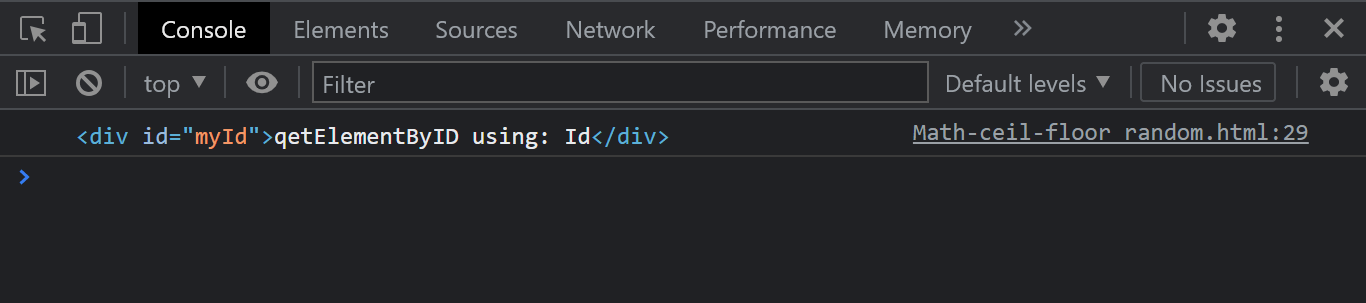
getElementById
The document.getElementById() returns an element object with a unique id attribute of a given element from the Document Object Model tree.
Syntax:
1
document.getElementById("idAtrribute")
Take the simple code example below.
HTML:
1
<div id="myId">qetElementByID using: Id</div>
JavaScript:
1234
//Accessing web element with an ID attribute const myId = document.getElementById('myId'); console.log(myId)
Console Output:
See the Pen
Get Element By Id by Ocxigin (@ocxigin)
on CodePen.
Notice how the getElementById method is used to return the specified element.
getElementsByTagName
The document.getElementsByTagName() returns an HTML Collection object with a specific tag name from the Document Object Model tree.
Syntax:
1
document.getElementsByTagName("h1")
HTML:
123456
<main> <div>qetElementByTagName using: Tag Name</div> <div>qetElementByTagName using: Tag Name</div> <div>qetElementByTagName using: Tag Name</div> <div>qetElementByTagName using: Tag Name</div> </main>
JavaScript:
1234
//Accessing web element by it tag name const myTagNames = document.getElementsByTagName('div'); console.log(myTagNames)
Console Output:
See the Pen
Get Element By Tag Name by Ocxigin (@ocxigin)
on CodePen.
Notice how the getElementsByTagName method is used to return an HTML Collection object.
getElementsByClassName
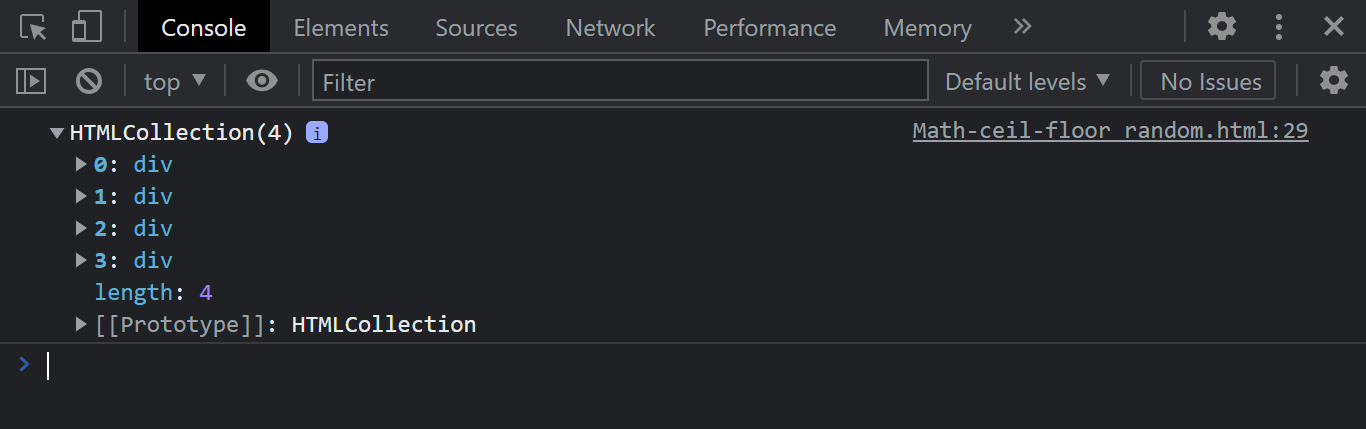
The document.getElementsByClassName() returns a collection of array-like objects with a specific class name from the Document Object Model tree.
Syntax:
1
document.getElementsByNameClass("class-name")
HTML:
123456
<main> <div class="one">qetElementsByTagName using: Class Name</div> <div class="one">qetElementsByTagName using: Class Name</div> <div class="one">qetElementsByTagName using: Class Name</div> <div class="one">qetElementsByTagName using: Class Name</div> </main>
JavaScript:
1234
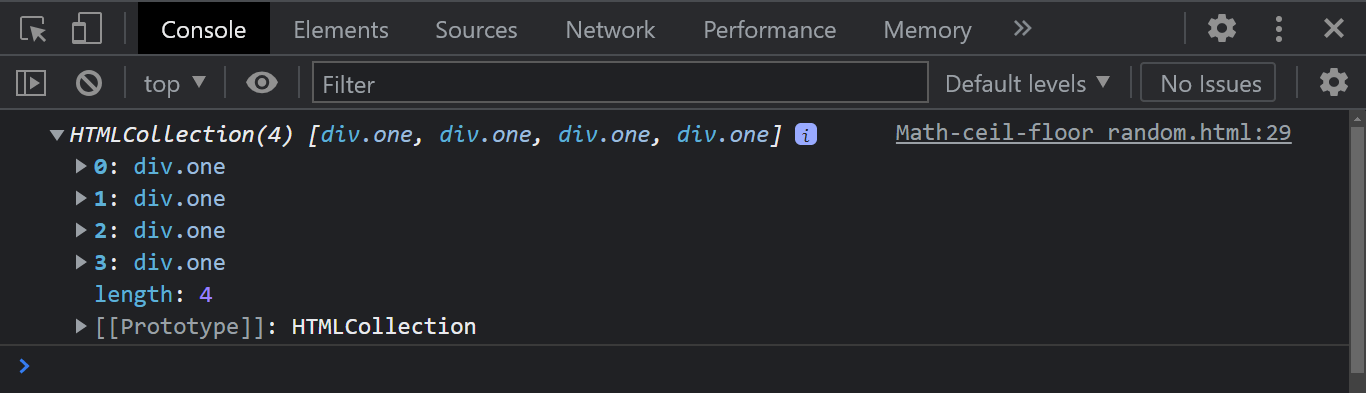
//Accessing web element by it class name const myClassName = document.getElementsByClassName('one'); console.log(myClassName)
Console Output:
See the Pen
getElementsByClassName by Ocxigin (@ocxigin)
on CodePen.
Notice how the getElementsByClassName method is used to return an HTML collection of array-like objects.
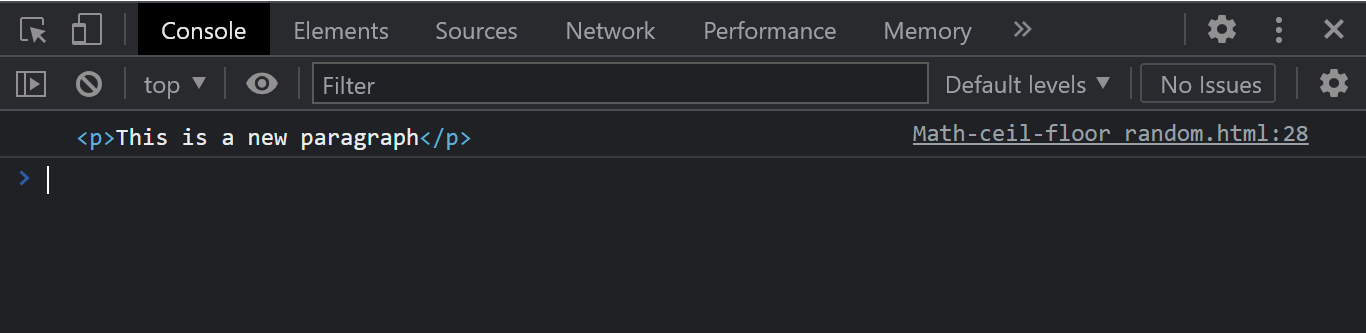
createElement
The document.createElement() creates a new HtmlElement referenced by the value passed in. The value is passed as a string in lowercase later in between double or single quote and a valid tag name should be used.
Syntax:
1
document.createElement("div")
JavaScript:
123456
//Creating a new element using createElement methods const newEl = document.createElement('p'); newEl.innerText = 'This is a new paragraph'; console.log(newEl);
Console Output:
See the Pen
Create Element by Ocxigin (@ocxigin)
on CodePen.
In the code sample above, we created a new element and parsed in a string of text.
Append
The element.append() is used to add a new element or text content to the last child of an element child. If you append an element/text to a parent tag, the element or text you appended is added to the last child of that element.
Take note that the append() method differs from the appendChild() of the nodeList method. While the append() method allows you to append multiple elements at once, the appendChild() can only append one. With the append() method, a text node can be appended, while appendChild() only appends an Element node.
Syntax:
1234
// you can pass in single value element.append("Element") //you can pass in multiple values element.append("string", "string")
HTML:
123456
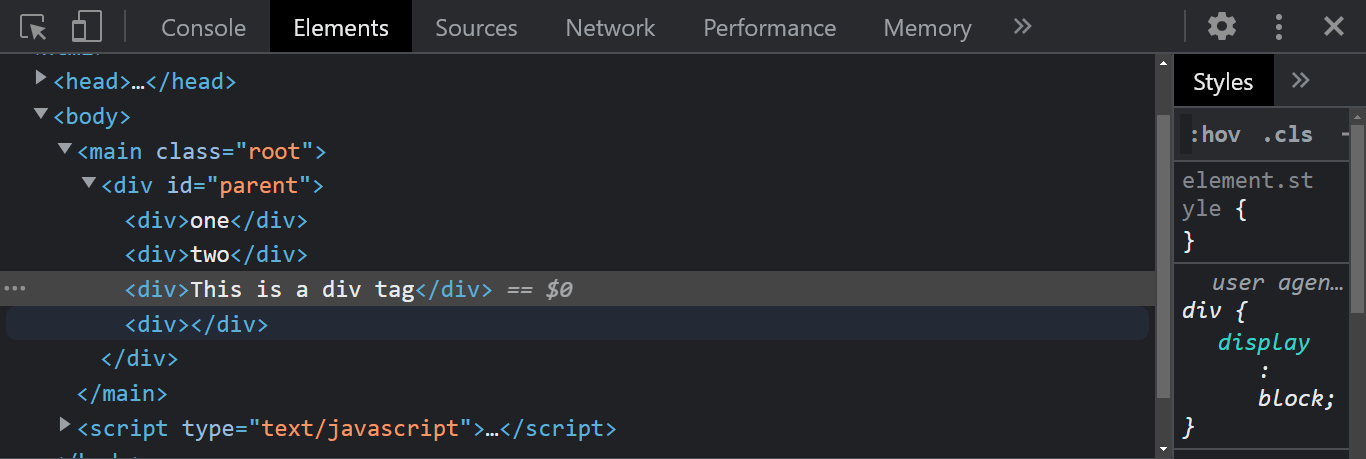
<main class="root"> <div id="parent"> <div>one</div> <div>two</div> </div> </main>
From the HTML code sample we have a < div > tag with an id of parent. Inside this < div > tag, we have two more nested < div > tags with the text content of one and two, respectively. We will add two more < div > tags to the children element.
Type and run the JavaScript below.
JavaScript:
1234567
const parentEl = document.querySelector('#parent'); const newEl = document.createElement('div'); const newElTwo = document.createElement('div'); parentEl.append(newEl, newElTwo); newEl.append('This is a div tag')
Console Output:
See the Pen
Append by Ocxigin (@ocxigin)
on CodePen.
Now, we have two new elements in the Document Object Model.
After
The element.after() is used to add a new element or text after a specified element within the Document Object Model tree.
Syntax:
1234
// you can pass in single value element.after("Element") //you can pass in multiple values element.after("string", "string")
HTML:
123456
<main class="root"> <div id="parent"> <div id="one">one</div> <div id="two">two</div> </div> </main>
JavaScript:
1234567891011
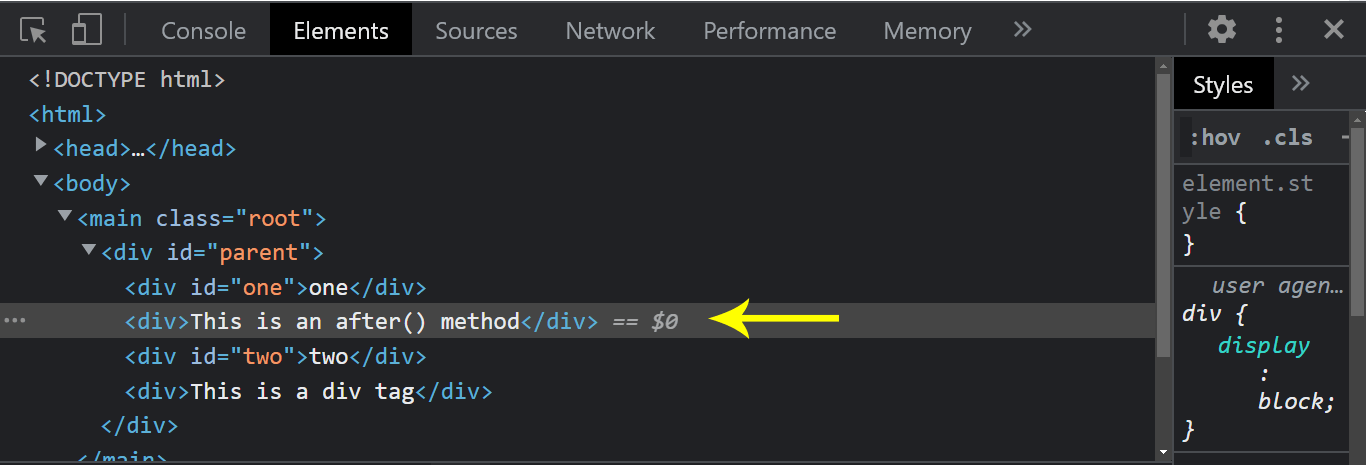
const parentEl = document.querySelector('#parent'); const one = document.querySelector('#one') const newEl = document.createElement('div'); const newElTwo = document.createElement('div'); parentEl.append(newEl); newEl.append('This is a div tag') one.after(newElTwo); newElTwo.innerText = 'This is an after() method';
Console Output:
See the Pen
After by Ocxigin (@ocxigin)
on CodePen.
We used the after() method to insert the newly created < div > tag to come directly after the first element.
Before
The element.before() is used to add a new element or text before a specified element within the Document Object Model tree. The before() do the direct opposite of what after() does.
Syntax:
1234
// you can pass in single value element.before("Element") //you can pass in multiple values element.beforer("string", "string")
HTML:
123456
<main class="root"> <div id="parent"> <div id="one">one</div> <div id="two">two</div> </div> </main>
JavaScript:
1234567891011
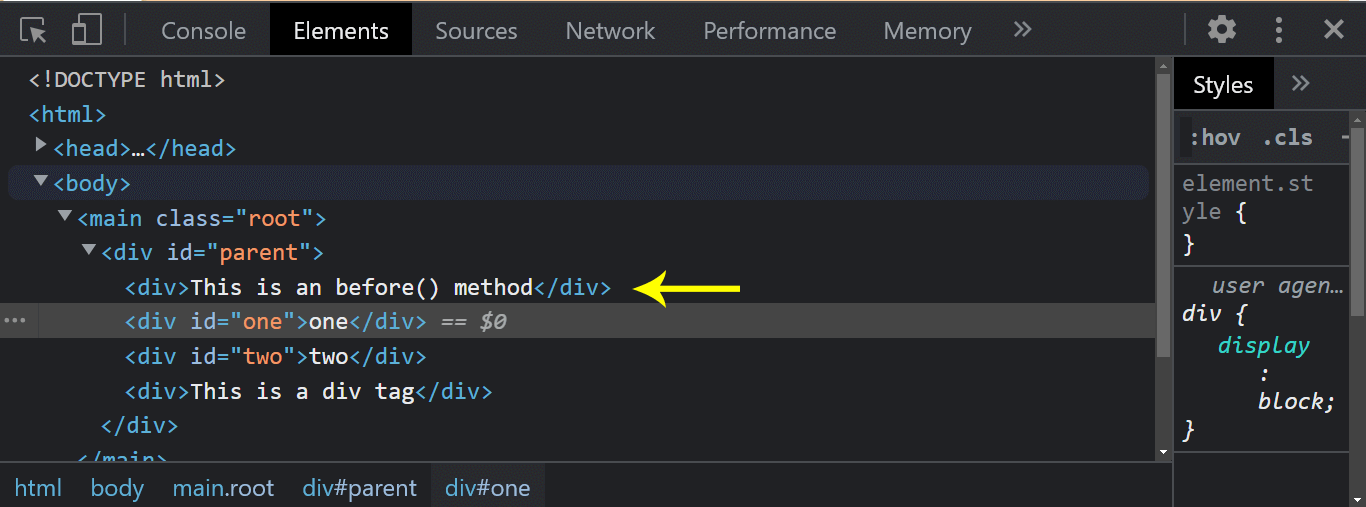
const parentEl = document.querySelector('#parent'); const one = document.querySelector('#one') const newEl = document.createElement('div'); const newElTwo = document.createElement('div'); parentEl.append(newEl); newEl.append('This is a div tag') one.before(newElTwo); newElTwo.innerText = 'This is an before() method';
Console Output:
See the Pen
Before by Ocxigin (@ocxigin)
on CodePen.
The example here is the same as the previous example for after(). We just replaced the after() with the before(). Now notice how the < div > element moves as the element’s first child.
Remove
The element.remove() removes the specified element from the Document Object Model. When using the method, you don’t have to assign a value to the parentheses.
Syntax:
1
element.remove()
Take the following example below.
HTML:
12345
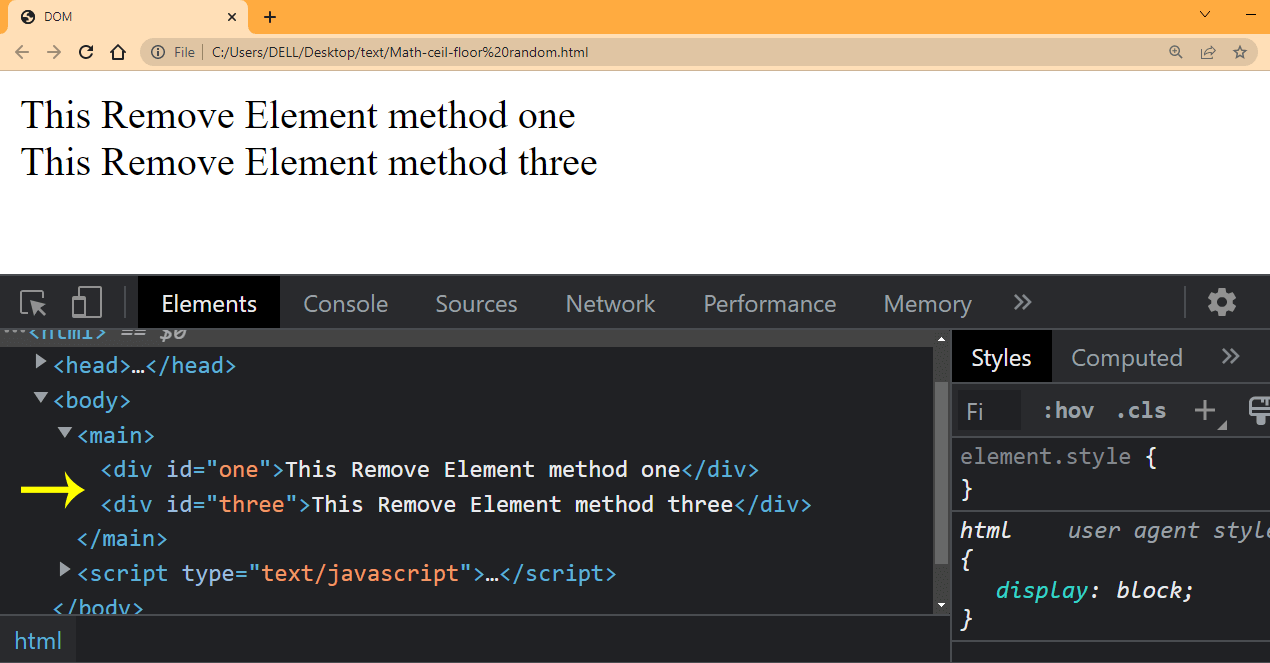
<main> <div id="one">This Remove Element method one</div> <div id="two">This Remove Element method two</div> <div id="three">This Remove Element method three</div> </main>
From the HTML example above, we have three < div > tags, we are going to remove the second < div > tag with an id of two. Now type and run the JavaScript code below.
JavaScript:
123
const removeEl = document.querySelector("#two"); const myEl = removeEl.remove();
Browser Output:
See the Pen
Remove by Ocxigin (@ocxigin)
on CodePen.
From the output, notice we now have just two < div > tags left out of the three we created.
setAttribute
The element.setAttribute() sets the attribute of a given element in the Document Object Model tree. The attribute is updated if the given attributes already exist in the element.
Note: When using the set attribute method, the first value takes in the name of the attributes. This might be an id, class, type, or name and then followed by the value you want the attribute to have.
Syntax:
1
element.setAttribute(name, value)
Take the following example below:
HTML:
1
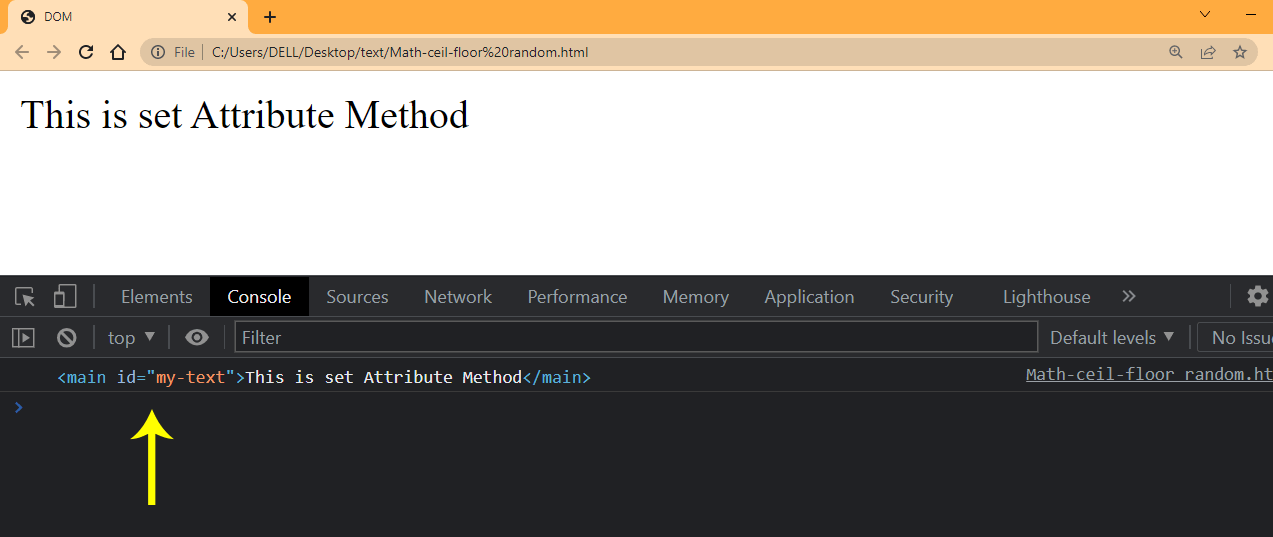
<main>This is set Attribute Method</main>
The HTML displays just a set text, with a main tag. Now type and run the JavaScript code given below.
JavaScript:
12345
const myAttribute = document.querySelector("main"); myAttribute.setAttribute("id", "my-text"); console.log(myAttribute);
Browser Output:
See the Pen
Set Attribute by Ocxigin (@ocxigin)
on CodePen.
Notice the output indicated by the arrow.
getAttribute
The element.getAttribute() returns the attribute of a given element in the Document Object Model tree. If the given attribute does not exist in the element, the attribute returns null.
Note : When using the get attribute method, you should only reference the name of the attribute you want to get. Also, remember that you can only get one attribute from the given element.
Syntax:
1
element.getAttribute(name)
Take the following example below.
HTML:
1
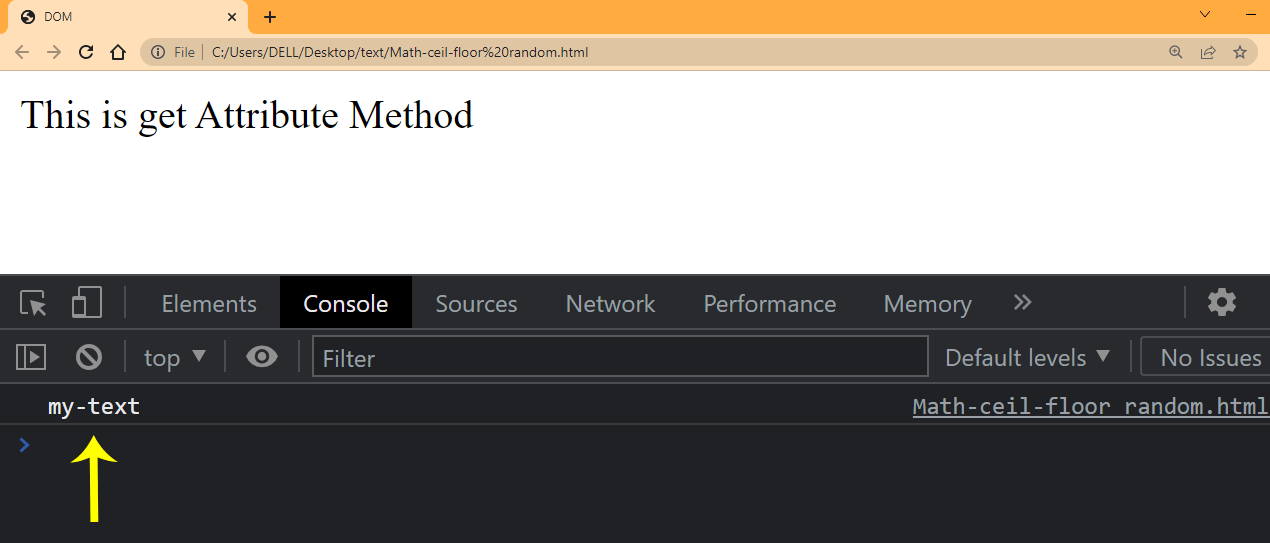
<main id="my-text">This is get Attribute Method</main>
We are going to get the id attribute we set earlier. Type and run the JavaScript code given below.
JavaScript:
12345
const myAttribute = document.querySelector("main"); const myAttr = myAttribute.getAttribute("id"); console.log(myAttr);
Browser Output:
See the Pen
Get Attribute by Ocxigin (@ocxigin)
on CodePen.
Notice from the arrow the return name of the id attribute value.
getAttributeNames
The element.getAttributeNames() returns the attribute as an array-like string. If the given element does not have an attribute in the element, it returns an empty array.
Note: When using the get attribute method, you don’t have to reference the name of the attributes you want to get.
Syntax:
1
element.getAttributeNames()
Take the following example below.
HTML:
1
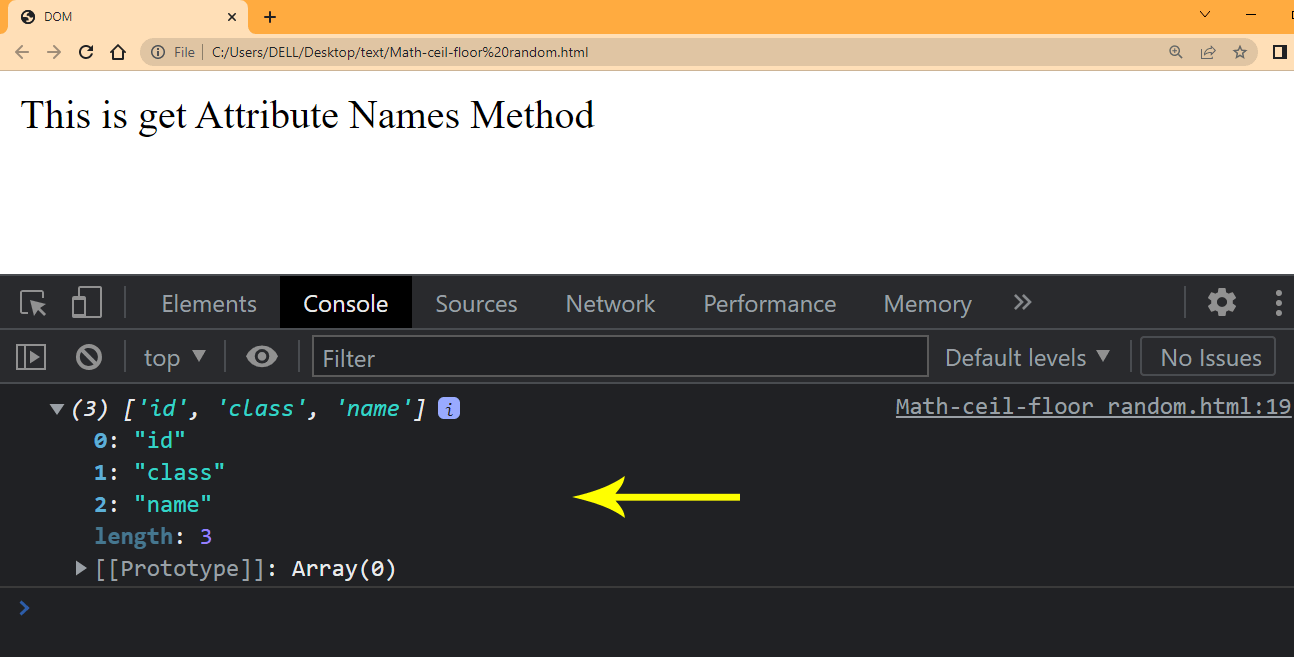
<main id="my-text" class="get" name="attribute">This is get Attribute Names Method</main>
We are going to get the name of the given attributes name specified in the element. Type and run the JavaScript below.
JavaScript:
12345
const myAttribute = document.querySelector("main"); const myAttr = myAttribute.getAttributeNames(); console.log(myAttr);
Browser Output:
See the Pen
Get Attribute Names by Ocxigin (@ocxigin)
on CodePen.
Notice from the arrow the returned attributes as an array.
hasAttribute
The element.hasAttribute() returns a boolean value of true if the attribute exists. If the given attribute does not exist in the element, false is returned.
Note: When using the has attribute method, you should only reference the name of the attribute you want to check. Also, remember that you can only get one attribute from the given element.
Syntax:
1
element.hasAttribute(name)
Take the following example below:
HTML:
1
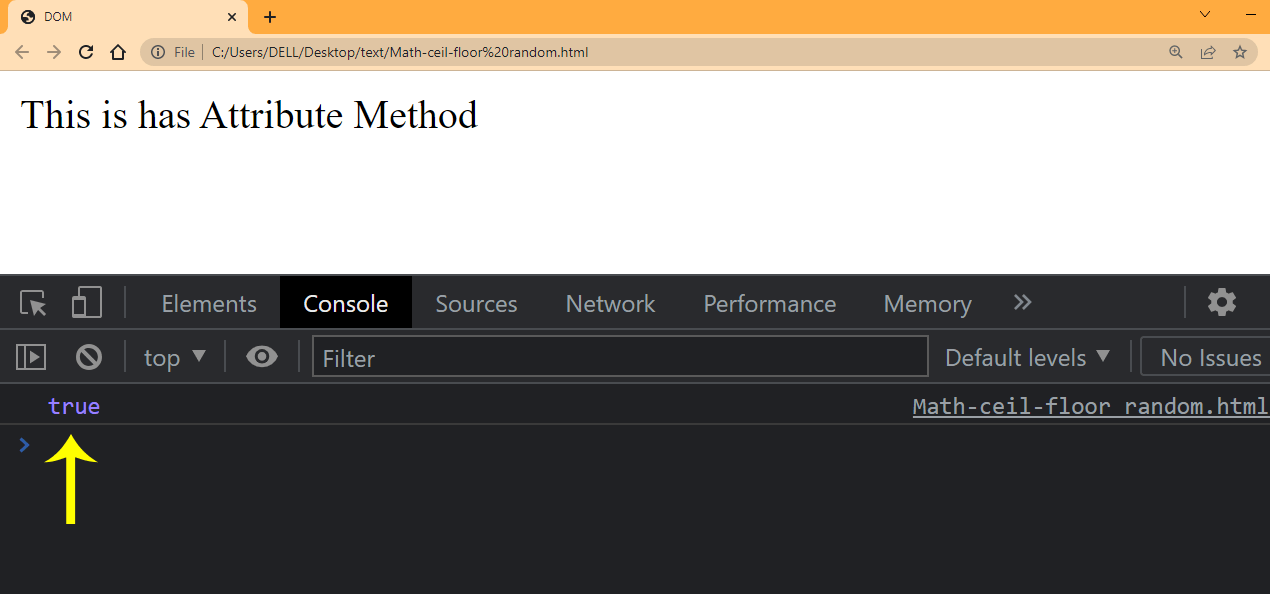
<main id="my-text">This is has Attribute Method</main>
JavaScript:
12345
const myAttribute = document.querySelector("main"); const myAttr = myAttribute.hasAttribute("id"); console.log(myAttr);
Browser Output:
See the Pen
has Attribute by Ocxigin (@ocxigin)
on CodePen.
See the true value indicated by the arrow.
removeAttribute
The element.removeAttribute() removes the attribute of a given element in the DOM tree. If the given attribute does not exist in the element, nothing is returned.
Note: When using the remove attribute method, you should only reference the name of the attribute you want to remove. Also, remember that you can only remove one attribute from the given element.
Syntax:
1
element.removeAttribute(name)
Take the following example below:
HTML:
1
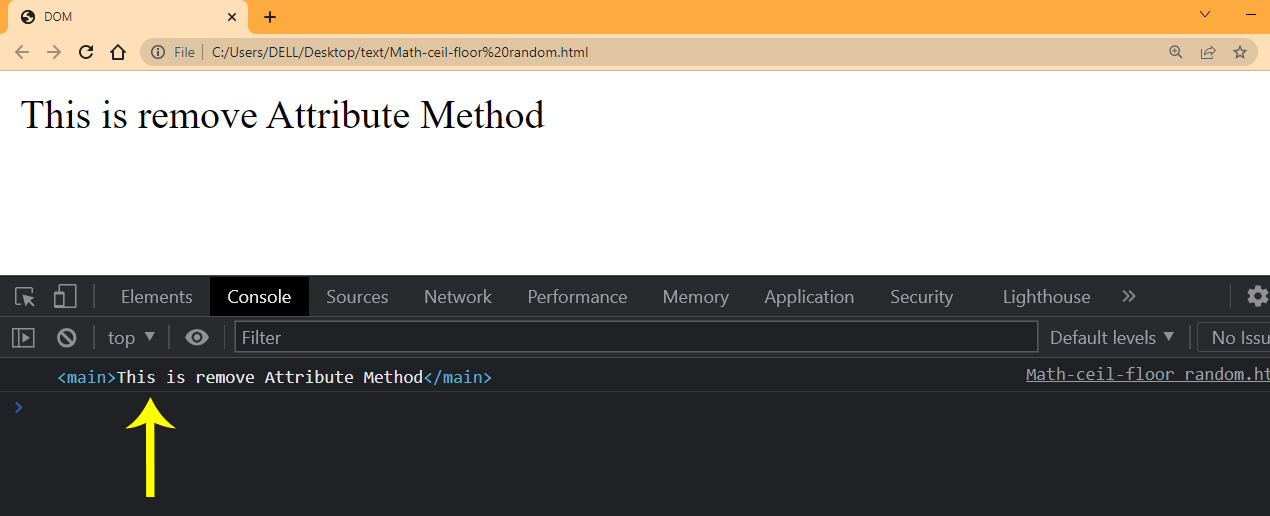
<main id="my-text">This is remove Attribute Method</main>
We are going to remove the id attribute we set earlier. Type and run the JavaScript code given below.
12345
const myAttribute = document.querySelector("main"); myAttribute.removeAttribute("id"); console.log(myAttribute);
Browser Output:
See the Pen
remove Attribute by Ocxigin (@ocxigin)
on CodePen.
See from the arrow that we no longer have an attribute on the element.
Node Instance Properties
Listed below are some node instance properties we can use to access, add or remove element nodes from the DOM tree.
childnodes
The node.childnodes property of the node interface returns a node list of child elements, of a specific element from the DOM tree. This includes elements, texts and comments.
Syntax:
1
document.body.childNodes
HTML:
12345678910
<main class="root"> <ul class="parent"> <li class="child-1 siblings">element one</li> <li class="child-2 siblings">element two</li> <li class="child-3 siblings">element three</li> <li class="child-4 siblings">element four</li> <li class="child-5 siblings">element six</li> <li class="child-6 siblings">element seven</li> </ul> </main>
From this HTML code above, notice we have 6 < li > elements listed out.
JavaScript:
1234
const getParent = document.querySelector('.parent'); const getChild = getParent.childNodes; console.log(getChild)
Console Output:
See the Pen
ChildNodes by Ocxigin (@ocxigin)
on CodePen.
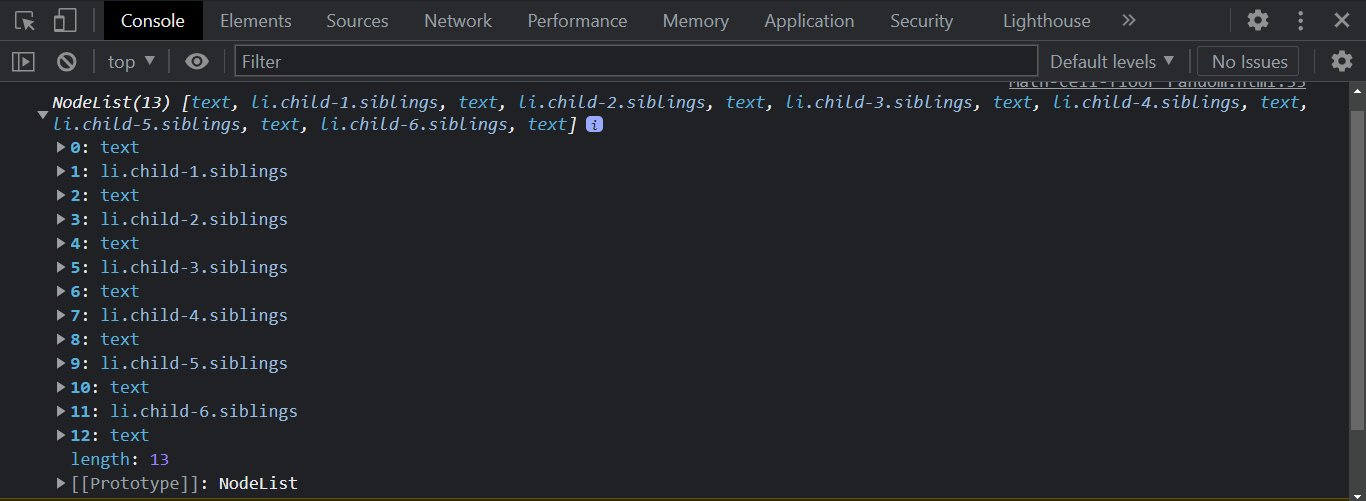
From the console output, the childNodes instance property returns 12 items with a length of 13. As stated earlier, the childNodes instance property returns the given child elements and the texts and comments.
firstChild
The node.firstChild property of the node interface returns the first child of a specific element from the Document Object Model tree and returns a null object when the element has no child.
Syntax:
1
document.body.firstChild
JavaScript:
1234
const getParent = document.querySelector('.parent'); const getChild = getParent.firstChild; console.log(getChild)
From this code example above and using the same HTML code template we used earlier, we try getting the firstChild node.
Console Output:
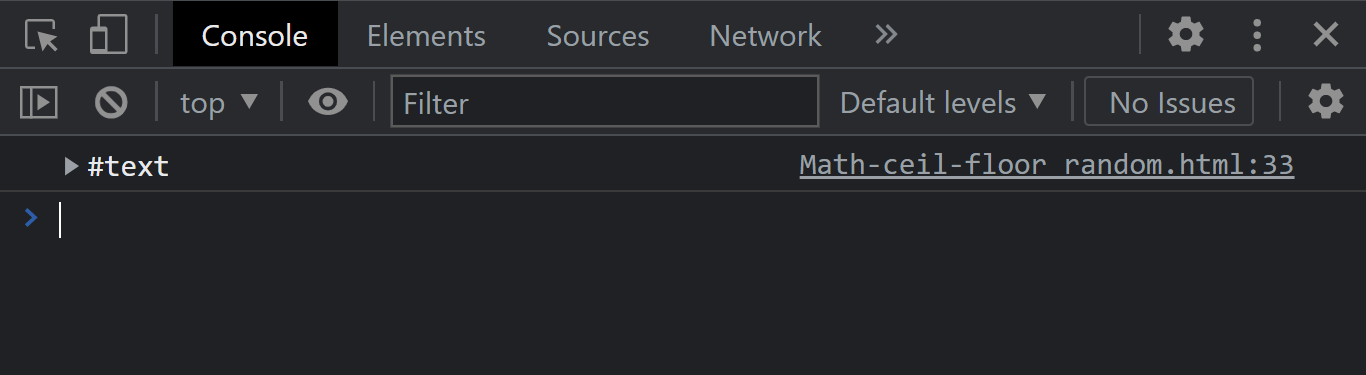
From the console output, we got a text node as the first child node. This is because the firstChild is a node instance property and not an element. What this means is the firstChild node returns elements, text, or comment. In this case, the firstChild node is a text.
If what you want to return is the first element instead of a node, try using the firstElementChild property. The firstElementChild property has been covered above.
lastChild
The node.lastChild property of the node interface returns the last child of a specific element from the DOM tree and returns a null object when the element has no child.
Syntax:
1
document.body.lastChild
JavaScript:
1234
const getParent = document.querySelector('.parent'); const getChild = getParent.lastChild; console.log(getChild)
Console Output:
See the Pen
Last Child by Ocxigin (@ocxigin)
on CodePen.
From the console output, we got a text node as the last child node.
Next Sibling
The node.nextSibling property of the node interface returns the next sibling of a specific element of the same level on the DOM tree and returns null if the element happens to be the last child.
Syntax:
1
document.body.nextSibling
JavaScript:
1234567
const getParent = document.querySelector('.parent'); const getChild = getParent.firstChild; const nextChild = getChild.nextSibling; console.log(nextChild)
Console Output:
See the Pen
Next Sibling by Ocxigin (@ocxigin)
on CodePen.
From the console output, we got the first element as the next sibling. This is because, after the text node, the child element comes next.
previousSibling
The node.previousSibling property of the node interface returns the previous sibling of a specific element of the same level on the Document Object Model tree. It returns null if the element happens to be the first child.
Syntax:
1
document.body.previousSibling
JavaScript:
1234567
const getParent = document.querySelector('.parent'); const getChild = getParent.lastChild; const previousChild = getChild.previousSibling; console.log(previousChild)
Console Output:
See the Pen
Previous Sibling by Ocxigin (@ocxigin)
on CodePen.
From the console output, we got the last element as the previous sibling.
Parent Node
The node.parentNode property of the node interface returns the parent element on the Document Object Model tree.
Syntax:
1
document.body.parentNode
JavaScript:
1234567
const getParent = document.querySelector('.parent'); const getChild = getParent.firstChild; const returnParent = getChild.parentNode; console.log(returnParent)
Console Output:
See the Pen
Parent Node by Ocxigin (@ocxigin)
on CodePen.
From the console output. We used the first child element to return the parent element.
textContent
The node.textContent property of the node interface returns or sets the text content of a given element on the Document Object Model tree.
Syntax:
1
document.element.textContent
JavaScript:
1234567
const getParent = document.querySelector('.parent'); const getChild = getParent.firstChild; const returnParent = getChild.parentNode; console.log(returnParent.textContent)
Console Output:
See the Pen
Text Content by Ocxigin (@ocxigin)
on CodePen.
Node Instance Methods
Node instance methods are functions that can be called on an instance of a Node.js class or object. These methods have access to the properties and methods of the class or object and can perform actions or manipulate data associated with the instance.
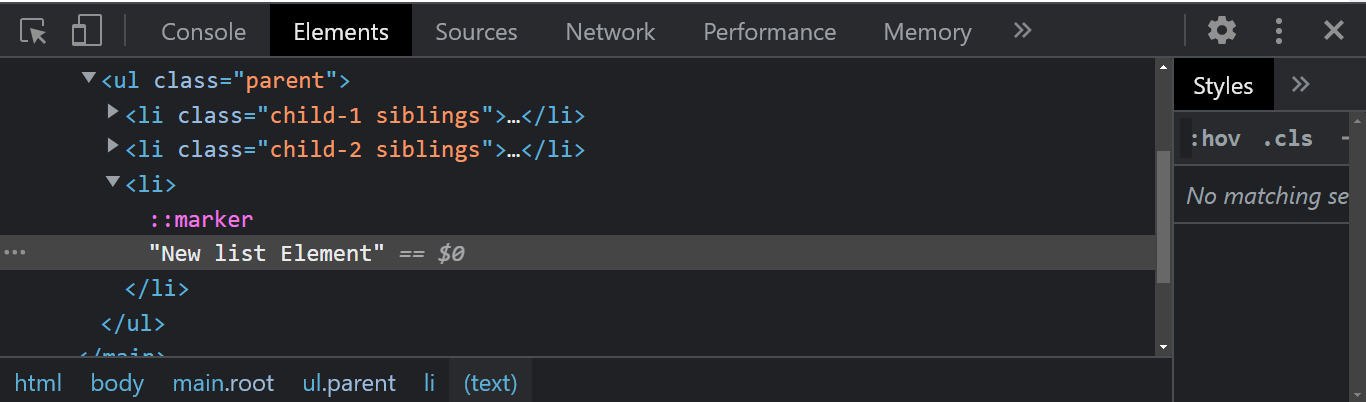
AppendChild
The node.appendChild() method of the node interface adds a child element to a given parent Node in the Document Object Model tree.
Syntax:
1
document.element.appendChild(childElement)
Take the code sample below.
HTML:
123456
<main class="root"> <ul class="parent"> <li class="child-1 siblings">element one</li> <li class="child-2 siblings">element two</li> </ul> </main>
JavaScript:
12345678910
//The parent element const getParent = document.querySelector('.parent'); //The create a new Paragraph const newLi = document.createElement('li'); const insertChild = getParent.appendChild(newLi); insertChild.innerText = 'New list Element'; console.log(insertChild)
Console Output:
See the Pen
AppendChild by Ocxigin (@ocxigin)
on CodePen.
From the console output, we now have three list items instead of the two we have.
RemoveChild
The node.removeChild() method of the node interface removes a child element of a given parent Node in the Document Object Model tree.
Syntax:
1
document.element.removeChild(childElement)
JavaScript:
1234567
//The parent element const getParent = document.querySelector('.parent'); const childOne = document.querySelector('li[class]'); const firstEl = getParent.removeChild(childOne); console.log(firstEl)
Console Output:
See the Pen
RemoveChild by Ocxigin (@ocxigin)
on CodePen.
From the console output, we now have one element after the first element was removed.
replaceChild
The node.replaceChild() method of the node interface replaces a child element with a new child element of a given parent Node in the Document Object Model tree.
Note: the replaceChild method takes in the new child element first and then the old child element you want to replace.
Syntax:
1
document.element.replaceChild(newElement, oldElement)
HTML:
12345
<main class="root"> <ul class="parent"> <li class="child-2 siblings">element two</li> </ul> </main>
JavaScript:
1234567891011
//The parent element const getParent = document.querySelector('.parent'); //List Element we want to replace const listEl = document.querySelector('li[class]'); //create new div element const div = document.createElement('div'); //Replace the list with div element const replaceList = getParent.replaceChild(div, listEl);
Console Output:
See the Pen
ReplaceChild by Ocxigin (@ocxigin)
on CodePen.
As indicated by the arrow, notice how the list element has been replaced with a div tag.
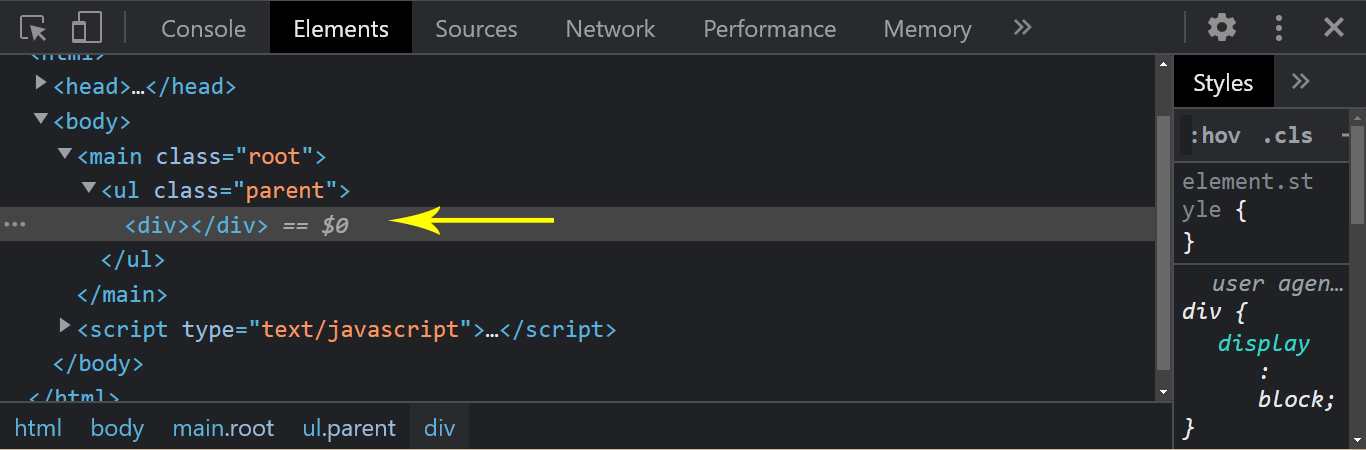
InsertBefore
The node.insertBefore() method of the node interface inserts a child element before the specified element of a given parent Node in the Document Object Model tree.
Syntax:
1
document.element.insertBefore(newElement, specifiedElement)
HTML:
1234567
<main class="root"> <ul class="parent"> <li class="childOne siblings">element one</li> <li class="childTwo siblings">element two</li> <li class="childThree siblings">element three</li> </ul> </main>
JavaScript:
1234567891011
//The parent element const getParent = document.querySelector('.parent'); //the List element we want to insert element before it const listEl = document.querySelector('.childTwo'); //create new div element const div = document.createElement('div'); //insert div element before list two element const placeDiv = getParent.insertBefore(div, listEl);
Console Output:
See the Pen
InsertBefore by Ocxigin (@ocxigin)
on CodePen.
From the console output, notice how the new div element we created was inserted before element two targeted.
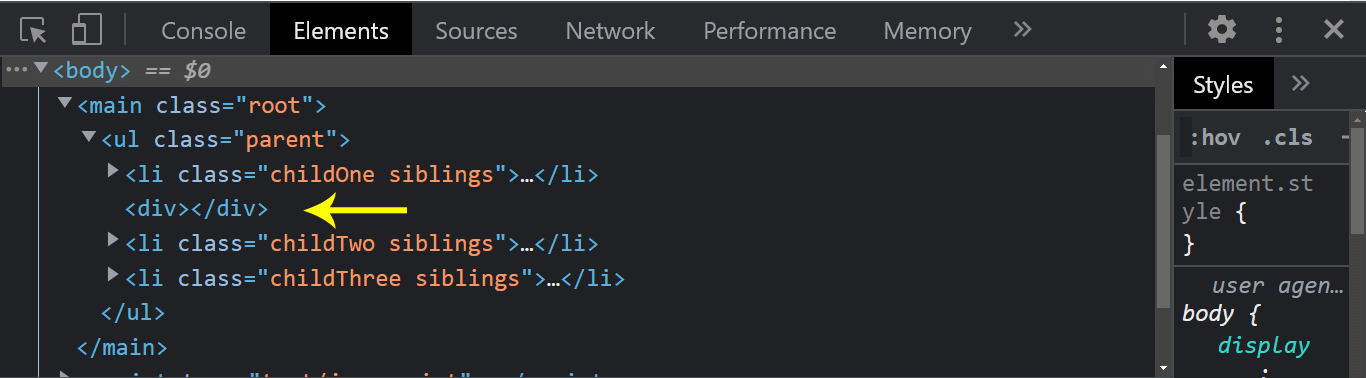
hasChildNodes
The node.hasChildNodes() method of the node interface returns a boolean value of true if the specified element has a child but returns false if the child is not present in the Document Object Model tree.
Note: white-space is also treated as a text node (empty string)
Syntax:
1
document.element.hasChildNodes()
HTML:
1234567
<main class="root"> <ul class="parent"> <li class="childOne siblings">element one</li> <li class="childTwo siblings">element two</li> <li class="childThree siblings">element three</li> </ul> </main>
JavaScript:
1234567
//The parent element const getParent = document.querySelector('.parent'); //Check if the parent element has a child node. const checkNode = getParent.hasChildNodes(); console.log(checkNode)
Console Output:
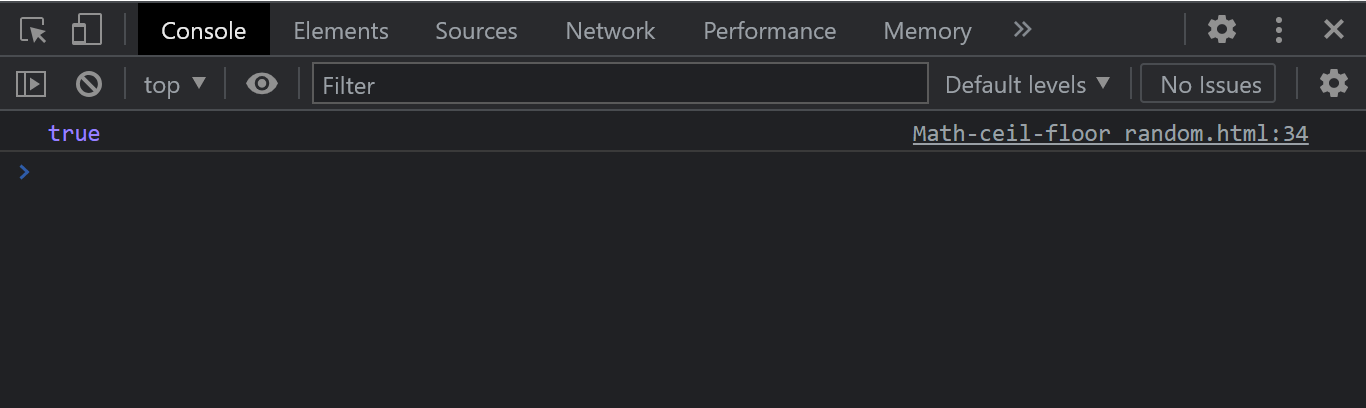
See the Pen
Has Child Nodes by Ocxigin (@ocxigin)
on CodePen.
From the console out, we have true printed out. This is because the parent has child nodes (Elements).
Difference between DOM Node and Element
The term Document Object Model or DOM node and Element node can be quite confusing, so we must iterate this point for clarity. But first, let’s better understand what Node and Elements are.
The Node
The node refers to an interface that serves as a base for other Web API objects in the Document object model (DOM).
Example of Node in the DOM:
Below is an HTML document. HTML documents are represented as Nodes and objects. This node allows developers to manipulate the web page using node properties and methods.
HTML DOCUMENTS:
1234567891011121314151617181920212223242526272829303132333435
<!DOCTYPE html> <html> <head> <meta charset="utf-8"> <meta name="viewport" content="width=device-width, initial-scale=1"> <title>This is an HTML document</title> <link rel="stylesheet" type="text/css" href="style.css"> </head> <body> <main> <!-- This is the website Navigation --> <header> <nav> <ul> <li>HOME</li> <li>SERVICES</li> <li>ABOUT</li> </ul> </nav> </header> <!-- This is the page section --> <section> <h1>The Document Object Model</h1> <p>The DOM gives web developers the flexibility to be able to manipulate, style and structure element nodes</p> </section> <!-- This is the page button --> <button>This is a Button</button> </main> <!-- This is the page footer --> <footer>This is a footer</footer> </body> </html>
From the above HTML document, the nodes refer to the following:
- HTML tags
- The text content with the HTML tags
- The HTML comment
- The Doctype declaration
- The HTML attributes, etc.
- White space (taps, spaces, line-breaks)
All these are referred to individually as nodes. So it’s valid to say the attribute node. To refer to only the attribute of the element or comment node to refer to the comments on the page only.
The instance property and instance methods are objects in JavaScript for manipulating and updating the nodes in the Document Object Model. This can either be comments, text, white spaces, or elements.
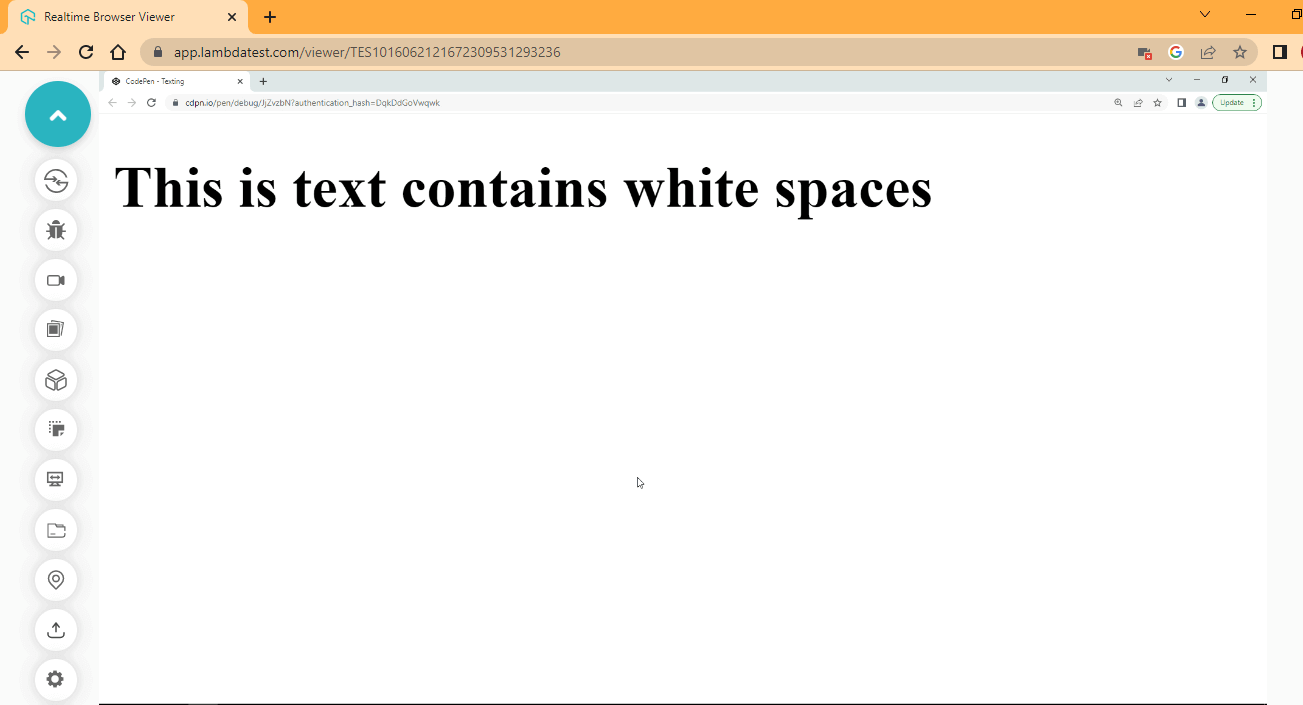
White Spaces
It’s important to note that whitespaces are nodes, which are taps, space, and line breaks. These White spaces are usually treated as text, and white spaces between two words are treated as a single character, while white spaces before and after the opening and closing tags are ignored. This helps to structure HTML content when it loads by the browser properly.
Try this code below.
HTML:
123456789
<main> <h1> This is text contains white spaces </h1> </main>
The HTML code above contains white spaces, which are created with space-tap, taps, and line breaks.
Browser Output:
See the Pen
Whitespace by Ocxigin (@ocxigin)
on CodePen.
From the browser output, notice how each word is laid out without taps. Based on how the text is formatted and laid out in the Text Editor, the browser removes these extra white spaces and lays out the content in a single line. To add or remove white space is done using CSS.
Element Nodes
The element node refers to the HTML tags. Examples of the element nodes are < p >, < div >, < main >, < h1 > etc. The element node has nothing to do with the text inside it, white spaces, or attributes. These are just separate nodes that can be attached to the element nodes. The element instance properties and methods are built-in objects that allow developers to manipulate the element nodes.
It’s important to note that the node instance properties and methods differ from the element instance properties and methods. The node instance properties and methods allow access to all node objects, which includes white space, comments, elements, attributes, etc., while element instance properties and methods only allow access to the element node. So this should not be used interchangeably.
Comment Nodes
The comment nodes are special kinds of nodes. It helps to explain what a particular section of your code is meant to do or is designed to do. Although comments can be accessed or created in a JavaScript environment, you are not necessarily going to be manipulating the comment node with JavaScript since they are not displayed by the browser.
Here is an example of a comment in HTML.
1234567
<!-- This is a comment node --> <!-- # You can also write # a comment in # This manner -->
Note the comments mentioned here are HTML comments, not JavaScript.
Difference between HTML Collections and a Node List
If you have read this far, you will have come across where we talked about some elements returning a live HTMLCollection or NodeList. We will break it down so that when you come across these terms next, you will know exactly what you are working with.
HTML Collection
This is a group of element nodes (array-like objects). We get an HTMLCollection when we use instance properties such as children and instance methods such as getElementsbyTagName() and getElementsByClassName(). An HTML collection is said to be live. This is because it auto-updates when a new element is parsed into the existing element.
An HTMLCollectiont returns only the given elements of the specified elements.
We have already covered how HTMLCollection works using the children, getElementsbyTagName(), and getElementsByClassName() properties and methods above.
Node List
NodeList are node objects. We get a NodeList when we use instance properties such as childNodes and instance methods such as getElementsbyName() and querySelectorAll(). A NodeList is said to be static. This is because it does not auto-update when a new element is parsed into the existing element.
A NodeList returns all the nodes of the given elements.
We have already covered how HTMLCollection works using the childNodes, getElementsbyName() and querySelectorAll() properties and methods above.
Shadow DOM and Virtual DOM
We have discussed the Document Object Model and its use cases, and another component of the DOM we have to discuss is the Shadow DOM and Virtual DOM.
What is Shadow DOM?
Shadow DOM refers to a separate Document Object Model tree of elements that can be append() into the main Document Object Model tree, but it’s not part of the main Document Object Model tree. However, when parsed by the browser, it behaves like it’s part of the main Document Object Model.
The shadow DOM gives us the flexibility to be able to work with another tree-like Document Object Model without making any changes to the main Document Object Model structure but using the shadow Document Object Model to add functionality to the page.
However, since Shadow DOM is a very new feature, browsers have implemented Shadow DOM in different ways and with different limitations. For example, some browsers allow you to use JavaScript in Shadow DOM by default, others don’t; some allow you to set up event handlers in Shadow DOM by default, and others don’t. This means that we still need to test our work across browsers.
Cloud-based cross browser testing platform like LambdaTest lets you perform both exploratory and automation testing of Shadow DOM on an online browser farm of 3000+ real browsers and operating systems combinations. You can further accelerate your testing cycles by running cross browser tests in parallel and reducing test execution time by multiple folds.
Subscribe to the LambdaTest YouTube Channel and stay updated with the latest tutorials around Selenium testing, Cypress testing, and more.
What is Virtual DOM?
Virtual DOM, on the other hand, is a concept mainly found in JavaScript frameworks such as React.js and Vue.js.
This is a direct representation or copy of the main Document Object Model into a memory called a Virtual DOM. This Virtual DOM has the same tree-like structure as the main Document Object Model. So anytime a change is made to the JSX or (JS) file, an update is made to the Virtual DOM.
In turn, the Virtual DOM refers to the part of the Document Object Model, where the changes were made and then provides necessary changes to the main Document Object Model.
This helps reduce the load time it would take if the changes were made directly to the main Document Object Model.
Differences between Shadow DOM and Virtual DOM
Shadow DOM and Virtual DOM are very different. Shadow DOM is a web component API and exists in major browsers locally. While Virtual DOM is an implementation by JavaScript frameworks like react.js and vue.js.
Conclusion
We just covered a complete guide to Document Object Model (DOM). And we covered the following.
- What is the Document Object Model (DOM),
- The DOM structure and DOM tree,
- Accessing the DOM interface
- Document instance properties and methods
- Node instance properties and methods
- Difference between DOM Node and Element
- HTMLCollection and NodeList
- What is Shadow and Virtual DOM
Alright! We’ve come to the end of this blog on Document Object Model.
Thanks for taking your time to read this article to completion. Feel free to ask questions. I’ll gladly reply. You can find me on Twitter, and other social media @ocxigin.
#Cheers
Frequently Asked Questions (FAQs)
What is Document Object Model concept?
The Document Object Model (DOM) is a programming interface for HTML and XML documents. It represents the structure of a document as a tree of nodes, with each node representing an element of the document, such as a paragraph or an image. The DOM allows developers to access and manipulate a document’s content, structure, and style and create dynamic, interactive web pages. It is a W3C standard and is supported by all modern web browsers.
What are DOM methods?
The Document Object Model (DOM) provides several methods that can be used to access and manipulate the elements of an HTML or XML document. Some common DOM methods include:
- getElementsByTagName(name): Returns a list of elements with the specified tag name.
- getElementsByClassName(name): Returns a list of elements with the specified class name.
- querySelector(selector): Returns the first element that matches the specified CSS selector.
- querySelectorAll(selector): Returns a list of elements that match the specified CSS selector.
- appendChild(node): Adds a new child node to the end of the list of children for a specific parent node.
- removeChild(node): Removes a child node from the list of children for a specific parent node.
- replaceChild(newNode, oldNode): Replaces an existing child node with a new node.
- createElement(tagName): Creates a new element with the specified tag name.
- createTextNode(text): Creates a new text node with the specified text.
- setAttribute(name,value): sets the attribute’s value to the given value.
- removeAttribute(name): removes the attribute with the specified name.
- getElementById(id): Returns the element with the specified id.
These are just some examples of the many methods available in the DOM. More complex operations can be achieved by combining different methods.
What is Document Object Model in XML?
The Document Object Model (DOM) is applied to XML documents, just like in HTML. The DOM provides a tree-based representation of an XML document, with each node in the tree representing an element, attribute, or text content in the XML document. In XML, the DOM tree comprises Node objects, which can be one of several types such as Element, Attribute, Text, Comment, Document, etc. Each node in the tree has properties and methods that can be used to access and manipulate the contents of the XML document.
What is a DOM in JavaScript?
In JavaScript, the Document Object Model (DOM) is an API that allows developers to access and manipulate an HTML or XML document’s elements, attributes, and content. The DOM represents the document as a tree of nodes, and each node in the tree represents an element, attribute, or text content in the document.
What is virtual DOM?
The virtual DOM is a concept in web development where an in-memory representation of the actual Document Object Model (DOM) is maintained. It enables efficient updating and rendering of web interfaces by minimizing direct manipulation of the real DOM.
What is virtual dom in React?
In React, the virtual DOM refers to the lightweight copy of the actual DOM maintained by React components. It allows React to efficiently update and render components by performing minimal updates to the real DOM based on the changes detected in the virtual DOM.
What is the DOM in HTML?
The DOM (Document Object Model) in HTML is a programming interface that represents the structure of an HTML document as a tree-like structure. It provides methods and properties for accessing, modifying, and manipulating the content and structure of an HTML document.
What are the three types of DOM?
The three types of DOM are the Core DOM, which represents the standard elements in an XML or HTML document; the XML DOM, which is an extension of the Core DOM for XML documents; and the HTML DOM, which is an extension of the Core DOM for HTML documents.
What are different DOM methods?
Different DOM methods include getElementById, getElementsByTagName, querySelector, createElement, appendChild, removeChild, and many more. These methods allow developers to select elements, create new elements, modify element attributes, and manipulate the structure of the DOM.
What are the functions of DOM?
The DOM (Document Object Model) serves as an interface between web content and scripts. It provides functions for accessing, modifying, and manipulating elements and their properties within an HTML document. The DOM enables dynamic interactions, event handling, and content manipulation on web pages.

The Document Object Model is a programming interface that comprises web pages (nodes) that is HTML tags such as < html >, < meta >, < title >, < body >, < footer > , < dv >, semantic and non-semantic tags and other nodes objects. The Document Object Model, which is a W3 standard, represents web pages as a tree-like structure of nodes, known as documents.
The Document Object Model allows web developers to manipulate, style, and structure node objects (HTML documents). For example, web elements are manipulated dynamically with JavaScript to add dynamic content and interactivity to the web page, while CSS is used to add aesthetics. This is referred to as styling to the web page.
Furthermore, the Document Object Model can also be used with other programming languages such as C#, Ruby, Python, Java, and PHP. However, on the front end, JavaScript and CSS are mostly used as these are the languages of the browser.
The DOM Structure or the DOM TREE
The DOM exists in a hierarchical tree-like structure, where each web element that makes up the document can be thought of as a node, that is, the element tags, the attribute assigned to the element, the comment, the text content, and the document as well is also a node.
The document object is the root object and can be found within the window’s object. The window’s object defines the document object and how it is rendered or loaded within the webpage.
The document object has properties and methods that can manipulate contents or element nodes on the page.
The diagram below gives a simple illustration of what the tree-like structure looks like.
From the Document Object Model structure shown above, you will notice how each element directly connects to other elements; this is known as a hierarchy. This hierarchy is important as this determines how elements are laid out and how they can be accessed with JavaScript and CSS.
Look at how this hierarchy is laid out in an HTML document.
|
1 2 3 4 5 6 7 8 9 10 11 12 13 14 15 16 17 18 19 20 21 22 23 24 25 26 27 28 29 30 31 32 33 34 |
<!DOCTYPE html> <html> <head> <meta charset="utf-8"> <meta name="viewport" content="width=device-width, initial-scale=1"> <title>This is an HTML document</title> <link rel="stylesheet" type="text/css" href="style.css"> </head> <body> <main> <!-- This is the website Navigation --> <header> <nav> <ul> <li>HOME</li> <li>SERVICES</li> <li>ABOUT</li> </ul> </nav> </header> <section> <h1>The Document Object Model</h1> <p> The DOM gives web developers the flexibility to be able to manipulate, style and structure element nodes (HTML elements). For Example web elements are manipulated dynamically with JavaScript to be able to add dynamic content and interactivity to the web page while CSS is used to add aesthetics, this is referred to as styling to the web page. Furthermore the DOM can also be used with other programming languages such as, C# (SEE SHARP), Ruby, Python, Java and PHP. However on the frontend JavaScript and CSS are mostly used as these are the languages of the browser. </p> </section> </main> </body> </html> |
Now that we have the HTML structure laid out, let’s break down how the hierarchy works.
From the code sample above, the HTML Document contains different types of HTML tags. Out of all these tags, we have the < html > tag at the top level, followed by the < head > tag. Inside the < head > tag, we have the < meta >,< title >, and < link > tags, respectively. Below the < head > tag, we have the < body > tag.
The < body > contains all the necessary tags responsible for displaying all the contents on the webpage. The < body > tag, as you can see, includes a < main > tag, a < header > tag, a < nav > tag, < ul > tag, and a < li > tag. Furthermore, below the < header > tag is the < section > tag, and inside the < section > tag are the < h1 > and < p > tags, respectively.
Please take note when a tag is placed inside another tag. This is referred to as nesting. So we can simply say that the < header > tag is nested inside the < main > tag, while the < main > is nested inside the < body > tag.
Nesting affects how elements are accessed with JavaScript. For instance, we can create a new element tag from our JavaScript file.
To do this, we will create the element tag, target the parent element, and then append the new element as a child element.
The image below explains this better.
From the image above, you will notice some elements appear at the top level, and other elements are placed inside them. You can use this to explain the hierarchical relationship as follows.
Root node
This refers to the topmost element in the Document Object Model tree. For example, in this case, the < HTML > tag is the root tag.
Parent node
This refers to the element directly at the top of another element. For example, the < body > tag is parent to the < main > tag, as the < body > tag is placed directly above the < main > tag.
Child node
This refers to the element directly below another element. For example, the < main > tag is a child element to the < body > tag because it is placed directly below the < body > element.
Grand-child node
This refers to any element that is below the child element. For example, the < header > is below the < main >, which is a child of the < body > tag. This makes the < header > tag a grand-child of the < body > tag.
Siblings
This refers to any two or more elements that share the same parent and are on the same level. For example, the < header > and the < section > tags share the parent, the < main > tag. Hence they can be referred to as siblings in the document tree.
Ancestor node
This refers to the element that all other elements are nested in. For example, in this case, the < html > can be referred to as the ancestor to other elements.
Descendants
The parent, children, siblings, and grand-children are all referred to as descendants of the root element. For example, every document tree element is a descendant of the < html > tag.
Leaf node
The last element or node in document three that does not have a child. A leaf node can also be described as the end of a branch in a Document Object Model tree.
The image below explains the above concept better.
Accessing the DOM Interface
The DOM is an interface that provides us with object nodes, and there are lots of built-in properties/methods we can use to access and manipulate the contents in the Document Object Model tree in JavaScript.
Using the HTML < script > tag, we can embed JavaScript code within the HTML file or link it to an external file and then use methods available in JavaScript to access and manipulate the Document Object Model.
This is necessary; for instance, we can create and validate a form field that lets users sign up for our newsletter, and we can also make web elements interactive when users over-hover them.
The next section will explain the methods and properties we can use to make changes to the Document Object Model.
Document Instance Properties
Document Instance Properties are used to capture information about the state of an object at a given point in time.
classList
The element.classList instance property returns a class attribute of a live DOMTokenList collection. The DOMTokenList instance methods are required to manipulate or make changes when using the classList instance properties.
The instance methods for the classList instance property are as follows.
- add(): used to add one or more classes to the class attributes of an element.
- remove(): used to remove one or more classes from the class attributes of an element.
- replace(): used to replace a given class with a new class within the class attributes of an element.
- toggle(): used to toggle a given class within a class attribute of an element. That is when you make use of the toggle method. It removes the class you assign to the element from the class attribute if the class exists and replaces it if the class does not exist within the element.
Take the example below.
HTML:
|
1 2 3 4 5 6 7 8 9 |
<h1>This is classList property</h1> <p>Click the boxes to change color</p> <main> <div class="default-Color" id="addOne">This is a add() method</div> <div class="default-Color" id="addTwo">This is a remove() method</div> <div class="default-Color" id="addThree">This is a replace() method</div> <div class="default-Color" id="addFour">This is a toggle() method</div> </main> |
See the Pen
classList box color switcher by Ocxigin (@ocxigin)
on CodePen.
From the HTML code example, we have an < main > as the parent tag, and we nested four < div > tags inside the < main > tag.
Each < div > tag is assigned a class of default-Color and an id of addOne, addTwo, addThree, and addFour, respectively.
CSS:
|
1 2 3 4 5 6 7 8 9 10 11 12 13 14 15 16 17 18 19 20 21 22 23 24 25 26 27 28 29 30 |
main { display: flex; } div { width: 150px; height: 80px; margin: 0.4em; border: 2px solid #000000; } .default-Color{ background: red; } .green { background: green; } .purple { background: purple; } .blue { background: blue; } .orange { background: orange; } |
While from the CSS code sample, we set a display of flex to < main > tag, the parent element in this case and we targeted the < div > tag, we set the width and height to 150px and 80px respectively, margin 0.4em across and a border of 2px solid and #000000 (black).
Furthermore, we set the default-Color to red, so each box is red by default, and we created four extra utility classes waiting to be used.
We will see how we can use JavaScript to change the elements using these classes.
JavaScript:
|
1 2 3 4 5 |
//Variable const addColor = document.querySelector('#addOne'); const removeColor = document.querySelector('#addTwo'); const replaceColor = document.querySelector('#addThree'); const toggleColor = document.querySelector('#addFour'); |
First, we use the querySelector() method to get the element and then assign them to a variable, as you can see. We create four variables named addColor, removeColor, replaceColor, and toggleColor, respectively.
Variables are just like containers; they help us store values so we can access them or reuse them later in our code. In this case, we want to be able to make changes to our element, so we assign each element to a variable, and we use the querySelector() method to reference the element id attribute.
|
1 2 3 4 5 6 7 8 9 10 11 12 13 14 15 16 17 18 19 20 21 22 23 24 25 |
// function //add() methods function addMyColorGreen(){ addColor.classList.add('green') console.log(addColor); } //remove() methods function addMyColorRed(){ removeColor.classList.remove('default-Color') console.log(removeColor); } //replace() methods function addMyColorBlue(){ replaceColor.classList.replace('default-Color', 'blue') console.log(replaceColor); } //toggle() methods function addMyColorOrange(){ toggleColor.classList.toggle('orange') console.log(toggleColor); } |
In JavaScript, functions allow us to perform takes or calculations that can be reused within our code. Also, we can make changes to a given element based on the values or tasks created within the function.
In this case, we created a function with the name addMyColorGreen(). Inside this function, we called the addColor variable, which we created earlier, and then assigned the classList instance property to target the class attribute of the element.
This returns a DOMTokenList, and we use the add() instance method of the DOMTokenList to add a CSS class of green from our stylesheet to the element attribute.
When done, any value associated with the CSS class upon assignment is parsed to the element.
In this case, we have a value of green parsed to the element as a background color.
Furthermore, you will have noticed that we also have a console.log() method with a value of addColor parsed right inside the function we just created. This will log the element to the console to see if the class we have assigned is parsed in as expected.
|
1 2 3 4 5 |
// EventLinsterners addColor.addEventListener('click', addMyColorGreen); removeColor.addEventListener('click', addMyColorRed); replaceColor.addEventListener('click', addMyColorBlue); toggleColor.addEventListener('click', addMyColorOrange); |
Writing functions are great, but they can be useless if they are not told when to behave. That is when the function should be called. In this case, we have event listeners.
Event Listeners, programmatically written as addEventListner(), is a JavaScript Event method that allows you to add an event to an element. When the event is triggered on the webpage, it takes in an event and a function you want to respond to. In this case, we assign a value to the click event. We want the function to respond when we click the object referenced on the addEventListener() method.
The object we are referencing is the addColor variable. When the element with the addColor variable is clicked on, we want the background color to change and long the element to the browser console.
Type the code above and run to see the output below, but remember to open up for dev tools (inspect).
To do this, simply right-click on the webpage and then click Inspect.
Browser Output:
From the browser output.
- The first box adds a green color to the background.
- The second box removes the red background and leaves it with a no-fill color with a border of black.
- The third box replaces the red with a blue color.
- The last box toggles between the red and orange color.
You can click the last box multiple times to see how the color changes continuously.
className
The element.className instance property sets or returns a class attribute of a given element.
The className property, like the classList, does not require a method to function; you can simply assign values to it directly.
Take the code example below.
HTML:
|
1 |
<main>This is a className property</main> |
We have a simple < main > tag with a display of text content. We need to parse a class attribute to the < main > tag using the className instance property.
Type and run the JavaScript below.
JavaScript:
|
1 2 3 4 5 |
const getMain = document.querySelector('main'); getMain.className = 'set-class'; console.log(getMain) |
Browser Output:
See the Pen
className: by Ocxigin (@ocxigin)
on CodePen.
See the display of the newly created class attribute in the console above.
innerHTML
The element.innerHTML instance property sets or returns the HTML content of an element. This is useful when we want to parse content together with the HTML tags into the Document Object Model.
Take the code example below.
HTML:
|
1 2 |
<main id="mainOne"></main> <main id="mainTwo"></main> |
We have two main tags, each with an id attribute of mainOne and mainTwo, respectively.
Now, let’s see how we can make some modifications to JavaScript. Type and run the JavaScript code below.
JavaScript:
|
1 2 3 4 5 6 7 8 9 |
//Variables const mainTag = document.querySelector('#mainOne'); const mainTagTwo = document.querySelector('#mainTwo'); const parseContent = `<p>This is main one</p>`; const parseContentTwo = `This is main Two`; mainTag.innerHTML = parseContent; mainTagTwo.innerHTML = parseContentTwo; |
From the JavaScript code above, parseContent is assigned a string value wrapped in HTML < p > tags, while parseContentTwo is assigned a string value with text content only.
Then we target the mainOne and mainTwo elements. Using the innerTHML property, we access the properties of both elements and then parse in parseContent and parseContentTwo.
We do this to parse the content to empty < main > tags. Now let’s take a look at how this works on the browser.
Browser Output:
See the Pen
innerHTML by Ocxigin (@ocxigin)
on CodePen.
From the browser output, we have the two content displays on the browser, but if we inspect the browser and take a look at the devtools, you will find that the parseContent variable has a < p > tag inserted inside the mainOne element while parseContentTwo variable only inserts the text content.
Also, the mainOne element displays the element parsed like mainTwo without displaying the < p >.
outerHTML
The element.outerHTML instance property sets and replaces the HTML tags and the content of a given element. This is useful when we want to parse new HTML tags to replace a given HTML tag and its content within the DOM.
Take the code example below.
HTML:
|
1 2 3 4 5 6 7 |
<main id="mainOne"> <ul> <li>This is a list element</li> </ul> </main> <main id="mainTwo">This is outerHTML</main> |
From the HTML code example above, we decided to add < li > with text content and nest it inside a < ul > tag, this < ul > tag is also nested inside the < main > tag we used earlier. So what we want to do is use the outerHTML instance property to replace the two < main > tags.
Type and run the JavaScript code below.
JavaScript:
|
1 2 3 4 5 6 7 8 |
const mainTag = document.querySelector('#mainOne'); const mainTagTwo = document.querySelector('#mainTwo'); const parseContent = `<p>This is main one</p>`; const parseContentTwo = `This is main Two`; mainTag.outerHTML = parseContent; mainTagTwo.outerHTML = parseContentTwo; |
From the code example above, we targeted the two main tags, and we used outerHTML to replace the tags and their content.
We assign the values we want to use to parseContent and parseContentTwo, and each variable is parsed to mainOne and mainTwo, respectively, using the outerHTML instance property. Now let’s see how this renders on the browser.
Browser Output:
See the Pen
outerHTML by Ocxigin (@ocxigin)
on CodePen.
As indicated by the two arrows inside the devtools, the two < main > tags have been replaced completely. The mainOne element and its descendants (< ul > and < li >) element have been replaced with just a < p > and a text content, while the mainTwo element is replaced with just text content with no given element.
innerText
The element.innerText instance property sets and replaces the content and descendants of a given element. This is useful when you want to parse new content into a given HTML tag.
Also, note that the innerText will only return text, so if you parse in HTML tags, it will return it as text and print it into the browser.
If the element you wish to update has a child element or descendants, it will be replaced with a text.
Take the code example below.
|
1 2 3 4 5 6 7 |
<h1>This is innerText</h1> <main id="mainOne"> <p>Happy Coding!</p> </main> <main id="mainTwo"></main> |
We have two < main > tags, a mainOne tag with a < p > tag and text content and an empty mainTwo tag. Now let’s see how we can change mainOne and mainTwo using innerText.
Type and run the JavaScript code below.
|
1 2 3 4 5 |
const mainOne = document.querySelector('#mainOne'); const mainTwo = document.querySelector('#mainTwo'); mainOne.innerText = '<em>Hello World</em>'; mainTwo.innerText = 'Hello World'; |
Browser Output:
See the Pen
innerText: by Ocxigin (@ocxigin)
on CodePen.
From the browser output, we set mainOne and mainTwo to display Hello World. The < em > tag we assigned to mainOne is supposed to make the text italic, but since we parse it through the innerText property, the text content is parsed as plain text with no italic styling effect.
And also, the < p > tag with the text of Happy Coding is completely replaced, while the mainTwo element we assigned a text of Hello World with no tags enclosing it is printed on the screen.
Another thing you have to take note of is how this affects the Document Object Model tree. From the devtool view, as you would have noticed, the < p > is completely replaced, and the mainTwo is updated with a new text.
outerText
The element.outerText instance property sets and replaces the HTML tag, its content and descendants within the Document Object Model tree. This is useful when you want to parse new content into a given HTML tag. This will replace the specified tag leaving you with only text content.
If the element you wish to update has a child element or descendants, it will be replaced with a text. So be sure you are parsing it to the last child on the element node to prevent error.
Take the code example below.
|
1 2 3 4 5 6 7 8 9 |
<strong>HTML:</strong> <h1>This is outerText</h1> <main id="mainOne"> <p>Happy Coding!</p> </main> <main id="mainTwo"></main> |
Just like the previous example from innerText, here we have the same HTML code setup. Now let’s see how we can use the outerText instance property to change the Document Object Model tree.
JavaScript:
|
1 2 3 4 5 |
const mainOne = document.querySelector('#mainOne'); const mainTwo = document.querySelector('#mainTwo'); mainOne.outerText = '<em>Hello World</em>'; mainTwo.outerText = 'Hello World'; |
Browser Output:
See the Pen
outerText by Ocxigin (@ocxigin)
on CodePen.
From the devtool how the two < main > tags have been replaced and the effect it has on the browser output.
children
The element.children instance property returns all the child/children of a given element. The children property returns it as a live HTML collection.
Also, take note that the children instance property only returns element nodes.
Take the code example below.
HTML:
|
1 2 3 4 5 6 7 8 |
<main class="root"> <div id="parent"> <div id="one">one</div> <div id="two">two</div> <div id="two">three</div> <div id="two">four</div> </div> </main> |
JavaScript:
|
1 2 3 4 5 |
const parentEl = document.querySelector('#parent'); const returnChildren = parentEl.children; console.log(returnChildren) |
Console Output:
See the Pen
children by Ocxigin (@ocxigin)
on CodePen.
From the console output, the children instance property returns all the child element of the given parent as a live HTML Collection.
firstElementChild
The element.firstElementChild instance property returns only the first child of a given element If the element you wish to return has no child element, it returns a null.
Take the code example below.
HTML:
|
1 2 3 4 5 6 7 8 9 10 |
<main class="root"> <ul class="parent"> <li class="child-1 siblings">element one</li> <li class="child-2 siblings">element two</li> <li class="child-3 siblings">element three</li> <li class="child-4 siblings">element four</li> <li class="child-5 siblings">element six</li> <li class="child-6 siblings">element seven</li> </ul> </main> |
JavaScript:
|
1 2 3 4 |
const getParent = document.querySelector('.parent'); const getChildOne = getParent.firstElementChild; console.log(getChildOne) |
Console Output:
See the Pen
firstElementChild by Ocxigin (@ocxigin)
on CodePen.
From the console output, notice that we have printed the first child element.
lastElementChild
The element.lastElementChild instance property returns only the last child of a given element. If the element you wish to return has no child element, it returns a null.
Take the code example below.
HTML:
|
1 2 3 4 5 6 7 8 9 10 |
<main class="root"> <ul class="parent"> <li class="child-1 siblings">element one</li> <li class="child-2 siblings">element two</li> <li class="child-3 siblings">element three</li> <li class="child-4 siblings">element four</li> <li class="child-5 siblings">element six</li> <li class="child-6 siblings">element seven</li> </ul> </main> |
JavaScript:
|
1 2 3 4 5 6 |
const getParent = document.querySelector('.parent'); const getChildSix = getParent.lastElementChild; console.log(getChildSix) |
Console Output:
See the Pen
lastElementChild by Ocxigin (@ocxigin)
on CodePen.
From the console output, notice that we have the last child element printed out.
nextElementSibling
The element.nextElementSibling instance property returns the next element of the same sibling in the Document Object Model level of a given element. If the element you wish to return happens to be the last child element, it returns a null.
Take the code example below.
HTML:
|
1 2 3 4 5 6 7 8 9 10 |
<main class="root"> <ul class="parent"> <li class="child-1 siblings">element one</li> <li class="child-2 siblings">element two</li> <li class="child-3 siblings">element three</li> <li class="child-4 siblings">element four</li> <li class="child-5 siblings">element six</li> <li class="child-6 siblings">element seven</li> </ul> </main> |
JavaScript:
|
1 2 3 4 5 6 7 |
const getParent = document.querySelector('.parent'); const getChildOne = getParent.firstElementChild; const getSiblings = getChildOne.nextElementSibling; console.log(getSiblings) |
Console Output:
See the Pen
nextElementSibling by Ocxigin (@ocxigin)
on CodePen.
From the console output, notice that we have the next element sibling printed out.
previousElementSibling
The element.previousElementSibling instance property returns the previous element of the same sibling in the Document Object Model level of a given element. If the element you wish to return happens to be the first child element, it returns a null.
Take the code example below.
HTML:
|
1 2 3 4 5 6 7 8 9 10 |
<main class="root"> <ul class="parent"> <li class="child-1 siblings">element one</li> <li class="child-2 siblings">element two</li> <li class="child-3 siblings">element three</li> <li class="child-4 siblings">element four</li> <li class="child-5 siblings">element six</li> <li class="child-6 siblings">element seven</li> </ul> </main> |
JavaScript:
|
1 2 3 4 5 6 7 |
const getParent = document.querySelector('.parent'); const getChildSix = getParent.lastElementChild; const getSiblings = getChildSix.previousElementSibling; console.log(getSiblings) |
Console Output:
See the Pen
previousElementSibling by Ocxigin (@ocxigin)
on CodePen.
From the console output, notice that we have the previous element sibling printed out.
Document Methods
In this section of this blog on the Document Object Model, I will try to describe some of the most useful methods available in DOM
QuerySelector
The querySelector() document method returns the first element that matches the specified CSS selector passed in within the Document Object Model tree.
Syntax:
|
1 |
document.querySelector(CSS selectors) |
Take the simple code example below.
HTML:
|
1 2 3 4 5 6 7 |
<div class="my-class">querySelector using: class</div> <div id="my-id">querySelector using: id</div> <section>querySelector using: tag Name</section> <input type="text" name="css-attribute" value="my input tag"/> |
JavaScript:
|
1 2 3 4 5 6 7 8 9 10 11 |
//Accessing web element by class Name const myClass = document.querySelector('.my-class'); //Accessing web element by id Name const myId = document.querySelector('#myId'); //Accessing web element with by Tag Name const section = document.querySelector('section'); //Accessing web element with class attribute const myInput = document.querySelector('input[type]'); |
See the Pen
QuerySelector by Ocxigin (@ocxigin)
on CodePen.
There are different ways to select elements using querySelector() methods. As long as the value assigned within the parenthesis is a valid way of selecting elements in CSS, the querySelector() method will return the element.
QuerySelectorAll
The querySelector() document method returns a static nodeList (Not Live) of all elements that match the specified CSS selector passed within the DOM tree.
Syntax:
|
1 |
document.querySelectorAll(CSS selectors) |
Take the simple code example below.
HTML:
|
1 2 3 4 5 6 7 |
<div class="my-class">querySelector using: class</div> <div id="my-id">querySelector using: id</div> <section>querySelector using: tag Name</section> <input type="text" name="css-attribute" value="my input tag"/> |
JavaScript:
|
1 2 3 4 |
//Accessing all web element with just one method const selectAll = document.querySelectorAll('.my-class, #my-id, section, input[type]'); console.log(selectAll) |
Console Output:
See the Pen
QuerySelectorAll by Ocxigin (@ocxigin)
on CodePen.
From the console output, notice how all the elements we selected are all listed out as a NodeList.
getElementById
The document.getElementById() returns an element object with a unique id attribute of a given element from the Document Object Model tree.
Syntax:
|
1 |
document.getElementById("idAtrribute") |
Take the simple code example below.
HTML:
|
1 |
<div id="myId">qetElementByID using: Id</div> |
JavaScript:
|
1 2 3 4 |
//Accessing web element with an ID attribute const myId = document.getElementById('myId'); console.log(myId) |
Console Output:
See the Pen
Get Element By Id by Ocxigin (@ocxigin)
on CodePen.
Notice how the getElementById method is used to return the specified element.
getElementsByTagName
The document.getElementsByTagName() returns an HTML Collection object with a specific tag name from the Document Object Model tree.
Syntax:
|
1 |
document.getElementsByTagName("h1") |
HTML:
|
1 2 3 4 5 6 |
<main> <div>qetElementByTagName using: Tag Name</div> <div>qetElementByTagName using: Tag Name</div> <div>qetElementByTagName using: Tag Name</div> <div>qetElementByTagName using: Tag Name</div> </main> |
JavaScript:
|
1 2 3 4 |
//Accessing web element by it tag name const myTagNames = document.getElementsByTagName('div'); console.log(myTagNames) |
Console Output:
See the Pen
Get Element By Tag Name by Ocxigin (@ocxigin)
on CodePen.
Notice how the getElementsByTagName method is used to return an HTML Collection object.
getElementsByClassName
The document.getElementsByClassName() returns a collection of array-like objects with a specific class name from the Document Object Model tree.
Syntax:
|
1 |
document.getElementsByNameClass("class-name") |
HTML:
|
1 2 3 4 5 6 |
<main> <div class="one">qetElementsByTagName using: Class Name</div> <div class="one">qetElementsByTagName using: Class Name</div> <div class="one">qetElementsByTagName using: Class Name</div> <div class="one">qetElementsByTagName using: Class Name</div> </main> |
JavaScript:
|
1 2 3 4 |
//Accessing web element by it class name const myClassName = document.getElementsByClassName('one'); console.log(myClassName) |
Console Output:
See the Pen
getElementsByClassName by Ocxigin (@ocxigin)
on CodePen.
Notice how the getElementsByClassName method is used to return an HTML collection of array-like objects.
createElement
The document.createElement() creates a new HtmlElement referenced by the value passed in. The value is passed as a string in lowercase later in between double or single quote and a valid tag name should be used.
Syntax:
|
1 |
document.createElement("div") |
JavaScript:
|
1 2 3 4 5 6 |
//Creating a new element using createElement methods const newEl = document.createElement('p'); newEl.innerText = 'This is a new paragraph'; console.log(newEl); |
Console Output:
See the Pen
Create Element by Ocxigin (@ocxigin)
on CodePen.
In the code sample above, we created a new element and parsed in a string of text.
Append
The element.append() is used to add a new element or text content to the last child of an element child. If you append an element/text to a parent tag, the element or text you appended is added to the last child of that element.
Take note that the append() method differs from the appendChild() of the nodeList method. While the append() method allows you to append multiple elements at once, the appendChild() can only append one. With the append() method, a text node can be appended, while appendChild() only appends an Element node.
Syntax:
|
1 2 3 4 |
// you can pass in single value element.append("Element") //you can pass in multiple values element.append("string", "string") |
HTML:
|
1 2 3 4 5 6 |
<main class="root"> <div id="parent"> <div>one</div> <div>two</div> </div> </main> |
From the HTML code sample we have a < div > tag with an id of parent. Inside this < div > tag, we have two more nested < div > tags with the text content of one and two, respectively. We will add two more < div > tags to the children element.
Type and run the JavaScript below.
JavaScript:
|
1 2 3 4 5 6 7 |
const parentEl = document.querySelector('#parent'); const newEl = document.createElement('div'); const newElTwo = document.createElement('div'); parentEl.append(newEl, newElTwo); newEl.append('This is a div tag') |
Console Output:
See the Pen
Append by Ocxigin (@ocxigin)
on CodePen.
Now, we have two new elements in the Document Object Model.
After
The element.after() is used to add a new element or text after a specified element within the Document Object Model tree.
Syntax:
|
1 2 3 4 |
// you can pass in single value element.after("Element") //you can pass in multiple values element.after("string", "string") |
HTML:
|
1 2 3 4 5 6 |
<main class="root"> <div id="parent"> <div id="one">one</div> <div id="two">two</div> </div> </main> |
JavaScript:
|
1 2 3 4 5 6 7 8 9 10 11 |
const parentEl = document.querySelector('#parent'); const one = document.querySelector('#one') const newEl = document.createElement('div'); const newElTwo = document.createElement('div'); parentEl.append(newEl); newEl.append('This is a div tag') one.after(newElTwo); newElTwo.innerText = 'This is an after() method'; |
Console Output:
See the Pen
After by Ocxigin (@ocxigin)
on CodePen.
We used the after() method to insert the newly created < div > tag to come directly after the first element.
Before
The element.before() is used to add a new element or text before a specified element within the Document Object Model tree. The before() do the direct opposite of what after() does.
Syntax:
|
1 2 3 4 |
// you can pass in single value element.before("Element") //you can pass in multiple values element.beforer("string", "string") |
HTML:
|
1 2 3 4 5 6 |
<main class="root"> <div id="parent"> <div id="one">one</div> <div id="two">two</div> </div> </main> |
JavaScript:
|
1 2 3 4 5 6 7 8 9 10 11 |
const parentEl = document.querySelector('#parent'); const one = document.querySelector('#one') const newEl = document.createElement('div'); const newElTwo = document.createElement('div'); parentEl.append(newEl); newEl.append('This is a div tag') one.before(newElTwo); newElTwo.innerText = 'This is an before() method'; |
Console Output:
See the Pen
Before by Ocxigin (@ocxigin)
on CodePen.
The example here is the same as the previous example for after(). We just replaced the after() with the before(). Now notice how the < div > element moves as the element’s first child.
Remove
The element.remove() removes the specified element from the Document Object Model. When using the method, you don’t have to assign a value to the parentheses.
Syntax:
|
1 |
element.remove() |
Take the following example below.
HTML:
|
1 2 3 4 5 |
<main> <div id="one">This Remove Element method one</div> <div id="two">This Remove Element method two</div> <div id="three">This Remove Element method three</div> </main> |
From the HTML example above, we have three < div > tags, we are going to remove the second < div > tag with an id of two. Now type and run the JavaScript code below.
JavaScript:
|
1 2 3 |
const removeEl = document.querySelector("#two"); const myEl = removeEl.remove(); |
Browser Output:
See the Pen
Remove by Ocxigin (@ocxigin)
on CodePen.
From the output, notice we now have just two < div > tags left out of the three we created.
setAttribute
The element.setAttribute() sets the attribute of a given element in the Document Object Model tree. The attribute is updated if the given attributes already exist in the element.
Note: When using the set attribute method, the first value takes in the name of the attributes. This might be an id, class, type, or name and then followed by the value you want the attribute to have.
Syntax:
|
1 |
element.setAttribute(name, value) |
Take the following example below:
HTML:
|
1 |
<main>This is set Attribute Method</main> |
The HTML displays just a set text, with a main tag. Now type and run the JavaScript code given below.
JavaScript:
|
1 2 3 4 5 |
const myAttribute = document.querySelector("main"); myAttribute.setAttribute("id", "my-text"); console.log(myAttribute); |
Browser Output:
See the Pen
Set Attribute by Ocxigin (@ocxigin)
on CodePen.
Notice the output indicated by the arrow.
getAttribute
The element.getAttribute() returns the attribute of a given element in the Document Object Model tree. If the given attribute does not exist in the element, the attribute returns null.
Note : When using the get attribute method, you should only reference the name of the attribute you want to get. Also, remember that you can only get one attribute from the given element.
Syntax:
|
1 |
element.getAttribute(name) |
Take the following example below.
HTML:
|
1 |
<main id="my-text">This is get Attribute Method</main> |
We are going to get the id attribute we set earlier. Type and run the JavaScript code given below.
JavaScript:
|
1 2 3 4 5 |
const myAttribute = document.querySelector("main"); const myAttr = myAttribute.getAttribute("id"); console.log(myAttr); |
Browser Output:
See the Pen
Get Attribute by Ocxigin (@ocxigin)
on CodePen.
Notice from the arrow the return name of the id attribute value.
getAttributeNames
The element.getAttributeNames() returns the attribute as an array-like string. If the given element does not have an attribute in the element, it returns an empty array.
Note: When using the get attribute method, you don’t have to reference the name of the attributes you want to get.
Syntax:
|
1 |
element.getAttributeNames() |
Take the following example below.
HTML:
|
1 |
<main id="my-text" class="get" name="attribute">This is get Attribute Names Method</main> |
We are going to get the name of the given attributes name specified in the element. Type and run the JavaScript below.
JavaScript:
|
1 2 3 4 5 |
const myAttribute = document.querySelector("main"); const myAttr = myAttribute.getAttributeNames(); console.log(myAttr); |
Browser Output:
See the Pen
Get Attribute Names by Ocxigin (@ocxigin)
on CodePen.
Notice from the arrow the returned attributes as an array.
hasAttribute
The element.hasAttribute() returns a boolean value of true if the attribute exists. If the given attribute does not exist in the element, false is returned.
Note: When using the has attribute method, you should only reference the name of the attribute you want to check. Also, remember that you can only get one attribute from the given element.
Syntax:
|
1 |
element.hasAttribute(name) |
Take the following example below:
HTML:
|
1 |
<main id="my-text">This is has Attribute Method</main> |
JavaScript:
|
1 2 3 4 5 |
const myAttribute = document.querySelector("main"); const myAttr = myAttribute.hasAttribute("id"); console.log(myAttr); |
Browser Output:
See the Pen
has Attribute by Ocxigin (@ocxigin)
on CodePen.
See the true value indicated by the arrow.
removeAttribute
The element.removeAttribute() removes the attribute of a given element in the DOM tree. If the given attribute does not exist in the element, nothing is returned.
Note: When using the remove attribute method, you should only reference the name of the attribute you want to remove. Also, remember that you can only remove one attribute from the given element.
Syntax:
|
1 |
element.removeAttribute(name) |
Take the following example below:
HTML:
|
1 |
<main id="my-text">This is remove Attribute Method</main> |
We are going to remove the id attribute we set earlier. Type and run the JavaScript code given below.
|
1 2 3 4 5 |
const myAttribute = document.querySelector("main"); myAttribute.removeAttribute("id"); console.log(myAttribute); |
Browser Output:
See the Pen
remove Attribute by Ocxigin (@ocxigin)
on CodePen.
See from the arrow that we no longer have an attribute on the element.
Node Instance Properties
Listed below are some node instance properties we can use to access, add or remove element nodes from the DOM tree.
childnodes
The node.childnodes property of the node interface returns a node list of child elements, of a specific element from the DOM tree. This includes elements, texts and comments.
Syntax:
|
1 |
document.body.childNodes |
HTML:
|
1 2 3 4 5 6 7 8 9 10 |
<main class="root"> <ul class="parent"> <li class="child-1 siblings">element one</li> <li class="child-2 siblings">element two</li> <li class="child-3 siblings">element three</li> <li class="child-4 siblings">element four</li> <li class="child-5 siblings">element six</li> <li class="child-6 siblings">element seven</li> </ul> </main> |
From this HTML code above, notice we have 6 < li > elements listed out.
JavaScript:
|
1 2 3 4 |
const getParent = document.querySelector('.parent'); const getChild = getParent.childNodes; console.log(getChild) |
Console Output:
See the Pen
ChildNodes by Ocxigin (@ocxigin)
on CodePen.
From the console output, the childNodes instance property returns 12 items with a length of 13. As stated earlier, the childNodes instance property returns the given child elements and the texts and comments.
firstChild
The node.firstChild property of the node interface returns the first child of a specific element from the Document Object Model tree and returns a null object when the element has no child.
Syntax:
|
1 |
document.body.firstChild |
JavaScript:
|
1 2 3 4 |
const getParent = document.querySelector('.parent'); const getChild = getParent.firstChild; console.log(getChild) |
From this code example above and using the same HTML code template we used earlier, we try getting the firstChild node.
Console Output:
From the console output, we got a text node as the first child node. This is because the firstChild is a node instance property and not an element. What this means is the firstChild node returns elements, text, or comment. In this case, the firstChild node is a text.
If what you want to return is the first element instead of a node, try using the firstElementChild property. The firstElementChild property has been covered above.
lastChild
The node.lastChild property of the node interface returns the last child of a specific element from the DOM tree and returns a null object when the element has no child.
Syntax:
|
1 |
document.body.lastChild |
JavaScript:
|
1 2 3 4 |
const getParent = document.querySelector('.parent'); const getChild = getParent.lastChild; console.log(getChild) |
Console Output:
See the Pen
Last Child by Ocxigin (@ocxigin)
on CodePen.
From the console output, we got a text node as the last child node.
Next Sibling
The node.nextSibling property of the node interface returns the next sibling of a specific element of the same level on the DOM tree and returns null if the element happens to be the last child.
Syntax:
|
1 |
document.body.nextSibling |
JavaScript:
|
1 2 3 4 5 6 7 |
const getParent = document.querySelector('.parent'); const getChild = getParent.firstChild; const nextChild = getChild.nextSibling; console.log(nextChild) |
Console Output:
See the Pen
Next Sibling by Ocxigin (@ocxigin)
on CodePen.
From the console output, we got the first element as the next sibling. This is because, after the text node, the child element comes next.
previousSibling
The node.previousSibling property of the node interface returns the previous sibling of a specific element of the same level on the Document Object Model tree. It returns null if the element happens to be the first child.
Syntax:
|
1 |
document.body.previousSibling |
JavaScript:
|
1 2 3 4 5 6 7 |
const getParent = document.querySelector('.parent'); const getChild = getParent.lastChild; const previousChild = getChild.previousSibling; console.log(previousChild) |
Console Output:
See the Pen
Previous Sibling by Ocxigin (@ocxigin)
on CodePen.
From the console output, we got the last element as the previous sibling.
Parent Node
The node.parentNode property of the node interface returns the parent element on the Document Object Model tree.
Syntax:
|
1 |
document.body.parentNode |
JavaScript:
|
1 2 3 4 5 6 7 |
const getParent = document.querySelector('.parent'); const getChild = getParent.firstChild; const returnParent = getChild.parentNode; console.log(returnParent) |
Console Output:
See the Pen
Parent Node by Ocxigin (@ocxigin)
on CodePen.
From the console output. We used the first child element to return the parent element.
textContent
The node.textContent property of the node interface returns or sets the text content of a given element on the Document Object Model tree.
Syntax:
|
1 |
document.element.textContent |
JavaScript:
|
1 2 3 4 5 6 7 |
const getParent = document.querySelector('.parent'); const getChild = getParent.firstChild; const returnParent = getChild.parentNode; console.log(returnParent.textContent) |
Console Output:
See the Pen
Text Content by Ocxigin (@ocxigin)
on CodePen.
Node Instance Methods
Node instance methods are functions that can be called on an instance of a Node.js class or object. These methods have access to the properties and methods of the class or object and can perform actions or manipulate data associated with the instance.
AppendChild
The node.appendChild() method of the node interface adds a child element to a given parent Node in the Document Object Model tree.
Syntax:
|
1 |
document.element.appendChild(childElement) |
Take the code sample below.
HTML:
|
1 2 3 4 5 6 |
<main class="root"> <ul class="parent"> <li class="child-1 siblings">element one</li> <li class="child-2 siblings">element two</li> </ul> </main> |
JavaScript:
|
1 2 3 4 5 6 7 8 9 10 |
//The parent element const getParent = document.querySelector('.parent'); //The create a new Paragraph const newLi = document.createElement('li'); const insertChild = getParent.appendChild(newLi); insertChild.innerText = 'New list Element'; console.log(insertChild) |
Console Output:
See the Pen
AppendChild by Ocxigin (@ocxigin)
on CodePen.
From the console output, we now have three list items instead of the two we have.
RemoveChild
The node.removeChild() method of the node interface removes a child element of a given parent Node in the Document Object Model tree.
Syntax:
|
1 |
document.element.removeChild(childElement) |
JavaScript:
|
1 2 3 4 5 6 7 |
//The parent element const getParent = document.querySelector('.parent'); const childOne = document.querySelector('li[class]'); const firstEl = getParent.removeChild(childOne); console.log(firstEl) |
Console Output:
See the Pen
RemoveChild by Ocxigin (@ocxigin)
on CodePen.
From the console output, we now have one element after the first element was removed.
replaceChild
The node.replaceChild() method of the node interface replaces a child element with a new child element of a given parent Node in the Document Object Model tree.
Note: the replaceChild method takes in the new child element first and then the old child element you want to replace.
Syntax:
|
1 |
document.element.replaceChild(newElement, oldElement) |
HTML:
|
1 2 3 4 5 |
<main class="root"> <ul class="parent"> <li class="child-2 siblings">element two</li> </ul> </main> |
JavaScript:
|
1 2 3 4 5 6 7 8 9 10 11 |
//The parent element const getParent = document.querySelector('.parent'); //List Element we want to replace const listEl = document.querySelector('li[class]'); //create new div element const div = document.createElement('div'); //Replace the list with div element const replaceList = getParent.replaceChild(div, listEl); |
Console Output:
See the Pen
ReplaceChild by Ocxigin (@ocxigin)
on CodePen.
As indicated by the arrow, notice how the list element has been replaced with a div tag.
InsertBefore
The node.insertBefore() method of the node interface inserts a child element before the specified element of a given parent Node in the Document Object Model tree.
Syntax:
|
1 |
document.element.insertBefore(newElement, specifiedElement) |
HTML:
|
1 2 3 4 5 6 7 |
<main class="root"> <ul class="parent"> <li class="childOne siblings">element one</li> <li class="childTwo siblings">element two</li> <li class="childThree siblings">element three</li> </ul> </main> |
JavaScript:
|
1 2 3 4 5 6 7 8 9 10 11 |
//The parent element const getParent = document.querySelector('.parent'); //the List element we want to insert element before it const listEl = document.querySelector('.childTwo'); //create new div element const div = document.createElement('div'); //insert div element before list two element const placeDiv = getParent.insertBefore(div, listEl); |
Console Output:
See the Pen
InsertBefore by Ocxigin (@ocxigin)
on CodePen.
From the console output, notice how the new div element we created was inserted before element two targeted.
hasChildNodes
The node.hasChildNodes() method of the node interface returns a boolean value of true if the specified element has a child but returns false if the child is not present in the Document Object Model tree.
Note: white-space is also treated as a text node (empty string)
Syntax:
|
1 |
document.element.hasChildNodes() |
HTML:
|
1 2 3 4 5 6 7 |
<main class="root"> <ul class="parent"> <li class="childOne siblings">element one</li> <li class="childTwo siblings">element two</li> <li class="childThree siblings">element three</li> </ul> </main> |
JavaScript:
|
1 2 3 4 5 6 7 |
//The parent element const getParent = document.querySelector('.parent'); //Check if the parent element has a child node. const checkNode = getParent.hasChildNodes(); console.log(checkNode) |
Console Output:
See the Pen
Has Child Nodes by Ocxigin (@ocxigin)
on CodePen.
From the console out, we have true printed out. This is because the parent has child nodes (Elements).
Difference between DOM Node and Element
The term Document Object Model or DOM node and Element node can be quite confusing, so we must iterate this point for clarity. But first, let’s better understand what Node and Elements are.
The Node
The node refers to an interface that serves as a base for other Web API objects in the Document object model (DOM).
Example of Node in the DOM:
Below is an HTML document. HTML documents are represented as Nodes and objects. This node allows developers to manipulate the web page using node properties and methods.
HTML DOCUMENTS:
|
1 2 3 4 5 6 7 8 9 10 11 12 13 14 15 16 17 18 19 20 21 22 23 24 25 26 27 28 29 30 31 32 33 34 35 |
<!DOCTYPE html> <html> <head> <meta charset="utf-8"> <meta name="viewport" content="width=device-width, initial-scale=1"> <title>This is an HTML document</title> <link rel="stylesheet" type="text/css" href="style.css"> </head> <body> <main> <!-- This is the website Navigation --> <header> <nav> <ul> <li>HOME</li> <li>SERVICES</li> <li>ABOUT</li> </ul> </nav> </header> <!-- This is the page section --> <section> <h1>The Document Object Model</h1> <p>The DOM gives web developers the flexibility to be able to manipulate, style and structure element nodes</p> </section> <!-- This is the page button --> <button>This is a Button</button> </main> <!-- This is the page footer --> <footer>This is a footer</footer> </body> </html> |
From the above HTML document, the nodes refer to the following:
- HTML tags
- The text content with the HTML tags
- The HTML comment
- The Doctype declaration
- The HTML attributes, etc.
- White space (taps, spaces, line-breaks)
All these are referred to individually as nodes. So it’s valid to say the attribute node. To refer to only the attribute of the element or comment node to refer to the comments on the page only.
The instance property and instance methods are objects in JavaScript for manipulating and updating the nodes in the Document Object Model. This can either be comments, text, white spaces, or elements.
White Spaces
It’s important to note that whitespaces are nodes, which are taps, space, and line breaks. These White spaces are usually treated as text, and white spaces between two words are treated as a single character, while white spaces before and after the opening and closing tags are ignored. This helps to structure HTML content when it loads by the browser properly.
Try this code below.
HTML:
|
1 2 3 4 5 6 7 8 9 |
<main> <h1> This is text contains white spaces </h1> </main> |
The HTML code above contains white spaces, which are created with space-tap, taps, and line breaks.
Browser Output:
See the Pen
Whitespace by Ocxigin (@ocxigin)
on CodePen.
From the browser output, notice how each word is laid out without taps. Based on how the text is formatted and laid out in the Text Editor, the browser removes these extra white spaces and lays out the content in a single line. To add or remove white space is done using CSS.
Element Nodes
The element node refers to the HTML tags. Examples of the element nodes are < p >, < div >, < main >, < h1 > etc. The element node has nothing to do with the text inside it, white spaces, or attributes. These are just separate nodes that can be attached to the element nodes. The element instance properties and methods are built-in objects that allow developers to manipulate the element nodes.
It’s important to note that the node instance properties and methods differ from the element instance properties and methods. The node instance properties and methods allow access to all node objects, which includes white space, comments, elements, attributes, etc., while element instance properties and methods only allow access to the element node. So this should not be used interchangeably.
Comment Nodes
The comment nodes are special kinds of nodes. It helps to explain what a particular section of your code is meant to do or is designed to do. Although comments can be accessed or created in a JavaScript environment, you are not necessarily going to be manipulating the comment node with JavaScript since they are not displayed by the browser.
Here is an example of a comment in HTML.
|
1 2 3 4 5 6 7 |
<!-- This is a comment node --> <!-- # You can also write # a comment in # This manner --> |
Note the comments mentioned here are HTML comments, not JavaScript.
Difference between HTML Collections and a Node List
If you have read this far, you will have come across where we talked about some elements returning a live HTMLCollection or NodeList. We will break it down so that when you come across these terms next, you will know exactly what you are working with.
HTML Collection
This is a group of element nodes (array-like objects). We get an HTMLCollection when we use instance properties such as children and instance methods such as getElementsbyTagName() and getElementsByClassName(). An HTML collection is said to be live. This is because it auto-updates when a new element is parsed into the existing element.
An HTMLCollectiont returns only the given elements of the specified elements.
We have already covered how HTMLCollection works using the children, getElementsbyTagName(), and getElementsByClassName() properties and methods above.
Node List
NodeList are node objects. We get a NodeList when we use instance properties such as childNodes and instance methods such as getElementsbyName() and querySelectorAll(). A NodeList is said to be static. This is because it does not auto-update when a new element is parsed into the existing element.
A NodeList returns all the nodes of the given elements.
We have already covered how HTMLCollection works using the childNodes, getElementsbyName() and querySelectorAll() properties and methods above.
Shadow DOM and Virtual DOM
We have discussed the Document Object Model and its use cases, and another component of the DOM we have to discuss is the Shadow DOM and Virtual DOM.
What is Shadow DOM?
Shadow DOM refers to a separate Document Object Model tree of elements that can be append() into the main Document Object Model tree, but it’s not part of the main Document Object Model tree. However, when parsed by the browser, it behaves like it’s part of the main Document Object Model.
The shadow DOM gives us the flexibility to be able to work with another tree-like Document Object Model without making any changes to the main Document Object Model structure but using the shadow Document Object Model to add functionality to the page.
However, since Shadow DOM is a very new feature, browsers have implemented Shadow DOM in different ways and with different limitations. For example, some browsers allow you to use JavaScript in Shadow DOM by default, others don’t; some allow you to set up event handlers in Shadow DOM by default, and others don’t. This means that we still need to test our work across browsers.
Cloud-based cross browser testing platform like LambdaTest lets you perform both exploratory and automation testing of Shadow DOM on an online browser farm of 3000+ real browsers and operating systems combinations. You can further accelerate your testing cycles by running cross browser tests in parallel and reducing test execution time by multiple folds.
Subscribe to the LambdaTest YouTube Channel and stay updated with the latest tutorials around Selenium testing, Cypress testing, and more.
What is Virtual DOM?
Virtual DOM, on the other hand, is a concept mainly found in JavaScript frameworks such as React.js and Vue.js.
This is a direct representation or copy of the main Document Object Model into a memory called a Virtual DOM. This Virtual DOM has the same tree-like structure as the main Document Object Model. So anytime a change is made to the JSX or (JS) file, an update is made to the Virtual DOM.
In turn, the Virtual DOM refers to the part of the Document Object Model, where the changes were made and then provides necessary changes to the main Document Object Model.
This helps reduce the load time it would take if the changes were made directly to the main Document Object Model.
Differences between Shadow DOM and Virtual DOM
Shadow DOM and Virtual DOM are very different. Shadow DOM is a web component API and exists in major browsers locally. While Virtual DOM is an implementation by JavaScript frameworks like react.js and vue.js.
Conclusion
We just covered a complete guide to Document Object Model (DOM). And we covered the following.
- What is the Document Object Model (DOM),
- The DOM structure and DOM tree,
- Accessing the DOM interface
- Document instance properties and methods
- Node instance properties and methods
- Difference between DOM Node and Element
- HTMLCollection and NodeList
- What is Shadow and Virtual DOM
Alright! We’ve come to the end of this blog on Document Object Model.
Thanks for taking your time to read this article to completion. Feel free to ask questions. I’ll gladly reply. You can find me on Twitter, and other social media @ocxigin.
#Cheers
Frequently Asked Questions (FAQs)
What is Document Object Model concept?
The Document Object Model (DOM) is a programming interface for HTML and XML documents. It represents the structure of a document as a tree of nodes, with each node representing an element of the document, such as a paragraph or an image. The DOM allows developers to access and manipulate a document’s content, structure, and style and create dynamic, interactive web pages. It is a W3C standard and is supported by all modern web browsers.
What are DOM methods?
The Document Object Model (DOM) provides several methods that can be used to access and manipulate the elements of an HTML or XML document. Some common DOM methods include:
- getElementsByTagName(name): Returns a list of elements with the specified tag name.
- getElementsByClassName(name): Returns a list of elements with the specified class name.
- querySelector(selector): Returns the first element that matches the specified CSS selector.
- querySelectorAll(selector): Returns a list of elements that match the specified CSS selector.
- appendChild(node): Adds a new child node to the end of the list of children for a specific parent node.
- removeChild(node): Removes a child node from the list of children for a specific parent node.
- replaceChild(newNode, oldNode): Replaces an existing child node with a new node.
- createElement(tagName): Creates a new element with the specified tag name.
- createTextNode(text): Creates a new text node with the specified text.
- setAttribute(name,value): sets the attribute’s value to the given value.
- removeAttribute(name): removes the attribute with the specified name.
- getElementById(id): Returns the element with the specified id.
These are just some examples of the many methods available in the DOM. More complex operations can be achieved by combining different methods.
What is Document Object Model in XML?
The Document Object Model (DOM) is applied to XML documents, just like in HTML. The DOM provides a tree-based representation of an XML document, with each node in the tree representing an element, attribute, or text content in the XML document. In XML, the DOM tree comprises Node objects, which can be one of several types such as Element, Attribute, Text, Comment, Document, etc. Each node in the tree has properties and methods that can be used to access and manipulate the contents of the XML document.
What is a DOM in JavaScript?
In JavaScript, the Document Object Model (DOM) is an API that allows developers to access and manipulate an HTML or XML document’s elements, attributes, and content. The DOM represents the document as a tree of nodes, and each node in the tree represents an element, attribute, or text content in the document.
What is virtual DOM?
The virtual DOM is a concept in web development where an in-memory representation of the actual Document Object Model (DOM) is maintained. It enables efficient updating and rendering of web interfaces by minimizing direct manipulation of the real DOM.
What is virtual dom in React?
In React, the virtual DOM refers to the lightweight copy of the actual DOM maintained by React components. It allows React to efficiently update and render components by performing minimal updates to the real DOM based on the changes detected in the virtual DOM.
What is the DOM in HTML?
The DOM (Document Object Model) in HTML is a programming interface that represents the structure of an HTML document as a tree-like structure. It provides methods and properties for accessing, modifying, and manipulating the content and structure of an HTML document.
What are the three types of DOM?
The three types of DOM are the Core DOM, which represents the standard elements in an XML or HTML document; the XML DOM, which is an extension of the Core DOM for XML documents; and the HTML DOM, which is an extension of the Core DOM for HTML documents.
What are different DOM methods?
Different DOM methods include getElementById, getElementsByTagName, querySelector, createElement, appendChild, removeChild, and many more. These methods allow developers to select elements, create new elements, modify element attributes, and manipulate the structure of the DOM.
What are the functions of DOM?
The DOM (Document Object Model) serves as an interface between web content and scripts. It provides functions for accessing, modifying, and manipulating elements and their properties within an HTML document. The DOM enables dynamic interactions, event handling, and content manipulation on web pages.


Author’s Profile
Alex Anie
A Front End Technical Writer. I write blogs on Front End Technologies, such as HTML, CSS, JavaScript. When I am not coding, I enjoy watching tutorials and listening to twitter spaces. I live in Lagos, Nigeria
Blogs: 16
Got Questions? Drop them on LambdaTest Community. Visit now


