
How To Fill And Submit Forms In Cypress
Sachin
Posted On: December 3, 2021
![]() 157766 Views
157766 Views
![]() 18 Min Read
18 Min Read
Web forms are one of the most common types of forms that you may have encountered when interacting with websites. An example of a simple form is a login page, where the user needs to enter the login credentials to access the relevant features of the platform. On the other hand, complex forms can contain a combination of user details, captchas, date pickers, and more.
Be it Cypress automation testing or Selenium ; the tests are meant to interact with the WebElements on the page. As per my experience, automating the website’s behavior using appropriate methods is a must-have skill for Cypress testing.
In this blog of the ongoing Cypress tutorial series, I will be covering the integral aspects related to forms: How to use Cypress to fill out forms and How to use Cypress to submit forms. In case you are coming from a Selenium background and intrigued to know what is Cypress, make sure to check out the Selenium vs Cypress comparison.
TABLE OF CONTENTS
What are Forms in HTML documents?
Before I deep dive into how to use Cypress to fill out forms or perform Cypress form validation, let me touch upon the essential aspects of Forms in HTML. Here, I will also focus on the different types of attributes that constitute the creation of a form.
HTML Forms are generally used to take different types of user inputs such as name, email address, phone numbers, card details, etc. These inputs are generally driven by forms through special elements (or controls) like checkboxes, text, password fields, input range, etc.
Users are generally required to complete a form by entering text, selecting items, etc., and submitting this form from the front-end. Once the content is submitted, a response is received from the server’s end. Understanding how to find HTML Elements using Cypress locators is a starting point to use Cypress to fill out forms and submit forms.
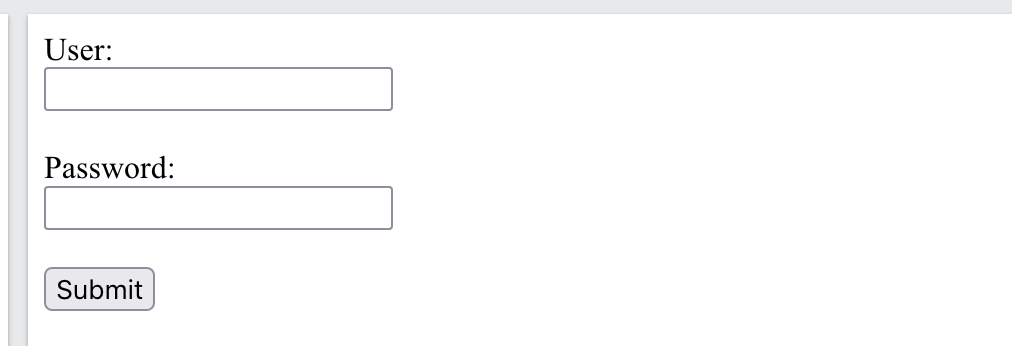
The <form> tag is used to create an HTML form. Here’s a simple example of a login form:
|
1 2 3 4 5 6 7 8 9 |
<html lang="en"> <form> <label>User: <br> <input type="text"></label><br> <label>Password:<br> <input type="password"></label><br> <input type="submit" value="Submit"> </form> </html> |
Now that we know the basic syntax of forms let’s implement the different input interactions with Cypress. I will walk you through each type of form that can be handled through the Cypress automation framework. I will also cover the potential limitations of Cypress from the perspectives of form submission and validation of forms.
Also read – Handling Touch and Mouse Events in Cypress
Form submission with Cypress
Here are some of the major types of WebElements that most of us would have come across on web pages:
Input Elements
<input> tag is the most used type of element in forms. This is because it allows you to add various types of user input fields that are majorly dependent on the attribute type.
Also read – Get Attribute Value in Selenium WebDriver
An input element can be a text field, password field, checkbox, radio button, etc. Each of these elements serves different purposes, and the approach in handling them purely depends on the element type.
Here are some of the major input fields that can be handled with Cypress test automation:
Text Fields
Text fields are single text input controls. In text fields, the type attribute has a value of the text. Here’s an example text input used to take username:
Example: Handling Text fields in Cypress
For demonstrating how to handle text fields in Cypress, I will be using the following HTML form:
|
1 2 3 4 5 6 |
<html lang="en"> <form action="https://www.automationtestinginsider.com/"> First name:<br><input name="firstname" type="text"><br> Last name:<br><input name="lastname" type="text"><br> </form> </html> |
The output of the above example is shown below:

Here is the Cypress implementation for handling text fields on a test website:
|
1 2 3 4 5 6 7 8 9 10 11 12 |
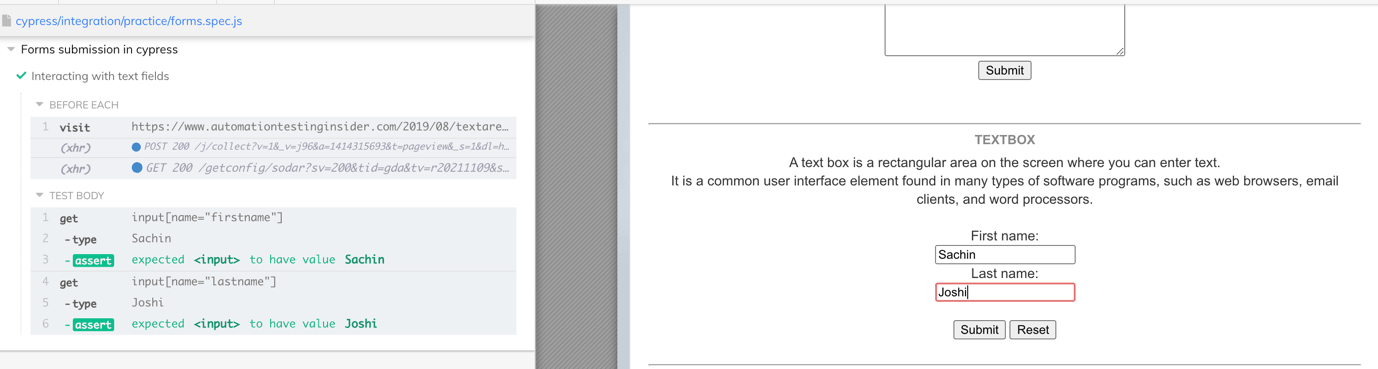
beforeEach('Launch site', ()=>{ cy.visit('https://www.automationtestinginsider.com/2019/08/textarea-textarea-element-defines-multi.html') }) it('Interacting with text fields',()=>{ cy.get('input[name="firstname"]') .type('Sachin') .should('have.value','Sachin') .get('input[name="lastname"]') .type('Joshi') .should('have.value','Joshi') }) |
Code Walkthrough
I am using cy.visit() to open the target website in the above code. Once the site is loaded, the cy.get() function is called by passing the CSS web locator.
Appropriate CSS locators in Cypress are used to locate the desired WebElement and interact with the same. For example, on similar lines, the cy.get() method is used for entering the ‘last name’ in the text field.
For both the fields, I am asserting the value using .should() to validate if the text is showing the same value or not.
Check out the below video that deep dives into Assertions in Cypress:
However, you can visit the LambdaTest YouTube channel for more videos in the Cypress Testing tutorial and videos on Selenium testing, so there’s never a shortage of learning opportunities.
Password Field
The characters in the password fields are masked; hence, they are shown as dots or asterisks. Akin to text fields, password fields are also input controls created using an <input> element with attribute type as password.
Example: Handling Password field in Cypress
Here’s an example of a password input inside <form> for user password:
|
1 2 3 4 5 6 |
<html lang="en"> <form> <label for="pwd">Password:</label> <input type="password" name="password" id="user-pwd"> </form> </html> |
The output of the above example is shown below:

Here is the Cypress implementation for handling password field on a test website:
|
1 2 3 4 5 6 7 8 9 |
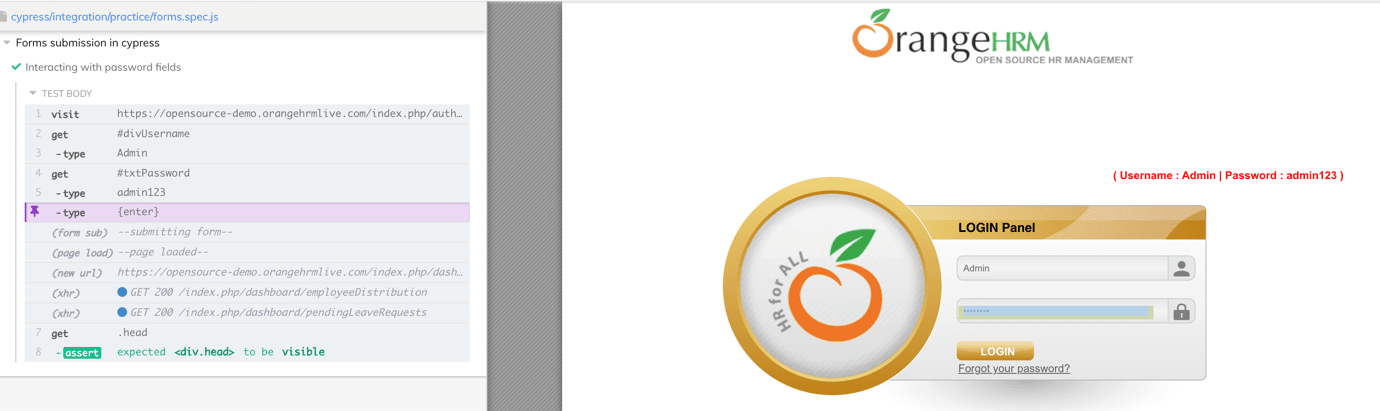
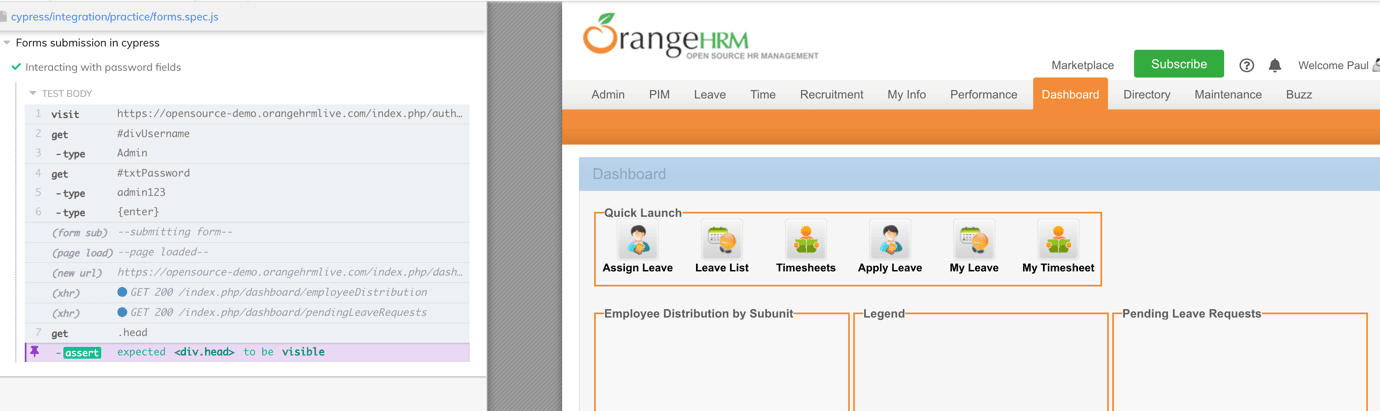
it('Interacting with password fields' ,()=>{ cy.visit('https://opensource-demo.orangehrmlive.com/index.php/auth/login') .get('#divUsername') .type("Admin") .get('#txtPassword').type('admin123') .type('{enter}') .get('.head') .should('be.visible'); }) |
Code Walkthrough
Here, I am visiting the site’s login page and locating the elements using the .get() method. An assert is raised using the using should() method if the login is unsuccessful.
Along with it, the visibility of the .head class is also checked to ensure that the required elements are available on the page.
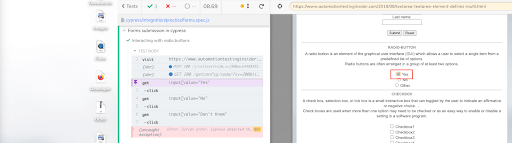
Radio Buttons are used when the user selects exactly one option out of the listed ones when submitting the HTML form. The Radio button is created using an <input> element with type attribute value as radio.
One of its common applications is when the user has to select their gender, marital status, or submit answers that have binary (i.e., yes/no) options.
Example: Handling Radio buttons in Cypress
Here’s an example of a radio buttons inside <form> tag:
|
1 2 3 4 5 6 7 8 |
<html lang="en"> <form> <input type="radio" name="gender" id="male"> <label for="male">Male</label> <input type="radio" name="gender" id="female"> <label for="female">Female</label> </form> </html> |
Here is the output of the HTML code:
![]()
Here is the Cypress implementation for handling radio buttons on a test website:
|
1 2 3 4 5 6 7 8 9 |
it('Interacting with radio buttons',()=>{ cy.visit('https://www.automationtestinginsider.com/2019/08/textarea-textarea-element-defines-multi.html') .get('input[value="Yes"') .click() .get('input[value="No"') .click() .get('input[value="Don\'t Know"') .click() }) |
Code Walkthrough
The first step is to locate (or identify) the radio button with the Value attribute. For realizing this, I am leveraging the <input> tag [Yes, No, etc.].
The click() method is used for selecting the required value (using the radio button on the form).
Also read – Click Command in Selenium
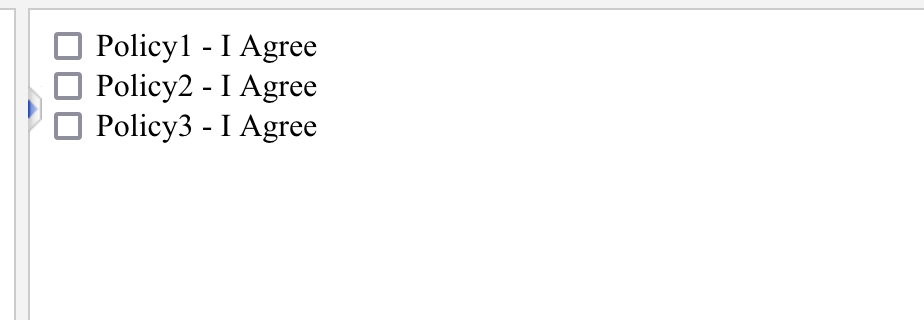
Checkboxes
Checkboxes in forms help you select more than one option from a list of predefined options. It is created using an <input> element with attribute type as checkbox.
Example: Handling Checkboxes in Cypress
For demonstrating how to handle checkboxes in Cypress, I have created a simple HTML form that comprises a few checkboxes.
|
1 2 3 4 5 6 7 8 9 10 11 12 |
<html lang="en"> <form> <input type="checkbox" name="policy" id="policy1"> <label for="policy">Policy1 - I Agree</label> <br> <input type="checkbox" name="policy" id="policy2"> <label for="policy">Policy2 - I Agree</label> <br> <input type="checkbox" name="policy" id="policy3"> <label for="policy">Policy3 - I Agree</label> </form> </html> |
Here is the output of the following HTML code:
Here is the Cypress implementation for handling checkboxes on a test website:
|
1 2 3 4 5 6 7 8 9 10 11 |
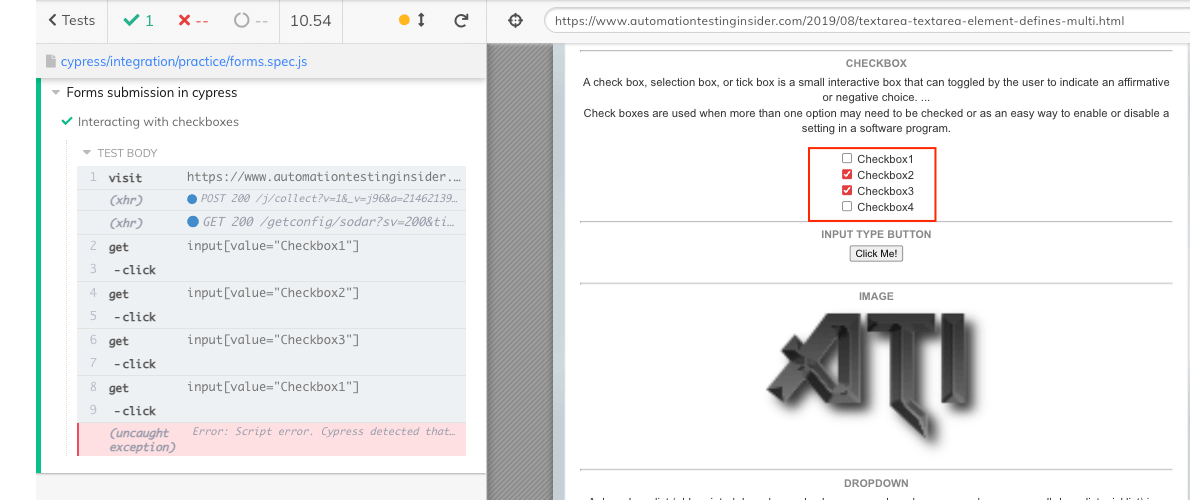
it('Interacting with checkboxes',()=>{ cy.visit('https://www.automationtestinginsider.com/2019/08/textarea-textarea-element-defines-multi.html') .get('input[value="Checkbox1"]') .click() .get('input[value="Checkbox2"]') .click() .get('input[value="Checkbox3"]') .click() .get('input[value="Checkbox1"]') .click() //this to uncheck first one again }) |
I have checked all the four checkboxes in the above example and unchecked them one by one.

Code Walkthrough
To get started, the required WebElement is identified using the Value attribute. Then, depending on your convenience, you can also use other attributes like ID, Name, etc.
Like XPath in Selenium, you can also choose to use XPath in Cypress if XPath is your go-to WebLocator for locating WebElements. As seen in the output below, Checkbox1 is unchecked (if checked) once we perform a click operation on it.
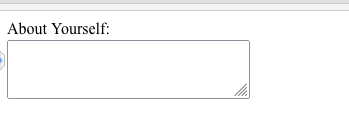
TextArea
Textarea is another form of text input field where users can enter more than one line of text. Textarea field is particularly useful when users submit lengthy text like feedback, instructions, etc.
With the attributes like rows, cols, and maxlength, you can limit the visibility and number of characters in the text area. The <textarea> tag element is used to create multi-line text fields.
The attribute rows is used to specify the visible number of lines, whereas cols is used to specify the visible width of a text area.
Example: Handling Textarea in Cypress
To demonstrate how to handle textarea in Cypress, I have created a simple HTML form containing a single text area.
|
1 2 3 4 5 6 7 8 |
<html> <body> <label for="address">About Yourself:</label> <form> <textarea rows="10" cols="30" name="address" id="address"></textarea> </form> </body> </html> |
Here is the output of the following HTML code:
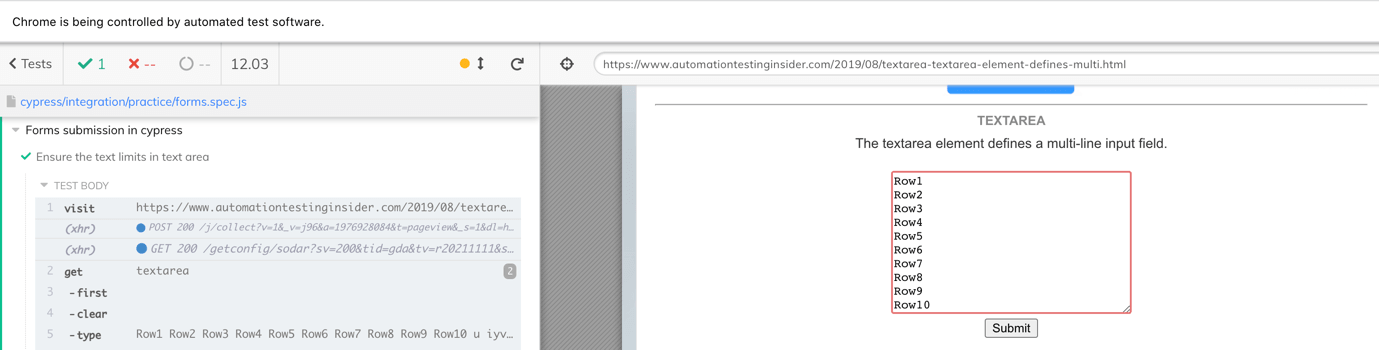
Here is the Cypress implementation for handling the text area (where rows are 10 in number). This means that text will be visible only till 10 rows. Post that, users will have to scroll to see the remaining text.
Shown below is the implementation to enter multiple rows with the use of new line character (i.e. “\n”):
|
1 2 3 4 5 6 7 8 9 |
it('Ensure the text limits in text area', () => { cy.visit('https://www.automationtestinginsider.com/2019/08/textarea-textarea-element-defines-multi.html') .get('textarea') .first() .clear() .type(Row1\n Row2\nRow3\nRow4\nRow5\nRow6\nRow7\nRow8\n Row9\nRow10\nRow11\nRow12') } ) |
Code Walkthrough
The cy.get(‘textarea’) method is used for locating the textarea field. The clear() method in Cypress is used for clearing the input text that might be pre-populated by default.
The type() method in Cypress is used for entering text across rows till Row-12. The text till row 10 is visible in the below screenshot, after which you will have to scroll down to see the content entered in the remaining rows. This is because we have limited the maximum number of rows to 10 for the <textarea> element.
Dropdown Menu
A dropdown menu provides a list of options that users can select before submitting the form. A common usage of dropdown menus is choosing the appropriate country/state/city from the pre-populated list.
It is created using the <select> element along with the <option> tag which lists the options available for selection. The <option> tag can be used without any attributes; however, a value attribute is a must if you want to send the selected values to the server once the form is submitted.
Example: Handling Dropdown menu in Cypress
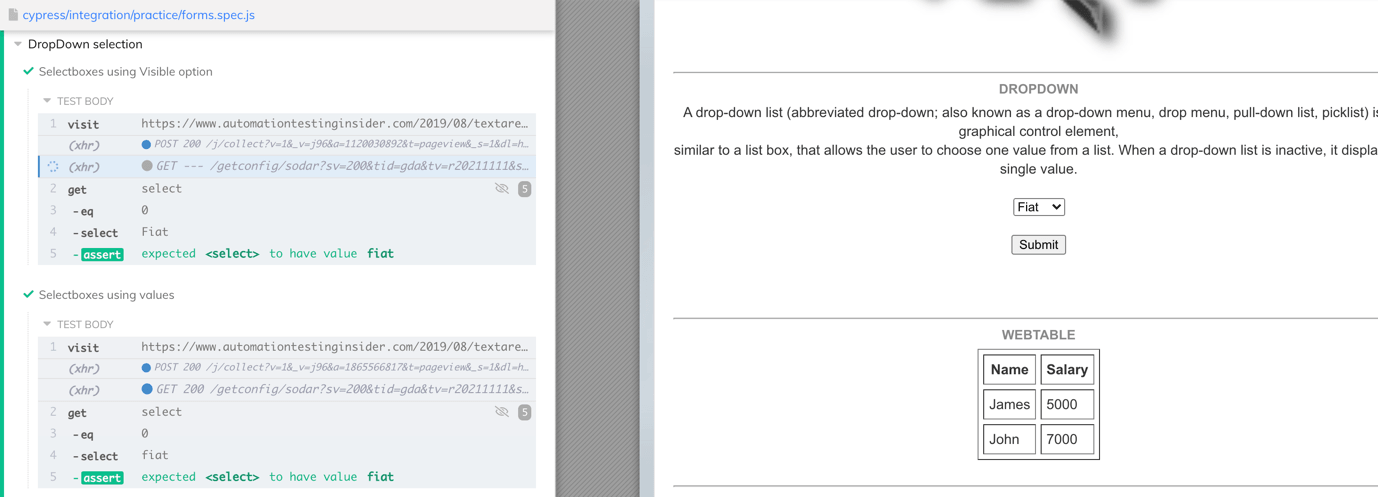
Here, I have created a simple downtown list that lets the user select their preferred automobile brand:
|
1 2 3 4 5 6 7 8 9 10 11 12 13 |
<html> <form action="/action_page.php"> <label for="cars">Choose a car:</label> <select name="cars" id="cars"> <option value="volvo">Volvo</option> <option value="saab">Saab</option> <option value="opel">Opel</option> <option value="audi">Audi</option> </select> <br><br> <input type="submit" value="Submit"> </form> </html> |
Here is the Cypress implementation for handling dropdown menu in Cypress:
|
1 2 3 4 5 6 7 8 9 10 11 12 13 14 15 16 17 |
describe.only('DropDown selection',()=>{ it('Select boxes using Visible option',()=>{ cy.visit('https://www.automationtestinginsider.com/2019/08/textarea-textarea-element-defines-multi.html') .get('select') .eq(0) .select('Fiat') .should('have.value','fiat') }) it('Select boxes using values',()=>{ cy.visit('https://www.automationtestinginsider.com/2019/08/textarea-textarea-element-defines-multi.html') .get('select') .eq(0) .select('fiat') .should('have.value','fiat') }) }) |
Code Walkthrough
The cy.select() method in Cypress is used for handling dropdowns in Cypress. The select(params) method accepts only one parameter. We can use attribute value as well as visible text value as a parameter to find and select the options from the list.
Once the option is selected from the dropdown, should() assert the values using the built-in assertion method ‘have.value’. The method returns the value of the selected option.
Submit and Reset Buttons
Input control of the submit type is used for sending the form data to the server. When the submit button is clicked, the data entered by the user is submitted (or passed) to either retrieve from the database or perform actions on the submitted data.
For instance, when a user enters login details, the username and password combination is sent to the server for verification. Then, the next set of actions are performed depending on the verification status. In scenarios where the user clicks the submit button without filling in the required entries, an error message is displayed on the screen.
On similar lines, reset type of input control is used to clear all the details that the users enter. This is especially useful if the user has to re-enter the details in the form and clean all the respective fields if the submission has to be done freshly.
Submit and Reset are created using the <input> tag, where the attribute value is set to “submit” and “reset,” respectively.
Example: Using Submit button in Cypress
I have created a simple form to demonstrate the handling of submit and reset buttons in Cypress:
|
1 2 3 4 5 6 7 8 |
<html> <form action="https://www.automationtestinginsider.com/"> First name:<br> <input name="firstname" type="text"><br> Last name:<br> <input name="lastname" type="text"><br><br> <input type="submit" value="Submit"> <input type="reset"> </form> </html> |
Here is the sample output with the submit and reset buttons:

Shown below are the two approaches for handling Submit button in Cypress:
Approach 1: Using ‘Submit Button’ in Cypress
Shown below is the sample demonstration to use Submit button on a form with Cypress:
|
1 2 3 4 5 6 7 8 9 10 |
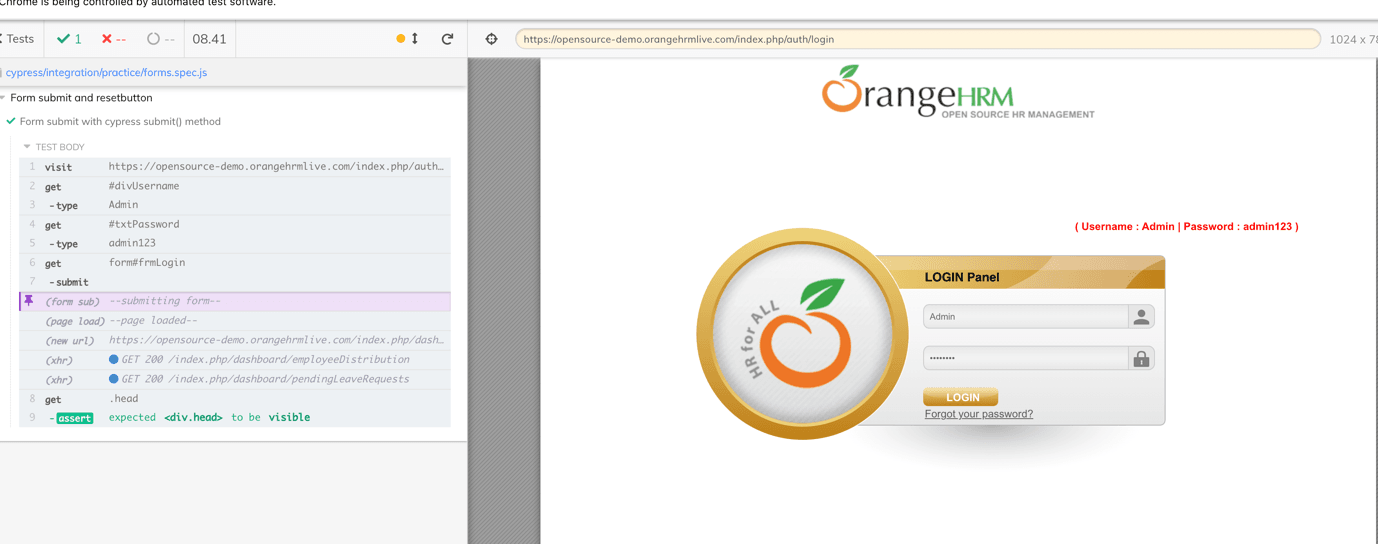
it('Form submit with cypress submit() method', () => { cy.visit('https://opensource- demo.orangehrmlive.com/index.php/auth/login') .get('#divUsername') .type("Admin") .get('#txtPassword').type('admin123') .get('form#frmLogin') .submit() .get('.head') .should('be.visible'); }) |
Code Walkthrough
The code is pretty simple 🙂 After entering the username and password, the submit() method is invoked to submit the contents entered in the form. In order to use the submit() method, we need to identify the form that has to be submitted.
For this, the form ID is used to identify the form and invoke the submit() method to submit the contents entered in the form. To check if the form is submitted successfully or not, the visibility of the dashboard is checked by invoking the should() method. Here, the in-built be.visible parameter is used for confirming the visibility.
Shown below is the execution snapshot:
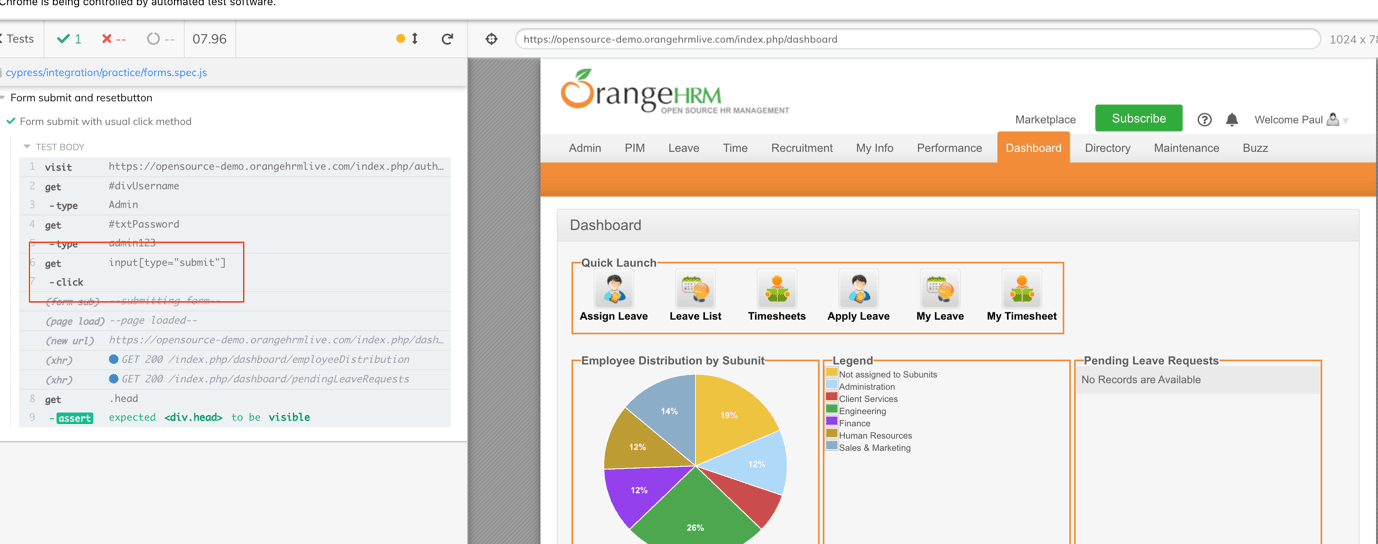
Approach 2: Using ‘Submit Button’ in Cypress
In this approach, the click() method is used for locating the Submit button using the appropriate locators in Cypress.
|
1 2 3 4 5 6 7 8 9 10 |
it('Form submit with usual click method', () => { cy.visit('https://opensource-demo.orangehrmlive.com/index.php/auth/login') .get('#divUsername') .type("Admin") .get('#txtPassword').type('admin123') .get('input[type="submit"]') .click() .get('.head') .should('be.visible'); }) |
Code Walkthrough
Form submission using the click() method is akin to how clicks are performed on any button on a page. However, the major difference between the earlier approach and this one is the methodology used for locating the button using the get(‘input[type=”submit”]’) method.
Once the button is located, the click() method is invoked for performing the requisite actions.
Shown below is the execution snapshot:
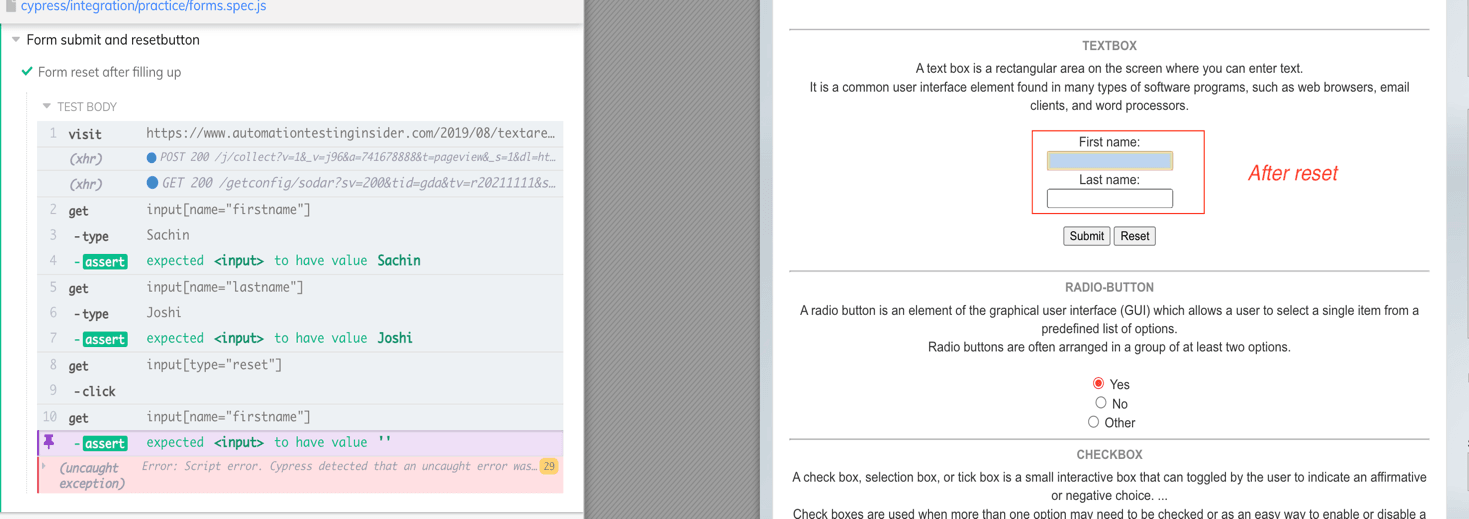
Example: Using Reset button in Cypress
Here is the implementation for using Reset buttons in Cypress:
|
1 2 3 4 5 6 7 8 9 10 11 12 13 |
it('Form reset after filling up',()=>{ cy.visit('https://www.automationtestinginsider.com/2019/08/textarea-textarea-element-defines-multi.html') cy.get('input[name="firstname"]') .type('Sachin') .should('have.value', 'Sachin') .get('input[name="lastname"]') .type('Joshi') .should('have.value', 'Joshi') .get('input[type="reset"]') .click() .get('input[name="firstname"]') .should('have.value','') }) |
Code Walkthrough
The Reset button is identified using the get(‘input[type=”reset”]’) method. Once the button is identified, a click operation is performed to empty the data entered in the username and password fields.
The should() method is used to by-pass the in-built parameter ‘have.value’ to ‘equal to.’
Take this certification to showcase your expertise with end-to-end testing using Cypress automation framework and stay one step ahead.
Here’s a short glimpse of the Cypress 101 certification from LambdaTest:
Starting your journey with Cypress End-to-End Testing? Check out how you can test your Cypress test scripts on LambdaTest’s online cloud.
File Upload Testing in Cypress
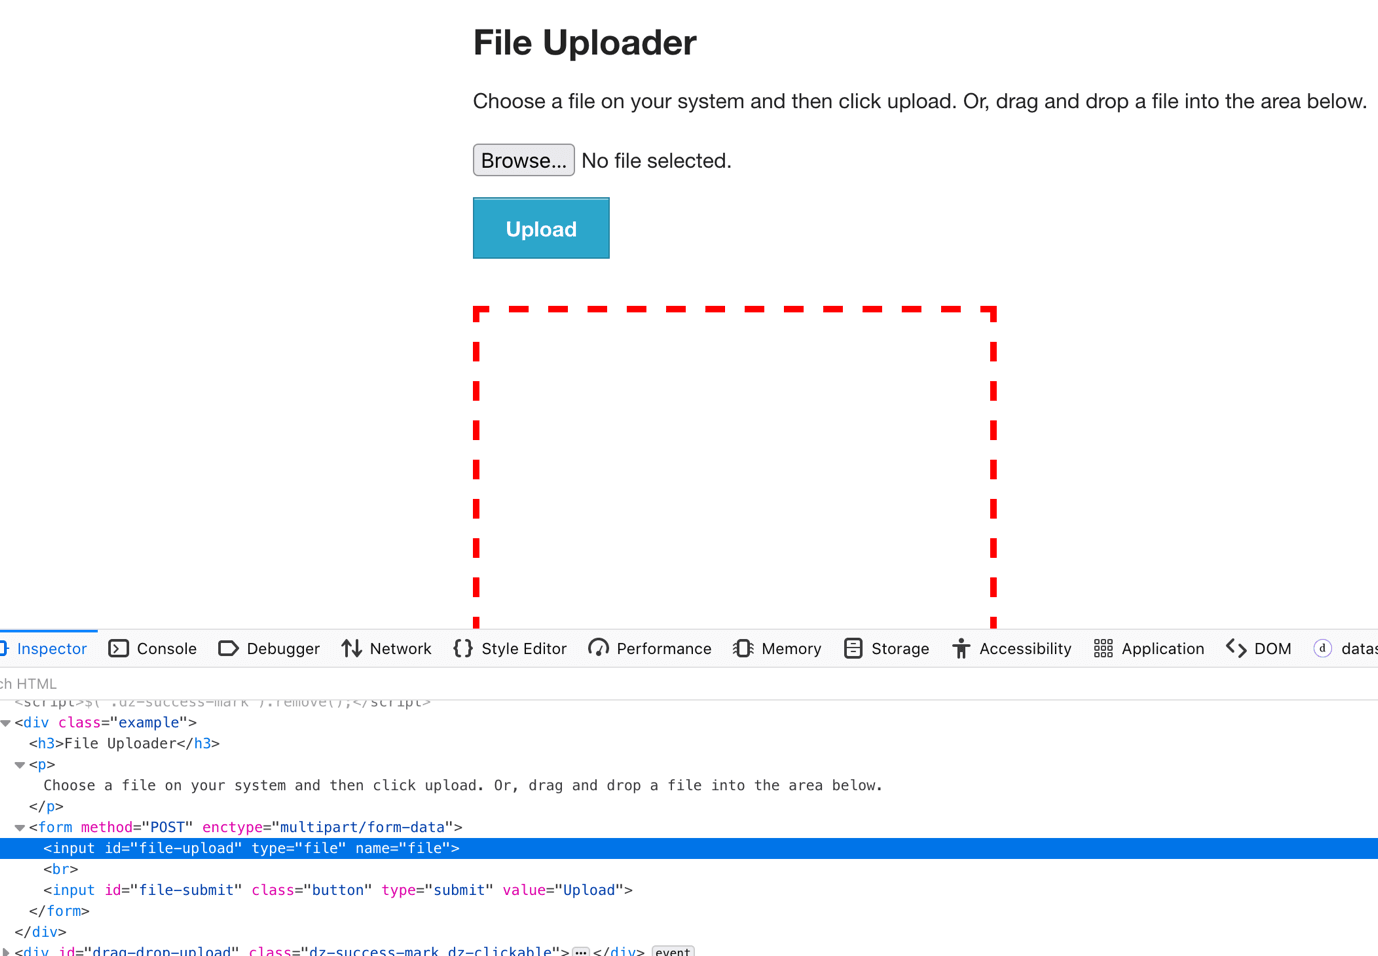
Input type file is a special control that lets the user upload documents such as image, pdf, docx, ppt, etc., when submitting the forms. File uploads is a common input type that is primarily used for uploading files like ID proofs, profile photos, etc. File upload control is created with input tags that have attribute value type=file.
Example: File Upload in Cypress
I have created a simple form to demonstrate file upload functionality in Cypress:
|
1 2 3 4 5 6 7 8 |
<html> <form method="POST" enctype="multipart/form-data"> <input id="file-upload" type="file" name="file"> <br> <input class="button" id="file-submit" type="submit" value="Upload"> </form> </html> |
Here is the output snapshot:
Demo: File Upload testing in Cypress
Cypress, by default, does not have built-in functionality to handle file uploads. Instead, the cypress-file-upload package is used for handling file uploads in Cypress.
Here is the series of steps for realizing file upload in Cypress:
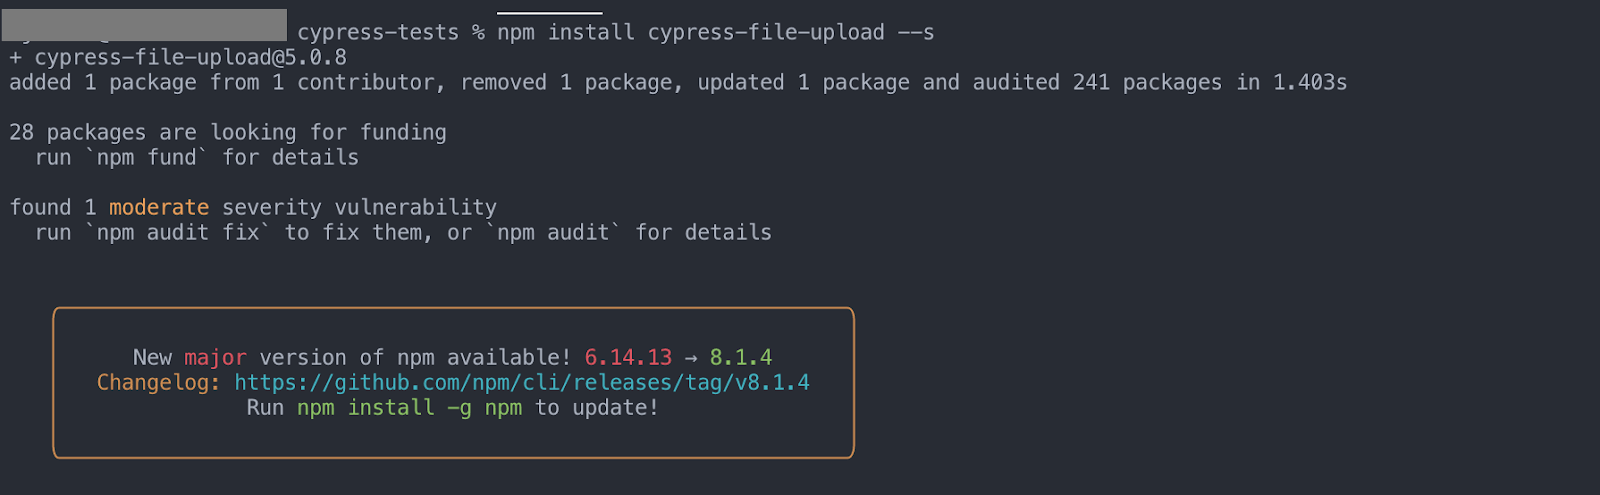
Step 1: Installing plugin
We first install the package by invoking the “npm install cypress-file-upload –save” command on the terminal.
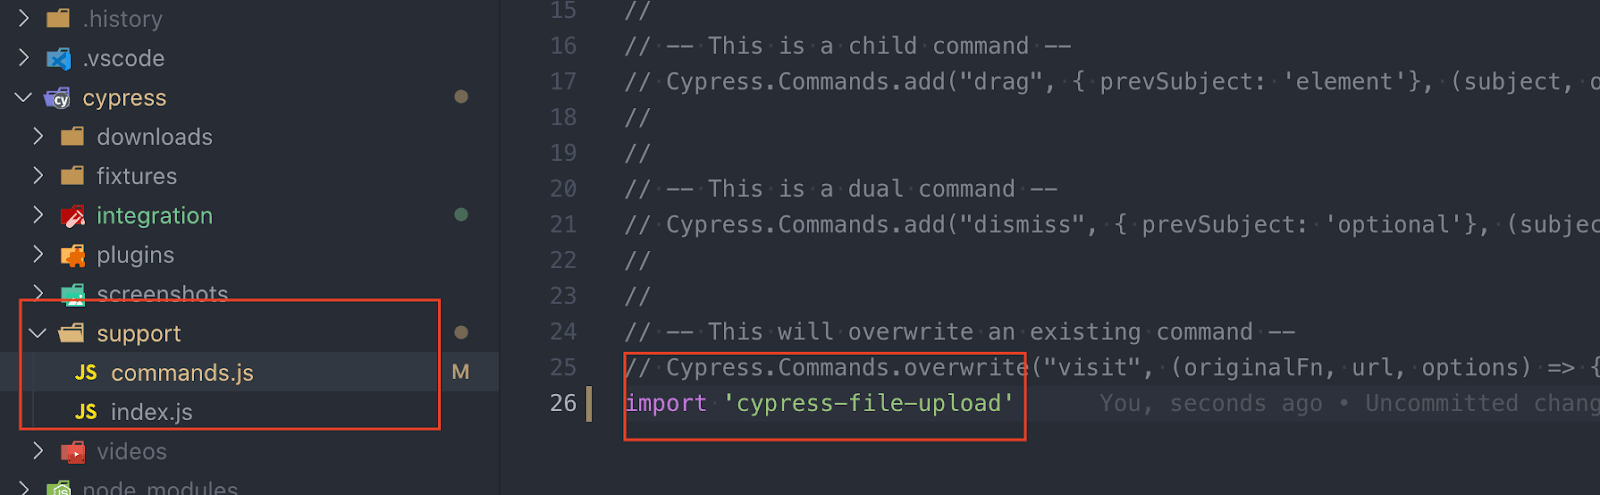
Step 2: Import package in command.js
Once the installation is done, add the statement import ‘cypress-file-upload’ in the command.js file. You can locate the command.js file under the support folder within the project.
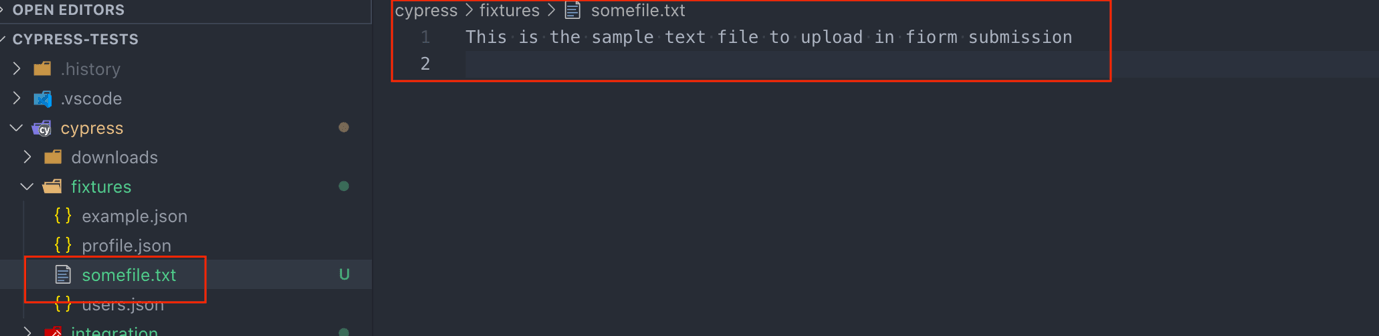
Step 3: Adding upload file to fixtures
We shall now place the file that we need to upload under the fixtures folder.
Step 4: Cypress implementation to upload files
Here is the sample implementation for uploading files using Cypress:
|
1 2 3 4 5 6 7 |
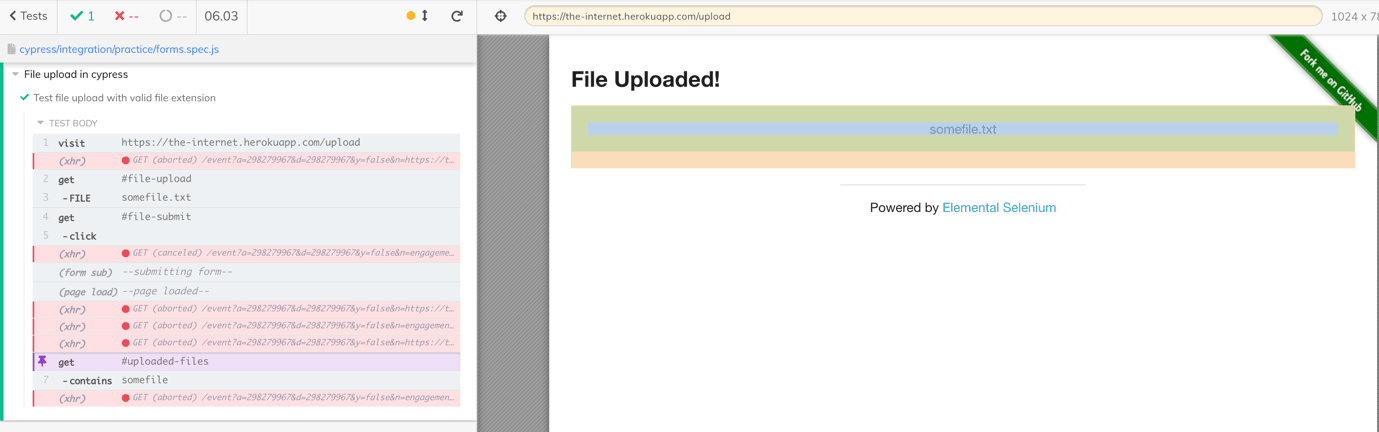
it('Test file upload with valid file extension', () => { const filePath='somefile.txt'; cy.visit("https://the-internet.herokuapp.com/upload") cy.get('#file-upload').attachFile(filePath) cy.get('#file-submit').click() cy.get('#uploaded-files').contains('somefile') }) |
Code Walkthrough
Once you get the locator for file input using .get(‘#file-upload’), I am attaching a file placed under a fixture using attachFile(
There is no need to specify the file path, as Cypress automatically looks for the required file under the fixtures folder.
Here is the output snapshot:
Also read – How To Find Broken Links Using Cypress [With Examples]
Handling Date picker in Form using Cypress
Date Picker is another type of input field using which users can select the required date from the options. Date picker can be created either using <input type=text> or <input type=date>.
|
1 2 3 4 5 6 7 |
<html> <form action="/action_page.php"> <label for="birthday">Birthday:</label> <input type="date" id="birthday" name="birthday"> <input type="submit"> </form> </html> |
Here is the Cypress implementation for handling date pickers:
|
1 2 3 4 5 6 7 8 9 |
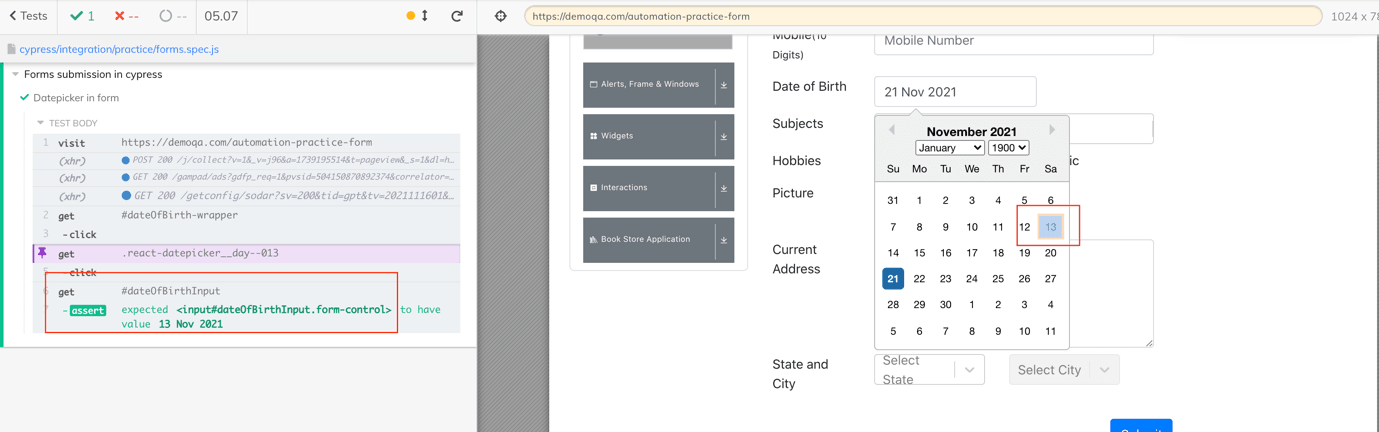
it.only('Datepicker in form', ()=>{ cy.visit('https://demoqa.com/automation-practice-form') .get('#dateOfBirth-wrapper') .click() .get('.react-datepicker__day--013') .click() .get('#dateOfBirthInput') .should('have.value', '13 Nov 2021') }) |
Code Walkthrough
First we identify (or locate) the date picker field with .get(‘#dateOfBirth-wrapper’). The fields in the date picker are shown once a click is performed on the picker.
For example, .get(‘.react-datepicker__day–013’) sets the date to “13 Nov 2021”. The date is verified using the .should() method by passing the ‘have.value’ as “13 Nov 2021”.
Here is the execution snapshot:
Read – Handle Date Picker in Selenium
Using Cypress to fill out Forms and submit them on a Cloud Grid
Now that I have covered the essentials of using Cypress to fill out forms, and submit & reset buttons, let me demonstrate everything using an end-to-end example. Rather than using a local Cypress Grid, I will be running tests on a cloud Cypress Grid like LambdaTest.
LambdaTest simplifies the task of executing your Cypress tests in parallel on a range of online browser and OS combinations hosted on the LambdaTest cloud grid. While writing this blog, there are 40+ browser versions for Cypress testing on the LambdaTest cloud grid.
There are umpteen benefits of cloud testing, the major ones being improved scalability, reliability, security, and improved browser coverage. You can refer to the getting started guide to Cypress testing on cloud to understand the benefits of cloud Cypress Grid better.
Demo: Using Cypress to fill out Forms
I will perform relevant actions on the form placed on the website under test. The implementation shown below covers all the standard input types that can be used when filling up forms:
|
1 2 3 4 5 6 7 8 9 10 11 12 13 14 15 16 17 18 19 20 21 22 23 24 25 26 27 28 29 30 31 32 33 34 35 36 37 38 39 40 41 |
it('Interacting with checkboxes',()=>{ cy.visit('https://www.automationtestinginsider.com/2019/08/textarea-textarea-element-defines-multi.html') .get('input[value="Checkbox1"]') .click() .get('input[value="Checkbox2"]') .click() .get('input[value="Checkbox3"]') .click() .get('input[value="Checkbox1"]') .click() //this to uncheck first one again }) describe('Form Submission on LambdaTest', () => { it('Fillup details and submit', () => { const filePath = 'somefile.txt'; cy.visit('https://demoqa.com/automation-practice-form') .get('#firstName') .type('Sachin') .get('#lastName').type('Joshi') .get('#userEmail').type('test.me@yopmail.com') .get('input[value="Male"]').click({force:true}) .get('#userNumber').type('1231231231') cy.get('#dateOfBirth-wrapper') .click() .get('.react-datepicker__day--013') .click() .get('#subjectsInput').type('Sports') .get('input[type="checkbox"][value="1"]').click({force:true}) cy.get('#uploadPicture').attachFile(filePath) cy.get('#currentAddress').type('This is long text area as you can type \n Multiple \n lines') cy.get('#state').type('Rajasthan{enter}') cy.get('#city').type('Jaipur') cy.get('#submit').click() }) }) |
LambdaTest config helps run tests in parallel against Chrome and Firefox on Windows & macOS platforms. There are a number of benefits of parallel testing with frameworks like Cypress, as it expedites the testing and release processes.
Perform Cypress Parallel Testing on LambdaTest and speed up the testing and release process. Check out how you can test your Cypress test scripts on LambdaTest’s online cloud.
Here is the lambdatest-config.json file that houses the configuration-related information for running Cypress tests at scale on LambdaTest. I have used the LambdaTest Cypress CLI to override the essential configuration from a JSON file.
Cypress CLI lets you manipulate the test configuration file [i.e., lambdatest-config.json] through the command-line interface (CLI), which allows you to override and/or manually modify your tests at any time you want.
|
1 2 3 4 5 6 7 8 9 10 11 12 13 14 15 16 17 18 19 20 21 22 23 24 25 26 27 28 29 30 31 32 33 34 35 36 37 38 39 40 41 42 43 44 45 46 47 48 49 50 51 52 53 54 |
{ "lambdatest_auth": { "username": "<username>", "access_key": "<access_key>" }, "browsers": [ { "browser": "Chrome", "platform": "Windows 10", "versions": [ "94.0" ] }, { "browser": "Firefox", "platform": "Windows 10", "versions": [ "92.0" ] }, { "browser": "Chrome", "platform": "macOS Big Sur", "versions": [ "94.0" ] }, { "browser": "Firefox", "platform": "macOS Big Sur", "versions": [ "92.0" ] } ], "run_settings": { "cypress_config_file": "cypress.json", "build_name": "Cypress", "parallels": 4, "specs": "./cypress/integration/practice/formSubmit.spec.js", "ignore_files": "", "npm_dependencies": { "cypress": "8.1.0" }, "feature_file_suppport": false, "video":true }, "tunnel_settings": { "tunnel": false, "tunnelName": null } } |
Once we are ready with the tests and configuration file demonstrating cross browser testing with Cypress, we can run the same on the LambdaTest grid by triggering the following command on the terminal:
lambdatest-cypress run
After a successful run, you will see the tests appended on the LambdaTest Grid.
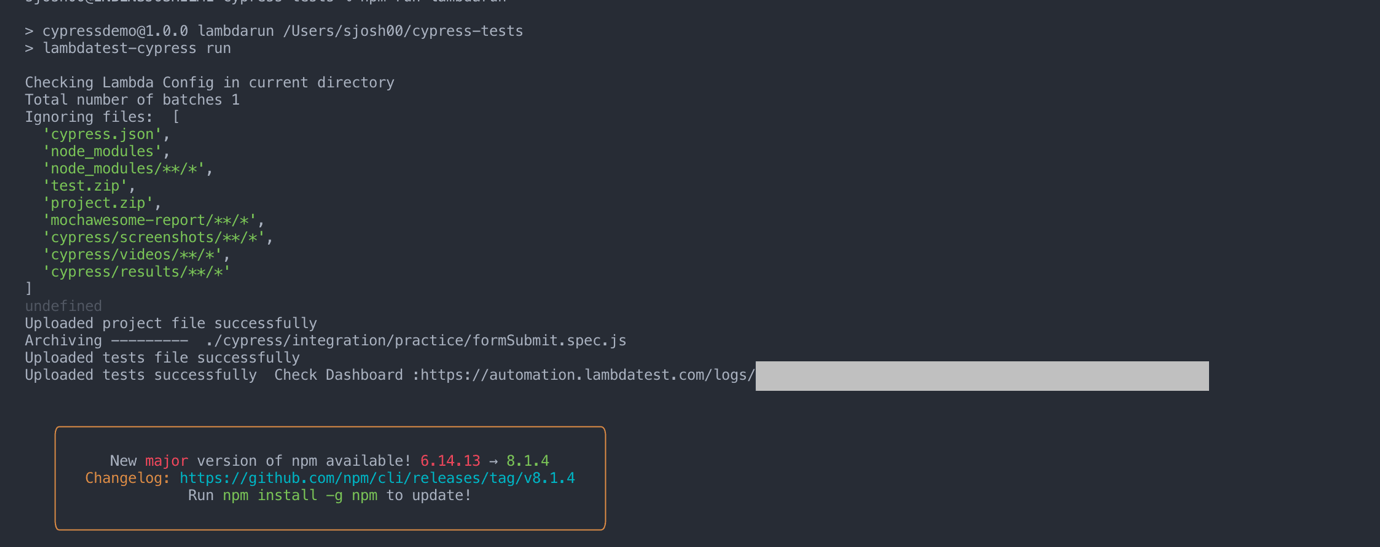
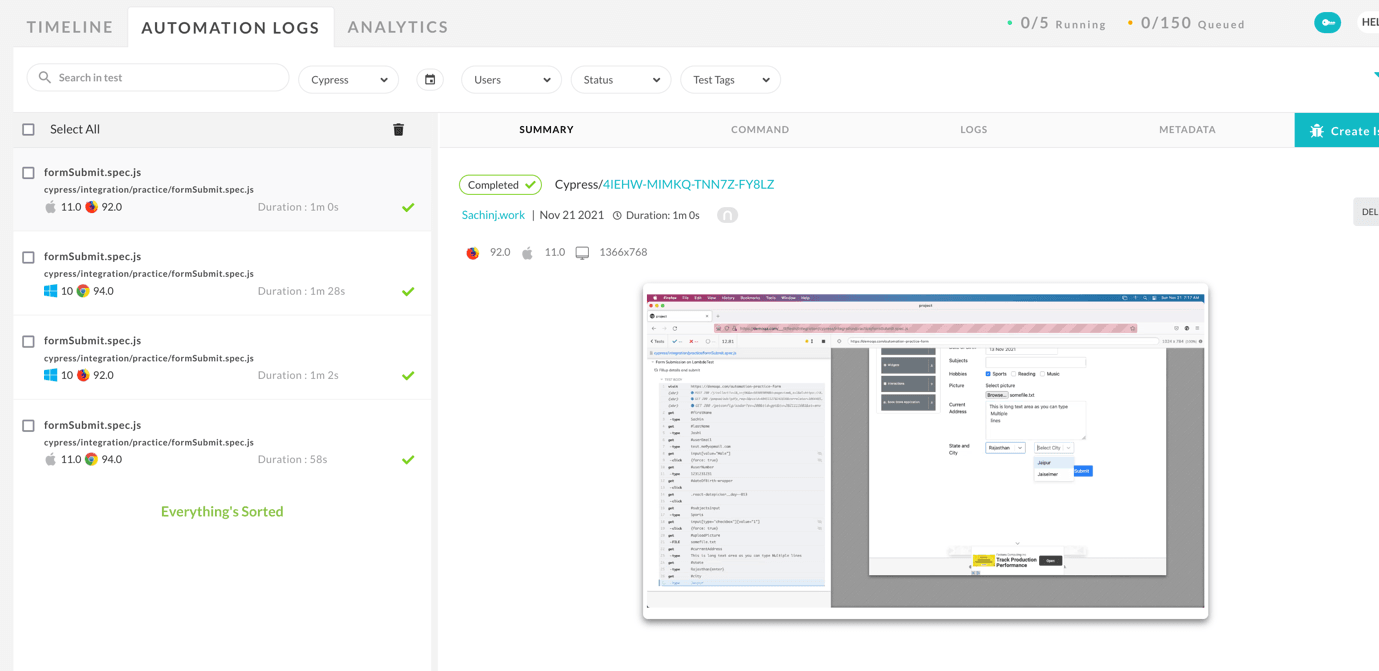
You can navigate to the LambdaTest automation dashboard to check the status of the test. As we have executed the tests parallely on Chrome and Firefox browsers, the same can be seen in the dashboard.
Also read – Web Performance Testing With Cypress and Google Lighthouse
Conclusion
I hope you enjoyed reading the blog on using Cypress to fill out forms and submit them, where we saw different types of form inputs that we come across in most websites and how we can automate the form submission with Cypress. We also covered the cross-browser capability of the Cypress testing tools like LambdaTest, and as evident from screenshots of the LambdaTest dashboard, it took us only 1 minute to execute the form test across four different combinations of firefox and chrome for Windows and macOS systems. Such is the power of cloud-based testing platforms.
Thank you and Happy Learning!!
Frequently Asked Questions
What is fixture in Cypress?
Cypress fixtures are essentially files that hold your cypress tests data. These files are located in <cypress_directory>/fixtures by default but can be set to a different directory. Cypress fixtures are mainly made up of test data represented in JSON format. Therefore, a JSON file will be created inside the fixtures folder, which can be used within the cypress testing environment.
How do you right click on Cypress?
By default, Cypress will throw an error when right-clicking multiple elements. However, to accommodate the use case of clicking on multiple elements, you can pass { multiple: true } and Cypress will iteratively apply the right click to each element.


Author’s Profile
Sachin
A Software Engineer by profession, love to work for open source projects and some of my own personal projects through blogging and learning. I have overall 7+ years of expertise in the various phases of the software development life cycle.
Blogs: 6
Got Questions? Drop them on LambdaTest Community. Visit now


