
How To Find HTML Elements Using Cypress Locators
Sachin
Posted On: September 25, 2021
![]() 78789 Views
78789 Views
![]() 20 Min Read
20 Min Read
Cypress is a new yet upcoming automation testing tool that is gaining prominence at a faster pace. Since it is based on the JavaScript framework, it is best suited for end-to-end testing of modern web applications. Apart from the QA community, Cypress can also be used effectively by the front-end engineers, a requirement that cannot be met with other test automation frameworks like Selenium.

Since Cypress is an open-source framework suited for testing modern web applications, many QA engineers prefer Cypress test automatio over testing with other automation frameworks.
To access any WebElement in the DOM (Document Object Model), you would need to use Cypress locators, comparable to locators in Selenium. Thus, by the end of this Cypress tutorial, you would be in a position to use Cypress locators to access WebElements in the DOM for realizing Cypress automation tests.
New to CSS Selectors? Check out this Ultimate CSS Selector cheat sheet to boost your web designing career.
Starting your journey with Cypress Testing? Check out how you can test your Cypress test scripts on LambdaTest’s online cloud.
TABLE OF CONTENTS
What are Cypress Locators
If you are coming from a Selenium automation background and willing to jump ship to the Cypress framework, the Cypress vs Selenium comparison would be helpful to make a wiser decision! In addition, you can take a quick refresher of the Cypress framework by visiting our earlier blog that deep-dives into the Cypress architecture and design.
Akin to locators in Selenium, Cypress locators are also used to find WebElements in the HTML Document Object Model (DOM). Once you find multiple elements in Cypress, relevant operations can be performed on these elements or assert their presence for validation.
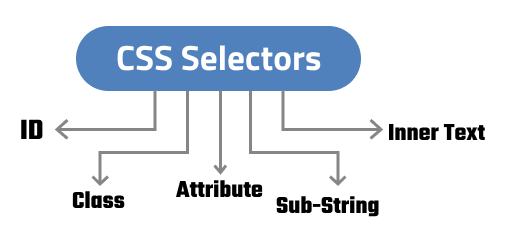
Locators are generally classified in the following categories, while they are being used to find multiple elements in Cypress:
- tags – Locate WebElements using HTML tags like <button>, <form>, <a>, etc.
- ids – Locate WebElements using the ID of the elements
- name – Locate WebElements using name attribute that is set for elements (especially form input elements)
- class – Locate WebElements by class value
- links – Locate WebElements by links text property
- attributes – Locate WebElements by one or multiple sets of attributes
Since the core fundamentals of web locators are agnostic of the automation framework, you can refer to our locators in Selenium that deep dive into each locator (mentioned above) in more detail.
Also Read – Cypress cross browser testing on the cloud
Get the best out of your Cypress tests with LambdaTest’s online Cypress automation tool. Check out how you can test your Cypress test scripts using LambdaTest’s online cloud.
How to use Locators in Cypress
Cypress supports only CSS selectors out of the box for locating elements in the DOM. So in case you intend to use other web locators like XPath, ID, etc., with Cypress, you need to add relevant external packages that support using those with Cypress locators.
Let’s deep dive into details of how to use and work with locators in Cypress. For this blog in the Cypress tutorial series, I will be using ecommerce practice site for showcasing the usage of the relevant web locators.

You can go through the following video to learn Cypress GET and FIND Command Hacks supported by the Cypress test automation framework. This will help you write your first cypress test and target HTML elements using the GET command. However, visit the LambdaTest YouTube channel for more Cypress videos, so there’s never a shortage of Cypress learning opportunities.
Identify HTML elements using ‘ID’ Cypress locator
IDs are the unique attributes given to the HTML elements that can be identified and updated with minimal effort. The ID attribute is unique across the DOM, due to which it is the fastest way for locating the required WebElement. It also helps in accelerating the interactions with the underlying elements in the DOM.
Here is a sample HTML page that showcases the syntax of ID in HTML:
|
1 2 3 4 5 |
<ul id="lists"> <li id="first"> Option 1 </li> <li id="second"> Option 2 </li> <li id="third"> Option 3 </li> </ul> |
Here, <ul> tag can be identified uniquely with CSS selectors command using $(‘#lists’).
Demonstration: ID locator in Cypress
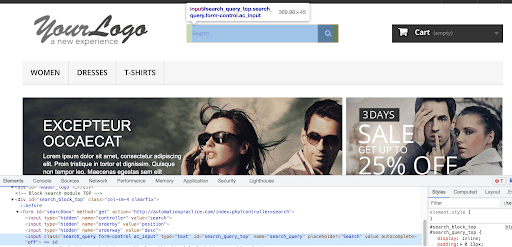
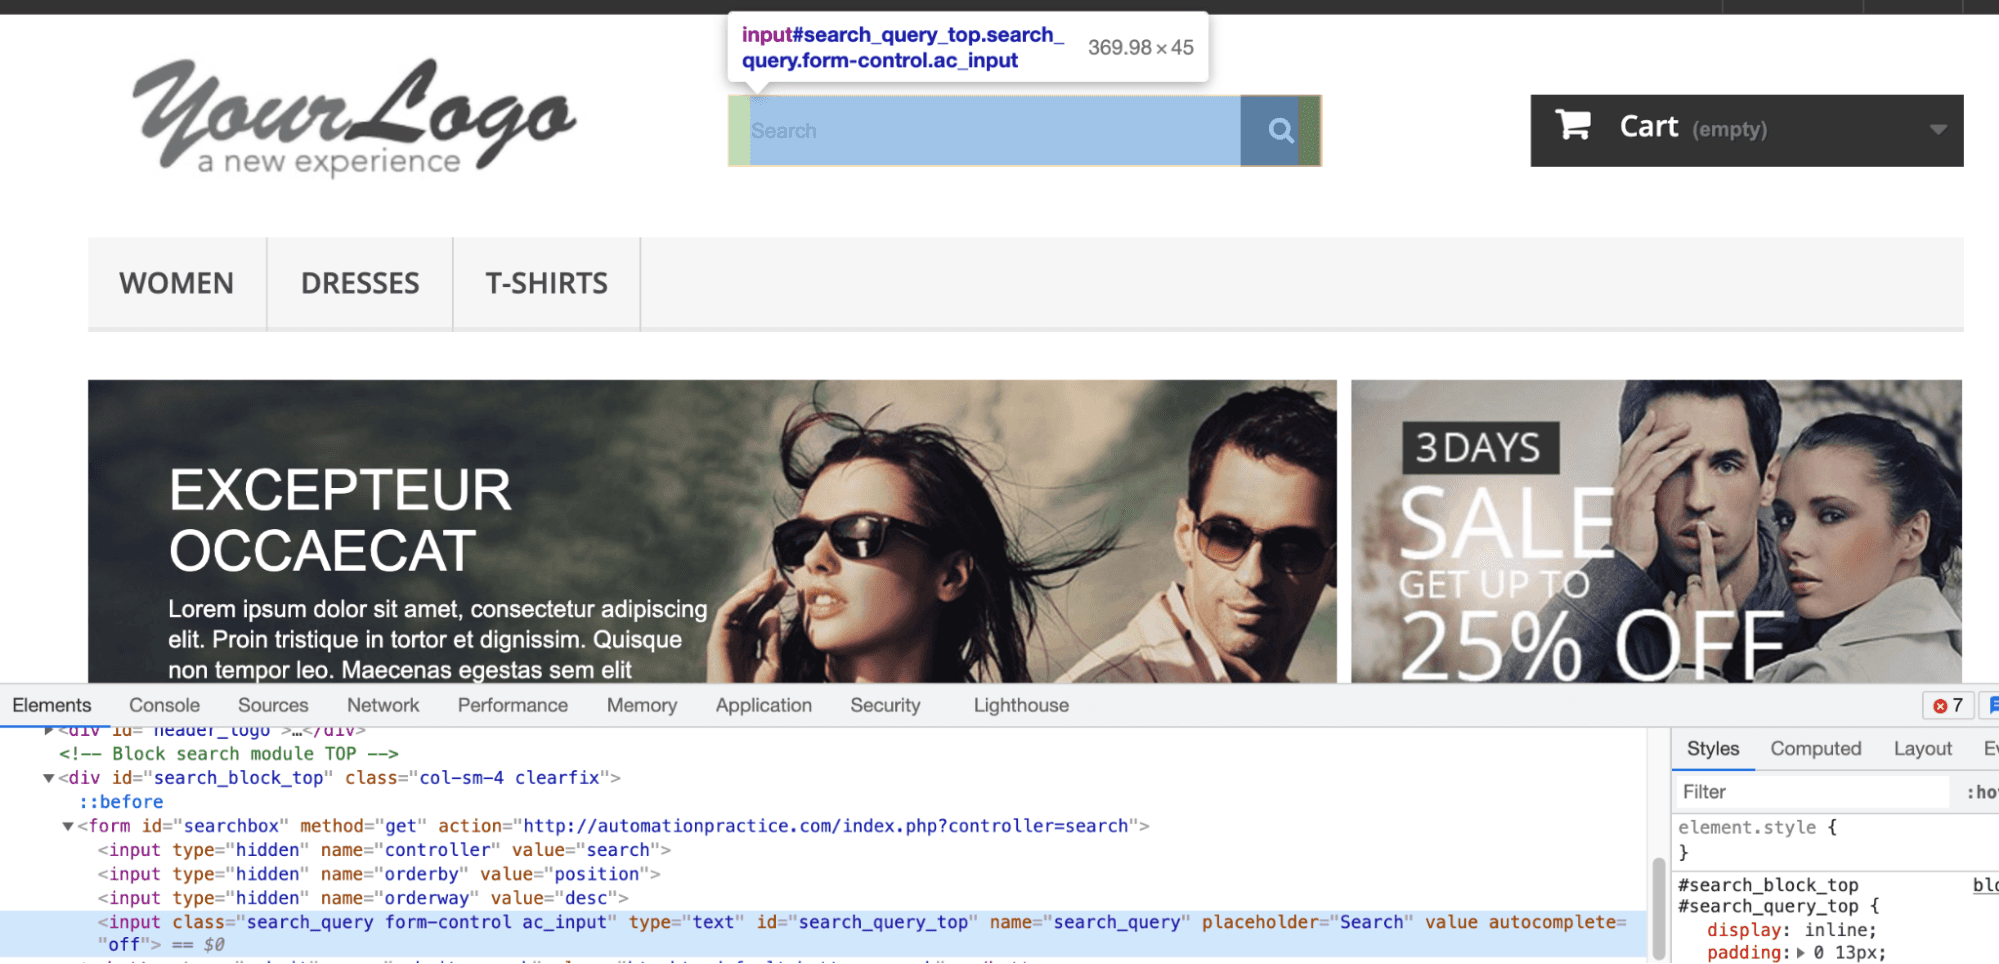
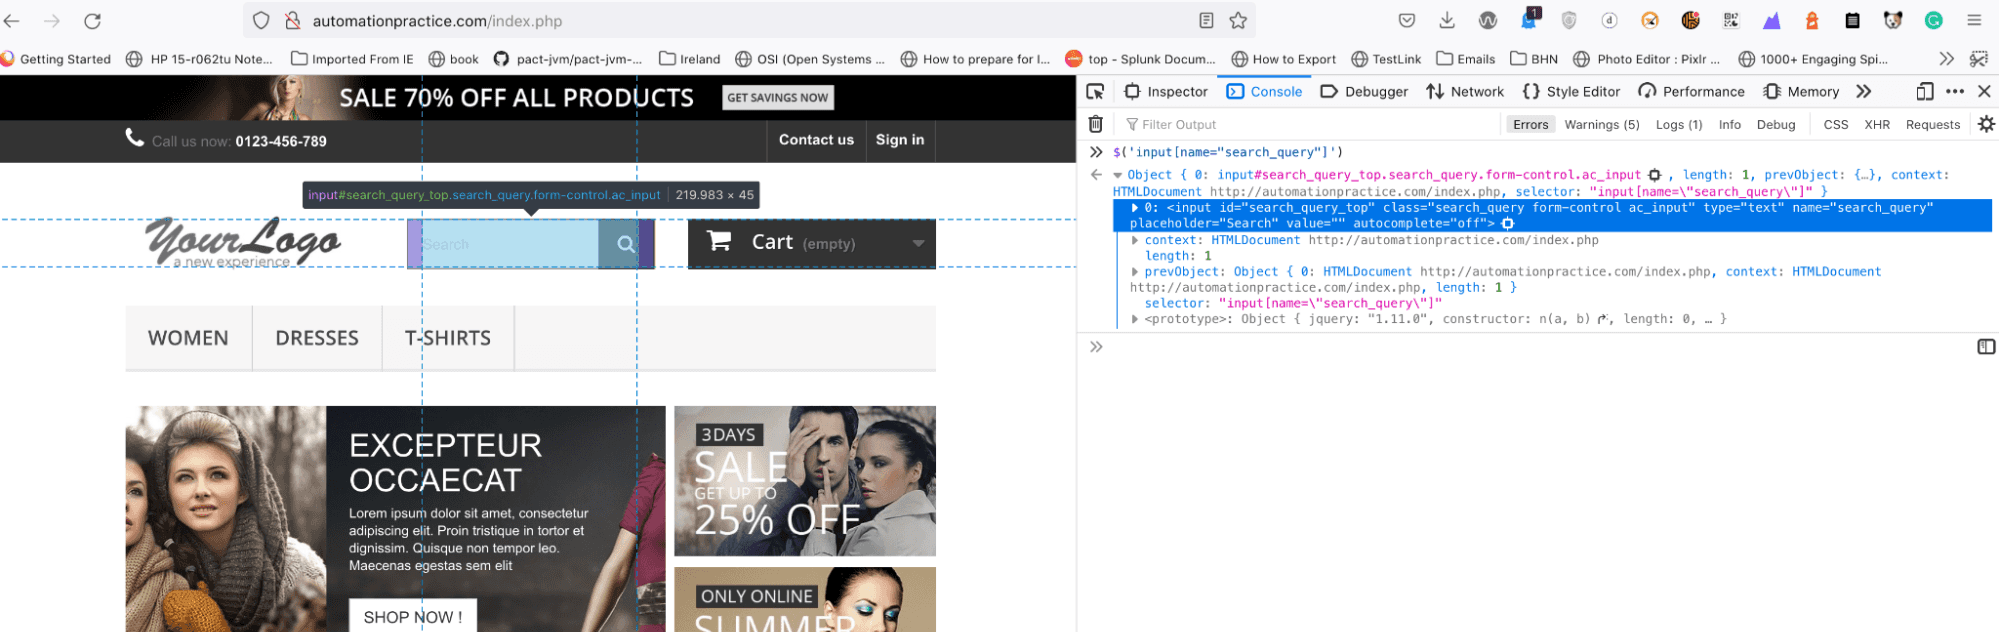
Let’s look at using an ID locator in Cypress using the example site that we showed earlier. Here, we locate the search bar on the site; the HTML representation of the search bar is below:
|
1 2 |
<input class=“search_query form-control ac_input” type=“text” id=“search_query_top” name=“search_query” placeholder=“Search” value="" autocomplete=“off”> |
Here is the implementation that demonstrates the use of the ID locator in Cypress:
|
1 2 3 4 5 6 7 8 9 10 11 12 |
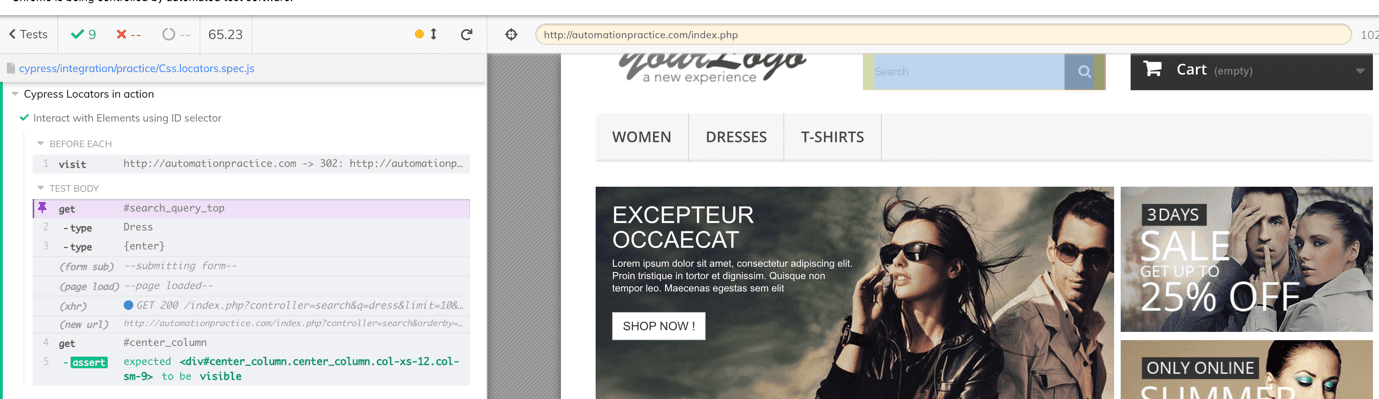
describe('Cypress Locators in action', ()=>{ beforeEach(()=>{ cy.visit('http://automationpractice.com') }) it('Interact with Elements using ID selector', ()=>{ cy.get('#search_query_top') //ids are identified using # prefix .type('Dress') .type('{enter}') .get('#center_column') .should('be.visible') }) }) |
cy.get() is used in Cypress to find multiple elements in DOM. The method accepts a parameter in the form of an identifier. Here we pass the ID of the element with ‘#’ as a prefix. Since the call is chainable, we used type() to enter values and used should() to assert the visibility of the corresponding WebElement.
Shown below is the execution screenshot, which indicates that the test execution was successful:
Identify HTML elements using ‘NAME’ Cypress locator
The HTML name attribute is mostly used by <form>,<button>, <input> tags where it helps to identify field details when submitted to the server. You can refer to our detailed blog on NAME locator in Selenium to get insights on the said web locator.
Here is a sample HTML page that showcases the syntax of NAME in HTML:
|
1 2 |
<input class=“search_query form-control ac_input” type=“text” id=“search_query_top” name=“search_query” placeholder=“Search” value="" autocomplete=“off”> |
Demonstration: NAME locator in Cypress
Shown below is the syntax of the NAME locator in Cypress:
|
1 |
cy.get(<tag>[name='value']) |
where <tag> can be HTML tags like input, form, etc. <tag> is optional, when not specified, it will match name against all the tags (wherever match is found).
|
1 2 3 4 5 6 7 8 9 10 11 |
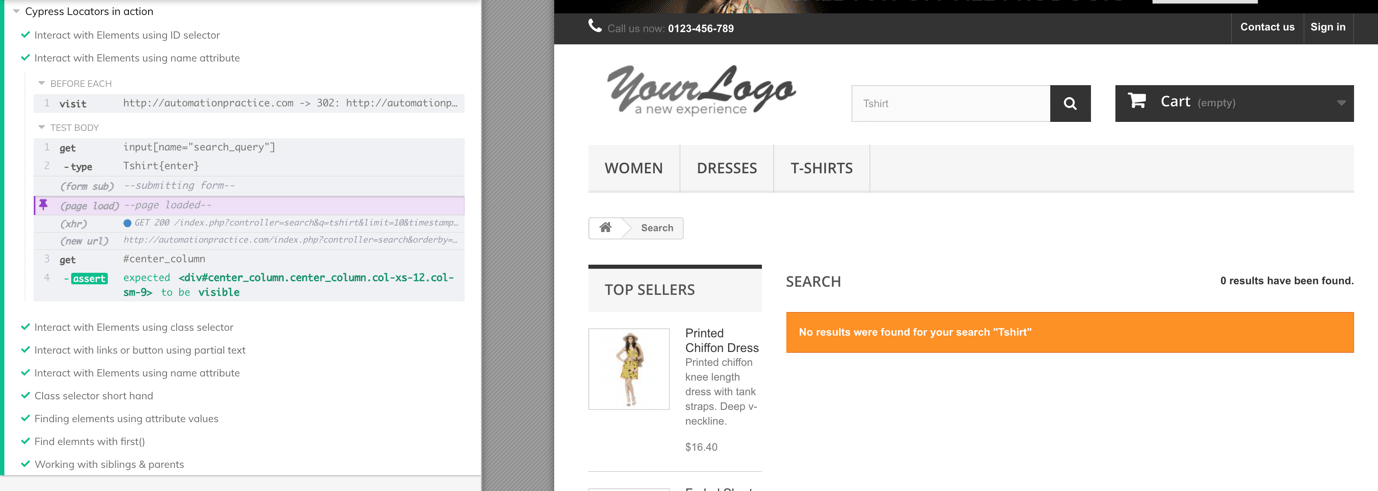
describe('Cypress Locators in action', ()=>{ beforeEach(()=>{ cy.visit('http://automationpractice.com') }) it('Interact with Elements using name attribute',()=>{ cy.get('input[name="search_query"]') //observe how we use name attribute .type('Tshirt{enter}') .get('#center_column') .should('be.visible') }) }) |
Code walkthrough
Once the site is opened after the beforeEach() execution, the test “Interact with Elements using name attribute” starts with identifying elements using the name attribute (‘search_query’) and then sends the search value to the text box using the type() method.
|
1 2 3 |
it('Interact with Elements using name attribute',()=>{ cy.get('input[name="search_query"]') //observe how we use name attribute .type('Tshirt{enter}') |
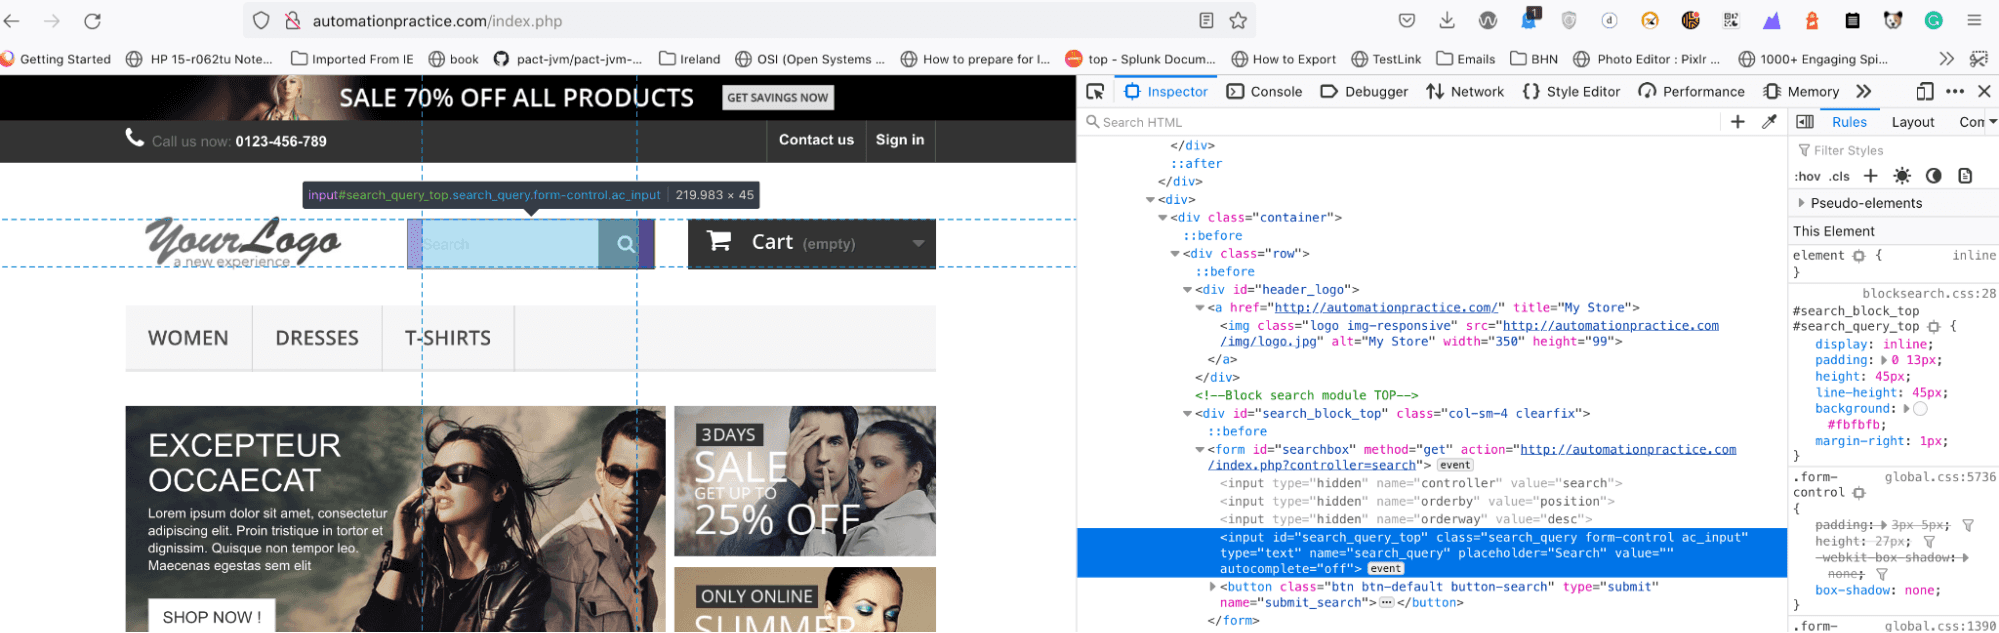
The Inspect tool in Google Chrome is used for locating the element using the CSS Selector. Here is how we use the browser console using $() as the CSS selector:
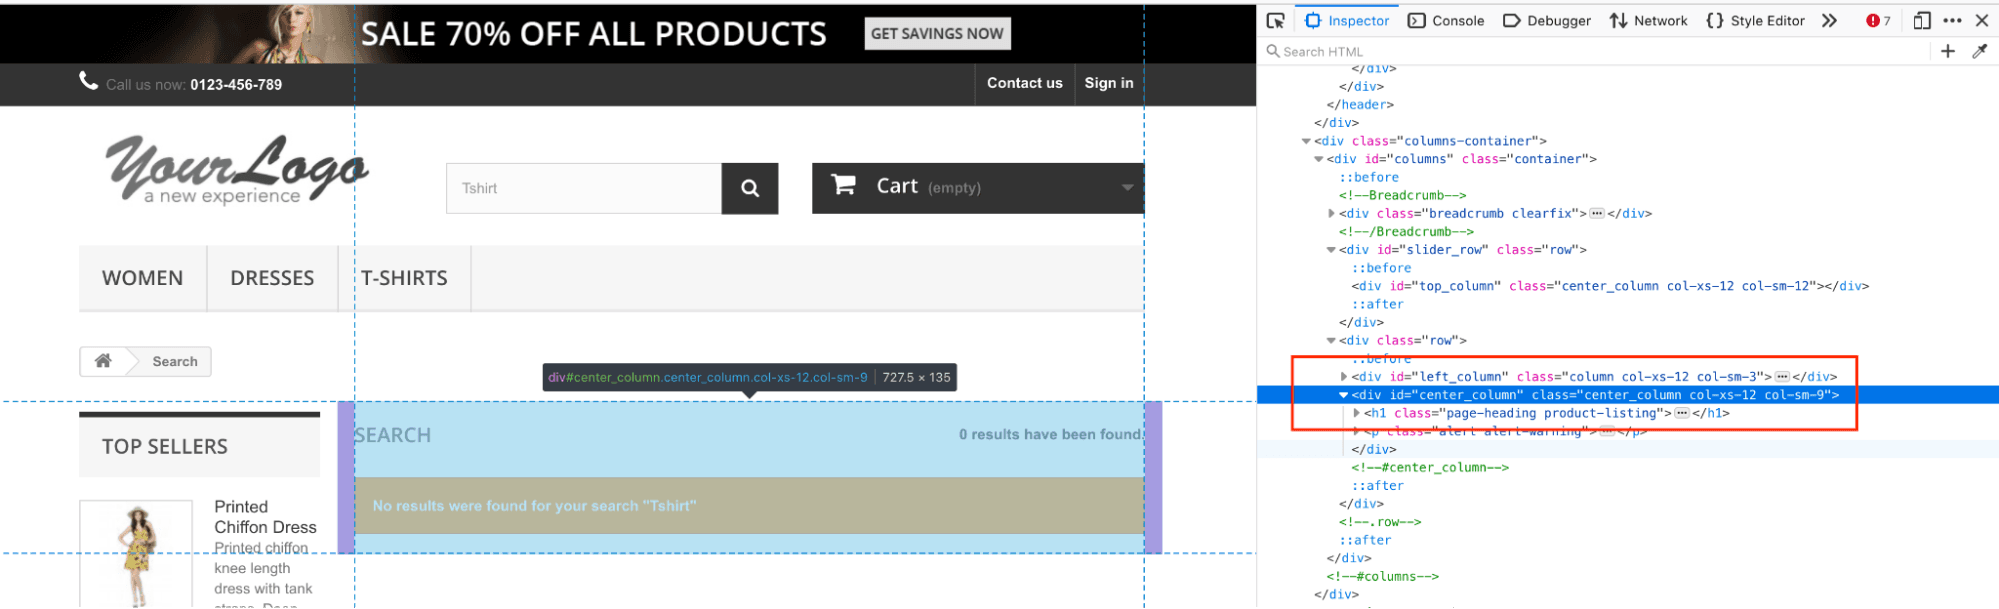
Once the search results are available, we can use the ID locator in Cypress to find multiple elements and assert using Cypress’s built-in assertion method should(‘be.visible’). An assert is raised if the search results are not displayed properly.
Execution
Shown below is the execution snapshot, which indicates the respective WebElement was located successfully using the NAME locator:
Identify HTML elements using ‘Attributes’ in Cypress
Attributes are ways to set a particular property of the HTML element. They also help define the behavior of the elements when a specific condition is set and triggered. Attributes are applied to almost all the HTML tags and work similarly to the NAME locator in Cypress. Thus, we can use the same syntax for locating elements using other attributes as well.
Shown below is the syntax to use attributes in Cypress:
|
1 |
cy.get(<tag>[attribute_name=attribute_value]) |
Additionally, consider a case where one would like to use Cypress to find multiple elements or all of them having attribute titles whose value contains ‘store’ (e.g., store-1, store-2, …). One of the brute force ways is to find each element one by one with the exact attribute value using the above syntax. However, this task is mundane and not beneficial when we need to find multiple elements in Cypress and add some common functional logic to them.
A better approach would be to use the regex-supported syntax in the CSS selector to get the list of items in one go.
Fortunately, Cypress provides an easier way to tackle this problem, where you can use patterns like starts-with and ends-with particular substring to match all the elements in the DOM.
| Purpose |
Syntax |
| To find all the elements containing values | *=, cy.get(<tags>[attr_name *= attr_value]) |
| To find all the elements starting with attr_value, we use | ^=, cy.get(<tags>[attr_name ^= attr_value]) |
| To find all the elements ending with attr_value | $=, cy.get(<tags>[attr_name $= attr_value]) |
Also Read: How To Get Attribute Value in Selenium WebDriver
Demonstration : Using Attributes in Cypress
|
1 2 3 4 5 6 7 8 9 10 11 12 13 14 15 |
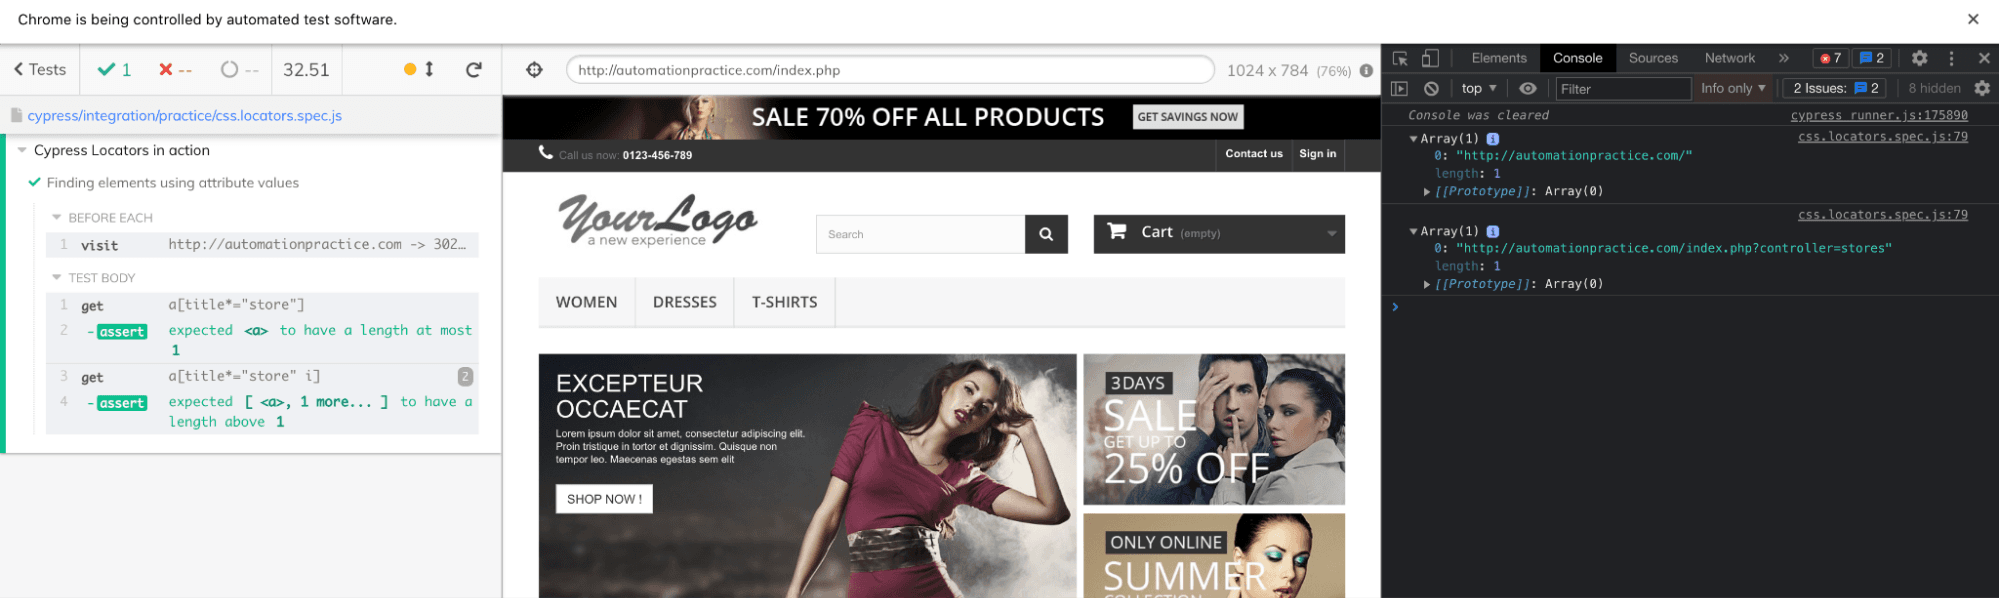
describe('Cypress Locators in action', ()=>{ beforeEach(()=>{ cy.visit('http://automationpractice.com') }) it('Finding elements using attribute values',()=>{ cy.get('a[title*="store"]') .should('have.length.at.most',1) cy.get('a[title*="store" i]') //case insensitive .should('have.length.gt',1) .each(i=> console.table([i.attr('href')])) }) }) |
Code Walkthrough
Step1
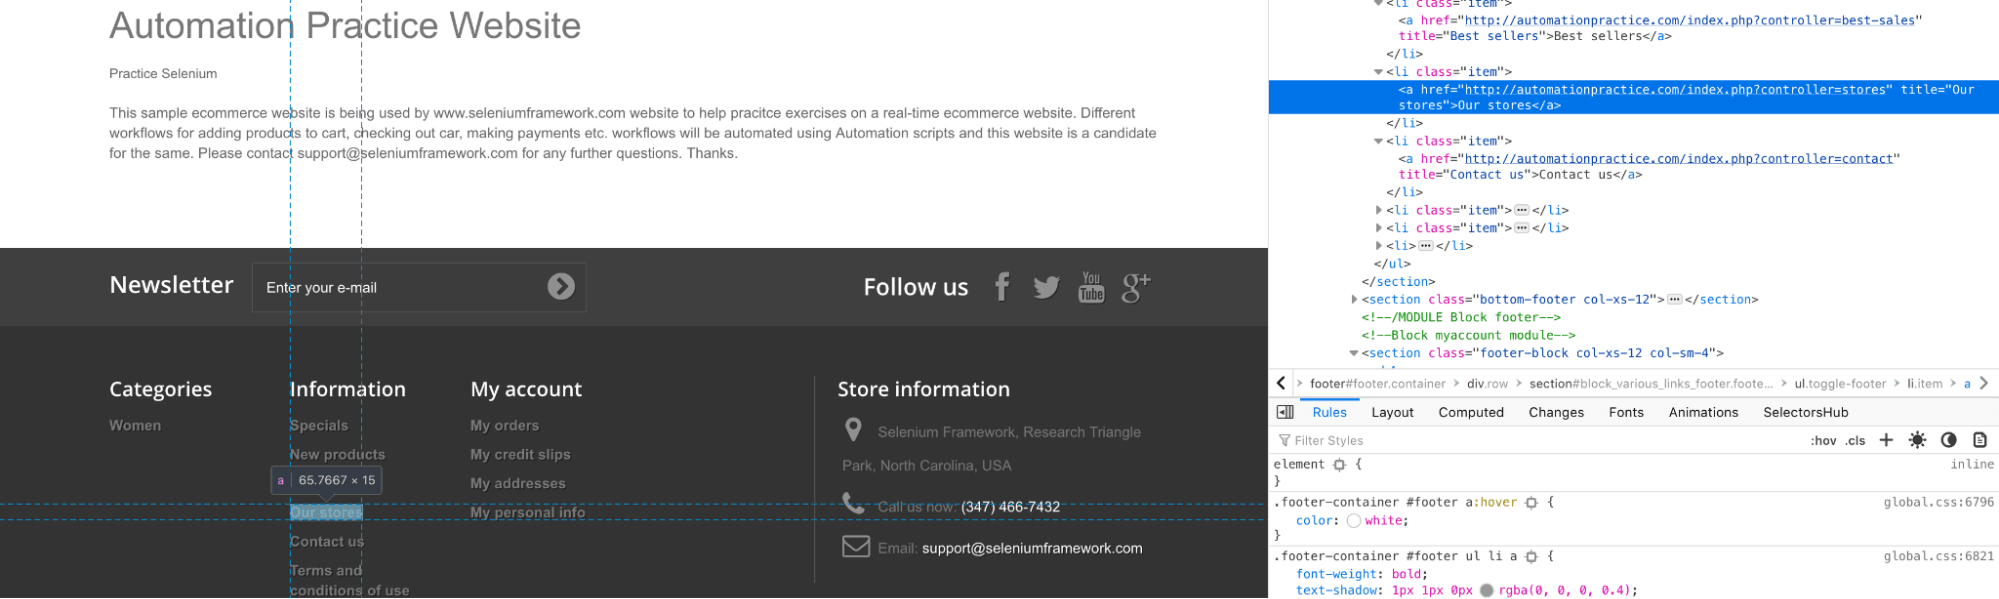
The cy.get() method is used in Cypress to find multiple elements based on attribute value using title*=store for locating Our Stores link from the footer as shown below:
Step 2
Once the intended WebElement is located, we validate that the page has at least one element that matches the required locator. Cypress built-in assertion method .should(‘have.length.at.most’,1) is used for checking length value where ‘have.length.at.most’ in Cypress evaluates the length of the located element.
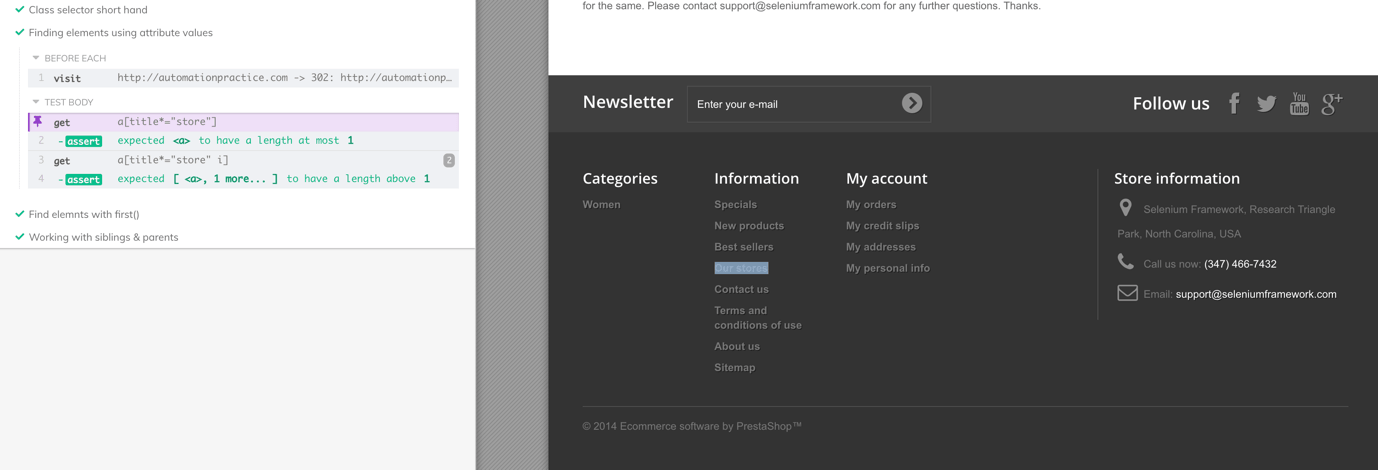
Step 3
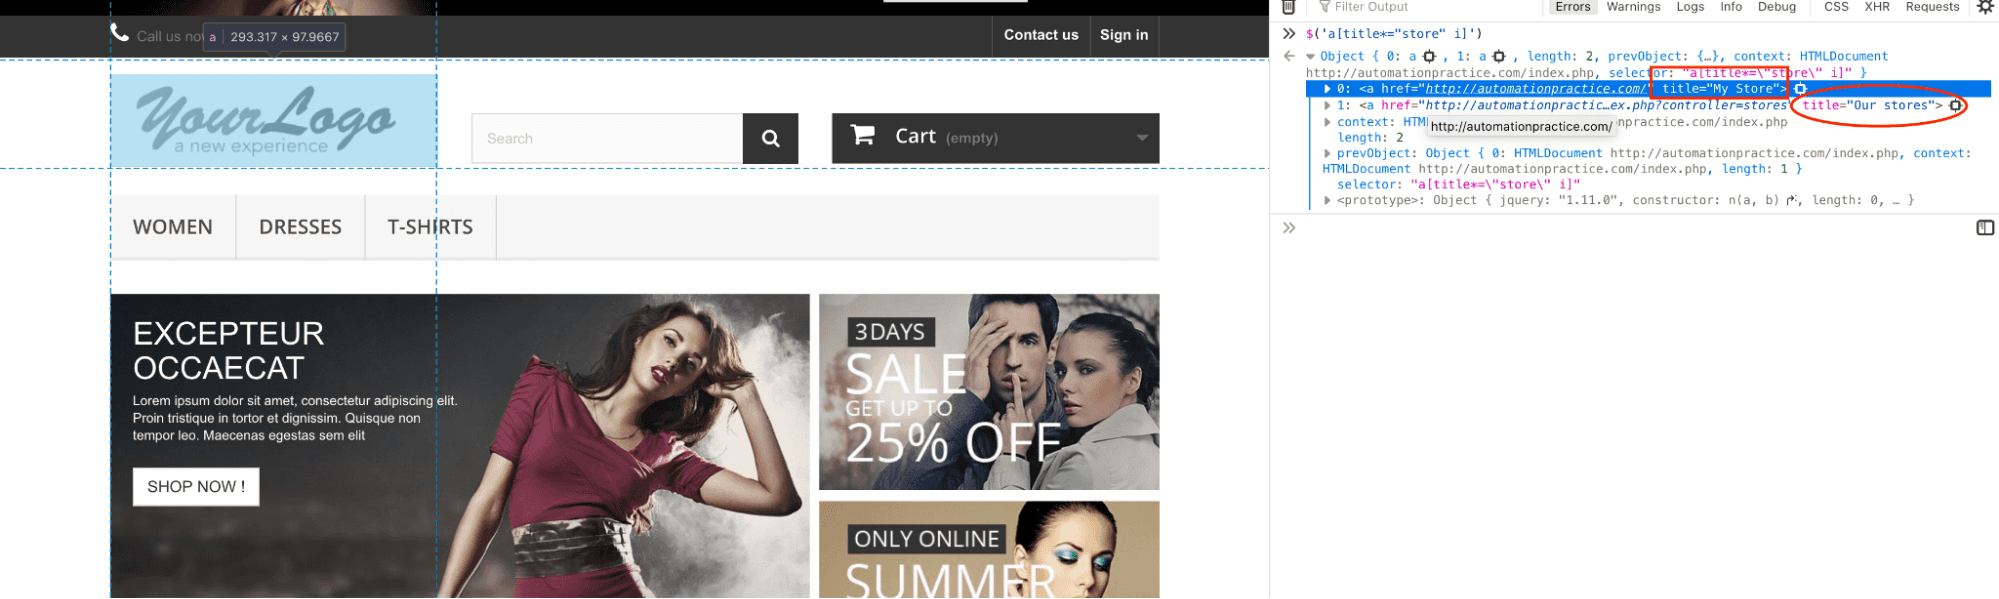
The cy.get(‘a[title*=”store” i]’) method is used to find all the links on the page that contains the title “store”. In the screenshot shown below, I have highlighted two elements on the page that matched the required locator:
- The first one is the logo with the title = “My Store”
- The second one is the footer with the title = “Our stores”
Step 4
The should() method is used for asserting if the length of the located WebElements is greater than 1. The length is checked using the have.length.gt method.
.each() in Cypress is used to iterate on each of the located WebElements. Here I am printing the href value using the attr([key]) method that returns the attribute value for the key provided as the argument.
|
1 2 |
.should('have.length.gt',1) .each(i=> console.table([i.attr('href')])) |
As seen below, the URL of each element that is located on the page is printed on the console:
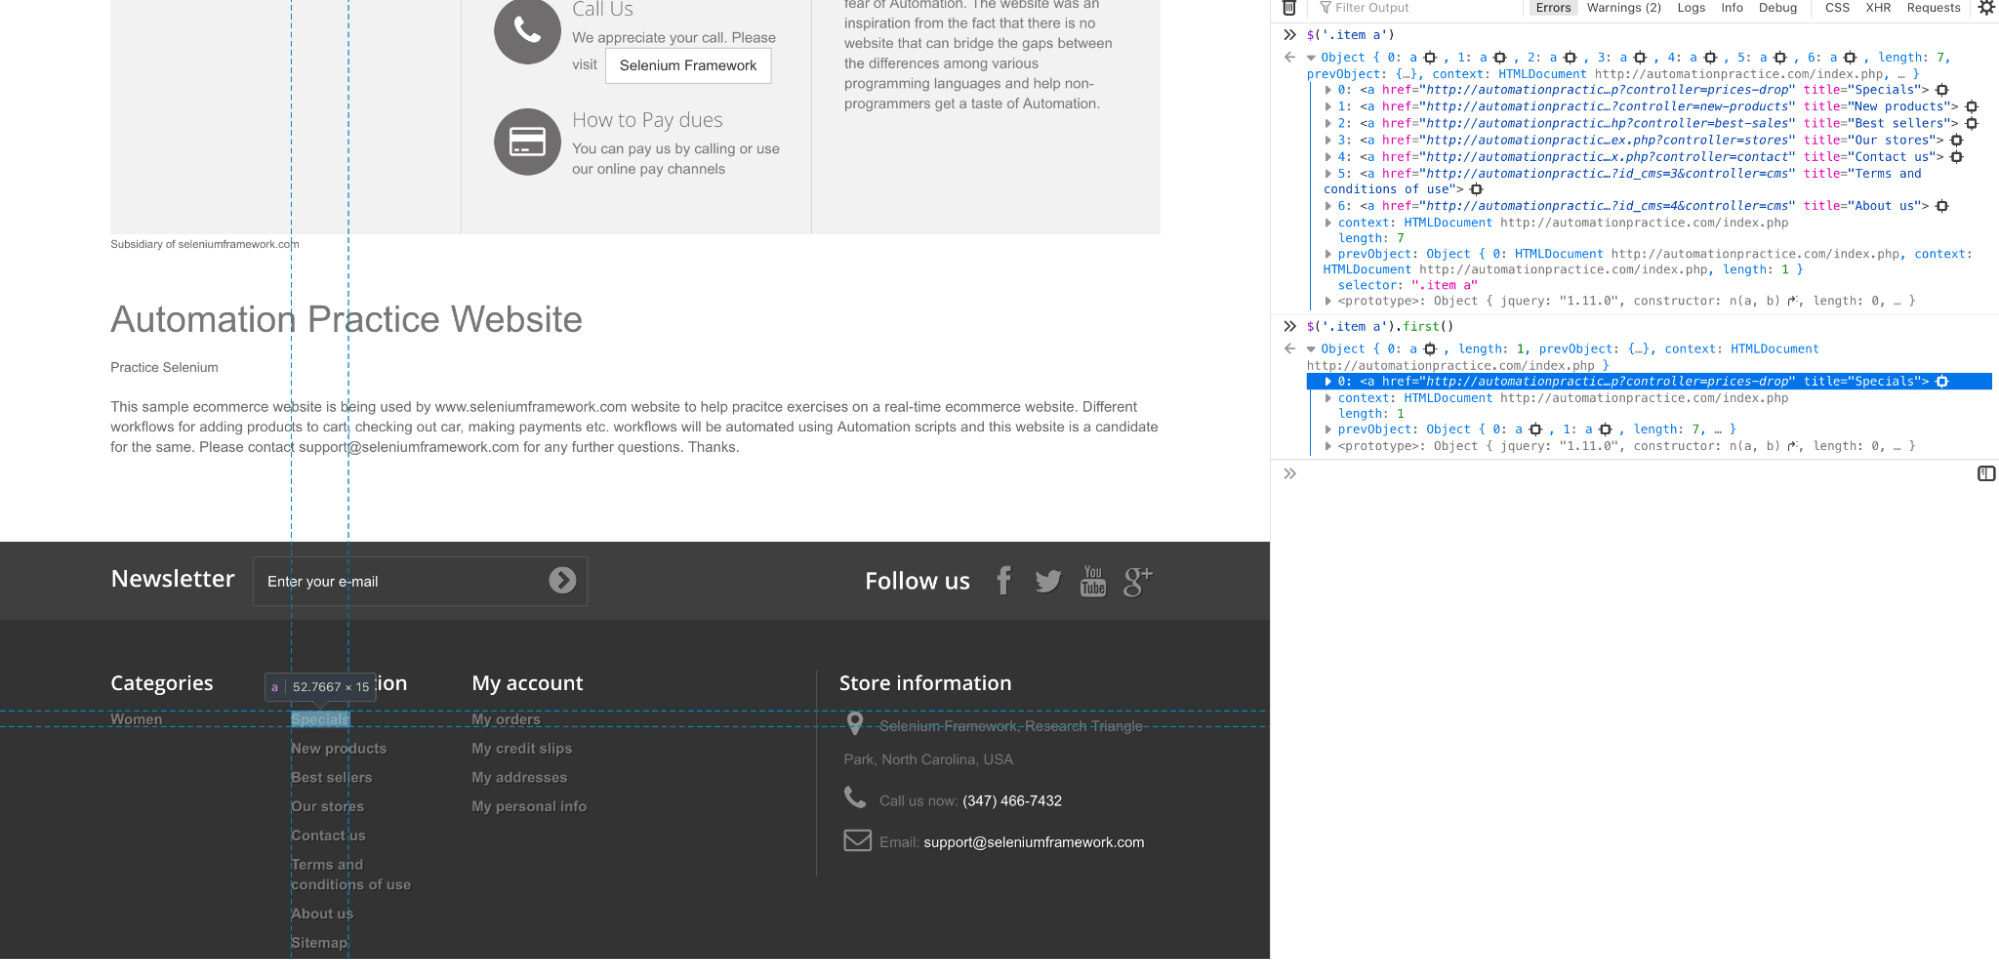
Identify HTML elements using ‘By Class’ in Cypress
HTML class attribute is mostly used for styling the element or group of elements. Unlike ID, class attributes need not be unique, which is why this is helpful when we need to apply a common style to multiple elements.
In Cypress, class selectors can be identified using the following options:
- cy.get(.<class_value>)
- cy.get(<tags>[class='<class_value’])
Demonstration: Using ‘By Class’ in Cypress
Consider the following HTML Page for demonstration:
|
1 |
<a href="http://automationpractice.com/index.php?id_category=3&controller=category" title=“Women” class=“sf-with-ul”>Women</a> |
Shown below is the implementation that demonstrates the usage of ‘By Class’ in Cypress:
|
1 2 3 4 5 6 7 8 9 10 11 12 13 14 15 16 17 18 19 20 21 22 23 24 25 26 27 28 29 30 31 32 33 |
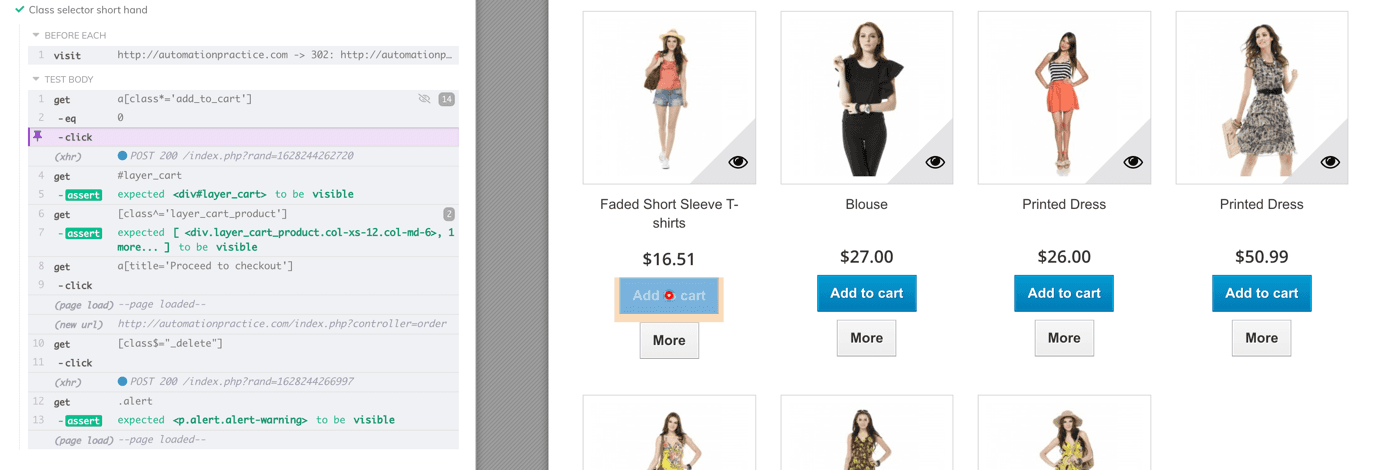
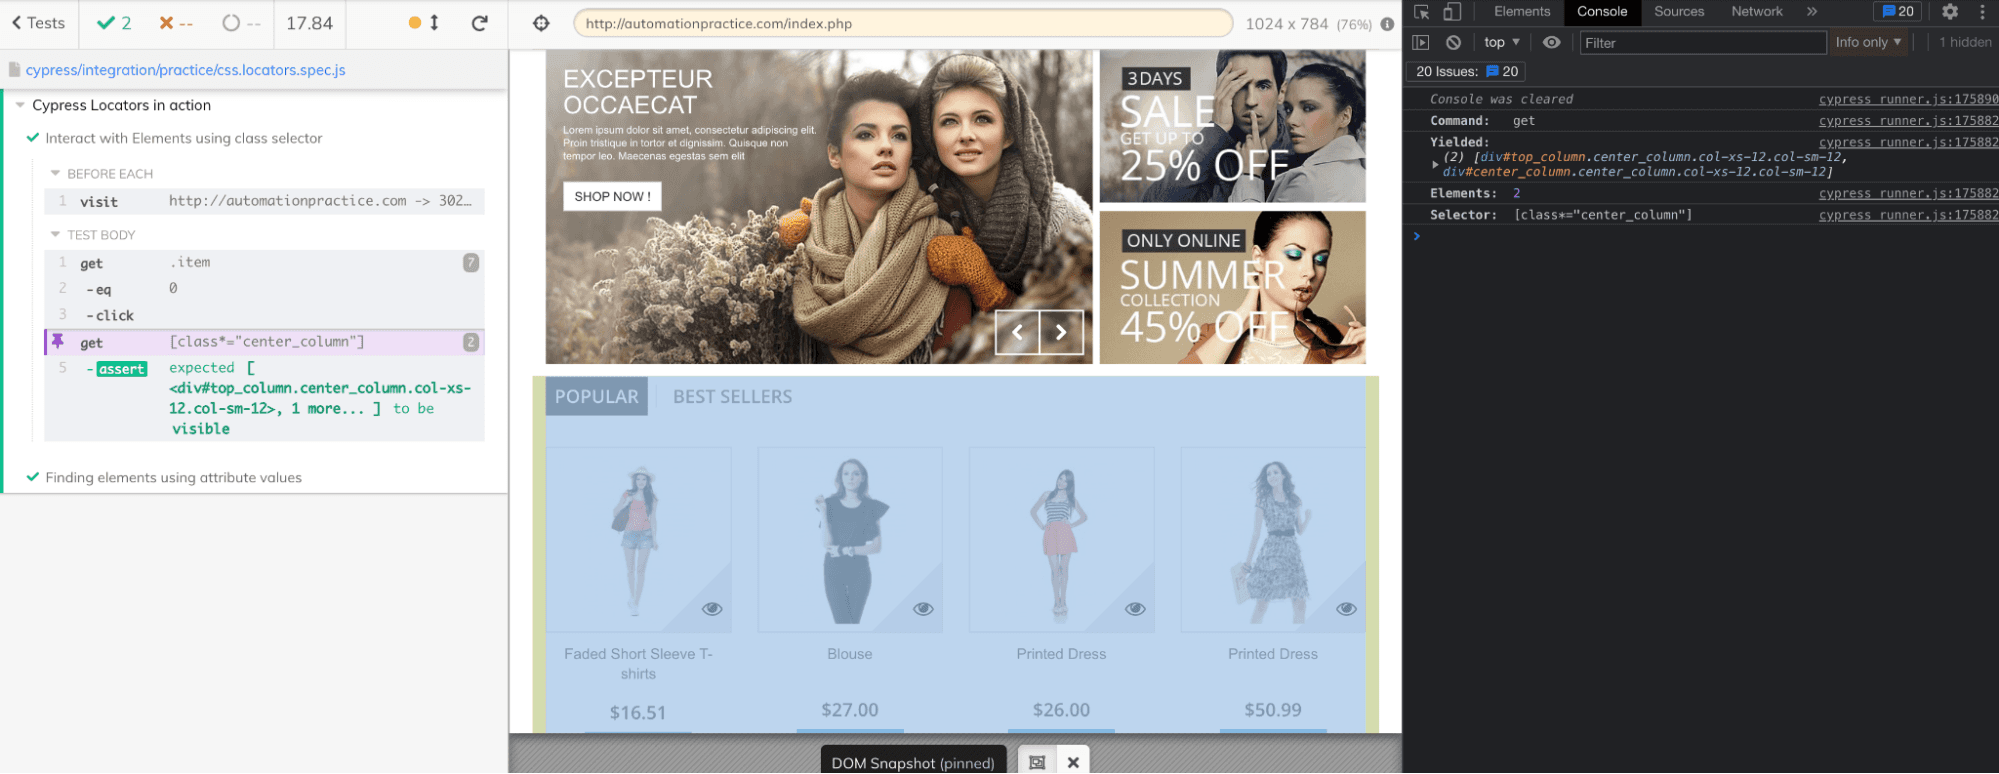
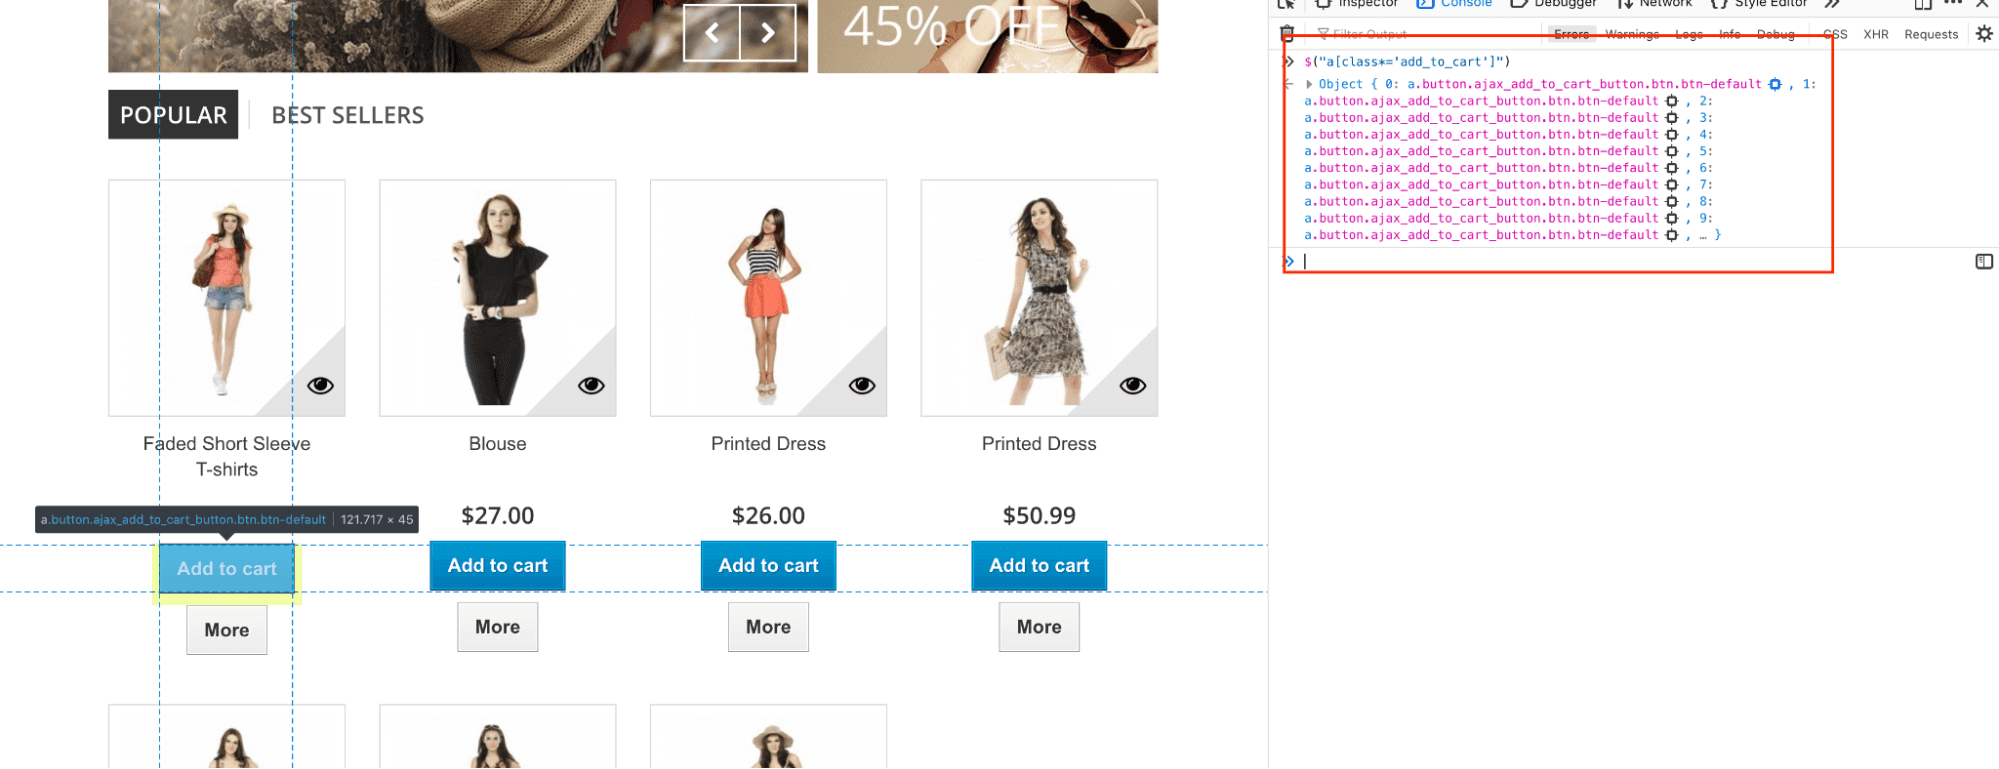
describe('Cypress Locators in action', ()=>{ beforeEach(()=>{ cy.visit('http://automationpractice.com') }) it('Interact with Elements using class selector',()=>{ cy.get('.item') .eq(0) //0th element in the array of elements .click() cy.get('[class*="center_column"]') .should('be.visible') }) it('Class selector short hand',()=>{ //find class containing value .. using *= cy.get("a[class*='add_to_cart']") .eq(0) // finding 0th element .click() .get("#layer_cart") .should('be.visible') //find class value that start with .. using ^= cy.get("[class^='layer_cart_product']") .should('be.visible') .get("a[title='Proceed to checkout']") .click() //find class that ends with... using $= cy.get('[class$="_delete"]') .click() .get('.alert') .should('be.visible') }) }) |
Code Walkthrough
Test 1: Interact with Elements using class selector
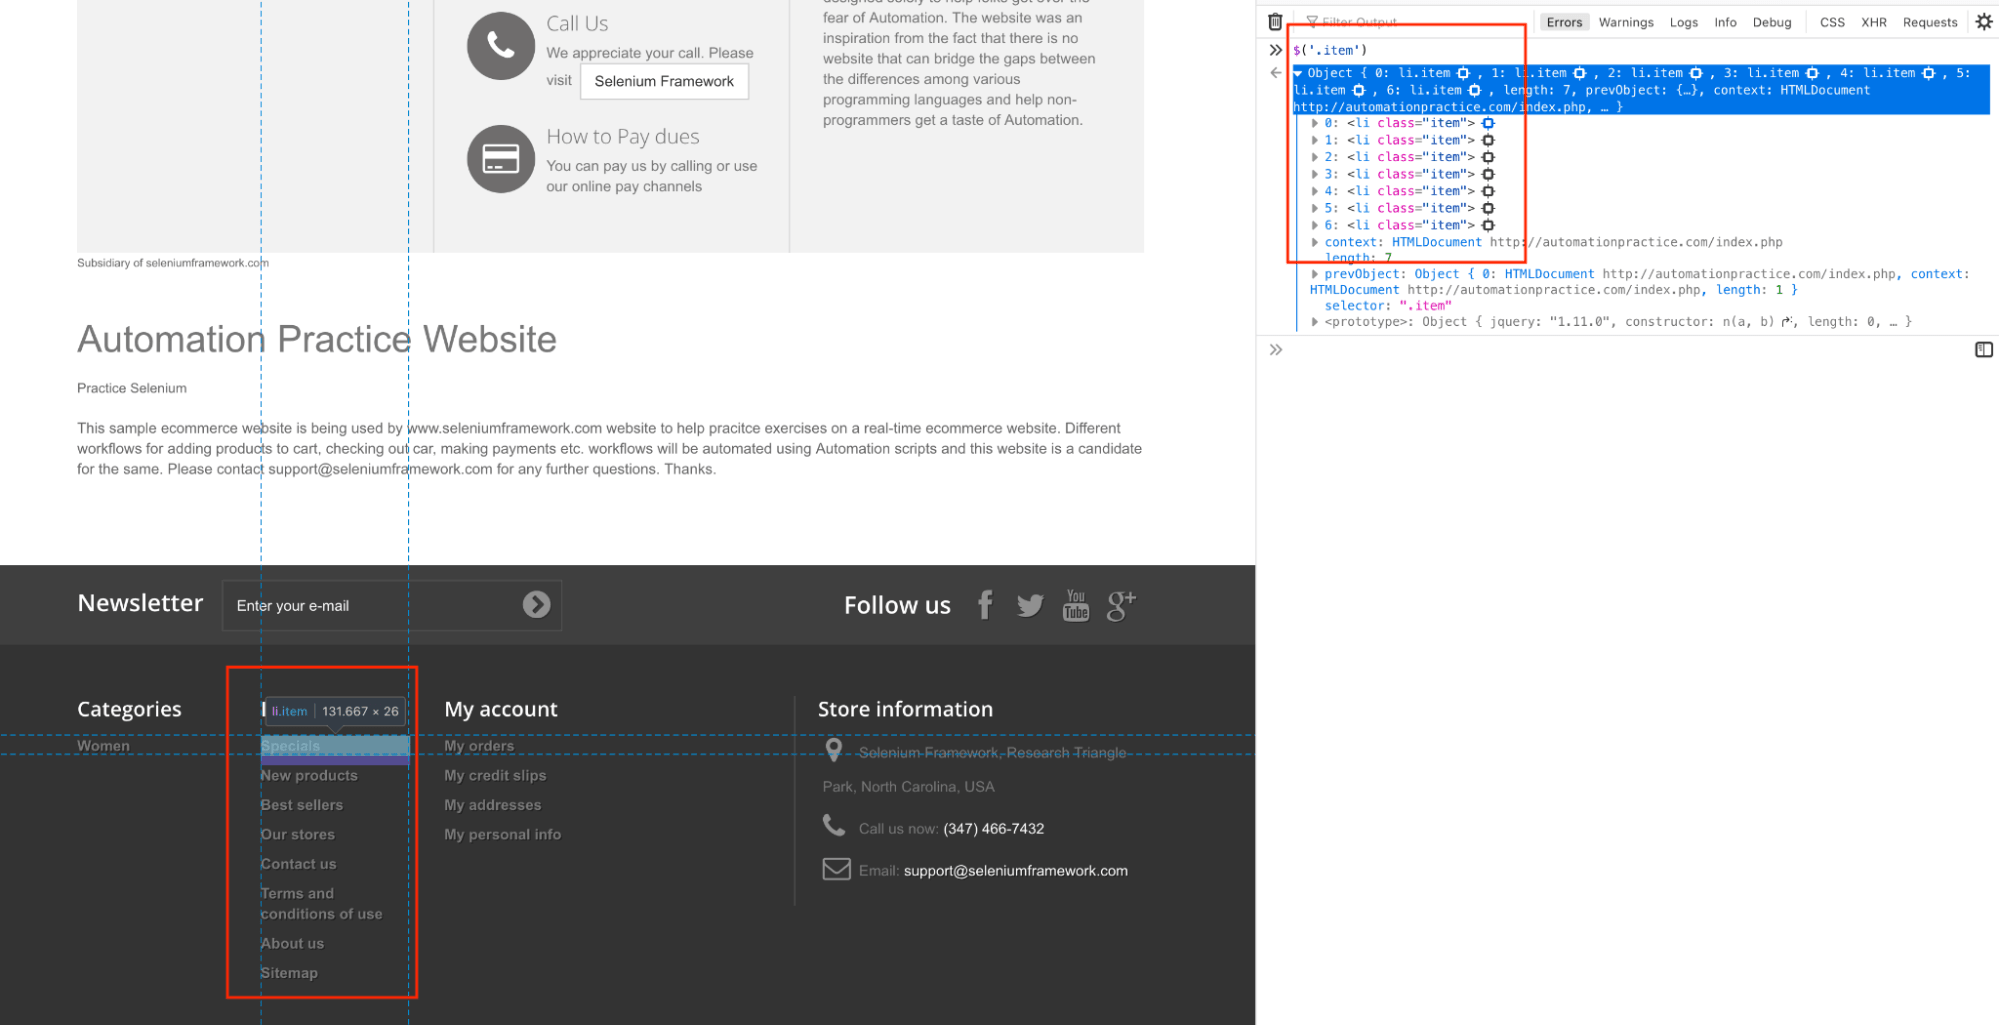
The cy.get(‘.item’) method is used to locate the element with class=”item”, which returns the list of elements matching the query.
|
1 |
cy.get('.item') |
Here is how the locator is identified using the Inspect tool in Chrome:
Once we get the list of the elements using the get() method, the eq(<index>) method in Cypress is used for locating the first element from the list. Once we locate the first element from the list, we click on the link that it points to (i.e. ‘Prices Drop’)
|
1 2 |
.eq(0) //0th element in the array of elements .click() |
Next, we find the class containing value using the cy. get(‘ [class*=”center_column”]’) method. Raise an assert on the visibility of the element using the .should() method.
Test 2: Class selector short hand
We find the first product from the list of items and add that product to the cart. We then validate the product present in the cart, remove the product and verify if the cart is empty.
For this, we make use of regex with the class selector so that the code looks cleaner.
|
1 |
cy.get("a[class*='add_to_cart']").eq(0) |
The above code locates the ‘Add to cart button’ on the home page and returns the first button using eq(0).
After clicking on the first button, we wait for the element with ID #layer_car to be visible to perform necessary operations on that WebElement.
Once the button is visible, we click on the same by locating it using its title (i.e. ‘Proceed to checkout‘).
|
1 2 3 4 |
cy.get("[class^='layer_cart_product']") .should('be.visible') .get("a[title='Proceed to checkout']") .click() |
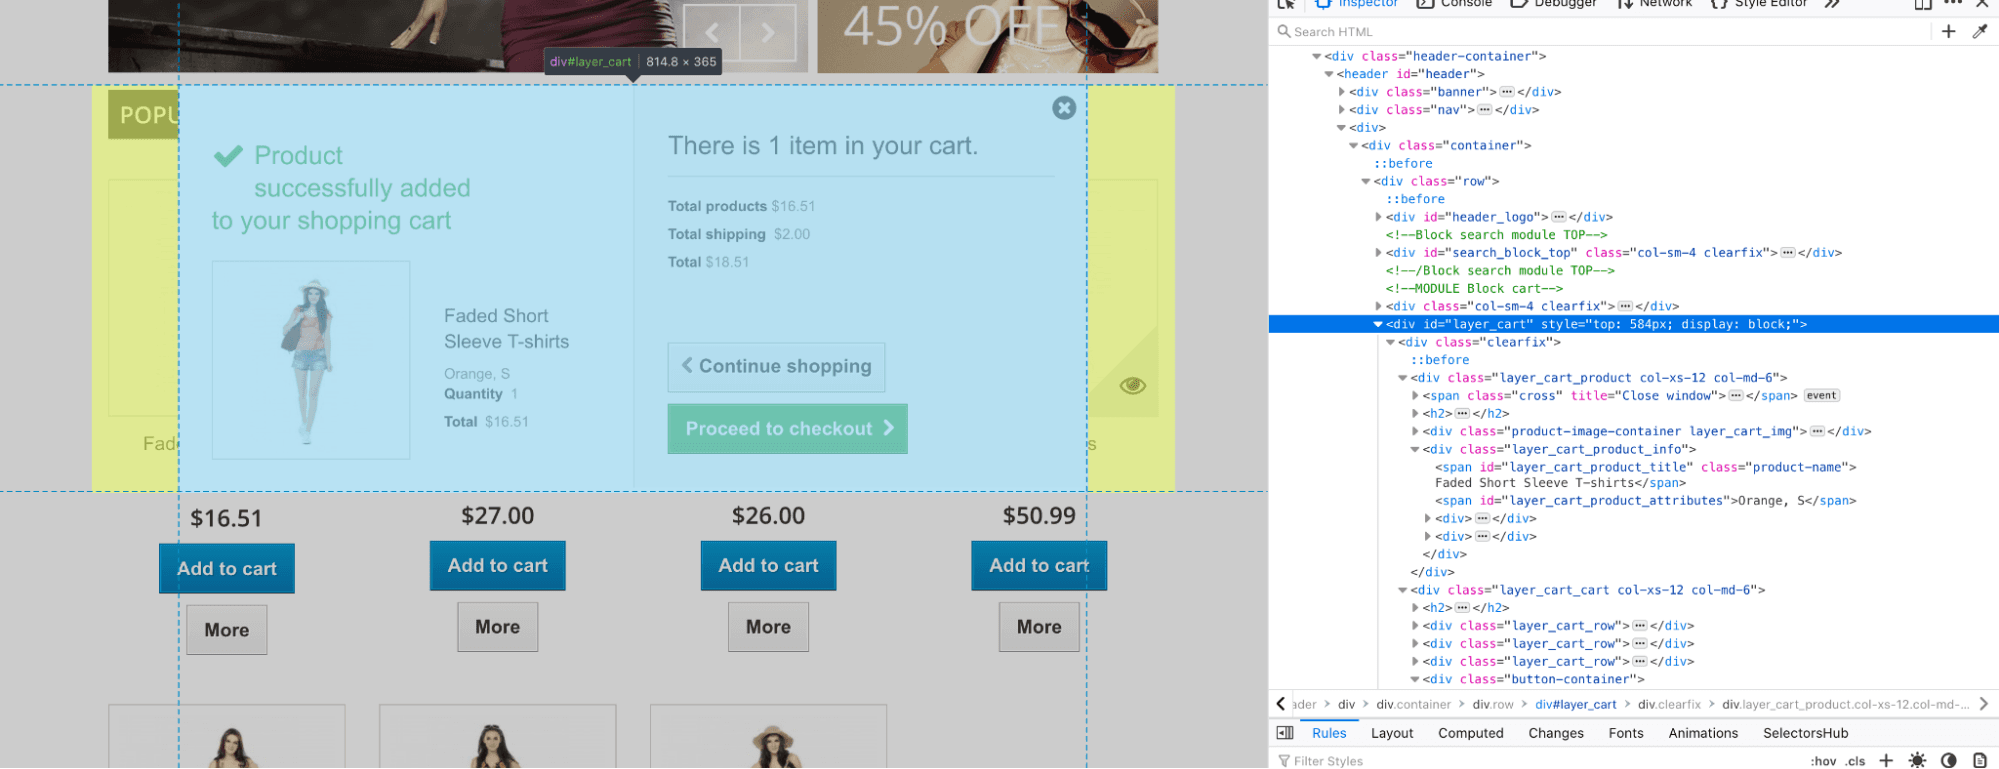
We add a Product to the cart by clicking on the ‘Proceed to checkout’ button.
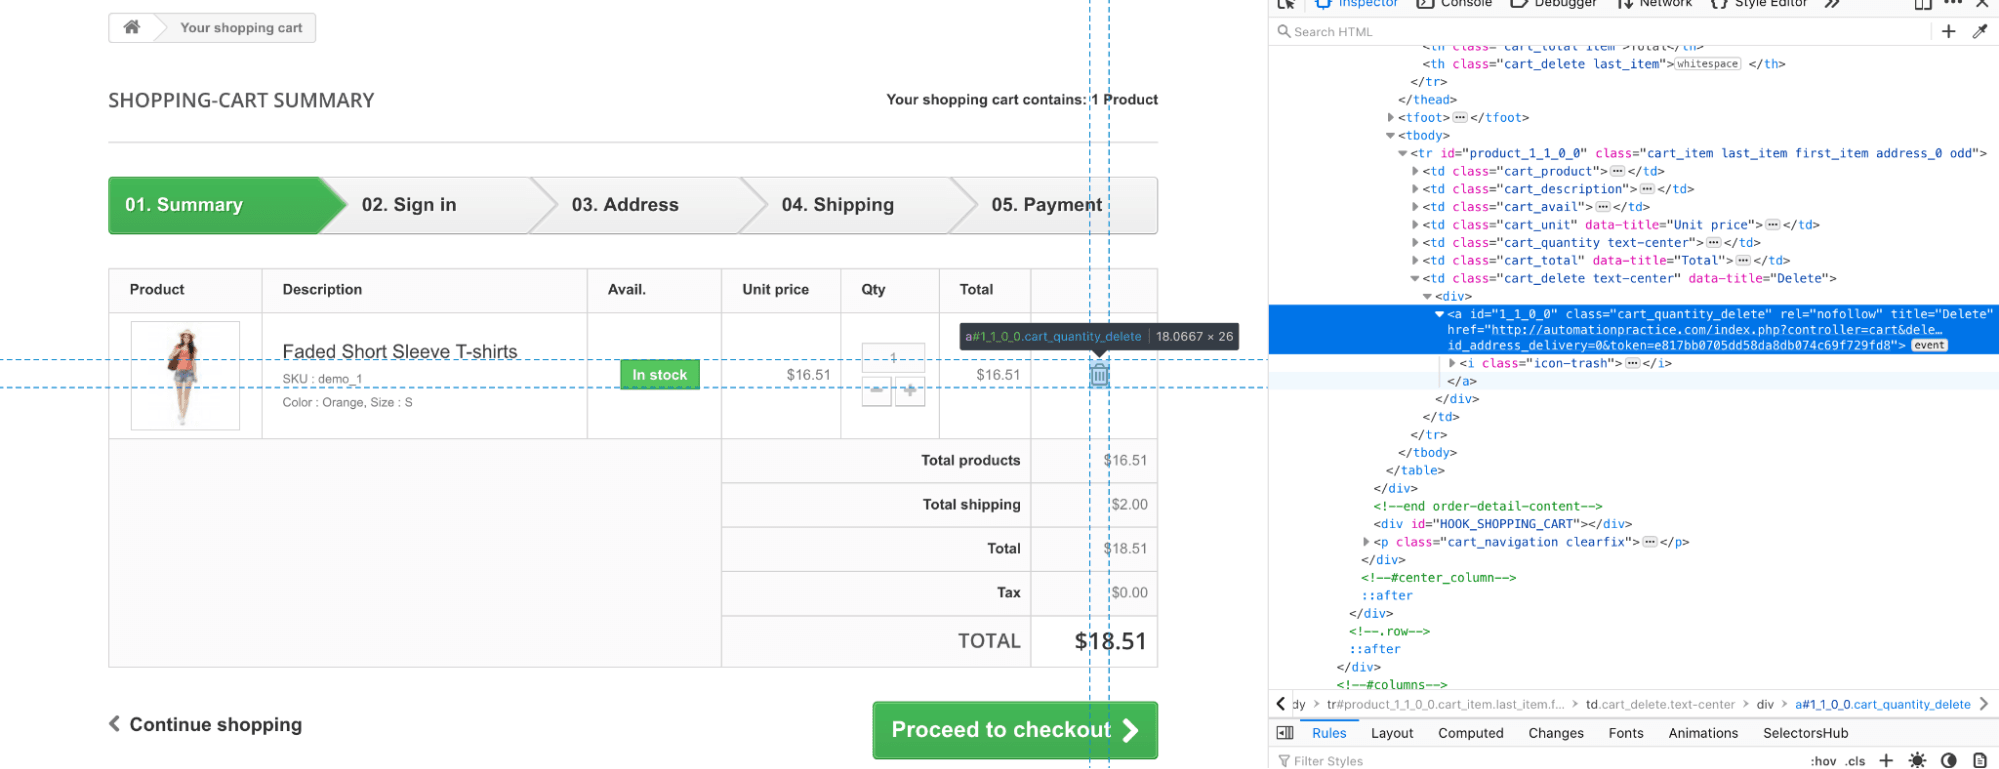
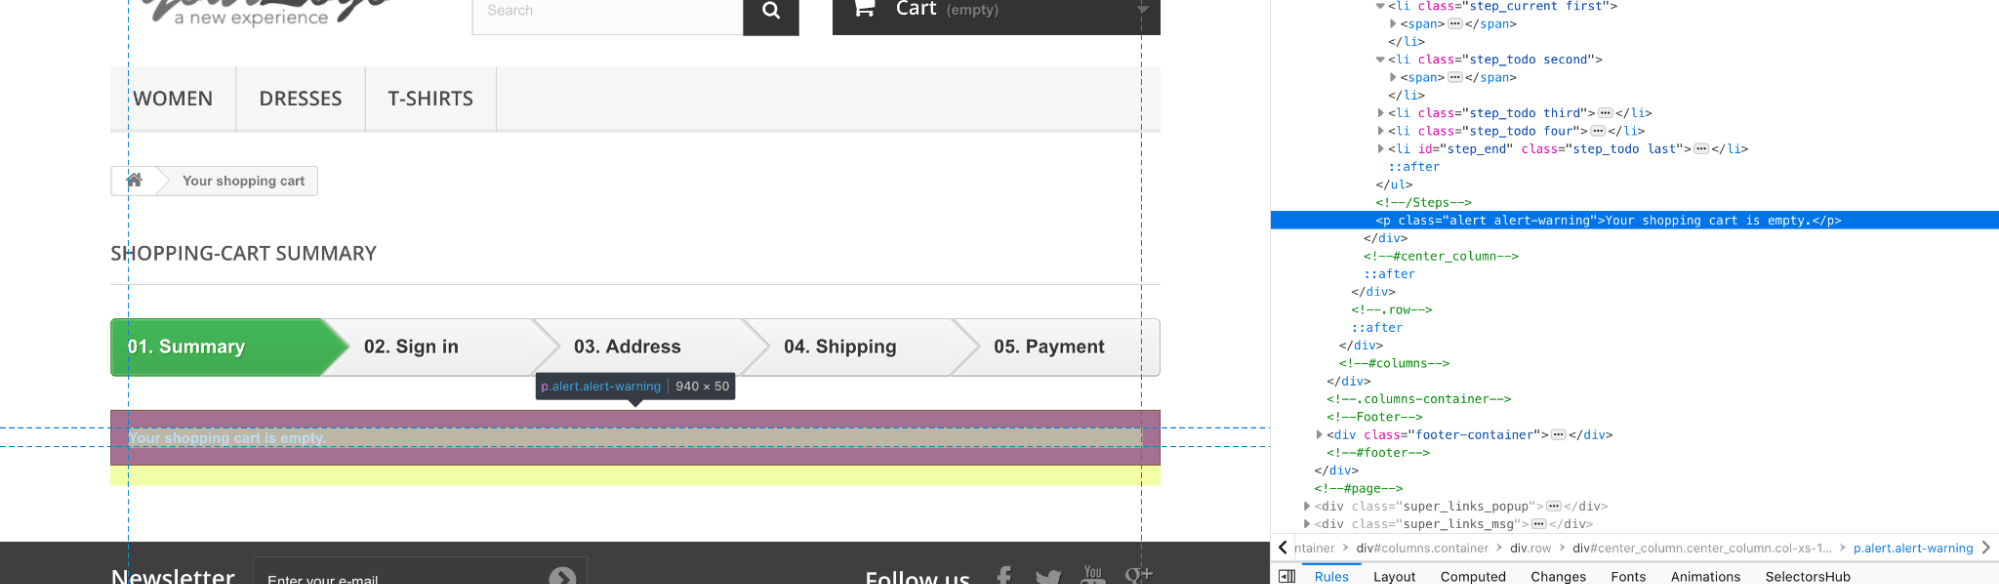
Once the item is added to the cart, we delete the same and check if the shopping cart is empty. The delete button is located using class$=”_delete”.
|
1 2 3 4 |
cy.get('[class$="_delete"]') .click() .get('.alert') .should('be.visible') |
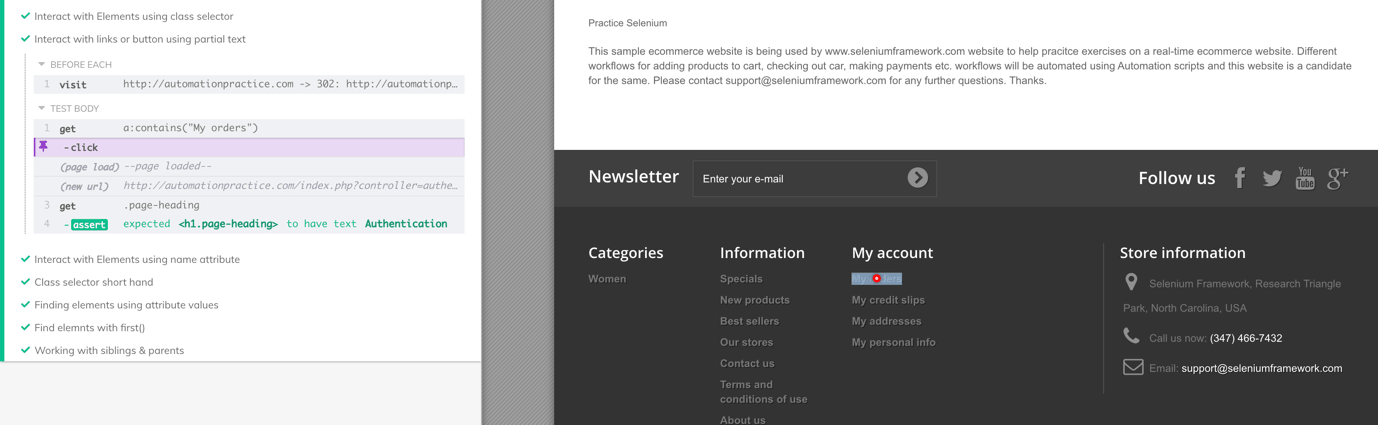
Identify HTML elements by ‘Link Text’ in Cypress
Links are ways for connecting web resources (or web pages) to another through anchor tags (i.e., <a>) and href attributes. For example, as shown below, My Orders is the link text displayed on the page.
|
1 |
<a href="http://automationpractice.com/index.php?controller=history">My orders</a> |
We can locate links in cypress using cy.get(<tags>:contains(‘<text>’)). Shown below is the sample implementation that demonstrates the usage of Link Text in Cypress:
|
1 2 3 4 5 6 |
it('Interact with links or button using partial text',()=>{ cy.get('a:contains("My orders")') // similar to partial link text .click() cy.get('.page-heading') .should('have.text','Authentication') }) |
Shown below is the execution screenshot, which indicates that the test execution is successful:
Also Read – How To Find Broken Links Using Cypress [With Examples]
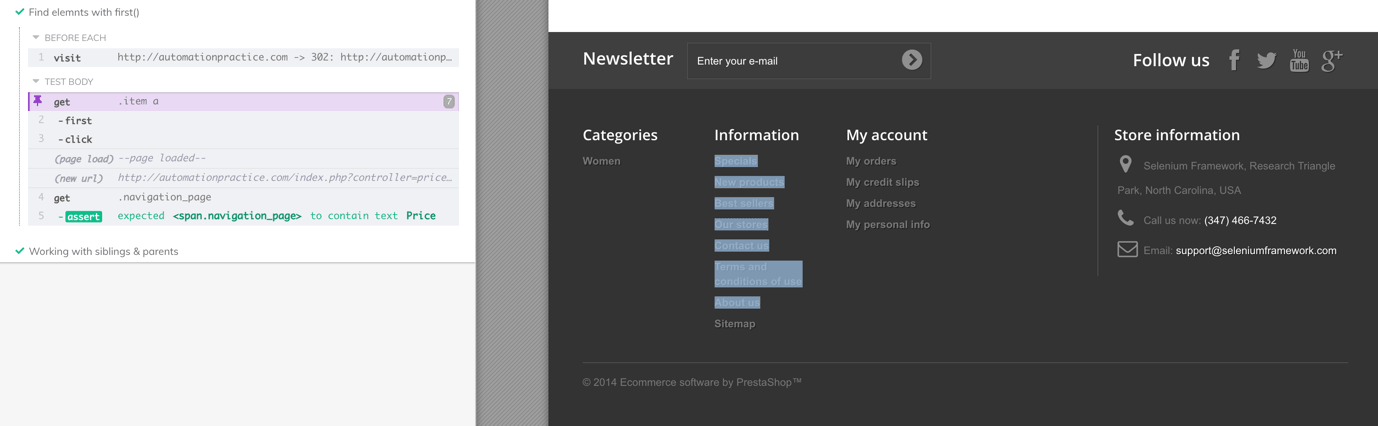
How to use the first() method in Cypress
Consider a scenario where you want to get the list of elements in DOM having a common pattern. For example, it could be items in the list, and you might be interested in fetching only the first item from the list.
To realize such a requirement, Cypress provides two approaches to get the first element in Cypress:
- eq(<index>) – Fetch element at <index> specified in the parameter. The example for this is covered above in the by class section.
- first() – Fetch only the first element from the list. It is useful when we intend to validate only the first element in the list.
To demonstrate the usage of the first() method in Cypress, we get all the links under the “item” class and use the first() method to click the first from the list.
|
1 2 3 4 5 6 7 |
t.only('Find elements with first()',()=>{ cy.get('.item a') .first() .click() .get('.navigation_page') .should('contain.text','Price') }) |
Shown below is the approach through which the first element is located on the desired web page:
Here is the execution snapshot:
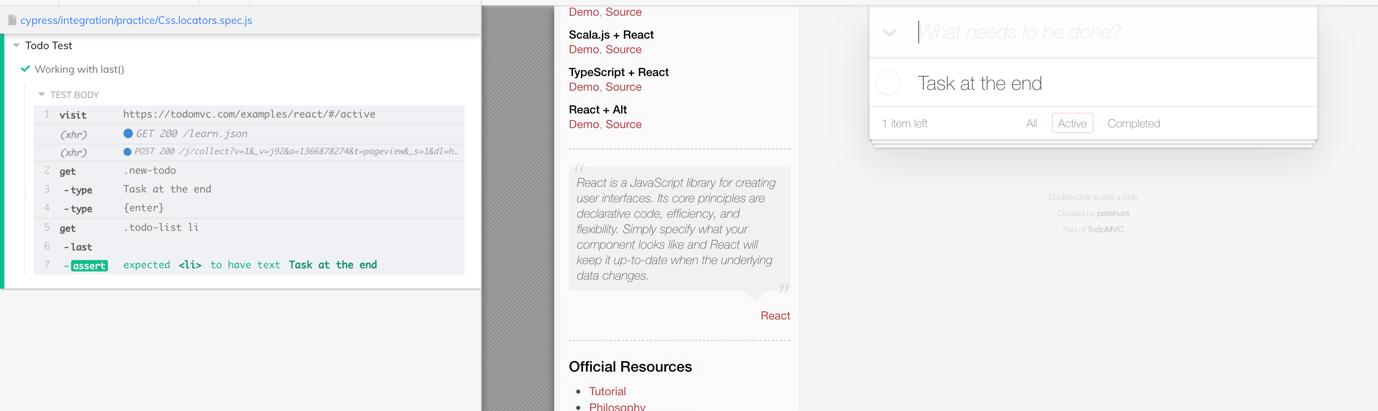
How to use the last() method in Cypress
Akin to the first() method, Cypress’s last() method is used to locate the last element in a list of elements. This is a handy utility when working with applications like the ToDo app, where tasks are added at the end of the list and verification has to be done w.r.t the tasks’ addition (or deletion).
For demonstrating the usage of the last() method, we use the React ToDo App where we would be adding items and accessing the last item from the list.
|
1 2 3 4 5 6 7 8 9 10 |
it.only('Working with last()', ()=>{ let task='Task at the end' cy.visit('https://todomvc.com/examples/react/#/active') .get('.new-todo') .type(task) .type('{enter}') .get('.todo-list li') .last() .should('have.text',task) }) |
Shown below is the execution snapshot:
Also Read: Scalable and Reliable Cross Browser Testing With Cypress Framework
Starting your journey with Cypress End-to-End Testing? Check out how you can test your Cypress test scripts on LambdaTest’s online cloud.
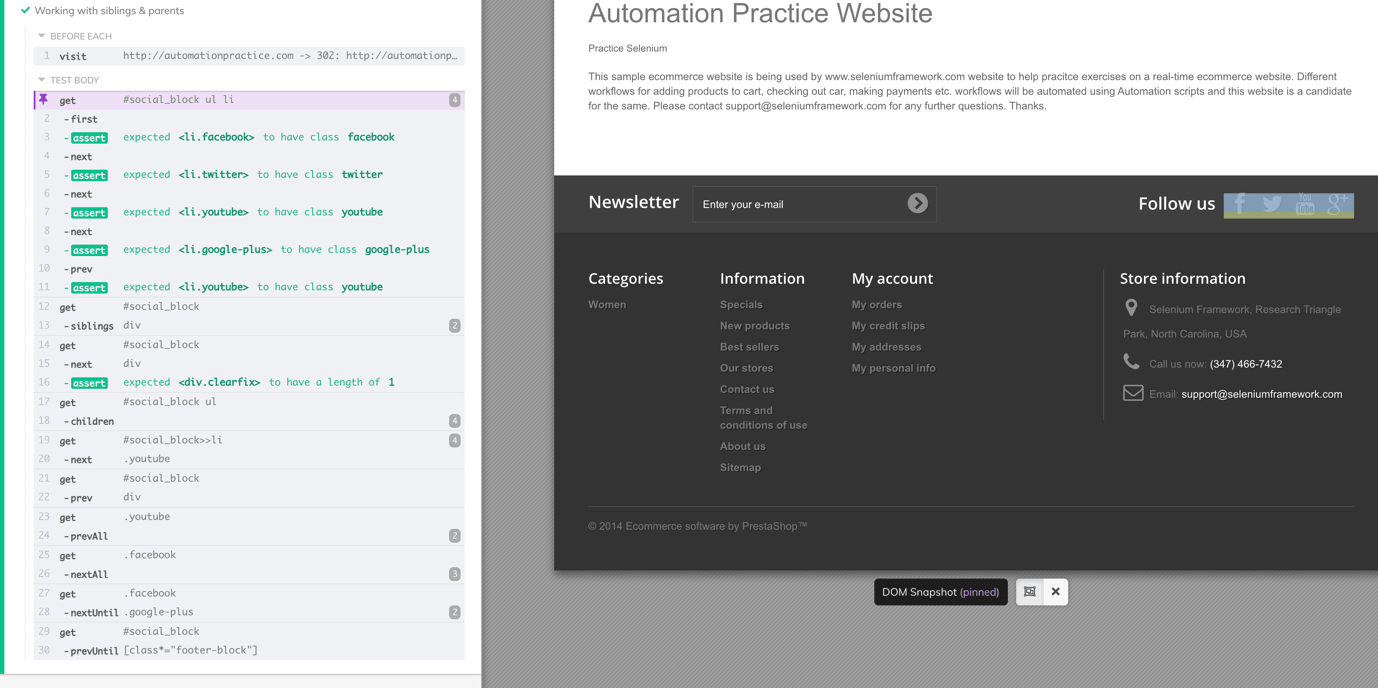
Handling ancestors and siblings elements in Cypress
In the below HTML, <li> elements are grouped inside common <ul> and they all are at the same level from the root. These are called siblings. <ul> will be immediate parent to the lists while <div> will be parent to <ul> & <li>.
|
1 2 3 4 5 6 7 8 |
<div list="items"> <ul id="social"> <li class='facebook'>facebook</li> <li class='twitter'>twitter</li> <li class='youtube'>youtube</li> <li class='google-plus'>youtube</li> </ul> </div> |
There are certain cases in automation where we might need to check the sequence of the items displayed on the page and for this, we can use the next() call in the chainable form in Cypress to find multiple elements and assert the sequence. Furthermore, similar to next(), we can use the prev() call to find previous siblings of selected elements.
nextUntil() and prevUntil() are the advanced ways of using the next() and prev() methods in Cypress. Suppose you want to validate the sequence of all the elements under siblings until some conditions set through selectors are not met. The nextUntil()/prevUntil() methods in Cypress validate the sequence of elements until certain conditions are met.
Shown below is the implementation that demonstrates the handling of ancestors and siblings using Cypress:
|
1 2 3 4 5 6 7 8 9 10 11 12 13 14 15 16 17 18 19 20 21 22 23 24 25 26 |
it.only('Working with siblings & parents', ()=>{ cy.get('#social_block ul li') .first() .should('have.class','facebook') .next() //to next siblings .should('have.class','twitter') .next() .should('have.class','youtube') .next() .should('have.class','google-plus') .prev() // using prev() back to previous sibling of google-plus which should be 'youtube' .should('have.class', 'youtube') cy.get('#social_block').siblings('div') //siblings() method to check all sibling with <div> tag cy.get('#social_block').next('div').should('have.length',1) //next() to find only next div cy.get('#social_block ul').children() //children() method to check sibling cy.get('#social_block>>li').next('.youtube') //next() with selector cy.get('#social_block').prev('div') //prev() with selector cy.get('.youtube').prevAll() //yields all before youtube cy.get('.facebook').nextAll() //yields all after facebook cy.get('.facebook').nextUntil('.google-plus') //yields twitter and youtube cy.get('#social_block').prevUntil('[class*="footer-block"]') // }) |
Shown below is the execution snapshot that indicates that the test execution was successful:
Take this certification to showcase your expertise with end-to-end testing using Cypress automahttps://www.lambdatest.com/blog/cypress-test-automation-framework/tion framework and stay one step ahead.
Here’s a short glimpse of the Cypress 101 certification from LambdaTest:
How to find HTML elements using Cypress XPath
Although Cypress only supports CSS selectors by default, external packages are now available that let you use XPath with Cypress. To use Cypress XPath, perform the following steps:
- Install cypress-xpath at the root of the project. using npm install cypress-path -d
- Set require(‘cypress-xpath’) under cypress/support/index.js. With this, you are all set to use XPath in tests
Using XPath is very popular with automation frameworks to locate elements in DOM. In practice, XPath uses generic format of //<tag>[@attribute=value]
// is used in Cypress to find multiple elements anywhere in the DOM. It is also called the relative path. Similarly, there is ‘/’ , which can be used to find WebElement at an absolute location. <tag> is optional; if specified, all the elements matching the conditions will be returned.
@attribute is the attribute of the elements against which the match needs to be done. You can also use Cypress XPath functions like contains(), text(), etc., to use more advanced features to locate relevant WebElements.
Here is the sample implementation that demonstrates the usage of Cypress XPath [ i.e. cy.xpath() ]:
|
1 2 3 4 5 6 7 8 9 10 11 12 13 14 15 16 17 18 19 20 21 22 23 24 25 26 27 28 29 30 31 |
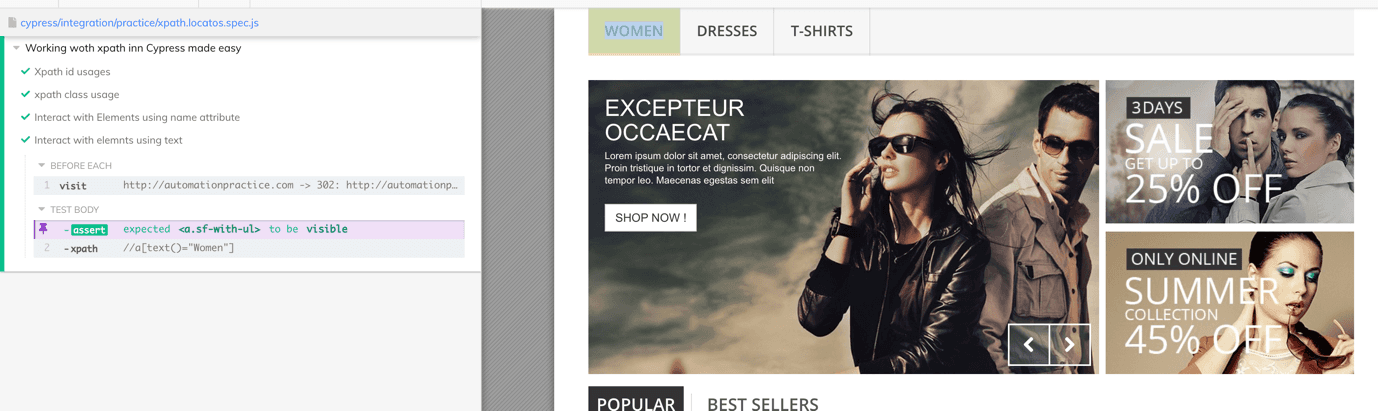
/// <reference types="cypress" /> /// <reference types="cypress-xpath" /> describe('Working with xpath in Cypress made easy', ()=>{ beforeEach(()=>{ cy.visit('http://automationpractice.com') }) it('Xpath id usages', ()=>{ cy.xpath('//*[@id="search_query_top"]') .type('Dress') .type('{enter}') .get('#center_column') .should('be.visible') }) it('xpath class usage',()=>{ cy.xpath('//*[@class="item"]//a') .eq(0) //0th element in the array of elements .click() cy.xpath('//*[contains(@class,"center_column")]') .should('be.visible') }) it('Interact with Elements using name attribute',()=>{ cy.xpath('//input[@name="email"]') .type('xyz@yopmail.com{enter}') .get(".alert") .should('contain.text','Newsletter') }) it.only('Interact with elements using text', ()=>{ cy.xpath('//a[text()="Women"]') .should('be.visible') }) }) |
Shown below is the execution snapshot:
Perform free end to end Cypress testing online.
How to find text using contains() command
When using Cypress to retrieve the text of an element, the contains command becomes an essential tool. This command efficiently locates the DOM element containing the desired text, even when CSS selectors present challenges. Unlike its name suggests, contains is not merely an assertion; it’s a powerful selector in Cypress. By combining contains with the appropriate tag name, you can precisely target the required element.
Cypress empowers you to handle situations where multiple DOM elements contain the same text. In such cases, contains will prioritize the first matching element. This emphasis on precision makes .contains() a frequently employed command in the Cypress toolkit.
Bonus Tip: Cypress Selector Playground
Cypress has another useful feature for users that helps locate CSS selectors easily on pages directly from the test runner. Selector Playground will always match and find the unique locators for the elements to not create an issue when using them.
Shown below is the priority of the unique locators that Cypress supports:
- data-cy
- data-test
- data-testid
- id
- class
- tag
- attributes
- nth-child
Where data-* are the cypress recommended attributes added to the WebElements to isolate the elements from JS/CSS changes that might break the test.

Also Read – Web Performance Testing With Cypress and Google Lighthouse
Conclusion
Cypress is a cutting-edge browser automation solution that is fast gaining the attention of the software community. It offers a better, more effective approach to web testing and is gaining popularity due to its ability to help teams keep pace with a complete range of application testing.
By using Cypress, you can take advantage of all built-in locators and features like intelligent matching and asynchronous commands to ensure that each test has no dependencies. In this Cypress tutorial, we have seen how we can use Cypress locators to access WebElements in the DOM for realizing Cypress automation tests. Moreover, although Cypress is built with a strict “no CSS selectors allowed” stance internally, external community packages now exist that allow you to write Cypress tests using XPath.
Though Cypress has a rich feature set, the true capabilities of Cypress can only be leveraged by running Cypress tests on a scalable cloud-based cross browser testing platform like LambdaTest. LambdaTest Cypress CLI simplifies the task of executing your Cypress tests in parallel on a range of online browser and OS combinations hosted on the LambdaTest cloud grid. While writing this blog, there are 40+ browser versions for Cypress testing on the LambdaTest cloud grid.
Happy Testing!
Frequently Asked Questions
Where can I find Cypress elements?
You can use the element to specify the class or use the attribute to target it. If you want to target an element with a placeholder for input or if the element is a test-id and your selector is bounded by square brackets, you must prefix it with #.
How do you wait for an element in Cypress?
Cypress commands have a default timeout of 4 seconds; however, most Cypress commands have customizable timeout options. Timeouts can be configured globally or on a per-command basis. For example, if you wanted to wait for an element to exist and be visible (cy.contains()), you could pass in an Array with the values: [‘isPresent’, ‘visible’].
Can we use xpath in Cypress?
Cypress does support XPath selectors, but that requires a plugin. In other words, you need the Cypress-Xpath plugin to get XPath working.


Author’s Profile
Sachin
A Software Engineer by profession, love to work for open source projects and some of my own personal projects through blogging and learning. I have overall 7+ years of expertise in the various phases of the software development life cycle.
Blogs: 6
Got Questions? Drop them on LambdaTest Community. Visit now


