How To Run Automation Tests Using Selenium and NodeJS [With Example]
Himanshu Sheth
Posted On: May 26, 2021
![]() 160652 Views
160652 Views
![]() 11 Min Read
11 Min Read
In the current software development era, Selenium is extremely important and makes up an inherent part of the software development cycle. It helps to build software that is tested continuously while being developed in the form of separate small individual units and a whole integrated set as well.
While Selenium is the most popular choice for automation testing, everyone wants to use the best possible technologies for better results. Amongst the programming language, NodeJs has made a spot for itself as a preferred one to be used along with Selenium to give best results for Selenium test automation.
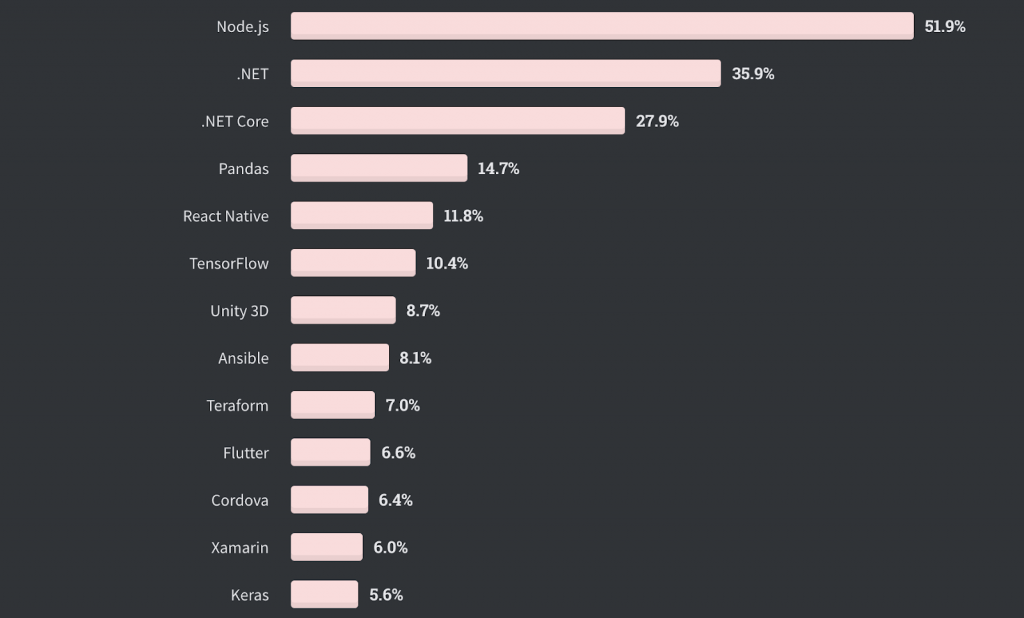
In this tutorial, we will start with some basic introduction to Selenium and NodeJs and why they make such a good solution when used together by using one Selenium NodeJs example. Let’s go!
TABLE OF CONTENT
If you’re new to Selenium and wondering what it is then we recommend checking out our guide – What is Selenium? If you are preparing for an interview you can learn more through Selenium interview questions.
Why Selenium and NodeJs For Web Automation Testing
Selenium is widely used in automation testing for web applications as it is an open source and widely-used cross browser testing tool. It provides support for almost all top browsers available like Chrome, Firefox, Opera, Internet Explorer and more. It can be integrated with almost all popular programming languages, automation tools, and libraries with the same ease making it a preferred choice for Selenium test automation.
NodeJs is a very good text-based open-source programming language that is widely used for online application development. It focuses online application development on a single programming language that represents the ‘Javascript Everywhere’ concept. It is known to improve the smoothness of dynamic web page interactions since it is used for both on the client and server sides.
Read 23 Node.js Best Practices For Automation Testing
In addition to their independent usefulness for the purpose of writing automation test cases, Selenium NodeJs make a very wonderful combination as both are easy to implement. Also, the implementation with Selenium and NodeJs can be kept in a single repository, thereby enabling developers to run it without any additional setup. They can also contribute if required.
Prerequisites to get started with Selenium and NodeJs
Here are the pre-quisites for getting started with Selenium and NodeJs:
- Machine with node setup with npm installed
- selenium-webdriver package for using it to run Selenium configurations
- Chrome driver package – web browser to run the test case. This is only applicable when tests are performed on a local Selenium Grid.
- Mocha assertion library
Setting up node and npm
Note : Incase you already have node and npm installed on your system, just update them to latest version using following
|
1 |
npm install npm@latest -g |
In order to install node/npm and then verify the setup follow these steps
- Download and install node just like any other program on your system from this website : nodejs.org
- Once the installation completes, type following commands on your terminal window to verify it
|
1 2 |
node -v npm -v |
Now that we have installed node and verified it, let’s create a npm project directory which we will be using to add automation tests. For this follow these simple steps
- Create a new directory in your system either through the UI or by using this command on terminal
- To make this directory as an npm project directory, navigate to it and initialize node
|
1 |
mkdir selenium-node-automation-project |
|
1 2 |
cd selenium-node-automation-project npm init |
Note: Running init command would throw a bunch of questions at you regarding the setup information. For starters, keep everything as default and submit.
Once all information is gathered by system, it will generate a package.json file for you in the directory. This is a config file that we can customize as required as we proceed with developing our automation.
Here’s a snapshot of how it will look like initially :
|
1 2 3 4 5 6 7 8 9 10 |
{ "name": "selenium-node-automation-project", "version": "1.0.0", "description": "Test for npm projects", "main": "index.js", "scripts": { "test": "test" }, "author": "Lambdatest" } |
Configuring Selenium with Node
Once we are done with setting up node(s), next would be to install a framework to work with Selenium and node together. For this navigate to your project folder, selenium-node-automation-project and execute following command
|
1 |
npm install selenium-webdriver |
Once this is installed, we download drivers for the WebDriver to interact with the specific browser under test. In this tutorial we will be downloading drivers for Firefox and Chrome as they are mostly used and can function with mostly all major operating systems.
You can download the latest GeckoDriver (for Firefox) from here and Chromedriver (for Google Chrome) from here. Next unzip them into some location/directory which is easily accessible and copy the absolute path for both the drivers and add it to your system’s PATH variables.
Having configured node and Selenium for Selenium NodeJs example, let us try to run a simple program to verify the setup. For this create a file test_setup.js inside the project folder, and add this code to it.
|
1 2 3 4 5 6 7 8 |
var webdriver = require('selenium-webdriver'); var driver = new webdriver.Builder(). withCapabilities(webdriver.Capabilities.chrome()). build(); driver.get('http://www.lambdatest.com'); driver.quit(); |
And execute it with following command
|
1 |
node test_setup.js |
You should see the Chrome browser getting instantiated and redirecting to Google.
Adding Mocha assertion library
Selenium test automation is not helpful if it’s not having any asserts, as they inform us and help verify whether the functionality is working as expected. Mocha is an assertion library used to put asserts and verifications in our Selenium node automation tests and, if required, can be used to run tests.
Read – How to use Assert and Verify in Selenium WebDriver
To install Mocha, run the following command inside the project folder
|
1 |
npm install -g mocha |
We will now modify our test_setup.js file to verify setup with Mocha before writing the first test case in complete formatted structure.
If this test passes, our setup is all good and we are ready for executing our first automation test case as a part of Selenium NodeJs example.
Read Mocha JavaScript Tutorial With Examples For Selenium Testing
Demonstration: Selenium with JavaScript on cloud-based Selenium Grid
One of the essential things when Selenium and NodeJs is following a proper directory structure. For this Selenium NodeJs example, we will add relevant files (that contain the implementation) inside the project folder. Further, we will run this Selenium NodeJs example over the cloud-based Selenium Grid by LambdaTest.We will verify the results on the LambdaTest dashboard.
LambdaTest is a cloud-based cross browser testing platform that allows users to perform automation tests at scale. The platform provides an Online Selenium Grid that supports multiple automation testing frameworks and enables users to run tests in parallel across 3000+ browsers and operating systems combinations. Along with running tests at scale, it also expedites the process of test automation as Selenium tests can be run in parallel across different browser & OS combinations.
Read – Parallel Test Execution in Selenium
You can also perform live interactive testing infrastructure, integrate with most loved CI/CD tools, project management tools, and get detailed analytics of your tests on the LambdaTest Dashboard.
selenium-node-automation-project already consists of package.json which will be modified as per our requirements. Other than that we will add 2 more folders to this: conf and tests.
- conf folder would hold configurations for single and parallel execution of test cases in single.conf.js and parallel.conf.js files respectively
- Tests folder will have Selenium NodeJs test files for single and parallel test cases, namely single.test.js and parallel.test.js respectively.
Let us now get our hands dirty with implementation and proceed further with this Selenium NodeJs example:
- tests folder contains the test *.js files which would contain various test cases organised in different files and folders as per the requirements.
As evident from line number 20, the sample test is of parallel test execution.. We have used a forEach loop to traverse through each capability and run cases on different browsers.
|
1 2 3 4 5 6 7 8 9 10 11 |
..................................... ..................................... ..................................... capabilities.forEach(function(caps) { describe("Google's Search Functionality for " + caps.browserName, function() { var driver; this.timeout(0); ..................................... ..................................... ..................................... |
To make it run for a single case, we just need to remove this function and then the applied capability would be of a single browser (and OS combination).
- conf folder
This folder contains configuration files for running single and parallel test cases which contain all the necessary capabilities in form of key value pairs. It also contains your LambdaTest username and access key to run and map the results on the dashboard as per the given capability set. You can obtain the user-name and access-key from the LambdaTest profile page.
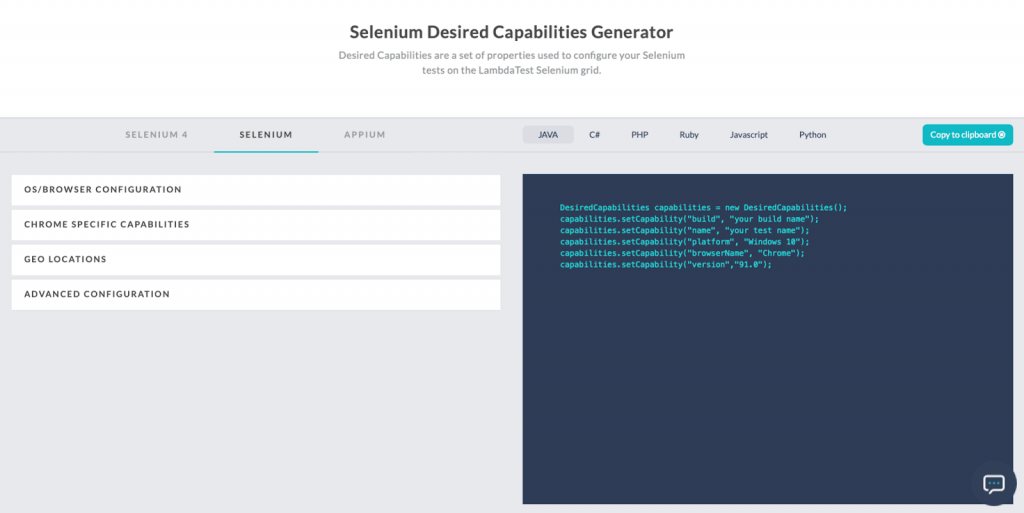
The capabilities are generated using LambdaTest Desired Capabilities generator. The tests are run on Chrome & Firefox browsers (latest version) available on the Windows platform.
Here are the generated capabilities generated for the demonstration of Selenium and NodeJs:
|
Key |
Description |
Value type |
Sample values |
|
build |
Name of the build you are executing |
String |
LambdaTest_Mocha_Sample |
|
name |
Name of the test executed |
String |
First_Test_Sample |
|
platform |
OS for running test |
String |
Windows 10 |
|
browserName |
Web browser to execute test |
String |
chrome/firefox |
|
version |
web browser version |
String |
latest/latest |
|
visual |
to enable step by step screenshot |
Boolean |
true/false |
|
network |
to capture network logs |
Boolean |
true/false |
|
console |
to capture console logs |
Boolean |
true/false |
|
tunnel |
to route traffic through local machine |
Boolean |
true/false |
The dependencies for the script and project are kept in package.json. Selenium 4.0.0-beta.3 is used for demonstrating this Selenium NodeJs example. Do check out our blog on What is new in Selenium 4 to gather understanding about the advantages of the same.
|
1 2 3 4 5 6 7 8 9 10 11 12 13 14 15 16 17 18 19 20 |
{ "name": "selenium-node-automation-project", "version": "0.0.1", "description": " Selenium nodejs automation project", "scripts": { "test": "npm run single && npm run parallel", "single": "./node_modules/.bin/mocha tests/single.test.js conf/single.conf.js", "parallel": "./node_modules/.bin/mocha tests/parallel.test.js conf/parallel.conf.js --timeout=100000" }, "keywords": [ "mocha", "LambdaTest", "selenium", "examples" ], "dependencies": { "mocha": "^6.2.0", "selenium-webdriver": "^3.0.0-beta-3" } } |
The folder structure needs to be tailor-made as per the project requirements.
Read – All you need to know W3C Compliance in Selenium 4
Once the basic setup is completed, run the following command to install those dependencies:
npm install
We are now good at executing our first Selenium NodeJs example. The LambdaTest dashboard will be used to verify results of the test execution. In order to run the test files run following commands
- To run a single test, trigger the following command on the terminal:
- To run tests in parallel, trigger the following command on the terminal:
|
1 |
npm run single |
|
1 |
npm run parallel |
To demonstrate parallel testing with Selenium NodeJs, we will be executing the parallel test file. As mentioned earlier, the tests would run on the latest versions of Chrome and Firefox browsers.
Once you run the command, it will give you the following output on terminal
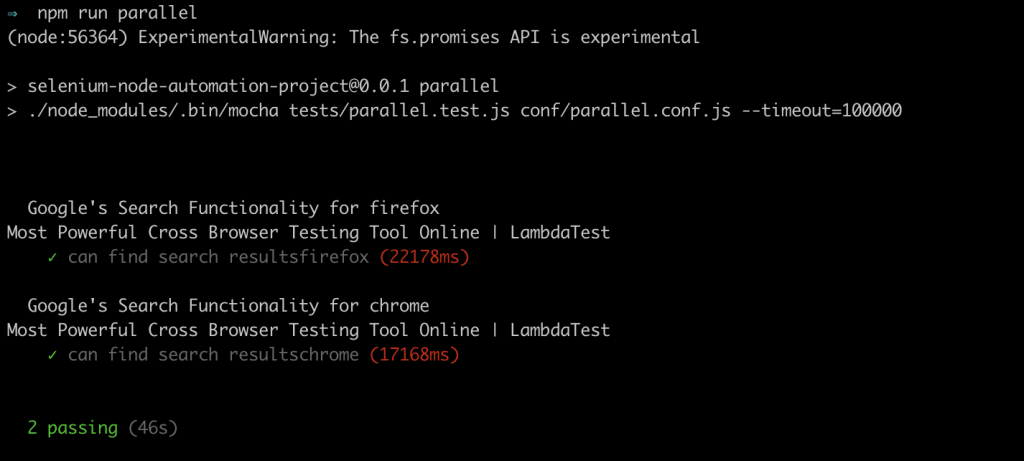
Next navigate to the LambdaTest automation dashboard to verify the execution details. As shown below, you will see the executions categorized in different sections:
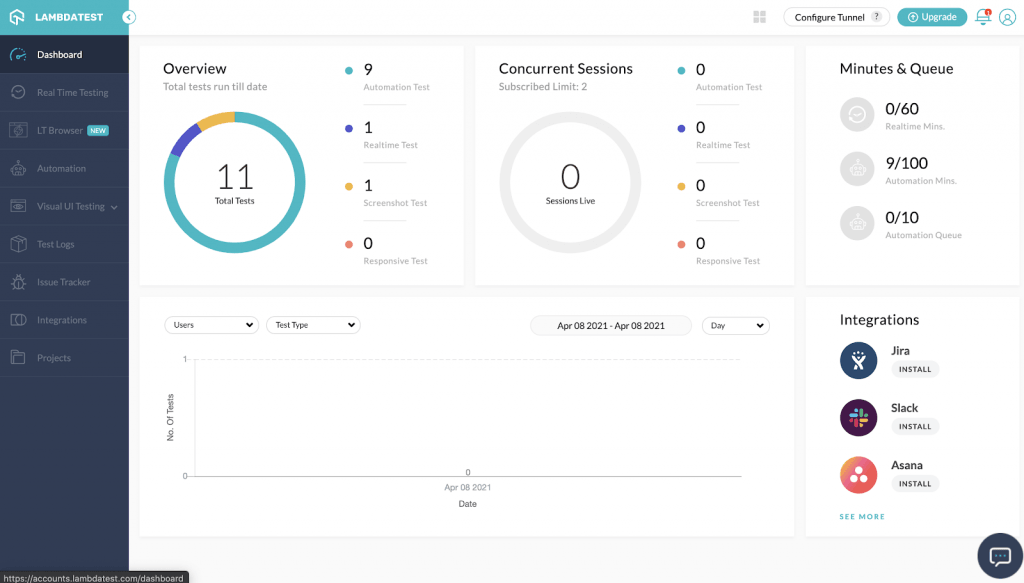
Under the Automation tab, you can see the execution of your tests, its timeline, automation logs related to the execution, and more.
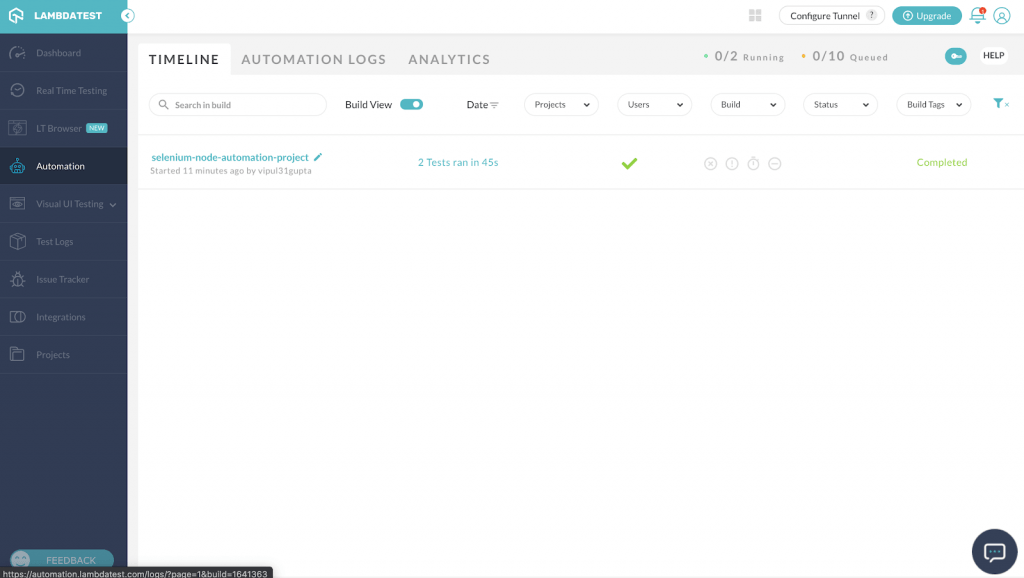
You can find all comprehensive and detailed information about the test case executed on this dashboard.
With this, you have successfully performed automation with Selenium and NodeJs.Are you excited to perform JavaScript automation testing on LambdaTest? Have a look at our detailed Selenium and NodeJs tutorial for web automation testing:
Wrap Up
Try your free automated cloud testing online!!! In this tutorial, we learned why Selenium and NodeJs are a preferred choice for Selenium test automation, understood the prerequisites to set up the system and demonstrated our first case execution on cloud Selenium Grid. For enhanced scalability, and performance it’s recommended to run your automation tests on cloud testing platforms like LambdaTest. So now it’s time for you to try out Selenium NodeJs testing! Also please reach out to us in case you have any questions or feedback regarding this article. Till then, Happy Testing!
Got Questions? Drop them on LambdaTest Community. Visit now


