
Learn To Run Selenium Tests On Chrome With Selenium ChromeDriver
Urwashi Priya
Posted On: March 27, 2024
![]() 284141 Views
284141 Views
![]() 12 Min Read
12 Min Read
With an incredible 65.31% global market share when writing this blog, Google Chrome is undoubtedly the market leader. It is well-known for its abundant valuable features and is one of the most popular options for internet users globally. Due to its extensive use and impact, ensuring websites work well on Chrome is crucial to web development and testing.
This blog deep dives into Selenium testing specifically tailored for Chrome browsers. Before diving into the technicalities, we’ll first explore the fundamentals of ChromeDriver and guide you through the seamless configuration process on your Windows and MacOS systems.
Enhance your Automation Testing interview proficiency with our meticulously curated compilation of questions and answers. Explore the comprehensive list of Automation Testing Interview Questions and Answers for valuable insights.
TABLE OF CONTENTS
- What is Selenium ChromeDriver?
- How to Download ChromeDriver for Selenium?
- Setting Up the ChromeDriver for Selenium
- How to Check the Installed Version of Selenium ChromeDriver?
- Steps to Run Automation Test With Selenium ChromeDriver
- Automating the Manual Process Of Managing Drivers
- Steps to Run Automation Selenium Tests On LambdaTest Cloud Grid
- Frequently Asked Questions
What is Selenium ChromeDriver?
Selenium ChromeDriver is an open-source tool that enables Selenium WebDriver to automate interactions with the Chrome browser for testing web applications.
Initializing the ChromeDriver object can be done easily with the following command:
In Python.
|
1 2 3 |
from selenium import webdriver driver = webdriver.Chrome() |
In Java.
|
1 2 3 4 |
import org.openqa.selenium.WebDriver; import org.openqa.selenium.chrome.ChromeDriver; WebDriver driver = new ChromeDriver |
 Note
NoteAutomate your tests on a Selenium cloud grid of 3000+ real browsers. Try LambdaTest Today!
How to Download ChromeDriver for Selenium?
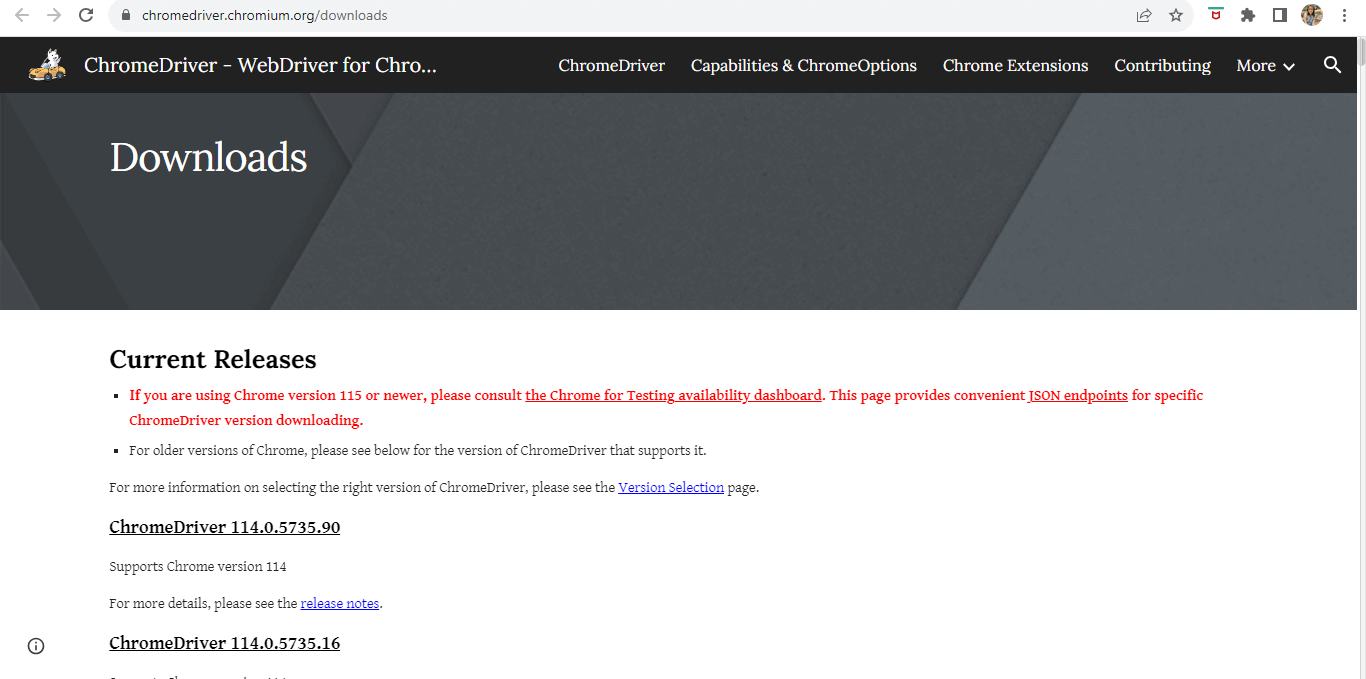
It is essential to know the version of Chrome running on your system and pick the ChromeDriver for Selenium that matches with it. ChromeDriver for Selenium can be downloaded from its official website.
Downloading Selenium ChromeDriver for version below or equal to 114.0
- Download the required version of ChromeDriver from its official website.
- Extract the contents of the downloaded ZIP file to a location of your choice on your computer.
Note: Ensure that ChromeDriver and your browser’s version is same.
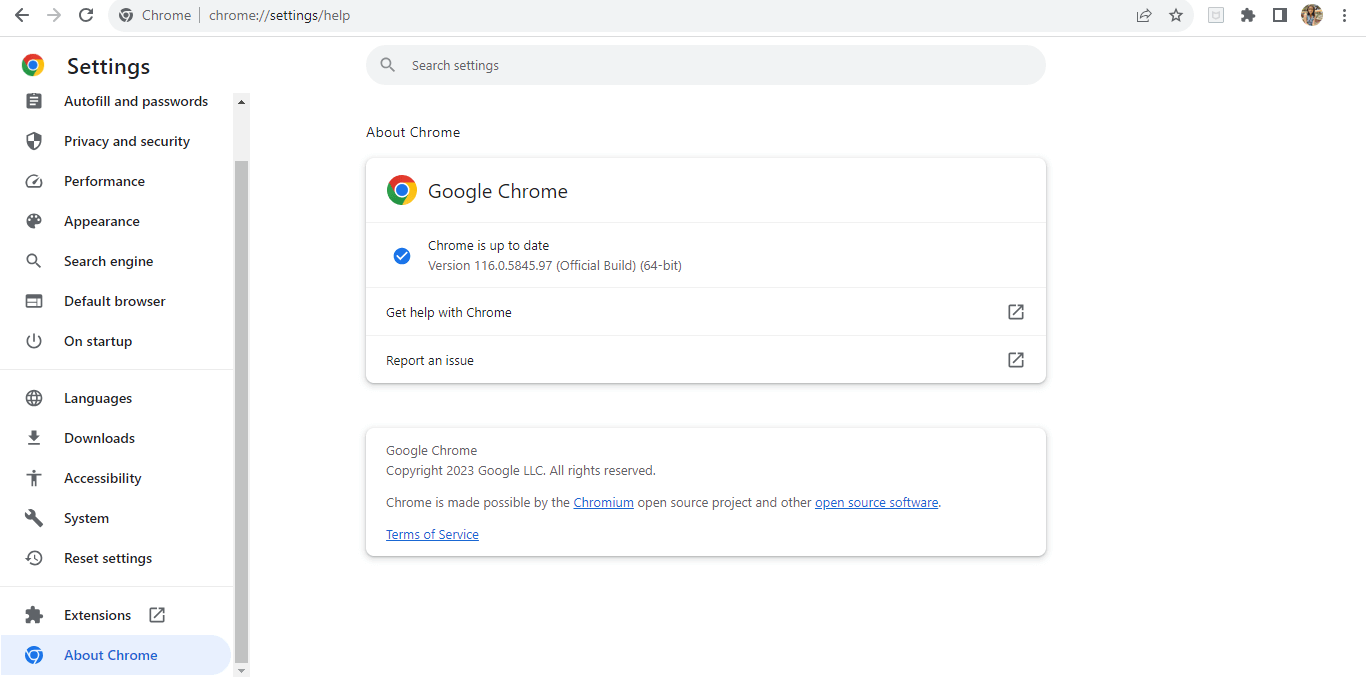
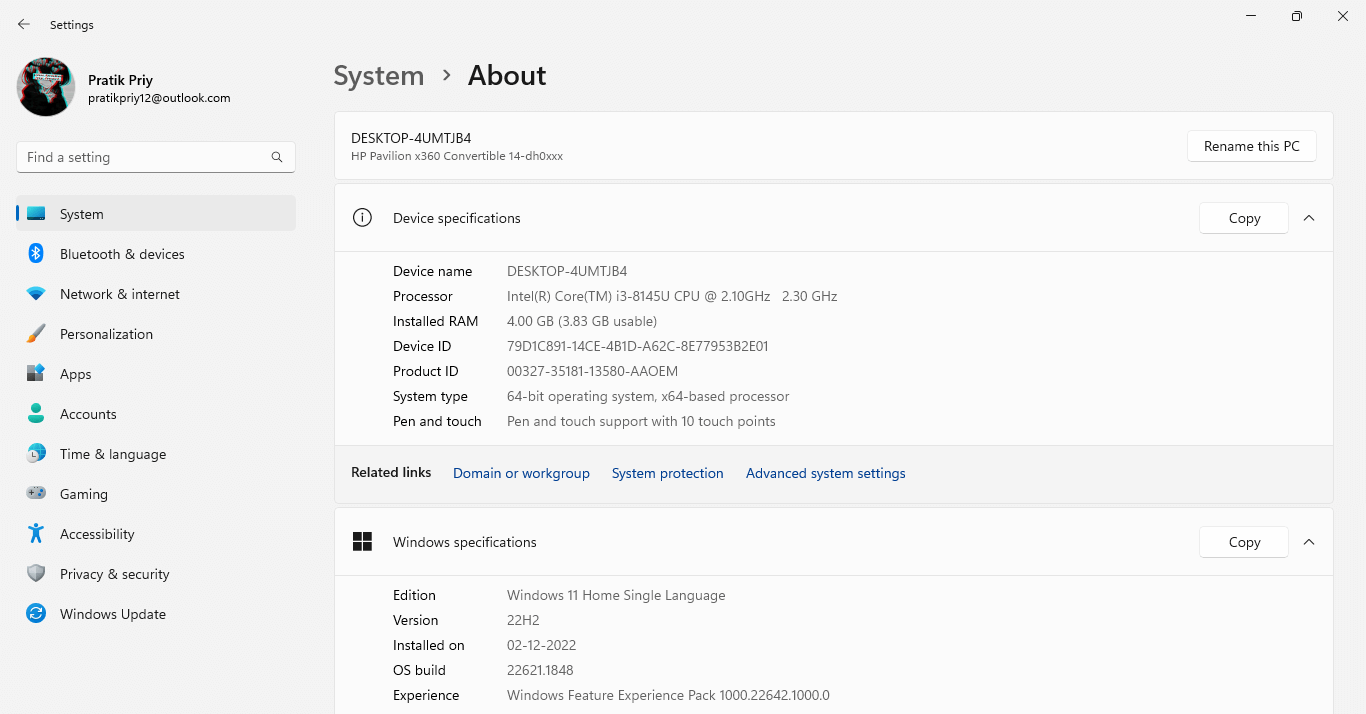
Now, the question arises, how do you check your browser version?
Click on the three dots in the top right corner of the Chrome browser. Go to option “Settings” and click on the “About Chrome” option.
Downloading Selenium ChromeDriver for version 115.0 and above
After ChromeDriver version 114.0, the steps of installing were changed. Now, Google has launched Chrome For Testing Availability(CFTA) dashboard.
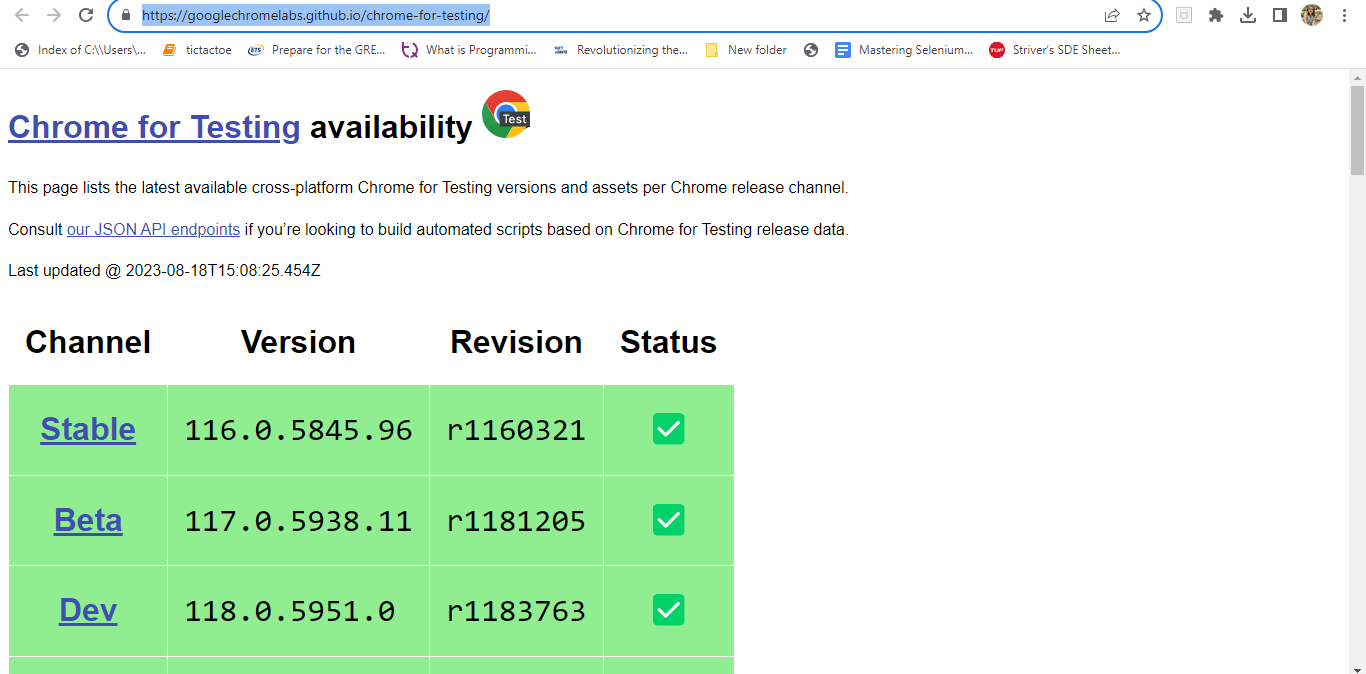
A version of Chrome will be installed, used explicitly for automation testing.
- Click on Stable and we will see a dashboard as shown below.
- Copy the URL according to your system specification, and the required version of Chrome and ChromeDriver gets installed.
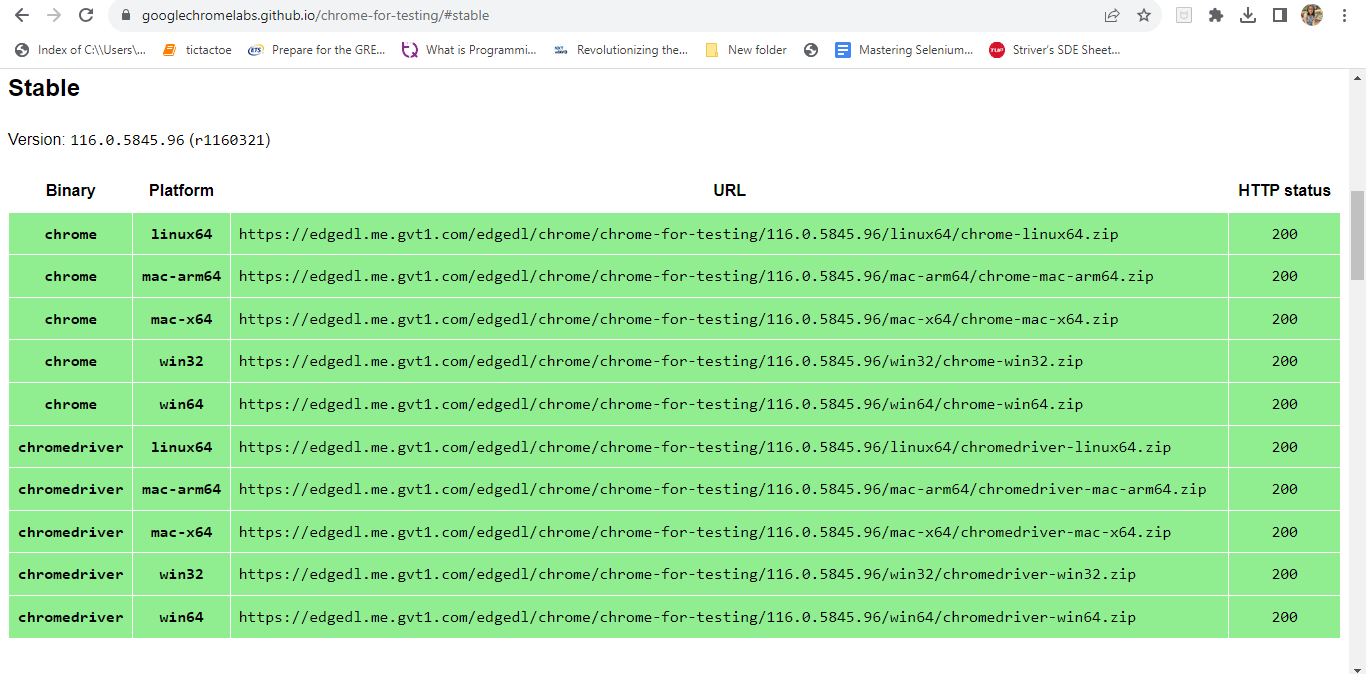
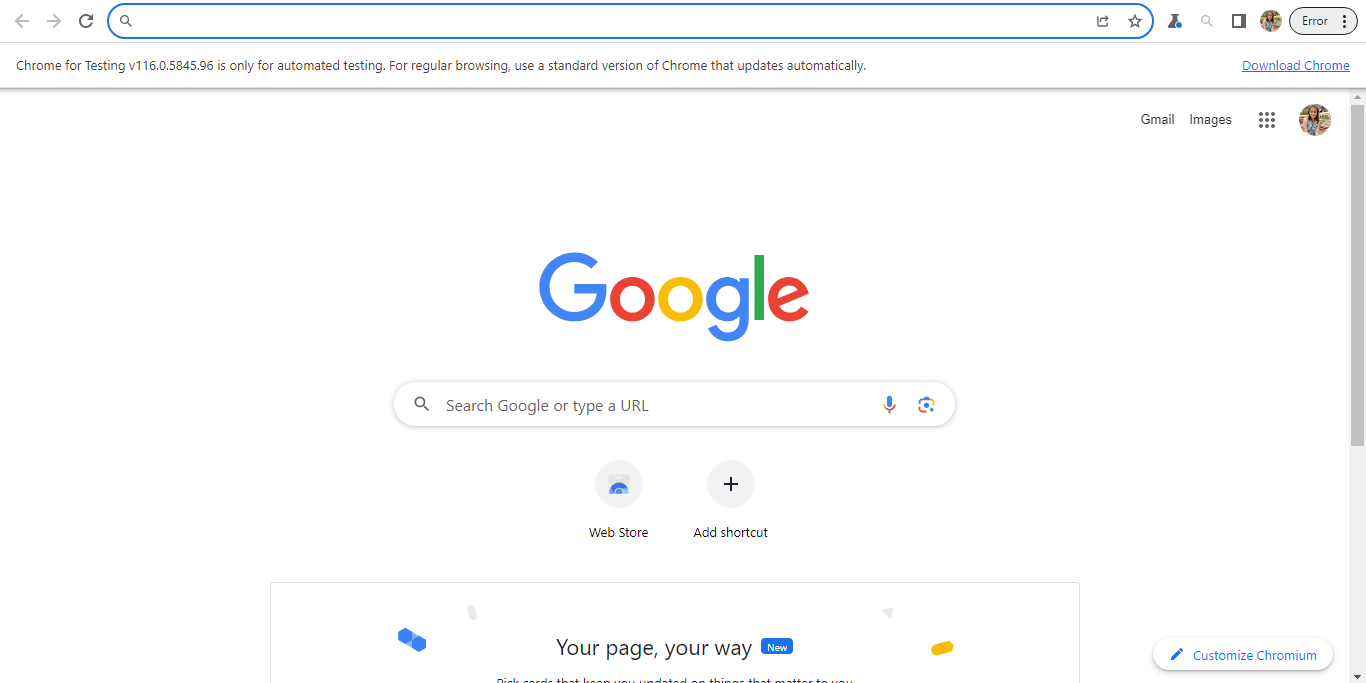
This version of Chrome is used only for automation purposes and opens with this notification at the top.
Note: Only Selenium version 4.11.0 and above is compatible with Chrome browser version 115.0 and above. All the other steps remain the same.
Setting Up the ChromeDriver for Selenium
Let’s look at how to setup or configure the downloaded ChromeDriver for automation testing on Chrome with different systems.
Steps for Windows users
- Open File Explorer and navigate to the extracted ChromeDriver folder.
- Copy the path of the ChromeDriver executable file (ChromeDriver.exe).
- Open the “About” section in the settings
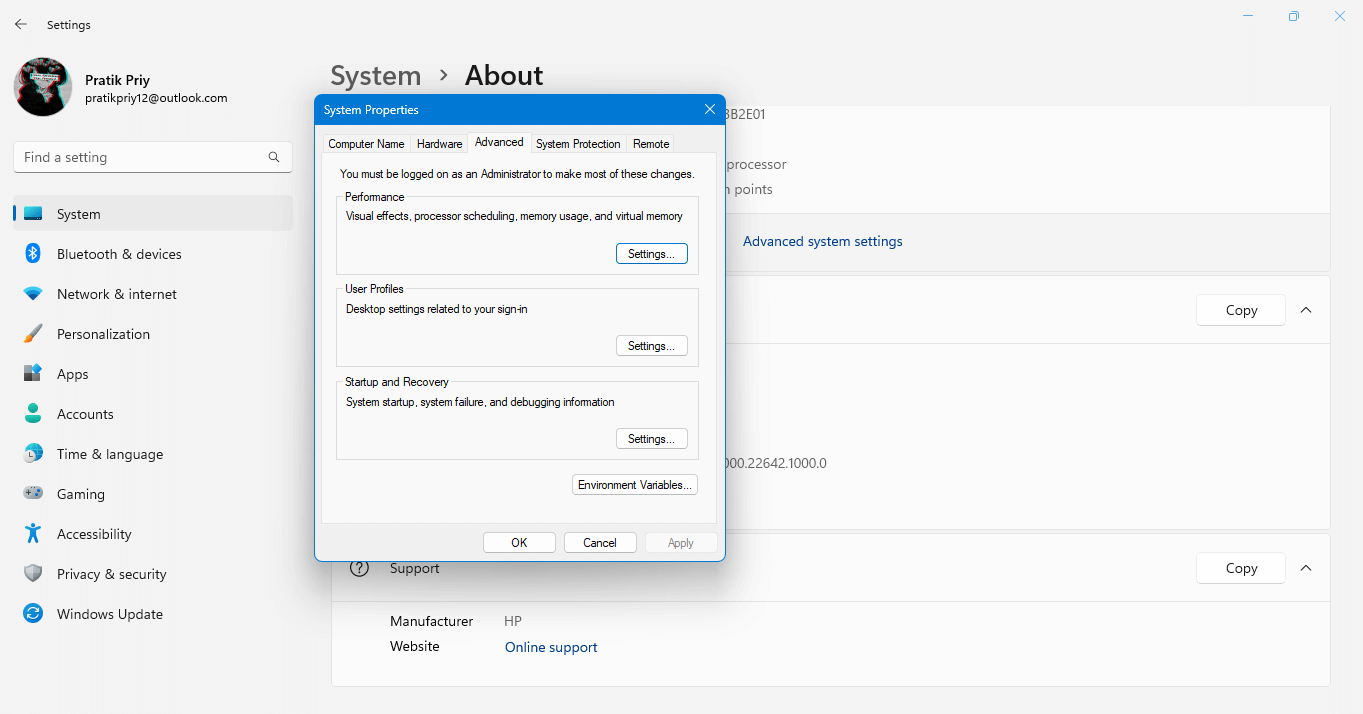
- In the System Properties window, click on “Advanced system settings“. A pop-up window appears.
- Click on the “Environment Variables” button.
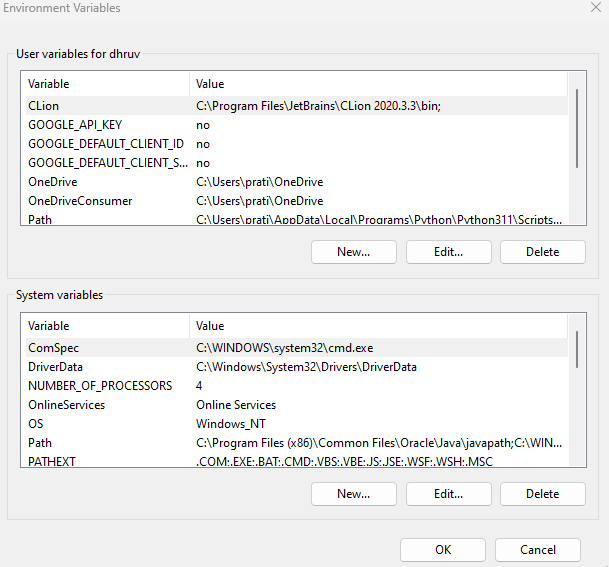
- Under the “System variables” section, locate the “Path” variable and select “Edit.”
- Click on “New” and paste the copied path of the ChromeDriver executable.
- Click “OK” to save the changes, and ChromeDriver is now installed on your Windows system.
Once ChromeDriver is set up and configured, you can enhance your testing with KaneAI, an AI-powered tool by LambdaTest that integrates seamlessly with Selenium for Chrome automation.
KaneAI helps developers and testers by offering smart debugging and test generation features. With real-time insights, it can assist in identifying and resolving issues related to browser-specific behavior in Chrome, speeding up the testing process and improving accuracy.
Steps for Mac users
- Once the download is complete, open the downloaded ZIP file.
- In the Finder, press Command+Shift+G and enter “/usr/local/bin” to go to the bin directory.
- Copy the extracted ChromeDriver executable file (ChromeDriver) into the “/usr/local/bin” directory.
Steps for Linux users
- Extract the contents of the downloaded ChromeDriver ZIP file.
- You can use the ‘unzip‘ command followed by the name of the ZIP file. For example: unzip ChromeDriver_linux64.zip.
- Decide on a location where you want to store the ChromeDriver executable. It’s common to store it in the ‘/usr/local/bin’ directory, already in the system’s PATH.
- To move the ChromeDriver executable to ‘/usr/local/bin’, use the following command: sudo mv ChromeDriver /usr/local/bin.
- Once the ChromeDriver executable is moved, you need to make it executable. To grant executable permissions, run sudo chmod +x /usr/local/bin/ChromeDriver.
How to Check the Installed Version of Selenium ChromeDriver?
To check the installed version of Selenium ChromeDriver, one can follow these steps:
- Open a terminal or command prompt.
- Type the following command:
- The terminal will display the version number of the installed Selenium ChromeDriver.
|
1 |
chromeDriver --version or chromeDriver -v` |

Alternatively, one can run the command chromeDriver without additional arguments. This will start ChromeDriver, and the output will display the version information.
This command only works when that chromedriver is installed explicitly in the environment variables path.
NOTE: While working with specific ChromeDriver versions for compatibility, you might encounter challenges during the maintenance phase. Updates to browsers and WebDriver versions can lead to mismatches that result in test failures. When a newer version of the browser, your existing test scripts might not function as expected due to version discrepancies. Manual download and setup as discussed above can be automated to make the lives of the testers or developers easy, which will be discussed later in this blog.
Steps to Run Automation Test With Selenium ChromeDriver
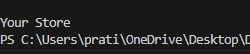
This section will show how to run the test scripts on one’s system. Here we have written a simple script in Python and Java, which will open an “e-commerce playground”. This is a demo website maintained by LambdaTest to run tests and learn the concepts. This script will print the title of the website. In our example, it will print “Your Store”.
Writing a simple test script in Python
|
1 2 3 4 5 6 7 8 9 10 11 12 13 14 15 16 17 18 19 20 21 22 23 24 25 26 |
from selenium import webdriver from selenium.webdriver.common.by import By from selenium.webdriver.common.action_chains import ActionChains from selenium.webdriver.chrome.service import Service as ChromeService import time import os # Set the specific path to the Chromedriver executable chromedriver_path = "C:/Users/prati/Downloads/chromedriver_win32/chromedriver.exe" # If the user has set the path in the environment variable, we can call in this way → chromedriver_path = os.environ.get(“Chromedriver_Path”) # Create Chrome driver options = webdriver.ChromeOptions() service = ChromeService(executable_path=chromedriver_path) driver = webdriver.Chrome(service=service, options=options) # Open the website driver.get("https://ecommerce-playground.lambdatest.io/") #print the name of the title title = driver.title print(title) driver.close() |
Output:
Writing a simple test script in Java
|
1 2 3 4 5 6 7 8 9 10 11 12 13 14 15 16 17 18 19 20 21 22 23 24 25 26 27 28 29 30 31 32 33 |
import org.openqa.selenium.WebDriver; import org.openqa.selenium.chrome.ChromeDriver; import org.openqa.selenium.chrome.ChromeOptions; import org.openqa.selenium.chrome.ChromeDriverService; public class Main { public static void main(String[] args) { // Set the specific path to the Chromedriver executable String chromedriverPath = "C:/Users/prati/Downloads/chromedriver_win32/chromedriver.exe"; // If the user has set the path in the environment variable, we can call in this way -> chromedriverPath = System.getenv(“chromedriver_Path”); // Create Chrome driver System.setProperty("webdriver.chrome.driver", chromedriverPath); ChromeOptions options = new ChromeOptions(); ChromeDriverService service = new ChromeDriverService.Builder() .usingDriverExecutable(new File(chromedriverPath)) .build(); WebDriver driver = new ChromeDriver(service, options); // Open the website driver.get("https://ecommerce-playground.lambdatest.io/"); // Print the title String title = driver.getTitle(); System.out.println(title); // Close the driver driver.quit(); } } |
Output:

Automating the Manual Process Of Managing Drivers
The pain of following the manual procedure. Selenium has used this concept to ship “Selenium Manager” out of the box as soon as you install the Selenium bindings. With Selenium Manager, you no longer have to worry about finding the right version, downloading it, setting it up, and maintaining it in the system path as it automates the steps involved.
We just need to write the following piece of code,
In Python:
driver = webdriver.Chrome()
In Java:
|
1 |
WebDriver driver = new ChromeDriver(); |
A Chrome’s driver object is instantiated, but this time, without having to download the driver binaries and mention a path as we saw in the manual procedure. This line of code works in a way such that it first identifies the current version of the browser, looks for a compatible driver in the environment, if found, uses it to instantiate the chrome driver object, otherwise, it downloads as per the version of chrome being used and manages it.
In Python
|
1 2 3 4 5 |
from selenium import webdriver driver = webdriver.Chrome() driver.get("https://ecommerce-playground.lambdatest.io/") driver.quit() |
In Java
|
1 2 3 4 5 6 7 8 9 10 |
import org.openqa.selenium.WebDriver; import org.openqa.selenium.chrome.ChromeDriver; public class Example { public static void main(String[] args) { WebDriver driver = new ChromeDriver(); driver.get("https://ecommerce-playground.lambdatest.io/"); driver.quit(); } } |
NoteAutomate your tests on a Selenium cloud grid of 3000+ real browsers. Try LambdaTest Today!
Steps to Run Automation Selenium Tests On LambdaTest Cloud Grid
To run your automation test on LambdaTest Cloud Grid, follow these steps:
1. Sign up for a LambdaTest account: Go to the LambdaTest website and sign up for an account if you still need to.
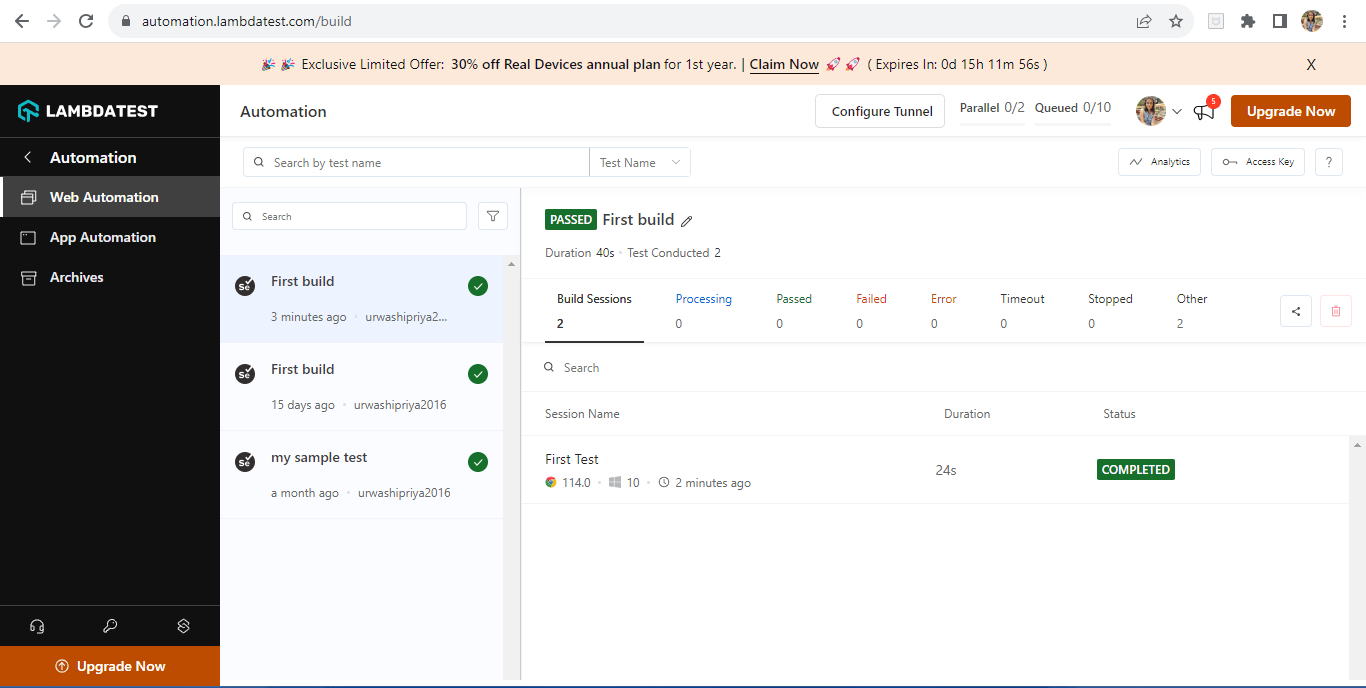
2. Retrieve your LambdaTest credentials: You can find these credentials in the “Automation” section of your LambdaTest account dashboard.
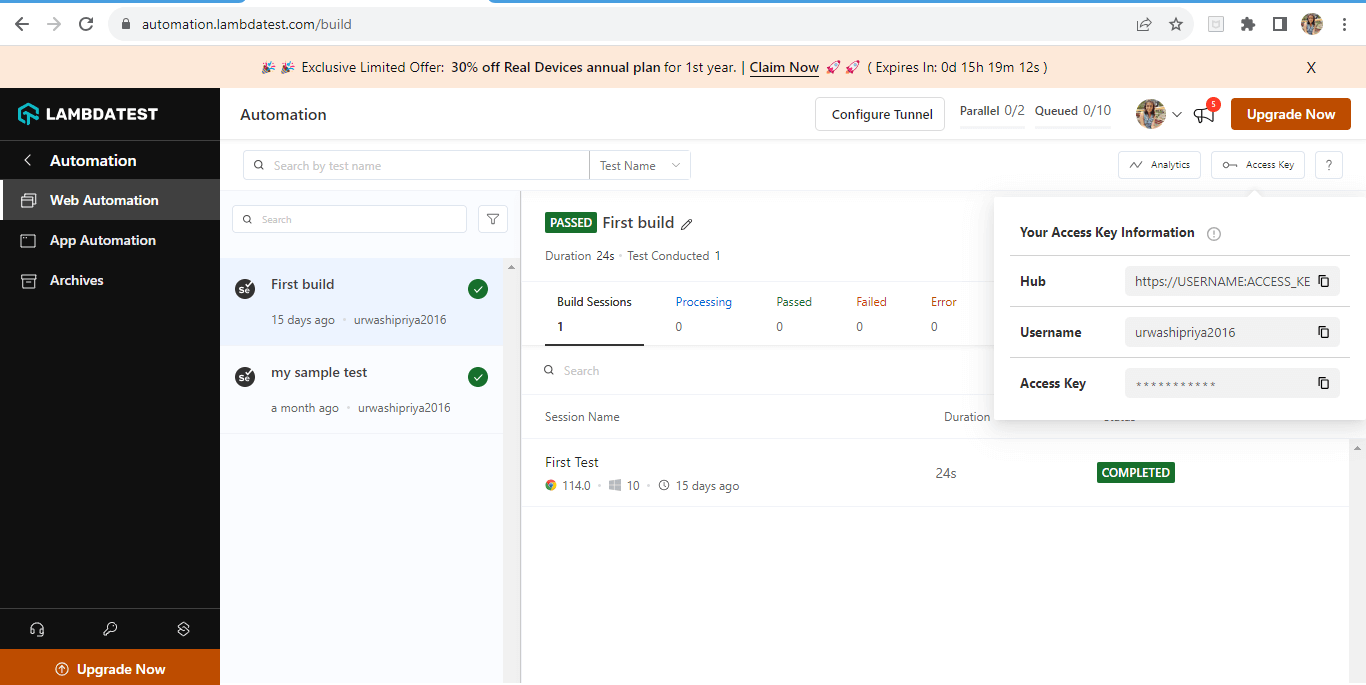
Note: access key information is present on the right hand side.
3. Update your test code to integrate with LambdaTest: To generate capabilities, go to capability generator. Select the code for which you want to generate and paste it. Here’s an example of how you can modify your code:
|
1 2 3 4 5 6 7 8 9 10 11 12 13 14 15 16 17 18 19 20 21 22 23 24 25 26 27 28 29 30 31 32 33 34 35 36 37 38 39 40 41 42 43 44 45 46 47 48 49 50 51 52 53 54 55 56 |
import pytest from selenium import webdriver from selenium.webdriver.common.by import By from selenium.webdriver.common.action_chains import ActionChains from selenium.webdriver.chrome.options import Options as ChromeOptions import time @pytest.fixture def driver(request): # Set the desired capabilities for LambdaTest Cloud Grid lt_options = { "build": "First build", "name": "First Test", "platformName": "Windows 10", "video": True, "w3c": True, # informing latest Selenium 4 being used "browserName": "Chrome", "browserVersion": "114.0", "selenium_version": "4.9.0", } # Replace "YOUR_LAMBDATEST_USERNAME" and "YOUR_LAMBDATEST_ACCESS_KEY" with your actual LambdaTest credentials username = "" access_key = "xx" remote_url = "http://{}:{}@hub.lambdatest.com/wd/hub".format(username, access_key) browser_options = ChromeOptions() # adding the capability to the chrome browser_options.set_capability("LT:Options", lt_options) # Create the WebDriver instance with the desired capabilities driver = webdriver.Remote(command_executor=remote_url, options=browser_options) yield driver # Quit the WebDriver instance after the test completes driver.quit() def test_scenario(driver): # Open the website driver.get("https://ecommerce-playground.lambdatest.io/") # Get the title of the page title = driver.title assert title == "Your Store" # Scrolling the entire webpage driver.execute_script("window.scrollTo(0, document.body.scrollHeight)") time.sleep(10) # Add assertions or additional steps as per your test scenario if __name__ == '__main__': pytest.main() |
Make sure to replace the placeholders (Your Build Name, Your LambdaTest Username, Your LambdaTest Access Key) with the appropriate values from your LambdaTest account.
This code is a Python script using the pytest testing framework and the Selenium framework to automate browser testing on the LambdaTest cloud platform. The purpose of this script is to demonstrate how to set up and perform automated tests on a website using the Selenium WebDriver and interact with the LambdaTest Cloud Grid for testing on different browsers and platforms.
Here’s a step-by-step code walkthrough:
- Import Statements:
- Fixture Definition (driver):
- Fixture Teardown:
- Test Scenario (test_scenario):
- Opening a specific website using driver.get().
- Getting the title of the webpage and asserting that it’s equal to “Your Store”.
- Scrolling down the page using JavaScript (driver.execute_script()).
- Performing a hover action over an element on the page using ActionChains.
- Adding some wait time using time.sleep() to simulate interactions and visual checks.
- The test is followed by a comment suggesting that more assertions or steps can be added based on the test scenario.
- Main Execution:
The code starts with importing necessary libraries: pytest for testing and modules from Selenium for browser automation.
The @pytest.fixture decorator defines a fixture named driver. A fixture is a way to set up and tear down resources needed for testing.
Inside the fixture, the desired capabilities for the LambdaTest Cloud Grid are defined using the lt_options dictionary. These capabilities specify the browser, version, platform, test name, build information, and other options for the test.
Finally, a WebDriver instance is created using the webdriver.Remote class. The instance connects to the LambdaTest hub using the constructed remote URL and Chrome options.
A yield statement is used, which means that the code after yield will run after the test is done executing.
In this case, the WebDriver instance is closed using driver.quit().
The actual test is defined as a function called test_scenario that takes the driver fixture as an argument.
The test involves the following steps:
The script’s main block is wrapped in an if __name__ == ‘__main__’: condition to ensure that its code is only executed when the script is run directly (not when imported as a module).
It invokes the pytest.main() function to run the test.
4. Run the test with LambdaTest integration: Execute the following command in the terminal to run your test code with the LambdaTest integration:
|
1 |
pytest name_of_your_test.py |
5. Review test results: Once the test run is complete, you can review the test results and logs on the LambdaTest dashboard. You’ll be able to see the screenshots, video recordings, and other details related to the test execution.
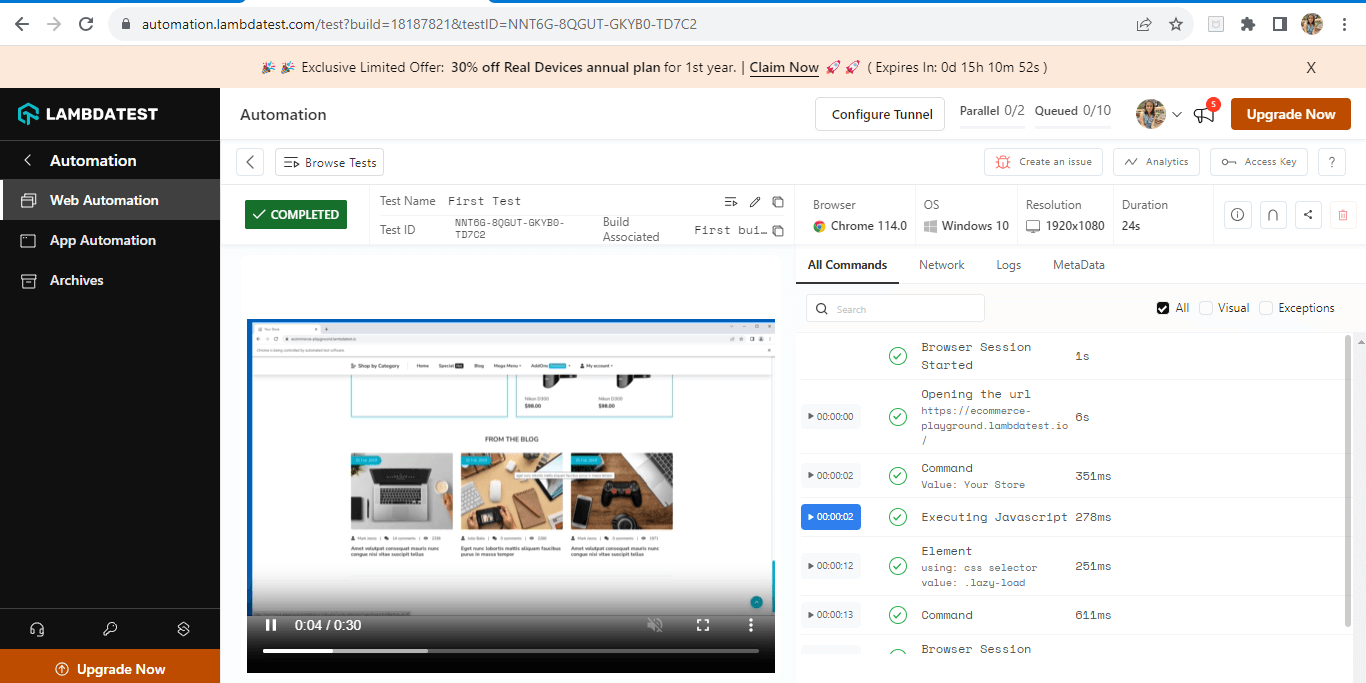
That’s it! Your automation test will now run on the LambdaTest Cloud Grid using the desired capabilities you specified.
Conclusion
In conclusion, Selenium ChromeDriver is a vital tool for automating web browser interactions, enabling precise testing and validation of web applications. The introduction of Selenium Manager streamlines the manual process of ChromeDriver management, making setup and maintenance more efficient.
Through Selenium Manager, ChromeDriver version compatibility challenges are alleviated, allowing for seamless automation. Integration with the LambdaTest Cloud Grid expands testing coverage across diverse browsers and platforms. As the realm of automation evolves, a solid grasp of Selenium ChromeDriver and its efficient management is crucial for delivering high-quality web applications.
Frequently Asked Questions (FAQs)
How do I troubleshoot installation issues with Selenium ChromeDriver?
If you encounter issues during installation, ensure that you have the correct version of ChromeDriver for your Chrome browser version. Also, make sure the ChromeDriver executable is accessible in the system’s PATH or provide the explicit path to the executable when initializing the ChromeDriver.
How to capture network traffic and analyze requests/responses with ChromeDriver?
It provides the capability to capture the browser’s network traffic using the Chrome DevTools Protocol. One can easily enable network logging and access network data, such as request and response headers, status codes, and timings, for analysis and debugging purposes.
How can I handle browser cookies and manage sessions with ChromeDriver?
ChromeDriver provides methods to handle browser cookies and manage sessions. You can use the add_cookie() method to add cookies, get_cookies() method to retrieve cookies, and delete_cookie() or delete_all_cookies() methods to remove cookies. By managing cookies, you can simulate different session states and test scenarios related to authentication, session management, and user preferences.


Author’s Profile
Urwashi Priya
Urwashi is a passionate software engineer with a knack for crafting elegant solutions to complex problems. With a deep understanding of cutting-edge technologies and a strong desire to share knowledge, she is a dedicated professional in the tech industry. Her expertise lies in creating engaging and insightful blog posts that provide valuable insights into the world of software engineering.
Blogs: 8
Got Questions? Drop them on LambdaTest Community. Visit now


