How To Select Multiple Checkboxes In Selenium WebDriver Using Java?
Vipul Gupta
Posted On: June 20, 2022
![]() 175448 Views
175448 Views
![]() 15 Min Read
15 Min Read
Have you ever wondered how frustrating it would be if you had to log in each time you wanted to view your Facebook profile? Or in a multiple-choice question where you’d like to mark many options but can’t? Or do you have to enter your card information each time you make a payment since you can’t save it?
These are only a few of the numerous instances on web pages where quick functionality might be useful. Stay logged in for a while, save card details, and much more with a simple click. Basically, it’s a technique to turn things on and off while also allowing for multi-selection.
The answer to this in the world of web development is Checkboxes. Checkboxes have a wide implementation in web pages and help users give consent/toggle or select multiple choices as required in various applications.
With their increased usage, as an automation engineer, it is expected that you know how to handle Checkboxes using test automation frameworks like Selenium.
In this Selenium Java tutorial, we will discuss various techniques on how to automate and how to select multiple Checkboxes in Selenium WebDriver using Java.
TABLE OF CONTENTS
What is a Checkbox?
A Checkbox is a GUI element on any webpage that facilitates users to make choices from the given set of options. Once the choice is made, it helps record it for further processing.
The Checkbox can allow the user to make:
- A single choice from the list of options
- Multiple choices from the list of options
- Give consent (or toggle on/off) for certain requirements on a webpage
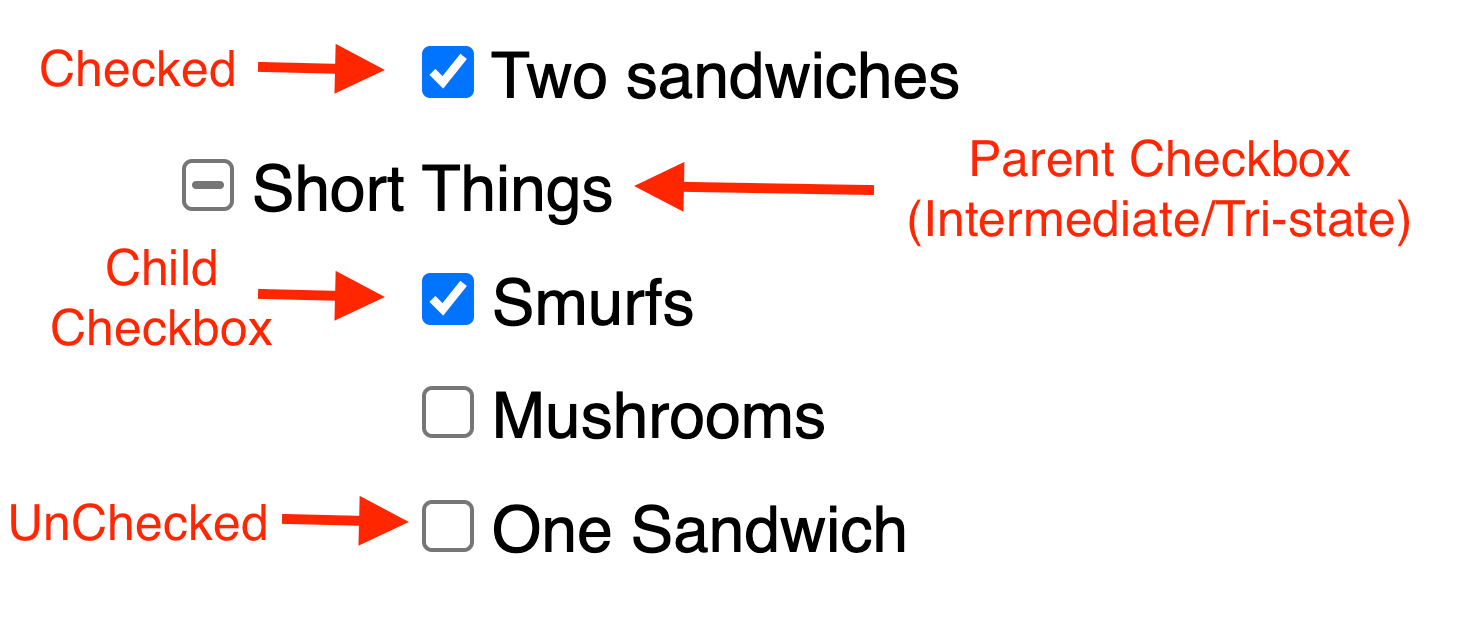
In the implementation, a Checkbox is said to have two states:
- When it is selected, it is termed as Checked
- When it is deselected, it is termed as UnChecked
It is interesting to note that some applications also provide an intermediate state also called a tri-state where instead of a tick mark, which is the usual representation of a checked Checkbox, a filled box or a dash is used to dedicate the selection. This happens in cases where we have parent-child Checkboxes, and a child Checkbox is selected that makes an auto-selection for all the parent Checkboxes in the hierarchy.
Checkboxes in Web pages
Checkboxes are majorly used on web pages to offer multiple choices to a user. On an HTML page, these can be identified with several unique properties that can be used to automate Checkboxes using Selenium WebDriver.
A Checkbox in DOM is defined using the input tag with type as Checkbox like the following:
|
1 |
<input type="checkbox"> |
Due to this implementation, all web element locator strategies can be used to locate and automate the Checkbox in Selenium WebDriver.
How to locate multiple Checkboxes in Selenium WebDriver?
Before we jump to how to select multiple Checkboxes in Selenium WebDriver using Java and the implementation part of Checkboxes in automation, it would be good to understand different ways to locate it in a webpage and how we can select the Checkbox once it is located.
Locating Checkboxes using the ID attribute
While using the ID locator in Selenium, in most well-designed web pages, an id value is allocated to all the HTML tags. So if the Checkbox under interaction has an id associated with it, then we can use that unique value to interact with the Checkbox.
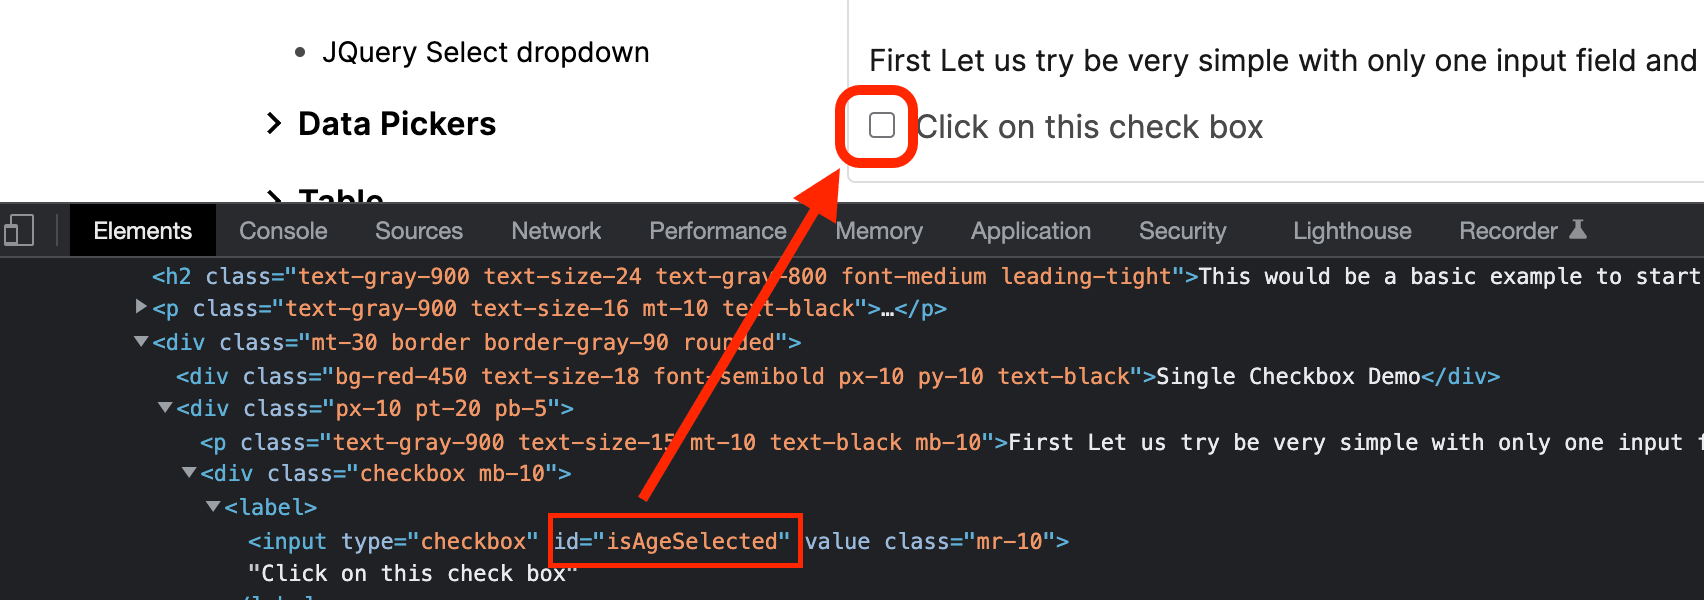
As for the Checkbox here, the id value is assigned. So it can be located as follows:
|
1 |
WebElement checkbox = driver.findElement(By.id("isAgeSelected")); |
Locating Checkboxes using the Class Name
className locator in Selenium can be used when there is a group of Checkboxes, and each of them needs to be interacted with since the elements of the same group would fall under the same class name.
Hence, the Checkboxes located by this means are stored in a List of WebElements and can be interacted with using the index from the list.
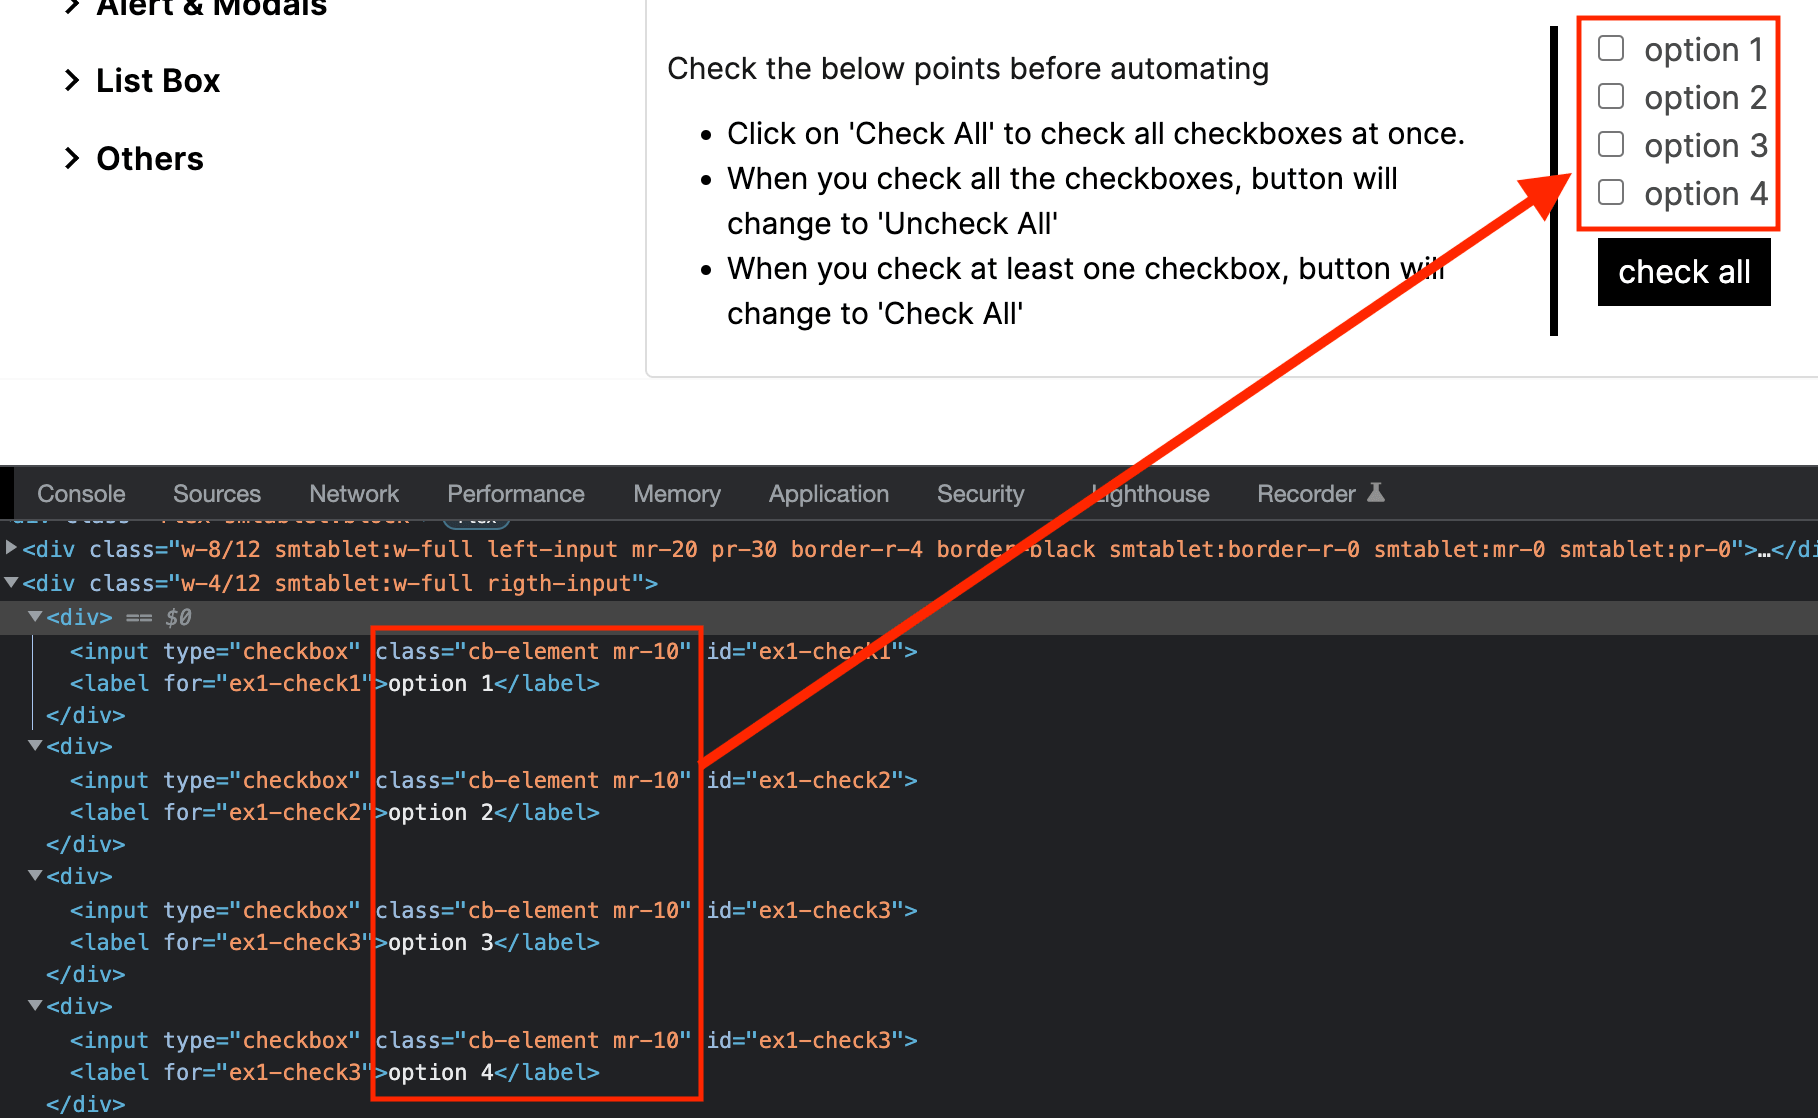
As seen in the above example, all Checkboxes are in the same group. Hence, they have the same Class Name.
They can be located as shown below:
|
1 |
List<WebElement> checkboxes = driver.findElements(By.className("cb-element mr-10")); |
Locating Checkboxes using the element Value
Checkboxes can be located using their Value attribute as Checkbox has a unique value assigned to it. This strategy is mostly used in cases when Checkboxes are in a group. Due to this, they would all have the same Class or Name attribute linked to them, along with having a unique Value that aids in interacting with a particular Checkbox.
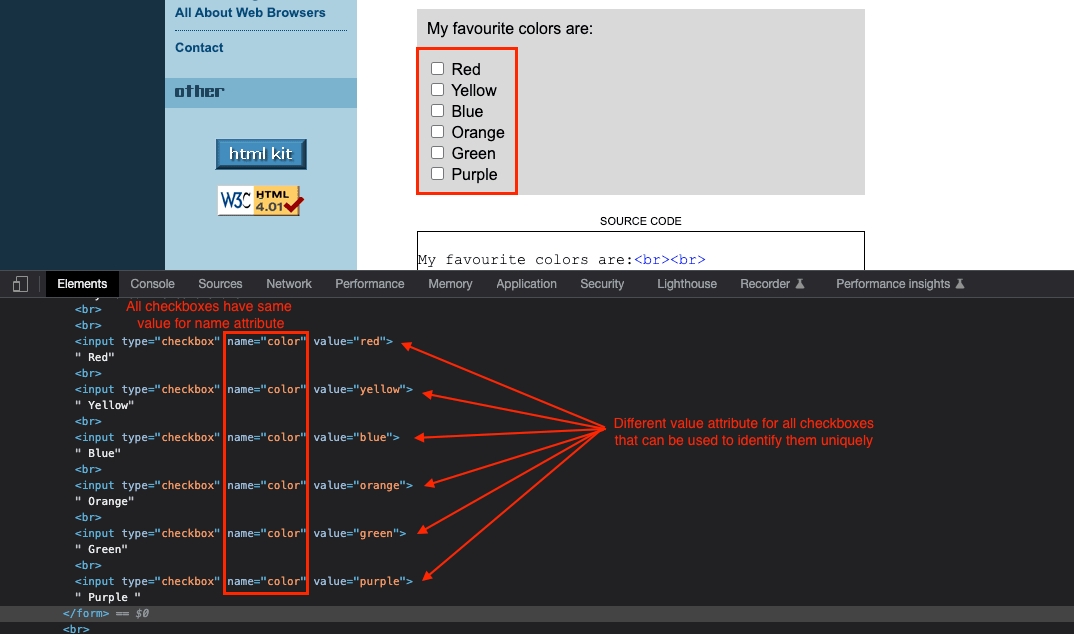
This is one example where the Class is the same for all the different Values. We can use the Value attributes for all the Checkboxes to identify them uniquely.
|
1 2 3 4 5 6 7 8 9 10 11 12 13 |
List<WebElement> checkboxes = driver.findElements(By.xPath("//input[@name='color']")); for(int i=0; i<checkboxes.size(); i++) { String value = checkboxes.get(i).getAttribute("value"); if (value.equalsIgnoreCase("orange")) { //perform action on checkbox which have value as orange break; } } |
Locating Checkboxes using CSS Selector or XPath
At times, it is not easy to locate an element on the web page directly using its attributes. The same is the case with Checkboxes. Sometimes, the implementation in DOM is not feasible to select them using unique identifiers, or even value attributes like we previously discussed.
In such cases, using a CSS selector or XPath Selector to locate the Checkboxes becomes the most ideal way:
|
1 2 3 4 5 |
//locating a checkbox using XPath WebElement checkbox = driver.findElement(By.xpath("//input[@id='isAgeSelected']")); //locating a checkbox using CSS Selector WebElement checkbox = driver.findElement(By.cssSelector("input[id='isAgeSelected']")); |
We have deep-dived into the different ways to locate a Checkbox. In the next section, we will learn how to select multiple Checkboxes in Selenium WebDriver using Java.
How to select multiple Checkboxes in Selenium WebDriver using Java?
Let’s look into the mechanisms through which you can interact with the checkbox.
Before that you can also watch this video to learn how to select multiple checkboxes in Selenium WebDriver Java.
A Checkbox in Selenium WebDriver can be selected/checked or deselected/unchecked by simply clicking on it using the click() method of the Selenium WebDriver.
Once a Checkbox is located, we simply click on it to change its state.
|
1 2 |
WebElement checkbox = driver.findElement(By.id("isAgeSelected")); checkbox.click(); |
If a Checkbox is in an unchecked state, then the click would transition it to a checked state and vice-versa.

Performing validations on Checkboxes using Selenium WebDriver
By validating Checkboxes, we mean to validate the state of a Checkbox before and after the Click() operation is performed on the Checkbox. For this, Selenium WebDriver provides few functions that can be used while working with multiple Checkboxes.
The isSelected() method is used to validate the current state of a Checkbox, irrespective of whether it is selected or not. Along similar lines, before clicking, we might need to check if the Checkbox is not only displayed but also enabled for interaction. The isEnabled() and isDisplayed() methods in Selenium are respectively used for checking if the checkboxes are displayed and enabled on the webpage.
An important thing to note here is that methods isDisplayed() and isEnabled() fall under pre-validation as they are used before clicking on the Checkbox. The isSelected() method falls under both pre and post validation as it helps to verify the state of the Checkbox before and after the click operation is performed.
Run your Selenium Java test scripts on 3000+ browsers & OS. Try LambdaTest Now!
Demonstration: Automating Multiple Checkboxes in Selenium WebDriver using Java
So far, we have looked at the different ways to locate, select and validate Checkboxes. In this section of this article on how to select multiple Checkboxes in Selenium WebDriver using Java, let us look at how Selenium WebDriver methods can be used for automating interactions with the Checkboxes on the page. I will be using Selenium Java bindings for the demo. A few things to note about the automation testing example before we start are:
- We will be creating a Maven project using Java in Eclipse IDE.
- It will use Selenium WebDriver for web automation and TestNG for test case execution.
- The project would consist of 2 files: BaseClass and TestCheckboxes.
- BaseClass.java will have the code for browser initialization and connecting to the Remote Selenium Grid.
- TestCheckboxes.java will have 2 test cases explaining all the ways to locate, select and perform validations on multiple Checkboxes in Selenium WebDriver.
Let’s get started now…
- Create a Maven project in Eclipse and name it as MultipleCheckboxes. Those who are not a fan of Eclipse can follow the same steps in the IDE of their choice. The setup and results would still be the same.
- Update the pom.xml file of your project to have Selenium and TestNG dependencies. We will be using the latest version for both of these.
- Add 2 Java class files inside your src/test package and name them as BaseClass.java and TestCheckboxes.java.
Code Walkthrough: BaseClass
Inside the BaseClass file, add the following code for browser session initialization to run the test cases and to close it after the case is completed.
This will be inherited to our test class, thus preventing redundancy for such code to create WebDriver sessions and launch the browser on the grid. It also provides an abstraction of driver code from every other class user.
Step 1. In this file, we start by creating an instance of Selenium Remote WebDriver as it will be used to execute the code on Selenium Cloud Grid.
|
1 |
public RemoteWebDriver driver = null; |
Executing on Selenium Grid cloud helps execute multiple cases together in parallel across a variety of browsers and OS. It also offers speed and scalability, making executions faster and more reliable.
If you’re new to Selenium and wondering what is cloud testing with Selenium, then we recommend checking out our guide on What is Selenium?
Subscribe to the LambdaTest YouTube Channel and stay updated with the latest tutorial around automated browser testing, Cypress E2E testing, Mobile App Testing, and more.
Step 2. As mentioned in the previous step, since we are using a cloud grid, we would need to add the credentials of the cloud platform used to execute our code. In this blog on how to select multiple Checkboxes in Selenium WebDriver using Java, the LambdaTest platform has been used.
|
1 2 |
String username = "<lambdatest_username>"; String accessKey = "<lambdatest_accesskey>"; |
LambdaTest facilitates cross browser testing over an online browser farm of 3000+ real browsers and operating systems on the cloud and also provides interactive dashboards to analyze the run reports and logs as required.
To fetch your username and access key, visit the LambdaTest Profile Section on your LambdaTest Dashboard after creating your profile on LambdaTest.
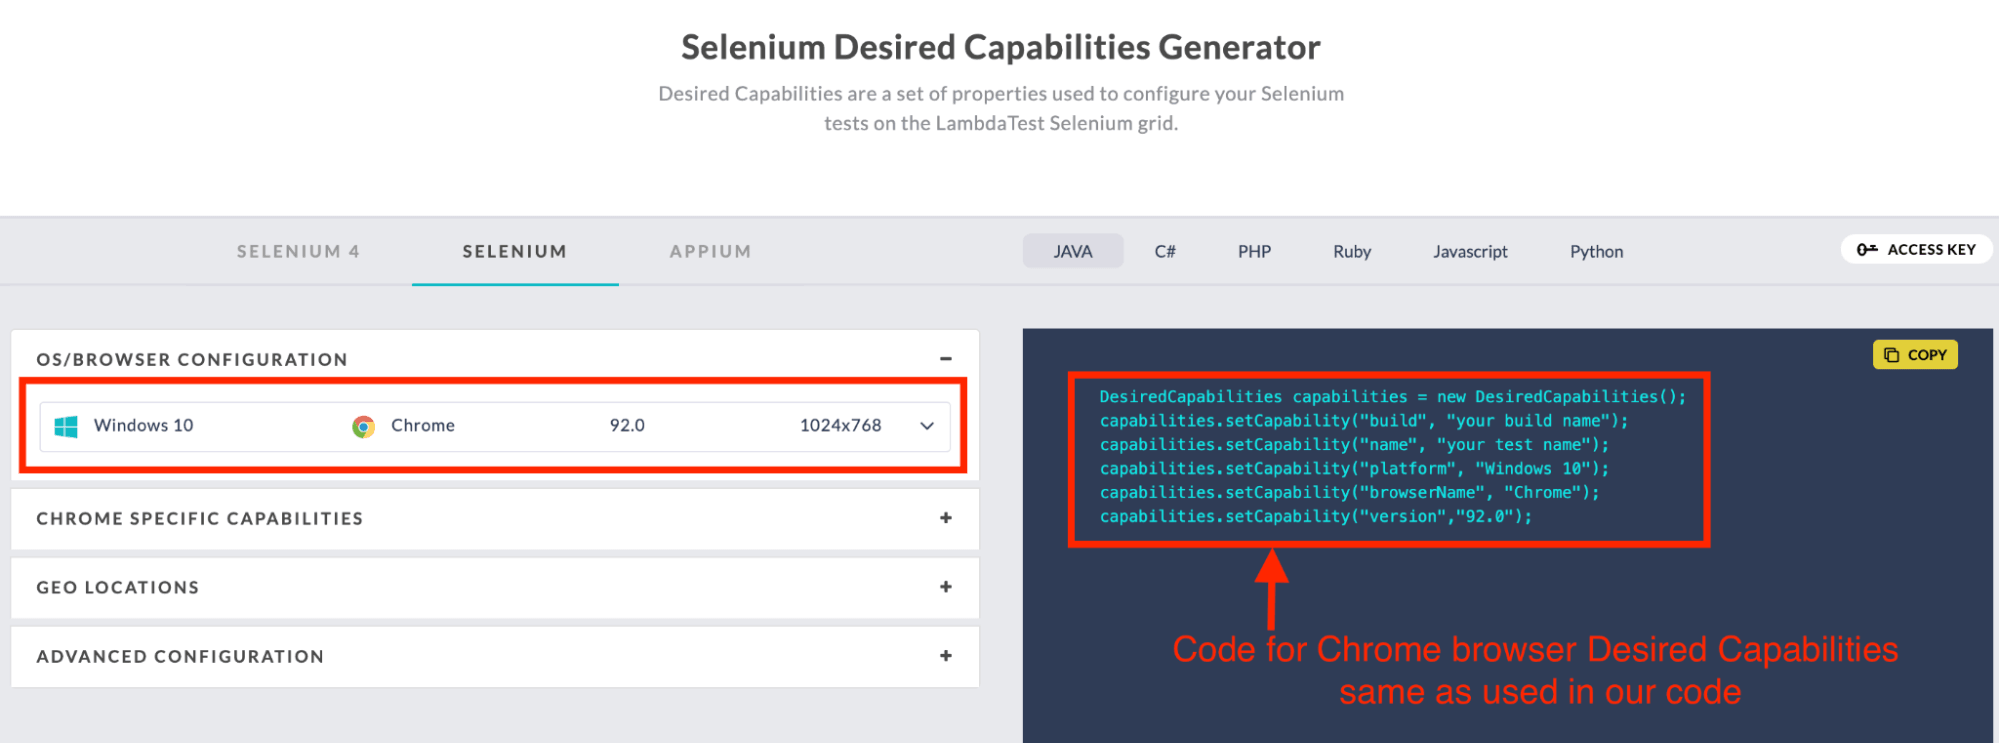
Step 3. Add the first function in this file setUp() to set the initial capabilities for the browser and make the connection with the LambdaTest remote grid.
This function is annotated with the @BeforeMethod annotation in TestNG, as we would want to execute this function before every test run.
|
1 2 3 4 5 6 7 8 9 10 11 12 13 |
@BeforeMethod public void setUp() { //code to set the DesiredCapabilites as needed for the browser //Selenium Capabillities Generator of LambdaTest can be used for this try { driver = new RemoteWebDriver( new URL("https://" + username + ":" + accessKey + "@hub.lambdatest.com/wd/hub"), capabilities); } catch (MalformedURLException e) { System.out.println("Invalid grid URL"); } } |
Another advantage of using the LambdaTest platform can be seen here with the use of Selenium Desired Capabilities Generator to perform Selenium TestNG testing on the LambdaTest platform with your desired browsers and operating systems combinations by selecting them as required.
Step 4. Once the test is completed, we also need to close the browser after each run, and that is why we add another function closeDriver() to close the browser and annotate it with @AfterMethod annotation to ensure execution after every test case.
|
1 2 3 4 |
@AfterMethod public void closeDriver() { driver.quit(); } |
Code Walkthrough: TestCheckboxes
Inside this TestCheckboxes.java file, we will add 2 test cases:
- TestCase 1: Demonstration of interaction with a single Checkbox.
- TestCase 2: Demonstration of interaction with multiple Checkboxes by traversing through them.
Both these cases will also have Checkbox validation methods.
Step 1. As you can see, both the test cases in this file have the common code to launch the browser and navigate to the webpage under test for which the below code is used.
|
1 2 |
System.out.println("Navigating to the URL"); driver.get("https://www.lambdatest.com/Selenium-playground/checkbox-demo"); |
Step 2-a. In the first test case testSingleCheckbox, we fetch the checkbox element using its ID locator.
|
1 |
WebElement checkbox = driver.findElement(By.id("isAgeSelected")); |
Step 2-b. After this, pre-validation is applied to verify if the given Checkbox is displayed or not, and on the basis of that, it is selected using the click() method.
|
1 2 3 4 5 |
if(checkbox.isDisplayed()) { System.out.println("Checkbox is displayed. Clicking on it now"); checkbox.click(); } |
Step 2-c. After checking the Checkbox, post-validation is applied to verify that the Checkbox is checked.
|
1 2 3 4 |
if(checkbox.isSelected()) { System.out.println("Checkbox is checked"); } |
Step 3-a. Now moving to the second test case testMultipleCheckbox, in this one, we have implemented the logic to traverse through a group of Checkboxes having the same class name to identify and interact with them along with pre and post validations.
Step 3-b. First step in this case would be to fetch the list of Checkbox web elements using the same class name and then store that into a variable of a List type.
|
1 |
List<WebElement> checkboxes = driver.findElements(By.className("cb-element mr-10")); |
Step 3-c. Next we use the for loop to traverse through the Checkboxes list and select all of them one by one after verifying that Checkbox is displayed and enabled to interact with.
|
1 2 3 4 5 6 7 |
for(int i=0; i<checkboxes.size(); i++) { if(checkboxes.get(i).isDisplayed() && checkboxes.get(i).isEnabled()) { checkboxes.get(i).click(); } } |
Step 3-d. After checking all of them, the next code is to deselect the Checkbox at index 1 from the list and then do a post validation to validate if it is unchecked after the click or not.
|
1 2 3 4 5 6 7 8 9 |
checkboxes.get(1).click(); if(checkboxes.get(1).isSelected()) { System.out.println("Checkbox is still selected"); } else { System.out.println("Checkbox is deselected successfully"); } |
With this, we have understood the entire code and implementation for the test class. Let’s continue to see the execution results on the local and the LambdaTest dashboard.
Test Execution
So far in this blog on how to select multiple checkboxes in Selenium WebDriver using Java, we have covered and understood the various ways to locate, interact and implement the code for Checkboxes automation. Now we move forward to execute the code as discussed in previous sections.
Since the project created is a TestNG project, we execute the cases as TestNG runs and observe the output would be like below on local and LambdaTest dashboard where we can see the details of execution.
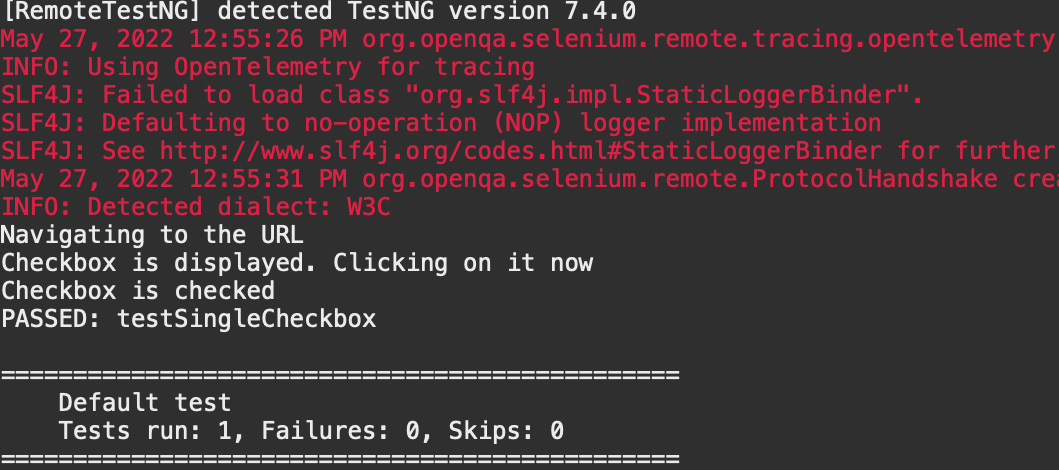
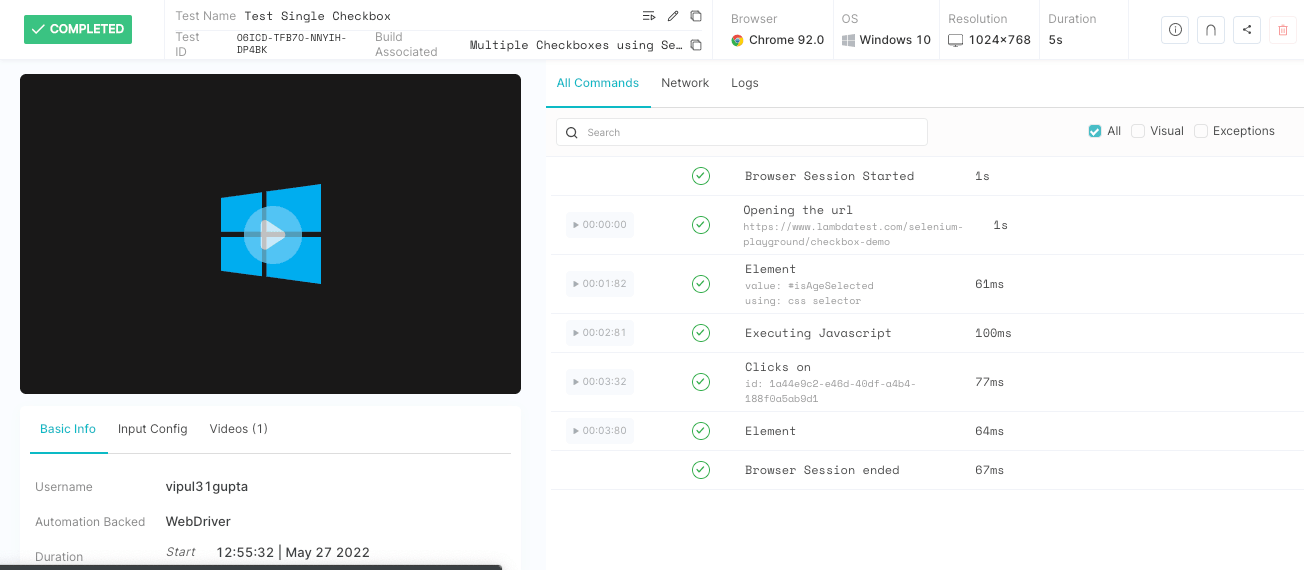
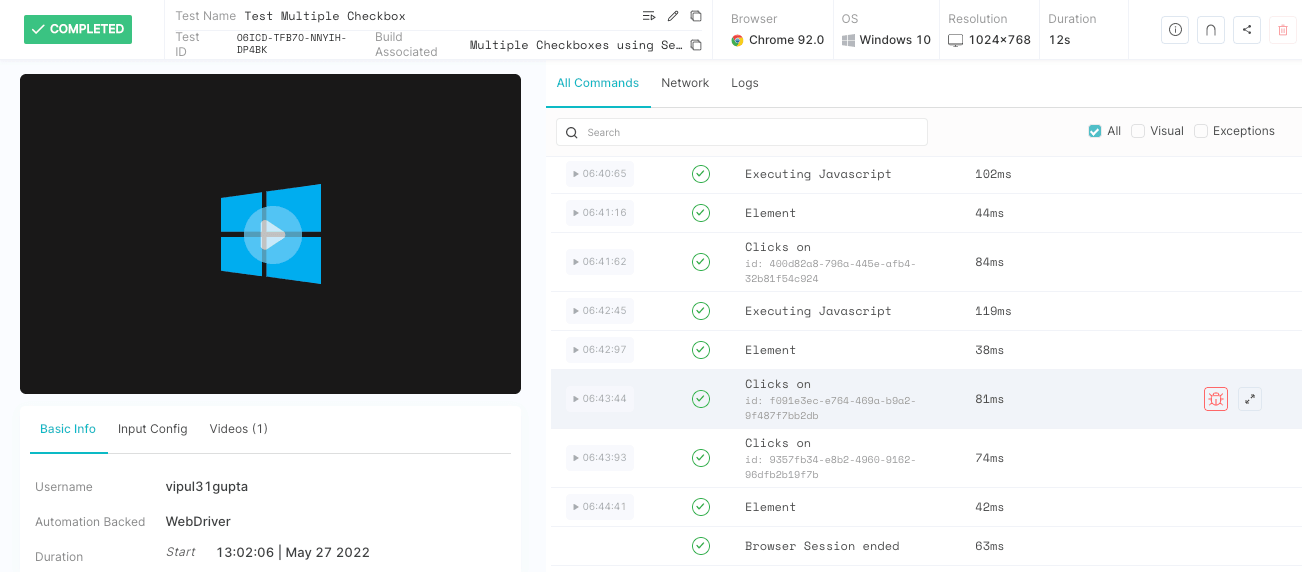
For test case 1: testSingleCheckbox
More detailed logs and step-by-step command execution can be seen on the LambdaTest dashboard by navigating to the test.
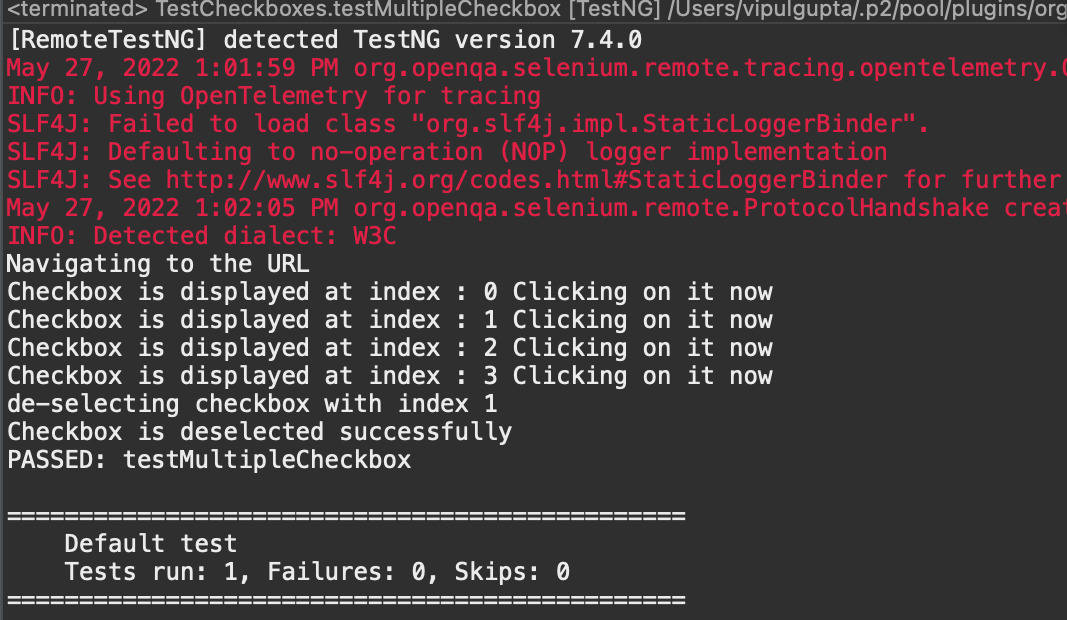
For test case 2: testMultipleCheckbox
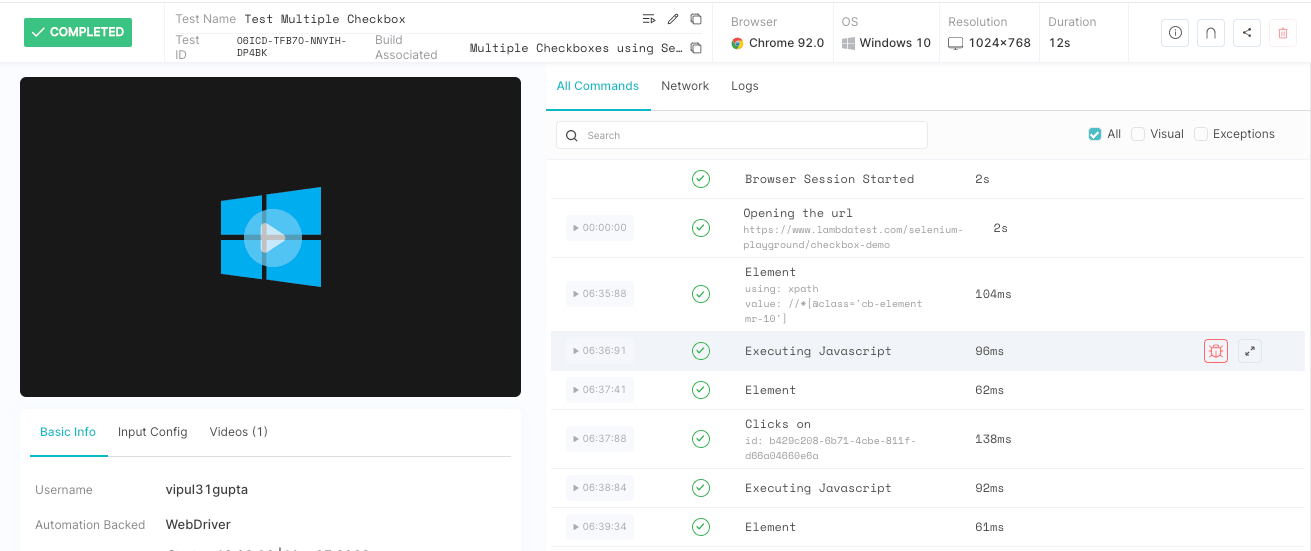
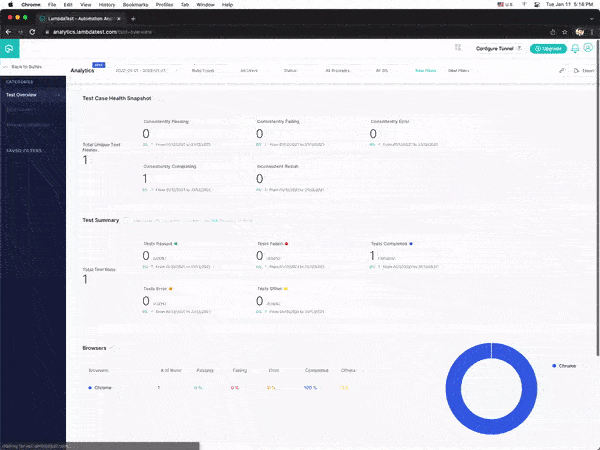
To use advanced tools for analyzing the performance of your tests, go to the LambdaTest Analytics Dashboard. You can see all test results, their status, and the overall number of tests passed or failed in the Test Summary area. In addition, you may see snapshots of recently executed test runs in the Test Overview section.
If you’re a developer or tester looking to advance your Selenium with Java abilities, the LambdaTest Selenium Java 101 certification can help you do just that.

Here’s a short glimpse of the Selenium Java 101 certification from LambdaTest:
Conclusion
We have now wrapped up the blog on how to select multiple Checkboxes in Selenium WebDriver using Java. In this, we have learned about different Checkbox locator strategies on the basis of implementation on the web page and how we can interact with them while performing automated UI testing.
This blog also explains the pre and post validations while working with Checkboxes in Selenium WebDriver and executing the same on the cloud Selenium Grid like LambdaTest while performing Selenium automation testing.
By now, you should be confident enough to work with multiple Checkboxes in your project. So go ahead and start checking some Checkboxes.
Happy Checking!!
Frequently Asked Questions (FAQs)
How do I select all checkboxes using the keyboard?
To check or uncheck a Checkbox, use the tab key to move the pointer to it and then tap the spacebar on the keyboard. The Space Bar will suffice. Press the spacebar to check or uncheck the Checkbox once the focus is on it (by hitting Tab).
How do I select multiple checkboxes in Chrome?
Simply click and drag to check or uncheck numerous Checkboxes at once. Allows you to quickly check numerous checkboxes by CLICKING AND DRAGGING, or even faster by using an ALT+CLICK AND DRAG area select.
What is isEnabled() and isSelected() in Selenium?
isEnabled() is a function for checking whether a web element is enabled or disabled on a page. isEnabled() is a function that is mostly used with buttons. isSelected() is a method for determining whether or not a web element is chosen. Radio buttons, dropdowns, and checkboxes are frequently used with the isSelected() method.


Author’s Profile
Vipul Gupta
Vipul Gupta is a passionate Quality Engineer with 6+ years of experience and keen interest in automation testing of Web and API based applications. He is having experience in designing and maintaining various automation frameworks. Currently working as Sr. SDET, he enjoys reading and learning about new test practices and frameworks.
Blogs: 23
Got Questions? Drop them on LambdaTest Community. Visit now