
Selenium Maven Dependency Tutorial
Rahul Rana
Posted On: February 26, 2024
![]() 137708 Views
137708 Views
![]() 21 Min Read
21 Min Read
While working on a project for test automation, you’d require all the Selenium dependencies associated with it like Selenium Maven dependencies. These dependencies are downloaded and upgraded manually throughout the project lifecycle, but managing dependencies can be quite challenging as the project gets bigger. This is why you need to build automation tools such as Maven to handle them automatically.
Maven can be defined as a software project management tool that uses the concept of project object model (POM). It enables the user to create an initial folder structure, perform compilation and testing, and then package and deploy the final product. It efficiently cuts down several steps followed in the build process and makes the build a one-step process.
In this Selenium Maven tutorial, I’ll explain what Maven is and why Maven is important as a build automation tool for managing Selenium Maven dependencies. Further, I’ll show you how to install Maven for your test automation projects and run your first project in this Selenium Maven tutorial.
TABLE OF CONTENTS
Why Use Maven?
Maven plays a crucial role in managing a project lifecycle, which typically includes validation, code generation, compilation, testing, packaging, and more. It is a build automation tool that works in phases rather than tasks(as in the case of Apache Ant). It is used to manage the life cycle of a project. Maven makes the build management process much easier, as you only need to specify the dependencies in the pom.xml file, and Maven will take care of the rest!
Some key reasons Maven is used are:
- It simplifies the build process & provides a uniform system.
- It handles compilation, distribution, dependency management, and other tasks efficiently.
- It increases reusability.
- It reduces the steps like adding jar files to the project library, building reports, executing Junit test cases, and creating jar/war/ear files for deployment.
- It has a repository that is centralized to manage jar files.
What Is Maven?
By now, you already know that Maven is a build automation tool used to manage project dependency and the whole project lifecycle. Maven was built by the Apache Software Foundation and is used primarily for Java projects. It was initially developed to simplify the Jakarta Turbine Project’s building process and is now widely used to make building processes easy and uniform.
Maven can be defined as a software project management tool that uses the project object model (POM) concept. It enables the user to create an initial folder structure, perform compilation and testing, and then package and deploy the final product. It efficiently cuts down several steps followed in the build process by a single-step process.
Some key terms for this Selenium Maven tutorial:
- Maven Local repository: It is a local repository in the developer’s machine that holds all the project artifacts. Project dependent jars are downloaded into the local repository when executing a Maven build.
- Maven Central Repository: It is a default repository in every official new project to Maven. Whenever any dependency is absent in the local repository, Maven automatically consults the central repository to download it.
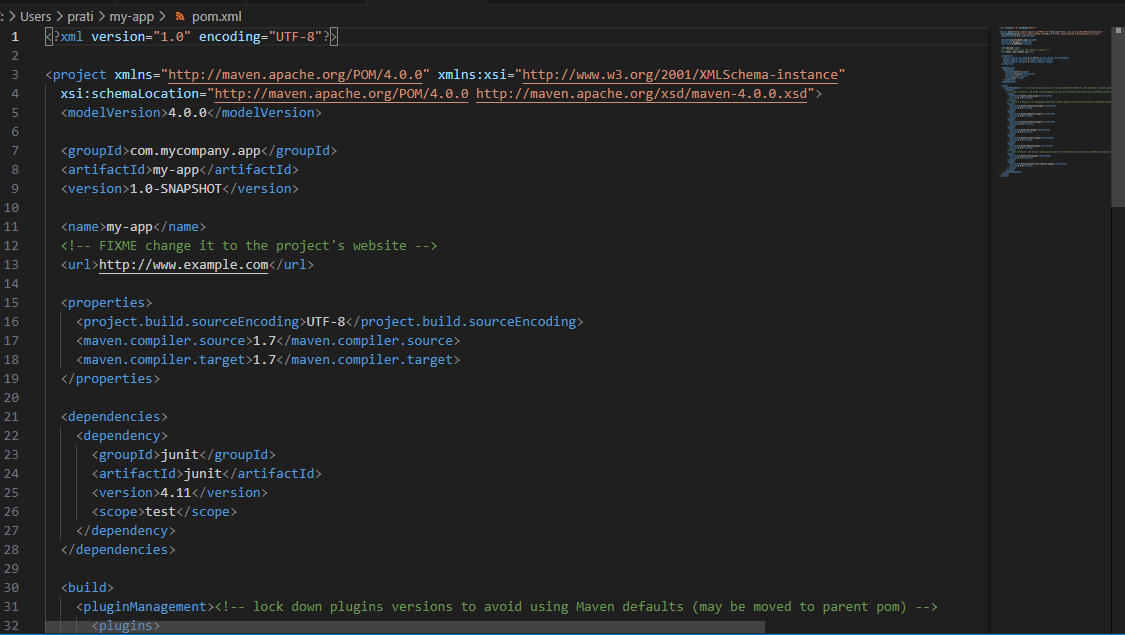
- Project Object Model: POM (XML) contains project information and configuration details used by Maven build. It is located in the root directory of each project. A sample POM looks like the following:
- Dependency: Any library on which a Java project is dependent to run or build is called a dependency. For example: Log4j jars, Apache Poi jars, Selenium Jars, etc. Dependencies are mentioned in pom.xml below:
- Surefire PlugIn: To execute an application’s unit tests during the build lifecycle test phase, one can use the Surefire Plugin. A surefire report is available in two formats: Plain text file(.txt) and XML file(.xml). This plugin is a must-have as it helps Maven identify tests even when using TestNG or Junit frameworks.
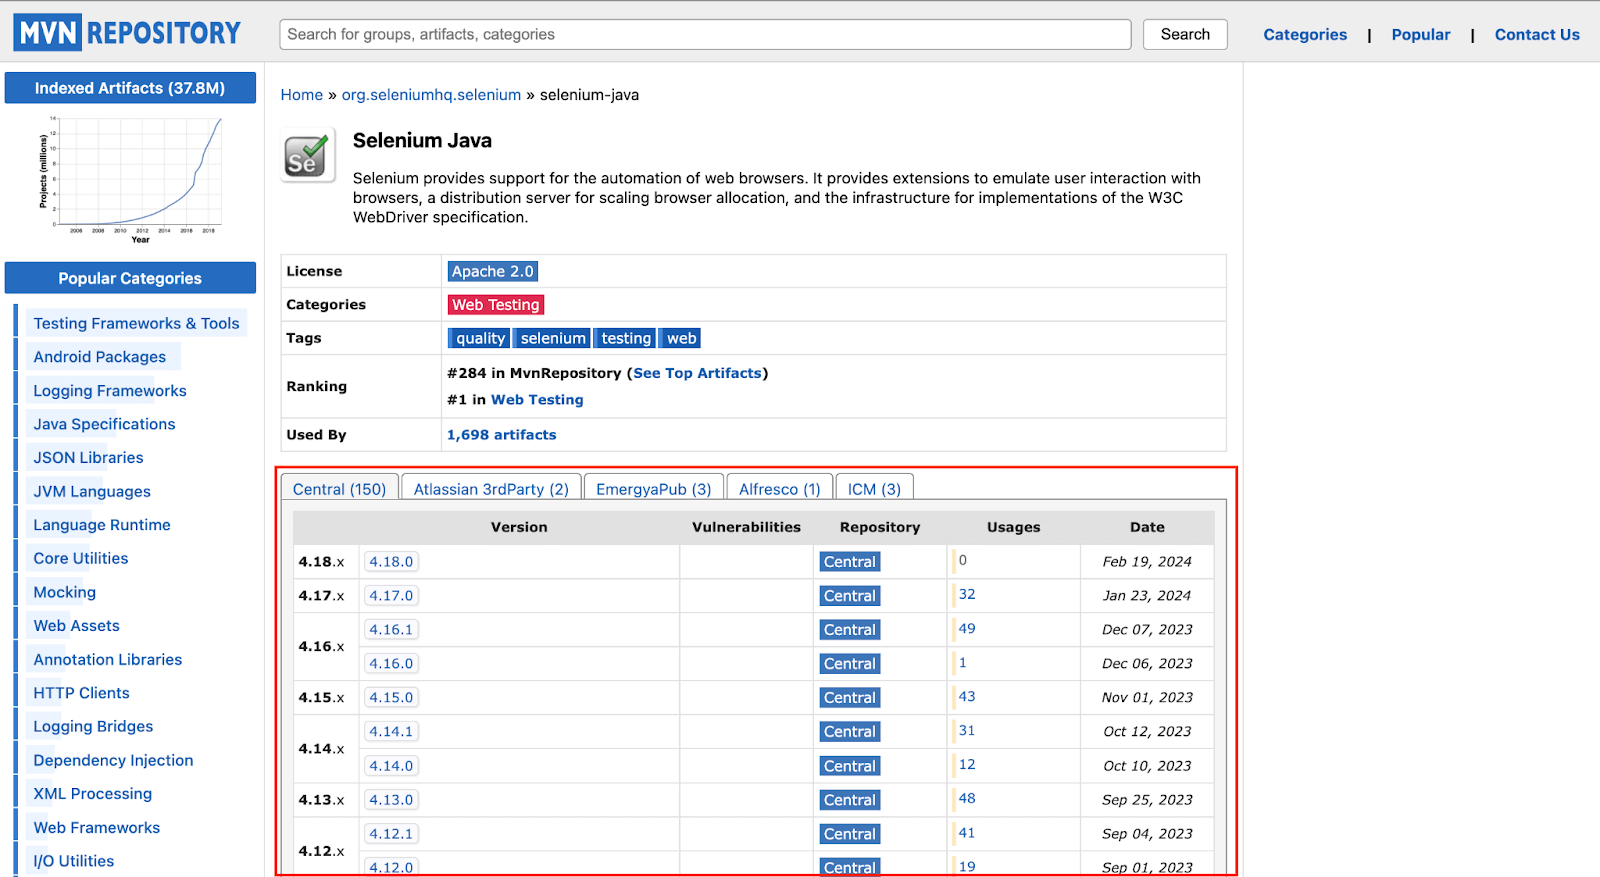
Maven repository is the one step place to look for all the dependencies you might want to use in your projects. You can search for specific dependencies in the search bar and see for yourself which one you want to include in your project as shown below in the screenshot.
How to Install Maven In Windows?
Maven can be installed either through Command-Line or with Eclipse IDE. We’ll first follow the steps to install it through Eclipse IDE.
How To Install Maven in Eclipse IDE?
Installing Maven in Eclipse is pretty straightforward; here are the steps:
Step 1: Click on Help from the top menu in Eclipse and select ‘Install New Software.’
Step 2: Click the Add button on the newly opened window.
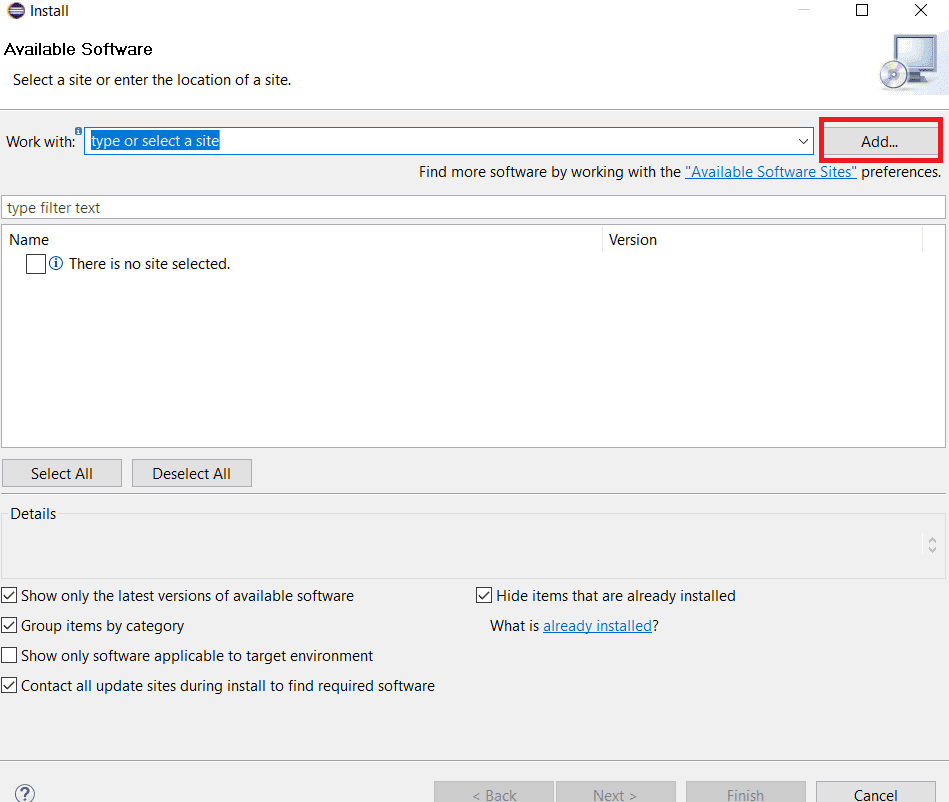
Step 3: In the “Work with” text box, type “https://download.eclipse.org/technology/m2e/releases/latest/”. This URL is the location from where Maven can be downloaded.
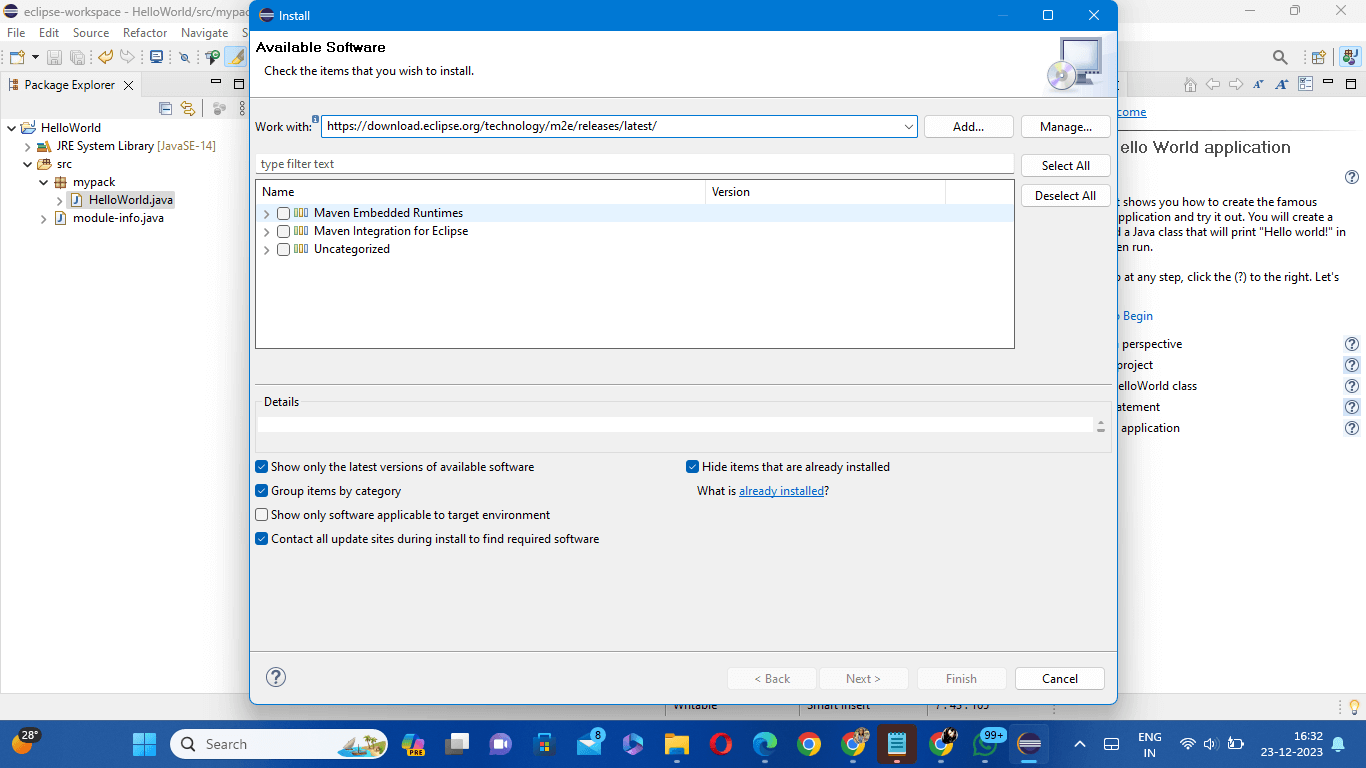
Step 4: After this, Select all items to install.
Step 5: Wait a few minutes for the window to complete its process.
Step 6: Keep the default settings and click on the Next button.
Step 7: Accept the Terms & Conditions and click on Finish.
Step 8: Wait for the installation to finish.
Step 9: After the installation, restart your eclipse. Click on Yes to see the changes being reflected.
Boom! You’ve now installed Maven successfully to your Eclipse IDE.
How To Install Maven Through Command Line?
If you want to go around the other way of installing Maven through the command line, please follow the below steps:
Step 1: Download & Install Java.
You need to install Java in your system if not already done. Click here to download the latest version of Java.
To check the Java version of your system, search and open run and type ‘cmd’ to launch the command prompt. Type ‘Java -version’ and press Enter to see which Java version is installed.
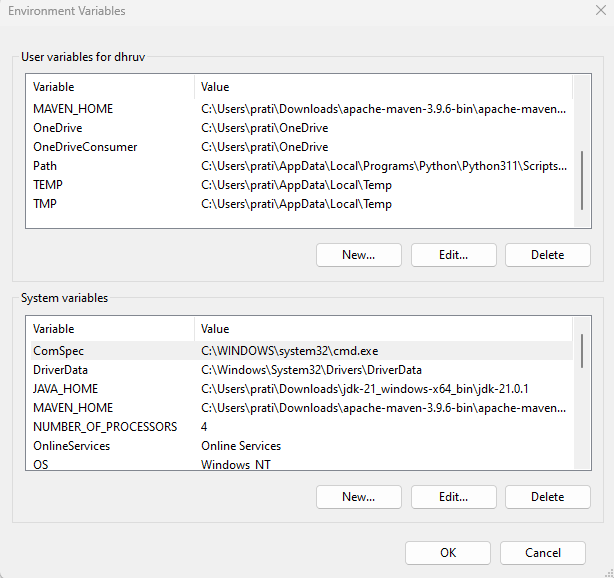
Step 2: Set Up Java Environment Variable
After installation of Java, set up the Java Environment Variable. Open the system settings to set the Java Environment Variable.
- Go to This PC right-click on the space anywhere within, and select Properties.
- Click on Advanced System Settings so that a new pop-up opens up.
- Now, from the pop-up window, click on Environment Variables.
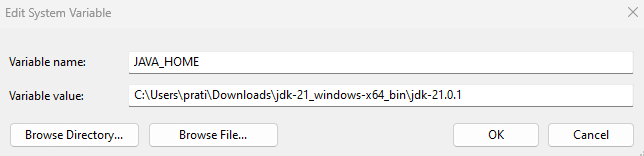
- Click on the New button under System variables.
- Type “JAVA_HOME” in the Variable name box, for example,
- You can now see the newly created Java variable under ‘System Variables’.
“C:\Users\prati\Downloads\jdk-21_windows-x64_bin\jdk-21.0.1” JDK path in the Variable value box and save the same.
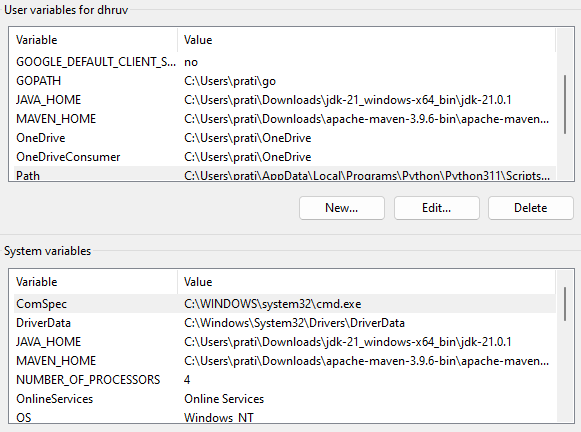
Step 3: Download Maven and Set Up Maven Environment Variable
- Maven can be downloaded from by clicking here.
- Extract it to some location in your machine at your convenience. For me, it is lying at “C:\Users\prati\Downloads\apache-maven-3.9.6-bin”.
- You can set up the Maven Environment Variable similar to how we set up the Java Environment Variable in the steps above.
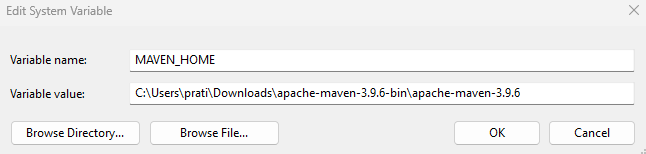
- Type ‘Maven_HOME‘ in the Variable name box and “C:\Users\prati\Downloads\apache-maven-3.9.6-bin\apache-maven-3.9.6” in the Variable value box.
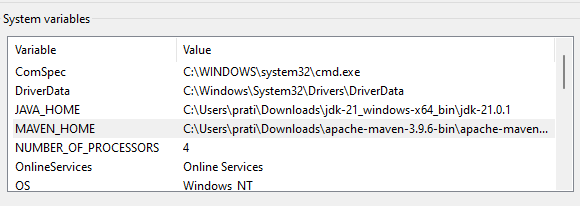
- You’ll now be able to see the newly created Maven variable under ‘System Variables.’
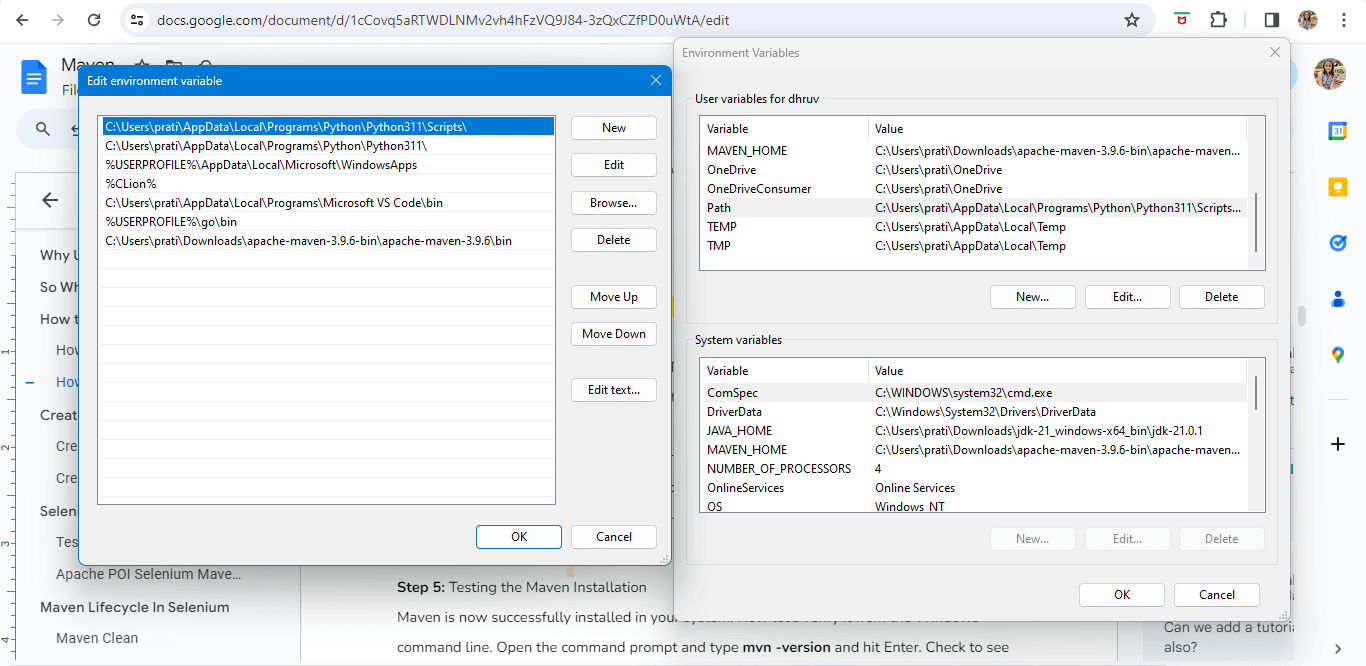
Step 4: Updating the Path Variable
To run Maven from the command line, we must necessarily update the Path Variable with Maven’s installation ‘bin’ directory.
- Open system properties through “This PC.”
- Navigate to ‘Advanced System Settings’.
- Click on ‘Environment Variables’.
- Click on the Edit button under user variables.
- Type ‘PATH’ in the Variable name box & “C:\Users\prati\Downloads\apache-maven-3.9.6-bin\apache-maven-3.9.6\bin” in the Variable value box.
Step 5: Testing the Maven Installation
Maven is now successfully installed in your system. Now, let’s verify it from the Windows command line. Open the command prompt, type ‘mvn -version’ and hit Enter. Check to see the version of Maven installed in your system displayed in the results.

Now you’re all set with Maven Installation and can create projects using Maven.
Create your First Maven Project
Like the Maven installation we discussed earlier in the Selenium Maven tutorial, you can create a Maven project either through Eclipse IDE or the Command Line.
Creating Maven Project with Eclipse IDE
Below are the steps to create a Maven Project with Eclipse IDE:
Step 1: Create a new project from the Eclipse IDE.
Step 2: From the new project window, expand Maven and select Maven Project and then click on Next.
Step 3: You may create a simple project or let go of this option. For now, we’ll use a simple project that would create a simple Maven-enabled Java project.

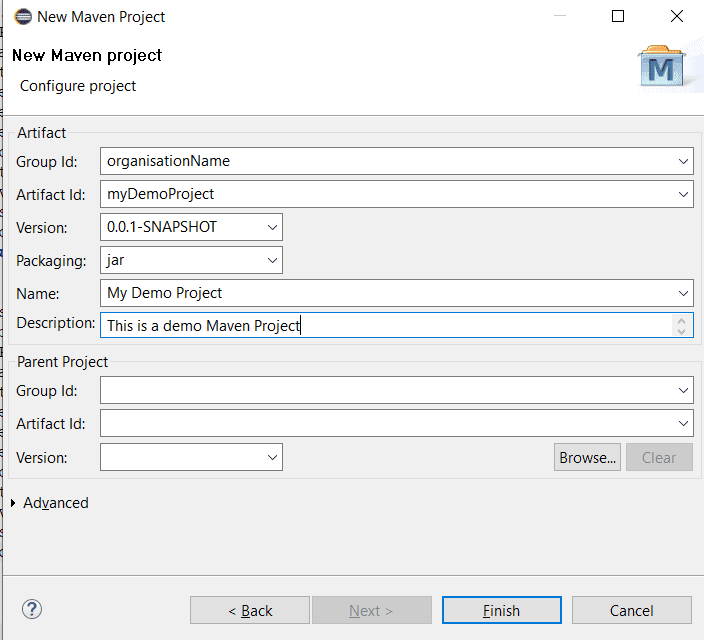
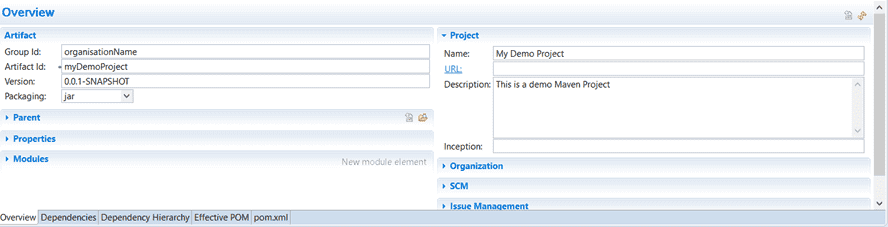
Step 4: Now upon clicking Next you’ll need to type information about the Maven project created. You may refer below descriptions to fill in the values:
- Group Id– corresponds to your organization’s name.
- Artifact Id– refers to the project name.
Note: The version can be chosen flexibly. If your project has no parent dependencies, you don’t need to fill in the project dependencies. Just fill in the appropriate information and click on ‘Finish’.
Step 5: Congrats! Your Maven project has now been created successfully!
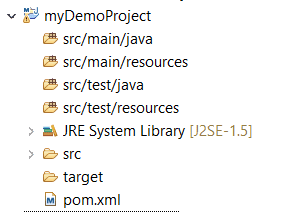
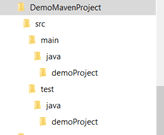
Note: Java code is placed in /src/main/java, resources are kept in /src/main/resources, testing code is placed in /src/test/java, and the testing resources are placed in /src/test/resources.
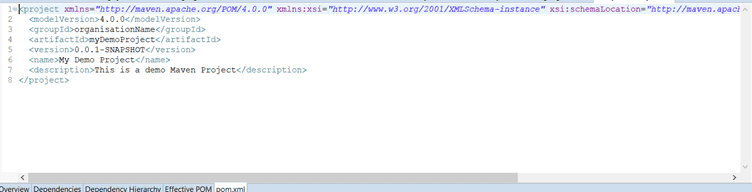
Step 6: You may now open the pom.xml to view the structure set up by Maven. You’ll see all the information we entered in ‘step 4’ here. You can use the tabs at the bottom to change the view. The pom.xml tab has the pom XML code for the Maven project.
The Maven Project is now ready to be used.
Creating Maven Project using Command Line
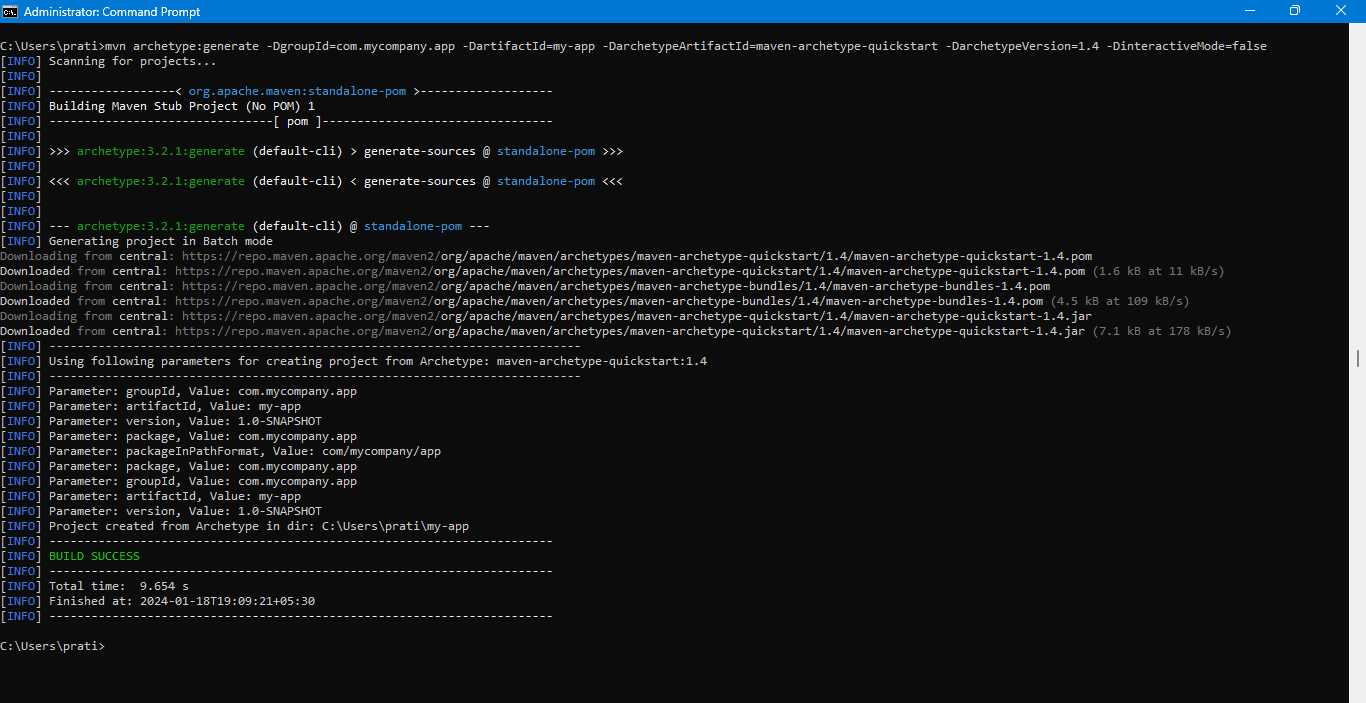
Step 1: Open a Command Prompt and navigate to the folder to set up your project. Once navigated, type the below command:
|
1 |
mvn archetype:generate -DgroupId=com.mycompany.app -DartifactId=my-app -DarchetypeArtifactId=maven-archetype-quickstart -DarchetypeVersion=1.4 -DinteractiveMode=false |
Here, DgroupId is the organization name, DartifactId is the project name, and DarchetypeArtifactId is the type of Maven project.
On clicking Enter, your Maven project will be created.
Step 2: You can go to the project location to see the newly created Maven project. You can open the pom.xml file, which is in the project folder, by default the POM is generated like this:
Step 3: You can view the default folder structure of your Maven project.
Now that we know how to create a Maven project, let’s try to integrate Selenium with Maven. But before we do that, we need to understand the various Dependencies that would help with this integration.
Selenium Maven Dependency For Your Automation Project
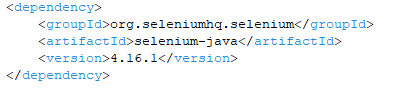
All the external libraries used in a project are called dependencies. Maven has an excellent feature that automatically downloads required libraries from its central repository, which makes it easy as you don’t have to store them locally. Below is an example of writing a Selenium Maven dependency in your pom.xml:
|
1 2 3 4 5 |
<dependency> <groupId>org.seleniumhq.selenium</groupId> <artifactId>selenium-java</artifactId> <version>4.16.1</version> </dependency> |
On adding the above Selenium Maven dependency, Maven will download the Selenium java library into our local Maven repository.
Another Selenium Maven dependency can be added to pom.xml based on the requirement. A few examples that you might have to use in our Selenium project are:
- TestNG Selenium Maven Dependency
- Apache POI Selenium Maven dependency
TestNG Selenium Maven Dependency
This would import the testing framework dependency for Java.
|
1 2 3 4 5 6 |
<dependency> <groupId>org.testng</groupId> <artifactId>testng</artifactId> <version>7.9.0</version> <scope>test</scope> </dependency> |
Apache POI Selenium Maven dependency
This would download the libraries required to access Microsoft format files.
|
1 2 3 4 5 6 7 8 9 10 11 |
<dependency> <groupId>org.seleniumhq.selenium</groupId> <artifactId>selenium-java</artifactId> <version>4.16.1</version> </dependency> <dependency> <groupId>org.testng</groupId> <artifactId>testng</artifactId> <version>7.9.0</version> <scope>test</scope> </dependency> |
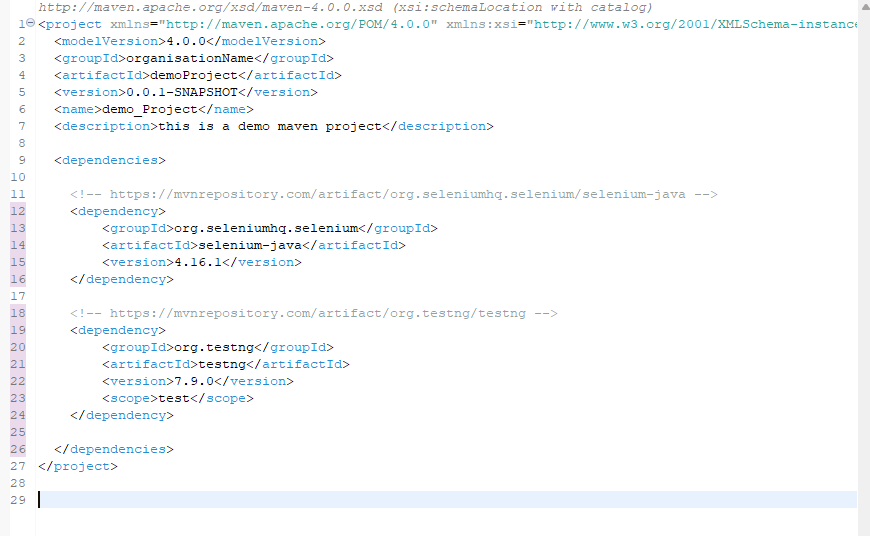
You can add these Selenium Maven dependencies in your pom.xml as shown below:
|
1 2 3 4 5 6 7 8 9 10 11 12 13 14 15 16 17 18 19 20 21 22 23 24 |
<project xmlns="http://maven.apache.org/POM/4.0.0" xmlns:xsi="http://www.w3.org/2001/XMLSchema-instance" xsi:schemaLocation="http://maven.apache.org/POM/4.0.0 http://maven.apache.org/xsd/maven-4.0.0.xsd"> <modelVersion>4.0.0</modelVersion> <groupId>LambdaTest</groupId> <artifactId>MyDemoProject</artifactId> <version>0.0.1-SNAPSHOT</version> <name>demo_Project</name> <description>this is a demo maven project</description> <dependencies> <dependency> <groupId>org.seleniumhq.selenium</groupId> <artifactId>selenium-java</artifactId> <version>4.16.1</version> </dependency> <dependency> <groupId>org.testng</groupId> <artifactId>testng</artifactId> <version>7.9.0</version> <scope>test</scope> </dependency> </dependencies> </project> |
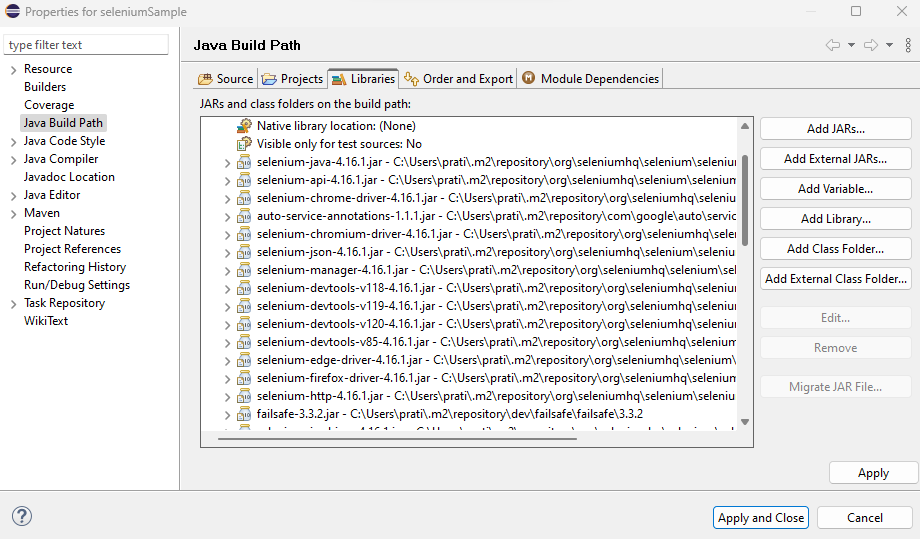
In case you want to validate how these Selenium Maven dependency import the required libraries, you’ll have to go back to the demo project and see what libraries are present by default.
To do the same you need to:
- Right-click on your project name and
- Configure the Build Path for your project and
- check under the Libraries tab of the newly opened window.
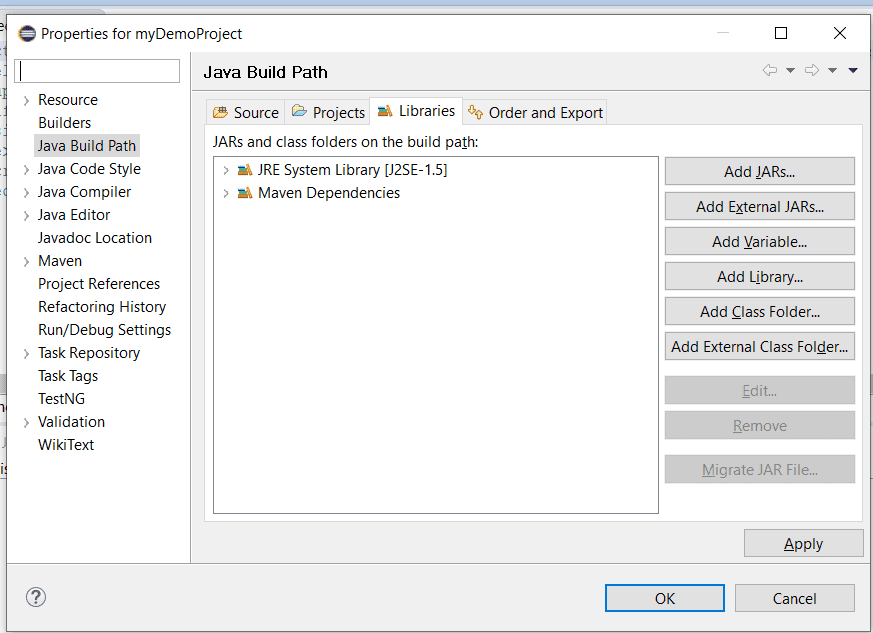
Here you can see the default libraries in your project for this Selenium Maven tutorial.
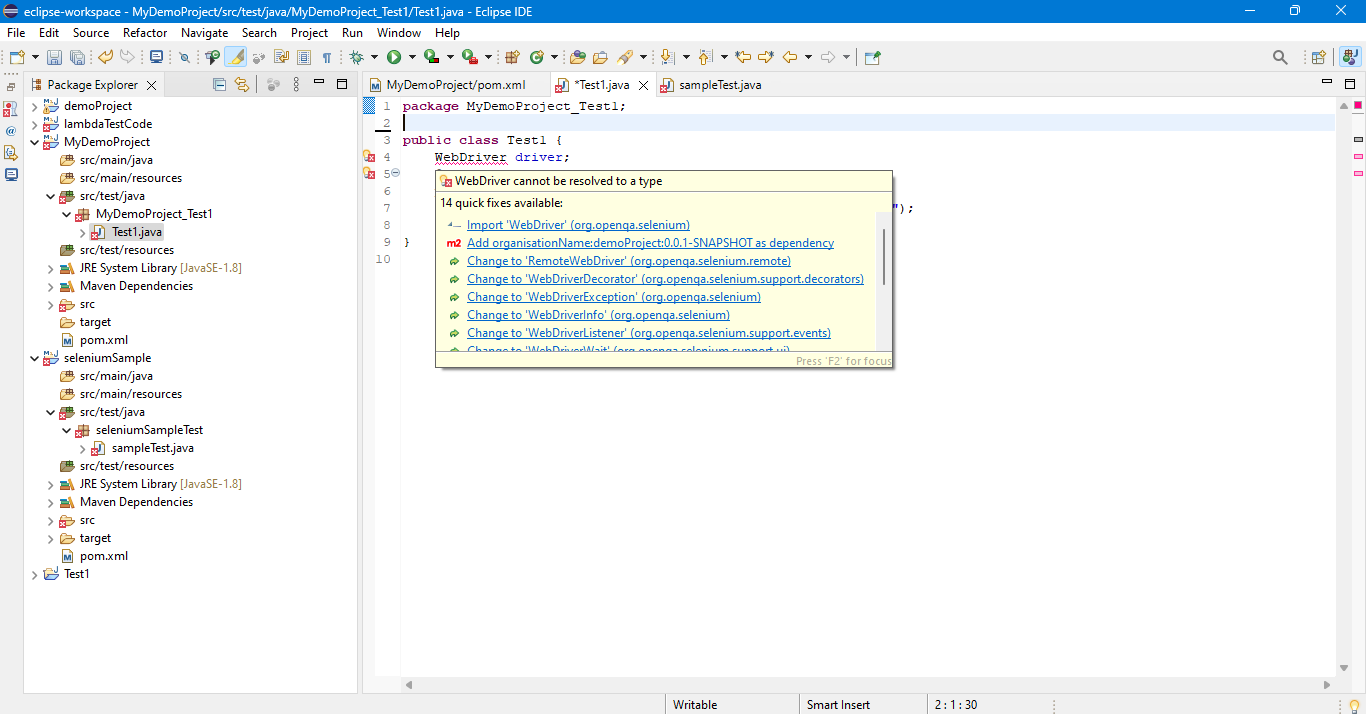
For a clearer vision, I’ll create a sample class using Selenium components and some TestNG annotations. Please note that I’ll create the sample test class under our project structure’s src/test/java folder. Below, the error correction can be done after adding the libraries.
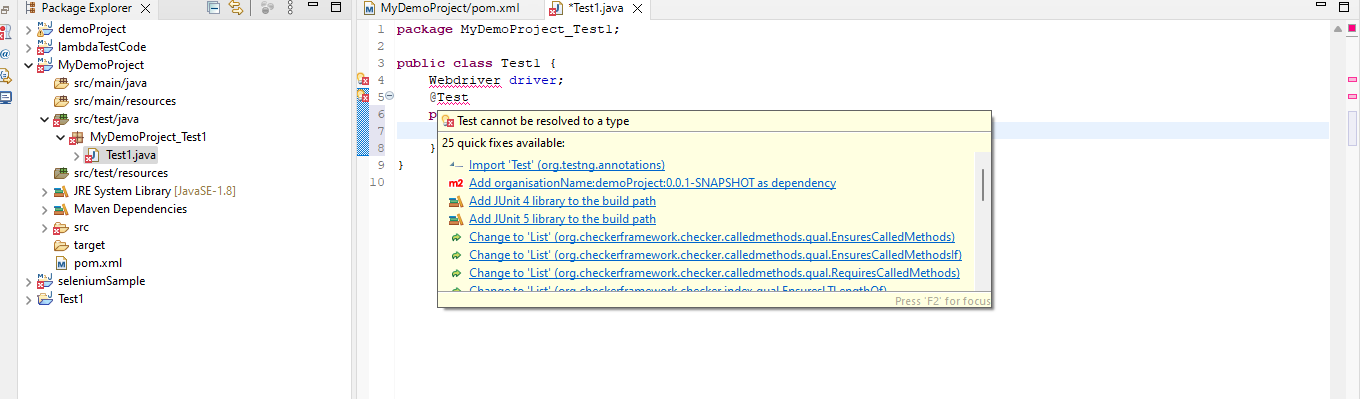
So, rather than manually adding libraries by configuring the project build path in this Selenium Maven tutorial, I’ll write the dependencies for the project in pom.xml, and Maven will directly download those from its repository. This saves the trouble of doing it manually and reduces the chance of missing out on adding some jars. So, here is how you add the dependencies:
The pom.xml before the Selenium Maven dependency is added:

pom.xml after the Selenium Maven dependency is added:
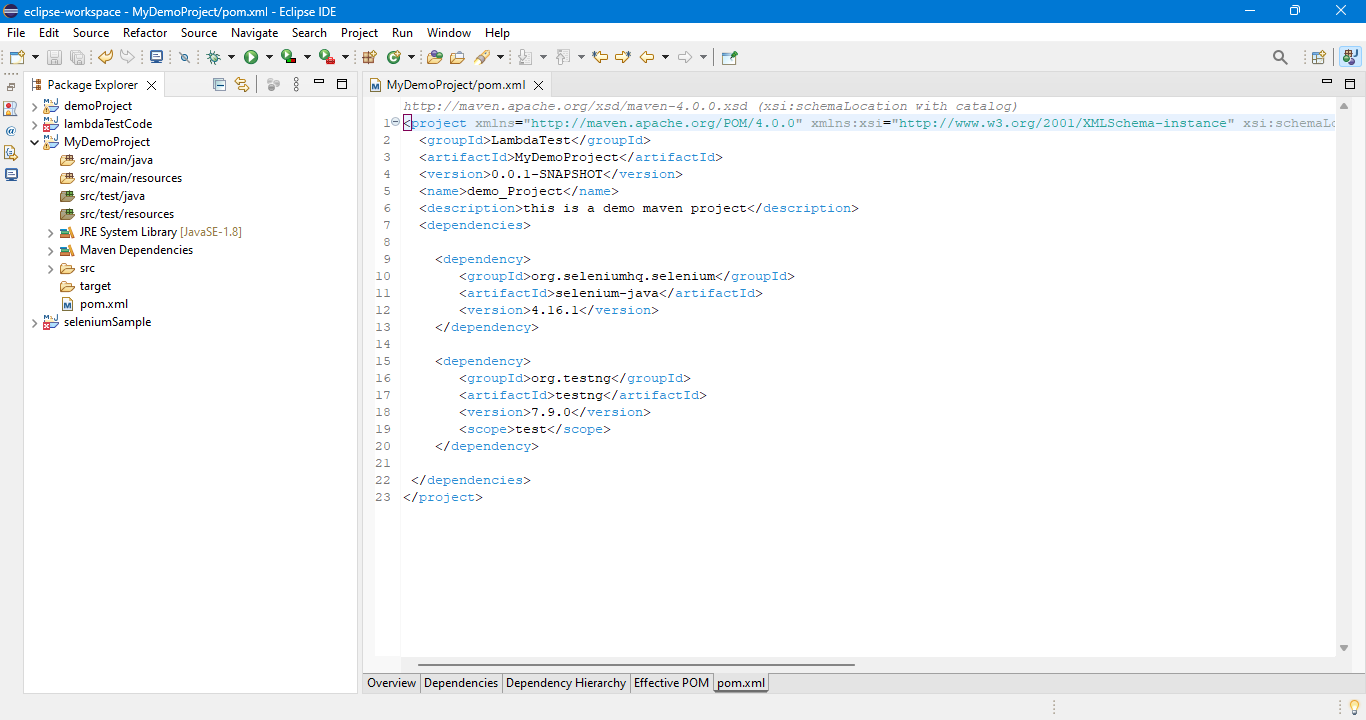
After you have saved and refreshed your project, check the build path and see the Selenium and TestNG libraries being added Selenium Maven dependency.
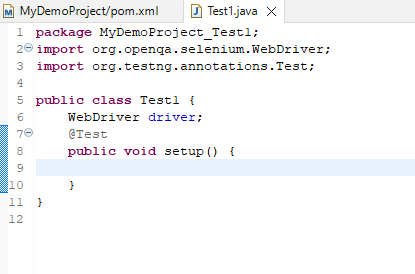
Also, you can now go to your test class and see the different options to correct the error thrown in this Selenium Maven tutorial:

You can simply Import the WebDriver, and you’d be good to go. Similarly, for Test annotation, just import testng.annotations.
You can add more dependencies like Apache POI, extent reporting, commons email, or anything that might be specific to your project in a similar fashion to your pom.xml.
Note: TestNG Selenium maven dependency seamlessly integrates with TestNG automation scripts, providing a practical and effective approach to streamline your testing processes.
Now we are done configuring the project, let us run the project to see if the tests work fine.
Maven Lifecycle In Selenium
There is a maven lifecycle in Selenium that every Maven build follows. The different methods are simply goals. Before going ahead, I’ll explain what these goals are.
Open a command line in your system, type mvn, and then Enter.
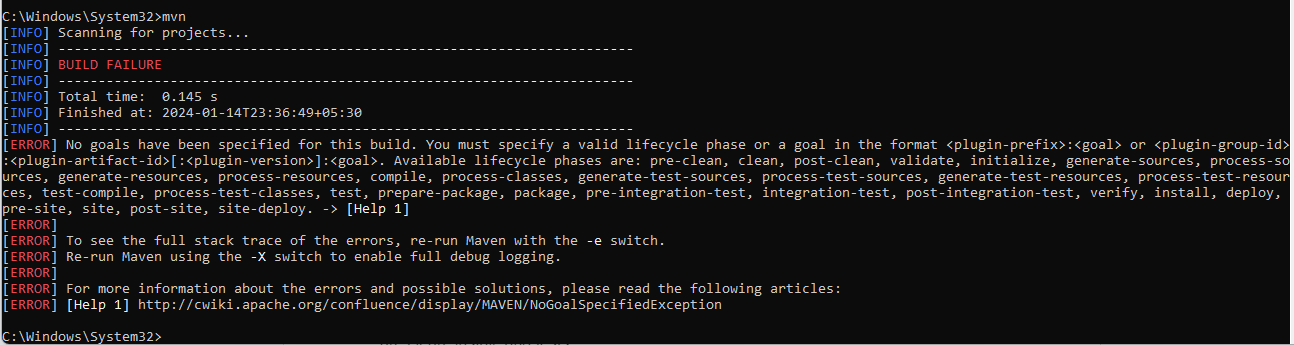
You can see a “Build Failure” message with an error saying that no goal has been defined in this Selenium Maven tutorial. As you parse through this message, you can see the different goals that can be defined for our Maven project. I’ll quickly go through these default goals before going into detail about the goals required for the Selenium project.
- validate: would check if our project is correct and all the required information is available
- compile: would compile the project source code
- test: would unit test the compiled source code of our project
- package: would package the compiled code into the distributable formats, like JAR
- integration-test: would deploy the package into an environment where we would run the integration tests
- verify: would verify if the package is valid
- install: would locally install the package
- deploy: would be used in integration or release environment by copying the final project into a remote repository where it can be accessed by other projects or developers
- clean: cleans up previous build artifacts
- site: creates site documentation for the project.
Of the above-said default goals, three are crucial for Selenium test automation. These three are clean, install, and tests.
You can use these goals alone or with a clean-install for this Selenium Maven tutorial.
- Clean- It would clean the target folder, i.e. the folder where the previous build’s libraries, build files(war, tar or jar files), reports, output files, etc are saved. On executing mvn -clean this target folder will be deleted.
- Install- It would install all the dependencies, in case of missing jars, and create the deployment file(war/jar files in case of JAVA) and then it’ll run the test.
- Test- It will simply run the test without creating any deployment file.
Note: When using Eclipse IDE, you can directly use any of these three goals by right-clicking on your pom.xml, then Run As and selecting any of the options.
Maven Clean
I’ll start with selecting Maven clean in this Selenium Maven tutorial, you can see the output below:
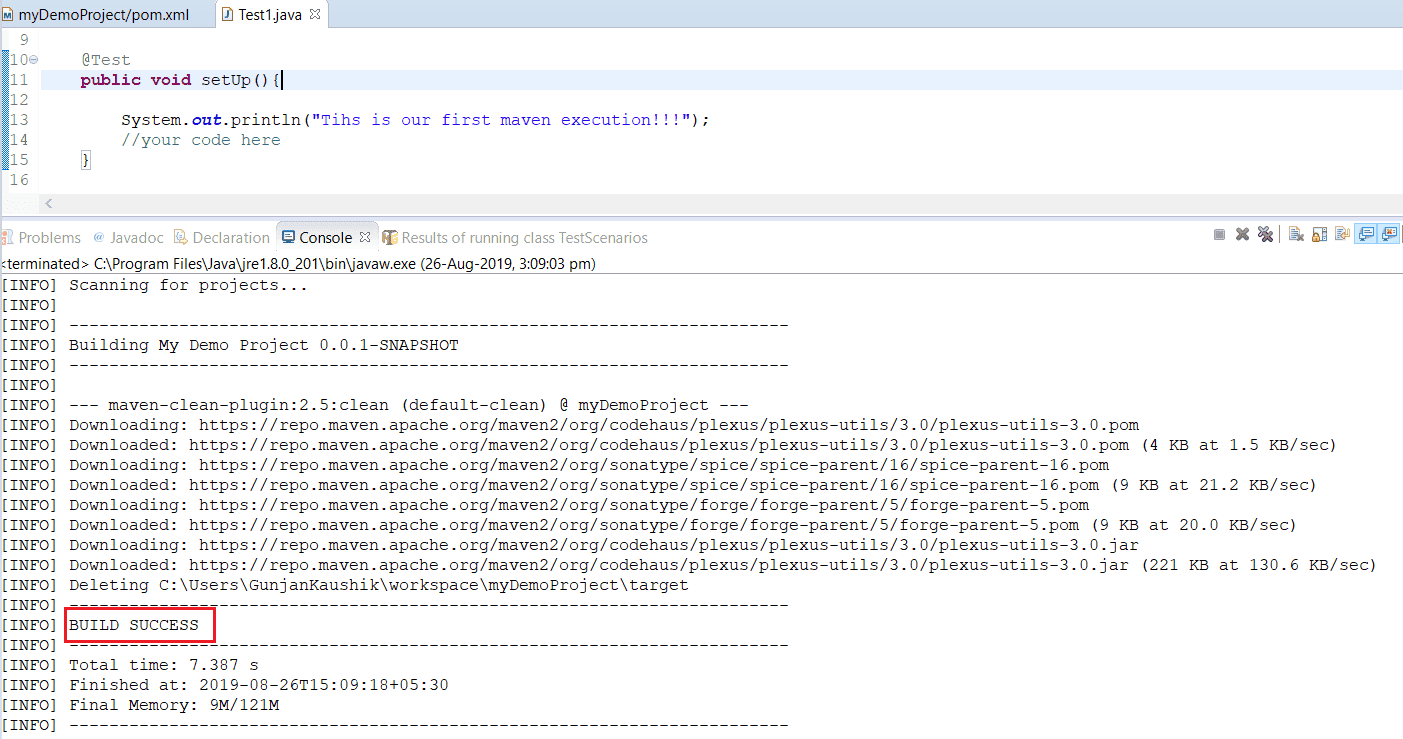
So here, the task of clean, which is to delete the target folder, has been completed, and hence, our Build is successful.
Maven Install
Before going to the second task of install, you need to add a plugin called the Maven Compiler plugin. Without it, the test automation build will fail. This plugin is used to identify the specific location of the compiler. You can add the plugin below in your pom.xml and refresh the project before executing the Maven install.
|
1 2 3 4 5 6 7 8 9 10 11 12 |
<build> <!-- To define the plugin version in your parent POM --> <pluginManagement> <plugins> <plugin> <groupId>org.apache.maven.plugins</groupId> <artifactId>maven-compiler-plugin</artifactId> <version>3.12.1</version> </plugin> </plugins> </pluginManagement> </build> |
Note: To read more about different types of Plugins for Maven, click here.
Upon adding this piece, your pom.xml would look like below:

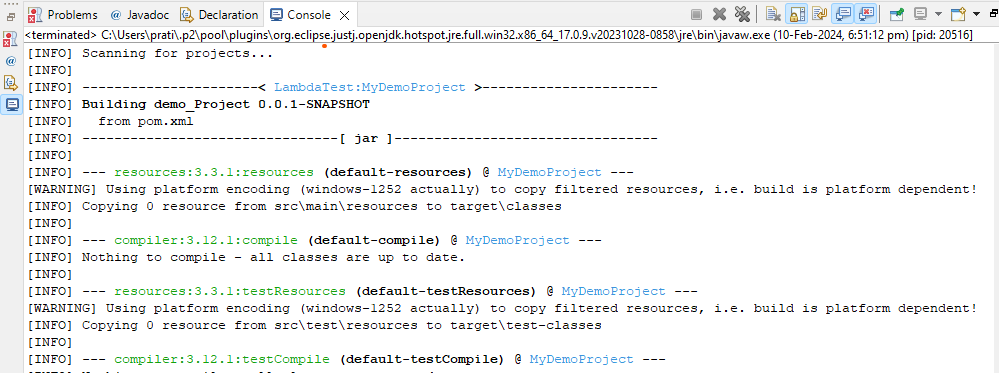
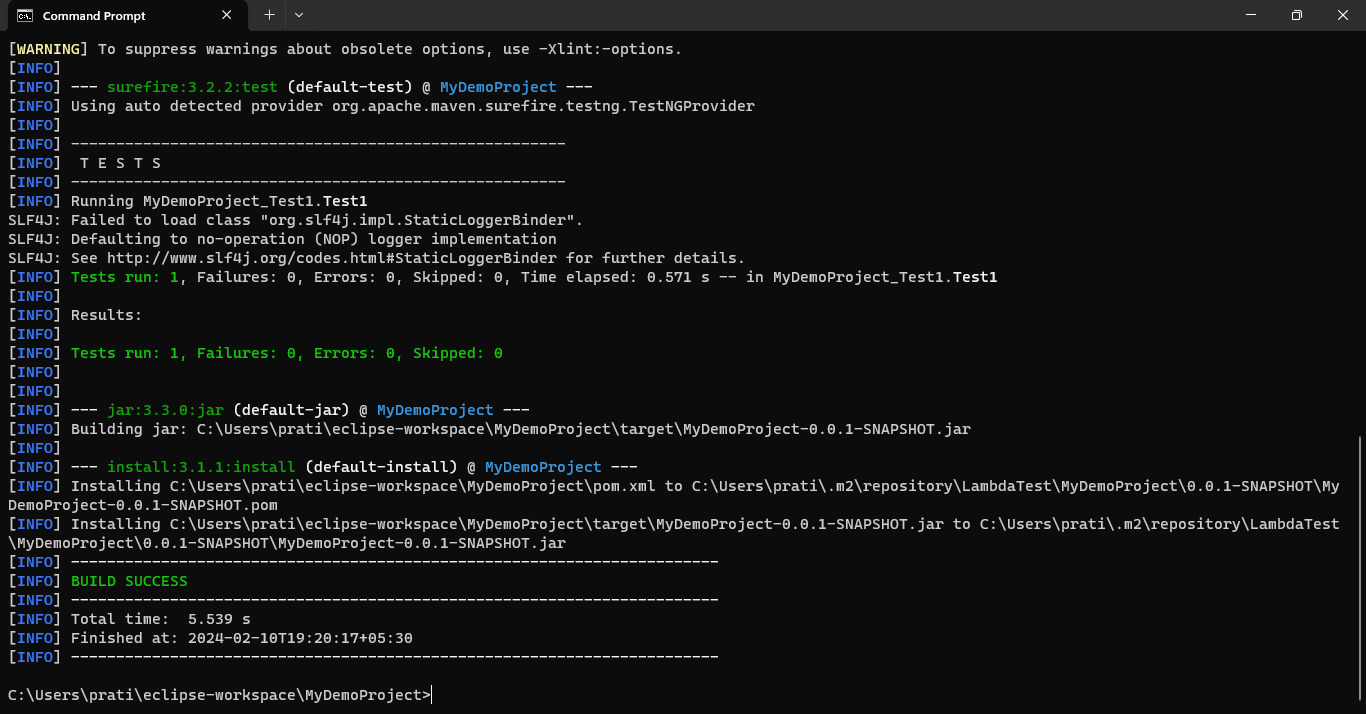
Now, go to Maven Install just like you did for Maven Clean in this Selenium Maven tutorial and observe the console output for the build installation:
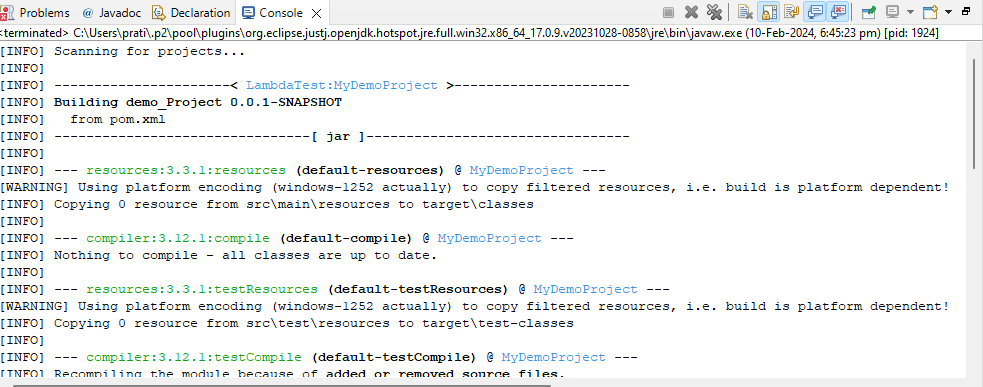
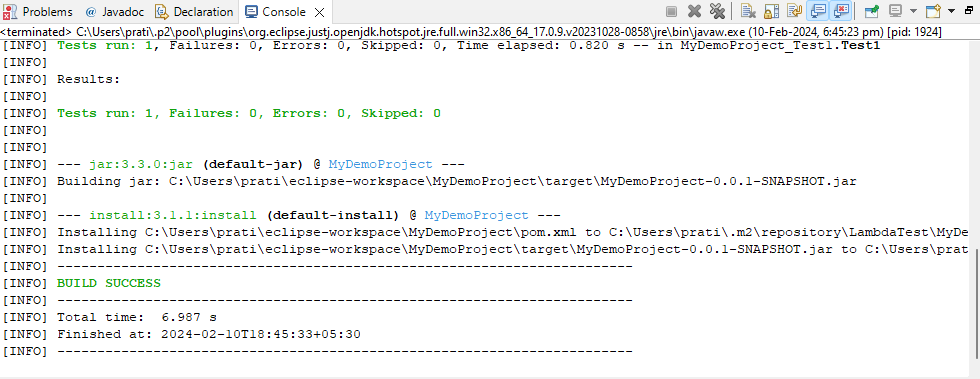
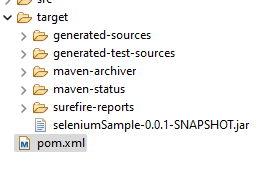
You can see in the console output that the Maven installer also executed the tests. To see the installed directories in your local system, refresh your project and see the generated directories. In the below snapshot, you can see all the files generated(a jar file as well since this is a simple JAVA program) as a result of the Maven install. You can share this jar file directly for others to execute.
Maven Test
Similarly, we can do Maven Test in this Selenium Maven tutorial and see the build results in the console:

The above steps show how execution can be done through Eclipse IDE, but in real-time project execution is done mostly through the command line So now we would use these goals from the command line. Before proceeding with these tasks, ensure that your current working directory in cmd points to your local workspace location. If we do not do this, our Maven command will not be able to find the desired pom.xml, and hence, our Selenium test automation build will fail.
Let us first do the Maven Clean using the command prompt in this Selenium Maven tutorial. We simply need to write ‘mvn clean’:
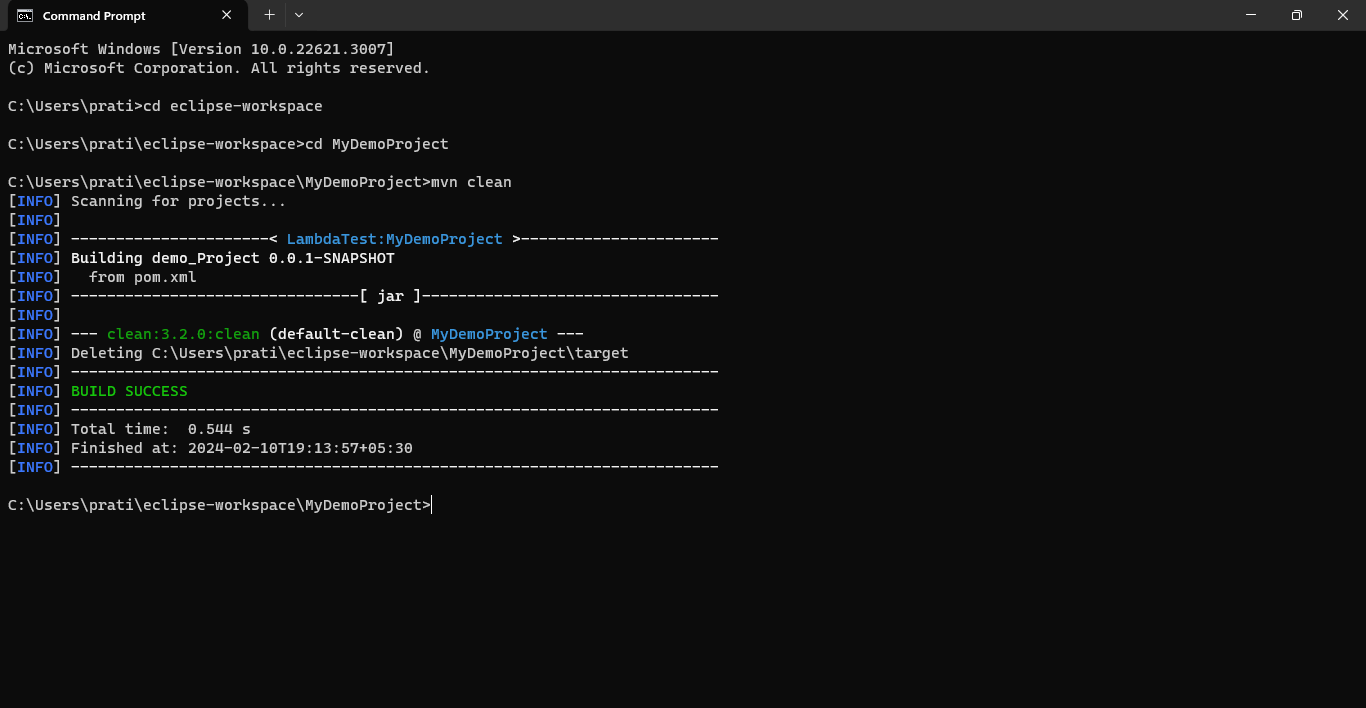
You can see the target folder getting deleted. The next step in this Selenium Maven tutorial is to do a Maven install by typing ‘mvn install’ in the command prompt.
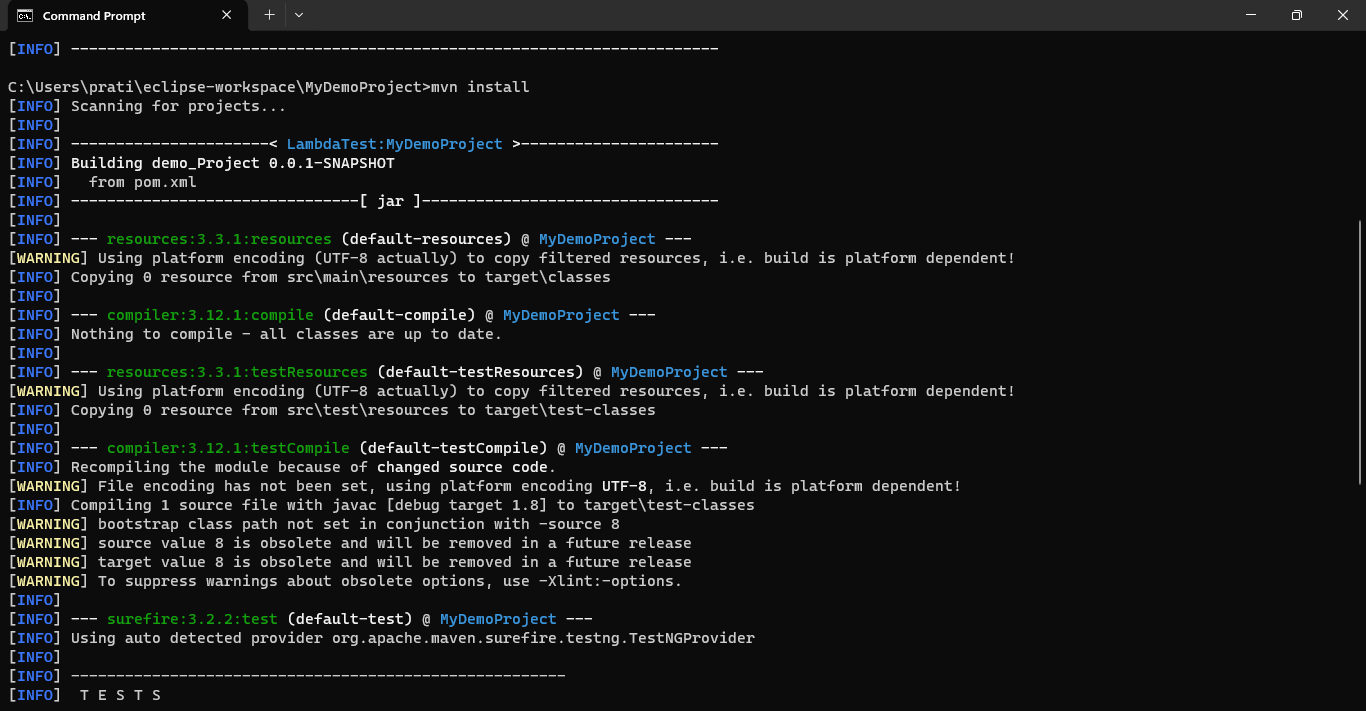
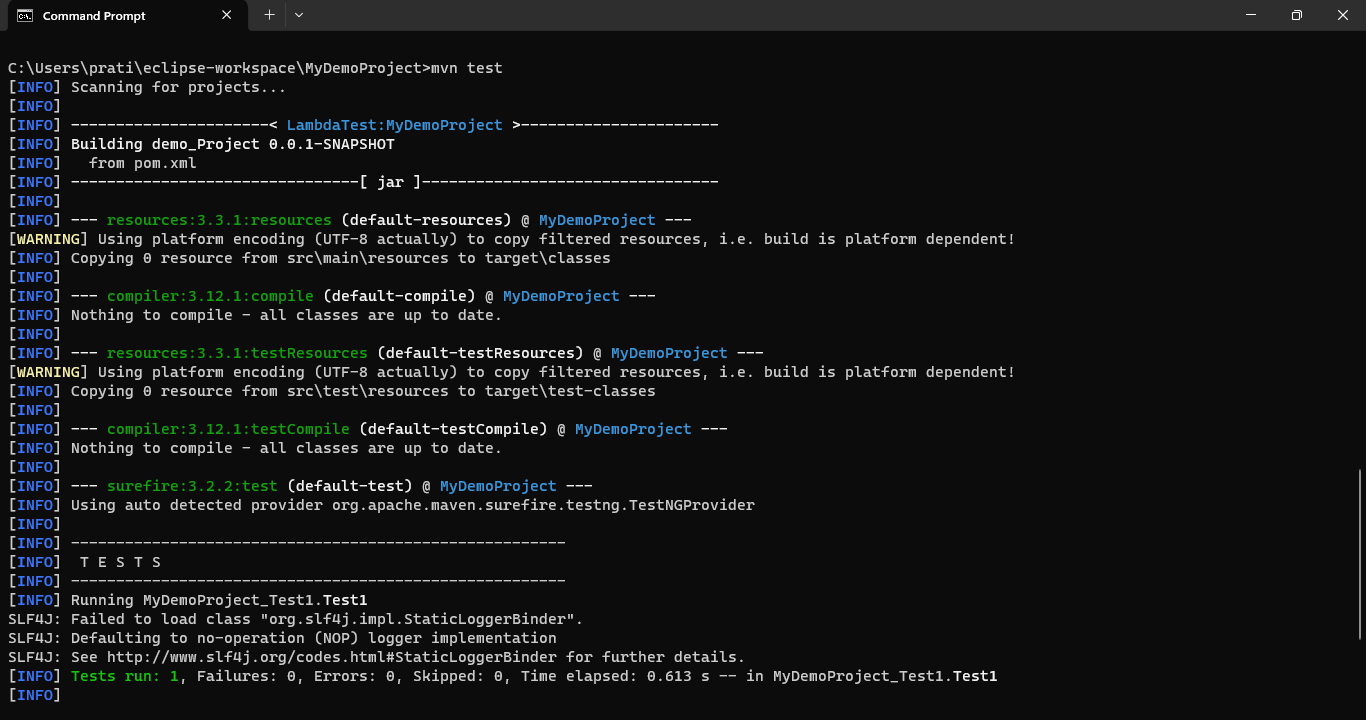
The console output is almost similar to what was there through Eclipse execution. Let us now perform a Maven test by typing ‘mvn test,’ which would execute the test without building jar files.
Now that you know the basic goals for executing our automated testing, you can run your Selenium automation scripts through Maven!
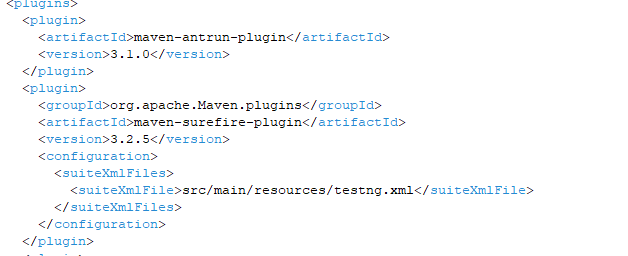
LMaven Surefire Plugin
By now you have read this term in this Selenium Maven tutorial quite some time in your console output logs, so I’ll shed some light on it. The surefire plugin helps Maven to identify the tests and is used with whichever framework your project is built on. To add the Surefire plugin to your pom.xml use the below code snippet:
|
1 2 3 4 5 6 7 8 9 10 |
<plugin> <groupId>org.apache.Maven.plugins</groupId> <artifactId>maven-surefire-plugin</artifactId> <version>3.2.5</version> <configuration> <suiteXmlFiles> <suiteXmlFile>src/main/resources/testng.xml</suiteXmlFile> </suiteXmlFiles> </configuration> </plugin> |
Your pom.xml should look like below:
Now I’ll run Maven test from eclipse in this Selenium Maven tutorial and see the results:
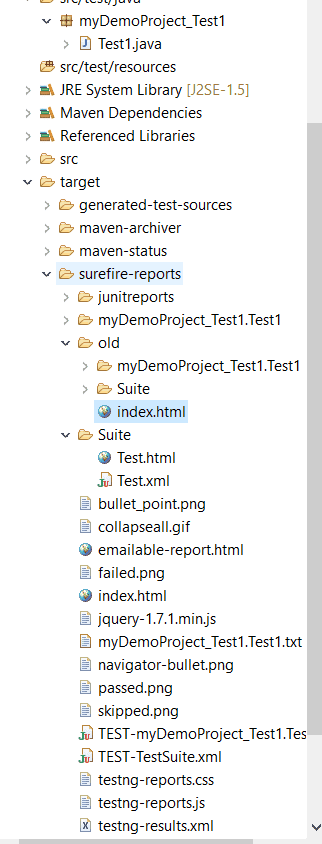
You can now check the reports that have been generated by default and in a similar way by typing ‘mvn test’ can execute this suite from the command prompt.
The report generally gets generated at the following location
|
1 |
“your_project_name/target/surefire-reports” |
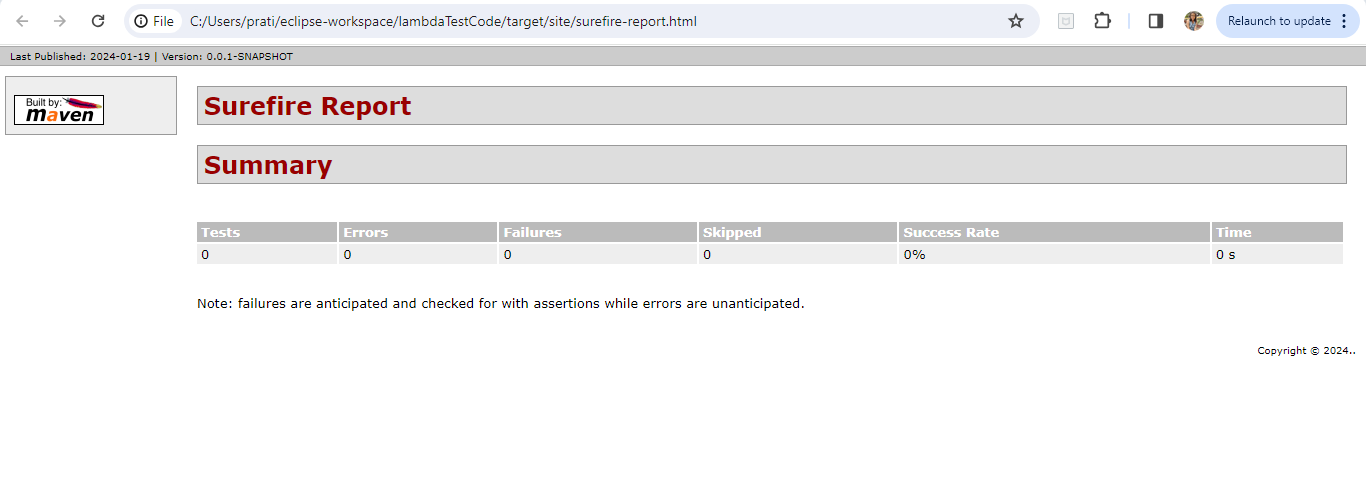
If in case, the report is not generated by default, we can find it from this location:
|
1 |
“${basedir}/target/site/surefire-report.html” |
Conclusion
In this Selenium Maven tutorial, I explored how Maven as a build automation tool can better manage Selenium Maven dependency for your project. With Maven, you wouldn’t have to worry about installing and upgrading your project libraries as they are done automatically with the tool. Now you know how to install Maven in your systems with both Eclipse IDE and with the command line. I also explained how to create a Maven project in Eclipse IDE Also, I went through the Maven lifecycle, and the goals used, and then I ran the Maven project.
This pretty much sums up everything you need to know to get started with Maven in this Selenium Maven tutorial. Do reach out to us in case of any questions or doubts. Also, I’d appreciate it if you could help us share this article and retweet it. That’s all for now. Happy Testing!!!
Frequently Asked Questions (FAQs)
What is Selenium Maven dependency?
Selenium Maven dependency is a feature in Maven that helps you easily include Selenium libraries in your Java project. It automatically downloads and manages the necessary Selenium files, making it simpler to set up and run automated tests.
How to add dependency in Maven for Selenium?
To include Selenium in a Maven project, open your IDE, create a Maven project, and locate the pom.xml configuration file. Inside the file, within the “dependencies” section, add the Selenium dependency by specifying its groupId, artifactId, and version. Save the file, and Maven will handle the download and integration of the Selenium library into your project seamlessly.
Is Maven required for Selenium?
Maven is commonly used and recommended for managing dependencies and building Selenium projects. While it is not strictly required, using Maven can simplify the setup, configuration, and management of Selenium dependencies, making it a preferred choice for many developers.
How to add Maven to Selenium?
To integrate Maven with Selenium, start by ensuring Java is installed on your system and set up the JAVA_HOME environment variable. Next, download and install Apache Maven, setting up the MAVEN_HOME environment variable and updating the PATH variable to include Maven. Finally, verify the installation by running “mvn –version” in the command prompt.
How to install a Maven dependency?
To install a Maven dependency, you need to add the dependency details to the pom.xml file of your project. Maven will automatically download and install the dependency from the configured repository when you build your project using the “mvn install” command.
What is Maven in Selenium?
Maven is a powerful build automation tool developed by the Apache Software Foundation, primarily designed for Java projects. Originally created to streamline the build process of the Jakarta Turbine Project, Maven has now become a widely-used solution for managing project dependencies and the entire project lifecycle.


Author’s Profile
Rahul Rana
Rahul works as a Product Marketer at LambdaTest. With his rich experience in the startup world, he wants to help startups reach new heights. An avid tech blogger, he also loves to dabble in music.
Blogs: 12
Got Questions? Drop them on LambdaTest Community. Visit now


