
How To Create & Run A Job In Jenkins Using Jenkins Freestyle Project?
Piyusha
Posted On: March 19, 2021
![]() 242539 Views
242539 Views
![]() 16 Min Read
16 Min Read
As per the official Jenkins wiki information, a Jenkins freestyle project is a typical build job or task. This may be as simple as building or packaging an application, running tests, building or sending a report, or even merely running few commands. Collating data for tests can also be done by Jenkins.
For instance, a real-world scenario could involve Jenkins allowing you to submit reports to log management at any specified stage concerning management, which may include details about artifacts or shipping application logs. In this Jenkins tutorial, we will dive deeper into how to create a job in Jenkins & eventually a Jenkins freestyle project.
Let’s find out more about Jenkins Build Job before we begin creating a Freestyle project.
TABLE OF CONTENT
- What is a Build Job?
- What is Jenkins Freestyle Project?
- Creating a Freestyle Build Job
- Jenkins Freestyle Project for Docker Container Images
- Jenkins Freestyle Project for Serverless Functions
- Converting a Project from Jenkins Freestyle project to a Declarative Pipeline
- Creating a Pipeline Project in Jenkins & Adding a Jenkinsfile
What is a Build Job?
The Build jobs are at the heart of any Jenkins build process. To put it plainly, imagine a Jenkins build job as a particular task or step in your entire build process. The task or step could involve merely compiling the source code and running your unit tests over. Or you can configure a build job to do other co-related tasks, such as
- Measuring code coverage or code quality metrics.
- Running your integration tests.
- Generating technical documentation.
- And even deploying the application to a web server.
Generally, a real project requires many separate but related build jobs in a CI or DevOps cycle.
Let us first understand what the Jenkins Freestyle project is and how we can create it.
What is Jenkins Freestyle Project?
Jenkins supports different types of build jobs. The two most commonly used Jenkins build jobs are-
- Freestyle builds
- Maven 2/3 builds
The best part about the Jenkins freestyle project is that it allows you to configure just about any build job, thus making them highly flexible and configurable. The Maven 2/3 builds, on the other hand, understand the Maven project structure and let you set up Maven build jobs quickly with added features.
In a freestyle build job, you can break down your build job into several smaller build steps, making it easier to organize builds in separate stages. E.g., in one step, a build might run a suite of functional tests and then tag the build in a second step if all functional tests are successful. It may be appropriate to invoke an Ant task or a Maven target or run a shell script in a technical terms build phase.
Various other Jenkins plugins also let you use additional types of build steps. These involve Grails, Gant, Rake, Gradle, Ruby, MSBuild, etc. But what highlights a Jenkins Freestyle project is that it lets you create general-purpose build jobs with maximum flexibility.
So the bottom line is- the freestyle projects allow you to configure just about any build job.
A Jenkins project involves steps and post-build actions and is a repeatable build job. There are limitations in the types of actions you can perform in a build step or post-build action. Within a Jenkins freestyle project, there are several standard plugins available to help you overcome this problem. These plugins allow you to configure build triggers and offer project-based security for the Jenkins project.
When to Use a Jenkins Freestyle Project?
An access to the shell or a batch environment propagates a high level of security access for the Jenkins freestyle project. In freestyle project environments, it’s convenient to create a script that instructs a Jenkins freestyle job to FTP a file from one server to another, compile a directory of Java code, or even run a SonarQube test. A Jenkins freestyle job can be as powerful and complex as any build job built with a Jenkins pipeline or a Groovy DSL. But the only drawback to freestyle projects is that the user must know how to script all of these actions, and developers need to learn how to manage these scripts.
Plugins such as Git, Maven, and SonarQube are the preferred way to access resources. And technologically, every developer can write a script to access those resources within a Jenkins freestyle project. However, it is recommended that every developer in the development team should follow the guided security best practices and inhibit from adapting a scripted approach.
Creating a Freestyle Build Job
To set up freestyle projects using Jenkins, we need to ensure that we have Jenkins installed and up and running. Also, it is mandatory to be authenticated as the ‘Admin.’ You can refer to our hands-on Jenkins tutorial to learn more.
Once you have Jenkins up & ready, let us create a Jenkins freestyle job.
Step 1.
- Get logged on to your Jenkins dashboard through the Jenkins installation path.
- Unless you have defined a private host, it will be hosted on the localhost at http://localhost:8080.
- In case your Jenkins is installed in another path, make sure to use the appropriate URL to access the dashboard.

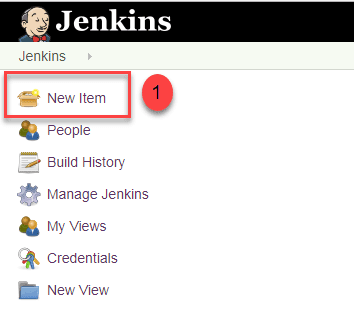
Step 2. Go to the “New Item” option at the top left-hand side of your main dashboard.
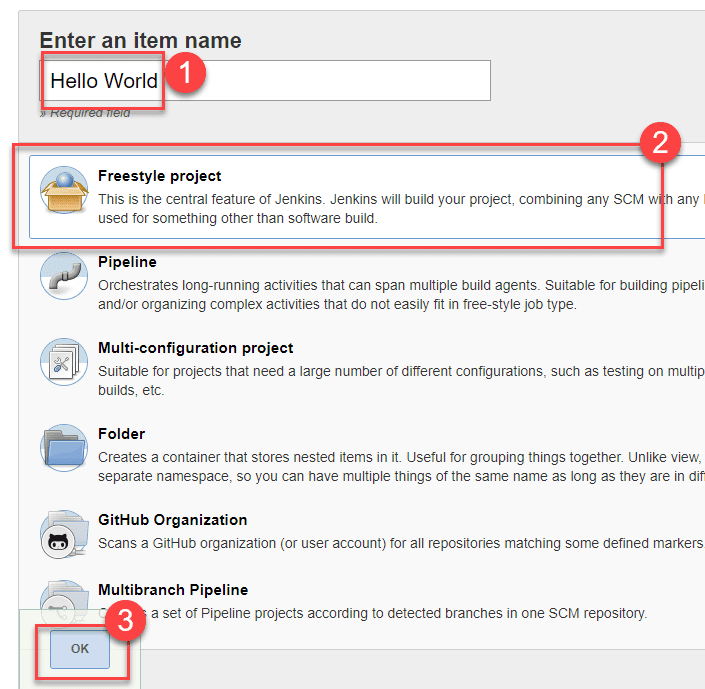
Step 3. On the next screen,
- Here enter the name of the item you want to create. Let us use the “Hello world.”
- Select ‘Freestyle project’ as the option for this new Item.
- Click OK.
When we hit Ok, Jenkins automatically takes us to the project configuration view, where we need to configure our project details. Additionally, we can provide intricate details through tab options.
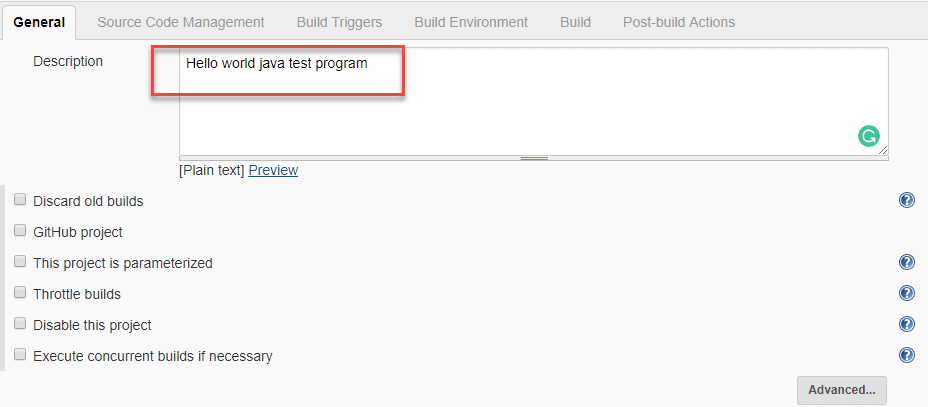
The first tab is the general details of the project. So the next step is to enter project details.
Step 4. Enter the project details in the General tab, including the name and description of the project that needs to be tested.
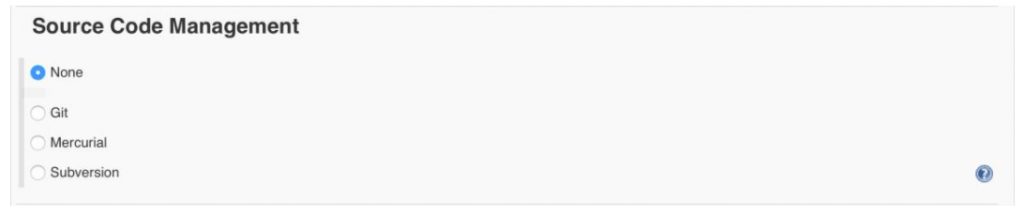
Next, let’s understand what the Source Code Management tab does. It checks out code from version control hosts, which implies that if your code is hosted on GitHub or any other repositories, you have to add the repository details. Jenkins will clone the repository.
The blue question mark icons present at the right-hand bottom side serve us with quick tips, and they can be very resourceful and provide more clarification at times.
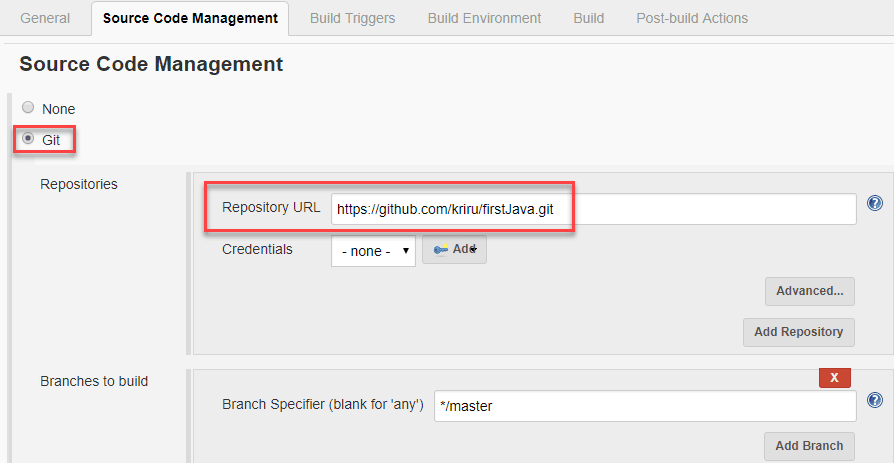
Step 5. Under Source Code Management(SCM) tab,
- Select Git as a repository source and enter your Git Repository URL.
- In case you have your repository created locally, it is permissible to use a local repository.
- Suppose the GitHub repository you are using is private. In that case, Jenkins will validate the login credentials with GitHub, and upon successful validation, it will then pull the source code from your GitHub repository.
After you have provided all the project & repo details, the next part is to build the code. You can manage the settings under the Build section to build the code at your desired time. You can even schedule the build to run periodically if needed.
Step 6. Go to the Build section and click on the Add build step.
Under the build section,
- Click on the “Add build step.”
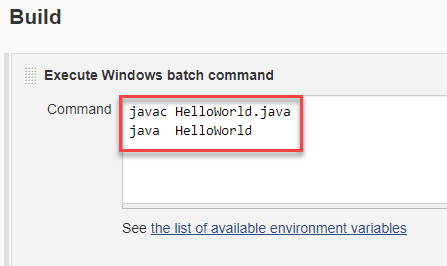
- Then, “Execute Windows batch command” and add the commands you want to execute during the build process.
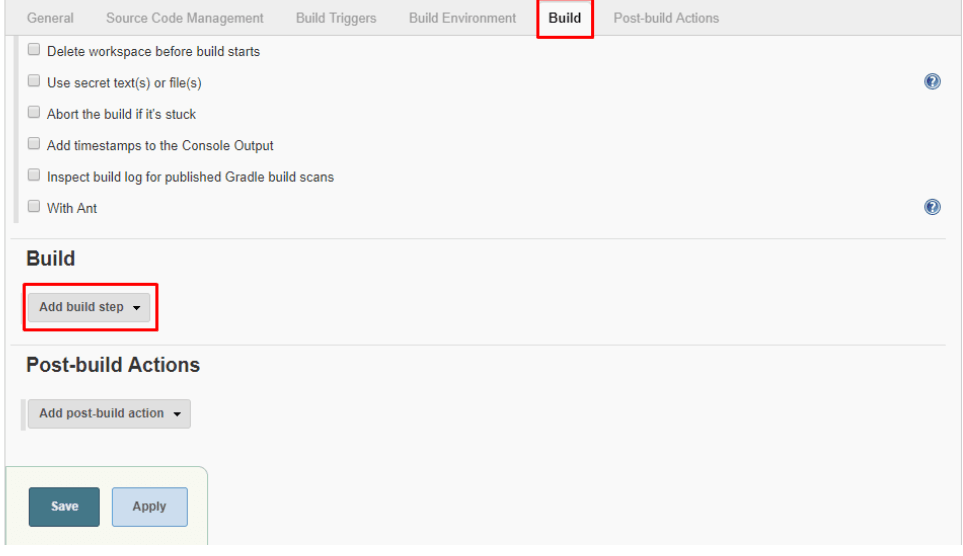
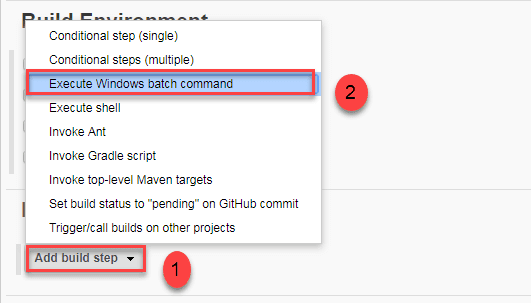
E.g., Java compile batch commands.
Step 7. When you have entered all the data,
- Click Apply.
- Save the project.
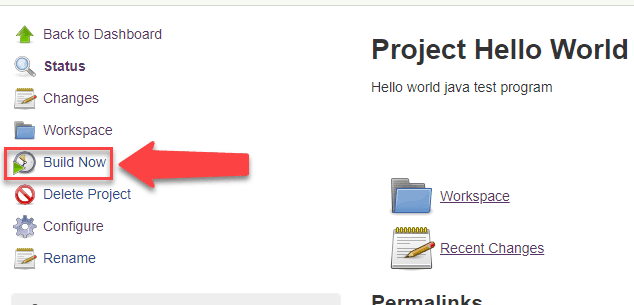
Step 8. On the left-hand side panel, click the Build Now button to build the source code.
Step 9. We can see the status of the build under Build History.
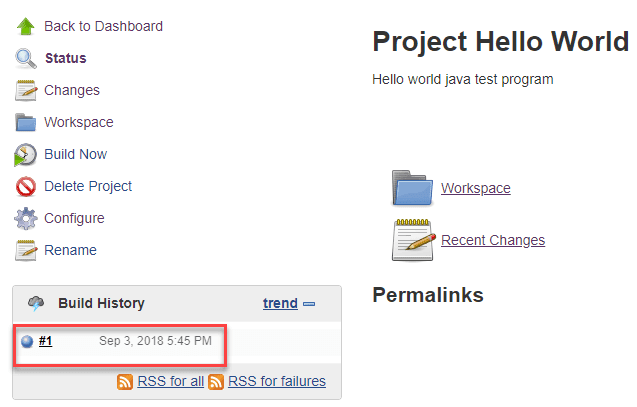
Step 10. We can verify the history of the executed build under the Build History by clicking the build number. By clicking on the Build Number –> Console Output, it should show you a success or failure message depending on how the job ran.
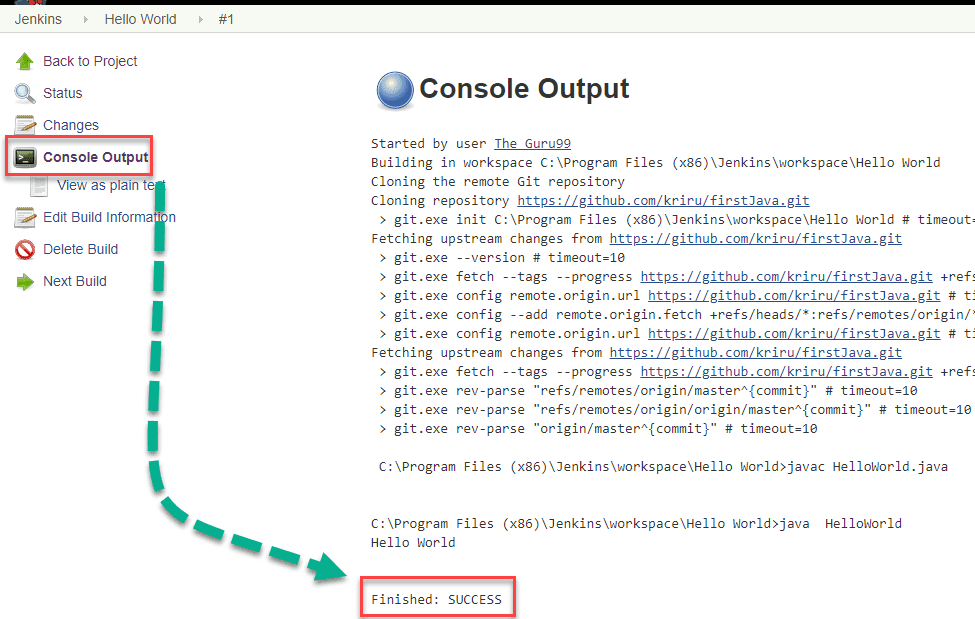
To sum up, we ran a ‘HelloWorld’ program on GitHub. Jenkin pulled up the source code from the remote repository and continuously built it at a frequency you define.

Jenkins Freestyle Project for Docker Container Images
The below demonstration is about creating a Jenkins Freestyle project that first builds a Docker image and then scans it for any vulnerabilities and compliance issues as a test over.
- Go to the Jenkins top page.
- Create a new project.
- Click on ‘New Item.’
- Enter a name for your project in ‘Enter an item name.’
- Select ‘Freestyle project.’
- Then click, OK.
- Next, add a build step.
- In the Build section → Add build step → select Execute shell→ Command.
- Enter the below command in the Command text box.
123echo "Creating Dockerfile..."echo "FROM imiell/bad-dockerfile:latest" > Dockerfiledocker build --no-cache -t test/test-image:0.1 . - Include a build step that will scan for vulnerabilities in the container image(s).
- Select Scan Prisma Cloud Images in the Add Create Phase drop-down list.
- Select the image to be scanned in the Image field by specifying the repository and tag.
- In case the image you want to scan is generated beyond this build, or if you want to scan for an image for each build, even if a new image is not generated by the build, then press Advanced and select Ignore Image Development Time.
- To directly publish the scan results in Jenkins, add a post-build action.
This post-build step depends on a file created by the previous scan-build step, which contains the scan results. In the Jenkins build tool, this step explicitly makes the results available for review. Note that the results have already been published in the Console during the last scan phase, and they are ready for analysis there.
- Select Publish Prisma Cloud Analysis Results from the drop-down menu under Add Post-Build Action.
- Accept the default in the Scan Result Folders.
- The publishing stage does not remove the result files from the scan. In the workspace, they remain.
- Click Save, then Build Now.
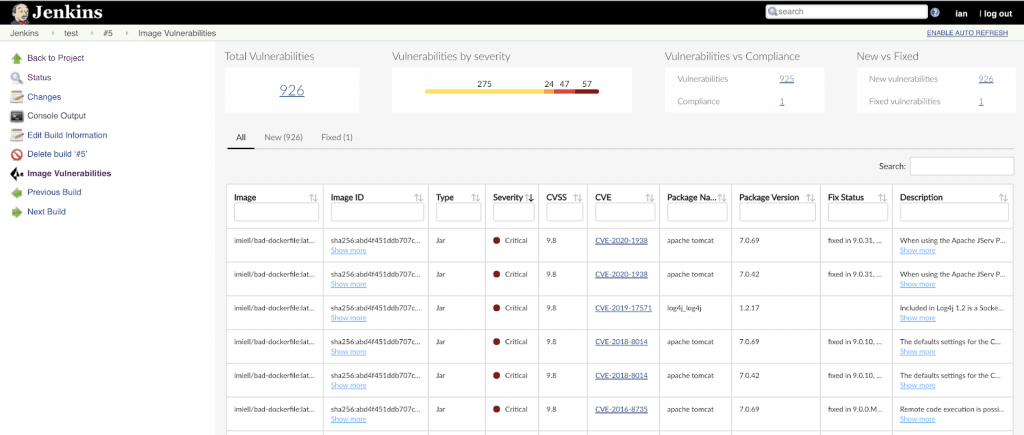
- Examine the results after the build completes. In the following places, scan reports are available:
- Prisma Cloud Console: Log into Console, go to Monitor –> Vulnerabilities –> Images –>CI.
- Jenkins: Scroll down into the build job –> then click Image Vulnerabilities to see a detailed report.

Jenkins Freestyle Project for Serverless Functions
It is similar to the procedure for container images to set up Jenkins to scan serverless functions, except that you can use the Scan Prisma Cloud Functions construct step.
Here:
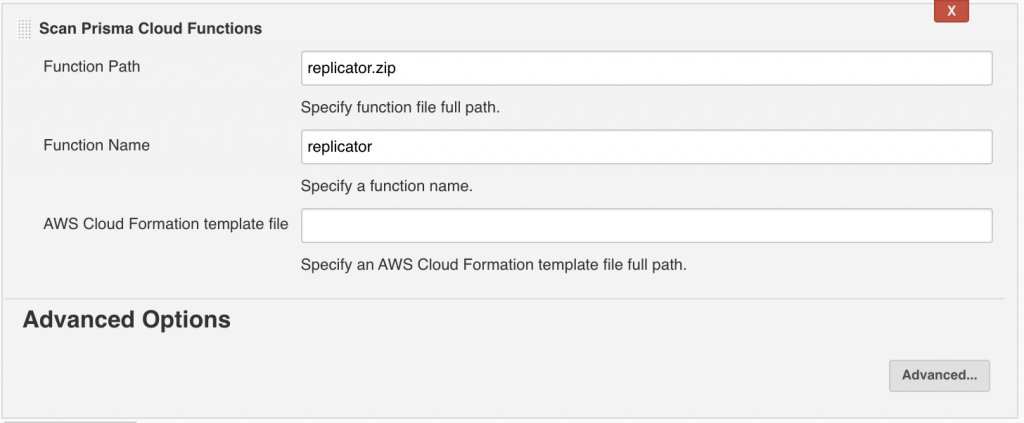
- Function Path — Path to the function’s ZIP archive to scan.
- Function Name — (This is Optional) Identifier string to align policy rules in the Console with scanned functions. When you build policy rules in the Console, the function name will target specific rules to specific functions. If this field is left undefined, the plugin fits the first rule function, where the name of the function is a wildcard.
- AWS CloudFormation template file — (This is Optional) Path to a template file in either JSON or YAML format with CloudFormation. Prisma Cloud checks the source code of the function for the AWS service APIs that are used, compares the APIs used with the permissions of the function, and reports when the functions have permissions for APIs they do not need.
Converting a Project from Jenkins Freestyle project to a Declarative Pipeline
In Jenkins, managing freestyle jobs is cumbersome. Declarative Pipelines offer a more modern and suggested solution. It is time-consuming and error-prone, however, to try to convert Freestyle jobs to Declarative Pipelines manually. You can use the Migration Assistant Declarative Pipeline plugin to streamline this operation. During the conversion, the Declarative Pipeline Migration Assistant uses a best-effort approach: supported configurations are converted automatically in Freestyle projects, and placeholder stages are generated for plugins that are not yet supported.
The Declarative Pipeline Migration Assistant’s advantages include:
- Generating a Jenkinsfile from a project for Freestyle.
- A Jenkinsfile customization.
- Creating a Jenkins pipeline project and inserting a Jenkins file.
Generating a Jenkinsfile from a project for Freestyle
A centralized configuration file, called a Jenkinsfile, is the basis for pipeline or multi-branch pipeline projects. In the text editor or GUI, a Jenkinsfile can be generated. The file is maintained either with the project code or, for example, a software configuration management (SCM) tool like Git in a separate repository. Using an SCM to store the file gives the configuration file a centralized location, enables code review and provides an audit trail for the pipeline. To build an initial Jenkinsfile, the Declarative Pipeline Migration Assistant uses information from a Freestyle project.
The Declarative Pipeline Migration Assistant is only accessible from the Jenkins UI and not from the Jenkins CLI.
See Defining Pipeline for more information about pipelines.
Prerequisites: Two plugins, namely
- The Pipeline plugins
- The Declarative Pipeline Migration Assistant plugin
Steps to generate a Jenkinsfile from a Freestyle project-
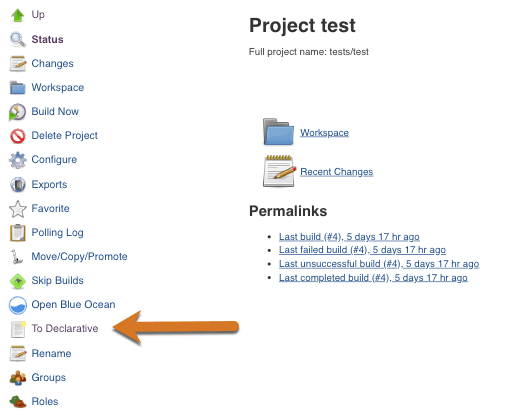
- Go to the –> Freestyle project.
- From the Freestyle project tab, choose To Declarative from the left navigation menu.
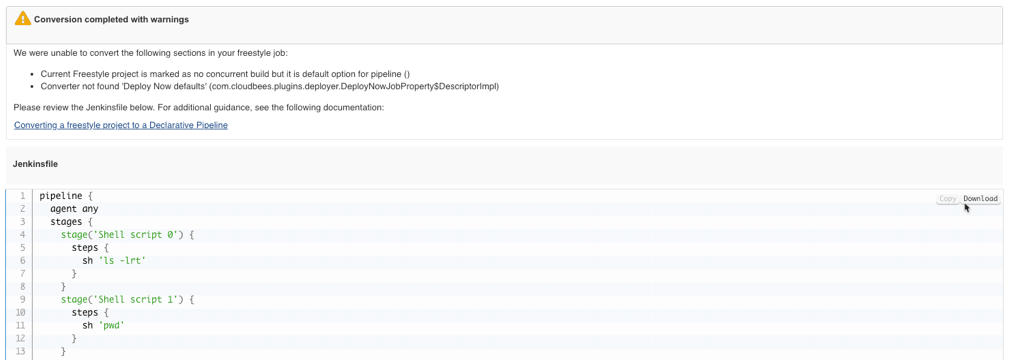
A Jenkinsfile will be supplied for review once the conversion is complete.

Currently, the Declarative Pipeline Migration Assistant plugin supports a small number of plugins.
It was unable to convert: if the conversion lists a warning for plugins,
- The plugin is not compatible with pipelines. You should review the documentation of the plugin to see if it is Pipeline-compatible. Use the shell step as a replacement option if the plugin is not compatible with the pipeline.
- The plugin is compatible with Pipeline and appears in the Snippet Generator. (See table below for a list of compatible plugins.) To construct the correct syntax, use the Snippet Generator.
- The plugin is compatible with the pipeline and will not appear in the Snippet Generator. For more detail on implementing the plugin, refer to the Pipeline documentation; see Customizing a Jenkinsfile.
- You can write plugins for the Declarative Pipeline Migration Assistant for reusability; see Extending the plugin for Declarative Pipeline Migration Assistant.
The table below exhibits a list of the supported plugins.
Jenkinsfile Customization
After creating a Jenkinsfile from a Freestyle project, you have few options.
- You can either copy-paste the Jenkinsfile into a text file.
- Or you can download the provided text file and open it in the text editor.
- Then, to perform the same tasks performed by the Freestyle project, review the Jenkinsfile and edit as required for the new Pipeline project.
Creating a Pipeline Project in Jenkins & Adding a Jenkinsfile
The next move is to add the Jenkinsfile as the configuration file to a Pipeline or Multibranch Pipeline project after creating a Jenkinsfile from a Freestyle project and editing the Jenkinsfile. Creating the Jenkins pipeline project first. Then, by copying and pasting the Jenkinsfile into the Pipeline editor or storing it in an SCM like GitHub and linking the repository to the Pipeline project, add the Jenkinsfile to your project.
Steps to create a Pipeline project and adding the Jenkinsfile:
Step 1: In Jenkins, create a pipeline project and copy and paste the Jenkinsfile text into the editor of the pipeline.
Step 2: Store the Jenkinsfile in a repository for SCM such as GitHub and:
- Connect the repository to the Jenkins Pipeline project
- Connect the repository to a Multibranch Pipeline project
or
Extending the Declarative Pipeline Migration Assistant Plugin
A small number of plugins are currently supported by the Declarative Pipeline Migration Assistant plugin. For a list of plugins supported, see the table above.
Beyond this list, if you want to add support for a particular plugin that is currently not supported, it involves attaching the API dependency to the converter and creating the extension.
Adding the API Dependence of the Converter
The following code snippet is illustrates how to add a dependency on the converter API:
|
1 2 3 4 5 |
<dependency> <groupId>org.jenkins-ci.plugins.to-declarative</groupId> <artifactId>declarative-pipeline-migration-assistant-api</artifactId> <version></version> </dependency> |
Creating the Extension
The following code snippet is an illustration of how to create the extension:
|
1 2 3 4 5 6 7 8 9 10 11 12 13 14 15 16 |
``` @Extension public class ShellConverter extends SingleTypedConverter<Shell> @Override public boolean convert( ConverterRequest request, ConverterResult result, Object target ) { Shell shell = (Shell) target; /* Do some work to generate a new stage . . . */ ModelASTStage stage = new ModelASTStage( this ); // use a utility method to add the stage to the pipeline model ModelASTUtils.addStage( request.getModelASTPipelineDef(), stage); // true for success, false for failure return true; } ``` |
Example Conversions
The abstract class SingleTypedConverter<T> defines the extension of the conversion.
- BuilderConverter: convert Builder
- BuildWrapperConverter: convert BuildWrapper
- JobPropertyConverter: convert JobProperty
- PublisherConverter: convert Publisher
- ScmConverter: convert SCM
- TriggerConverter: convert BuildTriggers
Example Build Step conversion
The following code snippet is an illustration of how to convert a Shell script Freestyle step using the API:
|
1 2 3 4 5 6 7 8 9 10 11 12 13 14 15 16 17 18 19 20 21 22 23 24 |
``` @Extension public class ShellConverter extends SingleTypedConverter<Shell> { @Override public boolean convert (ConerterRequest request, ConverterRequest result, Object target ) { Shell shell = (Shell) target; ModelASTStage stage = new ModelASTStage( this ); int stageNumber = request.getAndIncrement( SHELL_NUMBER_KEY ); stage.setName( "Shell script " + stageNumber ); ModelASTBranch branch = new ModelASTBranch( this ); stage.setBranches( Arrays.asList( branch ) ); ModelASTStep step = new ModelASTStep( this ); step.setName( "sh" ); ModelASTSingleArgument singleArgument = new ModelASTSingleArgument( this ); singleArgument.setValue( ModelASTValue.fromConstant( shell.getCommand(), this ) ); step.setArgs( singleArgument ); ModelASTUtils.wrapBranch(result, step, branch); ModelASTUtils.addStage(result.getModelASTPipelineDef(), stage); return true; } } ``` |
Example Build Wrapper Conversion
The following example converts the Config File Freestyle wrapper build using the API. This conversion uses a helper method to add a wrapper around all future build step conversions.
|
1 2 3 4 5 6 7 8 9 10 11 12 13 14 15 16 17 18 19 20 21 22 23 24 25 26 27 28 29 30 31 32 33 34 35 36 37 38 39 |
``` // This was to not have the config-file-provider plugin as a required dependency // But you can use (as you use your plugin) @OptionalExtension(requirePlugins = { "config-file-provider" }) public class ConfigFileBuildWrapperConverter extends SingleTypedConverter<ConfigFileBuildWrapper> { private Logger LOGGER = LoggerFactory.getLogger( ConfigFileBuildWrapperConverter.class ); @Override public boolean convert(ConverterRequest request, ConverterResult result, Object target) { ConfigFileBuildWrapper configFileBuildWrapper = (ConfigFileBuildWrapper) target; if(configFileBuildWrapper.getManagedFiles() == null || configFileBuildWrapper.getManagedFiles().isEmpty() ) { return true; } result.addWrappingTreeStep( () -> build( configFileBuildWrapper) ); return true; } private ModelASTTreeStep build(ConfigFileBuildWrapper configFileBuildWrapper) { ModelASTTreeStep configFileProvider = new ModelASTTreeStep( this ); configFileProvider.setName( "configFileProvider" ); ModelASTSingleArgument singleArgument = new ModelASTSingleArgument( null ); configFileProvider.setArgs( singleArgument ); ManagedFile managedFile = configFileBuildWrapper.getManagedFiles().get( 0 ); StringBuilder gstring = new StringBuilder( "[configFile(fileId:'" ); gstring.append( managedFile.getFileId()); gstring.append( "', targetLocation: '" ); gstring.append( managedFile.getTargetLocation() ); gstring.append( "')]" ); singleArgument.setValue( ModelASTValue.fromGString( gstring.toString(), this ) ); return configFileProvider; } } ``` |
Example Publisher Conversion
The following example converts the ArtifactArchiver Freestyle post-build step using the API. This conversion modifies the model to add some build conditions.
|
1 2 3 4 5 6 7 8 9 10 11 12 13 14 15 16 17 18 |
``` @Extension public class ArtifactArchiverConverter extends SingleTypedConverter<ArtifactArchiver> { @Override public boolean convert(ConverterRequest request, ConverterResult result, Object target) { ArtifactArchiver artifactArchiver = (ArtifactArchiver) target; ModelASTBuildCondition buildCondition; if(artifactArchiver.isOnlyIfSuccessful()) { buildCondition = ModelASTUtils.buildOrFindBuildCondition( result.getModelASTPipelineDef(), "success" ); } else { buildCondition = ModelASTUtils.buildOrFindBuildCondition( result.getModelASTPipelineDef(), "always" ); } ModelASTStep archiveArtifacts = ModelASTUtils.buildGenericStep(artifactArchiver, this); ModelASTUtils.addStep(buildCondition, archiveArtifacts); return true; } } ``` |
Depending on which condition the artifact needs to be executed, we add the step to the build condition.
Example SCM Conversion
The following example converts the Git SCM Freestyle stage using the API. This conversion adds a stage to the Pipeline model.
|
1 2 3 4 5 6 7 8 9 10 11 12 13 14 15 16 17 18 19 20 21 22 23 24 25 26 27 28 29 30 31 32 33 34 35 36 37 38 39 40 41 42 43 44 |
``` @OptionalExtension(requirePlugins = { "git"}) public class GitScmConverter extends SingleTypedConverter<GitSCM> { @Override public boolean convert(ConverterRequest request, ConverterResult result, Object target) { List<UserRemoteConfig> repoList = ( (GitSCM) target ).getUserRemoteConfigs(); if(repoList.isEmpty()){ return true; } ModelASTStage stage = new ModelASTStage( this ); stage.setName( "Checkout Scm" ); List<ModelASTStep> steps = new ArrayList<>(); // a step will be created per remote repository for( UserRemoteConfig userRemoteConfig : repoList) { ModelASTStep git = new ModelASTStep( null ); git.setName( "git" ); Map<ModelASTKey, ModelASTValue> args = new HashMap<>(); { ModelASTKey url = new ModelASTKey( this ); url.setKey( "url" ); ModelASTValue urlValue = ModelASTValue.fromConstant( userRemoteConfig.getUrl(), this ); args.put( url, urlValue ); } ... ModelASTNamedArgumentList stepArgs = new ModelASTNamedArgumentList( null); stepArgs.setArguments( args ); git.setArgs( stepArgs ); steps.add( git ); } ModelASTBranch branch = new ModelASTBranch( this ); branch.setSteps(steps); stage.setBranches( Arrays.asList( branch ) ); ModelASTUtils.addStage(result.getModelASTPipelineDef(), stage ); return true; } } ``` |
- Create a new stage.
- Steps will be generated as: – git url: “”, branch: ”,changelog: ”, credentialsId: ”, pool: ”
- A step is created based on each remote repository.
- Create the Git step.
- Add parameters – URL.
- In the original code, add more parameters.
- Configure args of the step.
- Create a branch for the stage.
- Use a utility method to add the stage to the Pipeline model.
Example Build Trigger Conversion
Using the API, the following example transforms the cron trigger. The pipeline mode is changed by this conversion to add a trigger property through a utility process.
|
1 2 3 4 5 6 7 8 9 10 11 12 13 14 15 16 17 |
@Extension public class TimerTriggerConverter extends SingleTypedConverter<TimerTrigger> { @Override public boolean convert(ConverterRequest request, ConverterResult result, Object target) { TimerTrigger timerTrigger = (TimerTrigger) target; String cronValue = timerTrigger.getSpec(); ModelASTTrigger modelASTTrigger = new ModelASTTrigger( this ); modelASTTrigger.setName( "cron" ); modelASTTrigger.setArgs( Arrays.asList(ModelASTValue.fromConstant( cronValue, this )) ); ModelASTUtils.addTrigger( result.getModelASTPipelineDef(), modelASTTrigger ); return true; } } |
That’s how you can create your very own pipeline projects!
Also, explore 50+ Commonly Asked Jenkins Interview Questions in 2023. Perfect for interview prep or boosting your Jenkins knowledge.
Wrapping Up!
In this blog, we saw the central feature of Jenkins learning how to create a job in Jenkins, Jenkins build job and creating pipeline projects. Through the Jenkins freestyle project, you can build your project, combine any SCM with any build system. We also saw a few extensions of Freestyle projects like the docker container images. The conversion of freestyle projects into Declarative Pipelines offers a more modern and suggested solution.
Let us know what you feel about this blog in the comments below. Try reproducing the steps for Jenkins to create and build a job to learn on the go.
Happy testing!


Author’s Profile
Piyusha
After being an avid Software developer by profession, I am an Inside content writer who enjoys writing. I enjoy conducting the necessary research to make my articles relevant, current and interesting.
Blogs: 10
Got Questions? Drop them on LambdaTest Community. Visit now


