
Getting Started With Nose2 in Python [Tutorial]
Himanshu Sheth
Posted On: April 21, 2021
![]() 108316 Views
108316 Views
![]() 18 Min Read
18 Min Read
Nose2 is a popular test runner in Python that can detect the unit tests in your project and execute them. If you are familiar with unittest – Python’s standard library and prefer the same over other test automation frameworks in Python, then you should have a brief look at Nose2 Python.

Nose2 Python is based on unittest and adds more value to the framework through its rich plugin ecosystem. In simple terms, Nose2 is an extension of the unittest module. Our earlier blog on the Selenium Python Nose tutorial took a deep dive into the older version of Nose (1.3.7). It is still being used by a certain percentage of the development and test fraternity.
In this blog, we look into the Nose2 framework that is a successor to Nose. By the end of this Python Nose tutorial, you would be in a comfortable position to leverage plugins in Nose2 to enhance your Selenium Python testing experience for Selenium test automation. If you are preparing for an interview you can learn more through Selenium interview questions.
TABLE OF CONTENT
Introduction to Nose2 Framework
Nose2 is a successor to Nose and was developed for extending unittest to ease the testing process. Nose2 is based on the plugins branch of unittest2.
In comparison to Nose and unittest, Nose2 provides a better plugin API and simplifies internal interfaces and processes. There are many plugins that built-in the Nose2 module, and these plugins are loaded by default. Some of the major plugins that are loaded by default aid in the parameterization of tests, organizing test fixtures into layers, capturing log messages, providing test coverage reporting, and more.
By default, Nose2 does not support parallel test execution, a feature that is extensively used in test automation. However, loading plugins is not tricky in Nose2, as plugin module names can be effortlessly added to the plugins list in the config file’s [unittest] section. There is also an option to pass the plugin module with the –plugin argument on the command line.
Hence, running tests in parallel with multiple processes with Nose2 is just about enabling the plugin through either of the options mentioned earlier! Nose2 is available on GitHub. Here are some more details about the project on Github:
How to Install the Nose2 Framework
Before we get started with this Python Nose tutorial, you need to install the Nose2 framework in your systems (if you don’t have it already). Nose2 can be installed by executing the following command on the terminal.
pip install nose2
As seen in the installation snapshot below, the 0.9.2 version of Nose2 is installed.

Nose2 package can be imported by using import nose2 in the implementation. If a specific module from a package is to be used, the same can be imported using:
|
1 |
from nose2.<package_name> import <module_name> |
How to Execute Nose2 Python Tests
As Nose2 is different from Nose, the command for triggering tests in Nose2 is also different. Here is the command for executing tests in Nose2-
|
1 |
nose2 --verbose <filename_without_.py> |
For example, if the filename that contains Nose2 tests is Test_Nose2_example.py, the command used for executing the tests inside should be:
|
1 |
nose2 --verbose Test_Nose2_example |
Nose2 test runner offers numerous options for capturing logs, reporting, etc. that can be used by passing the same on the console when executing the tests:
Test Discovery in Nose2
The nomenclature followed for modules (or files) and test cases starting with test_ is applicable in Nose2. The test classes that are enclosing the test methods should begin with Test.
Nose2 provides a plugin that implements automatic test module discovery. The plugin looks for modules (or test files) in packages and directories whose names start with test. It then fires the loadTestsFromModule() hook for all the discoveries, allowing the other plugins to load the actual tests. You can find more details about the discovery-based test loader in Nose2 is available.
Example Usage of Nose2 Framework
To demonstrate the usage of the Nose2 framework in this Python Nose tutorial, we use the same example which was earlier used in the demonstration of Nose, i.e. Google search for LambdaTest and perform a click on the first test result.
The implementation is nearly the same as the one we might have used when using the unittest module. The major (yet optional) inclusion is that of nose2.main(). It is used in the same manner as unittest.main() and the purpose is to run the tests in a single module.
|
1 2 3 |
if __name__ == '__main__': import nose2 nose2.main() |
Parameterized Tests in Nose2 Python
Unlike Nose that required installing a separate package (i.e. nose-parameterized) for test parameterization, Nose2 Python supports more kinds of parameterized and generator tests than Nose. It supports test generators in test classes, test functions, and in unittest TestCase subclasses.
This plugin implements the following functions for support loading tests from parameterized test functions and methods:
For parameterization of a function or test case method, nose2.tools.params() is used. We will be using the same in this Python Nose tutorial.
|
1 |
nose2.tools.params(*paramList) |
The parameters in the list can be simple values or tuples. For example, when performing Selenium Python testing (using parameterization) on a local Selenium Grid, we use simple values. On the other hand, when performing Selenium test automation on a cloud-based Selenium Grid (like LambdaTest), we would use tuples (i.e. combination of browser-name, browser-version, and operating system) for test parameterization.
Further details about the Nose2 Python plugin for parameterized tests is available here.
We port the example used in the Selenium Python Nose tutorial where the LambdaTest ToDo App was tested against three different browsers – Firefox, Microsoft Edge, and Chrome.
- Navigate to the URL https://lambdatest.github.io/sample-todo-app/
- Select the first two checkboxes
- Send ‘Happy Testing at LambdaTest’ to the textbox with id = sampletodotext
- Click the Add Button and verify whether the text has been added or not
Implementation
Code WalkThrough
As the test method has to be parameterized, we import the params function from nose2.tools package into the current file.
|
1 |
from nose2.tools import params |
The browsers against which the ToDo App has to be tested are passed as parameters under the @params decorator. The browser names are passed as values since the test is performed on a local Selenium Grid.
|
1 2 3 |
class LT_Parameterized_local_test(unittest.TestCase): @params("Firefox", "Chrome", "MicrosoftEdge") def test_to_do_app(self, browserName): |
The test method (i.e. test_to_do_app) accepts the browserName as input parameter and the same is used for Selenium test automation in the entire example for this Python Nose tutorial.
|
1 2 3 4 5 6 7 8 9 10 11 12 13 14 15 |
def test_to_do_app(self, browserName): if (browserName == "Chrome"): print("Test on Chrome Browser initiated") self.driver = webdriver.Chrome() elif (browserName == "MicrosoftEdge"): print("Test on Edge Browser initiated") # Set the Path accordingly self.driver = webdriver.Edge("C:\\EdgeDriver\\MicrosoftWebDriver.exe") elif (browserName == "Firefox"): print("Test on Firefox initiated") self.driver = webdriver.Firefox() self.driver.get('https://lambdatest.github.io/sample-todo-app/') ............................................... ............................................... |
The remaining implementation contains the actual test case logic and uses Selenium WebDriver APIs to locate the required web elements and perform actions on those elements. As that part of the implementation is independent of the test framework, we would not cover those aspects in this Python Nose Tutorial. You can refer to our earlier blogs on Selenium WebDriver where we have covered those areas in greater detail.
Execution
The following command is used for triggering the test execution:
|
1 |
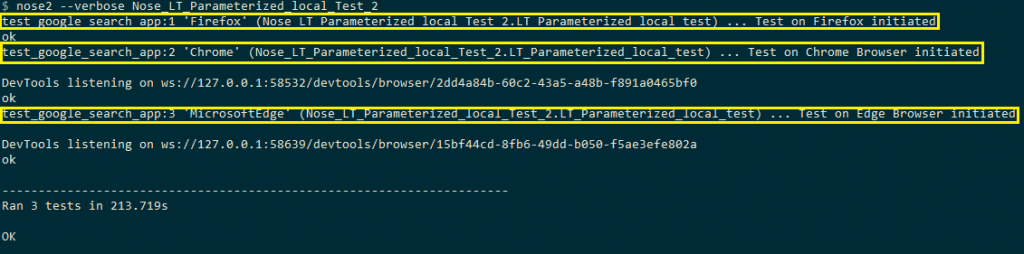
nose2 --verbose Nose_LT_Parameterized_local_Test_2 |
Nose_LT_Parameterized_local_Test_2 is the test name, i.e. The filename where the test cases are located is Nose_LT_Parameterized_local_Test_2.py. Here is the output snapshot-
Fixtures in Nose2
Nose2 has support for fixtures at class, module, and test (or method) levels, which is also the case with other popular frameworks like PyTest. To demonstrate the usage of fixtures in Nose2, we add setUp() and tearDown() fixtures in the example shown earlier.
The fixture for setup [i.e. setUp()] is called before any test method in the class (that contains the fixture) is executed. On the other hand, the fixture for teardown [i.e. tearDown()] is called after execution of every test method (that is implemented under the class).
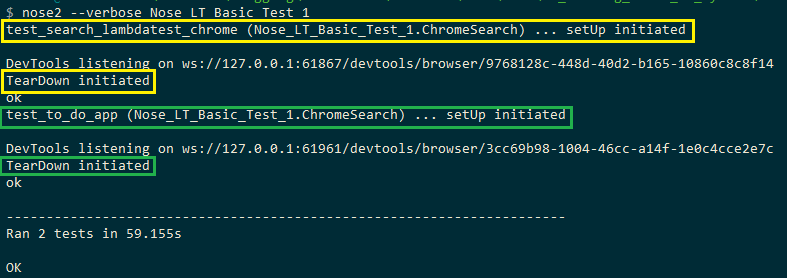
Shown here is the execution screenshot which shows that setUp/tearDown was called for every test case.
Organization of Test Fixtures into Layers
In this section of the Python Nose Tutorial, we look at Layers, a newly introduced concept in Nose2(version 0.4). The main advantage of using layers over traditional fixtures is flexibility in the organization of the fixtures. The aim is to have compatibility with the layers used by Zope’s testrunner.
Here are some of the things that can be achieved by using layers:
- Implementation of package-level fixtures by sharing a layer among all the test cases in the package.
- Creation of a much-deeper fixture tree than available levels (test, class, and module).
- Sharing of fixtures across tests in different modules without them being run multiple times.
Here is a simple demonstration of a class that implements at least a setUp method-
|
1 2 3 4 |
class Layer(object): @classmethod def setUp(cls): # ......................... |
The tearDown, testSetUp, and testTearDown methods can also be implemented as classmethods. Here is a short brief about the methods available with layers:
- setUp(cls) – Called before any of the tests belonging to that particular layer is executed.
- testSetUp(cls [, test]) – Called before the execution of each test that belongs to the layer (and its sub-layers). The method can accept an argument where the test case instance is passed to the method.
- tearDown(cls) – Called after any test belonging to the layer is executed. It will not be called if the layer did not have the coupled setUp method or the setUp could not run due to some exception.
- testTearDown(cls [, test]) – Called after each test belonging to the layer (and its sub-layers) is executed. It will be called only if the layer defines a setUp (or testSetUp) test method, and that method runs without any issues.
For assigning a layer to a test case, you need to set the test case’s layer property as shown below-
|
1 2 |
class Test(unittest.TestCase): layer = Layer |
Before using layers in the implementation, you have to load the plugin nose2.plugins.layers in the nose2.cfg (or unittest.cfg) present in the location from where Selenium automation testing is performed.
unittest.cfg (or nose.cfg)
|
1 2 3 4 5 6 7 8 9 10 |
[unittest] plugins = nose2.plugins.layers [test-result] always-on = True descriptions = True [layer-reporter] always-on = True colors = True |
Demonstration of fixtures (with Layers) in Nose2
For the demonstration of fixtures in this Python Nose tutorial, we use a cloud-based Selenium Grid as it is a more scalable option compared to a local Selenium Grid. LambdaTest is one such cloud-based Selenium Grid that provides the facility to run Selenium automation tests on 2,000+ different combinations of browsers, device emulators, and operating systems.
There is no learning curve involved in porting an existing implementation that works on a local Selenium Grid to a cloud-based Selenium Grid like LambdaTest. Selenium Python testing with Nose2 Python on a cloud-based Selenium Grid is a better option from an investment and scalability perspective.
After creating an account on LambdaTest, you should note the user name & access key from the Profile Section for accessing the Selenium Grid on LambdaTest. You can visit the Dashboard section to get details about the existing tests and the earlier tests that were executed on the platform.
The ToDo App on LambdaTest that was demonstrated earlier is executed three different browser and OS combinations:
- Chrome 71.0 on Windows 10
- Firefox 64.0 on Windows 10
- Safari 12.0 on macOS Mojave
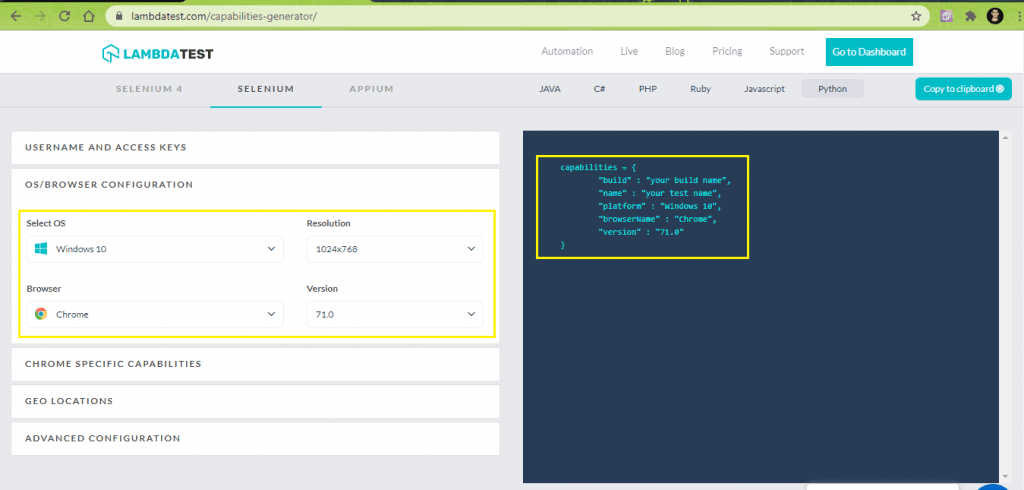
The Capabilities Generator on LambdaTest is used for generating the desired browser and platform capabilities. Shown below is the snapshot of the browser capabilities generated for the Chrome 71.0 & Windows 10 combination.
Implementation
Code WalkThrough
- The necessary Nose2 Python packages e.g. nose2.tools are imported at the start of the implementation.
- The combination of user-name and pass-key that is available in the profile section of LambdaTest is used for accessing the LambdaTest Grid URL.
- The Selenium WebDriver API uses the URL and browser & platform capabilities that were generated using the online generator.
- The most important part is the implementation of the Layer class under which the setUp/testTearDown methods are implemented.
1234567891011class Layer(object):@classmethoddef setUp(cls):urllib3.disable_warnings(urllib3.exceptions.InsecureRequestWarning)print("Inside setUp")@classmethoddef testTearDown(cls):global driverprint("Inside tearDown")# Close the browser.driver.quit()
The method setUp() will be called at the beginning of the class of test methods. On the other hand, testTearDown() will be called at the end of each test method that is a part of the class. Cleanup activities (related to the browser under test) are performed in that method and must be executed after each test method.
Instead of testTearDown, if we used the tearDown method, it would be called only once (i.e. at the end of the class of test methods). We used testTearDown since browser resources need to be freed after each test case. The setUp/testTearDown methods are included under the @classmethod decorator; else, they won’t be called during test execution.
- The layer needs to be assigned to the test case. Hence, the test case’s layer property is set using the implementation shown below-
- The browser and OS capabilities are passed to the @params decorator as Selenium Python testing is performed against each combination of desired capabilities.
|
1 |
from nose2.tools import params |
|
1 |
remote_url = "https://" + user_name + ":" + app_key + "@hub.lambdatest.com/wd/hub" |
|
1 |
driver = webdriver.Remote(command_executor = remote_url, desired_capabilities = capabilities) |
|
1 2 |
class LT_Fixture_Test(unittest.TestCase): layer = Layer |
|
1 2 3 4 5 6 7 8 9 10 11 12 13 14 15 16 17 18 19 20 21 22 23 |
ch_caps = { "build" : "Nose2 Fixture Testing using Chrome on Windows Environment", "name" : "Nose2 Fixture Testing on Chrome using Selenium Grid Environment", "platform" : "Windows 10", "browserName" : "Chrome", "version" : "71.0", "selenium_version" : "3.13.0", "chrome.driver" : 2.42 } ......................................... ......................................... class LT_Fixture_Test(unittest.TestCase): layer = Layer ......................................... ......................................... @params((ch_caps), (ff_caps), (saf_caps)) def test_lambdatest_todo_app(self, caps): global driver # Details can be sourced from https://automation.lambdatest.com/ remote_url = "https://" + user_name + ":" + app_key + "@hub.lambdatest.com/wd/hub" self.driver = webdriver.Remote(command_executor = remote_url, desired_capabilities = caps) |
The rest of the implementation is independent of the test runner as they make use of Selenium WebDriver APIs for locating and performing actions such as click, etc., on those web elements.
Execution
The following command is used for execution-
|
1 |
nose2 --verbose Nose_LT_Fixtures_Test_4 |
Here, Nose_LT_Fixtures_Test_4.py is the file that contains the test implementation. Shown below is the screenshot from the Automation tab on the LambdaTest platform.
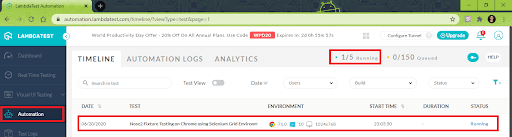
Here is the screenshot that indicates the completion of tests. All the test cases were executed serially, i.e. one after the other.
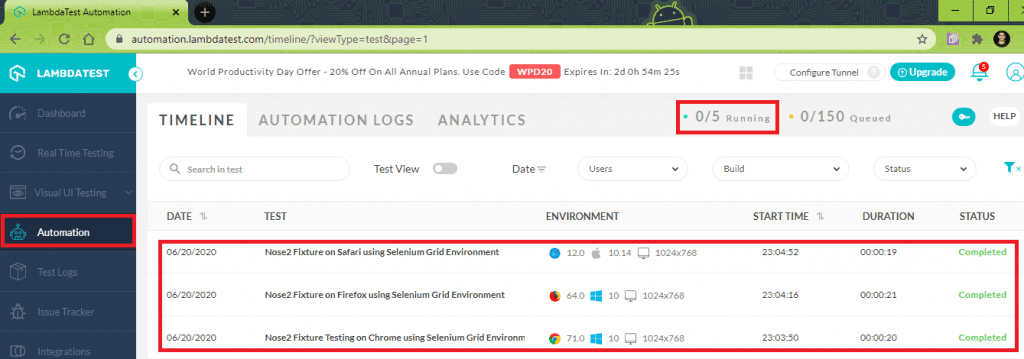
The terminal indicates that the setUp method ran only once, whereas the testTearDown method was executed after completing each test method.

Parallel Testing in Nose2
Parallel testing in Selenium lets you run the same tests simultaneously across different test environments. In this section of the Python Nose Tutorial, we look at how to realize parallel testing in Nose2 Python.
The mp plugin was introduced in Nose2 version 0.3 for enabling distribution of tests across multiple processes. Though parallel test execution results in improved execution speed (as tests are run in parallel), the improvement is more evident in IO-bound tests than CPU-bound tests. You also need to check if the usage of the mp plugin does not conflict with the other plugins that are not designed to work in conjunction with it.
Here are some of the ways in which parallelism can be achieved in Nose2 Python:
- Activation of the mp plugin by including the same in the [unittest] section in a config file OR
- Passing the module with the –plugin command-line option
|
1 2 |
[unittest] plugins = nose2.plugins.mp |
|
1 |
nose2 --plugin=nose2.plugin.mp |
After activating the mp plugin, you have to configure the number of processes that can be run in parallel. This can be achieved with the -N option OR
|
1 |
nose2 -N <num_parallel_processes> |
by setting the number of processes in the [multiprocess] section of a config file
|
1 2 |
[multiprocess] processes = <num_parallel_processes> |
It is important to note that tests do not run in the same order when parallelism is enabled. If test suites have inter-dependencies (which in itself is not a good programming practice) then the tests may randomly fail if mp plugin is enabled. There are other essential guidelines for test authors that you can find in the official documentation titled running tests in parallel with Nose2.
For demonstrating parallel test execution in Nose2 Python, we execute two test scenarios across six different browser & OS combinations in this Python Nose tutorial.
Test Case – 1
- Navigate to the URL https://lambdatest.github.io/sample-todo-app/
- Select the first two checkboxes
- Send ‘Happy Testing at LambdaTest’ to the textbox with id = sampletodotext
- Click the Add Button and verify whether the text has been added or not
Test Case – 2
- Navigate to the URL https://www.google.com
- Search for “Lambdatest”
- Locate the first search result and click on the same
- Assert if the title of the opened window does not match with the expected title
Both the test scenarios are executed against the following browser, OS combinations:
- Chrome (71.0), Windows 10
- Firefox (64.0), Windows 10
- Safari (12.0), macOS Mojave
For parallel Selenium Python testing, we would be using the old-style fixtures instead of Layers, as test suites using layers are not compatible with the multiprocess (or mp) plugin in this Python Nose tutorial. Do not try the combination of layers & multiprocess since it would not work.

Implementation (Test Case 1)
Implementation (Test Case 2)
Code Walkthrough
In both the test cases, standard setUp/tearDown fixtures are used. Browser resources are freed in the tearDown method.
|
1 2 3 4 5 6 7 8 9 10 11 12 13 14 |
def setUp(self): urllib3.disable_warnings(urllib3.exceptions.InsecureRequestWarning) print("Test Mod 2 - setUp initiated") ............................ ............................ def tearDown(self): # Close the browser print("Test Mod 2 - TearDown initiated") self.driver.quit() if __name__ == '__main__': import nose2 nose2.main() |
The browser and OS capabilities are generated using the LambdaTest capabilities generator, a sample of which is shown below:
|
1 2 3 4 5 6 7 8 |
#Set capabilities for testing on Safari saf_caps = { "build" : "Nose2 Testing using Safari on macOS Mojave Environment(6)", "name" : "Nose2 Testing on Safari using Selenium Grid Environment(6)", "platform" : "macOS Mojave", "browserName" : "Safari", "version" : "12.0", } |
The capabilities are passed in a parameterized form using the @params decorator.
|
1 2 3 4 5 |
@params((ch_caps), (ff_caps), (saf_caps)) def test_lambdatest_google_search(self, caps): # Details can be sourced from https://automation.lambdatest.com/ remote_url = "https://" + user_name + ":" + app_key + "@hub.lambdatest.com/wd/hub" self.driver = webdriver.Remote(command_executor = remote_url, desired_capabilities = caps) |
The remaining part of the implementation is self-explanatory as Selenium WebDriver APIs are used for achieving the end-result.
Execution
The following command was used for triggering parallel test execution-
|
1 |
nose2 --verbose Nose_LT_Parallel_Test_3 Nose_LT_Parallel_Test_3_1 --plugin=nose2.plugins.mp -N 4 |
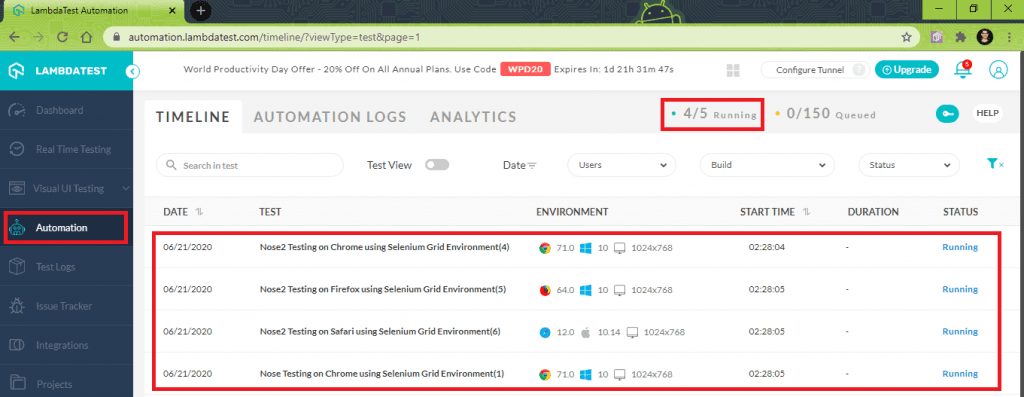
The multiprocess plugin (nose.plugins.mp) is enabled using the –plugin option. The number of processes to be executed in parallel are 4. My plan on LambdaTest supports parallelism up to five processes hence; we chose four for the demonstration.
Here is the screenshot from Automation tab in LambdaTest, which indicates that four tests were executing in parallel-
Here is the screenshot of test completion from LambdaTest and terminal where test execution was triggered-
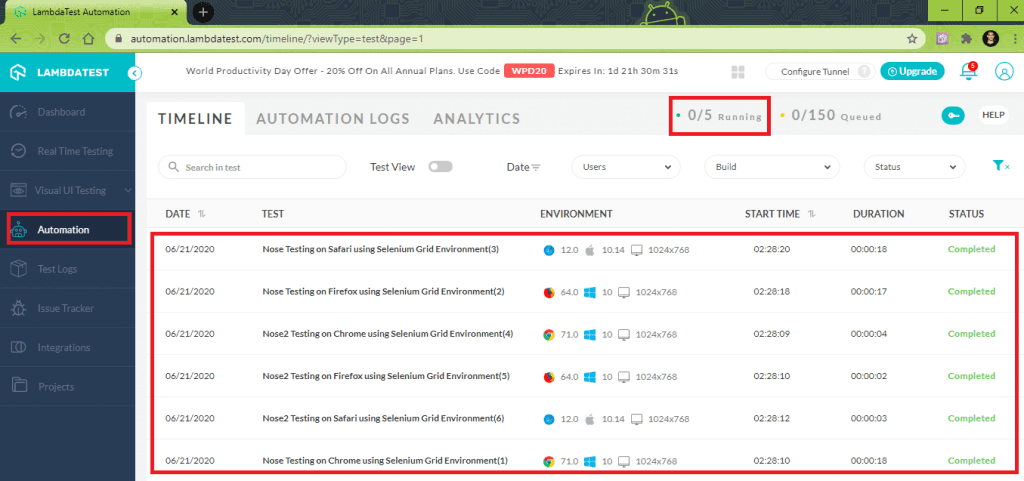
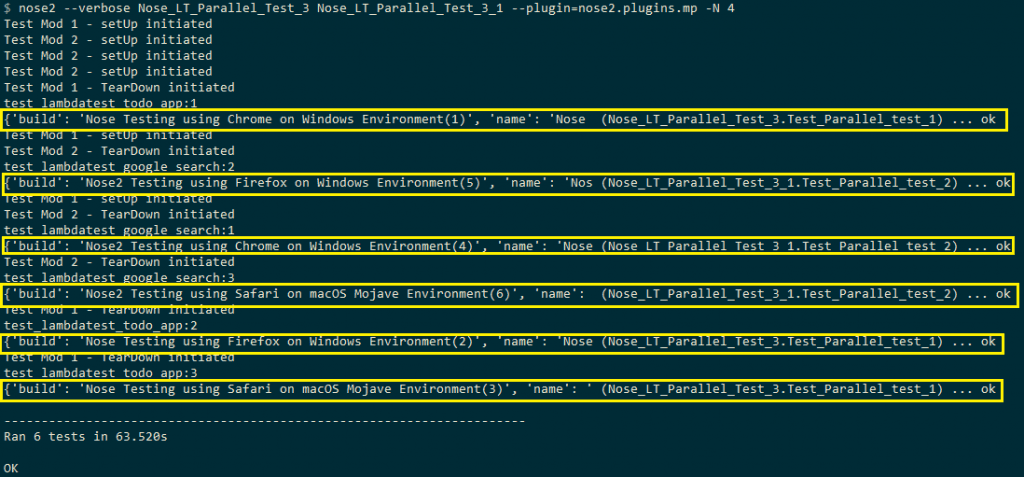
The total execution time for six cross browser tests was 63.52 seconds. With this section of Python Nose tutorial, we have covered the essential aspects of Selenium Python testing with Nose2.
Logging and Reporting in Nose2
Advanced bug reports in Selenium help in bridging the gap between the testers and developers. They also help in getting the issues fixed at a faster pace, thereby improving the overall quality of the web product. In this section of Python Nose tutorial, we look at how to create reports in Nose2 Python.
Nose2 has built-in plugins that let you capture logs during test execution. The logs are appended to the Python Nose test report of the failed tests. The logging functionality in Nose2 Python can be set either from the terminal (when triggering the execution command) or by adding the configuration in a unittest.cfg (or nose2.cfg) file.
|
1 2 3 4 5 6 |
[log-capture] always-on = False clear-handlers = False filter = -nose format = %(name)s: %(levelname)s: %(message)s log-level = NOTSET |
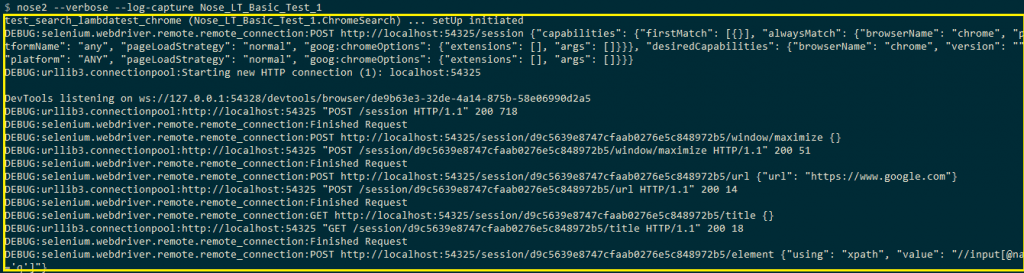
I prefer the –log-capture command-line option to enable logging in Nose2. Here is the command to enable logging-
|
1 |
nose2 --verbose --log-capture Nose_LT_Basic_Test_1 |
Here is the log output of the first test that was demonstrated earlier in this Python Nose tutorial.
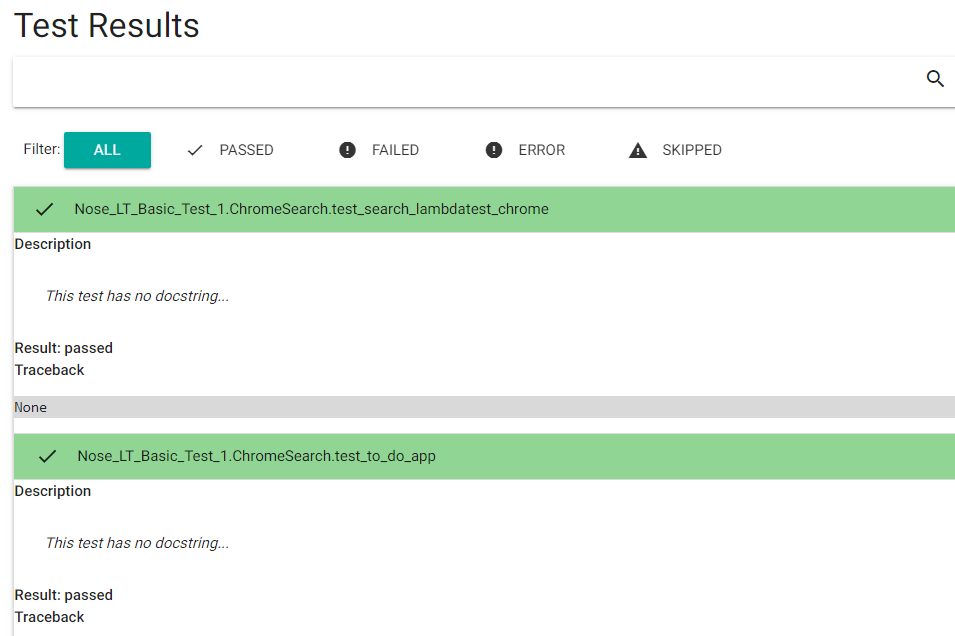
The nose2-html-report plugin is an external plugin that is used for generating an HTML-based Python Nose test report. The latest version of nose2-html-report is 0.6.0. The following command is used for installing the plugin:
|
1 |
pip install nose2-html-report |
Using the plugin, reports can be generated in HTML or XML format. Nose2 can recognize the plugin if an entry is added in the [plugin] key of the [unittest] section of nose2.cfg (or unittest.cfg). Here is the sample configuration for generating HTML reports for your unit tests-
|
1 2 3 4 5 6 7 8 9 10 |
[unittest] plugins = nose2_html_report.html_report [test-result] always-on = True descriptions = True [html-report] always-on = True path = Path_to_report_file\report.html |
For generating HTML Python Nose test report for the same test case, we run the following command on the terminal-
|
1 |
nose2 --verbose --log-capture --plugin=nose2_html_report.html_report Nose_LT_Basic_Test_1 |
Here is the execution screenshot and the generated HTML Python Nose test report-

Differences Between Nose2, Nose, and unittest2
Now that we have covered all the aspects related to Nose2 Python, let’s look at how Nose2 differs from Nose (and other automation frameworks in Python). Here are some of the critical differences between Nose2 and its predecessor:
- Nose2 is available for the Python versions that are currently supported by the Python team, whereas Nose is supported only for Python versions 2.4 (and above).
- Like unittest2, only module level and class level fixtures are supported in Nose2, whereas package-level fixtures are not supported.
- Unlike Nose which follows lazy loading, Nose2 does not need a custom importer as it imports test modules with __import__().
- The support for parameterized tests and generator tests is more extensive than Nose. Nose2 supports test generators in test classes, test functions, and in unittest TestCase subclasses.
- As far as loading of plugins is concerned, Nose uses setuptools entry points for finding and loading plugins. On the other handNose2 does not load any plugin into the test system and mandates that plugins should be listed in config files.
- In Nose2, all configurations have to be done via configuration files. On the other hand, Nose expects the configuration parameters to be available as command-line options. Hence, Nose2 is preferred if you want to perform repeat test runs as the configuration is stored in more readable configuration (.cfg) files.
And that’s a wrap for the second part of our Python Nose tutorial series!
Conclusion
In the second part of the Python Nose Tutorial series, we deep-dived into Nose2 Python and used it for Selenium test automation. If you are using unittest framework for Selenium Python testing, you should check out Nose2 as it adds more value to the unittest framework through its extensive plugin ecosystem.
Nose2 is also suited for cross browser testing as it supports parallel test execution via the multiprocess (mp) plugin and lets you download Python Nose test reports. The existing implementation that works on local Selenium Grid can be seamlessly ported to work with cloud-based Selenium Grid (such as LambdaTest). This helps in exploiting the winning features of Nose2 for expediting the test process.
Happy testing!


Author’s Profile
Himanshu Sheth
Himanshu Sheth is a seasoned technologist and blogger with more than 15+ years of diverse working experience. He currently works as the 'Lead Developer Evangelist' and 'Senior Manager [Technical Content Marketing]' at LambdaTest. He is very active with the startup community in Bengaluru (and down South) and loves interacting with passionate founders on his personal blog (which he has been maintaining since last 15+ years).
Blogs: 128
Got Questions? Drop them on LambdaTest Community. Visit now


