
Auto Healing in Selenium Automation Testing
Himanshu Sheth
Posted On: September 22, 2023
![]() 225115 Views
225115 Views
![]() 26 Min Read
26 Min Read
A number of challenges always loom large as the Application Under Test (AUT) undergoes endless cycles of bug fixes and enhancements. As the AUT grows in size and complexity, it will also trickle down on the automated test suite’s stability, reliability, and maintainability. All of this eventually results in intermittent test failures in the CI/CD pipeline, thereby impacting the overall health of the pipeline.
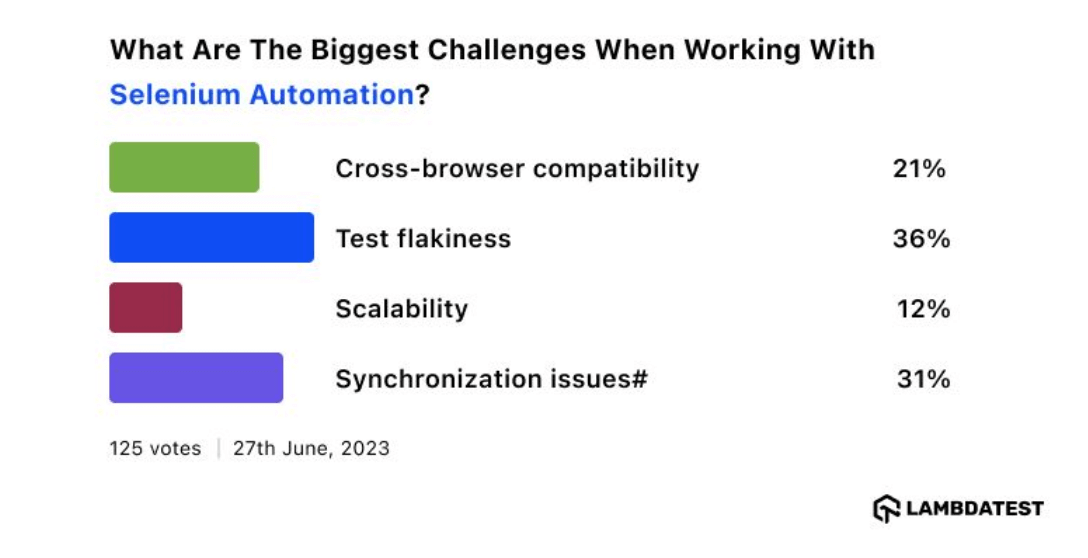
Over & above, there is a higher probability of witnessing unforeseen errors when the application is deployed across diverse environments (e.g., staging, production, etc.). As per a survey conducted by LambdaTest, test flakiness or test instabilities is one of the major challenges with tests devised using test automation frameworks like Selenium.
Instabilities in the test results normally occur due to internal and external factors, most of which can be controlled by focusing on efficient & scalable test design and execution. Flaky test design, incorrect wait strategies, dependent tests, and inadequate test isolation are some of the ‘controllable’ factors that lead to test flakiness.
In software testing, autohealing is a pivotal process that enables systems to automatically detect and rectify errors or anomalies without human intervention. By implementing sophisticated algorithms and monitoring mechanisms, autohealing systems swiftly identify issues, trigger corrective actions, and restore system functionality, minimizing downtime and enhancing overall reliability.
Auto healing of automated tests helps improve the effectiveness of test suite(s)/test(s) and increases the ROI of test automation. In this blog, we deep-dive into the nitty-gritty of auto healing in Selenium and how to reduce test maintenance costs with the auto healing feature (or Selenium capability) on LambdaTest Continuous Quality Cloud.
If you’re looking to improve your Selenium interview skills, check out our curated list of Selenium interview questions and answers.
TABLE OF CONTENTS
Flakiness Conundrum in Test Execution
Picture the below scenario that can cause nightmares to engineer:
The test code is all implemented and working fine, even when they are integrated in the CI/CD pipeline! Voila, CI/CD shows all green. 🙂Hell breaks loose when you realize that the same test suite fails in the next release without a single line of code change.
Time to don the hat of a debugger to locate and fix issues that seem to never exit in the first place .🙁
Now, the integral question that needs an immediate answer is, Why did the passing tests fail all of a sudden? It’s time to dissect the problem. First, upon debugging, you realize the pipeline configuration and network setup are all fine. Time to dig further to debug the underlying issue 🤔
Well, you finally realize that test flakiness was introduced due to locator changes in the front end (or UI).

The stability, maintainability, and reliability of the regression test suite(s) will increase multi-fold if the intermittent failures are healed before they make their way into Continuous Testing with CI/CD. In the scenario documented earlier, flakiness was due to the changes in the locators in the updated UI.
Apart from this, intermittent issues (e.g., slow response times, network flakiness, etc.) with external dependencies are some of the ‘external’ factors that can cause flakiness. Determinism is a fundamental property of any automation test suite, which means that the execution result shouldn’t change if there are no changes in the source code.
If a test is flaky, it’s usually caused by the application under test.
But I see flakiness being more often "fixed" on the test itself.
— Filip Hric 🇸🇰❤️🇺🇦 (@filip_hric) August 31, 2023
Irrespective of the source of flakiness, the bottom line is that it needs to be identified and fixed, or else it impacts release cycles along with the ROI of test automation. In a nutshell, there needs to be a definitive answer to the flakiness conundrum since the impact of flaky tests is not limited to only test execution!
Major Causes of Test Flakiness
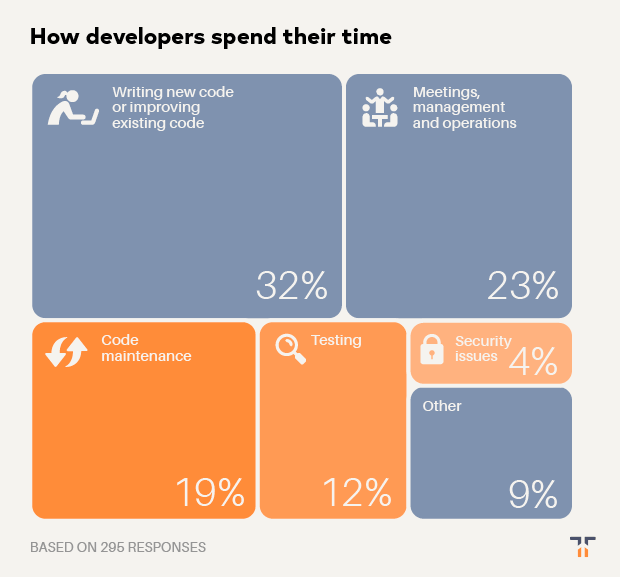
It turns out that developers (and QA engineers) spend more time maintaining, testing, and securing existing code than developing new code. In a nutshell, close to one-third of the time is spent on ‘Code Maintenance’!
And flakiness in tests also contributes to the maintenance and longevity aspects of the test suites (or test scenarios). An ACM Survey on Flaky Tests revealed that close to 59 percent of developers have encountered flay tests daily, monthly, or weekly. As aptly mentioned in the Costs & Consequences section of the survey:
- False alarms are the dominant consequence of flaky tests.
- Akin to test failures, flaky test failures should not be ignored.
- Frequent flaky tests can be highly threatening to the efficiency of the CI.
Now that we know that test flakiness can have a detrimental effect on the CI, release cycles, and developer’s productivity, let’s look at some of the common causes of flaky tests:
Frequent Application Changes
You would have faced the “Inconsistent test failures” syndrome when automating UI interactions using frameworks like Selenium. Well, these tests abruptly start failing without any changes in the code under test.
Usage of unreliable locators in Selenium or changes in locators owing to UI changes could result in intermittent test failures. Major overhaul in the UI is not referred to as UI changes. The changes could be minor updates in the UI and/or locators that make the tests unreliable & flaky.
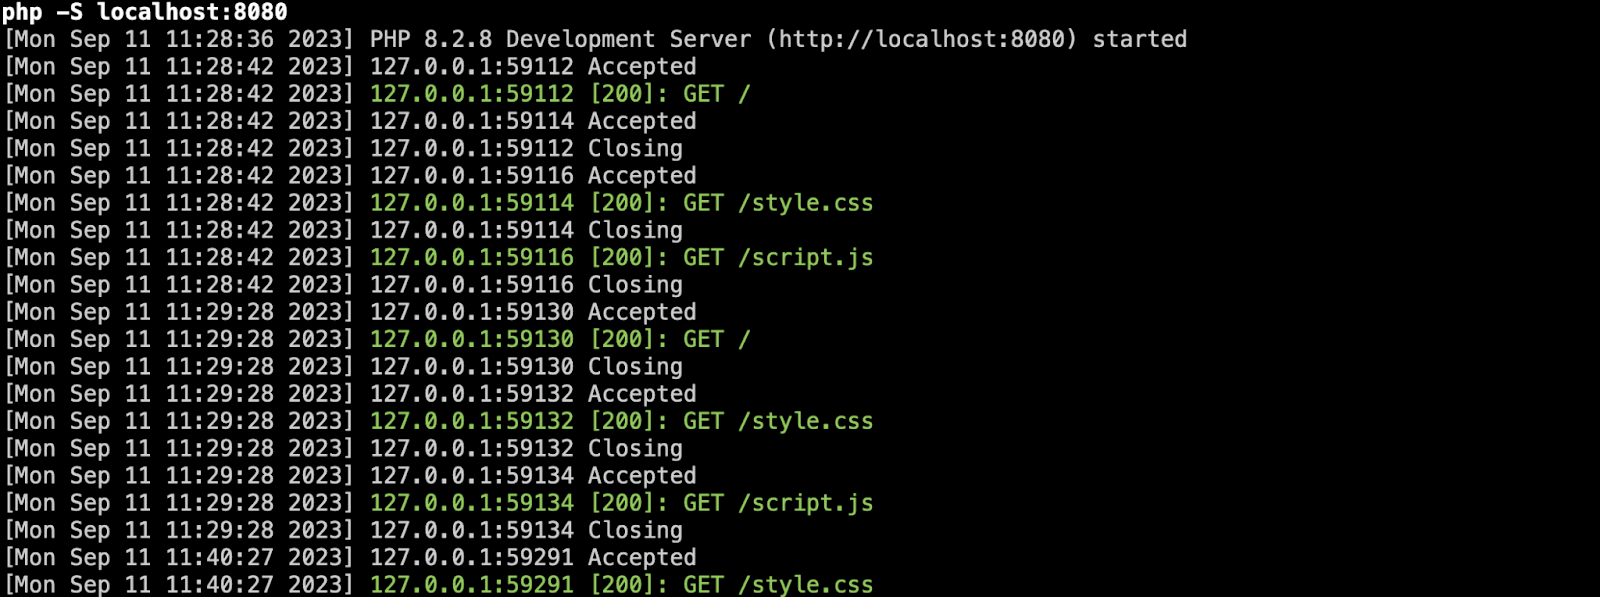
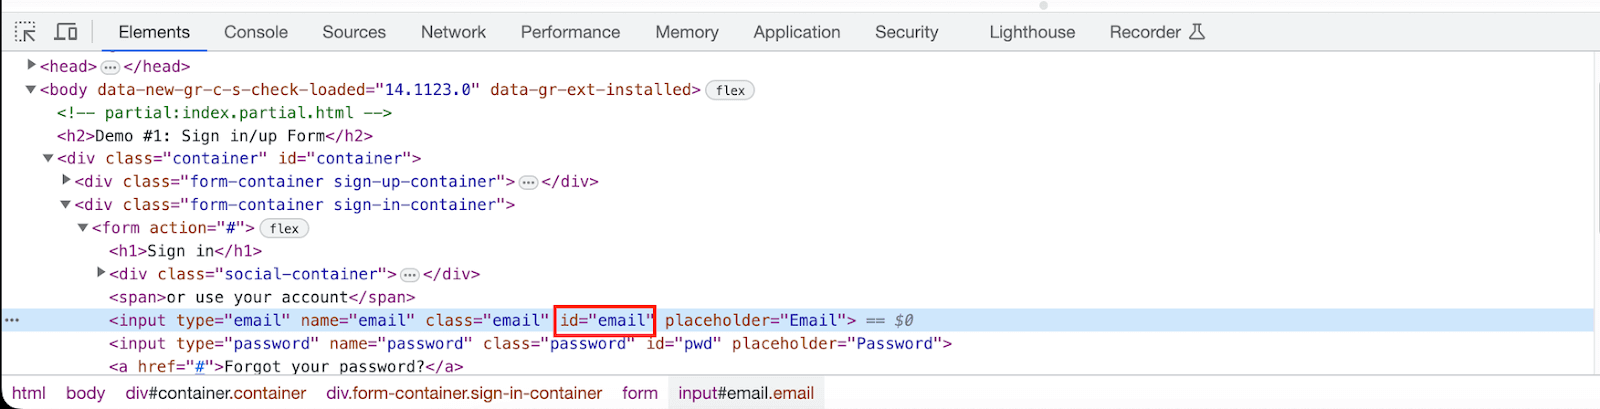
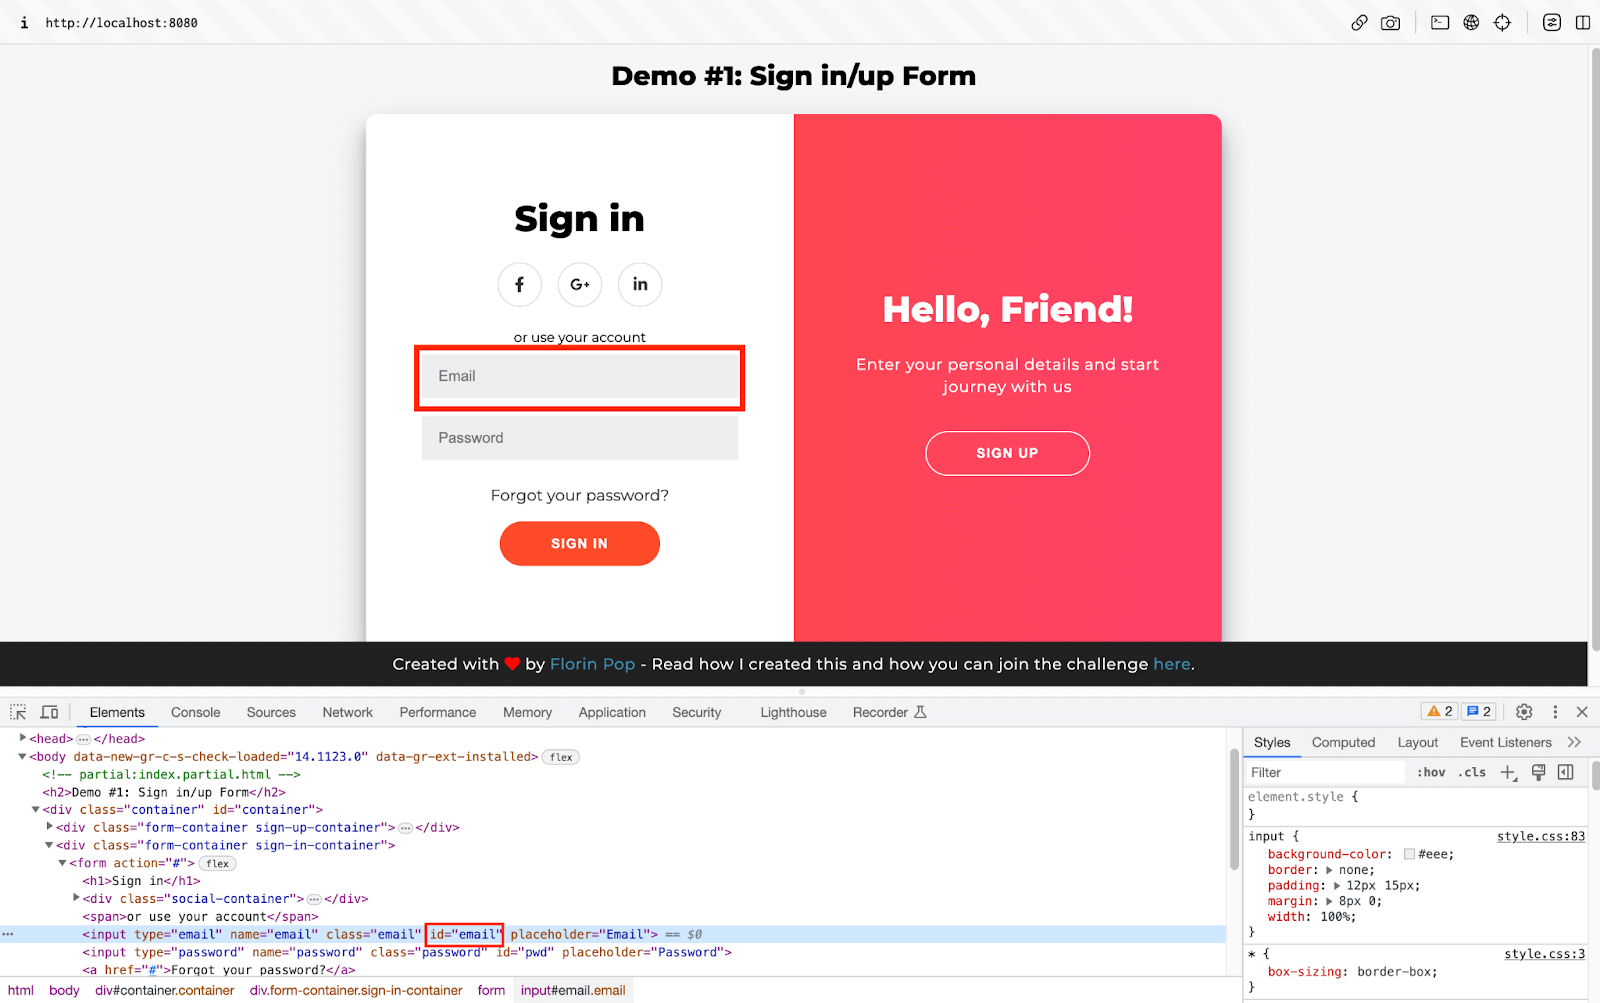
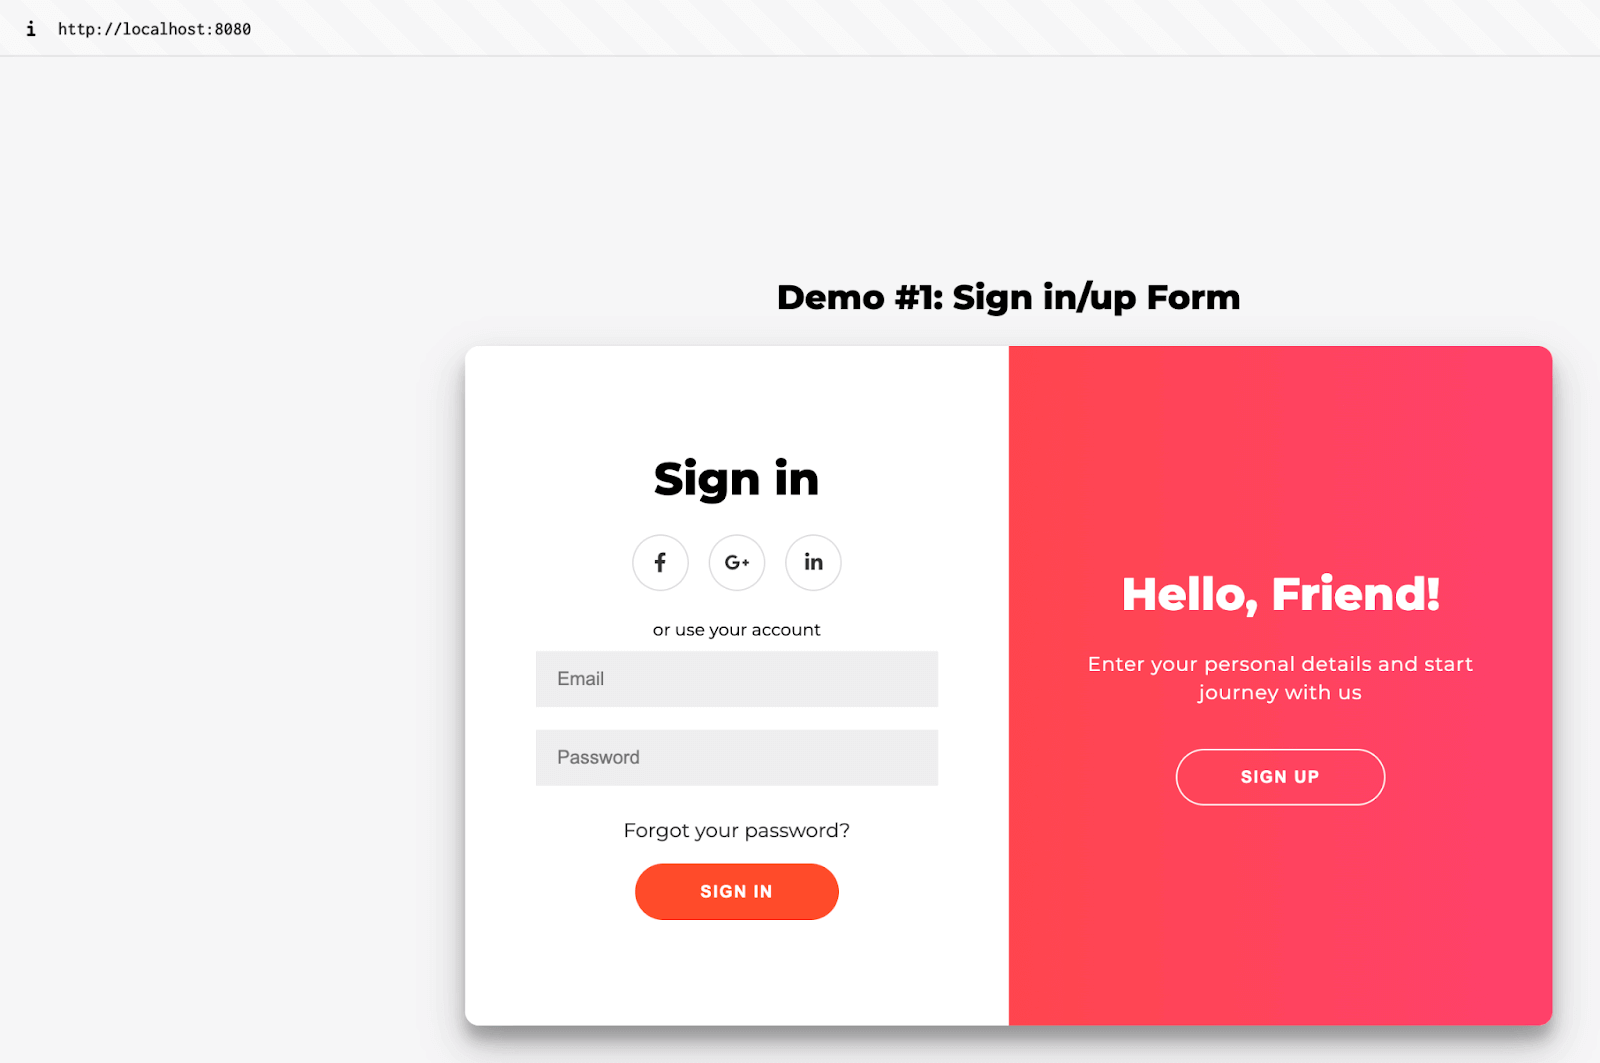
Consider a demo login page that lets users sign up & login using email and social accounts (i.e., LinkedIn, X, and Facebook). Load the page by triggering the php -S localhost:8080 command on the terminal.
Let’s consider a simple scenario where UI interactions are automated for the email-address element:
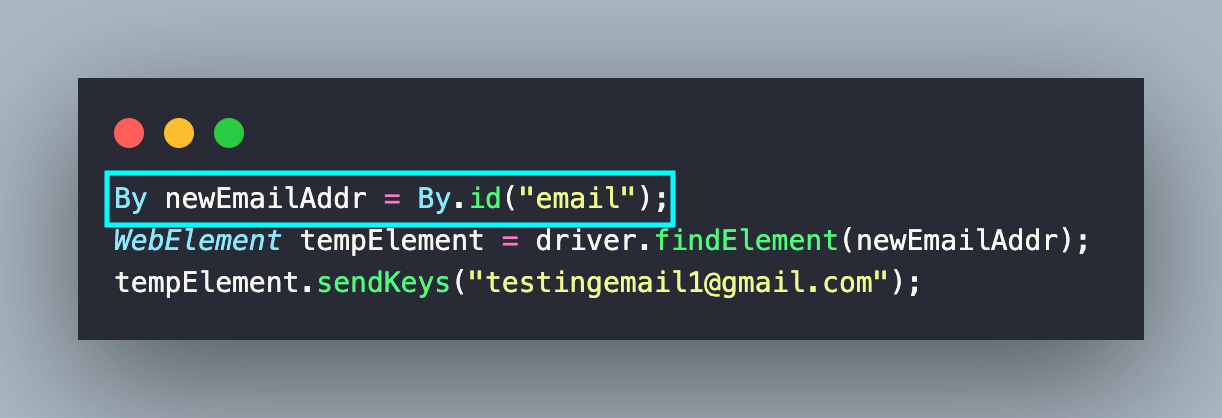
Before the locator changes
By.id(“email”) is used for locating the email-address element using the ID locator.

Here is how findElement in Selenium is used for entering the email address in the newly located element:

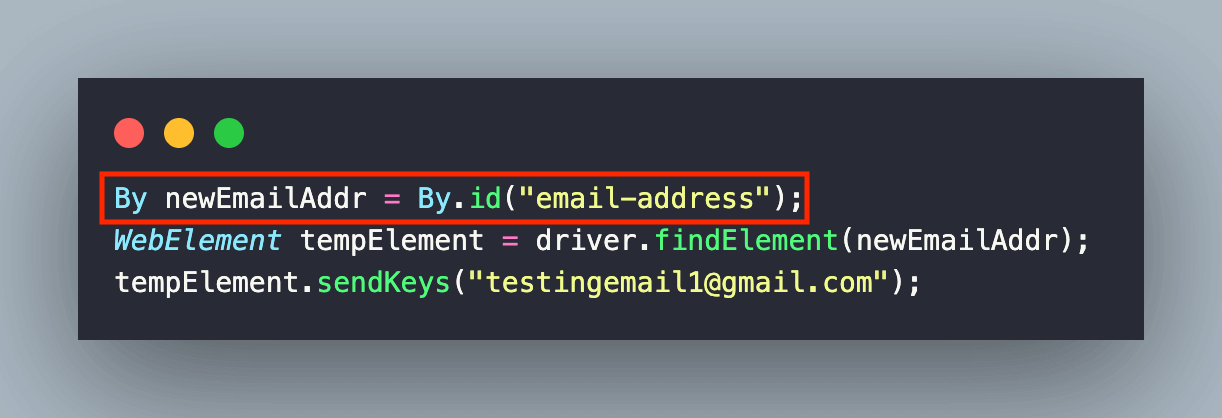
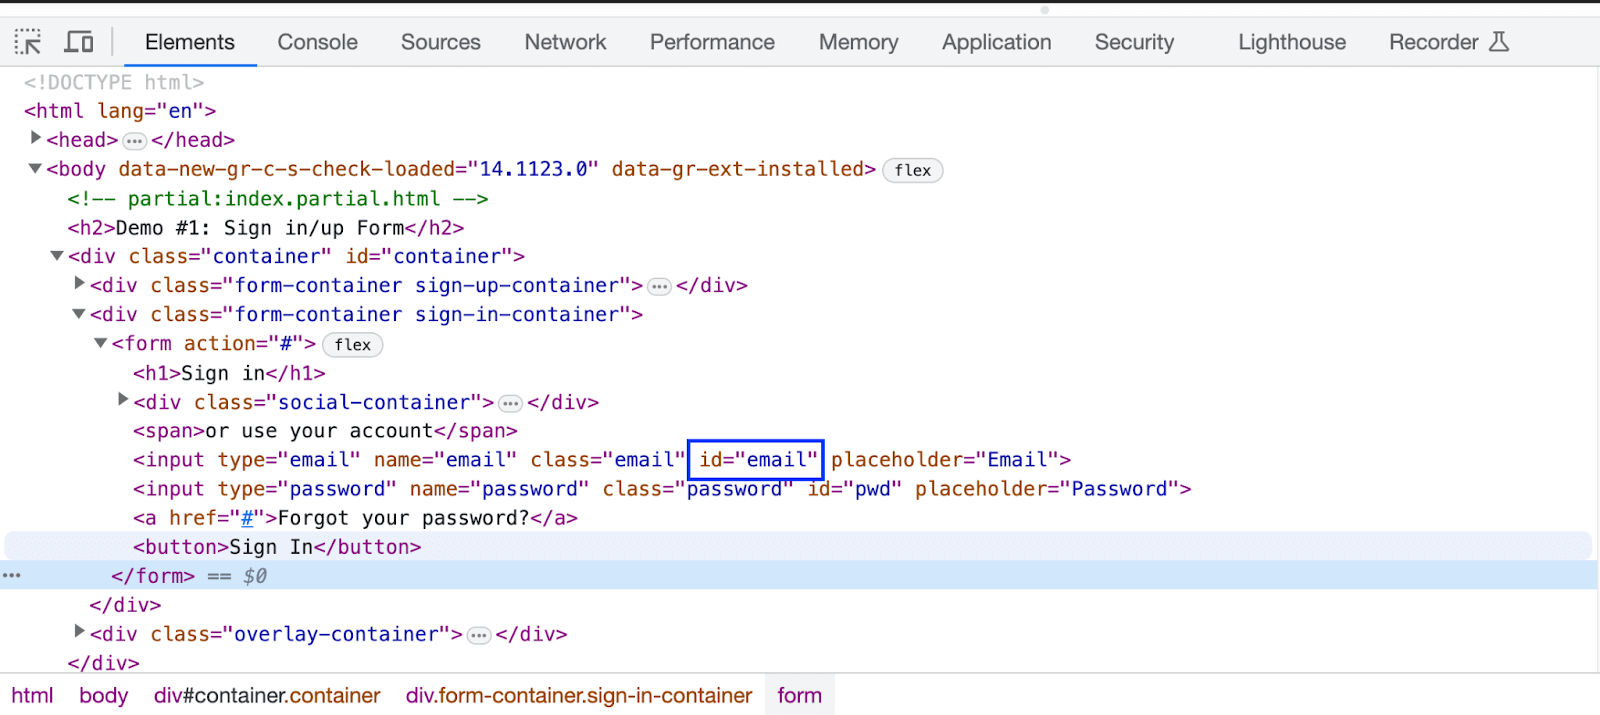
After the locator changes
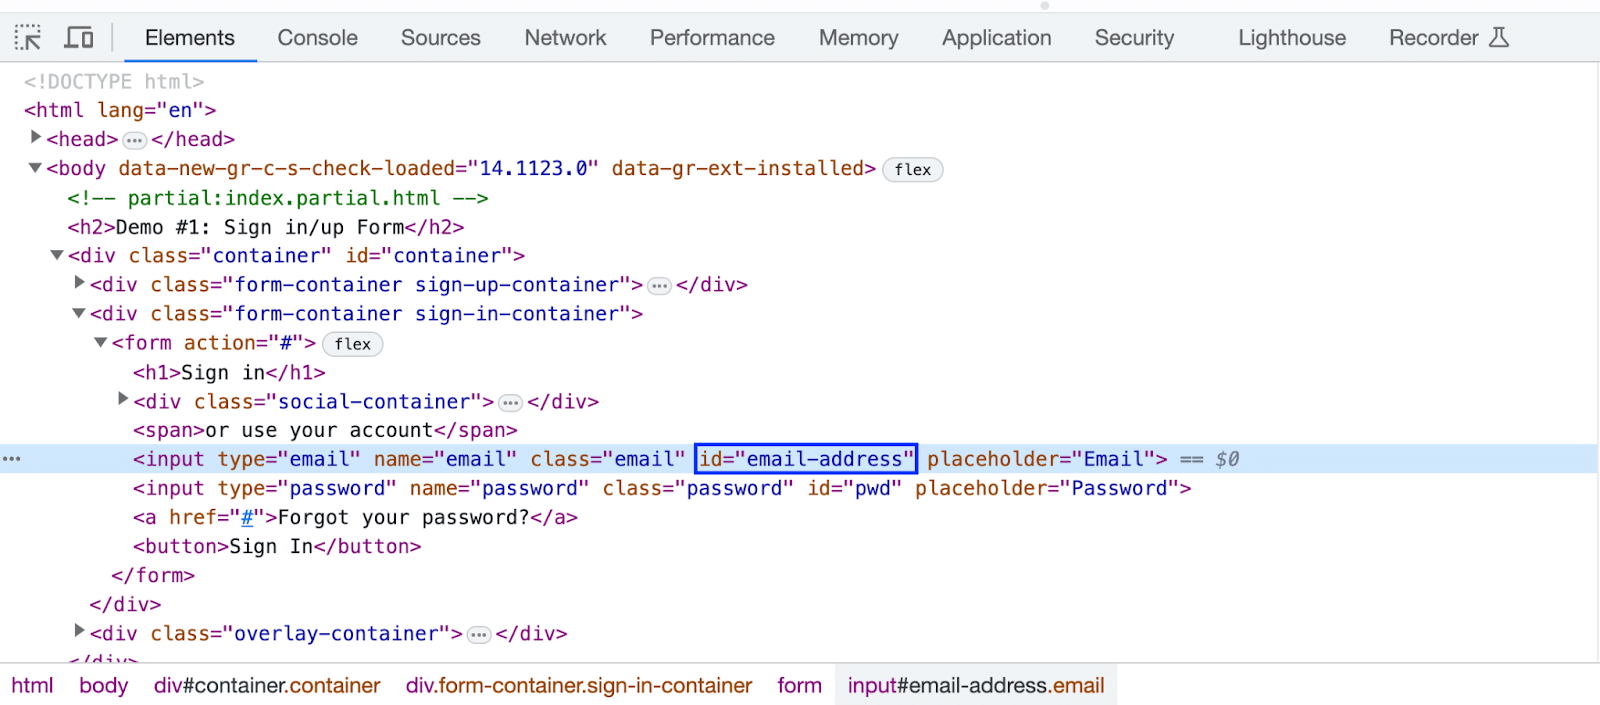
Consider a hypothetical (yet realistic) scenario where the ID of the email-address element is changed from “email” to “email-address” during the design and/or code updation process.
For demonstration purposes, we have changed the ID by invoking the document.getElementById() method on the Inspect console.
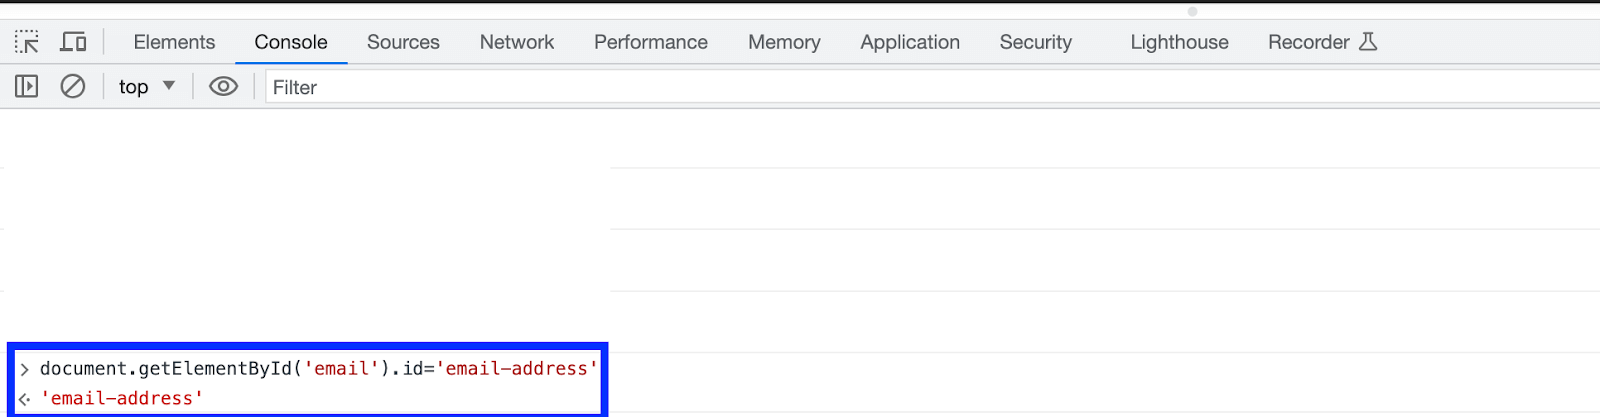
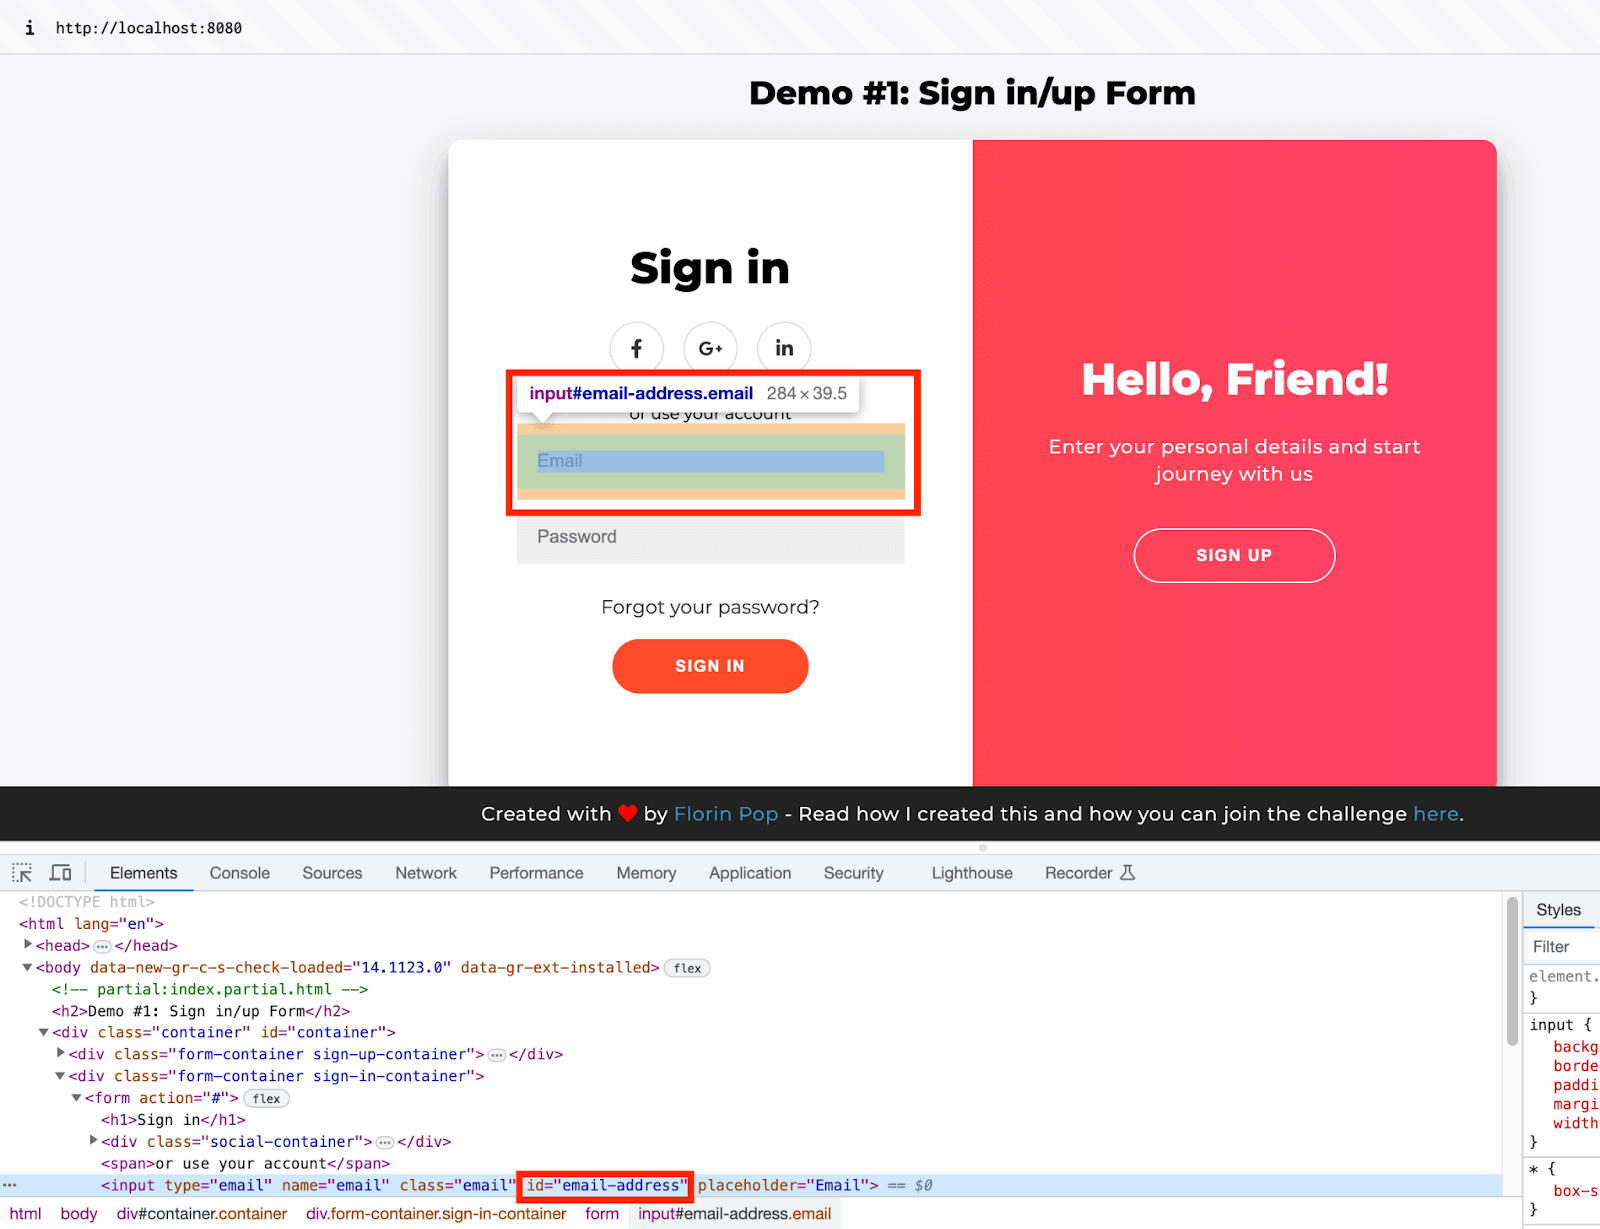
As seen above, the updated ID of the email-address element is “email-address”. The repercussion of this small change is huge, as the ID passed to the By class needs an update for the test execution to succeed:
In case the test is executed with the old ID, it would result in a NoSuchElementException, which eventually leads to the failure of the entire regression test suite. You can check out our comprehensive blog on Selenium Exceptions that deep dives into all the common exceptions you might encounter during automated testing.
The example being highlighted above just scratches the surface when it comes to test flakiness! It can have a snowball effect on the entire test suite(s), test releases, as well as CI. Auto healing of locators can be instrumental in overcoming the brittleness caused by static locators. We will look at auto healing in Selenium in the further sections of the blog.
Flaky Locator Strategy
There is an option to choose from a range of locators, like ID, Name, CSS Selector, XPath, etc., for locating elements in the DOM. Though you have options, choosing the best-suited locators for the automation tests is recommended. This helps improve the reliability, maintainability, and stability of the test suites.
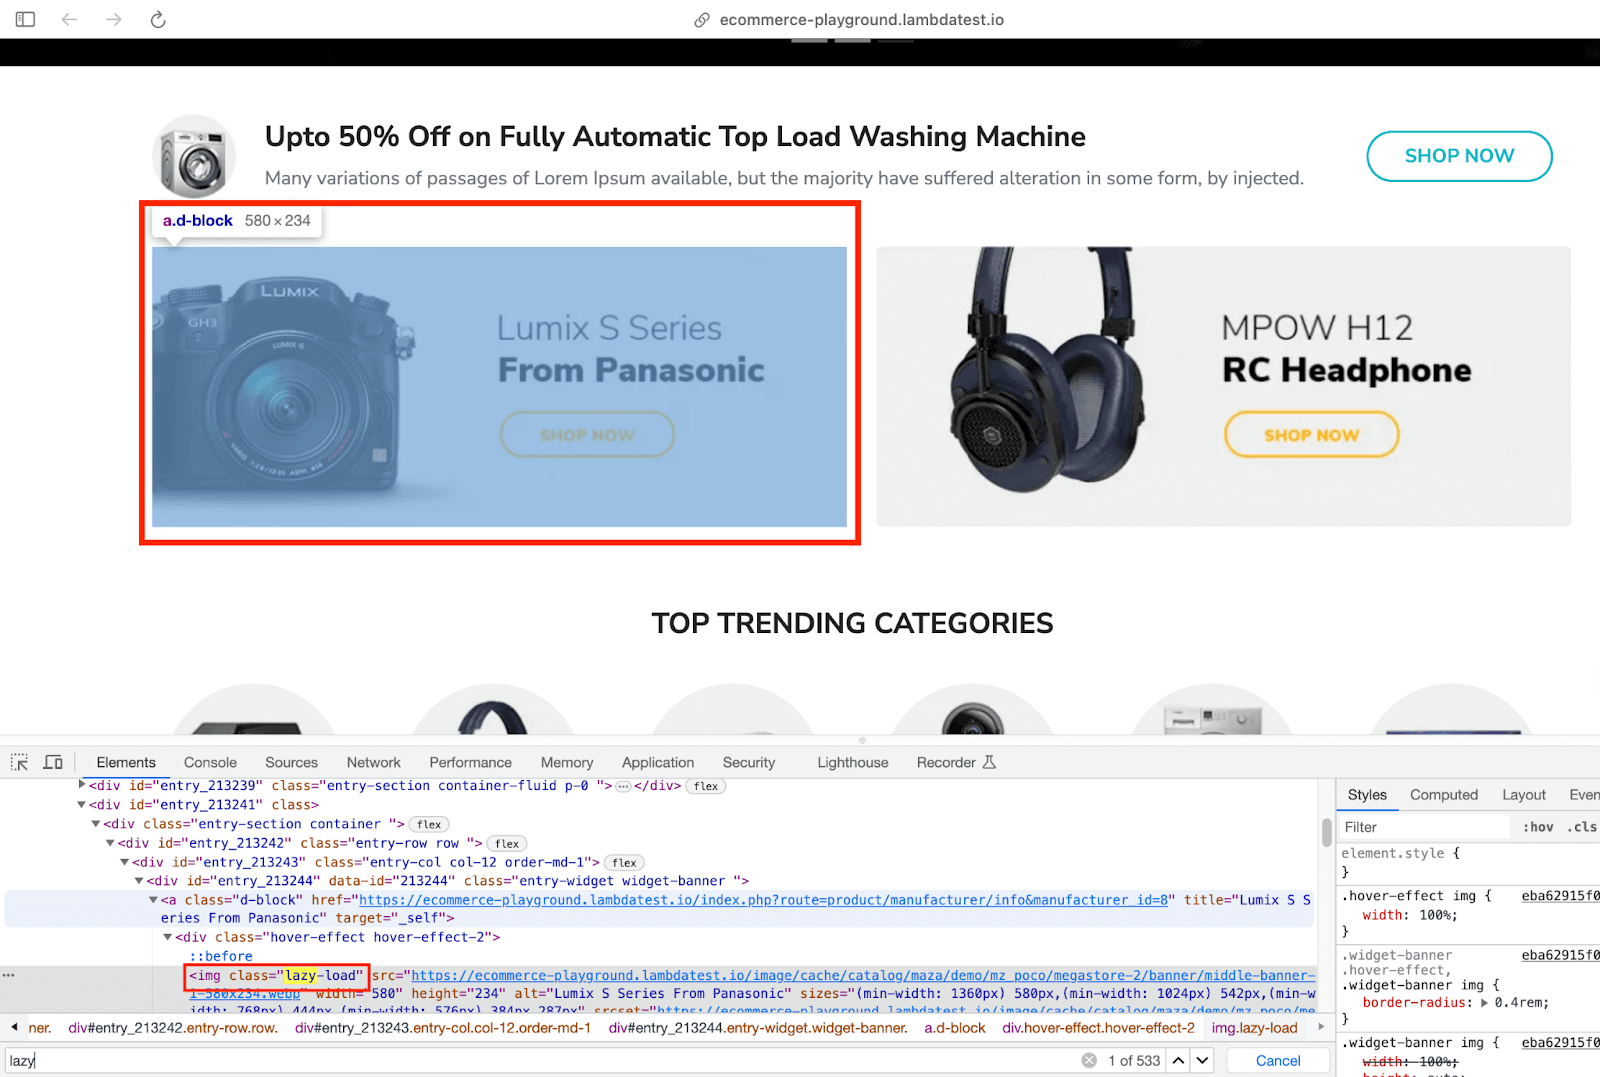
Over & above, you also need to take care of the challenges posed by dynamic website content and lazy loading of images. For instance, the LambdaTest eCommerce playground has a significant number of images that are loaded using the lazy loading technique.
Hence, it is recommended to choose dynamic locators that can accommodate the dynamic nature of the website content. You can check out the Selenium locators strategy blog that deep-dives into the best practices for using locators with Selenium WebDriver.
Synchronization Issues
Several external factors (e.g., network throttling, dependency on external services, etc.) can contribute to test flakiness. To counter such problems, you need to invest in improving the robustness and reliability of the tests.
Handling asynchronous calls in Selenium is also important since AJAX requests, animations, dynamic elements, async calls to other layers, etc., are common in today’s applications. As stated in the ACM Survey on Flaky tests, asynchronous waits are a major contributor to flakiness in front-end testing.
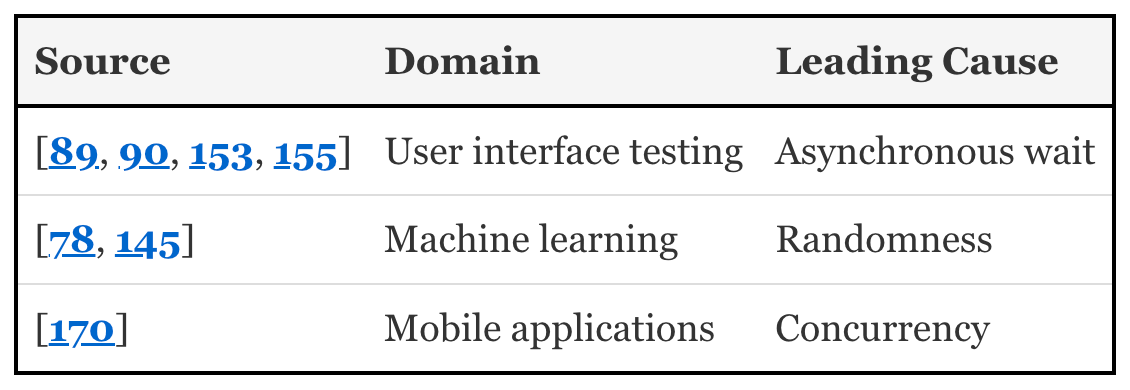
Close to 37 percent of commits under the asynchronous waits category were attributed to incorrect handling of waits for asynchronous calls. For instance, using Thread.sleep() in Selenium is a bad practice since it is a blocking call that will eventually elongate the overall test execution time.
Using Explicit Waits in conjunction with Expected Conditions in Selenium can be leveraged such that the test waits for a certain duration until the specified condition is met. Fluent Wait is another option for handling synchronization issues, particularly when the tests invoke asynchronous calls and intend to wait for it to finish before evaluating assertions.
Covering all the causes is beyond the scope of this blog! Apart from the causes mentioned above, here are some of the common causes of test flakiness:
- Flaky test infrastructure
- Inconsistency across third-party libraries
- Flaky test scripts
- Data dependencies
You can refer to common causes of test flakiness that delves into every pointer in great detail. For the remaining part of the blog, we will focus on how auto healing in Selenium can be leveraged to enhance the robustness of test suites by handling unexpected errors arising due to frequent UI changes.
Note: Feature and approach are used interchangeably throughout the remaining course of this blog.
What is Auto Healing in Selenium?
Auto healing automation is also referred to as self healing automation. Auto healing of Selenium locators (or Selenium) is a dynamic approach in test automation that helps overcome the brittleness associated with traditional static locators.
Traditional Selenium tests without the auto healing feature would fail in case there is an underlying change in the web locators. Auto healing brings much-needed intelligence to the automated tests, thereby enabling them to dynamically adapt to the changes in the document (i.e., application/website).
This is driven by state-of-the-art AI (Artificial Intelligence) and ML (Machine Learning) algorithms.
This further helps in the automatic recovery of the tests from certain failures that are encountered during the process of test execution. The automated test recovery catalyzed by the auto healing approach also improves the overall reliability of the CI pipeline.
A loose yet relevant analogy:
Akin to applying bandages on a wound, auto (or self) healing automatically heals the tests when they encounter a wound (i.e., error).
In the latter sections of the blog, we will focus on the nuances of auto healing in Selenium and how automation engineers can leverage the Auto Heal feature (on LambdaTest) to improve the resilience and robustness of the tests.
How does Auto Healing in Selenium Work?
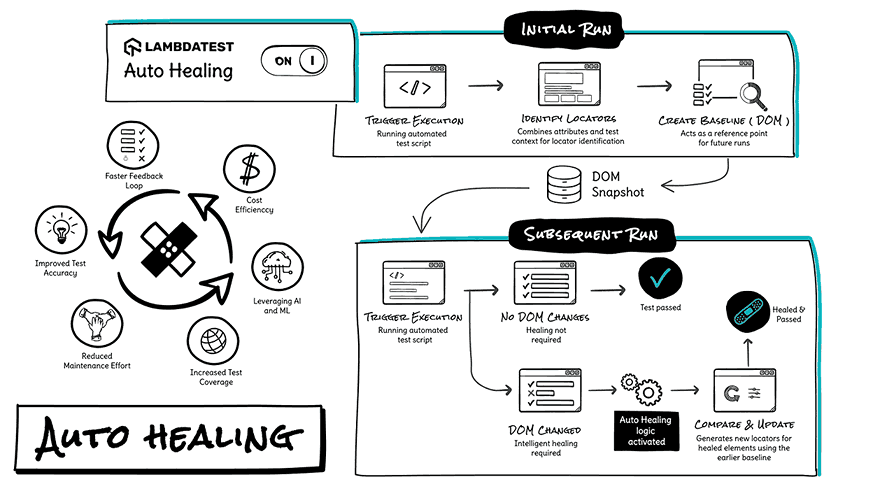
Though there are a few AI-powered open-source libraries for auto healing, we would be limiting our discussion to auto healing feature on LambdaTest. Let’s have a bird’s-eye view at the internal working of the said functionality (auto healing in Selenium):
- Auto healing in Selenium on LambdaTest intelligently adapts locators by combining attributes and the test’s context for ensuring the test’s stability and resilience
- The document (i.e., web page) is continuously scanned during runtime for any changes in the DOM
- Once the element is successfully located, the DOM path of the element is fetched and saved for future reference
- In case the element is referenced using the same locator (but not present on the page), the auto healing algorithm generates new locators for the elements using the earlier baseline
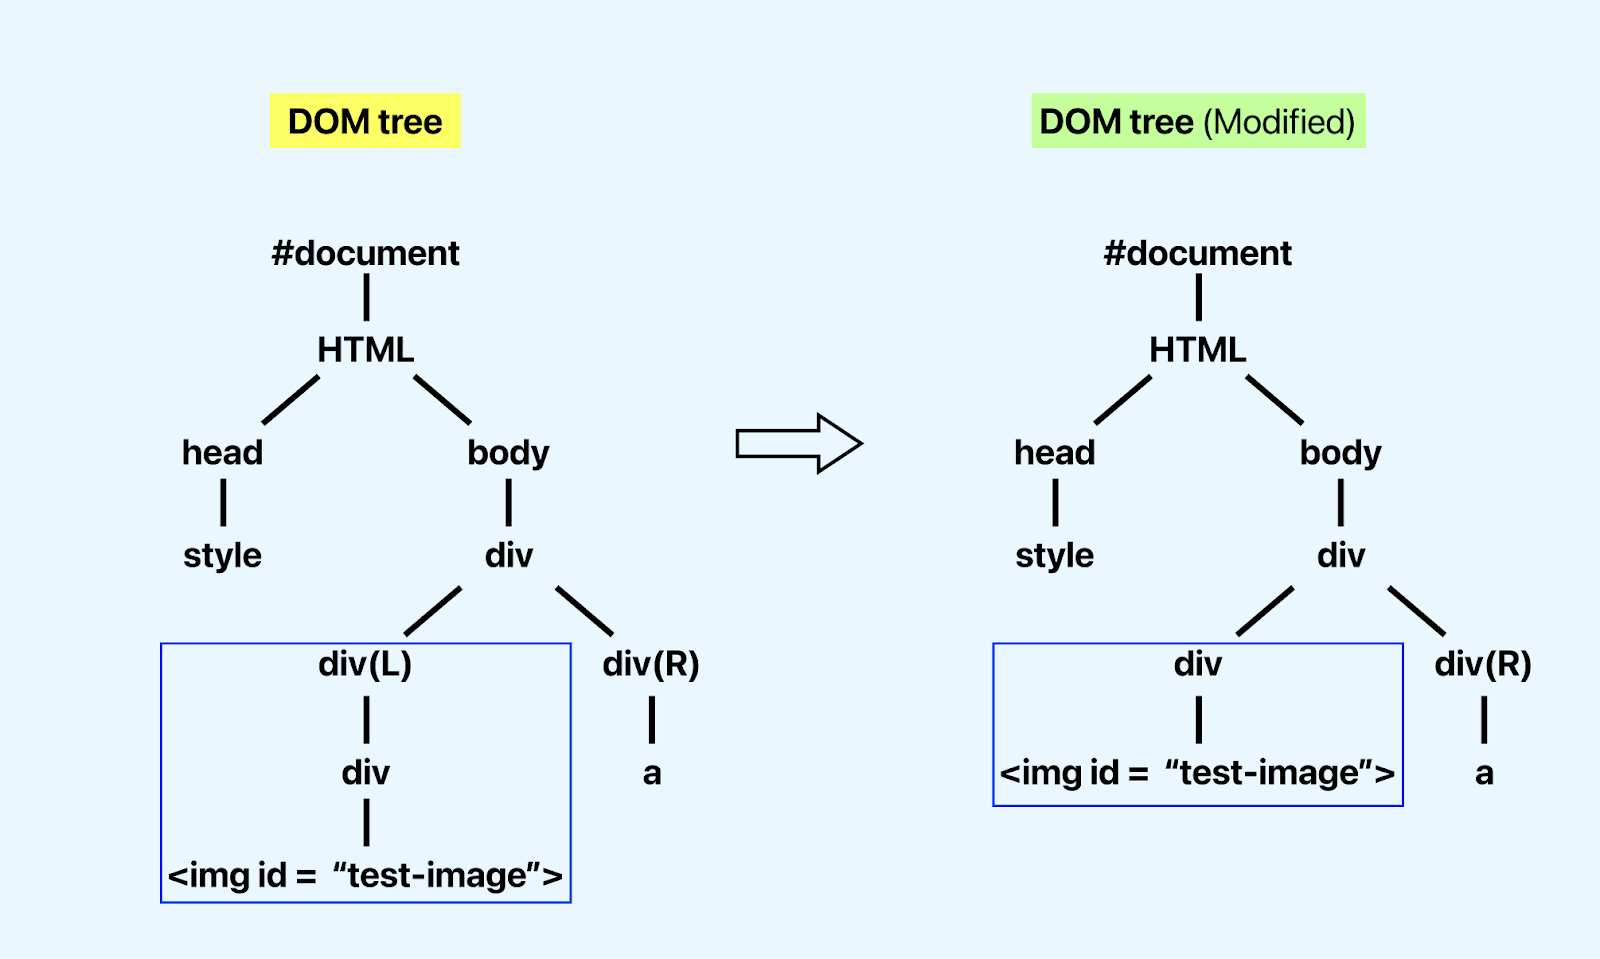
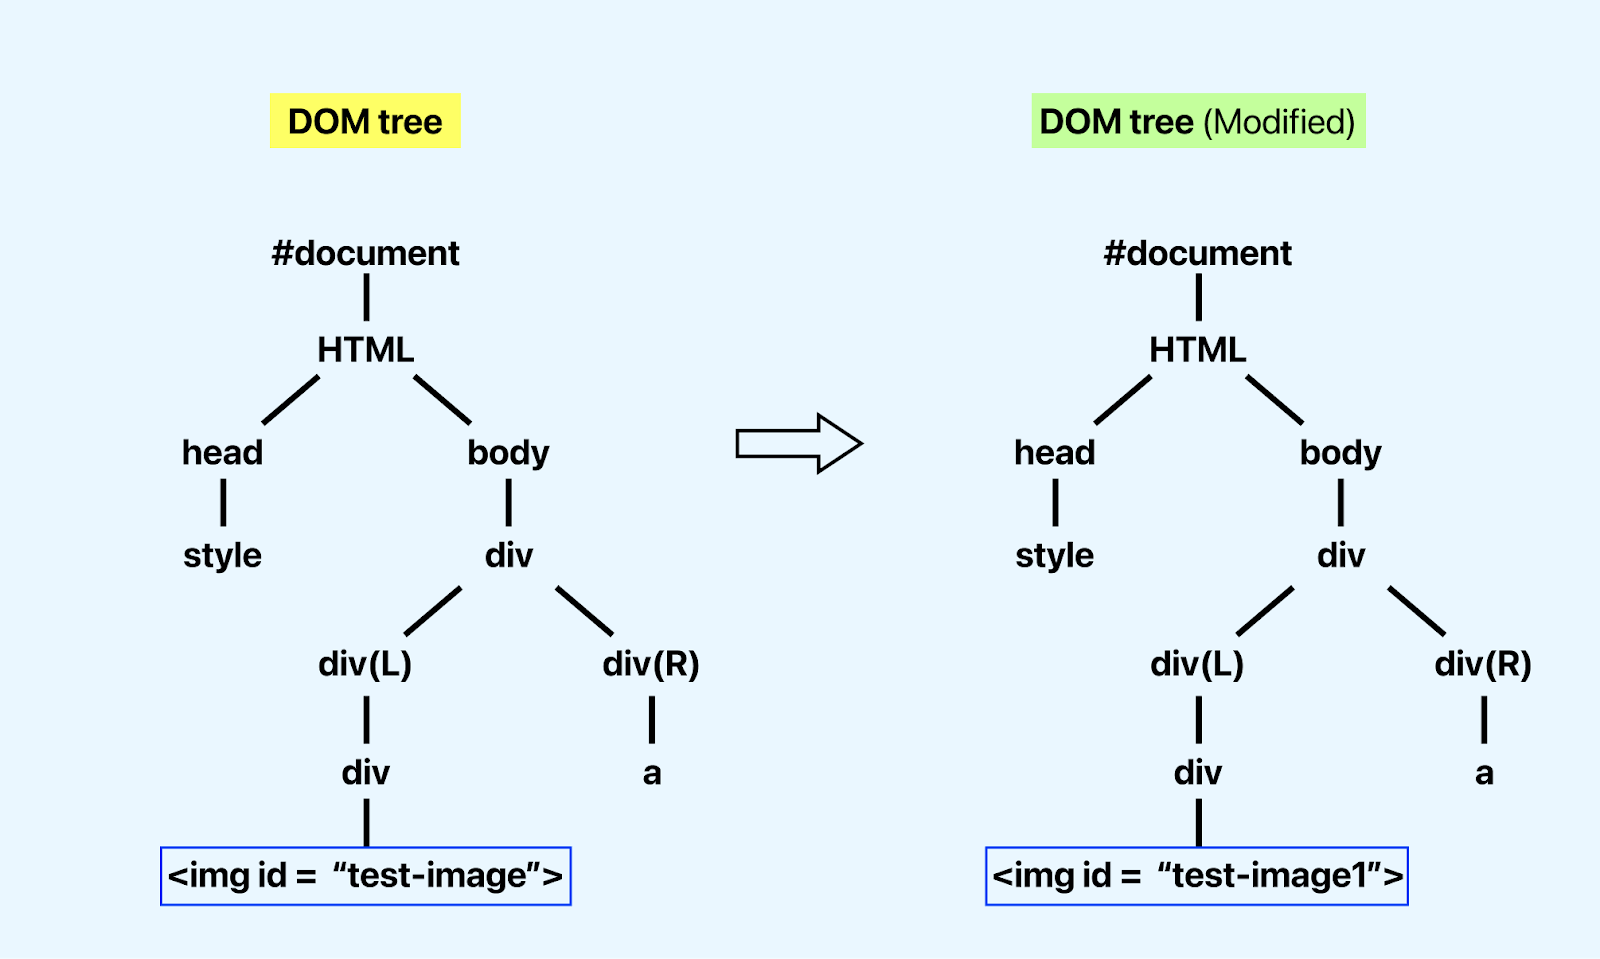
In the example shown below, there is a minor change in the structure of the DOM where the image (i.e. img) is under a different div. Existing baseline (on the left) is updated with the new tags ahead of the Image with id ‘test-image’. From the next run onwards, the snapshot on the right will be used as the baseline by the auto healing algorithm.
Automation test suite impacted with such minor changes will be auto healed by the auto healing algorithm.
Unlike the earlier example, here the DOM structure still remains the same but the ID of img is changed from test-image to test-image1. The said locator will be auto healed during the process of test execution.
In the scenario highlighted in the earlier section, there was no change in the DOM tree (or page layout), except that the ID locator of the email element was changed from email to email-address.
Locating element using old ID 👇
Here, the element can be located using the ID as email.
Snapshot from Inspect Tools below:
Locating & Healing element using updated ID 👇
Here, only the ID of the email element is changed to email-address whereas
the layout of the DOM tree remains unchanged. Once the test scenarios are executed, the locator (i.e. ID) will be healed from email-address to email.
The healing is possible, since the snapshot of the earlier test execution is available for AI-powered DOM comparison. Hence, the respective locator will be healed and the execution will result in a pass!

Snapshot from Inspect Tools below:
Both the execution cycles will pass since the locators are healed during the process of test execution! To summarize, auto healing in Selenium automatically recovers the tests from failures encountered due to changes in locators. This results in reduced test flakiness and improved test reliability & stability!
Now, let’s walk the talk with a demonstration of auto healing in Selenium on the LambdaTest cloud grid!
Demonstration: Auto Healing in Selenium
Before we head on to the demonstration of auto healing in Selenium, here is an important caveat that requires attention:
Auto healing can reduce test flakiness, but the overall increase in the test execution time largely depends on the overall layout of the DOM tree.
Now that we have covered the essentials of auto healing in Selenium, let’s get our hands dirty with a few examples. We will be using Selenium Java for the implementation of the test scenarios. Without further ado, let’s get started!

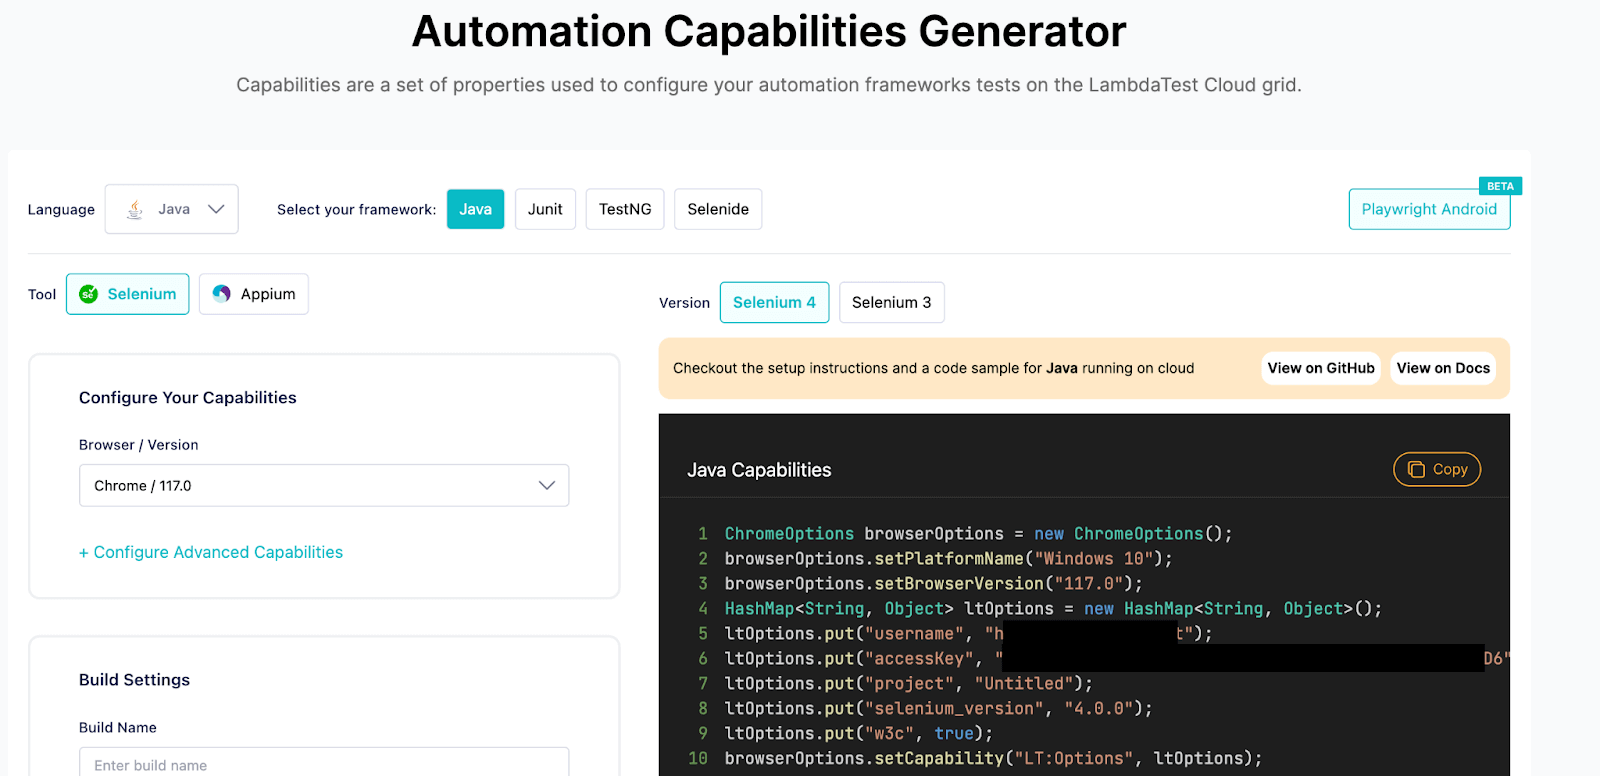
For demonstration, we would initially execute the test scenarios below by setting the autoHeal capability to true. The rest of the capabilities can be set using the LambdaTest Capabilities Generator.
Test Scenarios
Test Scenario – 1
| 1. Navigate to the eCommerce Playground Products Page. 2. Scroll until the product “MacBook Air” is located. 3. Click the “Buy Now” button. 4. Assert if the “Check out page” is not shown. |
Test Scenario – 2
| 1. Navigate to the eCommerce Playground Registration Page. 2. Enter the required details on the page. 3. Click the “Continue” button. 4. Assert if the “User registration is not successful”. |
Test Scenario – 3
| 1. Navigate to the Development Page. 2. Click on the “SIGN UP” button. 3. Enter the required details on the page. 4. Navigate to the Development Page within iFrame 5. Switch to the iFrame. 6. Enter the required registration details and click “Sign Up”. 7. Assert if the “Signup is not successful”. |
We would have two test execution cycles:
- Execution with unchanged locators
- Execution with locators that have changed during development
The second execution cycle should result in the healing of the locators, i.e., even though the earlier locators (e.g., Name, ID, etc.) on the page are changed, they would still be healed by the auto (or self) healing feature on LambdaTest.
Project Structure
Shown below is the overall directory structure:
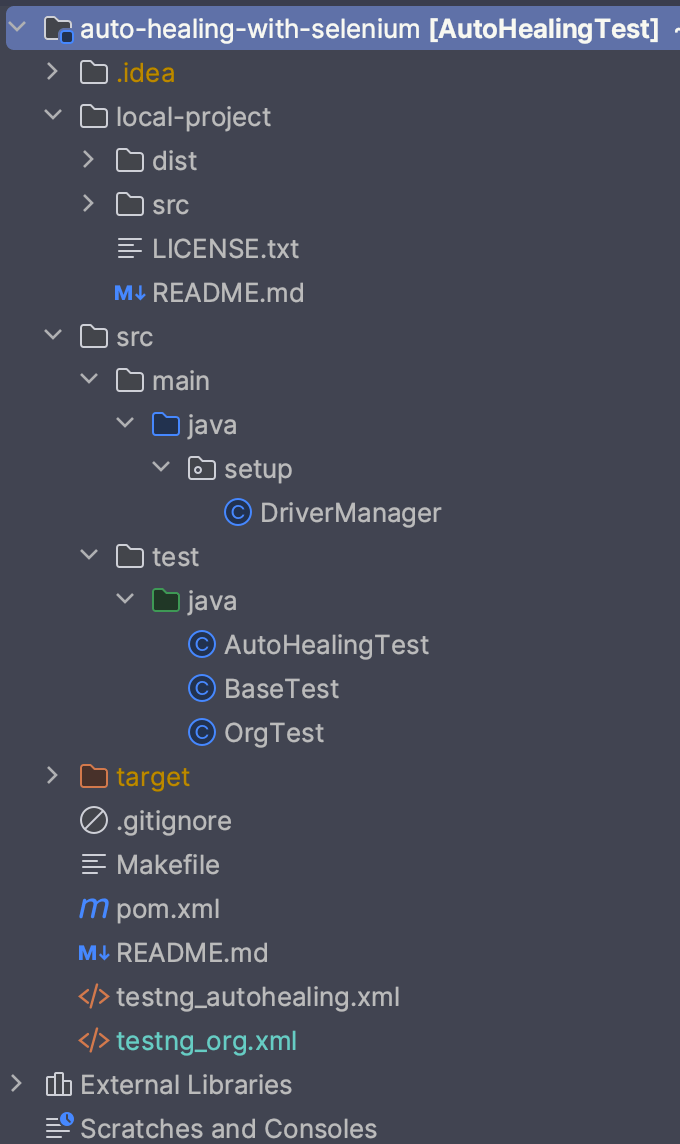
The local-project folder consists of the sign-up page, which will be used for localhost testing using the LambdaTest tunnel and Auto Heal feature on LambdaTest. The page is inspired by the Signup Form by Florin Pop; thanks for it. 🙂
The setup package (in src/main/java folder) consists of a single file named DriverManager.java. It contains wrapper functions for instantiating Remote WebDriver, setting up implicit timeouts, and more.
Lastly, the test/java folder consists of test files (OrgTest.java and AutoHealingTest.java) that contain almost the same test methods with a tinge of difference. AutoHealingTest.java contains test methods where some locators are intentionally changed using JavaScript Executor in Selenium WebDriver. This is where auto healing will be done by the auto hеaling feature on LambdaTest. We will dive more deeper in the Implementation section of this blog on auto healing in Selenium.
Implementation [POM, Wrapper Functions]
Before we kick start the implementation of auto healing in Selenium, let’s add the required project dependencies in the project POM file.
With the configuration details all set up, let’s look into the wrapper functions and test methods that we looked into earlier in the blog.
Code Walkthrough
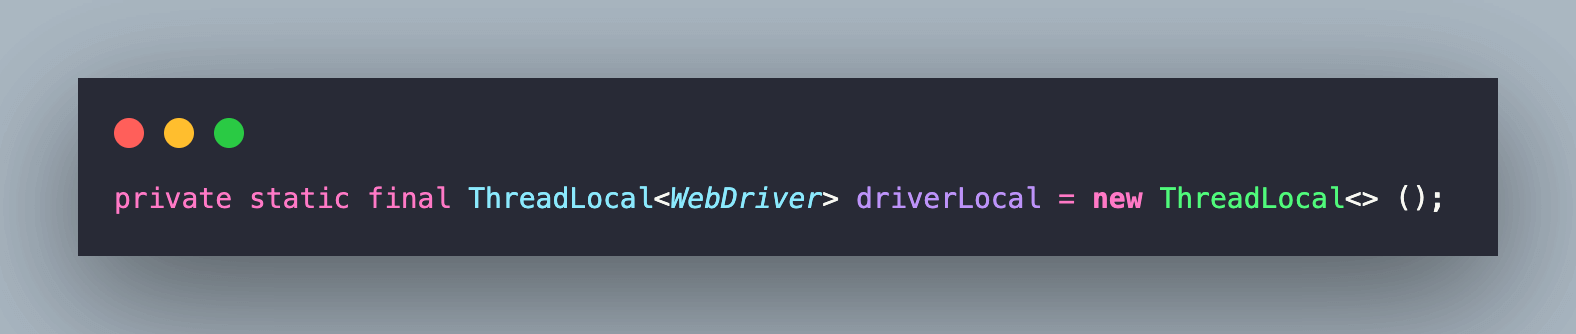
The source code for this file is inspired by the Selenium4POC repo. To ensure that the WebDriver instance is thread-safe, the ThreadLocal class is used for creating and managing thread-local variables. Also, thread-local variables for WebDriver instances are created since all the test scenarios are executed in parallel on LambdaTest Selenium Grid.
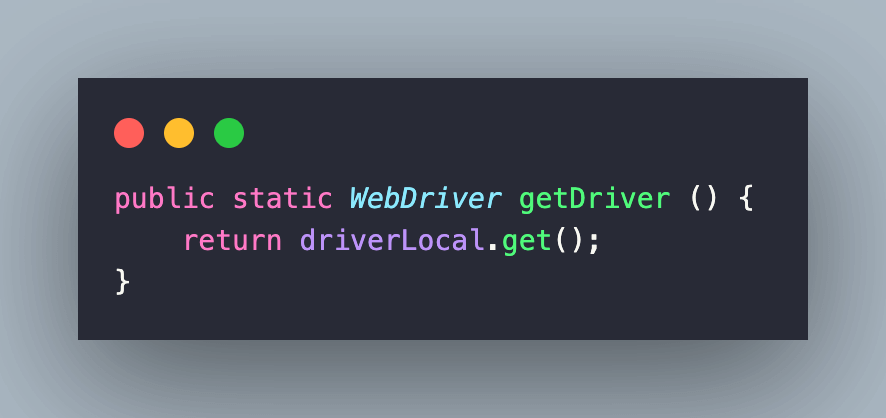
The getDriver() method returns the current thread’s value of this thread-local.
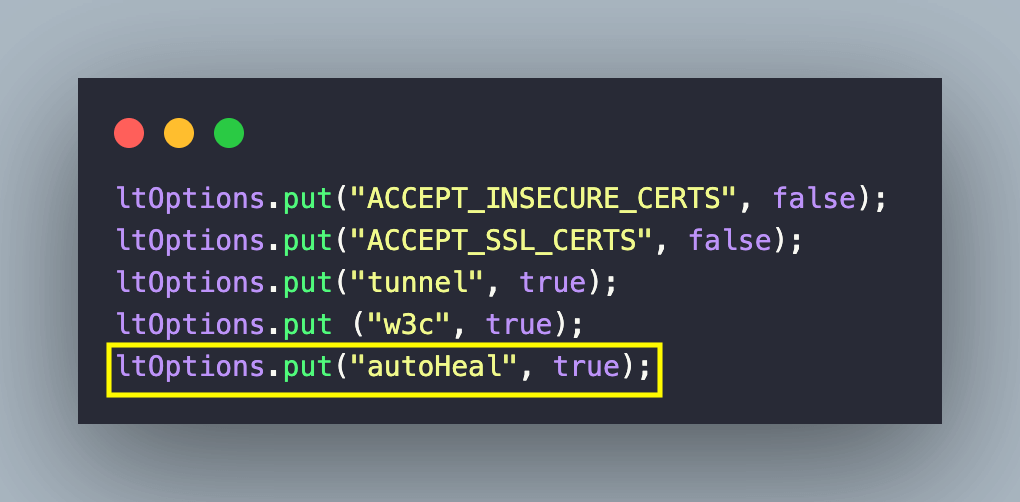
The setupRemoteChromeDriver() method lets you set the options (i.e., browserName, browserVersion, platformName, etc.). Since we are also doing localhost testing, the tunnel option (or capability) is set to true.
The autoHeal option (or capability) is set to true so that tests are auto healed and automatically recover from certain failures encountered during test execution.
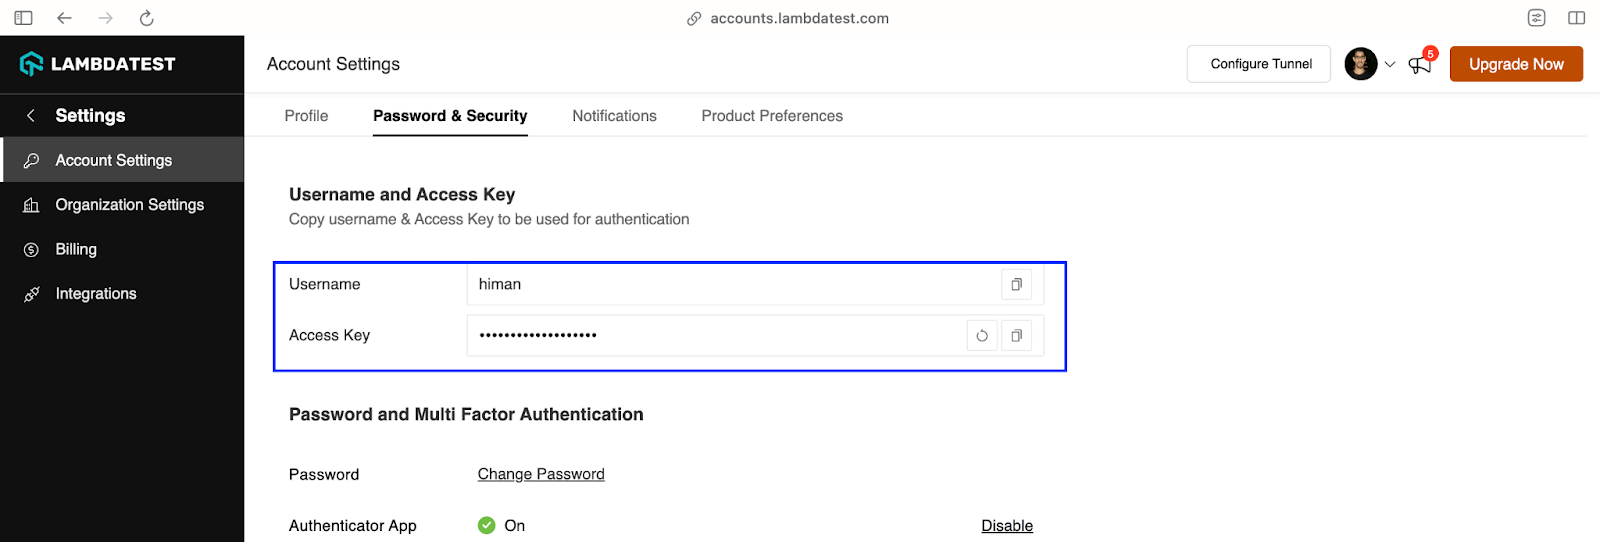
Since the test execution is done on the LambdaTest cloud grid, the RemoteWebDriver class in Selenium is used for instantiating respective browsers on the cloud. BrowserOptions, LambdaTest user-name & access-key, and Grid URL are also passed as parameters to the instance of the RemoteWebDriver class. You can find the LambdaTest credentials from the LambdaTest Accounts Page.

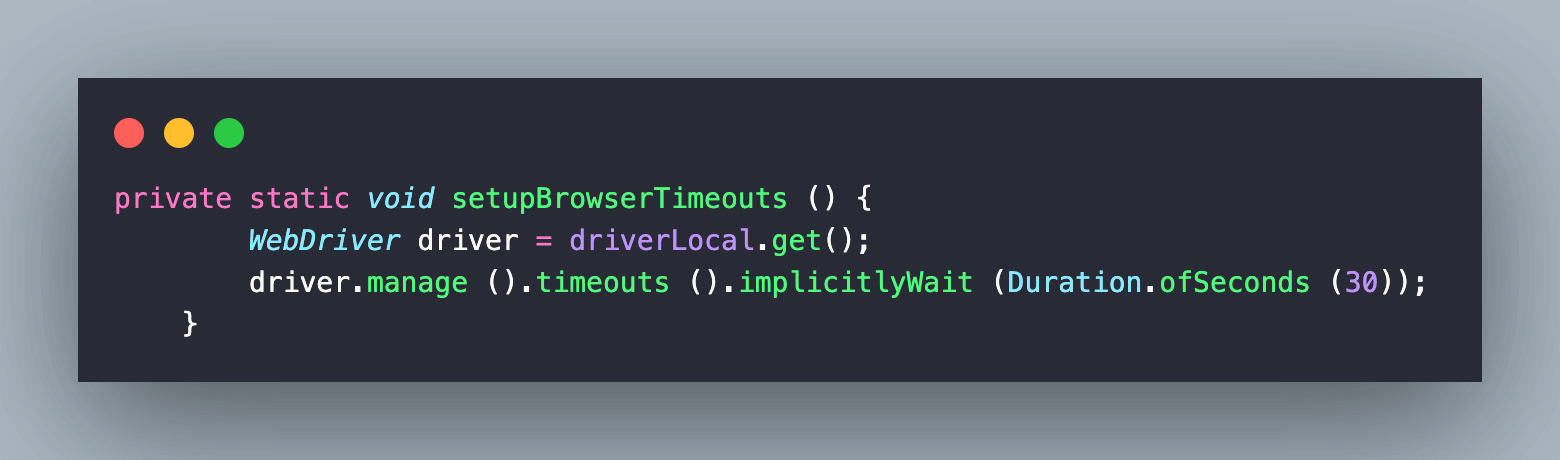
After the driver is set, an implicit wait of 30 seconds is set using the setupBrowserTimeouts() method.
Code Walkthrough
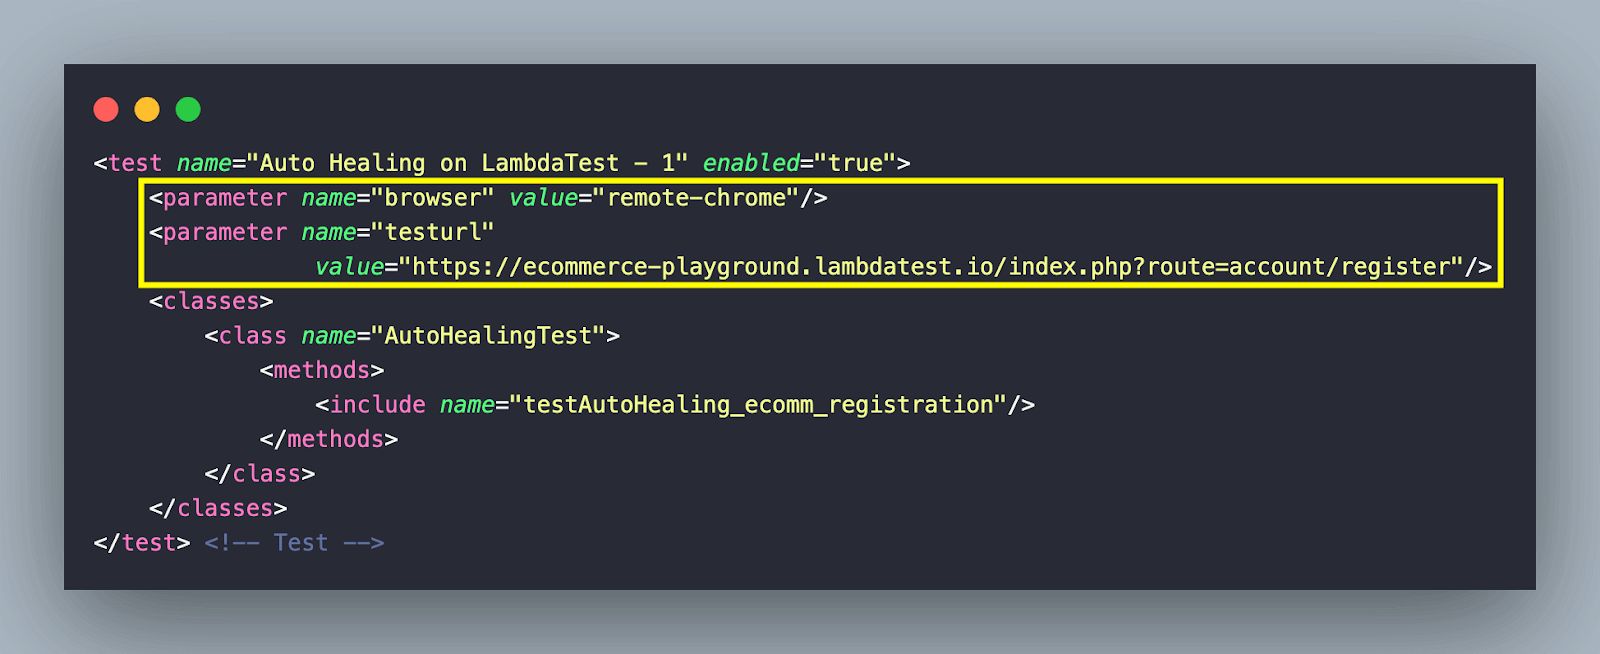
setupTest() is a parameterized method that takes browser as the input parameter, which is in-turn passed from the TestNG xml file (i.e. xml/testng_autohealing.xml or xml/testng_org.xml). The other parameter (i.e., testurl) is used directly inside the parameterized test method(s).
The alwaysRun attribute used along with the @BeforeClass annotation indicates that the annotated method [i.e., setupTest()] must be executed even if test methods inside the class fail or throw exceptions.
On successful execution, you should have the Chrome browser instantiated on the LambdaTest cloud grid.
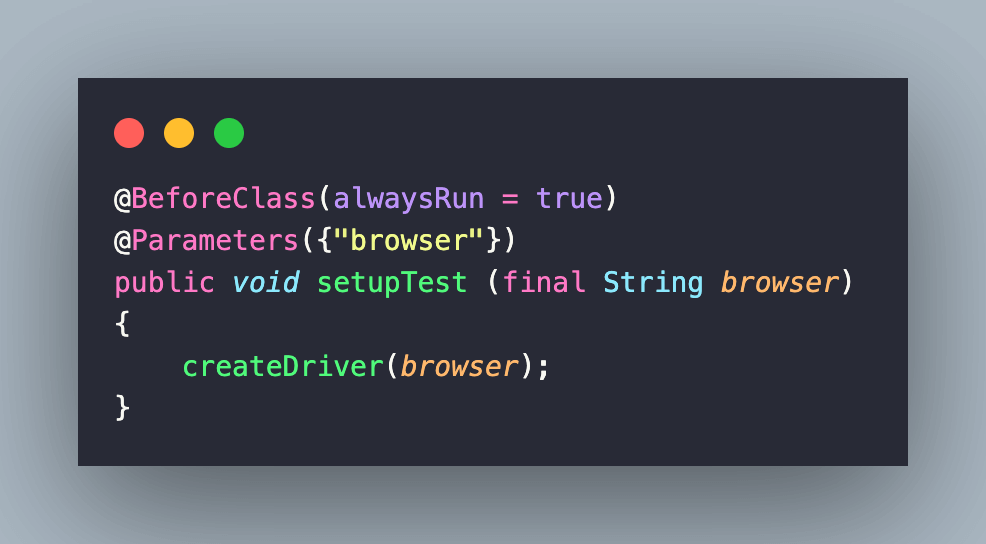
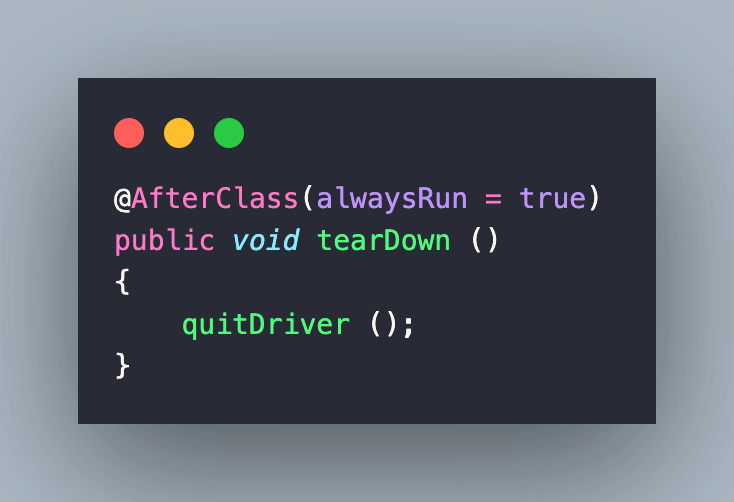
On similar lines, the tearDown() method implemented under the @AfterClass annotation is invoked once all the test methods in a test class have run. You can refer to the TestNG Annotations tutorial for a quick refresher about these annotations!
Implementation [Test Methods]
For simplification, we have separated the test methods into two files (located in the test/java folder):
- OrgTest.java: Contains implementation with the original locators in place. Hence, you would observe no auto healing when executing tests in the file.
- AutoHealingTest.java: Contains implementation with the new locators in place. Hence, you would observe the locators being auto-healed when executing test methods in the file.
Since the blog focuses more on auto healing in Selenium, we won’t be delving deeper into Selenium locator-specific implementation. Let’s get started…
Code Walkthrough
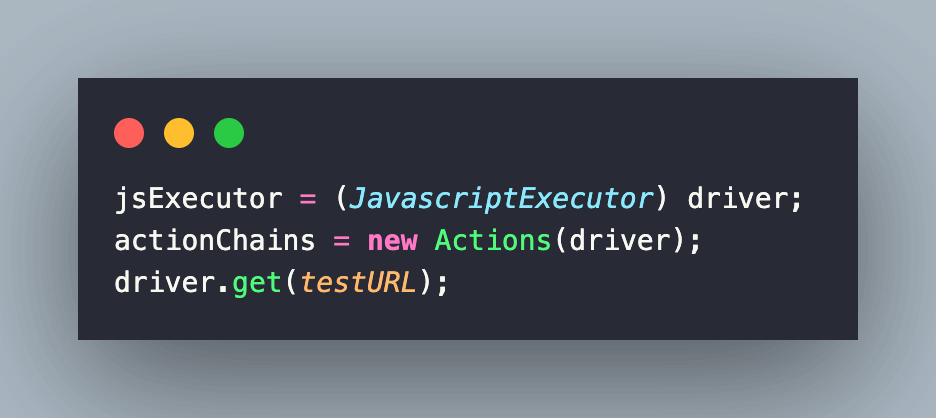
The OrgTest class extends BaseTest that contains utility functions for creating WebDriver instance and destroying the same via the quit() method in Selenium.
To start with, we create a reference to the JavascriptExecutor interface. This will be further used for executing JavaScript within Selenium script. Further, an object of the Actions class is created so that we can automate actions like mouse clicks, button clicks, and more.
Here, we will look into the important aspects of the test methods.
Test Method (Test Scenario – 1): testAutoHealing_ecommerce_cart
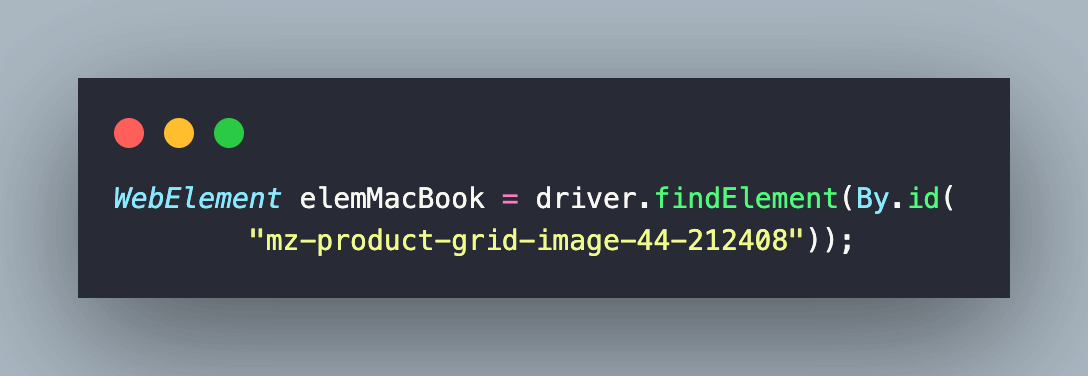
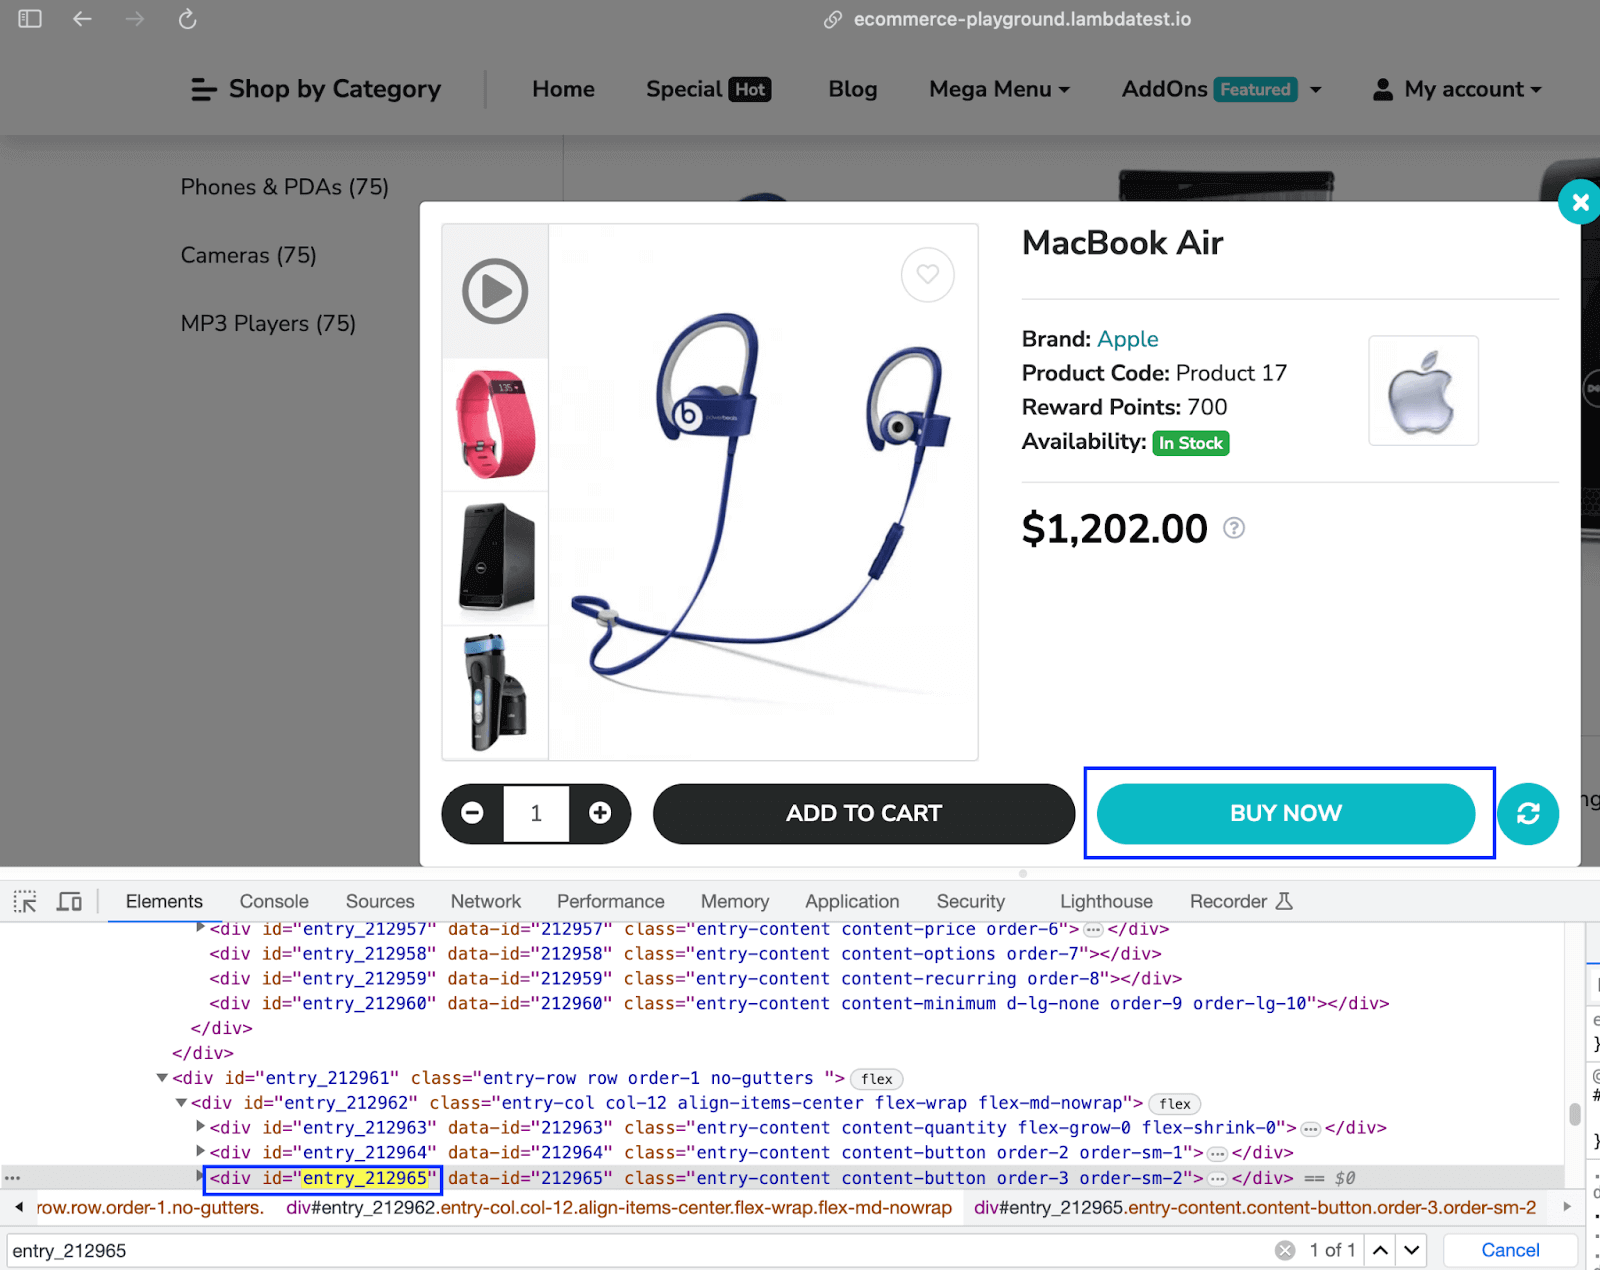
After navigating to the eCommerce Playground Product Page, the desired product (i.e., MacBook Air) is located using the ID locator in Selenium.
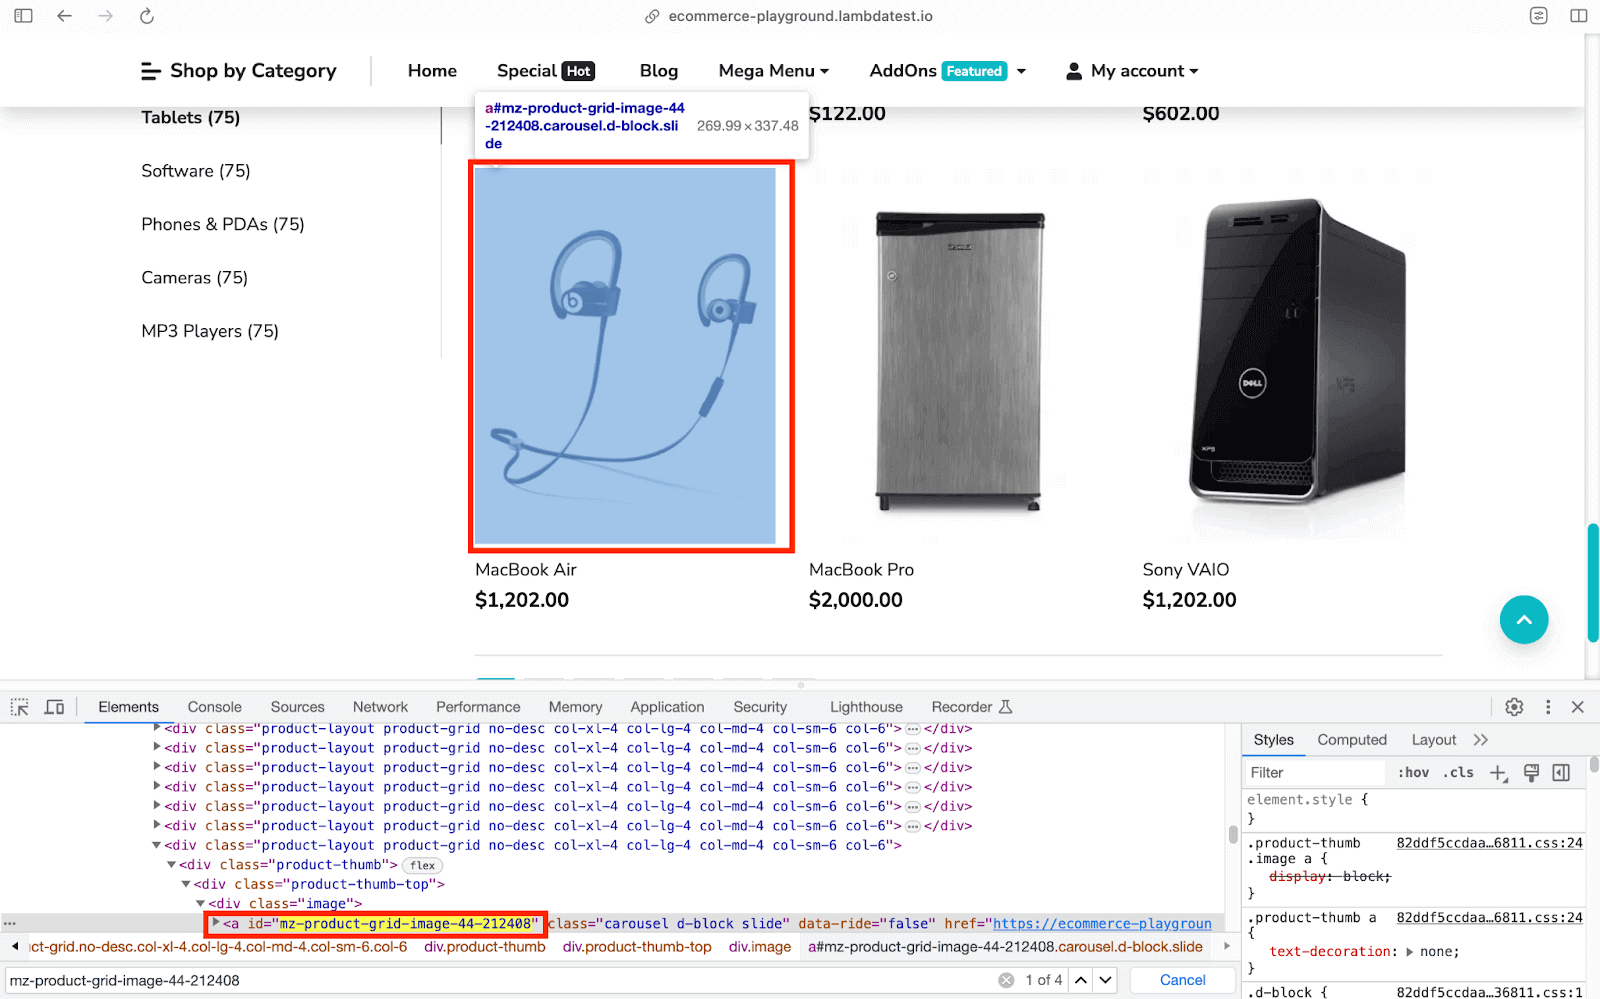
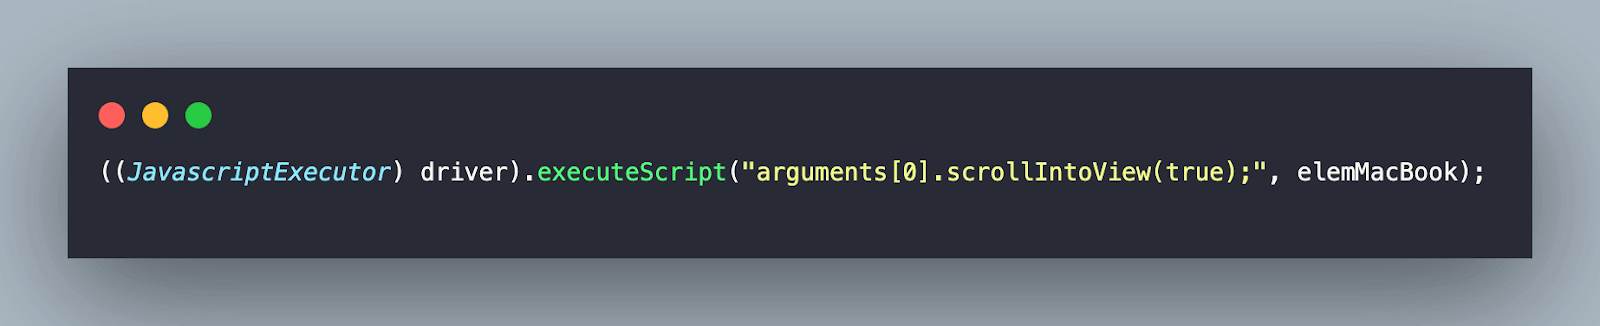
Once the element is identified (or located), we use the JS method scrollIntoView() to scroll into the visible area of the located element. scrollIntoView() is invoked using executeScript() method of the JavascriptExecutor interface.
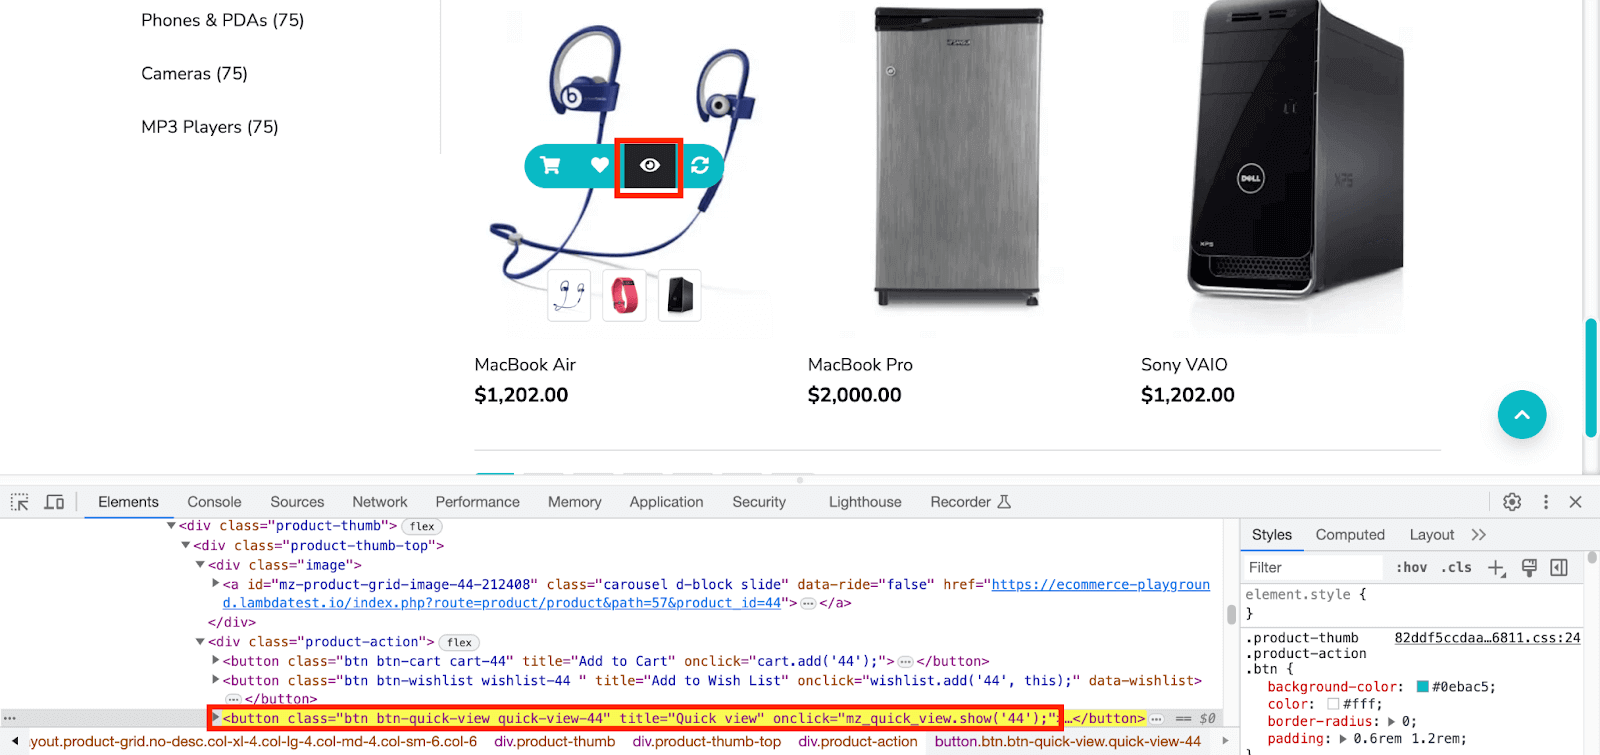
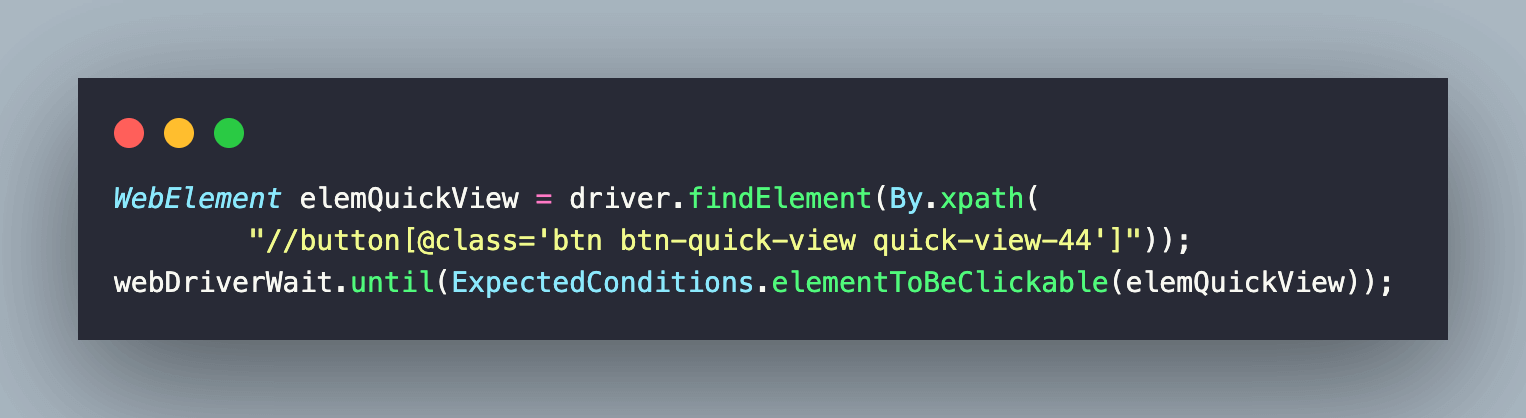
Once into the view, locate the Quick View button using the XPath locator. We use the elementToBeClickable ExpectedCondition in Selenium to wait until the element is not clickable. Once clickable, the element is clicked by invoking the Click method.
The Buy Now button is located using the ID locator, and a click is performed to navigate to the next page.
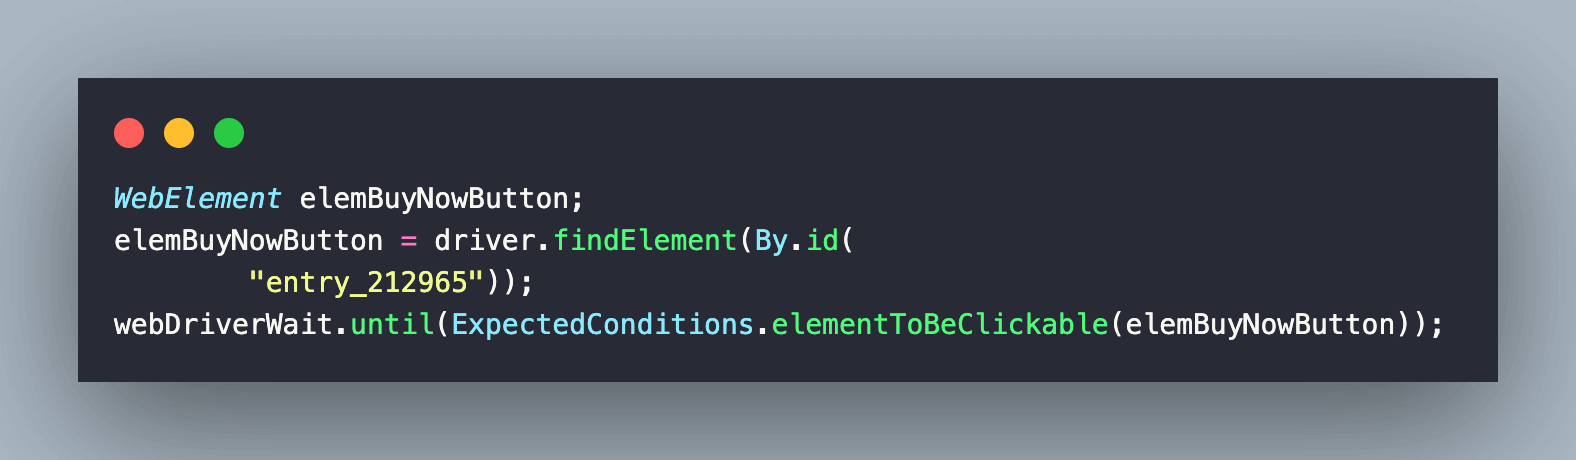
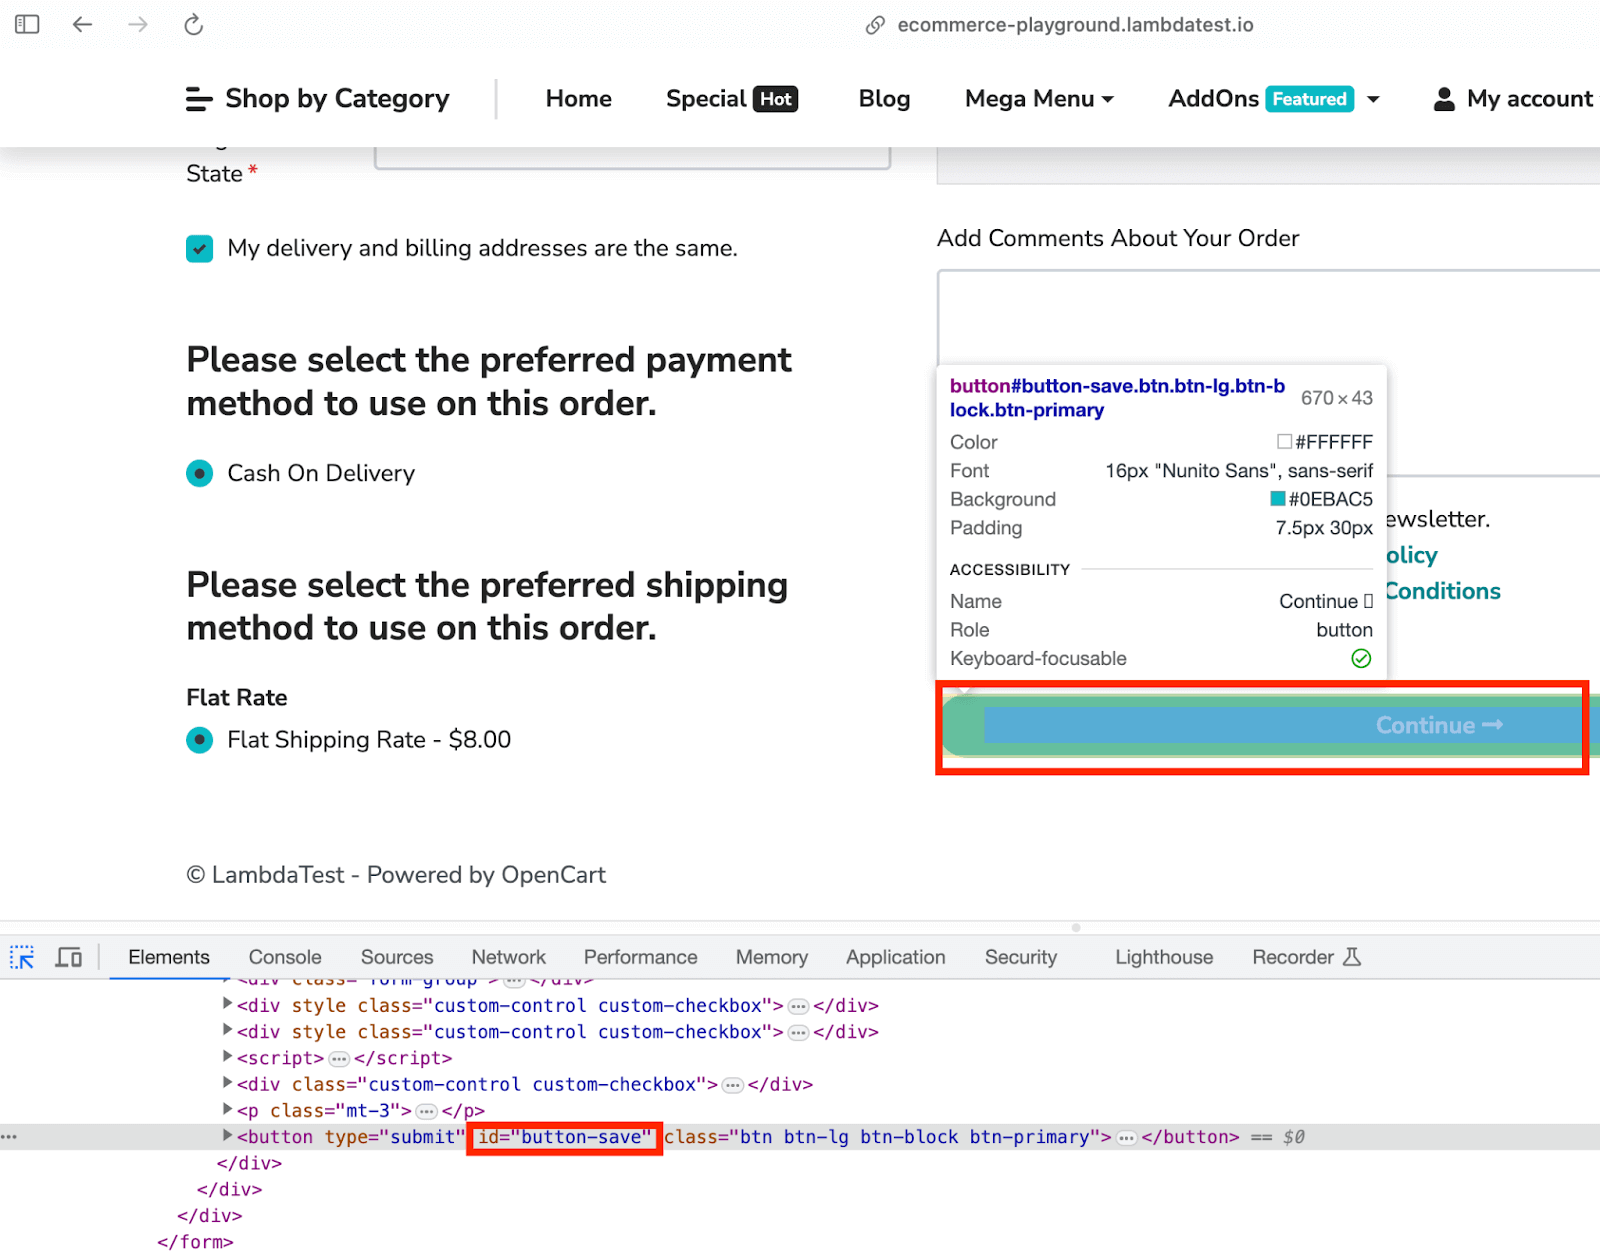
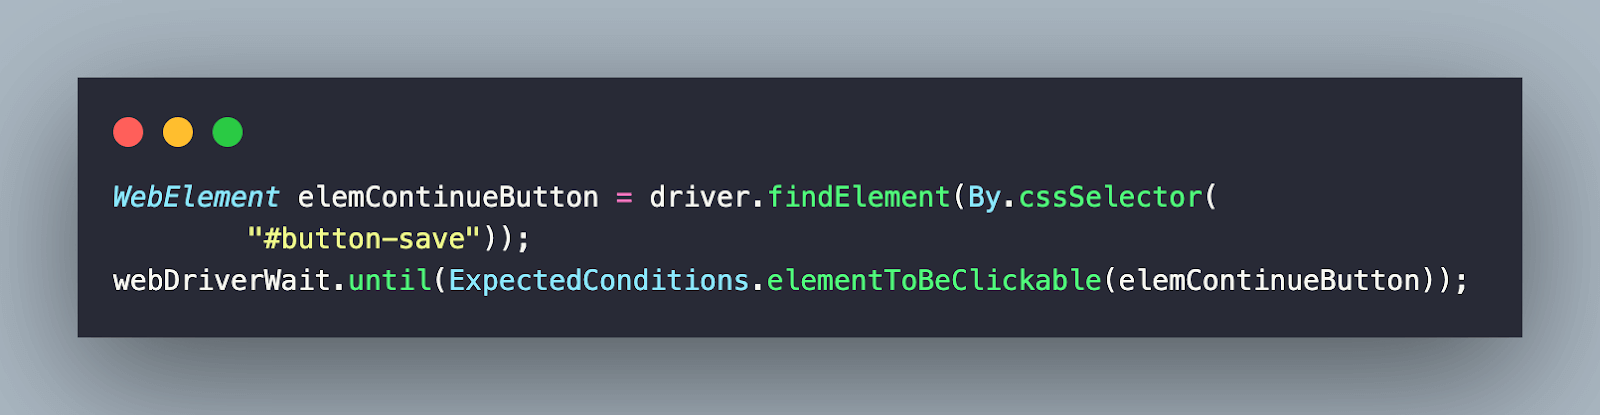
Finally, locate the Continue button (i.e., ID = button-save) on the page using the ID locator. An assert is raised in case the URL does not contain checkout.
Test Method (Test Scenario – 2): testAutoHealing_ecomm_registration
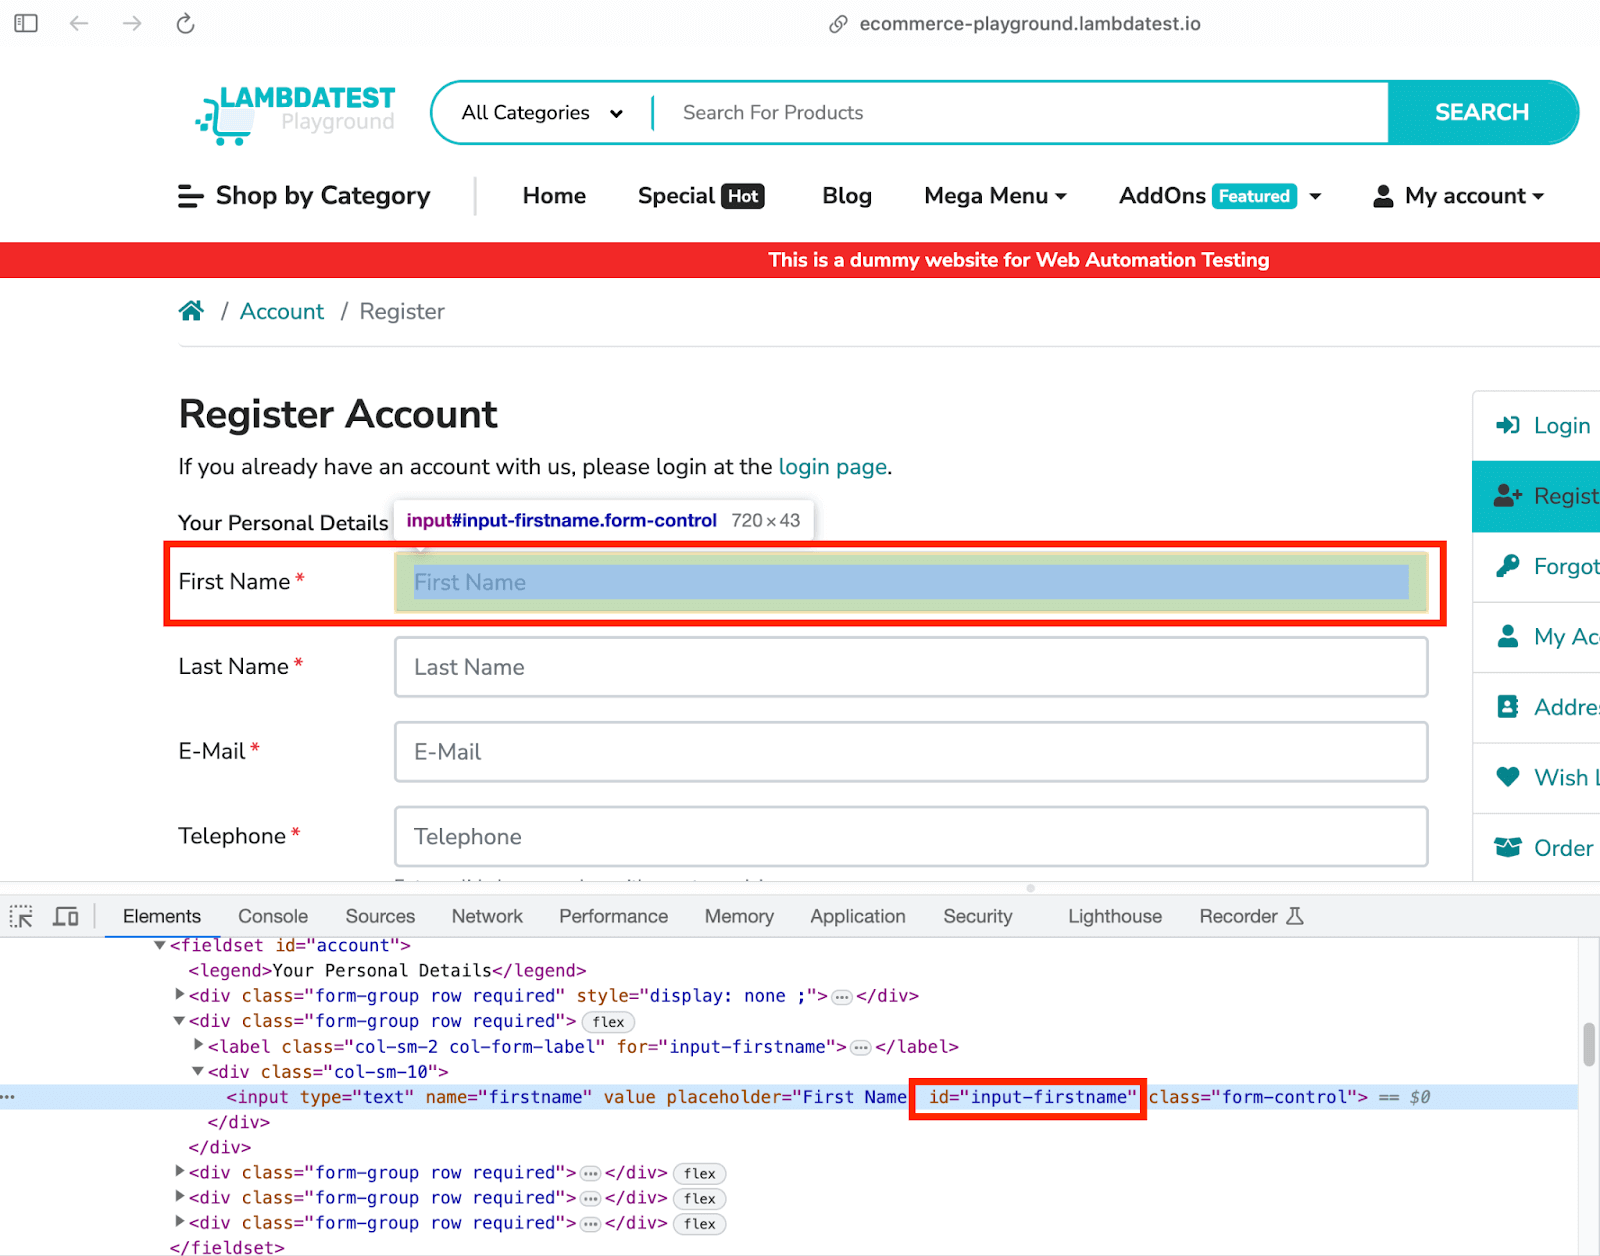
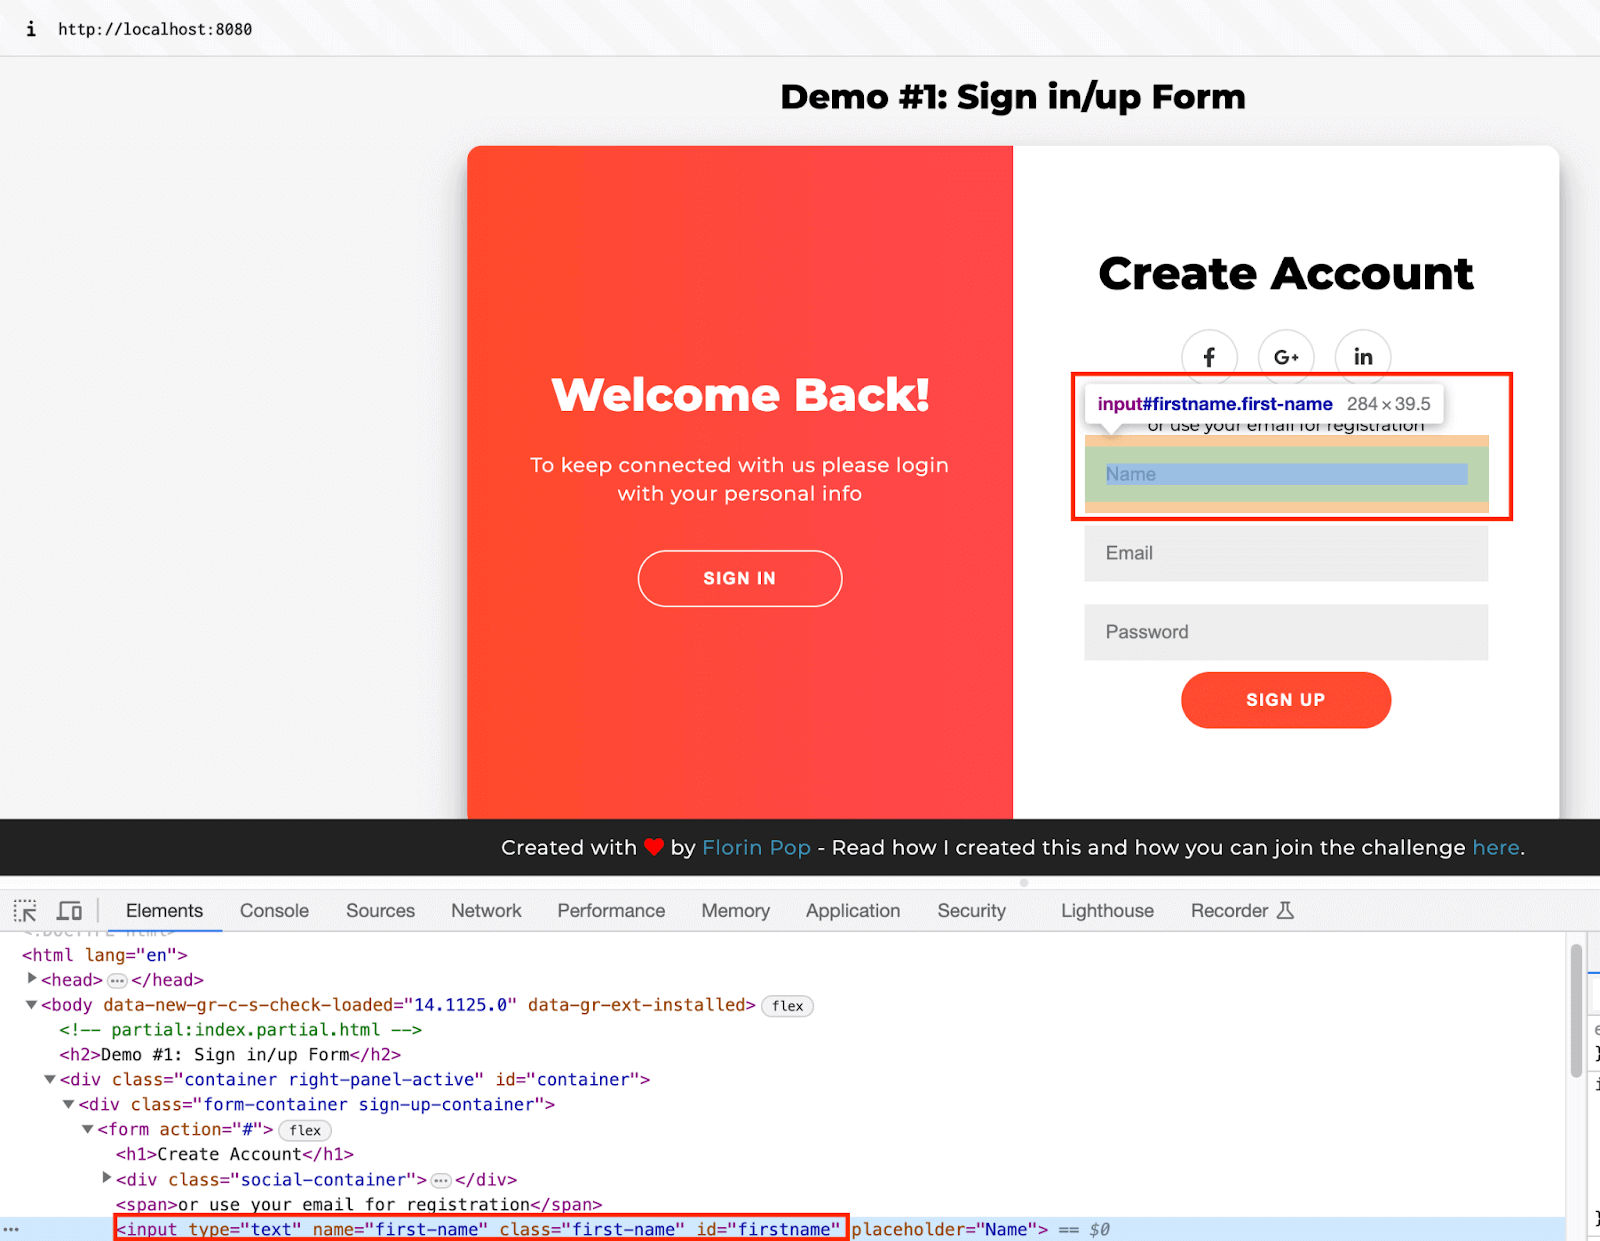
After navigating the eCommerce Playground Registration page, the respective elements are located using ID, XPath, and other locators. As shown below, the first name element is located using the ID locator, and sendKeys in Selenium is used for entering details in the text box.
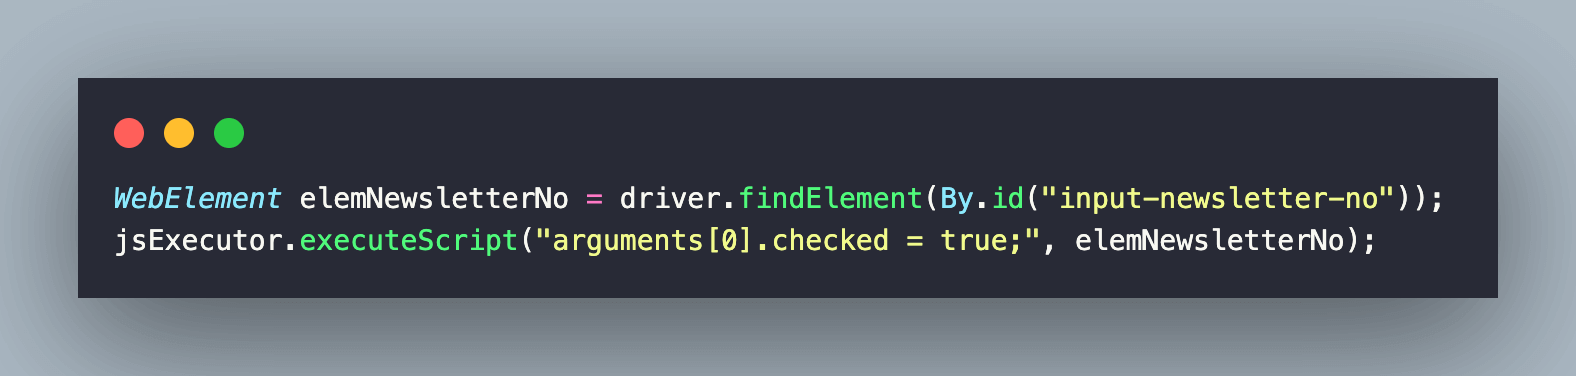
![DOM, arguments[0].checked](https://www.lambdatest.com/blog/wp-content/uploads/2023/09/DOM-arguments0.checked.png)
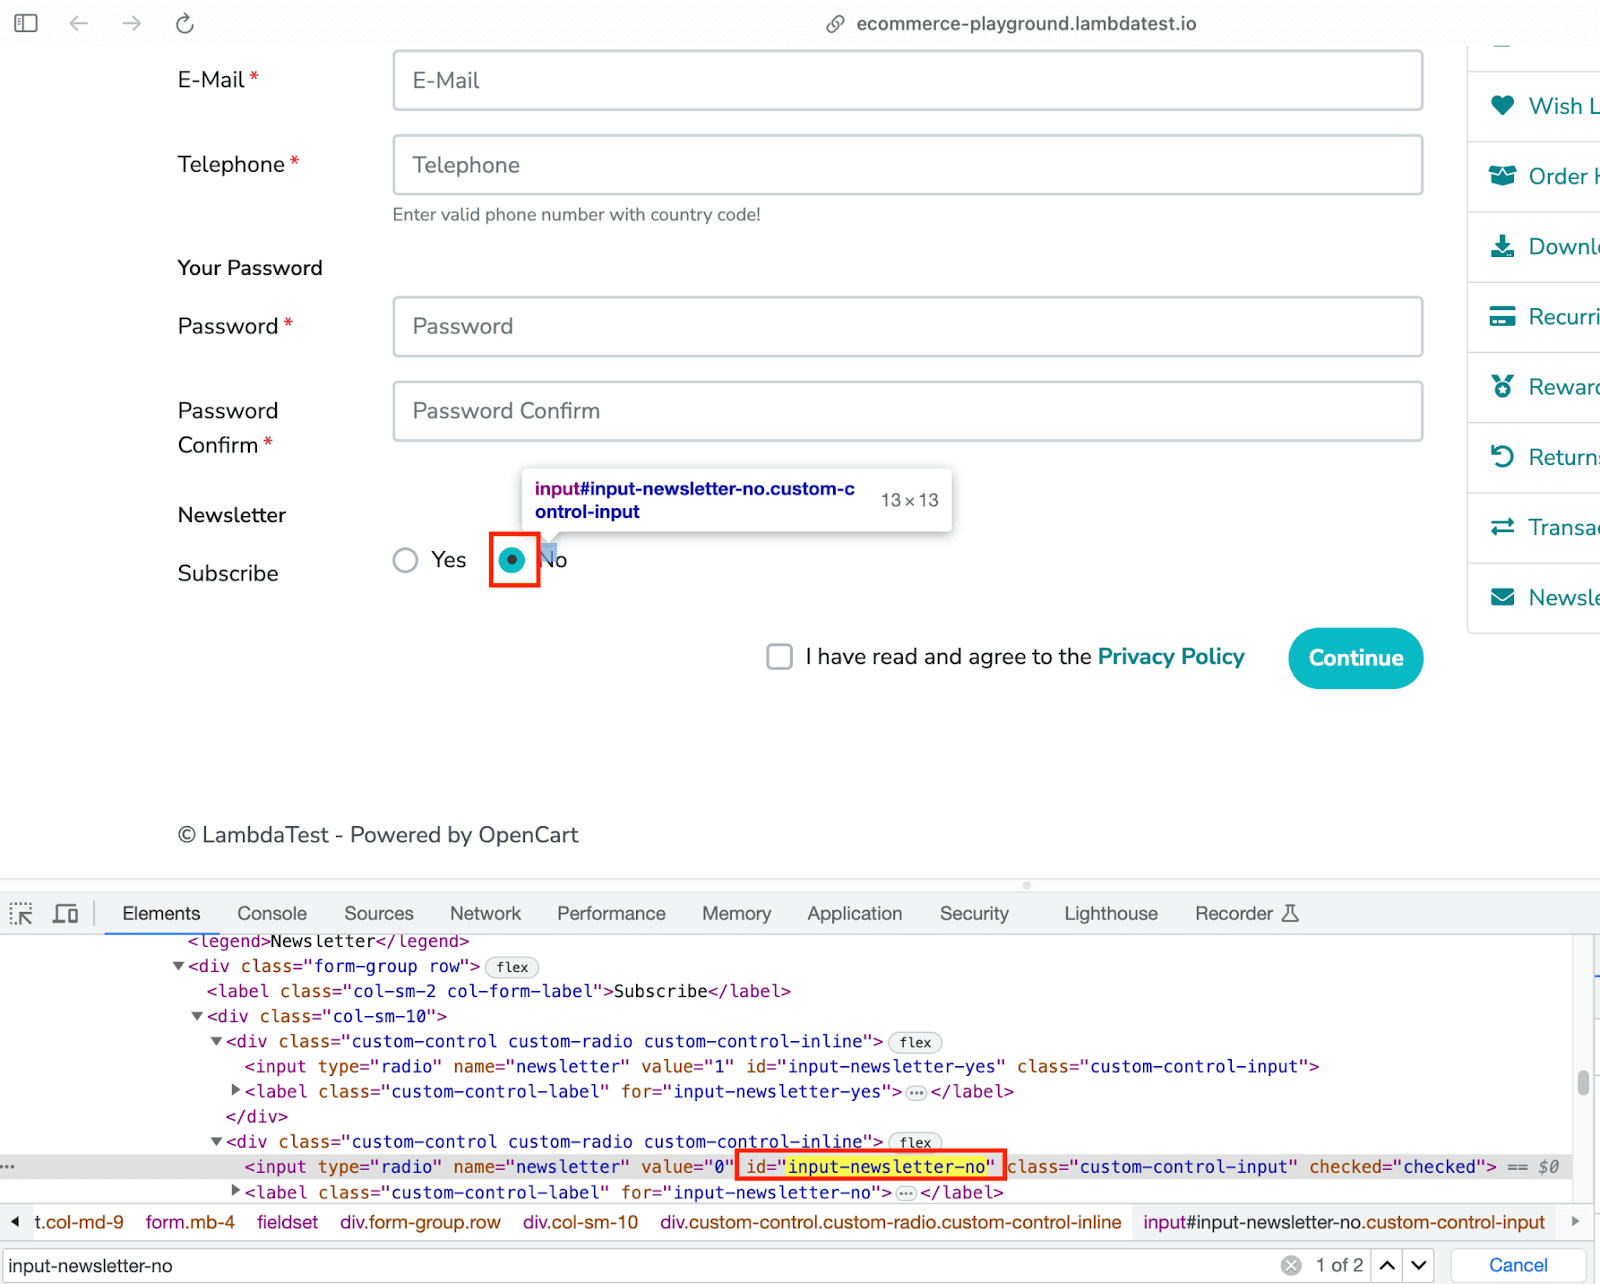
Subscription to newsletter is marked as NO by locating the respective Radio button. Since there are multiple elements of input-newsletter-no in the DOM, arguments[0].checked is used for toggling the state of the first argument (i.e., reference to the Radio button).
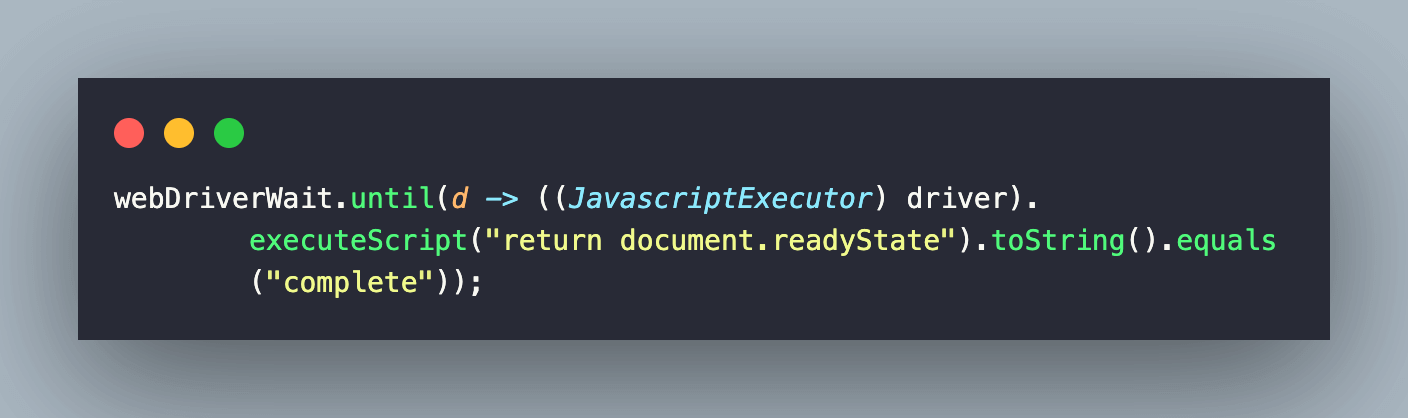
Now that all the required entries are filled, the Submit button is clicked. The Document.readyState property is checked for completion (i.e., complete), after which a check is performed to verify if the required page has opened.
Test Method (Test Scenario – 3): testAutoHealing_local_page
This test is performed on a document (or page) under development. Once you have downloaded its source code, navigate to the dist folder and trigger php -S localhost:8080 command on the terminal.
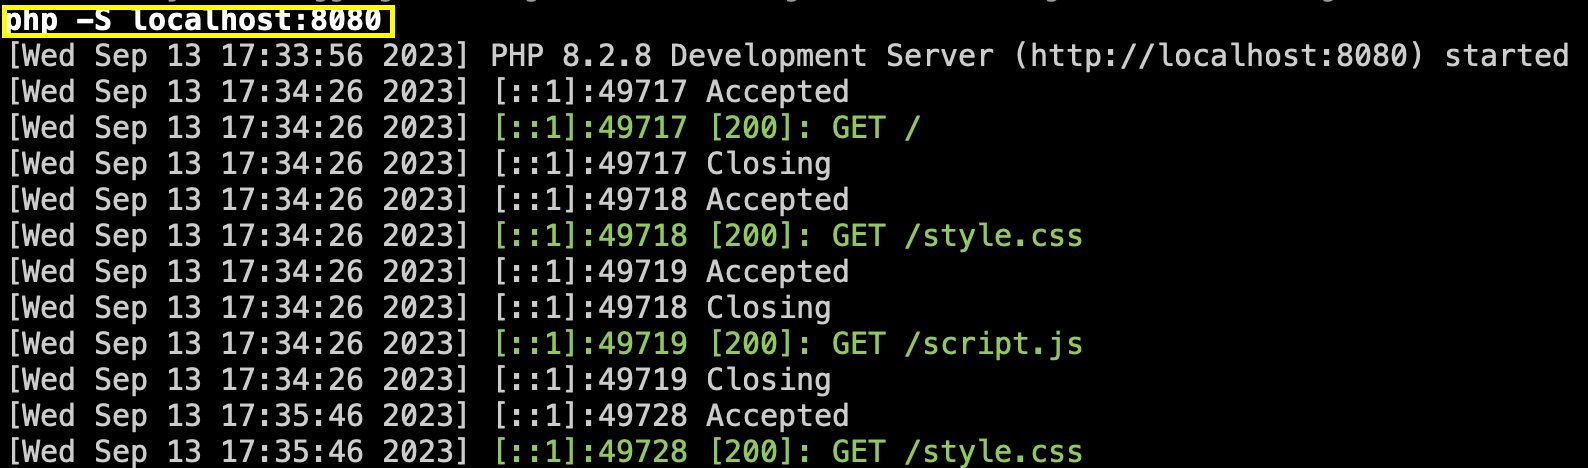
Navigate to localhost:8080 from the web browser.
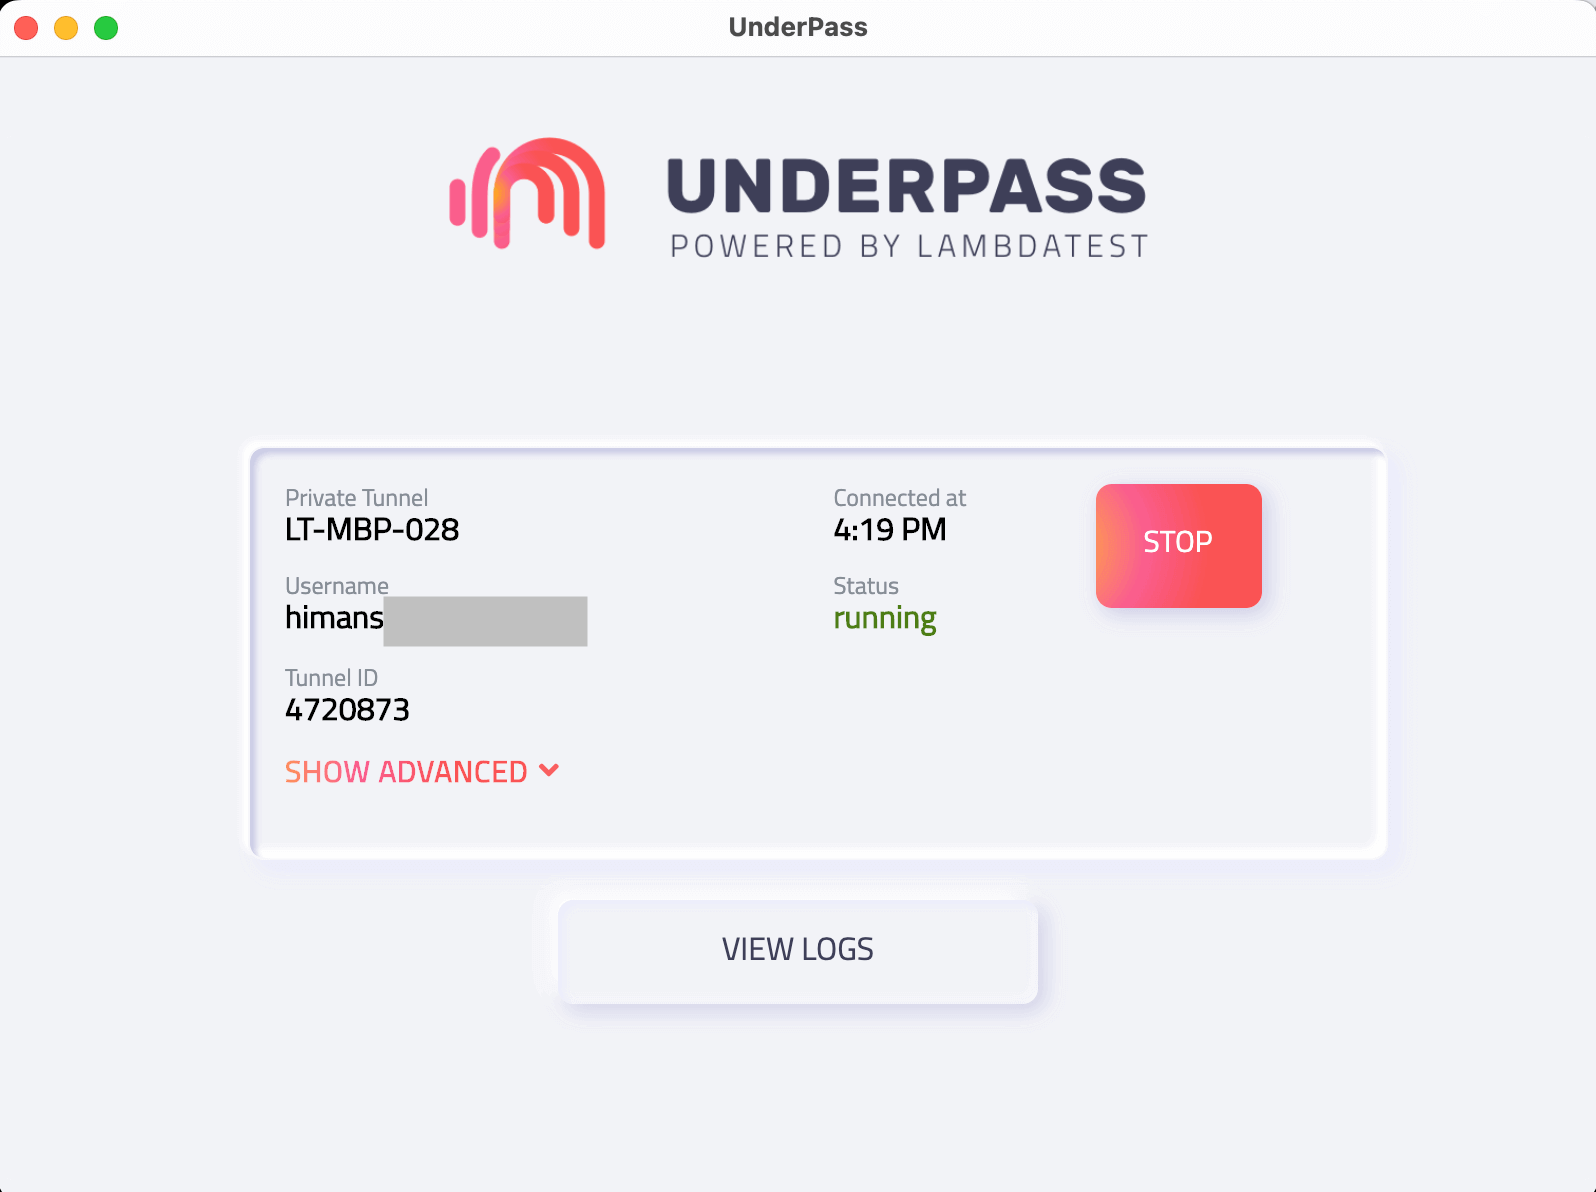
Since this is the case of localhost testing, we need to start the tunnel. To do the same, download Underpass from LambdaTest to establish an SSH tunnel between the OS & LambdaTest cloud server(s).
With this, we are all geared to test the local pages on LambdaTest! First, the SIGN UP button on the page is located using the ID locator. Once located, the button is clicked using the Click() method.
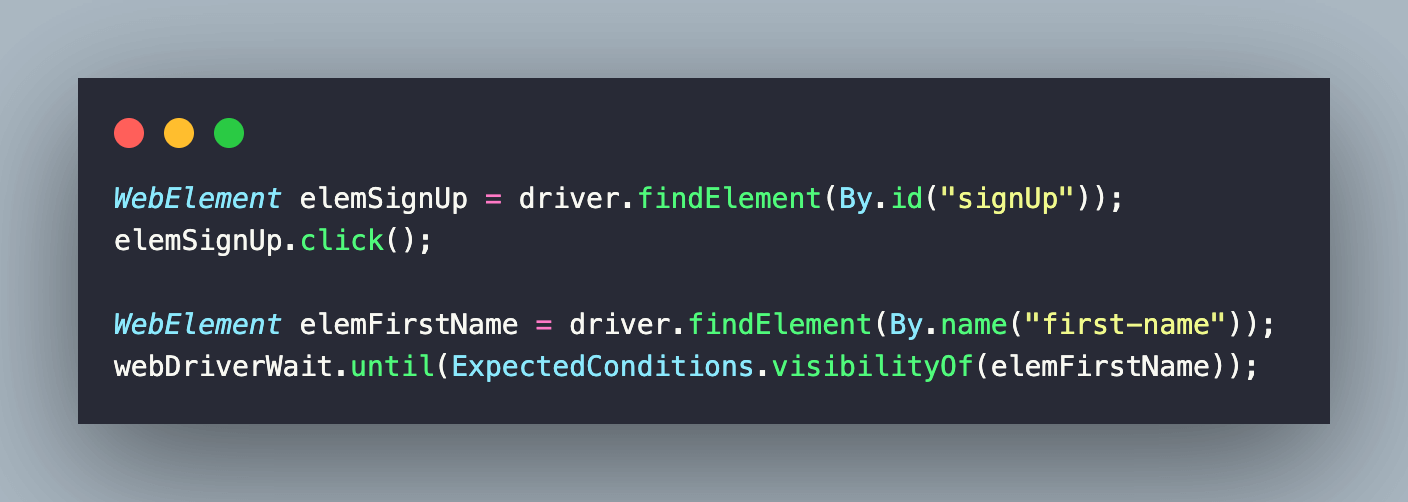
Required details like First Name, Email, and Password are entered using the same approach we have discussed. As a part of the next test, we navigate to http://localhost:8080/iframe.html, where the iFrame is a container of the earlier page (i.e., index.html). The intent of creating this page is to verify if auto healing of locators is possible within iFrames.
To get started, we first switch to the iFrame by invoking the switchTo() method of Selenium WebDriver. If you are new to iFrames, check the tutorial on handling iFrames with Selenium.
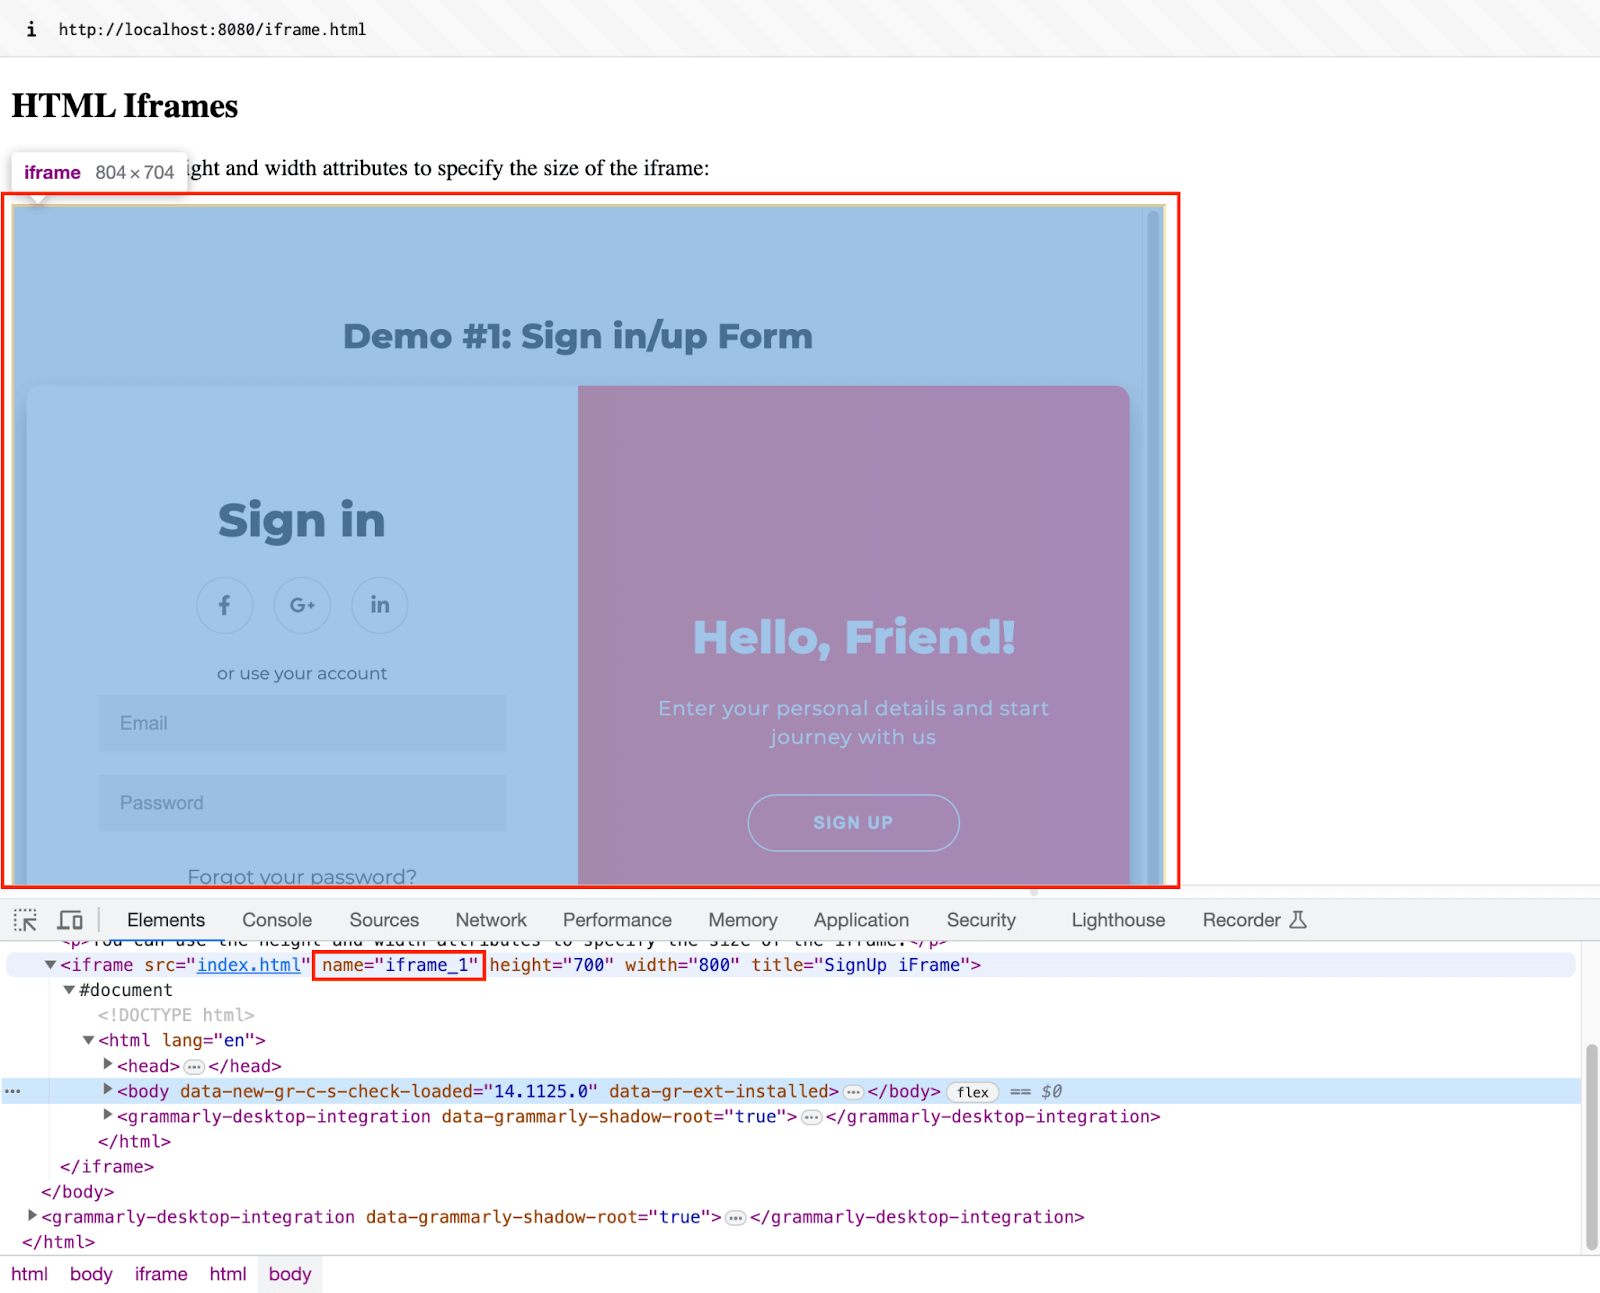
Once we switch to the iFrame, the combination of findElement() and sendKeys() methods is used for automating interactions with the elements in the DOM.

With this, we are all set to execute the tests on the LambdaTest platform! It is essential to note that we have set the autoHeal capability to true.
Execution [No Auto Healing]
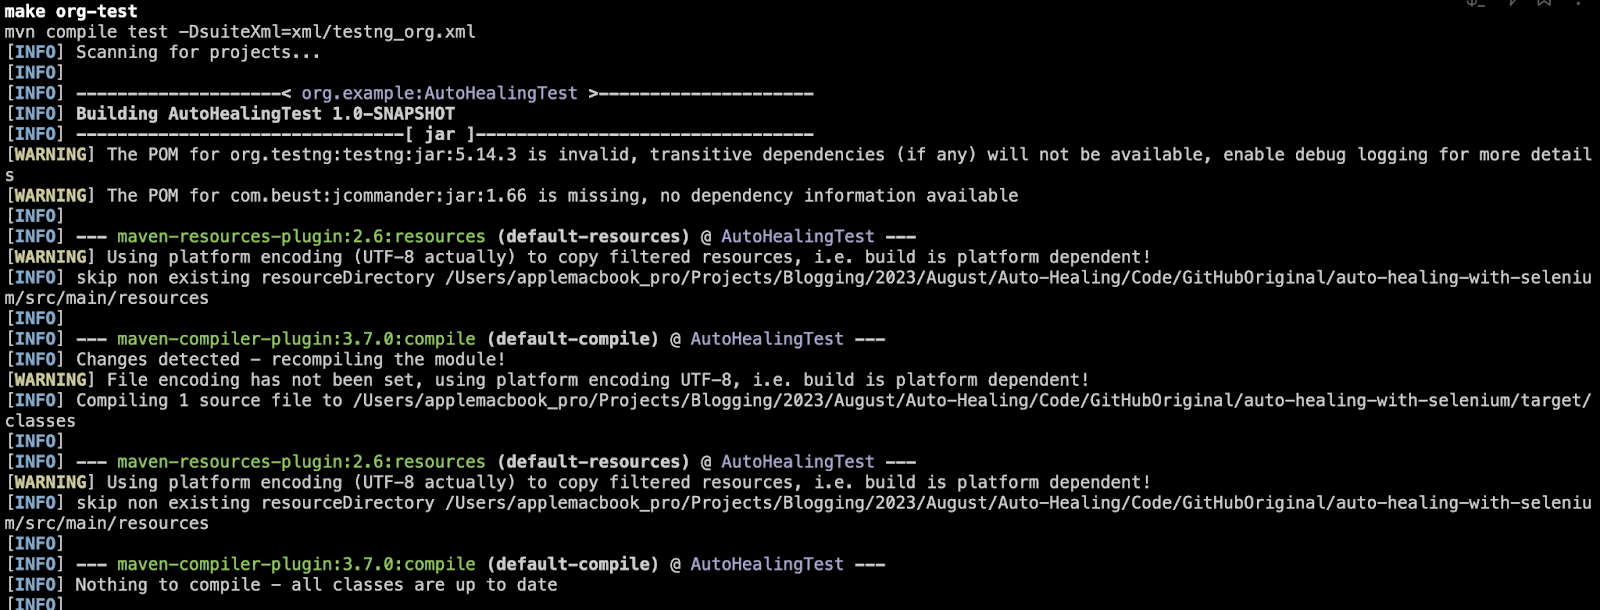
First, export the environment variables LT_USERNAME and LT_ACCESS_KEY by adding them in the Makefile.
![Execution [No Auto Healing]](https://www.lambdatest.com/blog/wp-content/uploads/2023/09/Execution-No-Auto-Healing-1-1-1.png)
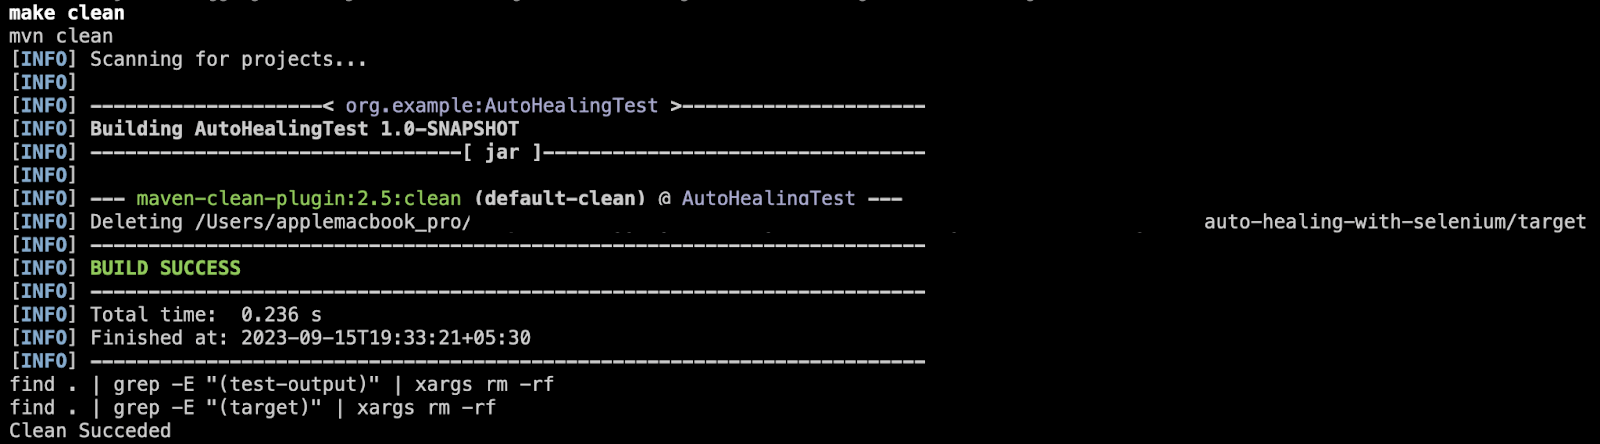
With this, we are all set to trigger the tests via the Makefile. Run make clean to clean any output/target directories.
Run make set-env to export the desired environment variables (i.e., LT_USERNAME and LT_ACCESS_KEY).

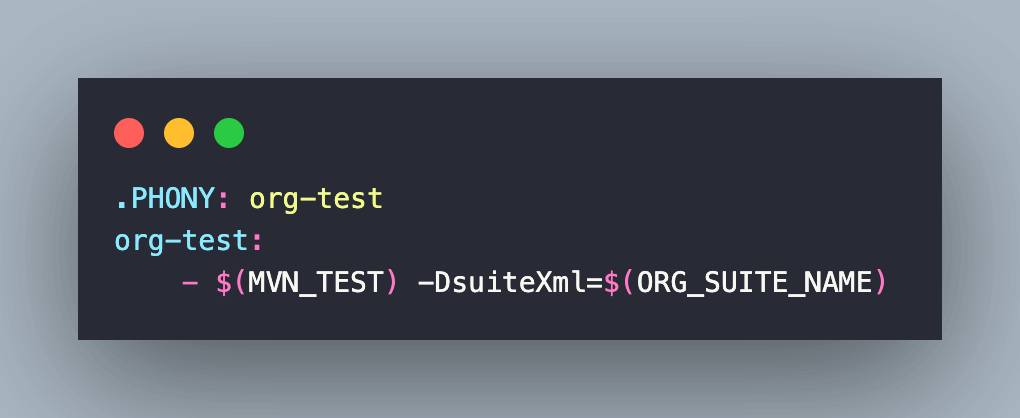
For simplification, we have two separate TestNG XML (i.e., testng_org.xml & testng_autohealing.xml) files to demonstrate auto healing in Selenium.
Run make org-test to execute tests with locators that have not been modified during development. Hence, we will not observe any auto healing of locators in this test execution cycle.
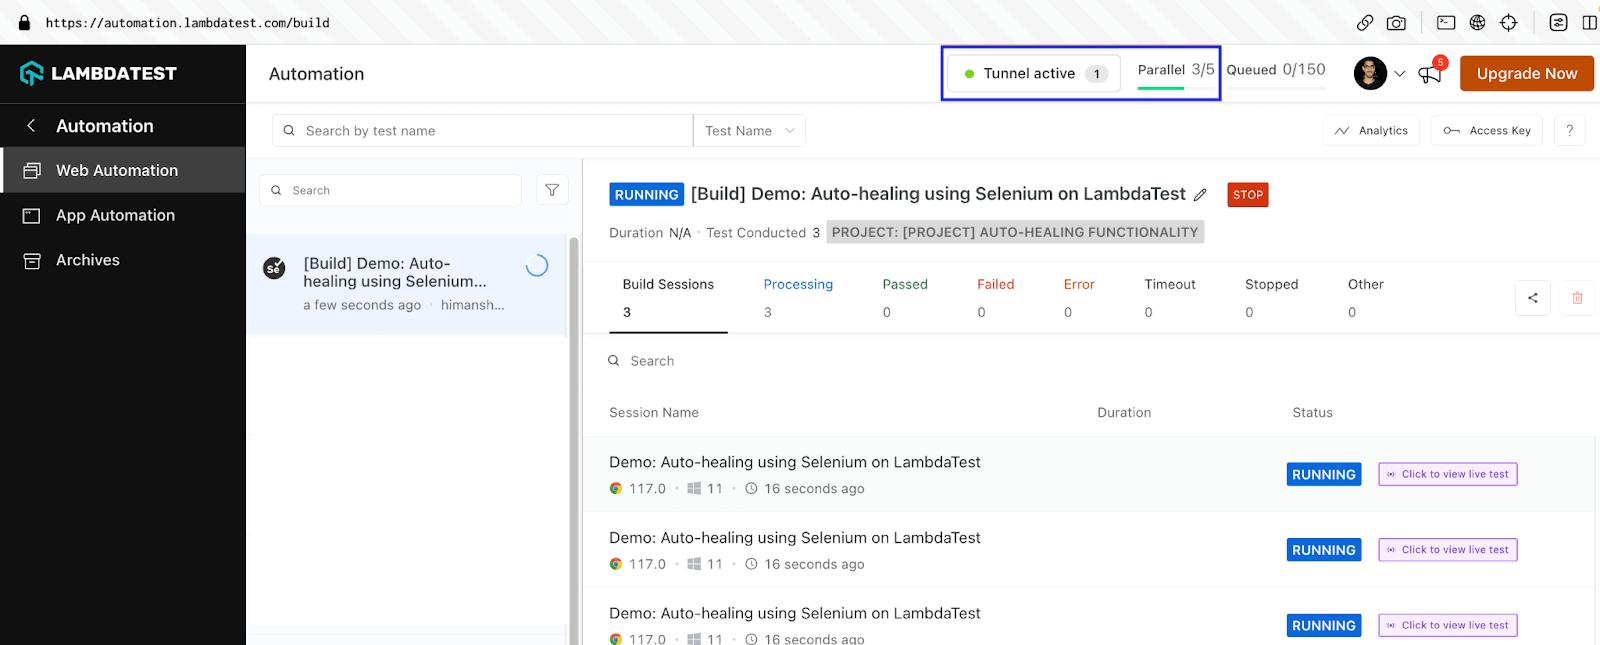
As seen below, the test execution is triggered with all three tests running in parallel on LambdaTest Selenium Grid.
Log on to the LambdaTest Automation Dashboard to check the status of the test execution.
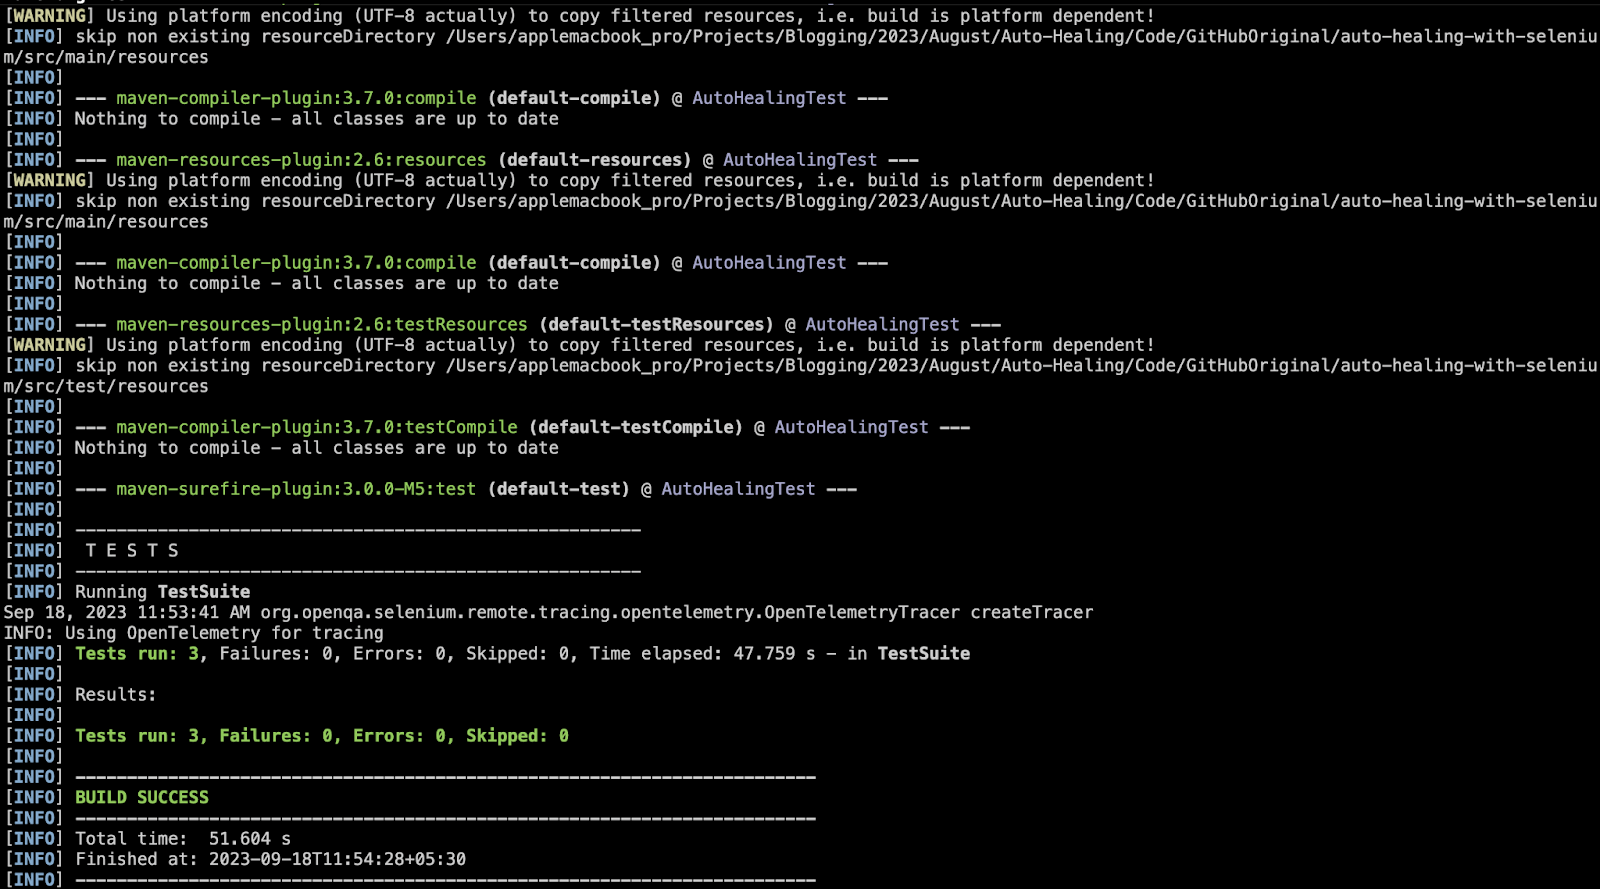
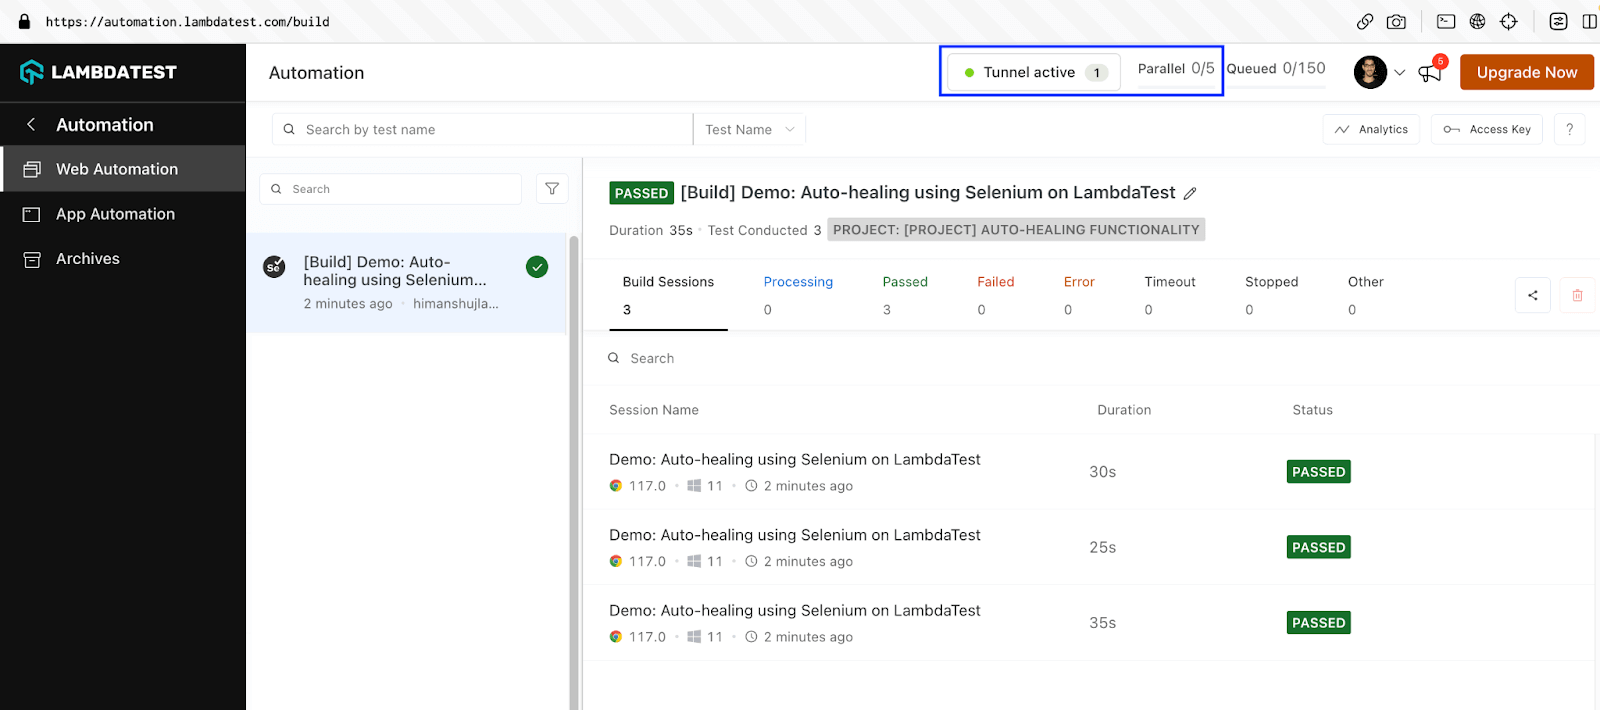
As seen below, the test execution was successful, and no auto healing was done since there was no change in the locators.
Things are getting exciting.🙂Now, let’s change a few locators using the executeScript() method in Selenium that helps execute JavaScript in the context of the currently selected frame (or window). Let’s set the ball rolling!
Implementation Changes [for Auto Healing demonstration]
As mentioned earlier in the above sections, we have kept the auto-healing tests in a separate file so that it becomes easy to differentiate between them! Here are the important code touch-points:
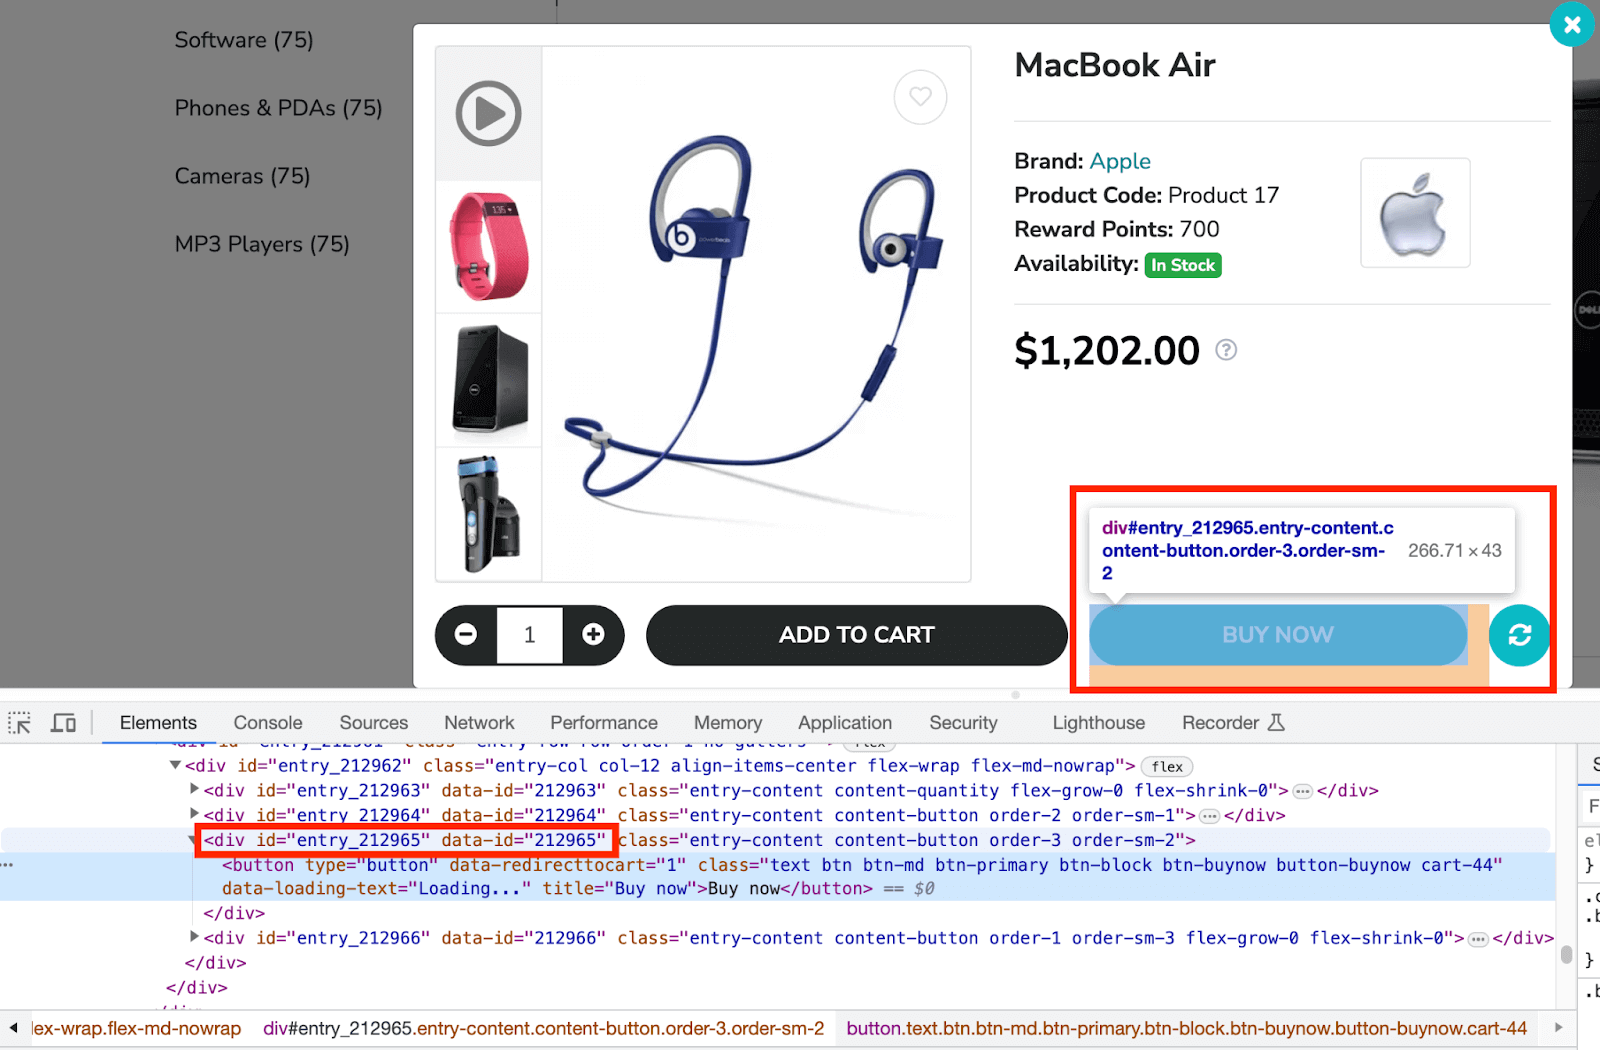
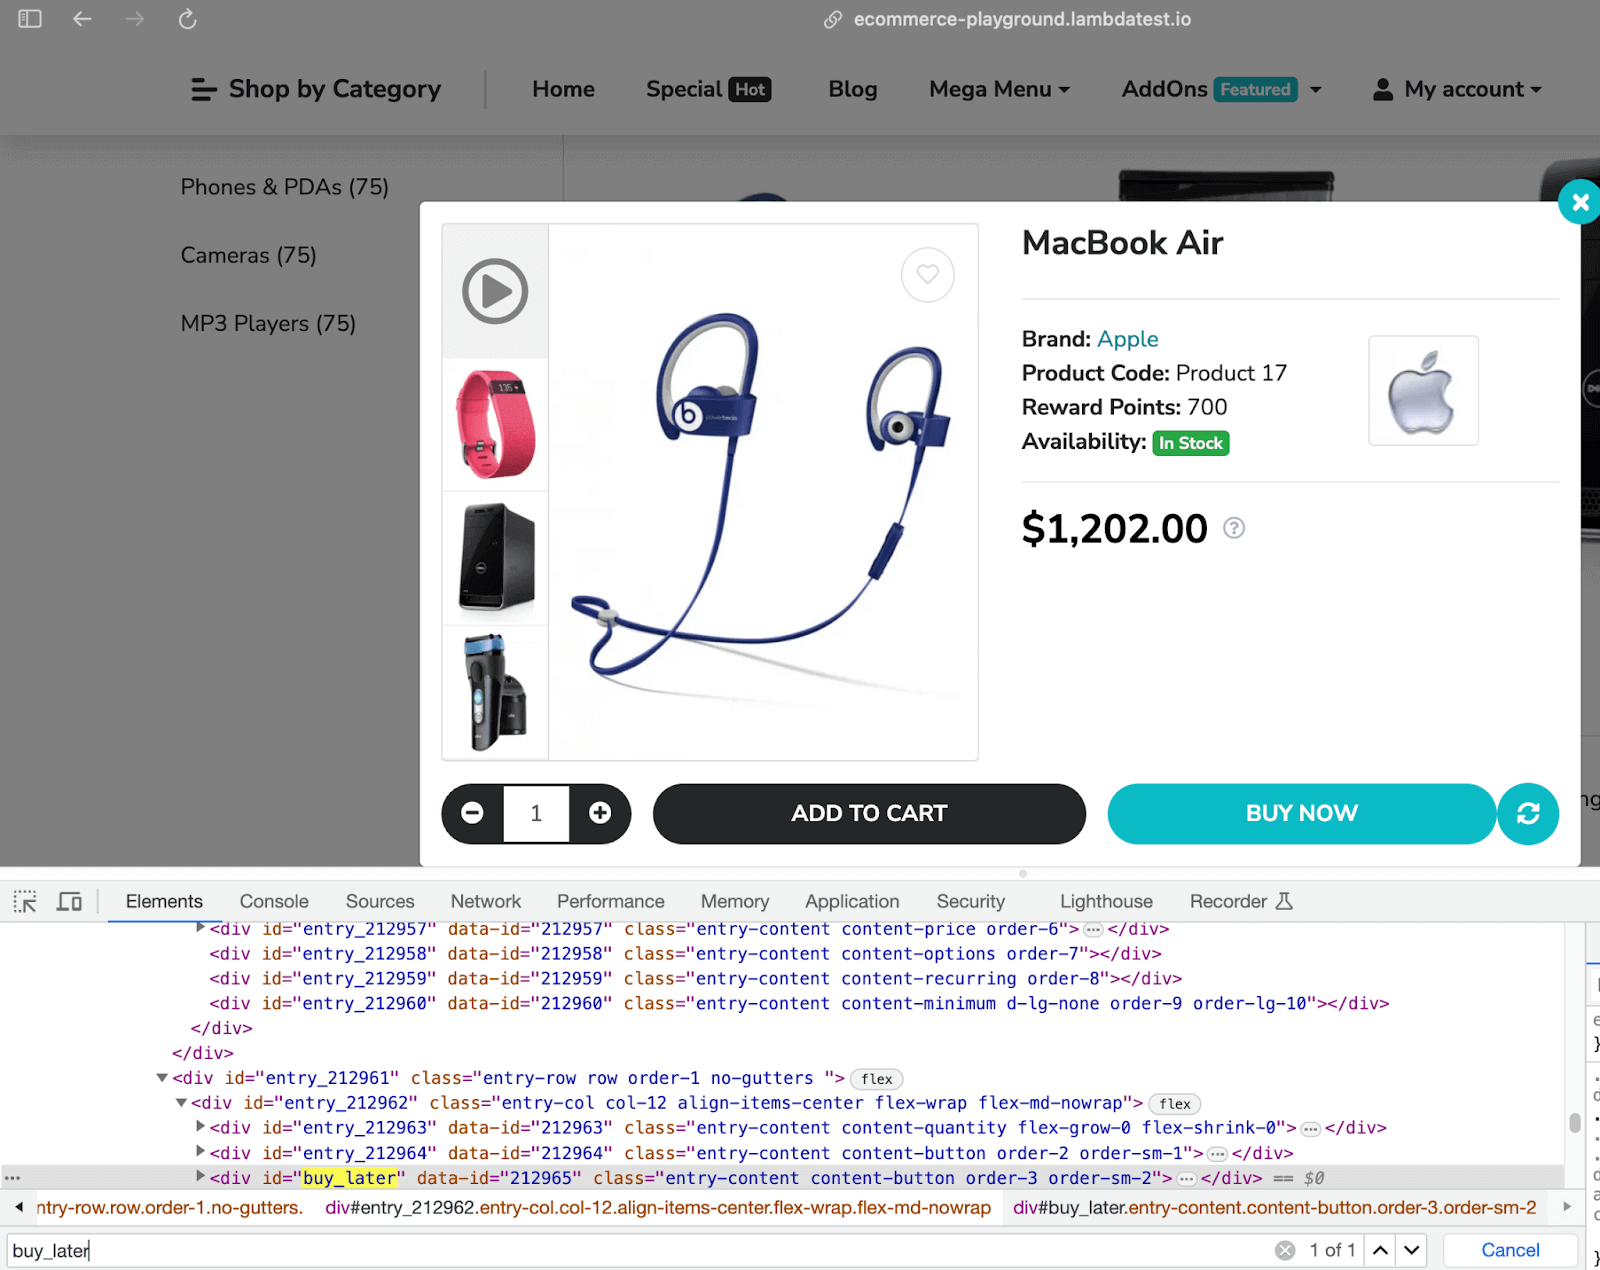
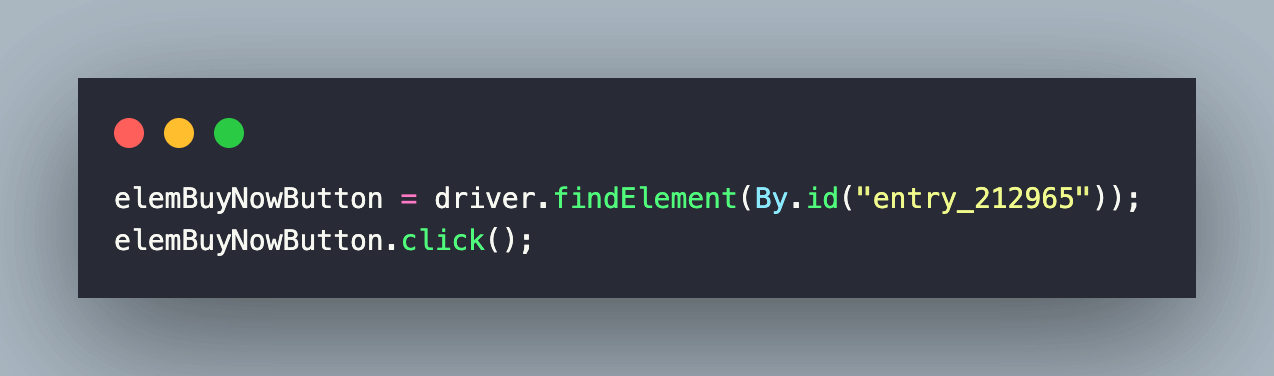
Let’s change locators in the first test scenario by replacing the ID entry_212965 to buy_later on the eCommerce Playground Product Page.
For demonstration, we execute the command on the DevTools console. As seen below, the ID of the said element is changed to buy_later.
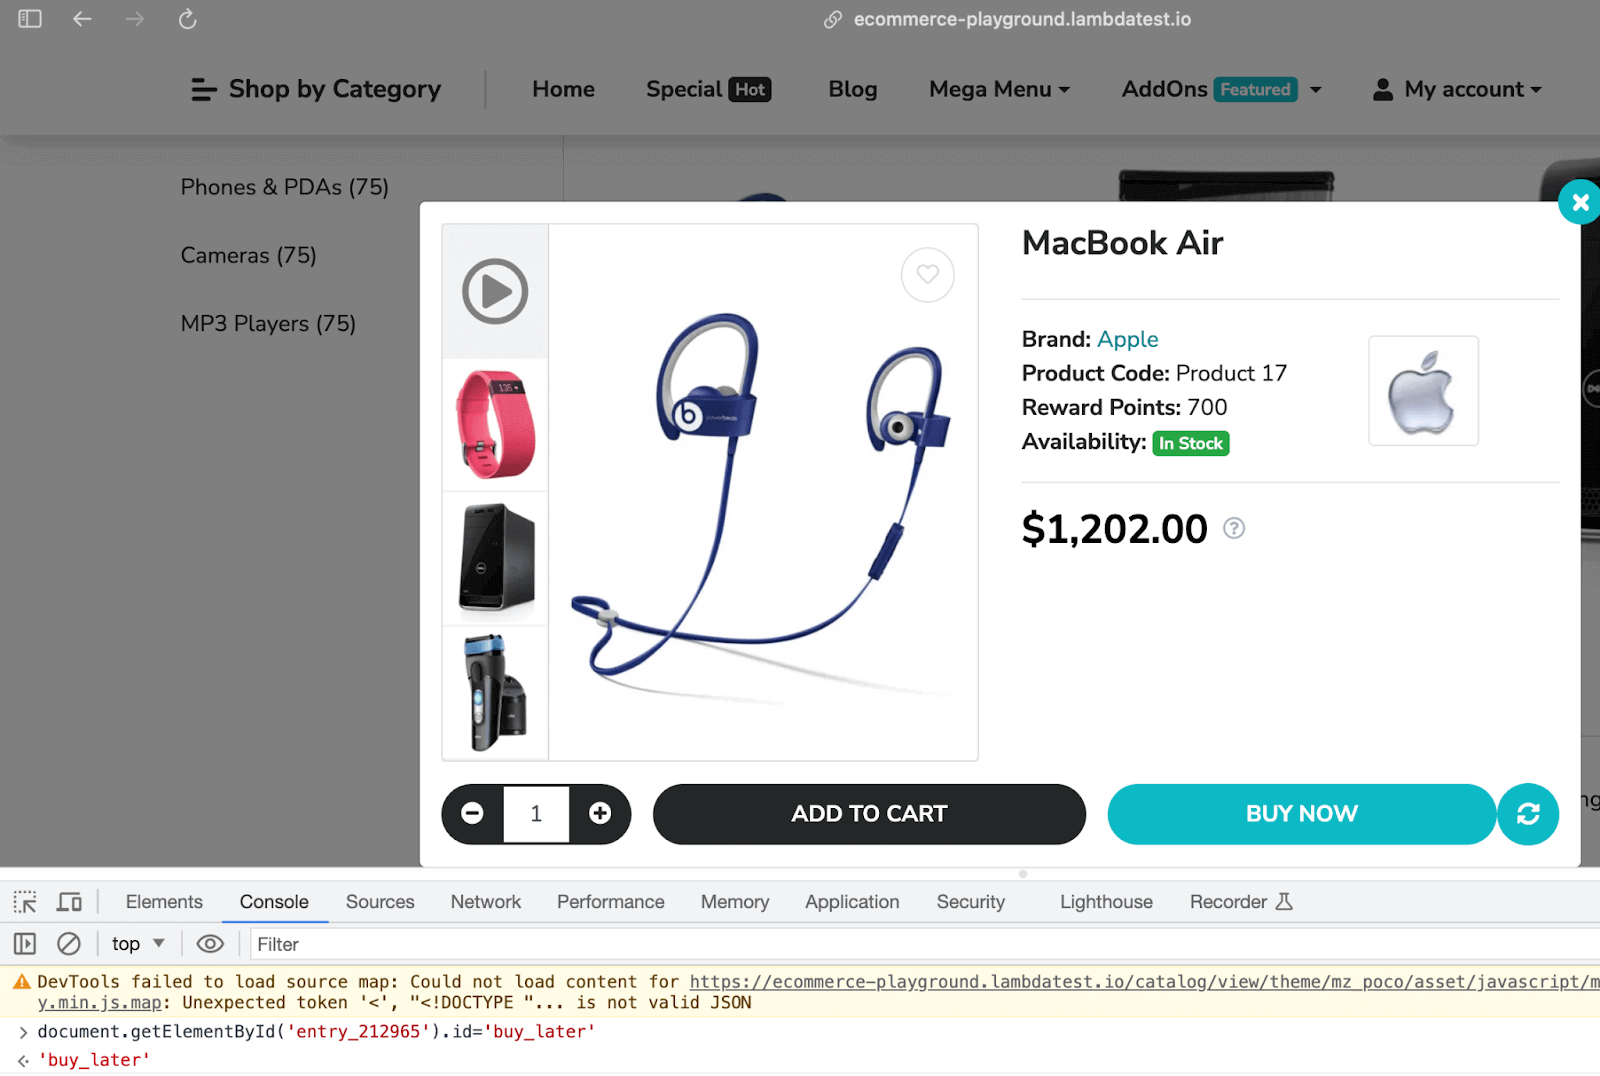
To mimic the same change via code, we first locate the element using the ID locator. Once the element is located, its ID is changed using the getElementById() method of the Document interface.
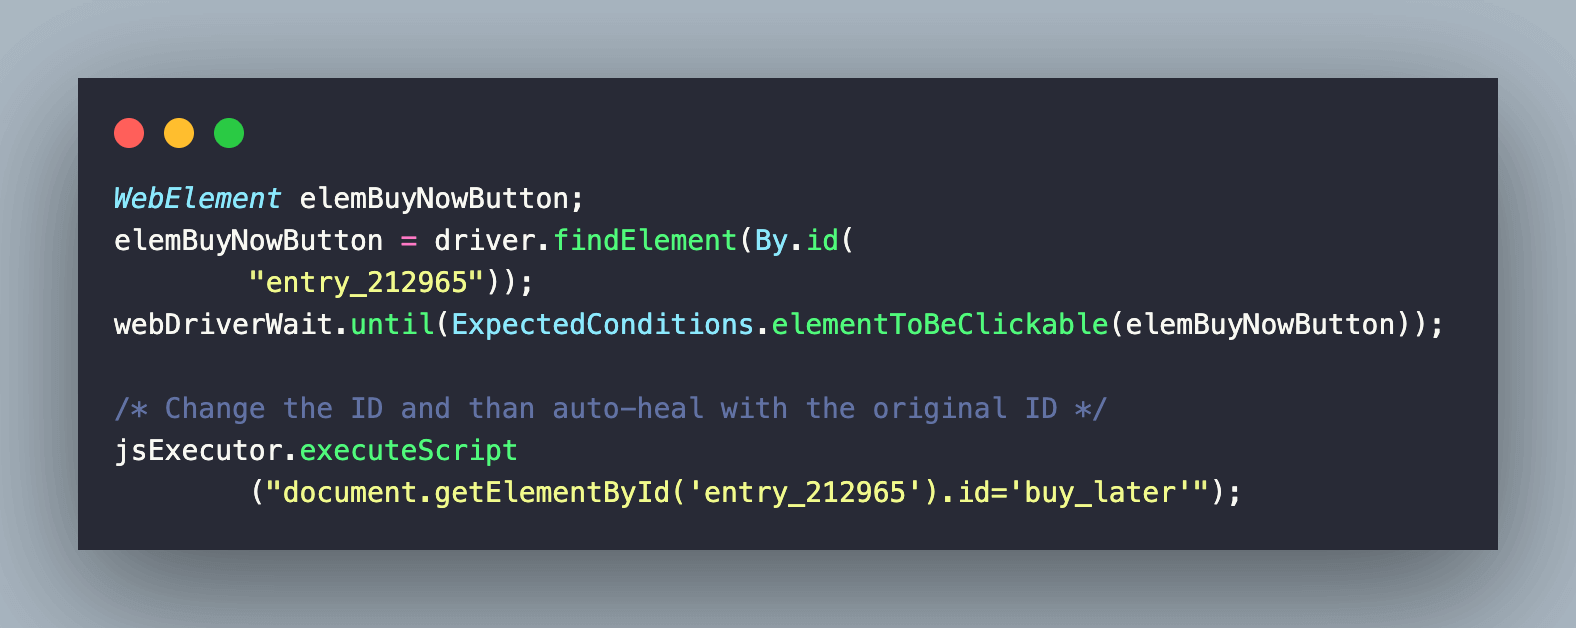
Now, here comes the magic of the auto healing logic. 🤔Instead of using the new locator (i.e. buy_later), we still use the old locator (i.e. entry_212965) in the test implementation.
As the AutoHeal capability on LambdaTest is set to true, the respective locator will be auto healing by the auto healing algorithm. In a nutshell, test execution will still be successful!
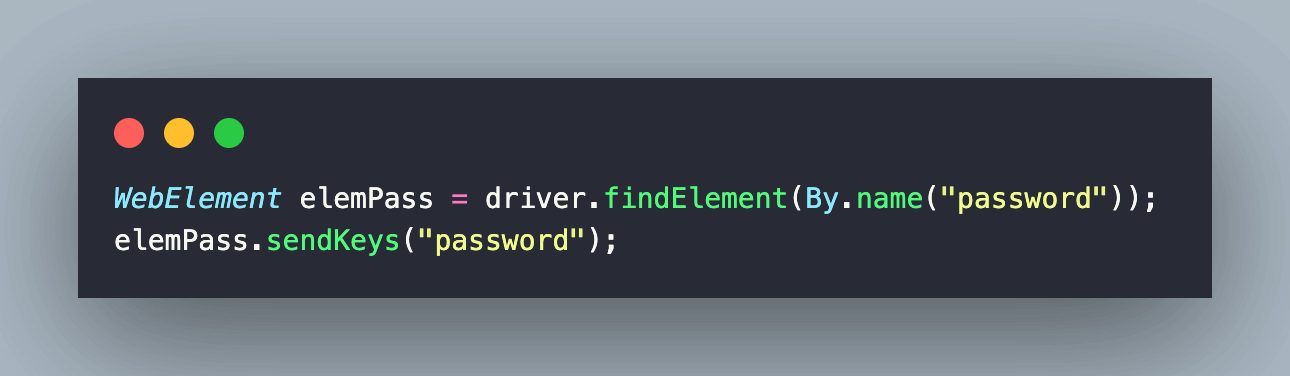
Let’s change locators in the second test scenario by modifying the NAME locator from password to password-new on the eCommerce Playground Registration Page.
As seen below, there is one element with the Name locator as a password.
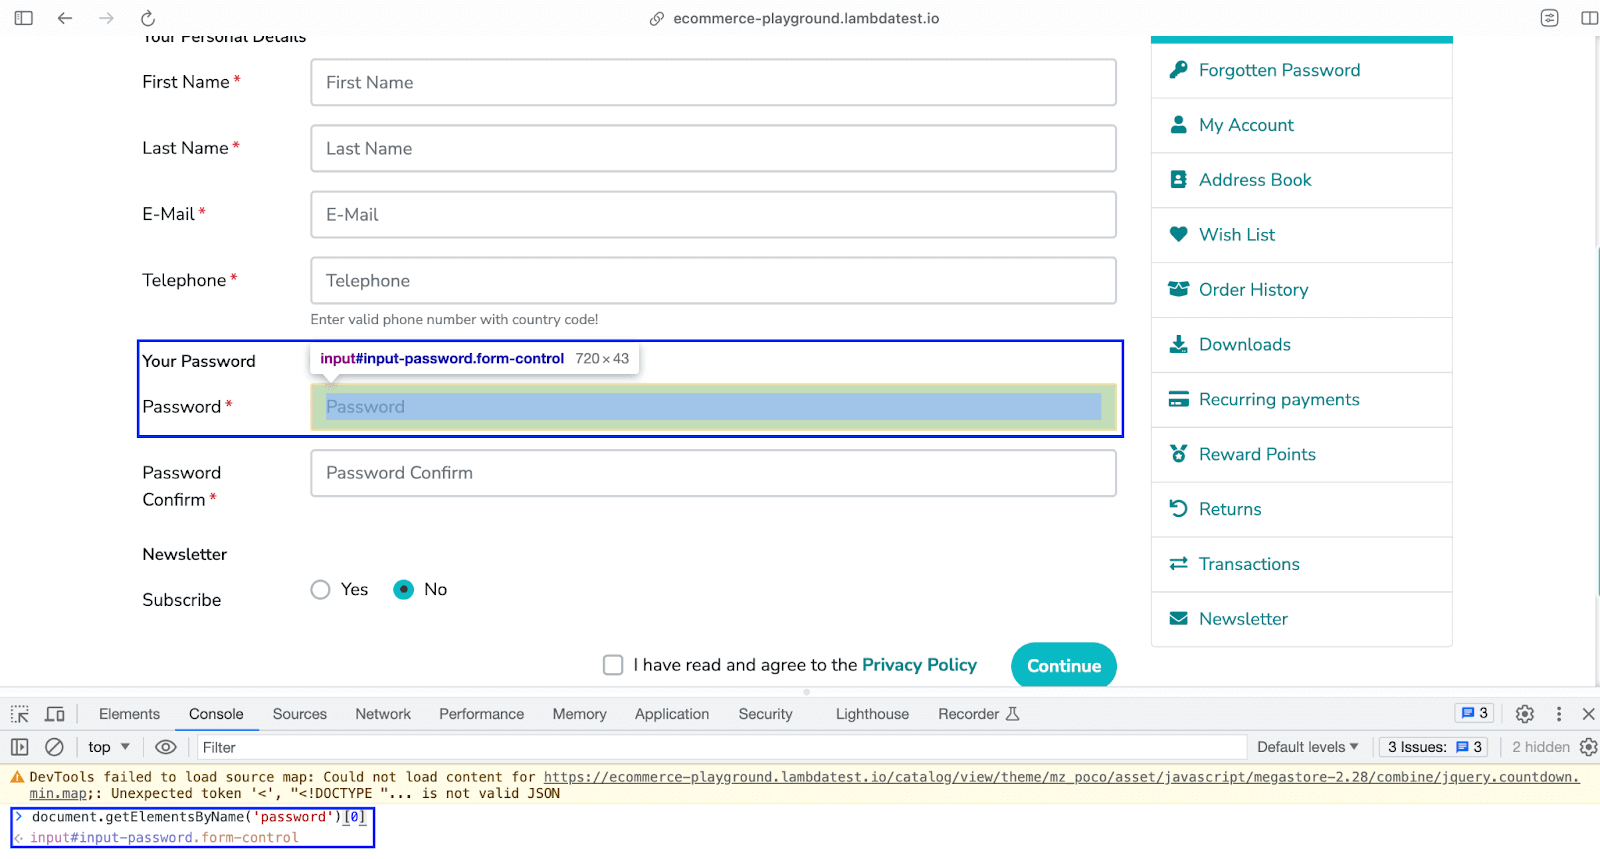
For demonstrating auto healing in Selenium, we manually changed the Name locator for the said element from password to password-new.
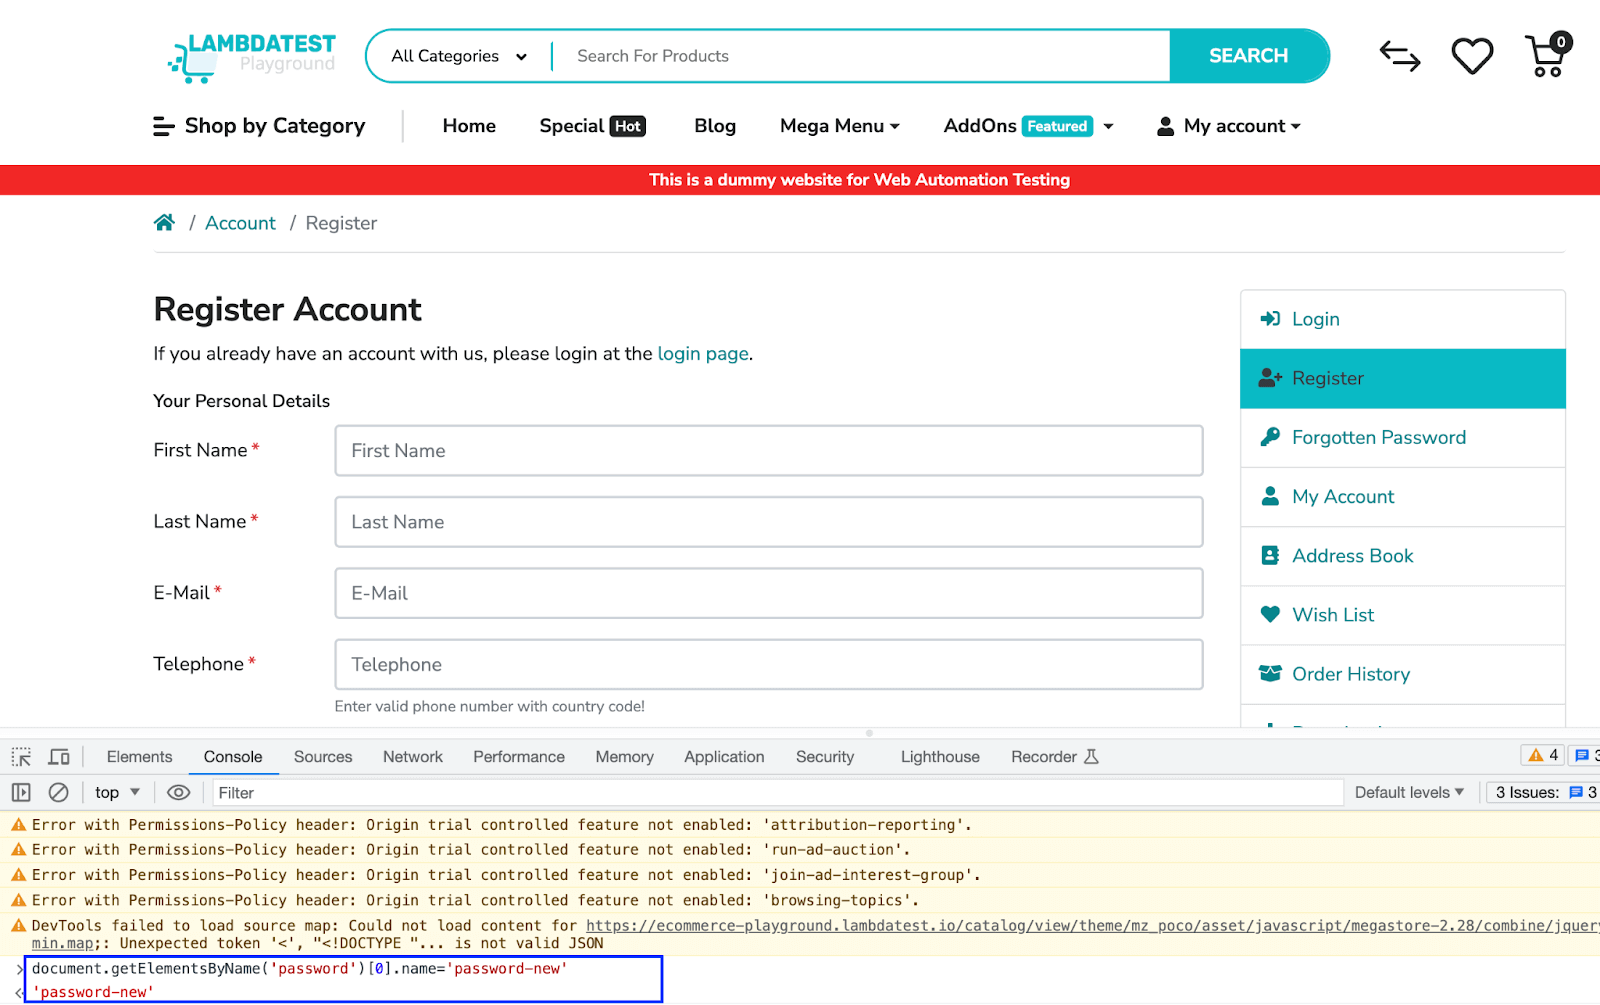
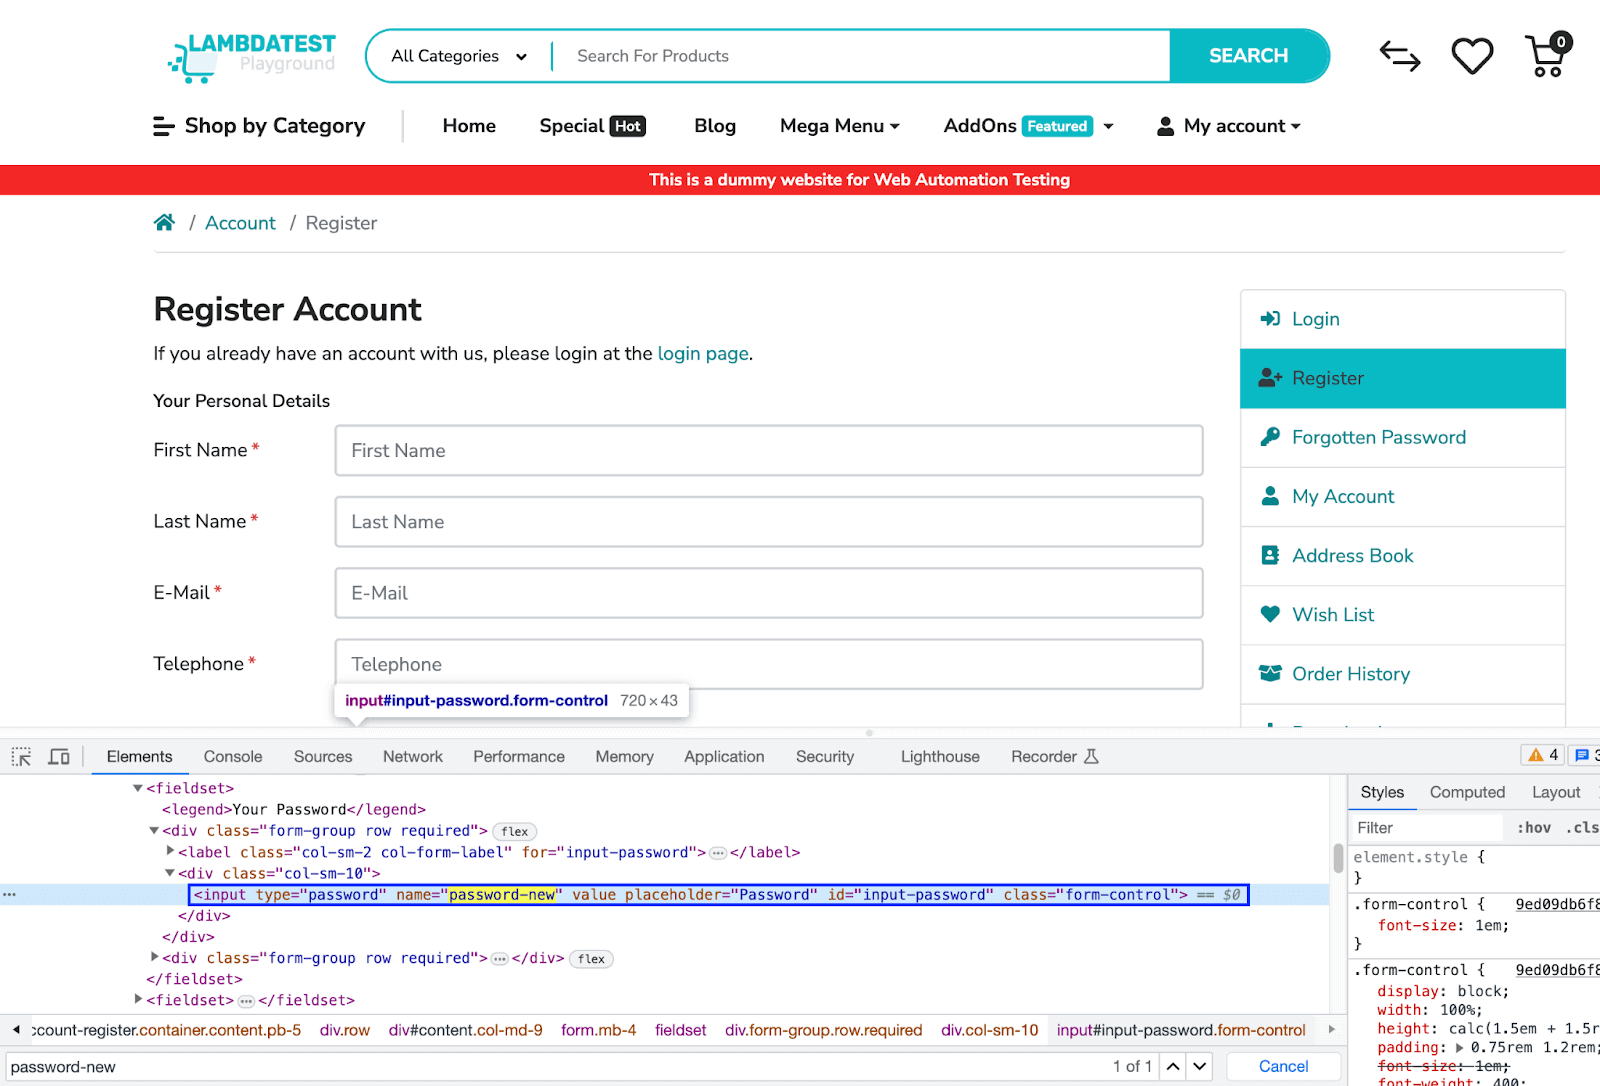
Now that we know that the locator change is working, we use the getElementsByName() method of the Document interface. Since the method returns an array, we change the Name locator of the first element of the array.

Even though the value of the locator has changed, the earlier locator value (i.e., password) is used for locating the said element. This is where the locator will be auto healed by the algorithm, and test execution still results in a success.
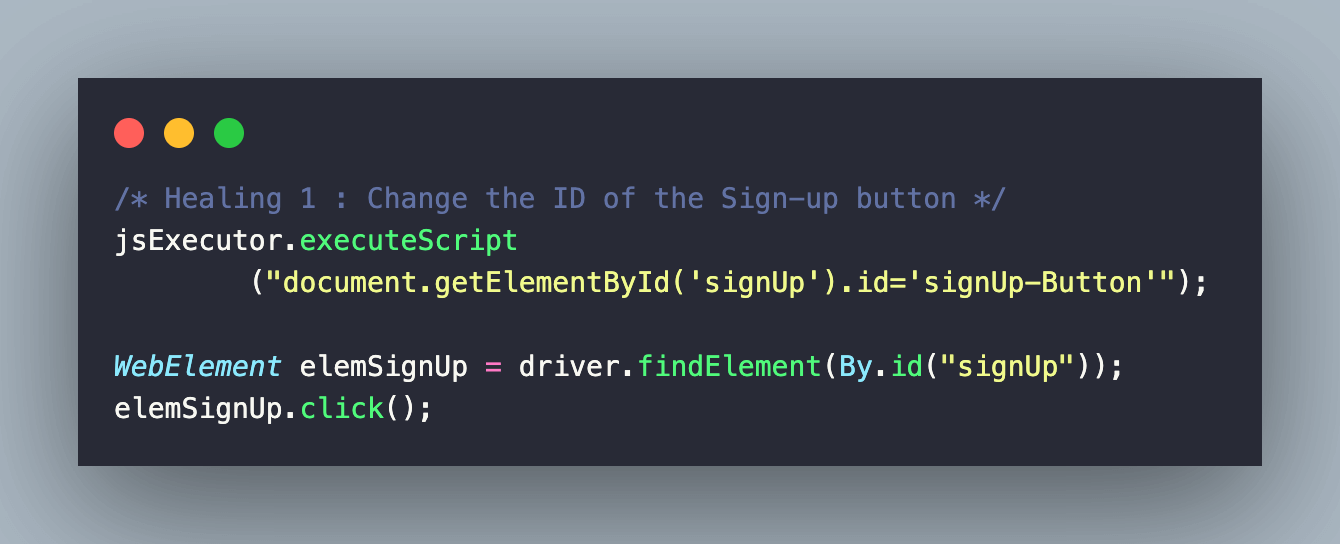
The same experiments are repeated in the third test scenario where the ID of the Sign Up button is changed from signUp to signUp-Button. Also, the earlier ID(i.e. signUp) is used to locate the button using its ID locator.
Execution [With Auto Healing]
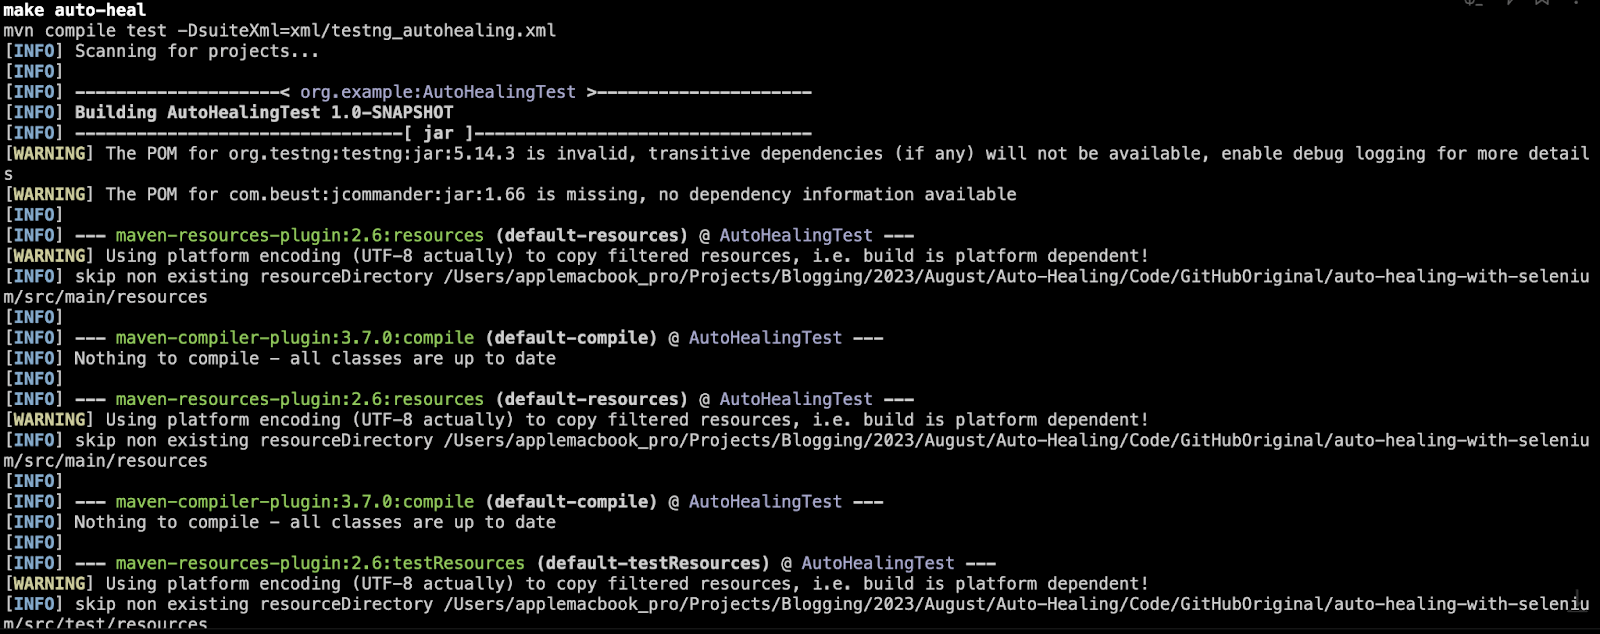
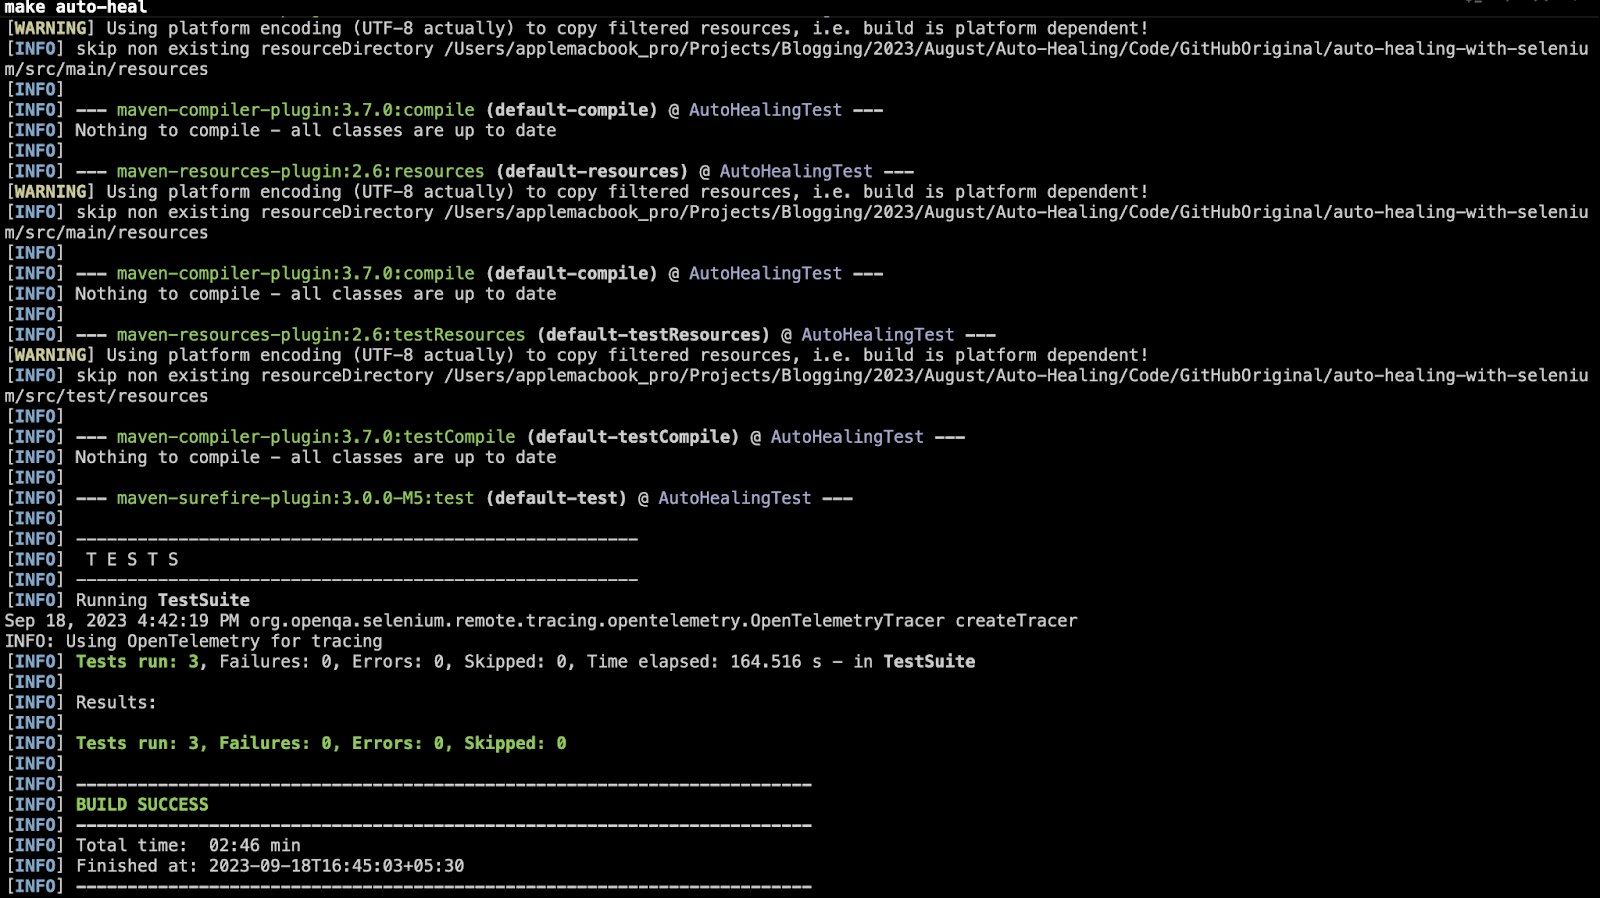
The test code with modified locators is present in AutoHealingTest.java. Run the command make auto-heal to execute the tests that have locators healed by the auto healing algorithm.
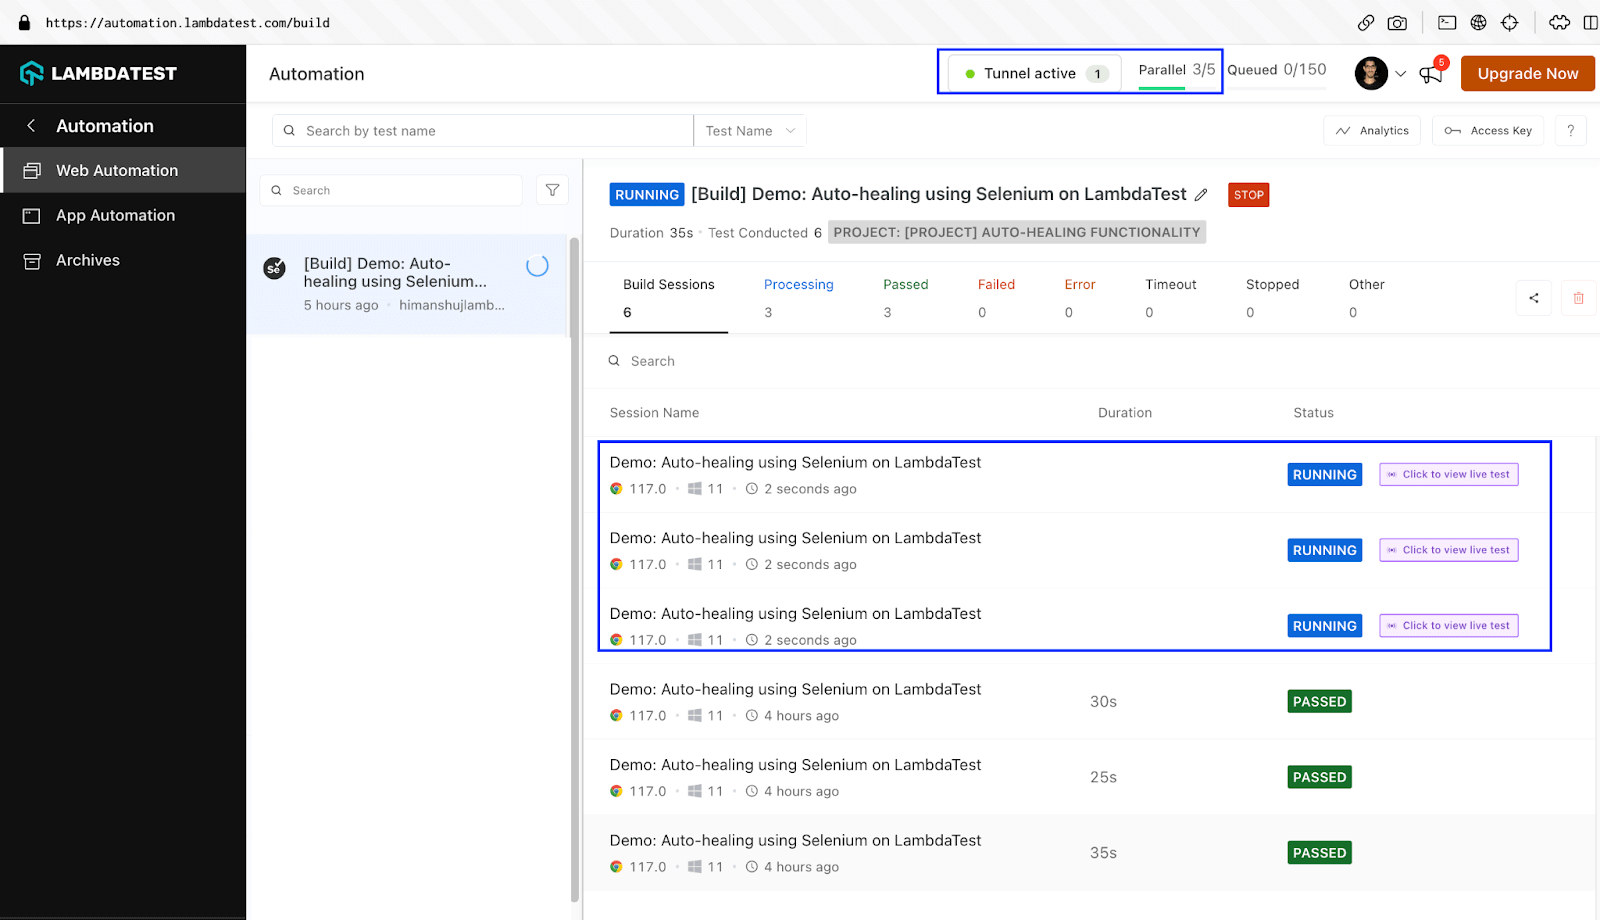
As seen below, the test execution was successful. However, a small bandage icon (for indicating healed tests) is next to the respective tests. One more noticeable change is the increase in the test execution time which can be largely attributed to the locators being healed by the algorithm!

In order to check the details of the healed locator, navigate to the respective test in the dashboard and click on the Bandage icon. You should be able to view details of the locator used for healing the test.
![]()
In a nutshell, auto healing should be used with caution, as there could be performance impact; the gravity of which largely depends on DOM size. Hence, it is recommended to patch the test code with the healed locator (on a case-to-case basis) to further reduce flakiness and increase stability of the tests!
Limitations of Auto Healing Code
Now that we have looked at the major upsides of auto (or self) healing, the integral question is: Can auto healing address all issues related to flakiness? Though auto healing on LambdaTest is designed to handle a wide range of issues, there are some limitations!
Or should we say that the learnings of auto healed tests must be utilized in making the tests less flaky (i.e., more stable & reliable). Without further ado, here are some of the limitations of the auto healing functionality:
Non-recoverable Errors
Auto healing cannot recover from certain failure types (e.g., WebDriver initialization errors, system-level failures, etc.)
Test Accuracy
Though auto healing does an excellent job of reducing test flakiness, there is a possibility that it might be masking underlying issues in the test scripts.
As mentioned earlier, it is imperative to review the logs, find the root cause of failure, and fix the test script (depending on the cause of flakiness).
Performance Impact
As seen throughout test execution, auto healing can have a slight impact on test execution time.
This impact can be largely attributed to the additional checks and recovery mechanisms used to recover the tests from potential failures!
Apart from this, false positives and false negatives are some of the other limitations of auto healing tests. Hence, a lot depends on the algorithm built for detecting the cause of failure and healing the cause with the healed locator!
It’s Time to Heal!
In general, auto healing functionality is built to improve the robustness and reliability of the tests. This, in turn, aids in reducing the flakiness factor in the tests!
Having said that, it just temporarily heals the wound, which in our case is the test (or test suite). The learnings of auto healed tests must be used for a near-permanent removal of flakiness aspects of the tests. At the end of it, auto healed tests cannot replace good test design or error-handling principles.
Think of auto healing as a remedy that needs a permanent fix such that healing is no longer necessary…


Author’s Profile
Himanshu Sheth
Himanshu Sheth is a seasoned technologist and blogger with more than 15+ years of diverse working experience. He currently works as the 'Lead Developer Evangelist' and 'Senior Manager [Technical Content Marketing]' at LambdaTest. He is very active with the startup community in Bengaluru (and down South) and loves interacting with passionate founders on his personal blog (which he has been maintaining since last 15+ years).
Blogs: 128
Got Questions? Drop them on LambdaTest Community. Visit now


