Getting Started with MongoDB Testing Using Selenium WebDriver
Daniel Mascarenhas
Posted On: September 25, 2023
![]() 168019 Views
168019 Views
![]() 9 Min Read
9 Min Read
Test automation has become an important part of product quality. Without good test automation coverage, the product cannot scale in terms of new features. In the last 20 years, I have seen how test automation teams have become the center of attention in the development team.
Software organizations are pressured to adopt new cutting-edge technologies to stay ahead. Continuous changes to the product are, hence, inevitable. Change to product functionality means change to test cases & so to the automation suite.
This change can be in any form: change in the testcase, test data, test config data, or the test report itself. Let’s say change in the test case can be handled by refactoring test cases. But what about the other changes? Can those unstructured changes be handled in a more structured way?
The answer to this question is Yes. Thanks to the new DB, which supports such data. It’s called MongoDB.
In this blog on MongoDB testing, we will take a closer look at different features offered by MongoDB and how to perform MongoDB testing using the Selenium test automation framework. If you are preparing for an interview you can learn more through Selenium interview questions.
TABLE OF CONTENTS
What is MongoDB?
MongoDB is an open-source database that can store large amounts of unstructured data. As opposed to rows and columns in typical SQL format, MongoDB uses non-SQL format, i.e., it stores data in collections and documents. Each collection contains a set of documents, and each document, in turn, has key-value pairs. Each document has an ID, which is the primary key and represents a unique value in a document.
As per the Stack Overflow developer survey conducted in 2023, MongoDB has been rated as the database most wanted by developers. Relational databases have been around for decades. MongoDB is a scalable, flexible NoSQL document database platform designed to overcome the relational databases approach.
It is a non-relational database. In relational databases, you need to define a schema beforehand. MongoDB doesn’t need such a requirement, making it flexible for introducing new changes. It costs less time and money.
The difference between SQL & NoSQL databases can be described below:
| SQL | NoSQL |
|---|---|
| Stands for Structured Query Language | Stands for Not Only SQL |
| Also called a Relational Database Management System (RDBMS) | Also called a Non-Relational Database Management System |
| Suitable for structured data with predefined schema | Suitable for unstructured and semi-structured data |
| Data is stored in tables with columns and rows | Data is stored in collections or documents |
| Requires vertical scaling to handle large volumes of data | Horizontal scaling makes it possible to handle large volumes of data |
| Examples: PostgreSQL, Oracle, Microsoft SQL Server | Examples: MongoDB, Cassandra, Amazon DynamoDB, Redis |
Let us now look at the key features of MongoDB.
MongoDB Features
MongoDB is an open-source database designed to support unstructured data. This DB has driver support for all popular languages like Java, Python, PHP, Node.js, C, C++, etc.
Here are some of its salient features.
- Scalability
- Ad-hoc queries for optimized, real-time analytics
- Native document validation and schema examination with Compass
- Easy replication
There is no need to define a schema before adding data. We can easily add fields to documents as per our needs. If the tester is referring to test data and test config in his test script from some database, he doesn’t have to worry about schema changes in case of any changes.
An ad hoc query is a short-lived command whose value depends on a variable. MongoDB uses MongoDB Query Language (MQL). It supports field queries, range queries, and regular expression searches. When designing the schema of a database, it is impossible to know in advance all the queries that will be performed by end users.
Let’s say a tester is storing his test results in MongoDB, using these ad-hoc queries, he can dwell on introducing test analytics.
MongoDB provides Compass as a client through which we can connect to a particular database and view documents and their fields.
MongoDB allows us to replicate data easily. Due to this, it helps us to distribute data across geographical regions.
 Note
NoteRun automated test suites on 3000+ environments. Try LambdaTest Today!
Why use MongoDB with Selenium?
Integrating MongoDB with Selenium, the powerful web automation framework, offers a compelling synergy that revolutionizes how we handle test data in the world of test automation.
While Selenium is renowned for automating web applications with precision and efficiency, MongoDB, a NoSQL database, is celebrated for its flexibility and scalability in data storage.
Combining these two technologies empowers testers and developers alike to manage test data dynamically, streamline test case execution, and enhance the overall efficiency of the testing process.
This section of the MongoDB testing tutorial will explore why incorporating MongoDB into your Selenium automation stack can lead to more robust and adaptable testing solutions.
- Schema Flexibility
- Detailed Test Reports
- Business Intelligence
As described initially, test cases rely on test data and config info. Most of the time, this info is stored in traditional DB. Test scripts refer to those data via DB. In case of continuous application changes, changing schema can be tedious. If we use MongoDB to store such data, we don’t have to worry about schema updates.
The second most important problem MongoDB solves is test reporting. Test Automation is usually run every day. It creates a lot of test reports and test execution data. In the usual test automation framework, the earlier test run’s report gets overwritten. If we push every test run’s results into MongoDB, we can build detailed test reports with historical data.
We need a mechanism that can store volumes of test reports and test execution data so that we can apply some intelligence & gain insights into our test execution. MongoDB is unstructured and capable of dealing with large data. It provides tools and ways to build sophisticated analytics queries. We can apply business intelligence to the unstructured data stored in MongoDB.
Let’s see some use cases in action in the next section of this MongoDB testing tutorial.
How to set up MongoDB with Selenium?
MongoDB’s NoSQL architecture pairs seamlessly with Selenium’s web automation capabilities, offering a dynamic approach to managing test data. In this section of the MongoDB testing tutorial, I will walk you through the steps to set up MongoDB with Selenium, including installing MongoDB and MongoDB Compass and creating a sample MongoDB database using Compass.
Installing MongoDB
When writing this blog on MongoDB testing, MongoDB version 6.0.6 is available. However, the Klov server we will use in this blog is incompatible with that MongoDB version. Hence, we will install MongoDB version 5.0.17 on Windows for this exercise.
- Go to this link:
- Locate the entry, mongodb-windows-x86_64-5.0.17.zip. Download and copy the zip file to C:\MongoDB. Extract it.
- Let’s create a data folder for MongoDB to store data. Create folder structure as C:\MongoDB\data.
- We are ready to start MongoDB. Go to the extracted folder. Go inside the bin folder. Start CMD from this path.
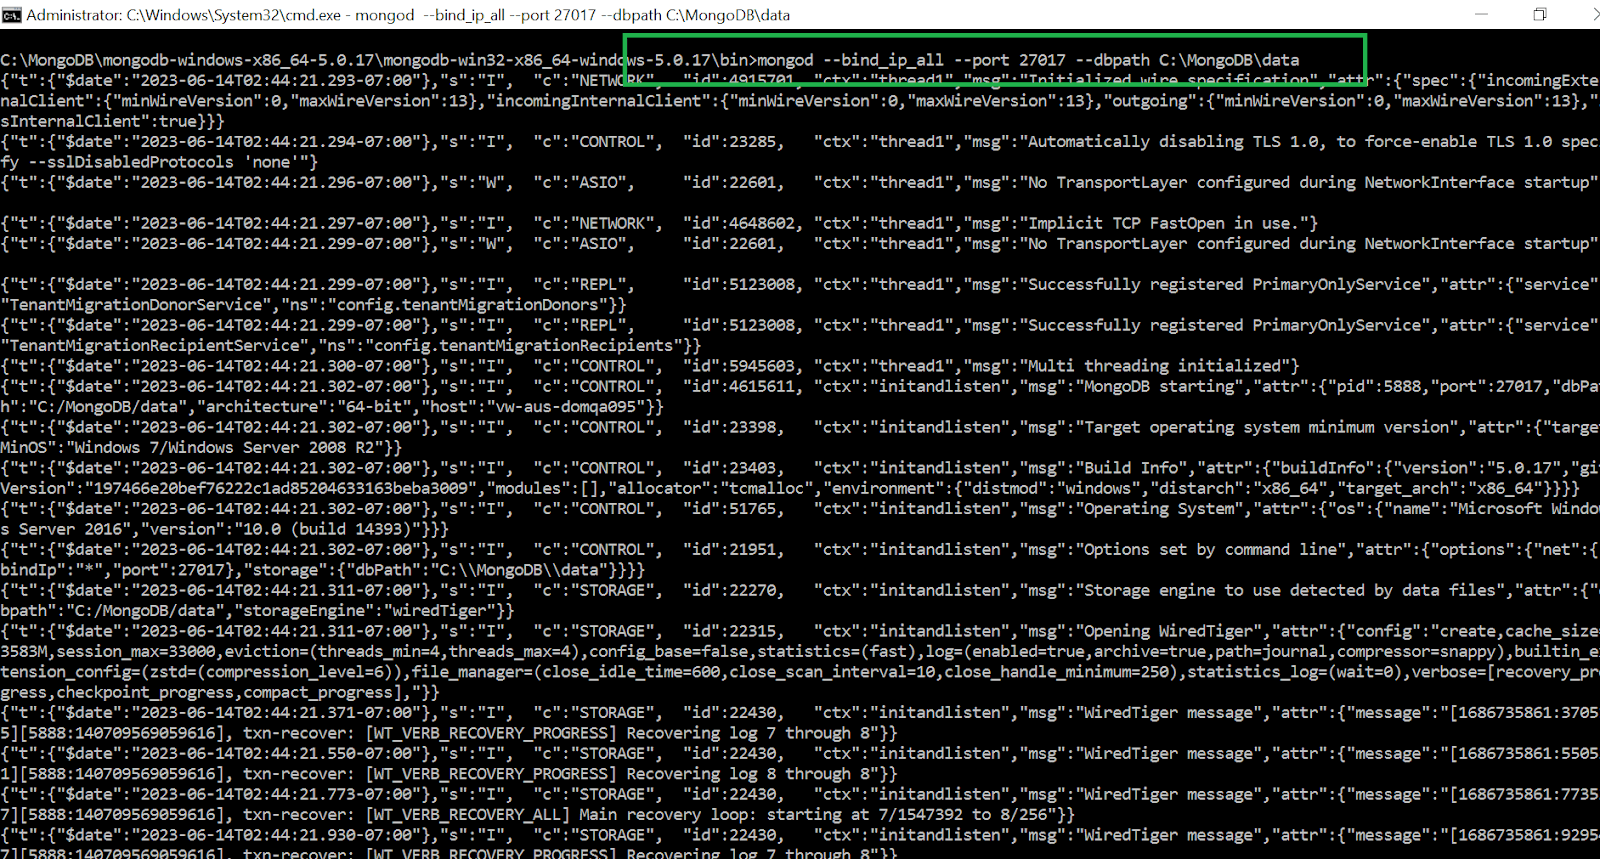
- Run the below command.
https://www.mongodb.com/download-center/community/releases/archive.
mongod –bind_ip_all –port 27017 –dbpath C:\MongoDB\data
Note: –bind_ip_all flag is required if MongoDB installed is on Windows to avoid connectivity issues. The default port is 27017. So even if it is not passed explicitly, that’s fine.
Command output would look something like this.:
Installing MongoDB Compass
MongoDB Compass is the UI client for MongoDB, where we visualize our data. We can interact with data using full CRUD functionality. We can run ad-hoc queries. We can also view and optimize the query performance. It is available on Linux, Mac, or Windows. Compass empowers us to make smarter decisions about indexing, document validation, and more. For this exercise, we will use Windows Server 2016; the steps might differ if you are using any other OS.
- Let’s now install ‘MongoDB Compass’. For this exercise, try to install it on the same machine where MongoDB is installed.
- Open Windows Powershell.
- Go to the location where MongoDB was extracted. Go to the bin folder. Locate Install-Compass.psl. Run Install-Compass.psl script from Windows Powershell. Sometimes, while running the script on Windows, it gives an error such as ‘PowerShell script is not digitally signed.’. To avoid this, first run the below command from powershell cmd.
- Run Install-Compass.psl. This will install a MongoDB client.
Set-ExecutionPolicy -ExecutionPolicy unrestricted

Creating a sample MongoDB database using Compass
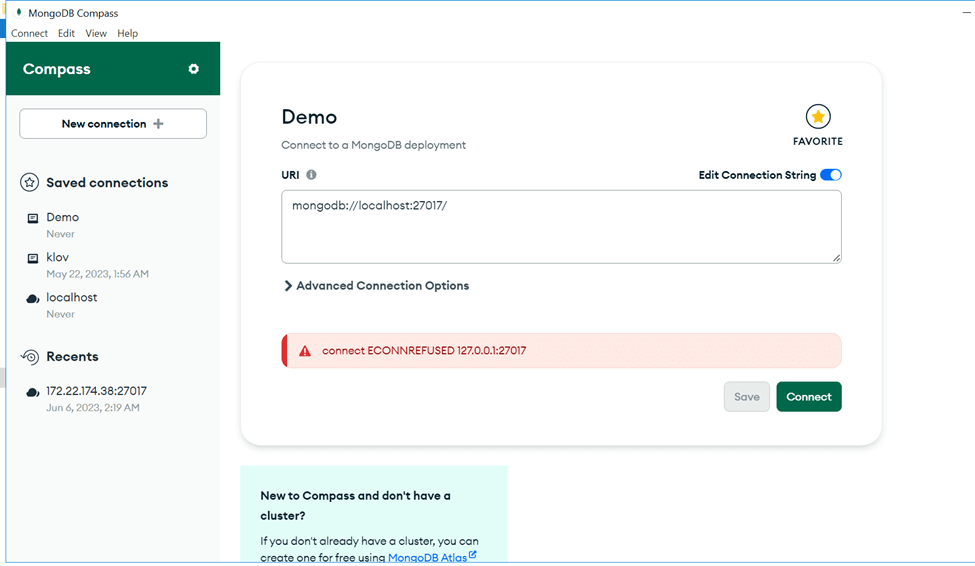
- Open the MongoDB Compass. It will launch the connect page, as shown below.
- Click on Connect. It will connect to the MongoDB server.
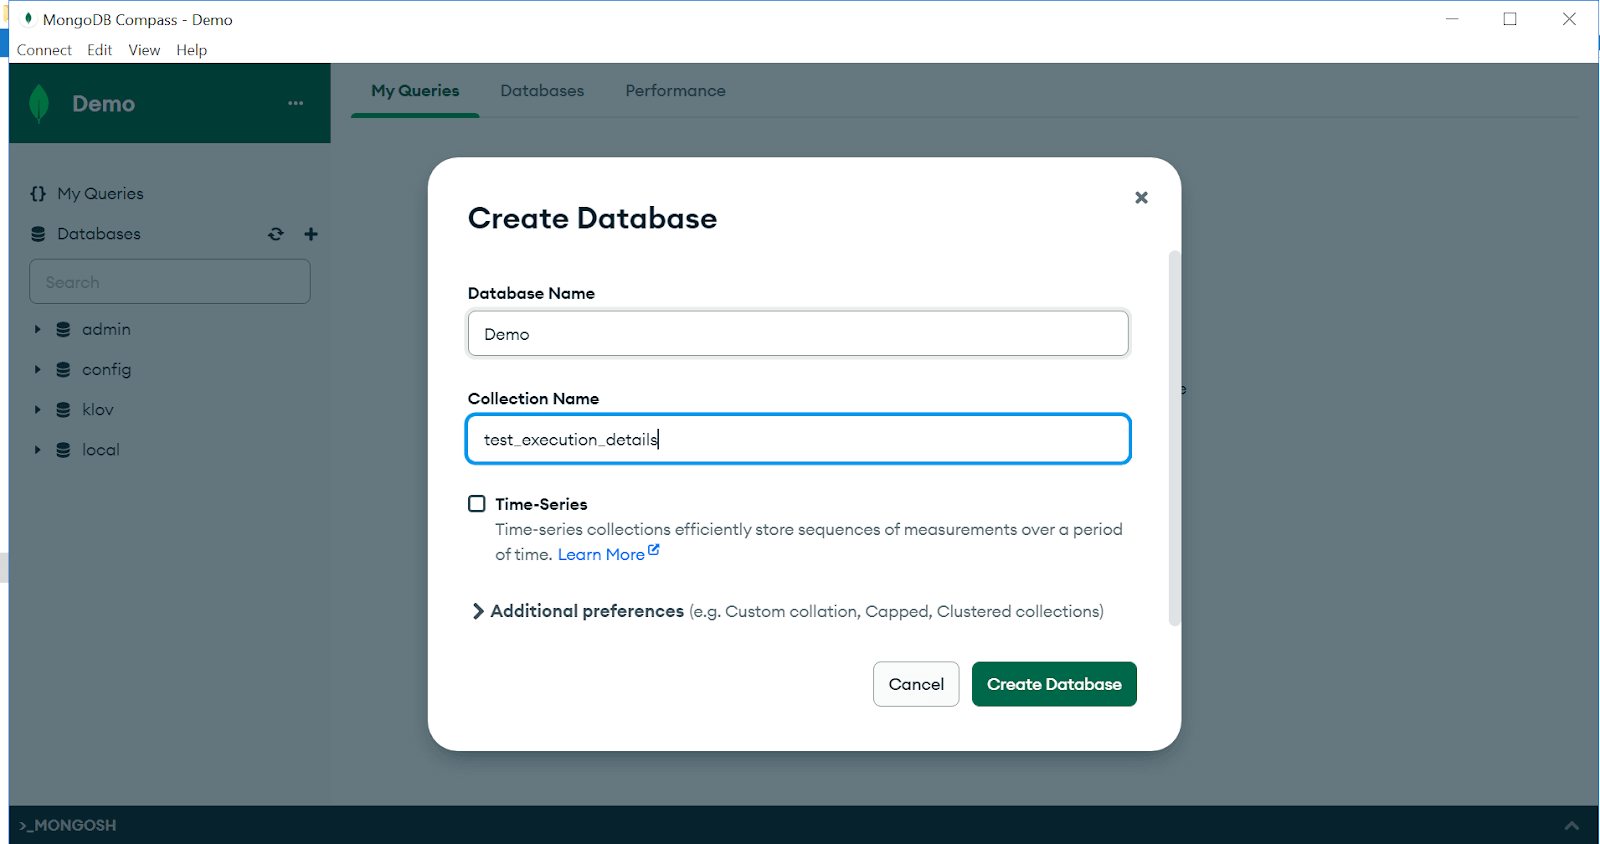
- Click on ‘+’ to create a new database. Give DB details to the database named ‘Demo’ as below and say ‘Create Database’.
- MongoDB Compass would create DB & would show a blank DB page as below.
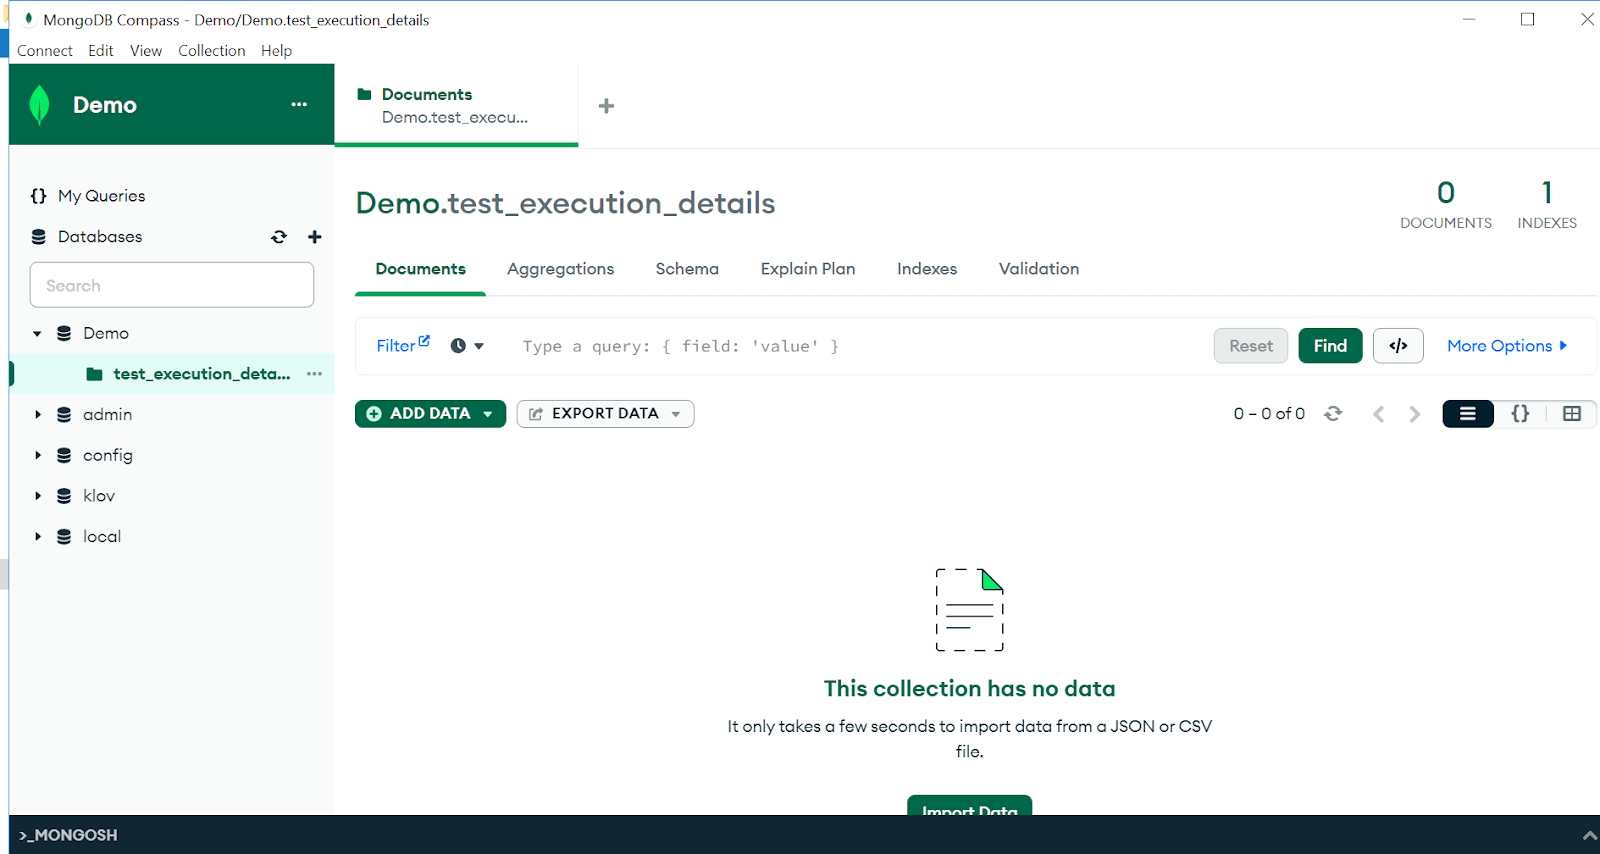
Our MongoDB is set up!
How to write a Selenium script to connect to MongoDB?
Let’s dive in and learn how to create Selenium scripts that establish a robust connection to MongoDB, unlocking possibilities for your MongoDB testing endeavors.
Code Setup
- Download the code from GitHub.
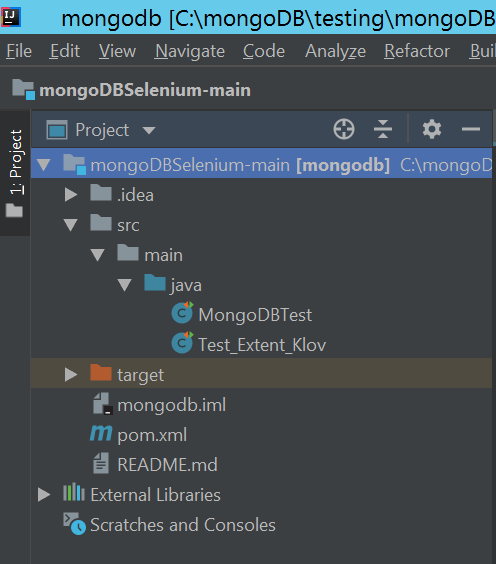
- Open the project in IntelliJ.
- In IntelliJ, use Java 11.0.2 as SDK and Maven 3.3.9.
- Project structure would look like this.
Code Walkthrough
For Selenium and TestNG libraries, we have added below the entries into pom.xml.
For MongoDB Java drivers, the below library is added.
|
1 2 3 4 5 |
<dependency> <groupId>org.mongodb</groupId> <artifactId>mongo-java-driver</artifactId> <version>3.12.13</version> </dependency> |
Besides the above libraries in pom.xml, we have added Maven plugins to build the project.
|
1 2 3 4 5 6 7 8 9 10 11 |
<plugins> <plugin> <groupId>org.apache.maven.plugins</groupId> <artifactId>maven-compiler-plugin</artifactId> <version>3.8.0</version> <configuration> <source>${javac.version}</source> <target>${javac.version}</target> </configuration> </plugin> </plugins> |
Finally, Java version 11 has been set to be used for compiling.
|
1 2 3 |
<properties> <maven.compiler.release>11</maven.compiler.release> </properties> |
Import statements: We need to import several libraries to accomplish our exercise.
connectToMongoDB(): Function to initialize and connect to MongoDB.
|
1 2 3 4 5 6 7 8 9 |
@BeforeClass public void connectToMongoDB(){ // Connect to MongoDB by giving {MongoDBHost} mongoClient = new MongoClient("{MongoDBHost}", 27017); // Get Database handle by replacing {MongoDBName} with DB name database = mongoClient.getDatabase("{MongoDBName}"); // Get collection handle by giving collection name created in MongoDB. test_execution_info = database.getCollection("test_execution_details"); } |
This function will initialize MongoClient and establish a DB connection with the MongoDB database and collection.
Provide the connection parameters to it.
{MongoDBHost}: IP Address of the machine where MongoDB is hosted.
Sometimes, we face issues binding to localhost on Windows. To avoid this, on the MongoDB host, open cmd and run ipconfig. Use the ‘ipv4 address’ as IP for connecting to MongoDB via script.
{MongoDBName}: Database ‘Demo’ created in earlier steps.
{MongoDBPort}: 27017
browserSetup(): Function to initialize browser setup.
|
1 2 3 4 5 6 7 8 9 |
private void browserSetup(){ WebDriverManager.chromedriver().setup(); ChromeOptions options = new ChromeOptions(); options.addArguments("--headless"); options.setBrowserVersion("109"); driver = new ChromeDriver(options); driver.manage().window().maximize(); driver.manage().timeouts().implicitlyWait(120, TimeUnit.MILLISECONDS); } |
We use WebDriver Manager to instantiate Chrome WebDriver instances. We will launch the browser in a headless manner.
Test1() and Test2(): Test methods
Let’s look at the two test methods, Test1 and Test2. These will perform simple checks on the LambadaTest application. It would also append test cases and test execution info into MongoDB.
|
1 2 3 4 5 6 7 8 9 10 11 12 13 14 15 16 17 18 19 20 21 22 23 24 25 26 27 28 |
@Test public void Test1(){ browserSetup(); // Create one MongoDB document to store test results of this test, Test1 doc = new Document("testname", "MongoDBTest 1"); // Lets append, some fields and value pairs into MongoDB document as below doc.append("testname", "MongoDBTest 1"); doc.append("description", "Detailed description of a positive test, test 1"); doc.append("author","Guru"); //Login to Lambdatest demo url driver.get(baseURL); driver.findElement(By.xpath(enterMessage)).sendKeys("MongoDBTest MongoDB"); driver.findElement(By.xpath((getCheckedValue))).click(); // Lets set the test result accordingly into MongoDB document if (driver.findElement(By.xpath(yourMessage)).isDisplayed()){ doc.append("status","PASS"); } else{ doc.append("status","FAIL"); } // Finally, Lets now insert document into collection test_execution_info.insertOne(doc); } |
In Test1(), we first create a document by passing the document and test names. We can then append details in key-value pairs. Once a pair of values is appended, we insert that document into the MongoDB collection at the end.
|
1 2 3 4 5 6 7 8 9 10 11 12 13 14 15 16 17 18 19 20 21 22 23 24 25 26 27 28 29 |
@Test public void Test2(){ browserSetup(); // Create one MongoDB document to store test results of this test, Test2 doc = new Document("testname", "MongoDBTest 2"); // Lets append, some fields and value pairs into MongoDB document as below doc.append("testname", "MongoDBTest 2"); doc.append("description", "Detailed description of a negative test, MongoDBTest 2"); doc.append("author","Geeta"); // Login to Lambdatest demo url driver.get(baseURL); driver.findElement(By.xpath(enterMessage)).sendKeys("MongoDBTest MongoDB"); driver.findElement(By.xpath((getCheckedValue))).click(); // Lets set the test result accordingly into MongoDB document if (!driver.findElement(By.xpath(yourMessage)).isDisplayed()){ doc.append("status","FAIL"); } else{ doc.append("status","PASS"); } // Finally, Lets now insert document into collection test_execution_info.insertOne(doc); } |
otherCRUDOperations(): This method showcases how different CRUD operations can be performed on MongoDB.
|
1 2 3 4 5 6 7 8 9 10 11 12 13 14 15 16 17 18 19 20 21 22 23 24 25 26 27 28 29 30 31 32 33 34 |
@Test public void otherCRUDOperations(){ // Create one simple test & append its result into MongoDB doc = new Document("testname", "MongoDB update test"); doc.append("testname", "MongoDB test"); doc.append("description", "Some description"); doc.append("author","Gopal"); //Some test steps here //Some test steps here //Some test steps here doc.append("status","PASS"); test_execution_info.insertOne(doc); //Now Lets update the record of same document //Retrieve the id of that particular document ObjectId docId = doc.getObjectId("_id"); //Construct a MongoDB query where id is equals to particular id. Using Filters we can construct desired query Bson query = Filters.eq("_id", docId); //Create a set of values to be updated, BasicDBObject set = new BasicDBObject("$set", new BasicDBObject("testname", "MongoDB test Updated")); //This method will first execute the query. It would then update first record (of search results) with below set of values test_execution_info.updateOne(query,set); //We can also delete the document test_execution_info.deleteOne(query); } |
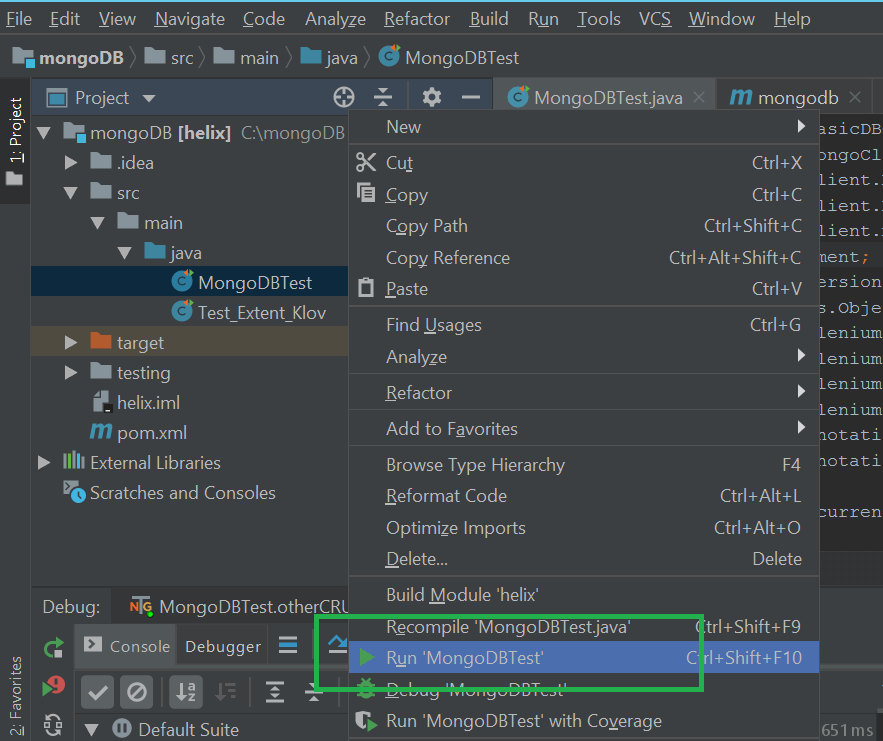
After updating connection details, execute the script via IDE.
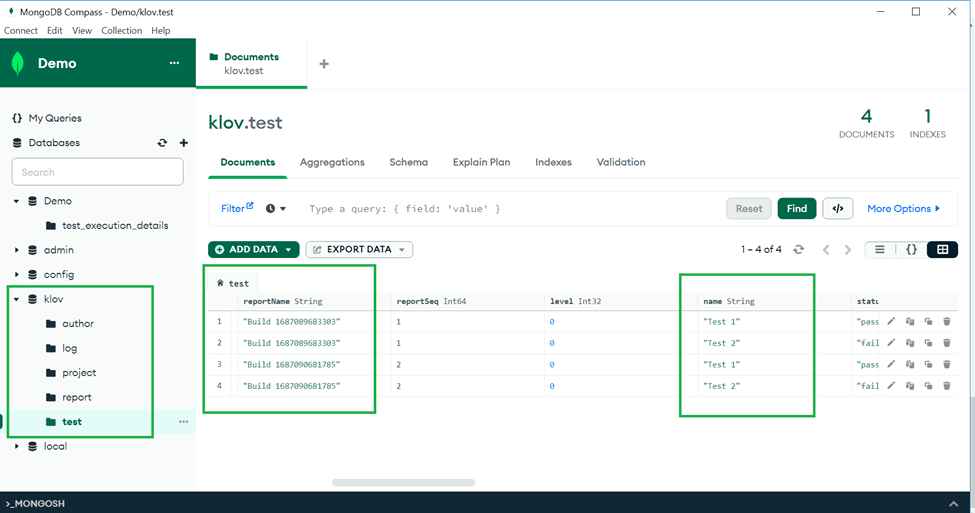
Once the test is executed, go back to MongoDB to check the test execution data.
As we can see below, data has been populated into MongoDB.

Let’s rerun the same test class to see how new execution data is getting appended into MongoDB.
We can see below MongoDB has inserted data for the next run. Since MongoDB assigned an object id for every record, it becomes easier to track historical data. We can use this historic execution data to build new reports or apply analytics.

So, this is how we can interact with MongoDB via Selenium scripts. MongoDB can help testers build test scripts that are resilient to any change. We can even build reports from scratch by leveraging MongoDB documents and collections.
Let’s now take an example of one third-party test automation reporting tool leveraging MongoDB to build sophisticated test automation reports.
NoteAutomate your test scripts with Selenium on the cloud. Try LambdaTest Today!
Third-Party Reporting Tools with MongoDB
As some might be familiar, Extent Report is one open-source reporting library useful for test automation. It can be easily integrated with major test automation frameworks like JUnit, TestNG, JGiven, etc. These reports have pie chart representation, test stepwise report generation, screenshots for failing test cases, etc. Due to a good, presentable user interface, these reports can be shared with all stakeholders.
Extent reports have gone one step ahead and leveraged MongoDB to build a real-time analytic report server called ‘Klov’.
What is Klov?
Klov is a reporting server for extent reports. It provides a detailed analysis of our most recent builds. It enables us to leverage historical data to analyze how tests have performed against AUT (Application under test). It works with the Extent Report Library to push data into a MongoDB instance. And then, these reports are published on the Klov server.
To use the Klov server, we should use extent reports in our tests. Let’s see how we can rewrite the earlier test using Klov for MongoDB.
How to set up Klov?
Installation of Klov is very simple. As the community version is Docker-based, we must deploy the container image to Docker.
Installing the Docker Engine on a CentOS machine
- Uninstall any older versions of Docker before attempting to install a new version.
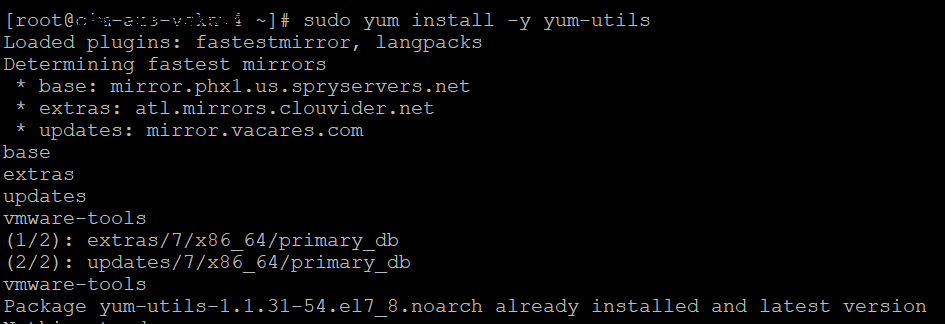
- Set up the rpm repository.
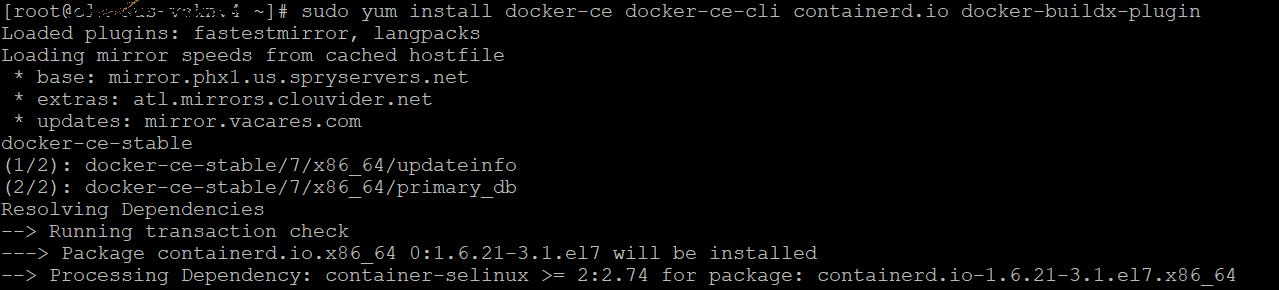
- Install the Docker Engine.
- Start Docker.
sudo yum remove docker \
-
docker-client \
docker-client-latest \
docker-common \
docker-latest \
docker-latest-logrotate \
docker-logrotate \
docker-engine
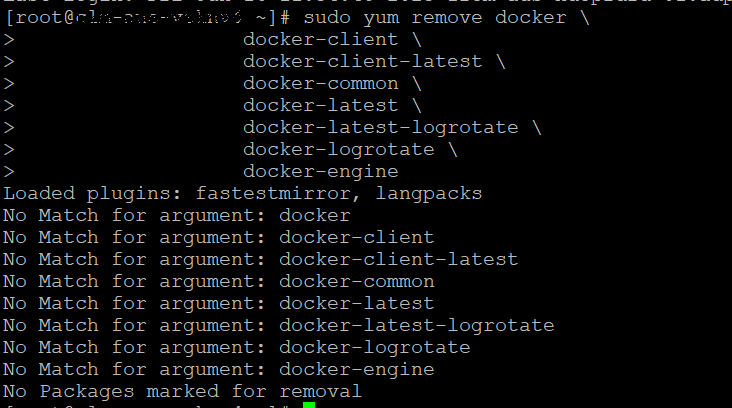
Note: yum might report that you have none of these packages installed as above. You can ignore that.
sudo yum install -y yum-utils
sudo yum-config-manager –add-repo
https://download.docker.com/linux/centos/docker-ce.repo

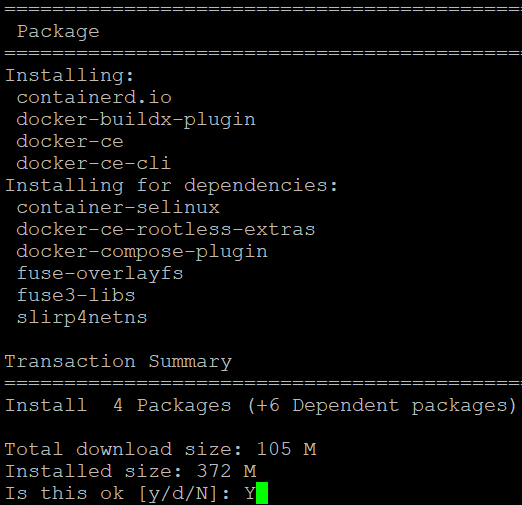
sudo yum install docker-ce docker-ce-cli containerd.io docker-buildx-plugin docker-compose-plugin
It would prompt the below question, type Y.
sudo systemctl start docker
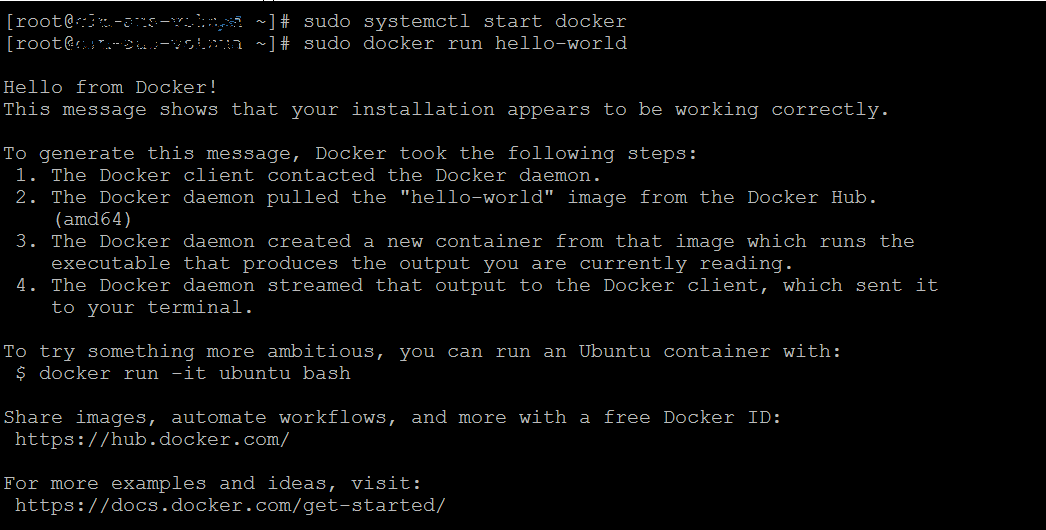
Verify that the Docker Engine installation is successful by running the hello-world image.
sudo docker run hello-world
Installing Klov image
- Download the Docker-compose.yml file to install the Klov image. Run the below command.
- Open the yml file. Update the MongoDB connection details and the port where Klov will be hosted.
- Start Klov.
- Open Klov at the $PORT you specified in docker-compose.yml or default:80. Give url as: http://
/projects - {MongoDBHost}: IP Address of the machine where MongoDB is hosted. Same as earlier.
- {KlovHost}: CentOS machine hostname where Klov Docker image is hosted.
- {KlovPort}: Port where Klov Server listens as mentioned in the Docker-compose.yml file. By default, it is 80.
- Start MongoDB
- Access the MongoDB Shell
- Switch to the Admin Database (Optional)
- Create a Test Database
- Verify the New Database
- Insert Data (Optional)
curl

https://raw.githubusercontent.com/extent-framework/klov-server/master/docker-compose.yml -o docker-compose.yml

version: '2'

services:

    klov:

        image: anshooarora/klov:1.0.1

        container_name: klov

        environment:

            - SPRING_DATA_MONGODB_URI=mongodb://{MongoDBHost}:{port}

        ports:

            - 80:80
In place of {MongoDBHost}, give the IP (ipv4) address of the Windows host machine where MongoDB is hosted (used earlier in the Selenium script). {port} would be the default MongoDB port, 27017.
docker-compose up
It should show a message such as “org.springframework.boot.StartupInfoLogger: Started KlovApplication in 9.266 seconds (JVM running for 10.14).”
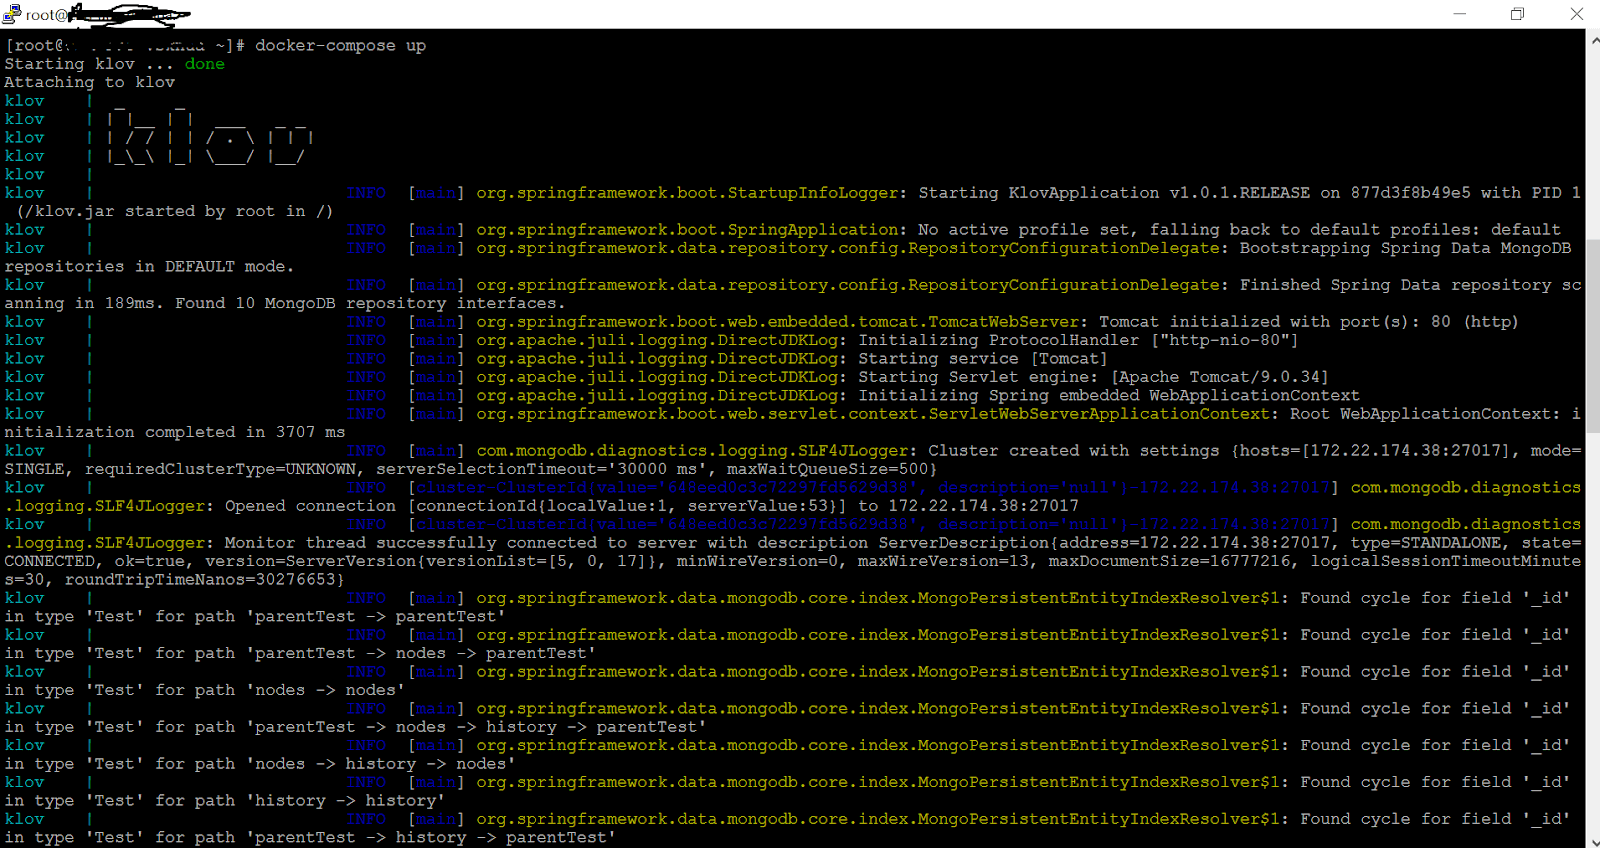
It would look something like this.

Changes required on the test project side for Klov
In pom.xml, in addition to earlier dependencies, we have below entries added for Klov.
|
1 2 3 4 5 6 7 8 9 10 11 |
<dependency> <groupId>com.aventstack</groupId> <artifactId>klov-reporter</artifactId> <version>5.0.2</version> </dependency> <dependency> <groupId>com.aventstack</groupId> <artifactId>extentreports</artifactId> <version>5.0.8</version> </dependency> |
Code Walkthrough
Import statements: We are using several libraries to accomplish our task.
klovSetup(): This function will initialize the Klov server.
|
1 2 3 4 5 6 7 8 9 10 |
@BeforeClass private void klovSetup(){ ExtentKlovReporter klov = new ExtentKlovReporter("LambdaTest"); klov.initMongoDbConnection("{MongoDBHost}",27017); klov.initKlovServerConnection("http://{KlovHost}:{KlovPort}"); //Create an instance of ExtentReports. extent = new ExtentReports(); // Attach Extent Reports to Klov Server. This will publish the Extent reports of all the tests of this class to Klov server extent.attachReporter(klov); } |
Method klovSetup() has all the methods required to establish and initialize the Klov server connection. It provides the below connection parameters.
browserSetup(): Function to initialize browser setup. We are using WebDriver Manager to instantiate Chrome WebDriver instances. We will launch the browser in a headless manner.
|
1 2 3 4 5 6 7 8 |
private void browserSetup(){ WebDriverManager.chromedriver().setup(); ChromeOptions options = new ChromeOptions(); options.addArguments("--headless"); driver = new ChromeDriver(options); driver.manage().window().maximize(); driver.manage().timeouts().implicitlyWait(120, TimeUnit.MILLISECONDS); } |
Test1(), Test2(): Let’s see how test execution details can be pushed to extent reports and then to the Klov server.
|
1 2 3 4 5 6 7 8 9 10 11 12 13 14 15 16 17 18 19 20 21 22 23 24 25 26 27 28 29 30 31 32 33 34 35 36 37 38 39 40 41 42 43 44 45 46 47 48 |
@Test public void Test1(){ browserSetup(); // Create entry for this test into extent report. By giving key details, such as Test name, description, author etc. extentTest = extent.createTest("MongoDBTest 1", "Detailed description of test 1"); extentTest.assignAuthor("Guru"); // Log information about your test into the extent report extentTest.info("Started with MongoDBTest 1"); driver.get(baseURL); driver.findElement(By.xpath(enterMessage)).sendKeys("MongoDBTest MongoDB"); driver.findElement(By.xpath((getCheckedValue))).click(); // Based on testcase checkpoints, append final execution status into extent Report try { Assert.assertEquals(driver.findElement(By.xpath(yourMessage)).isDisplayed(), true, "Message is not matched."); extentTest.pass("PASS"); }catch(AssertionError e){ extentTest.fail("FAIL: "+e.getMessage()); } } @Test public void Test2(){ browserSetup(); // Create entry for this test into extent report. By giving key details, such as Test name, description, author etc extentTest = extent.createTest("MongoDBTest 2", "Detailed description of test 2"); extentTest.assignAuthor("Geeta"); // Log information about your test into the extent report extentTest.info("Started with MongoDBTest 2"); driver.get(baseURL); driver.findElement(By.xpath(enterMessage)).sendKeys("MongoDBTest MongoDB"); driver.findElement(By.xpath((getCheckedValue))).click(); // Based on testcase checkpoints, append final execution status into extent Report try { Assert.assertEquals(driver.findElement(By.xpath(yourMessage)).isDisplayed(), false, "Message is matched."); extentTest.pass("PASS"); }catch(AssertionError e){ extentTest.fail("FAIL: "+e.getMessage()); } } |
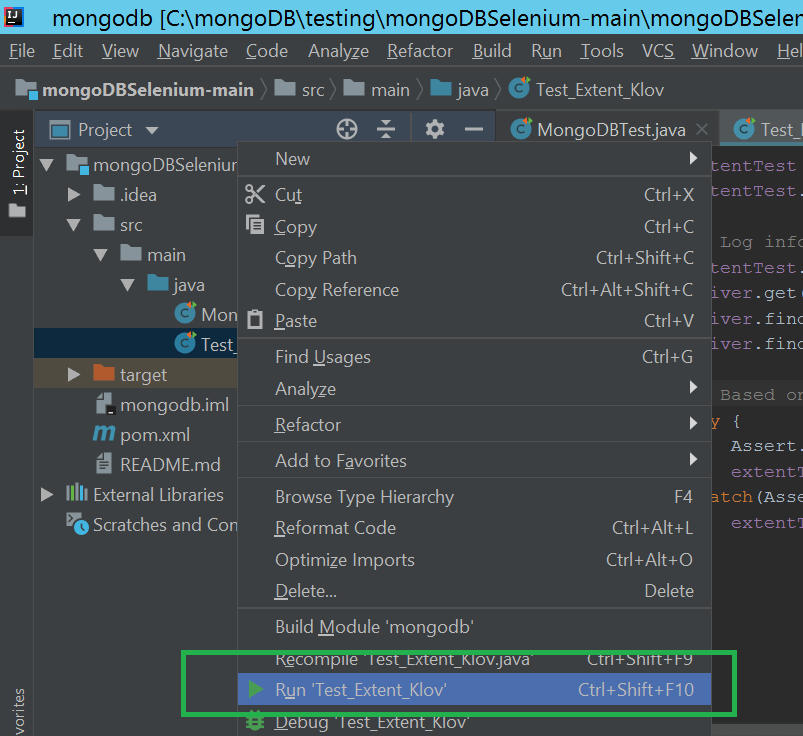
Provide all the connection details as discussed above and execute the above script via IntelliJ.
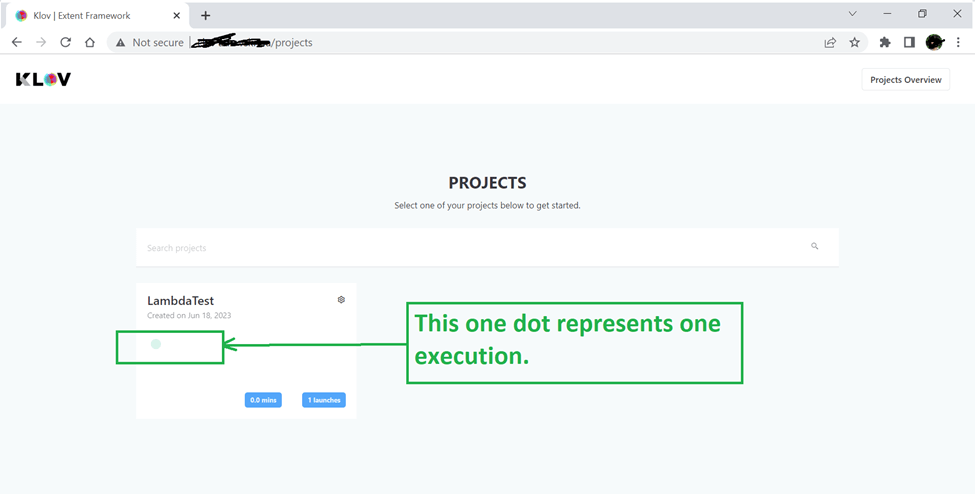
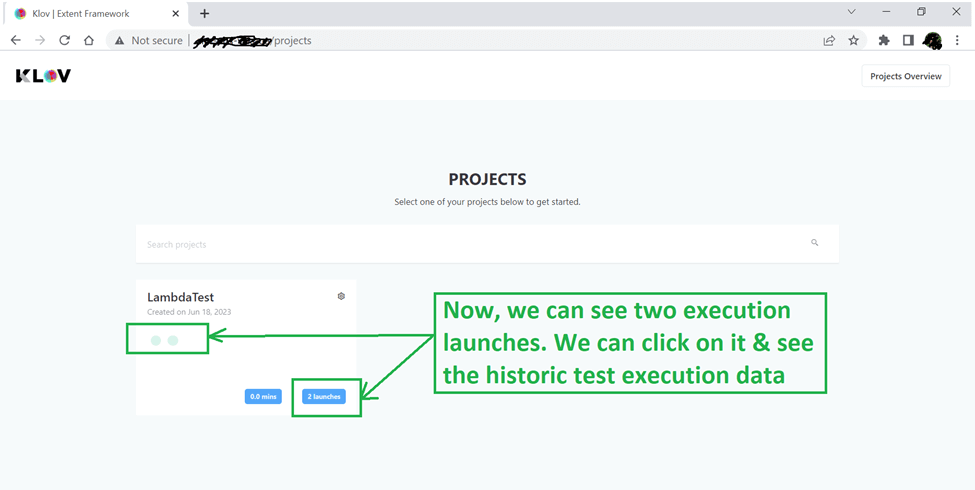
After execution, access the Klov server URL now. You will see new entry called ‘LambdaTest.’
Let’s rerun the same test script to have more execution data and revisit the Klov server.
If we navigate further, we will see detailed test execution reports with analytics.
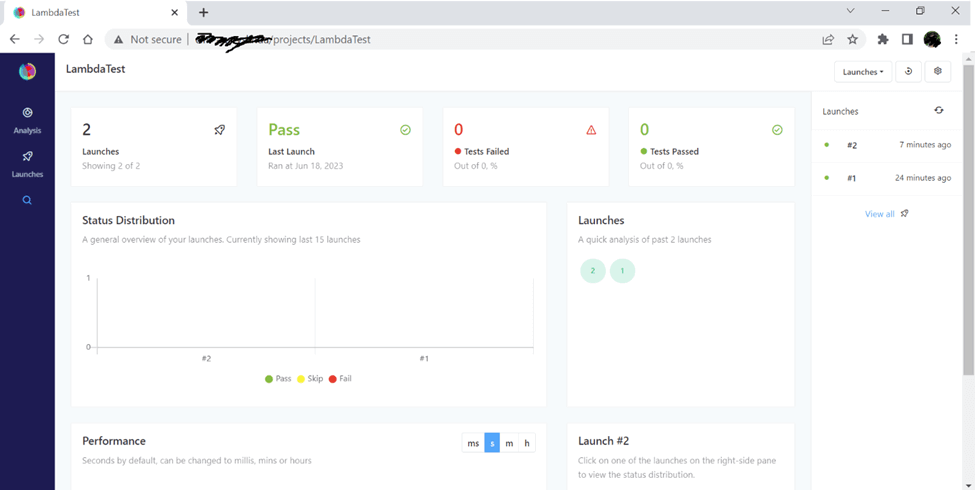
Klov created the above reports based on MongoDB. It created a good schema in MongoDB to store different aspects of test execution reports.
Conclusion
With this, we’ve reached the conclusion of this blog post on MongoDB testing. We saw why Selenium with MongoDB is a powerful combination. We can build test scripts with MongoDB to refer to dynamic test config and test data. We can also store and look into historical data of test execution results. We can build it from scratch or use a reporting tool, Klov, which uses MongoDB internally.
Frequently Asked Questions (FAQs)
What is MongoDB in testing?
In the context of testing, MongoDB refers to a NoSQL, document-oriented database commonly used to store and manage test data. MongoDB is particularly popular in testing and quality assurance due to its flexibility, scalability, and ability to handle unstructured or semi-structured data.
How to create a test database in MongoDB?
In MongoDB, you can create a test database by following these steps:


Author’s Profile
Daniel Mascarenhas
Daniel has experience in Testing & quality assurance for software products (Web, Enterprise & SaaS products) spread across design, development & validation. He has also implemented Test automation solutions at various Government & private sector companies to improve their quality process.
Blogs: 2
Got Questions? Drop them on LambdaTest Community. Visit now