Most Complete MSTest Framework Tutorial Using .Net Core
Himanshu Sheth
Posted On: March 6, 2021
![]() 242076 Views
242076 Views
![]() 5 Min Read
5 Min Read
With the advent of programming languages like Python, Ruby on Rails, etc., there is thinking amongst the developer community that the C language is losing relevance. Strikingly, C is still considered a dominant programming language for system programming as it provides optimized machine instructions for any type of provided input. Not only C, the languages that are derived from C, i.e., C# and C++, are also embraced with arms wide open by the developer community. As far as unit testing/automation testing using C# is concerned, there are some frameworks like NUnit, xUnit.Net, MSTest Framework, etc., to save the day.
Selenium is a widely popular test automation framework as it is compatible with C# and other popular programming languages. It is predominantly used for cross browser testing as it enables interactions with the web elements (present on a web-page) via Selenium WebDriver. It supports all popular web browsers: Firefox, Chrome, Safari, Internet Explorer, Microsoft Edge, etc.
We have covered What Is Selenium? and Selenium WebDriver architecture in more detail in our earlier blogs. You should definitely check them out in case you are relatively new to the Selenium framework. Test frameworks compatible with Selenium can be used to perform automated browser testing or cross browser testing of website/web applications.
In this Selenium C# tutorial, we have a look at the MSTest framework, which is the default test framework for testing .Net applications. We will also cover the aspects related to cross browser testing and parallel testing with MSTest.
Below are some of the sub-topics that are covered as a part of this MSTest tutorial:
TABLE OF CONTENT
- What is the MSTest framework?
- Setting up MSTest framework for Visual Studio
- Salient Features of MSTest V2
- Annotations in MSTest
- Automated browser testing with MSTest Framework & Selenium
- Running MSTest on Local Selenium Environment
- Parallel Testing using MSTest Framework
- Cross Browser Testing using MSTest Framework on the Cloud
- It’s a Wrap
- FAQs
What is the MSTest framework?
MSTest framework for Selenium automated testing is the default test framework that comes along with Visual Studio. In the earlier days, it started as a command-line tool for executing tests. It is also referred to as Visual Studio Unit Testing Framework; however, the name MSTest is more synonymous with the developers.
The MSTest framework provides the necessary tools to verify & validate your source code. The framework recognizes tests via the different attributes/annotations under which the test code is present. Some of the popular attributes are [TestInitialize], [TestMethod], [TestCleanup], etc. We will have a detailed look at each of these attributes in further sections of this MSTest tutorial.
Since the MSTest framework comes pre-bundled with Visual Studio, developers who use the Visual Studio IDE for development & testing prefer the MSTest framework over other test frameworks like NUnit, xUnit.Net, etc. However, the choice & preference will also depend on the type & complexity of the project.
Setting up MSTest framework for Visual Studio
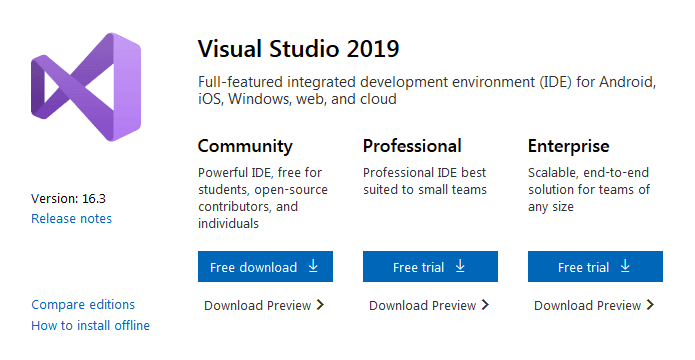
For development, we are making use of the Community Edition of Visual Studio 2019; the same can be downloaded from the official download site of Visual Studio. You also have the option to choose from the Professional or Enterprise edition, though the choice should solely depend upon your project requirements.
The necessary packages are selected for the installation since the packages occupy a good amount of disk space after installation.
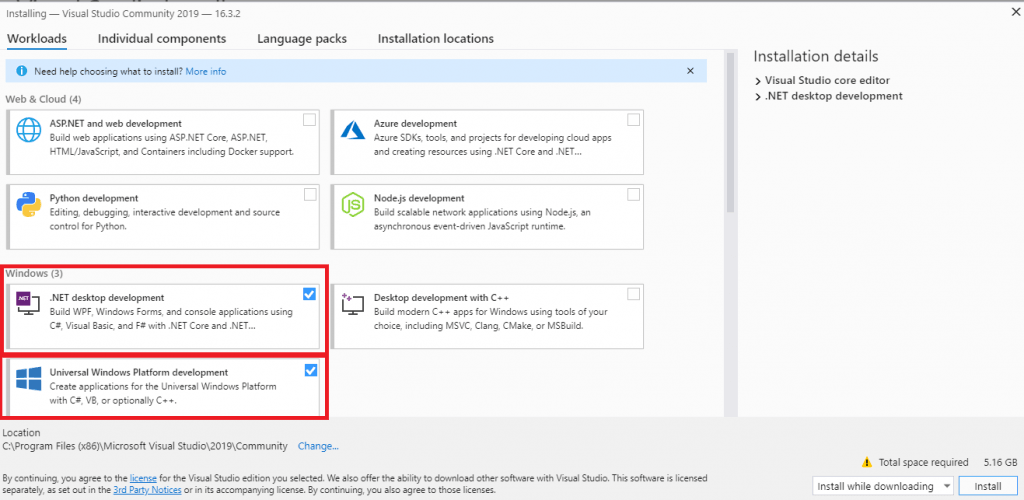
Once the installation is complete, we have to install the required packages for executing the tests based on the MSTest framework.
Installation of MSTest Framework & MSTest Adapter
Every test framework requires the corresponding Test Adapter to be installed, as the test adapter is an enabler for executing the test code. As this Selenium C# tutorial is focused on the MSTest framework, you have to install MSTest Adapter to run MSTests.
In order to install the required packages, perform the following steps:
- Create a new project of the type ‘MSTest Test Project (.Net Core)’ in Visual Studio.
- As it is a project based on the MSTest framework, the default C# file that comes along with the project has a couple of attributes, i.e., [TestMethod] and [TestClass].


In case you have not created an MSTest Test Project, you can still install the MSTest framework using the ‘NuGet Package Manager Console commands’ or using the NuGet GUI.
At the time of this blog, the latest version of the MSTest framework and MSTest Adapter was 2.2.1, respectively.
You can download and install the MSTest framework by either of the two methods, as shown below:
a. PM (Package Manager) commands from the ‘‘NuGet Package Manager Console” – For executing commands from the NuGet PM console, go to ‘Tools’ -> ‘NuGet Package Manager’ -> ‘Package Manager Console.’

To install the packages, we make use of the Install-Package command with the required
|
1 2 3 |
Install-Package MSTest.TestAdapter Install-Package MSTest.TestFramework Install-Package Microsoft.NET.Test.Sdk |
The installation screenshots are shown below:
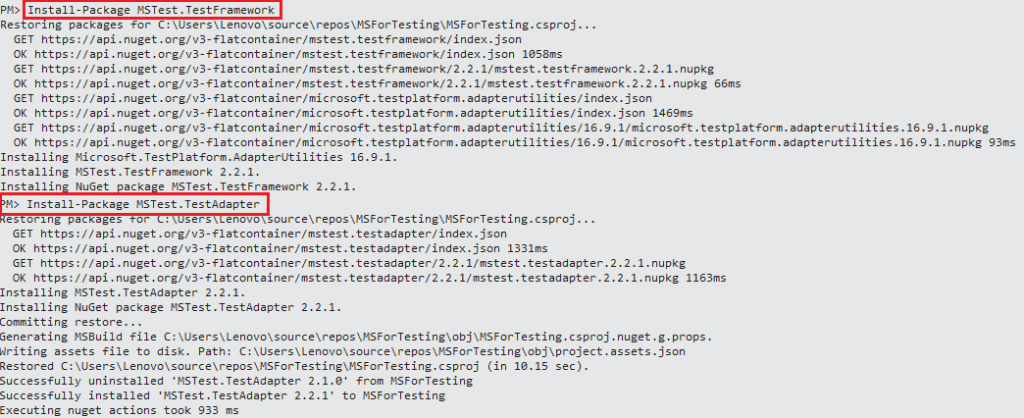
You can confirm whether the packages are installed or not by executing the command Get-Package on the Package Manager Console. Shown below is the command execution output:
|
1 2 3 4 5 6 7 8 |
PM> Get-Package Id Versions -- -------- MSTest.TestFramework {2.2.1} MSTest.TestAdapter {2.2.1} coverlet.collector {1.2.0} Microsoft.NET.Test.Sdk {16.5.0} |
b. NuGet Package Manager – To open the NuGet Package Manager, go to ‘Tools’ -> ‘NuGet Package Manager’ -> ‘Manage NuGet Packages for Solution.’

In the Browse section, search for the following packages and click Install:
- MSTest.TestAdapter
- MSTest.TestFramework
- Microsoft.NET.Test.Sdk

In this MSTest tutorial, any reference to the MSTest framework refers to MSTest v2, i.e., version 2.2.1.
To know about the installation and setup of the MSTest framework in detail, you can refer to our blog: MSTest Tutorial On: Environment Setup For Selenium Testing.
Take this certification to master the fundamentals of Selenium automation testing with C# and prove your credibility as a tester.
Here’s a short glimpse of the Selenium C# 101 certification from LambdaTest:
Salient Features of MSTest V2
The M2Test V2 framework was introduced a couple of years back with powerful features that are ideal for using the MSTest framework for cross browser testing. Some of the striking features of MSTest V2 are below:
- Open-Source – MSTest V2 is open-source, and the project is hosted on GitHub. The public repositories of the MSTest V2 are Microsoft/testfx and Microsoft/testfx-docs. Since the project is open-source, it allows contributions from the community.
- Cross-Platform support – V2 version of the MSTest framework is a cross-platform implementation of the framework using which developers can write tests targeting .NET Framework, .NET Core, and ASP.NET Core on platforms like Linux, Mac, and Windows. Begin your free ASP.NET testing.
- Extensible – Like other test frameworks, the MSTest framework can now be extended with custom test attributes & custom asserts.
- Data-driven testing -The framework allows the users to define their tests’ behavior by providing the facility to data drive the tests. By making the tests data-driven, one method can be executed multiple times by providing different input arguments.
- Annotations – Similar to other test frameworks like NUnit that support annotations, the V2 version of MSTest framework allows customizing the execution of the test execution lifecycle via annotations e.g. [TestClass], [TestMethod], [TestInitialize], [TestCleanup], etc.
- Parallel Test execution – Using MSTest V2, tests can be executed in parallel, reducing the test execution time. Parallel test execution can be achieved using In-Assembly Parallel (via Annotations or RunSettings).
The MSTest V2 portfolio comprises the framework, adapter, templates, etc.
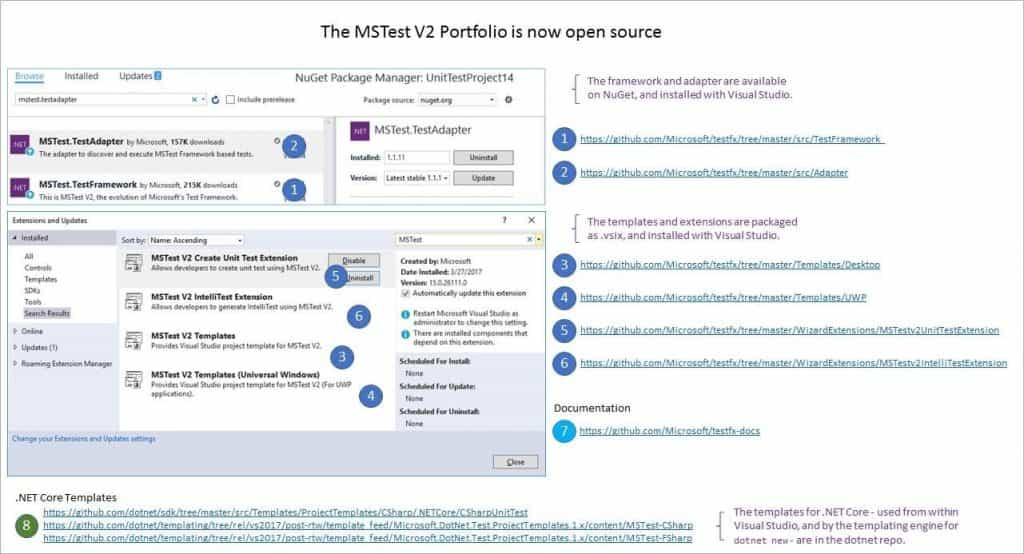
Due to the implementation of these features, MSTest V2 is preferred by developers who are performing automated browser testing using Selenium C#.
Migration from MSTest V1 to MSTest V2
We highly recommend using the latest version of Visual Studio, i.e., VS 2019, but in case you are using an old version that comes with MSTest V1, you can migrate to MSTest V2 by following these simple steps:
- Remove the reference to Microsoft.VisualStudio.QualityTools.UnitTestFramework.
- Add a reference to MSTest V2 nuget package – MSTest.TestFramework.
- Add reference to MSTest V2 nuget package – MSTest.TestAdapter.
This MSTest Tutorial for beginners and professionals will help you learn how to use MSTest framework with Selenium C# for performing Selenium automation testing.
Annotations in MSTest
The primary role of annotations in a test framework is to inform the underlying framework on how the source code should be interpreted. Once the code is compiled, a DLL (Dynamic Link Library) is generated, which can be executed using the console or a GUI.
Like the NUnit framework annotations, the MSTest framework also adds annotations between brackets before the method is declared. For example, the basic setup for automated browser testing can be done using the [TestInitialize] annotation. The resources allocated during initialization can be freed using the method implemented under the [TestCleanup] annotation.
In this MSTest tutorial, we will cover the most frequently used MSTest framework annotations:
| Annotation | Description |
|---|---|
| [TestInitialize] | Marks a method that should be called before each test method. One such method should be present per test class. |
| [TestCleanup] | Marks a method that should be called after each test method. One such method should be present per test class. |
| [TestClass] | Marks a class that contains tests. |
| [TestMethod] | Marks a method, i.e., an actual test case in the test class. |
| [DataRow] | Allows setting the values of the parameters of the test. More than one [DataRow] annotation can be present in the code. |
| [DataTestMethod] | It bears the same functionality as the [TestMethod] attribute except that it is used when the [DataRow] attribute is used. |
| [AssemblyInitialize] | Marks a method that should be called once before the execution of any method in the assembly code. |
| [AssemblyCleanup] | Marks a method that should be called once after the execution of any method in the assembly code. |
| [Ignore] | Marks a test method or test class that should be considered for execution, i.e., it is ignored. |
| [TestCategory] | Specify the category for the test |
| [ClassInitialize] | Methods that will be called only once before executing any of the test methods present in that class. |
| [ClassCleanup] | Methods that will be called only once after executing the test methods present in that class. |
There are other annotations like [DynamicData], [DataSource], etc., but these are not much relevant in the context of cross browser testing or automated browser testing.
To demonstrate the usage of annotations in the MSTest Framework, we will create a simple test code with two test cases. The code under each Annotation only has a Console.WriteLine to trace the execution flow.
FileName – 1_Demo_Test.cs
Shown below is the execution log:
|
1 2 3 4 5 6 7 |
Inside AssemblyInitialize Inside ClassInitialize Inside TestMethod Test_1 Inside TestInitialize Inside TestMethod Test_2 Inside TestCleanup |
Implementation under [ClassInitialize] & [ClassCleanup] annotations are respectively called once before & after executing the methods in the class. Similarly, implementation under [TestInitialize] and [TestCleanup] annotations are respectively called once before & after executing each test of the class.
Automated browser testing with MSTest Framework & Selenium
During the process of web product development, you would have encountered situations where some functionalities do not work as expected on certain browsers (or browser versions) or devices or operating systems. Hence, it is necessary to test the product functionalities on different browsers, particularly on those browsers which your customers will use to access your website/web application.
From a development standpoint, you have to ensure that changes for browser compatibility do not hamper the design aspects of the product, i.e., the UI and UX. MSTest can be used with the Selenium framework to perform cross browser testing and ensure that the behavior of the product is uniform across different browsers and devices, you can also read what is Selenium to understand better.
Running MSTest on Local Selenium Environment
Cross browser testing can be performed by installing the Selenium WebDriver of the browser on which you want to do the testing. Selenium WebDriver for popular web browsers like Chrome, Firefox, Internet Explorer, Microsoft Edge, etc. can be downloaded from the locations mentioned below:
| Browser | Download Locations |
|---|---|
| Opera | https://github.com/operasoftware/operachromiumdriver/releases |
| Firefox | https://github.com/mozilla/geckodriver/releases |
| Chrome | http://chromedriver.chromium.org/downloads |
| Internet Explorer | https://github.com/SeleniumHQ/selenium/wiki/InternetExplorerDriver |
| Microsoft Edge | https://developer.microsoft.com/en-us/microsoft-edge/tools/webdriver/ |
If the WebDriver executable is present in the location where the web browser executable is present, you need not specify the path when the WebDriver instance is created in the source code.To demonstrate the MSTest framework usage with local Selenium WebDriver, we will take the example of a simple To-Do app.
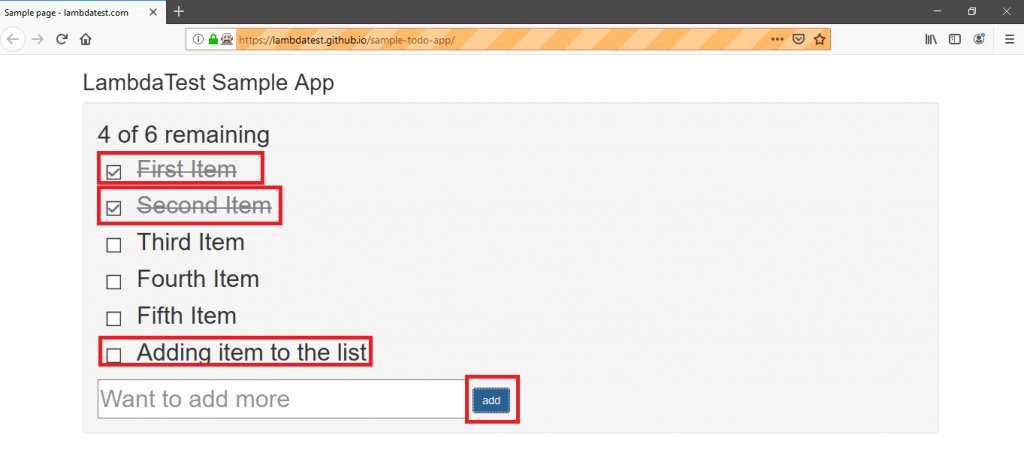
The test scenario for the Sample ToDo app will be:
- Navigate to the to-do app https://lambdatest.github.io/sample-todo-app/ using the Firefox WebDriver.
- Mark the first two items as Done, i.e., Check those two items.
- Add a new item – Adding item to the list.
- Click the Add button to add that new item to the list.
Implementation
Create a new project of the type MSTest Test Project (.Net Core). The default test framework for this project is MSTest. Hence you need not perform the package installation for the MSTest framework again. As we will be using the Selenium framework, you have to install the Selenium WebDriver.
To install the Selenium WebDriver packages for Visual Studio, you have to execute the following commands on the Package Manager Console:
|
1 2 3 |
Install-Package Selenium.WebDriver Install-Package Selenium.Firefox.WebDriver Install-Package Selenium.WebDriver.ChromeDriver |
In case you require in-depth information about Selenium WebDrivers and web element locators, we recommend you to check out the Locators In Selenium WebDriver tutorial.
FileName – src/Test/Utilities/Browser.cs
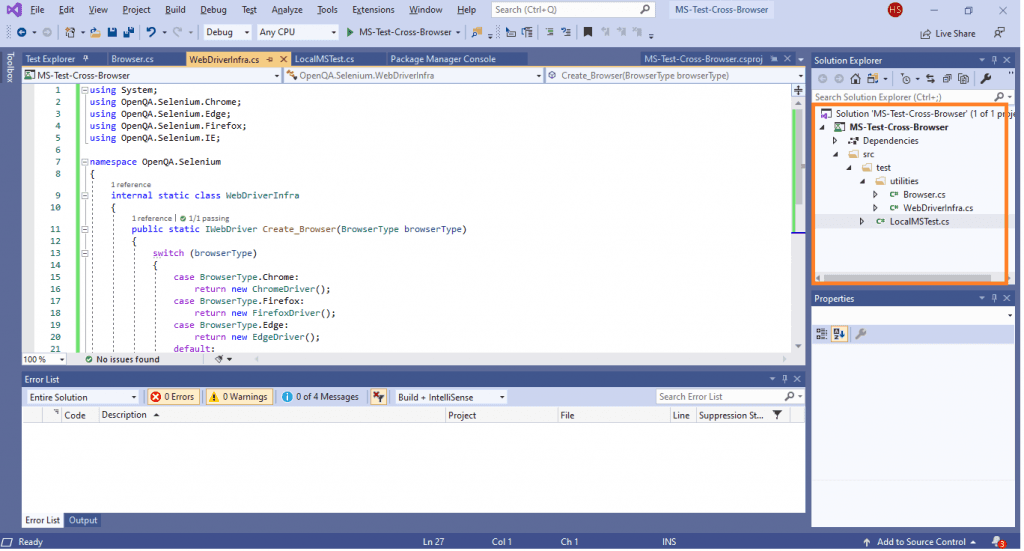
To make the code more modular, we have separated the task of creating Selenium WebDrivers for different web browsers in a separate file, i.e., WebDriverInfra.cs. All it has is the implementation for the creation of WebDriver instances of Chrome, Firefox, Edge, etc.
FileName – src/Test/Utilities/WebDriverInfra.cs
The code structure is as shown below:
FileName – src/Test/LocalMsTest.cs
Code Walkthrough
Step 1 – To start with, the entire Test Code is added under an [TestClass] annotation.
|
1 2 3 4 5 6 7 8 9 10 11 |
using OpenQA.Selenium.Support.UI; using OpenQA.Selenium.Interactions; /* For using Remote Selenium WebDriver */ using OpenQA.Selenium.Remote; namespace MS_Test_Cross_Browser { [TestClass] ................... .................... } |
Step 2 – The ‘LambdaTest ToDo app’ is executed against two web-browsers, i.e., Firefox and Chrome. Hence, the [DataRow] attribute is used to set the values of the parameters (Firefox and Chrome) of the test.
|
1 2 3 4 5 6 7 8 9 10 11 12 13 14 15 16 |
namespace MS_Test_Cross_Browser { [TestClass] public class UnitTest { .............................. .............................. [TestMethod] [DataRow(BrowserType.Chrome)] [DataRow(BrowserType.Firefox)] .............................. .............................. } .............................. } |
Step 3 – The method, i.e., NavigateToDoApp, which contains the actual test implementation, is added under the [TestMethod] annotation.
The test method is iteratively called for each browser type, i.e., Chrome and Firefox, and once the browser instance is created, the required test operations are performed.
|
1 2 3 4 5 6 7 8 9 10 11 12 13 14 15 16 17 18 19 20 21 |
[TestClass] public class UnitTest { String test_url = "https://lambdatest.github.io/sample-todo-app/"; String itemName = "Yey, Let's add it to list"; [TestMethod] [DataRow(BrowserType.Chrome)] [DataRow(BrowserType.Firefox)] public void NavigateToDoApp(BrowserType browserType) { using (var driver = WebDriverInfra.Create_Browser(browserType)) { driver.Navigate().GoToUrl(test_url); driver.Manage().Window.Maximize(); .................................. .................................. } } } |
The first two items on https://lambdatest.github.io/sample-todo-app/ are checked and a new item with the text ‘Yey, Let’s add it to list’ is added to the list. The required web elements on the page are located using the Inspect Tool functionality of the respective browser.
|
1 2 3 4 5 6 7 8 9 10 11 12 13 14 15 16 17 18 19 20 21 22 23 24 25 26 27 28 |
public void NavigateToDoApp(BrowserType browserType) { using (var driver = WebDriverInfra.Create_Browser(browserType)) { driver.Navigate().GoToUrl(test_url); driver.Manage().Window.Maximize(); Assert.AreEqual("Sample page - lambdatest.com", driver.Title); // Click on First Check box IWebElement firstCheckBox = driver.FindElement(By.Name("li1")); firstCheckBox.Click(); ............................................. ............................................. // Verified Added Item name IWebElement itemtext = driver.FindElement(By.XPath("/html/body/div/div/div/ul/li[6]/span")); String getText = itemtext.Text; Assert.IsTrue(itemName.Contains(getText)); /* Perform wait to check the output */ //System.Threading.Thread.Sleep(4000); Console.WriteLine("LT_ToDo_Test Passed"); driver.Quit(); ............................................. ............................................. |
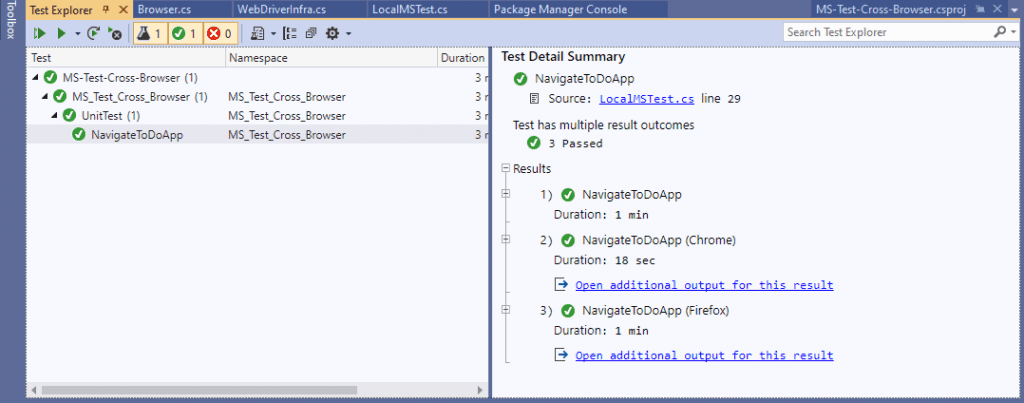
Below is the execution snapshot on the Firefox browser and a screenshot from Test Explorer on Visual Studio.
Parallel Testing using MSTest Framework
Parallelism in the MSTest framework can be achieved by using the In-assembly Parallel feature of MSTest V2. Below are the two ways in which it can be implemented:
- Using Annotations
- Workers – Indicate the number of threads to run the tests. Set it to ‘0’ in case you do want serial execution.
- Scope – Indicates if the runner should parallelize threads at the Method Level or Class Level. If the Scope is set to MethodLevel, all the tests are executed in parallel. If the Scope is set to ClassLevel, tests in the class are executed serially, whereas the test classes will be executed in parallel. If there are scenarios where there is inter-dependency between the tests, you should use parallel execution at ClassLevel.
- Using RunSettings
Parallelism is possible at the Class level or the Method level.

The syntax is as shown below:
|
1 2 |
[assembly: Parallelize(Workers = 0, Scope = ExecutionScope.MethodLevel)] [assembly: Parallelize(Workers = 0, Scope = ExecutionScope.ClassLevel)] |
In the above syntax:
In case your project has multiple test assemblies which you want to parallelize, you can achieve parallelism by creating a file named .runsettings at the root of the solution.
|
1 2 3 4 5 6 7 8 9 |
<?xml version="1.0" encoding="utf-8"?> <RunSettings> <MSTest> <Parallelize> <Workers>4</Workers> <Scope>MethodLevel</Scope> </Parallelize> </MSTest> </RunSettings> |
The example demonstrated as a part of Local Testing can be converted to Parallel Test by simply adding the following line in src/Test/LocalMsTest.cs
|
1 |
[assembly: Parallelize(Workers = 2, Scope = ExecutionScope.MethodLevel)] |
Cross Browser Testing using MSTest Framework on the Cloud
Parallel testing on local infrastructure can hit a roadblock if you want to test your website/web application across ‘N’ different browsers, browser versions, operating systems, and devices. You obviously cannot invest endlessly in setting up the test infrastructure since it is neither scalable nor economical. Not performing thorough cross browser testing might result in a buggy experience if the customer accesses your product from an untested web browser. It reduces the overall test coverage as well.
A feasible solution is to use a cloud based cross browser testing platform like the LambdaTest, where tests are executed on a Remote Selenium Grid. Using LambdaTest, cross browser tests can be executed on 3000+ different combinations of browsers, operating systems, and devices.
Porting the existing implementation to remote Selenium Grid requires changes in the infrastructure-related code. Once you create an account on LambdaTest, you should make a note of the user-name & access-key from Profile Section as that combination is used for accessing the remote Selenium Grid on LambdaTest. The Automation Dashboard can be used to view all your text logs, screenshots, and video recording for your entire Selenium test.
The desired browser and platform capabilities are generated using LambdaTest capabilities Generator. For example, below are the capabilities for Safari on the macOS Mojave platform:
|
1 2 3 4 5 6 7 8 |
DesiredCapabilities capabilities = new DesiredCapabilities(); capabilities.SetCapability("user","Your Lambda Username") capabilities.SetCapability("accessKey","Your Lambda Access Key") capabilities.SetCapability("build", "your build name"); capabilities.SetCapability("name", "your test name"); capabilities.SetCapability("platform", "MacOS Mojave"); capabilities.SetCapability("browserName", "Safari"); capabilities.SetCapability("version","12.0"); |
For demonstrating the usage of LambdaTest and the effectiveness of Parallel test execution on a Remote Selenium Grid, we will implement the below three test cases:
Test Case 1 – LamdaTest Sample To-Do App.
- Navigate to the to-do app https://lambdatest.github.io/sample-todo-app/.
- Mark the first two items as Done, i.e., Check those two items.
- Add a new item – Adding item to the list.
- Click the Add button to add that new item to the list.
Browsers on which cross-browser testing is performed are:
| Browser | Browser version | Platform/Operating System |
|---|---|---|
| Chrome | 72.0 | Windows 10 |
| Microsoft Edge | 18.0 | Windows 10 |
| Firefox | 70.0 | macOS High Sierra |
| Safari | 12.0 | macOS Mojave |
Test Case 2 & 3 – Google Search for LambdaTest.
- Navigate to Google.com
- Search for LambdaTest
- Quit the browser window
Both the test cases are the same, but the execution will be performed on different web browsers.
| Test Case 2 | Test Case 3 | ||||
|---|---|---|---|---|---|
| Browser | Browser Version | Platform/Operating System | Browser | Browser Version | Platform/Operating System |
| Chrome | 72.0 | Windows 10 | Microsoft Edge | 18.0 | Windows 10 |
| Microsoft Edge | 18.0 | Windows 10 | Firefox | 70.0 | macOS High Sierra |
| Firefox | 70.0 | macOS High Sierra | Safari | 2.0 | macOS Mojave |
Implementation
FileName – 2_LT_Parallel_Test.cs
Code Walkthrough
Step 1 – OpenQA.Selenium.Remote package/namespace is imported as RemoteWebDriver class is defined in it.
|
1 2 |
/* For using Remote Selenium WebDriver */ using OpenQA.Selenium.Remote; |
Step 2 – The LambdaTest credentials are passed for accessing the remote Selenium Grid. Refer to our documentation on LambdaTest Authentication Credentials to learn how to integrate LambdaTest in your test scripts.
|
1 2 3 4 |
String username = "user-name"; String accesskey = "access-key"; String gridURL = "@hub.lambdatest.com/wd/hub"; ....................................................................... |
Step 3 – Browser & Device capabilities are generated using the LambdaTest capabilities generator, and the same is passed to the Remote WebDriver API.
|
1 2 3 4 5 6 7 8 9 10 11 12 13 14 15 |
DesiredCapabilities capabilities = new DesiredCapabilities(); capabilities.SetCapability("user", user-name); capabilities.SetCapability("accessKey", access-key); capabilities.SetCapability("build", "Google Search (2) using MsTest in Parallel on LambdaTest"); capabilities.SetCapability("name", "Google Search (2) using MsTest in Parallel on LambdaTest"); capabilities.SetCapability("platform", "Windows 10"); capabilities.SetCapability("browserName", "Firefox"); capabilities.SetCapability("version", "62.0"); ................................................................................. ................................................................................. ................................................................................. driver = new RemoteWebDriver(new Uri("https://user-name:access-key@hub.lambdatest.com/wd/hub"), capabilities, TimeSpan.FromSeconds(600)); |
Step 4 – The current plan on LambdaTest defines how many tests can be executed in parallel on the Remote Selenium Grid. For demo purposes, we have used 5 Parallel tests. Therefore, we have set the scope of Parallelism to MethodLevel with Workers to 5, i.e., five threads/tests.
|
1 |
[assembly: Parallelize(Workers = 5, Scope = ExecutionScope.MethodLevel)] |
Step 5 – The initialization code is implemented as a part of the [TestInitialize] attribute. It will be called only once during the initialization of the tests.
|
1 2 3 4 5 6 7 8 |
[TestInitialize] public void setupInit() { capabilities = new DesiredCapabilities(); capabilities.SetCapability("user", username); capabilities.SetCapability("accessKey", accesskey); } |
Step 6 – As the browser capabilities on LambdaTest accept input parameters as browser-name, browser-version, platform-name, the combination is passed via [DataRow] attribute. These are passed as the input parameters to each test-case.
Each test is executed iteratively till all the test combinations as a part of [DataRow] are exhausted. The remote web-driver is created as a part of the test-case as it uses these three parameters to create a browser instance on the target platform.
|
1 2 3 4 5 6 7 8 9 10 11 12 13 14 15 16 17 18 19 20 21 22 23 |
[DataTestMethod] [DataRow("chrome", "72.0", "Windows 10")] [DataRow("MicrosoftEdge", "18.0", "Windows 10")] [DataRow("Firefox", "70.0", "macOS High Sierra")] [DataRow("Safari", "12.0", "macOS Mojave")] [TestMethod] public void LT_ToDo_Test(String browser, String version, String os) { String itemName = "Yey, Let's add it to list"; capabilities.SetCapability("browserName", browser); capabilities.SetCapability("version", version); capabilities.SetCapability("platform", os); capabilities.SetCapability("build", "LT ToDoApp using MsTest in Parallel on LambdaTest"); capabilities.SetCapability("name", "LT ToDoApp using MsTest in Parallel on LambdaTest"); driver = new RemoteWebDriver(new Uri("https://" + username + ":" + accesskey + gridURL), capabilities, TimeSpan.FromSeconds(2000)); driver.Url = "https://lambdatest.github.io/sample-todo-app/"; ................................................... ................................................... ................................................... |
The rest of the implementation is specific to what needs to be achieved as a part of the test case, i.e., Operations on LambdaTest ToDo app or Google Search for ‘LambdaTest’ on specific browser/OS combinations.
As seen in the execution snapshot procured from Visual Studio, the test case is performed for 4 different browser/OS combinations, which were passed in the [DataRow] attribute.
|
1 2 3 4 5 6 7 8 9 10 11 12 13 14 15 16 17 18 19 20 |
Results 1) LT_ToDo_Test Duration: 1 min 2) LT_ToDo_Test (chrome,72.0,Windows 10) Duration: 24 sec 3) LT_ToDo_Test (MicrosoftEdge,18.0,Windows 10) Duration: 27 sec Open additional output for this result 4) LT_ToDo_Test (Firefox,70.0,macOS High Sierra) Duration: 37 sec Open additional output for this result 5) LT_ToDo_Test (Safari,12.0,macOS Mojave) Duration: 28 sec |
You can visit https://automation.lambdatest.com/logs/?testID=

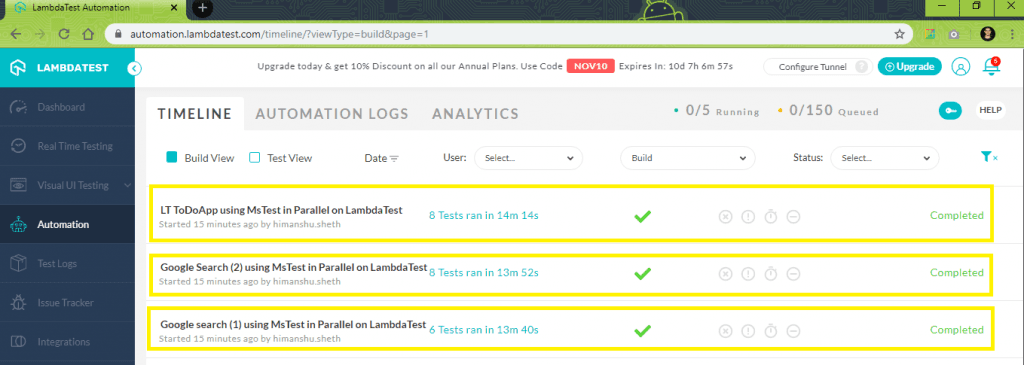
Below is the snapshot of successful test execution from Test Explorer on Visual Studio and Automation Tab (Test Status = Completed) on LambdaTest.

It’s a Wrap
In this Selenium C# tutorial, we had a look at the MSTest framework – default test framework that comes along with Visual Studio. MSTest V2 can be used for cross browser testing as it supports parallelism, which is an important aspect when it comes to automated browser testing. The advantage of MSTest V2 is that it has cross-platform support and is highly extensible. Annotations/attributes simplify the division of the various sections involved in a test case, i.e., initialization, test case logic, de-initialization. The MSTest framework can also be used to define the behavior of the tests as it supports data-driven tests.
When it comes to cross-browser testing, cloud-based testing can opt over local cross-browser testing. It is more scalable and helps you test the product thoroughly on different (browser + platform + device) combinations.
Frequently Asked Questions
How do you add MSTest to a project?
- Right-click on the solution in Solution Explorer.
- Choose Add > New Project > Installed > Visual C# > choose Test > choose MSTest Test Project (.NET Core).
- In the Name box, enter the name, and then select OK.
Is xUnit better than MSTest?
The xUnit tool supports parameterized tests using the Theory attribute, which MSTest doesn’t. Also, xUnit doesn’t require a mandatory Visual Studio Test Project, as in the case of MSTest. This makes xUnit better than MSTest in some scenarios.
How do I run MSTest from the command line?
Open the Visual Studio command prompt from the Start menu, and use the command MSTest /testcontainer.
Got Questions? Drop them on LambdaTest Community. Visit now


