
Complete Guide To Selenium Testing with GitHub Actions
Suparna Khamaru
Posted On: May 5, 2021
![]() 130796 Views
130796 Views
![]() 14 Min Read
14 Min Read
CI/CD pipelines are here to stay and contribute tremendously to continuous integration and delivery across all global projects. This article will be a guide to configure, set up builds and tests with “GitHub Actions”, primarily using Selenium WebDriver. This article shall also cover some of the most generic GitHub Actions examples, and user flows.
You can accelerate your test cycles and trim down your overall test execution by running Selenium tests in parallel from GitHub Actions on LambdaTest cloud.
If you’re looking to improve your Selenium interview skills, check out our curated list of Selenium interview questions and answers.
Let’s get right into it, starting with an intro to Selenium GitHub Actions!
TABLE OF CONTENT
Introduction to GitHub Actions
GitHub Actions is one of the most recent CI workflow mechanisms that is looking not only impactful and promising but also quick and easy. The configurations and set-up are found to be within the Git repository pages. It’s now easier than ever to automate your software workflows, thanks to GitHub Actions, including CI/CD. As we no longer need to go to a third-party site to peek on our build runs, it’s going to save a lot of our otherwise spent time. To get started with Selenium test automation, we must first understand the following GitHub Actions example.
GitHub Actions Component
If we visit any GitHub repository project, we will notice a series of menu tabs, as shown in the below sample figure.
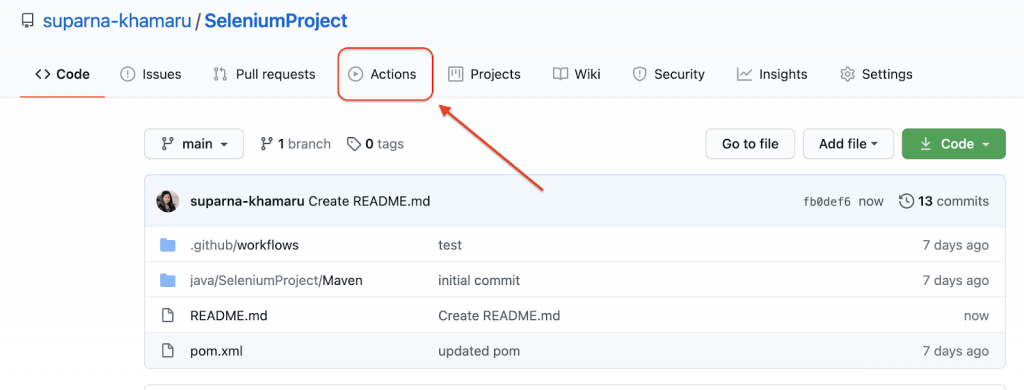
The red highlighted box in the above figure is the section of our interest, where lies different varieties of GitHub workflows and GitHub Actions components.
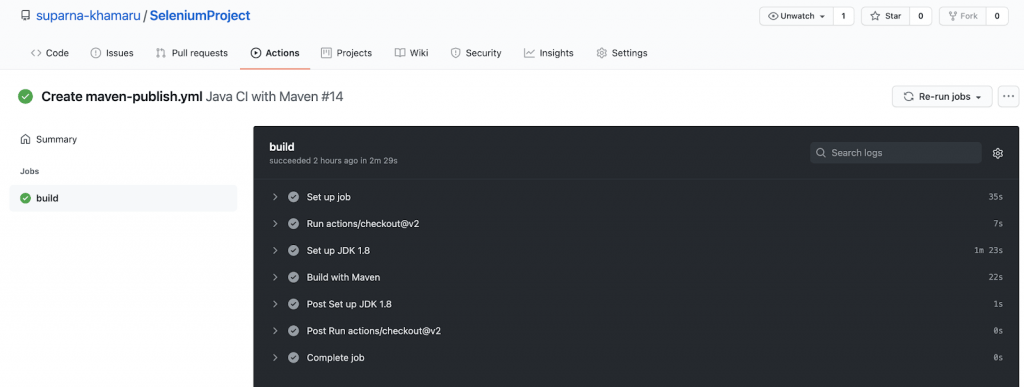
Attached below is a GitHub Actions tab screen figure when sample workflows are set up and running.
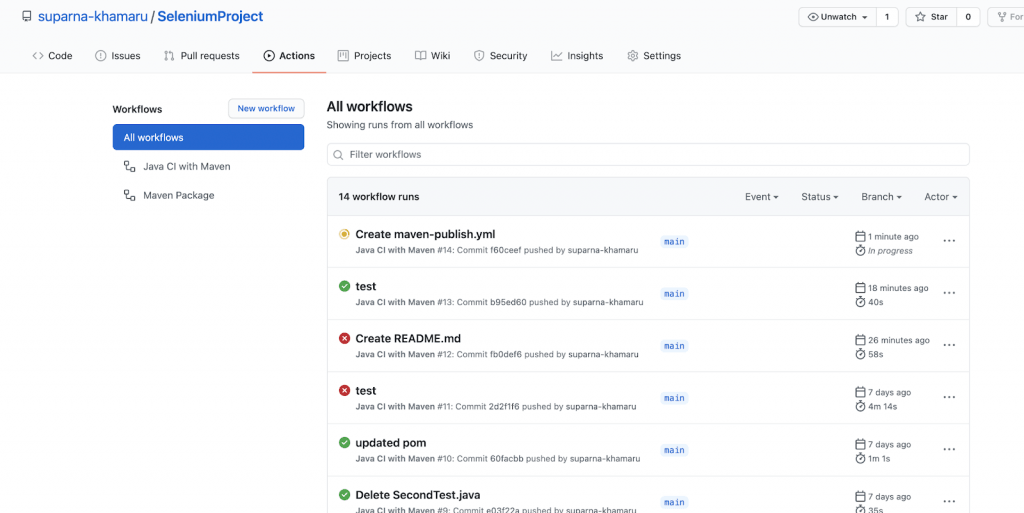
Like the usual CI mechanism, if the build passes, then we see a Green Tick Mark (✅). If the build fails, then we see a Red Cross Mark (❌) beside the particular run, which is usually auto-initiated as soon as the user commits any change in the GitHub repository.
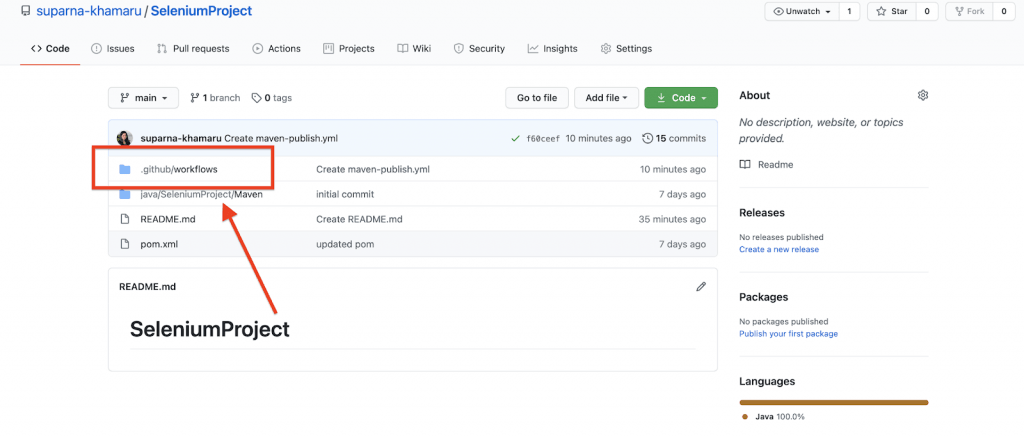
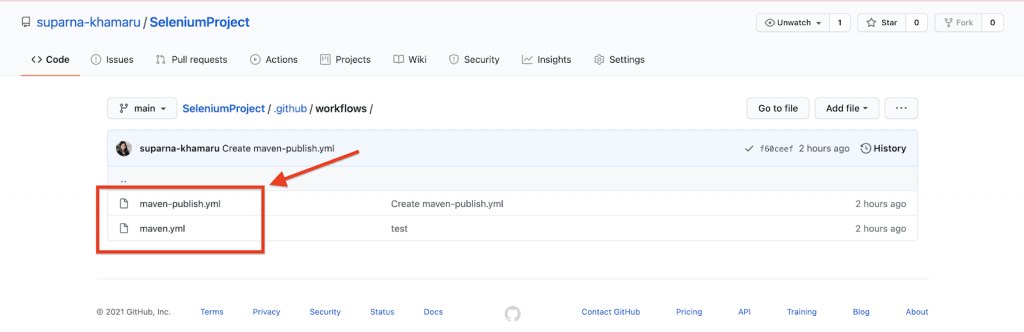
GitHub Actions tab primarily provides us with a mechanism to build multiple workflows as per the instructions or commands provided in YAML files, placed in .github/workflows folder of the GitHub repository, as can be observed in the figure below.
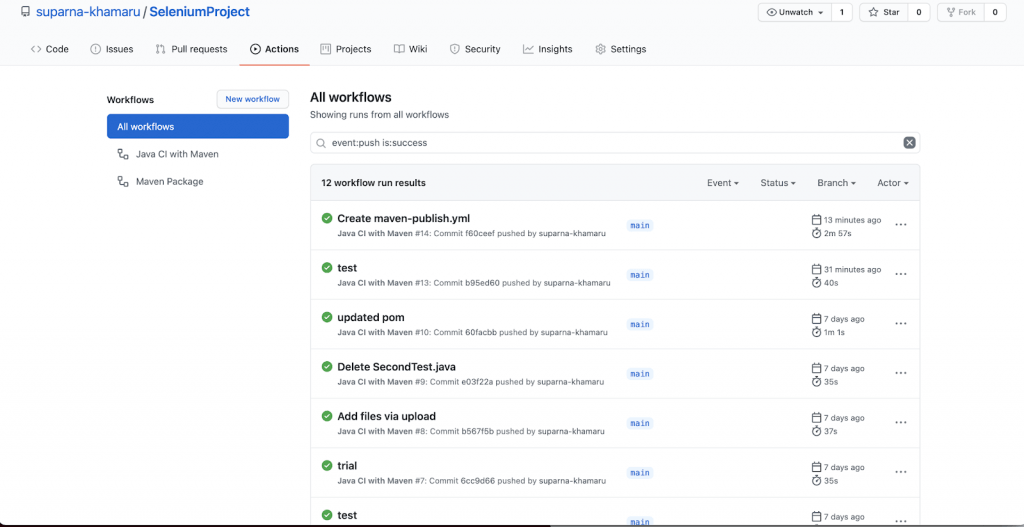
The GitHub Actions tab screen also provides the flexibility to filter build runs as per our need with few basic filtering options. We can either search or use the filtering options directly.
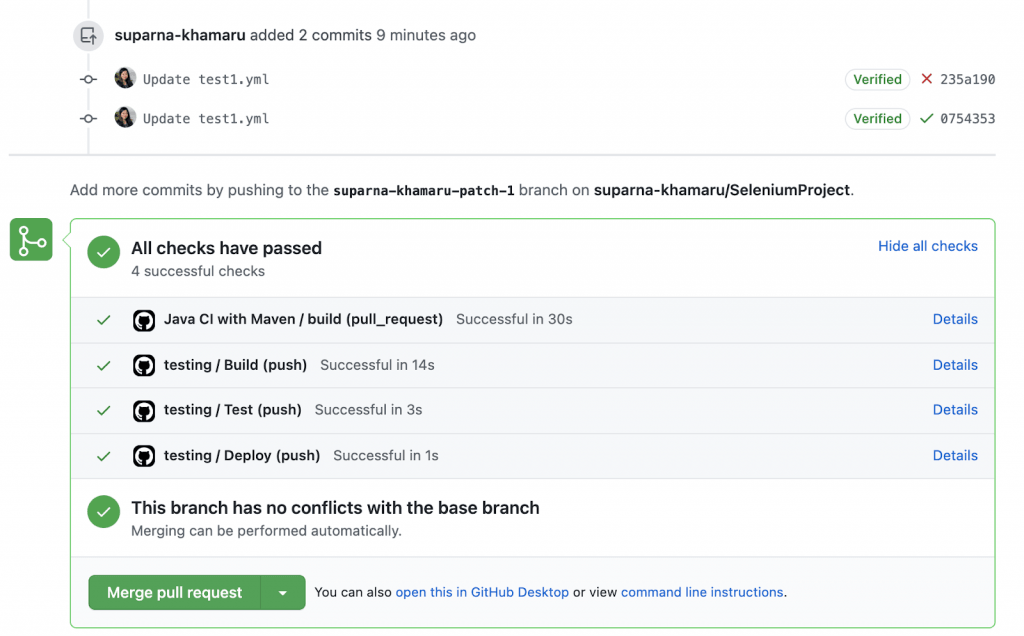
Provided below is an image of a sample scenario where the user views the filtered view of the run builds triggered on every git push that passed successfully. We can observe that build run time is also displayed on the right side of each ran build in the displayed workflow view.
Creating GitHub Actions Workflow
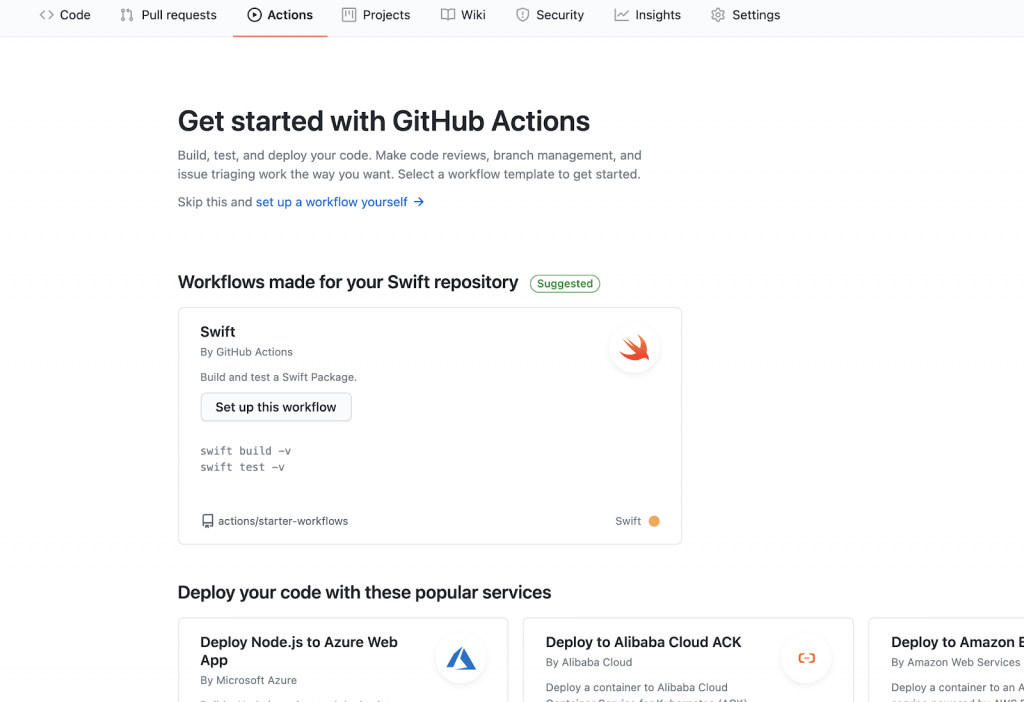
When a user visits the GitHub Actions tab for the first time, when no configurations are done yet, we will notice a view attached in the screen below.
We may also notice that GitHub is auto-suggesting users to set up the possible workflow to be selected at the top of the page.
Example:
- If the project is a Swift project, automatically, the user is suggested to set up a “Swift” workflow at the top of the suggestions list, as we would notice below shortly.
- If the project is a Maven-based Java project, automatically, a user is suggested to set up the “Java with Maven” workflow at the top of the suggestions list.

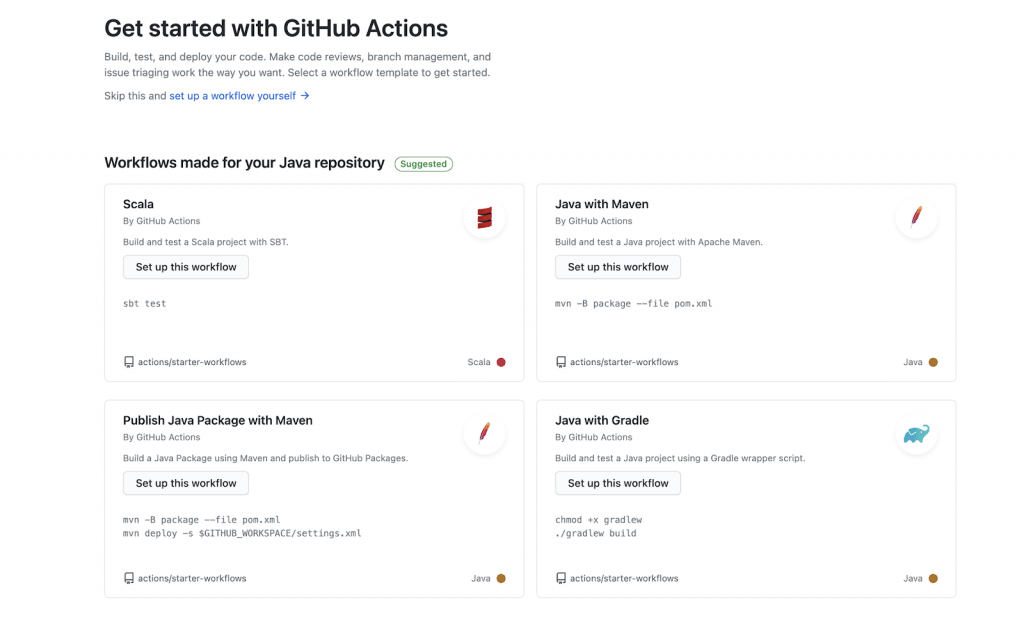
Suppose a user selects any of the above-listed options based on the project’s need. In that case, the user is already automatically provided with auto-generated scripts in a YAML file, which can be further configured as per our need and then committed into the existing GitHub repository.
Once the YAML file is committed & pushed to GitHub repo with required commands/instructions, we would start noticing that the workflow is triggered automatically. The build starts running remotely on the same GitHub Actions tab. We can see the status of the build run as well on the same screen.
Now, let us create a new workflow and see how it works below:
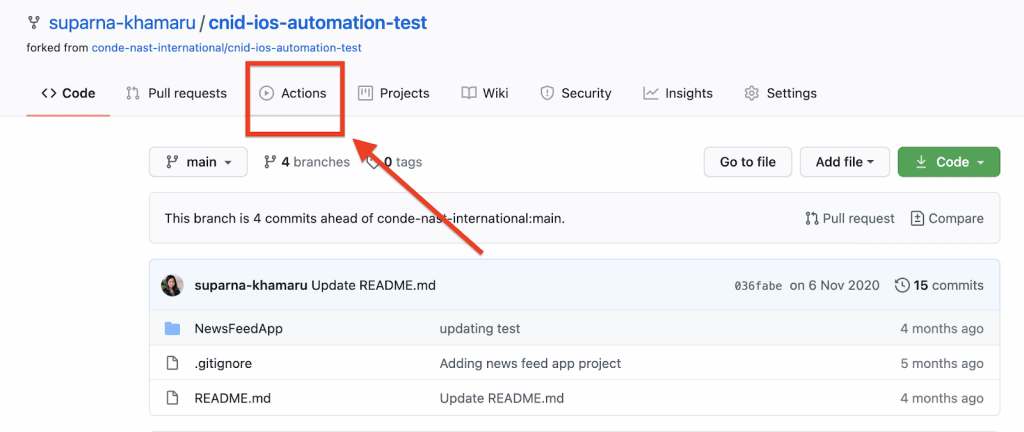
Step 1: Let us consider a Sample Test repository of an XCUITest Swift project.
Step 2: Click on the “Actions” tab of the XCUITest GitHub repository page.
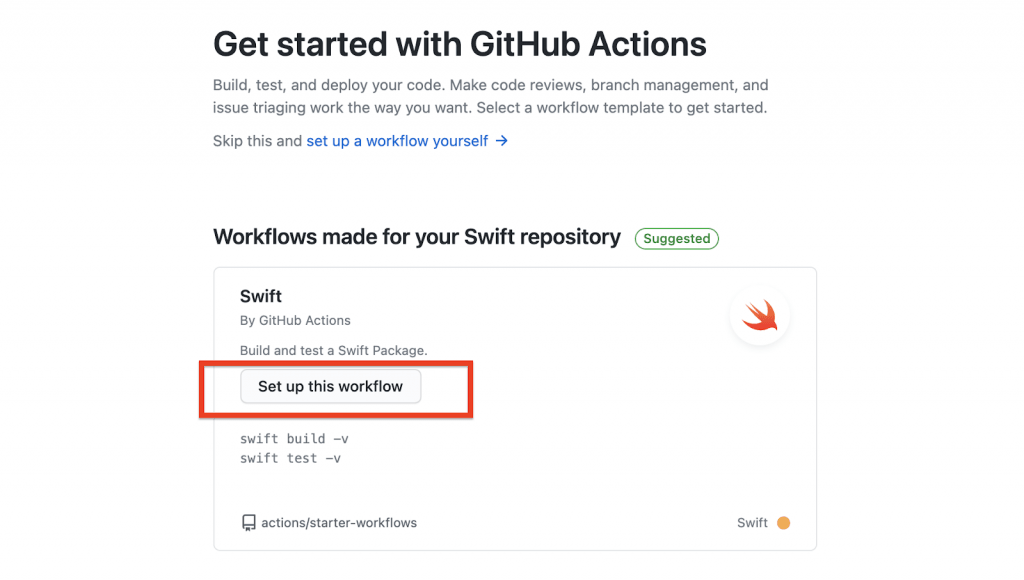
Step 3: When no workflows are set up yet, we would most probably notice that the GitHub Actions page already auto-suggests us to set up a recommended workflow at the top of the page, as can be found from the screenshot below.
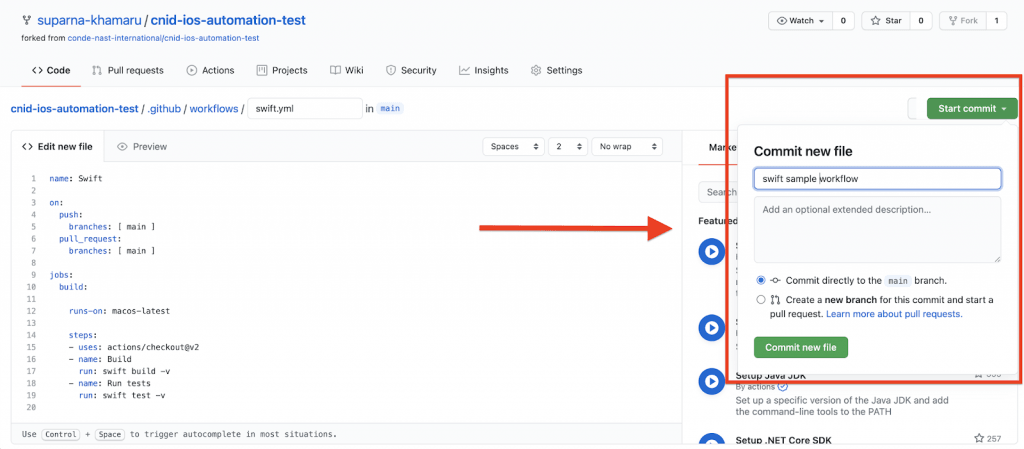
Step 4: Click on the “Set up this workflow” button in the required workflow, which we want to set up. In this case, it would be the Swift workflow, as our chosen sample XCUITest project is a Swift based project.
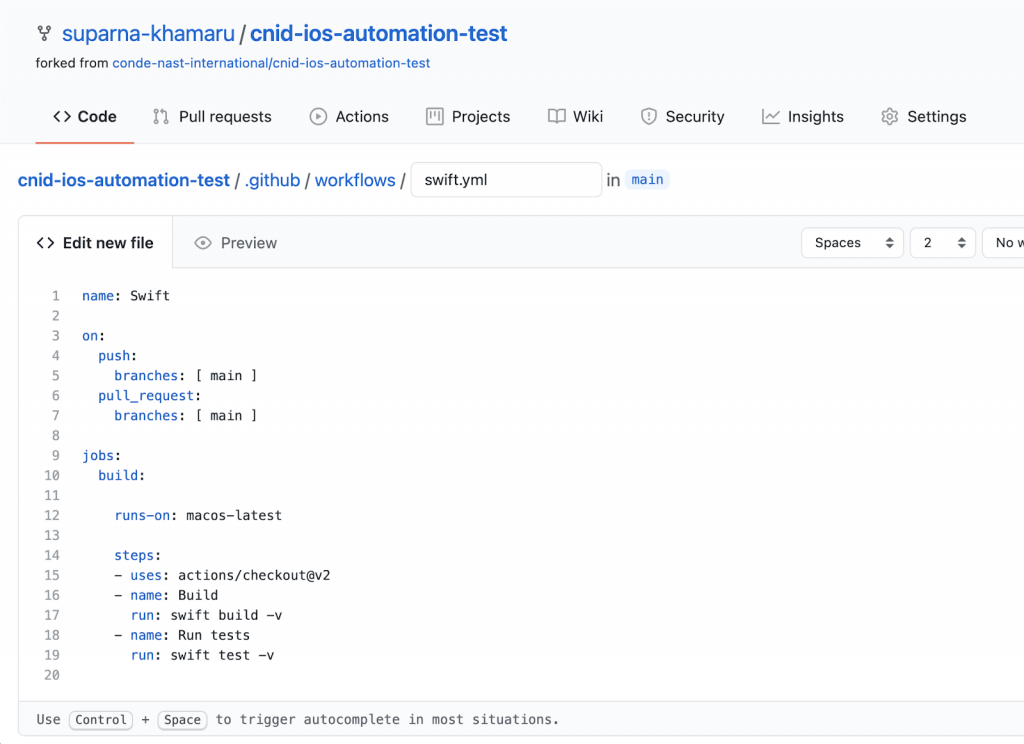
Step 5: Immediately, we would notice that a list of predefined commands is automatically generated, as shown below.
While a slight modification would be required to build any set-up, the basic commands are auto-generated by GitHub’s initial sample set up, which we can modify based on our project’s need further.
Step 6: On the right side of the page, we would notice the “Start commit” button.
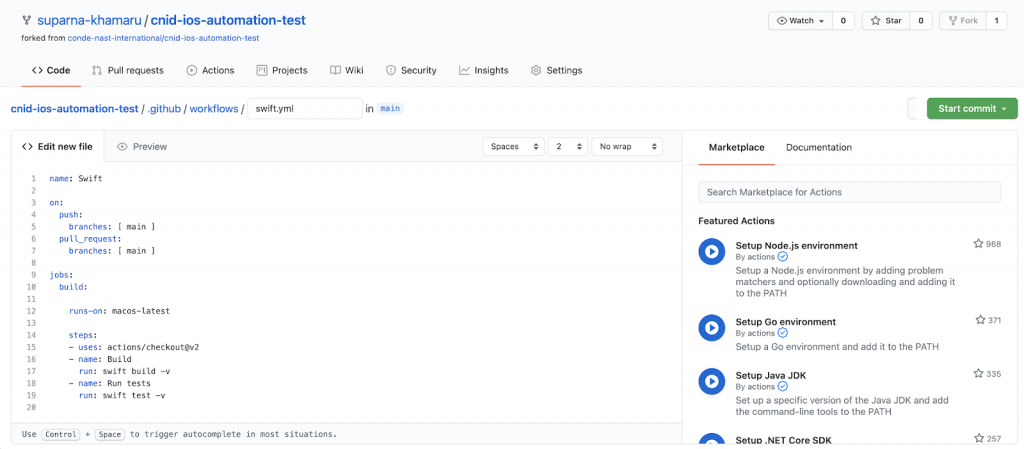
Step 7: Clicking on the “Start commit” button allows the user not only to add comments for commit, but also lets the user to:
- Directly commit to master / main, which is selected by default, as can be observed from the figure below.
- Create a new branch for the user to create a new pull request.
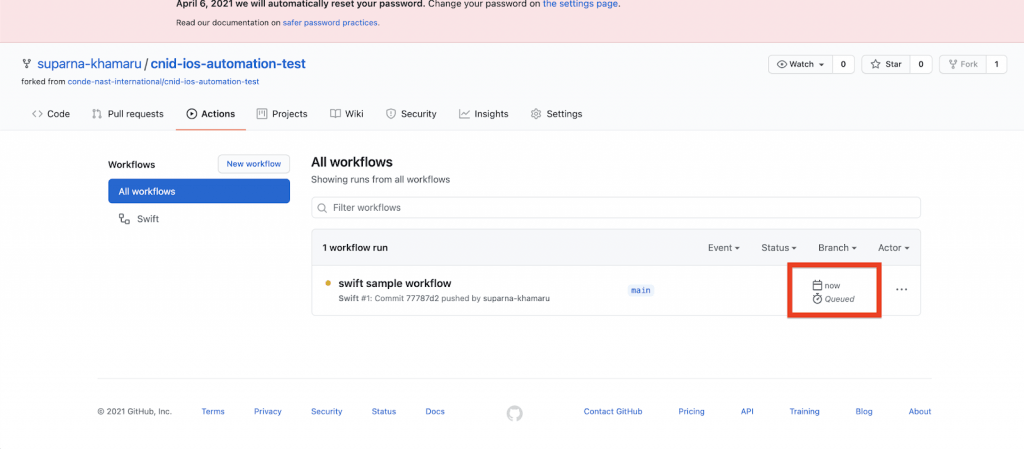
Step 8: Once the commit is successfully done, we would notice that our new workflow is successfully created in the “Actions” tab, where initially the workflow’s build job goes into a Queue.
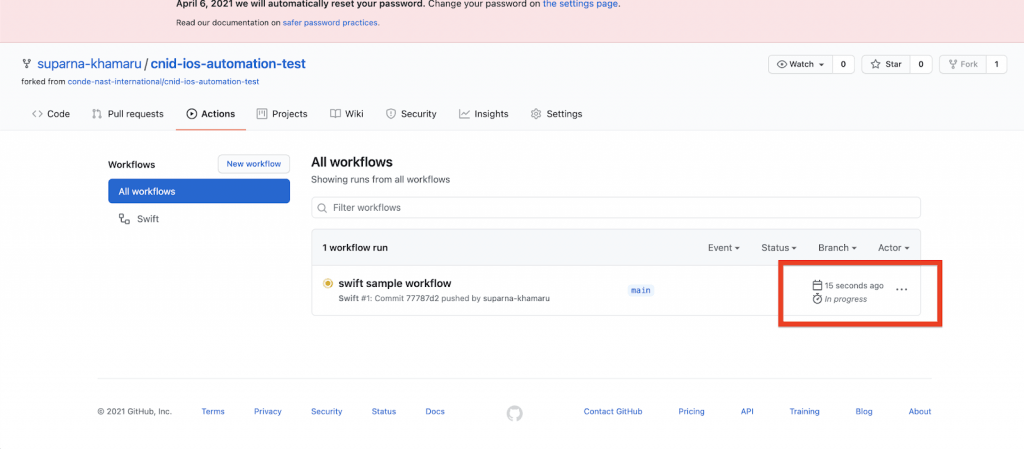
Step 9: Post Queue, the workflow’s build job starts building and running the instructions/commands in the YAML file committed by us and changes the build status from “Queued” to “In progress“.
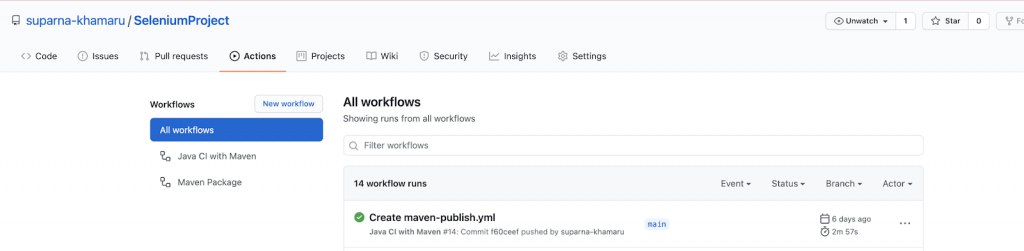
Step 10: Post completion of all the build runs, we would notice the status changed to pass/fail based on the outcome of the build run.
- If the build passes, then we see a Green Tick Mark (✅) beside the built run.
- If the build fails, then we see a Red Cross Mark (❌) beside the built run.

Workflow File Structure
One GitHub Repository may have multiple workflows configured, each building different actions required for building, testing, and deploying. The workflow file structure looks very similar to the Jenkins-file and CircleCI config (YAML) file formats. So, the formats we need to keep in our mind while dealing with YAML files are that we cannot enter incorrect formats, and we need to follow the proper indentation, colons and dashes all across the file, which primarily consists of key-value pairs, lists and maps.
Below is an example of a sample skeleton auto-generated when the project’s workflow is selected as “Java with Maven” based.
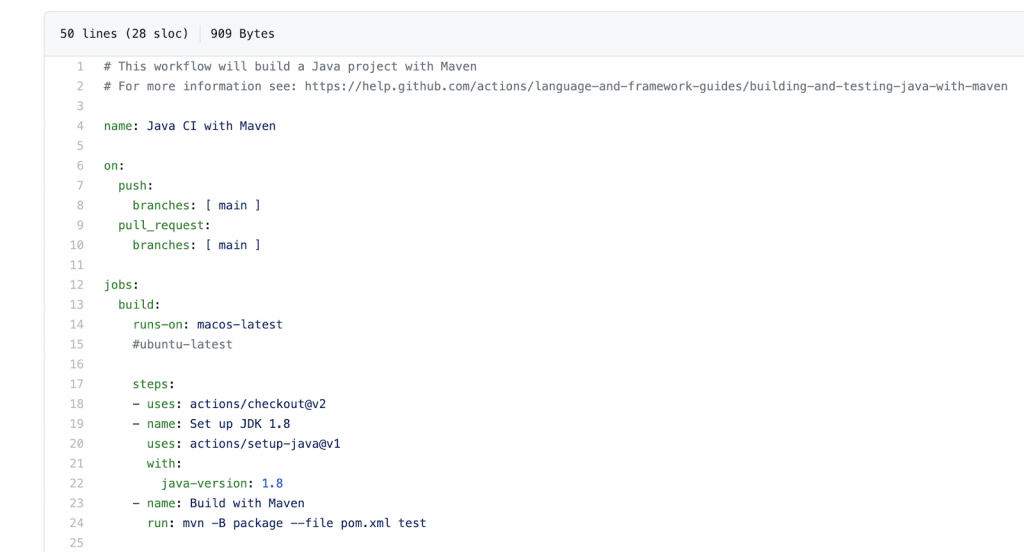
When we look closely at the syntaxes of the commands used in the above Yaml file, the following shall be observed-
- Name of workflow
- On Attribute
- Jobs
- Job name
- Job runner information
- Job Steps
Let us explore all these one by one.
How to name your Workflow?
If we want to have multiple workflows to build a CI pipeline to run tests with Selenium GitHub Actions, it is recommended to name your workflows accordingly. It is also to be noted that it is not a mandatory field, and if skipped, GitHub shall create a default name for us from the defined path & name of the file.
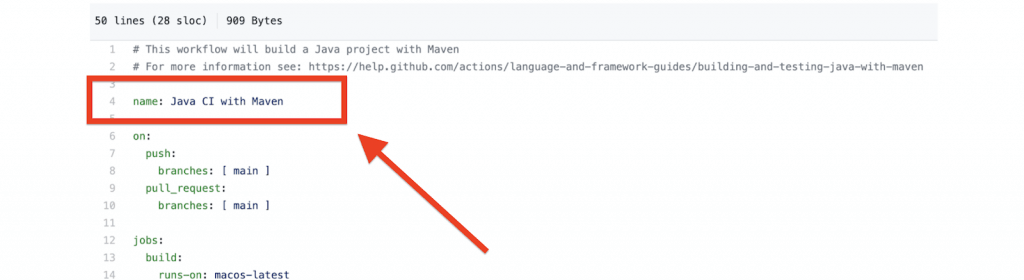
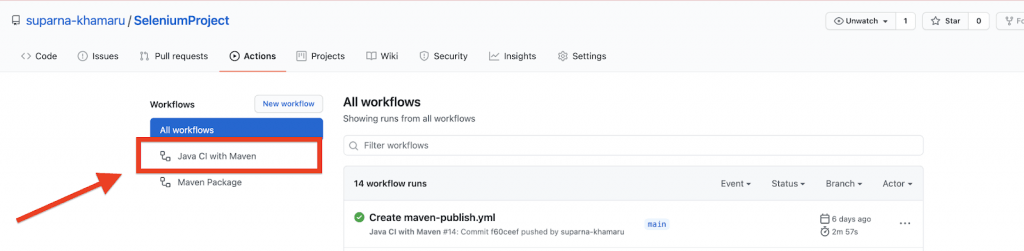
In the above-configured YAML file, line 4, key – ‘name’ denotes the name of the Workflow, the value of which shall be displayed in the ‘Actions’ tab, post configuration as shown below.
When to trigger the Workflow?
‘On’ attribute is mandatory and is seen as an important step to be added in every workflow as this step allows the user to define when to run the workflow in a GitHub Actions example.
There are different approaches to trigger the workflow, such as:
- push
- pull_request
- release
…and many more.
We can also use the above events in different ways with Selenium GitHub Actions.
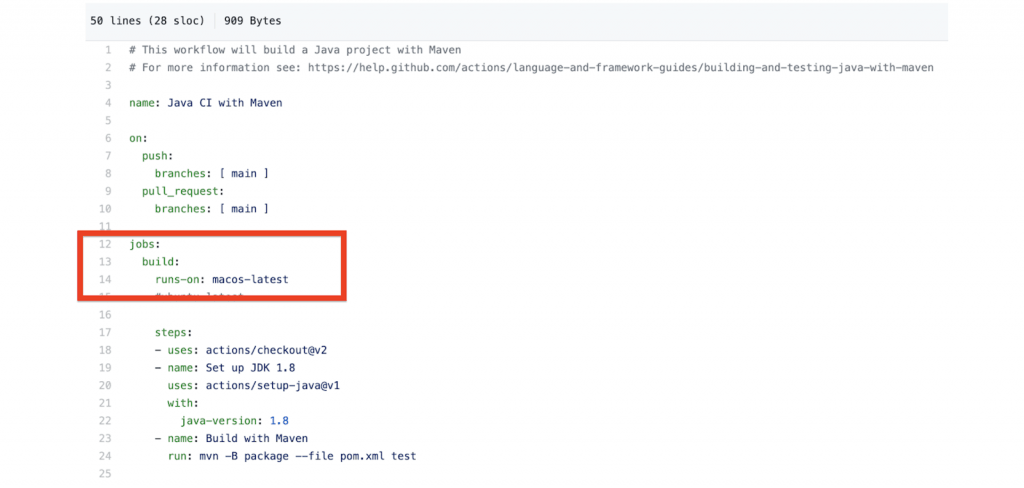
Where do the Build Jobs run?
Based on the user-chosen build machine configuration, primarily from the below list of predefined GitHub supported VMs, all GitHub jobs run in the Actions tab.
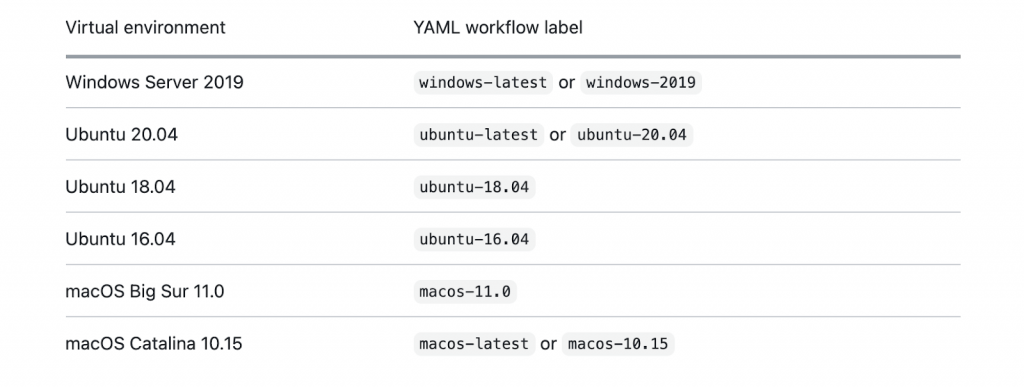
In our example, we have chosen “macos-latest” to run our build from the above list of GitHub supported VMs. We can alternatively use any of the other VM with required specific OS versions as well.
How to configure steps for the Build Runs?
Let us consider a sample example of a Maven & Java based Test project.
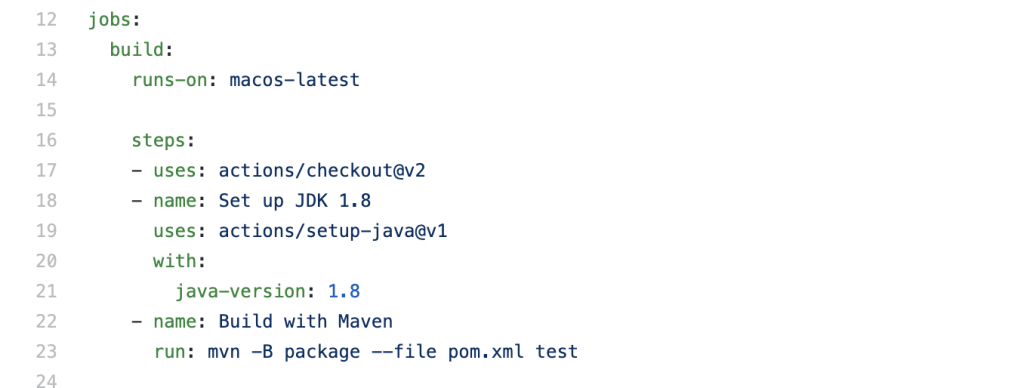
Jobs and Job Name
In the above workflow sample, our jobname is “build” in line 13, right under ‘jobs’. We also name it “maven_build_job” if that lets the user know better about the job.
We should note that:
- Every workflow must have at least one job.
- All workflow jobs run in parallel by default.
- Each job may have multiple job steps.
- If any job needs to be run in sequential order like in a CI pipeline, where the test job needs to run after completion of the build job, we can add “needs” dependency in the test job.
As a result of which, the same pipeline status can be viewed when a PR is raised, as shown below:
Job Steps
It consists of a List of defined commands that perform certain actions.
-
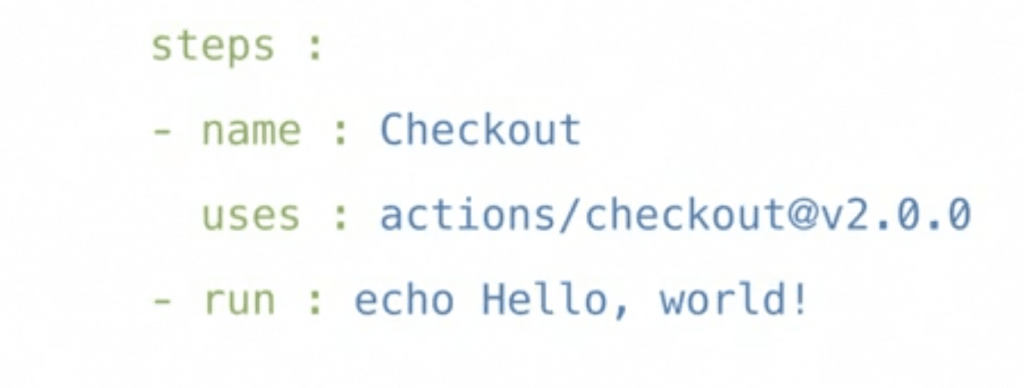
Each Step may have the following parameters:
- name -> optional
- uses -> defines “what action to use” and “location of action”.
- runs -> one or series of commands to run in the Job Step in OS’ default shell
An example of a Job step can be observed below:
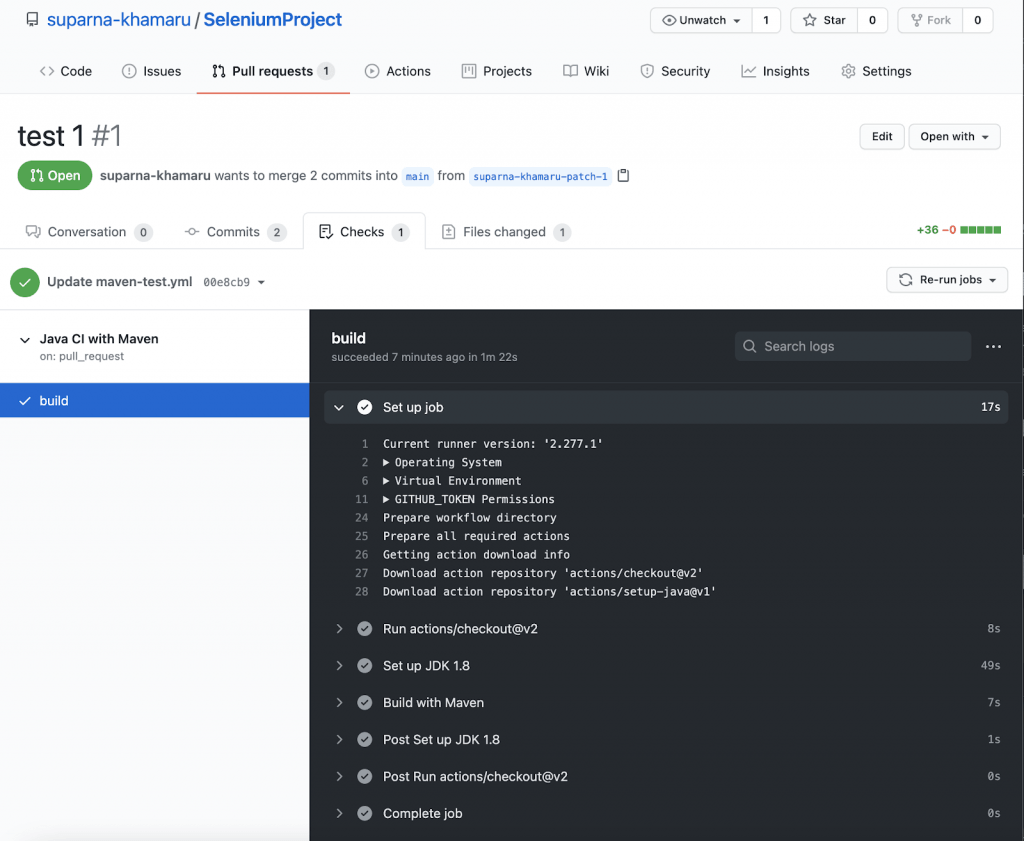
How do Pull Requests reflect on the Build Runs?
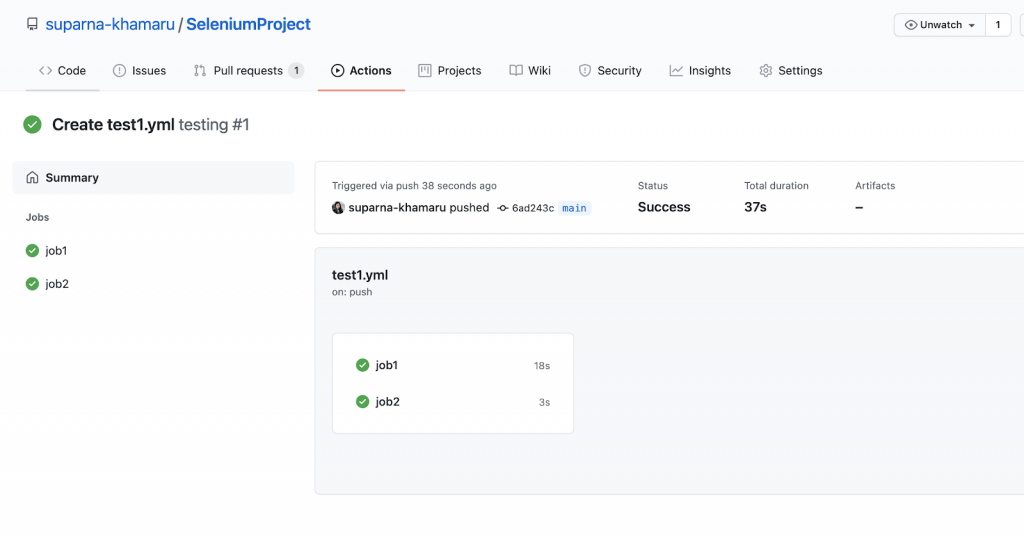
All the latest build runs of GitHub commits in PR are automatically linked to the below-marked section. Clicking on the “Details” link also navigates the user to respective builds.
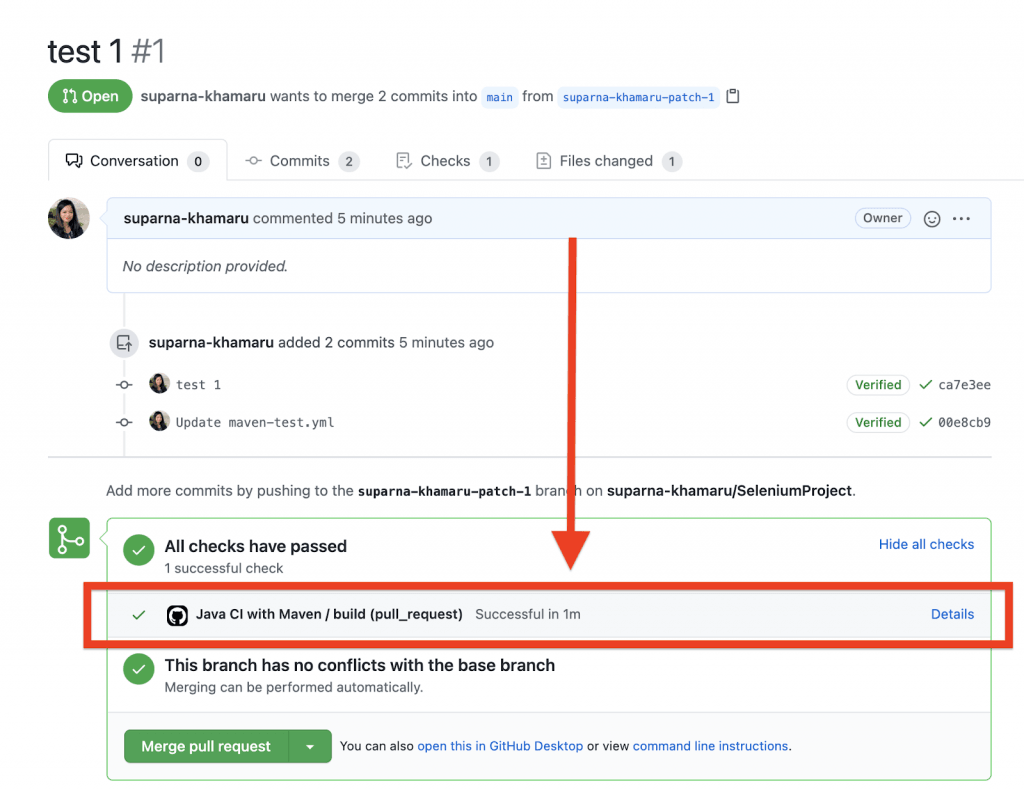
A sample view of a build is provided below when a user clicks on the Details link in the Build run section of Pull Request.
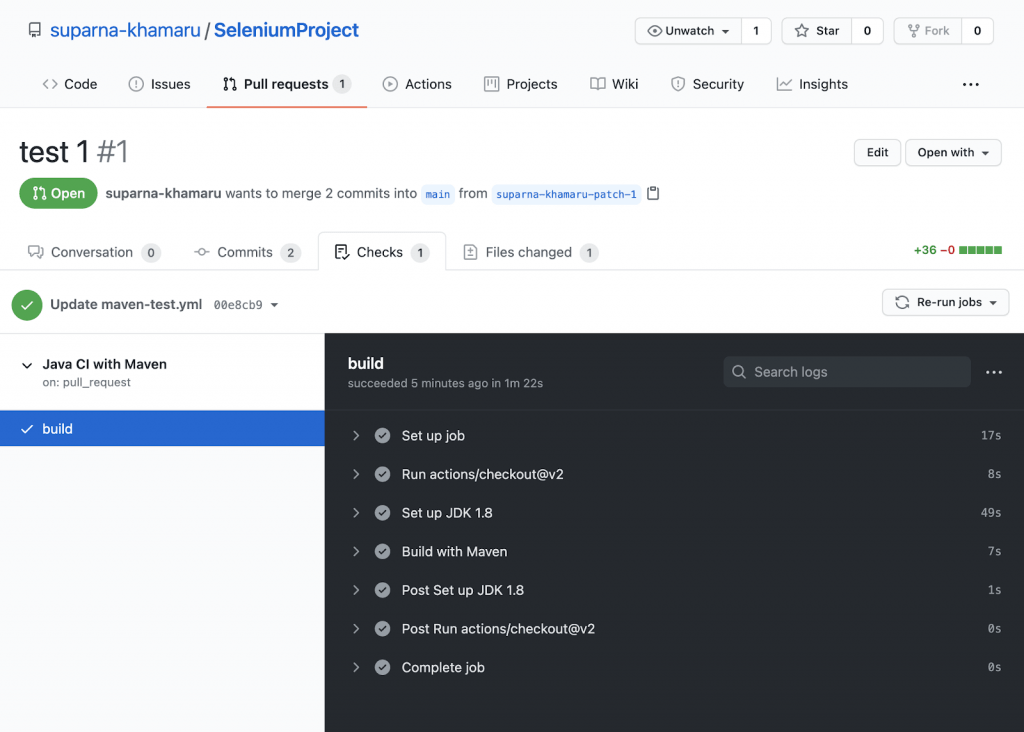
We can also click on each of the above accordions to view the detailed logs of the build runs step by step.
One such accordion is expanded below for our understanding. We can click and expand multiple accordions if required, based on our convenience.
How to manage your Workflow runs?
While we can also build CI pipelines using Selenium GitHub Actions, there is much more we can do from what we have discussed in this article, considering all GitHub Actions examples.
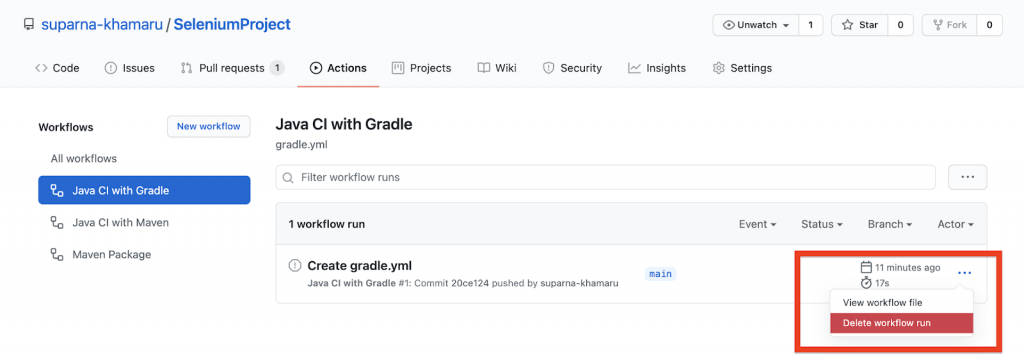
Some of them are listed down:
- Deleting a workflow
- Disable a workflow
- Cancelling a running workflow
- Re-running a workflow
- Creating Status badges
Clicking on the below marked “Delete workflow run” button in the workflow build screen deletes the selected workflow from the Actions tab.
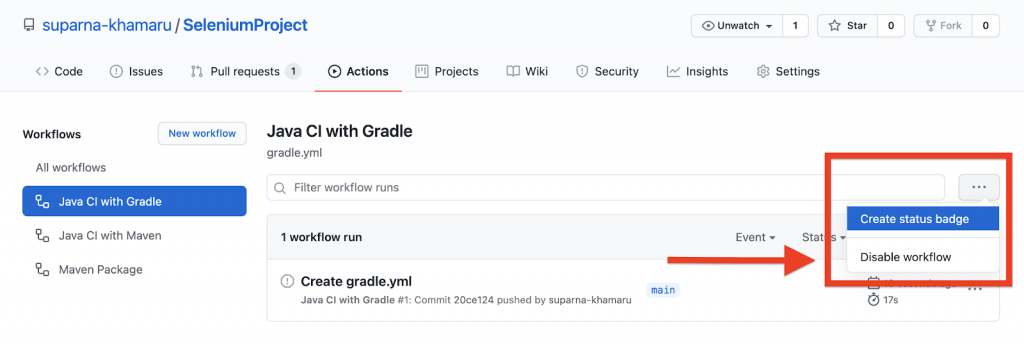
Clicking on the below marked “Disable workflow” button in the workflow build screen disables the selected workflow from the Actions tab.
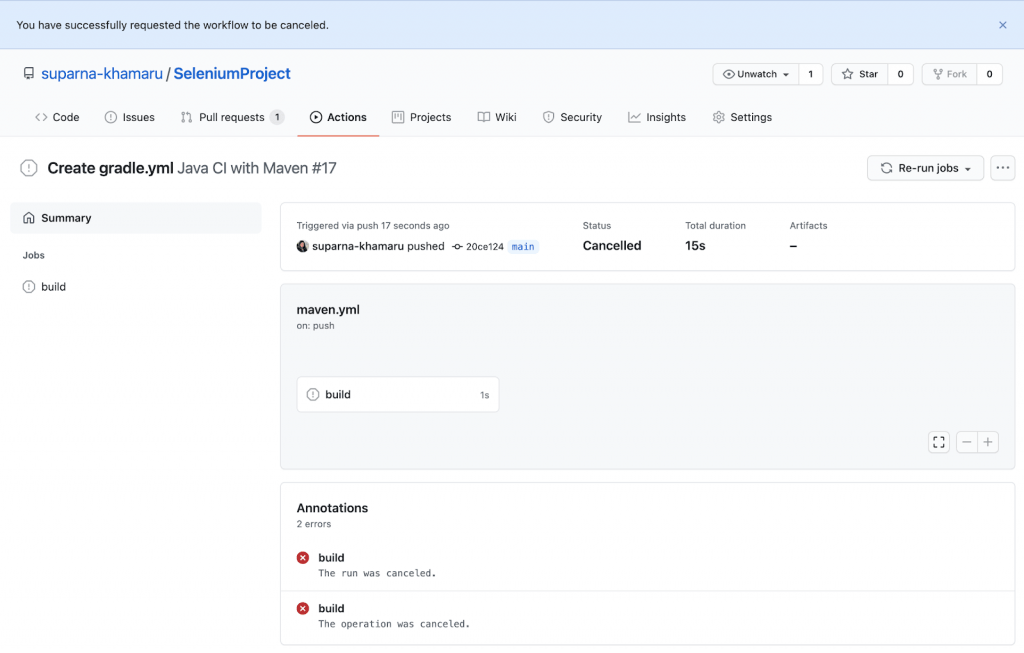
If a workflow is currently running, we can cancel the build run by clicking on the “Cancel workflow” button highlighted below.
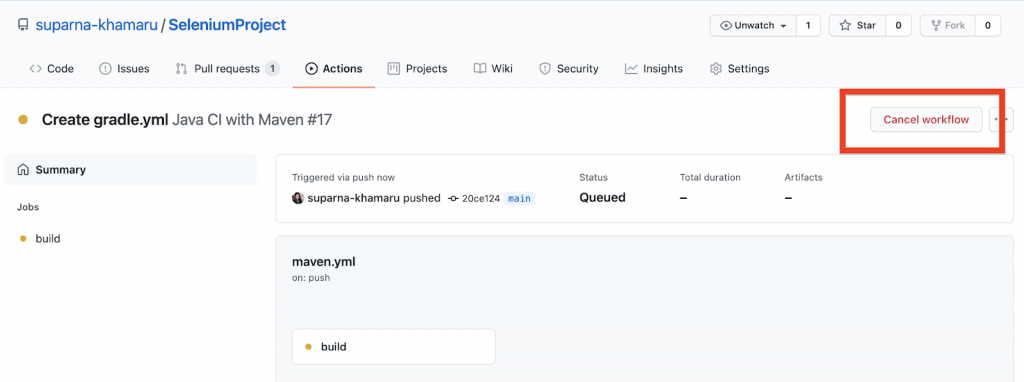
Post cancellation of the running workflow, we would notice the below screen.
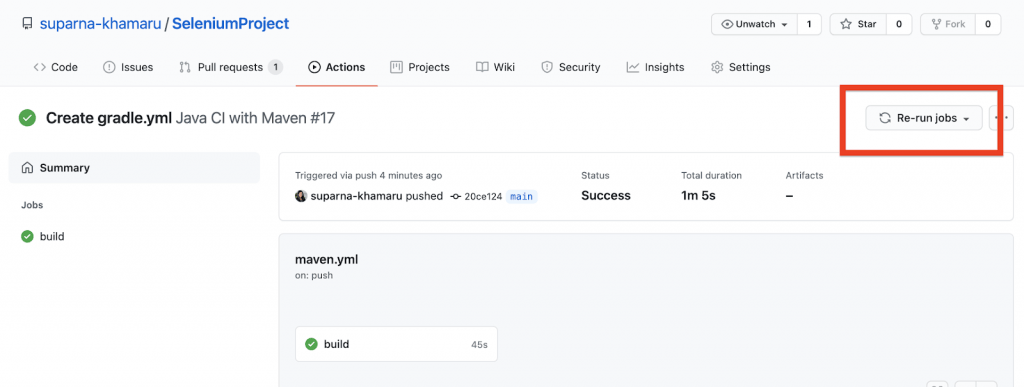
Manual click of the “Re-run jobs” button as marked in the workflow screen re-runs the selected build again.
If we view any build run in Actions tab, we would notice three-dots on the right side of the screen as shown in the image below, which is selected in blue below “Re-run jobs” dropdown.
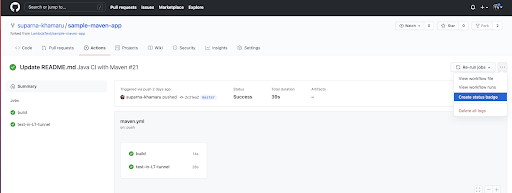
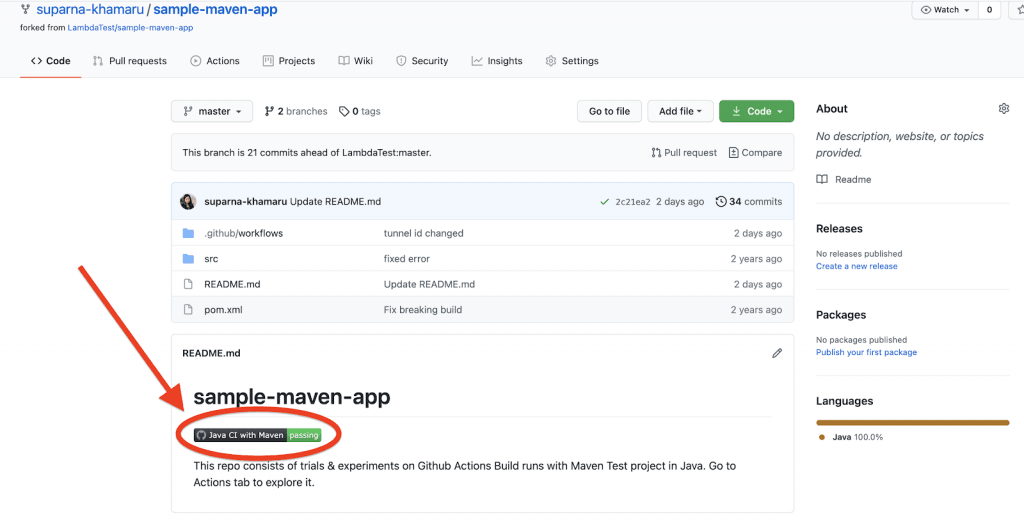
On clicking above “…” button, we click on “Create status badge”, copy the content and paste it in our desired location such as in the readme file to denote the latest build run status as shown below in the red highlighted section.
How does the Build Run in ‘Actions’ workflow when triggered?
Upon completing the successful build run of the commit change, we can also observe and analyze the step-by-step build run as we see in any other CI-CD tool, as shown below.

RUN YOUR TESTING SCRIPT ON SELENIUM GRID
3000+ Browsers AND OS
You can accelerate your test cycles and trim down your overall test execution by running Selenium tests in parallel from GitHub Actions on LambdaTest cloud.
Executing Selenium Testing Scripts with GitHub Actions Workflow
We hope all the GitHub Actions examples above have helped you understand the workflow better. Now, let us configure a workflow by applying all the above GitHub concepts we learned so far with Selenium test automation..
Step 1: Sample Selenium Test Script
Write a sample test class in your sample Maven Java project, integrated with Junit under the folder src/test/java.
|
1 2 3 4 5 6 7 8 9 10 11 12 13 14 15 16 17 18 19 20 21 22 23 24 25 26 27 28 29 30 |
package SeleniumProject.Maven; import java.util.concurrent.TimeUnit; import org.junit.Test; import org.openqa.selenium.WebDriver; import org.openqa.selenium.chrome.ChromeDriver; import org.openqa.selenium.chrome.ChromeOptions; import io.github.bonigarcia.wdm.WebDriverManager; public class AppTest { public WebDriver driver; public String baseUrl = "https://www.lambdatest.com/"; @Test public void test1() { WebDriverManager.chromedriver().setup(); ChromeOptions options = new ChromeOptions(); options.addArguments("--no-sandbox"); options.addArguments("--disable-dev-shm-usage"); options.addArguments("--headless"); driver = new ChromeDriver(options); driver.manage().timeouts().implicitlyWait(20,TimeUnit.SECONDS); driver.manage().window().maximize(); driver.get(baseUrl); driver.close(); } } |
Step 2: Adding dependencies
Make sure to add the mentioned below required dependencies in pom.xml file
|
1 2 3 4 5 6 7 8 9 10 11 12 13 14 15 16 17 18 |
<dependencies> <dependency> <groupId>junit</groupId> <artifactId>junit</artifactId> <version>4.11</version> <scope>test</scope> </dependency> <dependency> <groupId>org.seleniumhq.selenium</groupId> <artifactId>selenium-java</artifactId> <version>3.141.59</version> </dependency> <dependency> <groupId>io.github.bonigarcia</groupId> <artifactId>webdrivermanager</artifactId> <version>4.3.1</version> </dependency> </dependencies> |
Step 3: Workflow Configuration
While adding a new workflow, make sure to add the below YAML file lines as provided below.
If we note closely, there is no significant difference between test_1 and test_2, as only the maven test command is run differently.
|
1 2 3 4 5 6 7 8 9 10 11 12 13 14 15 16 17 18 19 20 21 22 23 24 25 26 27 28 29 30 31 32 33 34 35 |
name: Build and Test on: [push] jobs: build: runs-on: ubuntu-latest steps: - uses: actions/checkout@v2 - name: Set up JDK 1.8 uses: actions/setup-java@v1 with: java-version: 1.8 - name: Build with Maven run: mvn -B package --file pom.xml test_1: runs-on: ubuntu-latest steps: - uses: actions/checkout@v2 - name: Set up JDK 1.8 uses: actions/setup-java@v1 with: java-version: 1.8 - name: Test with Maven run: mvn clean test test_2: runs-on: ubuntu-latest steps: - uses: actions/checkout@v2 - name: Set up JDK 1.8 uses: actions/setup-java@v1 with: java-version: 1.8 - name: Test with Maven run: mvn -B package --file pom.xml test |
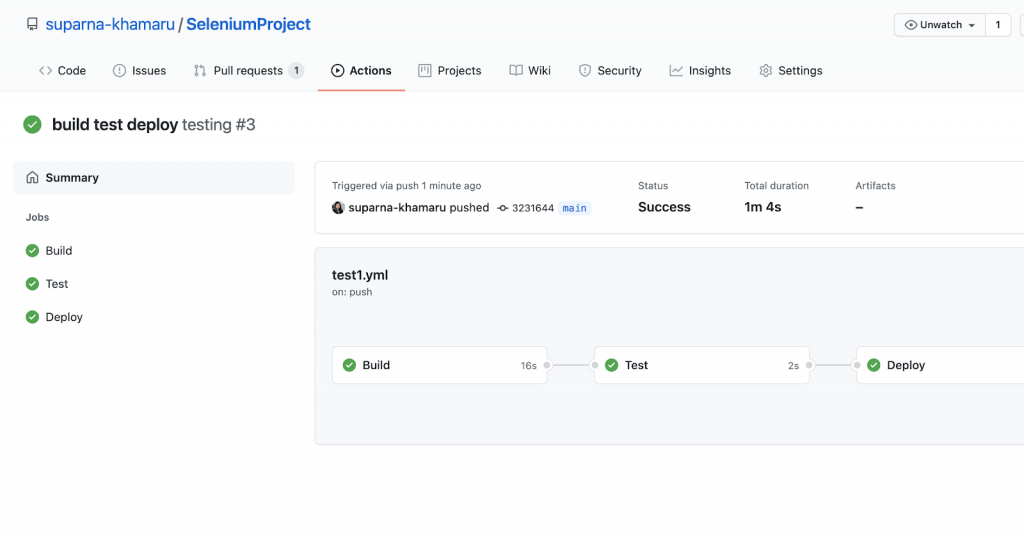
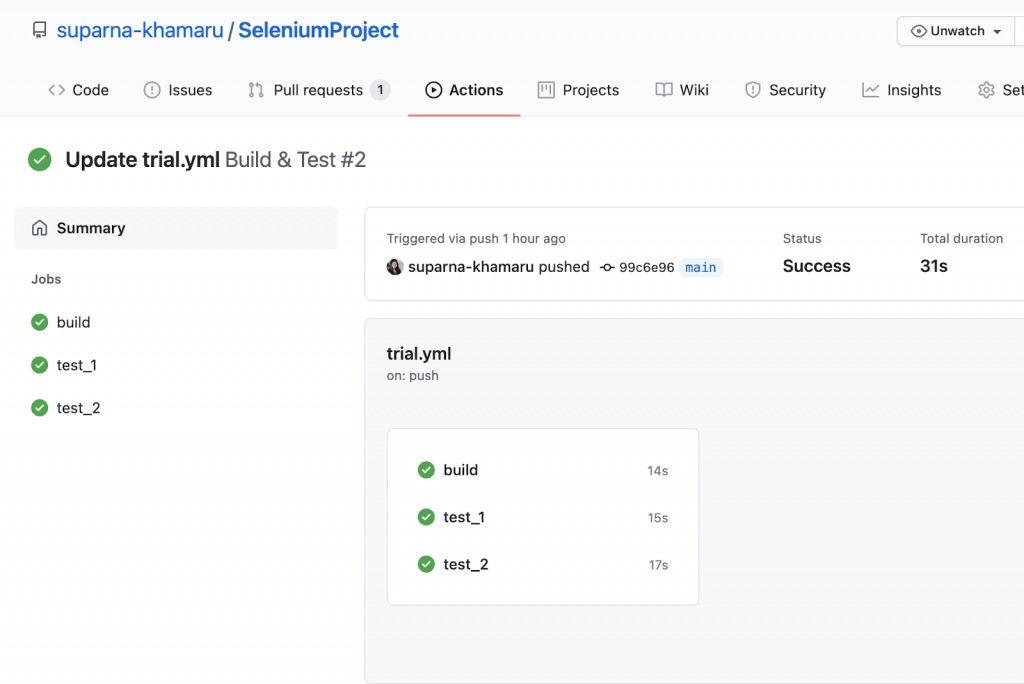
Step 4: Test Executions in GitHub Actions Workflow
Post running of all workflows in the GitHub Actions tab, we should notice the outcome/status of all Build runs in the below format.
As we can notice below, the builds have run successfully, but each of the test jobs also has run successfully in a few seconds.
Step 5: If there is an error of Google Chrome not installed in the configured VM, we may have to add the below configuration in the above workflow Yaml file. Although, this may be an optional step.
|
1 2 3 4 5 6 7 8 9 10 11 12 13 14 15 16 17 18 19 |
jobs: build: runs-on: ubuntu-latest steps: - uses: actions/checkout@v2 - name: Set up JDK 1.8 uses: actions/setup-java@v1 with: java-version: 1.8 server-id: github settings-path: ${{ github.workspace }} - name: Install Google Chrome run: | chmod +x ./scripts/InstallChrome.sh ./scripts/InstallChrome.sh - name: Build with Maven run: mvn -B package --file pom.xml test |
In the above lines of code, we may also notice that on the Step Install Google Chrome: multiple commands are passed for running. This syntax is to be used whenever we want to pass multiple commands in a single build step run.
Executing Selenium Test Automation with LambdaTest and GitHub Actions
In order to perform Selenium GitHub Actions using LambdaTest, we need to set it up by following the instructions provided on the official website. Once you have done that, we can start your first LambdaTest tunnel using our LambdaTest credentials in the Terminal/Command Prompt app of your system.
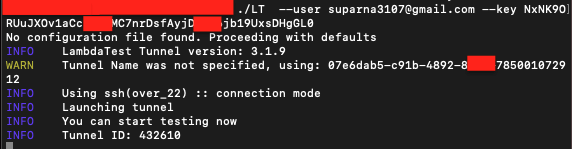
Once the tunnel is started, let us try to test it after integrating the Tunnel to Github Actions by passing the following commands in the GitHub Actions’ YAML file:
|
1 2 3 4 5 6 7 8 9 10 11 12 13 14 15 16 17 18 19 20 21 22 |
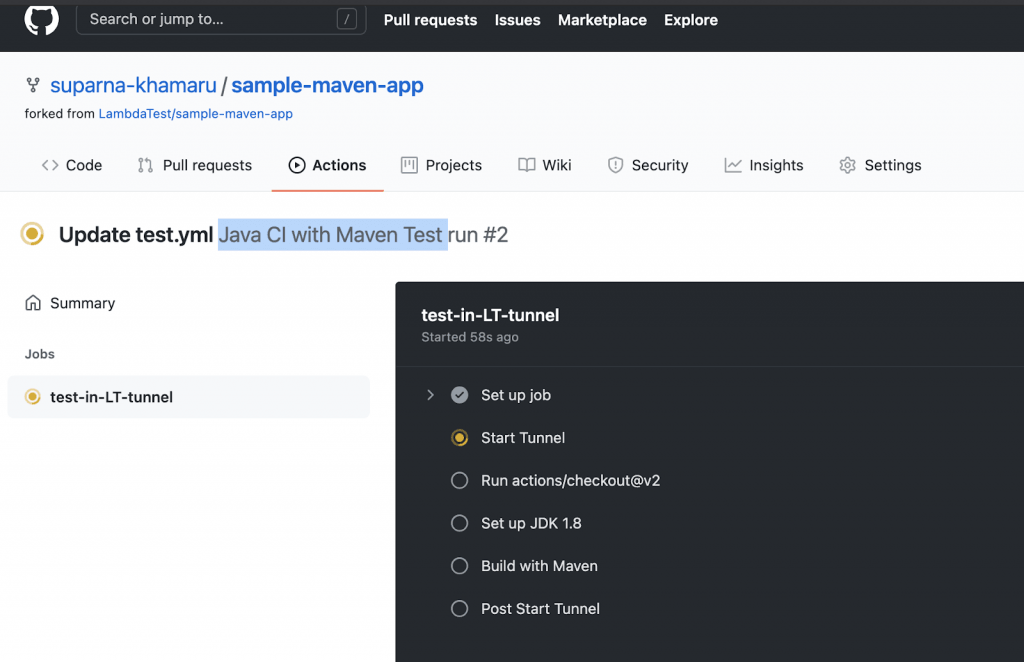
name: Java CI with Maven Test run on: [push] jobs: test-in-LT-tunnel: runs-on: ubuntu-latest steps: - name: Start Tunnel uses: LambdaTest/LambdaTest-tunnel-action@v1 id: tunnel-id with: user: suparna3107@gmail.com accessKey: add your own access key here.. tunnelName: "testTunnel-id" - uses: actions/checkout@v2 - name: Set up JDK 1.8 uses: actions/setup-java@v1 with: java-version: 1.8 - name: Build with Maven run: mvn clean test |
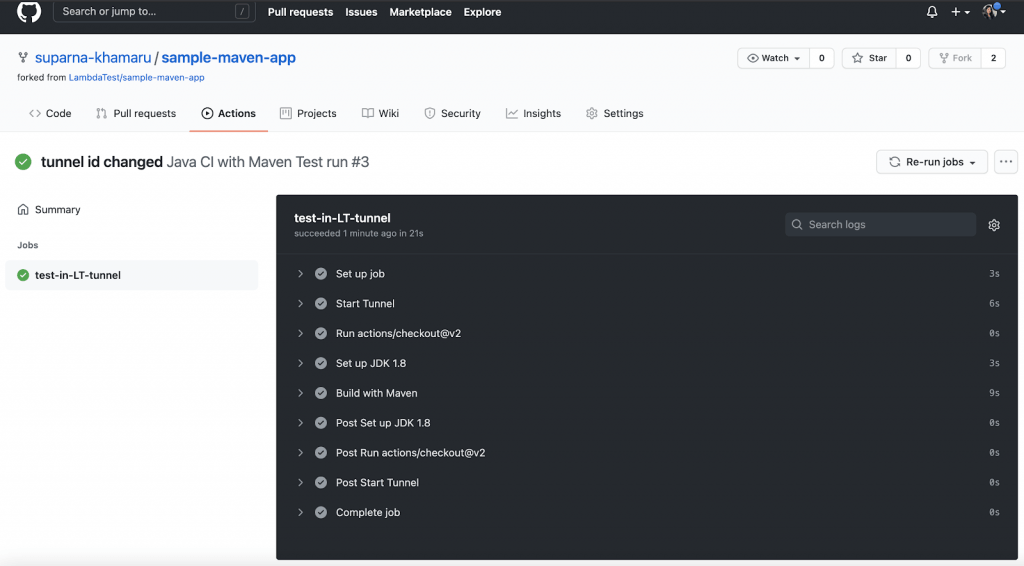
The above commands should start following all the passed instructions, and we should see a screen such as shown below in the Github Actions tab for the newly committed code.
To ensure that there are multiple tunnel commands in multiple files, we need to provide unique tunnel ID names to each command run so that our tests or builds do not fail due to the same tunnel name copied everywhere.
When the build job is run successfully, The build job turns green, and we can see that all the build job steps have passed successfully, as shown below.
Note: Experience reliable automated testing with Selenium Testing Tool on a cloud grid of 3000+ browsers and operating systems.
That’s All, Folks!
Congratulations! We have just created a series of CI workflows for executing Selenium tests with Java and Maven. Github Actions has made CI look much more straightforward than ever before, right?
Similarly, the above approaches can be used for building and running all other tests as well just by changing the run command in job steps where required. This is a crucial step to perform Selenium test automation with GitHub Actions. Run your Selenium tests in GitHub Actions.
Feel free to explore the sample project here to explore and have further hands-on experience with Selenium GitHub Actions.
Happy testing!


Author’s Profile
Suparna Khamaru
Works as Principal Software Engineer in RSA Security. Specializes in Mobile Automation & Quality holding several years of experience across varieties of world-class mobile and web applications.
Blogs: 3
Got Questions? Drop them on LambdaTest Community. Visit now


