
Selenium Testing With Selenide Element Using IntelliJ & Maven
Muthuraja
Posted On: February 1, 2019
![]() 51254 Views
51254 Views
![]() 16 Min Read
16 Min Read
There are a lot of tools in the market who uses Selenium as a base and create a wrapper on top of it for more customization, better readability of code and less maintenance for eg., Watir, Protractor etc., To know more details about Watir please refer Cross Browser Automation Testing using Watir and Protractor please refer Automated Cross Browser Testing with Protractor & Selenium.
We are going to take a look on another popular library “Selenide”, that uses Selenium as a base for automated cross browser testing.
Powered by Selenium WebDriver, testing with Selenide is free as Selenide element is an open source library for automation testing. In fact, this library is addressed and more focus on automation testing especially Concise API and stable tests. Selenium automation testing with Selenide has been very convenient and effective.
If you’re new to Selenium and wondering what it is then we recommend checking out our guide – What is Selenium? If you are preparing for an interview you can learn more through Selenium interview questions.
TABLE OF CONTENTS
- Benefits Of Selenium Testing With Selenide Element
- Why Do We Still Need Another Wrapper?
- Kick-Starting Selenium Testing With Selenide element
- Selenium Testing With Selenide: Setting Up The Environment
- Selenium Testing With Selenide element – Download IntelliJ And Setting Up Maven project
- Wish To Perform Selenium Testing With Selenide On A Different Browser?
- Cross Browser Parallel Test Automation
- Selenium Testing With Selenide– Sample Code(Self Explanatory): Cross Browser Parallel Automation in Local
- What Is Desired capability?
- Running Parallel Test In LambdaTest For Selenium Testing With Selenide
- Changes In BaseConfig Class For LambdaTest
- How To Set Environment Variable For LambdaTest Username/Password?
Benefits Of Selenium Testing With Selenide Element
Testing with Selenide Element Supports multiple languages:
- Java
- Scala
- Groovy
- Clojure
Integration Options are:
- Can use BDD
- Can use with JUnit, TestNG, JBehave, Cucumber, Serenity
- Can use to integrate with Extent Report, Allure Report etc.,
- Supports Cross Browser Parallel execution
- Page Objects
To know about which companies perform Selenium testing with Selenide, please refer this link.
Why Do We Still Need Another Wrapper?
There are several testing libraries around Selenium WebDriver, but what makes Selenium testing with Selenide special?
Below are some of the major attractions of performing Selenium testing with Selenide element.
- Concise UI Test: Selenide API consist of very few classes which were build on top of Selenium. Implementing Automation test code used for Selenium testing with Selenide element is clean, better readability and ease to use.
- AJAX challenges: The beauty of AJAX is to make the web page retrieve data from server without loading the entire page. For eg., if you add the entry in the form, assume at left pane in the page the recent added data is displayed then the whole page not getting refreshed and return the data. When automate this in web page, we often we end up the issue “No Such Element Exception”. To handle this, different wait method should be applied in Selenium WebDriver. However, when we perform Selenium testing with Selenide, this is already addressed and no additional code is required.
- Time out issues: While running automation sometime we end up with timeout issue for eg.,loading web page takes time or finding elements takes time. This is handled well through Selenium testing with Selenide, by default it waits 4 seconds if uses Selenide Inbuild methods. On top of it, you can still configurable more secs for better synchronization.
- Automated Screenshots: Selenium testing with Selenide by default, takes snapshot of failed test cases unlike Selenium WebDriver. In Selenium WebDriver you need to add explicit code. Please take a look on below snapshot which actually takes snapshot and share the location where it’s located.
- StaleElementException: There are two reason this exception occurs:
- The element no longer attached in the DOM but you code might have referenced to the element
- The element has been deleted or modified with same id or same attribute completely.

You can watch this video to learn how to handle Stale Element Reference Exceptions in Selenium with Java.

As Selenide was developed as a wrapper on top of Selenium, here are some key libraries that you may find familiar if you have already used Selenium frameworks:
| selenium-java: Used latest version of selenium Java API |
| selenium-server: to support selenium Grid for parallel execution |
| webdrivermanager: to support inbuild browser configuration to avoid initialization |
| testng: Support TestNG framework |
| commons-fileupload: To handle file uploads capability to your servlet and web application |
| junit: Support JUnit Framework |
The beauty of Selenium testing with Selenide is:
- You can still use Selenium WebDriver Directly
- You can use any webdriver instance
Kick-Starting Selenium Testing With Selenide element
Selenium testing with Selenide group offer 3 simple things to kick start your test automation, which are:
- Open the page
- $(element).doAction()
- $(element).check(condition)
For e.g., Please take a look on below snapshot:
| Selenium WebDriver | Selenide |
|---|---|
| driver.get(“https://www.lambdatest.com/) | Open(https://www.lambdatest.com/) |
| driver.findElement(By.className(“#submit”)).click() | $(“#submit”).click(); |
| String actualResult=driver.findElement(By.className.message).getText() //Conditions If(text.contains(actualResults) |
$(“.message.”).shouldHave(text(“Hello”)) |
You can observe the readable and concise syntax used for testing with Selenide element.
Selenium Testing With Selenide: Setting Up The Environment
The pre-requisites are JDK 1.8.0 and Intellij.
For installing Java, minimum JDK 8 is required, to download in official site click here.
After download, installation is very simple and self-explanatory to complete.
After installation is complete, you would have to setup the classpath so that the program understand where the java is located in your machine
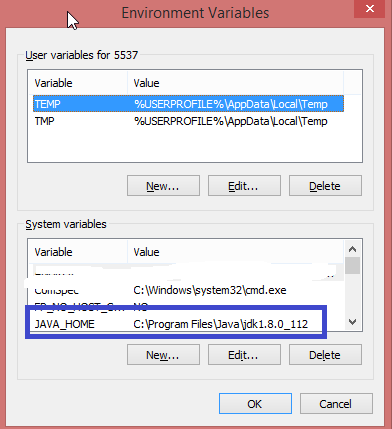
This can be done in windows operating system by searching for “Environment Variables” and selecting “Edit System Environment Variables”. Create JAVA_HOME in system variable and PATH as mentioned in the below snapshot.
Create JAVA_HOME in System variable and update the value where the Java is located in your machine.
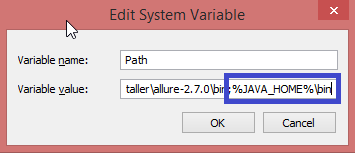
Now, we need to edit the Path system variable and add JAVA_HOME in it so that all run time programs are able to detect Java in your machine. Make sure you append the value after adding a semicolon.
To verify, if JDK is properly installed or not. You need to supply the below command:
java -version

Kudos! You just installed JDK successfully on your machine.
Selenium Testing With Selenide element – Download IntelliJ And Setting Up Maven project
There are multiple IDE’s available in the market. In this article, I recommend using IntelliJ for Selenium testing with Selenide. IntelliJ is a free, open-source Java IDE(Integrated Development Environment) for developing Java, Kotlin based software programming. This tool has Community and Ultimate version, community version of IntelliJ can be downloaded from here.
After download Intellij, the installation part is pretty much easy, just follow with instruction and keep going with default parameter and complete it.
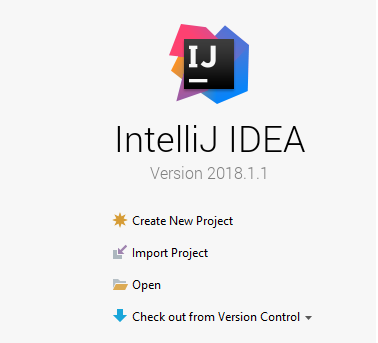
Open Intellij and select “Create New Project” from Dashboard window.
For this article, I would prefer to use a “Maven” project. Select the particular Java version that we installed and click on Next with Default parameters.

Enter values in necessary fields like GroupID, ArtifactID and keep it as default version.

Leave the project name and select where your project is to be located.
The created project for testing with Selenide element is displayed in IntelliJ as mentioned below.
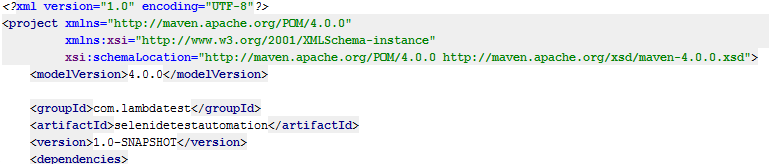
Add Selenide Maven Dependency as mentioned below:
|
1 2 3 4 5 6 7 8 |
<dependencies> <!-- https://mvnrepository.com/artifact/com.codeborne/selenide --> <dependency> <groupId>com.codeborne</groupId> <artifactId>selenide</artifactId> <version>5.1.0</version> </dependency> </dependencies> |
Feel free to add the required transient dependencies in your class path. As I previously mentioned, Selenide library supports TestNG, JUnit frameworks.
Selenium Testing With Selenide element- Sample Code(Self Explanatory)
|
1 2 3 4 5 6 7 8 9 10 11 12 13 14 15 16 17 18 19 20 21 22 23 24 25 26 27 28 29 30 31 32 33 34 35 36 37 38 39 40 41 42 43 |
package selenidesamples; import org.openqa.selenium.By; import org.testng.Assert; import org.testng.annotations.Test; import static com.codeborne.selenide.CollectionCondition.texts; import static com.codeborne.selenide.Condition.text; import static com.codeborne.selenide.Selenide.*; public class LambdaSampleParallelTestAutomation extends BaseConfig_LambdaTest { /** * Author: Muthuraja R * Description: Validate Error message in Registration Page and capture one of error throws correct or not */ @Test public void verifyStartTestingButton() { //Launch Lambdatest page open("https://www.lambdatest.com/"); //use CSS Selector to find element and click for navigating register page $(".nav>li.login>a").click(); //Verifying Page title using Selenide reusable method Assert.assertEquals("Sign up for free | Cross Browser Testing Tool | LambdaTest - LambdaTest", title()); //Verifying text "Sign up" $(".signup-titel").shouldHave(text("SIGN UP")); //Feeding value to the text using .val //Feeding value to the text using sendkeys $(By.name("organization_name")).val("org"); $(By.name("name")).sendKeys("Name"); $(By.name("email")).sendKeys("test@gmail.com"); $(By.name("password")).sendKeys("test1234"); //using shortcut to signup instead of clicking button $(By.name("phone")).val("13452").pressEnter(); //Capturing actual results and verifying with expected one using collections $$(".error-mass").shouldHave( texts("This email is already registered", "Please enter a valid Phone number", "To proceed further you must agree to our Terms of Service and Privacy Policy")); } } |
In the above example:
- Login to LambdaTest Page.
- Click on Register button.
- Enter invalid value in org, fullname, work email, desired password and phone to target on mandatory fields to make sure it returns error.
- Finally capture all errors throws in the page using collections.
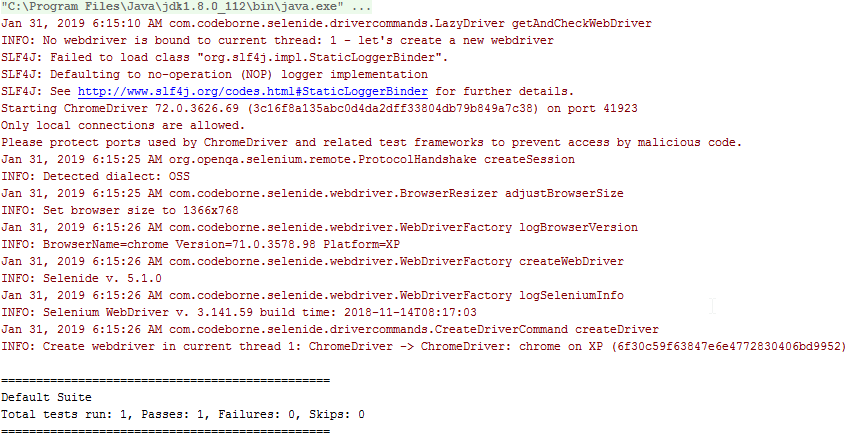
As compared in previous section, testing with Selenide is lightweight, ease to use and offers better readability with comparison to Selenium. I didn’t include browser configuration or any pre-requisites like @BeforeClass or @BeforeMethod and not used loops to iterate and get content of error message.
To run your local browser simply, just use url and write basic test as mentioned above.
The Default browser is “chrome” browser, in case you haven’t declared any configuration. Here is the test result for local test execution without browser configuration.

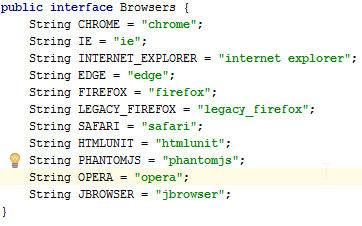
Wish To Perform Selenium Testing With Selenide On A Different Browser?
To run the same test in other browsers is also pretty simple. For example, in case you want to use Firefox browser I configured as below.

To know more about browser configuration and how to know Selenide element support which browsers, please take a look on below snapshot.
Reusable Commands For Selenium Testing With Selenide element
Here we deep dive on Selenide reusable commands:
|
1 2 3 4 5 6 7 8 9 10 11 12 13 14 15 16 17 18 19 20 21 22 23 24 25 26 27 28 29 30 31 32 33 34 35 36 37 38 39 40 41 42 43 |
package selenidesamples; import org.openqa.selenium.By; import org.testng.Assert; import org.testng.annotations.Test; import static com.codeborne.selenide.CollectionCondition.texts; import static com.codeborne.selenide.Condition.text; import static com.codeborne.selenide.Selenide.*; public class LambdaSampleParallelTestAutomation extends BaseConfig_LambdaTest { /** * Author: Muthuraja R * Description: Validate Error message in Registration Page and capture one of error throws correct or not */ @Test public void verifyStartTestingButton() { //Launch Lambdatest page open("https://www.lambdatest.com/"); //use CSS Selector to find element and click for navigating register page $(".nav>li.login>a").click(); //Verifying Page title using Selenide reusable method Assert.assertEquals("Sign up for free | Cross Browser Testing Tool | LambdaTest - LambdaTest", title()); //Verifying text "Sign up" $(".signup-titel").shouldHave(text("SIGN UP")); //Feeding value to the text using .val //Feeding value to the text using sendkeys $(By.name("organization_name")).val("org"); $(By.name("name")).sendKeys("Name"); $(By.name("email")).sendKeys("test@gmail.com"); $(By.name("password")).sendKeys("test1234"); //using shortcut to signup instead of clicking button $(By.name("phone")).val("13452").pressEnter(); //Capturing actual results and verifying with expected one using collections $$(".error-mass").shouldHave( texts("This email is already registered", "Please enter a valid Phone number", "To proceed further you must agree to our Terms of Service and Privacy Policy")); } } |
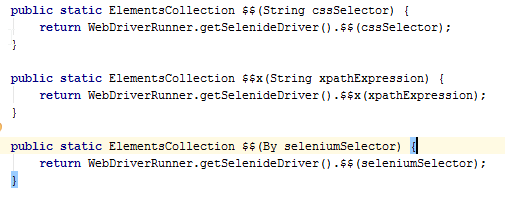
In above simple reusable method, we are going to take a look on what is “$” and “$$” and selenium action and conditional commands.
$ and $$ Method Definitions:
In Selenide Terminology:
- $ Indicate finds Single Element
- $$ Indicate finds More than one Elements used Collections
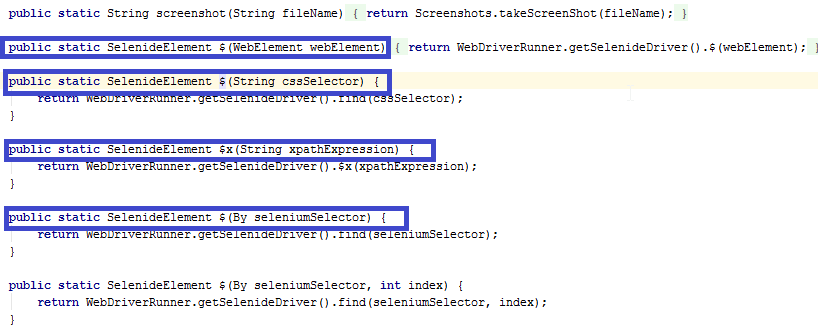
In above snapshot, an argument in Selenide element method accepts different types:
- WebElement (Element)
- cssSelector as String
- Xpath as String
- SeleniumSelector as By (for eg., By.xpath(“”))
For the cssSelector and xpath, you can assign locator directly as string which is ease to use and maintain locators.
Conditions:
In above sample program, we use the following condition to verify the results without assertion:
- $(“.signup-titel”).shouldHave(text(“SIGN UP”));
- In this method, I verify “SIGN UP”text exists which I use “shouldHave” method
- “.signup-title” is cssLocator
- $ indicates find/return single element
- $$(“.error-mass”).shouldHave(texts(“This email is already registered”, “Please enter a valid Phone number”,”Another condition to verify…..“));
- Used CSS Selector to locate error message which returns more than one error.
- shouldHave is method to verify the condition the necessary text appears.
- texts accepts argument in array where you can pass multiple expected text conditions.
- This method should verify condition between actual and expected results.
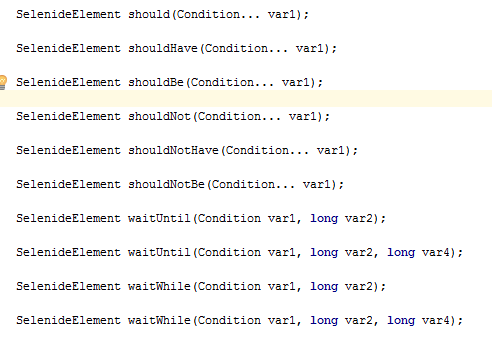
In build, the above condition like shouldbe, ShouldHave exhibits smart waiting capabilities:
- shouldbe(“visible”)
- shouldHave(Text(“Hello Test”))
- shouldNotBe(“selected”)
- should(“disappear)
By default, $.should() Method waits up to 4 seconds. However, if you wish to change the timeout then you can customize it in the following ways:
- Configuration.timeout=4000 (Millisecs)
- Mvn –Dselenide.timeout=8000 //mvn specific command
For Verifying expected text in collections:
|
1 2 3 4 |
$(By.xpath("//p[@class='error-mass']")).shouldBe(Condition.visible).shouldHave( textCaseSensitive("This email is already registered", “Another Text”, “Another Text”)); |
More Functions:
| $(“div”).scrollTo(); | $(“div”).doubleClick(); |
| $(“div”).innertText(); | $(“div”).contextClick(); |
| $(“div”).innerHtml(); | $(“div”).hover(); |
| $(“div”).exists(); | $(“div”).dragAndDrop(); |
| $(“select”).isImage(); | Zoom(3.5); |
| $(select”).getSelectedText(); | $(“select).getSelectedValue();..many more |
Cross Browser Parallel Test Automation
So far we have seen how to implement Selenium testing with Selenide element and run a test on a single instance using local browser.
Problem Statement: In order to execute the same tests in multiple browsers and its multiple versions on sequential basis is tedious and mentally exhausting process. Also, it becomes infeasible to get automation test results feedback at earliest or soon. Especially, in an agile release window following CI/CD(Continuous Integration and Continuous Delivery) Integration process. In your local system , you can install a limited number of browsers, what if you wish to use 40-50 browsers or even more with multiple browser versions?
Solution:
Selenium Grid: To address this challenge, Selenium Grid is a solution. There is option to address this problem by adding additional machines as selenium node wherein our desired capabilities are utilized to pass the appropriate browser version. However, maintaining a local grid could be very challenging. This is where “Cloud” solutions play a vital role.
LambdaTest – A Free Cross Browser Testing Tool: LambdaTest offers automated and live interactive cross browser testing on a Selenium grid consisting of 3000+ real browsers and operating system online. LambdaTest has the capability to select multiple operating systems with a combination of its browser to ensure your web application runs seamlessly across the different configurations. In the real world, most of the testing is carried out in Windows with a combination of Chrome, Firefox, etc. How about the Linux platform with different browsers? How about MAC OS with IE browser? You can test it all using LambdaTest for browser compatibility testing.
LambdaTest also offers Cross Browser Test Automation in Parallel. We can run a single automation test on multiple browsers and their versions.
In the below section, I’m going to set up Selenium Grid (Hub and Node) and how to run the test in parallel on Chrome and Firefox browser using TestNG suite.xml
Selenium Grid Configuration Setup:
- Go to seleniumhq website.
- Download Selenium Server latest version and store in your comfortable folder location.
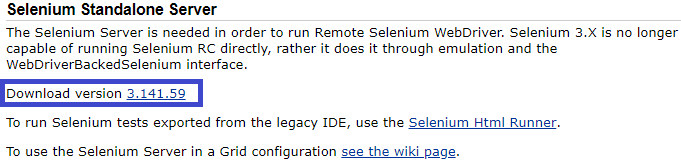
To run Selenium Grid in Local, go to the folder location in command prompt and enter the command as mentioned below.
java –jar selenium-server-standalone-3.141.59.jar –role hub
* hub indicates server where it acts as host and control your browser.

Selenium Server gets started successfully as show in the below snapshot.

Now, it’s turn for Selenium Node.
Selenium Node Configuration Setup:
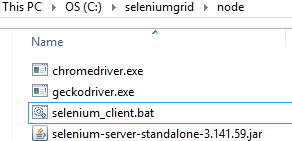
In the above snapshot, I downloaded Chrome Driver and Firefox Driver which are required to run your test in remote instance. I also created batch file to run the configuration by one click instead of each time open command prompt and enter the commands.
To create a batch file, enter the following commands. Please make sure the extension must be “.bat”
java -jar selenium-server-standalone-3.141.59.jar -role node -hub
http://localhost:4444/grid/register
To run the batch file, navigate to specific folder in command prompt and enter “file name of your batch file” as mentioned like below snapshot.

To verify no of browser instance in Grid console, Navigate to http://localhost:4000
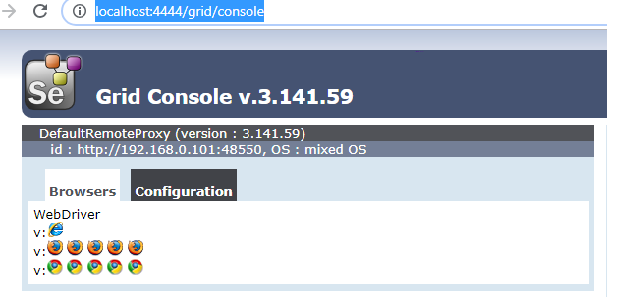
By default 5 Firefox, 5 Chrome and 1 IE browser exists. It’s up to your convenient number of browser instance required which can be configured in your Selenium node configuration.
Now, it’s time to run your parallel automation in cross browser platform.
Selenium Testing With Selenide– Sample Code(Self Explanatory): Cross Browser Parallel Automation in Local
In this example, I keep it as same class in previous section but one slight modification is, I create inheritance relationship between this class and base class.
Derived Class:
|
1 2 3 4 5 6 7 8 9 10 11 12 13 14 15 16 17 18 19 20 21 22 23 24 25 26 27 28 29 30 31 32 33 34 35 36 37 38 39 40 41 42 43 |
package selenidesamples; import org.openqa.selenium.By; import org.testng.Assert; import org.testng.annotations.Test; import static com.codeborne.selenide.CollectionCondition.texts; import static com.codeborne.selenide.Condition.text; import static com.codeborne.selenide.Selenide.*; public class LambdaSampleParallelTestAutomation extends BaseConfig_LambdaTest { /** * Author: Muthuraja R * Description: Validate Error message in Registration Page and capture one of error throws correct or not */ @Test public void verifyStartTestingButton() { //Launch Lambdatest page open("https://www.lambdatest.com/"); //use CSS Selector to find element and click for navigating register page $(".nav>li.login>a").click(); //Verifying Page title using Selenide reusable method Assert.assertEquals("Sign up for free | Cross Browser Testing Tool | LambdaTest - LambdaTest", title()); //Verifying text "Sign up" $(".signup-titel").shouldHave(text("SIGN UP")); //Feeding value to the text using .val //Feeding value to the text using sendkeys $(By.name("organization_name")).val("org"); $(By.name("name")).sendKeys("Name"); $(By.name("email")).sendKeys("test@gmail.com"); $(By.name("password")).sendKeys("test1234"); //using shortcut to signup instead of clicking button $(By.name("phone")).val("13452").pressEnter(); //Capturing actual results and verifying with expected one using collections $$(".error-mass").shouldHave( texts("This email is already registered", "Please enter a valid Phone number", "To proceed further you must agree to our Terms of Service and Privacy Policy")); } } |
Base Class:
|
1 2 3 4 5 6 7 8 9 10 11 12 13 14 15 16 17 18 19 20 21 22 23 24 25 26 27 28 29 30 31 32 33 34 35 36 37 38 39 40 41 42 43 44 45 46 47 48 49 50 51 52 53 54 55 56 57 58 59 |
package selenidesamples; import org.openqa.selenium.WebDriver; import org.openqa.selenium.remote.DesiredCapabilities; import org.openqa.selenium.remote.RemoteWebDriver; import org.testng.annotations.AfterClass; import org.testng.annotations.BeforeClass; import org.testng.annotations.Parameters; import java.net.MalformedURLException; import java.net.URL; import static com.codeborne.selenide.Selenide.open; import static com.codeborne.selenide.WebDriverRunner.setWebDriver; public class BaseConfig_LambdaTest { private WebDriver driver; private DesiredCapabilities desiredCapabilities; public String getLambdaUserName() { return System.getenv("LAMBDA_USERNAME"); } public String getLambdaPassword() { return System.getenv("LAMBDA_PASSWORD"); } @BeforeClass @Parameters({"browserName", "platform", "browserVersion", "visualEnable"}) public void init(String browserName, String platform, String browserVersion, String visualEnable) throws MalformedURLException { desiredCapabilities = new DesiredCapabilities(); if (browserName.equals("chrome")) { desiredCapabilities.setCapability("browserName", "chrome"); } else if (browserName.equals("firefox")) { desiredCapabilities.setCapability("browserName", "firefox"); } desiredCapabilities.setCapability("platform", platform); desiredCapabilities.setCapability("version", browserVersion); desiredCapabilities.setCapability("visual", visualEnable); desiredCapabilities.setCapability("build", "LambdaTestBuild"); desiredCapabilities.setCapability("name", "LambdaTest Execution"); System.out.println("https://" + getLambdaUserName() + ":" + getLambdaPassword() + "@hub.lambdatest.com/wd/hub"); driver = new RemoteWebDriver(new URL("https://muthu.crr:Kw8xyUoShEO9GAtPqW509OWHggQYzzaLJnznu9R3RChfRSnmhh@hub.lambdatest.com/wd/hub"), desiredCapabilities); //driver = new RemoteWebDriver(new URL("https://" + getLambdaUserName() + ":" + getLambdaPassword() + "@hub.lambdatest.com/wd/hub"), desiredCapabilities); setWebDriver(driver); open("https://www.lambdatest.com/"); driver.manage().window().maximize(); } @AfterClass public void tearDown() { if (driver != null) driver.quit(); } } |
What Is Desired capability?
It’s a key/value pairs that stores browser properties, platform properties etc., For eg., It’s specific to what browser name, browser version, platform name like Windows 10, Linux etc., This will determine the behaviour of the browser during run time.
The setCapability method help to initialize and let “WebDriver” know which environment and browser to run.
The beauty of Desired Capability is, to run same test cases in different browsers with combination of its version and operating system in parallel.
In above example, I’m going to explain how I created sample test that run more than one browser.
Baseconfig class is a “Base Class” which holds Parameters, BeforeClass and AfterClass which are actually annotation of TESTNG. To know more details about TESTNG, please visit <a href=”https://testng.org/doc/index.html” rel=”noopener” rel=nofollow” target=”_blank”>here but this example step by step how I designed for sample test.
Step 1: Configure TestNG XML with Thread configuration and Parameterization as below.
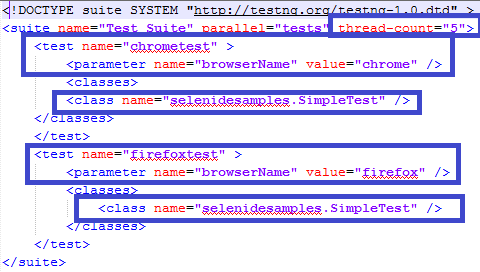
| thread-count | 5 (Mention how many thread count need) |
| Parameter | Initialize parameter name and its value for eg., chrome or firefox |
| Class | Include class name indicates which class you would like to execute |
TESTNG makes your life easier in terms of running test in parallel. Configure same class under Test tag in the suites and make sure parameters added under Test for independent execution.
Step 2: @Parameters name must be same as what as mentioned in TestNG suites.xml
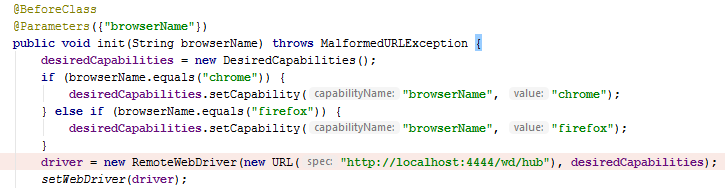
While executing this code in multiple thread , two browser instances get created and run your test in parallel.4
As we already configured selenium server and it’s running. We use RemoteDriver to initialize the server host details and configure desired capabilities.
setWebDriver(driver): This method is important to initialize your customized browser configuration let WebDriverRunner in Selenide Framework otherwise it will throw timeout error and consider default browser (chrome) will execute the test in single instance.
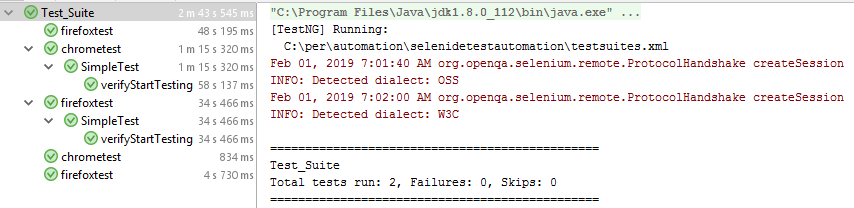
Here is the test result in parallel execution for multiple browsers.
Running Parallel Test In LambdaTest For Selenium Testing With Selenide
To execute same test in Parallel on LambdaTest is very simple and straightforward. I’m going to explain same scripts in LambdaTest except few tweak in the code on BaseConfig class & TestNG.
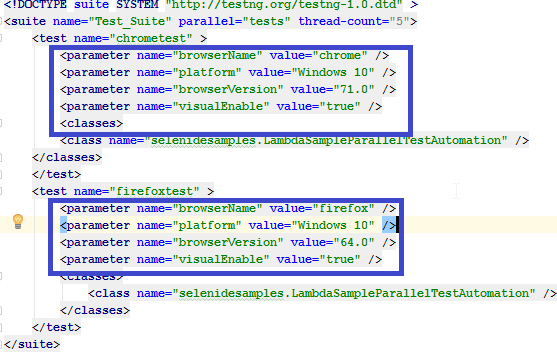
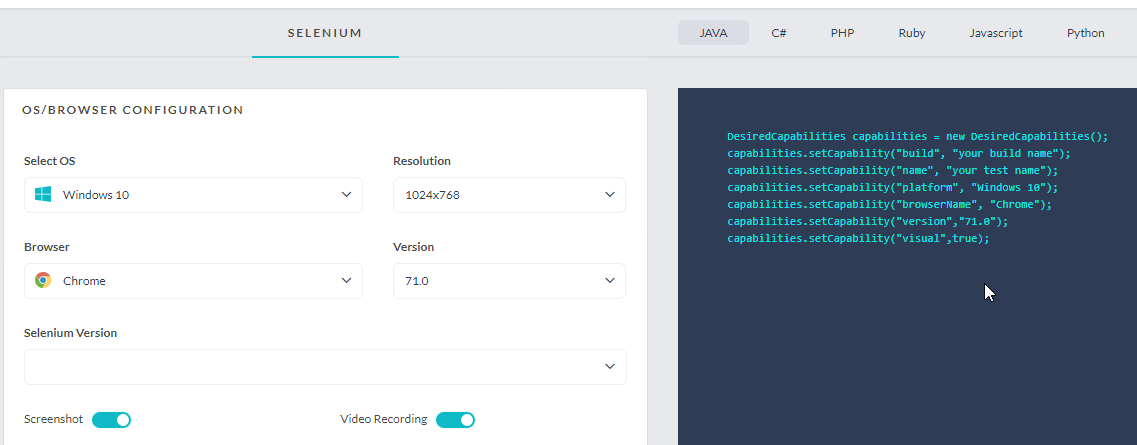
In this example, I added few more parameters to run the same script in LambdaTest
| Browser Name | Customized way to configure your browser name like Chrome, Firefox etc |
| Platform | LambdaTest offers to run in different platform Windows 10, Linux etc., |
| Browser Version | LambdaTest offers you to select different browser version which actually help you to validate your test like how your product is being used by customers |
| Visual Enable | This feature is basically to record all execution in videos and logs. |
You still can add customized configuration, please visit Capabilities Generator.
Changes In BaseConfig Class For LambdaTest
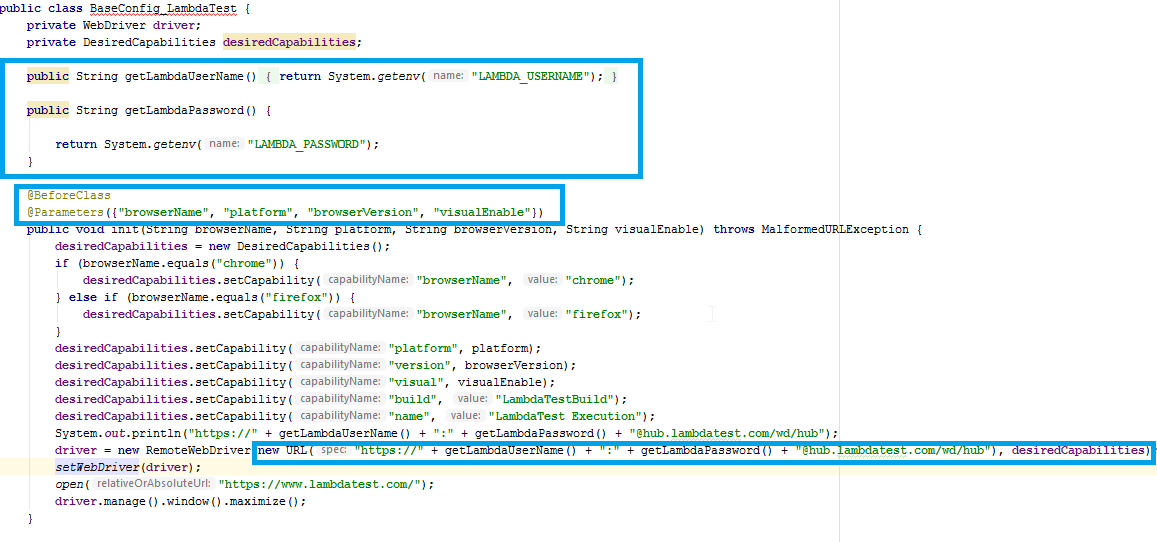
In the above code, I use two method which are:
- getLambdaUserName()
- getLambdaPassword()
These methods will actually get LambdaTest User account and password from environment variable which you set in the machine.
How To Set Environment Variable For LambdaTest Username/Password?
In Windows 10 -> Search Environment Variable -> Edit the System Environment Variable -> Click New button
- Enter variable name as “LAMBDA_USERNAME”
- Enter variable value as “YOUR_LAMBDA_ACCOUNT”

Note:
- Similarly do the same for Password
- API key can be generated in your profile page in LambdaTest Login
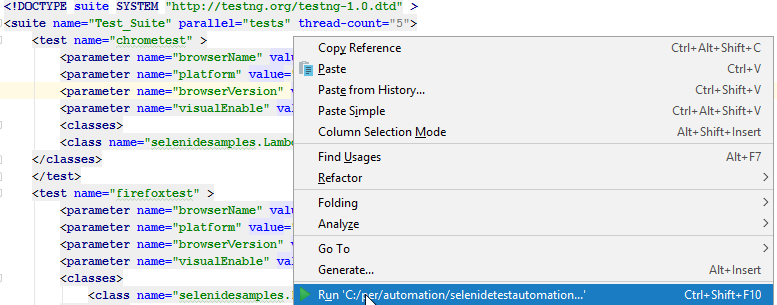
- Open “testsuites_Parallel_Lambda.xml”.
- Right click on the xml and click Run in Intellij.
Click “Ok” button
To Run Parallel:
Test results run in LambdaTest portal and the result can be displayed in the below snapshot.
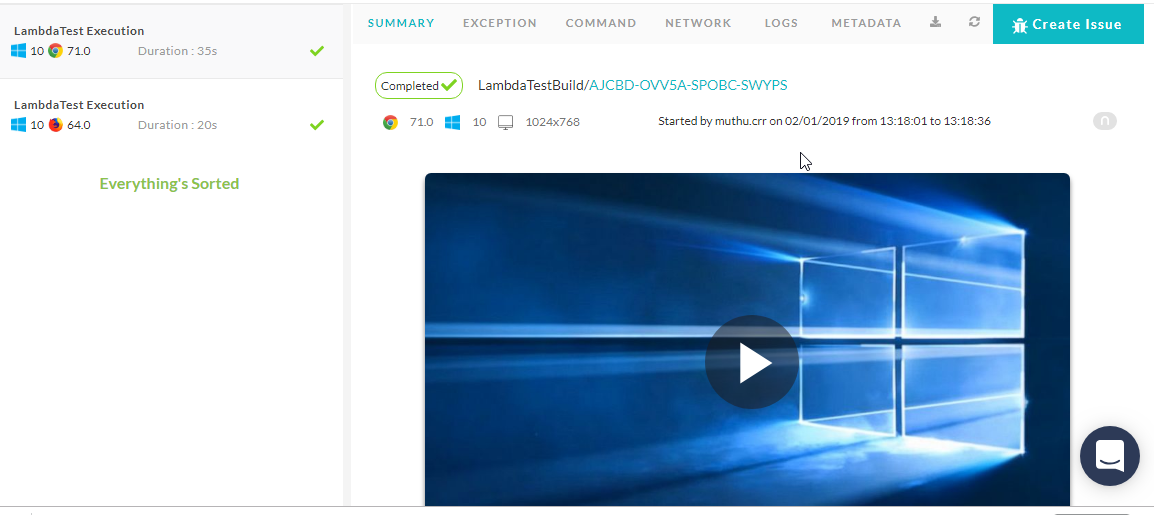
Navigated to specific test for detail view, where you can see the following parameter of the screen.
- Summary
- Exception
- Command
- Network
- Logs
- Metadata
Conclusion:
Selenide is a wonderful library which actually addresses many issues which was developed on top of Selenium. This library helps you to achieve your test with better reusable and better readability. The advantage of make use of this tool is, you still can write both Selenium WebDriver and Selenide element code part of your framework which makes Stable and strong.
Thanks for your time, please keep us posted your feedbacks and comments.


Author’s Profile
Muthuraja
Blogs: 4
Got Questions? Drop them on LambdaTest Community. Visit now


