
A Complete Guide to SVG Animation
Clinton Joy Fimie
Posted On: March 18, 2024
![]() 77390 Views
77390 Views
![]() 24 Min Read
24 Min Read
Introducing Scalable Vector Graphics (SVGs) for front-end developers has likely been a familiar experience, as they are frequently incorporated into numerous projects. Unlike image formats like PNGs or JPEGs, SVGs are different. They can take still images and turn them into exciting, animated visuals. SVGs are more than just static images – they can be brought to life with SVG animation.
In this blog, we will delve into SVG animation, exploring its vast potential and how these animations consistently function across different browsers and devices. From its capacity to create compelling visuals to its seamless compatibility, we will unravel the depth and versatility of SVG animations.
TABLE OF CONTENTS
What is SVG?
Scalable Vector Graphics, abbreviated as SVG, is an open-standard, XML-based format for describing two-dimensional graphics. As the name suggests, SVG possesses a distinctive trait: the ability to infinitely scale images without compromising quality, making it exceptionally suitable for display across diverse devices and resolutions.
SVG works as a markup language, employing a defined set of instructions to illustrate graphical components in a manner understandable to humans and machines alike. These instructions delineate shapes using pathways, polygons, circles, and more.
Moreover, SVG facilitates various styling alternatives, including integration with Cascading Style Sheets (CSS). This empowers designers and developers, allowing them to manipulate and elevate visual elements within the graphics.
Here are some examples of websites that make smart use of SVG animations.
Example 1– CodePen
Example 2– Anime.js
The inherent limitations of traditional image formats often hinder the creation of impactful visual narratives. This is where SVGs excel, possessing the ability to infuse static elements with dynamism, thereby granting an edge in crafting captivating visual effects.
Let’s dive deeper into the basics of SVG to understand it better.
Basics of SVG
SVG graphics are crafted using XML-driven tags that act as blueprints for delineating shapes, determining their attributes, and pinpointing their placements within a coordinate setup. These shapes can be modified through presentation attributes or CSS, granting styling possibilities.
The inherent strength of SVG lies in its capacity for performing transformations, allowing elements to be resized, rotated, or skewed while also allowing the grouping and nesting of shapes. This flexibility gives developers the ability to organize and control their visual elements.
Understanding SVG Structure
Understanding the foundation of SVG lies in understanding four key elements: an XML-based markup language, the root <svg> element, nested components, and the coordinate system.
SVG documents use the XML structure, ensuring human readability and ease of comprehension. The XML structure involves elements enclosed within the HTML opening and closing tags. This markup language facilitates the expression of graphic elements in a format that is both intuitive and accessible.
Example:
<?xml version=”1.0″ encoding=”utf-8″?>
The root <svg> element is the container for the entire SVG graphic. Within this element, crucial attributes like width and height are specified, defining the dimensions of the SVG canvas. This element establishes the overall framework for constructing intricate graphics and animations.
Nested elements within SVG documents also play a crucial role in defining diverse graphical components, ranging from basic shapes like lines, circles, and paths. Each of these elements may possess attributes that define specific properties, such as stroke color, fill color, or positioning. The nested structure allows for the creation of complex graphics by combining and organizing individual elements.
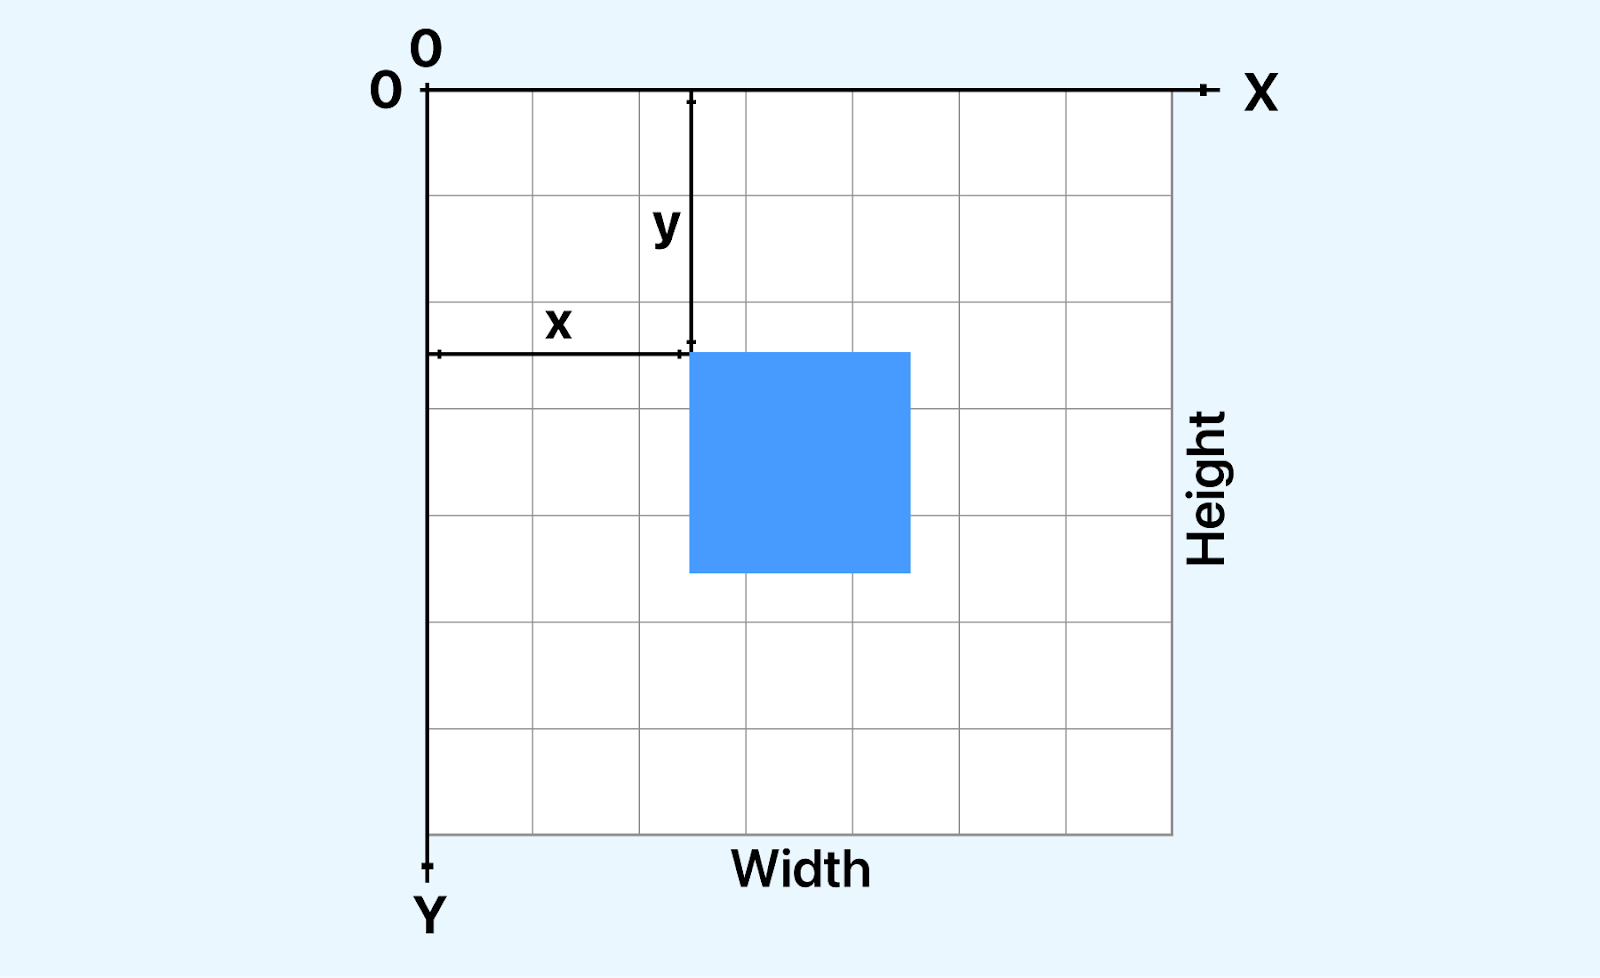
SVG employs a coordinate system that typically places the origin at (0,0), situated in the top-left corner of the canvas. A solid understanding of this coordinate system is needed for accurately positioning and manipulating elements within an SVG graphic. With full knowledge of how coordinates function in SVG, we can ensure precise placement and alignment of various graphic elements.
Creating SVG Elements
Constructing SVG elements involves utilizing the XML structure to articulate graphical components within the SVG canvas. This process lets us draft an array of shapes and forms that serve as the foundational elements for dynamic SVG animations. This journey has many possibilities, from manipulating basic shapes and grouping diverse elements to incorporating text with stylized fonts and defining elaborate patterns and gradients.
SVG accommodates a lot of basic shapes, including <circle>, <rect>, <line>, and <path>. These fundamental elements are placed in the <svg> container, where attributes such as position, size, and appearance are defined.
The <g> element is a container for grouping multiple SVG elements. This organizational feature proves invaluable, mainly when orchestrating intricate SVG animations involving the simultaneous manipulation of diverse elements.
The <text> element integrates textual components into the SVG canvas. Text elements contribute to a nice and visually captivating SVG when coupled with font styles and various styling attributes.
SVG versatility also extends to the creation of patterns and gradients through elements like <pattern>, <linearGradient>, and <radialGradient>. These and many more elements empower us to add depth and complexity to their designs, therefore enhancing the aesthetic of the SVG.
Attributes and Properties
Attributes and properties play a role in tailoring the visual characteristics and behavior of SVG elements. They serve as instrumental tools for defining colors, shapes, and various other features, categorizing them into different types, such as common attributes, transformational attributes, animation attributes, and responsive design attributes. These categories collectively contribute significantly to shaping the overall aesthetics of SVG graphics.
Common Attributes
Common attributes, exemplified by elements like fill and stroke, are fundamental in determining the color properties of an SVG element. The fill attribute specifies the interior color, while the stroke attribute controls the outline color. Additionally, the opacity attribute influences the transparency level of an element, allowing for nuanced visual effects.
Transformational Attributes
Transformation attributes, represented by transform, empower us to dynamically alter the size, rotation, or position of an SVG element. The transform property has access to properties like scale, rotate, skew, transform-origin, and translate. And just like the name, it plays a huge role in transforming your SVG.
Animation Attributes
SVG boasts animation attributes, including animate and animateTransform, which are designed to infuse dynamic effects into graphics over time. With this attribute, you can specifically design animation transformations like scaling, rotation, and translation. You can set a duration for your animation, and also set a repeat count. These attribute properties facilitate seamless transitions and transformations, contributing.
Responsive Design Attributes
Attributes like viewBox in SVG cater to responsive design needs, ensuring that graphics adapt and scale appropriately across diverse screen sizes. Responsive design attributes contribute to a more versatile and user-friendly presentation, optimizing the viewing experience on various devices.
These attributes collectively form the foundation of SVG customization, allowing us to exert precise control over the appearance and behavior of our scalable visual graphics.
To fully understand the structure of an SVG, let’s consider an SVG image of an arrow and look at its components.
|
1 2 3 4 |
<?xml version="1.0" encoding="utf-8"?> <svg width="800px" height="800px" viewBox="0 0 24 24" fill="none" > <path d="M12 5V19M12 5L6 11M12 5L18 11" stroke="#000000" stroke-width="2" stroke-linecap="round" stroke-linejoin="round"/> </svg> |
See the Pen
Arrow SVG by Clinton Joy (@Cejay101)
on CodePen.
From the SVG above, you can see that the SVG code starts with the following declaration:
<?xml version=”1.0″ encoding=”utf-8″?>
This declaration indicates to the browser that the document adheres to XML standards and utilizes UTF-8 encoding, ensuring compatibility and proper interpretation.
The <svg> element is the root element of an SVG document, and it defines several attributes that control the overall appearance and behavior of the SVG image. Here’s a table summarizing the common attributes of the <svg> element:
| Attributes | Description |
| width | Specifies the width of the SVG image in pixels. |
| height | Specifies the height of the SVG image in pixels. |
| viewBox | Defines the coordinate system and visible area of the SVG content. |
| fill | Sets the default fill color for all shapes within the SVG element. |
Next, we have the <path> element, which is used to create shapes, such as lines, curves, and polygons. In the provided SVG, the <path> element creates a circle.
The <path> element defines the circle’s path using the d attribute. The stroke attribute specifies the stroke color of the circle, and the stroke-width attribute specifies the stroke width. The stroke-linecap attribute specifies the shape of the end caps of the stroke.
The provided SVG image demonstrates the basic structure and elements of SVG. The <svg> element defines the SVG document, providing the canvas on which graphical elements are drawn defining the boundaries and properties of the SVG canvas. And the <path> element delineates the specific shapes and paths, outlining the graphic elements to be rendered within that canvas.
Benefits of SVG Animation
SVG animation is a technique for adding life to a static animation on the web. Unlike traditional image formats like PNG and GIF, which store pixel data, SVG animations are defined by mathematical equations that describe all the shapes of an image and the transformations.
Here are some benefits of SVG animations.
- Scalability: SVG graphics possess remarkable scalability, maintaining impeccable quality irrespective of size variations. This ensures animations retain their sharpness and clarity, delivering a consistent visual experience across diverse devices and screen resolutions.
- Performance: In terms of performance, SVG animations shine because they are inherently lightweight. They demand minimal browser processing, resulting in swift transitions and quicker load times. This lightweight nature contributes significantly to smoother user experiences.
- Resolution Independence: What sets SVG animations apart is their resolution independence. They transcend screen resolutions, holding onto their sharpness and precision regardless of the device or monitor specifications. This characteristic ensures that the visual excellence of the SVG animations remains intact universally.
- Versatility: The versatility of SVG animations is boundless. They offer various possibilities, from fundamental transformations to complex motion paths and interactive elements. This flexibility empowers designers and developers to craft diverse and engaging effects.
- Accessibility: An essential aspect of SVG animations is their adherence to Web Content Accessibility Guidelines (WCAG), making them accessible to visually impaired users reliant on screen readers. This commitment to accessibility broadens the reach of SVG animations, ensuring inclusivity and usability for all users.
Now you know the basics of SVG and its benefits, let’s look at what animations are in SVG.
Getting Started with SVG Animation
There are different techniques and ways to animate SVGs; some are beginner-friendly, and some involve more complex techniques and knowledge. Here is an overview of the key aspects of SVG animation techniques you should know:
- Synchronized Multimedia Integration Language (SMIL): SMIL, or Synchronized Multimedia Integration Language, is a powerful tool for SVG animations. Working on an XML-based structure, SMIL is designed to improve multimedia presentations on the web. SMIL can orchestrate multiple animations in synchronization, thereby crafting elaborate and harmonized visual effects.
- CSS Animation: This method involves specifying animations through CSS keyframes, presenting a user-friendly way to manage SVG animations, and seamlessly incorporating additional styling properties.
- JavaScript Animation: JavaScript allows dynamic manipulation of SVG elements. This programming language also allows us to edit SVGs into graphics. Widely used libraries such as GreenSock (GSAP) and Snap.svg are preferred for those seeking to create interactive SVG animations.
- Combining Techniques: Just as the name suggests, the combination techniques involve combining the previously discussed techniques. Frequently, a blend of SMIL, CSS, and JavaScript can be used to create nice and intriguing SVG animations. This combination offers the flexibility to pick the most fitting approach tailored to the unique complexities and requisites of each animation project.
- CSS-Based SVG animation
- JavaScript-Based SVG animation
- Multi-device Testing: View your website on pre-installed device viewports.
- Built-in DevTools: Individual Chrome DevTools are available for each device for easy debugging.
- Network Simulation: Test website performance on various Internet speeds (fast/slow 3G, offline).
- Recording: Capture screen or browser tab for bug reporting and sharing.
- anime.timeline({ duration: 750, easing: “easeOutExpo” }): This initializes an Anime.js timeline for orchestrating the animation sequence. The duration specifies the total animation duration, and the easing defines the animation’s timing function.
- .add({ targets: “.sun”, d: [{ value: toggle ? sunPath : moonPath }] }): Here, the animation sequence targets the sun element’s SVG path (d attribute) and transitions it between the sunPath and moonPath values based on the current toggle state. With this, we effectively morph the visual representation between a sun and a moon.
- SVG Sprite Script
- Browser Compatibility
- Responsive Design
The use of CSS, the most popular way of animating SVGs, simplifies the animation process, making it accessible to every developer aiming to incorporate SVG elements with dynamic visual appeal.
In the further sections of this blog, we will delve deeper into the practical application of these SVG animation techniques.
Types of SVG Animation
Techniques, tools, and types—aren’t they the same thing?? Well No. While SVG animations have different techniques and tools used in their implementation, there are only two types of SVG animations, and this is solely based on their mode of implementation, which is either through the use of CSS or JavaScript. So there are two types of SVG animations, and they are
These two types are different, and in this section of our blog, we will discuss them along with examples of how they can be used to animate SVGs. We will also see some of the tools we previously discussed in action.
CSS-Based SVG animation
CSS-based SVG animation provides an intuitive approach to animating SVG graphics. Using familiar CSS syntax, we can define animations for SVG elements using keyframes, transitions, and other CSS animation properties. Integrating our SVG animation into CSS makes managing and maintaining animation effects and other design elements easy.
This type of animation is typically for simple, lightweight animations or effects that don’t require complex interactivity or dynamic behavior. CSS-based animations are great for adding subtle transitions, hover effects, or keyframe animations to SVG elements, enhancing the visual appeal of web interfaces without the need for JavaScript.
Let’s look at this example of using CSS keyframes in creating an SVG loader animation.
HTML:
|
1 2 3 4 5 6 7 8 9 10 11 12 13 14 15 16 17 18 19 20 21 22 23 24 25 26 27 28 29 30 31 32 33 34 35 36 37 38 39 40 41 42 43 44 45 46 47 48 49 50 51 52 53 54 55 56 57 58 59 60 61 62 63 64 65 66 67 68 69 70 71 72 73 74 75 76 77 78 79 80 81 82 83 84 85 86 87 88 89 90 91 92 93 94 95 96 97 98 99 100 101 102 103 104 105 106 107 108 109 110 111 112 113 114 115 116 117 118 119 120 121 122 123 124 125 126 127 128 129 130 131 132 133 134 135 136 137 138 139 140 141 142 143 144 145 146 147 |
<!DOCTYPE html> <html lang="en"> <head> <meta charset="UTF-8" /> <meta name="viewport" content="width=device-width, initial-scale=1.0" /> <title>Document</title> <link rel="stylesheet" href="./style.css" /> </head> <body> <nav> <h3> <a href="https://www.lambdatest.com/" ><img class="logo" src="https://www.lambdatest.com/resources/images/logos/logo.svg" alt="logo" /></a> </h3> <ul class="nav-items"> <li><a href="https://www.lambdatest.com/feature">Platform</a></li> <li><a href="https://www.lambdatest.com/enterprise">Enterprise</a></li> <li><a href="https://www.lambdatest.com/blog/">Resources</a></li> <li> <a href="https://www.lambdatest.com/support/docs/getting-started-with-lambdatest-automation/" >Developers</a > </li> <li><a href="https://www.lambdatest.com/pricing">Pricing</a></li> <li> <a class="upgrade-btn" href="https://billing.lambdatest.com/billing/plans" >Upgrade</a > </li> </ul> <img class="hamburger" src="https://www.lambdatest.com/resources/images/icons/toggle_menu.svg" alt="" /> </nav> <header> <h2>Get started for free</h2> <div class="platforms"> <a href="https://accounts.google.com/o/oauth2/auth/oauthchooseaccount?client_id=706758774682-bjrjup3sgcqmqm1n4dq62pk72mvu8mhn.apps.googleusercontent.com&redirect_uri=https%3A%2F%2Faccounts.lambdatest.com%2Flogin%2Fgoogle%2Fcallback&scope=openid%20profile%20email&response_type=code&state=Kz4s0sM1i5Sa8v74vOBkteLIljh1cDn4YQpcvnSG&service=lso&o2v=1&theme=glif&flowName=GeneralOAuthFlow" class="platform-button link" > <img src="https://raw.githubusercontent.com/Cejay101/LamdaTestImages/e863498d271de5c15fcce14ee75bad4aad55bc7d/images/google-color-svgrepo-com.svg" alt="google icon" />Sign up with Google</a > <a href="https://github.com/login/oauth/authorize?client_id=b41139b9749e27d4487b&redirect_uri=https%3A%2F%2Faccounts.lambdatest.com%2Flogin%2Fgithub%2Fcallback%2Fv1&scope=user%3Aemail&response_type=code&state=mA5eziVBDxkmH1LwCJT9k1uID3mSVm3W8Jf8ohJo" class="platform-button link" ><img src="https://raw.githubusercontent.com/Cejay101/LamdaTestImages/e863498d271de5c15fcce14ee75bad4aad55bc7d/images/github-142-svgrepo-com.svg" alt="Github icon" />Sign up with Github</a > </div> <?xml version="1.0" encoding="utf-8"?> <svg id="loading" xmlns="http://www.w3.org/2000/svg" width="100" height="100" viewBox="25 25 50 50" > <style> @keyframes outer { 0% { stroke-dasharray: 1, 200; stroke-dashoffset: 0; } 50% { stroke-dasharray: 89, 200; stroke-dashoffset: -35; } 100% { stroke-dasharray: 89, 200; stroke-dashoffset: -124; } } @keyframes inner { 0% { stroke-dasharray: 1, 200; stroke-dashoffset: 0; } 50% { stroke-dasharray: 67, 200; stroke-dashoffset: -29; } 100% { stroke-dasharray: 67, 200; stroke-dashoffset: -93; } } #outer { animation: outer 1.5s ease-in-out infinite; } #inner { animation: inner 1.5s ease-in-out infinite -0.5s; } circle { fill: none; stroke: #000; stroke-width: 2; opacity: 0.5; } </style> <circle id="outer" cx="50" cy="50" r="20"> <animateTransform attributeName="transform" dur="2s" from="0 50 50" repeatCount="indefinite" to="360 50 50" type="rotate" /> </circle> <circle id="inner" cx="50" cy="50" r="15"> <animateTransform attributeName="transform" dur="2s" from="0 50 50" repeatCount="indefinite" to="360 50 50" type="rotate" /> </circle> </svg> </header> </body> <script src="./animate.js"></script> </html> |
In our code, we created a design with a loader animation for when a link is clicked. Our primary focus will be on the loader animation, which we implemented using two <circle> elements nested inside an <svg> element. Each circle represents a part of the loading animation.
The outer and inner circle animation is defined using the @keyframes rule. Each keyframe rule specifies different animation states at various percentages of the total duration.
We have the stroke-dasharray and stroke-dashoffset properties that control the appearance of the dashed line animation, defining the length of the dashes and the gap between them. Additionally, the opacity property adjusts the transparency of the circles, giving them a semi-transparent appearance.
The animation property applies the keyframe animations to the circles. Each circle element (#outer and #inner) is associated with its respective keyframe animation (outer and inner). Properties such as animation-duration, animation-timing-function, animation-delay, and animation-iteration-count control the timing and repetition of the animations.
Lastly, the <animateTransform> elements within each circle continuously rotate the circles, specifying a transformation animation that rotates the circles around their center points.
Before we see the result of our code, let’s add some CSS to the design, so it looks better and well presented.
CSS:
|
1 2 3 4 5 6 7 8 9 10 11 12 13 14 15 16 17 18 19 20 21 22 23 24 25 26 27 28 29 30 31 32 33 34 35 36 37 38 39 40 41 42 43 44 45 46 47 48 49 50 51 52 53 54 55 56 57 58 59 60 61 62 63 64 65 66 67 68 69 70 71 72 73 74 75 76 77 78 79 80 81 82 83 84 85 86 87 88 89 90 91 92 93 94 95 96 97 98 99 100 101 102 103 104 105 106 107 108 109 110 111 112 113 114 115 116 117 |
@import url("https://fonts.googleapis.com/css2?family=Nunito:wght@400;700&display=swap"); * { margin: 0; padding: 0; } body { background-color: #ffffff; font-family: "Nunito", sans-serif; } /* Nav bar */ nav img { width: 200px; } .nav-items { list-style: none; gap: 2rem; display: flex; align-items: center; } nav a:hover { color: #56bbc6; } nav { display: flex; justify-content: space-between; align-items: center; padding: 1rem; font-size: 1.2rem; background-color: white; box-shadow: 0px 0px 25px #888888; position: relative; } nav a { color: #000000; text-decoration: none; } nav .upgrade-btn { background: linear-gradient(90deg, #3532ec, #800080); color: white; border: none; border-radius: 5px; padding: 10px 20px; } nav .upgrade-btn:hover { background: linear-gradient(90deg, #211f98, #5b075b); color: white; } .hamburger { display: none; } /* header */ header { padding: 3rem; display: flex; flex-direction: column; align-items: center; } img { width: 20px; } h2 { font-size: 3rem; color: rgb(36, 54, 96); text-align: center; } .platforms { display: flex; gap: 2rem; margin: 2rem; justify-content: center; } .platforms a { text-decoration: none; display: flex; gap: 5px; } .platform-button { background: none; color: rgb(36, 54, 96); border: 2px solid transparent; border-image: linear-gradient(90deg, #0000ff, #800080); border-image-slice: 1; border-image-width: 2px; border-image-outset: 0; border-radius: 0px; padding: 10px 20px; cursor: pointer; } .platform-button:hover { background: linear-gradient(90deg, #e2e2f1, #f1d3f1); } #loading { display: none; } @media screen and (max-width: 952px) { .hamburger { display: block; width: 30px; } .nav-items { display: none; } } |
Output:
Everything is now coming together. We can see our design but have yet to see our loading animation. Let’s add some JavaScript to put it all together to ensure that whenever our links are clicked, we have our loading SVG appear.
JavaScript:
|
1 2 3 4 5 6 7 8 9 10 11 12 13 14 15 16 17 |
const loading = document.getElementById("loading"); const links = document.querySelectorAll("a"); links.forEach(function (link) { link.addEventListener("click", function (event) { event.preventDefault(); loading.style.display = "block"; setTimeout(function () { window.location.href = link.href; }, 2000); // 2 seconds delay }); }); |
In the JavaScript code above, we have set the loading animation to be displayed when a user clicks on any of the links. Using JavaScript, we have added an event listener to each link on the page. When a user clicks on a link, the default behavior of navigating to the new page is prevented. Instead, a loading animation is displayed for 2 seconds before the browser navigates to the new page.
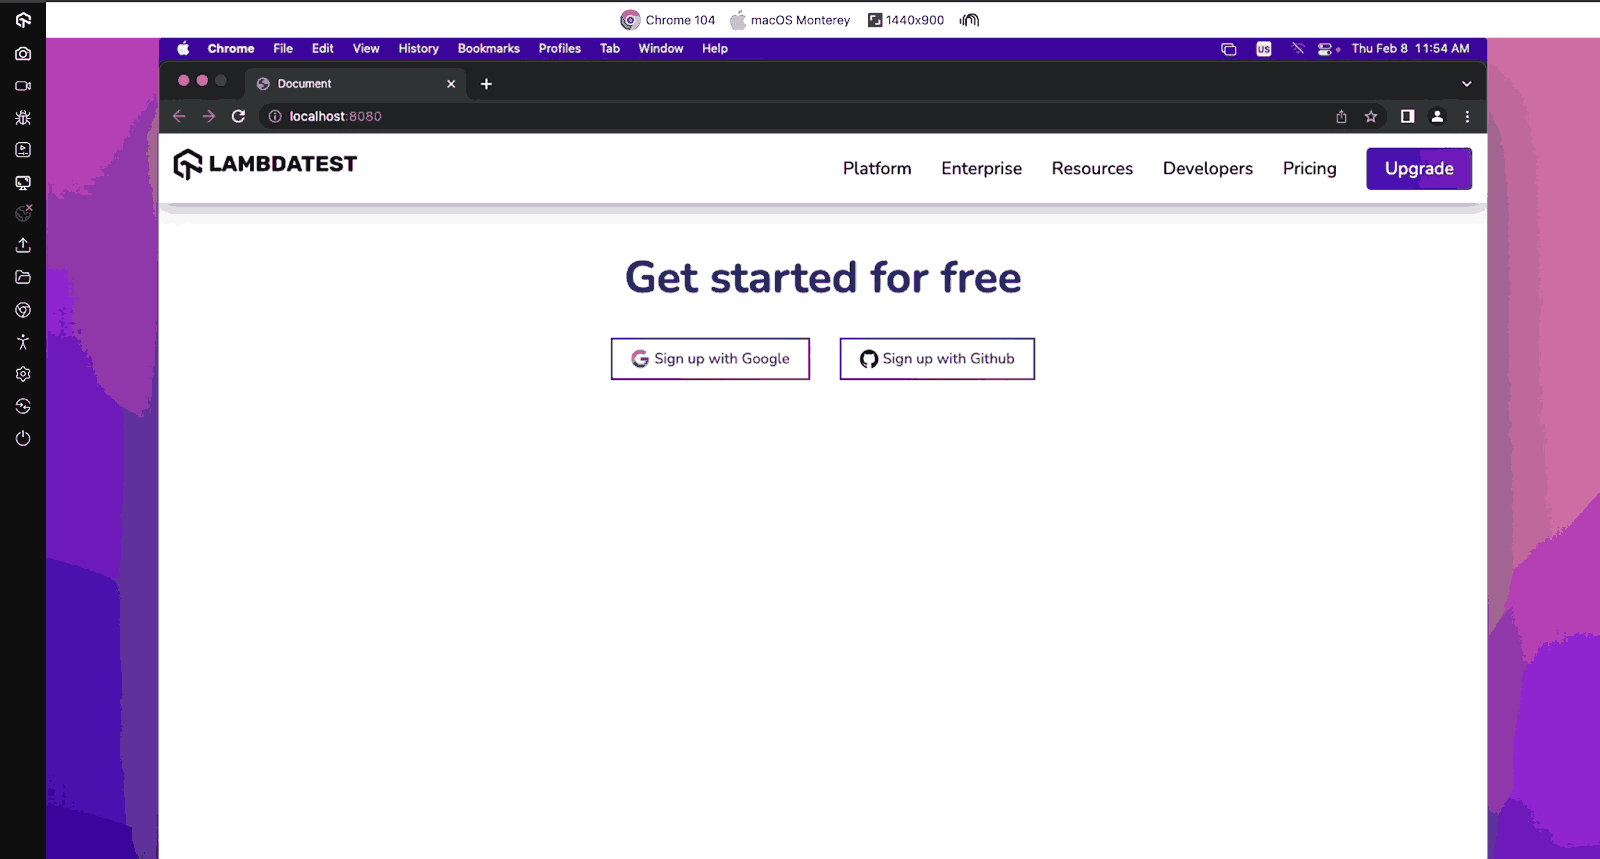
Output:
The above output for CSS-based SVG animation is rendered on LambdaTest. It is an AI-powered test orchestration and execution platform that lets you perform manual and automation testing at scale on a remote test lab with 3000+ real environments.
Subscribe to the LambdaTest YouTube Channel to learn about tutorials covering Selenium testing, real device cloud, and more.
See the Pen
CSS-based SVG animation by Clinton Joy (@Cejay101)
on CodePen.
JavaScript-Based SVG Animation
JavaScript-based SVG animation uses JavaScript and its libraries to create dynamic and interactive SVG animations. It provides a powerful and flexible approach to animating SVG graphics, allowing us to create custom animations and behaviors through scripting.
JavaScript-based SVG animation is better suited for more complex and interactive animations, such as interactive data visualizations, dynamic user interfaces, browser-based games, and simulations. JavaScript allows more control over SVG elements than CSS-based animation, enabling developers to create highly interactive and dynamic experiences that respond to user input or real-time data.
JavaScript-based SVG animation is done by using different libraries, such as
GreenSock (GSAP), Snap.svg, D3.js, Vivus, and Anime.js to manipulate SVG attributes and properties.
To show how JavaScript-based SVG animations are created, we will develop a hamburger menu icon animation using the GSAP library.
After creating the file for our project, we will first download the GSAP library from their website. For this example, we will use the GSAP CDN, which we will attach to our HTML file.
|
1 |
<script src="https://cdnjs.cloudflare.com/ajax/libs/gsap/3.12.4/gsap.min.js"></script> |
With all that said and done, let’s move on to our code.
HTML:
|
1 2 3 4 5 6 7 8 9 10 11 12 13 14 15 16 17 18 19 20 21 22 23 24 25 26 27 28 29 30 31 32 33 34 35 36 37 38 39 40 41 42 43 44 45 46 47 48 49 50 51 52 53 54 55 56 57 58 59 60 61 62 63 64 65 66 67 68 69 70 71 72 73 74 75 76 77 78 79 80 81 82 83 84 85 86 |
<!DOCTYPE html> <html lang="en"> <head> <meta charset="UTF-8" /> <meta name="viewport" content="width=device-width, initial-scale=1.0" /> <title>Document</title> <link rel="stylesheet" href="./style.css" /> </head> <body class="body"> <nav> <h3> <a href="https://www.lambdatest.com/" ><img class="logo" src="https://www.lambdatest.com/resources/images/logos/logo.svg" alt="logo" /></a> <svg class="hamburger" xmlns="http://www.w3.org/2000/svg" viewBox="0 0 100 100" > <line class="line-one" x1="15" y1="36" x2="80" y2="36" fill="none" stroke="#000" stroke-width="6" ></line> <line class="line-two" x1="15" y1="50" x2="80" y2="50" fill="none" stroke="#000" stroke-width="6" ></line> <line class="line-three" x1="15" y1="64" x2="80" y2="64" fill="none" stroke="#000" stroke-width="6" ></line> </svg> </h3> <ul class="nav-items hidden"> <li><a href="https://www.lambdatest.com/feature">Platform</a></li> <li><a href="https://www.lambdatest.com/enterprise">Enterprise</a></li> <li><a href="https://www.lambdatest.com/blog/">Resources</a></li> <li> <a href="https://www.lambdatest.com/support/docs/getting-started-with-lambdatest-automation/" >Developers</a > </li> <li><a href="https://www.lambdatest.com/pricing">Pricing</a></li> <li> <a class="upgrade-btn" href="https://billing.lambdatest.com/billing/plans" >Upgrade</a > </li> </ul> </nav> <script src="https://cdnjs.cloudflare.com/ajax/libs/gsap/3.12.4/gsap.min.js"></script> <script src="./animate.js"></script> </body> </html> |
From the code above, we have created a simple nav bar and added an SVG for the hamburger menu, which we will focus on and animate using the GSAP library.
CSS:
|
1 2 3 4 5 6 7 8 9 10 11 12 13 14 15 16 17 18 19 20 21 22 23 24 25 26 27 28 29 30 31 32 33 34 35 36 37 38 39 40 41 42 43 44 45 46 47 48 49 50 51 52 53 54 55 56 57 58 59 60 61 62 63 64 65 66 67 68 69 70 71 72 73 74 75 76 77 78 79 80 81 82 83 84 85 86 87 88 89 90 91 92 93 94 95 96 97 98 99 100 101 102 103 |
@import url("https://fonts.googleapis.com/css2?family=Nunito:wght@400;700&display=swap"); * { margin: 0; padding: 0; } body { background-color: rgb(225, 225, 225); font-family: "Nunito", sans-serif; } /* Nav bar */ nav img { width: 200px; } .nav-items { list-style: none; gap: 2rem; display: flex; align-items: center; margin-left: 1rem; } nav a:hover { color: #56bbc6; } nav { display: flex; justify-content: space-between; align-items: center; padding: 1rem; font-size: 1.2rem; background-color: white; box-shadow: 0px 0px 25px #888888; position: relative; } nav h3 { display: flex; width: 100%; justify-content: space-between; align-items: center; } .nav-items a { color: #000000; text-decoration: none; } .nav-items .upgrade-btn { background: linear-gradient(90deg, #3532ec, #800080); color: white; border: none; border-radius: 5px; padding: 10px 20px; } .nav-items .upgrade-btn:hover { background: linear-gradient(90deg, #211f98, #5b075b); color: white; } .hamburger { display: none; } svg { cursor: pointer; margin-left: auto; } /* Media Queries */ .hidden { display: flex; } @media screen and (max-width: 952px) { nav { align-items: start; flex-direction: column; } .hamburger { display: block; width: 60px; } .nav-items { list-style: none; gap: 2rem; display: flex; flex-direction: column; margin: auto; } .hidden { display: none; } } |
CSS is important, as it helps bring our design together, making it more visually appealing.
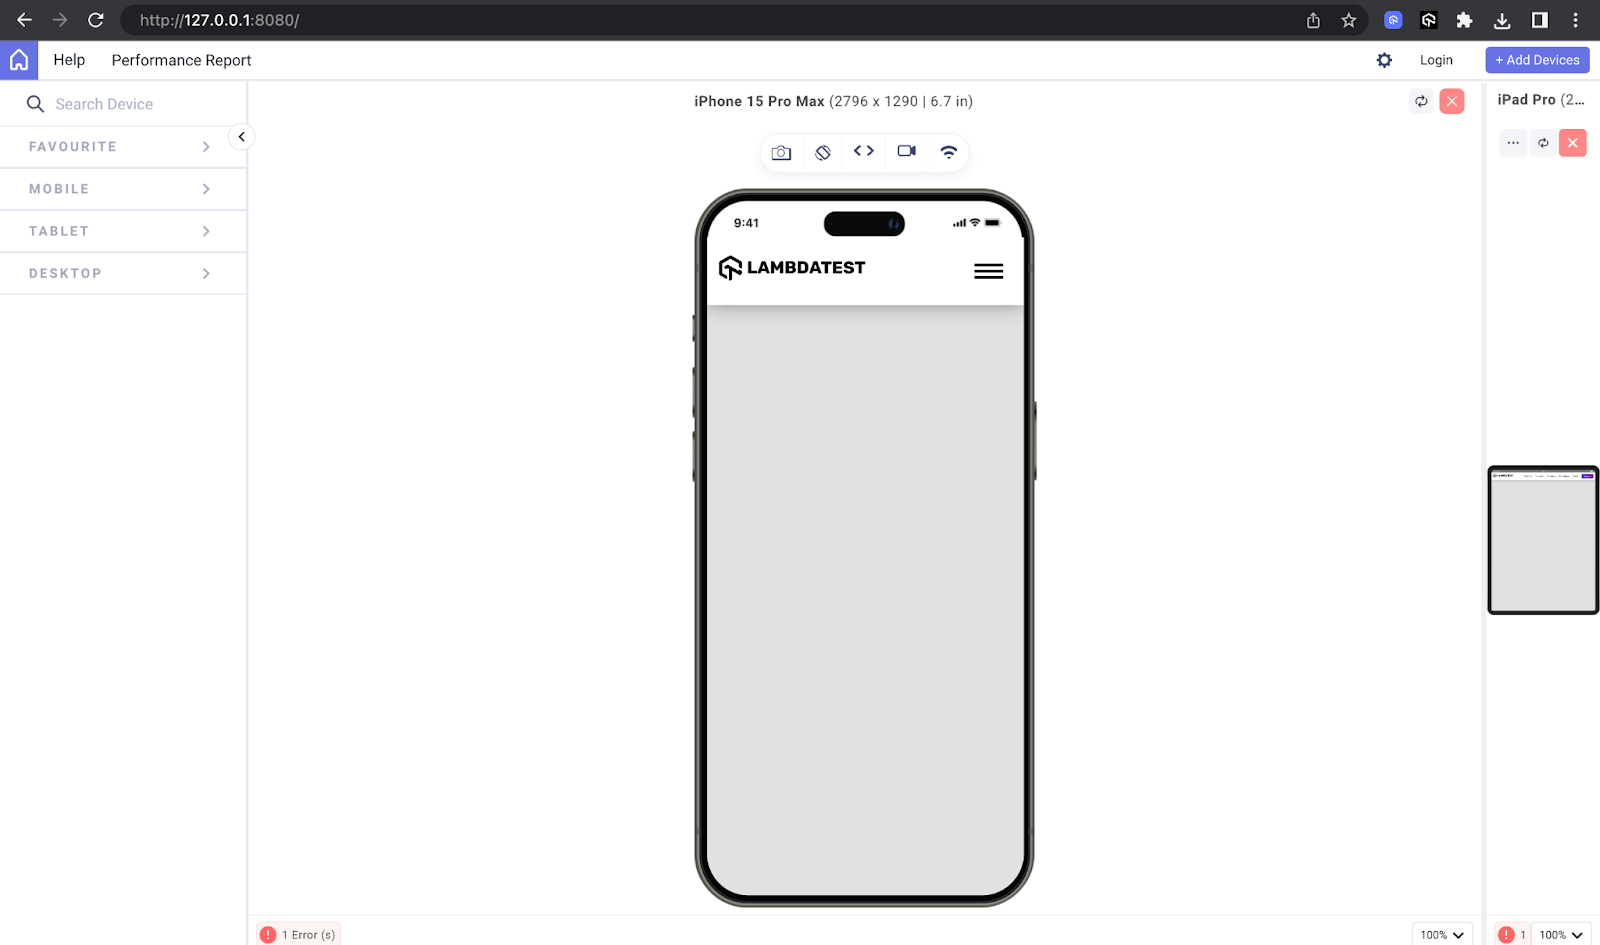
We have used LT Browser – a developer-friendly tool to render our output.
LT Browser is a desktop application designed to help developers with responsive testing. It’s a Chromium-based browser, similar to Chrome, with functionalities focused on creating websites that work flawlessly on various device viewports.
Features:

Here is the result of our code using CSS.
Mobile:
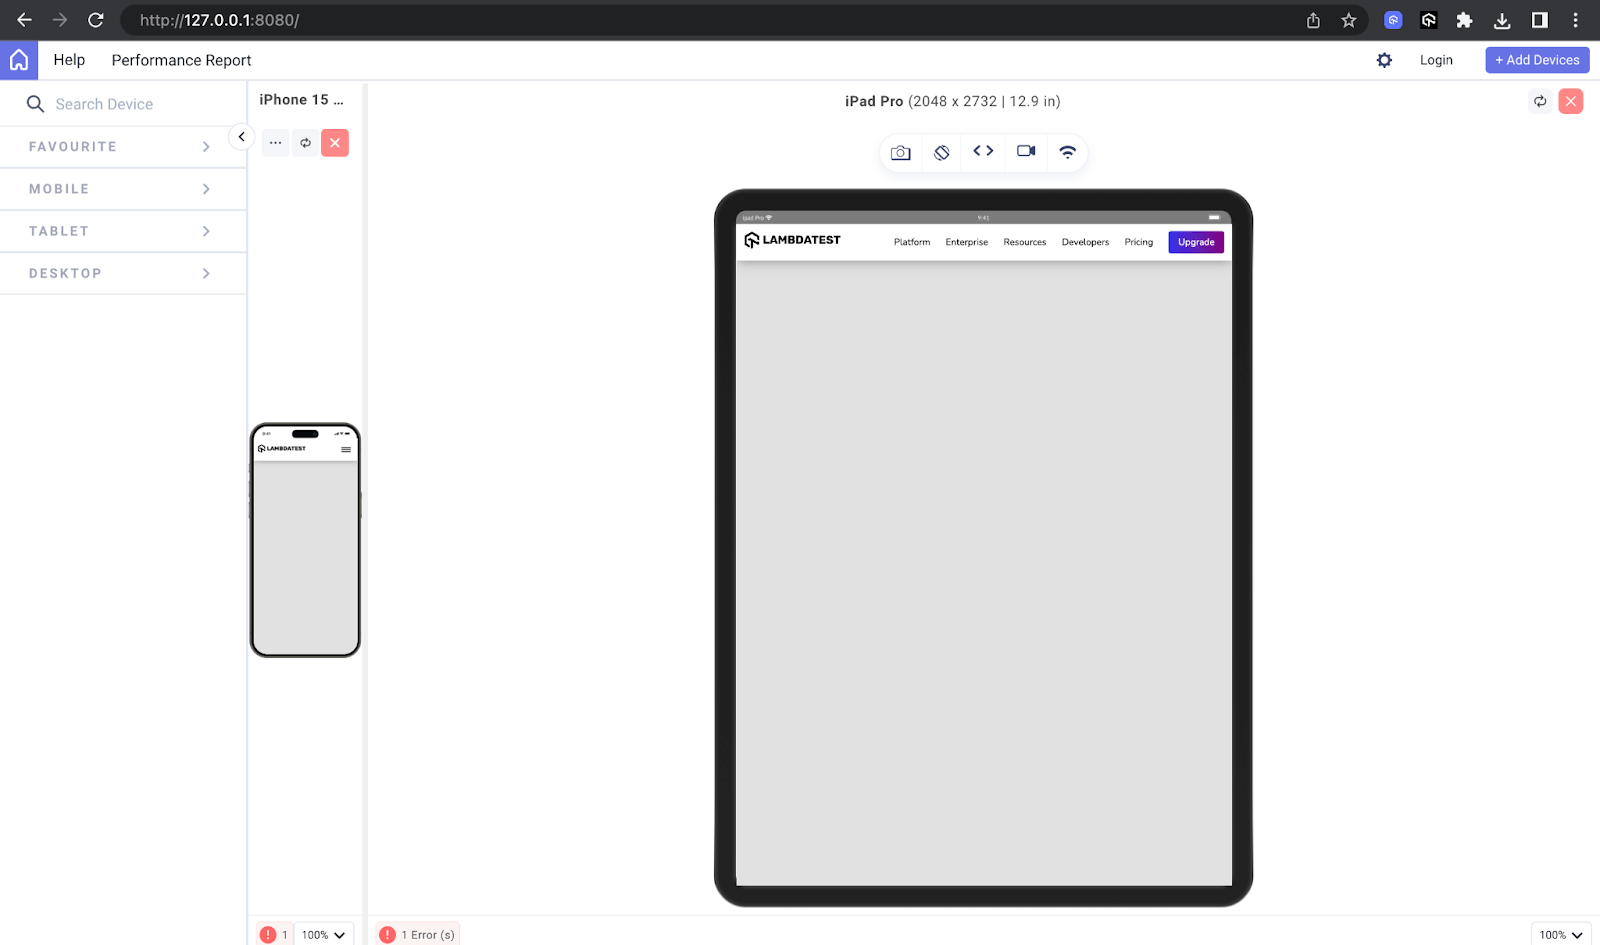
Tablet:
Now, let’s move on to the key aspect of our design: animating the hamburger menu using the GSAP library.
JavaScript:
|
1 2 3 4 5 6 7 8 9 10 11 12 13 14 15 16 17 18 19 20 21 22 23 24 25 26 27 28 29 30 31 32 33 34 35 36 37 38 39 40 41 42 43 44 45 |
// "use strict" const hamburger = document.querySelector(".hamburger"); const navItems = document.querySelector(".nav-items"); const lineOne = hamburger.querySelector(".line-one"); const lineTwo = hamburger.querySelector(".line-two"); const lineThree = hamburger.querySelector(".line-three"); const lines = [lineOne, lineTwo, lineThree]; const tlm = new TimelineMax({}); const toggleMenu = new TimelineMax({ paused: true, reversed: true }); hamburger.addEventListener("mouseenter", () => { if (hamburger.classList.contains("js-x")) { return; } tlm.staggerTo( lines, 0.0125, { scaleX: 1.5, repeat: 1, yoyo: true, svgOrigin: "50 50" }, 0.125 ); }); toggleMenu .to(lineTwo, 0.125, { scaleX: 0 }, 0) .to(lineOne, 0.25, { transformOrigin: "50% 50%", y: 14 }, "slide") .to(lineThree, 0.25, { transformOrigin: "50% 50%", y: -14 }, "slide") .to(hamburger, 0.25, { rotation: 360 }) .to(lineOne, 0.25, { rotation: 45 }, "cross") .to(lineThree, 0.25, { rotation: -45 }, "cross"); hamburger.addEventListener("click", () => { hamburger.classList.toggle("js-x"); toggleMenu.reversed() ? toggleMenu.play() : toggleMenu.reverse(); navItems.style.display = toggleMenu.reversed() ? "none" : "flex"; }); window.addEventListener("resize", () => { location.reload(); }); |
In the code above, we can see GSAP in action.
We started our JavaScript by selecting and initializing variables. Here, we can see each class of our hamburger SVG selected: .line-one, .line-two, .line-three, .hamburger, etc. This variable’s initialization is very important for our animation, as we need to target each element in our SVG.
Right after variable initialization, using GSAP, we implemented our hover animation. We used the mouseenter event listener to listen for when our user hovered over our hamburger menu. It checks if the hamburger menu button has the class js-x (indicating it’s in an X state, typically representing an open menu).
If it does, it returns without executing the animation. It uses the GSAP library to animate the lines of the hamburger menu button, making them scale up and down with a slight delay between each line.
Next, using GSAP, we created a menu toggle animation. Using the click event listener, we created a unique animation for when the hamburger menu is clicked. On clicking the js-x class on the hamburger menu button, it changes its appearance between a hamburger icon and an X. It changes the display style of the navigation items (navItems) based on the state of the toggleMenu animation.
Output:
 Note
NoteTest your SVG animations on real Android and iOS devices Try LambdaTest Today!
Advanced SVG Animation Techniques
In the earlier sections of the blog, we explored the fundamental techniques of animating SVGs through CSS and JavaScript. These methods serve as the foundational approaches widely adopted by developers for creating dynamic SVG visuals. However, as we strive to elevate the sophistication of SVG animations, we delve into advanced techniques that offer a more nuanced and powerful spectrum of possibilities.
Two prominent advanced uses of SVG animation can be displayed in Synchronized Multimedia Integration Language (SMIL) and the utilization of morphing and paths. While vanilla CSS and JavaScript remain the go-to choices for many developers, incorporating advanced techniques can significantly enhance the expressive capabilities of SVG animations.
Synchronized Multimedia Integration Language (SMIL)
SMIL stands out as an advanced XML-based markup language tailored explicitly for orchestrating multimedia presentations and animations on the web. While vanilla CSS and JavaScript provide robust animation capabilities, SMIL introduces a more declarative approach, allowing us to define the timing, sequencing, and synchronization of various HTML elements.
Let’s consider this simple design to see how SMIL functions:
|
1 2 3 4 5 6 7 8 9 10 11 12 13 14 15 16 17 18 19 20 21 22 23 24 25 26 27 28 29 30 31 32 33 34 35 36 37 38 39 |
<!DOCTYPE html> <html lang="en"> <head> <meta charset="UTF-8" /> <meta name="viewport" content="width=device-width, initial-scale=1.0" /> <link rel="stylesheet" href="./style.css" /> <title>Document</title> <style> img{ width: 250px; } body { display: flex; flex-direction: column; justify-content: center; align-items: center; padding: 1rem; } </style> </head> <img src="https://www.lambdatest.com/resources/images/logos/logo.svg" alt=""> <svg viewBox="0 0 100 100"> <rect id="one" x="35" y="1" width="4" height="0.21" fill="black"> <animate id="one" attributeName="x" begin="0s" dur="1.5" keyPoints="1;0;1" to="60" fill="" repeatCount="indefinite" /> </rect> <rect x="35" y="1" width="4" height="0.21" fill="black"> <animate attributeName="x" begin="0.5" dur="1.5" keyPoints="1;0;1" to="60" fill="" repeatCount="indefinite" /> </rect> <rect x="35" y="1" width="4" height="0.21" fill="black"> <animate attributeName="x" begin="1" dur="1.5" keyPoints="1;0;1" to="60" fill="" repeatCount="indefinite" /> </rect> <rect x="35" y="1" width="4" height="0.21" fill="black"> <animate attributeName="x" begin="1.5" dur="1.5" keyPoints="1;0;1" to="60" fill="" repeatCount="indefinite" /> </rect> </svg> </body> </html> |
In the above code, we can see the usage of SMIL animations within SVG elements to create synchronized and repetitive animations of rectangles moving horizontally across the SVG canvas.
Within each <rect> element, there is an <animate> element used to define the animation behavior. The attributeName attribute specifies the attribute to be animated (x in this case), and the to attribute specifies the target value of the attribute after the animation completes. You can also see the use of different attributes in the animate element to specify the duration of the animation and also the color; this is simply the SMIL in action.
Output:
See the Pen
Untitled by Clinton Joy (@Cejay101)
on CodePen.
Morphing and Path Animations
Morphing is simply a smooth transition between the shapes of an SVG. With SVGs, you can define two or more shapes; through morphing, you can seamlessly transform one shape into another.
For instance, change a circle to a square or something else. SVG morphing is very common and important in modern-day websites, and in this section, we will see a very common use case of SVG morphing and path animations.
Dark mode is a feature very common in modern websites. Often, we are presented with a clickable icon that serves as a toggler between the light and dark modes. We will see how we can use morphing and path animation to transition smoothly from the light mode icon to the dark mode icon.
HTML:
|
1 2 3 4 5 6 7 8 9 10 11 12 13 14 15 16 17 18 19 20 21 22 23 24 25 26 27 28 29 30 31 32 33 34 35 36 37 38 39 40 41 42 43 44 45 46 47 48 49 50 51 52 53 54 55 56 57 58 59 60 61 62 63 64 65 66 67 68 69 70 71 72 73 74 75 76 77 78 79 80 81 82 83 84 85 86 87 88 89 90 91 92 93 94 95 96 97 98 99 100 101 102 103 104 105 |
<!DOCTYPE html> <html lang="en"> <head> <meta charset="UTF-8" /> <meta name="viewport" content="width=device-width, initial-scale=1.0" /> <title>Document</title> <link rel="stylesheet" href="./style.css" /> </head> <body class="body"> <nav> <h3> <a href="https://www.lambdatest.com/" ><img class="logo" src="https://www.lambdatest.com/resources/images/logos/logo.svg" alt="logo" /></a> </h3> <svg class="darkmode" width="55" height="55" viewBox="0 0 55 55" fill="none" xmlns="http://www.w3.org/2000/svg" > <path class="sun" d="M55 27.5C55 42.6878 42.6878 55 27.5 55C12.3122 55 0 42.6878 0 27.5C0 12.3122 12.3122 0 27.5 0C42.6878 0 55 12.3122 55 27.5Z" fill="#FFD600" /> </svg> <ul class="nav-items"> <li><a href="https://www.lambdatest.com/feature">Platform</a></li> <li><a href="https://www.lambdatest.com/enterprise">Enterprise</a></li> <li><a href="https://www.lambdatest.com/blog/">Resources</a></li> <li> <a href="https://www.lambdatest.com/support/docs/getting-started-with-lambdatest-automation/" >Developers</a > </li> <li><a href="https://www.lambdatest.com/pricing">Pricing</a></li> <li> <a class="upgrade-btn" href="https://billing.lambdatest.com/billing/plans" >Upgrade</a > </li> </ul> <img class="hamburger" src="https://www.lambdatest.com/resources/images/icons/toggle_menu.svg" alt="" /> </nav> <div id="title"> <h1 class="light"> Next-Generation Mobile Apps and Cross Browser <span>Testing Cloud</span> </h1> </div> </div> <div id="features"> <div id="features-group"> <div class="feature"> <p>1</p> <h2>24/7 Support</h2> Got questions? Throw them to our 24/7 in-app customer chat support or email us on support@lambdatest.com. </div> <div class="feature"> <p>2</p> <h2>Third-Party Integrations</h2> With a single click, push bugs in your choice of project management tools, directly from LambdaTest platform. </div> <div class="feature"> <p>3</p> <h2>Documentation</h2> Step-by-step documentation for various test automation frameworks to help you run your first Selenium script. </div> </div> </div> <script src="/animate.js"></script> <script src="https://cdnjs.cloudflare.com/ajax/libs/animejs/3.2.1/anime.min.js"></script> </body> </html> |
In the above code, our primary focus lies within the SVG element, which encapsulates various properties such as height, width, and viewBox, delineating the dimensions and boundaries of our SVG graphic. Nested within this SVG container is a path element, which defines the visual characteristics of our SVG icon. Through the manipulation of this path element, we can seamlessly morph the SVG from a light icon to its dark icon.
CSS:
|
1 2 3 4 5 6 7 8 9 10 11 12 13 14 15 16 17 18 19 20 21 22 23 24 25 26 27 28 29 30 31 32 33 34 35 36 37 38 39 40 41 42 43 44 45 46 47 48 49 50 51 52 53 54 55 56 57 58 59 60 61 62 63 64 65 66 67 68 69 70 71 72 73 74 75 76 77 78 79 80 81 82 83 84 85 86 87 88 89 90 91 92 93 94 95 96 97 98 99 100 101 102 103 104 105 106 107 108 109 110 111 112 113 114 115 116 117 118 119 120 121 122 123 124 125 126 127 128 129 130 131 132 133 134 135 136 137 138 139 140 141 142 143 144 145 146 147 148 149 150 151 152 153 154 155 156 157 158 159 160 161 162 163 164 165 166 167 168 169 170 171 172 173 174 175 176 177 178 |
@import url("https://fonts.googleapis.com/css2?family=Nunito:wght@400;700&display=swap"); * { margin: 0; padding: 0; } body { background-color: rgb(225, 225, 225); font-family: "Nunito", sans-serif; } /* Nav bar */ nav img { width: 200px; } .nav-items { list-style: none; gap: 2rem; display: flex; align-items: center; margin-left: 1rem; } nav a:hover { color: #56bbc6; } nav { display: flex; justify-content: space-between; align-items: center; padding: 1rem; font-size: 1.2rem; background-color: white; box-shadow: 0px 0px 25px #888888; position: relative; } nav a { color: #000000; text-decoration: none; } nav .upgrade-btn { background: linear-gradient(90deg, #3532ec, #800080); color: white; border: none; border-radius: 5px; padding: 10px 20px; } nav .upgrade-btn:hover { background: linear-gradient(90deg, #211f98, #5b075b); color: white; } .hamburger { display: none; } svg { cursor: pointer; margin-left: auto; } /* BODY */ #title { text-align: center; } #title h1 { font-family: "Fraunces", sans-serif; max-width: 735px; font-size: 60px; margin: 4rem auto; } #title h1 span { border-bottom: #56bbc6 solid 3px; } #features { height: 50vh; width: 100%; } #features-group { margin: 0 auto; display: flex; flex-direction: row; align-items: center; justify-content: space-evenly; padding: 4rem; } .feature { width: 28%; align-content: center; text-align: center; background-color: #56bbc613; padding: 20px 5px; border-radius: 10px; } .feature :first-child { font-family: "Fraunces", sans-serif; font-weight: 600; font-size: 24px; border: dotted 1px #0a6069; border-radius: 50%; height: 56px; width: 56px; margin: 0 auto 30px; display: flex; align-items: center; justify-content: center; } .feature h2 { font-family: "Fraunces", sans-serif; font-size: 24px; line-height: 40px; text-align: center; margin-bottom: 18px; } .feature span { font-family: "Manrope", sans-serif; height: 128px; font-style: normal; font-weight: 400; font-size: 18px; line-height: 32px; text-align: center; color: #222; } /* Media Queries */ @media screen and (max-width: 1100px) { #features-group { flex-direction: column; gap: 2rem; } .feature { width: 80%; } #title h1 { font-size: 60px; } } @media screen and (orientation: portrait) { #title { height: 60%; display: flex; } #features-group { flex-direction: column; gap: 2rem; } .feature { width: 100%; } } @media screen and (max-width: 700px) and (orientation: portrait) { #title h1 { font-size: 40px; } } @media screen and (max-width: 952px) { .hamburger { display: block; width: 30px; } .nav-items { display: none; } } |
The CSS above gives a visual appeal to our design, but it plays no role in the morphing of our SVG. Let’s see how this is done using JavaScript.
JavaScript:
|
1 2 3 4 5 6 7 8 9 10 11 12 13 14 15 16 17 18 19 20 21 22 23 24 25 26 27 28 29 30 31 32 33 34 35 36 37 38 39 40 41 42 43 44 45 46 |
const moonPath = "M13 28.5C13 43.6878 27.5 56 27.5 56C12.3122 56 0 43.6878 0 28.5C0 13.3122 12.3122 1.00001 27.5 1.00001C27.5 -0.999998 13 13.3122 13 28.5Z"; const sunPath = "M55 27.5C55 42.6878 42.6878 55 27.5 55C12.3122 55 0 42.6878 0 27.5C0 12.3122 12.3122 0 27.5 0C42.6878 0 55 12.3122 55 27.5Z"; const darkMode = document.querySelector(".darkmode"); const sun = document.querySelector(".sun"); let toggle = false; darkMode.addEventListener("click", () => { // Using anime.js const timeline = anime.timeline({ duration: 750, easing: "easeOutExpo", }); timeline .add({ targets: ".sun", d: [{ value: toggle ? sunPath : moonPath }], }) .add( { targets: ".darkmode", rotate: toggle ? 320 : -60, }, "-=350" ) .add( { targets: ".body", backgroundColor: toggle ? "rgb(225,225,225)":"rgb(22,22,22)" , color: toggle ? "rgb(22,22,22)":"rgb(225,225,225)" , }, "-=750" ); // switching the toggle toggle = !toggle; // Toggle the variable for the next click }); |
Earlier, we mentioned that there are two types of SVG animation. Morphing and CSS path animations is a JavaScript-based SVG animation requiring a JavaScript animation library, in this case, the Anime.js library.
The code above performs two major functions: to toggle and morph the SVG path.
We started by creating variables for our sun and moon paths, which are the paths to the icons we will be morphing, and also selecting the classes of the elements we will target.
We also created a toggle initializer and a click event listener to listen for when the darkmode button is clicked. Inside this function, we perform the SVG morphing using Anime.js and add a cool rotating effect.
Lastly, we update the toggle initializer to ensure that subsequent clicks on the darkmode button alternate between light and dark modes.
Output:
Optimizing SVGs
We must consider optimization to ensure the consistency of our SVG on different devices and browsers, as it is very important. Various strategies can be used to provide the optimization of our SVG, some of these strategies include,
SVG Sprite Script
The SVG sprite script is a technique for optimizing the loading and rendering of multiple SVGs on a web page. This process combines the various SVGs into a sprite script file and then selectively displays them when needed using CSS.
Loads of benefits come from using an SVG sprite script, as the combination of these SVG assets reduces the number of HTTP requests required to fetch each image, leading to faster loading times and improved performance. It also reduces the file size of our SVG and SVG sprite sheets, which can be cached by the browser, resulting in subsequent visits to the website benefiting from faster loading times.
Browser Compatibility
Browser compatibility is a critical consideration when working with SVG animations. While SVGs are widely supported across modern browsers, there are still variations in how different browsers handle SVG features and rendering.
Different browsers may support different SVG properties or features; it is necessary to test our design on other web browsers online and provide a fallback for non-supported browsers. Different browser testing tools, virtual machines, and cloud-based testing platforms like LambdaTest simulate various browser environments and identify any compatibility issues early in the development process.
Responsive Design
Responsive testing, like browser compatibility, is equally important when dealing with SVGs. When it comes to SVG animations, responsive design plays a significant role in maintaining consistency and usability across different devices. Media queries for standard devices can adjust SVG animation properties, such as animation speed or complexity, based on the device’s capabilities. And just like browser compatibility, responsiveness can be tested using responsive testing tools like LT Browser, offered by LambdaTest.
Conclusion
This blog has provided a comprehensive guide to SVG animation. It reveals its versatility and strength in enhancing the web experience and allowing us to create dynamic and engaging content. We began with the basics of SVG, where we discussed the SVG structure, how SVG elements are created, and how the attributes and properties of the SVG affect its appearance.
We also discussed SVG animation, where we saw the list of tools that we can use to carry out SVG animation. We also mention that SVG animations are of two types: CSS-based and JavaScript-based animations. We saw different real-world examples of SVG animations in use.
As we continued to push further, we saw advanced SVG animation techniques like SMIL and path animation to achieve SVG morphing.
In essence, SVG animation is a tool of endless possibilities. It enables us to create dynamic, engaging, and accessible content that captivates audiences and enhances the digital landscape. So, let’s continue exploring, experimenting, and innovating with SVG animation.
Frequently Asked Questions (FAQs)
Can an SVG be animated?
Yes, SVG can be animated.
Is SVG better than GIF?
SVG is better for vector graphics, while GIF is better for animations with limited colors.


Author’s Profile
Clinton Joy Fimie
Clinton Joy is a front-end developer and technical writer with 3 years of experience in the tech field. With diverse experience ranging from graphic design to front-end development, back-end development, and technical writing, he loves creating visually appealing, user-friendly solutions and communicating technical concepts in the clearest way possible.
Blogs: 6
Got Questions? Drop them on LambdaTest Community. Visit now


