
TestCafe Tutorial: How To Select Page Elements Using TestCafe Selectors
Bonnie
Posted On: September 27, 2022
![]() 229356 Views
229356 Views
![]() 29 Min Read
29 Min Read
Let’s assume you want to build or create a web page as a web developer. First, you will create an HTML file that comprises semantic and non-semantic elements (e.g. < header >, < section >, and < footer > are examples of semantic elements). < div >, < span >, < h1 >, and < p > are examples of non-semantic elements.
You must style the HTML elements using CSS to ensure the web page is super-responsive on different viewport sizes. The best way to style an HTML element is by targeting it using CSS Selectors.
For instance, you could provide a unique id or class for styling the < header > element. The id and class attributes make it easier to target the < header > element and add styling to it on a CSS file. Therefore, there is a provision to add the id and class attributes by writing HTML code that looks like < header id=”header” > and < header class=”header” >.
What do CSS Selectors have in common with TestCafe Selectors? Before answering that question, let us first understand what is TestCafe and what are TestCafe Selectors in this TestCafe tutorial.
By the end of this TestCafe tutorial on TestCafe Selectors, you will have learned how to use TestCafe Selectors for selecting elements on the web page.
TABLE OF CONTENTS
- What is TestCafe?
- What are TestCafe Selectors?
- How to install TestCafe?
- Understanding Page Object Model
- How to use TestCafe Selectors to select page elements?
- Accessing Shadow DOM
- Limitations of TestCafe Selectors
- Running tests using TestCafe on cloud Selenium Grid?
- Frequently Asked Questions (FAQs)
What is TestCafe?
TestCafe is a Node.js-based open-source automation testing framework that can be majorly used for End to End (E2E) testing of web applications. TestCafe supports both JavaScript and TypeScript.
As a web developer and technical writer, I have been working on a portfolio website that helps me showcase my expertise. However, how can I ensure that the website does what I expect it to do when viewed on different browsers and operating systems? This is where I leverage the benefits of end-to-end (E2E) testing.
I can run End to End tests using TestCafe because it does not require any external dependencies like WebDriver (in the case of Selenium). Also, TestCafe uses the browsers I already have on my machine.
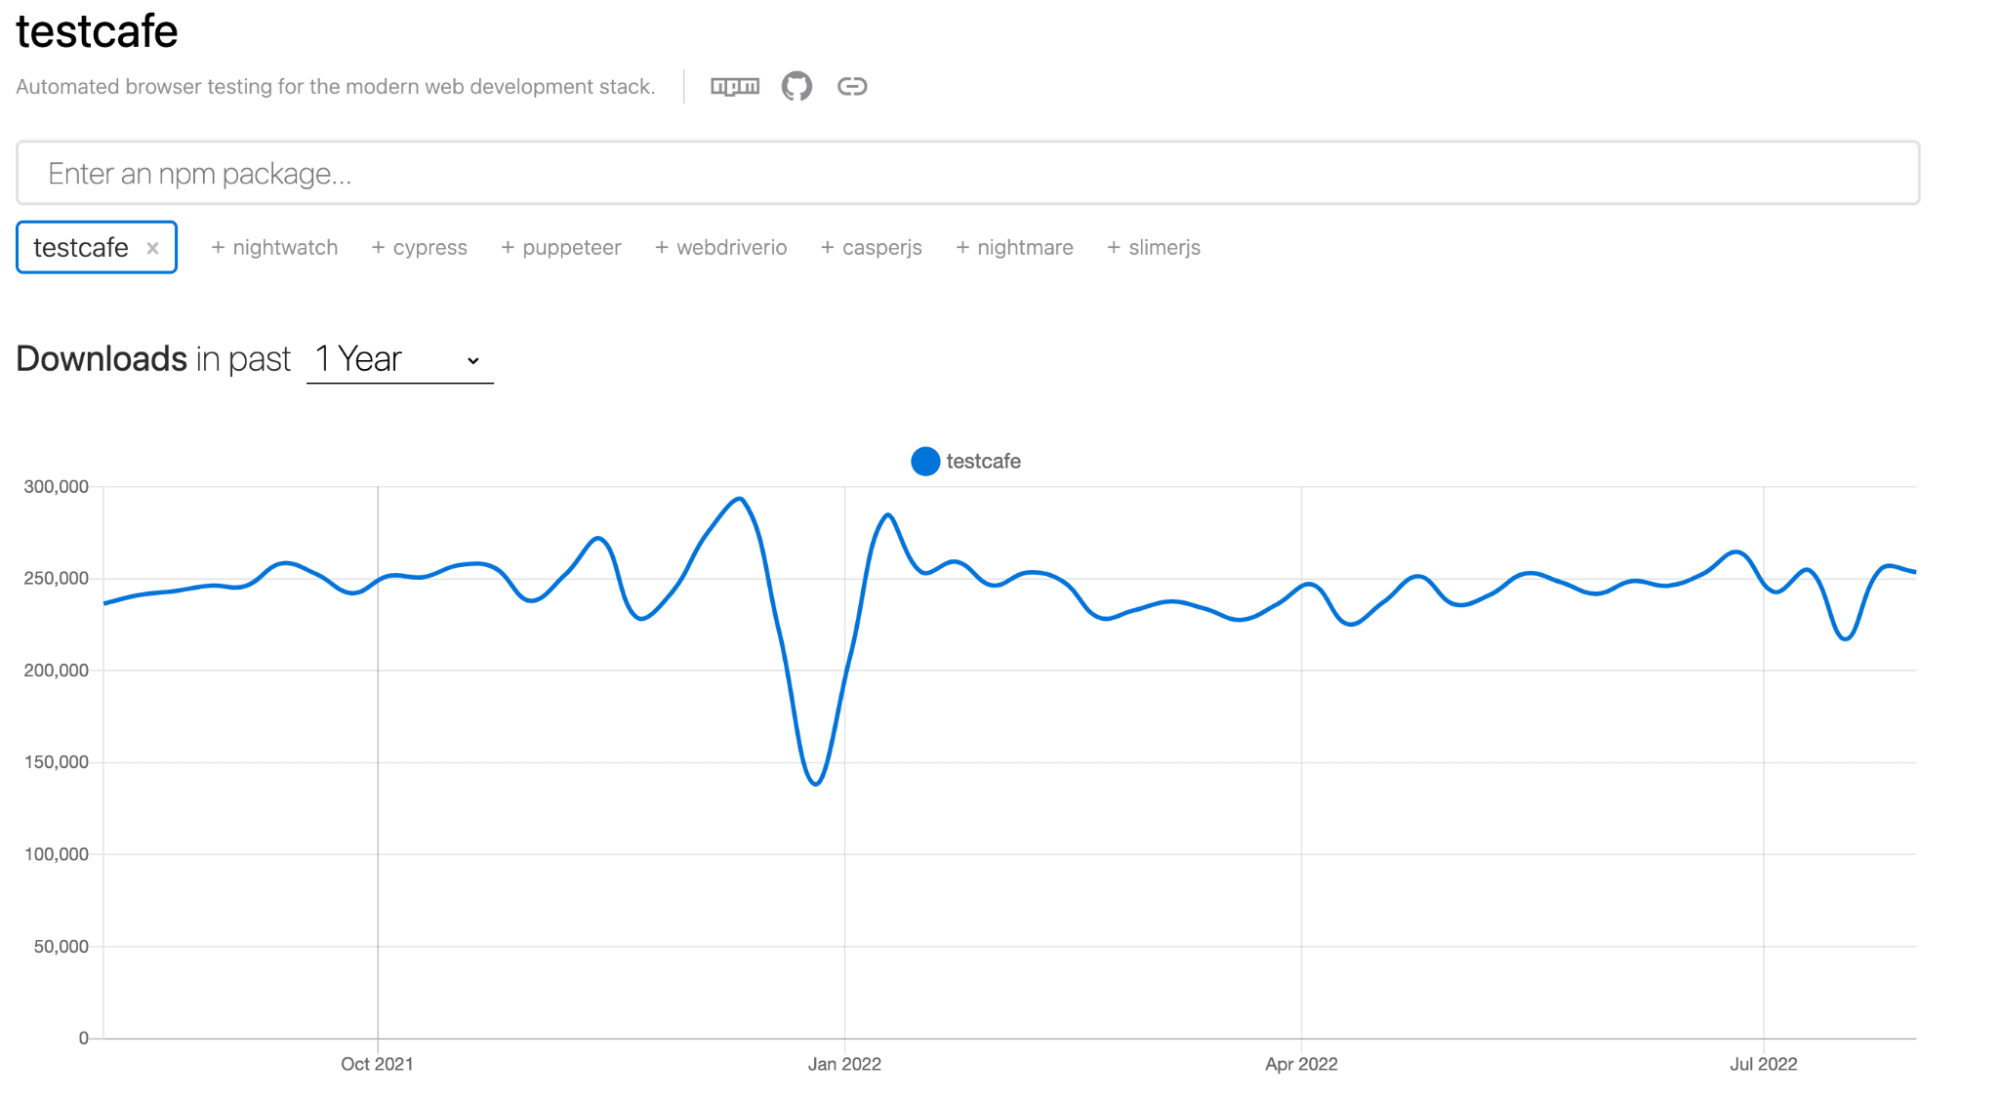
At the time of writing this TestCafe tutorial, TestCafe had 9.4K stars and 659 forks, and the latest version was 1.20.1.
What are TestCafe Selectors?
TestCafe Selectors are selectors that filter a web page and return page elements that match specified user-defined criteria. In simple terms, TestCafe Selectors target page elements you want to test, akin to how CSS Selectors target the HTML elements you want to style.
For example, let’s consider a form on a web page with two inputs and a submit button. If you wanted to style the input elements and the button, you would have to target them using CSS Selectors, as you mentioned earlier.
What if you wanted to test whether a user can fill in the form and submit the input data using Testcafe?
TestCafe can identify the form inputs and buttons using TestCafe Selectors (like CSS selectors), as they both take advantage of unique ids or class attributes to locate the elements.
In this TestCafe tutorial on TestCafe Selectors, we will go through different types of TestCafe Selectors and learn how to use them to find page elements that you want to test.
Run TestCafe Tests on the cloud! Try LambdaTest Now!
How to install TestCafe?
In this section of this TestCafe tutorial on how to use TestCafe Selectors to select page elements, you will learn how to install TestCafe and use TestCafe Selectors. To install and use TestCafe in your system, you need an IDE, Node.js, and Node Package Manager (NPM) installed.
I will use Visual Studio Code as the IDE for the demonstration. However, you can use the IDE of your choice.
To install TestCafe on your machine, please follow the steps:
Step 1: Create a folder called “TestCafeSelectors,” then right-click on the folder and open it using Visual Studio Code.
Once the “TestCafeSelectors” folder has opened on VS Code, open the terminal on VS Code by clicking the “Terminal” option on the top of your VS Code window, and then select “New Terminal,” as shown below.

Step 2: Run the command below on your terminal to install TestCafe.
|
1 |
npm install testcafe |
Step 3: Once the installation is done, run the command below to see the version of TestCafe installed.
|
1 |
testcafe -v |
Step 4: Run the command below to create a package.json file.
|
1 |
npm init |
The package.json file represents various metadata relevant to your project. The package.json file also helps NPM identify the project’s information and dependencies.
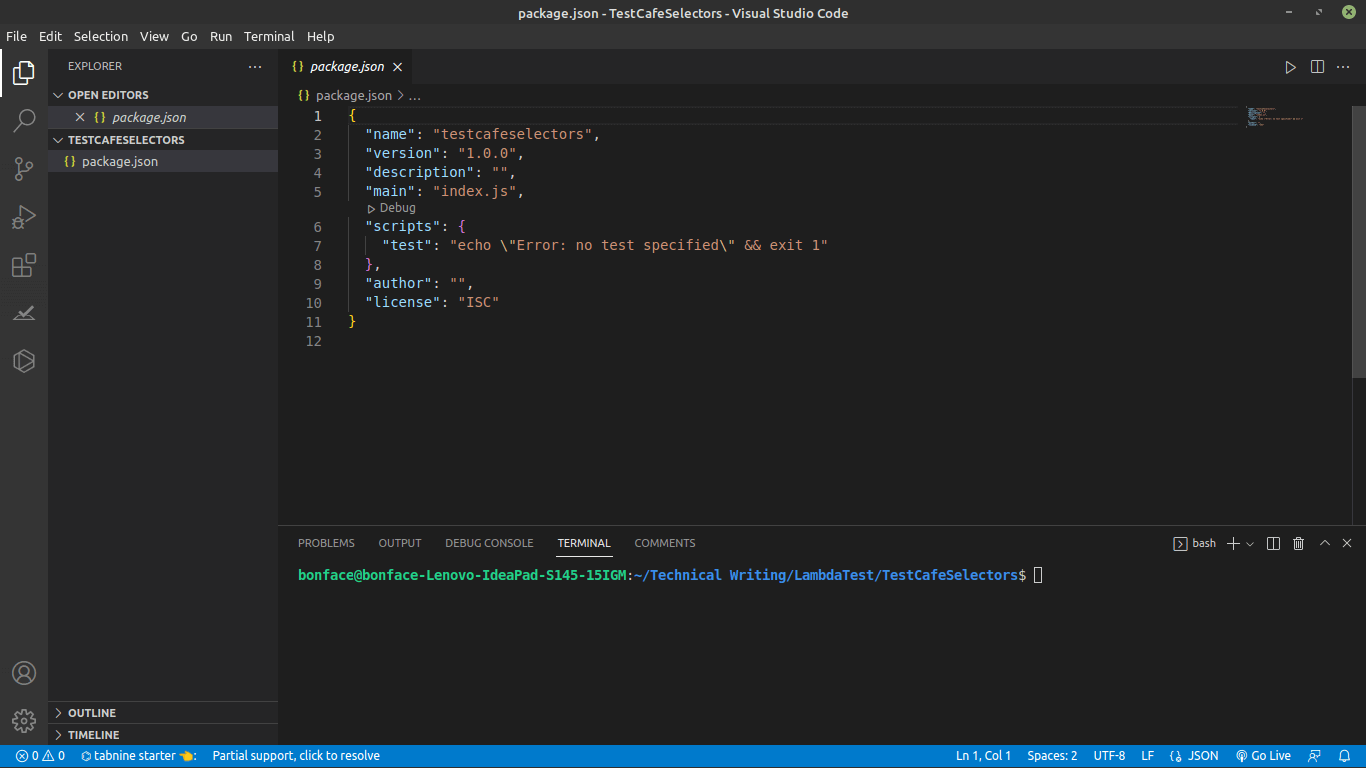
If you open the package.json file, it should look as shown above. The only thing we now need is to add TestCafe as a dependency for our project.
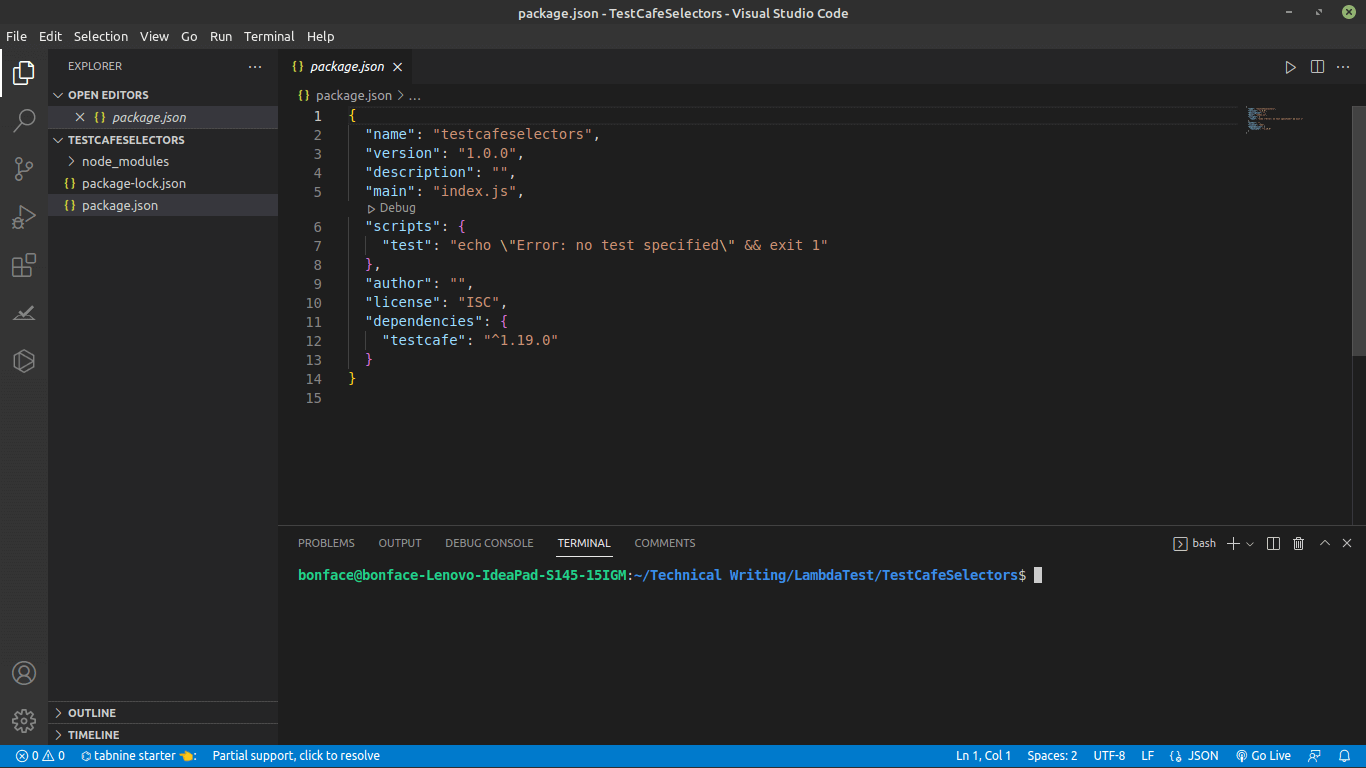
Step 5: Run the command below to add TestCafe as a dependency to the project.
|
1 |
npm install testcafe |
Now, you find that TestCafe has been added as one of the dependencies.
Before we go through different types of TestCafe Selectors and learn how to use them to target page elements that you want to test, let me talk about the Page Object Model.
Understanding Page Object Model
Page Object Model, also known as POM, is a design pattern commonly used by testers when performing automation testing. The primary aim of the Page Object Model is to avoid code duplication and enhance code reusability. The POM design pattern is more programmer-friendly, making it easier to maintain and enhance test code.
As mentioned earlier in this TesCafe tutorial on TestCafe Selectors, test automation frameworks like TestCafe help navigate a web page and perform relevant actions with the WebElements that are targeted using the appropriate TestCafe Selectors.
The Page Object Model houses all the WebElements, actions, and validations happening on a page in one single Page Object. The POM directs us to create an object representing the UI of the page we want to test.

The benefits of using the Page Object Model are more prevalent when testing complex and large-scale applications. Adopting the POM design pattern can be a huge time and cost saver on large-scale applications. The reason is that these applications are only expected to grow larger and more complex with every software release.
Improved maintenance reduces the overhead costs involved in enhancing the test code.
Implementing Page Object Model
As a developer, tester, or SQE, you should habitually implement the Page Object Model in your project.
Let’s look at how the Page Object Model can be implemented in a test case that demonstrates how to choose page elements using TestCafe Selectors.
Step 1: Create a new folder in your project and name it “TestCase” in the path “TestCafeSelectors/TestCase”.
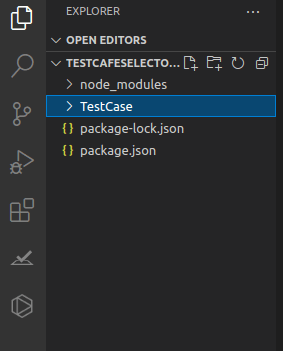
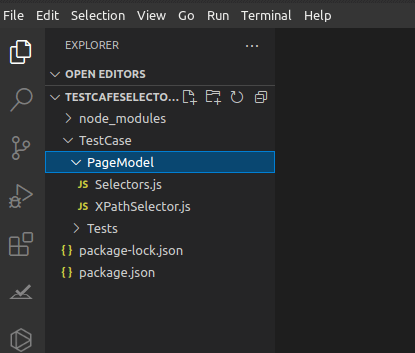
Step 2: In the “TestCafe” folder, create two other folders called “PageModel” and “Tests”.
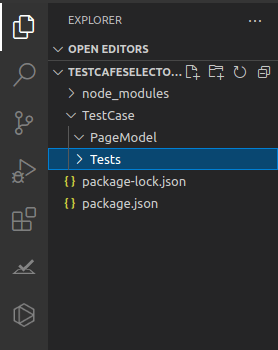
Step 3: In the “PageModel” folder, create a file called “selectors.js” in the path “TestCafeSelectors/TestCase/PageModel/selectors.js” as shown below.

The next step is to set up the Page Object Model to demonstrate how to use TestCafe Selectors to locate page elements. However, before I show you how to do that, let us assume you have an e-commerce website.
On this e-commerce website, customers have to register or create an account for them to be able to check out items they have added to the cart. Now, how can you ensure that customers can register successfully without any issues?
To ensure that the registration form works as expected, you can use TestCafe to run an automated test where TestCafe simulates the customer interaction with the inputs and buttons on the registration page.
To demonstrate how to use TestCafe Selectors to select page elements, I will be using the LambdaTest e-commerce playground. To set up the Page Object Model for this project, declare the “TestCafeSelectors” class in the “selectors.js” file and export its instance as shown below.
|
1 2 3 4 5 6 7 |
class TestCafeSelectors { constructor() { } } export default new TestCafeSelectors(); |
The next step is to import the Selector function on top of the “selectors.js” file. After that, let us add properties and assign a selector to them inside the constructor.
How to use TestCafe Selectors to select page elements?
Before performing any selector operation, you must find an XPath path to interact with the element. Some ways to get the element path are by ID, className, a unique attribute such as p, div, h1, or creating a custom XPath where you create relations between elements like child, parent, or sibling.
You can now see how TestCafe Selectors are closely related to CSS selectors. Let us now see some TestCafe element selector examples.
Selecting page elements by ID
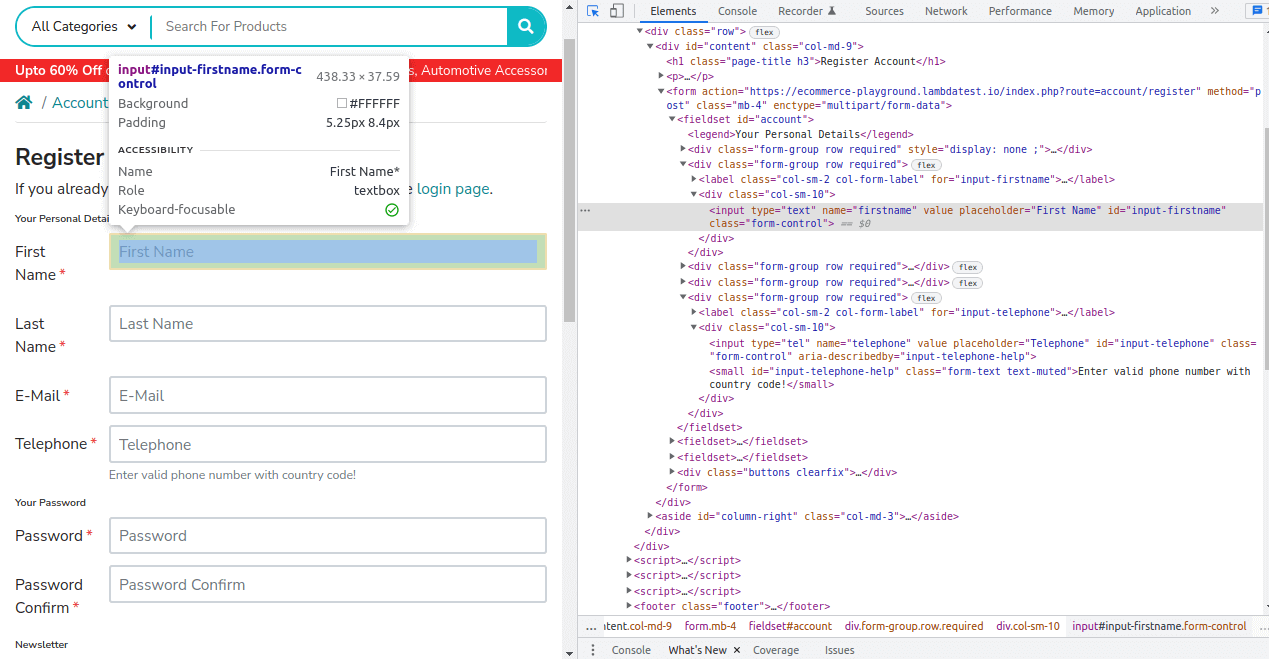
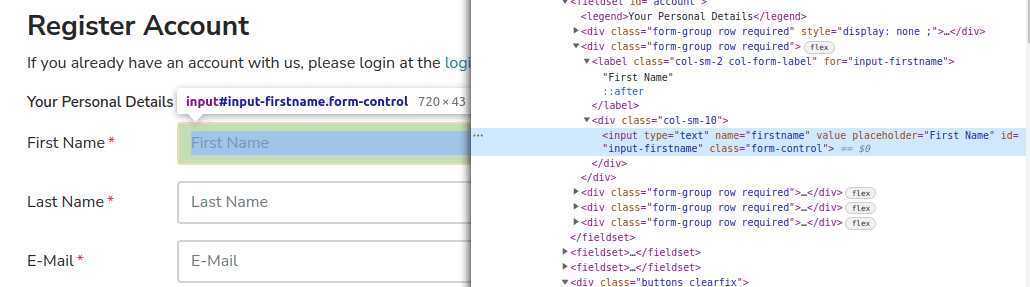
To learn how to select a page element by ID, navigate to the e-commerce website registration page I mentioned earlier. Inspect the web page and get the ID locator of “First Name” input which the user is expected to fill when registering for an account, as shown below.
The next step is to add the “First Name” ID locator to the Page Object Model. To do this, let us introduce the “firstnameInput” property and assign a selector to it.
To assign a selector to the “firstnameInput,” we must import it at the top of the “selectors.js” file from TestCafe. The “selectors.js” file should now look as shown below.
|
1 2 3 4 5 6 7 8 9 10 |
import { Selector, t } from 'testcafe'; class TestCafeSelectors { constructor() { this.firstnameInput = Selector('#input-firstname'); } } export default new TestCafeSelectors(); |
Let’s now create a test case that opens the browser, navigates to the e-commerce website registration page URL, and enters “John” into the “First Name” input field. Note that the test will use the existing directory structure we discussed earlier.
In our project’s “Tests” folder, create a file called “SelectorsTest.js,” as shown below.
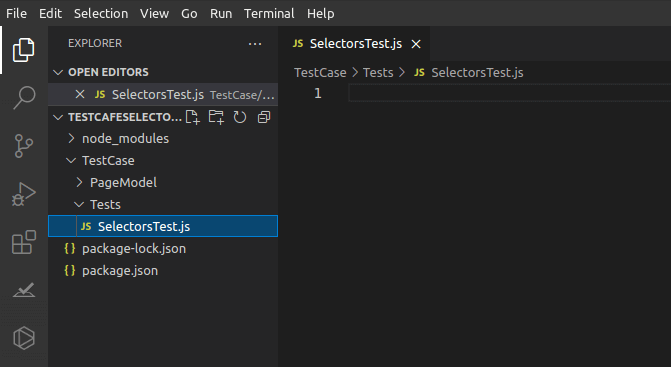
In the “SelectorsTest.js” file, at the top, import the page model instance named “TestCafeSelectors” from the “Selectors.js” file in the PageModel folder, as shown below.
|
1 |
import TestCafeSelectors from "../PageModel/Selectors"; |
After adding the page model module, let us create a variable called “pageURL” that will hold the e-commerce website URL, as shown below.
|
1 2 3 |
import TestCafeSelectors from "../PageModel/Selectors"; const pageURL = 'https://ecommerce-playground.lambdatest.io/index.php?route=account/register' |
Next, let us declare a fixture named “Registration Page” as shown below.
|
1 2 3 4 5 6 |
import TestCafeSelectors from "../PageModel/Selectors"; const pageURL = 'https://ecommerce-playground.lambdatest.io/index.php?route=account/register' fixture('Registration Page') .page(pageURL) |
Note that fixtures are used to divide the list of test cases into categories. They help to manage test cases with different test pages. For example, each fixture can represent tests on the Product Page, Check Out Page, or Home Page.
Let us now create a test named “FirstName,” as shown below.
|
1 2 3 4 5 6 7 8 9 10 |
import TestCafeSelectors from "../PageModel/Selectors"; const pageURL = 'https://ecommerce-playground.lambdatest.io/index.php?route=account/register' fixture('Registration Page') .page(pageURL) test("FirstName", async t => { }); |
The test case we declared above is an asynchronous function that contains test code with a test controller object(t). Note that all test actions are implemented as an async function of the test controller t, which is used to access the test run API.
When TestCafe executes a Selector query, it waits for the target element to appear in the DOM. To learn more about it, you can go through this blog on handling waits in Selenium.
To enable TestCafe to wait for the target element to load, let us add the “t.wait” function into our “FirstName” test as shown below:
|
1 2 3 4 5 6 7 8 9 10 11 |
import TestCafeSelectors from "../PageModel/Selectors"; const pageURL = 'https://ecommerce-playground.lambdatest.io/index.php?route=account/register' fixture('Registration Page') .page(pageURL) test("FirstName", async t => { await t }); |
Understanding t.wait Function In TestCafe
Wait commands are important for test automation frameworks such as TestCafe and Selenium. Including wait commands in your test code helps the testing framework to wait for a web page to load or an element to appear on the web page. If wait commands are not used, Element Not Found Exceptions might occur.
TestCafe has six types of wait commands or mechanisms. These commands or mechanisms are:
- Wait Method.
- Wait Mechanism for Actions.
- Wait Mechanism for Selectors.
- Wait Mechanism for Assertions.
- Wait Mechanism for XHR and Fetch Requests.
- Wait Mechanism for Redirect.
The t.wait Function is part of the second wait mechanism, which automatically waits for the element to become visible before an action is executed. Note that an element must be interactable before an operation can be performed on it.
TestCafe actions can interact with elements if they satisfy the following conditions:
- An element is within the
< body >element of a page window or an< iframe >window. - An element is visible.
- An element is not overlapped.
TestCafe automatically waits for the target element to become visible when running a test. It tries to evaluate the specified selector multiple times within the timeout. If the element does not appear, the test will fail.
With the “t.wait” function in place, let us now use a method TestController called “typeText.” The TestController takes two parameters; where the first parameter is a selector that identifies the page element in the DOM to receive input focus.
The second parameter is the text we intend to enter in the selected page element, which in our case is “John.” The .typeText syntax looks as shown below.
|
1 |
t.typeText(selector, text) |
Since we already declared the Selector in the page model and imported it to our test file, let us add “firstnameInput’, which is the name we gave the selector, as our first parameter in the “.typeText” TestController as shown below in the final code.
|
1 2 3 4 5 6 7 8 9 10 11 |
import TestCafeSelectors from "../PageModel/Selectors"; const pageURL = 'https://ecommerce-playground.lambdatest.io/index.php?route=account/register' fixture('Registration Page') .page(pageURL) test("FirstName", async t => { await t .typeText(TestCafeSelectors.firstnameInput, 'John') }); |
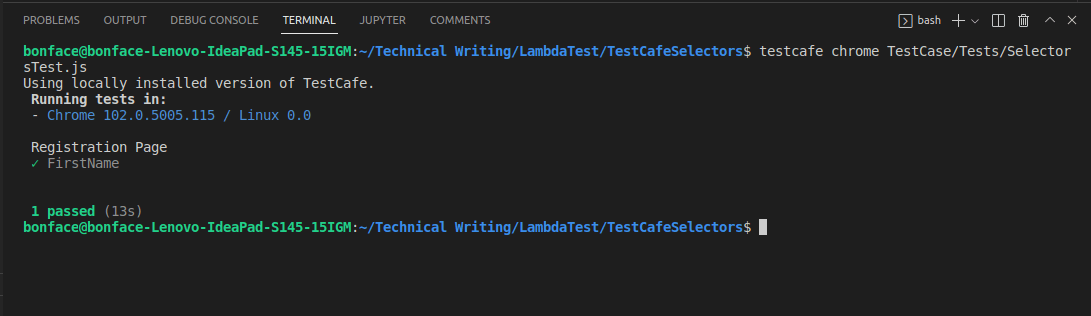
To make sure that TestCafe is able to select the “First Name” input element and type the name “John,” run the command below on your command line.
|
1 |
testcafe chrome TestCase/Tests/SelectorsTest.js |
Note that the command specifies the browser to use and the file that has the test we want to be performed on the Test Web Page.
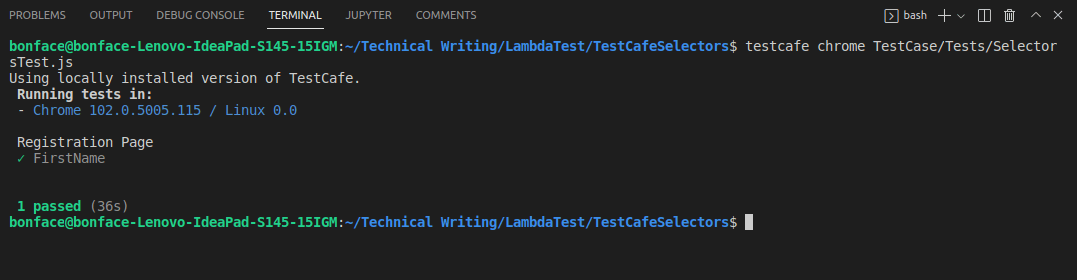
TestCafe will launch the Chrome browser, navigate the e-commerce website registration page URL and enter the name “John” into the “First Name” input field.
If there are no errors, you should be notified on the terminal that the test ran successfully, as shown below.
Selecting page elements by Class Name
In this section of this TestCafe tutorial, we will learn to select page elements by Class Name locator. Let us consider a page on which you want to interact with an element with no ID. What can be done in such cases? The first thing you need to do is to check whether the page element has a class name.
For example, when you inspect the e-commerce website registration page to get ID locators, you will find that the “Continue” submit button has no ID. To enable TestCafe to locate the button, you need to get the submit button class name, then add “input.” before the class instead of “#,” which represents ID locators.
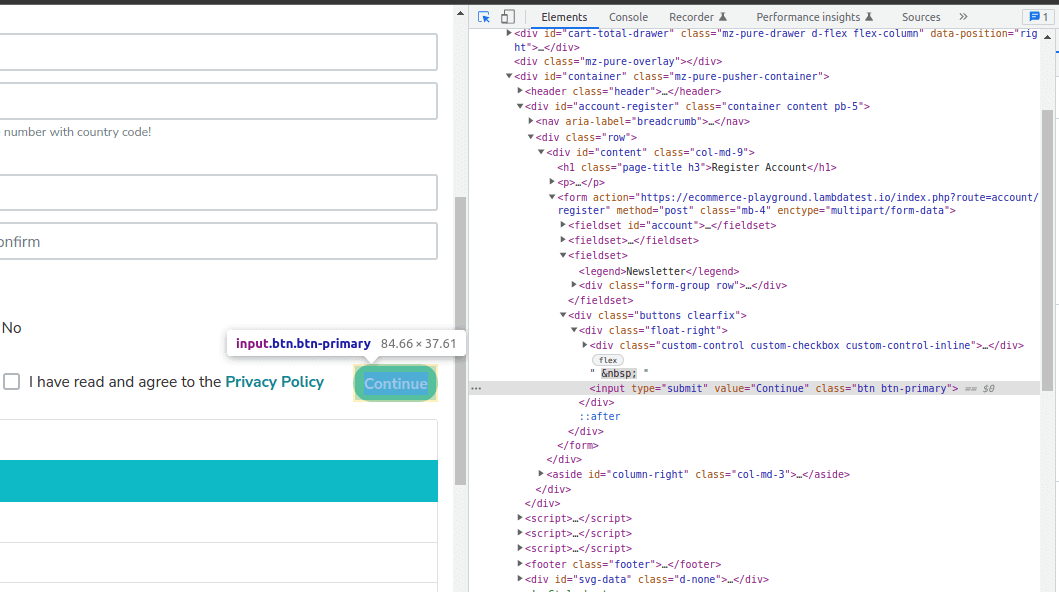
In the test case project, the first step is to add the “Continue” submit button class name locator to the Page Object Model.
To do that, let us introduce the “continueBtn” property and assign a selector to it, as shown below on the “selectors.js” file.
|
1 2 3 4 5 6 7 8 9 10 |
import { Selector, t } from 'testcafe'; class TestCafeSelectors { constructor() { this.continueBtn = Selector('input.btn-primary'); } } export default new TestCafeSelectors(); |
To test the submit button, let us use a method TestController called “.click,” which performs a click on the page element. The TestController takes one parameter, which is used to identify the page element. To learn more about it, you can refer to this blog on the Selenium click method button.
Once you have imported the page model to your test file, the “SelectorsTest.js” file should now look as shown below in the snippet:
|
1 2 3 4 5 6 7 8 9 10 11 |
import TestCafeSelectors from "../PageModel/Selectors"; const pageURL = 'https://ecommerce-playground.lambdatest.io/index.php?route=account/register' fixture('Registration Page') .page(pageURL) test("SubmitButton", async t => { await t .click(TestCafeSelectors.continueBtn) }); |
Run the command below, and TestCafe can select the submit button as it was able to select the “First Name” input when locating an element using ID.
|
1 |
testcafe chrome TestCase/Tests/SelectorsTest.js |
Selecting page elements by Attribute
When selecting a page element by attribute, you use a Selector.withAttribute method, which finds elements with the specified attribute or attribute value. The syntax of the method looks as shown below.
|
1 |
Selector().withAttribute(attrName [, attrValue]); |
Attribute name (attrName) is case-sensitive together with attribute value (attrValue), but attribute value is optional.
Understanding Attribute Name and Attribute Value
Attributes are used to give more meaning to HTML tags, where they define additional characteristics or properties of the page element. Attributes are always specified in the start or opening tag, where they usually consist of attribute name and value pairs such as name=”value.” Note that attribute values should always be enclosed in quotation marks.
In the example below, “for” inside the < label > tag is an attribute name, while “input-firstname” is the attribute value.
|
1 |
<label for="input-firstname"> </label> |
Let us assume that you want to test the “First Name” input element on the e-commerce website page I mentioned earlier, but it has no ID or Class Name locators.
What you can do is check whether the input has any attributes. In this case, the “First Name” input tag has attribute name “name” and attribute value “firstname,” as shown below.

To see if TestCafe can locate the “First Name” input element by attribute, the page model code in the “Selectors.js” file should look as shown below.
|
1 2 3 4 5 6 7 8 9 10 |
import { Selector, t } from 'testcafe'; class TestCafeSelectors { constructor() { this.firstnameInput = Selector('input').withAttribute("name", "firstname"); } } export default new TestCafeSelectors(); |
Import the Page Object Model to the “SelectorsTest.js” file and the code should look as shown below.
|
1 2 3 4 5 6 7 8 9 10 11 |
import TestCafeSelectors from "../PageModel/Selectors"; const pageURL = 'https://ecommerce-playground.lambdatest.io/index.php?route=account/register' fixture('Registration Page') .page(pageURL) test("FirstName", async t => { await t .typeText(TestCafeSelectors.firstnameInput, 'John') }); |
Run the command below and see if the test runs successfully.
|
1 |
testcafe chrome TestCase/Tests/SelectorsTest.js |
After hitting the enter button to run the command on the command line, you will run into the error below.
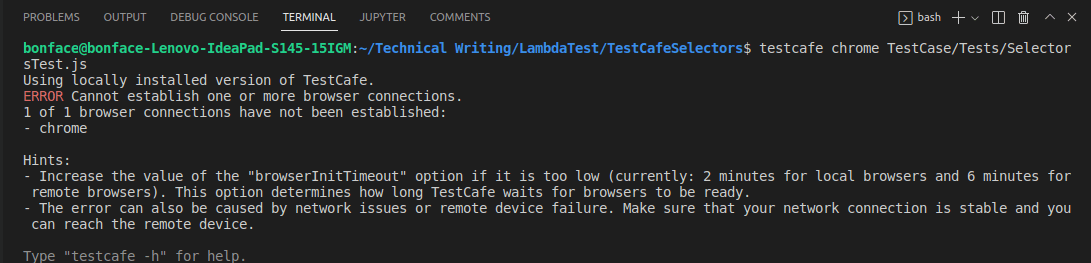
The issue is that TestCafe waits for the browser to be ready but times out before the browser is ready. The solution is to increase the value of the “browserInitTimeout” option, which will give enough wait time until the browser is ready.
To give TestCafe more wait time, add “.wait(5000)” to your code in the “SelectorsTest.js” file, as shown below.
|
1 2 3 4 5 6 7 8 9 10 11 12 |
import TestCafeSelectors from "../PageModel/Selectors"; const pageURL = 'https://ecommerce-playground.lambdatest.io/index.php?route=account/register' fixture('Registration Page') .page(pageURL) test("FirstName", async t => { await t .typeText(TestCafeSelectors.firstnameInput, 'John') .wait(5000) }); |
Run the test command and you should be notified on the terminal that the test ran successfully as shown below.
Selecting page elements by custom XPath
XPath is a technique used to navigate through the HTML structure of a page. It can be used to navigate both HTML and XML documents. XPath provides an option to search for an element within a web page dynamically. You can refer to this XPath cheat sheet to learn more about XPath locators.
To use Custom XPath in TestCafe to select a page element, you must create a custom function and import it into your test file. Let us implement Custom XPath in our project by creating a file named “XPathSelector.js” in the PageModel folder, as shown below.
In the “XPathSelector.js” file, import Selector from TestCafe at the top and create a custom function named “getElementsByXPath.” Then export the function at the bottom. Your code in the “XPathSelector.js” should look as shown below.
|
1 2 3 4 5 6 7 8 9 10 11 12 13 14 15 16 17 18 19 |
import { Selector } from 'testcafe'; const getElementsByXPath = Selector(xpath => { const iterator = document.evaluate(xpath, document, null, XPathResult.UNORDERED_NODE_ITERATOR_TYPE, null); const items = []; let item = iterator.iterateNext(); while (item) { items.push(item); item = iterator.iterateNext(); } return items; }); export default function (xpath) { return Selector(getElementsByXPath(xpath)); } |
The next step is to import XPathSelector from “XPathSelector.js” at the top of the “Selectors.js” file in the PageModel folder to use the “getElementsByXPath” function.
Let us now use the XPathSelector in the Page Object Model, which targets elements with the custom path “//*[@id=’input-firstname]” as shown below.
Your code in the “Selectors.js” file should look as shown below.
|
1 2 3 4 5 6 7 8 9 10 11 |
import { Selector, t } from 'testcafe'; import XPathSelector from './XPathSelector'; class TestCafeSelectors { constructor() { this.firstnameInput = XPathSelector("//*[@id='input-firstname']"); } } export default new TestCafeSelectors(); |
Let us now create a test case that uses the Page Object Model in “SelectorsTest.js” file in the Tests folder. In the test, TestCafe opens a browser instance, navigates to the e-commerce website registration page URL, and enters “John” into the “First Name” input selected by custom XPath “//*[@id=’input-firstname]”.
Your code in the “SelectorsTest.js” file should now look as shown below.
|
1 2 3 4 5 6 7 8 9 10 11 12 |
import TestCafeSelectors from "../PageModel/Selectors"; const pageURL = 'https://ecommerce-playground.lambdatest.io/index.php?route=account/register' fixture('Registration Page') .page(pageURL) test("FirstName", async t => { await t .typeText(TestCafeSelectors.firstnameInput, 'John') .wait(5000) }); |
Run the command below to see if TestCafe is able to locate the “First Name” input element and enter “John”.
|
1 |
testcafe chrome TestCase/Tests/SelectorsTest.js |
If there are no errors, you should be notified on the terminal that the test ran successfully, as shown below.

Selecting page elements by relations
Apart from selecting a page element using TestCafe with the methods mentioned above, TestCafe provides other methods to select a page element by relations between elements. Relations between elements include:
- Parent
- Child
- Sibling
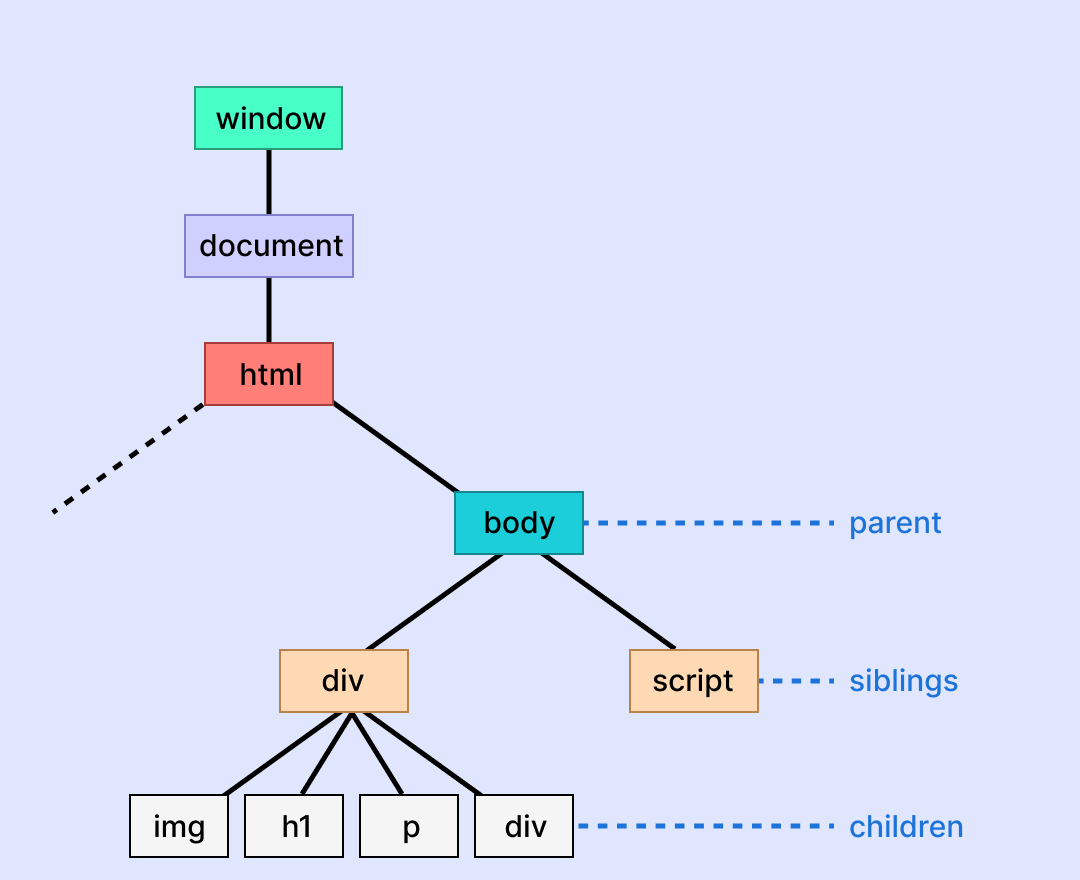
Every web page comprises an HTML document referred to as a document tree. Elements in the document tree can be described as a family tree where there are parents, children, and siblings.
A parent is an element directly above and connected to an element in the document tree. A child is directly below and connected to an element in the document tree. A sibling is an element that shares the same parent with another element.
Selector.parent Method
The Selector.parent Method has three types of syntax which are parent(), parent(index) and parent(cssSelector).
The first method syntax looks as shown below, and it returns an array of parent elements, starting with the closest relatives.
|
1 |
Selector().parent() |
Here is how you can use the method in an example that selects all ancestors of all div elements.
|
1 2 3 4 5 6 7 8 9 10 |
import { Selector, t } from 'testcafe'; class TestCafeSelectors { constructor() { this.inputClosestParents = Selector('input').parent(0); } } export default new TestCafeSelectors(); |
Here is how you can use the method in an example that selects all furthest ancestors of all inputs.
|
1 2 3 4 5 6 7 8 9 10 |
import { Selector, t } from 'testcafe'; class TestCafeSelectors { constructor() { this.inputFurthestParents = Selector('input').parent(-1); } } export default new TestCafeSelectors(); |
The third method syntax looks as shown below and it looks for parent elements that match the CSS Selector parameter.
|
1 |
Selector().parent(cssSelector) |
Here is how you can use the method in an example that selects all divs that are ancestors of a form element.
|
1 2 3 4 5 6 7 8 9 10 |
import { Selector, t } from 'testcafe'; class TestCafeSelectors { constructor() { this.formDivParents = Selector('form').parent(‘div’); } } export default new TestCafeSelectors(); |
Selector.child Method
The Selector.child Method has three types of syntax which are child(), child(n), and child(cssSelector). The first method syntax looks as shown below, and it returns an array of child elements, starting with direct descendants.
|
1 |
Selector().child() |
The method can be used in an example that selects all children of a form element, as shown below.
|
1 2 3 4 5 6 7 8 9 10 |
import { Selector, t } from 'testcafe'; class TestCafeSelectors { constructor() { this.formChildren = Selector('form').child(); } } export default new TestCafeSelectors(); |
The second method syntax looks as shown below, and it returns an array of n-th closest descendant elements.
|
1 |
Selector().child(n) |
If n is negative, the method returns an array of n-th most distant descendant elements.
The method can be used in an example that selects all the closest children of all div elements, as shown below.
|
1 2 3 4 5 6 7 8 9 10 |
import { Selector, t } from 'testcafe'; class TestCafeSelectors { constructor() { this.divClosestChildren = Selector('div').child(0); } } export default new TestCafeSelectors(); |
The method can also be used in an example that selects all furthest children of all div elements as shown below.
|
1 2 3 4 5 6 7 8 9 10 |
import { Selector, t } from 'testcafe'; class TestCafeSelectors { constructor() { this.divFurthestChildren = Selector('div').child(-1); } } export default new TestCafeSelectors(); |
The third method syntax looks as shown below and it looks for element descendants that match the CSS Selector argument.
|
1 |
Selector().child(cssSelector) |
The method can be used in an example that selects all input elements that are children of a form element, as shown below.
|
1 2 3 4 5 6 7 8 9 10 |
import { Selector, t } from 'testcafe'; class TestCafeSelectors { constructor() { this.formInputChildren = Selector('form').child(‘input’); } } export default new TestCafeSelectors(); |
Selector.sibling Method
The Selector.child Method has three types of syntax which are sibling(), sibling(n), and sibling(cssSelector). The first method syntax looks as shown below, and it returns an array of sibling elements, starting with the closest relatives.
|
1 |
Selector().sibling() |
The method can be used in an example that selects all siblings of all input elements, as shown below.
|
1 2 3 4 5 6 7 8 9 10 |
import { Selector, t } from 'testcafe'; class TestCafeSelectors { constructor() { this.inputSiblings = Selector('input').sibling(); } } export default new TestCafeSelectors(); |
The second method syntax looks as shown below and it returns an array of n-th closest sibling nodes.
|
1 |
Selector().sibling(n) |
If n is negative, the method returns an array of n-th most distant descendant sibling nodes.
The method can be used in an example that selects all div elements’ siblings that go first in their parent’s child list as shown below.
|
1 2 3 4 5 6 7 8 9 10 |
import { Selector, t } from 'testcafe'; class TestCafeSelectors { constructor() { this.divClosestSiblings = Selector('div').sibling(0); } } export default new TestCafeSelectors(); |
The method can also be used in an example that selects all form elements siblings that go last in their parent’s child lists, as shown below.
|
1 2 3 4 5 6 7 8 9 10 |
import { Selector, t } from 'testcafe'; class TestCafeSelectors { constructor() { this.inputFurthestSiblings = Selector('input').sibling(-1); } } export default new TestCafeSelectors(); |
The third method syntax looks as shown below and it looks for element siblings that match the CSS Selector argument.
|
1 |
Selector().child(cssSelector) |
The method can be used in an example that selects all input elements that are succeeding siblings of a form element, as shown below.
|
1 2 3 4 5 6 7 8 9 10 |
import { Selector, t } from 'testcafe'; class TestCafeSelectors { constructor() { this.formInputSibling = Selector('form').sibling(‘input’); } } export default new TestCafeSelectors(); |
Accessing Shadow DOM
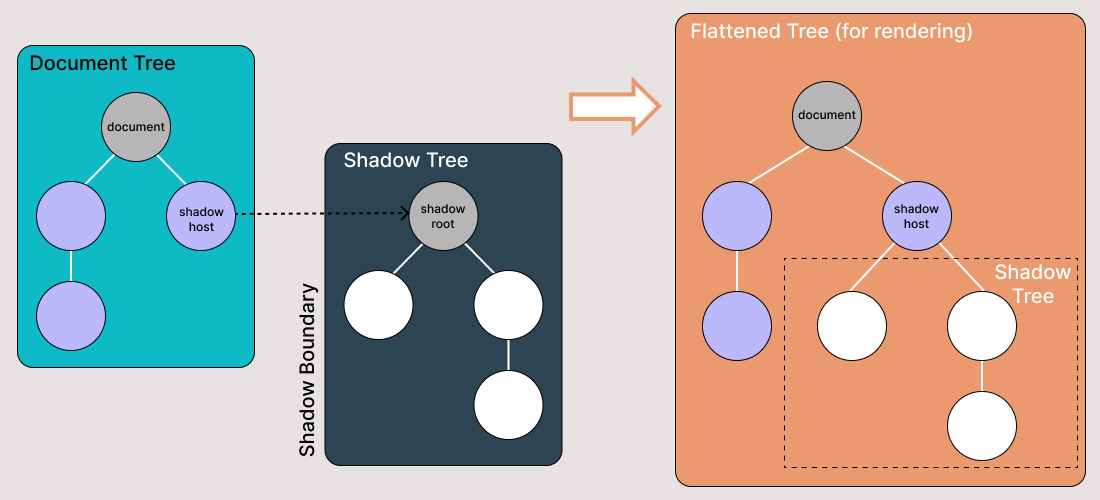
Shadow DOM is a DOM tree with elements and styles isolated from the DOM. Shadow DOM differs from the regular DOM in that the main CSS does not affect the styling.
The Shadow DOM is completely encapsulated, keeping the markup structure, style, and behavior hidden and separate from other codes. The encapsulation is so that different parts do not clash, and the code can be kept nice and clean.
Some examples of shadow DOM are:
- Embedded forms.
- Embedded tweets.
- Embedded YouTube videos.
- Chat pop-ups.
When testing, you cannot access shadow DOM elements directly. To interact with the shadow DOM in TestCafe, identify the root node of a shadow tree, and use other selector methods to traverse it. You can identify the root node of a shadow tree using Selector.shadowRoot Method.
Selector.shadowRoot Method
This method returns the shadow root node chain to other methods to traverse the shadow DOM. The method returns null if the shadow DOM is not open and its syntax looks as shown below.
|
1 |
selector.shadowRoot() |
The example below shows how to identify the root node, access the shadow tree, and return the < p > element from the shadow DOM.
|
1 2 3 4 5 6 7 8 9 10 11 12 13 14 15 16 17 18 |
import { Selector } from 'testcafe'; fixture`ShadowDOM` .page`https://devexpress.github.io/testcafe/example/`; test('ShadowDOM Test', async t => { const shadowRoot = Selector('div').withAttribute('id', 'shadow-host').shadowRoot(); const paragraph = shadowRoot.child('p'); await t.expect(paragraph.textContent).eql('This paragraph is in the shadow tree'); try { await t.click(shadowRoot); } catch (error) { await t.expect(error.code).eql('E27'); } }); |
Let’s have a walkthrough of the code above.
Step 1: The selector function is imported from TestCafe to be used in the test code.
Step 2: A fixture called “ShadowDOM” is declared, where it represents a group of tests targeted by one URL.
Step 3: The Test.page method is used to specify the URL of the web page being tested.
Step 4: A test case called “ShadowDOM Test” is declared, where it is an asynchronous function that contains test code with a test controller object (t).
Step 5: A variable called “shadowRoot” is declared where its value is a “selector.shadowRoot method” that selects a “div” with attribute name “id” and attribute value “shadow-host.”
Step 6: A variable called “paragraph” is declared where it calls “shadowRoot” declared in step 5. The variable creates a method called “shadowRoot.child()” that returns an element child “p.”
Step 7: “t.expect.eql method” is used where the method asserts that the actual value is equal to the expected value. “paragraph.textContent” is the actual value while “This paragraph is in the shadow tree” is the expected value.
Step 8: Try statement is used to define a block code to be tested for errors while it is being executed. Also, a catch statement defines a block of code to be executed if an error occurs in the try block.
Note: In this case, the try statement will cause an error if the shadow root is targeted directly or used in assertions.
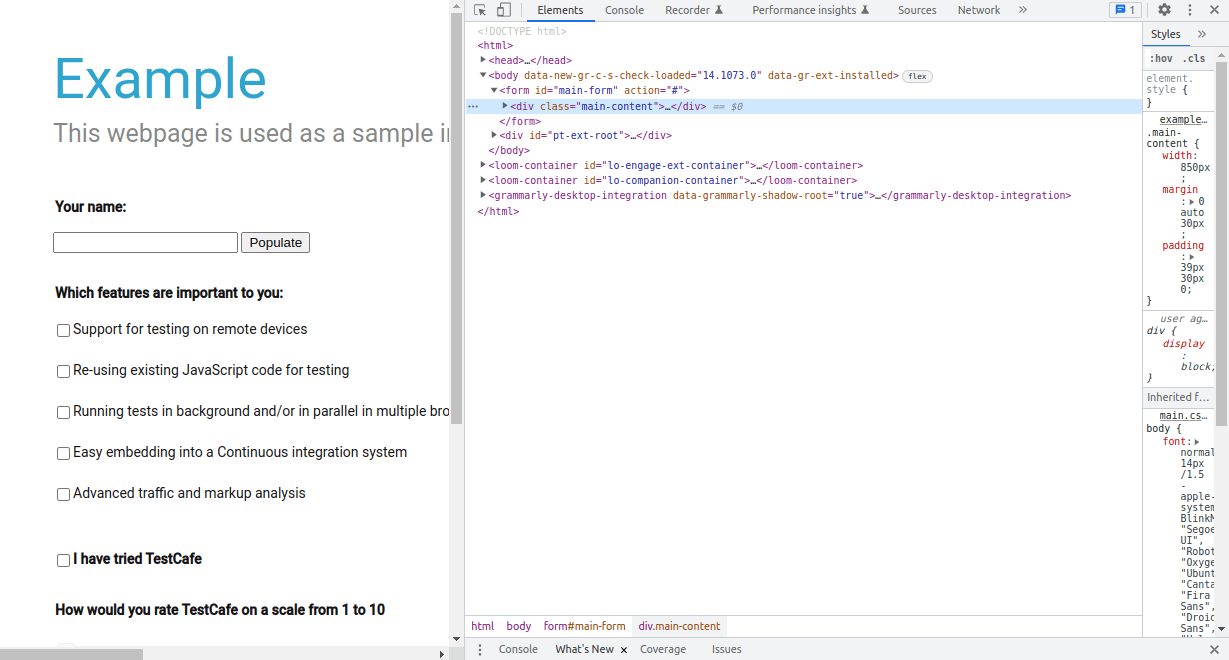
How to find Shadow DOM?
To identify shadow DOM in a web page:
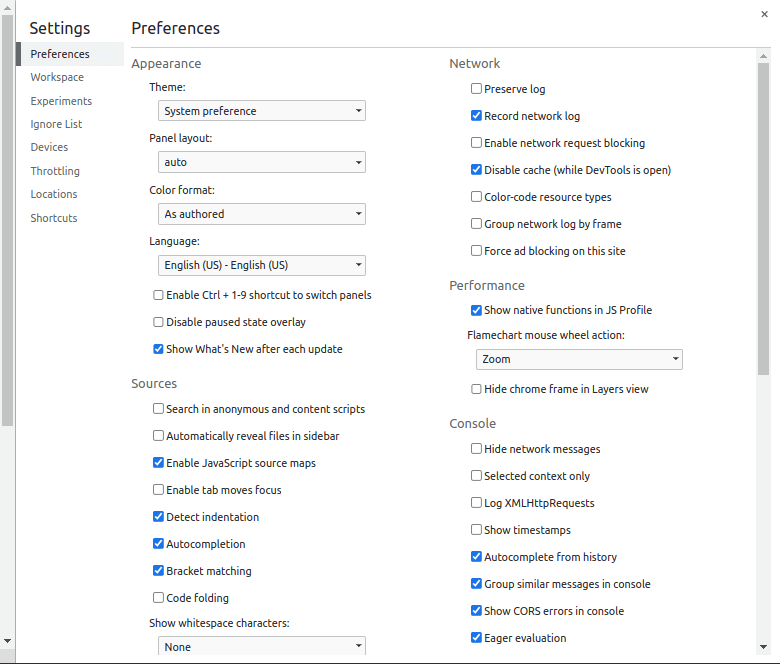
- Navigate to the web page and open the devtools as shown below.
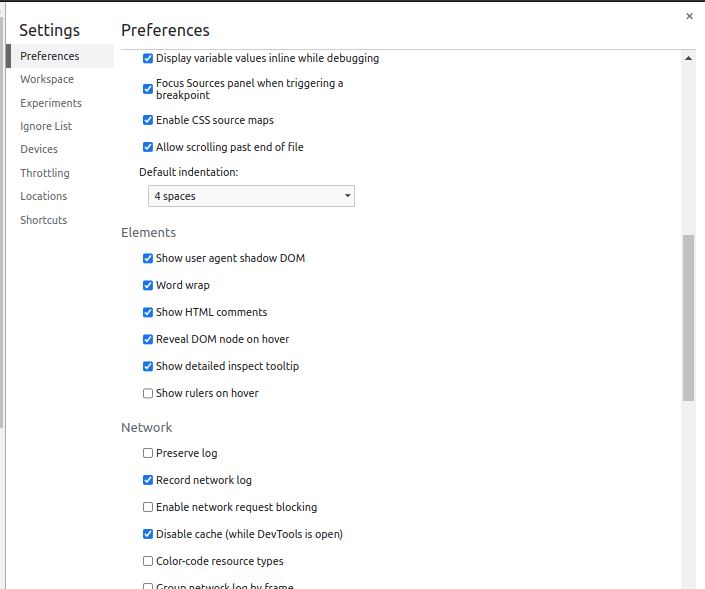
- Click the settings gear in the top-right corner of the devtools window to open settings as shown below.
- Under the “Elements,” enable the “show user agent shadow DOM” checkbox as shown below.
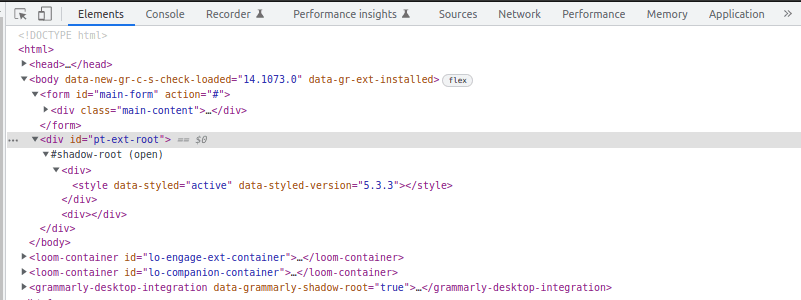
- Go back to devtools, and you should be able to identify shadow DOM, as shown below.
Watch this video to learn what Shadow DOM is and how to automate it using Selenium WebDriver.
Limitations of TestCafe Selectors
There are three types of TestCafe Selectors. These TestCafe Selectors are:
- Keyword-Based TestCafe Selectors
- Function-Based TestCafe Selectors
- Selector-Based TestCafe Selectors
Keyword-Based TestCafe Selectors filter the page in search of elements that match a CSS selector. Function-Based TestCafe Selectors execute a client-side function that traverses the DOM. Selector-Based TestCafe Selectors execute or filter the results of another Selector query.
These TestCafe Selectors have limitations. These limitations are:
- Selector queries cannot access user variables outside their scope.
- Keyword-Based TestCafe Selectors and Selector-Based TestCafe Selectors do not accept custom arguments.
- Function-Based TestCafe Selectors cannot contain generators or async/await keywords.
Running tests using TestCafe on cloud Selenium Grid
As developers, when we create a web app and push it to production, users can access it using different browsers, browser versions, and operating systems. Your task as a developer or tester is to ensure that the web app performs as expected on all these browsers, browser versions, and operating systems.
To test the web app on all these browsers and operating systems, you need an in-house test infrastructure. Unfortunately, running and maintaining an in-house test infrastructure can be quite expensive. Using TestCafe and cloud Selenium Grid can be beneficial because it eliminates the need to invest in the maintenance of the in-house test infrastructure.
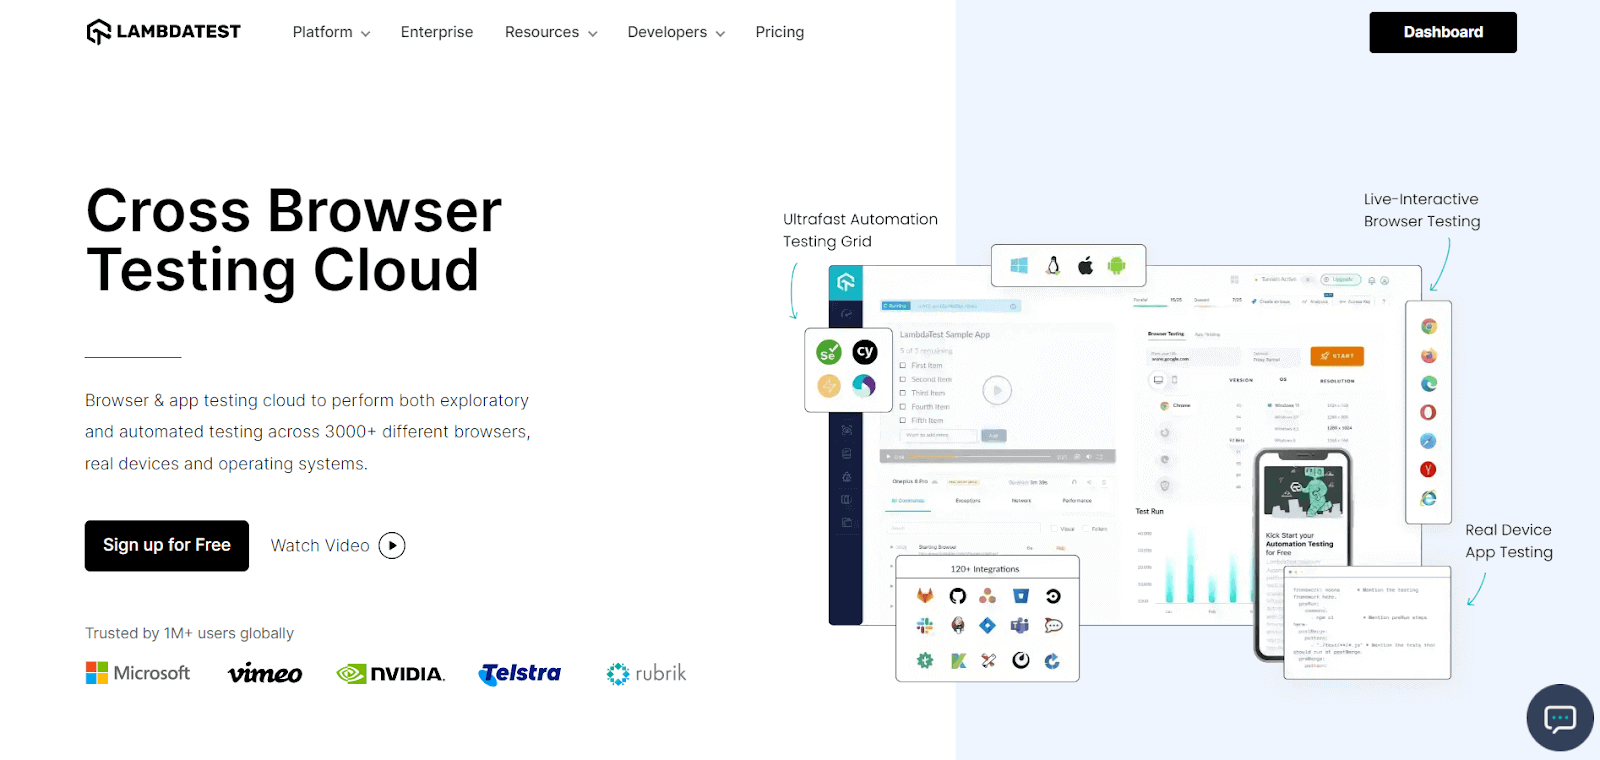
Cloud Selenium Grid provides you with an option to run tests on a range of virtual browsers, browser versions, and operating systems securely over the cloud. LambdaTest is one of the top cross browser testing platforms offering cloud Selenium testing, a secure, scalable, and reliable cloud-based Selenium Grid Infrastructure that lets you run tests at scale on an online browser farm of 3000+ browsers and operating systems.
You can follow the LambdaTest YouTube Channel for more such videos around Selenium testing, CI/CD, Cypress UI testing, and more.
To use LambdaTest Selenium Grid together with TestCafe to run your tests, you will need a LambdaTest account.
- Navigate to the LambdaTest website and log in if you already have an account, or create one if you don’t have an account yet.
- Once you are logged in, navigate to the automation page by clicking Automation on the left sidebar of your screen and selecting “Builds”
- To use TestCafe with LambdaTest Grid, you need LambdaTest credentials (i.e., username and access key). To get the credentials, click the “Access Key” button on the right side of your screen.
- Let us now save the credentials (username and access key) to environment variables LT_USERNAME and LT_ACCESS_KEY in our project.
- To save username to environment variable LT_USERNAME and access key to LT_ACCESS_KEY on Linux/Mac, run the following commands.
- For Windows, run the following commands.
- To add these credentials to an environment variable in your project, run the following command on the Visual Studio command line.
- Then add your credentials as shown below.
- Make sure you save the file by pressing CTRL + X and enter.
- LambdaTest has an npm plugin that allows you to integrate TestCafe with LambdaTest for seamless cross browser compatibility and true test coverage. You can install the plugin by running the following command:
- Run the below-mentioned command to look at the browsers supported by the LambdaTest Selenium Grid:
- Let us save our TestCafe credentials in our project so that our authentication on LambdaTest Selenium Grid goes through. You can save the credentials by running the commands below.


|
1 2 |
$ export LT_USERNAME= insert your username $ export LT_ACCESS_KEY= insert your access_key |
|
1 2 |
$ set LT_USERNAME= insert your username $ set LT_ACCESS_KEY= insert your access_key |
|
1 |
nano .bashrc |
|
1 2 |
$ export LT_USERNAME= insert your username $ export LT_ACCESS_KEY= insert your access_key |
|
1 |
npm install testcafe-browser-provider-lambdatest |
|
1 |
testcafe -b lambdatest |
|
1 2 |
$ set LT_USERNAME=*insert your username* $ set LT_ACCESS_KEY=*insert your accesskey* |
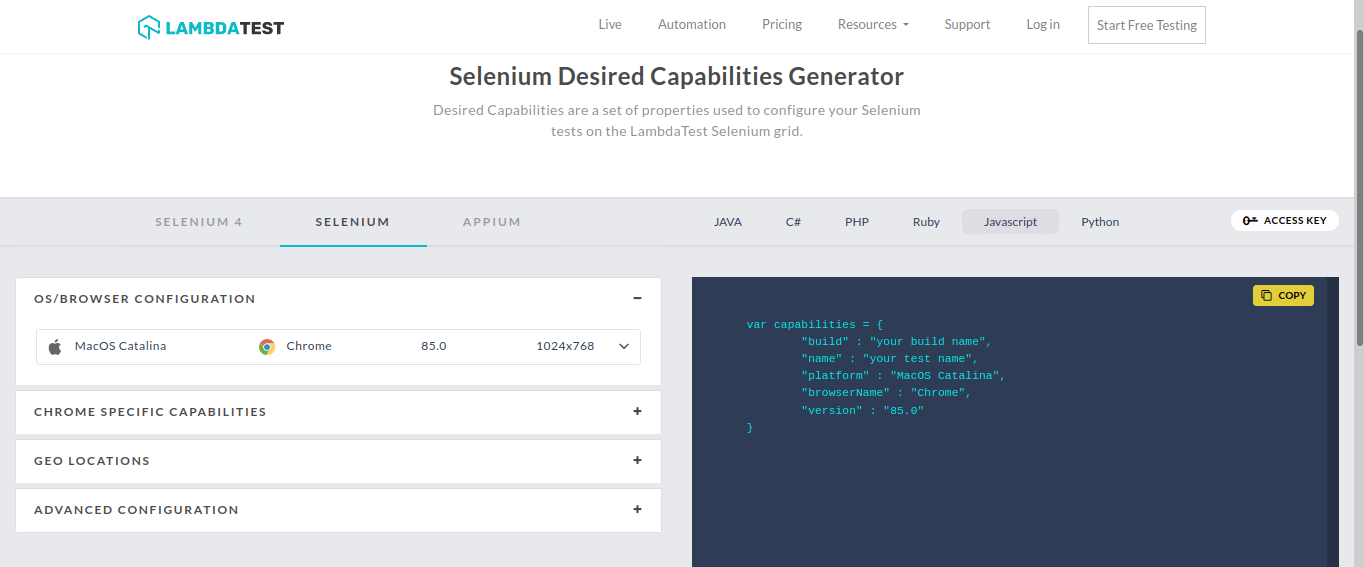
Let’s assume you want to test the “First Name” input element of the e-commerce website registration page we mentioned earlier on a Chrome browser version 85.0 + macOS combination.
- To define your desired set of browser and operating system combinations, you can use LambdaTest Capabilities Generator as shown below:
- After setting your desired combinations, create a file called config.json and add your combinations as shown below without changing the code.
- Navigate to the e-commerce website registration page. Inspect the web page and get the ID locator of “First Name” input which the user is expected to fill when registering for an account, as shown below.
- The next step is to add the “First Name” ID locator to the Page Object Model. as shown below.
- Since we already declared the Selector in the page model and imported it to our test file, let us add “firstnameInput’, which is the name we gave the selector, as our first parameter in the “.typeText” TestController as shown below in the final code.
- To run a test on (Chrome 85.0 + MacOS Catalina) combination, run the command below.
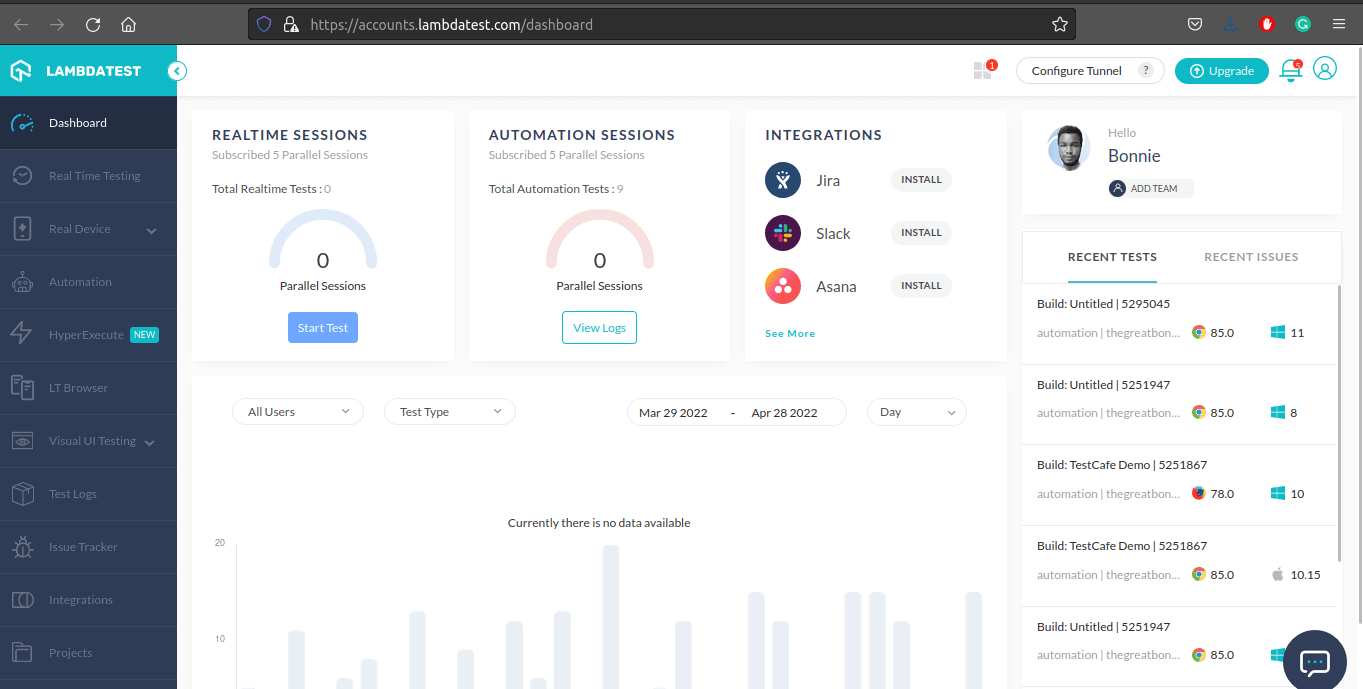
- If you visit your LambdaTest Dashboard on the right side of your screen, you should be able to see your recent tests, as shown below.
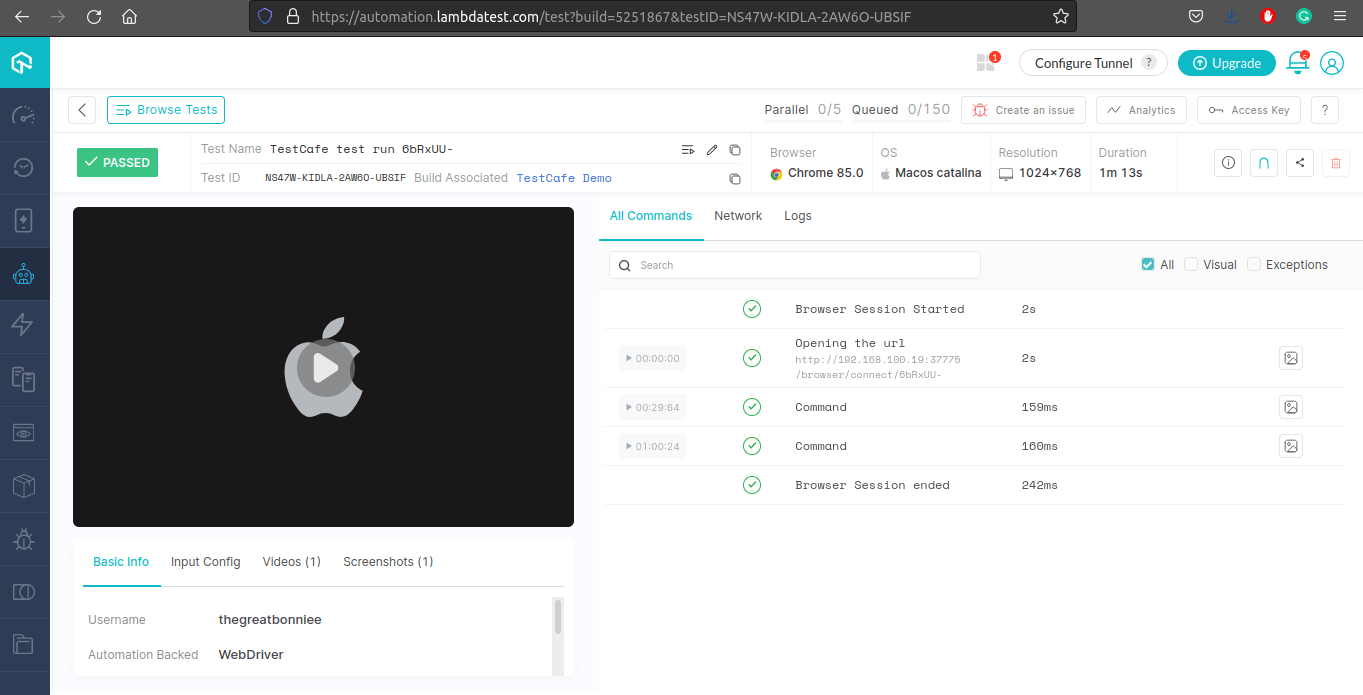
- If you click on one of the tests, you will be redirected to the Automation Dashboard, where all the information about the test is available. This information includes a video and a screenshot that shows you how the test went.

|
1 |
testcafe "lambdatest:Chrome@85.0:MacOS Catalina" TestCase/Tests/SelectByIDTest.js |
If you are a developer or a tester, this certification will acknowledge your expertise in using JavaScript to create automated browser tests. The Selenium JavaScript 101 certification is a globally-recognized certification that proves your expertise and skill in using Selenium with JavaScript.
Conclusion
With this, we have reached the end of this TestCafe tutorial on TestCafe Selectors. As you have seen from the examples used in this TestCafe tutorial, TestCafe Selectors are similar to CSS Selectors in both purpose and syntax. We have learned about TestCafe Selectors and how to use them to select page elements.
We further deep-dived into accessing Shadow DOM and showcased how to perform TestCafe testing on a cloud Selenium grid like LambdaTest.
Happy Testing!
Frequently Asked Questions (FAQs)
What is selector in TestCafe?
TestCafe provides a way to select DOM elements for interaction with the help of a so-called “selector”. A selector in TestCafe is a string representing an HTML tag or one of its attributes combined with CSS selector syntax.
Can we use XPath in TestCafe?
XPath is a powerful tool for locating specific nodes in an XML document. It’s used by many front-end technologies, including TestCafe.


Author’s Profile
Bonnie
I am a Web Developer, Technical Writer, and Content Creator. I help developers become better Technical Writers and Make Money Online.
Blogs: 4
Got Questions? Drop them on LambdaTest Community. Visit now


