
Fluent Interface Design Pattern in Automation Testing
Faisal Khatri
Posted On: October 27, 2022
![]() 285355 Views
285355 Views
![]() 26 Min Read
26 Min Read
Recently, I was going through some of the design patterns in Java by reading the book Head First Design Patterns by Eric Freeman, Elisabeth Robson, Bert Bates, and Kathy Sierra.
It is an awesome book with lots of knowledge about multiple design patterns in Java.
As I searched for examples to practice the design patterns I had recently read about in the book, I came across a pattern called Fluent Interface. I found it quite impressive and thought of creating an example code to write web automation tests using the fluent interface design pattern with Selenium WebDriver.
Here is an example of the code from one of the tests to show you how easy it is to read and understand:
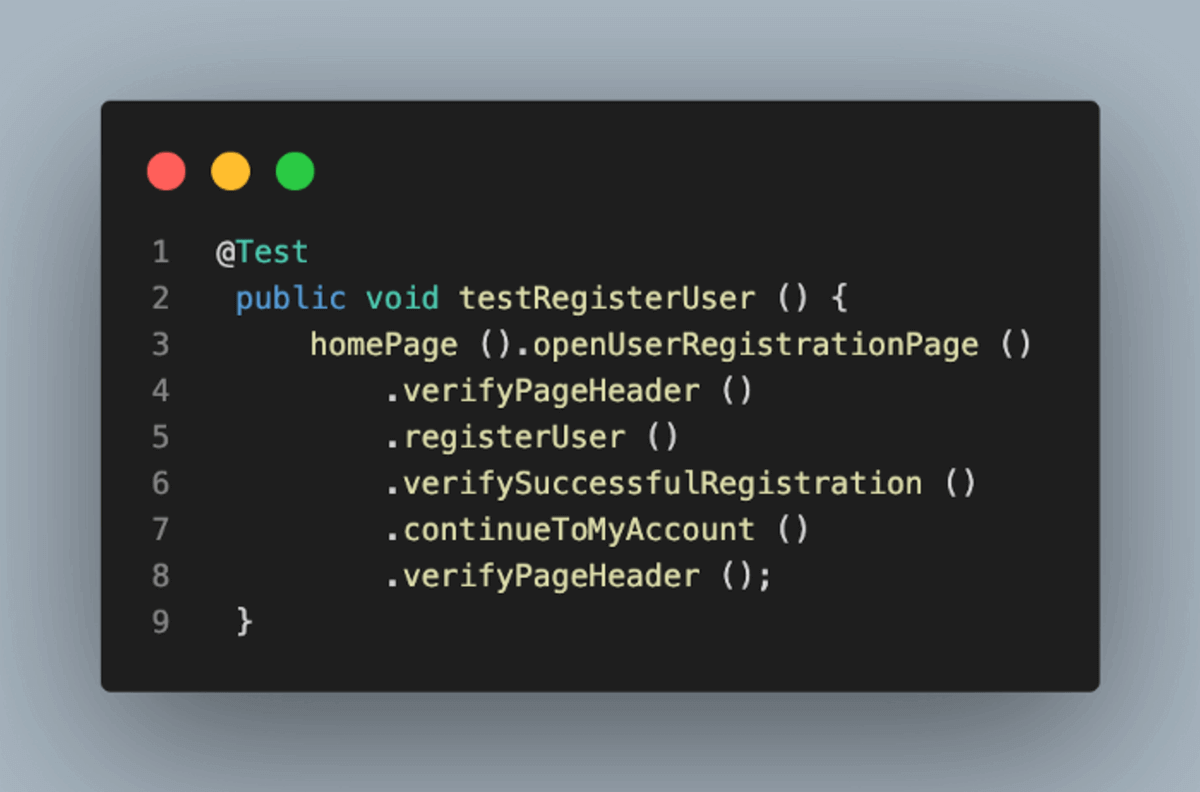
I guess you might have a fair idea of what this test does. It will navigate to the Website’s Homepage, open the Registration Page and verify its header.
Next, it will register the user, verify whether registration is successful, and then continue to the My Account Page.
The steps for continuing to the My Account Page and checking its header had to be included, as that marks the completion of the Registration process.
The point to note here is that no test data has been passed in the tests nor the method signature making it look clean and crisp!
Test data is passed internally while registering the user within the registerUser() method. Details and explanations will follow in this tutorial on Fluent Interface Design Patterns, Keep reading!
You see how simple and cool it is to write tests in a Fluent Way!
TABLE OF CONTENTS
- What is a Fluent Interface Design Pattern?
- Getting Started with Fluent Interface Design Pattern
- How to write Selenium automation tests using the Fluent Interface Design Pattern?
- End-to-End Testing with Fluent Interface Design Pattern
- What is a Builder Pattern?
- Running the Tests
- Frequently Asked Questions (FAQs)
What is a Fluent Interface Design Pattern?
A fluent interface provides an easy-readable, flowing interface that often mimics a domain-specific language. Using this pattern results in code that can be read nearly as human language.
A fluent interface can be implemented using any of:
- Method chaining – calling a method returns some object on which further methods can be called.
- Static factory methods and imports.
- Named parameters – can be simulated in Java using static factory methods.
A fluent interface design pattern helps us write an easy-readable code that can be understood without putting effort into technically understanding the code.
The other benefit is that it helps in mimicking the domain-specific language, which means we can read the code in business language and understand what it does.
For example, check out the below code snippet, which is written using the fluent interface design pattern. This is how the fluent interface design pattern mimics domain-specific language.
|
1 2 3 4 5 6 |
homePage ().openUserRegistrationPage () .verifyPageHeader () .registerUser () .verifySuccessfulRegistration () .continueToMyAccount () .verifyPageHeader (); |
By reading the code we get a better understanding in business terms that this piece of code will perform user registration and check if it is successful.
Getting Started with Fluent Interface Design Pattern
Let’s get into a deeper discussion and overview about how you can easily write tests in a fluent design interface pattern.
Before I begin writing about how I wrote the tests and discuss the code, let me tell you about the tools and the website under test.
Tools Used
Following tools have been used in writing and running the tests:
- Programming Language: Java
- Web Automation Tool: Selenium WebDriver (latest version)
- WebDriverManager is used for managing the drivers.
- Test Runner: TestNG
- Build Tool: Maven
Application Under Test
LambdaTest E-Commerce Playground Website is used for writing the end-to-end tests in this blog on fluent interface design pattern. This website is used as it has a full end-to-end demo business flow from registering a user to adding and checking out the product and confirming the order.
There are multiple screens having various fields like textboxes, checkboxes, radio buttons, dropdown fields, etc., which can be used to demo good examples of writing automated tests using Selenium WebDriver.
It also gives newbies in automation testing a fair idea of performing end to end testing and practicing writing automated tests using Selenium WebDriver. As this is a demo website, anyone can try their hands on this website and learn automation testing.Also, with the help of LambdaTest, you can test your website for 3000+ different browsers and versions.
Let’s move towards creating a test strategy that we would use to perform end-to-end testing on this website.
Test strategy for automating end-to-end flow
Following is a test automation strategy derived from testing the end-to-end flow of the website:
- The User will navigate to the website.
- From the Home Page of the screen, the user will navigate to the Registration Page and register himself. Verification will be done by asserting the registration successful message.
- User will click on the Shop by Category option on the top left and select a category for selecting the product to purchase.
- From the Product Page, the user will hover over any product he likes and select the Add to cart option. Once a product is added to the cart, assertions will be performed to check the success message displayed.
- On the Checkout page, the user will provide the billing address details, and an assertion will be made for the product name and its respective price.
- Once a product is checked out, the user lands on the Order Confirmation page, where the product name, price, and shipping address will be asserted, and after that Order will be marked as confirmed.
- Finally, an Order confirmation message would be verified in the tests, which marks the end of the test journey.
GitHub Repository
All of the code showcased above is located in this GitHub Repository. Please check out the following packages in the mentioned GitHub repository for tests, page objects, and test data for the code described in this blog on the fluent interface design pattern:
Test: Checkout src\test\tests\lambdatestecommerce\ EndToEndWebsiteTests.java
Page Objects: Checkout src\test\pages\lambdatestecommerce package inside the project.
Test Data: Checkout src\test\data\ package inside the project.
How to write Selenium automation tests using the Fluent Interface Design Pattern?
As discussed in the Tech Stack section of this blog on the fluent interface design patterns, Maven is used to create this project. TestNG is used as a test runner. Once the project is created, we need to add the following dependencies for Selenium WebDriver, TestNG, WebDriverManager, JavaFaker, and Lombok in the pom.xml file.

Versions of the dependencies are set in a separate properties block. This is done for maintainability, so if we need to update the versions, we can do it easily without searching the dependency throughout the pom.xml file.
Details about the dependencies:
- Selenium WebDriver: Core Selenium dependency for web automation.
- TestNG: This dependency helps to run the tests.
- WebDriverManager: This dependency carries out the driver management, so you don’t have to download the drivers to run the tests in browsers manually.
- JavaFaker: This dependency helps in generating fake test data on run time.
- Lombok: This dependency helps in automatically generating Getters, Setters, and using the Builder pattern, so you can get rid of writing lengthy java classes and boilerplate code.
Run your Selenium scripts across 3000+ browser environments. Try LambdaTest Now!
End-to-End Testing with Fluent Interface Design Pattern
Before we begin and start with the steps used for writing the end-to-end tests in a Fluent way, some basic things need attention so it helps you to understand better. A combination of the following things are used in this project. I hope you have a basic understanding as a prerequisite:
- Page Object Model is used for maintaining Page Objects, and the fluent interface design pattern is used for writing tests.
- Builder Pattern is used for fake test data generation.
Let’s begin with implementing the test automation strategy discussed earlier in this blog on fluent interface design patterns.
Test 1: User Registration
To start the tests, we need to navigate to the website, open the registration page, register the user, and perform some assertions to check what we did was correct.
Here is the first test of this project:
|
1 2 3 4 5 6 7 8 9 |
@Test public void testRegisterUser () { homePage ().openUserRegistrationPage () .verifyPageHeader () .registerUser () .verifySuccessfulRegistration () .continueToMyAccount () .verifyPageHeader (); } |
But before we move on to understanding how the tests work, I guess there would be multiple questions that would appear in your mind, like what does the Website look like, what does the Registration Page look like, and what fields/locators are we working on?
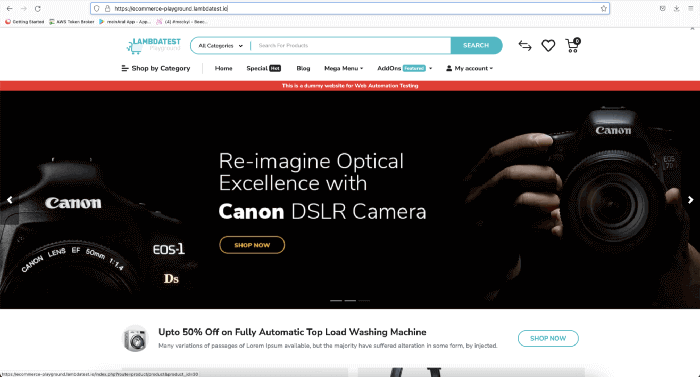
So, to answer those questions first, here is what the Homepage of the LambdaTest ECommerce Playground looks like:
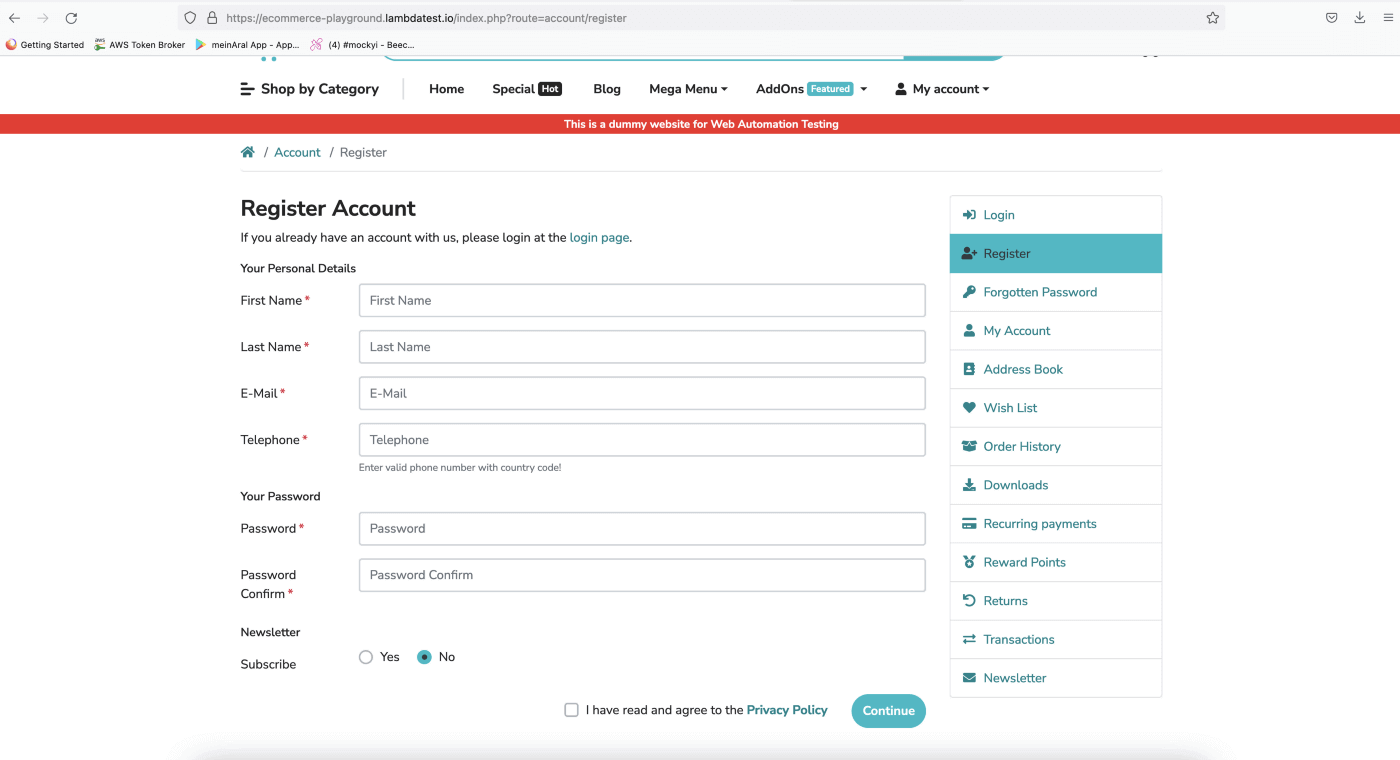
Here is the screenshot of the Registration Page, which opens after navigating to My Account >> Registration link from the above page.
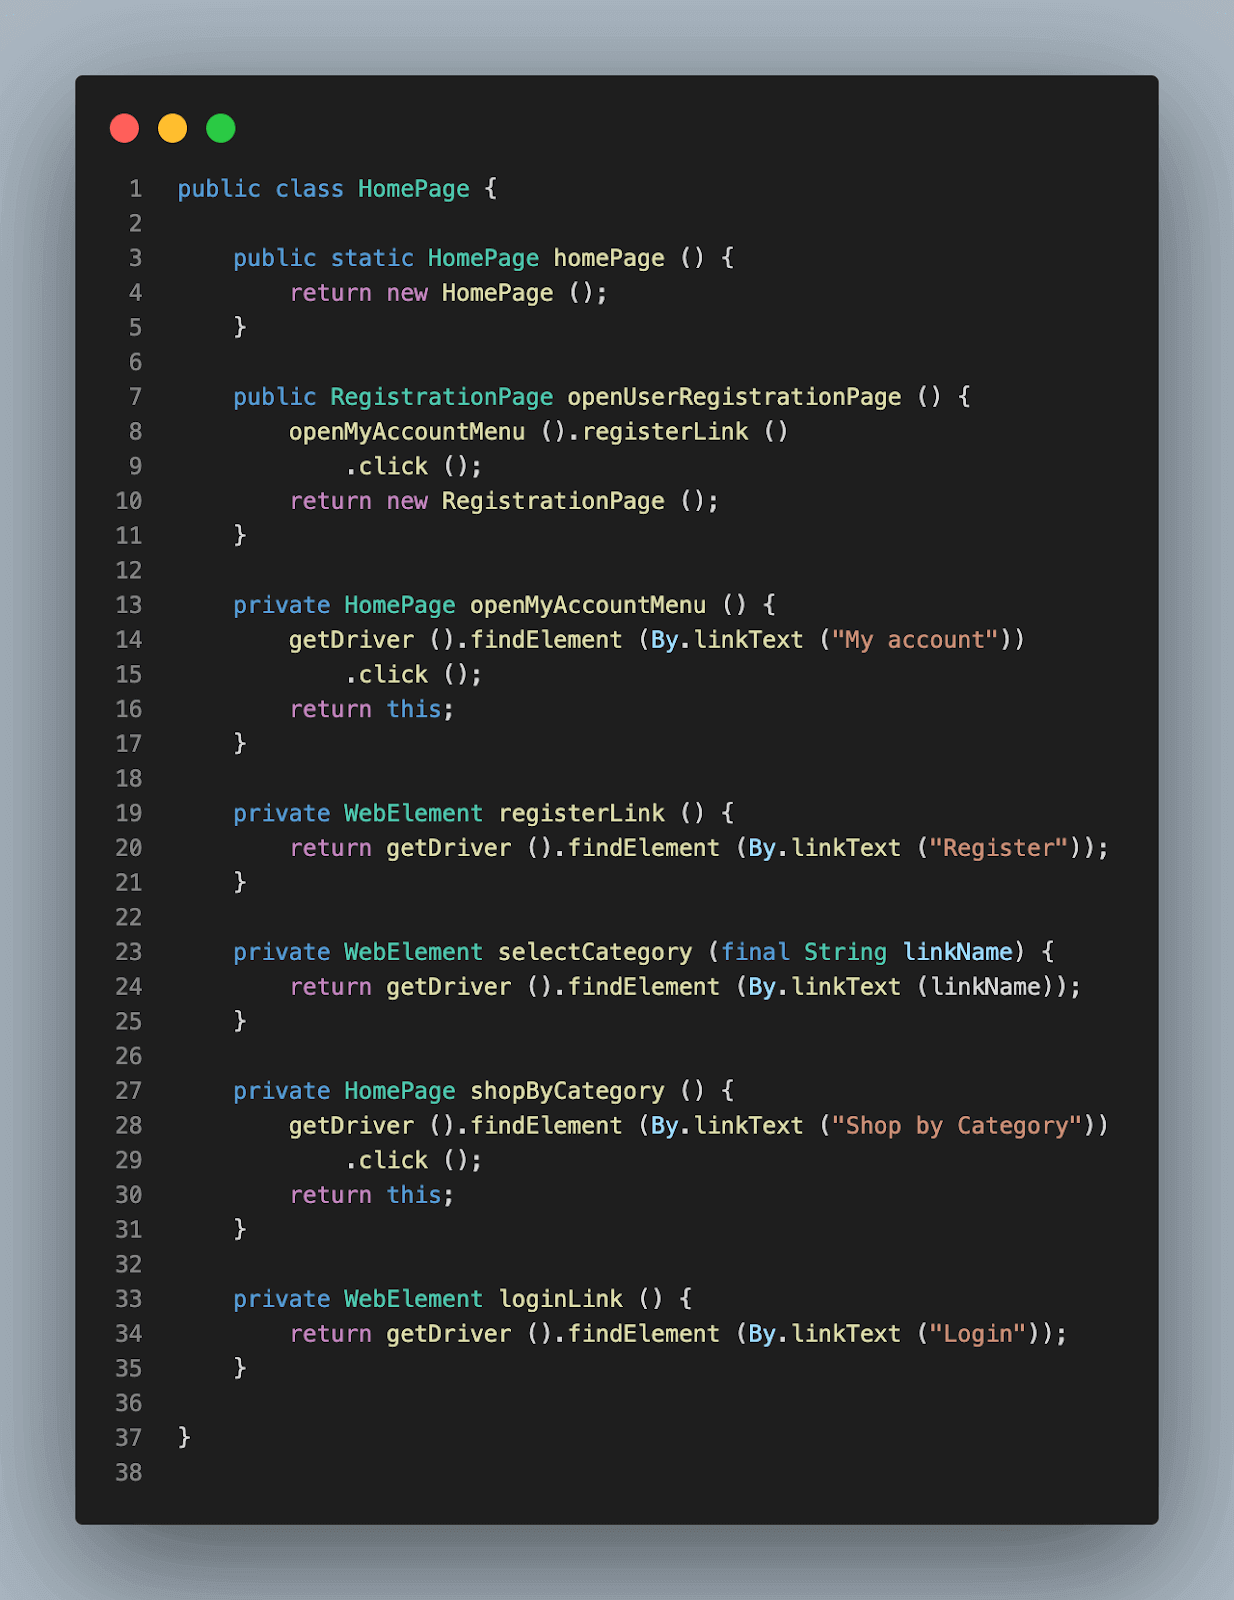
We need to first find the locators for the Home Page and then move on to the Registration Page.
|
1 2 3 4 5 6 |
private WebElement registerLink () { return getDriver ().findElement (By.linkText ("Register")); } private WebElement selectCategory (final String linkName) { return getDriver ().findElement (By.linkText (linkName)); } |
registerLink() and selectCategory() methods are returning the WebElements which are actually locators for these respective fields.
|
1 2 3 4 5 |
private HomePage openMyAccountMenu () { getDriver ().findElement (By.linkText ("My account")) .click (); return this; } |
openMyAccountMenu() method will locate the element for My Account link and will click on it.
openMyAccountMenu() is a part of the fluent interface design pattern and will return the instance of the Home Page class. The beauty of the “return this” statement is it will allow performing method chaining with all the methods in the HomePage class.
|
1 2 3 4 5 |
public RegistrationPage openUserRegistrationPage () { openMyAccountMenu ().registerLink () .click (); return new RegistrationPage (); } |
openUserRegistrationPage() will return a new instance of the Registration Page class once the user clicks on the register link. This will allow chaining the methods in the Registration Page with this page’s methods.
|
1 2 3 |
public static HomePage homePage () { return new HomePage (); } |
Note: A static constructor has been created in every class, so we don’t have to instantiate the respective page object classes and use static methods by importing it directly in the test class.
Next, we need to focus on the Registration Page and take care of the process of registering the user.
For registration, first, we need to find the locators of the Register user form and provide the necessary test data so it can be filled in automatically when the test runs every time. By doing this, we can eliminate manually changing the test data every time to generate a newly registered user.
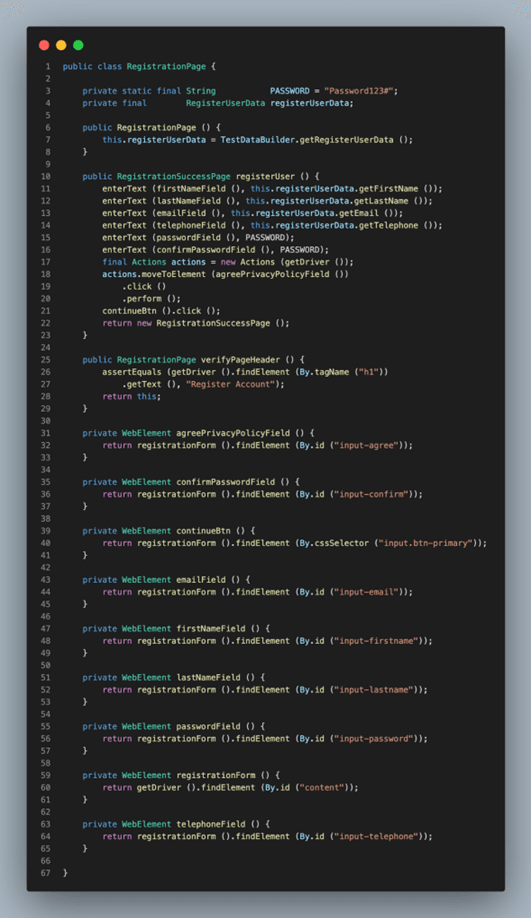
We first need to check if we have landed on the correct page by checking the page header to see if it displays the text: “Register Account”.
|
1 2 3 4 5 |
public RegistrationPage verifyPageHeader () { assertEquals (getDriver ().findElement (By.tagName ("h1")) .getText (), "Register Account"); return this; } |
verifyPageHeader() method performs this check by locating the element of the page header and then checking it with the expected text: “Register Account” that we have provided for assertion.
Notice the return this statement at the end. This returns the instance of the Registration Page class and helps in chaining this method with other methods of the Registration Page Class.
|
1 2 3 4 5 6 7 8 9 10 11 12 13 14 15 16 17 18 19 20 21 22 23 24 25 26 27 28 29 30 31 32 33 34 35 36 37 38 39 40 41 |
private WebElement registrationForm () { return getDriver ().findElement (By.id ("content")); } private WebElement firstNameField () { return registrationForm ().findElement (By.id ("input-firstname")); } private WebElement lastNameField () { return registrationForm ().findElement (By.id ("input-lastname")); } private WebElement emailField () { return registrationForm ().findElement (By.id ("input-email")); } private WebElement telephoneField () { return registrationForm ().findElement (By.id ("input-telephone")); } private WebElement passwordField () { return registrationForm ().findElement (By.id ("input-password")); } private WebElement confirmPasswordField () { return registrationForm ().findElement (By.id ("input-confirm")); } private WebElement emailField () { return registrationForm ().findElement (By.id ("input-email")); } private WebElement agreePrivacyPolicyField () { return registrationForm ().findElement (By.id ("input-agree")); } private WebElement continueBtn () { return registrationForm ().findElement (By.cssSelector("input.btn-primary")); } |
There are multiple fields which need to be filled in for registering the user in the system. firstNameField(), lastNameField() , emailField() , telephoneField() , passwordField(), confirmPasswordField(),etc. are mandatory fields required to be filled in to register a user.
So, the methods returning the respective Selenium locators have been created in the RegistrationPage class. Since all these fields are available inside the Registration Form UI component, hence registrationForm() method is created to locate the registration form as a parent locator. All the other fields, like the first name, last name, email, telephone, password, etc., are located using the registrationForm() method as the parent locator.
So, while finding elements for the first name field, Selenium WebDriver will search for Registration Form first, and inside that component, it will search for the first name field. This parent-child element finding strategy helps in locating the elements faster.
Before we execute the registerUser() method, we need to have the data available readily so it can be input in the respective fields required for registering the user. For doing this, the RegisterUserData class is used. This class has required variables that are mandatory for registering a user.
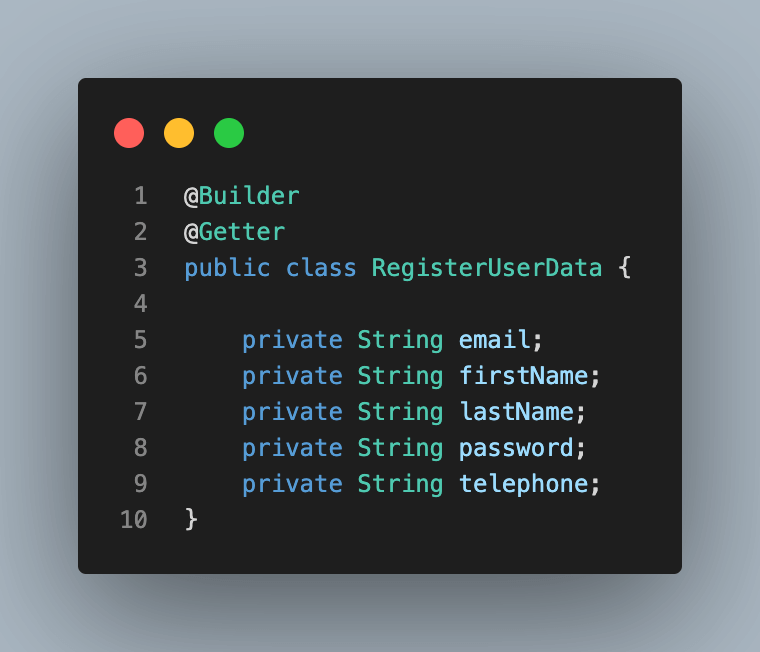
Notice the @Getter and @Builder annotations, which are put on top of the class name. These are annotations provided by Lombok.
- @Getter annotation will provide all the getter methods for the variables on run time.
- @Builder annotation helps us use the Builder Pattern without writing the boilerplate code.
Before we proceed towards generating the Fake test data for filling in the form, let’s get some understanding about the Builder Pattern, as it will help in understanding the process of fake test data generation easily.
What is a Builder Pattern?
Considering the above scenario of registering a user where we need to pass multiple parameters in a test, normally, what we do is create a method with that many parameters and use the POJO class with the variables (fields required to register the user) to set the values in the test using the constructor of the POJO class.
For example, we must pass first name, last name, email, and password for registering users. Now, we create a POJO class, generate Getters and Setters inside that class and set the values in the respective fields using a constructor. Checkout the code example below for the representation of what we are discussing:
|
1 2 3 4 5 6 7 8 9 10 11 12 13 14 15 16 17 18 19 20 21 22 23 24 25 26 27 28 29 30 31 32 33 34 35 36 37 38 39 40 41 42 43 44 45 46 47 |
public class RegisterUser { private String email; private String firstName; private String lastName; private String password; public RegisterUser (final String firstName, final String lastName, final String email, final String password) { this.firstName = firstName; this.lastName = lastName; this.email = email; this.password = password; } public String getEmail () { return this.email; } public String getFirstName () { return this.firstName; } public String getLastName () { return this.lastName; } public String getPassword () { return this.password; } public void setEmail (final String email) { this.email = email; } public void setFirstName (final String firstName) { this.firstName = firstName; } public void setLastName (final String lastName) { this.lastName = lastName; } public void setPassword (final String password) { this.password = password; } } |
Now, if we want to use this POJO we would have to create an instance of this class and pass the values in the parameters as given in the code example below:
|
1 2 3 4 |
@Test public void testRegisterUser () { final RegisterUser registerUser = new RegisterUser ("John", "Doe", "john@abc.com", "Password123"); } |
Imagine if there are multiple other fields also added in the registration form like address fields related to address line one, line 2, line 3, city, state, country, etc. We would need to add those variables in the POJO, and accordingly, the parameters in the constructor and, finally, in the tests will keep incrementing.
Thanks to the Builder Pattern, such a complex problem can be sorted out easily without writing multiple lines of code and making changes in the POJO classes again and again.
Builder Pattern helps us solve the issue of setting the parameters by providing a way to build the objects step by step by providing a method that returns the final object, which can be used in the actual tests.
Let’s move back to the register User Data class, where we discussed using the Builder Pattern. Lombok helps us write short and crisp code without having to write boilerplate code. By passing the @Getter annotation, it automatically generates Getters for the variables declared in RegisterUserData class. Similarly, it generates the Builder pattern boilerplate code on run time by just passing the @Builder tag relieving us from writing additional code.
|
1 2 3 4 5 6 7 8 9 10 |
@Builder @Getter public class RegisterUserData { private String email; private String firstName; private String lastName; private String password; private String telephone; } |
POJO is ready, next we need to pass on the data so it can be used in tests. We would use the JavaFaker library to generate the fake data to pass tests. TestDataBuilder Class will take care of building the data for us.
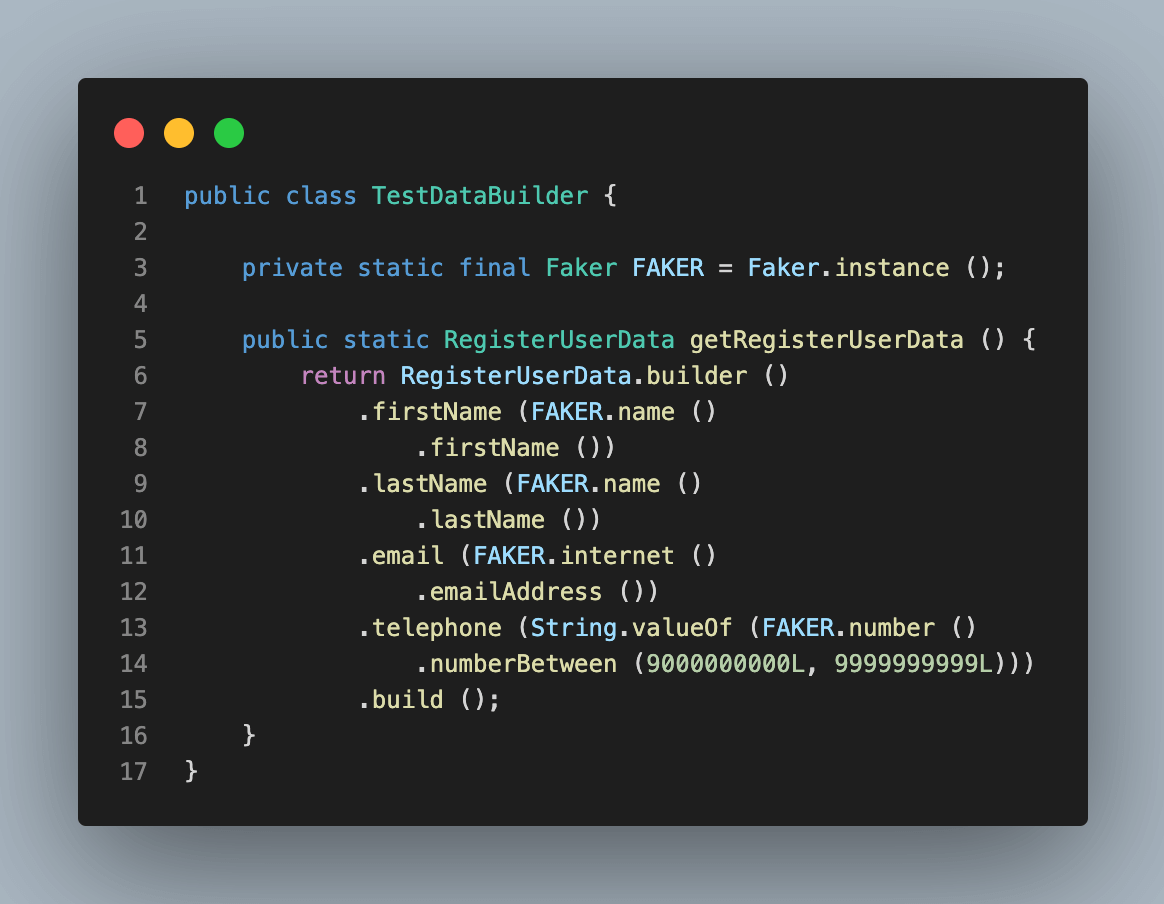
getRegisterUserData() method will return a set of data required for the mandatory fields for registering a user.
|
1 2 3 4 5 6 7 8 9 10 11 12 13 14 |
public RegistrationSuccessPage registerUser () { enterText (firstNameField (), this.registerUserData.getFirstName ()); enterText (lastNameField (), this.registerUserData.getLastName ()); enterText (emailField (), this.registerUserData.getEmail ()); enterText (telephoneField (), this.registerUserData.getTelephone ()); enterText (passwordField (), PASSWORD); enterText (confirmPasswordField (), PASSWORD); final Actions actions = new Actions (getDriver ()); actions.moveToElement (agreePrivacyPolicyField ()) .click () .perform (); continueBtn ().click (); return new RegistrationSuccessPage (); } |
When the registerUser() method is executed it will invoke getRegisterUserData() method and generate the required data on run time and help in registering the user.
Once the user is registered successfully, it will return a new instance of the Registration Success Page as this is the next page that will be displayed on the screen once registration is successful.
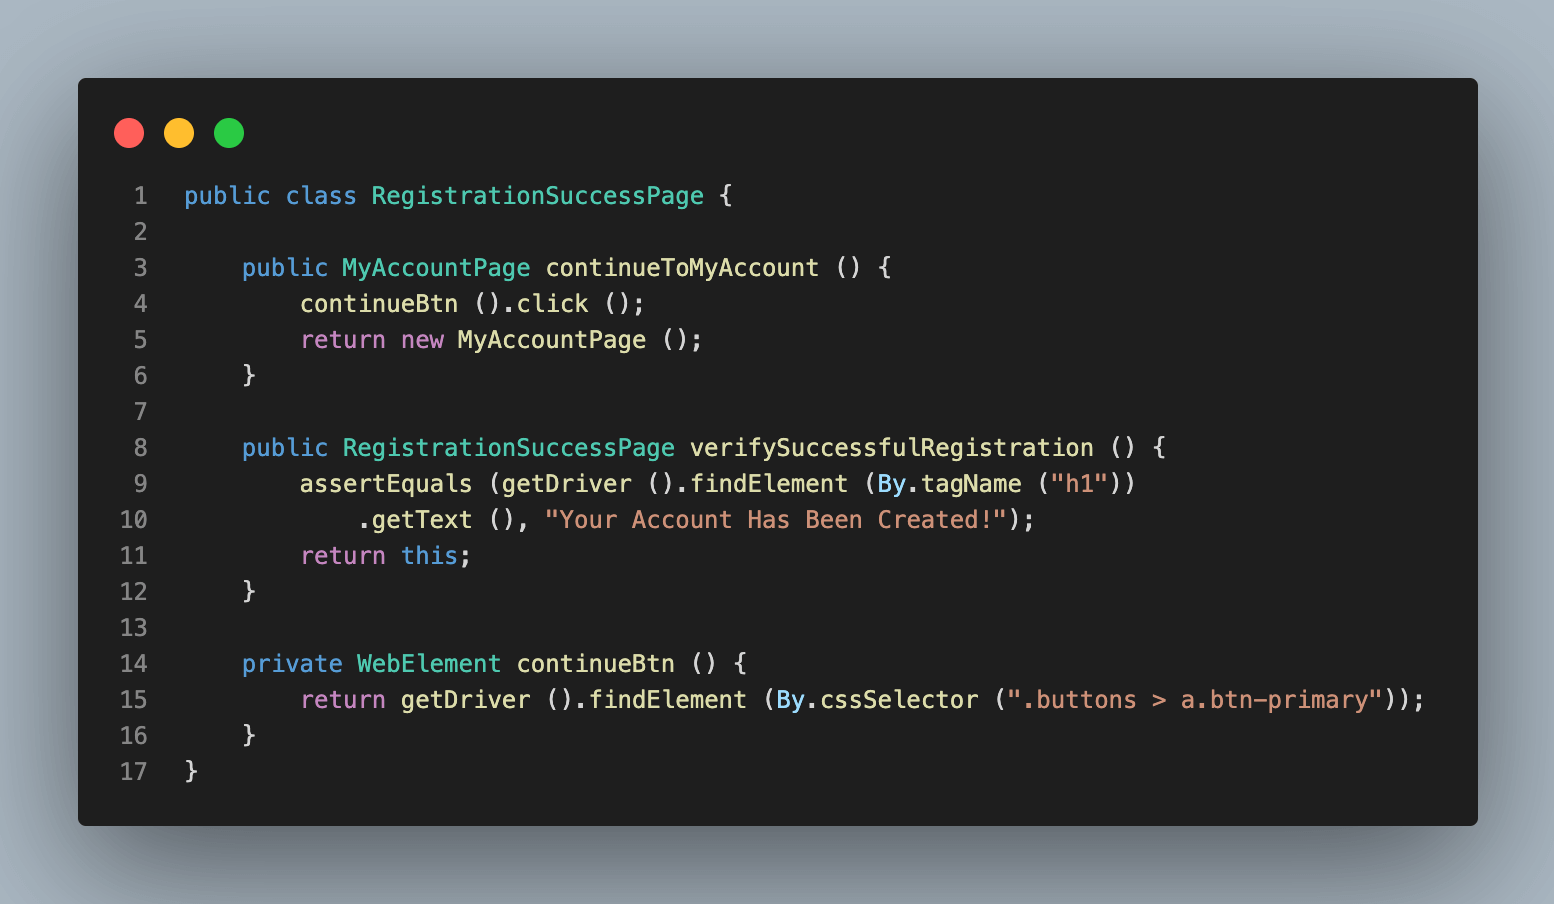
verifySuccessfulRegistration() method will check for the locator of the success message, get its text and will compare with the expected message “Your Account Has Been Created!” provided in the method. This assertion will be done using the assertEquals() method provided by TestNG.
|
1 2 3 4 5 |
public RegistrationSuccessPage verifySuccessfulRegistration () { assertEquals (getDriver ().findElement (By.tagName ("h1")) .getText (), "Your Account Has Been Created!"); return this; } |
After verification of successful registration is done, the continueToMyAccount() method is called in the test which will click on the Continue button and return a new instance of My Account Page.
|
1 2 3 4 5 6 7 8 9 |
private WebElement continueBtn () { return getDriver ().findElement (By.cssSelector (".buttons > a.btn-primary")); } public MyAccountPage continueToMyAccount () { continueBtn ().click (); return new MyAccountPage (); } |
On the My Account Page we are just verifying that the page header My Account is correctly displayed.
To do this, the MyAccountPage class is created, and within it, the verifyPageHeader() method is created, which takes care of the assertion.
|
1 2 3 4 5 6 7 8 |
public class MyAccountPage { public MyAccountPage verifyPageHeader () { assertEquals (getDriver ().findElement (By.tagName ("h2")) .getText (), "My Account"); return this; } } |
With this, our test for registering the user ends.
Now, it makes sense to read the following code and understand what it is doing!
|
1 2 3 4 5 6 7 8 9 |
@Test public void testRegisterUser () { homePage ().openUserRegistrationPage () .verifyPageHeader () .registerUser () .verifySuccessfulRegistration () .continueToMyAccount () .verifyPageHeader (); } |
Test 2: Add Product to Cart
Next, we move on to check the second business scenario by adding a product to Cart. Here is the test for it:
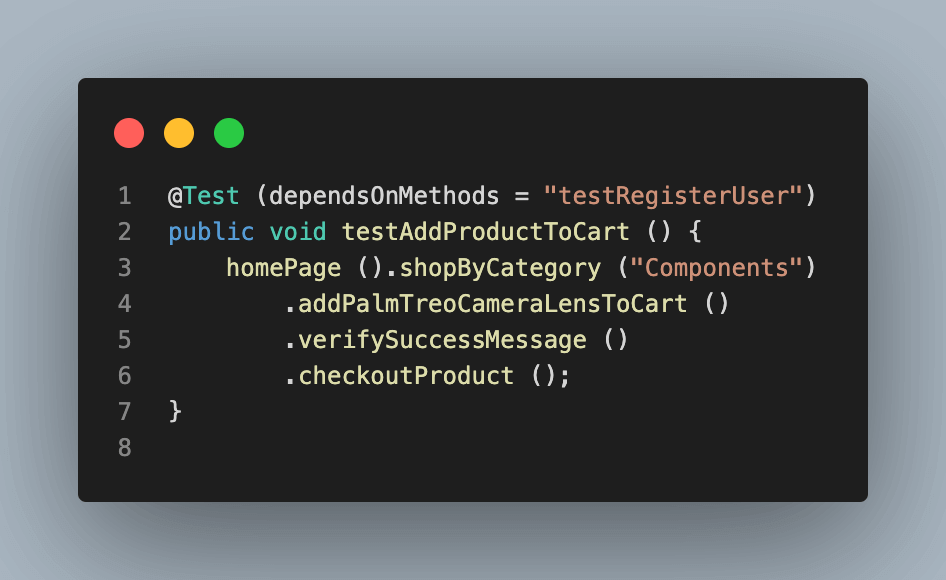
Since we are writing end-to-end tests, it makes sense to add the dependsOnMethods attribute to this test as it depends on the registered user. The core reason to use this attribute is that this test will be executed only when the registered user tests run successfully. If the register user test fails, this test will be skipped. This helps save time and leads us to fast feedback in case of failure.
Though adding a product to the cart is allowed as a guest user as well, when checking out, the system will ask the user to register to continue, so it is good if we start the test journey as a registered user.
Below is the Screenshot of the Product Page as it appears on the LambdaTest ECommerce Playground website:
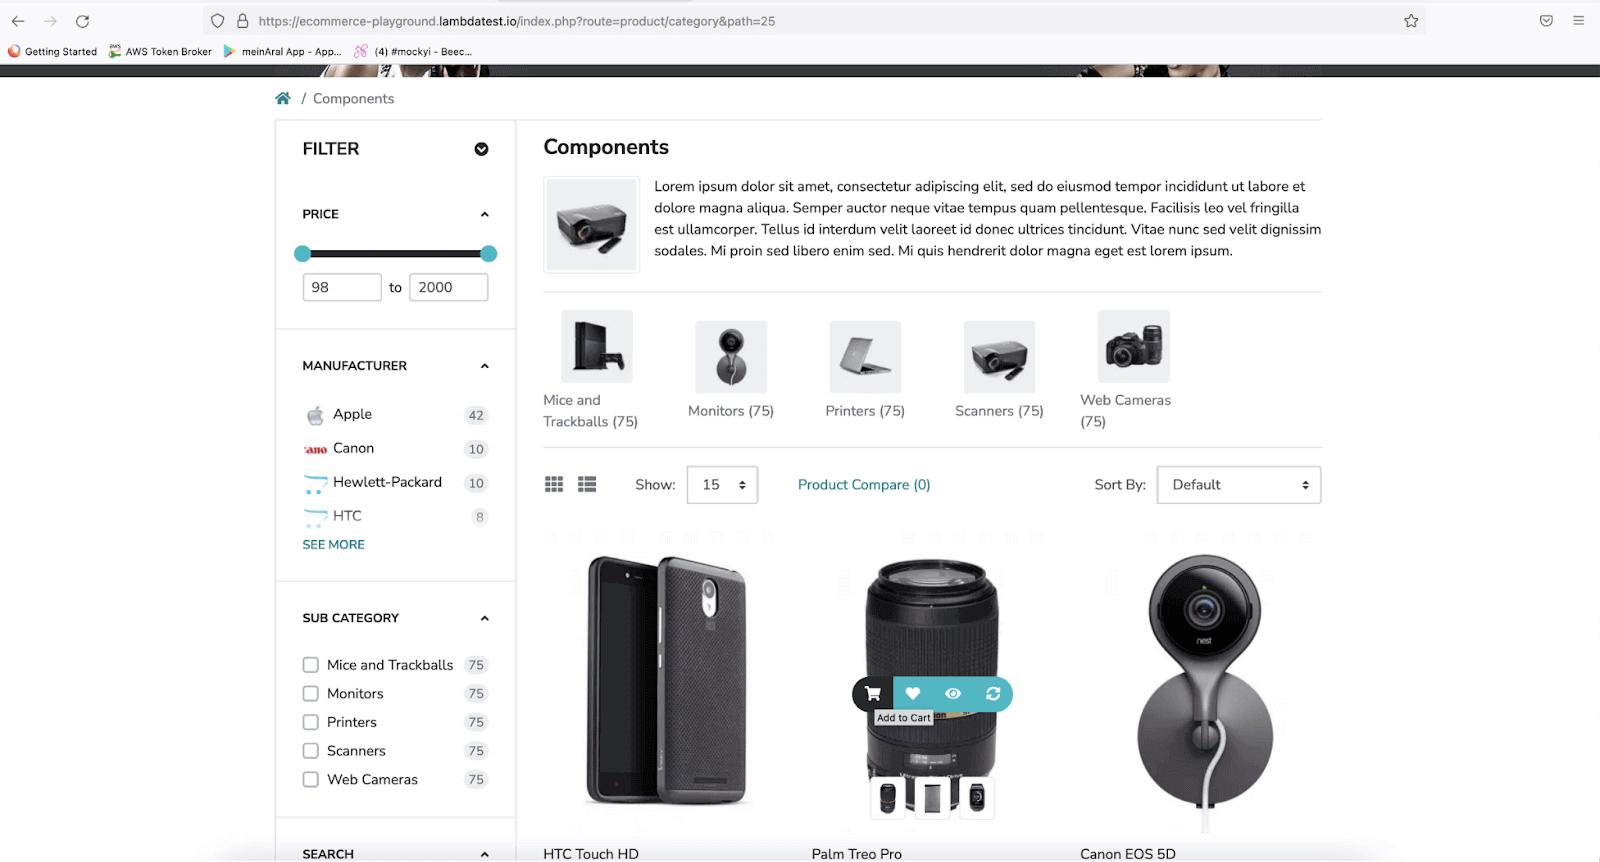
In this test, from the Home Page, we would navigate to the Product Page by clicking on Shop by Category link and selecting the Components category, then we would be adding Palm Treo Camera Lens product to the cart and verify the success message(this assures that the product was added successfully to the cart), and finally we move on to Checkout Product page to check out the product.
|
1 2 3 4 5 6 7 8 9 10 11 12 |
public class HomePage { public static HomePage homePage () { return new HomePage (); } public ProductPage shopByCategory (final String linkName) { shopByCategory ().selectCategory (linkName) .click (); return new ProductPage (); } } |
shopByCategory() method takes in the link name as parameter, clicks on that respective link provided, which, in our case is, Components and returns a new instance of Product Page class.
Parameterization of the link name in this method is done, as in the case we need to click on any other link, we can provide that respective link name, and the same code will work.
|
1 2 3 4 5 6 7 8 9 10 |
public ProductPage addPalmTreoCameraLensToCart () { final Actions actions = new Actions (getDriver ()); actions.moveToElement (palmTreoCameraLens ()) .pause (200) .moveToElement (addToCartBtn ()) .pause (100) .click () .perform (); return this; } |
We need to select a product to add it to the cart, for this, we would be selecting the Palm Treo Camera Lens and will add it to the cart. This part is a bit tricky as the option to add the product to the cart is displayed after hovering over the product.
Hence, Selenium’s Actions class has been used as it provides the flexibility to chain UI actions and helps us do the same manual action the user would be doing in an automated way. The Actions class of Selenium WebDriver allows us to use the fluent interface design pattern by chaining methods.
The code snippet of the addPalmTreoCameraLensToCart() method provided above is self-explanatory.
Note that this method will return the instance of the Product page and help us chain this method with other methods of the Product Page class.
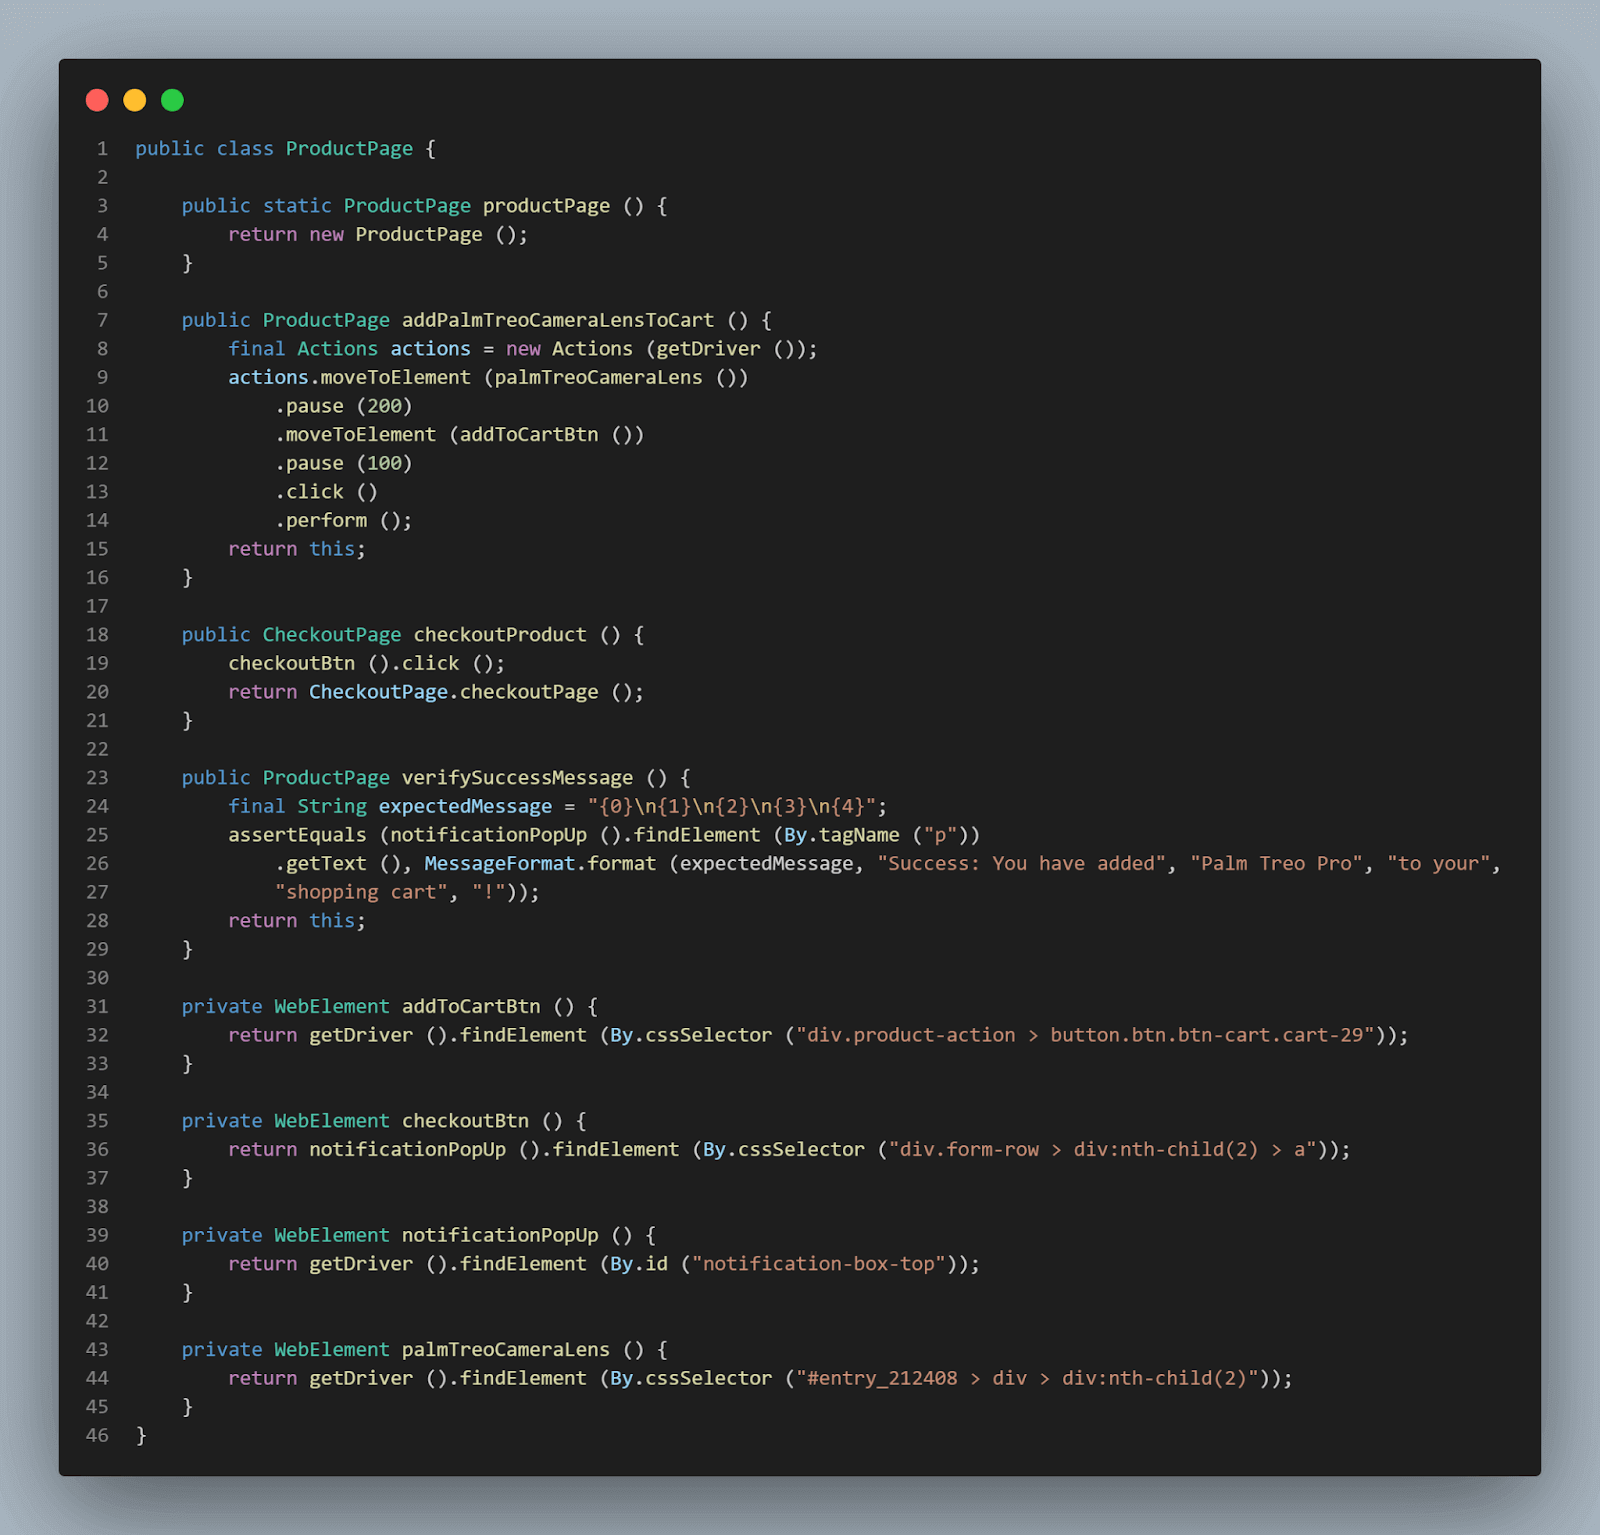
To verify that the product is added successfully to the cart and confirm that the actions we did above are doing what they are expected to do, we will verify the success message in the next step.
Note here, MessageFormat class is used to format the expected message and make it look more readable and concise. Finally, we will be moving ahead to check out the product next.
|
1 2 3 4 5 6 7 |
public ProductPage verifySuccessMessage () { final String expectedMessage = "{0}\n{1}\n{2}\n{3}\n{4}"; assertEquals (notificationPopUp ().findElement (By.tagName ("p")) .getText (), MessageFormat.format (expectedMessage, "Success: You have added", "Palm Treo Pro", "to your", "shopping cart", "!")); return this; } |
The checkoutProduct() method from Product Page class returns a new instance of Checkout Page class after clicking on the Checkout Button displayed on the Success Message on Product Page.
|
1 2 3 4 5 6 7 8 |
private WebElement checkoutBtn () { return notificationPopUp ().findElement (By.cssSelector ("div.form-row > div:nth-child(2) > a")); } public CheckoutPage checkoutProduct () { checkoutBtn ().click (); return CheckoutPage.checkoutPage (); } |
This marks the completion of our test 2.
Let’s now focus on the next test to check out the product.
Test 3: Checkout Product
In this test, we will check the Checkout Product page and verify its functionality of checking out the product.
Below is the screenshot of the page appearing on the LambdaTest ECommerce Playground website.
This is the test that will help us to verify the product checkout functionality.
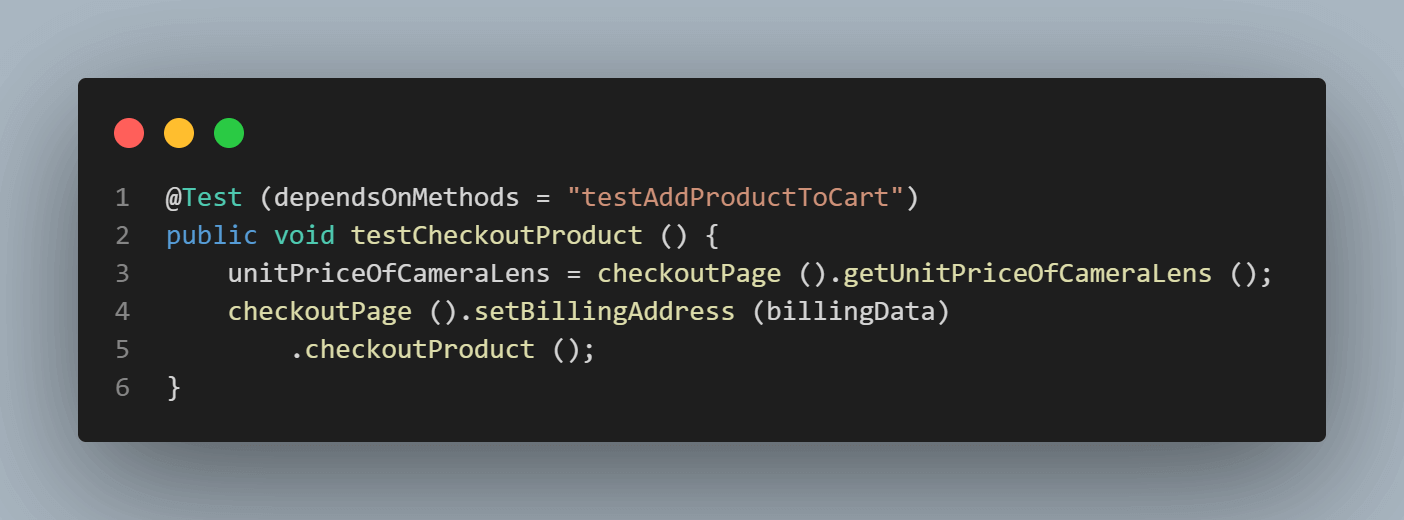
Again, as discussed earlier, this test depends on the Add Product to Cart test, which means if the addition of the product to the cart test fails, this test will be skipped. It will be executed only if the added product to the cart test passes.
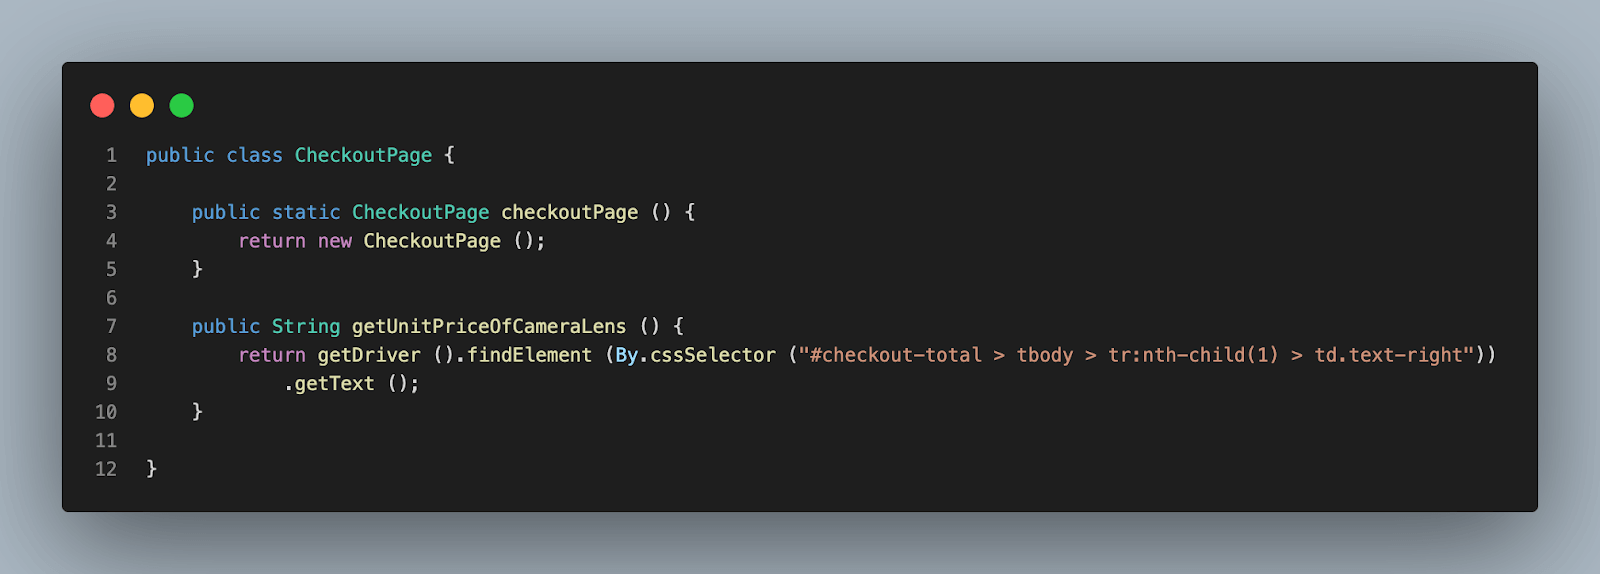
We would be storing the unit price of the camera lens in a global variable named unitPriceofCamerLens in the first step of this test as it will help us to use this value in asserting the unit price on the order confirmation page.
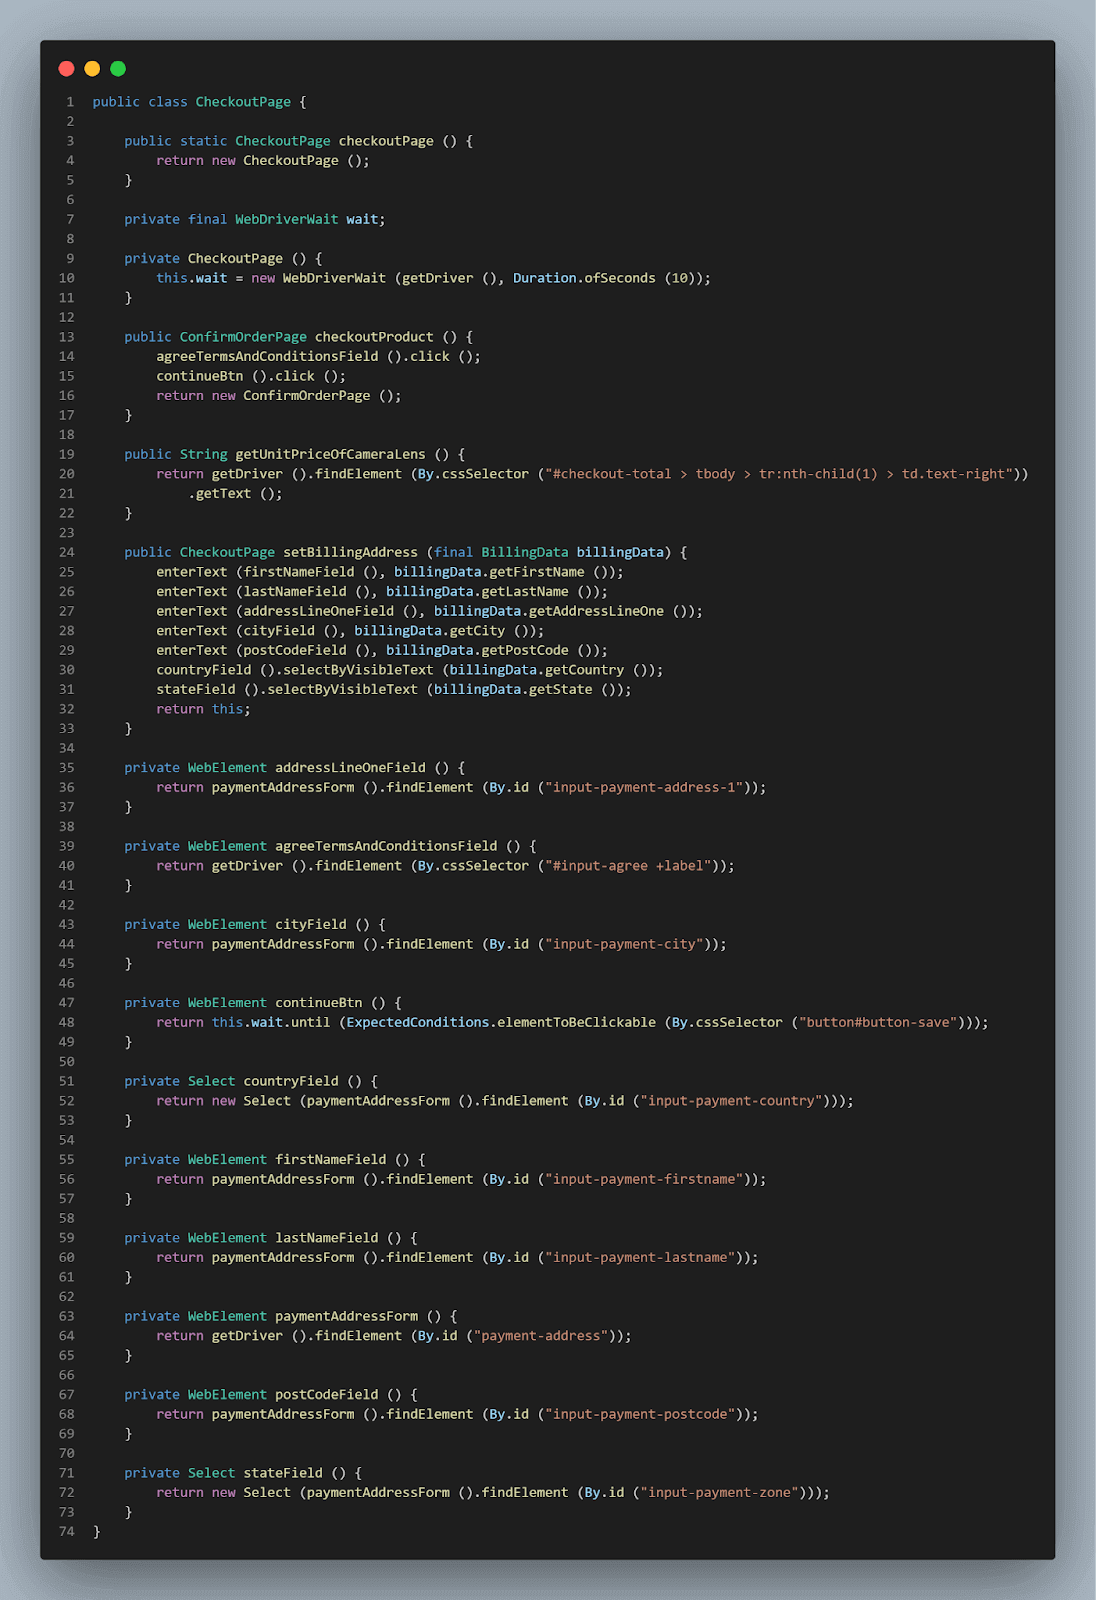
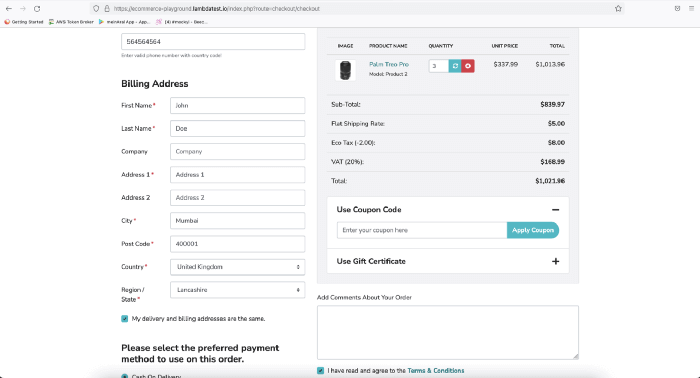
Next, on the Checkout Page, we would set the billing address and check out the product.
Again, for setting the billing address, Builder Pattern has been used, and test data is generated using the JavaFaker library, which eases the pain of handling test data on run time.
|
1 2 3 4 5 6 7 8 9 10 11 |
@Builder @Getter public class BillingData { private String firstName; private String lastName; private String addressLineOne; private String city; private String postCode; private String country; private String state; } |
For Billing Data, the mandatory fields required to fill in the form are:
- First Name
- Last Name
- Address Line one
- City
- Post Code
- State
- Country
We have taken these fields into consideration and created a Billing Data class and added the annotations @Getter and @Builder which will help for using this class with Builder Pattern. The skeleton of the data is created.
Let’s move on to generate the test data, which will be taken care of in the Test Data Builder class.
|
1 2 3 4 5 6 7 8 9 10 11 12 13 14 15 16 17 18 19 20 21 |
public class TestDataBuilder { private static final Faker FAKER = Faker.instance (); public static BillingData getBillingData () { return BillingData.builder () .firstName (FAKER.name () .firstName ()) .lastName (FAKER.name () .lastName ()) .addressLineOne (FAKER.address () .streetAddress ()) .city (FAKER.address () .cityName ()) .postCode (FAKER.address () .zipCode ()) .country ("India") .state ("Maharashtra") .build (); } } |
getBillingData() method will return a set of data required for the mandatory fields for setting the Billing address required to be entered before checking out the product.
|
1 2 3 4 5 6 7 8 9 10 |
public CheckoutPage setBillingAddress (final BillingData billingData) { enterText (firstNameField (), billingData.getFirstName ()); enterText (lastNameField (), billingData.getLastName ()); enterText (addressLineOneField (), billingData.getAddressLineOne ()); enterText (cityField (), billingData.getCity ()); enterText (postCodeField (), billingData.getPostCode ()); countryField ().selectByVisibleText (billingData.getCountry ()); stateField ().selectByVisibleText (billingData.getState ()); return this; } |
When the setBillingAddress() method is executed it will invoke getBillingData() method and generate all the required data for setting the billing address on run time.
|
1 2 3 4 5 6 7 8 9 10 11 12 13 14 15 16 17 |
public class CheckoutPage { private WebElement continueBtn () { return this.wait.until (ExpectedConditions .elementToBeClickable (By.cssSelector ("button#button-save"))); } private WebElement agreeTermsAndConditionsField () { return getDriver ().findElement (By.cssSelector ("#input-agree +label")); } public ConfirmOrderPage checkoutProduct () { agreeTermsAndConditionsField ().click (); continueBtn ().click (); return new ConfirmOrderPage (); } } |
Once the billing address is set, next we would be moving ahead to checkout the product by clicking on the agree terms and condition checkbox and then finally clicking on the Continue button to proceed to the Order Confirmation page.
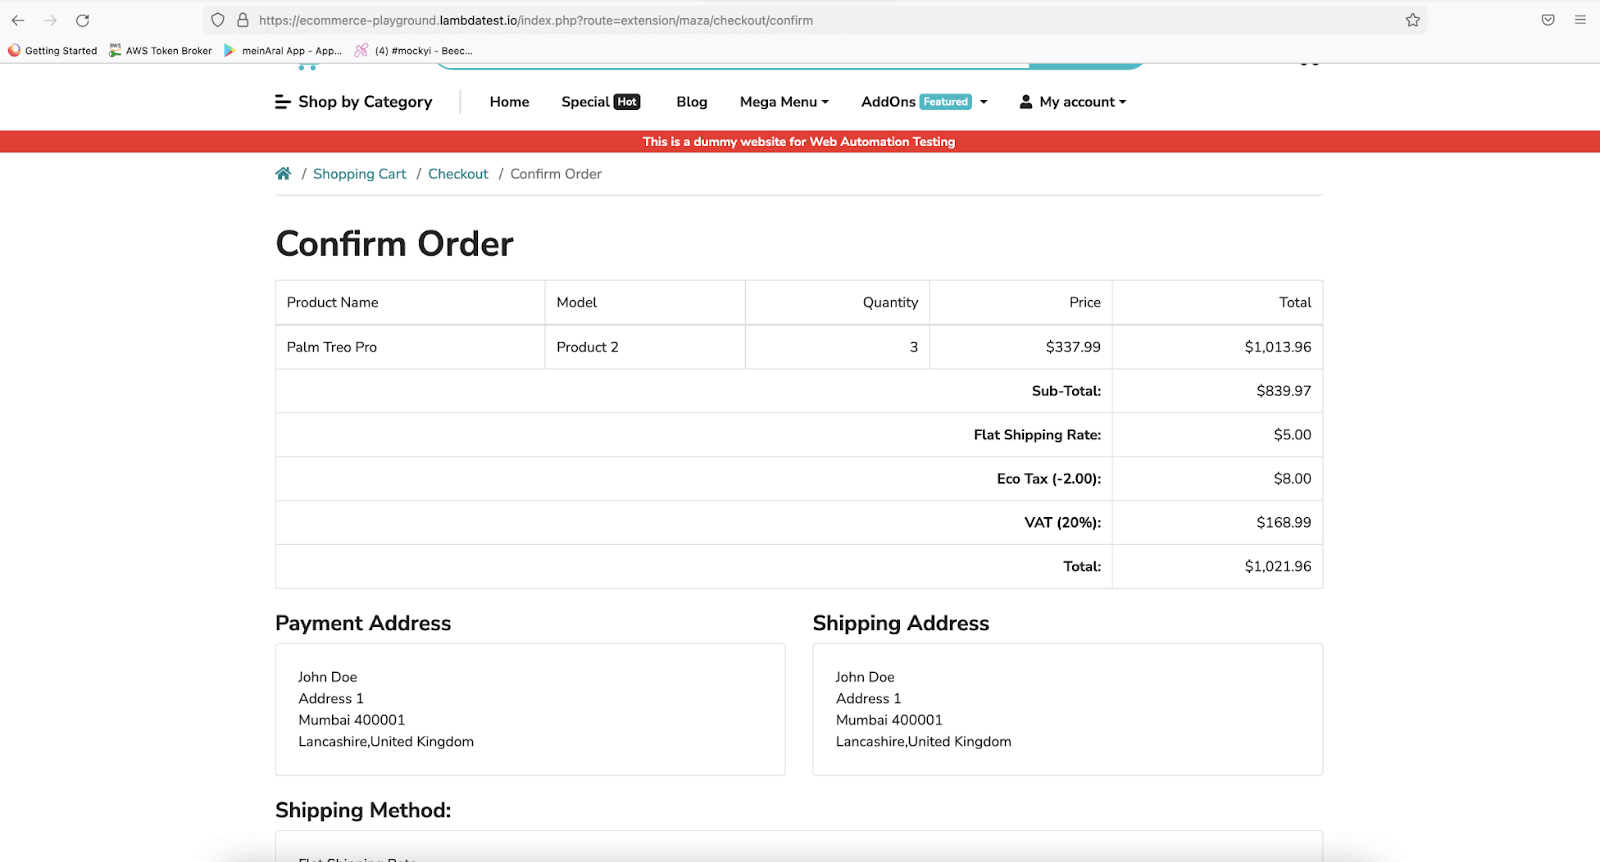
Test 4: Confirm Order Test
Now, it’s time to confirm the order we have placed using the previous test.
Below is the Confirm Order page screenshot as it appears on the LambdaTest ECommerce Playground website.
On this page, we would be making some assertions and verifying that the product we selected is only the one we are checking out, along with the price we saw in the initial stage of adding the product page.
We will verify the shipping address we added while checking out the product.
This test will help us verify the Order Confirmation functionality:
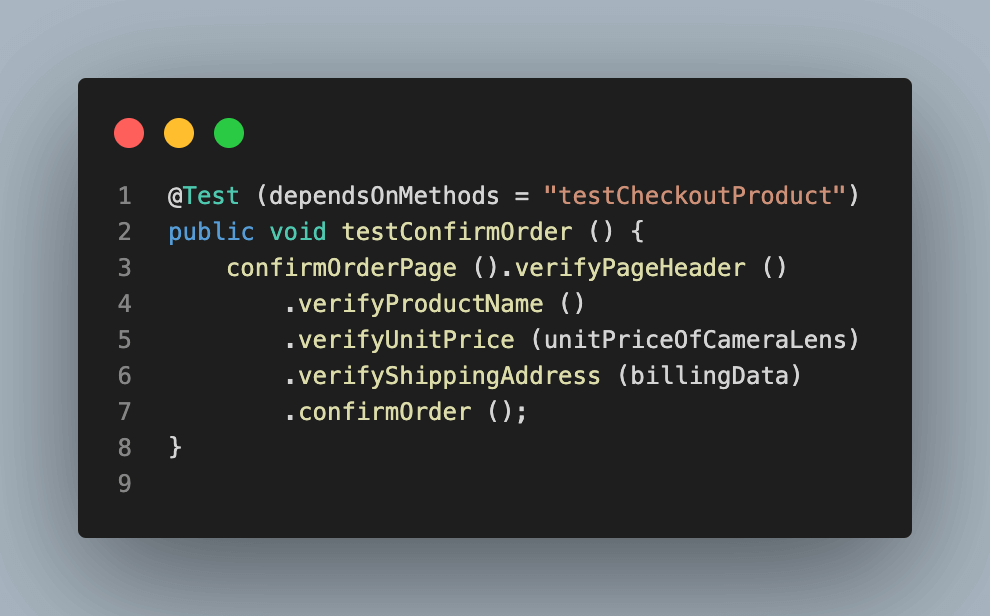
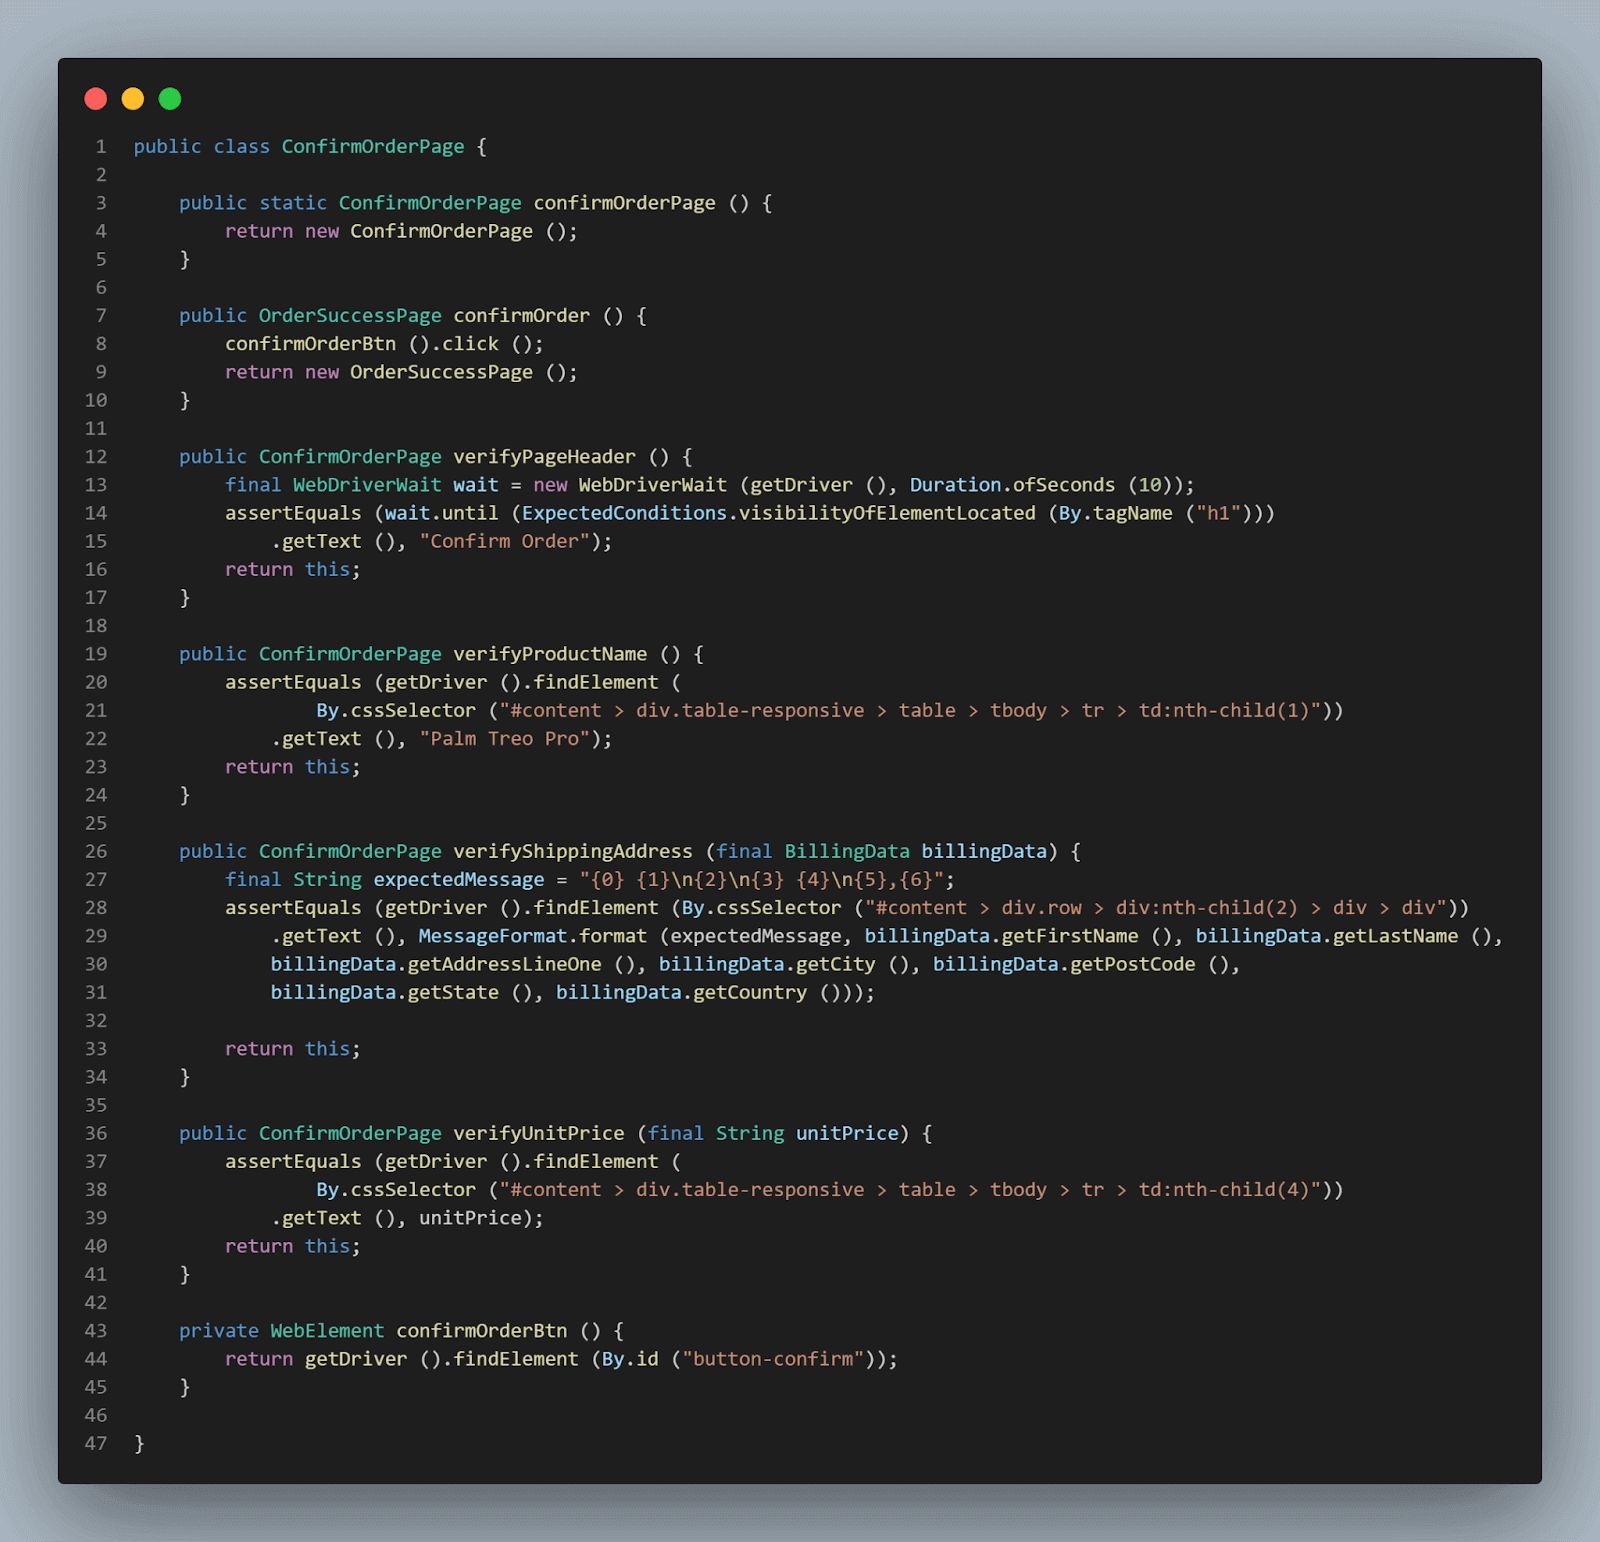
The verifyPageHeader() method has been created to assert the page header to confirm that we are on the correct page before we proceed to run our next steps of assertions.
This method returns an instance of the Confirm Order Page class, so we could use it by chaining with other methods of the Confirm Order class.
|
1 2 3 4 5 6 |
public ConfirmOrderPage verifyPageHeader () { final WebDriverWait wait = new WebDriverWait (getDriver (), Duration.ofSeconds (10)); assertEquals (wait.until (ExpectedConditions.visibilityOfElementLocated (By.tagName ("h1"))) .getText (), "Confirm Order"); return this; } |
The verifyProductName() method asserts the product name to check we are ordering the correct product. This method also returns the instance of Confirm Order Page class, so it would be easy to fluently use this method by chaining it with other methods of the Confirm Order Page class.
|
1 2 3 4 5 6 |
public ConfirmOrderPage verifyProductName () { assertEquals (getDriver ().findElement ( By.cssSelector ("#content > div.table-responsive > table > tbody > tr > td:nth-child(1)")) .getText (), "Palm Treo Pro"); return this; } |
Do you remember we had saved the unit price of the test class by creating a global variable called unitPriceOfCameraLens in the test? We would pass that variable in the verifyUnitPrice() method parameter. This value will be compared with the value we would be fetching for the product’s unit price from the Order Confirm page.
|
1 2 3 4 5 6 |
public ConfirmOrderPage verifyUnitPrice (final String unitPrice) { assertEquals (getDriver ().findElement ( By.cssSelector ("#content > div.table-responsive > table > tbody > tr > td:nth-child(4)")) .getText (), unitPrice); return this; } |
Next we need to make sure that the Billing address we have entered in the previous step is correctly displayed in the Shipping Address section of the Order confirmation page.
The verifyShippingAddress() method will assert the billing address. This method will take Billing Data as a parameter, as we would be passing the same instance of billing data that we used for setting the billing address. It helps set and get the same data and eases our task of asserting the address.
|
1 2 3 4 5 6 7 8 9 10 11 |
public ConfirmOrderPage verifyShippingAddress (final BillingData billingData){ final String expectedMessage = "{0} {1}\n{2}\n{3} {4}\n{5},{6}"; assertEquals (getDriver ().findElement (By.cssSelector ("#content > div.row > div:nth-child(2) > div > div")) .getText (), MessageFormat.format (expectedMessage, billingData.getFirstName (), billingData.getLastName (), billingData.getAddressLineOne (), billingData.getCity (), billingData.getPostCode (), billingData.getState (), billingData.getCountry ())); return this; } |
After the shipping address is verified, we will be moving ahead with confirming the order. confirmOrder() method will click on the Confirm Order button and help us confirm the order.
|
1 2 3 4 5 6 7 8 |
private WebElement confirmOrderBtn () { return getDriver ().findElement (By.id ("button-confirm")); } public OrderSuccessPage confirmOrder () { confirmOrderBtn ().click (); return new OrderSuccessPage (); } |
This marks our confirm order tests complete, now let’s move to checking if the order was successfully marked as complete.
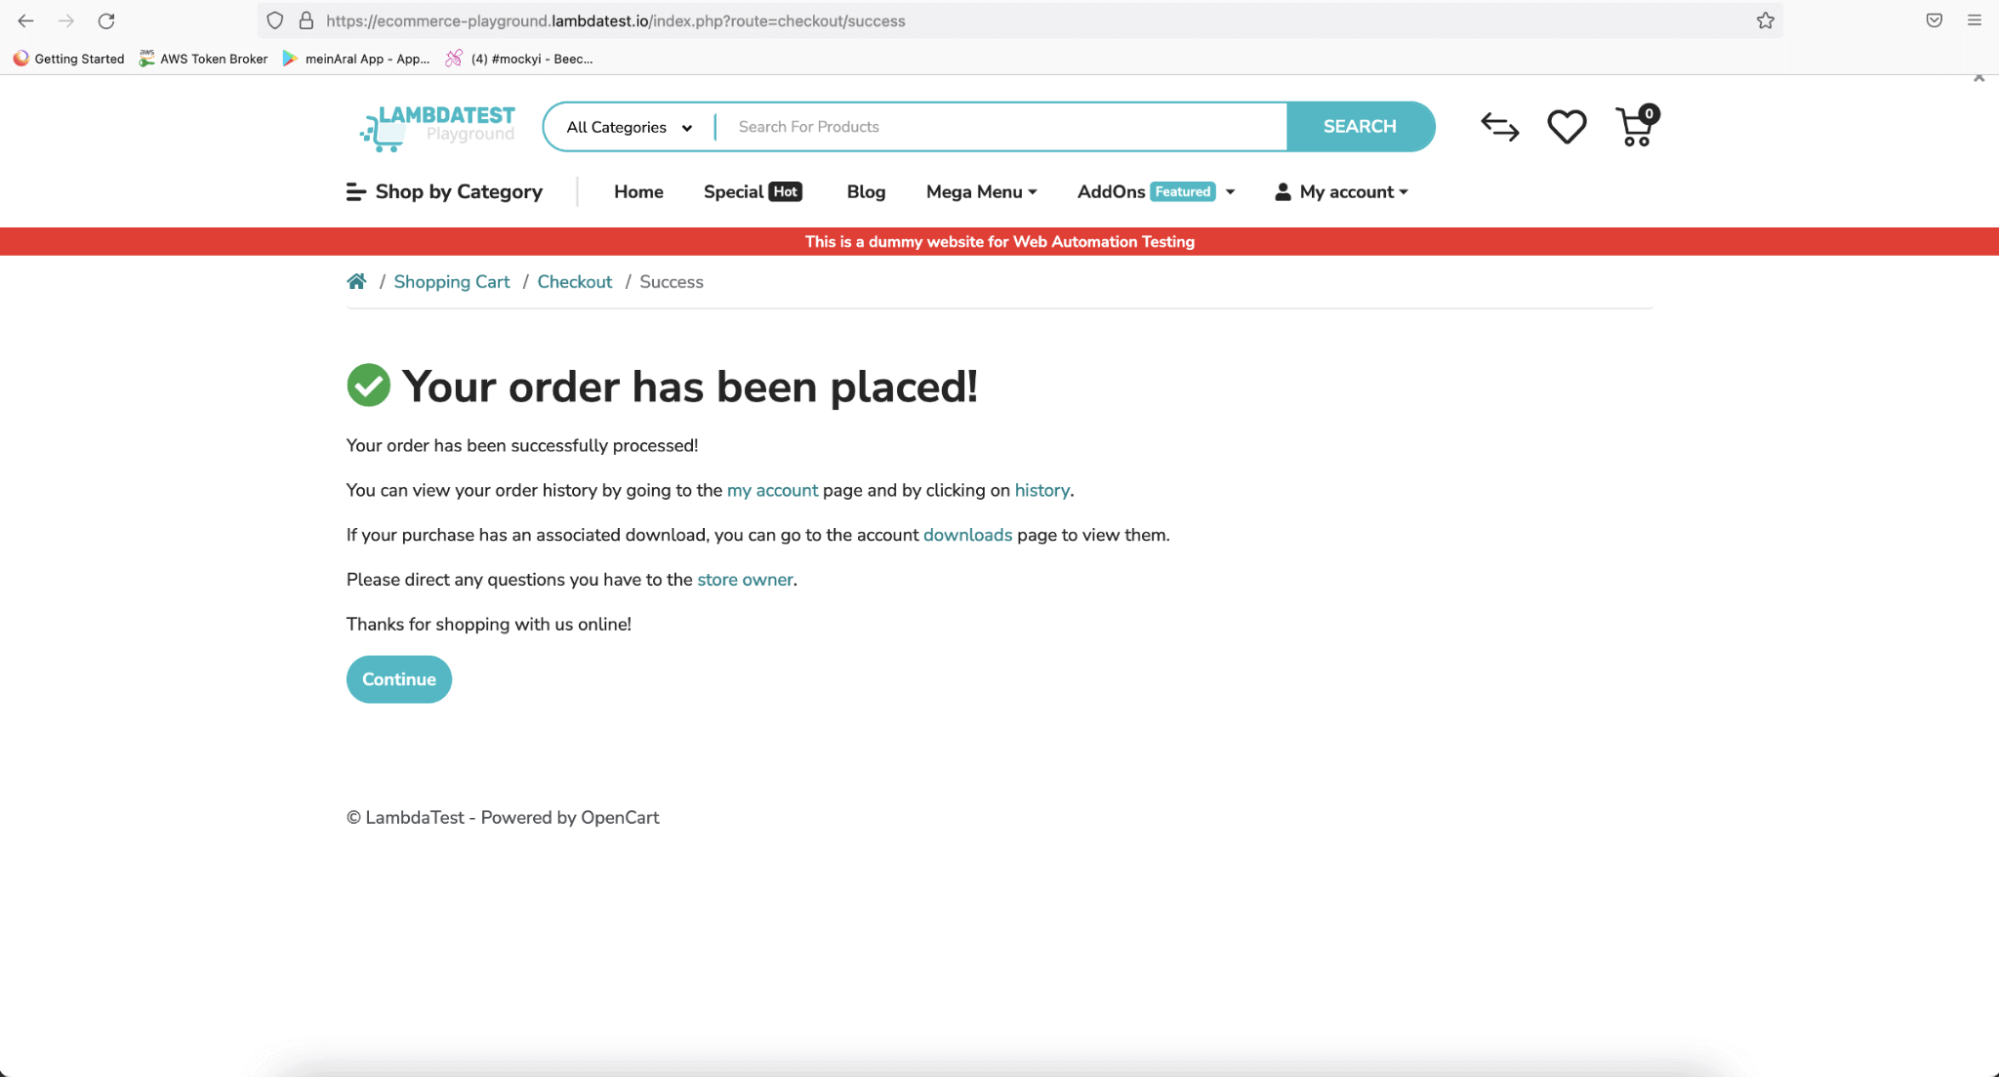
Test 5: Order Success Test
We have completed almost our test journey, with the last step remaining, where we need to check if the order we placed has been successful.
Below is the Order Success page screenshot as it appears on the LambdaTest ECommerce Playground website.
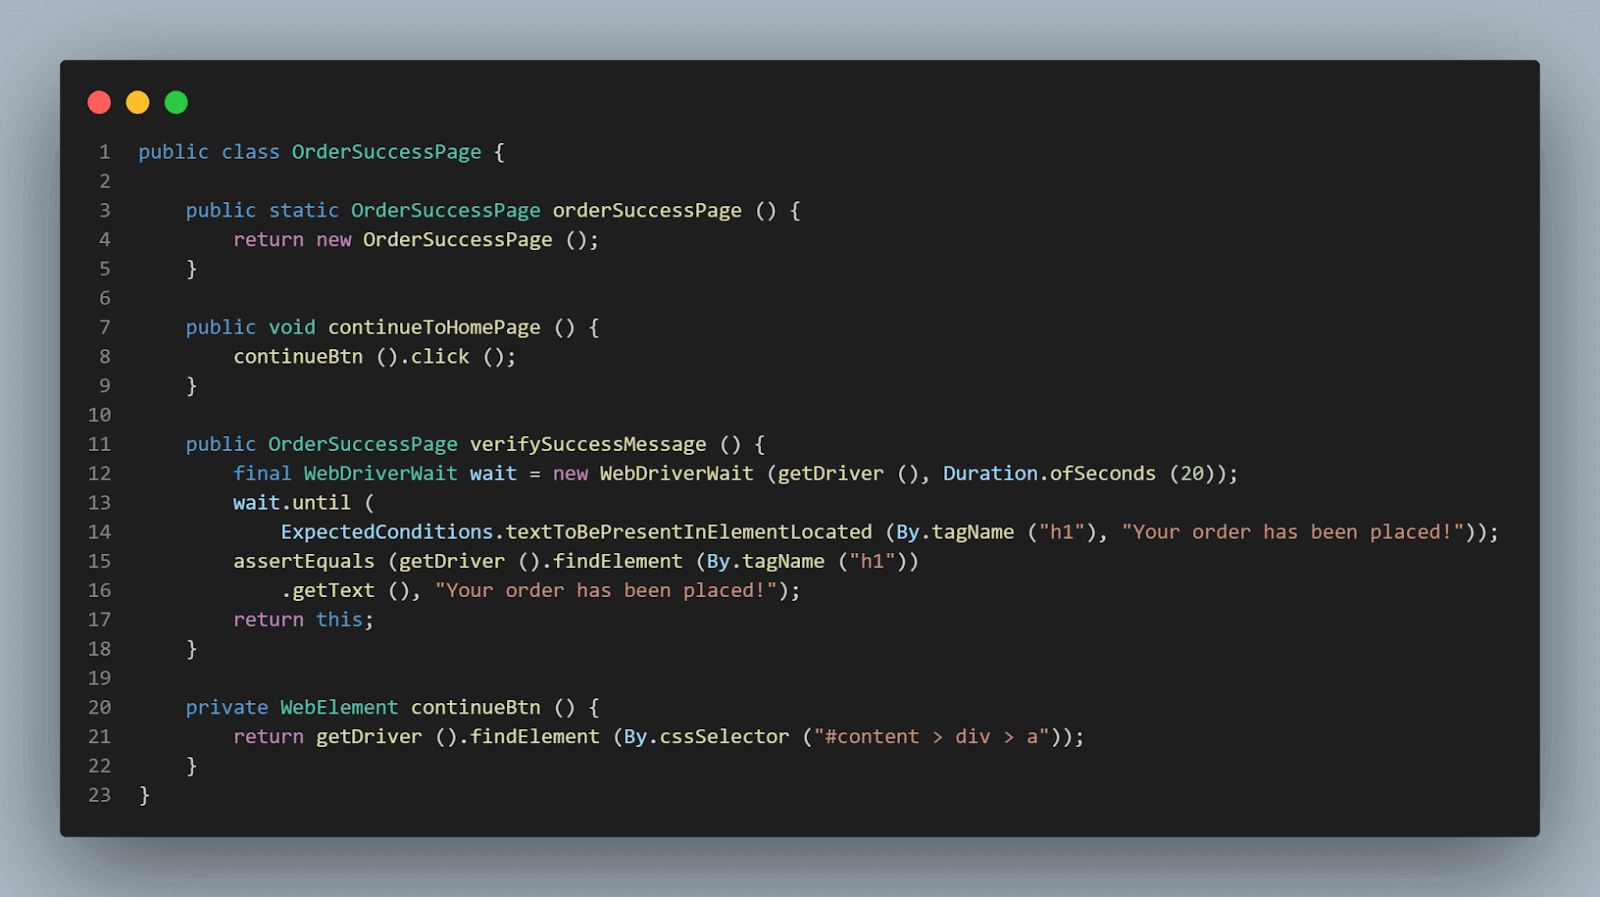
Here is the test that will help us verify whether the Order was successfully placed.

In this test, we will verify the success message displayed on the Order Success Page after placing the order and confirming it.
|
1 2 3 4 5 6 7 8 |
public OrderSuccessPage verifySuccessMessage () { final WebDriverWait wait = new WebDriverWait (getDriver (), Duration.ofSeconds (20)); wait.until ( ExpectedConditions.textToBePresentInElementLocated (By.tagName ("h1"), "Your order has been placed!")); assertEquals (getDriver ().findElement (By.tagName ("h1")) .getText (), "Your order has been placed!"); return this; } |
verifySuccessMessage() method finds the element of the success message text on the page and compares it with the expected text “Your order has been placed!” and returns the instance of the Order Success Page class so this method could be chained with other methods of Order Success Page class.
|
1 2 3 4 5 6 |
private WebElement continueBtn () { return getDriver ().findElement (By.cssSelector ("#content > div > a")); } public void continueToHomePage () { continueBtn ().click (); } |
Once the verification of the success message is done, we would be clicking on the Continue button, which will help us navigate to the Home Page marking the end of the end to end test journey for the product purchase on LambdaTest ECommerce Playground website.
Running the Tests
There are two ways to run the tests, and in both ways, tests would be running on the LambdaTest cloud platform on the Chrome Browser.
Cloud-based test infrastructure like LambdaTest provides instant access to an online Selenium Grid of 3000+ real browsers, devices, and operating systems. Development and testing teams can accelerate their release cycle by running tests in parallel and cutting down test execution by multiple folds.
Also, subscribe to LambdaTest YouTube Channel and get detailed tutorials around Selenium automation, Cypress automation, and more.
- From the IDE using TestNG.
- From the CLI using Maven.
TestNG
TestNG is used as a test runner. Hence testng.xml has been created, using which we will run the tests by right-clicking on the file and selecting the option Run ‘…\testng.xml’. But before running the tests, we need to add the LambdaTest username and access Key in the Run Configurations since we are reading the username and accesskey from System Property. Add Values in the Run Configuration as mentioned below:
-Dusername = < LambdaTest username >-DaccessKey = < LambdaTest access key >
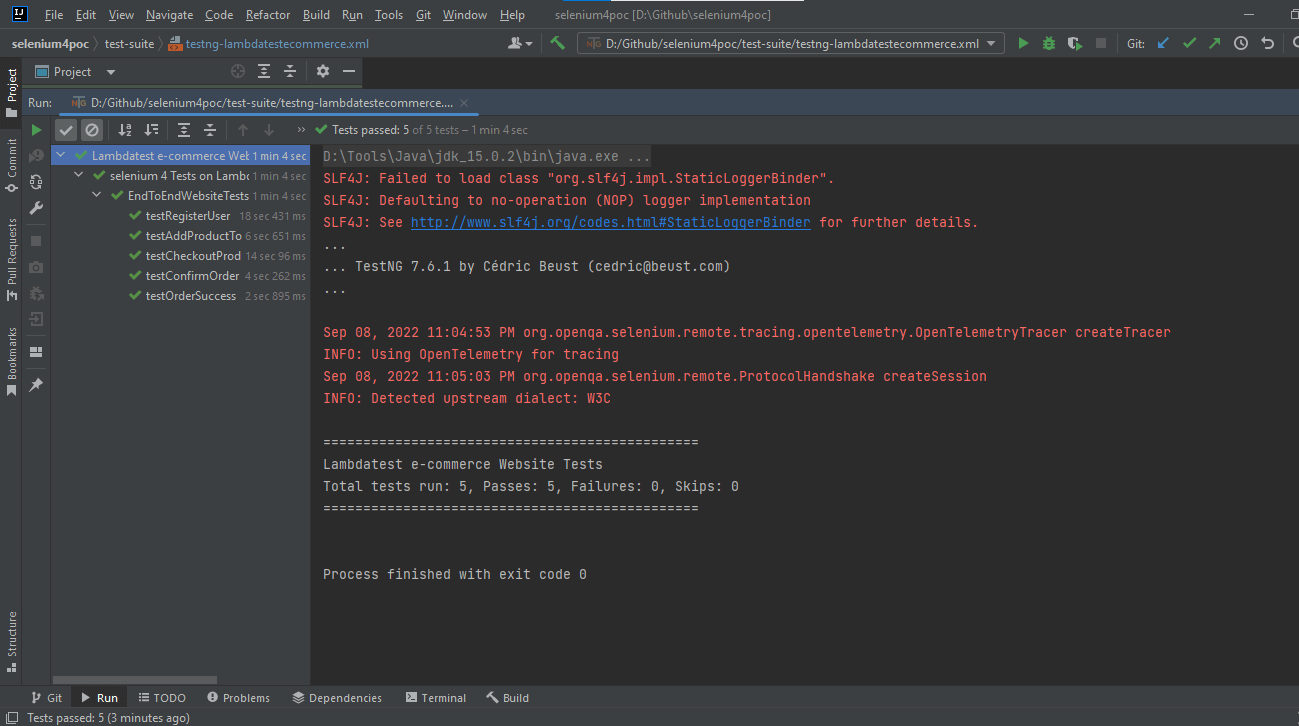
Here is the Screenshot of the test run locally using Intellij IDE.
Maven
To run the tests using maven, the following steps need to be run:
- Open command Prompt/Terminal.
- Navigate to the root folder of the project.
- Type the command:
mvn clean install -Dusername=< LambdaTest username > -DaccessKey=< LambdaTest accessKey >.
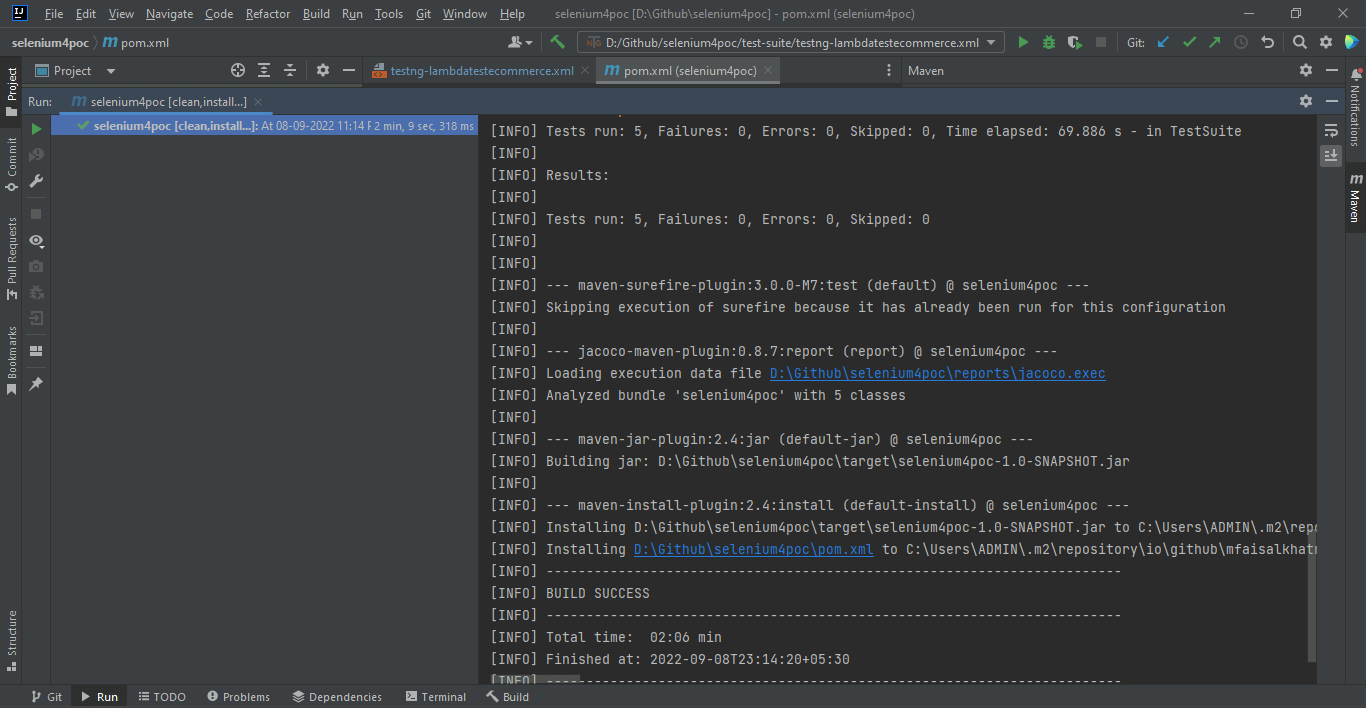
Following is the screenshot from IntelliJ, which shows the execution status of the tests using Maven:
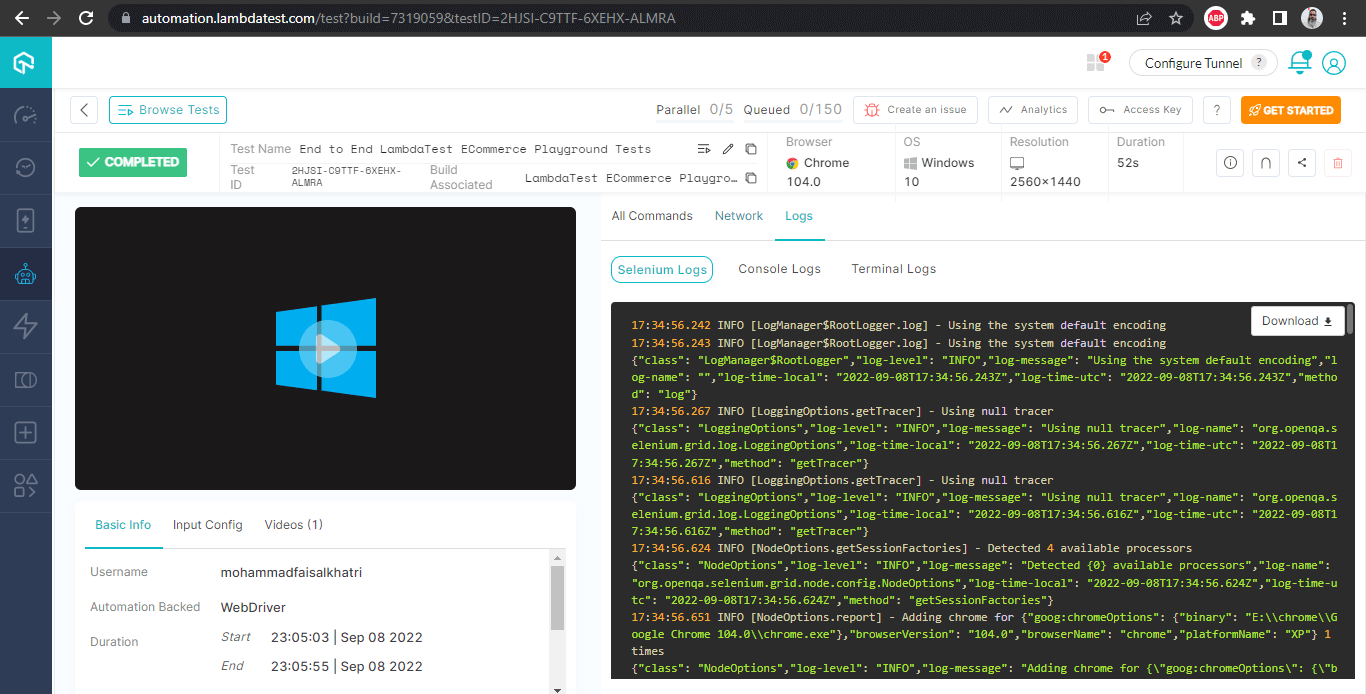
Once the tests are run successfully, we can check out the LambdaTest Dashboard and view all the video recordings, screenshots, device logs, and step-by-step granular details of the test run.
Check out the Screenshots below, which will give you a fair idea of the dashboard for automated app tests.
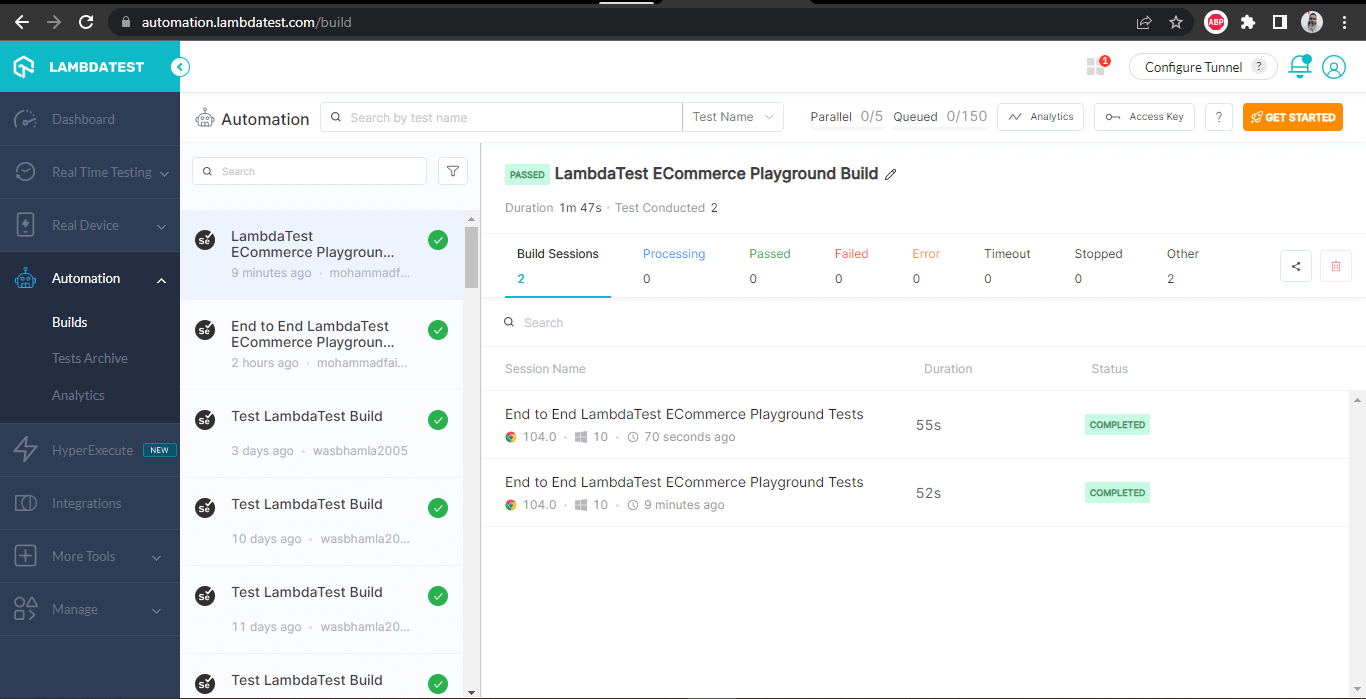
The following Screenshots show the details of the build and the tests that were run.
Again, the test name, browser name, browser version, OS name, respective OS version, and screen resolution are all correctly visible for each test.
It also has the video of the test that was run, giving a better idea about how tests were run on the device.
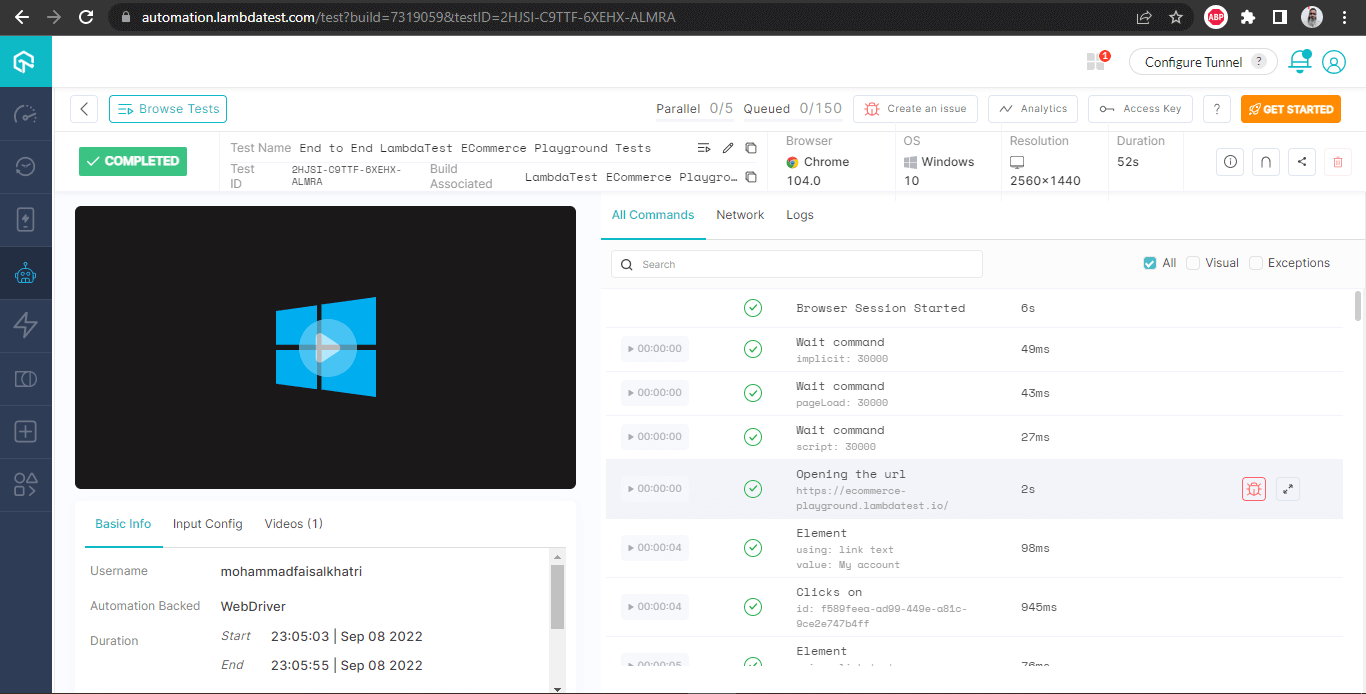
This screen shows all the metrics in detail, which are very helpful from the tester’s point of view to check what test was run on which browser and accordingly also view the Selenium logs.
If you’re a tester or developer looking to enhance your Selenium Java skills, the LambdaTest Selenium Java 101 certification can help you advance your Selenium with Java skills.

Conclusion
In this blog on the fluent interface design pattern, we discussed writing the Selenium web automation tests in a fluent way. We used LambdaTest Ecommerce Playground website to run an end to end test journey where we registered a new user and passed the registration data using the builder pattern. Next, we moved on to add a product to the cart, checkout, and finally confirm the order and verify that the order was successfully placed.
I hope you enjoyed reading the blog on the fluent interface design pattern and learned about Fluent and Builder patterns.
Happy Testing!
Frequently Asked Questions (FAQs)
What is fluent design pattern?
Fluent design pattern is a way of designing and developing software applications in which the components are composed of elements that are visually connected to each other and dynamically change as the user interacts with the application.
What is the fluent user interface?
In contrast to the current prevailing design trend toward skeuomorphic interfaces, the fluent user interface focuses on cleanliness and clarity. By stripping away unnecessary design elements, it helps users focus on the content of an application and makes it easier to navigate.
Why do we need fluent interface?
A fluent interface makes code easier to read because it’s not just one big block of text with everything jammed together; rather, method calls are broken up into individual chunks of coherent commands that stand on their own and can be read separately from each other.


Author’s Profile
Faisal Khatri
Faisal is a Software Testing Professional having 14+ years of experience in automation as well as manual testing. He is a QA, freelancer, blogger and open source contributor. He loves learning new tools and technologies and sharing his experience by writing blogs.
Blogs: 40
Got Questions? Drop them on LambdaTest Community. Visit now


