
How To Generate Code Coverage Report Using JaCoCo-Maven Plugin
Harshit Paul
Posted On: July 23, 2021
![]() 113981 Views
113981 Views
![]() 24 Min Read
24 Min Read
Code coverage is a software quality metric commonly used during the development process that lets you determine the degree of code that has been tested (or executed). To achieve optimal code coverage, it is essential that the test implementation (or test suites) tests a majority percent of the implemented code.
There are a number of code coverage tools for languages like Java, C#, JavaScript, etc. Using the best-suited code coverage tool is important to understand the percentage of code tested and take appropriate actions to ensure that you achieve the ideal code coverage!
For optimal code testing, many companies use the JaCoCo-Maven plugin that helps generate detailed code coverage reports. JaCoCo-Maven plugin is a free code coverage library for Java projects. It is based on the study of existing integration libraries that were created by the EclEmma team. At a larger extent, code coverage does give a brief overview of the product quality as higher the coverage, lesser are the chances of untested code getting into the release cycle.

TABLE OF CONTENT
What is Code Coverage?
Code Coverage is a metric used in software development to represent the extent to which an application’s source code is executed while a test suite is run. To see and evaluate the code coverage of a software application, a report is produced. Then, code quality may be ensured using this code coverage report.
The JaCoCo-Maven plugin is used to generate code coverage reports. Source code with high code coverage has more of its code executed during testing. For example, if the software you are testing contains 100 lines of code and the number of code lines validated in the software is 90, then the code coverage percentage of that software application will be 90%.
Benefits of Code Coverage
Code coverage is a very useful metric for developers, testers, and QA engineers. Here are some of the salient benefits of code coverage:
- Code coverage reports provide useful insights in detection and elimination of dead code. This can be avoided by following implementation best-practices which in turn results in improved code maintainability and better product quality.
- Quality assurance can help detect code that has not been covered using the test implementation.
- Developers can finish the software development process faster, increasing their productivity, scalability, and efficiency. This results in reduced Time to Market (TTM).
As we know, code coverage is very important for every software product. However, if you are a developer or a tester, you can cure your interest in code coverage via the article: Code Coverage vs Test Coverage, which one is better?
Now that we have done a quick recap about the integral aspects of code coverage, let’s deep dive into our core topic i.e. generating code coverage reports using Jacoco Maven plugin.
What is JaCoCo-Maven Plugin?
JaCoCo-Maven (abbreviation for Java Code Coverage) plugin is an open-source code coverage tool for Java. It creates code coverage reports and integrates well with IDEs(Integrated development environments) like Eclipse IDE.
It also integrates smoothly with CI/CD tools (e.g. Jenkins, Circle CI, etc.) and project management tools (e.g. SonarQube, etc.). It is a part of the Eclipse Foundation and has replaced the EclEmma code coverage tool in Eclipse.
How does JaCoCo-Maven Plugin work?
-
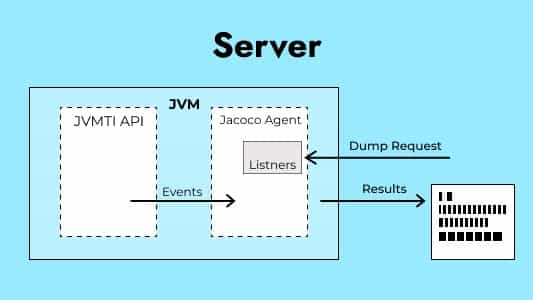
- The JaCoCo-Maven plugin runs the coverage by instrumenting Java code through a runtime agent. In simple terms, you attach this agent to a JVM (Java Virtual Machine) when it starts. This agent is termed as JaCoCo agent. The first execution start-agent starts this JaCoCo Runtime Agent.
- Whenever a class is loaded, JaCoCo can instrument the class so that it can view when the class is called and what lines (of code) are called during the testing process. By keeping this track, it builds up the code coverage statistics which is done on the fly during the second execution (i.e. generate-report).
- By default, the file is created as soon as the JVM terminates but it is also possible to run the agent in server mode. This triggers a dump of the results and the report is created before the termination. Shown below are the internals of the JaCoCo plugin:
- You can define goals and rules in the configuration of the JaCoCo-Maven plugin. This offers you the flexibility to set limits and helps in checking the amount of code coverage.
- Maven-surefire plugin is the default Maven plugin. This runs the tests in JVM and provides coverage reports. While the JaCoCo plugin instruments the code already executed by a plugin (e.g. Surefire plugin). Thus, it is a good practice to check for the dependency of the maven-surefire plugin.
Read – Getting Started With Maven for Selenium
Why is Jacoco Maven Plugin good for code coverage?
The JaCoCo-Maven plugin is appropriate for code coverage because of the following reasons:
- While working on any project, developers mostly prefer IDEs because it simplifies the coding and testing experience. JaCoCo can be installed on Eclipse IDE in the name of EclEmma, by downloading EclEmma from its marketplace.
- It is easy to add the JaCoCo plugin to all types of builds, including ANT, Maven, and Gradle. It can also be integrated with CI/CD tools like Jenkins, Circle CI, etc. This makes it versatile for a lot of use cases.
- The code coverage report generated by JaCoCo is a simple and informative HTML file that can be viewed in any browser or IDE.
- JaCoCo also provides offline instrumentation (i.e., all the classes are instrumented before running any tests).
- Analysis of a report is also quite easy, as it is color-based and provides the exact percentage of code coverage.
How to set up JaCoCo Plugin with Maven?
To get code coverage reports in a Maven project, we first need to set up the JaCoCo Maven plugin for that project. By integrating the JaCoCo plugin, the results of the code coverage analysis can be reviewed as an HTML report. The current version of the JaCoCo-Maven plugin can be downloaded from the MVN Repository.
Here are the steps to integrate JaCoCo Maven plugin with a Maven project:
1. Every Maven project has a pom.xml file, used to declare all the dependencies and plugins. The JaCoCo-Maven plugin is declared in the same POM.xml file. The XML code for the same is :
|
1 2 3 |
org.jacoco jacoco-maven-plugin 0.8.6 |
This is the basic XML code added under the build tag for specifying the JaCoCo plugin in a Maven-based project. We can enhance the functionality (like mentioning when a report should be generated, etc.) by specifying goals and rules in the execution tag.
2. After the version tag, we add the execution tag. This tag prepares the properties or execution to point to the JaCoCo agent and is passed as a VM (in this case, JVM) argument.
3. For running simple unit tests, two goals set in execution tags will work fine. The bare minimum is to set up a prepare-agent and report goals.
|
1 2 3 4 5 6 7 8 9 10 11 12 13 14 15 |
org.jacoco jacoco-maven-plugin 0.8.6 prepare-agent prepare-agent report test report |
- Prepare-agent goal: The prepare-agent goal prepares the JaCoCo runtime agent to record the execution data. It records the number of lines executed, backtraced, etc. By default, the execution data is written to the file target/jacoco-ut.exec.
- Report goal: The report goal creates code coverage reports from the execution data recorded by the JaCoCo runtime agent. Since we have specified the phase property, the reports will be created after the compilation of the test phase. By default, the execution data is read from the file
target/jacoco-ut.exec, and the code coverage report is written to the directorytarget/site/jacoco/index.html.
4. For running simple unit tests, the above configuration works fine. However, we would need constraints to be put on the code coverage reports (e.g. specify the destination directory, etc). This can be done via a configuration tag.
|
1 2 3 4 5 6 7 8 9 10 11 12 13 14 15 16 17 18 19 20 21 22 23 |
org.jacoco jacoco-maven-plugin 0.8.6 prepare-agent prepare-agent ${project.build.directory}/coverage-reports/jacoco-ut.exec surefireArgLine report test report ${project.build.directory}/coverage-reports/jacoco-ut.exec ${project.reporting.outputDirectory}/jacoco-ut |
Configuration of first execution :
As per the above code, you can see some tags like destFile, etc., are specified. Here is a brief description of the tags:
- destFile tag: The destFile tag is used for setting the path to the file containing the execution data.
- propertyName-surefireArgLine tag: This tag sets the name of the property that contains the settings for the JaCoCo runtime agent. This also sets the VM argument line when the unit tests are run.
Configuration of second execution :
As per the above code, you can see tags like dataFile, etc., are specified. Here is a brief description of the tags:
- dataFile tag: The dataFile tag is used to set the path to the file containing execution data.
- outputDirectory tag: This tag sets the output directory for the code coverage reports.
5. We can also add rules to our configuration tag to keep a check on the code coverage percentage. This can be done as shown below:
|
1 2 3 4 5 6 7 8 9 10 11 12 13 14 15 16 17 18 19 20 21 22 23 24 25 26 27 28 29 30 31 32 33 34 35 36 37 38 39 |
org.jacoco jacoco-maven-plugin 0.8.6 prepare-agent prepare-agent ${project.build.directory}/coverage-reports/jacoco-ut.exec surefireArgLine report test report ${project.build.directory}/coverage-reports/jacoco-ut.exec ${project.reporting.outputDirectory}/jacoco-ut jacoco-check check PACKAGE LINE COVEREDRATIO 0.50 |
Configuration of third execution :
Here, a new goal check is defined. The jacoco:check goal is bound to verify the rule specified. Rule is given in the rule tag. You have the flexibility to specify more than one rule.
- Element tag: This tag specifies the element on which the rule has to be applied.
- Limit tag: Tags like counter, value, minimum, etc., are used to limit the code coverage percentage. A command like mvn clean verify can be used for ensuring whether the rule is followed or not.
6. There are multiple goals and rules which can be defined in the JaCoCo-Maven plugin configuration.
Code Coverage Reports Using Maven and JaCoCo Plugin
In this section, we would demonstrate the steps to generate code coverage report using the JaCoCo Maven plugin. The demonstration is done by taking a very simple test scenario. So, let’s get started.
Also, watch this in-depth tutorial to learn how to measure code coverage in Java using the JaCoCo plugin.
Pre-requisites:
- Maven 3.0 or higher: Maven is a project development management and comprehension tool. You can install the latest version from the official Apache Maven website.
- Java 1.5 or higher: You need to ensure that Java is installed on your machine. In case you do not have Java installed, please download the latest version of Java from the official Java website.
- Eclipse IDE for Java Developers: Though you can use the IDE of your choice, for this demo we have used the Eclipse IDE.
Steps to create a simple Maven Project:
-
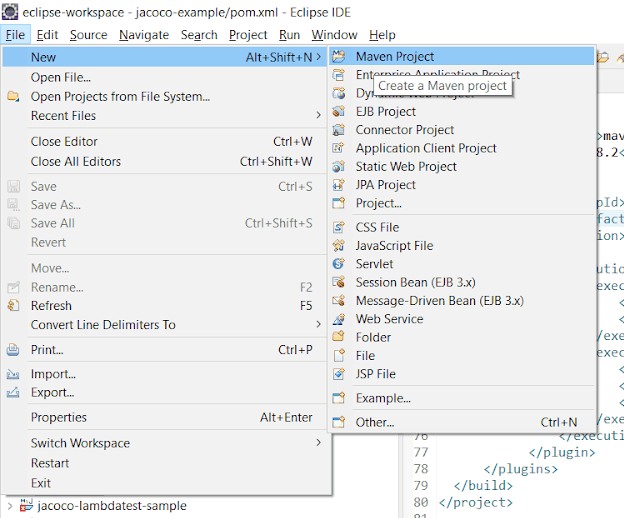
- In Eclipse IDE, Go to File>New>Maven Project.
-
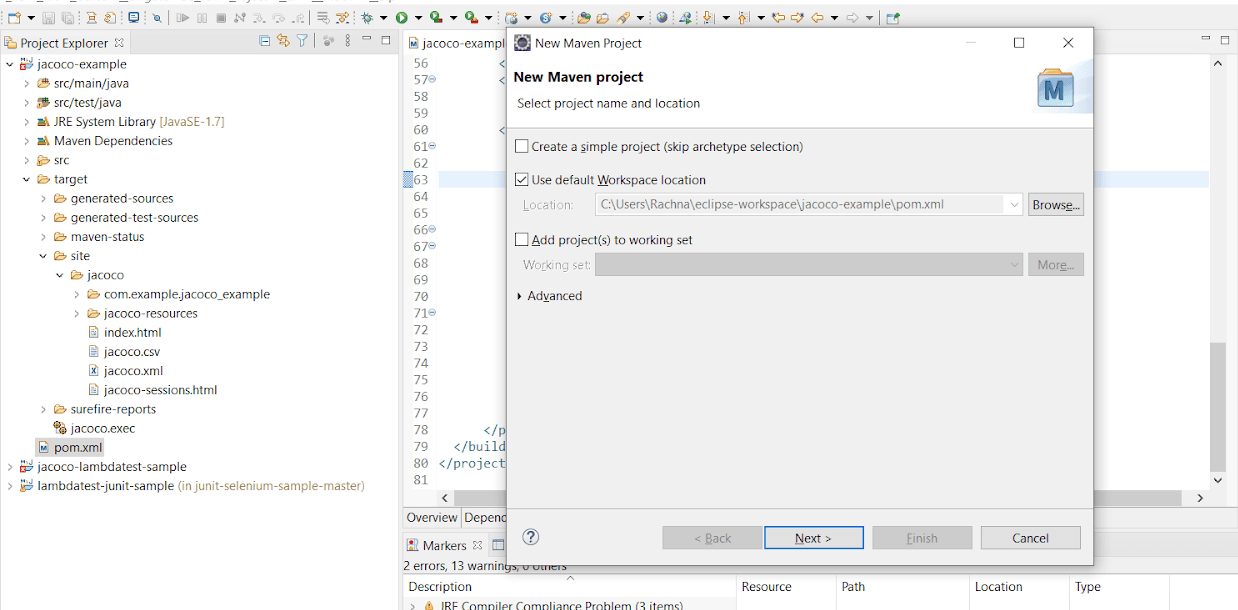
- A new dialog box appears. Make sure that the ‘Use default Workspace location’ checkbox is ticked. Click Next.
-
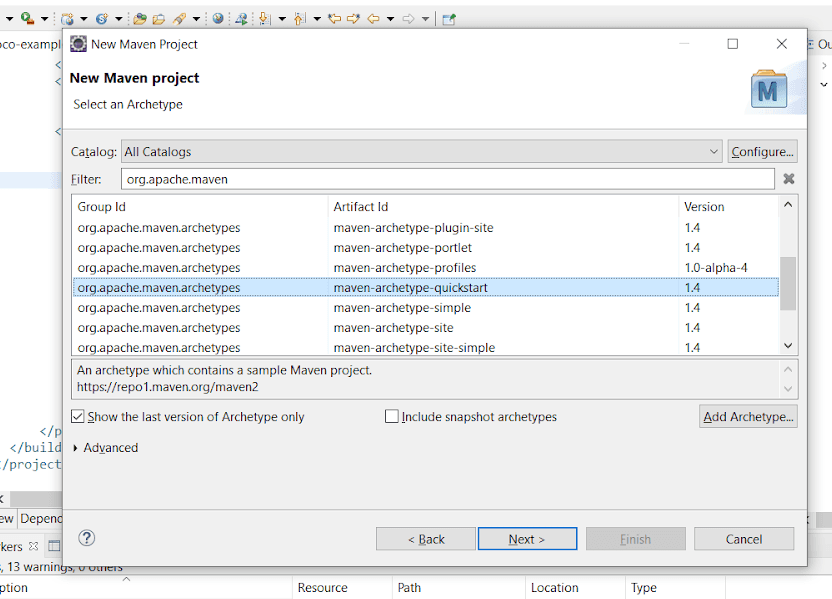
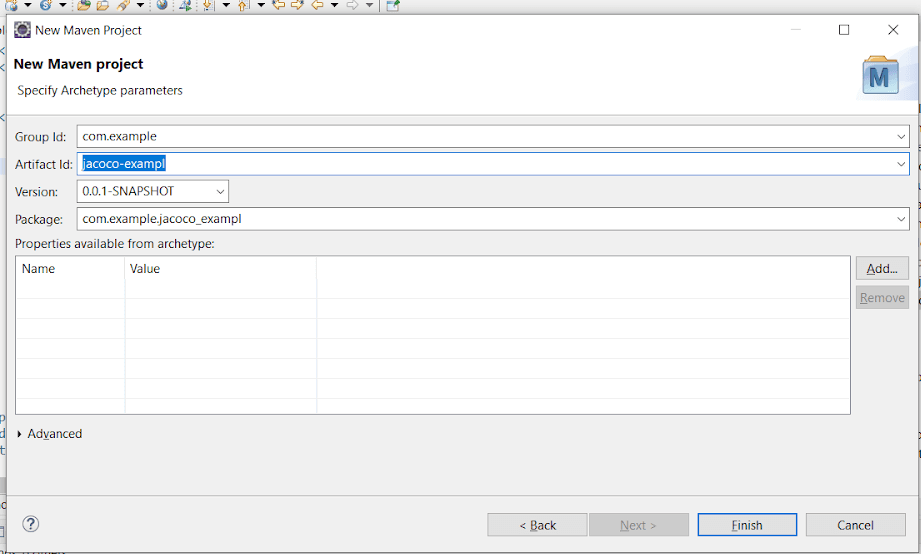
- For selecting Archetype in the project, type org.apache.maven in the textbox that is located next to the Filter. Select maven-archetype-quickstart and click Next.
-
- Now, specify the Group Id as com.example and Artifact Id as jacoco-example. The artifact Id is our project name. Finally, click on the Finish button.
-
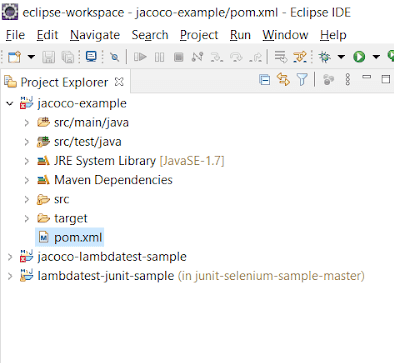
- You can see the project file and folder hierarchy in Project Explorer.
How to specify JaCoCo Maven plugin in POM.xml
-
- Open POM.xml, scroll to tag. We will specify the JaCoCo-Maven plugin in the section that lists the Maven plugins. Just copy the below code and paste it above the tag.
|
1 2 3 4 5 6 7 8 9 10 11 12 13 14 15 16 17 |
org.jacoco jacoco-maven-plugin 0.8.6 <!--first execution : for preparing JaCoCo runtime agent--> prepare-agent prepare-agent <!--second execution : for creating code coverage reports--> report test report |
-
- Since we are demonstrating report generation for automated web testing with JUnit, we will also declare the JUnit dependency in POM.xml.Here is the entire content of POM.xml:
|
1 2 3 4 5 6 7 8 9 10 11 12 13 14 15 16 17 18 19 20 21 22 23 24 25 26 27 28 29 30 31 32 33 34 35 36 37 38 39 40 41 42 43 44 45 46 47 48 49 50 51 52 53 54 55 56 57 58 59 60 61 62 63 64 65 66 67 68 69 70 71 72 73 74 75 76 77 78 |
<!--?xml version="1.0" encoding="UTF-8"?--> 4.0.0 com.example jacoco-example 0.0.1-SNAPSHOT jacoco-example UTF-8 1.7 1.7 <!-- JUnit dependencies added to run test cases --> junit junit 4.11 test <!-- Maven plugin for Project Management --> maven-clean-plugin 3.0.0 <!-- see http://maven.apache.org/ref/current/maven-core/default-bindings.html#Plugin_bindings_for_jar_packaging --> maven-resources-plugin 3.0.2 maven-compiler-plugin 3.7.0 maven-surefire-plugin 2.19.1 maven-jar-plugin 3.0.2 maven-install-plugin 2.5.2 maven-deploy-plugin 2.8.2 org.jacoco jacoco-maven-plugin 0.8.6 prepare-agent prepare-agent report test report |
- From the project directory, traverse to com.example.jacoco_lambdatest package existing in src/main/java. Create a new Java class named LambdaTest.java. We will write a simple setUp() function in it that provides the desired capabilities of Selenium Grid.
|
1 2 3 4 5 6 7 8 9 10 11 12 13 14 15 16 17 18 19 20 21 22 23 24 25 26 27 28 29 |
package com.example.Jacoco_lambdatest; import java.net.MalformedURLException; import java.net.URL; import org.junit.Before; import org.junit.Test; import org.openqa.selenium.By; import org.openqa.selenium.remote.DesiredCapabilities; import org.openqa.selenium.remote.RemoteWebDriver; public class LambdaTest { public static String username = ""; public static String accessKey = ""; public static DesiredCapabilities setUp() throws Exception { DesiredCapabilities capabilities = new DesiredCapabilities(); capabilities.setCapability("platform", "Windows 10"); capabilities.setCapability("browserName", "Chrome"); capabilities.setCapability("version", "87.0"); // If this cap isn't specified, it will just get the any available one capabilities.setCapability("resolution","1024x768"); capabilities.setCapability("build", "First Test"); capabilities.setCapability("name", "Sample Test"); capabilities.setCapability("network", true); // To enable network logs capabilities.setCapability("visual", true); // To enable step by step screenshot capabilities.setCapability("video", true); // To enable video recording capabilities.setCapability("console", true); // To capture console logs return capabilities; } } |
Adding JUnit test Cases in the project:
-
- We will create a simple JUnit test case in AppTest.java. This is provided by default, in the src/test/java under the package name com.example.jacoco_lambdatest.
|
1 2 3 4 5 6 7 8 9 10 11 12 13 14 15 16 17 18 19 20 21 22 23 24 25 26 27 28 29 30 |
package com.example.Jacoco_lambdatest; import java.net.MalformedURLException; import java.net.URL; import org.junit.Before; import org.junit.Test; import org.openqa.selenium.By; import org.openqa.selenium.remote.DesiredCapabilities; import org.openqa.selenium.remote.RemoteWebDriver; import com.example.Jacoco_lambdatest.*; public class AppTest { public static RemoteWebDriver driver; @Test public void testScript1() throws Exception { try { DesiredCapabilities capabilities = LambdaTest.setUp(); String username =LambdaTest.username; String accessKey = LambdaTest.accessKey; RemoteWebDriver driver = new RemoteWebDriver(new URL("https://"+username+":"+accessKey+"@hub.lambdatest.com/wd/hub"),capabilities); driver.get("https://lambdatest.github.io/sample-todo-app/"); driver.findElement(By.name("li1")).click(); driver.findElement(By.name("li2")).click(); driver.findElement(By.id("sampletodotext")).clear(); driver.findElement(By.id("sampletodotext")).sendKeys("Yey, Let's add it to list"); driver.findElement(By.id("addbutton")).click(); driver.quit(); } catch (Exception e) { System.out.println(e.getMessage()); } } } |
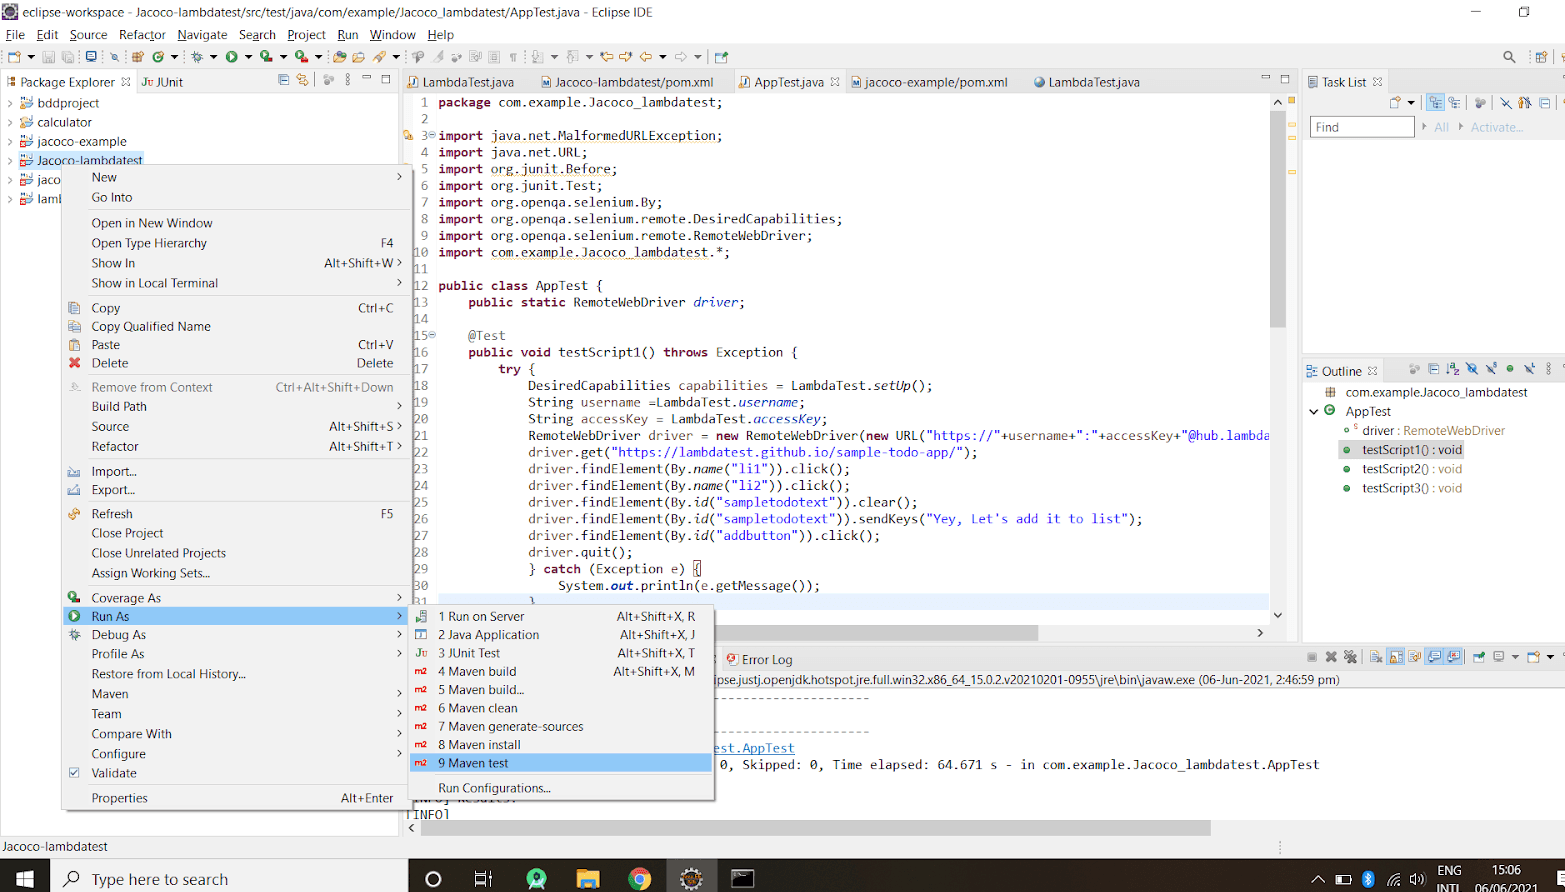
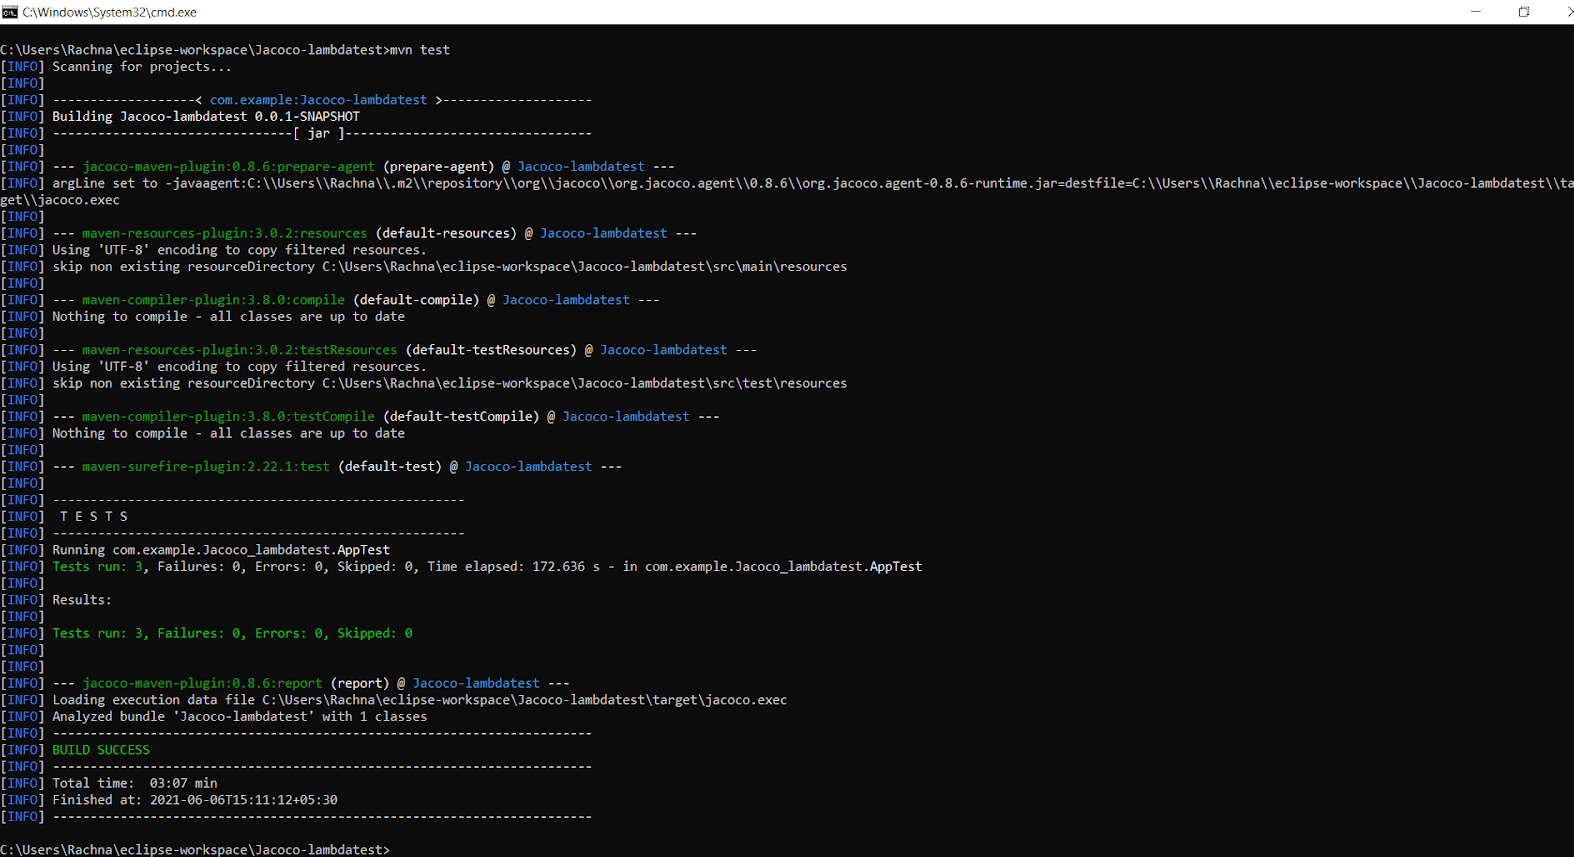
Generating code coverage reports:
-
- Just click on the Run As button and set the configuration as Maven Test.
-
- Instead, you can open cmd(Command Line), traverse to the project folder, and run the maven command, “mvn test.”
-
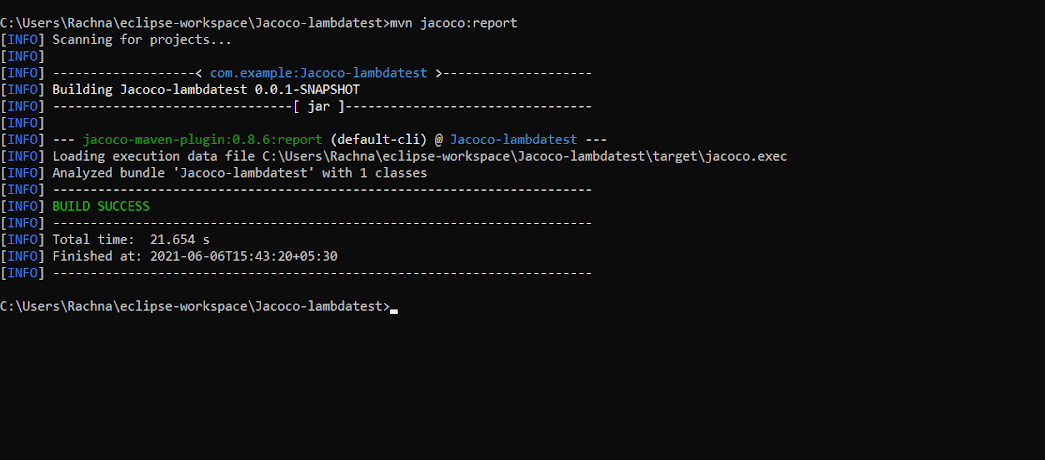
- Running the JUnit tests will automatically set the JaCoCo agent in motion. It will create a report in binary format in the target directory, with path target/jacoco.exec. The output of jacoco.exec cannot be interpreted single-handedly but other tools like SonarQube and plugins can interpret it. As we have earlier specified the jacoco:report goal, it will generate readable code coverage reports in popular formats like HTML, CSV, and XML.
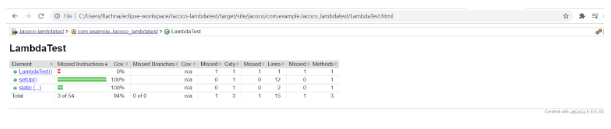
- As the build is successful, go to the target folder, then to the site>jacoco folder. The code coverage report (i.e. index.html) is located in target/site/jacoco/index.html. The report looks like this:

-
- You can drill down at a micro level by clicking on com.example.jacoco_lambdatest>LambdaTest in the report.
-
- By clicking on specific functions, you will have a more detailed view in LambdaTest.java.
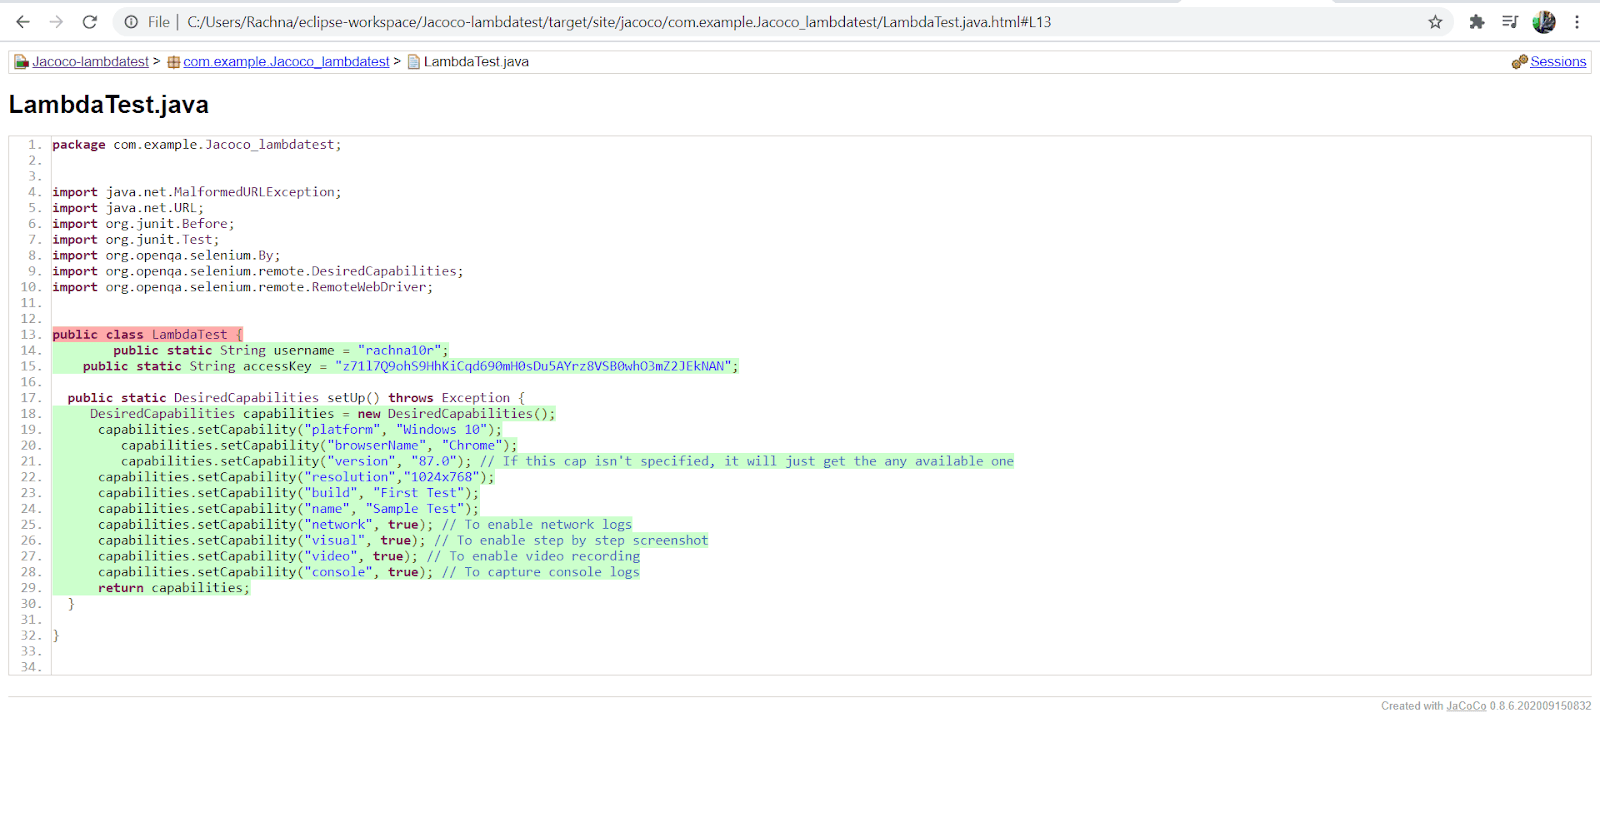
- Here, you would see a lot of diamonds of different colors like green, yellow and red. These are the specifications used in the report to symbolize which line of code was executed and when it was executed. We will learn more about it in the next section of the report analysis. With this, you have successfully generated a code coverage report via the Jacoco Maven plugin.
Analysis of the Code Coverage Report
Our code coverage report shows 94% instruction coverage, 100% branch coverage, which is a great code coverage score. Later, we will try to achieve a 100% code coverage score by adding more test cases.
The 38 instructions shown by JaCoCo in the report refer to the bytecode instructions instead of Java code instructions. The JaCoCo reports help you visually analyze
code coverage by using diamonds with colors for branches and background highlight colors for lines. A brief explanation of the diamonds seen in the code coverage report is below:
- Red diamond indicates that no branches have been exercised during the testing phase
- Yellow diamond indicates that the code is partially covered (i.e. some branches are not exercised)
- Green diamond indicates that all branches are exercised during the test
The same color code applies to the background highlight color for the line coverage.
The report mainly provides three crucial metrics :
- Line coverage: This reflects the amount of code exercised based on the number of Java byte code instructions called by the tests.
- Branch coverage: This shows the percentage of exercised branches in the source code. These are typical if/else or switch statements.
- Cyclomatic complexity: This reflects code complexity via the number of paths needed to cover all possible paths in a code. It also refers to the number of test cases needed to implement to cover the entire code. As there is no switch or statement in the code, the cyclomatic complexity will be 1; only one execution path is sufficient to cover the entire code.
Introducing more test cases for improving code coverage
-
- To achieve better code coverage, more tests need to be introduced that test the code that was not covered earlier via the test implementation.
- Go to AppTest.java in src/test/java to add more test cases.
- The new test cases added to AppTest.java will look as follows:
|
1 2 3 4 5 6 7 8 9 10 11 12 13 14 15 16 17 18 19 20 21 22 23 24 25 26 27 28 29 30 |
@Test public void testScript2() throws Exception { try { DesiredCapabilities capabilities = LambdaTest.setUp(); String username = LambdaTest.username; String accessKey = LambdaTest.accessKey; RemoteWebDriver driver = new RemoteWebDriver(new URL("https://"+username+":"+accessKey+"@hub.lambdatest.com/wd/hub"),capabilities); driver.get("https://lambdatest.github.io/sample-todo-app/"); driver.findElement(By.name("li2")).click(); driver.findElement(By.name("li3")).click(); driver.findElement(By.id("sampletodotext")).clear(); driver.findElement(By.id("sampletodotext")).sendKeys("Yes, Let's add it to list"); driver.findElement(By.id("addbutton")).click(); driver.quit(); } catch (Exception e) { System.out.println(e.getMessage()); } } @Test public void testScript3() throws Exception { try { DesiredCapabilities capabilities = LambdaTest.setUp(); String username = LambdaTest.username; String accessKey = LambdaTest.accessKey; RemoteWebDriver driver = new RemoteWebDriver(new URL("https://"+username+":"+accessKey+"@hub.lambdatest.com/wd/hub"),capabilities); driver.get("https://lambdatest.github.io/sample-todo-app/"); driver.findElement(By.name("li4")).click(); driver.findElement(By.id("sampletodotext")).clear(); driver.findElement(By.id("sampletodotext")).sendKeys("Yes, Let's add it!"); driver.findElement(By.id("addbutton")).click(); driver.quit(); } catch (Exception e) { System.out.println(e.getMessage()); } } |
-
- Let’s run the maven jacoco:report to publish a new coverage report.
-
- JaCoCo offers a simple and easy way to track code coverage score by declaring minimum requirements. Build fails if these requirements are not met else the build is successful.
- These requirements can be specified as rules in POM.xml. Just specify the new execution specifying ‘check’ goal in POM.xml. Add the below code after the second <execution> tag in POM.xml.
|
1 2 3 4 5 6 7 8 9 10 11 12 13 14 15 |
<!--Third execution : used to put a check on the entire package--> jacoco-check check PACKAGE LINE COVEREDRATIO 0.50 |
-
- With this, we are limiting our coverage ratio to 50%. This signifies a minimum of 50% of the code should be covered during the test phase.
- You can run maven clean verify to check whether the rules set in jacoco:check goal are met or not.
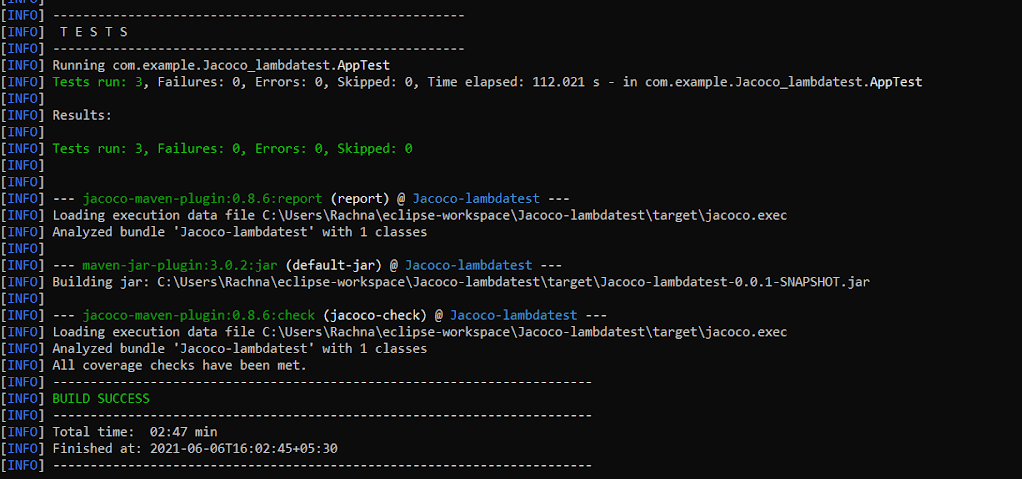
- The log shows “All coverage checks have been met.” as our code coverage score is 94% which is greater than our minimum 50%.
Automation Testing On LambdaTest Selenium Grid using Maven Project with Jacoco Plugin
Selenium testing on the cloud helps you attain better browser coverage, increased test coverage, and accelerated time to market. Parallel testing in Selenium helps you achieve the above mentioned requirements.
LambdaTest Cloud Selenium Grid is a cloud-based scalable Selenium testing platform that enables you to run your automation scripts on 2000+ different browsers and operating systems.
Pre-requisites:
To run the test script using JUnit with Selenium, first, we need to set up an environment. You would first need to create an account on LambdaTest. Do make a note of the username and access-key that is available in LambdaTest profile section.
We will use this sample project for Java Selenium testing.
Importing project to Eclipse IDE:
After downloading a zip file of the project: junit-selenium-sample from GitHub, we import it to Eclipse IDE by following the below mentioned steps:
-
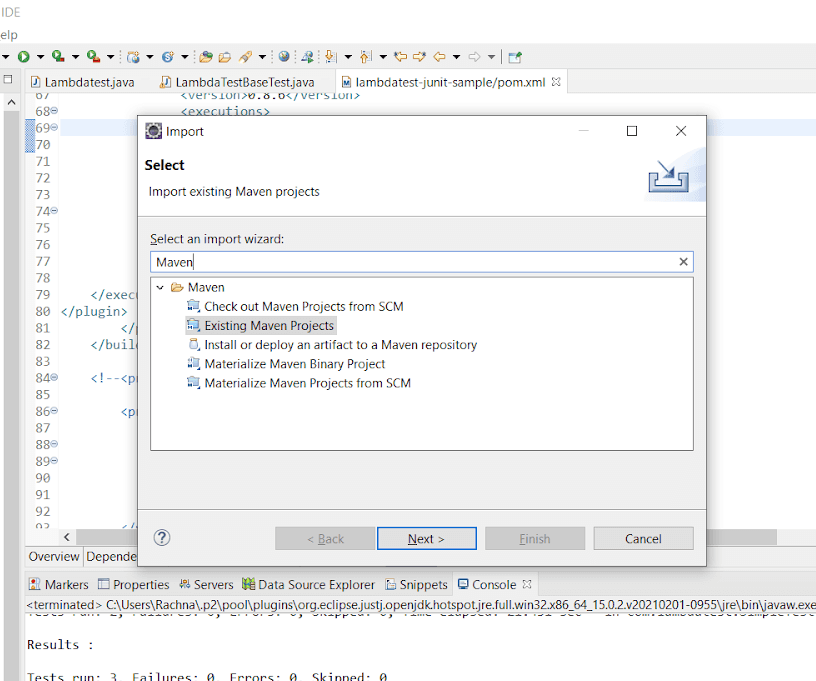
- Go to your Eclipse IDE, click on the File menu and select Import. A new dialog box appears.
- Type Maven in the textbox below and select Existing Maven Projects, and then click Next.
-
- In the next dialog box, click on Browse and traverse to the project folder. Also, tick the checkbox giving the path to the POM.xml file, and click Finish.
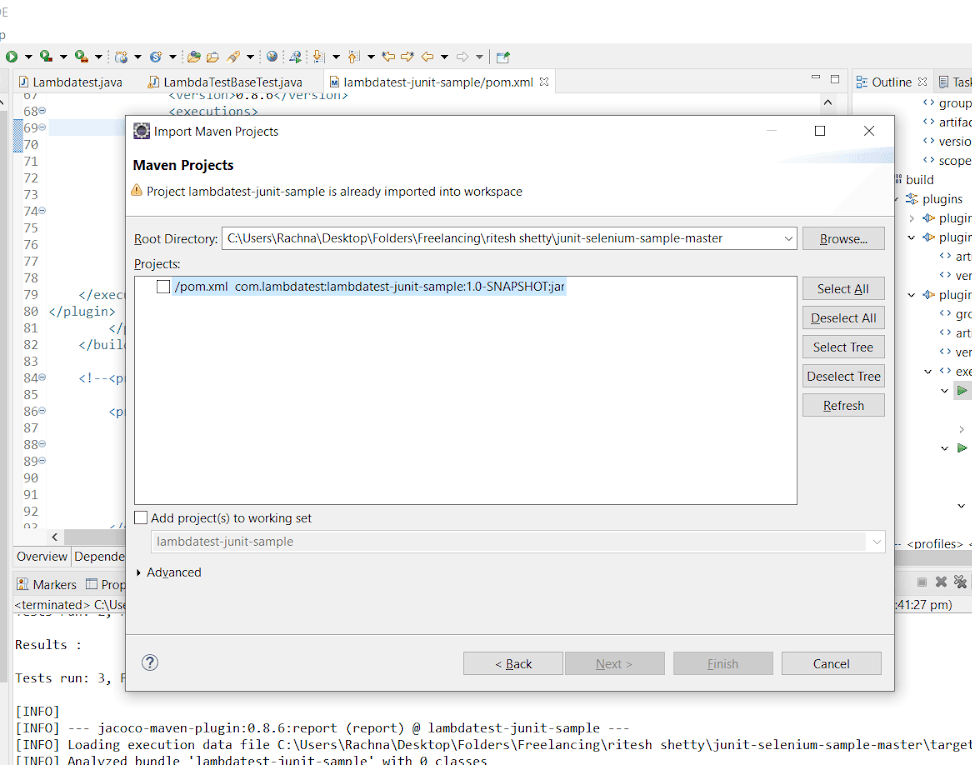
- Your project will be loaded in Eclipse IDE successfully.
Adding dependencies in the POM.xml file:
-
- Open the POM.xml, now add the dependencies of JUnit, Selenium, and JaCoCo Maven Plugin. After adding the dependencies to the code of POM.xml should look like this:
|
1 2 3 4 5 6 7 8 9 10 11 12 13 14 15 16 17 18 19 20 21 22 23 24 25 26 27 28 29 30 31 32 33 34 35 36 37 38 39 40 41 42 43 44 45 46 47 48 49 50 51 52 53 54 55 56 57 58 59 60 61 62 63 64 65 66 67 68 69 70 |
<!--?xml version="1.0" encoding="UTF-8"?--> 4.0.0 com.lambdatest lambdatest-junit-sample 1.0-SNAPSHOT UTF-8 2.19.1 default <!--JUnit dependency--> junit junit 4.12 test commons-io commons-io 1.3.2 test <!--Selenium dependency--> org.seleniumhq.selenium selenium-java 2.52.0 test com.googlecode.json-simple json-simple 1.1.1 test <!--Apache Maven Plugins--> maven-compiler-plugin 3.0 1.8 1.8 maven-surefire-plugin 2.19.1 <!--JaCoCo Maven Plugin--> org.jacoco jacoco-maven-plugin 0.8.6 prepare-agent prepare-agent report test report |
|
1 |
<em><a href="https://github.com/rachnaagrawal/junit-selenium-sample/blob/master/pom.xml" target="_blank" rel="nofollow noopener">Github</a></em> |
Configuring the Desired Capabilities for JUnit Automation Testing:
-
- To connect to LambdaTest Selenium Automation Grid, the first thing done is invoking a remote webdriver. This remote driver requires some capabilities like browser, browser versions, operating system, etc., to build an environment. The code to it looks as follows:
|
1 2 |
WebDriver driver = new RemoteWebDriver(new URL("https://" + username + ":" + accesskey + "@hub.lambdatest.com/wd/hub"), DesiredCapabilities.firefox()); //A class named DesiredCapabilities is used to create an environment as a Firefox browser. |
-
- In the JUnit automation testing code, the capabilities like browser, browser versions, operating system information, etc., can be customized and are passed via Capabilities Object.
- LambdaTest has made this process very easy by providing an inbuilt Capabilities Generator. The Capabilities Generator will automatically generate the code for desired capabilities based on your input. Such as, our configurations are:
| Fields | Selected Values |
| Operating Systems | Windows 10 |
| Browser | Chrome |
| Browser Version | 62.0 |
| Resolution | 1024×768 |
| Selenium Version | 3.13.0 |
- Selecting the above-specified configuration in the Capabilities generator and paste it to LambdaTestBseTest.java.
Specifying LambdaTest Username and Access Key in required Java Class:
-
- In the Project Explorer, you would see 3 Java classes: LambdaTestBaseTest.java (contains the setup required for Java Selenium testing), Parallelized.java (contains Junit tests for parallel testing on LambdaTest Selenium grid), and SimpleTest.java (contains simple unit tests).
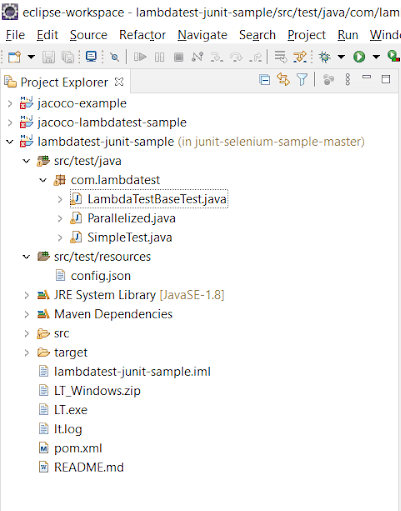
- LambdaTestBaseTest.java fetches the required data like desired capabilities, username, and access key from a config file. This is provided in src/test/resources as config.json.
- Specify the desired capabilities, Username, and Access key in config.json. This JSON file is used as you can provide multiple configurations in it for realizing parallel testing with Selenium. to specify multiple configurations in config.json and then fetch them later.
|
1 2 3 4 5 6 7 8 9 |
[ { "tunnelName":"LambdaTest tunnel", "buildName":"running Java Selenium Tests", "testName":"Jacoco JUnit Test", "username": "user-name", "access_key":"access-key", "operatingSystem" : "win10", "browserName" : "chrome", "browserVersion" : "62.0", "resolution" : "1024x768" }] |
Unit Testing using JUnit with Selenium:
-
- SimpleTest.java is the Java class for specifying a single unit test case for testing and performing code coverage using the JaCoCo Maven plugin.
|
1 2 3 4 5 6 7 8 9 10 11 12 13 14 15 16 17 18 19 20 21 22 23 24 |
package com.lambdatest; import com.lambdatest.LambdaTestBaseTest; import org.junit.Test; import org.openqa.selenium.By; import static org.junit.Assert.assertEquals; public class SimpleTest extends LambdaTestBaseTest { /** * Simple Test case annotation for JUnit Test * @throws Exception */ @Test public void validateUser() throws Exception { driver.get("https://lambdatest.github.io/sample-todo-app/"); driver.findElement(By.name("li1")).click(); driver.findElement(By.name("li2")).click(); driver.findElement(By.id("sampletodotext")).clear(); driver.findElement(By.id("sampletodotext")).sendKeys("Yey, Let's add it to list"); driver.findElement(By.id("addbutton")).click(); } } |
-
- This is a simple Selenium WebDriver test that will open a sample to-do application that will do the following task:
- Mark the first two items as mark done.
- Add a new item to the list.
- Return the added item.
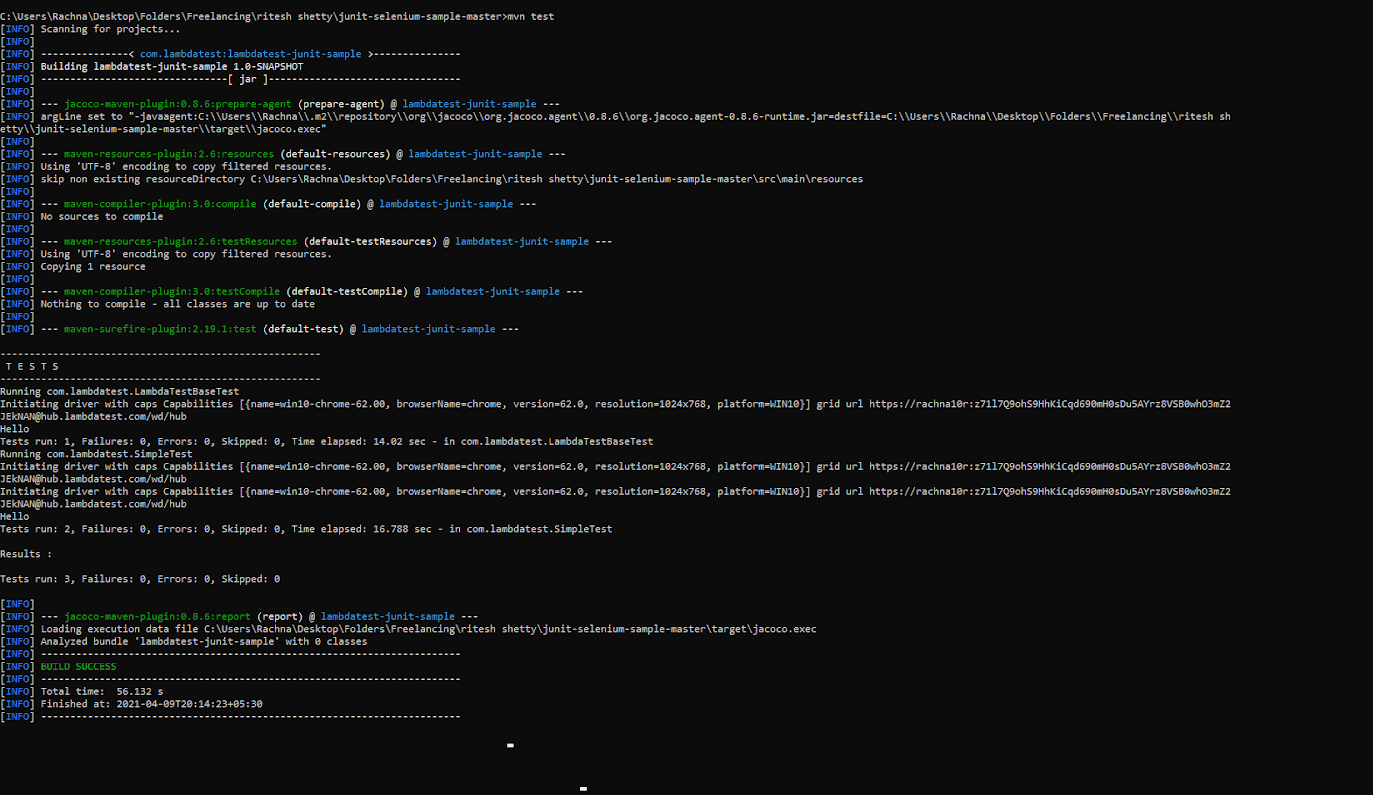
- Trigger the command mvn test on the terminal to build and run the test case.
- This is a simple Selenium WebDriver test that will open a sample to-do application that will do the following task:
-
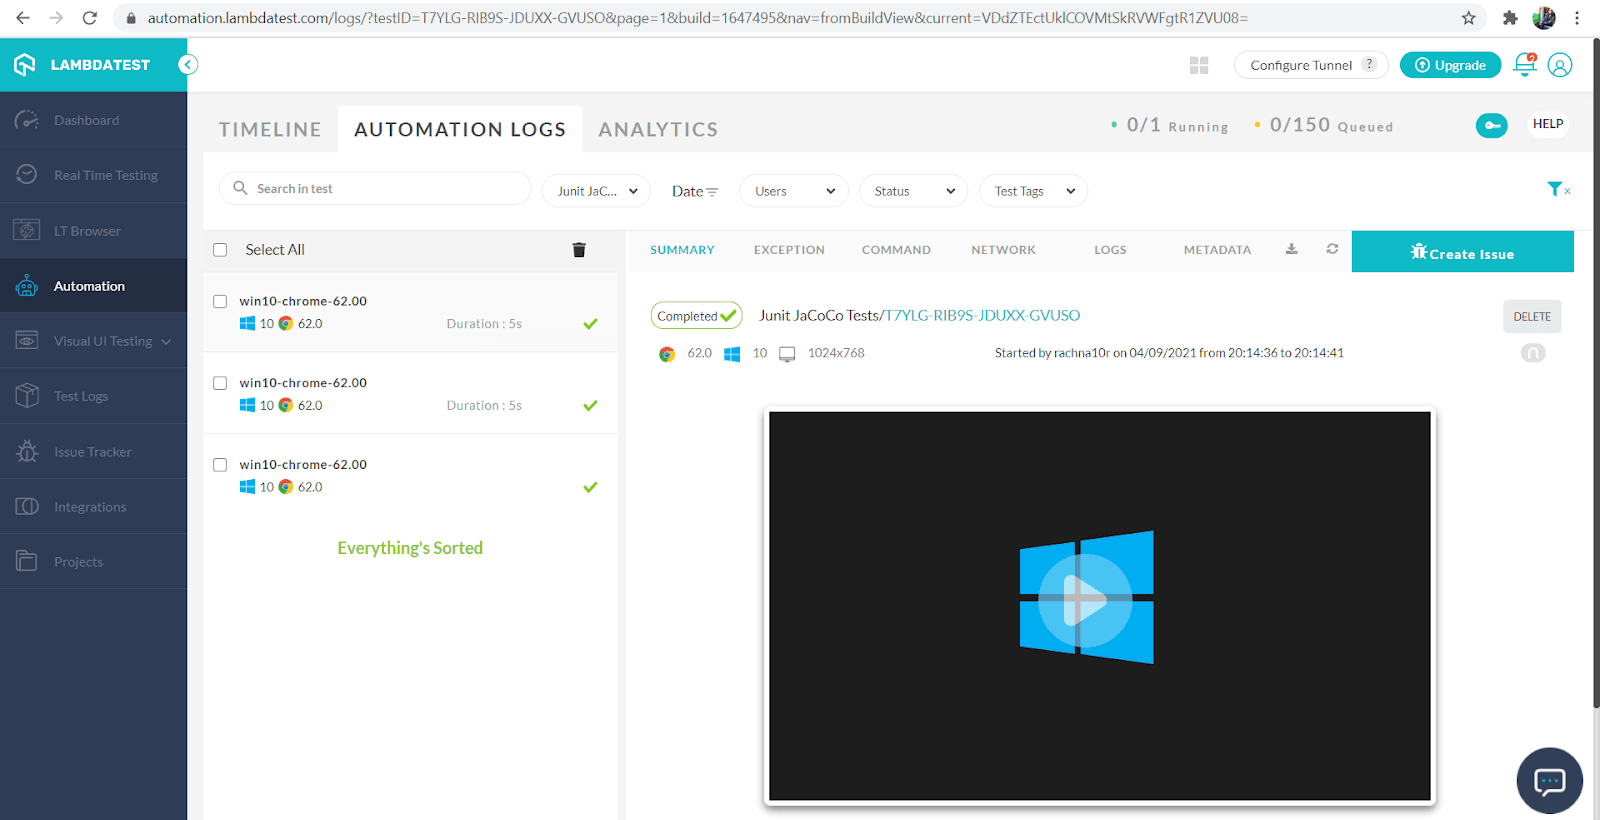
- Now, login to your LambdaTest Account and go to Automation. You will find the tests you ran under the build name “JUnit JaCoCo Tests.”
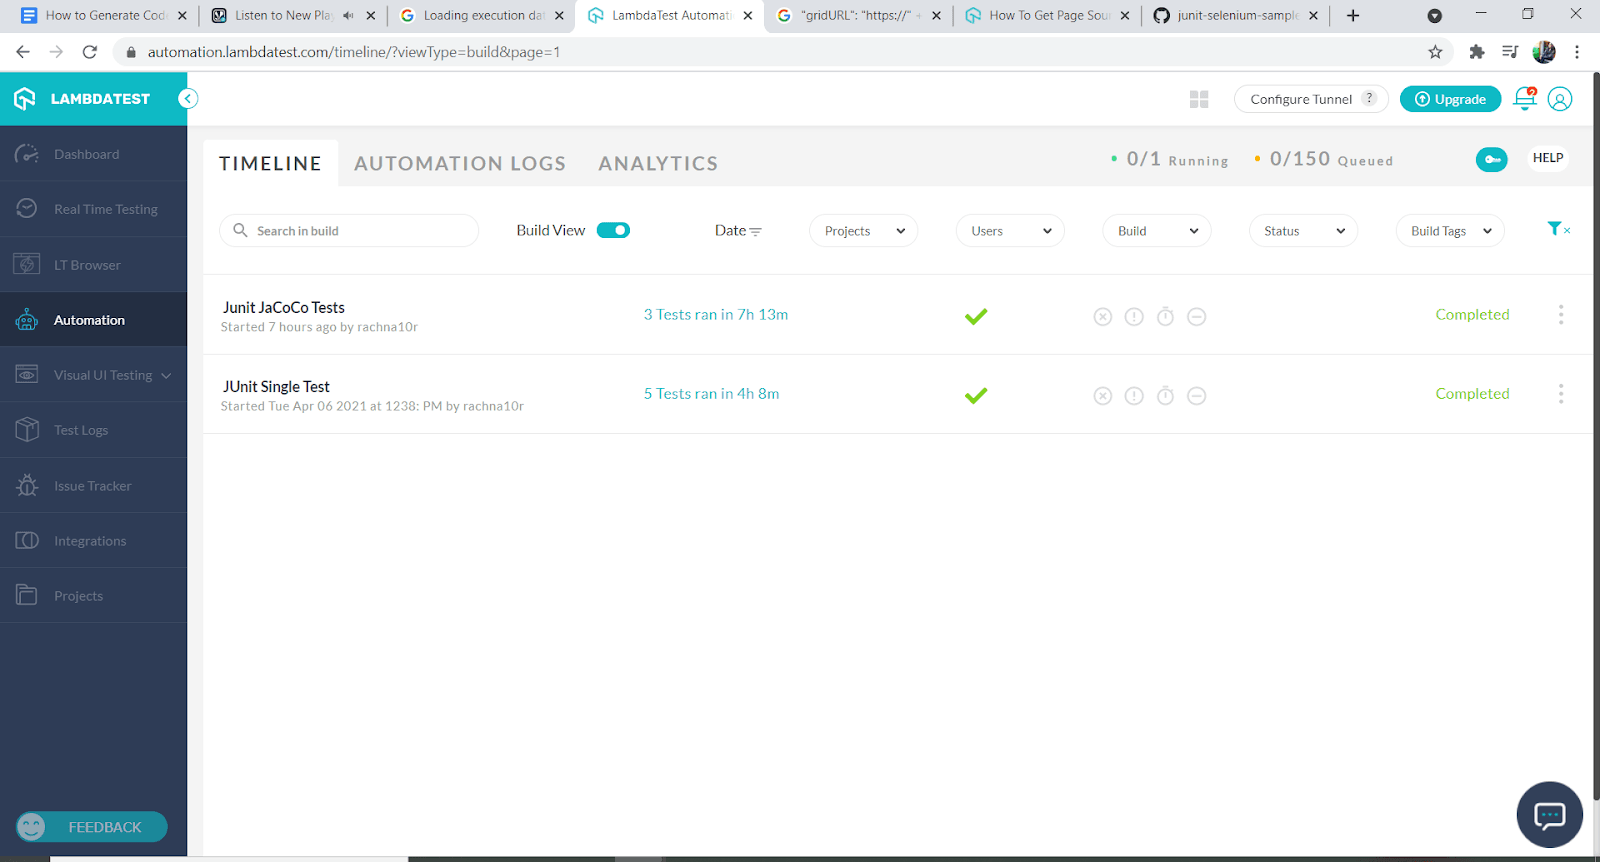
-
- Click on “JUnit JaCoCo Tests” and review them in detail. LambdaTest has recorded the video. So you can see the visuals too.
Generating Code Coverage Report via JaCoCo Maven Plugin:
- Now, as we have run the JUnit test cases on LambdaTest Selenium Grid, the code coverage report should be generated via the JaCoCo Maven plugin.
- Just go to the target folder, you will find the binary format of the report as jacoco.exec.
- You can view the HTML, CSV, and XML form of the code coverage report in the target/site/jacoco folder as index.html, jacoco.csv, and jacoco.xml, respectively.
- Great! Now you can also try to improve the code coverage score and analyze the code coverage report generated.
Conclusion
In this article, we have seen how to use the JaCoCo-Maven plugin to generate code coverage reports for Java projects. We have also leveraged the agility and scalability of LambdaTest Selenium Grid cloud to automate the test processes. Remember, though, 100% code coverage is not responsible for reflecting effective testing, as it only shows the amount of code exercised during tests.
Yet, it helps to reduce the number of bugs and improves the software release quality. Also, it adds minimal overhead to the build process and allows it to keep a certain threshold as the development team adds edge cases or implements defensive programming.

Frequently Asked Questions (FAQs)
What is jacoco?
Jacoco, short for Java Code Coverage, is a widely used code coverage tool in the Java ecosystem. It helps developers analyze how much of their code is tested by collecting data on executed lines and branches. Jacoco generates insightful reports that aid in identifying untested areas and improving test coverage.
What is jacoco used for?
Jacoco is a widely used code coverage tool in software development. It helps assess how much of the codebase is covered by tests. By identifying untested areas, developers can improve software quality and make informed decisions.
How to generate a jacoco report in intellij?
To generate a JaCoCo report in IntelliJ, follow these steps:
- Go to “Run” in the main menu.
- Select “Edit Configurations.”
- Click the “+” button and choose “JUnit.”
- Configure your test suite.
- In the “Coverage” tab, enable “JaCoCo” and set the desired options.
- Run your tests.
- Find the JaCoCo report in the designated output directory.
How to exclude classes from jacoco code coverage?
To exclude classes from JaCoCo code coverage, you can use the maven-surefire-plugin or maven-failsafe-plugin in your Maven project. Configure the tag within to specify the classes you want to exclude. Remember to update your pom.xml accordingly and rerun the code coverage analysis.
How does jacoco work?
Jacoco is a Java code coverage library. It tracks code execution during tests, creating coverage reports. It measures how much of the code is exercised to help identify untested areas. Developers can use this valuable feedback to improve the quality of their software and identify potential bugs.
What is jacoco-maven-plugin?
The jacoco-maven-plugin is a helpful tool for code coverage analysis in Maven-based projects. It allows you to measure the extent to which your tests are exercising your code, providing valuable insights into the quality and effectiveness of your test suite.
What is jacoco code coverage?
Jacoco code coverage is a tool used in software development to measure how much of the source code is tested by automated tests. It helps identify areas of code that lack sufficient test coverage. By providing valuable insights, Jacoco enables developers to improve the quality and reliability of their software.
How to check jacoco code coverage?
To check JaCoCo code coverage, follow these steps:
- Set up JaCoCo plugin in your build tool (e.g., Maven, Gradle).
- Execute test cases with coverage enabled.
- Access the generated report in the specified output directory.
- Review the report for code coverage metrics.


Author’s Profile
Harshit Paul
Harshit works as a product growth specialist at LambdaTest. He is also an experienced IT professional, who loves to share his thoughts about the latest tech trends as an enthusiast tech blogger.
Blogs: 78
Got Questions? Drop them on LambdaTest Community. Visit now


