
Configure Cucumber Setup In Eclipse And IntelliJ
Harshit Paul
Posted On: May 10, 2021
![]() 220208 Views
220208 Views
![]() 10 Min Read
10 Min Read
This article is a part of our Content Hub. For more in-depth resources, check out our content hub on Selenium Python Tutorial and Selenium Cucumber .
Selenium is a test automation framework extensively used by organizations looking to expedite the web-product testing process. As far as test automation frameworks in Java are concerned, TestNG is largely preferred by QA engineers for the development & enhancement of test suites. With the adoption of Agile methodology in the work environment, a diverse set of stakeholders like QAs, technical managers, program managers; including non-technical team members are willing to work collaboratively for the betterment of the product.
The project lifecycle includes the business analysts and other stakeholders testing the application in a thorough manner. This is where the necessity to incorporate Behaviour Driven Development(BDD) comes into the picture. Cucumber is a popular BDD tool that is widely used for test automation.
In the first article of the Cucumber Selenium tutorial series, we will see how to setup Cucumber in Eclipse and IntelliJ for automated browser testing.
TABLE OF CONTENT
If you are already familiar with Selenium with Java, you can also check our TestNG tutorial or if you’re looking to improve your Cucumber interview skills, check out our curated list of Cucumber interview questions and answers.
What is Cucumber framework in Selenium
Cucumber is a Behavior Driven Development(BDD) framework used for automated browser testing. It enables diverse project stakeholders to come up with test scenarios that are written in plain English. This encourages participation from team members that do not come from a technical background.
Read – Selenium Python Tutorial: Getting Started With BDD In Behave
This simple text uses Gherkin language which can be easily understood by technical & non-technical people alike. Cucumber is written using the Ruby programming language but it supports other popular languages like Java, Python, and more.
Advantages of Cucumber framework
Though there are a number of BDD tools like SpecFlow, Behave, etc.; Cucumber for Selenium automation is the most popular of them all.
Here are the major reasons why QA engineers prefer Cucumber over other BDD frameworks:
- Technical and business teams can participate in test scenario development since the tests are written in plain & simple English.
- It supports multiple programming languages like Java, JavaScript, Ruby, Python, etc.
- No prior coding experience is required to come up with test scenarios in Cucumber Selenium. Even a manual tester with zero exposure to coding can be a part of Cucumber framework creation.
- It helps in the creation of modular and reusable code.
Now that we have covered the basics of the Cucumber framework, let’s look at how to setup Cucumber in Eclipse. In this IntelliJ Cucumber tutorial, we would also cover setting up Cucumber for IntelliJ and using Cucumber with Maven. Here are the pre-requisites for installing the Cucumber framework:
- Install Java
- Install Eclipse IDE for Java or Install IntelliJ
- Install Maven
- Install Selenium WebDriver
- Install JUnit
- Install Cucumber
Once you are done with all the installations mentioned above, you can now proceed with Cucumber setup in Eclipse and IntelliJ (i.e. IDE of your choice). We would cover IntelliJ setup with Cucumber in the IntelliJ Cucumber tutorial section of this blog.
How to configure Cucumber in Eclipse
In this section, we will see how to add relevant JARs to a Java project so that you can setup Cucumber in Eclipse. In case you have already worked with the TestNG framework, follow the same procedure for adding required Jars to the project. In case you are just getting started with Selenium automation testing, you may follow the below steps for realizing Cucumber setup in Eclipse:
Step 1
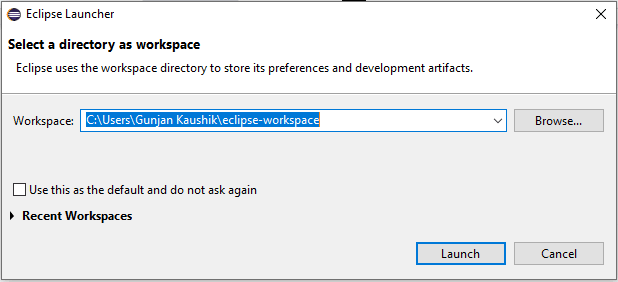
Open the Eclipse exe by double-clicking on the same. If you are opening it for the first time you will get an option to select the workspace where all the created projects will be saved.
You can change your workspace directory anytime by using the Browse button. Since I already had a workspace, I got the following screen:
Step 2
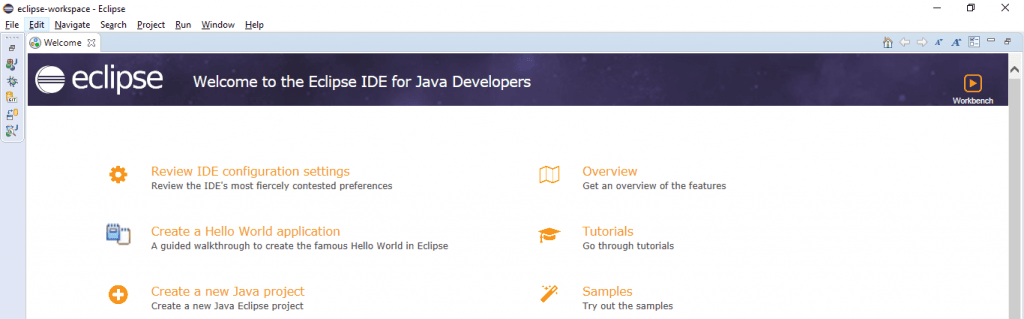
Click on the Launch button and you will see the Welcome window of Eclipse. You may close this window since it not required to setup Cucumber in Eclipse.
Step 3
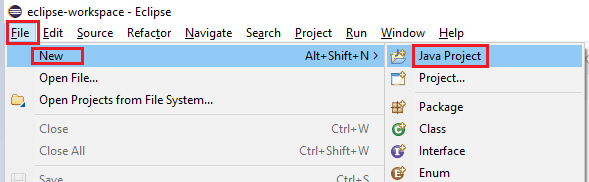
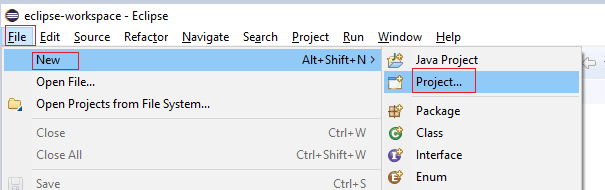
The next step is to create a Project. Navigate to File > New > Java Project for creating a new project.
Step 4
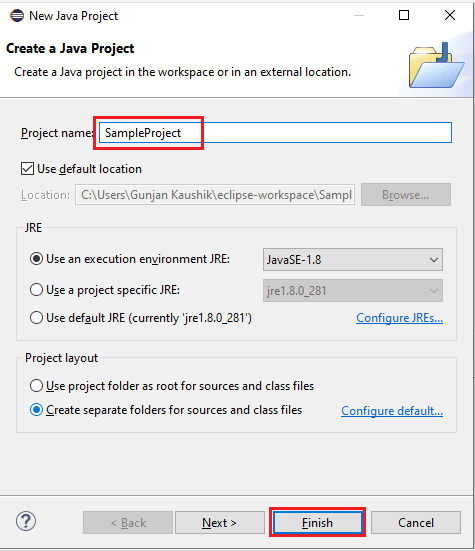
Next, you will see a window to enter your project name. Give a name to your project and click on the Finish button.
You will now be able to see your project in the Project Explorer window.
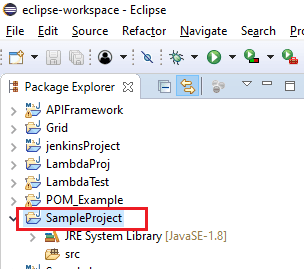
Step 5
Now that the project is ready, it’s time to add the relevant Cucumber and Selenium JARs to your project. I have already downloaded the Selenium and Cucumber JARs since these JAR files are required for to setup Cucumber in Eclipse.
Right-click on the Sample Project in the project explorer and navigate to Build Path > Configure Build Path.
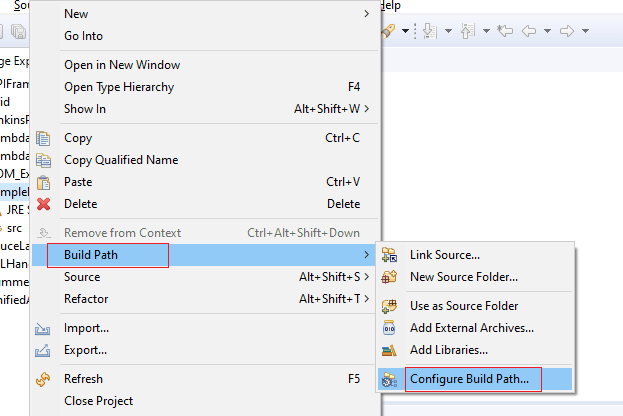
Step 6
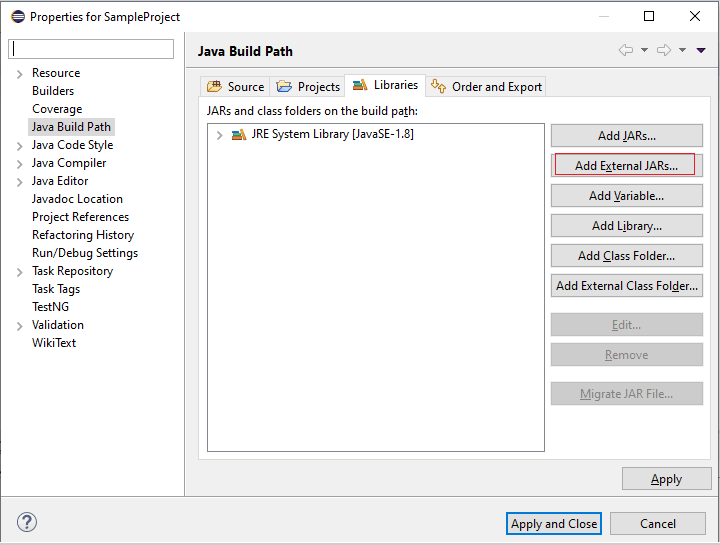
Now click on Add External JARs button
Step 7
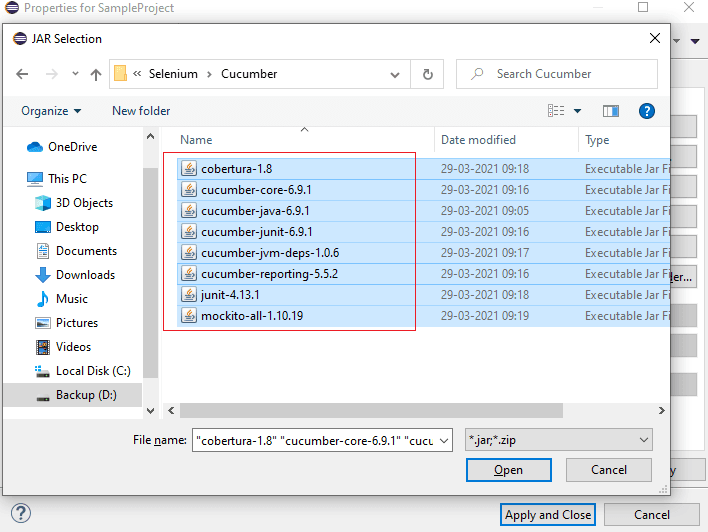
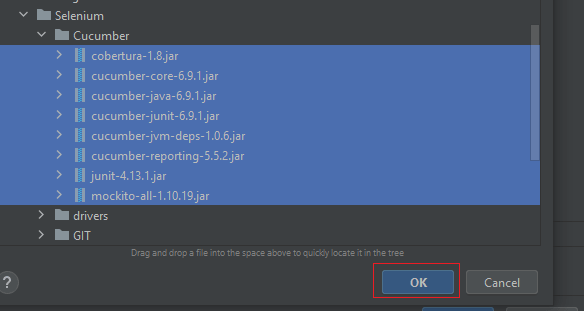
Browse to the location where you have downloaded the JAR files and select the downloaded Cucumber JARs and click Open.
Step 8
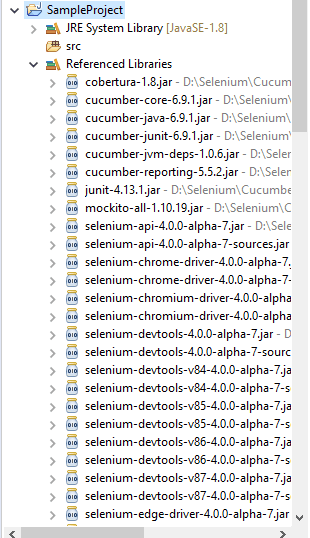
Similarly, add all the Selenium JARs required for completing the Cucumber setup in Eclipse. Upon adding, you will see the JARs under the Libraries tab.

Step 9
Finally, click on Apply and Close. With this, you have successfully imported the JARs required to setup Cucumber in Eclipse. The imported JARs will be visible under the ‘Referenced Libraries’ tab of the project.
You can take this certification as proof of expertise in the field of test automation with JavaScript to empower yourself and boost your career.
Here’s a short glimpse of the Selenium JavaScript 101 certification from LambdaTest:
How to install Cucumber in IntelliJ
Now that we have setup Cucumber in Eclipse, let’s look at how to configure Cucumber with IntelliJ (another popular IDE for Java development) in this section of IntelliJ Cucumber tutorial. Here are the steps to configure Cucumber in IntelliJ.
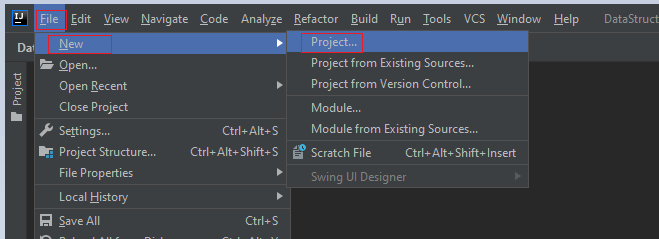
Step 1
Launch the IntelliJ IDE and navigate to File > New > Project.
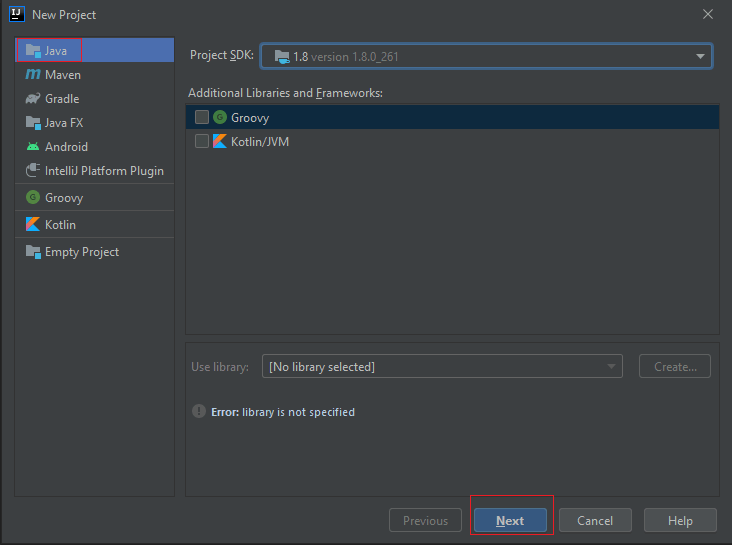
Step 2
Select Java and click on Next till you arrive on the following screen:
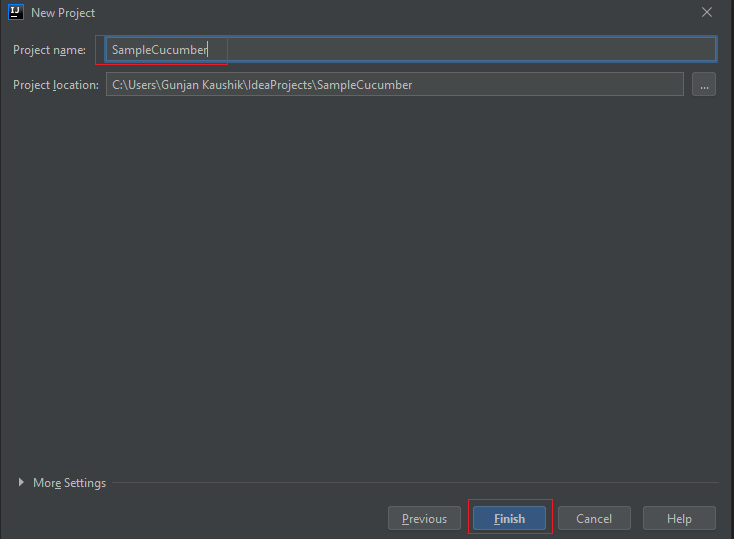
Step 3
Give a name to your project and click on Finish.
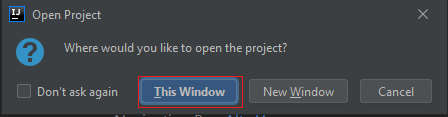
Step 4
You will get a prompt to open the project in the same window or a new window.You can select ‘This Window’.
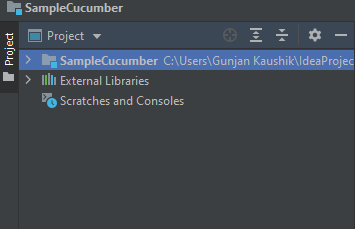
Step 5
You will see the project getting displayed in the project explorer.
Step 6
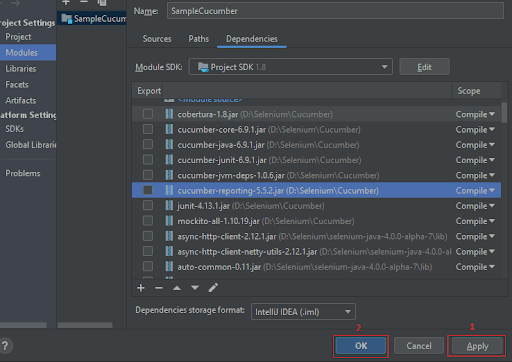
Import the required JARs for Selenium and Cucumber, similar to how it was done with Cucumber setup in Eclipse. To do so, navigate to File > Project Structure > Modules.
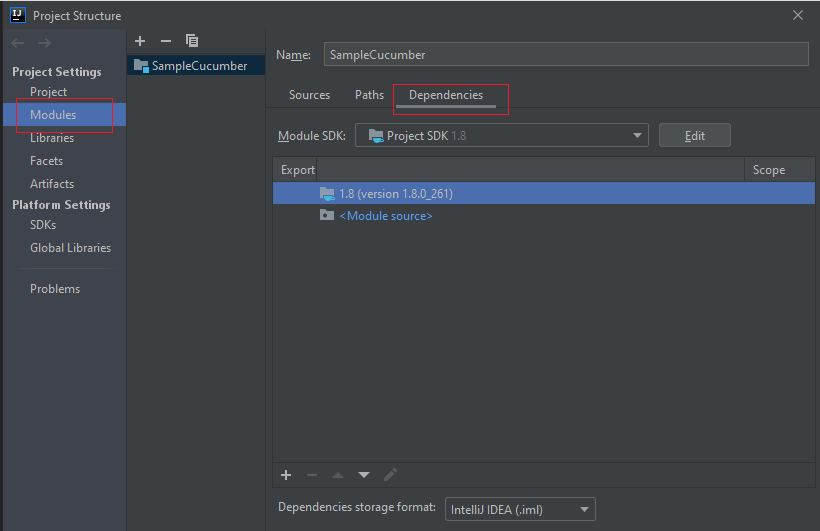
Step 7
As highlighted in the above screenshot select the Dependencies Tab. Add the required dependencies by clicking on the ‘+’ sign towards the bottom and select the required JARs (or Directories).
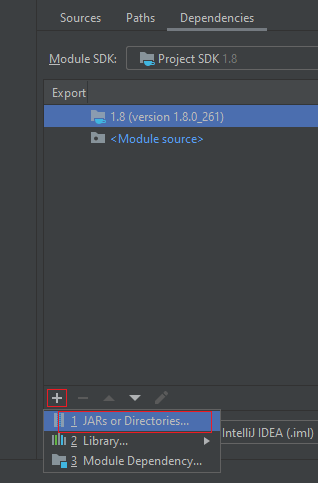
Step 8
Select the JARs through the ‘browse menu’ and click on OK.
Step 9
On similar lines, add the Selenium JARs. With this, the Cucumber Selenium dependencies are added to the project. Click on Apply and then press OK.
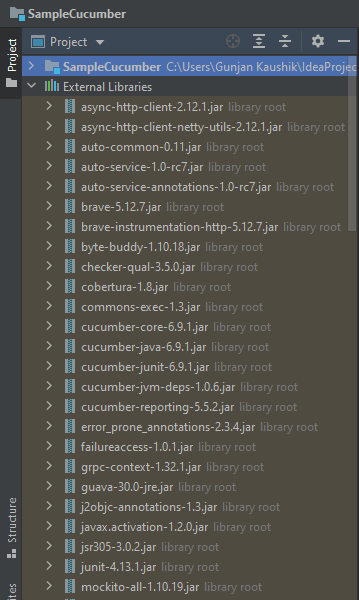
Like Cucumber setup in Eclipse, the imported JARs will be available under the ‘External Libraries’ section.
Now that we have covered the aspects related to IntelliJ and Cucumber in IntelliJ Cucumber tutorial section, let’s move to the next section of this Cucumber Selenium tutorial.
In the Maven tutorial, we saw how Maven eases the project configurations as the dependencies can be added directly in the project’s pom.xml. Maven will directly import the required jars once you specify them in the pom.xml. With this approach, you can do away with the manual addition of jar files to the test automation project.
How to create Cucumber Maven project in Eclipse
We will be using Cucumber setup in Eclipse (using Maven). The steps mentioned in the IntelliJ Cucumber tutorial section still remain the same. Hence, you can use either of the IDEs as per your convenience. This is the primary reason why we covered these two IDEs in this introductory blog of the Cucumber Selenium tutorial series.
Step 1
Navigate to File > New > Project.
Step 2
From the dialog, expand Maven; select Maven Project and click on Next.
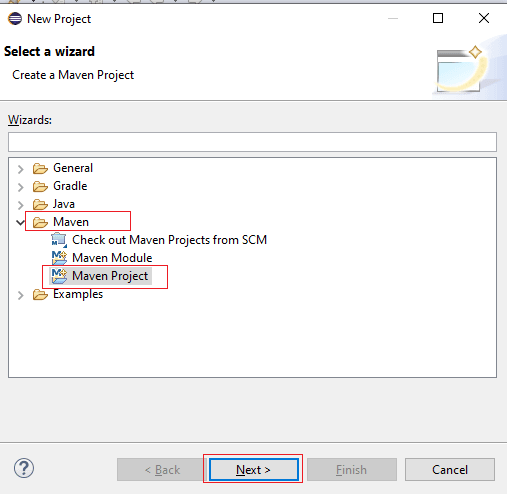
Step 3
Select the checkbox to Create a Simple Project and click on the Next button.
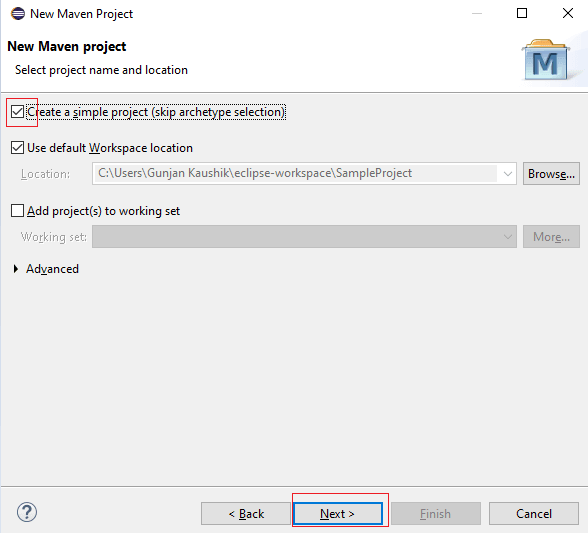
Step 4
Enter the details like the Group and Artifact ID, and click on the Finish button.

You will see your Maven project under the project explorer.

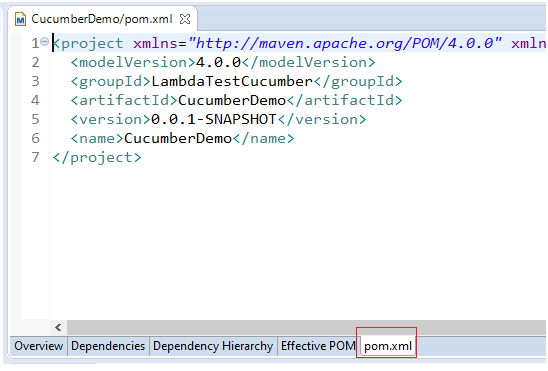
pom.xml will contain package information for resolving the Cucumber and Selenium dependencies.
Step 5
Click on the pom.xml tab at the extreme right. You will see an XML file that contains all the project details.
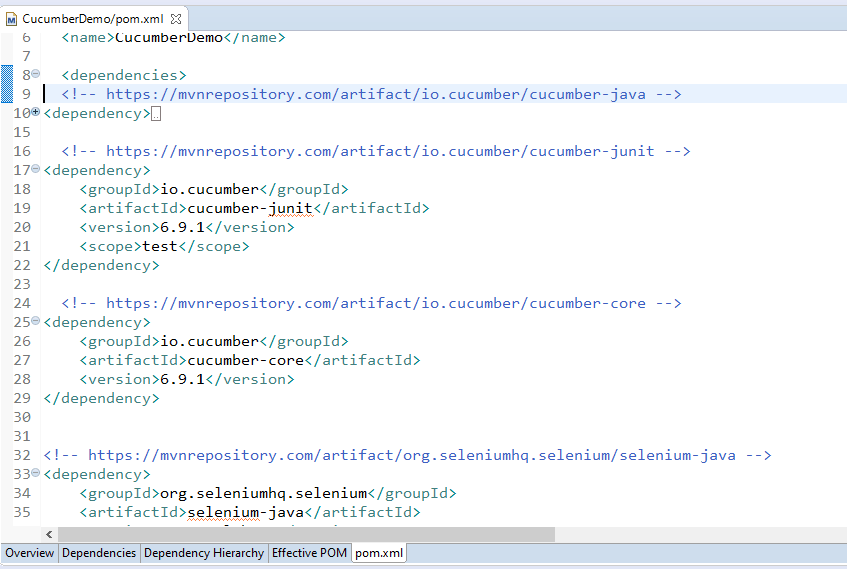
Step 6
Fetch the maven dependencies from the Maven Repository and add the dependencies manually in pom.xml. Shown below is an example pom.xml where we added the required dependencies from the Maven repository:
Save the project and here you go. Your Maven project is all set to be used to run Cucumber tests using Selenium WebDriver. In the next article of the Cucumber Selenium tutorial series, we will demonstrate how to write Cucumber tests for automated browser testing.
Conclusion
Cucumber is one of the widely used BDD frameworks for performing automation testing. The major advantage of a BDD framework like Cucumber is that diverse set of team members can participate in creating impactful test scenarios. Along with Cucumber setup in Eclipse, we also covered setting up Cucumber in IntelliJ in the IntelliJ Cucumber tutorial section of this blog.
In our first blog of the Cucumber Selenium tutorial series, we took a deep dive into how to configure Cucumber & Selenium WebDriver with Eclipse. We also had a look at setting up Selenium WebDriver & Cucumber with IntelliJ IDEA IDE. In order to avoid manual addition of jar files to the project. This is where Selenium with Cucumber using Maven can be super helpful as the Cucumber Selenium dependency is added to the project pom.xml file. Now that we have covered the configuration aspects related to the Cucumber framework, we would look into the implementation aspects in the subsequent blogs of Cucumber Selenium tutorial series.
Happy Testing!


Author’s Profile
Harshit Paul
Harshit works as a product growth specialist at LambdaTest. He is also an experienced IT professional, who loves to share his thoughts about the latest tech trends as an enthusiast tech blogger.
Blogs: 78
Got Questions? Drop them on LambdaTest Community. Visit now


