
How to Handle Shadow Root in Selenium Java
Faisal Khatri
Posted On: April 22, 2024
![]() 138998 Views
138998 Views
![]() 19 Min Read
19 Min Read
When automating tests using Selenium, there may be a scenario where you can’t find an element on a web page even though it seems to be in the Document Object Model (DOM).
In this case, Selenium throws a NoSuchElementException() error.
One common reason for this error is the presence of Shadow DOM elements. Although the element is present in the DOM, it’s encapsulated within a Shadow root in Selenium and requires special handling to access it for automation testing.
In this Selenium Java tutorial, we’ll delve into Shadow root elements, how they work, and, most importantly, how to handle Shadow root in Selenium Java.
TABLE OF CONTENTS
What is a Document Object Model?
Document Object Model is a language-independent and cross-platform interface that serves the HTML or XML document as a tree structure. In this tree structure, each node is an object that represents a part of the document.
When a web page is loaded in the browser, the HTML code is converted into a hierarchical representation of the HTML document called a DOM tree. It has a data model consisting of root nodes and a series of child node elements, attributes, etc.
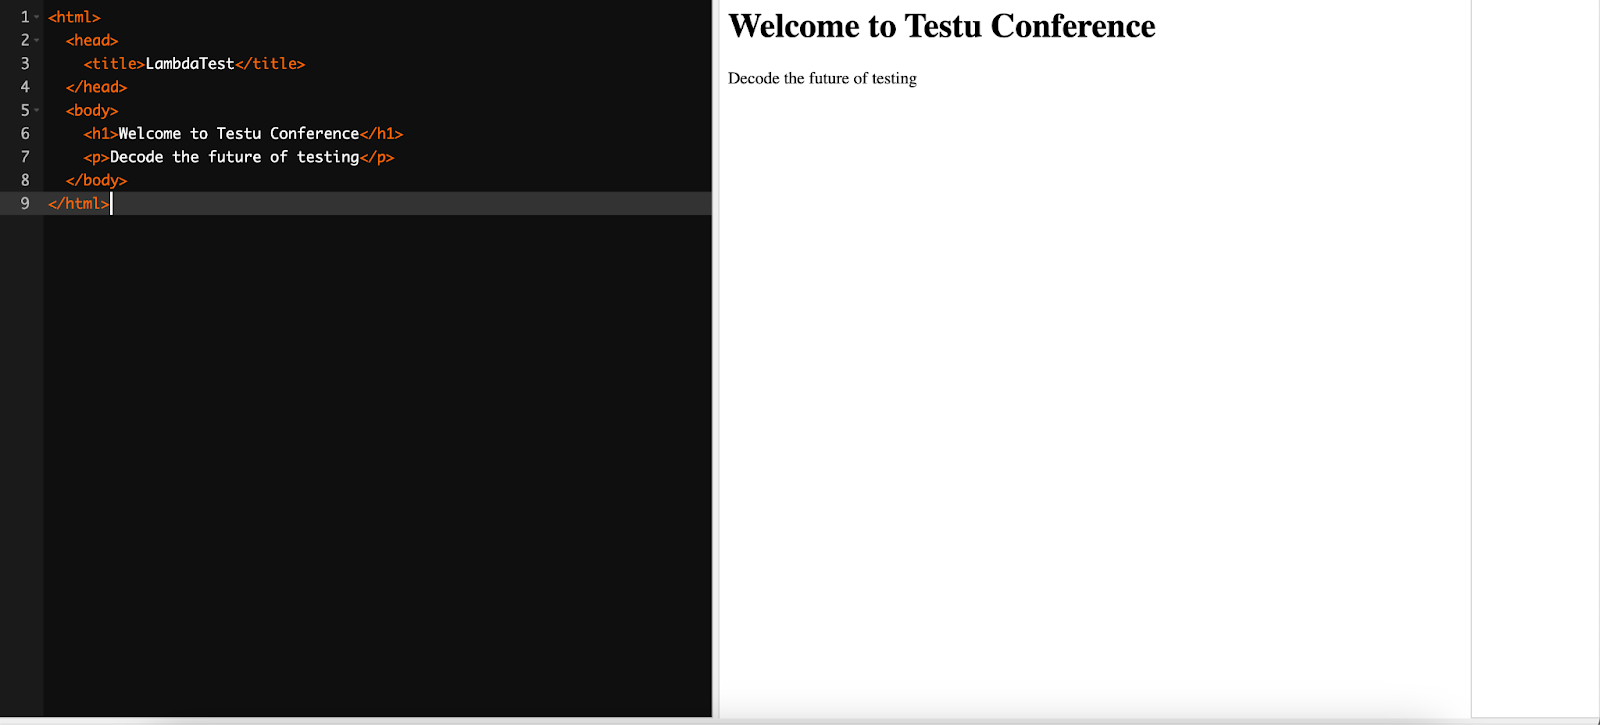
Following is the HTML code when loaded on the web page:
|
1 2 3 4 5 6 7 8 9 |
<html> <head> <title>LambdaTest</title> </head> <body> <h1>Welcome to Testu Conference</h1> <p>Decode the future of testing</p> </body> </html> |
The above HTML code will be represented as a DOM tree as follows:
|
1 2 3 4 5 6 7 8 9 10 |
- Document (root) - html - head - title - "LambdaTest" - body - h1 - "Welcome to Testu Conference" - p - "Decode the future of testing" |
Here is the actual representation of HTML after it is rendered in the browser.
 Note
NoteAutomate Shadow DOM With Selenium on Cloud. Try LambdaTest Today!
Overview of Web Components
Web components are a popular approach to building micro frontends that help develop reusable custom elements.
It helps in the encapsulation and interoperability of individual HTML elements. Web components are based on existing web standards. Widgets and custom components built on the web component standards, can be used with any JavaScript library or framework that works with HTML. Web components work across all modern browsers.
Following are the four different types of web component standards:
- Custom Elements
- HTML Templates
- HTML Imports
- Shadow DOM
In the next section of this tutorial on handling Shadow root in Selenium Java, we will learn more about the Shadow root element of Shadow DOM.
What is Shadow Root?
Shadow root is a part of Shadow DOM. In Shadow DOM, the web browser renders the DOM elements without adding them to the main DOM tree. It is used to achieve encapsulation in HTML documents.
The style and behavior of one part of the document can be kept hidden and separate from the other code in the same HTML document to avoid interference by implementing Shadow DOM.
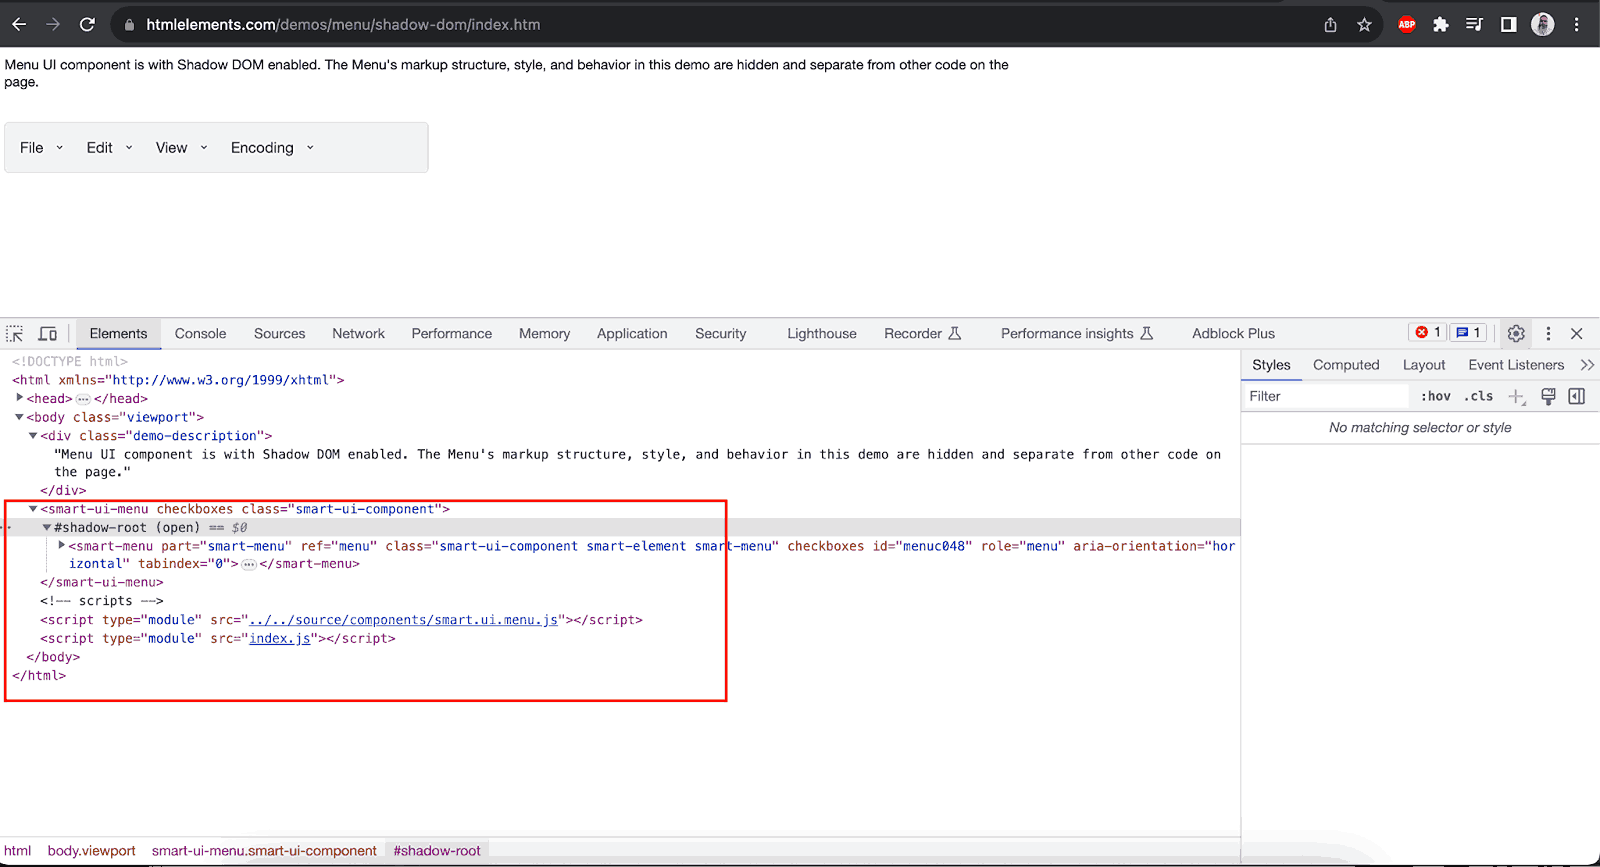
Ideally, the Shadow DOM elements are hidden; however, they can be seen using the developer tools option in the browsers. The below screenshot is an example of Shadow DOM.
In the code below, #shadow-root is called Shadow DOM.
The following pictorial representation will help you understand Shadow DOM easily.
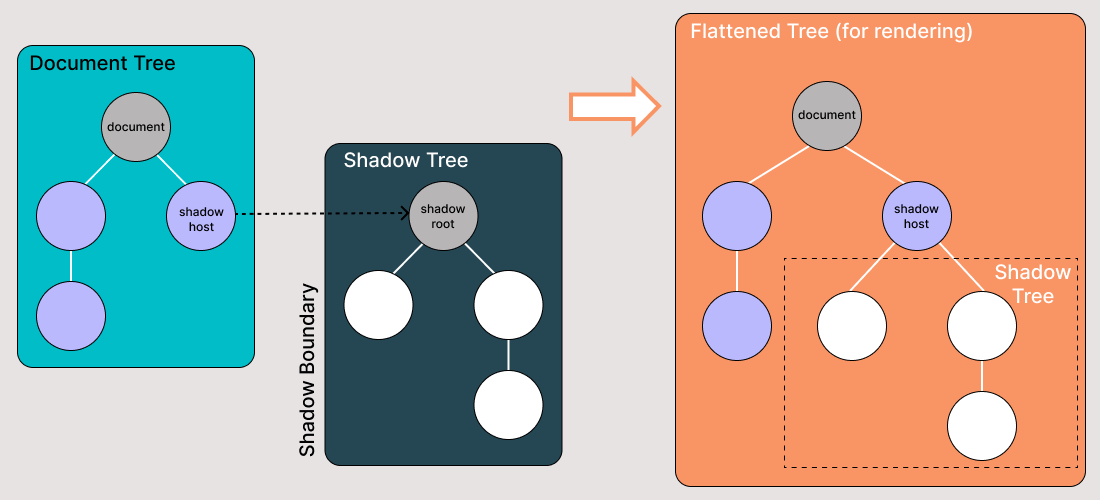
The element from where the Shadow DOM starts is called Shadow host. A Shadow tree is the DOM tree inside Shadow DOM, and the root node or the topmost node of the Shadow tree is called the Shadow root.
A Shadow boundary is where the Shadow DOM ends and the regular DOM begins. We need to locate the Shadow root first, as it is the place from where the Shadow DOM begins.
Before we dive deep into handling Shadow root in Selenium Java, let’s learn different ways to find Shadow root using developer tools.
Finding Shadow Root Using Developer Tools
In this section of this tutorial on handling Shadow root in Selenium Java, we will look at how to find Shadow root elements using developer tools.
Shadow DOM elements are particularly useful when creating custom elements. Shadow DOM is used to encapsulate an element’s HTML, CSS, and JS, thus producing a web component.
As the Shadow DOM elements are encapsulated from the regular DOM, they are not directly accessible in the Developer Tools window as they are hidden. We need to enable the “Show user agent shadow DOM” preference in the Developer Tools window.
Enabling the “Show user agent shadow DOM”
Shown below are the steps to enable the “Show user agent shadow DOM” preference.
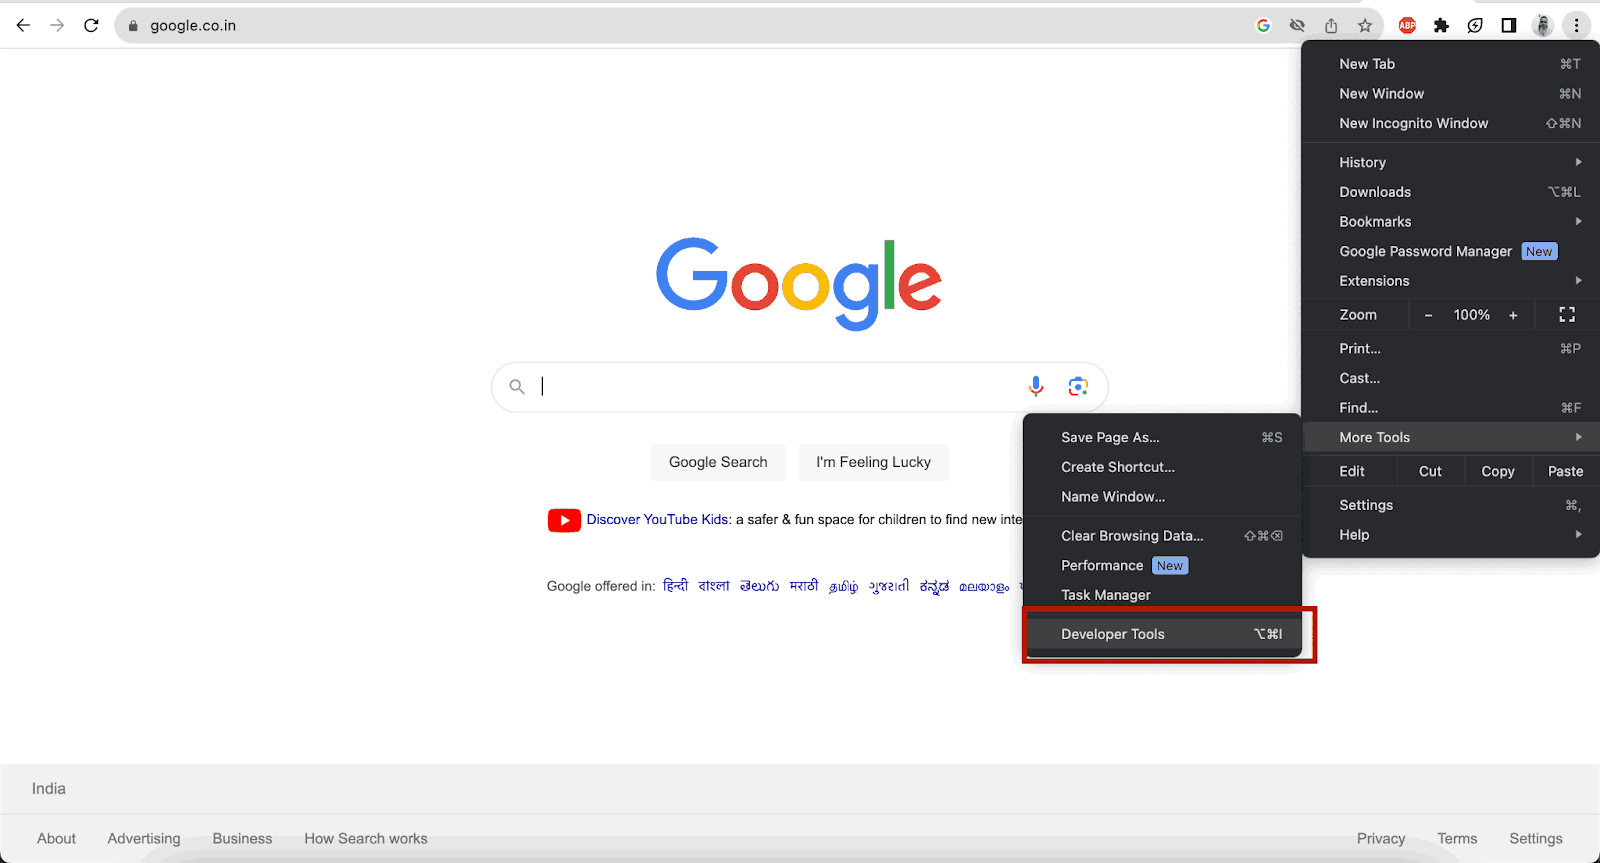
Step 1: Open the Developer Tools window in Chrome browser by pressing F12 or clicking on the Three dots on the right top of the browser. After that, navigate to More Tools > Developer Tools.
Step 2: Click on the gear icon on the top right corner of the Developer Tools window to open the preferences screen and tick on the “Show user agent shadow DOM” option.
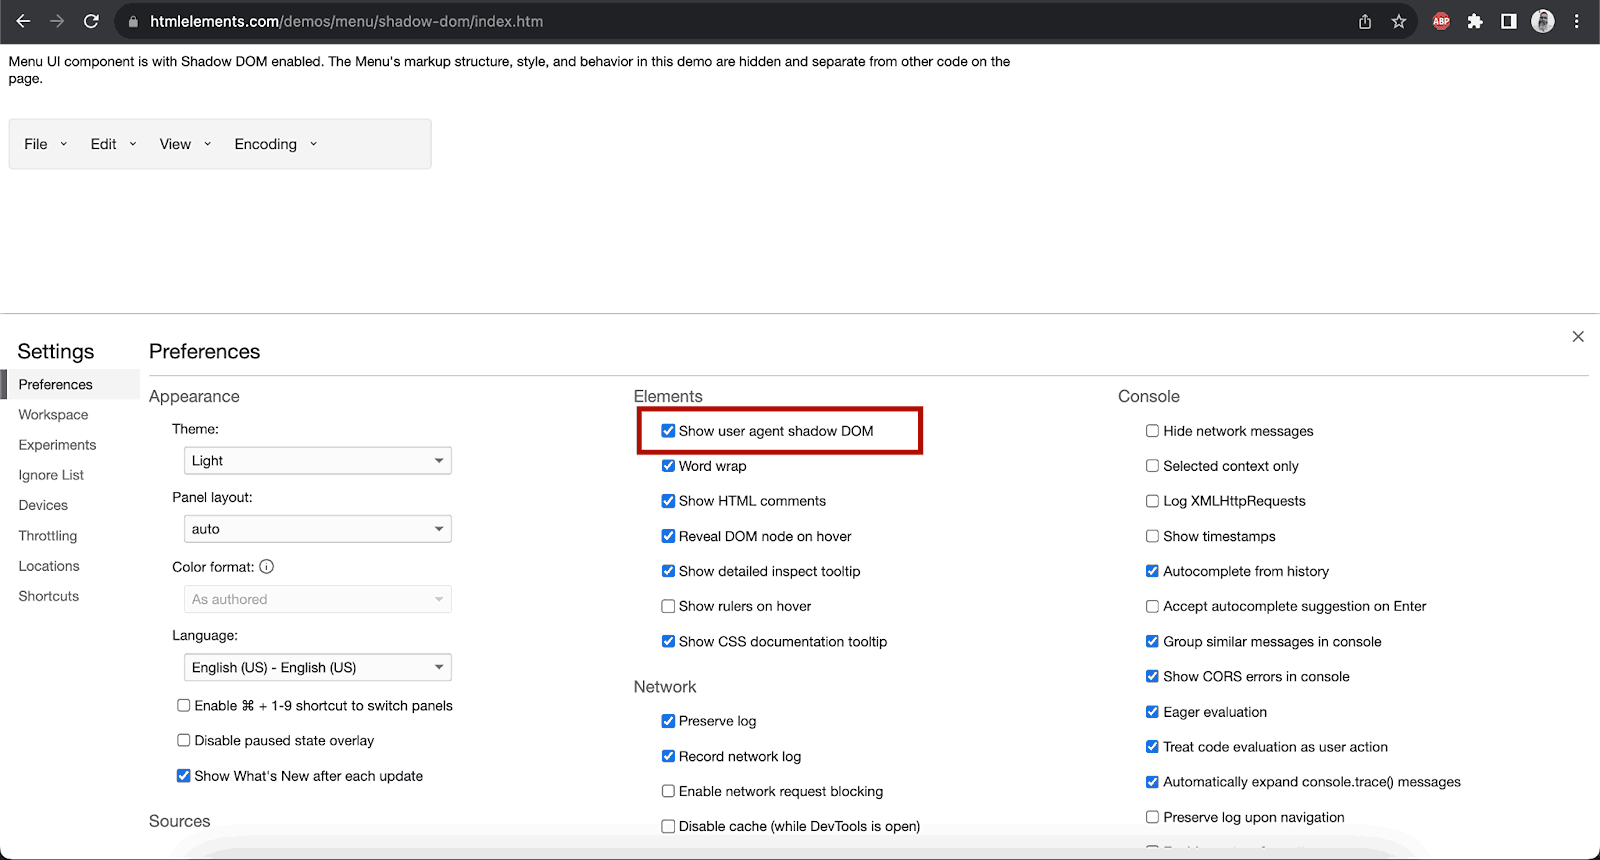
We have set the preference successfully. Press the Escape key to move back to the Developer Tools option window to find and validate the Shadow root element.
Locating and validating the Shadow root element in the browser
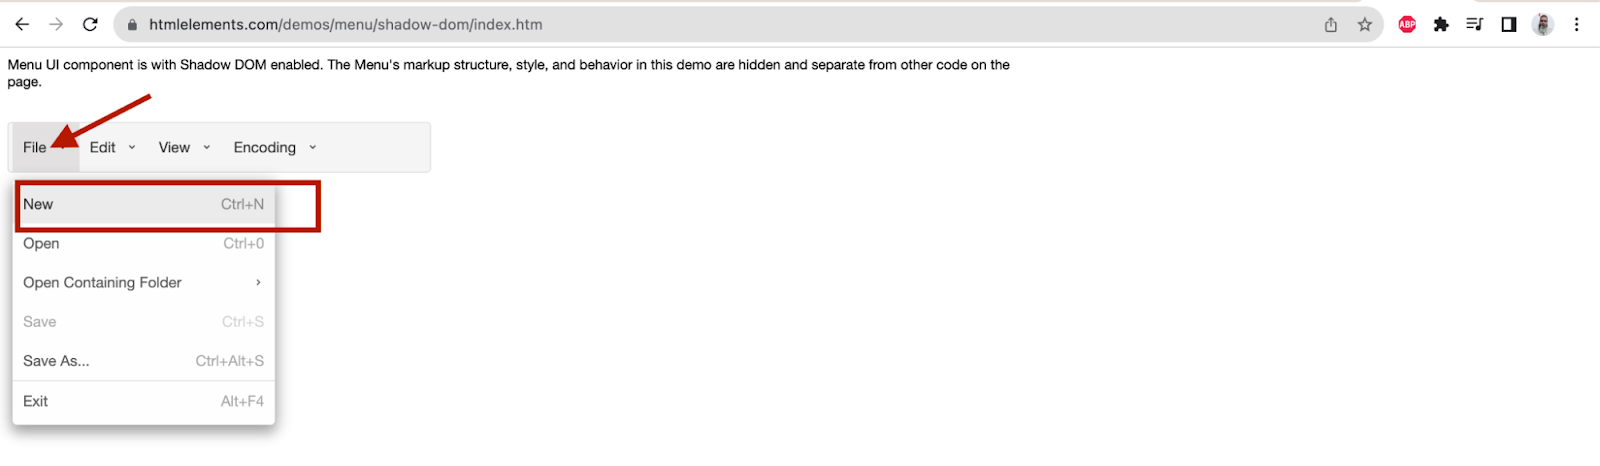
We will use the Menu Shadow DOM Demo page for demonstration purposes. This page has a menu with Shadow DOM elements containing four menus: File, Edit, View, and Encoding. We will find the locator for the File menu and also validate it in the Chrome browser console.
Let’s go step-by-step and locate the Shadow root element in the browser.
Step 1: Navigate to the Menu Shadow DOM Demo page and open the Developer Tools window.
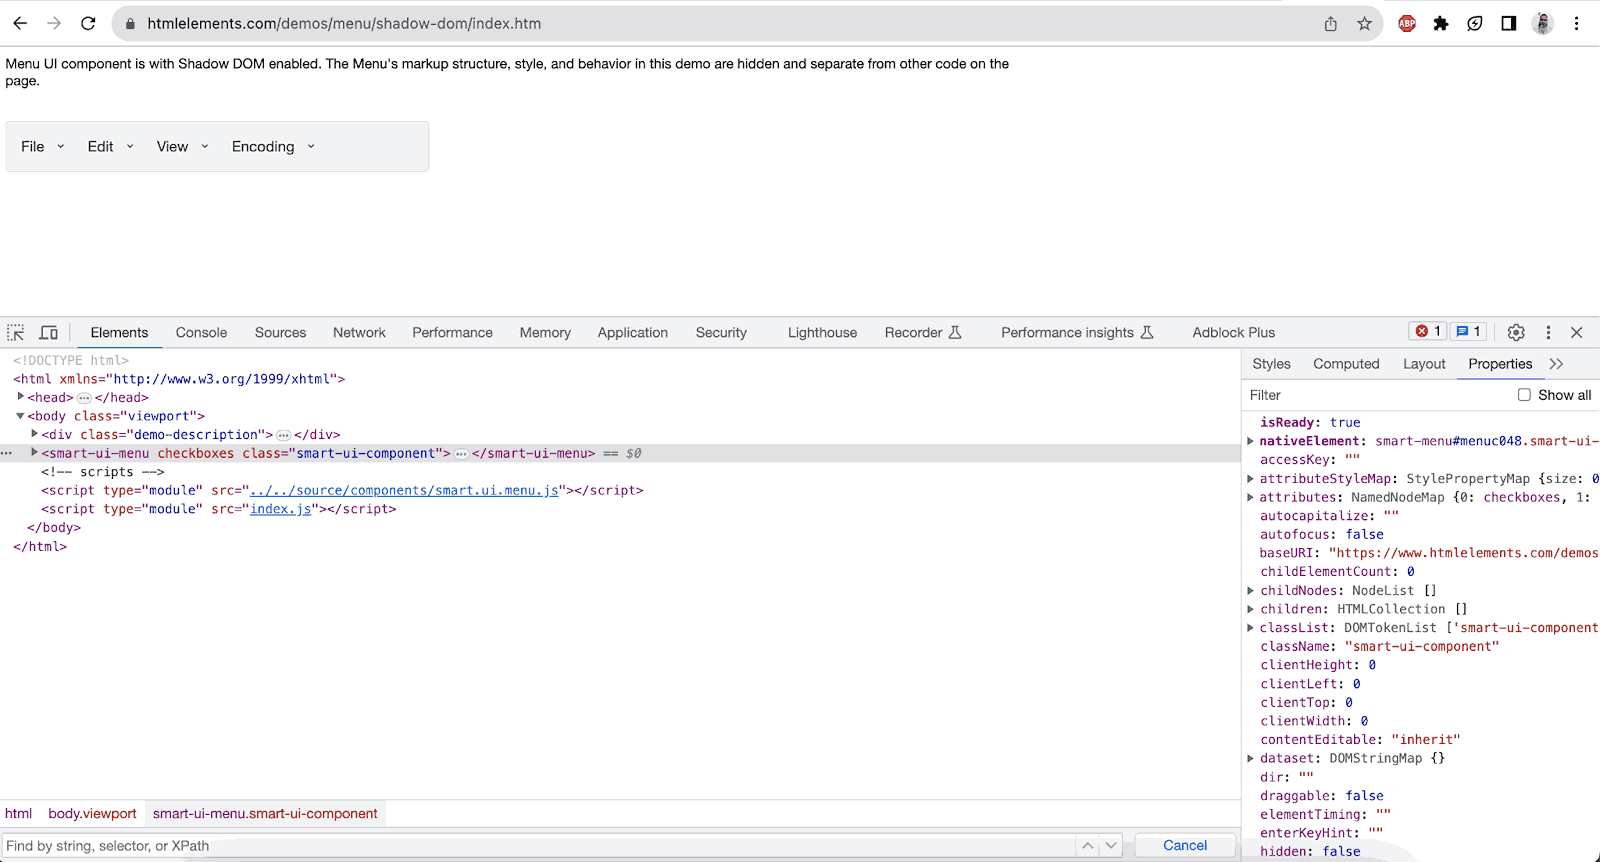
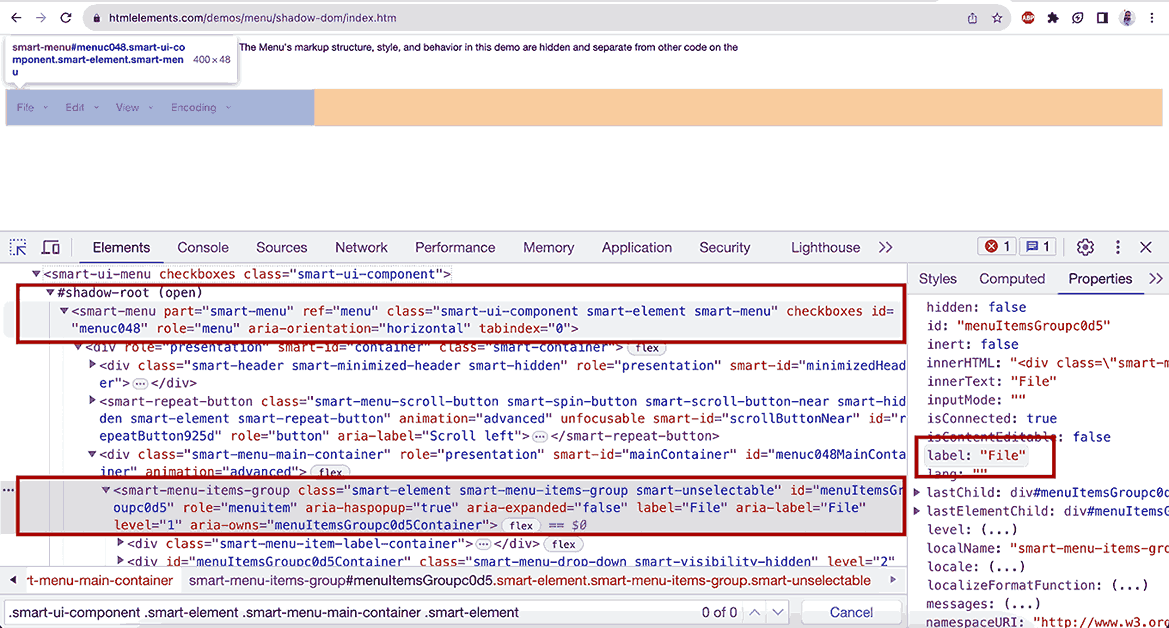
Step 2: Expand the node and check for the Shadow root element.
Step 3: Locate the File menu by clicking on the arrow icon on the top left of the Developer Tools window.
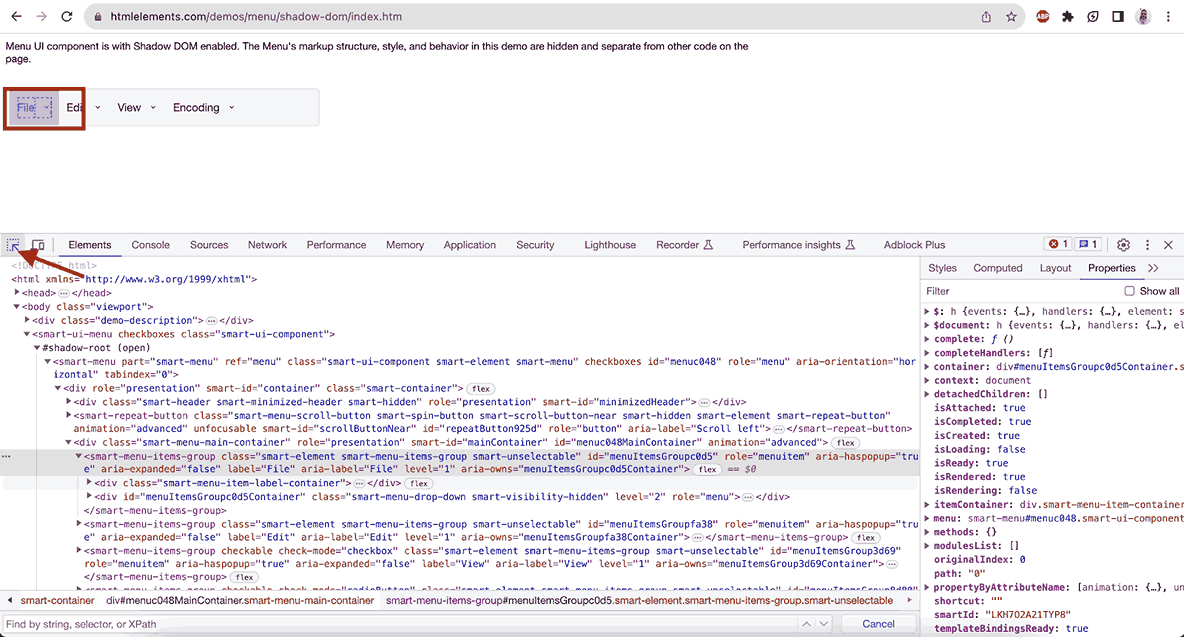
Step 4: Here, the ID selector used for the File menu is a dynamic value. It changes every time the page is refreshed; hence, we cannot use this selector.
So, let’s create the CSS Selector using the parent-child relationship in the DOM.
First, we will have to consider the selector before the #shadow-root. Here, let’s take the class name smart-ui-component.

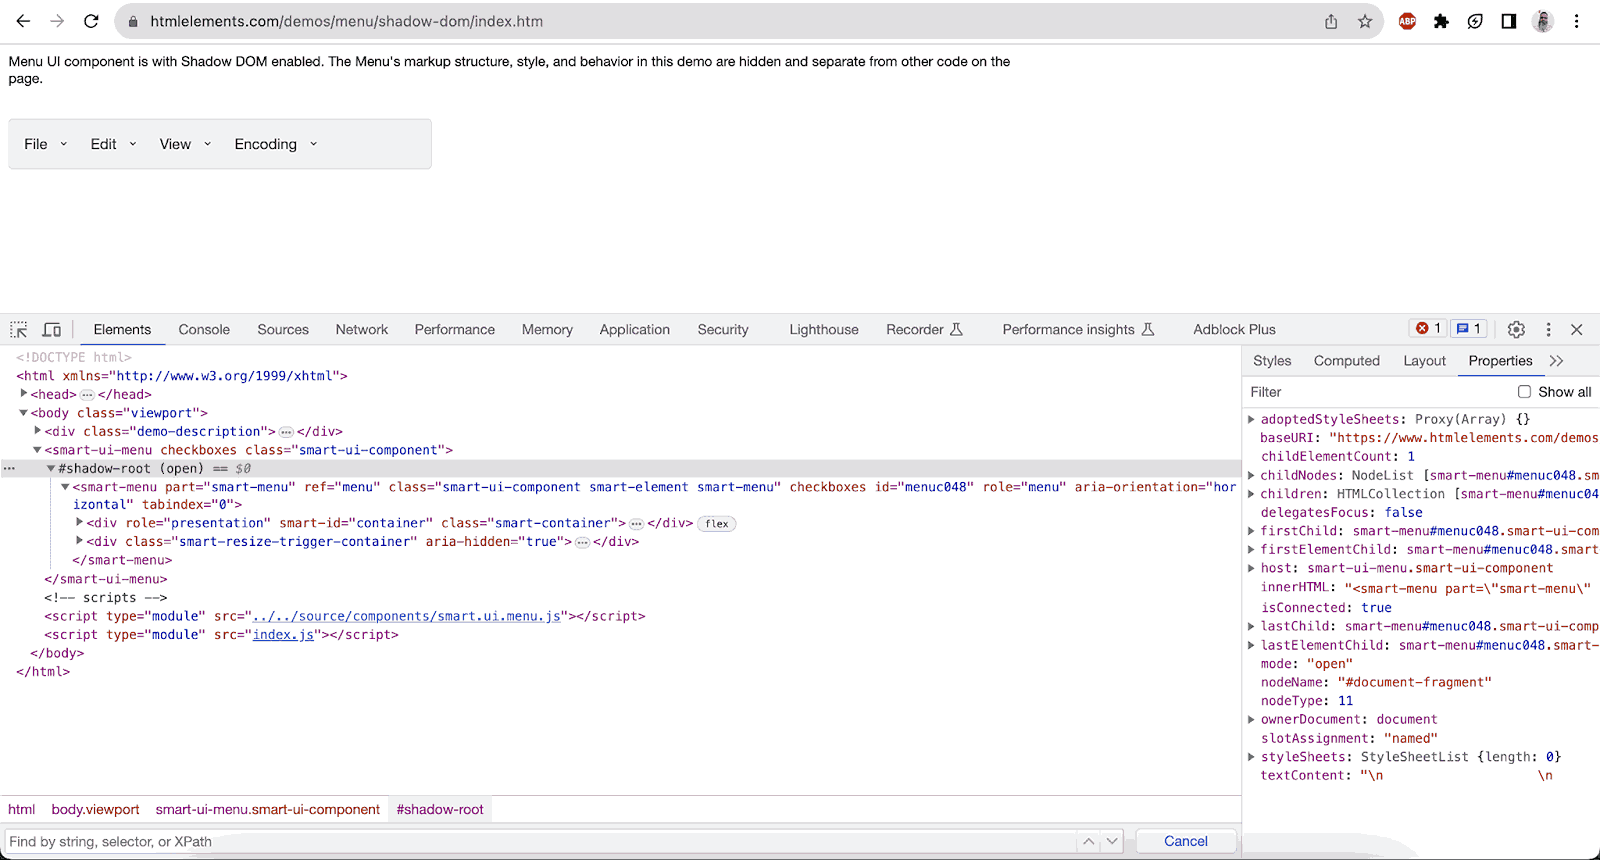
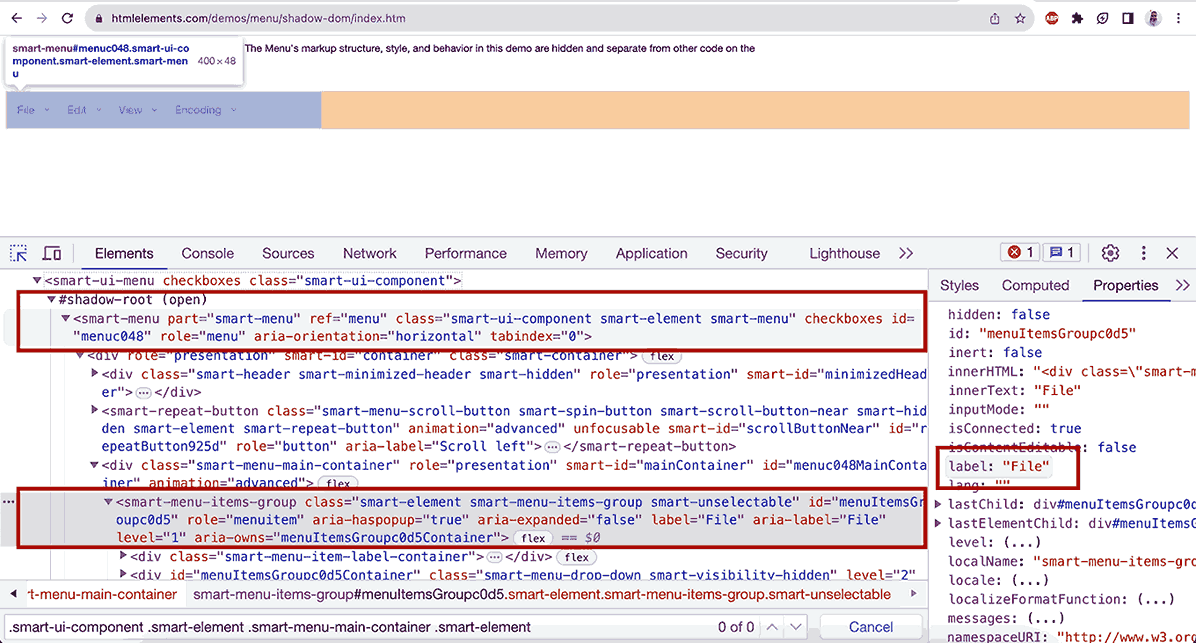
Step 5: We need to take a locator from the first HTML tagline after #shadow-root, as it will be the parent of the Shadow root element.
Next, locate the File menu WebElement using its respective HTML tag and class name.
We will use CSS Selector, focusing on the class name and HTML tags here. The ID selector in the DOM for this web element is dynamic, changing with each refresh of the web page.
Next, we need to get the text of the File menu, which is File, and as seen in the Properties tab on the right-hand side of the window, the attribute label can be used for it.
So, the final CSS Selector that we can use for locating the File menu is:
- To locate the Shadow host, use the class name .smart-ui-component.
- To locate the File menu inside the Shadow root, use the .smart-element .smart-menu-main-container .smart-element.
- Once the File menu WebElement is located, use the attribute label to get its text.
We have the CSS Selector .smart-ui-component > .smart-element .smart-menu-main-container .smart-element. However, we can not directly use this selector in the Elements tab to locate the web element as it is a Shadow root element.
It is better to validate this selector in the browser before we use it in our tests using Selenium WebDriver as it will save time. In case the selector is not valid, Selenium WebDriver will throw NoSuchElementException, and we will again have to check for the valid selector.
To validate the selector in the Developer Tools window, use the following steps:
Step 1: Navigate to the browser console.
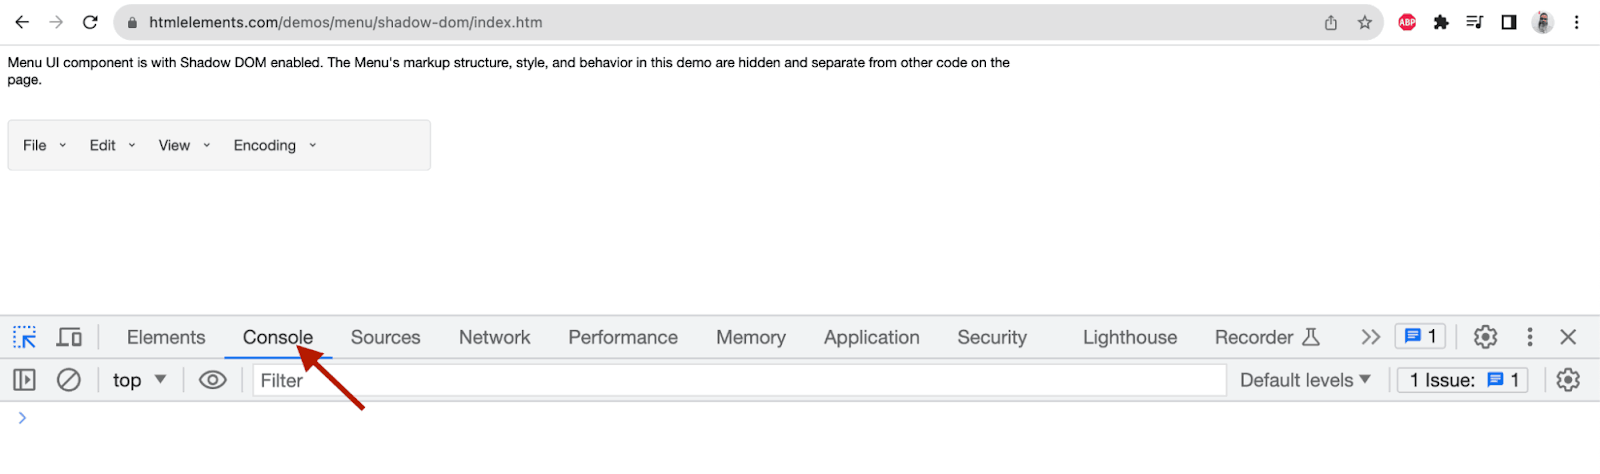
Step 2: Use the querySelector with the shadowRoot command and check the output in the console.
The following query can be used to locate the Shadow host in the console:
|
1 |
document.querySelector('.smart-ui-component').shadowRoot.querySelector('.smart-element .smart-menu-main-container .smart-element ').getAttribute('label') |
After entering the above query, press the Enter key to validate if we get the text of the menu name File in the output.
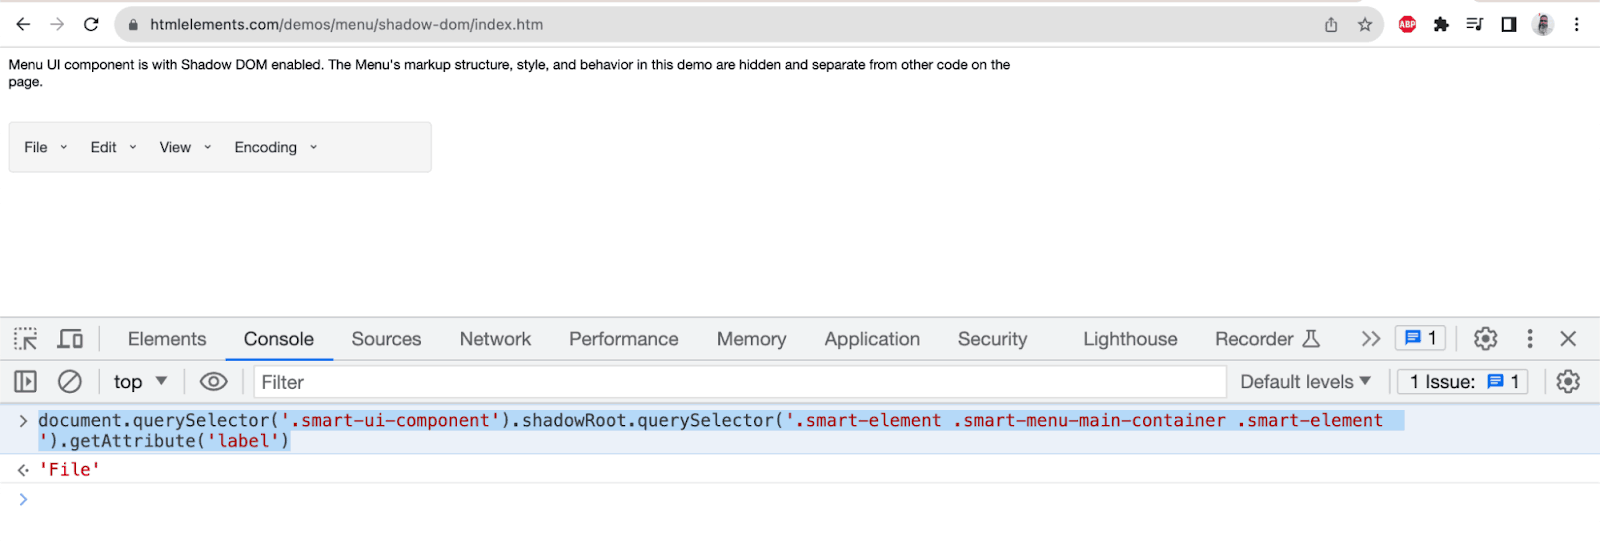
We can check out the text File printed in the console output, thus making the validation for the selector successful. We can use this selector while running automated tests using Selenium with Java.
In this section, we have learned how to handle Shadow root in Selenium Java using developer tools. In the next section, we will explore how to handle Shadow root in Selenium Java using the getShadowRoot() method and JavaScriptExecuter.
Finding Shadow Root Using Selenium Java
In this section of this tutorial on handling Shadow root in Selenium Java, we will look into different ways to find Shadow root elements in Selenium.
The Shadow root elements can not be directly located in the automated tests using Selenium WebDriver as we do for the normal DOM elements.
The following strategies can be used to handle Shadow root in Selenium Java.
- Using getShadowRoot() method.
- Using JavaScriptExecutor
Before we begin discussing the code and writing the automated tests, let us first get some basic information regarding the web page under test and also the tools used for test automation.
- Programming language – Java 17
- Web automation tool – Selenium WebDriver 4.10.0
- Build tool – Maven
- Test runner – TestNG
- Cloud-based testing platform – LambdaTest
Project Setup
Create a new Maven project and update the required dependencies for Selenium WebDriver and TestNG in the pom.xml. The following is the screenshot of pom.xml
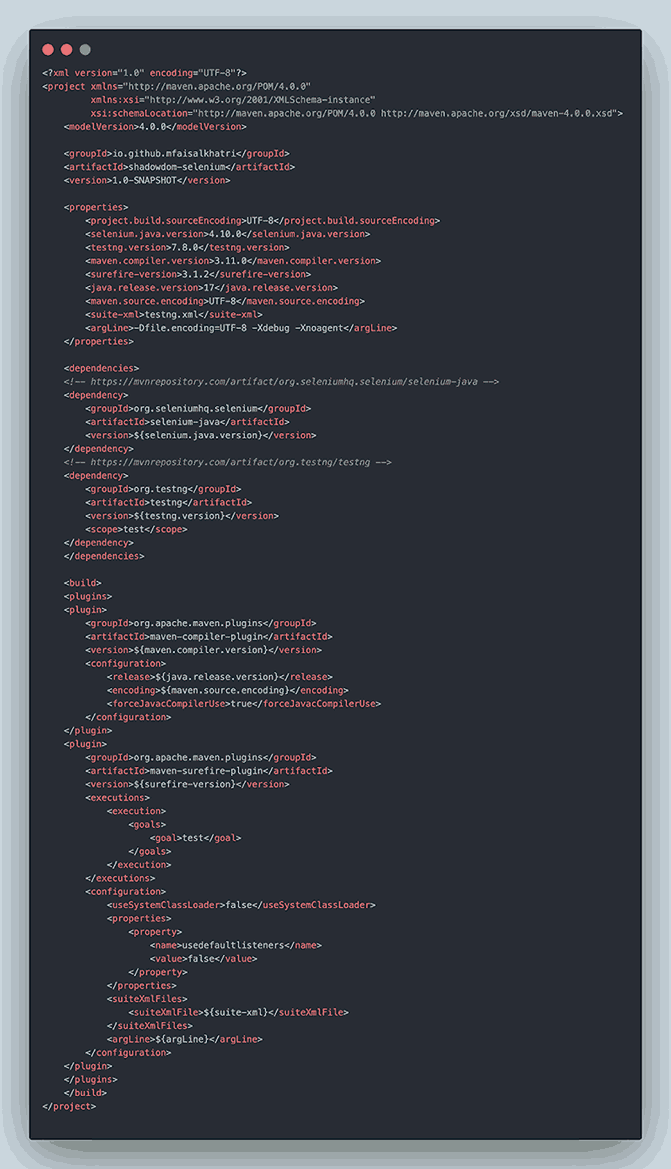

Page Object Model (POM) in Selenium Java has been used in this project as it helps maintain the project by improving test case maintenance and removing code duplication.
In this section of the tutorial on handling Shadow root in Selenium Java, we will demonstrate how to find the Shadow root element of the Menu Shadow DOM Demo page using Selenium WebDriver.
With the help of the test scenarios, code walkthroughs will be provided to help understand how to locate and interact with the Shadow root elements.
Let’s use the getShadowRoot() method to locate the Shadow root in Selenium Java.
Locating Shadow Root in Selenium Java Using getShadowRoot() Method
The getShadowRoot() method was introduced with the release of Selenium WebDriver 4.0.0 and above. The getShadowRoot() method returns a representation of an element’s Shadow root for accessing the Shadow DOM of a web component. NoSuchElementException() is thrown by this method if the Shadow DOM element is not found.
Test Scenario 1:
|

Implementation:
In Test Scenario 1, we need to navigate to the demo page, locate the File menu and perform assertion by getting the text of the menu File.
Here, we need to locate the File menu first and use the getShadowRoot() method in Selenium WebDriver to locate it.
The following method available in the HomePage class will locate the File menu.
In the fileMenu() method, the first web element we locate is the shadowHost using the classname smart-ui-component. This is required as it is the element just before the Shadow DOM.
Next, we search for the Shadow root in the DOM next to it. The #shadow-root(open) is next to the <smart-ui-menu checkboxes=”” class=”smart-ui-component”>
</smart-ui-menu> HTML element.
So, we will have to locate the Shadow root element using this Shadow host. SearchContext interface is used here to return the Shadow root element using the getShadowRoot() method. getShadowRoot() method is a part of the WebElement interface, which is implemented in the RemoteWebElement class of Selenium WebDriver.
Finally, the Shadow root element for the File menu is located using the CSS Selector .smart-element .smart-menu-main-container .smart-element.
Now, to perform assertion, we need to get the text of the menu, i.e., File. As seen in the screenshot above, the text can be retrieved using the attribute label.
The following method will provide us with the text.
|
1 2 3 |
public String getFileMenuText() { return fileMenu().getAttribute("label"); } |
We have located the File menu and the text of the menu; it is now time to write the test and perform the assertion.
It is very simple to understand that this test will navigate to the Menu Shadow DOM Demo page. From the website’s home page, it will check for the File menu text and assert it with the expected text File.
Test Scenario 2:
|
Implementation:
In Test Scenario 2, we need to click on the File menu. After that, get the text of the New option displayed in the menu and assert its text.
In Test Scenario 1, we have already located the File menu. Here, we will open the File menu by clicking on it and getting the text of the New option.
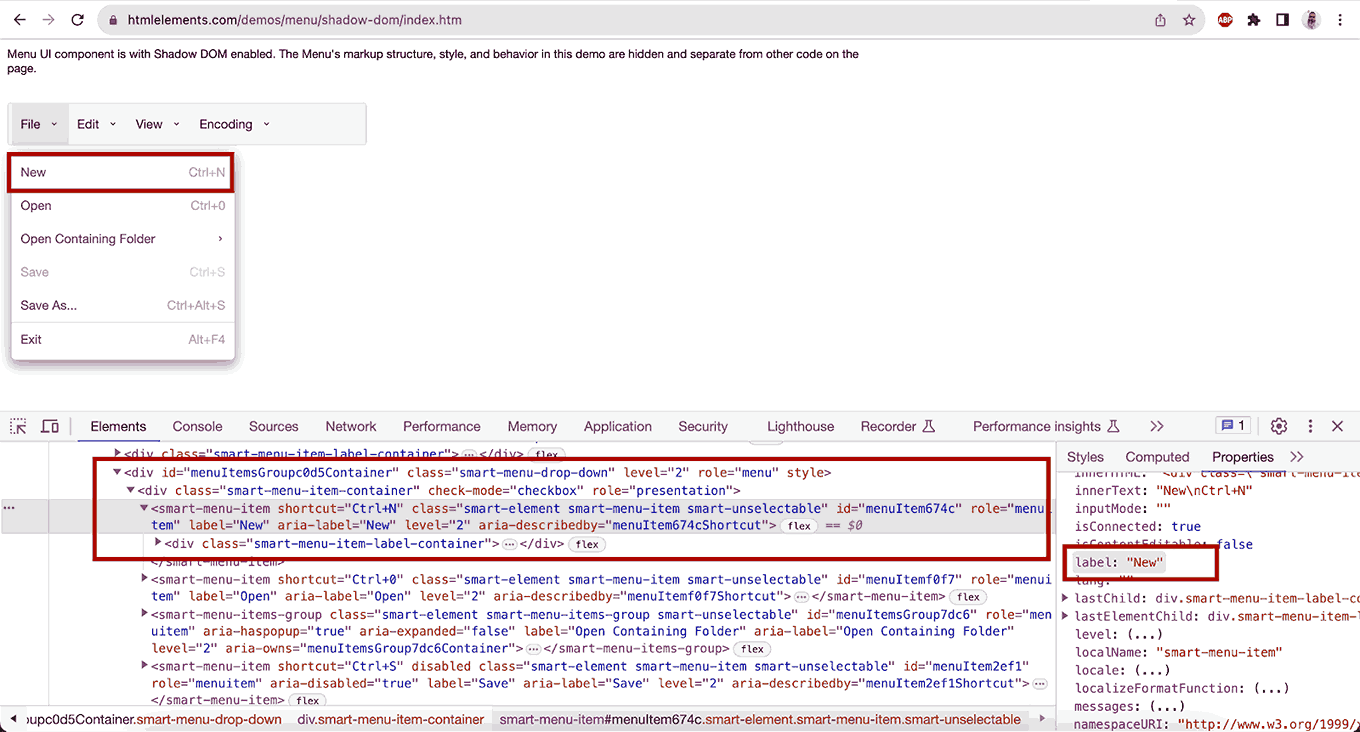
From the screenshot above, we can use the following CSS Selector to locate the New option.
The CSS Selector .smart-menu-drop-down div smart-menu-item.smart-element can be used to locate the New option and its attribute label to get its text.
The following method will help us locate the New option and get its text.
The getNewMenuText() method will open the File menu, search and locate the New option, and return the attribute label.
Let’s write the test and perform the assertion for the text in the New option.
In this test, we first navigate to the Menu Shadow DOM Demo page. From the home page of the website, get the text of the New option and perform assertion on the menu text.
New.
In the next section, to find Shadow root in Selenium Java, we will use the JavaScriptExecutor strategy.
Locating Shadow Root in Selenium Java Using JavaScriptExecutor
Another way to find and locate Shadow root in Selenium Java is using JavaScriptExecutor. If you have not upgraded to Selenium 4, this approach will be useful as it works in all the latest and older versions.
Subscribe to the LambdaTest YouTube Channel and stay updated with the latest tutorials around Selenium, automated testing, and more.
Using JavaScriptExecutor to handle Shadow root in Selenium Java is pretty simple. We need to follow the same steps as we did while working with the getShadowRoot() method. First, find the Shadow host element and then expand and locate the Shadow root elements using it.
Test Scenario 3:
|

Implementation:
In this test scenario, we will locate the Shadow root element for the Edit menu and perform assertion by getting its text Edit.
As we are using JavaScriptExecutor here, the expandRootElement() method is created to expand and locate the Shadow root element.
The above method will execute the script return arguments[0].shadowRoot on the WebElement provided in the method parameter and get the Shadow root.
Next, let’s locate the Edit menu and get its text.
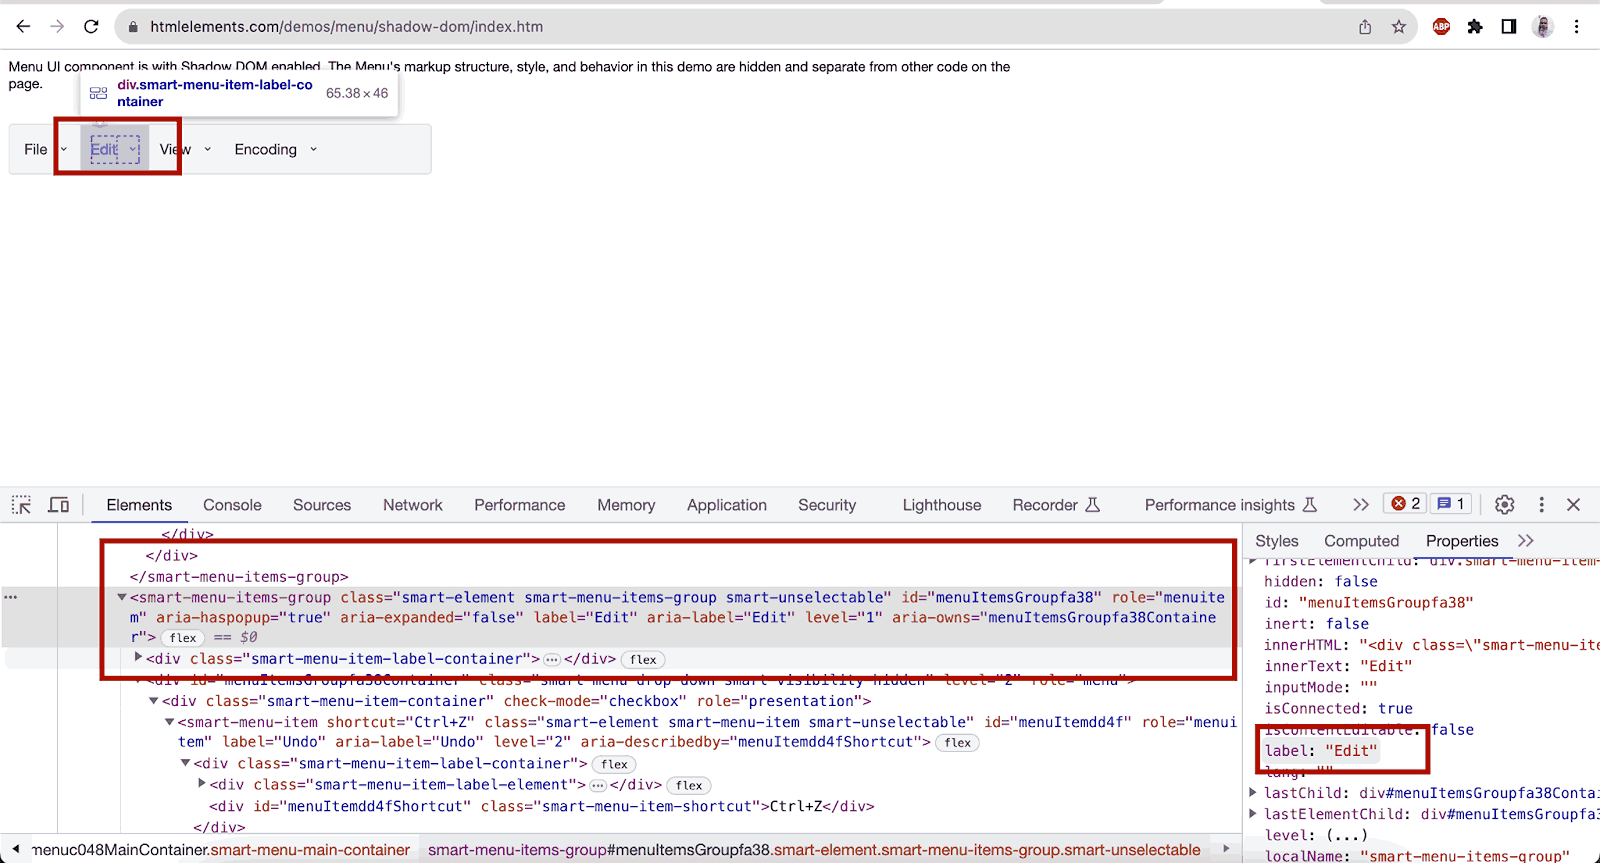
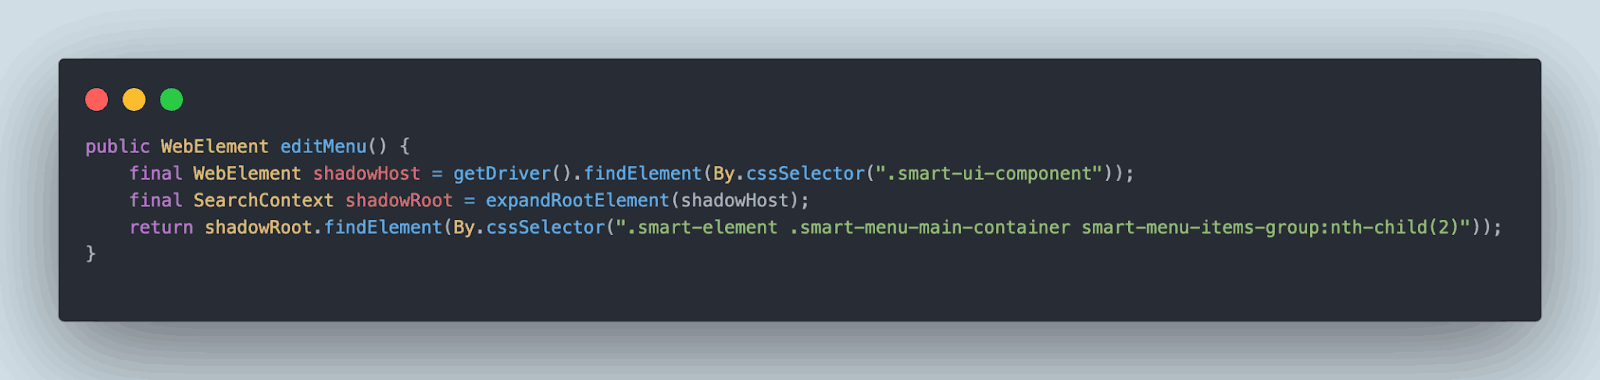
The editMenu() method returns the WebElement for the Edit menu. To get the Shadow root element, the expandRootElement() method is used where the shadowHost WebElement is passed as a parameter.
|
1 2 3 4 5 |
public WebElement editMenu() { final WebElement shadowHost = getDriver().findElement(By.cssSelector(".smart-ui-component")); final SearchContext shadowRoot = expandRootElement(shadowHost); return shadowRoot.findElement(By.cssSelector(".smart-element .smart-menu-main-container smart-menu-items-group:nth-child(2)")); } |
Once the Shadow root element is located, we search for the Edit menu using the CSS Selector and return the WebElement.
The attribute label is used to get the text Edit from the menu name. The following method, editMenuText(), returns the text in String format.
|
1 2 3 |
public String getEditMenuText() { return editMenu().getAttribute("label"); } |
Let’s write the test and complete the scenario by performing an assertion.
This test completes the scenario where we navigate to the Menu Shadow DOM Demo page, locate the Edit menu, and perform assertion by verifying the Edit text of the menu name.
Test Scenario 4:
|
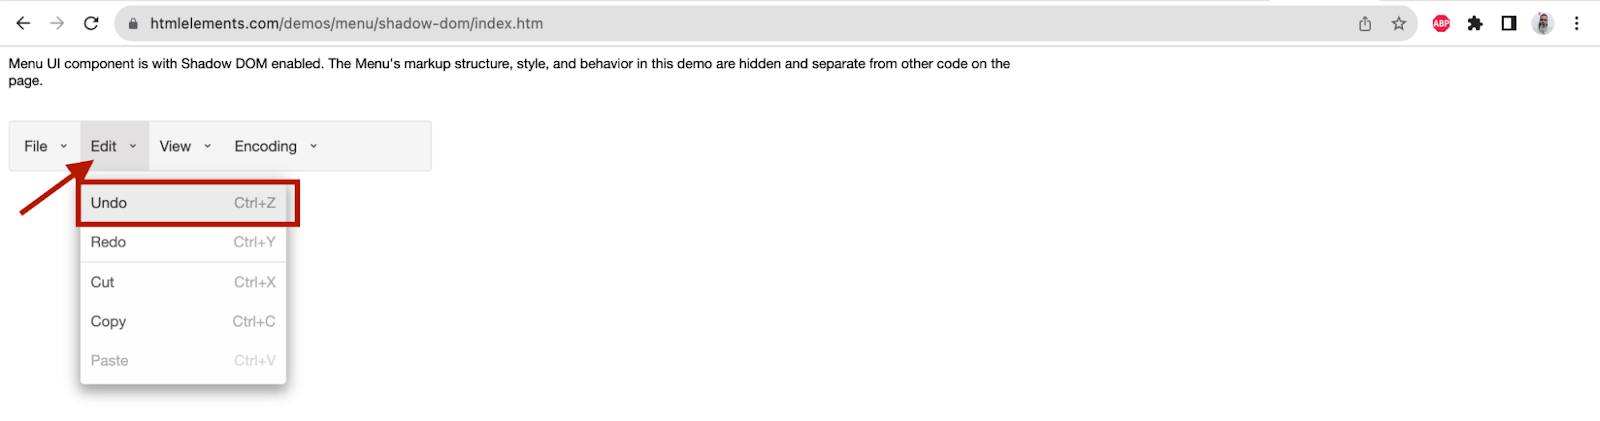
Implementation:
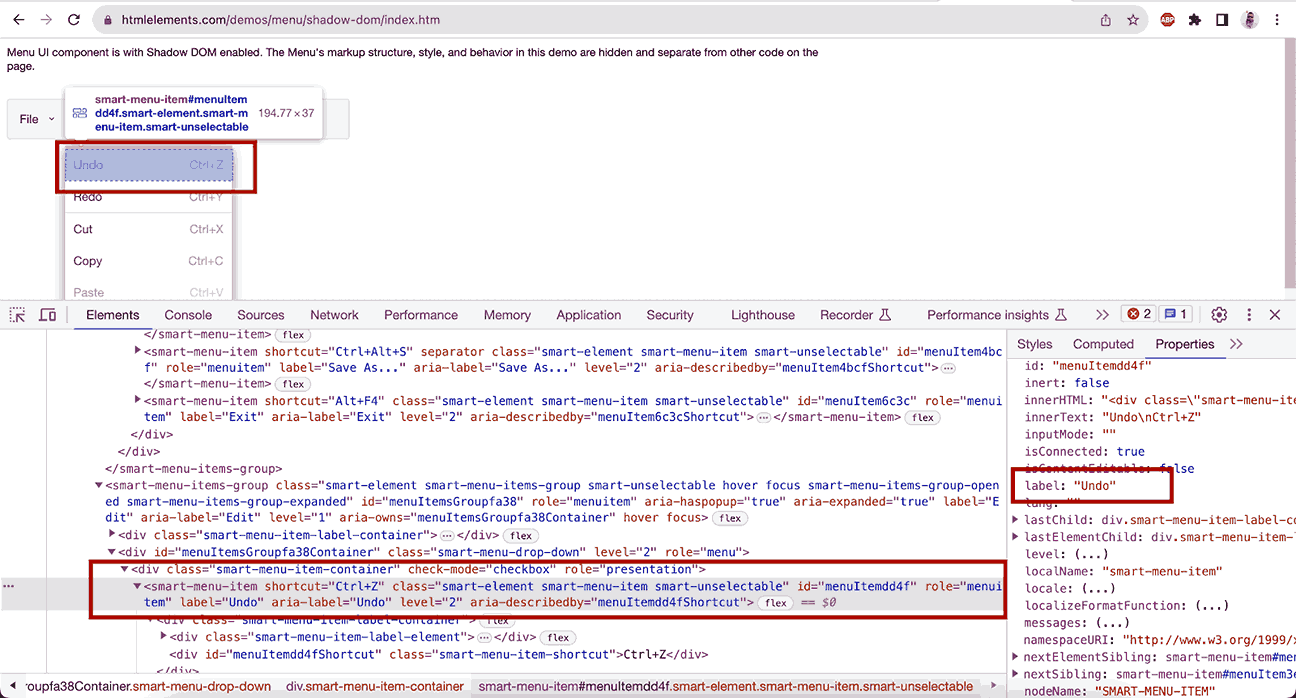
In this test scenario, we will click the Edit menu to open the dropdown. In the dropdown, we locate the Undo option and perform an assertion to verify its text Undo.
We will reuse the existing editMenu() method created in Test Scenario 3 to locate the Edit menu’s WebElement using the expandRootElement() method, which locates the Shadow root element using JavaScriptExecutor.
The openEditMenu() method will click on the Edit menu and open the dropdown.
|
1 2 3 |
public void openEditMenu() { editMenu().click(); } |
The getUndoMenuText() method will locate the Undo option and return the text Undo in the String format.
|
1 2 3 4 5 |
public String getUndoMenuText() { openEditMenu(); return editMenu().findElement(By.cssSelector(".smart-menu-drop-down div smart-menu-item.smart-element")) .getAttribute("label"); } |
When we locate the WebElements, let’s proceed and write the final test to complete Test Scenario 4.
|
1 2 3 4 5 6 7 8 |
@Test public void testUndoMenuShadowRootElement() { getDriver().get("https://www.htmlelements.com/demos/menu/shadow-dom/index.htm"); final HomePage homePage = new HomePage(); assertEquals(homePage.getUndoMenuText(), "Undo"); } |
In this test, we navigate to the Menu Shadow DOM Demo page. From the home page, click on the Edit menu and assert the text of the Undo option.
With this test, we have completed the code implementation of all four scenarios. Minor refactoring was done in the test since the driver.get() statement was getting repeated in all the tests. I have moved that statement out and placed it in a navigateToWebsite() method, using @BeforeClass annotation in TestNG. So, this annotation will be used as soon as this class is called before running the test.
Test Execution
There are two ways to execute the tests:
- Using TestNG
- Using Maven
Test Execution Using TestNG
We need to have the testng.xml file in the project’s root folder. The following test blocks are required in the testng.xml file to run all our tests. The tests will be running on the LambdaTest cloud grid on the Chrome browser.
LambdaTest is an AI-powered test orchestration and execution platform that lets you perform automation testing at scale on a remote test lab of 3000+ real environments. With LambdaTest, you can accelerate your software release cycles by performing Selenium Java testing in parallel across numerous browsers and operating system combinations.
|
1 2 3 4 5 6 7 8 9 10 11 12 13 14 15 16 17 |
<?xml version="1.0" encoding="UTF-8"?> <!DOCTYPE suite SYSTEM "http://testng.org/testng-1.0.dtd"> <suite name="Shadow DOM Automation Tests"> <test name="Shadow Root Element Tests on HTMLElements Website on LambdaTest Cloud Grid"> <parameter name="browser" value="remote-chrome"/> <classes> <class name="ShadowRootTests"> <methods> <include name="testFileMenuShadowRootElement"/> <include name="testNewMenuShadowRootElement"/> <include name="testEditMenuShadowRootElement"/> <include name="testUndoMenuShadowRootElement"/> </methods> </class> </classes> </test> <!-- Test --> </suite> |
We need to add the following values to run the tests on the LambdaTest cloud grid:
- LambdaTest Username
- LambdaTest Access Key
These values can be passed using the Run Configuration window in the IDE as
-DLT_USERNAME = <LambdaTest Username> -DLT_ACCESSKEY=<LambdaTest AccessKey>
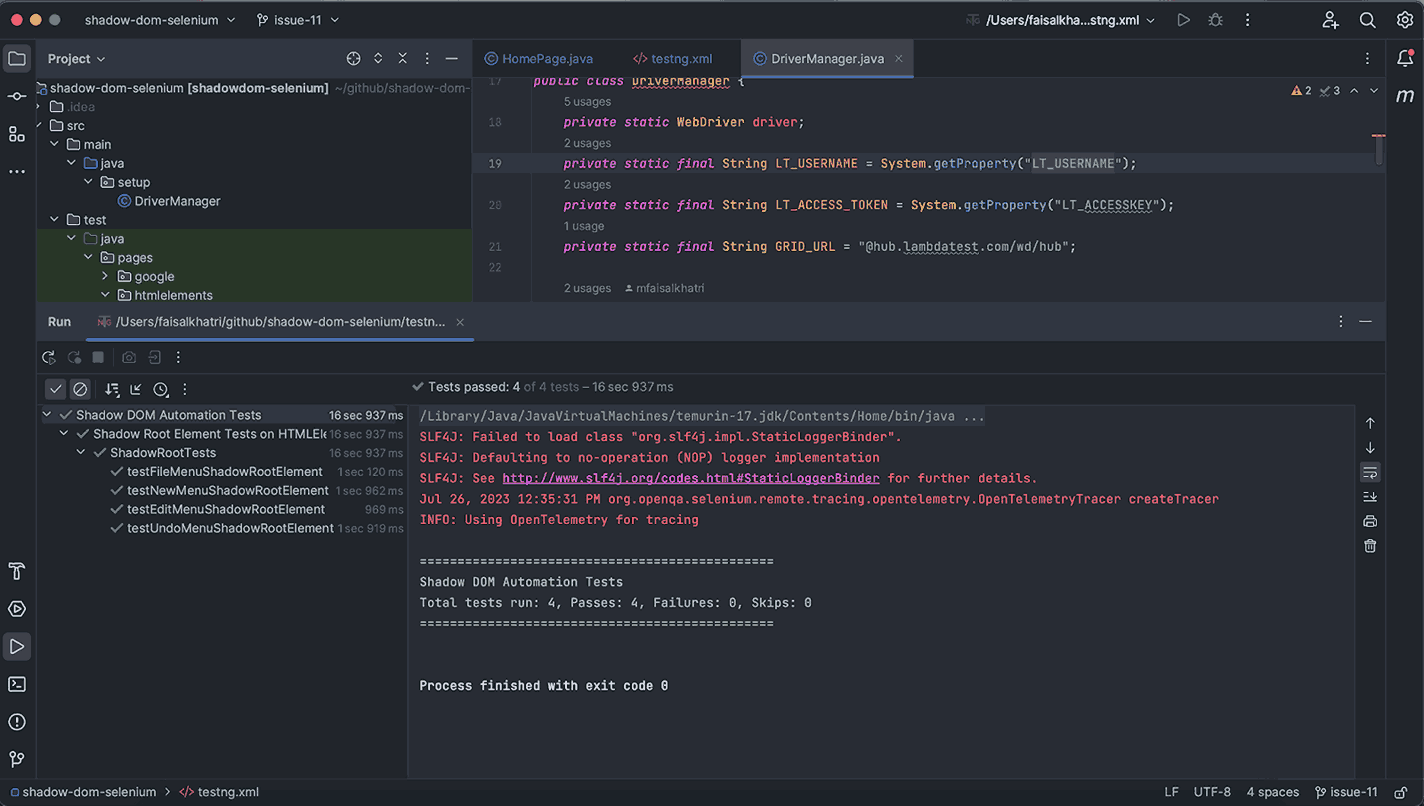
To run this testng.xml file, right-click on it and select the option Run ‘…/testng.xml
Here is the screenshot of the tests run using IntelliJ IDE:
Test Execution Using Maven
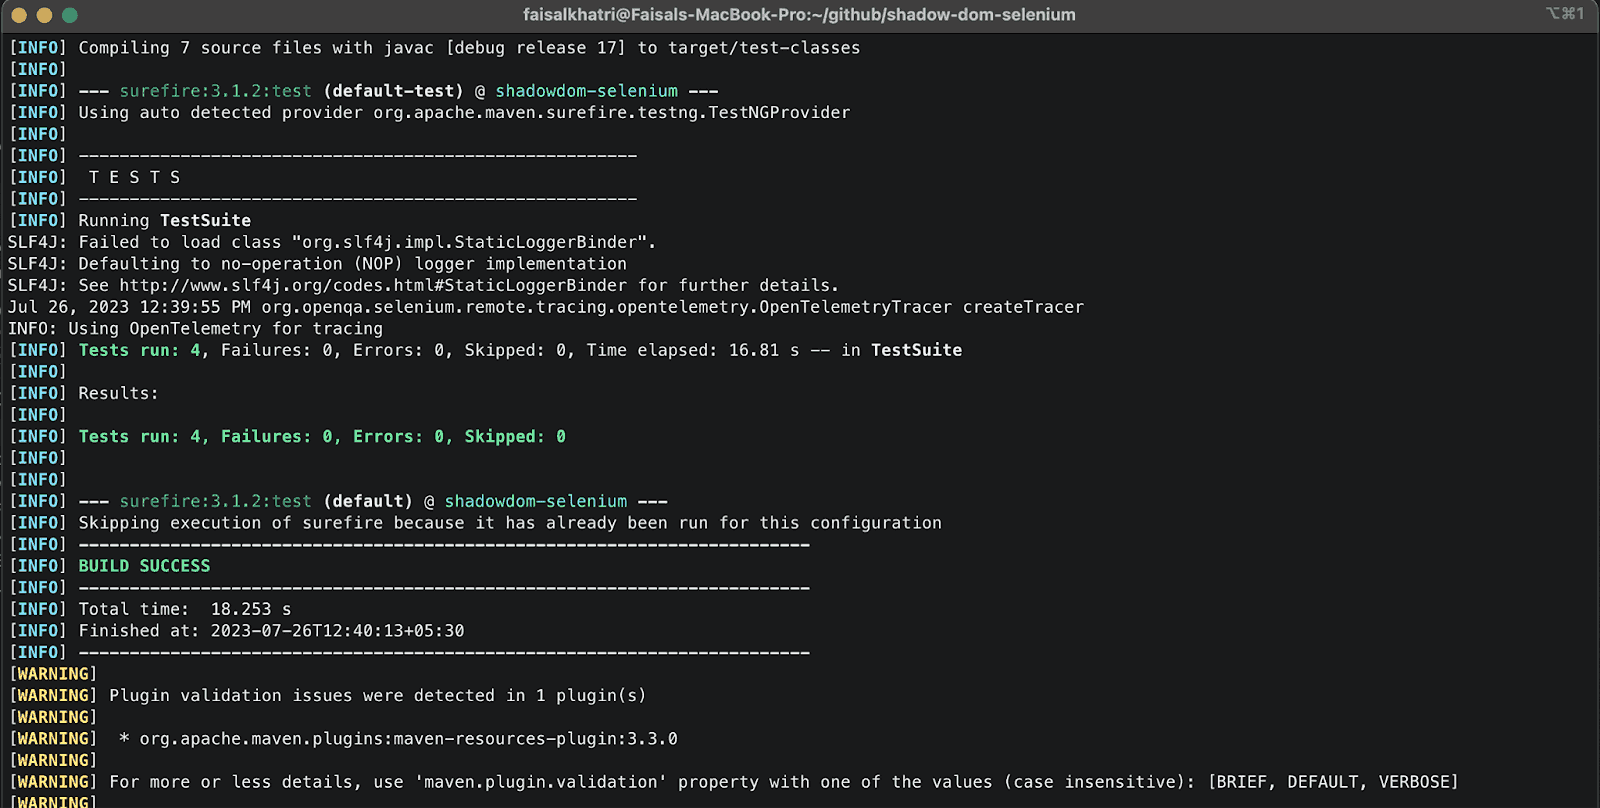
To execute the tests using Maven, open the terminal, navigate to the root folder of the project, and run the following command:
mvn clean test -DLT_USERNAME = <LambdaTest Username> -DLT_ACCESSKEY=<LambdaTest AccessKey>
Here is the screenshot of the tests run using the terminal:
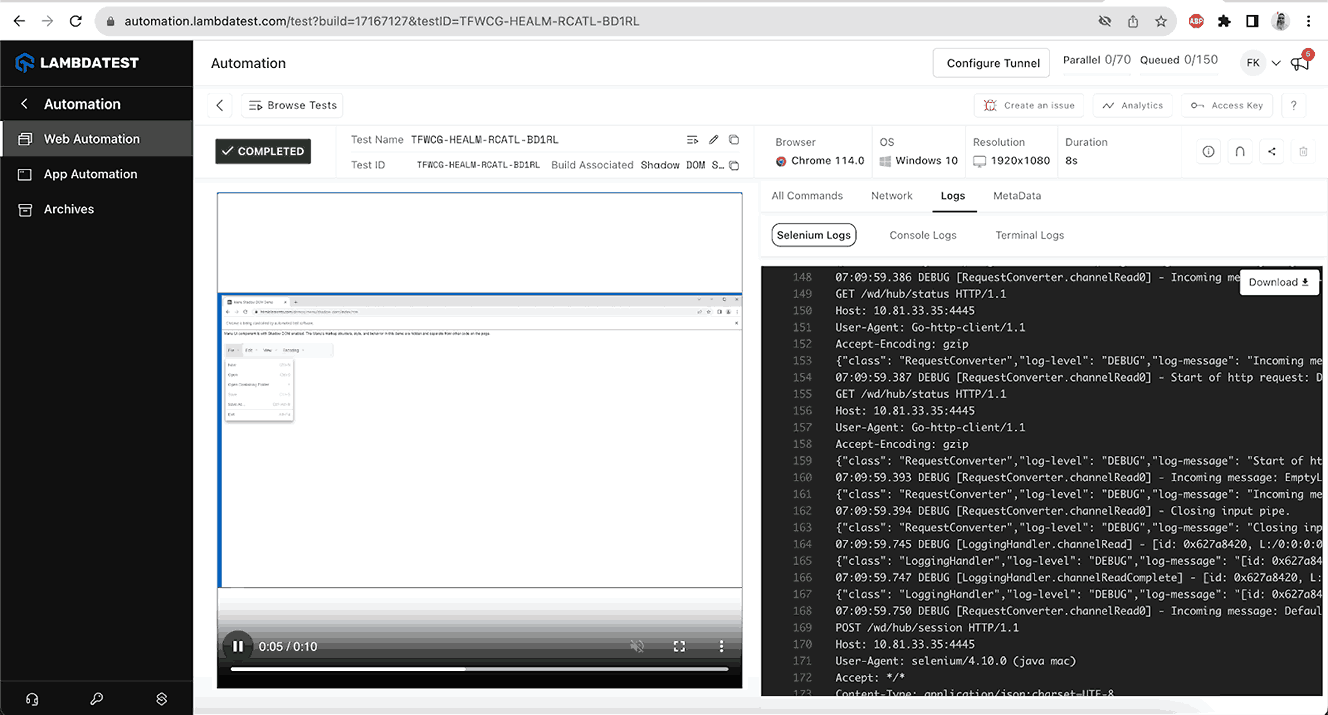
Once the tests pass, you can view the test execution results on the LambdaTest Web Automation Dashboard, which provides all the details of the test execution.
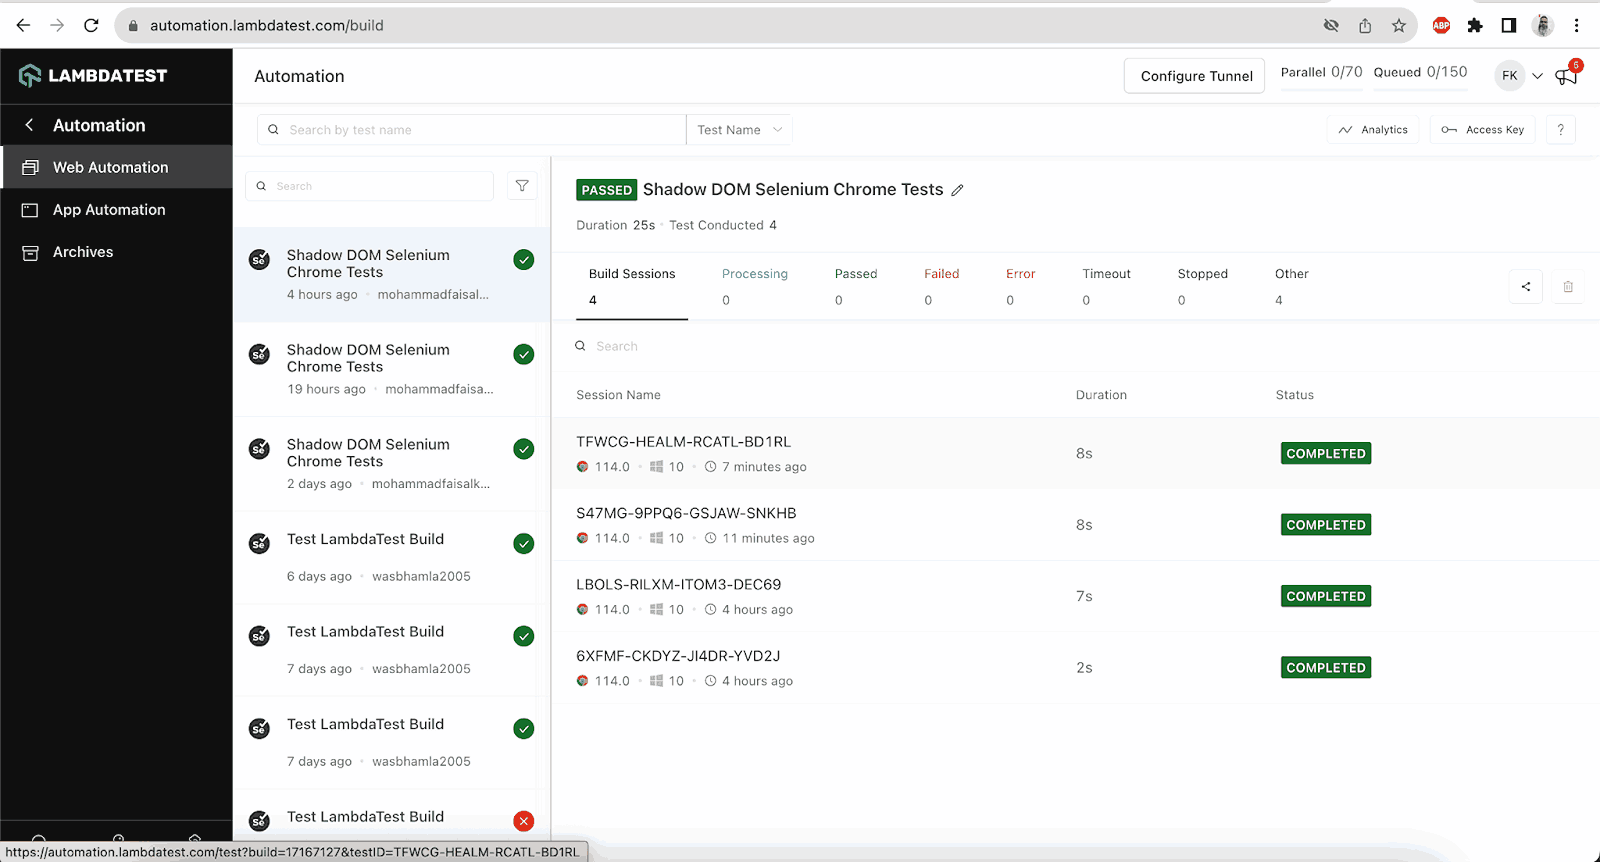
You can view details like video recordings, screenshots, Selenium logs, OS name, browser resolution, duration of test execution, etc.
Conclusion
In this tutorial, we explored how to handle Shadow root in Selenium Java.
We also discussed the DOM, Shadow tree, and Shadow root elements. Further, to automate the Shadow root elements, we used the getShadowRoot() method, which was introduced with Selenium WebDriver 4.
The JavaScriptExecutor can be used to handle Shadow root in Selenium Java. If you are working on the Selenium WebDriver version less than 4, using JavaScriptExecutor is an ideal solution to handle Shadow root in Selenium Java. However, with the Selenium 4 release, as we have the getShadowRoot() method, we can use it as it is much easier than JavaScriptExecutor.
Frequently Asked Questions (FAQs)
How do you inspect Shadow root?
While direct inspection isn’t available, use the Shadow DOM WebDriver to find elements using locators. You can then log their text/attributes or create a function to traverse and print the Shadow DOM structure.
Does Selenium 4 support Shadow DOM?
Selenium 4.1+ offers built-in support for Shadow DOM. The getScreenshotAs() method (indirectly) provides access. Ensure your WebDriver (e.g., ChromeDriver) is compatible for smooth automation.


Author’s Profile
Faisal Khatri
Faisal is a Software Testing Professional having 14+ years of experience in automation as well as manual testing. He is a QA, freelancer, blogger and open source contributor. He loves learning new tools and technologies and sharing his experience by writing blogs.
Blogs: 40
Got Questions? Drop them on LambdaTest Community. Visit now


