- Automation
- Home
- /
- Learning Hub
- /
- Jest Tutorial
- -
- March 17 2023
Jest Tutorial: Complete Guide to Jest Testing
Explore Jest tutorial, your go-to guide for mastering Jest testing. Run Jest automation tests in parallel across multiple browser and OS combinations.
OVERVIEW
Jest is one of the most popular JavaScript testing frameworks built by Meta (Facebook). As it works with Babel, TypeScript, Node, React, Angular, and Vue-based projects, it has been used on over 3,898,000 public repositories on GitHub.
According to the official Jest website, Jest saw a mark of more than 50 million downloads in July 2022. It was initially designed to perform unit testing for React components and gained massive popularity within a blink of an eye. Its popularity led to its massive usage and uncountable updates.
Today, Jest is used to perform testing for React components along with full-fledged front-end and back-end JavaScript applications. Many people misinterpret Jest as a library instead of a framework, which is not the case. Jest also comes with a CLI (Command Line Interface) that lets you run relevant commands from the terminal. Moreover, it also offers an assertion library, test runner, support for mocking techniques, and much more.
In this Jest tutorial, we will dive deep into every aspect of the Jest framework. We will kick-start the Jest tutorial with the basics of Jest (i.e., installation, configuration, etc.) and test execution using the Jest framework on local & cloud grids. The learnings of this Jest tutorial can be utilized in using Jest in an ideal manner in your project.
Before we look into the internals of Jest, let’s do a quick recap of unit testing since Jest is majorly used for performing unit tests in web applications
What is Jest Framework?
Jest is a framework for ‘delightful JavaScript testing.’ It is built on top of Jasmine and is a popular testing framework specifically built to perform mainly unit testing of React and React Native applications. As per Christoph Nakazawa, the brain behind Jest, the main focus of Jest is to provide support and simplicity in testing heavy web apps.
Along with unit testing, Jest can also be used for component testing (i.e., testing different components of the application). It is used to test every component and app built around JavaScript, for example - web apps rendering from browsers. Jest also has a massive advantage compared to other popular test automation frameworks because of its non-reliance on third-party apps and software.
Therefore, it is the most widely used automation test framework for JavaScript. It is considered one of the best unit testing frameworks.
Despite all the positives, unit testing is not very helpful for front-end software or components. The setup and configuration of unit testing for front-end components require more effort and is very time-consuming. This is where Jest comes in handy. It reduces this time consumption and complexity to a massive extent.
Note : You can release a bug and error-free software faster by making unit testing a mandatory part of your development process. To know more about how to do Jest unit testing checkout this detailed post.
Jest Architecture
To get a deep understanding of how Jest works, understand its architecture, here is an official video by the creators of Jest.
Jest Basics
The two most commonly used terms in Jest are: Mock and Spy. Mock captures objects from a constructor by erasing the actual implementation, while Spy is used for spying on every method call in Jest.
Let’s have a deeper look at Mock and Spy individually.
Mock
As per Jest’s official documentation, Mock functions erase the actual function implementation, capture the function calls with related parameters, capture instances of a constructor, and specify the test-time configuration of all the values returned. This whole process makes the testing of dependent codes easy. Jest Mocking is a technique we can use to remove any dependency between the test subjects and run the tests in isolation. A dependency is generally a module that our test subjects import.
Moreover, Mock functions return whatever we want them to return. This feature makes testing all possible paths easy, as we have control over function parameters. This means we can make the function return whatever we want: true, false, and error.
In Jest, you can mock both a function and a module. To create a mock for any function, you need to use jest.fn(); for a module, you’ll use jest.mock.
Let’s take an example of mocking a function and understand it better:
Const mockFn = jest.fn();
mockFn();
expect(mockFn).toHaveBeenCalled();
The first line in the above code initializes a simple mock called in the second line. The third line checks whether this mock is called. We can also check it by looking for a return value. Look at the following snippet:
const returnsTrue = jest.fn(() => false);
console.log(returnsTrue()); // false;
.mock Property
Every mock function has a .mock property that stores the data of how a function is called and what it returns. This property also tracks the value of this keyword in every call.
const myMock1 = jest.fn();
const a = new myMock1();
console.log(myMock1.mock.instances);
// > [ <a> ] // .mock.instances gives out the instance of myMock1

const myMock2 = jest.fn();
const b = {};
const bound = myMock2.bind(b);
bound();
console.log(myMock2.mock.contexts);
// > [ <b> ]
Spy
Spy is somewhat similar to mock, as it creates a mock function like jest.fn(), tracks every call to object[methodName], and returns a mock function. It is also known as a partial mock object. As the name suggests, Spy tracks all the calls to the function. It helps verify whether the function has been called under the right condition and with the right values and parameters.
In short, Spy observes every call that is made to a method without changing the method itself. Spy can also be used for a class full of different functions and methods, and we want to mock them. To set a spy on any method, we use this syntax:
const spy = jest.spyOn(method, string);
In the end, we need to reset the spy so that the method returns to its original implementation. This can be done using the spy.mockRestore() method.
Developers like freedom and Jest gives them just that. Below are some of the most basic Jest concepts that give developers the power to develop tests and testing conditions fast with lesser effort.
describe Blocks
Jest offers describe Blocks that organize Jest test cases in logical groups. It lets us create certain divisions into the test suite called blocks. These blocks are helpful in many cases, for example: when we need to group all the test cases of a specific method or class together.
Syntax:
describe("Filter function", () => {
// test stuff
});
We can also create a nested describe block that contains a list of two or more describe blocks. The describe blocks are also responsible for cleaning up the JSDOM after every test execution. We can call the describe method to create a block by using the callback function.
‘it’ or ‘test’ Tests
The ‘it’ keyword is used when we want to start a new individual test case definition. We can also use ‘test’ as an alias for ‘it.’ The test case definition created by ‘it’ can be used in the ‘describe’ callback.
If we are to combine the above two, we use ‘describe’ with a callback for creating a new test module, and then we use ‘it’ inside that describe block to create one or more individual tests.
describe(Jest()', () => {
it('should be the best framework', () => {
expect(Jest.bestFramework.toBeTruthy());
});
});
beforeAll and afterAll
The beforeAll block is responsible for running a specific function before the test suite starts executing any of the tests in the file. If the function in beforeAll returns a JavaScript promise, it waits for it to resolve before running any tests.
The most common use case of beforeAll is the setting up of any global state to be used by one or more tests in the suite. For example - Selenium, since the web drivers are initiated in a beforeAll() block.
afterAll(fn)
The afterAll block is used to run a specific function after all the tests in a suite have been executed successfully. If the functions result in a JavaScript promise, it stops the execution and waits until the promise has been resolved.
The most common use case of afterAll is the clean-up, i.e., the afterAll block allows you to remove all the global setup states created or shared across the test suite.
Both beforeAll and afterAll are used within the describe block. beforeAll runs at the beginning, while afterAll runs towards the end of the block. These are used in one-time setup and teardown hooks which we will discuss in the later sections of this Jest tutorial with examples. (Refer to the section Jest Hooks: Setup and Teardown).
Jest Skip Tests
When working with a relatively large project and code database, there may be scenarios where you want to skip certain tests from the execution. Say 5 out of 1000 cases fail due to external dependencies, and you want to skip these specific tests. This can be done by using the skip tests functionality of Jest. This feature comes under the below aliases:
- test.skip(name, fn).
- it.skip(name, fn).
- xit(name, fn).
- xtest(name, fn).
Suppose you’ve a test ‘testWaterLevel’’ and you want to skip its execution:
test.skip(‘this test is broken’, () => {
expect(testWaterLevel()).toBe(0);
});
This code block skips the execution of a given test and runs all the other tests in the suite. You also have the option to comment out the code related to such tests, but using skip tests methods is nicer, easier, and considered a best practice.
Jest Installation
In this Jest tutorial, we will be walking through writing and performing tests with Jest. But before testing your JavaScript code, you must perform some prerequisite steps. Only after installing Jest and its associated software will you be able to exploit the features of Jest.
Prerequisites
Before installing Jest and running Jest scripts on your system, you need to have the below-mentioned libraries and packages installed:
- Java SDK
- NodeJS and npm
- Browser Driver
Java is one of the most popular languages for developing Selenium automation testing scripts. As the Jest framework incorporates the usage of Selenium, you also need to install the Java Development Kit (JDK 7.0 and above). You can download the JDK from its official website.
NPM stands for Node Package Manager. You can install Node JS from the npm manager or the nodejs.org website.
Browser drivers are used to implement Selenium WebDriver’s protocols that convert given commands into a browser’s native API.
| BROWSER | DOWNLOAD LOCATION |
|---|---|
| Opera | https://github.com/operasoftware/operachromiumdriver/releases |
| Firefox | https://github.com/mozilla/geckodriver/releases |
| Chrome | http://chromedriver.chromium.org/downloads |
| Internet Explorer | https://github.com/SeleniumHQ/selenium/wiki/InternetExplorerDriver |
| Microsoft Edge | https://blogs.windows.com/msedgedev/2015/07/23/bringing-automated-testing-to-microsoft-edge-through-webdriver/ |
Or you can run the given command in your terminal to install the Chrome driver that instantiates Chrome and places executable files under the root directory.
npm install -g chromedriver
For the Safari browser, there is an in-built driver called safaridriver, which is already available in most Selenium client libraries. To configure your Safari browser for enabling WebDriver support, run the following command in your terminal:
/usr/bin/safaridriver --enable/usr/bin/safedriver is Apple’s executable path for safaridriver.
Selenium WebDriver
Jest needs the Selenium WebDriver installed in your system in case you are testing on a local Selenium Grid. It is recommended to have the WebDriver installed in the root directory. It is a non-negotiable dependency.
Once you’ve installed npm on your system, you can install the Selenium WebDriver using the below command.
npm install selenium-webdriver
Installing Jest on your System
Now that you’ve moved past the prerequisites, you need to install the Jest package module. Jest comes in the form of a node package. You can install it by using any node-based package manager like npm. To install Jest, open your command prompt or preferred terminal and type the following command:
npm init —-yThis command will initialize the npm. The second step is to write the below command to install Jest.
npm install -g jestThe -g in the above command indicates that the module will be installed globally. Now press enter and wait for the process to complete. Once the installation is complete, type the next given command to get an executable file in the bin folder of its root directory.
npm install –save-dev jestYou can now verify if Jest has been installed by giving the following command:
jest -versionThis command returns the current version of Jest installed on your system. Voila! Your system is ready to play with Jest: The JavaScript Testing Framework.
Using Jest with NodeJS Project
NodeJS is a JavaScript runtime environment that executes JavaScript code in the backend, mainly outside the browser. It also offers the largest collection of open-source libraries that can be used to develop highly reliable backend applications and APIs.
In this section of this Jest tutorial, we will discuss the steps of installing and using Jest for your NodeJS project.
Installing and Using Jest with NodeJS
To install and use Jest with your node.js project, you need to ensure that you have NodeJS and npm installed on your system. If yes, follow the steps:
- First, open the terminal on your system.
- Run the following command to create a new directory
mkdir JestApp. - Now, enter this new directory with this command.
cd JestApp. - Within this directory, initialize a project with this command
npm init –y. - Now launch this project in your preferred code editor. Ensure that your project folder has a package.json file.
- Under the project directory, create two new folders: src and test. The src folder will contain the main source code of your project, while the test folder will include the test cases for unit testing with Jest.
- Now open the package.json file and configure the “scripts” block to “jest”.
{
"name": "jest",
"version": "1.0.0",
"description": "",
"main": "index.js",
"scripts": {
"test": "jest"
},
"keywords": [],
"author": "",
"license": "ISC",
}
}
Once you’ve installed Jest, your package.json should look like this
{
"name": "jest",
"version": "1.0.0",
"description": "",
"main": "index.js",
"scripts": {
"test": "jest"
},
"jest": {
"collectCoverage":true
},
"keywords": [],
"author": "",
"license": "ISC",
"dependencies": {
"jest": "^28.1.0"
}
}
You are now all set to create your NodeJS app and test it with the Jest framework. Once you are done with unit testing of your NodeJS AUT, you can move ahead by performing end-to-end testing on real devices to ensure further efficiency.
Writing First Test for Jest Framework
Once you are done with the initial setup and installation of Jest (and its prerequisites), it’s time you write your first test using the Jest framework. In this section of this Jest tutorial, you will learn how to set up a test environment with the Jest framework.
Let us start by installing Selenium dependencies and cloning the tutorials from LambdaTest’s jest-selenium-webdriver-sample repository. Run the following Git command on your terminal:
git clone https://github.com/LambdaTest/jest-selenium-webdriver-sample
cd jest-selenium-webdriver-sample
In the above command, we are cloning a sample repository by LambdaTest that helps us execute Jest tests with LambdaTest automation testing cloud.
You can use cross browser testing tools like LambdaTest, which offers more than 3000 browsers and real device simulators & emulators to perform testing.
Subscribe to the LambdaTest YouTube Channel to get more such tutorials around automated browser testing , App test automation, Cypress E2E testing, Mobile App Testing, and more.
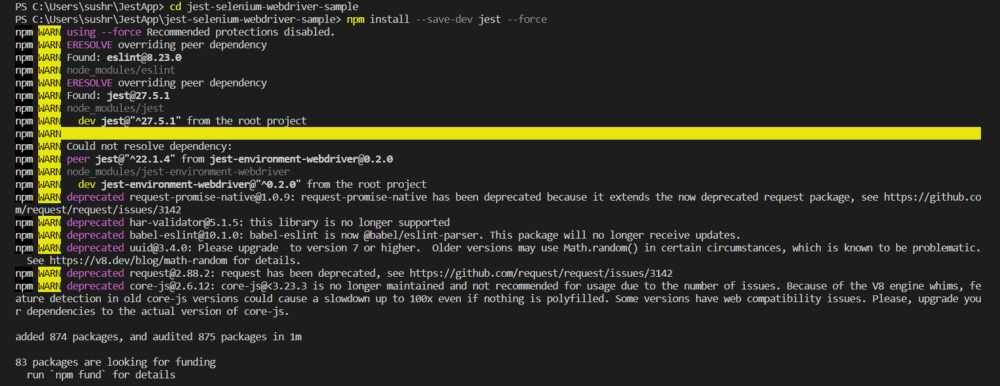
Now, install Jest by running the following command.
npm install --save-dev jest --force- -save-dev saves the version and name of whichever package is being installed by the given command. This storing of version and name happens in the dev-dependency object.
Dev-dependencies are the packages we only need while developing the project and not deploying.
- -force is used to overwrite your local branch commit history forcefully.
You need to set up your user name and access key from LambdaTest. You can get your credentials from the LambdaTest Profile or the LambdaTest Dashboard.
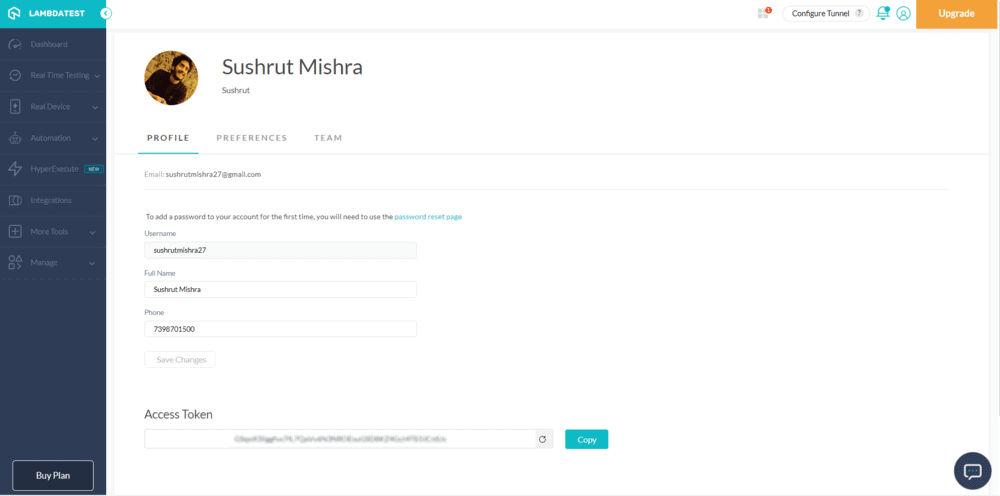
The next step is to set your LambdaTest Username and Key in the environment variables.
Linux/macOS
export LT_USERNAME="YOUR_USERNAME"
export LT_ACCESS_KEY="YOUR_ACCESS_KEY"
Windows
set LT_USERNAME="YOUR_USERNAME"
set LT_ACCESS_KEY="YOUR_ACCESS_KEY"
Let us now create a sample test with Jest on LambdaTest cloud grid. Copy the below code that hosts Jest test for a simple To-Do app.
// local.test.js
const webdriver = require('selenium-webdriver');
const { until } = require('selenium-webdriver');
const { By } = require('selenium-webdriver');
const LambdaTestRestClient = require('@lambdatest/node-rest-client');

const username = process.env.LT_USERNAME || 'YOUR_USERNAME';
const accessKey = process.env.LT_ACCESS_KEY || 'YOUR_ACCESS_KEY';

const AutomationClient = LambdaTestRestClient.AutomationClient({
username,
accessKey
});
var driver = new webdriver.Builder()
.forBrowser('chrome')
.build(3.141.59);

const getElementById = async (driver, id, timeout = 2000) => {
const el = await driver.wait(until.elementLocated(By.id(id)), timeout);
return await driver.wait(until.elementIsVisible(el), timeout);
};

const getElementByName = async (driver, name, timeout = 2000) => {
const el = await driver.wait(until.elementLocated(By.name(name)), timeout);
return await driver.wait(until.elementIsVisible(el), timeout);
};

const getElementByXpath = async (driver, xpath, timeout = 2000) => {
const el = await driver.wait(until.elementLocated(By.xpath(xpath)), timeout);
return await driver.wait(until.elementIsVisible(el), timeout);
};

let sessionId = null;

describe('webdriver', () => {
let driver;
beforeAll(async () => {
driver = new webdriver.Builder()
.usingServer(
'https://' + username + ':' + accessKey + '@hub.lambdatest.com/wd/hub'
)
.withCapabilities(capabilities)
.build();
await driver.getSession().then(function(session) {
sessionId = session.id_;
});
// eslint-disable-next-line no-undef
await driver.get("https://todomvc.com/examples/react/#/");
}, 30000);

afterAll(async () => {
await driver.quit();
}, 40000);

test('test', async () => {
try {
const lnk = await getElementByName(driver, 'li1');
await lnk.click();

const lnk1 = await getElementByName(driver, 'li2');
await lnk1.click();

const inpf = await getElementById(driver, 'sampletodotext');
await inpf.clear();
await inpf.sendKeys("Yey, Let's add it to list");

const btn = await getElementById(driver, 'addbutton');
await btn.click();

const output = await getElementByXpath(
driver,
'//html/body/div/div/div/ul/li[5]/span'
);
const outputVal = await output.getText();
expect(outputVal).toEqual("Fifth Item");
await updateJob(sessionId, 'passed');
} catch (err) {
await updateJob(sessionId, 'failed');
await webdriverErrorHandler(err, driver);
throw err;
}
}, 35000);
});

async function webdriverErrorHandler(err, driver) {
console.error('Unhandled exception! ' + err.message);
if (driver && sessionId) {
try {
await driver.quit();
} catch (_) {}
await updateJob(sessionId, 'failed');
}
}
function updateJob(sessionId, status) {
return new Promise((resolve, reject) => {
AutomationClient.updateSessionById(
sessionId,
{ status_ind: status },
err => {
if (err) return reject(err);
return resolve();
}
);
});
}
This is all you need to do to run your first test in Jest.
You can also test your react AUT on the LambdaTest platform by following the given steps. Before going in, you need to set up LambdaTest authorizations. You can get your credentials from your LambdaTest Profile or through the LambdaTest Dashboard.
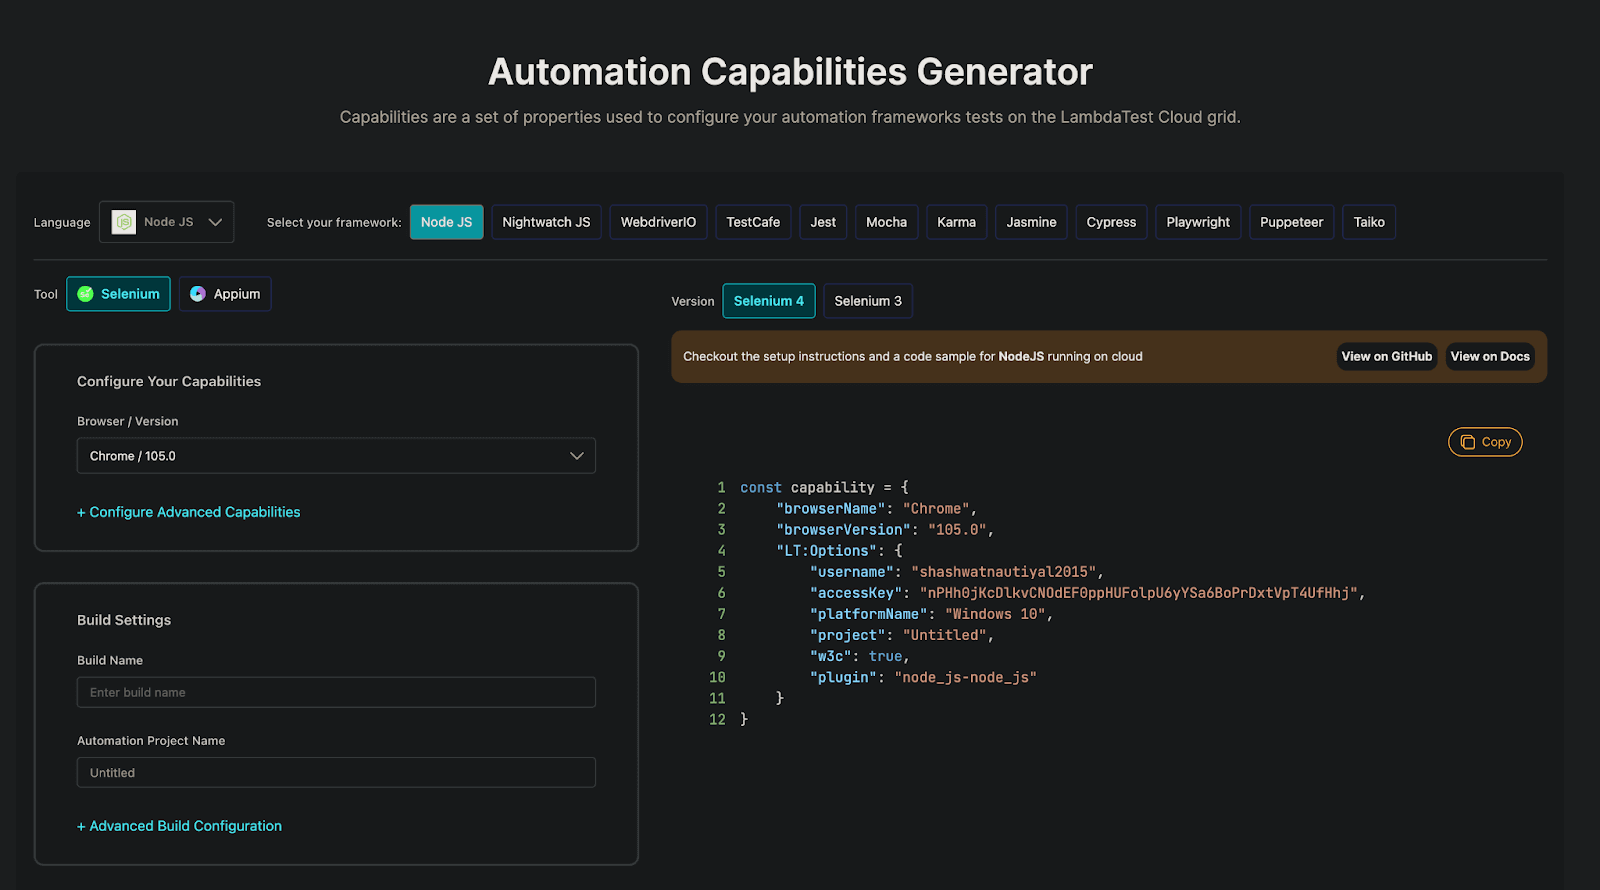
- Create a new file called capabilities.js and paste capabilities from LambdaTest Capabilities Generator.
- Add your username and access key to the index.test.js file and modify the beforeAll function to run the test on LambdaTest.
const USERNAME = "";
const ACCESS_KEY = "";
const GRID_HOST = "hub.lambdatest.com/wd/hub";
const GRID_URL = "https://" + USERNAME + ":" + ACCESS_KEY + "@" + GRID_HOST;

beforeAll(async () => {
driver = new Builder().usingServer(GRID_URL).withCapabilities(capabilities).build();

await driver.get(rootURL);
});
Running a test on LambdaTest in parallel across 5 different browsers
LambdaTest supports parallel testing, which allows you to run the same test across different browsers simultaneously. To do this, create multiple instances of the WebDriver with different capabilities.
const { Builder } = require('selenium-webdriver');

const browsers = ['chrome', 'firefox', 'safari', 'edge', 'opera'];

describe('Google Search', function() {
browsers.forEach((browser) => {
it('should open Google in ${browser}', async function() {
let driver = new Builder()
.usingServer('https://USERNAME:ACCESS_KEY@hub.lambdatest.com/wd/hub') // replace USERNAME and ACCESS_KEY with your LambdaTest credentials
.withCapabilities({
platform: 'windows 10',
browserName: browser,
version: 'latest'
})
.build();

await driver.get('https://www.google.com/');
let title = await driver.getTitle();
expect(title).toEqual('Google');

await driver.quit();
}, 15000);
});
});
Jest Matchers and Viewing Test Results on LambdaTest
Jest uses "matchers" to let you test values in different ways. For example, in the `toBe` matcher we used earlier, it checks for exact equality. There are numerous other matchers available in Jest like `toEqual` (for checking deep equality), `toBeNull `, `toBeDefined`, `toBeTruthy`, `toBeFalsy`, etc.
test('two plus two', () => {
const value = 2 + 2;
expect(value).toBeGreaterThan(3);
expect(value).toBeGreaterThanOrEqual(3.5);
expect(value).toBeLessThan(5);
expect(value).toBeLessThanOrEqual(4.5);
});
After you run tests on LambdaTest, you can view the test results on LambdaTest dashboard. It will provide you with test status, test environment, and other details. You can also view the video of your Selenium test execution and share the test result link with your team. Now, in the upcoming sections of this Jest tutorial, we will dive deeper into the Jest framework.
Jest Parameterized Tests
Parameterized tests in Jest are used to run and execute the same test code under different conditions and input parameters. It is a best practice to set up test methods that retrieve the data from the source, making testing with the same method easy under different circumstances.
The data source can be in any form, be it a collection of objects, a database table, or even an external file.
Parameterized tests help fasten the testing process, avoid code duplication, and make it easy to maintain. These also help eradicate the need to add multiple ‘it’ and ‘test’ commands in the describe block.
If you are using Jest version >23.x, you won’t have to install additional packages for using parameterized tests. However, in other cases, you’ll have to install the jest-each package. Once you’ve installed this package, you can include parameters in your tests and perform parameterized testing.
Let us see an example for checking palindrome in Jest versions > 23:.
describe("isPalindrome", () => {
it.each([
["madam", true],
["Lambda", false]
])("input is '%s'", (text, expected) => {
expect(isPalindrome(text)).toBe(expected);
});
});
Jest Matchers
Matchers in Jest allow you to test data values in several ways. These, when combined with the expect keyword, are used in enforcing assertions, i.e., comparison of the output value with the expected value.
For example: In the below code, we are checking whether the taken object is from the correct class.
it('check_object_of_Car', () => {
expect(newCar()).toBeInstanceOf(Car);
});
The expect keyword contains the test value together with the matcher function toBeInstanceOf(). That’s not it! Matchers allow you to test value in more ways, let’s discuss a few of them in brief:
Exact Equality
The most common way of comparing test data using matchers is with exact equality.
test('two_plus_two', () => {
expect(2 + 2).toBe(4);
});
In the above code, .toBe(4) is the matcher that expects the returned value to be equal to the expected value.
This function is very similar to the Object.is function and hence enforces exact equality. In case you want to check the returned value rather than enforcing equality, you can use toEqual.
test('object assignment', () => {
const data = {one: 1};
data['two'] = 2;
expect(data).toEqual({one: 1, two: 2});
});
Truthiness
Normally, you define the keywords undefined, false, and null differently. But there may be times when you want these to mean the same. This is possible with the truthiness helpers in Jest. Here are some of them:
- toBeNull matches if the value is null.
- toBeUndefined matches if the value is undefined.
- toBeDefined is the exact opposite of toBeUndefined.
- toBeTruthy returns true if the condition of an if condition is satisfied.
- toBeFalsy returns false if the condition of an if condition is not satisfied.
Let us understand it with an example where we test these for a Null value:
test('null', () => {
const n = null;
expect(n).toBeNull();
expect(n).toBeDefined();
expect(n).not.toBeUndefined();
expect(n).not.toBeTruthy();
expect(n).toBeFalsy();
});
Let us understand it with an example where we test these for a Null value:
Number Matchers
Similar to truthiness and equality, we can also use matchers to match numbers in jest tests. There are several operations of matching numbers, be it equivalency or comparison. Below mentioned are a few of them:
test('one plus one', () => {
const value = 1 + 1;
expect(value).toBeGreaterThan(2);
expect(value).toBeGreaterThanOrEqual(3.5);
expect(value).toBeLessThan(3);
expect(value).toBeLessThanOrEqual(2);

// toEqual and toBe are equivalent for numbers
expect(value).toBe(2);
expect(value).toEqual(2);
});
In case you are dealing with decimals, you need to ensure that matchers do not result in rounding errors. Hence, for floating point numbers, we use toBeCloseTo() number matcher.
test('adds decimal values', () => {
const value = 0.1 + 0.2;
expect(value).toBeCloseTo(0.3);
});
String Matchers
Matching strings in Jest is no different. You can match strings using toMatch(), here’s how:
test('there is no I', () => {
expect('LambdaTest').not.toMatch(/I/);
});

test('match Test', () => {
expect('LambdaTest').toMatch(/Test/);
});
Jest Hooks: Setup and Teardown
Setting up a few conditions and functions before a test runs and tearing them down right after the execution is an important step of testing. These may include the works that need to happen before and after tests are executed. Jest provides helper functions for that.
Let us look at them:
Repeated or Iterable Setup
Suppose you need to do some setup before each test, and you have several tests to be executed in line. For example - Say you have many test cases to be executed on Chrome and the same Chrome instance has to be used across all. Therefore, Chrome can be instantiated in the setup block. For setup, you can use beforeEach().
Each test follows a new setup and hence must end with a teardown. This teardown can be achieved by afterEach(). Look at the example below:
beforeEach(() => {
//run this before every test execution
//Get the database
});

afterEach(() => {
//run this after every test execution
//Clear the database
});

test('database has tableA’, () => {
expect(isTable('tableA')).toBeTruthy();
});

test('database has tableB', () => {
expect(isTable('tableB')).toBeTruthy();
});
In the above code, before every test, beforeEach() setups and initializes a database. The test is executed based on the values from the database. Now when the test is done, afterEach() clears the database.
One-time Setup
In many cases, you may need to set up and teardown only once. This is where beforeAll() and afterAll() are used. These two are called within the describe block and are helpful in synchronous tests.
As we have already discussed in the above sections of this Jest tutorial, beforeAll() runs at the beginning while afterAll() runs towards the end of the block.
beforeAll(() => {
//run this before every test execution
//Get the database
});

afterAll(() => {
//run this after every test execution
//Clear the database
});

test('database has tableA’, () => {
expect(isTable('tableA')).toBeTruthy();
});

test('database has tableB', () => {
expect(isTable('tableB')).toBeTruthy();
});
In the above example, unlike beforeEach() and afterEach(), a one-time setup with beforeAll() and afterAll() initializes and clears the database only once.
Scoping
The before and after blocks are automatically applied to every test in a suite by default. As we have already discussed, all the tests are grouped within the describe block together. Moreover, the before and after blocks work only for the tests that are inside the describe block. Any test outside the ‘describe’ block won’t have any before or after operations. The setup and teardown are only effective and scoped for the tests within the block.
Jest Code Coverage
Code coverage is an extremely important and non-negotiable aspect of a testing framework. It ensures that there are no untested paths in a code and hence determines the overall efficiency of a project.
Jest allows you to generate code coverage by adding the --coverage flag. That’s it, you don't need additional installation or setup to get code coverage.
npm test --coverage
yarn test --coverage
Jest can collect from every test of a test suite, including the test files that haven’t been executed or remain untested. With the above commands, Jest collects code coverage from the functions under the tests, and it doesn’t include the entire project code.
Therefore, it also provides a –collectCoverageFrom flag that requires a path to be specified. This commands Jest to retrieve coverage from that path.
npm test -- --coverage --collectCoverageFrom="./src/**"
Coverage Threshold
Every project aims for certain code coverage, and Jest comes with a threshold property that fails a suite or test if the required coverage is not met. This can be done by configuring coverageThreshold.
Say you want to have a code coverage of 80%, you can modify your package.json file as below:
{
...
"jest": {
"collectCoverage": true,
"collectCoverageFrom": ["./src/**"],
"coverageThreshold": {
"global": {
"lines": 80
}
}
}
}
Setting up the above code gives you an error whenever the threshold is not met. For example - you set up a coverage threshold of 80% and received only 50%. You’ll see a message like this:
Jest: “global” coverage threshold for lines (80%) not met: 50%
If you’re working with Jest testing, you must include these three in your package.json file:
- collectCoverage
- collectCoverageFrom
- coverageThreshold
Although you should always aim for the maximum code coverage, it’s not always critical to set a high threshold coverage, but it certainly is a best practice to set a baseline for your code coverage. This ensures the efficiency of your project.
HTML Report Generation
Jest allows us to fetch test reports in the HTML format using the jest-html-reporter package. It is a great library that converts the test results into colorful HTML format with various configuration options.
HTML reports are important since major project stakeholders can look at the minutest details of the tests with test reports. If you are using Jest, you should make use of this library. First, let us see how to install this package:
npm install –save-dev jest-html-report
Now, we need to add a new package.json file. Let's name it “jesthtmlreporter.config.json”. This file should have the same location as the package.json file. When created, include the following specifications in the file:
{
"pageTitle": "HTML Report",
"outputPath": "testReport.html",
"includeFailureMsg": true
}
Now under the script section of your package.json file, add the below given line:
"test:CI": "set CI=true && react-scripts test --env=jsdom --testResultProcessor =./node_modules/jest-html-reporter"
In the above lines, “set CI = true” ends the execution as soon as all the tests in the suite are executed.
“--env = jsdom” gives the tests a mock browser environment.
And that’s it. This is all that you need to do for HTML report generation with the Jest framework. In the next sections of this Jest tutorial, we will learn how to set up and test react apps and components with the Jest framework.
Testing React app using Jest Framework
In this section of this Jest tutorial, we will learn how to set up and test react applications on the LambdaTest Selenium cloud platform using Jest and Selenium. Our objectives with this section of this Jest tutorial include setting up an environment for testing React AUT using Jest and Selenium, running the Jest framework locally, and testing applications on the LambdaTest cloud platform.
Setting up a project
Make sure you use the latest node and npm. You can check it using the commands below.
node -v
npm -v- Navigate to a directory where you want to create your project.
cd Desktopmkrdir jestDemo
cd jestDemo
npm init -ynpm install selenium-webdriver && npm install chromedriver && npm install jest{
"name": "jestdemo",
"version": "1.0.0",
"description": "",
"main": "index.js",
"scripts": {
"test": "jest"
},
"keywords": [],
"author": "",
"license": "ISC",
"dependencies": {
"chromedriver": "^104.0.0",
"jest": "^28.1.3",
"selenium-webdriver": "^4.4.0"
}
}
const { By, until } = require("selenium-webdriver");
const defaultTimeout = 3000;

const getElementByCss = async (driver, name, timeout = defaultTimeout) => {
const el = await driver.wait(until.elementLocated(By.css(name)), timeout);
return await driver.wait(until.elementIsVisible(el), timeout);
};

const getElementByXpath = async (driver, xpath, timeout = defaultTimeout) => {
const el = await driver.wait(until.elementLocated(By.xpath(xpath)), timeout);
return await driver.wait(until.elementIsVisible(el), timeout);
};

module.exports = {
getElementByXpath,
getElementByCss,
};
const { Builder, Key } = require("selenium-webdriver");
const { getElementByXpath, getElementByCss } = require("./helpers");
const { capabilities } = require("./capabilities");

const rootURL = "https://todomvc.com/examples/react/#/";
let driver;

describe("todo tests", () => {
beforeAll(async () => {
driver = new Builder().forBrowser("chrome").build();

await driver.get(rootURL);
});

afterAll(async () => {
await driver.quit();
}, 40000);

it("add first todo", async () => {
await driver.get(rootURL);
const input = "This is first todo";
const newTodoInput = await getElementByCss(driver, ".new-todo");

await newTodoInput.click();

await newTodoInput.clear();
await newTodoInput.sendKeys(input);
await newTodoInput.sendKeys(Key.ENTER);

const outputTodo = await getElementByXpath(
driver,
"/html/body/section/div/section/ul/li/div/label"
);

const output = await outputTodo.getText();
expect(output).toEqual(input);
});
});
const output = await outputTodo.getText();
expect(output).toEqual(input);
});
/.../ Previous code
it("add second todo", async () => {
await driver.get(rootURL);

const input = "This is second todo";
const newTodoInput = await getElementByCss(driver, ".new-todo");

await newTodoInput.click();

await newTodoInput.clear();
await newTodoInput.sendKeys(input);
await newTodoInput.sendKeys(Key.ENTER);

const outputTodo = await getElementByXpath(
driver,
"/html/body/section/div/section/ul/li[2]/div/label"
);
const output = await outputTodo.getText();
expect(output).toEqual(input);
});
});
npm run test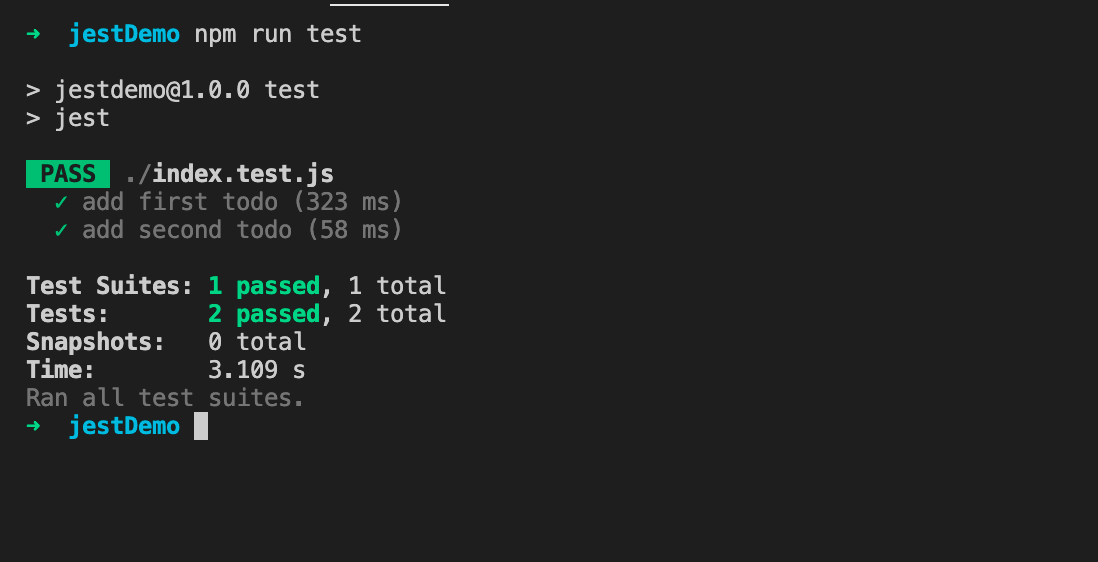
Browsers Supported by Jest
Jest is compatible with all major browsers, including:
- Google Chrome (27 & above)
- Firefox (10 & above)
- IE (9 & above)
- Opera (69 & above)
- Safari (7.1 & above)
How To Run Jest Tests on LambdaTest?
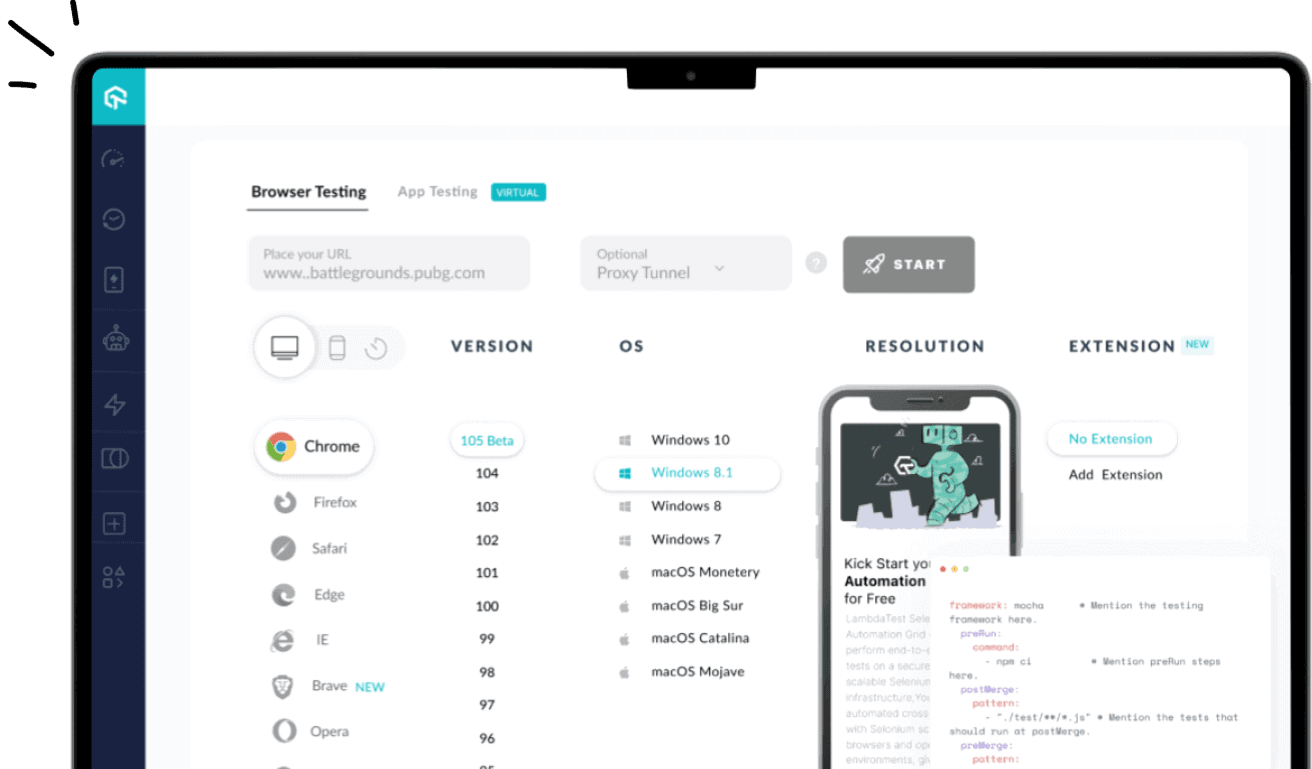
Jest cloud grids like LambdaTest allow you to perform Jest testing at scale. LambdaTest allows you to perform automated cross browser testing on an online browser farm of 40+ browsers and operating systems to expedite the test execution in a scalable way. Moreover, it increases the test coverage with better product quality.
To run your first Jest automation testing script online, refer to our GitHub repository. No need to worry about the challenges with Jest infrastructure. Want to know a fun fact? Your first 100 Jest automation testing minutes are on us with just a free sign-up. You can also avail benefits of manual cross-browser testing, responsive testing, and more with a lifetime of free access to LambdaTest, the world's fastest-growing cloud Jest Grid.
Our detailed Jest tutorials will help you develop a better functional understanding of the Jest framework. Finally, kick-start your Jest automation journey by running your first Jest test script on the LambdaTest cloud.
Snapshot Testing for React Front Ends
In this section of this Jest tutorial, we will learn to set up and perform snapshot tests in react applications using the Jest framework. Snapshot tests are a significant way of testing UI by comparing previous UI components to newer UI components. This testing ensures that your UI components do not change unexpectedly.
How does snapshot testing work?
Snapshot testing works by rendering a UI component, which takes a snapshot of the component, and then compares it to a reference snapshot file stored alongside. The test will fail if the two snapshots do not match, if there is an unexpected change, or if the reference snapshot needs to be updated to the new version of the UI component.
Let us now see how snapshot testing for React front-end works with Jest.
Step 1: Project Set up
First, create a new React application by running an `npx create-react-app jest-snapshot-demo` command in your terminal.
npx create-react-app jest-snapshot-demo
Now navigate to the React application using `cd jest-snapshot-demo` and run `npm start` to start the React app.
cd jest-snapshot-demoStep 2: Create a React App
Now, we will walk through the creation of a basic React frontend AUT. Open the react application in your favorite IDE and navigate to src/App.js.
- Modify the App.js file by importing and adding the ‘Todos’ component, which we will create in the next step.
import './App.css';
import Todos from './Todos';
function App() {
const todos = ["Doctor Appointment", "10 min walk", "Grocery Shopping"];

return (
<div className="App">
<Todos todos={todos} />
</div>
);
}
export default App;
import React from 'react';

const Todos = ({ todos }) => {
if (!todos) {
return <></>;
}

if (todos.length === 0) {
return <div>Todo list is empty</div>;
}

return (
<div>
{todos.map((todo) => (
<h1 key={todo}>{todo}</h1>
))}
</div>
);
};

export default Todos;
This marks the creation of our basic React app. Now, if you visit `http://localhost:3000/` in your browser, your screen will display the list of todos you’ve just created.
Step 3: Writing Snapshot Tests for React Component
In this subsection of this Jest tutorial, we will write snapshot tests for the React component we’ve just created. Follow the given step-by-step process to write and execute a snapshot test.
- Open your terminal and install `react-test-renderer` by running `npm install react-test-renderer` on your project directory.
npm install react-test-renderer import React from 'react';
import renderer from 'react-test-renderer';
import Todos from './Todos';
it("renders correctly when there are no todos", () => {
const tree = renderer.create(<Todos />).toJSON();
expect(tree).toMatchSnapshot();
});
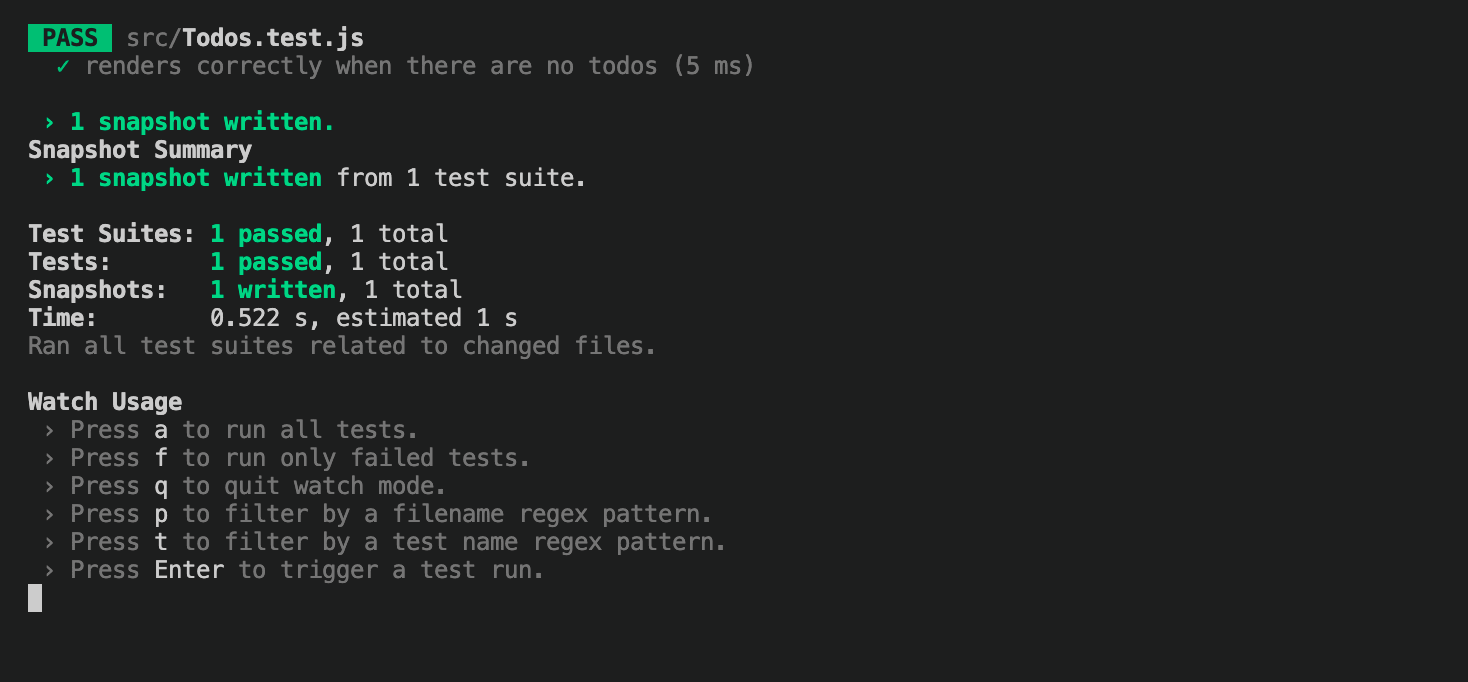
it("renders correctly when there are empty todo", () => {
const todos = [];
const tree = renderer.create(<Todos todos={todos} />).toJSON();
expect(tree).toMatchSnapshot();
});

it("renders correctly when there are 3 todos", () => {
const todos = ["Shopping", "Yoga class", "Doctor Appointment"];
const tree = renderer.create(<Todos todos={todos} />).toJSON();
expect(tree).toMatchSnapshot();
});
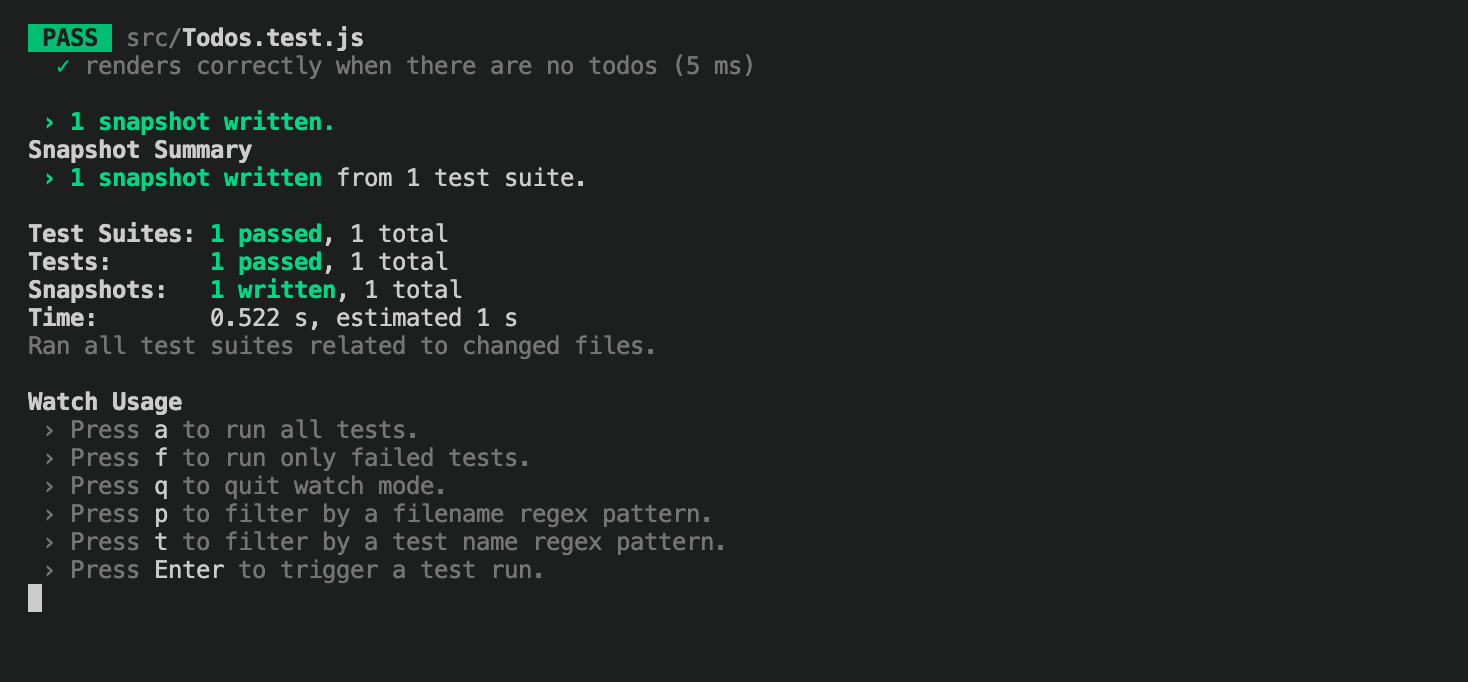
Step 4 Verify snapshot test
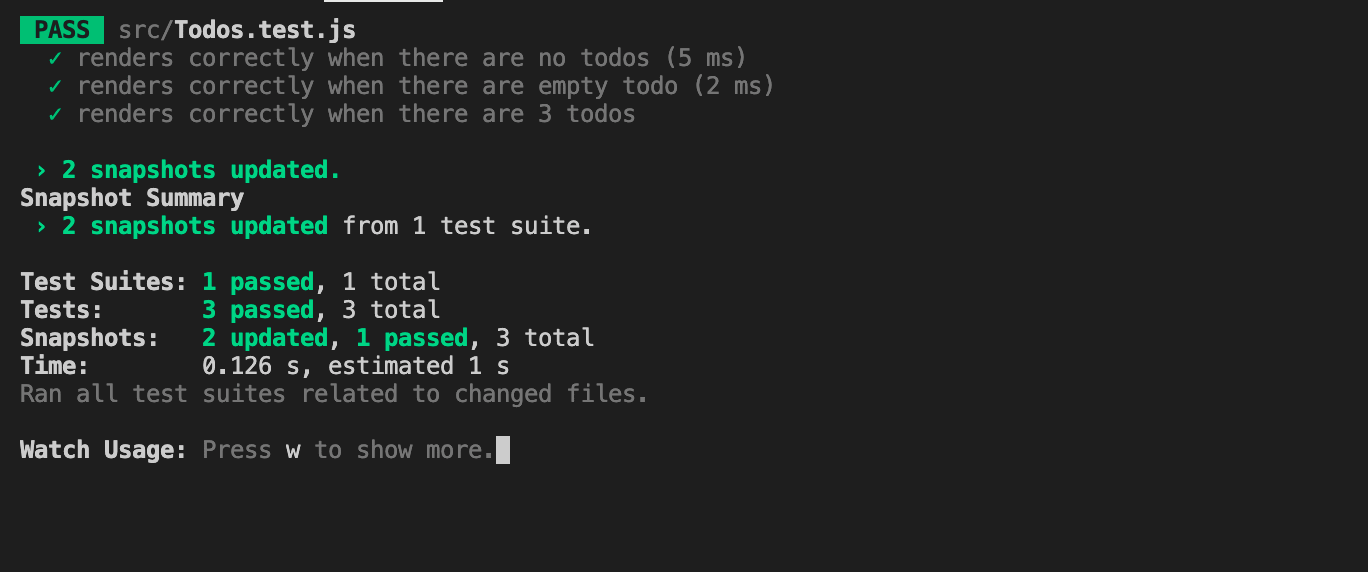
Snapshot testing is excellent at finding any abrupt changes or mistakes in the UI. If there are any changes in the UI and the new snapshot doesn’t match the previous one, it will throw an error. Here's how you can verify a snapshot test of the React component we’ve created.
- Make changes to your Todos component by replacing the h1 tag with h2 and the div with span.
import React from 'react';

const Todos = ({ todos }) => {
if (!todos) {
return <></>;
}

if (todos.length === 0) {
return <span>Todo list is empty</span>;
}

return (
<div>
{todos.map((todo) => (
<h2 key={todo}>{todo}</h2>
))}
</div>
);
};

export default Todos;
npm test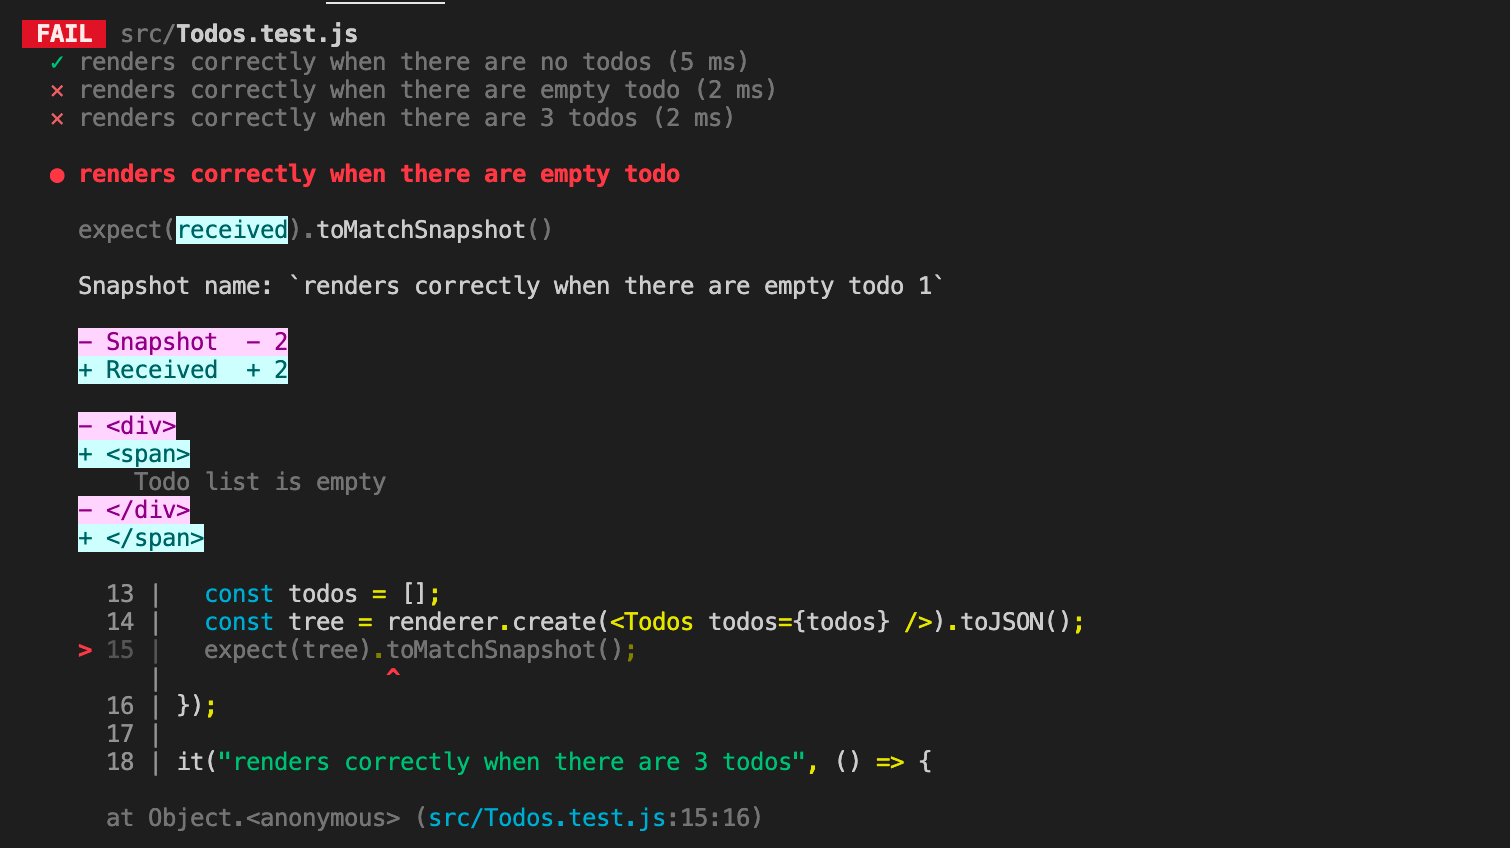
Advantages & Limitations
All in all, Jest is a very powerful framework for JavaScript automation testing with many benefits that include zero configuration, snapshots, amazing APIs, incredible speed, and much more.
Let’s see some of its major advantages.
- Inbuilt CLI
- Modules
Jest comes with all of the features that are required in a modern testing framework. Built-in modules provide good support for plugins, and there is no need to download any other third-party executable, like Mocha or Cucumber, to perform certain activities. In case you need to add any other library with Jest, they are easily configurable and there are no compatibility issues.
- Migration
Migrating a current test project to the Jest framework is easy and can be done programmatically using code mods module.
- Not basic test runner
The framework is not just a basic test runner; on the other hand, it also offers advanced features such as auto mocking modules, coverage thresholds, and mappers. This includes support for multiple projects in the same runner and customer resolvers such as Babel and Webpack.
- Pre-commit hooks
Jest framework offers pre-commit hooks, which are an effective method to reduce the number of tests performed by a test suite. These tests are popularly known as snapshot tests and are useful in reducing regression testing efforts.
- Fast and Safe
- Documentation and Support
- Easy Mocking
- Code Coverage
Jest has a CLI tool that offers out-of-the-box code coverage. The Jest configuration file hosts a collectCoverage property for this feature. The CLI ensures the control of your test scripts and testing is in your hands. It also has an interactive mode that automatically runs tests for the latest commits.
Jest allows you to run unit testing for different units in parallel, which saves a lot of time and avoids repetition. Jest runs all the tests in a queue. In case the queue has some failed tests, Jest runs them first and then sets up the queue again based on the test execution time. Jest is faster than other frameworks when it comes to executing test cases. In addition to speeding up the entire test suite, Jest offers great efficiency in its watch mode enabling users to analyze how specific changes affect the overall output.
The documentation and community support are impeccable. Each topic featured in the documentation comes with an apt real-life example.
The Jest community over Discord is very helpful.
Jest makes it simple to mock any object out of scope as it incorporates a custom resolver for various imports.
It comes with a Mock Functions API that allows you to mock imports. This feature helps in spying on function calls.
Jest provides an excellent way of getting code coverage for your tests. It comes with a --coverage command that needs no additional setup.
Jest provides the feature to skip one or more tests while in debug mode. You can generate coverage reports even for such untested cases.
Limitations of Jest Testing
Jest's biggest weakness is that it is a newer and less widely used framework among JavaScript developers. It has less tooling and library support available compared to more mature libraries (like Mocha). This can be a big drawback for developers who want to run and debug their tests in an IDE like WebStorm.
Using auto-mocking features can slow down your test suite. This is because the more dependencies a module has, the more work Jest needs to do to fake them out and make them behave like real dependencies to test your code.
Along with this, snapshot testing with Jest is not a good fit for projects that produce large snapshot files with thousands of lines.
Why Test with Jest Framework?
There are many JavaScript testing frameworks and tools available in the market: Mocha, Chai, Jasmine, Cypress, and whatnot. But why should you use Jest? We have already covered a few points of why Jest is one of the best automation testing frameworks for JavaScript testing. Let us now establish a concrete answer as to why you should test with the Jest framework. The best reasons to use Jest are its rich feature set. Let’s look at a few more characteristics and features of Jest:
As per the official Jest website, it has been used on more than 3,898,000 public repositories on GitHub. This number proves that Jest has become one of the best JavaScript testing frameworks in the market, and the credit goes to the features it lays out. Let’s have a look at some of its best features.
- Zero configuration
- Reliable mocking support
- Sandboxed testing environment
- Built-in code coverage
- Speed and Performance
- Snapshots
- Rich API
- Super easy migration
Jest requires minimal configuration and setup. It is one of the rarest test frameworks that do not require a complex setup before testing the applications.
Jest framework supports almost every type of mocking. It supports everything from mocking individual API calls to functional and timer mocking.
Jest provides a sandbox environment for every test to ensure that no two tests interfere and execute in an isolated environment. This feature supports the isolation property of unit testing.
Jest comes with built-in support for code coverages. It offers out-of-the-box CLI-based commands to deliver precise code coverage and ensure the overall efficiency of an app or project. You can use the –coverage command or the –collectCoverage property in the Jest configuration file.
As it runs tests parallely in isolated sandboxes, the speed of unit testing with Jest increases manifolds. Not only does it execute individual tests fast, but it also boosts the overall speed and performance of the testing suite.
Jest supports a feature to take a snapshot of every react component that is tested. This snapshot can verify the output and the app’s behavior.
Jest claims to have a rich API. From it to expect, it has a range of helpful APIs that allow you to match and validate values, meet desired conditions, and whatnot. One such example is the Expect API, which offers various matcher functions. These matcher functions can be used to validate certain values and conditions.
It also incorporates numerous assertion types explained well in the Jest official documentation. As it is open source, Jest community members can add their matchers to its API list. You can check them here: jest-extended.
No matter what tool or framework you’ve been using, you can always migrate to Jest without facing typical programmatic issues with your module. Thanks to the jest-codemods module, you can migrate from any testing framework to Jest without doing any dirty migration work.
It doesn’t matter if you’re using Jasmine, Mocha, Chai, Tape, or any other framework. You can easily migrate to Jest with the help of jest-codemods. With the help of jscodeshift, this third-party runs a code transformation procedure on your existing codebase. jscodeshift is a toolkit that is responsible for running codemods for JavaScript.
Coming back to jest-codemods: You can run the below command to migrate your existing test codebase to Jest.
npx jest-codemodsRefer to this link to know more about jest-codemods: https://github.com/skovhus/jest-codemods
The Rise of Jest Framework
Initially created by Facebook, Jest is a popular testing framework for React applications. Since then, the tool has grown in popularity and is used for testing both front-end and back-end applications.
Facebook, Airbnb, Spotify, The New York Times, Travel Perk, Twitter, and Instagram are among the prominent companies that reportedly adopt Jest in their tech stack.
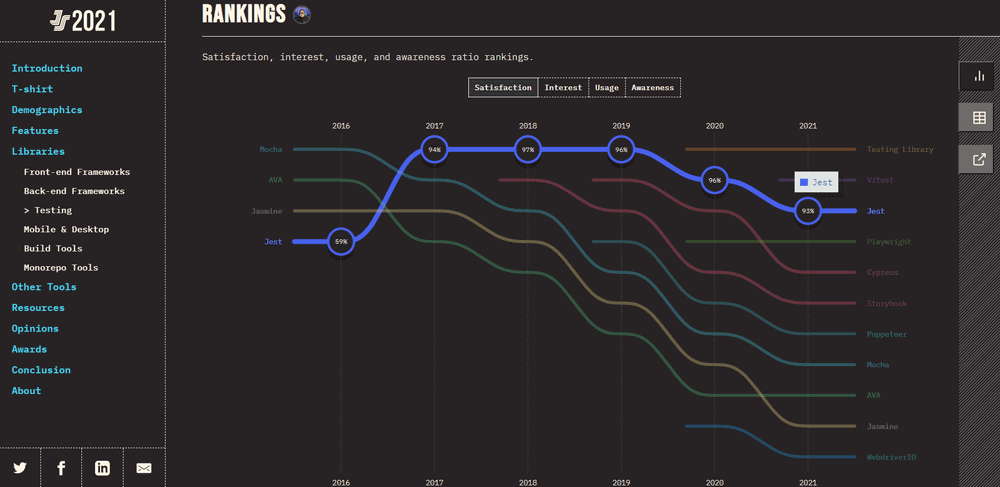
Check out The State of JS 2021 Jest testing data on the basis of developer Satisfaction, Interest, Usage and Awareness.
Satisfaction:
According to the State of JS survey, Jest has been the most interesting and satisfying framework for JavaScript testing. There has been a constant rise in the level of satisfaction among the tester community ( 59% in 2016 to 93% in 2021).
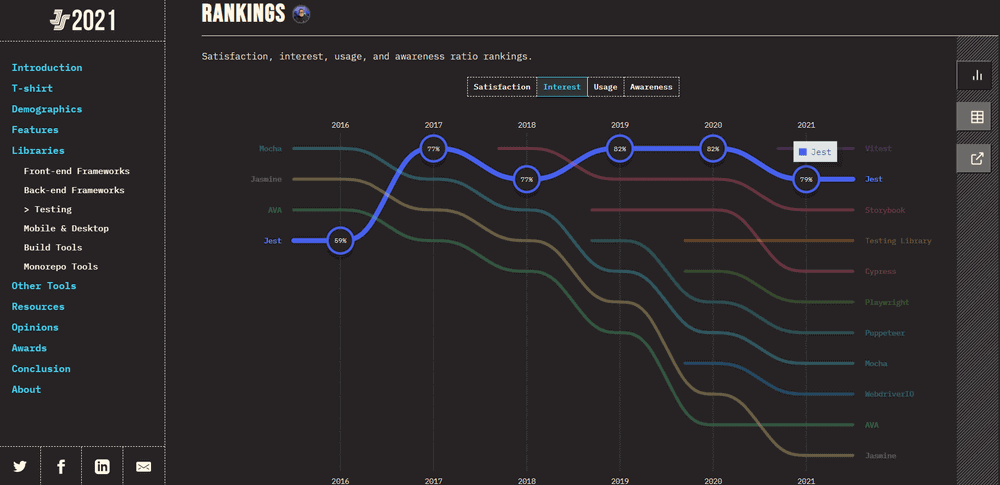
Interest:
The interest among the developers and testers community has also shown a consistent rise, i.e., from 59% in 2016 to 79% in 2021.
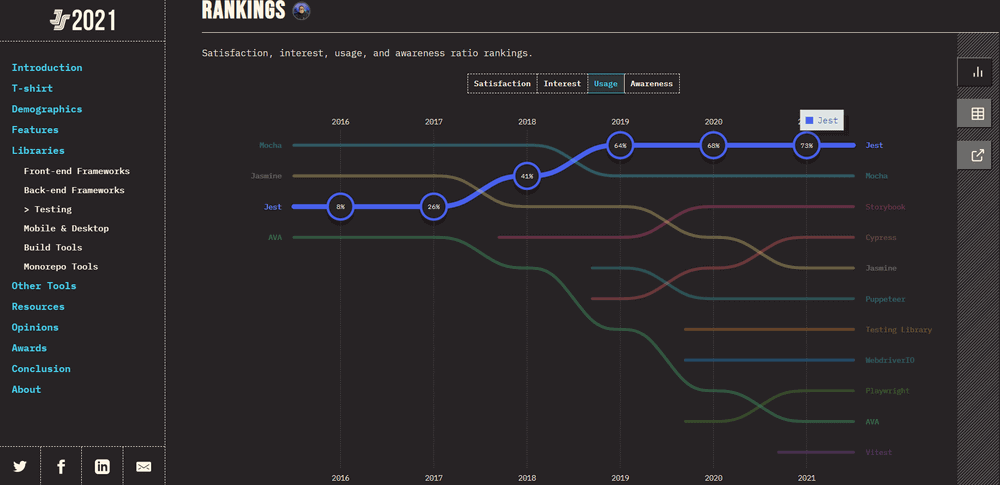
Usage:
According to the State of JS survey, Jest has been the most widely used testing framework for JavaScript testing, among other frameworks. It shows a significant rise from 8% in 2016 to 73% in 2021.
Awareness:
Since 2016, Jest has shown a consistent rise in its awareness among the tester community. Not only this, prominent companies like Facebook, Spotify, Airbnb, Twitter, etc, have also adopted Jest in their tech stack. It has shown a significant rise from 36% in 2016 to 95% in 2021.
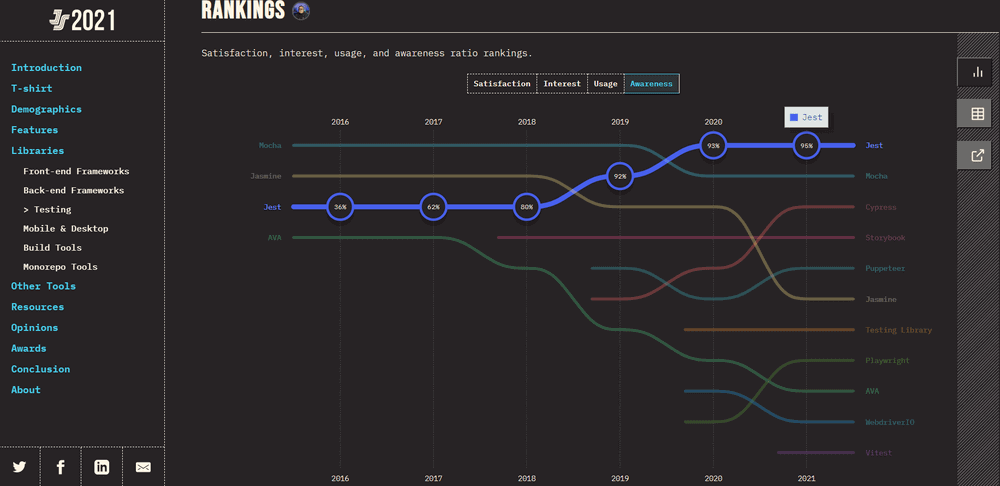
The State of JS survey also shows that 57 % of testers and developers would like to use it again for their testing needs, and around 15% would like to learn Jest.

Bonus: Import ES modules with Jest
ES modules or ECMAScript modules are the standard package formats for JavaScript code that can be reused at any point. Modules are commonly defined with a variety of import and export statements. If you want to take advantage of ES modules in Jest, you won’t be able to simply incorporate the import/export syntax because Jest requires the default Node syntax. It requires nothing but a simple configuration in the .babelrc file.
But first, let us see an example of a simple code that uses an ES module.
export function a() {
return "function a";
}
Now we have an equivalent test that imports a module.
import { a } from "./index";

describe("function a", () => {
it("should return expected value", () => {
expect(a()).toEqual("function a");
});
});
The default Jest configuration will work just fine with the above example when we perform the given change. Your .babelrc file should look like this:
{
"env": {
"test": {
"plugins": ["@babel/plugin-transform-modules-commonjs"]
}
}
}
Importing ES modules with Jest also requires the installation of a few dependencies. Run the following command in your terminal:
$ npm install --save-dev jest @babel/plugin-transform-modules-commonjs
With these small changes in your configuration, you are all set to work with the import of ES modules in Jest.
Jest vs Mocha vs Jasmine
As per the Stack Overflow Developer Survey of 2021, JavaScript is the most popular programming language. With such popularity and use-case, it is obvious that JavaScript gets flooded with various automation testing tools. As per the State of JS 2020, Jest, Mocha, and Jasmine are the top three most popular JavaScript testing frameworks. In this Jest tutorial on Jest vs Mocha vs Jasmine, we make a detailed comparison between these three frameworks.
Jest
The main focus of Jest is the testing of front-end components and apps. As we’ve already discussed, it is a zero-configuration framework achieved by being built on top of Jasmine. The core package of Jasmine does not depend on any external dependency. Hence, any framework built on top of it gets an easy low-dependence package. Jest pairs best with React apps.
Who uses Jest?
At Facebook, it is the primary framework for testing ReactJS components. Moreover, prominent organizations like Spotify, Airbnb, Travel Park, Instagram, etc., have adopted the Jest framework in their tech stack.
Advantages of Jest
Jest is becoming the most used automation framework in JavaScript testing. Below are some points that make Jest a better framework.
- Jest is a framework that runs unit testing for each unit in isolation, supporting parallel testing. This makes it faster than other JavaScript testing frameworks.
- The Jest documentation is very easy to understand, especially for developers new to the test-driven development approach.
- It supports Snapshot testing (i.e., Smart Visual Regression testing by taking screenshots). During front-end testing, this feature comes in handy to detect and debug any UI bugs.
Cons of Jest
With all the advantages and features, Jest is undoubtedly one of the best JavaScript testing frameworks. However, it also has a few disadvantages.
- Compared to Jasmine and Mocha, it doesn’t support many libraries or tools.
- The auto-mocking feature in Jest can slow the process as it increases the number of dependencies for mocking.
- Snapshot feature is not feasible for larger files with thousands of lines.
Jasmine
Jasmine works well with front-end and back-end apps and is a fast-aiming testing framework. It is also one of the oldest and most stable JavaScript testing frameworks. However, its front-end suite works better with Angular components rather than React. This is where Jest stands out as a preferred testing framework for React-based projects.
Who uses Jasmine?
Jasmine has been in the market for long and has a very active community. Giant corporations that prominently adopt Jasmine in their tech stack are: Uniqlo, GitHub, Accenture, Typeform, etc.
Advantages of Jasmine
Jasmine and Selenium are among the most popular tools for JavaScript and Web UI respectively. Combining these two for your JavaScript automation testing can prove very beneficial. Here are some advantages of choosing Jasmine over Jest and Mocha.
- It is compatible with most frameworks and libraries, making it very flexible.
- Jasmine offers a set of built-in assertion and matcher methods that can easily match expectations and help improve the readability of Jasmine tests.
- It doesn’t rely on DOM, browser, or any other framework.
Cons of Jasmine
Though it is independent, flexible, and powerful, it also has disadvantages. Let’s look at a few of them.
- Easy installation doesn’t guarantee easy setup. Setting up Jasmine is very complex as users need to choose assertion or mocking libraries before even using them.
- It is challenging to perform asynchronous testing with Jasmine.
- Integration required for snapshot testing is not easy.
Mocha
Mocha can be stated as the most flexible JavaScript testing framework out of all three. With flexibility and simplicity as its main focus, Mocha works well with various projects and tech stacks. Unlike Jest, Mocha doesn’t depend on the mocking, stubbing, and assertion libraries; hence the developers get the advantage of choosing any library. However, it has fairly more dependencies than the other two.
Who uses Mocha?
Giant multinational corporations like Accenture, Netlify, Asana, Yahoo, Oyo Rooms, Coursera, Wix, etc., include Mocha in their tech stack.
Advantages of Mocha
Below given points make Mocha one of the most preferred frameworks for JavaScript testing.
- The Mocha API is very simple and similar to Jasmine. It is more conductive than Jasmine as it covers many scenarios, including BDD.
- Tests run serially in Mocha. This results in flexible and accurate reports, mapping all the unhandled exceptions to their correct test cases.
- It supports both BDD (Behavior Driven Development) and TDD (Test Driven Development).
Cons of Mocha
Mocha proves itself to be a very powerful tool and competes well with Jest and Jasmine. However, it also has disadvantages.
- Mocha requires multiple configuration and setup efforts. This is where Jest proves itself better.
- Auto-mocking and snapshotting are not very feasible.
- The lack of developer tooling and onboarding features makes it a bit complex for first-time developers.
Final Words
In this Jest tutorial, we’ve learned everything about Jest in detail. We covered various Jest concepts, testing your JavaScript and React apps using the Jest framework, and also established a brief comparison between Jest, Mocha, and Jasmine. We also discussed various features, advantages, and capabilities of the Jest framework.
However, we can’t just claim the superiority of any framework over others. Different frameworks focus on different aspects and choosing one mostly depends on individual needs. Of course, choosing the best JavaScript testing framework for your project may prove to be more challenging, but it is something you can’t run from.
The final deciding factor is your needs and expectations from the framework. Considering the tech stack you’re working on, Angular, React, or NodeJS, you can choose the most suitable JavaScript testing framework. We hope this Jest tutorial turned out beneficial for you.
On this page
- What is Jest Framework
- Jest Architecture
- Jest Basics
- Jest Installation
- Using Jest with NodeJS Project
- Writing First Test for Jest Framework
- Jest Parameterized Tests
- Jest Matchers
- Jest Hooks: Setup and Teardown
- Jest Code Coverage
- HTML Report Generation
- Testing React app using Jest Framework
- Browsers Supported by Jest
- How To Run Jest Tests on LambdaTest
- Snapshot Testing for React Front Ends
- Advantages & Limitations
- Why Test with Jest Framework
- The Rise of Jest Framework
- Bonus: Import ES modules with Jest
- Jest vs Mocha vs Jasmine
- Frequently Asked Questions (FAQs)
Frequently asked questions
- General →
Did you find this page helpful?
More Hubs
Try LambdaTest Now !!
Get 100 minutes of automation test minutes FREE!!


