
A Complete Guide To CSS Houdini
Anurag Gharat
Posted On: January 3, 2023
![]() 29874 Views
29874 Views
![]() 23 Min Read
23 Min Read
As a developer, checking the cross browser compatibility of your CSS properties is of utmost importance when building your website. I have often found myself excited to use a CSS feature only to discover that it’s still not supported on all browsers. Even if it is supported, the feature might be experimental and not work consistently across all browsers. Ask any front-end developer about using a CSS feature whose support is still in the experimental phase in most prominent web browsers. 🙁
However, some CSS features outshine others, even though they are in the experimental phase. In the end, developers would want to be early adopters of technology. Talking about early adoption, you should check out CSS Houdini. Like me, many front-end developers are super excited about it since it is considered the future of writing code with CSS. It is considered the most exciting development in CSS since CSS Flexbox and grid.
The first question that comes to mind is, “What is so special about CSS Houdini”? Well, it literally gives you the super-power through which you can have tighter control over the styling of web pages. So, let’s look at how you can do much more as a front-end developer with CSS Houdini!
There have been many advancements in HTML and JavaScript in the last few years. You can now extend HTML and create your components and custom properties. But CSS, there’s nothing much yet! As a developer, you have a lot of constraints while working with CSS. You can only use the properties supported by the browser and have limited control over the styling and layout of the webpage.
Imagine the possibilities if we are allowed to extend CSS using JavaScript. No restrictions and no rules! Extend CSS as you wish! Adding new features which will be performant and consistent across all browsers will be easy for developers.
But what will CSS Houdini do?
Let’s consider that you want to implement an angled border button in your website, but the existing browsers don’t support it. So instead of waiting for the browser to provide support, you can import the paint worklet directly into your project and apply the angled border and clipping property to your buttons without worrying about browser compatibility. This is as easy as installing a plugin for a feature. You can create a worklet by yourself or use one already created by other developers.
Like the paint worklet, we have a layout worklet to implement masonry layout, animation API to implement custom animations, and properties API to register custom properties with type checking.
In this blog, learn what CSS Houdini is, how it handles web page rendering issues, the CSS Houdini APIs, and some practical examples.
TABLE OF CONTENTS
Introduction to CSS Houdini
CSS Houdini is an umbrella term for browser APIs that expose certain parts of the CSS rendering engine to the developers. This allows developers to extend CSS without compromising on performance. We can add new features using JavaScript and share them as project modules. Hence developers are no longer restricted to using only the properties supported by the browser.
For the first time, the developers can extend the various stages present in the browser’s rendering pipeline.
The main goal of CSS Houdini is to present a set of new APIs to the developers so that they can attach (hook) their code in the CSS engine. This allows the developers to extend the existing CSS with features not yet available on some browsers.
You might wonder what CSS Houdini has to do with your small website.
Think of the bigger picture!
Wouldn’t it be nice if you could get more control over the rendering of your website, use the latest features in CSS without worrying about cross browser compatibility, and import CSS features just like you import modules in JavaScript? This is what Houdini is trying to achieve!
A Houdini task force comprised engineers from top companies like Google, Microsoft, Apple, HP, and IBM. The aim of this task force was simple:
How can we improve the developer experience by giving them better control of the rendering process of the web page?
The ultimate goal was to give developers more control over the browser’s rendering process and improve CSS capabilities without compromising performance.
They achieved this by exposing parts of the CSS engine, allowing developers to build APIs that hook directly into the browser. I have covered the same in the section where the focus is on the problems Houdini is trying to solve. By opening up these parts, developers can extend the stages in the pipeline with JavaScript and add new features.
So, which are these parts? I will dive deep into it in the subsequent sections of the blog.
Before we dive deeply into CSS Houdini, let’s understand why we need CSS Houdini in the first place and what problem it is trying to solve.
Why use CSS Houdini?
You might have noticed that it has taken a lot of time for a CSS feature to be available in all browsers since its announcement. Alas, cross browser compatibility issues arise since not all the web browsers (and browser versions) support all the available CSS properties (including the ones in the experimental phase).
In JavaScript, features are added and adopted very quickly, but in CSS, it’s the exact opposite. Ask any CSS developer 😣 It takes a lot of time to propose a new feature, approve it, and wait for all browsers to adopt it and then use it. It took years for our favorite CSS Grid to be available in all browsers.
The other problem is that you might want to use a feature, but it might not be supported in all browsers. In such a case, you choose another workaround which is CSS polyfill.
Polyfill is a piece of JavaScript code that provides modern features in the older browser that lack support. It acts as a browser fallback for missing properties in older browsers. For example, a polyfill code can provide the CSS outline property in Internet Explorer 7, where the property is not supported.
As interesting as CSS polyfill sounds, it has a lot of drawbacks.
The main downside of using a CSS polyfill is that it negatively impacts the browser’s performance. The polyfill code is never as efficient as the native CSS code. Hence it can never work as a replacement.
To understand the drawback and why CSS Houdini is important, we must first know how a browser loads a web page.
Role of Browser Rendering Pipeline
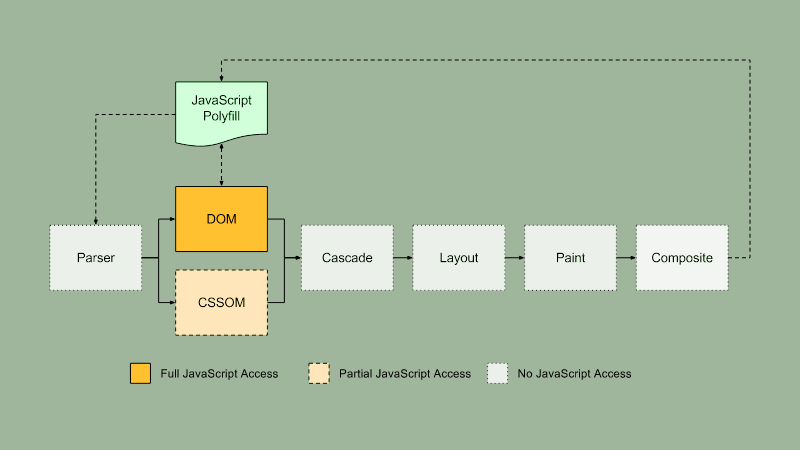
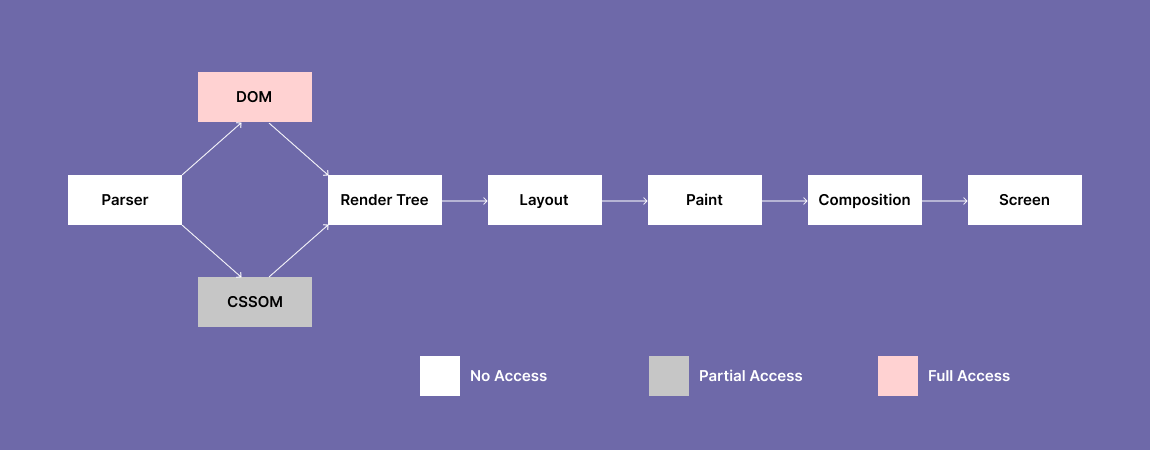
The below image depicts various stages present in the browser rendering engine pipeline. A web page goes through all these stages before it is displayed on the screen.
Let’s understand each stage in detail

DOM and CSSOM
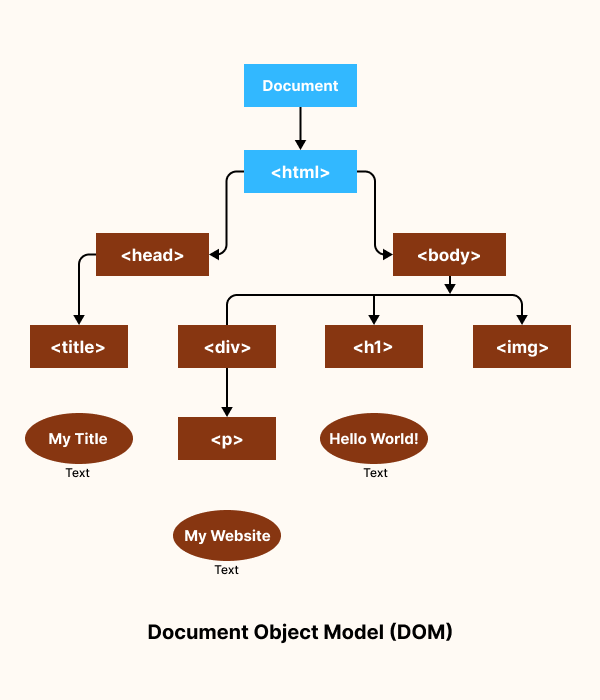
Whenever a request is sent from the browser, the server returns a web page. This web page is an HTML document. While loading this web page, the browser scans the HTML code and generates a JavaScript object called a Node for every HTML element.
For example, every ‘div’ generates a JavaScript object from the HTMLDivElement class function. After the browser has gone through the entire page, it builds a tree-like structure of the nodes from the entire document. This tree-like structure is called a DOM (Document Object Model).
JavaScript has access to this DOM with the help of DOM APIs. Using these APIs, a developer can manipulate the DOM.
Here’s a simple example of how we can change the text inside the < p > tag using JavaScript.
HTML:
|
1 2 3 4 5 6 7 8 9 |
<div> <p id="text">Hi, there!</p> <button onclick="changeText()"> Change Text </button> </div> |
JavaScript:
|
1 2 3 4 5 |
function changeText() { document.getElementById("text").innerHTML = "Hello World!"; } |
Output:
See the Pen
DOM Manipulation using JavaScript by Anurag Gharat (@anurag-gharat)
on CodePen.
After reading the HTML file and constructing the DOM, the browser collects all the CSS styles from all the existing sources and builds a CSSOM (Cascading Style Sheet Object Model).
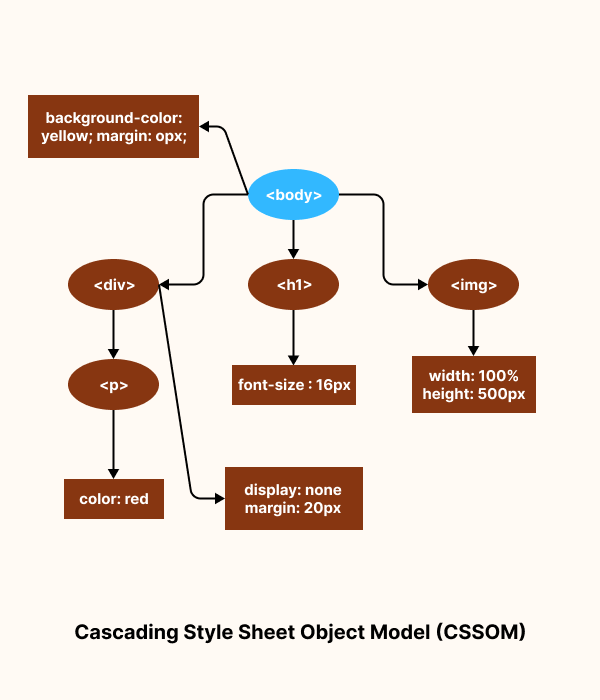
CSSOM is a CSS representation of DOM. Each node in CSSOM contains the style that will be applied to that particular node in DOM that the CSS Selector is targeting.
First, a final CSS is generated by considering the specificity (overriding some styles if they are repeated); only then is the CSSOM created. CSSOM does not contain elements that are not printed on the screen.
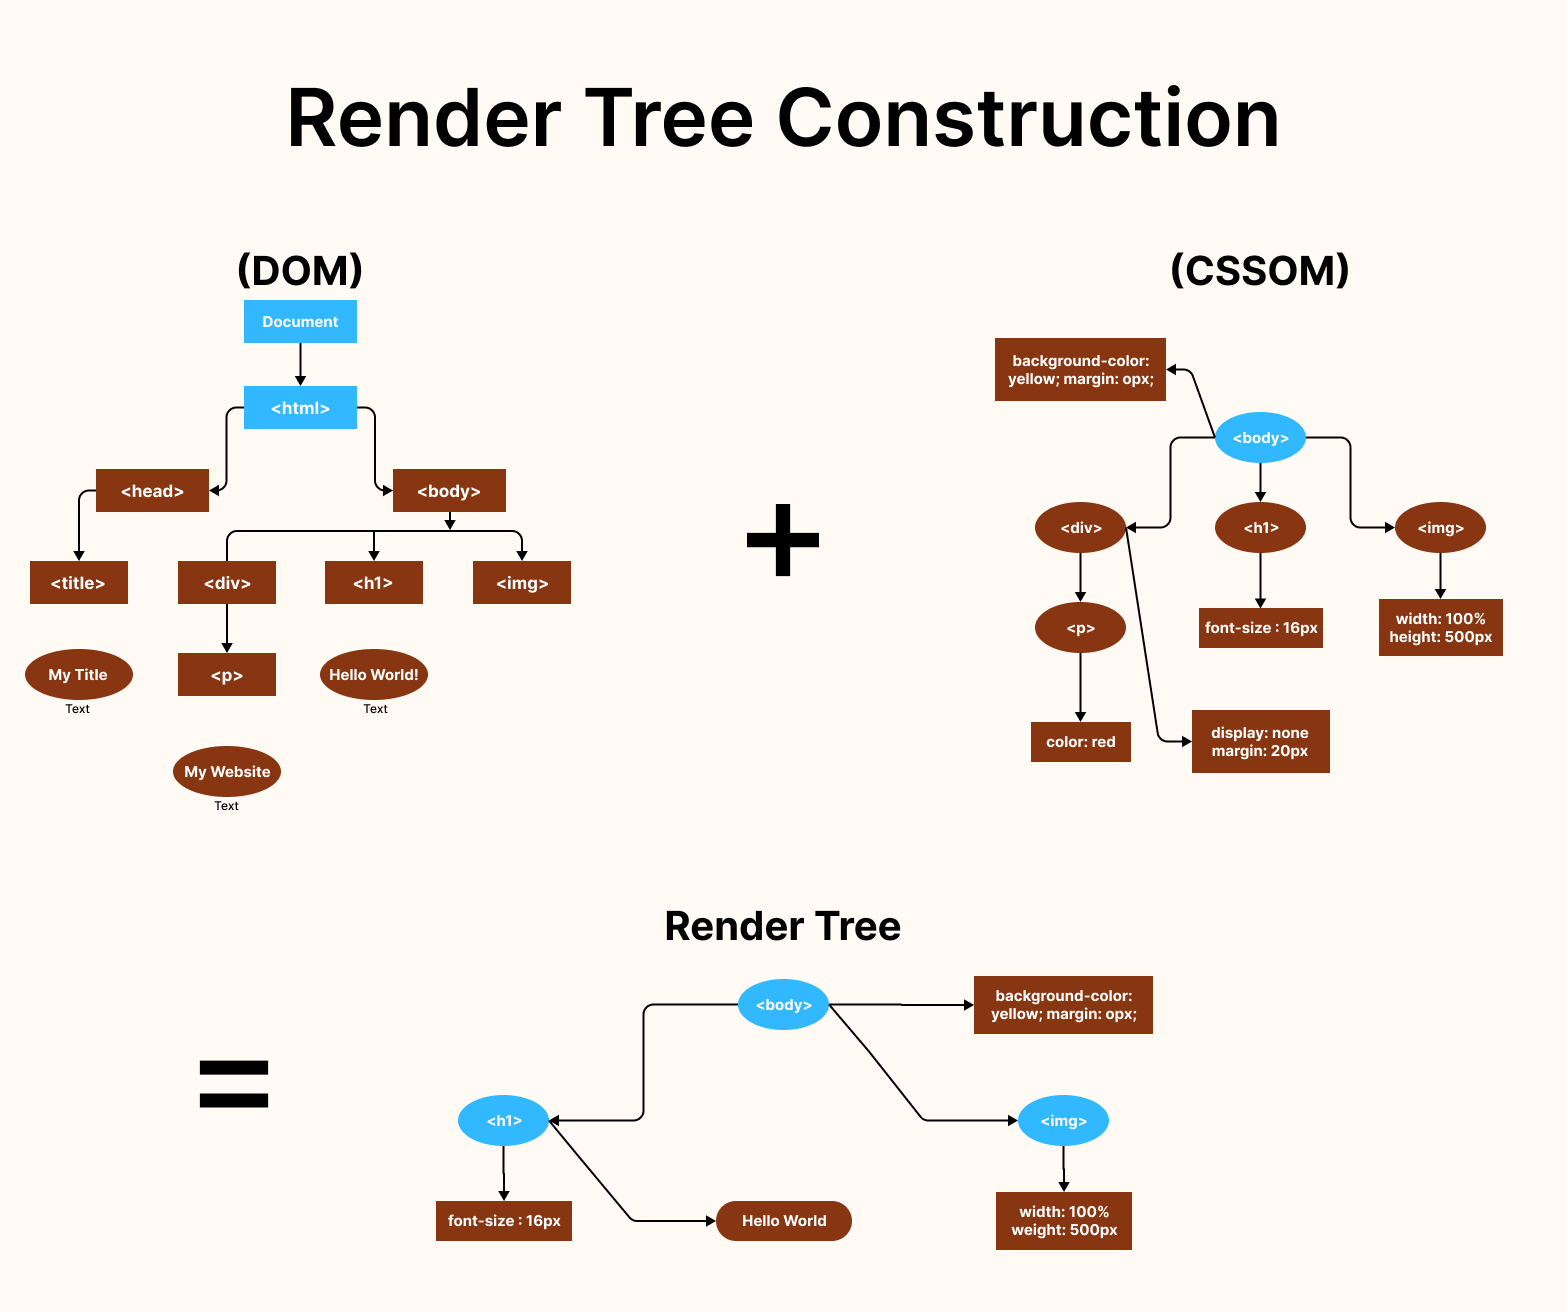
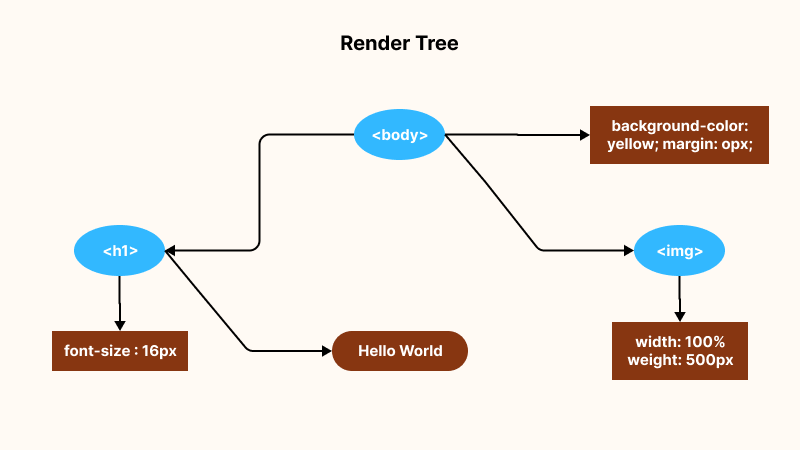
Render Tree
In the third step, we combine the DOM and CSSOM to form a render tree. While creating the render tree, the browser checks every node from the root and determines the styles attached to it. Only the elements that are supposed to be present on the screen are added in the render tree nodes.
If there’s a node with a property display set as none, that node and its descendants are not added to the render tree. Similarly, the head section of the web page contains no visible information and hence is not included in the render tree.
Layout
The layout operation is responsible for calculating the position and dimensions of each node from the render tree. The layout is the process by which the width, height, and location of all nodes in the render tree are determined. In this step, the browser determines the width, height, location, and geometry of each node present in the render tree and creates a layout.
Layout operation is also called browser reflow. This operation runs every single time the browser viewport is changed.
Paint
Up until now, the browser has created layers of each element separately. In paint operation, the browser works on each layer and fills them with visual elements like borders, colors, backgrounds, fonts, shadows, etc.
This process is performed on each layer separately. Paint operation is also called rasterization.
Composition
In this step, we combine all the layers generated till now and draw them on the screen as a single web page. After the composition operation, the web page is displayed on the browser.
This sequence of events is called the critical rendering path.
So let’s quickly summarise
- DOM is generated from the HTML code.
- CSSOM is created based on the stylesheets (Internal and External).
- DOM and CSSOM are combined to form the render tree.
- Layers are created based on the render tree in the layout operation.
- Visual factors are added to each layer in the paint operation.
- Layers are combined in the composition process and presented on the screen.
Once all the critical rendering path steps are completed, JavaScript attached to the code is loaded. However, there is a slight issue with the web page rendering that we typically face. In the next section of this blog, we will explore the issues with the rendering of a web page.
What’s the issue with the rendering of a web page?

As seen above, a developer has limited access to DOM and CSSOM. (The degree of access to CSSOM is unspecified in the official docs)
So if you ever have to write a polyfill for CSS, you cannot plug it into CSSOM directly since you don’t have access to it. You can only plug it inside the DOM.
This means you have to update the DOM, resulting in a re-rendering of the complete web page. The browser will reinitiate the rendering process whenever you make any DOM changes.
Re-rendering your website once or twice after you initially load it might sound like a small dent in your website performance. But consider a case where you have written a polyfill that will run every time you scroll. This will make your webpage load multiple times, significantly affecting performance.
For example, let’s say you created a CSS smooth scroll polyfill function that brings CSS smooth scroll property in old browsers and Internet Explorer. This polyfill function runs every time the browser detects scroll. This makes the web page reload whenever the function is invoked, hence affecting the performance.
So we need to find a way to modify or extend the CSS without triggering the re-render. That means modifying the rendering cycle without touching the DOM.
How does CSS Houdini handle web page rendering issues?
Houdini introduces a new set of APIs that lets the developers access the parts of the browser rendering pipeline. For the first time, you will have access to the layout, painting, and other processes of the website. Developers can go above the regular CSS styling and create their properties, layout, and animations.
This extension of the CSS engine is possible due to CSS Houdini APIs. CSS Houdini is a set of APIs that expose parts of the CSS engine.
CSS Houdini APIs
CSS Houdini consists of two sets of APIs.
- Low-Level APIs
- High-Level APIs
These APIs (low-level and high-level) make it easier for developers to create extensions for CSS. These extensions might be to polyfill features that are not yet available in a browser, experiment with new layout methods, or add creative borders or other effects.
These extensions act as polyfill to provide features that are not yet available in the browser. Using these APIs, developers extend the stages of the CSS rendering pipeline by adding custom JavaScript code and creating custom features like layouts, borders, backgrounds, etc.
Low-Level APIs
These APIs form the foundation of the High-level APIs.
- Worklets
- Typed Object Model API
- Custom Properties API
- Font Metrics API
High-Level APIs
These High-level APIs represent the four stages of the browser’s rendering pipeline.
- Paint API
- Layout API
- Animation Worklet API
- Parser API
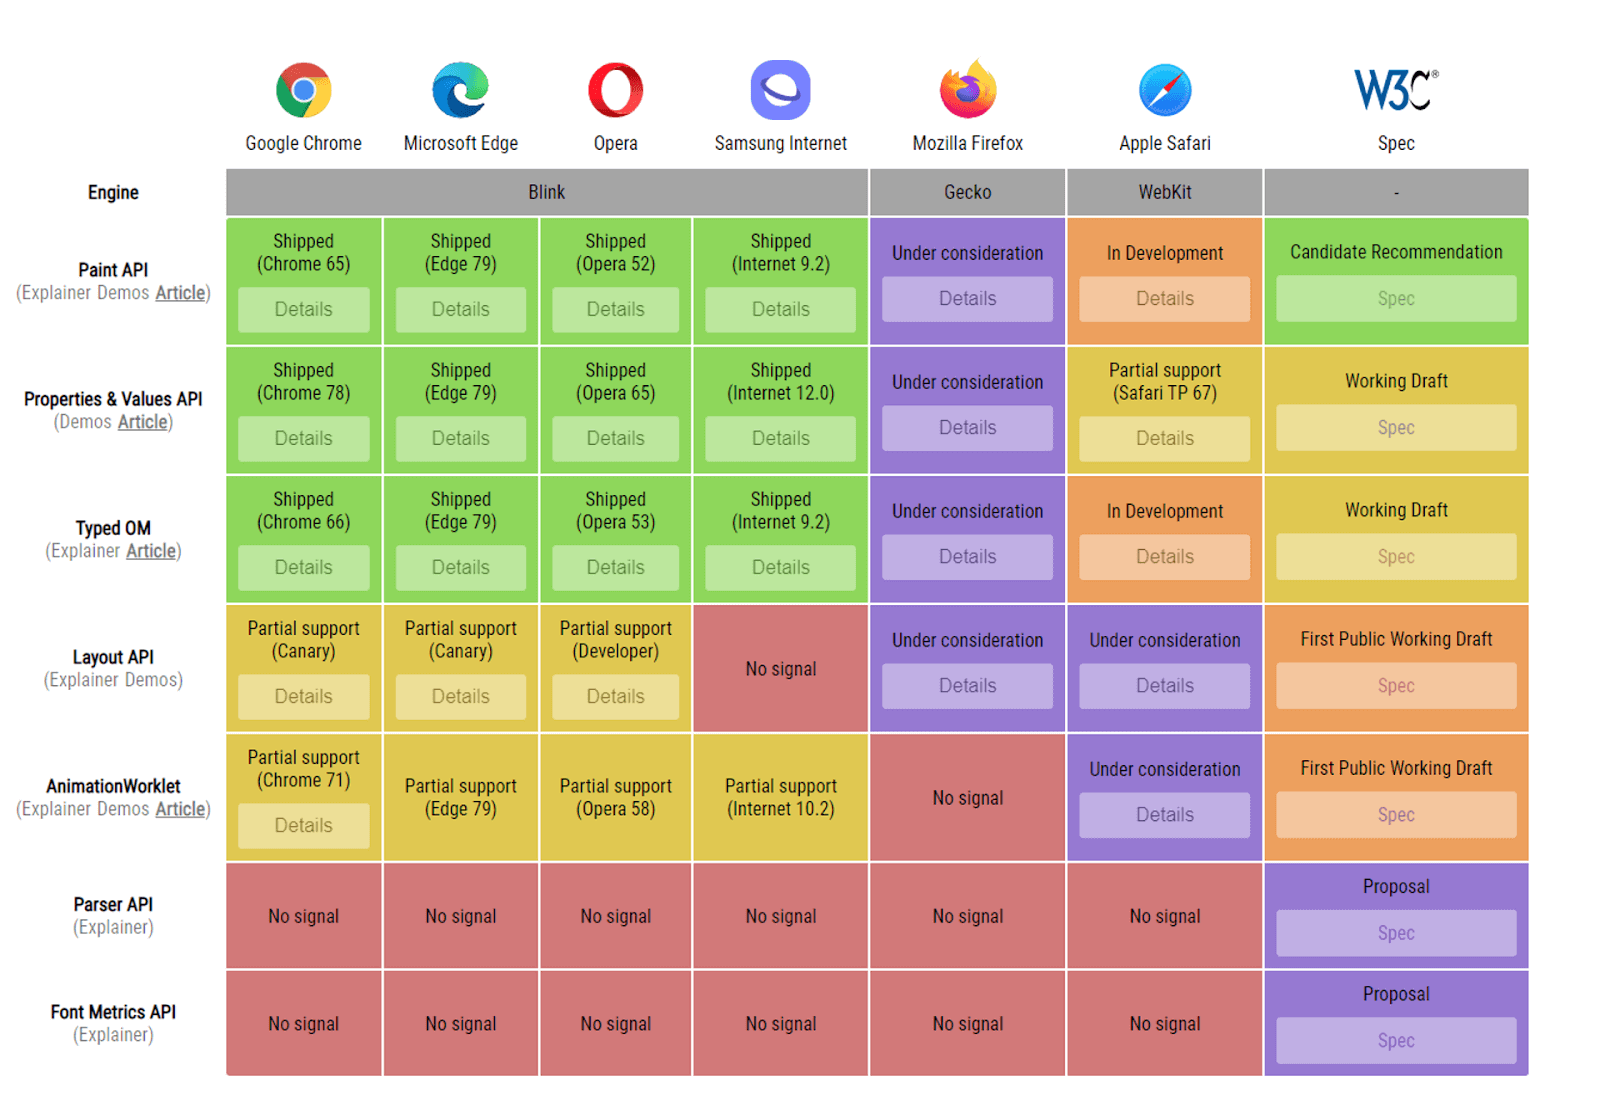
As of November 2022, only paint API, custom properties API, and typed object model API is supported in Chromium-based browsers and will be available soon in Firefox and Safari. So only use these supported browsers to check the output of the explained examples.
Following is the browser support for Houdini APIs.
Worklets
A worklet is a lightweight version of a web worker and acts as an extension point of the browser rendering engine for the developers. Each worklet runs in a separate context and has no access to the window, document objects, or high-level functions.
Worklets run independently of the main thread and can be invoked at any point of the rendering pipeline. Worklets are the JavaScript modules that attach themselves to the browser and make the high-level APIs work. They are imported and registered using a single line of JavaScript.
Currently, CSS Houdini supports three worklets.
- Paint Worklet
- Layout Worklet
- Animation Worklet
Importing a paint worklet:
|
1 |
CSS.paintWorklet.addModule("url-of-worklet"); |
Using an imported worklet:
|
1 2 3 |
body{ background-color: paint(confetti) } |
Typed Object Model API
CSS values come with a variety of units. We have px, rem, em, ch, cm, and more! Interacting with so many units is difficult for any developer. Currently, the only way for developers to read and modify CSS values using JavaScript is by parsing them into Strings. This makes it difficult to perform arithmetic operations, and code is more prone to errors.
|
1 2 3 4 5 6 7 8 9 10 11 12 13 14 15 16 17 18 19 20 21 |
<!DOCTYPE html> <html lang="en"> <head> <meta charset="UTF-8"> <meta http-equiv="X-UA-Compatible" content="IE=edge"> <meta name="viewport" content="width=device-width, initial-scale=1.0"> <title>Lambda Test</title> </head> <body> <section> <div style="height: 100px;" id="heading"> <h1>Lambda Test</h1> </div> </section> </body> </html> <script> var heading = document.getElementById('heading') console.log(heading.style.height) console.log(typeof heading.style.height) </script> |
Output:
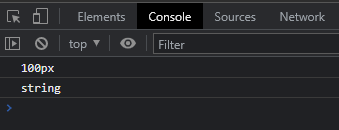
As you can see in the above example, the 100px value is a string. So to add any value to it, we need first to parse it into an Integer, perform our operation, and convert it back to a String. This gets even tougher when the unit used is relative, like %, vh/vw.
Typed Object Model API adds more semantics to the CSS by exposing them as JavaScript objects. Hence instead of taking a CSS value and parsing it into a String, Typed OM APIs provide you with a JavaScript Object with value and unit property. This approach is faster, and the code is more maintainable and less prone to errors.
Using computedStyleMap() we get an object which consists of the value and the unit. It is easier to perform the calculations and work with a numerical value.
Here is how we use Typed Object Model API.
|
1 2 3 4 5 |
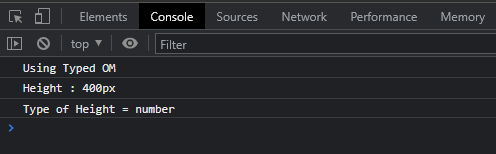
//select the container using javascript var elem = document.getElementById('container') console.log("Using Typed OM ") console.log("Height : " + elem.computedStyleMap().get("height")); console.log("Type of Height = " + typeof elem.computedStyleMap().get("height").value); |
Output:
computedStyleMap() method is used for parsing computed properties and attributeStyleMap is used for parsing and modifying inline styles.
Typed Object Model API performs type checking. So if you pass a wrong data type, it will show an error in the console.
Here’s an example showing how easy it is to interact with CSS properties using the Typed Object Model API.
HTML:
|
1 2 3 4 5 6 |
<body> <div id="container"> <h1 id="heading">Typed OM using CSS Houdini</h1> <p>Open the console log</p> </div> </body> |
CSS:
|
1 2 3 4 5 6 7 8 9 10 11 12 13 14 15 16 17 18 19 |
body { background-color: #fefefe; display: flex; justify-content: center; align-items: center; } h1 { font-family: 'Courier New', Courier, monospace; font-size: 30px; } div { display: flex; flex-direction: column; justify-content: center; align-items: center; height: 400px; width: 800px; } |
JavaScript:
|
1 2 3 4 5 6 7 8 9 10 11 12 13 14 15 16 17 18 19 20 21 22 23 24 25 26 27 28 29 |
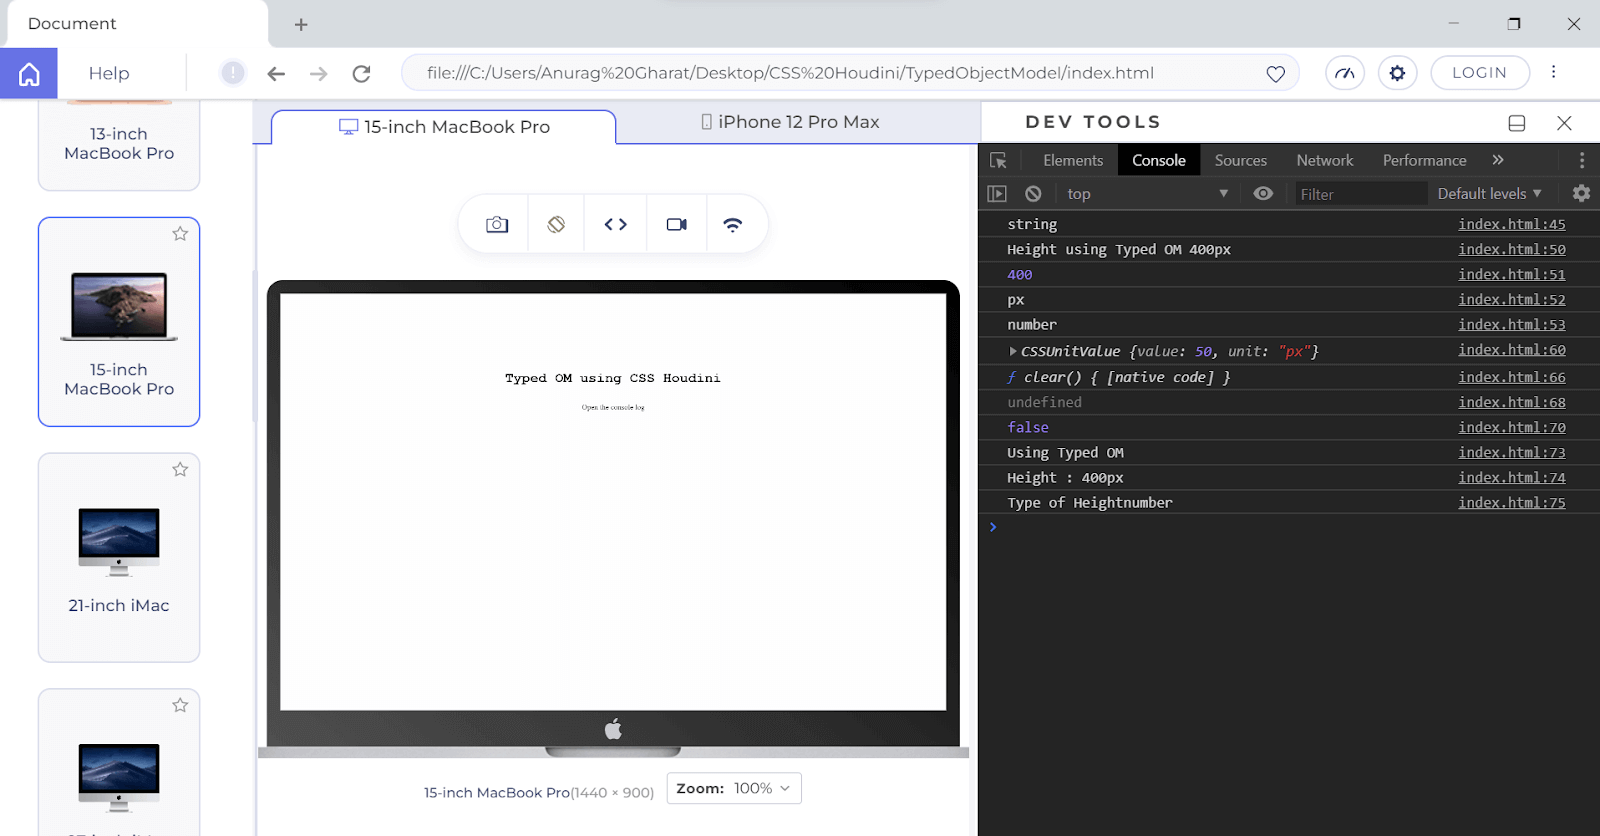
//select the container using javascript var elem = document.getElementById("container"); elem.style.height = 500; console.log(typeof elem.style.height); //String //getting styles using Typed OM console.log(elem.computedStyleMap().get("height")); console.log(elem.computedStyleMap().get("height").value); console.log(typeof elem.computedStyleMap().get("height").value); console.log(elem.computedStyleMap().get("height").unit); //setting styles using Typed OM var elemTwo = document.getElementById("heading"); elemTwo.attributeStyleMap.set("font-size", CSS.px(50)); //getting inline-styles console.log(elemTwo.attributeStyleMap.get("font-size")); //an error will be thrown if we pass a non string value //elemTwo.attributeStyleMap.set('font-size', CSS.px(asd)) //Clear all the styles console.log(elemTwo.attributeStyleMap.clear); //delete font-size style console.log(elemTwo.attributeStyleMap.delete("font-size")); //check if style is present console.log(elemTwo.attributeStyleMap.has("font-size")); |
Output:
See the Pen
Typed Object Model CSS Houdini by Anurag Gharat (@anurag-gharat)
on CodePen.
Here I am using LT Browser – a complementary tool by LambdaTest, to test my output.
LT Browser is a mobile-friendly tester offered by LambdaTest – a continuous quality cloud testing platform for manual and automated testing for web and mobile. With LT Browser, you can test your website’s responsiveness on over 50+ device viewports. It supports responsive testing on the mobile, tablet, desktop, and even laptops.
Check out the following tutorial for more details.
Subscribe to the LambdaTest YouTube channel for tutorials around Selenium testing, Playwright, Cypress, and more.
LT Browser provides tons of amazing features like
- Check the mobile view of your websites.
- Compare the side-by-side view of the website on different viewports
- Generate performance reports of your websites.
- Network simulation to test websites across varying networks.
- Perform one-click bug logging and video recording of test sessions.
We recently went live with the beta version of our all-new Chromium-based LT Browser 2.0, which has several new features and enhancements.

To get started, visit our support documentation – Getting started with LT Browser 2.0.
Along with the Object, we also get useful methods like clear, delete, and has.
|
1 2 3 4 5 6 |
//Clear all the styles console.log(elemTwo.attributeStyleMap.clear) //delete font-size style console.log(elemTwo.attributeStyleMap.delete('font-size')) //check if style is present console.log(elemTwo.attributeStyleMap.has('font-size')) |
Custom Properties and Values API
Custom properties and values API allows developers to create CSS properties with data types, initial values, and inheritance rules. Developers can register these properties using the ‘registerProperty()’ method or the ‘@property’ rule.
CSS Custom Properties API extends the CSS variables and adds Type checking. You can add a variable in the ‘:root{}’ block and use it throughout your CSS file.
|
1 2 3 4 5 6 |
:root { --primary-color: blue; } body { background-color: var(--primary-color); } |
One of the downsides of using a regular CSS variable is that there is no type checking. So if the browser encounters a value that does not match the expected property value type. It directly discards the property.
The other drawback of using a regular CSS variable is that we can’t animate the property. The browser does not know what the expected type of the property is hence it is unable to handle the animations. But registered properties allow us to handle CSS animations since they come with a type.
You can create your custom CSS property in two ways:
- Using the registerProperty() method in your JavaScript file.
- Using @property in your CSS file
|
1 2 3 4 5 6 |
CSS.registerProperty({ name: "name-of-property", syntax: "<property-type>", inherits: false / true, initialValue: "initial-value", }); |
|
1 2 3 4 5 |
@property --property-name { syntax: "<property-type>"; inherits: false/true; initial-value: initial-value; } |
Let’s take an example to understand CSS custom property. In this example, we will create two custom properties. One with the registerProperty() method and another with the @property rule.
HTML:
|
1 2 3 4 5 |
<body> <h1>CSS CUSTOM PROPERTY</h1> </body> |
CSS:
|
1 2 3 4 5 6 7 8 9 10 11 12 13 14 15 |
@property --primaryColor { syntax: "<color>"; inherits: false; initial-value: teal; } body { height: 100vh; width: 100%; display: flex; justify-content: center; align-items: center; background-color: var(--primaryColor); color: var(--textColor) } |
JavaScript:
|
1 2 3 4 5 6 |
CSS.registerProperty({ name: "--textColor", syntax: "<color>", inherits: false, initialValue: "orange", }); |
Output:
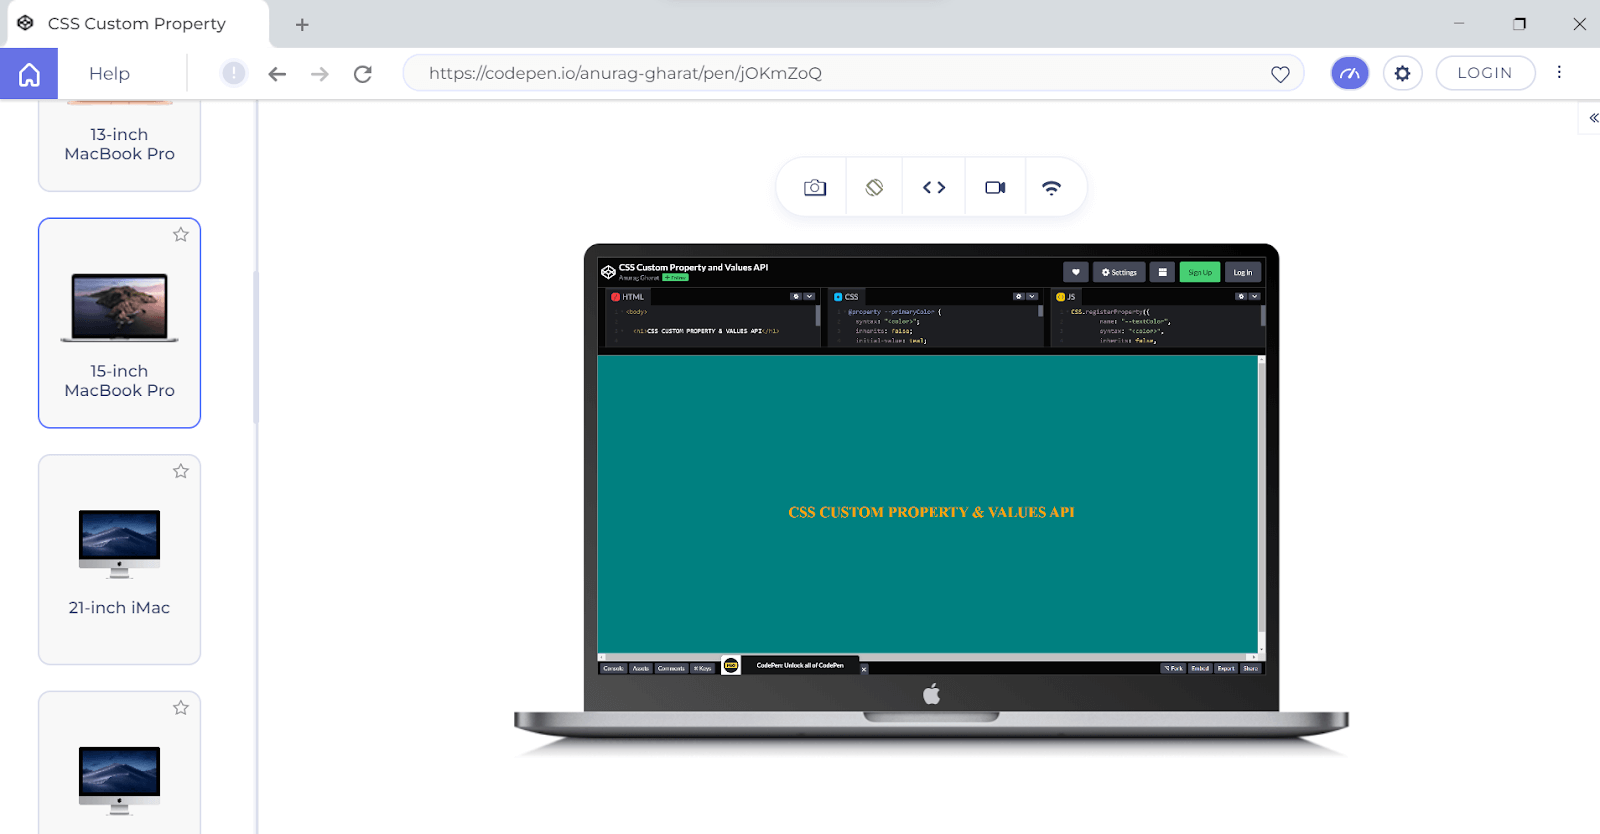
See the Pen
CSS Custom Property and Values API by Anurag Gharat (@anurag-gharat)
on CodePen.
Font Metrics API
According to the documentation, font metrics API will contain methods that will allow the developers to measure the dimensions of the textual elements that are being rendered on the screen. For example, using this API, you can perform text truncation on multiple line text elements.
Currently, this API is still in a very early stage of development, so there is a high chance that the specifications and features may change.
Paint API
CSS paint API allows developers to generate graphics using JavaScript functions during the Paint stage of the browser’s rendering pipeline. This is achieved with the help of Paint Worklet. In the Background, Paint API uses the CanvasRenderingContext2D, which is the subset of HTML5 Canvas API.
Using a paint worklet, you can create custom backgrounds, borders, outlines, and more! You can define your own custom painting functions or use the existing worklets created by other developers.
This API has the best support and is enabled in all the Chromium-based browsers, under consideration for Firefox and in the development stage for Safari. You can use the paint() function as a value to the CSS properties and pass the registered Paint worklet.
Here the developers define the paint functions and use them as CSS properties in their CSS file.
Steps
- Create your own worklet using the registerPaint() method or link an already created worklet using CDN.
- Register and add it to your project using the addModule() method.
- Use the paint() function as a CSS value to the background property.
- Add a polyfill script to ensure the worklet runs on all old browsers.
|
1 2 3 |
registerPaint("name-of-worklet", { //..code }); |
|
1 |
CSS.paintWorklet.addModule("path-to-worklet.js-file"); |
|
1 2 3 |
.demo { background: paint(name-of-worklet); } |
|
1 |
<script src="cdn-link-to-polyfill-file.js"></script> |
So, let’s take an example and show you the possibilities of paint API. For this example, we will use already created worklets. There are lots of cool worklets to choose from. I loved the static gradient one, so I’ll use that.
HTML:
|
1 2 3 4 5 6 |
<section> <div class="demo"> <h1>PAINT WORKLET - CSS Houdini</h1> </div> </section> <script src="https://unpkg.com/Houdini-static-gradient/worklet.js"></script> |
CSS:
|
1 2 3 4 5 6 7 8 9 10 11 12 13 14 15 16 17 18 19 20 21 22 23 24 25 26 27 28 29 30 31 |
body { padding: 0; margin: 0; box-sizing: border-box; background-color: #222; } section { height: 100vh; width: 100%; } div { width: 100%; height: 100%; display: flex; align-items: center; justify-content: center; } .demo { background: paint(static-gradient); --static-gradient-size: 5; --static-gradient-color: #7743DB; --static-gradient-direction: to-bottom; } h1 { font-size: 3rem; color: #fff; } |
JavaScript:
|
1 |
CSS.paintWorklet.addModule('https://unpkg.com/Houdini-static-gradient/worklet.js') |
Output:
See the Pen
CSS Houdini Paint Worklet – Static Gradient by Anurag Gharat (@anurag-gharat)
on CodePen.
You can get a lot creative with the paint API. The possibilities are limitless. Check out these two examples that I created using paint API. I went a step ahead and added keyframes animation to it.
Example 1
Here is the code for our first example.
HTML:
|
1 2 3 4 5 6 7 |
<section> <div class="demo"> <h1>CSS Houdini is Awesome!</h1> </div> </section> <script src="https://unpkg.com/extra-confetti/worklet.js"></script> |
CSS:
|
1 2 3 4 5 6 7 8 9 10 11 12 13 14 15 16 17 18 19 20 21 22 23 24 25 26 27 28 29 30 31 32 33 34 35 36 37 38 39 40 41 42 43 44 45 46 47 48 49 50 51 52 53 |
body { padding: 0; margin: 0; box-sizing: border-box; background-color: #222; } section { height: 100vh; width: 100%; display: flex; align-items: center; justify-content: center; } div { width: 1000px; height: 500px; background-color: aquamarine; display: flex; align-items: center; justify-content: center; } .demo { background: paint(extra-confetti); --extra-confettiNumber: 20; --extra-confettiLengthVariance: 20; --extra-confettiWeightVariance: 10; animation: animateConfetti 1s infinite; } h1 { font-size: 5rem; color: #fff; } @keyframes animateConfetti { 0% { --extra-confettiNumber: 20; } 50% { --extra-confettiNumber: 60; } 100% { --extra-confettiNumber: 100; } } |
JavaScript:
|
1 |
CSS.paintWorklet.addModule("https://unpkg.com/extra-confetti/worklet.js"); |
Output:
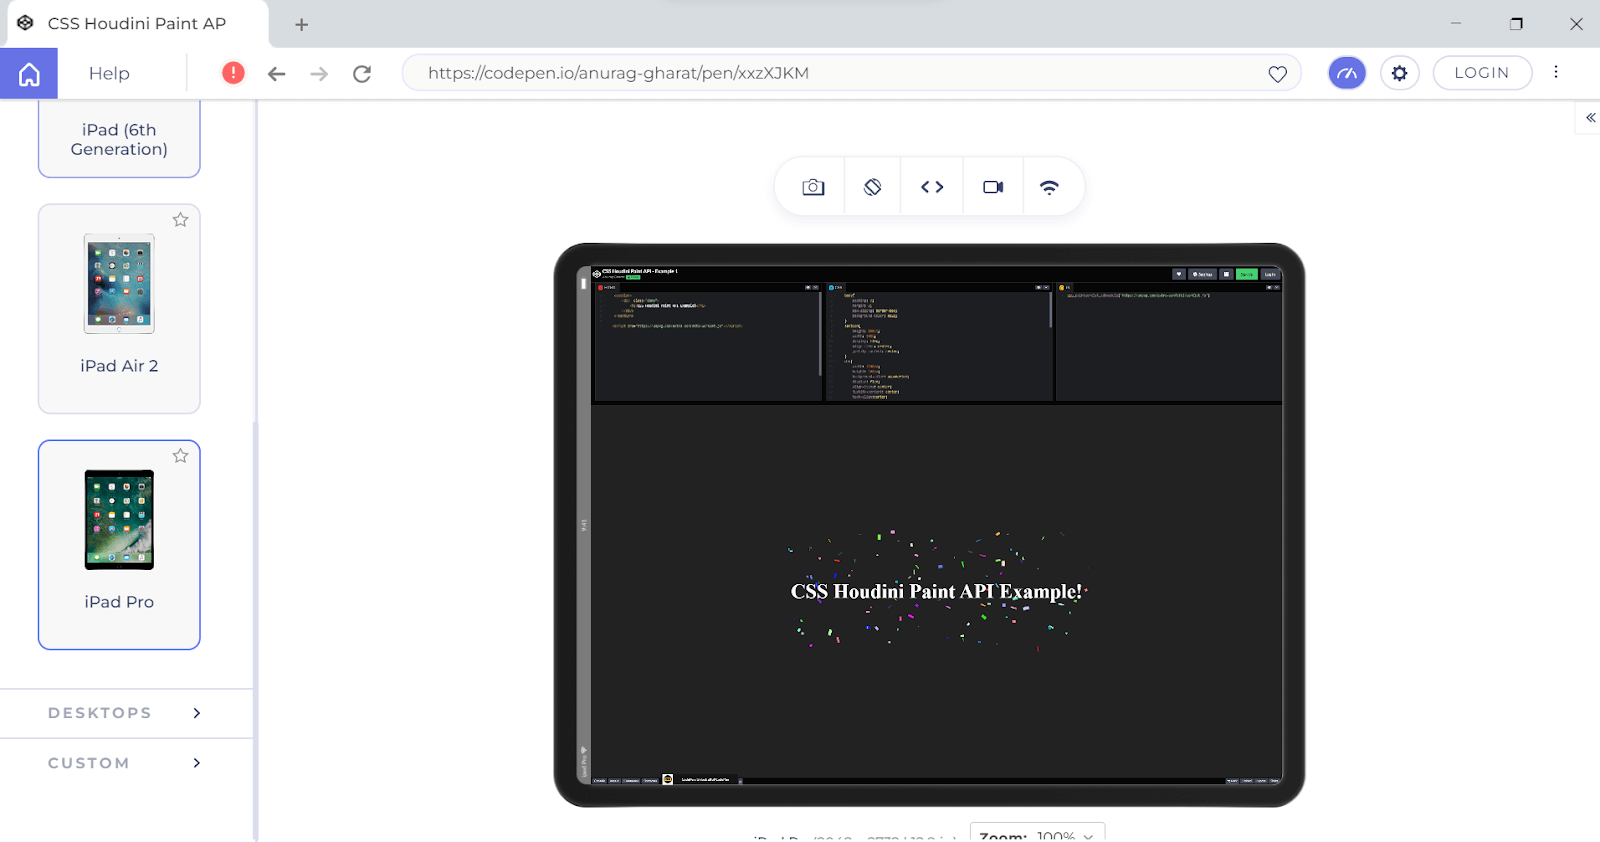
See the Pen
CSS Houdini Paint API – Example 1 by Anurag Gharat (@anurag-gharat)
on CodePen.
Example 2
Now let’s look at the code for our second example.
HTML:
|
1 2 3 4 5 |
<section class="demo"> </section> <script src="https://unpkg.com/Houdini-alien@0.1.1/AlienPainter.js"></script> |
CSS:
|
1 2 3 4 5 6 7 8 9 10 11 12 13 14 15 16 17 18 19 20 21 22 23 24 25 26 27 28 29 30 31 32 33 34 35 36 37 38 39 40 41 42 43 44 |
body { padding: 0; margin: 0; box-sizing: border-box; } section { height: 100vh; width: 100%; display: flex; align-items: center; justify-content: center; } .demo { background-image: paint(alien); --alien-bg-color: #222; --alien-fg-color: #f321f1; --alien-grid-size: 2; animation: animateAlien 2s infinite; } @keyframes animateAlien { 0% { --alien-grid-size: 2; } 25% { --alien-grid-size: 3; } 50% { --alien-grid-size: 4; } 75% { --alien-grid-size: 3; } 100% { --alien-grid-size: 2; } } |
JavaScript:
|
1 2 3 |
CSS.paintWorklet.addModule( "https://unpkg.com/Houdini-alien@0.1.1/AlienPainter.js" ); |
Output:
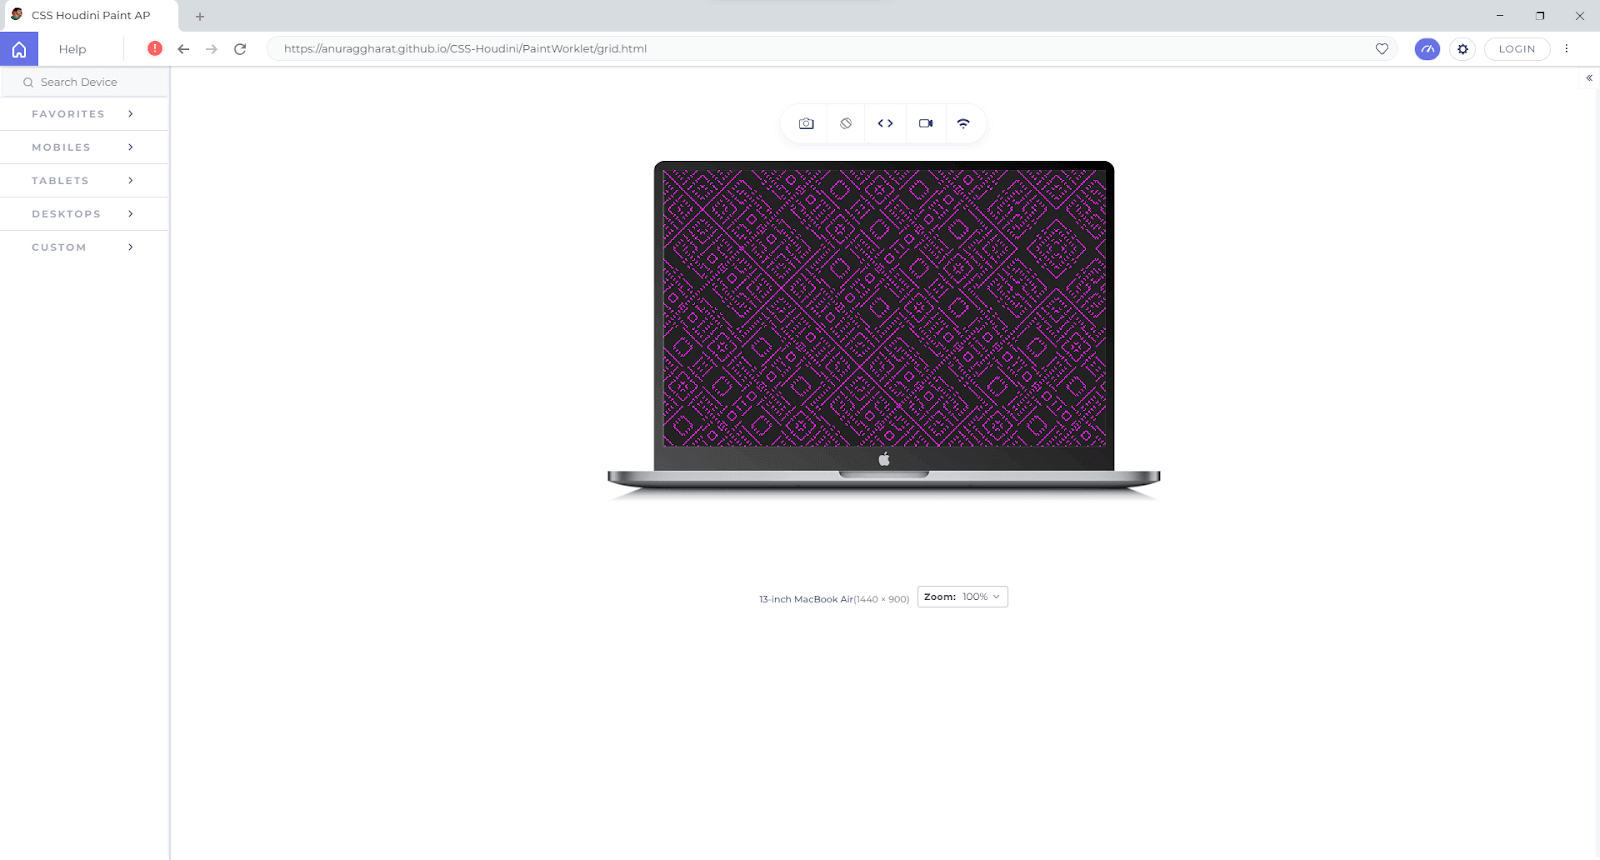
See the Pen
CSS Houdini Paint – Example 2 by Anurag Gharat (@anurag-gharat)
on CodePen.
Layout API
CSS layout API allows the developers to create their own Display properties. This API extends the layout stage of the browser’s rendering pipeline. Layout API will make creating new and complex layouts easy for developers.
Similar to the paint API, the layout worklet needs to be registered before it can be used.
|
1 2 3 4 5 6 |
registerLayout( "mylayout", class { //code for the layout } ); |
Once registered, you can add the layout API in your HTML file using the add method.
|
1 |
CSS.layoutWorklet.addModule('path-to-layout-worklet'); |
Finally, use the layout function against the display property in your CSS file.
|
1 2 3 |
.container { display: layout(mylayout); } |
Currently, layout API is not supported in all browsers; hence we won’t be able to see a working demo.
Animation API
Animation API improves the performance of web animations by running them on their own worklet. This API is the extension of the Composite stage of the browser’s rendering pipeline. The API allows the developers to generate KeyframeEffect animations based on user inputs like a scroll, hover, and click. These animations are non-blocking and more performant than the existing ones since they run off the main thread(on their own worklet).
Similar to the other worklets, the animation worklet needs to be registered first.
|
1 2 3 4 5 6 |
registerAnimator( "myanimation", class { //code for custom animation } ); |
Then add it as a module in your main JavaScript file.
|
1 |
CSS.animationWorklet.addModule("path-to-animation-worklet"); |
Animation API has partial support in Chromium-based browsers and is not supported by Firefox and Safari, so we won’t be able to see a working demo.
Parser Worklet
Parser worklet extends the parsing stage of the browser’s rendering pipeline and is built on top of the Typed Object Model. The goal of this API is to allow the Developer access to the Rendering Engine’s Parser. With this API, you can create new rules, perform nesting, extend CSS and apply external properties.
Currently, this API is not implemented; hence the specifications aren’t clear. But this API has a massive scope since developers can extend the CSS parsing phase and directly tell the browser what CSS property follows.
Conclusion
I am very excited about CSS Houdini APIs. How cool is it that the developers get access to all the rendering pipeline stages? This means more control and power in the hands of the developers. All these new APIs and worklets have opened a new world of possibilities. You are now not restricted to the browser-supported CSS properties. You can create your own CSS property polyfills or use the ones already created without worrying about browser compatibility. This will make the developer experience a lot better.
CSS Houdini is still in the early stages of development but has shown the potential to change how developers write the styles. This is still the surface; there are a lot more APIs that are yet to be announced. As a developer, the CSS Houdini project is one of the most exciting projects to look forward to in the upcoming years.
I hope you learned something new and exciting from this blog. CSS has always been a tricky topic for all developers. So many new features are coming up, and it is vital to stay updated on them. It’s time to use some of the APIs mentioned above in your projects!
Frequently Asked Questions (FAQs)
What is CSS Houdini?
CSS Houdini is a set of APIs to allow developers extend the capabilities of a web browser’s rendering engine. Rather than being a programming language like JavaScript, it is a set of APIs that can be accessed by any language that can interact with a browser.
Why CSS Houdini?
Using CSS Houdini for style changes speeds up parsing times compared to JavaScript HTMLElement.style. Unlike other rendering models, Houdini’s code does not wait for the first rendering cycle to complete before it starts. Instead, it is included in the first cycle – creating styles that are renderable and understandable.


Author’s Profile
Anurag Gharat
Anurag Gharat is a Full Stack Developer, Freelancer, and Technical Writer based in India. He is currently working as a Software Engineer in one leading IT services company.
Blogs: 8
Got Questions? Drop them on LambdaTest Community. Visit now


