
How to Write Your First Cypress Test [With Examples]
Kailash Pathak
Posted On: March 14, 2024
![]() 54199 Views
54199 Views
![]() 21 Min Read
21 Min Read
Choosing an ideal testing framework, especially with a different technology stack, can be challenging for new users, particularly those switching from other testing tools to Cypress. This shift might involve adapting to unfamiliar technological stacks. However, Cypress addresses this challenge by providing an in-built tool called ‘Cypress Studio’.
There are two ways to write your first Cypress test:
- Using ‘Cypress Studio’
- Writing your script
In this blog, we will discuss how a new user can start his journey in Cypress and efficiently write the first Cypress test. You will also see the implementation of Cypress tests on local machines and cloud grids.
TABLE OF CONTENTS
What is Cypress Studio?
Cypress Studio provides a user-friendly interface for test case creation. It is a record and playback tool that captures user interactions with the application being tested. Using Cypress Studio, you can record user interactions in JavaScript. Whatever the step you follow in UI, Cypress Studio automatically records the steps in the backend in the test file
Here are some benefits of using Cypress Studio:
- Record and Playback
- Codeless Test Automation
- Reduce Learning Curve
- Fast Script Creation
- Debugging the script
The interface supports a record-and-playback mechanism, allowing users to record their interactions with the application. This feature is particularly useful for users who may not have extensive programming knowledge, enabling them to create test scripts without manually writing code.
One of the primary advantages of Cypress Studio is its codeless approach. Users can create and edit test scripts without writing code, making it accessible to individuals with limited programming knowledge. This lowers the entry barrier for manual testers and non-developers to participate in test automation.
The simplicity and clarity of Cypress Studio’s interface reduce the learning curve for users new to automated testing. This enables teams to onboard new members quickly and encourages broader team participation in the testing process.
Cypress Studio records all the steps of UI interaction so if someone wants to create the script fast he/she can record the script and can re-use the record script for further development.
Debugging in Cypress Studio involves examining and modifying the recorded script to ensure it accurately reflects the intended test scenario. Users can edit and debug the recorded script. This flexibility allows users to tweak tests as needed, which strikes a balance between codeless development and human scripting.
In the next section, you will see how we can set up Cypress Studio.
Setting up Cypress Studio
Before setting up Cypress Studio, you need to install Cypress. You can install Cypress using the following commands:
npm install cypress --save-dev
or
yarn add cypress --dev
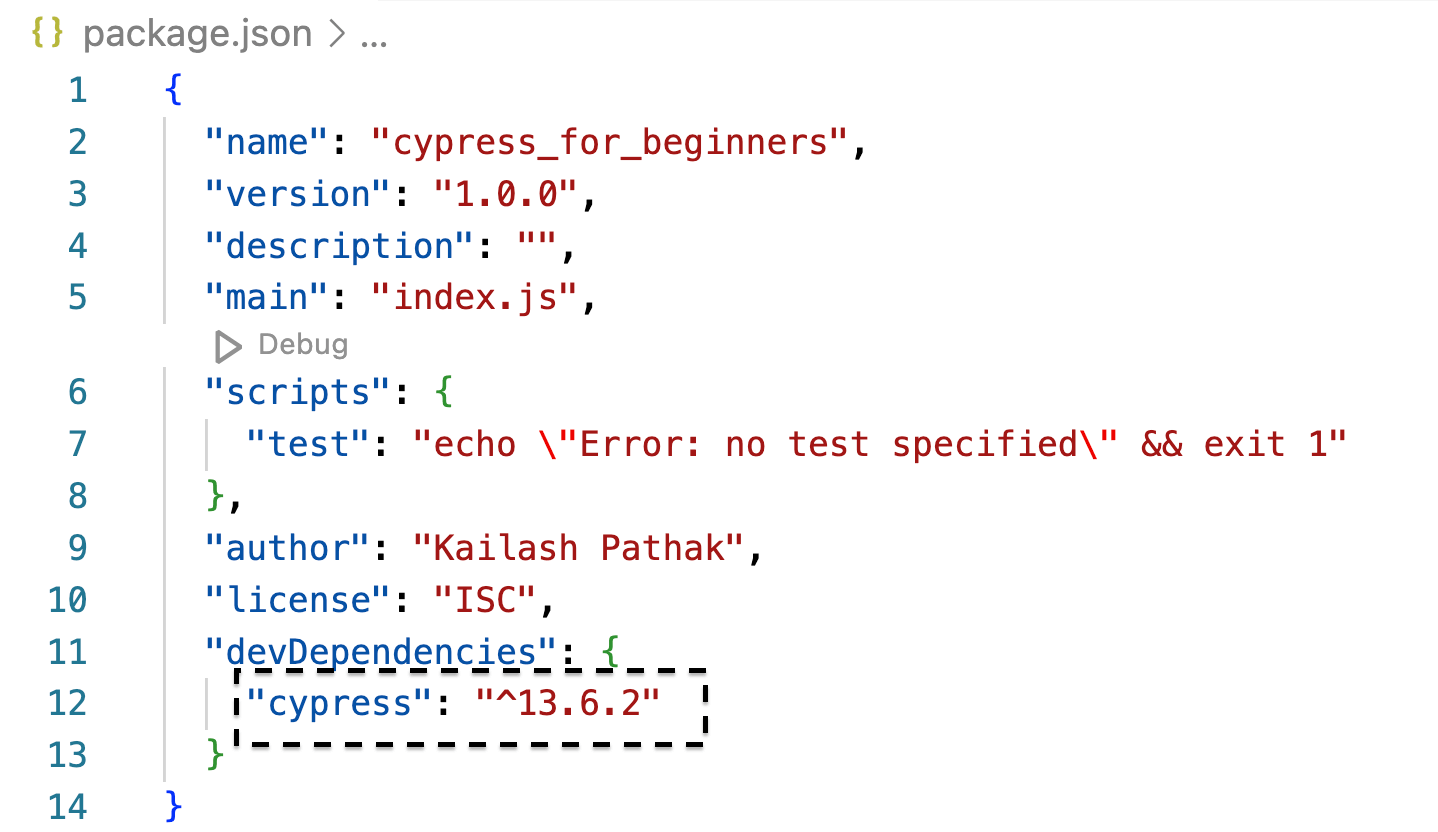
In the screenshot below, you can see that the latest version of Cypress has been installed. However, when writing this blog on your first Cypress test, Cypress’s latest version was 13.6.2.
The next step is to enable Cypress Studio. To enable this feature, we must set experimentalStudio:true in the configuration file.
|
1 2 3 4 5 6 7 8 9 |
const { defineConfig } = require("cypress"); module.exports = defineConfig({ e2e: { experimentalStudio:true, setupNodeEvents(on, config) { // implement node event listeners here }, }, }); |
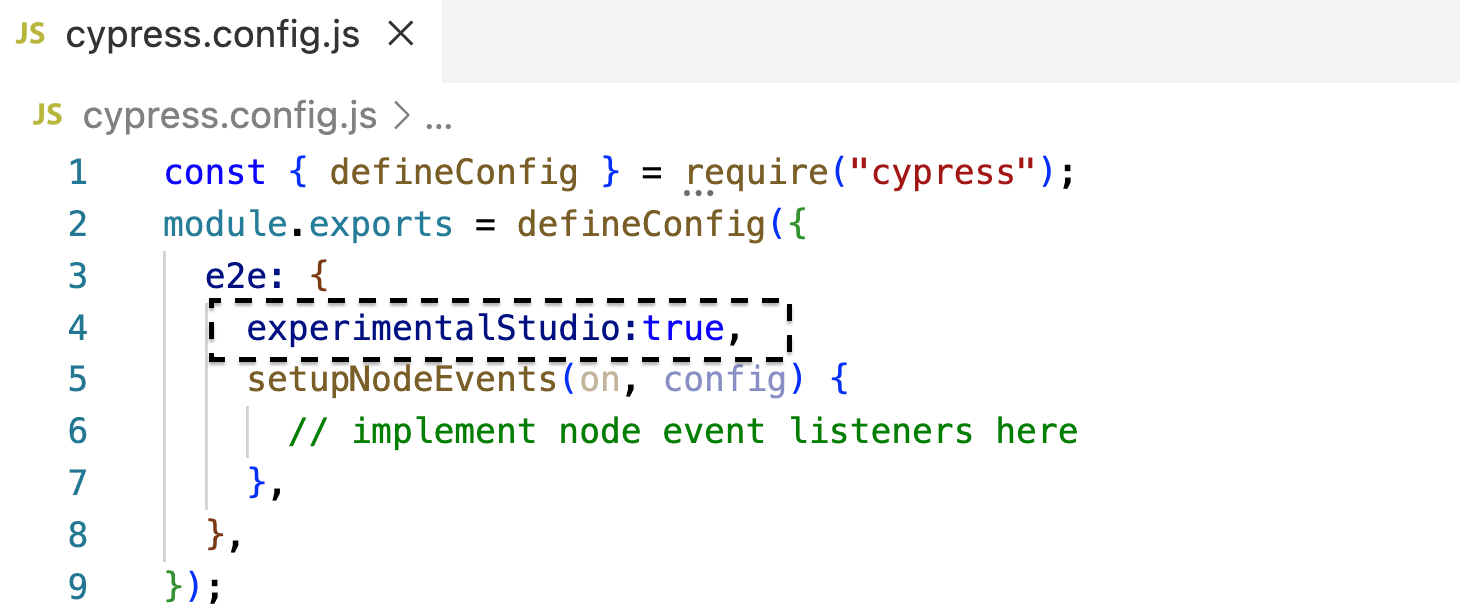
We have updated the cypress.config.js (configuration file)to enable the Cypress Studio feature. Now, the next step is to record the script.
Ways of Recording the Script
We can record the script using Cypress Studio. Below are two options to record the script:
- Create a test with Cypress Studio
- Add New Test
Using the ‘Create test with Cypress Studio’ Option
You should have some existing test cases before recording using the option ‘Create test with Cypress Studio’ in Cypress Runner.
Let’s run the following command to open Cypress Runner.
yarn cypress open
After opening the Cypress Runner, run an existing test case. As we run the command, it will open Cypress Runner with the option ‘Create test with Cypress Studio.’
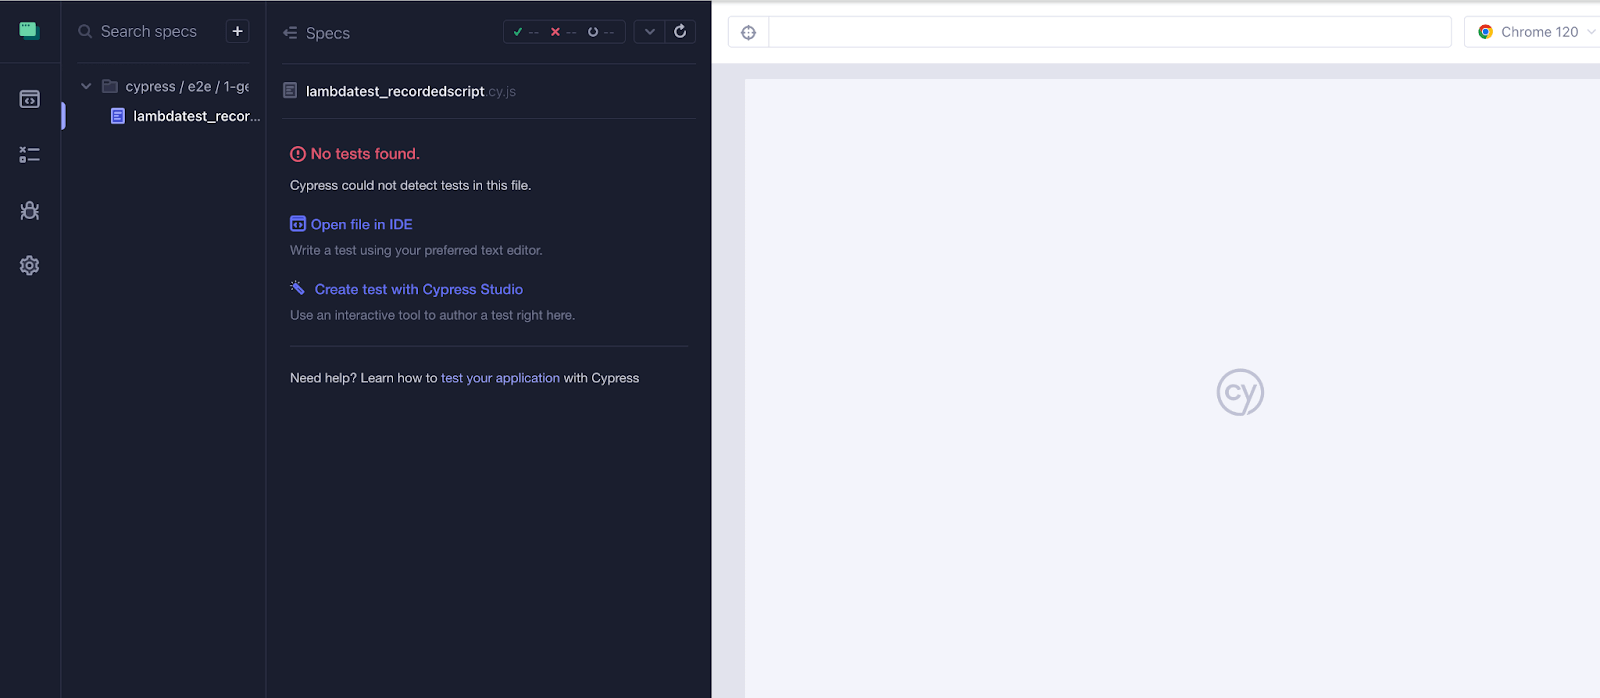
Clicking on the ‘Create test with Cypress Studio’ link in the Cypress Test Runner initiates Cypress Studio and prompts you to provide the URL of the application you want to test.

Let’s record the test scenario below.
|
Once we record the above scenario, we will be asked to save the recorded commands.
Let’s save the command that is recorded by providing the recorded script’s name.
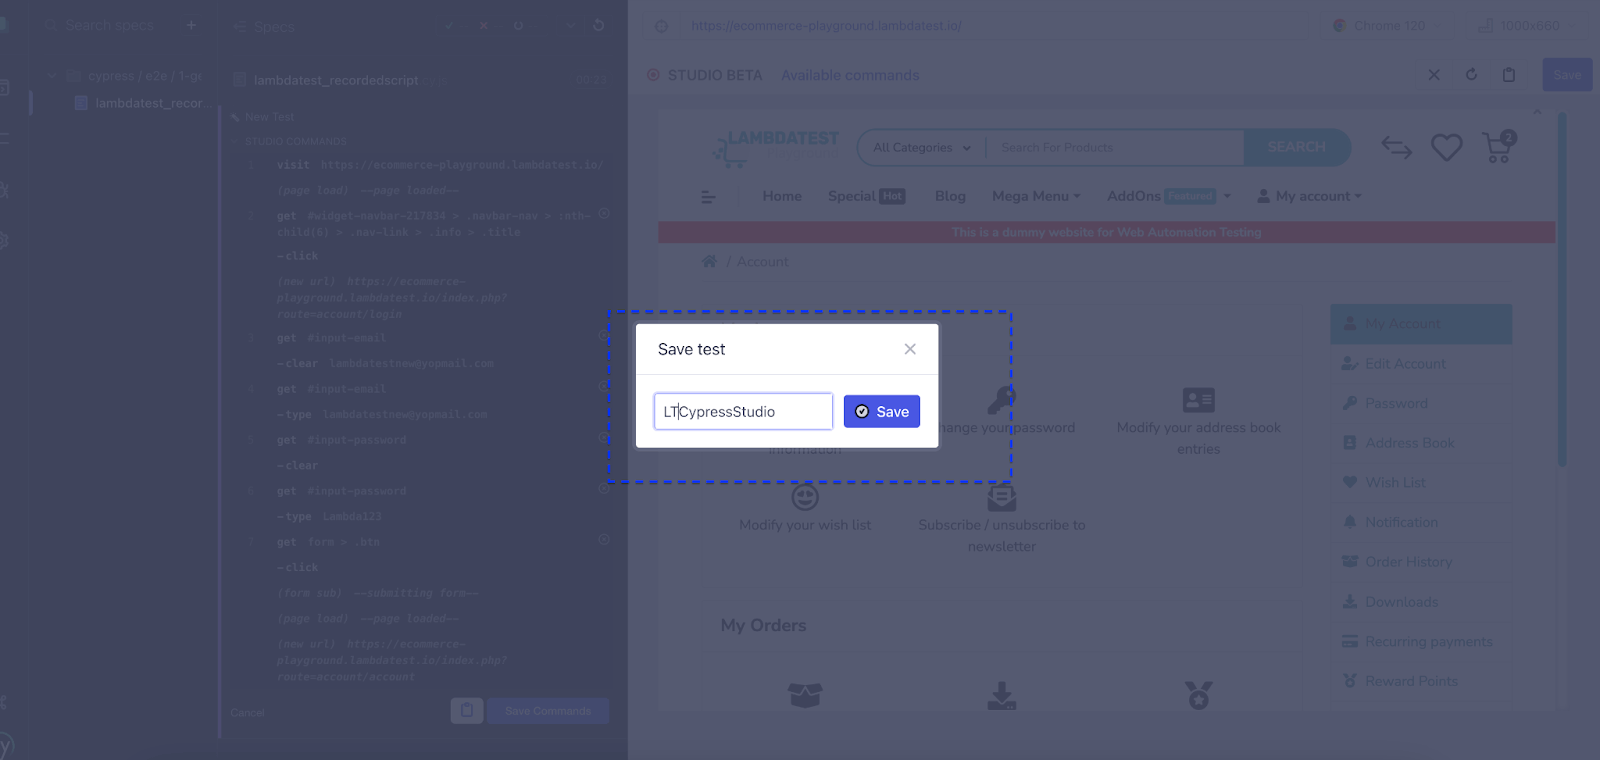
Once we save the recorded script, it is automatically saved under the path ‘e2e/LTCypressStudio’. This path indicates the location within your Cypress project where the test script file is stored.
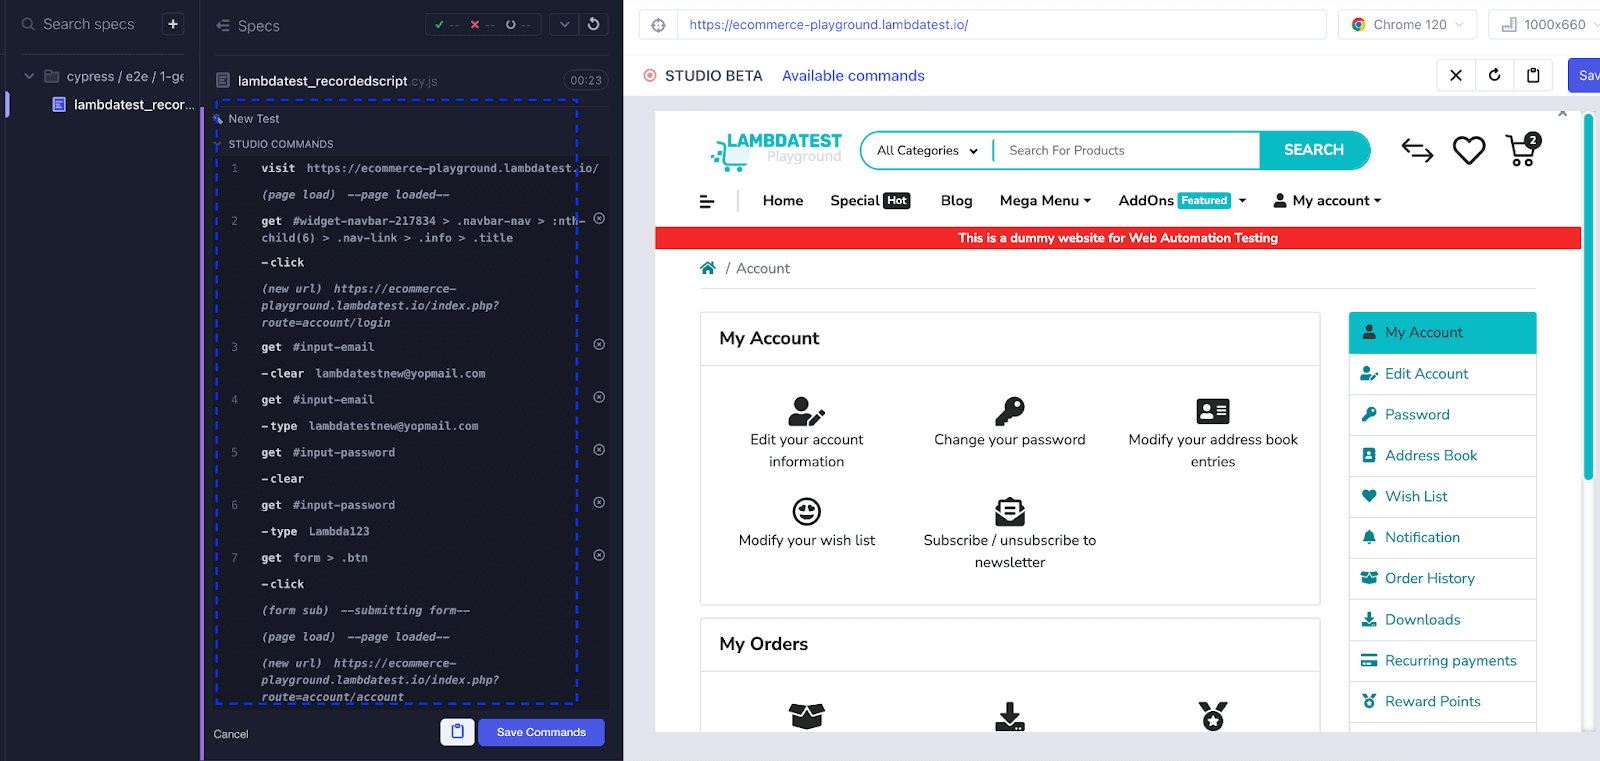
Below is the recorded script where you can see the generated code. Once the recording is done, it will end with line /*==== End Cypress Studio ==== */
|
1 2 3 4 5 6 7 8 9 10 11 12 13 14 |
describe('Cypress Studio Recorded Script', () => { /* ==== Test Created with Cypress Studio ==== */ it('LTCypressStudio', function() { /* ==== Generated with Cypress Studio ==== */ cy.visit('https://ecommerce-playground.lambdatest.io/'); cy.get('#widget-navbar-217834 > .navbar-nav > :nth-child(6) > .nav-link > .info > .title').click(); cy.get('#input-email').clear('lambdatestnew@yopmail.com'); cy.get('#input-email').type('lambdatestnew@yopmail.com'); cy.get('#input-password').clear(); cy.get('#input-password').type('Password1'); cy.get('form > .btn').click(); /* ==== End Cypress Studio ==== */ }) }) |
We have seen above one option to record the script by clicking on the link ‘Create test with Cypress Studio’ from Cypress Runner.
Let’s see the second option, i.e., ‘Add New Test’ to record the script.
Adding New Test
This option is used when you want to create a completely new Cypress test. It lets you define and execute specific test scenarios in a new file.
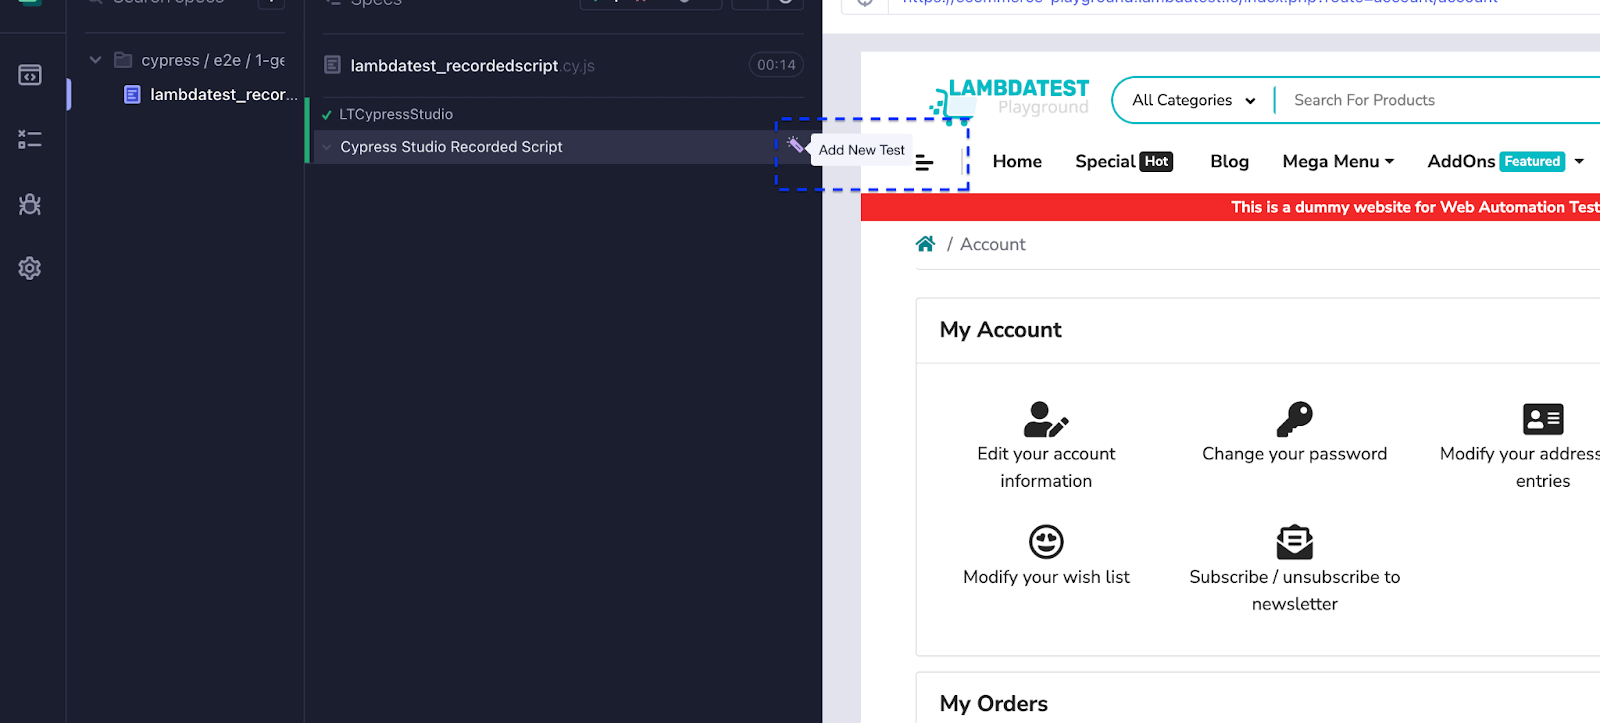
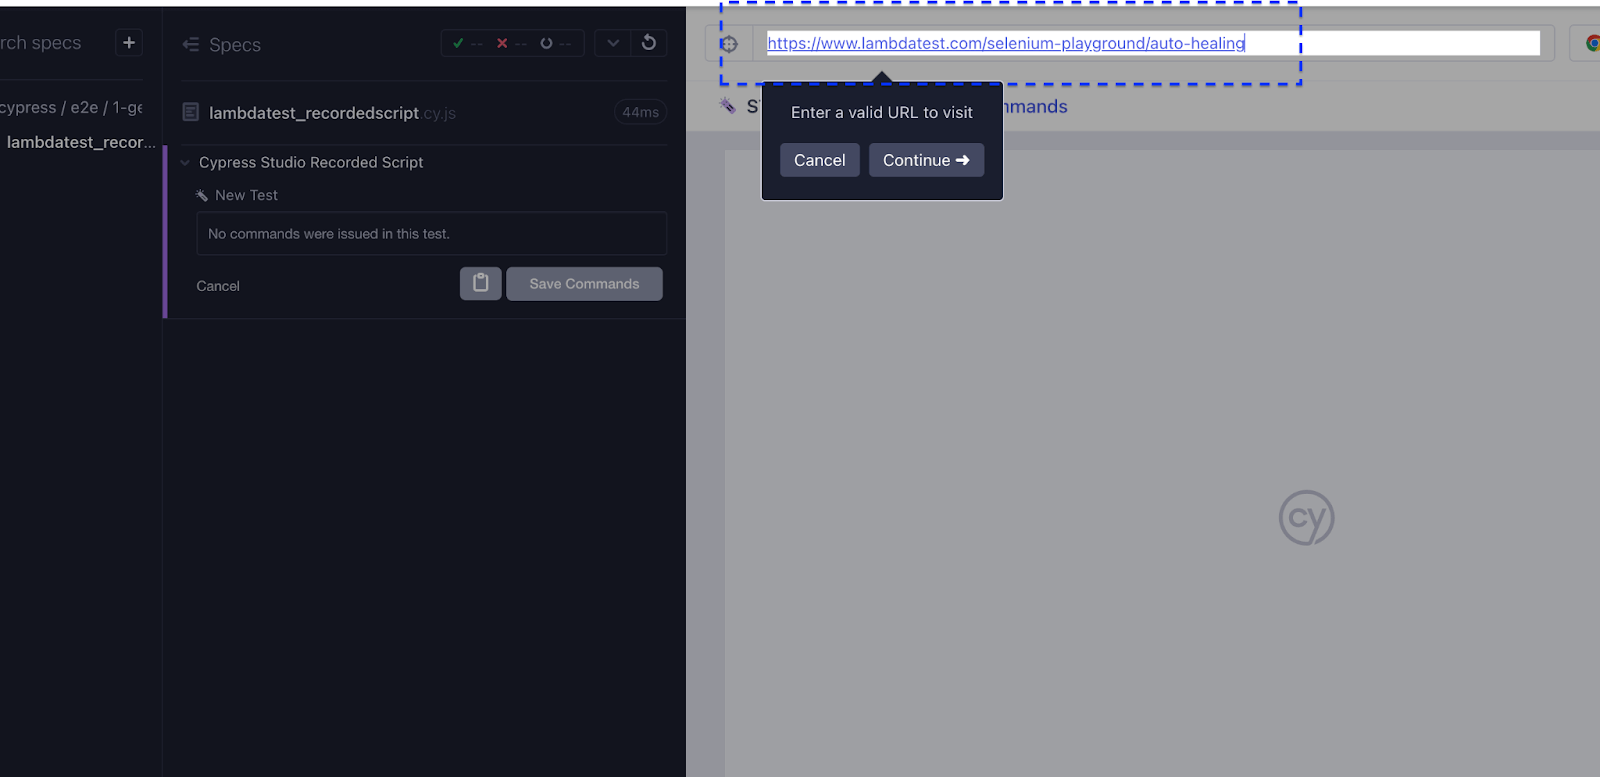
As we click on ‘Add New Test,’ it will ask us to enter the URL. Let’s record the scenario below.
|
After recording, click Save Commands. Let’s give the name ‘LambdaTestAddNewTest.’
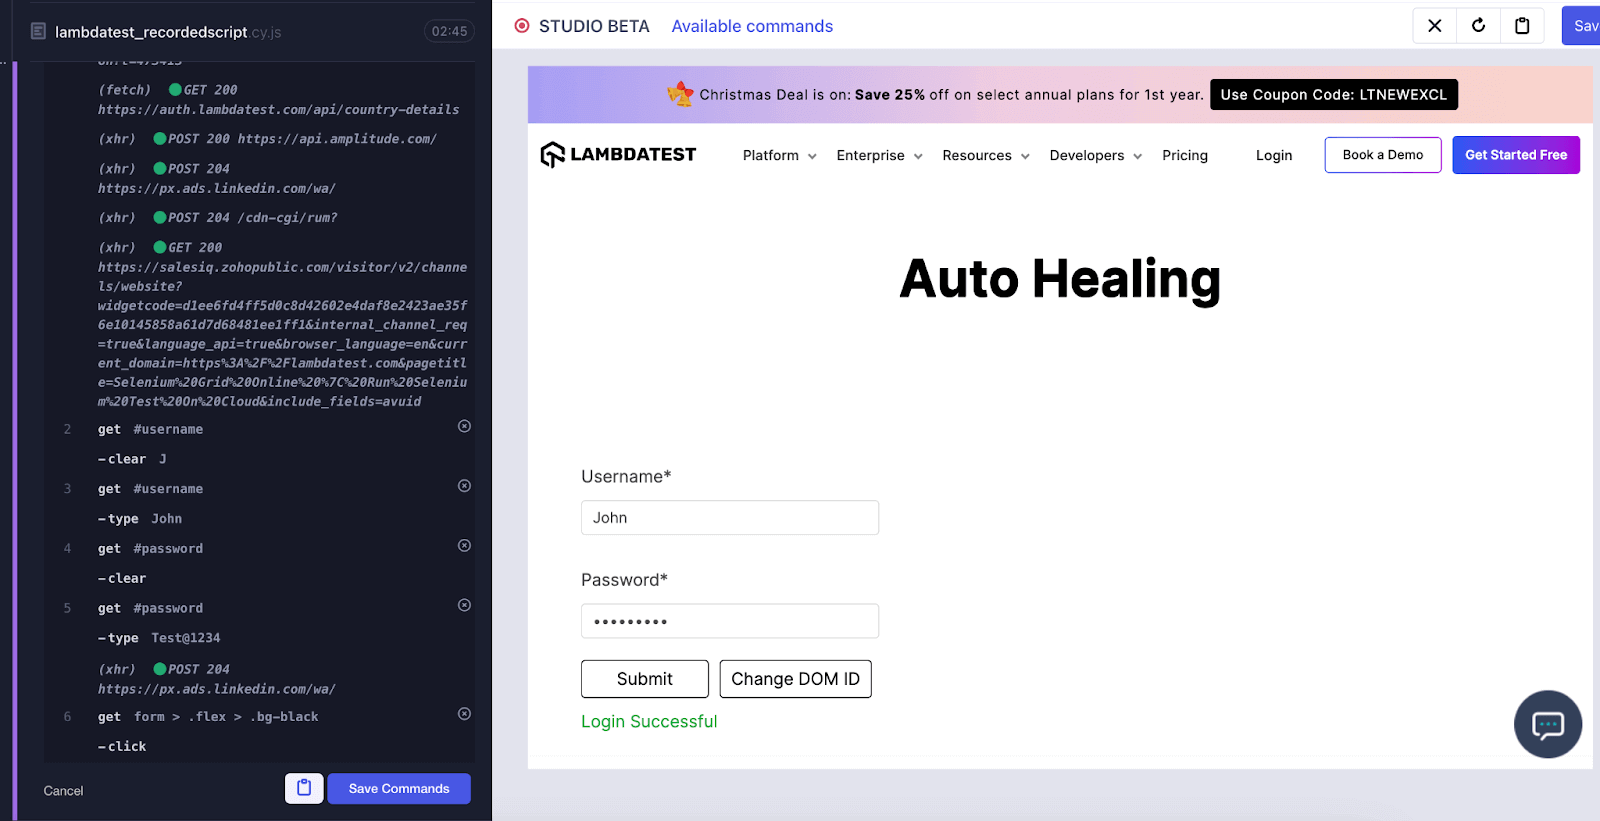
Once we save the script by giving some name, the test case executes and passes successfully. Below is the recorded script by Cypress Studio.
|
1 2 3 4 5 6 7 8 9 10 11 |
/* ==== Test Created with Cypress Studio ==== */ it('https://www.lambdatest.com/selenium-playground/auto-healing', function() { /* ==== Generated with Cypress Studio ==== */ cy.visit('https://www.lambdatest.com/selenium-playground/auto-healing'); cy.get('#username').clear(); cy.get('#username').type('LambdaTest'); cy.get('#password').clear(); cy.get('#password').type('Test@1234'); cy.get('form > .flex > .bg-black').click(); /* ==== End Cypress Studio ==== */ }); |
Modifying the Existing Script
Using Cypress Studio, we can add new scripts and update the existing script with more commands.
Add Commands to Test
This option is useful when adding Cypress commands to an existing test. It allows you to extend the functionality of an already defined test or modify its behavior by incorporating additional Cypress commands.
Let’s update one of the previously recorded scripts where we are login into https://ecommerce-playground.lambdatest.io/
|
1 2 3 4 5 6 7 8 9 10 |
it('LTCypressStudio', function() { /* ==== Generated with Cypress Studio ==== */ cy.visit('https://ecommerce-playground.lambdatest.io/'); cy.get('#widget-navbar-217834 > .navbar-nav > :nth-child(6) > .nav-link > .info > .title').click(); cy.get('#input-email').clear('lambdatestnew@yopmail.com'); cy.get('#input-email').type('lambdatestnew@yopmail.com'); cy.get('#input-password').clear(); cy.get('#input-password').type('Lambda123'); /* ==== End Cypress Studio ==== */ }) |
Cover the below scenario to update the existing script using Cypress Studio.
|
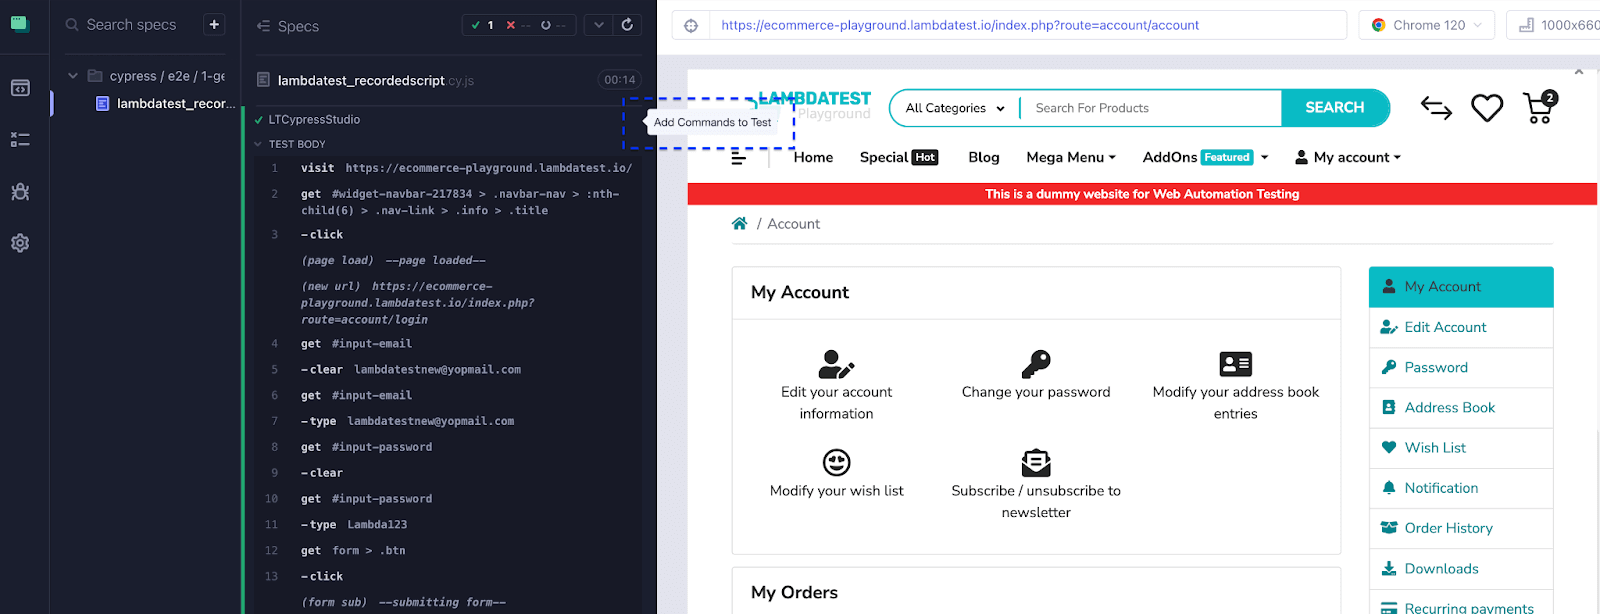
Click on ‘Add Commands to Test’ from Cypress Runner.
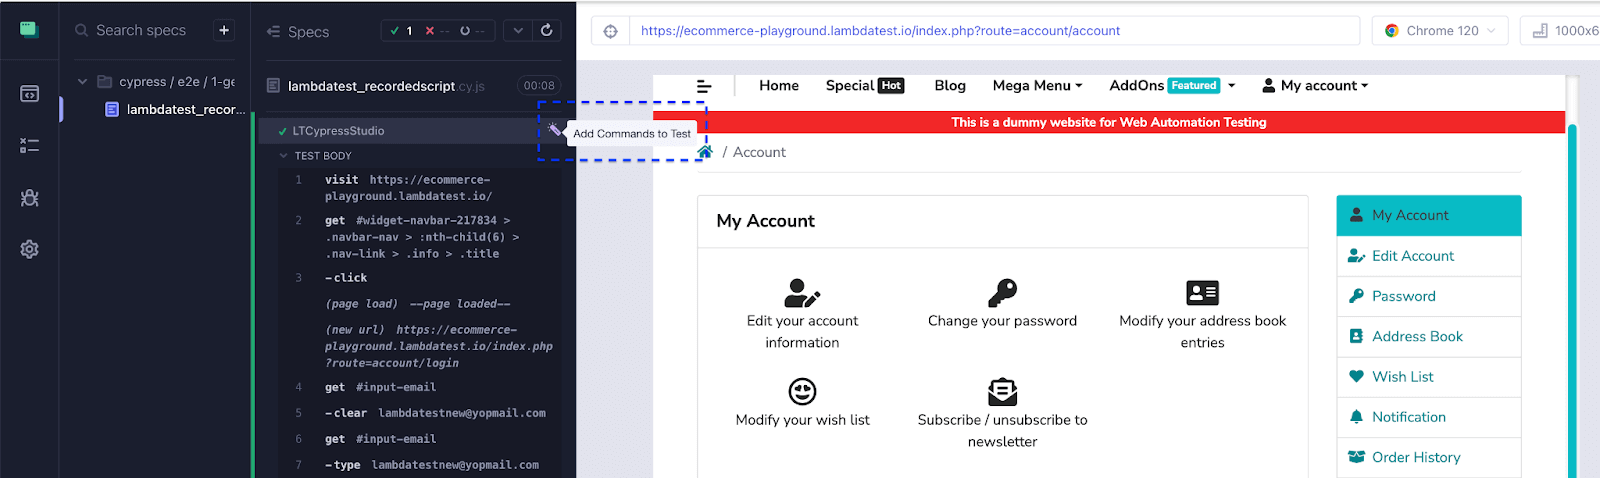
As part of Cypress Studio, when we click ‘Add Commands to Test,’ the complete test case is rerun. In our case, the user is logged in to the site. After that, we can search for the product ‘HP,’ add it to the cart, and redirect to the View Cart page.
The Cypress command log shows that each updated step is recorded with the ‘Save Commands’ button. Once you click the ‘Save Commands’ button, the script is updated with more steps.

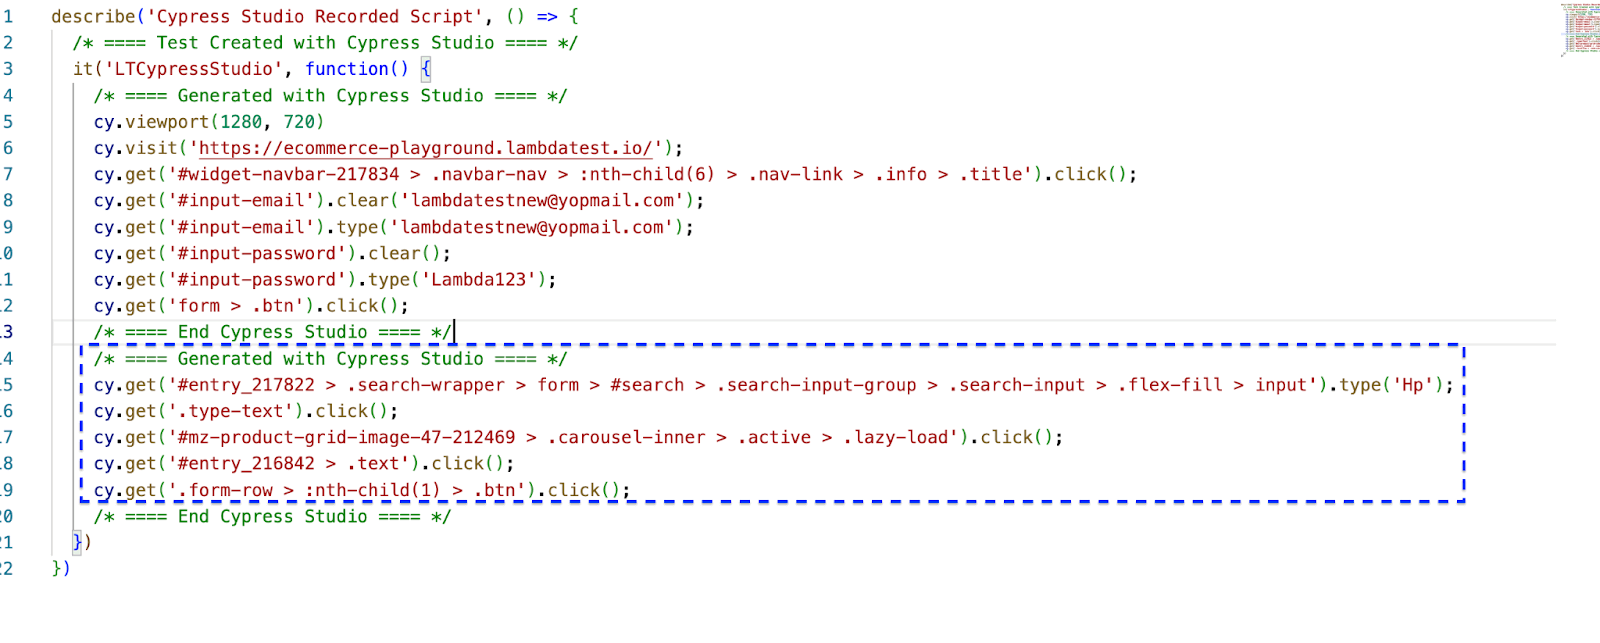
The screenshot below shows that once the scenario is completed, the script will be updated with some more steps. You can see some more steps are added, so you can update the existing script using Cypress Studio. Below is the script that is recorded.
Cypress Studio is beneficial for those seeking to swiftly generate test scripts without needing to code, making it especially advantageous for novices getting started with Cypress.
Despite being a handy tool for rapidly creating code-free test scripts, Cypress Studio encounters difficulties when handling intricate test scenarios or scenarios incorporating dynamic data.
So far, we have seen how you can record scripts using the built-in tool Cypress Studio. In the next section, you will see how we can create a Cypress test case by writing our script.
Writing First Cypress Test Script
Writing Cypress scripts manually refers to crafting test code directly using JavaScript or TypeScript rather than relying on visual recording tools like Cypress Studio. Cypress uses Mocha as its default automation testing framework.
When you install Cypress, it automatically includes Mocha, and you don’t need to install Mocha separately to use it with Cypress. Integrating Mocha with Cypress provides a structured and organized way to write end-to-end tests. Cypress leverages Mocha’s syntax, which includes describe and it blocks for test organization, as well as hooks for setup and teardown, to create a clear and readable testing structure.
Before writing the script, we need to set up Cypress. Below are some of the steps that we have to follow.
Step 1: Install Cypress
To write the script on your own, let’s set up Cypress using the following commands:
npm install cypress —-save-dev
or
yarn add cypress —-dev
The screenshot below shows that Cypress’s latest version was 13.6.2 when this blog on writing your first Cypress test was written.
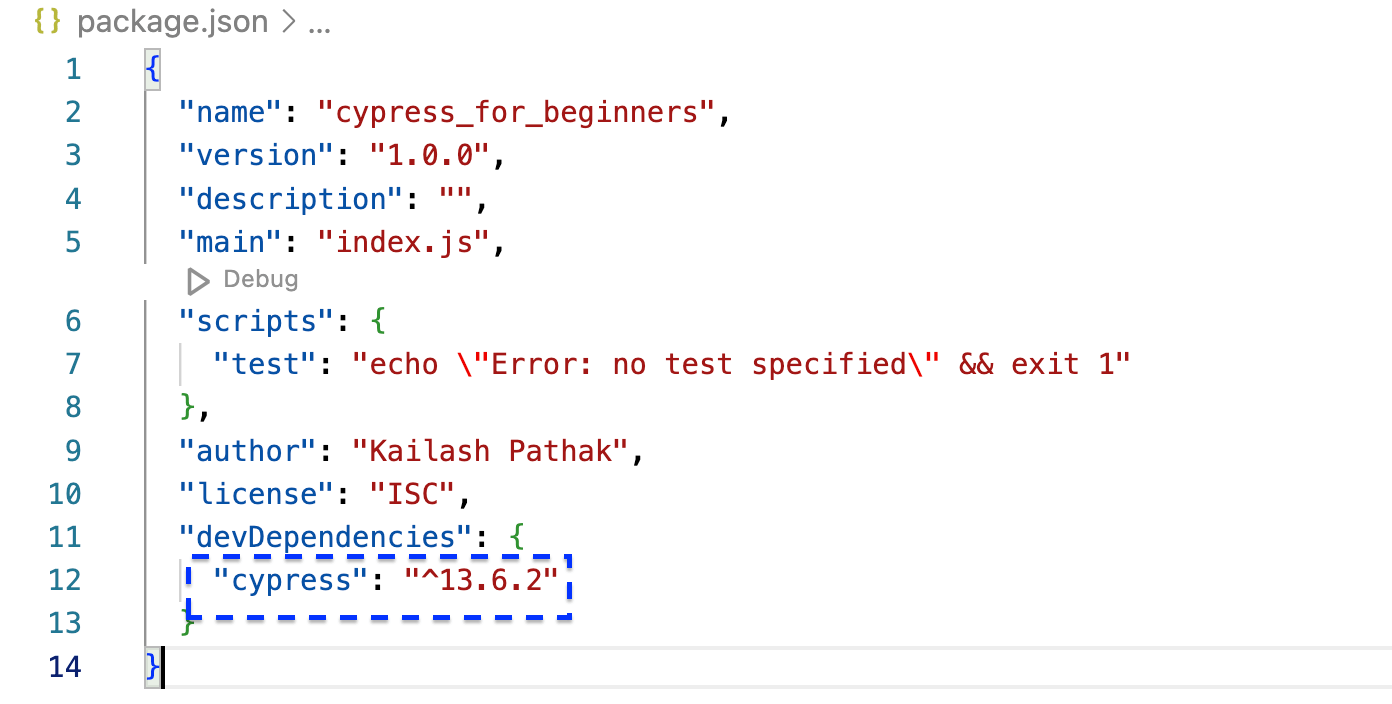
After installation, the folder structure looks like the one below, with different folders given in brief detail below.
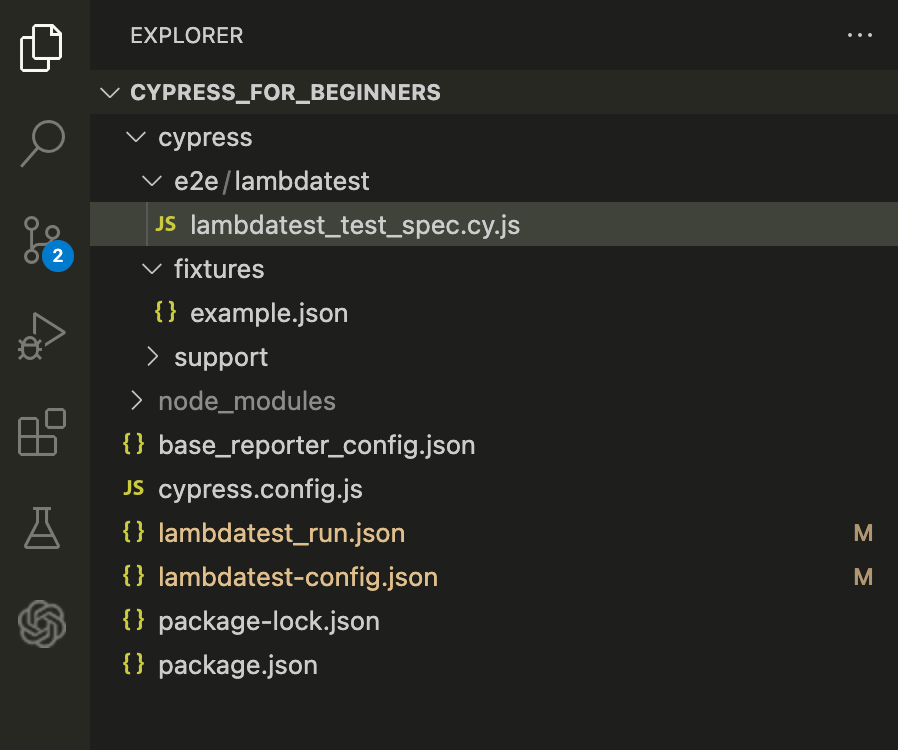
The table below summarizes the purpose of each directory and file within the Cypress project.
| Directory/File | Description |
| cypress/ | Directory for containing all Cypress-related files. |
| fixtures/ | Directory for storing static data (e.g., JSON files) used as test fixtures. |
| e2e/ | Directory where test files are stored: Cypress looks for test files in this directory by default. |
| support/ | Directory containing the commands.js file. It is used to extend Cypress commands and customize its behavior. |
| Cypress.config.js | File where various options and Cypress behavior can be set. |
| package.json | File holding metadata about the project and its dependencies. |
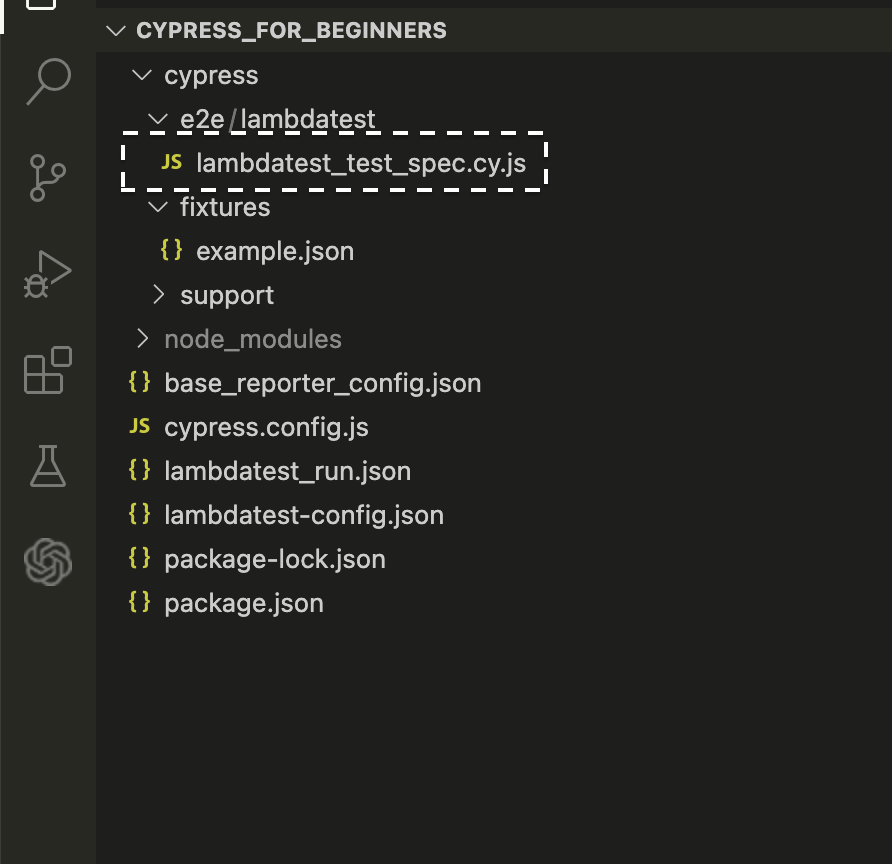
Step 2: Create a Test File
Create a new test file under cypress/e2e/ to run the e2e test case. Let’s give a name to the file, e.g., lambdatest_test_spec.cy.js
Step 3: Write Your Test
As we mentioned above, Cypress supports the Mocha framework. Therefore, we must grasp key concepts before proceeding to our initial script.
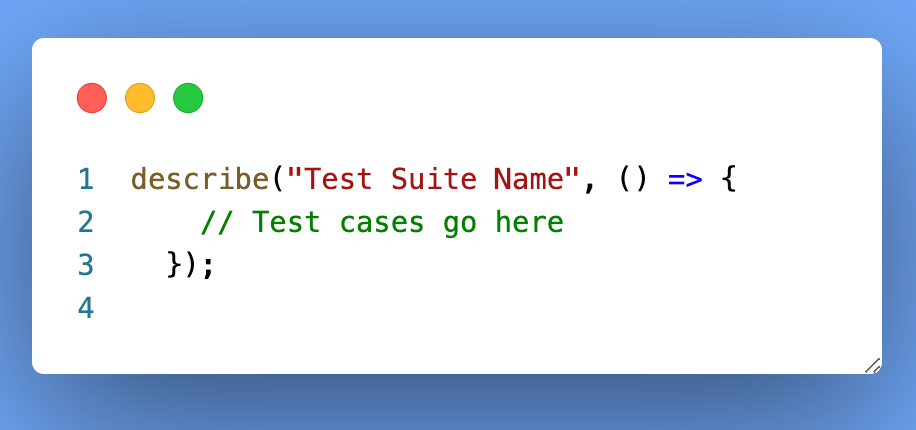
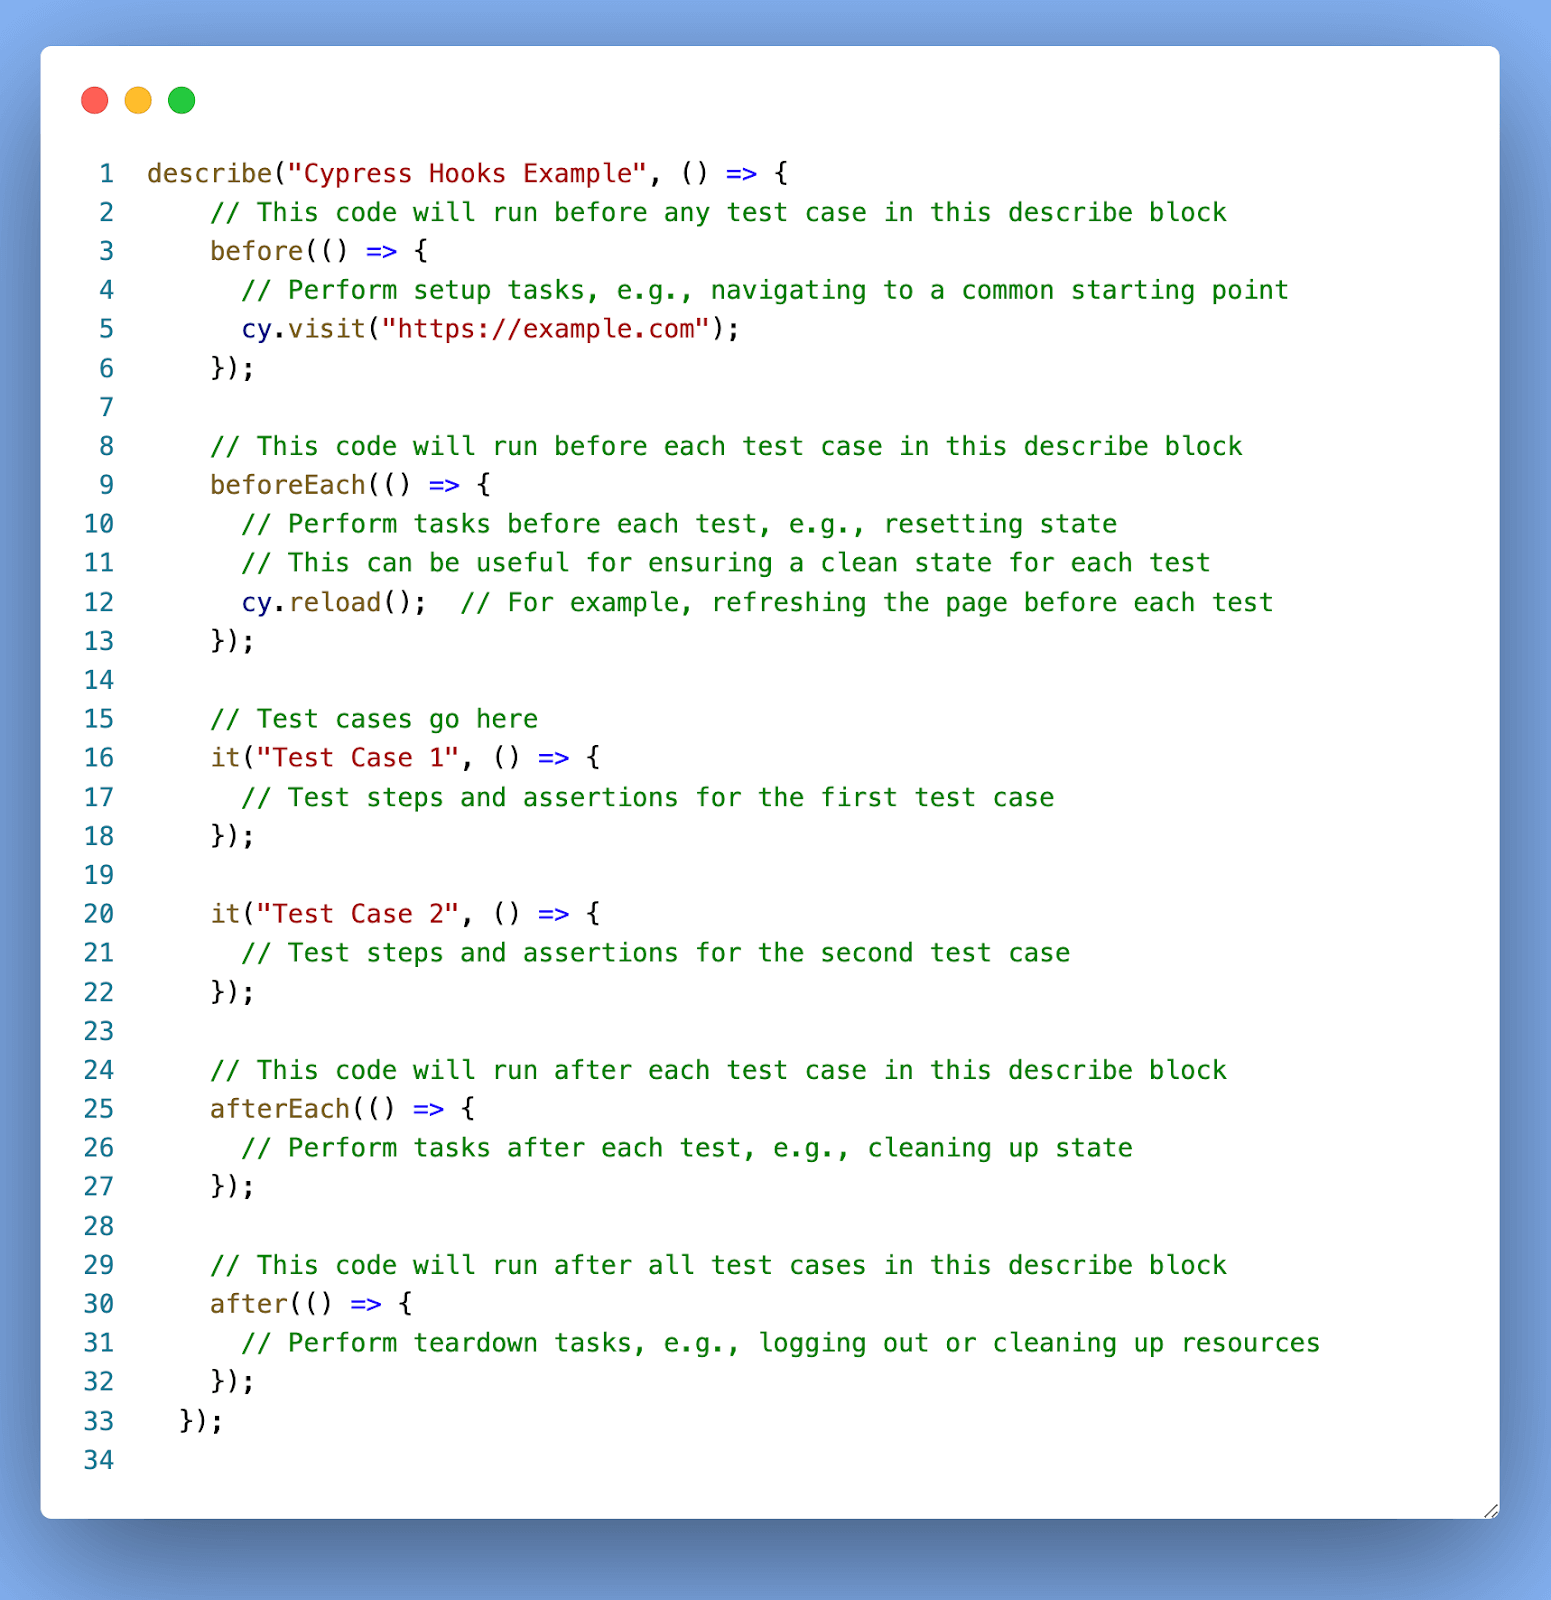
describe() Block
Mocha uses the describe and it blocks to structure test suites and individual test cases.describe() is used to group tests.
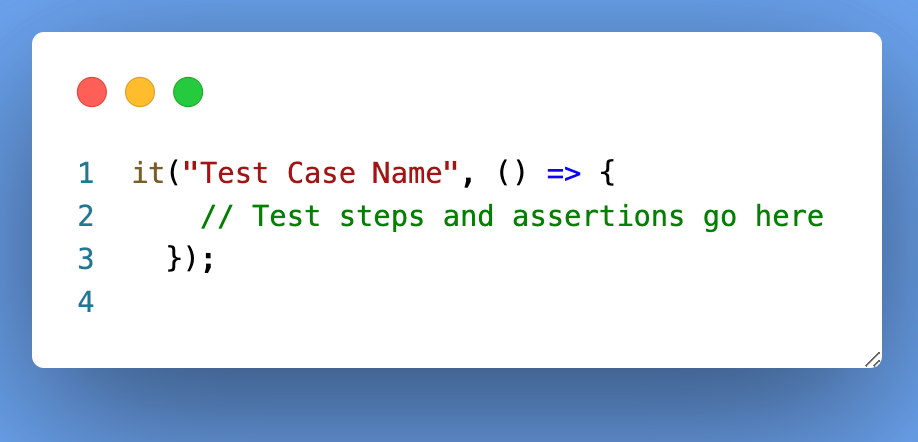
it() Block
it() is used to define individual test cases.
Hooks
Mocha supports hooks such as before(), beforeEach(), after(), and afterEach(). Cypress utilizes these hooks for setup and teardown tasks, like preparing the test environment and cleaning up before running tests.
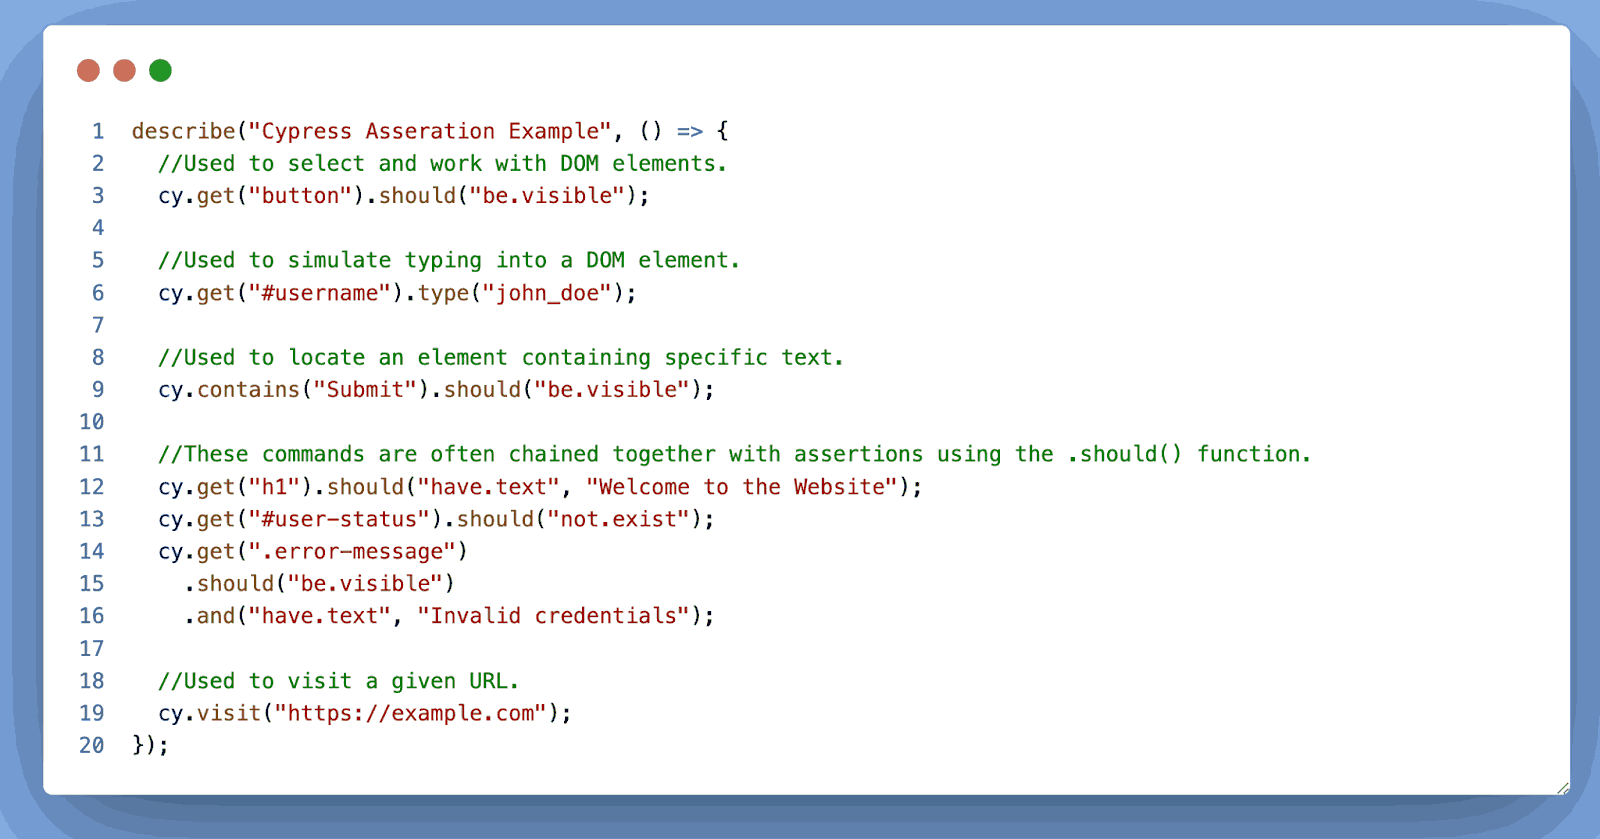
Assertions
Mocha itself doesn’t include built-in assertion libraries. Cypress, however, provides its assertion library and extends Mocha with Chai assertions. Cypress uses Chai assertions to assert conditions in your tests.
Some of the Examples are .should(‘have.text’, ‘Expected Text’),.should(‘not.equal’, ‘Expected Text’),.should(‘exist’),.should(‘not.be.disabled’), .should(‘have.class’, ‘active’), etc.

Excluding the Tests
You can use the .skip() method to exclude a specific Cypress test. This method can be applied to a Cypress test or a description block.
Excluding the Tests
You can use the .skip() method to exclude a specific Cypress test. This method can be applied to a Cypress test or a description block.
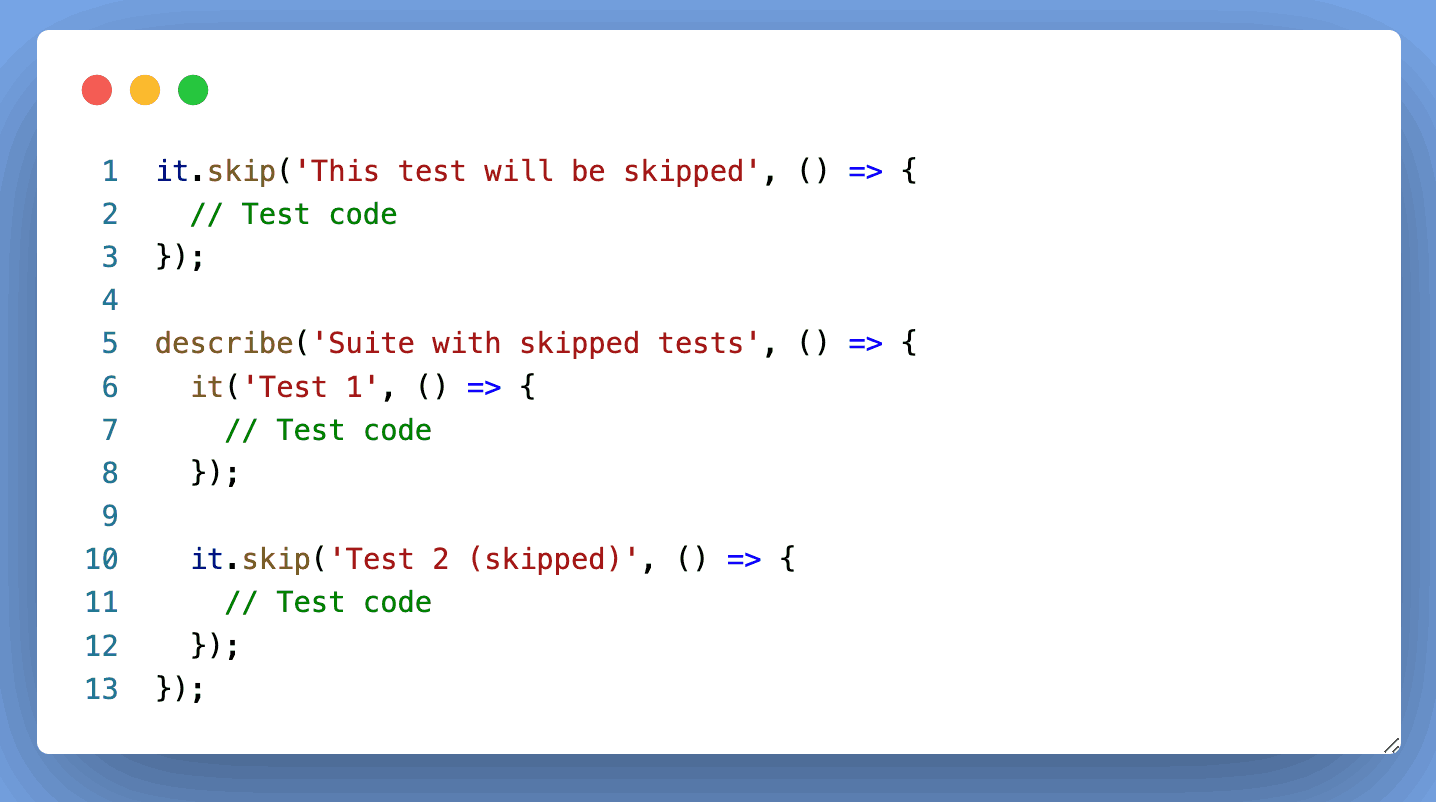
The describe.skip() function in Cypress is used to skip the entire test suite within the describe block. Here’s an example:

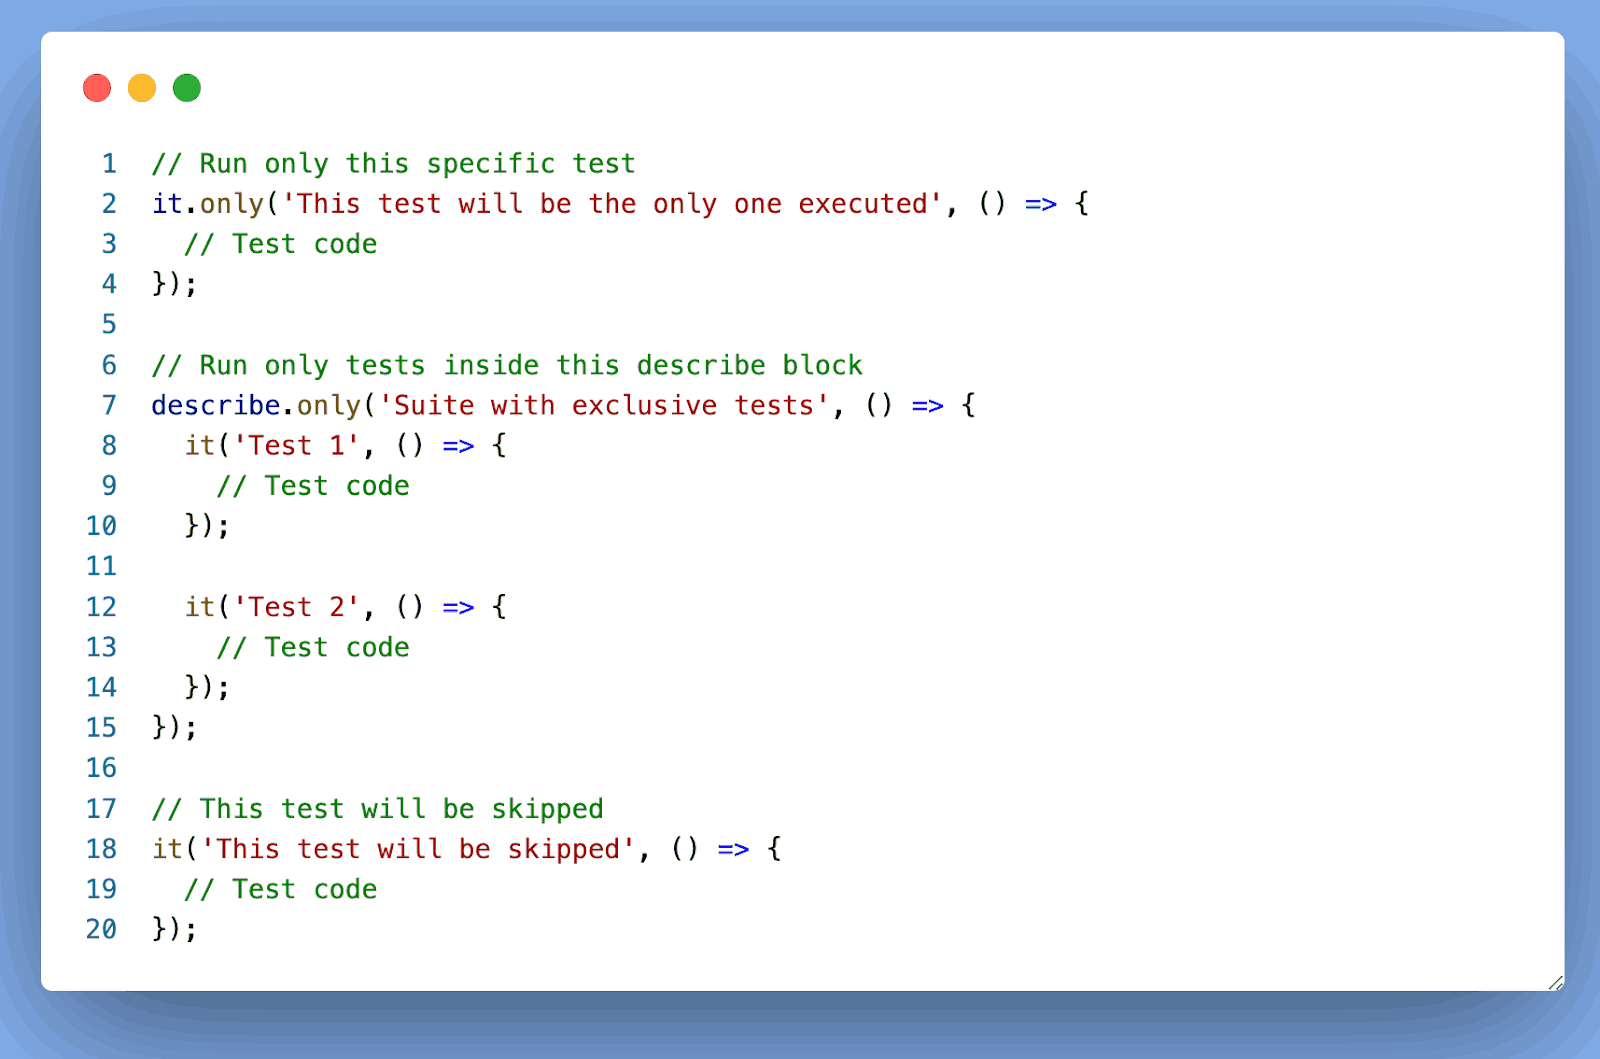
Including the Tests
You can use the .only() method to run only specific tests or test suites during the test execution. When you use .only on a Cypress test or a suite, only that test or suite will be executed, and all other tests without .only will be skipped.
So far, we have discussed some concepts required of a user writing his script for the first time. Let’s now put that knowledge into practice by crafting a simple Cypress Script.
Let’s write the script for the below scenario.
|
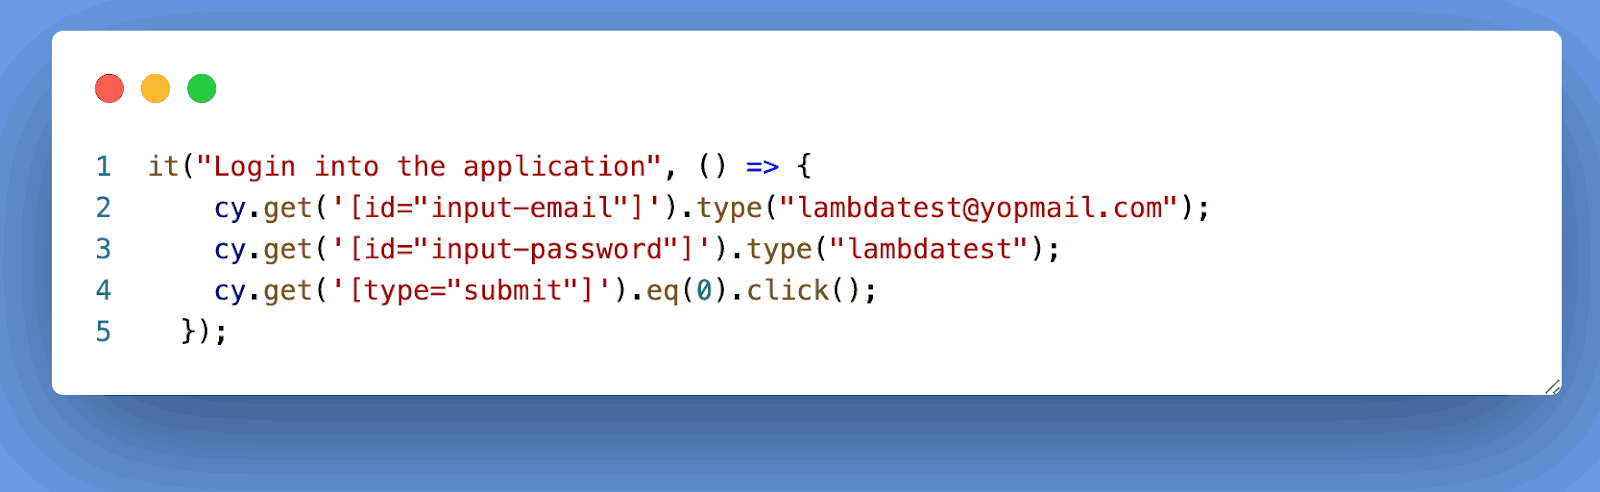
Open lambdatest_test_spec.cy.js and write a simple Cypress test to visit a website, log in, and search for the product.
|
1 2 3 4 5 6 7 8 9 10 11 12 13 14 15 16 17 18 19 20 |
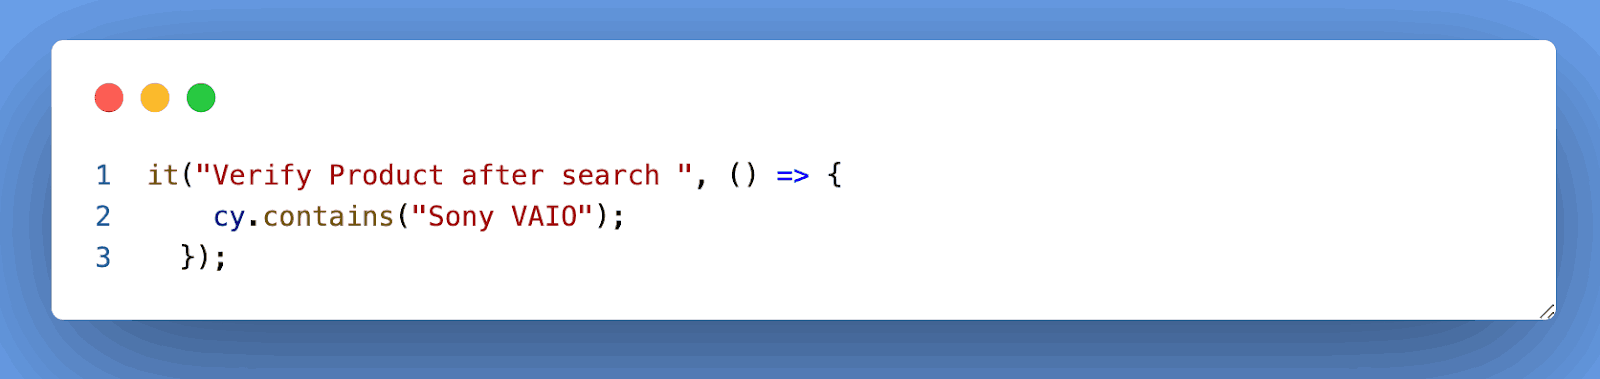
/// <reference types="cypress" /> describe("Lambdatest Login ",() => { it("Open the URL", () => { cy.visit( "https://ecommerce-playground.lambdatest.io/index.php?route=account/login" ); }); it("Login into the application", () => { cy.get('[id="input-email"]').type("lambdatest@yopmail.com"); cy.get('[id="input-password"]').type("lambdatest"); cy.get('[type="submit"]').eq(0).click(); }); it("Search the Product", () => { cy.get('[name="search"]').eq(0).type("VAIO"); cy.get('[type="submit"]').eq(0).click(); }); it("Verify Product after search ", () => { cy.contains("Sony VAIO"); }); }); |
Code Walkthrough
Let’s do a code walkthrough to understand the script in detail.
describe Block
describe(“LambdaTest Login”, () => { … }): This block represents a test suite named ‘Lambdatest Login’ that contains multiple Cypress test cases related to the LambdaTest login functionality.

Open the URL
Visit the specified URL, which is the login page of the LambdaTest application.

Login into the application
Enter the Email and Password input fields, enter the respective values, and click the Login button.
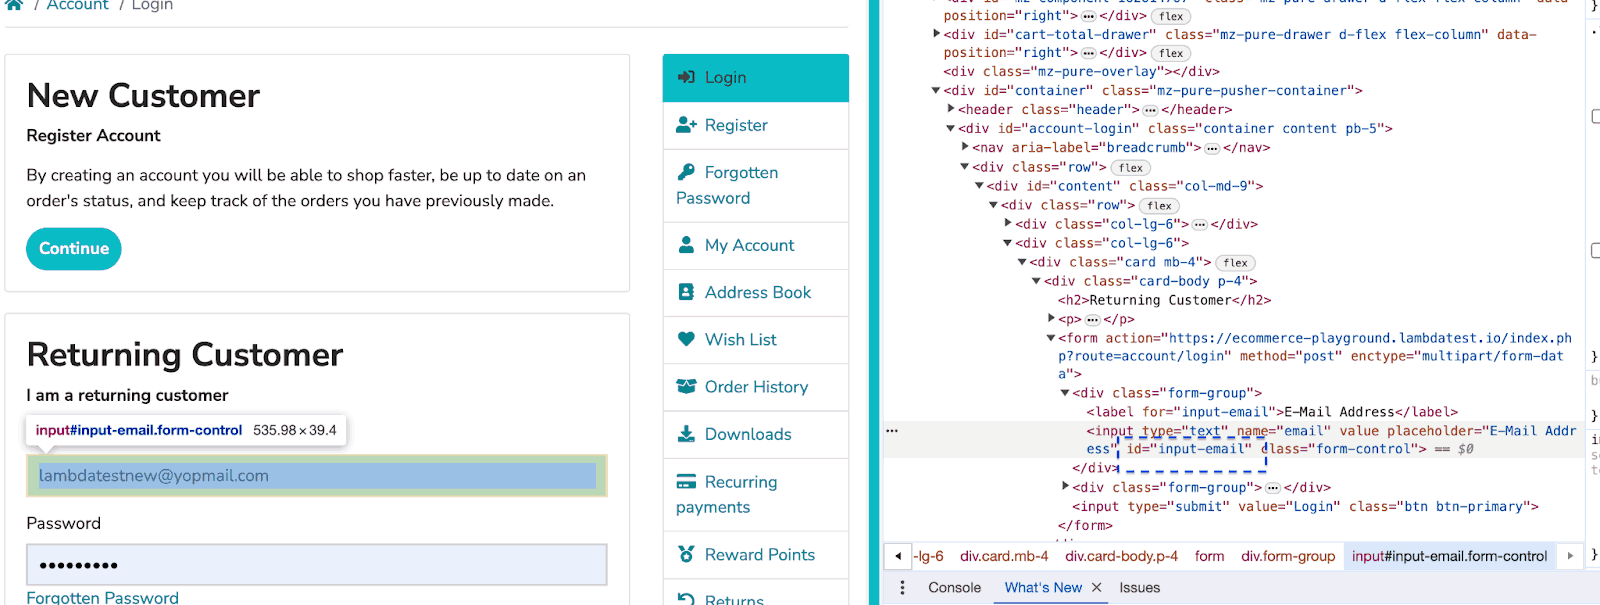
In the script, we used different locator strategies to interact with elements on the web page. Locators identify and target HTML elements, allowing Cypress to perform actions like typing text, clicking buttons, etc.
Here is the detail of each locator used here:
[id=”input-email”]: Targets the input element with the ID attribute set to “input-email.”
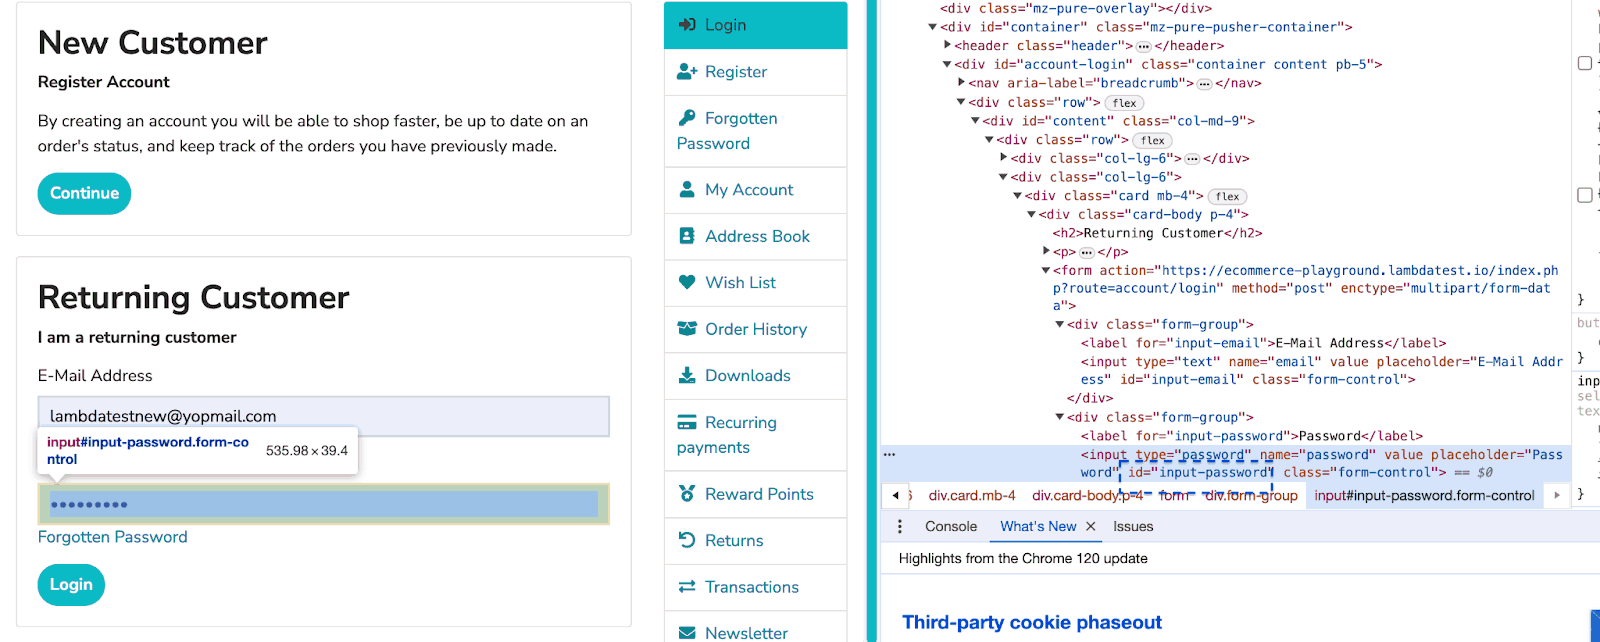
[id=”input-password”]: This function targets the input element with the ID attribute set to “input-password.”
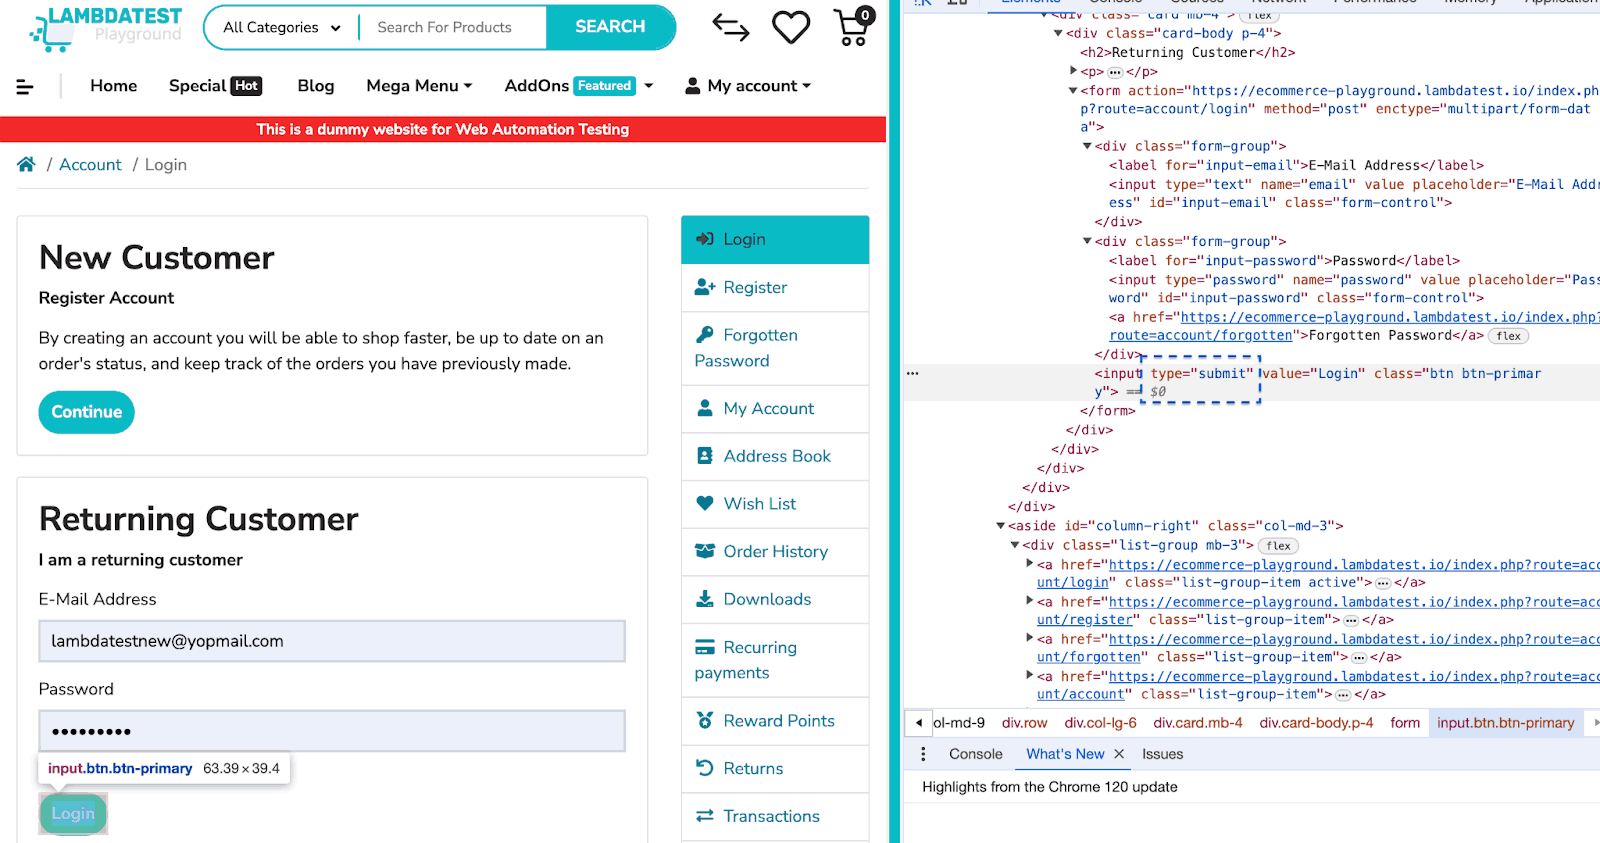
[type=”submit”]: This function targets the Submit button(s). The .eq(0) selects the first matching button.
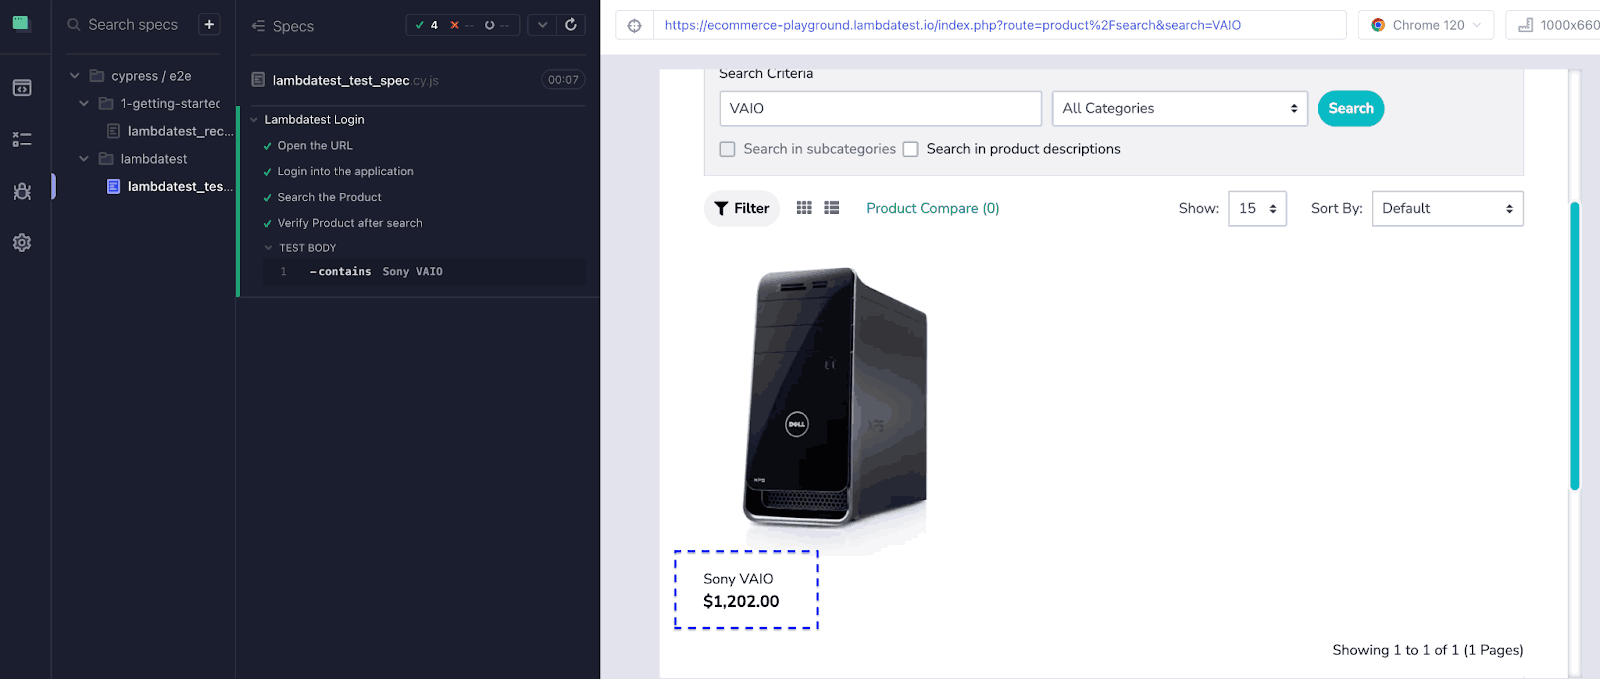
Search the Product
You can search the data by entering a value in the input field, ‘VAIO,’ and clicking the Search button.
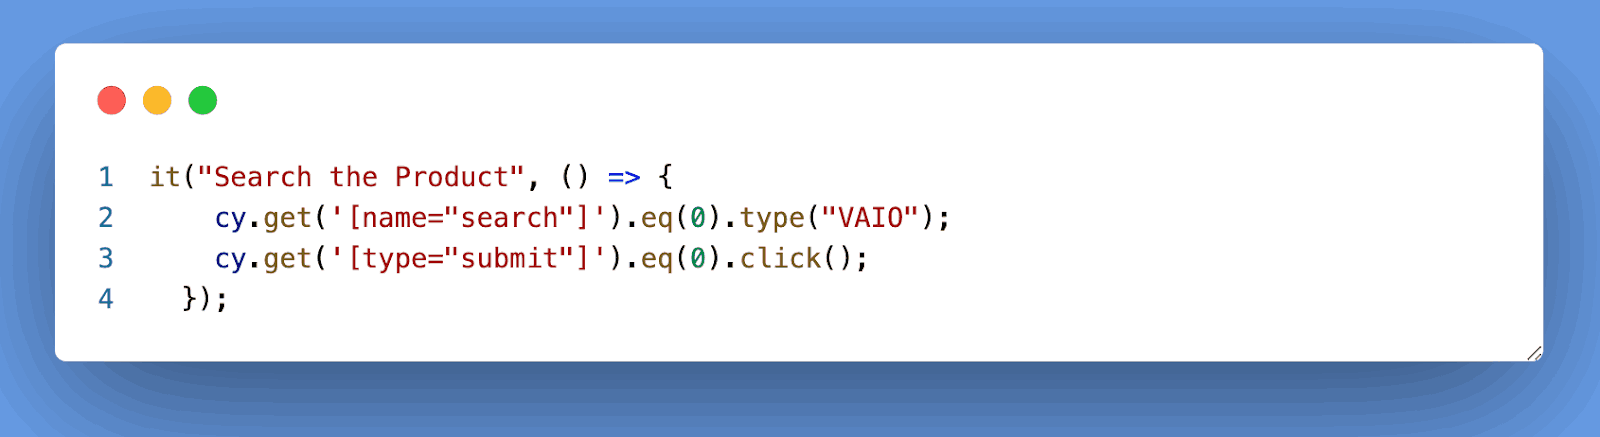
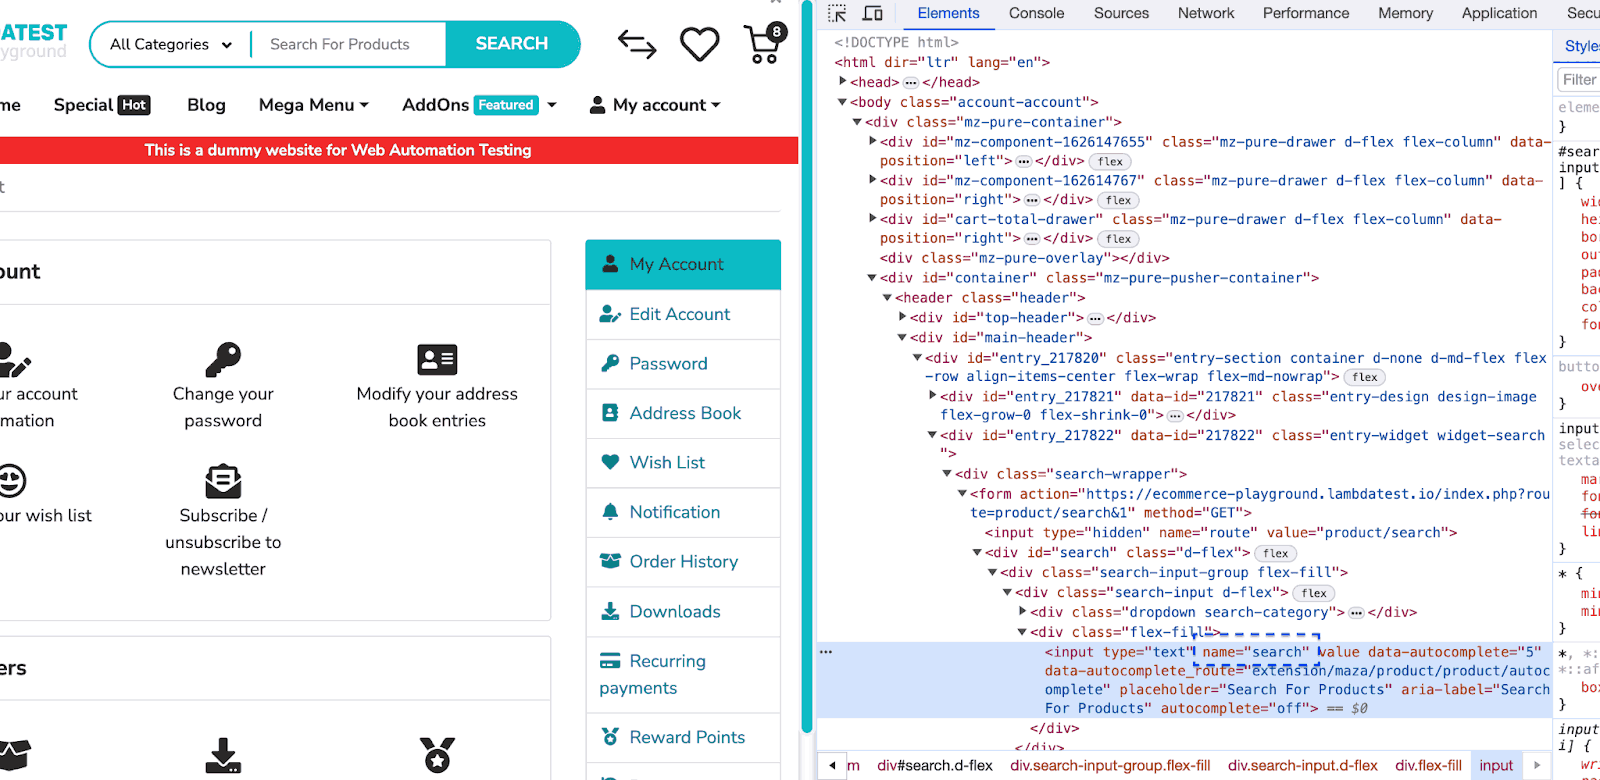
[name=”search”]: This function targets the input element with the name attribute set to “search.”
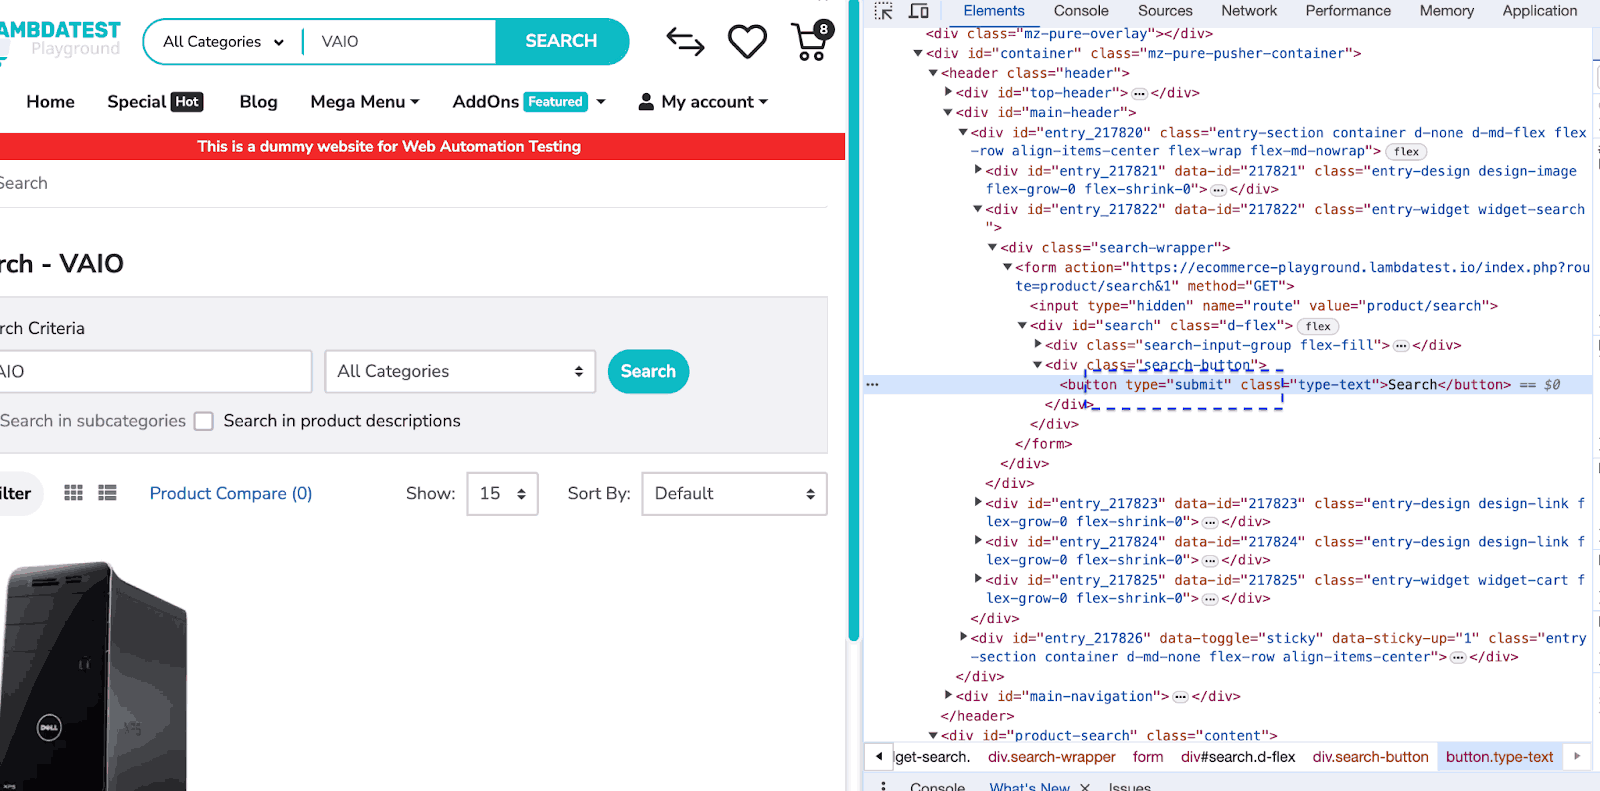
[type=”submit”]: This function targets the Submit button(s). The .eq(0) selects the first matching button.
Verify Product after search
Verifies that the search results page contains the text “Sony VAIO.”
Step 4: Execute the Test Case
There are different ways of executing the Cypress test cases.
- Headed mode: where we can see all executing steps in the browser window.
- Headless mode: where we execute tests without loading a complete web browser.
Running Test in Headed Mode
To execute the Cypress test case in the headed mode locally, we must run the following command:
yarn cypress open
or
npx cypress open
As we run the command, it will open the below screen.
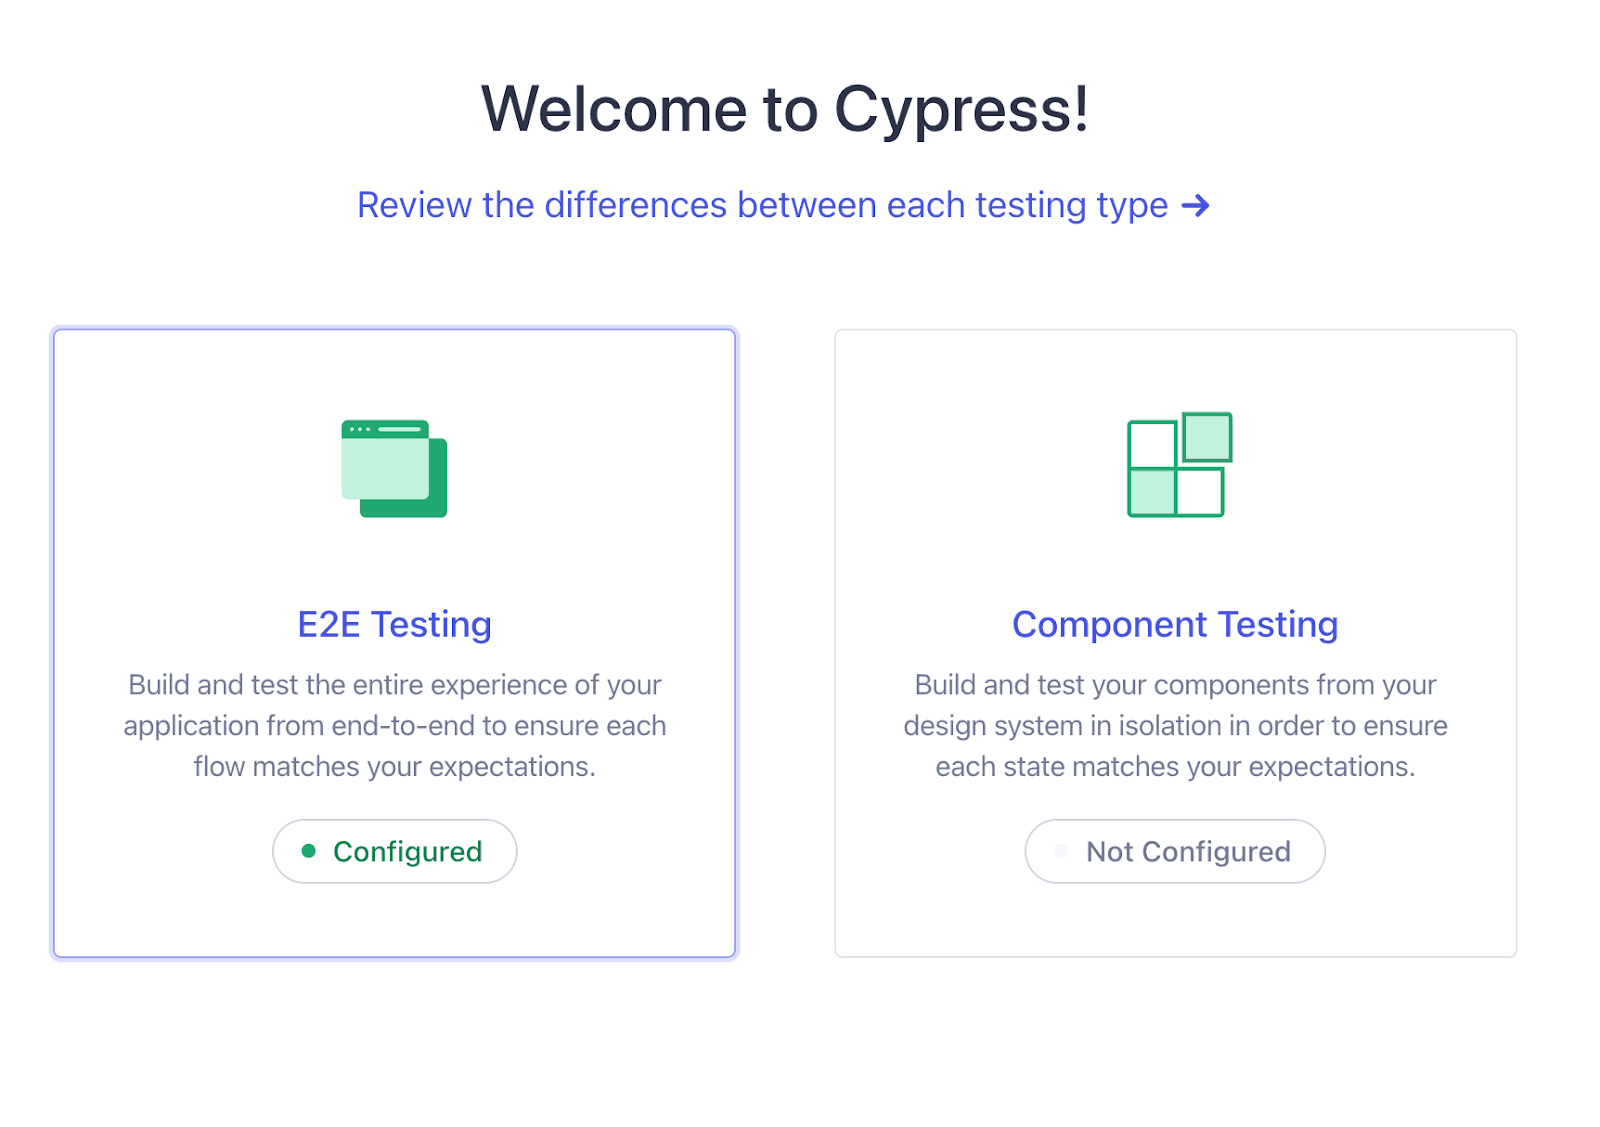
There are two options: E2E testing and Component Testing.
E2E Testing: E2E testing allows users to simulate user interactions, navigate through the application, and validate the application’s behavior as a whole.
Component Testing: Component testing focuses on testing individual application components in isolation. Component testing aims to verify that each application part behaves as expected independently of the other components.
Select E2E Testing from the above screenshot, then select the desired browser for testing. Finally, launch the Cypress Runner to initiate the testing environment.
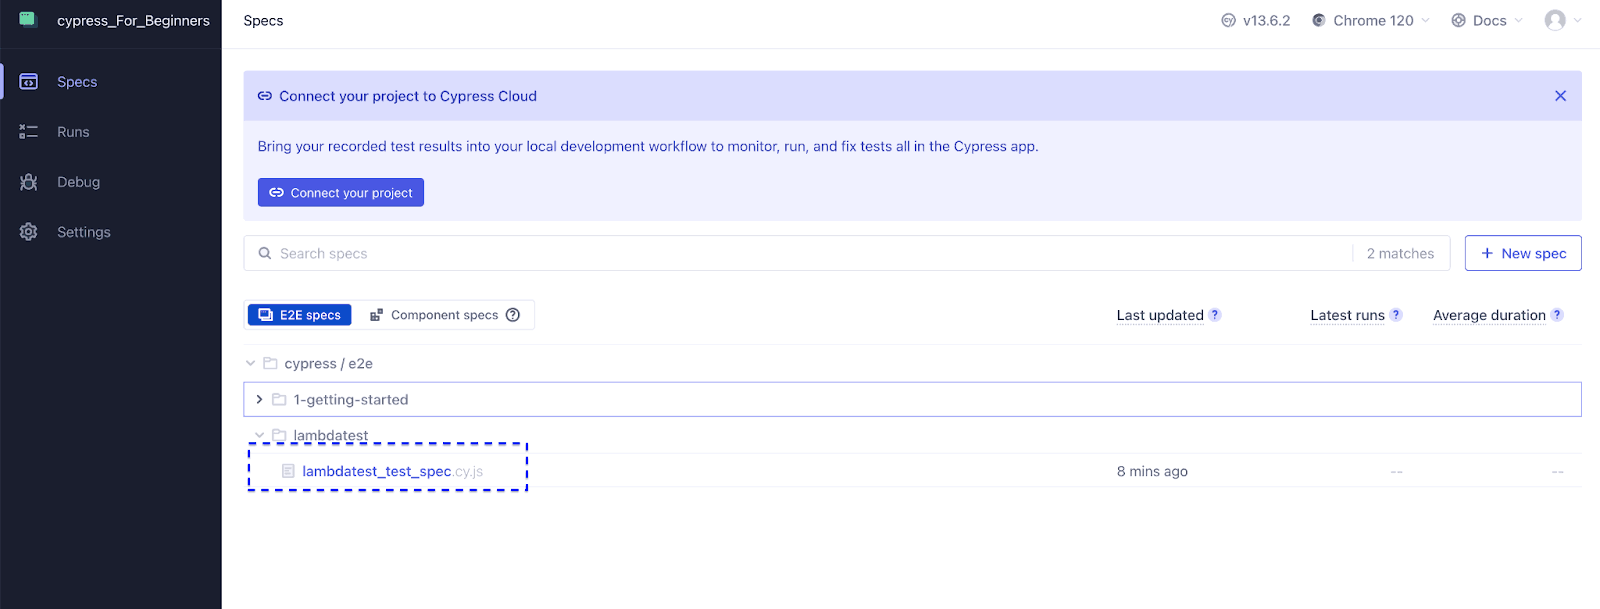
Click on ‘lambdatest_test_spec.cy.js’ to start executing the tests, and finally, you will see all test steps passed.
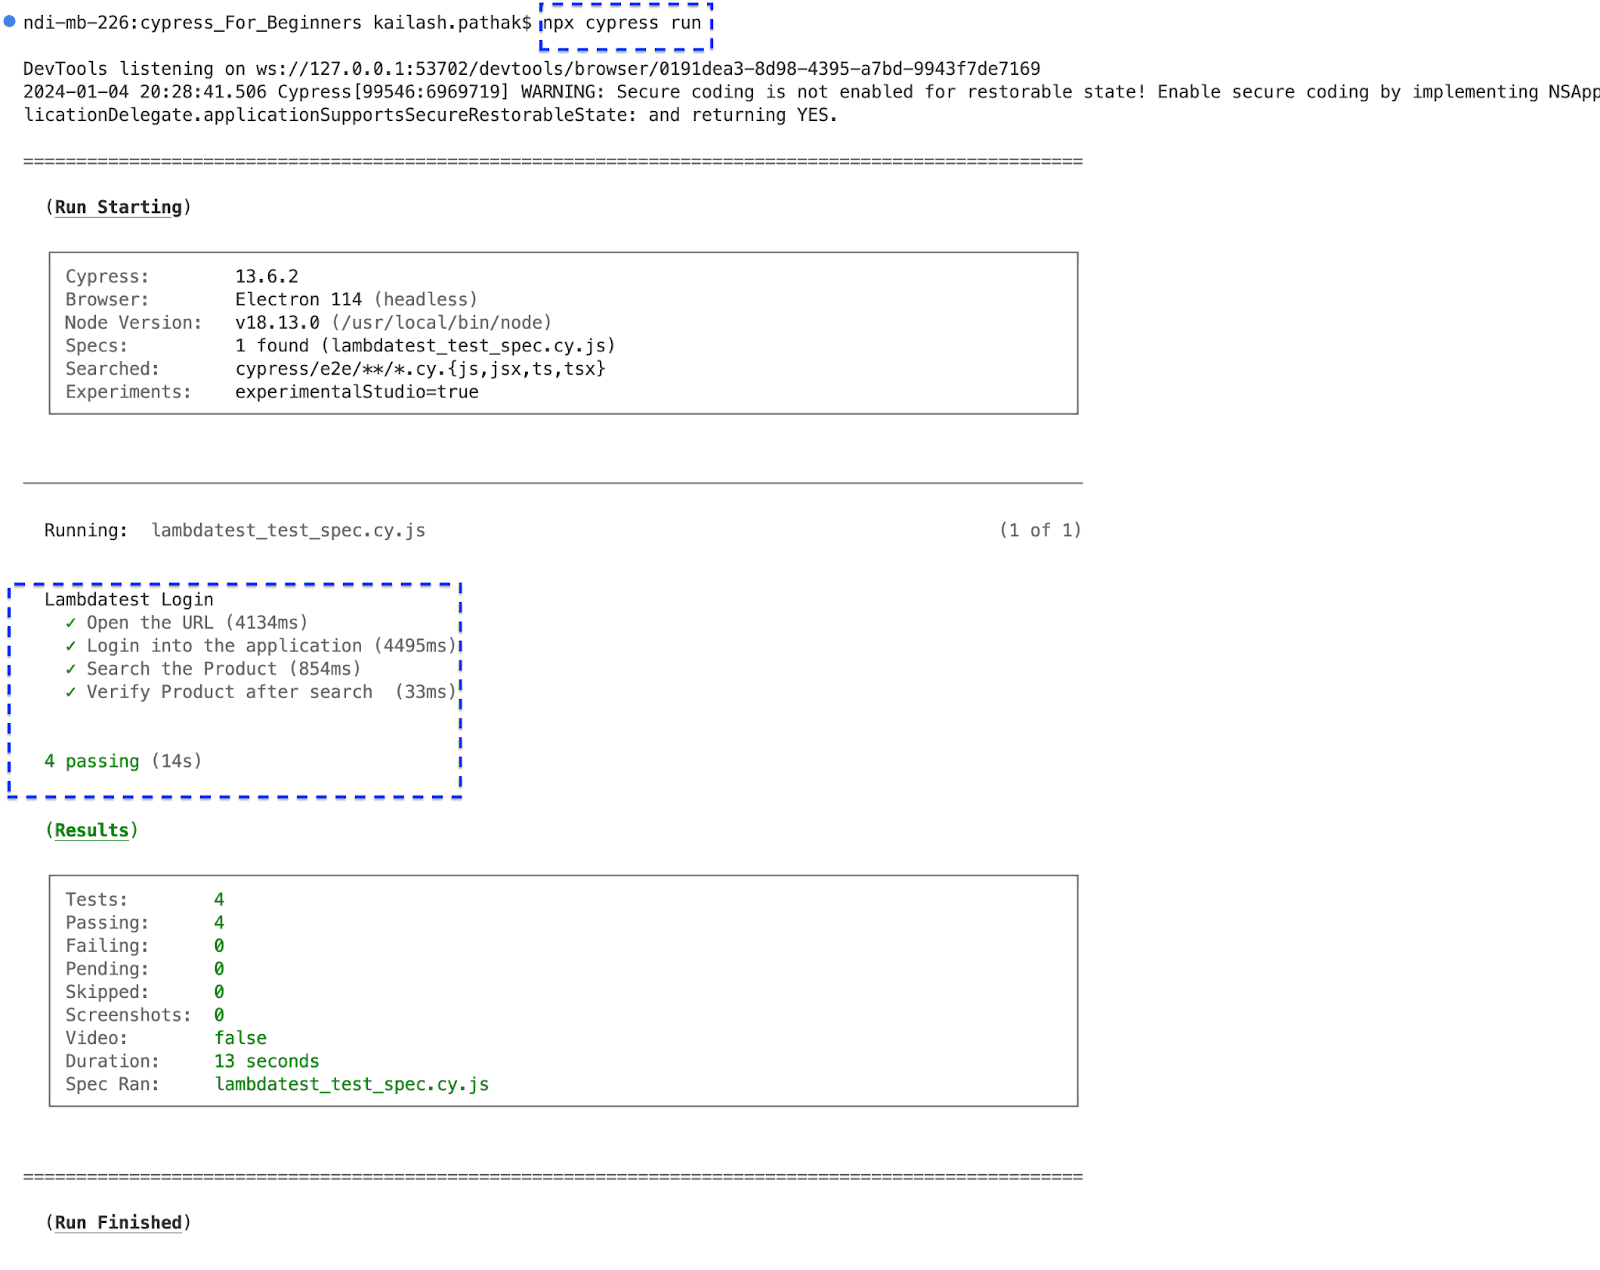
Running Test in Headless Mode
By default, Cypress runs in ‘headless mode,’ where the browser runs in the background without opening a visible browser window.
The command to run the Cypress test case in headless mode is:
yarn cypress run
or
npx cypress run
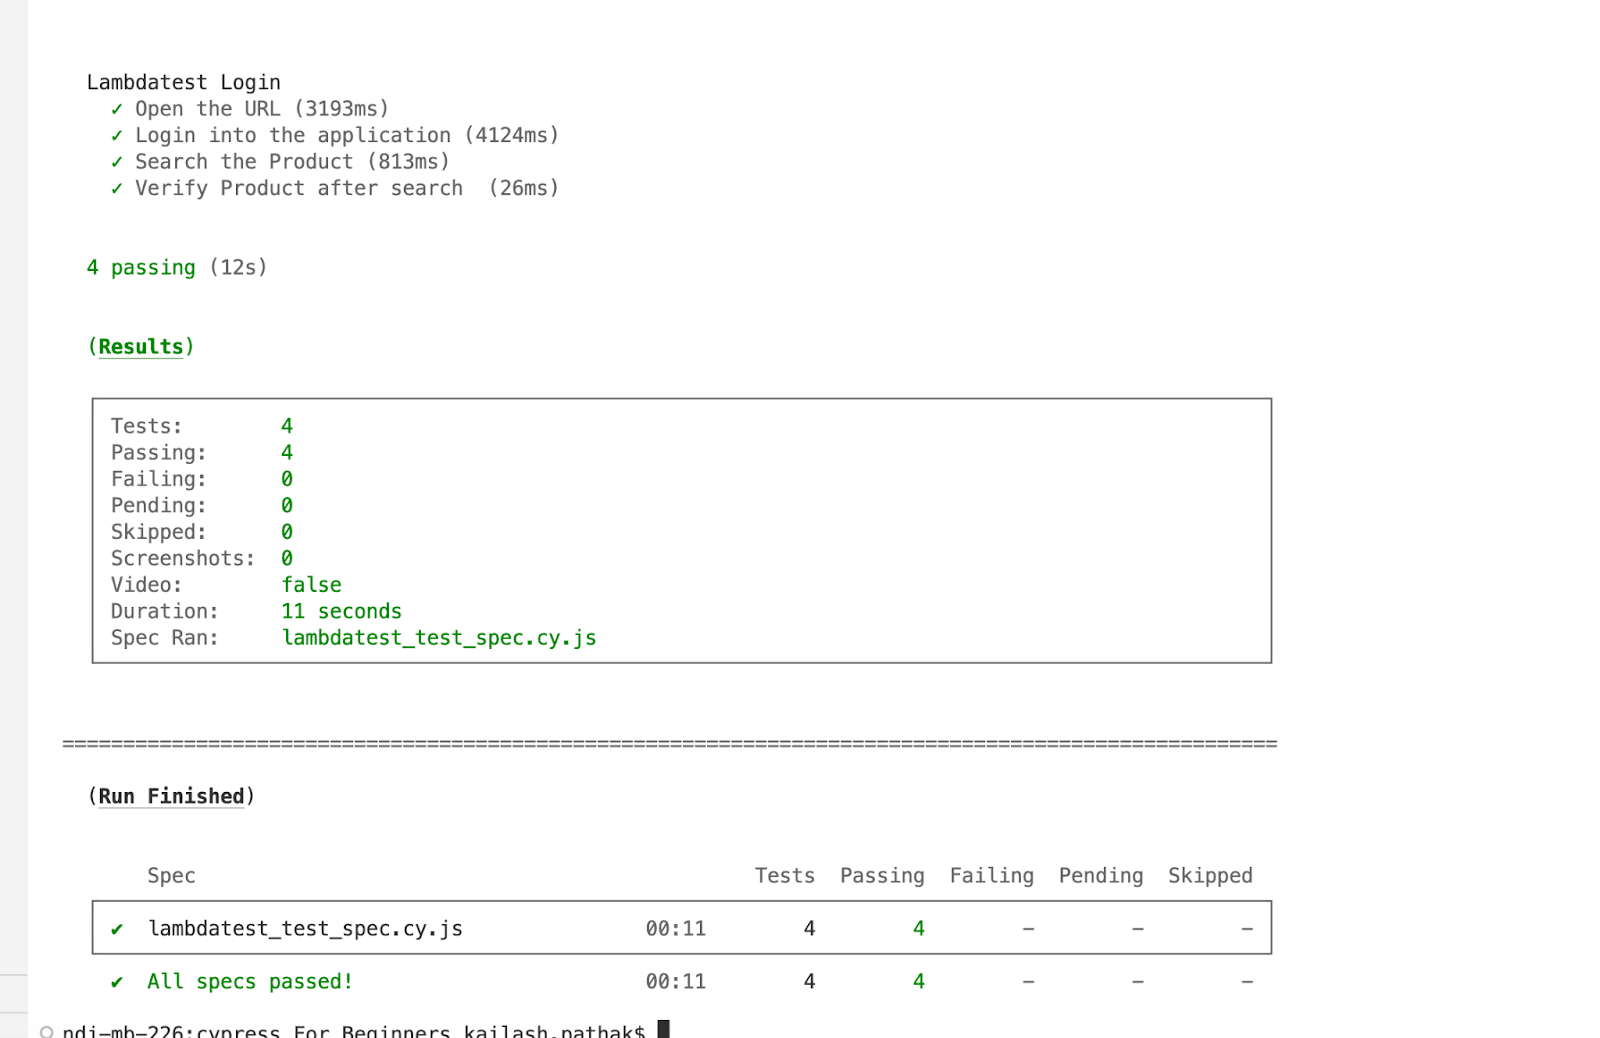
The screenshot below shows that all test cases are executed successfully in a headless browser.
There are some other commands that you can use to execute the test cases.
Run a full test present in the e2e folder in the Headless mode:
Use the command:
npx cypress run
or
yarn cypress run
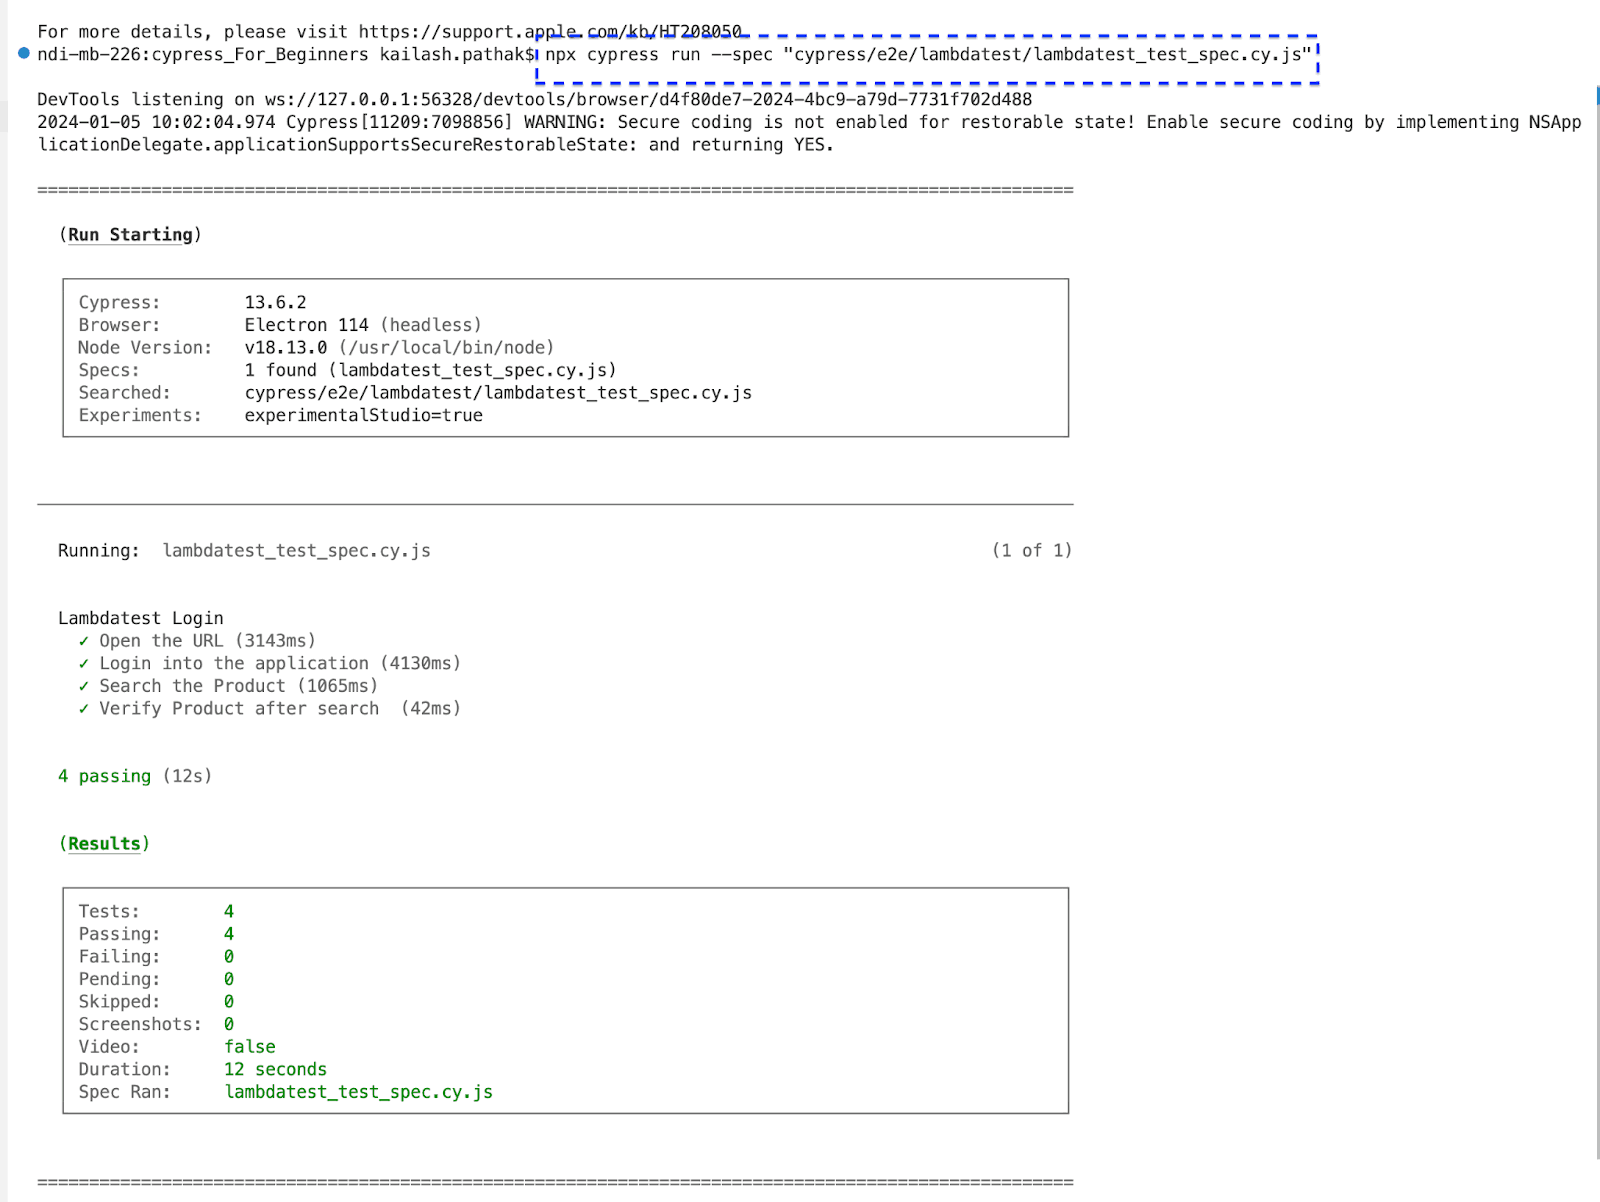
Run a particular test case on the default browser in the Headless browser:
The default browser is Electron when you run test cases in headless mode. Use the following command to execute a particular test case on the default browser:
npx cypress run --spec "cypress/e2e/lambdatest/lambdatest_test_spec.cy.js"
Execute test case on a particular browser in the Headless mode:
Use the following command to execute a specific test case on a particular browser. In this case, we are running on the Chrome browser in headless mode.
npx cypress run --browser chrome --spec "cypress/e2e/lambdatest/lambdatest_test_spec.cy.js"
So far, we have explored creating a test script using Cypress Studio and saw how to write the script manually. We have also reviewed different approaches for running these test cases in a local environment. Now, let’s see how we can execute the test cases in the cloud.
Running Cypress test cases in the cloud has various benefits. Cloud-based testing platforms provide scalability, allowing you to scale your testing infrastructure based on the project’s needs. They also enable parallel testing, allowing you to run multiple tests concurrently.
There are various cloud-based platforms in the market. LambdaTest emerges as a standout choice. LambdaTest is an AI-powered test orchestration and execution platform that lets you perform manual and automation testing at scale with over 3000+ browsers and OS combinations to help you automate Cypress test cases on the cloud. It also offers access to real devices and browsers, providing a more accurate simulation of how end-users will experience your web application.
How to Automate Your First Cypress Test on Cloud?
Running Cypress test cases on the cloud is crucial for comprehensive and accurate testing of modern web applications. As cloud testing environments like LambdaTest gain prominence, it becomes imperative to validate that the infrastructure supports the intricacies of testing. This ensures that Cypress test cases can be tested in cloud-based environments, guaranteeing the application’s reliability and functionality in real-world scenarios.
You can accelerate Cypress testing and reduce test execution time by multiple folds by running parallel tests on LambdaTest across multiple browsers and OS configurations.
Subscribe to the LambdaTest YouTube Channel for the latest updates on tutorials around Selenium testing, Cypress e2e testing, and more.
As we execute the test cases on the LambdaTest platform, we must configure our tests for the LambdaTest Cypress cloud grid.
Prerequisite:
- You already have an account on LambdaTest .
- You have an access token to run test cases on LambdaTest.
The Username and Access key can be obtained from the LambdaTest Dashboard.
Configuring Cypress Test on LambdaTest
Step 1: Install the CLI
The command-line interface of LambdaTest enables us to execute your Cypress tests on LambdaTest. Use the Cypress CLI command via npm, as shown below.
npm install -g lambdatest-cypress-cli
Step 2: Generate lambdatest-config.json
Under the root folder, configure the browsers you want to run the tests. Use the init command to generate a sample lambdatest-config.json file or create one from scratch. Use the below command.
lambdatest-cypress init
In the generated lambdatest-config.json file, pass the information below. Fill in the required values in the lambdatest_auth, browsers, and run_settings sections to run your tests.
In the file below, we pass three browsers (Chrome, Firefox, and Electron) and run the test case in two browsers simultaneously.

Run the below command to execute the test case on the LambdaTest.
lambdatest-cypress run --sync=true
As we run the above command, test execution starts, and test cases are run in parallel on the LambdaTest platform.
Test Case Execution
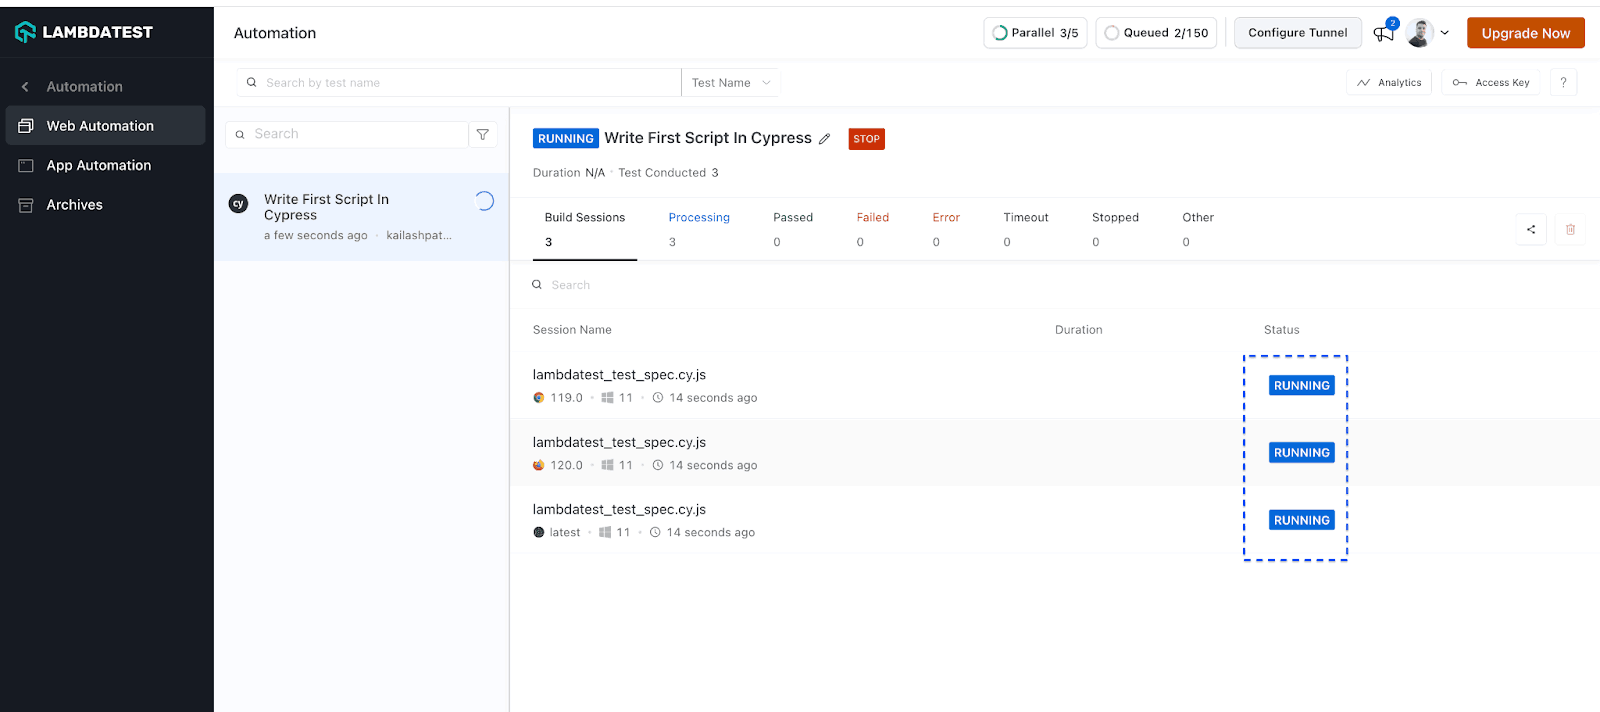
As we execute the test cases in the screenshot below, both test cases start executing in browsers (Chrome, Firefox) parallelly, and we can see the detailed report in the LambdaTest dashboard.
LambdaTest Web Automation Dashboard offers users a convenient and intuitive interface to oversee test results, review test outcomes, and utilize various platform features. It enables live interactive testing, offering users a real-time view of the website or web application they are testing on a specific browser and operating system.
The screenshot below shows the test case starting to execute in browsers (Chrome, Firefox, and Electron).
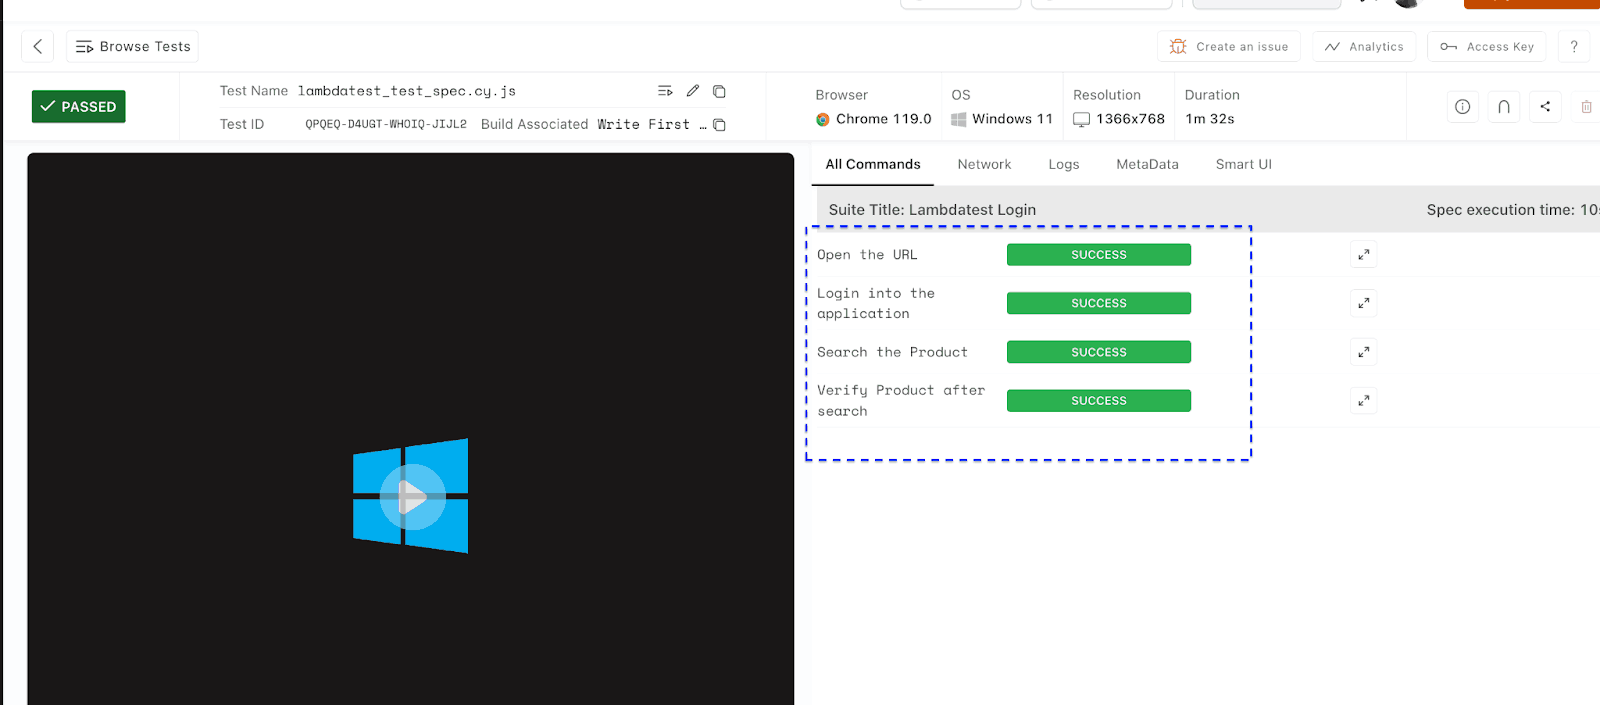
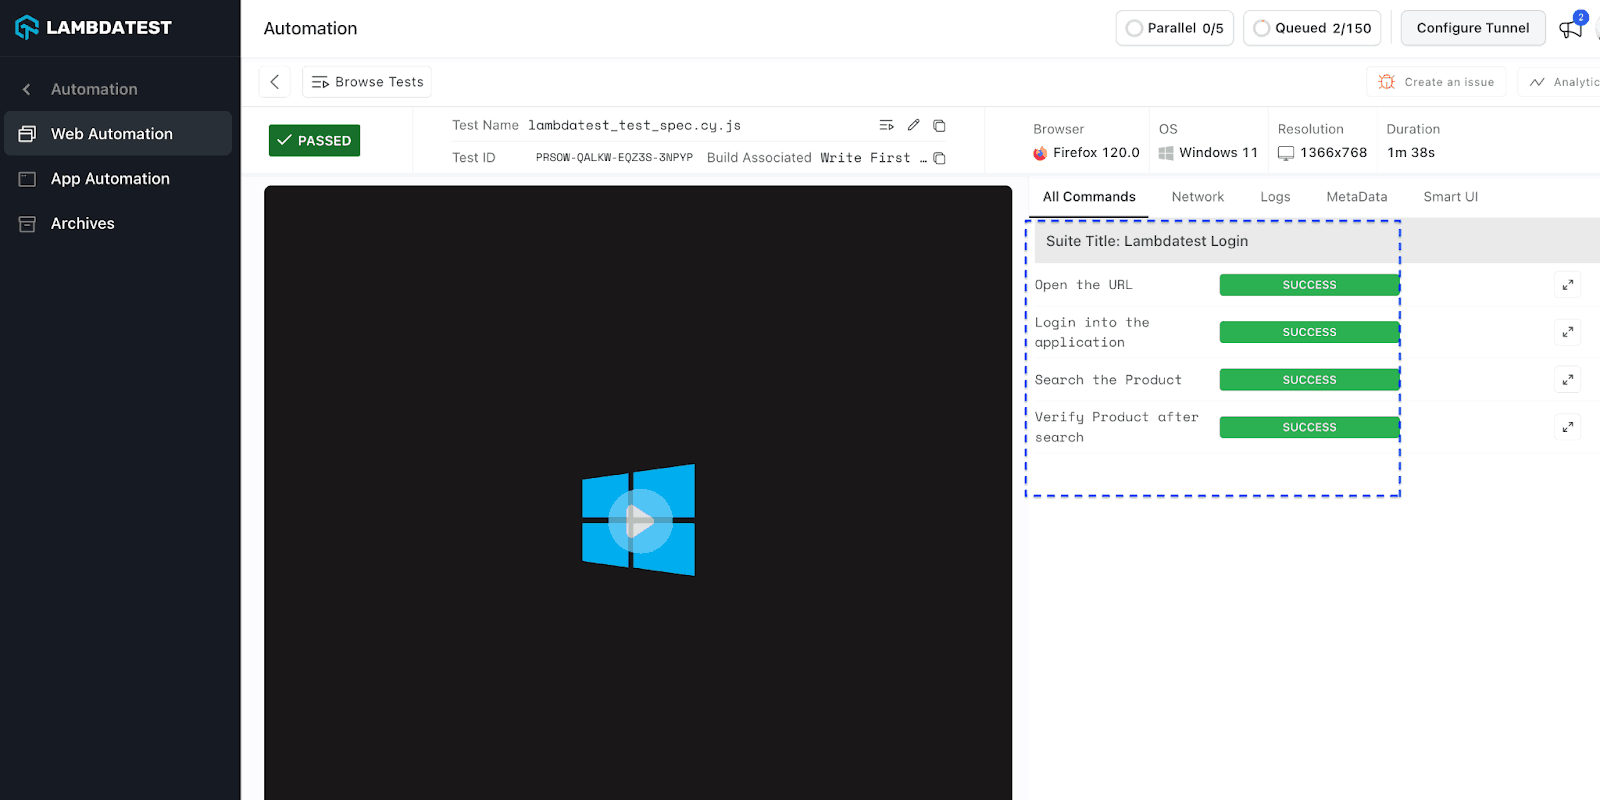
The screenshot below shows that test cases are passed in the browser (Chrome, Firefox, and Electron).
Here is the console log of executed test cases in the Chrome browser. You can see that three of the test cases have passed on the LambdaTest Grid.
Here is the console log of executed test cases in the Firefox browser. You can see that three test cases have passed on the LambdaTest Grid.
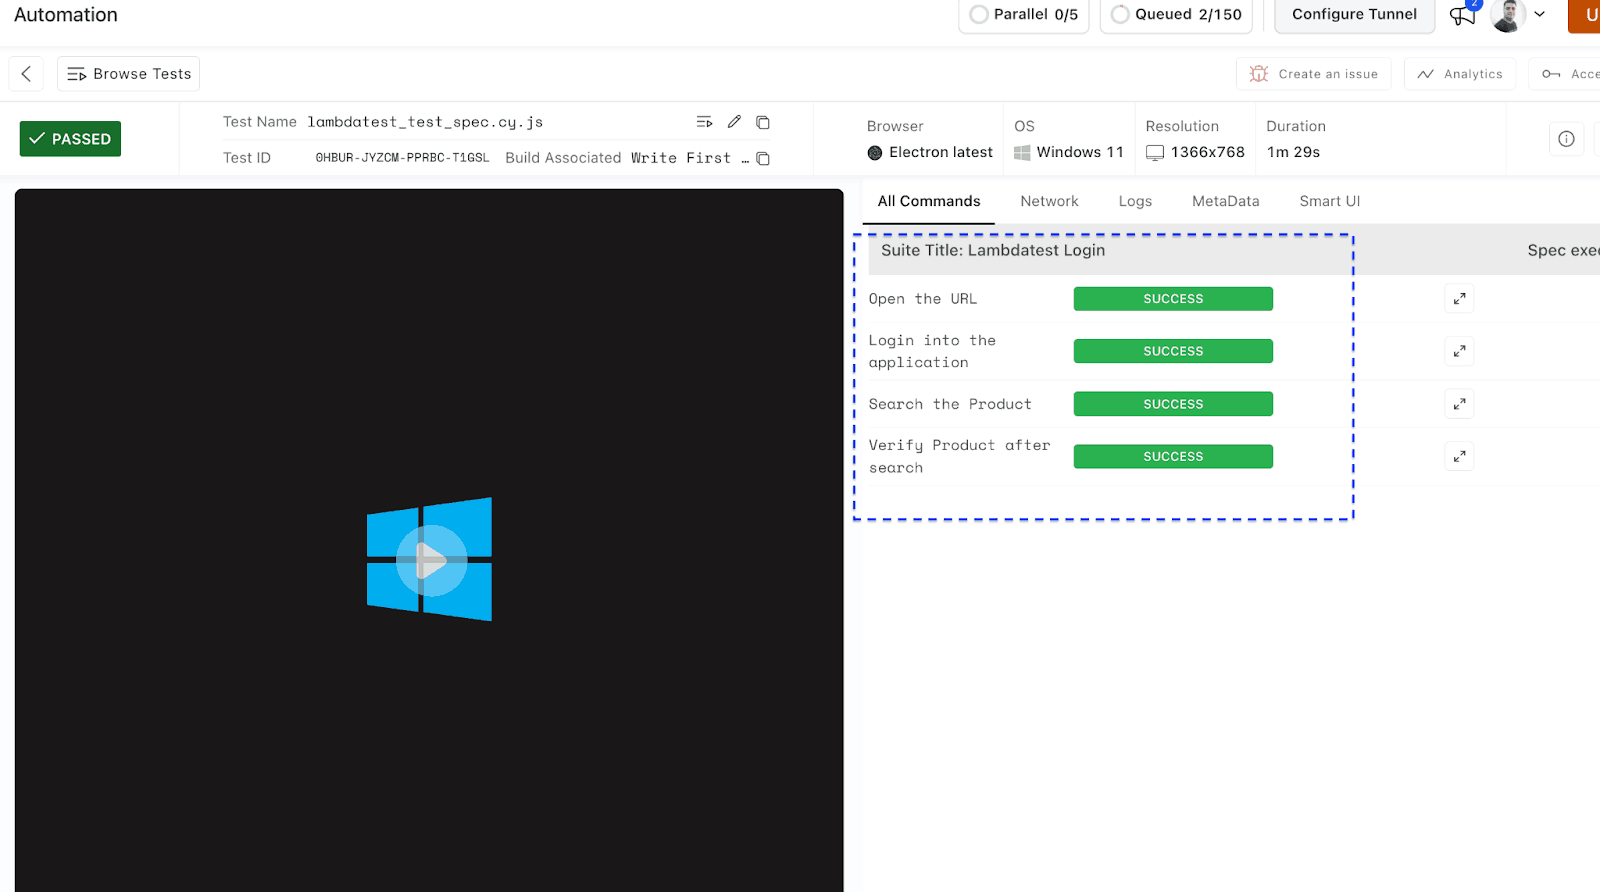
Here is the console log of executed test cases in the Electron browser. You can see that three of the test cases have passed on the LambdaTest Grid.
If you’re a developer or tester looking to elevate your skills with Cypress, consider diving into the Cypress 101 certification to stay ahead of the game.
Conclusion
You have taken a comprehensive journey into Cypress test automation, breaking down the process step by step with live examples. You have also seen how to write the test case using the Cypress built-in tool ‘Cypress Studio’ and the manual script-writing process. Furthermore, you’ve explored the steps a new user can take to commence their Cypress experience and outlined effective strategies for starting to write scripts. Also, different ways of recording the script and how to update the existing script.
Furthermore, we’ve discussed the integration of LambdaTest, an AI-powered test orchestration and execution platform, and how it enhances the capabilities of Cypress automation. By seamlessly running our Cypress tests across different browser versions and platforms, you can ensure our applications’ compatibility and reliability in diverse environments. This integration empowers you to deliver high-quality web experiences to users across the digital landscape.
Frequently Asked Questions (FAQs)
What is Cypress testing for?
Cypress testing is primarily used to automate the testing of web applications. It allows developers and QA engineers to write, run, and debug tests directly within the browser. Cypress provides a comprehensive testing framework that facilitates end-to-end testing, integration testing, and unit testing of web applications. It enables testers to simulate user interactions, such as clicking buttons, filling out forms, navigating through the application, and then asserting expected behaviors and outcomes. Overall, Cypress testing helps ensure web application functionality, performance, and reliability across various browsers and environments.
What are Cypress function tests?
Cypress function tests, also known as functional tests, are automated tests used to verify the functionality of web applications. In Cypress, function tests involve writing test scripts to simulate user interactions with the application’s features and functionalities. These tests validate whether the application behaves correctly according to its specifications and requirements.


Author’s Profile
Kailash Pathak
Currently working as Sr. Quality Lead Manager in a US-based MNC company. Where I am responsible for setting up the overall QA Automation strategy and ensuring that we deliver a high-quality product to our end users. Apart from my role, I have involved myself in educating the community about Software Testing and Test Automation. I am a Blogger and YOUTUBER. I have written a couple of blogs which can find out on my site https://qaautomationlabs.com/
Blogs: 9
Got Questions? Drop them on LambdaTest Community. Visit now


