
How to Perform E2E Testing Using Cypress CLI and Test Runner
Kailash Pathak
Posted On: August 16, 2023
![]() 294930 Views
294930 Views
![]() 23 Min Read
23 Min Read
End-to-End (E2E) testing is a software testing methodology that focuses on testing an application’s workflow from start to finish, simulating real user interactions, and verifying that all components of the system work together correctly.
To illustrate E2E testing, let’s consider a live scenario involving an eCommerce website. The goal is to test the entire purchasing process, from when a user adds items to the shopping cart until the order is successfully placed. We usually follow the below approach.
- Test Setup: Ensure the testing environment is prepared with the latest version of the application and necessary test data.
- Test Case/Automation script Preparation: Define test cases/scripts to cover the complete order placement process, including adding items to the cart, user authentication, shipping selection, payment processing, and order confirmation.
- Test Execution: Begin the test by simulating user interactions, such as adding items to the cart, filling in user details, selecting shipping options, entering payment information, and confirming the order.
- Test Completion: Review the test results, identify critical issues, and summarize the overall findings, including bugs, errors, or unexpected behavior.
By performing E2E testing in a live scenario like this, you can gain confidence in the reliability and functionality of the eCommerce website’s purchasing process.
Running E2E tests using Cypress CLI helps you configure test runs, generate reports, and integrate with other tools and services to streamline your testing process. It provides a command-line interface to manage and execute E2E tests efficiently. The Cypress CLI provides a comprehensive set of commands and features that empower developers and testers to perform robust and efficient E2E testing.
The other way to run E2E tests is using Cypress Test Runner, which provides an interactive graphical interface that allows developers and testers to run their tests, monitor their progress, and analyze the results in real-time. When using the Cypress Test Runner, you can select specific test files or test suites to execute and then observe the test execution step by step.
You will learn more about different ways of running tests in Cypress, i.e., using Cypress CLI and Test Runner in the later sections of this Cypress tutorial.
TABLE OF CONTENTS
What is E2E Testing?
End-to-End (E2E) testing is a software testing strategy that focuses on verifying the complete flow of an application from start to finish. It aims to ensure that all system components, including user interfaces, APIs, databases, and integrations, work together properly and meet the desired functionality.
It is often performed after unit testing and integration testing, which test individual components and their interactions, respectively. By conducting E2E testing, the entire system is evaluated as a whole, simulating real-world user scenarios and ensuring that the application behaves as expected in a production-like environment.
The primary goal of E2E testing is to validate the application’s functionality, reliability, and performance from end to end. It helps uncover any defects or issues arising from the interactions between different components. By thoroughly testing the application’s complete flow, E2E testing provides confidence that the system works as intended and meets the requirements of the end-users or business.
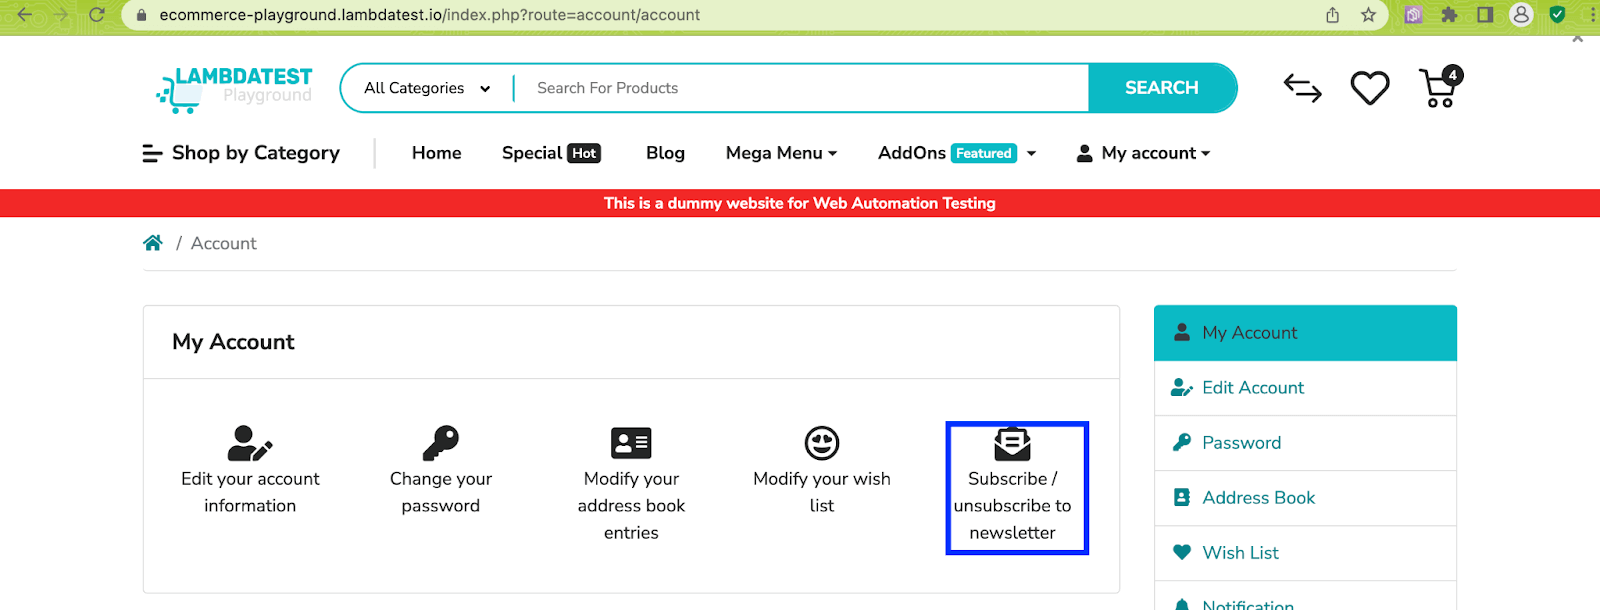
Let’s take an example of a simple E2E test scenario where you login into LambdaTest’s eCommerce Playground with valid credentials. After login subscribe to the newsletter and verify whether the subscription was successful.
 Note
NoteRun Cypress tests across 40+ browser versions on cloud. Try LambdaTest Today!
Why Cypress for End-to-End Testing?
E2E testing is a type of software testing that verifies the entire application from start to finish. This means that E2E tests simulate real user interactions with the application, ensuring that all of the application’s features work together as expected. Cypress is the best fit for E2E testing for several reasons:
- Ease of Use
- Automatic waiting and real-time reloading
- Automatic screenshots and video recording
- Built-in Test Runner
- Active and supportive community
- Full control over the application
Cypress provides an intuitive and easy-to-use API, which makes it user-friendly and allows developers/testers to write tests quickly. Its syntax is straightforward, and the documentation is extensive and well-maintained.
Cypress automatically waits for DOM elements to become available and actions to complete, eliminating the need for manual waits or timeouts. It also provides real-time reloading, which means developers/testers can see the impact of their code changes immediately during test execution.
Cypress automatically captures screenshots and records videos during test runs. This is helpful for visual debugging and for documenting test failures, making it easier to understand and reproduce issues.
Cypress comes with a built-in Test Runner, which means there is no need to set up or configure additional tools or frameworks. The Test Runner provides a clear interface to view test results, manage test files, and execute tests with a simple command.
Cypress has a vibrant and active community of developers who contribute to its development and provide support. The official documentation is comprehensive and regularly updated, and there are numerous community-written tutorials, blog posts, and plugins available
Cypress provides developers and testers with complete access and authority over the application being tested. This encompasses DOM manipulation, network request stubbing, and the integration of custom JavaScript code to modify the application’s functionality. This flexibility empowers extensive testing and the emulation of intricate scenarios.
To understand Cypress E2E testing, let’s take a closer look at the test automation pyramid. We routinely do each level of testing listed in this pyramid while performing Cypress testing.
Subscribe to the LambdaTest YouTube Channel to get the latest updates on tutorials around Selenium testing, Cypress e2e testing, Appium, and more.
Testing Pyramid Layers in Cypress
Cypress team introduced component testing with Cypress 10 that allows developers to test individual components quickly, regardless of their complexity. Component tests differ from E2E tests in that instead of visiting a URL to pull up an entire app; a component can be “mounted” and tested on its own.
In the context of Cypress, here’s how the testing pyramid can be applied:
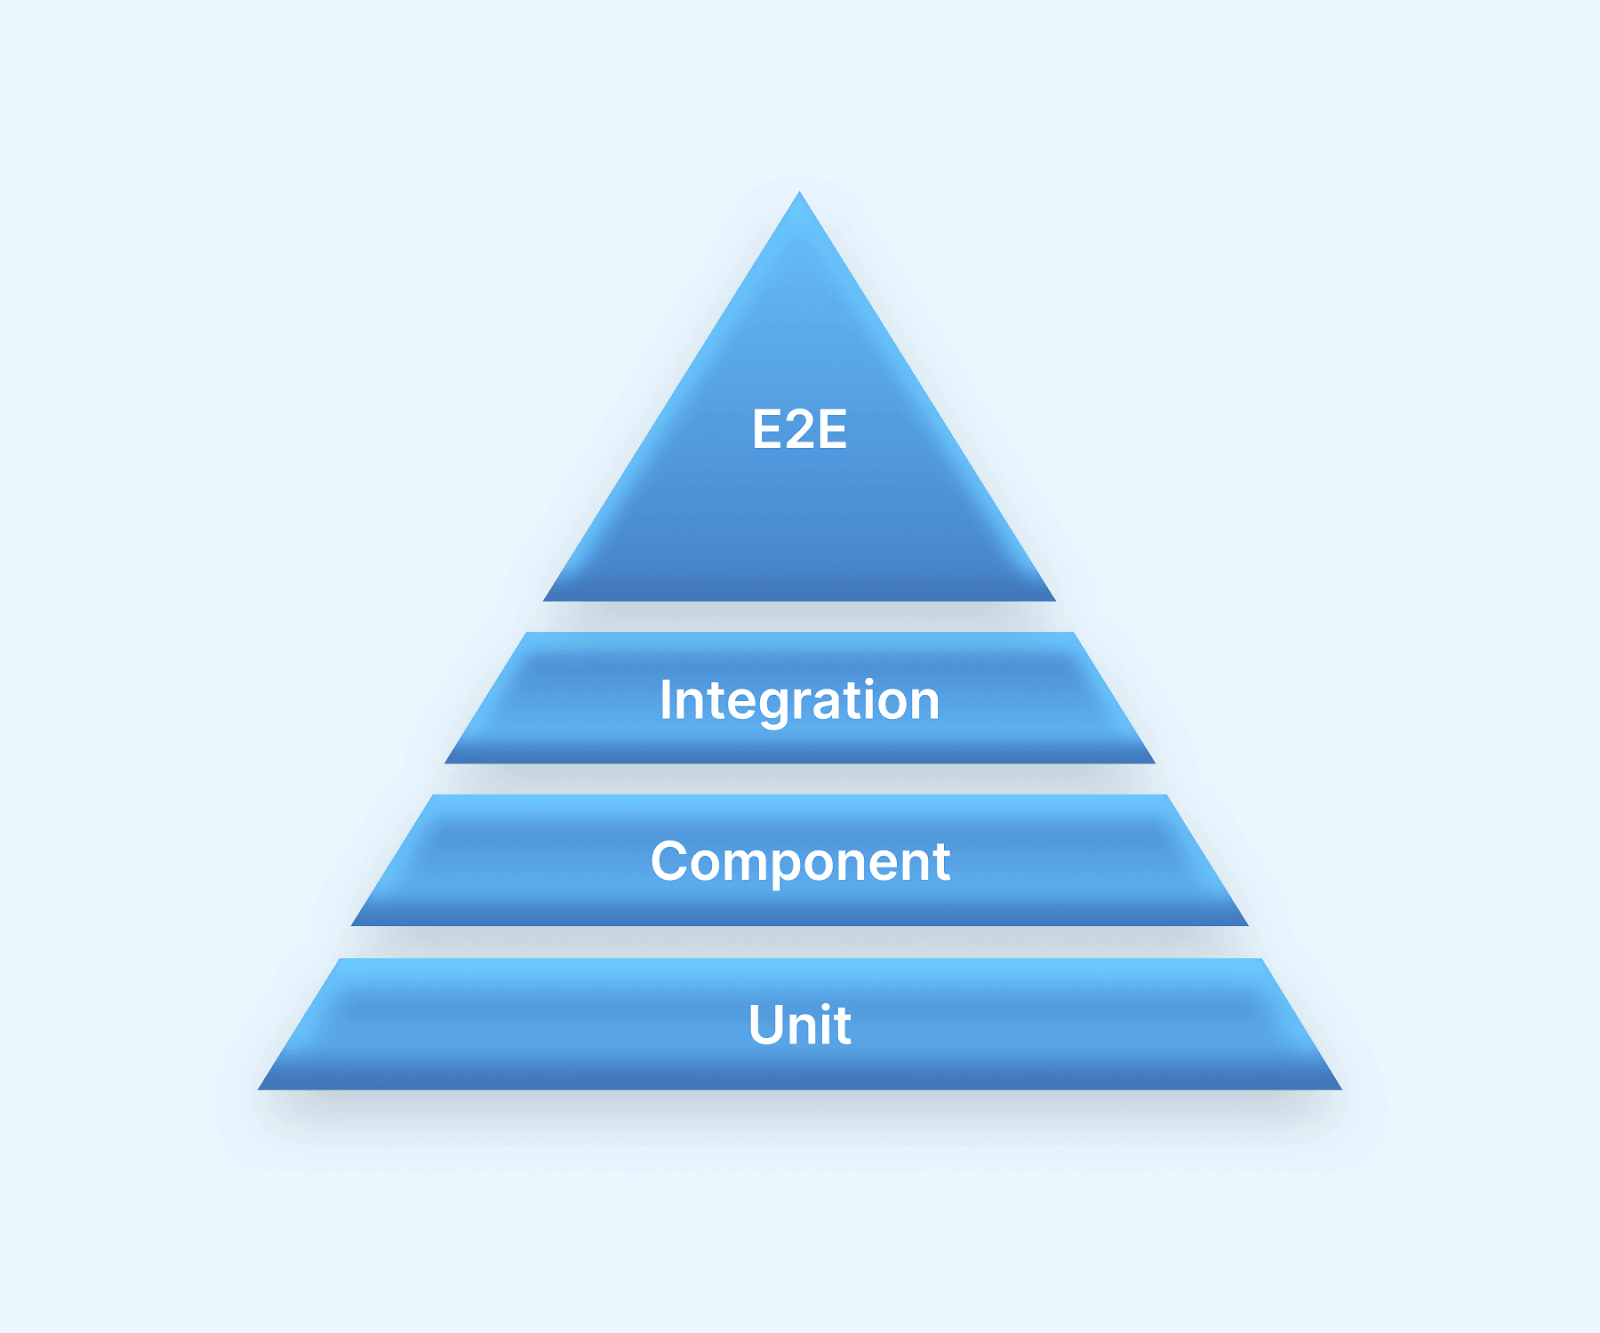
Unit Tests
These tests focus on testing individual components or functions in isolation. In Cypress, you can use frameworks like Mocha or Jest to write unit tests for your JavaScript functions.
These tests are typically executed quickly and frequently, ensuring that each component of your application works as expected.
Component Tests
These tests verify the behavior of individual components or UI elements in your application. In Cypress, you can write component tests that interact with specific UI elements and verify their functionality.
These tests ensure that each component functions correctly within the application’s context.
Integration Tests
Integration tests focus on testing the interactions between different components or modules in your application. In Cypress, you can write integration tests that simulate user interactions and verify the integration of various components.
These tests ensure that the different parts of your application work together seamlessly.
End-to-End (E2E) Tests
These tests span the entirety of the application’s process, validating its behavior holistically. Within Cypress, E2E tests can be authored to replicate user actions, engage with the UI, and authenticate anticipated results.
Although these tests often demand more time for execution, they deliver a sense of assurance in the comprehensive functionality of your application.
To know more about component testing, let’s see the difference between end-to-end testing and component testing
Differences Between End-to-End Testing and Component Testing
End-to-end testing and component testing are two different levels of testing in the Software Development Life Cycle. Here are the key differences between them:
| Parameters | End-to-End Testing | Component Testing |
|---|---|---|
| Scope | End-to-end testing focuses on testing the entire system or application from end to end, including all integrated components and subsystems. It ensures that all the components work together correctly and that the system behaves as expected from a user’s perspective. | Component testing, on the other hand, concentrates on testing individual components or units in isolation, verifying their functionality, and ensuring that they work as intended. |
| Levels of integration | End-to-end testing involves testing the interactions and integration between different components, subsystems, and external systems. It covers the flow of data and controls across the entire system. | Component testing, on the other hand, is concerned with testing the functionality and behavior of individual components in isolation without considering their interactions with other components or subsystems. |
| Test environment | End-to-end testing often requires a complete or near-complete system setup, including all required components, databases, servers, and external services. It aims to replicate the production environment as closely as possible. | Component testing, on the other hand, can be performed in isolation, often using a test environment that simulates or mocks other components or dependencies. |
| Test Speed and Complexity | End-to-end tests can be slower to execute since they cover a broader scope and may involve waiting for various interactions and elements to load and respond. | Component tests are generally faster and less complex because they deal with smaller units of code and avoid interactions with external dependencies, which reduces test setup time. |
Here is an example of Cypress E2E test scenario:
Test Scenario
https://ecommerce-playground.lambdatest.io/index.php?route=account/login |
Implementation
In the following scenario, we will navigate to the website and perform searches using both valid and invalid data.

Let’s execute the test cases in Searchwith_validAndinvalid_data.cy.js.
Execution

What is Cypress CLI (Command Line Interface)?
CLI stands for Command-Line Interface. It is a text-based interface used to interact with a computer operating system or software by typing commands instead of using a graphical user interface (GUI).
Typically, CLI commands consist of a command followed by optional parameters or arguments. The user enters the command, and the system responds with the requested action or provides feedback on the command’s execution. CLI is popular among developers and system administrators due to its efficiency, flexibility, and ability to automate tasks through scripts or batch files.
Some well-known examples of CLI interfaces include the Windows Command Prompt (cmd.exe), PowerShell (for Windows), the Unix/Linux shell (such as Bash), and the macOS Terminal (based on the Unix shell).
The Cypress CLI provides a set of commands that enable developers and testers to interact with the WebElements and control the Cypress testing framework from the command line. It allows you to initialize new Cypress projects, run tests, open the Cypress Test Runner, and perform various other testing-related tasks.
With the Cypress CLI, you can perform various tasks, including:
- Opening the Cypress Test Runner: The CLI allows you to open the Cypress Test Runner, which provides a graphical user interface for running and debugging your tests. You can use this interface to select and execute individual test files or suites, view test results, and debug failing tests.
- Running tests in headless mode: Using Cypress CLI, you can run Cypress test automation in headless mode, which means the tests run without displaying the graphical user interface of the Test Runner. This is useful for running tests in a Continuous Integration (CI) environment or as part of an automated test suite.
- Running tests in different browsers: The Cypress CLI lets you specify the browser in which you want to run your Cypress tests. You can choose from popular browsers like Chrome, Firefox, or Electron or even specify custom browser configurations.
- Running tests in parallel: If you have a large suite of tests, the Cypress CLI enables you to run Cypress parallel testing across multiple instances of Cypress. This can significantly reduce the overall test execution time.
- Generating test reports: You can generate HTML or JSON reports for your test runs using the Cypress CLI. These reports provide detailed information about the test results, including passed and failed tests, execution times, and error messages.
- Managing configuration options: The Cypress CLI allows you to configure various options for Cypress, such as specifying the test file patterns to include or exclude, setting environment variables, configuring plugins, and more.
Here are some common commands we can run using Cypress CLI:
| Cypress CLI Commands | Description |
|---|---|
| cypress open | Launches the Cypress Test Runner, which provides a graphical interface for running and interacting with Cypress tests. |
| cypress run | Executes Cypress tests in headless mode, without the graphical interface. This command is useful for running tests in a continuous integration (CI) environment or as part of an automated testing pipeline. |
| cypress install | Installs the necessary dependencies and sets up Cypress for a project. It ensures that the required binaries are downloaded and configured correctly. |
| cypress init | Initializes a new Cypress project by creating the necessary files and directories. |
| cypress version | Displays the current version of Cypress CLI and the installed Cypress package. |
| cypress help | Provides help documentation and information about available commands and options. |
| cypress run –headed | By default, test cases run headless by passing –headed will force the browser to be shown. |
| cypress run –record –parallel | Run recorded test cases across multiple machines. |
| cypress run –browser chrome | The “browser” argument is used to run the test cases in a particular browser. |
| cypress run –spec ‘cypress/e2e/examples/actions.cy.js’ | To run the particular .spec file. |
| cypress run –config pageLoadTimeout=10000 | The values mentioned here will override the value set in the configuration file. |
| cypress run –group admin-tests –spec ‘cypress/e2e/admin/**/*’ | Command will run all of the Cypress tests in the cypress/e2e/admin directory and its subdirectories. The –group flag specifies the name of the group to which the tests belong. |
What is a Cypress Test Runner?
Cypress also comes with a built-in Test Runner GUI that provides an interactive interface for running and debugging tests. To launch the Test Runner, you can use the Cypress open command. This opens a Test Runner window where you can select and run individual tests, view test results, and debug your code.
The Cypress Test Runner operates directly in the browser and runs tests within it, enabling real-time visibility into the application under test. It offers a built-in time-traveling feature that allows developers to inspect and debug the application’s state at any point during the test execution. This makes it easier to troubleshoot and identify the causes of test failures.
Some key features of Cypress Test Runner include:
- Interactive Test Runner: Cypress Test Runner has an interactive user interface that allows you to view the test execution in real time. You can see the commands being executed, their results, and any errors or failures. This live feedback makes it easy to identify and diagnose issues during test execution.
- Time Travel: Cypress allows you to “time travel” through your application and see exactly what happens at each step of your test. You can pause the test execution, step forward or backward, and inspect the application’s state at any time.
- Debugging with DevTools: Cypress integrates with the browser’s Developer Tools, allowing you to debug your application and tests directly from the Cypress Test Runner. You can set breakpoints, inspect variables, step through code, and interact with the application while the test is running.
- Real-Time Reloads: Cypress automatically detects changes made to the test code and reloads them in the Test Runner interface. This live reload functionality provides a seamless development experience, allowing developers to see the immediate effects of their code changes without manually reloading the page.
- Network Stubbing and Spying: Cypress allows developers to stub or intercept network requests made by the application. This enables you to simulate different network scenarios, control the responses from APIs, and test edge cases.
Below is the screenshot of Cypress Runner, which opens when the user runs the command ‘yarn cypress open’.
NoteRun Cypress tests in parallel and reduce developer feedback. Try LambdaTest Today!
Running Test Cases in Cypress
When it comes to running Cypress test cases, there are different approaches you can take depending on your specific requirements and testing environment.
Here we will be discussing how you can run Cypress test cases using:
- Cypress CLI
- Cypress Test Runner
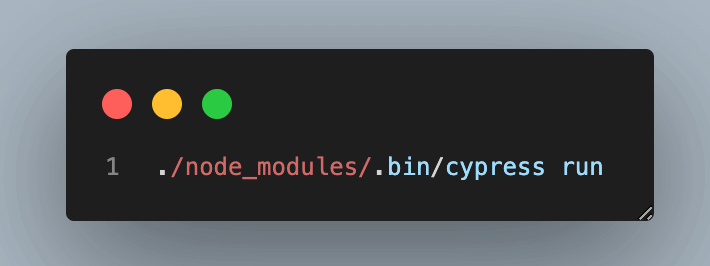
The Cypress CLI provides a straightforward way to run Cypress automation from the command line. You can use the cypress run command to run your tests in headless mode or cypress open to run them in interactive mode. The Cypress CLI also offers various options and flags to customize the test run, such as specifying specific test files, setting environment variables, and generating test reports.
Now let’s take some examples to execute the test cases in Cypress CLI.
Test Scenario
|
Implementation
Let’s create a new folder under the e2e folder named “demoCypressCLIRunner” to perform Cypress UI testing.
Create the first test spec to check the login feature for the site with the name subscriptionScenario..cy.js under the folder ‘demoCypressCLIRunner’.
For demo purposes, we are using the LambdaTest eCommerce Playground site.
Use Case
Login into the application and update the newsletter subscription.
|
1 2 3 4 5 6 7 8 9 10 11 12 13 14 15 16 17 18 19 20 21 22 23 24 25 26 27 28 29 30 31 32 |
describe('Login and Subscribe', () => { it('Logs in and subscribes to newsletter', () => { // Visit the web site cy.visit('https://ecommerce-playground.lambdatest.io/index.php?route=account/login') // Click on login button cy.get('[value="Login"]').click() // Enter the valid email and password cy.get('#input-email').type('lambdatestnew@yopmail.com') cy.get('#input-password').type('Lambda123') // Click on login button cy.get('[value="Login"]').click() // Verify user logged in successfully cy.url().should('include', 'index.php?route=account/account') cy.contains('My Account').should('be.visible') // Subscribe the newsletter cy.contains('Newsletter').click() cy.get('#input-newsletter-yes').click({force:true}) cy.get('[value="Continue"]').click() // Verify the subscription success message cy.get('.alert-success').should('contain', 'Success: Your newsletter subscription has been successfully updated!') }) }) |
How to Run Test Cases in CLI?
There are different ways to run the Cypress test cases in CLI.
Command 1:
Run all Cypress tests using Cypress CLI in the Electron default headless browser.
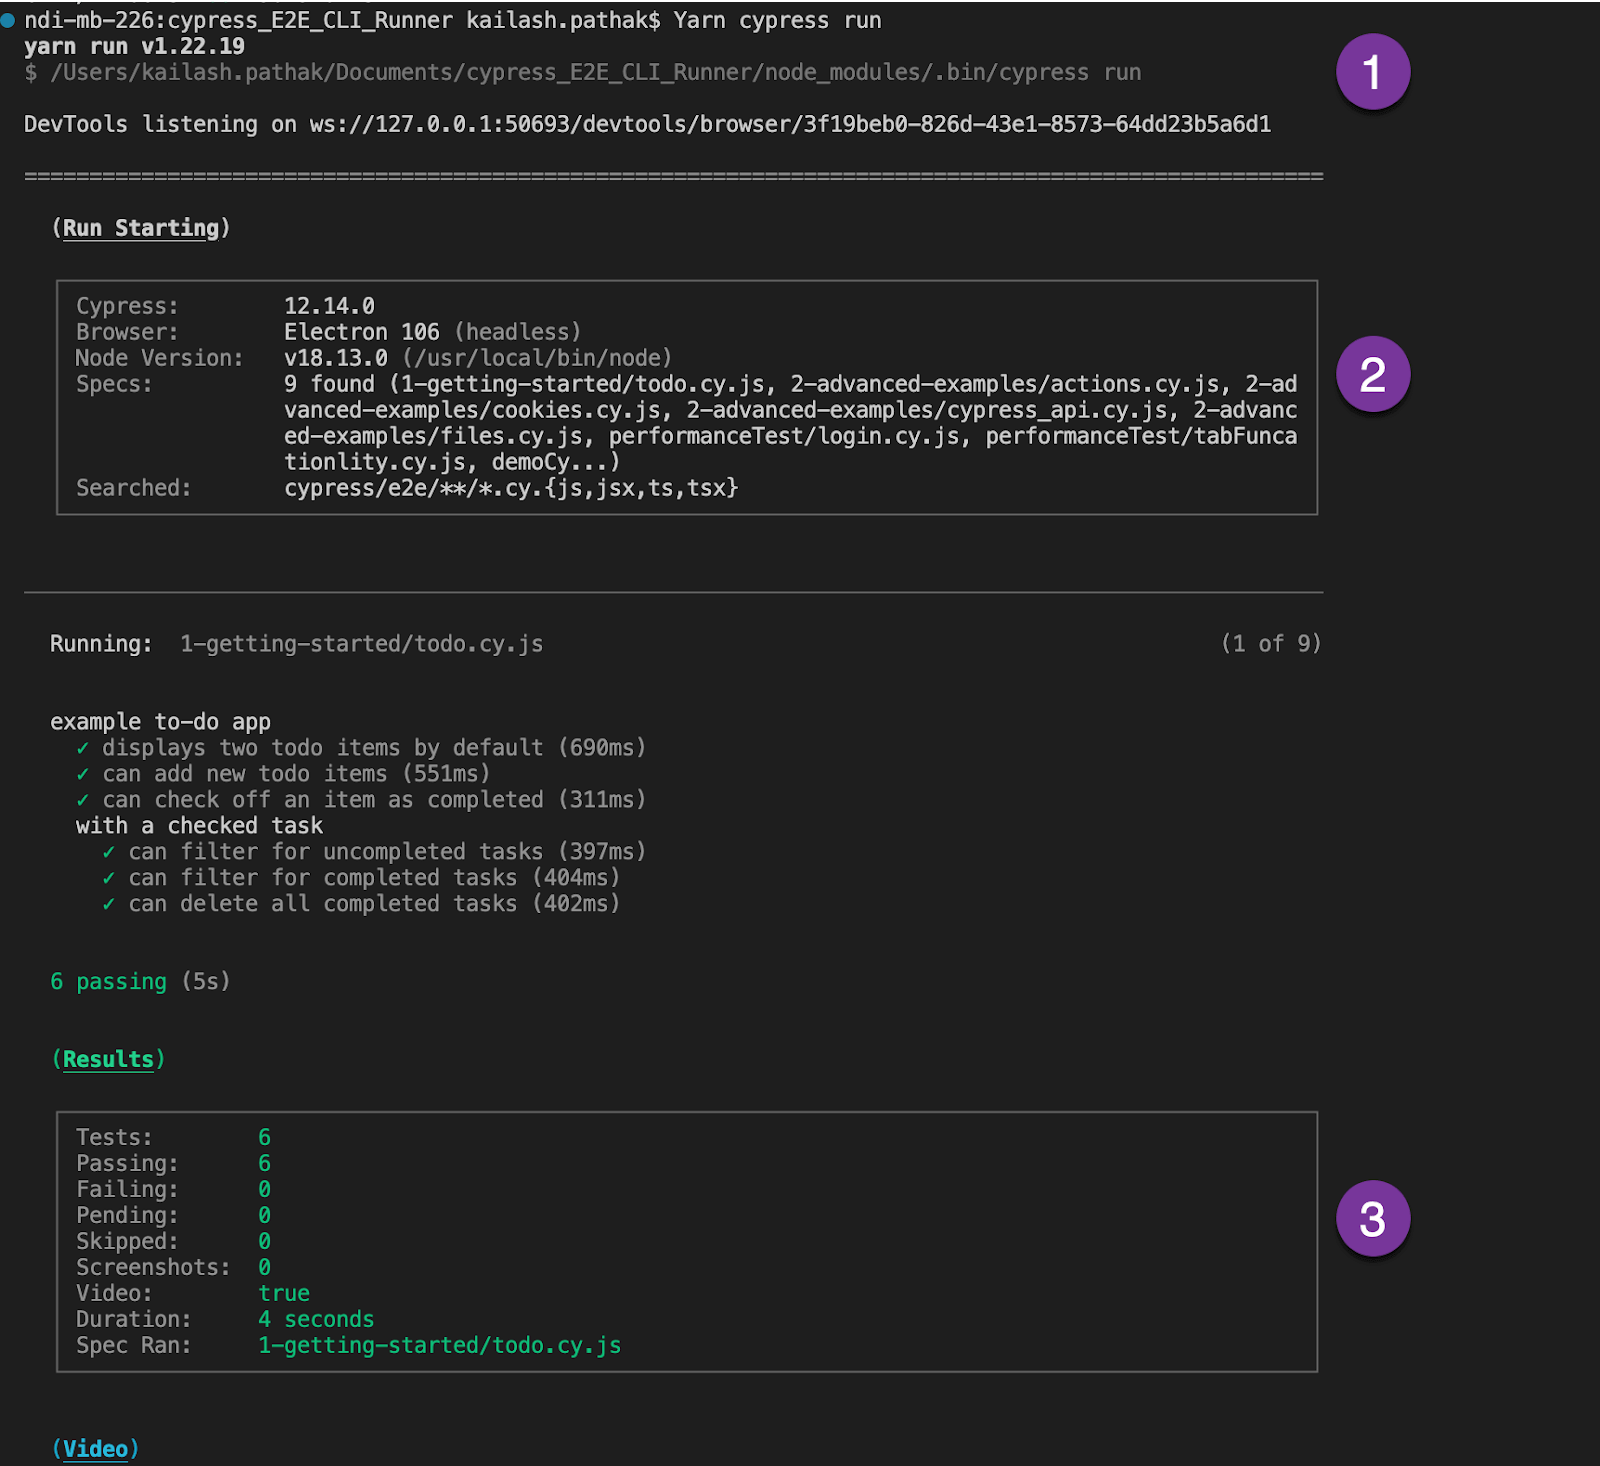
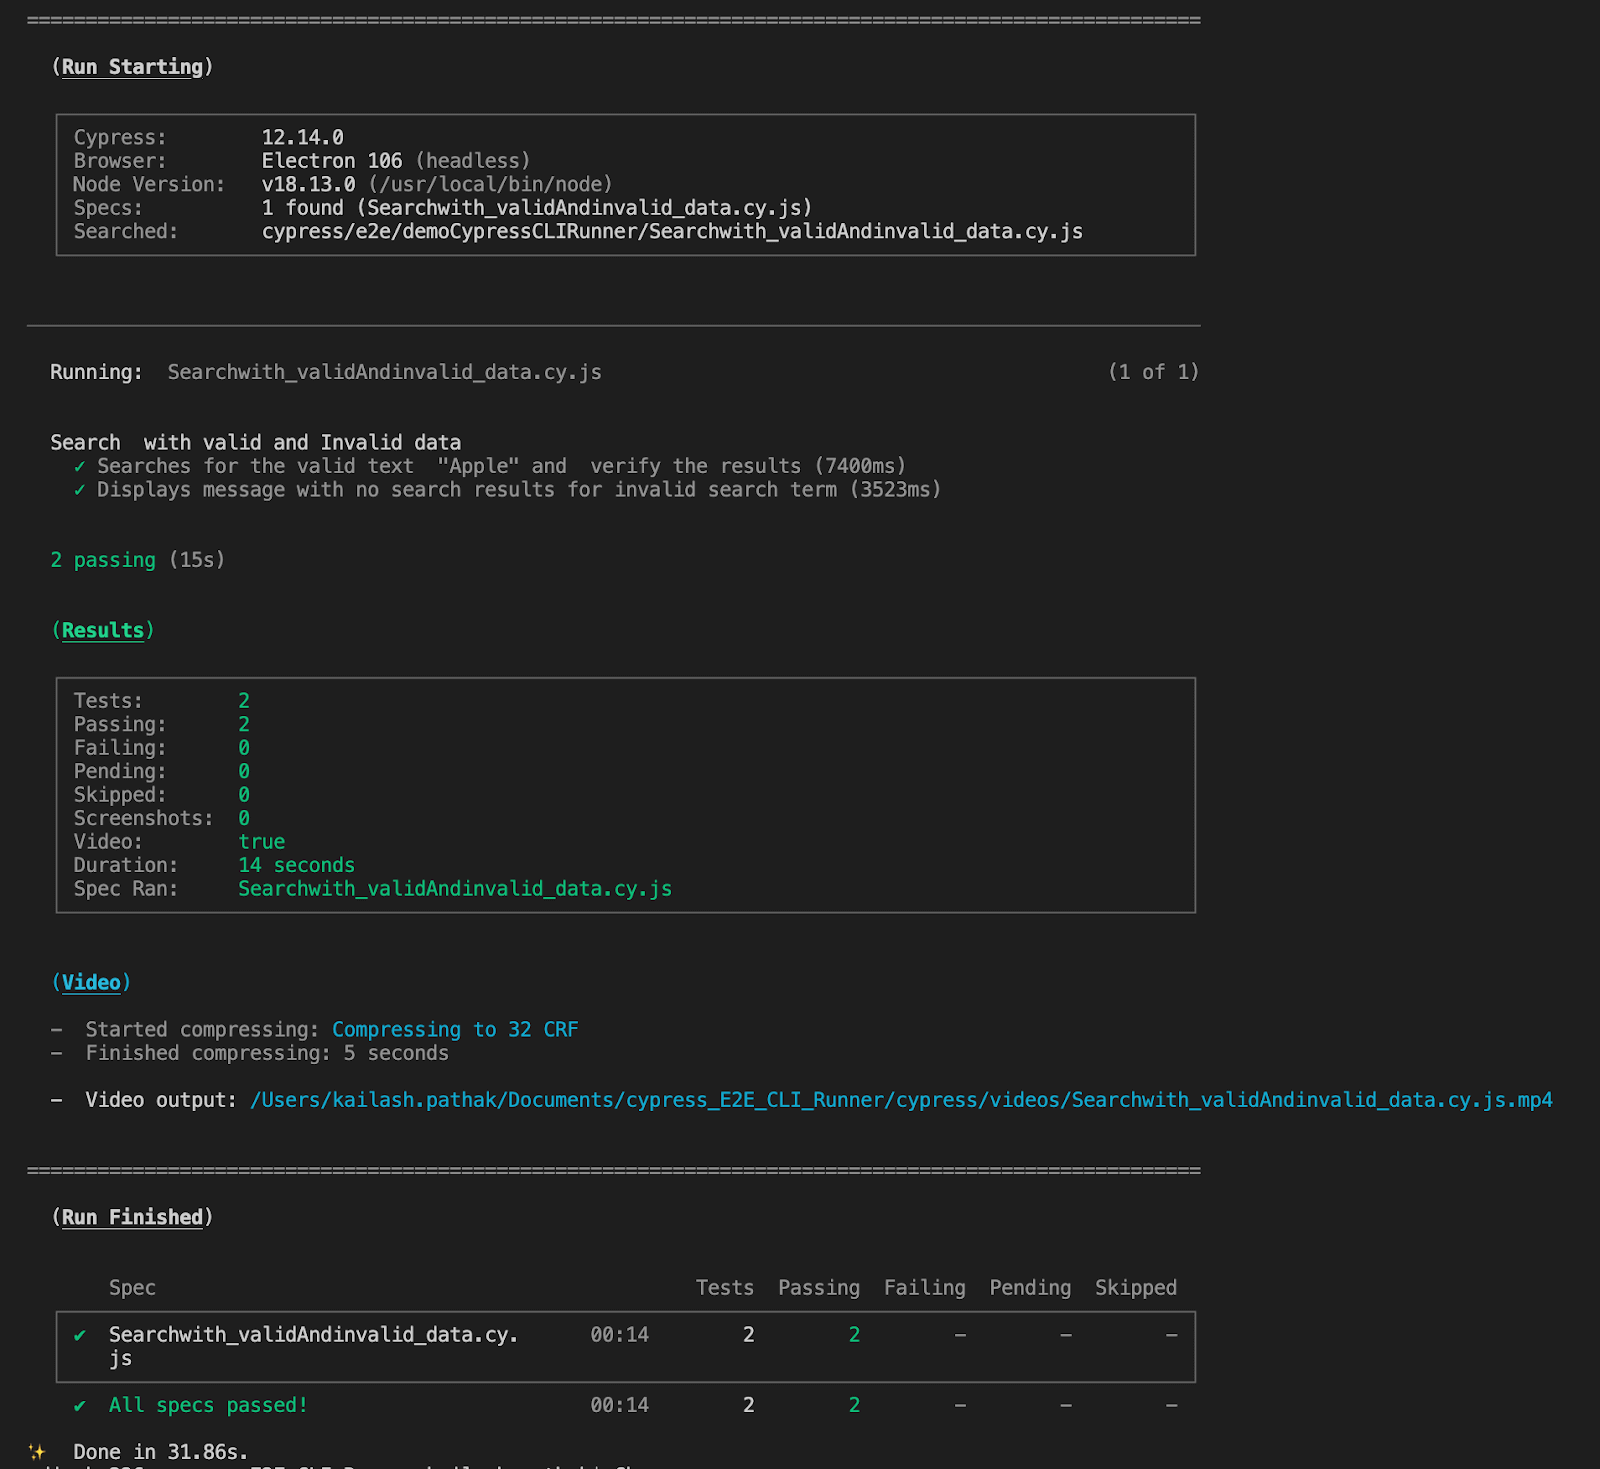
Output
All the tests are in headless mode in the default browser Electron. The Cypress command ran successfully, and our tests got executed.
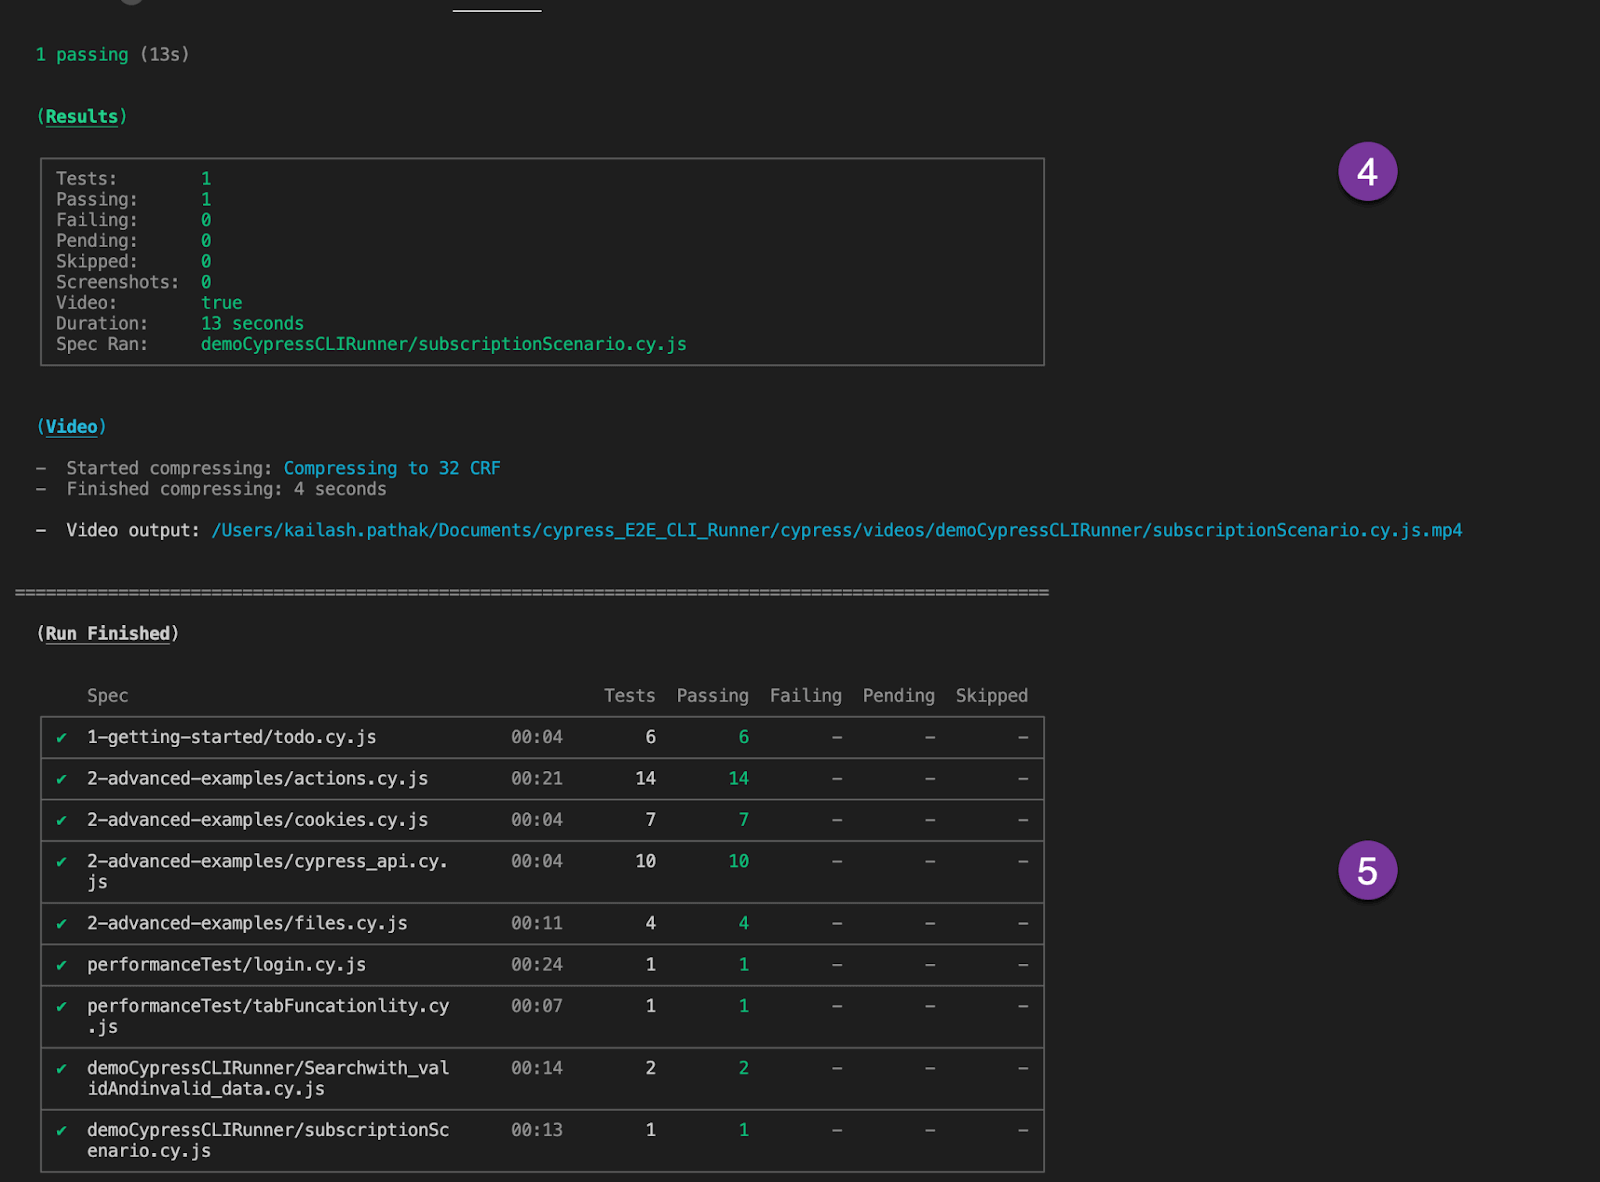
Now, let’s understand some important aspects of this execution marked by the numbered tickets:
- Command used to run all the test files present under the “e2e” folder.
- Test cases started with Cypress, Browser, and Node versions with the number of test .spec files.
- Test cases are executed one by one in the 3rd sticker. It shows that the first .spec file is passed.
- Recording of all the test cases is saved under the ‘videos’ folder, which greatly helps during debugging.
- Final test cases execution result report with parameters like Tests, Passing Test, Failing Test, Pending, and Skipped Tests.
Command 2:
Run the particular test in headless mode in the default browser Electron.
To run specific spec files from the list of test cases under the e2e folder, we can mention the path using “–spec” along with the “cypress run” command.
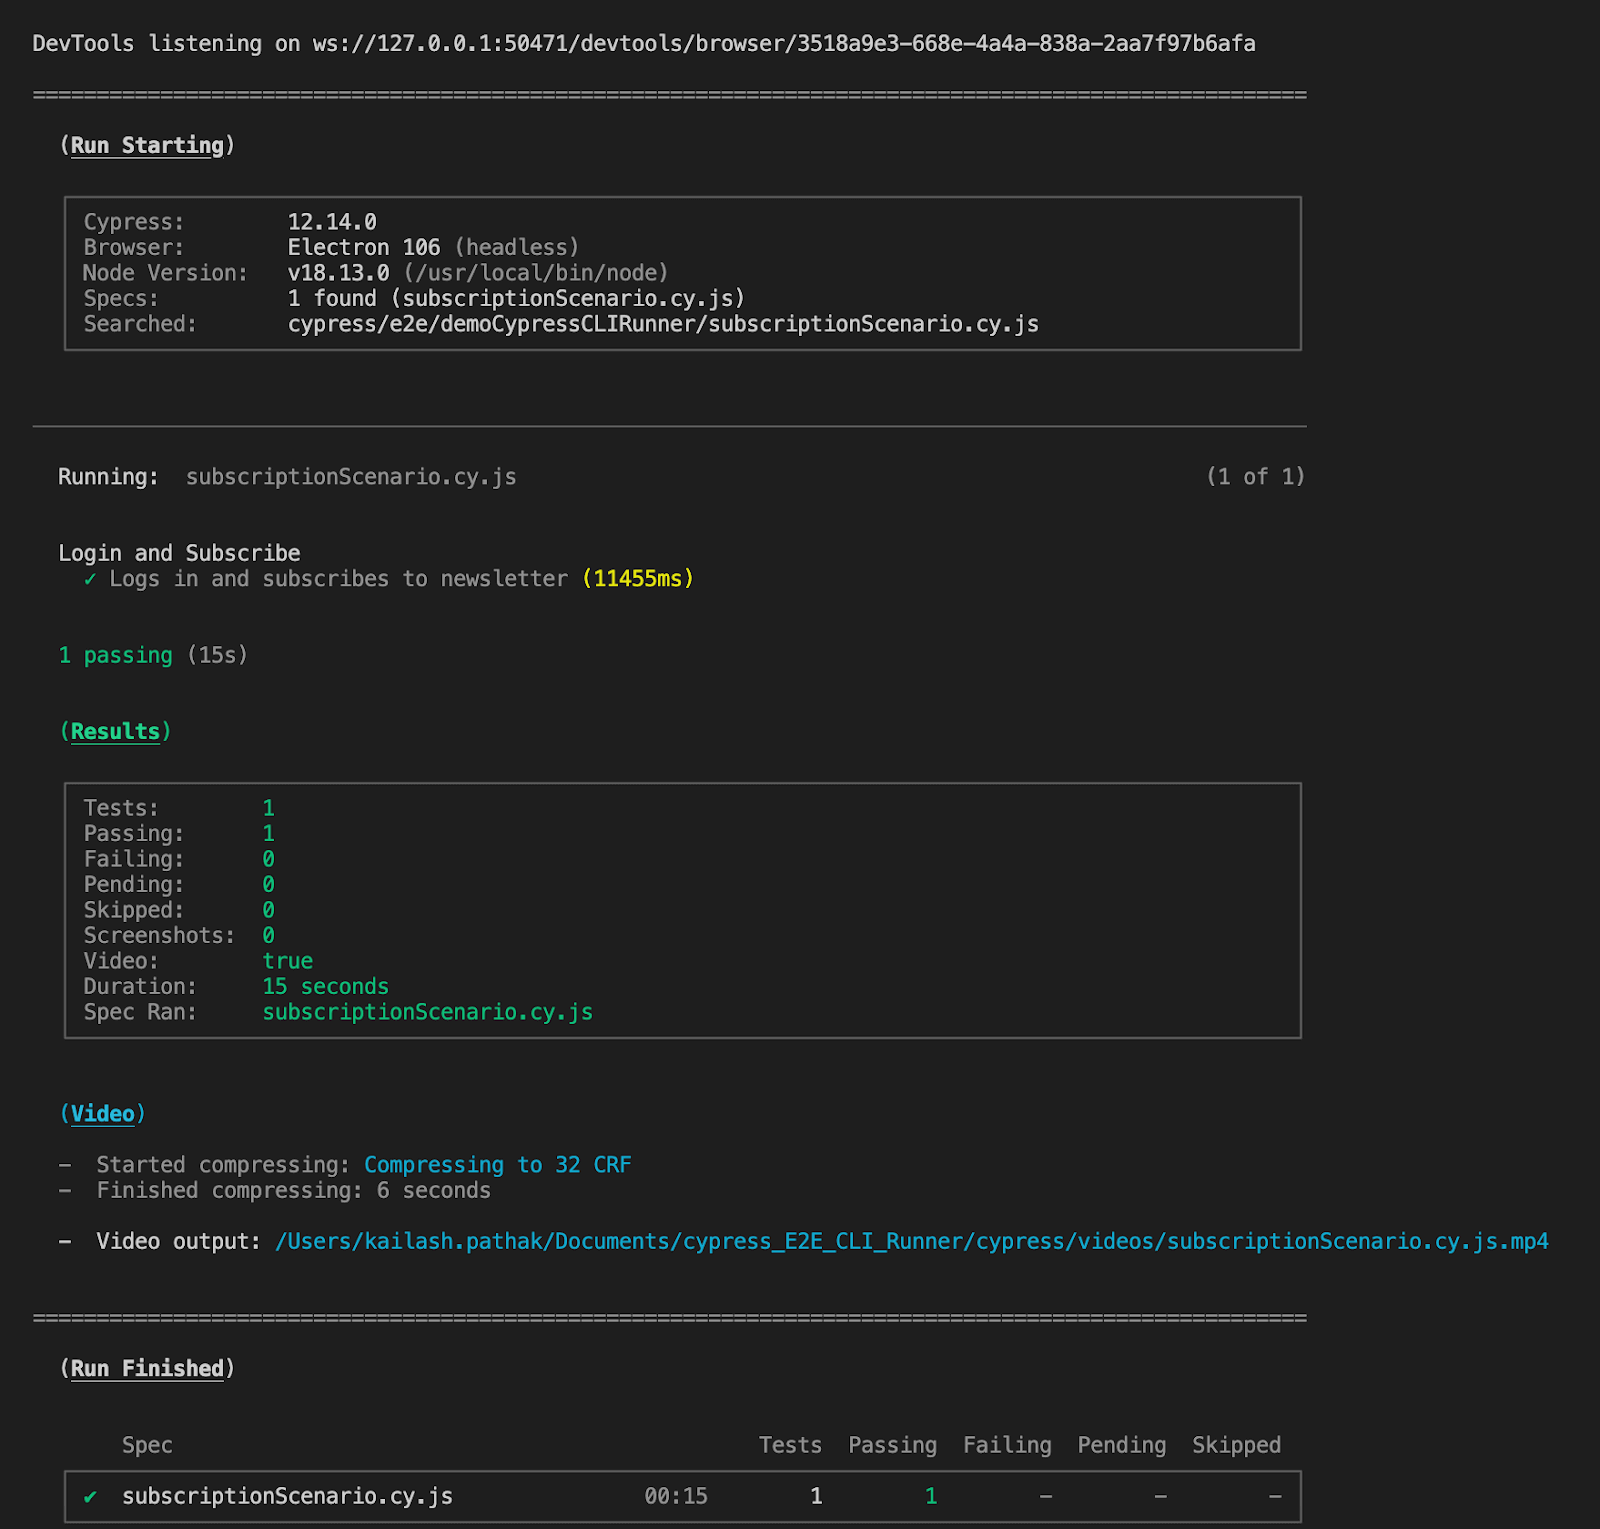
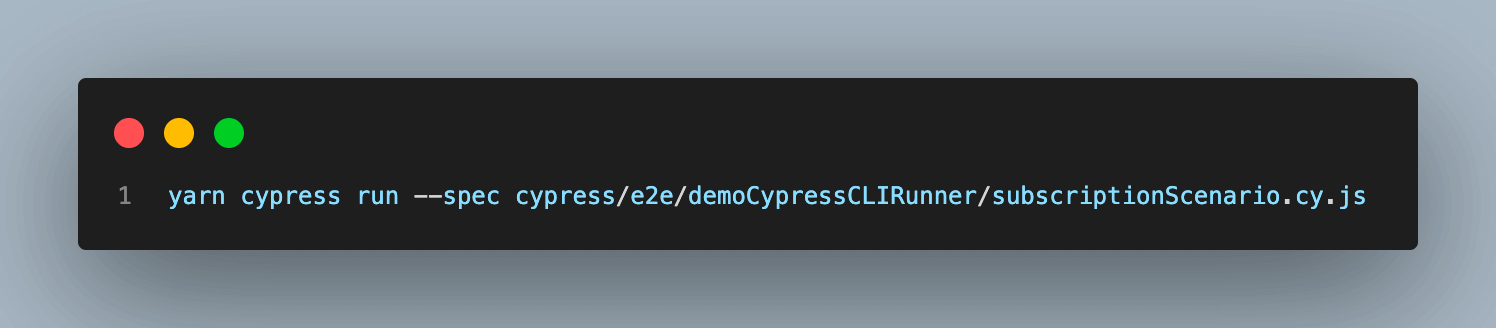
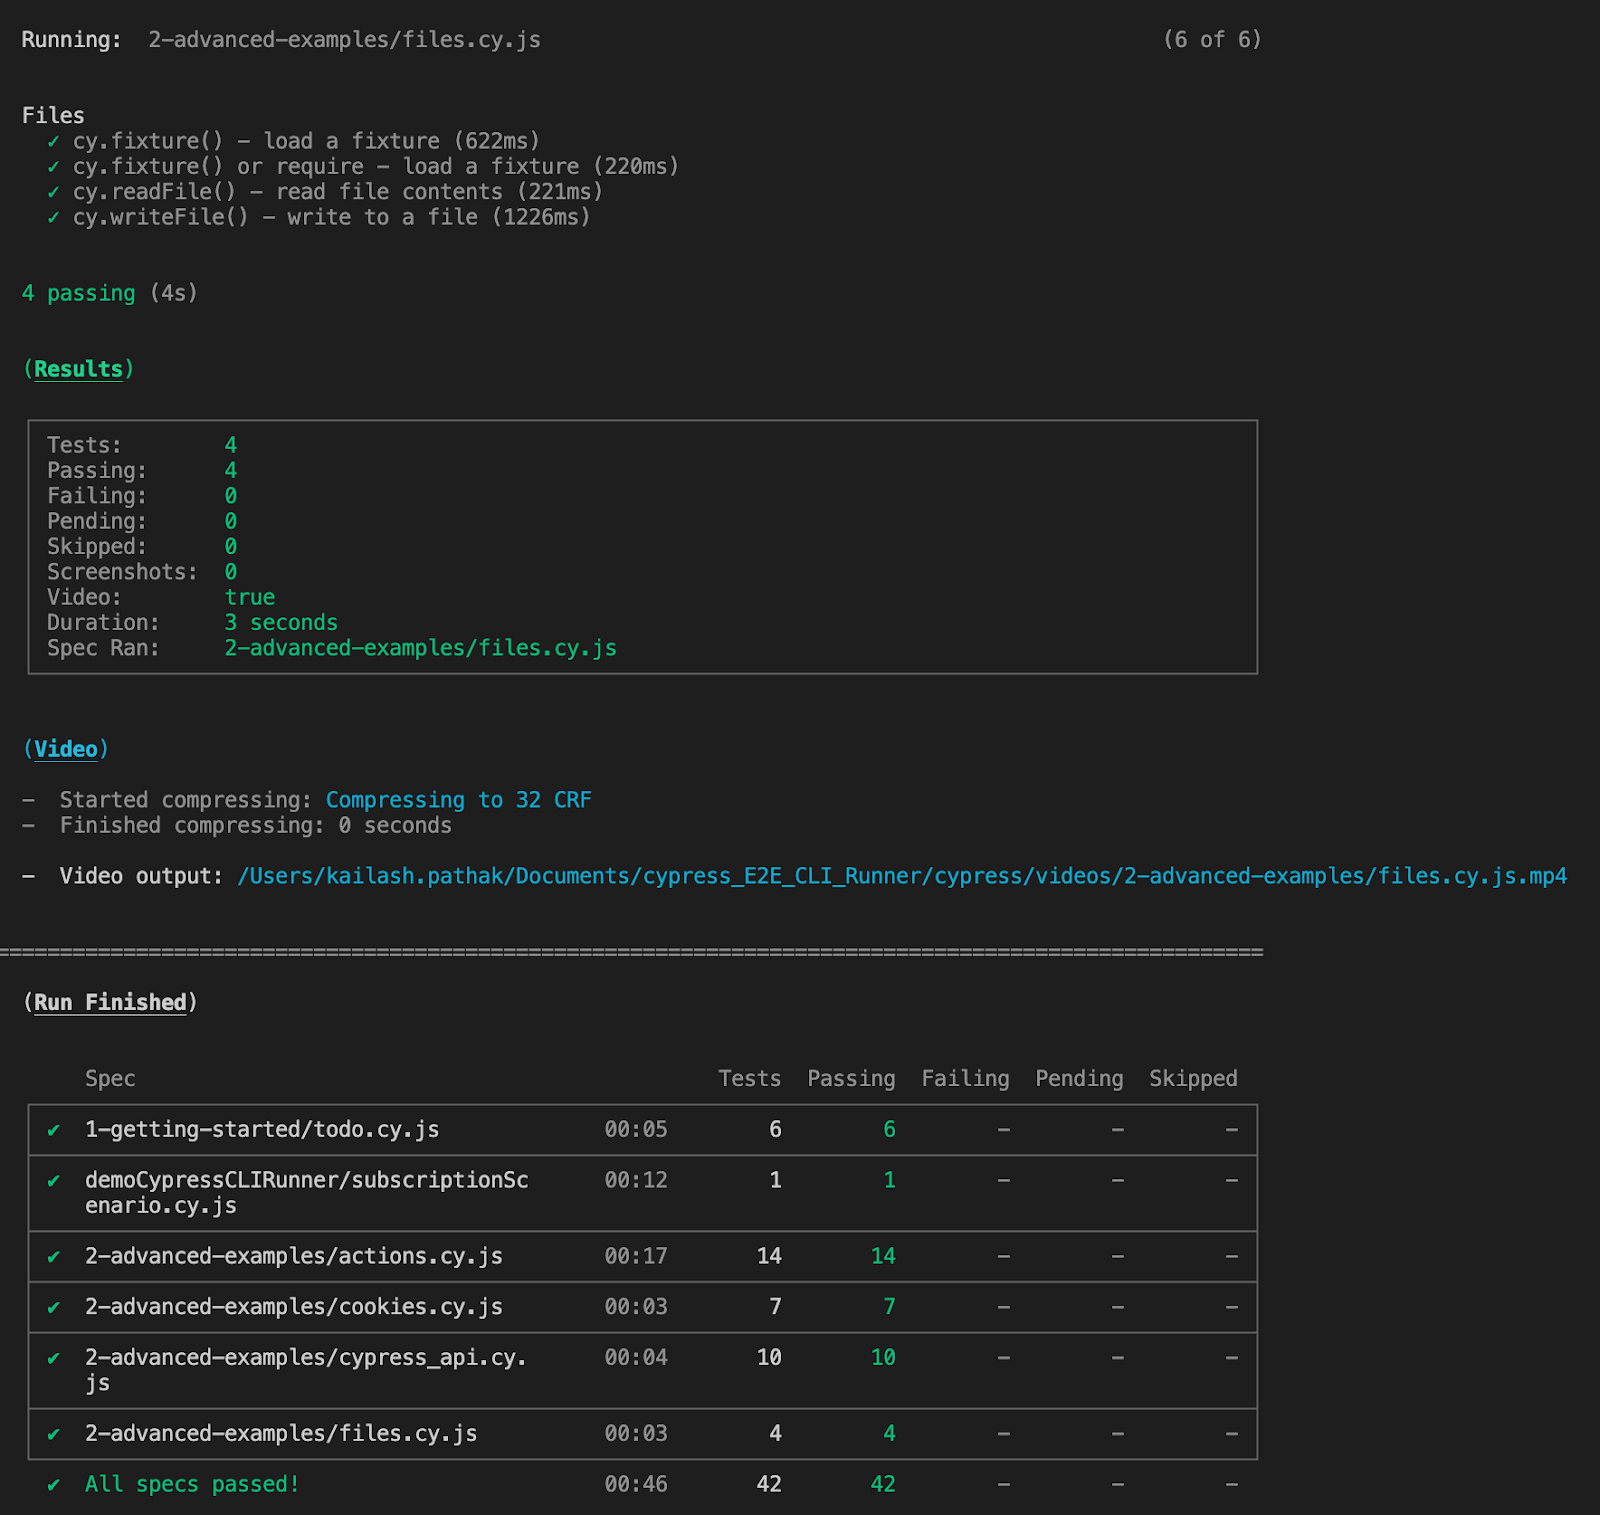
Output
In the output, we can see the test case execution report of a particular .spec.
Command 3:
Run all the tests in Cypress CLI to run tests in Chrome (Headless Mode).

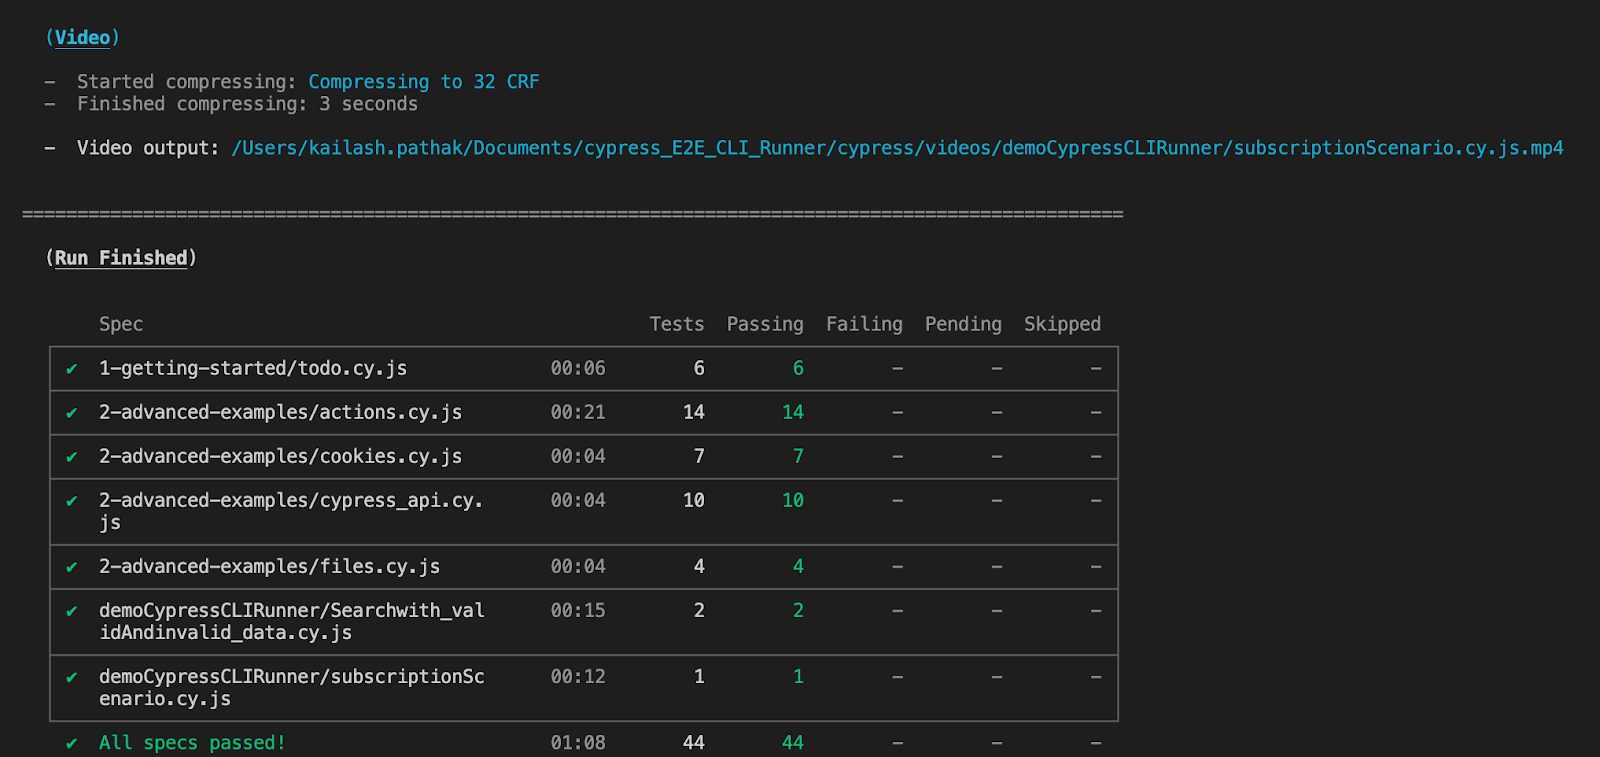
Output
In the output, we can see the test case execution report of all test cases in the Chrome browser.
Command 4:
Run a particular test case in Cypress CLI to run tests in (Headless Mode).
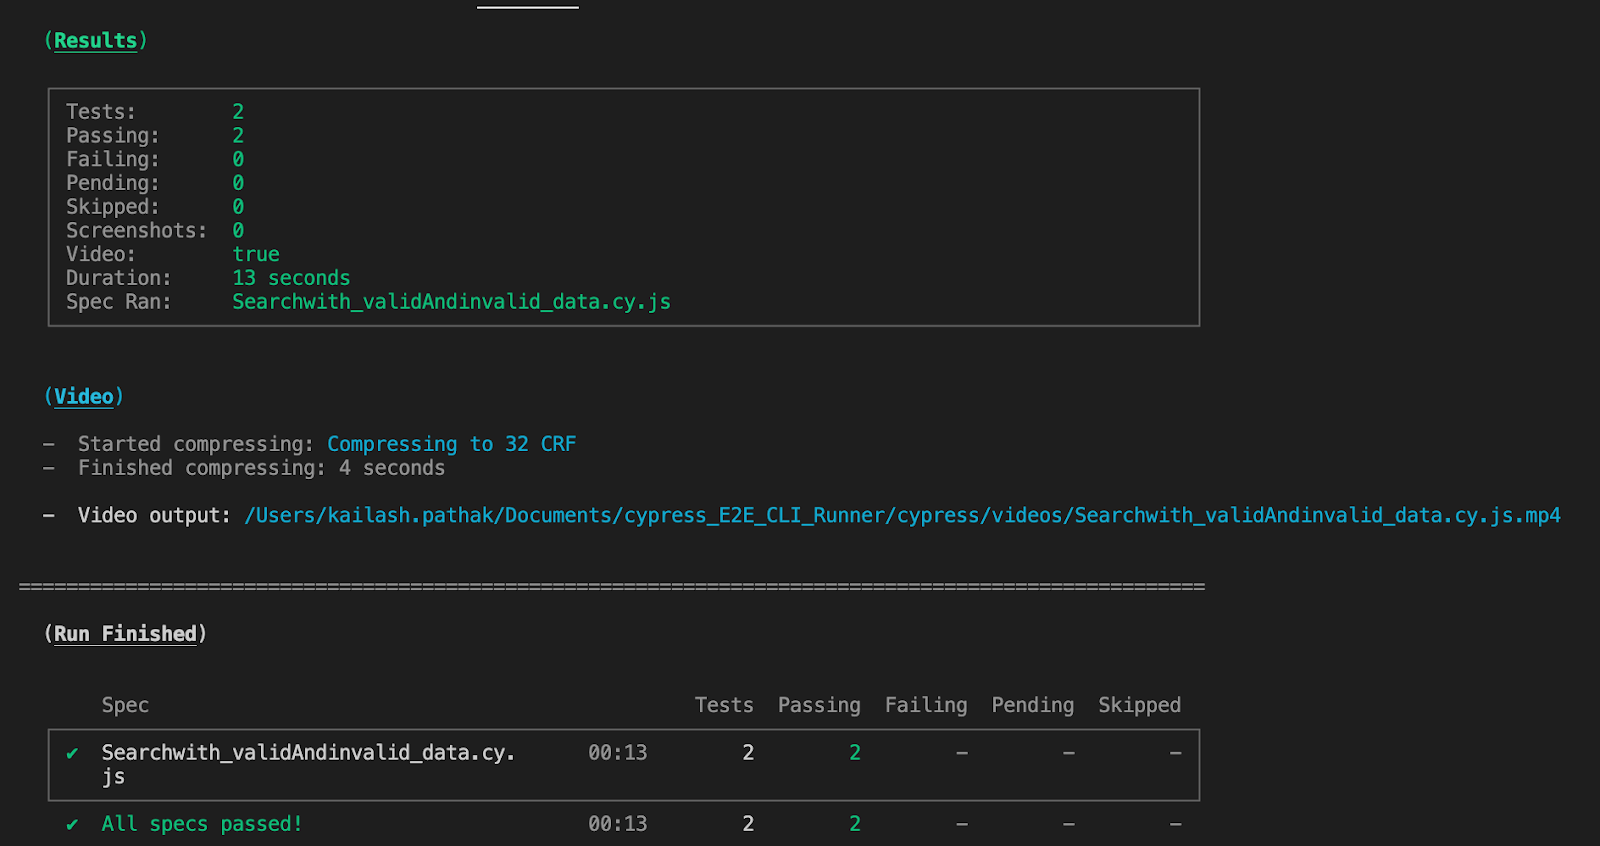
Output
In the output, we can see the test case execution report of a particular .spec in the Chrome browser.

Let’s take one more scenario.
Test Scenario
https://ecommerce-playground.lambdatest.io/index.php?route=account/login |
Implementation
Create the second test case with the name “Searchwith_validAndinvalid_data.cy.js” under the LambdaTest folder.
In the below test case, we are covering the search with valid and invalid data and verifying the search result.
Use Case
Open the site and search with valid and invalid data.
|
1 2 3 4 5 6 7 8 9 10 11 12 13 14 15 16 17 18 19 20 21 |
describe('Search with valid and Invalid data' , () => { beforeEach(() => { cy.visit('https://ecommerce-playground.lambdatest.io/index.php?route=account/login') }) it('Searches for the valid text "Apple" and verify the results', () => { // Enter the search data and submit the form cy.get('[name="search"]').eq(0).type('Apple') cy.get('.type-text').click() // Verify the search results cy.url().should('include', 'search=Apple') cy.contains('Search - Apple').should('be.visible') cy.get('.product-layout').should('have.length.gt', 0) }) it('Displays message with no search results for invalid search term', () => { // Enter search term and verify returns no results and submit form cy.get('[name="search"]').eq(0).type('xyz') cy.get('.type-text').click() // Verify message for no search results cy.contains('There is no product that matches the search criteria.').should('be.visible') }) }) |
Command 1:
Run all the tests in Cypress CLI in default browser Electron (Headless Mode).
|
1 |
yarn cypress run |
Output
Command 2:
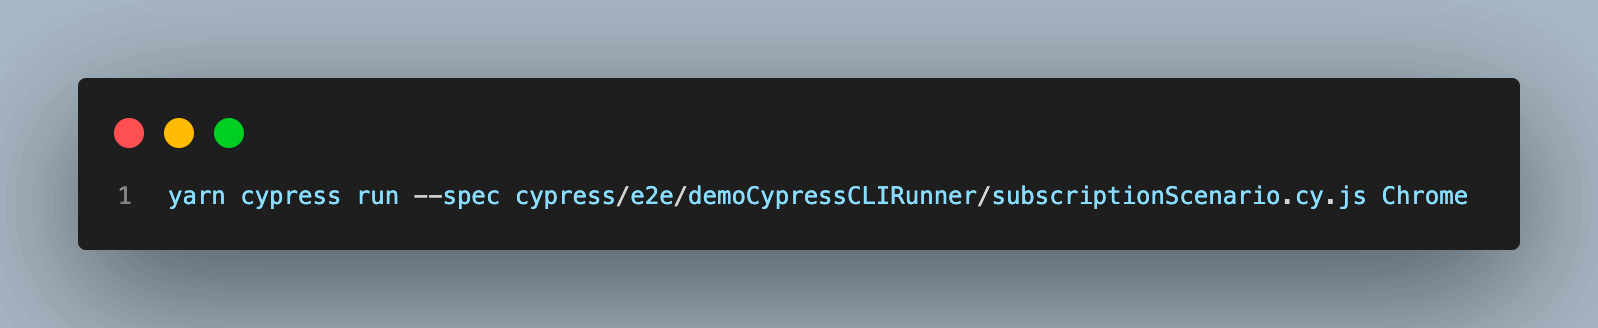
Run a particular test in Cypress CLI to run tests in Chrome (Headless Mode).
|
1 2 |
yarn cypress run --spec cypress/e2e/demoCypressCLIRunner/Searchwith_validAndinvalid_data.cy.js Chrome |
Output
Command 3:
Run all test cases in Cypress CLI to run tests in Chrome (Headless Mode).
|
1 |
yarn cypress run --headless --browser chrome |
Output

Command 4:
Run particular test in headless mode in Chrome browser.
|
1 2 |
yarn cypress run --spec cypress/e2e/demoCypressCLIRunner/Searchwith_validAndinvalid_data.cy.js Chrome |
Output
How to Run Test Cases in Cypress Test Runner?
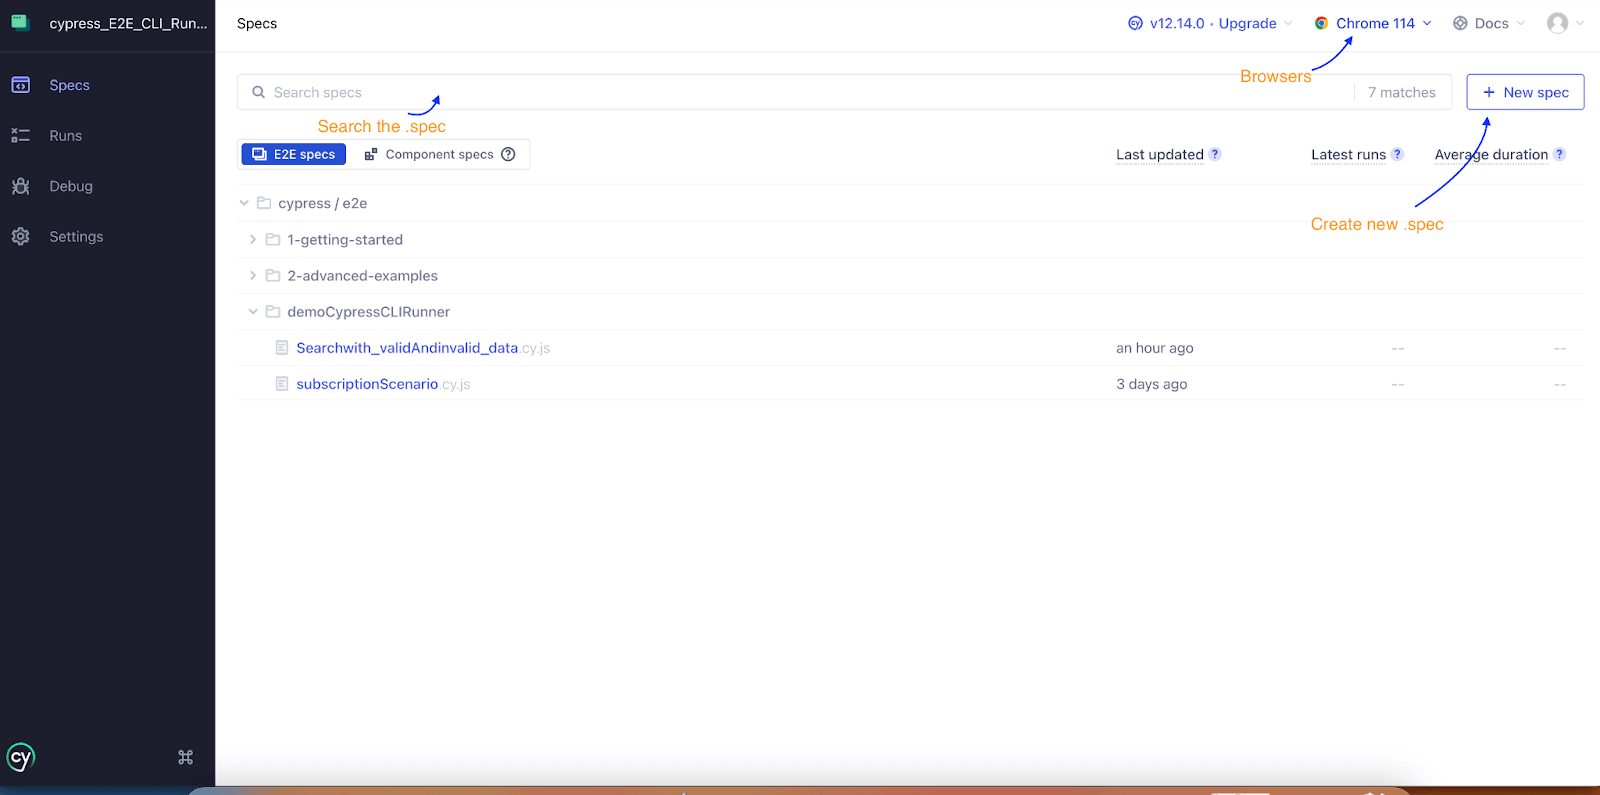
Cypress Test Runner provides a user interface (UI) that allows you to interact with and run your Cypress tests. After executing the appropriate command to start the Test Runner, the UI will be launched. From there, you have several options for running your tests.
By default, Cypress will launch the Test Runner UI with its default browser, which is typically Electron. However, you can switch to a different browser by selecting it from the available options in the browser drop-down menu.
To run a single test, just enter the particular .spec name and execute the test case.

Another way to run a single test is to click on a specific test case, and it will start executing.
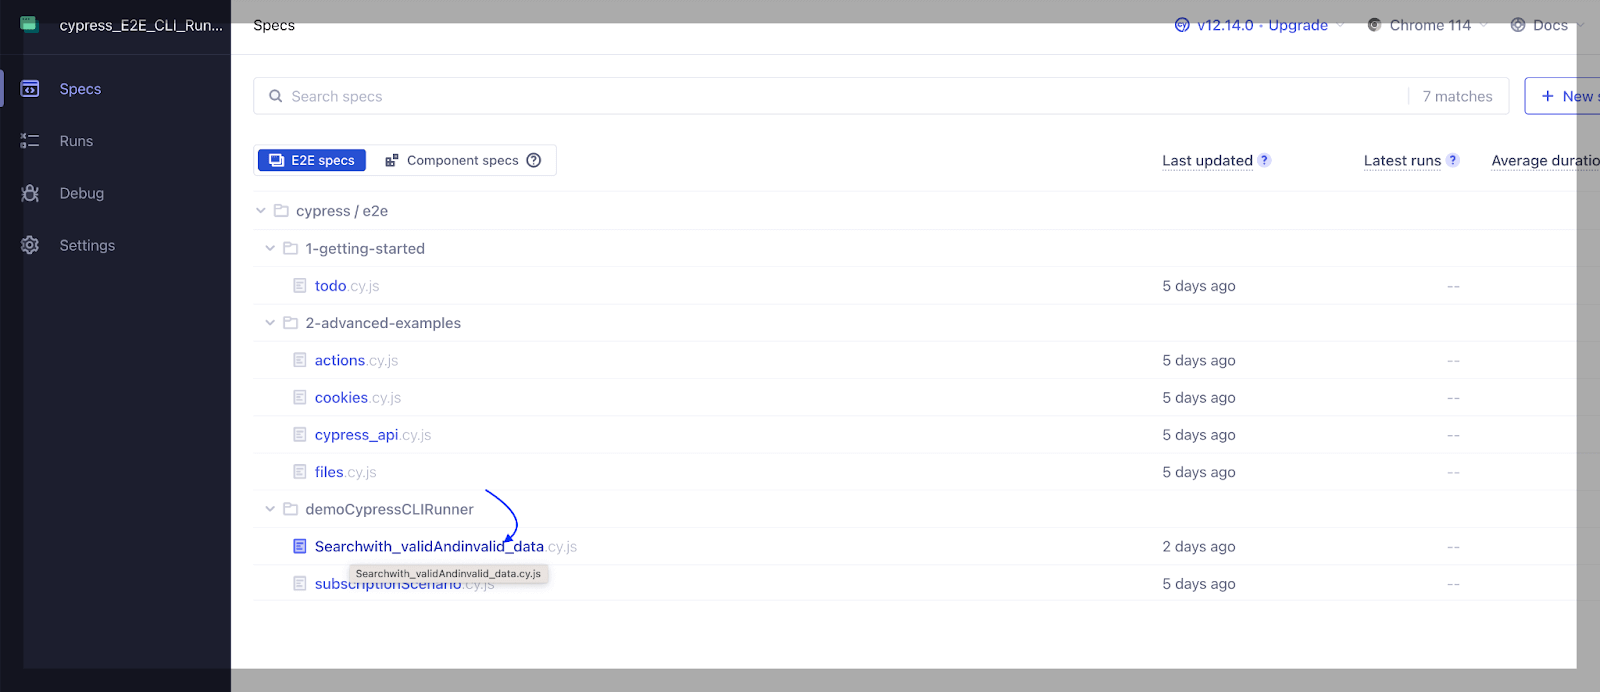
If you want to run the test case, run the command ‘yarn cypress open’, which will open the Cypress Test Runner from where you can execute the test cases.
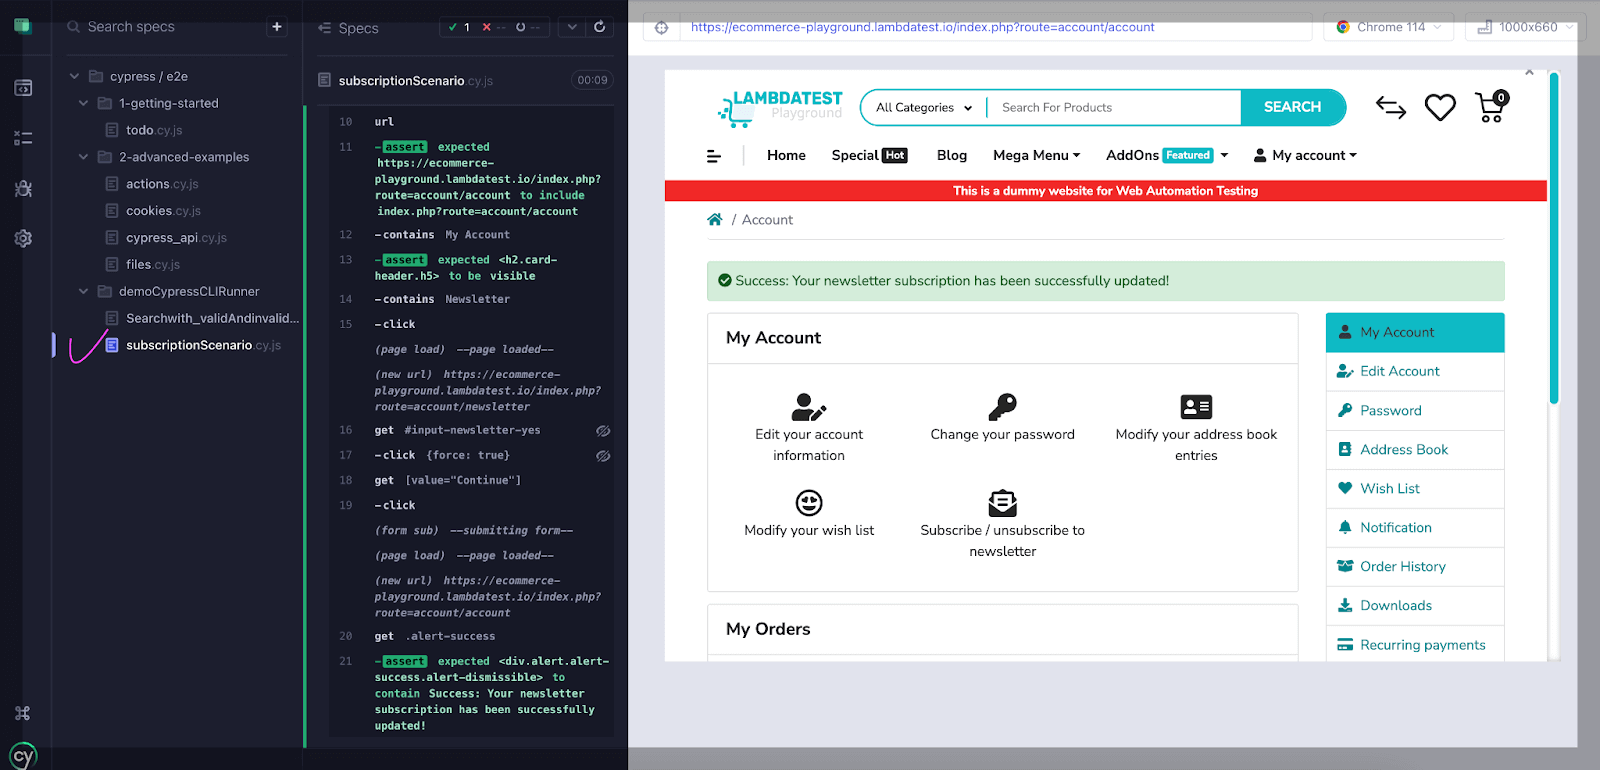
Execution
Let’s execute both test cases Searchwith_validAndinvalid_data.cy.js and subscriptionScenario.cy.js in non headless mode using UI by passing –ui in command.

You can also leverage the potential of Cypress E2E testing on the cloud and run Cypress test cases over real browsers and OS combinations. AI-powered test orchestration and execution platforms like LambdaTest offer a scalable Cypress cloud to perform automation testing across 40+ real desktop browsers.
To get started, check out the documentation: Getting Started With Cypress Testing.
Ready to elevate your Cypress automation skills? Join our specialized Cypress 101 certification program tailored for developers and testers seeking to expand their proficiency in Cypress test automation. Gain advanced insights, hone your abilities, and unlock a world of opportunities on your journey in test automation.
Note: Now you can perform online cross browser testing on macOS Browsers online to make sure your websites and web apps are compatible with all versions.
Conclusion
With Cypress CLI, you can run tests from the command line, which helps integrate tests into your CI/CD pipelines or run them in headless environments.
On the other hand, Cypress Test Runner offers a range of features that enhance the testing experience. It provides a real-time view of your application as tests run, allowing you to see each step executed and the application’s response. This helps in debugging and understanding the test flow.
Frequently Asked Questions (FAQs)
How to run Cypress cmd?
- Navigate to Your Project Directory: Open your command prompt or terminal and navigate to the root directory of your Cypress project.
- Run the Command: Use the following command to execute Cypress tests:
1npx cypress open
This command will open the Cypress Test Runner, allowing you to select and run your test files interactively.
If you want to run tests in headless mode (without the interactive Test Runner UI), you can use:
- Select the Test File: In the Test Runner, select the test file you want to run from the list of available test files.
- Run Tests: Click on the test file name to run the tests within that file.
|
1 |
npx cypress run |
Remember, before using the command-line approach, ensure that you have Cypress installed in your project by running npm install cypress or yarn add cypress, depending on your package manager.
What is a Cypress command?
The “Cypress command” typically refers to the command-line interface (CLI) commands provided by the Cypress testing framework. These commands allow you to interact with Cypress, run tests, manage configurations, and perform various testing-related tasks. Some common Cypress commands include:
- cypress open: Opens the Cypress Test Runner, providing an interactive interface to run and debug tests.
- cypress run: Executes tests in headless mode, which is suitable for automated testing and integration with CI/CD pipelines.
- cypress install: Installs the Cypress framework and its dependencies within your project.
- cypress verify: Checks the installed version of Cypress and its compatibility with your project.
- cypress –help: Displays the list of available commands and their descriptions.
- cypress –version: Displays the currently installed version of Cypress.
- cypress run –spec
: Runs a specific test spec file. - cypress run –record: Records test runs in the Cypress Dashboard for insights and videos.
- cypress run –parallel: Runs tests in parallel with a paid Cypress Dashboard plan.
These commands are executed in your terminal or command prompt and allow you to control various aspects of your testing workflow using the Cypress framework.


Author’s Profile
Kailash Pathak
Currently working as Sr. Quality Lead Manager in a US-based MNC company. Where I am responsible for setting up the overall QA Automation strategy and ensuring that we deliver a high-quality product to our end users. Apart from my role, I have involved myself in educating the community about Software Testing and Test Automation. I am a Blogger and YOUTUBER. I have written a couple of blogs which can find out on my site https://qaautomationlabs.com/
Blogs: 9
Got Questions? Drop them on LambdaTest Community. Visit now


