
How To Use For Loop In Robot Framework: A Detailed Guide
Paulo Oliveira
Posted On: November 7, 2023
![]() 177977 Views
177977 Views
![]() 37 Min Read
37 Min Read
When diving deep into the world of test automation, you may often encounter situations where you have to perform the same set of actions repeatedly but with different information or small changes in order. For instance, consider validating a web application’s functionality across multiple user profiles or testing a search feature with many keyword combinations. Making separate test cases for each of these is a tough job, and you might make mistakes or repeat the same things many times.
In test automation, making repetitive tasks more efficient, accurate, and thorough is crucial. Among the methods to achieve this, using loops stands out as an exciting solution. In Robot Framework, loops can be used significantly, and they are helpful for various tasks, including test cases and keyword iteration.
Robot Framework is an open-source framework that uses a data-driven or keyword-driven approach for test case design and execution, allowing you to create readable and maintainable test cases. Unlike conventional programming languages, Robot Framework’s syntax provides a user-friendly way to implement loops, ensuring that test cases can be repeated while still being easy to read and maintain.
That is where loops in Robot Framework come to the rescue. They enable testers to create a structured, repeatable template of actions, which can then be iterated over different data sets or conditions. By utilizing the power of loops, test automation professionals can ensure extensive test coverage while minimizing manual effort and potential errors. If you’re looking to improve your Robot Framework interview skills, check out our curated list of questions and solutions at Robot Framework Interview Questions.
TABLE OF CONTENTS
- Basics of Robot Framework
- Understanding loops in general programming
- Diving into the For loop in Robot Framework
- Common pitfalls and troubleshooting
- Practical Examples of For Loop in Robot Framework
- Tips for efficient test automation using For loop
- Case Study
- Best Practices for using the For loop
- Frequently Asked Questions
Robot Framework has emerged as an open-source framework primarily facilitating acceptance testing. Developed using Python, it stands out due to its user-friendly scripting mechanism, allowing developers and testers to create robust and easy-to-understand test scenarios. One of the key features is that it focuses on using keyword-driven methodology.
This characteristic means that creating test scenarios feels more like writing in human language, enhancing the ease of understanding and future updates. With its capability to integrate with a wide variety of libraries, from web app testing with Selenium to database interactions via DatabaseLibrary, Robot Framework has positioned itself as an essential tool for various automation testing needs.
There are many test automation frameworks to choose from. However, for any developer or tester, it is essential to know which test automation framework works best based on the project requirement.
To know about each framework and its features, explore this blog on the best test automation frameworks, which cover both web and mobile testing frameworks, providing you with a valuable guide that can be helpful for the tester and developer to choose the right framework.
Among the assorted loop structures, the For loop is a commonly recognized and widely used entity across numerous programming languages.
Robot Framework elevates the utility of loops for several reasons.
- Native support: No need for external add-ons; the framework readily supports loops.
- Flexibility: From numerical ranges to dictionary pairs, For loop servers to various testing requirements.
- Readability: The framework’s keyword-focused design makes the loop accessible, even for non-programmers.
- Integration: They can be smoothly combined with features like tags or variable assignments.
Problem Example
Imagine you’re testing a web app with many user accounts. You need to log in as each user, go to the settings page, and check if a specific setting is turned on. Doing this for every user is tedious and can lead to mistakes, so it’s a great idea to use the For loop in Robot Framework to automate it.
Now that we know a little about the For loop in Robot Framework let’s get into the basics of Robot Framework.
Basics of Robot Framework
Robot Framework is a game-changer in acceptance testing and ATDD (Acceptance Test-Driven Development). This open-source automation framework, developed using Python, is not only user-friendly but also powerful in its capabilities.
Robot Framework’s syntax and test cases
For someone approaching this framework for the first time, the syntax stands out for its clarity. Each test case typically begins with a descriptive name, followed by the steps (or keywords) to execute and their respective arguments.
For instance,
|
1 2 3 4 5 |
*** Test Cases *** Send Message to Application Open Browser https://www.lambdatest.com/selenium-playground/simple-form-demo Chrome Input Text id=user-message Mymessage Click Button id=showInput |
Keyword-driven approach and its advantages in test automation
Robot Framework uses a keyword-driven approach for test automation, which offers multiple benefits:
- Readability: Test cases read like plain English instructions, making them easy to understand even for non-developers.
- Reusability: Keywords can be used across multiple test cases, reducing redundancy.
- Modularity: Keywords are grouped into libraries, allowing easy updates to generate all relevant test cases automatically.
- Extensibility: Custom keywords can be created, making the framework adaptable to evolving applications.
- Collaboration: The approach encourages team collaboration and can serve as effective documentation.
 Note
NoteValidate your web and mobile application across various devices and browsers. Try LambdaTest Today!
The basic structure of Robot Framework’s scripts
A standard Robot Framework script consists of sections, each serving a unique purpose.
- Settings
- Variables
- Test Cases
- Keywords
- Teardown and setup
Imports libraries and sets up the test suite, including suite-level setups and teardowns.
|
1 2 3 4 |
*** Settings *** Library SeleniumLibrary Suite Setup Launch Application Suite Teardown Close Application |
Defines variables for dynamic testing and easy script modification.
|
1 2 3 |
*** Variables *** ${URL} https://www.lambdatest.com/selenium-playground/simple-form-demo ${BROWSER} Chrome |
Outlines individual tests using keywords.
|
1 2 3 4 5 |
*** Test Cases *** Login to Application Open Browser ${URL} ${BROWSER} Input Text id=user-message Mymessage Click Button id=showInput |
Creates custom keywords for reusable actions.
|
1 2 3 4 |
*** Keywords *** Launch Application Open Browser ${URL} ${BROWSER} Maximize Window |
Define pre and post-test actions at both suite and individual test case levels.
These sections form a modular, adaptable test script. Robot Framework’s keyword-driven approach and structured format make it a robust tool for test automation.
Understanding loops in general programming
Every programmer, irrespective of the language they work in or the applications they develop, automatically encounters a foundation concept: the loops.
At its most fundamental level, a loop allows for repeating a block of code multiple times based on a condition or a set of conditions. But why is this iterative capability so vital in programming?
Why are loops essential?
Loops play an instrumental role in reducing redundancy. Instead of writing the same piece of code repeatedly, a loop allows a programmer to define that specific action once and repeat it as needed.
It not only makes the code cleaner but also reduces potential errors. More importantly, loops provide a means to handle dynamic data. When the exact number of iterations needed isn’t known in advance or varies, loops offer the flexibility to adapt to different scenarios and datasets.
Common loops: for, while, and do-while (brief touch)
In this section, we will dive deep into each type of loop and briefly examine how they function.
- For Loop
- While Loop
- Do-While Loop
The most recognized loop structure, the For loop, is typically used when the number of iterations is known. The For loop in Python is primarily used to iterate over sequences (like lists, tuples, strings, or ranges). Its syntax differs from some languages that use initialization, condition, and iteration components.
For Example,
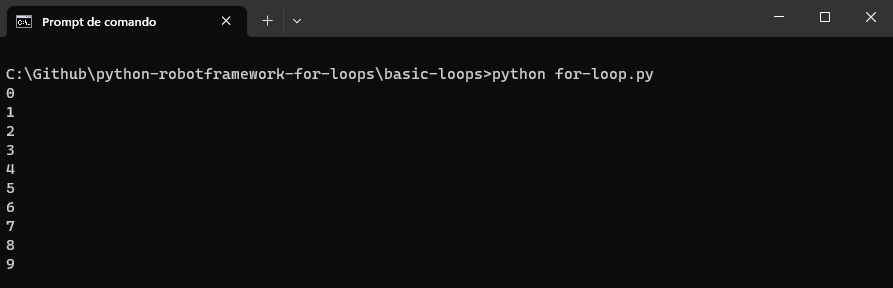
Using a For loop for printing the number ranging from 0-9
|
1 2 |
for i in range(10): print(i) |
Result
The while loop is a more flexible structure, perfect for situations where the number of iterations isn’t defined from the outset. The loop continues as long as the specified condition remains true. The while loop checks a condition before each iteration and will keep looping as long as the condition remains true.
For Example,
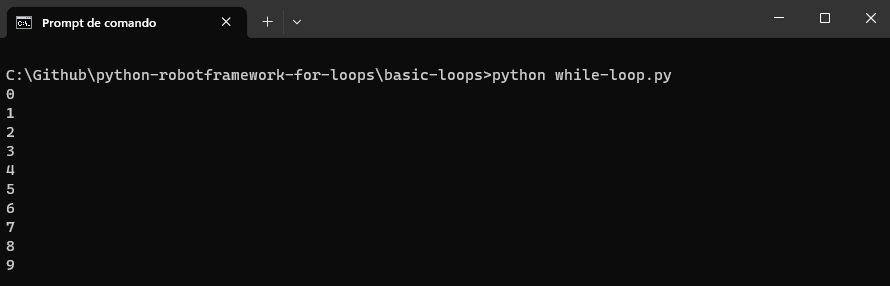
Using a while loop for printing the number ranging from 0-9
|
1 2 3 4 |
i = 0 while i < 10: print(i) i += 1 |
Result
A slight variation of the while loop, the do-while loop ensures that the code block within the loop executes at least once before checking the condition. It’s beneficial in scenarios where the initial run is mandatory. Python does not have a built-in do-while loop, but one can emulate its behavior using a while loop with a conditional break.
For Example,
Using a do-while loop to print the number ranging from 0-9.
|
1 2 3 4 5 6 |
i = 0 while True: print(i) i += 1 if i >= 10: break |
Again, this prints the numbers from 0 to 9. The loop will consistently execute the code block at least once and then continue looping until the condition in the if statement becomes true.
Result

While these are simple loop structures, you can use them cleverly to handle more complicated programming tasks.
Loops used with real-life examples
In programming, loops are similar to repeating tasks, and in this section of the blog on using For loop in Robot Framework, we’ll explore how loops can be applied in real-life examples.
- Data processing
- User input validation
- Automated testing
Consider an application that processes records in a database. There might be thousands, if not millions, of entries.
Using loops, you can iterate over each record, processing the data and updating or categorizing it. With loops, managing such vast datasets would be a challenging, if not impossible, task.
In an online banking application, a loop can validate a user’s PIN or security answer during login. If the entered data is incorrect, the user is prompted to try again, up to a certain number of attempts. After reaching the limit, the account is temporarily locked for security reasons.
Using loops to check if the entered data is correct. If it’s incorrect, the loop allows the users to try again and keeps track of the number of attempts. If the maximum allowed attempts are reached, the loop exits, and the account is temporarily locked. Ensuring both security and a user-friendly login process.
In the context of software testing, loops play a pivotal role in scenarios where repetitive tasks or sequences need to be validated under different conditions or datasets, for example, testing login to many different valid and invalid usernames and passwords.
Using loops, you can automate the repetitive task of testing the login process with a different set of credentials. The loop will iterate via username and password, running the same validation steps each time. It saves time and ensures the login functionality is thoroughly tested with various conditions or datasets.
Loops are not just an essential part of programming. They’re fundamental to solving problems in software development. They provide an elegant way to handle repetition and are versatile for different scenarios. The main idea in programming is to automate tasks for efficiency, and loops, like the rhythmic For loop, vigilant while loop, or eager do-while loop, are essential tools for programmers.
NoteLeverage the real-life examples by performing automation tests with Robot Framework. Try LambdaTest Today!
Diving into the For loop in Robot Framework
Now that we understand how loops can help automate repetitive tasks, let’s take a closer look at the core concept of the For loop in Robot Framework.
Syntax and structure specific to Robot Framework
Mastering the For loop in Robot Framework is essential for effective test automation. It stands out for its unique, keyword-driven syntax, prioritizing readability and simplicity.
For instance,
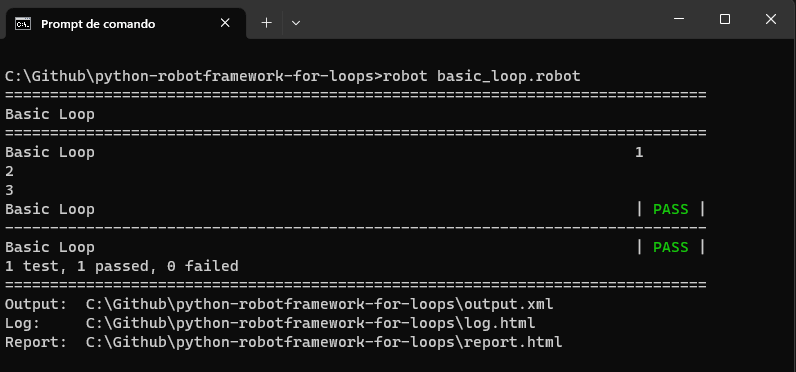
In this simple loop, the numbers 1, 2, and 3 are logged to the console. The loop begins with the FOR keyword and ends with the END keyword, making it easy to understand.
|
1 2 3 4 5 |
*** Test Cases *** Basic Loop FOR ${item} IN 1 2 3 Log To Console ${item} END |
Result
Normal For loops
For more complex tasks that involve several steps or need extra logic, the regular or multi-line loop is the best option.
For instance,
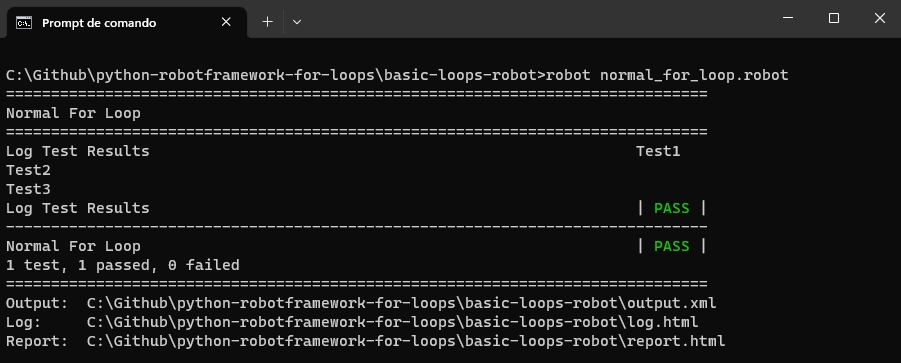
This loop logs each test and then verifies if the length of the test name exceeds four characters.
|
1 2 3 4 5 6 7 |
*** Test Cases *** Log Test Results FOR ${test} IN Test1 Test2 Test3 Log To Console ${test} ${length}= Get Length ${test} Should Be True ${length} > 4 END |
Result
Range, list, and dictionary iterations
The For loop in Robot Framework is highly adaptive when dealing with different data structures.
- Range iteration
- List iteration
- Dictionary iteration
This technique uses a For loop in Robot Framework to iterate through numbers, much like Python’s range function. For instance, in a test case where you need to check pagination on a web application, you can use a For loop to click the “Next” button a specified number of times.
This loop would iterate through a numerical range, clicking the “Next” button and performing the validation at each iteration to ensure the new page of content loads as expected.
For instance,
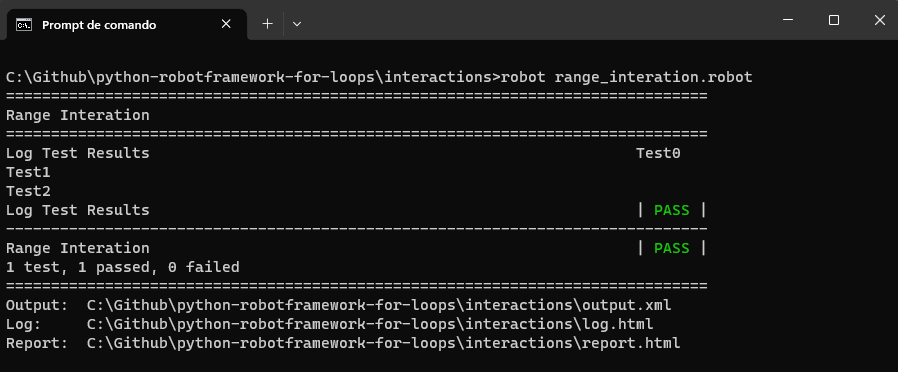
The code below is a simple example of a For loop in Robot Framework. The code logs the messages to the console for three iterations.
|
1 2 3 4 5 |
*** Test Cases *** Log Test Results FOR ${number} IN RANGE 3 Log To Console Test${number} END |
Result
Test0, Test1, Test2.
Lists, also known as arrays in other programming languages, consist of ordered elements that Robot Framework can effortlessly iterate using a For loop.
For instance, consider a scenario where you need to test the checkout process of an eCommerce website. You might have a list of product IDs that you want to add to the shopping cart. In this case, you can use a For loop in Robot Framework to iteratively go through this list.
During each iteration of the loop, you can add a product to the cart. This For loop automation helps you efficiently perform a repetitive task and ensures that the shopping cart functionality functions correctly for various products.
For instance,
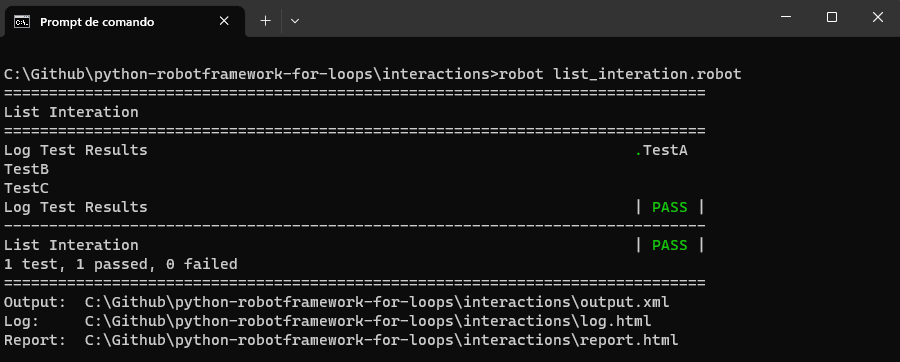
The code iterates via the list of test names and logs them to the console. This can be useful for testing multiple cases or scenarios in a sequence.
|
1 2 3 4 5 6 |
*** Test Cases *** Log Test Results @{tests}= Create List TestA TestB TestC FOR ${test} IN @{tests} Log To Console ${test} pr END |
Result
Dictionaries featuring key-value pairs can be easily traversed using the For loop in Robot Framework. For example, in automated testing of a user registration form, you might have a dictionary with usernames as keys and user details as values.
Using a For loop in Robot Framework, you can iterate through this dictionary, filling out the registration form for each user with their respective details, effectively testing the form’s handling of various input data.
For instance,
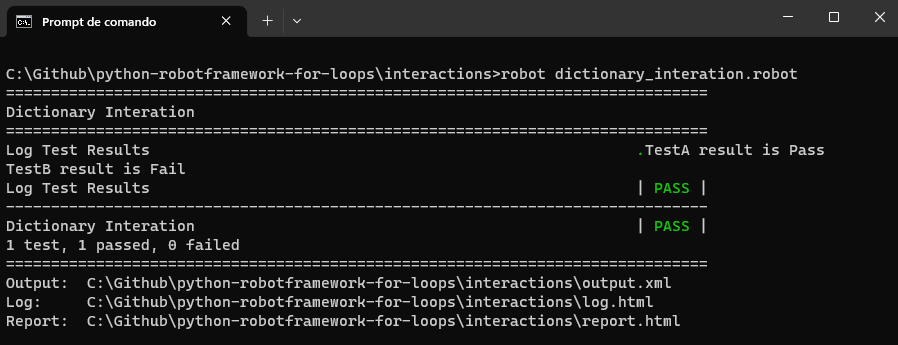
The code illustrates iterating through a dictionary of test results (test names and their corresponding outcomes) and logging them to the console. It is useful for reporting and reviewing test results for multiple tests in a structured manner.
|
1 2 3 4 5 6 |
*** Test Cases *** Log Test Results &{test_results}= Create Dictionary TestA=Pass TestB=Fail FOR ${test} ${result} IN &{test_results} Log To Console ${test} result is ${result} END |
Result
TestA result is Pass, and TestB result is Fail.
The For loop in Robot Framework follows the same basic looping principles as other programming languages but stands out with its easy-to-understand syntax and structure. It gives testers a simple yet strong tool for making test cases work well and quickly grasp.
Alternatives to For loop
There are various alternatives to using a For Loop in test automation or programming in general. The choice largely depends on your specific use case and the programming language or framework you’re using. Here are some alternatives:
- Parallel Execution
- State Machines
- While Loop
- Library Methods
- Event-Driven Programming
- Database Queries
For independent and resource-intensive tasks, parallel execution can be a faster alternative to sequential looping. Libraries and frameworks for parallel computation can execute multiple iterations simultaneously.
You can also use Robot Framework to perform parallel execution, explore this blog on Robot Framework parallel test execution, and get valuable guidelines with demonstration.
It offers an effective alternative to nested loops for handling complex logic, enhancing both readability and maintainability. A state machine consists of a finite set of states, transitions between those states, and actions performed during those transitions. In essence, a state machine simplifies complex logic by breaking it down into manageable states and transitions.
For example, consider the common scenario of web pagination. Suppose you are building a test to automatically navigate through a paginated list of items on an eCommerce website. You could have states such as “FirstPage,” “MiddlePage,” “LastPage,” and “End.” Transitions could be triggered by actions like “Click Next,” “Click Previous,” and “Reach End.”
You can use a while loop to iterate based on a condition rather than a fixed range. This is useful for cases where you don’t know the exact number of iterations in advance.
Sometimes, the operation you need to perform is so common that there’s a library method that accomplishes it without requiring a loop. For instance, summing an array of numbers or finding the maximum value.
In some cases, particularly for UI or network operations, an event-driven approach can be more appropriate. Instead of looping, you set up event listeners and callbacks.
For data retrieval and manipulation tasks, it’s often more efficient to use a single database query rather than looping through records individually.
By understanding your specific use case, you can select the most appropriate alternative to a For loop.
Common pitfalls and troubleshooting
Using the For loop in Robot Framework can significantly enhance the power and flexibility of your test automation scripts. It’s common for testers, especially those new to Robot Framework or loops, to face certain pitfalls. Awareness of these can help you avoid them and ensure the smooth running of your test cases.
Let’s look into the common areas in which you might face issues and how you can overcome them.
Understanding the common errors
As a beginner, there can be some common errors that you might not give much attention to, but when it is time to debug, it consumes time to identify and fix them. In the upcoming section, we will cover some standard errors that we may face.
- Loop variable issues
- Incorrect indentation
One common error is not initializing or using loop variables. Each iteration in a loop typically deals with a unique value and fails to capture. It can lead to unexpected results.
For instance,
In the code below, while the loop seems straightforward, using a global variable ${item} may have unexpected consequences if the variable is altered elsewhere.
|
1 2 3 4 5 6 7 8 9 |
*** Variables *** ${item} NONE *** Test Cases *** Loop Issue FOR ${item} IN 1 2 3 Log To Console Processing ${item} END |
Always ensure that the loop variable is localized and not affected by external factors.
As with many scripting languages, Robot Framework relies on indentation to distinguish between loop declarations and their content. Incorrectly indented scripts can lead to misinterpretations.
For instance,
In the code below, the Log keyword isn’t indented correctly, which might cause the Robot Framework to misinterpret the loop’s structure.
|
1 2 3 4 5 |
*** Test Cases *** Loop Issue FOR ${element} IN @{elements} Log To Console Processing ${element} END |
Proper indentation is crucial for clarity and proper script execution.
Tools and methodologies for debugging loops
Given that loops introduce repetition and potential complexity, debugging issues within them demands a systematic approach.
- Built-in logger
- DEBUG: This provides general debugging information that is less detailed than TRACE. It is suitable for logging key points in a loop to understand the flow.
- INFO: Standard level for informational messages. It marks loop entry and exit points or significant state changes.
- WARN: Indicates potential issues that may not prevent your tests from running but are worth noting for future review.
- ERROR: Logs critical issues that have caused test failures or incorrect behavior.
- External debuggers
- LambdaTest LT Debug
Robot Framework has a robust built-in logging mechanism for insightful tracking and debugging. Using log statements strategically placed within your loops or other code structures can give you a clearer picture of the loop’s execution flow and assist in identifying problematic areas.
The framework supports different log levels to capture varying degrees of detail, such as.
Some Integrated Development Environments (IDEs) that support Robot Framework, like PyCharm or RED, offer debugging capabilities. You can set breakpoints, watch variables, and step through your loops to closely monitor their behavior. Additionally, you can leverage your debugging toolkit with LambdaTest LT Debug.
Debugging loops can be a difficult task, and repetitive issues can be hard to spot. Utilizing traditional methods might be time-consuming.
LambdaTest LT Debug can smoothly integrate with your testing environment, it provides detailed tracking and debugging. Like Robot Framework’s built-in logger, LT Debug allows you to place log statements strategically within loops or other code structures. This gives you a clear view of your loop’s execution flow and helps you identify or pinpoint problematic areas.
Practical Examples of For Loop in Robot Framework
When For loop in Robot Framework is used correctly, loops offer extensive capabilities ranging from processing multiple web elements to data-driven testing.
Let’s delve deeper into their applications, providing clear code examples and thorough explanations.
Iterating over a list of web elements
When automating web tests, it’s common to interact with a list of elements, like links in a navigation bar or items in a drop-down list.
For instance,
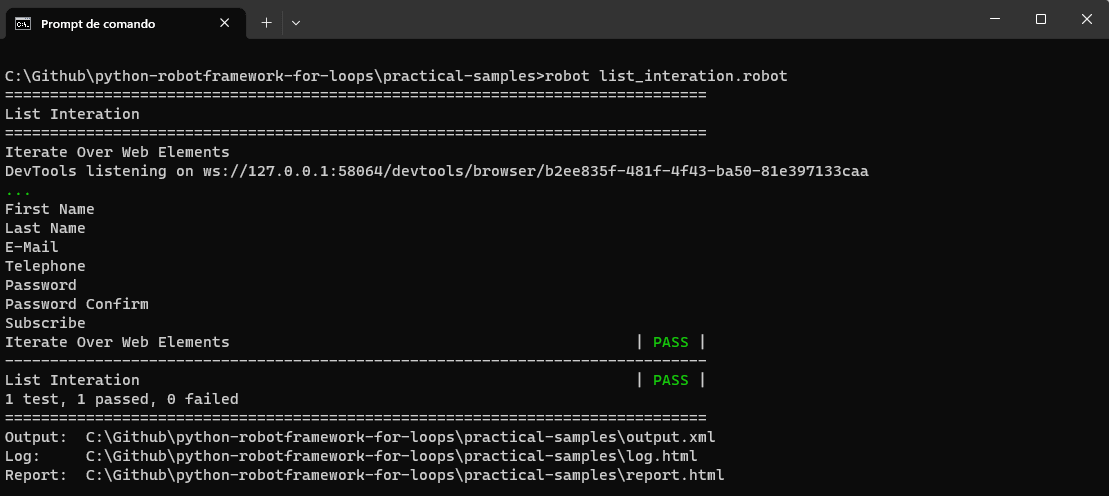
In the code below, we are trying to test the functionality of logging in to a web application by iterating through and verifying elements on the login page. Validating the product listings on an eCommerce website.
|
1 2 3 4 5 6 7 8 9 10 11 12 13 14 15 16 17 18 19 |
*** Settings *** Library SeleniumLibrary *** Variables *** ${URL} https://ecommerce-playground.lambdatest.io/index.php?route=account/register ${ELEMENT_CLASS} css:.col-sm-2 *** Test Cases *** Iterate Over Web Elements Open Browser ${URL} Chrome Maximize Browser Window @{items} = Get WebElements ${ELEMENT_CLASS} FOR ${item} IN @{items} ${text} = Get Text ${item} Log To Console ${text} END Close Browser |
Let’s understand the code into points below
- Initialization
- Test case setup
- Browser interaction
- Web element collection
- Loop iteration
- It extracts the text content of the element.
- Logs this text content to the console for visibility.
- Test case completion
The script begins by setting up the website URL and the CSS class used to identify web elements.
It starts a test case named “Iterate Over Web Elements.”
The script opens a Chrome browser and navigates to the specified URL. It maximizes the browser window for a full view.
Using the defined CSS class, it collects all web elements on the page that match this class. These elements are stored in a list variable.
For loop is initiated to go through each web element in the list.
After processing all web elements in the list, the test case ends.
To summarize, the script sets up, opens a browser, identifies and captures web elements, and then iterates through these elements, logging their text content to the console.
Result
Using loops for data-driven testing
The use of loops in data-driven testing serves to magnify both the efficiency and the effectiveness of your test suite. Data-driven testing involves re-running the same test scenario with varied input and validation data. Here are some in-depth reasons why loops are highly beneficial for data-driven testing.
- Efficiency: Eliminates code redundancy using the same test logic for different data sets.
- Consistency: Ensures uniform test conditions for all data points.
- Scalability: Easily accommodates new test scenarios or more data points.
- Maintainability: Simplifies debugging and updates since the core logic is in one place.
- Flexibility: Allows dynamic test execution, such as skipping data or stopping tests.
- Resource optimization: Helps in saving time and the computer’s resources by minimizing the need to start and stop tests repeatedly.
For instance,
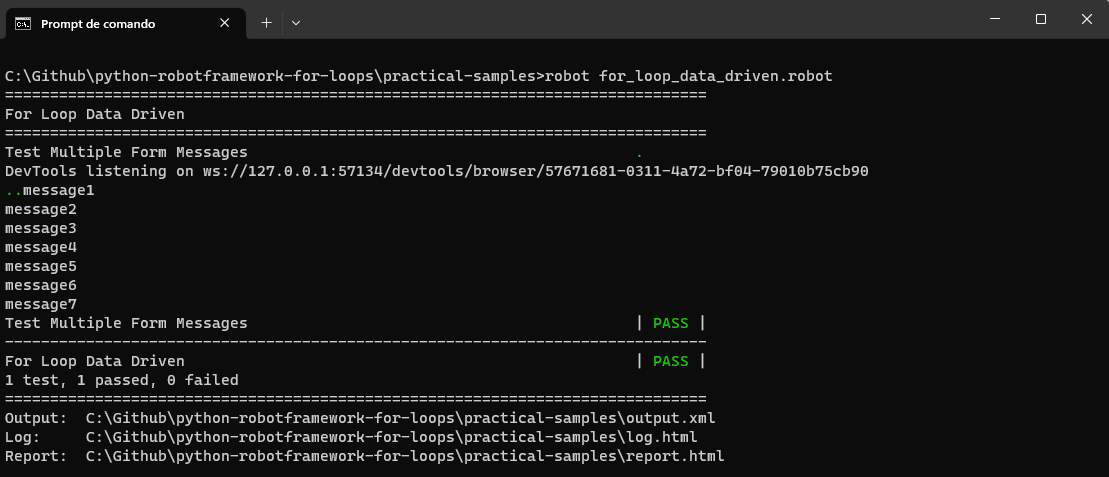
A particle use case for data-driven testing is to validate a form’s ability to display different messages correctly.
|
1 2 3 4 5 6 7 8 9 10 11 12 13 14 15 16 17 18 19 20 21 22 23 24 25 |
*** Settings *** Library SeleniumLibrary *** Variables *** ${URL} https://www.lambdatest.com/selenium-playground/simple-form-demo *** Keywords *** Message Action [Arguments] ${message} Input Text id=user-message ${message} Click Button id=showInput ${text} = Get Text id=message Log To Console ${text} *** Test Cases *** Test Multiple Form Messages @{messages} = Create List message1 message2 message3 message4 message5 message6 message7 Open Browser ${URL} Chrome Maximize Browser Window FOR ${message} IN @{messages} Message Action ${message} END |
Let’s understand the code into points below
- Browser interaction
- Message list preparation
- For Loop iteration
- Keyword execution
The test case begins by opening and maximizing the browser.
It prepares a list of messages. This list likely contains different messages that must be tested on the web page.
The For loop in Robot Framework is initiated to iterate over the list of messages.
For each message in the list, the “Message Action” keyword is called. This keyword performs a series of actions, such as filling the message, clicking a button, and retrieving and printing the message text.
Result
Nested loops: loop within a loop scenario.
Nested loops in test automation are a useful tool for handling complex testing needs that involve multiple variables or aspects. While a single loop is adequate when dealing with just one factor, like various user credentials, real-world testing often involves considering several factors at once, and that’s where nested loops become valuable.
For example, if you have 3 browsers and 3 operating systems, a nested loop will ensure you test all 9 combinations. This is often referred to as combinatorial testing, and it’s crucial for identifying edge cases that might not appear when variables are tested in isolation.
For instance,
A practical use case for nested loops, getting two lists of browsers and versions, we open a page using these configurations, close the browser, and log these configurations to the console.
|
1 2 3 4 5 6 7 8 9 10 11 12 13 14 15 16 17 18 19 20 21 22 23 24 |
# Required Libraries for the automation script. *** Settings *** Library SeleniumLibrary # Configuration and Test Data variables. *** Variables *** # Base Test Configuration ${URL} https://ecommerce-playground.lambdatest.io/index.php?route=account/register *** Test Cases *** Check Matrix Elements @{browsers} = Create List Chrome Firefox Edge @{versions} = Create List 117 116 FOR ${browser} IN @{browsers} FOR ${version} IN @{versions} Open Browser ${URL} ${browser} ${version} Close Browser Log To Console Executed on: ${browser} and ${version} END END |
Result
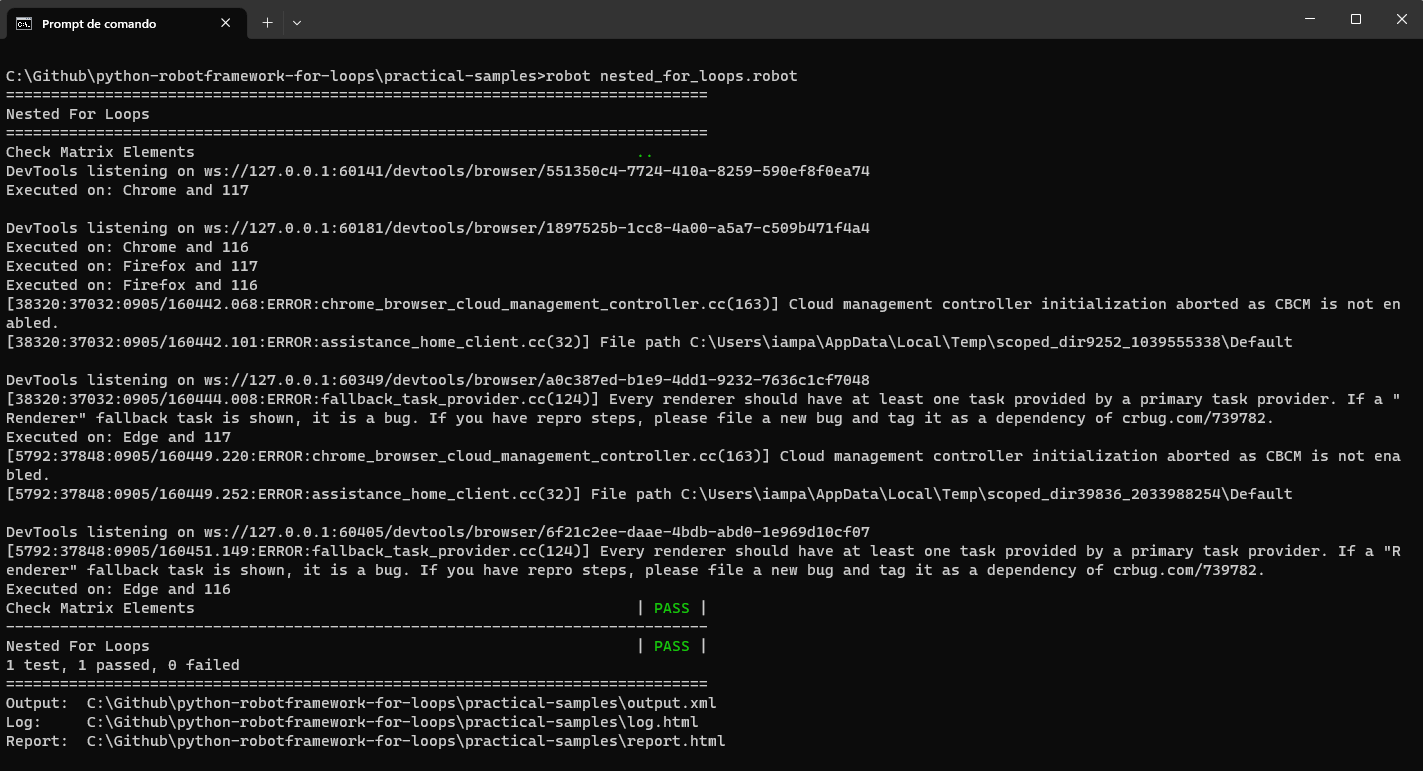
Note: It is important to mention that using nested loops is not a good practice, so you can analyze if this is really needed or if you can use other alternatives.
Iterating over files and directories
Iterating over files and directories is a common necessity in automation tasks, particularly when you are dealing with bulk data, batch processing, or you need to apply a set of actions on multiple files or folders. This ability to traverse a filesystem can simplify many aspects of test automation.
For instance,
- Bulk data handling: Let’s say you have a folder containing hundreds of data files you need to read and validate. Manually checking each file would be time-consuming and cause errors. By using iteration over directories, you can automate this process, making it faster and more accurate.
- Dynamic test scenarios: When your test cases are driven by data stored in multiple files, iteration allows for a more dynamic approach to reading these files and executing corresponding test cases.
- File and directory management: In some test scenarios, you might need to clean up test directories by deleting temporary files or perhaps moving files to specific directories based on some criteria (e.g., archiving logs). Iteration over directories can automate these tasks.
- Enhanced validation: Imagine a scenario where you need to validate the contents of multiple files against certain criteria. Looping through files allows you to execute this in batch mode, making the validation process more efficient.
- Modular tests: With iteration, you can build more modular tests that are easier to maintain. Each file can represent a different module or feature to be tested, making it easier to manage your test suite.
For instance,
Let’s take a practical use case by creating a code that interacts with files and dictionaries. Below is the folder structure that we are going to use to demonstrate the iteration.
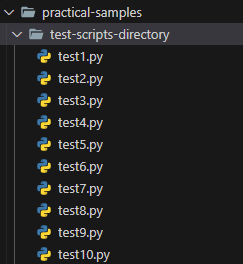
We can have the code to interact with the directory and files inside it.
|
1 2 3 4 5 6 7 8 9 10 11 |
*** Settings *** Library OperatingSystem *** Test Cases *** Process Files In Directory ${path} = Set Variable test-scripts-directory @{files} = List Files In Directory ${path} FOR ${file} IN @{files} Log To Console Processing file: ${file} END |
After importing the necessary library, this code snippet specifies a directory path. It then lists all files in this directory and iterates over them, logging each file’s name. You can expand this to process or analyze file content.
When running the code, we could see that thorough comprehension of the For loop in Robot Framework can substantially elevate the quality and efficiency of your test automation processes. The given examples offer a mere glimpse of its vast capabilities. By understanding its intricacies and applications, testers can sculpt comprehensive, scalable, and effective test scripts.
Tips for efficient test automation using For loop
The For loop in Robot Framework has significantly improved the capabilities of automation scripts, making it easier for testers to handle repetitive tasks. Yet, their true power comes to light when combined with other testing strategies.
In this section, we explore advanced techniques that can be seamlessly integrated with the For loop in Robot Framework to enhance test automation efficiency and effectiveness.
Parallel loop execution for faster test runs
One of the prime ways to speed up the tests is to utilize loops by executing them in parallel. Especially in cases where loop iterations are independent of each other, parallel execution can reduce test run time accordingly.
How it works?
Parallel execution involves running multiple loop iterations simultaneously, leveraging the multi-core capabilities of modern processors.
Implementation Tip
While Robot Framework does not inherently support parallel loop iterations, there are external tools, such as Pabot, which can be integrated with Robot Framework to achieve parallel execution. The key is to ensure each iteration is isolated and doesn’t interfere with others.
Utilizing the For loops for setup and teardown in test suites
Setup and teardown phases are essential parts of a test suite, ensuring the testing environment is correctly initialized and eventually cleaned up. The For loop in Robot Framework can be instrumental in handling scenarios where multiple setups or teardown steps are needed.
Implementation Tip
By combining the For loop in Robot Framework with the suite’s setup and teardown, you can automate environment preparations and cleanup efficiently. This ensures that each test case runs in a consistent, controlled setting, improving the reliability of your test results.
Case Study
In this section, we will apply some of the knowledge of this blog about using the For loop in Robot Framework in a Selenium automation test.
Real-life application of For loop in Robot Framework
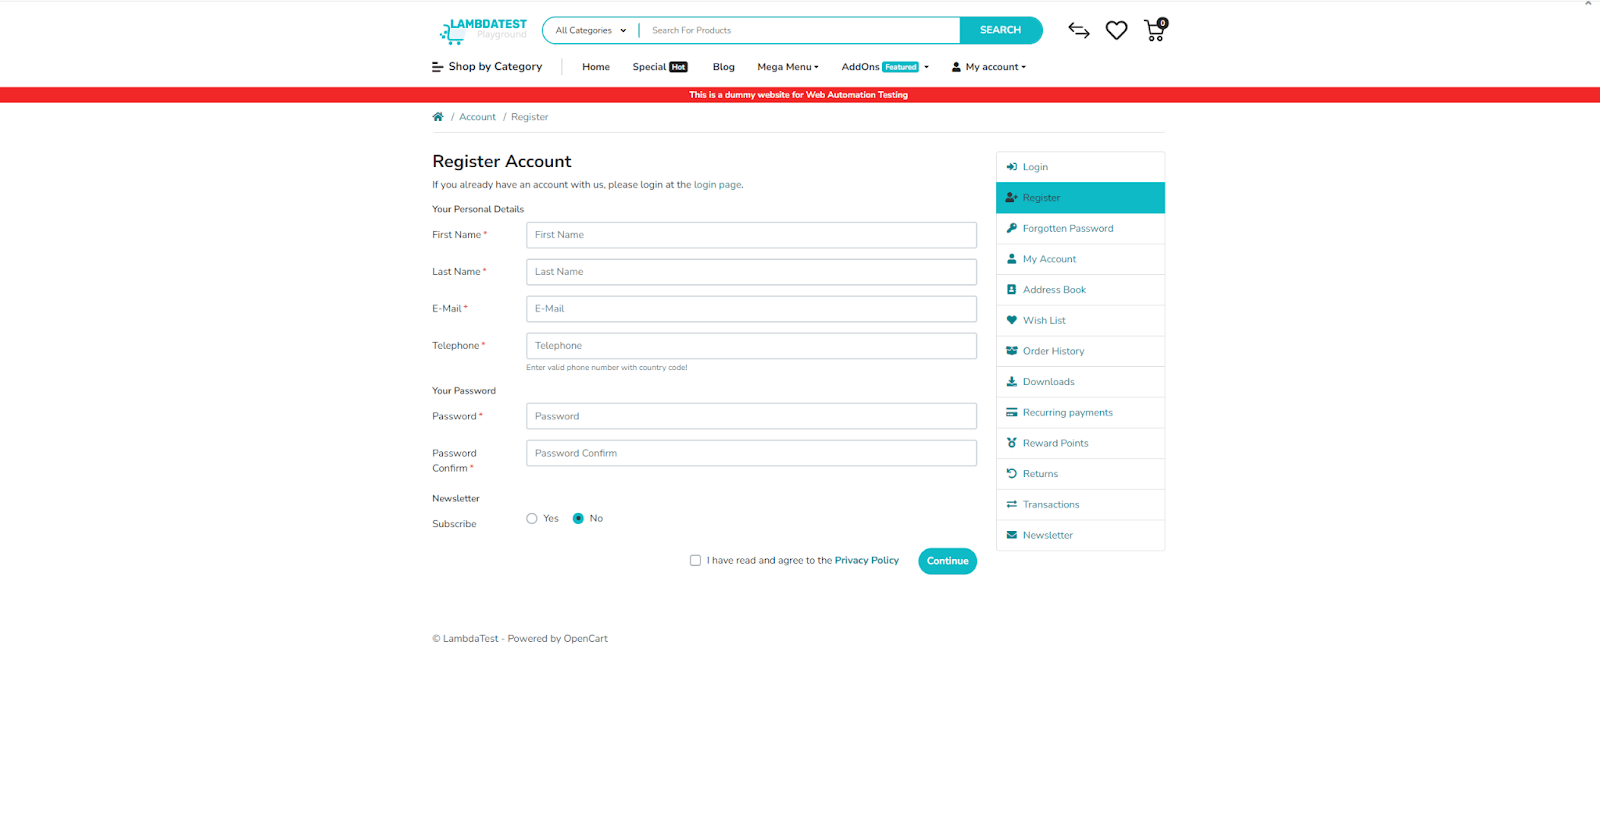
Imagine you are working on an eCommerce website with a huge product catalog list, and your task is to validate that the product details, price, and availability are correctly displayed on the website for all the various products, Manually testing each product page details can be time-consuming and nearly seems difficult to complete the task.
For such intensive use cases, you can use the For loop in Robot Framework to automate the testing process by iterating through the list of products and their details, making it possible to finish the task on time and with quality.
To advance the testing process more effectively, you can integrate Robot Framework with any of the cloud services in the market. In this case, we’ll use LambdaTest as our cloud service to illustrate these concepts.
LambdaTest is an AI-powered test orchestration and execution platform that lets you run manual and automated tests at scale with over 3000+ real devices, browsers, and OS combinations.
To perform Selenium Python testing on the LambdaTest cloud grid, you should use the capabilities to configure the environment, and we will run our test on the popular Chrome browser with the Windows 11 operating system.
In the further section, we will look deep into how to set capabilities to configure the environment and how to select the browser and operating system of our choice.
Let us look into the test scenario that we are going to work on.
Test Scenario 1
Preconditions:
Steps:
Postconditions:
|
Project setup
Before diving into testing, it’s essential to establish a robust testing environment. Properly configuring this environment is a crucial step that ensures a hassle-free coding experience and optimizes testing potential.
Now, let’s focus on the essential steps before starting the testing process. By following these key measures, you can ensure that your testing procedure is organized and efficient, leading to successful outcomes in your testing efforts.
Step 1: Download and install Python
Begin by installing Python, if not already installed, from the official Python website.
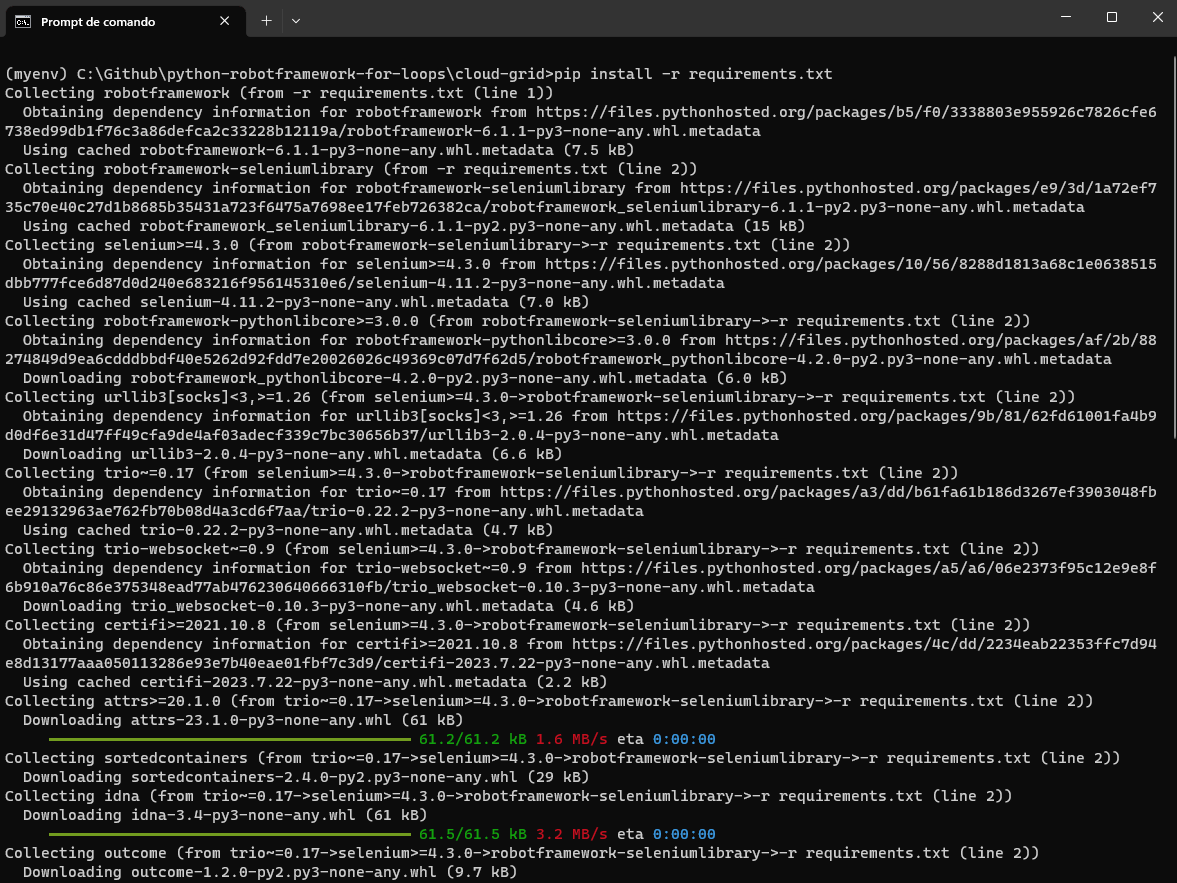
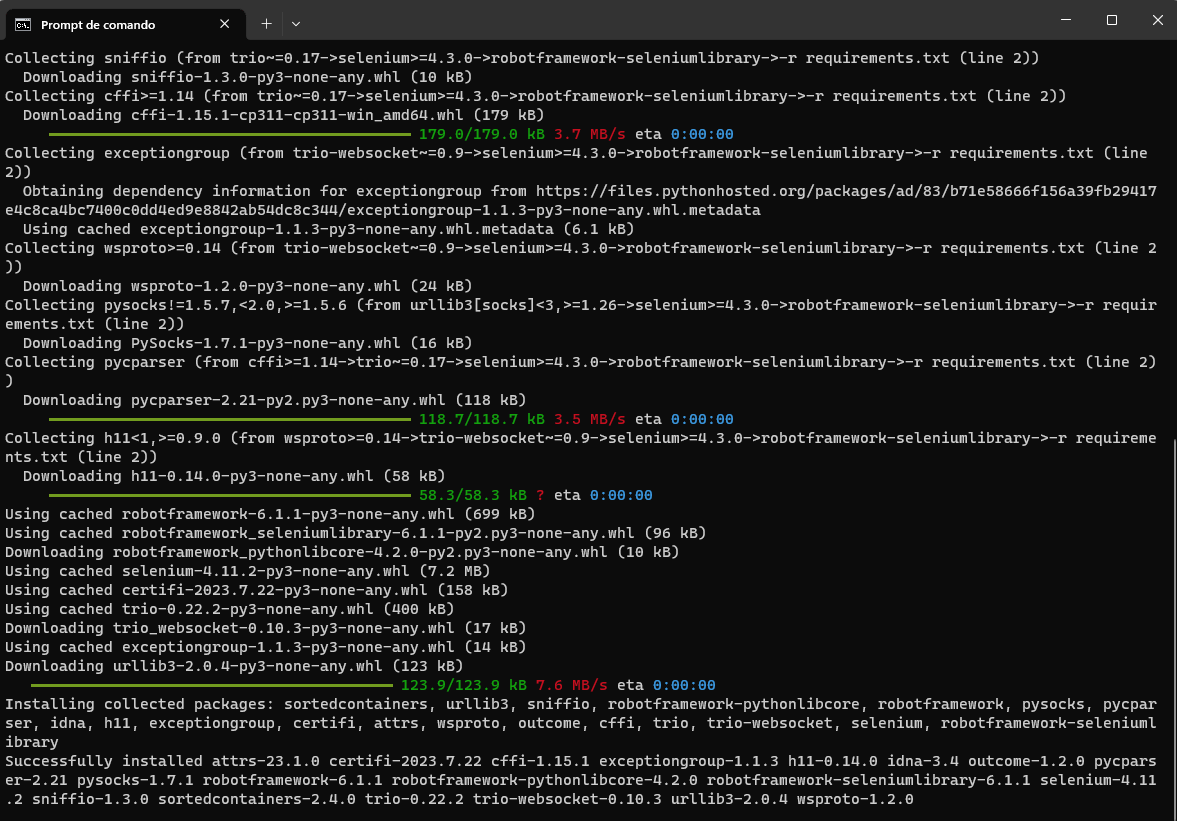
Step 2: Install Robot Framework and Robot Framework Selenium libraries
Once Python is installed, use the Python package manager, pip, to install Selenium and pytest just by running the following command.
|
1 |
pip install -r requirements.txt |
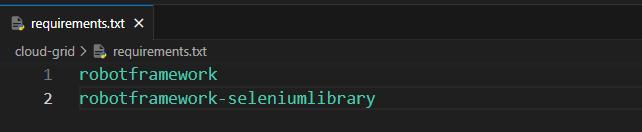
Step 3: Create a file
Create a file called requirements.txt that contains the dependencies that we would need to install.
After running, you can see the below output
Step 4: Download and Install an IDE
In this case, we will be using VS Code as our IDE, and you are free to use any preferred IDE of your choice.
Step 5: Setting up pytest in Visual Studio Code
To configure pytest as your test runner in Visual Studio Code, follow these straightforward steps:
- Create a project folder: Make a folder for your project, and name it anything you want.
- Open the project folder in VS Code: Open this new project folder in Visual Studio Code.
- Access the command palette: You can reach the command palette by going to “View” in the menu and choosing “Command Palette.” Or simply press Ctrl+Shift+P (Cmd+Shift+P on macOS).
- Configure tests: In the command palette, type “Configure Tests” and select it from the options.
- Choose pytest as the test runner: When asked, pick pytest as your preferred test runner.
- Select the root directory: Go for the root directory option. It sets up a pytest for your entire project.
By following these simple steps, you’ll have pytest set up as your test runner in Visual Studio Code, making it easier to manage your tests right inside the editor.
If you’re using the pytest framework for running automation tests, you can explore our pytest tutorial. It allows you to run your test suites in parallel across multiple browsers and operating systems for comprehensive test coverage.
Subscribe to the LambdaTest YouTube channel for more videos on parallel testing and Selenium testing and to enhance your testing experience!
Now that our project setup is completed let’s get started setting up the capabilities from the LambdaTest platform.
Setting up Lambdatest
Step 1: Create a LambdaTest account.
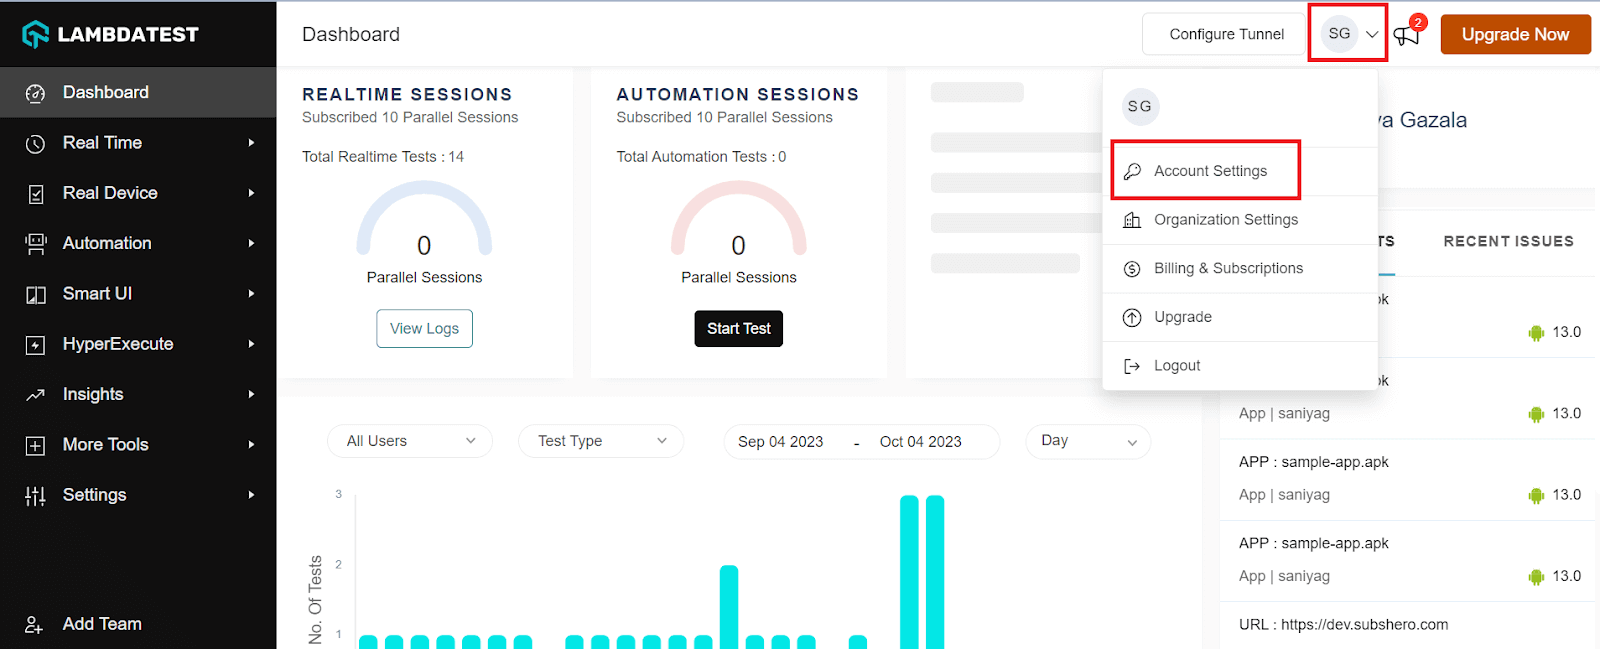
Step 2: Get your Username and Access Key by going to your Profile avatar from the LambdaTest dashboard and selecting Account Settings from the list of options.
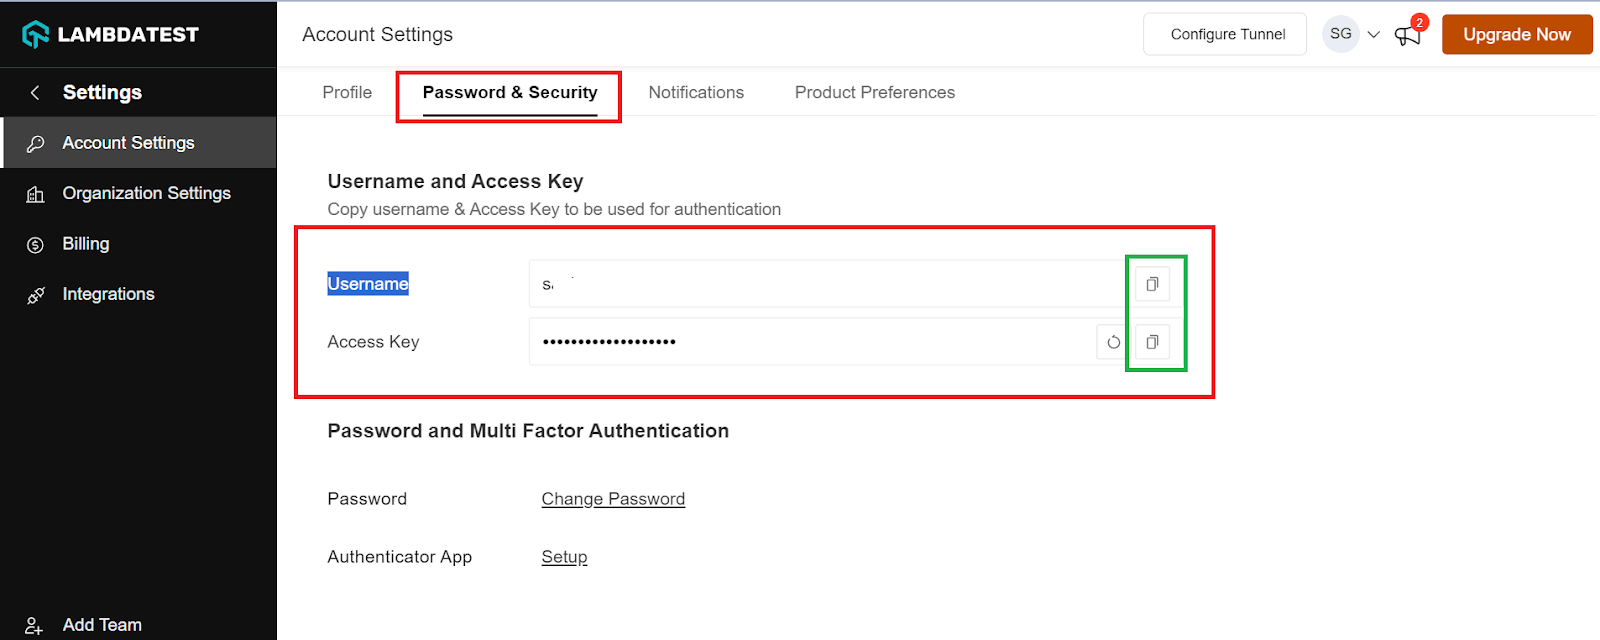
Step 3: Copy your Username and Access Key from the Password and Security tab.
Step 4: Generate Capabilities, which contain details like your desired browser and its various operating systems. Generate your LambdaTest Capabilities Generator as per your requirement.
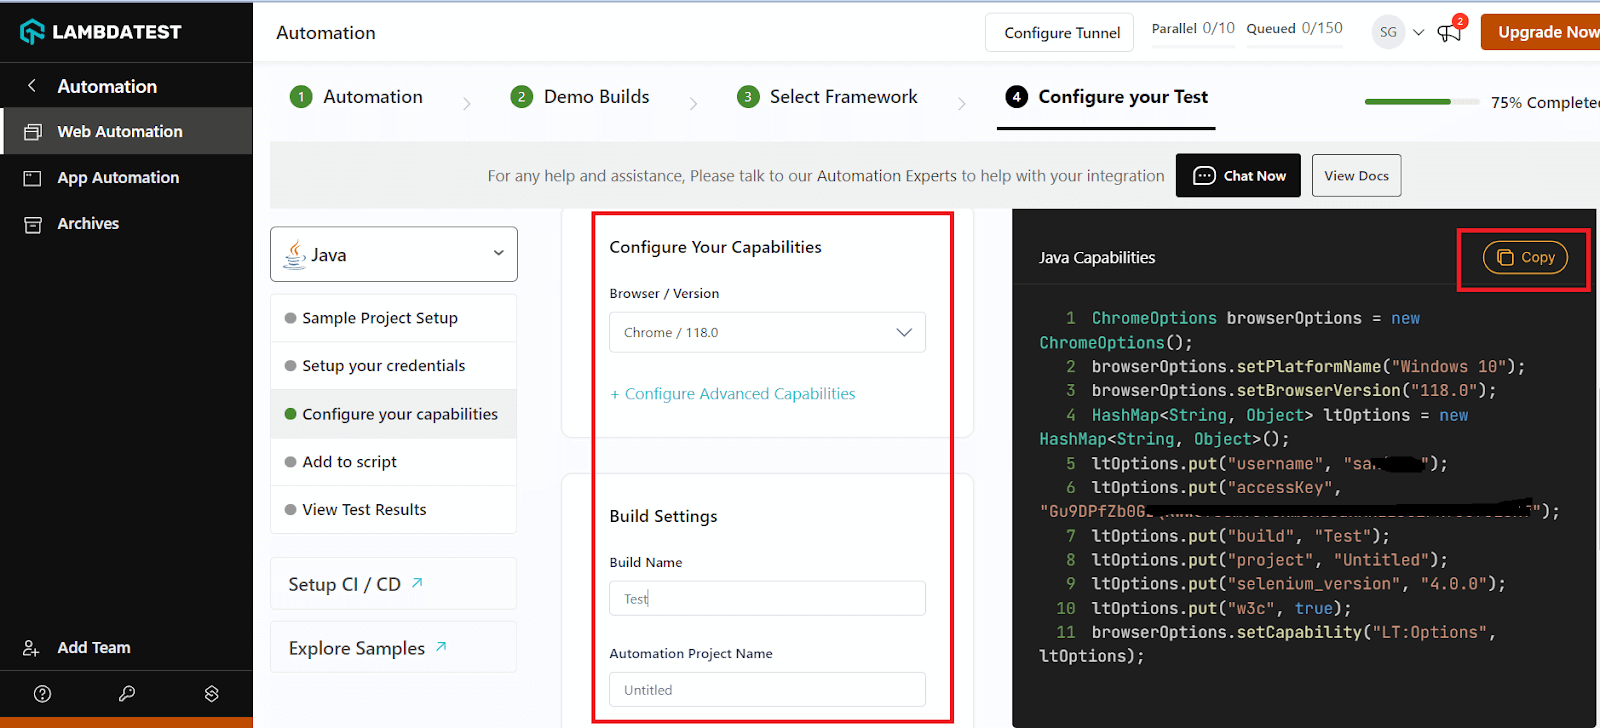
Step 5: Now that you have both the Username, Access key, and capabilities copied, all you need to do is paste it into your test script.
In the following section, we will look into the implementation part of the LambdaTest cloud platform.
Implementation
|
1 2 3 4 5 6 7 8 9 10 11 12 13 14 15 16 17 18 19 20 21 22 23 24 25 26 27 28 29 30 31 32 33 34 35 36 37 38 39 40 41 42 43 44 45 46 47 48 49 50 51 52 53 54 55 56 57 58 59 60 61 62 63 64 65 66 67 68 69 70 71 72 73 74 75 76 77 78 79 80 81 82 83 84 85 86 87 88 89 90 91 92 93 |
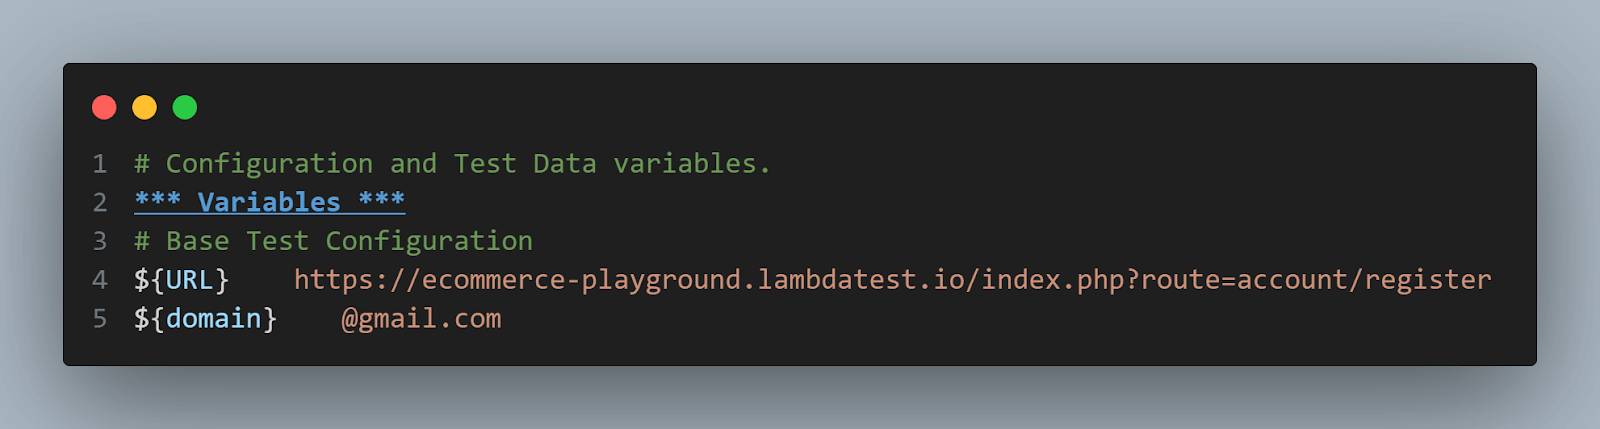
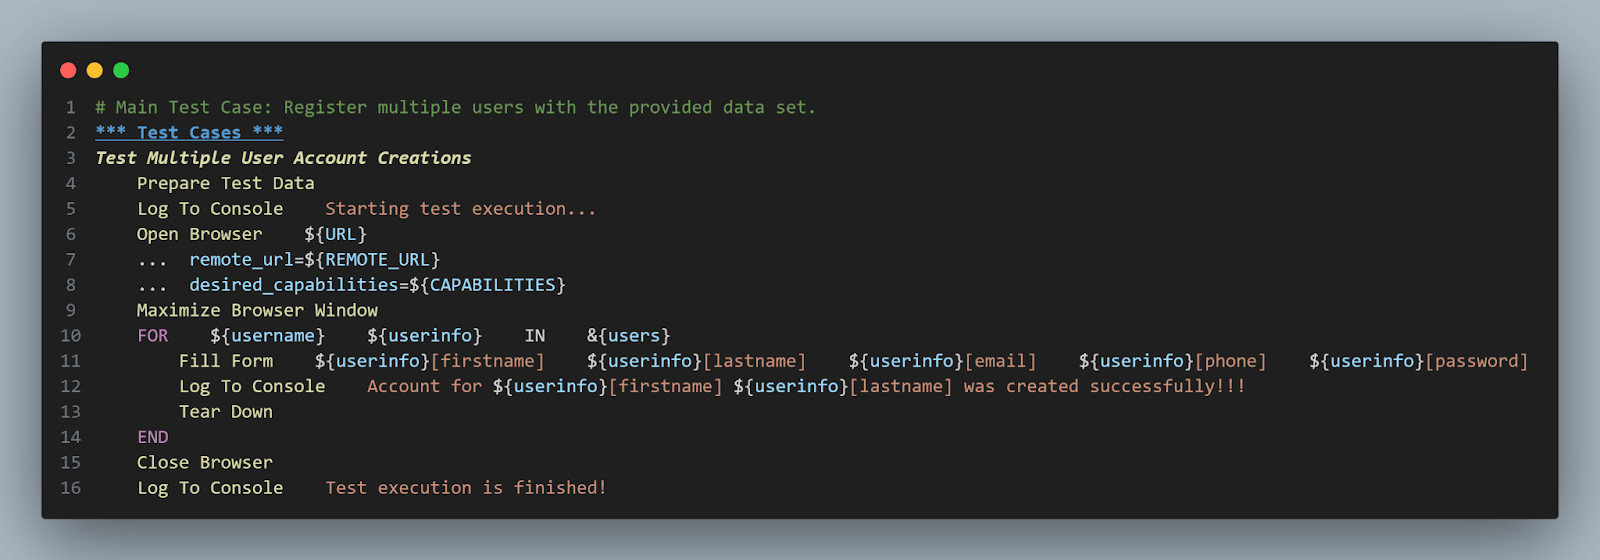
# Required Libraries for the automation script. *** Settings *** Library SeleniumLibrary Library Collections Library String # Configuration and Test Data variables. *** Variables *** # Base Test Configuration ${URL} https://ecommerce-playground.lambdatest.io/index.php?route=account/register ${domain} @gmail.com # Data set for registration forms. @{first_names} = Paulo Maria John Tatiane Kim Joana @{last_names} = Oliveira Silva Kennedy Grey Kardashian Prado @{telephones} = 999888777 888777666 777666555 666555444 555444333 444333222 @{passwords} = 123456 234567 345678 456789 567890 678901 &{users} # empty dictionary to store users # LambdaTest Cloud Grid configurations. &{options} browserName=Chrome platform=Windows 11 version=latest name=For Loop Test Case buildName=For Loop Build Name projectName=For Loop Project Name &{CAPABILITIES} LT:Options=&{options} ${REMOTE_URL} http://%{LT_USERNAME}:%{LT_ACCESS_KEY}@hub.lambdatest.com/wd/hub # Custom Keywords *** Keywords *** # Keyword to generate a random string of given length. Generate Random String [Arguments] ${length}=8 ${random_string} = Evaluate ''.join(random.choices(string.ascii_letters + string.digits, k=${length})) modules=random,string [Return] ${random_string} # Keyword to generate a user data set for the registration forms. Prepare Test Data Log To Console Preparing test data... ${len} = Get Length ${first_names} FOR ${i} IN RANGE ${len} ${my_random_string} = Generate Random String 10 ${firstname} = Get From List ${first_names} ${i} ${lastname} = Get From List ${last_names} ${i} ${mail} = Set Variable ${my_random_string}${domain} ${phone} = Get From List ${telephones} ${i} ${pwd} = Get From List ${passwords} ${i} # Create an inner dictionary for each user &{user_info}= Create Dictionary firstname=${firstname} lastname=${lastname} email=${mail} phone=${phone} password=${pwd} # Store this user_info dict under the user's first name (or you can choose another key) Set To Dictionary ${users} ${firstname} ${user_info} END Log To Console Test data is now ready! # Keyword to fill the registration form with provided user details. Fill Form [Arguments] ${firstname} ${lastname} ${email} ${telephone} ${password} Input Text id=input-firstname ${firstname} Input Text id=input-lastname ${lastname} Input Text id=input-email ${email} Input Text id=input-telephone ${telephone} Input Text id=input-password ${password} Input Text id=input-confirm ${password} Click Element //label[@for='input-agree'] Click Button //input[@value='Continue'] # Keyword to reset the test environment after each iteration. Tear Down Click Element //a[@class='list-group-item'][14] Go To ${URL} # Main Test Case: Register multiple users with the provided data set. *** Test Cases *** Test Multiple User Account Creations Prepare Test Data Log To Console Starting test execution... Open Browser ${URL} ... remote_url=${REMOTE_URL} ... desired_capabilities=${CAPABILITIES} Maximize Browser Window FOR ${username} ${userinfo} IN &{users} Fill Form ${userinfo}[firstname] ${userinfo}[lastname] ${userinfo}[email] ${userinfo}[phone] ${userinfo}[password] Log To Console Account for ${userinfo}[firstname] ${userinfo}[lastname] was created successfully!!! Tear Down END Close Browser Log To Console Test execution is finished! |

Before jumping to the outcomes, let’s understand what the code is trying to perform in a step-by-step procedure.
Code Walkthrough
Step 1: Import statement
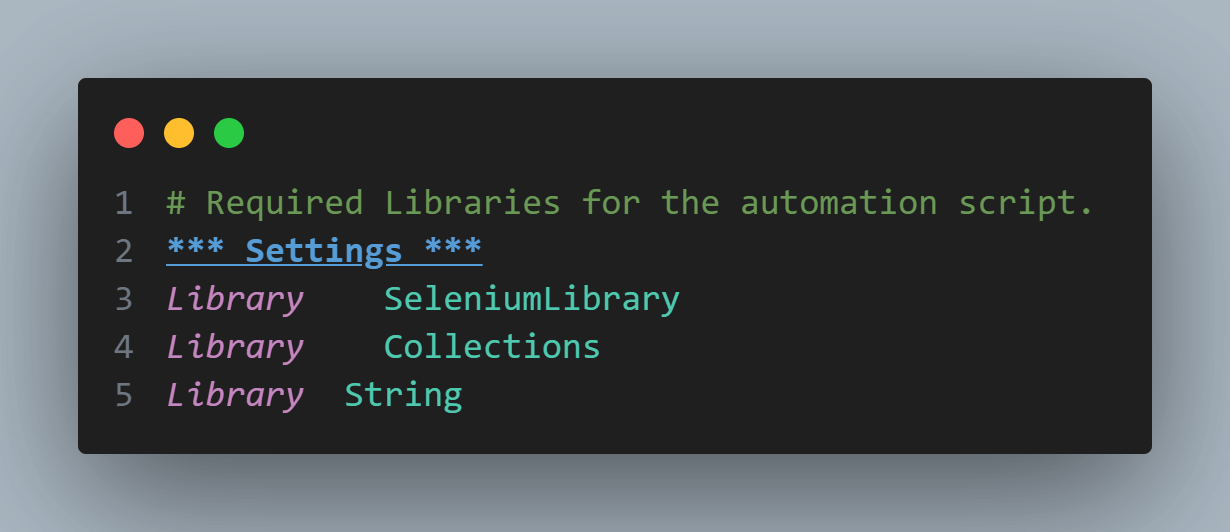
At the very beginning, the script imports three essential libraries in the Settings section of the script:
- SeleniumLibrary: Vital for web automation tasks.
- Collections: Enables us to manipulate lists and dictionaries.
- String: Provides functionalities for various string operations.
Step 2: Setting up initial variables
- Define the base URL to be tested (${URL).
- Set the domain for email addresses used during the test (${domain).
Step 3: Other related variables
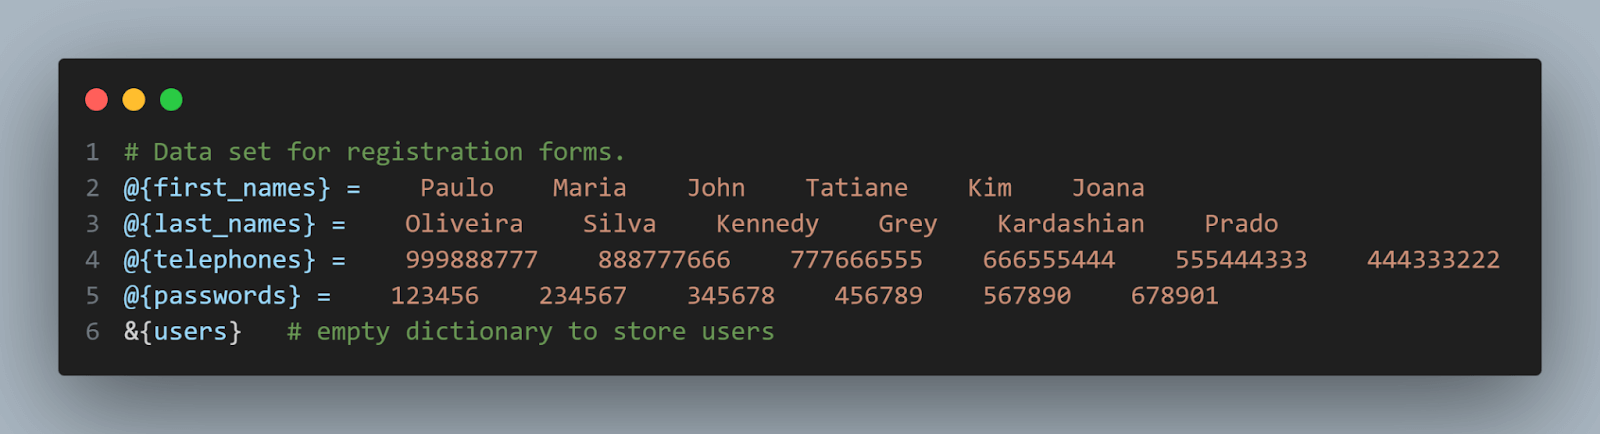
- We will add some variables related to the test data that we will use to create the new user accounts. There are some lists to store 6 first names, last names, telephones, and passwords.
- Initial structure to an empty dictionary to store the users during the preparation data phase of the script.
Step 4: Configuring LambdaTest cloud grid (variable section)
Define the configuration settings for LambdaTest cloud grid using &{options}, ${CAPABILITIES}, and ${REMOTE_URL}.

In Robot Framework, keywords are like building blocks for actions that can be reused to make scripts more efficient. In this case study, four specific keywords have been created to simplify the testing process.
Step 5: Creating custom keywords
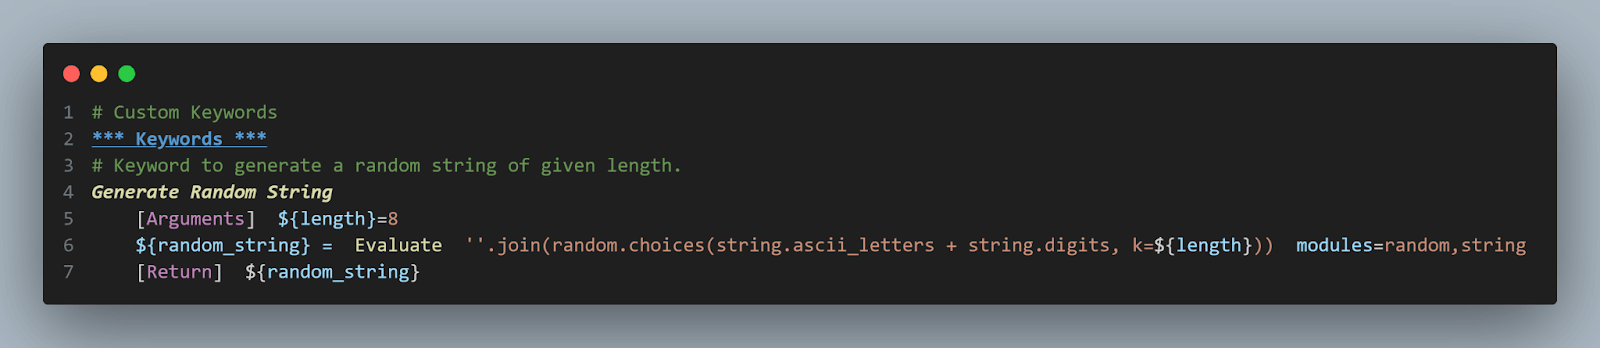
- Generate Random String: A custom keyword that, as its name suggests, produces a random alphanumeric string of a given length. We utilize this keyword to generate unique email addresses for the test case. This is necessary because the website restricts having multiple accounts with the same email, so we rely on random email strings.
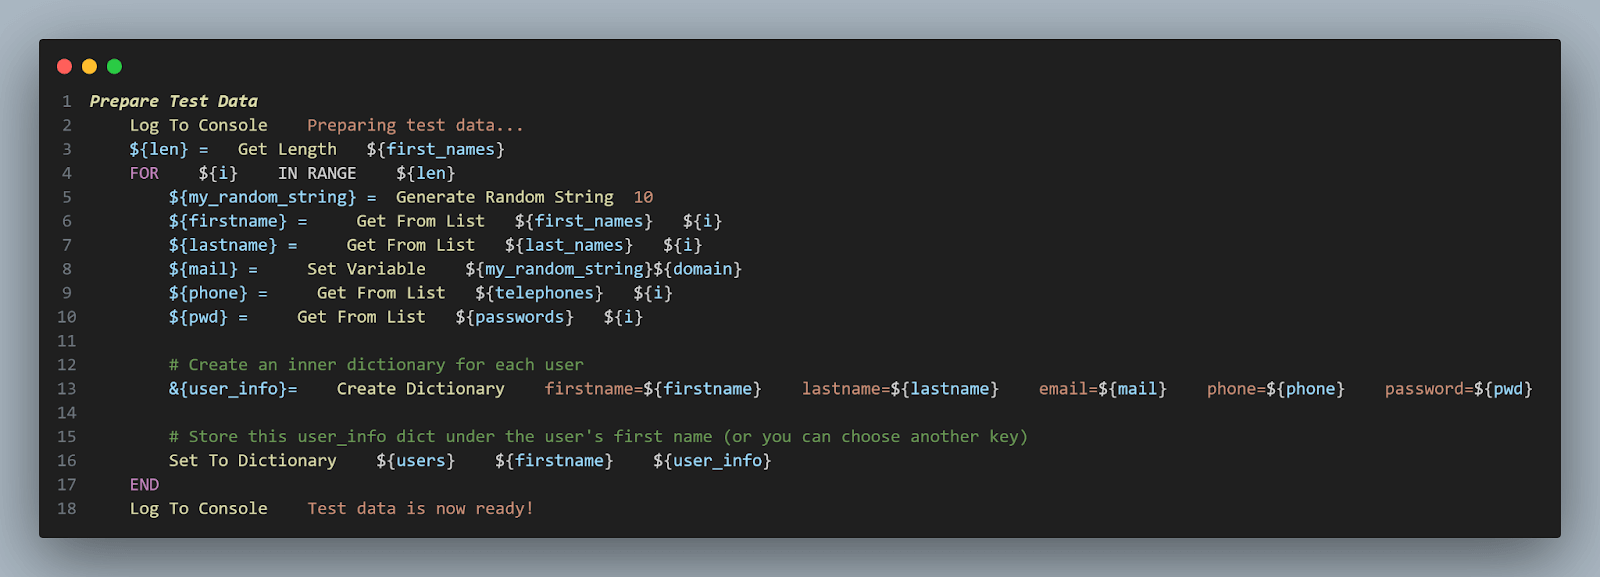
- Prepare Test Data: Before executing tests, this keyword prepares a set of user data. It combines the provided lists and creates a dictionary, &{users}, that holds individual user details. The advantage is that it offers structured data, easy retrievals, and ensures data consistency.
Step 6: Filling out the registration form
Focusing on the FOR loop in the above code, this is where the magic happens.
The FOR loop iterates based on the previously determined range, ${len}. For each iteration:
- A unique random string is generated with a fixed length of 10
- First and Last Name are fetched from their respective lists, with ${i} ensuring we fetch the right data for the current iteration
- The unique email for the user is created by appending ${domain} to the random string
- Phone and password details are similarly retrieved from their respective lists.
Every iteration creates a detailed user data set. This data is structured into a dictionary named &{user_info}.
Once the user’s data is structured, it’s stored in the master ${users} dictionary. The first name of the user acts as the key, ensuring quick retrieval.
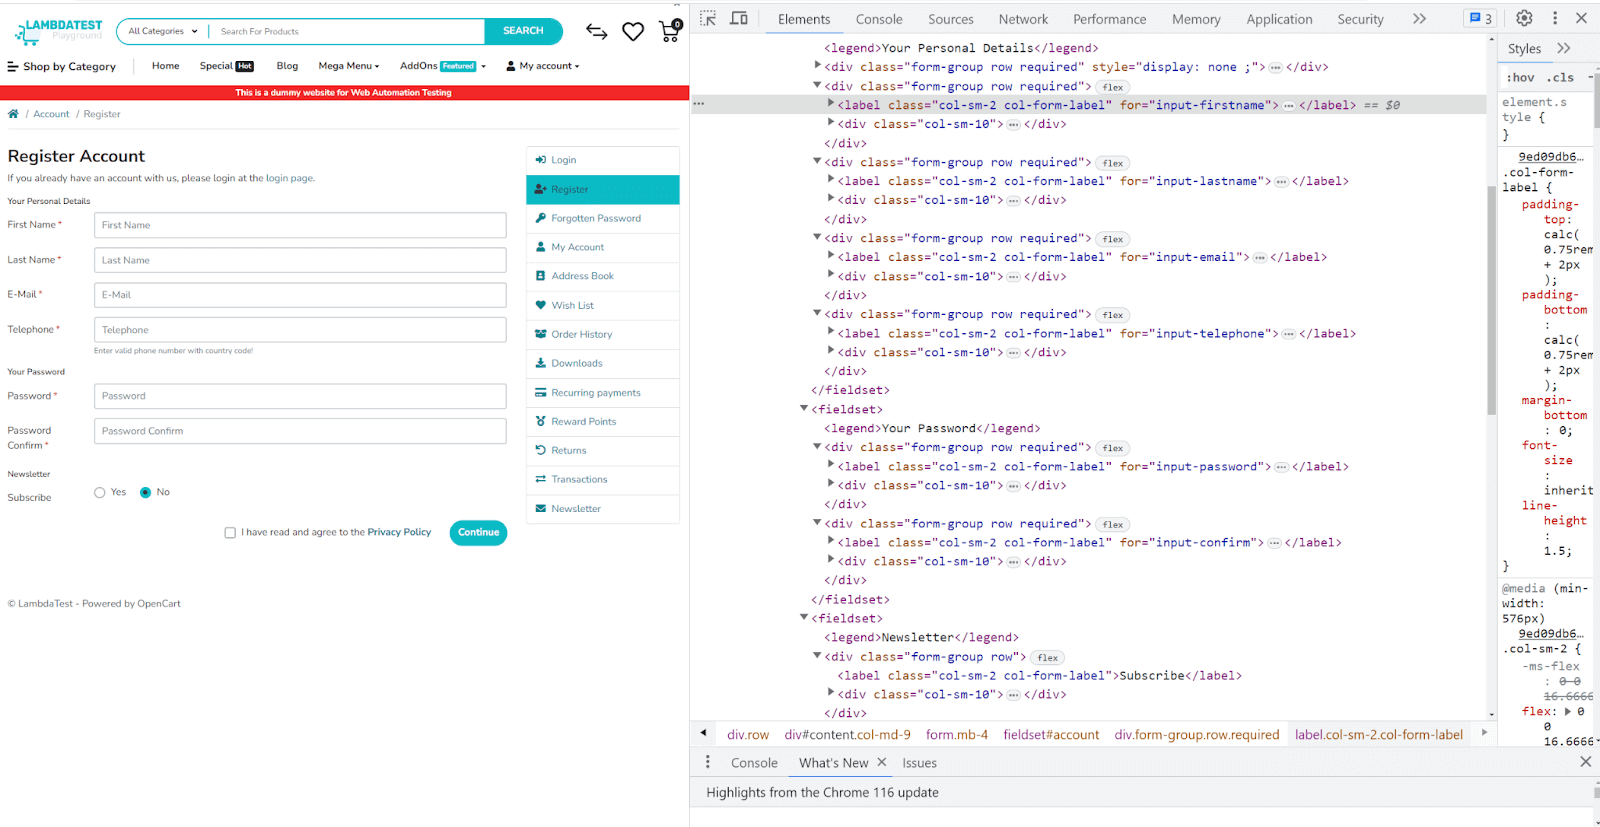
This keyword, Fill Form simulates the actual account creation process. It inputs the user’s data into specific fields on a form and submits it.
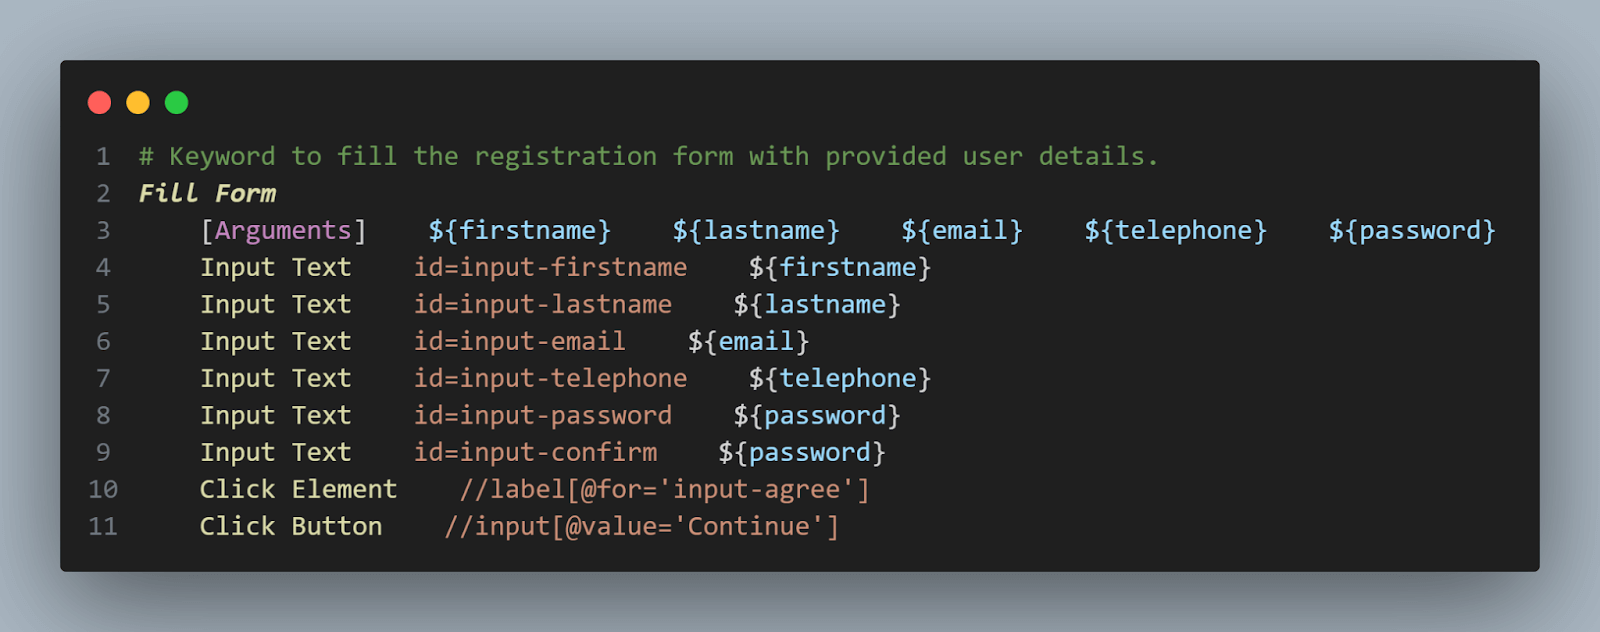
To locate each of these elements, you can check the IDs using the Inspect tool. For example, for the First Name input field.
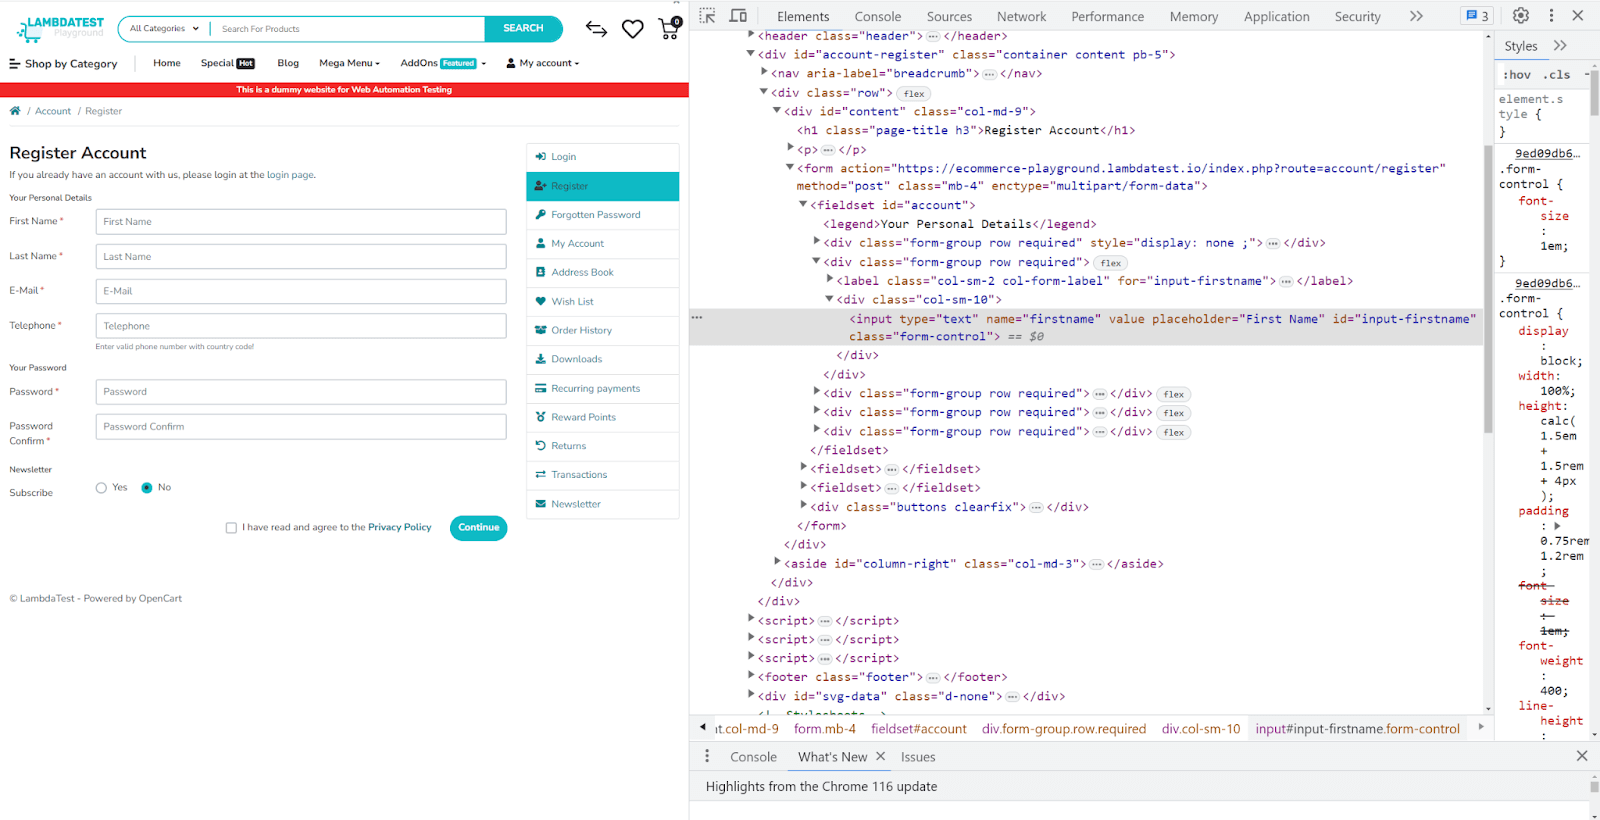
For deeper insights on how to locate elements in Selenium, explore this blog on Selenium locators. This resource provides detailed information on locators like XPath, CSS selectors, and more. It also provides practical insights into identifying and interacting with web elements during the test automation.
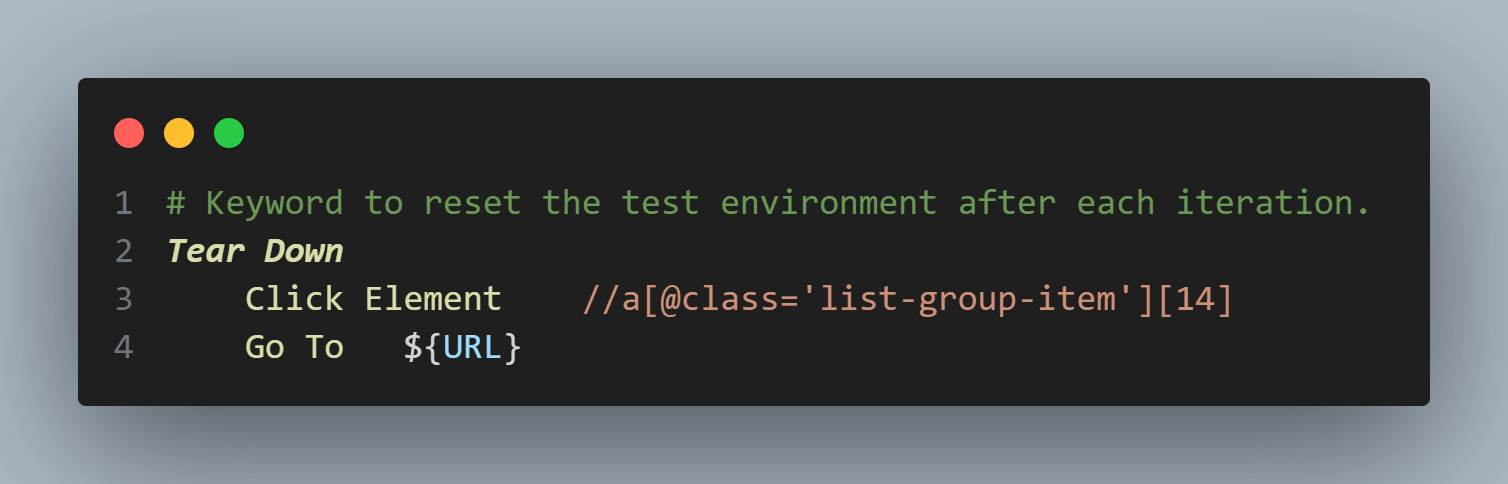
Step 7: Resetting the environment (Tear Down Keyword)
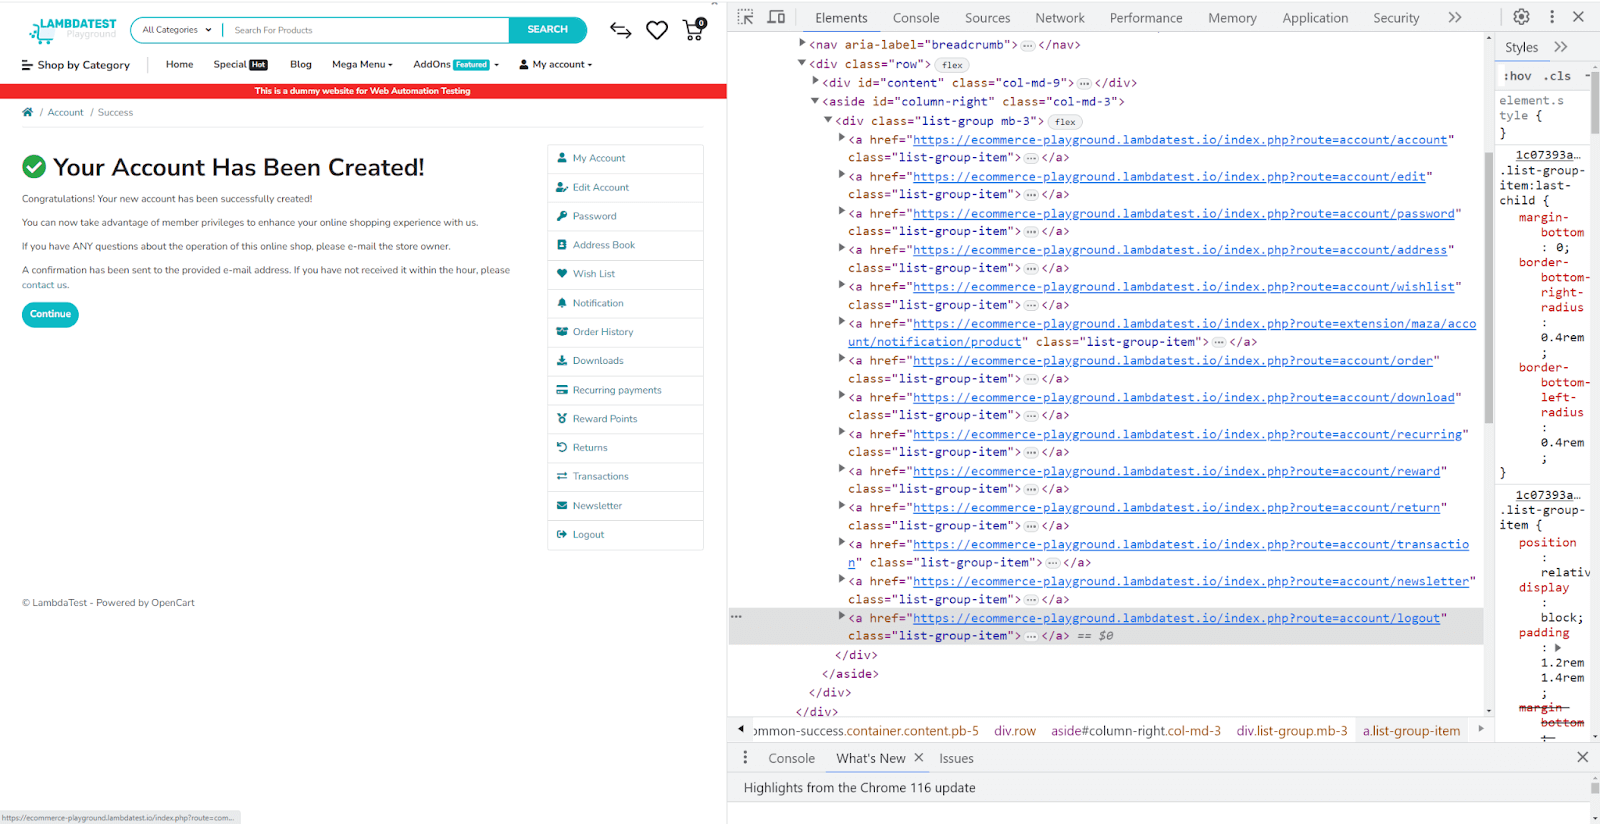
The Tear Down keyword resets the environment, ensuring the web page is fresh for the next iteration. This consists of clicking on the Logout menu and redirecting to the main URL.
To locate the logout option on the page, you can get the CSS using the Inspect tool.
Step 8: Test multiple user account creations
The main test case. Here’s what it does, step by step.
- Preparation: Call the Prepare Test Data keyword to get the data ready.
- Initialization: Opens the browser with the specified LambdaTest configurations and maximizes the window.
- Looping through user Data: The script now loops through each user data set stored in the &{users} dictionary.
- Form Fill: For each user, the script fills in their details on the form and logs a success message.
- Environment reset: Post each user registration, the script calls Tear Down to reset the environment.
- Completion: After all iterations, the script closes the browser and logs the test completion message.
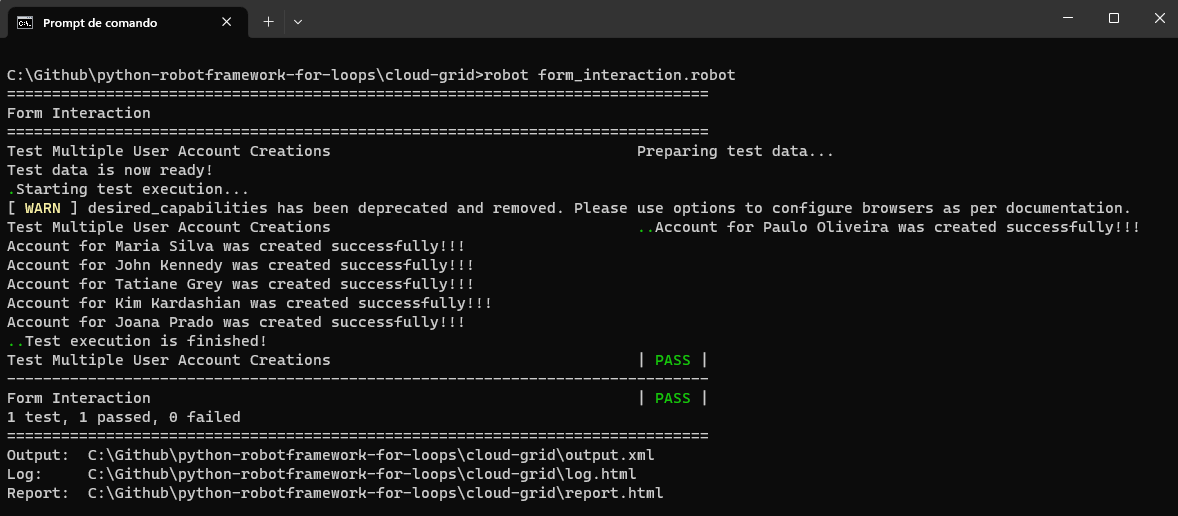
Run your tests using the following command.
|
1 |
robot form_interaction.robot |
Result
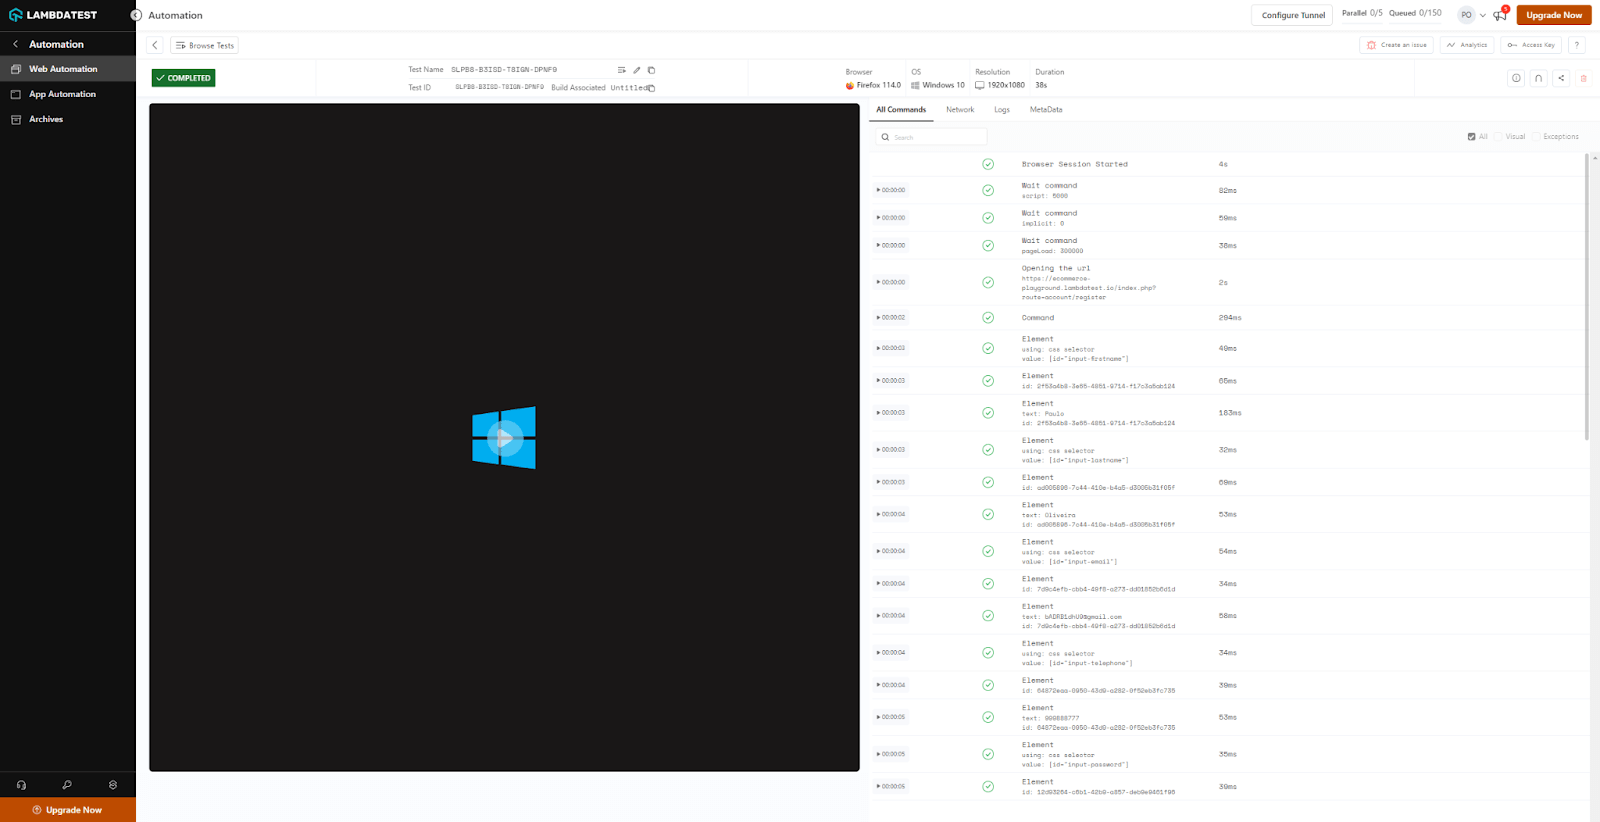
You can also check the test execution in the LambdaTest dashboard, as shown below
Best Practices for using the For loop
Leveraging the power of the For loop in Robot Framework promises enhanced functionality and coverage for your test automation. However, the proper use of loops demands a set of best practices to ensure optimal execution, maintainability, and readability. Let’s discuss some of these guidelines.
Keeping loops readable: The significance of whitespace and indentation
The first and foremost aspect of scripting, whether test automation or any programming task, is readability. A well-indented, spaced-out loop can immensely improve the script’s clarity.
Tip: Maintain clear indentation to distinguish the For loop declaration from its content, enhancing readability and understanding. This not only helps the author but also assists team members or future contributors in understanding the script’s flow quickly.
Limiting the loop count to ensure test efficiency
While loops provide the convenience of iteration, overextending their use can lead to lengthy test execution times. Always be careful of the number of iterations.
Tip: If your loop requires many iterations, perhaps consider if all of them are essential for your test. Can some be grouped together? Are there redundant checks? Organizing the iterations can significantly optimize the test runtime.
Avoiding infinite loops
Endless loops are a big problem for programmers, especially in test automation, where timing matters a lot.
Imagine this real-life example: You’re testing a website with multiple pages, clicking the ‘Next’ button to go to the next page. You might think it’s enough to keep clicking while the ‘Next’ button is there. But if the website has a bug where the ‘Next’ button keeps showing even on the last page, your test could get stuck in a never-ending loop.
Tips: Always ensure there’s a clear, reachable termination condition. For, the For loop in Robot Framework, which inherently has a defined set of iterations (like a list of elements), the risk is lower. However, when combining conditions with loops or modifying loop variables within the loop, exercise caution to ensure you’re not unintentionally creating an endless loop.
Properly handling loop breakouts and continuations
Sometimes, during loop execution, you might want to skip a particular iteration (continue) or halt the entire loop prematurely (break). Robot Framework provides Continue For Loop and Exit For Loop If keywords for these purposes.
|
1 2 3 4 5 6 7 8 9 10 11 12 13 14 15 |
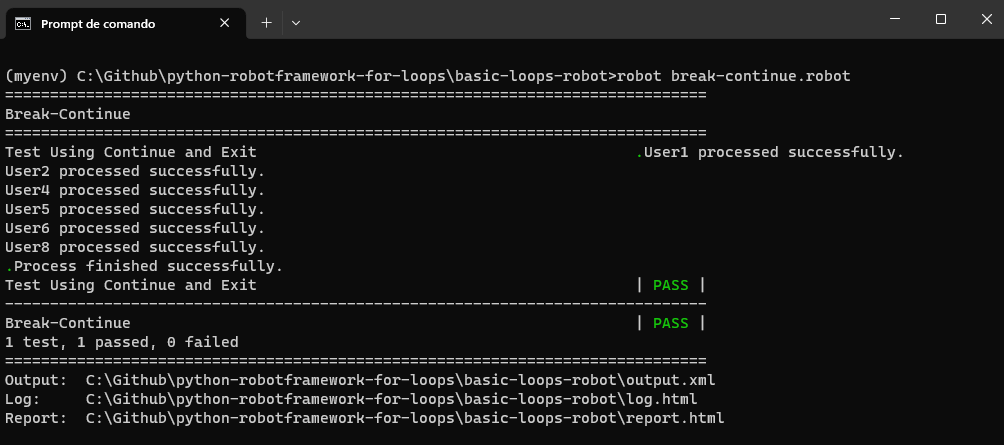
*** Test Cases *** Test Using Continue and Exit # Create the users list @{user_list}= Create List User1 User2 BlockedUser User4 User5 User6 BlockedUser User8 ThiefUser User10 # Iterate through the users list and perform the validation FOR ${user} IN @{user_list} Continue For Loop If '${user}' == 'BlockedUser' Exit For Loop If '${user}' == 'ThiefUser' Log To Console ${user} processed successfully. END Log To Console Process finished successfully. |
In the provided code, if a user from the list is BlockedUser, the loop will skip the remaining actions for that specific user and move to the next. If the status is ThiefUser, the loop breaks out entirely. If the user is different, the entire loop will be executed, and a message like User1 will be processed successfully. As displayed, always handle these breakouts carefully, ensuring no loose ends in your test logic.
Result
Conclusion
The journey from understanding the basics of loops in general programming to diving deep into their implementation in Robot Framework highlights the remarkable flexibility and adaptability these tools provide.
The potential of loops goes beyond just going through lists of numbers. Their real strength is creating test cases that dynamically change with different inputs, making tests more efficient and thorough. Whether running tests with various data sets, validating the web elements step by step, or setting up and cleaning up test suites, loops are the key parts of effective automation scripts.
The learning process in test automation keeps evolving. Robot Framework offers a lot to explore. For loop in Robot Framework is a powerful tool, but there’s so much more to discover in this framework. Ultimately, you have a vast canvas, and the For loop is like your paintbrush. It’s your time to craft your automation masterpiece.
Frequently Asked Questions (FAQs)
Which tool is used for Robot Framework?
Testers often complement Robot Framework with the Selenium2library to perform web automation. This library harnesses Selenium’s capabilities for web-based tasks within Robot Framework.
Is Robot Framework better than pytest?
Robot Framework is more suitable for keyword-driven testing, while pytest offers a broader range of testing options for Python projects.
What is a timeout in Robot Framework?
In Robot Framework, a timeout is the maximum wait time for an action or condition to be satisfied during test execution. If the action or condition takes longer than the specified timeout, it results in a test failure.
Is Robot Framework Codeless?
Robot Framework is not entirely codeless but is designed to be human-readable. It uses a plain-text format with keywords and arguments, making it accessible to technical and non-technical users.


Author’s Profile
Paulo Oliveira
Paulo is a Quality Assurance Engineer with more than 15 years of experience in Software Testing. He loves to automate tests for all kind of applications (both backend and frontend) in order to improve the team’s workflow, product quality, and customer satisfaction. Even though his main roles were hands-on testing applications, he also worked as QA Lead, planning and coordinating activities, as well as coaching and contributing to team member’s development. Sharing knowledge and mentoring people to achieve their goals make his eyes shine.
Blogs: 15
Got Questions? Drop them on LambdaTest Community. Visit now


