
How To Use Robot Framework For Parallel Test Execution
Himanshu Sheth
Posted On: June 20, 2023
![]() 164666 Views
164666 Views
![]() 31 Min Read
31 Min Read
Over the years, there have been monumental changes in the processes used for developing, testing, and delivering software. Development & release cycles have become considerably short, with Continuous Integration and Continuous Delivery (CI/CD) catalyzing these changes.
Continuous testing is one of the guiding pillars of the continuous integration process, as it aids in accelerating feedback and improving product quality. There is a constant race against time, but acceleration shouldn’t be achieved at the cost of quality!
This is where automated testing at scale can prove beneficial in unearthing bugs and increasing the overall test coverage. All of this can be achieved by accelerating the CI/CD pipelines with parallel tests (or parallel test execution). On a lighter note, parallel testing is one of the most trusted & reliable friends of CI/CD 🙂
The majority of the test automation frameworks provide the flexibility to run tests in parallel at different levels – test, test suite, method, class, and more. Though the level of parallelism depends on the nuances of the underlying framework, you need to choose the parallelism approach based on your execution requirements.
When it comes to automated testing with Python, there is flexibility to choose from several frameworks – PyUnit, Pytest (or pytest), Behave, and Robot, amongst others.
Frameworks like pytest support parallel test execution out of the box, whereas parallel testing in Robot, PyUnit, etc., is enabled using supporting tools and libraries. In this blog on using the Robot framework for parallel test execution, I will cover how to run automation tests in parallel using the Robot framework on the local grid, as well as the cloud Selenium grid.
If you want to upscale your Robot Framework interview skills, head over to our Robot Framework Interview Questions for a curated list of questions and solutions.
TABLE OF CONTENTS
What is Robot Framework?
For starters, Robot is a popular Python-based extensible keyword-driven open-source framework. It is primarily used for test automation, Acceptance Test Driven Development (ATDD), Behavior Driven Development (BDD), and Robotic Process Automation (RPA ).
The Robot framework uses an easy-to-read syntax that utilizes human-readable keywords. The framework-agnostic keywords define the actions that must be performed in a particular test.
Keywords in the Robot framework are divided into three categories:
High-level keywords
High-level keywords provide an abstract representation of the underlying business functionality. They improve the readability and maintainability of the test cases since they can encapsulate low-level keywords.
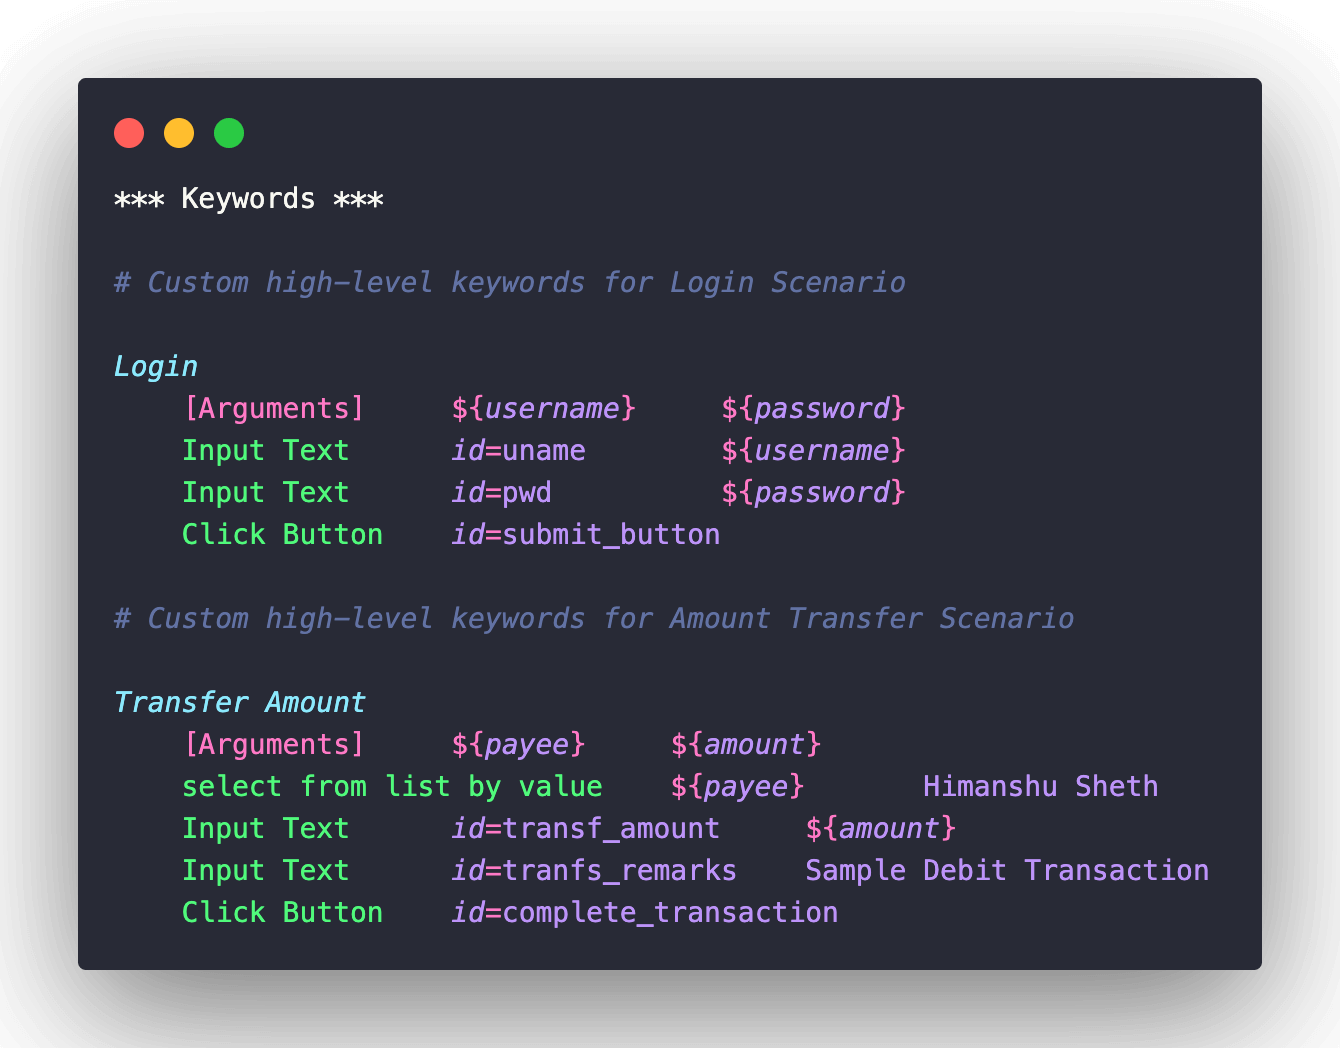
They should resonate with the actions being performed in the said use case. Consider a banking application (or website) where users need to login before doing any financial transaction. Login, Transfer Amount, etc., are some of the high-level keywords in line with the business case.
Low-level keywords
Low-level keywords represent the operations performed as a part of the test scenario. These keywords, defined in libraries or resource files, can be either custom-built libraries or built-in keywords provided by the Robot framework.
Keywords that are a part of the BuiltIn library and SeleniumLibrary in Robot can be leveraged in automating test scenarios. Should Contain, Should Be Equal, Skip If, etc., are some of the keywords that are a part of the BuiltIn library. Select From List By Value, Input Text, Click Button, Click Element, Wait Until Element Is Visible, etc., are some of the prominent keywords that are a part of the SeleniumLibrary.
The SeleniumLibrary in Robot uses the Selenium WebDriver, which further helps automate interactions with the web browser.
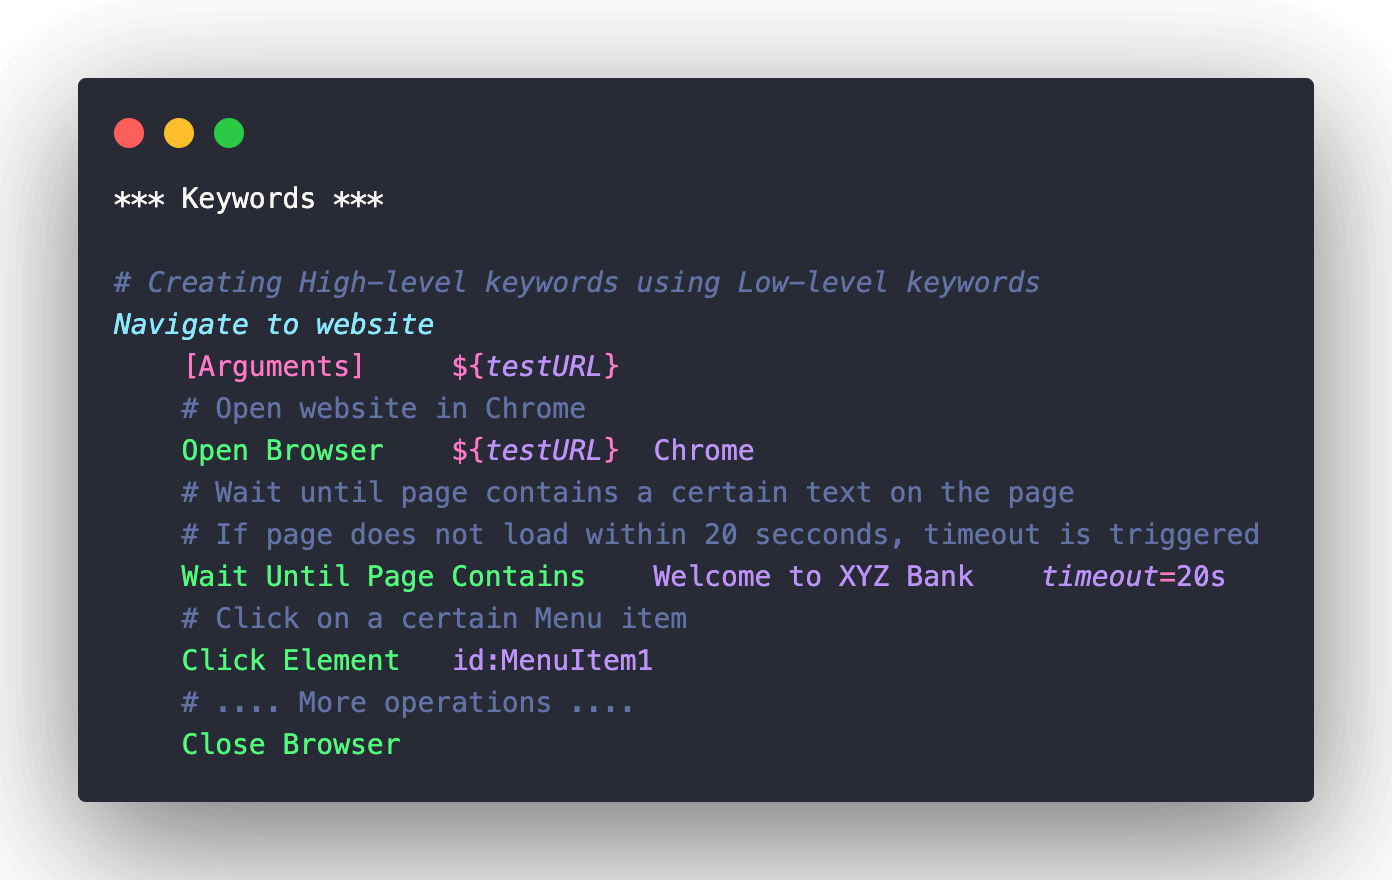
Here is the sample usage of low-level keywords for creating high-level keywords.
Technical keywords
Technical keywords are built-in keywords that help with test management and test execution. They help with logging, controlling execution flow, and error handling.
Capture Page Screenshot, Capture Element Screenshot, Pass Execution If, Log, Log To Console, etc., are some of the technical keywords in Robot. For instance, the keyword to Capture Element Screenshot can be leveraged for capturing a screenshot of a certain WebElement and comparing it across different releases.
In the below-mentioned example, we capture the screenshots of the entire webpage and the Button element. The screenshots are placed in a customized directory instead of ${OUTPUT_DIR} (or present working directory).
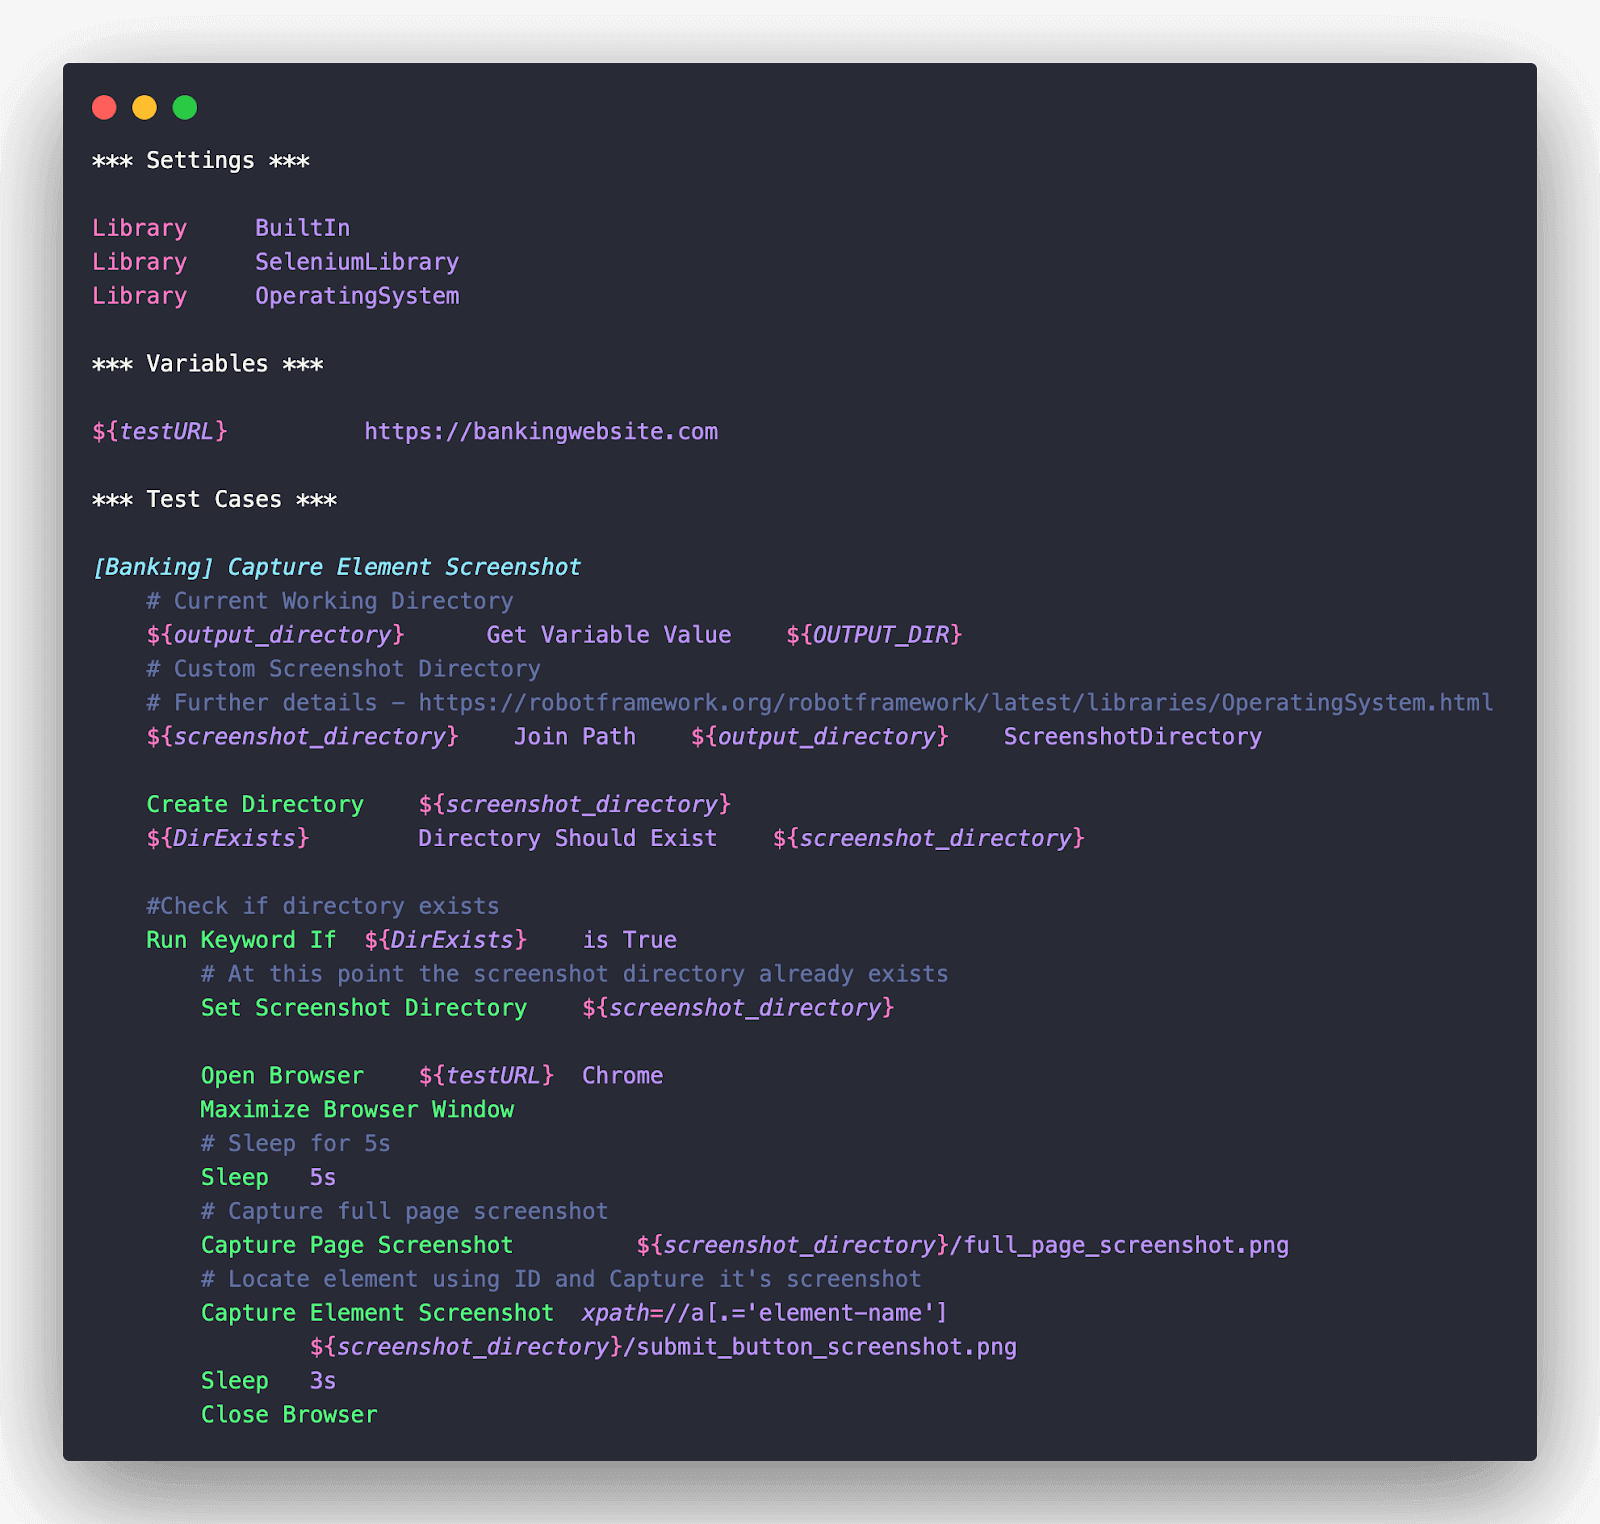
Along with BuiltIn and SeleniumLibrary, we have also included the OperatingSystem library for using Directory-related keywords (i.e., Create Directory and Directory Should Exist).
 Note
NoteAutomate website testing using Robot framework across 3000+ environments. Try LambdaTest Today!
Robot Framework Architecture
Robot is an open-source, extensible, and language-independent framework. All of this is possible using the test libraries written in that particular programming language.
The Remote Library Interface allows the test libraries to be run as external processes. It uses the XML-RPC protocol for communication; hence test libraries can be implemented for programming languages (e.g., Java, C#, JavaScript, etc.) that support the protocol. For example, the jrobotremoteserver is a remote server for the Robot framework implemented using Java.
Here are some of the major building blocks of the Robot Framework:
Robot Framework
Referred to as the framework’s core which is implemented in Python. It is primarily responsible for test execution and test case management.
The core has no information regarding the TUT (Target Under Test), as the entire interaction is handled by the test libraries. It is also responsible for features related to logging and reporting.
Test Data
As the name indicates, test data serves as the input to the test cases. The test data is written in a tabular format to enhance the maintainability of the tests.
Once the Robot framework receives the input data, it starts executing the test scenarios and generates detailed reports in HTML format. Robot also offers integration with popular reporting tools & dashboards like Allure, Report Portal, and Grafana.
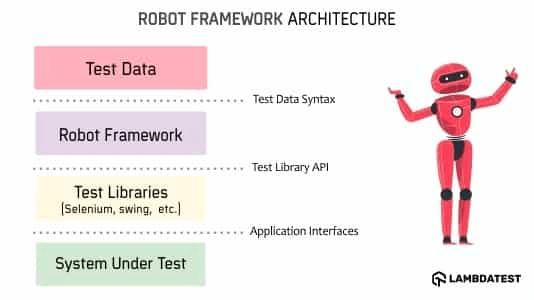
Test Libraries
As seen in the architecture diagram, Test Libraries act as the bridge (or interface) between the Robot Framework Core and SUT. Test libraries in Robot contain the keywords, thereby improving its maintainability & reusability.
Apart from Robot Standard Libraries, SeleniumLibrary in Robot can be extensively used when performing automated testing using the framework. Do check out this exhaustive list of Robot libraries that comprises mid-level (framework) Libraries, low-level (driver) Libraries, and Remote Libraries.
System Under Test (SUT)
This is the target on which the automated tests are performed. It could be either a website or a web application.
Test Cases in Robot consist of Test Steps that, in turn, use the Test Libraries for realizing interactions with the SUT. Like any other test automation framework, test cases can be organized in test suites for improved maintenance.
Benefits of Parallel Testing in Robot Framework
The Robot framework does offer out-of-the-box support for parallel test execution. However, it recommends the usage of Pabot – a parallel test executor for tests written using the Robot framework.
Before we deep dive into using the Robot framework for parallel test execution with Pabot, let’s quickly revisit the salient benefits of parallel test execution.
Accelerated Test Execution
By default, Robot tests run in a sequential manner. The serial execution applies to tests as well as test suites. Even if a single test takes a few seconds to execute, the complete test execution time might go up to a few minutes (for a significantly last test suite).
Running tests serially might yield results in the short run, but the approach falters when test suites consisting of numerous tests have to be executed in a CI/CD pipeline. This is where parallel testing in Robot can be highly instrumental, as it helps accelerate the test execution by leveraging parallelism at the test and/or test-suite level.
Increased Test Coverage
Parallel test execution in Robot helps improve product quality, as tests are run across different input combinations. The said combination can consist of generic input values (e.g., input URL, email address), browser names, browser versions, platform names, etc., depending on the scenario under test.
Below is an example of a Robot script where tests will be executed in parallel on Chrome and Safari browsers. This logic can be further scaled to run tests on different input combinations.
All of this eventually helps increase the overall test coverage and identify issues at a significantly faster pace.
Faster Feedback Cycles
As seen so far, there are umpteen benefits of speeding up test cycles using parallel test execution. Another major benefit of parallel testing is shortened feedback loops for issue discovery, bug fixes, and testing the fixes for potential side effects.
The same guiding principles also apply to the Robot framework, as continuous testing with Robot can be realized by running parallel tests in a CI pipeline. Jenkins, GitLab, TeamCity, Azure DevOps, and GitHub Actions are some of the top CI/CD tools supported by the Robot framework.
The combination of parallel testing & CI/CD aids in improving the effectiveness of the pipeline, shortening feedback cycles, and improving product quality at every step of product development.
Achieve More with Fail-Fast Approach
Consider a scenario where you have 100’s of tests triggered in a CI/CD pipeline but only a selected few (e.g., 10 tests) fail all the time. What if these 10 independent tests are run in parallel in the next execution cycle? This approach will be instrumental in ensuring that tests are completed quickly or fail-fast, thereby helping save time as well as crucial $!
It is essential to note that tests when executed in parallel, might exhibit flakiness in case tests are interdependent or reliant on any sort of ordering. Apart from following Selenium’s best practices for test case design, you could also look at reducing the number of parallel processes.
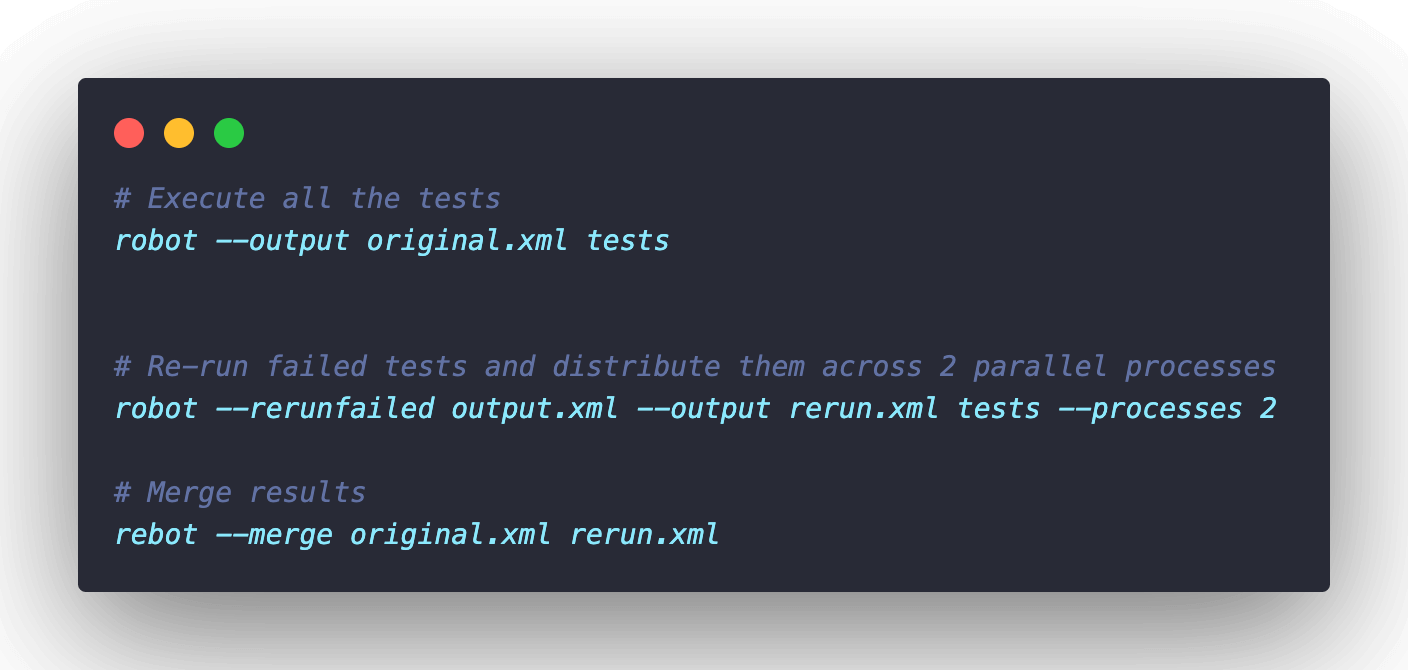
Robot framework provides the flexibility to re-run only failed tests, post which the results can be merged into a single results file using rebot.
You can refer to the Robot official documentation that deep dives into flaky-test management and re-execution of failed tests.
Apart from the benefits mentioned above, I would recommend revisiting this blog that deep-dives into all the major benefits of parallel testing. Now that the platform is all set let’s look at how to leverage Pabot (Parallel Robot Framework) for realizing parallel test execution.
Introduction to Pabot (Parallel Robot Framework)
The Robot framework executes individual tests and tests within multiple test suites in a sequential manner. In case you want a quick recap of Robot, look at this detailed Robot framework tutorial, where we have covered all the essential aspects of Robot, including test execution on local and cloud Selenium grid(s).
As mentioned earlier, Pabot is a parallel test runner for the Robot framework. Pabot lets you run Robot tests in parallel at test-level as well as test-suite level.
By default, Pabot does parallelization at the test suite level. Each process has its own memory space and runs a single test suite. In this case, individual tests within the test suite run sequentially, whereas all the test suites (e.g., test1.robot, test2.robot, etc.) run in parallel.
Resource file(s) normally houses reusable components like high-level keywords, variables, libraries, and other settings normally used across tests and test suites.
Below is an example Resource file (e.g., common.robot):
Installation
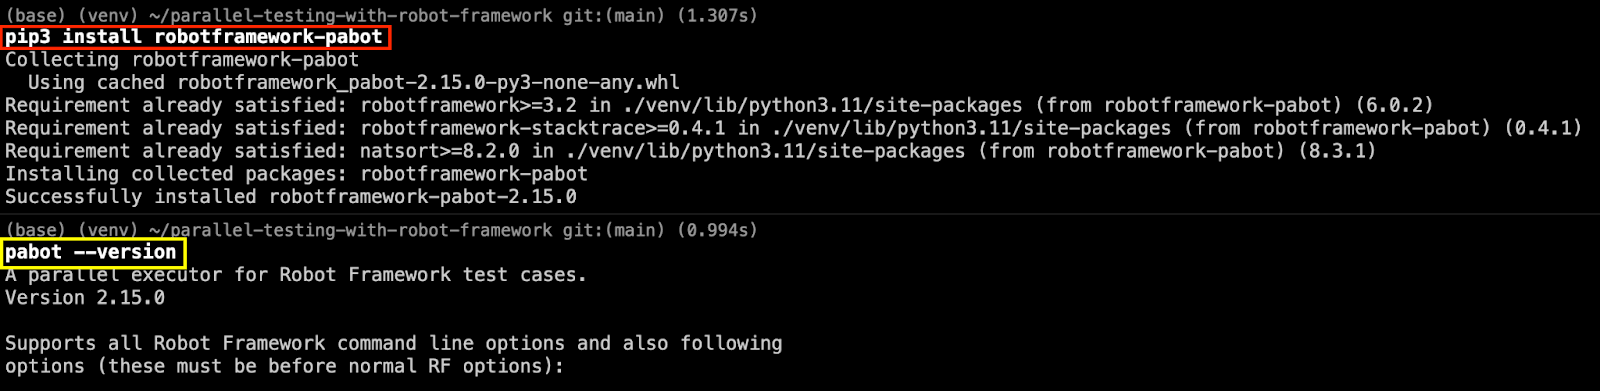
Like any other Python package, Pabot can also be installed globally or inside a virtual environment (venv). At the time of writing this blog on using Robot framework for parallel test execution, the latest version of Pabot is 2.15.0.
Global installation of Pabot
Invoke the following command on the terminal to install Pabot:
|
1 |
pip3 install -U robotframework-pabot |

Though pip3 is the recommended package manager for Python 3.x, you can still use pip with Python 3.x. In that case, the installation command is pip install -U robotframework-pabot.
Pabot installation in Virtual Environment (virtualvenv)
Virtual Environment (virtualvenv) provides much-need isolation of builds, thereby providing better management of Python packages for different projects.
Follow the below-mentioned steps for installing Pabot in venv:
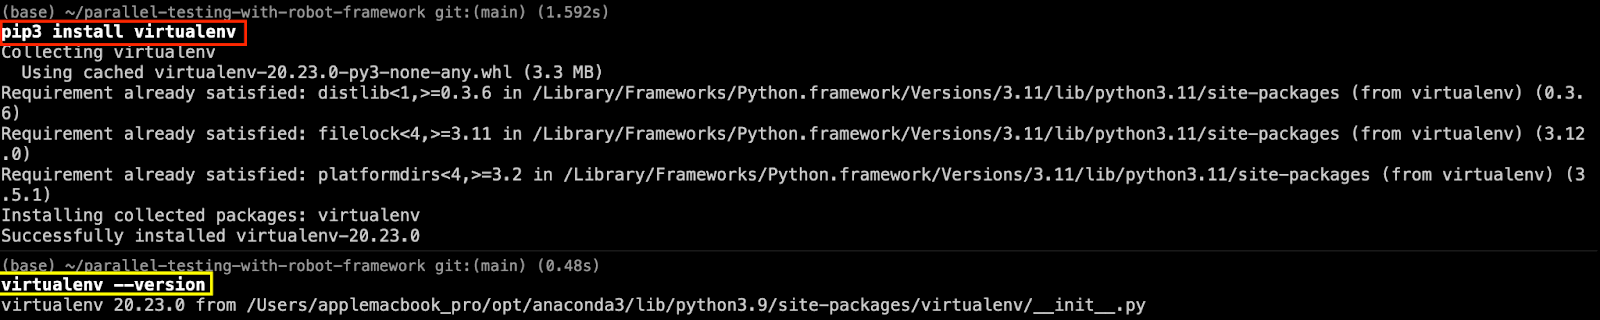
- Run the command pip3 install virtualenv on the terminal if venv is not installed on your machine.
- Create a virtual environment in the project folder by invoking the virtualenv venv command on the terminal. It is important to note that the environment name (i.e., venv in our case) is arbitrary.
- Activate the environment (i.e., venv) by invoking the source venv/bin/activate command on the terminal.
- Invoke the command pip3 install robotframework-pabot to install the latest version of Pabot.


Usage
Now that the Pabot installation is successful, let’s look at the commands to achieve parallelism at test and test-suite levels. By default, Pabot splits the execution at the suite level. Every process runs a single suite, you can also configure the number of parallel executors using the –processes option.
If not specified, Pabot enables two CPU cores that run one process each. Specifying all in –processes creates as many processes as the number of executable test suites or tests. However, this option must be used with caution, as too much parallelism might affect the performance and/or cause invalid test failures.
Parallel Execution with Pabot at suite-level (default)
|
1 |
pabot [path to tests] |
For instance, the command shown below starts 2 processes and runs test suites located in Tests/CloudGrid folder in parallel.
|
1 |
pabot --verbose Tests/CloudGrid |
As seen below, two processes (with PID 91894 and 91895) running in parallel are executing different test suites.

Parallel Execution with Pabot at test level
|
1 |
pabot --verbose --testlevelsplit [path to tests] |
For instance, the command shown below starts 2 processes and runs individual tests located in test suites in the Tests/CloudGrid folder in parallel.
|
1 |
pabot --verbose --testlevelsplit Tests/CloudGrid |
As seen below, two processes (with PID 93731 and 93732) running in parallel are executing two separate tests – App.Example 1 & App.Example 2

Customize the number of parallel processes
As mentioned earlier, the –processes option lets you achieve the same. Simply specify the number of processes (in integer format) that you want to start in parallel.
|
1 |
pabot --verbose --processes <num_of_processes> |
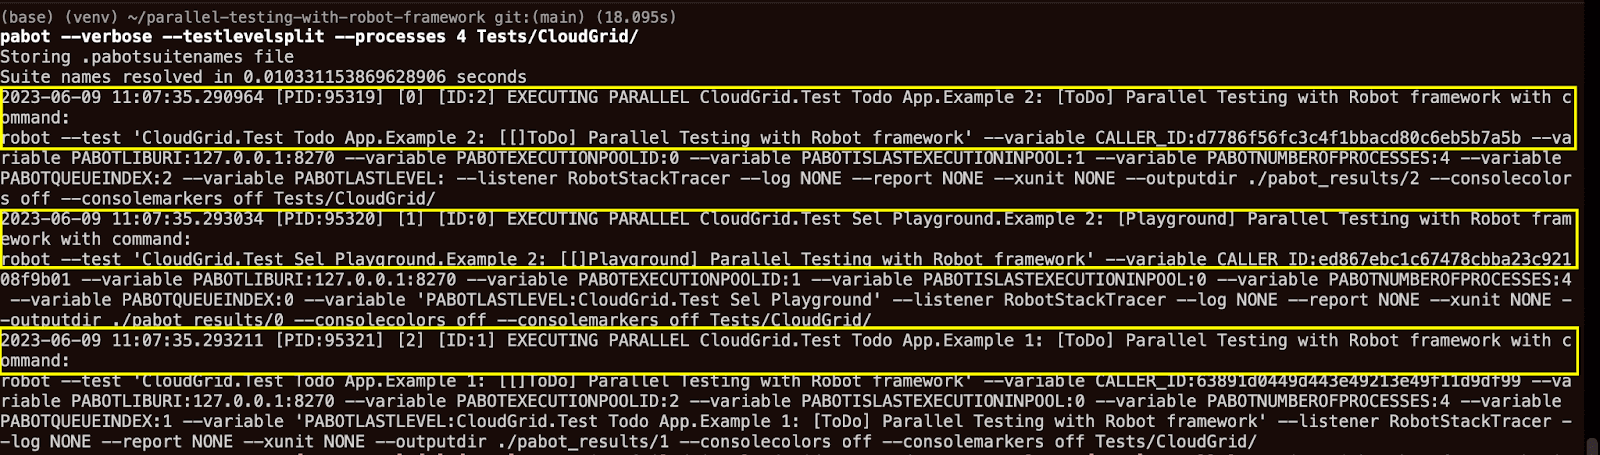
In the below command, we have specified the number of parallel processes as 4 with parallelism at the test level. However, only 3 parallel processes (PID – 95319, 95320, and 95320) are kick-started since maximum tests in a particular test-suite is 3.
|
1 |
pabot --verbose --testlevelsplit --processes 4 <path_to_tests> |
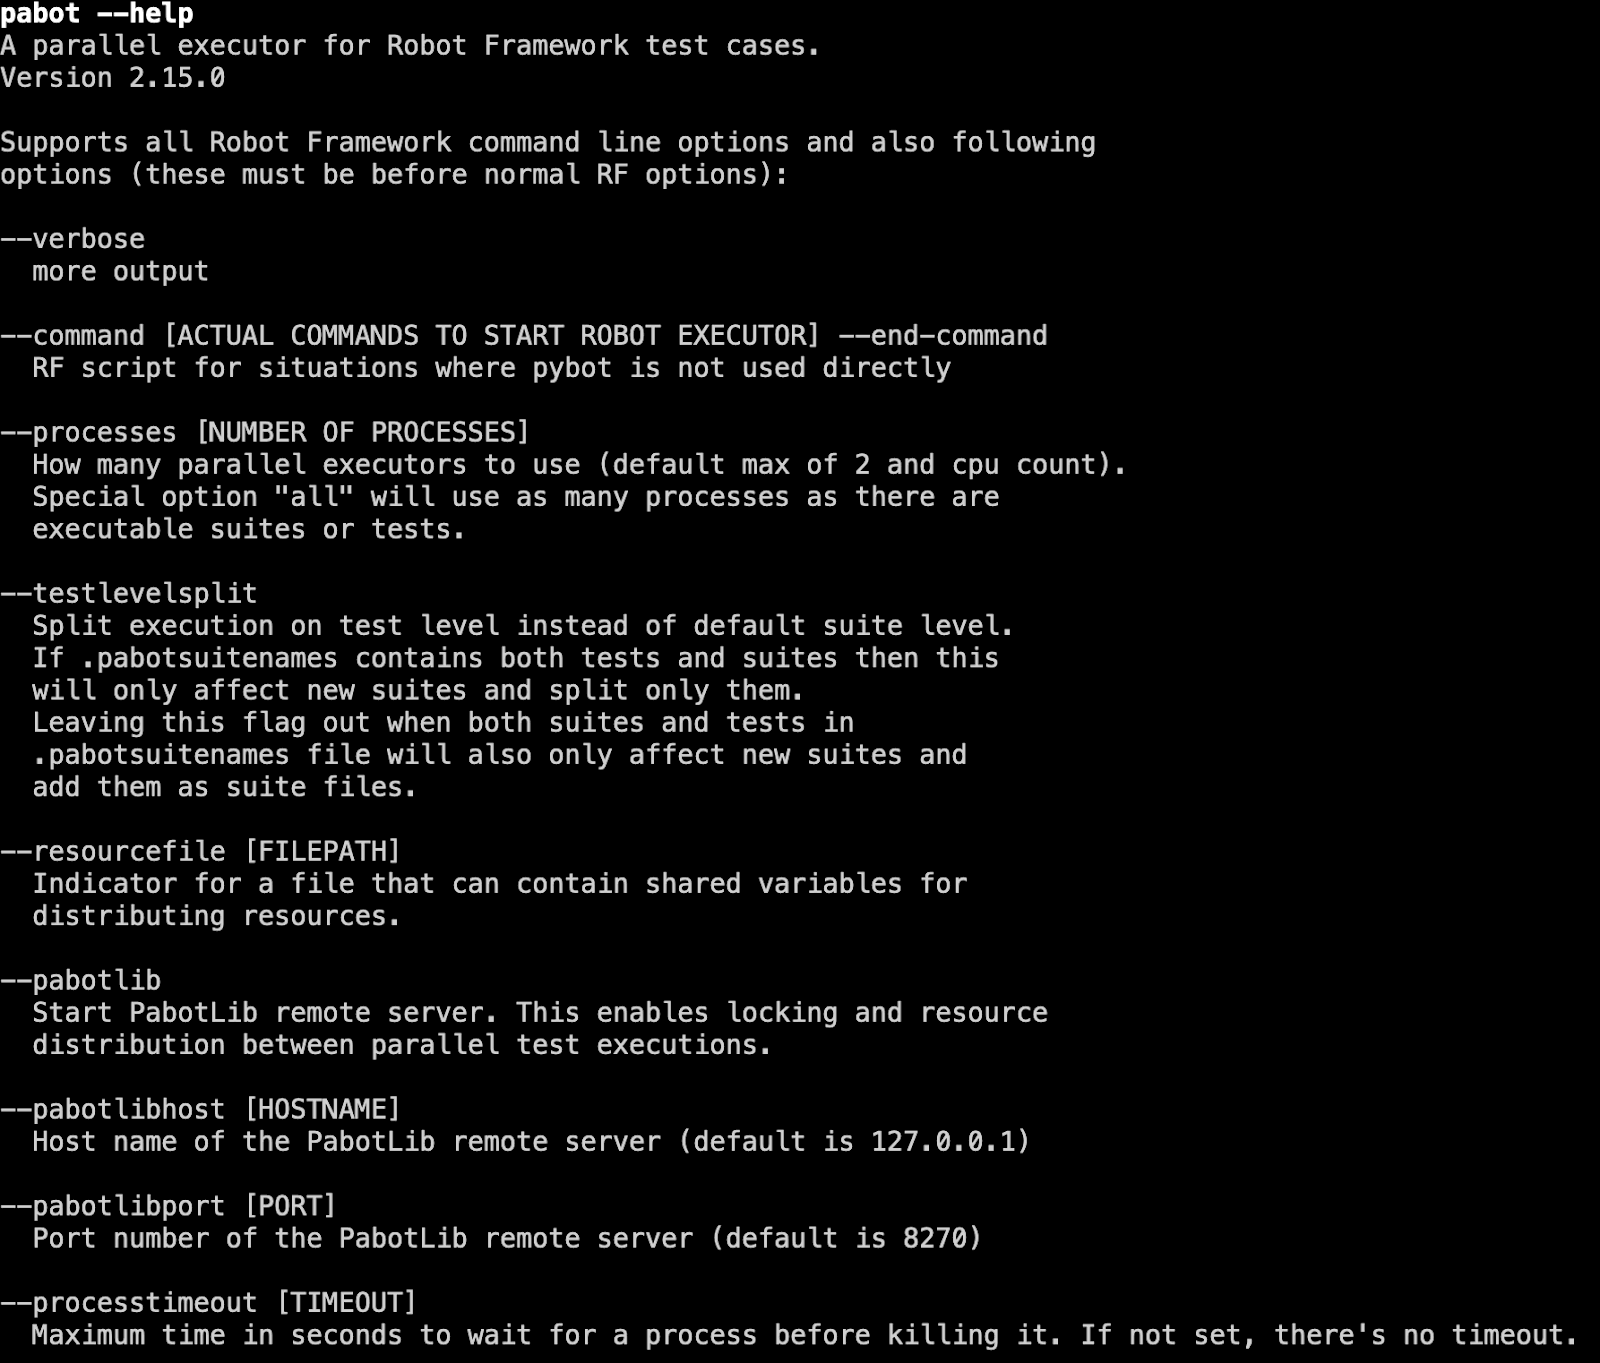
Run pabot –help on the terminal in case you want to have a look at other options supported by the runner.
In a nutshell, Pabot can be used for parallel test execution to optimize resource utilization by leveraging the available memory and CPU cores in the machine.
Now that we have covered all the essentials of Pabot, let’s look at using Robot framework for parallel test execution on Local Grid as well as LambdaTest cloud Grid.

Demo: Parallel Testing in Selenium Robot using Pabot
The primary pre-requisite for the demonstration is Python 🙂, you can refer to getting started with Selenium Python in case you need a quick recap of Python for Selenium automated testing. For demonstrating parallel testing with Robot using Pabot, I would be running the same test scenarios across the local grid and LambdaTest cloud grid.
I am using a macOS (Ventura 13.4) machine with the latest versions of Chrome and Safari installed. Some of the steps might vary in case you are using some other platform (e.g., Windows).
Test Scenario – 1
|
Test Scenario – 2
|
Test Scenario – 1
|
Project Prerequisites
Before I deep dive into the implementation, let’s do a quick walk-through of the setup used for implementing the scenarios. I am using Visual Studio (VS) Code IDE and Poetry Package Manager (instead of pip) as it simplifies project management to a huge extent.
Follow the below-mentioned steps for creating a Robot project in VS Code:
Step 1
After adding the project in VS Code, please run the command to create a virtual environment after navigating to the parent project folder.
|
1 |
virtualenv venv |
|
1 |
source venv |

Step 2
Install Poetry by invoking the following command on the terminal:
|
1 |
pip3 install poetry |

Step 3
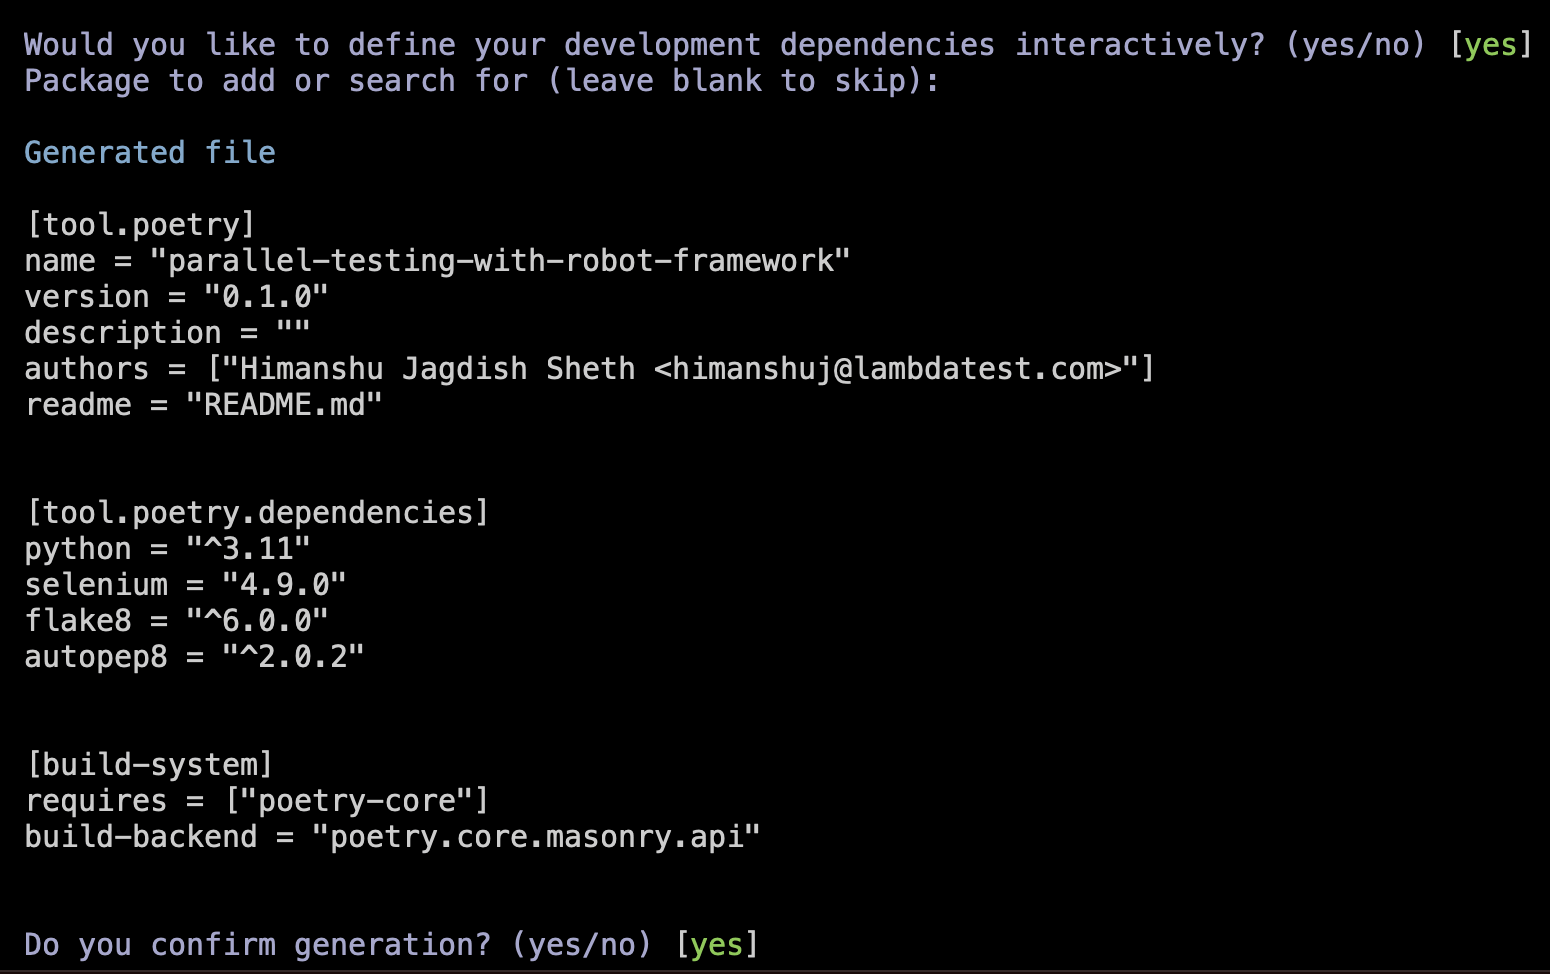
Dependencies, plugins, and build configurations are a part of pyproject.toml. In our case, we have already added the respective packages and dependencies in project.toml.
If pyproject.toml is not present for your project, run the command poetry init on the terminal. Post that, select the following packages using Poetry (via pyproject.toml):
- Python (v 3.11.0)
- Selenium (v 4.9.0)
- Flake8
- Autopep8
Select the relevant package name and version from the list (e.g., selenium, autopep8, etc.).
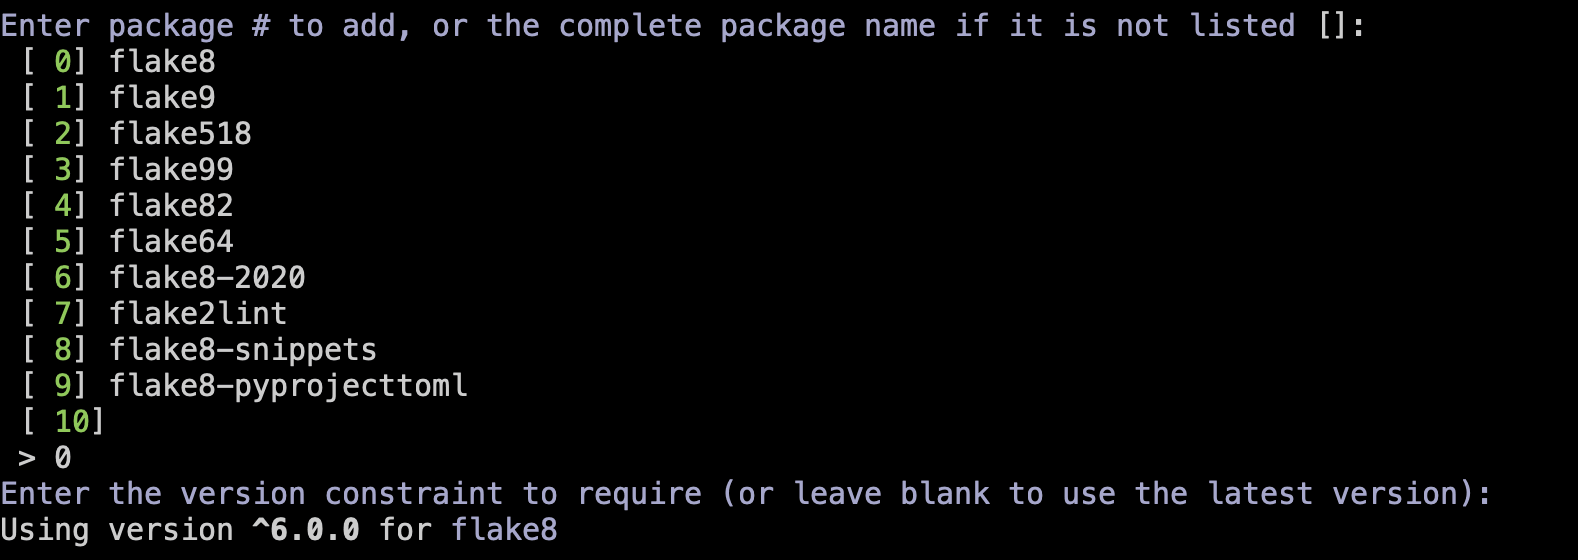
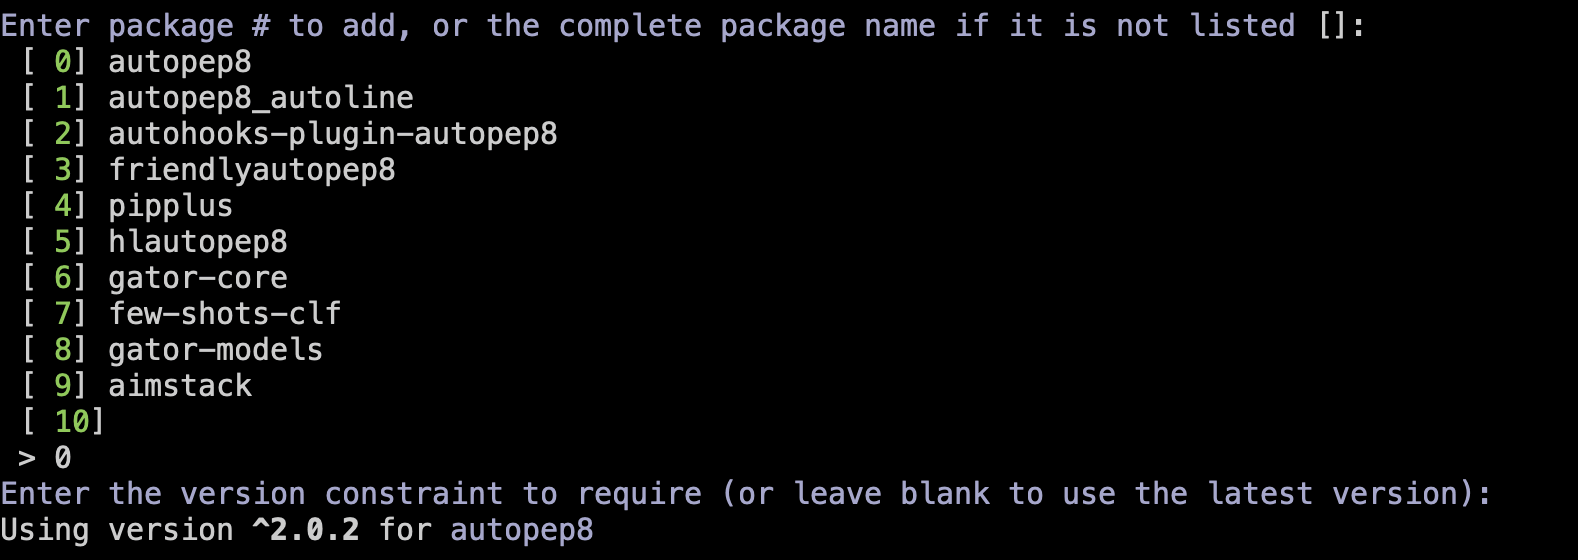
Once all the packages are selected for pyproject.toml, press Enter to complete the generation of the file.
Step 4
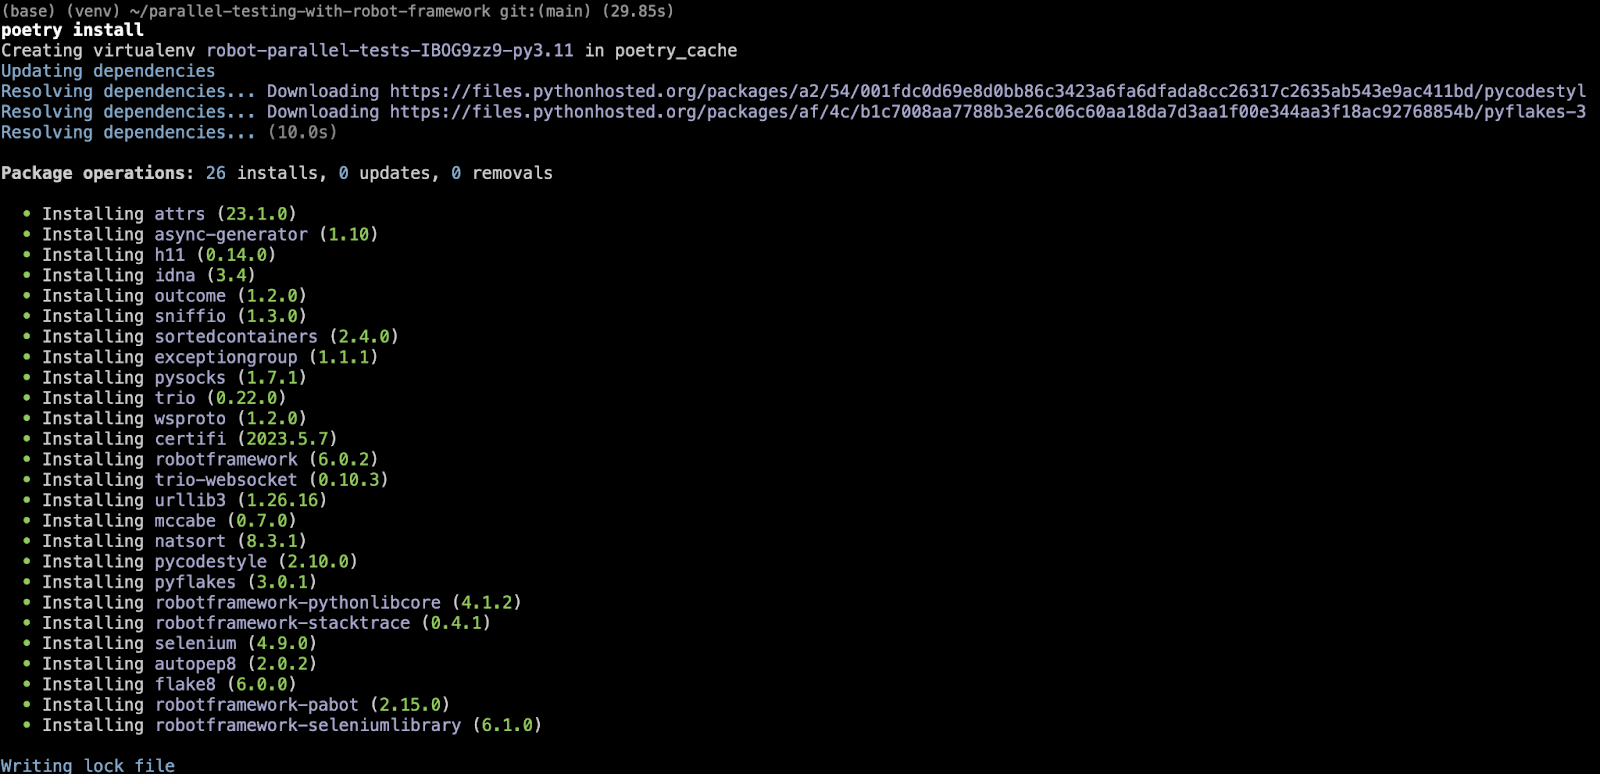
Invoke the command poetry install for setting up the project configurations. On completion, this will generate the files pyproject.toml and poetry.lock.
Step 5
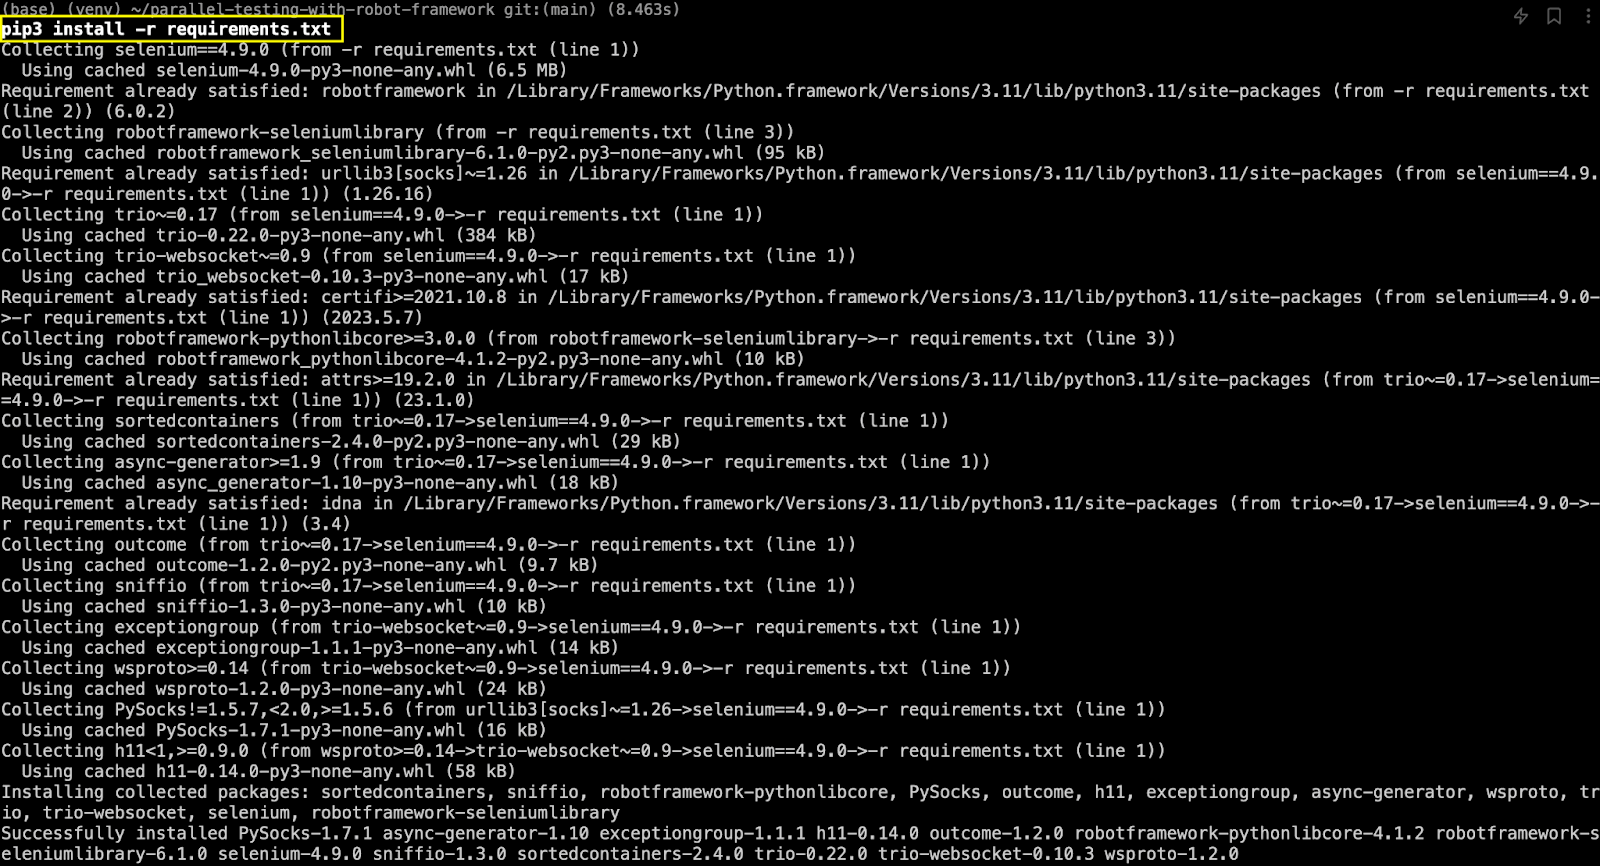
Install the project dependencies (i.e., selenium, robotframework, and robotframework-seleniumlibrary).
Invoke the command pip3 install -r requirements.txt to install the project dependencies (or packages).
Project Setup
Shown below is the project setup that will be used in the Robot framework for parallel test execution on the local grid and LambdaTest cloud grid.
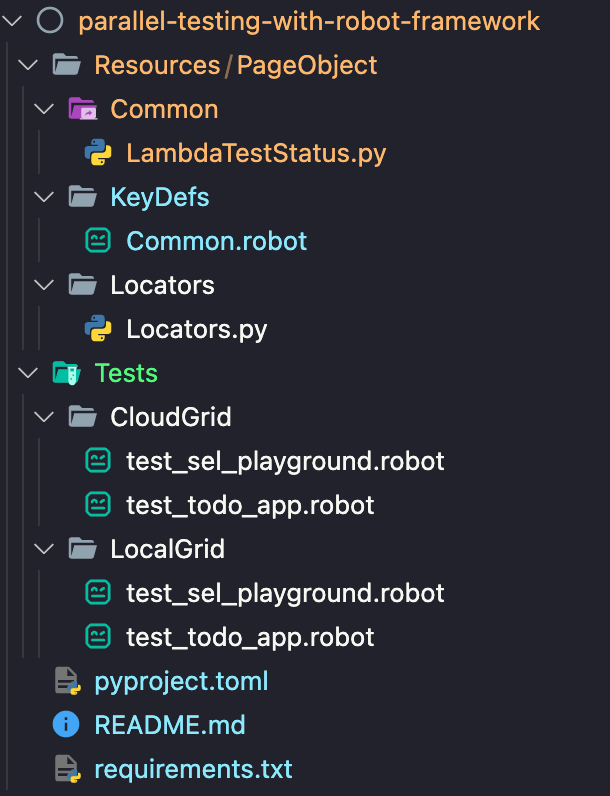
Here is a gist of the overall folder structure:
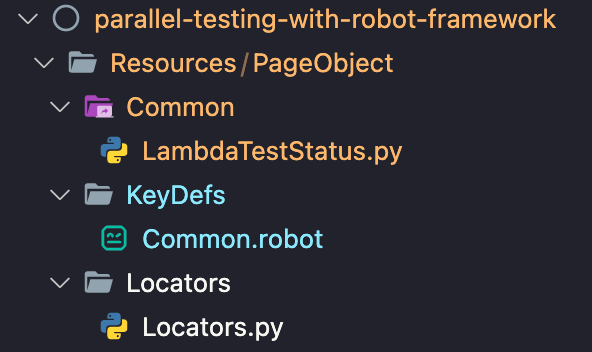
- Resources/PageObject
- Tests
This folder contains three subfolders – Common, KeyDefs, and Locators that contain implementation related to test execution status and high-level keywords used in the tests.
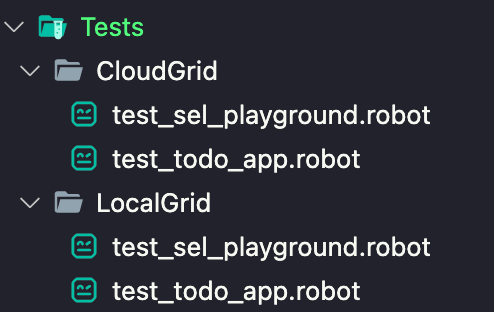
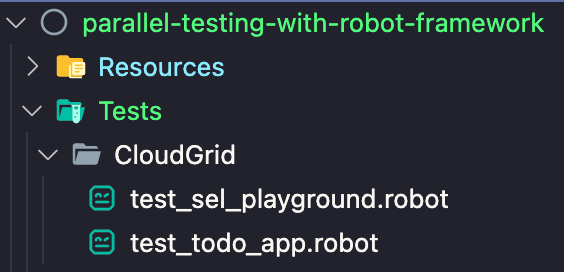
As the name indicates, Tests contain implementation of the actual tests using the Robot framework for parallel test execution with the Pabot runner.
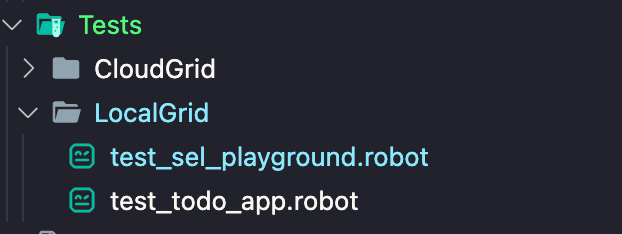
Since the demo will be performed on the local grid and the cloud-based LambdaTest grid, we have segregated the test implementation into separate subfolders – LocalGrid and CloudGrid
Apart from the folders mentioned above, we have pyproject.toml & requirements.txt that contain build system-related settings & project dependencies, respectively.
For better continuity, I will cover aspects related to execution on the cloud grid in a separate section.
Implementation
For better code maintainability, we have used Page Object Model (POM) in Selenium Python to decouple the dependency between the locators and test code. Let’s dive deep into the specifics of the implementation!
- Resources/PageObject/Locators
- Resources/PageObject/KeyDefs
- Opening & Closing web browser on local grid
- Opening & Closing web browser on a particular OS on LambdaTest cloud grid
- Tests/LocalGrid
To ensure that changes in the locators have minimal impact on the test code, locators used in the test cases are placed in the Locators.py file.
Here, we have used different locators in Selenium, like ID, CSS Selector, linkText, XPath, etc., to locate WebElements on the page. The WebElements can be located using built-in Inspect Tools or plugins like SelectorsHub, POM Builder, etc.
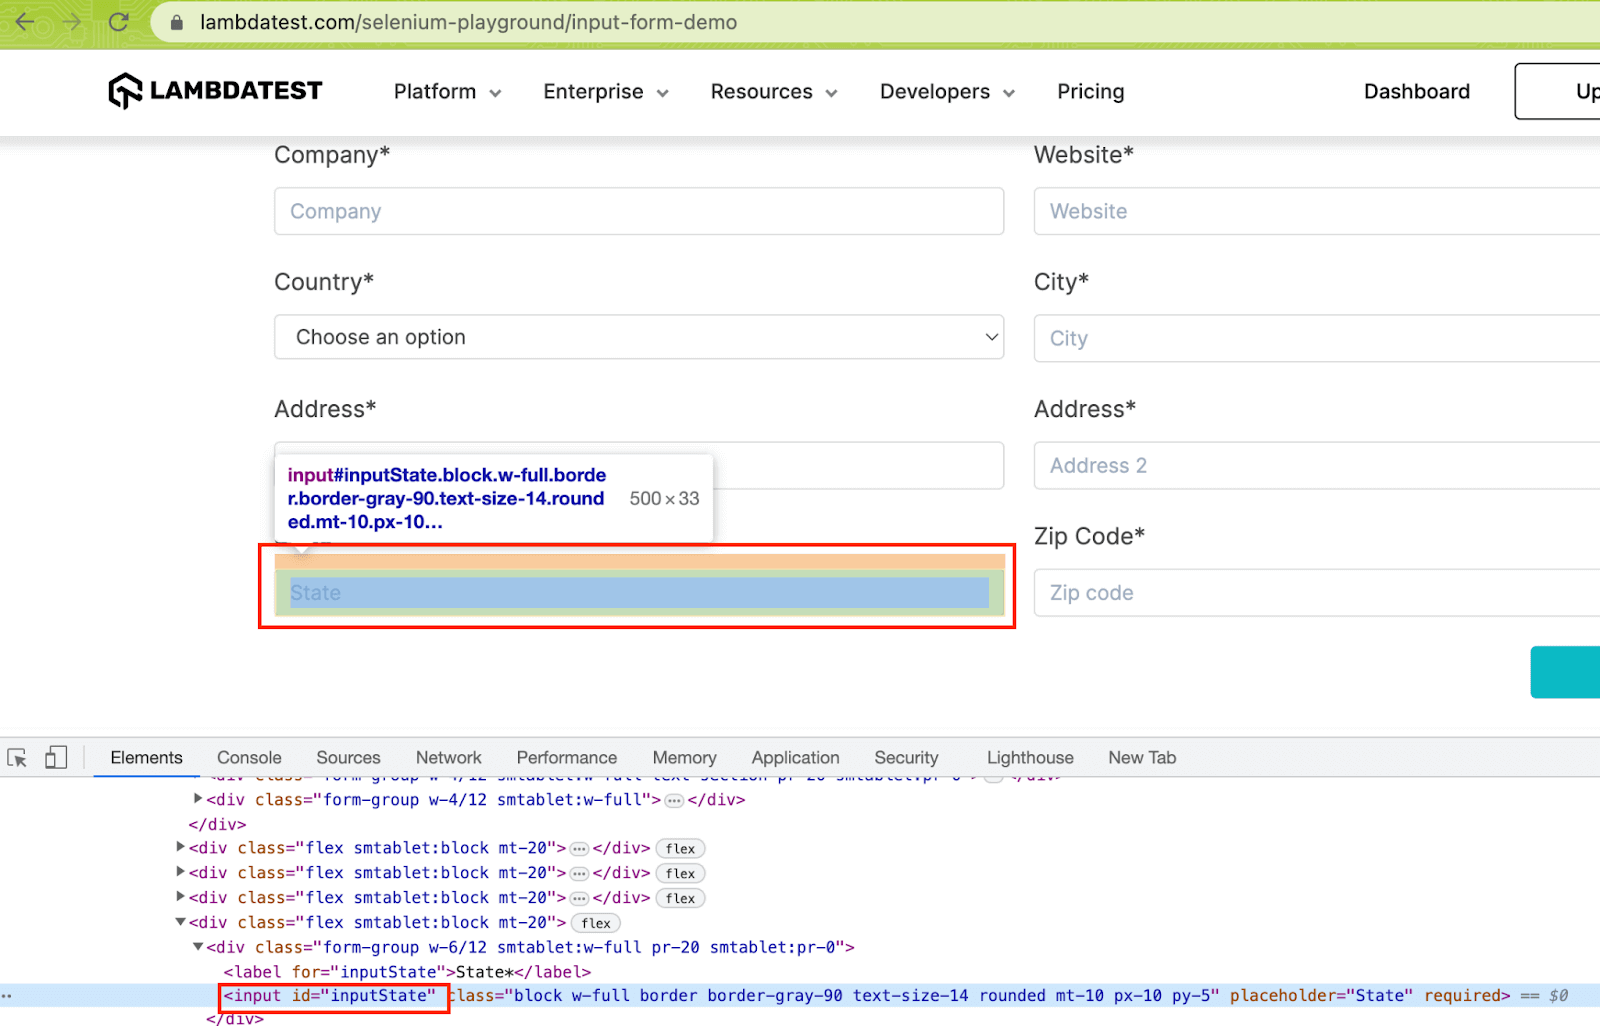
Let’s take the case of the URL https://lambdatest.github.io/sample-todo-app/ used in Test Scenario – 1. The Name locator in Selenium is used for locating the elements ‘First Item’ and ‘Second Item’.
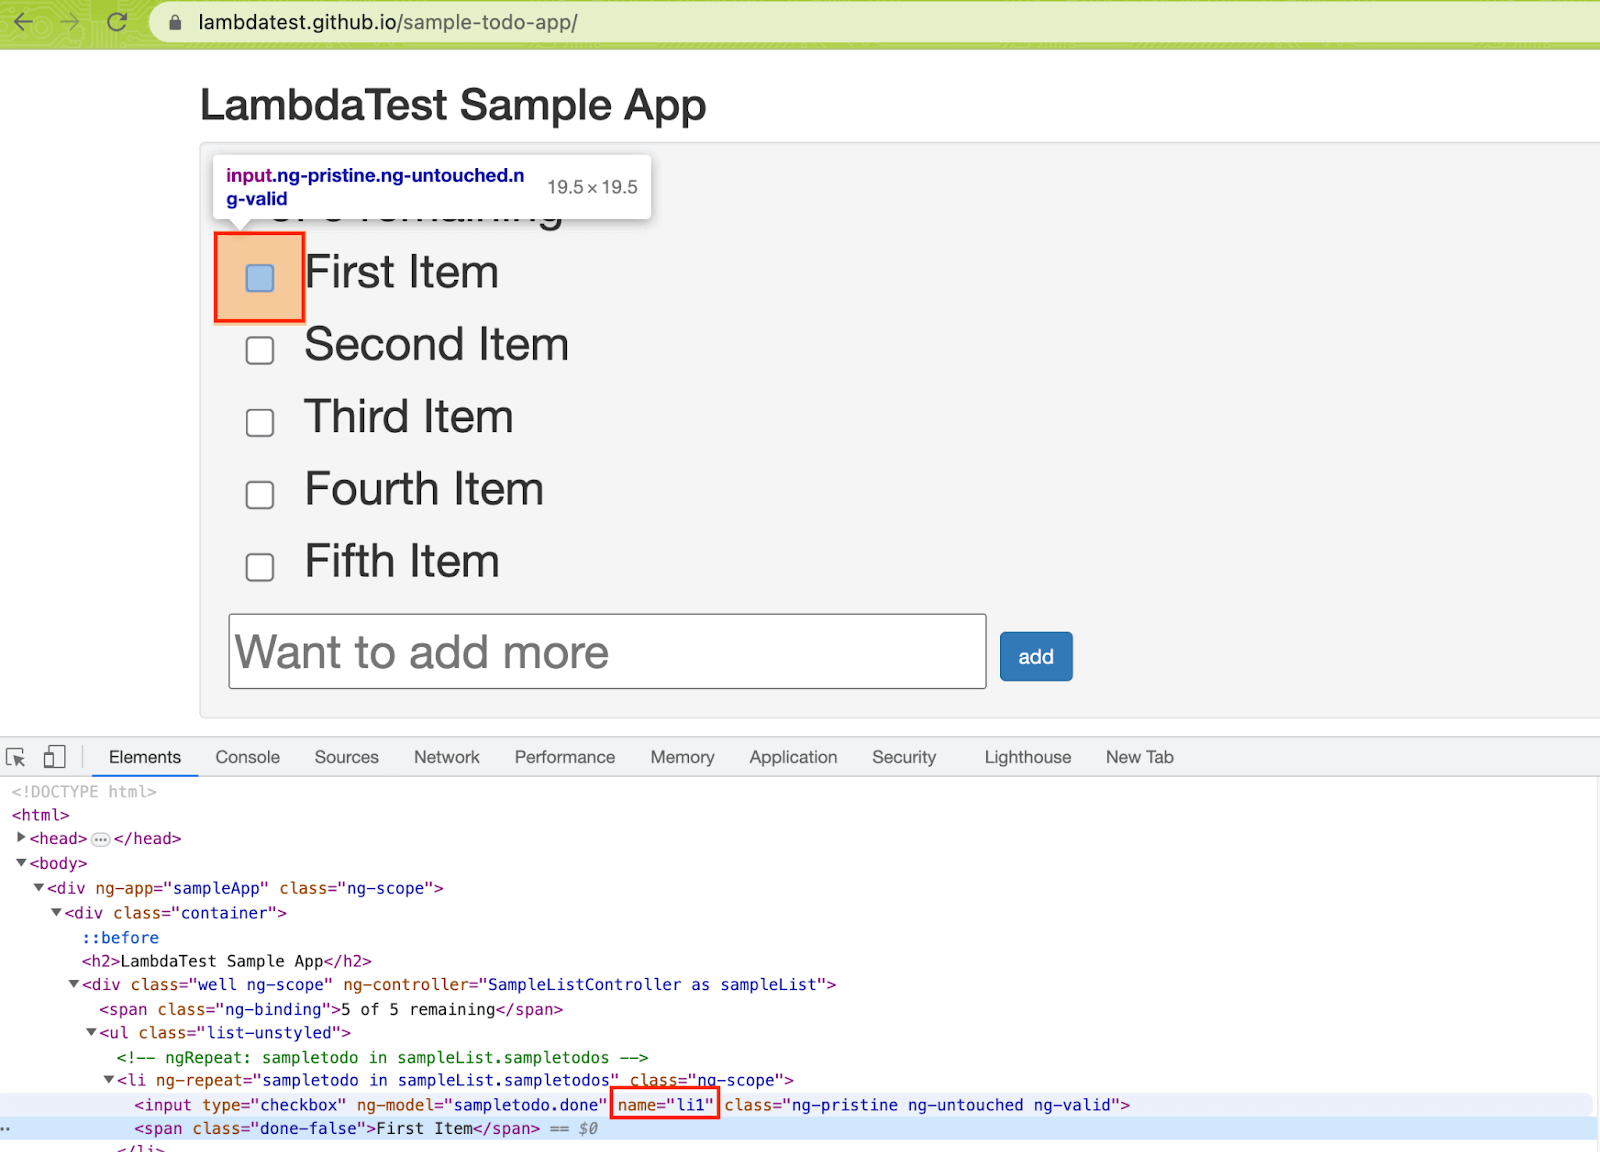
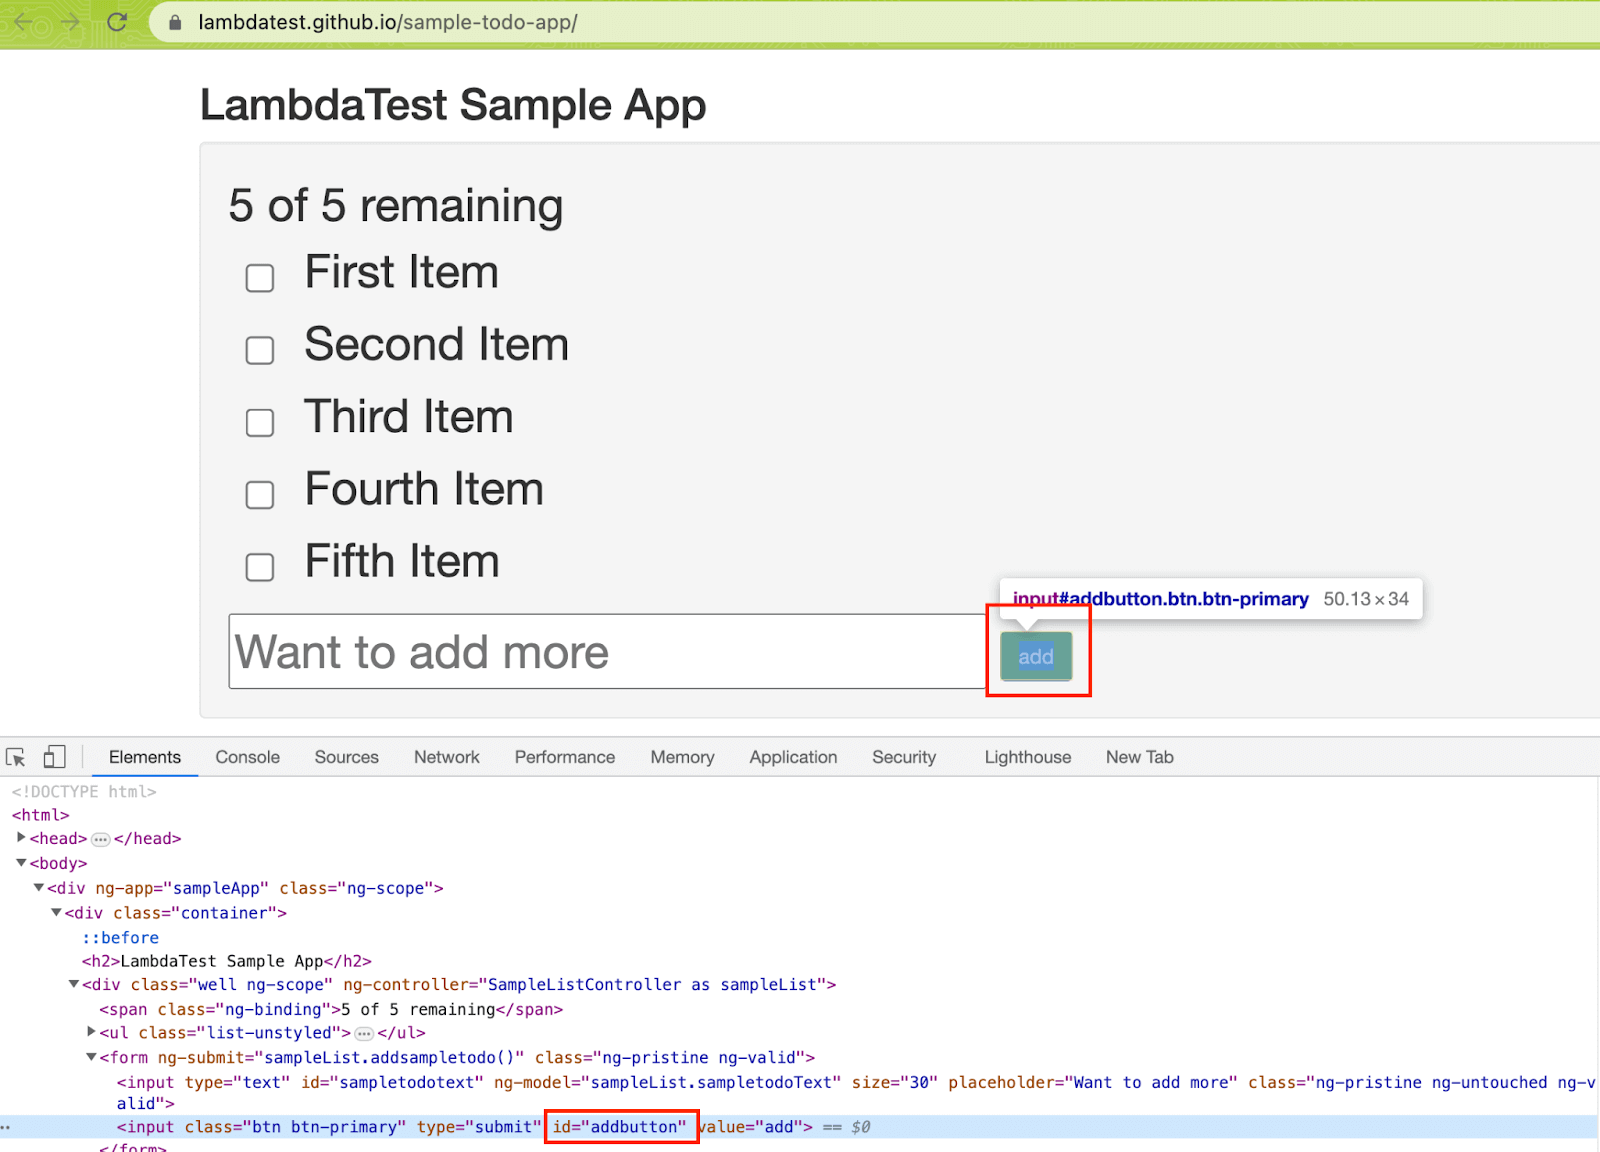
On similar lines, the ID locator in Selenium is used for locating the ‘Add’ button on the page.
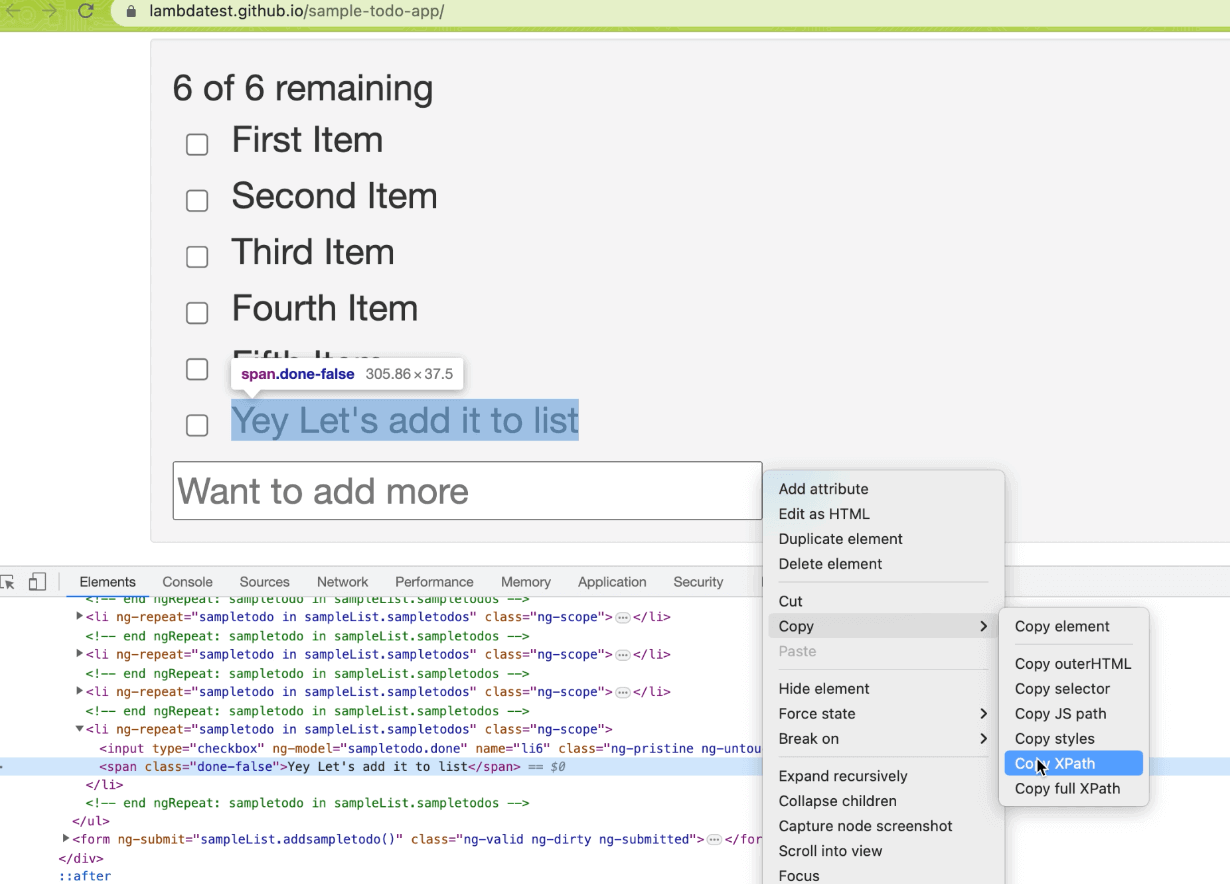
Lastly, once the new item is added to the ToDo list, it is located using the XPath locator in Selenium.
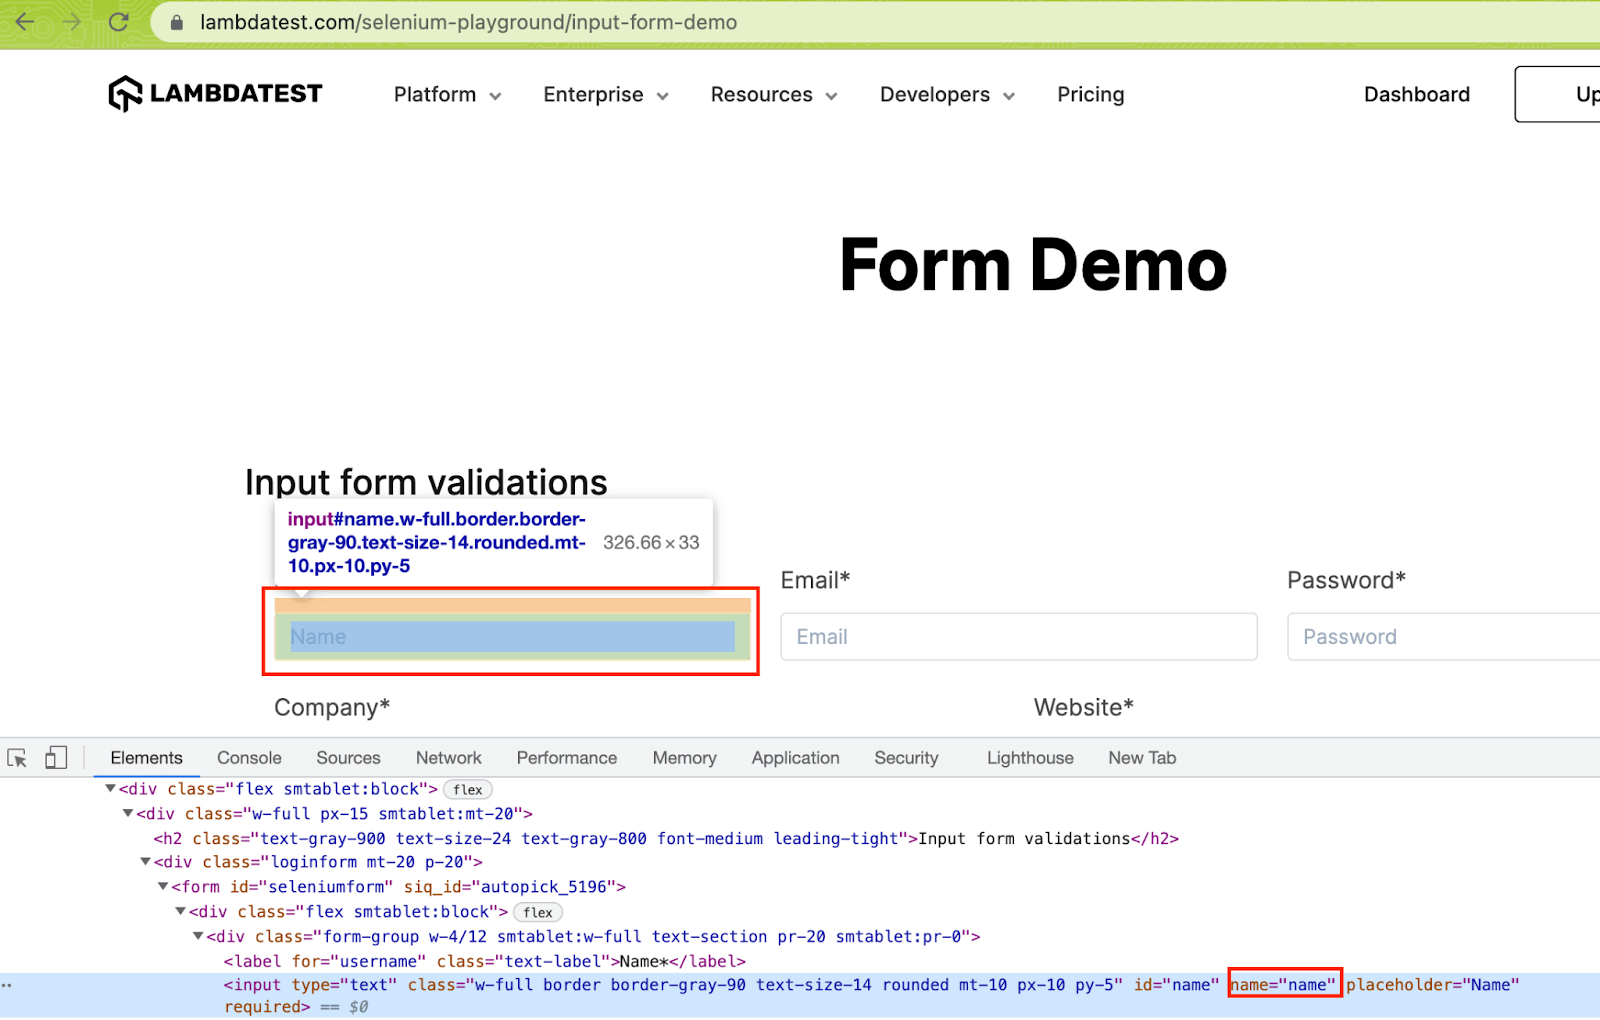
On similar lines, we have used the combination of CSS Selectors, Name, ID, and XPath locators for locating WebElements on LambdaTest Selenium Playground.
In case you have any confusion in choosing the best-suited selectors, do look at the CSS Selectors vs XPath guide for making a more informed decision.
This folder contains a single file named Common.robot that contains the implementation of high-level keywords that let you perform common actions:
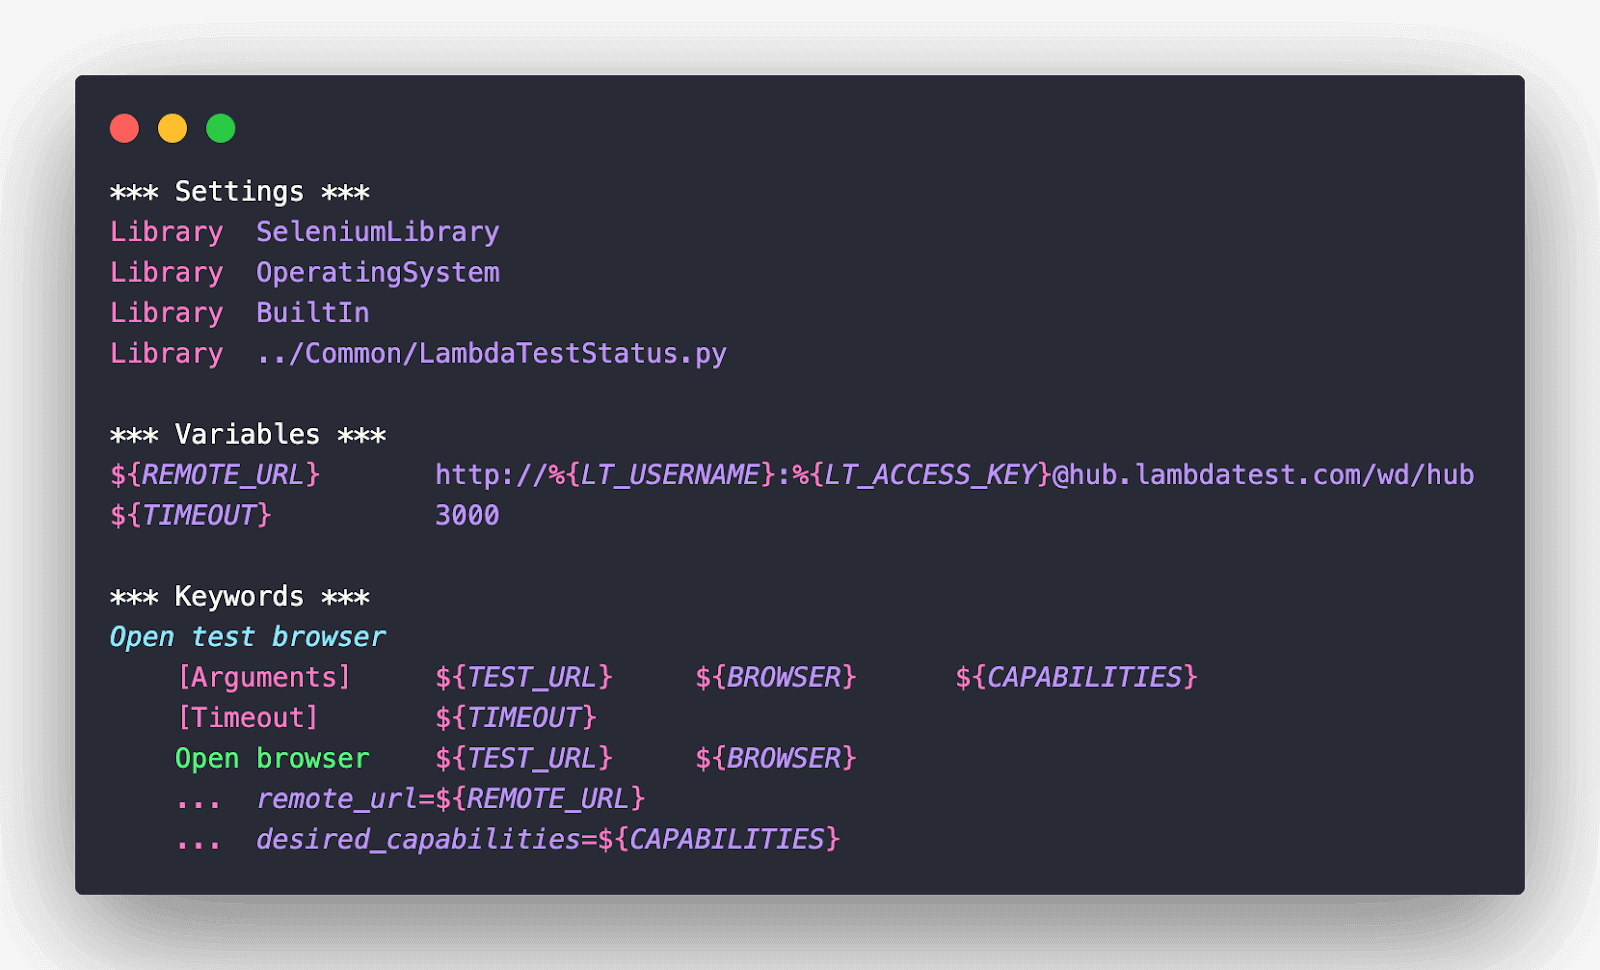
To get started, we include all the relevant libraries, resource files, and variable files in the Settings section. As seen below, we have imported the SeleniumLibrary, which provides low-level keywords for automating interactions with the elements on the page.
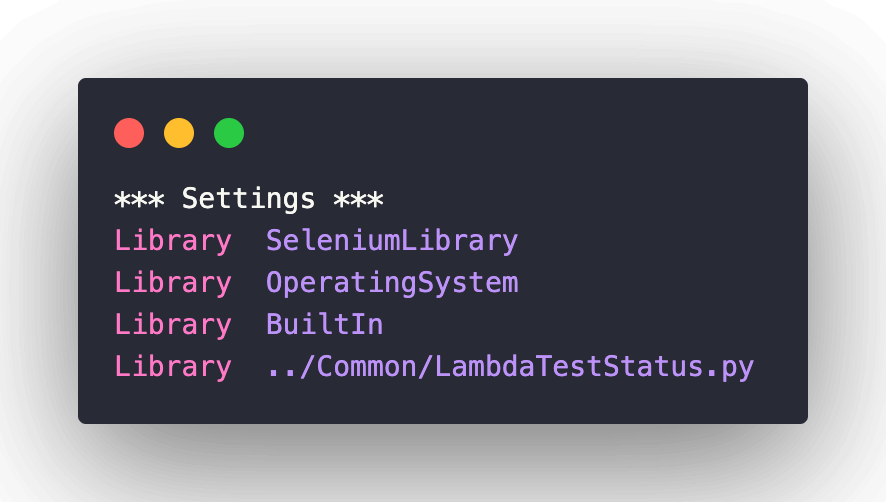
It is important to note that Selenium2Library has been renamed to SeleniumLibrary since Robot version 3.0. Hence, we have used SeleniumLibrary throughout this blog on using Robot Framework for parallel test execution.
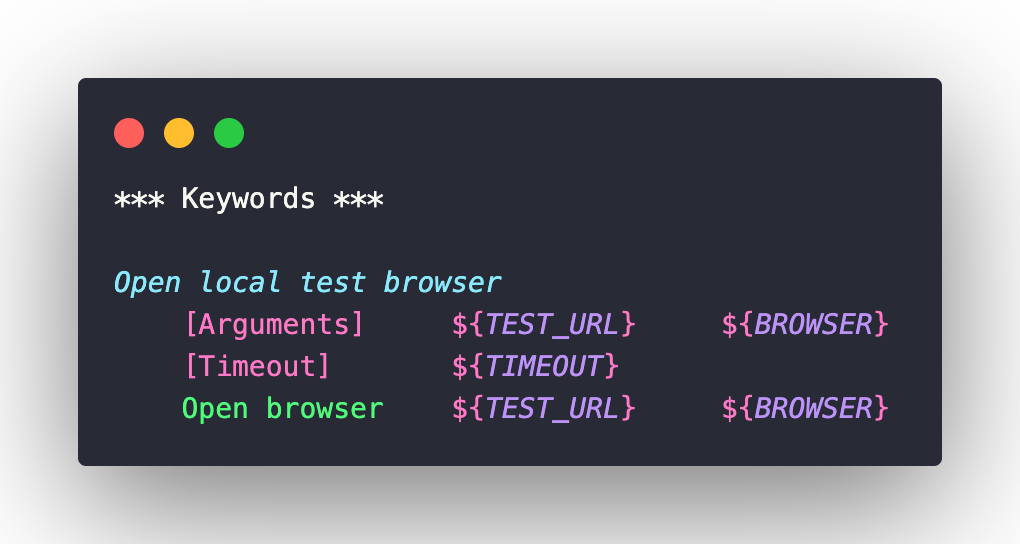
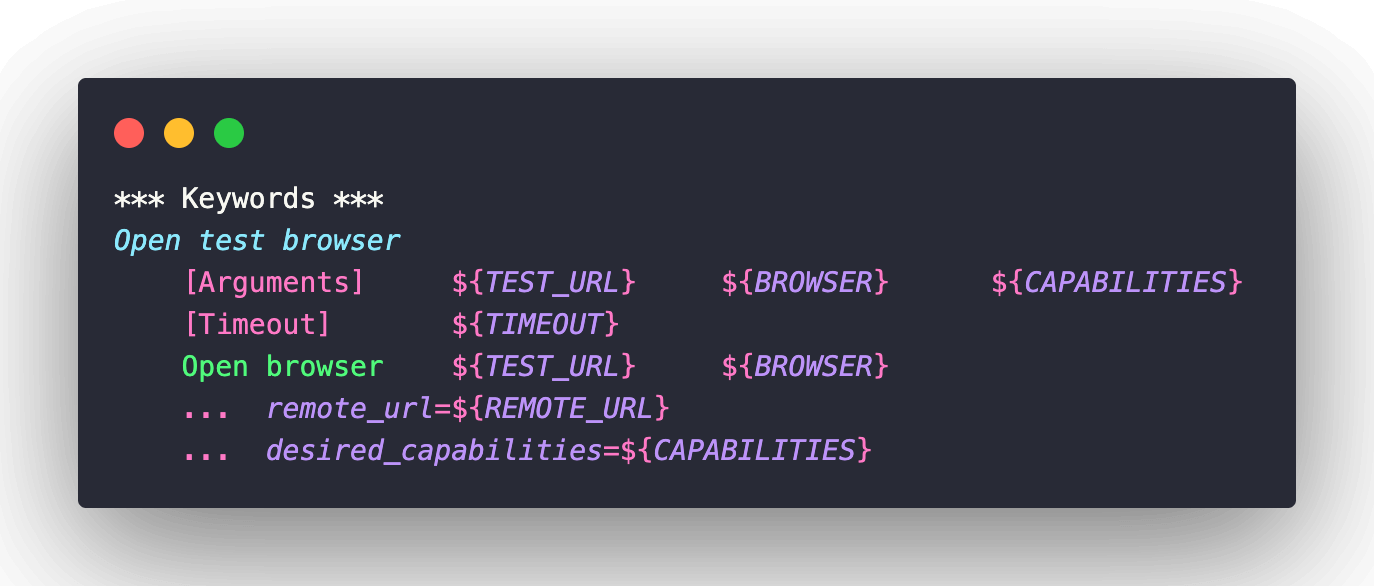
Open local test browser is a high-level keyword that takes two input arguments – Test URL and Test Browser. It internally uses the low-level keyword Open browser for instantiating the respective browser and opening the Test URL.
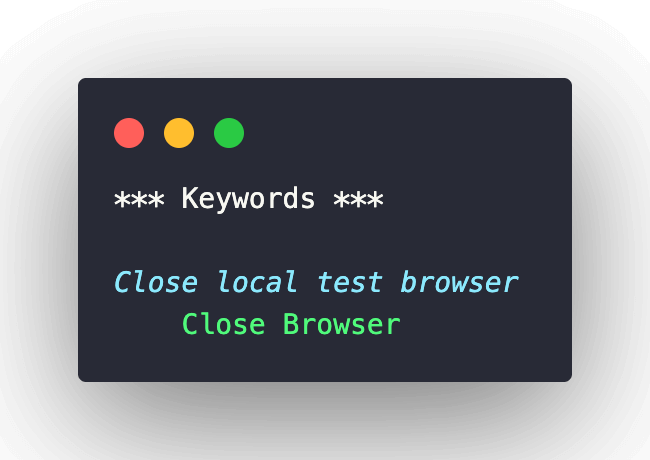
Close local test browser is a high-level keyword that internally uses the Close browser for closing the instantiated browser.
This folder contains two .robot files that contain the implementation of the two test scenarios. Let’s look at some of the common aspects of the test files.
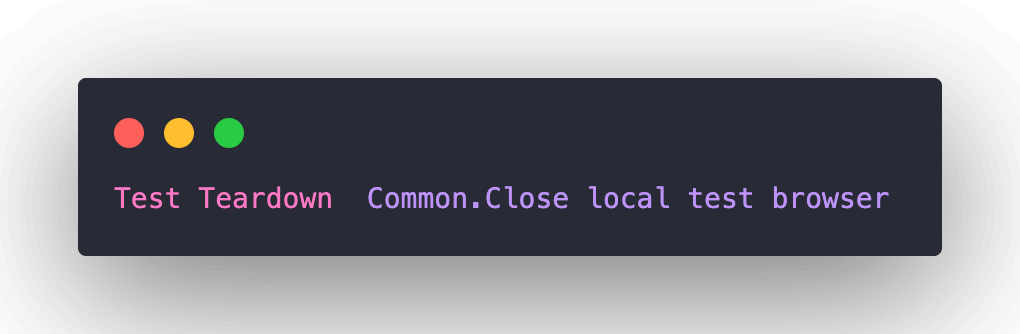
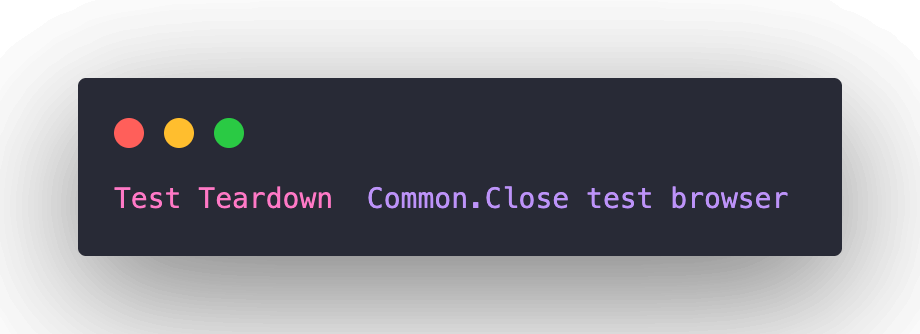
Since the Test Teardown keyword executes after every test case and test suite, we invoke the Close local test browser keyword in Common.robot for closing the browser instance.
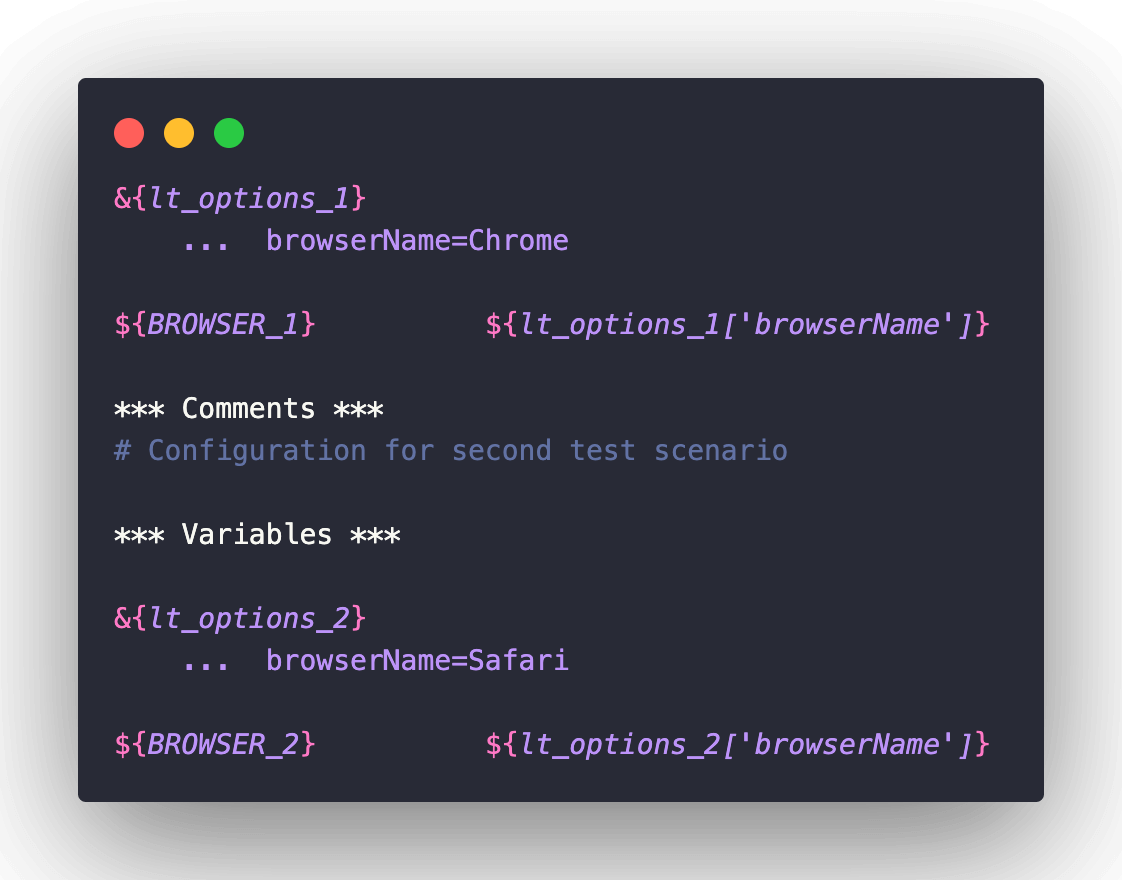
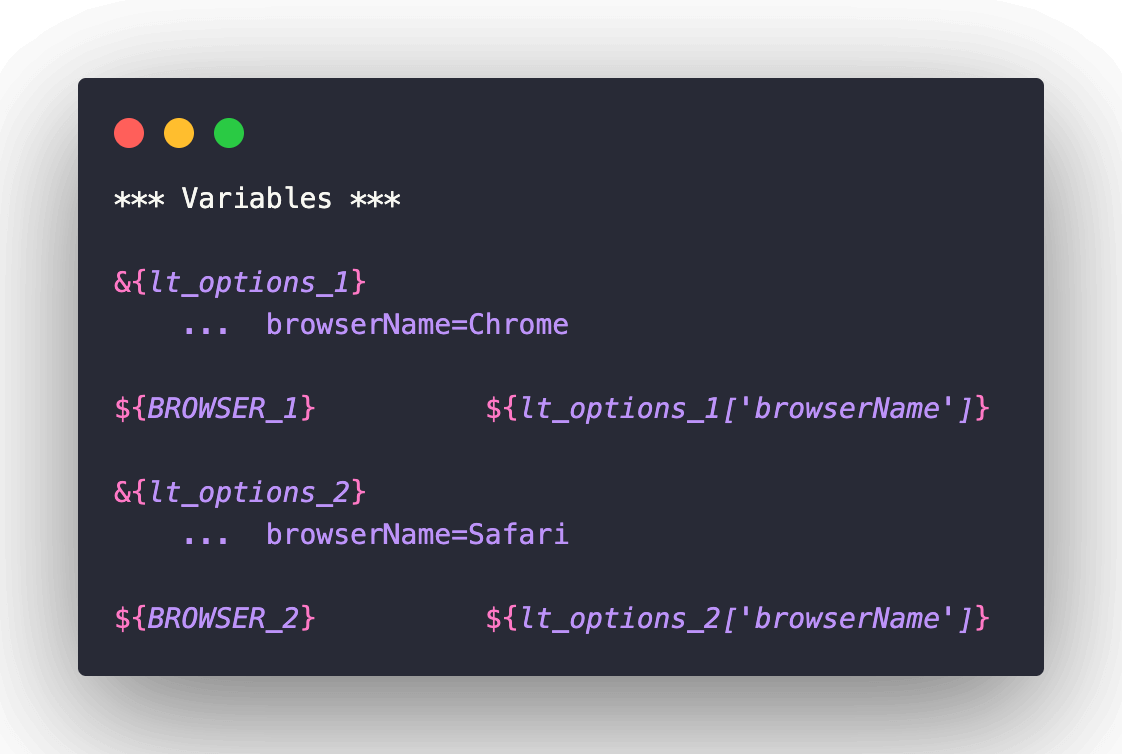
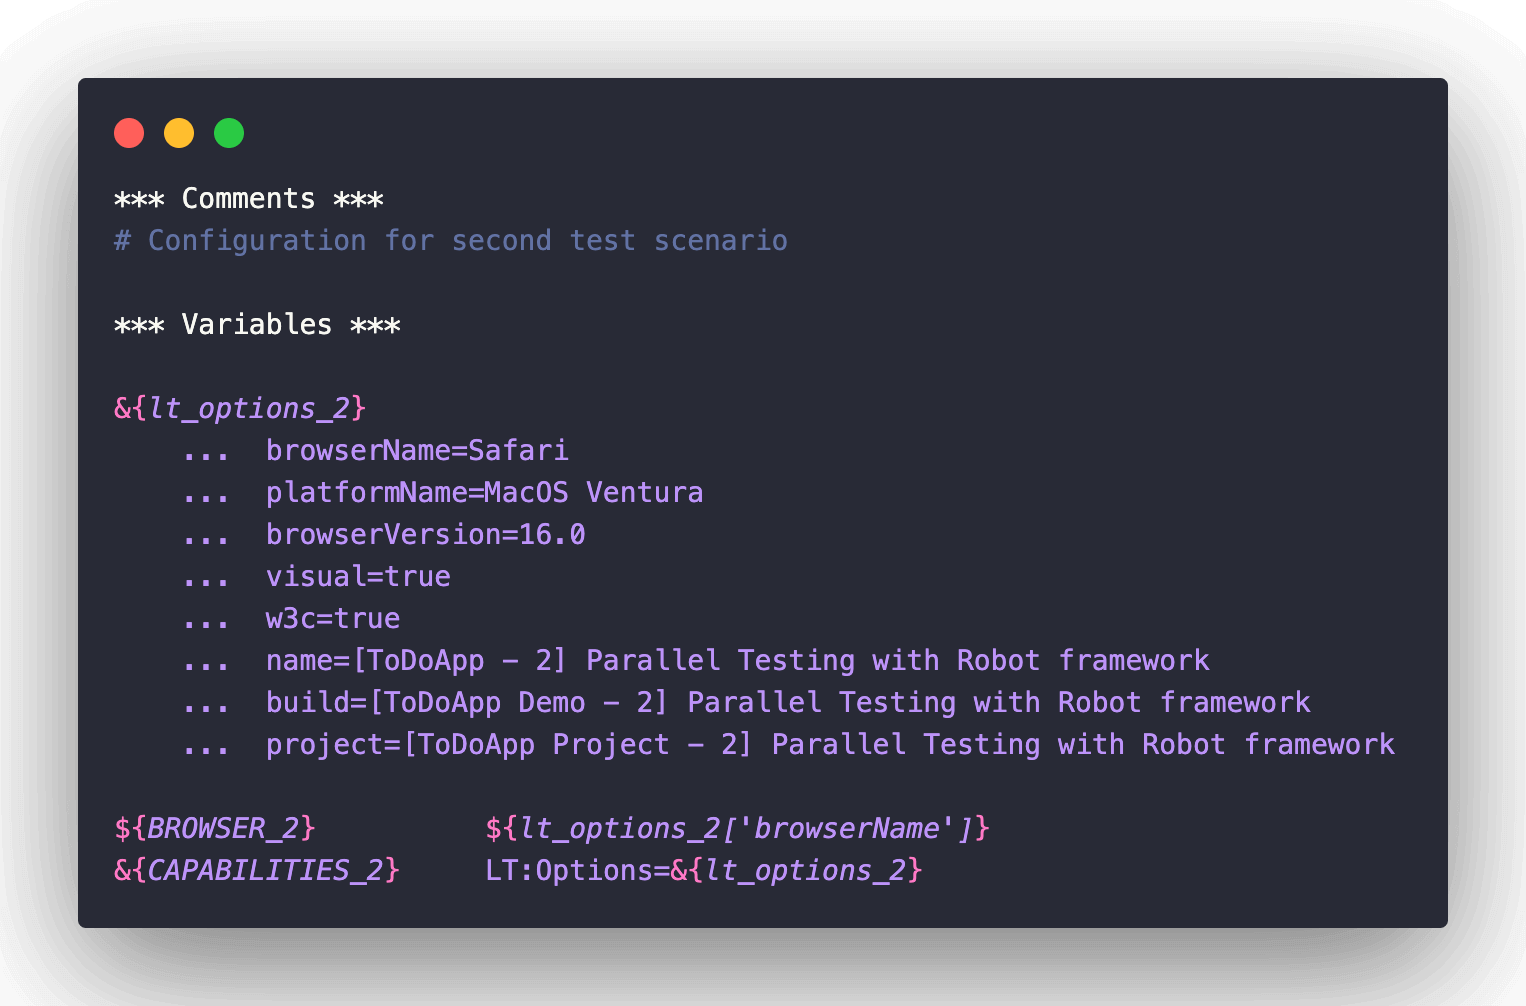
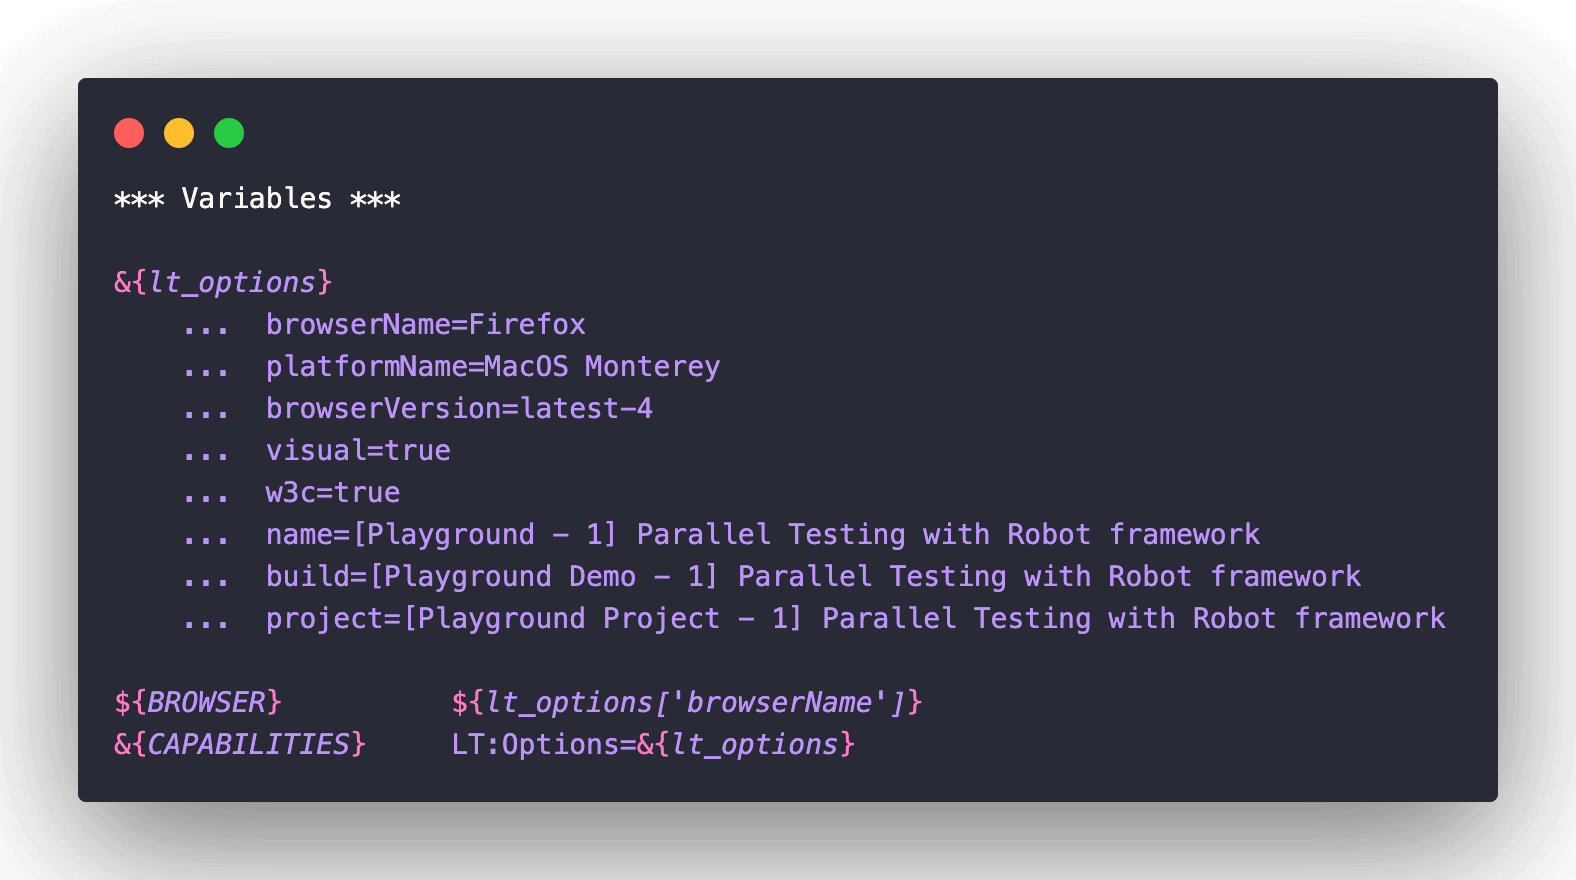
Test Scenarios (1) & (2) from Test Suite 1 will be executed in parallel on Chrome & Safari browsers. Two user-defined variables, lt_options_1 and lt_options_2, are used for assigning the respective browser to the browserName setting. In our case, they are set to Chrome and Safari respectively.
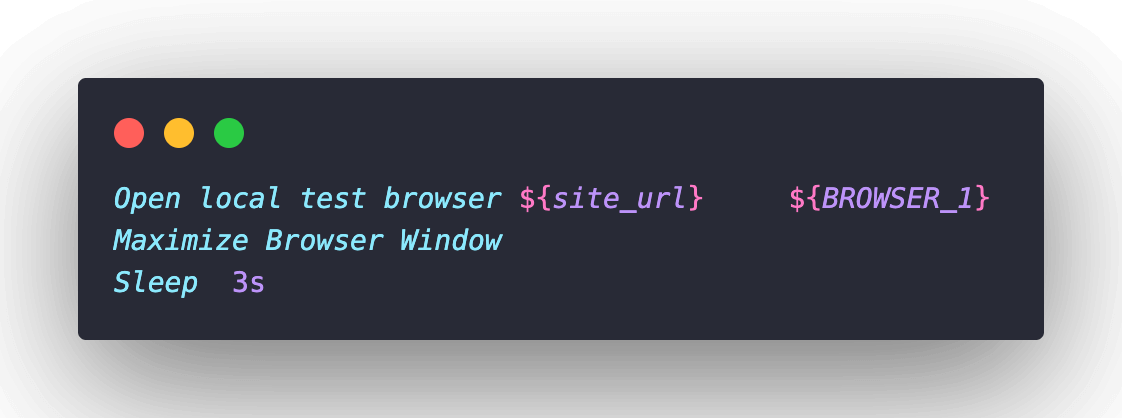
The test URL is first opened using the Open local test browser keyword with the test URL and test browser passed as input arguments. The web browser is maximized as it is considered a good Selenium practice.
The Page should contain element keyword of SeleniumLibrary is used for checking the presence of the checkboxes (for first & second items) on the page. The items are checked using the Click button keyword in SeleniumLibrary.

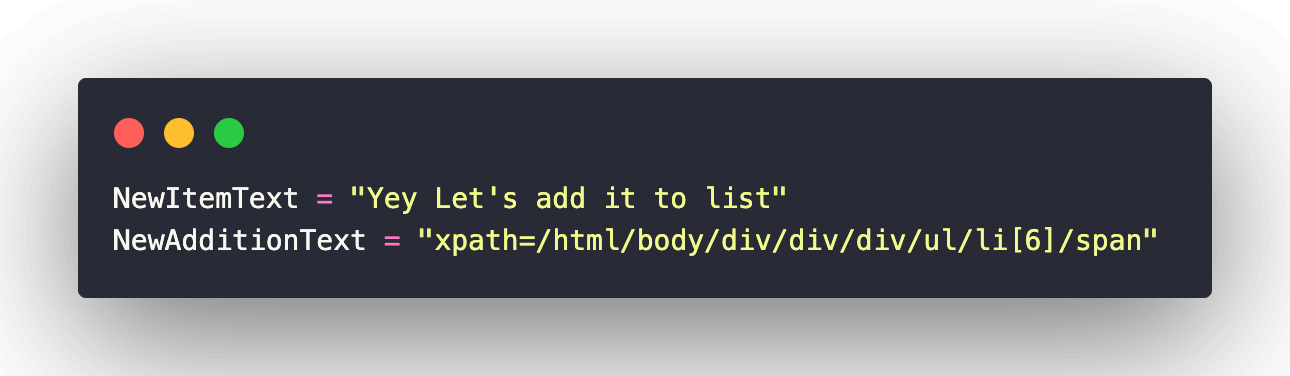
Lastly, the Input text keyword is used for inputting “Yey Let’s add it to list” as the new item in the ToDo app. The Add button is clicked to add the said item to the list.

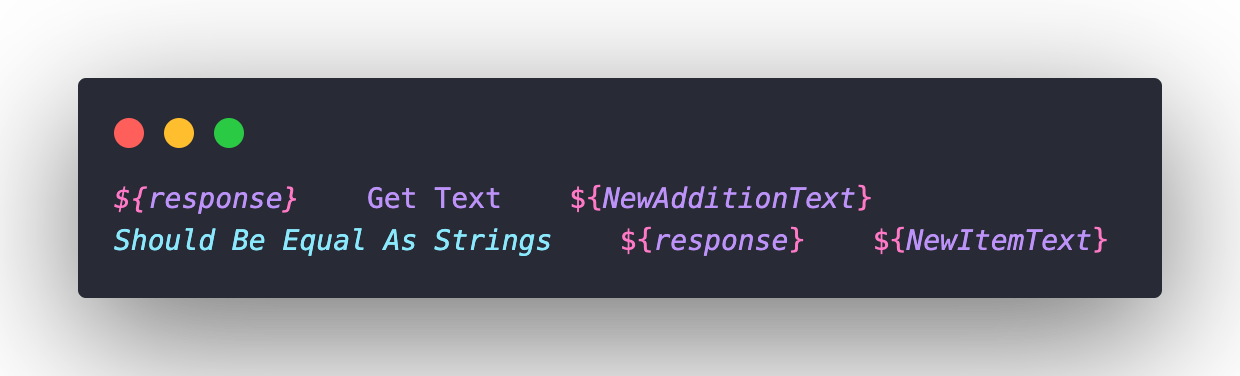
The Get Text keyword in SeleniumLibrary returns the text value of the element identified by the below-mentioned XPath.
The Should Be Equal As Strings keyword in the BuiltIn library compares the string value assigned to ${response} with the expected value. The test fails if both the string objects are unequal.
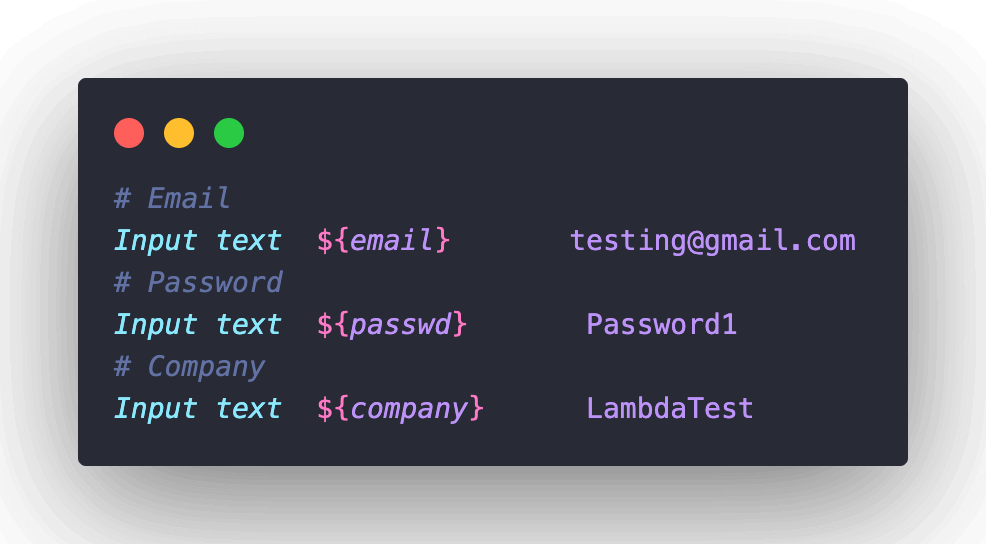
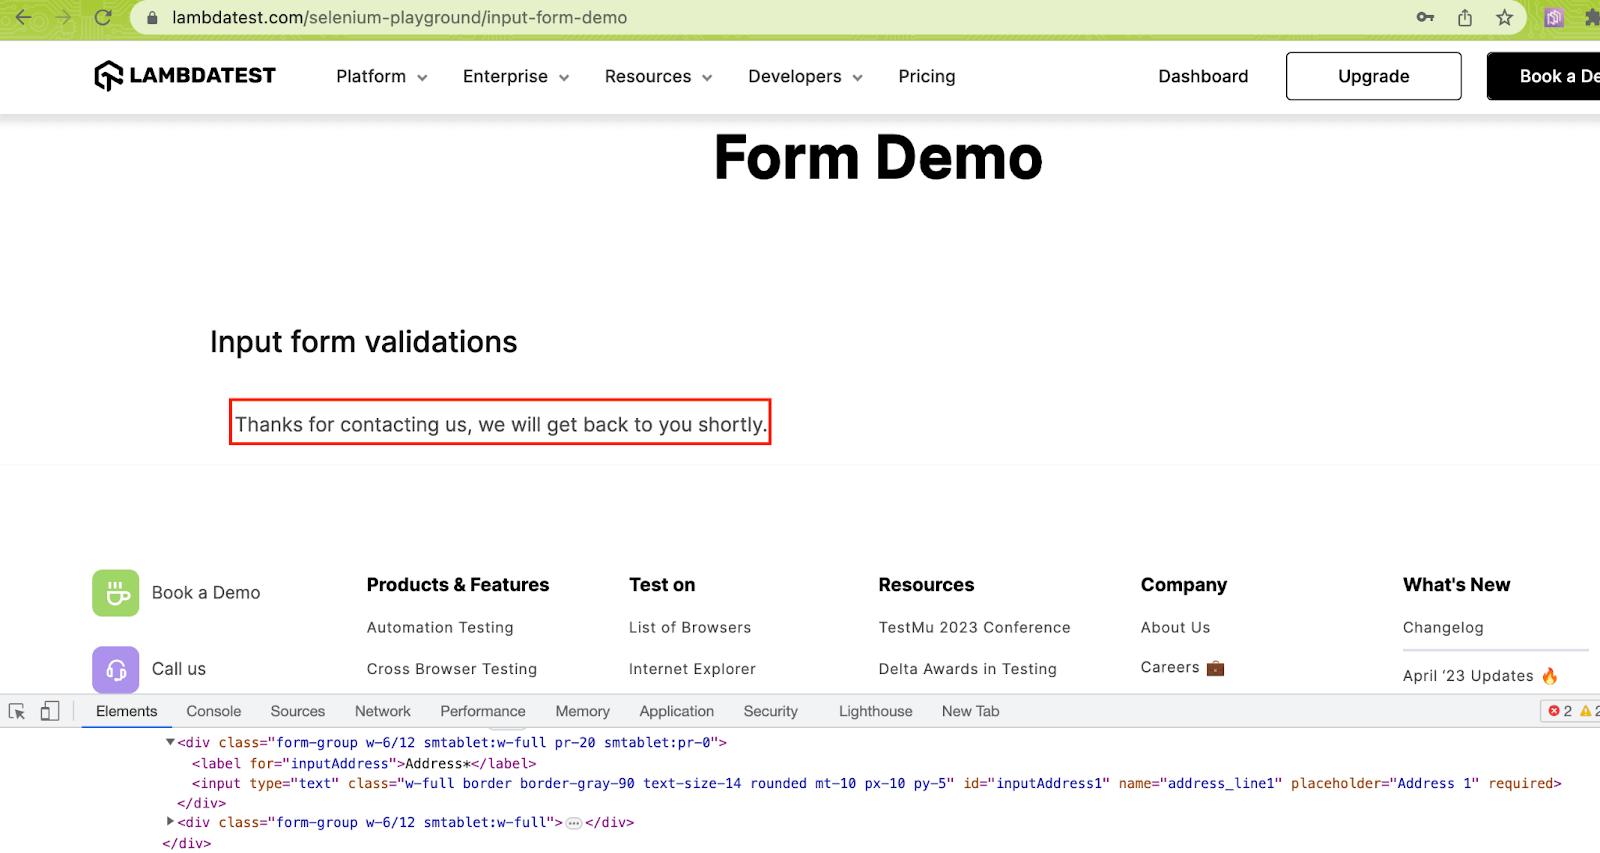
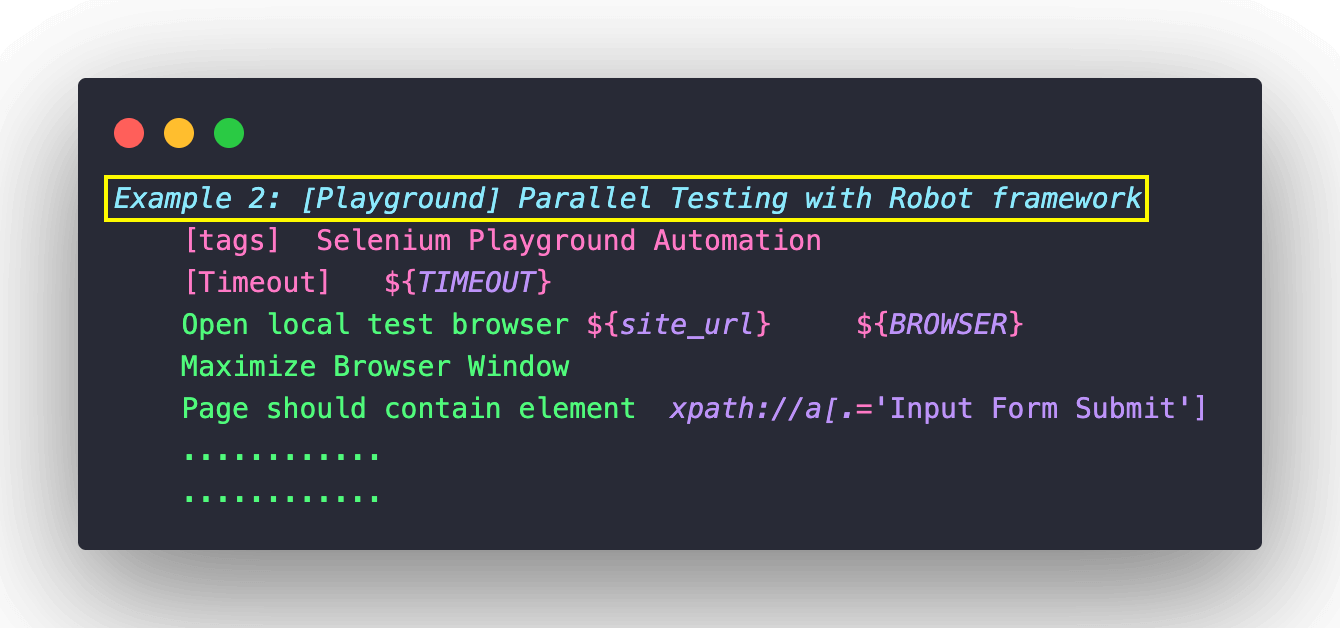
The test scenario in the above test suite is executed only on the local Firefox browser. Once the test URL is opened using the Open local test browser keyword, a check is performed to validate if Input Form Submit is present on the page. The WebElement is located using the XPath property, and its presence is validated using Page should contain element keyword of SeleniumLibrary.

Once the click is performed, the Input Form Demo opens up. Here, entries in the text boxes (i.e., Name, Email, Password, etc.) are populated using the Input text keyword in SeleniumLibrary.
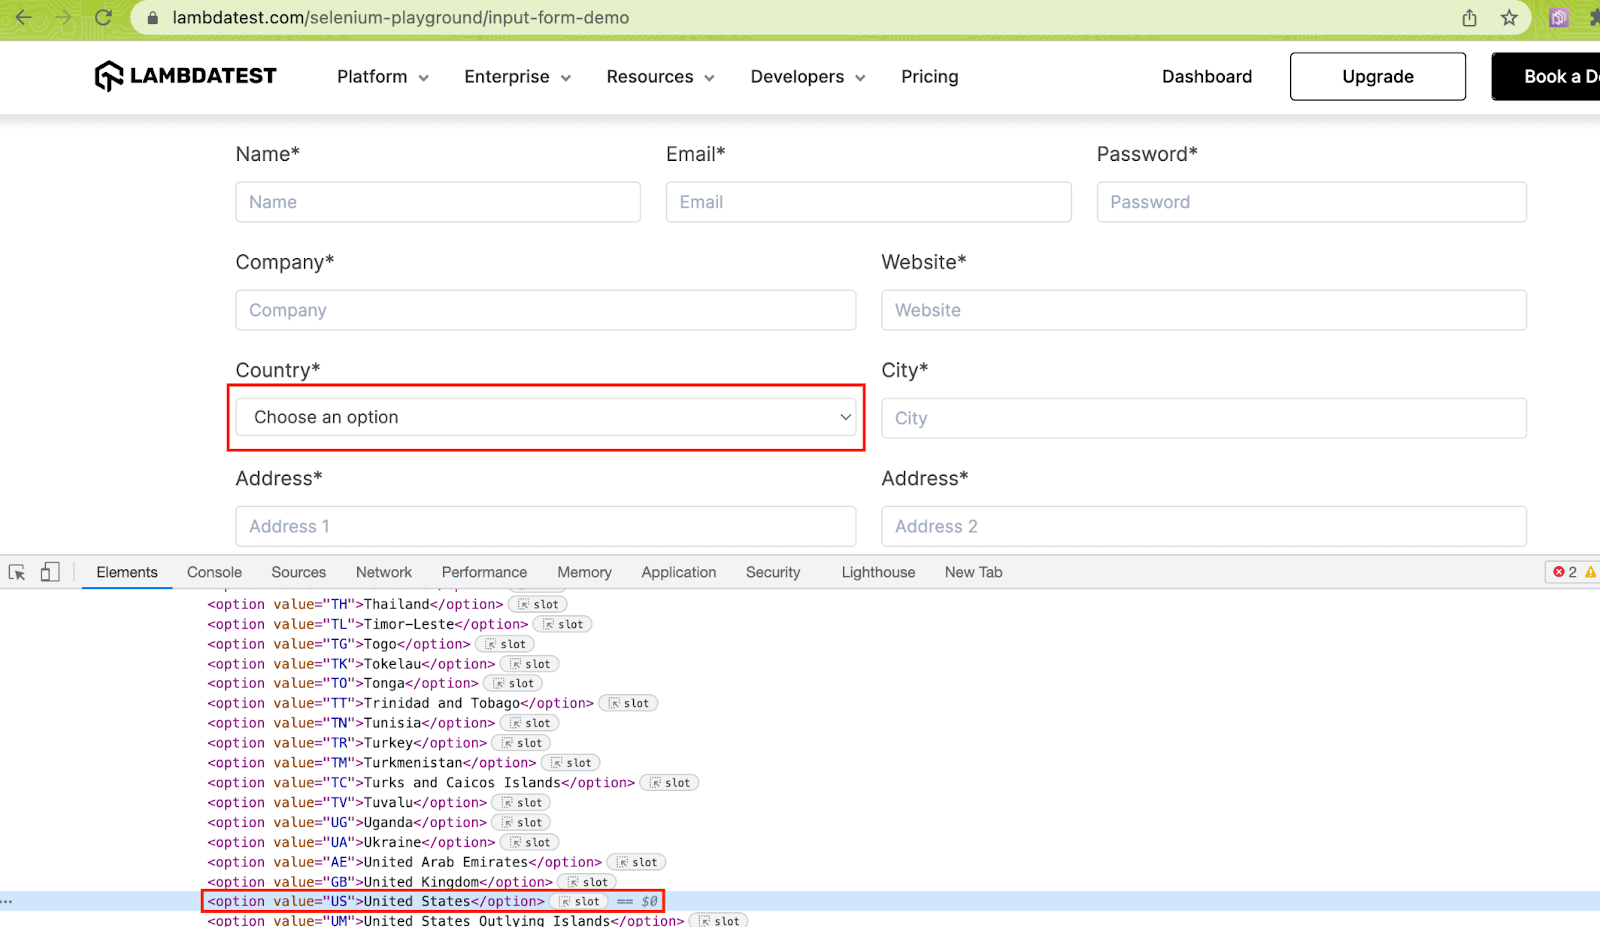
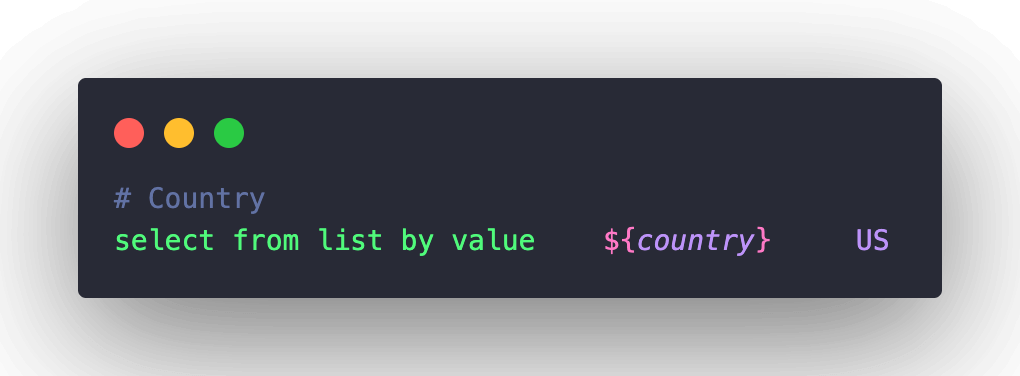
Lastly, the select from list by value keyword is used for selecting “US” from the country drop-down.
Once the inputted data is submitted by clicking the Submit button, the Execute JavaScript keyword in SeleniumLibrary is used for triggering a window scroll to the start of the page. The keyword’s functionality is very much similar to that of JavaScriptExecutor in Selenium WebDriver!
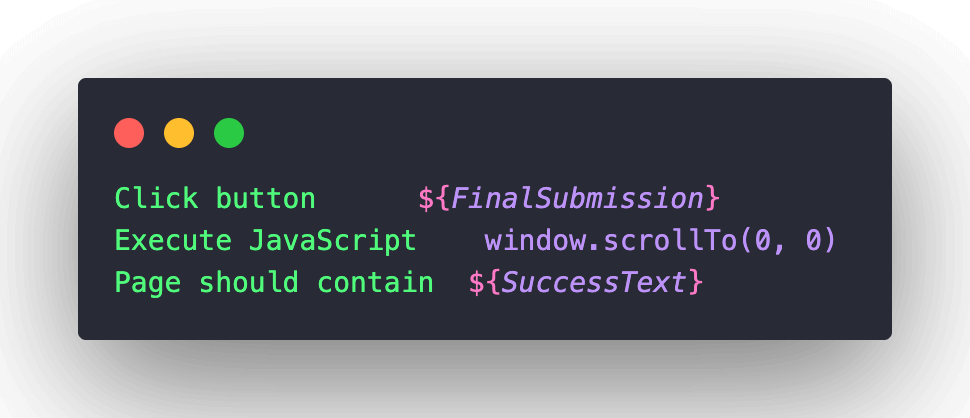
Finally, the presence of the text “Thanks for contacting us, we will get back to you shortly.” is checked to verify if the page submission was successful.
|
⚡💡SeleniumLibrary is not thread-safe; hence there is no safety-net for concurrent access to browser instances or parallel test execution across multiple threads. Pabot runner eliminates the thread-safety issue, as parallelism is done at the process-level (not the thread-level). Each process in Pabot has its own memory space, due to which parallel processes can run in isolation without interfering with each other! |
Execution
Before using the Robot framework for parallel test execution, let’s run the same tests sequentially. This is to benchmark the test execution time (or performance) when the same test scenarios are run in parallel using Pabot runner.
Please clone the repo in case you have not done the same. After completing the steps mentioned in the Project Prerequisites section of this blog on using the Robot framework for parallel test execution.
Serial Test Execution (Purpose: Benchmarking)
Invoke the following command to run the test scenarios located in Tests/LocalGrid folder serially.
It is essential to note that the time taken for execution also depends on factors like machine performance, browser performance, network connectivity, and more. Hence, the numbers being showcased might vary depending on the factors mentioned above.
|
1 |
robot Tests/LocalGrid/ |
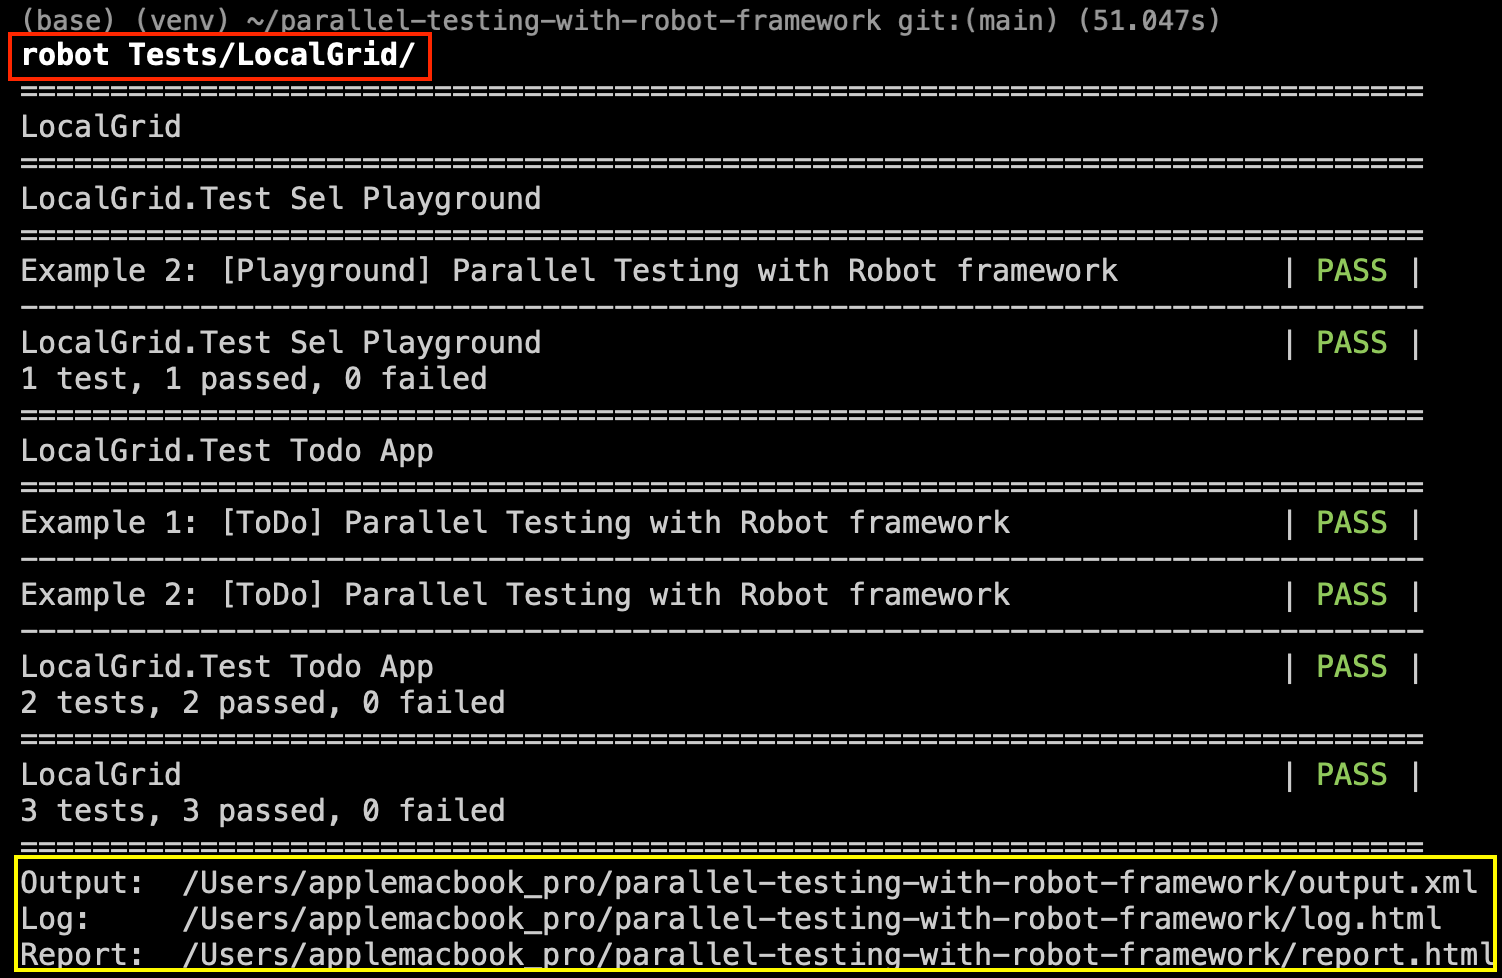
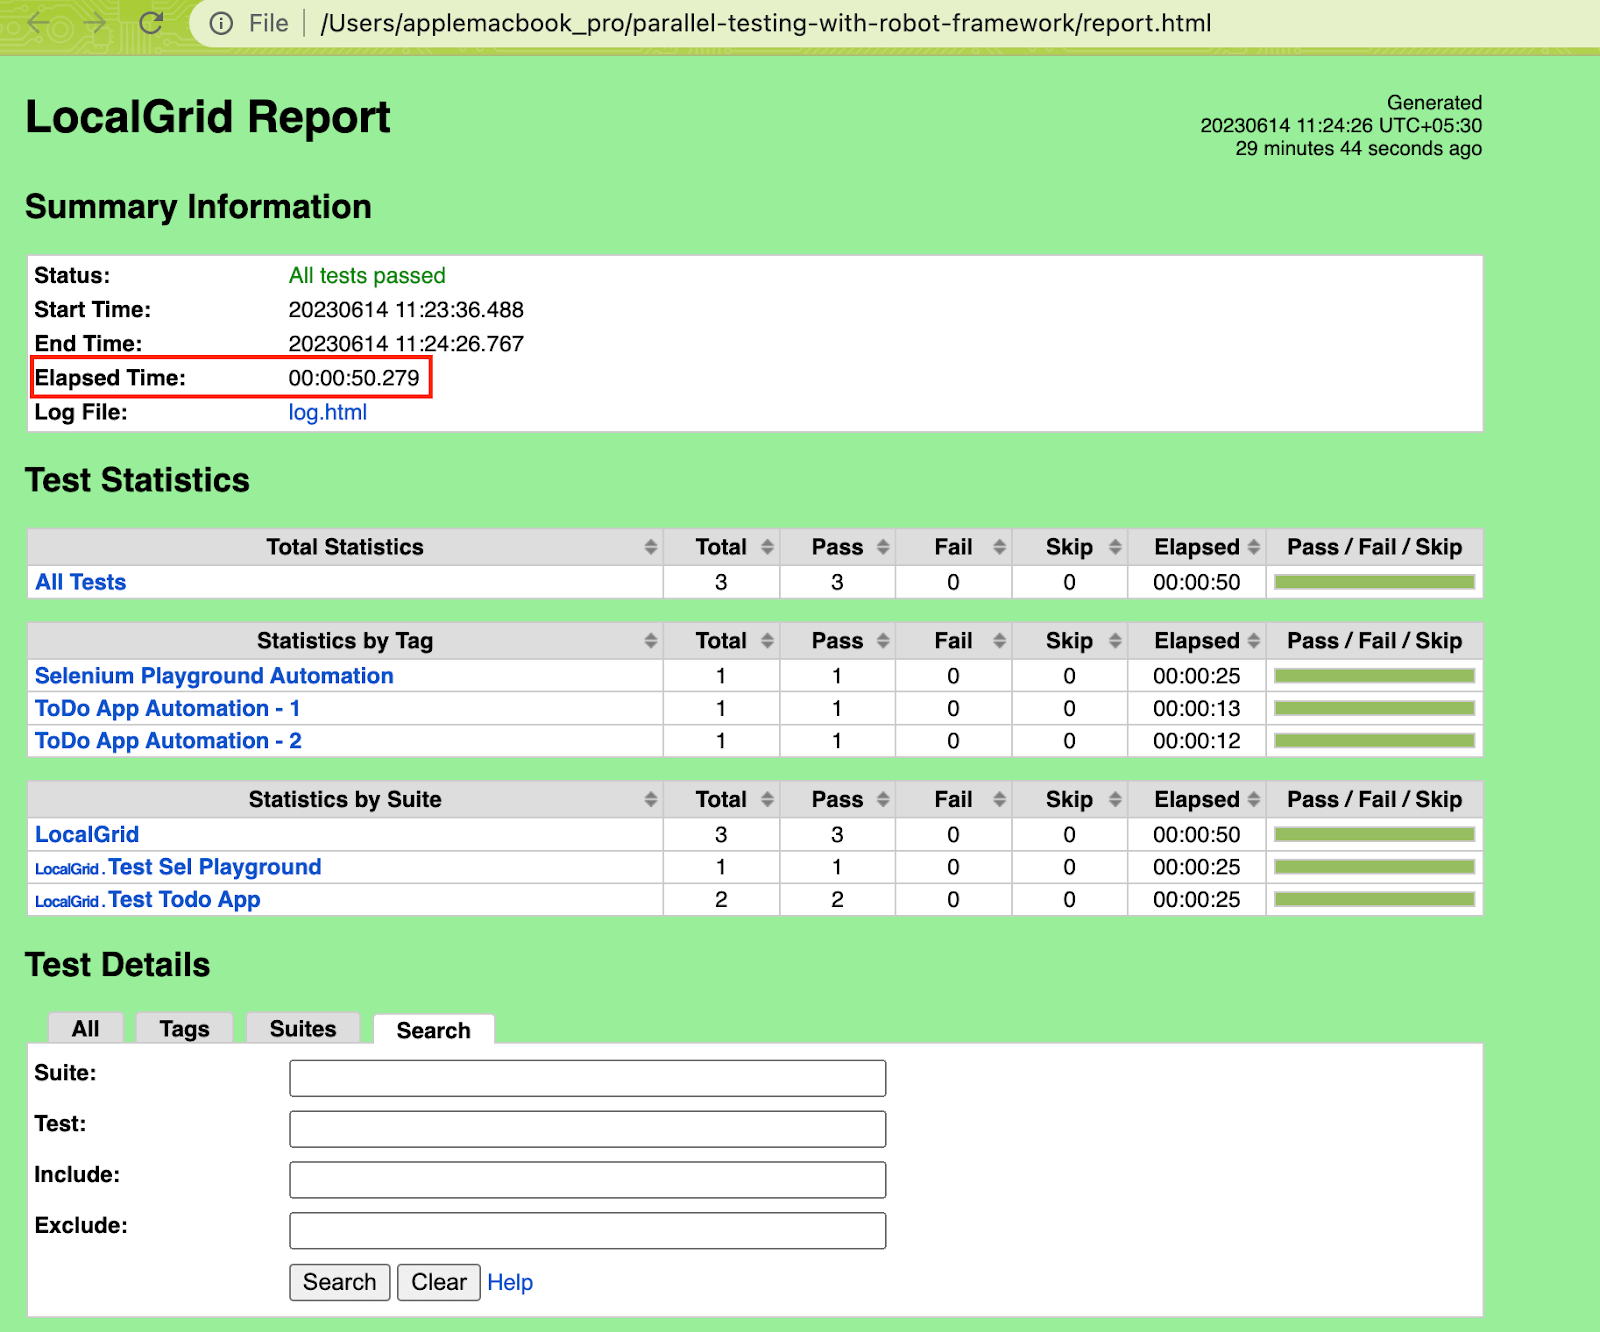
As seen in the Test Report, the serial test execution of three test scenarios took around 50 seconds on my machine (i.e., MacBook Pro, 2 GHz Quad-Core Intel Core i5 processor).
Let’s see what happens when the tests and/or test suites are run in parallel using Pabot runner.
Parallel Test Execution (Default: Suite-Level)
By default, Pabot splits the test execution at the test-suite level, with each process running a separate suite. Tests inside a test-suite (i.e., *.robot file) run in series, whereas the suites run in parallel.
In our case, we have two test-suites where test_todo_app.robot consists of two test scenarios, whereas test_sel_playground.robot consists of a single test scenario.
Invoke the following command on the terminal to run Robot test suites in parallel using Pabot.
|
1 |
pabot --verbose --outputdir results --log local_test_parallel_log.html --report local_test_parallel_report.html Tests/LocalGrid/ |
– –verbose : Increase the verbosity level
– –outputdir : Specify the directory used for storing the results
– –log : Name of the log file generated post test execution
– –report : Name of the report file (in specified format) generated post test execution
Shown below is the execution snapshot which indicates the test execution was successful:
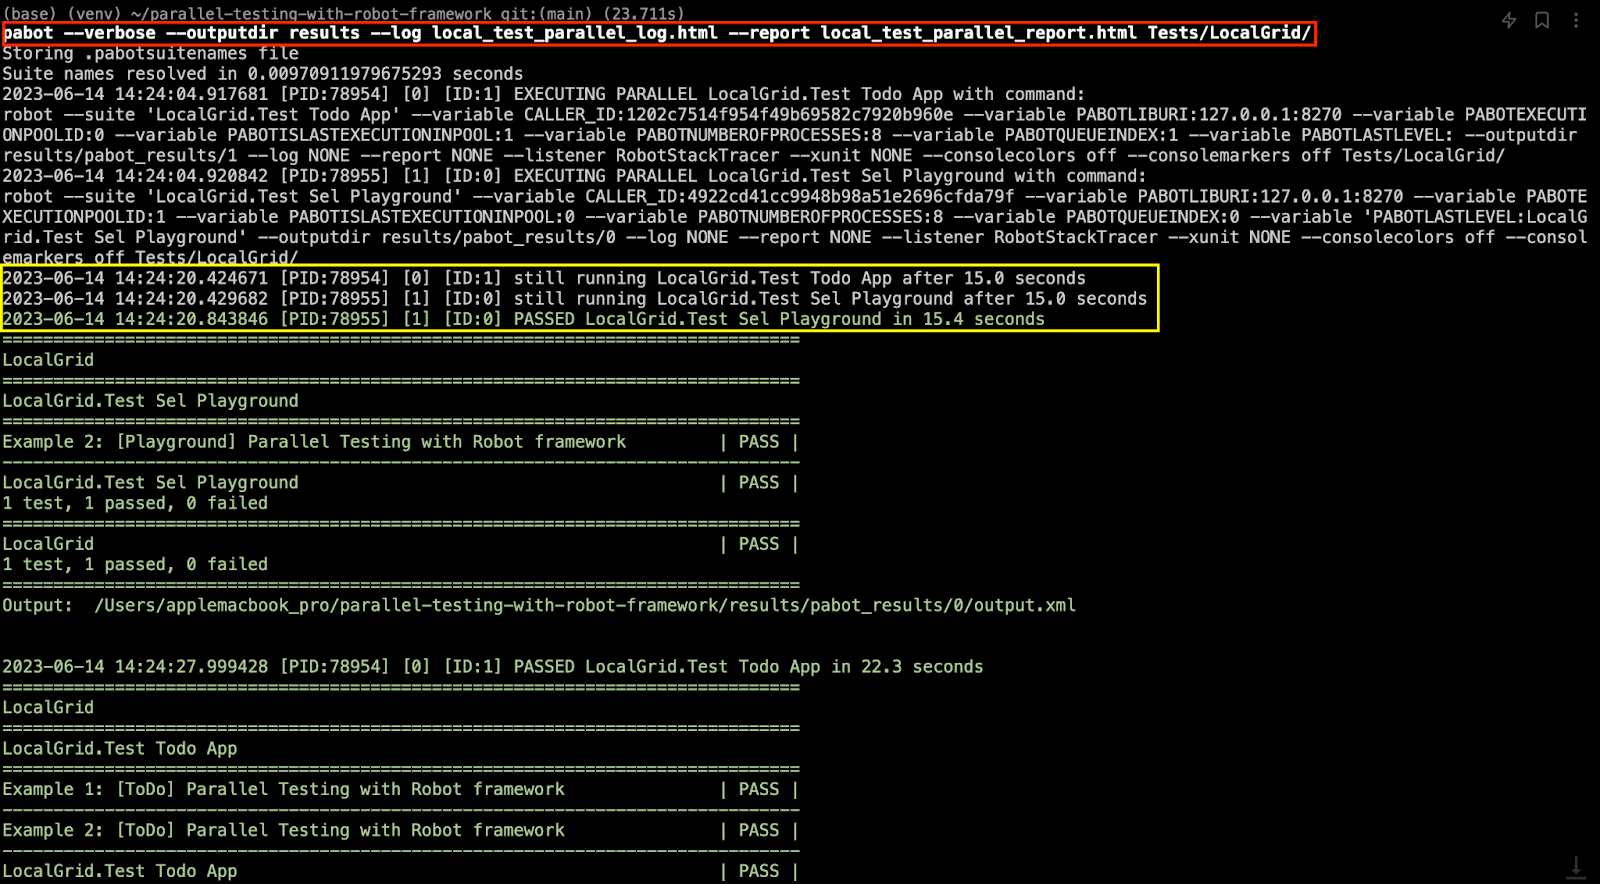
Here are some interesting things to notice from the test execution:
- Test suites are executing in parallel, with each process (PID: 78954 and PID:78955) running a separate suite
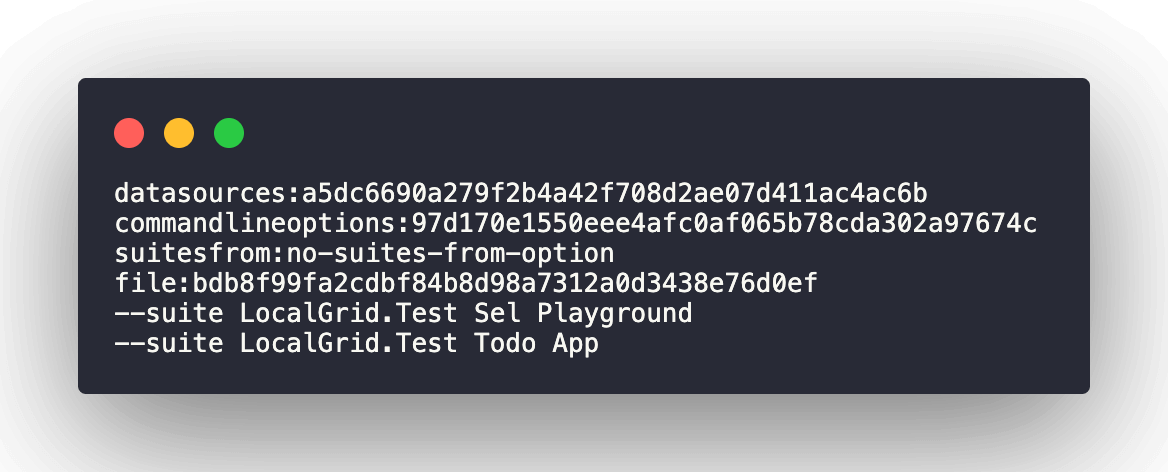
- A file named .pabotsuitenames is auto-generated during the phase of test execution. It contains information related to test suites when they are executed in parallel.
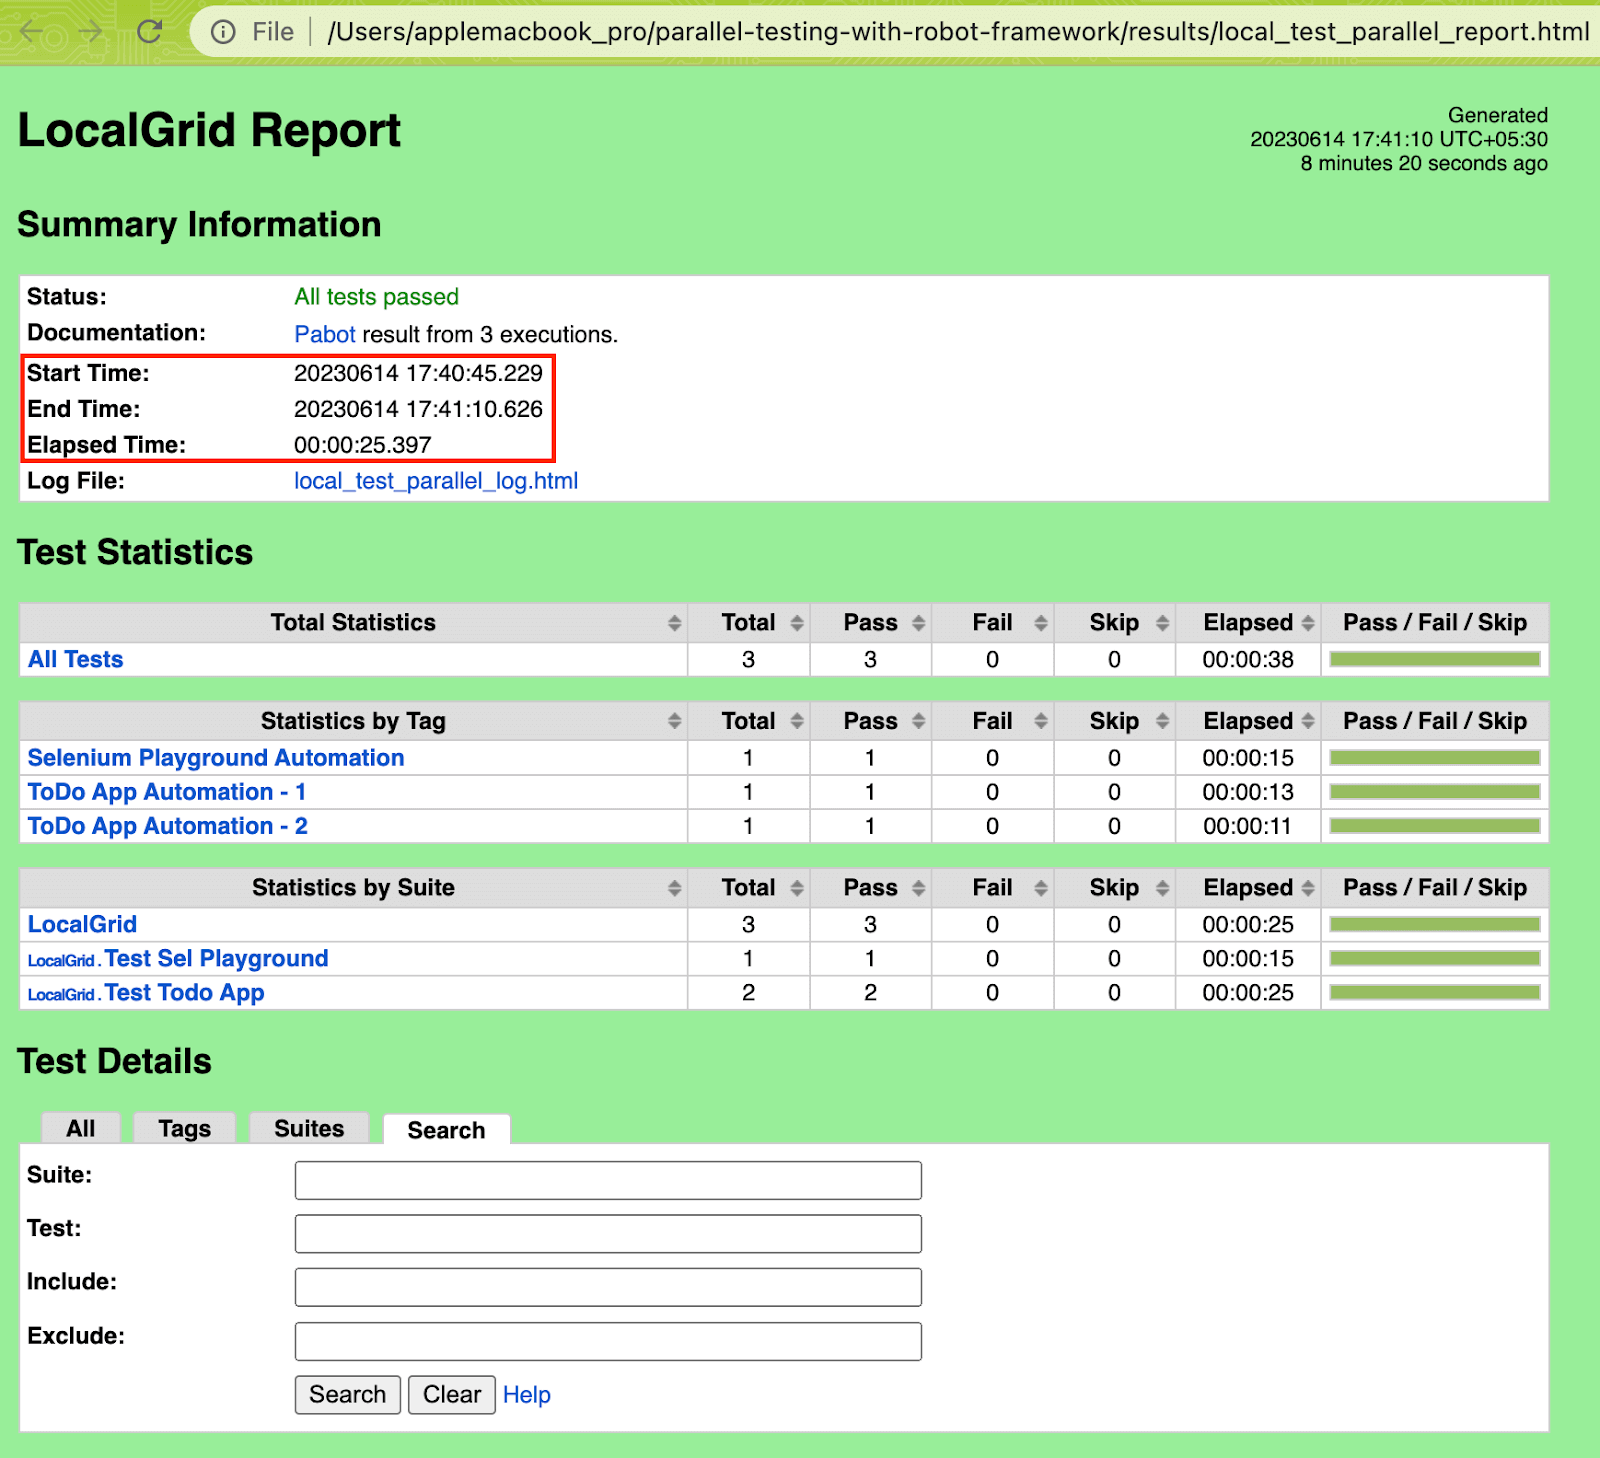
- The total test execution time has come down from 50 seconds (with serial execution) to 23 seconds (with suite-level parallelism).
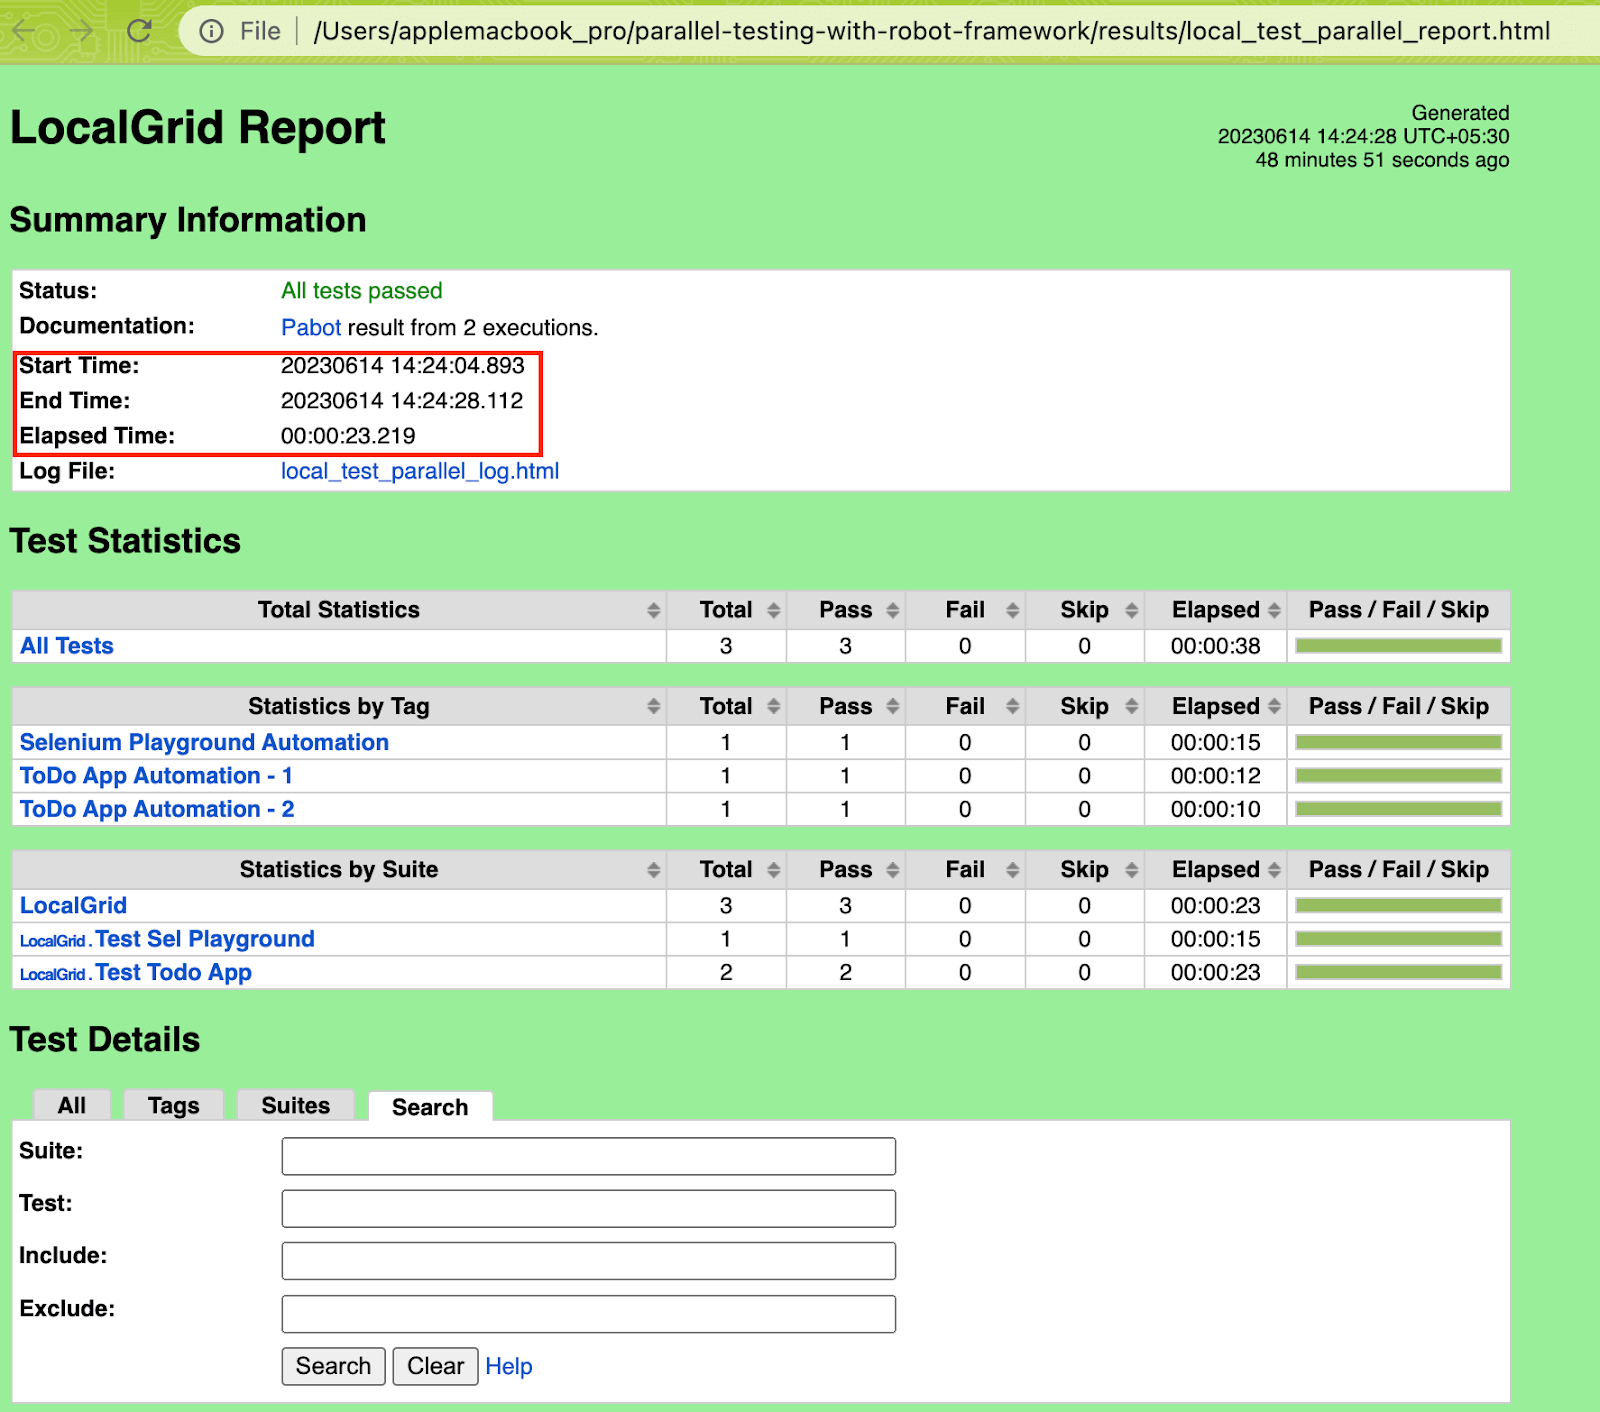
In a nutshell, suite-level parallelism with Pabot provided ~50 percent savings in test execution time!
Parallel Test Execution (Test-Level)
Pabot lets you achieve parallel execution at test-level through the –testlevelsplit option. In case .pabotsuitenames contains both tests and test-suites, then –testlevelsplit will only affect new suites and split only them.
Here, each process runs a single test case. For instance, if the test suite(s) have four tests (e.g. T1, T2, T3, T4), then four separate processes (P1, P2, P3, P4) will run each test in parallel. Test-level parallelism must be preferred over suite-level parallelism in cases where suite(s) have a large number of independent tests that can run concurrently.
In our case, there are three test scenarios that can run in parallel.
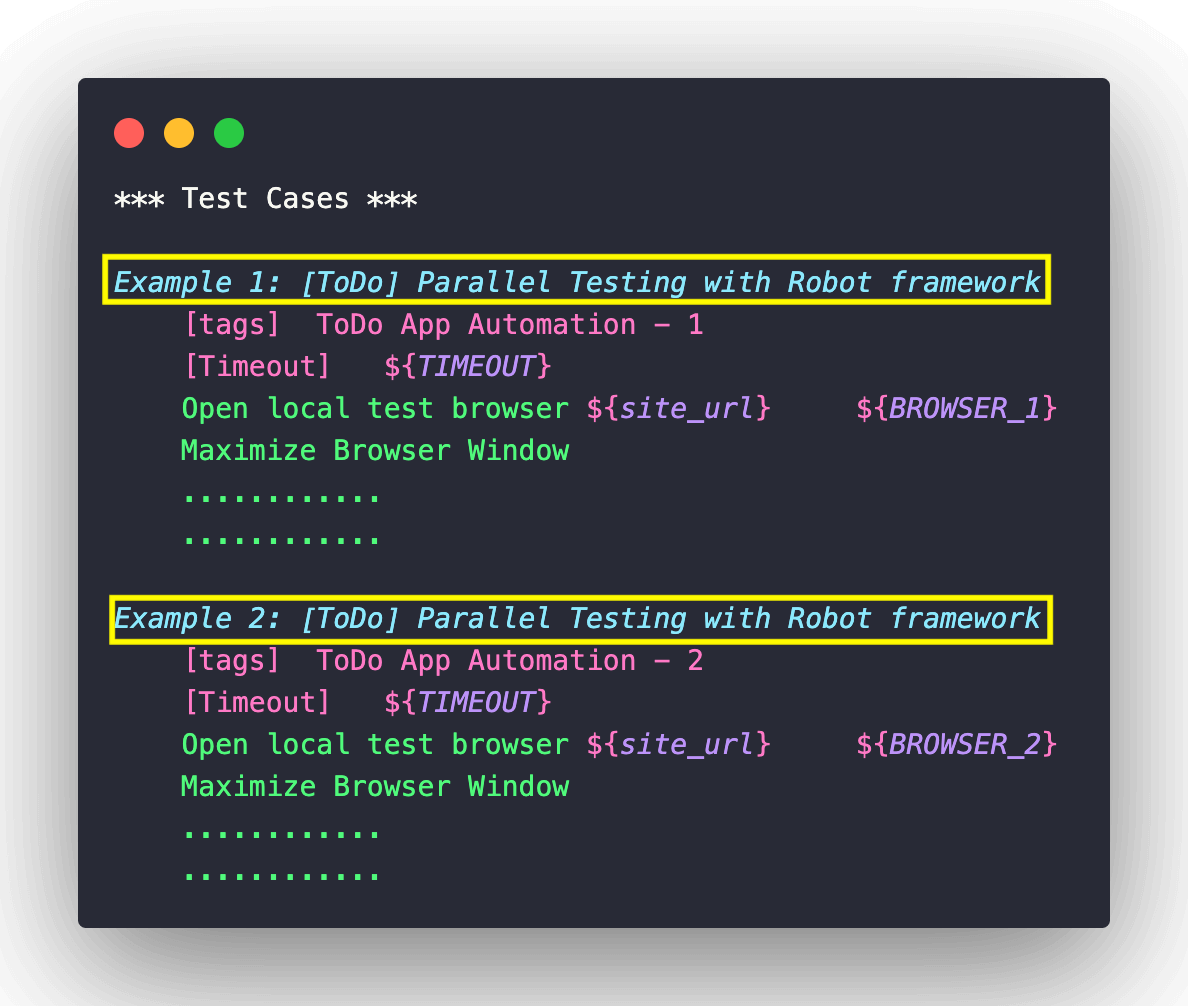
Invoke the following command on the terminal to run individual tests in parallel using Pabot.
|
1 |
pabot --verbose --testlevelsplit --outputdir results --log local_test_parallel_log.html --report local_test_parallel_report.html Tests/LocalGrid/ |
Since there are three tests in total, three parallel processes are invoked with each running a single test. As seen in the test execution screenshot, three parallel processes (PID: 92660, 92661, and 92662) handle one test scenario each.
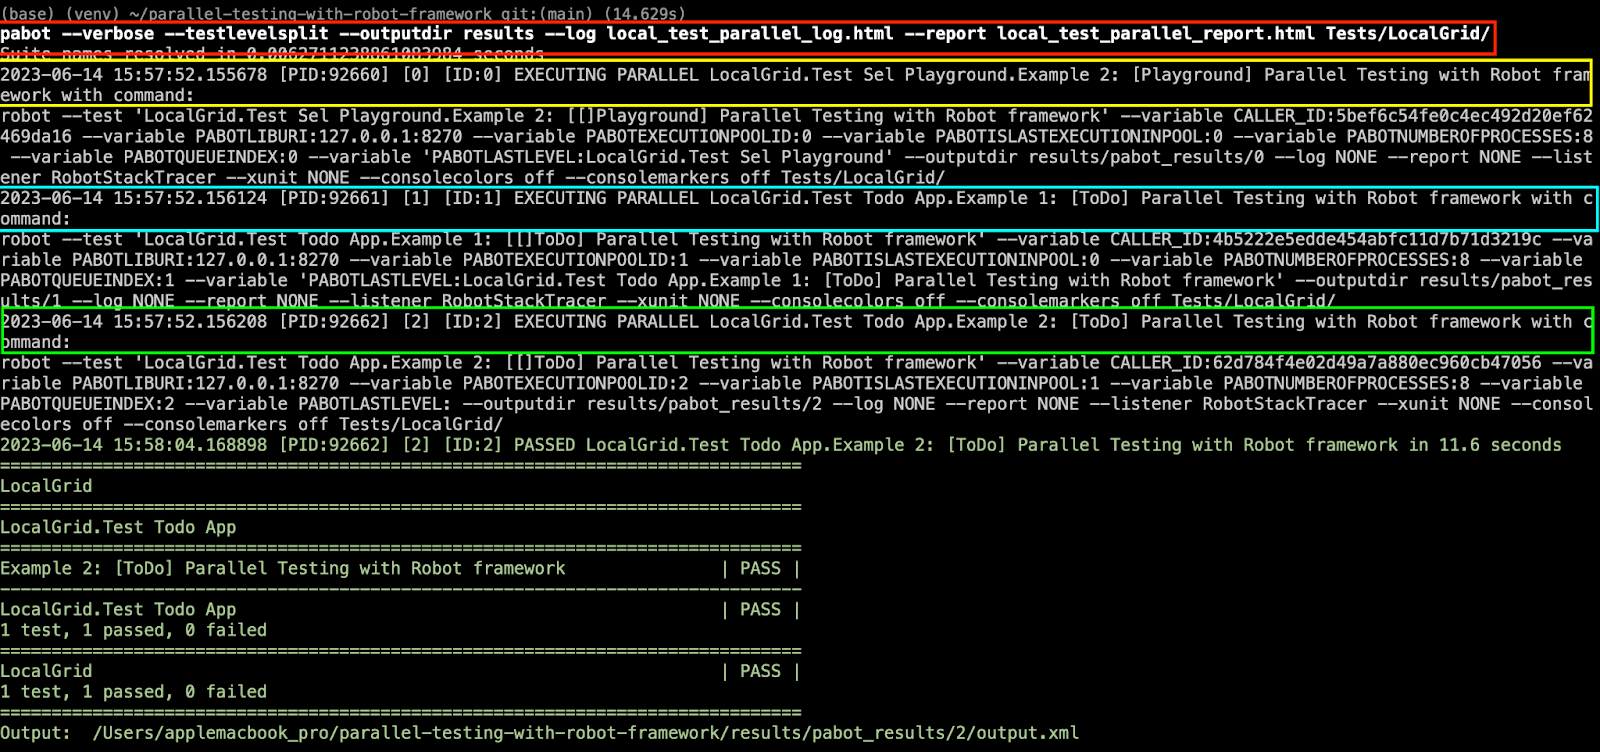
The total test execution time has come down from 50 seconds (with serial execution) and 23 seconds (with suite-level parallelism) to 14 seconds (with test-level parallelism).

It is important to note that the total execution time might vary from one run to another. For instance, subsequent runs (with the same load conditions) resulted in 16 seconds & 17 seconds, respectively.
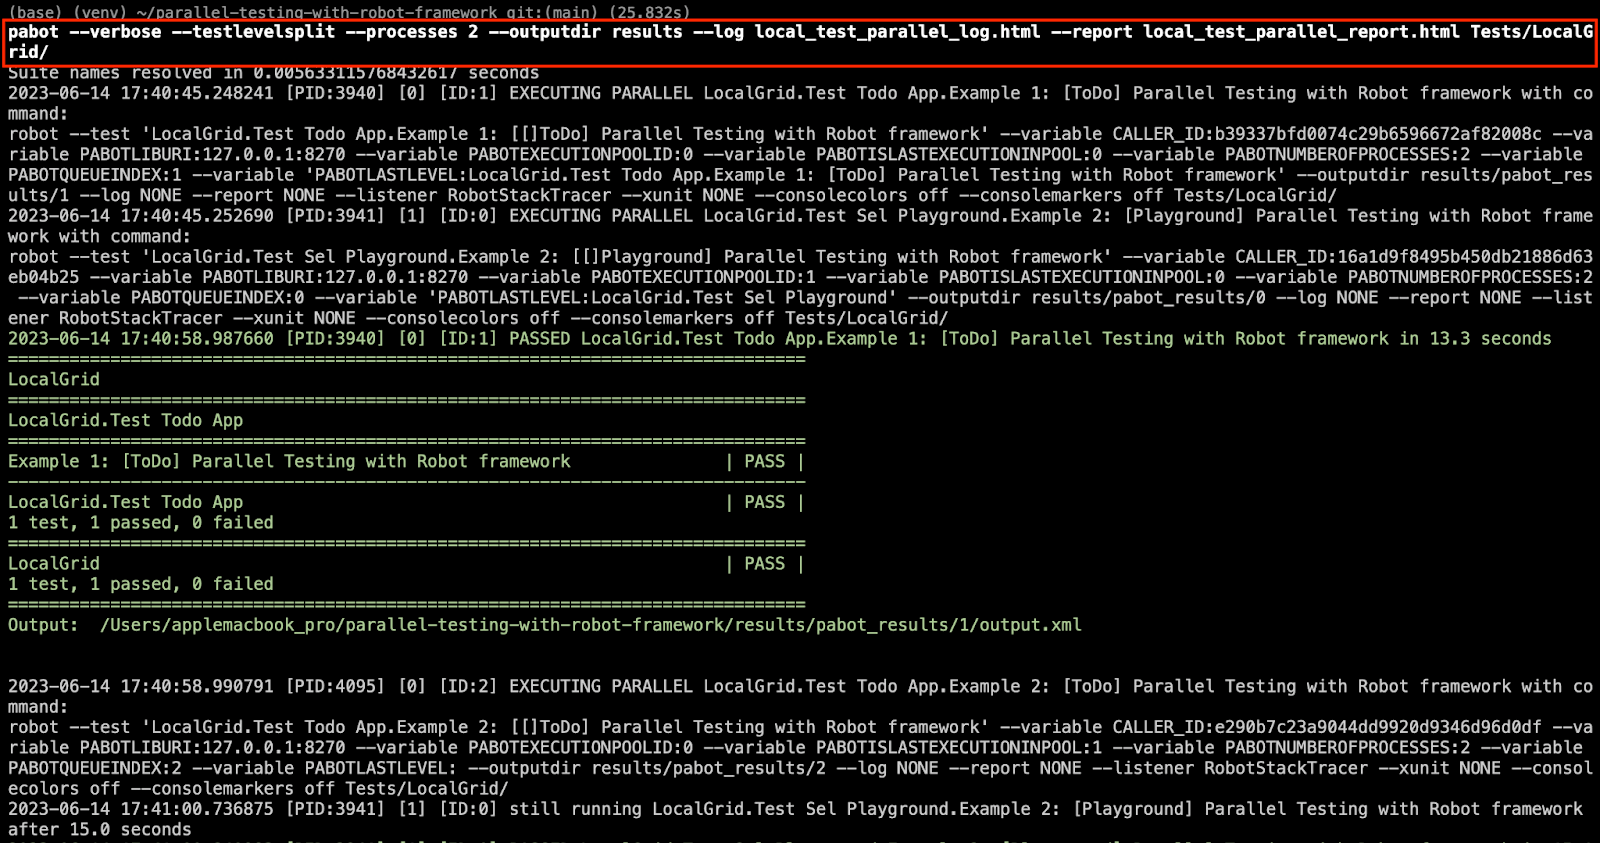
Customize Number of Parallel Executors
There are scenarios where you might want to invoke more/less parallel executors to achieve more out of parallelism with the Robot framework. This is where the –processes option lets you customize the number of parallel executors for test case execution. It is recommended to take the available resources (physical CPU cores, memory, etc.) into account when customizing the number of parallel executors.
|
1 |
pabot --processes <num_parallel_processes> |
Let’s do a test split execution with 2 parallel processes and see the difference. Invoke the following command on the terminal:
|
1 |
pabot --verbose --testlevelsplit --processes 2 --outputdir results --log local_test_parallel_log.html --report local_test_parallel_report.html Tests/LocalGrid/ |
As seen from the execution snapshot and test report, the total test execution time is 25 seconds (i.e., same as test-suite level execution). However, the execution time might vary from one test run to another.
To summarize, both thread-level and suite-level parallelism can potentially accelerate test execution time. However, you must keep a watchful eye on test dependencies and available resources (i.e., CPU cores, memory, etc.) to avoid conflicts or flaky tests (or unexpected results).
Parallel Testing using Pabot on Cloud Grid
So far, we have demonstrated using the Robot framework for parallel test execution with Pabot on the local machine (macOS Ventura). So far, so good 🙂However, a challenge arises if tests have to be performed on different platforms and browser combinations. What if we have to execute the tests mentioned above on the latest and/or older version of Chrome, Firefox, etc., installed on Windows 10 and Windows 11 machines?
In such cases, we can leverage the benefits of cloud testing as it helps in executing automated UI tests at scale reliably and securely. With the rapid proliferation of cloud technologies, it is imperative to lean on cloud testing to realize:
- Reduced infrastructure costs
- Better test coverage
- Shortened developer feedback
- Improved product quality
In this section of the Selenium Python testing tutorial using Robot framework, we will demonstrate how to port the existing Robot tests so that it runs on LambdaTest cloud grid. LambdaTest is a cloud-based digital experience testing platform that lets you run Selenium automation tests with Robot on 3,000+ browsers and operating systems online!
You can also Subscribe to the LambdaTest YouTube Channel and stay updated with the latest tutorials around automation testing, Selenium testing, Cypress, CI/CD, and more.
Visit our support documentation to get started with Selenium Python testing.
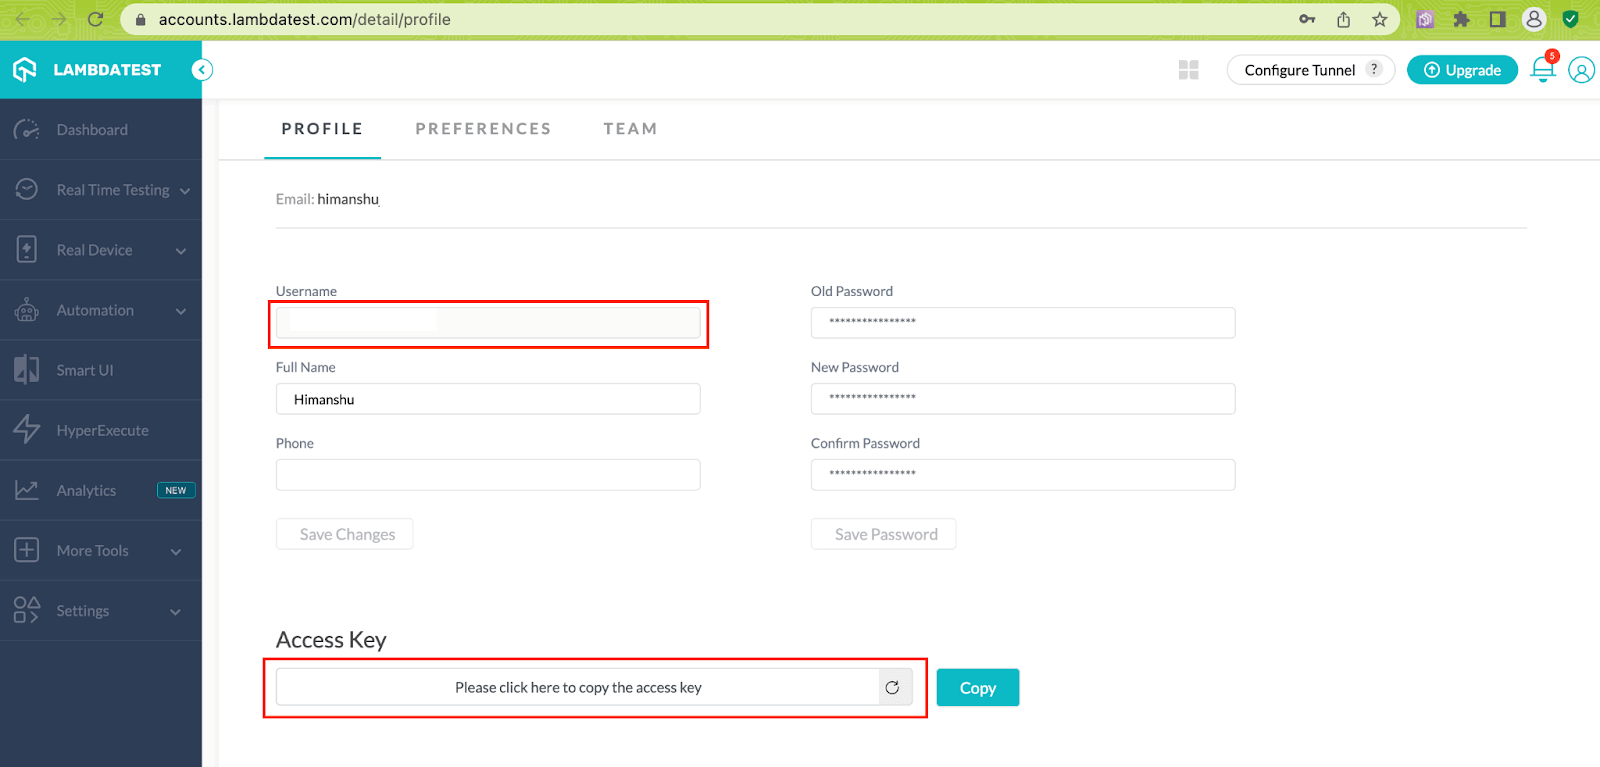
To get started, you need to create an account on LambdaTest. Post that, please make a note of your username and access key, which are available in the LambdaTest Profile section.

Now export the environment variables LT_USERNAME and LT_ACCESS_KEY, as they are required for running tests on LambdaTest.

Project Setup
Prerequisites and Project setup remain almost the same as shown in the ‘Parallel Testing Demonstration’ earlier. The only difference is that the ported tests are located in the Tests/CloudGrid folder.
Implementation (Porting Changes for Execution on Cloud Grid)
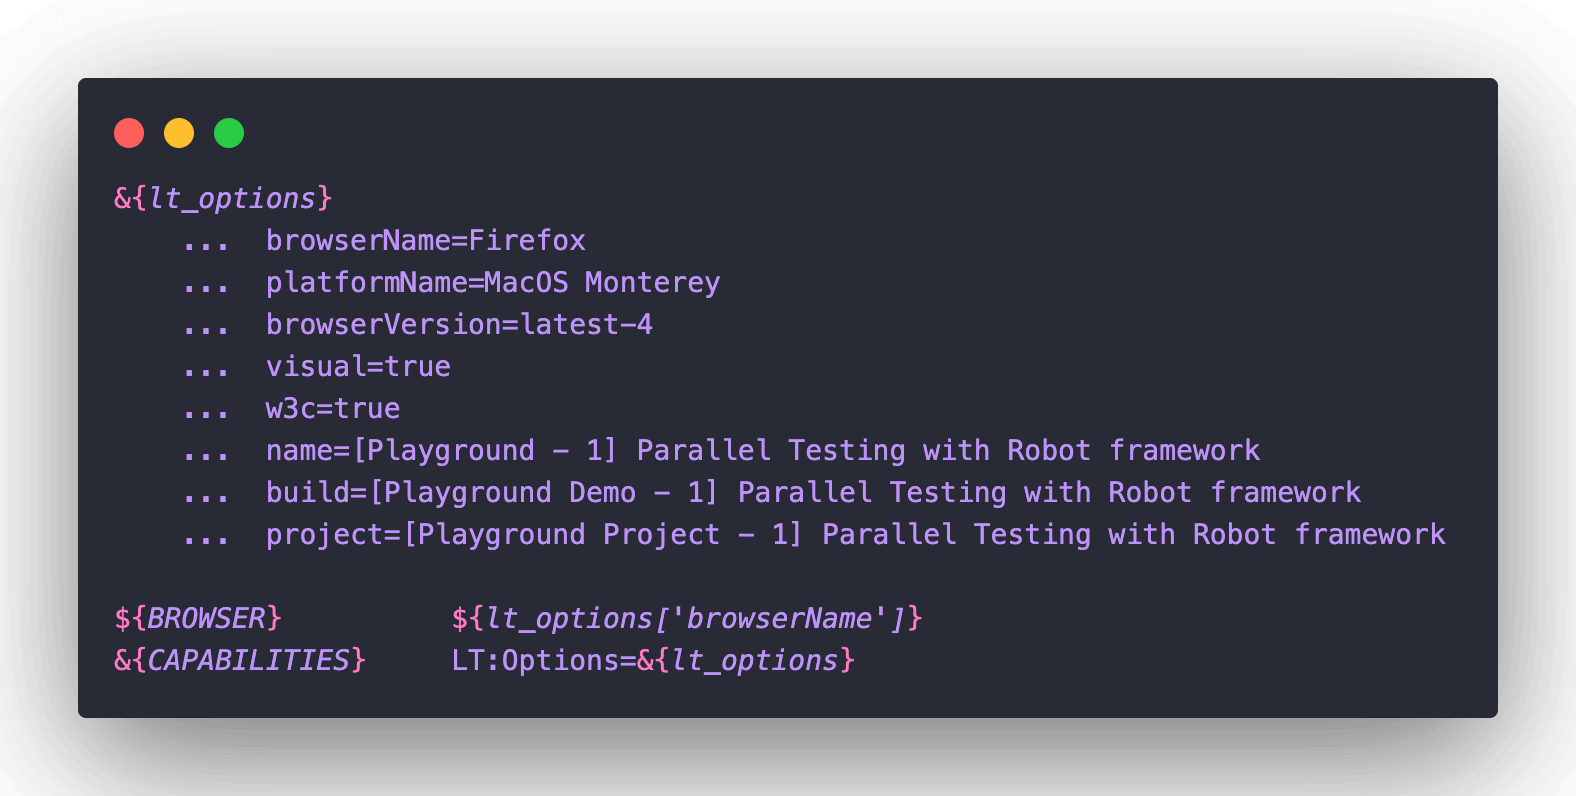
As the first step, we copy the relevant capabilities from the LambdaTest Capabilities Generator. Since SeleniumLibrary is compatible with Selenium 4, we choose the capabilities for Python with Selenium 4. Though there is no separate mention of Robot in the ‘Select your framework’, you can still use the capabilities-related nomenclature in the implementation.
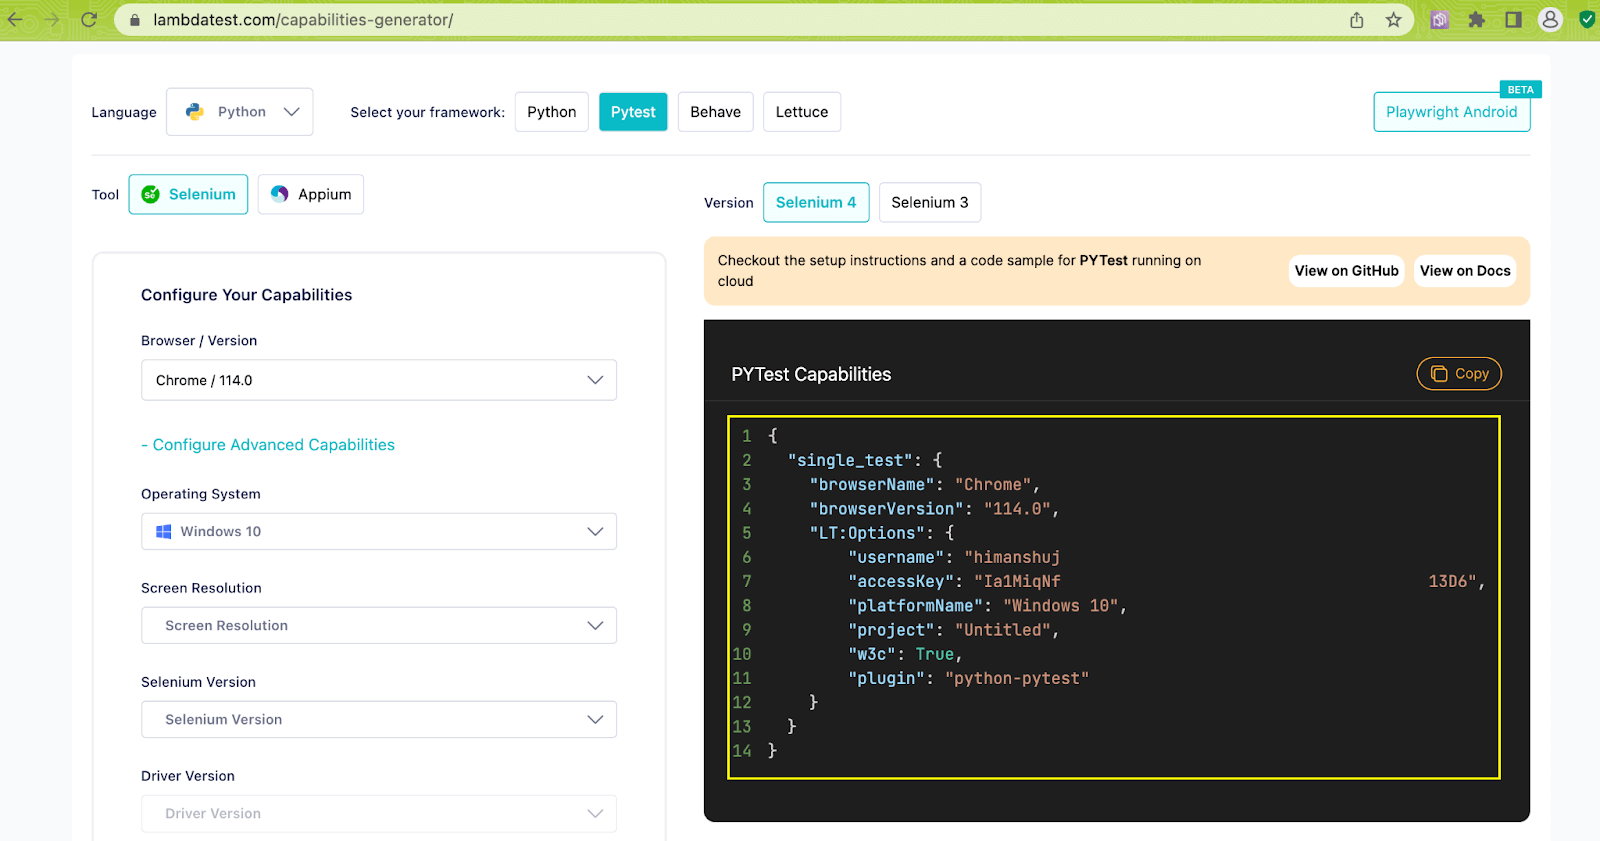
For instance, you can use the following when setting the capabilities (all in String format):
| Capabilities (Selenium 4) | Sample Values |
|---|---|
| platformName | Windows 11, MacOS Ventura, etc. |
| browserName | Chrome, Firefox, Safari, etc. |
| browserVersion | String value based on the browser used for testing |
| w3c | True (when tests are executed using Selenium 4) |
| Name (optional) | Test name |
| Build (optional) | Build name |
| Project (optional) | Project name |
The first test scenario (for ToDo app) is to be tested on Chrome (latest version) on Windows 11. Shown below are the capabilities:
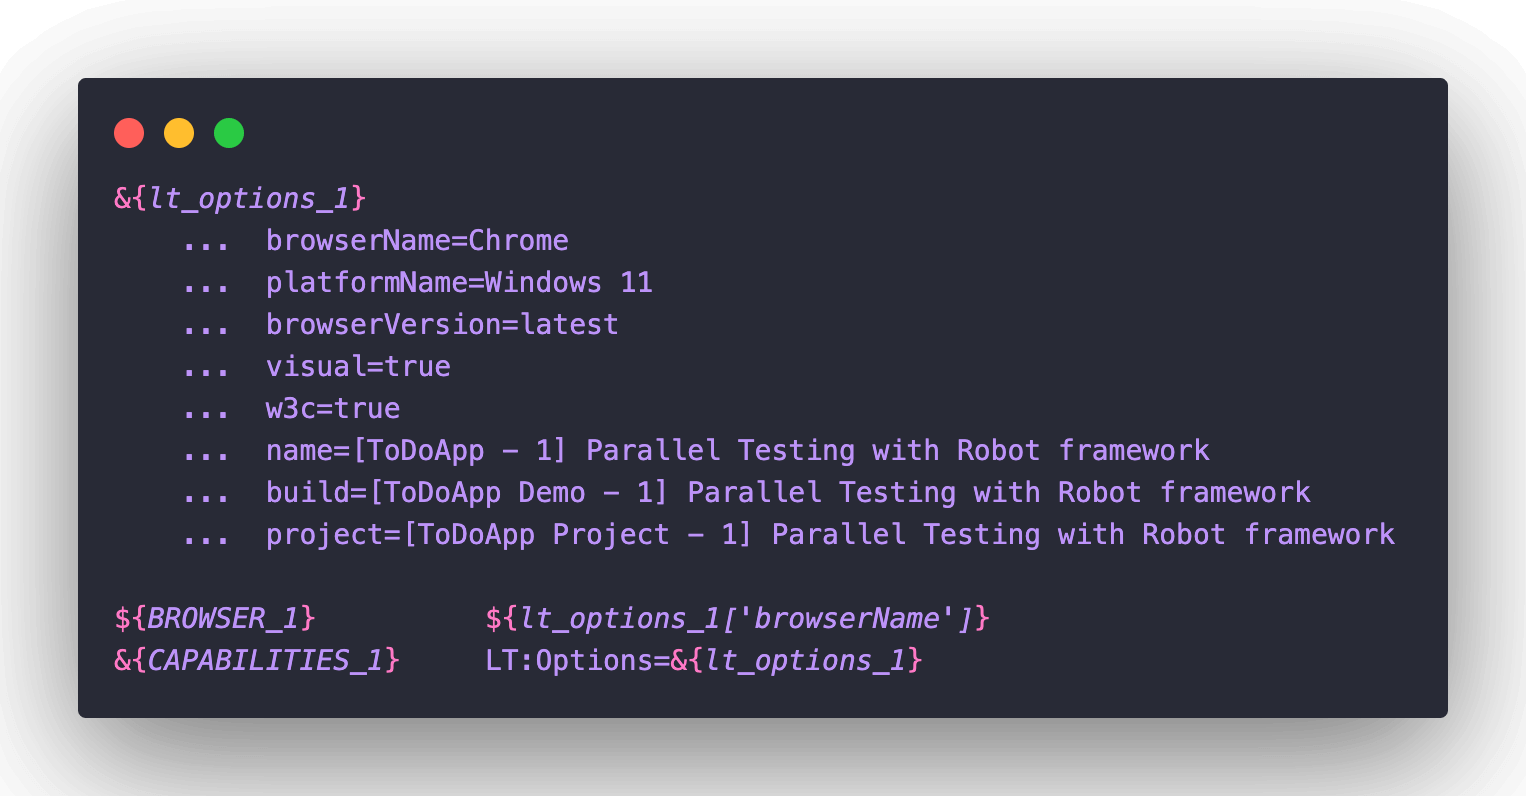
On similar lines, we updated the capabilities for browser & combinations used in Test Scenario – 1 (of Test Suite – 2).
We have added a few Variables and High-level keywords that will be used for opening test browser(s) on the desired operating system (or platform).
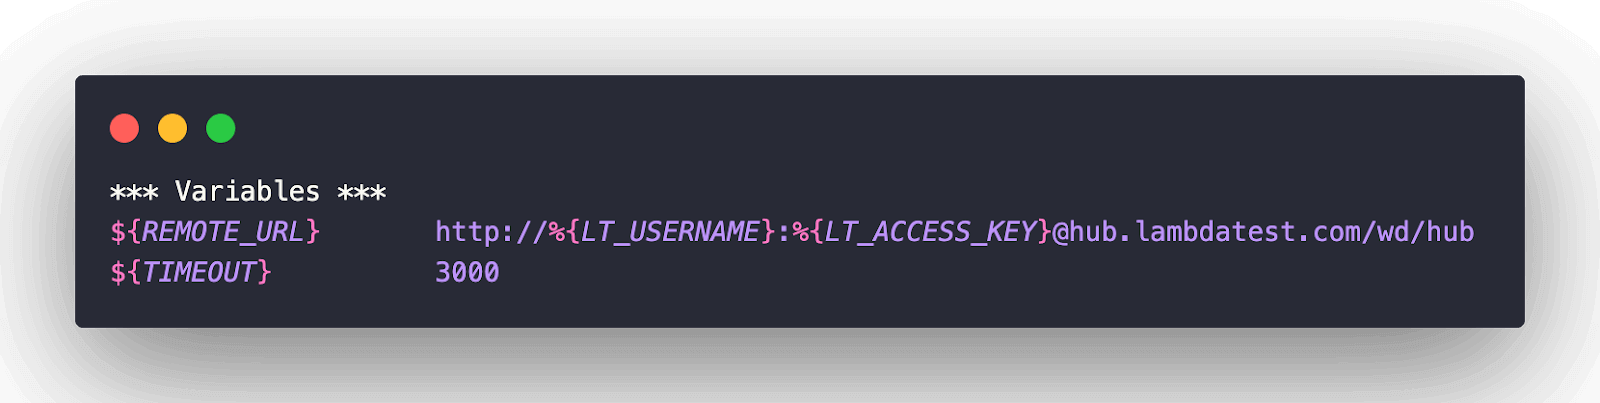
${REMOTE_URL} is the LambdaTest Hub address which will be further used by the Open Browser keyword in Robot to open the desired browser (e.g., Chrome) on the respective platform (e.g., Windows 11).
Two high-level keywords are created for opening and terminating the browser instance instantiated on the desired platform (or OS). LambdaTest Hub URL and Desired Capabilities are passed as parameters to the low-level keyword Open browser.

Now that the infrastructure-level settings are all done, let’s look at the changes in the test logic (in Tests/CloudGrid/test_sel_playground.robot).
Step 1 (Addition of Grid URL and Capabilities)
As mentioned earlier, we first add the desired capabilities comprising of the remote browser, version, and user-defined capabilities (i.e. Project name, Test name, etc.) for LambdaTest.
Step 2 (Open Test Browser on Test OS )
The high-level keyword Open test browser which accepts three parameters – Test URL, Browser, and Desired Capabilities.
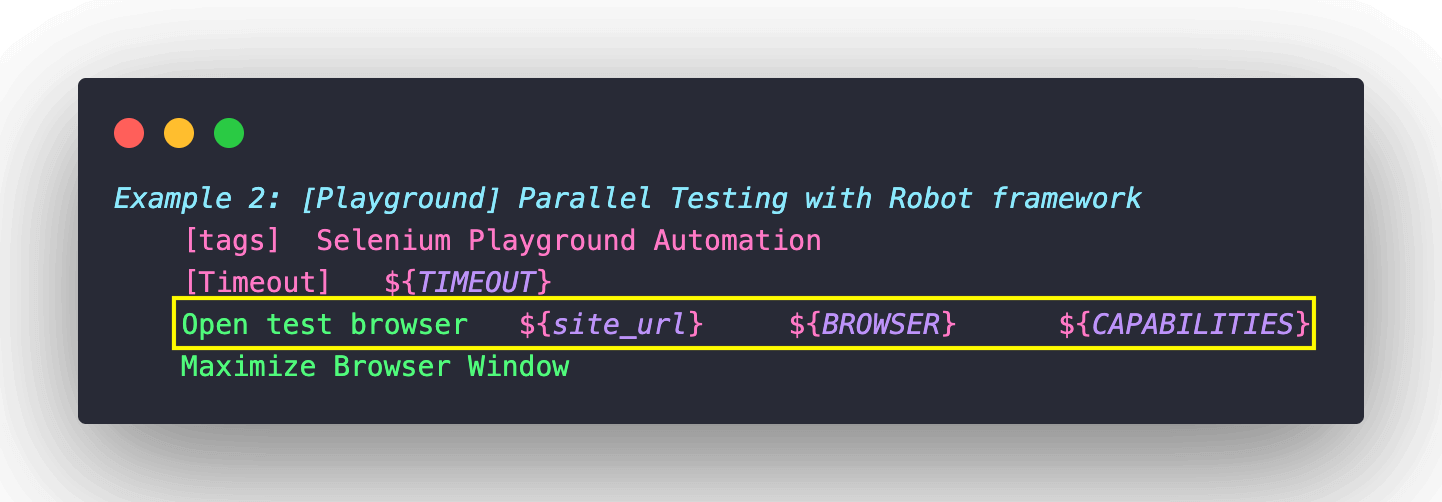
There is no change in the core test logic, except that Close test browser high-level keyword is used for closing the instantiated browser instance.
Execution
Before execution, set the environment variables LT_USERNAME and LT_ACCESS_KEY on the terminal. You can find the same in the LambdaTest Profile section.
macOS/Linux
|
1 2 |
export LT_USERNAME="YOUR_LAMBDATEST_USERNAME" export LT_ACCESS_KEY="YOUR_LAMBDATEST_ACCESS_KEY" |
Windows
|
1 2 |
set LT_USERNAME="YOUR_LAMBDATEST_USERNAME" set LT_ACCESS_KEY="YOUR_LAMBDATEST_ACCESS_KEY" |
Now that the environment variables are set, invoke the following command on the terminal to run individual tests in parallel (on LambdaTest Grid) using Pabot.
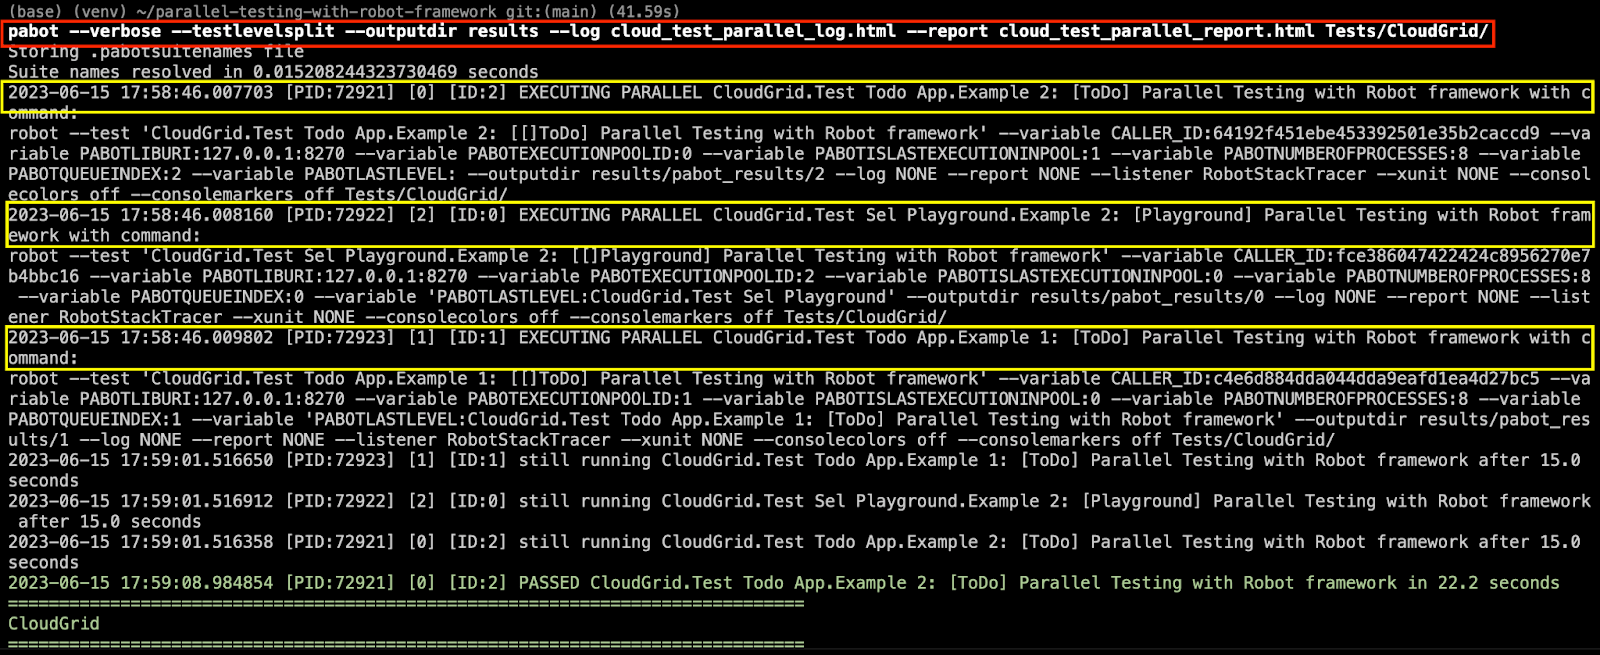
|
1 |
pabot --verbose --testlevelsplit --outputdir results --log cloud_test_parallel_log.html --report cloud_test_parallel_report.html Tests/CloudGrid/ |
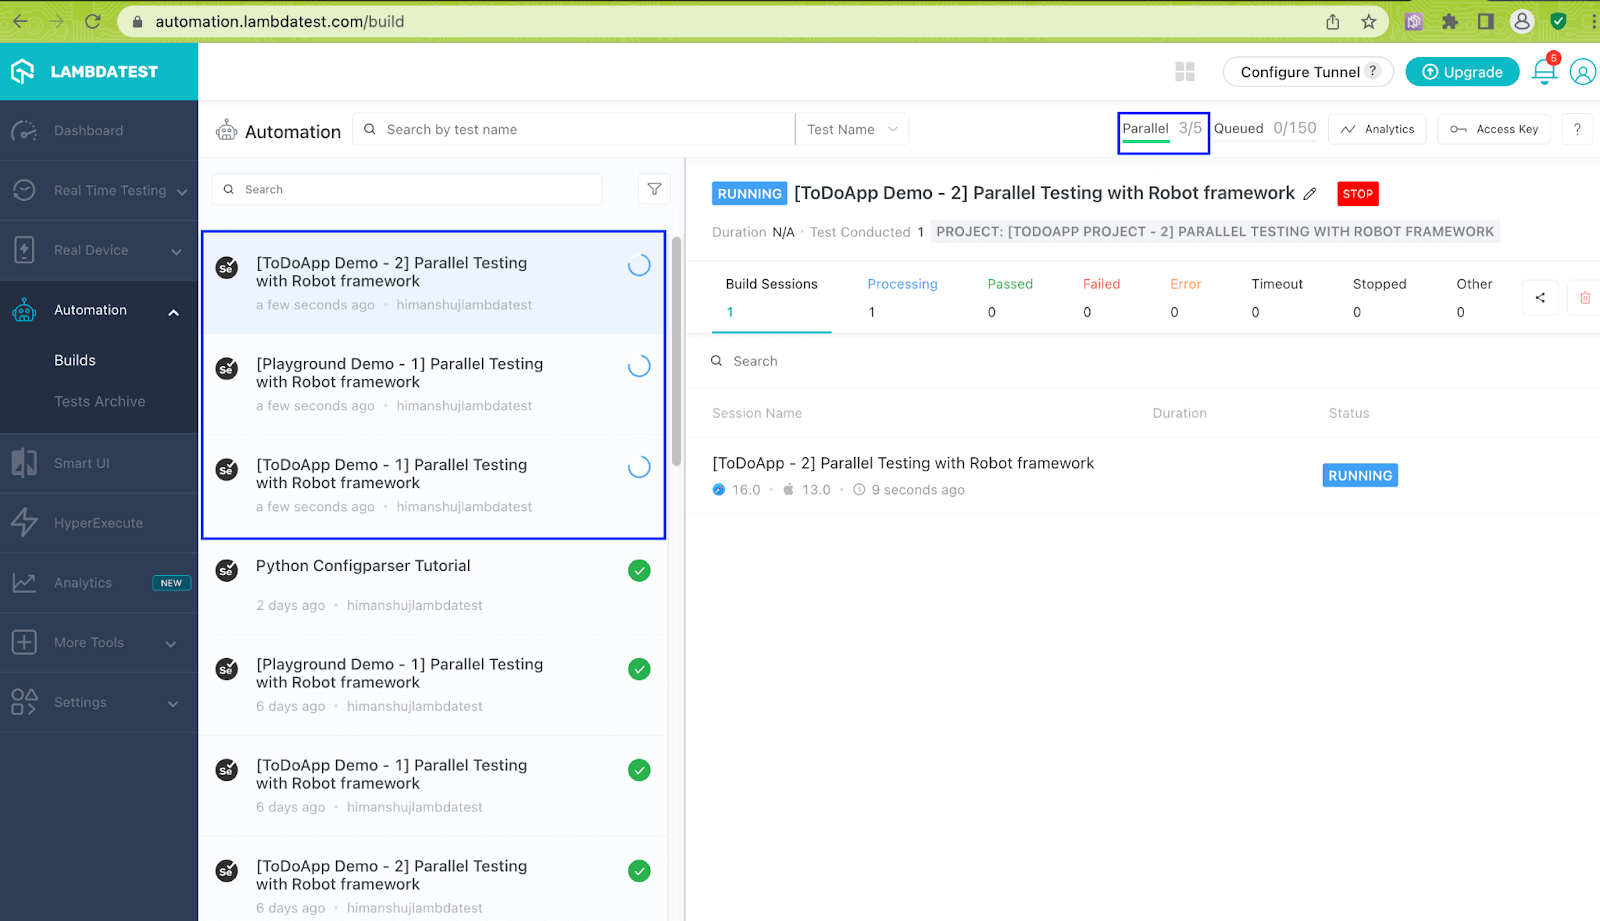
The above command will kick-start three processes, each of which runs a test scenario (or test case) in parallel. Shown below is the terminal and LambdaTest dashboard screenshot(s) that indicates that the parallel execution resulted in Success. 🚀
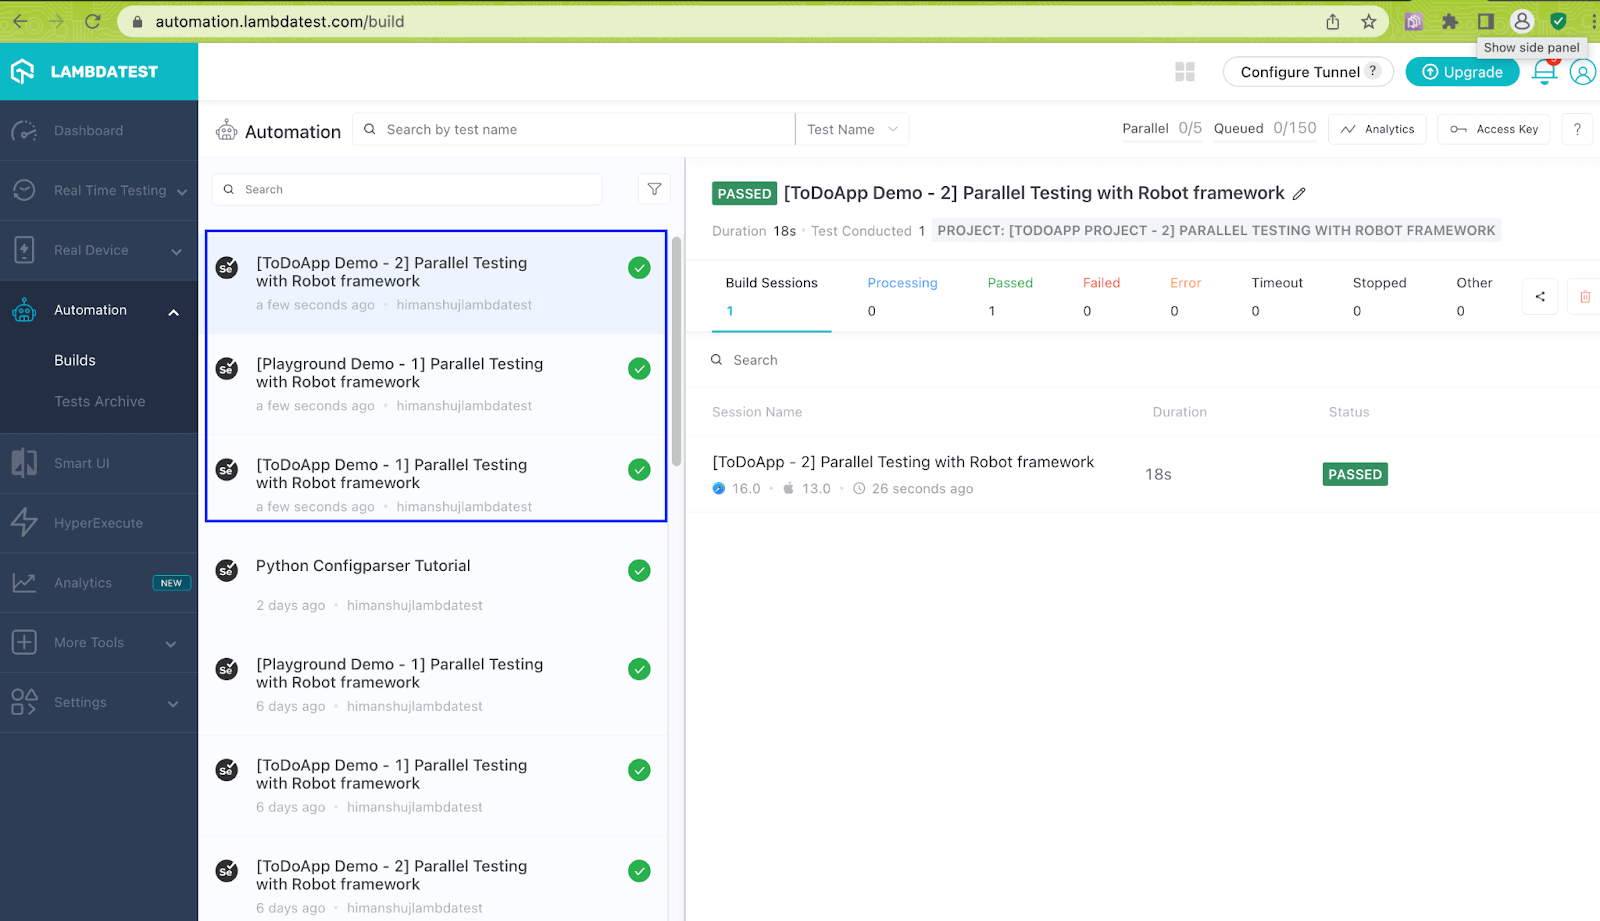

With this, we have successfully used the Robot framework for parallel test execution with Pabot on the local grid and LambdaTest cloud grid. Testing Cloud with Robot framework can be leveraged when you want to run tests at scale in continuous CI/CD pipelines!
Are you enthusiastic about becoming proficient in Python automation testing? Opting for a Selenium Python 101 certification program is an excellent choice to kickstart your path towards becoming an automation testing specialist and improving your Python abilities. Enrolling in this program will provide you with a solid groundwork for effectively utilizing Selenium Python in your testing projects, helping you excel in your automation testing journey.
It’s a Wrap
Thanks for getting this far! Though the Robot framework supports sequential test execution (out-of-the-box), tests can be run in parallel by leveraging the Pabot test runner. Pabot lets you parallelize test-suites as well as tests, that too without major code modifications.
As we all know, excessive parallelism can cause test flakiness if the tests are not designed to handle concurrent execution. It becomes essential to follow Selenium’s best practices when opting for parallel test execution. You can also leverage the benefits of a cloud grid like LambdaTest in case you are looking to capitalize on the benefits of cloud testing and continuous integration.
Until next time, happy testing!
Frequently Asked Questions (FAQs)
Does Robot Framework support parallel execution?
Yes, Robot Framework does support parallel execution. Starting from version 3.2, Robot Framework introduced native support for parallel test execution.
To enable parallel execution in Robot Framework, you can use the –parallel command-line option or the –processes option to specify the number of parallel processes to use.


Author’s Profile
Himanshu Sheth
Himanshu Sheth is a seasoned technologist and blogger with more than 15+ years of diverse working experience. He currently works as the 'Lead Developer Evangelist' and 'Senior Manager [Technical Content Marketing]' at LambdaTest. He is very active with the startup community in Bengaluru (and down South) and loves interacting with passionate founders on his personal blog (which he has been maintaining since last 15+ years).
Blogs: 128
Got Questions? Drop them on LambdaTest Community. Visit now


