
How To Use JUnit Ignore Test Annotation [With Examples]
Faisal Khatri
Posted On: May 12, 2023
![]() 186569 Views
186569 Views
![]() 30 Min Read
30 Min Read
JUnit 5 is a widely adopted open-source unit testing framework for Java-based projects undergoing constant evolution to meet developers’ changing needs. One of the newest features introduced in JUnit 5 is the ability to disable individual tests or even entire test classes using the @Disabled annotation. Also, it has introduced conditional disabling of the test methods or classes based on the Operating System, System Property, Environment Variable, Custom Conditions, etc.
This conditional disabling of the test feature is very helpful in cases where you have a huge repository of unit tests and want to ignore some of the tests while execution, maybe, as those tests don’t add value to the feature on which you are working.
For example, you are working on an eCommerce product with multiple features like User Registration, Login, Product Search, Product Cart, Payment integration, Checkout, etc. Each feature has multiple unit tests for it.
Consider a scenario where you are working on the Payment integration feature.
Hence, you need to execute all the payment integration unit tests. Unit tests related to Registration, Login, Cart, etc., are not about the feature you are working on. Hence, these unit tests can be ignored for the time being until you complete the feature under progress.
Likewise, if you know that there is a known issue in one of the tests about payment integration that is being worked upon by other devs, and if you run that test, it will fail. Hence it is suggested to disable that specific test until the known issue is fixed.
Here, conditional disabling of the tests will help you save time by ignoring the tests you feel don’t add value to your feature.
It is recommended to turn on all the unit tests once the feature is complete to check if your code doesn’t have any side effects on other features.
In this blog on JUnit Ignore Test annotation, we will look at the @Disabled annotation and different annotations related to the conditional disabling of tests in JUnit 5. We will be discussing how it works and walkthrough the common use cases.
Whether you are an experienced JUnit user or getting started with Unit testing using JUnit 5, this blog on JUnit Ignore Test annotation will provide valuable inputs and practical advice on how to disable/skip tests using different annotations. If you are preparing for an interview you can learn more through Junit interview questions.
TABLE OF CONTENTS
Why Ignore Test Cases?
There could be several reasons why test cases are ignored, such as changes in project requirements, outdated or irrelevant test cases, lack of resources or time, duplication of tests, and issues with test design or execution. Some scenarios where ignoring test cases come in handy include the following:
Feature under development
Consider a scenario where you don’t want to run a certain test or set of test cases because the feature is still in development. Well, this is normally the case with any type of web product!
For example, user registration has bugs, and another developer is fixing them. So, it is better to skip the unit tests for user registration as we know it will fail as the fix is under development.
Feature independence
Tests are not about the feature currently being worked upon.
For example, the developer is working on adding products to cart features. Hence, running the unit tests about user registration can be skipped.
In such cases, as we know, the ROI of running such tests would be equivalent to zero, so it is better to skip them.
OS-dependent features
When the tests are specific to an OS, and you don’t want those tests to run as you are working on a different one as specified in the tests.
For example, the test must be tested on macOS with Safari browser. However, currently, you have Windows installed on your local machine. So, even if you run this test, it will eventually fail. Hence, it is better if we skip this test.
Runtime dependencies
When the tests are specific to a JRE version and currently, in your local machine, you have a different one.
For example, the test is written to verify the functionality on a higher version like JRE 17, and in your local, you have JRE 11 installed. Hence, chances are the test will fail, so that we can ignore this test as well.
Product level dependency
Another scenario that comes to my mind is performing JUnit testing on cloud-based digital experience testing platforms like LambdaTest by leveraging its HyperExecute Cloud for blazing-fast automation testing. However, the rights to this feature are provided to a specific user in the team, and the feature you are working on doesn’t require the tests to be executed on HyperExecute.
We can also ignore such tests using the SystemProperty/Environment variable, i.e. if the tests are run using a specific LambdaTest Username that comes via System Property/Environment variable, the tests should be ignored.
Run JUnit tests across 3000+ browser and OS combinations. Try LambdaTest Now!
What is @Disabled Annotation in JUnit 5?
With the latest version of JUnit 5 (currently 5.9.2), @Disabled annotation of the JUnit Annotations has been introduced in place of JUnit @Ignore Test annotation, which can be used to ignore or skip the tests during execution. It is a part of org.junit.jupiter.api package.
When a test method or a test class has a @Disabled annotation on top of it, that respective test method or test class will not be executed during test runs. This annotation comes in handy when you want to skip a few tests temporarily without having to remove them from the test suites altogether.
The @Disabled annotation can be applied at the test class or method level. When used at the test class level, all the test methods will be disabled.
When applied at the test method level, it will disable that specific method only.
Subscribe to our LambdaTest YouTube Channel to catch up with the latest tutorials around Selenium testing, Cypress testing, and more.
How to use @Disabled Annotation in JUnit 5?
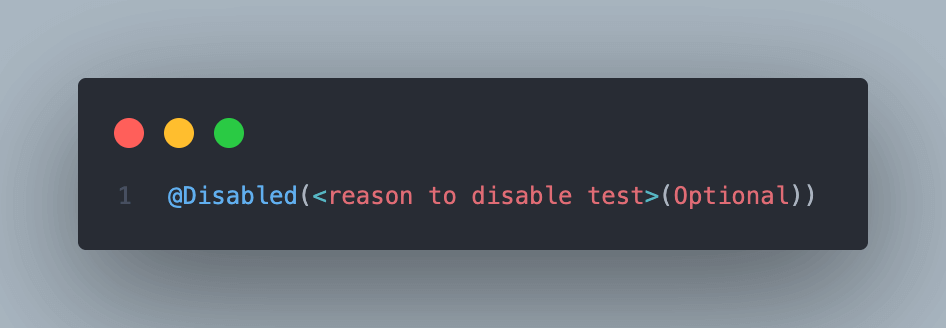
The @Disabled annotation is used to exclude/skip execution of the tests from the test suite. A test method or class can be disabled using the @Disabled annotation.
This annotation accepts one optional parameter where we can supply the reason for disabling the test.
Syntax
Using @Disabled annotation on the Test Method
Following example code shows how to use @Disabled annotation on the Test Method.
|
1 2 3 4 5 6 7 8 9 10 11 12 13 14 15 16 |
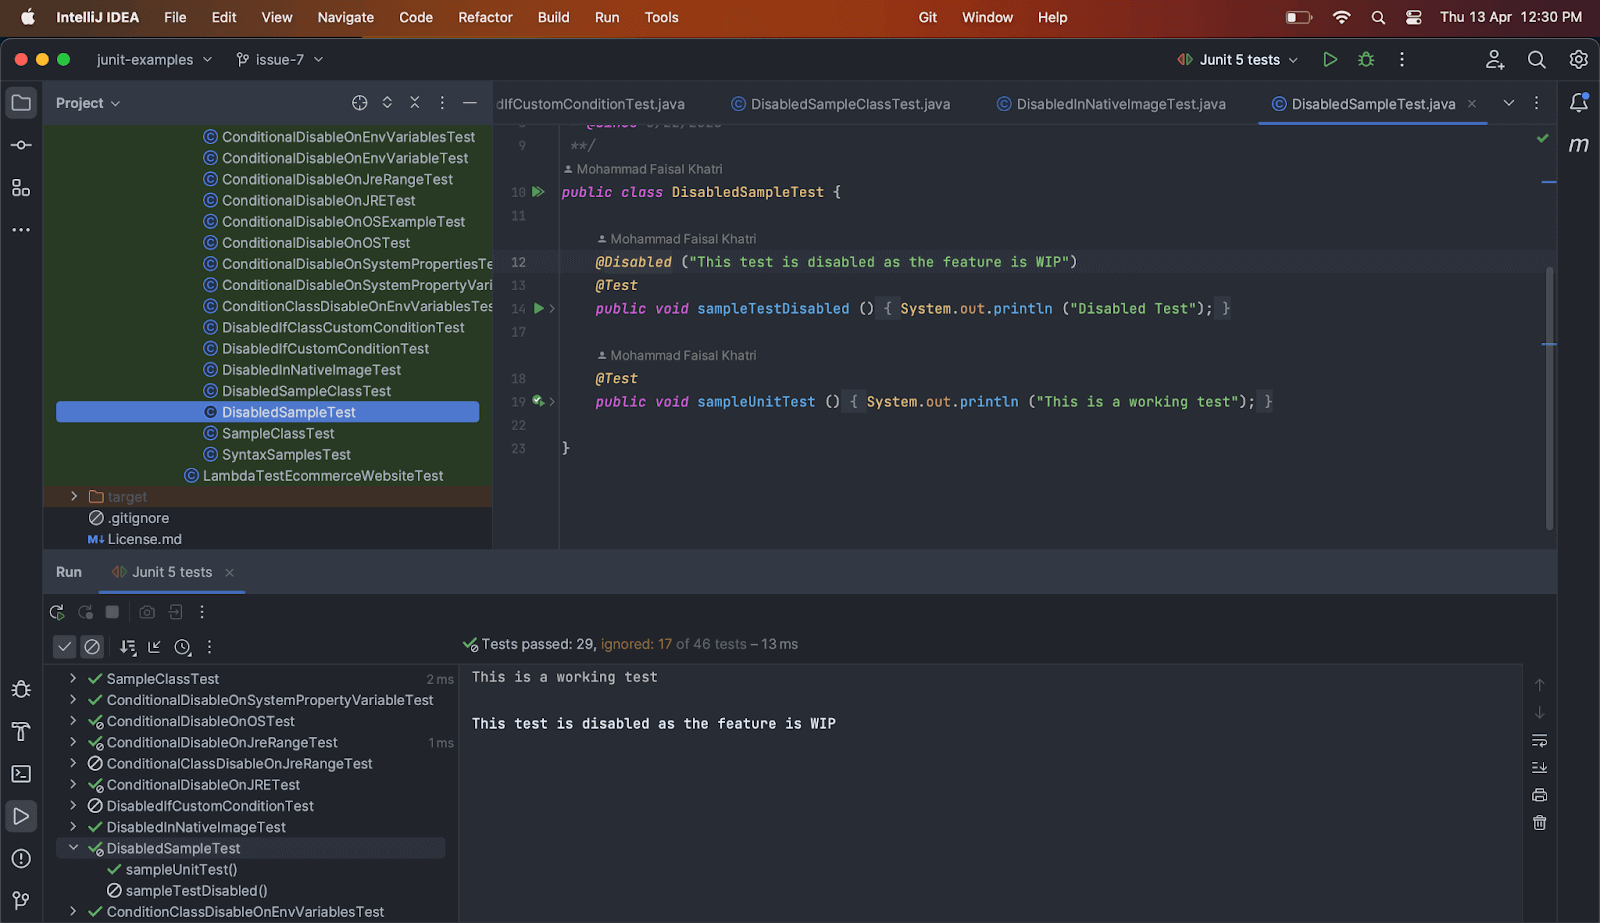
import org.junit.jupiter.api.Disabled; import org.junit.jupiter.api.Test; public class DisabledSampleTest { @Disabled ("This test is disabled as the feature is WIP") @Test public void sampleTestDisabled() { System.out.println ("Disabled Test"); } @Test public void sampleUnitTest() { System.out.println ("This is a working test"); } } |

Test Execution
On executing the above tests, it is expected that the following lines should be printed in the console.
- For the disabled test, i.e., sampleTestDisabled() method, the reason “This test is disabled as the feature is WIP” should be printed.
- For the sampleUnitTest() test method, the statement “This is a working test” should be printed.

Using @Disabled annotation on the Test Class
Following example code shows how to use @Disabled annotation on the Test Class
|
1 2 3 4 5 6 7 8 9 10 11 12 13 |
@Disabled ("The tests in this class are disabled as the feature is WIP") public class DisabledSampleTest { @Test public void sampleUnitTestOne() { System.out.println ("Sample Test One"); } @Test public void sampleUnitTest() { System.out.println ("This is a working test"); } } |
Test Execution
On executing the above tests, the statement – “The tests in this class are disabled as the feature is WIP” should be printed twice in the console (as there are two tests in the class) considering all the tests are skipped as @Disabled annotation is placed over Test Class.
Conditional Disabling of Tests
Compared to JUnit Ignore Test annotation, JUnit 5 also provides multiple methods that can be used to Disable tests based on certain conditions. Conditional disabling of tests can be useful in multiple scenarios in large automation test suites, as follows:
Integration Tests
External dependencies like Database or web service may be required to be active and running in case of integration tests. If these external dependencies are unavailable, the test is expected to fail. Hence, in such cases where external dependencies are unavailable, we can disable the tests using Conditional disabling annotations.
System Properties/ Environment Variables
Some tests may be run on specific system properties or environment variables. In case these variables are not available, it may fail. Hence we can disable such tests based on the System Property/Environment Variables.
Operating System
Some tests may require specific Operating Systems like Windows, macOS, etc. In case the required platform is not available, these tests will fail. In this case, we may disable the tests based on the Operating System or its respective architectures.
Let’s move to the next section of this blog on using JUnit Ignore Test annotation and learn more about conditional disabling of the tests while performing JUnit automated testing with Selenium.
How to Disable Conditional Test Execution using JUnit 5?
Compared to JUnit Ignore Test annotation, JUnit 5 offers the flexibility to disable the tests based on the conditions related to Operating System(OS), OS architecture, Java runtime environments and their range, System Property Conditions, Environment variable conditions, and Custom conditions.
The ExecutionCondition extension API in JUnit Jupiter allows the developers to enable or disable test execution on certain conditions programmatically.
Based on the supplied ExtensionContext, an ExecutionCondition is evaluated for each test class to determine if all its tests should be executed. Similarly, based on the ExtensionContext, an ExecutionCondition is checked to determine whether the test method should be executed.
The point to note here is that the evaluation works like the short-circuiting boolean OR operator. Hence, there is no guarantee that a condition is evaluated because another extension might have already caused a test to be disabled.
If multiple conditions are provided for a test to make it disabled, say, for example, @DisabledIfSystemProperties accepts multiple conditions as an array of @DisabledIfSystemProperty annotation.
So, when the test is executed, as soon as it evaluates any of the conditions to true, it will disable the test and not evaluate the other condition.
The following JUnit Ignore Test annotations can be used for conditionally disabling the tests:
| Annotation | Explanation | Example |
|---|---|---|
| @DisabledOnOs | Disable the tests based on OS | @DisabledOnOs(OS.Windows) |
| @DisabledOnJre | Disabled the test based on JRE | @DisablesOnJre(JRS.JAVA_15) |
| @DisabledForJreRange | Disable the test for a JRE Range. | @DisabledForJreRange(min = JRE.JAVA_9, max = JRE.JAVA_11) |
| @DisabledIfSystemProperty | Disable the test if a System Property matches the provided value. | "@DisabledIfSystemProperty (named = ""username"", matches = ""abc"", disabledReason = ""This test is disabled"")" |
| @DisableIfSystemProperties | Disable the test based on multiple conditions as an array of @DisabledIfSystemProperty annotation. | @DisabledIfEnvironmentVariable(named = "disabletest", matches = "yes", disabledReason = "This test is disabled") |
| @DisabledIfEnvironmentVariable | Disable the test if an Environment Property variable matches with the provided value. | "@DisabledIfSystemProperties (value = { @DisabledIfSystemProperty (named = ""username"", matches = ""abc"", disabledReason = ""This test is disabled""), @DisabledIfSystemProperty (named = ""unittest"", matches = ""one"", disabledReason = ""This test is disabled"") })" |
| @DisabledIfEnvironmentVariables | Disable the test based on multiple conditions as an array of @DisabledIfEnvironmentVariable annotation. | "@DisabledIfEnvironmentVariables(value = {@DisabledIfEnvironmentVariable (named = ""skiptest"", matches = ""true"", disabledReason = ""This test is disabled”), @DisabledIfEnvironmentVariable (named = ""disabletest"", matches = ""yes"", disabledReason = ""This test is disabled”)})" |
| @DisabledIf | Disable the test on custom conditions provided by the user. | @DisabledIf (value = "customCondition", disabledReason = "Test disabled as custom condition evaluated to true") |
| @DisabledInNativeImage | Disable the test within GraalVM native image. | @DisabledInNativeImage |
All of the above-mentioned annotation-based conditions are available in JUnit Jupiter’s org.junit.jupiter.api.condition package.
All annotations accept an optional parameter – “disabledReason,” in case the developer needs to provide the reason for disabling the tests.
Disabling Tests on Operating System and Architecture Conditions
A test method or a test class can be disabled based on the Operating System (macOS, Windows, etc.) and Architecture (AMD, ARM, x64, etc.) conditions using the @DisabledOnOs annotation.
Syntax
Using @DisabledOnOs annotation on the Test Method
Following example code shows how to use @DisabledOnOs annotation on the test method.
|
1 2 3 4 5 6 7 8 9 10 11 12 13 14 15 16 17 18 19 20 21 |
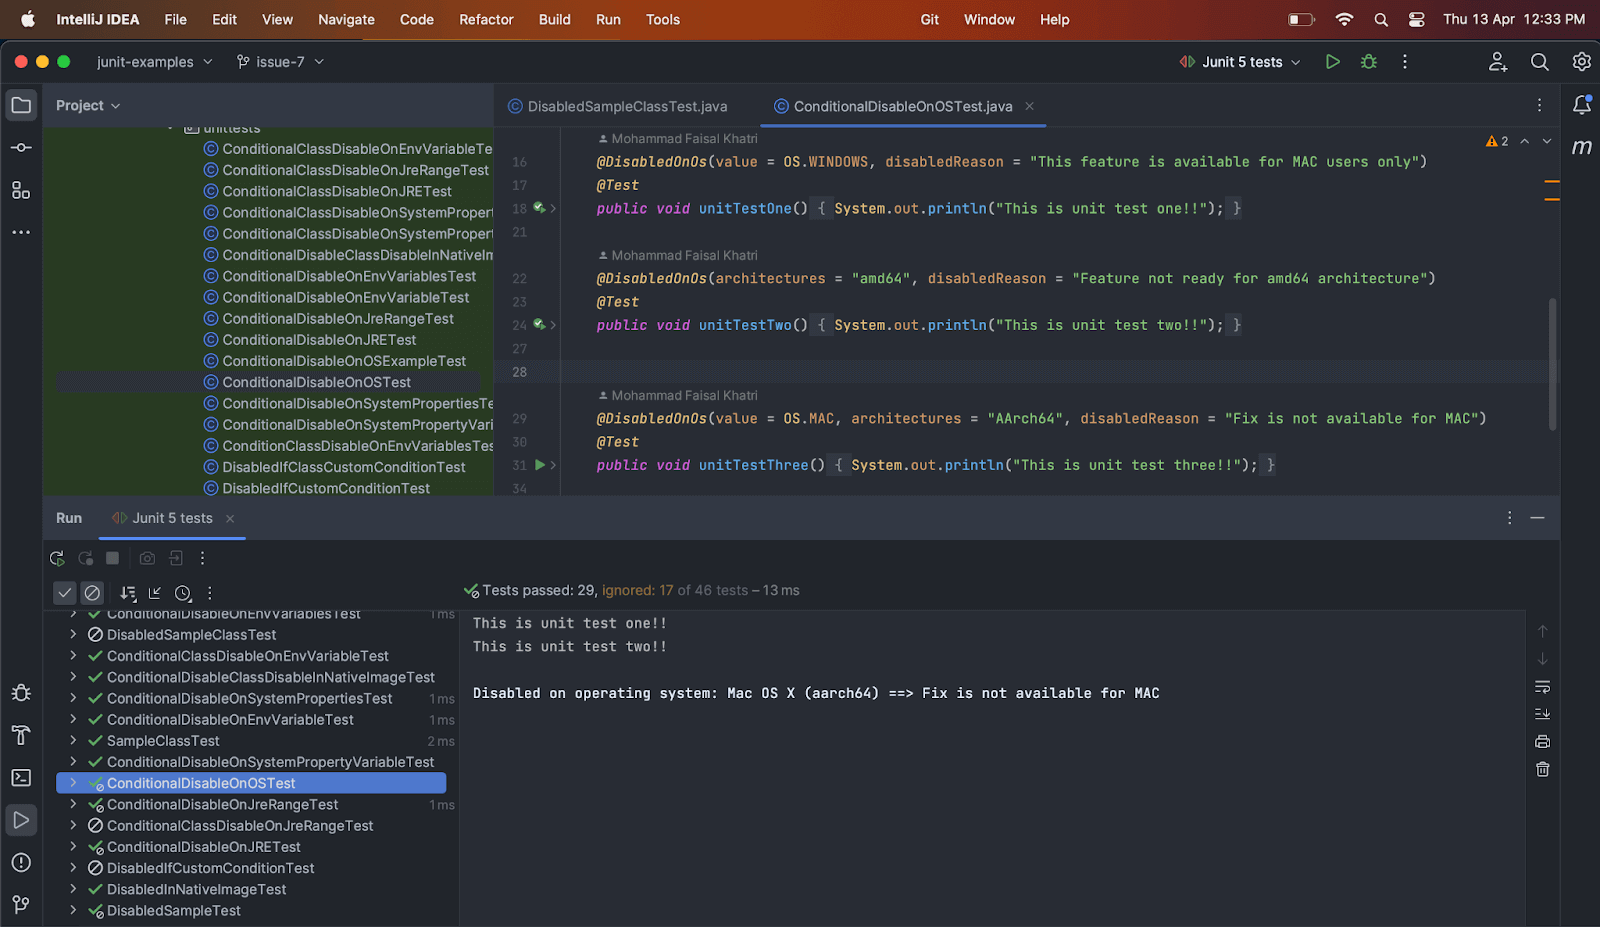
public class ConditionalDisableOnOSTest { @DisabledOnOs(value = OS.WINDOWS, disabledReason = "This feature is available for MAC users only") @Test public void unitTestOne() { System.out.println("This is unit test one!!"); } @DisabledOnOs(architectures = "amd64", disabledReason = "Feature not ready for amd64 architecture") @Test public void unitTestTwo() { System.out.println("This is unit test two!!"); } @DisabledOnOs(value = OS.MAC, architectures = "AArch64", disabledReason = "Fix is not available for MAC") @Test public void unitTestThree() { System.out.println("This is unit test three!!"); } } |
Test execution on Windows having amd64 architecture
After executing the test on a Windows machine with amd64 architecture, the print statement of unitTestThree() should only be printed in the console.
unitTestOne() and unitTestTwo() methods should not be run, instead, the reason for disabling the tests should be printed in the console.
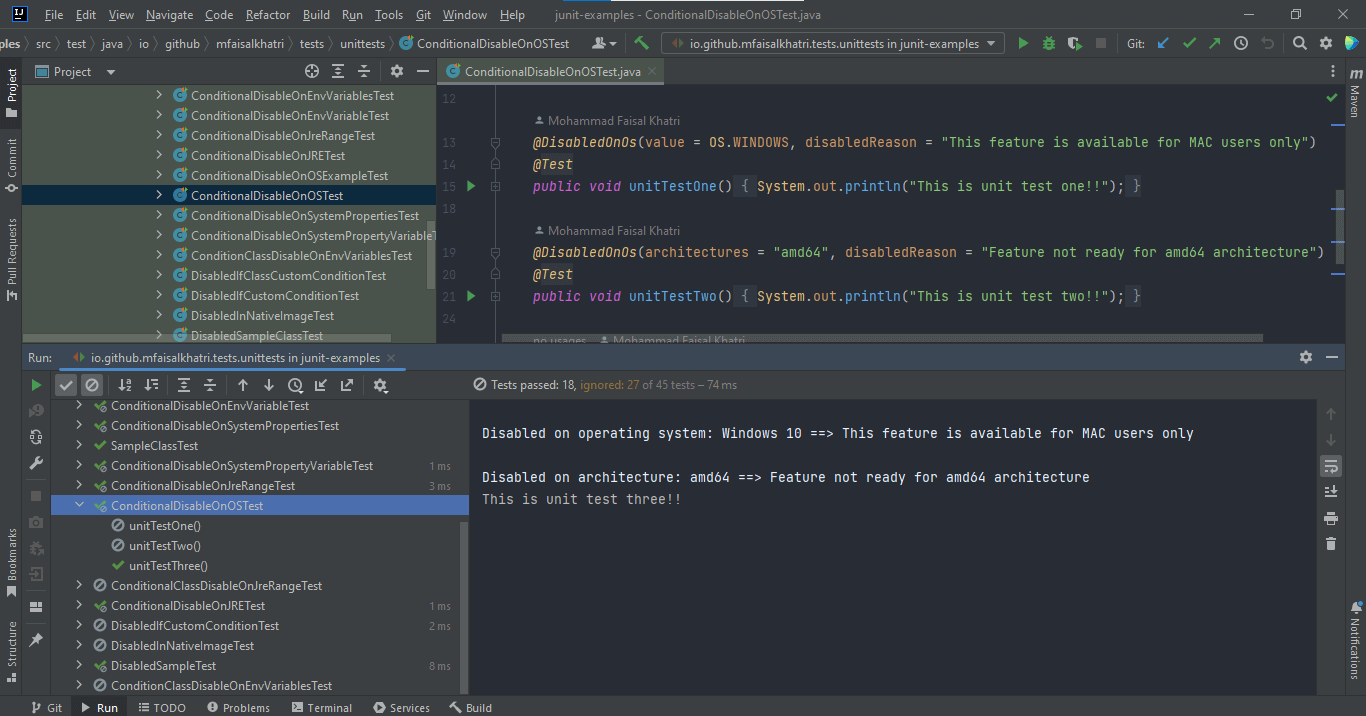
Test execution on macOS
After executing the tests on a macOS, the unitTestThree() method should not be run, and the reason for disabling the tests should be printed on the console.
unitTestOne() and unitTestTwo() methods should be run successfully.
Using @DisabledOnJre annotation on the Test Method
The following example code shows how to use @DisabledOnOs annotation on the test class.
|
1 2 3 4 5 6 7 8 9 10 11 12 13 14 15 16 17 18 |
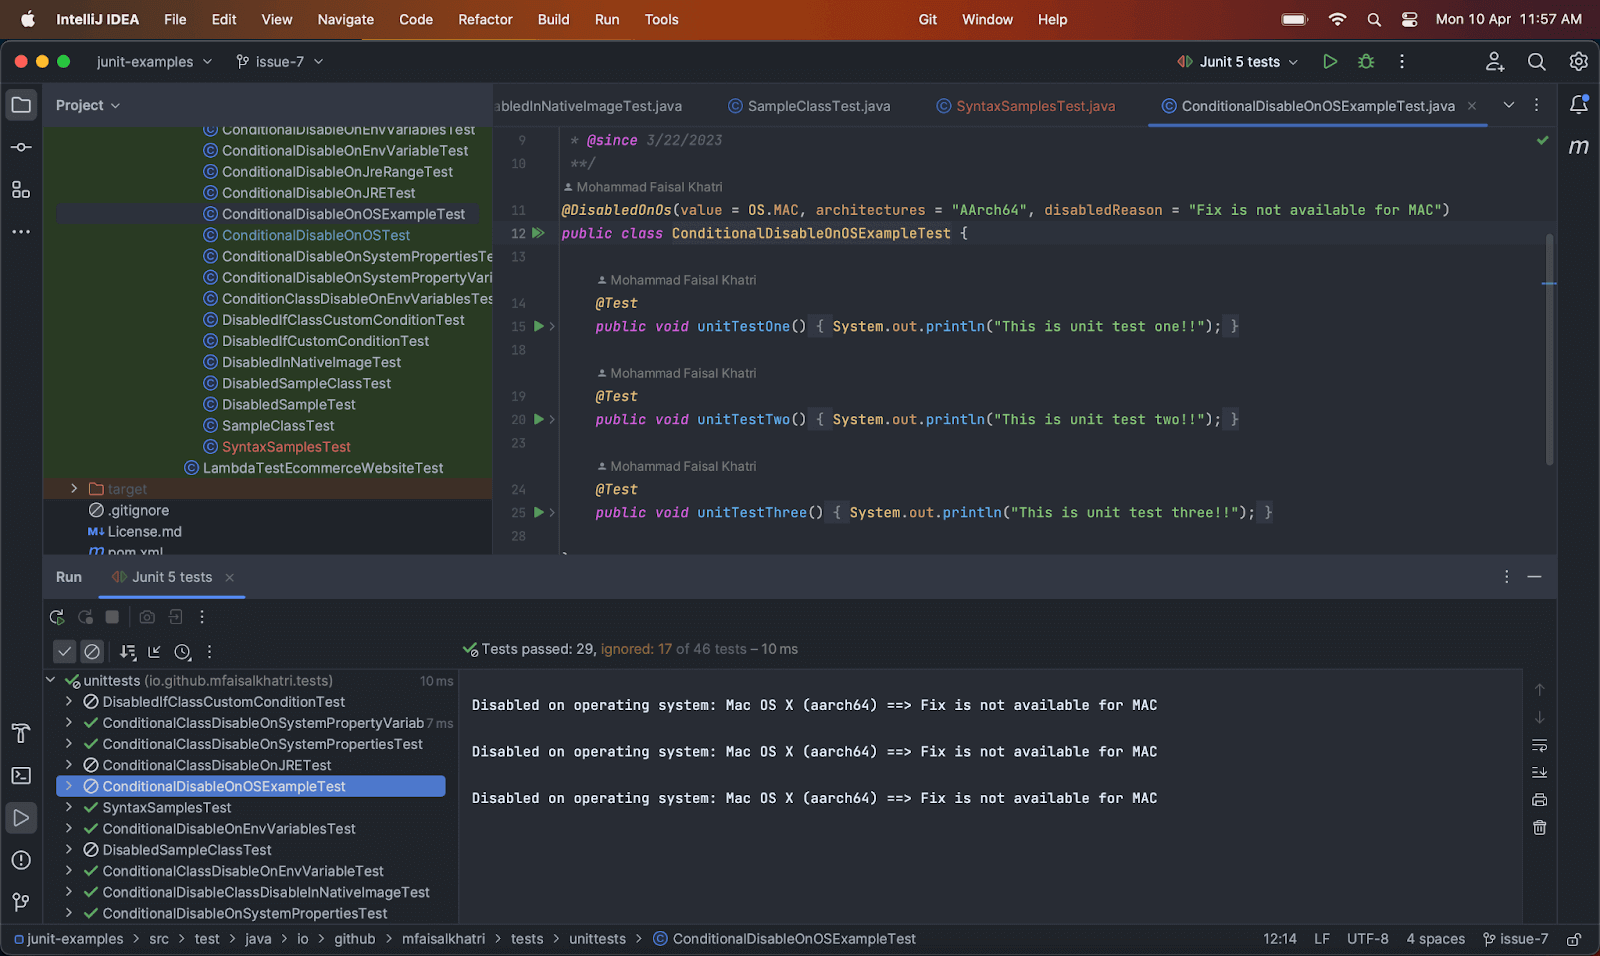
@DisabledOnOs(value = OS.MAC, architectures = "AArch64", disabledReason = "Fix is not available for MAC") public class ConditionalDisableOnOSExampleTest { @Test public void unitTestOne() { System.out.println("This is unit test one!!"); } @Test public void unitTestTwo() { System.out.println("This is unit test two!!"); } @Test public void unitTestThree() { System.out.println("This is unit test three!!"); } } |
Test execution on macOS with AArch64 architecture
Before we execute the test, let’s check the architecture of the Operating System we are working on. It is pretty simple to find the architectural details. We can execute the following line of code and print the details in the console.
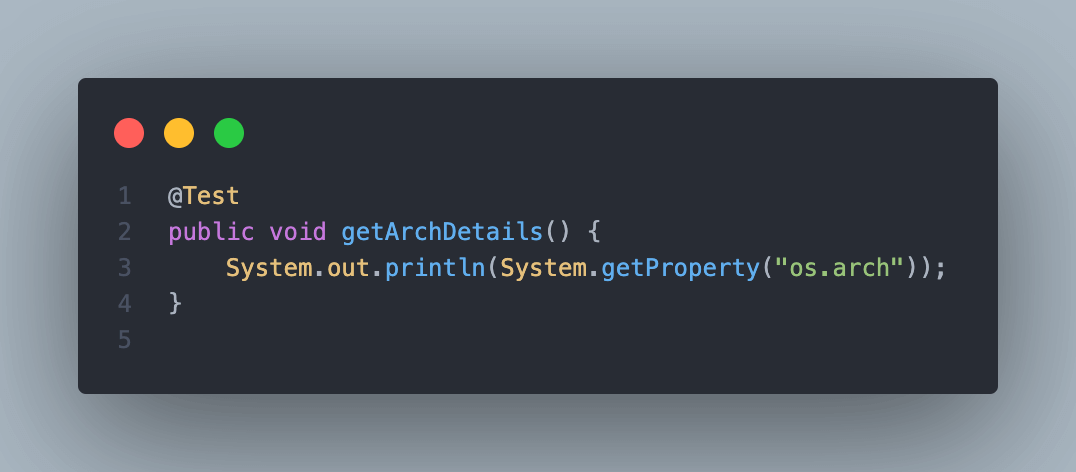
On executing the above lines of code, it should print the OS architecture in the console. The above code was executed on macOS Ventura.
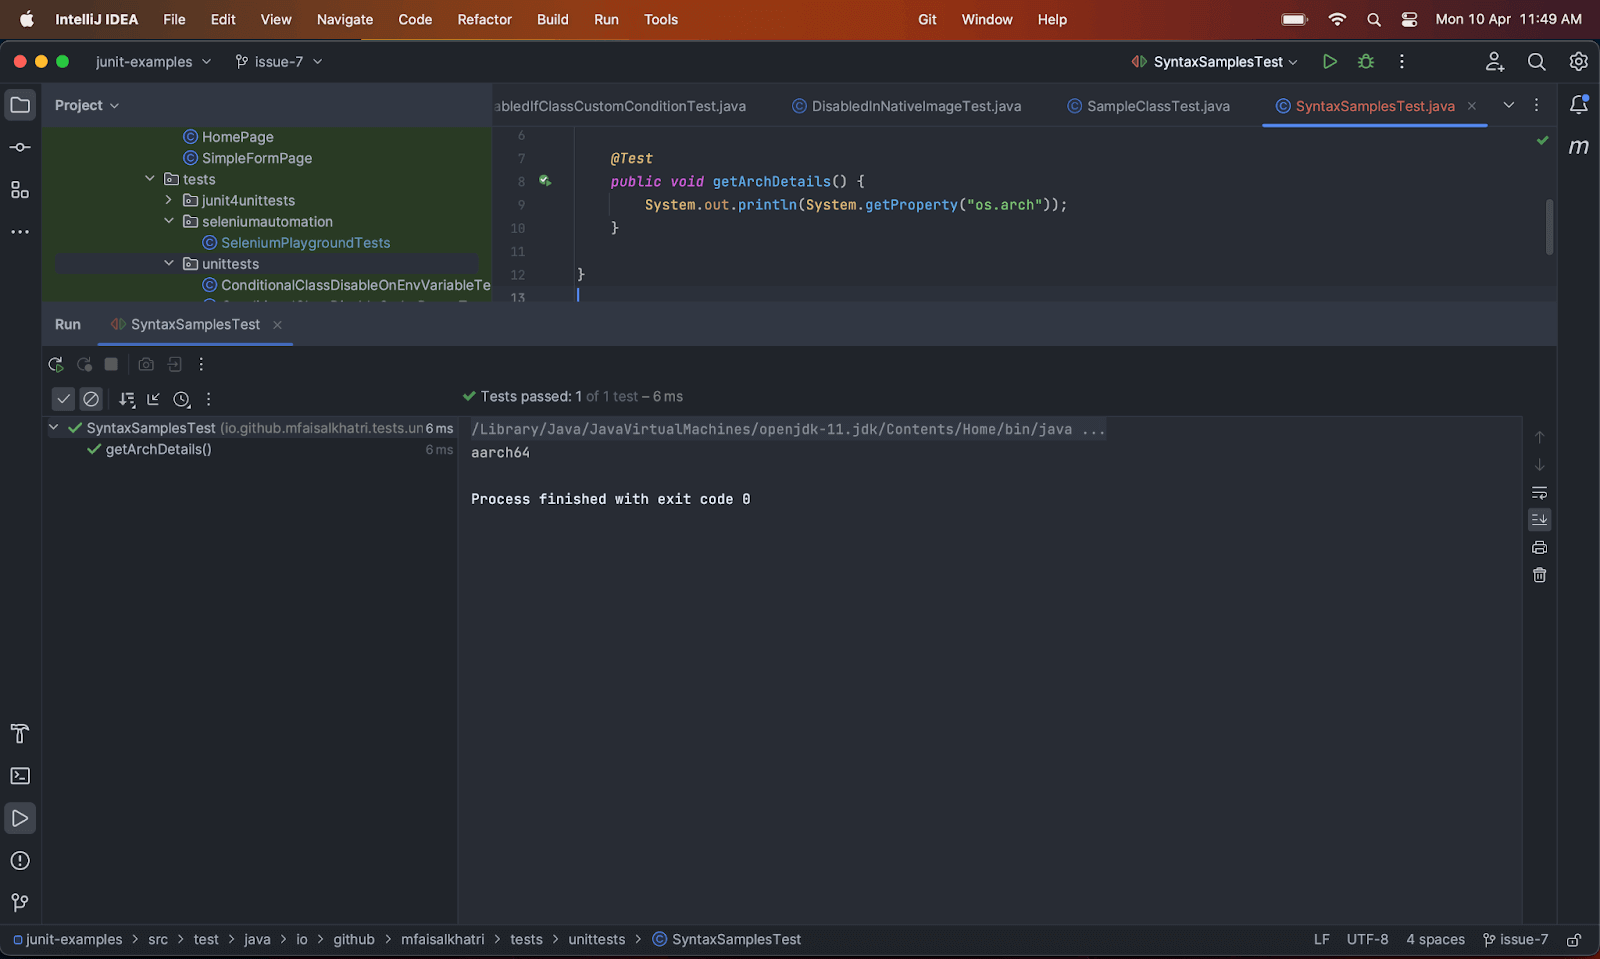
As we can see, the output was printed as “aarch64”. Similarly, we can execute the same code to find out the architecture of the Windows operating system, and we should get the respective architecture output.
On executing the tests in the ConditionalDisableOnOSExampleTest class on the Mac with AArch64 architecture, none of the tests should be run, and the reason for disabling the tests should be printed in the console.
In a large automation test suite, tests might have to be executed only on certain platforms (e.g., Windows/macOS, etc.) or certain browsers (Firefox/Chrome, etc.).
In such cases, we should use the JUnit Ignore Test annotation to ignore the test execution that does not apply to the requisite combination. Though that section of the test code will still be a part of the final image, its execution will be disabled based on certain criteria.
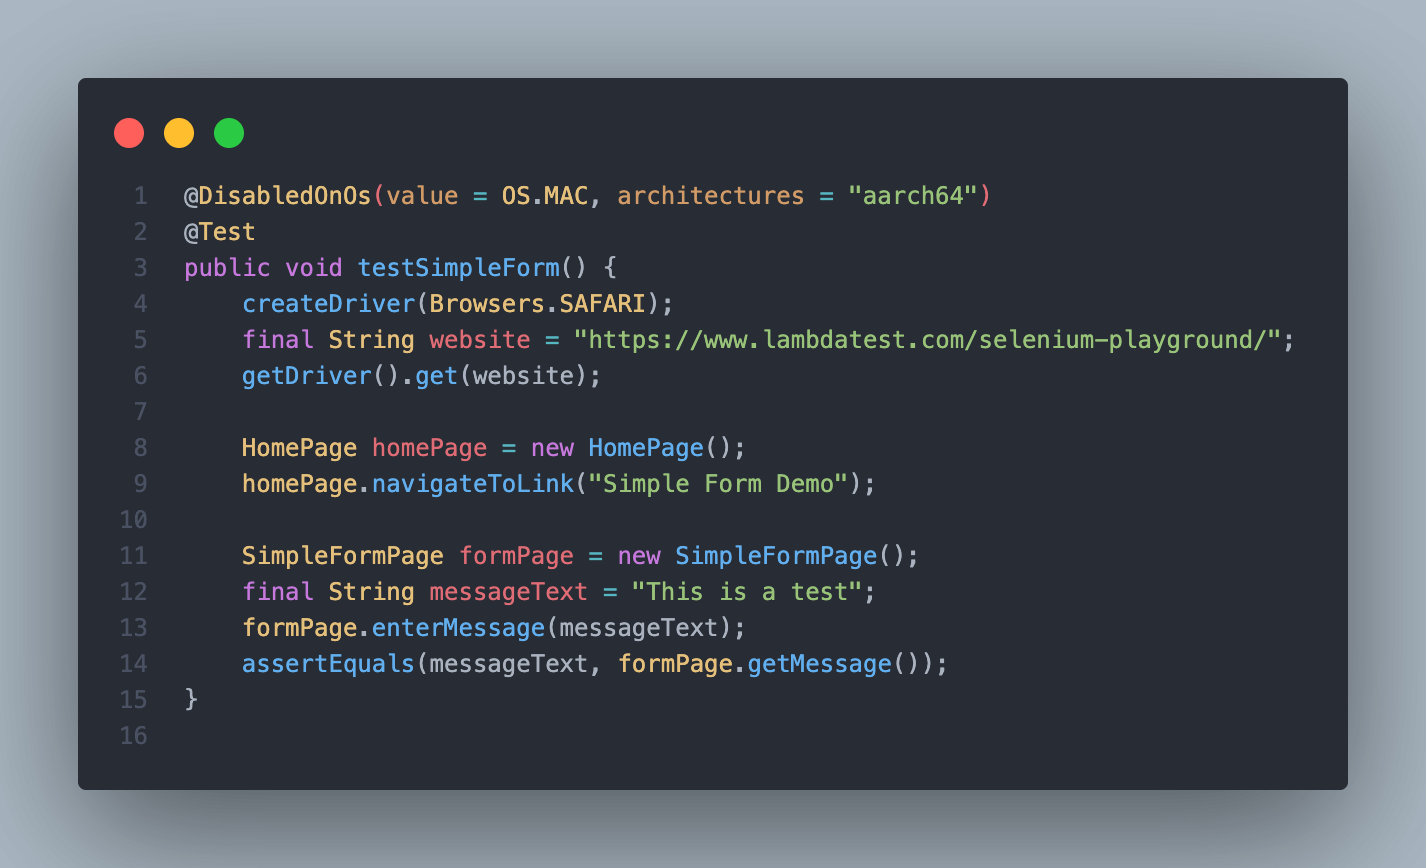
Let me walk you through one example of Selenium automation and disable the tests based on OS.
We will not be going into a deep discussion of Selenium WebDriver here. The idea behind showing this example is to focus on disabling the tests using @DisabledOnOs annotation.
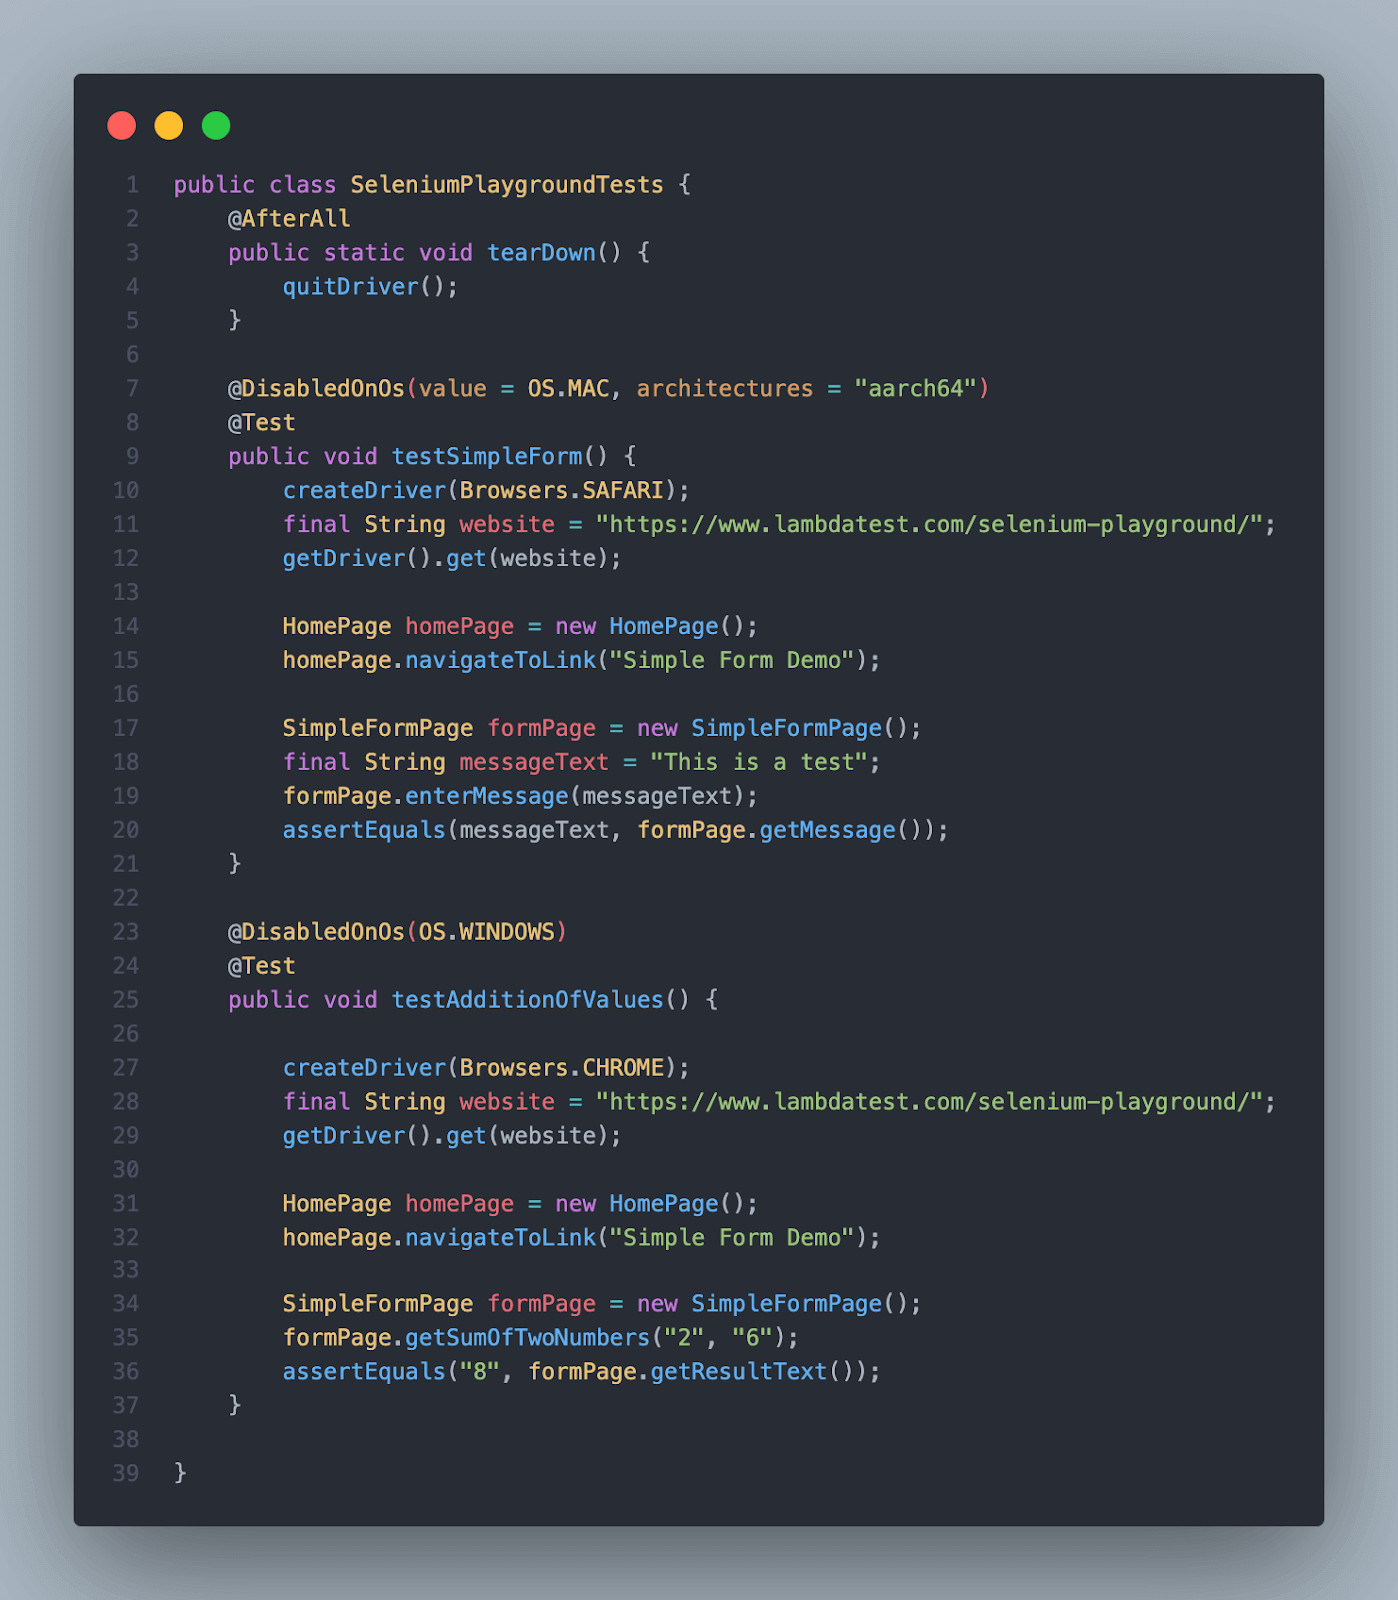

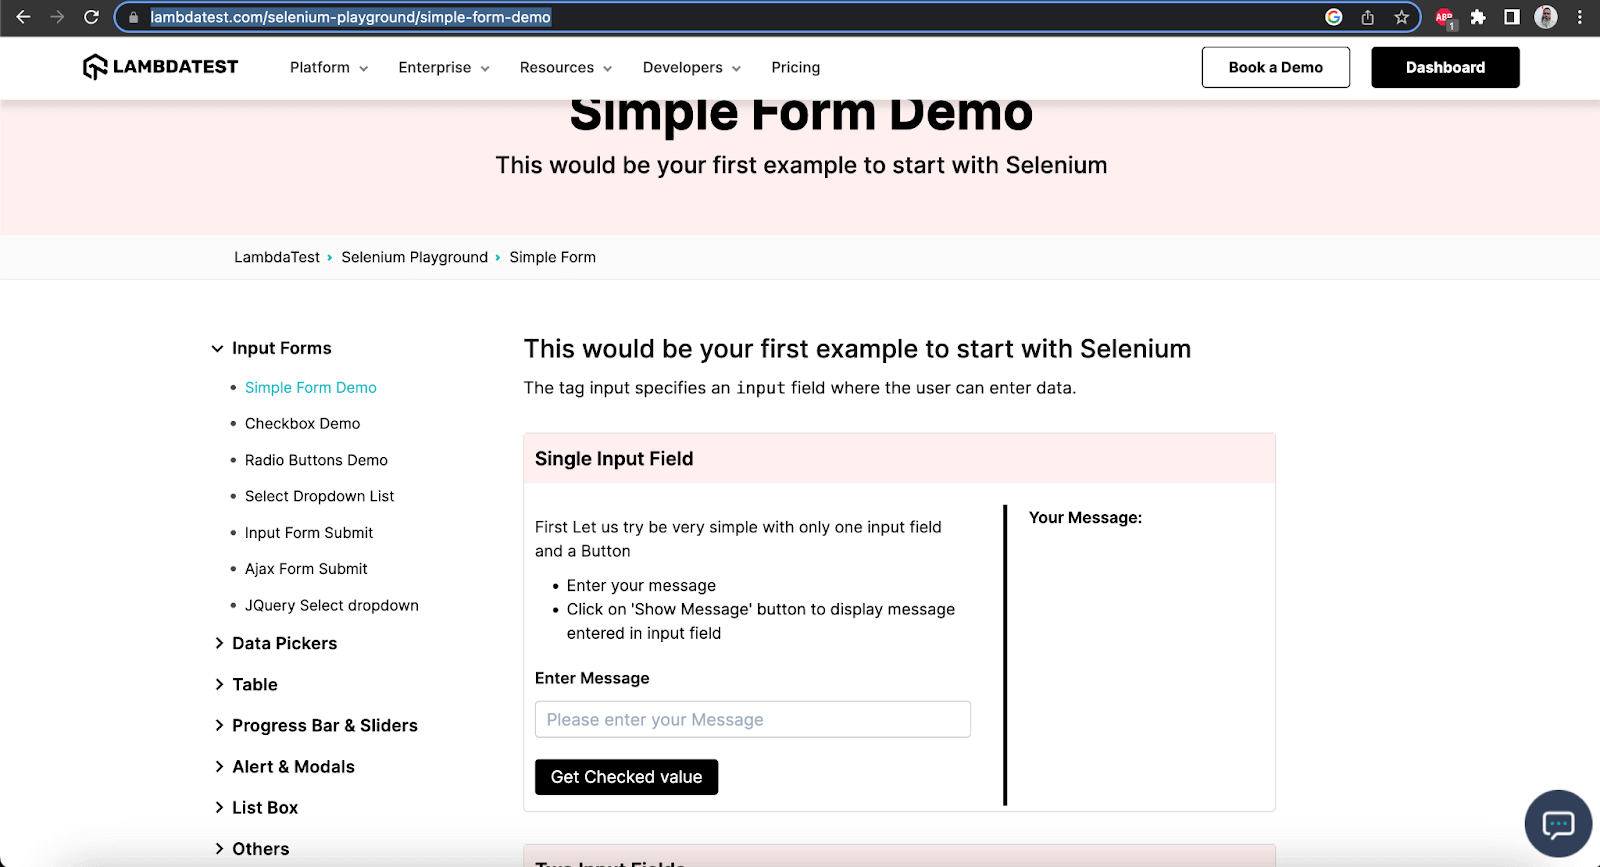
LambdaTest’s Selenium Playground website is used to demonstrate this example using Selenium WebDriver. This website has been used as multiple screens have various fields like textboxes, checkboxes, radio buttons, dropdown fields, etc., that can be used to demo good examples of writing automated tests using Selenium WebDriver.
Coming back to the example shown here, the Simple Form Demo page has been used here to write and run the demo tests.
There are two sample sections in the Simple Form Demo Screen.
Single Input Field
Dual Input fields
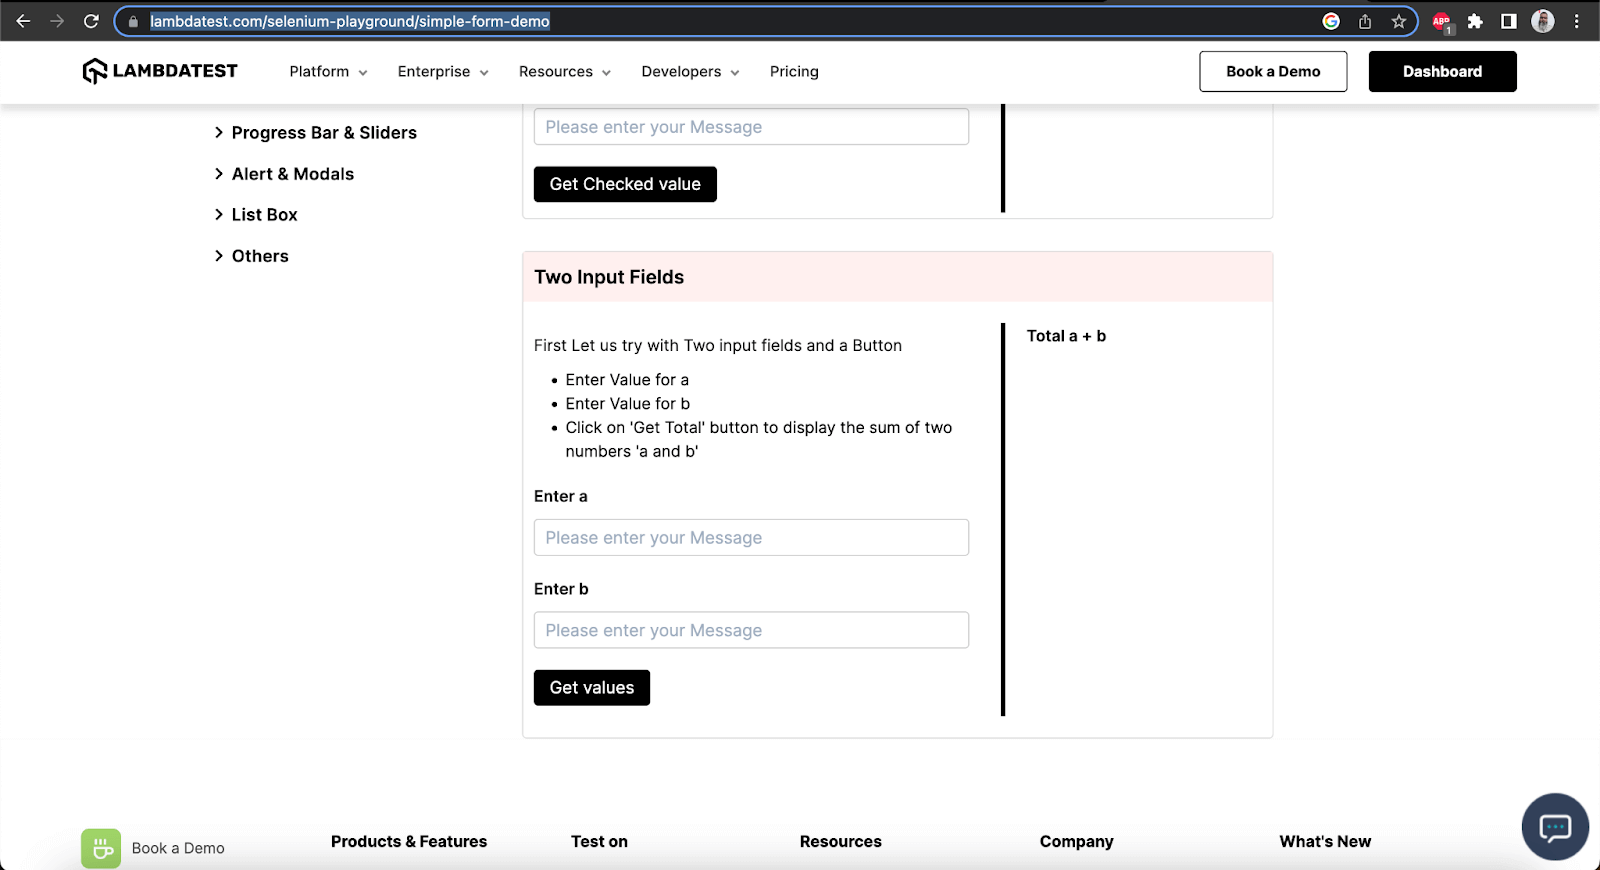
In this example, we have written the tests for both sections; however, the test execution will be based on OS conditions.
The first single input form test is set to run on Operating Systems other than macOS (Safari Browser). Ideally, it must be disabled on macOS (Safari Browser).
The second test, two input field tests, is set to run on Operating Systems other than Windows (Chrome). Hence, it should be disabled on Windows OS.
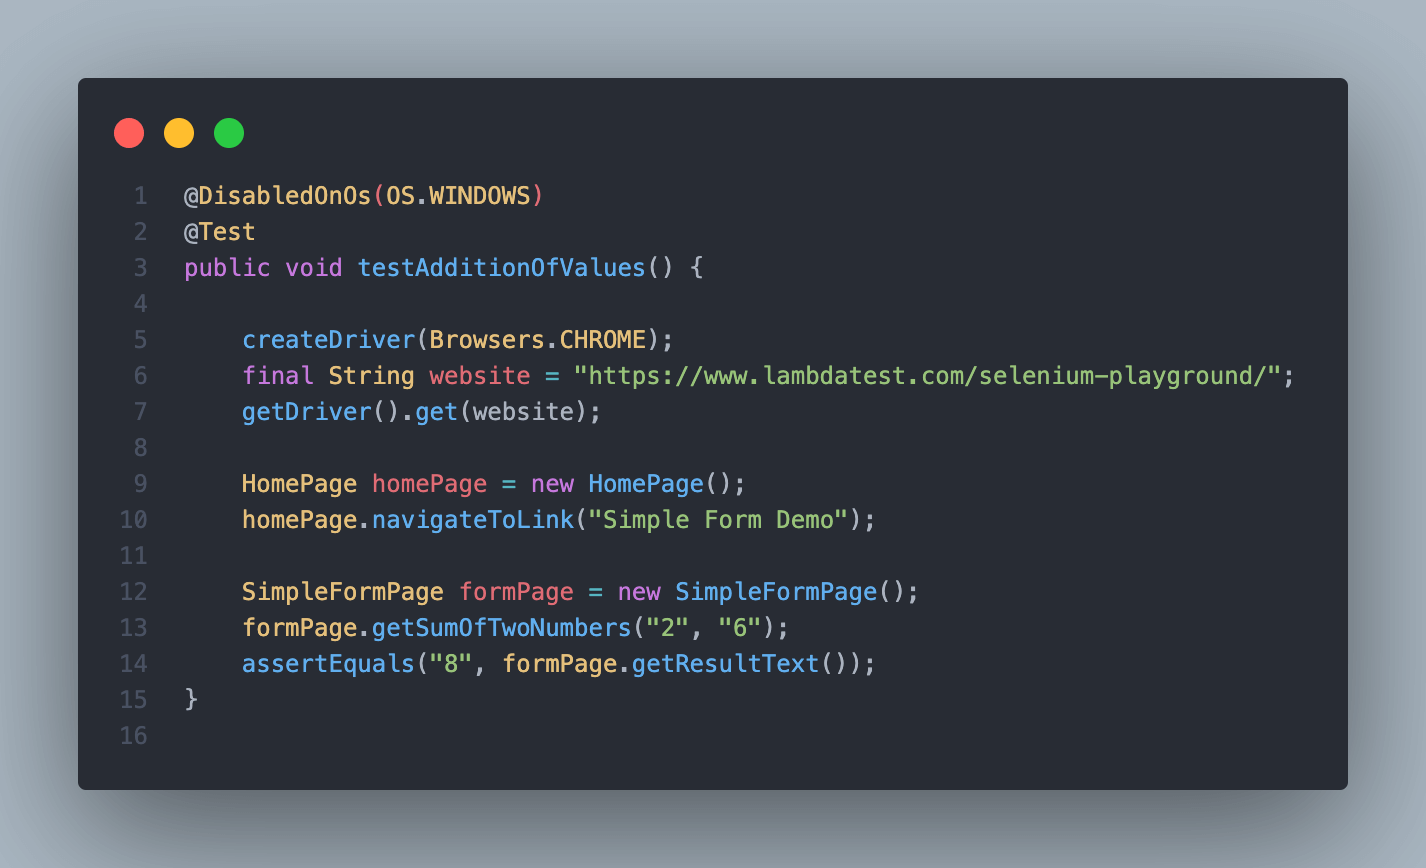
Test Execution
On executing the above tests on macOS, only test 2, i.e., the testAdditionOfValues() test method, should be executed successfully.

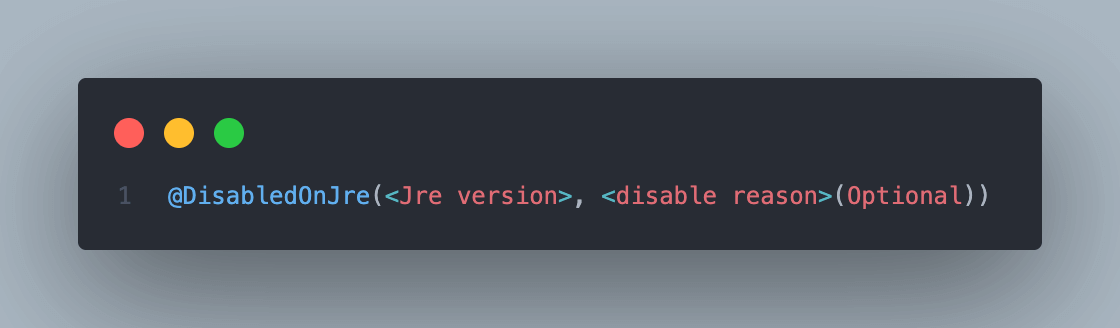
Disabling Tests on Java Runtime Environment Conditions
A test method or a test class may be disabled on particular Java Runtime Environment (JRE) versions using the @DisabledOnJre annotation.
Syntax

Using @DisabledOnJre annotation on the Test Method
The following example code shows how to use @DisabledOnJre annotation on the test method.
|
1 2 3 4 5 6 7 8 9 10 11 12 13 14 |
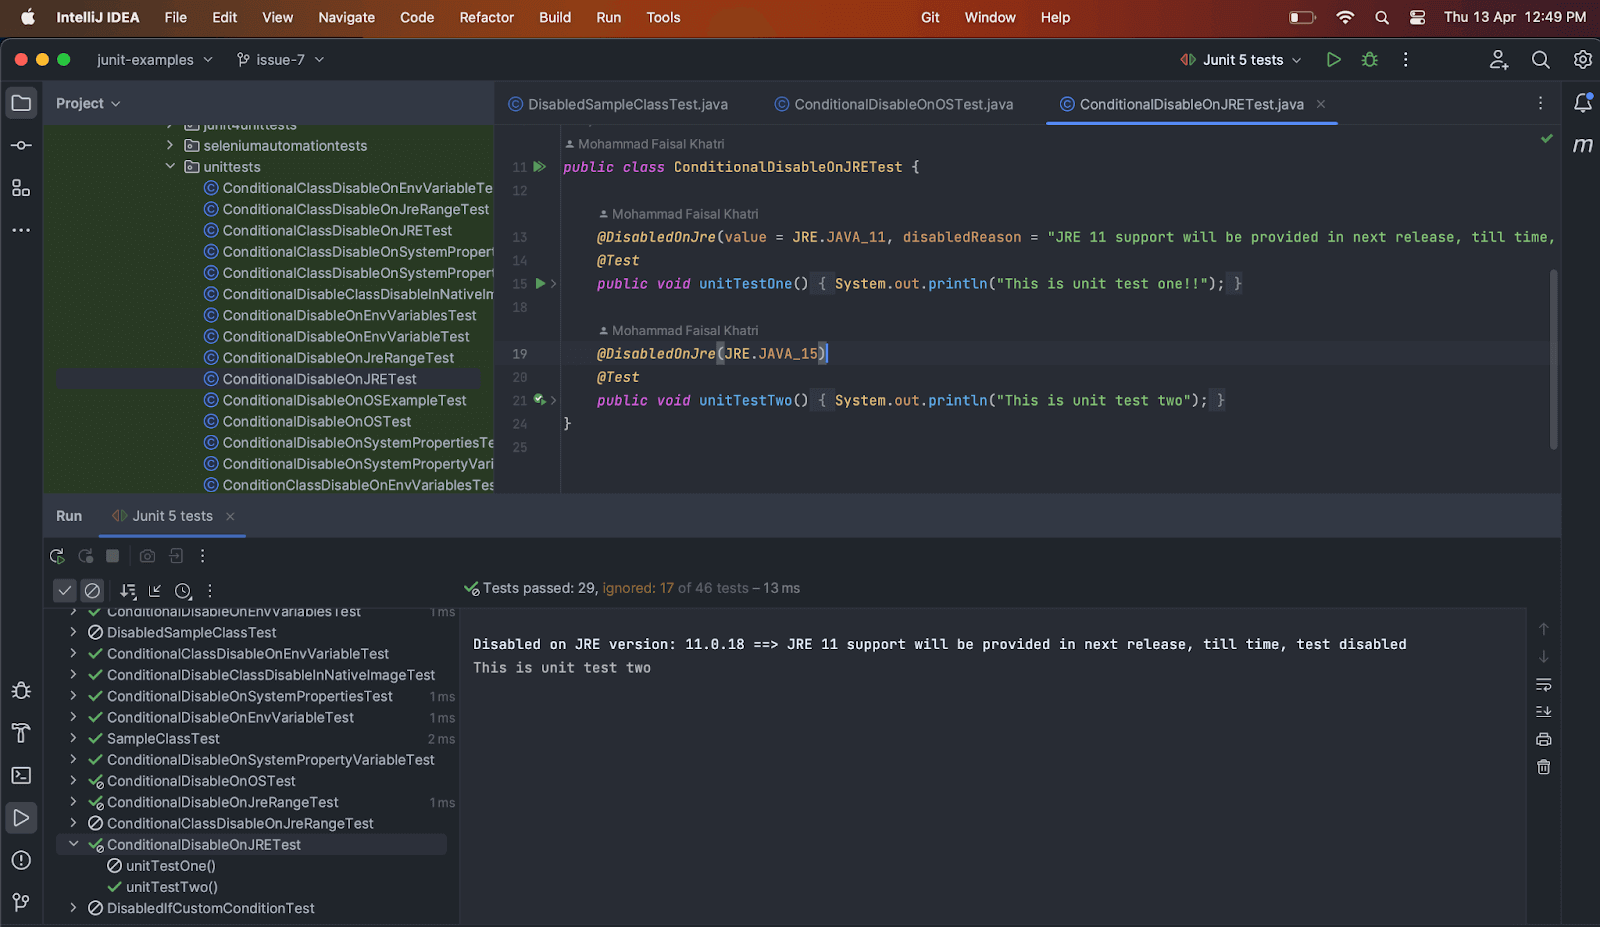
public class ConditionalDisableOnJRETest { @DisabledOnJre(value = JRE.JAVA_11, disabledReason = "JRE 11 support will be provided in next release, till time, test disabled") @Test public void unitTestOne() { System.out.println("This is unit test one!!"); } @DisabledOnJre(JRE.JAVA_15) @Test public void unitTestTwo() { System.out.println("This is unit test two"); } } |
Test Execution
After executing the tests on a machine with the JRE version 11 installed, only the unitTestTwo() method should be run, and its respective print statement should be printed in the console.
For unitTestOne(), it should print the disabled reason in the console.
Using @DisabledOnJre annotation on the Test Class
The following example code shows how to use @DisabledOnJre annotation on the test class.
|
1 2 3 4 5 6 7 8 9 10 11 12 13 |
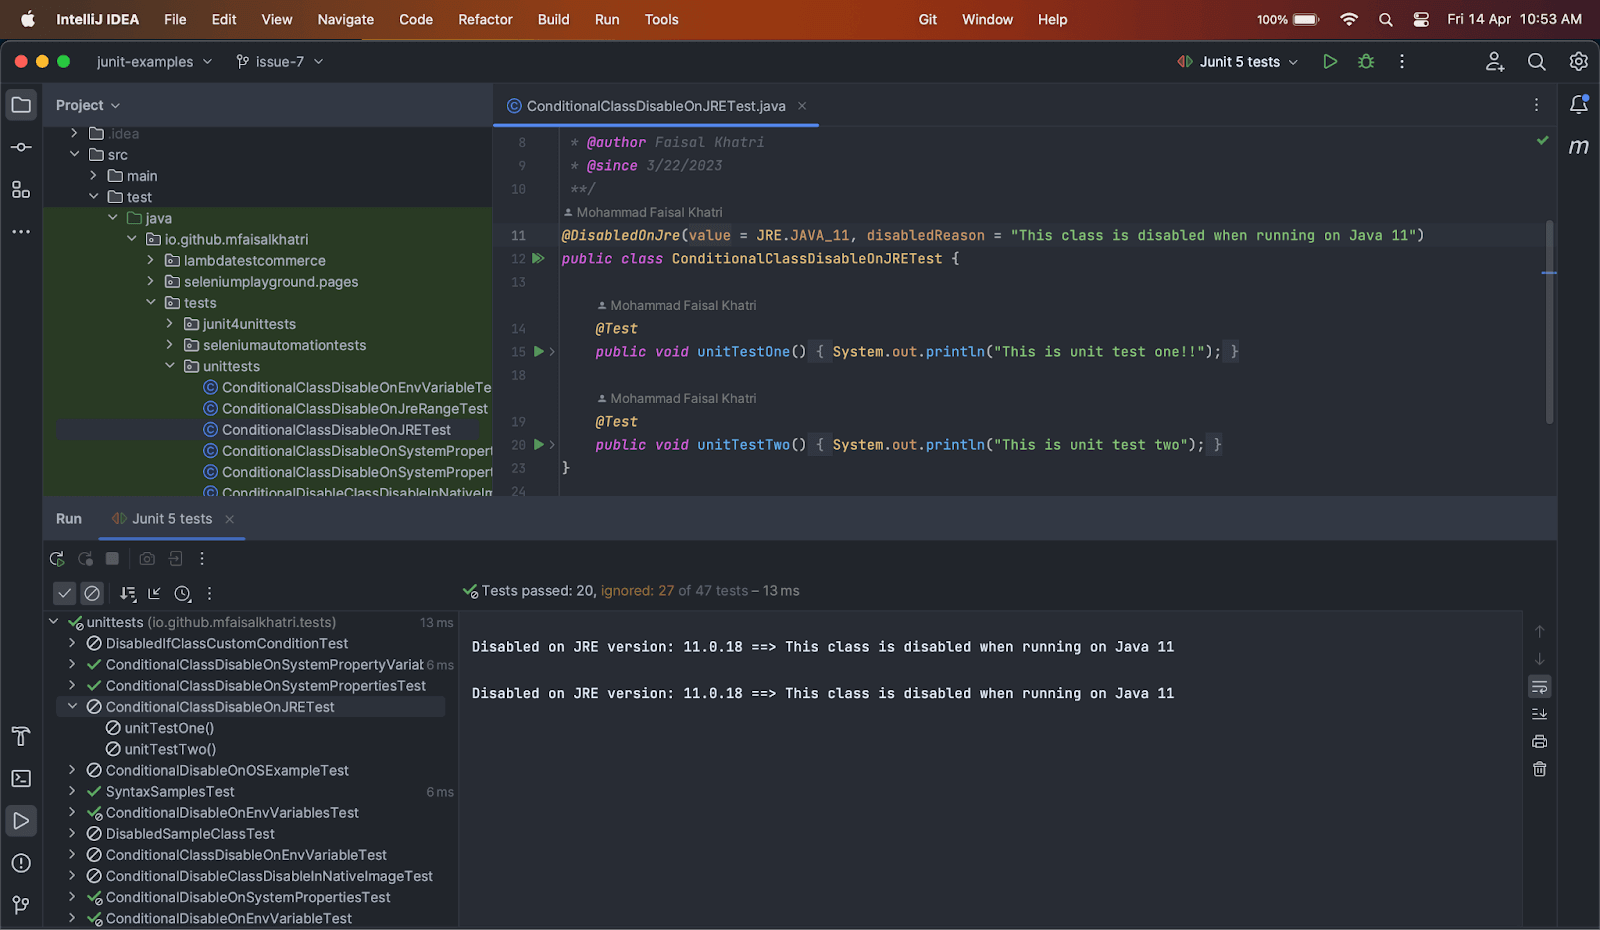
@DisabledOnJre(value = JRE.JAVA_11, disabledReason = "This class is disabled when running on Java 11") public class ConditionalClassDisableOnJRETest { @Test public void unitTestOne() { System.out.println("This is unit test one!!"); } @Test public void unitTestTwo() { System.out.println("This is unit test two"); } } |
Test Execution
All the test methods in the above-mentioned ConditionalClassDisableOnJRETest class should be skipped, and the disabled reason should be printed in the console when executing on a machine that has JRE 11 installed.
Disabling Tests on Java Runtime Environment Range Conditions
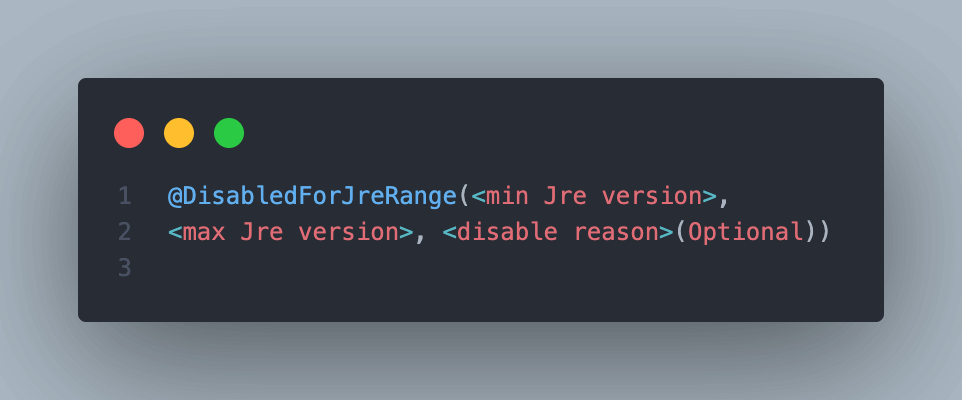
Compared to JUnit Ignore Test annotation, JUnit 5 also provides us the option to disable the test or the test class on the particular range of Java Runtime Environment (JRE) versions by using the @DisabledForJreRange annotation.
This annotation accepts three parameters: min, max, and disabledReason. The disabledReason parameter is optional.
In the min and max parameters, users can supply the minimum and maximum JRE version values for which the tests need to be disabled.
Syntax
Using @DisabledForJreRange annotation on the Test Method
The following example code shows how to use @DisabledForJreRange annotation on the test method.
|
1 2 3 4 5 6 7 8 9 10 11 12 13 14 15 16 17 18 19 20 21 |
public class ConditionalDisableOnJreRangeTest { @DisabledForJreRange(min = JRE.JAVA_11) @Test public void unitTestOne() { System.out.println("This is unit test one!!"); } @DisabledForJreRange(max = JRE.JAVA_9) @Test public void unitTestTwo() { System.out.println("This is unit test two!!"); } @DisabledForJreRange(min = JRE.JAVA_9, max = JRE.JAVA_11) @Test public void unitTestThree() { System.out.println("This is unit test three!!"); } } |
There are three tests in the above class. The first test method unitTestOne(), has the @DisabledForJreRange with a min parameter, which means that this test should be disabled on the machine having a range of JRE version 11 and above.
The next test method unitTestTwo(), has the parameter max set as JRE.JAVA 9, which means that this test should not be run on a machine that has the JRE version range at the maximum of JRE 9, meaning, this test will be disabled for all JRE versions less than
Java 9. However, if the user has a JRE version greater than JRE 9, this test will not be disabled.
Lastly, the third test method unitTestThree(), has the min and max range defined, which is pretty much straightforward. The test method should be skipped while executing the JRE range between JRE 9 and 11.
Test Execution
Let’s run the tests on the machine with JRE 11 installed.
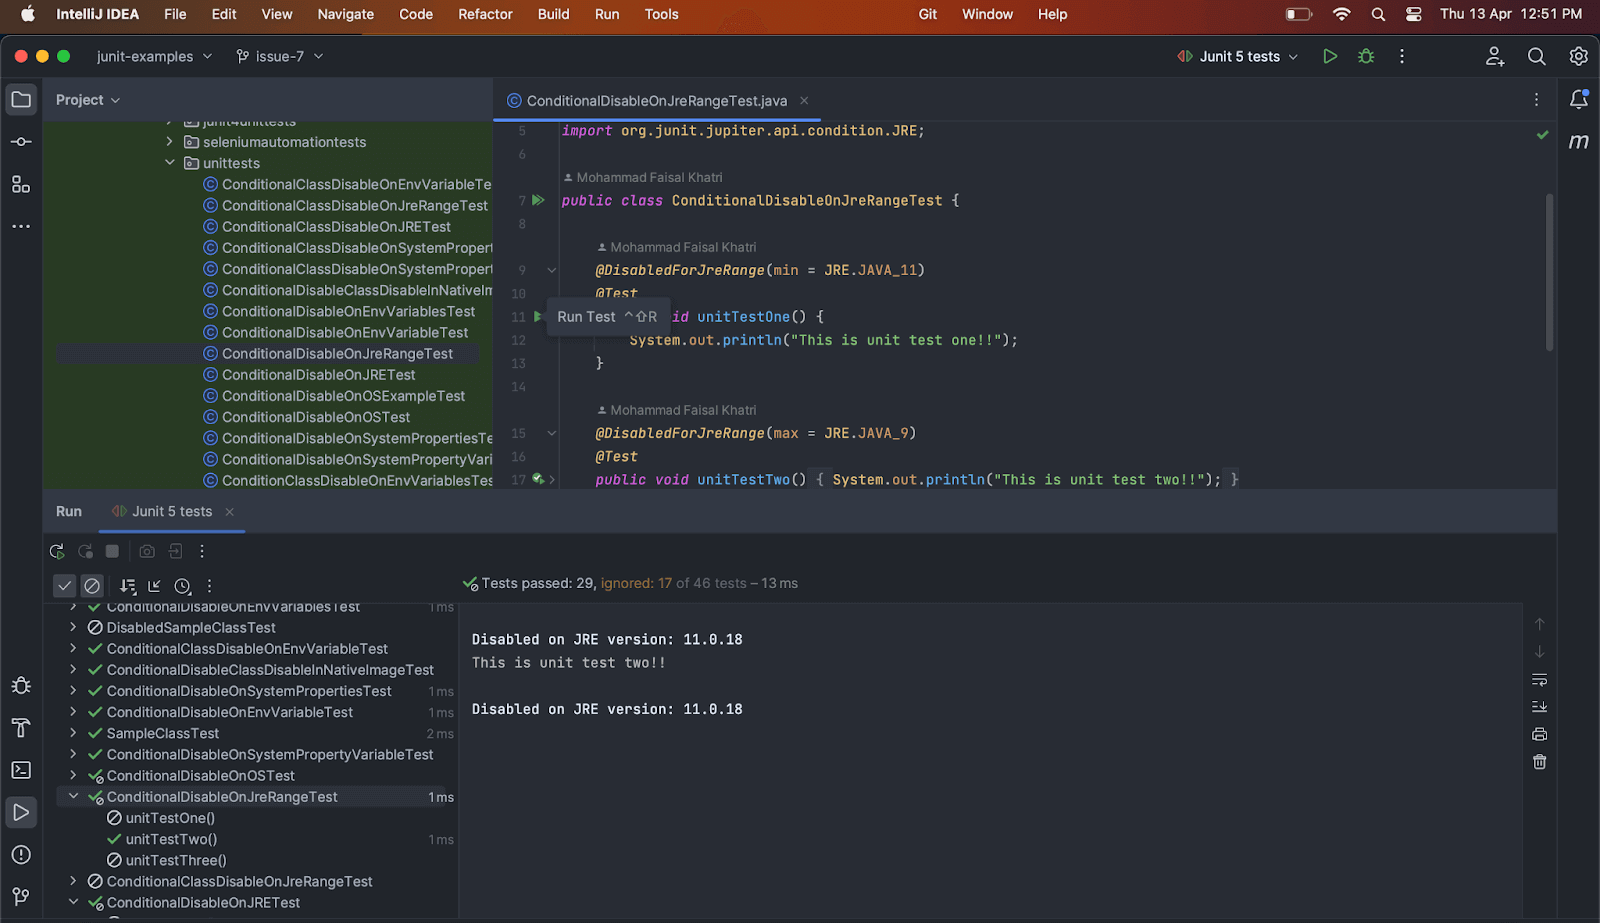
After executing the tests, only the test method unitTestTwo() was run successfully since the tests were run on a machine with JRE 11 installed, and the condition for unitTestTwo() states that max it should be JRE 9.
The other two tests were disabled as it comes in the range of JRE 11, which is installed on the machine where the tests were run.
Using @DisabledForJreRange annotation on the Test Class
The following example code shows how to use @DisabledForJreRange annotation on the test class.
|
1 2 3 4 5 6 7 8 9 10 11 12 13 |
@DisabledForJreRange(min = JRE.JAVA_9, max = JRE.JAVA_15, disabledReason = "Tests disabled for JRE range 9 - 15") public class ConditionalClassDisableOnJreRangeTest { @Test public void unitTestOne() { System.out.println("This is unit test one!!"); } @Test public void unitTestTwo() { System.out.println("This is unit test two!!"); } } |
There are two tests in the ConditionalClassDisableOnJreRangeTest class. The annotation for DisabledForJreRange is put at the class level. Hence, both tests should be skipped while executing the tests between the JRE range from 9 to 15.
We can also apply the condition based on the requirement for only min JRE version, only max JRE version, or a range of JRE versions as provided in the example code.
Test Execution
Let’s run the tests on the machine with JRE 11 installed.
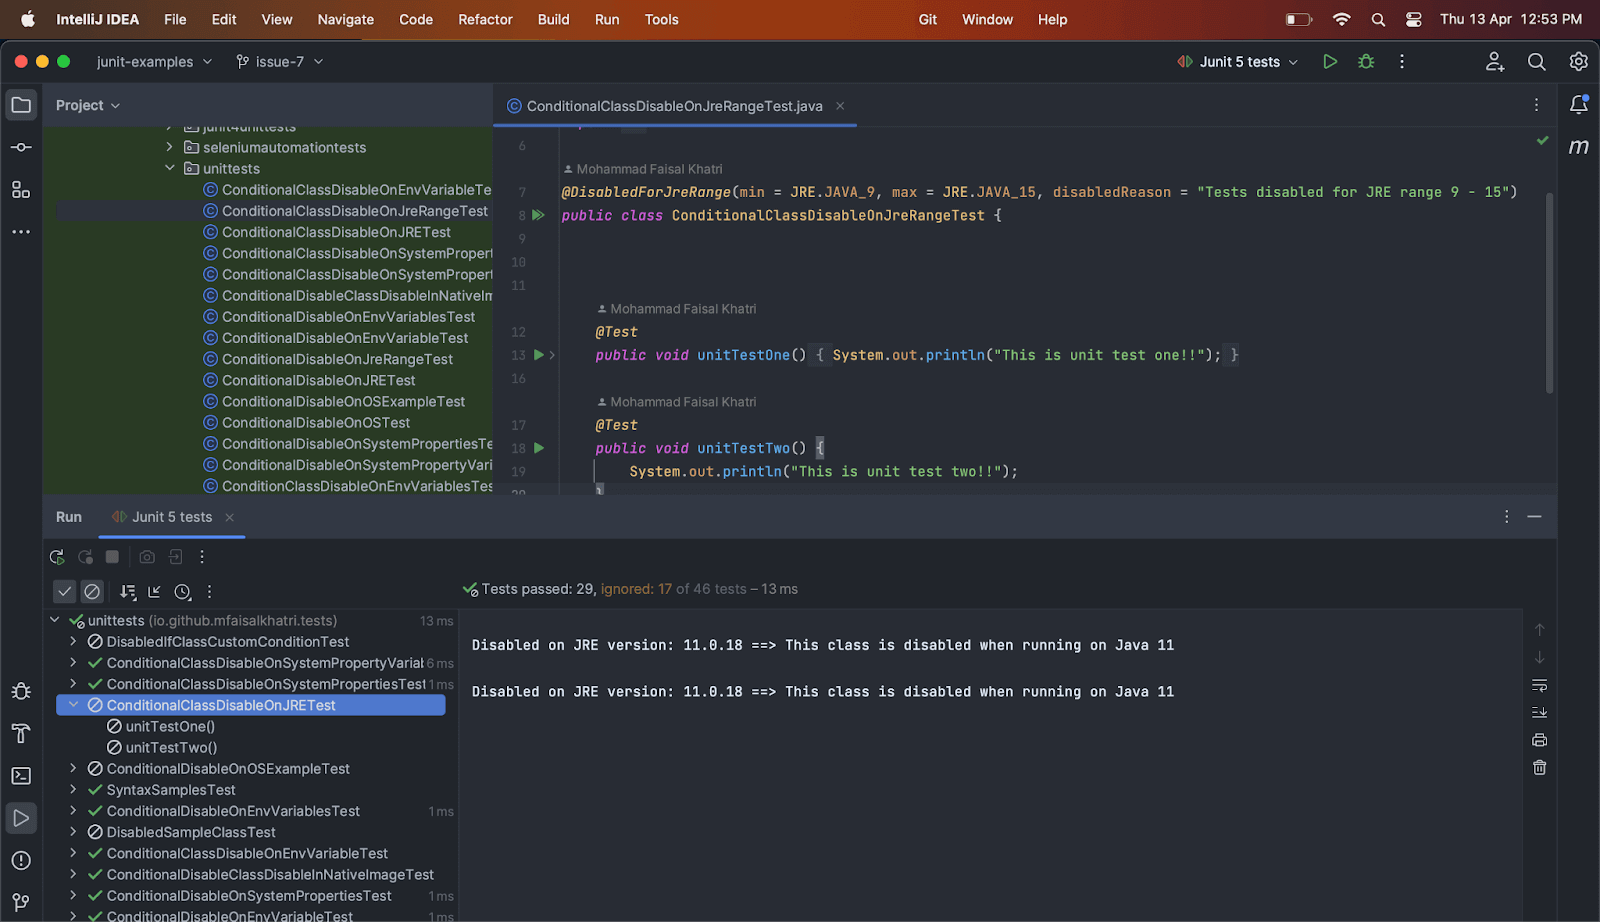
It can be seen in the test execution output no tests are run, and the disabled reason was printed in the console.
Disabling Tests on System Property Conditions
A test method or a test class may be disabled based on the named JVM System Property using the @DisabledIfSystemProperty annotation.
Syntax
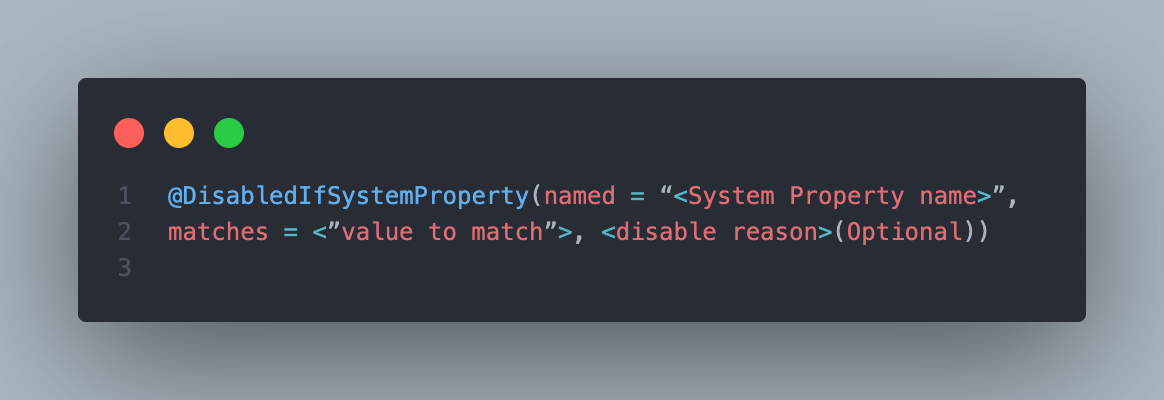
Using @DisabledIfSystemProperty annotation on the Test Method
The following example code shows how to use @DisabledIfSystemProperty annotation on the test method.
|
1 2 3 4 5 6 7 8 9 10 11 12 13 14 |
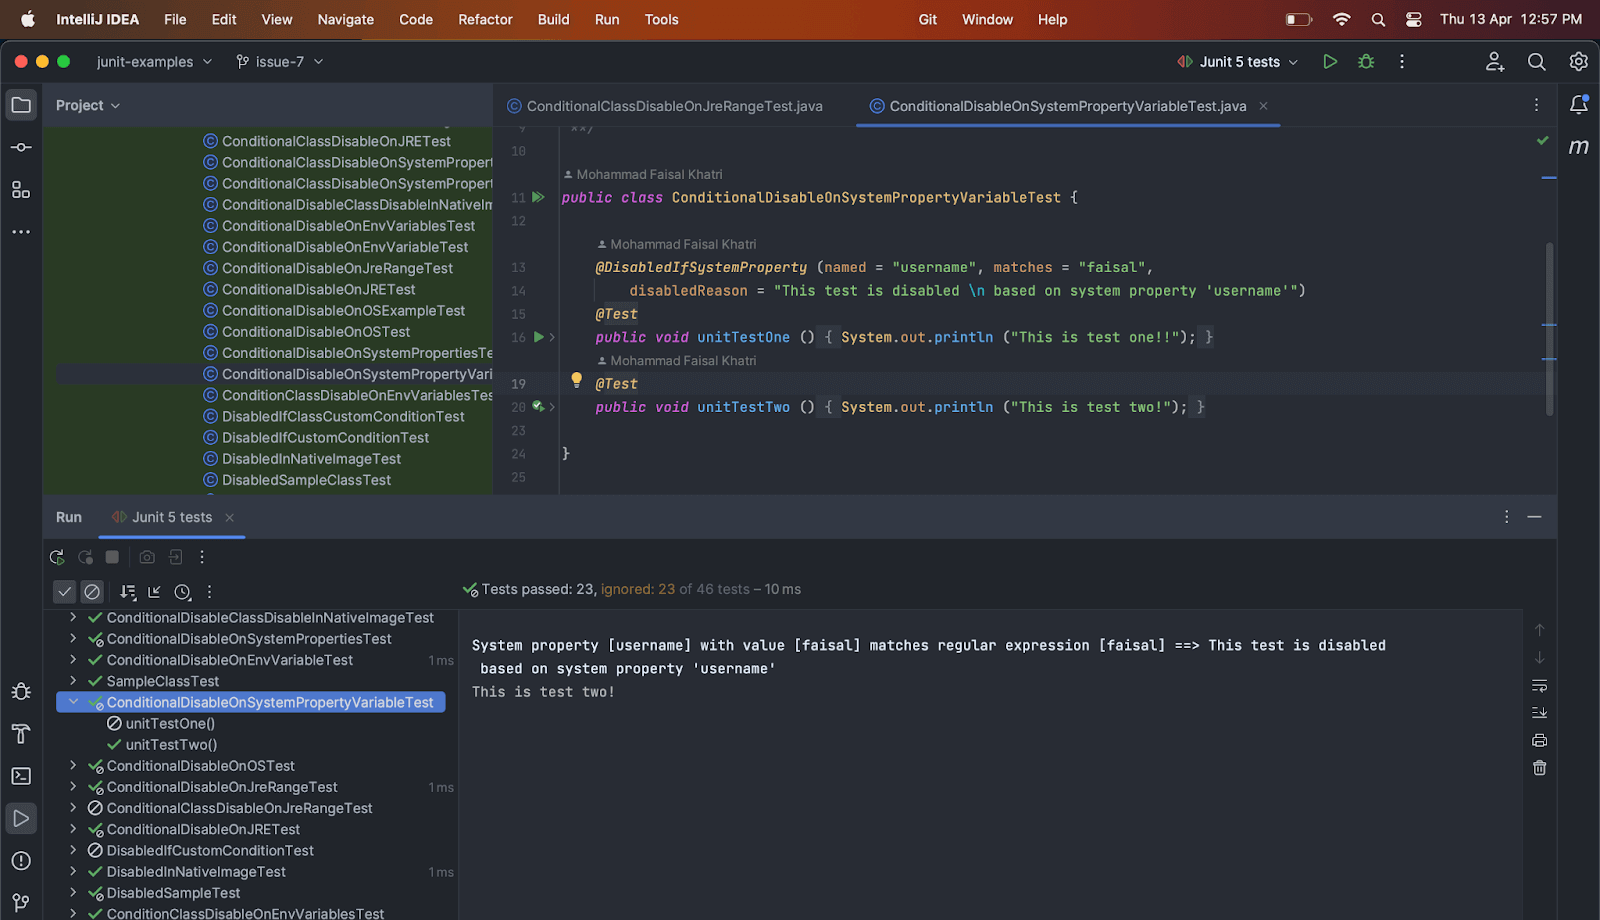
public class ConditionalDisableOnSystemPropertyVariableTest { @DisabledIfSystemProperty (named = "username", matches = "faisal", disabledReason = "This test is disabled based on system property 'username'") @Test public void unitTestOne () { System.out.println ("This is test one!!"); } @Test public void unitTestTwo () { System.out.println ("This is test two!"); } } |
There are two tests defined in this class, unitTestOne() test method has the @Disabled IfSystemProperty annotation on it, which says that if System Property named – “username” matches “faisal”, this test should be disabled.
The other test method unitTestTwo(), does not have any disabled condition, so this test should be run when the tests are executed.
Test Execution
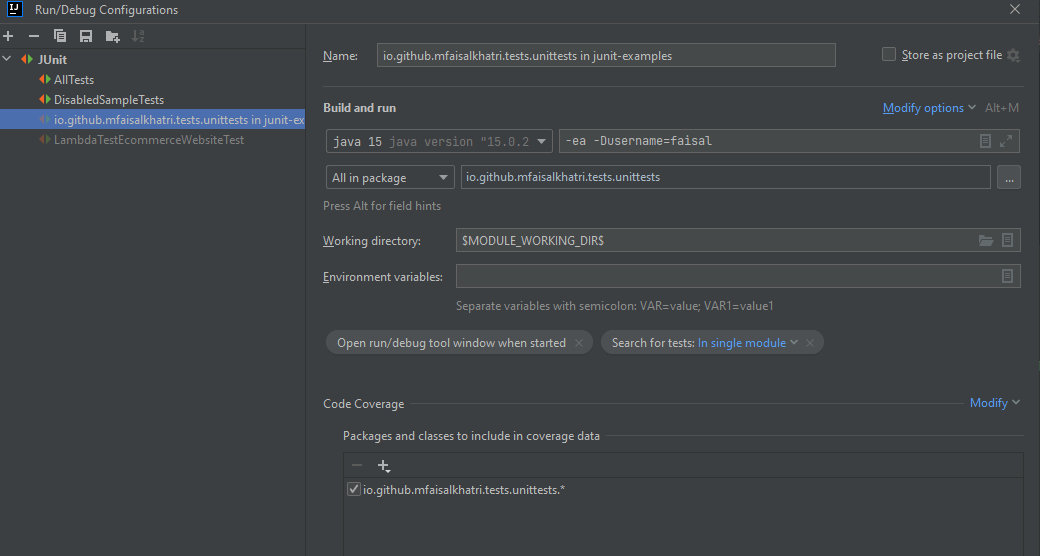
The System Property value is supplied while running the tests using the JUnit configuration window in the VM Options field “-Dusername=faisal”.
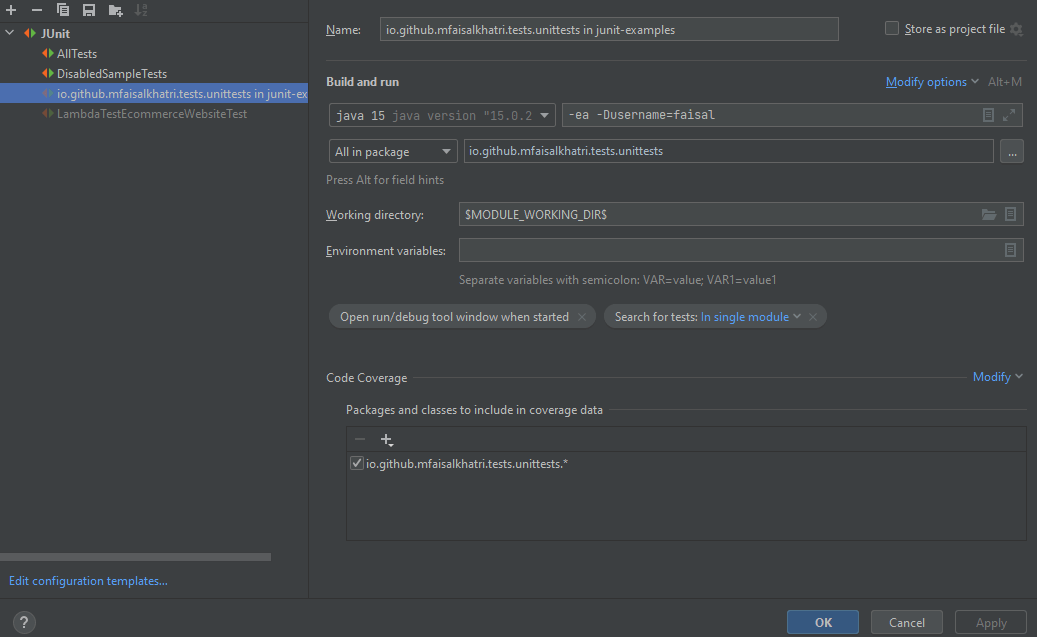
On executing the tests after supplying the System Property variable named username value as “faisal”, test method unitTestOne() should be skipped, and the disabled reason should be printed in the console.
Test method unitTestTwo() should be executed, and its respective print statement should be printed in the console.
Using @DisabledIfSystemProperty annotation on the Test Class
The following example code shows how to use @DisabledIfSystemProperty annotation on the test class.
|
1 2 3 4 5 6 7 8 9 10 11 12 13 |
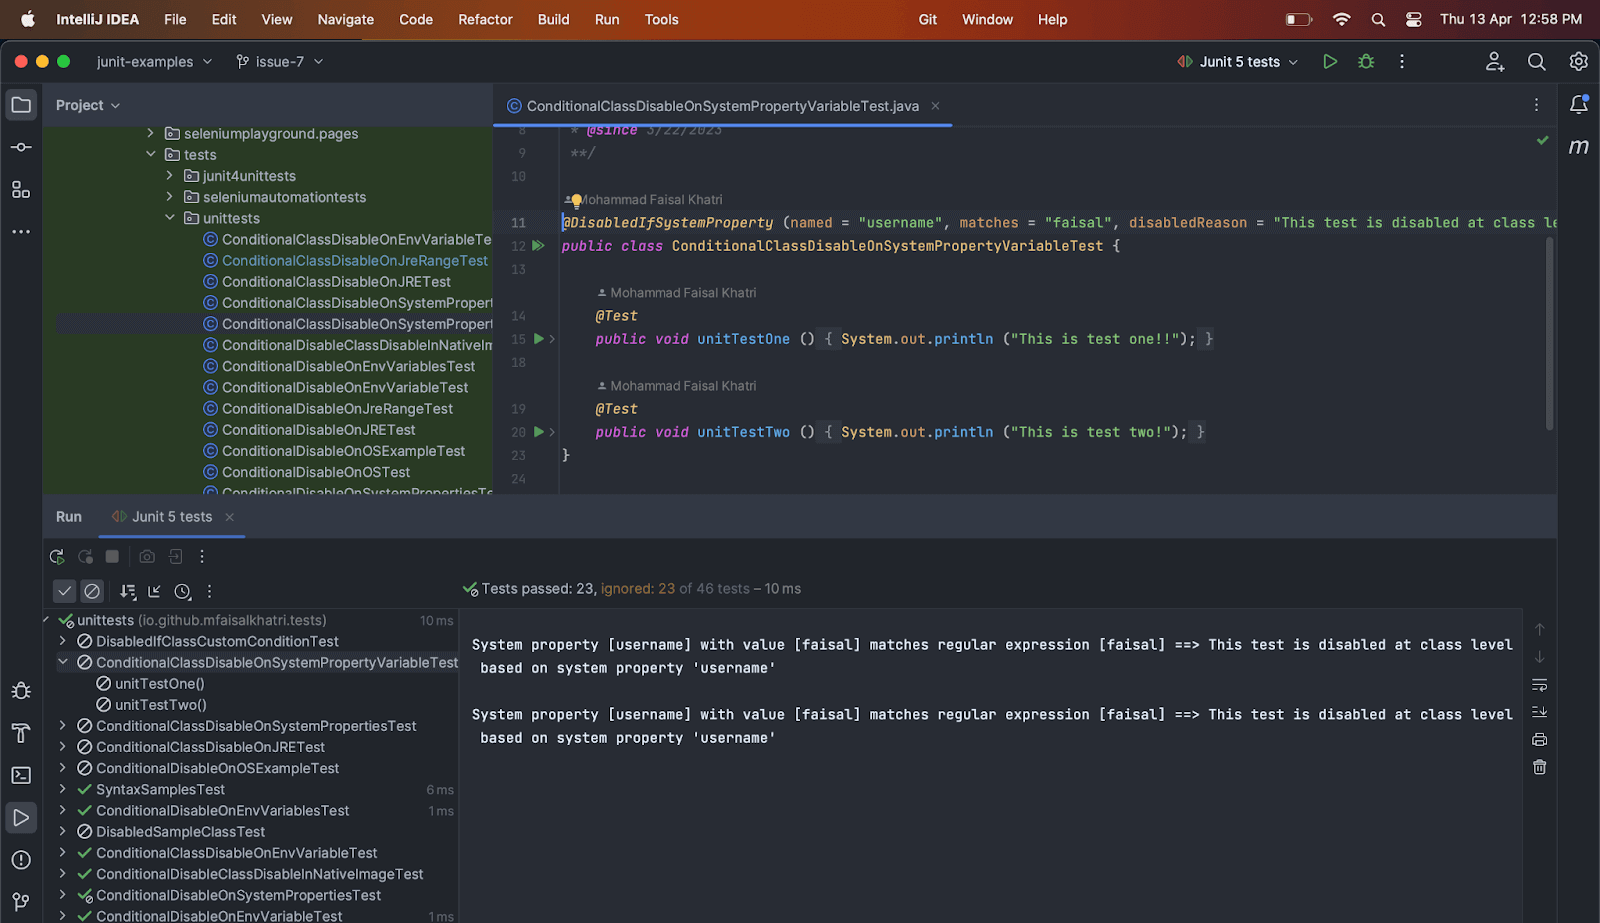
@DisabledIfSystemProperty (named = "username", matches = "faisal", disabledReason = "This test is disabled at class level based on system property 'username'") public class ConditionalClassDisableOnSystemPropertyVariableTest { @Test public void unitTestOne () { System.out.println ("This is test one!!"); } @Test public void unitTestTwo () { System.out.println ("This is test two!"); } } |
Test Execution
On executing the tests after supplying the System Property variable named username value as “faisal”, both of the test methods unitTestOne() and unitTestTwo() should be skipped and the disabled reason should be printed in the console, as the annotation is supplied at class level, so all the tests inside the class should be skipped.
Disabling Tests on System Properties Conditions
Compared to JUnit Ignore Test annotation, JUnit 5 also provides an annotation where tests can be disabled based on an array of System Property conditions. Let’s check how we can use it.
Syntax
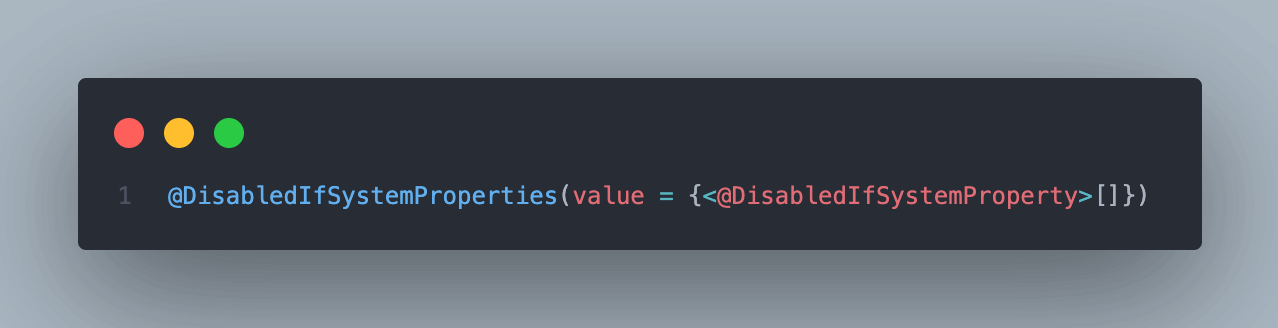
Using @DisabledIfSystemProperties annotation on the Test Method
The following example code shows how to use @DisabledIfSystemProperties annotation on the test method.
The test will be disabled if either of the system property conditions given in the annotation array is evaluated to be true.
|
1 2 3 4 5 6 7 8 9 10 11 12 13 14 15 |
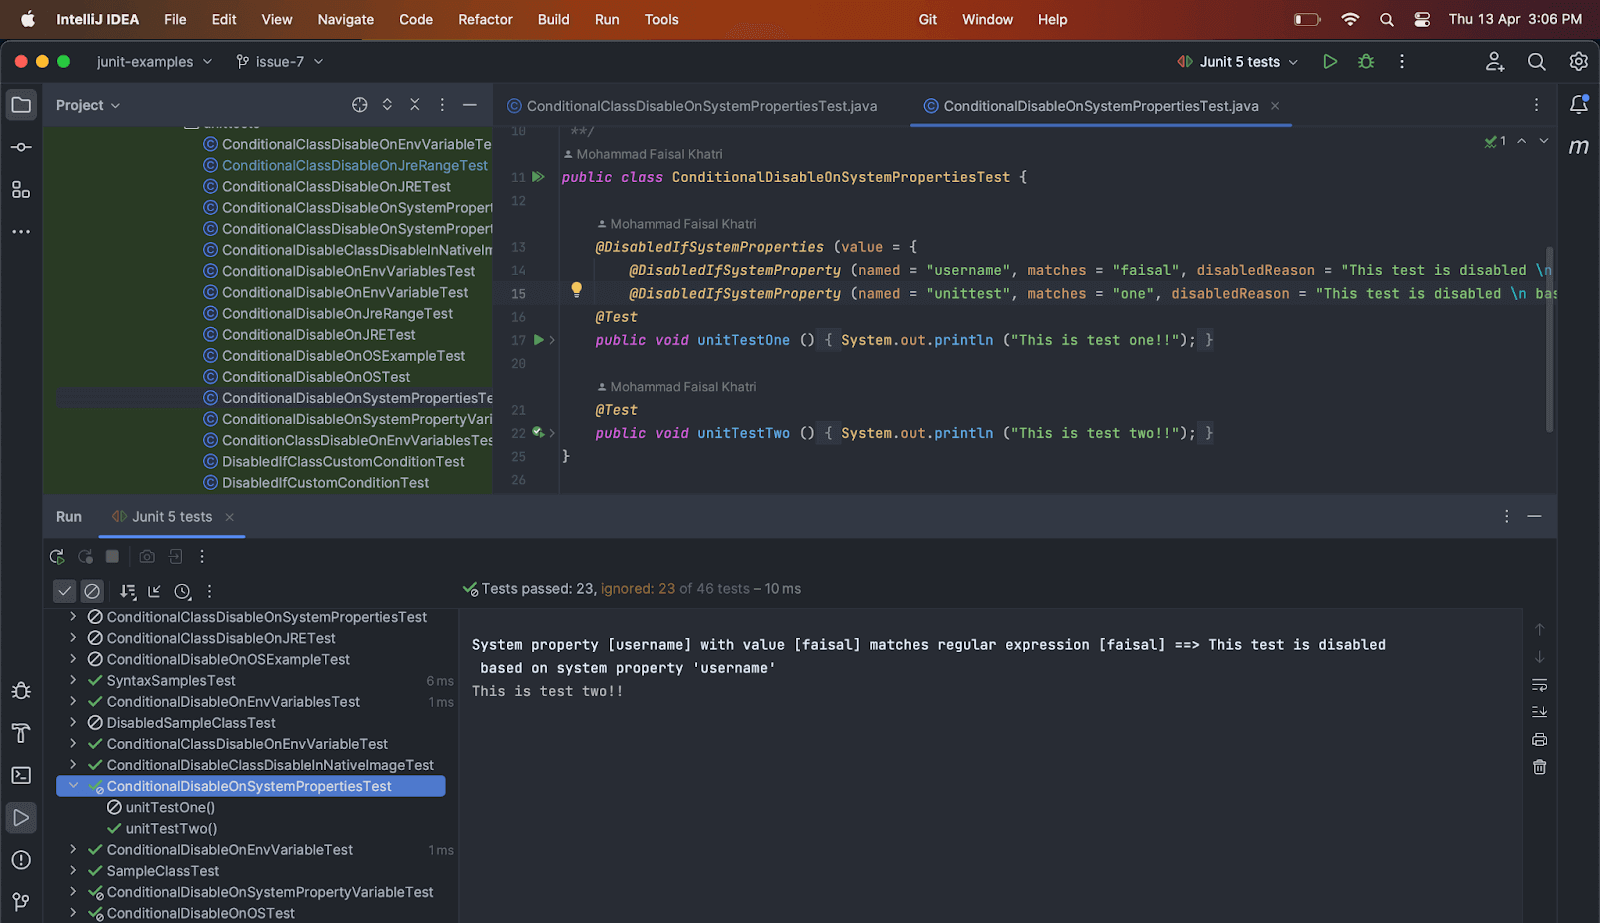
public class ConditionalDisableOnSystemPropertiesTest { @DisabledIfSystemProperties (value = { @DisabledIfSystemProperty (named = "username", matches = "faisal", disabledReason = "This test is disabled based on system property 'username'"), @DisabledIfSystemProperty (named = "unittest", matches = "one", disabledReason = "This test is disabled based on system property 'unitest'") }) @Test public void unitTestOne () { System.out.println ("This is test one!!"); } @Test public void unitTestTwo () { System.out.println ("This is test two!!"); } } |
There are two tests in the class ConditionalDisableOnSystemPropertiesTest. The first test method unitTestOne(), has the annotation @DisabledIfSystemProperties with two System Property conditions as below.
- System Property username matches the value “faisal”.
- System Property unittest matches the value “one”.
The second test method unitTestTwo(), has no disabling condition; hence it should be executed successfully when tests are run.
Test Execution
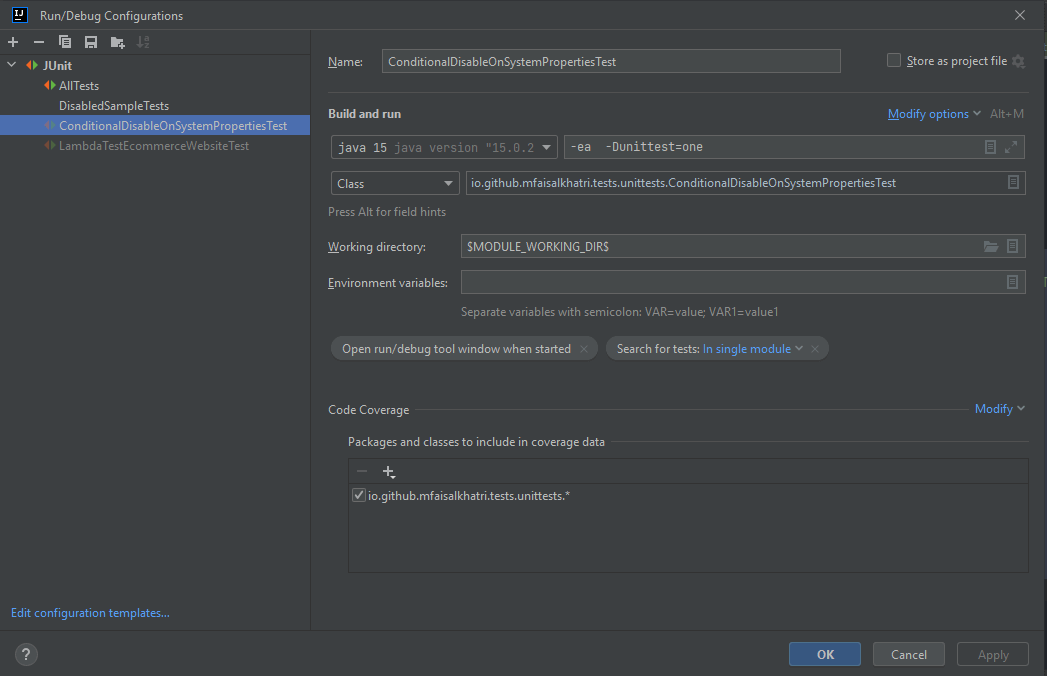
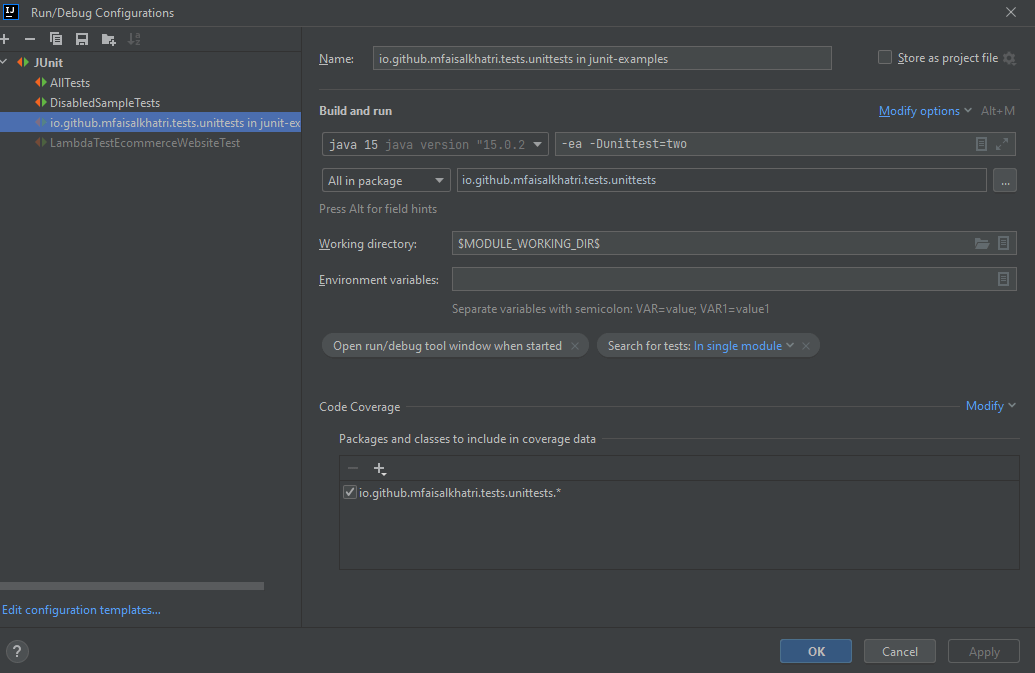
Let’s run the tests by adding the System Property named username as “faisal” in the configuration.
The unitTestOn() method was skipped on executing the tests, and the disabled reason is printed for it. As mentioned earlier, if either of the conditions mentioned in the array is evaluated to be true, the test will be disabled.
The unitTestTwo() test method successfully printed the print statement in the console.
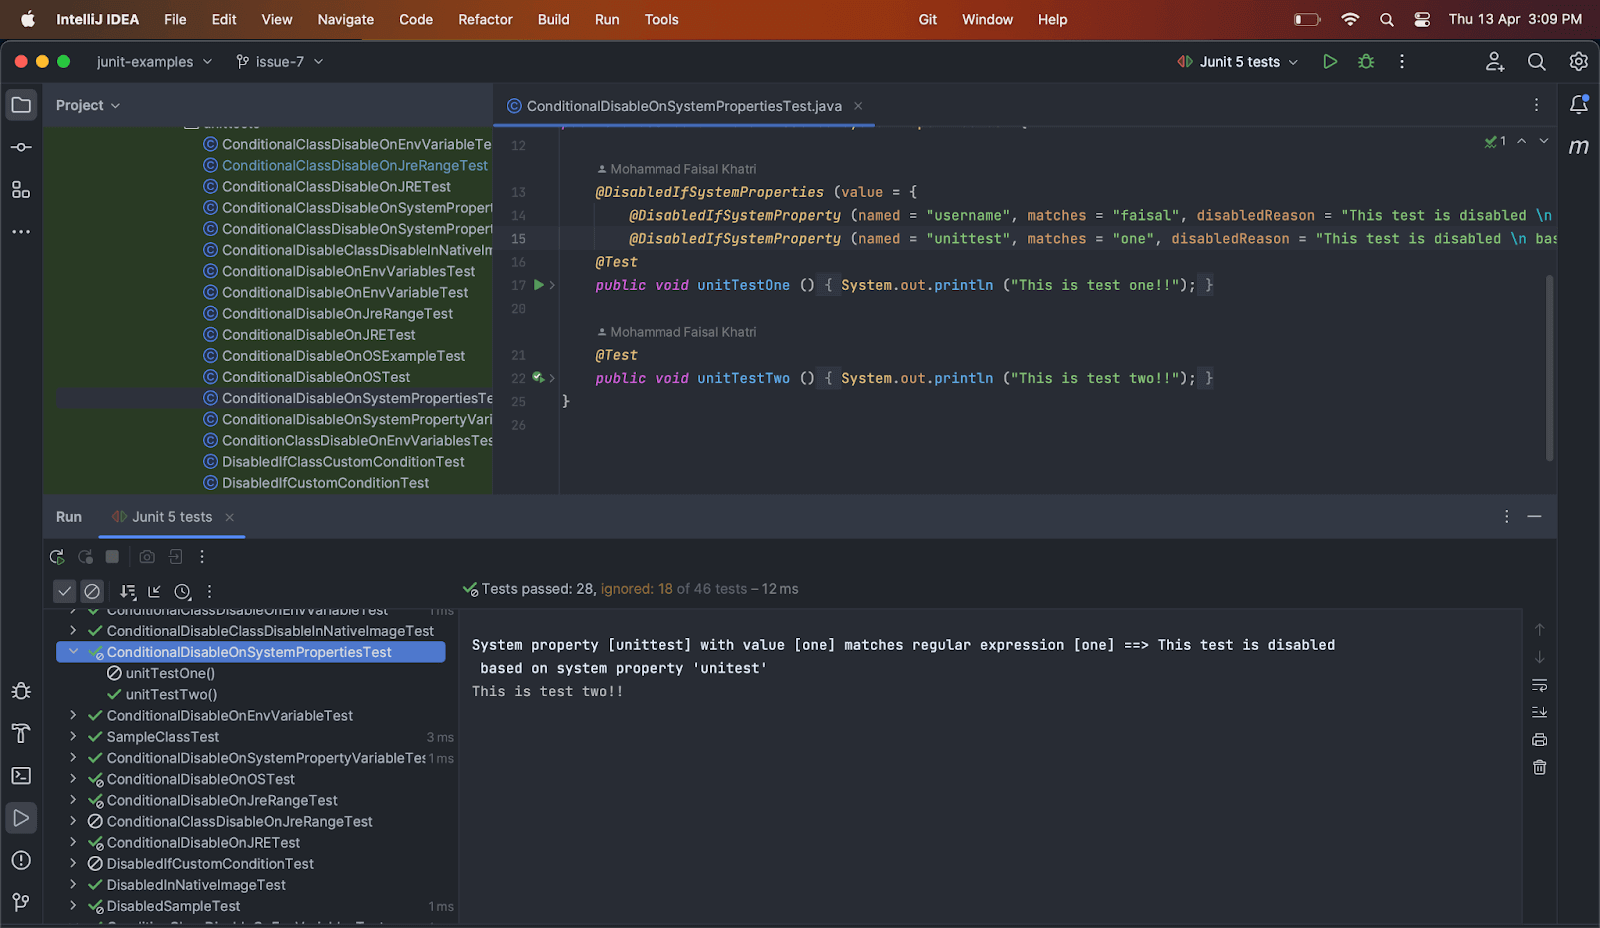
Let’s now execute the same tests by providing the second System Property named “unittest” as “one” and check the output.
As expected, the first test method unitTestOne() was skipped during execution.
Using @DisabledIfSystemProperties annotation on the Test Class
The following example code shows how to use @DisabledIfSystemProperties annotation on the test class.
The test will be disabled in case either of the system property conditions given in the annotation array is evaluated to true, like we saw in the example of test methods in the earlier section above.
|
1 2 3 4 5 6 7 8 9 10 11 12 13 14 15 |
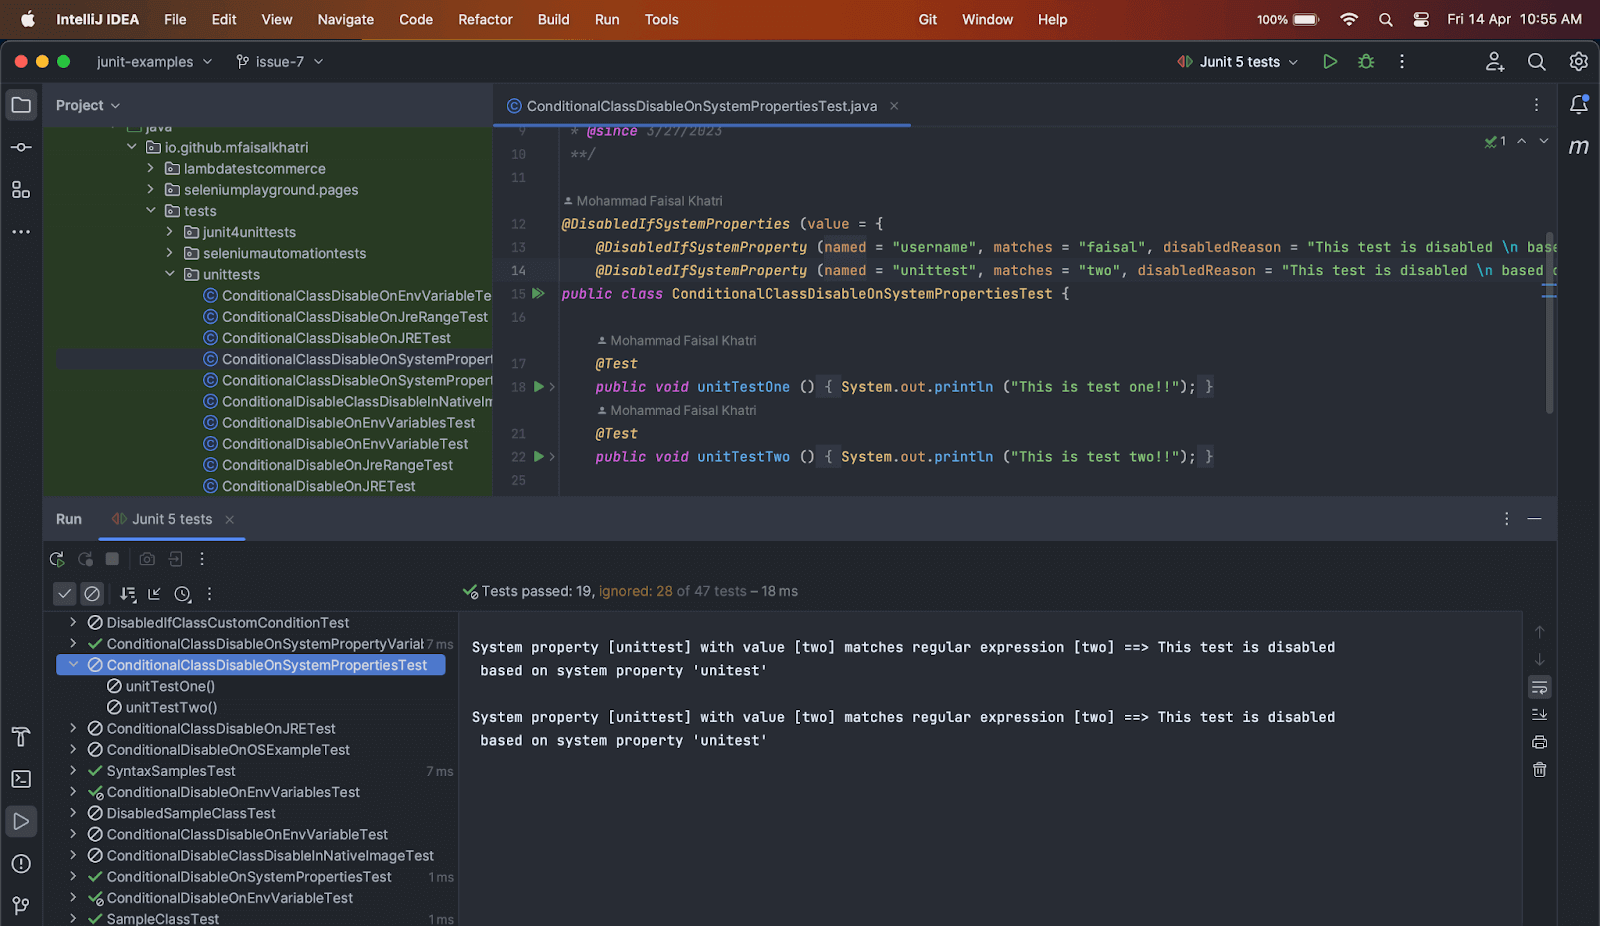
@DisabledIfSystemProperties (value = { @DisabledIfSystemProperty (named = "username", matches = "faisal", disabledReason = "This test is disabled based on system property 'username'"), @DisabledIfSystemProperty (named = "unittest", matches = "two", disabledReason = "This test is disabled based on system property 'unitest'") }) public class ConditionalClassDisableOnSystemPropertiesTest { @Test public void unitTestOne () { System.out.println ("This is test one!!"); } @Test public void unitTestTwo () { System.out.println ("This is test two!!"); } } |
The test class ConditionalClassDisableOnSystemPropertiesTest has two tests inside it. Both test methods should be skipped during the execution of the tests if either of the System Property conditions evaluates to true.
Test Execution
Let’s run the tests by adding the System Property named unittest as two.
As expected, both the test methods were skipped during execution, and the disabled reason was printed in the console.
Disabling Tests on Environment Variable Conditions
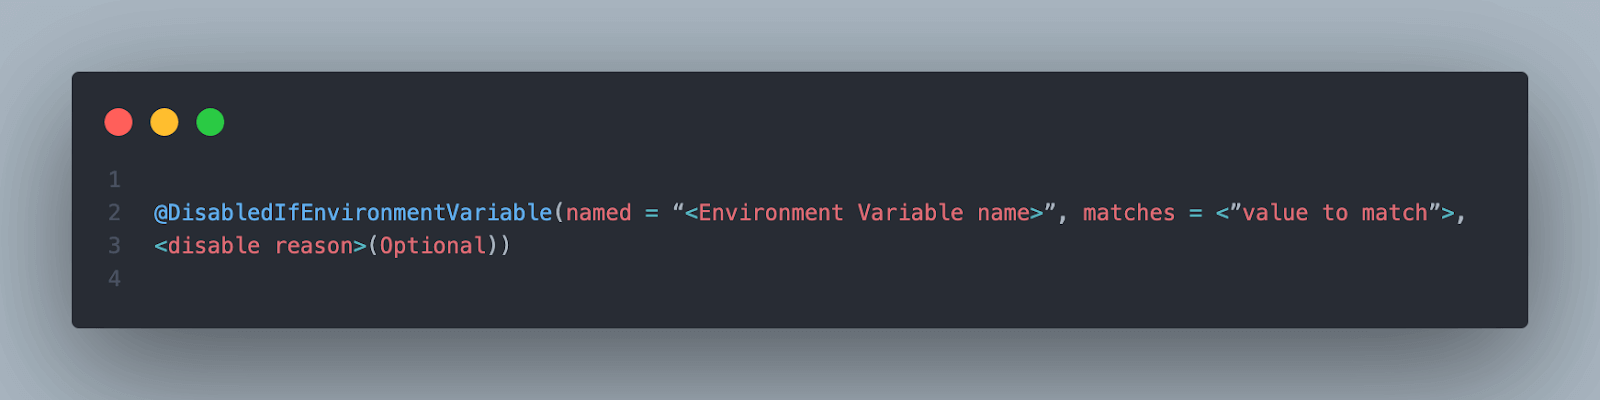
A test method or a test class may be disabled based on the named Environment Variable from the underlying operating system using the @DisabledIfEnvironmentVariable annotation.
Syntax
Using @DisabledIfEnvironmentVariable annotation on the Test Method
The following example code shows how to use @DisabledIfEnvironmentVariable annotation on the test method.
|
1 2 3 4 5 6 7 8 9 10 11 12 13 14 |
public class ConditionalDisableOnEnvVariableTest { @DisabledIfEnvironmentVariable (named = "disabletest", matches = "yes", disabledReason = "This test is disabled based on env variable named 'disabletest'") @Test public void unitTestOne () { System.out.println ("This is unit test one!!"); } @Test public void unitTestTwo () { System.out.println ("This is unit test two!!"); } } |
There are two tests in the ConditionalDisableOnEnvVariableTest class. Test method unitTestOne() has the @DisabledIfEnvironmentVariable annotation over it with the condition that if the environment variable named disabletest has the value “yes,” then it should be disabled.
The second test method unitTestTwo(), does not have any condition, so it should be run successfully.
Test Execution
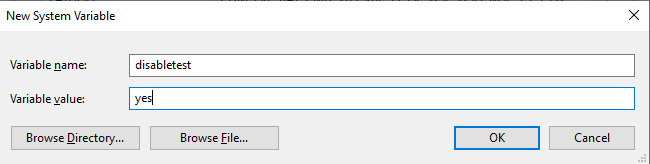
Before executing the tests, we need to create an environment variable named “disabletest” and update its value to “yes”.
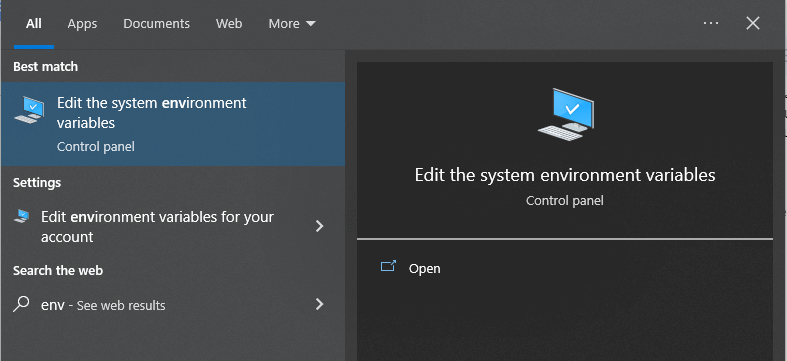
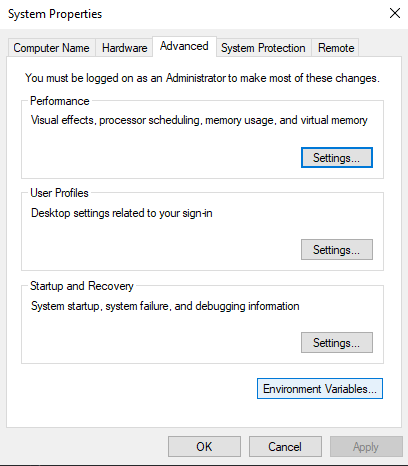
Creating an Environment Variable in Windows 10
- Click on the Start button and type “Env”.
- Click on the “Edit the system environment variables” option.
- Click on Environment Variables… button.
- In the System variables section, click the New button, as shown in the screenshot below.
- Create a new variable named disabletest and enter its value – yes.
- Click on the OK button.
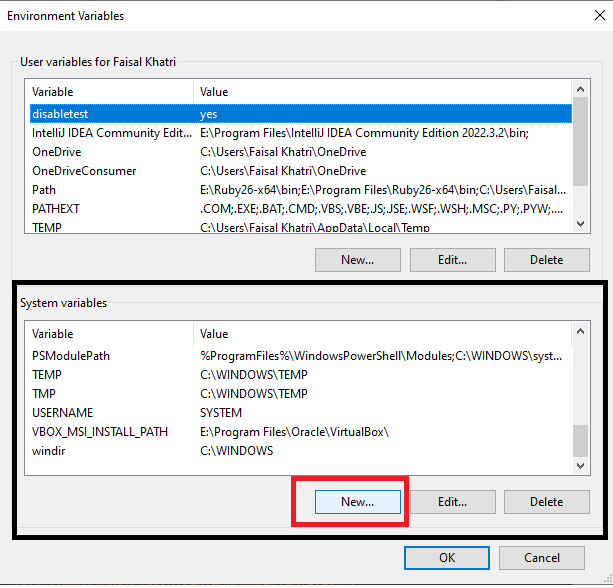
Once the variable is added successfully, it can be seen in the list of variables in the System variables section.

Let’s run the test now.
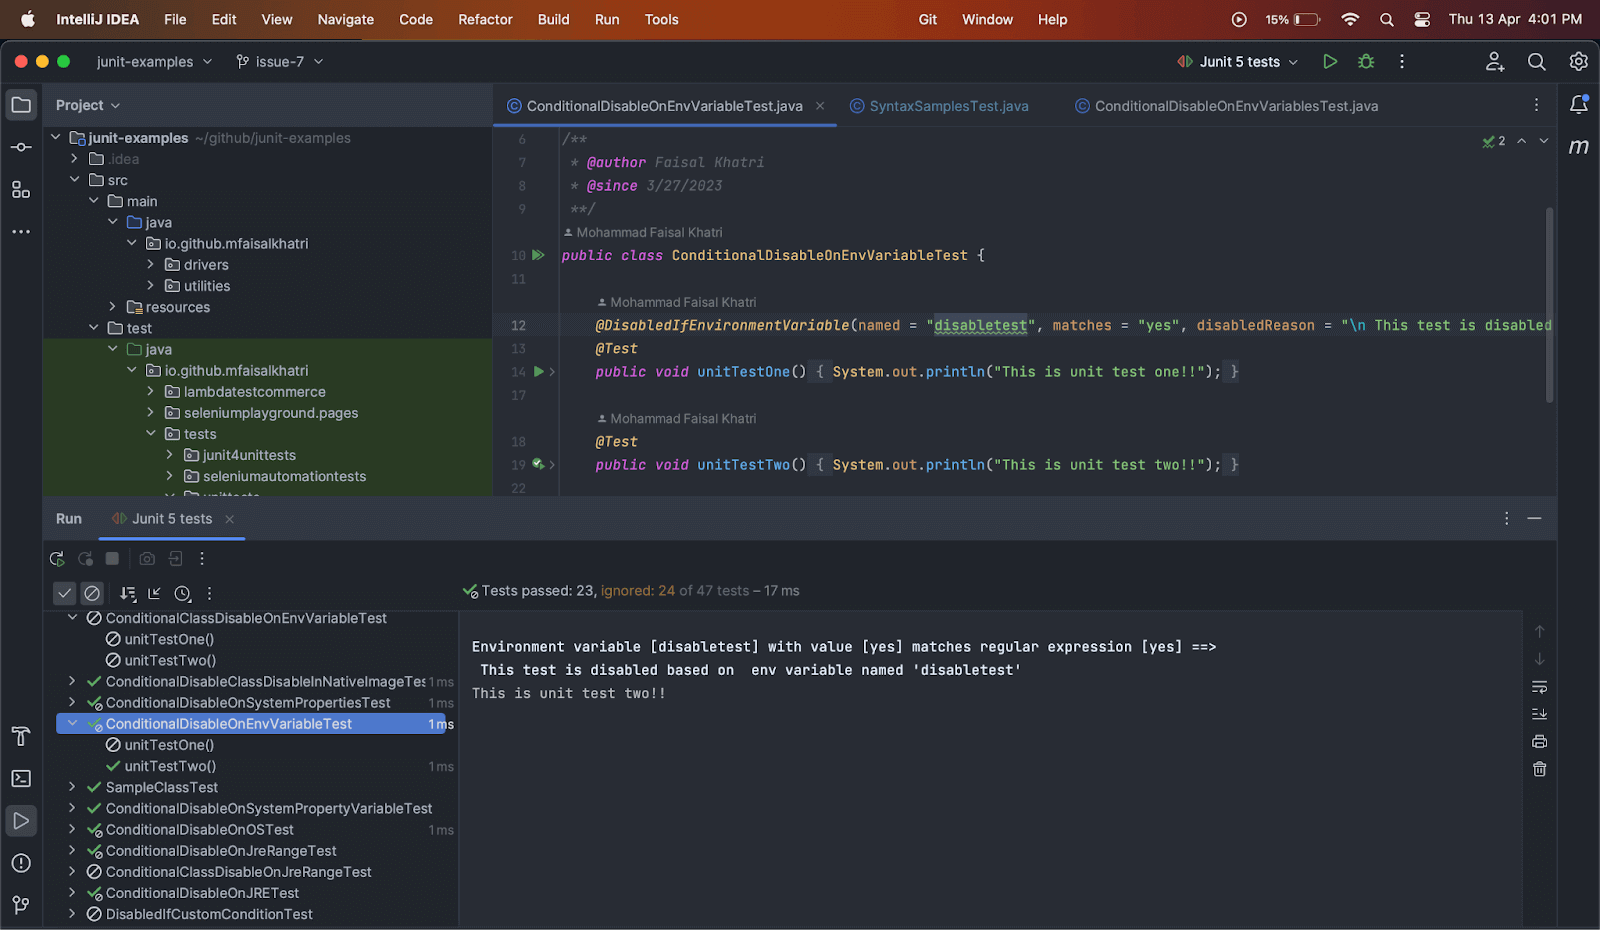
The test method unitTestOne() was skipped and the disabled reason was printed in the console. The test method unitTestTwo() was successfully run.
Using @DisabledIfEnvironmentVariable annotation on the Test Class
The following example code shows how to use @DisabledIfEnvironmentVariable annotation on the test class.
|
1 2 3 4 5 6 7 8 9 10 11 12 |
@DisabledIfEnvironmentVariable (named = "disabletest", matches = "yes", disabledReason = "This test is disabled based on env variable named 'disabletest'") public class ConditionalClassDisableOnEnvVariableTest { @Test public void unitTestOne () { System.out.println ("This is unit test one!!"); } @Test public void unitTestTwo () { System.out.println ("This is unit test two!!"); } } |
In this section of the blog on JUnit Ignore Test annotation, ConditionalClassDisableOnEnvVariableTest class, @DisabledIfEnvironmentVariable annotation is put over the test class with a condition that if environment variable named “disabletest” matches “yes” all the tests in the class should be skipped during execution.
Test Execution
As we have already set the environment variable named disabletest to yes, the same should work here as well. Let’s run the test now.
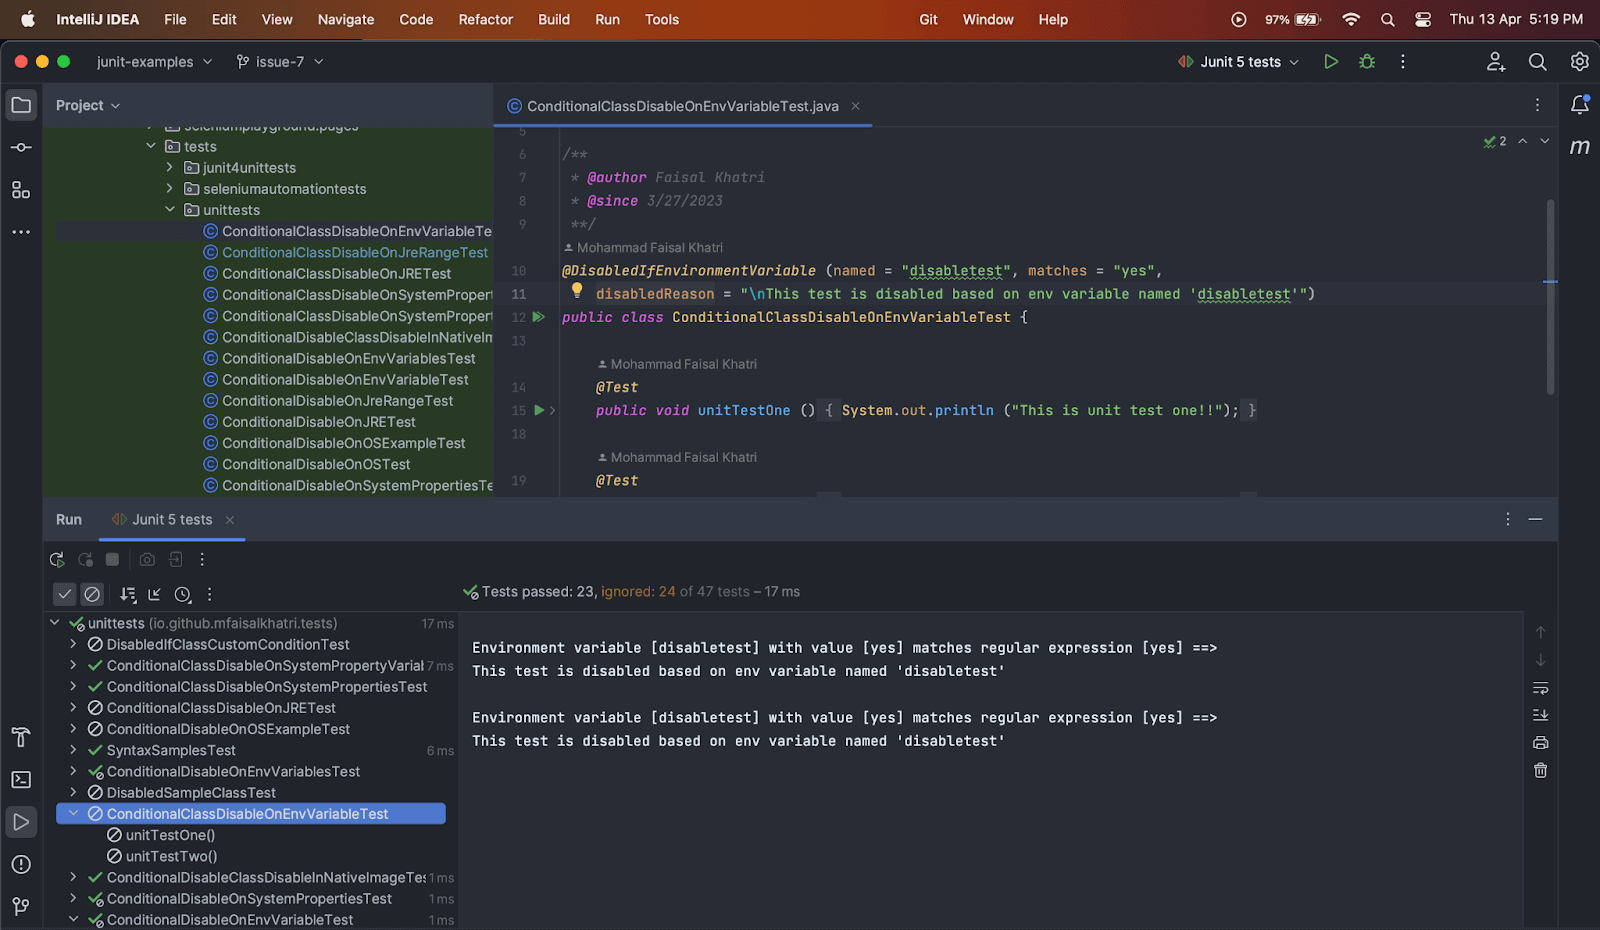
Both tests inside the test class were skipped, and the disabled reason provided in the annotation was printed on the console.
Disabling Tests on Environment Variables Conditions
Tests can also be skipped based on multiple environment variables. Compared to JUnit Ignore Test annotation, JUnit 5 provides us with @DisabledIfEnvironmentVariables annotation that helps disable tests based on multiple environment variables. However, it should be noted that the test will be disabled based on either of the environment variables provided in the array, evaluating to true .
Syntax
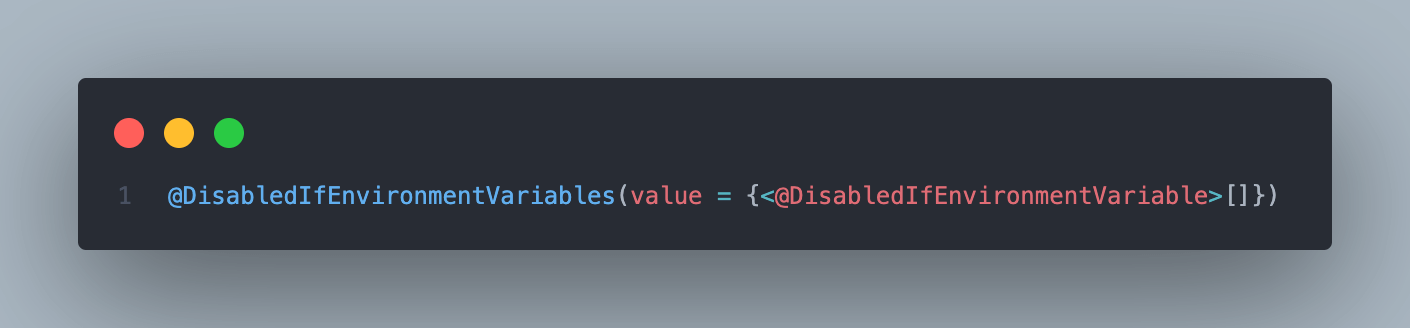
Using @DisabledIfEnvironmentVariables annotation on the Test Method
The following example code shows how to use @DisabledIfEnvironmentVariables annotation on the test method.
|
1 2 3 4 5 6 7 8 9 10 11 12 13 14 15 |
public class ConditionalDisableOnEnvVariablesTest { @DisabledIfEnvironmentVariables (value = { @DisabledIfEnvironmentVariable (named = "skiptest", matches = "true", disabledReason = "This test is disabled based on env variable named 'skiptest'"), @DisabledIfEnvironmentVariable (named = "disabletest", matches = "yes", disabledReason = "This test is disabled based on env variable named 'disabletest'") }) @Test public void unitTestOne () { System.out.println ("This is unit test one!!"); } @Test public void unitTestTwo () { System.out.println ("This is unit test two!!"); } } |
In this example, there are two test methods inside the ConditionalDisableOnEnvVariablesTest class, namely, unitTestOne() and unitTestTwo().
The first test unitTestOne() has @DisabledIfEnvironmentVariables annotation with two conditions mentioned in the array to disable the test. It will be skipped if any of the conditions provided in the array is considered true.
The second test method unitTestTwo(), has no condition for making it disabled. Hence it should run successfully on execution.
Test Execution
While executing the tests in the earlier section of this blog on JUnit Ignore Test annotation, we had already defined the environment variable “disabletest” and added its value to “yes”. Let’s run the test now.
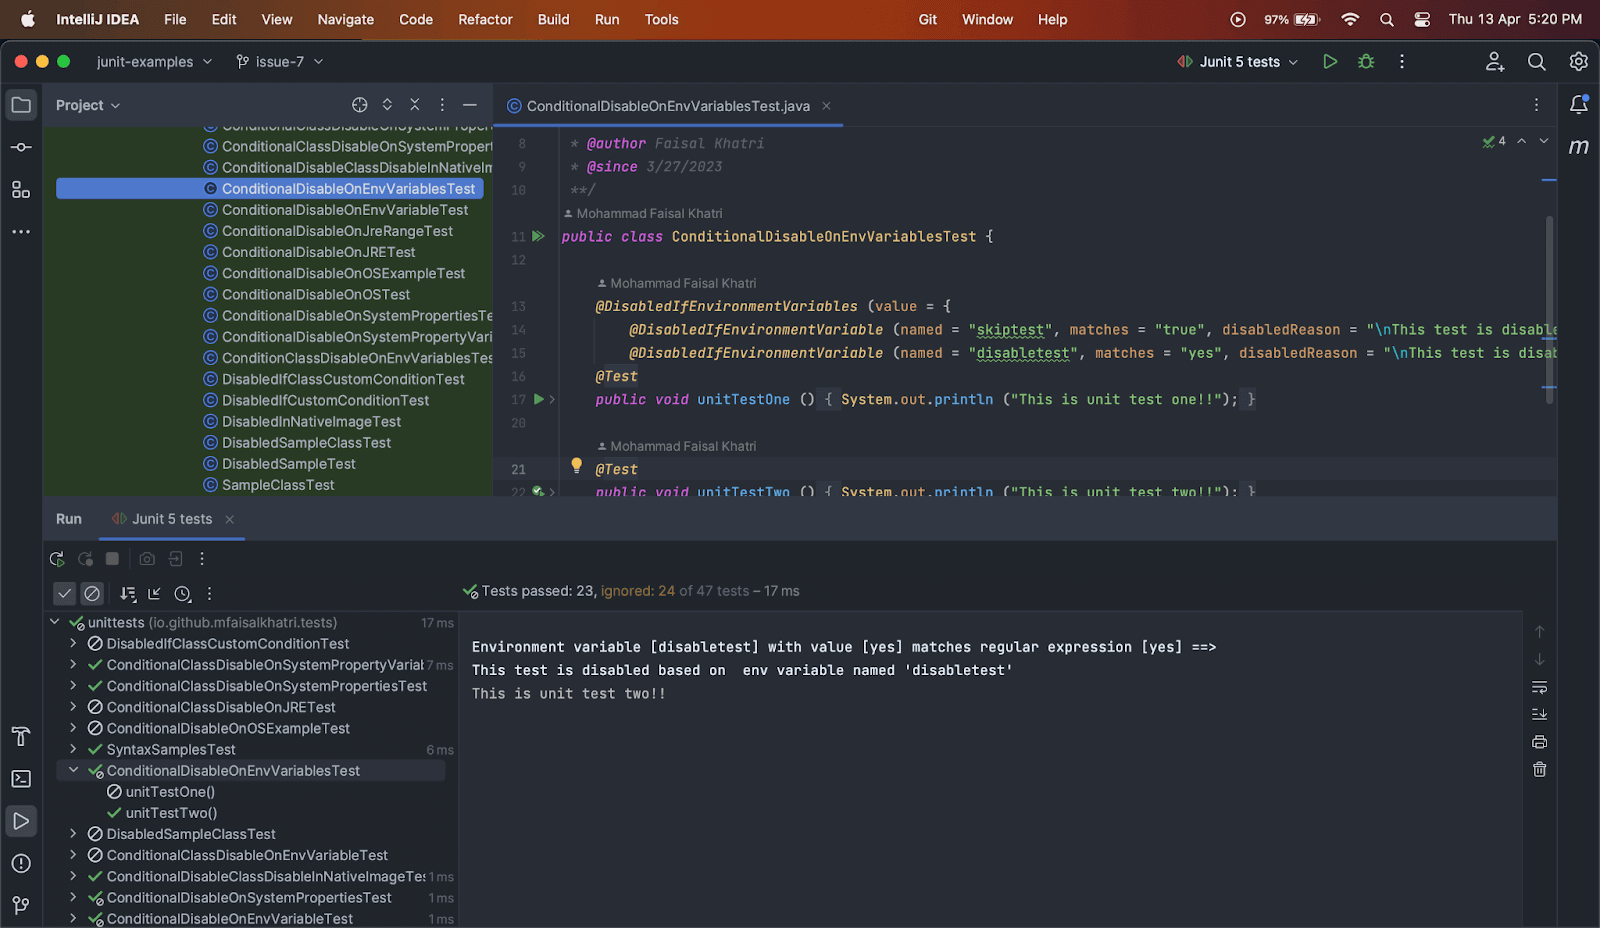
The first test was skipped, and the disabled reason was printed in the console.
The test method unitTestTwo() was run successfully.
Using @DisabledIfEnvironmentVariables annotation on the Test Class
The following example code shows how to use @DisabledIfEnvironmentVariables annotation on the test class.
|
1 2 3 4 5 6 7 8 9 10 11 12 13 |
@DisabledIfEnvironmentVariables(value = { @DisabledIfEnvironmeest", matches = "yes", disabledReason = "this test is disabled based on env variable named 'disabletest'")}) public class ConditionClassDisableOnEnvVariablesTest { @Test public void unitTestOne() { System.out.println("This is unit test one!!"); } @Test public void unitTestTwo() { System.out.println("This is unit test two!!"); } } |
In this example code, there are two test methods inside the ConditionalDisableOnEnvVariablesTest class, namely, unitTestOne() and unitTestTwo(). @DisabledIfEnvironmentVariables annotation put over the class has two conditions mentioned in the array to disable the test.
Both of the tests in the class should be skipped in case any of the conditions provided in the array is evaluated to be true.
Test Execution
While executing the tests in the earlier section of this blog on JUnit Ignore Test annotation, we had already defined the environment variable “disabletest” and added its value to “yes”. Let’s run the test now.
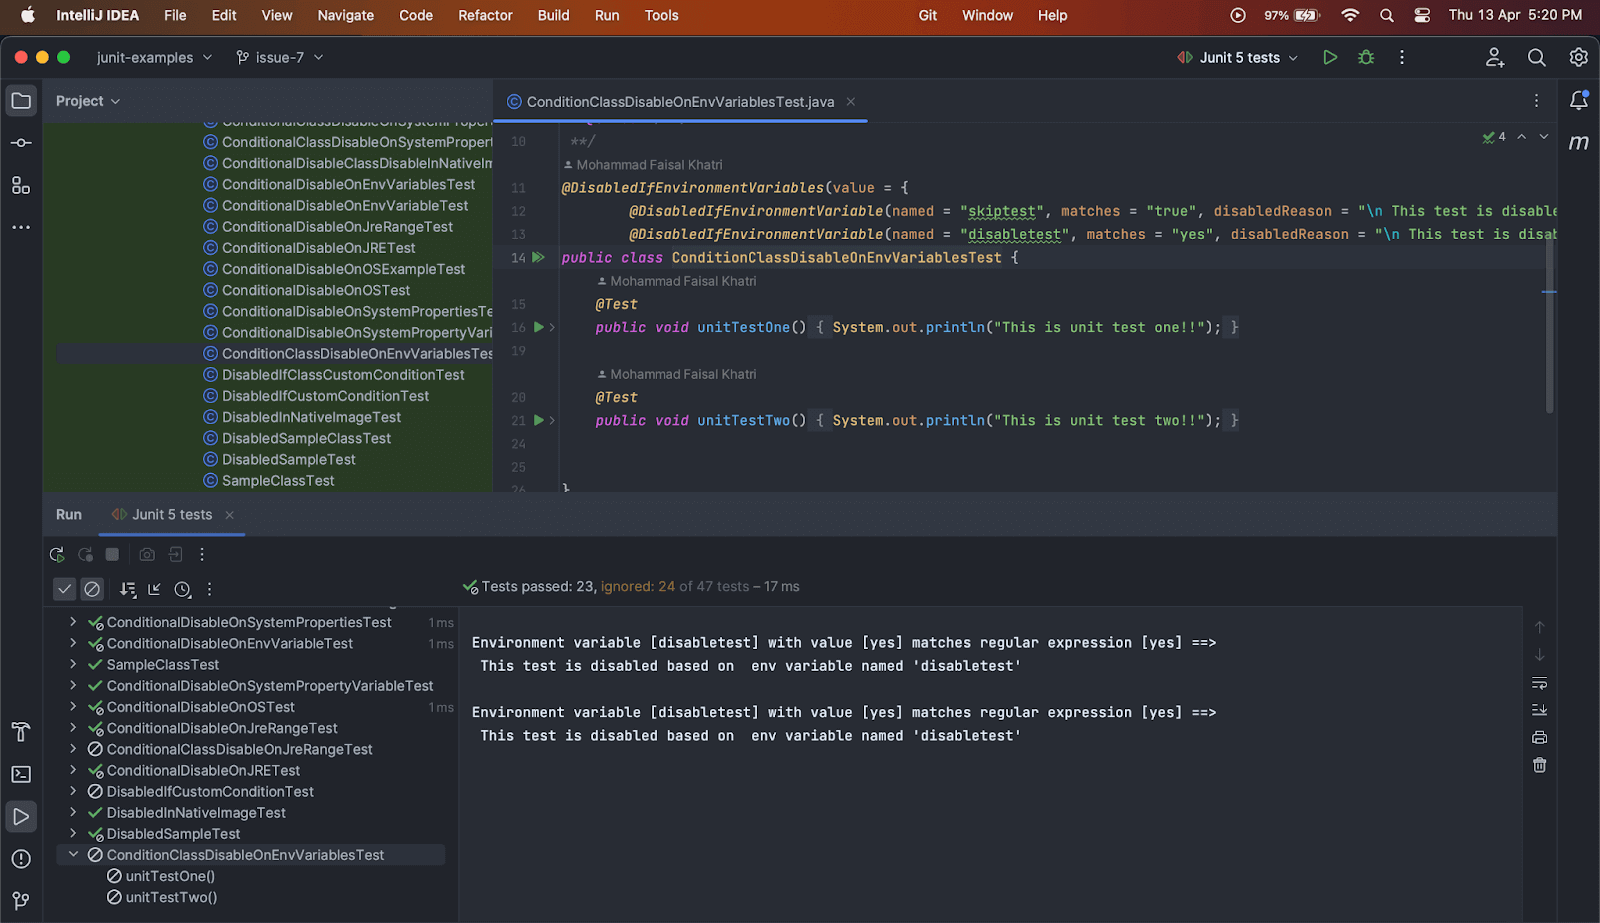
As we can see, both tests were skipped as the annotation was placed over the class.
Disabling Tests on Custom Conditions
Using JUnit 5, test methods or test classes can also be disabled based on the custom conditions that can be created by the user as compared to JUnit Ignore Test annotation. This condition can be created using the @DisabledIf annotation.
Syntax
Using @DisabledIf annotation on the Test Method
The following example code shows how to use @DisabledIf annotation on the test method.
|
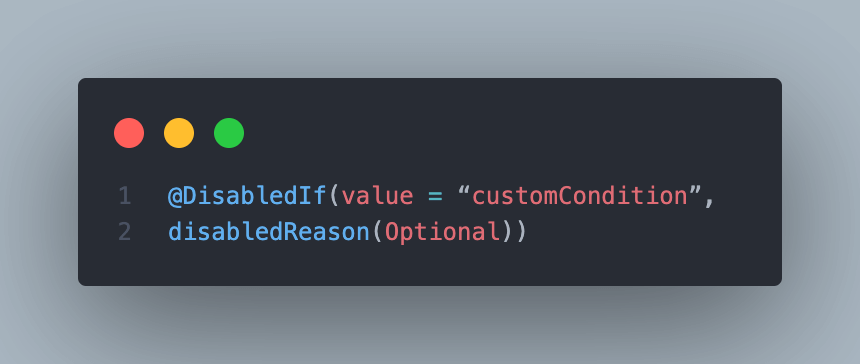
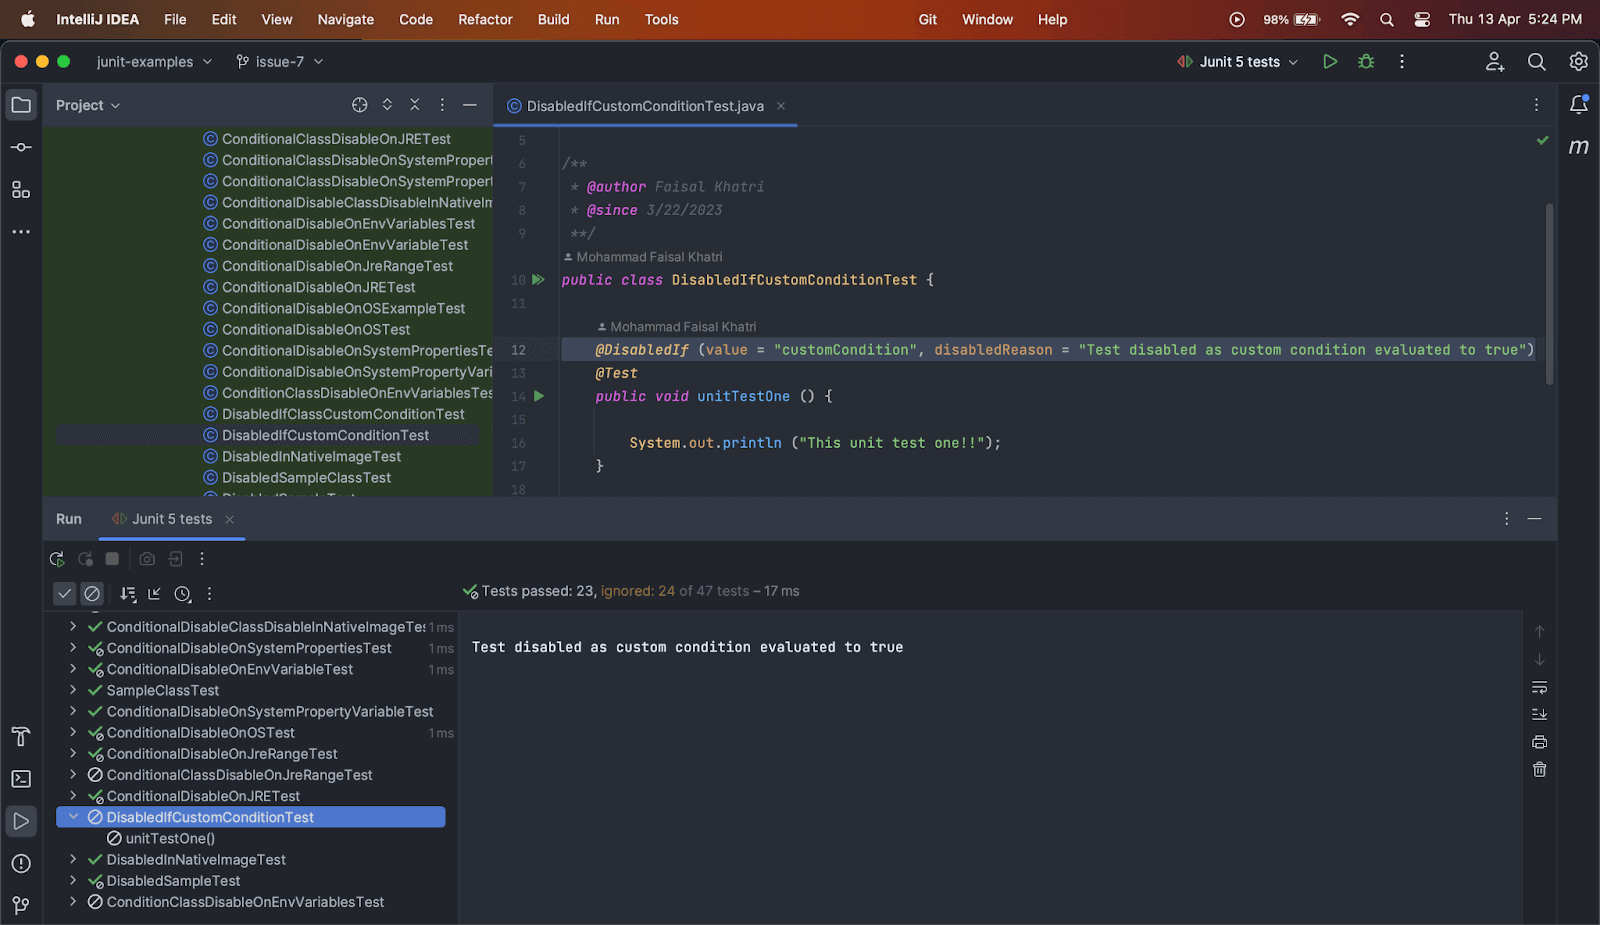
1 2 3 4 5 6 7 8 9 10 11 12 13 |
public class DisabledIfCustomConditionTest { @DisabledIf (value = "customCondition", disabledReason = "Test disabled as custom condition evaluated to true") @Test public void unitTestOne () { System.out.println ("This unit test one!!"); } boolean customCondition () { return true; } } |
The customCondition() method is created which returns a boolean value “true”, as this is a demo code we are returning value “true”. However, any conditional statement can be updated here.
If the condition is true, the test method should be skipped while executing the tests.
The Custom Condition can also be created in another class and referenced by its fully qualified name. However, the conditional method should be made static in the external class.
Test Execution
As we return the boolean value as “true” in the condition, the test method was skipped and the disabled reason was printed in the console.
Using @DisabledIf annotation on the Test Class
The following example code shows how to use @DisabledIf annotation on the test class.
|
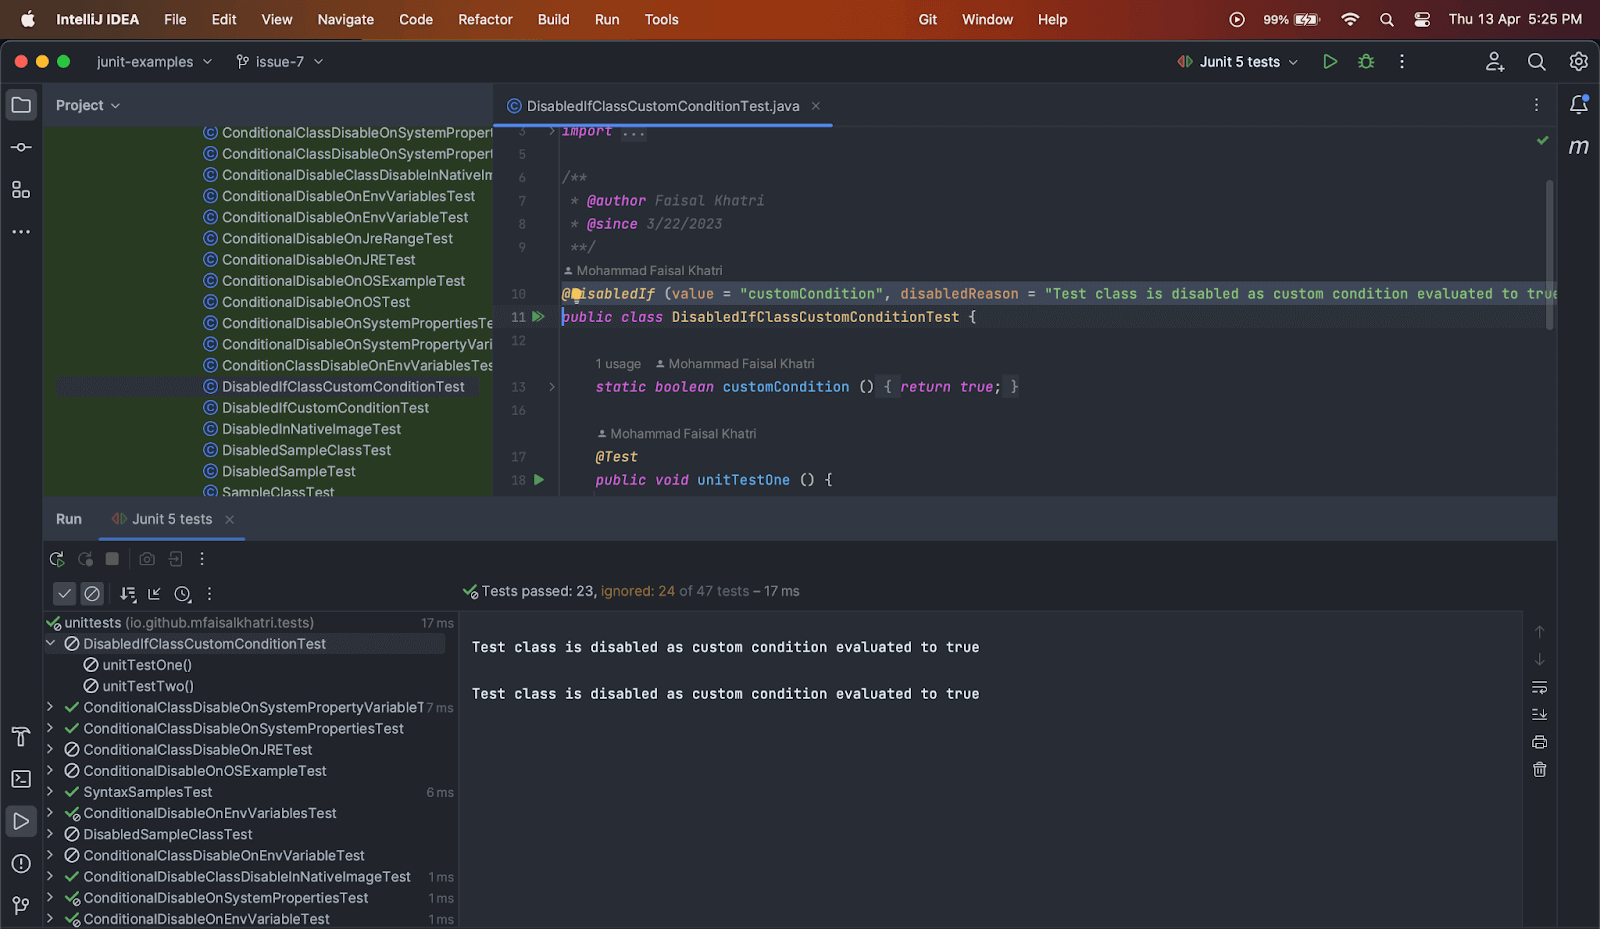
1 2 3 4 5 6 7 8 9 10 11 12 13 14 15 16 17 18 19 |
@DisabledIf (value = "customCondition", disabledReason = "Test class is disabled as custom condition evaluated to true") public class DisabledIfClassCustomConditionTest { static boolean customCondition () { return true; } @Test public void unitTestOne () { System.out.println ("This unit test one!!"); } @Test public void unitTestTwo () { System.out.println ("This unit test two!!"); } } |
The Custom Condition method needs to be made static in case we need to disable the test at the class level. Hence, a static customCondition() method is created, returning a true hard-coded value, as this is just a demo code. This method can be based on a condition and return a respective boolean value based on the evaluation of the condition.
In this example code, DisabledIfClassCustomConditionTest class has the @DisabledIf annotation put over it, and the custom condition returns true. Hence, this test class should be skipped during execution.
Test Execution
Both of the tests in the class were skipped during execution as the annotation was put over the test class and the custom condition was evaluated to be true. The disabled reason was printed in the console.
Disabling Tests on Native Image Conditions
Using JUnit 5, test methods or test classes can also be disabled within a GraalVM native image using the @DisabledInNativeImage annotation as compared to the JUnit Ignore Test annotation.
This annotation is typically used when running tests on a native image using Gradle or Maven plugin using the GraalVM Native Build Tools project.
Syntax
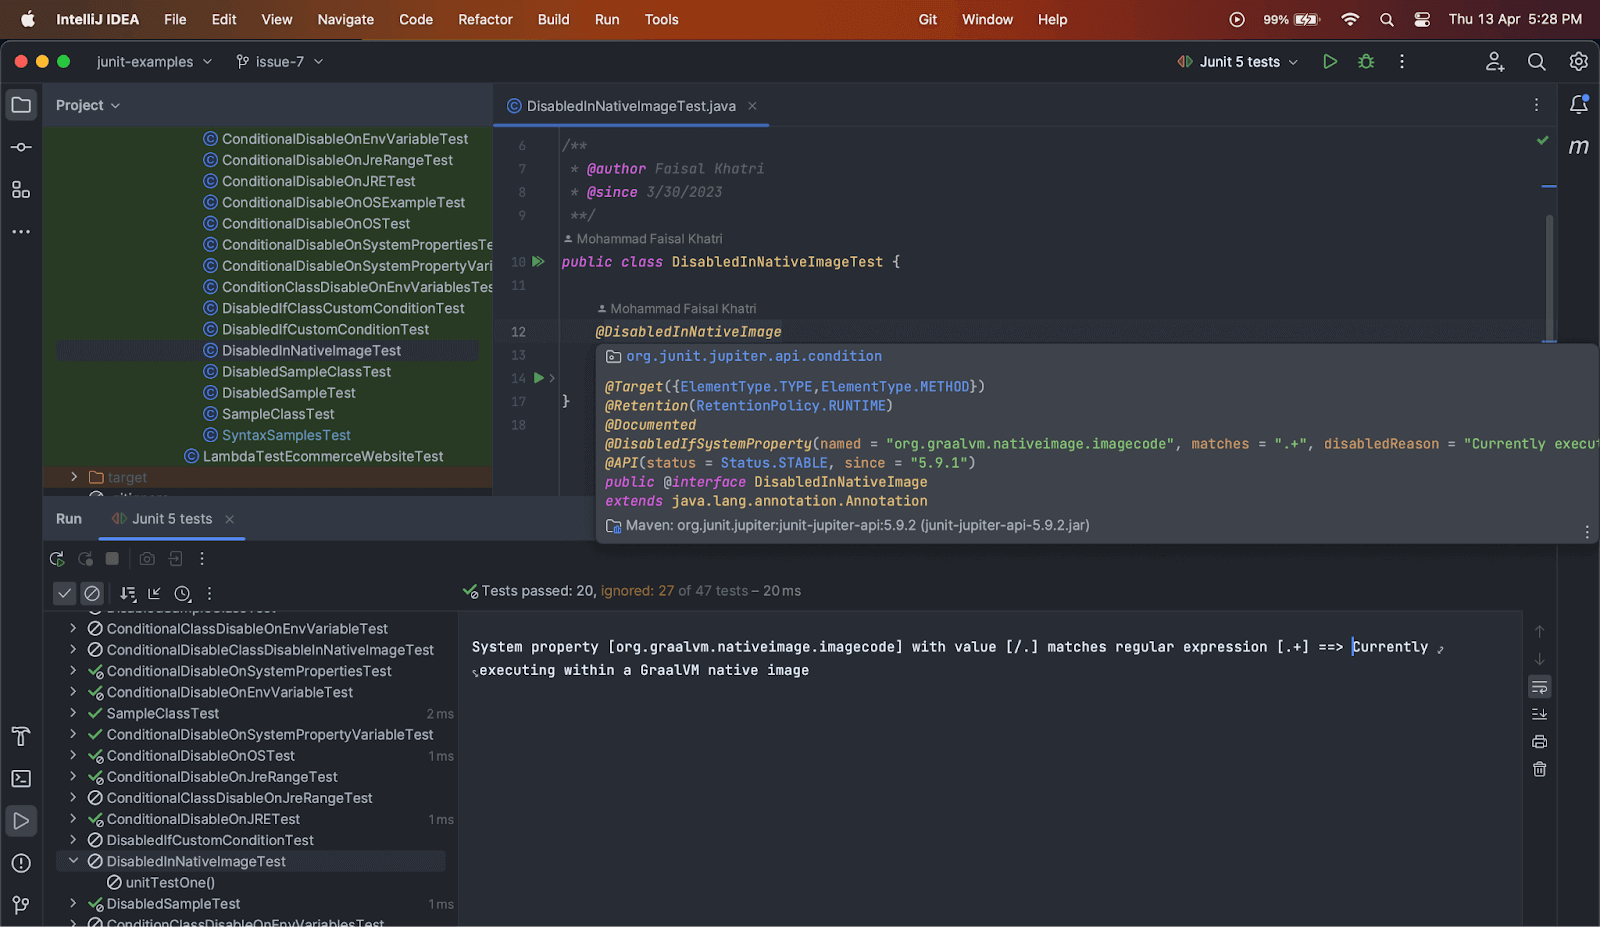
Using @DisabledInNativeImage annotation on the Test Method
The following example code shows how to use @DisabledInNativeImage annotation on the test method.
|
1 2 3 4 5 6 7 8 |
public class DisabledInNativeImageTest { @DisabledInNativeImage @Test public void unitTestOne() { System.out.println ("This is unit test one!"); } } |
Test Execution
When the tests are executed within the GraalVM native image, it should be disabled, and the disabled reason as updated in the annotation (by default, it has the disabled reason updated as “Currently executing within a GraalVM native image”, should be printed in the console.
Using @DisabledInNativeImage annotation on the Test Class
The following example code shows how to use @DisabledInNativeImage annotation on the test class.
|
1 2 3 4 5 6 7 8 9 10 11 12 13 |
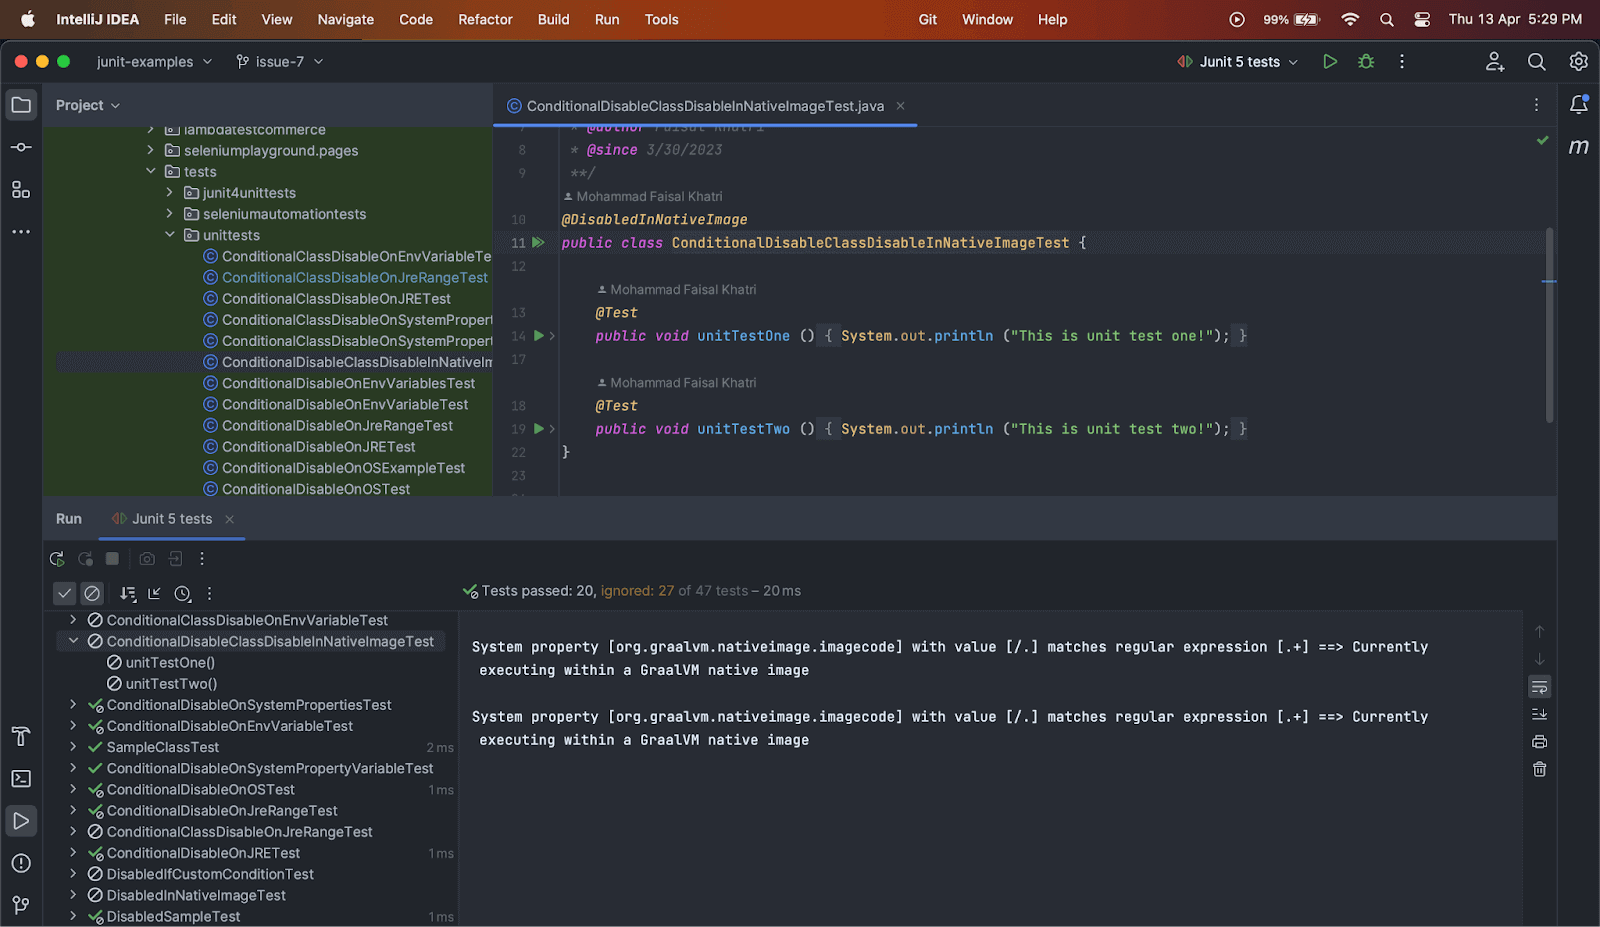
@DisabledInNativeImage public class ConditionalDisableClassDisableInNativeImageTest { @Test public void unitTestOne () { System.out.println ("This is unit test one!"); } @Test public void unitTestTwo () { System.out.println ("This is unit test two!"); } } |
Test Execution
When the tests are executed within the GraalVM native image, this test class should be disabled and both of the tests inside the class should be skipped.
The disabled reason, as updated in the annotation (by default, it has the disabled reason updated as “Currently executing within a GraalVM native image”, should be printed in the console.
That was all about skipping the tests using JUnit 5.
In case you haven’t updated to JUnit 5 yet and are working with its older version, that is 4, let’s check how to skip the tests using JUnit Ignore Test annotation.
Skipping Tests in JUnit 4
JUnit 4 is the older version of JUnit, which was released in 2006. As it is widely used in many projects, let’s discuss how to skip tests in JUnit 4 using JUnit Ignore Test annotation.
In JUnit 4, the @Ignore annotation is used to skip or ignore the tests. However, Conditional test execution is not supported in JUnit 4, unlike JUnit 5, as we discussed above.
Using @Ignore annotation on Test Method
The JUnit @Ignore Test annotation could be applied to an individual test method to skip its execution. In this case, we need to put the JUnit @Ignore Test annotation above the test method we need to skip.
The following example code shows how to use JUnit @Ignore Test annotation on the test method.
|
1 2 3 4 5 6 7 8 9 10 11 12 13 |
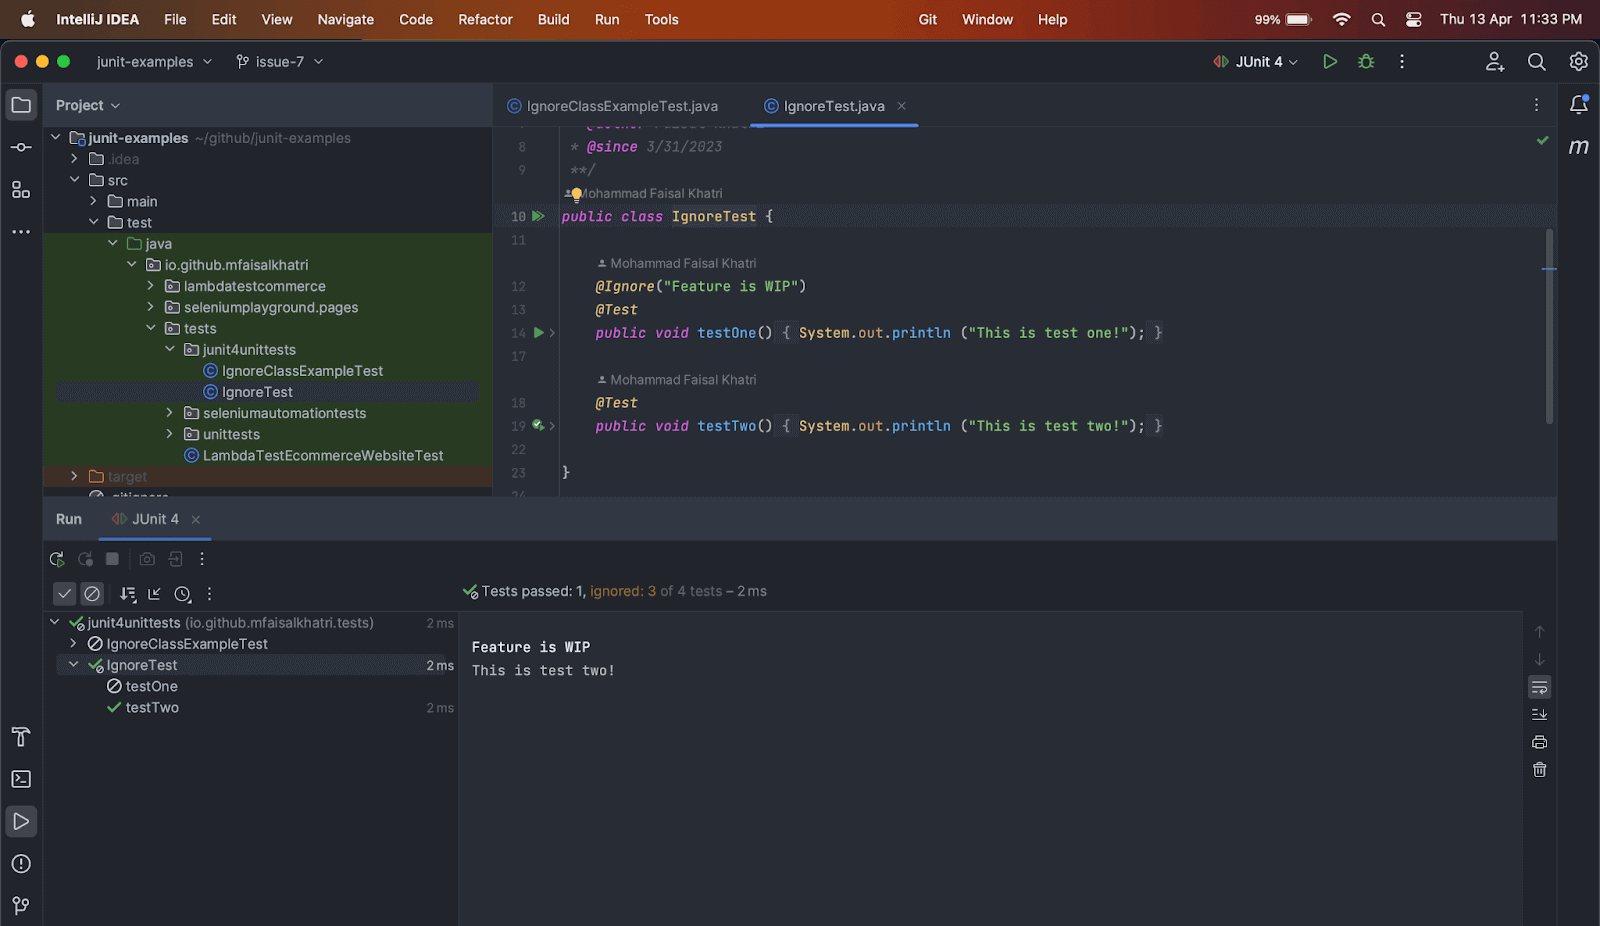
public class IgnoreTest { @Ignore("Feature is WIP") @Test public void testOne() { System.out.println ("This is test one!"); } @Test public void testTwo() { System.out.println ("This is test two!"); } } |
Test Execution
Once the tests are run, the test method testOne() should be ignored while execution and the reason provided within the annotation (“Feature is WIP”) should be printed in the console.
Only the test method testTwo() should be executed successfully.
Using @Ignore annotation on Test Class
The JUnit @Ignore Test annotation can also be applied to the Test Class to skip all the tests falling under the class. In this case, we need to use the JUnit @Ignore Test annotation above the class we need to skip.
The following example code shows how to use @Ignore annotation on the test method.
|
1 2 3 4 5 6 7 8 9 10 11 12 13 |
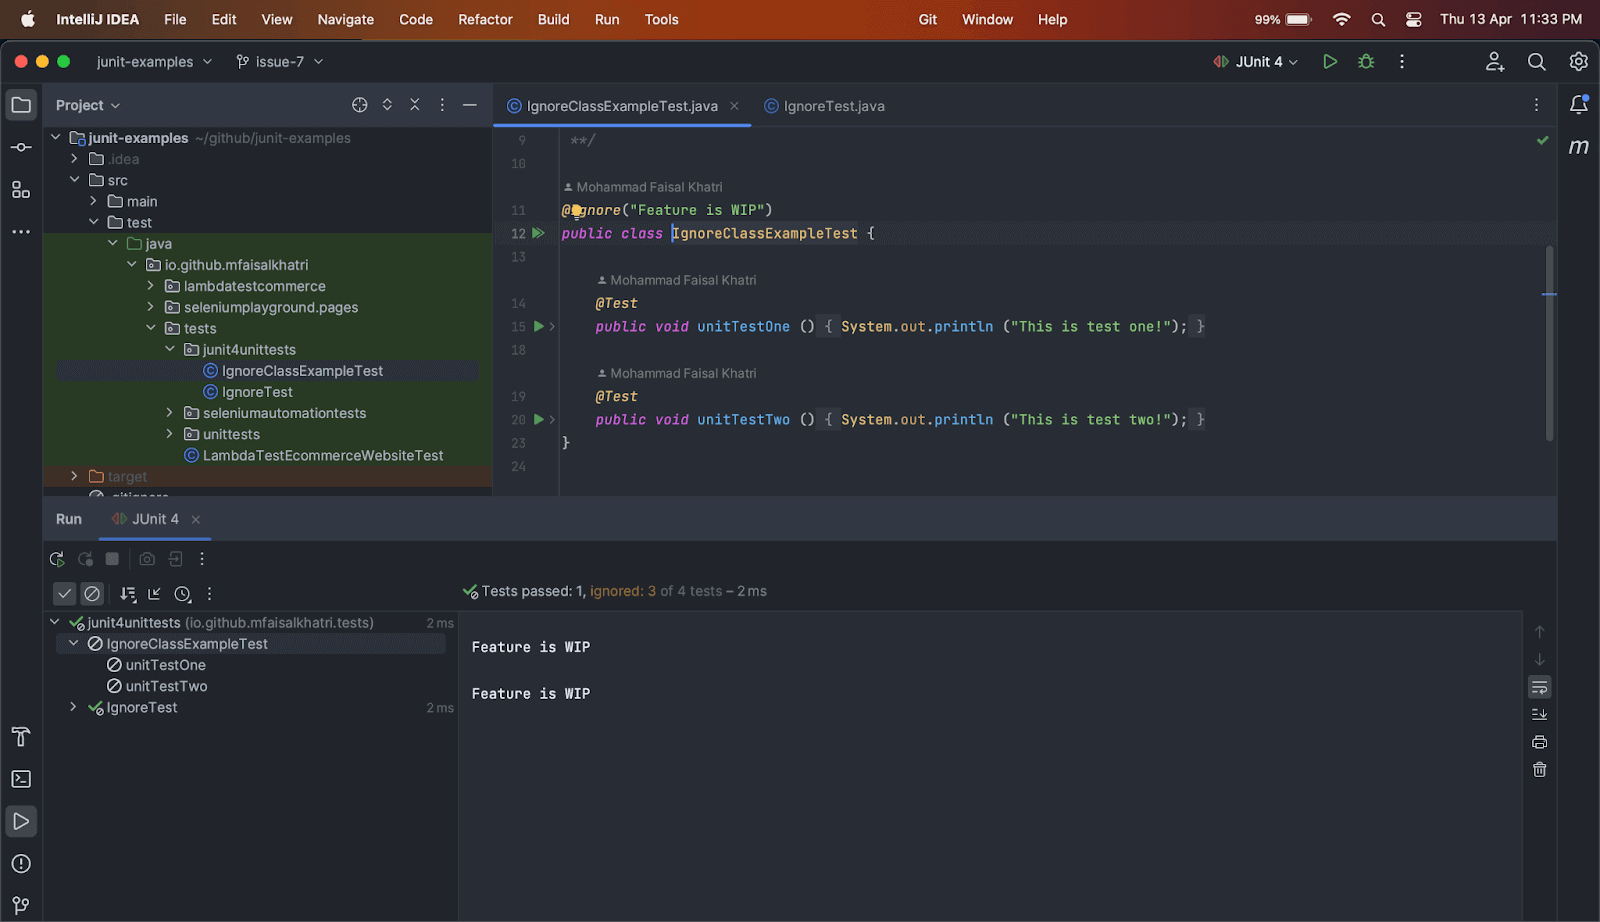
@Ignore("Feature is WIP") public class IgnoreClassExampleTest { @Test public void unitTestOne () { System.out.println ("This is test one!"); } @Test public void unitTestTwo () { System.out.println ("This is test two!"); } } |
Test Execution
Both of the tests in the class should be skipped when the tests are executed and the reason provided in the parameter of the annotation should be printed in the console.
If you are a developer or a tester, you can challenge your skills in performing automated testing with JUnit with the free JUnit certification by LambdaTest.
Summary
To summarize, as discussed in this blog on JUnit Ignore Test annotation, there are multiple scenarios where a developer would need to skip the tests while performing unit testing using JUnit.
For doing so, in JUnit 4, the JUnit @Ignore Test annotation is used to skip the tests. With the evaluation of the softwares and ever changing industry demands, JUnit 5 has provided us with multiple annotations to disable the tests.
It provides the feature to disable tests using @Disabled annotation and also allows disabling tests based on conditions related to OS, JRE, JRERange, System Property, Environment variable, GraalVM native images. It also provides the users with a leverage to disable tests based on custom conditions that can be created by the user.
With all the examples and detailed information provided, I hope you enjoyed reading this blog on JUnit Ignore Test annotation.
Happy Testing!!
Frequently Asked Questions (FAQs)
Which annotation in JUnit 5 should be used if you want to ignore a test scenario?
You can use the @Disabled annotation to ignore the test in JUnit 5.
How do I ignore a test in JUnit 5?
In JUnit 5, you can ignore a test using the @Disabled annotation. Here are the steps to ignore a test in JUnit 5:
- Identify the test method you want to ignore.
- Add the @Disabled annotation before the test method.
- Provide a reason why the test is being ignored in the annotation.


Author’s Profile
Faisal Khatri
Faisal is a Software Testing Professional having 14+ years of experience in automation as well as manual testing. He is a QA, freelancer, blogger and open source contributor. He loves learning new tools and technologies and sharing his experience by writing blogs.
Blogs: 40
Got Questions? Drop them on LambdaTest Community. Visit now


