
Pyppeteer Tutorial: The Ultimate Guide to Using Puppeteer with Python
Himanshu Sheth
Posted On: January 5, 2024
![]() 149263 Views
149263 Views
![]() 28 Min Read
28 Min Read
Pyppeteer, a Python library used for web browser automation, is a valuable resource in the testing world. It serves as the unofficial counterpart to Puppeteer, a renowned JavaScript library. By leveraging Pyppeteer, users can manipulate web browsers, automate tasks, and extract data from websites using Python.
This Pyppeteer tutorial will walk you through the installation process and will cover all the major scenarios that can be automated with code examples.
So, let’s get started!
TABLE OF CONTENTS
- What is Pyppeteer?
- How to install Pyppeteer?
- Demonstration: Web automation with Pyppeteer
- Setting up a browser session with Pyppeteer
- Clicking buttons with Pyppeteer
- Printing PDF files with Pyppeteer
- Opening specified version of Chromium browser with Pyppeteer
- Switching tabs with Pyppeteer
- Taking screenshots with Pyppeteer
- Managing cookies with Pyppeteer
- Handling iFrames with Pyppeteer
- Handling alerts and pop-ups with Pyppeteer
- Handling dynamic content with Pyppeteer
- Web scraping with Pyppeteer
- Parallel execution with Pyppeteer
- Difference between Pyppeteer and Puppeteer
- Frequently Asked Questions (FAQs)
What is Pyppeteer?
Pyppeteer, a Python library, is an unofficial Python port of Puppeteer (a Node.js Chromium browser automation library). Pyppeteer APIs can be leveraged for automating interaction with web elements, scraping content from dynamic websites, handling iFrames, and more.
Though the last released version of Pyppeteer was 1.0.2, on Jan 11, 2022, the QA community still uses the library for web automation on the Chromium browser on the local machine (or cloud grid). Pyppeteer can be used with pytest and PyUnit (Python’s default unit testing framework).
Note: Please replace pip3 with pip depending on the pip version installed on your machine. Also, function and method are used interchangeably throughout the blog.
|
How to install Pyppeteer?
As stated in the Pyppeteer installation guide, Pyppeteer requires Python 3.6 (or above) installed on the machine. As a good practice, we would install Pyppeteer in a virtual environment (venv) to isolate it from the packages in the base environment.
When writing this blog, the latest version of Pyppeteer is 1.0.2.

Run the commands virtualenv venv and source venv/bin/activate on the terminal to create the virtual environment.

Now that the virtual environment is ready, let’s install Pyppeteer using either of the two ways mentioned below:
- Run the command
pip3 install pyppeteer(orpip install pyppeteer) on the terminal - The latest version of Pyppeteer, i.e., 1.0.2, can also be installed by executing
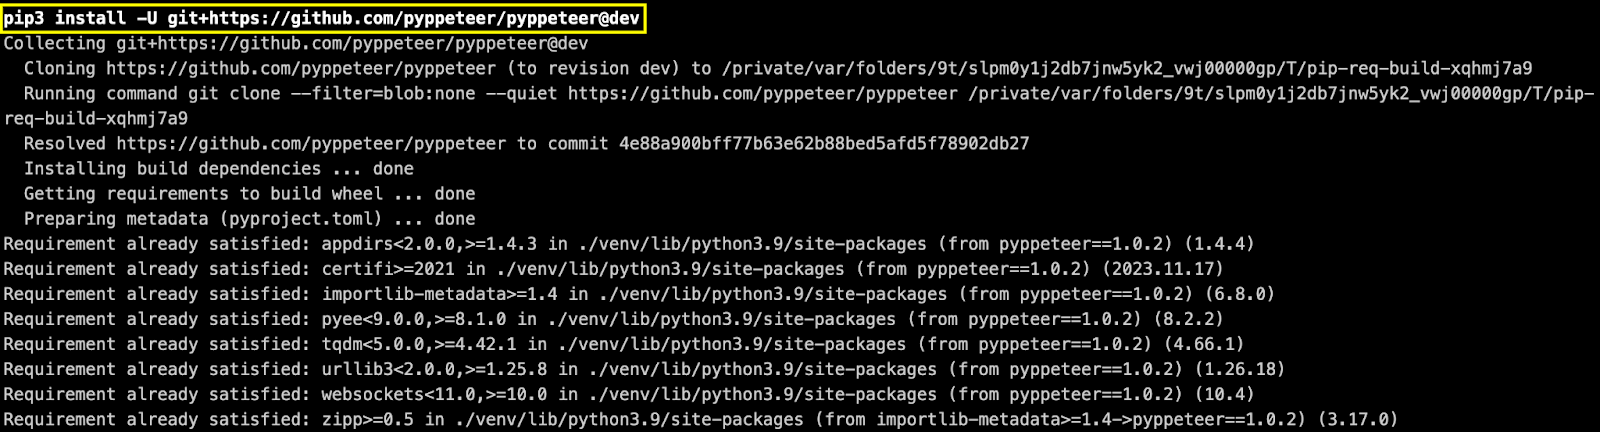
pip3 install -U git+https://github.com/pyppeteer/pyppeteer@devon the terminal.
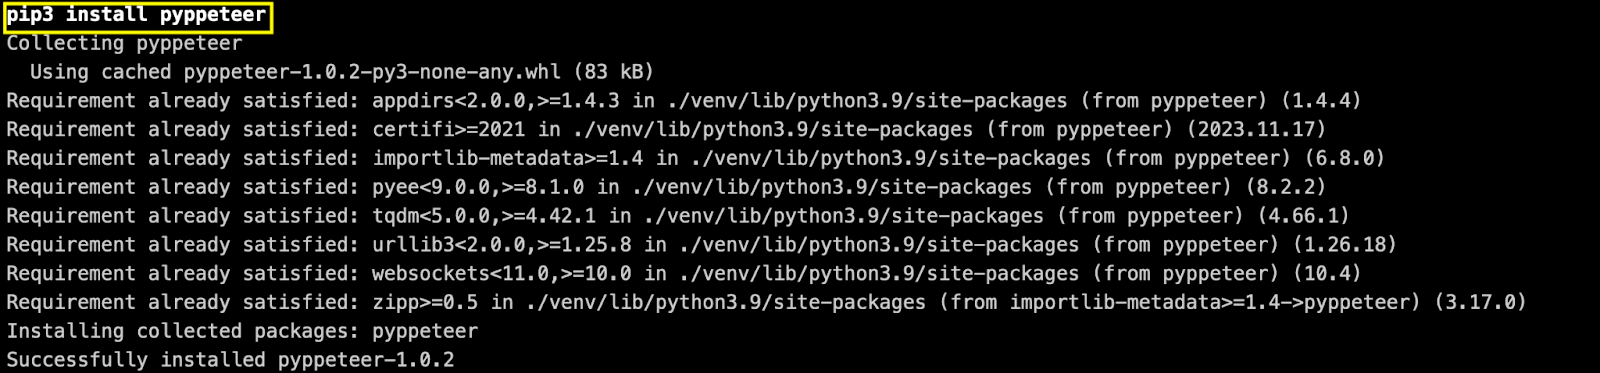
As seen above, Pyppeteer (v 1.0.2) was successfully installed in the virtual environment (venv).
If Pyppeteer is run for the first time and no Chromium is in the machine, it downloads and installs the latest version.

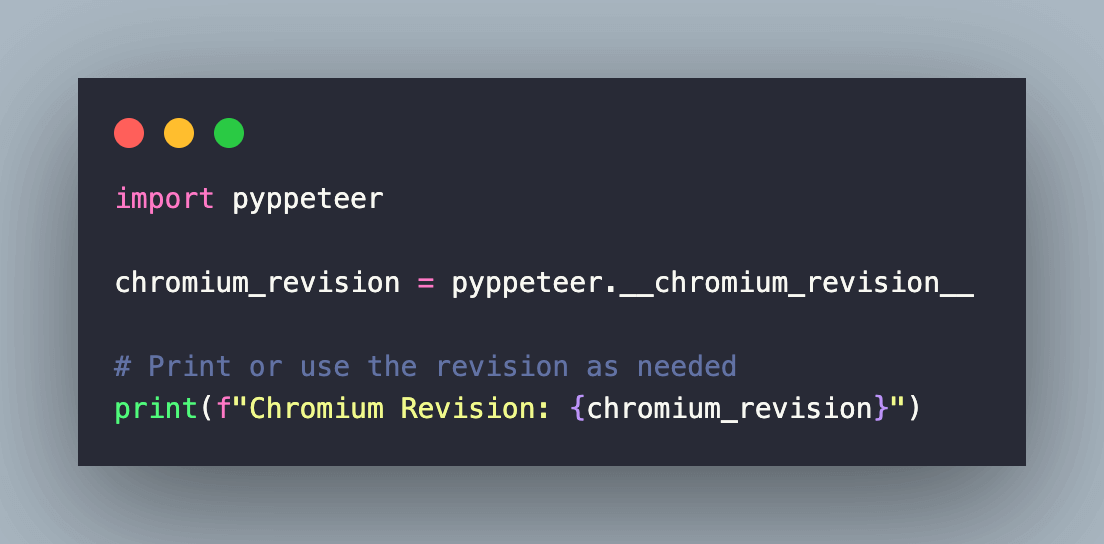
Pyppeteer also lets you use a specified version of Chromium. The Default value can be checked using pyppeteer.__chromium_revision__, which is 588429 in our case.

As seen below, it downloaded & installed Chromium (v 71.0) on the machine.

In further sections of the blog, we will demonstrate using the $PYPPETEER_CHROMIUM_REVISION environment variable to use a certain Chromium version.

Now that the Pyppeteer setup is complete, let’s look at some prominent test scenarios (or use cases) that can be automated using Pyppeteer.
Demonstration: Web automation with Pyppeteer
For demonstration of major test scenarios, we have used Pyppeteer in conjunction with the pytest framework. This choice is primarily due to support for pytest fixtures, test parameterization, and more.
Directory Structure
As seen in the project structure, the configuration and execution are driven via a Makefile. All the relevant test scenarios (or use cases) that demonstrate the usage of Pyppeteer APIs are separated into different folders.
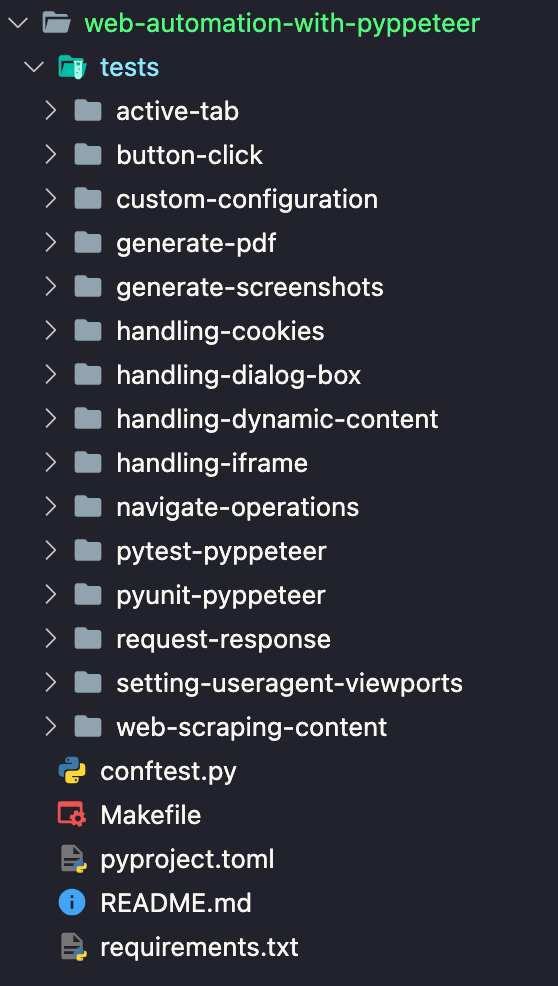
Here is a closer look at the directory structure:
Configuration (or setup) files
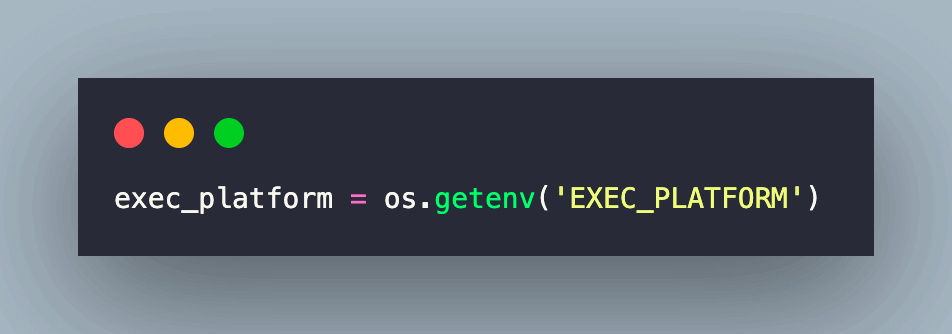
The conftest.py file in pytest contains the implementation related to fixtures, hooks, and other configuration options used in the test code. Based on the value of the environment variable EXEC_PLATFORM, Pyppeteer tests will be executed on the local Chromium browser or on Chrome (which is built on Chromium) on a cloud grid like LambdaTest.
LambdaTest is an AI-powered test orchestration and execution platform that allows you to perform Puppeteer testing using Python on an online browser farm spanning 50+ browser versions on the cloud-based testing infrastructure, ensuring efficient automation testing using the Pyppeteer library.
With LambdaTest, you can also perform parallel testing at scale and accelerate software release cycles by multiple folds.
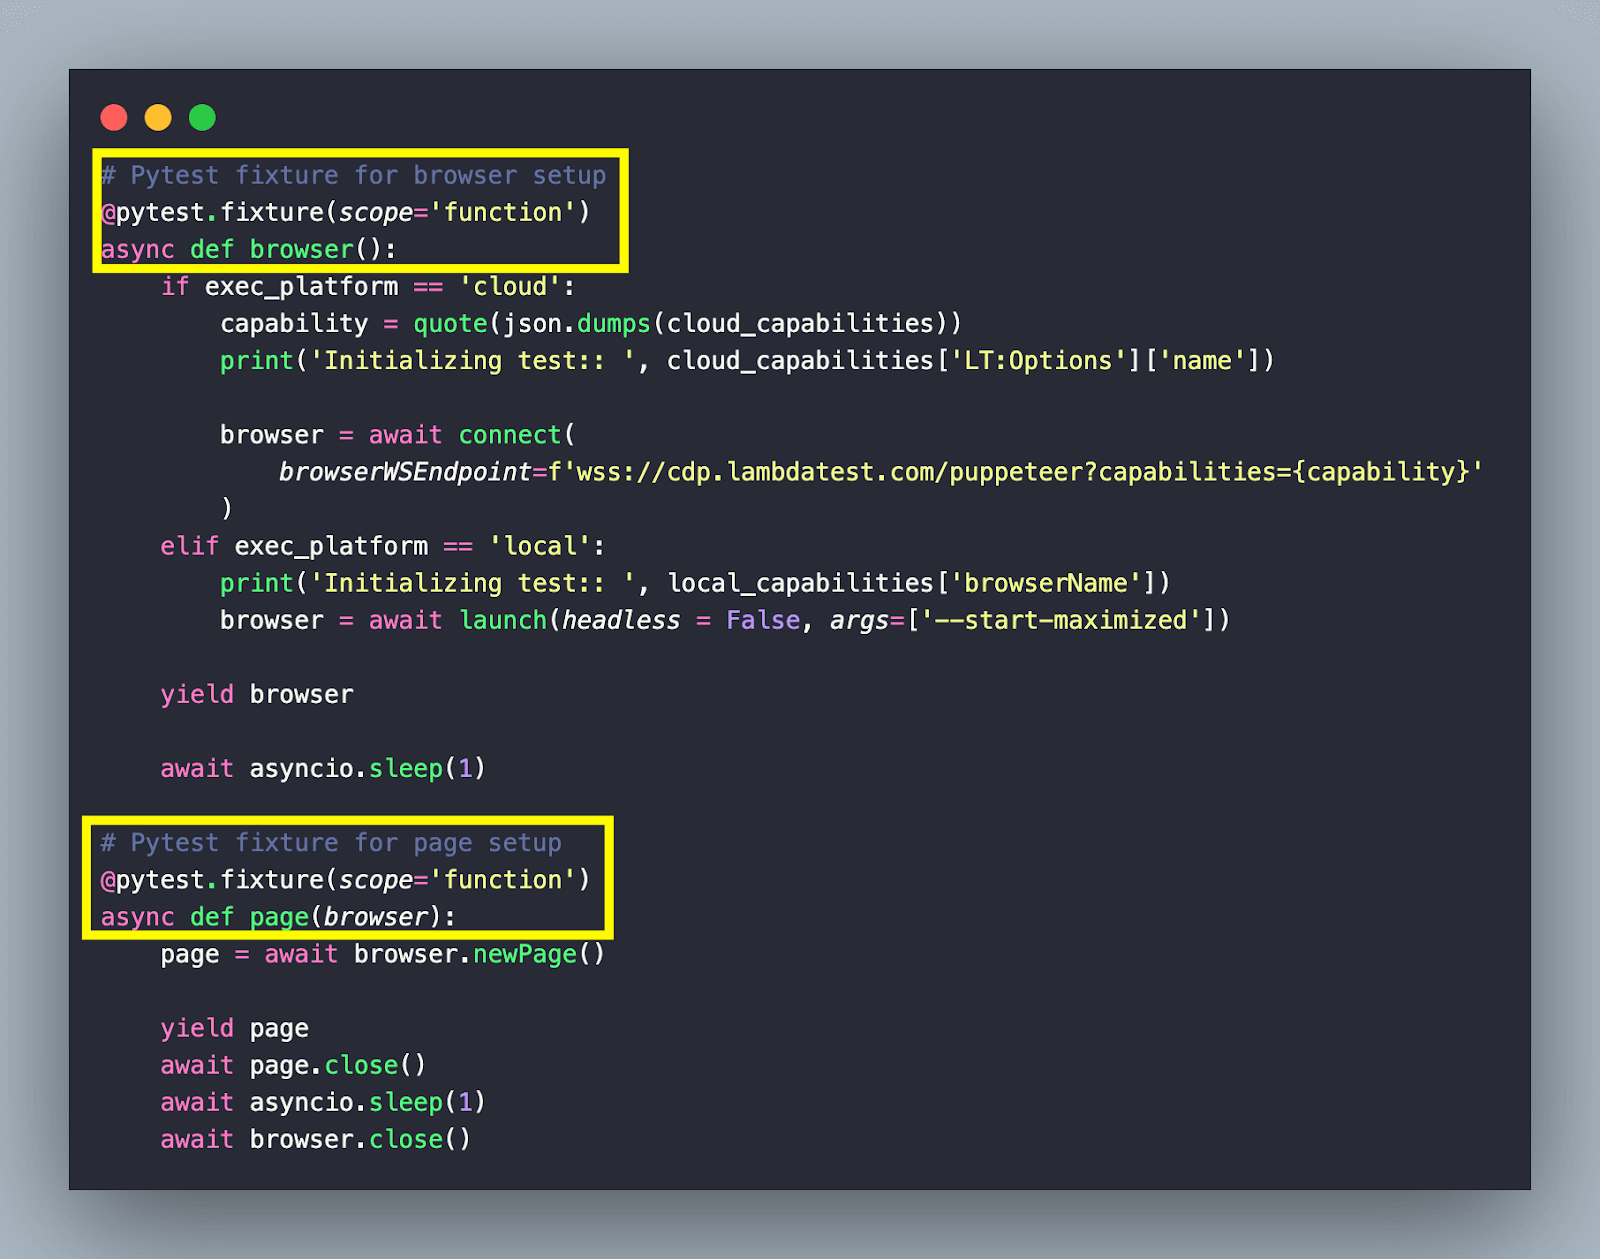
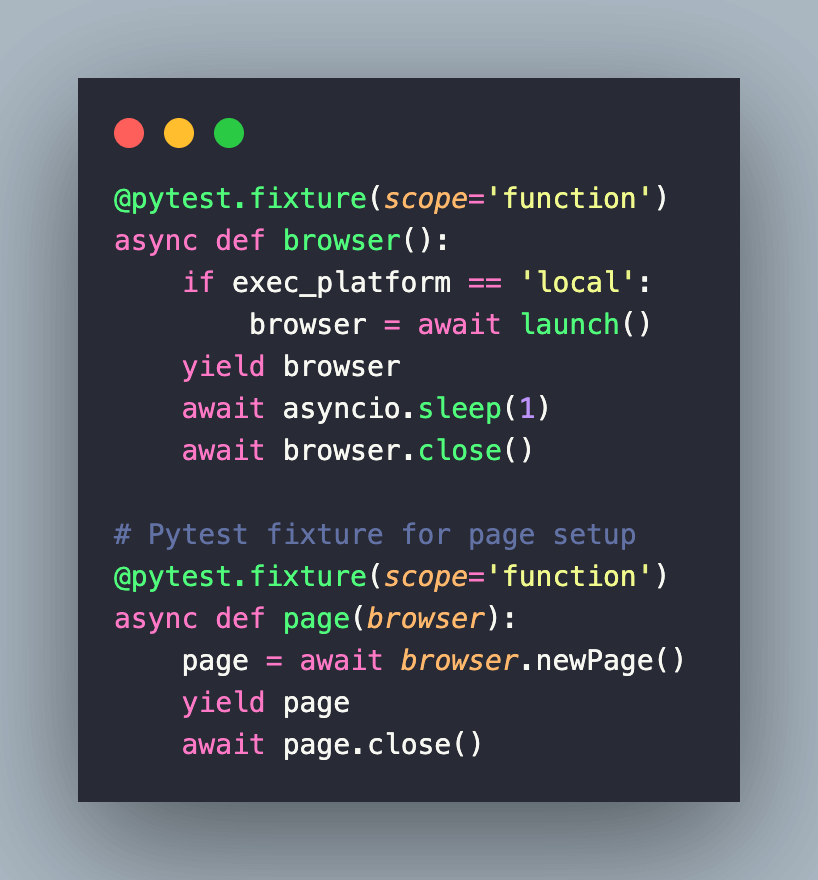
Fixture: Creation of a new browser instance
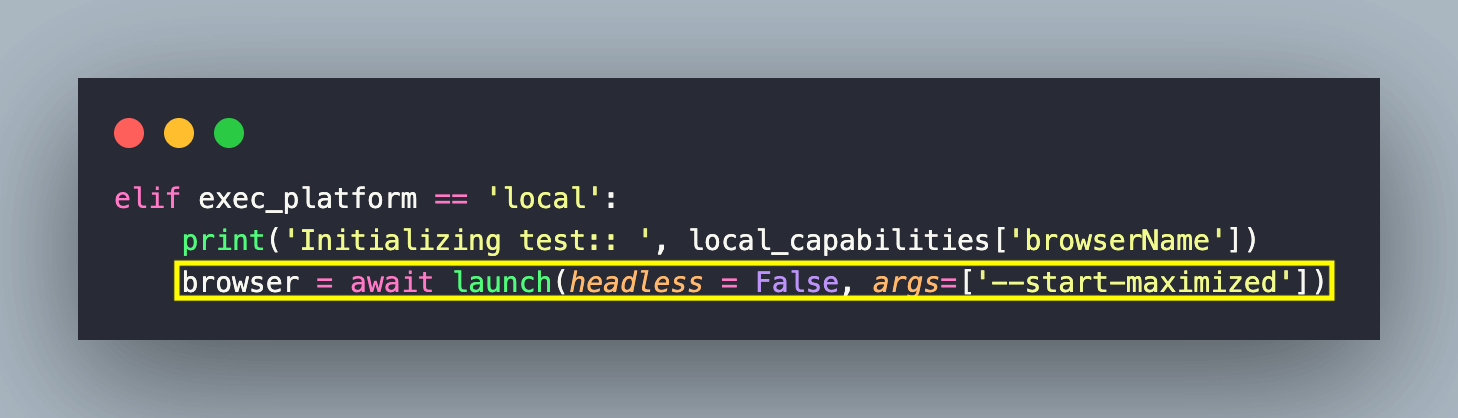
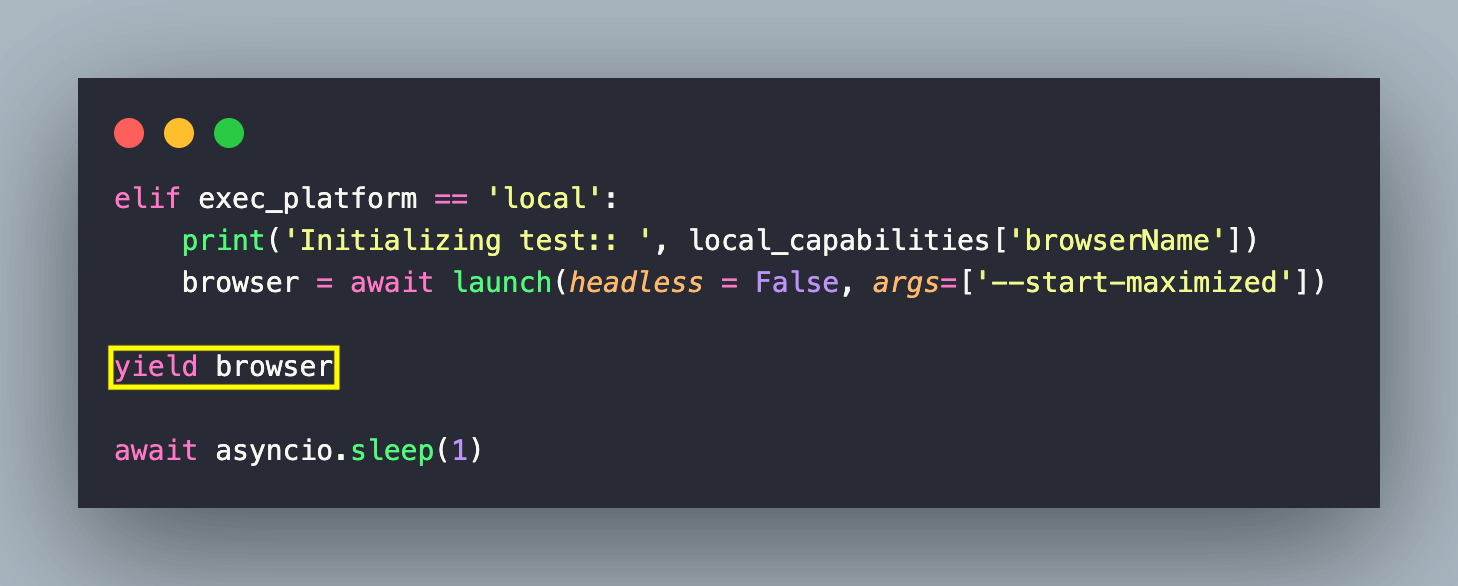
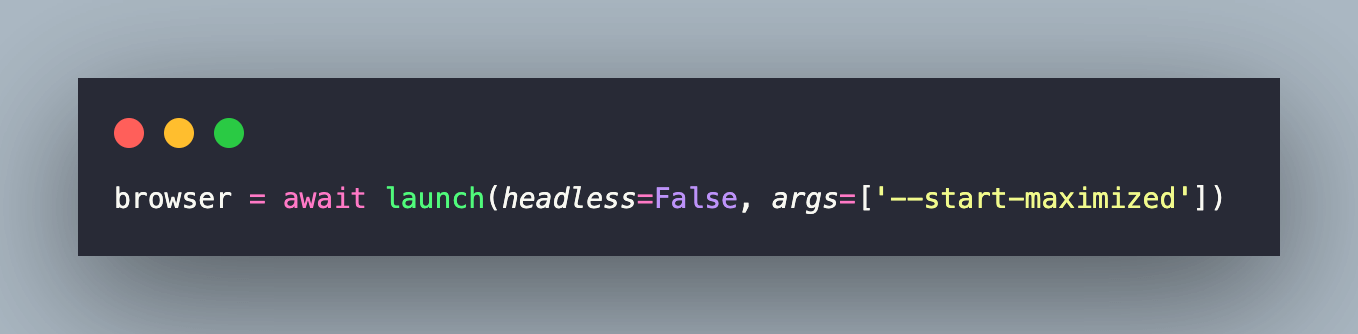
The scope of the pytest fixture (i.e., @pytest.fixture) is set to function. Hence, the fixture is set up and torn down before & after executing a test function (or method). If EXEC_PLATFORM is set to local, the Chromium browser on the local machine is instantiated using the launch() method in Pyppeteer.
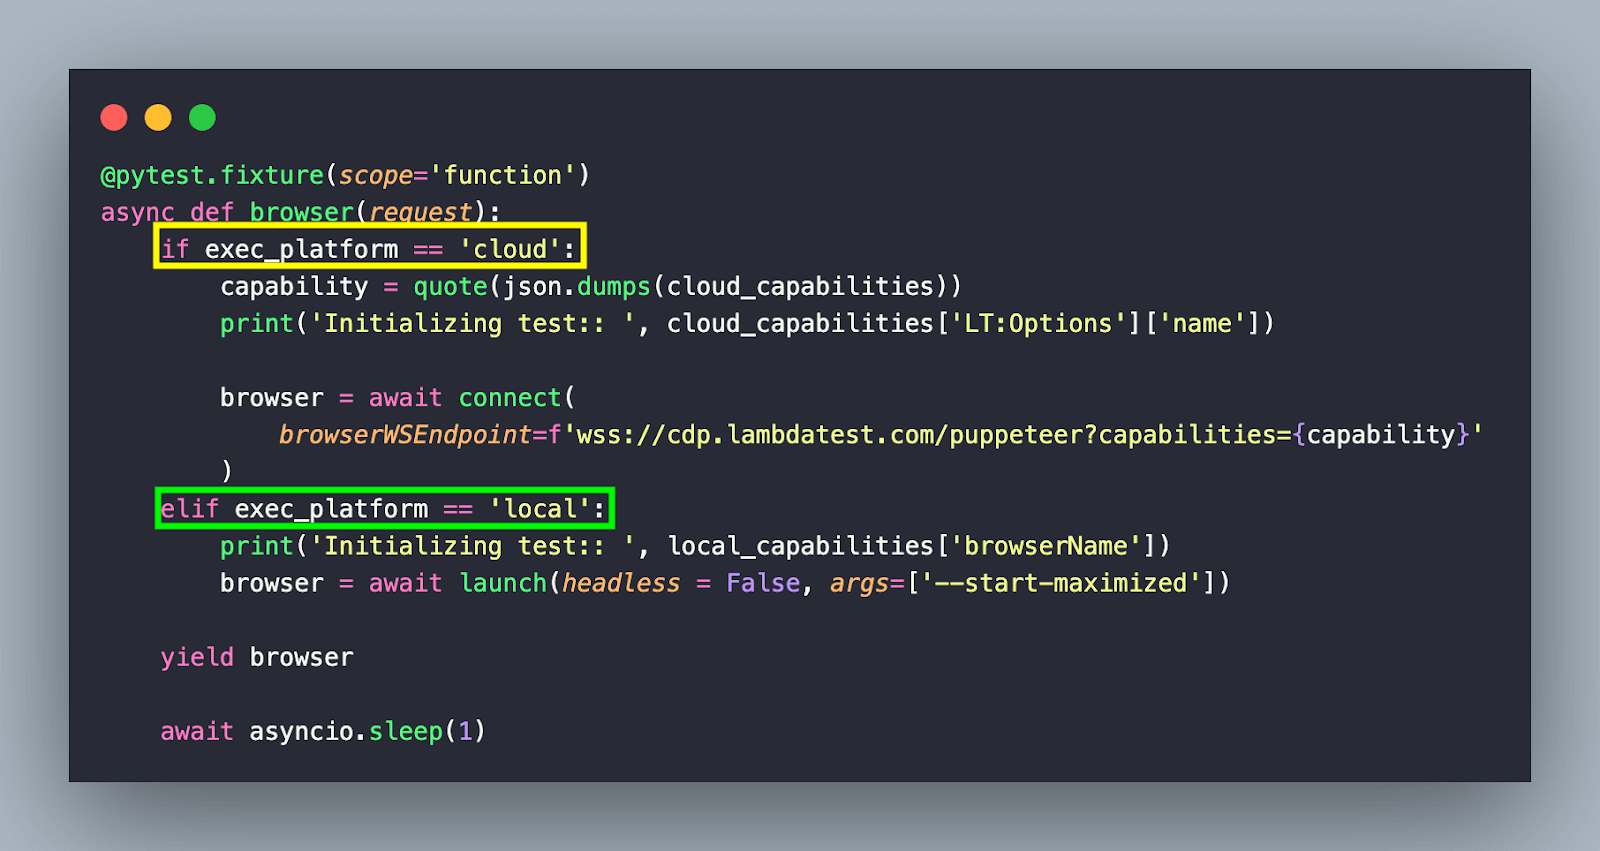
The launch() method is a part of the pyppeteer.launcher module that is used to launch an instance of Chrome browser in headless mode (default). Since we intend to run the tests in non-headless mode, we set the headless parameter to False. The [‘–start-maximized’] argument starts the browser in a maximized window.
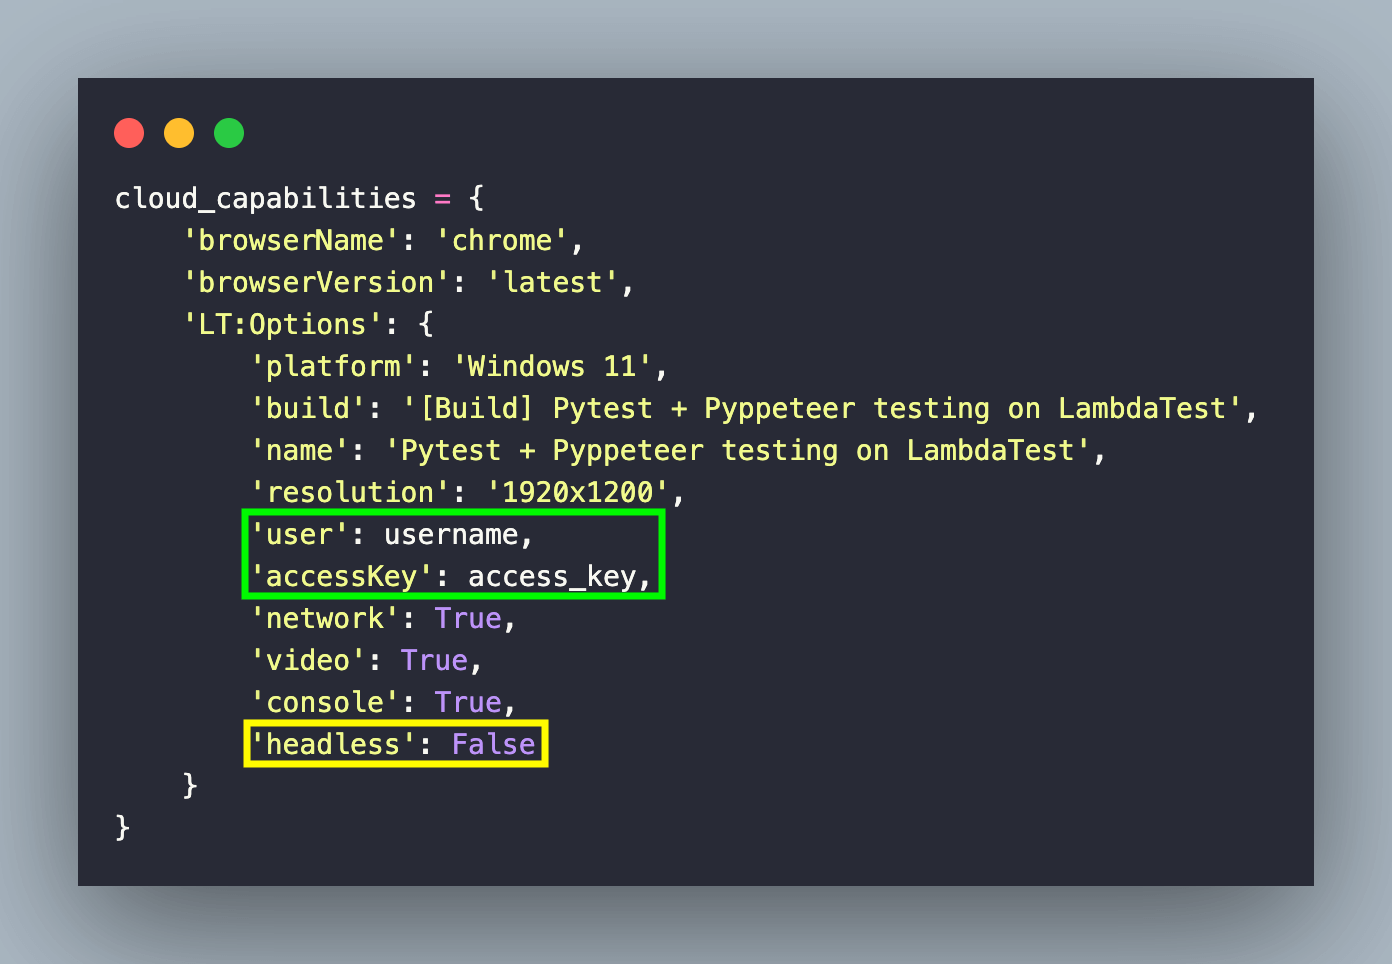
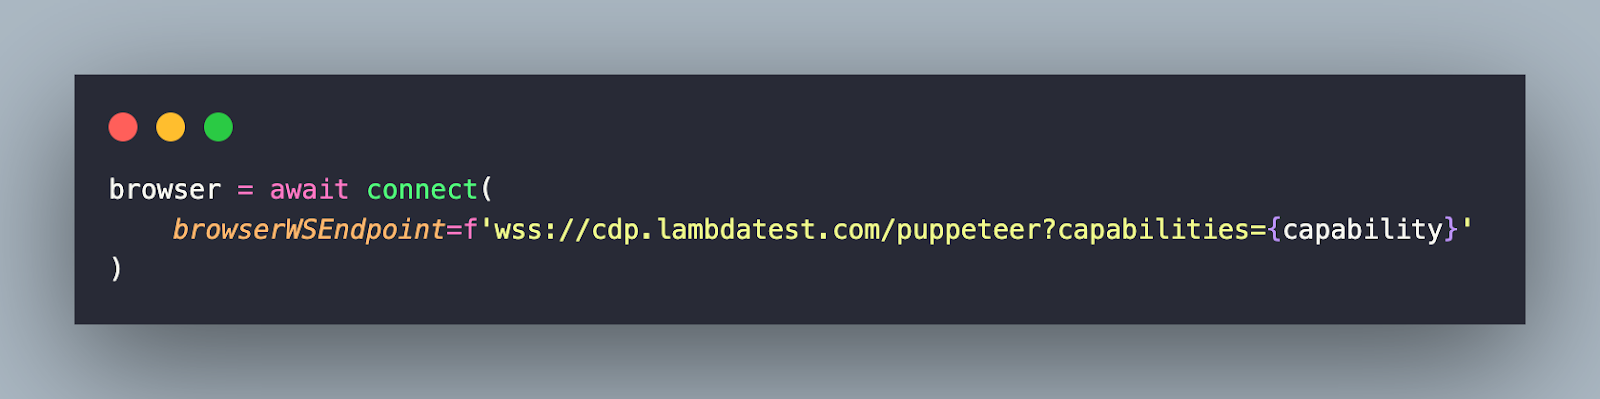
If EXEC_PLATFORM is set to cloud, the Chrome browser on the LambdaTest grid is instantiated using the connect() method in Pyppeteer. In the demonstration, we used the WebSocket endpoint (browserWSEndpoint) that points to wss://cdp.lambdatest.com/puppeteer. We have used the Endpoint from the Puppeteer sample on LambdaTest.
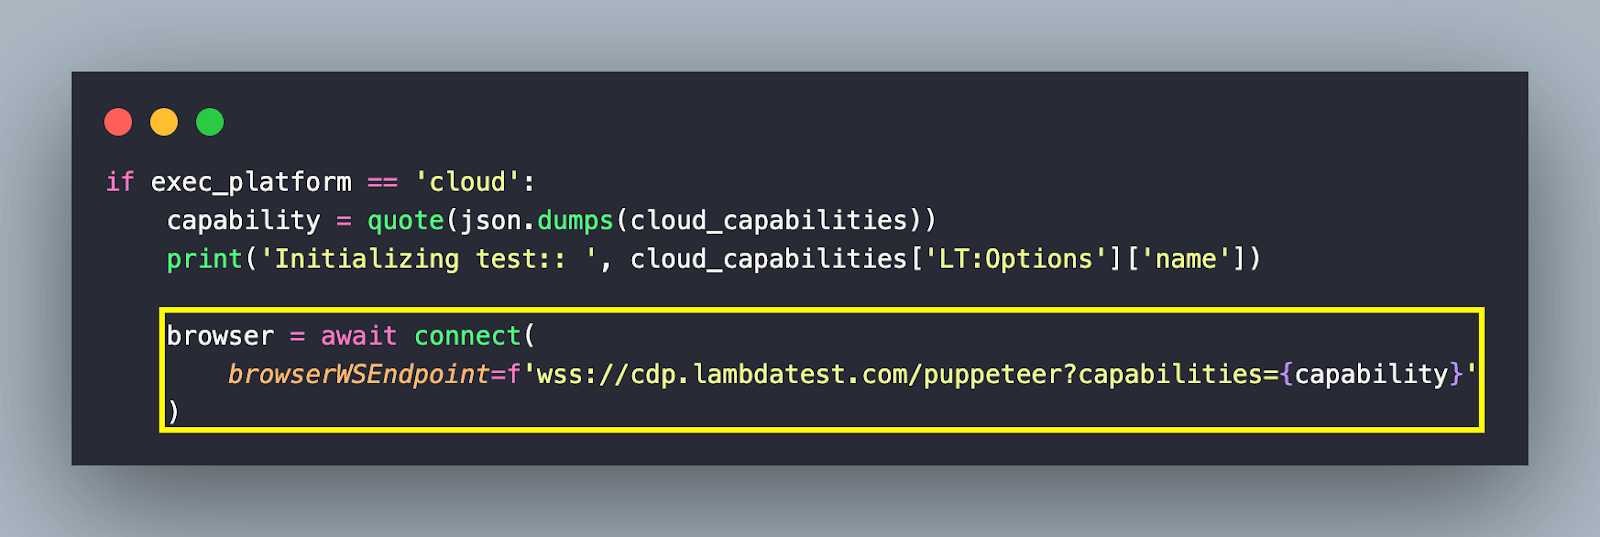
The capabilities (in dictionary format) generated using LambdaTest Capabilities Generator are passed as a query parameter to browserWSEndpoint. The dumps() function of the json module converts the capabilities into a JSON formatted string.
As seen below, the values of username and access_key are obtained from the environment variables LT_USERNAME and LT_ACCESS_KEY specified in the Makefile. Since we want to check out the execution, the headless capability is set to False.
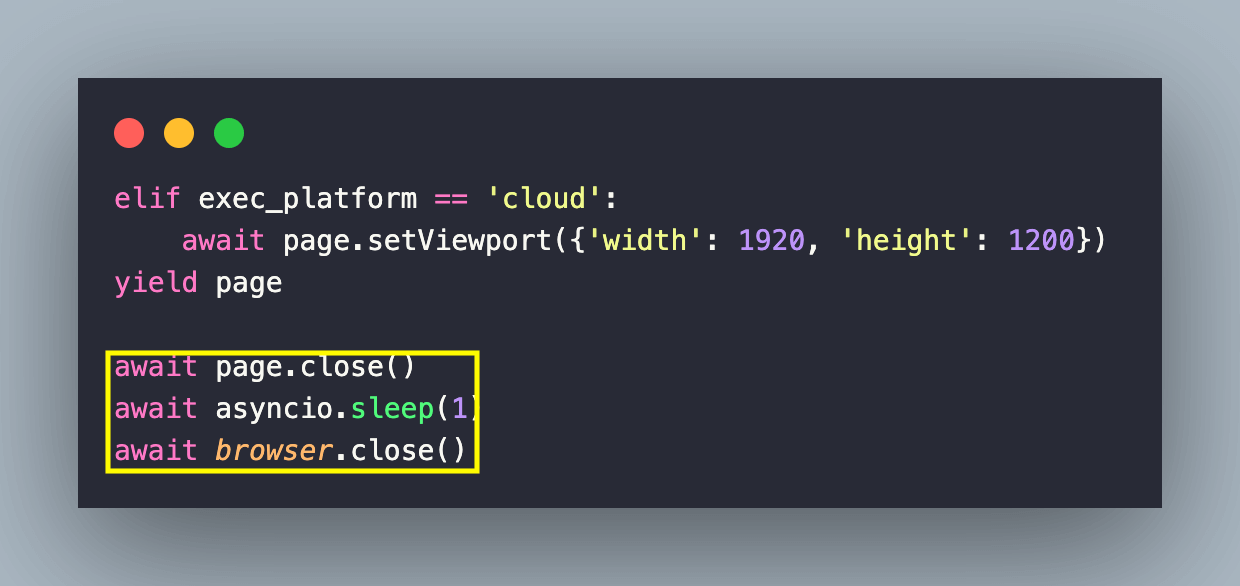
Finally, yield is used for defining the teardown code (i.e., releasing browser resources) after the test execution is complete. In our case, we close the browser instance in the fixture responsible for opening a new Browser page.
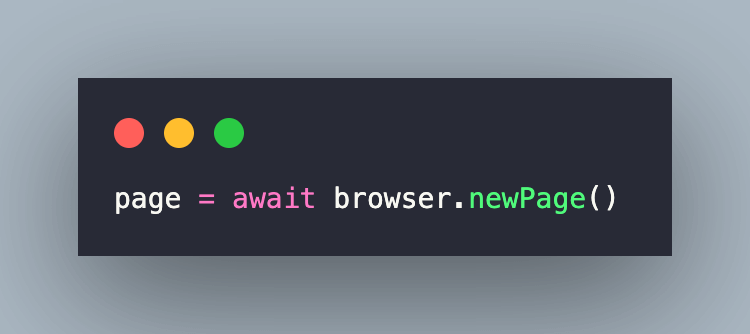
Fixture: Creation of a new page
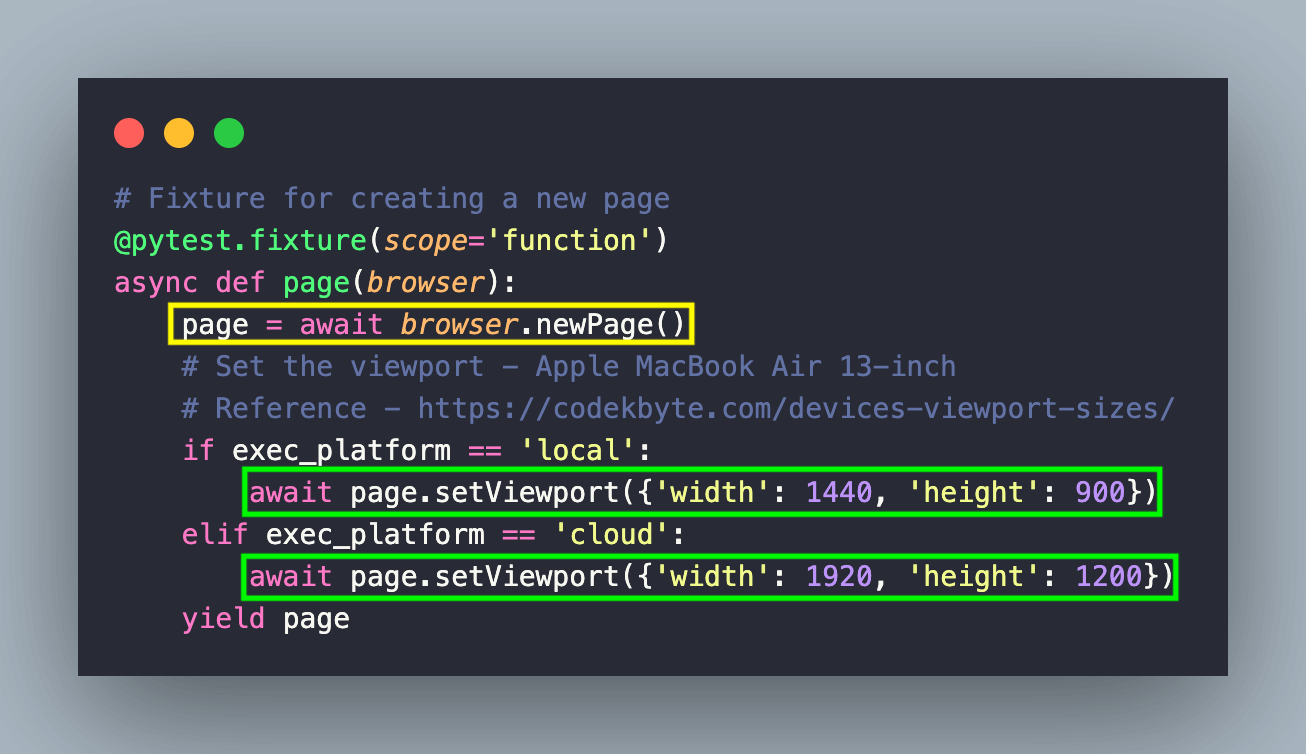
Next up, we have a Fixture of function scope primarily responsible for creating (or opening) a new page. The fixture takes the newly created browser instance as the input parameter.
The newPage() method of the BrowserContext class is invoked to open up a new web page. Since the viewport sizes differ when the tests are run on the local machine (i.e., MacBook Pro 13 inch) & cloud grid, the same is set using the setViewport() method of the page class. The required viewport width & height are passed in a dictionary format to the setViewport() method.
Finally, the resources used by the browser (created in the browser() fixture) and page(s) that are created in the page() fixture are released as a part of the teardown code.
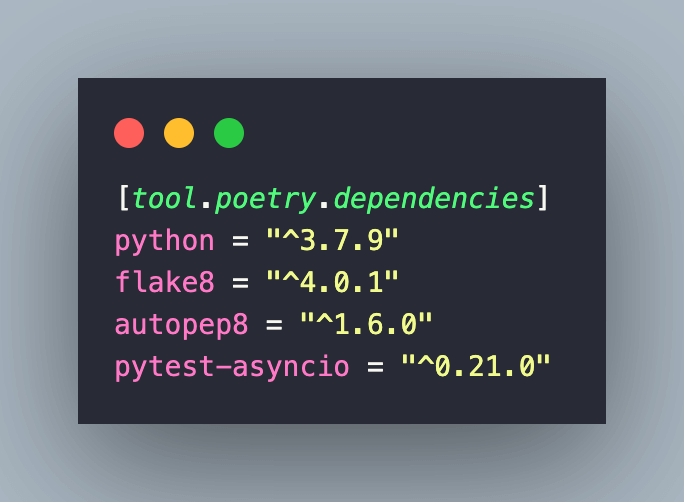
pyproject.toml
The pyproject.toml file contains the configuration settings used by the Poetry package manager.
All the project dependencies (i.e., flake8, autopep8, and pytest-asyncio) are under the [tool.poetry.dependencies] section. pytest-asyncio is a pytest plugin that provides support for coroutines as test functions. Awaits inside the test code are made possible with this plugin. The pytest asyncio is also instrumental in greatly reducing the test execution time!
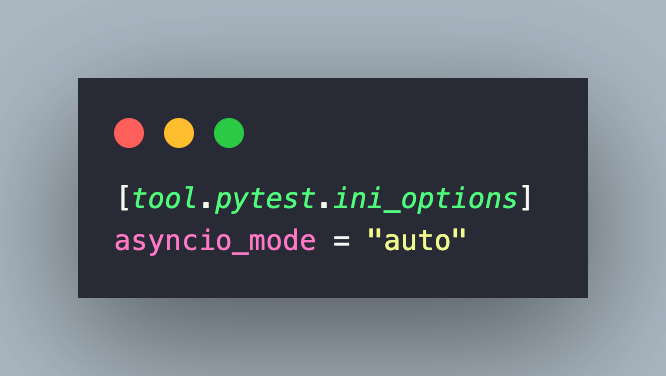
In the [tool.pytest.ini_options] section, the asyncio mode is set to auto. This means that the asyncio mode will be automatically detected and enabled by pytest, depending on the presence of async fixtures (or tests).
requirements.txt
The requirements.txt contains all the packages and libraries required for execution.
The pytest-order plugin is used for ordering the execution of the tests. pytest parallel execution is performed for a couple of test scenarios. Hence, the pytest-xdist plugin is installed to realize the same.
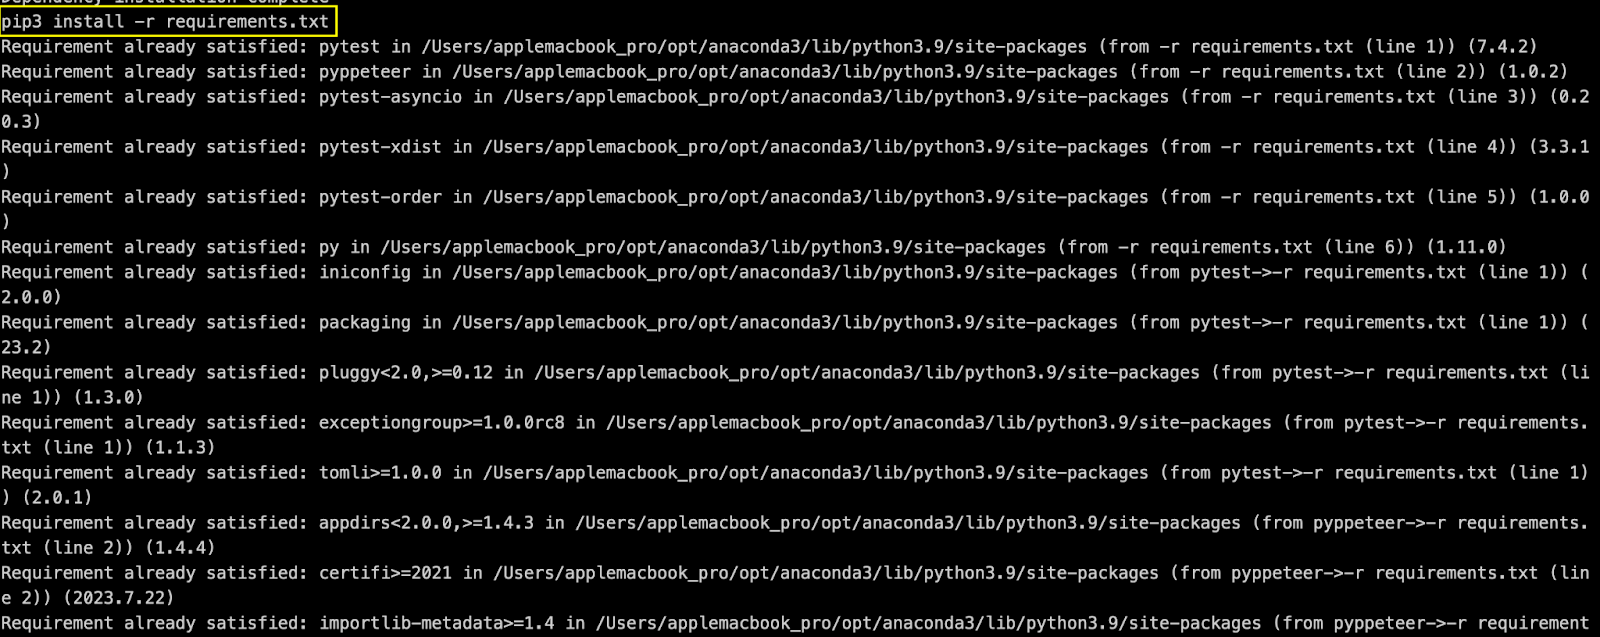
All the dependencies and packages are installed by executing poetry install and pip3 install -r requirements.txt on the terminal.

Makefile
As stated earlier, the execution is all driven using the Makefile. Depending on the Python and pip versions installed on your machine, you may change python3 & pip3 to python & pip, respectively.
Since environment variables LT_USERNAME and LT_ACCESS_KEY are used for accessing the LambdaTest cloud grid, replace them with credentials from LambdaTest Accounts Page. Also, make install sets up configurations & installs dependencies from the .toml & requirements.txt, respectively.
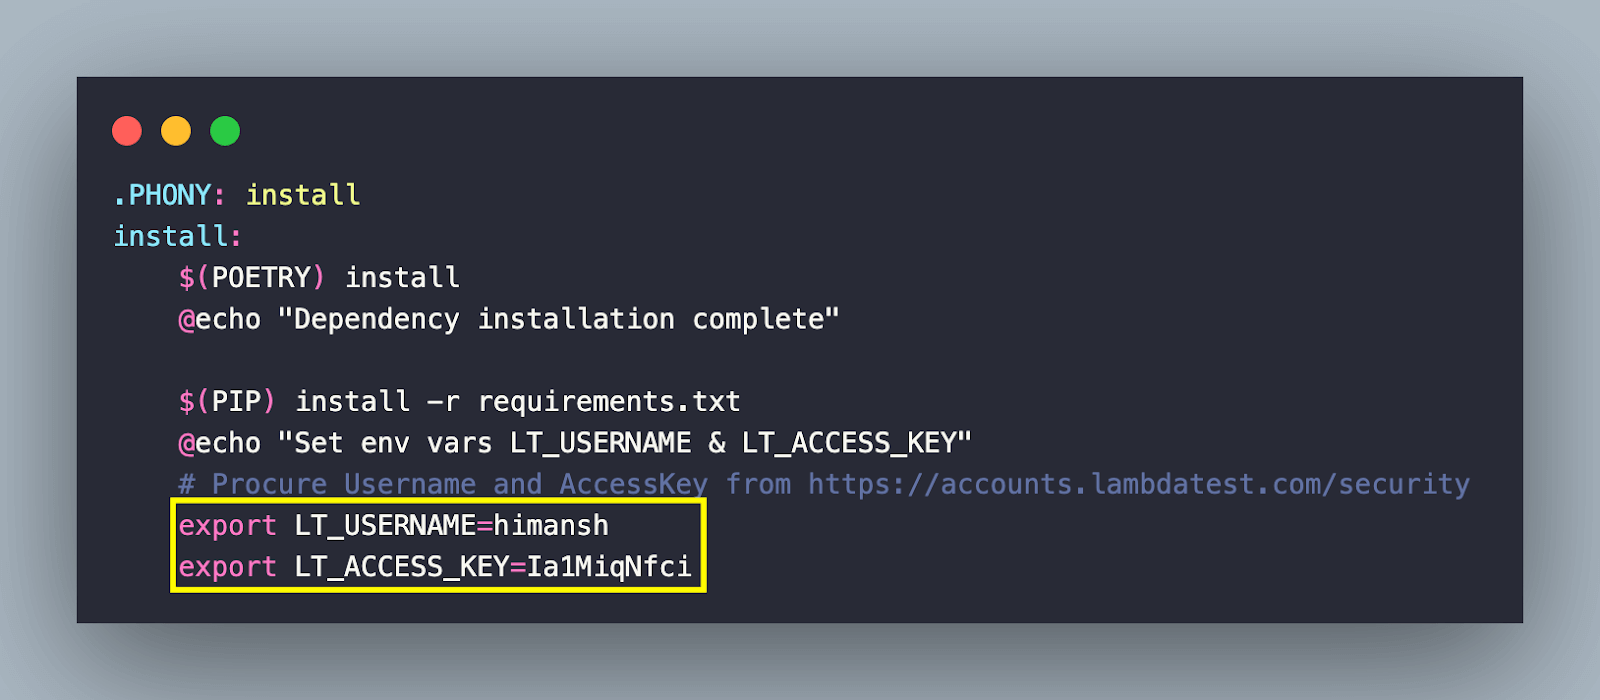
Invoking make clean on the terminal removes all the generated files or artifacts (e.g., *.pyc) created during the build process.

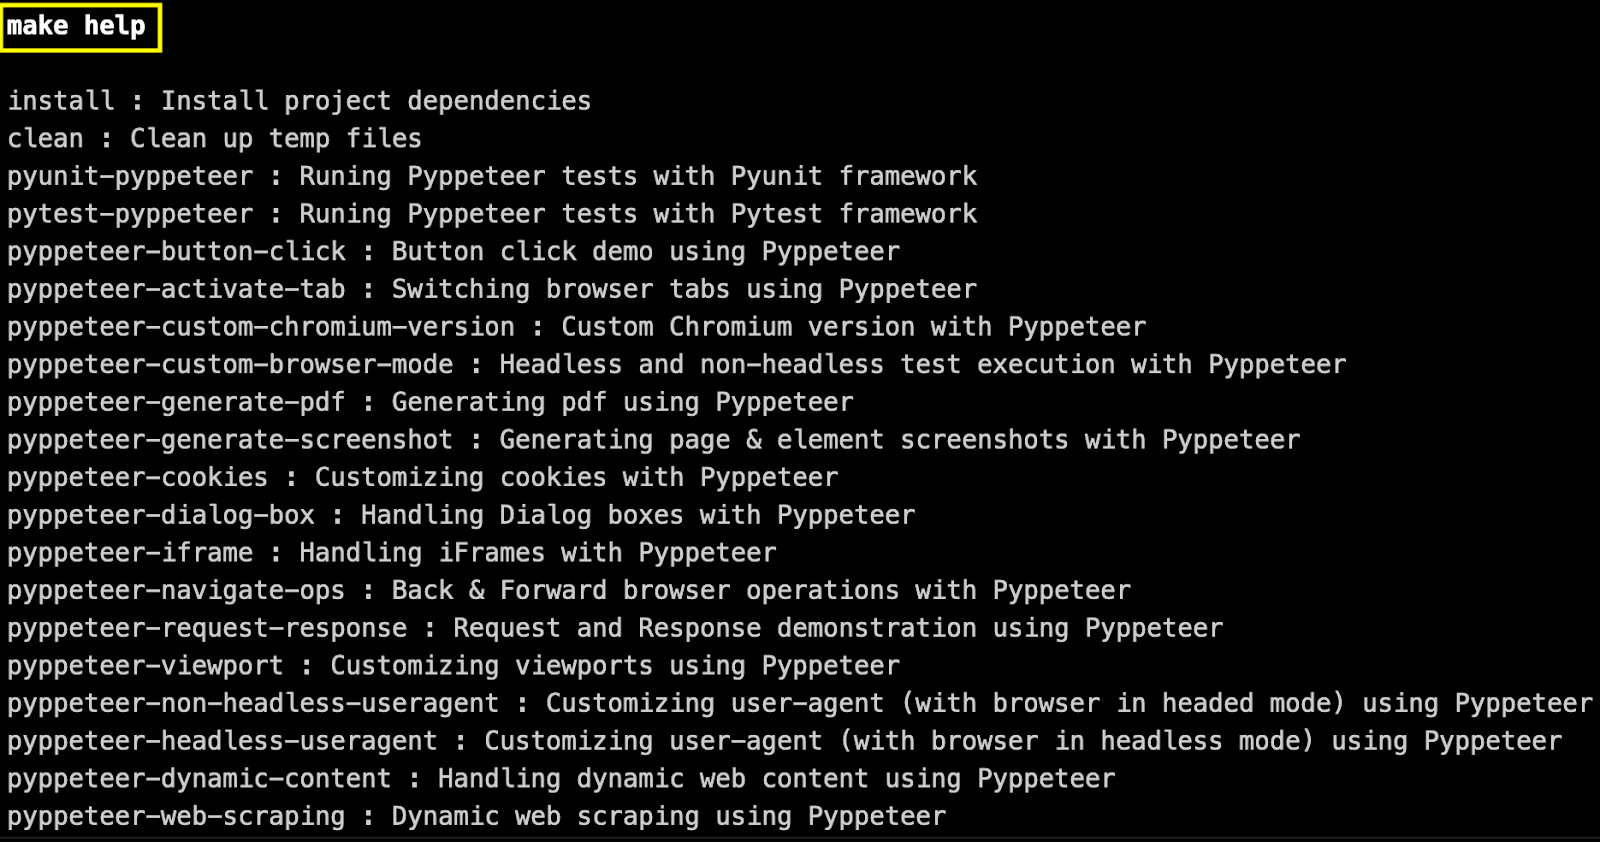
Typing make help provide all the options available for execution.
Like earlier, we are not getting into the nuances of Makefile since it is pretty much self-explanatory! With the stage all set, let’s get our hands dirty by implementing some prominent scenarios (including web scraping) with Pyppeteer.
| Note: The examples below work on local Chromium (EXEC_PLATFORM = local) and Chrome on LambdaTest cloud grid (EXEC_PLATFORM = cloud). |
Setting up a browser session with Pyppeteer
Like any other library (or framework), the first step is to instantiate the browser and navigate to the respective URL. The launch() function of the pyppeteer.launcher module is invoked to start up a new instance of the Chrome (or Chromium) browser.
As stated in the Pyppeteer official documentation, the headless option is set to False so that the browser is invoked in non-headless (or headed) mode. Additional arg (or argument), i.e., –start-maximized, is also passed to the launch() function so that the browser is maximized.
Now that the browser is instantiated, the newPage() function is invoked to create a new page within the browser. The method returns a Page object that represents the newly opened page.
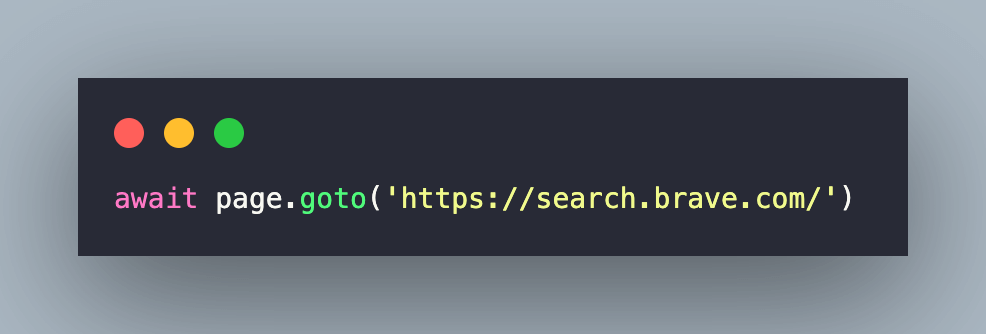
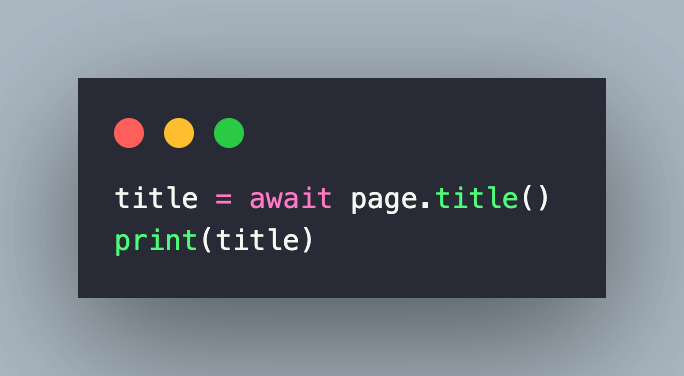
Finally, the goto() method of the Page class is used to navigate to the URL under test.
We compare the page title with the expected title in the current test. An assert is raised in case the titles do not match.
There are a couple of ways to invoke the test scenarios. The choice depends on the automation framework being used in conjunction with Pyppeteer.
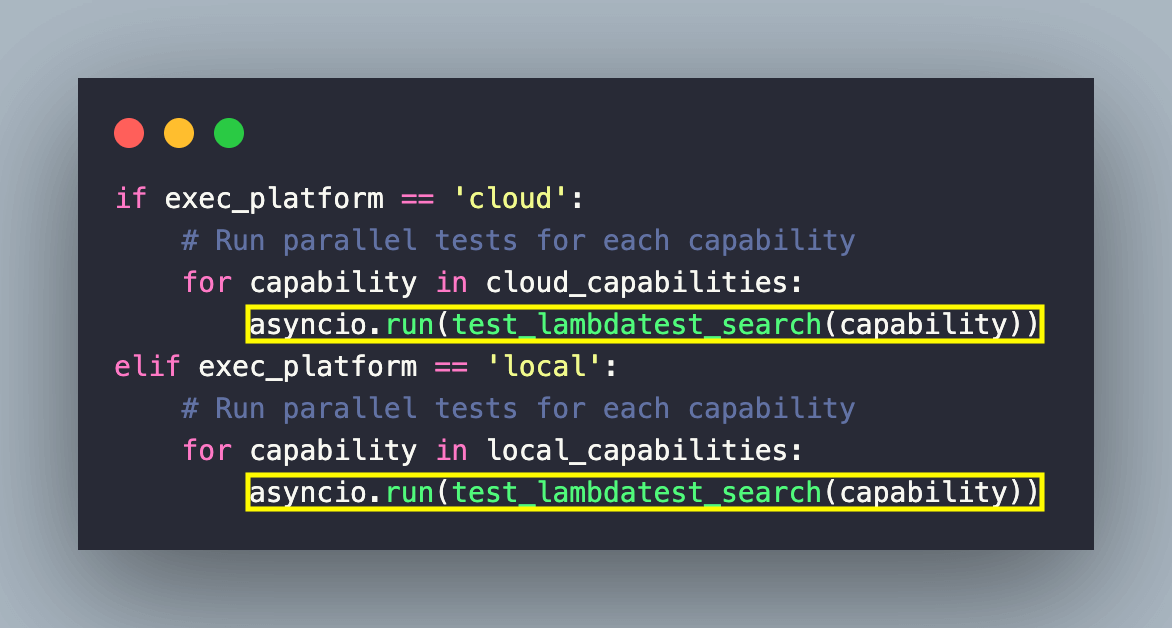
Approach 1: Using the run function of the asyncio module
The first approach is using the run_until_complete(future) method (of the asyncio module) until the future has been completed. It blocks the execution of the code following it.
The second approach is to execute the coroutine directly by passing the coroutine to the run() function of the asyncio module. As stated in the official documentation, the run() function cannot be called when another asyncio event loop is running in the same thread.
As shown below, the test method [i.e., test_lambdatest_search() ] is passed to the run() function. These test execution steps are repeated for all the browser capabilities passed to the test method (or coroutine).
Here is the complete implementation of setting up a browser session with Pyppeteer when coroutines (or test methods) are run using the run() function.
Approach 2: Using Pyppeteer with pytest
As mentioned earlier, Pyppeteer can also be used with the pytest framework. The yield in conjunction with pytest fixtures is used for implementing the setup and teardown logic for the following:
- Instantiating the browser [using either connect() or launch() methods]
- Creating a new page in the browser context [using newPage() method]
- Closing & releasing the resources held by the instantiated browser and page
Here is the complete implementation of setting up a browser session with Pyppeteer in conjunction with the pytest framework:
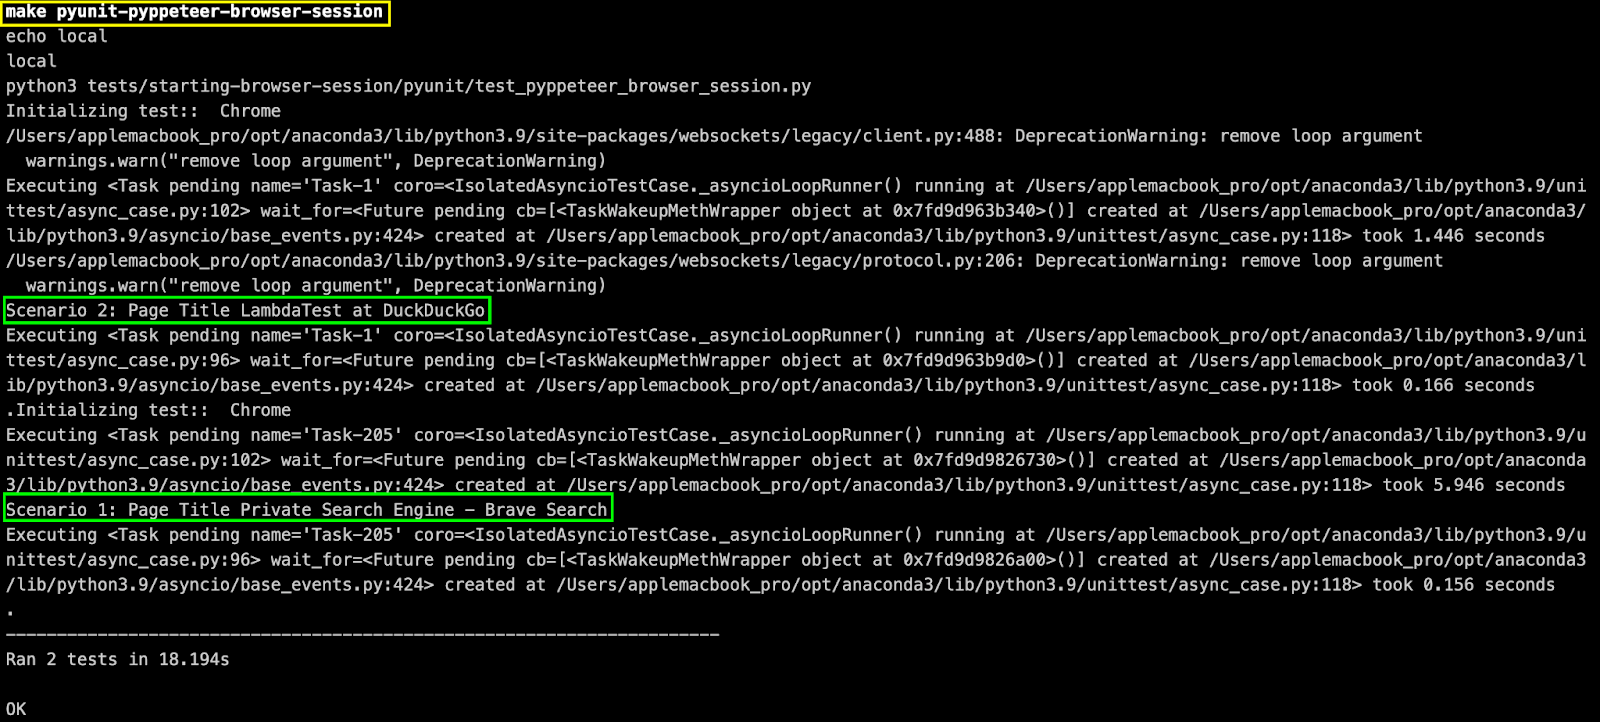
Approach 3: Using Pyppeteer with PyUnit
As stated earlier, Pyppeteer can also be used with the PyUnit (or unittest) framework. However, I would always prefer pytest (with Pyppeteer) over PyUnit (with Pyppeteer) since PyUnit (or unittest) methods are synchronous – a deal breaker when used with the Pyppeteer library!
Since the intent is to run synchronous and asynchronous code, we have used the IsolatedAsyncioTestCase test class in the unittest module. The IsolatedAsyncioTestCase class provides an API similar to TestCase and accepts coroutines as test functions. It also isolates the test case’s asyncio event loop, providing each test case with its fresh event loop.
The IsolatedAsyncioTestCase class provides the asyncSetUp() & asyncTearDown() methods that accept coroutines. These methods are called after setUp() and before tearDown(), respectively.
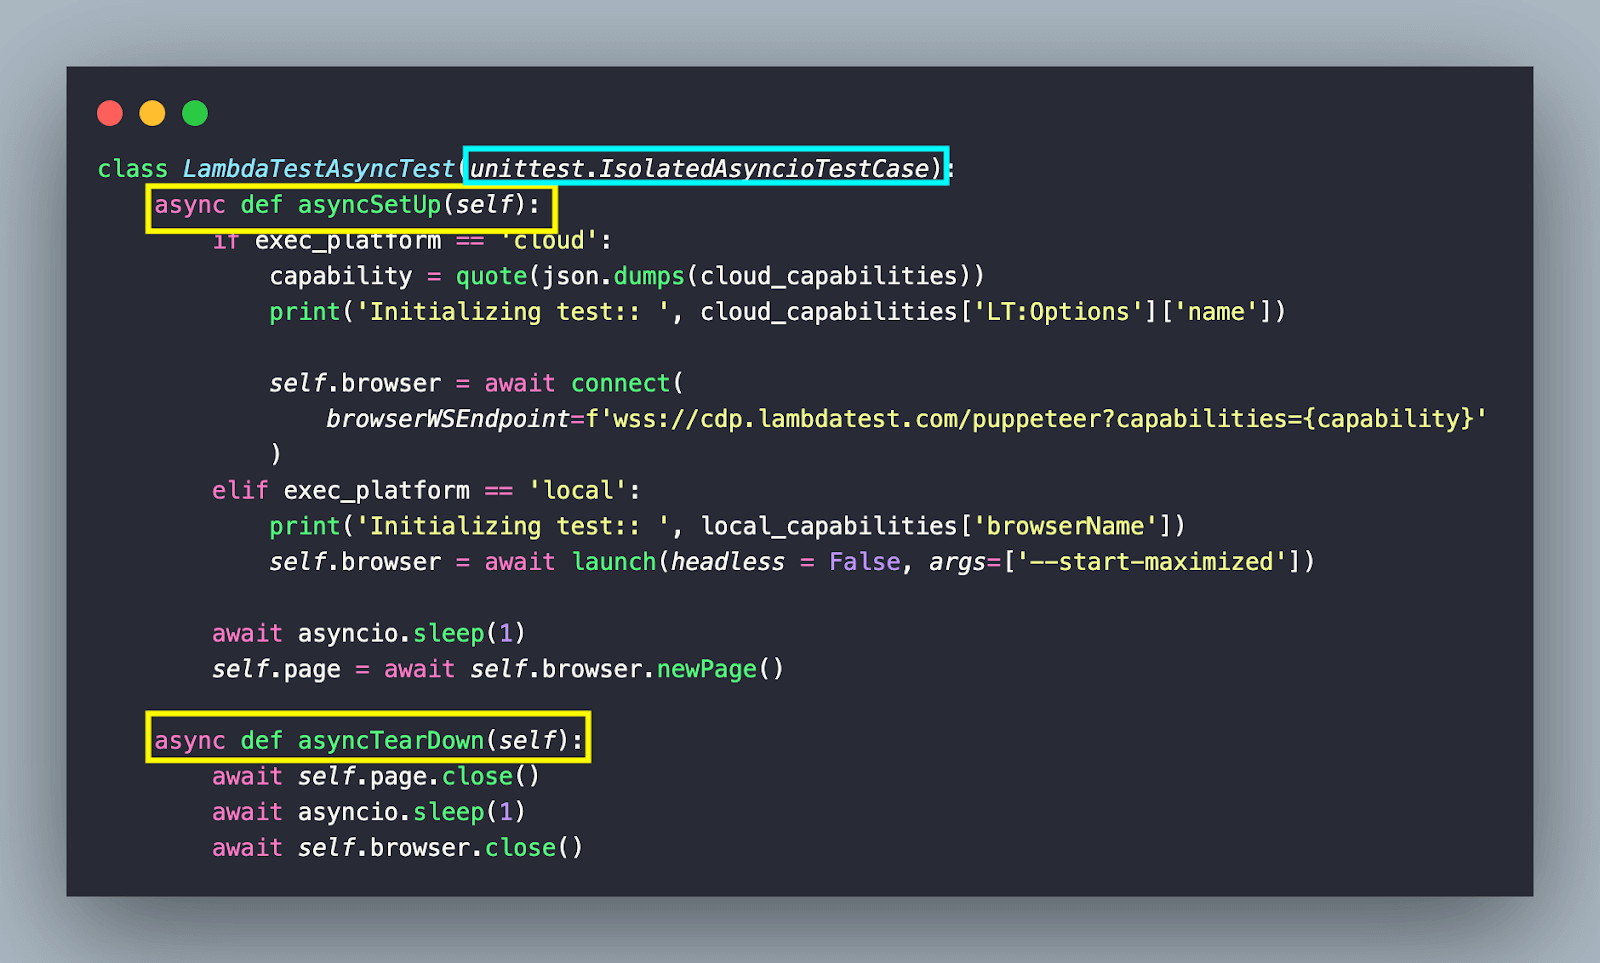
Here is the complete implementation of setting up a browser session with Pyppeteer in conjunction with the PyUnit (or unittest) framework:
Execution
To run the set up a browser session with Pyppeteer, simply trigger the relevant make command from the terminal:
| Make command | Purpose |
|---|---|
| pyunit-pyppeteer-browser-session | Start a browser session using PyUnit with Pyppeteer |
| pytest-pyppeteer-browser-session | Start a browser session using pytest with Pyppeteer |
| asyncio-run-pyppeteer-browser-session | Start a browser session with Pyppeteer using asyncio.run() |
| asyncio-run-complete-pyppeteer-browser-session | Start a browser session with Pyppeteer using asyncio.get_event_loop().run_until_complete |
As seen below, we have set the EXEC_PLATFORM to local and successfully started a browser session using PyUnit (or unittest) with Pyppeteer.
 Note
NoteTest your Puppeteer test scripts online over 3000+ browsers and OS combinations. Try LambdaTest Today!
Clicking buttons with Pyppeteer
Page class in Pyppeteer provides the click() method for clicking on an element that matches the selector. For example, when clicking buttons with Selenium, the first step is to locate the element using XPath, CSS Selector, or any other suitable locator.
Once the element is located, the click() method also scrolls it into view (if needed). Once inside the view, it uses the mouse to click in the element’s center. Like the Selenium exception, the click() method raises PageError if it is impossible to interact with the element (or if there is any other error on the page).
Syntax
|
1 |
coroutine click(selector: str, options: dict = None, **kwargs) |
The available options are below:
- button (str) – left, right, or middle (default: left)
- clickCount (int) – 1 (default)
- delay (int|float) – Time to wait between mouse-down and mouse-up in milliseconds (default – 0)
Demonstration
For demonstrating button click with Pyppeteer, we use the following test scenario:
|
The complete implementation of realizing button clicks with Pyppeteer:
Code Walkthrough
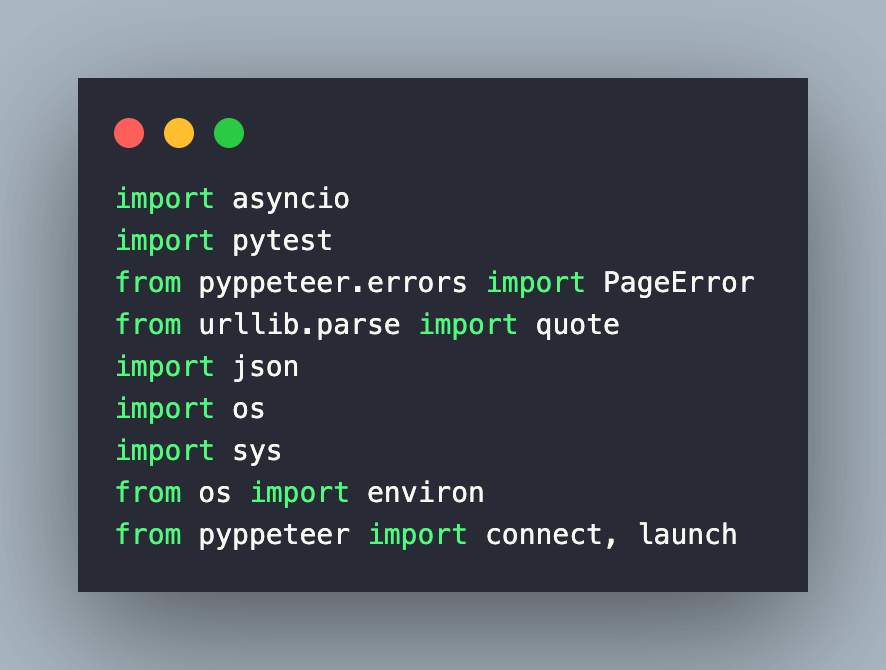
Since we are using the pytest framework with Pyppeteer library, we first import pytest, pyppeteer, and json modules.
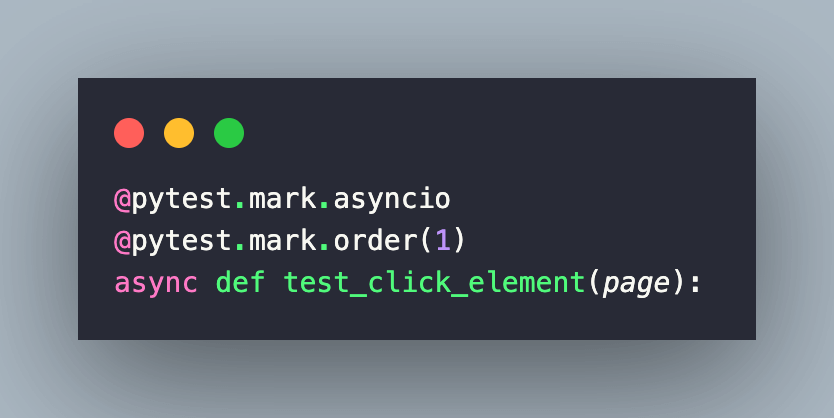
The tests are marked with the @pytest.mark.asyncio decorator, making them coroutines instead of tests (or test methods). This lets us use await code inside the tests.
Next, the @pytest.mark.order marker of the pytest-order plugin is used to order the execution of the tests.
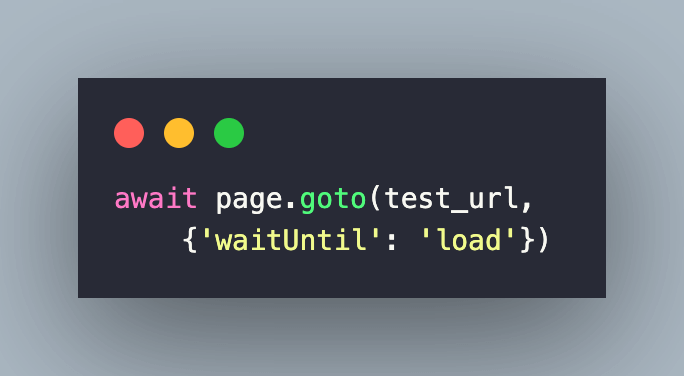
The goto() method of the Page class is invoked to navigate to the URL under test. The waitUntil option is set to load (i.e., default – navigation succeeds when the load event is fired).
The waitUntil option can also be set to domcontentloaded (i.e., DOMContentLoaded is fired), networkidle0 (i.e., no more than 0 network connections for at least 500 ms), or networkidle2 (i.e., no more than 2 network connections for at least 500 ms).
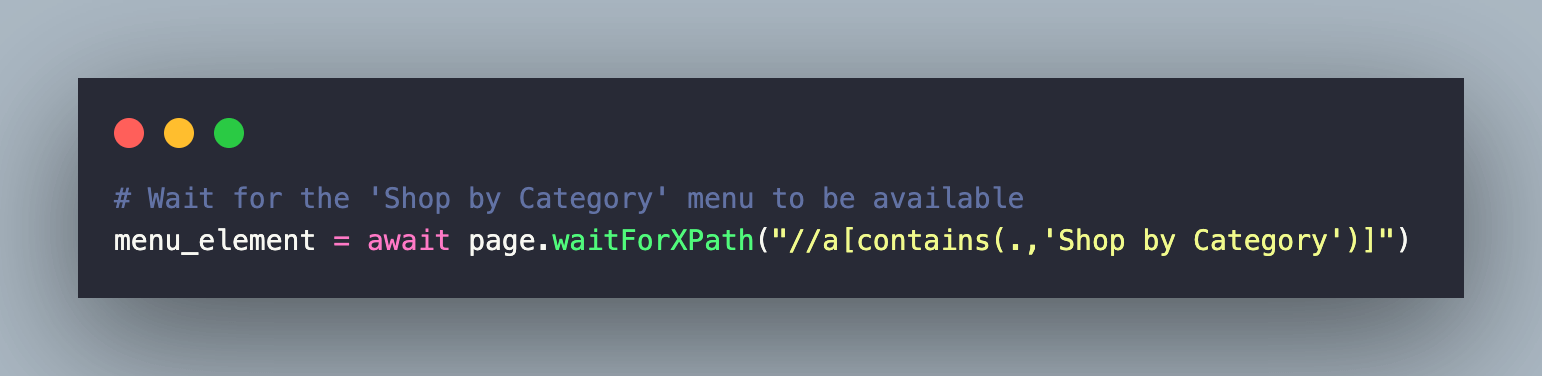
Now that the page is loaded, we use the waitForXPath() method until the element matching the XPath appears on the page. The default wait is 3000 ms.
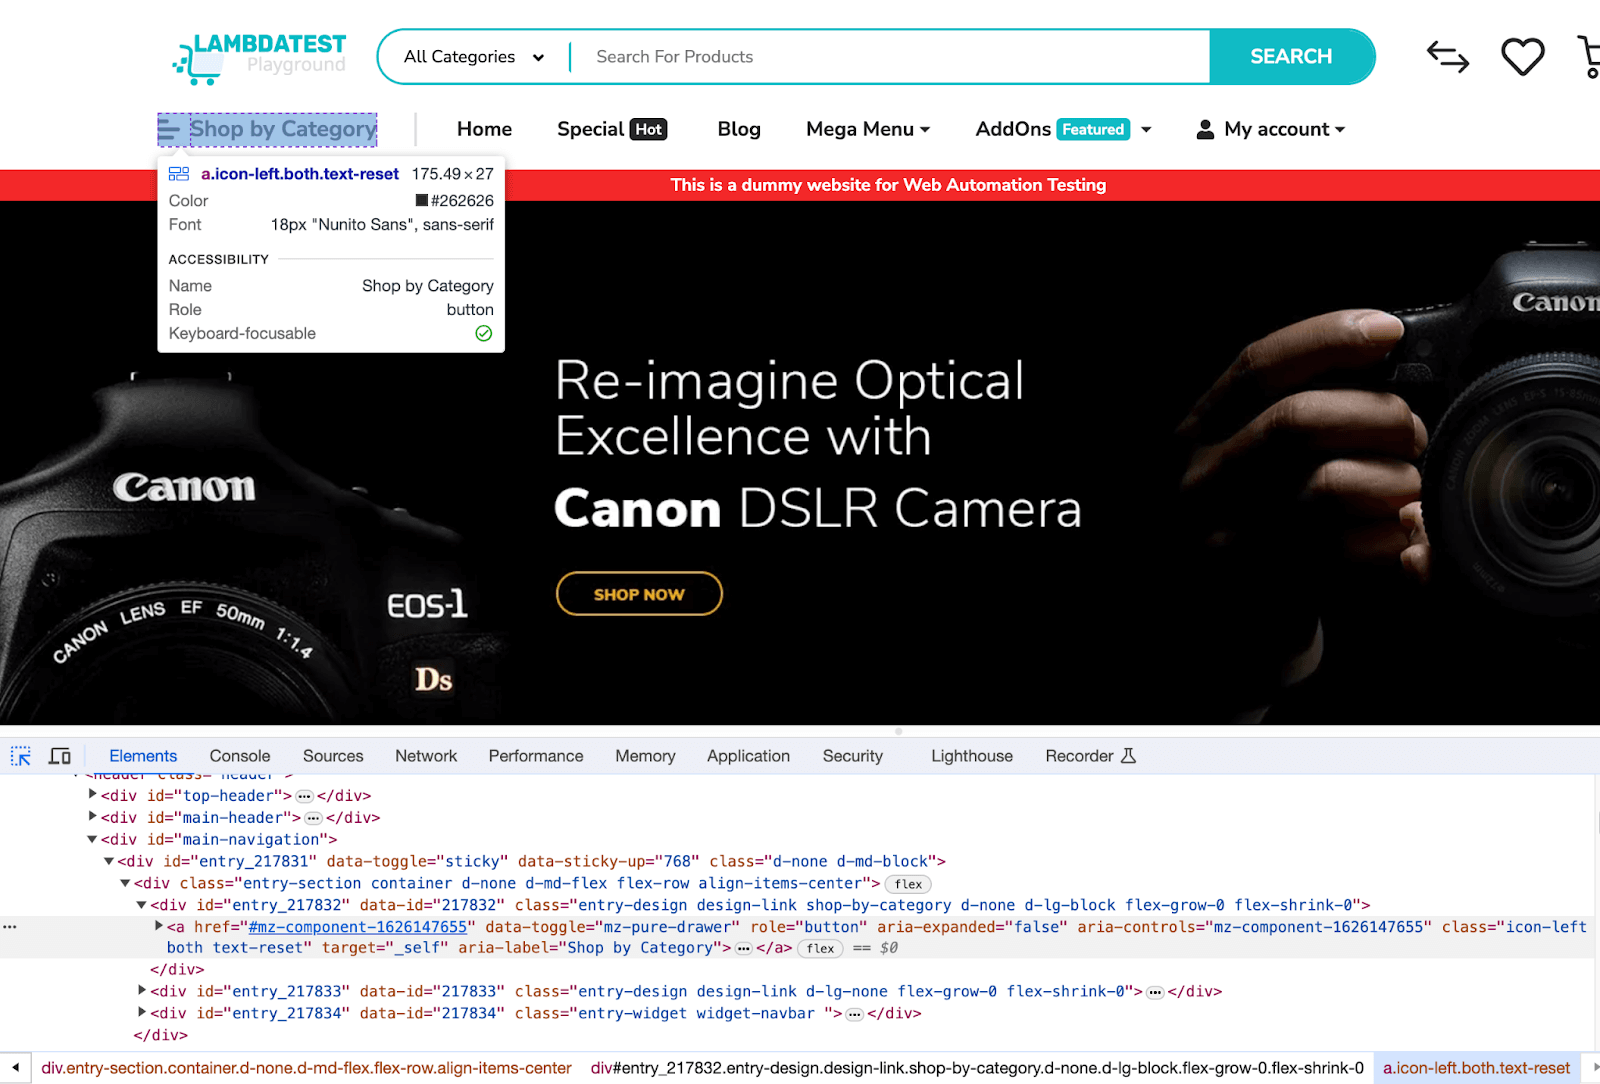
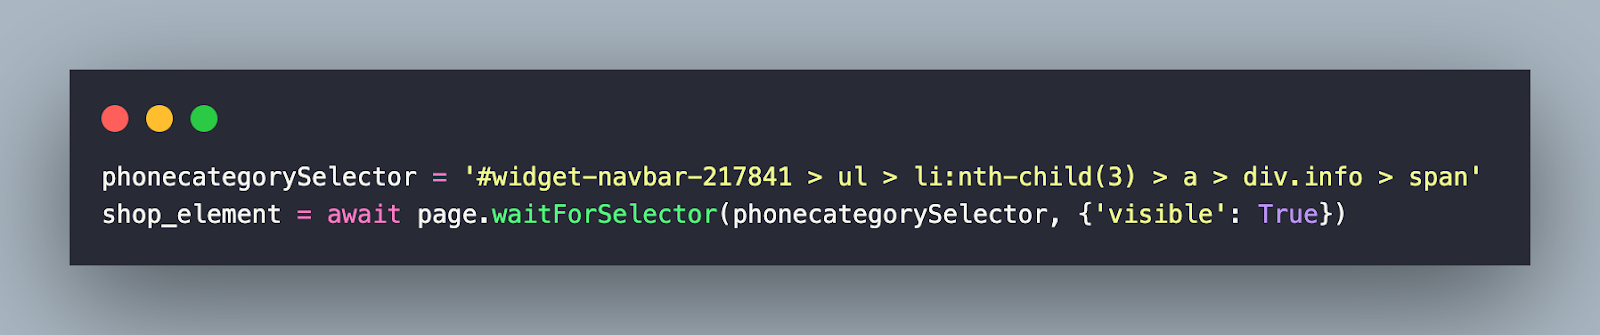
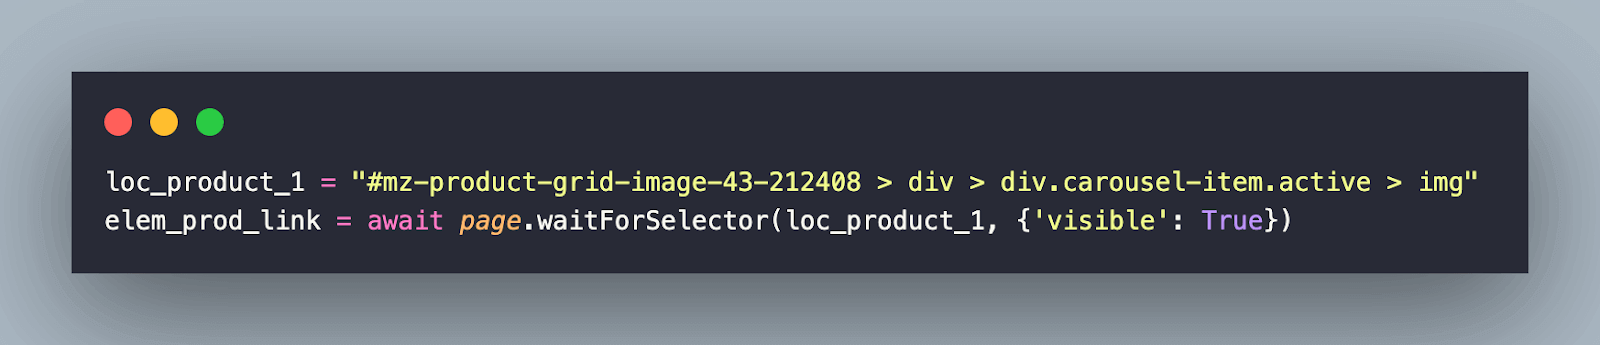
We locate the menu item using the CSS Selector, passed to the waitForSelector() method of the Page class. The method returns immediately in case the selector already exists on the page. On the other hand, it waits until the selector appears on the page for the duration specified by the timeout value (default – 3000 ms).
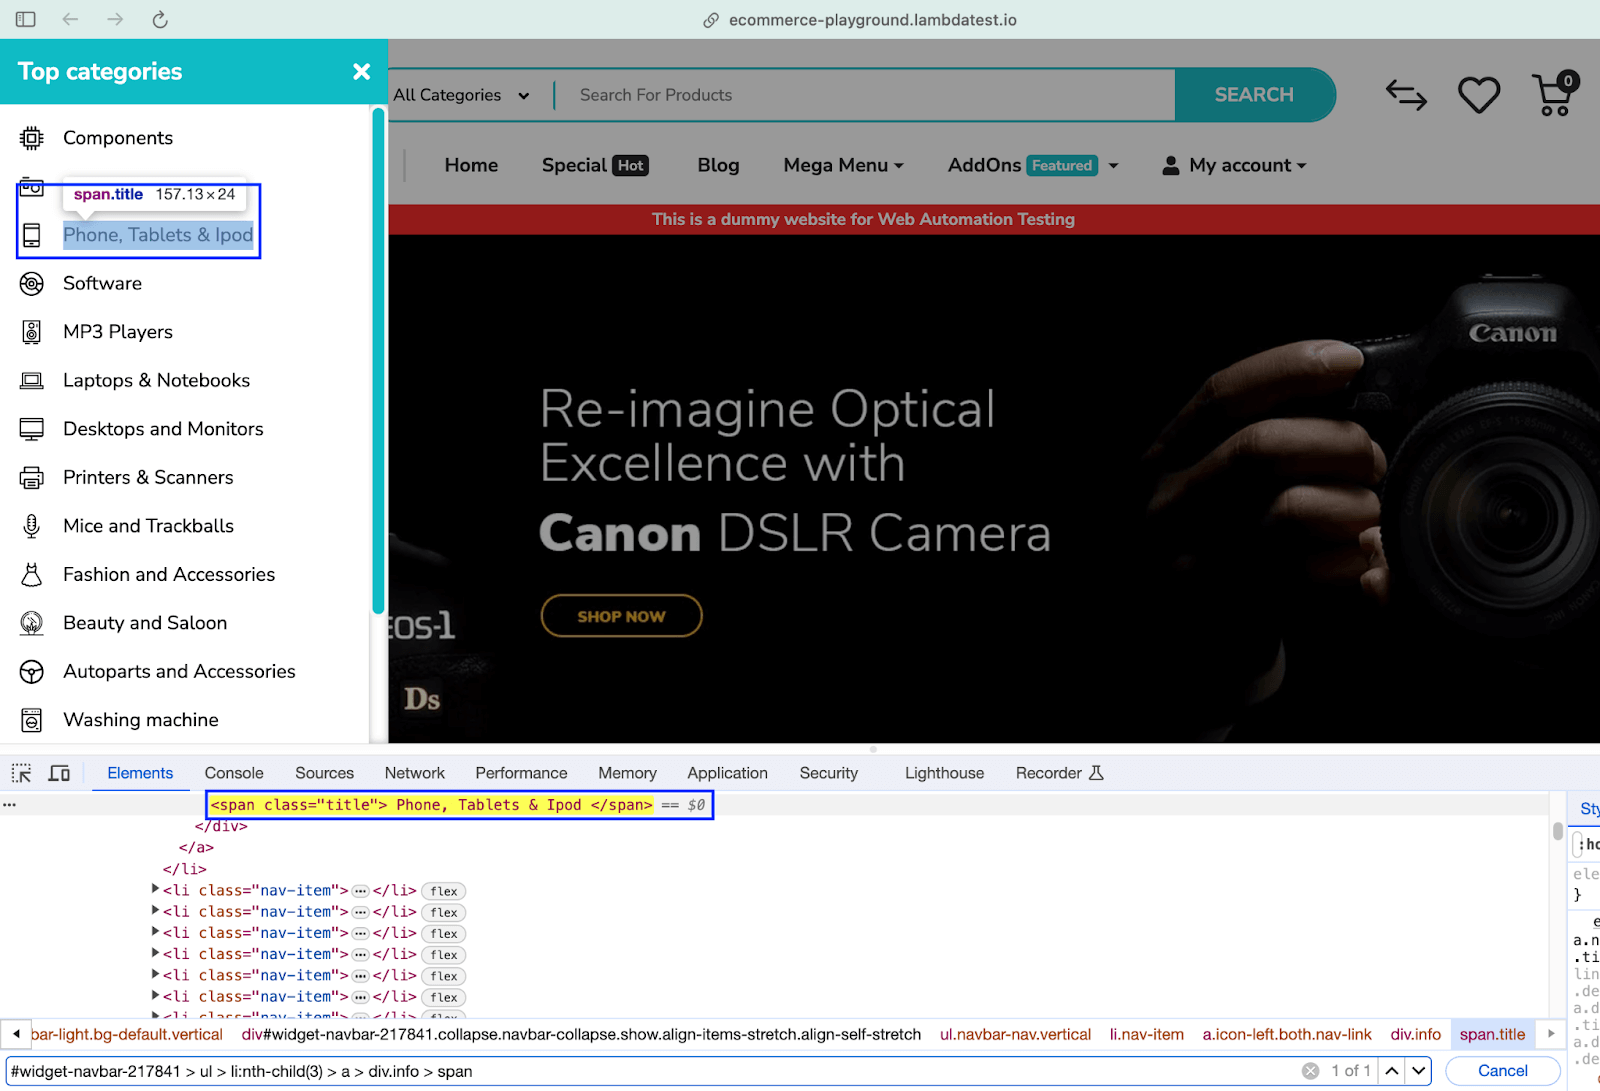
As seen below, the visible option is set to True; hence, it waits for the element to be visible when it is present in the DOM.
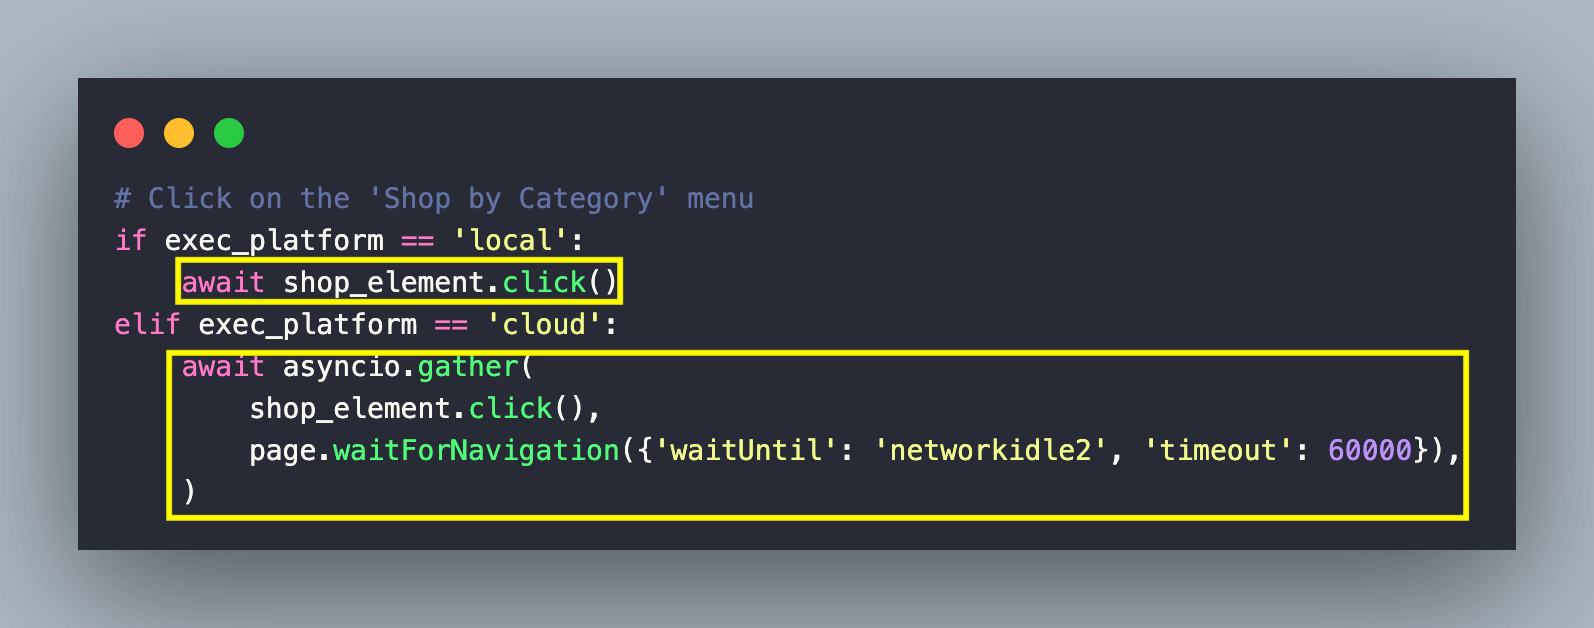
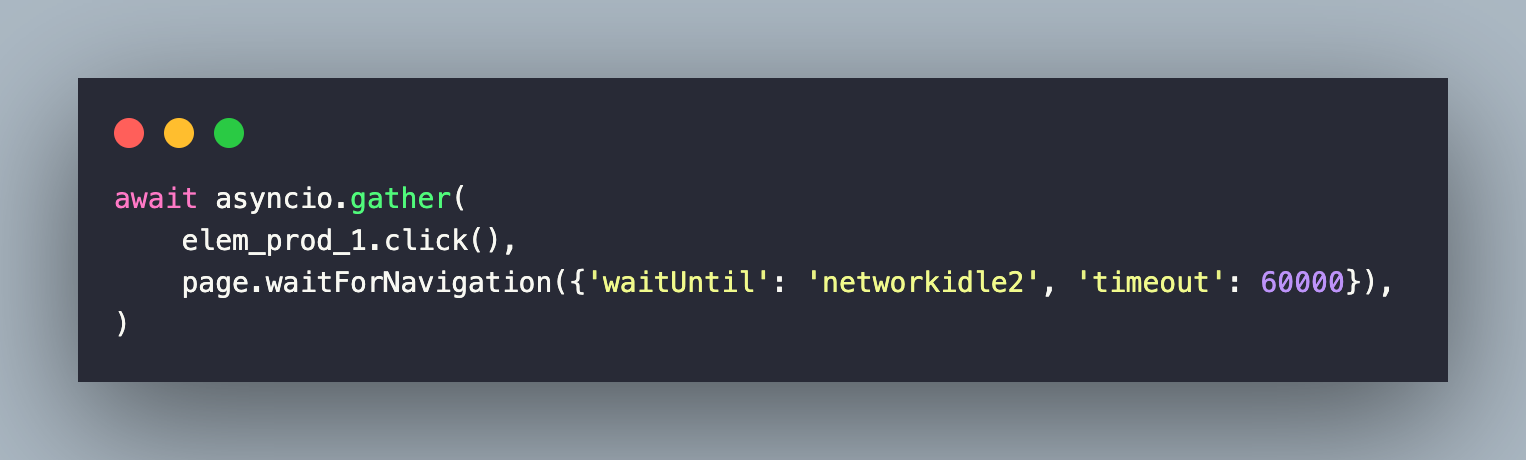
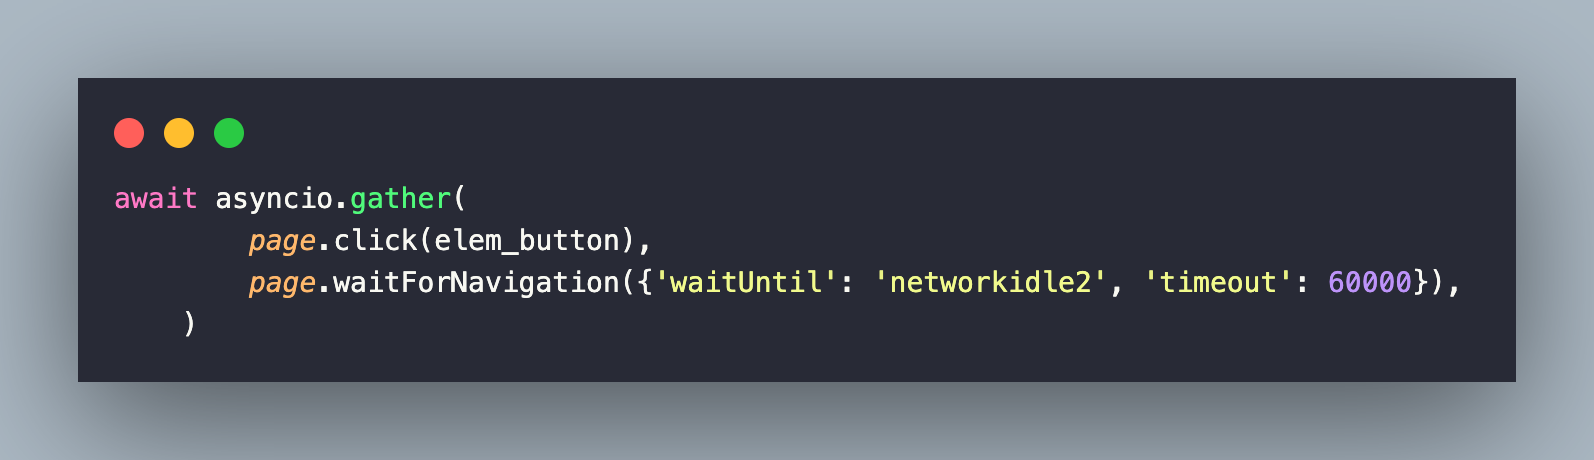
Once the element is located, the click() method is invoked for clicking on the element. In order to ensure that there is zero test flakiness (when using the cloud grid), we have also used the waitForNavigation() method with the timeout set to 60000 ms.
The waitUntil option in the method is set to networkidle2. Hence, the execution moves to the next line only if there is a timeout or when there are no more than 2 network connections for at least 500 ms.
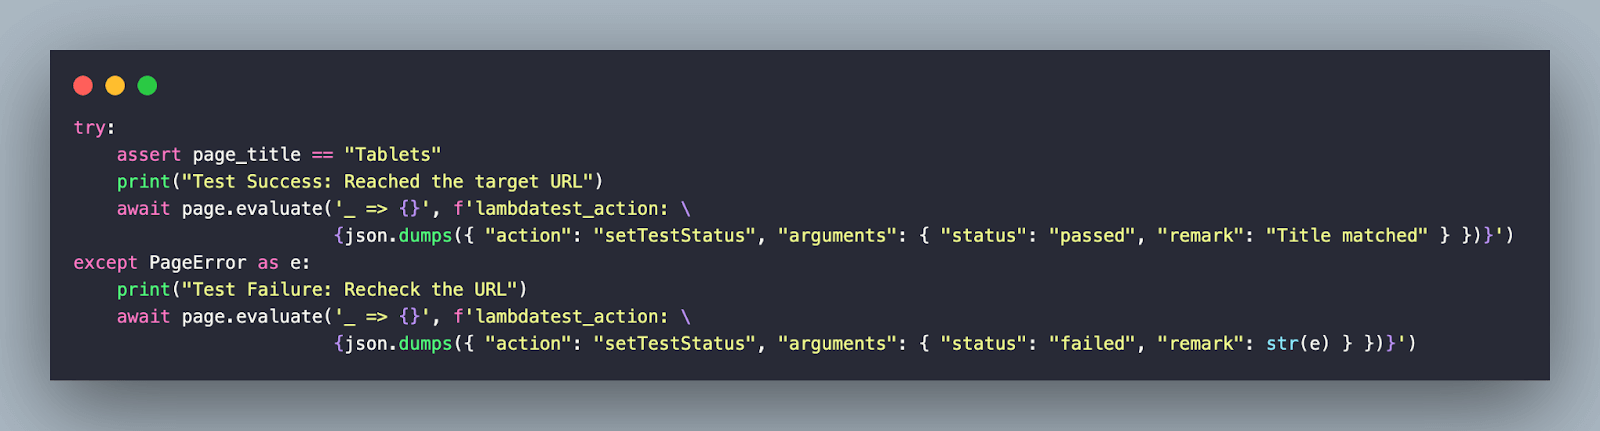
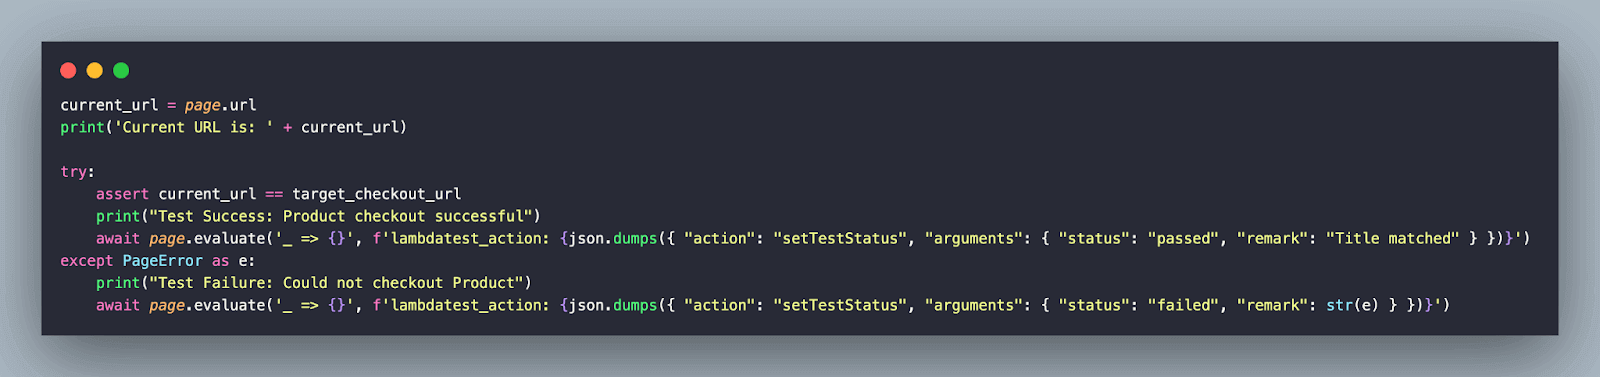
Then, we check the page title using the title() method of the Page class.
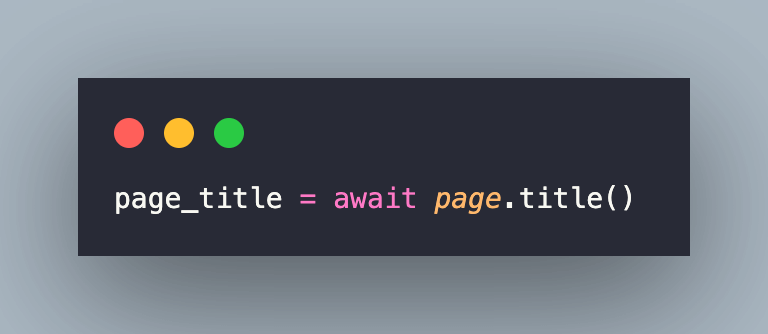
Once we have the page title, the page.evaluate() method in Pyppeteer is used to execute JavaScript code within the context of a page. An assert is raised in case the title (of the current page) does not match with the expected page title.
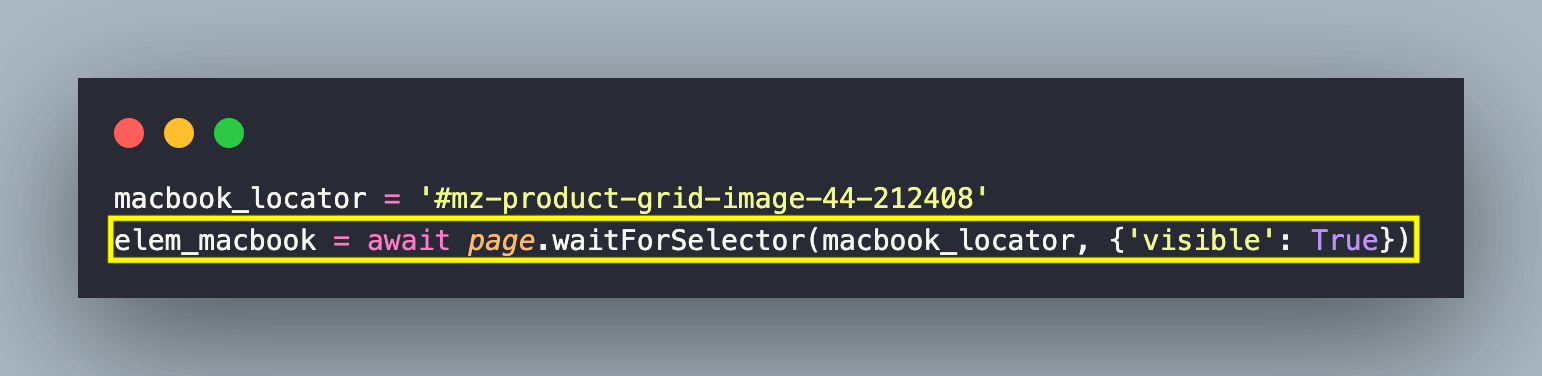
Now that we are on the Product Page, we locate the respective WebElement using the CSS Selector. The visible option in the waitForSelector() method is set to True; hence, it waits for the located element to be visible in the DOM. By default, the timeout is 30000 ms (or 30 seconds).
Once the button is clicked, we pause the execution (for 2 seconds) by invoking the asyncio.sleep(). It is used for introducing asynchronous delays in an event loop.
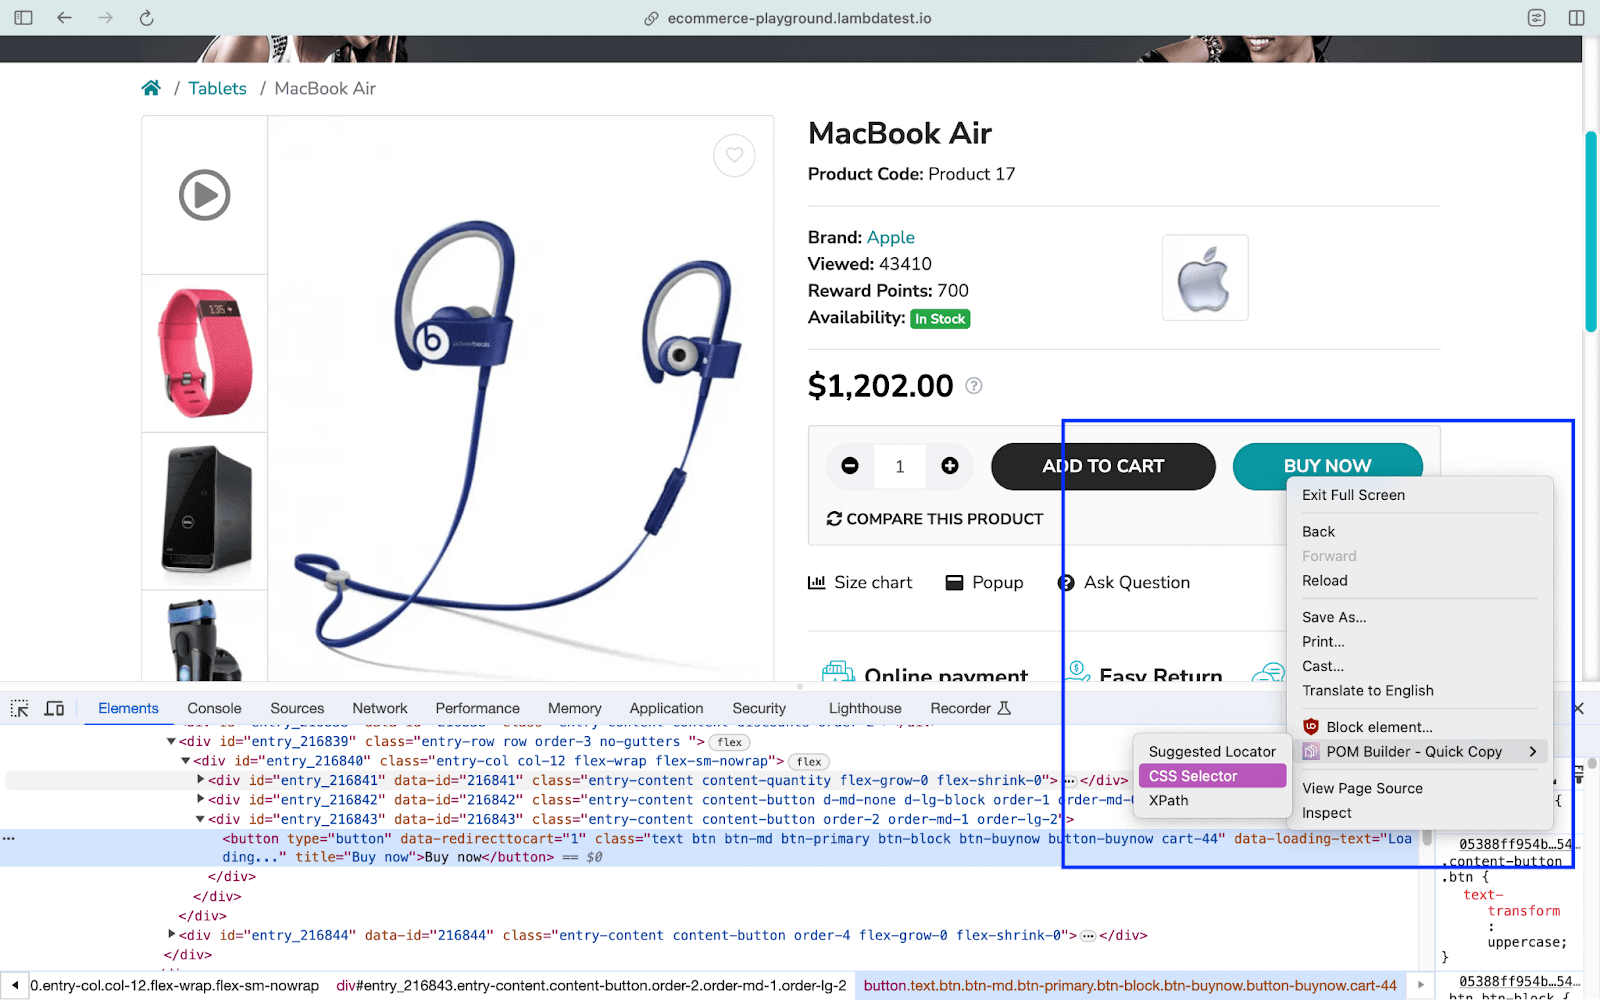
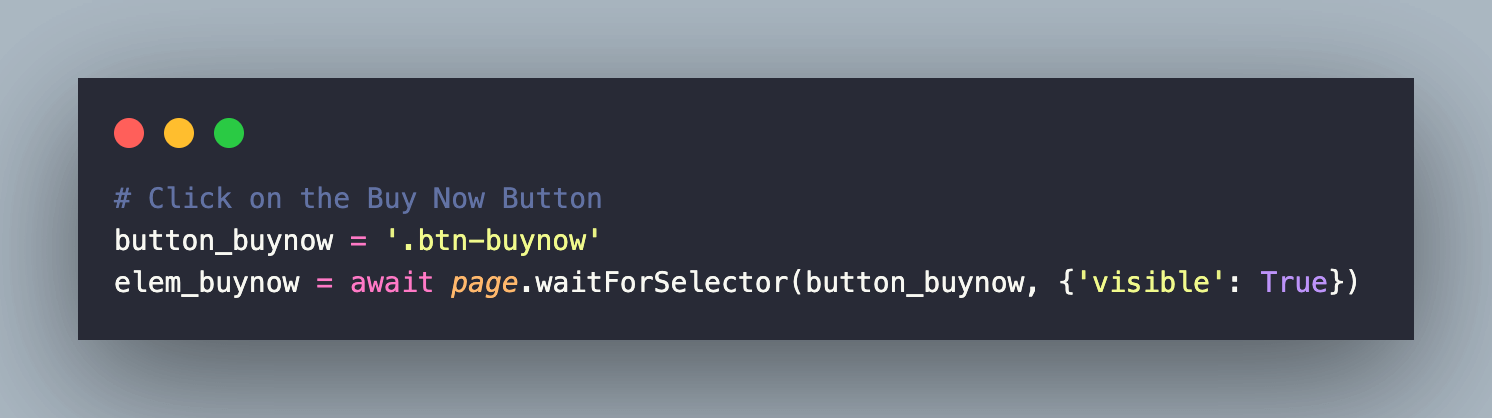
After an asynchronous sleep of 2 seconds, the Buy Now button is located using the CSS Selector (i.e., .btn-buynow). Like earlier, the visibility of the located element is checked; otherwise, an exception is raised if the element is not visible within a default timeout of 30000 ms.
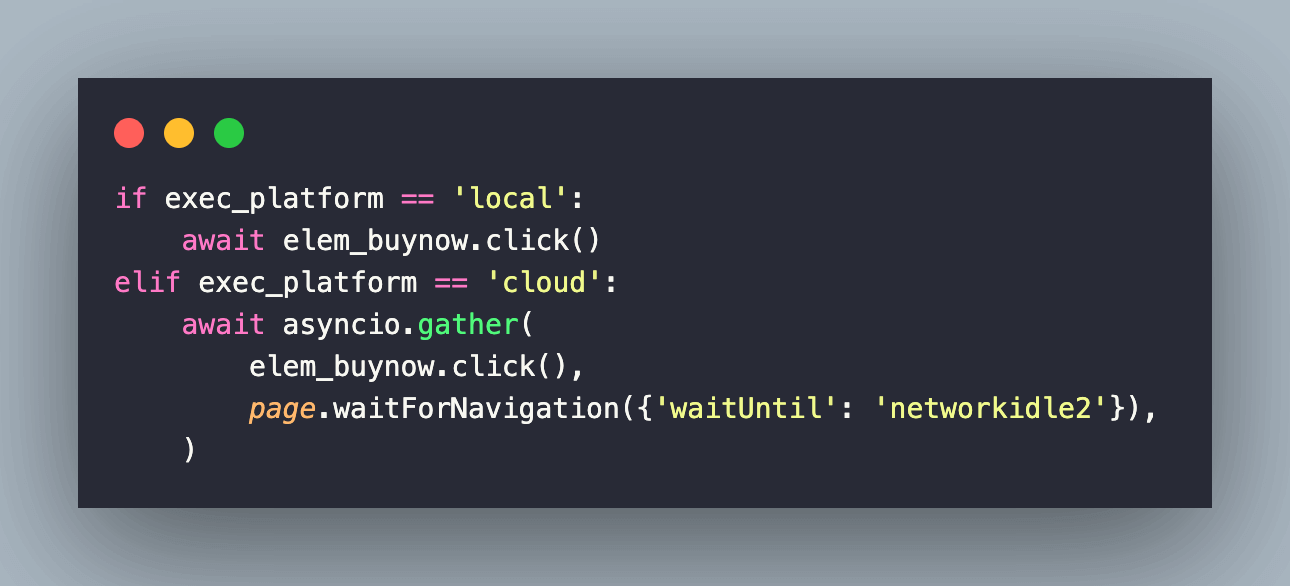
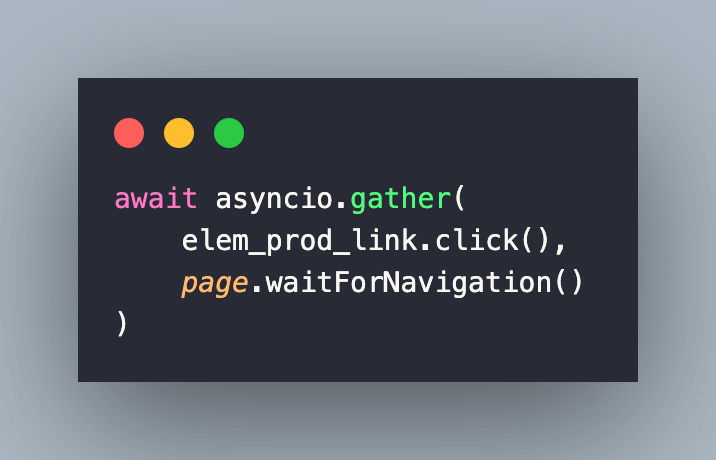
Here, we have used asyncio.gather(), a function provided by the asyncio library that allows multiple coroutines to be executed concurrently and waits for them to complete before moving further with the execution.
In our case, the click to the located element (or button) and waiting for the page to load with the waitUntil option set to networkidle2 are executed as a part of the gather() function.
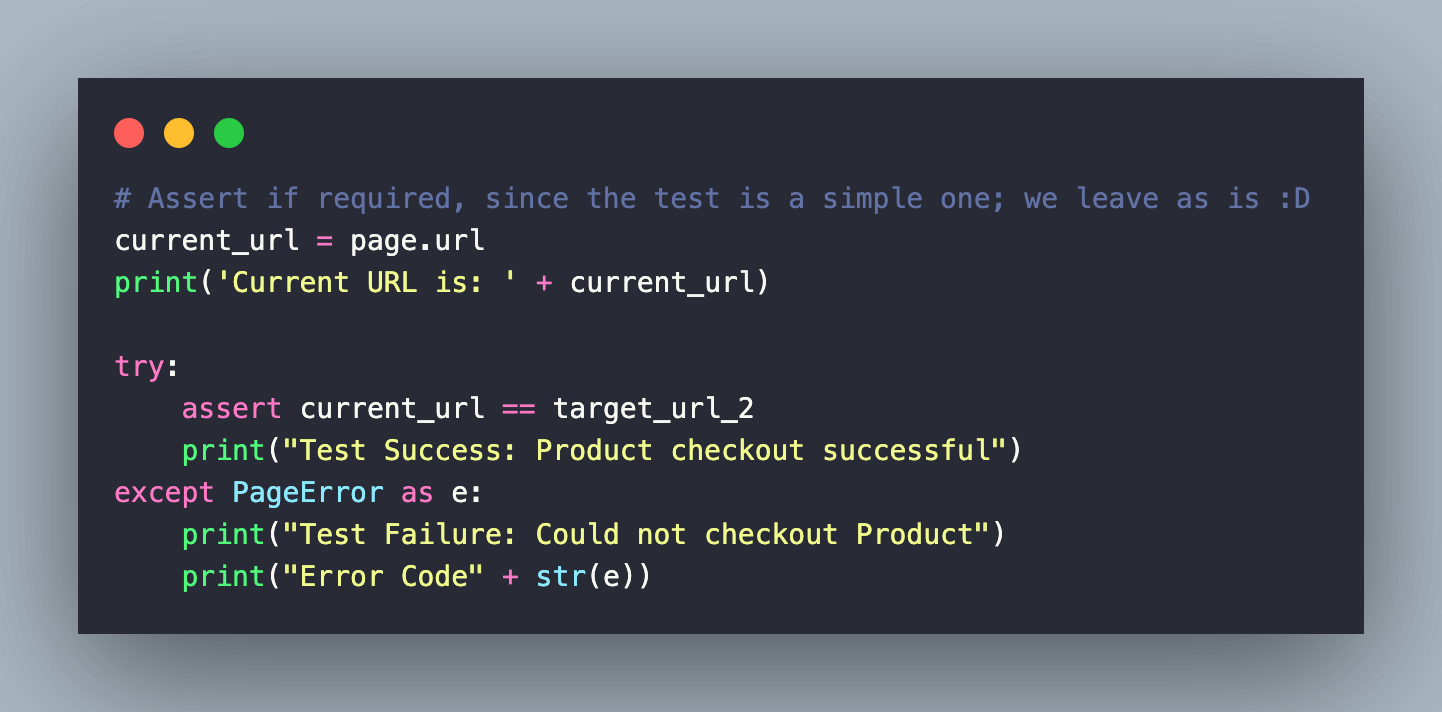
Finally, the current page’s URL is fetched by invoking the url() method of the Page class. An assert is raised if the current URL does not match the expected destination URL.
Execution
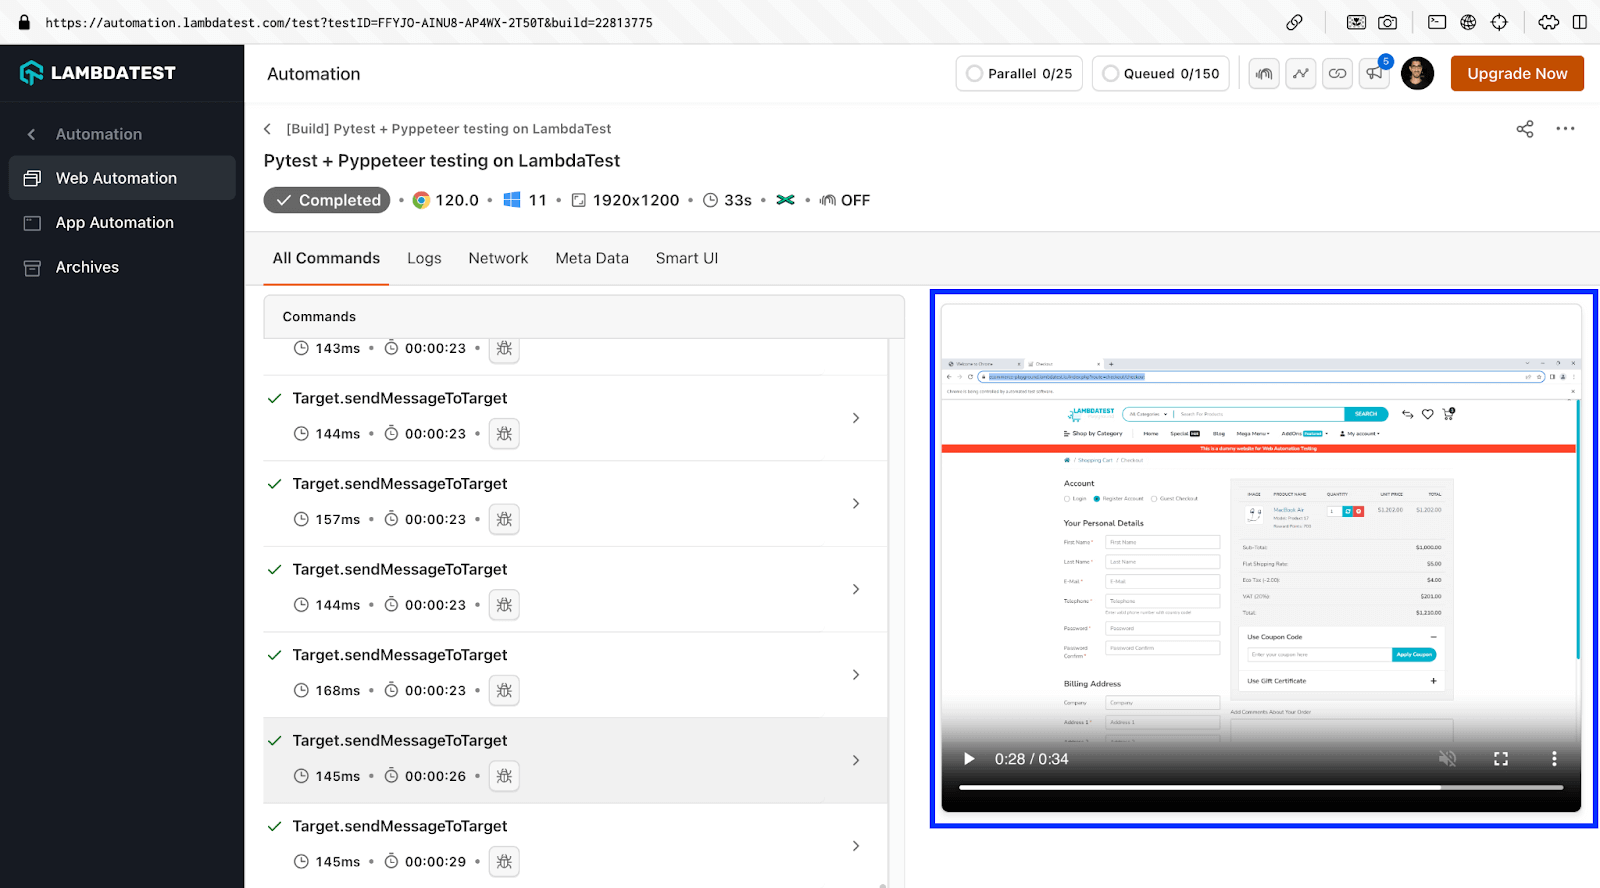
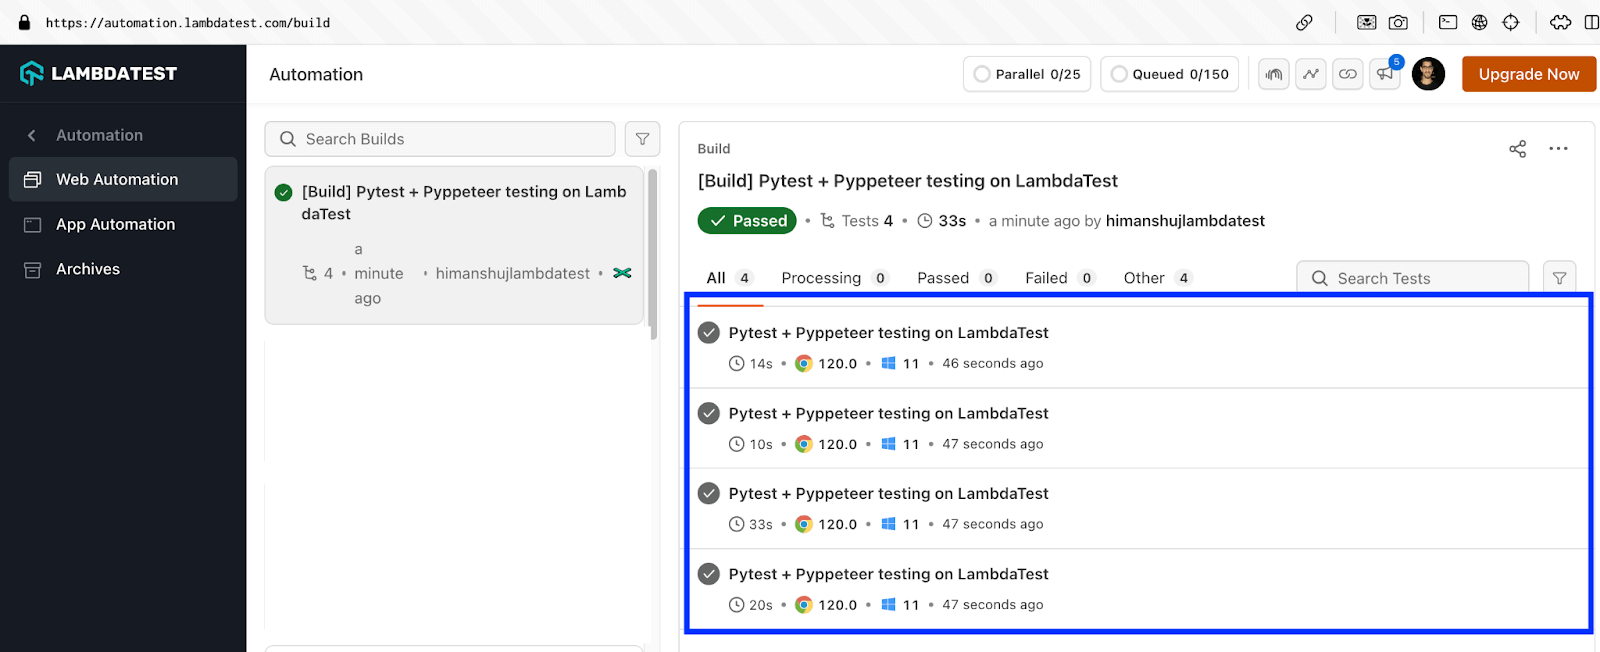
To automate interactions with a button element with Pyppeteer, invoke the command make pyppeteer-button-click on the terminal. In our case, we have set the execution to the LambdaTest cloud grid.
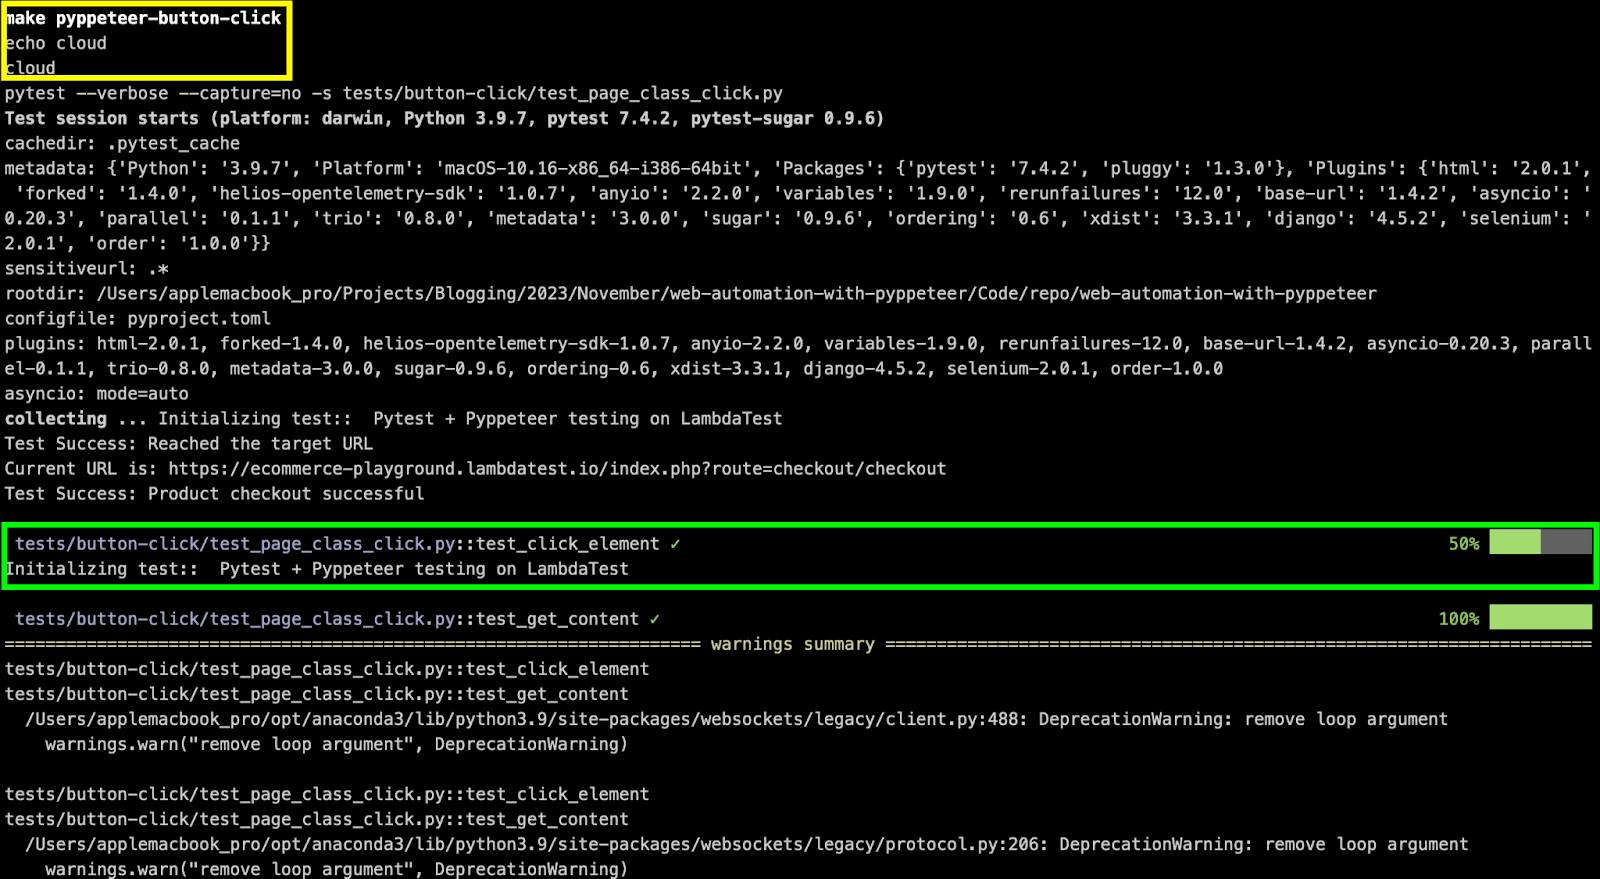
Below is the snapshot from the LambdaTest Automation Dashboard indicating that the test execution was successful.
Printing PDF files with Pyppeteer
Testing PDF files is a common test scenario with any automation framework, and the same is the case with the Pyppeteer library. The pdf() method (or coroutine) of the Page class lets you generate a pdf of the entire web page.
As stated in official Pyppeteer documentation, generating PDFs is only supported in headless mode. The pdf() method provides many options, some mentioned below:
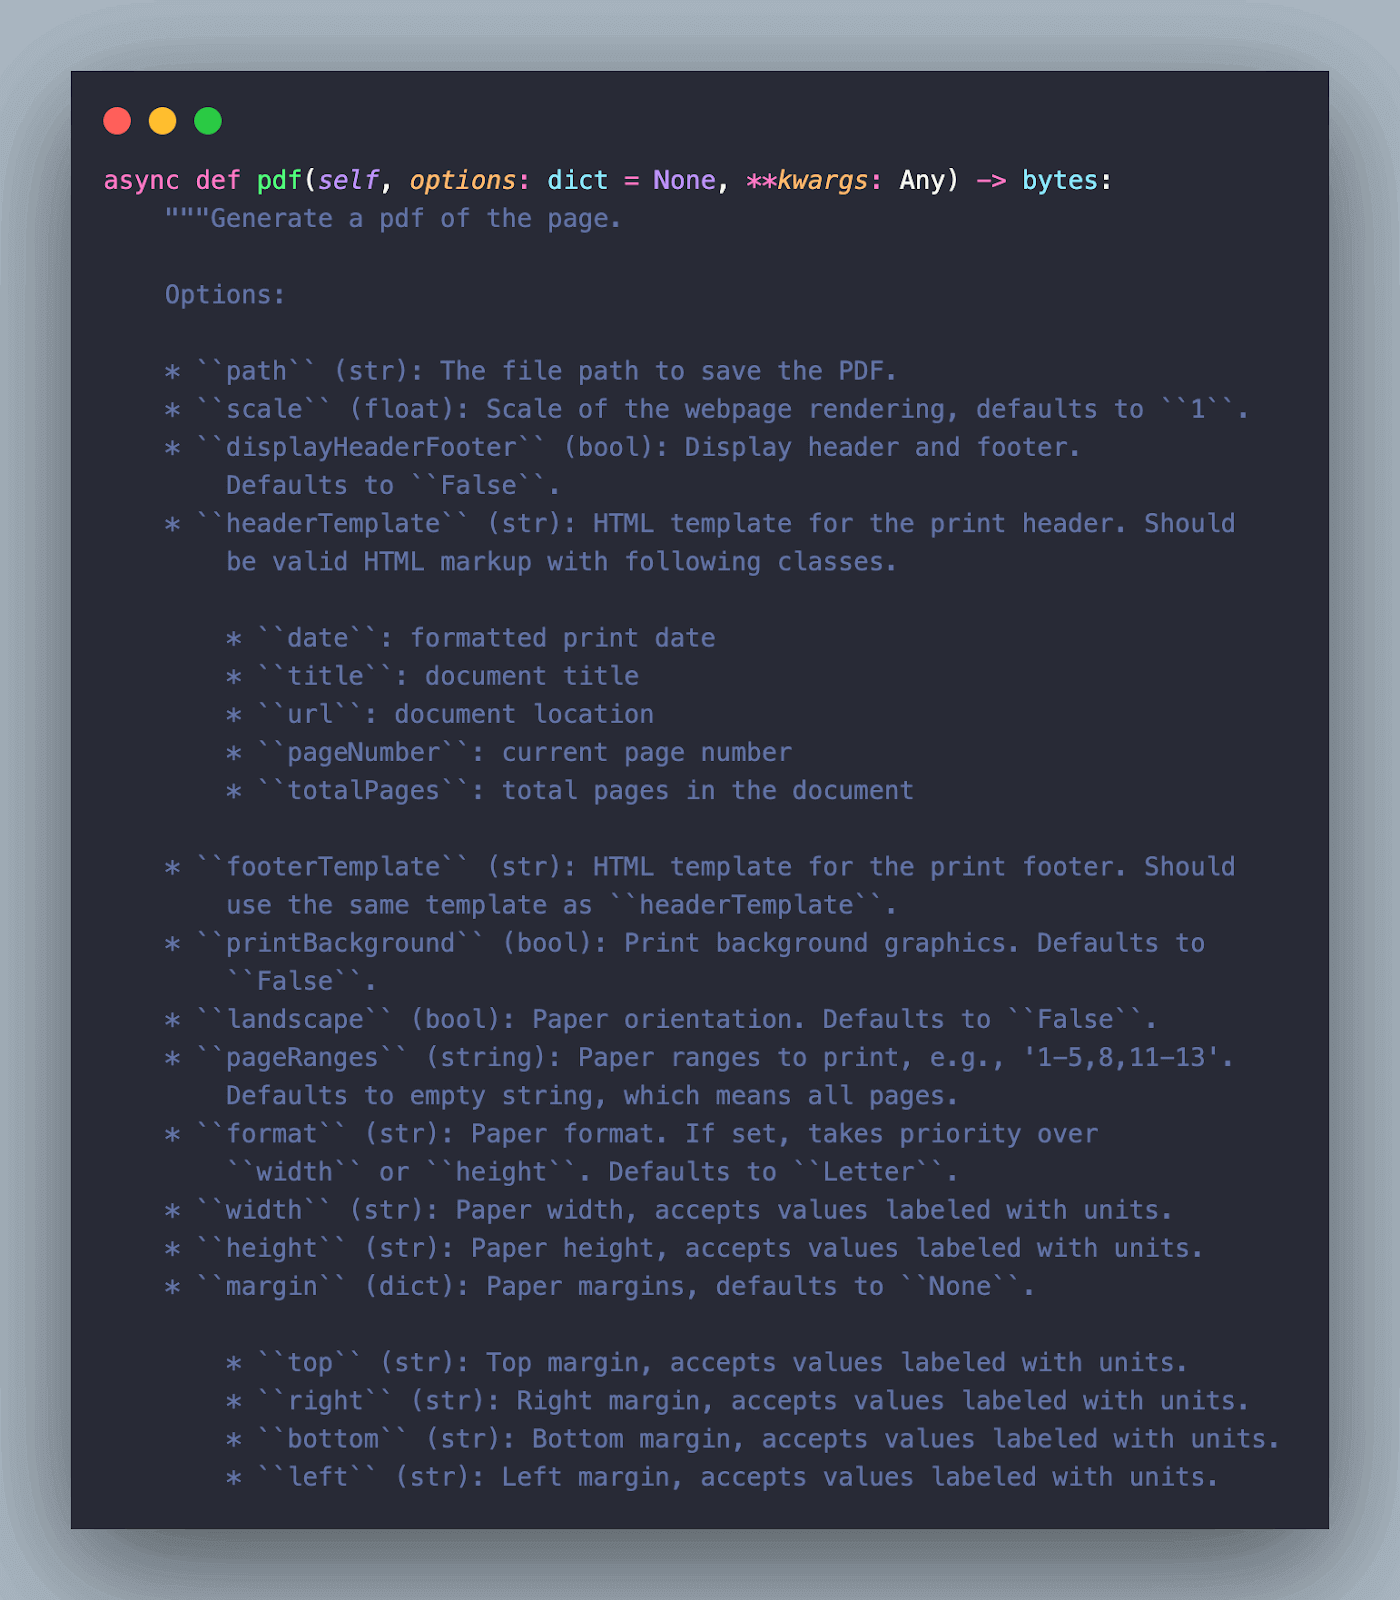
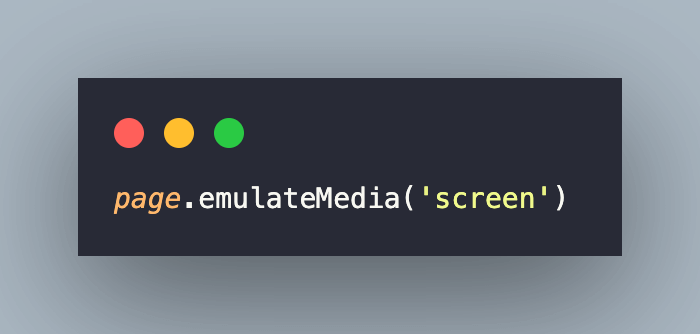
By default, the pdf() method generates a pdf of the page with print CSS media. For generating a PDF with screen media, page.emulateMedia(‘screen’) needs to be invoked before invoking the pdf() method.
Code Walkthrough
The launch() method is invoked for instantiating headless Chrome. Since we are using pytest with Pyppeteer, browser instance and new pages on the browser are created under the pytest fixture with function scope.
Before printing the page, the emulateMedia() method is called to simulate the appearance of the page when rendered for screen media.
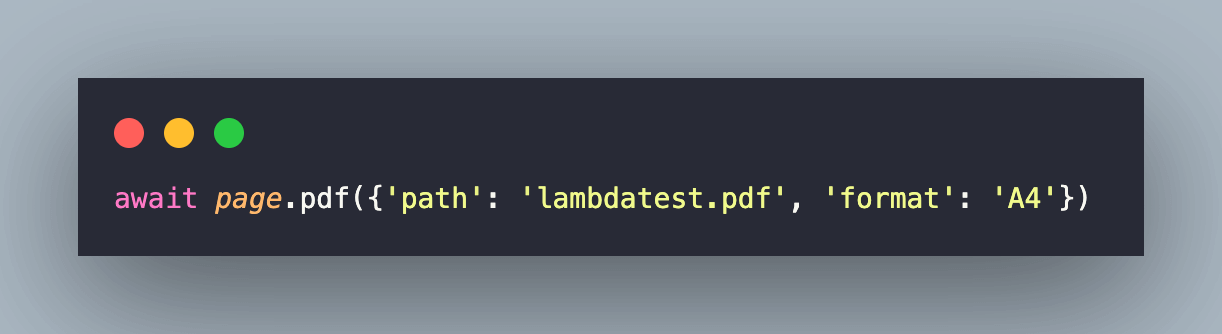
Finally, the pdf() method of the Page class is invoked with the path set to current-working-directory/lambdatest.pdf and format set to A4.
Execution
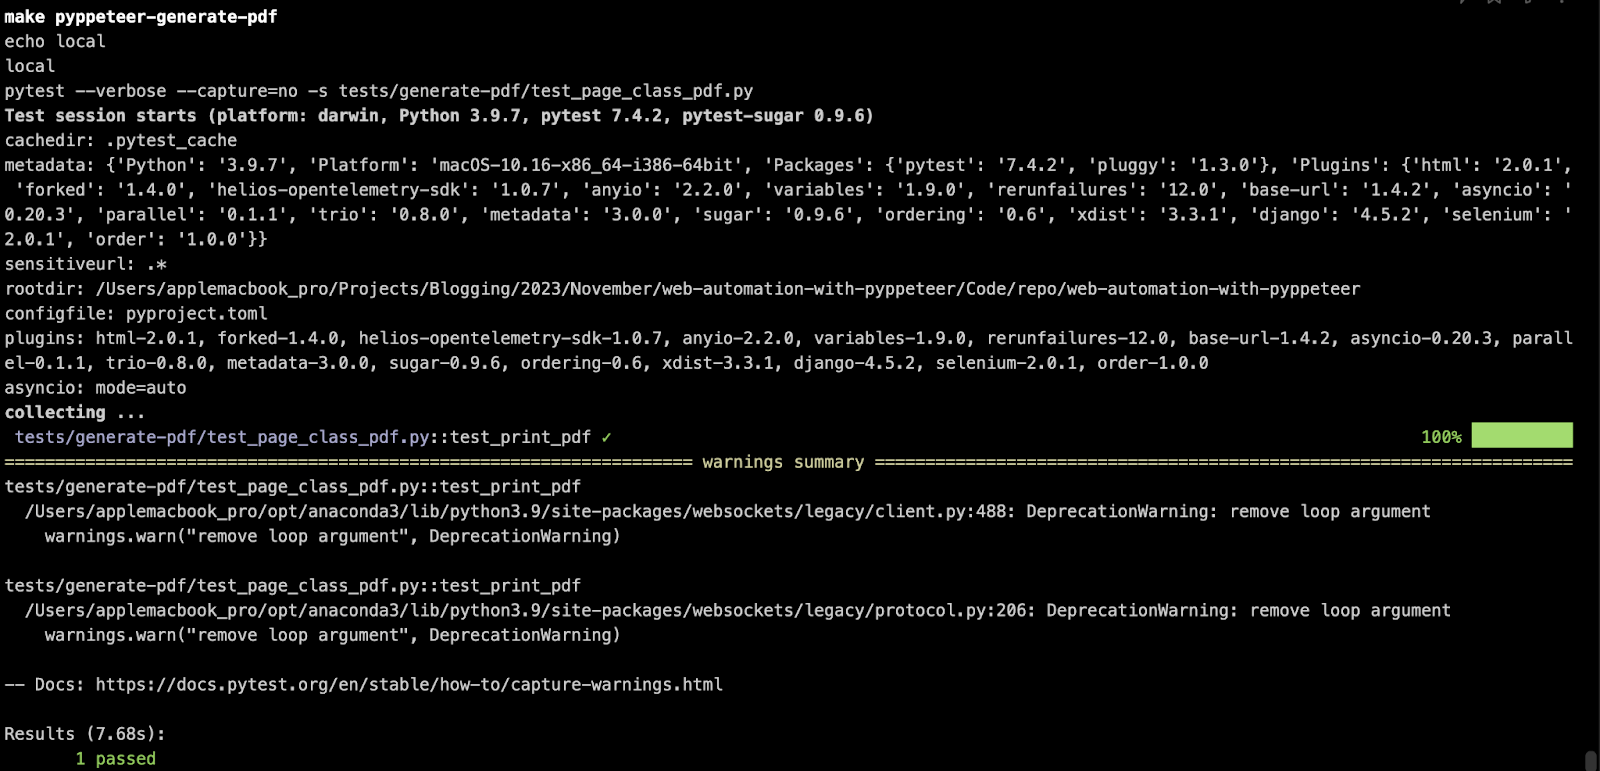
In order to generate a PDF of the current web page with Pyppeteer, invoke the command make pyppeteer-generate-pdf on the terminal. We have instantiated the Chromium browser on the local machine for this scenario.
Below is a screenshot of the generated PDF document:
Opening specified version of Chromium browser with Pyppeteer
As stated in the earlier sections, Pyppeteer also provides the flexibility to use a specified version of Chromium. The version can be specified in the PYPPETEER_CHROMIUM_REVISION environment variable.
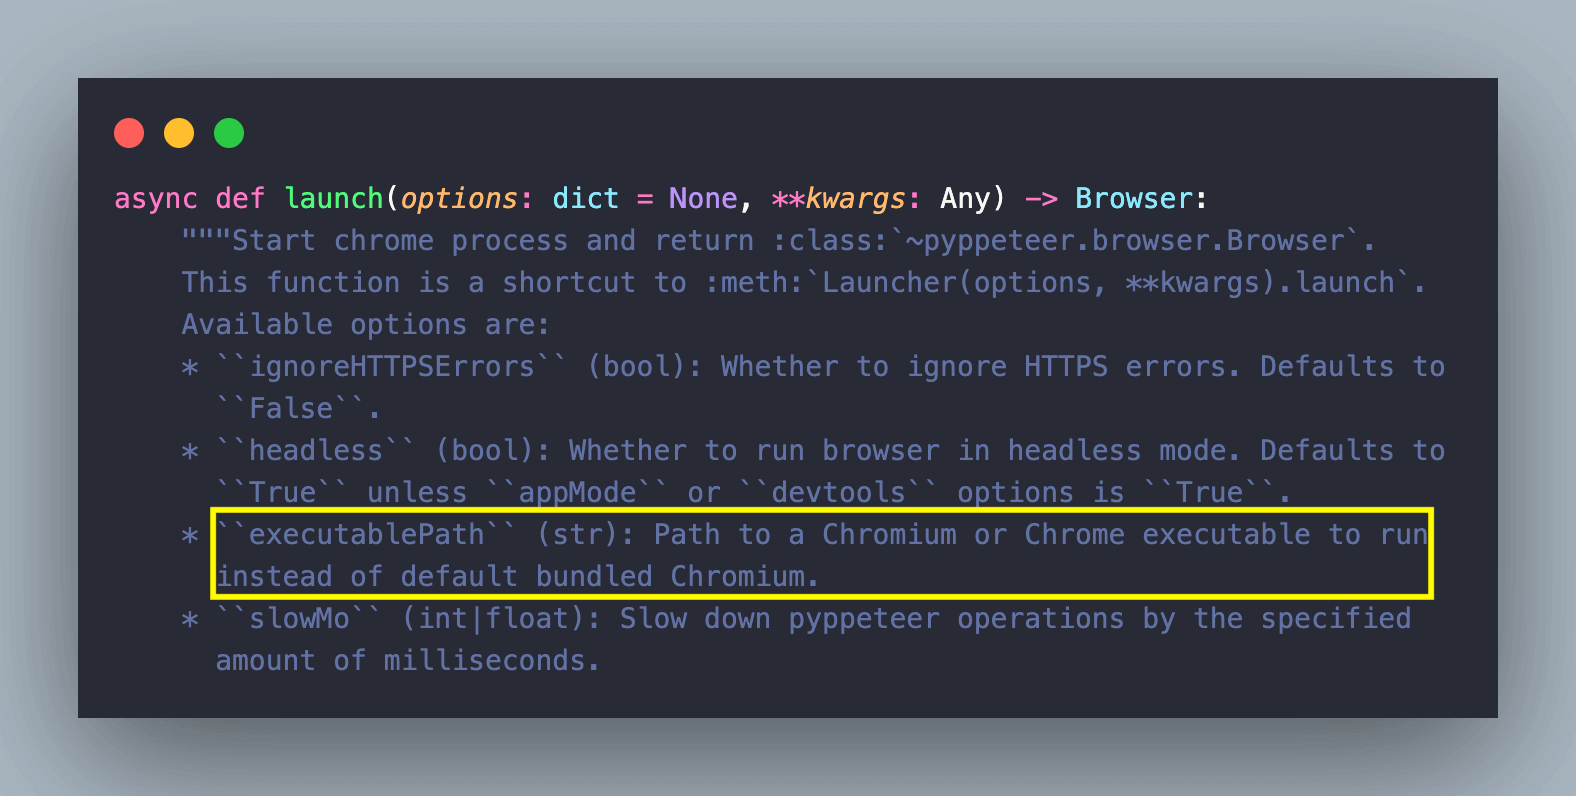
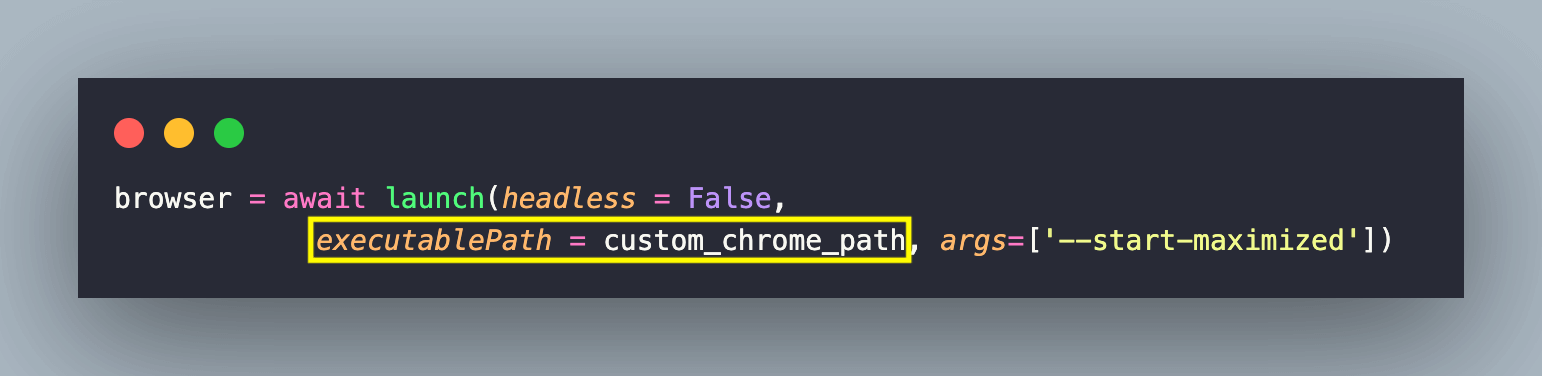
The other option is downloading the required version of the Chromium browser on the machine. After that, we have to pass the path to launch() method of the Launcher class. The executablePath option in the launch() method lets you run the specified Chromium version instead of the default bundled Chromium.
To run a particular version of Chromium on the machine (e.g., macOS in my case), we downloaded a couple of Chromium versions from the following locations:
| Chromium version | Download Location |
|---|---|
| Latest Chromium version | |
| Older Chromium versions |
https://commondatastorage.googleapis.com/chromium-browser-snapshots/index.html?prefix=Mac/ |
I have uploaded the downloaded different Chromium browser versions in the mac-chrome folder.
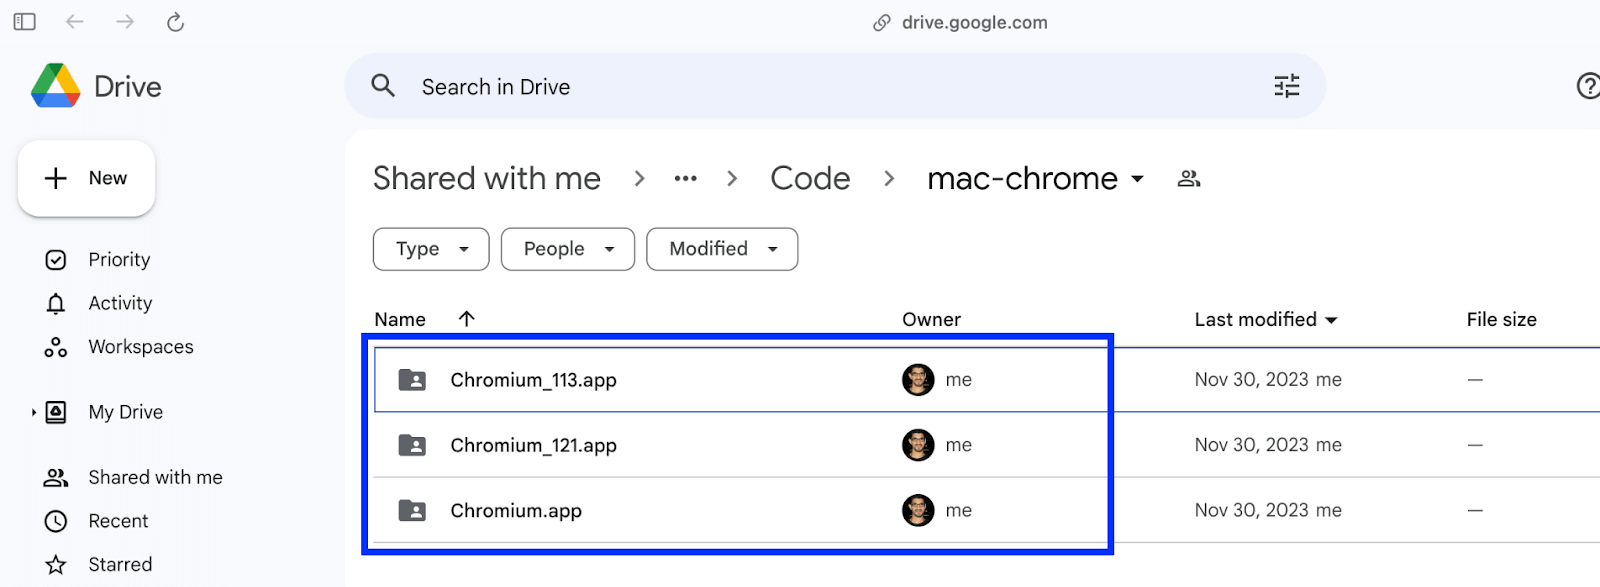
Once downloaded, you need to copy the different versions of Chromium in the mac-chrome folder in the root of the working directory.

With this, we are all set to run Pyppeteer with the different versions of the Chromium browser!
Demonstration
In the sample shown below, choosing Chromium versions (default, 121, and 113) is flexible depending on the value of the CHROMIUM_VERSION environment variable. For this example, you must ensure that EXEC_PLATFORM is set to local.
Code Walkthrough
To get started, we read the value of the environment variable CHROMIUM_VERSION.
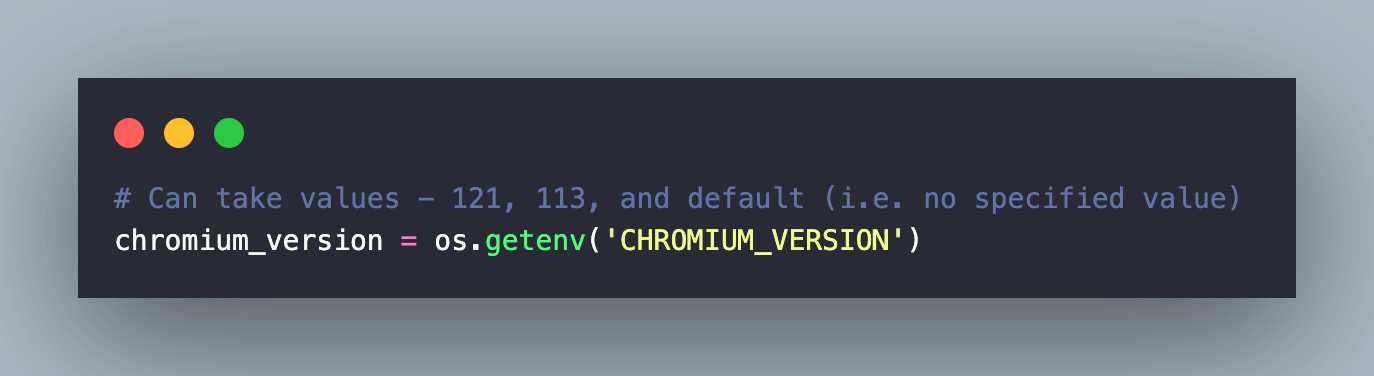
Once the value of the environment variable is read, the custom path is assigned to executablePath [of the launch() method].
![executablePath [of the launch() method]](https://www.lambdatest.com/blog/wp-content/uploads/2024/01/executablePath-of-the-launch-method.png)
As seen in the modified pytest fixture implementation, the custom Chromium browser is launched in non-headless mode and maximized state.
As stated in the official documentation, Pyppeteer works best with the version of Chromium it is bundled with. However, we did not encounter any issues when testing with the custom versions of the Chromium!
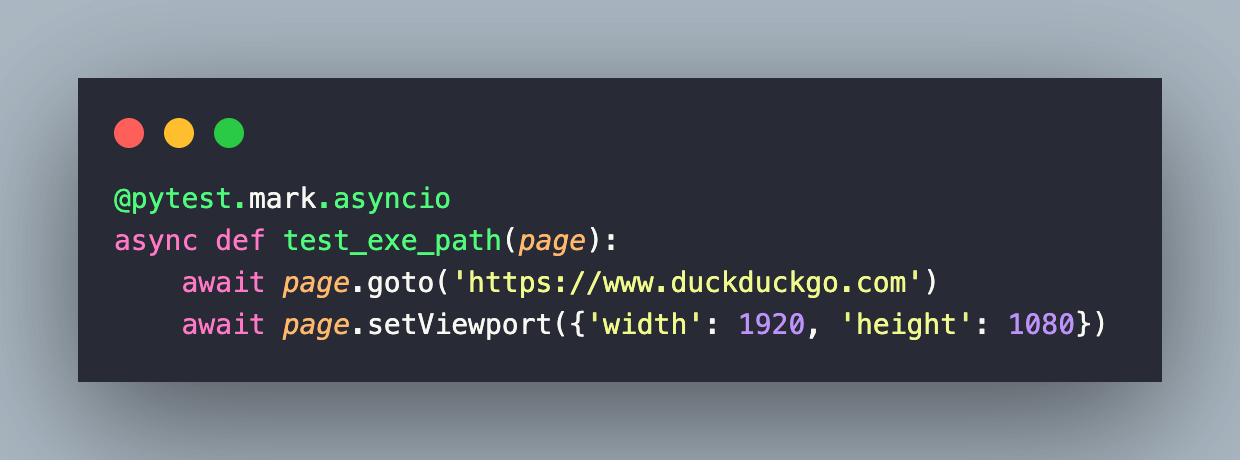
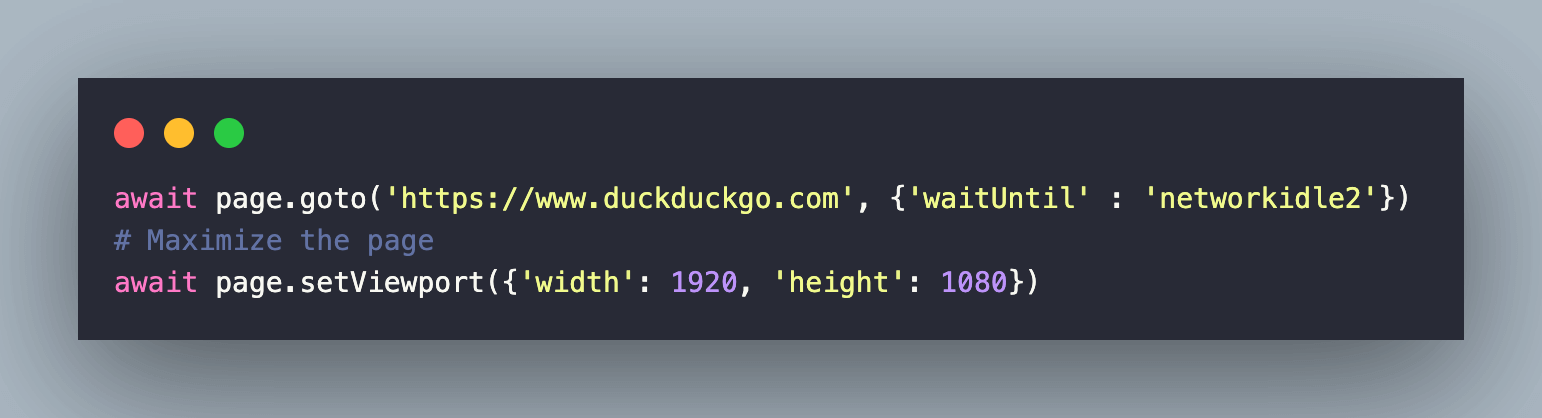
In the test method [i.e. test_exe_path()], we first set the viewport size to (1920* 1080) using the setViewport() method.
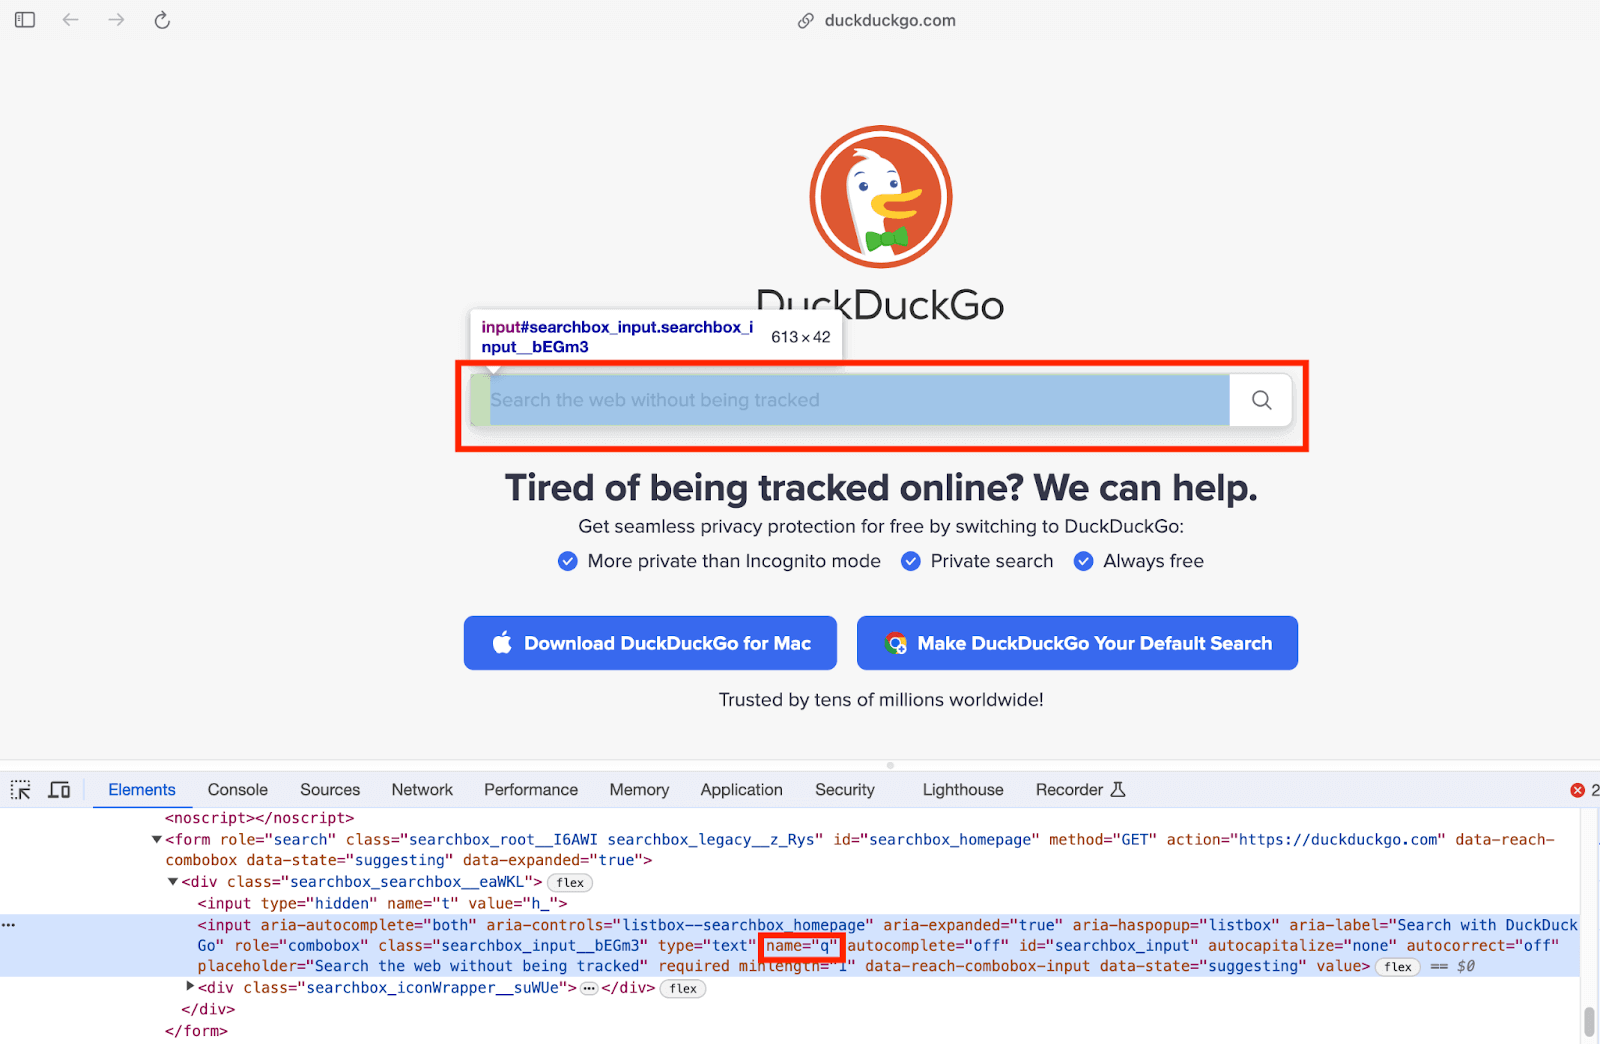
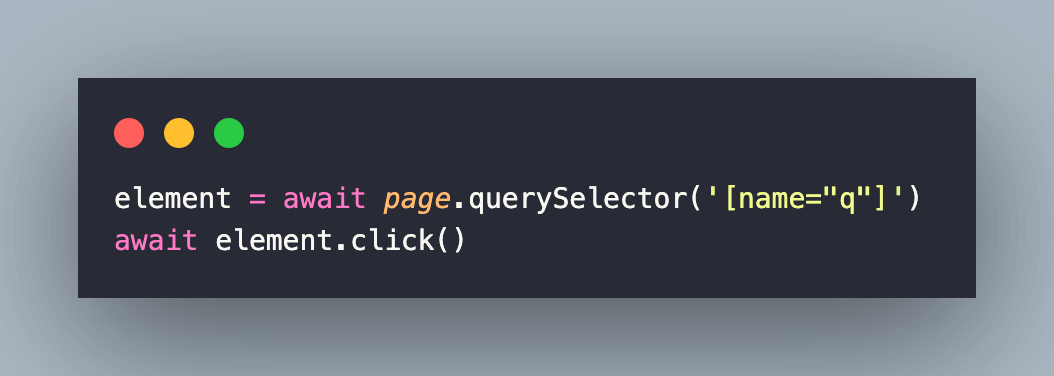
After that, we locate the text-box element in the DuckDuckGo search page with the CSS Selector.
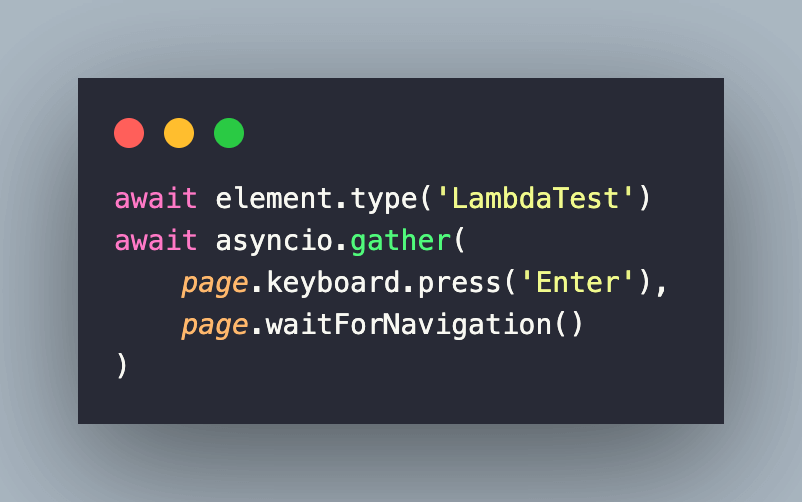
Next, we enter the search term LambdaTest in the search box. As a part of asyncio.gather(), we first trigger the Enter key via the press() method of the keyboard class. The waitForNavigation() method waits (for a maximum of 30000 ms) for the navigation event to occur before it proceeds to the next step in execution.
Execution
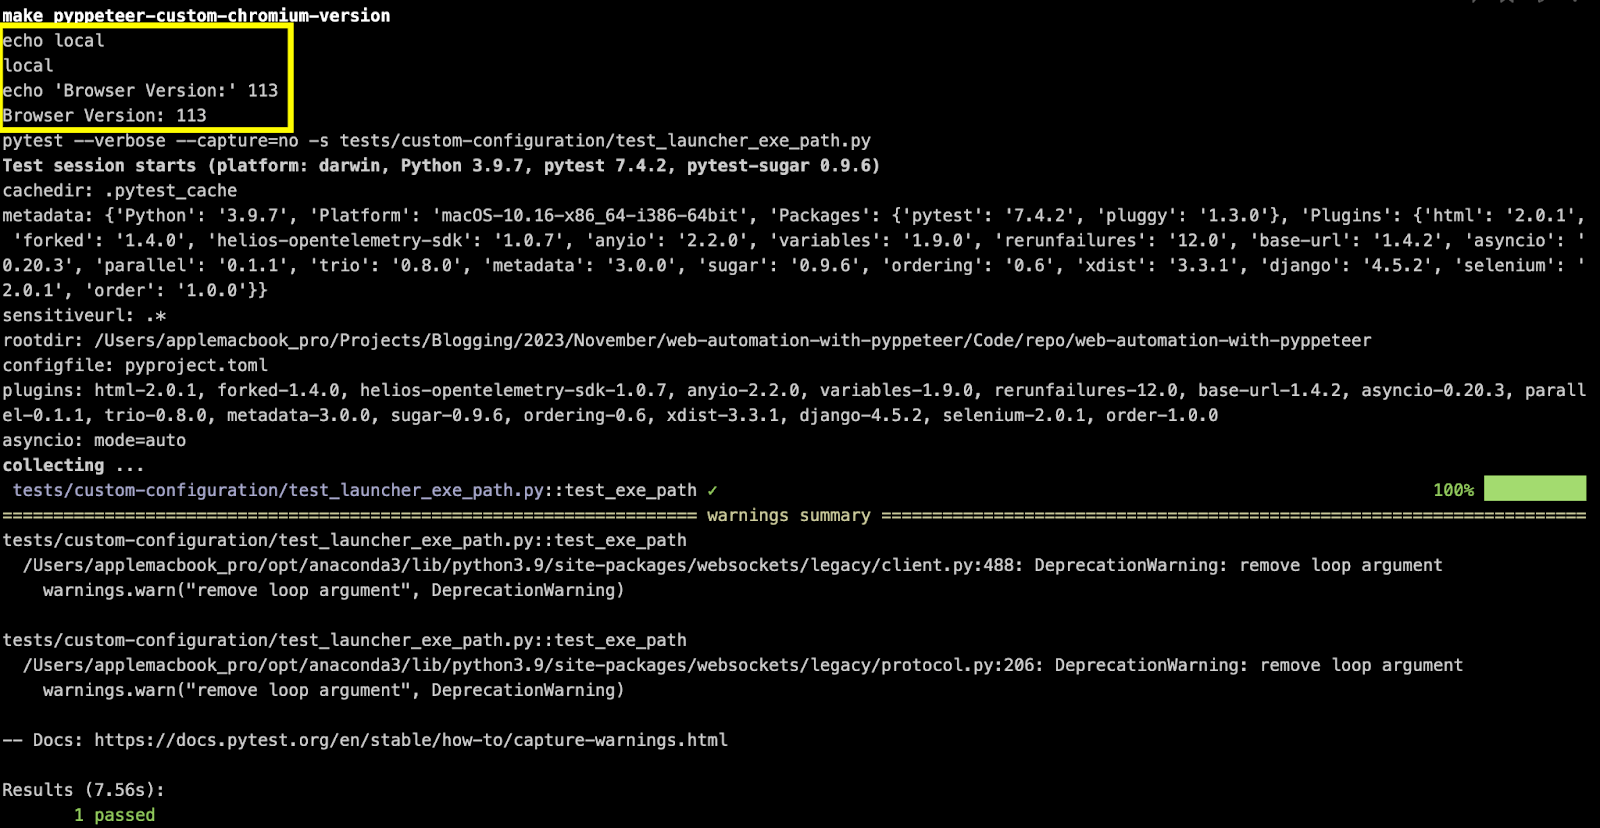
We first set the EXEC_PLATFORM variable to local. For execution on Chromium version 121, set the CHROMIUM_VERSION to 121 by triggering the export CHROMIUM_VERSION=121 command on the terminal. Run the make pyppeteer-custom-chromium-version command to run the automated test on the specified Chromium version.
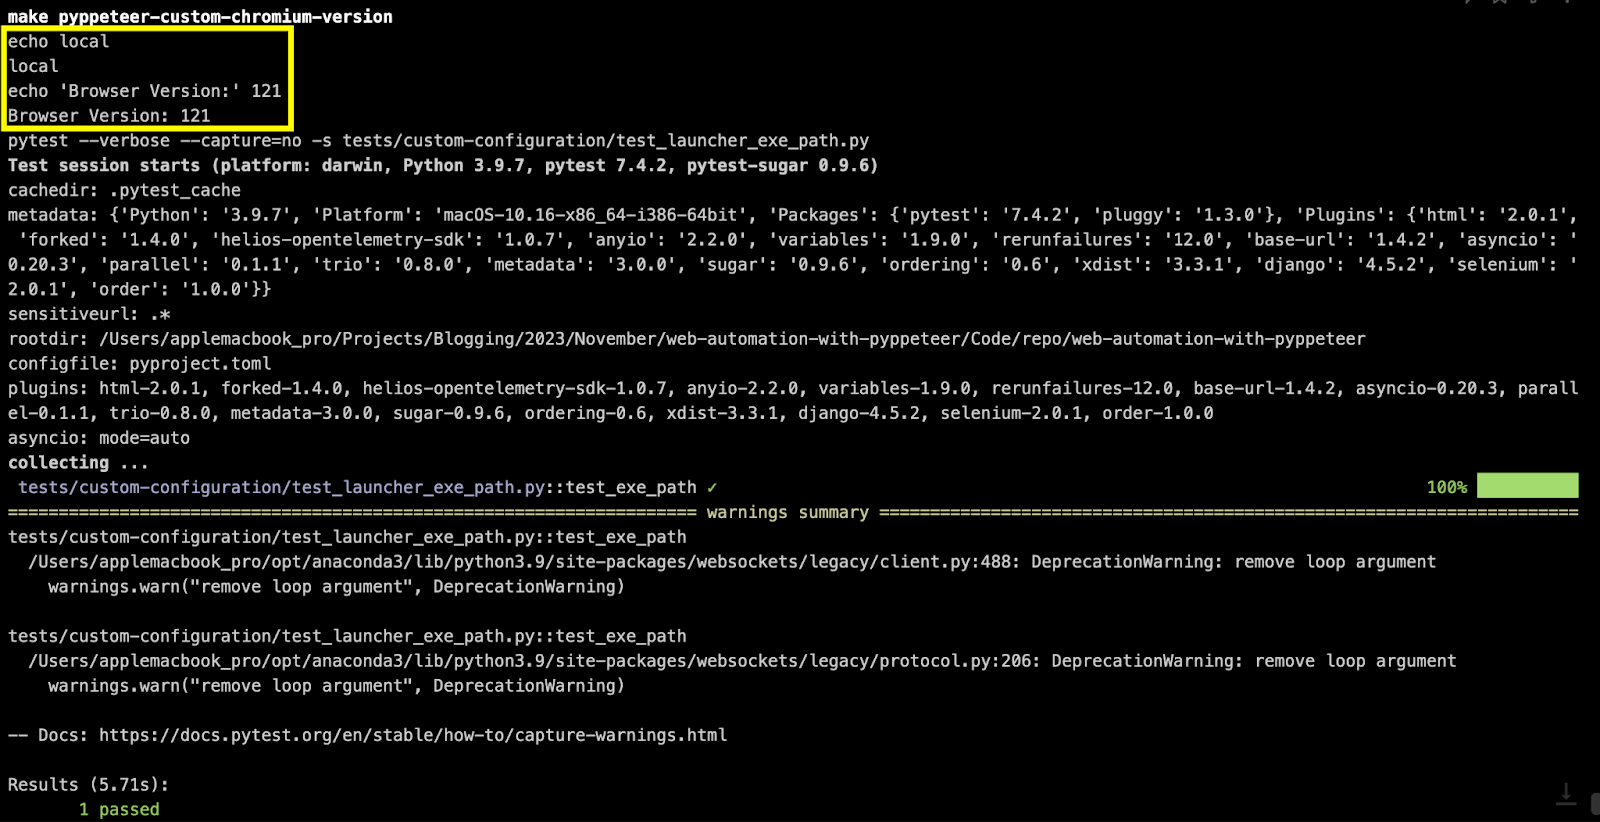
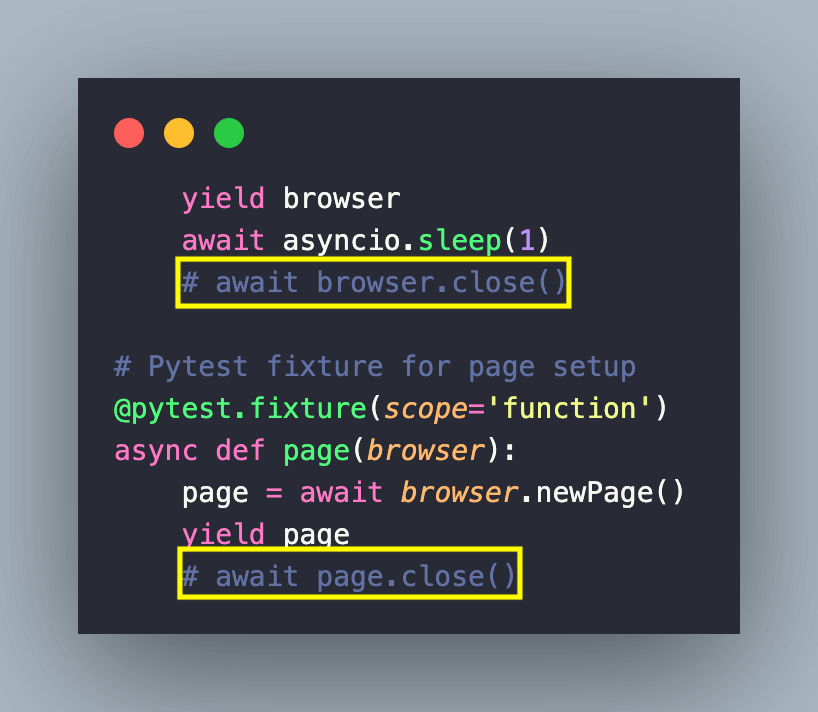
To verify the Chromium version, we temporarily disabled closing (or releasing resources) of the Page & Browser.
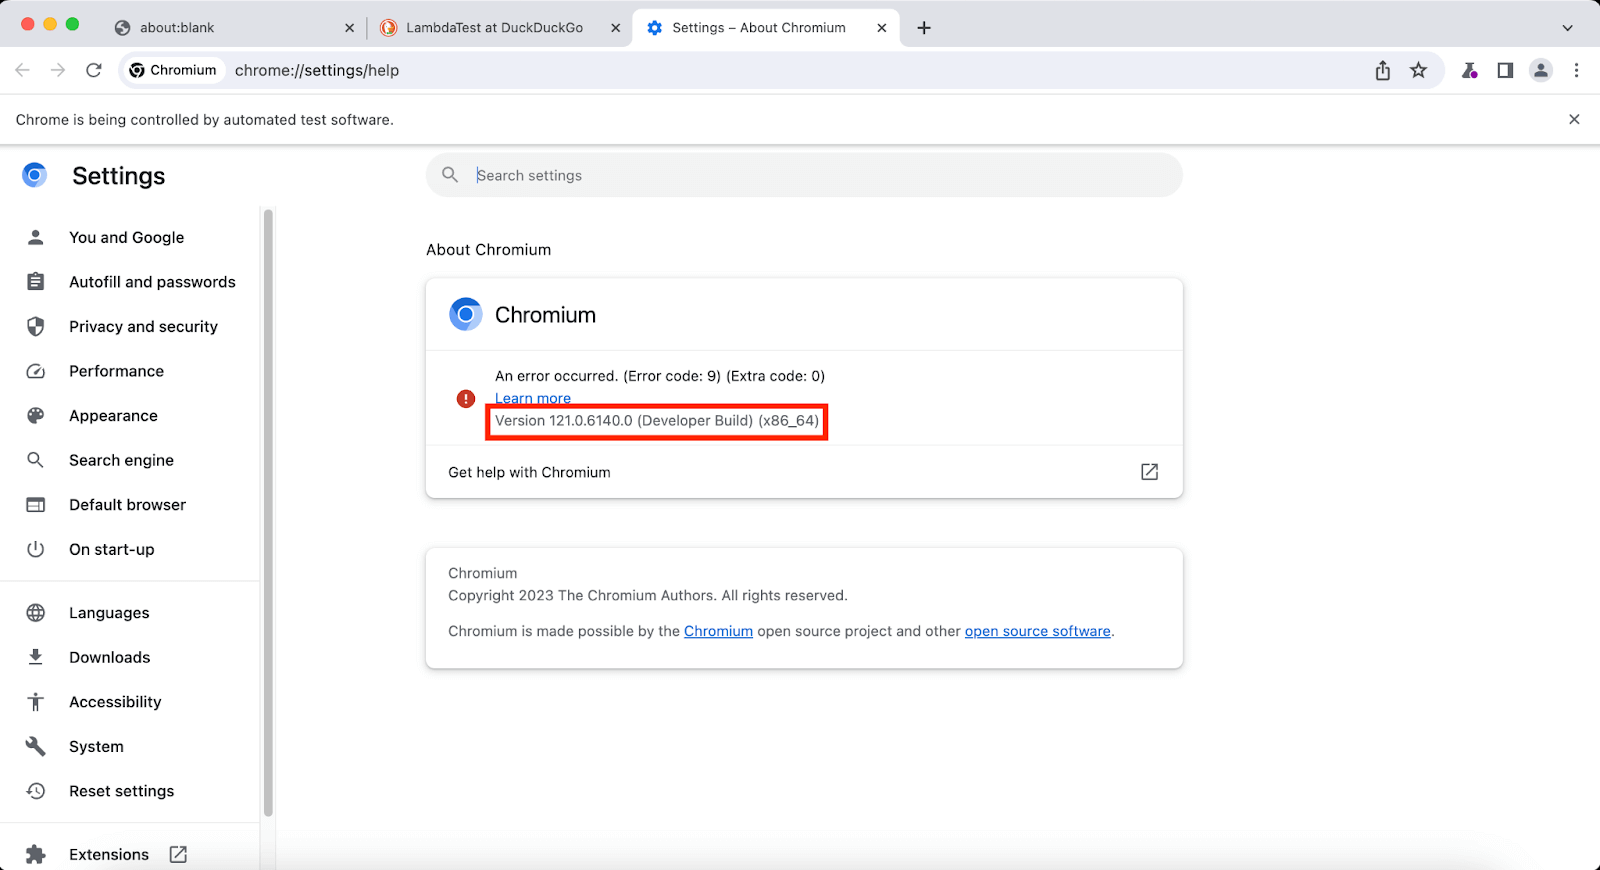
As seen below, the tests are rightly triggered on Chromium v121!
For execution on Chromium version 113, set the CHROMIUM_VERSION to 113 by triggering the export CHROMIUM_VERSION=113 command on the terminal. Run the make pyppeteer-custom-chromium-version command to run the automated test on the specified Chromium version.

Switching tabs with Pyppeteer
Switching tabs in a browser is very commonly used when automating browser-based test scenarios. The same principle also applies to Pyppeteer as well. Every invocation of the newPage() method in Pyppeteer returns a Page Object. This becomes the identifier of the page, similar to window handles in Selenium. To learn more about it you can go through this blog on handling windows in Selenium.
In case more than one browser page is open, you use the targets() method that returns a list consisting of all active targets inside the browser. Switching to a certain tab (or activating a tab) in Pyppeteer is done via the bringToFront() method of the Page class.
Demonstration
For demonstration, let’s open up two browser tabs and switch to the first tab using the bringToFront() coroutine.
Code Walkthrough
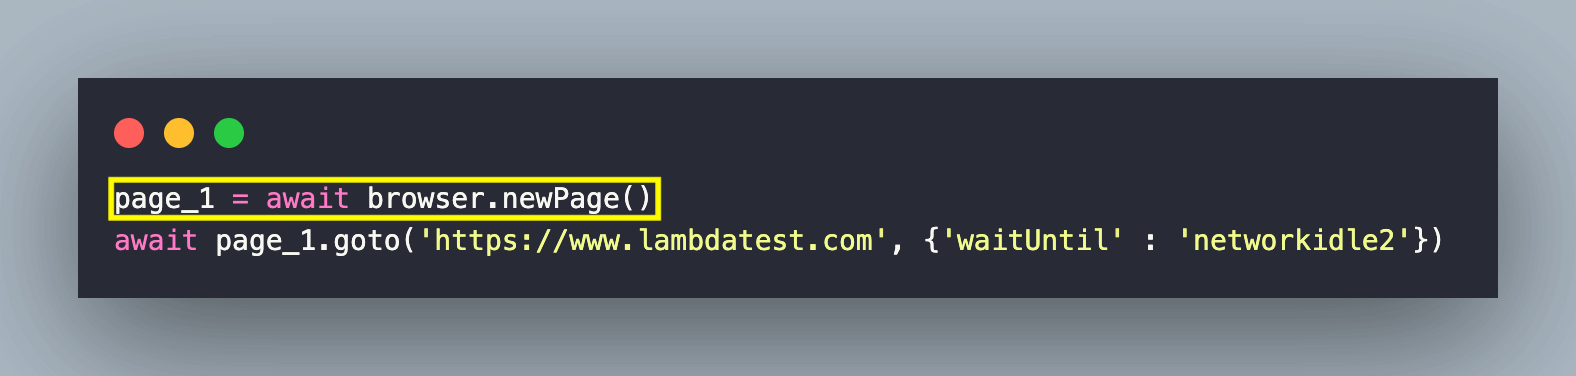
Since the test scenario remains unchanged, we would only focus on how tabs are switched in the example. First, we open a new page with the URL under test set to DuckDuckGo.
Next, we open a new page with the URL under test set to LambdaTest. As seen below, the page identifier is set to page_1.
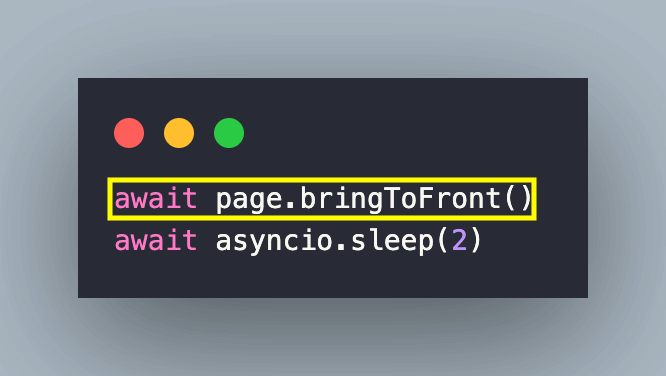
For switching to the earlier tab, we invoke the bringToFront() method on the page object – page.
Execution
Invoke the command make pyppeteer-activate-tab on the terminal with the Chromium browser instantiated on the local machine.
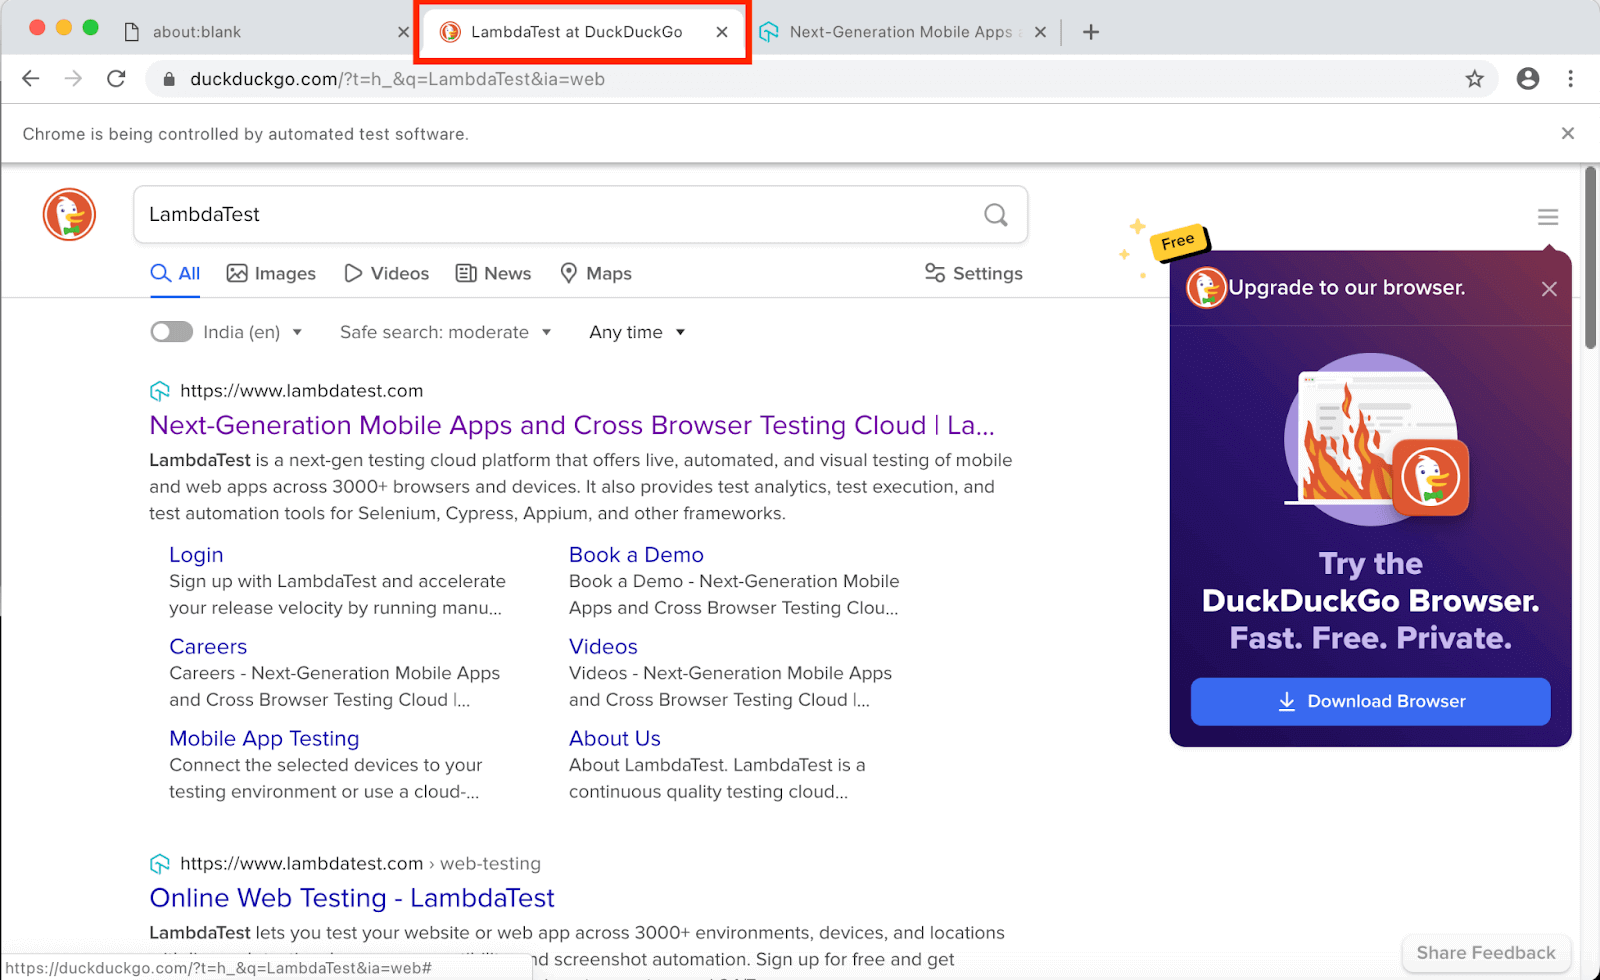
As seen in the execution screenshot, the older tab (where the DuckDuckGo scenario is run) is brought back to focus.
Taking screenshots with Pyppeteer
Capturing screenshots with Selenium, Pyppeteer, Cypress, etc., is a common practice for isolating and debugging visual issues in the website/app. Screenshots are also essential for visual regression testing, as it helps in comparing captured screenshots with the baseline screenshots.
Apart from identifying visual inconsistencies, screenshots (full-page or element-level) provide a visual confirmation of the page at a particular point in time. The screenshot() method of the Page class helps capture a screenshot of the entire page or a particular element that is currently under focus.
The screenshot() method throws an ElementHandleError in case the target element is detached from the DOM.
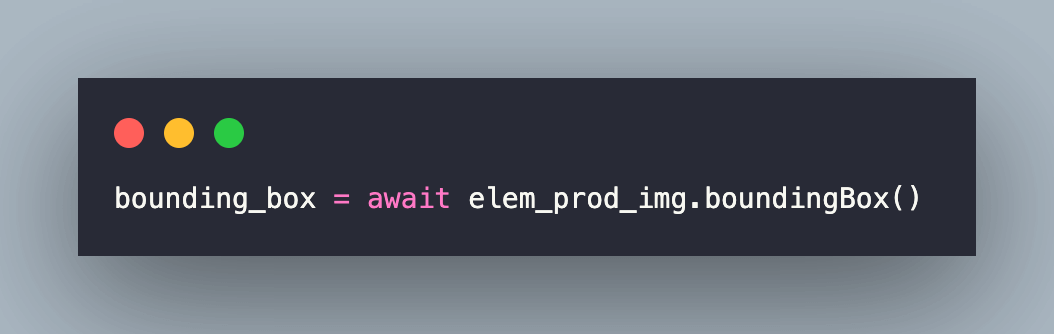
For capturing element screenshot, we first capture the element using an appropriate locator. Once located, the boundingBox() method is used to calculate the bounding box of the element.
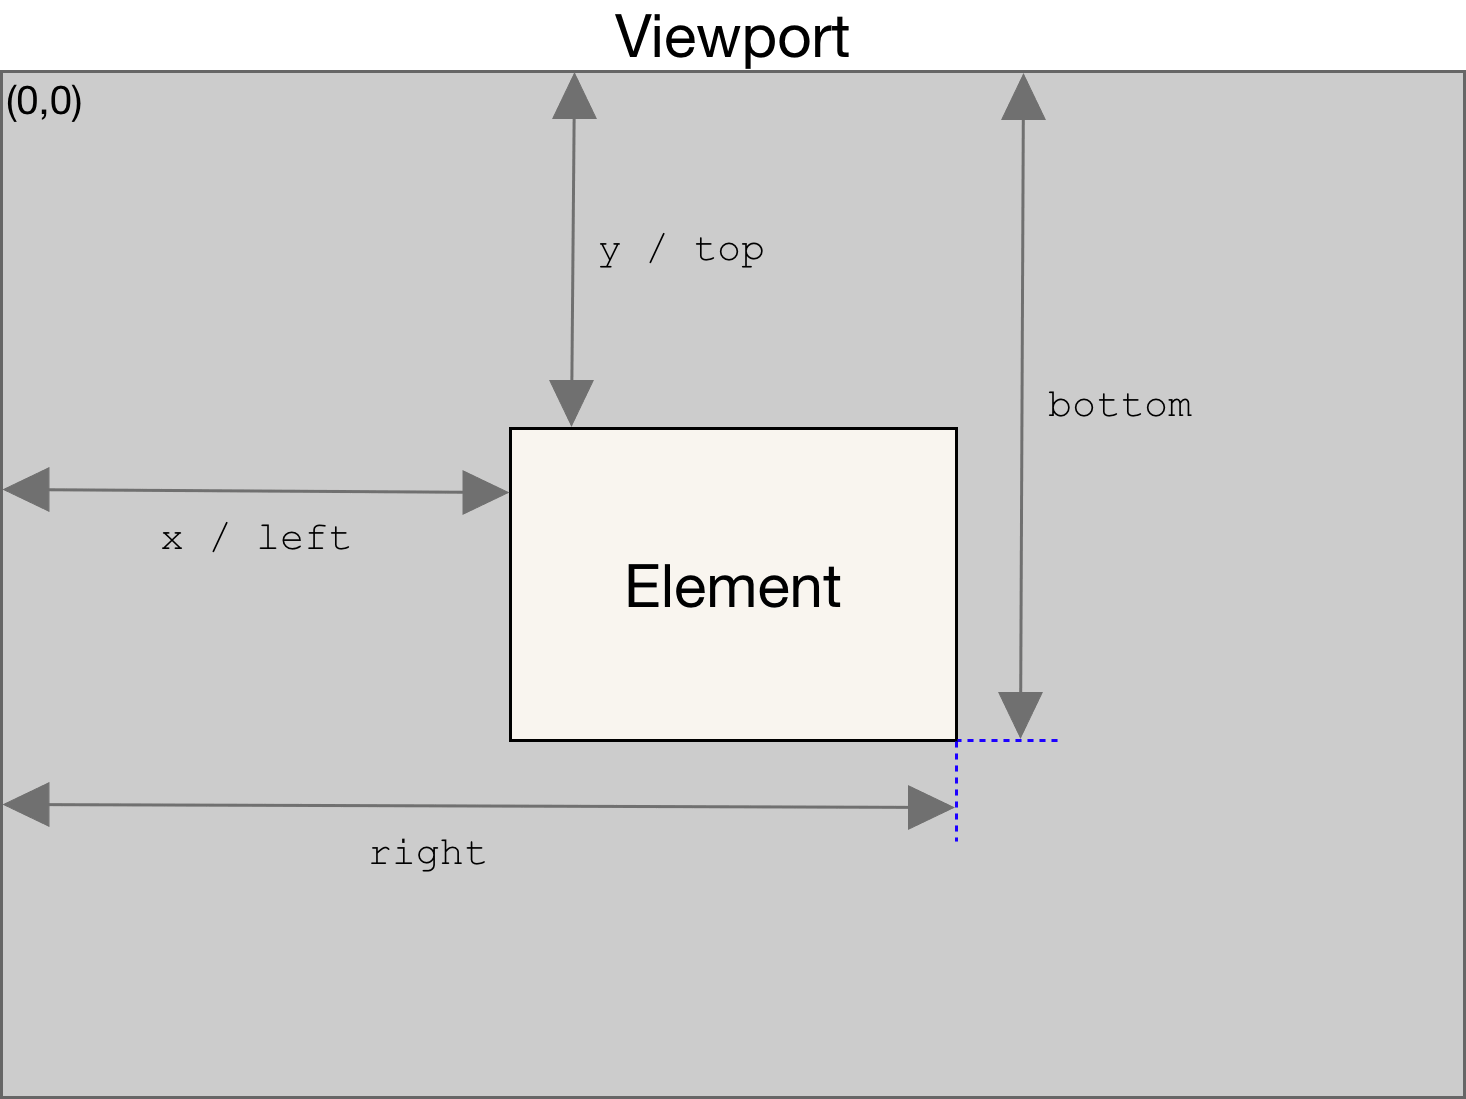
The boundingBox() method returns a dictionary of items mentioned below:
- x (integer): X coordinate value in pixels
- y (integer): Y coordinate value in pixels
- width (integer): Element width in pixels
- height (integer): Element height in pixels
Demonstration
For demonstrating capturing screenshots with Pyppeteer, we automate the following test scenario on Chromium installed on the local machine (EXEC_PLATFORM = local):
|
Code Walkthrough
We first navigate to the LambdaTest eCommerce Playground using the goto() method of the Page class.
Next, we locate the required element using the CSS Selector property. Instead of CSS Selector, you can also use XPath, in which case you would need to use waitForXPath() instead of the waitForSelector() method.
Click operation is performed on the located element using the click() method. Like before, the waitForNavigation() method after the click helps wait for the completion of the navigation operation before the browser proceeds with further actions.
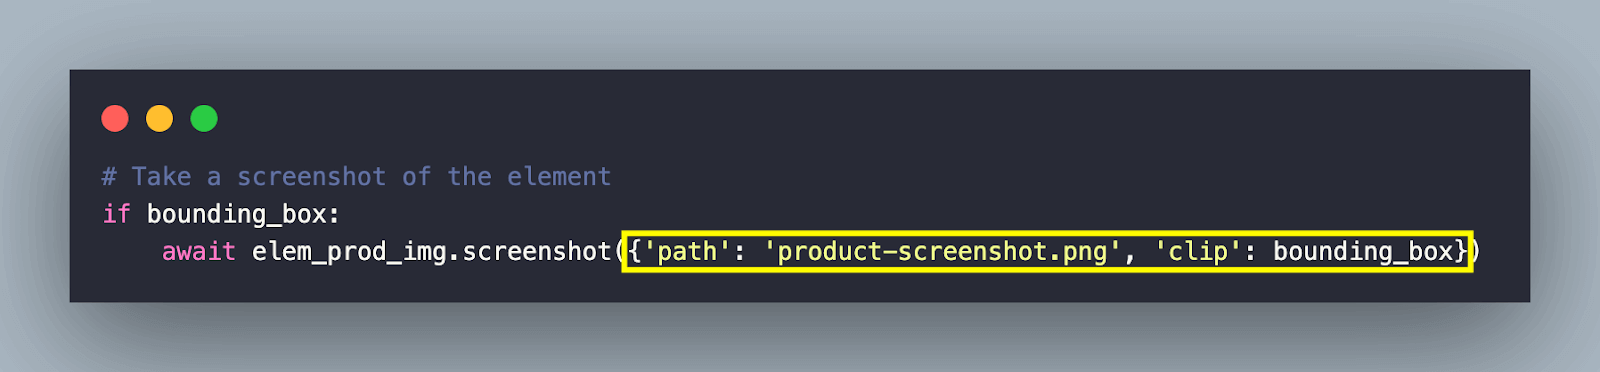
The product image is located via the CSS Selector. The querySelector() method of the Page class returns the ElementHandle of the element that matches the selector.

Next, the boundingBox() method on the located element returns a dictionary of the bounding box.
To capture a screenshot of the element, the screenshot() method is used with the clip option that specifies an object (of type dict), which specifies the clipping region of the page. The screenshot is saved as product-screenshot.png.
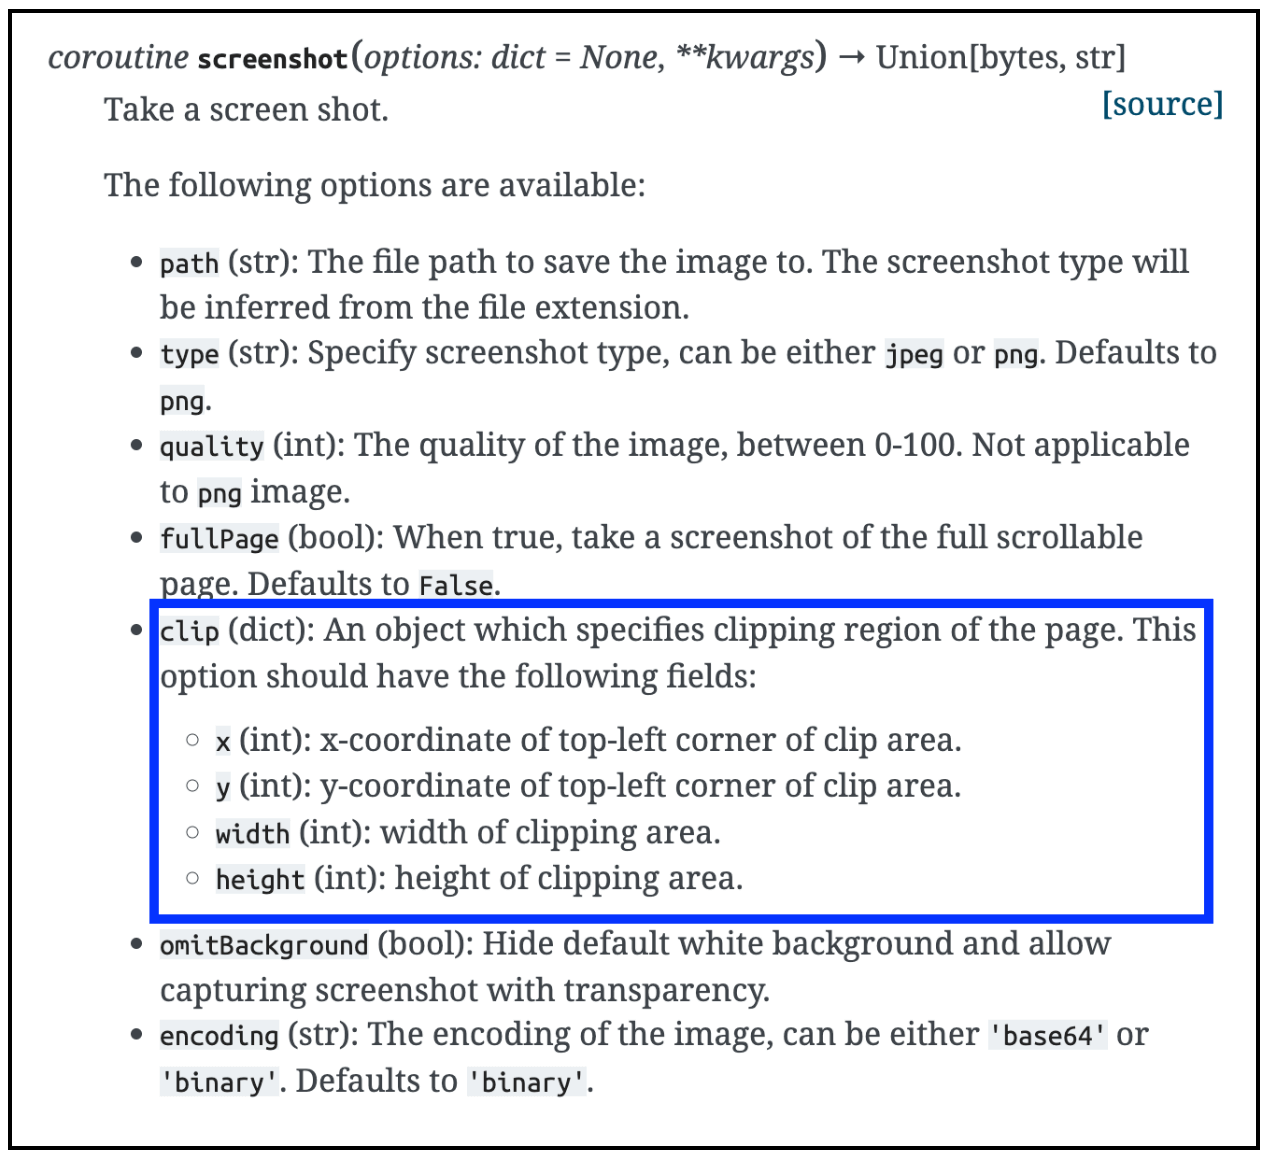
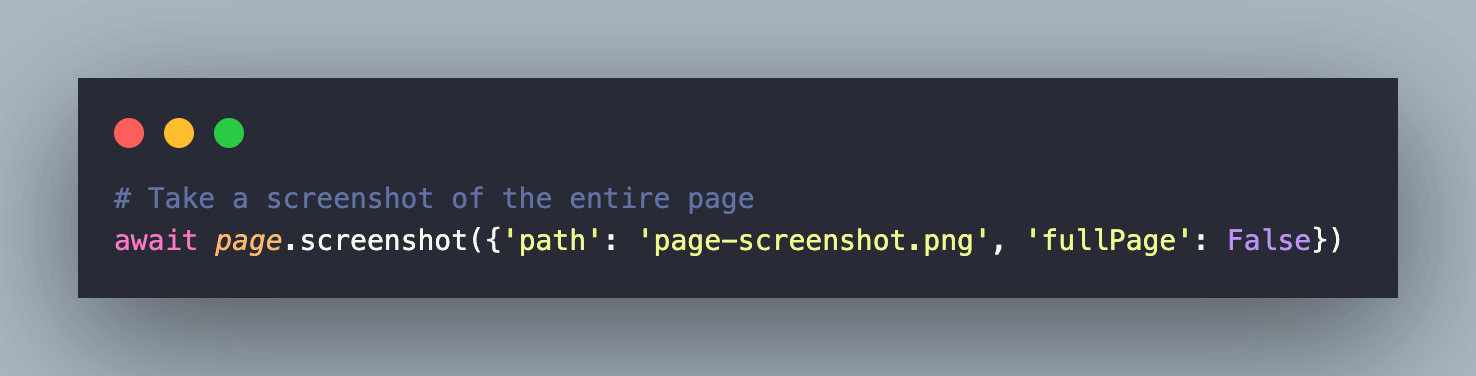
The page screenshot (saved as page-screenshot.png) is captured by invoking the screenshot() method. The fullPage option is set to False (default) and takes a screenshot of the page currently under display.
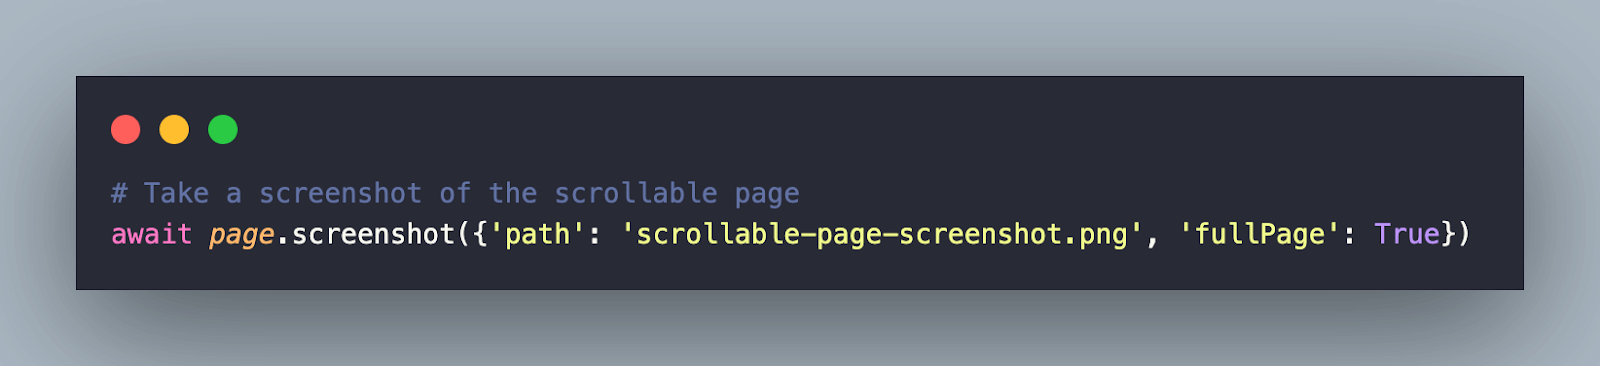
Full-page (or scrollable) screenshot is captured by setting the fullPage option to True.
Execution
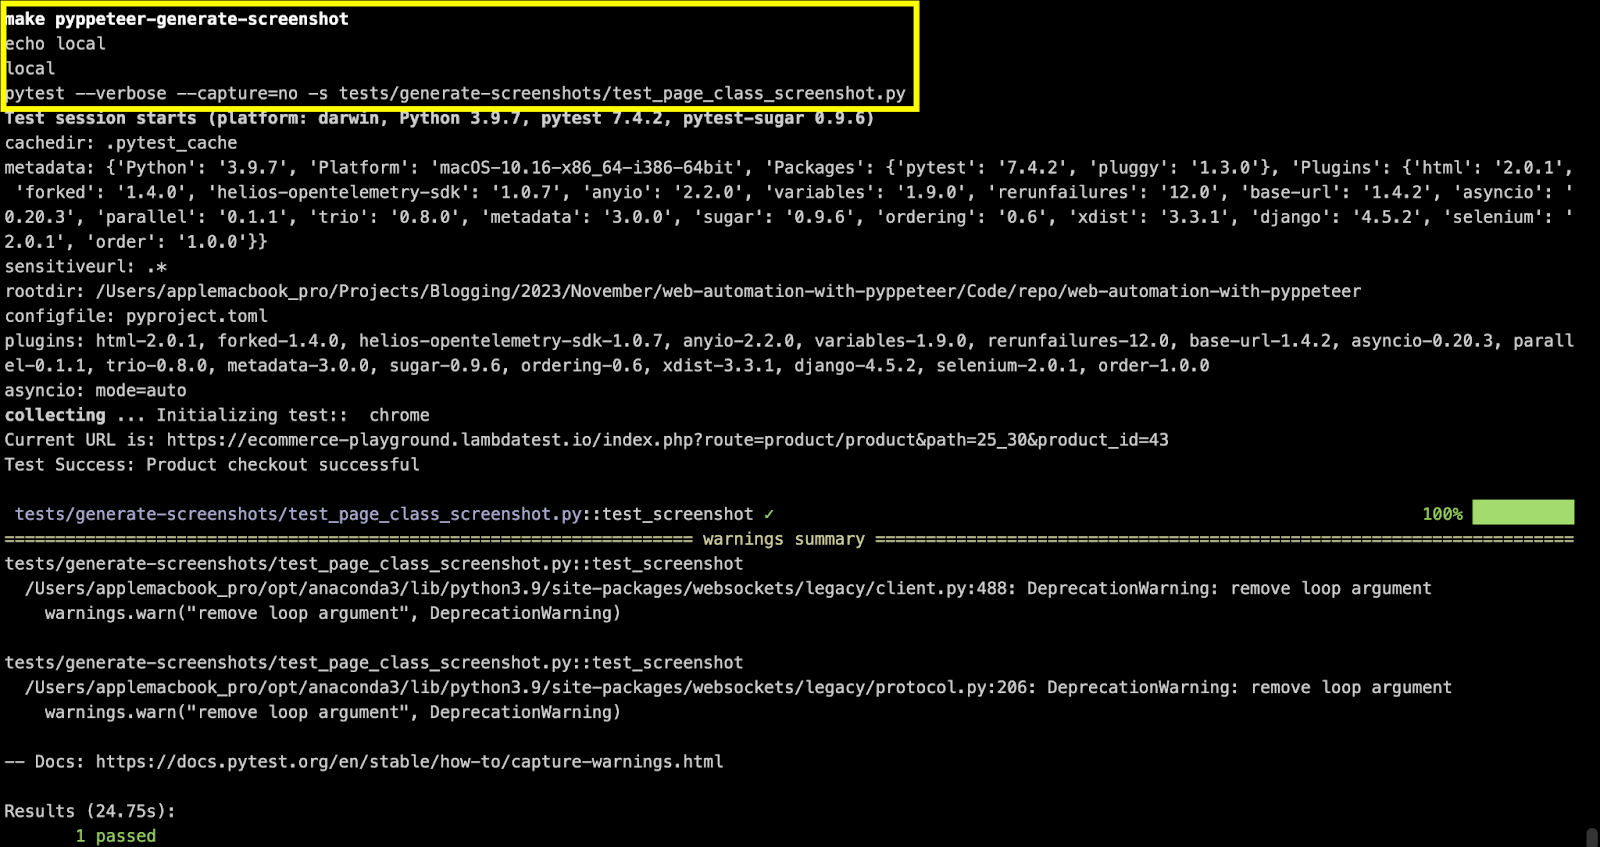
Invoke the command make pyppeteer-generate-screenshot on the terminal with the Chromium browser instantiated on the local machine. As seen below, the test execution is successful.
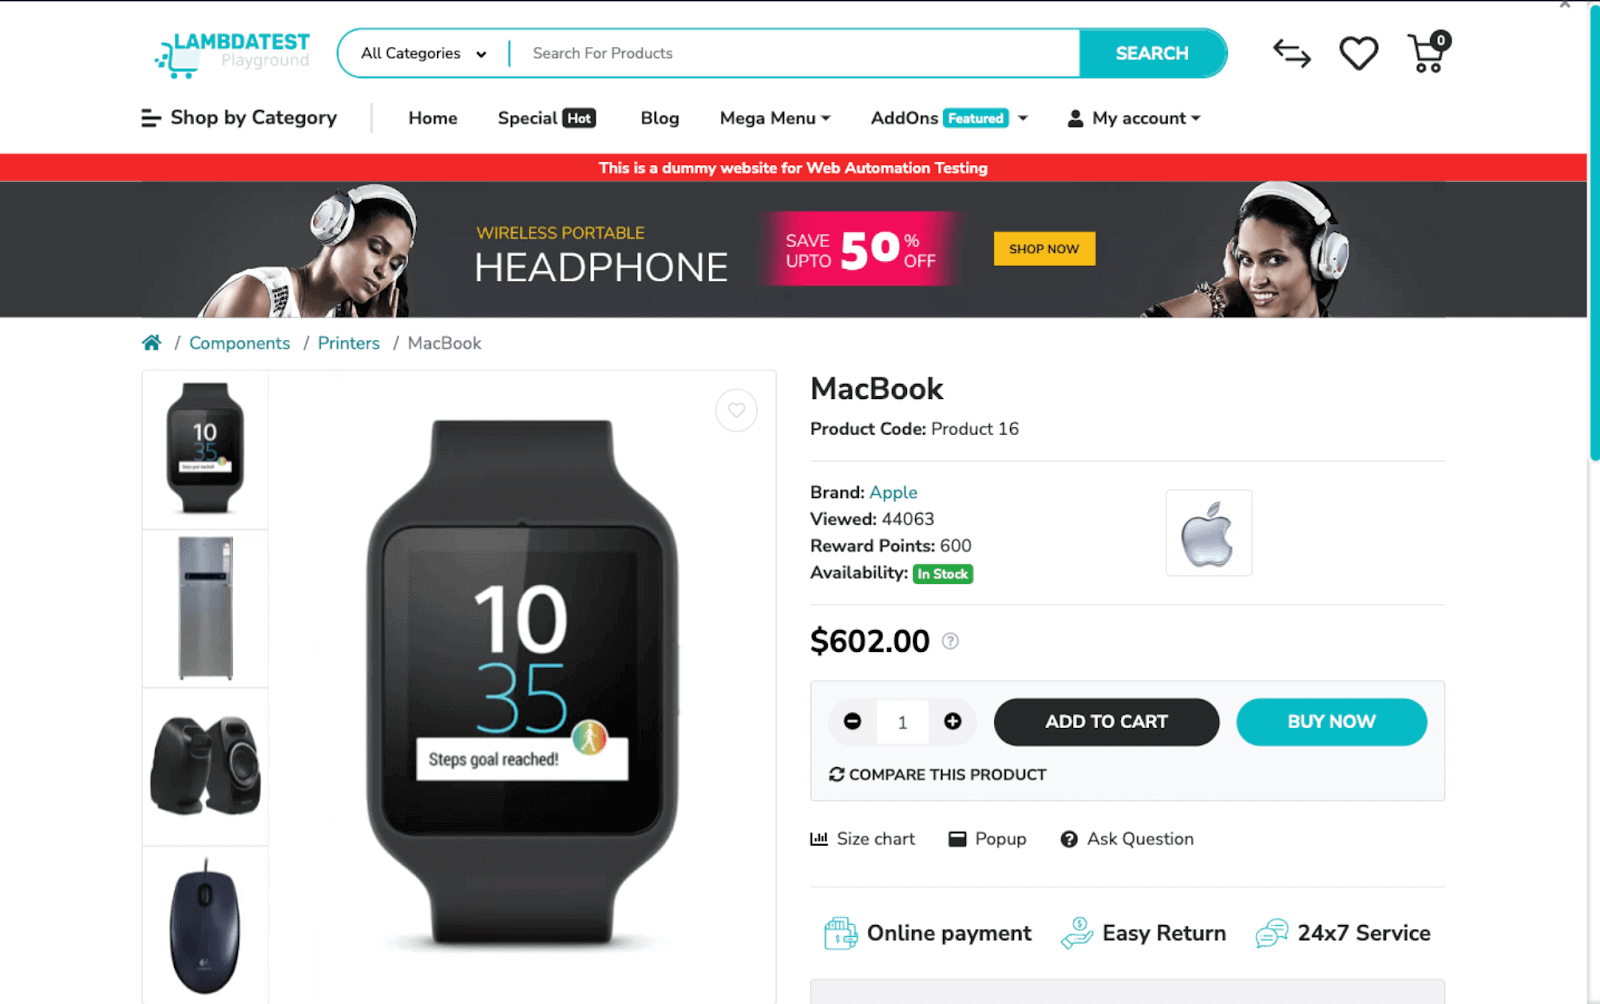
The full-page screenshot is below:
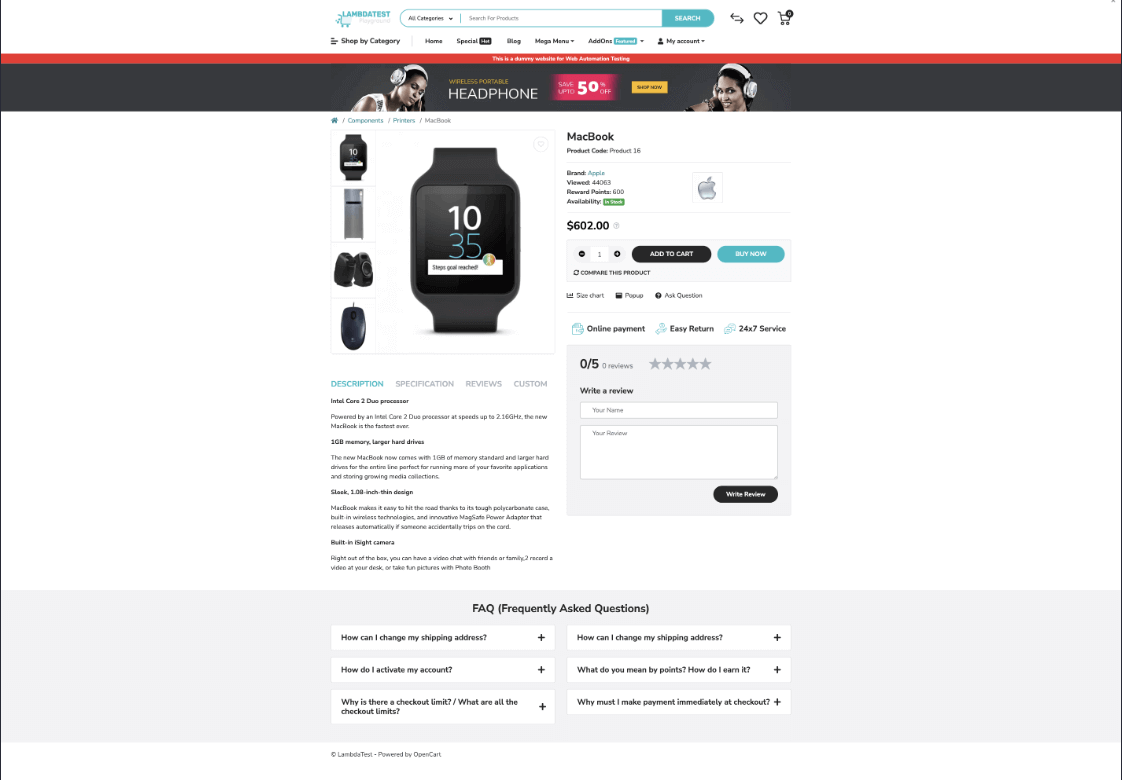
The scrollable-page screenshot is below:
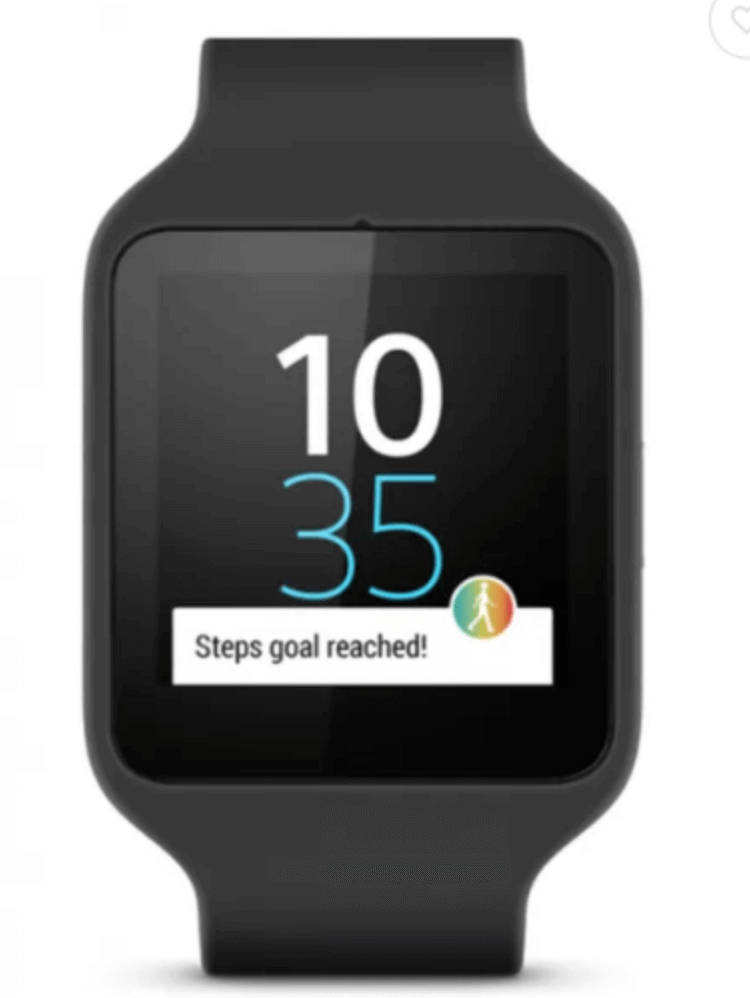
The element screenshot is below:
In summary, the screenshot() method of Pyppeteer has all the options to realize visual regression testing with Python!
Managing cookies with Pyppeteer
Website cookies plays an integral role in automated testing. Modifying cookies can be useful for test scenarios related to session management, localization testing, handling cookie consent, and cross browser testing.
I recommend reading this detailed blog on handling cookies with Selenium, as overall cookie handling principles remain unchanged irrespective of the framework (or library) used for automated testing. The Pyppeteer library provides the following methods (or coroutines) for cookie management:
| Test Method | Description | Reference |
|---|---|---|
| cookies | Returns cookies for the current URL | https://miyakogi.github.io/pyppeteer/reference.html #pyppeteer.page.Page.cookies |
| deleteCookie | Delete cookie passed as a dictionary (or dict) to the method | https://miyakogi.github.io/pyppeteer/reference.html #pyppeteer.page.Page.deleteCookie |
| setCookie | Set a cookie passed as a dictionary (or dict) to the method | https://miyakogi.github.io/pyppeteer/reference.html #pyppeteer.page.Page.setCookie |
Demonstration
For demonstrating cookie management with Pyppeteer, we automate the following test scenario on Chromium installed on the local machine (EXEC_PLATFORM = local):
|
Code Walkthrough
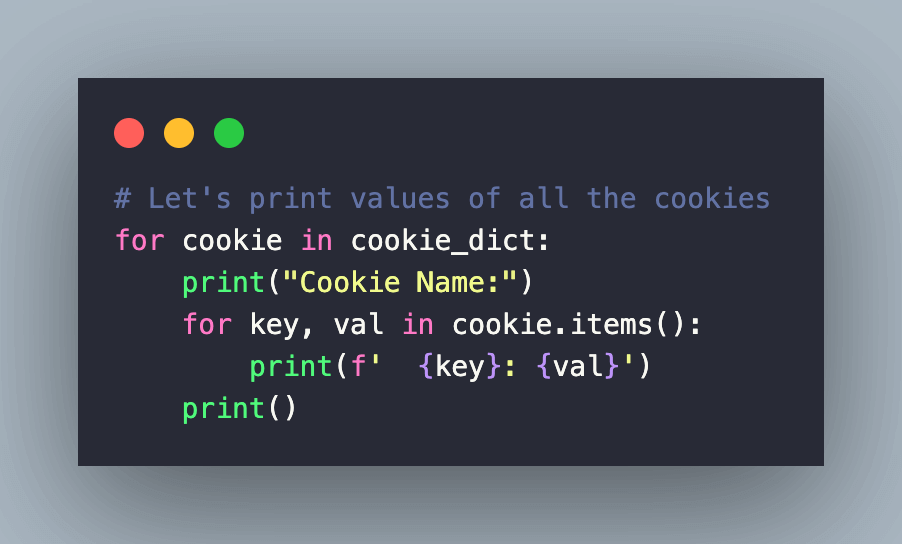
After navigating to the URL under test, get the cookies by invoking the cookies() method of the Page class.
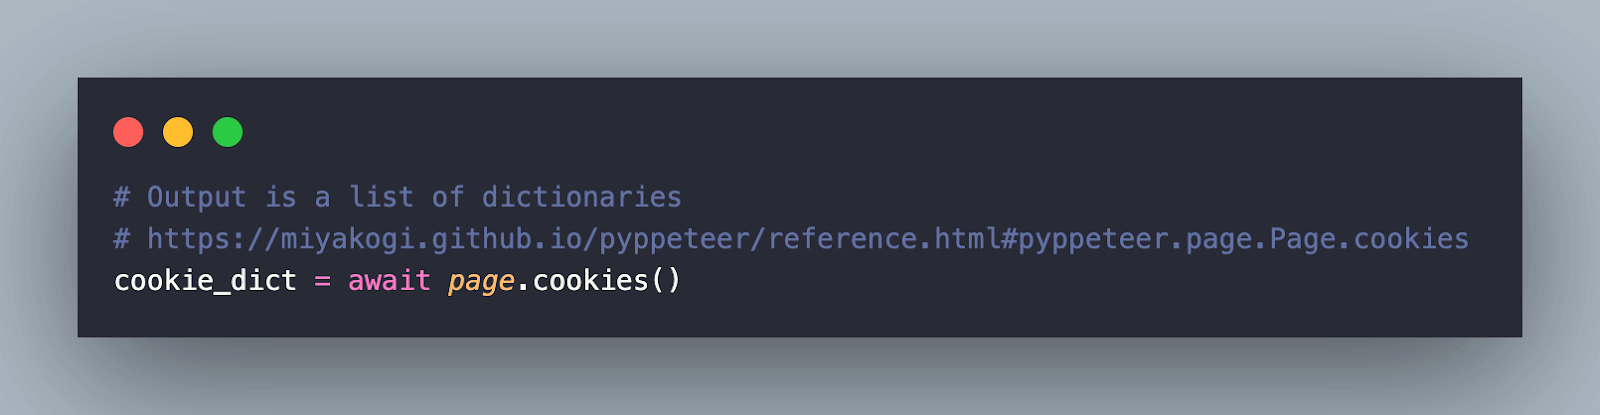
The cookies() method returns a dictionary of key: value pairs. An iterative For loop is used for printing the value of each cookie.
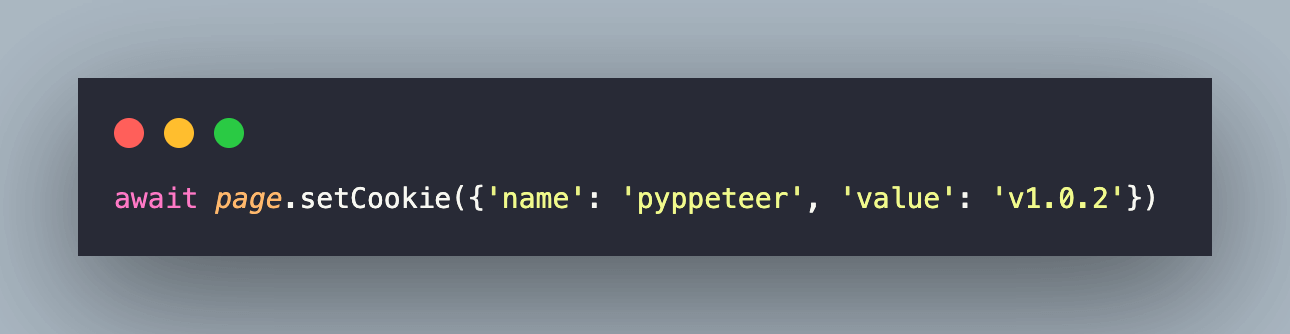
Next up, we set a new cookie pyppeteer to v1.0.2 value with the setCookie() method of the Page class.
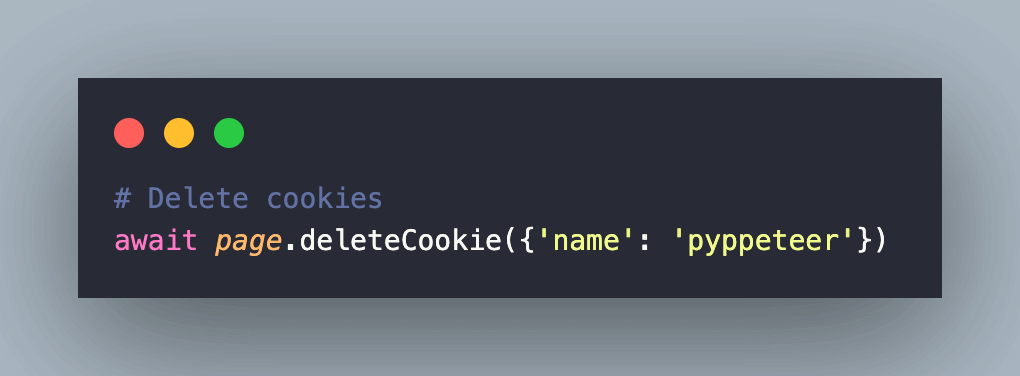
With the new cookie set, we delete the cookie pyppeteer by invoking the deleteCookie() method, where the cookie name is passed as a parameter to the method.
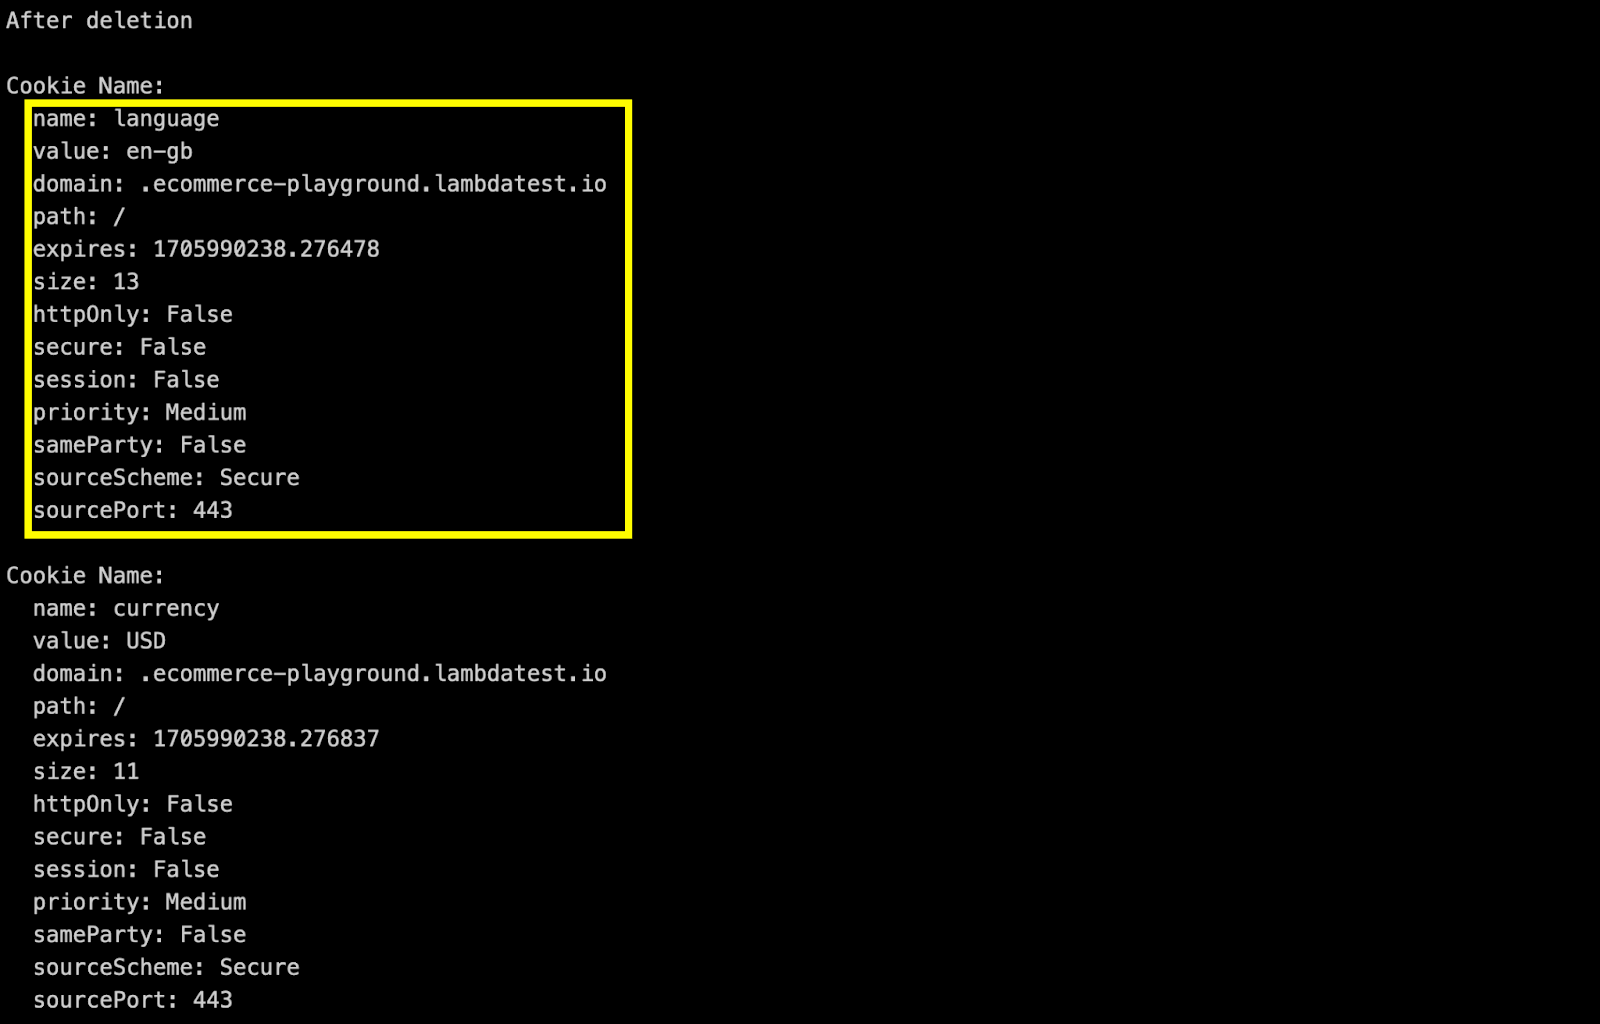
At each step, cookies are printed before & after the deletion of cookies.
Execution
Invoke the command make pyppeteer-cookies on the terminal with the Chromium browser instantiated on the local machine. As seen below, the newly-added cookie pyppeteer is successfully set to v1.0.2, and the cookie added by the setCookie() method was successfully deleted by the deleteCookie() method.
Handling iFrames with Pyppeteer
iFrames (or inline frames) are commonly used in websites to insert a document from an entirely different domain. Handling iFrames with Selenium, Cypress, Pyppeteer, and other automation frameworks is a common test scenario for automating interactions with modern websites.
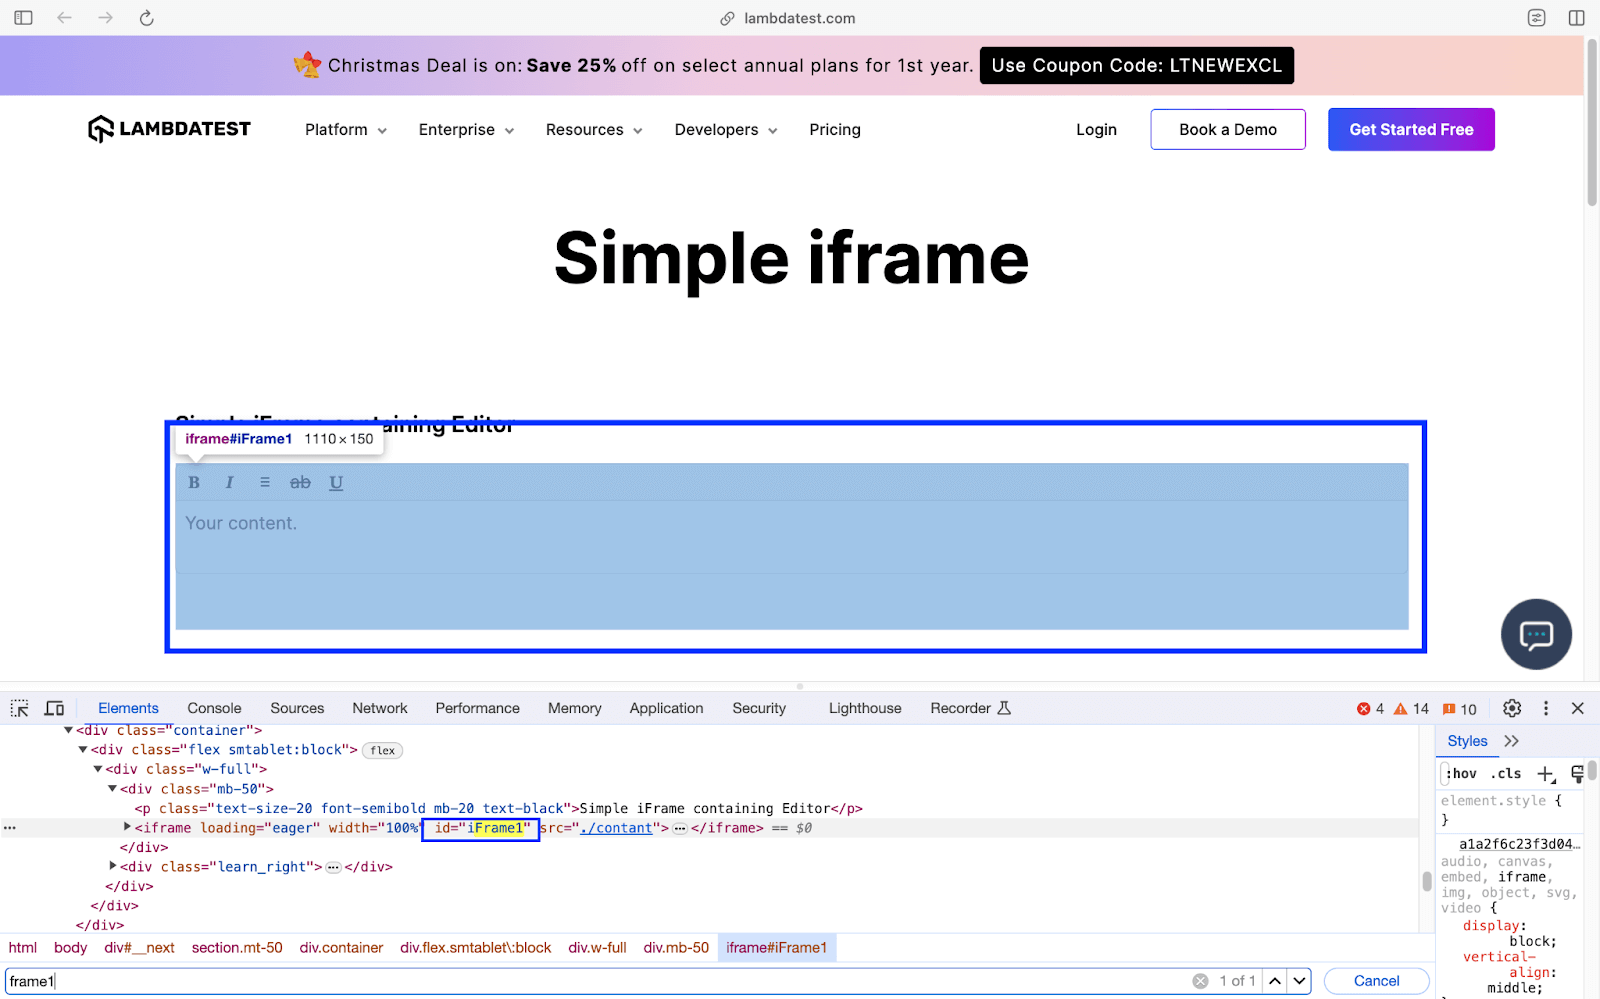
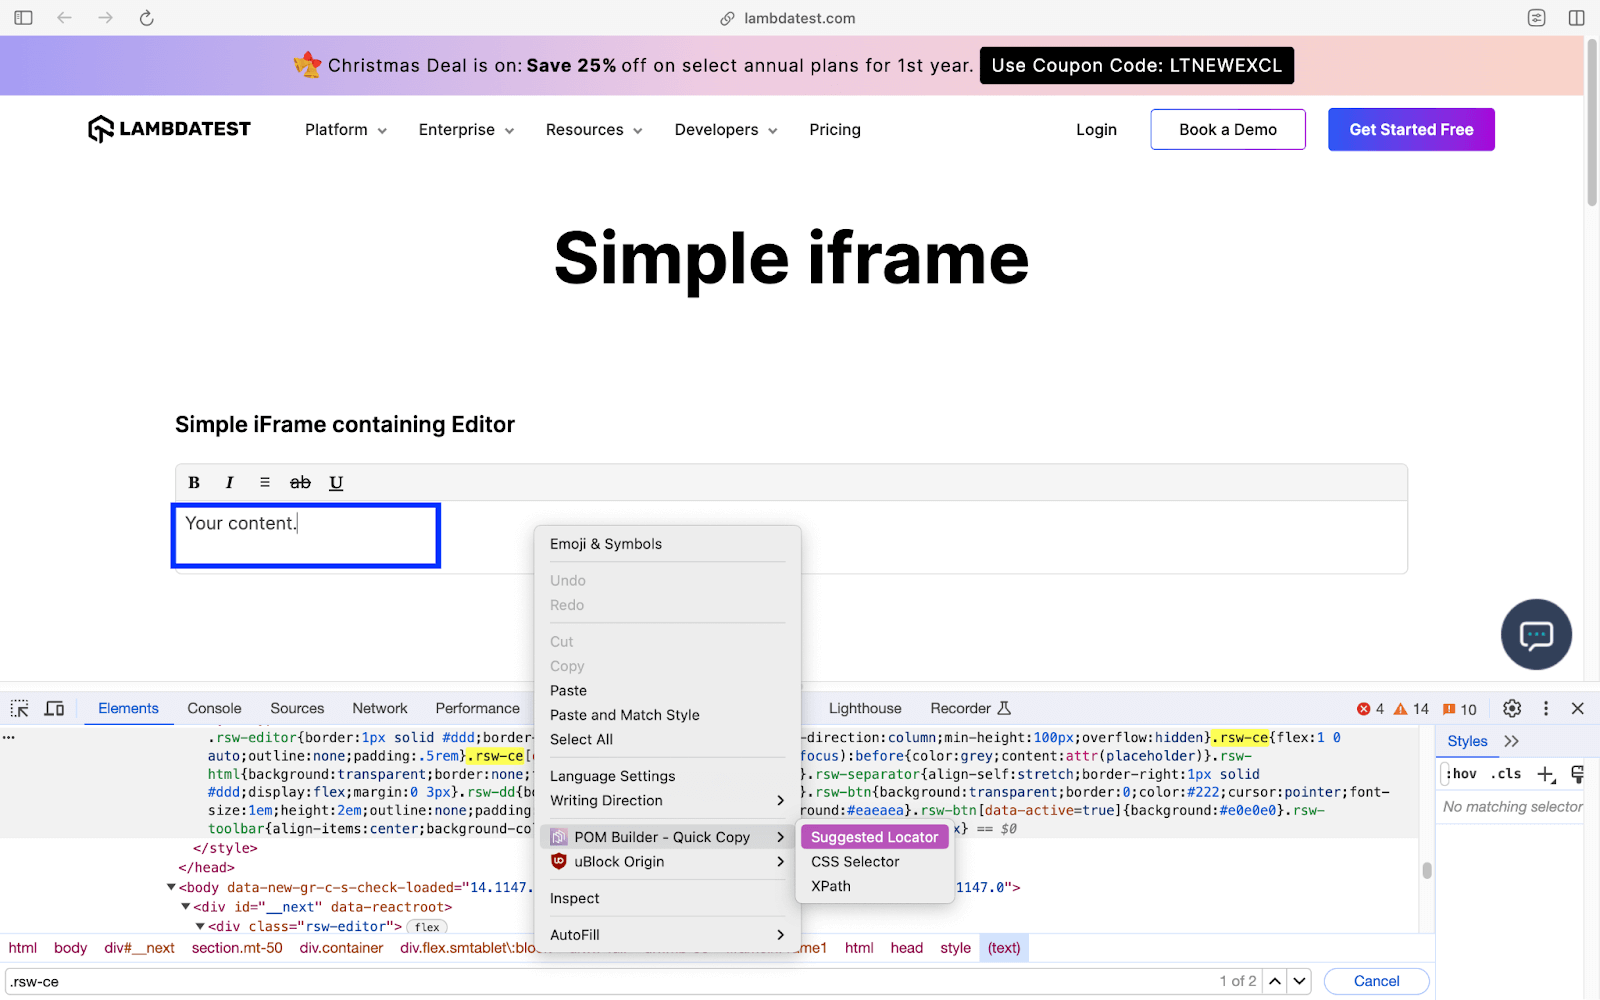
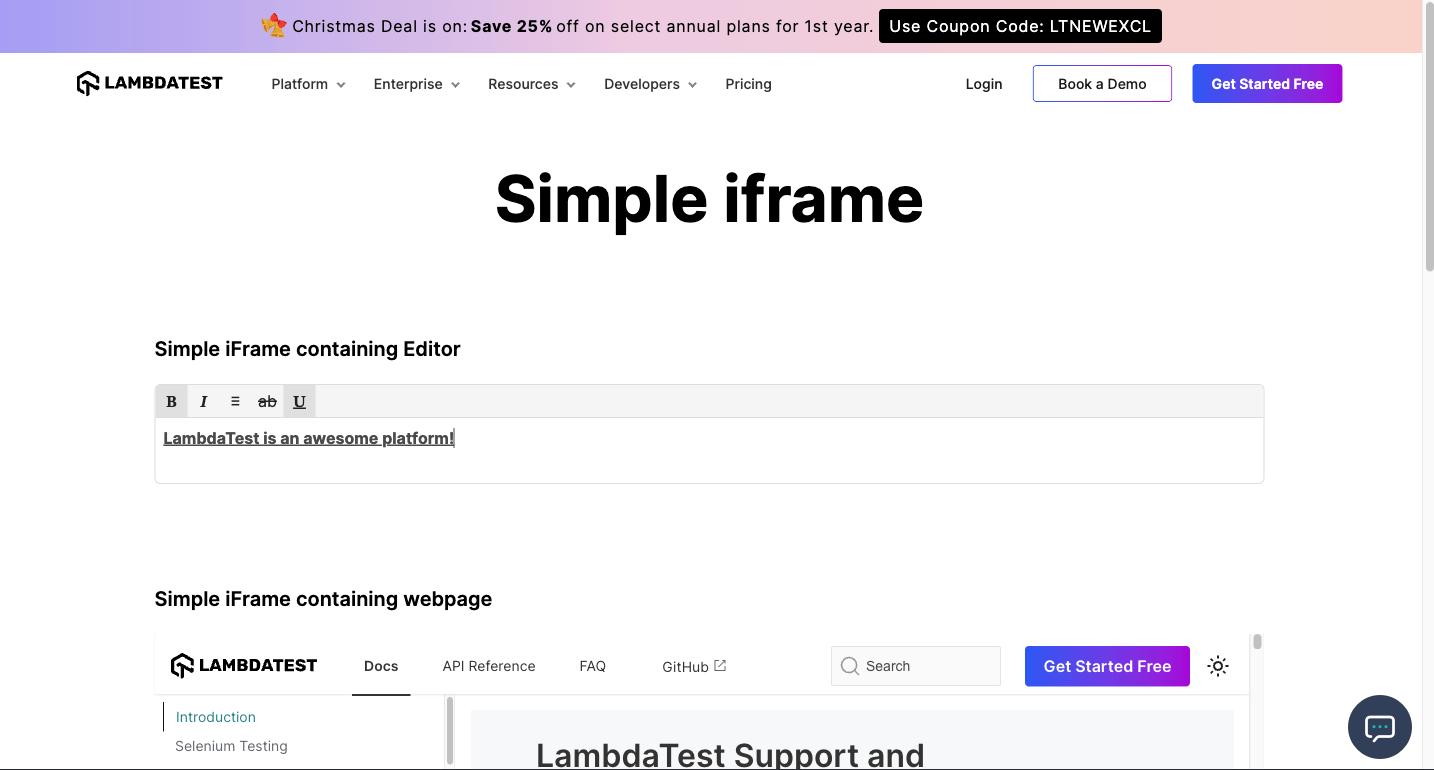
The < iframe > tag in HTML specifies an inline frame. Every HTML page (or document) has a top-level frame called a parent frame. The parent (or main) frame is the container of the child frames or iFrames. Shown below is an example of an iFrame from LambdaTest Selenium Playground.

iFrame Example
The methods (or coroutines) for accessing iFrames with Pyppeteer are available in the Frame class. Here are some prominent methods for handling iFrames with Pyppeteer:
| Test Method | Description | Reference |
|---|---|---|
| parentFrame | Get the parent frame. Returns None if the frame is the main frame or a detached frame | https://miyakogi.github.io/pyppeteer/reference.html #pyppeteer.frame_manager.Frame.parentFrame |
| childframes | Get all child frames inside the parent frame | https://miyakogi.github.io/pyppeteer/reference.html #pyppeteer.frame_manager.Frame.childFrames |
| name | Get the name of the current frame | https://miyakogi.github.io/pyppeteer/reference.html #pyppeteer.frame_manager.Frame.name |
| isDetached | Returns True if the frame is detached | https://miyakogi.github.io/pyppeteer/reference.html #pyppeteer.frame_manager.Frame.isDetached |
Demonstration
For demonstrating iFrame handling with Pyppeteer, we automate the following test scenario on Chromium installed on the local machine (EXEC_PLATFORM = local):
|
Code Walkthrough
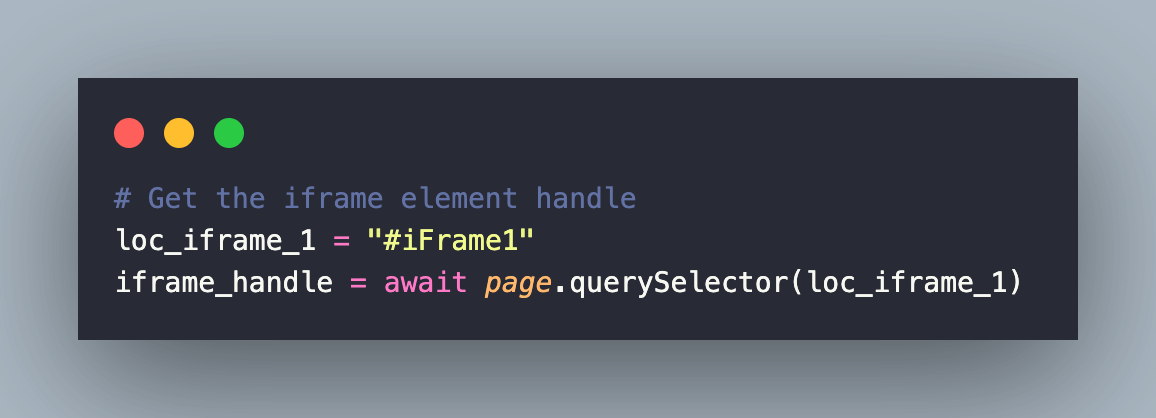
After navigating to the iFrame Demo page, we first locate the iFrame using the ID locator (i.e., iFrame1). The querySelector() method is used to check the presence of the iFrame selector.
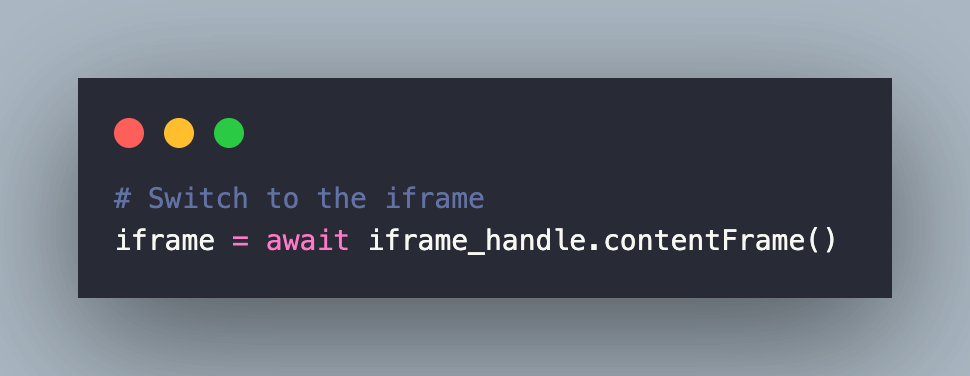
Next, we use the contentFrame() method on the located element to get the content frame for the element handle.
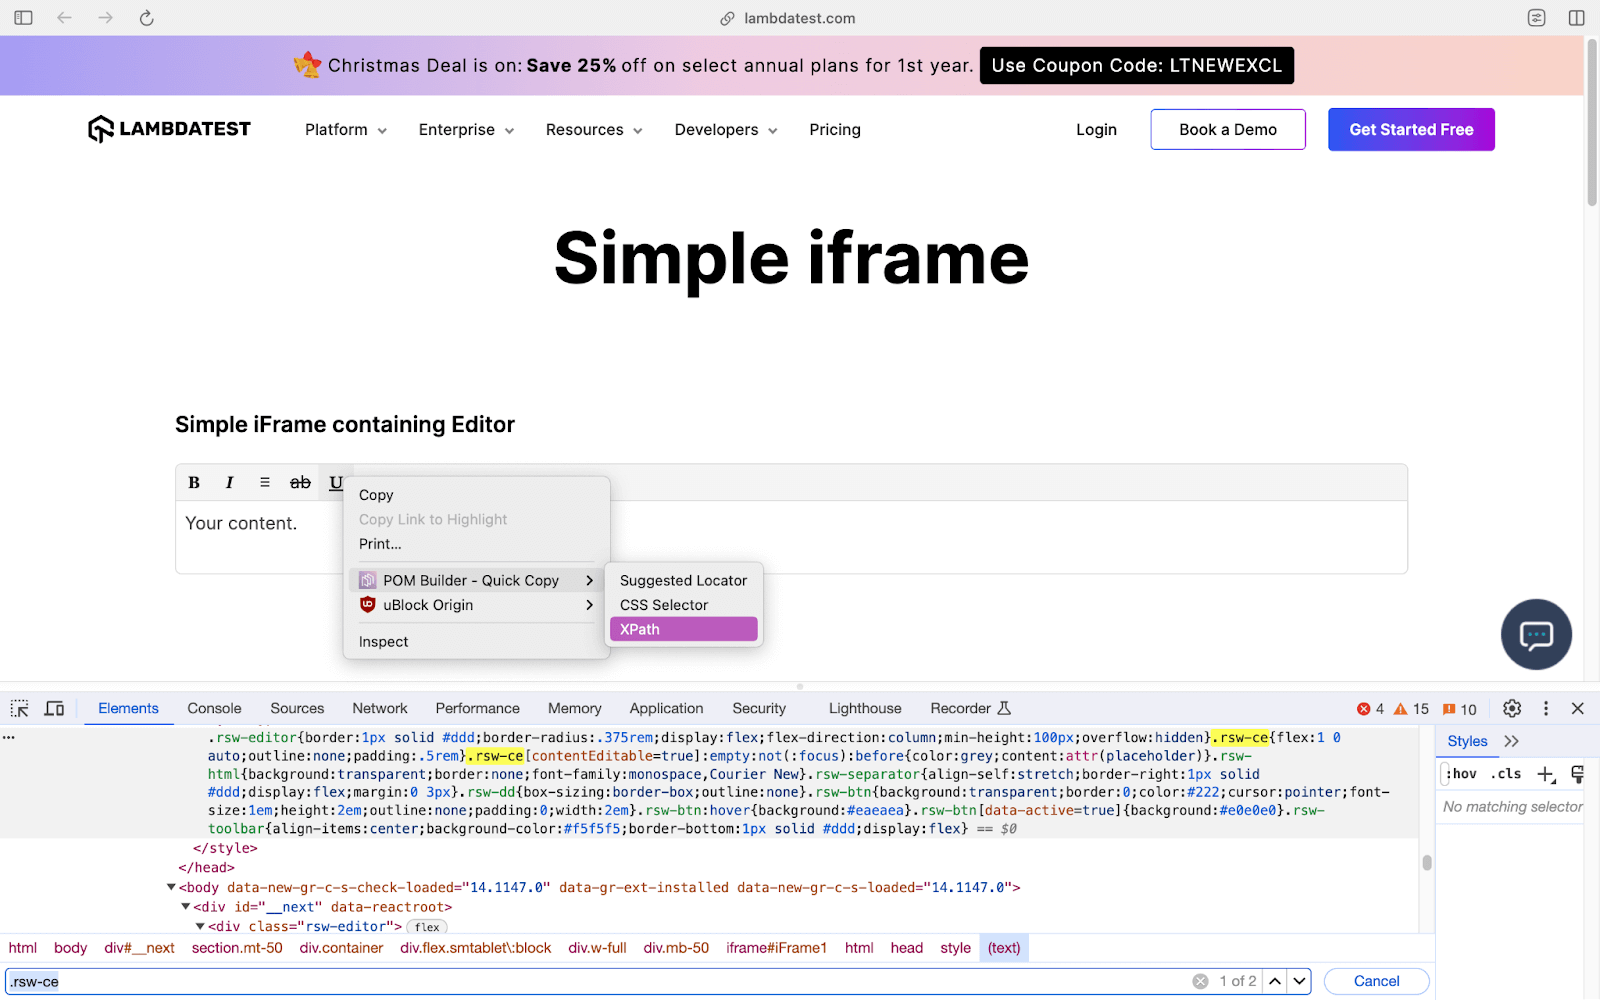
Now that we have switched to the iFrame, we locate the text-area element using the CSS Selector (i.e., .rsw-ce). To simplify the process of locating elements, I have used the POM Builder plugin on Arc browser.
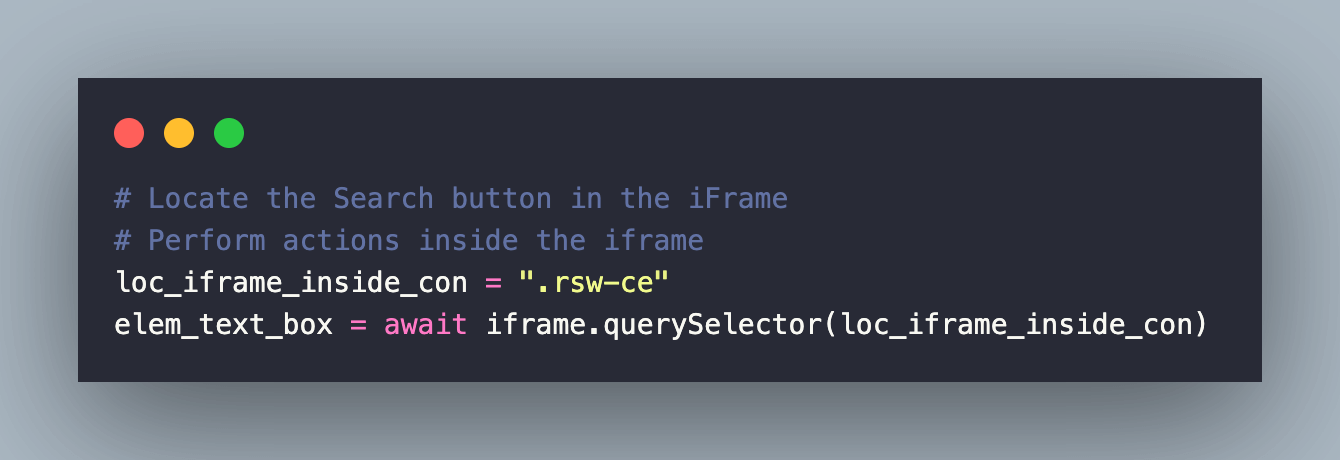
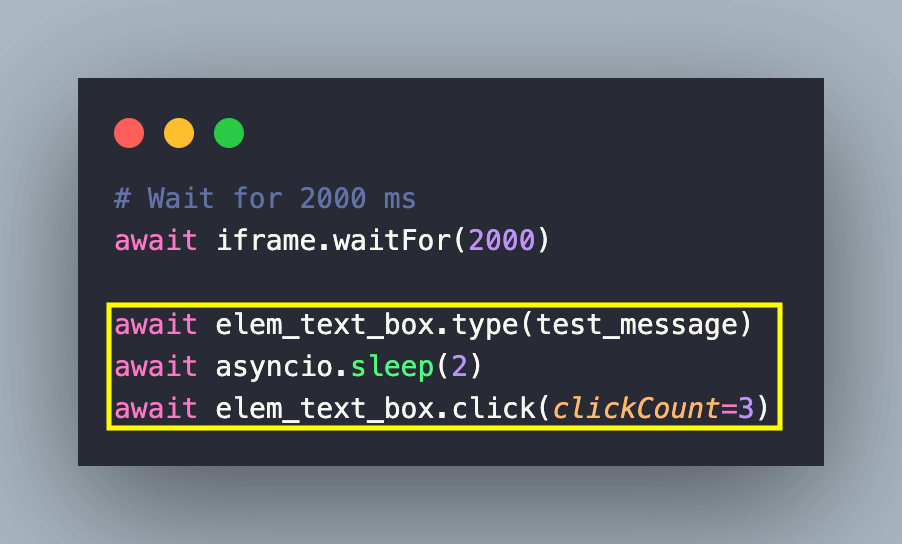
Since the text-area contains the default text, we first select the text by setting the clickCount to 3 in click() – a method used for stimulating mouse click on a DOM element.

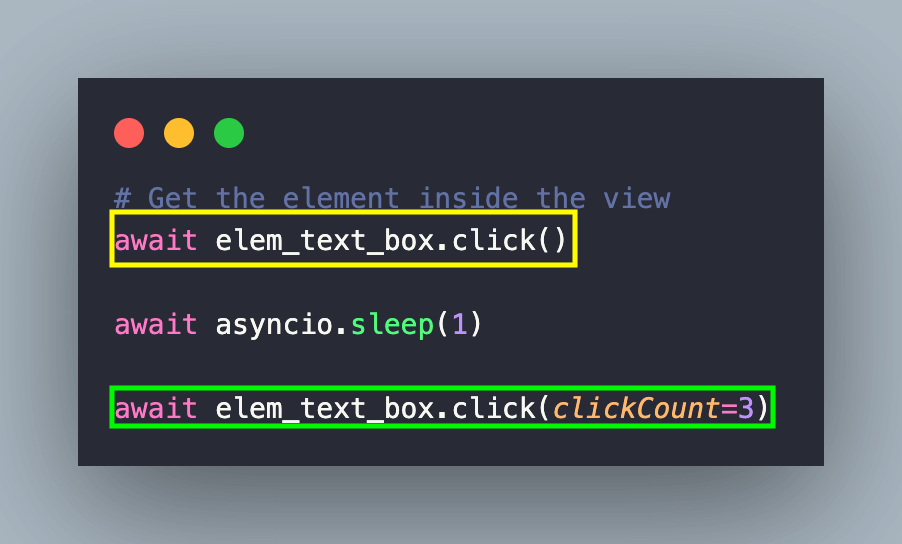
The content in the text-area is deleted by pressing the Backspace key using the press() method of the Keyboard class.

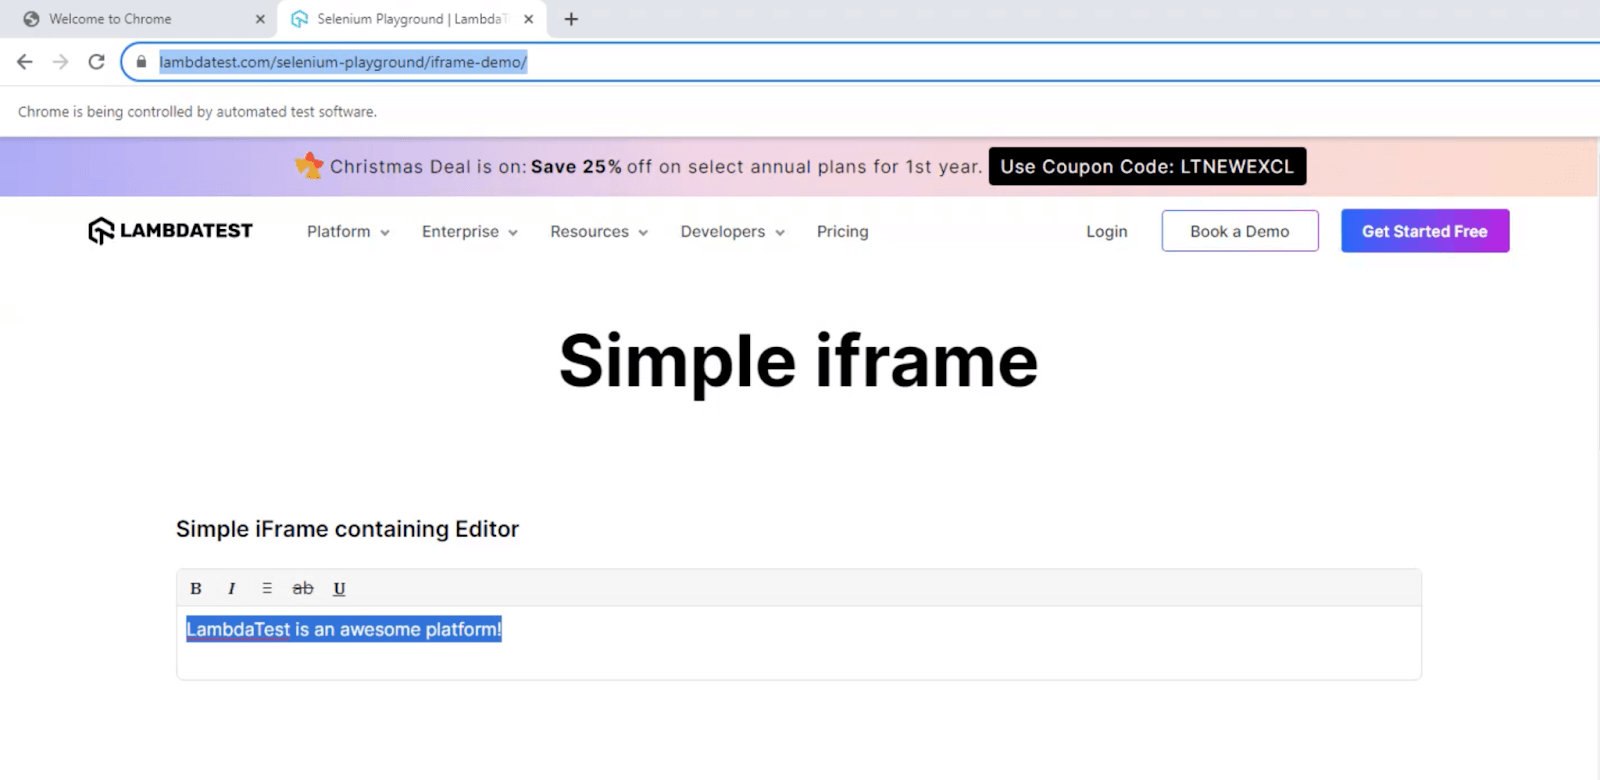
Enter the required text LambdaTest is an awesome platform! in the text area by invoking the type() method on the text-area element. Since we also want to Bold & Italicise the text, we again select the entire text by setting the clickcount to 3.
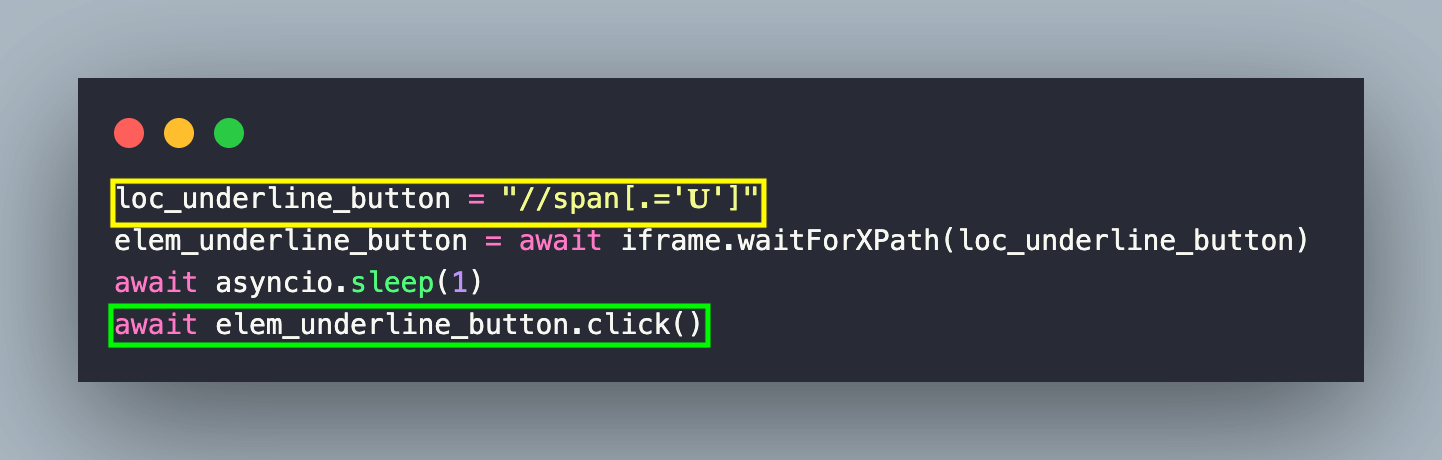
Since we want to underline the text, we locate the element using the XPath locator. Once the element (i.e., loc_underline_button) is located, a click operation is performed to underline the text in the text area.
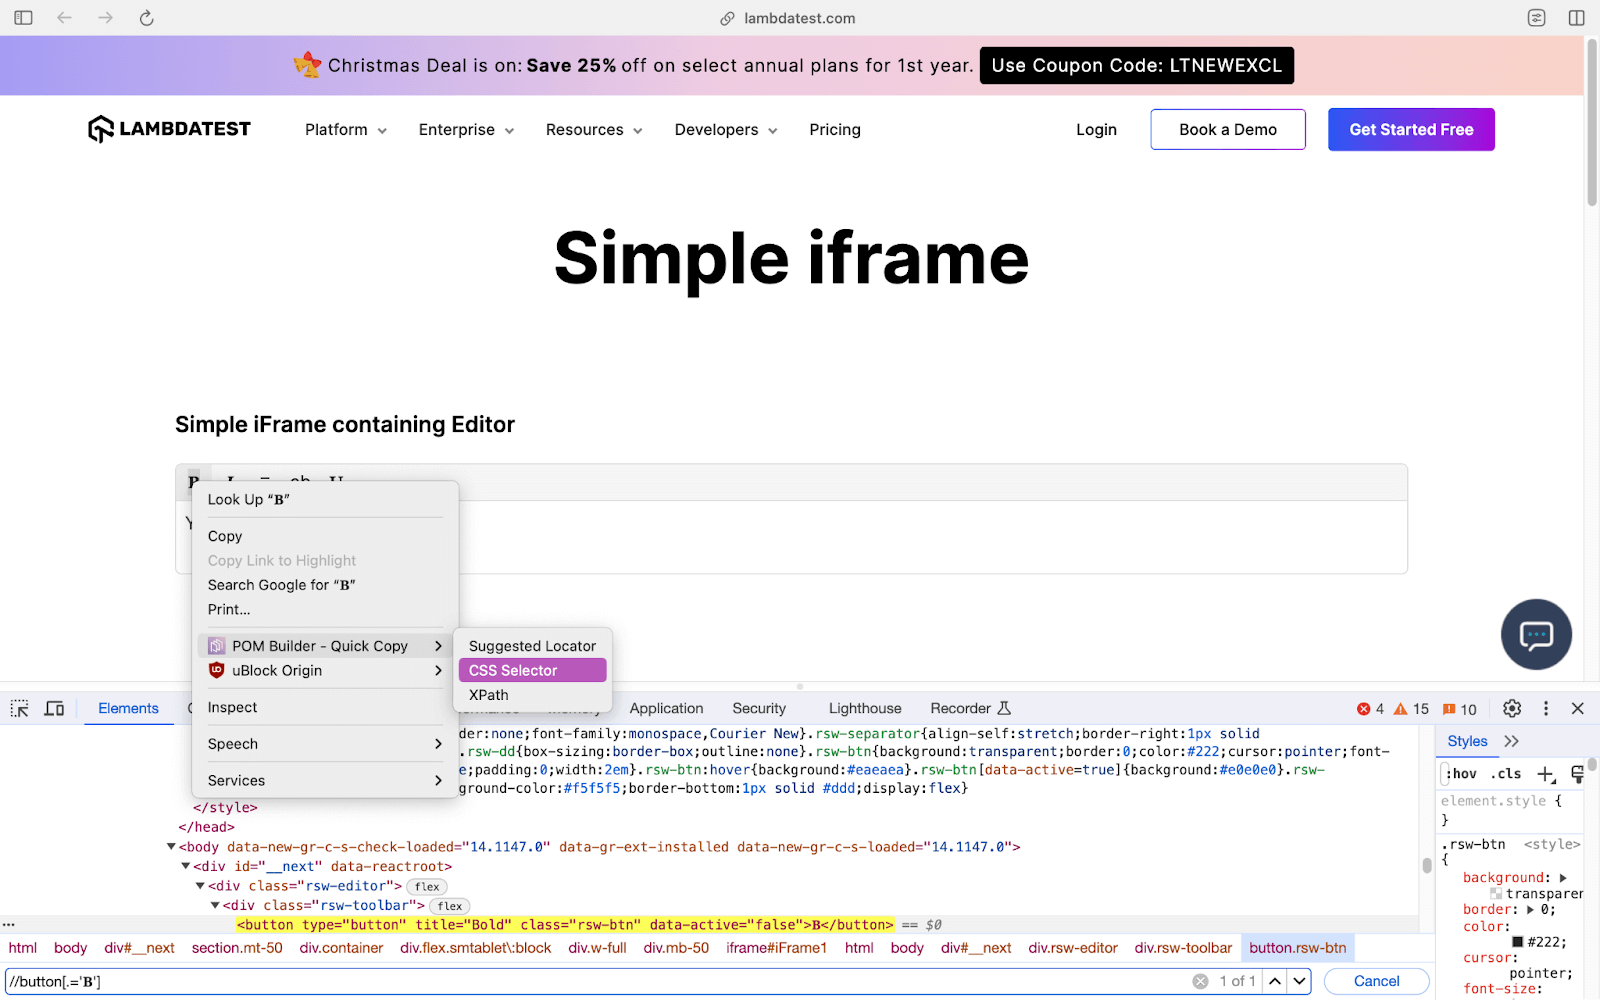
Similarly, we locate the element (to bold the text) using the CSS Selector. Once the element (i.e., loc_bold_button) is located, a click operation is performed to bold the text in the text area.
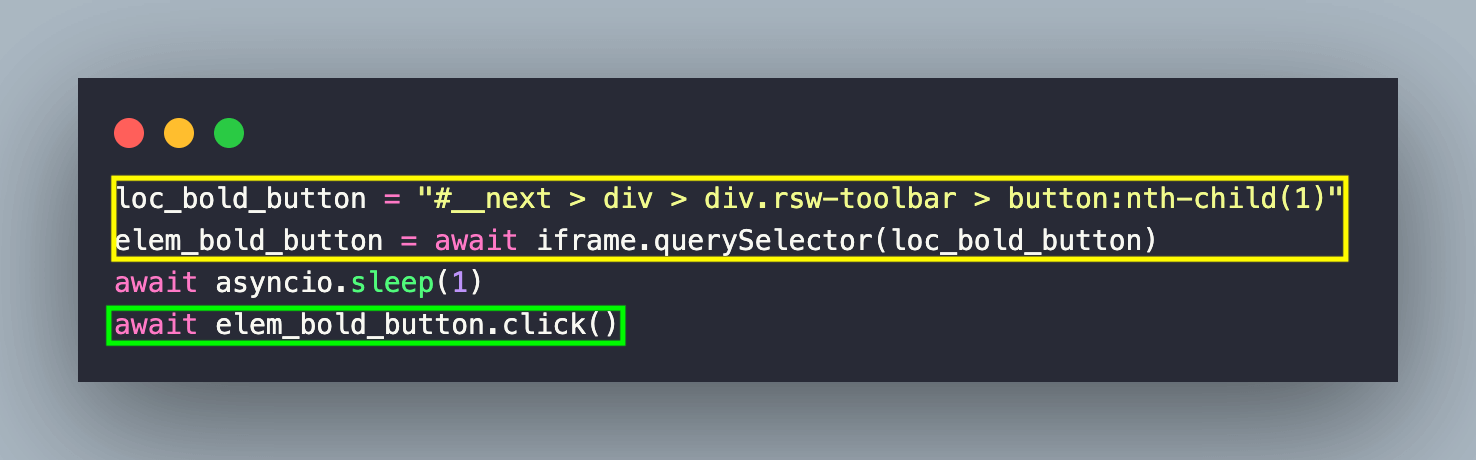
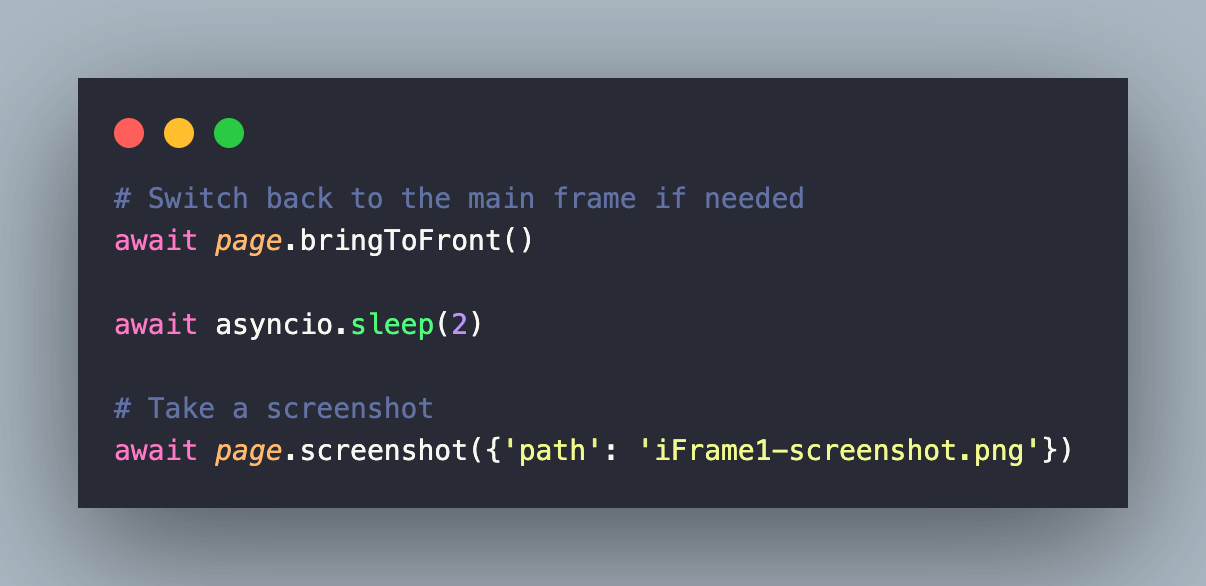
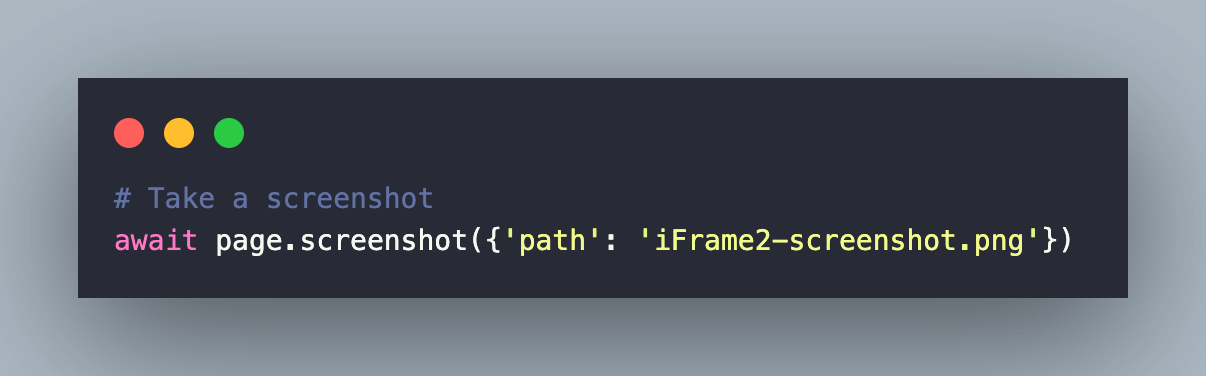
We switch back to the main window (or tab) by invoking the bringToFront() method. Post this, we take a full-page screenshot (iFrame1-screenshot.png) using the screenshot() method that was discussed in the earlier section.
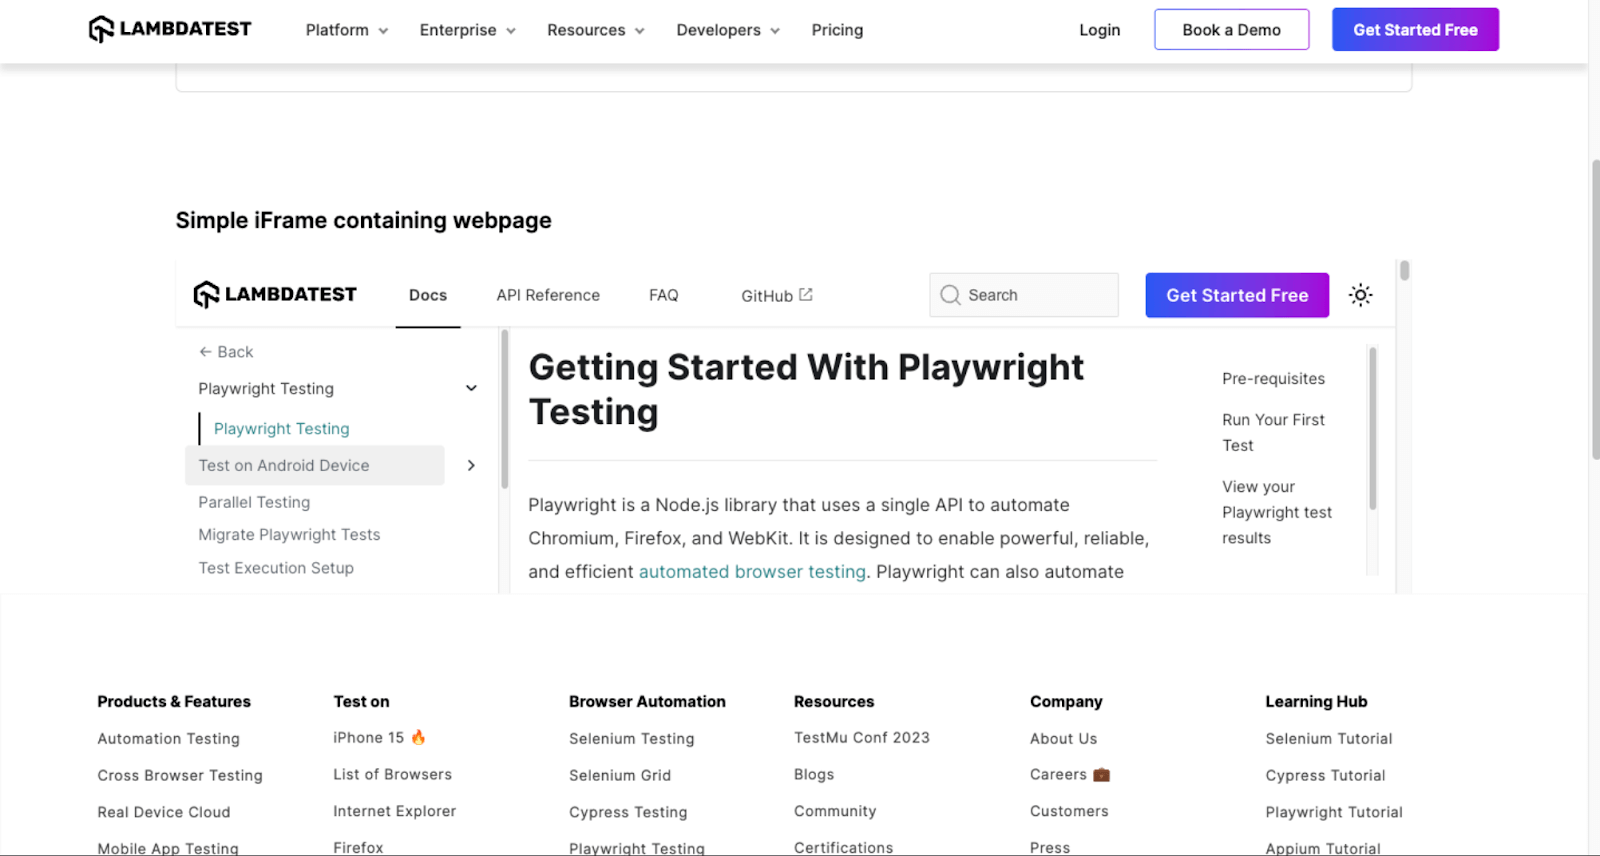
For the second test scenario, we first locate the iFrame element using the XPath locator (i.e., iFrame2).
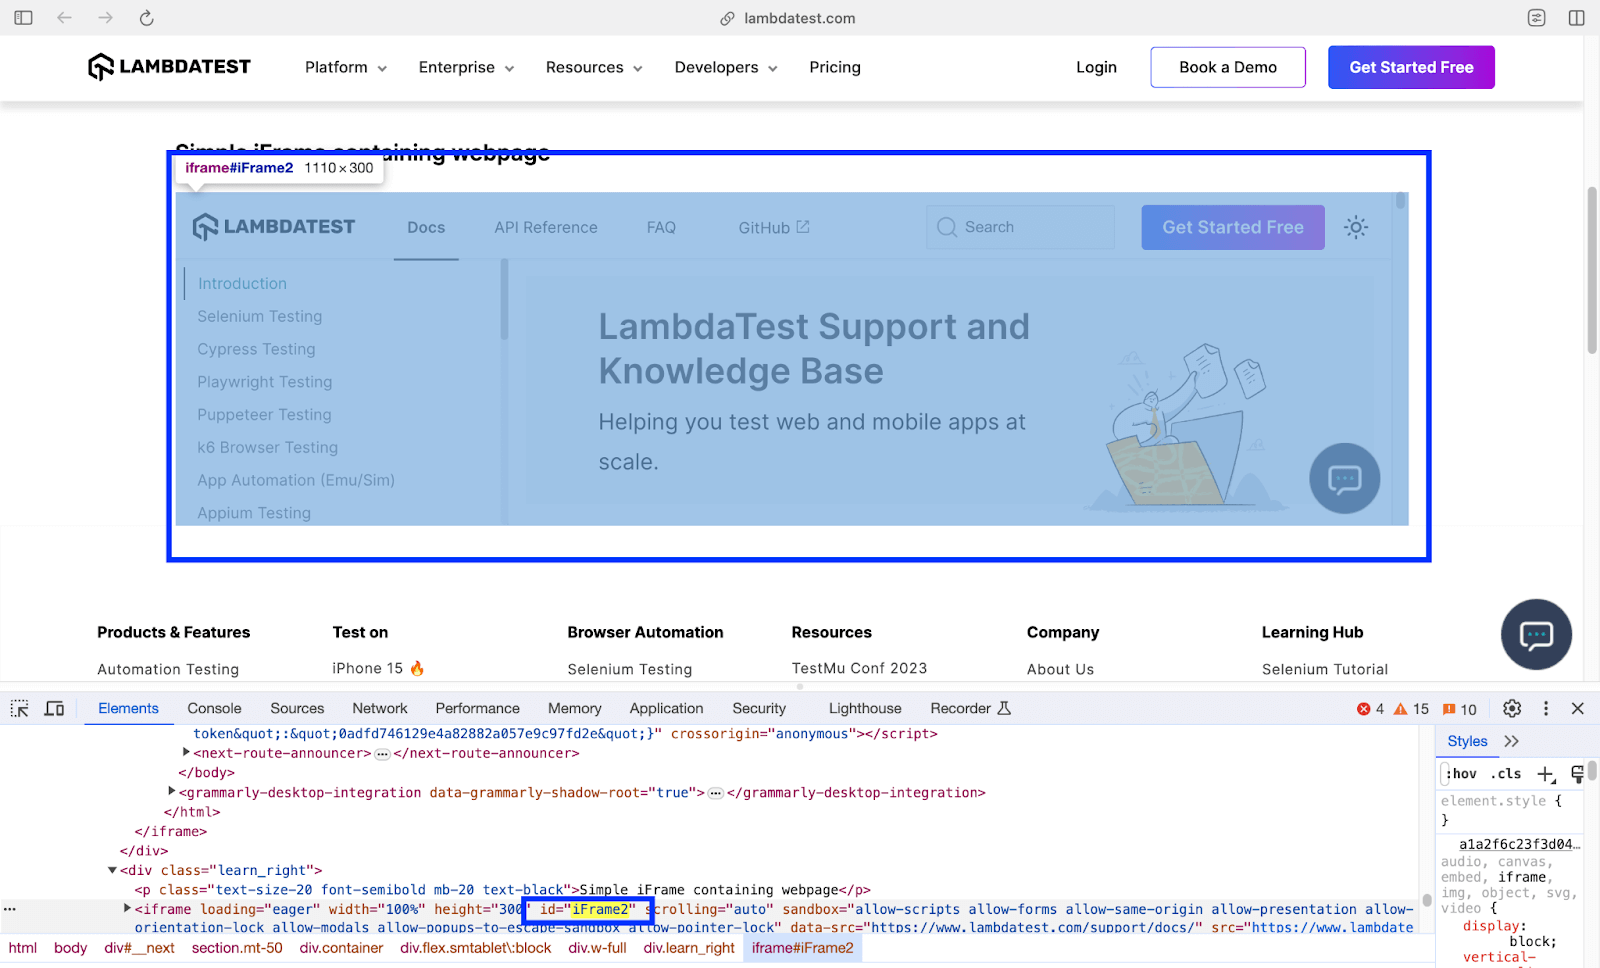
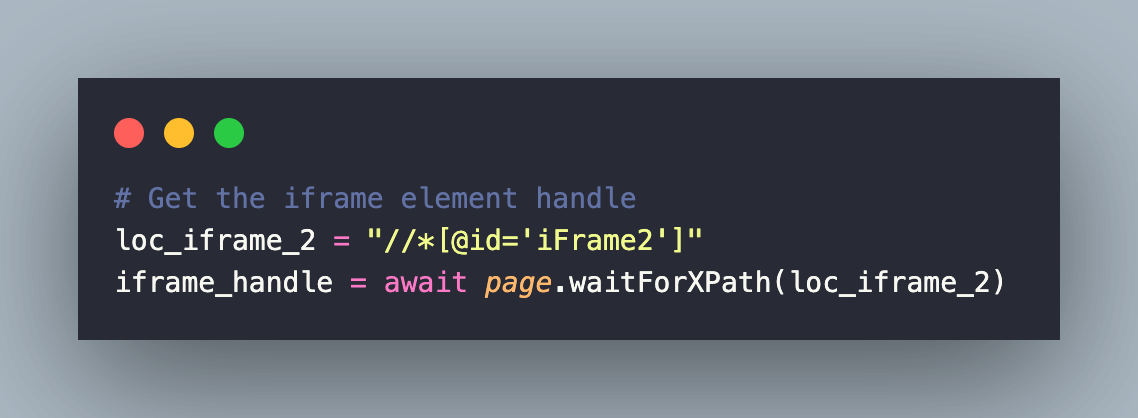
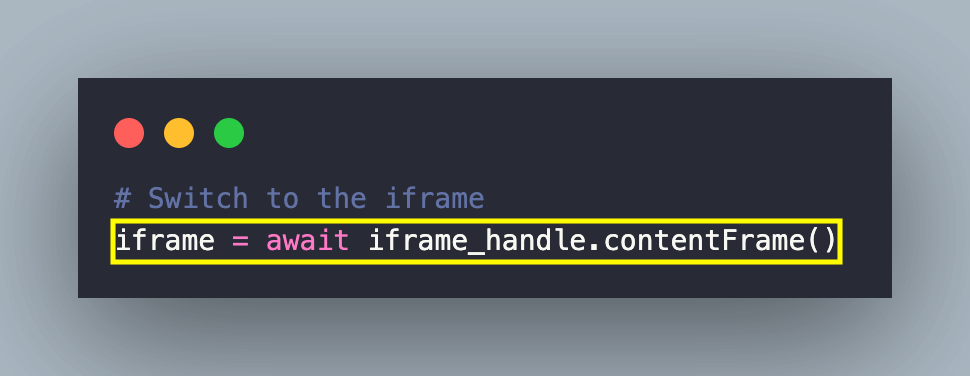
Switch to the iFrame by invoking the contentFrame() method on the element located in the previous step.
As seen below, two occurrences of the XPath //a[.=’Playwright Testing’] exists.
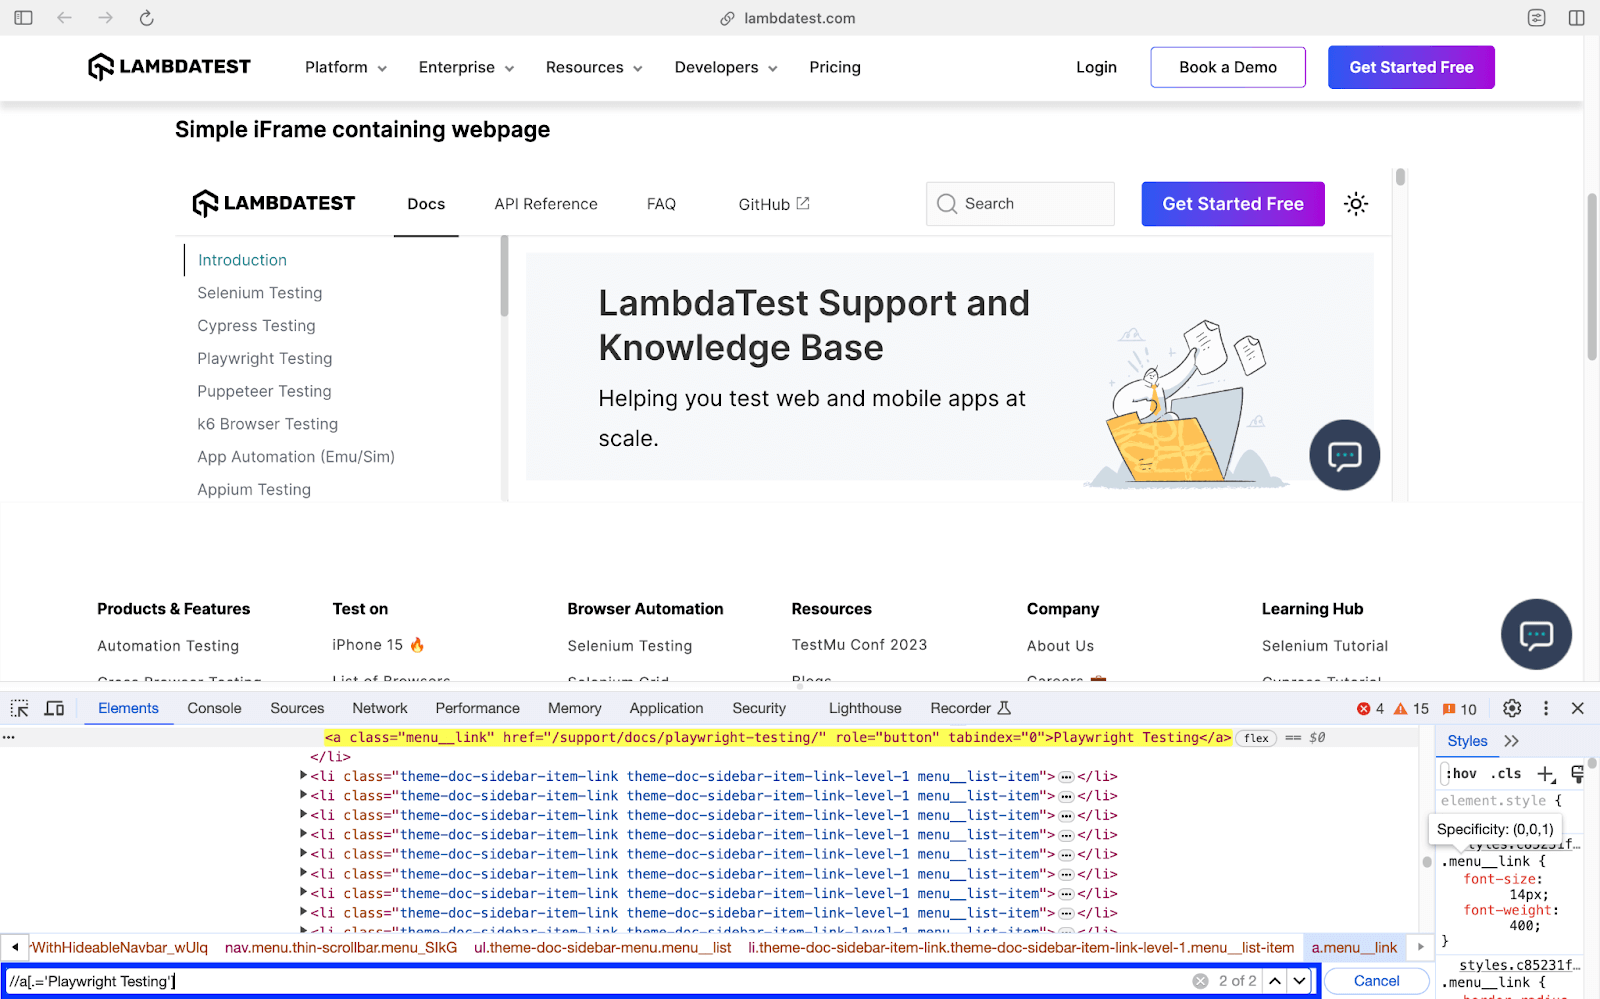
However, the element from the iFrame is selected since the waitForXPath is invoked on the iFrame element.
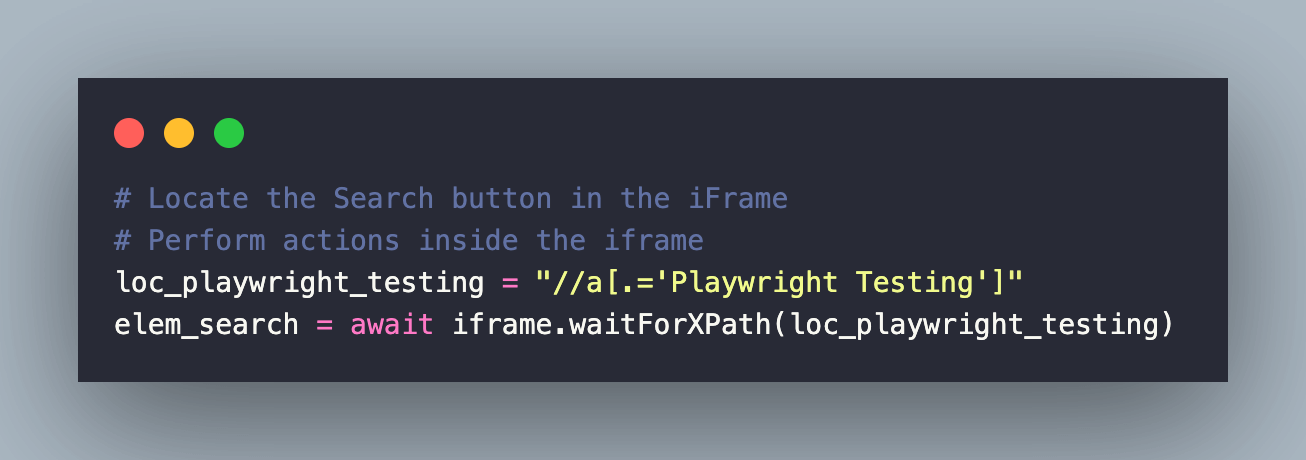
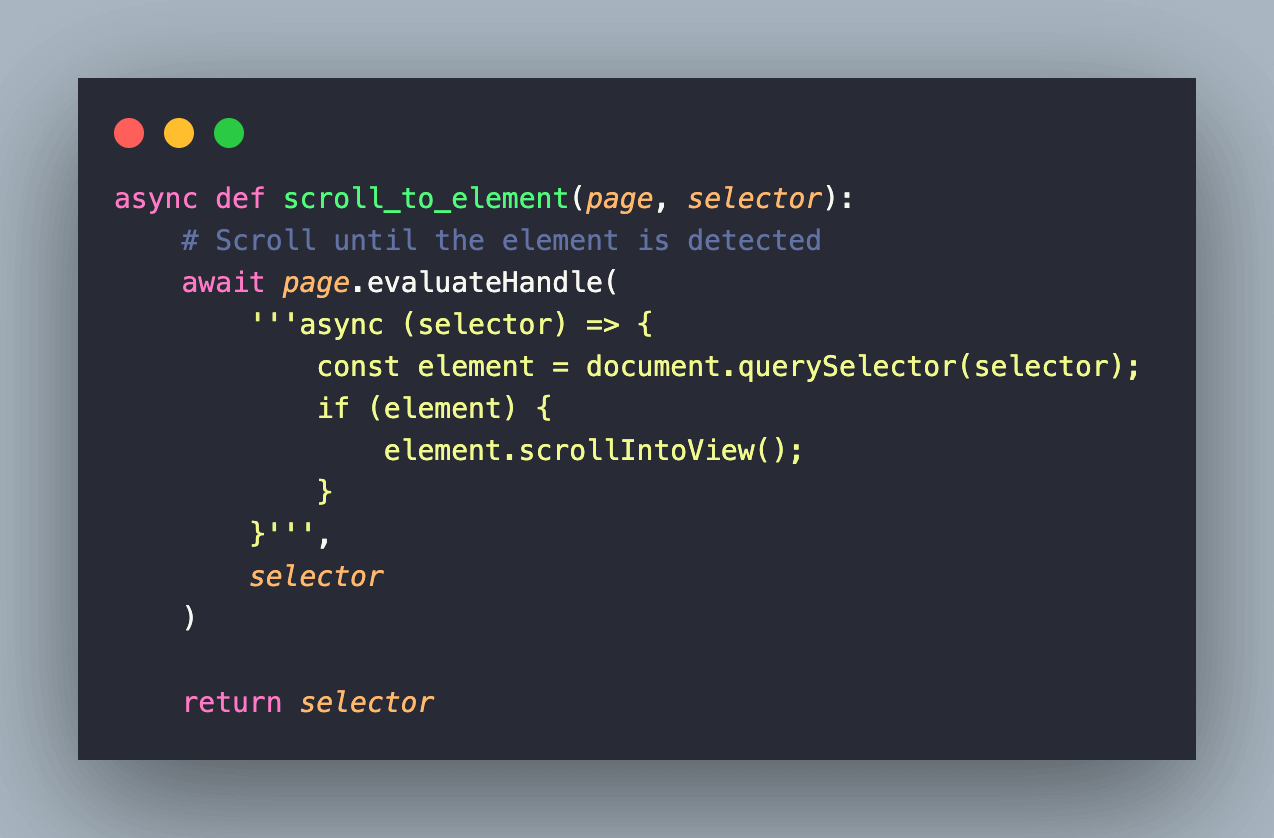
Now that the element within the iFrame is located, we scroll to the element by invoking the scroll_to_element() user-defined method.
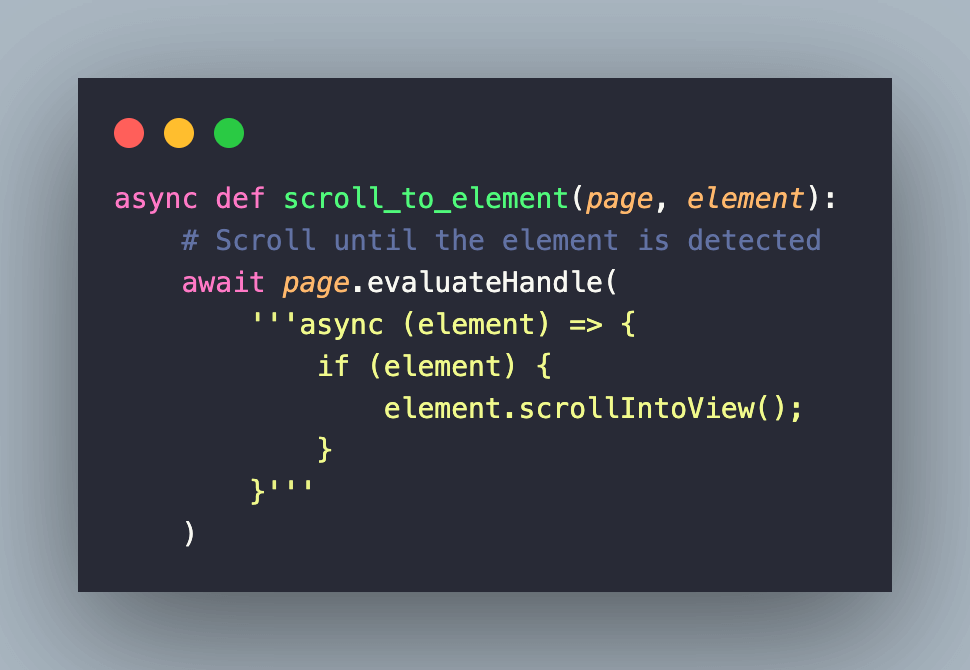
A click() operation is performed so that it navigates to the Playwright testing documentation page.
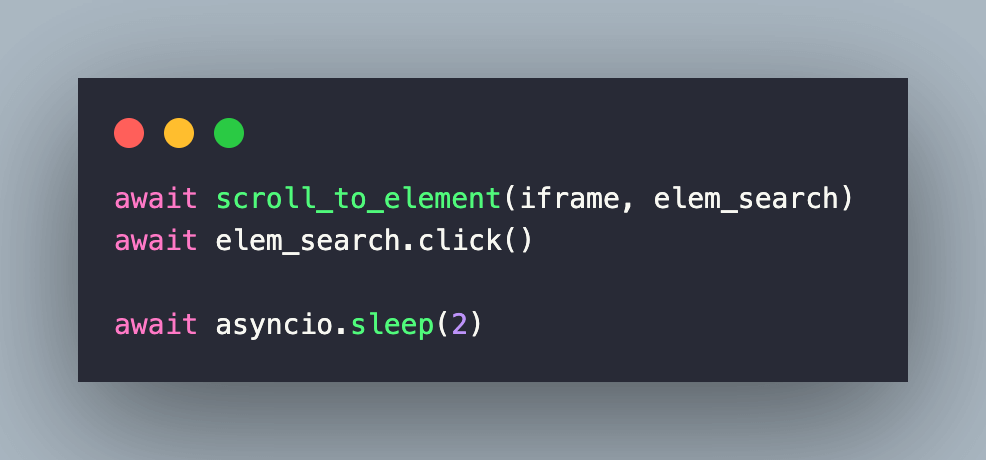
Finally, we capture a screenshot of the entire page via the screenshot() method.
Execution
Invoke the command make pyppeteer-iframe on the terminal with the Chromium browser instantiated on the local machine. As seen below, the test execution is successful.
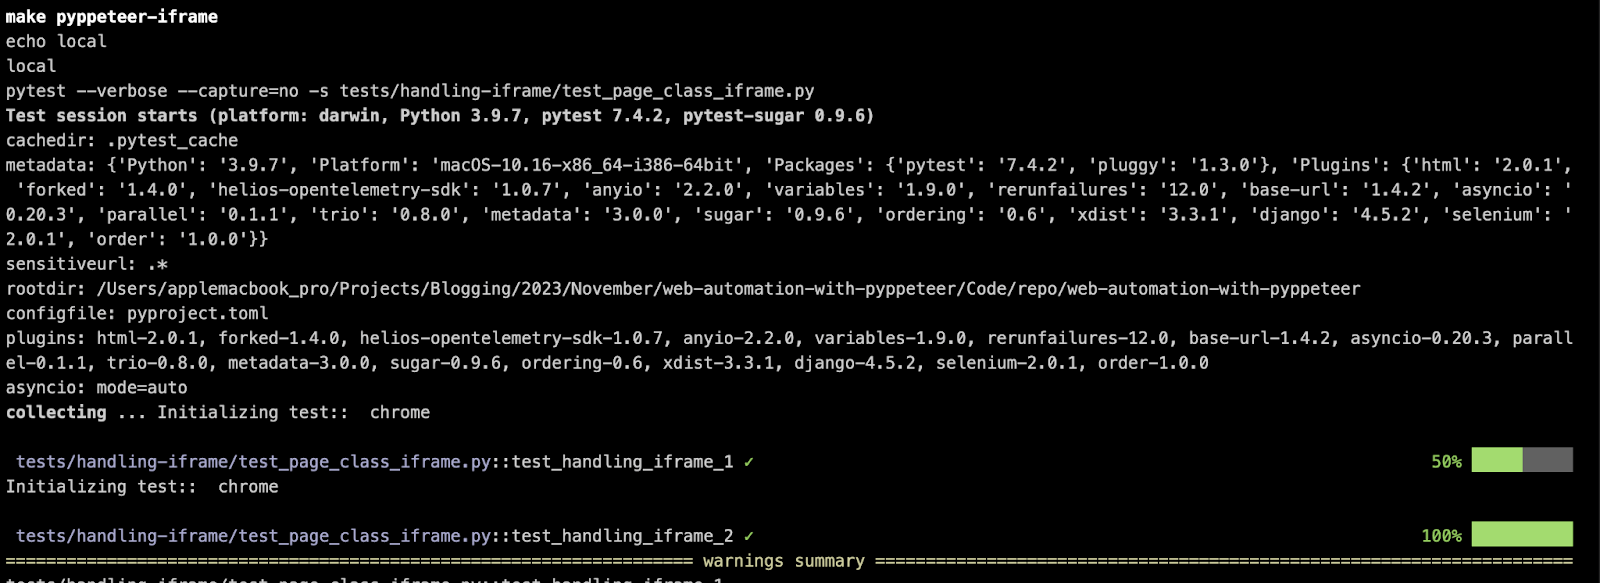
The iFrame screenshots are also successfully generated at the end of the test execution.

With this, you are also set to tackle iFrame-related challenges with the Pyppeteer library!
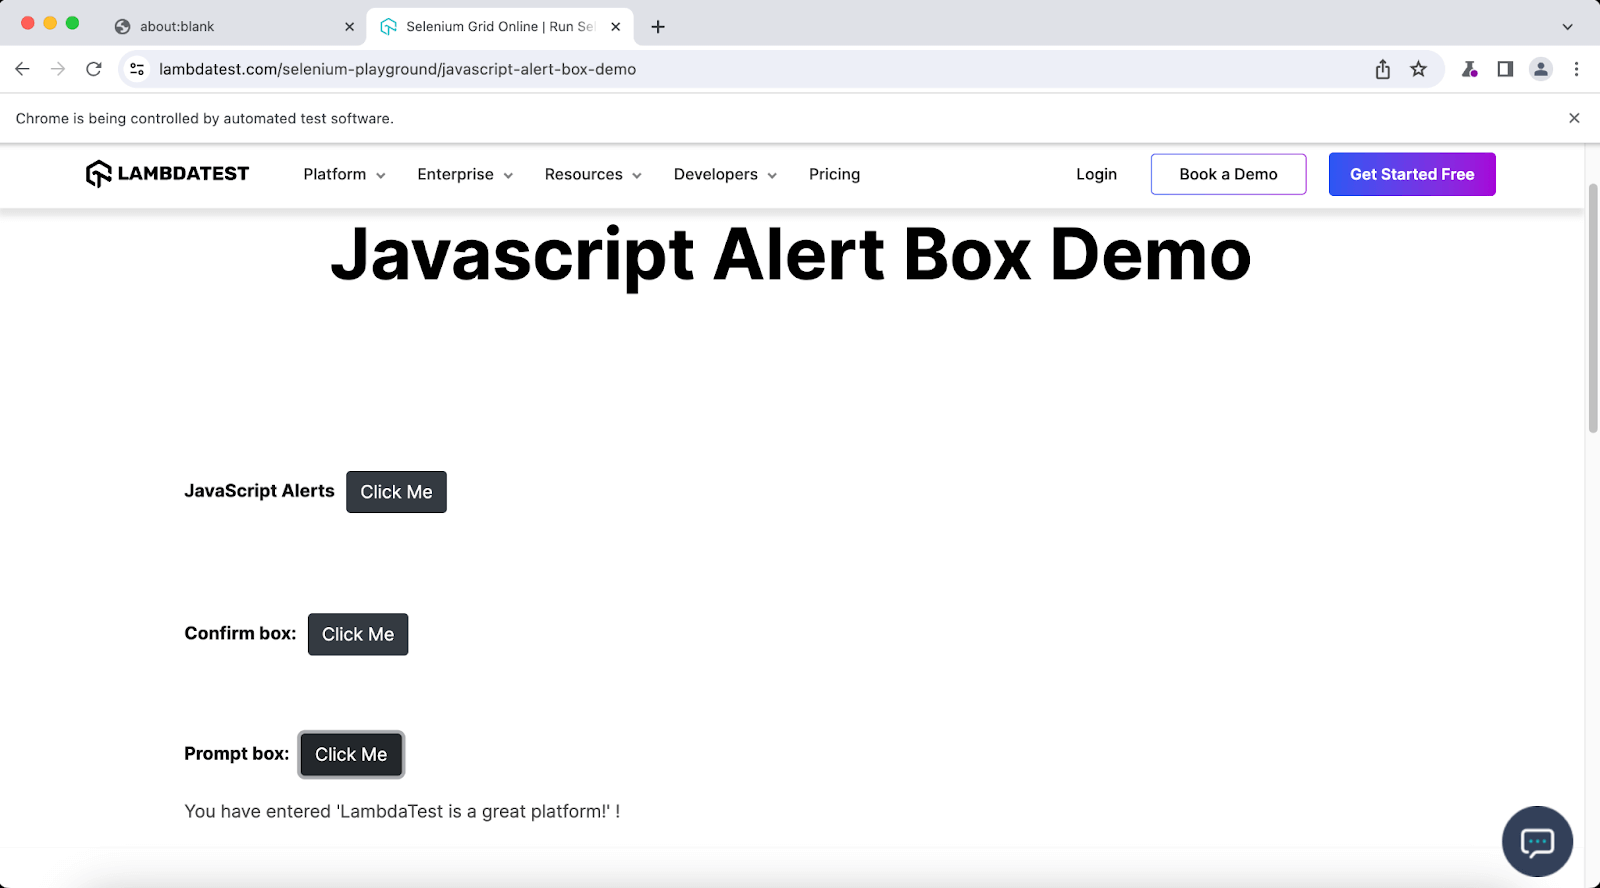
Handling alerts and pop-ups with Pyppeteer
Alerts and Pop-ups (or pop-ups) are used extensively in websites for gathering user information, seeking confirmation from end-users, and more. Simple alerts, information alerts, and prompt alerts are some of the most common types of alerts used across websites. You can learn more about handling alerts through this blog on handling alerts in windows using Selenium.
All websites show a ‘Cookie Consent’ popup when you visit the same for the first time or from an incognito window. Below is an Exit popup on the LambdaTest website that prompts the user to try out the platform.
Since the guiding principles of alerts and popups remain unchanged, we recommend you look at the video below, which deep dives into its essentials.
As far as the Pyppeteer library is concerned, the dialog class provides methods that help handle popups and alerts. Dialog objects are dispatched by page via the dialog event.
The dismiss() method is below the dialog box. On similar lines, the accept(promptText: str = ‘’) method lets you accept the dialog. You can also pass a promptText (format: string), which is the text to enter in the prompt.
Demonstration
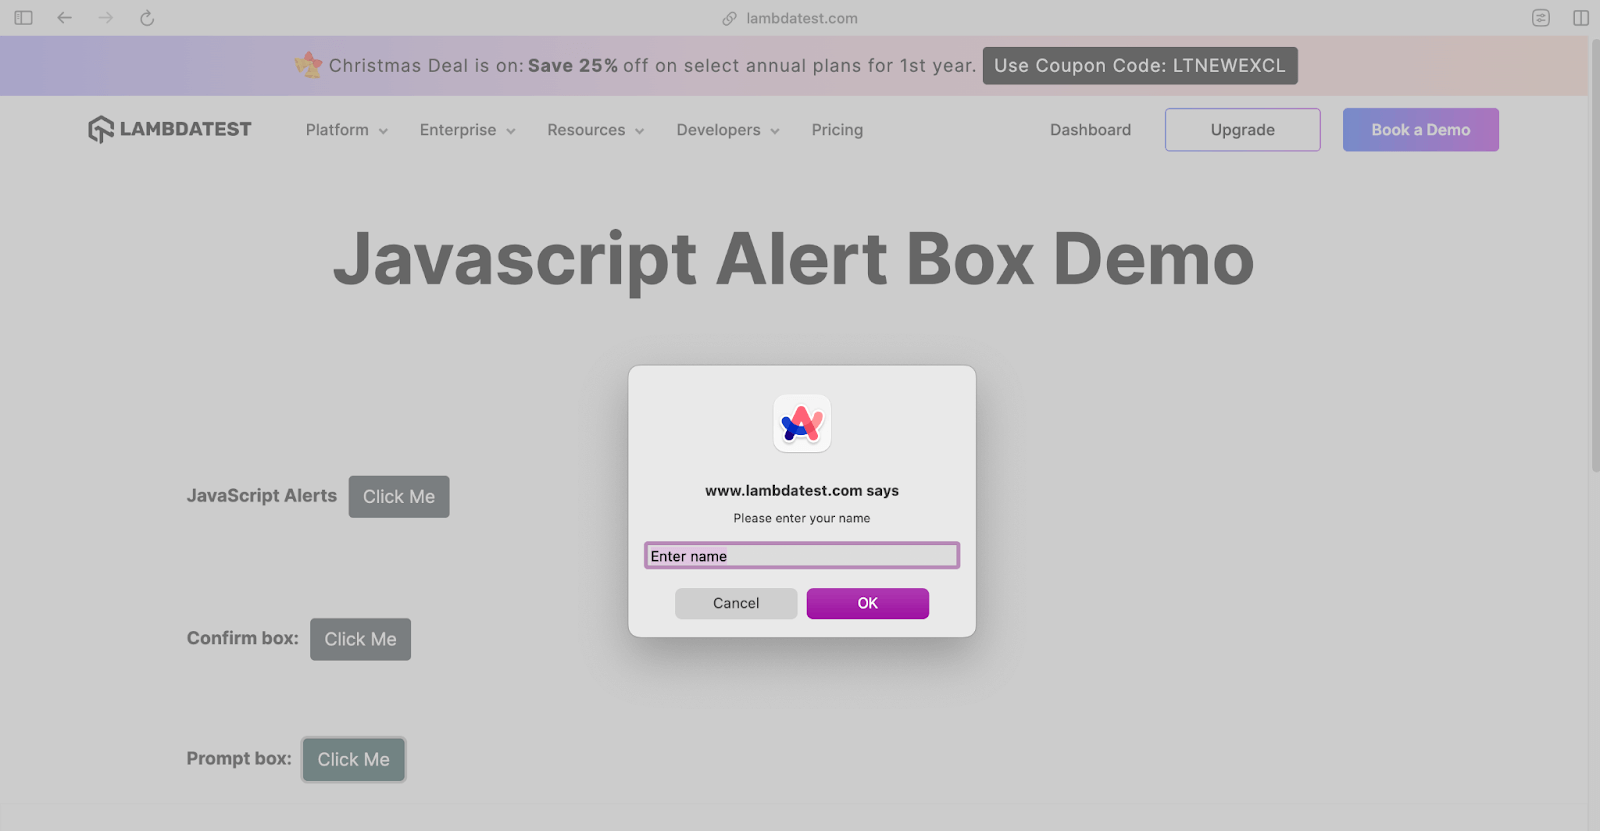
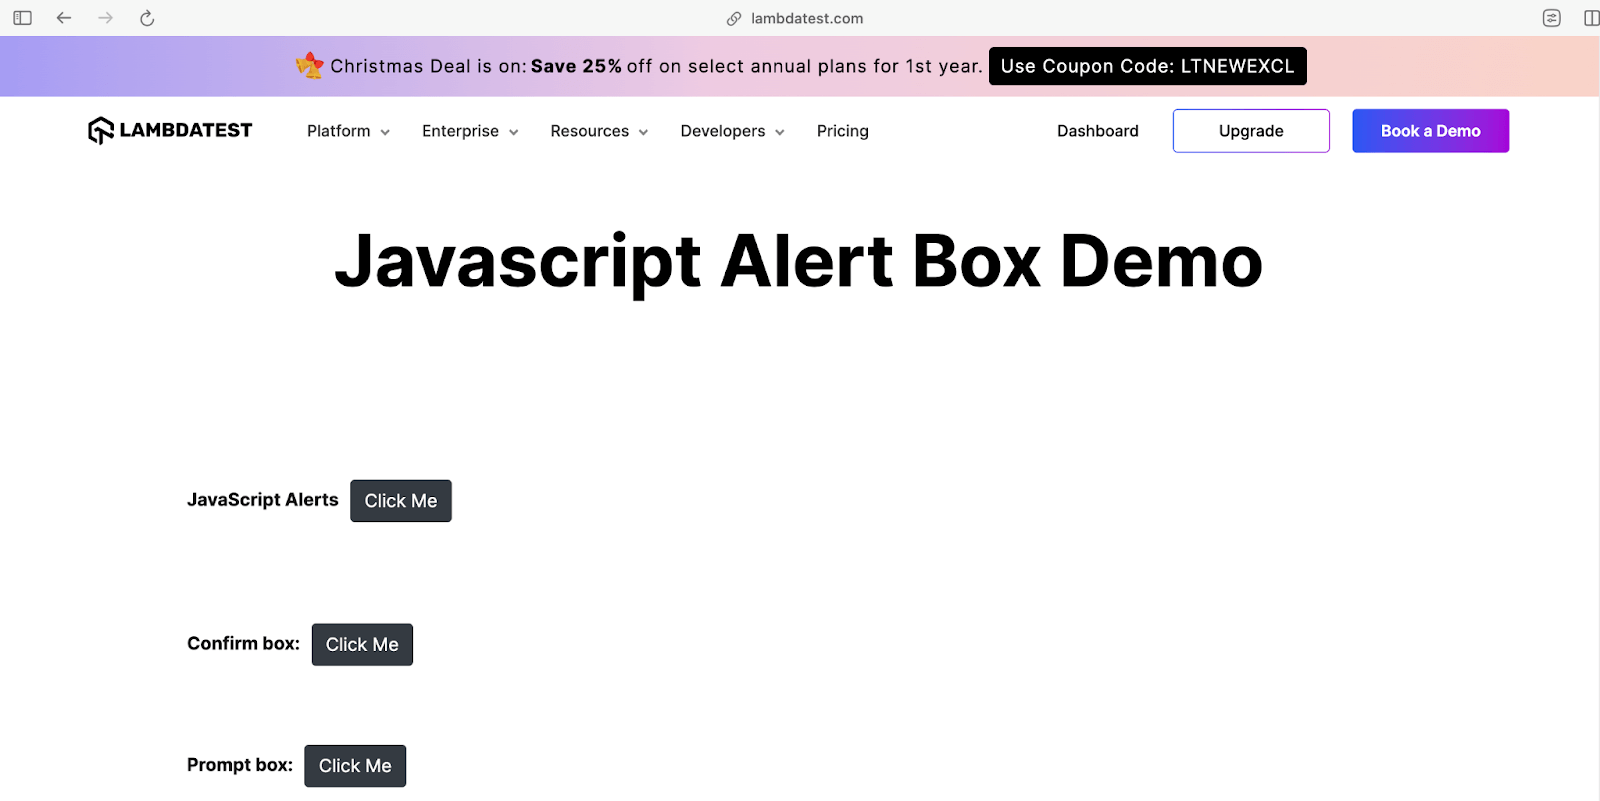
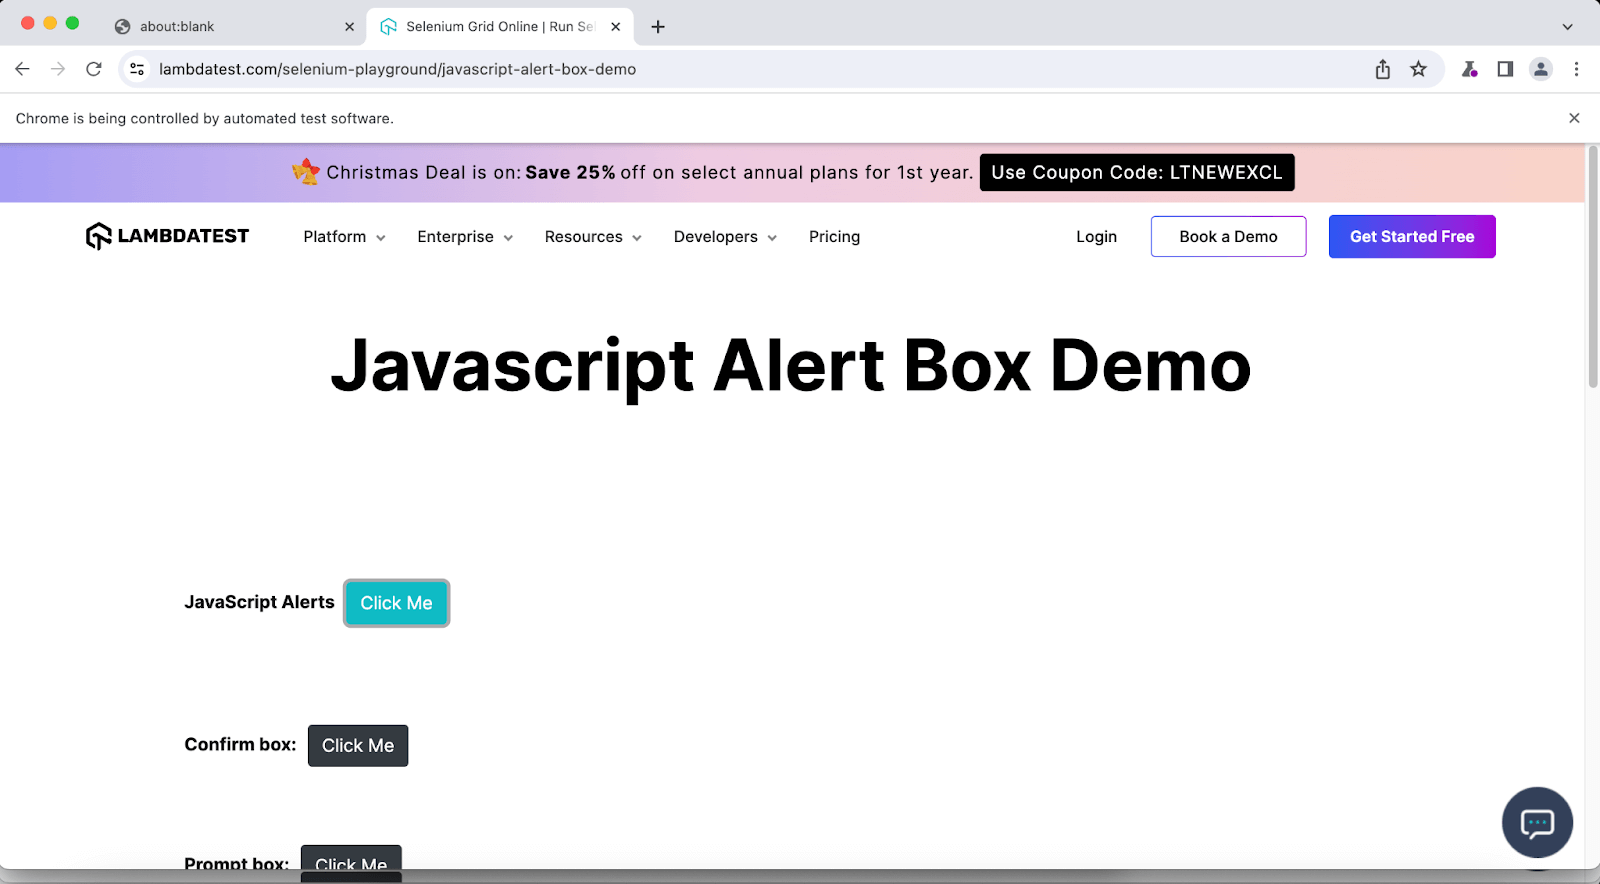
For demonstrating the usage of dialog boxes (or alerts & popups) with Pyppeteer, we would be automating interactions with the different alerts in LambdaTest Playground – Alert Demo.
The scenarios are automated with Chromium installed on a local machine (EXEC_PLATFORM = local). However, the same tests would also work seamlessly with Pyppeteer on LambdaTest cloud (EXEC_PLATFORM = cloud)
Code Walkthrough
Four separate event listeners are created for automating interactions with the dialog boxes:
| Method | Purpose |
|---|---|
| handle_js_dialog_box(dialog) | Event listener for handling JS alert dialog box |
| handle_confirm_accept_dialog_box(dialog) | Event listener for handling confirm dialog box (Status – Confirm) |
| handle_confirm_dismiss_dialog_box(dialog) | Event listener for handling confirm dialog box (Status – Dismiss) |
| handle_confirm_prompt_dialog_box(dialog) | Event listener for handling prompt dialog box |
Let’s deep dive into different test scenarios bifurcated based on the interactions they have with the respective alert box.
- Test Method: test_handling_js_alerts()
- Test Method: test_handling_confirm_accept_alerts()
- Test Method: test_handling_confirm_dismiss_alerts()
- Test Method: test_handling_prompt_alerts()
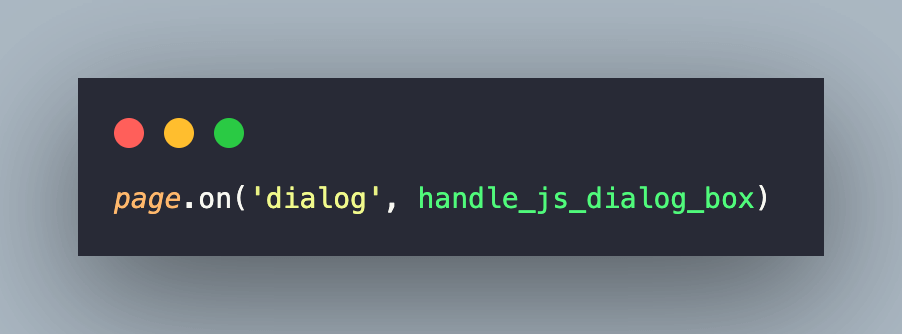
After navigating to the LambdaTest Alert Demo website, the page.on() method in Pyppeteer is used for attaching event listeners to the current page. The syntax of the page.on() method is below:
|
1 |
await page.on(event, callback) |
– event: Event name (string) to listen for.
– callback: Callback function to be executed when the specified event fires.
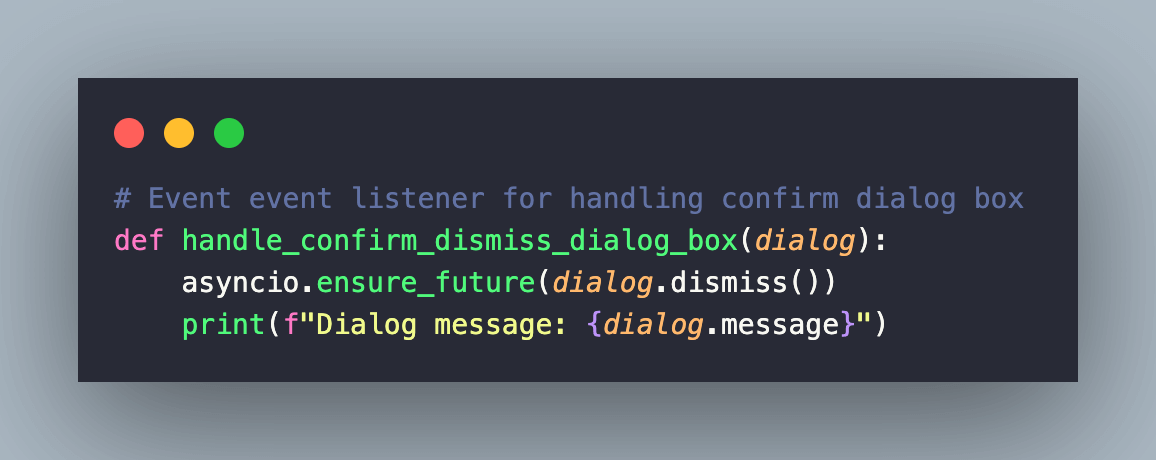
Since dialog objects are dispatched by the page via the dialog event, the method listens to that particular event. The callback function in the current scenario is handle_js_dialog_box(dialog).
Here is the implementation of the callback function:
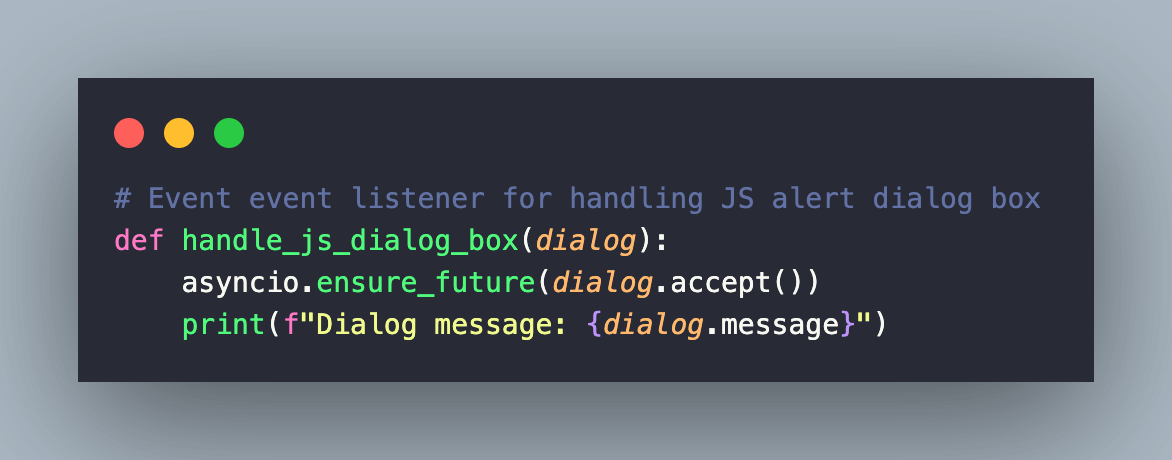
The asyncio.ensure_future() method of the asyncio module is used for background execution of the accept() method. In short, when the callback function is fired, it accepts the dialog box. The message() method of the dialog class prints the message attached to the current dialog box.
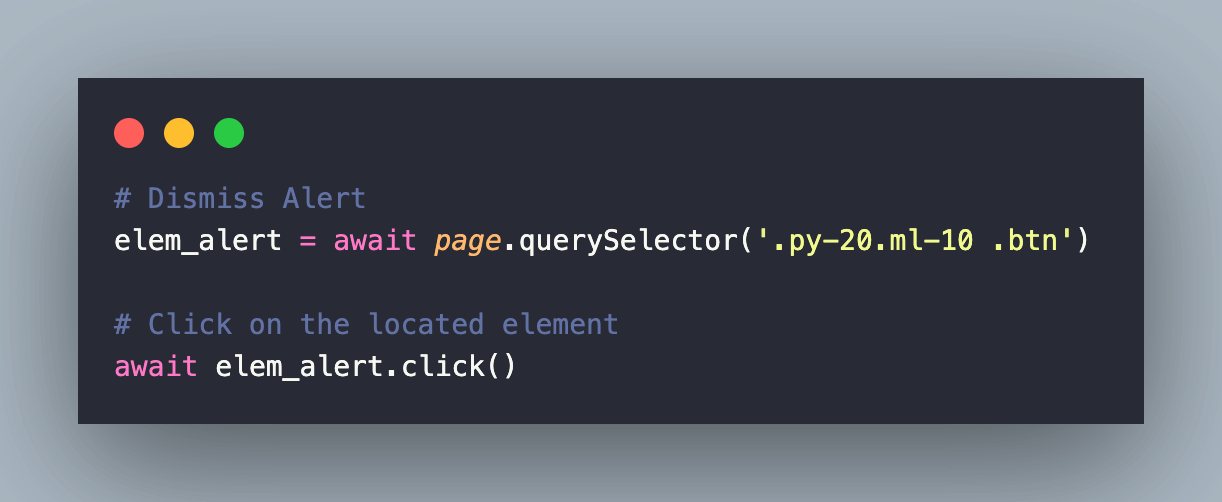
Next, locate the Click Me button associated with JavaScript Alerts on the page.

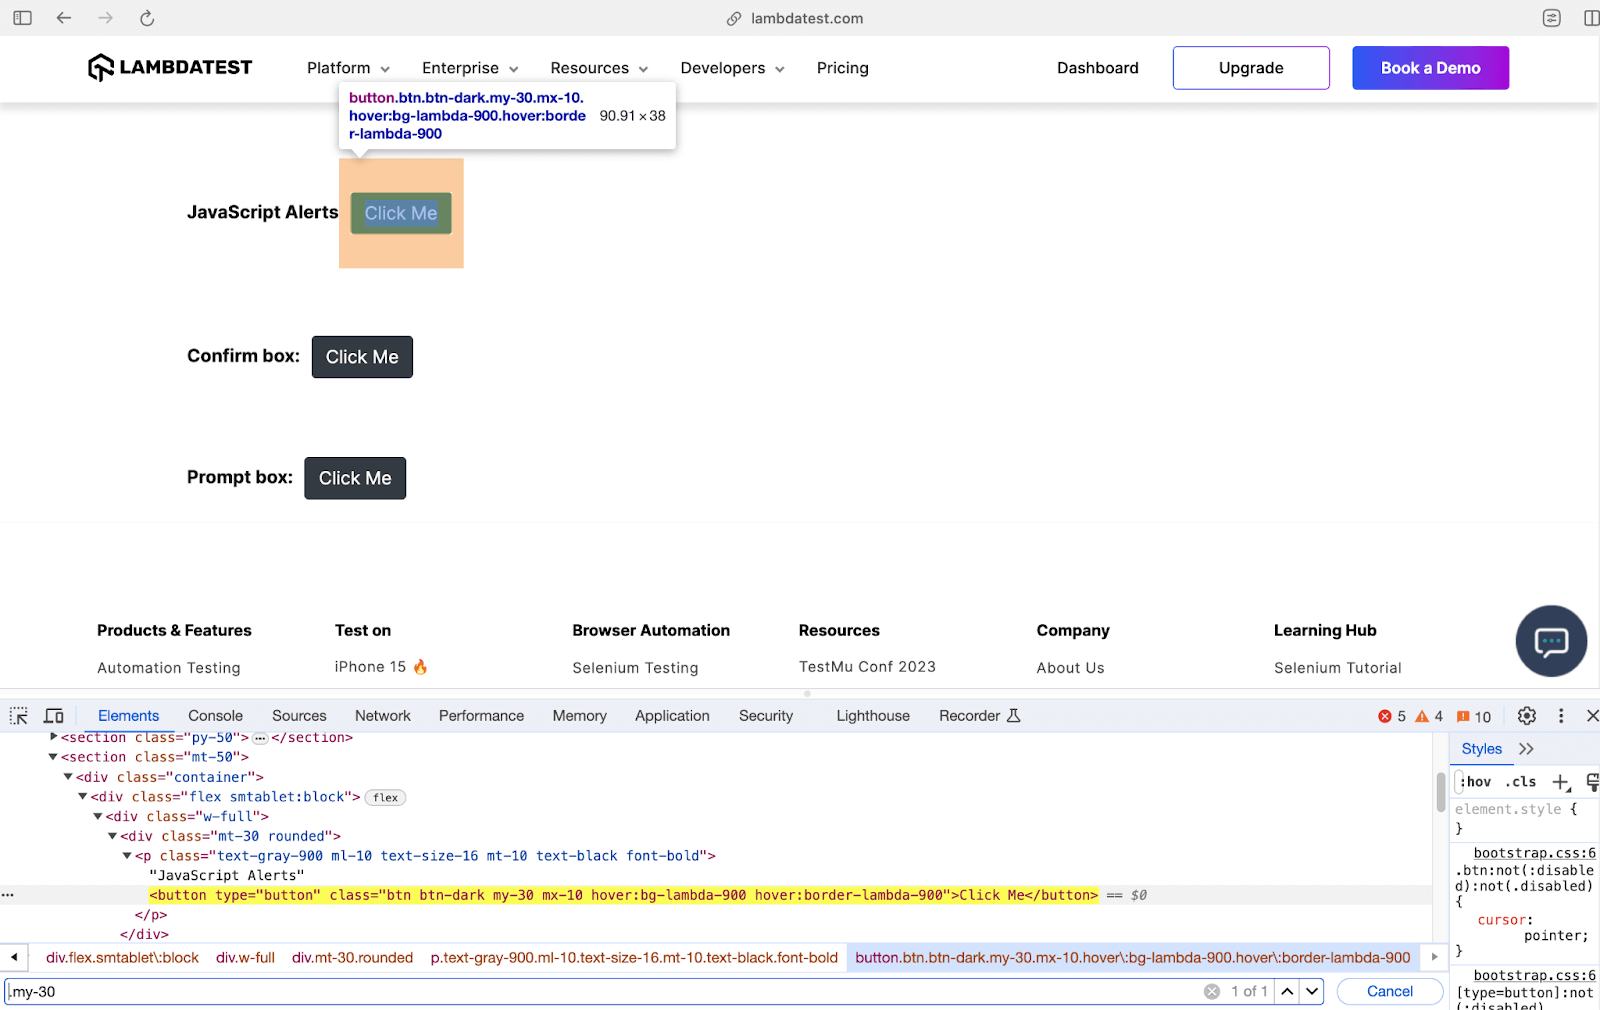
Since the element is located using the CSS Selector, we use the querySelector() method to get the element (i.e. elem_alert) matching that locator.
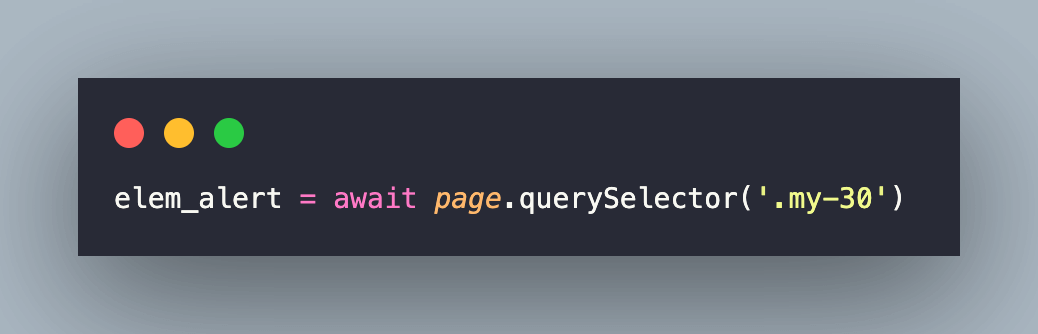
Finally, the click() method of the button element is invoked so that it opens up the dialog box.
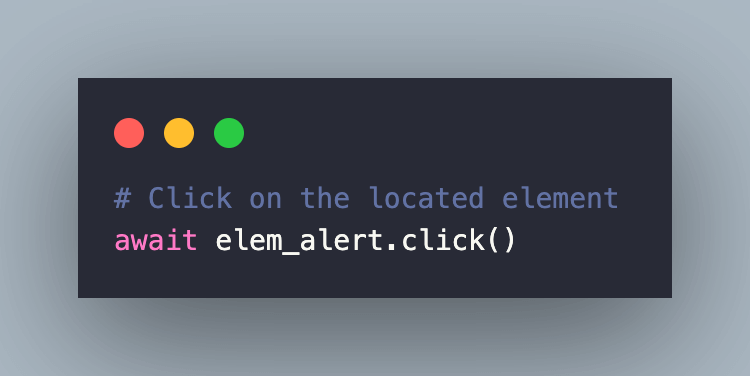
With this, the dialog event is also fired, after which the respective callback function [i.e., handle_js_dialog_box(dialog)] is executed non-blocking.
Like before, the page.on() method in Pyppeteer is used for attaching event listeners to the current page.

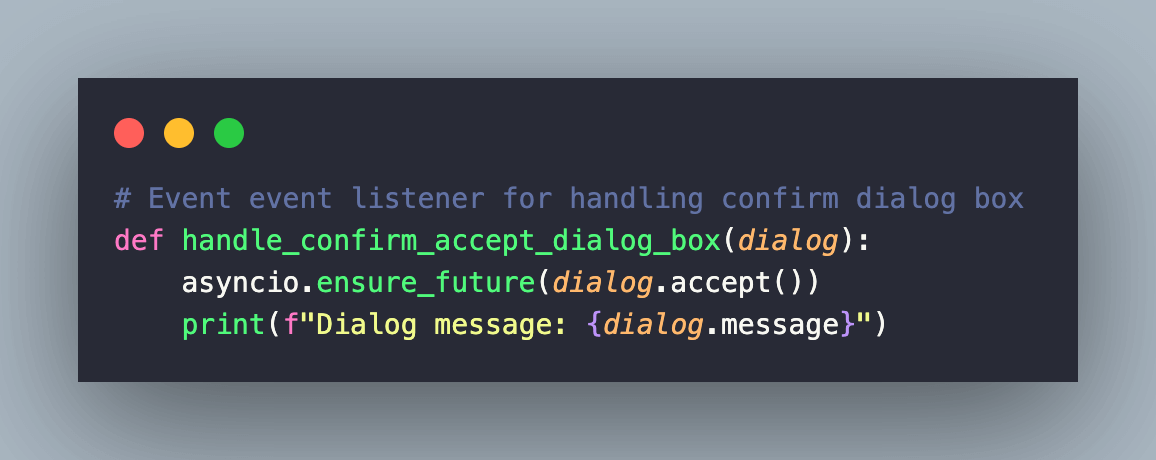
Here is the implementation of handle_confirm_accept_dialog_box():
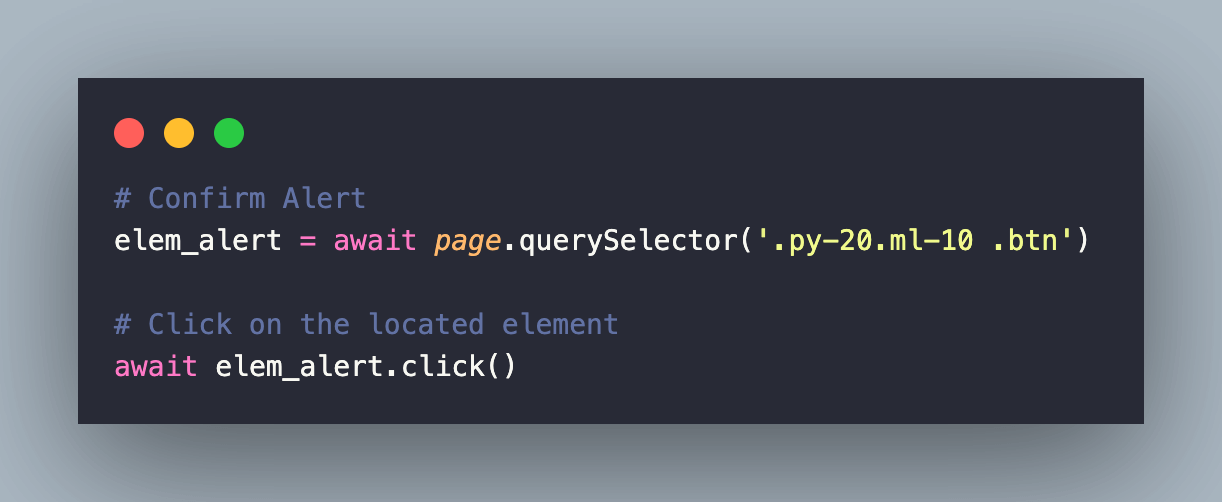
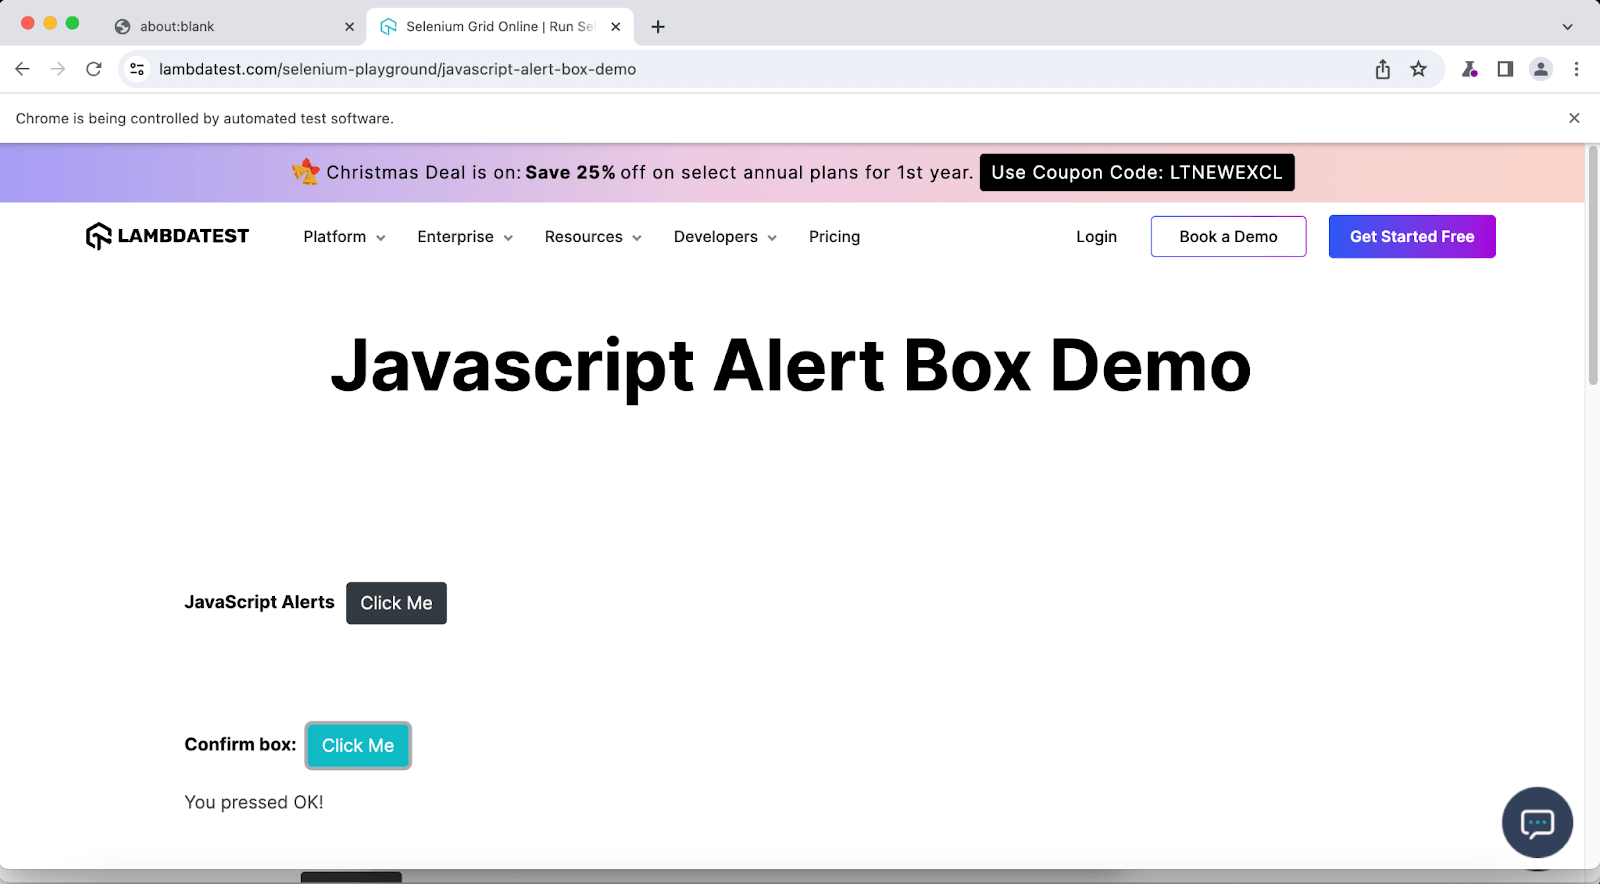
Next, locate the Click Me button associated with the Confirm box on the page.

Like earlier, the click() method of the button element is invoked; after which the respective callback function [i.e., test_handling_confirm_accept_alerts(dialog)] is executed in a non-blocking manner.
Like before, the page.on() method in Pyppeteer is used for attaching event listeners to the current page.
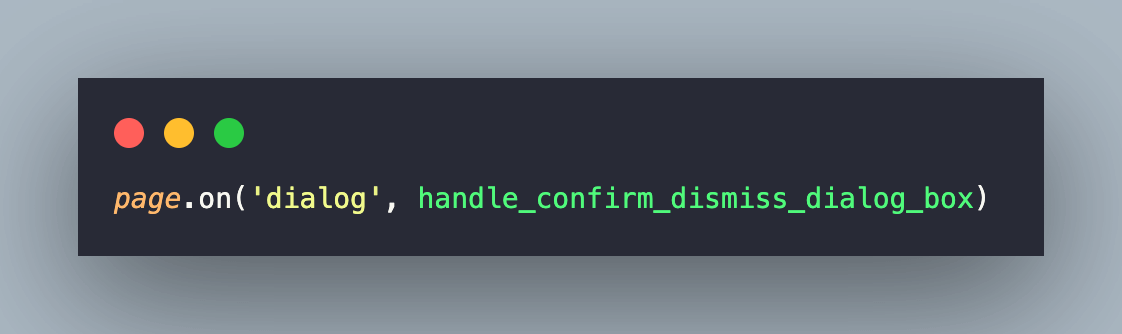
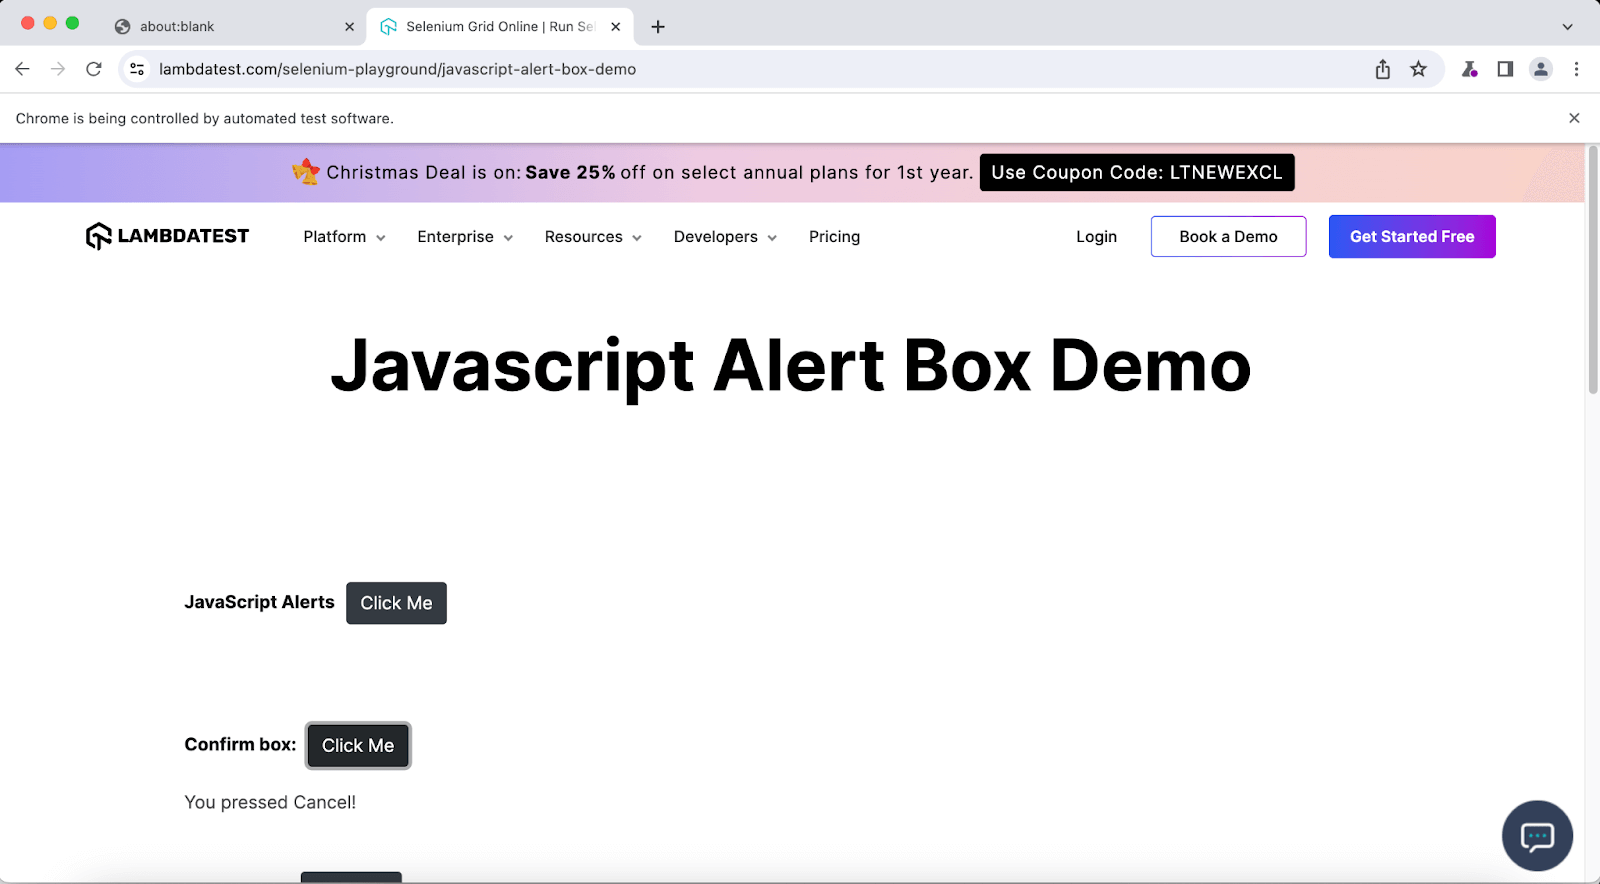
Since the dialog box will be dismissed, the dismiss() method of the Dialog class is invoked in the callback function.
Next, locate the Click Me button associated with the Confirm box on the page.

Like earlier, the click() method of the button element is invoked, after which the respective callback function [i.e., test_handling_confirm_dimiss_alerts(dialog)] is executed in a non-blocking manner.
Like before, the page.on() method in Pyppeteer is used for attaching event listeners to the current page.
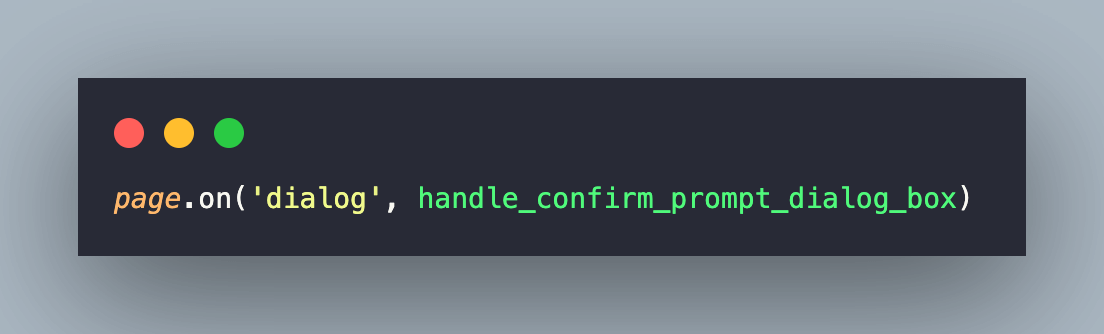
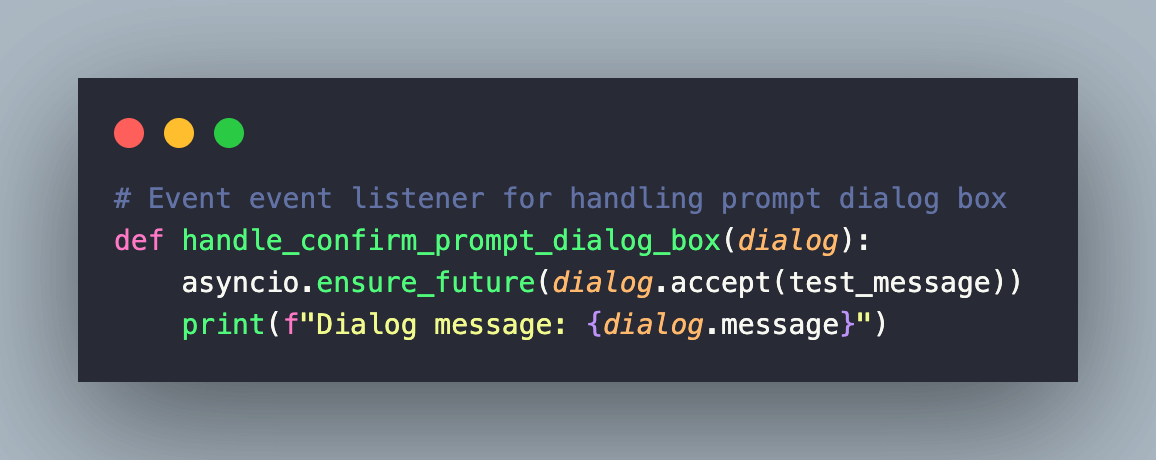
Since there is a text message that needs to be entered in this prompt box, the respective message (i.e., test_message) is passed to the accept() method.
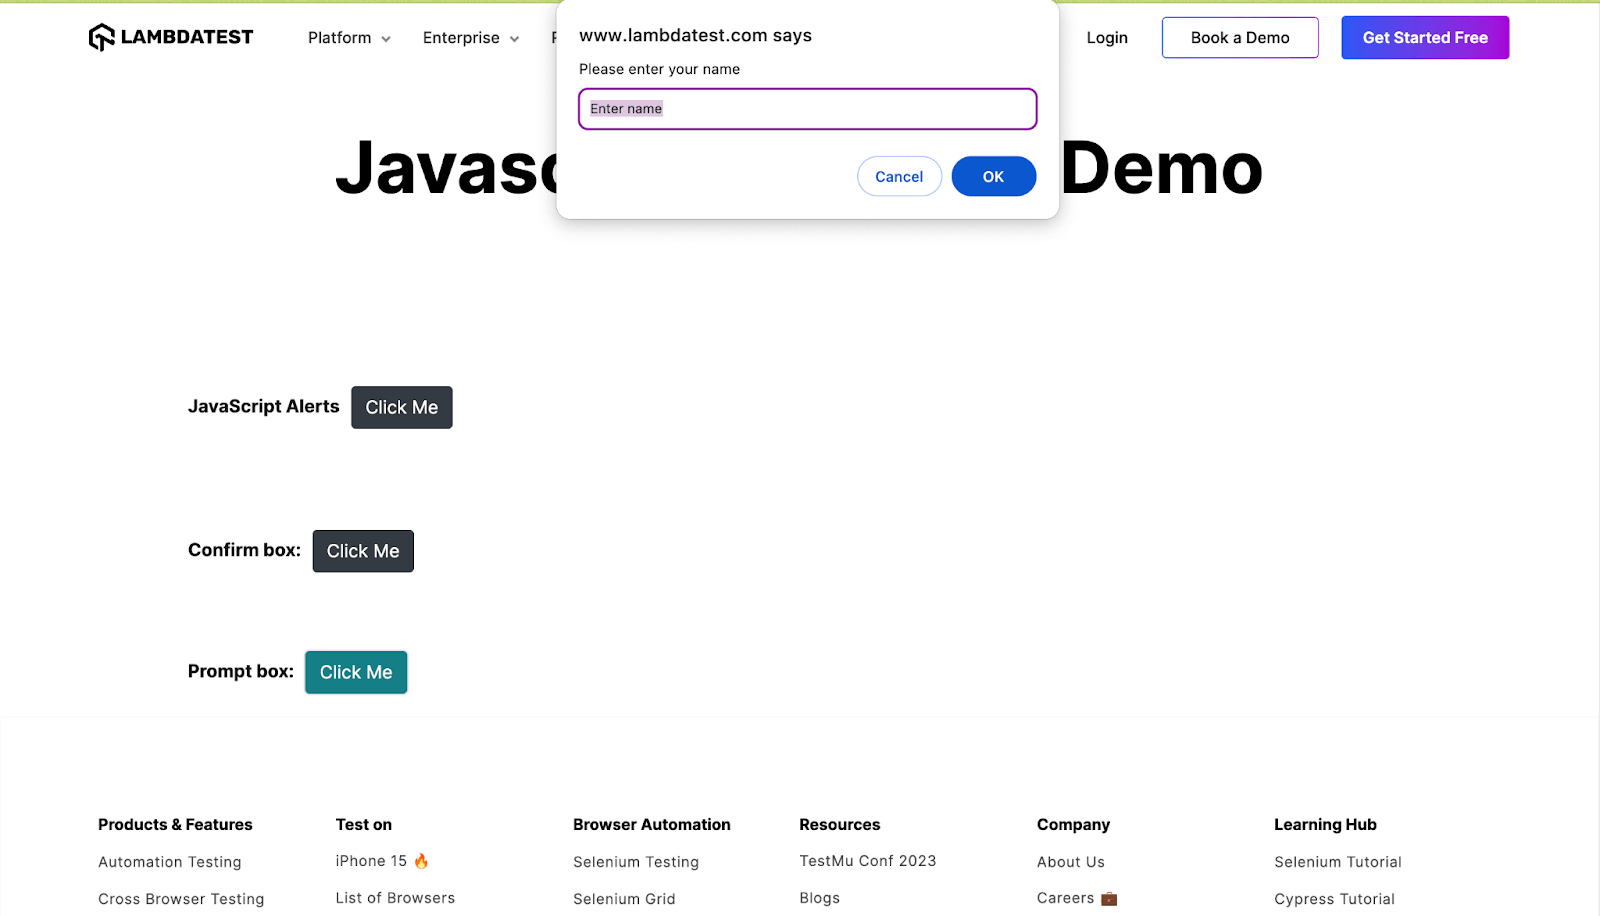
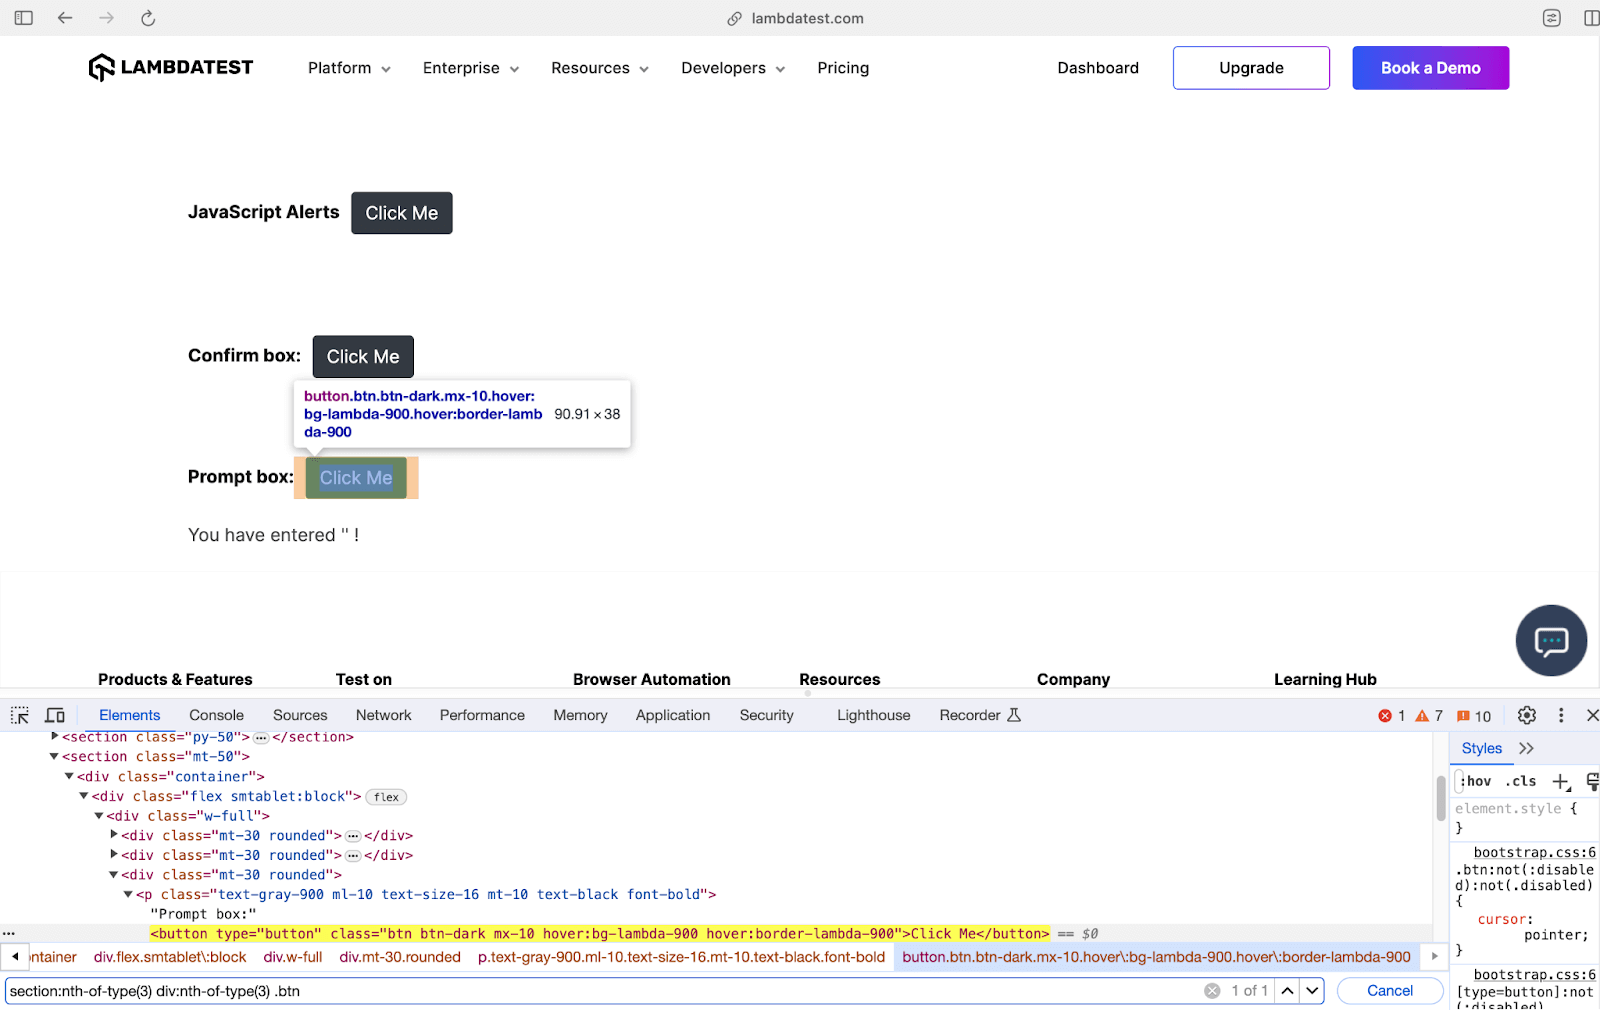
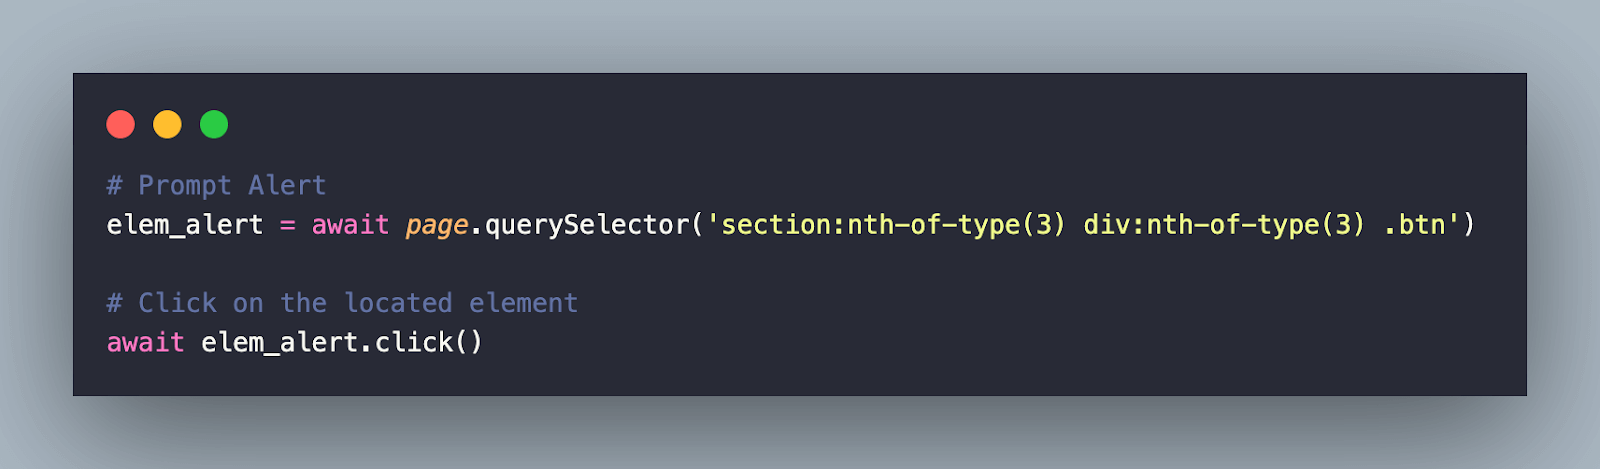
The Click Me button associated with the Prompt box uses the CSS Selector property. The respective callback function [i.e., handle_confirm_dismiss_dialog_box(dialog)] is executed once the dialog box appears after the click operation on the button element.
Execution
Invoke the command make pyppeteer-dialog-box on the terminal with the Chromium browser instantiated on the local machine. As seen below, the test execution is successful.
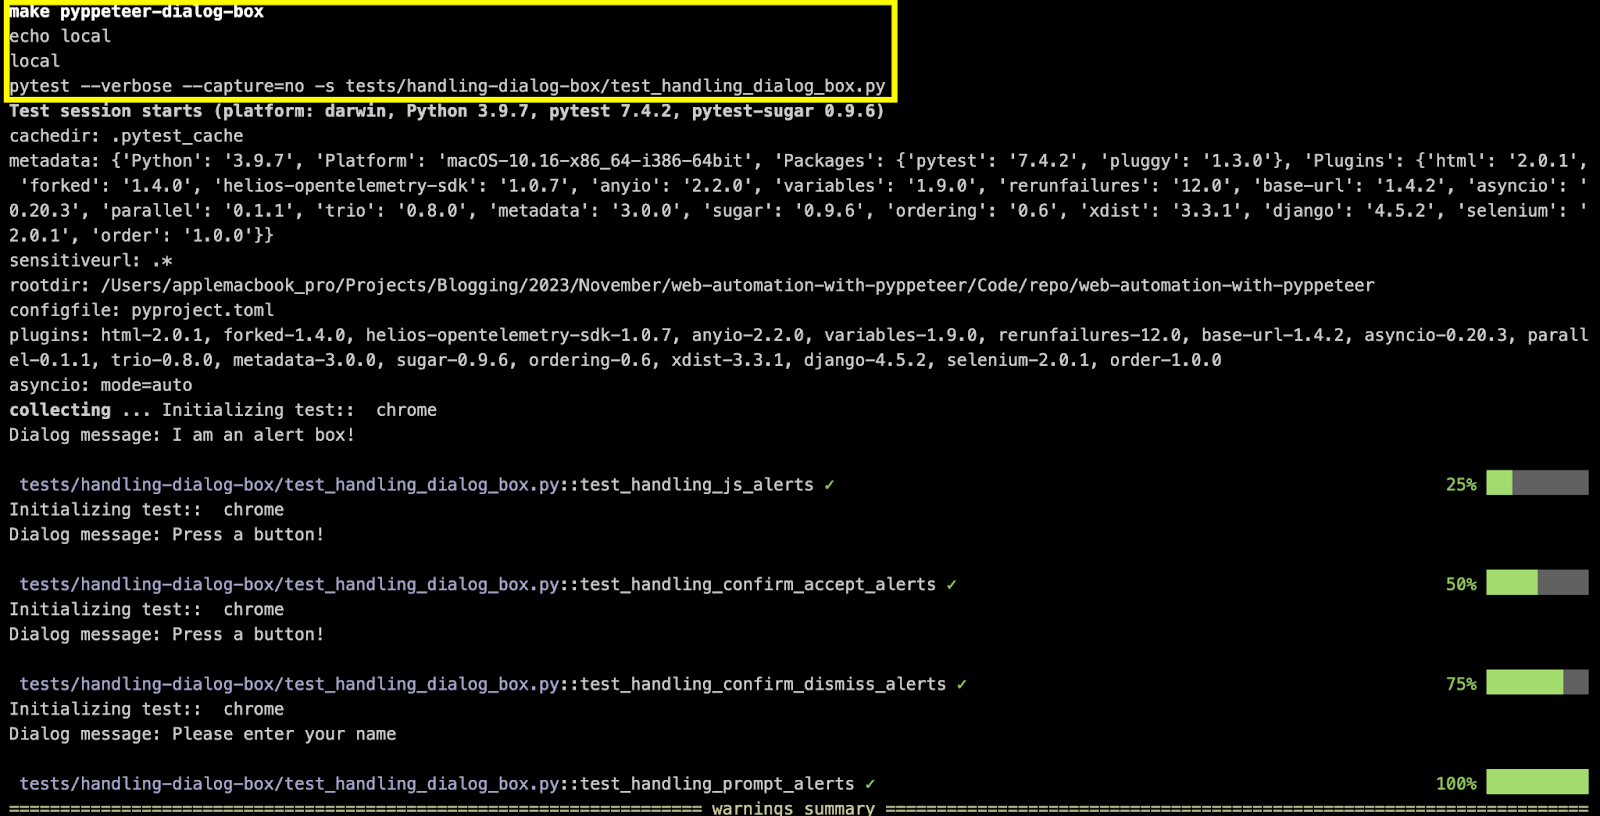
Shown below are the execution snapshots that indicate that the interactions with the dialog (or alert) boxes were successful.
Though alerts that open up a dialog box, popups (or pop-ups) are mere window(s) that appear on top of the existing content of the page. Automating interactions with popups involves locating the window using appropriate locators (i.e., CSS Selector, XPath.
After that, we use appropriate coroutines (i.e., waitForXPath, waitForSelector) to detect the presence of the popup element. Once detected, you can interact with it by clicking buttons or performing other actions.
Handling dynamic content with Pyppeteer
Most modern-age websites (including SPAs) leverage JavaScript for loading and updating content on the page. AJAX (Asynchronous JavaScript and XML) retrieves data from the server and updates relevant sections (or parts) on the page. This means that the content on the page is loaded with a reading of the entire page.
Not only content, the WebElements can also be dynamic. These WebElements are invoked at run-time and dynamically added to the page. It is important to note that there is a difference between dynamic elements and hidden elements (display: none, visibility: hidden).
A WebElement can never be hidden as well as dynamic. For instance, a web page could have a collapsed dropdown element (or menu) that becomes visible dynamically based on the interactions with the element. Handling dynamic dropdown elements with Selenium, Pyppeteer, and other frameworks (or libraries) needs to be in an automation engineer’s arsenal!
For instance, YouTube is a prominent website that leverages dynamic loading of content to showcase video content to its end-users. As seen below, content (including videos, and meta-data) on the LambdaTest YouTube channel is loaded dynamically when the user performs a scroll operation.


For a demonstration of dynamic content handling with Pyppeteer, we would be automating interactions with WebElements on the following websites:
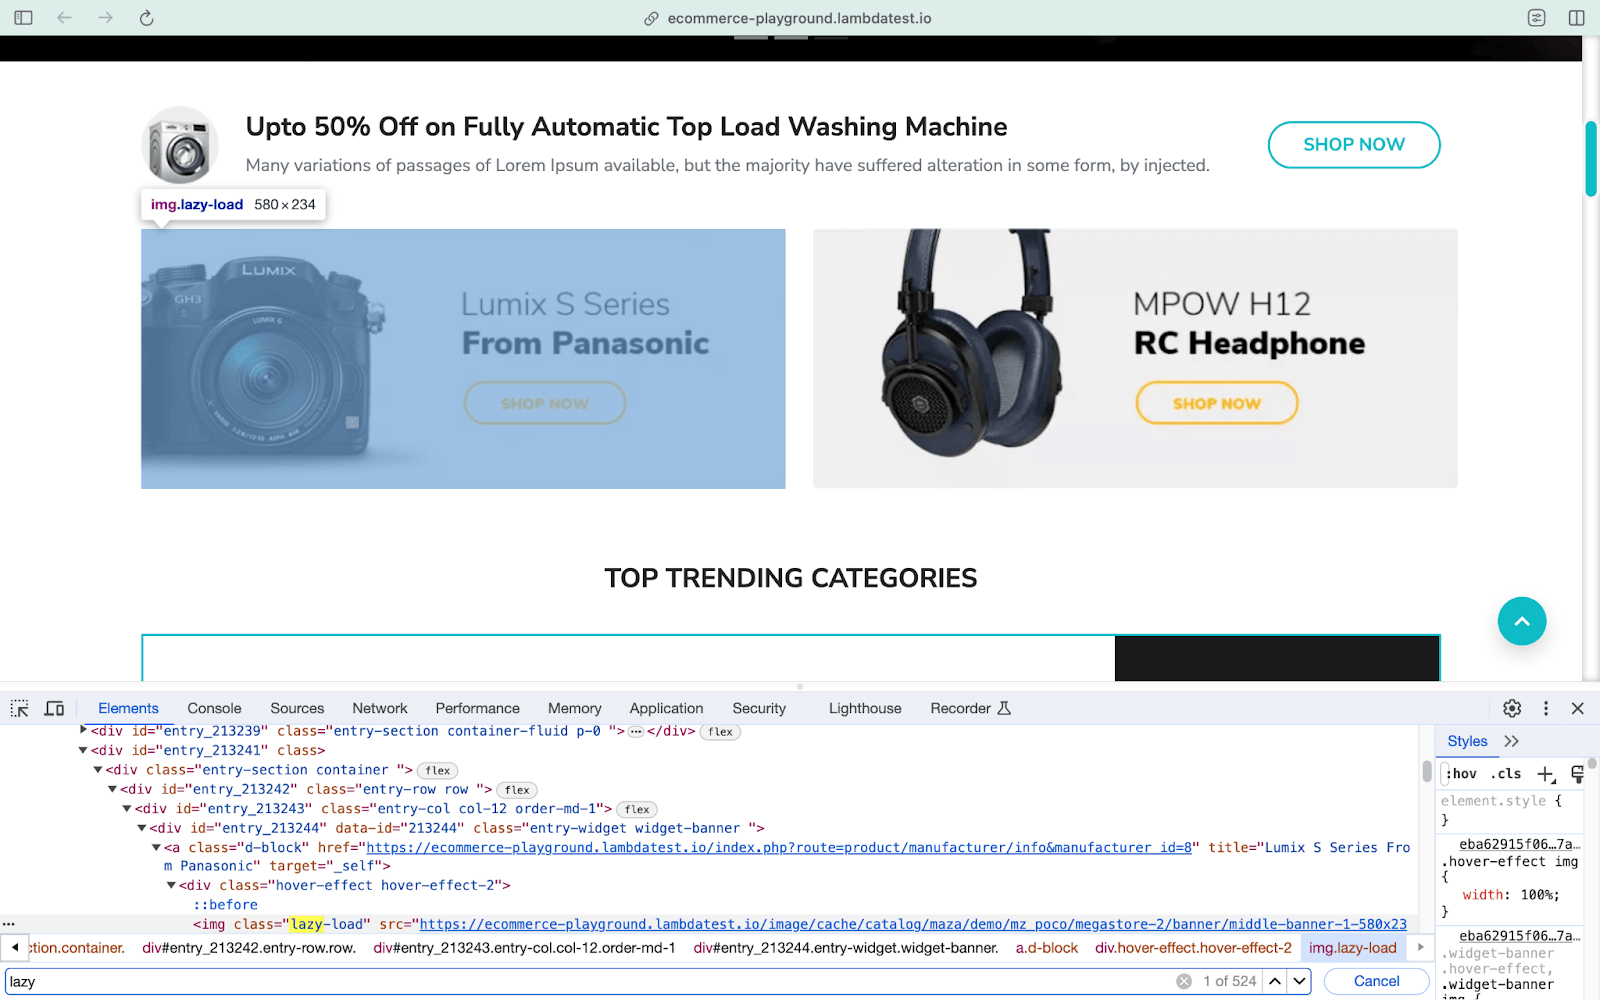
Along with dynamically loaded content, the LambdaTest eCommerce Playground also lazy loaded images for better website performance.
Demonstration
For demonstrating dynamic content handling with Pyppeteer, we automate the following test scenario on Chrome installed on a local machine (EXEC_PLATFORM = local) or LambdaTest cloud grid (EXEC_PLATFORM = cloud)
Test Scenario 1
|
Test Scenario 2
|
Test Scenario 3
|
Test Scenario 4
|
Though all four test scenarios appear similar, the difference lies in how the content (including images) is presented on the website. In one of the scenarios, we would also be demonstrating scroll operations that come in handy when automating interactions with dynamically loaded content.
Implementation
Here is the implementation of all the test scenarios. We will be dissecting the code in further sections of the blog!
Code Walkthrough (Test Scenario – 1)
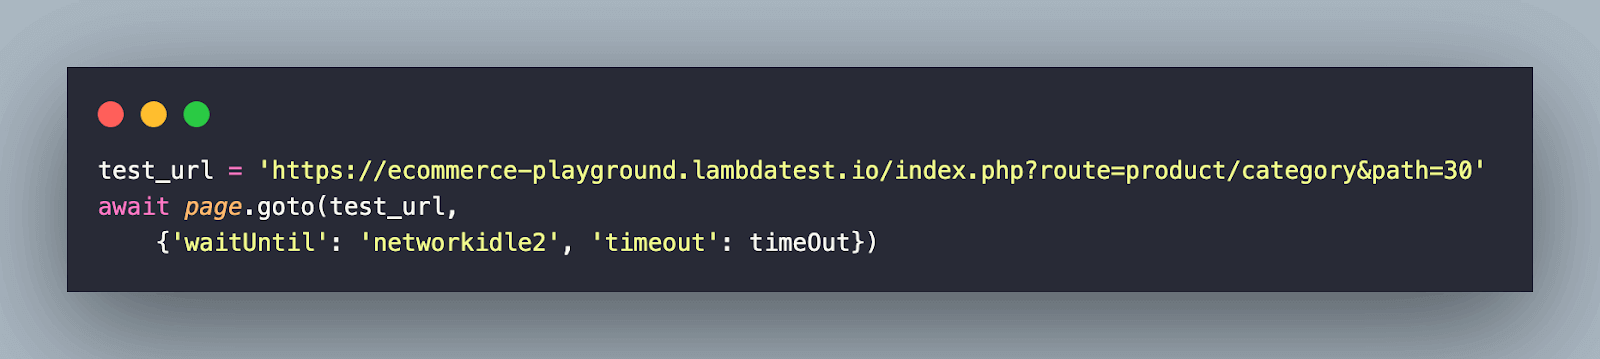
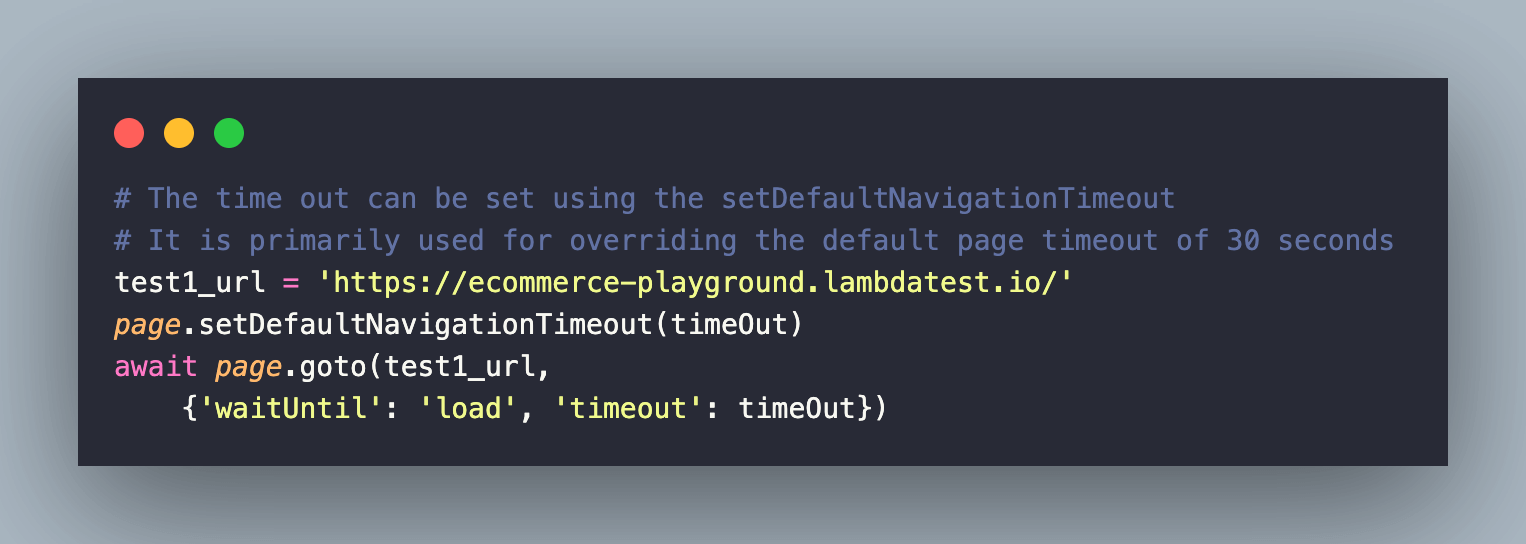
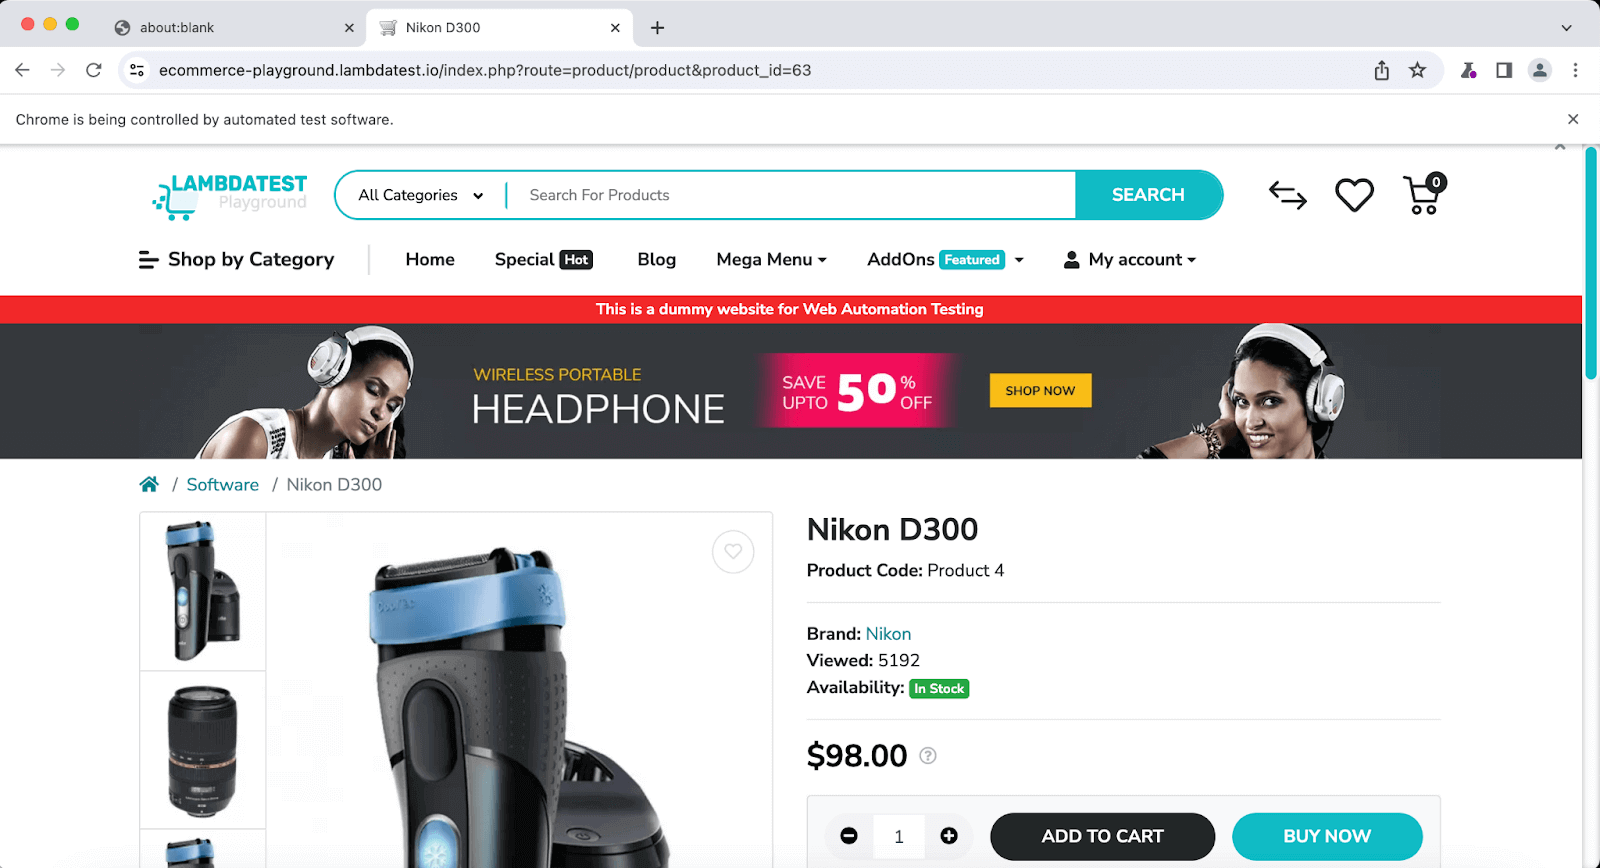
In the test test_lazy_load_ecomm_1(), we first navigate to the test URL using the goto() method. The navigation timeout is set to 60000 ms, overriding the default timeout of 30000 ms.
Once the page is loaded, we use the querySelector() method to get the element matching the specified CSS Selector.

Once the element is located, the scrollIntoView() method of the Element’s interface (in JavaScript) is used to scroll into view of the specified element.

The asyncio.ensure_future() method of the asyncio module is used to convert the promise (i.e., navigationPromise) returned by waitForNavigation() into an asynchronous task.
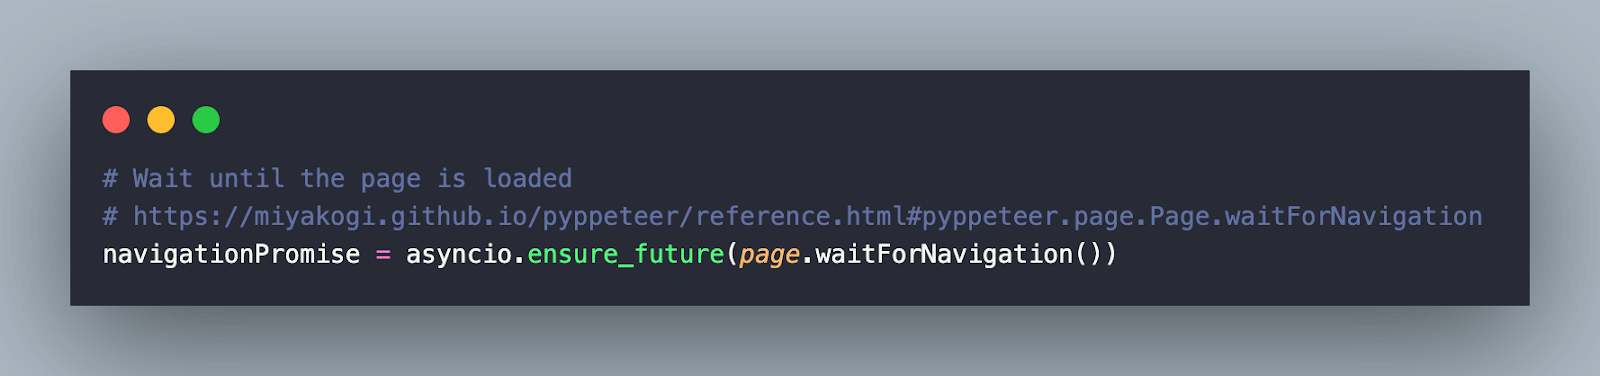
The click() method clicks on the element in the previous step. Finally, await navigationPromise waits for the completion of the navigation operation (i.e., the page would have loaded completely by the end of this step).

Assert if the post-navigation URL does not match with the target URL.

Code Walkthrough (Test Scenario – 2)
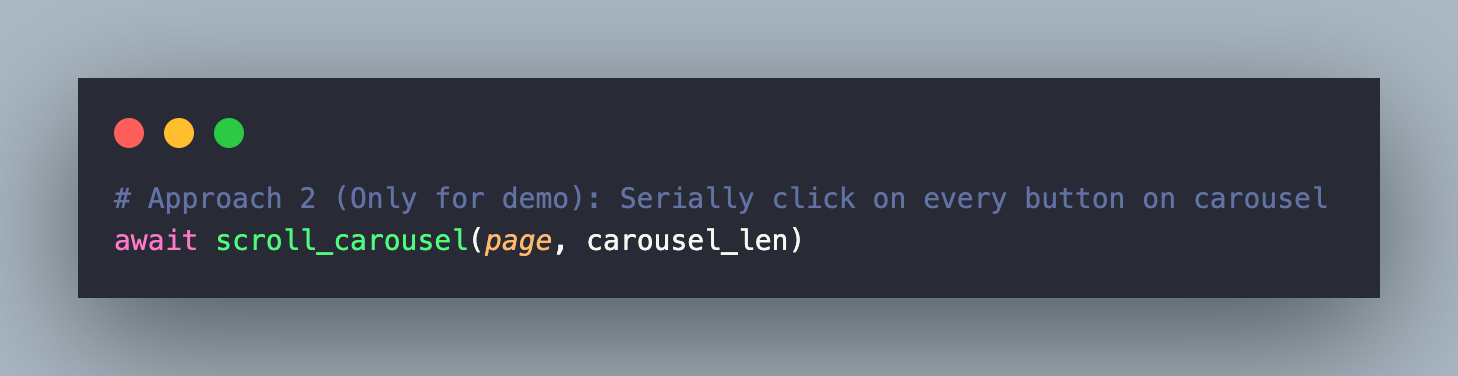
After navigating to the test URL, we invoke the user-defined scroll_carousel() method that takes two input parameters – page instance & carousel count (i.e., carousel_len = 4).
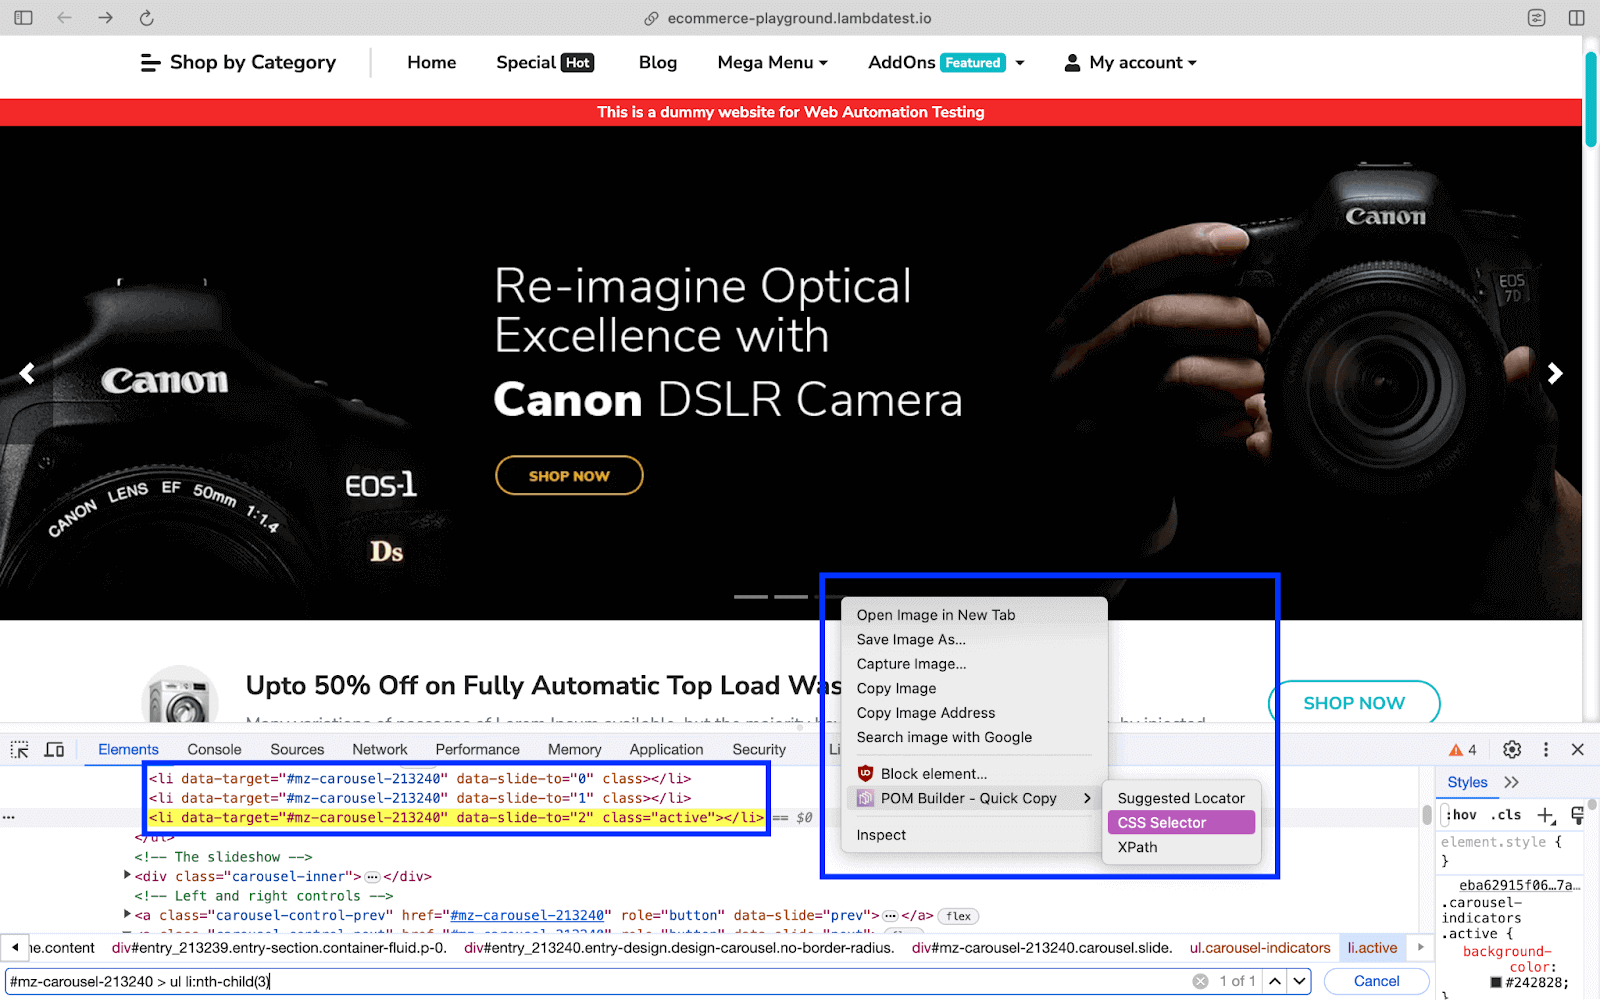
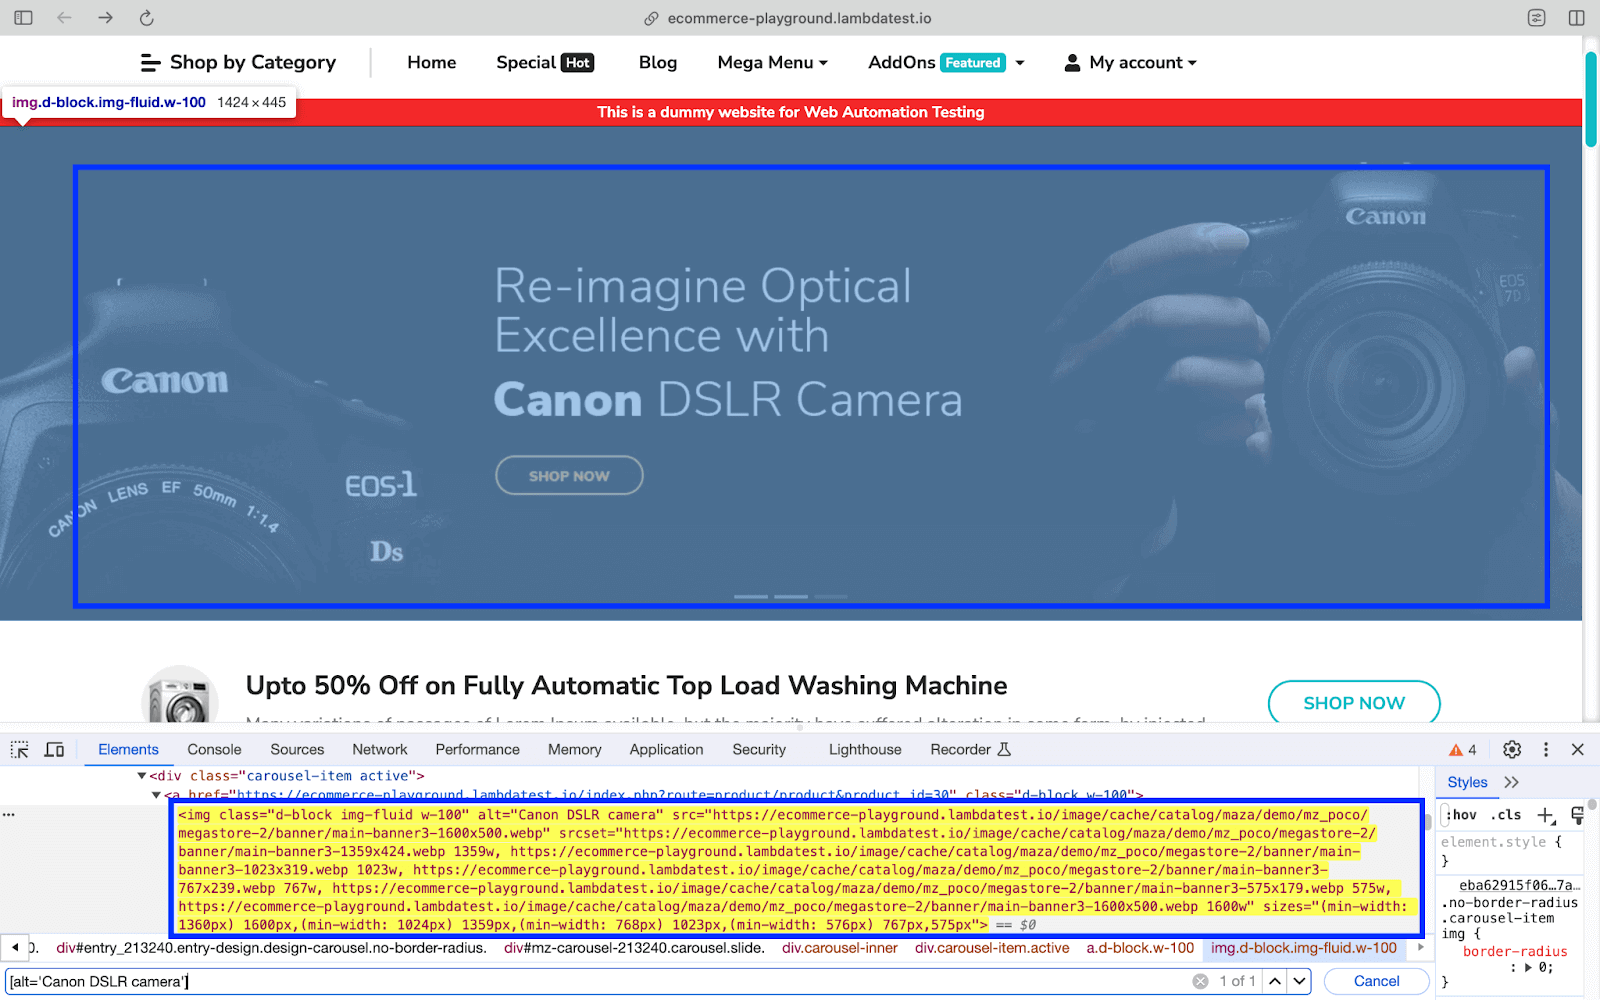
As shown below, the carousel contains 3 items, our target element is located in the final scroll.
Here is the implementation of the scroll_carousel() method:
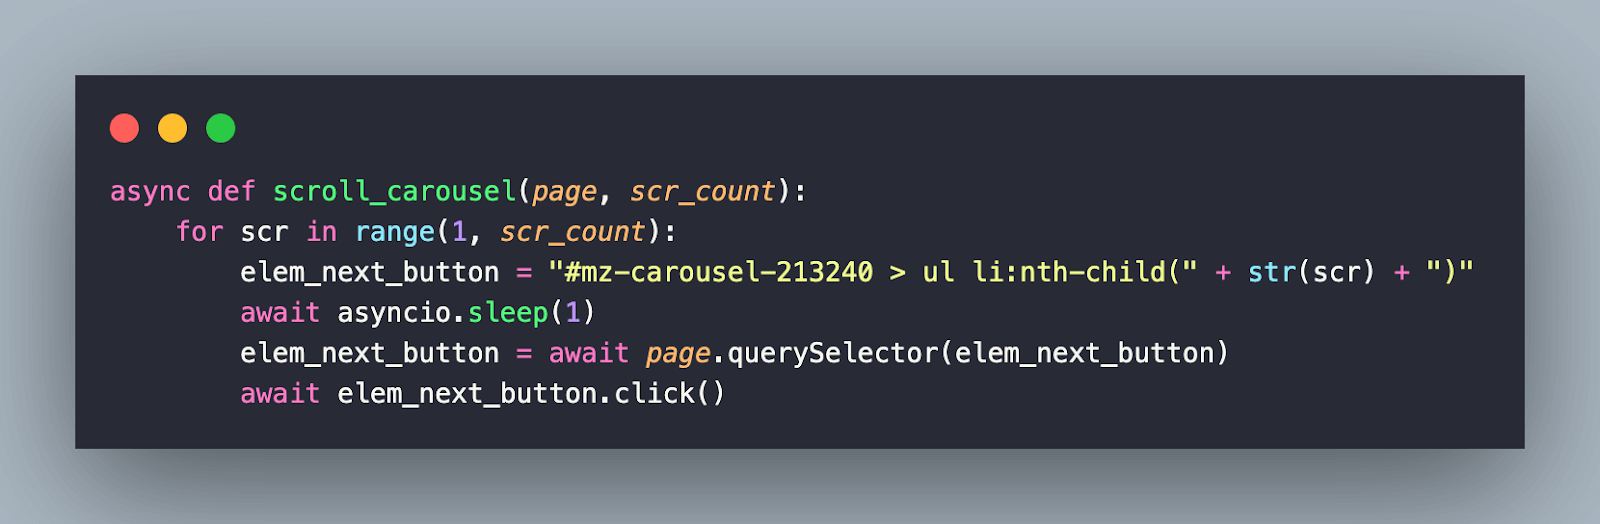
The end count of the carousel is set to 4. Hence, the for loop executes in the 1..4 range. The next button on carousel is located using the CSS Selector:
- Button 1: #mz-carousel-213240 > ul li:nth-child(
1) - Button 2: #mz-carousel-213240 > ul li:nth-child(
2) - Button 3: #mz-carousel-213240 > ul li:nth-child(
3)
At each step, the click() method on the located button element invokes the click operation. Since the loop runs from 1 through 3, the final click is performed on the last item (or button) in the carousel.

Now that we are at the target location in the carousel, the element is located via the CSS Selector. The option visible is set to True so that the waitForSelector()
method waits for the located element to be visible on the page.
Finally, the asyncio.gather() of the asyncio library is called for executing the click() method on the located element and waiting for the navigation to complete [i.e., waitForNavigation() ].
Like before, an assert is raised if the current URL does not match with the target URL.
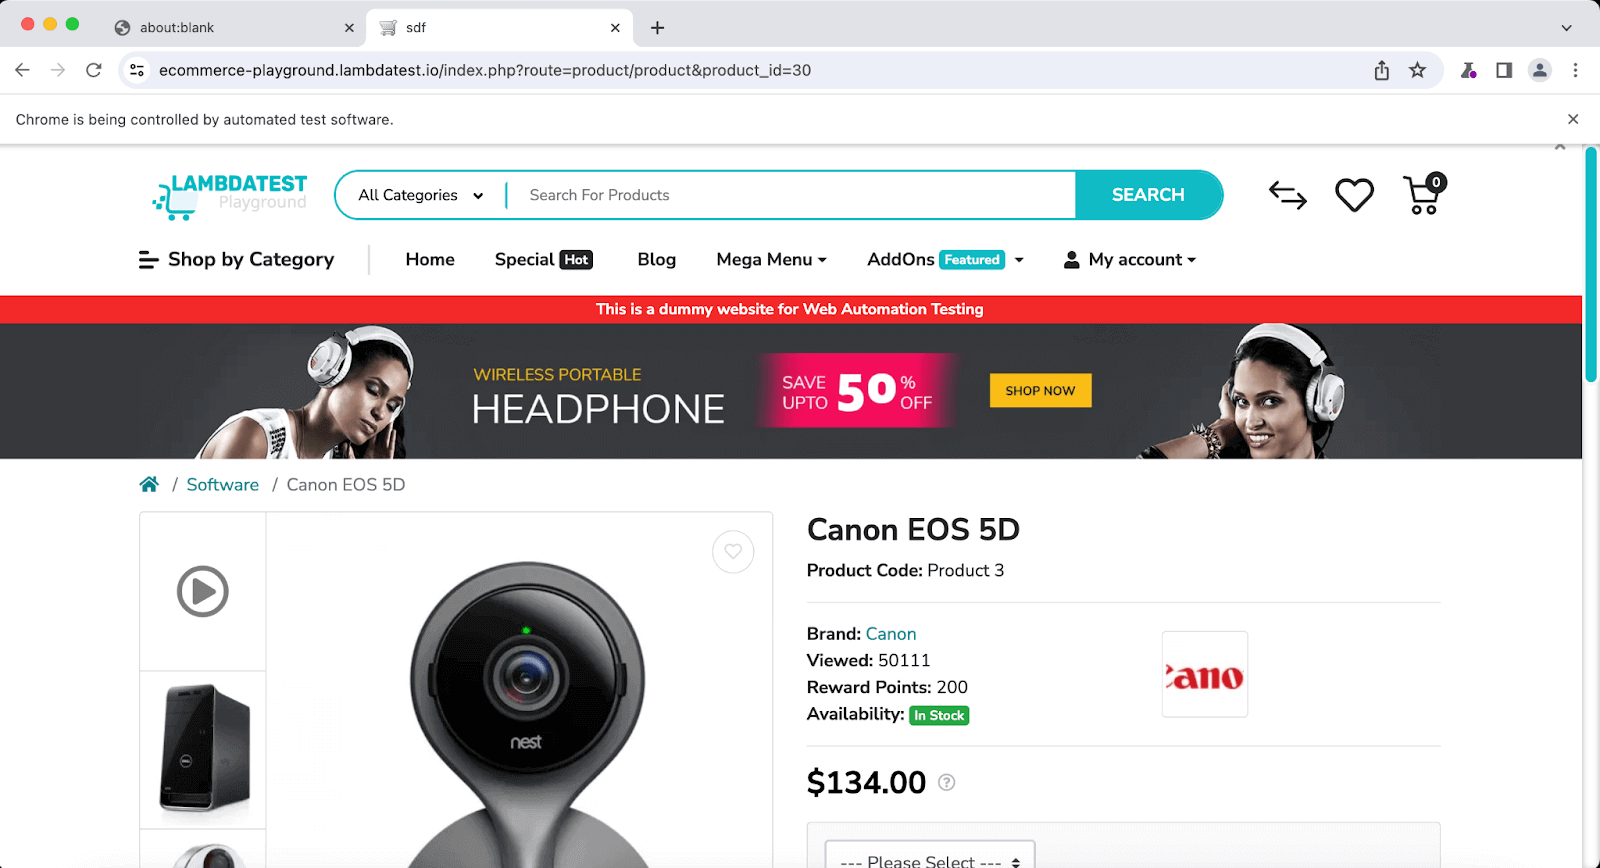
Code Walkthrough (Test Scenario – 3)
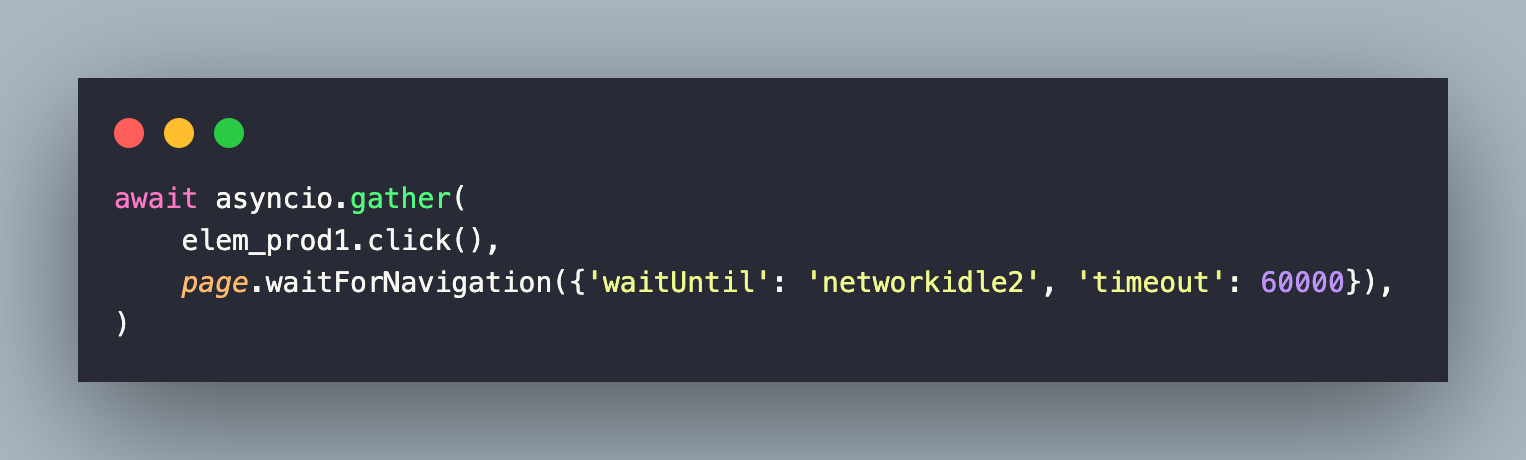
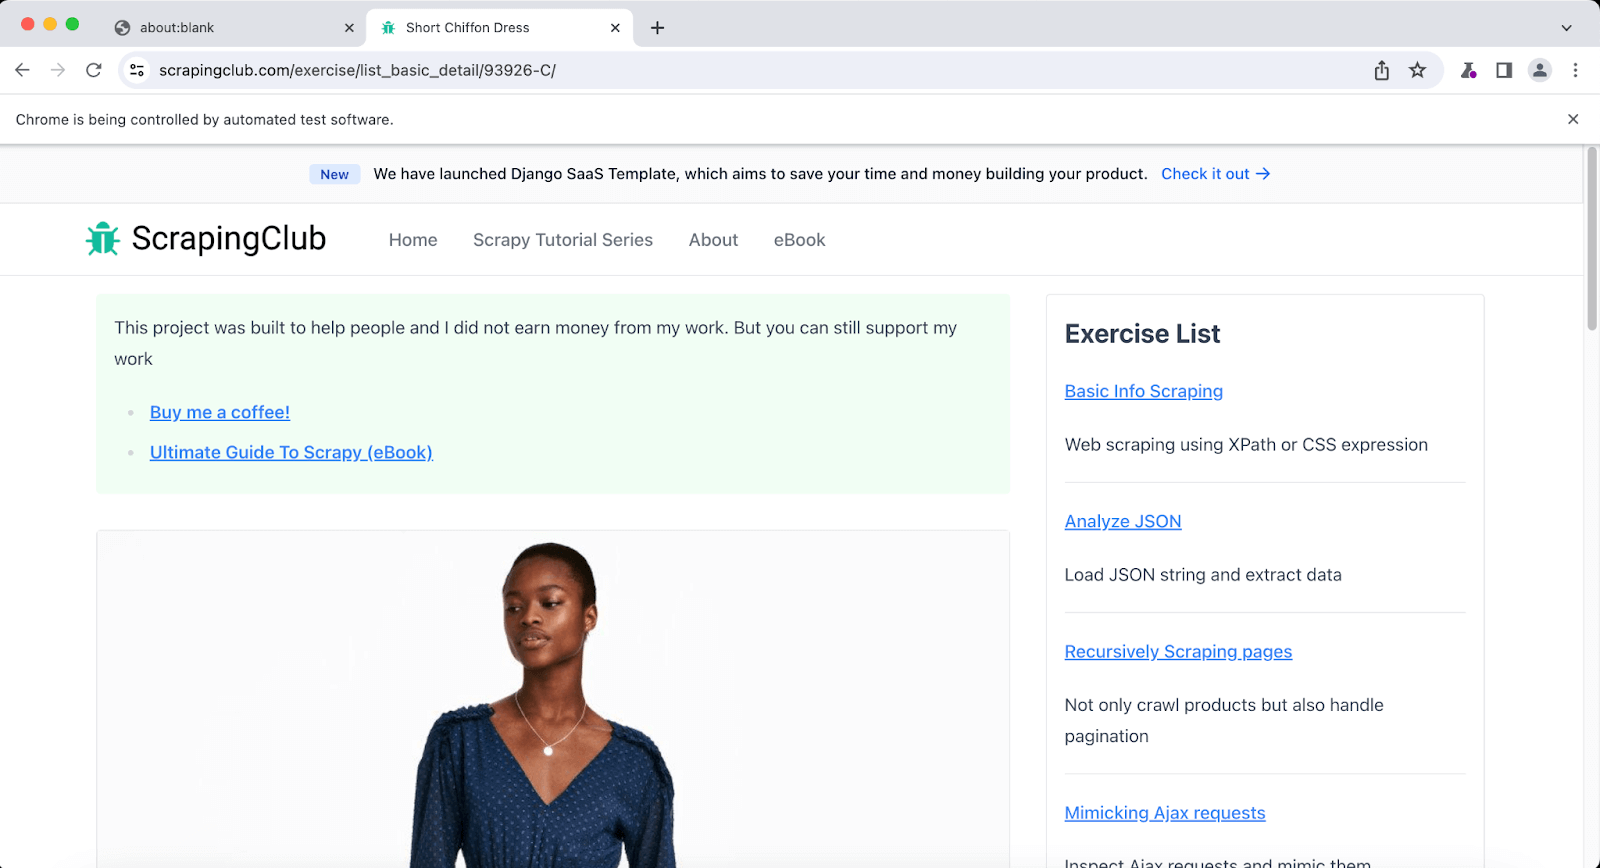
After navigating to the test URL, we locate the element via the CSS property – .grid .p-4 [href=’/exercise/list_basic_detail/93926-C/’]. The querySelector() method returns the element (i.e., elem_prod1) matching the selector.
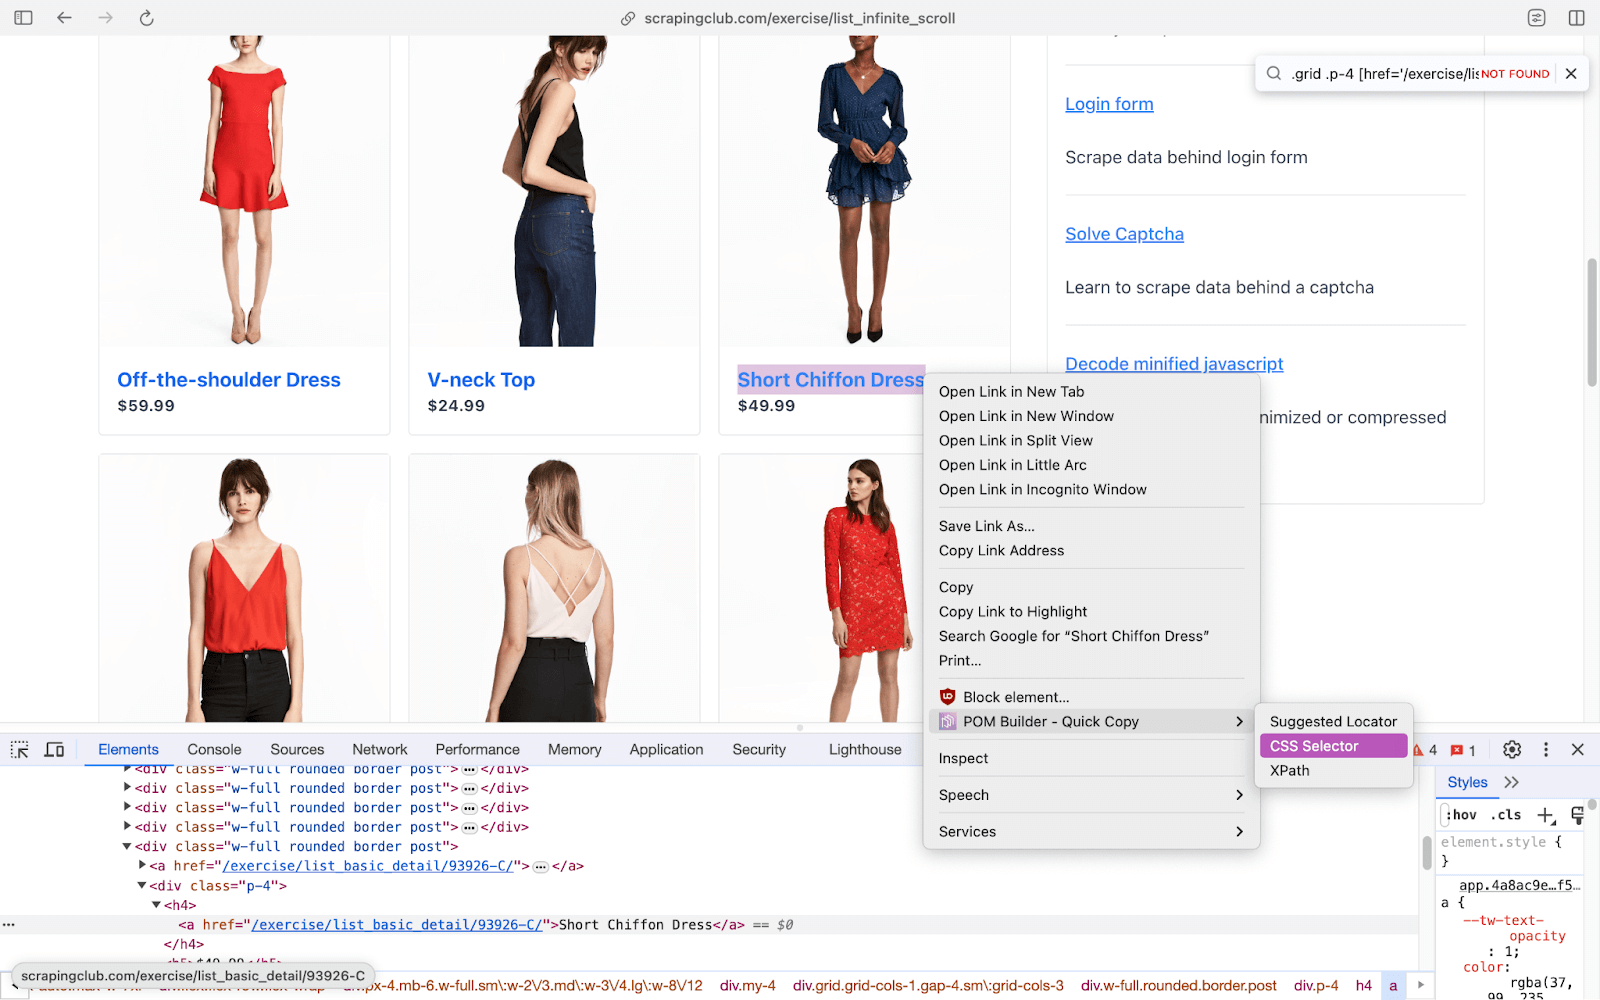
The click() method on elem_prod1 performs a click on the element. As always, we wait for a maximum of 60000 ms for the navigation to complete.
Code Walkthrough (Test Scenario – 4)
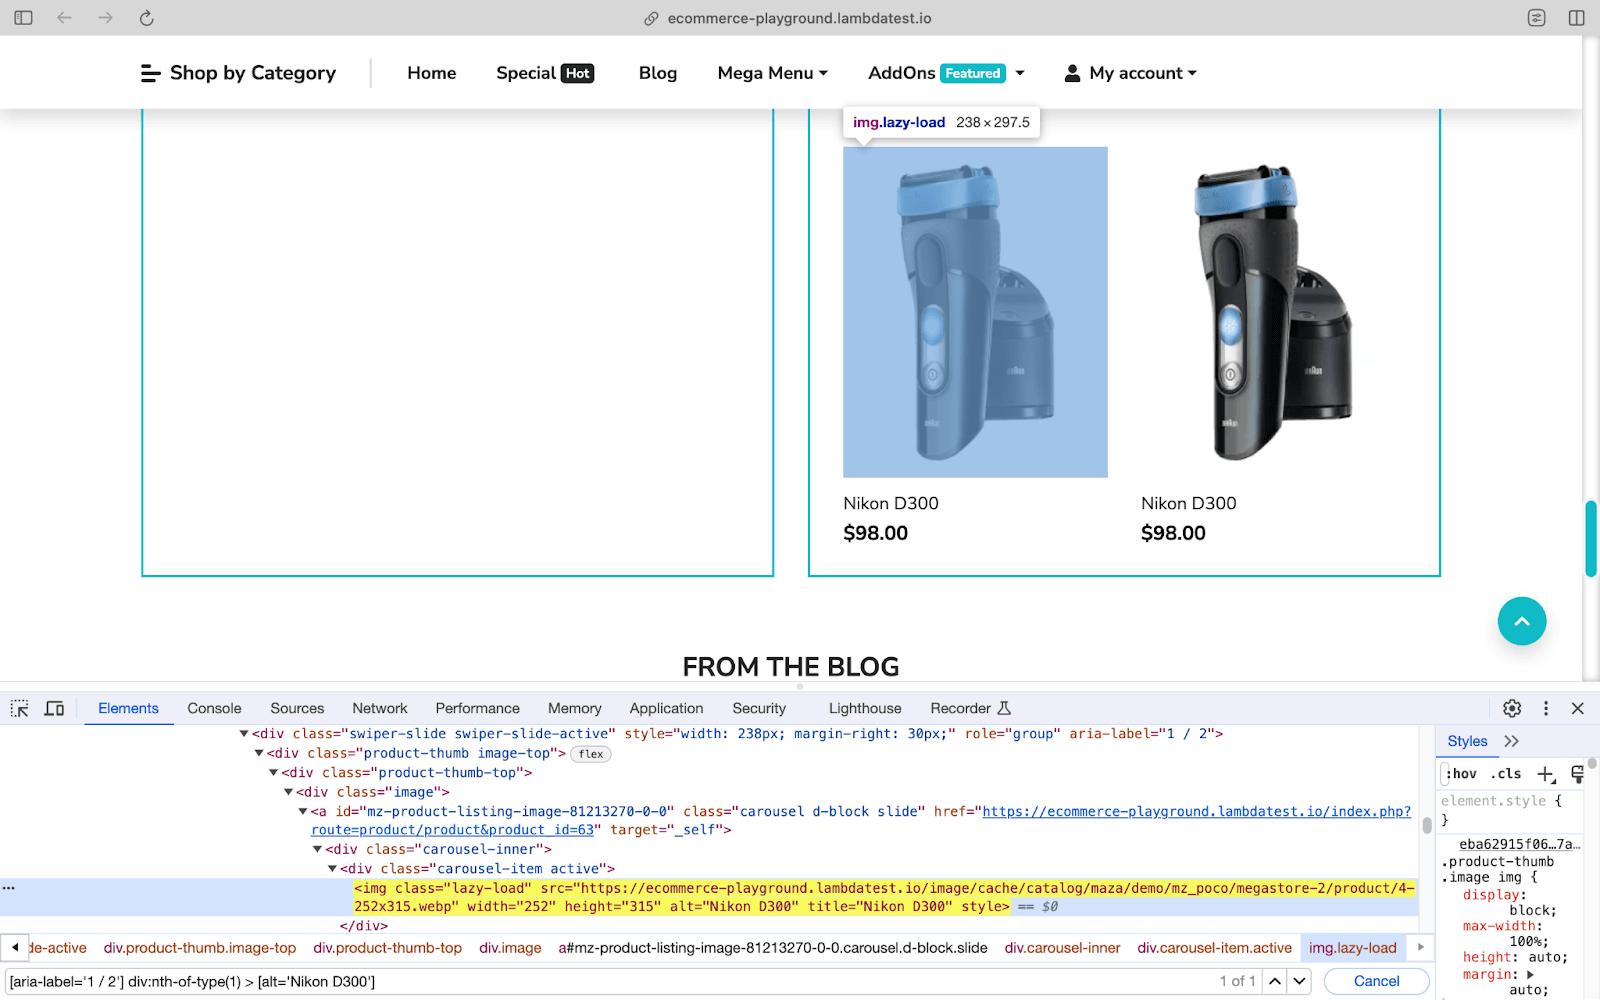
In this test scenario, the target image (or element) is lazy-loaded and available only after 2~3 scrolls.
After the test URL is loaded, the next step is to ensure that all the content on the page has loaded completely. For this, we perform a vertical scroll operation till the end of the page is reached. The logic of scrolling a page in Selenium is very similar to that used in Pyppeteer!
For vertical scrolling, we have created a user-defined method named scroll_end_of_page(). I have ported the code from my existing implementation, which I used for my other web scraping blog. 🙂
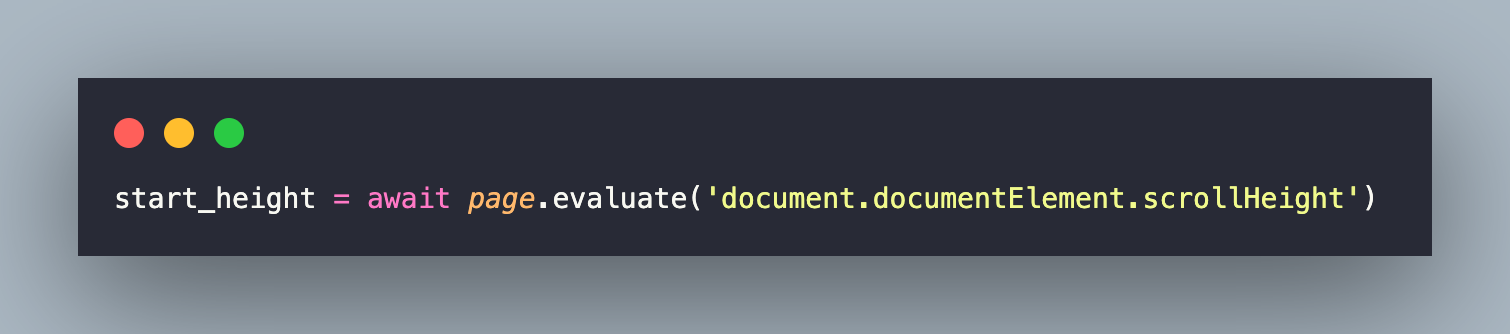
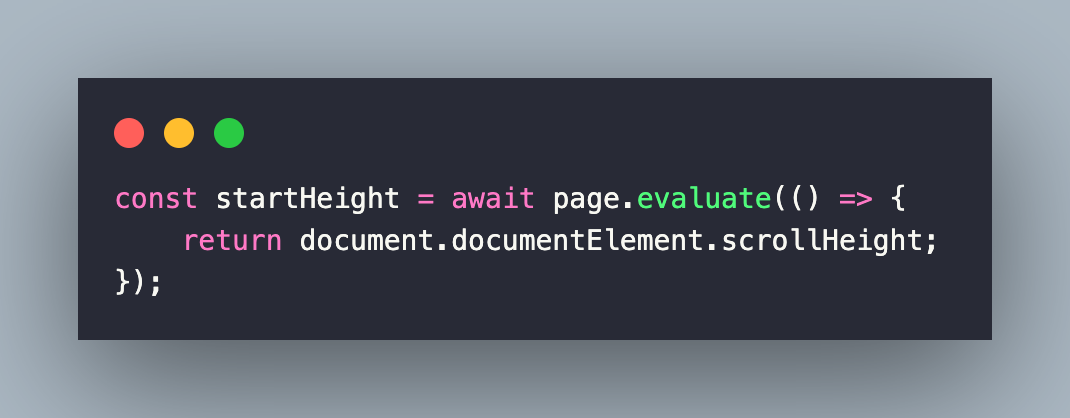
Once the page is loaded (in maximized mode), we first get the scrollable height using the JavaScript function document.documentElement.scrollHeight. The JavaScript logic is executed using the page.evaluate() method.
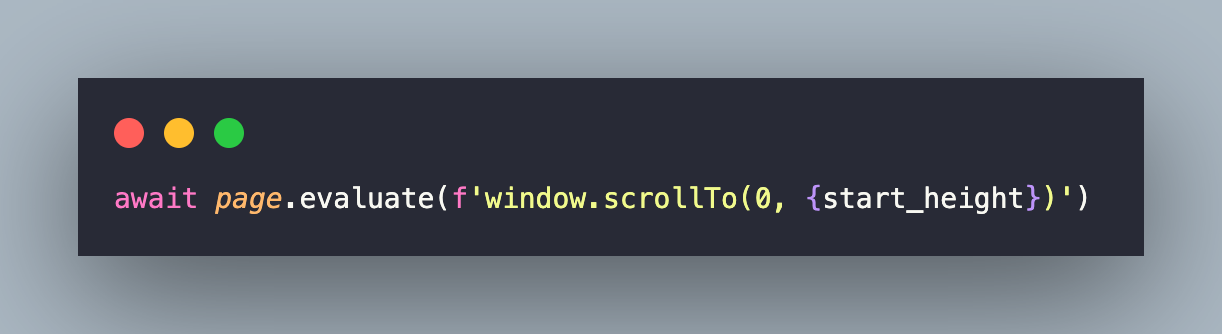
Next, a While loop is run where a vertical scroll is performed using the Window.scrollTo() method (in JS) with document.documentElement.scrollHeight as the input argument. Since it is a JavaScript function, it is executed using the evaluate() method of the Page class.
To witness the Window.scrollTo() method in action, open the Test URL in the browser. Then trigger the following commands in the browser console:
- document.documentElement.scrollHeight
- window.scrollTo(0, document.documentElement.scrollHeight)
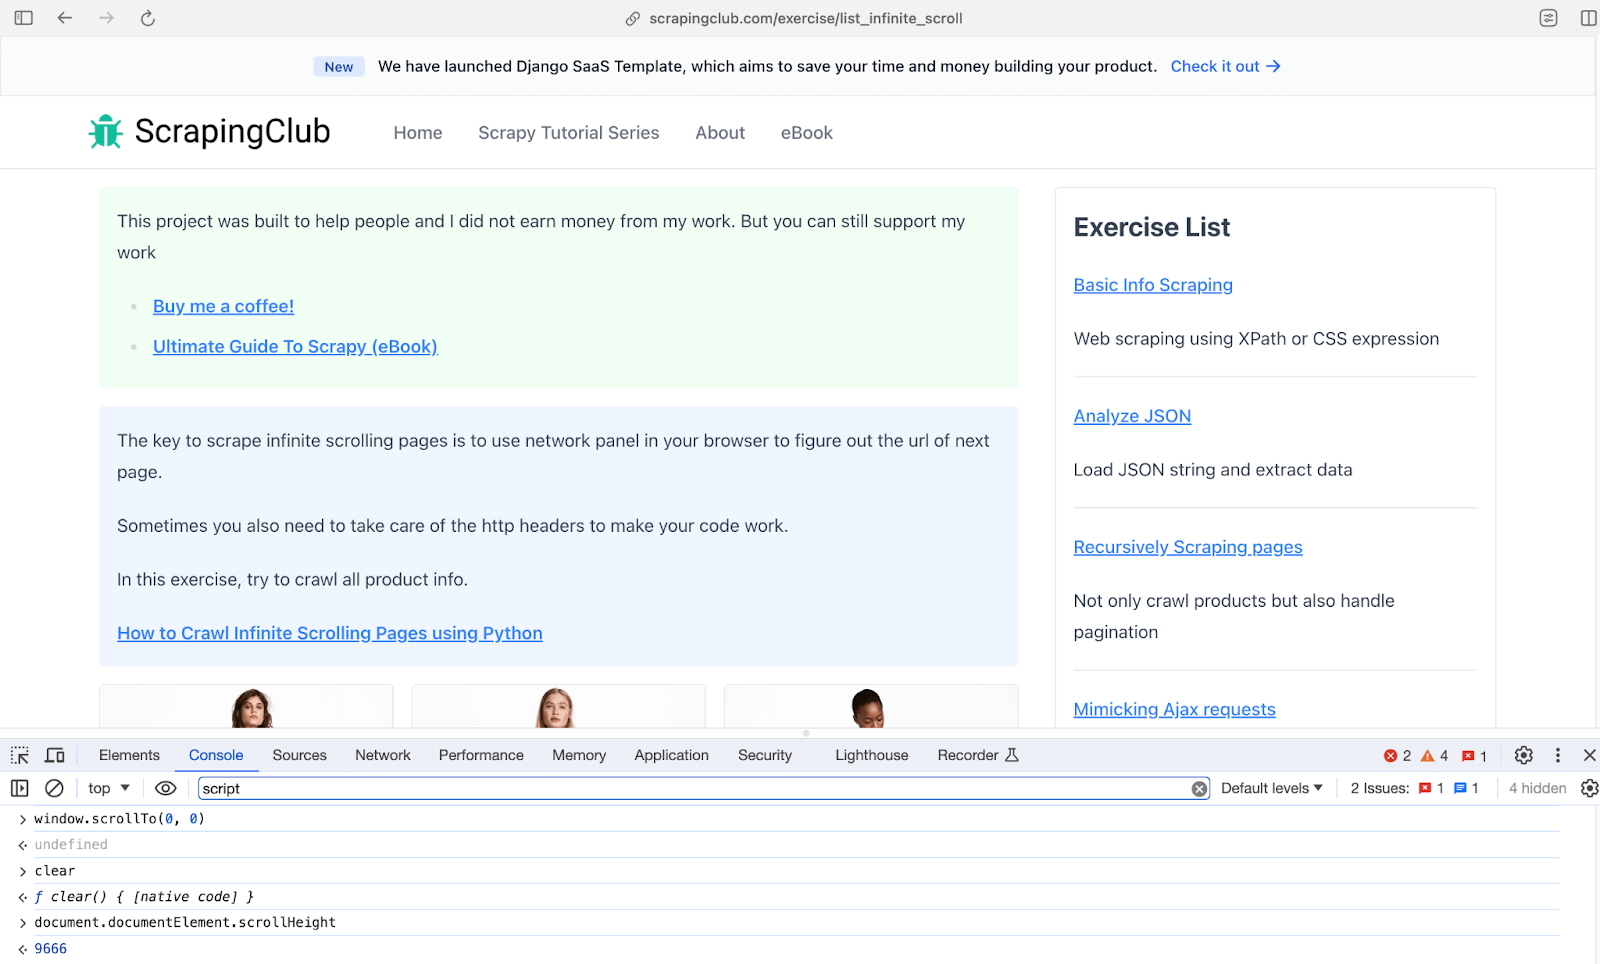
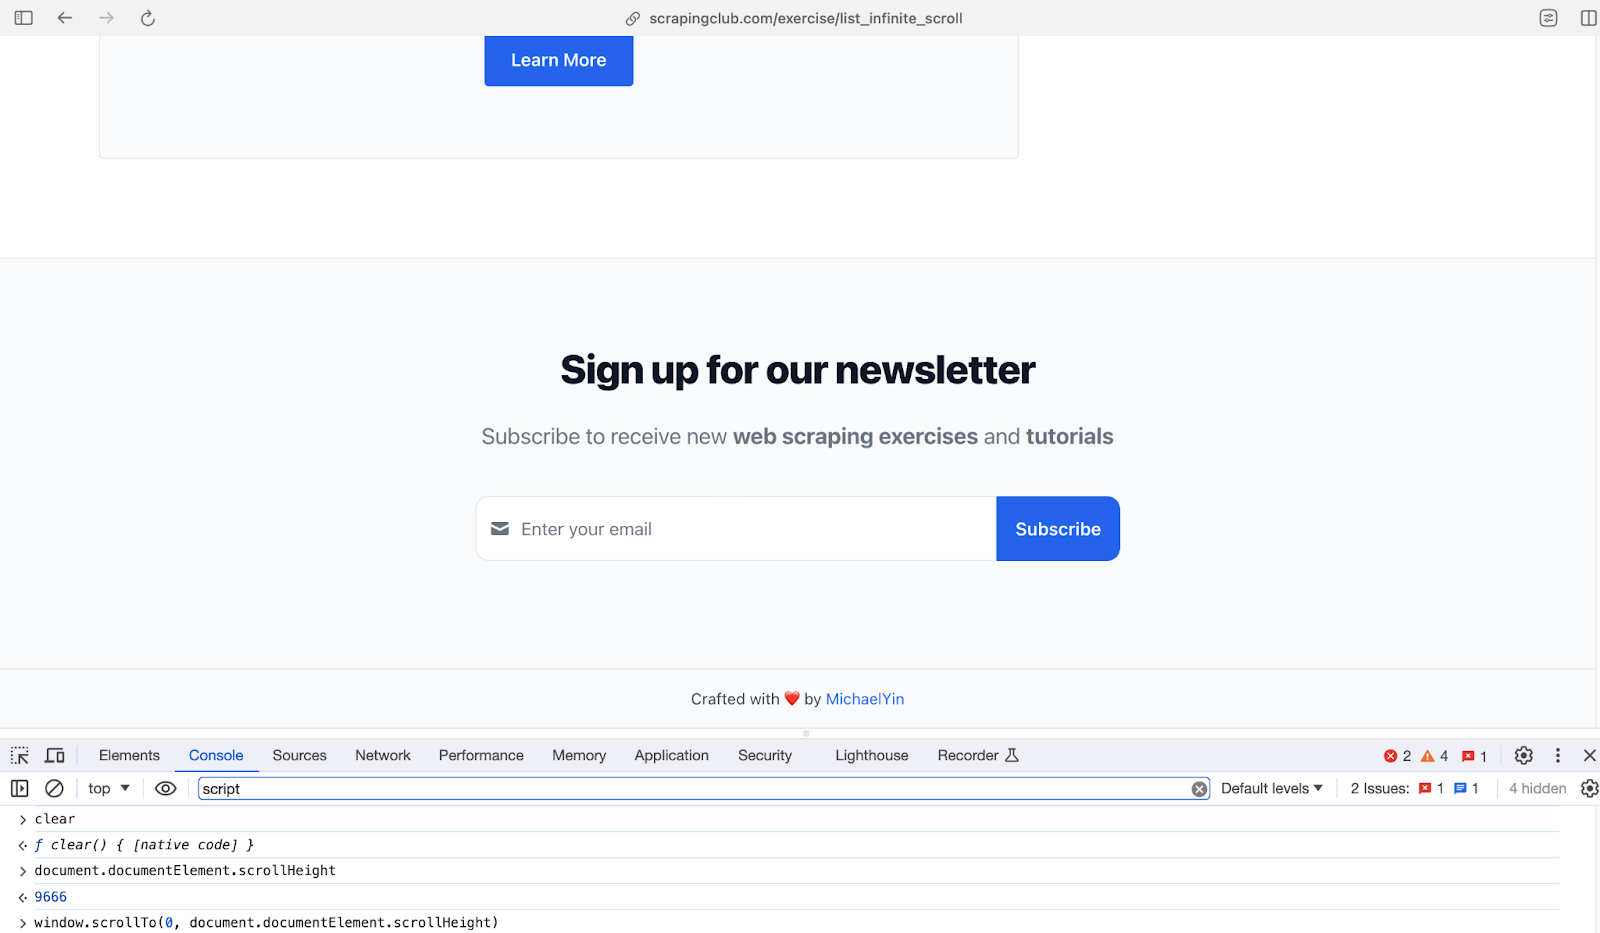
The above two actions are performed till we reach the end of the document (or page). This is when we break from the while loop!

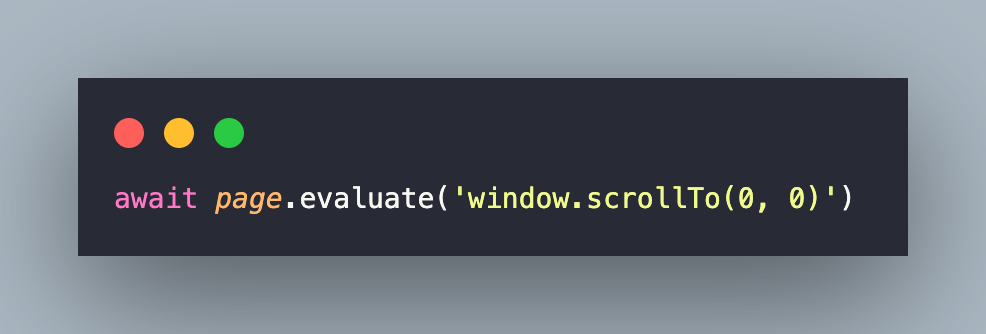
Now that the page load is complete, we scroll to the top of the page by executing the JS function window.scrollTo(0, 0) via the evaluate() method of Pyppeteer.
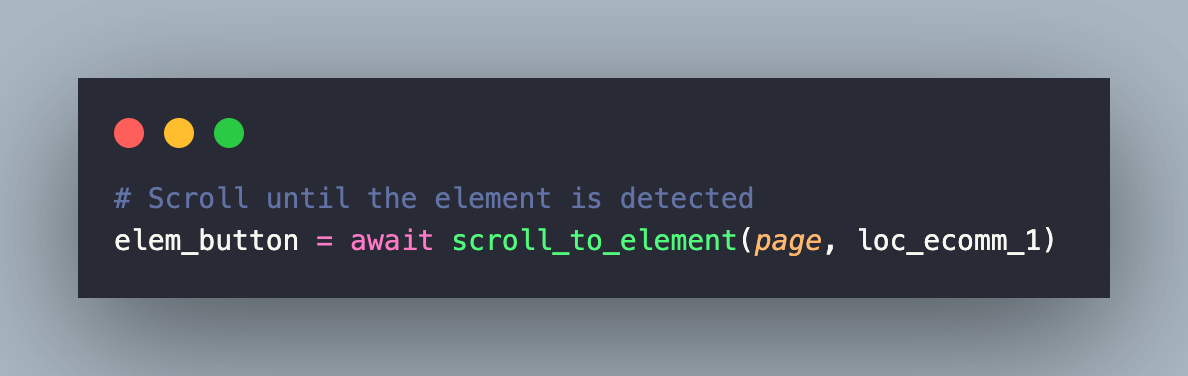
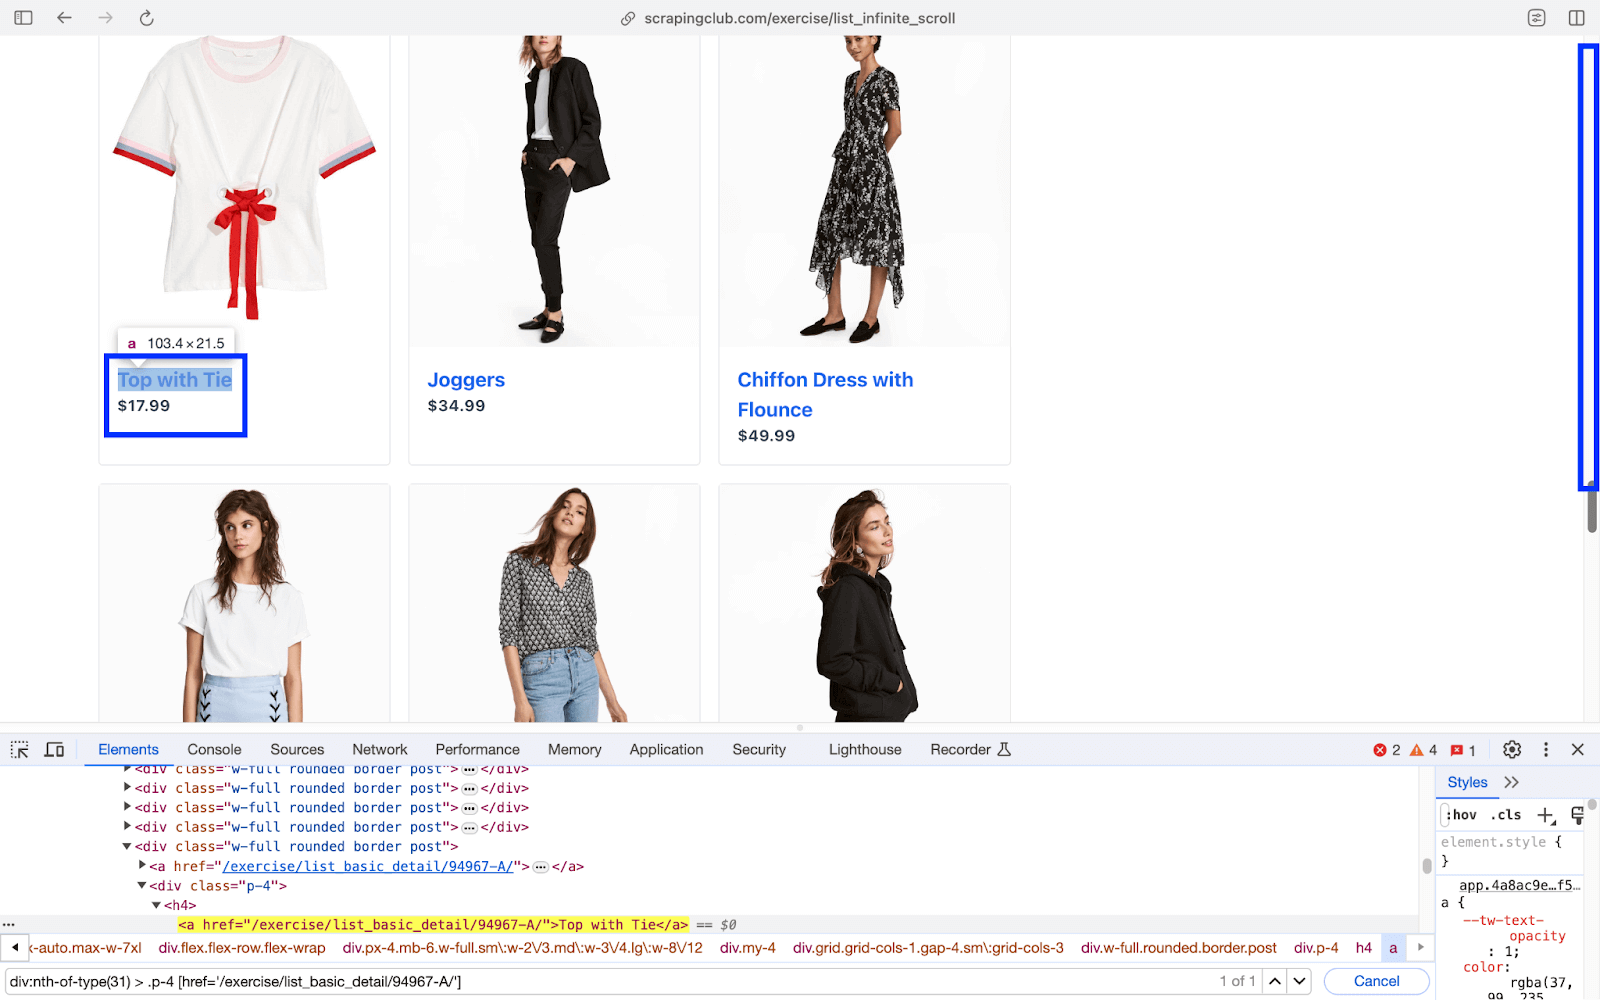
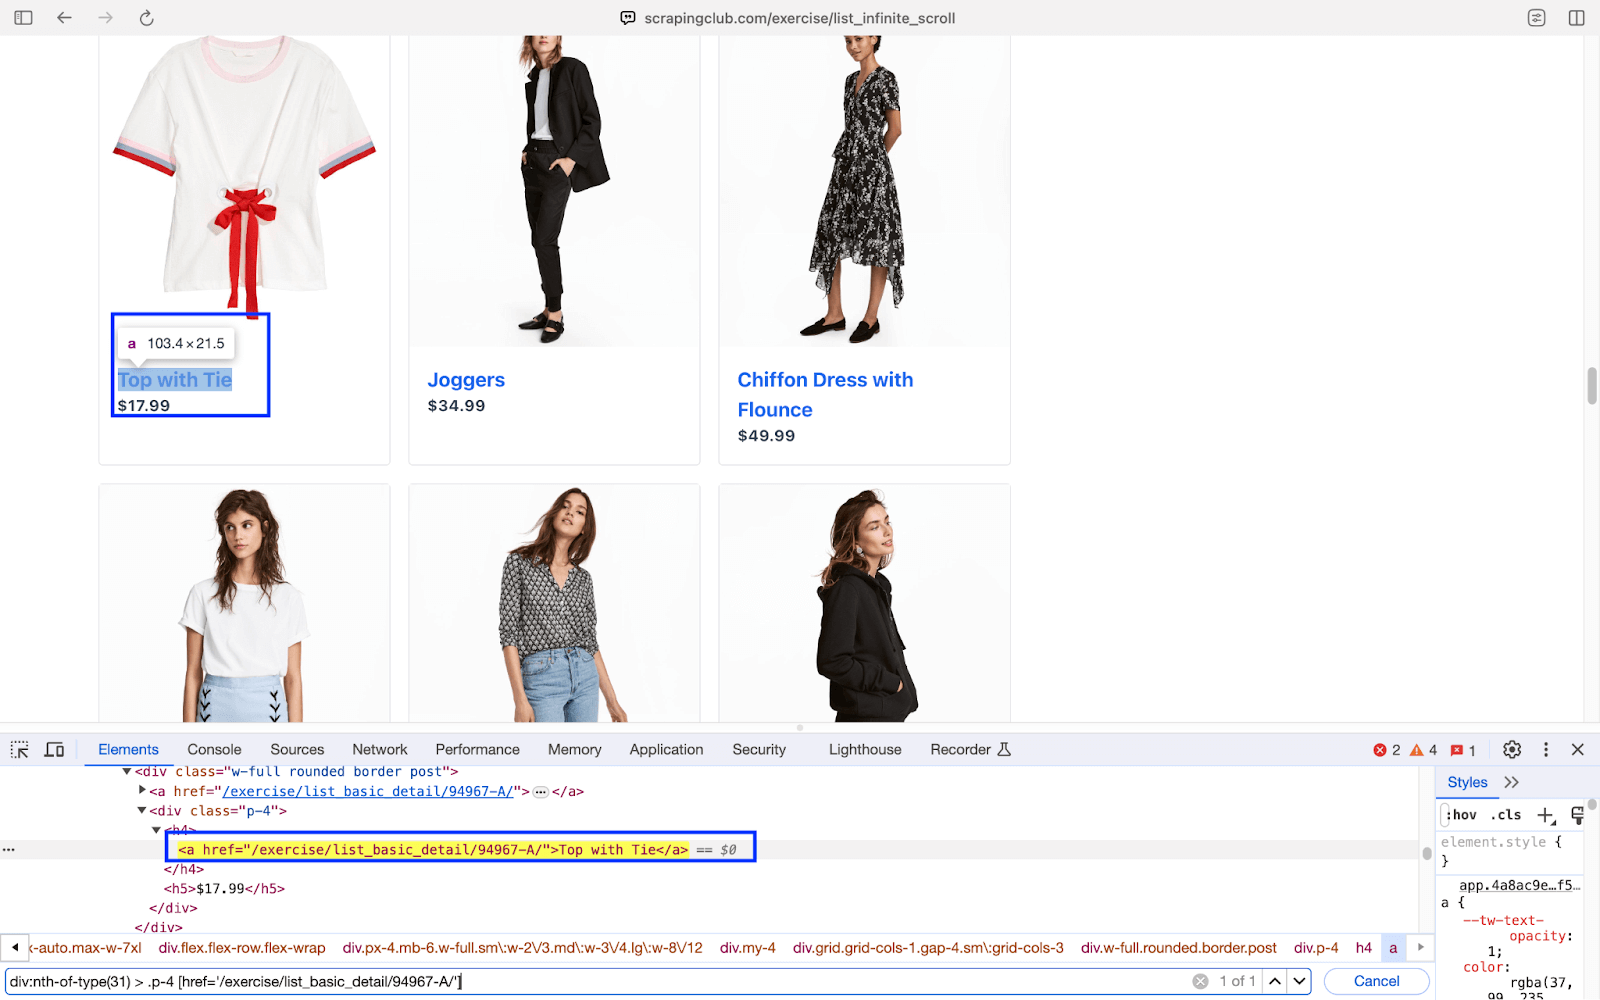
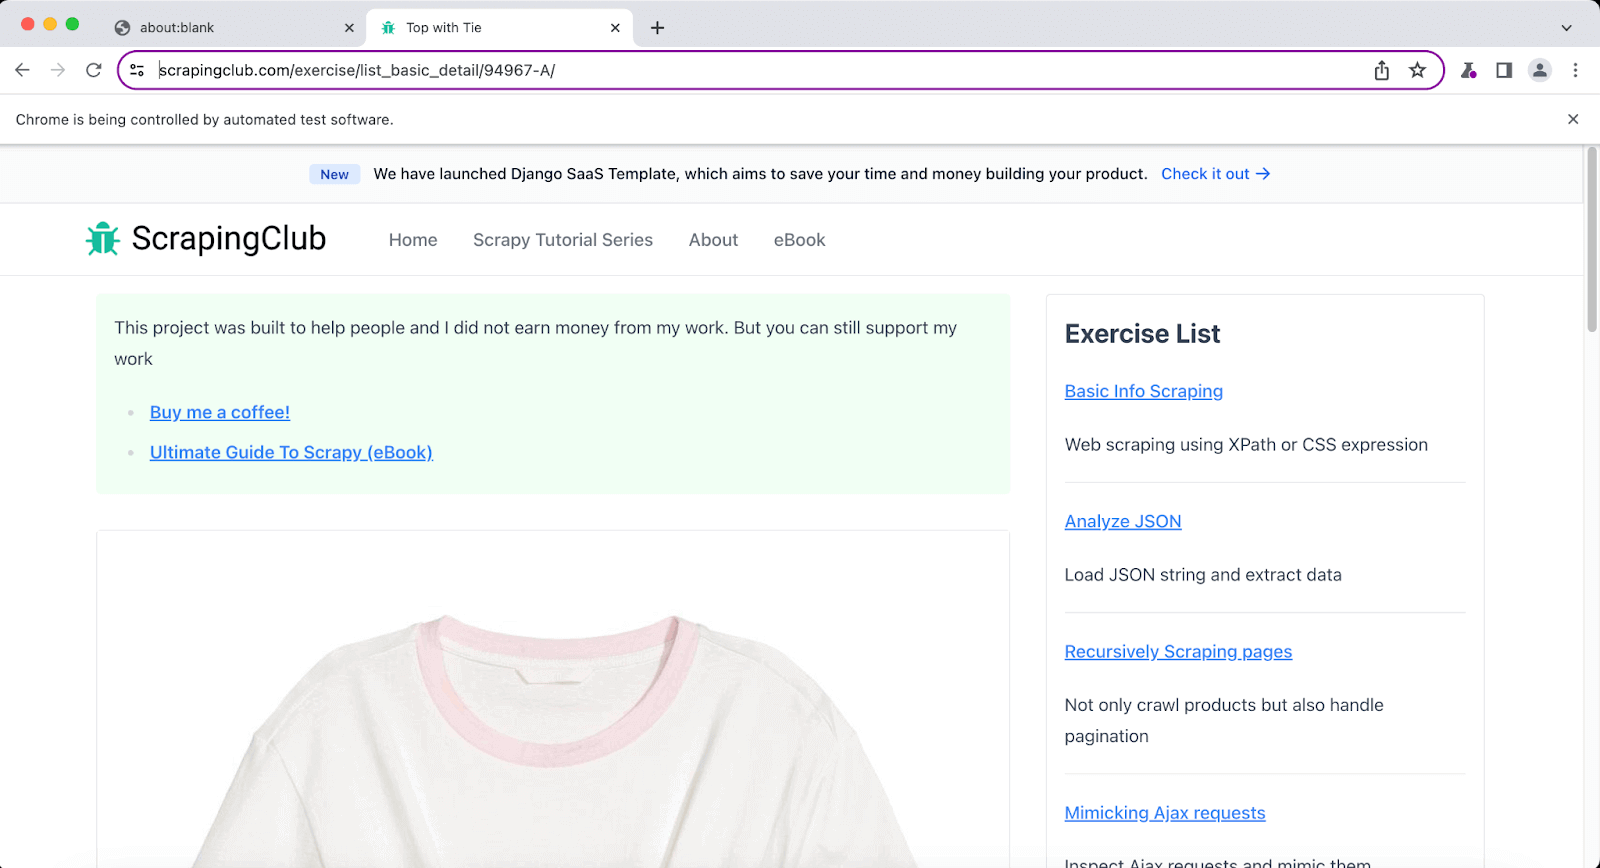
Next, we locate the target element using the CSS Selector div:nth-of-type(31) > .p-4 [href=’/exercise/list_basic_detail/94967-A/’] and scroll into the view using the user-defined function scroll_to_element().

Finally, a click is initiated on the element (i.e., elem_button) located in the earlier step. As usual, the waitForNavigation() helps in waiting for the page navigation to complete.
The current page URL is obtained via the page.url attribute. An assert is raised if the URL does not match with the expected URL!

Execution
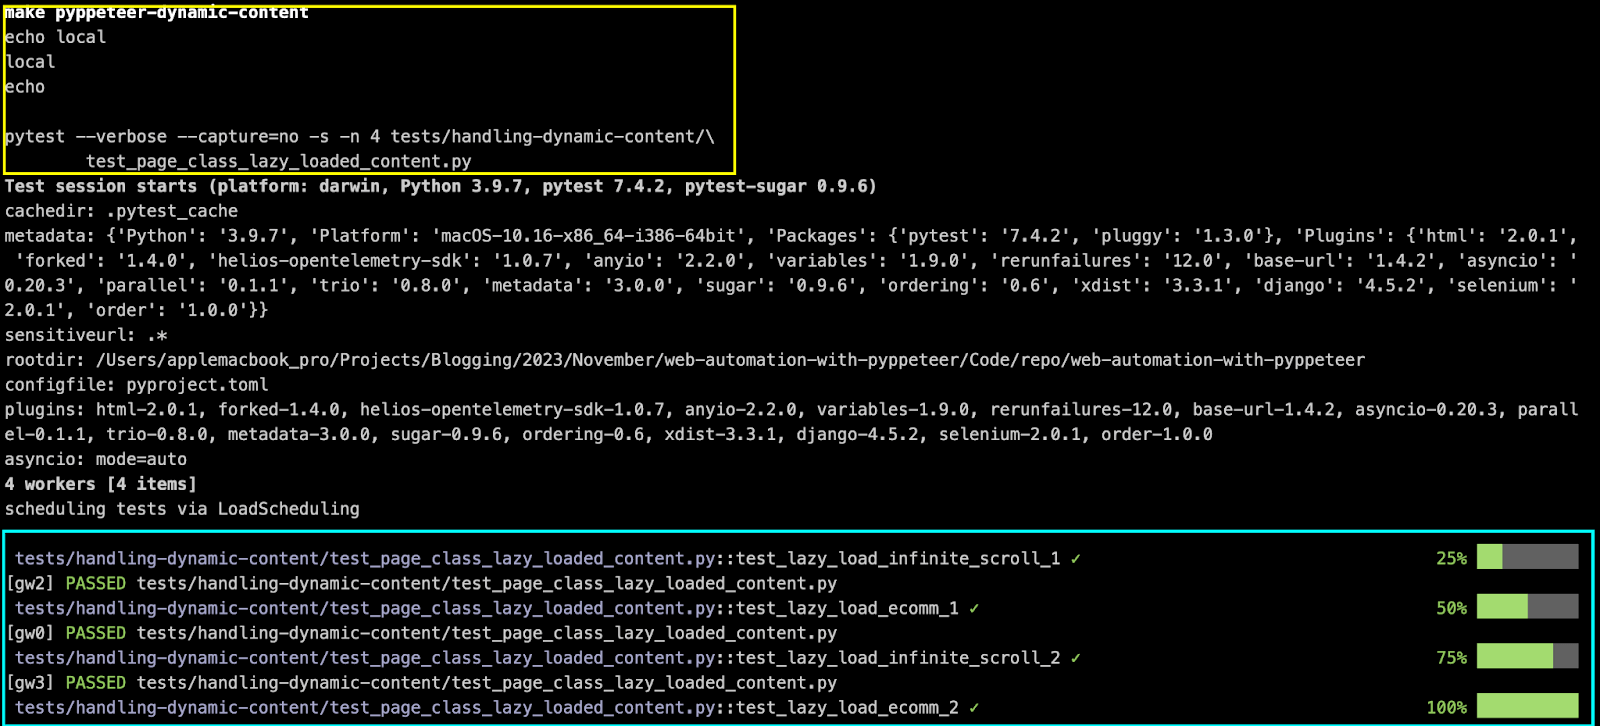
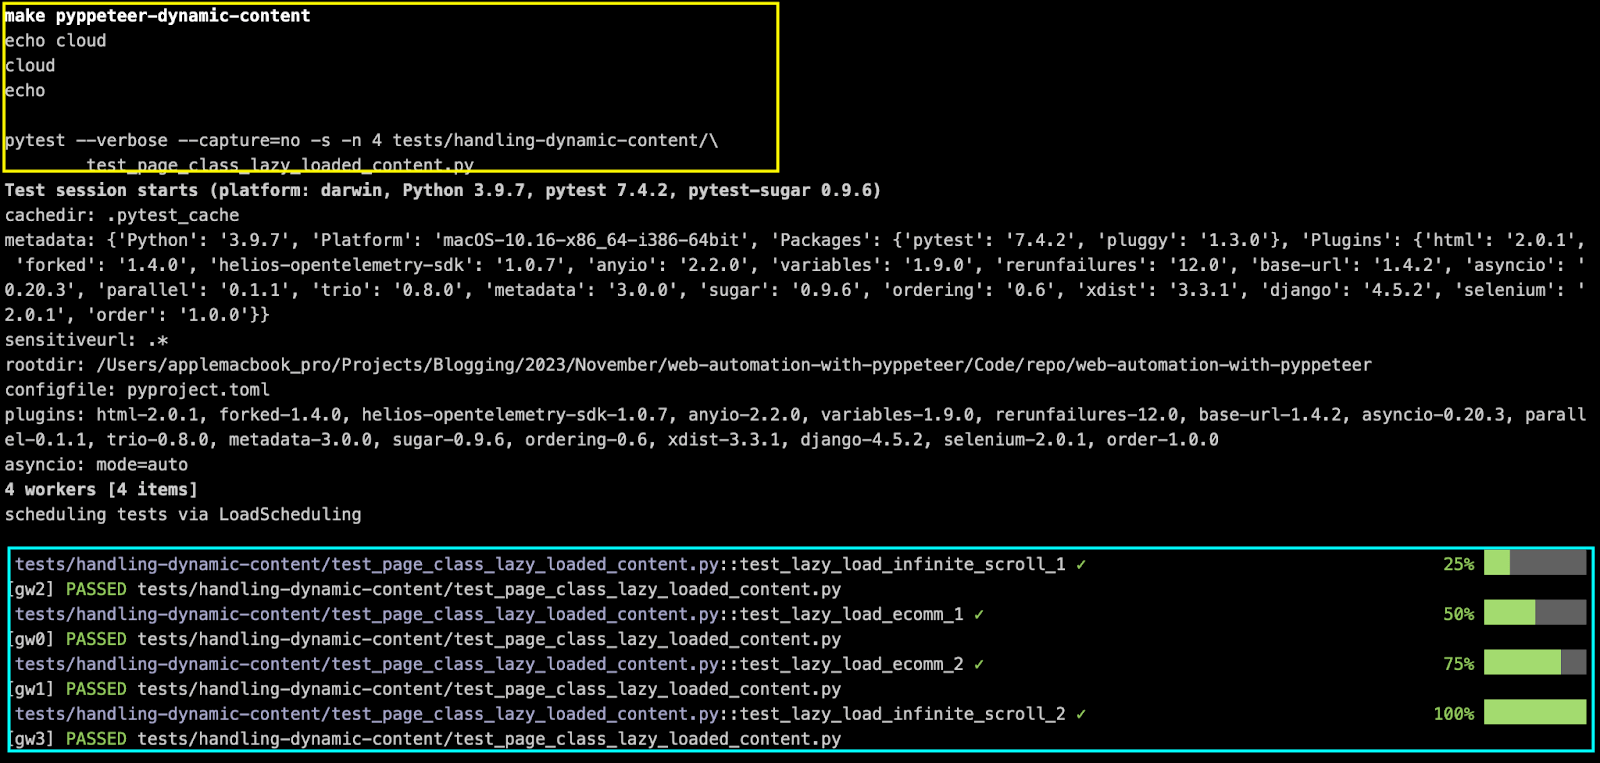
Invoke the command make pyppeteer-dynamic-content on the terminal with the Chromium browser instantiated on the local machine (EXEC_PLATFORM = local). You can also perform web scraping using Chromium (or Chrome) on the LambdaTest cloud grid (EXEC_PLATFORM = cloud).
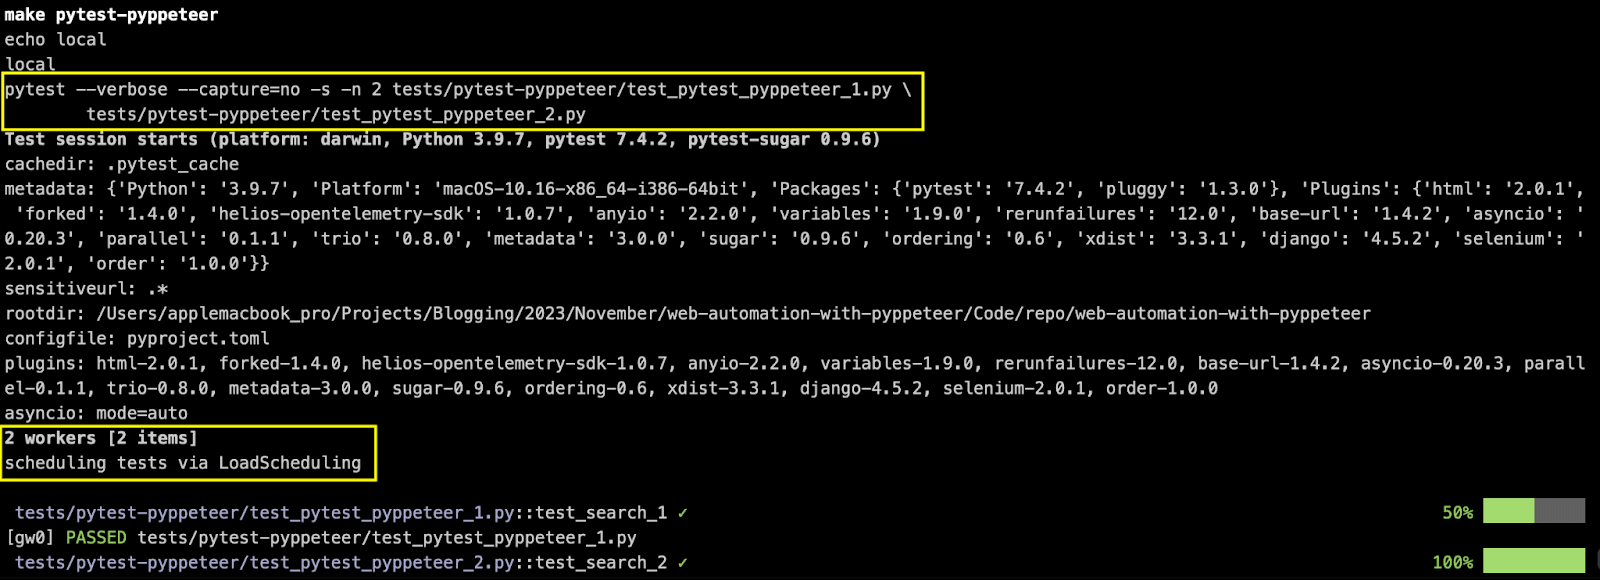
As seen below, all four test scenarios are executed in parallel using the pytest-xdist plugin for parallel execution with pytest & Pyppeteer.
The execution snapshots of the test scenarios are below:
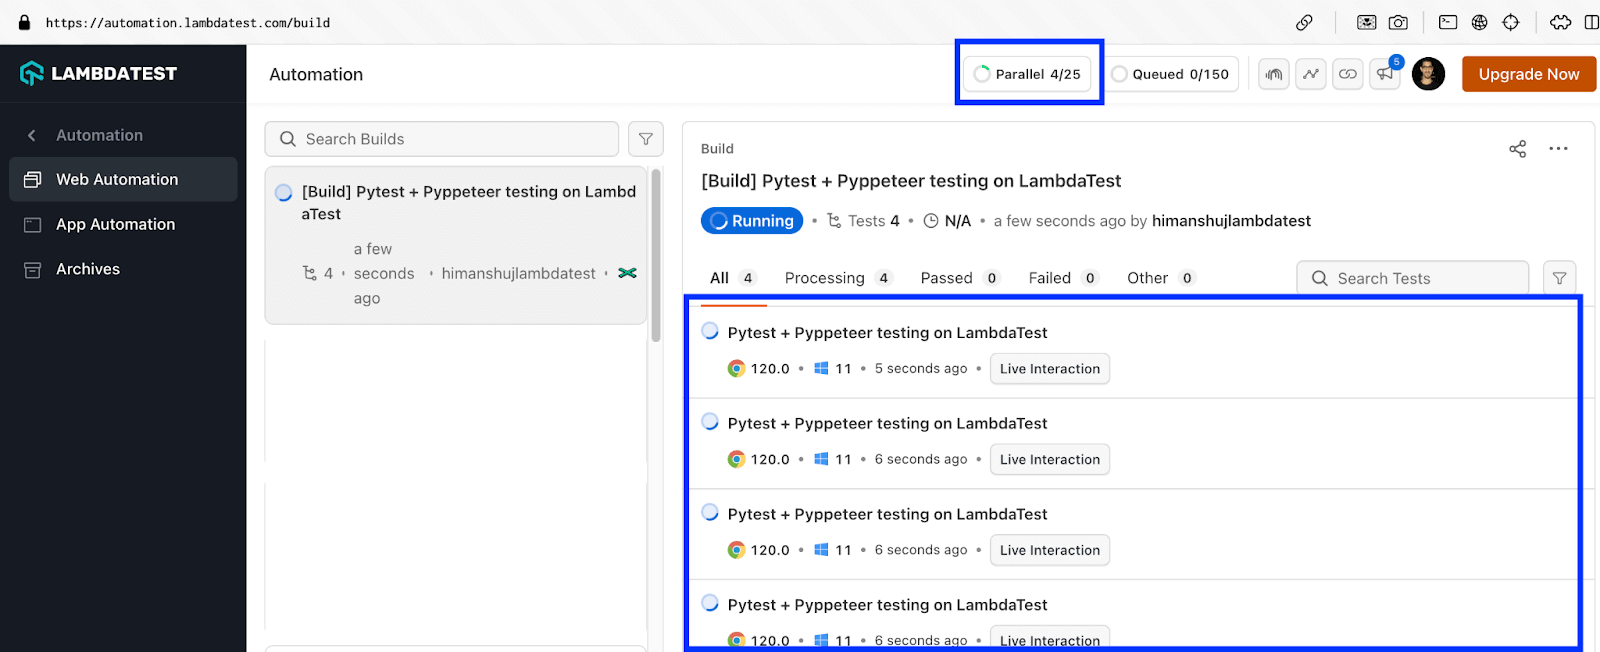
We also executed the same tests on the LambdaTest Grid and the execution was successful!
Shown below are the execution screenshots from LambdaTest Automation Dashboard:
Now that we have introduced the nuances of parallel testing in this section let’s do a detailed deep-dive in the further sections of the blog!
Web scraping with Pyppeteer
Python is one of the most prominent languages used extensively for web scraping. For starters, web scraping uses automated tools (or libraries) to extract meaningful information from websites.
Competitor analysis, Data analysis, and Lead generation are some of the main uses of web scraping. Apart from Pyppeteer, Selenium, and Beautiful Soup can also scrap static and dynamic web content. If you want to learn about the fine nuances of web scraping, please refer to this detailed blog that deep-dives into web scraping using Python.
For demonstration web scraping with Pyppeteer, I would be porting scraping logic that was used for scraping product content from LambdaTest eCommerce Playground.
Demonstration
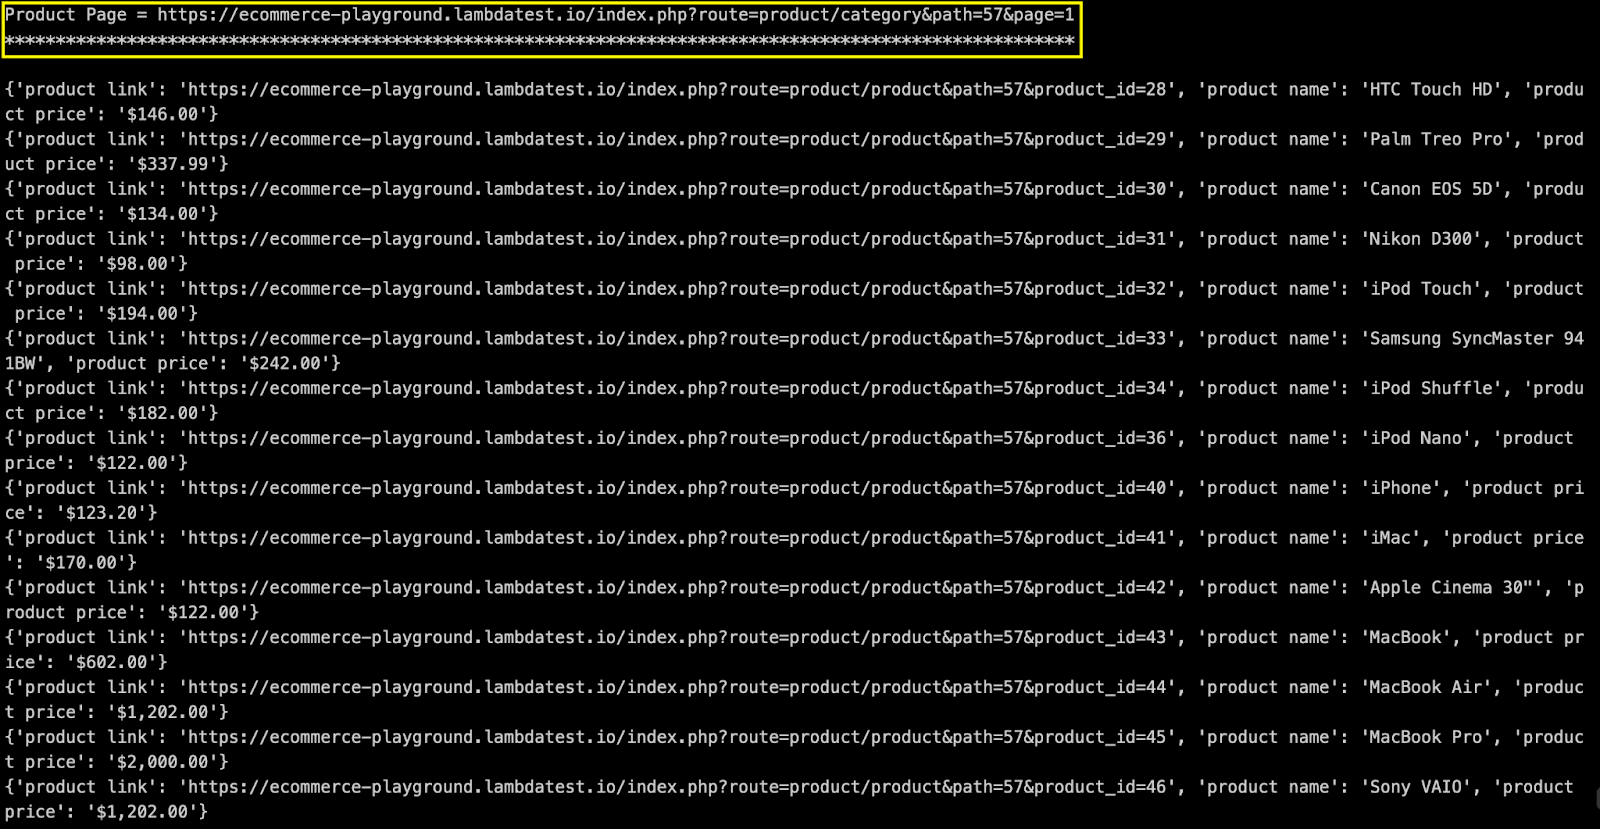
As mentioned above, we would be scraping product meta-data (i.e., Name, Price, and Image Link) from the eCommerce website.

The scraping logic with Pyppeteer can be executed on local Chromium (i.e., EXEC_PLATFORM=local) as well as Chrome/Chromium on LambdaTest Cloud Grid (i.e., EXEC_PLATFORM=cloud).
Code Walkthrough
To get started, we set up the test URL that comprises of the base URL followed by the page number (i.e. &page=< page-number >).
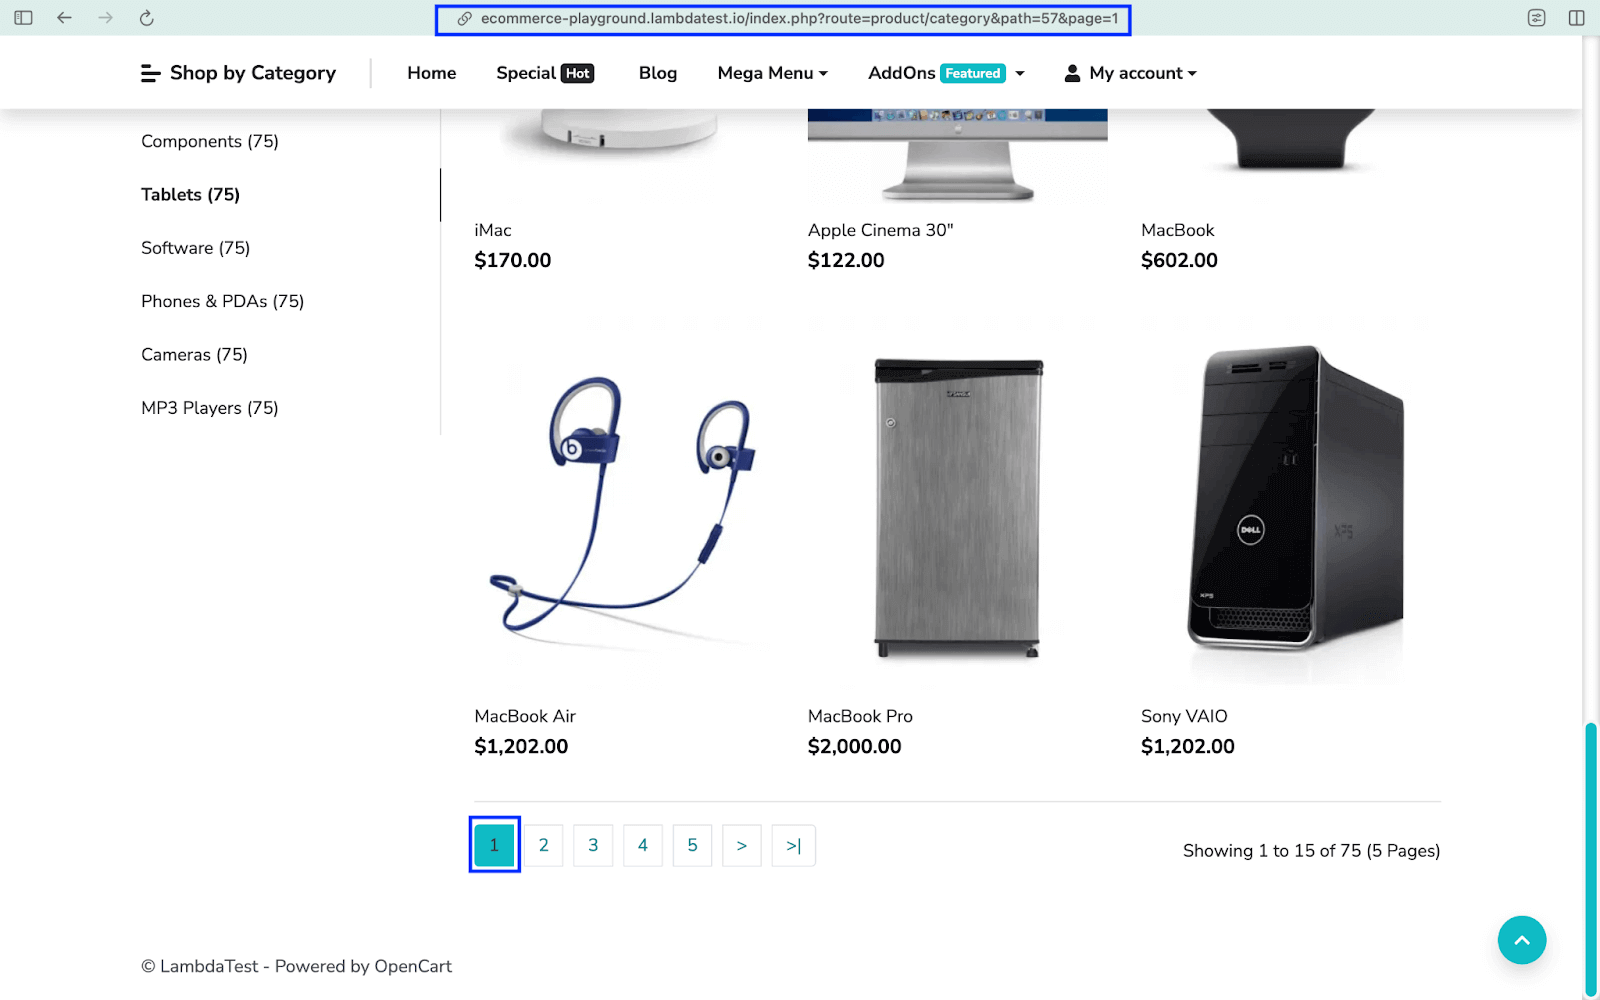
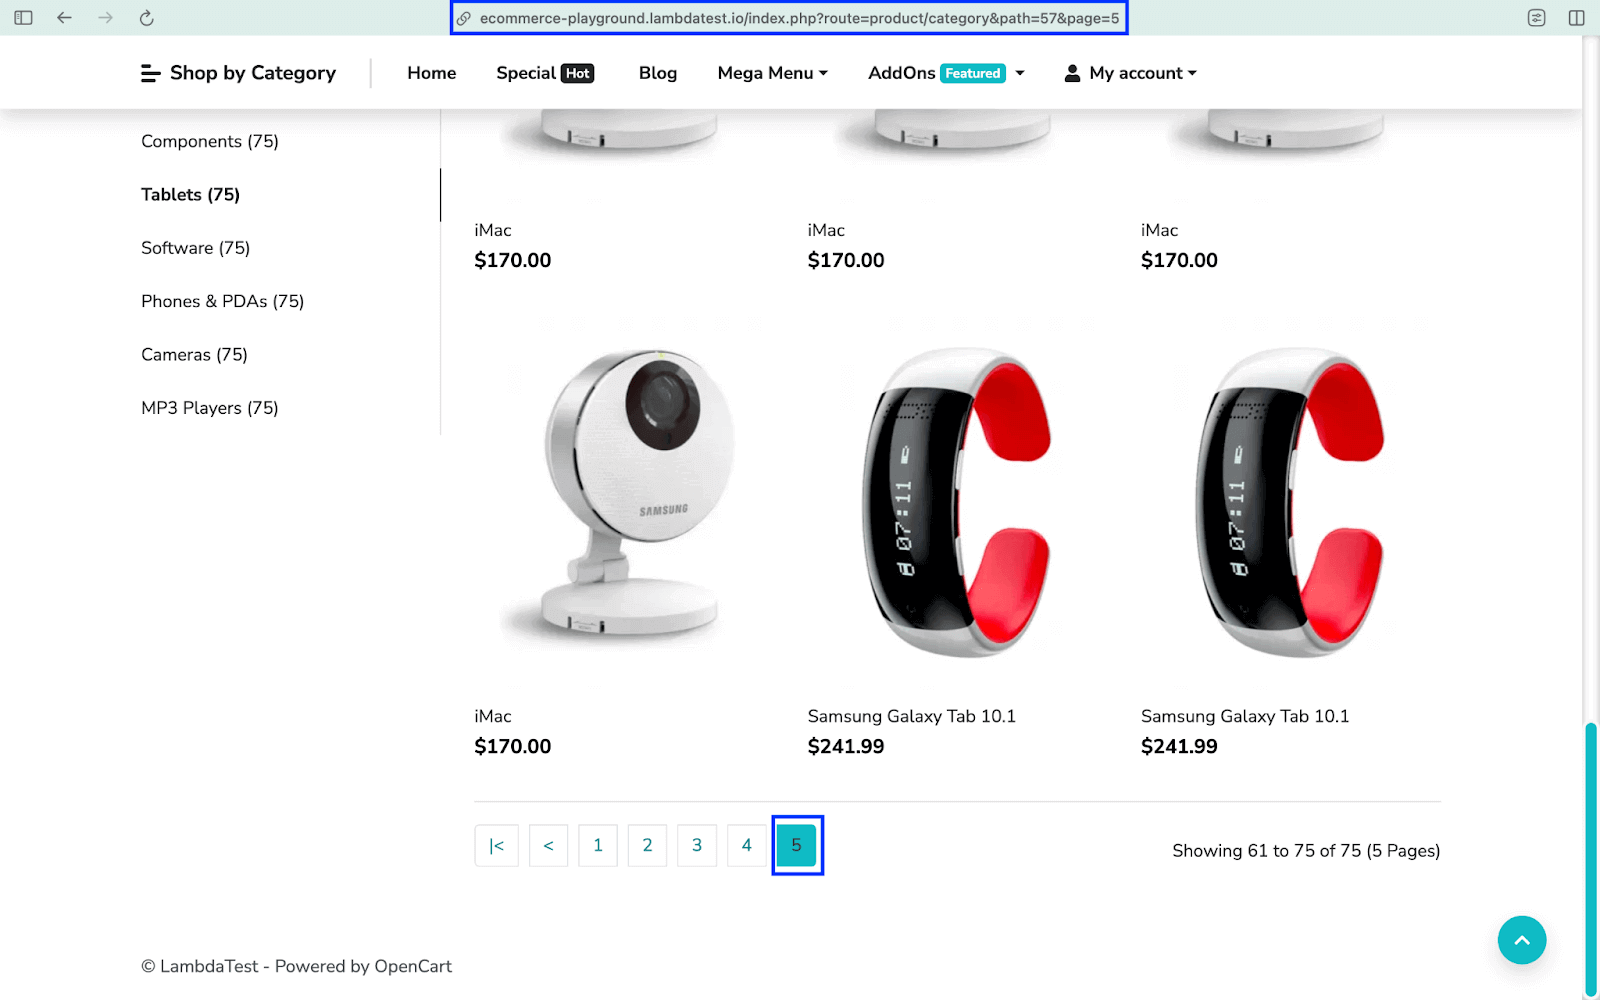
As seen above, there are a total of 5 pages in the product category. Hence, the scraping implementation is executed in an iterative loop [from 1 .. 6].
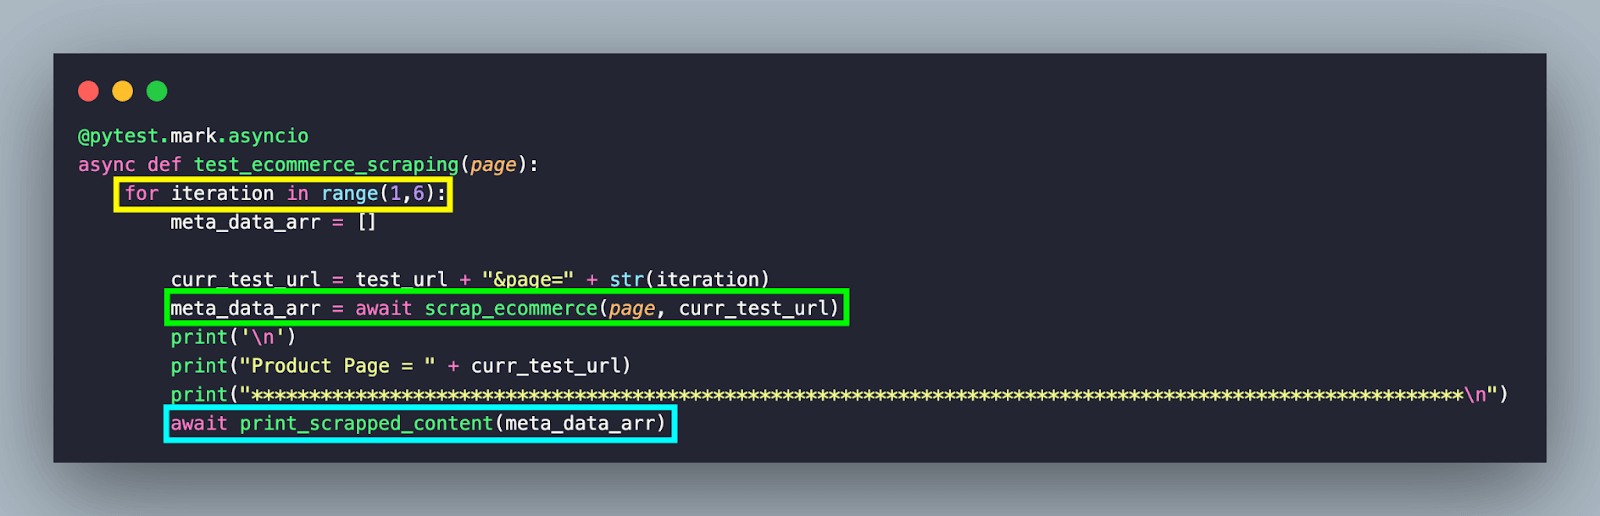
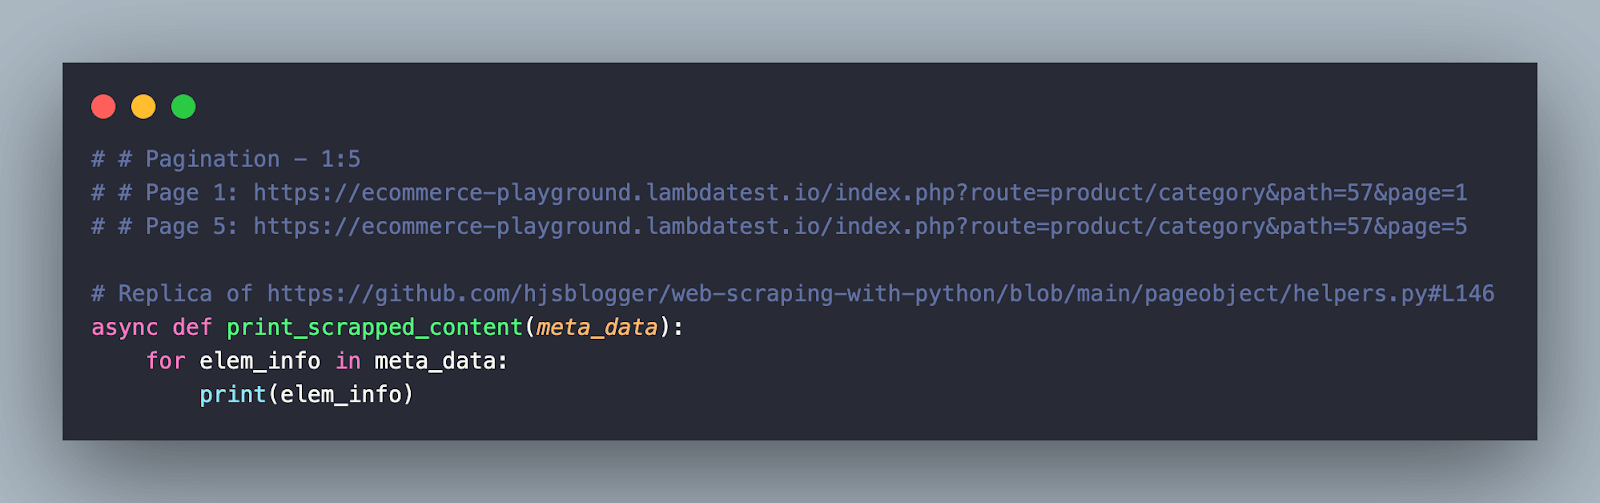
Here are the two main coroutines (or methods) that are used in scraping the test website:
- scrap_ecommerce() – Method that scraps content [or meta-data] from the current URL and stores it in a list
- print_scrapped_content() – Prints the content scrapped by the scrap_ecommerce() method
Let’s look at each of them in more detail!
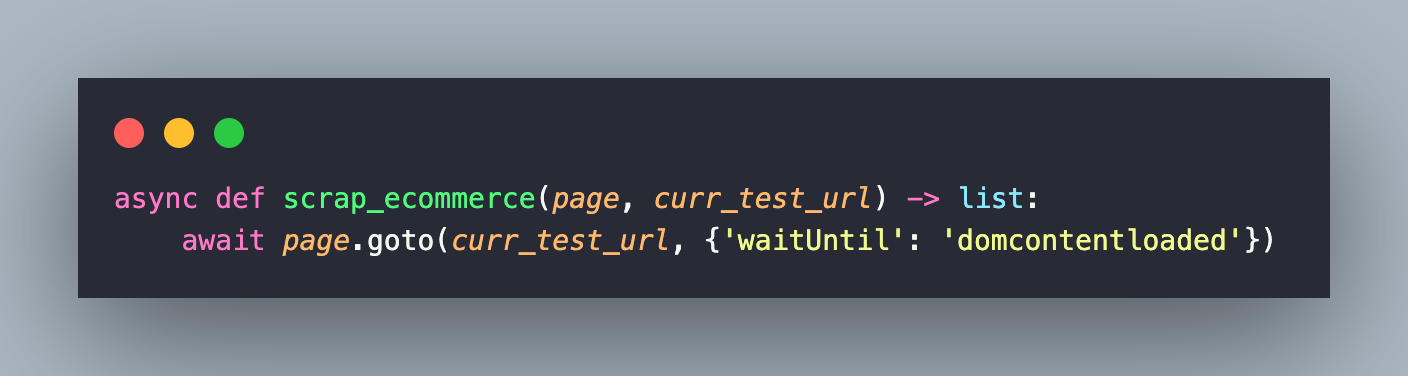
The scrap_ecommerce() method takes two parameters:
- page – browser page that is created using the newPage() method
- curr_test_url – URL (example) from which the content needs to be scrapped using Pyppeteer
The goto() method takes the test URL as the input parameter. Along with it, the waitUntil option is set to domcontentloaded (i.e. wait for a maximum of 30000 ms till the firing of the DOMContentLoaded event).
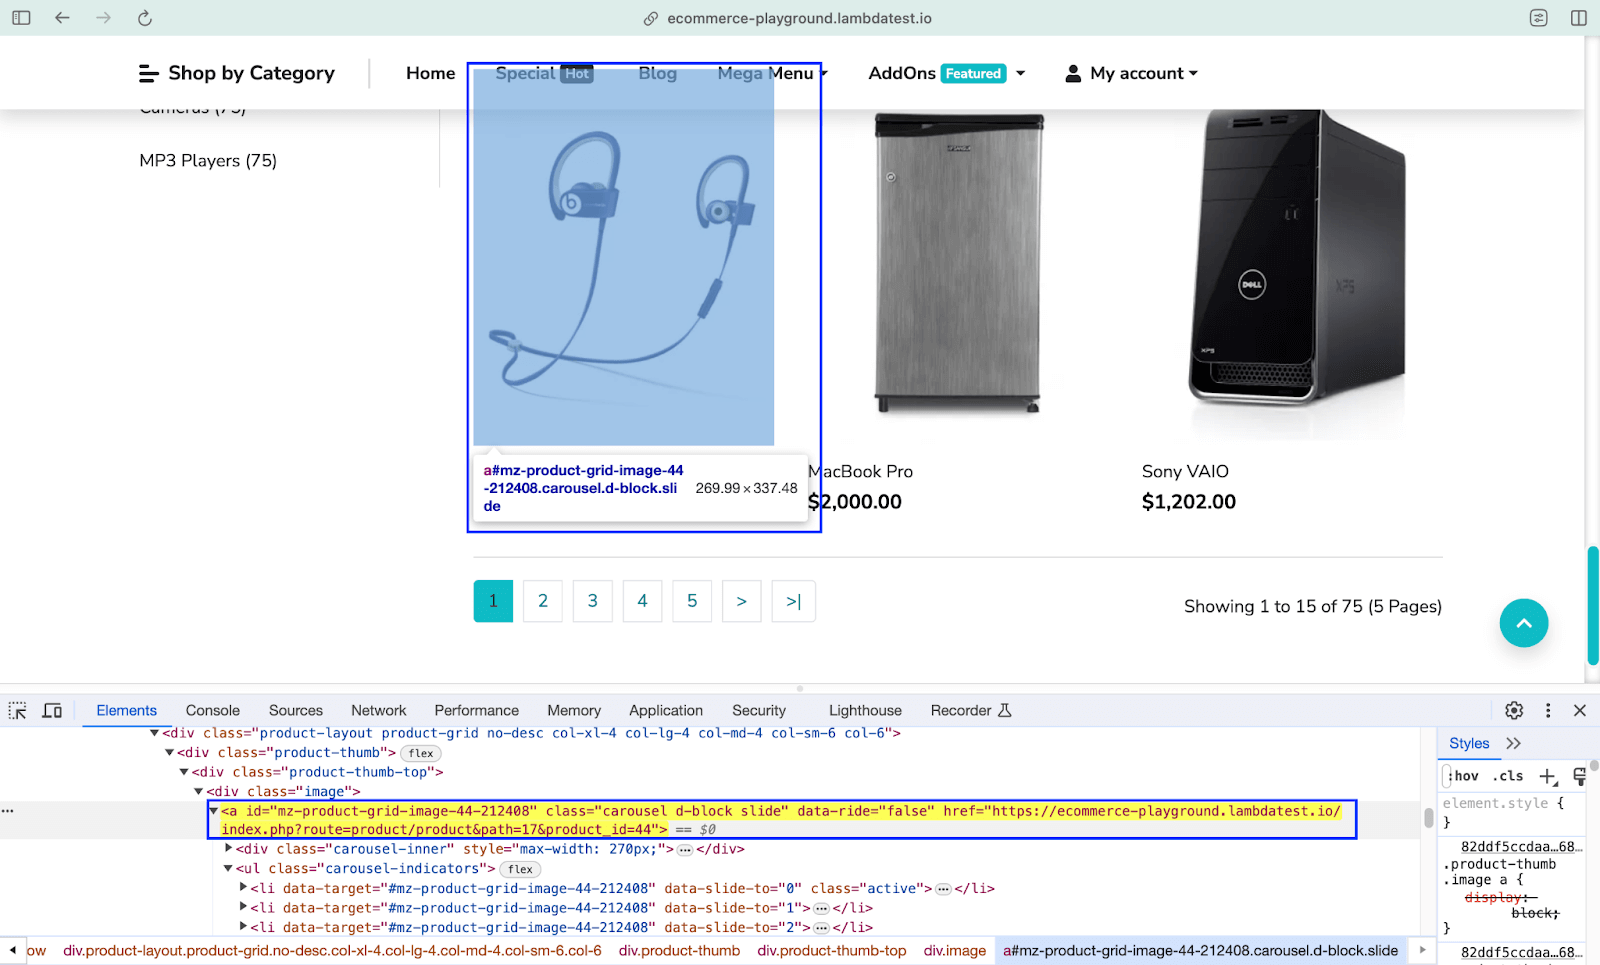
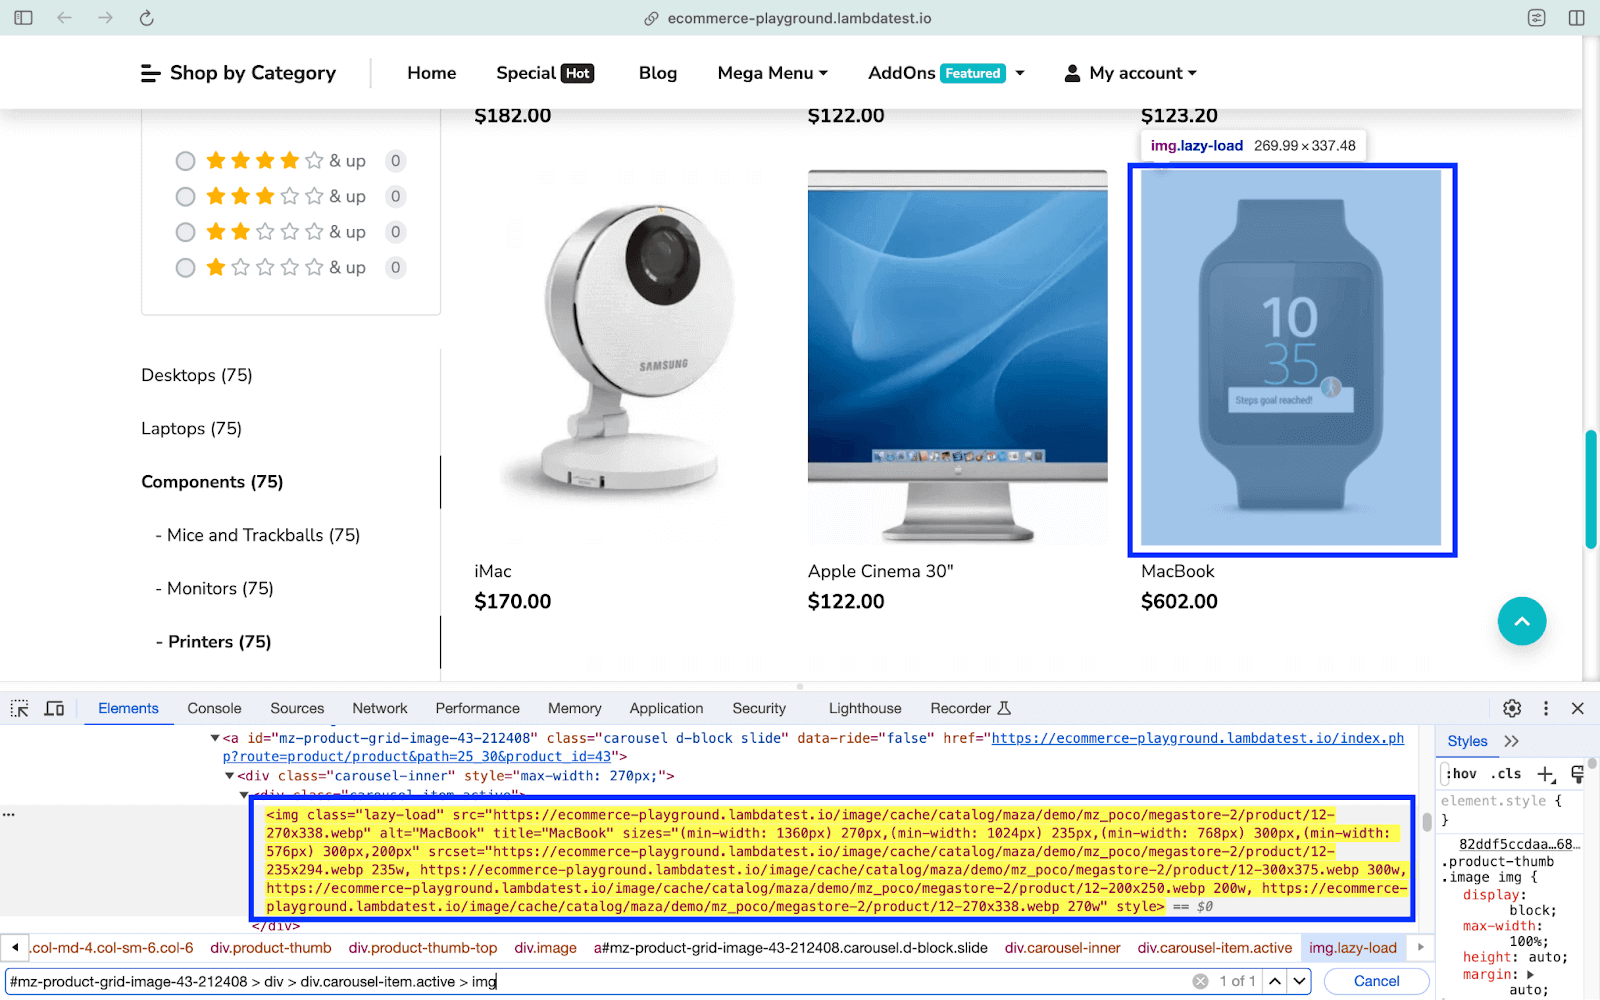
The product page contains 15 products, where the product meta-data is within a common CSS Selector
(.product-layout.product-grid.no-desc.col-xl-4.col-lg-4.col-md-4.col-sm-6.col-6)
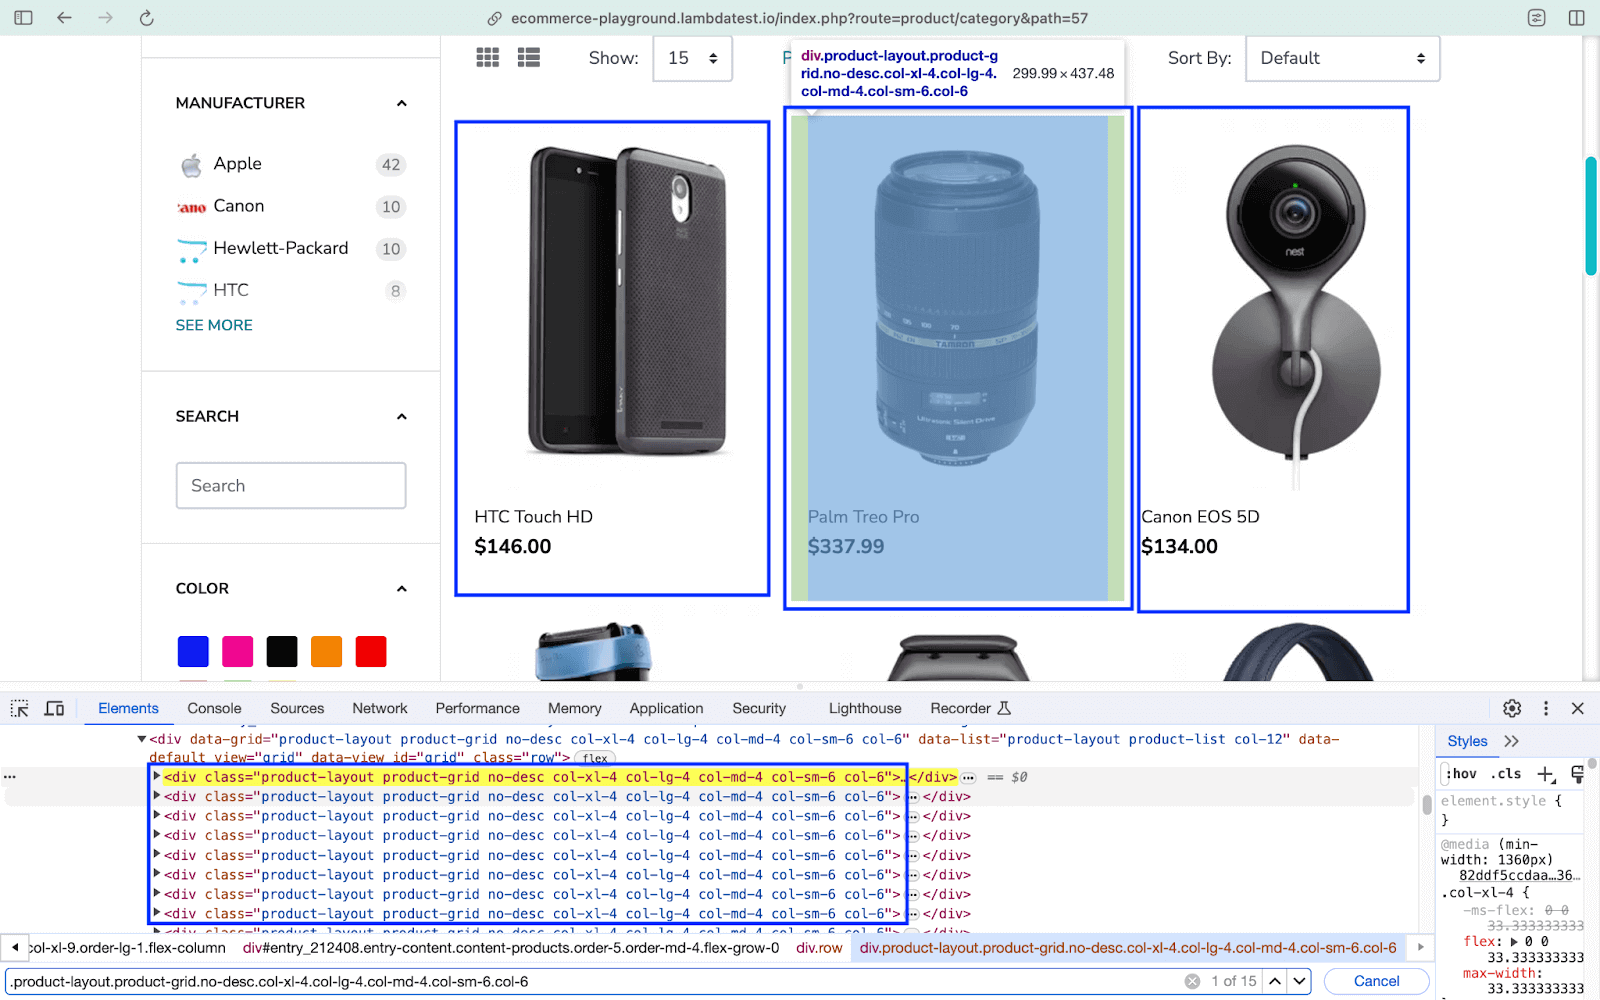
Hence, 15 elements (on every product page) match the element located using the above CSS Selector. The querySelectorAll() method of the Page class returns a list that contains elements matching the provided CSS Selector. The list will be further used to iteratively scrap information (i.e., name, cost) of each product.

Next, we run a for loop (1 .. 16) to scrap information of all the 15 products (or elements) under the div located in the previous step.

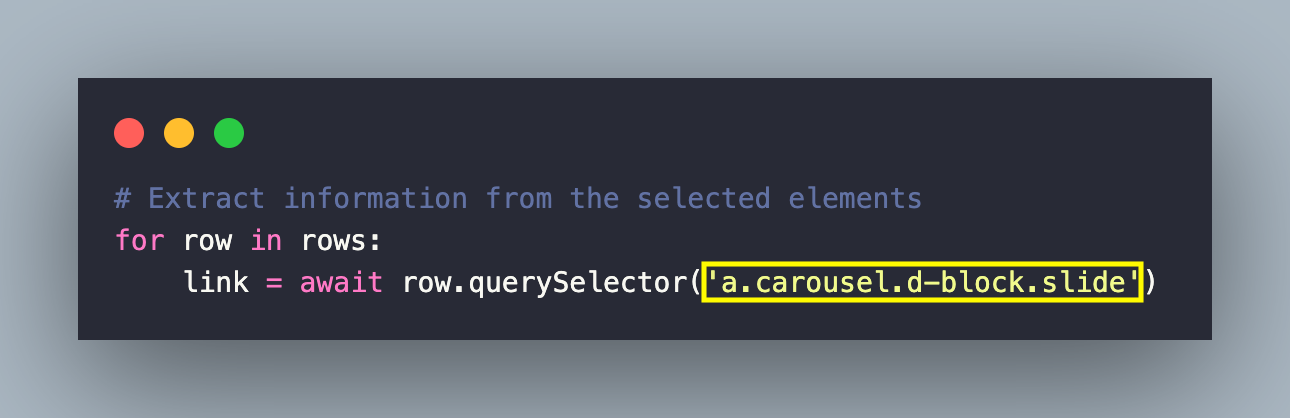
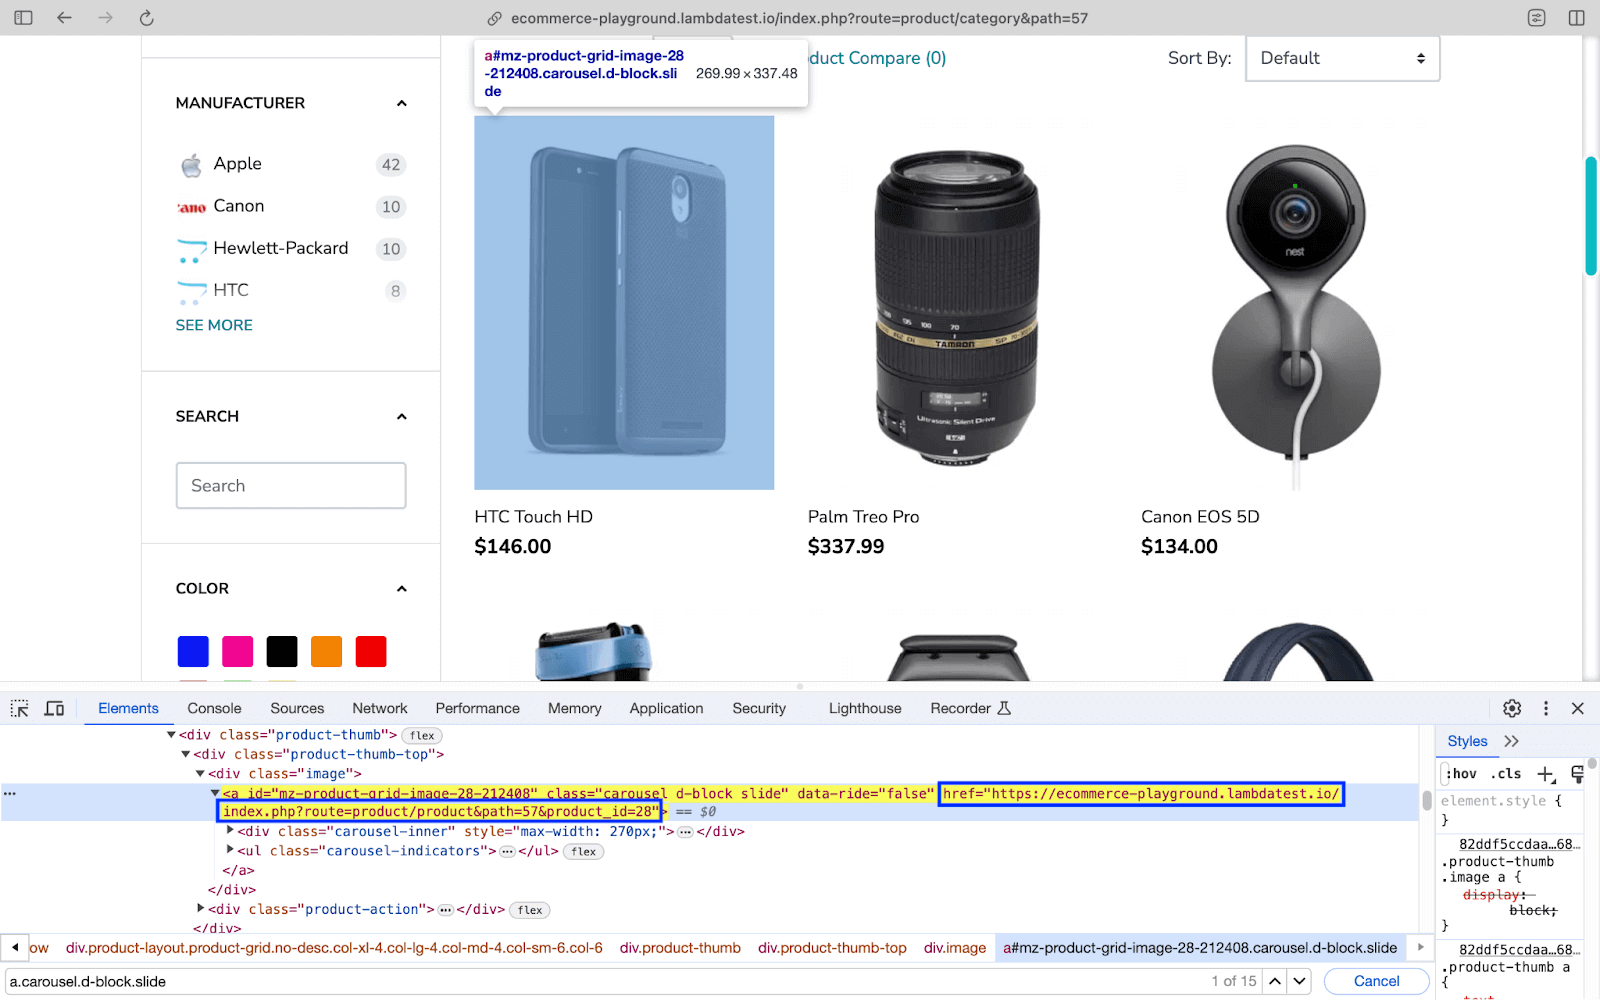
The product link is obtained by locating the respective element using the querySelector() method. As seen below, the first argument is the tag that must be searched for (i.e., a – anchor tag), and the second is the CSS Class attribute.
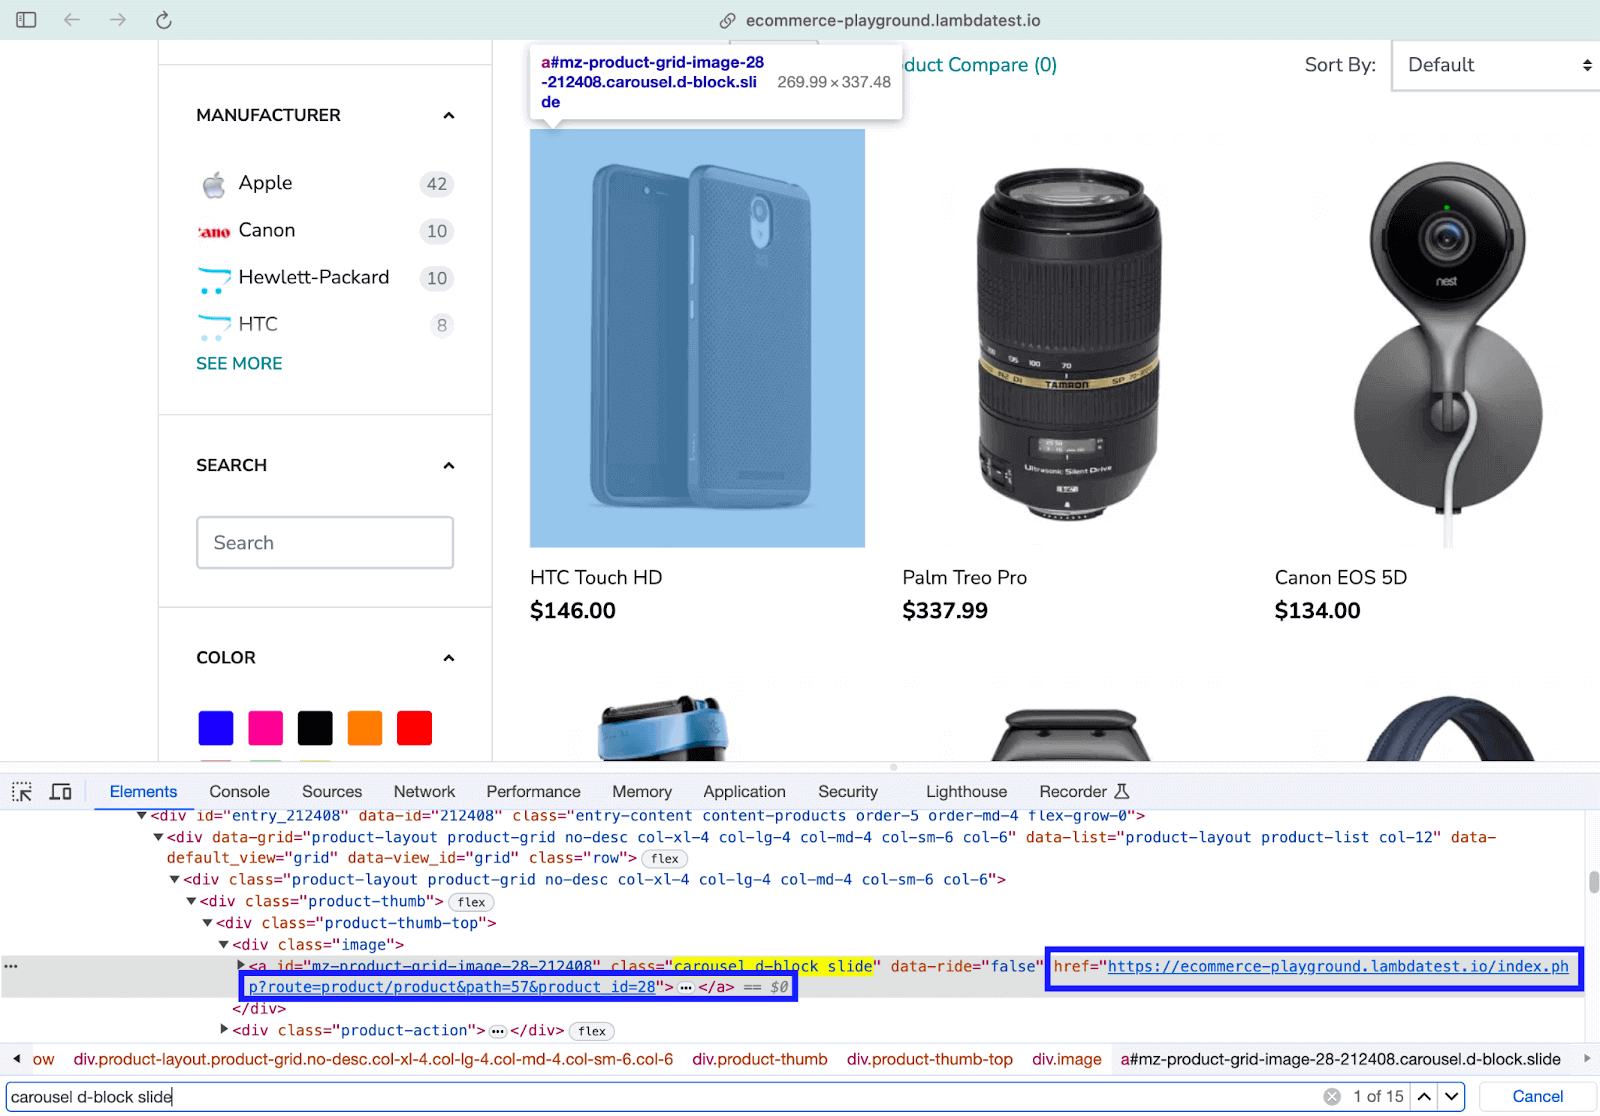
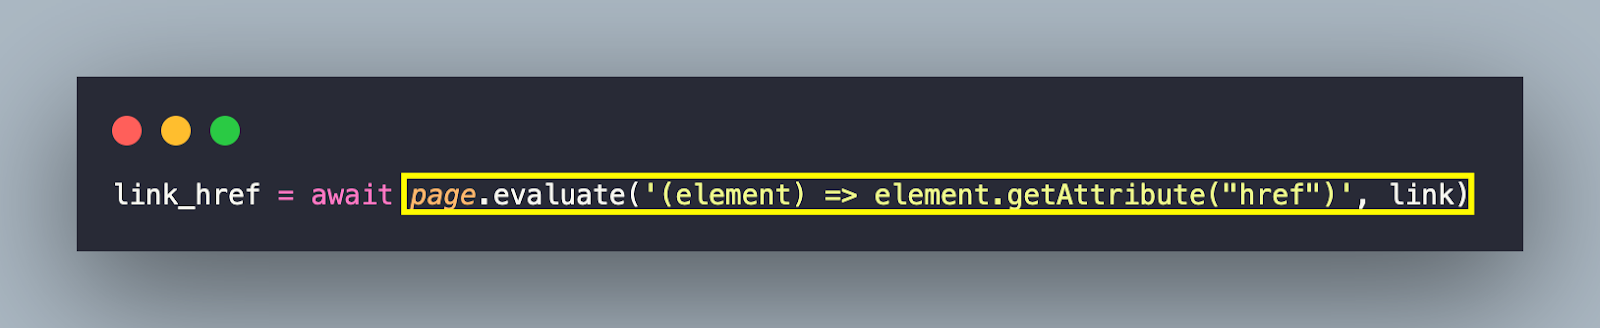
Now that we have located the element, the link (or href) to the product page is obtained by executing a JS-function (on browser) via the evaluate() method of the Page class.
The JS function uses the arrow function syntax and takes a parameter named element. The getAttribute() method of the Element interface returns the value of the href attribute of the element.
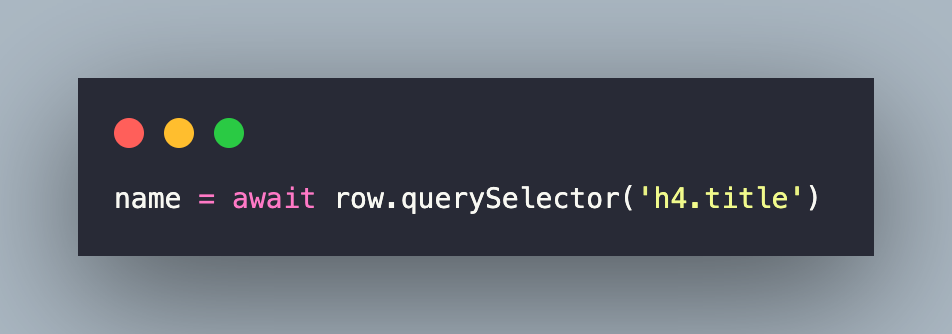
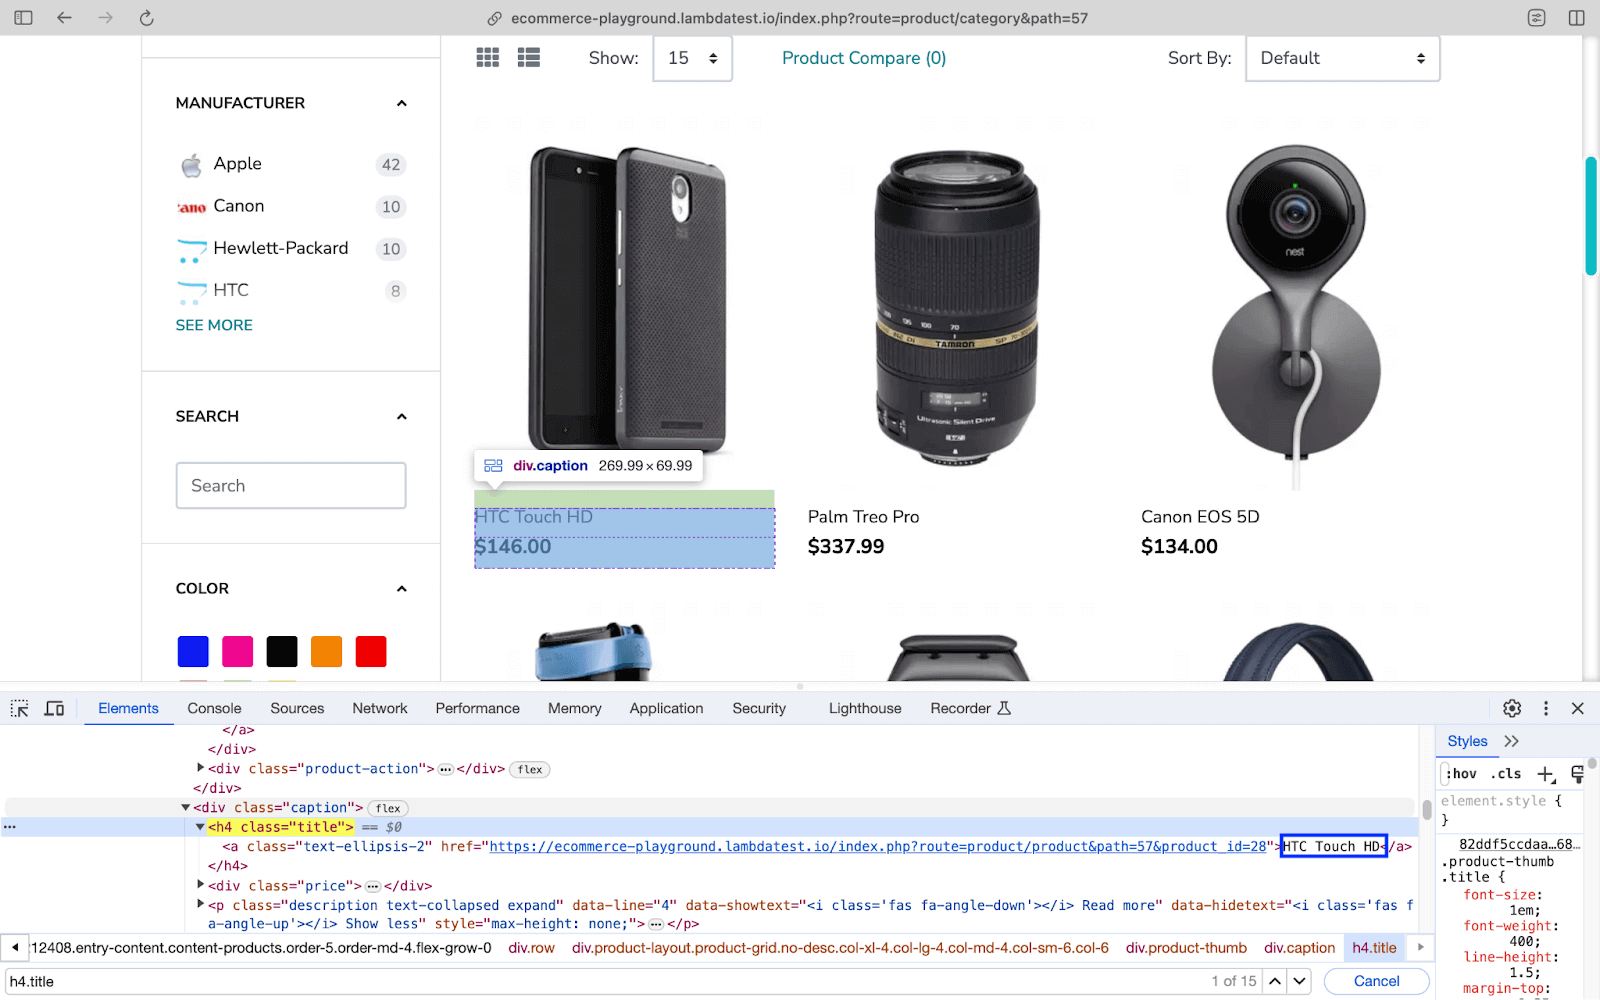
The product name is also scraped by first locating the respective element using the querySelector() method. The first argument is the h4 tag, and the second argument is the Class Name locator title.
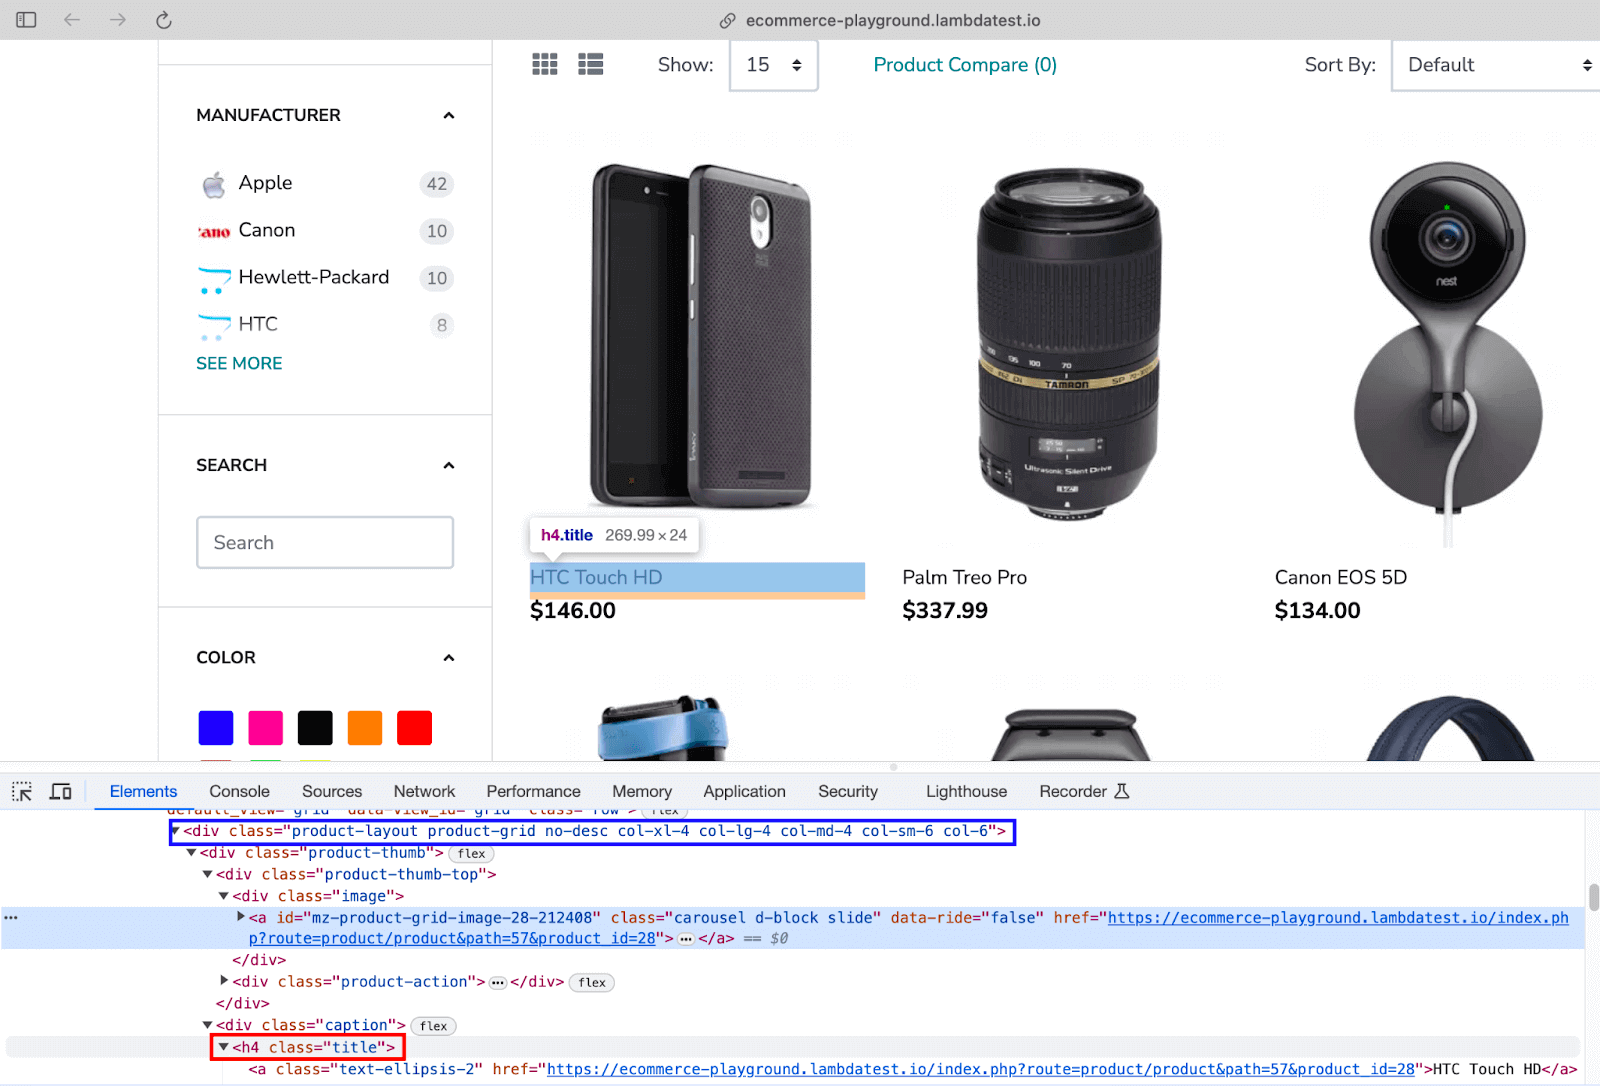
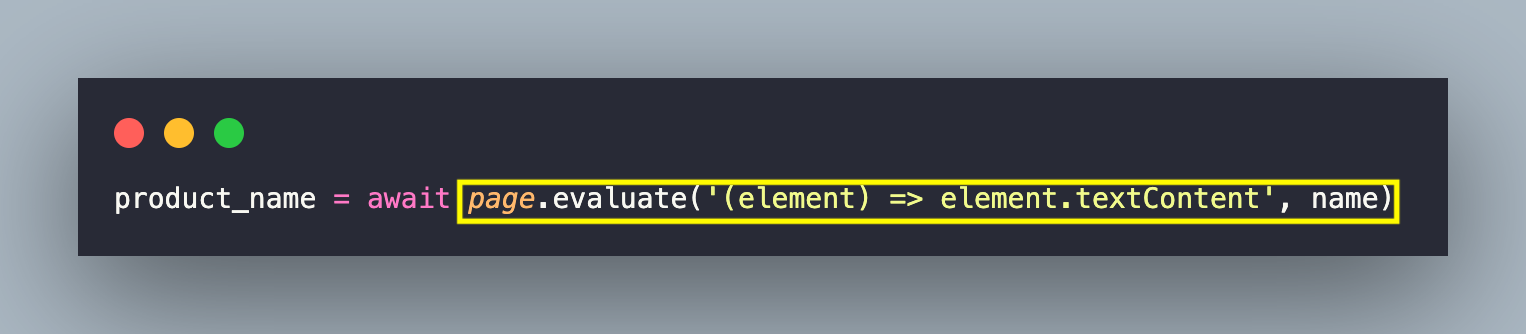
Once the element is located, the text content is obtained using the JavaScript method – textContent() on the located element (i.e., element.textContent). It uses the arrow function syntax where the element (i.e., name) is passed as an input parameter.
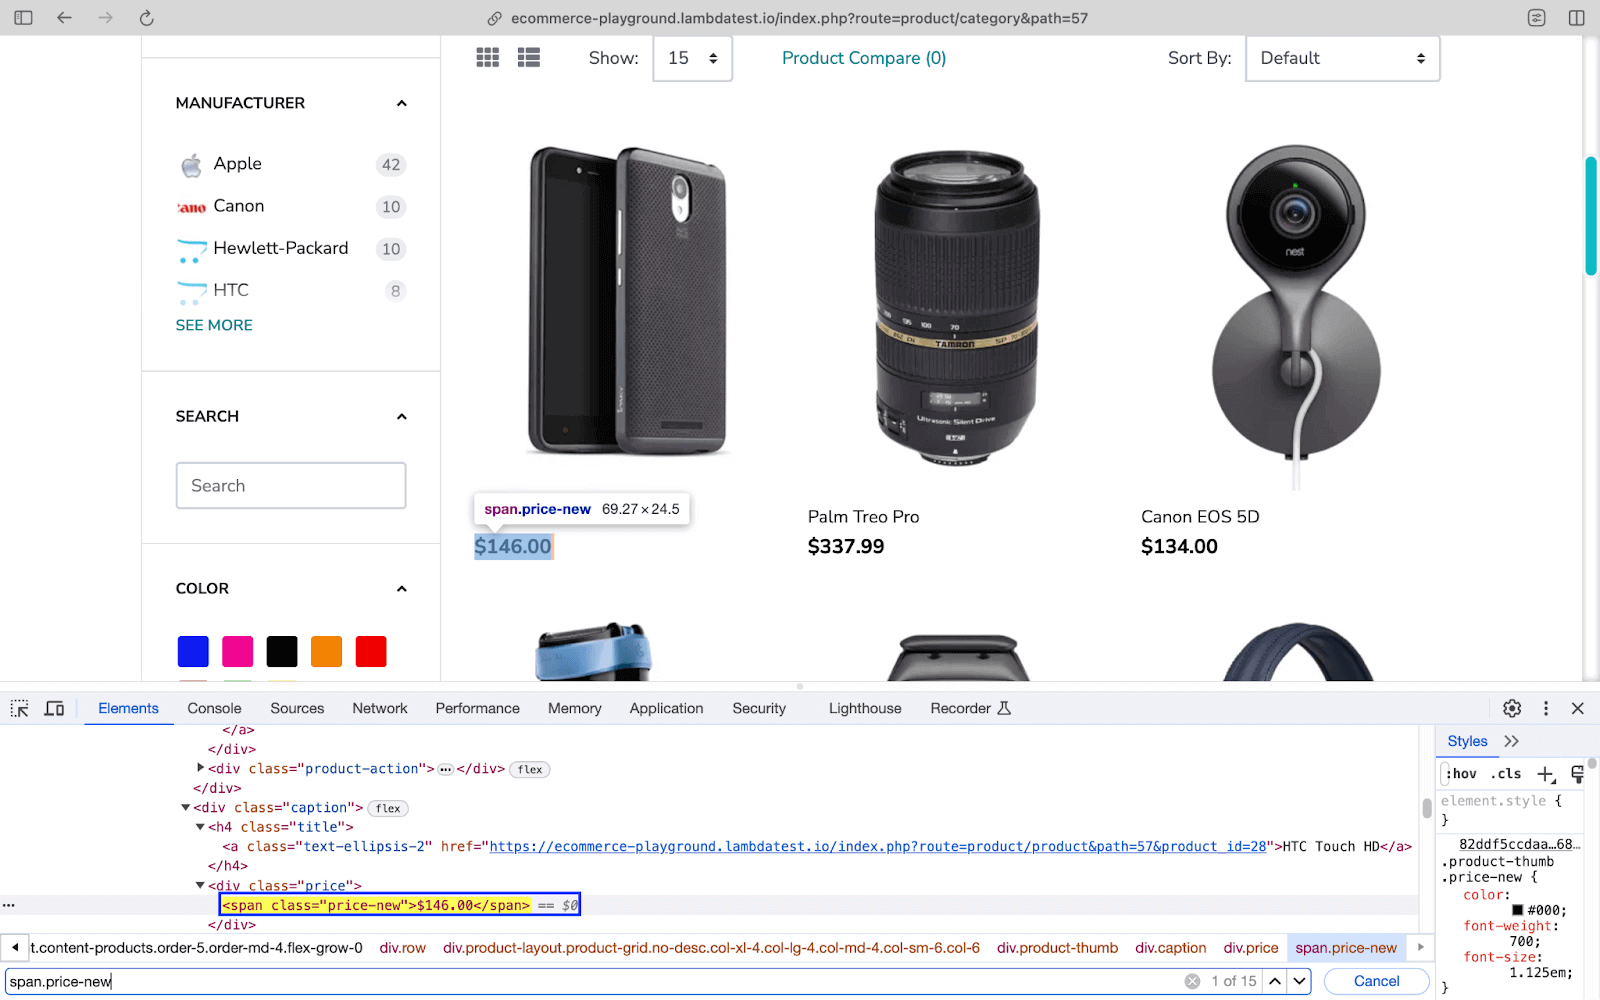
Lastly, the price of the respective product is scraped by first locating the element using the querySelector() method. As seen below, the text under the element with Class Name price-new provides the product price.
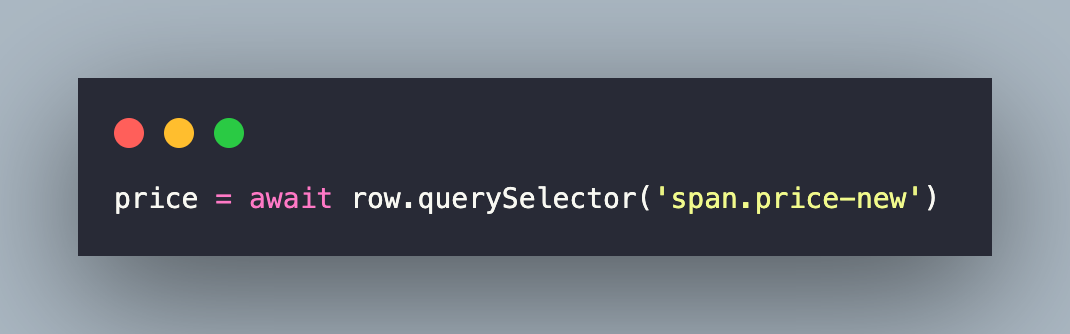
Like before, the text content is obtained using the JavaScript method – textContent() (or element.textContent). It uses the arrow function syntax where the element (i.e., price) is passed as an input parameter.
![]()
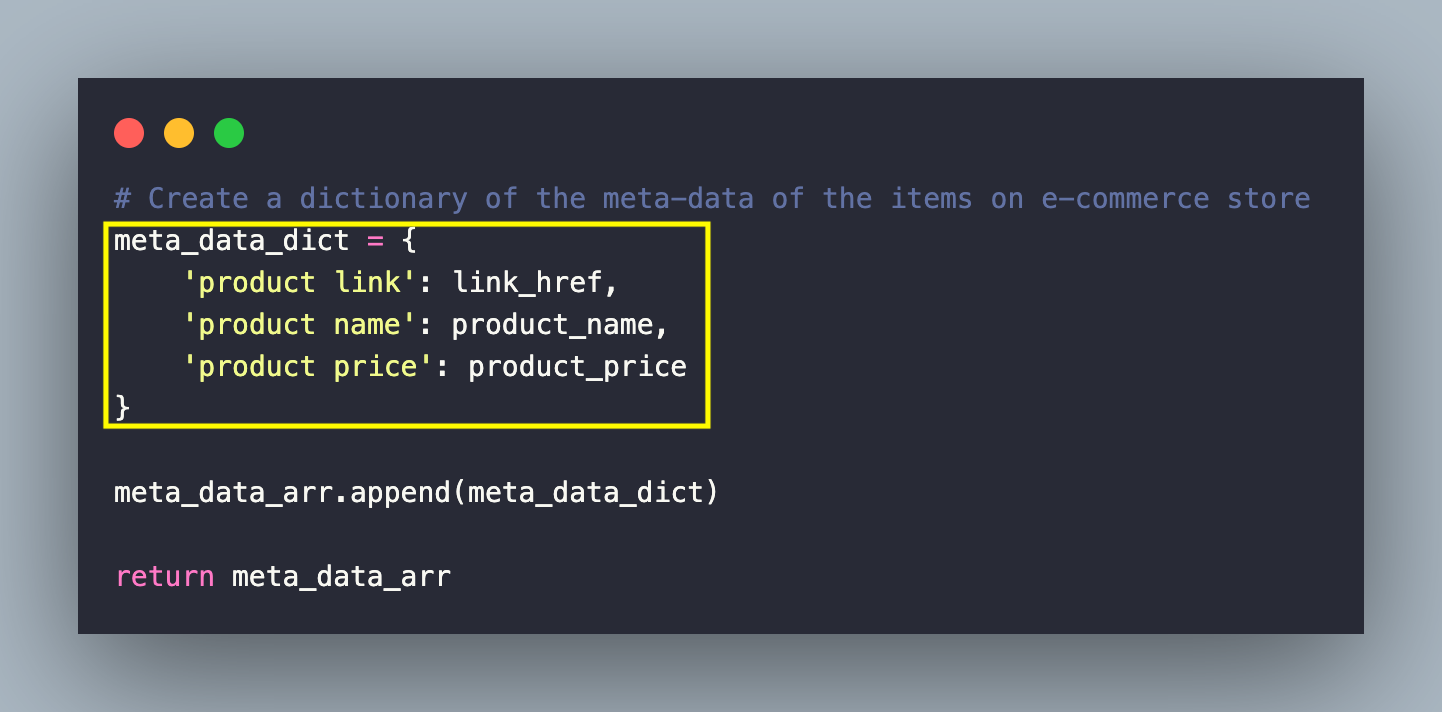
Now that we have scraped the required information (or meta-data), a dictionary (i.e., meta_data_dict) is created and appended to the list (i.e., meta_data_arr).
The above-mentioned steps are repeated for all the other product pages (i.e., Product Page 1 → Product Page 5), and the scraped data is displayed on the screen.
Execution
Invoke the command make pyppeteer-web-scraping on the terminal with the Chromium browser instantiated on the local machine (EXEC_PLATFORM = local). You can also perform web scraping using Chromium (or Chrome) on the LambdaTest cloud grid (EXEC_PLATFORM = cloud).
As seen below, the Chrome browser was successfully instantiated on the local machine.

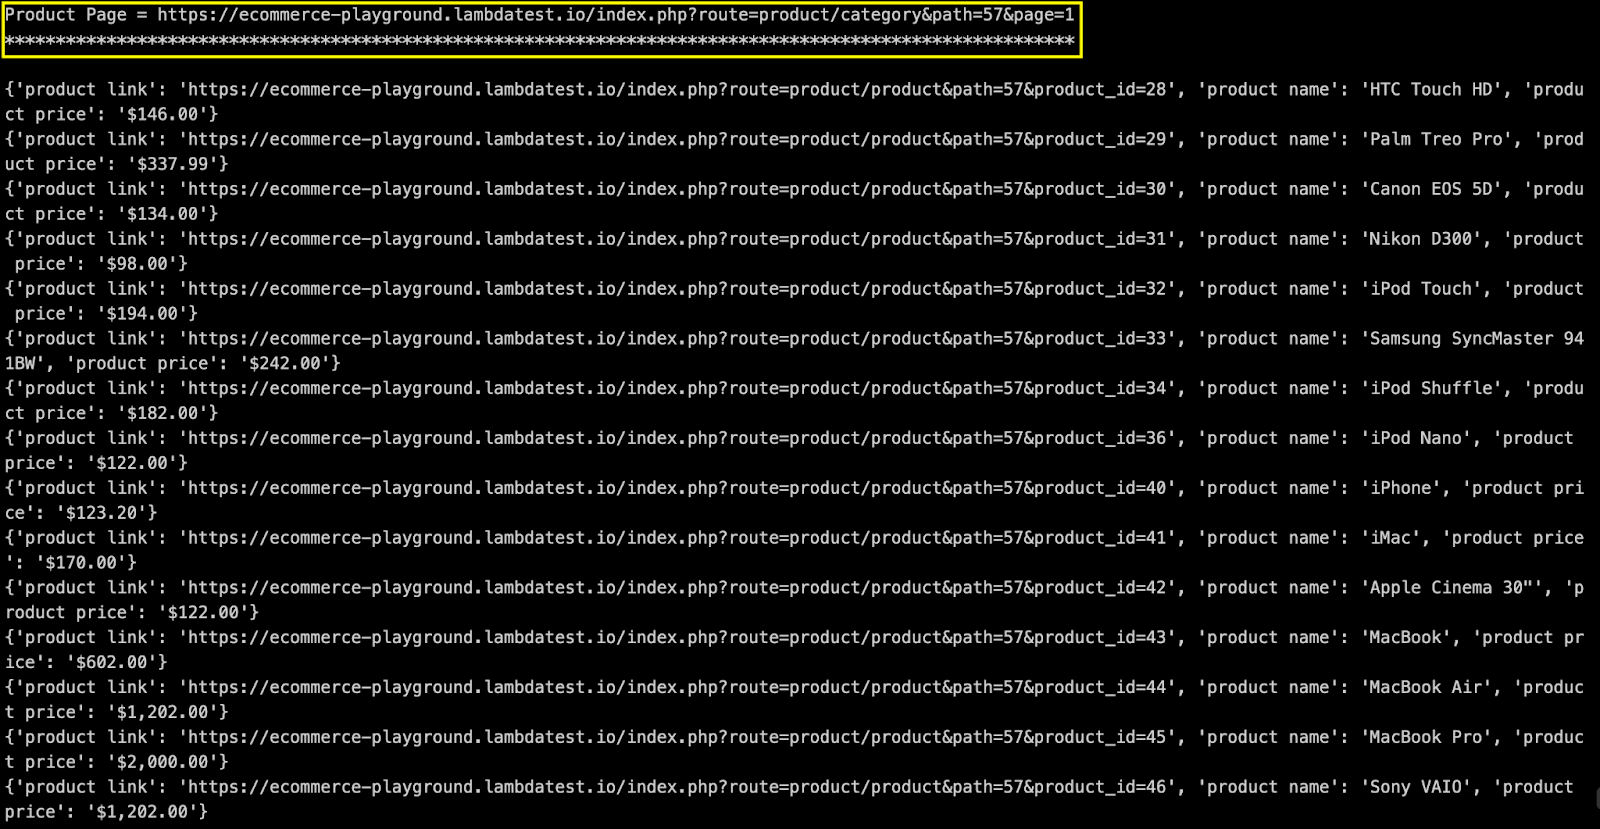
Here are the screenshots of the scrapped content of Product Page 1 and Product Page 5.
With this, we have successfully scraped a website using Pyppeteer! As always, use web scraping with utmost caution and responsibility. 🙂
Parallel execution with Pyppeteer
Pyppeteer does not have built-in support for parallel test execution. However, tests can be run parallel with Pyppeteer by leveraging other test automation frameworks (or libraries) offering support.
Before you parallelize the tests, it is important to follow the test execution best practices, the most important being test isolation (or independent tests).
In the section where we demonstrated dynamic content handling with Pyppeteer, we used the pytest plugin pytest-xdist to trigger the tests in parallel. If you are new to pytest, check out the pytest tutorial that deep-dives into the basic nitty-gritty of the framework.
The video below shows how to use the pytest-xdist plugin with Selenium, but the learnings also apply to Pyppeteer!
You can subscribe to the LambdaTest YouTube Channel for more tutorials on Selenium testing, Playwright testing, Cypress testing, and more.
pytest-parallel is another popular pytest plugin that can be used instead of pytest-xdist. The major advantage of the pytest-parallel plugin is its thread-safe approach and improved performance due to the usage of non-blocking IO for HTTP requests. Though we could have also chosen unittest (or PyUnit), features like fixtures, parameterized testing, and advanced assertions make pytest the de-facto choice for parallel testing.
As a part of the installation, we had already installed the pytest-xdist plugin via requirements.txt
Demonstration
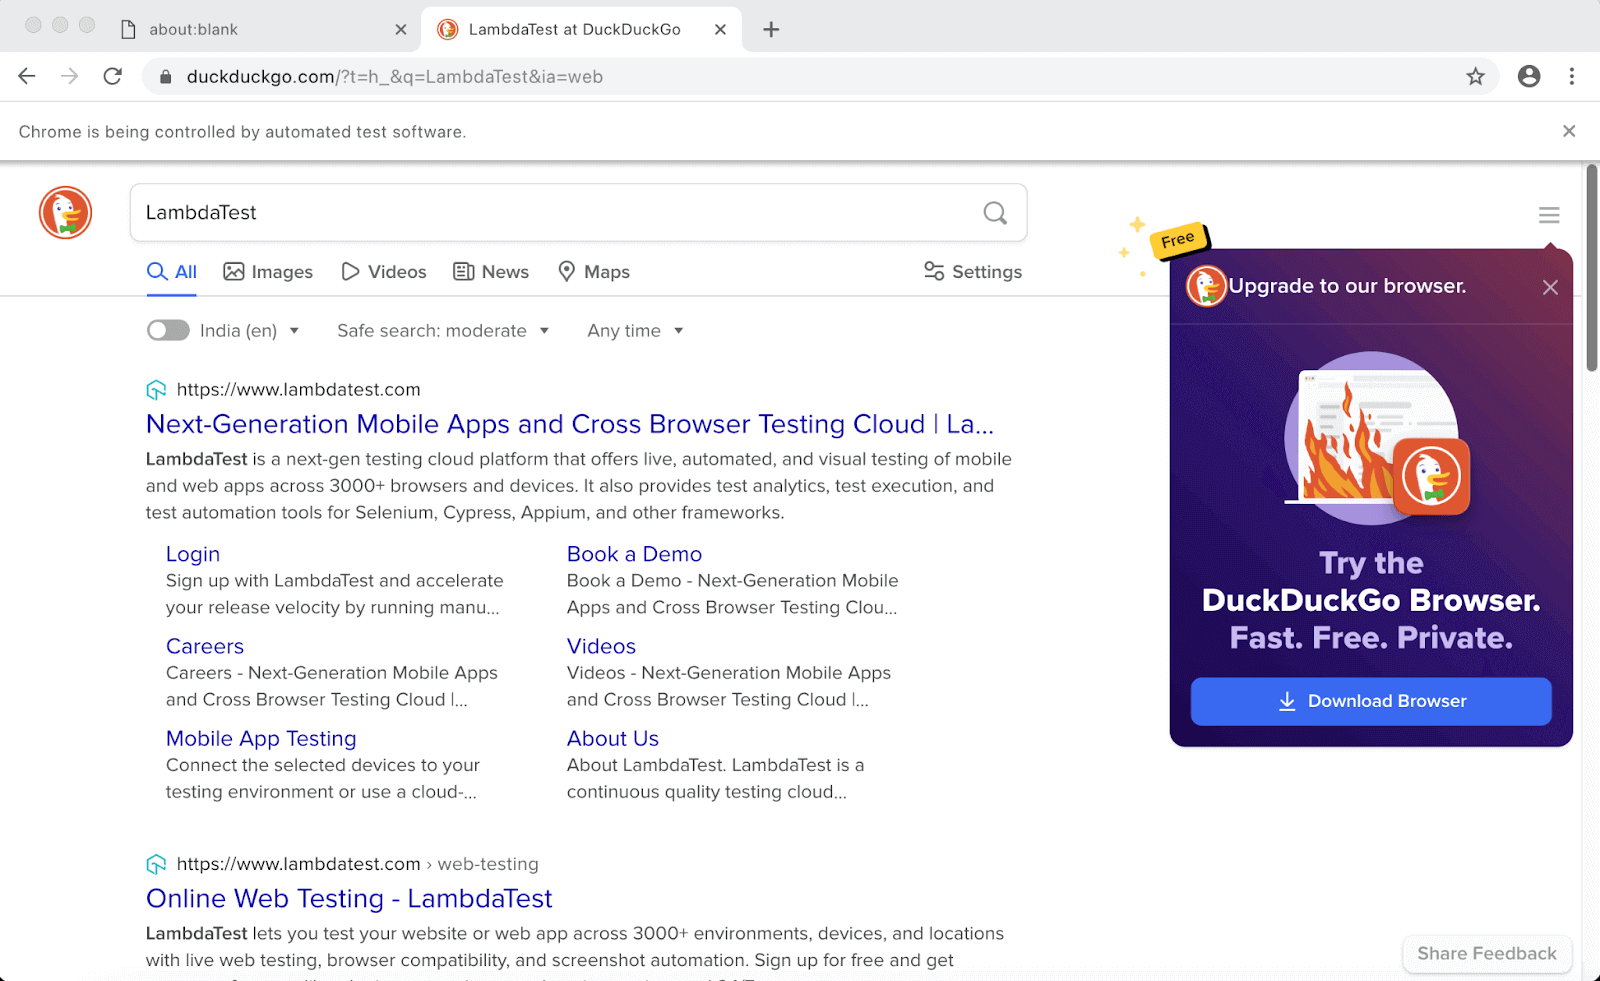
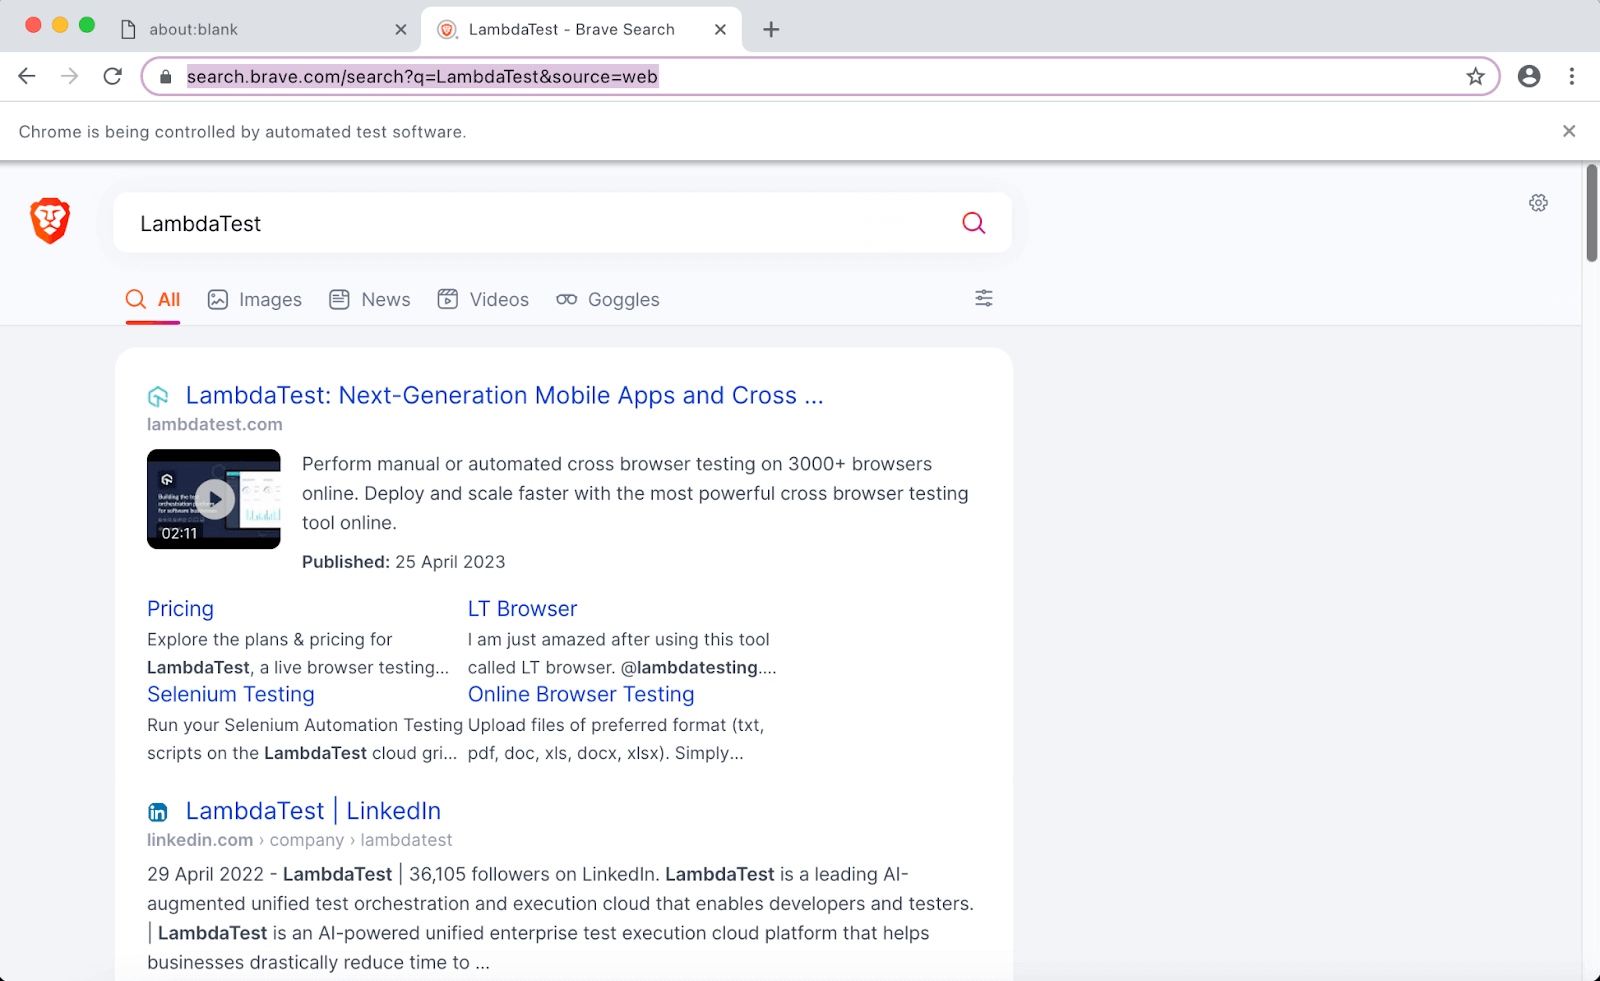
For demonstrating parallel execution with Pyppeteer using pytest, we have created two Python files that have their implementation of fixtures and tests. Setting the EXEC_PLATFORM to local lets you run tests in parallel on the local machine, whereas setting EXEC_PLATFORM to cloud runs tests on the LambdaTest cloud grid.
| FileName | Test Scenario |
|---|---|
| test_pytest_pyppeteer_1.py | Search “LambdaTest” on DuckduckGo |
| test_pytest_pyppeteer_2.py | Search “LambdaTest” on Brave Search |
Since the overall implementation steps remain largely unchanged, we would be avoiding code walkthrough for this section!
Execution
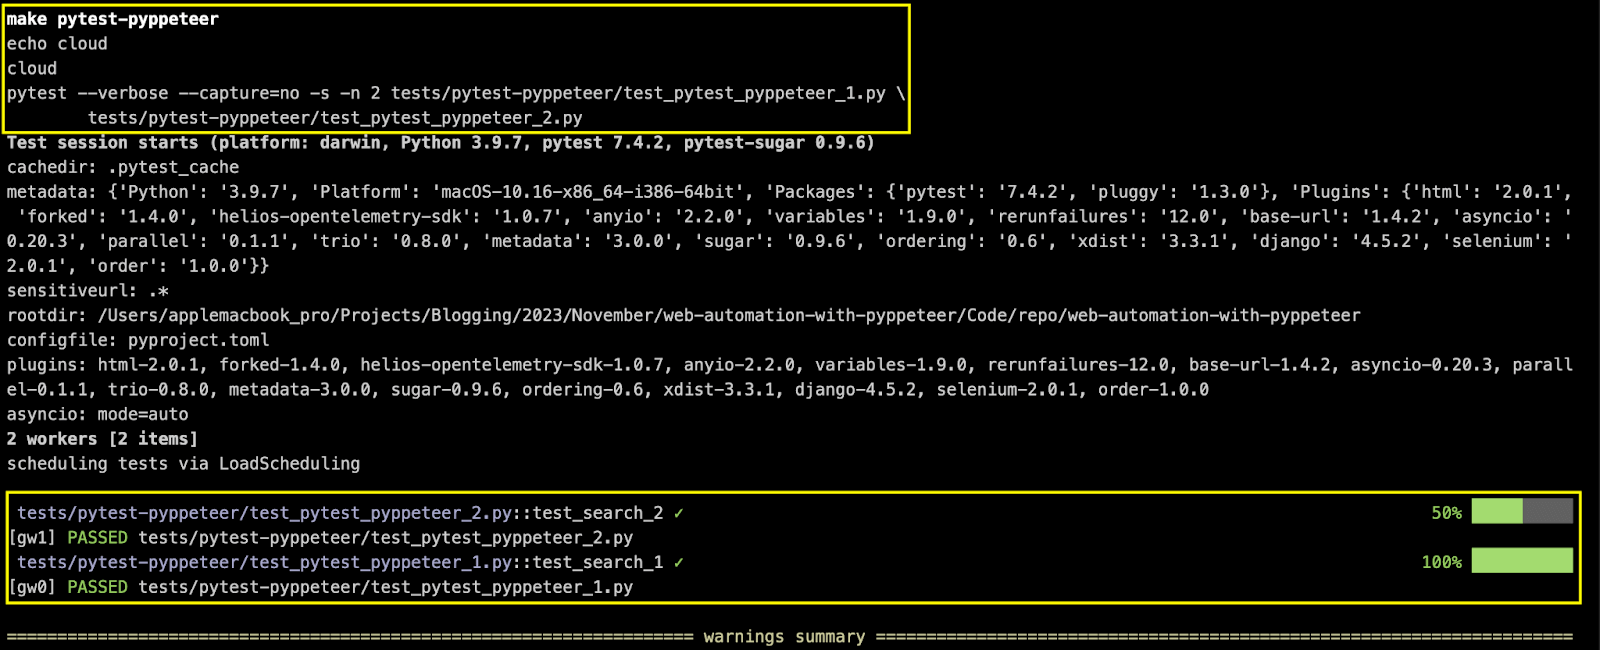
Invoke the command make pytest-pyppeteer on the terminal to trigger the execution. As seen in the execution snapshot on the local machine, the -n 2 option starts two processes in parallel, with tests in both files executing in separate processes.
It is important to note that tests in separate files are executed in parallel, whereas multiple tests in the same file run in a serial manner.
Here is the browser output, which indicates that the tests were executed successfully.
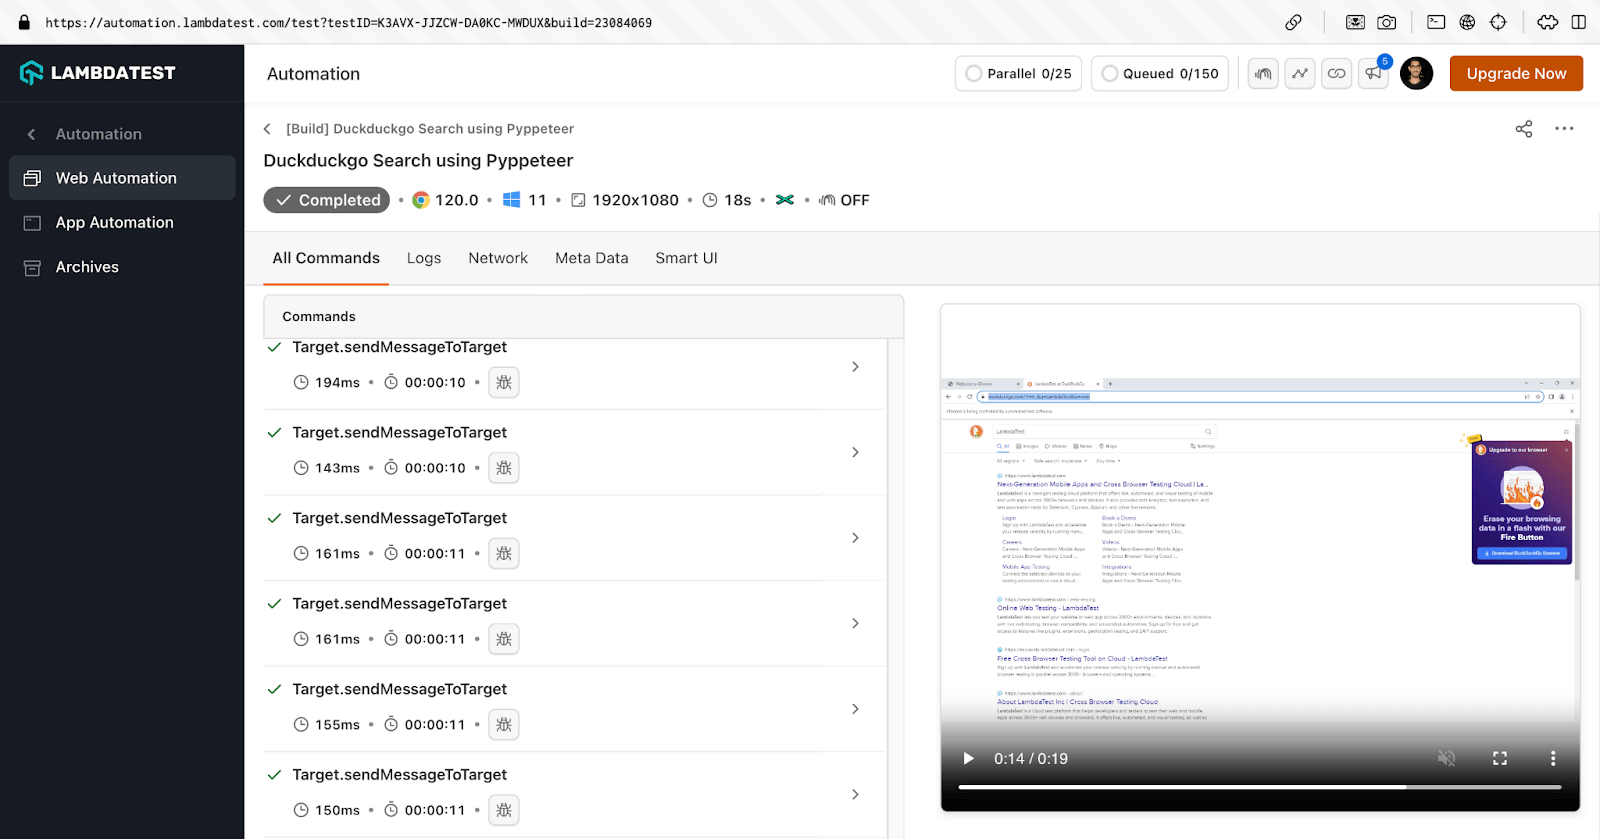
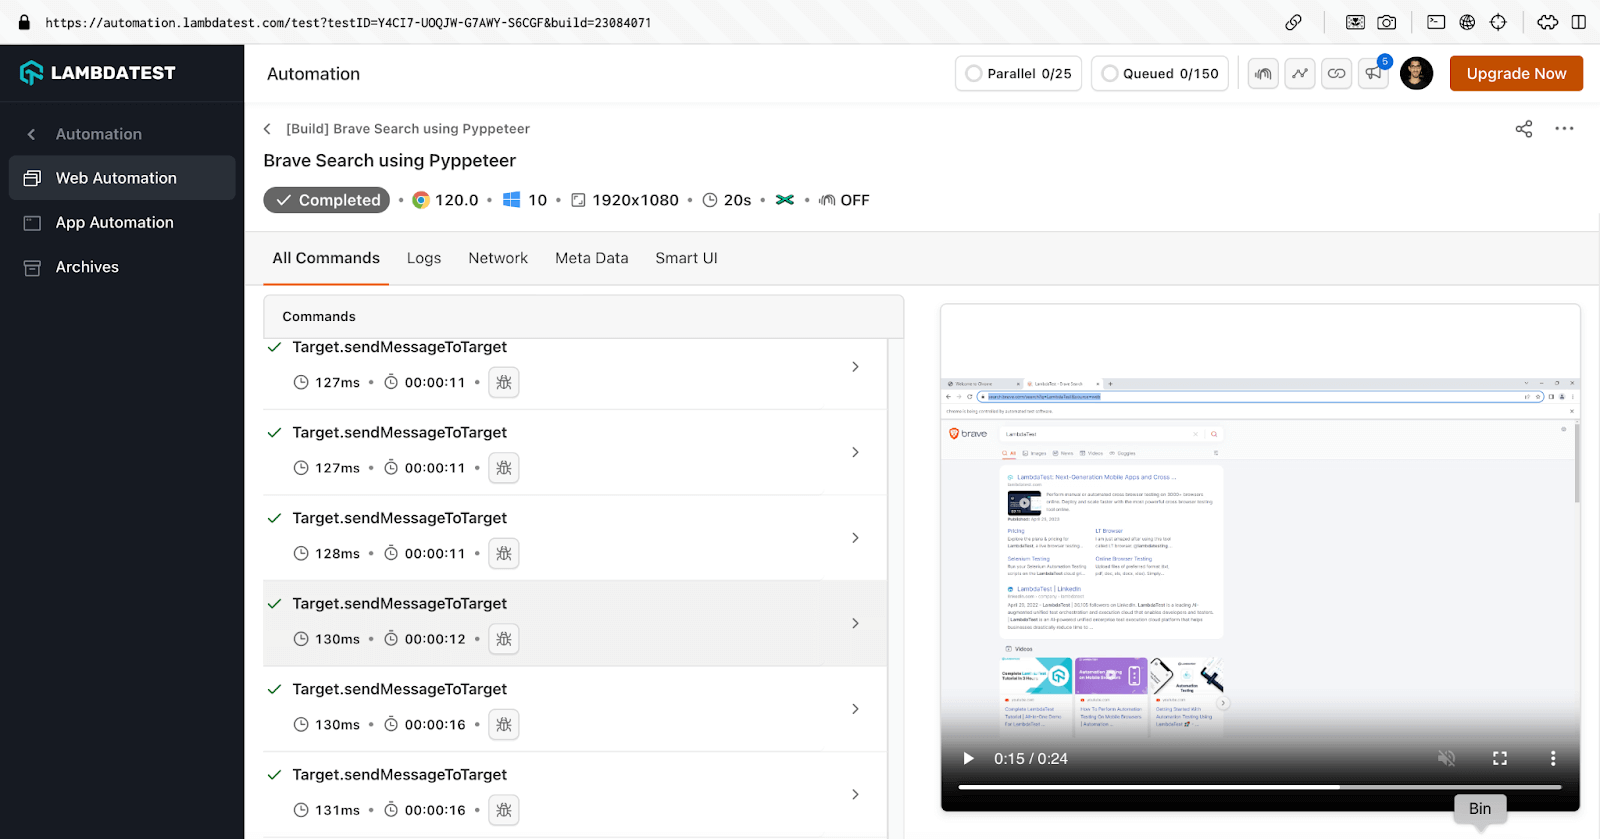
You can find the LambdaTest username and access key in the LambdaTest Password & Security page. Shown below is the execution on the LambdaTest cloud, which was triggered by setting EXEC_PLATFORM to cloud.
As seen on the dashboard, the tests in both the Python files are running in parallel.

As seen below, the test execution was successful.
Difference between Pyppeteer and Puppeteer
As stated in the official Pyppeteer documentation, Pyppeteer is an unofficial port of Puppeteer. Both frameworks provide high-level APIs that let you interact with the Elements in a document (or page) when opened on Chrome (or Chromium browsers).
Language-specific differences
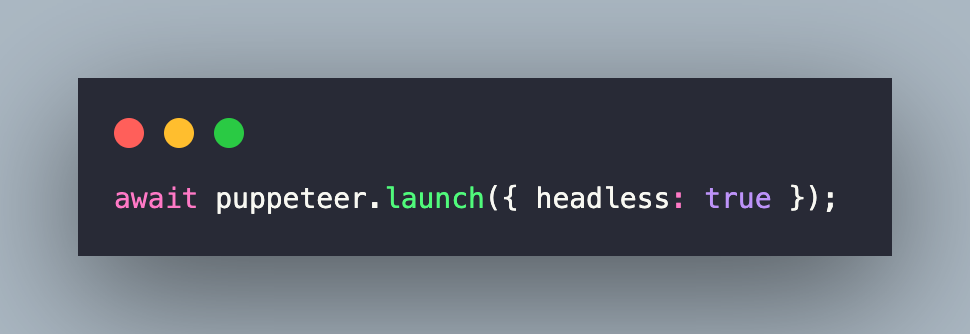
Python-based Pyppeteer & JavaScript-based Puppeteer are very much similar, barring aside some high-level differences. For the Pyppeteer demonstration on LambdaTest, we used the endpoint that is also used for Puppeteer:
Since Pyppeteer is based on Python, it leverages the asyncio library for writing concurrent code using the async/await syntax. As Puppeteer is based on JavaScript, it leverages Promises that are objects representing the completion (or failure) of an asynchronous operation.
Keyword arguments for options
As seen so far, Pyppeteer accepts both dictionary & keyword arguments for options.
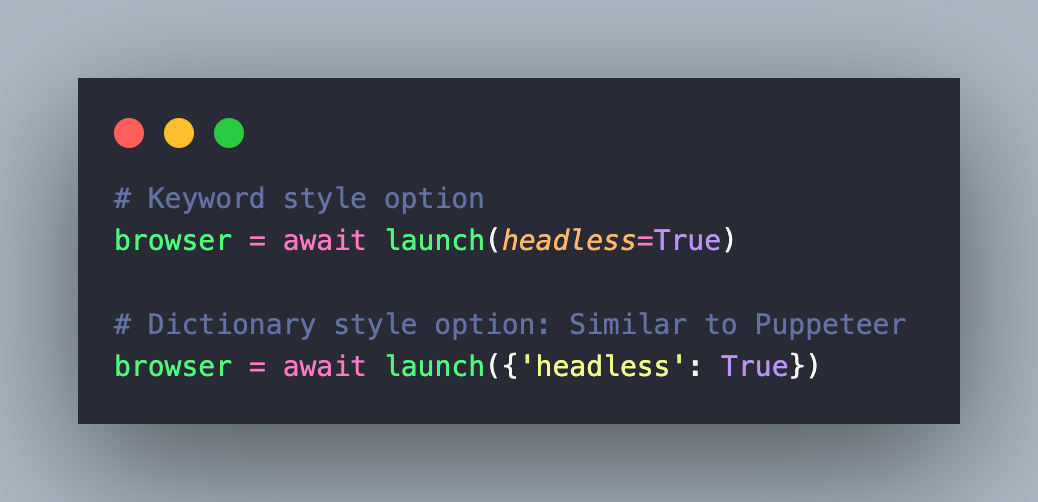
On the other hand, Puppeteer uses object for passing options to methods.
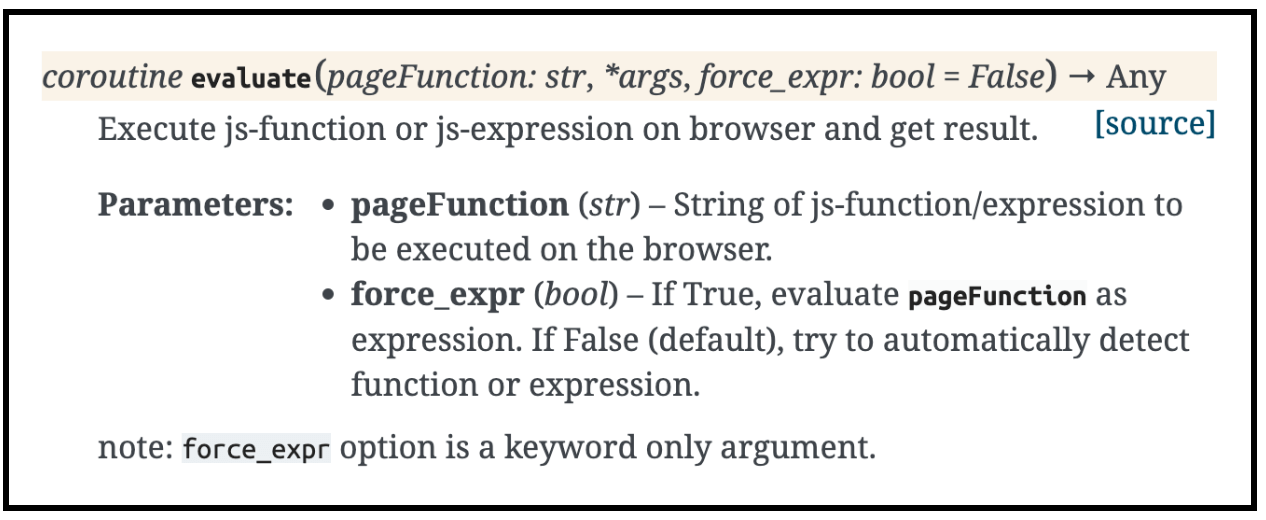
The evaluate() method
The page.evaluate() method in Pyppeteer takes a string of JavaScript.

On the other hand, the page.evaluate() method in Puppeteer takes JavaScript raw function (or string of JavaScript expression).
There are a few more differences between Pyppeteer and Puppeteer, I recommend going through the Pyppeteer vs Puppeteer comparison for more information. Even though the Pyppeteer project is no longer under maintenance, it is still used by the community!
If you are looking for options, you can switch to other frameworks like Puppeteer or Selenium. However, the choice depends on the project complexity and technical expertise of the said library (or framework).
It’s A Wrap
Thanks for making it this far! In this super-exhaustive Python tutorial with Puppeteer, we deep-dived into almost all the use cases (or scenarios) that can be realized with the Pyppeteer library. Like other Python-based test automation frameworks like pytest, unittest, etc., Pyppeteer can be leveraged for web automation and scraping of pages.
Lastly, switching (or porting) from Pyppeteer to Puppeteer/Selenium should be considered in scenarios where you want to harness the potential the other frameworks (or libraries) offer. You can also leverage Pyppeteer on LambdaTest since it lets you run tests at scale, that too on different versions of Chrome (or Chromium).
The integration of Pyppeteer with LambdaTest provides a seamless environment for executing scripts, ensuring compatibility testing on a diverse set of browser versions. This combination not only enhances the scalability of your testing but also allows you to validate the performance and functionality of your applications in a wide range of browser environments. LambdaTest’s infrastructure, combined with Pyppeteer’s capabilities, provides a robust solution for efficient and comprehensive web application testing.
Happy Testing 🙂
Frequently Asked Questions (FAQs)
What is Pyppeteer in Python?
Pyppeteer is a Python library that provides a high-level API to control headless browsers using the Chrome DevTools Protocol. It is essentially a Python port of the popular Node library Puppeteer, which is maintained by the Chrome team at Google.
What is the difference between Pyppeteer and Puppeteer?
Pyppeteer and Puppeteer are sibling libraries designed for different programming languages, Python and JavaScript, respectively. Yet, they aim to provide a high-level interface to control headless browsers through the Chrome DevTools Protocol.
Puppeteer, developed by Google for Node.js, has been widely adopted in the JavaScript community, offering features like web scraping and automated testing. On the other hand, Pyppeteer is the Python adaptation of Puppeteer, allowing Python developers to leverage similar capabilities using Python syntax and asyncio. Despite their language differences, both libraries empower developers to automate tasks in headless browsers effectively.


Author’s Profile
Himanshu Sheth
Himanshu Sheth is a seasoned technologist and blogger with more than 15+ years of diverse working experience. He currently works as the 'Lead Developer Evangelist' and 'Senior Manager [Technical Content Marketing]' at LambdaTest. He is very active with the startup community in Bengaluru (and down South) and loves interacting with passionate founders on his personal blog (which he has been maintaining since last 15+ years).
Blogs: 128
Got Questions? Drop them on LambdaTest Community. Visit now


