Selenium 3 vs Selenium 4: Key Differences
Akash Nagpal
Posted On: July 20, 2023
![]() 170974 Views
170974 Views
![]() 29 Min Read
29 Min Read
Selenium 4 has ignited a wave of enthusiasm and anticipation within the testing community. This significant update introduces an array of fresh capabilities, architectural refinements, and performance enhancements, propelling Selenium to the forefront of the next generation of automation testing.
A recent poll conducted by LambdaTest for Selenium 3 vs Selenium 4 over there social media platforms shows the users of Selenium 3 are fairly in good numbers. Hence, it is equally important to cater to the audiences on both sides.
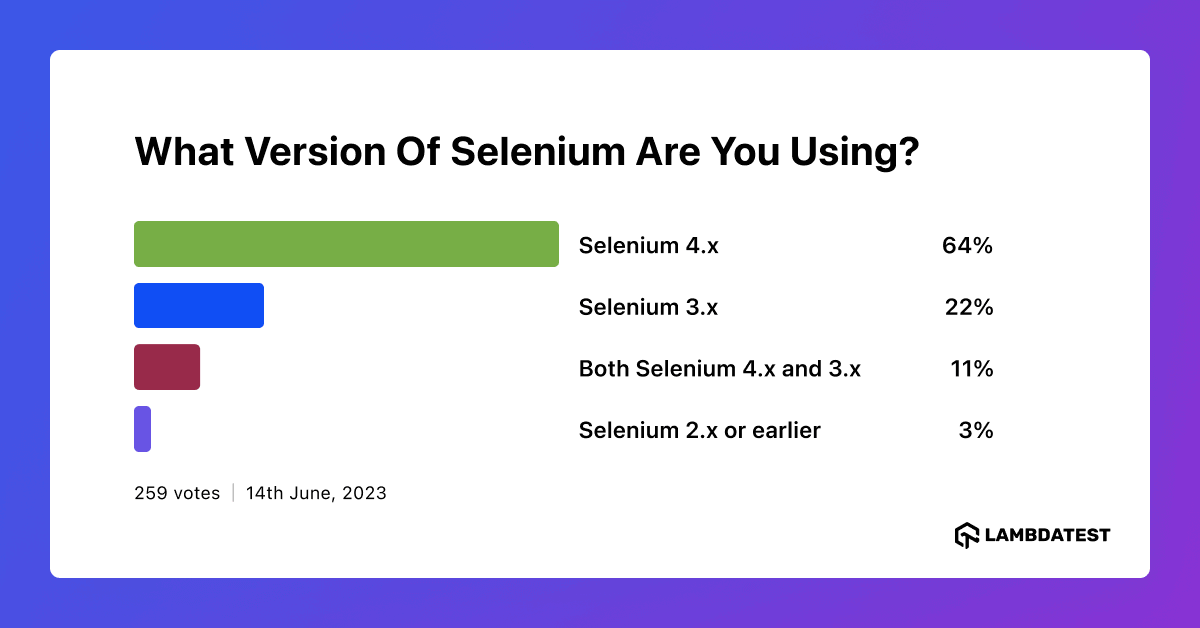
TABLE OF CONTENTS
- What is Selenium
- Selenium Versions
- Advantages of Selenium 4
- The Architecture of Selenium 3 vs Selenium 4
- Significant Improvements in Selenium 4
- Selenium Manager
- New Features and Enhancements
- Use Cases and Practical Applications of Selenium 4 Features
- Summarizing the Key Differences
- Frequently Asked Questions
In this blog, we will delve into the key differences between Selenium 3 vs Selenium 4. We will look at the architecture of Selenium 3 vs Selenium 4 in detail, along with the new features and enhancements introduced in the latest Selenium 4.
What is Selenium ?
Selenium is a popular open-source framework that testers rely on to automate the testing of web applications across browsers. With Selenium, testers can write scripts in different languages like Java, Python, c#, Ruby, Javascript, etc. These scripts empower testers to interact with web elements, execute actions, and verify web application behavior.
Selenium suite has Selenium WebDriver, Selenium Grid, and Selenium IDE. Each of them has a distinct function, and together they offer a complete web automation testing solution. Additionally, Selenium is adaptable and available on several platforms thanks to its compatibility with multiple operating systems like Windows, macOS, and Linux.
If you are preparing for an interview you can learn more through selenium interview questions.
Features Of Selenium
Selenium offers many crucial features, making it a favorite among developers and testers for test automation. Let’s look at some of the features that make Selenium such an effective solution for automating web application testing.
- Cross-browser compatibility: Selenium is compatible with major online browsers such as Chrome, Firefox, Safari, and Microsoft Edge, allowing tests to be run reliably across several browser settings, thereby enabling comprehensive compatibility testing.
- Multi-language support: Selenium provides APIs in different programming languages, allowing testers to develop automation scripts in their favorite language. It gives flexibility and allows testers to leverage their preferred programming language and existing skills.
- Element locators: Selenium offers a variety of locators to locate and interact with web elements, including IDs, class names, CSS selectors, XPath expressions, and more.
- Test Automation Framework Integration: Selenium can work with different test automation frameworks, giving testers access to extra features and functionalities. By integrating with frameworks like TestNG and JUnit, testers can effectively organize their test suites, generate detailed test reports, and implement advanced automation practices.
- Parallel Test Execution: Selenium offers parallel testing through Selenium Grid, allowing testers to distribute tests over numerous PCs and browsers simultaneously. This functionality offers quicker test execution and increased test automation efficiency.
Selenium Versions
A tester/developer should always be aware of the previous versions and the latest releases of Selenium for automation testing.
- Selenium 3: Selenium 3 was an incremental update to WebDriver in 2016 without the Selenium RC Code, focusing on improving stability and bug fixes. It maintained compatibility with previous versions and introduced minor enhancements but did not introduce significant changes.
- Selenium 4: Selenium 4 is the latest major release, introduced in 2021. It brought several new features and enhancements to the Selenium framework, which we will discuss later in this blog. Selenium 4 aimed to address some of the limitations of previous versions and provide a more user-friendly and efficient testing experience.
As a result of the widespread usage and significance of Selenium 3 and Selenium 4, in this blog, we will delve deeper into only these two major versions to uncover their unique features and functionalities.
Selenium 3
Selenium 3 is the third major version of the Selenium test automation framework. It is a popular open-source framework that testers rely on to automate the testing of web applications across browsers and platforms.
The significant change in Selenium 3 is removing the original Selenium Core implementation and replacing it with one backed by WebDriver. The architecture for Selenium 3 includes the JSON Wire Protocol. We will learn about JSON Wire Protocol later in the blog.
In Selenium 3, the core functionality remains consistent; that is, it enables users to interact with web elements and automate web testing across different browsers.
Selenium 4
Selenium 4 is the successor to Selenium 3, the next major version of the Selenium framework.
Selenium 4 introduced the W3C WebDriver protocol, which replaced the previously used JSON wire protocol in Selenium 3. It has been a game changer and one of the key differentiating factors that set Selenium 4 apart from its predecessor, Selenium 3.
We will look into the W3C WebDriver protocol of Selenium 4 in detail while comparing the architectures of Selenium 3 vs Selenium 4 in the subsequent section.
 Note
NoteAutomate your Selenium test scripts! Try LambdaTest Today!
Advantages of Selenium 4
As mentioned above, Selenium 4 is an upgrade from the older version of Selenium 3. Hence, the advantages of Selenium 4 apply in the broader discussion for enhanced automated testing.
Here are some of the primary benefits of upgrading to Selenium 4:
- Enhanced Performance: Selenium 4 includes many performance improvements, such as improved browser interactions and faster test execution. WebDriver W3C Protocol replaces the older JSON Wire protocol in Selenium 4. These improvements result in faster test completion, allowing testers to provide faster feedback and reduce total test execution time.
- Native File Upload Support: Selenium 4 includes native file upload functionality, reducing the requirement for workarounds or third-party libraries to handle file upload scenarios. Testers may seamlessly interact with file upload elements, making test automation for file-related tasks more streamlined and efficient.
- Relative Locators: Selenium 4 introduces the concept of relative locators, which provide additional flexibility in locating web elements based on their relationship with other elements. This feature simplifies identifying elements in dynamic web pages, making test script maintenance easier and reducing the impact of UI changes.
- Unified Selenium DevTools API: Selenium 4 brings a new feature that lets testers access Chrome DevTools directly from their automated tests. This feature uses the Chrome DevTools Protocol (also known as CDP), which is a set of tools built directly into Chromium-based browsers like Chrome, Opera, and Microsoft Edge to help developers debug and investigate websites. We’ll have a detailed discussion on CDP later in this blog.
- Improved Selenium IDE: Selenium 4 comes with an improved version of the Selenium IDE (Integrated Development Environment), offering support for Selenium-supported programming languages like Java, Python, Ruby, etc, a more intuitive user interface, and additional features. Selenium Grid 4 architecture supports 4 processes – Session Map, Node, Router, and Distributor. Not only this, Selenium Grid 4 has a more scalable and traceable infrastructure. If you’re a beginner, don’t worry we’ll learn about these terms in detail later in the blog.
The Architecture of Selenium 3 vs Selenium 4
When comparing the architecture of Selenium 3 vs Selenium 4, notable differences reflect the advancements and improvements made in Selenium 4. Let’s explore the architecture of both versions:
Selenium 3: Architecture
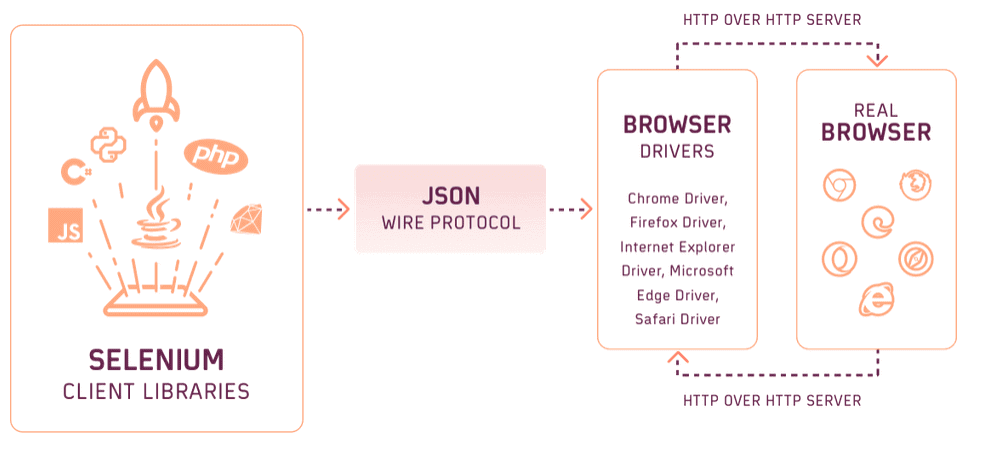
The architecture of Selenium 3 revolves around the Selenium WebDriver, Selenium Grid for parallel testing, and browser drivers for browser communication. This architecture enables testers to automate web application testing across different browsers and platforms.
Selenium 3 follows a client-server architecture consisting of four major components:
- Selenium Client Library / Language Bindings
- JSON wire protocol over HTTP
- Browser Drivers
Selenium 3’s architecture is based on the JSON Wire Protocol. JSON stands for JavaScript Object Notation. JSON Wire Protocol simplifies information exchange between Client and Server using HTTP (Hypertext Transfer Protocol).
The JSON Wire Protocol is used to transmit data between the client and server through the Hypertext Transfer Protocol (HTTP). In simple terms, when a request is made from a Selenium client, it is sent over HTTP and received by the JSON Wire Protocol. The browser driver ensures the security of this request. Once the server processes the request, it generates a response, which is then sent back to the client for further processing.
Selenium 4: Architecture
Selenium 4 introduces architectural changes and enhancements compared to Selenium 3. The critical difference is the inclusion of the Selenium DevTools API as the W3C standard. This significantly impacts the architecture, resulting in a more unified and streamlined approach.
In Selenium 4, the Selenium WebDriver architecture consists of the following four major components:
- Selenium Client Libraries/ Language Bindings
- WebDriver W3C Protocol
- Browser Drivers
All the components in Selenium WebDriver 4 are similar to those in Selenium 3, except that the JSON Wire protocol is replaced with the new W3C WebDriver protocol. So, let’s discuss this in detail.
In Selenium 4, the communication between the client and the server is done using the W3C WebDriver protocol (For Eg. recent/modern versions of all major browsers (Internet Explorer, Firefox, and Chrome) are considered W3C-compliant). The client consists of two main parts: the Selenium Client and the WebDriver Language Bindings. On the other hand, the server is represented by the Browser Drivers.
Selenium Client sends out a request to perform a command. WebDriver Language Bindings is primarily intended for running operations. After an automated test script operates on the Web Browser, Browser Drivers receive the client’s request and send over a response.
The Selenium Client and WebDriver Language Bindings are critical architecture components, with each language having its bindings. Bindings indicate that the exact instructions may be used in many languages. For example, a command developed in Java has also been written in C#, Python, Ruby, and other languages.

Significant Improvements in Selenium 4
When comparing the performance and stability of Selenium 4 to Selenium 3, considerable differences showcase Selenium 4’s advances. Let’s look at the performance and stability of both versions.
- Bundling Selenium Manager out of the box: In Selenium 3, developers had to manually download the required browser driver binaries and configure them for use(had an open library called WebDriverManager to automate the process, but it required to download explicitly). This manual process was time-consuming and prone to errors, especially when working with different browsers and their corresponding driver versions.
Improvement: Selenium Manager in Selenium 4’s latest update addresses this issue by simplifying the process, automatically downloading and configuring the correct driver versions. The latest Selenium Manager now comes bundled with the Selenium bindings. Therefore, testers just need to install the latest browser along with the Selenium Bindings instead of installing drivers and setting the path for automated testing. This improvement reduces the likelihood of encountering unexpected errors and improves the overall stability of test automation. We’ll learn about it in detail in later sections of the blog.
- Enhancements in Action API: In Selenium 3, the Action class is a vital component that allows testers to perform complex user interactions, such as mouse actions, keyboard actions, and multi-step actions on web elements. It enables users to chain together multiple actions to create test scenarios that simulate real user interactions with a web application.
Improvement: In Selenium 4, As Selenium moved from the older JSON Wire Protocol to the newer W3C WebDriver Protocol, the foundational components controlling user actions became more detailed and precise. Actions API is a low-level interface for providing virtualized device input actions to the web browser. This upgrade brought significant power to the framework, allowing various input devices to be utilized in multiple ways. We’ll be learning more about this later in this blog.
- Introduction of Window Management: Window management in Selenium is the capability of controlling and interacting with multiple browser windows or tabs during test automation. In Selenium 3, window management was achieved by creating a new driver object and then performing the switch operation using the WindowHandle method to perform subsequent steps.
Improvement: In Selenium 4, window management capabilities have been enhanced with the introduction of the new Window API. The API – newWindow allows users to create and switch to a new window/tab without creating a new WebDriver object.
- ChromeDriver: ChromeDriver is designed to facilitate communication and control between the WebDriver API, which is used for automating browser actions, and the Chrome browser itself. The newly updated ChromeDriver by the Chrome Team provides better compatibility and performance with the Chrome browser. It leverages the latest Chrome DevTools Protocol to enhance automation capabilities.
- Optimized Selenium Grid: Selenium 4 introduces an optimized Selenium Grid that offers improved scalability and parallel testing. It enables the efficient distribution of test cases across multiple nodes and provides enhanced resource utilization.
- Chrome DevTools Integration: Selenium 4 integrates seamlessly with Chrome DevTools, allowing testers to access advanced debugging and profiling features directly from their automation scripts. This integration enhances the ability to diagnose and troubleshoot issues during test execution.
- DesiredCapabilities: In Selenium 4, the DesiredCapabilities class has been deprecated, and the Options class has been introduced as a replacement for configuring and customizing the desired capabilities of browsers or browser drivers. The Options class in Selenium 4 enables testers to customize the desired capabilities of browsers to suit their specific requirements, providing control over browser behavior during testing. Testers can specify the browser, platform, version, and other configuration parameters easily, making it more convenient to manage test environments.
- Relative Locators: Relative Locators in Selenium 4 bring significant value by enabling testers to easily locate web elements based on their proximity and relationships with other elements. Testers can conveniently choose from a range of options to locate elements, including above, below, to the left, to the right, or close to a specific element.
- Selenium IDE: Selenium 4 includes an improved and revamped Selenium IDE. The Selenium IDE is a record and playback tool that enables testers to create and execute automation scripts without writing code quickly. With the new Selenium IDE, testers can enjoy an enhanced user interface, additional features, and improved extensibility options, making creating and maintaining automation scripts easier.
- Actions API: Selenium 4 introduces new methods and enhancements to the Action class, providing more robust and comprehensive support for performing advanced test execution. The Action API in Selenium 4 offers precise management over the capabilities of designated input devices. Selenium presents interfaces for three types of input sources: keyboard input for keyboard devices, pointer input for devices like mouse, pens, or touch devices, and wheel inputs for scroll wheel devices (introduced in Selenium 4.1.2).
- Session Map: The Session Map acts as a central repository for managing test sessions and tracking their status.
- Node: The Node process represents an individual test node or machine in the Selenium Grid.
- Router: The Router process acts as a traffic controller, receiving test requests from clients and routing them to the appropriate Node based on the requested capabilities.
- Distributor: The Distributor process plays a crucial role in load balancing and distributing test execution across multiple Nodes.
- Right-clicking a test or suite
- Selecting Export
- Picking a language/test framework
- Clicking the Export button
- C# / NUnit
- C# / xUnit
- Java / JUnit
- JavaScript / Mocha
- Python / pytest
- Ruby / RSpec
- Use the dragAndDrop(WebElement source, WebElement target) method.
- Use the series of actions: clickAndHold(WebElement source), moveToElement(WebElement target), release .
- Use Case of Relative Locators:
- Use Case of Chrome DevTools Protocol:
Also Read: Selenium PHP Tutorial: A Comprehensive Guide, with Examples & Best Practices
Selenium Manager
Selenium Manager serves as the “official driver manager” for the Selenium framework. It was created as a Command-Line Interface (CLI) tool using the Rust programming language and incorporated the knowledge gained from the development and upkeep of WebDriverManager since 2015.
With WebDriverManager, developers could automate the management of browser drivers. WebDriverManager is an open-source Java library that automates the process of downloading, setting up, and managing browser drivers as per the browser versions and operating systems. To use this feature, testers, and developers had to download and configure the WebDriverManager dependency into the project. It could be done using build management tools such as Maven or Gradle. You may find this dependency on the Maven Repository or click here. If you would be interested in learning further, you may refer to our blog on How To Use WebDriverManager in Selenium (it is not practiced now, however)
Managing browser drivers in Selenium 3 and the earlier versions of Selenium 4
Testers and Developers had to manually download the necessary browser driver binaries and configure them for usage. These Drivers are platform-specific binary files. Therefore, to make a driver management process to use Selenium WebDrive, This process consisted of 3 major steps: Download, Setup, and Maintenance. It meant testers had to identify the driver type according to the operating system and the browser version.
For example, if we are using Chrome, we need to download ChromeDriver by considering the operating system (Windows, Linux, or macOS) and the architecture (typically 32 or 64 bits). We need to sync this ChromeDriver with the browser version installed on the machine. We would then have to configure the system environment variables to include the location of the ChromeDriver executable.
This manual procedure was prone to errors and time-consuming, especially when dealing with different browsers and their respective driver versions. Therefore, Selenium 4 (versions including 4.6 and after) solved this challenge by bundling Selenium Manager out of the box, which, as mentioned earlier, was built on the knowledge gained from the development and upkeep of WebDriverManager since 2015.
Managing browser Drivers as per the latest versions of Selenium 4
There are two ways to incorporate Selenium Manager into our project. For Selenium version 4.6 and above, an official release has been made by Selenium recently in which the Selenium Manager was included in the Selenium Bindings only. So while downloading these bindings, a tester/developer can then use Selenium Manager for testing with a single line of code. On the other hand, In Selenium version 4.5 and below, we had to incorporate the dependency in the project and then use the manager. Let us learn about both of these methods in detail:
For Selenium version 4.6 and above (Latest)
In its beta 1 version, Selenium Manager is invoked transparently by the Selenium bindings when no browser driver is detected on the PATH or no third-party driver manager is being used.
To execute a Selenium test using Selenium 4.6, you simply require Chrome, Firefox, or Edge browsers to be installed.
For launching Chrome using Selenium Manager the code would be:
|
1 |
WebDriver driver = new ChromeDriver(); |
The above line of code would work only after the installation of Selenium Bindings (v4.6 and above) because Selenium Manager was officially bundled with the Selenium Bindings.
For Selenium version below 4.6
To use the Selenium Manager without the Selenium bindings, we have to include the dependency file similarly as we did in WebDriver Manager. Based on the installed version, this dependency will automatically download the required browser drivers(this is the same as adding the dependency for WebDriverManager, a more updated way to do the same).
|
1 2 3 4 5 |
<dependency> <groupId>org.seleniumhq.selenium</groupId> <artifactId>selenium-manager</artifactId> <version>4.6.0</version> </dependency> |
You may click here to access all the list of updated versions of Selenium Manager dependency.
Now, we have successfully incorporated Selenium Manager into our project and can use it easily for automated testing.
For example, for launching Chrome using Selenium Manager the code would be:
|
1 |
WebDriver driver = new ChromeDriver(); |
Therefore, moving further in this blog, we will be sticking to the latest standards. We will be using Selenium Manager for the drivers required for Selenium tests.
New Features and Enhancements
Selenium 4 brings a host of exciting new features and enhancements that further elevate the capabilities of this popular test automation framework. With a focus on improving efficiency, scalability, and flexibility, Selenium 4 introduces several key features that aim to streamline the automation process and enhance the overall testing experience. Let us look at some of these new features and enhancements offered by Selenium 4 in brief::
We have a short video on our YouTube Channel running through the new key features introduced in Selenium 4.
ChromeDriver
Let’s start with the Selenium 4 Webdriver hierarchy (see figure below) and then look at how ChromeDriver works.
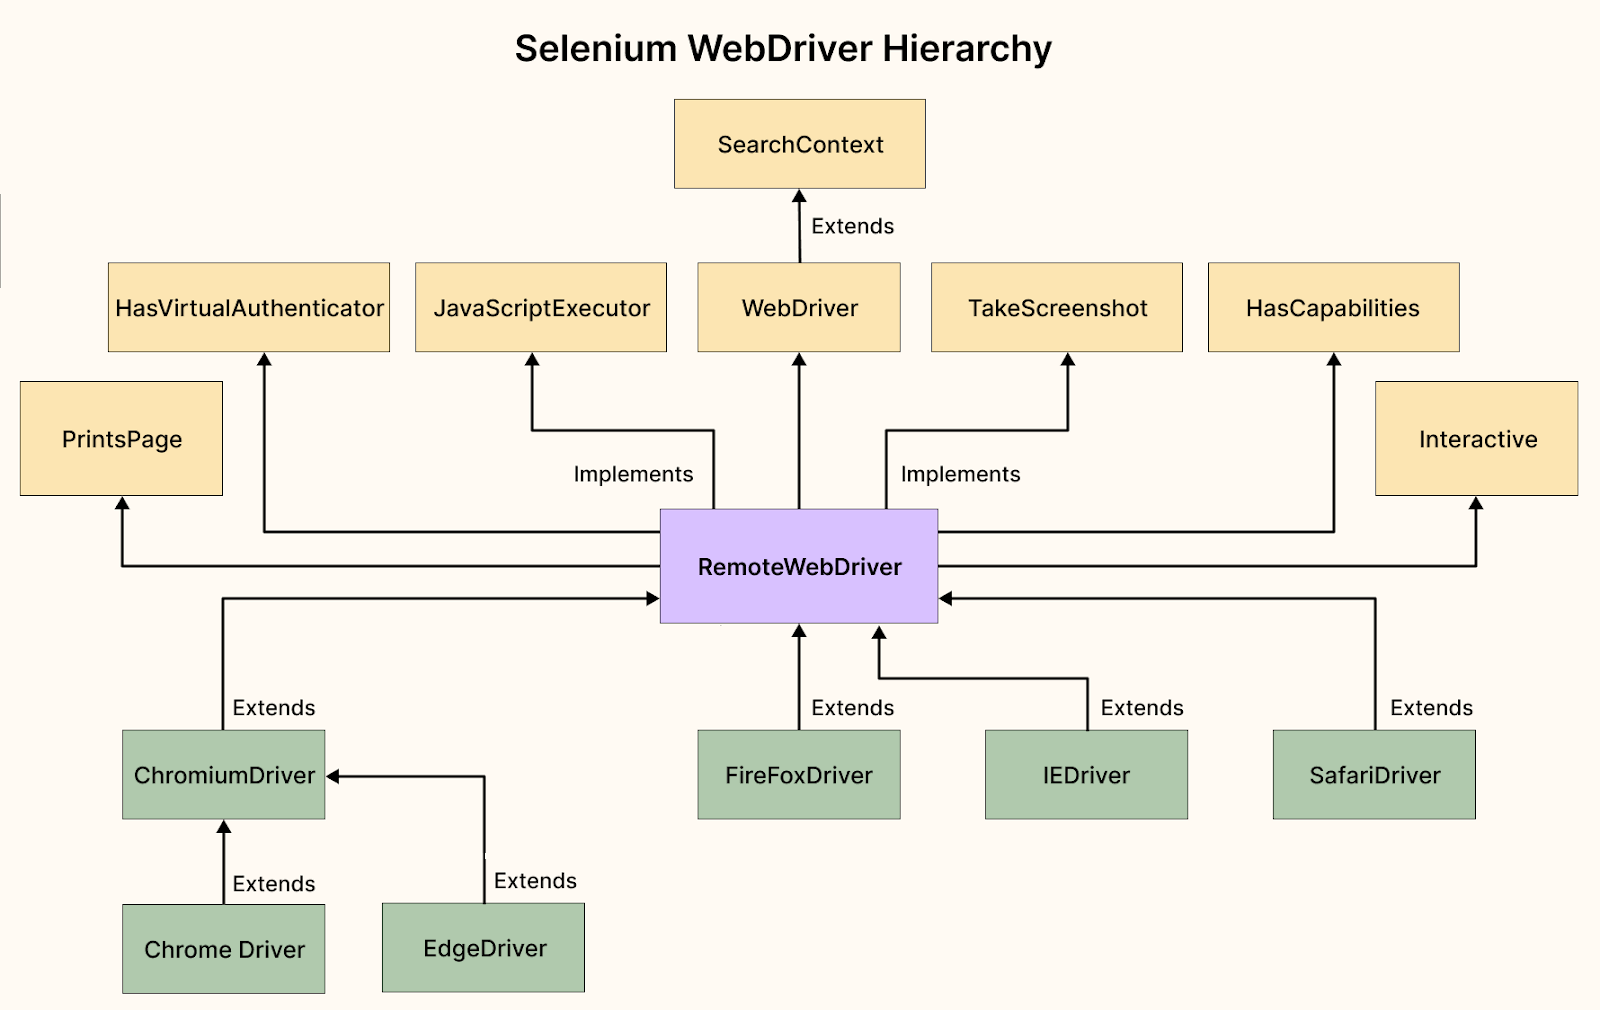
ChromeDriver is a separate executable that acts as a bridge between Selenium WebDriver and the Chrome browser. ChromeDriver implements the WebDriver protocol, a standardized interface for automating web browsers. It is designed to facilitate communication and control between the WebDriver API, which is used for automating browser actions, and the Chrome browser itself.
Selenium 3 and Selenium 4 are based on the ChromeDriver extension. In Selenium 3, ChromeDriver extends Remote WebDriver. In Selenium 4, however, the ChromeDriver Class extends Chromium Driver. ChromeDriver is continually updated to align with the latest versions of the Chrome browser and to provide stability, compatibility, and enhanced automation capabilities.
Optimized Selenium Grid
In Selenium 4, Hub and Node jars are packaged together in a single jar file. Compared to Selenium 3, testers would no longer have to launch the Hub and Node jars each time they wanted to undertake automated testing.
The design of Selenium Grid 4 supports four processes:
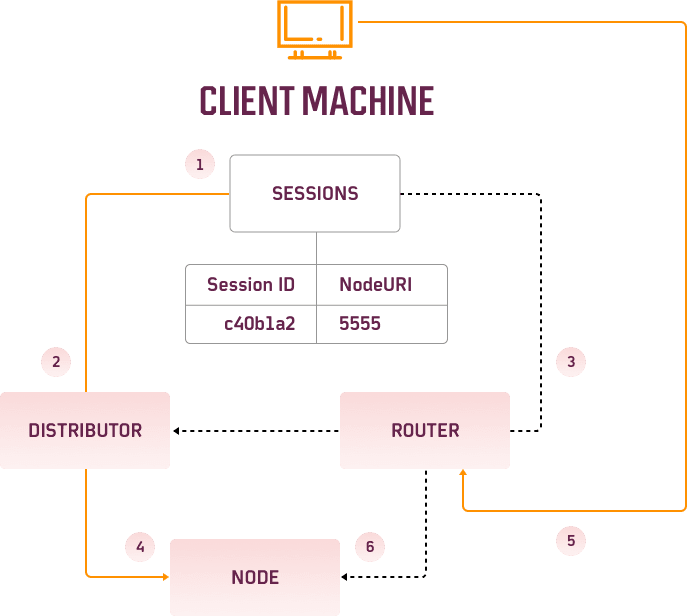
This new design of optimized Selenium Grid by Selenium 4 improves test distribution, resource management, and overall efficiency, making it an indispensable component for large-scale test automation projects.
Selenium 4’s Grid capability can be effectively and significantly leveraged with a cloud-based Selenium Grid. Cloud-based Selenium Grid solutions, such as LambdaTest, offer indispensable scalability, reliability, and security that are challenging to replicate with a local Selenium Grid. Leveraging Selenium testing on the cloud empowers teams to achieve enhanced browser coverage, test efficiency, and test comprehensiveness, as multiple tests can seamlessly run in parallel on the cloud-based Selenium Grid.
The All New Headless Mode
Headless is an execution mode for Firefox and Chromium-based browsers, enabling users to run automated scripts without displaying the browser window, making it invisible during execution. In older versions of Selenium, you could easily set this mode while configuring the browser options. But starting from Selenium 4.8.0, that method will be outdated, and you’ll have to set it using specific arguments when configuring the browser options.
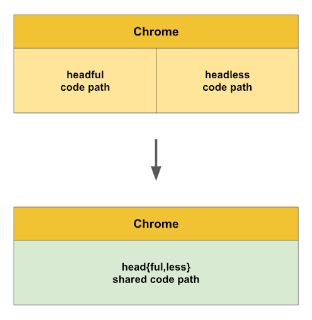
Upgrades in Headless Mode: Chrome
Before the update, The old Headless was a separate implementation; therefore, it had its bugs and features that weren’t present in Headful Chrome. This created a confusing situation where any automated browser test might pass in headful mode but fail in Headless mode, or vice versa.
Therefore, the Chrome team set out to solve this problem and unify Headless and headful modes once and for all.
To try the new Headless mode, pass the –headless=new command-line flag:
|
1 |
chrome --headless=new |
For now, the old Headless mode is still available via:
|
1 |
chrome --headless=old |
How to use headless mode from now onwards?
Users can set the desired headless mode by adding arguments to the browser options. Let us understand both of them.
Before:
|
1 2 3 4 5 6 7 8 9 |
ChromeOptions options = new ChromeOptions(); options.setHeadless(true); WebDriver driver = new ChromeDriver(options); driver.get("https://www.lambdatest.com/selenium-playground/simple-form-demo"); driver.quit(); |
After:
|
1 2 3 4 5 6 7 8 9 |
ChromeOptions options = new ChromeOptions(); options.addArguments("--headless=new"); WebDriver driver = new ChromeDriver(options); driver.get("https://www.lambdatest.com/selenium-playground/simple-form-demo"); driver.quit(); |
DesiredCapabilities
In Selenium 4, DesiredCapabilities class has been replaced by Options class. Now we need to pass the Options class object as a parameter to the driver constructor.
The Options class provides a more streamlined and specific approach for setting browser-specific options and preferences. Each browser has its own corresponding options class, such as ChromeOptions, FirefoxOptions, SafariOptions, etc. For example, with the Options class, testers can set browser-specific arguments to turn certain features or behaviors on or off. They can configure browser profiles to manage user preferences, cookies, and default download locations.
Here’s an example of how ChromeOptions and DesiredCapabilities can be used in Selenium 4 and Selenium 3:
In Selenium 4
|
1 2 3 4 5 6 7 8 9 10 11 12 13 14 15 16 17 18 19 |
import org.openqa.selenium.WebDriver; import org.openqa.selenium.chrome.ChromeDriver; import org.openqa.selenium.chrome.ChromeOptions; public class SeleniumTest { public static void main(String[] args) { ChromeOptions options = new ChromeOptions(); // addArguments parameter tells Chrome browser that it should be run without UI (Headless) options.addArguments("--headless=new") WebDriver driver = new ChromeDriver(options); driver.get("https://ecommerce-playground.lambdatest.io/"); driver.quit(); } } |
In Selenium 3
|
1 2 3 4 5 |
DesiredCapabilities capabilities = new DesiredCapabilities(); capabilities.setCapability("browser", "Chrome"); capabilities.setCapability("version", "86"); capabilities.setCapability("platform", "MacOS Catalina"); capabilities.setCapability("headless",true); |
Selenium IDE
Selenium 4 introduced an upgraded Selenium IDE that offers significant improvements over Selenium 3. It is available for Microsoft Edge, Firefox, and Chrome browser offering expanded functionality beyond simple recording and playback of tests. The SIDE Runner tool enables parallel execution of Selenium tests on both local and cloud-based Selenium Grids. The IDE also includes enhancements to its graphical user interface (GUI) to provide a more intuitive and user-friendly experience. These improvements enhance the overall usability and flexibility of the Selenium IDE for testers.
The new Selenium IDE has better features for recording and playing back tests, improved scripting capabilities, and enhanced support for managing test cases.
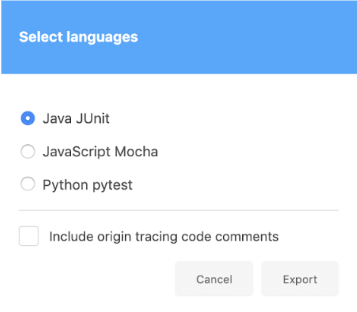
Code Export
Testers have the option to export test or suite of tests to WebDriver and use it on Selenium Grid.
The steps for exporting the code include:
Currently, Selenium IDE supports the following languages and test frameworks:
This allows testers to choose the language binding that best fits their project requirements.
Relative Locators
In Selenium 4, Relative Locators – above, below, toRightof, and toLeftof were introduced to identify elements ‘relative’ to a specific element in DOM. In contrast to Selenium 3, we do not need to execute a sequence of findElement statements to find the surrounding elements.
Selenium utilizes the JavaScript method getBoundingClientRect() to detect the size and location of elements on the page. Then it uses this information to find the elements next to them.
Let’s see how Relative Locators function with a practical code example in Java:
We aim to find the “Get Checked Value” button beneath the “Enter Message” input field.
First, for better understanding, let’s look at this Form (I suggest you to open and play around with this form first).

In Selenium 4, we can employ the relativeTo() method to establish the connection between elements. Here, we will first get the ID for “Enter Message” input field and “Get Checked Value” button to find the Element via findElement().
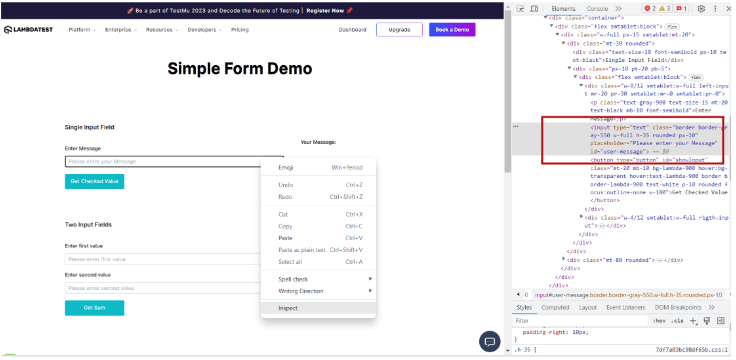
Here’s how you can discover the “Get Checked Value” button in relation to the “Enter Message” input field.
|
1 2 3 4 5 6 7 8 9 10 11 12 13 14 15 16 17 18 19 20 21 22 23 24 25 26 27 28 29 30 31 32 33 34 |
import org.openqa.selenium.By; import org.openqa.selenium.WebElement; import org.openqa.selenium.chrome.ChromeDriver; import org.openqa.selenium.support.locators.RelativeLocator; public class RelativeLocatorExample { public static void main(String[] args) { // Create an instance of Chrome Browser with latest version WebDriver driver = new ChromeDriver(); // Navigate to the web page driver.get("https://www.lambdatest.com/selenium-playground/simple-form-demo") // Locate the "Email" input field WebElement messageInput = driver.findElement(By.id("user-message")) // Locate the "Submit" button relative to the "Email" input field WebElement submitButton = driver.findElement(RelativeLocator.withTagName("button").below(messageInput)) // Perform actions on the "Submit" button submitButton.click() // Close the browser driver.quit() } } |
In the above code, we first use a locator (in this case, By.id) to find the “Enter Message” input field. Then, using the below() function of the RelativeLocator class, we identify the “Get Checked Value” button located below the “Enter Message” input field. Therefore, this is how, testers and developers can adapt element locating strategies based on the visual relationships between elements, making your test automation scripts more robust and maintainable.
Chrome DevTools
In Selenium 4, the integration of Chrome DevTools provides a powerful set of tools and features to enhance testing capabilities. With Chrome DevTools, testers can directly access and utilize a wide range of functionalities the Chrome browser offers from within their automation scripts.
Selenium 4 supports the Chrome DevTools Protocol (CDP) through a DevTools interface. This integration allows for easy emulation of applications and provides a range of APIs to diagnose issues and make real-time edits to web pages. Additionally, these APIs enable testers to conduct Geolocation Testing by replicating different geographical locations and emulating various network conditions such as 2G, 3G, 4G, and more.
To demonstrate the usage of Chrome DevTools in Selenium 4, consider the following code example:
|
1 2 3 4 5 6 7 8 9 10 11 12 13 14 15 16 17 18 19 20 21 22 23 24 25 26 27 28 29 30 31 32 33 34 35 36 37 38 39 40 41 |
import org.openqa.selenium.chrome.ChromeDriver; import org.openqa.selenium.chrome.ChromeOptions; import org.openqa.selenium.devtools.DevTools; import org.openqa.selenium.devtools.DevToolsException; import io.github.bonigarcia.wdm.WebDriverManager; public class SeleniumTest { public static void main(String[] args) { // Run Chrome in headless mode ChromeOptions options = new ChromeOptions(); options.addArguments("--headless=new") WebDriver driver = new ChromeDriver(options); DevTools devTools = driver.getDevTools(); try { // Enable the Network domain devTools.createSession(); devTools.send("Network.enable", null); // Emulate network conditions: online, latency 100ms, download throughput 1024 KB/s devTools.send("Network.emulateNetworkConditions", Map.of("offline", false, "latency", 100, "downloadThroughput", 1024)); // Perform interactions or assertions on the webpage driver.get("https://ecommerce-playground.lambdatest.io/"); // Close the DevTools session devTools.close(); } catch (DevToolsException e) { e.printStackTrace(); } finally { driver.quit(); // Quit the browser } } } |
In this example, we first set up ChromeOptions. By adding the “–headless=new” argument, it runs Chrome in headless mode, meaning the browser operates without a visible graphical user interface.
Here, DevTools enable the Network domain and configure network conditions. It sends commands to the DevTools using devTools.send(). In the above example, it enables the network and emulates specific network conditions such as being online, with a latency of 100ms and a download throughput of 1024 KB/s.
This code example shows how Selenium 4 provides testers direct access to Chrome DevTools functionality, allowing them to use it for automation testing.
Action API
The Actions API in Selenium offers precise control over the capabilities of designated input devices. Selenium provides three interfaces for different types of input sources: one for keyboard devices, another for mouse, pen, or touch devices, and a third one for scroll wheel devices (introduced in Selenium 4.2).
These Actions are essential features that enable complex interactions with web components such as mouse and keyboard operations. These automates complicated user activities like dragging and dropping, lingering over components, double-clicking, etc.
Using Selenium, you can create individual action commands for each input type and link them together in a sequence. By calling the perform method associated with these actions, you can execute them all simultaneously in a synchronized manner. This level of control allows for fine-tuned interactions with web elements, making test scenarios more realistic and accurate.
Actions like clicking a button or entering a keyword in the search bar are prime examples of using a mouse or keyboard. Interactions usually done using a mouse and a keyboard can be automated using the Actions class in Selenium. As the name suggests, the Actions class contains a collection of actions that can be performed in a web application.
In Selenium 4, Actions has introduced new methods that provide additional capabilities for performing actions on web elements.
Let us understand some of these methods:
contextClick():
This method simulates a right-click action on an element.
doubleClick():
This method simulates a double-click action on an element.
|
1 2 3 4 5 6 7 8 9 10 11 12 13 14 15 16 17 18 19 20 21 22 23 24 25 26 27 28 29 30 31 32 33 34 35 36 37 38 39 40 41 42 43 |
import static org.testng.Assert.assertEquals; import java.util.concurrent.TimeUnit; import org.openqa.selenium.By; import org.openqa.selenium.WebDriver; import org.openqa.selenium.WebElement; import org.openqa.selenium.chrome.ChromeDriver; import org.openqa.selenium.interactions.Actions; public class clickDemo { public static void main(String[] args) { // instantiate the driver WebDriver driver = new ChromeDriver(); //specify the URL of the website driver.get("https://ecommerce-playground.lambdatest.io/"); //maximise the window driver.manage().window().maximize(); WebElement element = driver.findElement(By.id("entry_217825")); //For doubleClick() Actions action = new Actions(driver); action.doubleClick(element).build().perform(); assertEquals(driver.getTitle(), "iPod Touch"); //For contextClick() driver.manage().timeouts().pageLoadTimeout(10, TimeUnit.SECONDS); action.contextClick().build().perform(); driver.quit(); } } |
click():
This method performs a click action on an element.
|
1 2 3 4 5 6 7 8 9 10 11 12 13 14 15 16 17 18 19 20 21 22 23 24 25 26 27 28 29 30 31 32 33 34 35 36 37 38 39 40 41 42 43 44 45 46 47 48 49 50 |
import static org.testng.Assert.assertEquals; import org.openqa.selenium.By; import org.openqa.selenium.Keys; import org.openqa.selenium.WebDriver; import org.openqa.selenium.WebElement; import org.openqa.selenium.chrome.ChromeDriver; import org.openqa.selenium.interactions.Actions; public class click { public static void main(String[] args) { //instantiate the driver WebDriver driver = new ChromeDriver(); //specify the URL of the webpage/form driver.get("https://www.lambdatest.com/selenium-playground/simple-form-demo"); //maximise the window driver.manage().window().maximize(); //create an object for the Actions class and pass the driver argument Actions action = new Actions(driver); //specify the locator of the search box in which the product has to be typed WebElement elementToType = driver.findElement(By.id("user-message")); //pass the value of the product/message action.sendKeys(elementToType, "Welcome To LambdaTest").build().perform(); //specify the locator of the search button WebElement elementToClick = driver.findElement(By.className("showInput")); //perform a mouse click on the search button action.click(elementToClick).build().perform(); //verify the title of the website after searching the product assertEquals(driver.getTitle(), "Your Message"); driver.quit(); } } |
dragAndDrop():
The dragAndDrop(WebElement source, WebElement target) method is used to drag an element from the source and drop it into the target location.
There are two ways to perform this with the help of the Actions class in Selenium-
This is the way we manually drag and drop a file or an image from a source to the destination:
|
1 2 3 4 5 6 7 8 9 10 11 12 13 14 15 16 17 18 19 20 21 22 23 24 25 26 27 28 29 30 31 32 33 34 35 36 |
import java.util.concurrent.TimeUnit; import org.openqa.selenium.By; import org.openqa.selenium.WebDriver; import org.openqa.selenium.WebElement; import org.openqa.selenium.chrome.ChromeDriver; import org.openqa.selenium.interactions.Actions; public class ActionsTest { public static void main(String[] args) { WebDriver driver = new ChromeDriver(); driver.get("https://ecommerce-playground.lambdatest.io/"); driver.manage().timeouts().pageLoadTimeout(10, TimeUnit.SECONDS); driver.manage().window().maximize(); Actions action = new Actions(driver); WebElement source = driver.findElement(By.id("TestId-1")); WebElement destination = driver.findElement(By.id(“testId-2”)); action.clickAndHold(source).moveToElement(destination).release().build().perform(); driver.quit(); } } |
Use Cases and Practical Applications of Selenium 4 Features
Let us discuss some examples and use cases showcasing the practical application of specific features in Selenium 4:
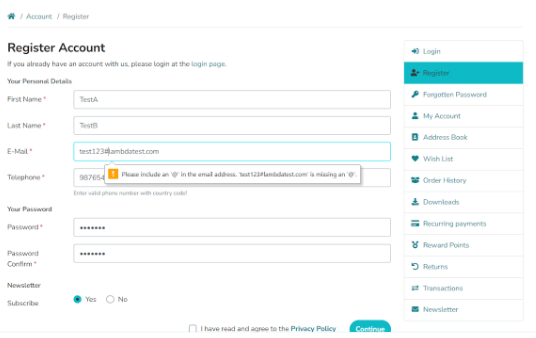
Form Validation – When validating a form, you can take advantage of relative locators to quickly discover and interact with error messages located near the related input fields. You can, for example, look for the error message underneath the “Email” input box in this Form to see if it displays the right validation message.
Navigation Menu Testing – When testing a navigation menu, you can use relative locators to identify menu items based on their relative placements to one another. You can, for example, find the menu item to the right of a given menu item and conduct activities such as clicking or validating its wording.
Geolocation Testing – Geolocation testing using Chrome DevTools involves simulating different geolocation data to test how a web application behaves under different geographic locations. This is particularly useful for location-based applications that provide different content or features based on the user’s location. Chrome DevTools provides a feature to override the browser’s geolocation and set custom latitude and longitude values.
Summarizing the Key Differences
We have understood till now that Selenium 4 offers a more advanced and robust test automation framework than Selenium 3.
Let us briefly summarize the key differences of Selenium 3 vs Selenium 4.
| Selenium 4 | Selenium 3 | |
|---|---|---|
| WebDriver Manager / Selenium Manager | Selenium 4 integrates Selenium Manager as a built-in feature, providing automated management of browser drivers. WebDriver Manager in Selenium 4 automatically downloads the appropriate driver binaries based on the specified browsers, handles the configuration, and ensures compatibility. | In Selenium 3, WebDriver Manager was not a built-in feature, requiring developers to manually download the required browser driver binaries and perform manual configuration. |
| DevTools API | Selenium 4 uses W3C standard protocol | Selenium 3 uses JSON wire protocol |
| Performance | Improved performance and faster execution | Potential performance issues |
| Selenium Grid | Optimised Selenium Grid with enhanced GUI and support for Docker | Selenium 3 offers parallel testing through Selenium Grid, but with no support for Docker. |
| ChromDriver | Chrome Driver class extends chromium driver class | Chrome Driver class extended Remote webdriver class |
| New Features | Relative Locators, Grid enhancements, Chrome DevTools. | Limited feature set |
Therefore, Selenium 4 brings significant architectural improvements, incorporates DevTools API, introduces new features, enhances performance, improves stability, benefits from active community support, and provides a more advanced and feature-rich platform compared to Selenium 3.
Conclusion
We explored the significant changes in Selenium 3 vs Selenium 4, focusing on the current version’s features and enhancements. Selenium 4 provides a more standardized and unified architecture and improved features, stability, and performance. The architecture improvements, new capabilities such as Chrome DevTools and Relative Locators, and the optimized Selenium Grid contribute to increased test automation efficiency and effectiveness.
In case you are considering migrating to the latest version of Selenium, you may refer to our guide on Selenium 3 to Selenium 4 Migration or watch our video on the YouTube channel.
Frequently Asked Questions (FAQs)
What are the new features in Selenium 4?
Selenium 4 brings several exciting enhancements and features that make test automation easier and more powerful. These include a revamped Selenium IDE with improved features, support for Chrome DevTools Protocol for advanced browser capabilities, an upgraded WebDriver architecture for better performance, enhanced relative locators to locate elements easily, and an optimized Selenium Grid that allows running tests in parallel and scaling efficiently.


Author’s Profile
Akash Nagpal
Akash Nagpal is a passionate tech enthusiast with strong software development skills, specializing in ReactJS and managing Restful APIs and other core frontend languages such as JavaScript, CSS, and HTML. With a deep understanding of these languages, he is proficient in building dynamic and interactive user interfaces. He is also well-versed in frameworks like Tailwind and Bootstrap, enabling him to create visually appealing and responsive software apps. His expertise in problem-solving allows him to combine creativity with technical proficiency, resulting in engaging and user-friendly experiences. With a drive for innovation and a constant eagerness to learn, he is committed to delivering high-quality solutions that push the boundaries of web development.
Blogs: 8
Got Questions? Drop them on LambdaTest Community. Visit now