
How To Perform Visual Regression Testing With Selenium And Smart UI
Faisal Khatri
Posted On: October 10, 2023
![]() 258806 Views
258806 Views
![]() 26 Min Read
26 Min Read
User Interface or UI is the most critical front-facing part of an application. If it is not good enough to capture the users’ attention, they may stop using the application. Currently, all businesses are operated online, and the basic need for operating an online business is to have a website or a mobile application that supports all the browsers, operating systems, and mobile devices that are popular in the region where the business is operated.
If the website or mobile application fails to captivate users, they may exit the site immediately after landing on the homepage. This phenomenon is often called the website’s bounce rate, indicating instances where visitors neither interact with content nor proceed to the second page.
As per the report, the average bounce rate is somewhere between 26% to 70%, with the optimal range between 26% to 40%. If the bounce rate is too high, it may affect the businesses, and the websites might not lead to conversion in sales.
Another report by Contentsquare says that users, after landing on the website, spent around 45 seconds to 54 seconds. This is less than a minute, and if the website behavior, responsiveness, and uniformity between the website pages are not good, users might leave the website without navigating to other pages.
Hence, monitoring the application’s User Interface(UI) and the User Experience(UX) is important. User experience(UX) refers to how easy the application is for the end user to learn and use.
Social Media websites such as Facebook, Instagram, Twitter, etc, do not come with an operating manual or a user guide. The UI and UX are so easy to understand that it appeals to the user to register themselves, login, and start using the application. Similarly, the same goes for shopping applications like Amazon. The UI makes it clear to the user that they can register, login, buy a product, or even cancel an order at their fingertips.
Though some applications have user guides, most are made in such a self-understanding fashion that users can learn to use them independently because the User Interface(UI) and User Experience(UX) make it so simple.
With every release of the applications, minor or major changes may be applied to existing User Interfaces, or new screens may also be added. With this, there is a need to check the application’s visuals after the recent changes have been applied by performing a round of regression tests on the User Interface(UI). It refers to checking the background color, text color, font, images, logo, etc are displayed correctly. The actual screen of the application can also be compared with the mock screens.
Here is a screenshot of an image showing how the visual regression is performed as the product evolves.
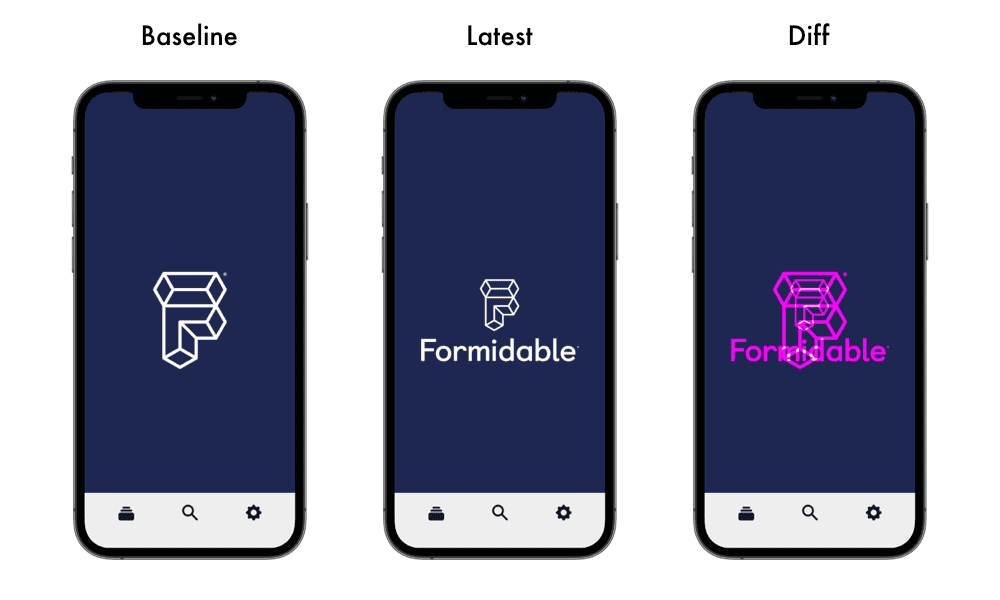
In the baseline image, which is the initial version of the application, we can see that only the logo was displayed. In the next version, the logo and the text were designed to be displayed in the app. In the visual regression test, the difference was highlighted by comparing the latest image of the application with the baseline image.
In this blog on Selenium visual regression testing, we will discuss visual regression testing in detail and how to perform it with Selenium and LambdaTest’s SmartUI.
New to Selenium? Check our getting started guide – What is Selenium? If you are preparing for an interview you can learn more through Selenium interview questions.
TABLE OF CONTENTS
- What is Visual Regression Testing?
- How does Visual Regression Testing work?
- Why is Visual Regression Testing important?
- How to run Visual Regression Tests with Selenium and LambdaTest’s Smart UI?
- Getting Started with Selenium Visual Regression Testing on Smart UI
- Final Thoughts
- Frequently Asked Questions (FAQs)
What is Visual Regression Testing?
Visual regression testing is a method to verify that the changes made to the User Interface(UI) of the application are correct so the users don’t face any difficulty interacting with it. It is a kind of regression testing. However, in this testing type, the User Interface of the application is closely tested and compared with the previous version.
Visual Validations such as location of the web elements, brightness, contrast, and color of the buttons, menus, components, text, and their respective alignments are verified in visual regression tests.
The target is to find visual bugs, such as misaligned buttons, overlapping images, texts, or buttons, partially visible elements, rendering issues, etc.
To make it understand better, let’s take a hypothetical example of a login screen of a demo application. Version 1 of the application had a simple login screen where the user could enter the Username and Password and click the Log In button to enter the website.
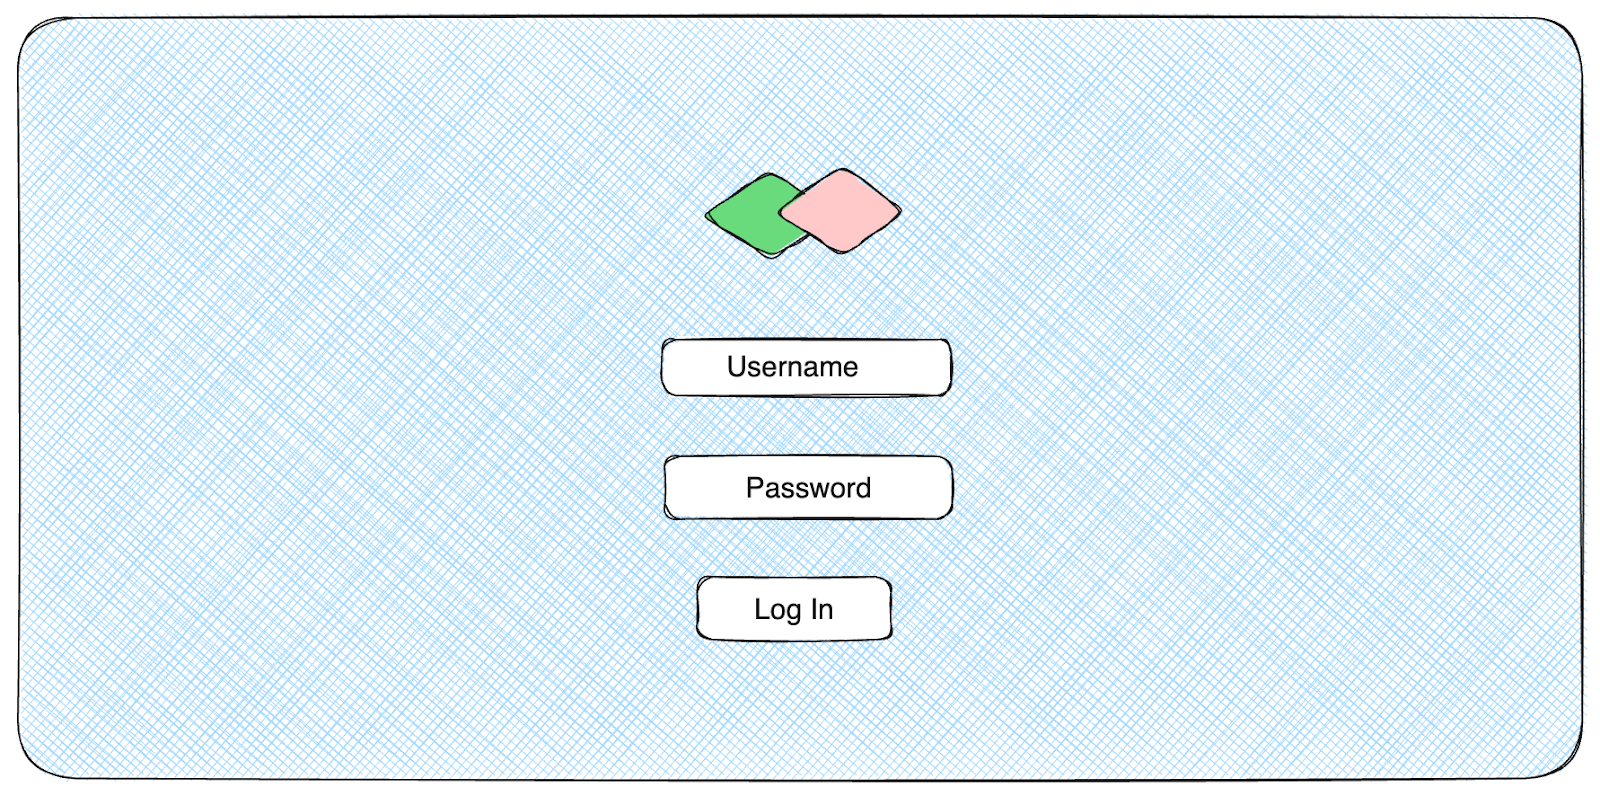
In Version 2 of the application, a new feature is introduced to allow users to sign in using their Google and Apple accounts. To accommodate this change, two new buttons were introduced on the Login page with Google and Apple account logos, allowing users to log in with the respective accounts.

After the changes were implemented on Version 2 of the website, it can be seen that for accommodating the Google and Apple logos for allowing Login with the respective accounts, the Log In button was misaligned and started to overlap with the Password field.
This is a visual bug that can be caught using visual regression testing. This issue could occur across browsers, operating systems, and devices. It can be a huge turn-off and might irk the visitors to the website, and they may even stop using the website due to it.
As this is a simple example, Log In button overlapping with the Password field can be seen easily. However, imagine a Home Page screen of an eCommerce website. If changes happen on such a congested page with many web elements, texts, images, etc., it is hard to notice the issue manually.
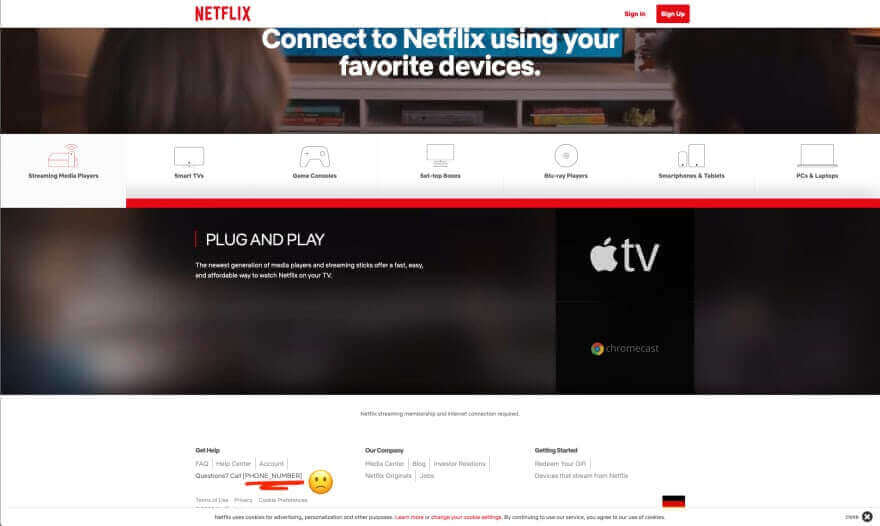
Another example of the visual bug is the following screenshot from the Netflix website, where the visual bug surfaced that showed the placeholder instead of the phone number.
In such a situation, automated visual regression testing can come to the rescue and save our time as well as upkeep the quality of the application. Visual regression testing should be done for websites and mobile applications across different platforms, browsers, and mobile devices.
 Note
NoteRun your Selenium visual tests with AI-infused Smart UI. Try LambdaTest Today!
How does Visual Regression Testing work?
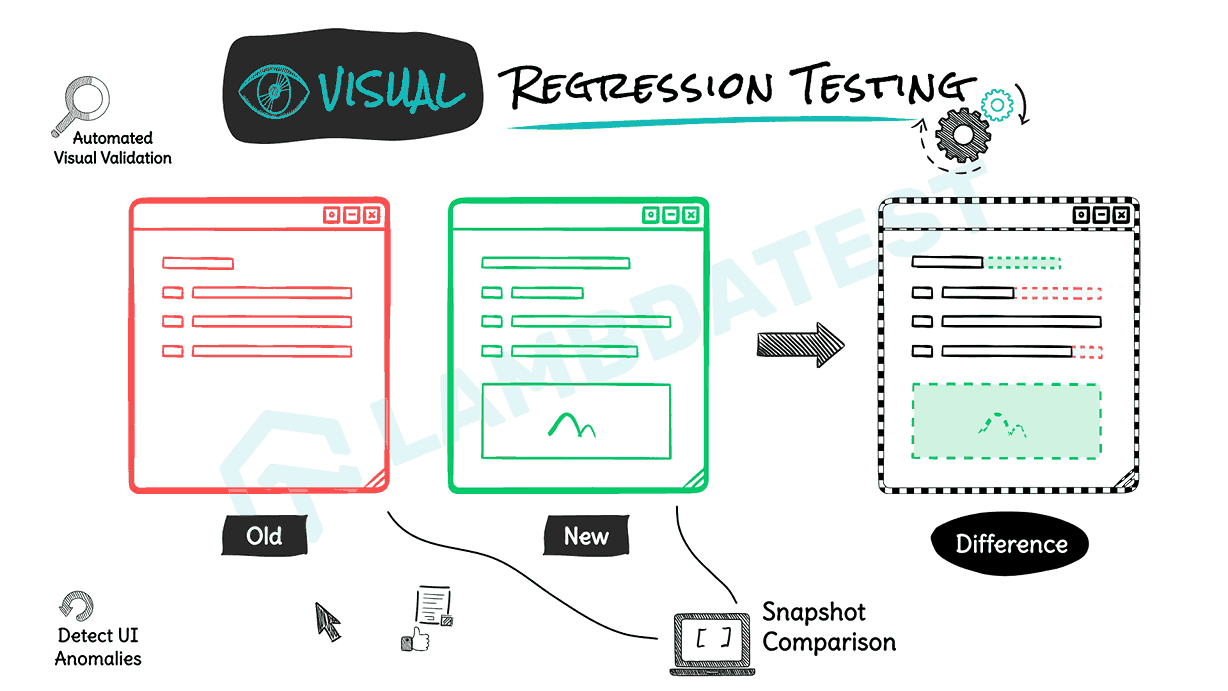
Visual regression testing is performed by pixel-by-pixel comparison of two application screenshots. The first one is taken with the stable version of the application.
For example, Version 1, which is the stable version of the application, this image is termed a “Baseline image.” The second screenshot is taken after the required changes are applied to the application. For example, Version 2, which is the current version under development, this image is called “Current Image.”
Both screenshots are compared by verifying that the web elements on the page are aligned correctly, not overlapping, and displayed in proper size and color. The text and fonts are also compared in visual regression tests.
The test is marked as successful if both of the comparisons of the screenshots show that there is no difference between them and the UI of the new version of the application is the same as it was in the previous version.
However, the test will fail if there is a difference in comparison between the images. The visual regression tool highlights the difference in Baseline v/s Current Image and shows the mismatch percentage.
Apart from showing the mismatch between the Baseline and Current image, visual regression testing also has many other important points to uncover. Let’s find out all of them in the next section of this blog on Selenium visual regression testing, where we discuss the importance of visual regression testing.
Why is Visual Regression Testing important?
An application can be useless if the UI and UX are not good and don’t support the application’s working. As per the Leadpages UX statistics, a good UI can raise a website’s conversion rate by 200%, whereas a 1-second delay in page response results in a 7% reduction in conversions.
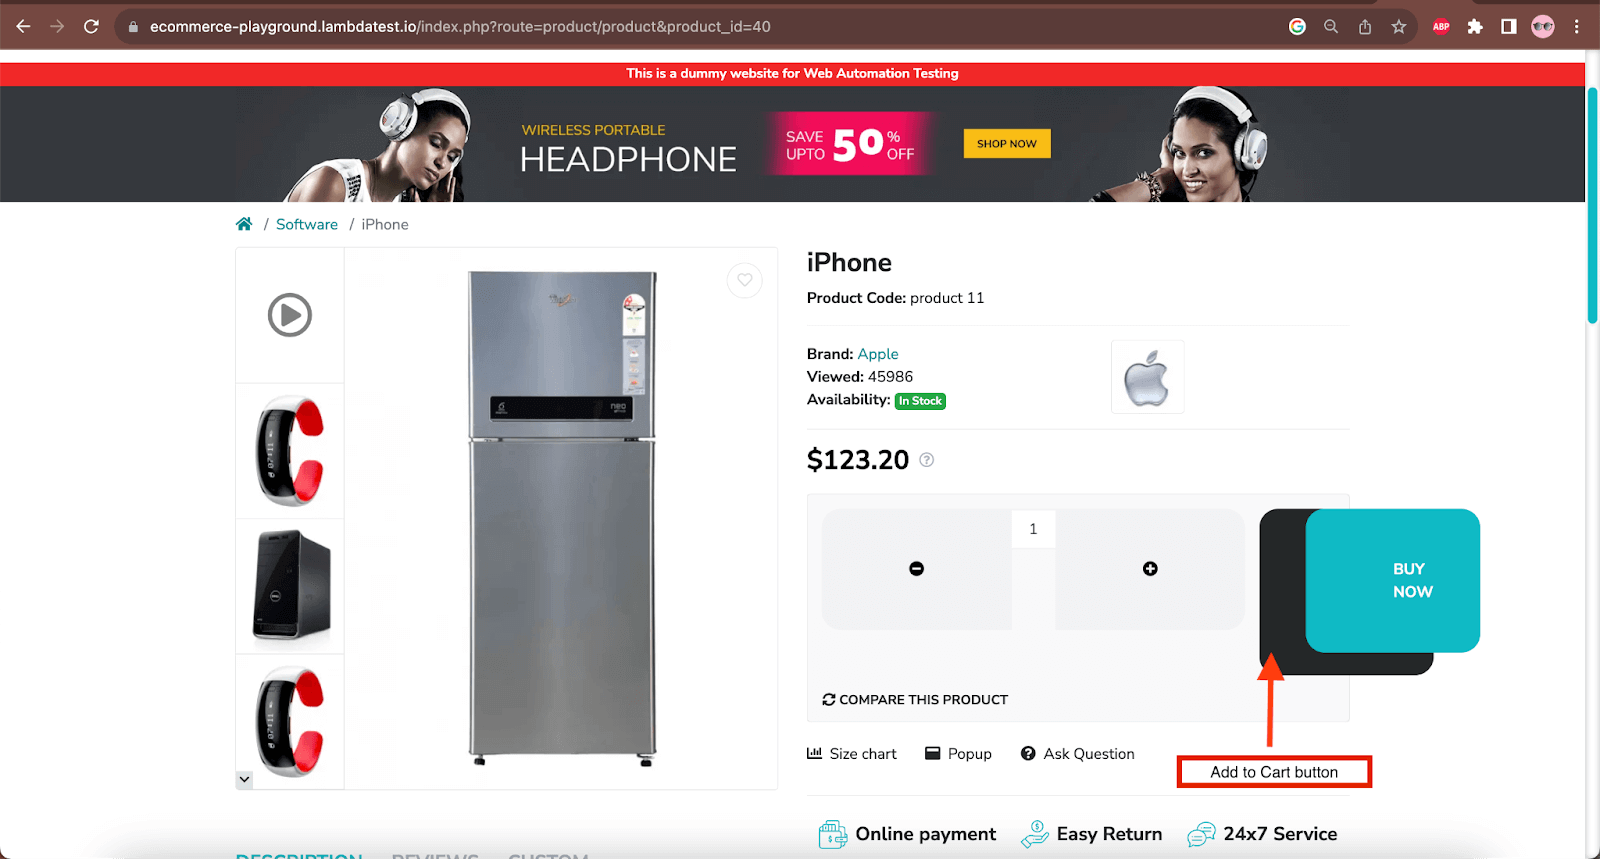
Let’s take an example of an eCommerce web application, where the user can search for a product from the Home page and click the Add to Cart button to add the product to the cart. However, if the Add to Cart button overlaps and is misaligned with the Buy Now button and is not clickable, it would block the user from adding the product to the cart and eventually purchasing it.
Here, it has nothing to do with the functionality, as it will work once the user can add the product to the cart using the Add to Cart button. The problem is with the UI; the Add to Cart button is not displayed correctly.
The following screenshot shows the visual bug where the Add to Cart button is misaligned, and the user cannot interact. Also, it can be seen that the size of the Buttons is not as per the standard and needs to be fixed.
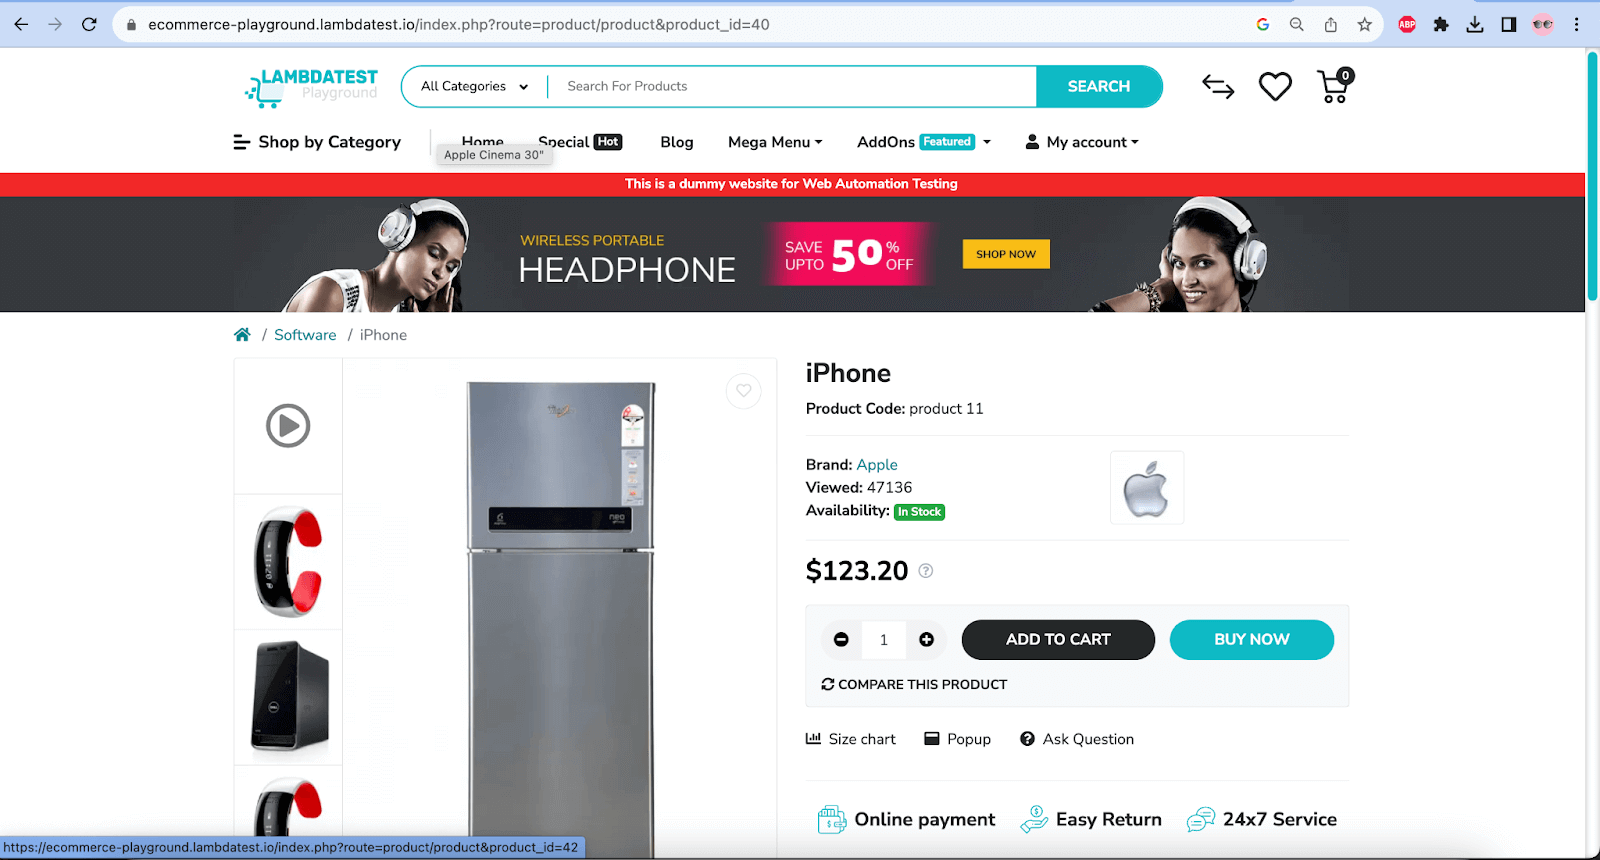
Screenshot of the web page after the visual bug was fixed
Functional testing mostly covers the verification and validation of data input and output. However, it doesn’t cover the visual issues like alignment of the buttons, text, background color contrast, etc. So, visual regression testing can help us uncover the UI issues here.
Visual regression testing is important in the following ways:
- It helps provide a better User Interface and User Experience.
- A good User Interface and User Experience builds trust and credibility.
- It helps in identifying Cross-platform, Cross-browser, and Cross-devices issues.
- A better UI and UX can serve as a guide to the user towards actions.
- It helps verify what aspects of UI are being worked upon for the betterment of the business through websites/applications.
Considering the importance of visual regression testing, it is recommended to spend some effort on visual testing that might help in user retention.
Note: Visual Testing captures and verifies the visual appearance of an application or webpage to identify deviations from the expected design. On the other hand, Visual Regression Testing detects unintended visual changes between different versions of an application or webpage to prevent design regressions.
Let’s now move ahead and check out how to perform visual regression testing using Selenium WebDriver and LambdaTest’s Smart UI.
How to run Visual Regression Tests with Selenium and LambdaTest’s Smart UI?
In visual regression testing, we compare screenshots and identify pixel variations. It is integrated with HyperExecute from LambdaTest, allowing you to execute Smart UI tests on the platform. We will use the following test scenario to demonstrate Selenium visual regression testing using Smart UI.
Test Scenario 1
|

Test Scenario 2
|

Before implementing the test scenarios, let’s learn about setting up Selenium visual regression testing with Smart UI on the LambdaTest cloud grid.
NotePerform Smart UI testing across 3000+ desktop environments. Try LambdaTest Today!
Getting Started with Selenium Visual Regression Testing on Smart UI
To use Selenium visual regression testing on Smart UI, we first need to register with LambdaTest and access LambdaTest’s Smart UI.
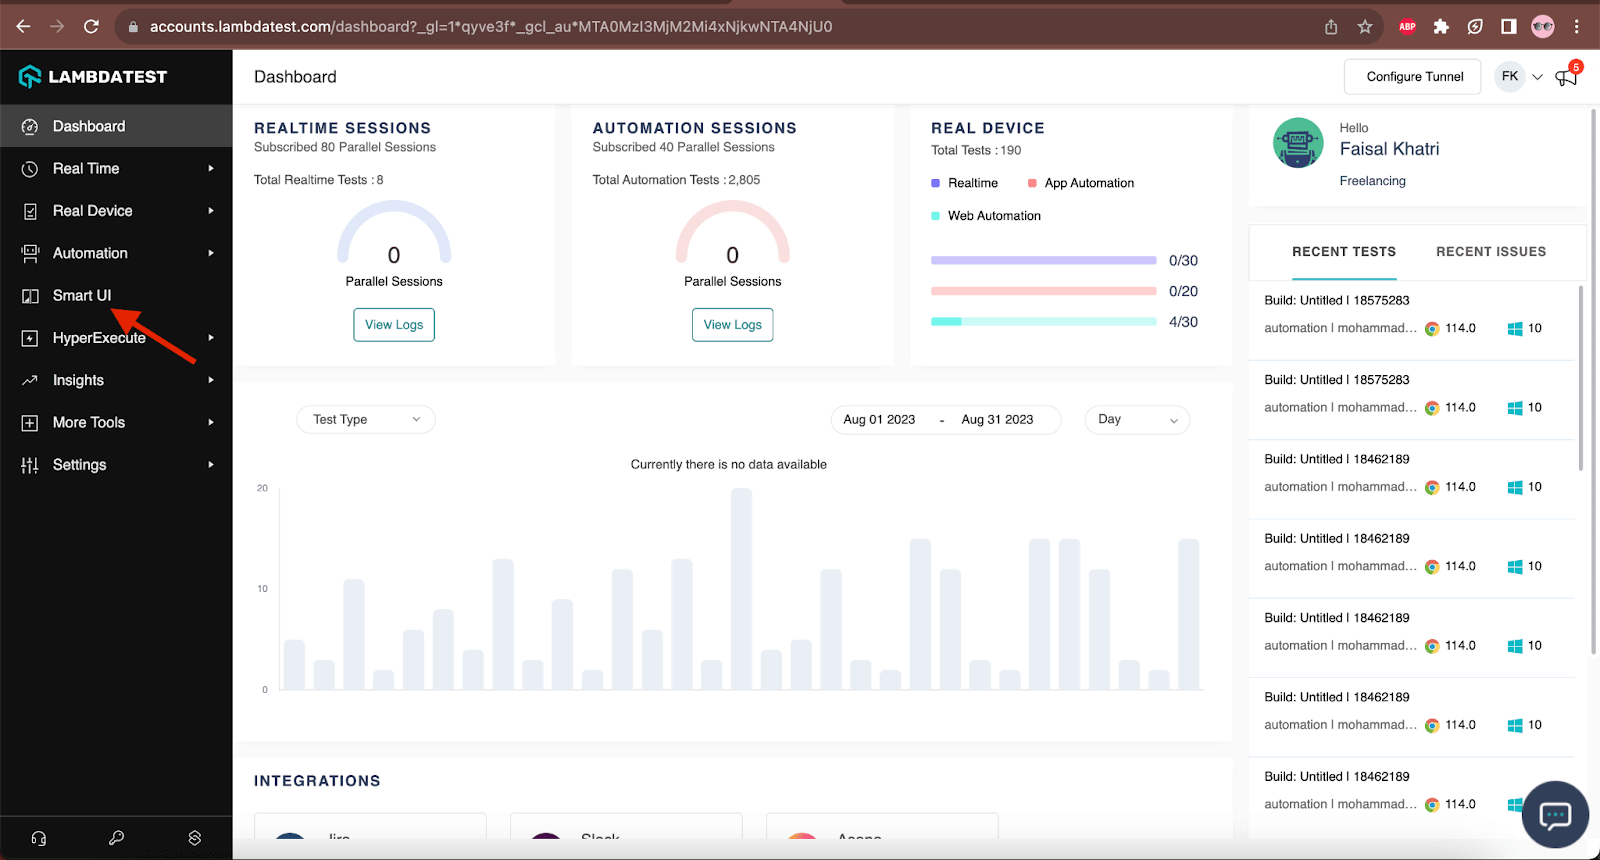
Once we have access, log into the LambdaTest account, navigate to the Dashboard screen, and perform the following steps:
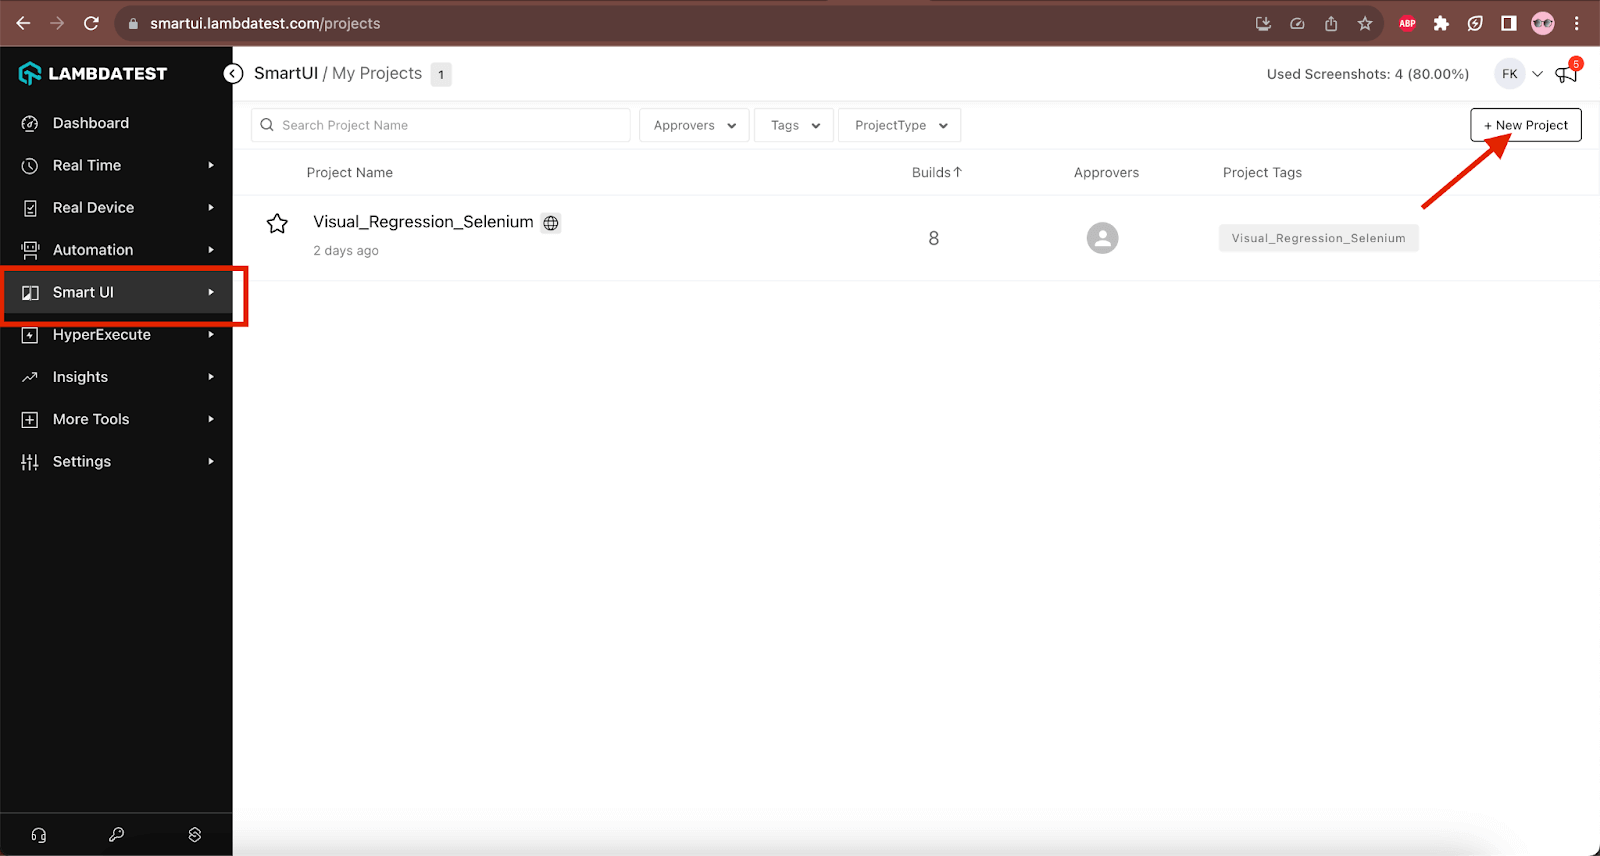
- On the left-hand menu section, click the Smart UI menu.
- In the Smart UI window, click the New Project button on the right-hand top corner of the screen.
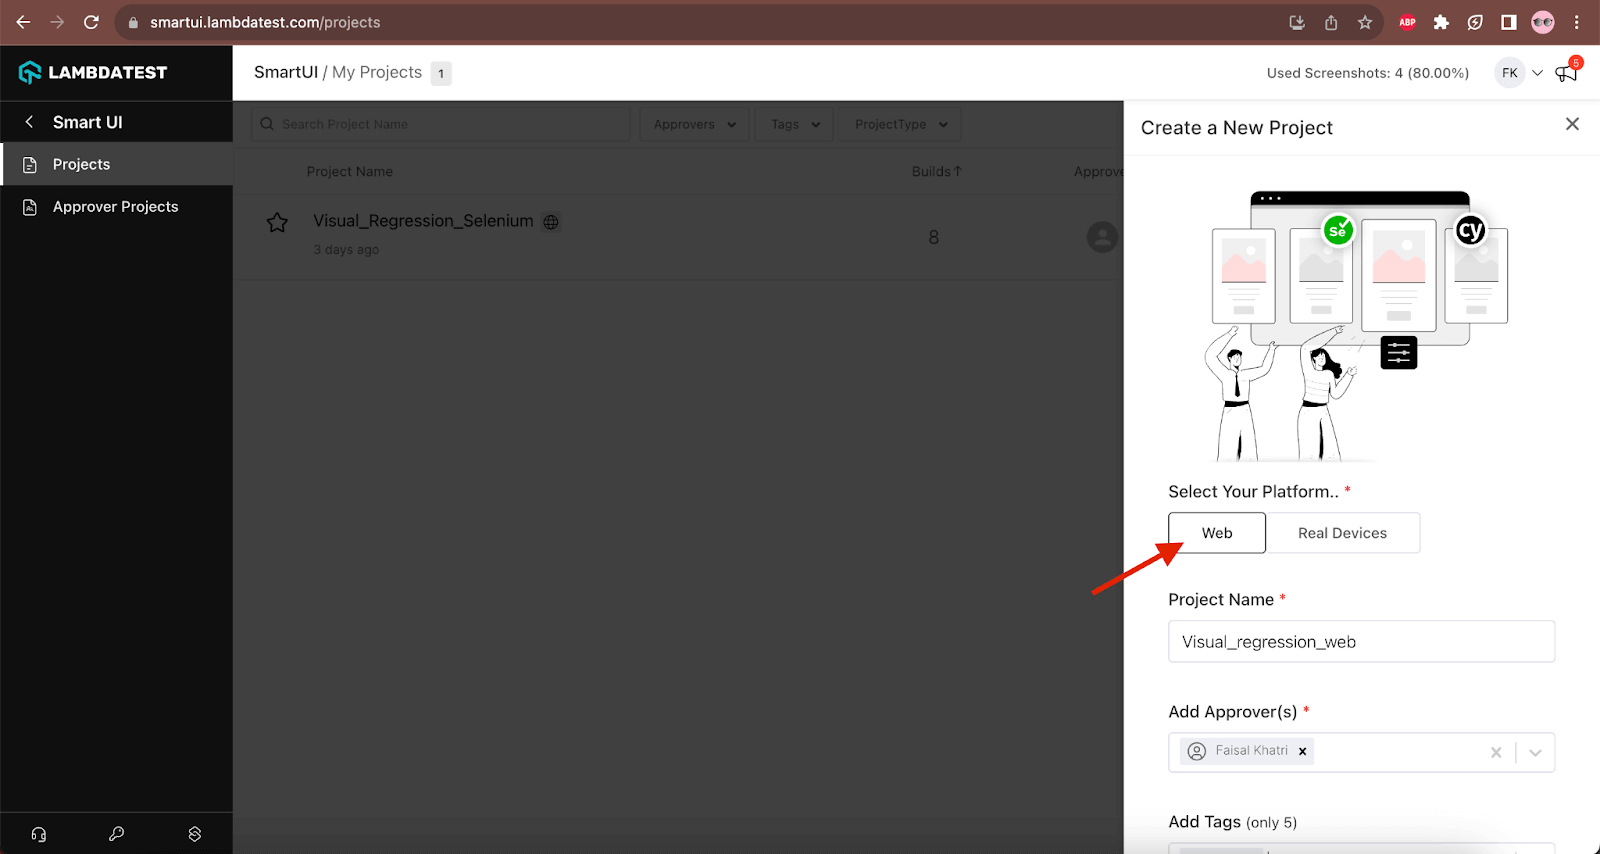
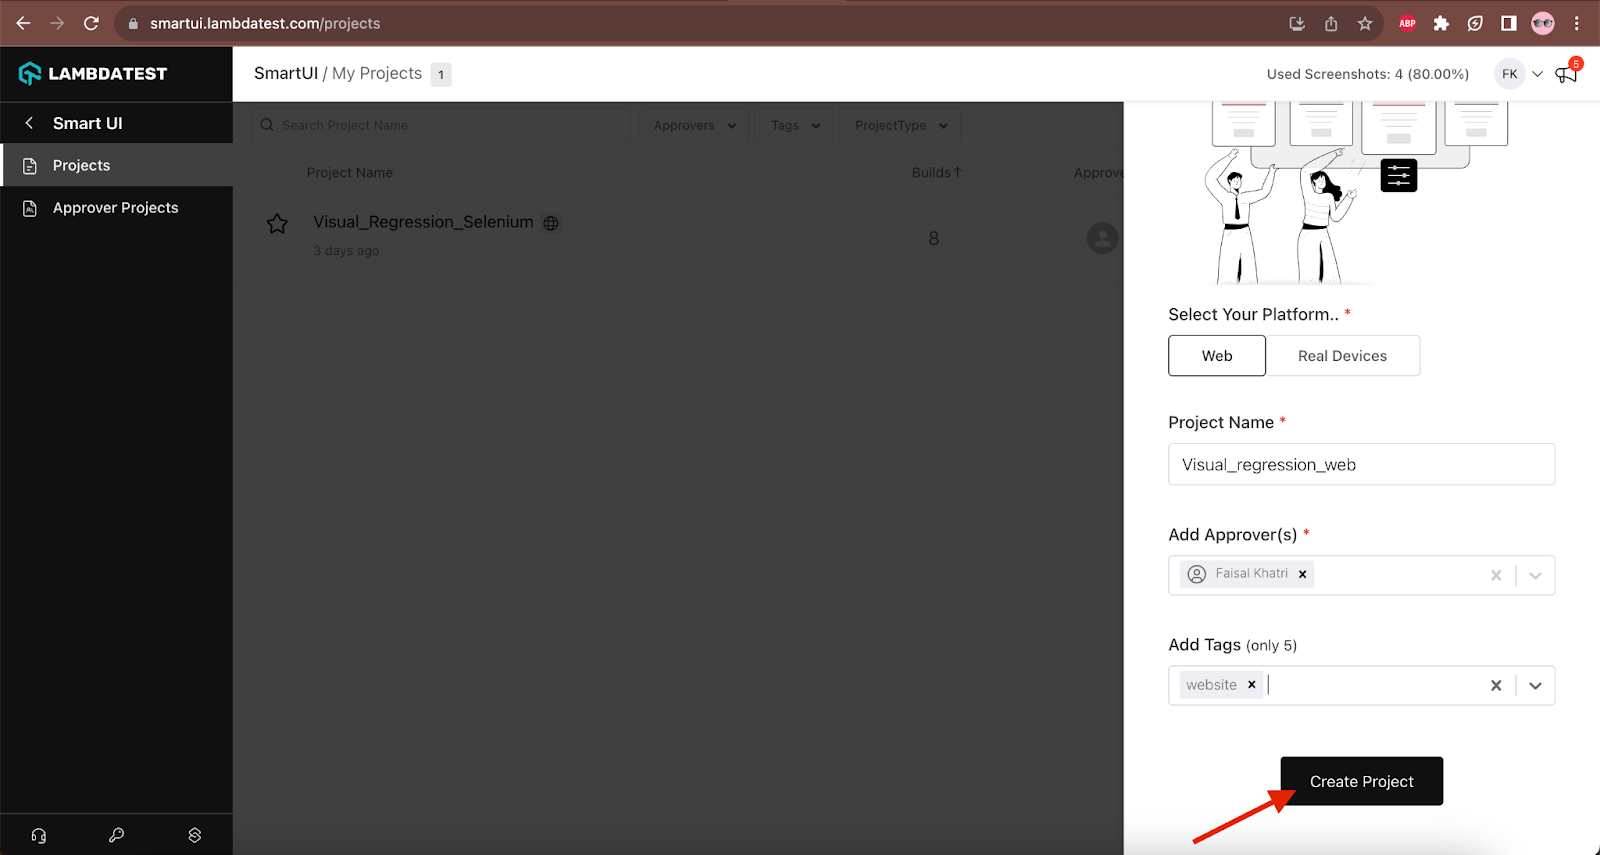
- Update the project details, as we will be performing the Selenium visual regression testing for the website, we need to select the platform as “Web”.
Visual regression testing can also be performed for mobile applications using real mobile devices and the Appium framework. Next, provide the project name.
- Select your name in the Approver Name field, or if it’s your organization account and you need another person to be an approver, select the respective person’s account name in this box. Once all the details are updated, click the Create Project button to create the project successfully.
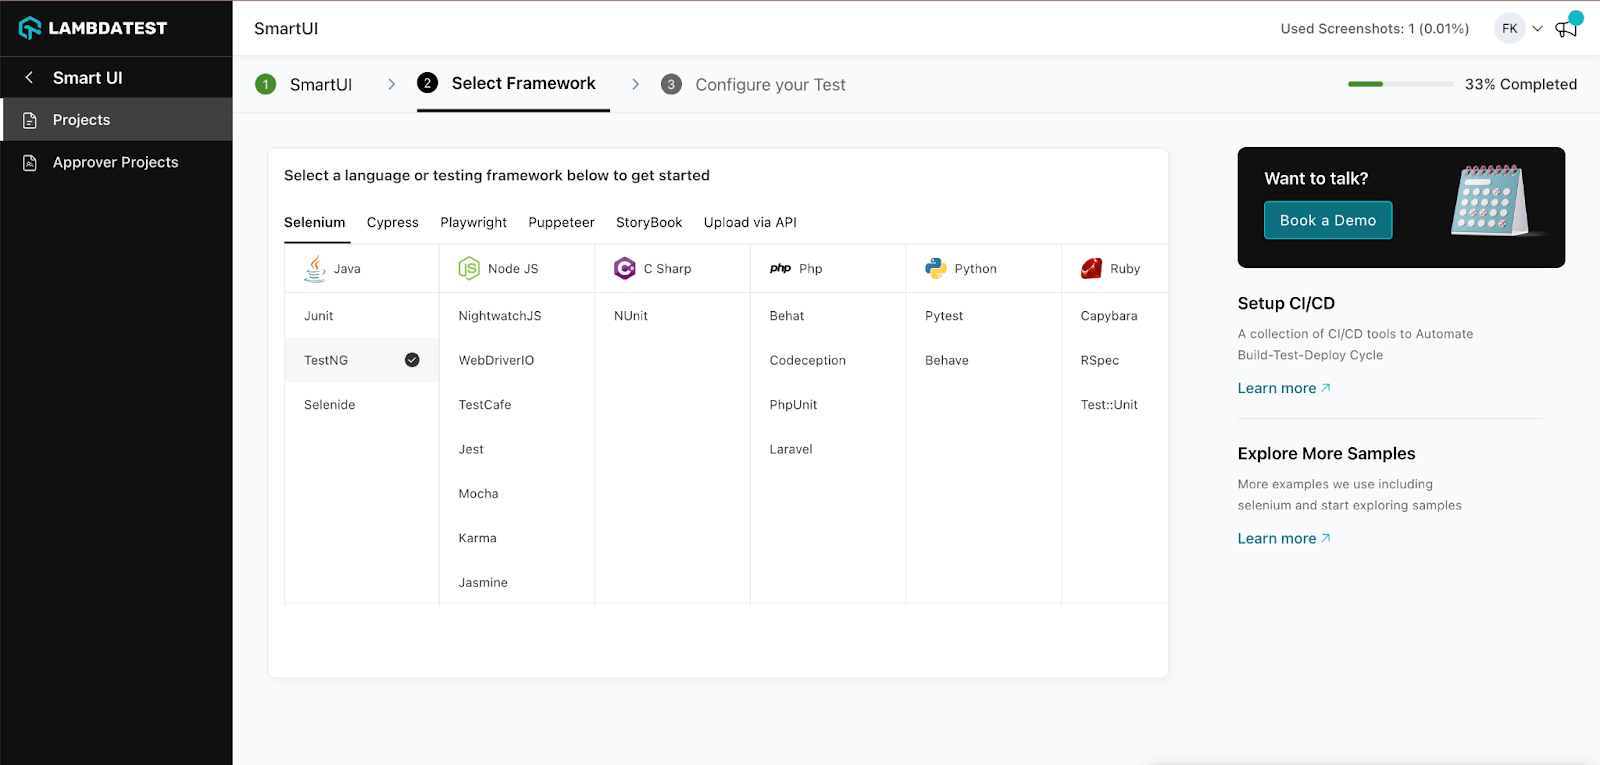
- Next, select the framework you want to run your automation tests with. We will be selecting Selenium, Java, and TestNG here.
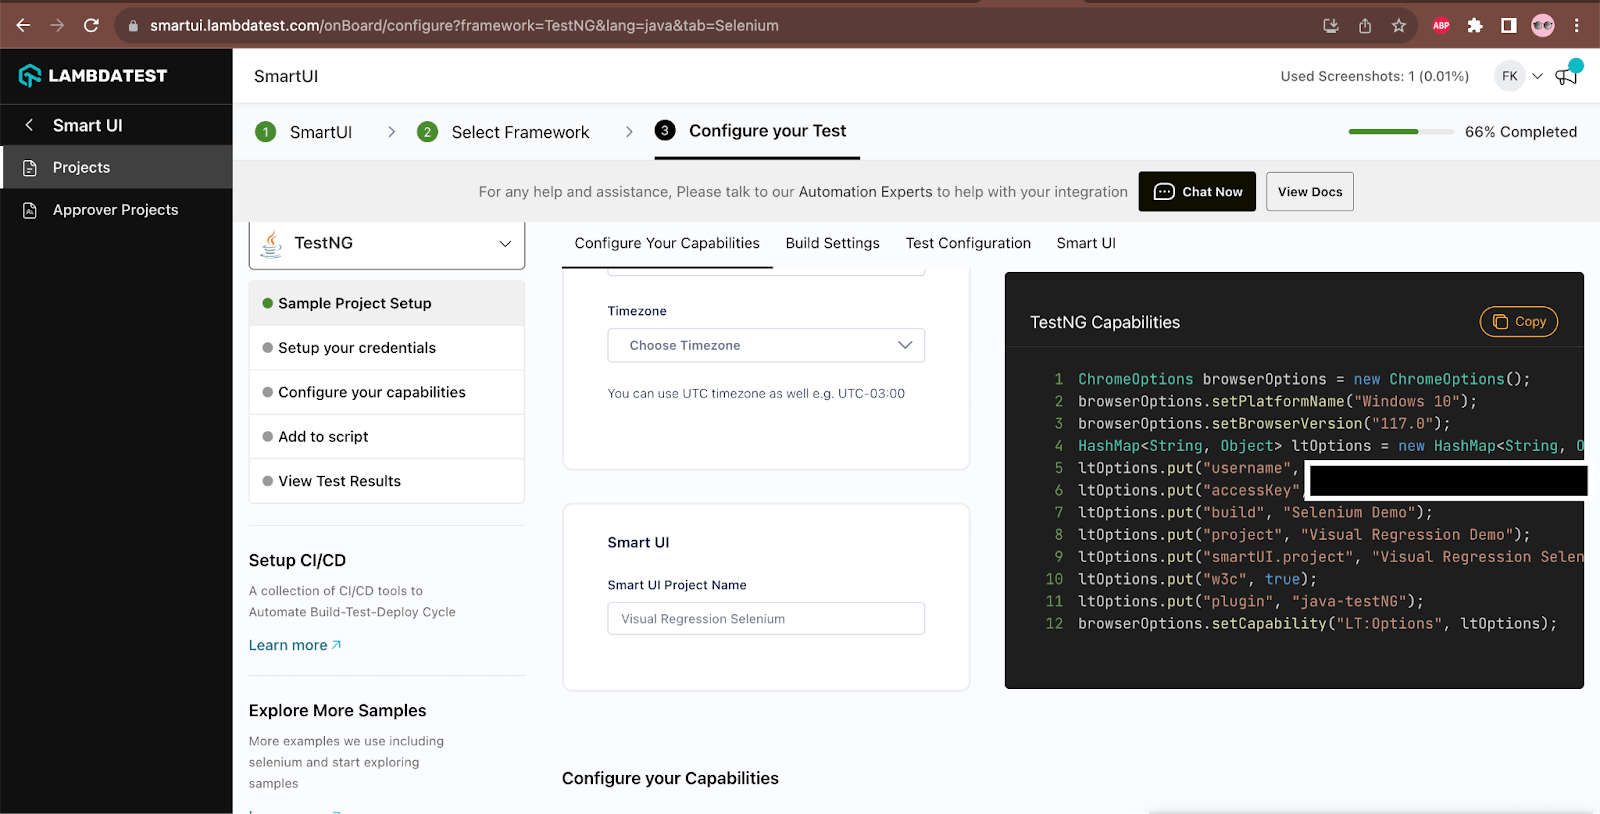
- On selecting the framework, we will be taken to the next screen, where we will be provided with the screen to set the configurations. Ensure to provide the Smart UI Project Name capability in this screen, which is mandatory for Selenium visual regression testing. Once the capabilities are updated, we can copy it and use it in our automation test configuration.
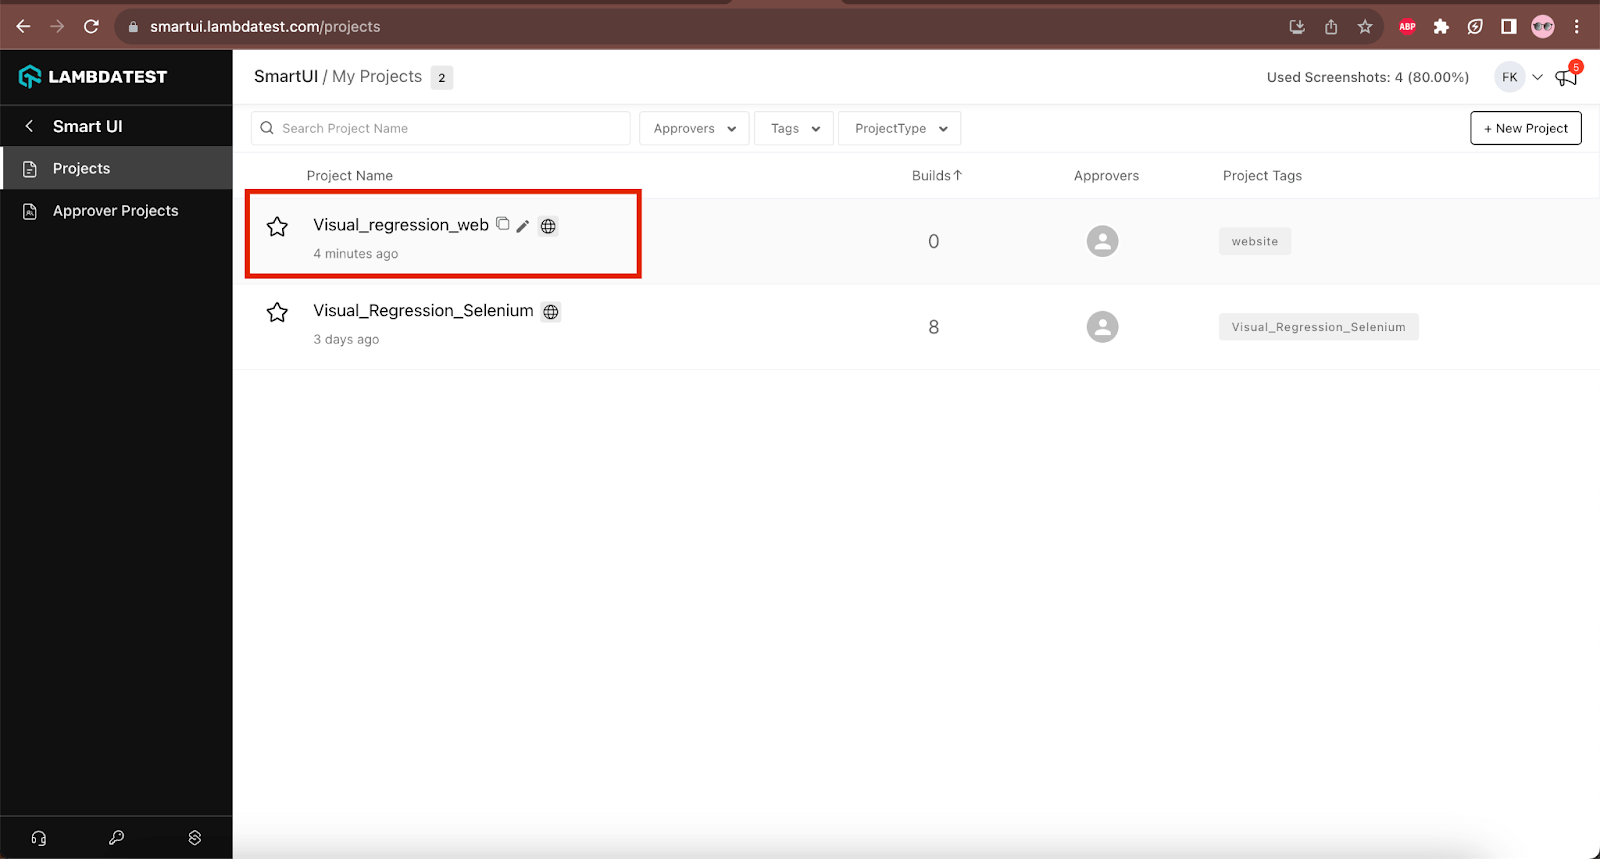
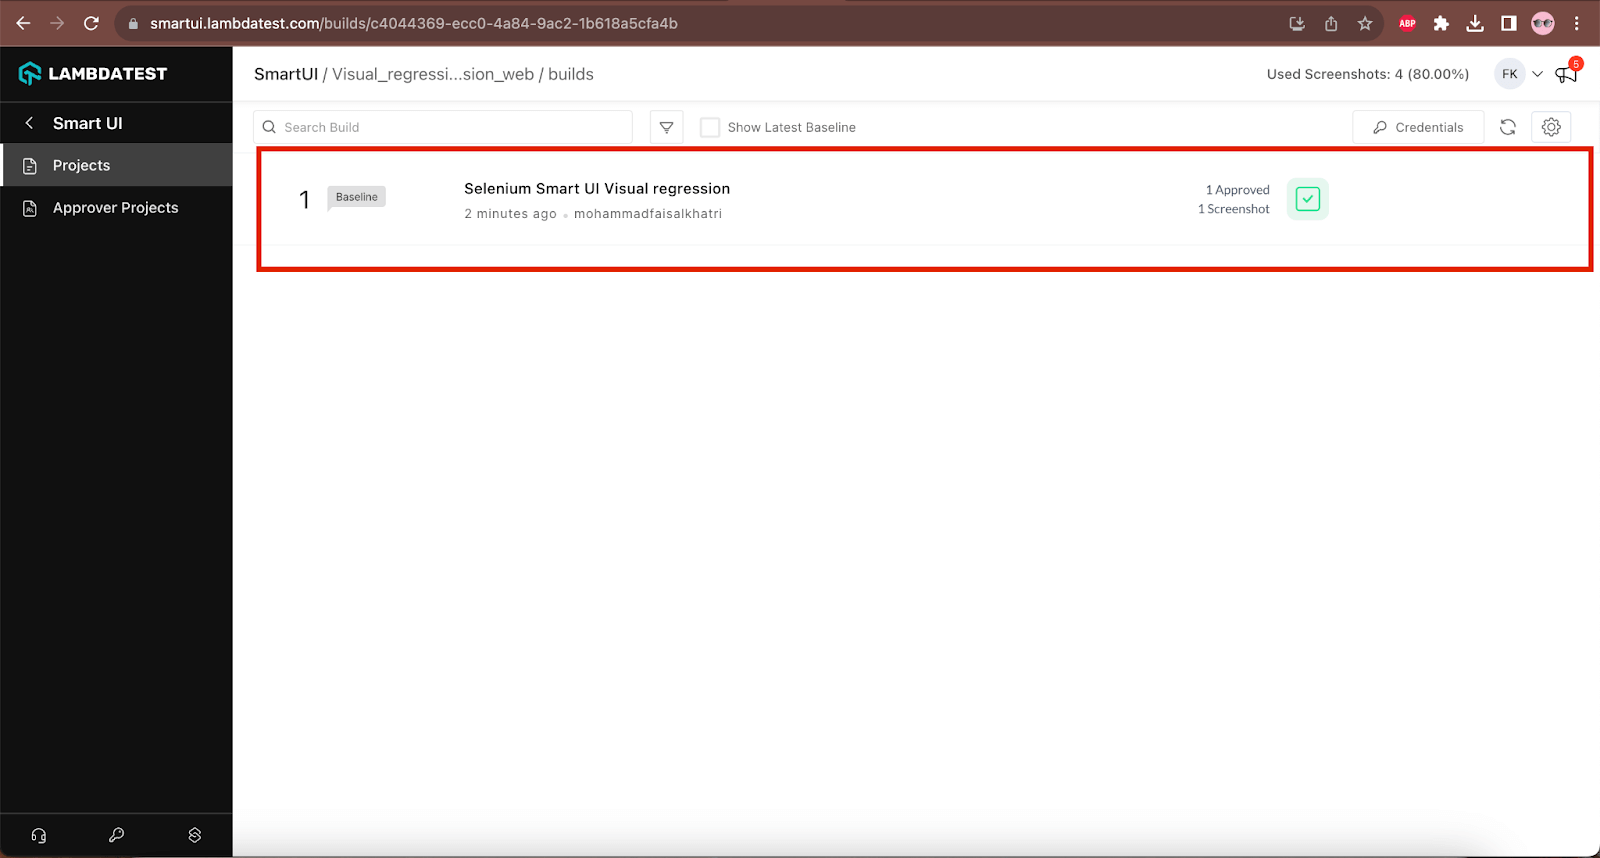
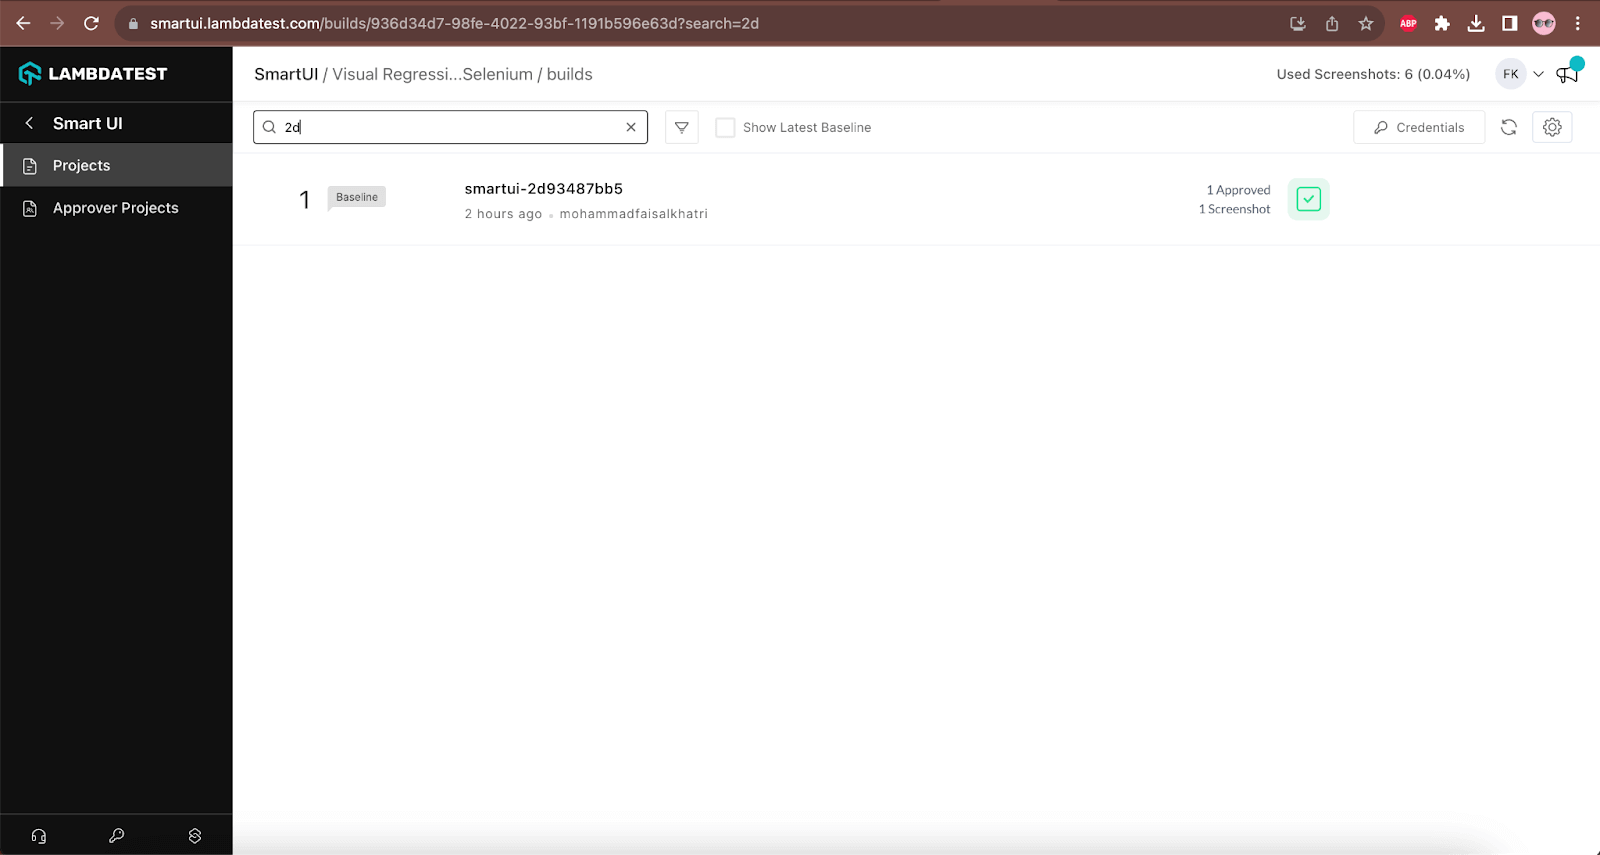
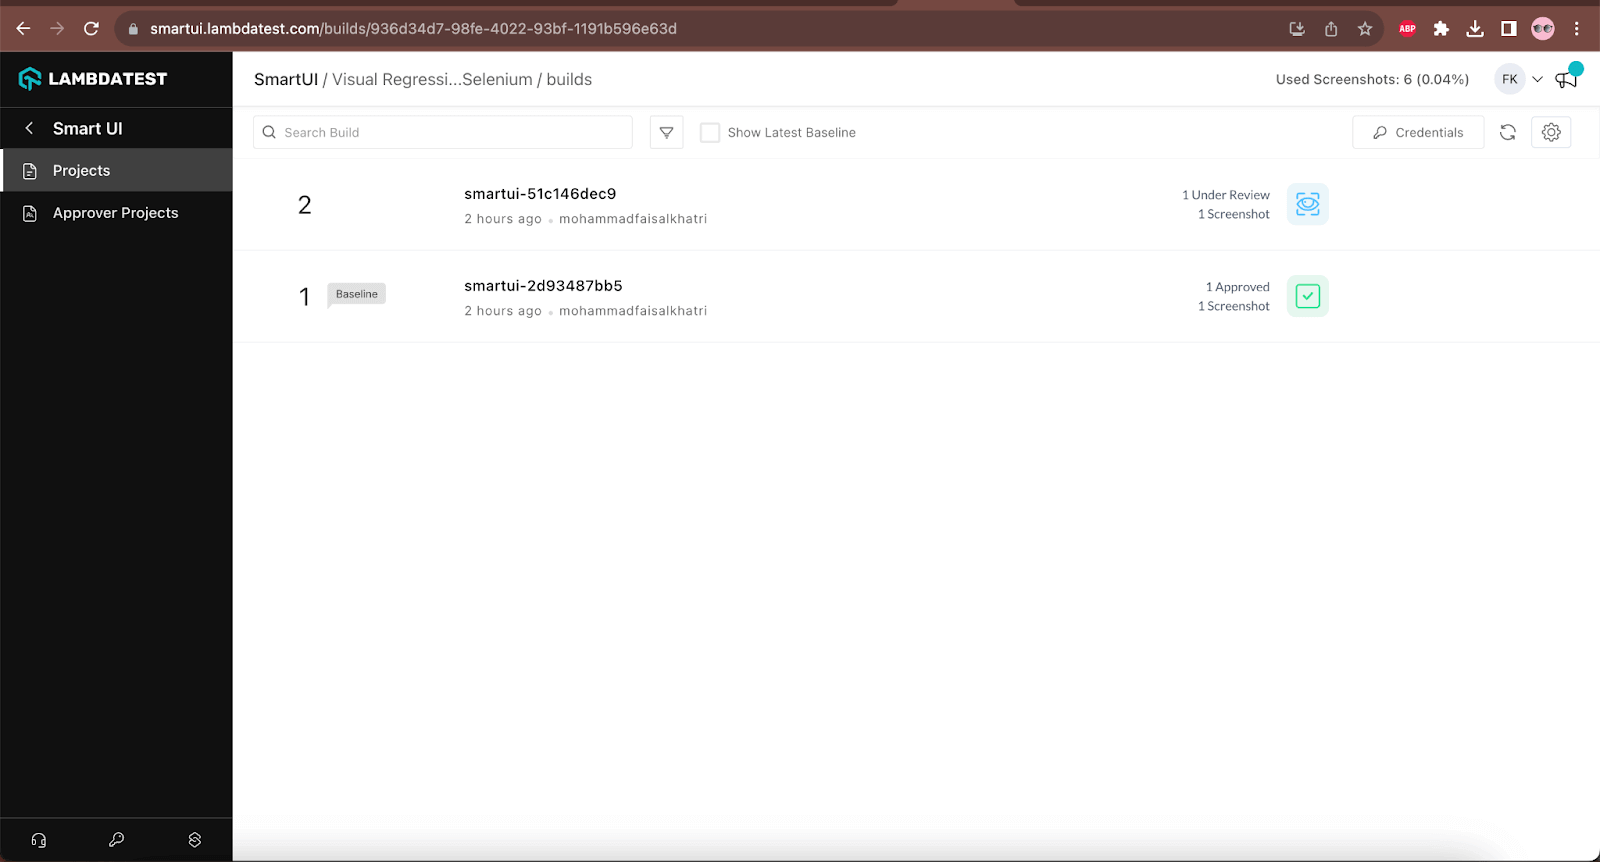
- Once the project is created successfully, it will be shown in the Smart UI project screen as shown in the screenshot below:
Setting the Baseline Image
After the Smart UI project is created successfully, we need to set the Baseline image, the visual regression will be performed by comparing the Baseline image with the current image of the application.
There are two ways to capture the Baseline image:
- Uploading the Baseline image using Smart UI API.
- Running the web automation test and setting the screenshot image captured in the first test as the Baseline image.
Uploading the Baseline image using Smart UI API
The following steps need to be performed to upload the Baseline image using API:
Step 1:
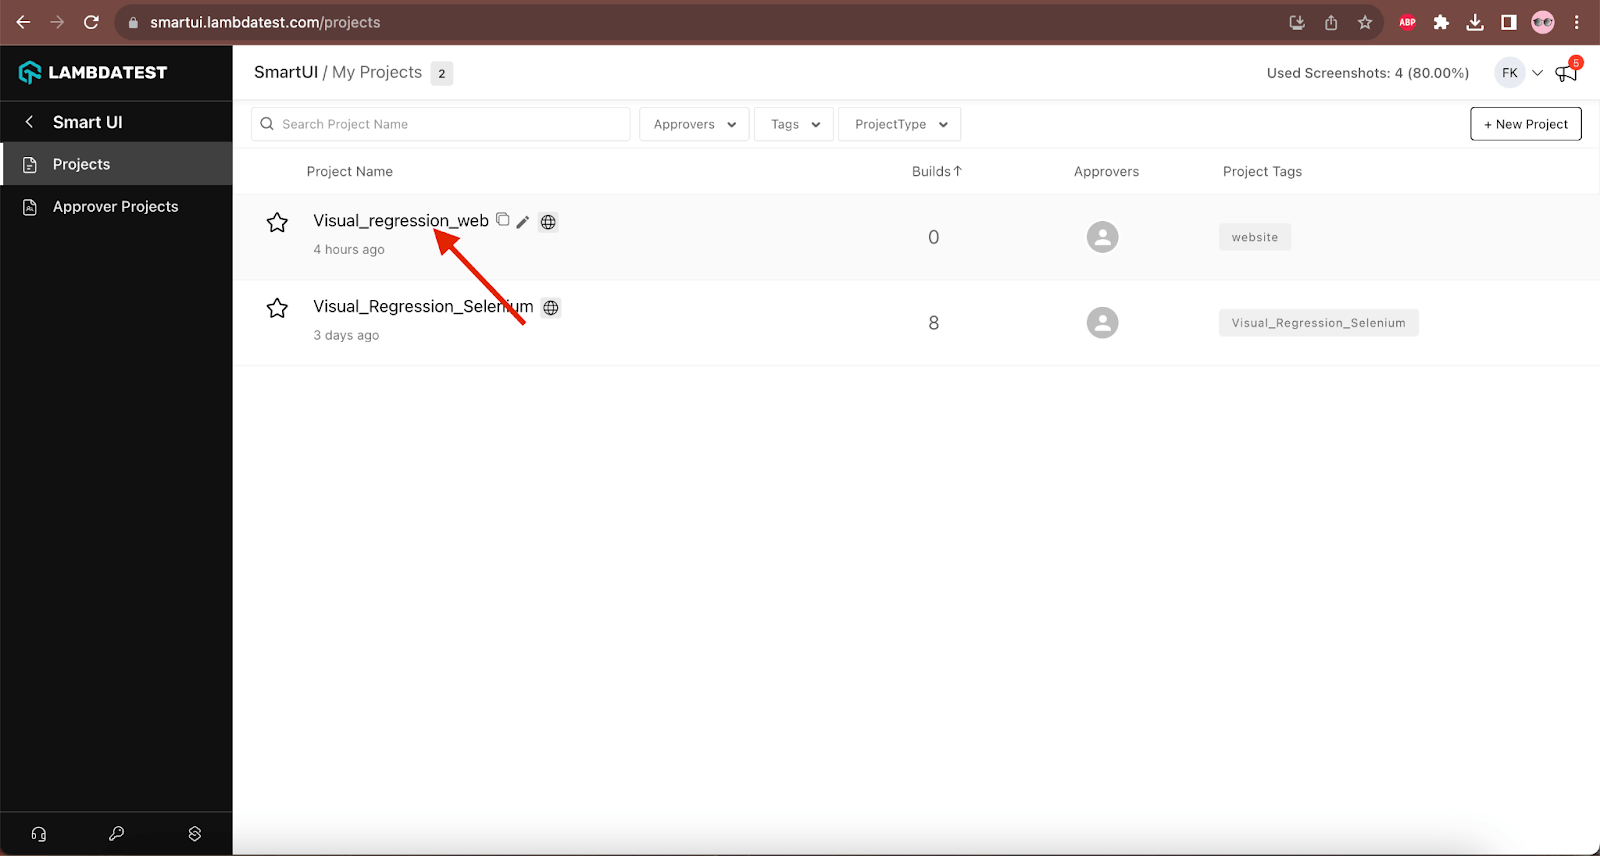
Navigate to the Smart UI Project screen and click on the project for which the Baseline image needs to be uploaded. Here, we will select the project we created in the previous section – “Visual_regression_web”.
Step 2:
On the next screen, click the Upload API button.
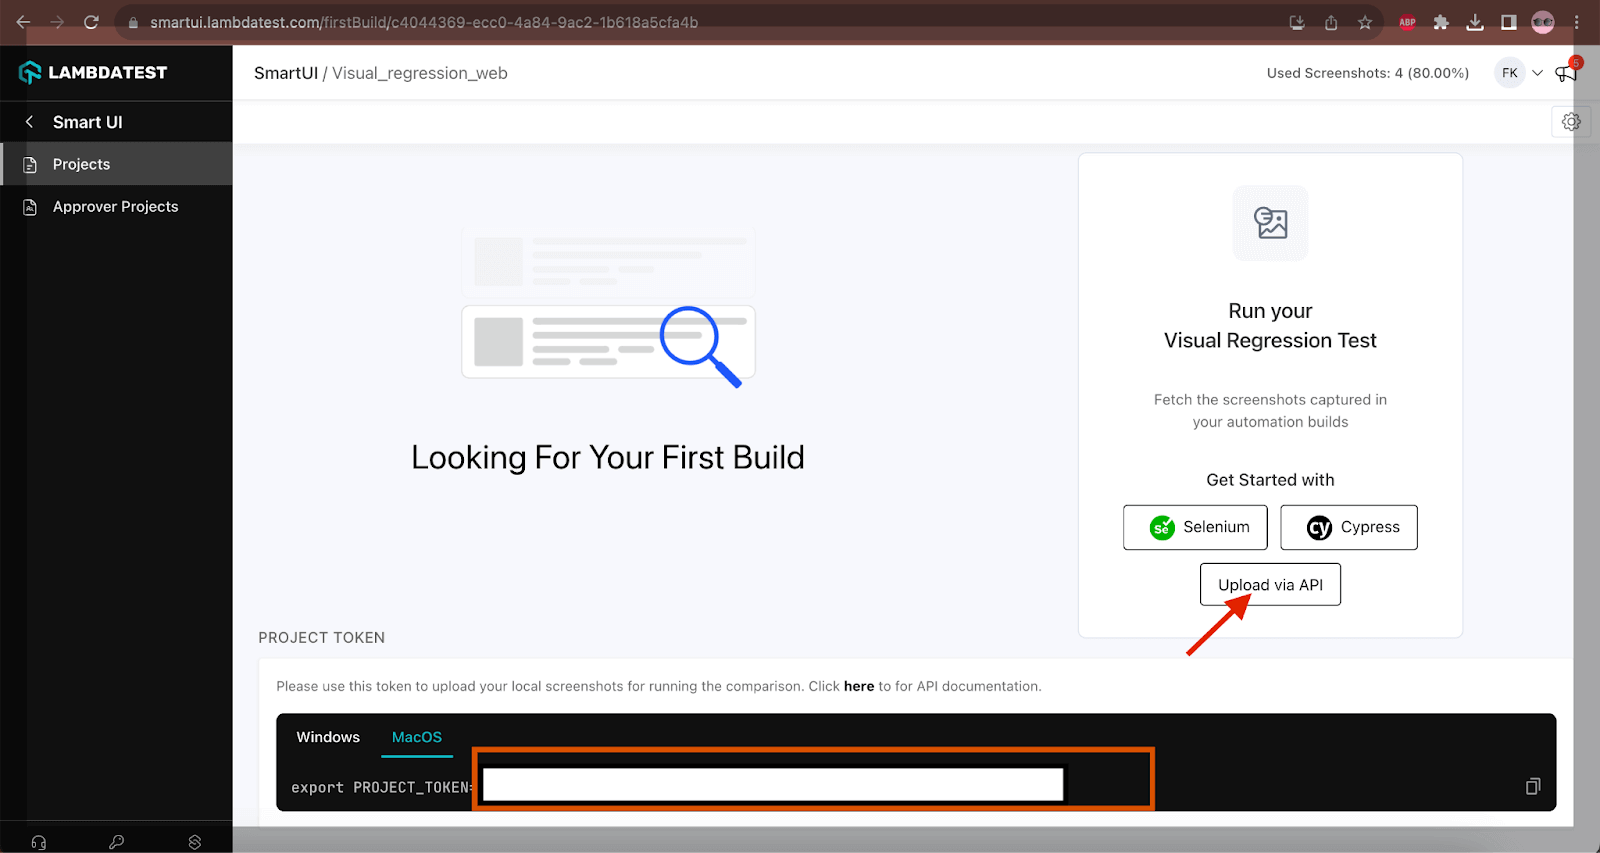
Step 3
In the next screen, Swagger will be displayed with the API details.
- Click the Smart UI Automation tab.
- Checkout for the Upload Screenshots API endpoint. This endpoint will be used to upload the Baseline image.
- Copy the value provided in the after the words “PROJECT_TOKEN=” text. This will be required to upload the Baseline image.
- Click the Try it out button to upload the image.

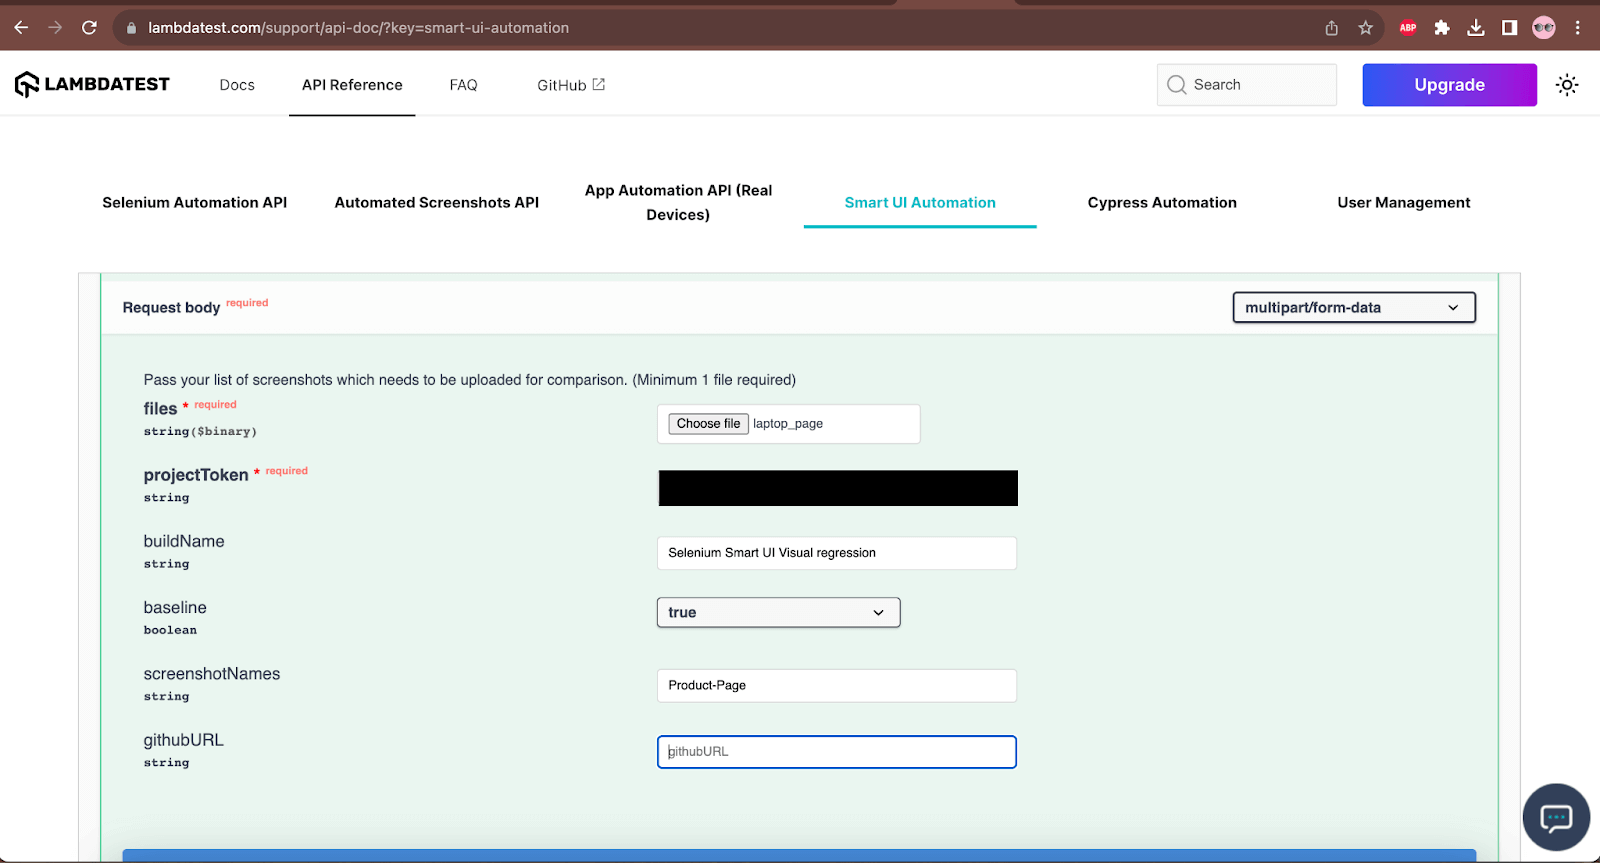
Step 4
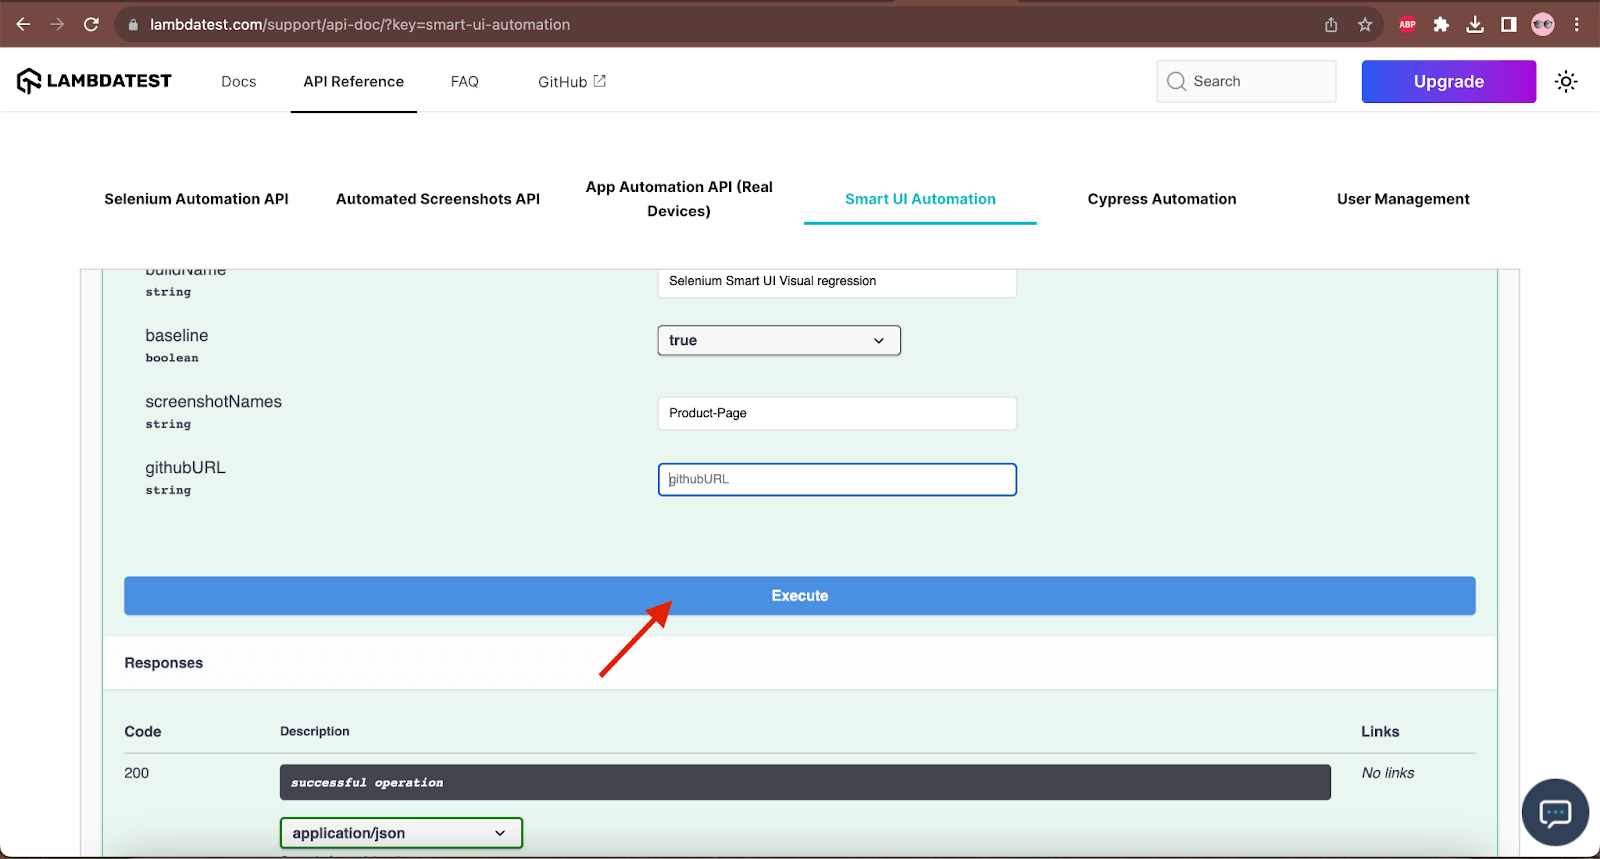
After clicking the Try it out button, the following details must be provided in the API request to upload the Baseline image successfully.
| Field Name | Description |
|---|---|
| Files | We need to select the image file that needs to be set as a Baseline image in this field. Multiple files can also be selected here. |
| projectToken | This value is provided in the previous screen where we clicked on the Upload API button; we already copied this value previously that can be pasted in this field. |
| buildName | The name of the build for which you are running the tests. Any value can be provided here. It can be left as it is since it is an optional field. |
| Baseline | Select true in this field. |
| ScreenshotNames | Provide a name for the screenshot image. |
| githubURL | This is an optional field; it can be left blank. If needed, the GitHub URL for the project can be provided here. |
Step 5
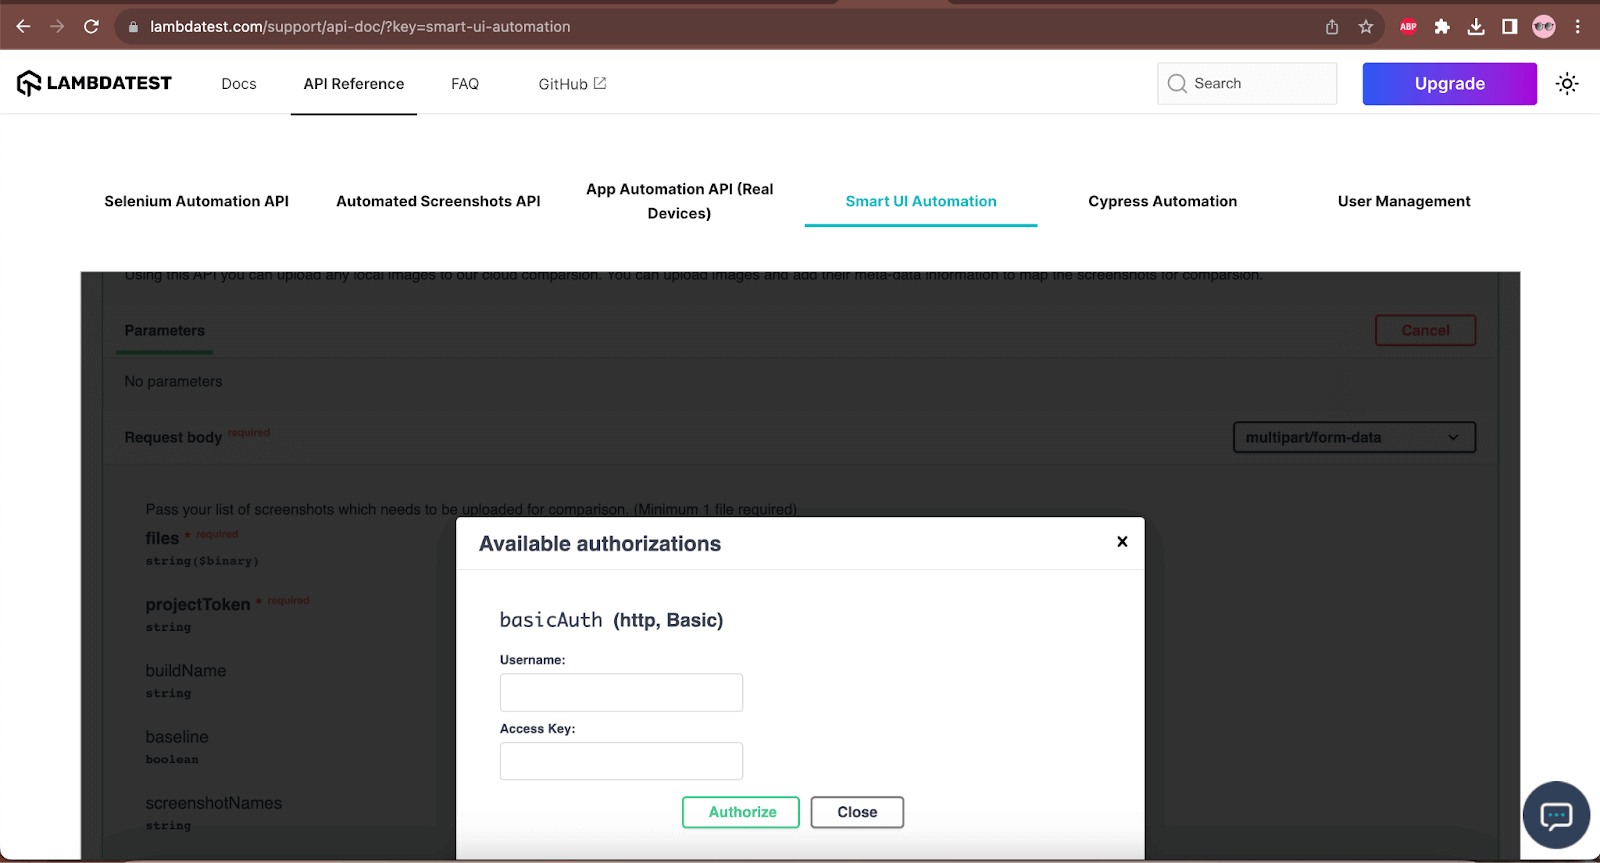
Enter the Authorization details by clicking the Authorize button on the top right corner of the screen.
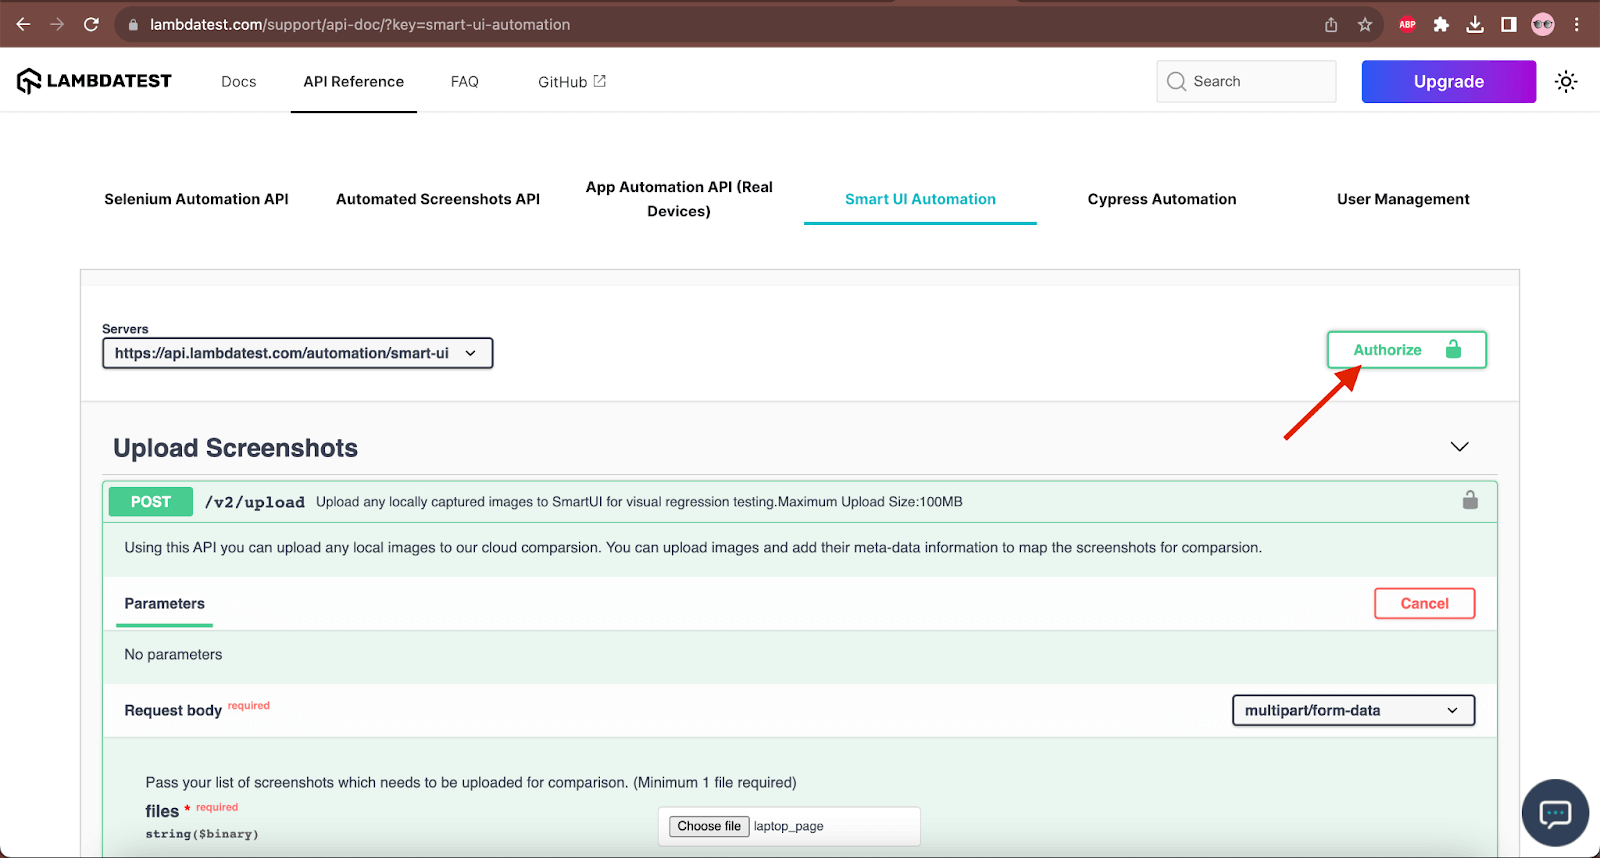
Step 6
Enter the LambdaTest credentials in the authorization details. The LambdaTest credentials are in the Profile >> Account Settings section.
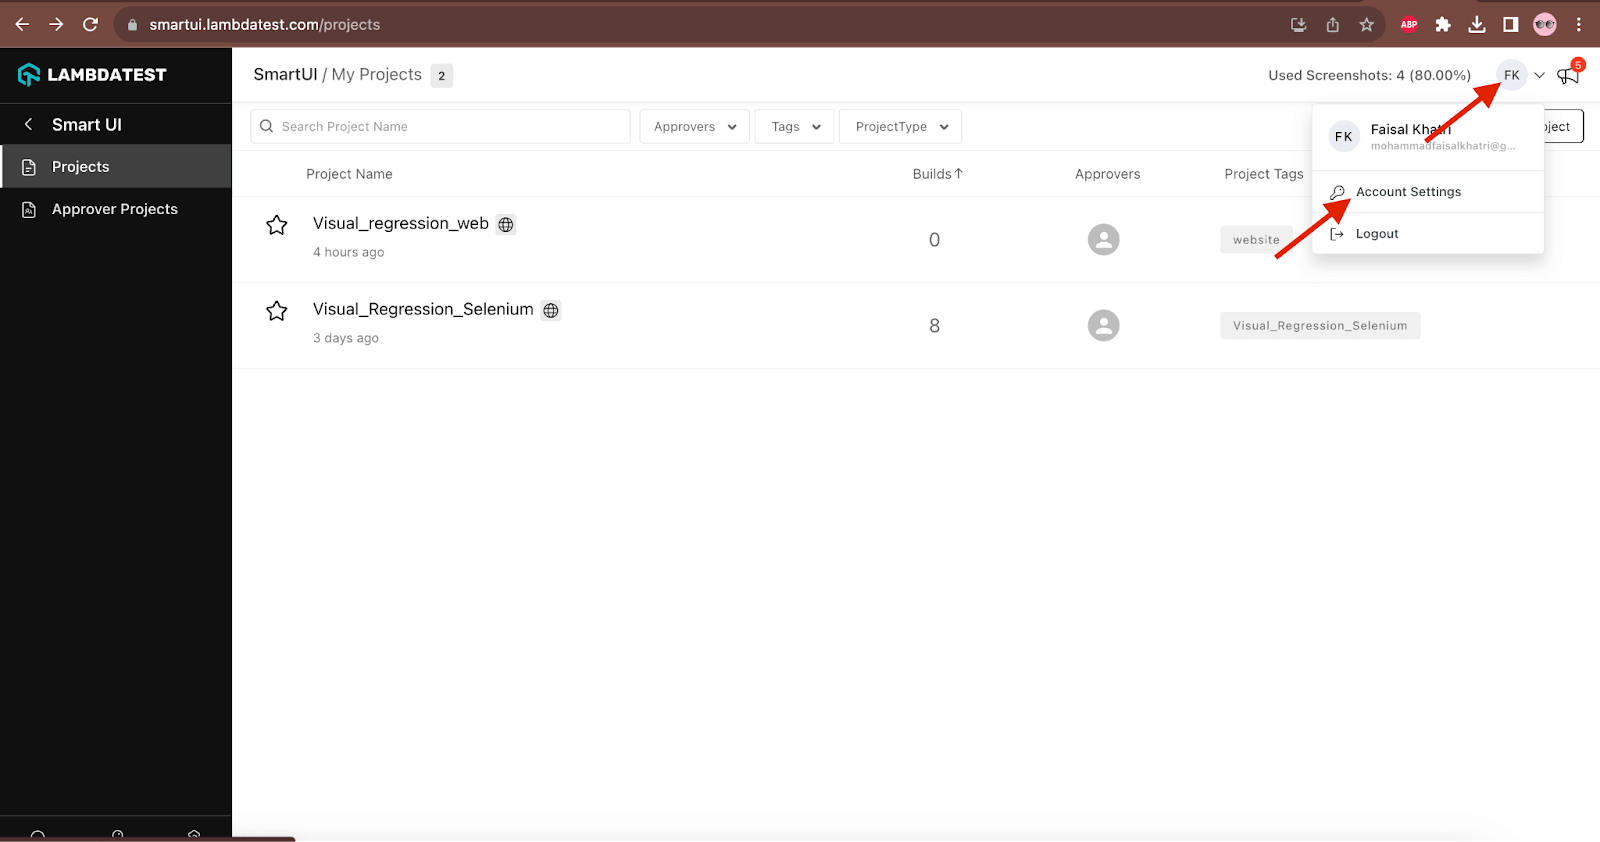
In the Account Settings window, navigate to the Password and Security Tab and copy and paste the Username and Access Key values.
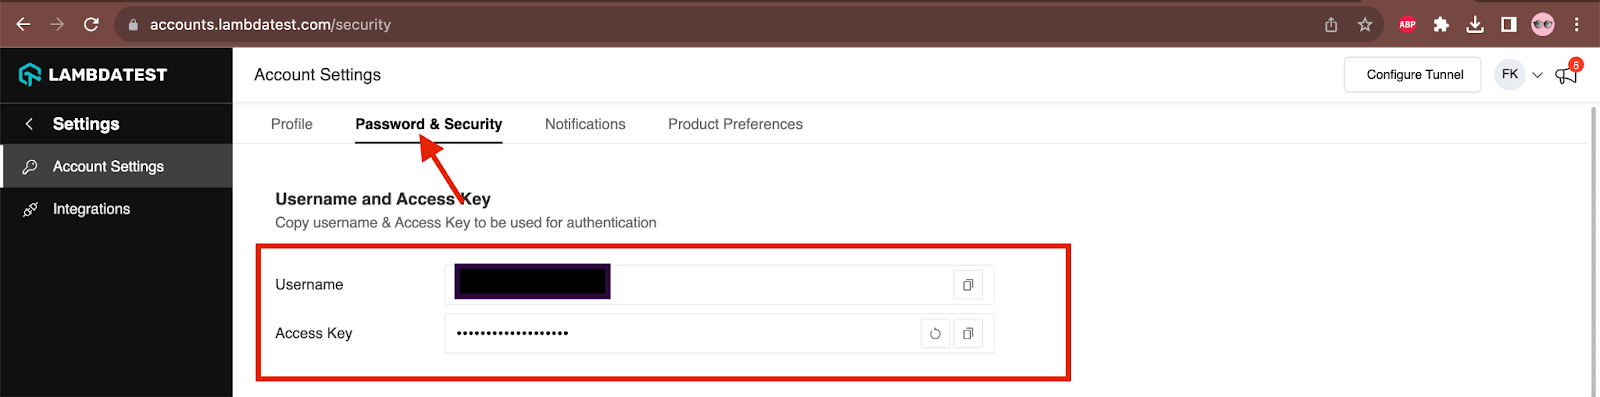
These values can be copied and pasted in the Authorization window. Click on the Authorize button and close the Authorization window.
Step 7
Click on the Execute button to upload the Baseline image.
On successful execution of the API request, we should get a response with status code 200 and status – “success” along with other details.
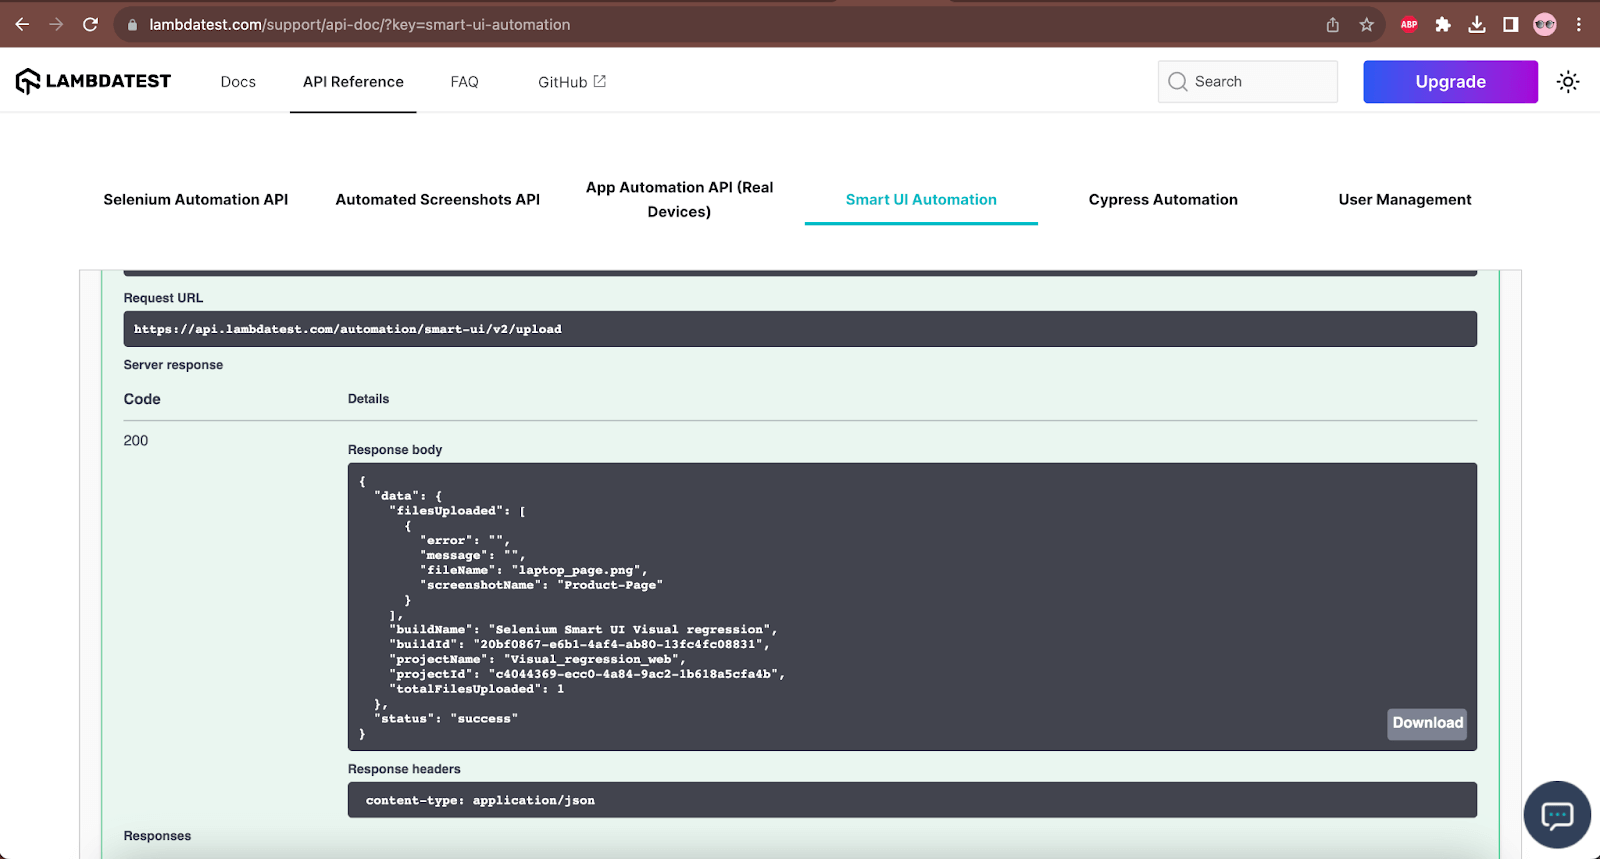
On successfully uploading the image through API, it should be reflected in the Smart UI project and marked as an Approved Baseline image.

We have successfully uploaded the Baseline image using the Smart UI API.
Uploading Baseline Image using the Web Automation Tests
The other option to upload the Baseline image is to upload the image using the web automation tests; we will check out in the next section of this blog on Selenium visual regression testing after setting up the automation project with Selenium WebDriver.
Let’s first create and set up the web automation project. The following tech stack will be used to demo Selenium visual regression testing with Smart UI.
|
Project Setup
Let’s create a Maven project and update the dependencies for the Selenium WebDriver and TestNG in the pom.xml file. Maven-compiler-plugin is updated in the build section of pom.xml to compile the sources of the project. The Maven-surefire-plugin is provided as it allows executing the tests in the project during the build lifecycle.
Following is the pom.xml file used in the project.

With the dependencies and plugins addition in the pom.xml file, the project setup is complete. Let’s now move ahead and learn how to perform Selenium visual regression testing with a practical scenario in the next section of this blog on Selenium visual regression testing.
Implementation [Test Scenario 1]
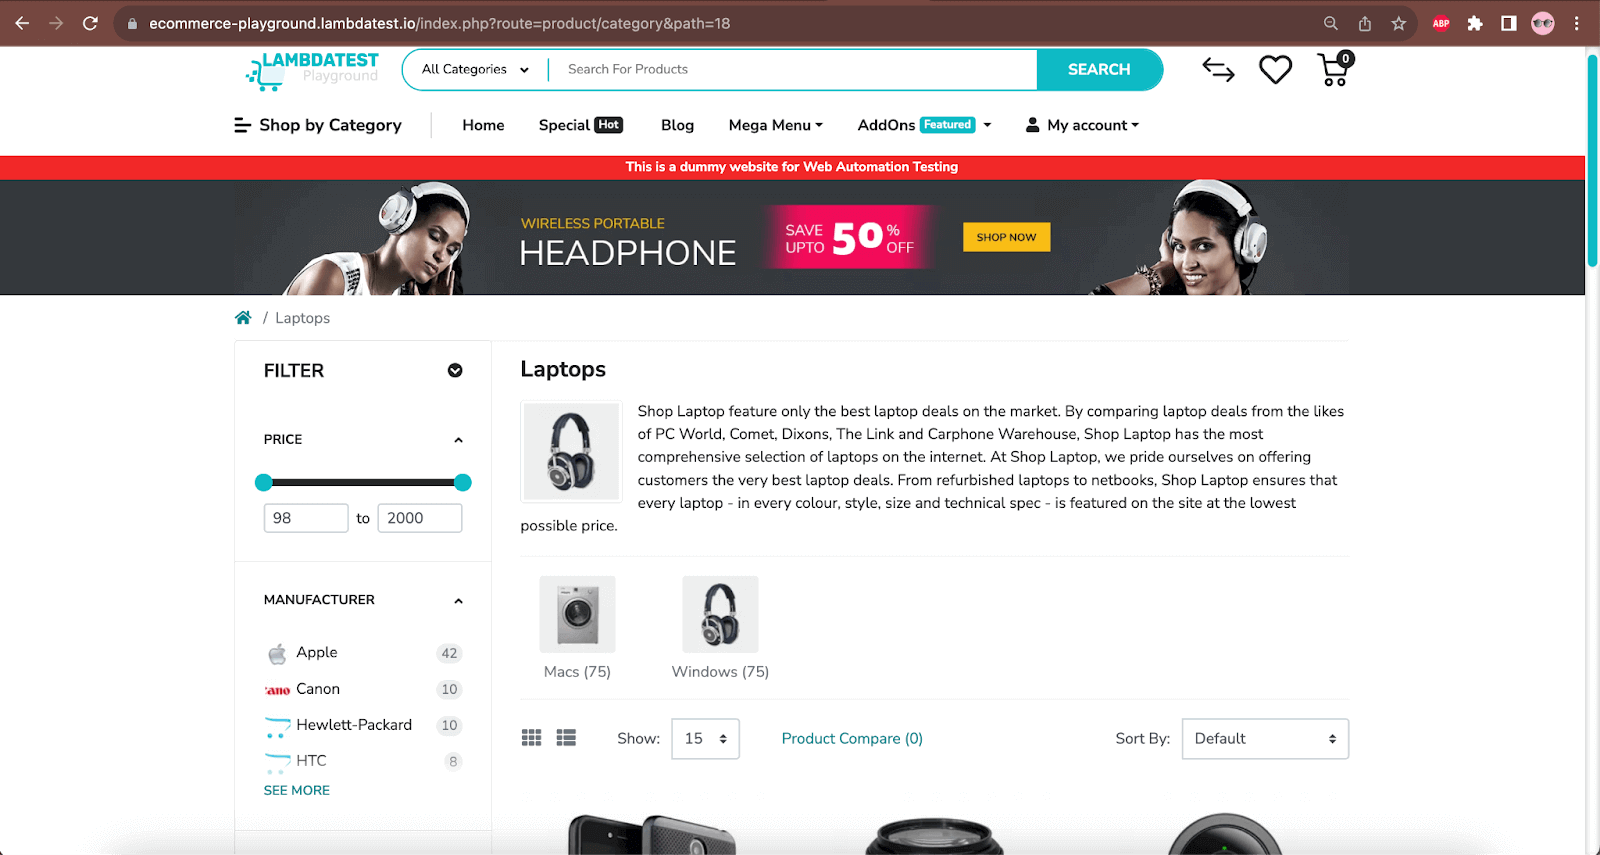
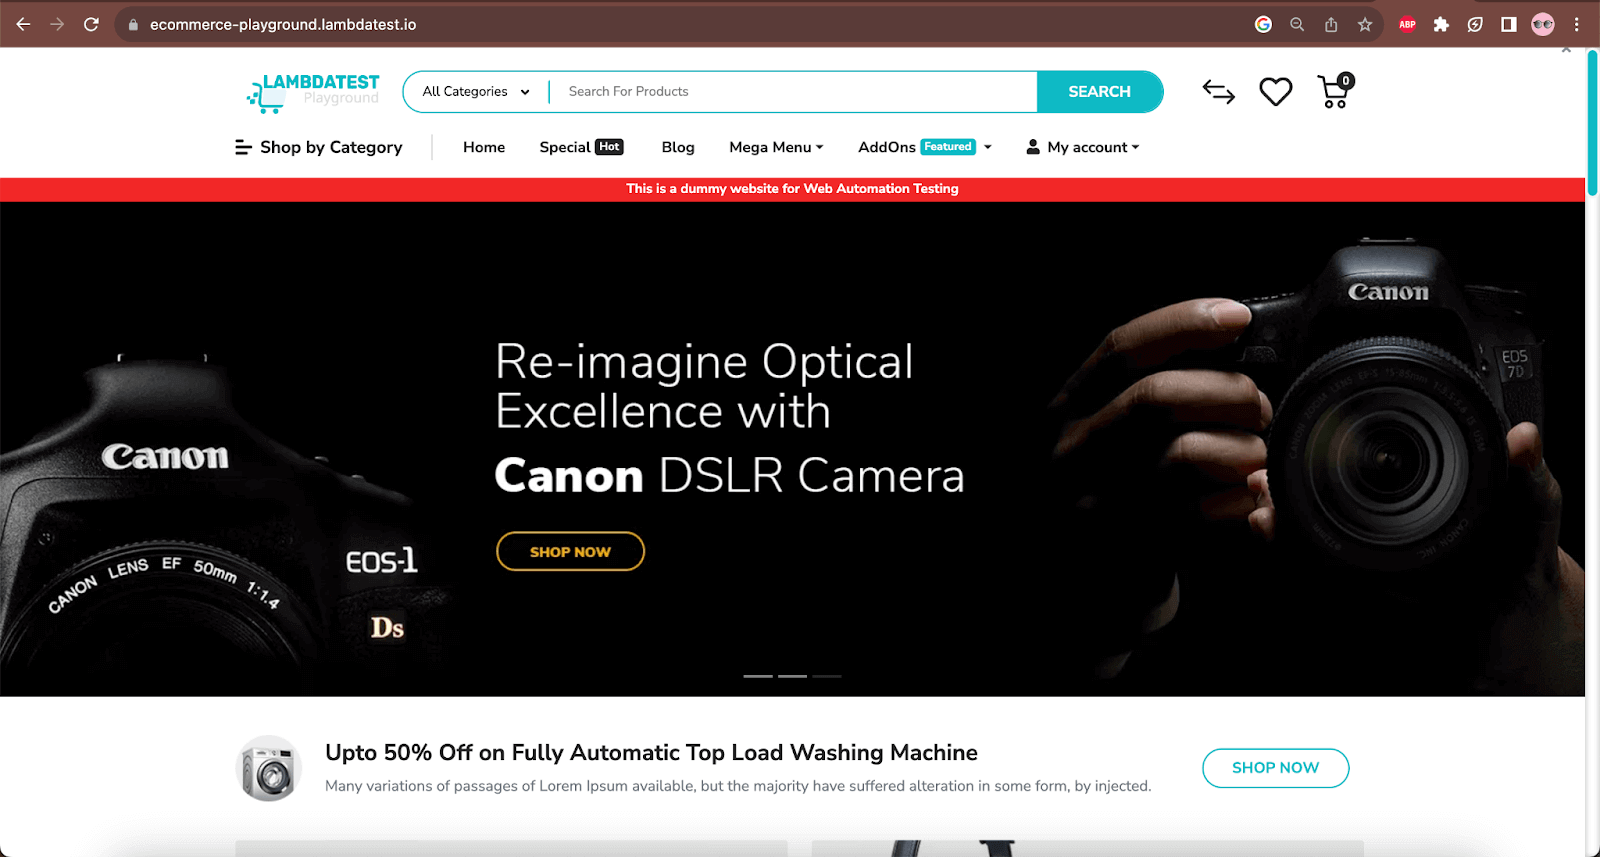
In this scenario, we will perform the visual regression for the LambdaTest eCommerce playground website’s Laptop product page by comparing it with the Desktop product page.
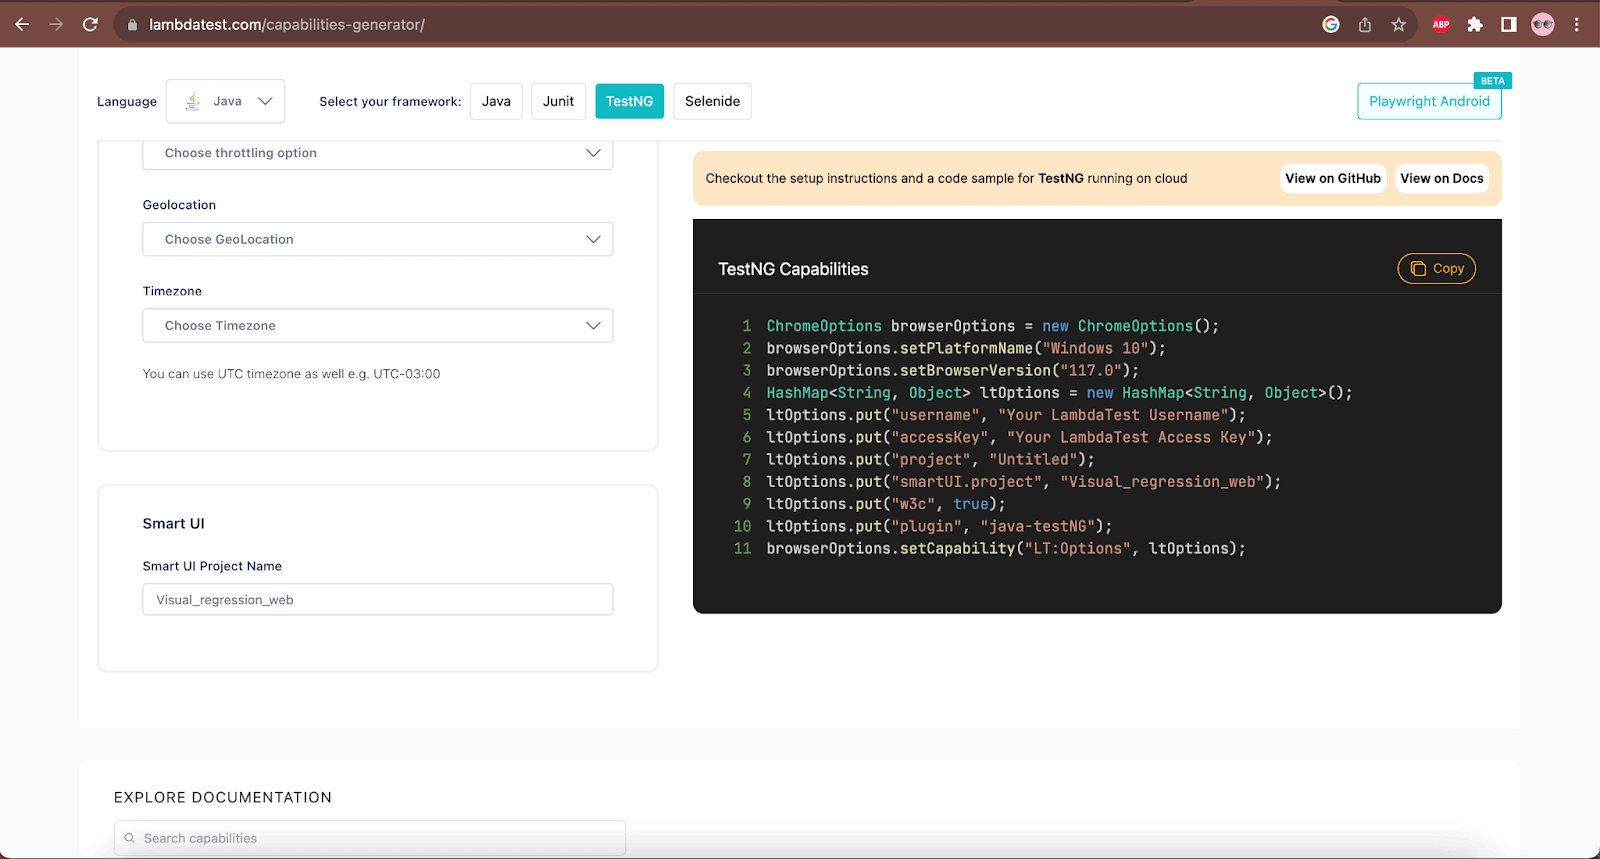
Before writing the tests and performing the image comparison using the visual regression Smart UI, we must configure the LambdaTest capabilities to run the test.
The LambdaTest Capabilities Generator helps us get all the required capabilities to run the test on the LambdaTest cloud grid.
LambdaTest is an AI-powered test orchestration and execution platform that lets you perform visual regression testing at scale using visual testing tools like Selenium. With the LambdaTest AI-driven Smart UI platform, you can run automated visual tests on an online Selenium grid across 3000+ browser environments.
If you wish to perform Selenium visual regression testing using LambdaTest SmartUI, visit the documentation – Selenium visual regression testing with Smart UI.
We also have a dedicated tutorial on visual regression testing with Smart UI. Watch it below!
Subscribe to our LambdaTest YouTube Channel for the latest updates on tutorials around Selenium, automation testing, and more.
For running the visual regression tests using Smart UI, the following capabilities are required:
- Smart UI Project Name – the values can be supplied using the key “smartUI.project” in the code.
Additionally, the following Smart UI options can be provided in the configuration to help perform Selenium visual regression testing using pixel-to-pixel comparison.
| Option Name | Description |
|---|---|
| largeImageThreshold | It will set the pixel granularity at the rate at which the pixel blocks are created. |
| errorType | It will show the differences in the output screen by identifying the pixel change type and capturing the intended view. |
| ignore | It removes the pixel-to-pixel false-positive rate in identifying the screenshot. |
| Transparency | It helps in adjusting test transparency settings and strikes a balance between highlighting and visual screening. |
| boundingBoxes: [box1, box2] | By specifying a bounding box measured in pixels from the top left, the comparison area can be narrowed down. |
| ignoredBoxes: [box1, box2] | By specifying a bounding box measured in pixels from the top left, a part of the image can be excluded from comparison |
| ignoreAreasColoredWith | By specifying an RGBA color, the colored areas of the image can be excluded from comparison. |
For more details about the options below, checkout the Advanced Test Settings options page.
Setting the Baseline image
The Baseline image must be set first to perform the Selenium visual regression testing. We saw one way to update the Baseline image using the Smart UI API in the earlier section of this blog on Selenium visual regression testing. Let’s now learn about updating the Baseline image using the automation code.
Baseline image can be updated from the code using the following desired capability:
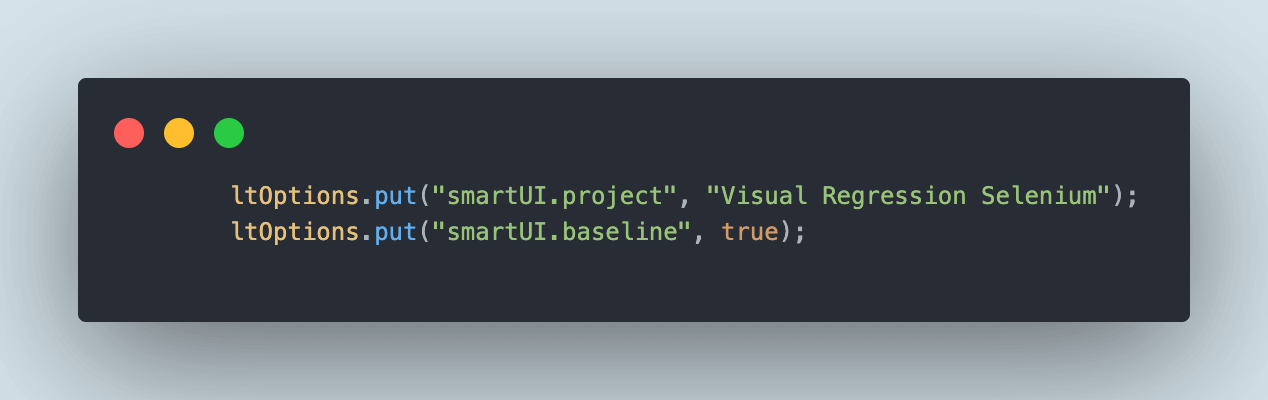
The values for the key “smartUI.project” is the name of the project we created in the Smart UI on the LambdaTest cloud grid.
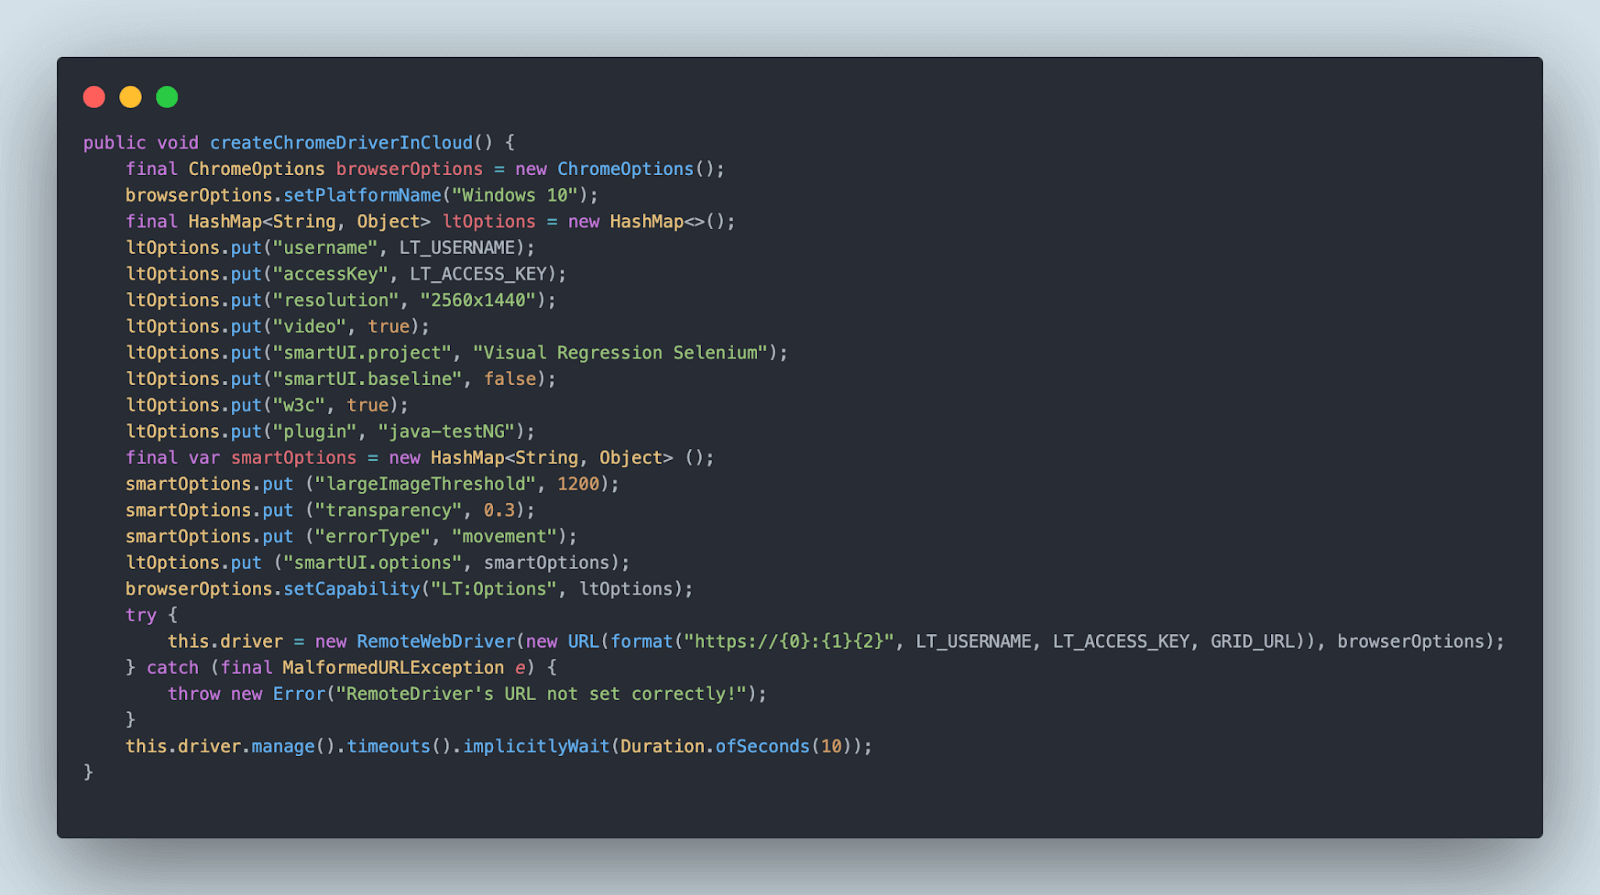
The above capability is provided in the createChromeDriverInCloud() method in the DriverManager class.
The method createChromeDriverInCloud() sets the desired capabilities and options to run the web automation tests on the LambdaTest cloud grid.
createChromeDriverInCloud() also has the Smart UI options “largeImageThreshold”, “transparency”, and “errorType.” It is updated as follows:
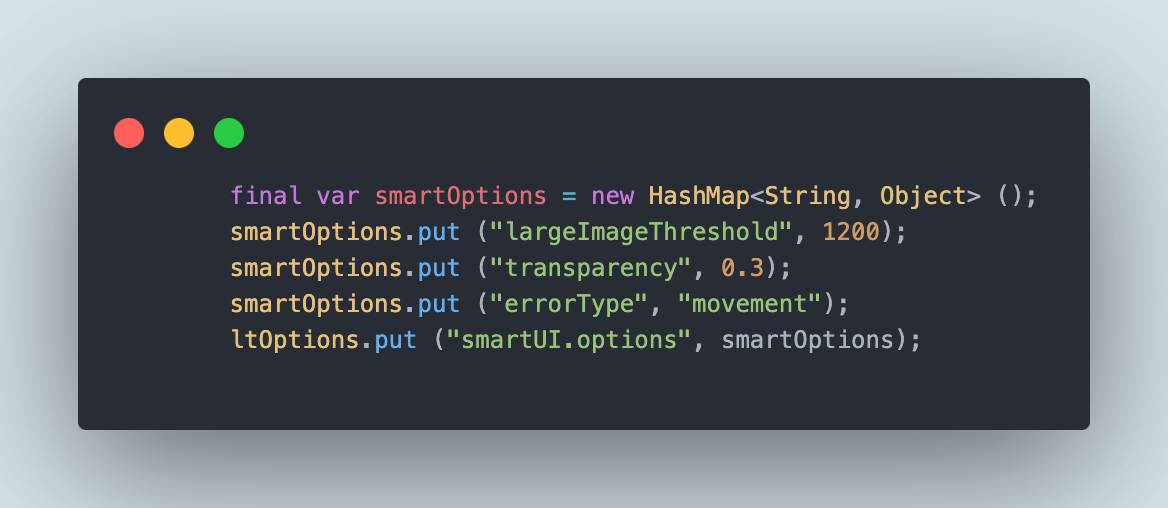
Here is the full createChromeDriverInCloud() method for your ready reference:
With this, we have completed the configuration and setup of the project. Next, let’s discuss writing the tests.
Implementation
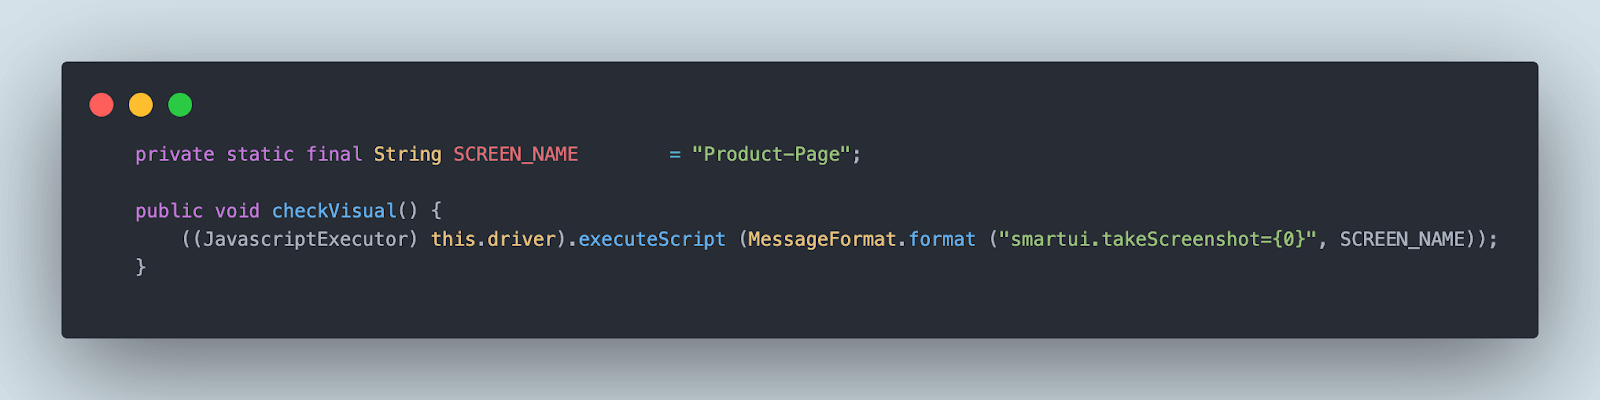
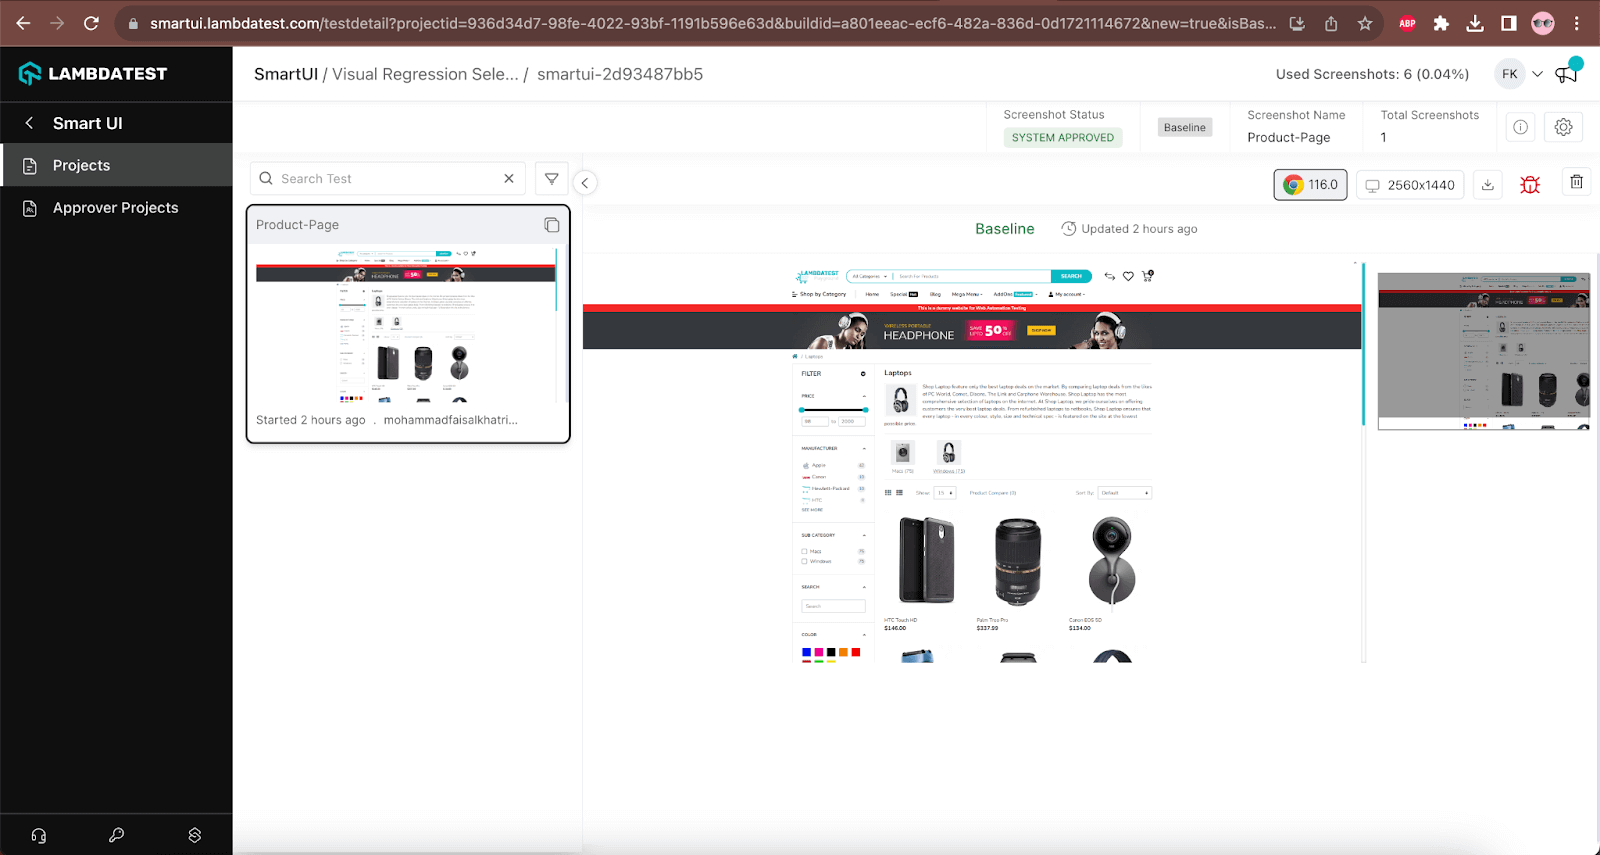
The ProductPage class has the checkVisual() method to help us perform the Selenium visual regression testing.
The checkVisual() method will take a screenshot and update its name to “Product-Page”. This screenshot will be compared against the Baseline image.
Next, let’s write an automated test for Selenium visual regression testing.
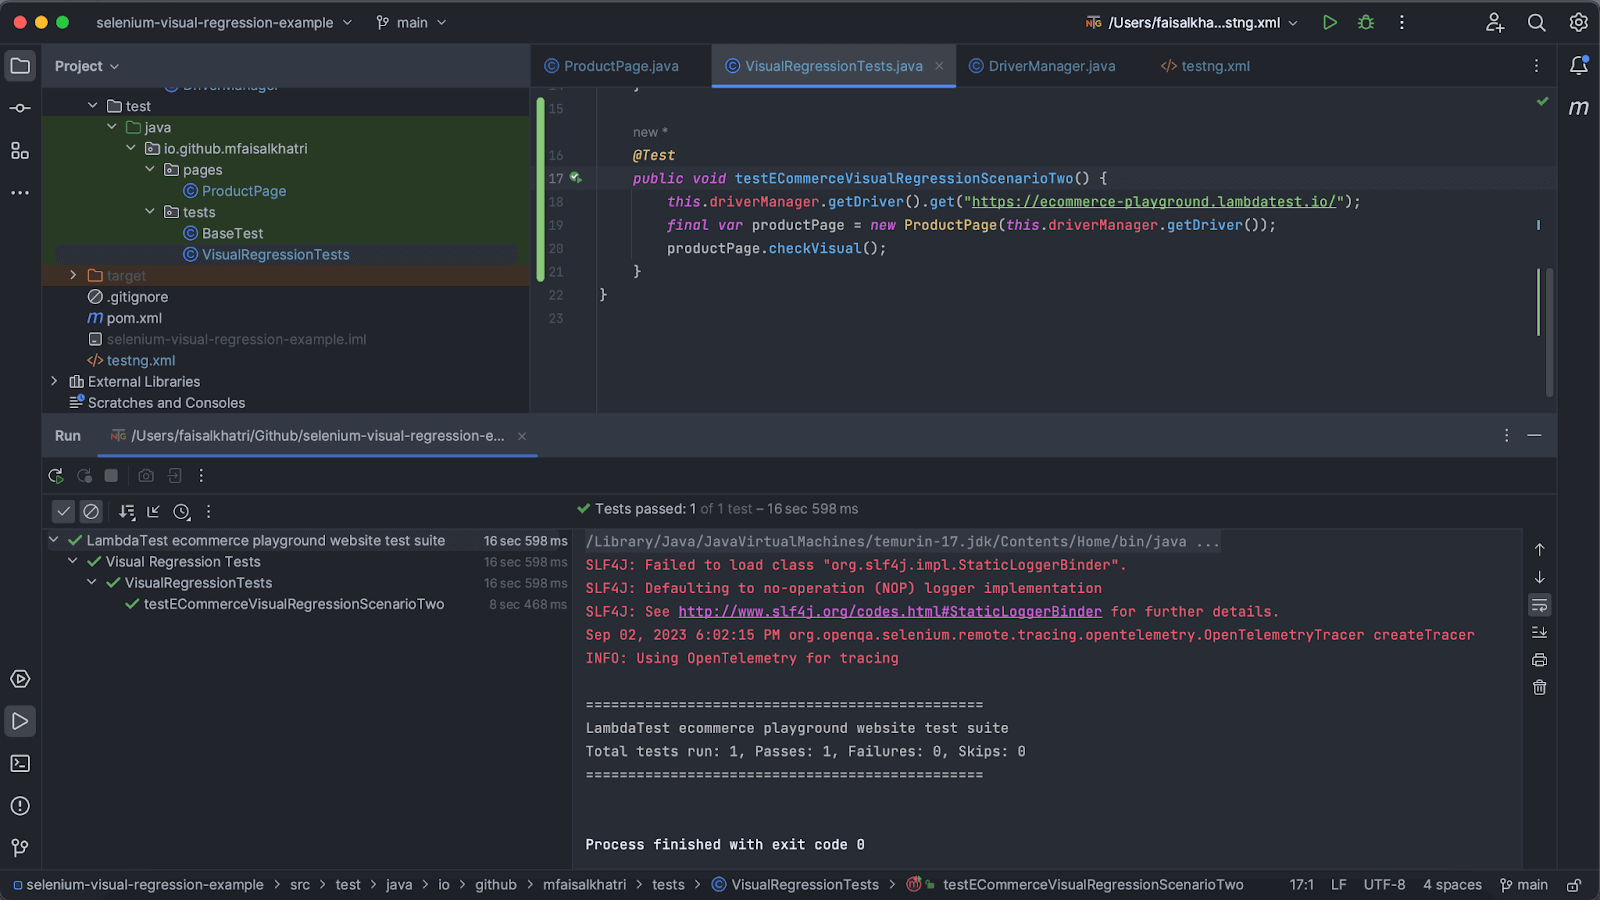
The VisualRegressionTests class is created for housing all the visual regression tests. For testing Test Scenario 1, the testECommerceVisualRegressionScenarioOne() method is created.
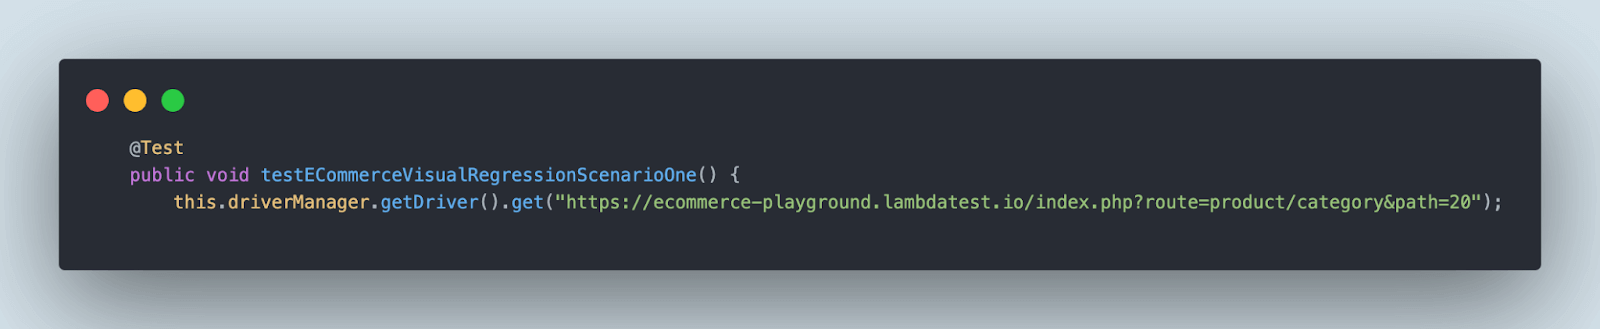
The following line of code will navigate to the Laptop Product page screen.

Next, the ProductPage class is instantiated, and its checkvisual() method is called, which will capture the screenshot of the Laptop product page.
The screenshot captured from this test will be uploaded in the LambdaTests’s Smart UI and marked as a Baseline image.
Next, we will rerun the test by changing the navigation URL and pointing it to the Desktop product page.
To summarize, the following is the current screenshot of the Laptop product Page
Test Execution:
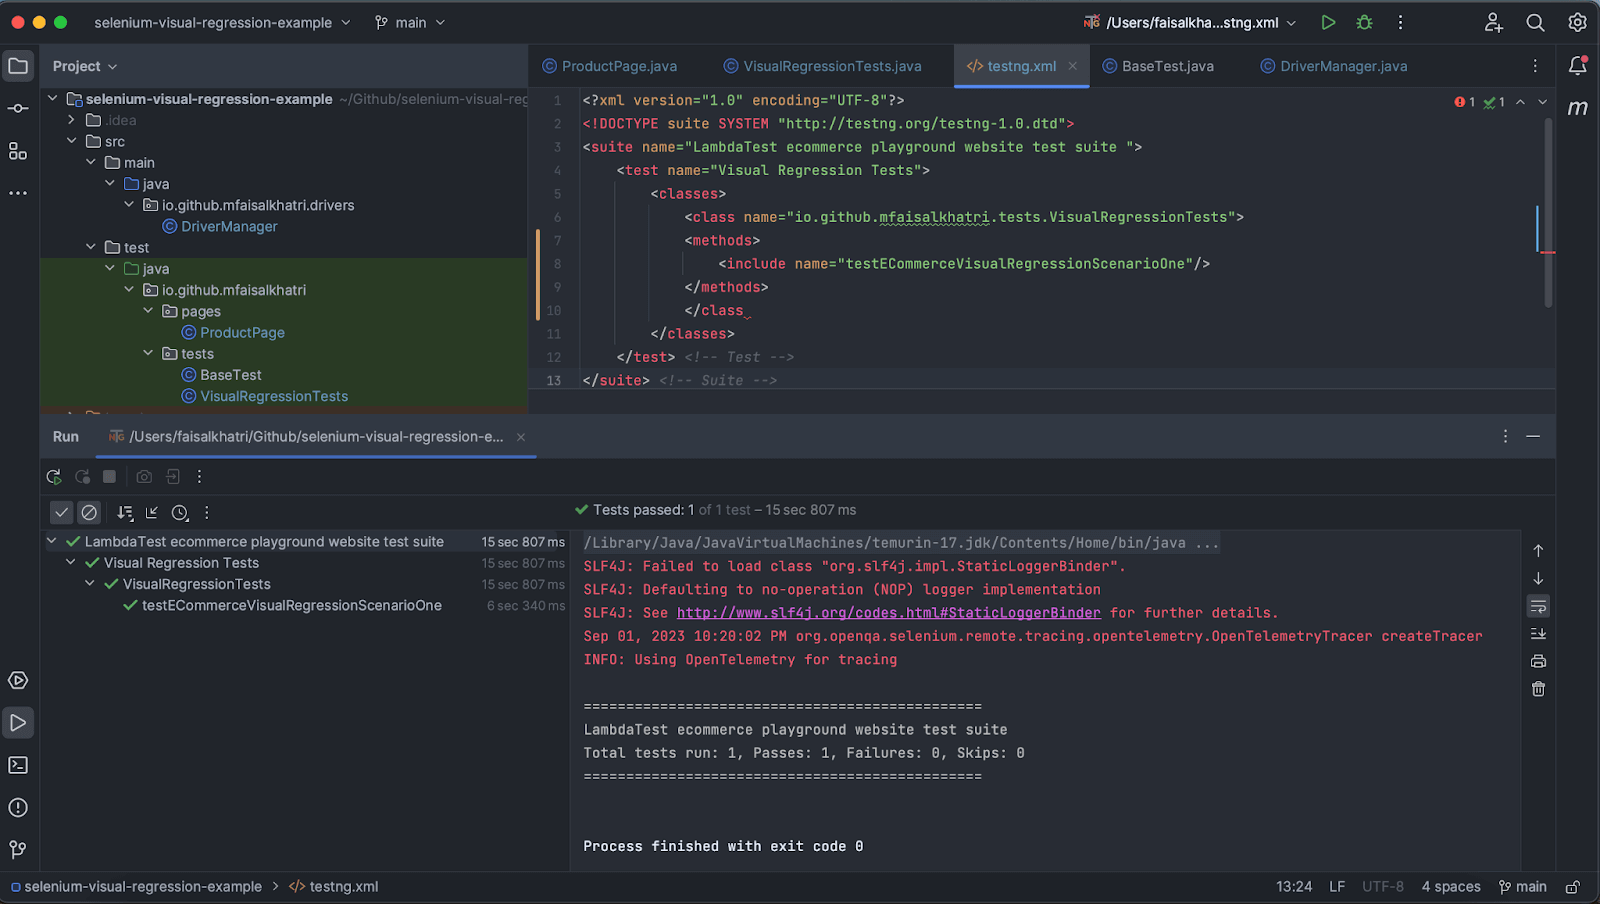
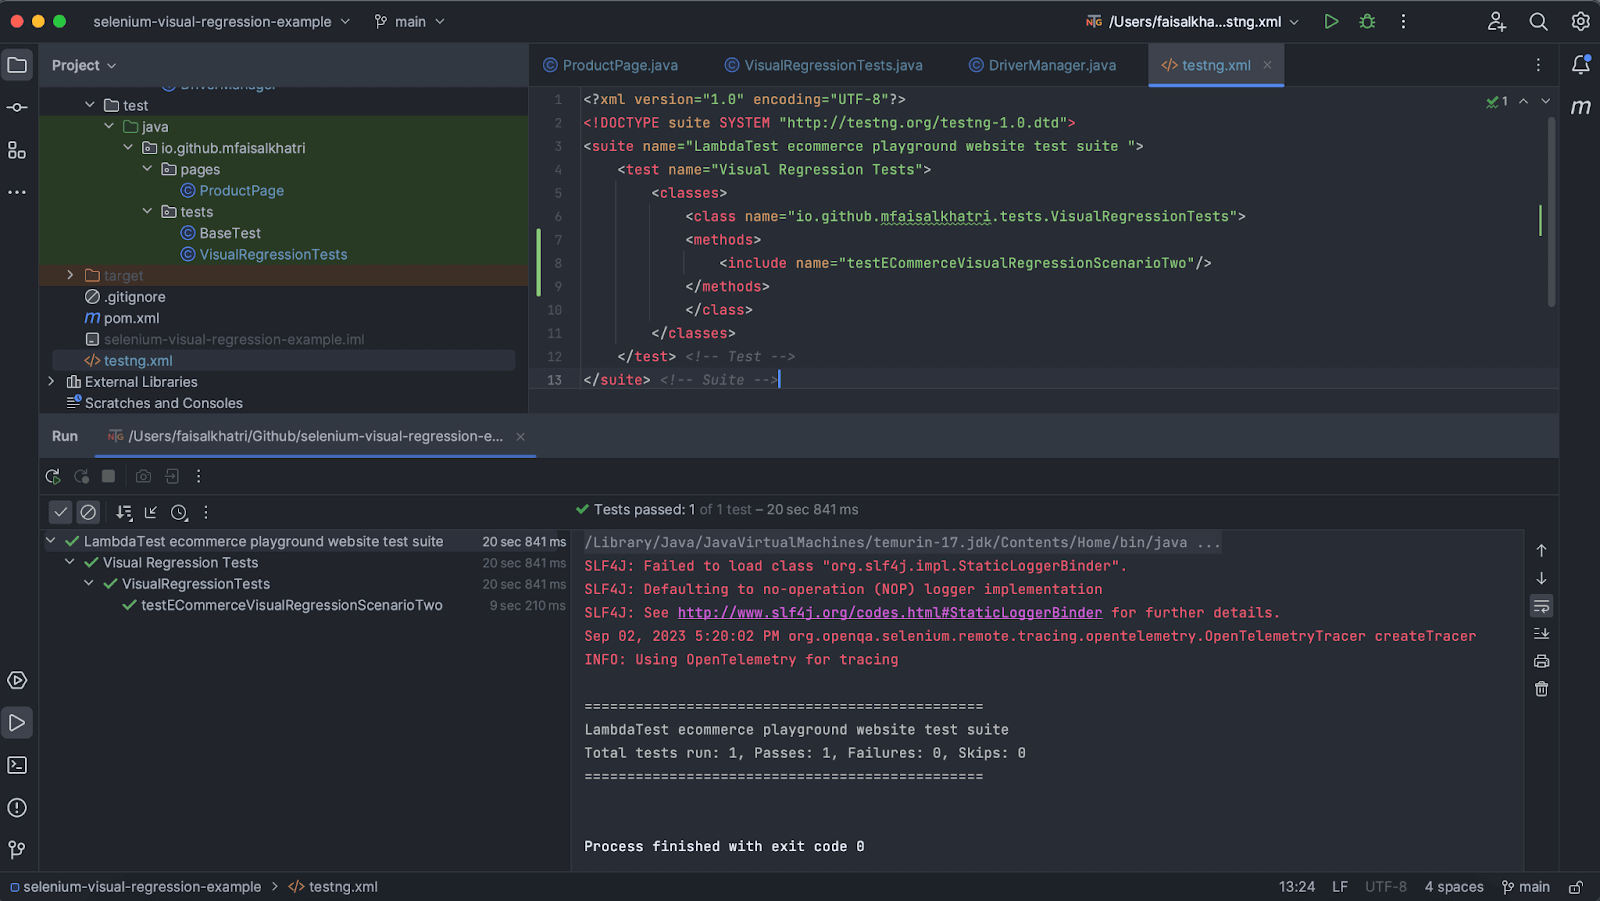
The following testng.xml file is created in the project’s root folder. We will be executing this file to run the test.
|
1 2 3 4 5 6 7 8 9 10 11 12 13 |
<?xml version="1.0" encoding="UTF-8"?> <!DOCTYPE suite SYSTEM "http://testng.org/testng-1.0.dtd"> <suite name="LambdaTest ecommerce playground website test suite "> <test name="Visual Regression Tests"> <classes> <class name="io.github.mfaisalkhatri.tests.VisualRegressionTests"> <methods> <include name="testECommerceVisualRegressionScenarioOne"/> </methods> </class </classes> </test> <!-- Test --> </suite> <!-- Suite --> |
Run the test to upload the Baseline image by right-clicking on the testng.xml file and selecting the option ‘../Run ../testng.xml’
Screenshot of the test execution using IntelliJ:

Baseline image is set in the Smart UI testing platform on LambdaTest cloud grid after the test execution is complete.
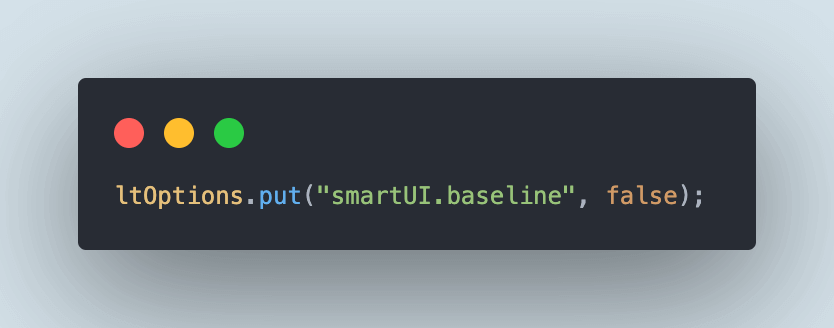
The Baseline image is set, next, to run the comparison, we need to change the createChromeDriverInCloud() method in the DriverManager class by setting the “smartUI.baseline” capability to false.
The second change we require is to update the website URL so it navigates to the Desktop product page before it takes the screenshot.
Run the test again by right-clicking on the testng.xml file. Once this test is executed successfully, LambdaTests’s Smart UI will perform the visual regression and provide us with the results.
The following screenshot shows us the results of Selenium visual regression testing.
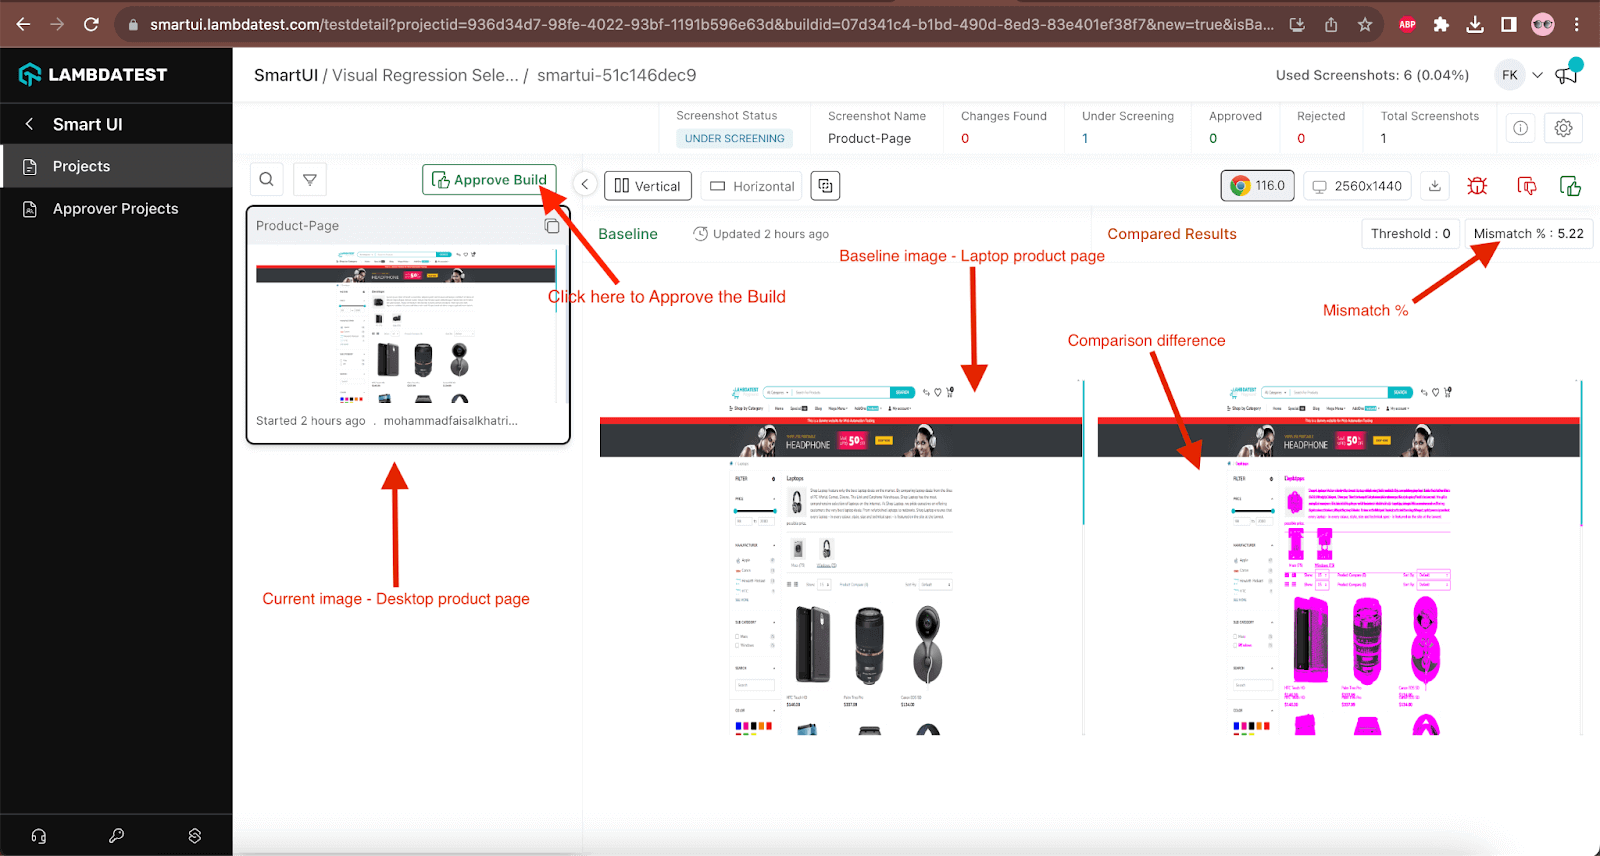
In the above screen, we can see the detailed view of the visual regression where the screenshots of the current image, Baseline image, and their respective difference is shown. We can also see that LambdaTest’s Smart UI provides us with the Mismatch percentage, i.e. 5.22%, by performing the pixel-to-pixel comparison.
The differences between the screenshots are highlighted in pink in the third image. We can Approve the build by clicking on the Approve Build button or Reject it using the Reject button displayed above the Mismatch %.
Implementation [Test Scenario 2]
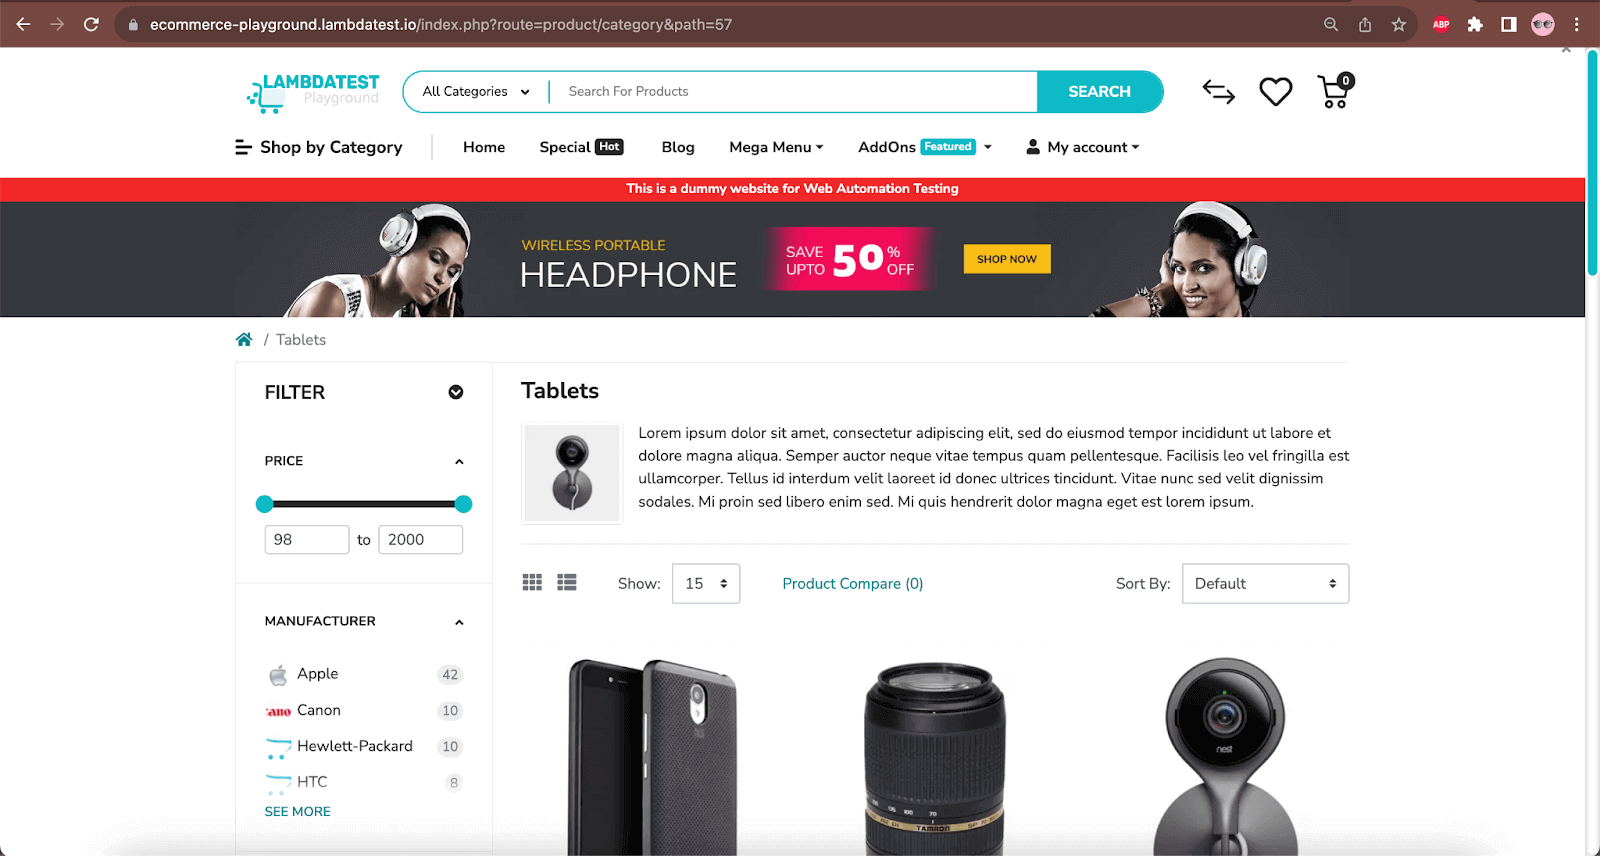
In this scenario, we will perform the visual regression by changing the Baseline image to the Tablets product page and comparing it with the Home page of LambdaTest’s eCommerce playground Website. In this scenario, we will manually set the Baseline image using LambdaTest’s Smart UI.
The following is the screenshot of the Tablets product page.

The following is the Home page of the LambdaTest eCommerce website against which the Tablets product page will be compared in visual regression.
Writing the Tests
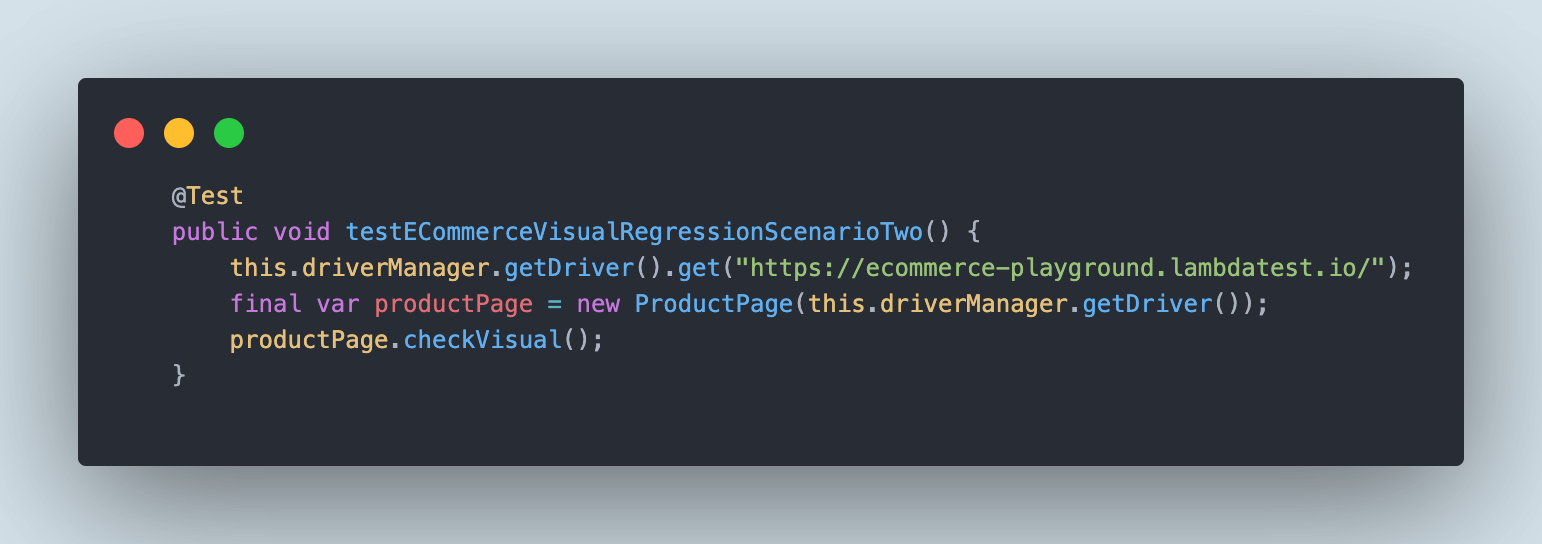
The test method testECommerceVisualRegressionScenarioTwo() is created in the VisualRegressionTests class
|
1 2 3 4 5 6 |
@Test public void testECommerceVisualRegressionScenarioTwo() { this.driverManager.getDriver().get("https://ecommerce-playground.lambdatest.io/index.php?route=product/category&path=57"); final var productPage = new ProductPage(this.driverManager.getDriver()); productPage.checkVisual(); } |
The following line of code will navigate to the Tablets Product page screen.

Next, the ProductPage class is instantiated, and its checkvisual() method is called, which will capture the screenshot of the Tablet product page.

Test Execution
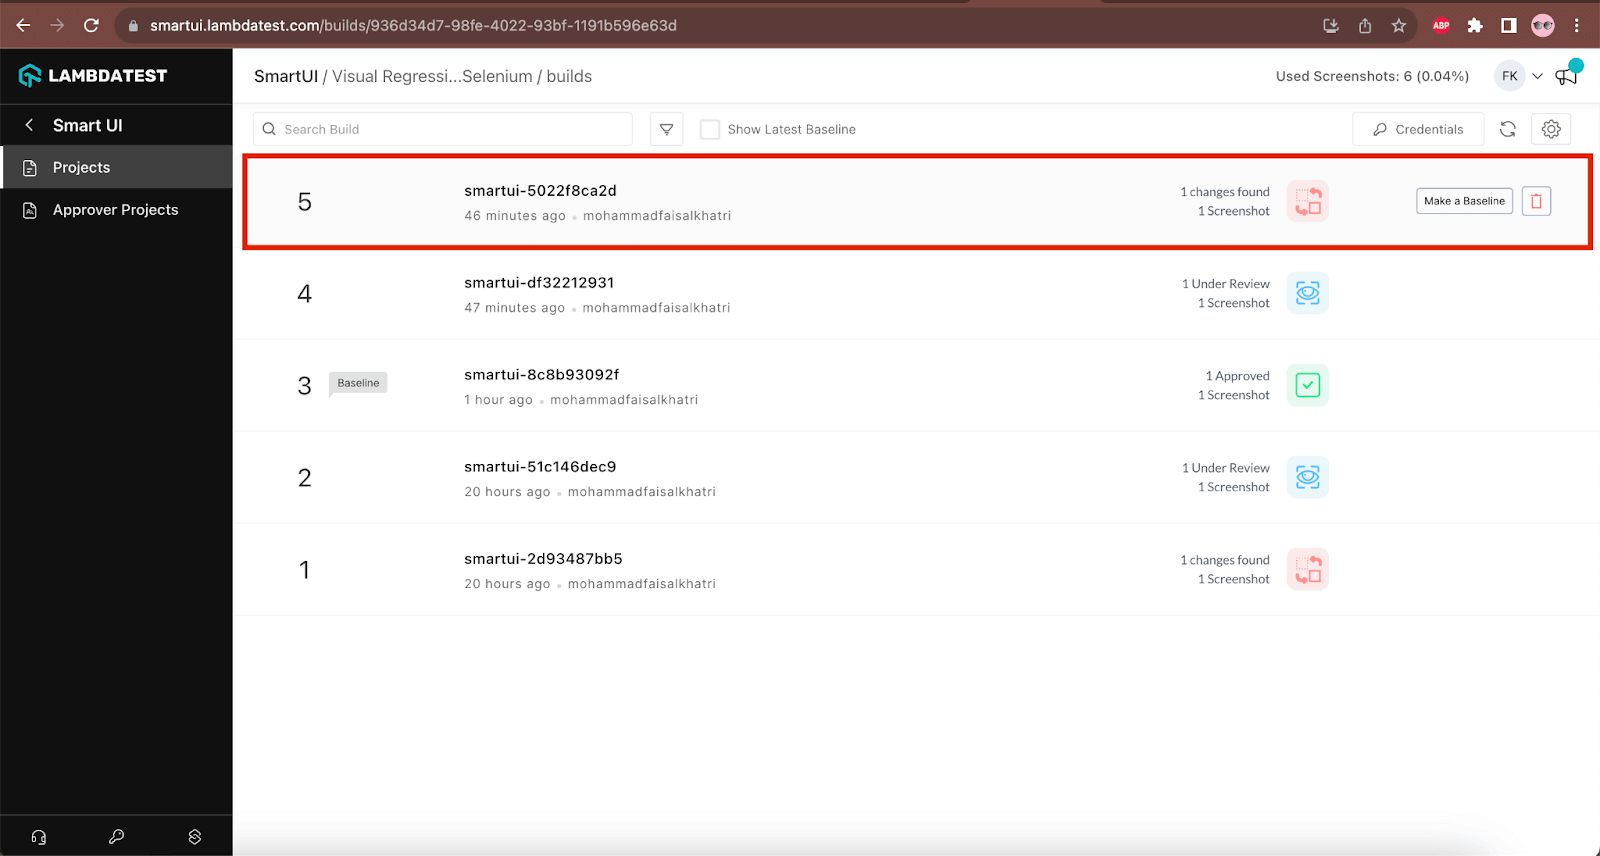
We will be executing this test twice. After the first execution of the test, we will set the Baseline image from the LambdaTest’s Smart UI. The visual regression comparison will be done on the second execution of the test.
The following testng.xml is created to execute the tests.
|
1 2 3 4 5 6 7 8 9 10 11 12 13 |
<?xml version="1.0" encoding="UTF-8"?> <!DOCTYPE suite SYSTEM "http://testng.org/testng-1.0.dtd"> <suite name="LambdaTest ecommerce playground website test suite "> <test name="Visual Regression Tests"> <classes> <class name="io.github.mfaisalkhatri.tests.VisualRegressionTests"> <methods> <include name="testECommerceVisualRegressionScenarioTwo"/> </methods> </class> </classes> </test> <!-- Test --> </suite> <!-- Suite --> |
Here is the screenshot of the test execution from IntelliJ:
After the test execution is complete, we should be able to see the screenshot uploaded to the Smart UI testing tool.
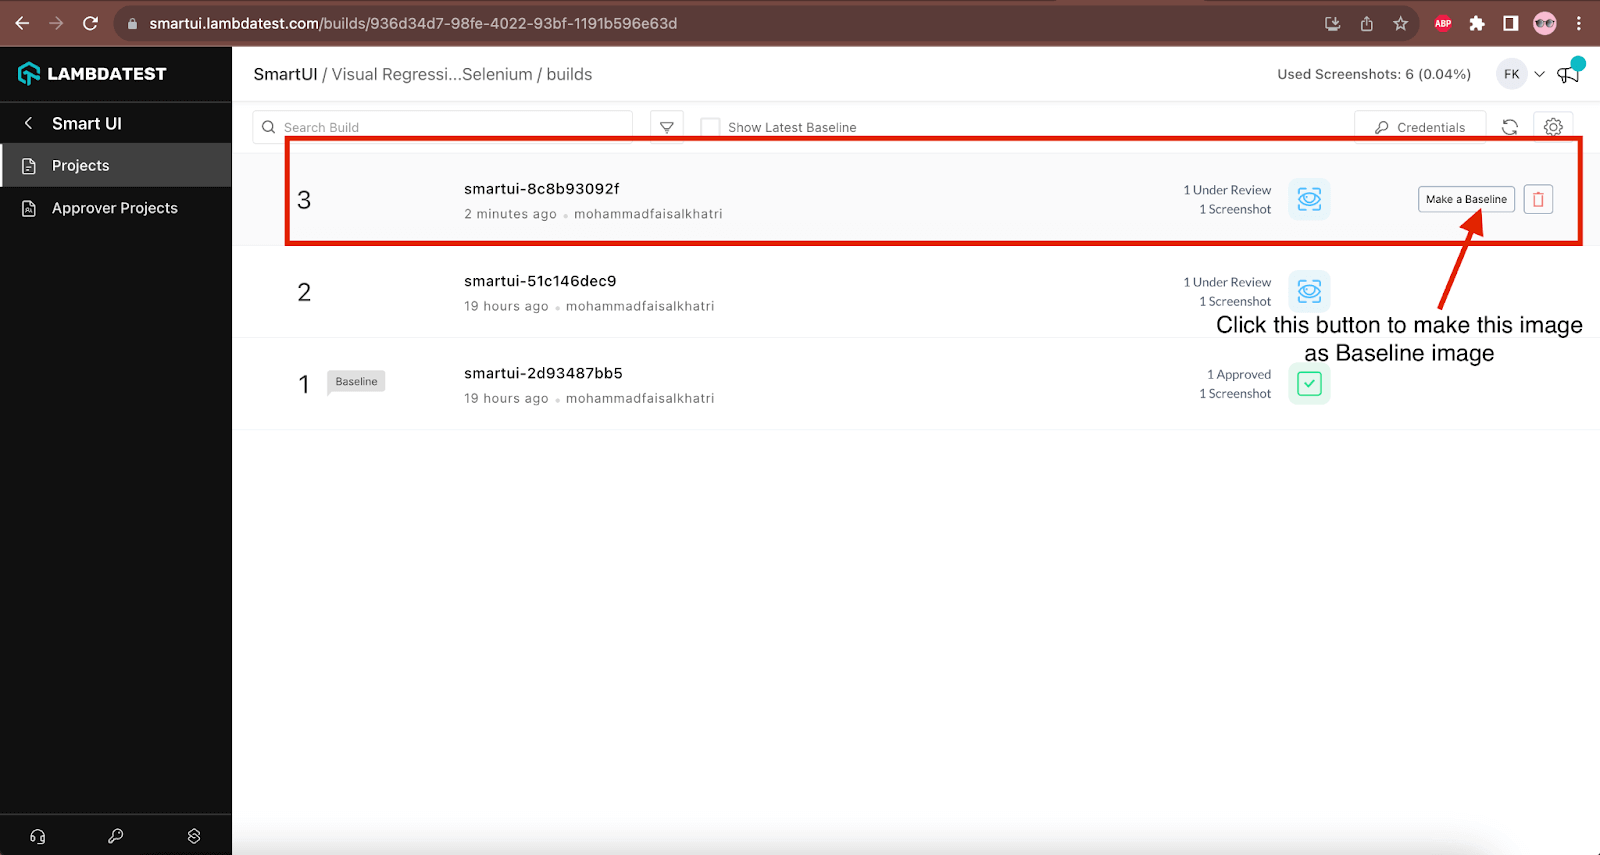
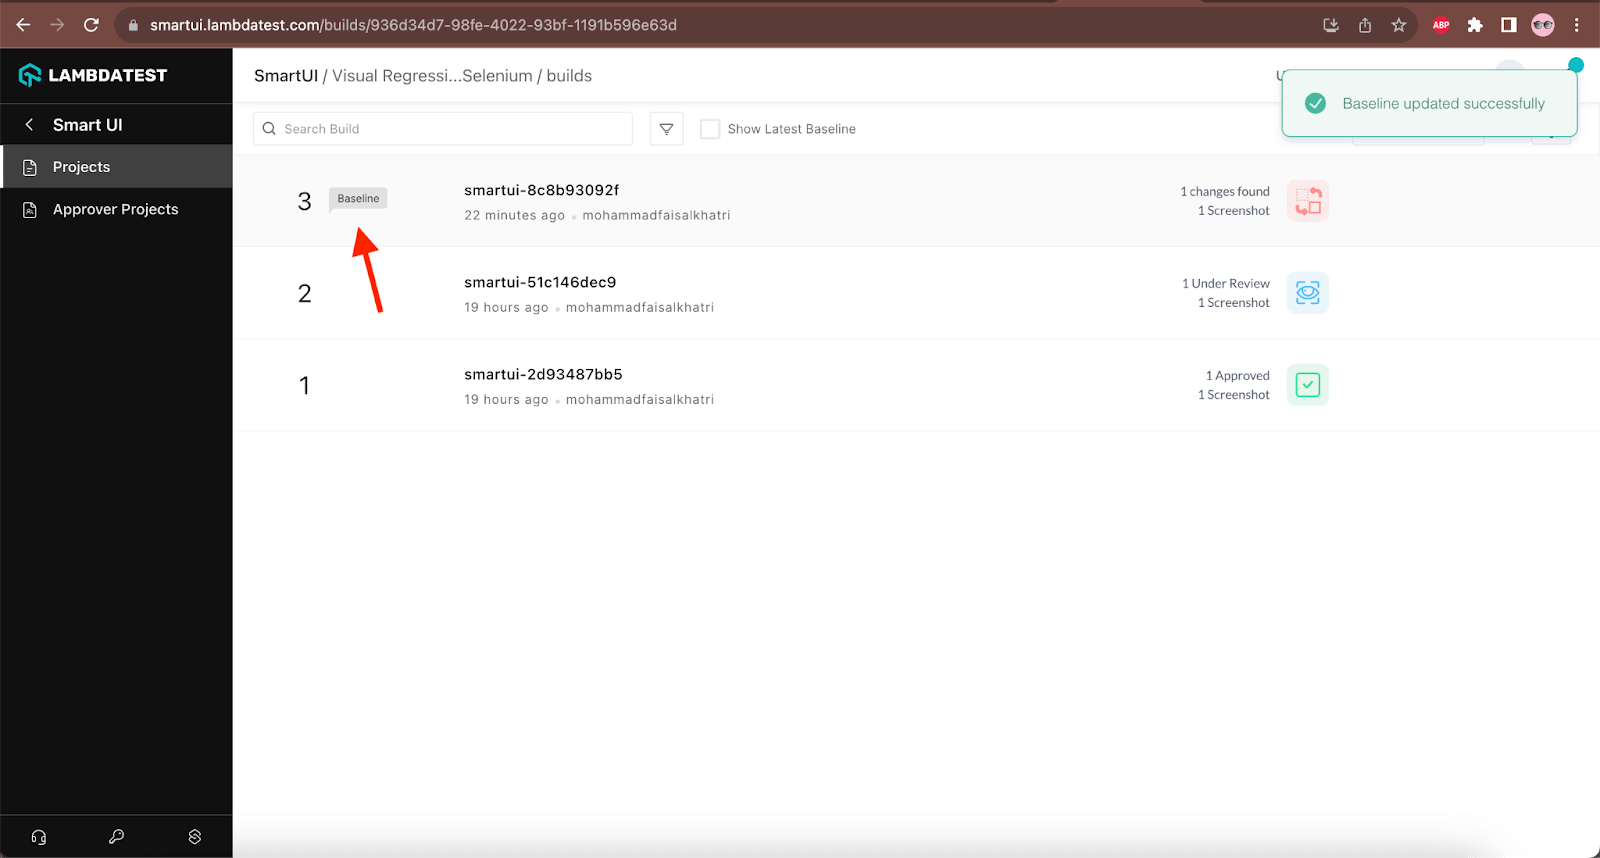
Click on the Make a Baseline button to update the current screenshot of the Tablets product page as a Baseline image for further visual regression tests.
Now, let’s return to the testECommerceVisualRegressionScenarioTwo() and update the URL to navigate the website’s Homepage.
Let’s execute the test using the same testng.xml file again and check the visual regression testing on the Smart UI.
After the test execution is complete, we should be able to see the screenshot uploaded to the LambdaTest’s Smart UI.
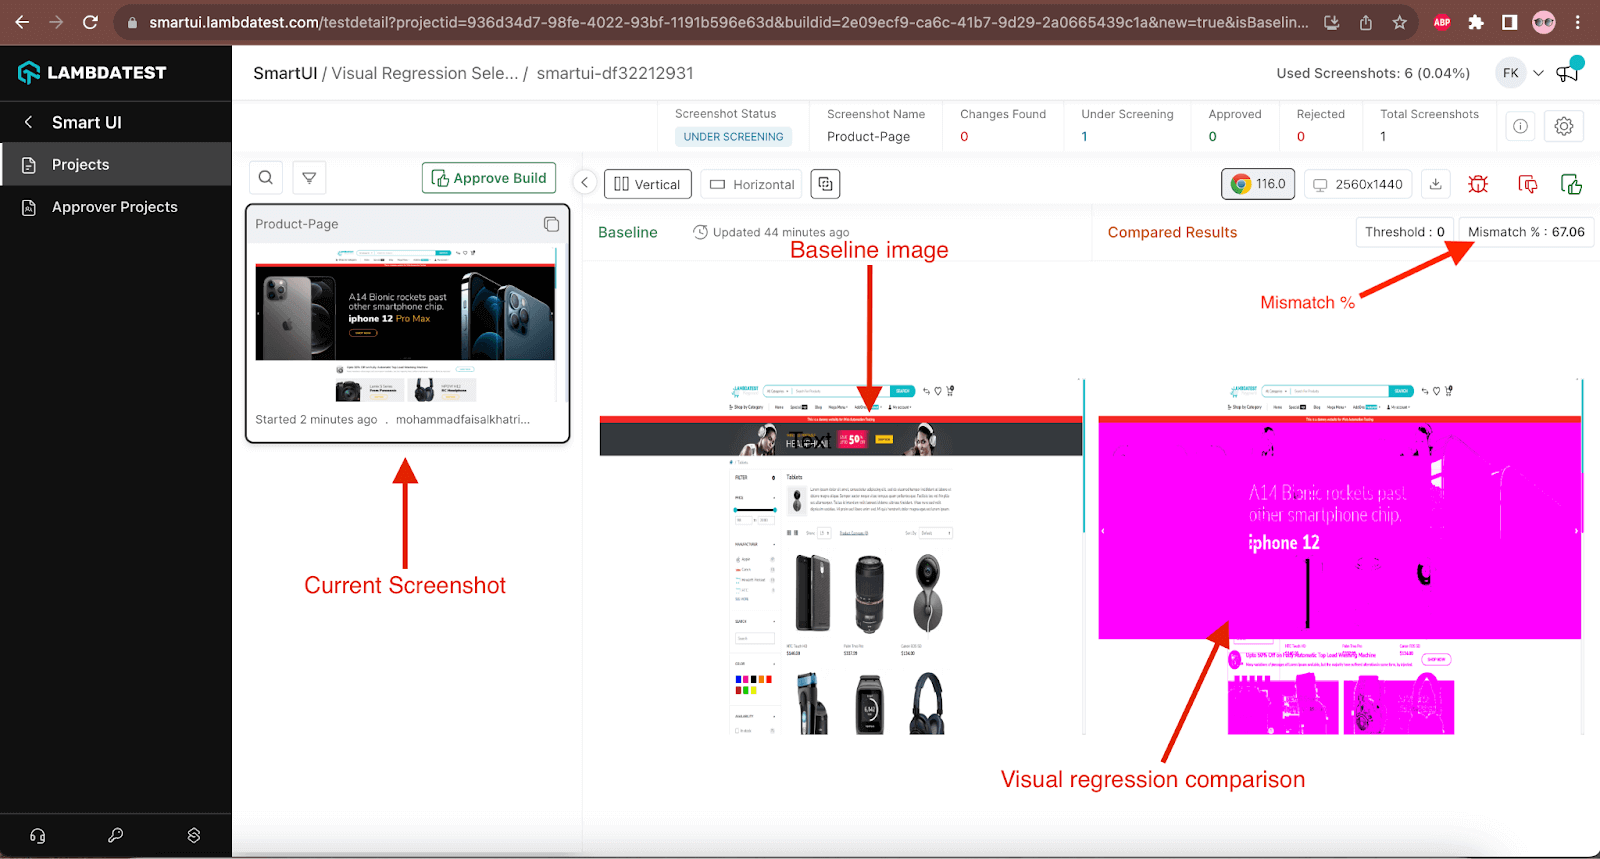
It can be seen in the image above the visual regression comparison shows a major difference of 67.06% between the Baseline image and the current image screenshots.
By running the above tests, it can be confirmed that visual regressions can help us catch the User Interface level bugs and correct them before it gets leaked into the production. It can also help in improving the overall User Experience.
Final Thoughts
Visual regression is the key to improving the overall User Experience and helps identify the UI-level issues. As we saw in the demonstration, it can highlight the granular differences by performing pixel-to-pixel comparisons. Thus making Software Developer’s and Software Tester’s lives easier.
In my experience, Selenium visual regression testing should be made a part of the Unit Test stage in the automated pipeline to get faster feedback on the User Interface, as it is the first thing that is seen by the end users. Faster feedback on the UI will help fix the issues early and help build the product’s quality.
Frequently Asked Questions (FAQs)
What is visual testing in Selenium?
In Selenium, visual testing refers to capturing and comparing visual elements or screens of a web application to detect any differences or visual regressions between different versions. This ensures the application’s user interface remains consistent and visually correct across various browsers, devices, or releases. Visual testing tools in Selenium capture screenshots and perform image comparisons to identify any unexpected visual discrepancies.
Can Selenium test images?
Selenium is primarily designed to test web applications and interact with web elements, such as buttons, text fields, and links. It doesn’t have built-in capabilities for testing images directly.
However, Selenium can indirectly test images because it can interact with web elements that display images, such as validating whether images are present, checking the attributes of image elements (e.g., alt text), or verifying that images load correctly. Selenium can also capture screenshots of web pages, which can be somewhat used for visual testing.
To perform more in-depth image testing, such as comparing the actual content of images or verifying specific image characteristics, you may need to use additional libraries or tools alongside Selenium, such as image processing libraries or specialized visual testing tools. These tools can help you analyze and validate images more comprehensively.
Can we test video in Selenium?
Selenium is primarily designed for automating interactions with web elements in a web browser, and it doesn’t have built-in capabilities for directly testing video content. However, you can perform video-related testing tasks indirectly using Selenium and other tools and techniques.
- Video Playback Testing: You can use Selenium to interact with video player controls on a web page, such as play, pause, volume control, and full-screen mode. This allows you to automate user interactions with video players and verify that the controls work as expected.
- Video Element Verification: Selenium can help you verify that video elements (HTML < video > tags) are present on a web page, and you can also check attributes like the source URL, poster image, and playback settings.
- Video Load and Buffering Testing: You can automate scenarios to ensure that videos load properly, buffer without issues, and play smoothly without interruptions.
- Capturing Video Screenshots: Selenium can capture screenshots of web pages, including video frames. This can be useful for visual testing to verify that the video content appears correctly on the web page.
- Network Traffic Analysis: You can use Selenium with browser developer tools to monitor and analyze network requests related to video streaming. This can help you identify issues with video content delivery.
For more comprehensive video testing, especially for verifying video content itself (e.g., checking video quality, content accuracy), you may need to use specialized video testing tools and libraries in addition to Selenium.


Author’s Profile
Faisal Khatri
Faisal is a Software Testing Professional having 14+ years of experience in automation as well as manual testing. He is a QA, freelancer, blogger and open source contributor. He loves learning new tools and technologies and sharing his experience by writing blogs.
Blogs: 40
Got Questions? Drop them on LambdaTest Community. Visit now


