
Automating Flutter Apps Using Appium Flutter Driver With Java
Faisal Khatri
Posted On: February 6, 2024
![]() 146551 Views
146551 Views
![]() 27 Min Read
27 Min Read
Mobile users worldwide have been constantly increasing over the recent years. Mobile applications have enabled the delivery of daily-use goods to luxury commodities at the customers’ doorstep.
As per Statista, mobile app downloads increased to 255 billion in 2022, up by more than 80 percent from 140.7 billion app downloads in 2016. Users downloaded almost 77 billion mobile applications worldwide during the first half of 2023.
The growing demand for mobile applications necessitates continuous development of robust frameworks that enable quick and adaptable mobile app creation, keeping pace with rapidly evolving business needs.
There are many native mobile application development frameworks, like React Native, Ionic, Xamarin, Swift, etc., that are popular and trending in the market. Flutter is the latest addition to these frameworks that support building cross-platform application development. As shown below, Flutter has gained immense popularity compared to other cross-platform mobile app testing frameworks available in the market!

For faster feedback on the build quality, it is recommended to perform automation testing as it can provide accurate results on executing the same tests multiple times.
In this Appium testing tutorial, we will learn to test the Flutter mobile application using the Appium Flutter Driver with Java. We will also deep dive into installing Flutter, using Inspector, and writing mobile automation tests using Appium. To delve deeper into the realm of Appium, explore our dedicated hub focusing on Appium Interview Questions.
TABLE OF CONTENTS
What is Flutter?
Flutter is Google’s cross-platform open-source mobile development framework for developing Android and iOS applications using a single code base. Introduced in May 2017, it is a comprehensive framework encompassing widgets, a rendering engine, testing and integration tools, and APIs. This all-inclusive framework empowers developers to build and deploy mobile applications effortlessly.
Since its launch, it has proven to be a great cross-platform framework that can be used to develop high-quality applications that look like native Android and iOS apps. Examples of applications built using Flutter include Google, Alibaba, and many others.
Flutter is a convenient toolkit that is easy for creating animations and high-quality UI components. It has 250.9K followers over X (earlier Twitter), 160K Stars on GitHub, and 124K followers on Reddit. When writing this blog, the latest version of Flutter is 3.16.
Different types of mobile applications
There are three different types of mobile applications:
- Native mobile app
- Mobile web app
- Hybrid mobile app
What are native mobile applications?
Native mobile applications are developed specifically for the phone’s operating system. Almost 98% of the phones run on either Android or iOS. These applications are installed on the device and store the data on it. These applications have access to essential phone peripherals like cameras, GPS, microphones, and more.
While developing native Android applications, developers commonly use languages like Kotlin or Java, while the development of iOS applications typically involves languages such as Swift and Objective-C. Some native mobile applications include the Calculator app, Google Maps, and popular games like Pokémon GO.
What are mobile web applications?
Mobile web applications are web applications that are optimized for mobile screen(s). They are websites written in HTML/CSS, run by a browser, and aren’t mobile applications.
These applications don’t need to be downloaded and installed on the phone. It can access a limited amount of the device’s native features and information like geolocation, media, etc. Examples of mobile web applications include the Uber app and shopping websites like amazon.com. These websites can run on the mobile browser and perform all the functions like a mobile application.
What are hybrid mobile applications?
Hybrid applications combine elements of both Native and Web applications. The core application is built using web technologies like HTML, CSS, and JavaScript and then wrapped within a native application.
The app is run within a native application and its embedded browser rather than being shown using a mobile browser. An Android application uses the WebView element to display the app, while the iOS application uses the WKWebView for the same function.
In short, Hybrid Mobile app = Native app + Mobile Web app. Examples of Hybrid applications include Facebook, Twitter, LinkedIn and Instagram.
Testing Flutter applications v/s Native applications
Assessing native applications is straightforward, thanks to the availability of tools and frameworks designed for conducting unit testing on these applications.
The Espresso framework by Android can be used to test native Android applications. Similarly, the XCTest framework can be used to test iOS applications. Over and above these frameworks, other mobile app testing tools like WebdriverIO and Appium are popular and used for testing mobile applications thoroughly. Recently, Appium released a 2.0 version with more advanced features, making it a more robust framework.
For testing the Flutter app, the flutter_driver that comes pre-installed with Flutter SDK can be used to write automated tests. However, the problem in using flutter_driver is that the test engineer should be well versed in Dart programming language to write tests using flutter_driver.
Flutter applications can be automated using the Appium Flutter Driver, developed by the Appium community. With the Appium Flutter Driver, there is no need to get exposure to the Dart programming language. The automation tests of the Flutter application can be written in Java, JavaScript, Python, etc., the languages supported by the Appium framework.
To automate any mobile application, we need to locate the selectors that can be used to locate the mobile elements on the application and interact with them. The Appium Inspector tool cannot be used to find the Flutter application’s selectors.
The Flutter Widget Inspector tool can visualize and explore Flutter widget trees and help understand the existing layouts. We will also require help from developers and ask them to add the respective locators in the application so that they can be used in the automated tests to interact easily with the mobile elements.
The following is a summarized list that shows the difference between testing the Native and Flutter applications:
| Criteria | Flutter App | Native App |
| Programming language | Dart | Java, Kotlin, Swift, Objective-C |
| Unit testing frameworks | flutter_driver | Espresso for Android and XCTest for iOS |
| Drivers used for Android app automation | Appium Flutter Driver | Appium UIAutomator2 driver, Appium Espresso Driver |
| Drivers used for iOs app automation | Appium Flutter Driver | Appium XCUITest Driver |
| Locating and Inspecting the elements tool | Flutter Widget Inspector | Appium Inspector |
| Access to Codebase | Required for using Flutter Widget Inspector | Not Required |
| Locator Strategies | Using Appium Flutter Finder, the following can be used: 1. byValueKey (String key) 2. byValueKey (int key) 3. byToolTip (String toolTipText) 4. byType (String type) 5. byText (String input) 6. byAncestor (FlutterElement of, FlutterElement matching, boolean matchRoot, boolean firstMatchOnly) 7. byDescendant (FlutterElement of, FlutterElement matching, boolean matchRoot, boolean firstMatchOnly) 8. bySemanticsLabel (String label) 9. bySemanticsLabel (Pattern label) |
For Android: 1. Accessibility ID 2. ClassName 3. ID 4. UISelector 5. XPath (not recommended) For iOS: 1. Test ID 2. iOS Class Chain 3. iOS Predicate String 4. XPath (not recommended) |
Let’s dive deep into how to perform automated Flutter testing using the Appium Flutter Driver with Java.
Getting started with Flutter
As we learned in the earlier section of this blog on using Appium Flutter Driver with Java, Appium Inspector cannot inspect and locate the Flutter application’s mobile elements. Hence, we need a Flutter Widget Inspector for it.
In this section, we will learn about downloading and installing Flutter SDK. Next, we will check out a Flutter sample app and update the required settings in Android Studio. Finally, we will run the Flutter app on the Android emulator and check out the Flutter Widget Inspector.
We need access to the Flutter application’s code base for running the Flutter Widget Inspector. The following steps will help us install Flutter on the local machine.
Downloading and Installing Flutter SDK
You can download Flutter SDK from Flutter’s official website for Windows, macOS, Linux, and ChromeOS platforms.
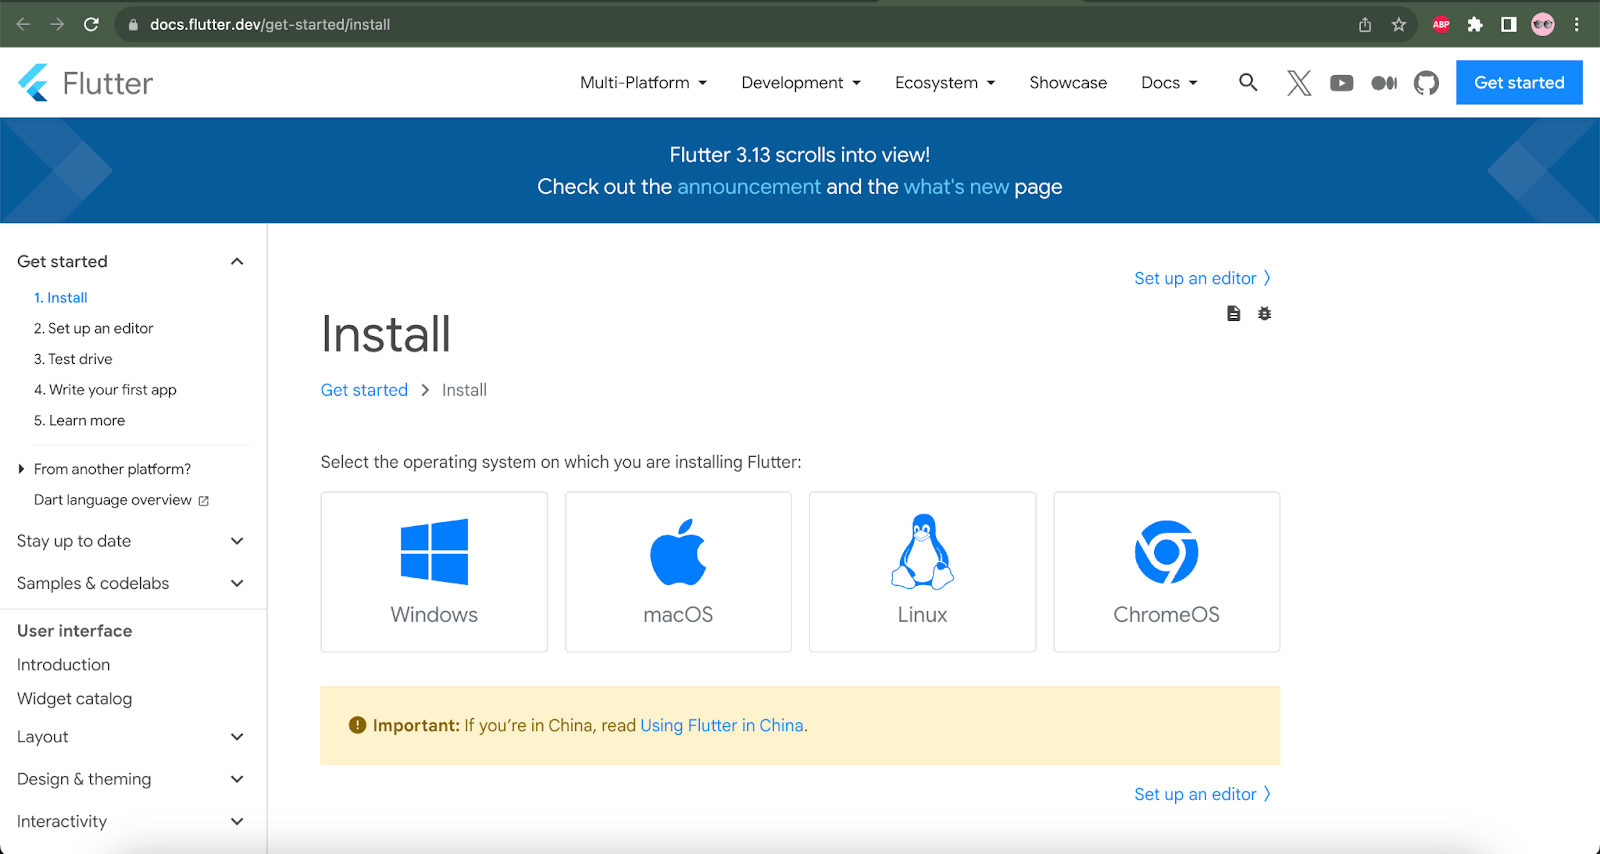
I am currently using macOS, so I will be clicking on the macOS box and navigating to the download page for further installation steps on macOS.
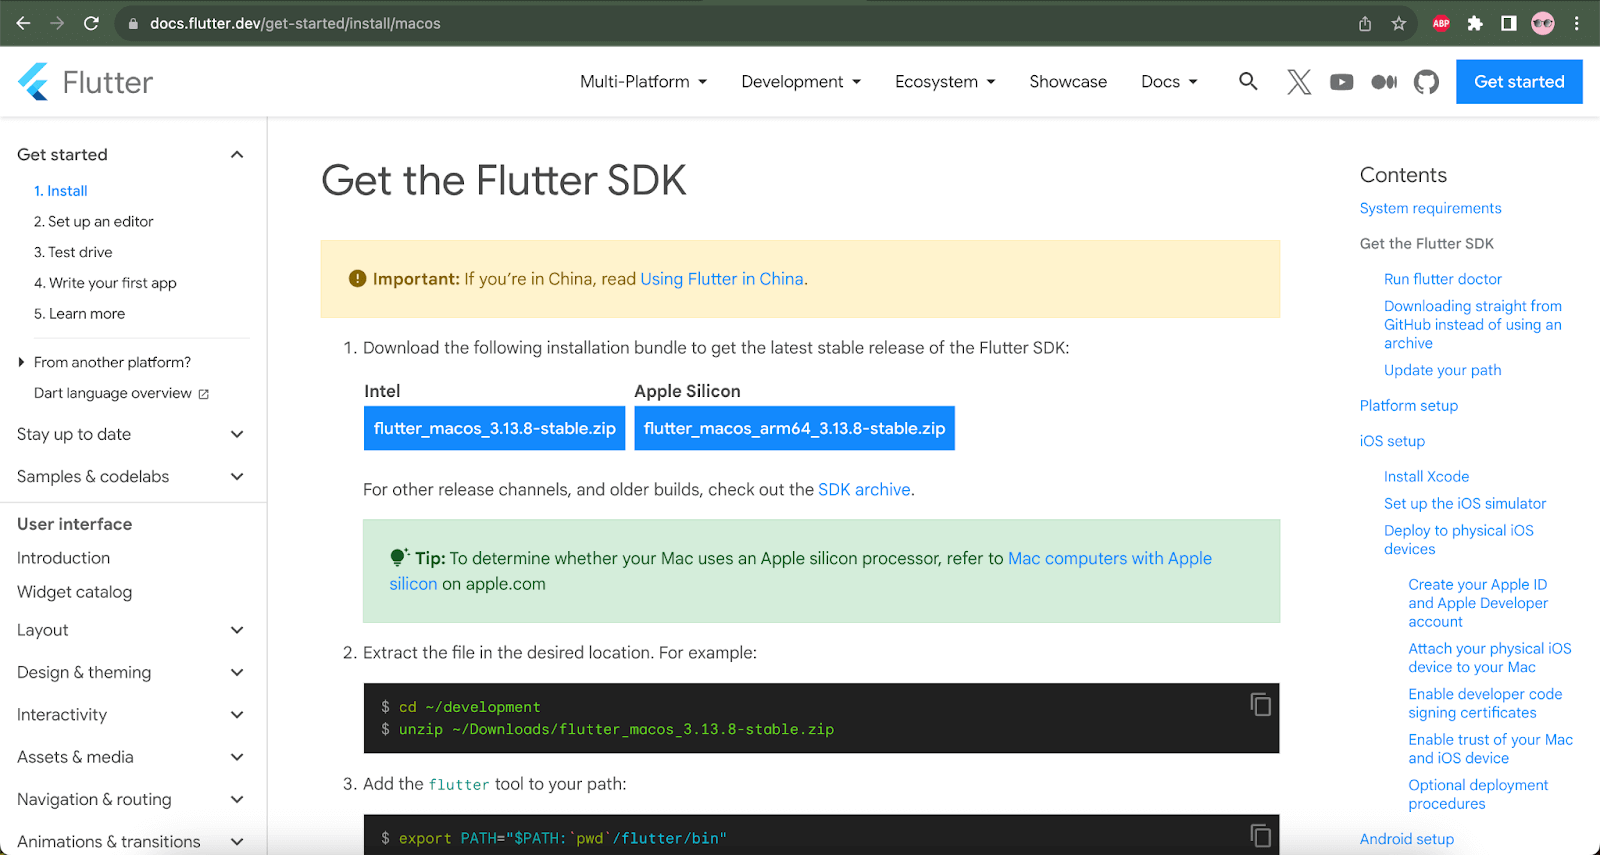
On the macOS installation details page, I will select and download the Apple Silicon zip file, as I currently use the Macbook Pro with an M2 chip. Another zip file for Macs with Intel chips can also be used.
Once the zip file is downloaded, we must perform the following steps to install Flutter SDK on the local machine:
- Extract the downloaded zip file.
- Setting the Environment variable for Flutter.
- Run Flutter Doctor.
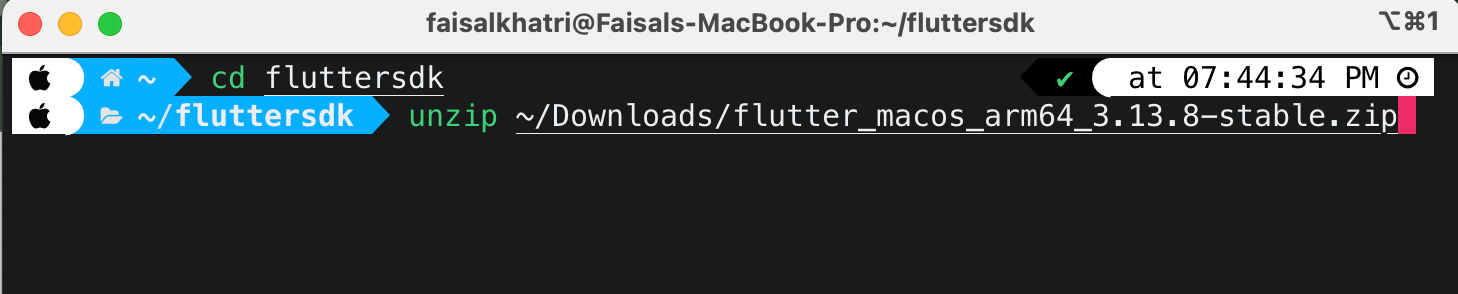
Let’s create a new folder named “fluttersdk” to extract the Flutter SDK files.
To unzip the files, we can make use of the following command:
unzip < file path where the flutter zip file is downloaded >
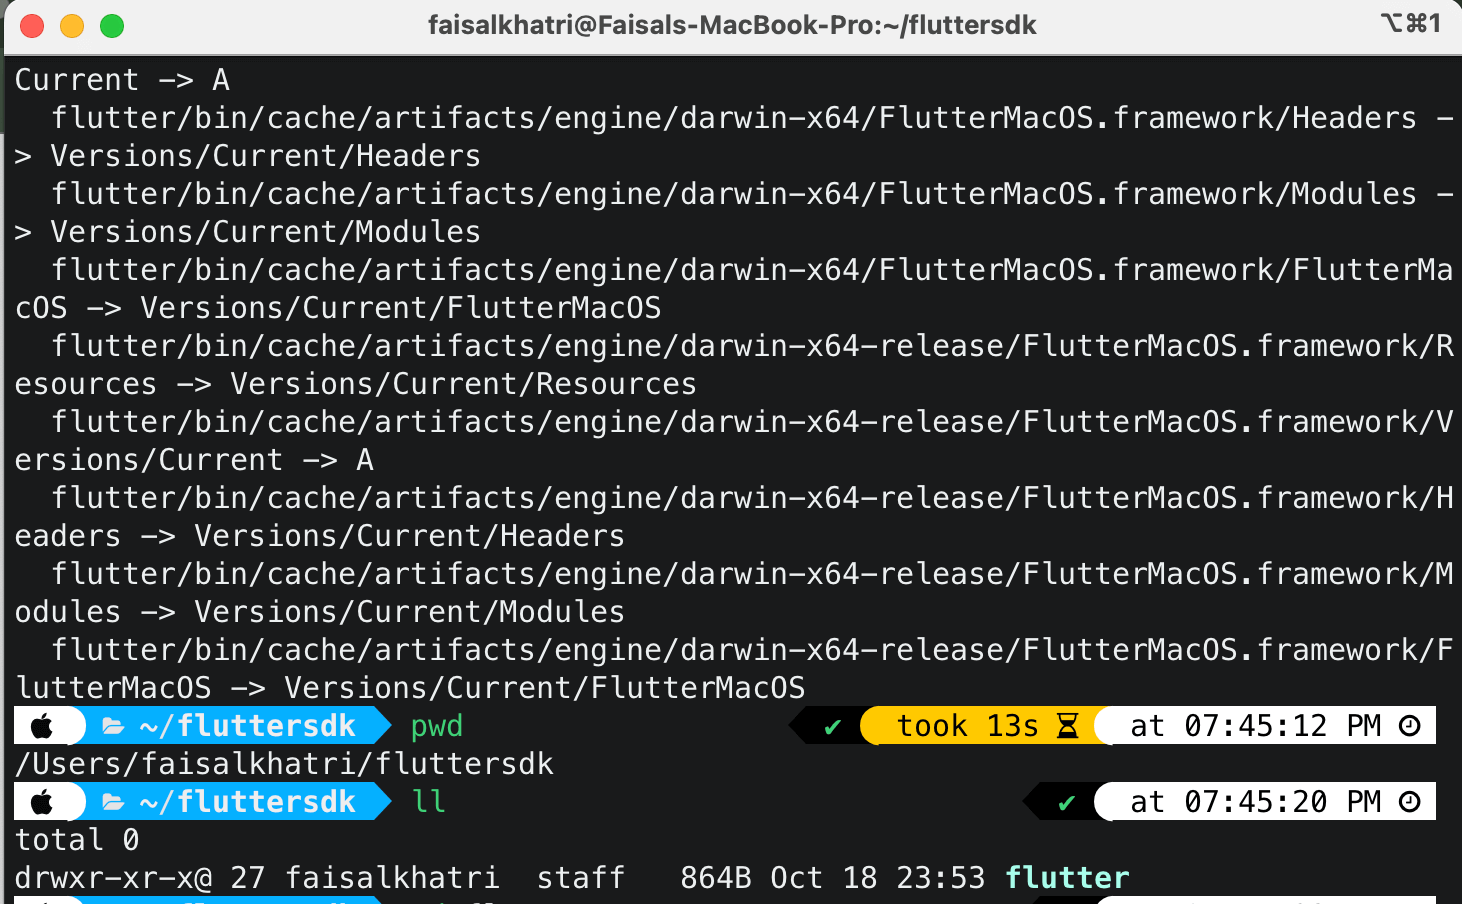
The following screenshot shows that the extraction of the Flutter SDK files is complete:
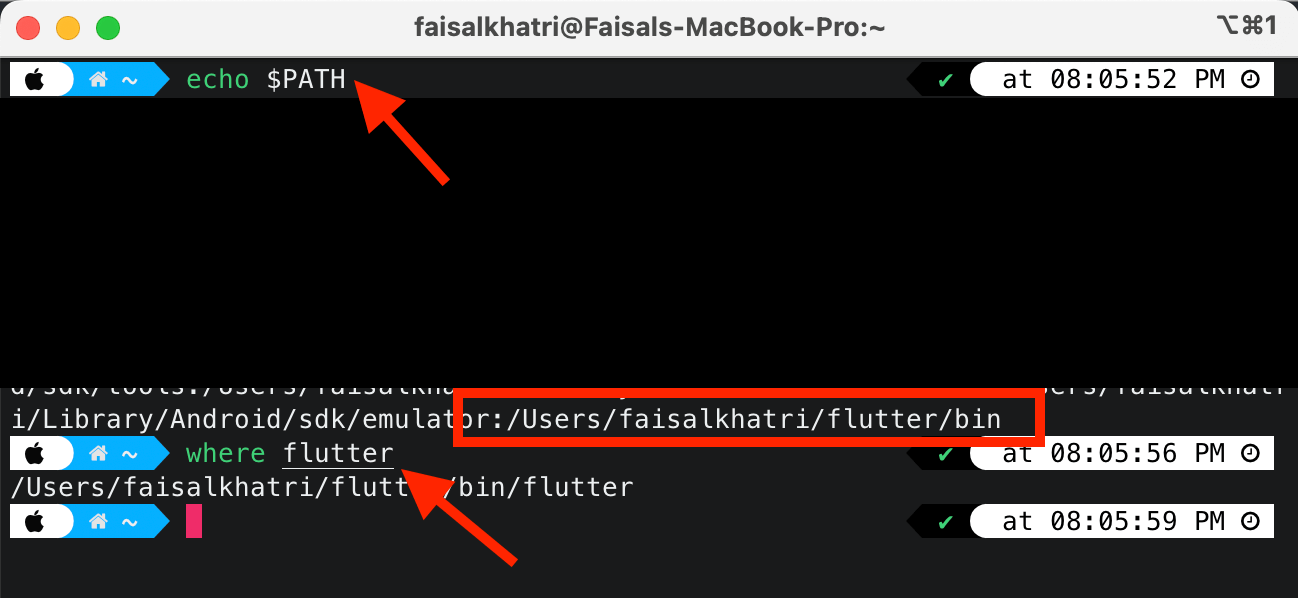
To set the environment variable path, open the terminal and update the path as mentioned in the screenshot below. Change the [PATH_OF_FLUTTER_GIT_DIRECTORY] to the path where the Flutter SDK files were extracted.

For example, I have extracted the Flutter SDK files to /Users/faisalkhatri/flutter/bin, so the path will be as follows:

Once the path is exported successfully, we can confirm the Flutter path update using the following commands:
Flutter Doctor is created to diagnose the developer’s computer and provide information on whether the Flutter setup is correct. It ensures that Flutter is ready to use. It also provides information on whether a new version is available for upgrade.

After completing the Flutter SDK installation, let’s clone the Flutter sample mobile app.
Cloning the Flutter sample mobile app
With the help of the following command, the Flutter sample repository can be cloned.
|
1 |
git clone git@github.com:flutter/samples.git |
Opening the Flutter sample application in Android Studio
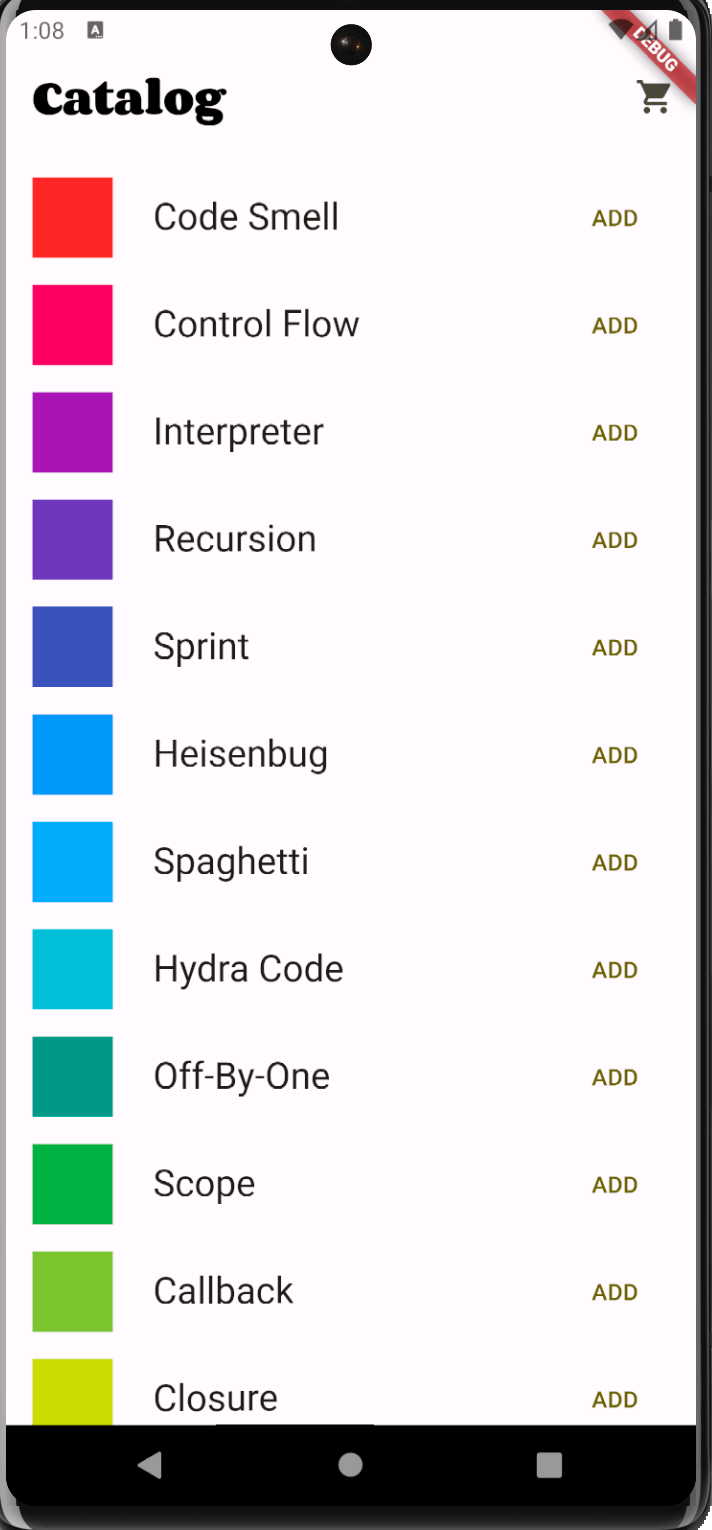
The Provider Shopper sample Flutter application will be used for test automation.
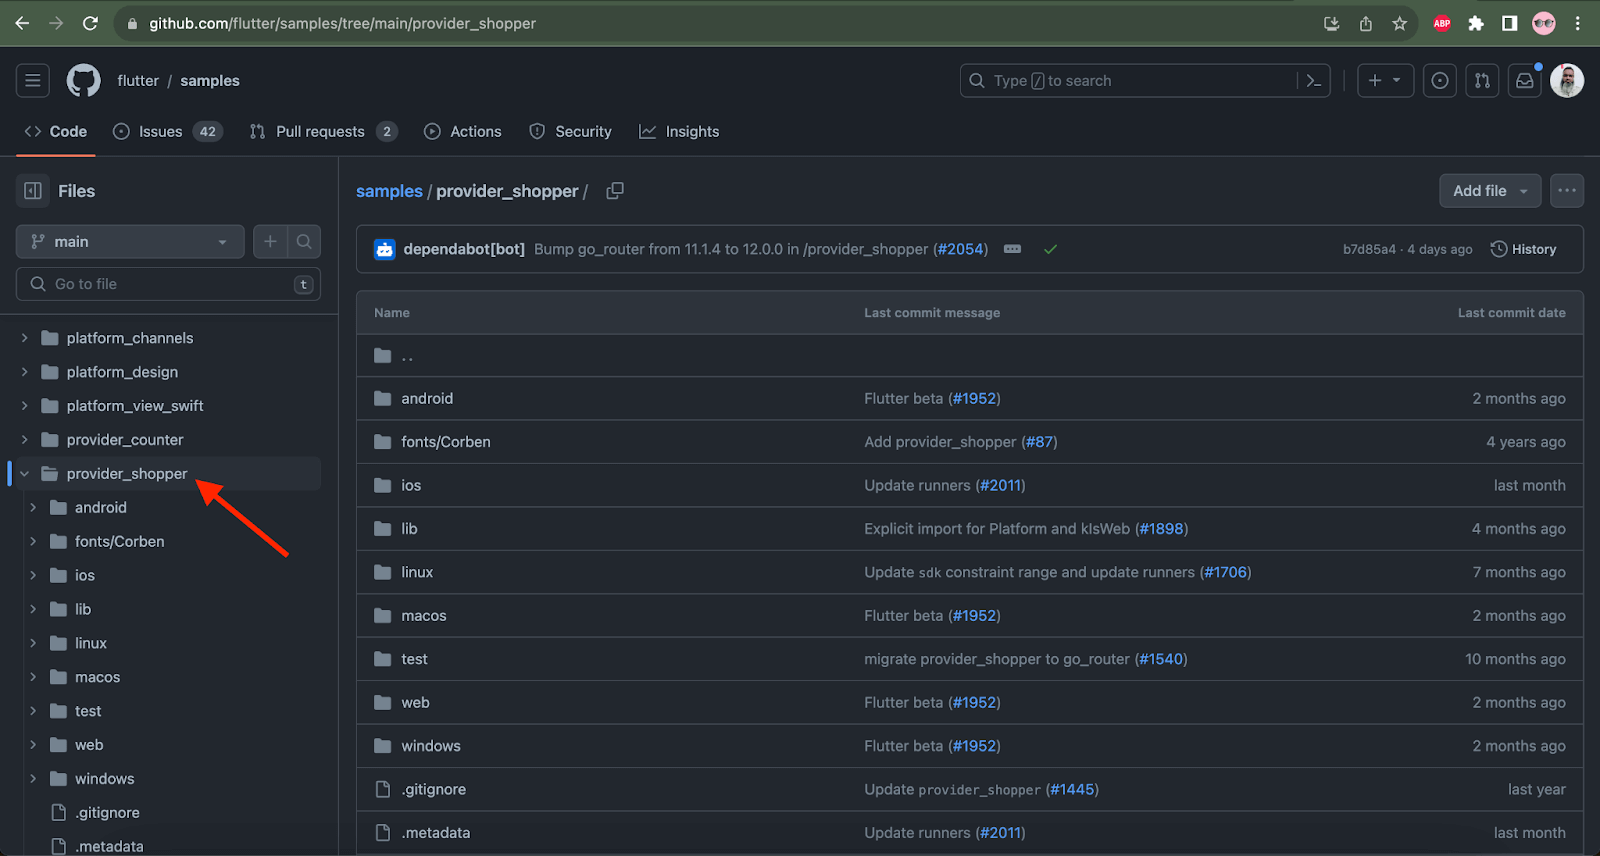
Open the project in the Android Studio app after the successful cloning of the sample project repository is complete.
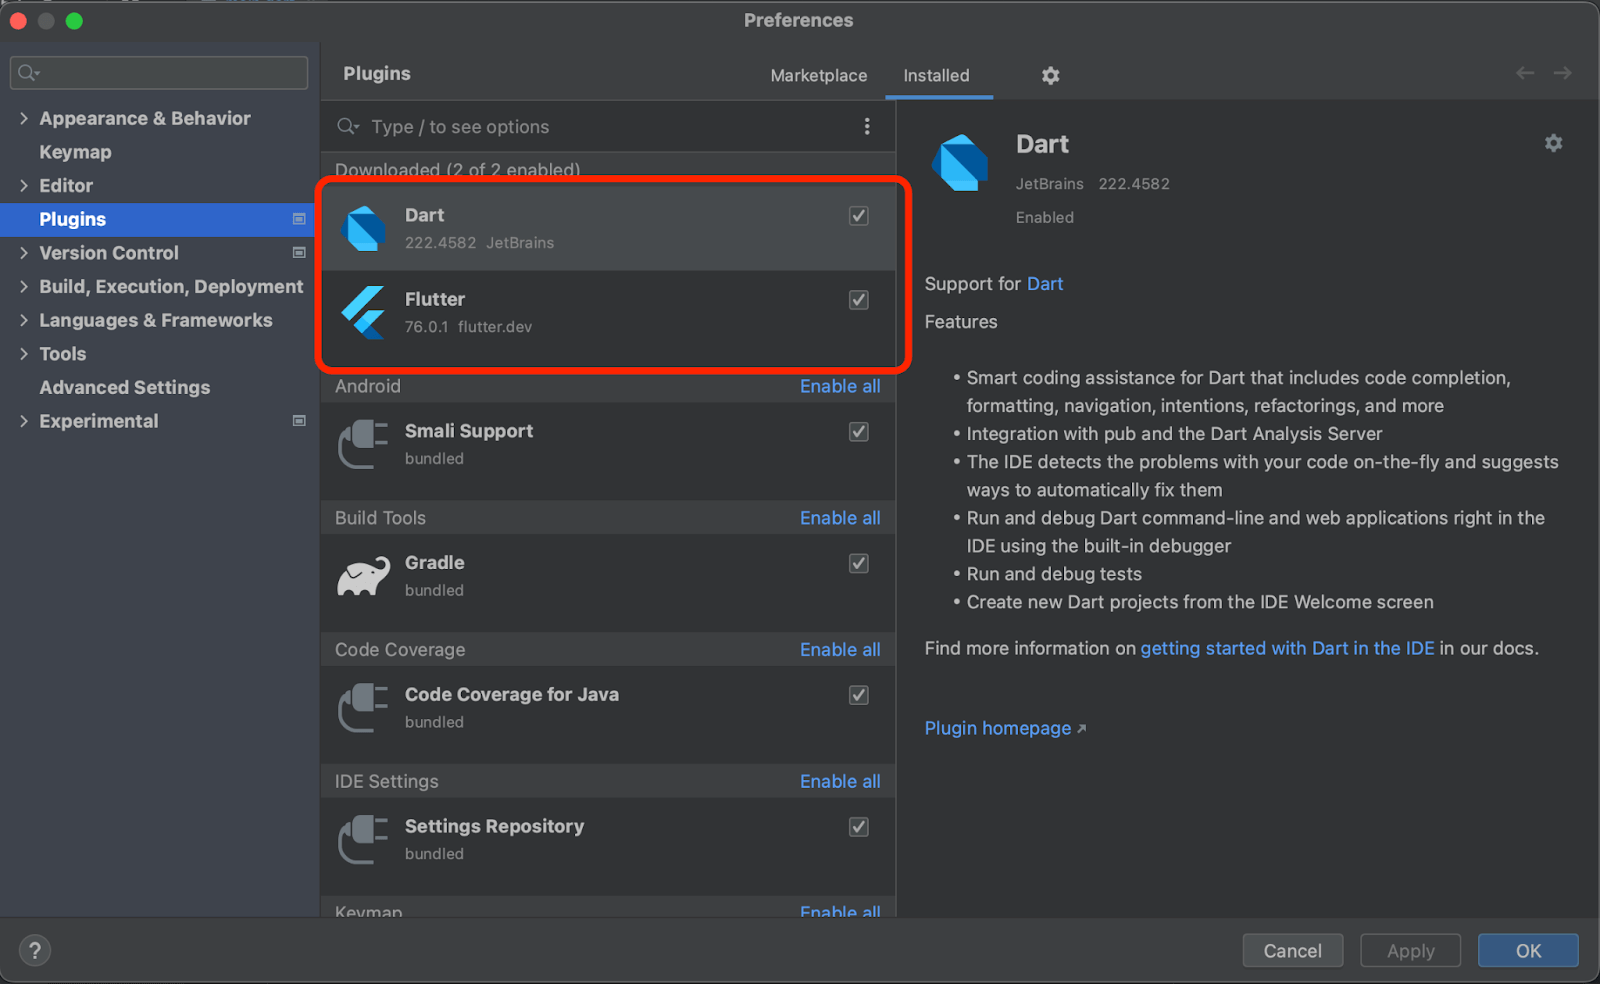
Adding the Flutter plugin to Android Studio
The Flutter plugin needs to be added to Android Studio as it helps compile and run the Flutter app. The Flutter plugin can be installed using the Android Studio >> Settings >> Plugins menu.
Setting the Flutter SDK path in Android Studio
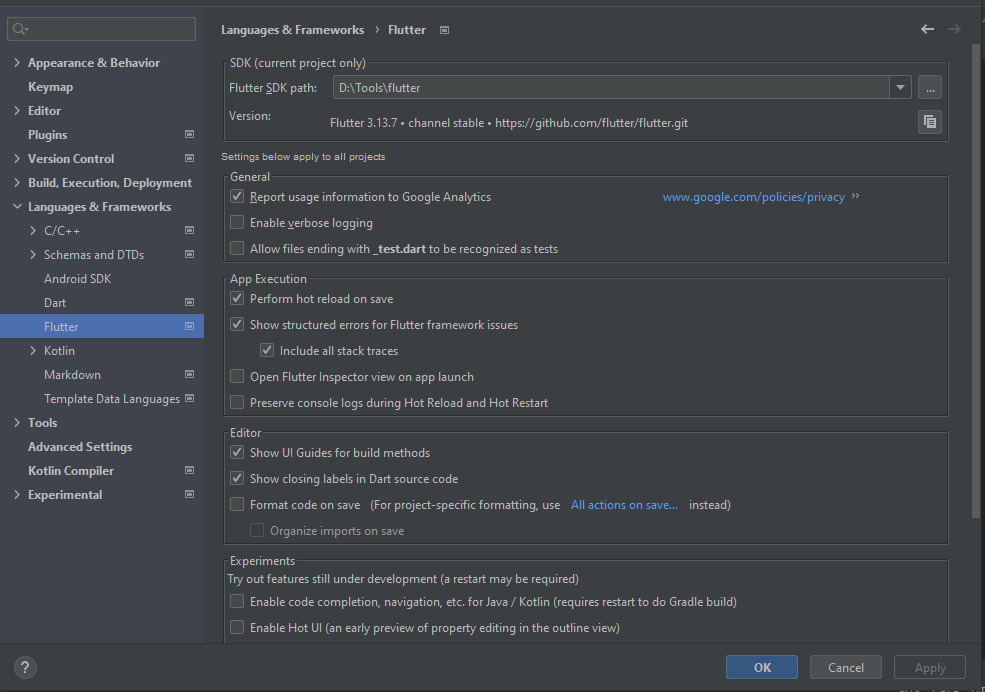
| Note: The Flutter SDK includes the full Dart SDK and has the Dart command-line interface in its bin folder. |
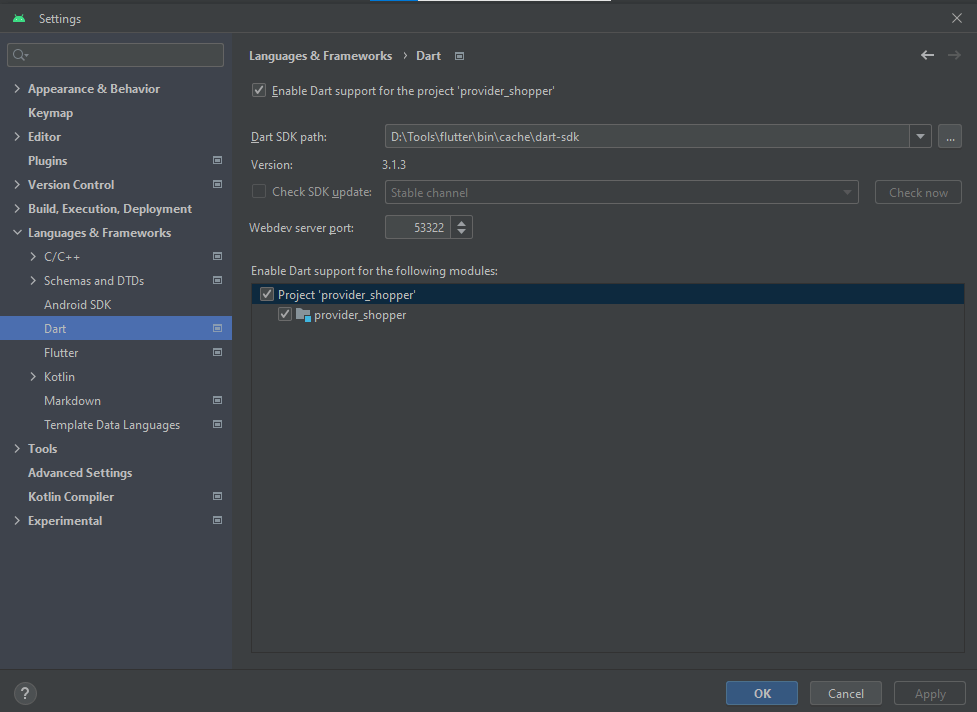
Once Flutter SDK is configured, Dart SDK will be auto-configured.
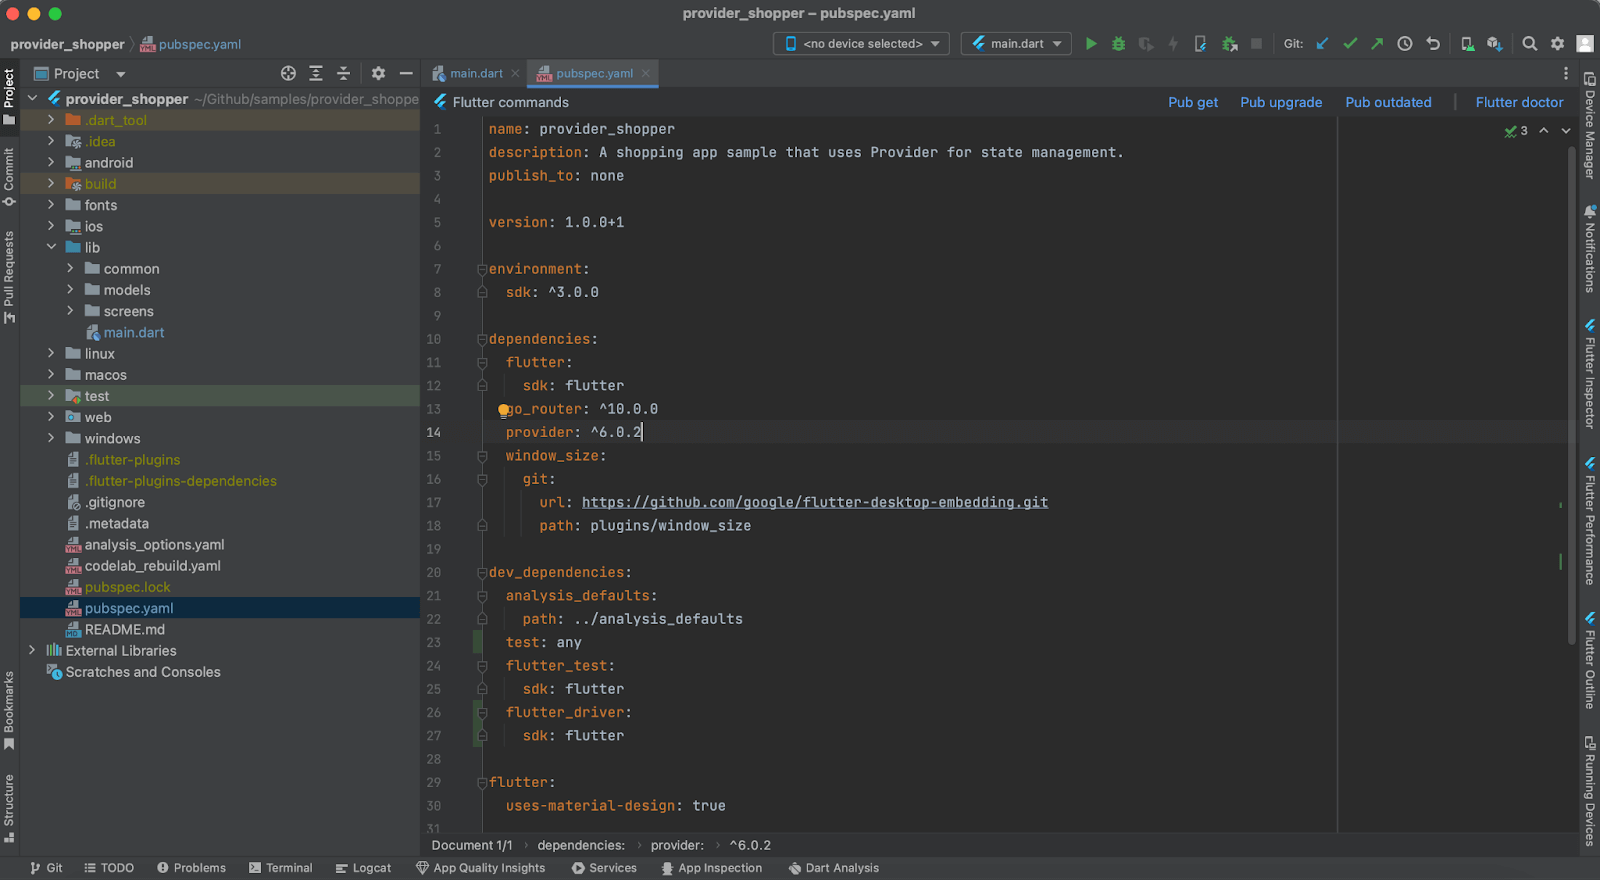
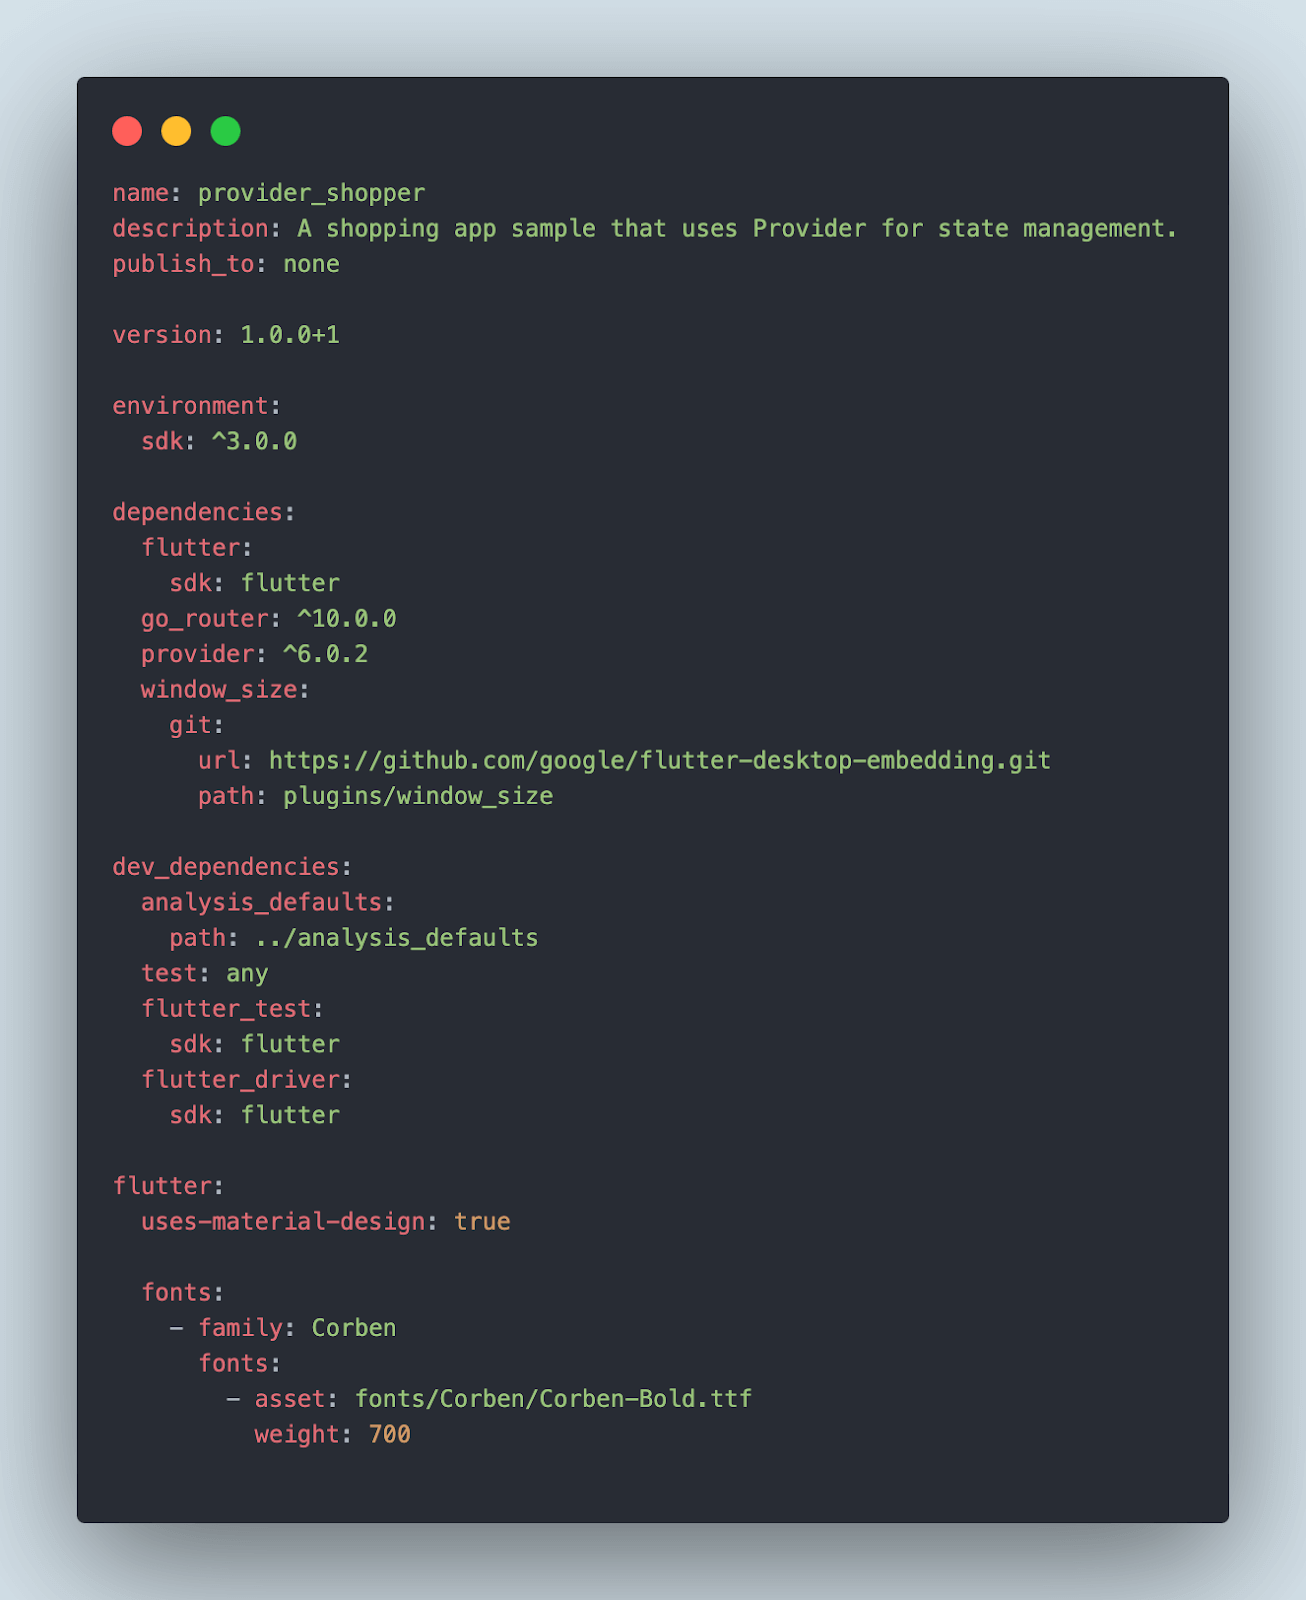
Updating the dev dependencies in the pubspec.yml file
The dev_dependencies for flutter_test, test, and flutter_driver need to be added in the pubspec.yml file.
|
1 2 3 4 5 6 |
dev_dependencies: test: any flutter_test: sdk: flutter flutter_driver: sdk: flutter |
The below screenshot of the pubspec.yml file shows the additions of dev_dependencies.
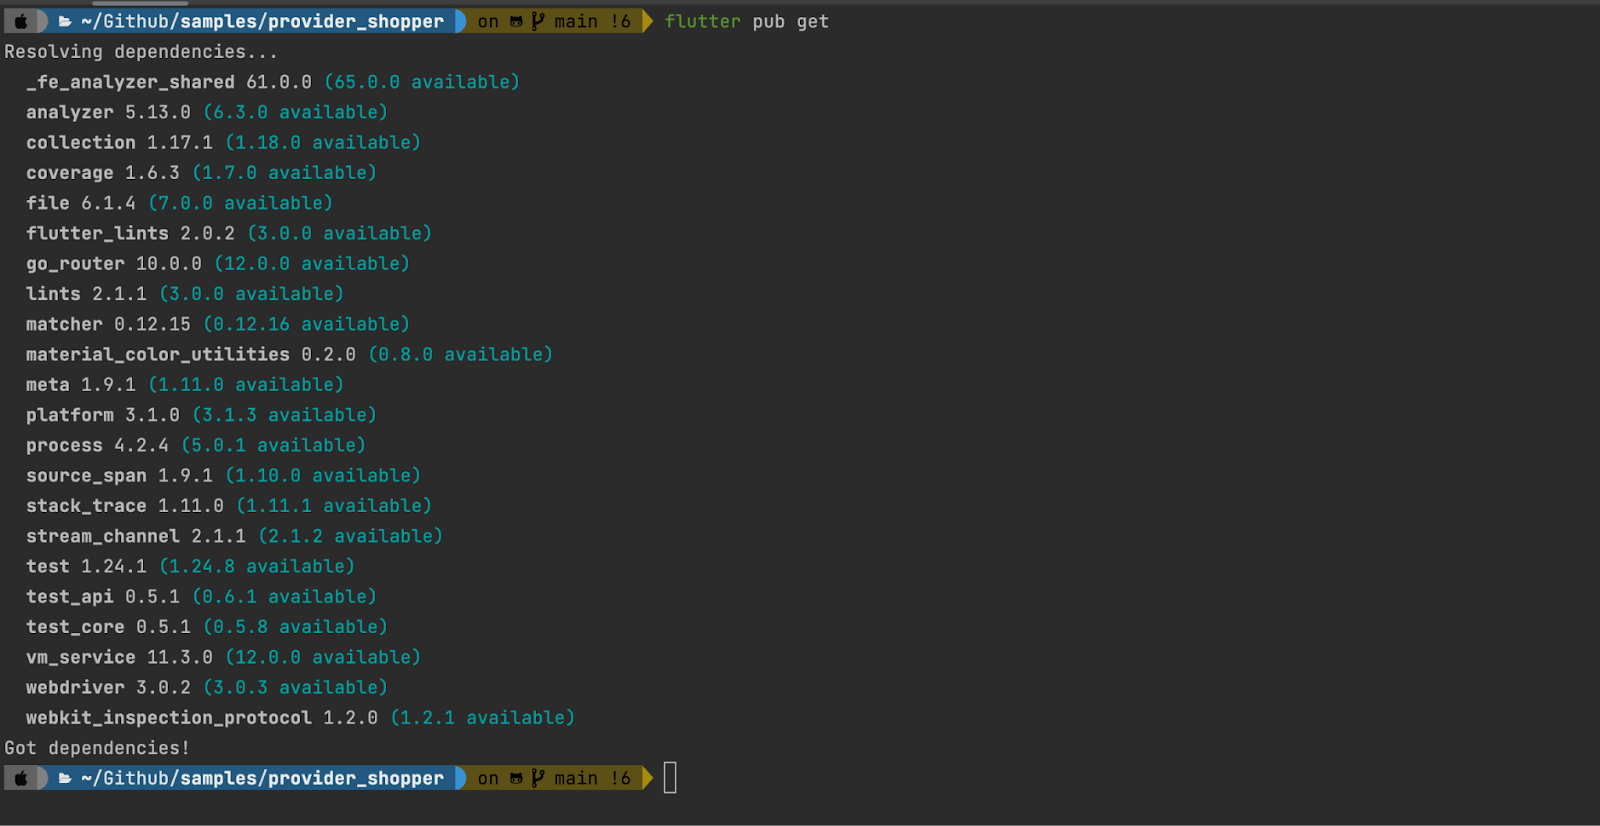
Importing the dev dependencies
The dev_dependencies updated in the pubspec.yml need to be imported, which can be done using the following command:
|
1 |
flutter pub get |
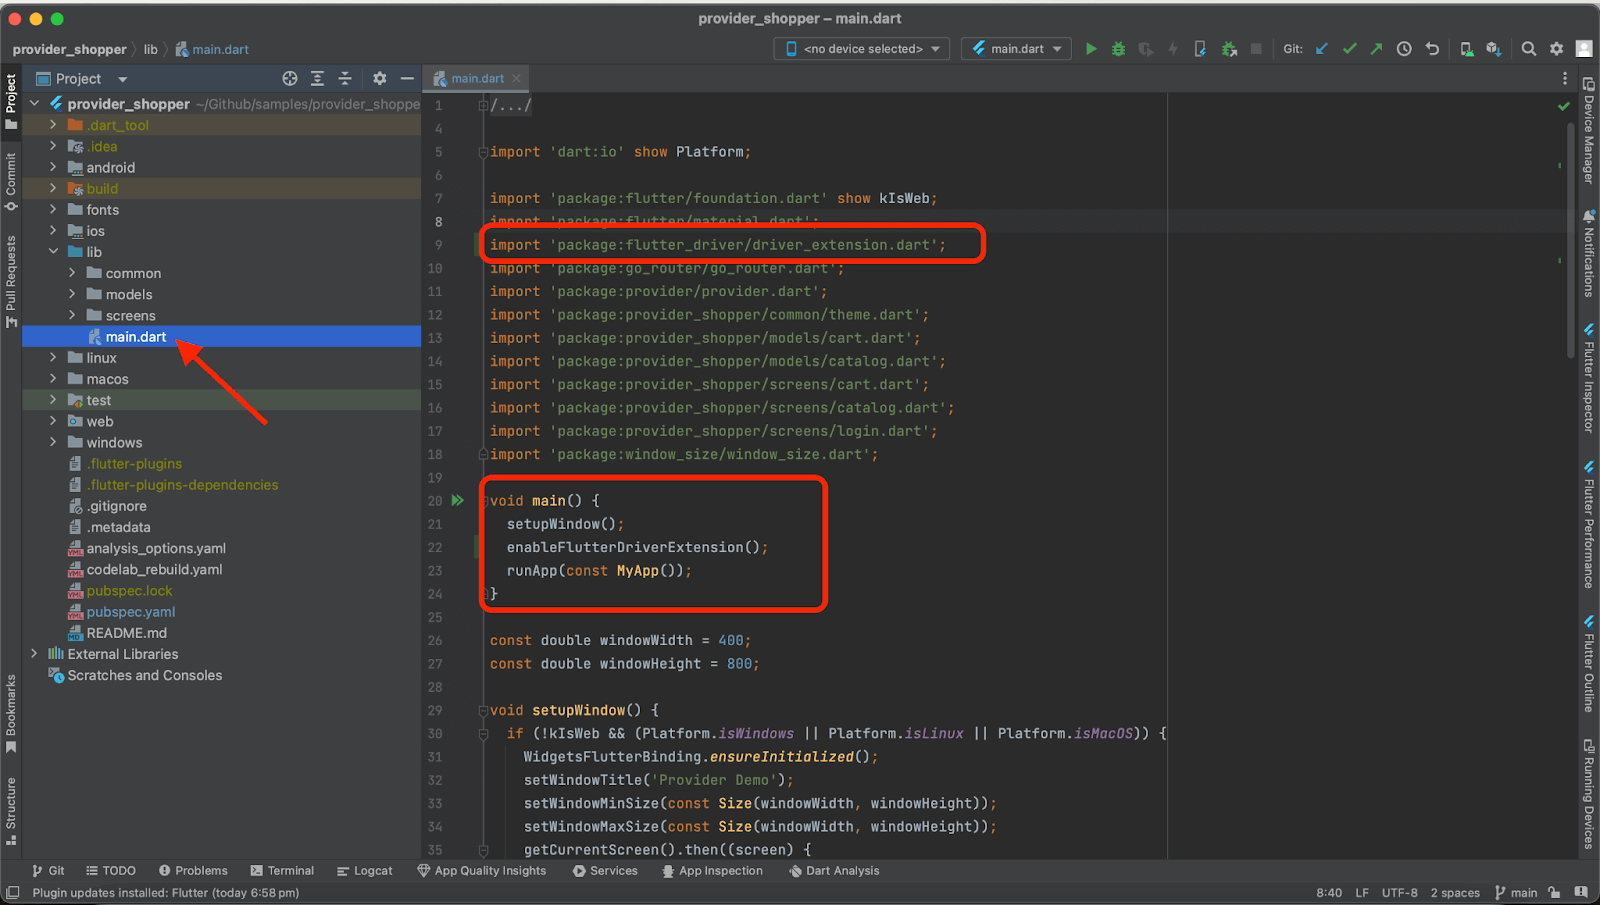
Updating the main.dart file
The following import statement needs to be added to the main.dart file for importing flutter_driver_extension.
|
1 |
import 'package:flutter_driver/driver_extension.dart'; |
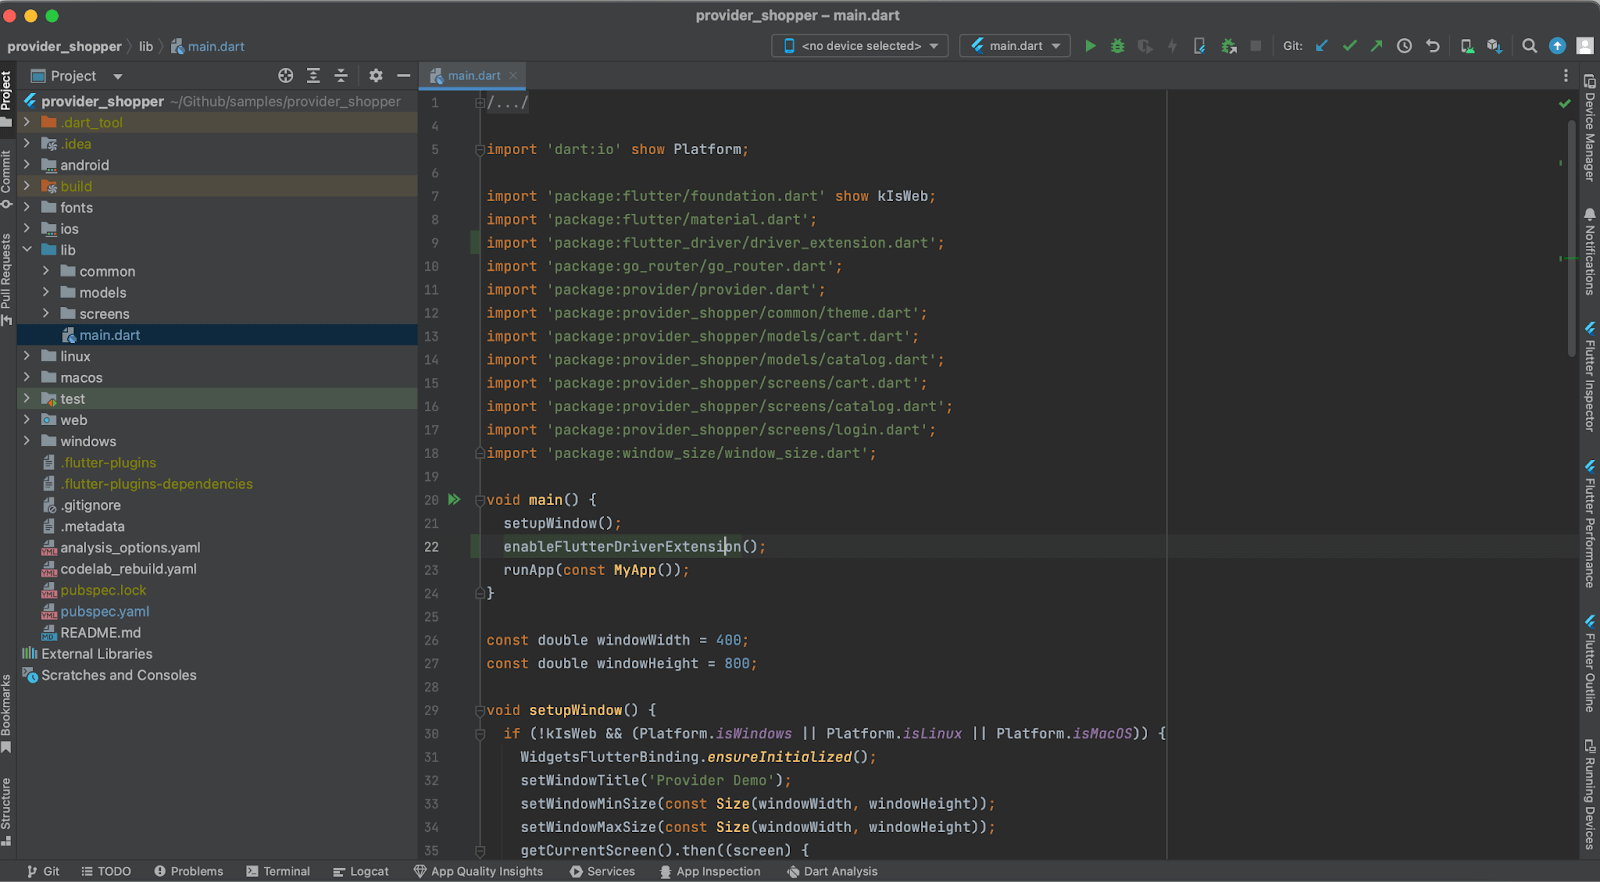
The enableFlutterDriverExtension() method should be added in the main() method before the runApp statement in the main.dart file.
|
1 2 3 4 |
void main() { enableFlutterDriverExtension(); runApp(MyApp()); } |
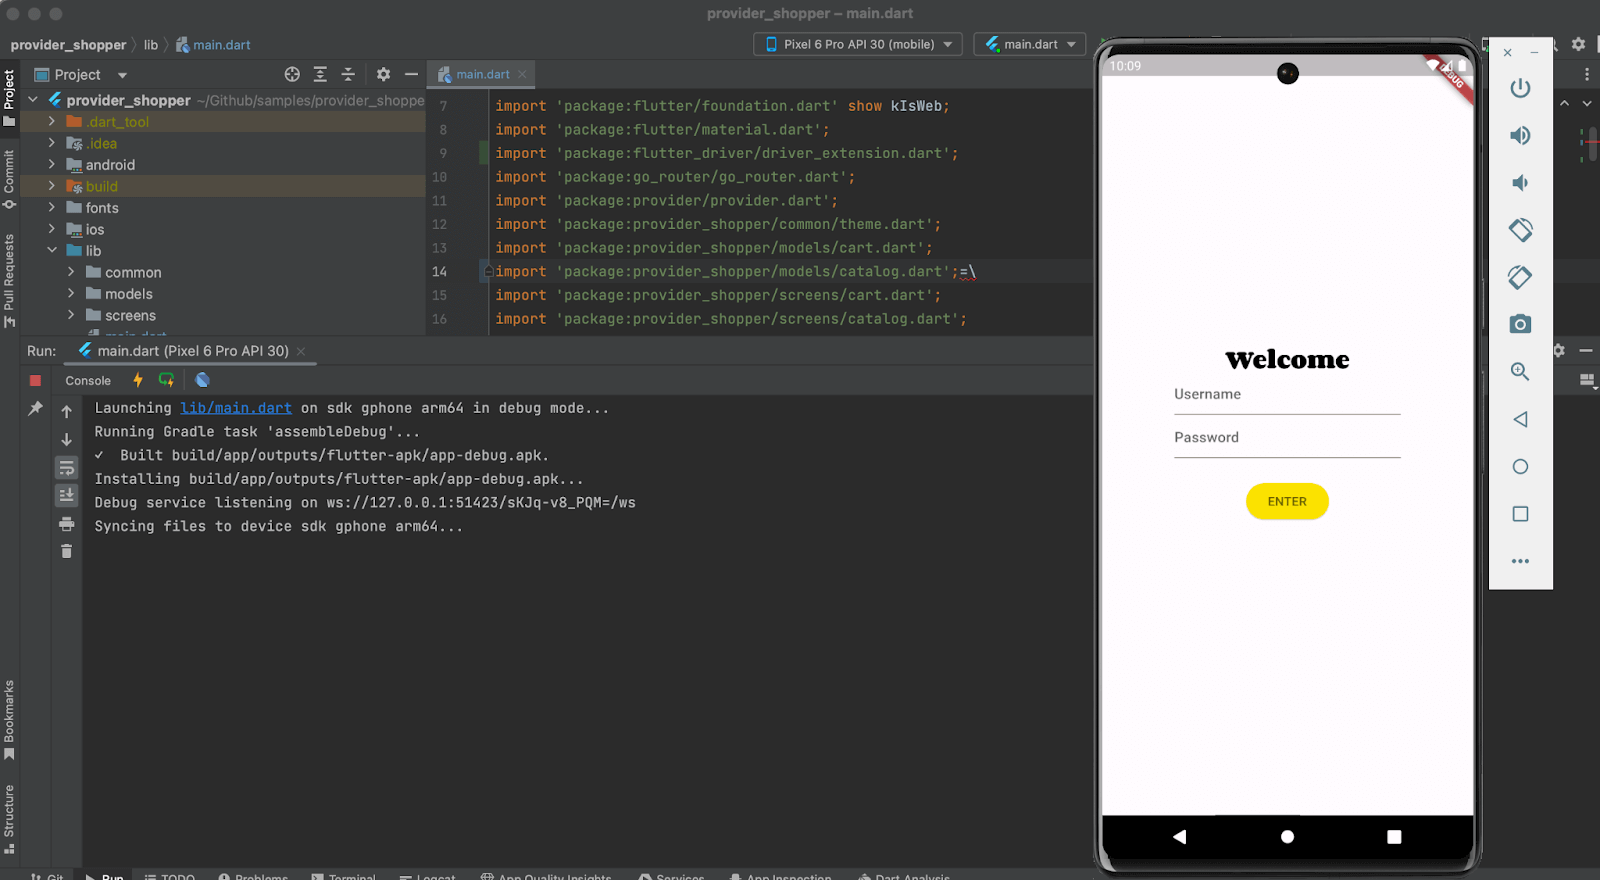
Below is the screenshot of the main.dart file after adding the code mentioned above statements:
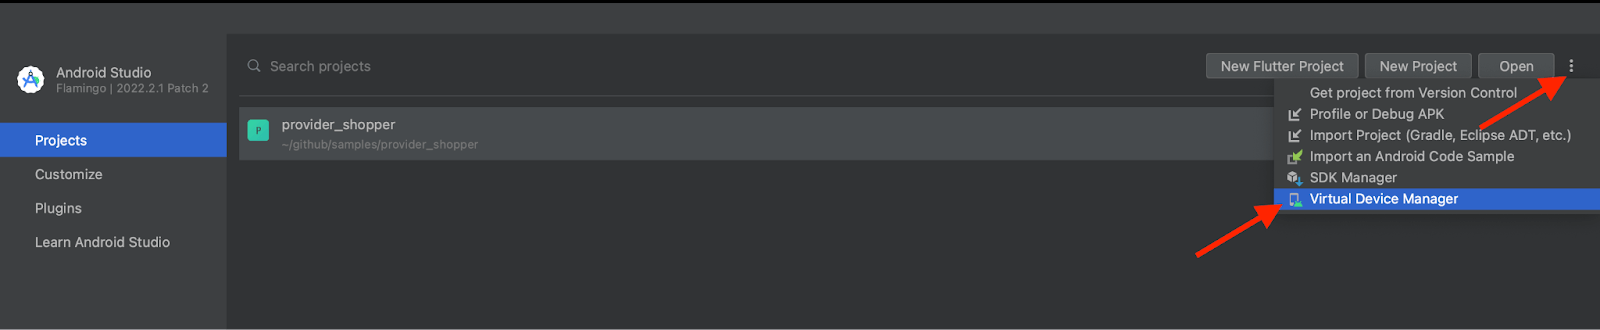
Starting the Flutter Android application on the Android emulator
The Flutter application can be run on the Android emulator by using the following steps:
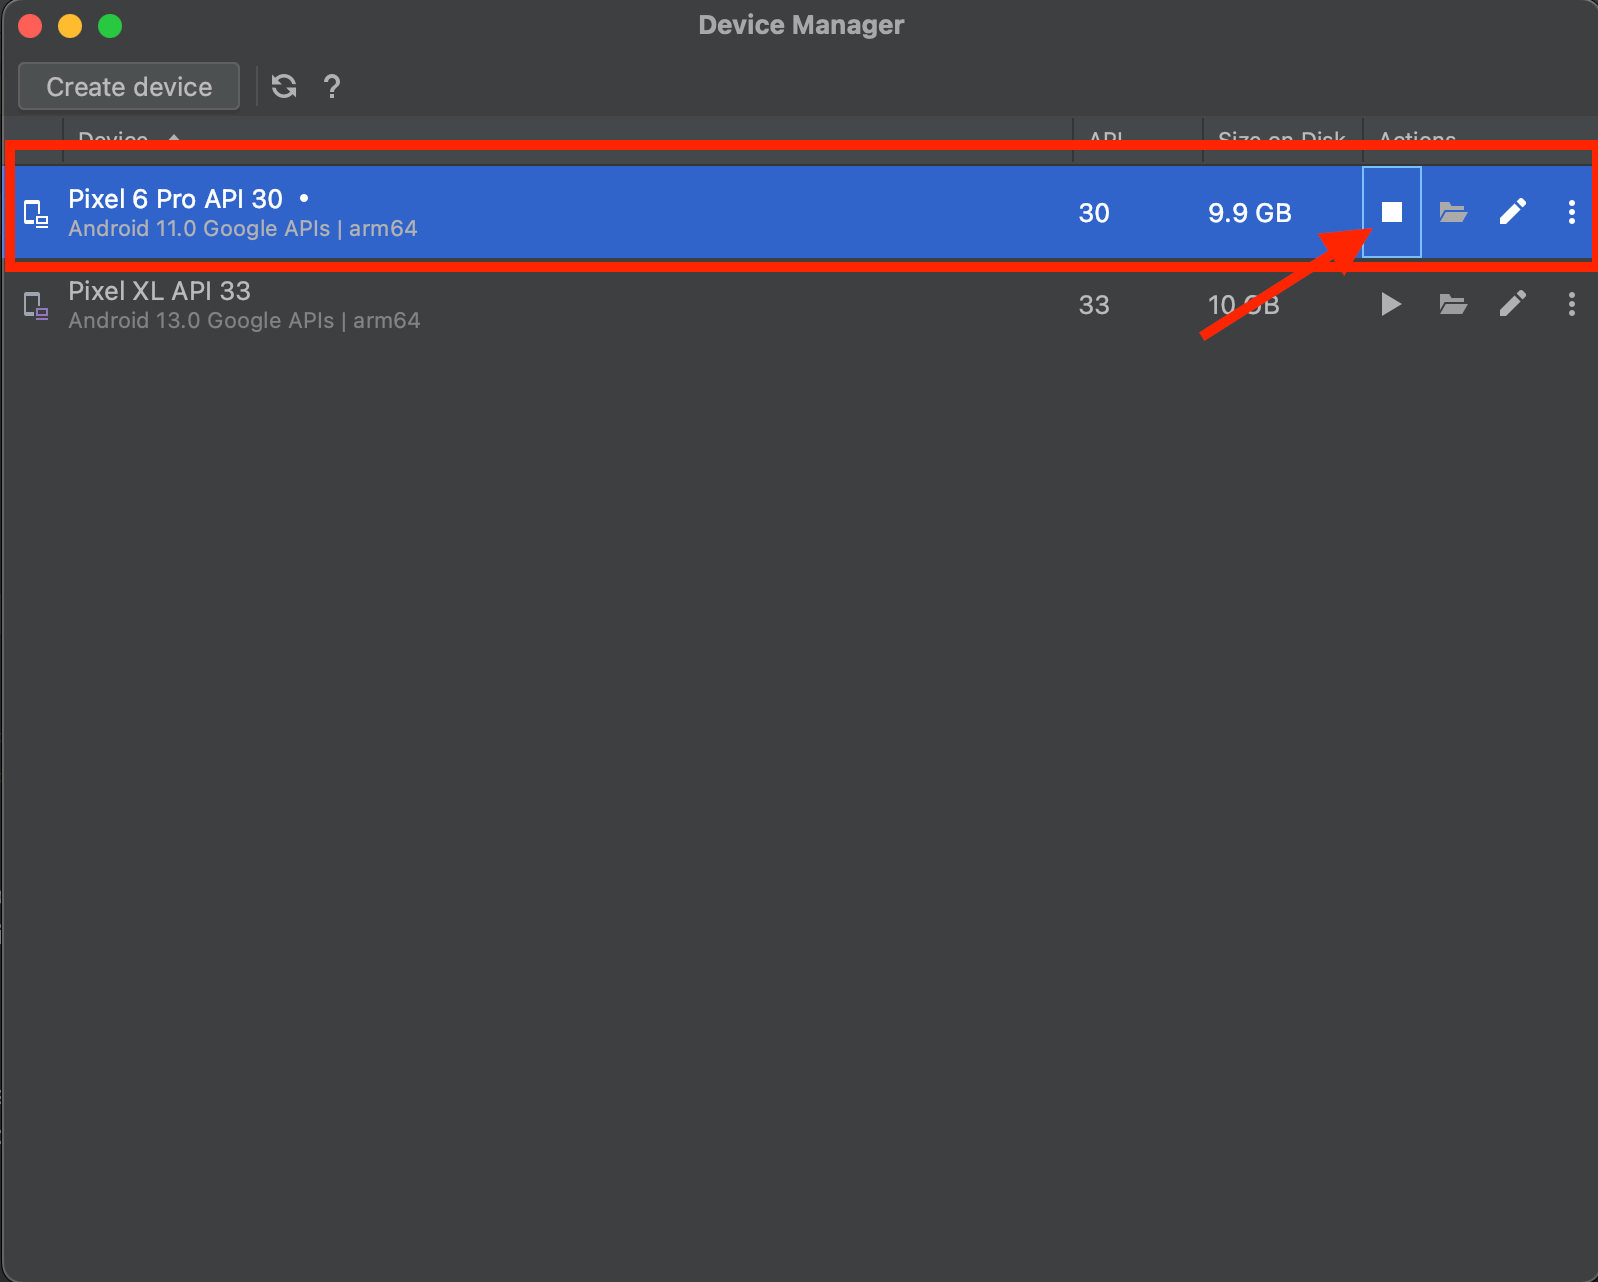
- Start the Android emulator.
- Select the Android emulator name from the dropdown box, click the Play button to build the Provider Shopper application locally, and run it on the selected emulator.
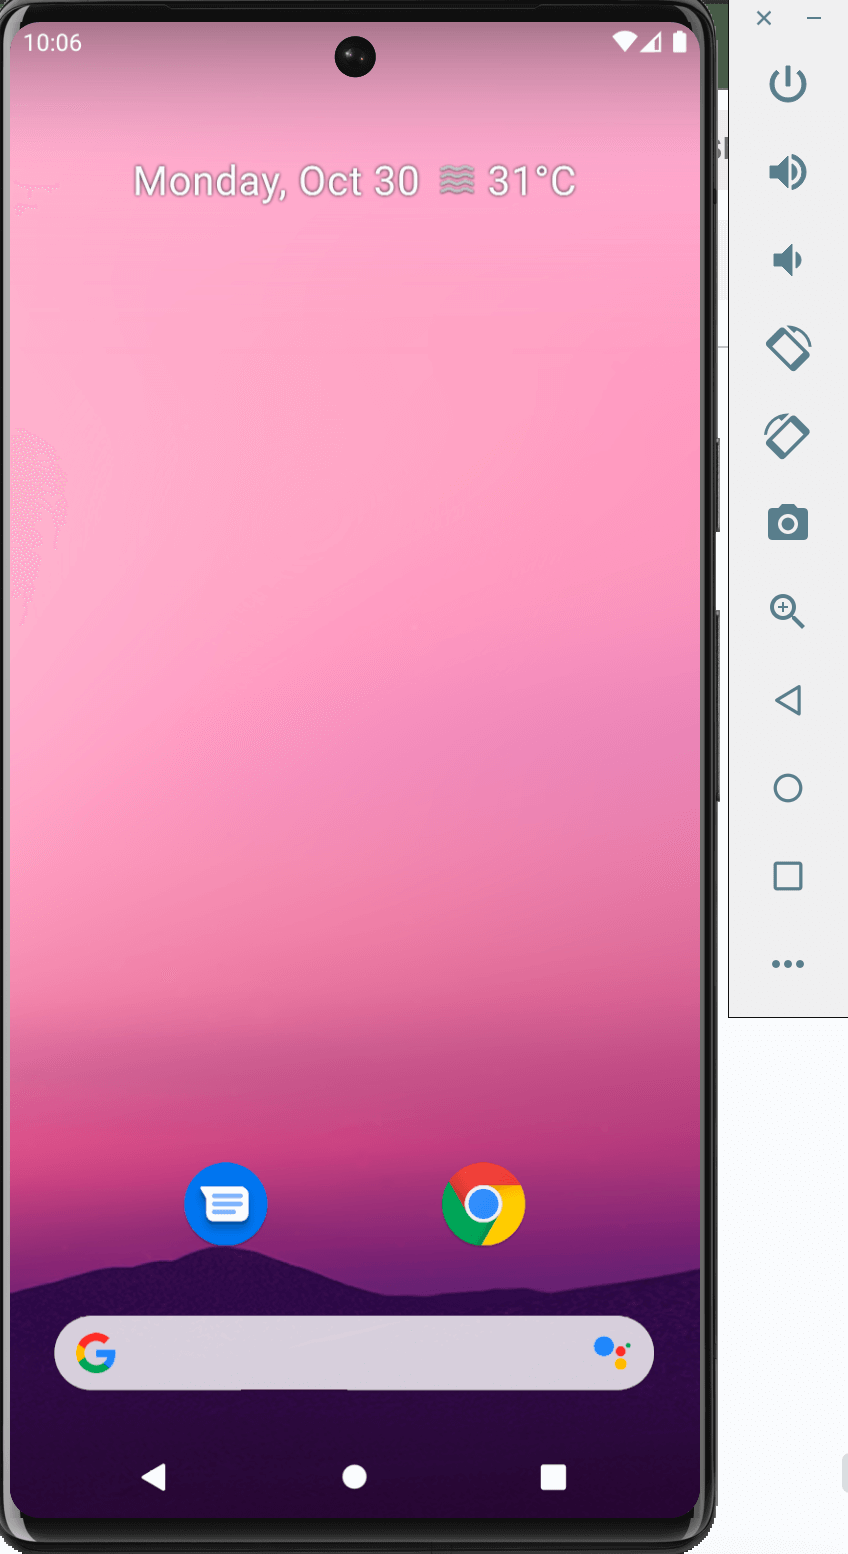

The Flutter app should be started as shown in the screenshot below:
 Note
NoteTest your Flutter apps on a real device cloud. Try LambdaTest Today!
How to test Android Flutter applications using Appium Flutter Driver?
The following are the details about the technical stack used in this blog to automate the Flutter application using Appium Flutter Driver with Java.
| Programming Language/Tool/Framework | Version |
|---|---|
| Java | 17 |
| Appium | 2.0 |
| Android Studio | 2022.2.1 Patch 2 |
| Provider Shopper | 1.0.0 |
| Flutter Inspector | 3.10.6 |
| Appium Flutter Driver | 1.20.2 |
| Appium Flutter Finder – Java | 1.0.4 |
| Maven | 3.9.5 |
| TestNG | 7.8.0 |
The first step in automating any mobile application is to locate the mobile elements to perform the interactions on it. In the case of Flutter applications, the Flutter Widget Inspector, which comes as an inbuilt tool with Flutter, will be used to inspect elements. The Appium Inspector is incapable of locating the Flutter mobile elements.
What is Flutter Widget Inspector?
Within the Flutter framework, Widgets serve as the fundamental building blocks. They encompass form controls like textboxes and buttons and layouts like centering, padding, and rows.
Flutter widget trees can be explored and visualized using the Flutter Widget Inspector. It helps in understanding existing layouts and diagnosing the layout issues.
The Flutter Inspector is a tool that helps explore and visualize the Flutter widget trees. It can help locate the selectors for the mobile elements used in the mobile automation tests. It can also be used to understand the existing layouts and diagnose related issues.
How to use Flutter Widget Inspector?
Flutter Widget Inspector can only be started after the local build is created and the Flutter application runs in the Emulator/Simulator. To showcase the work of Flutter Widget Inspector, we will be running the local build on an Android emulator.
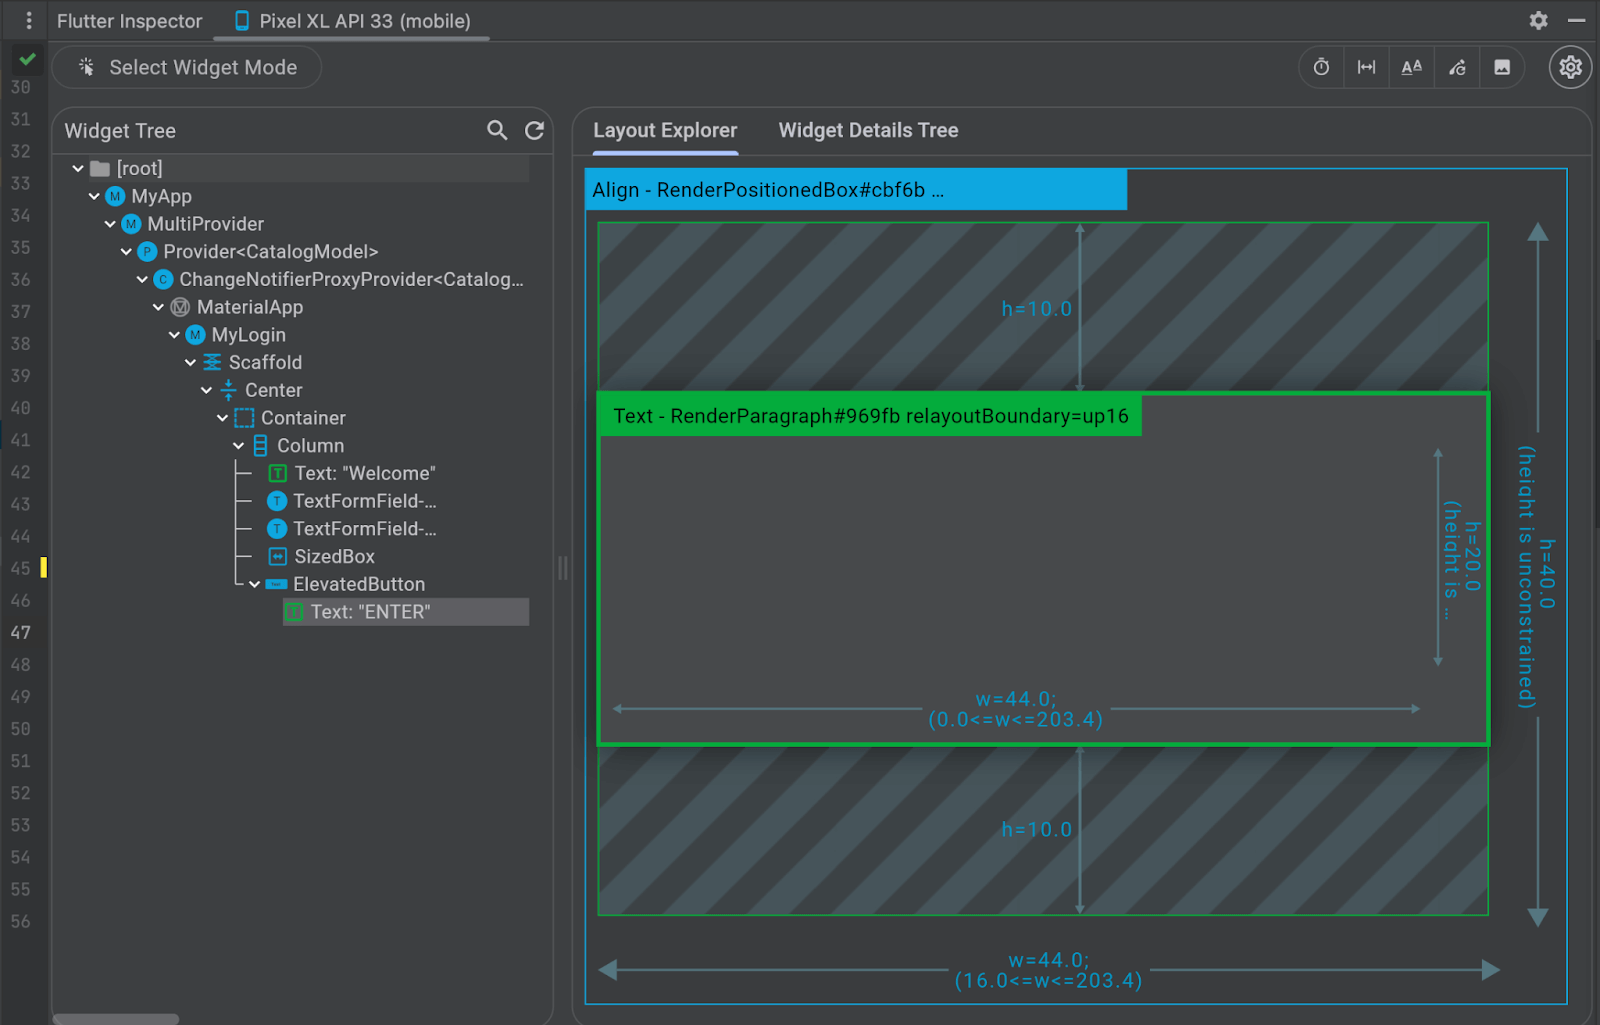
Flutter Widget Inspector can be started by clicking on the Flutter Inspector toolbar on the extreme right of the Android Studio screen.
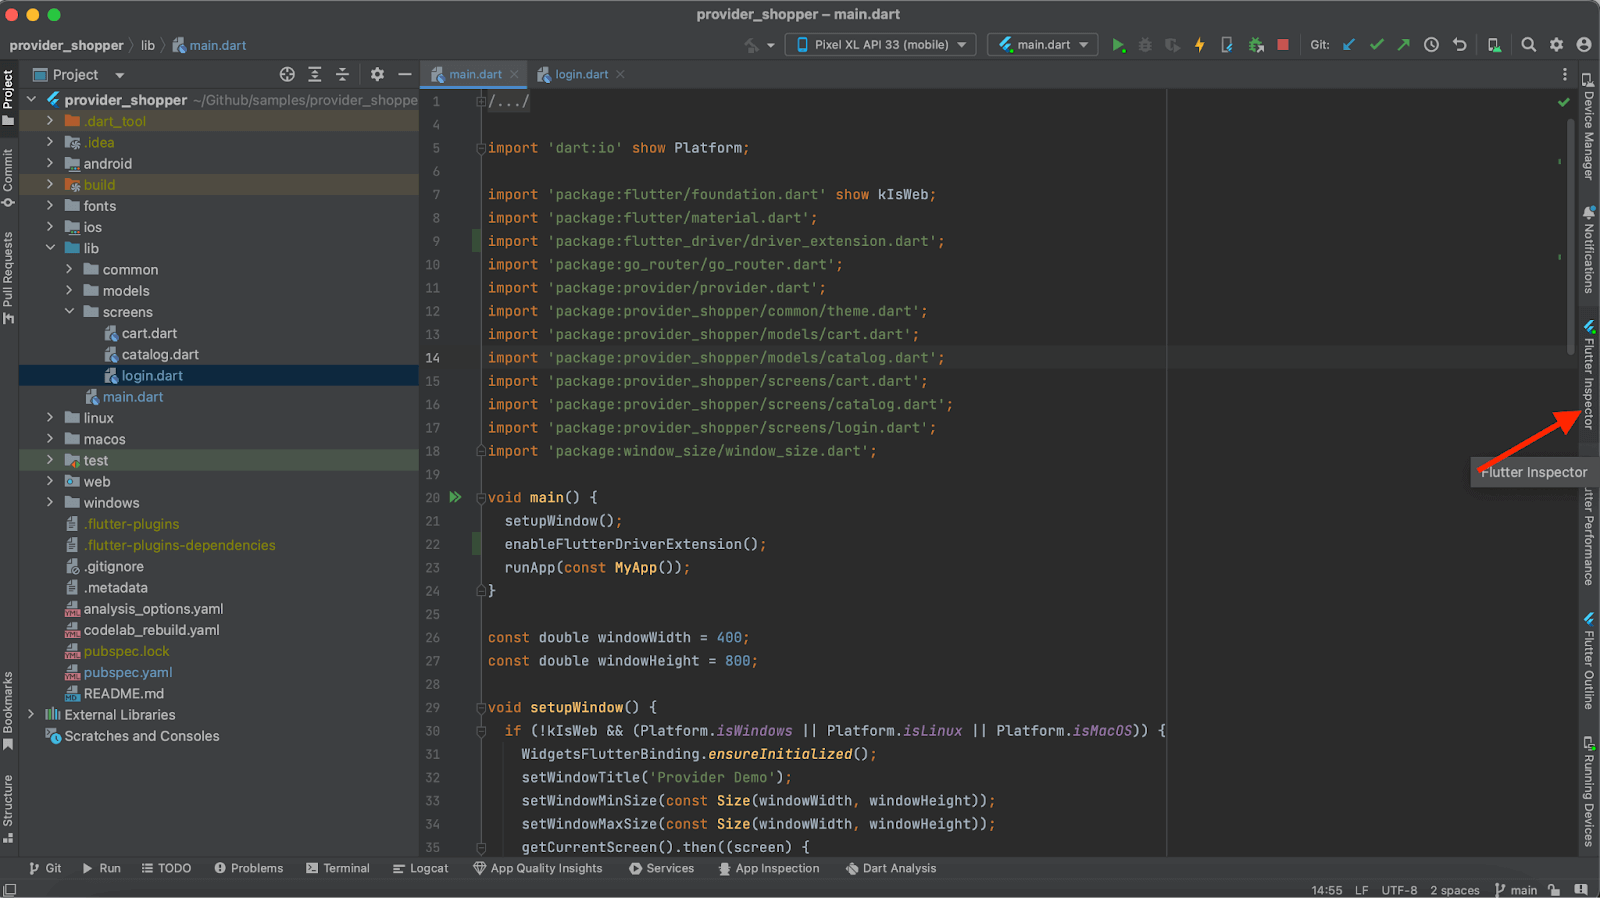
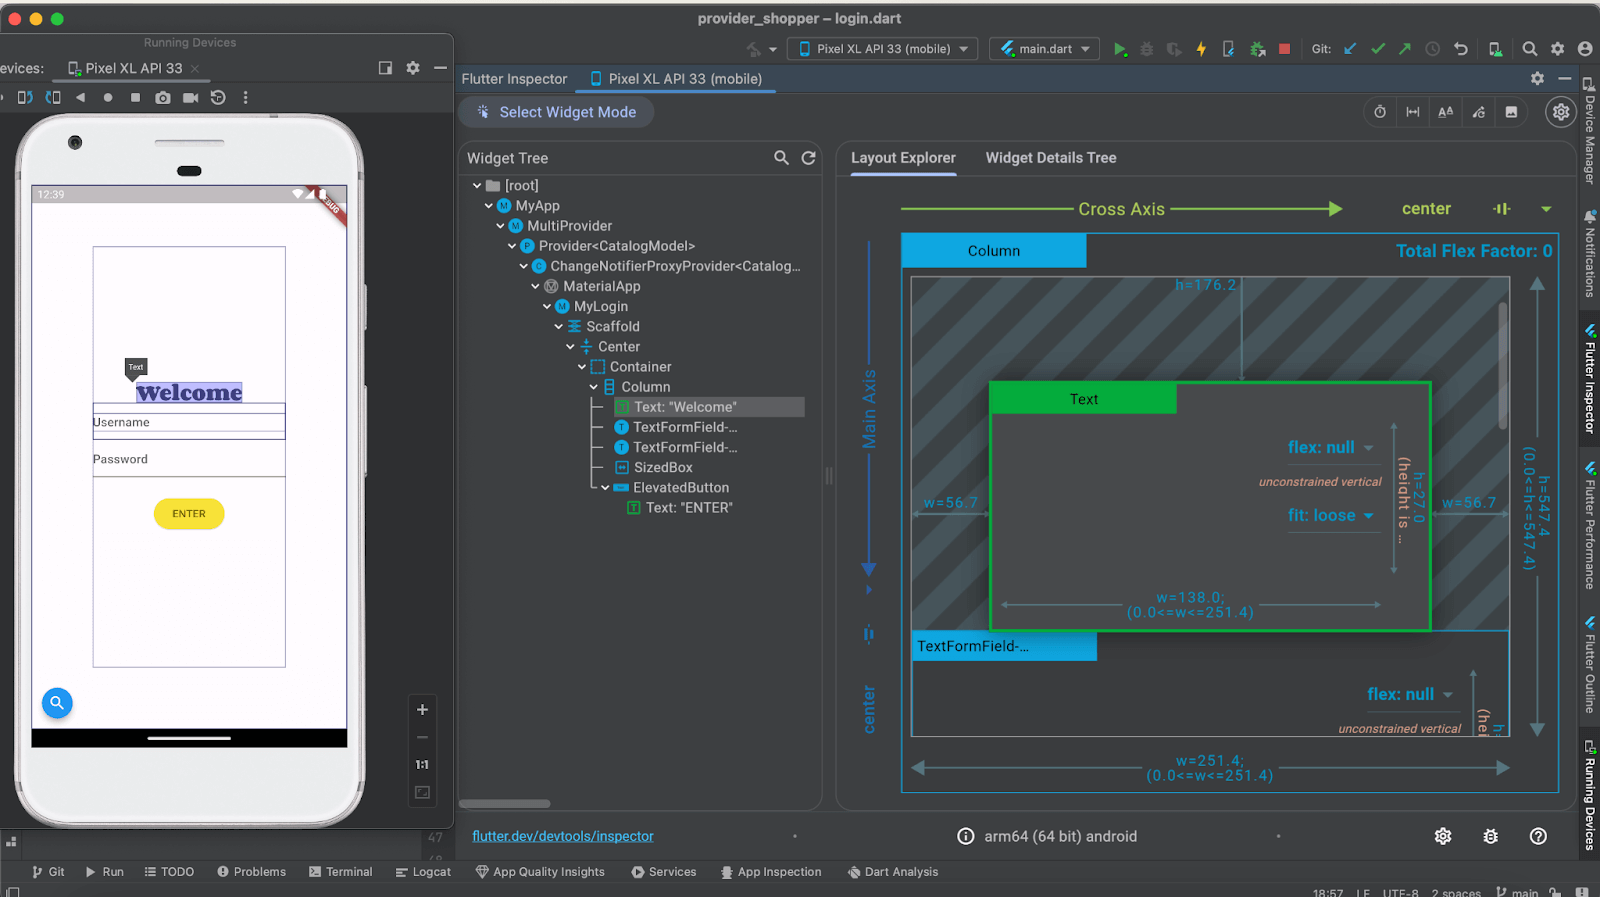
The Flutter Widget Inspector should open as shown in the screenshot below:
We need to follow the below steps to locate the mobile elements:
- Click on the Select Widget Mode button in Flutter Inspector.
- Navigate to the Android emulator and select the field for which the mobile element needs to be located.
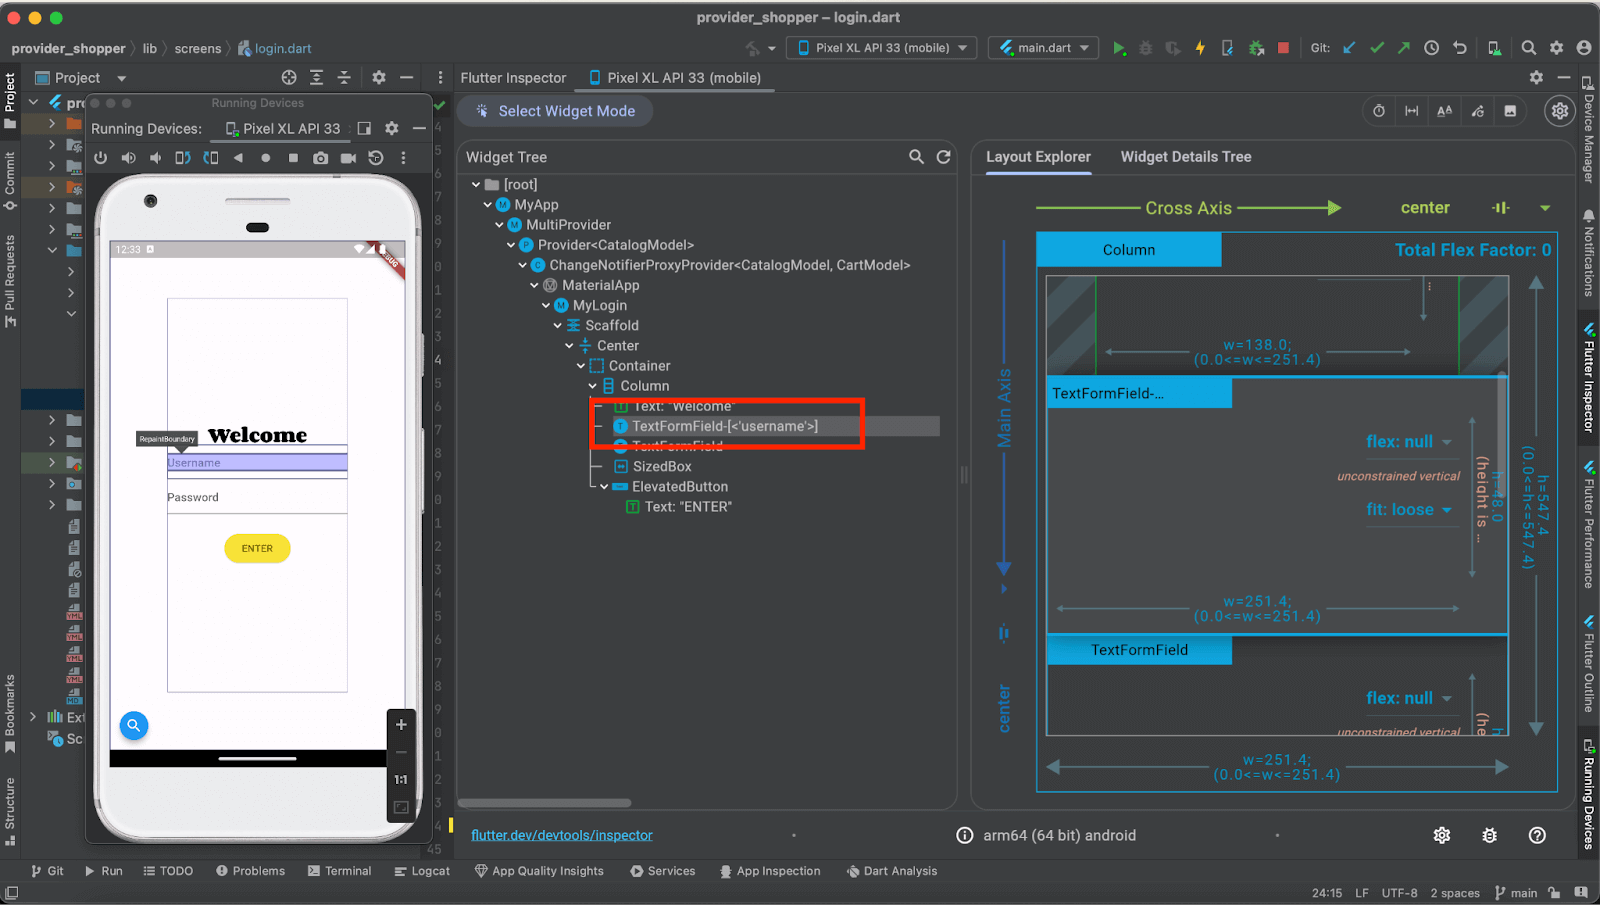
Let’s locate the mobile element for the Username field of the Provider Shopper app by clicking on the Select Widget Mode button and selecting the Username field in the app. It will locate the mobile element for the Username field, and as shown in the screenshot below, it shows the mobile element as “TextFormField”.
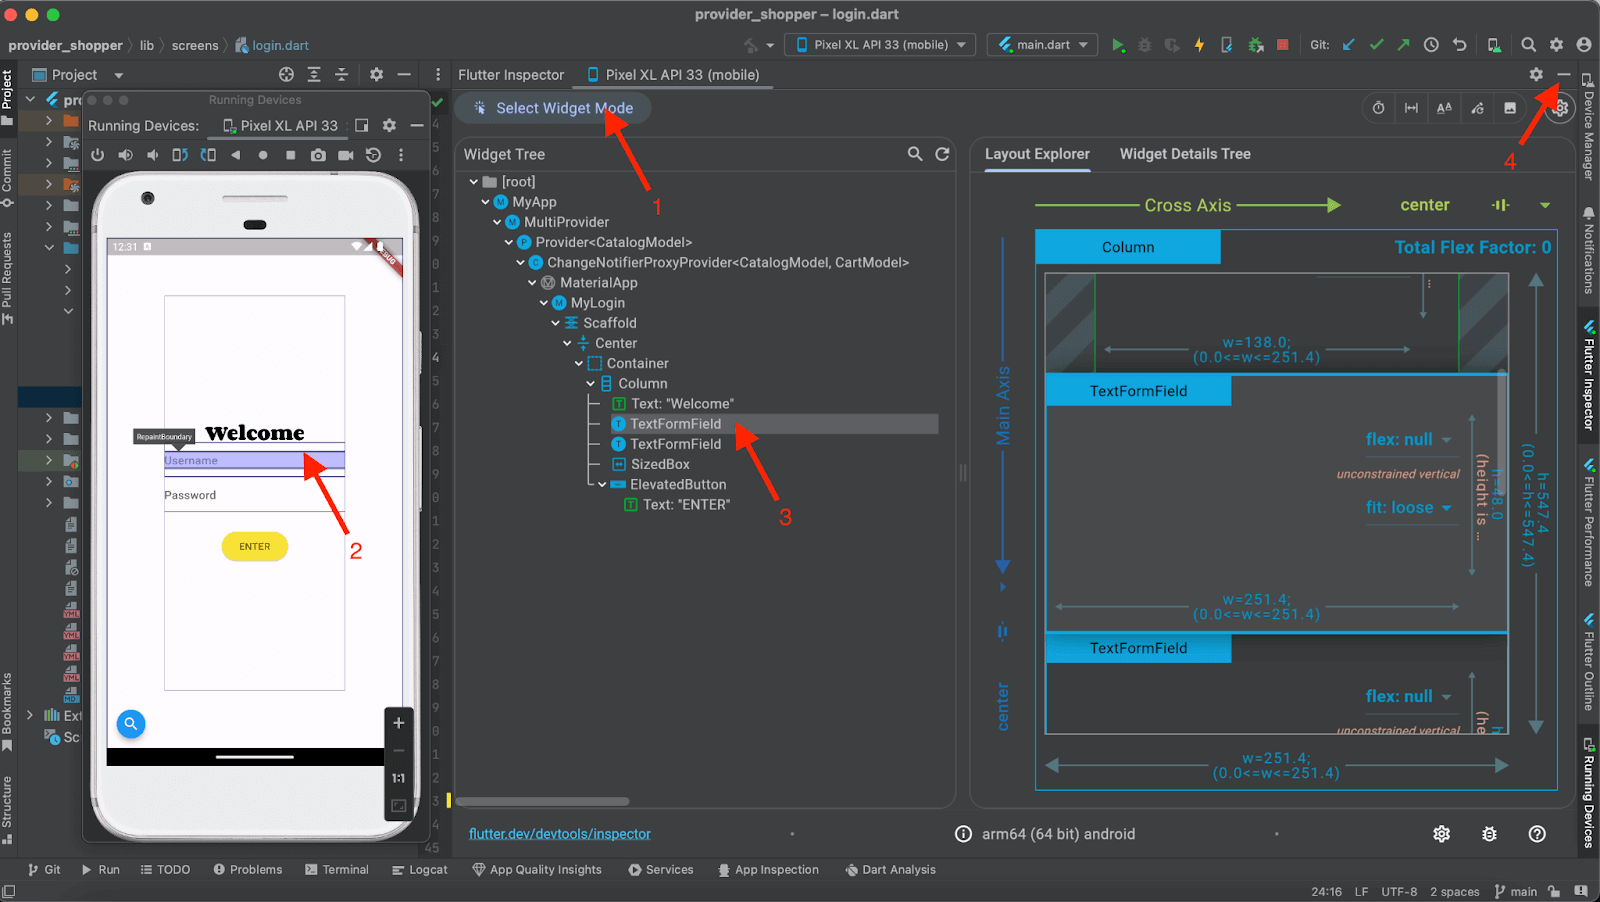
However, if you notice, there is no key attached to it. Hence, it will be challenging to locate this field as we can see other elements for which the same element, “TextFormField,” is shown.
Let’s add a key to the Username field to make it unique so we can locate it easily.
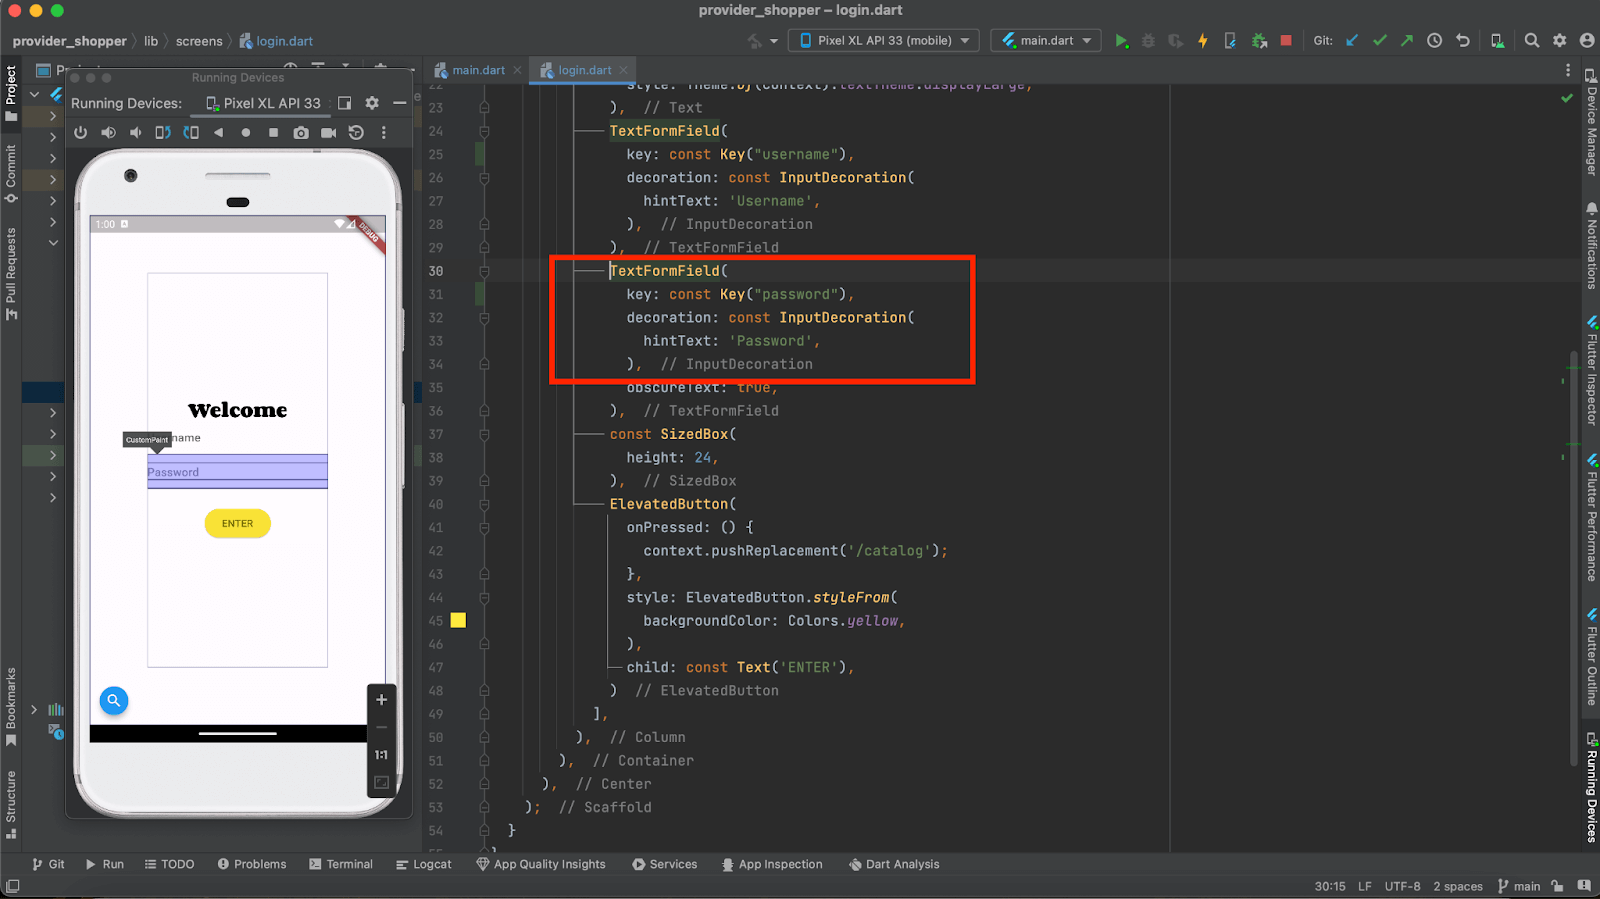
To add a key, we need to minimize the Flutter Widget Inspector window; just below it, we will notice the login.dart file is already open. This file houses all the elements and their respective properties for the login page.
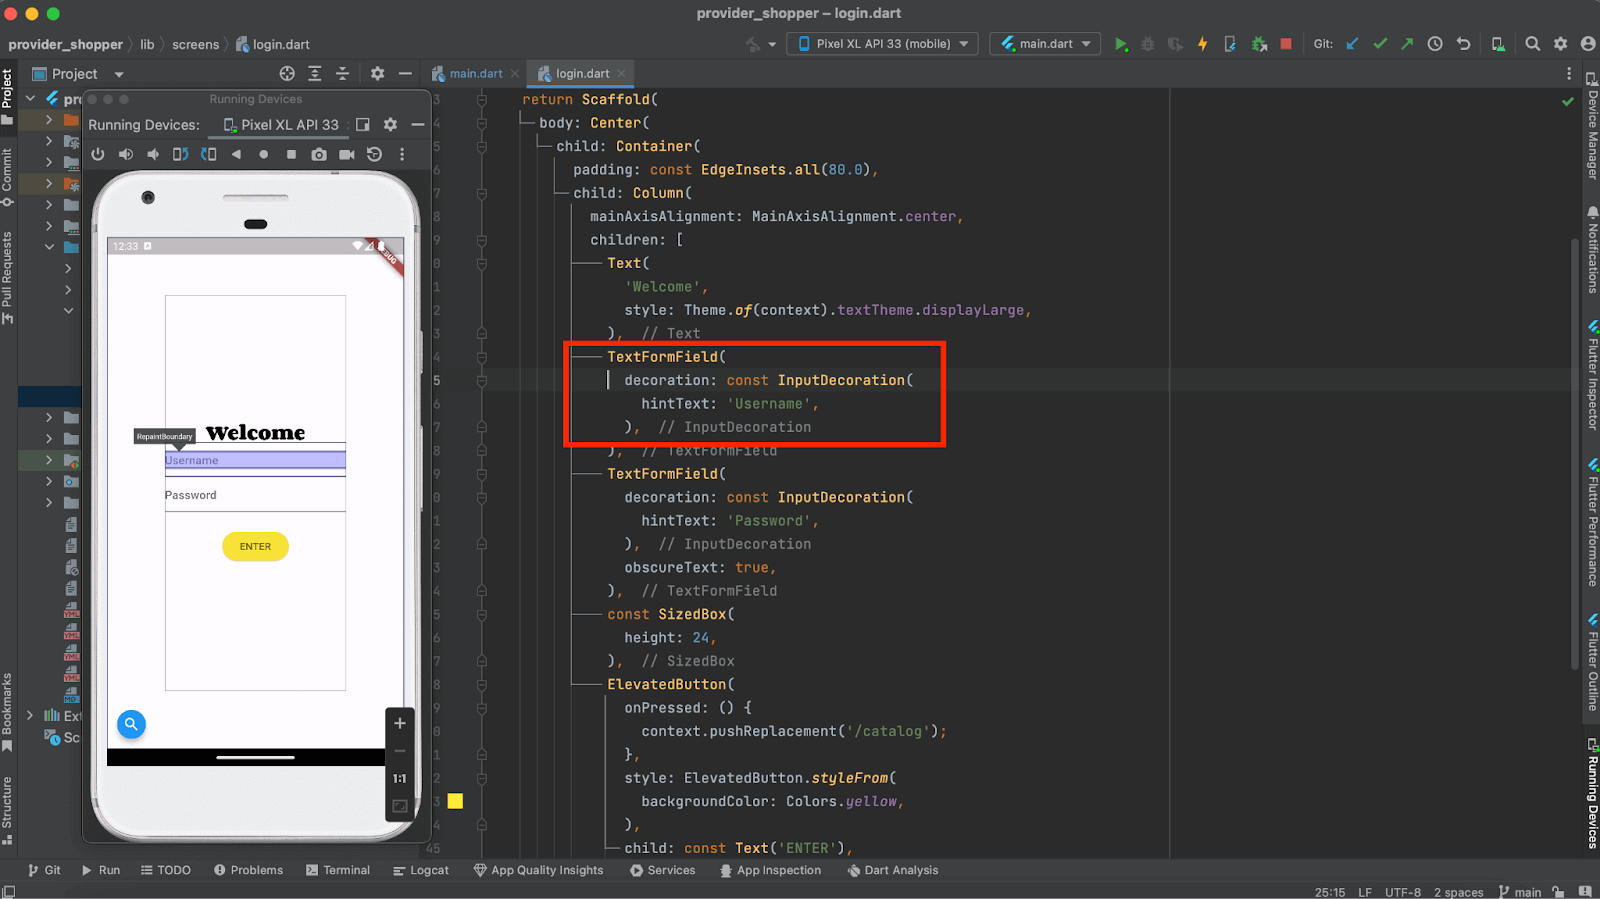
Let’s add the key for the Username field by adding the following line of code:
key: const Key("username"),
Save the login.dart file after adding the key for the Username field.
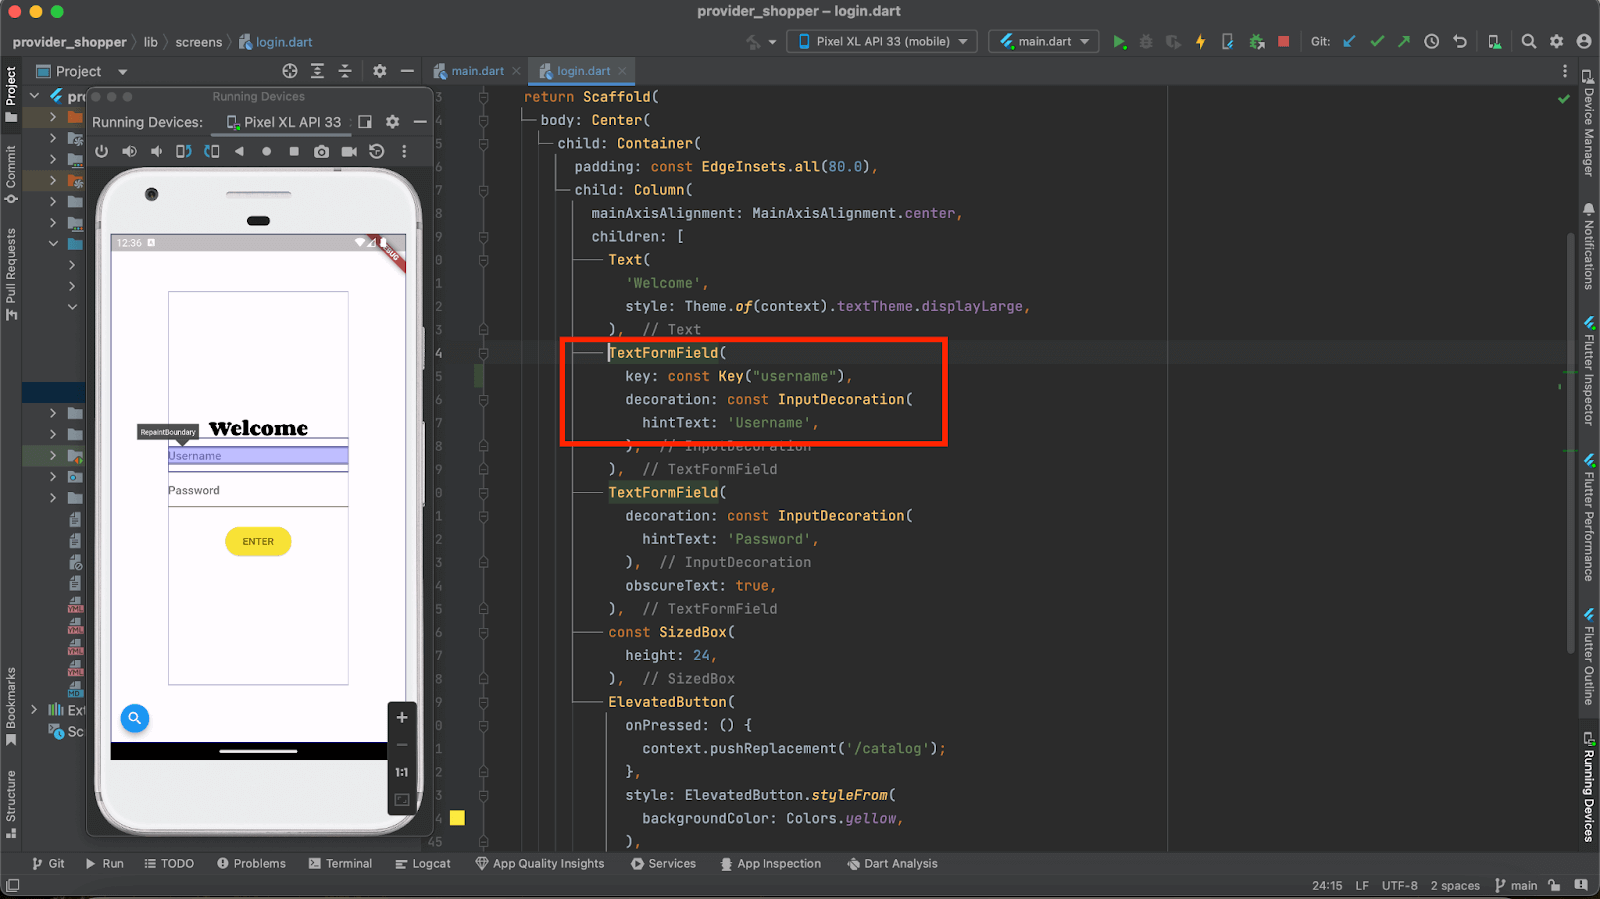
Halt the locally running app, restart it, and build it locally. Then, utilize the Flutter Widget Inspector to confirm the successful addition of the key by inspecting the Username field.
We can also see that the key value “username” is displayed next to the TextFormField for Username.
Congratulations! The key for the Username field is successfully added and can be used as a locator for locating this field in the automation tests.
Let’s repeat the same steps for the Password field and update its key.

Next, we need to locate the mobile element for the ENTER button to click on it to log in to the application.
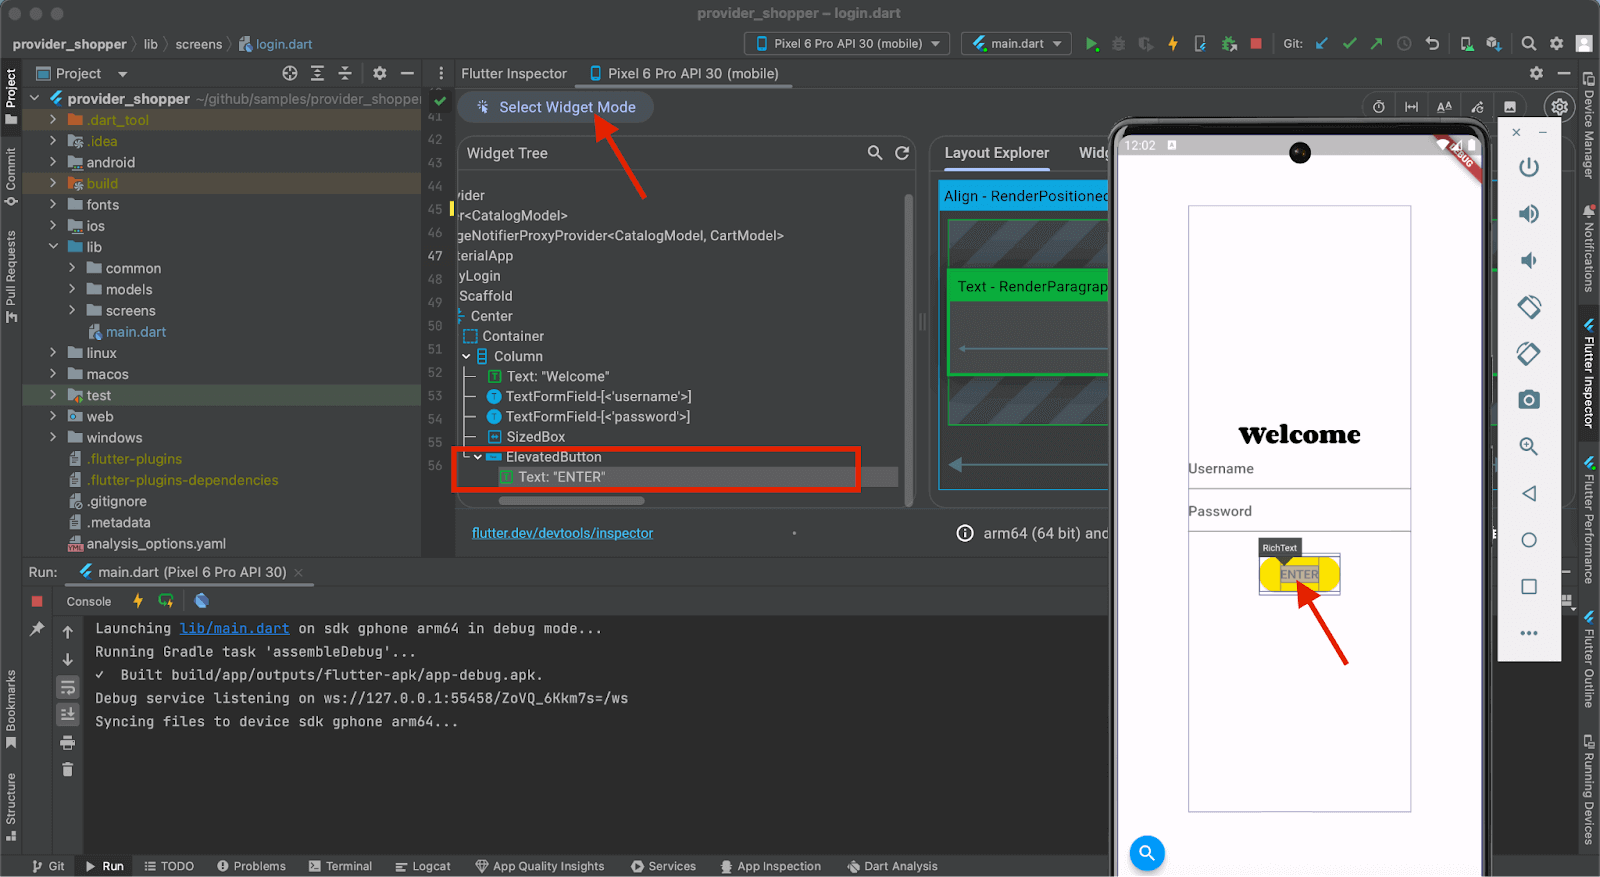
We will follow the same steps as we did for the Username and Password fields, but we will not be updating the key for this button; as we can see, it already has the mobile element – TEXT– with the value “Enter”. This can be used in automated tests for interacting with this button.
To run the Android automation tests, we would require the apk file to be generated. As we use Appium Flutter Driver with Java to interact with the app and run the automation tests, we must compile the build in debug or profile mode as Appium Flutter Driver does not support the apps in release mode.
Generating the build for Android and iOS
The following commands can be used to generate the Flutter app build in debug and profile mode for Android and debug, profile, and simulator mode for iOS.
| Operating System | Build Type | Flutter Command to generate build |
| Android | debug | flutter build apk –debug |
| profile | flutter build apk –profile | |
| iOS | debug | flutter build ios –debug |
| simulator | flutter build ios –simulator | |
| profile | flutter build ios –profile |
Please make sure that before you run the command for generating the build, the local instance, if running, should be stopped by pressing the red Stop button on the toolbar.

The following command should be executed in the terminal for generating the Android build in debug mode:
|
1 |
flutter build apk --debug |
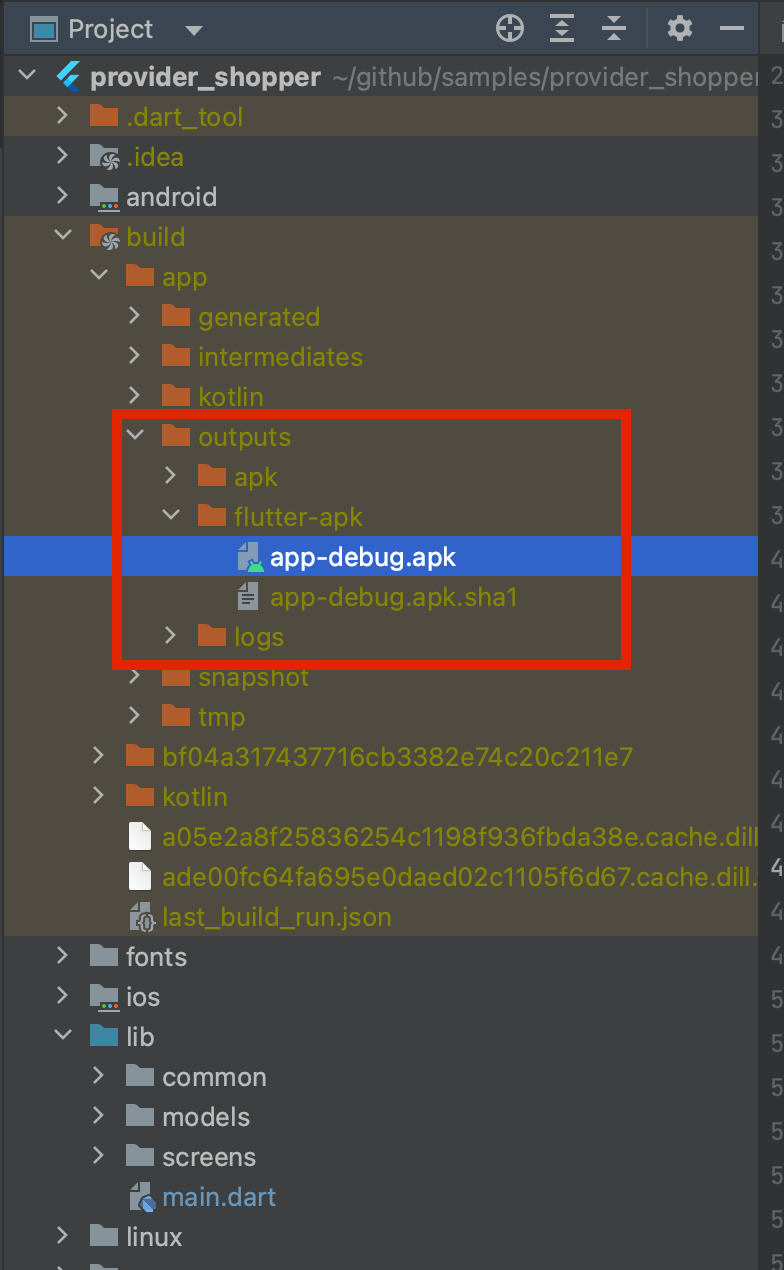
Once the build generation is finished, the build output path will be printed in the console.

Let’s navigate to the path printed in the console and copy the apk file generated so we can use it in our automation tests.
Writing the automated tests for the Flutter app
The following are the summarized steps we did in the previous part of the blog before we wrote the automated tests using Appium Flutter Driver with Java:
- Configure the Flutter SDK.
- Set up the Flutter app project in Android Studio.
- Locate the mobile elements using Flutter Widget Inspector.
- Generate the Android build.
Finally, we are in the last stage of this blog on using Appium Flutter Driver with Java, where we will be writing the automated tests for the Provider Shopper – a sample app by Flutter. We will run the tests on the Samsung Galaxy S21 5G Real Device on the LambdaTest cloud grid that has Android 13 installed on it.
LambdaTеst is an AI-powered tеst orchеstration and еxеcution platform that allows you to perform Flutter app tеsting on a rеal dеvicе cloud both manually and automatically using tеsting framеworks such as Appium, Espresso, and XCUITеst.
Subscribe to the LambdaTest YouTube Channel and stay updated with the latest tutorials on mobile app testing, Appium automation, automation testing, and more.
The following test scenario will be automated in the app.
Test Scenario:
|

Implementation [Test Scenario]
Before implementing the test scenarios, we must download and install the Appium Flutter Driver. It can be installed using the terminal with the following command:
|
1 |
appium driver install --source=npm appium-flutter-driver |
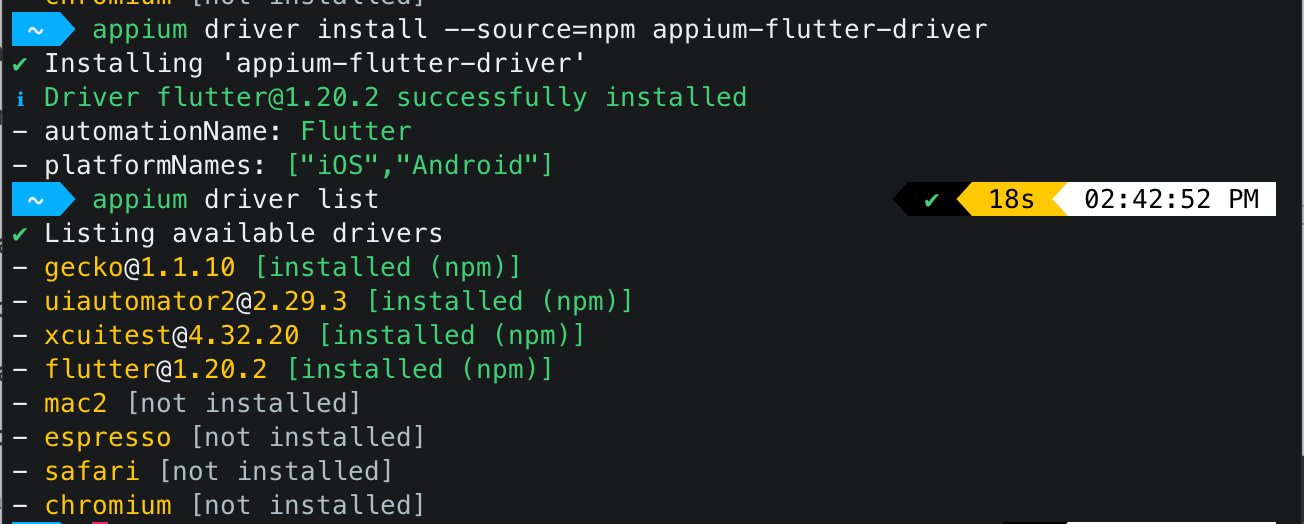
With the installation of Appium Flutter Driver, we are now ready to start writing the test automation scripts for the Provider Shopper Flutter app.
A Maven project needs to be created, and the dependencies for Appium, Appium Flutter Finder, and TestNG should be added to the pom.xml file.
Once the dependencies are updated in the pom.xml it is the time now to start with the configuration of Android Driver and its respective capabilities so we could run the tests on the Android device successfully. For setting the Android Driver and its capabilities, AndroidDriverManager class is created.

In AndroidDriverManager class, the first method that we will be discussing is the createAndroidDriver() that will set the Android Driver and its capabilities.
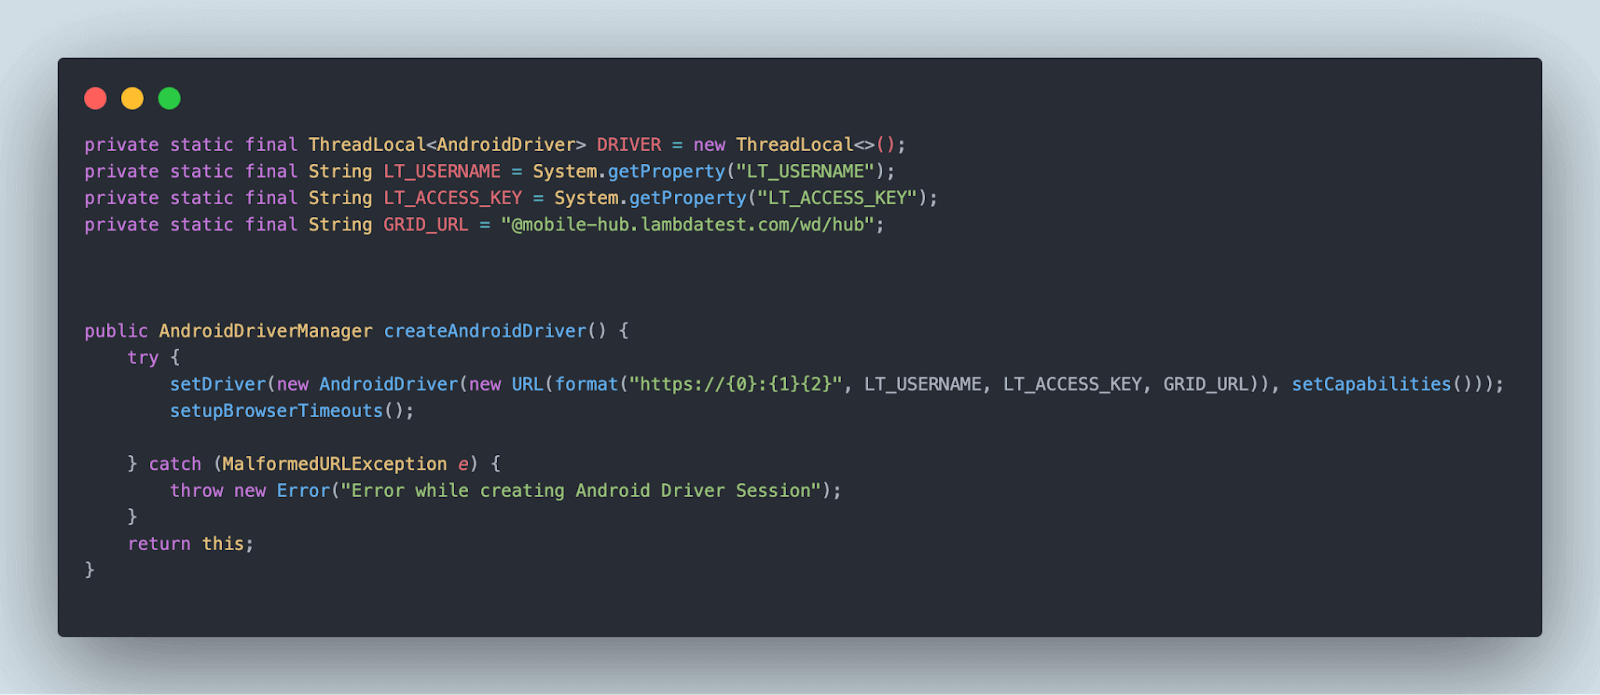
The ThreadLocal class is used to instantiate the Android Driver instance. This ensures that each thread has its isolated instance of the Android Driver. This will help us run the tests in parallel smoothly. Next, the setDriver() method will set the Android Driver.

For running the tests on the LambdaTest cloud grid, we need to provide the LambdaTest Username, Access Key, and Grid URL along with the desired capabilities. The LambdaTest Username and Access Key will be supplied while running the tests as the respective values are taken using the System.getProperty method.
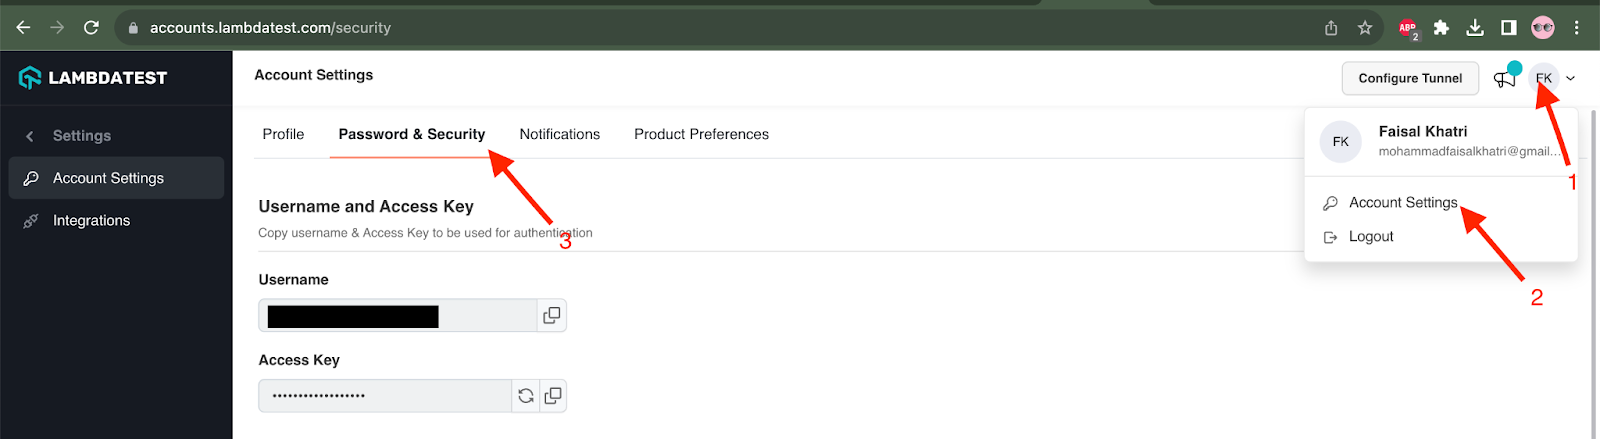
The LambdaTest Username and Access Key can be fetched from the Account Settings >> Password & Security screen after logging in to the LambdaTest website.
The setCapabilities() method sets the desired capabilities for running the test on the LambdaTest cloud grid.
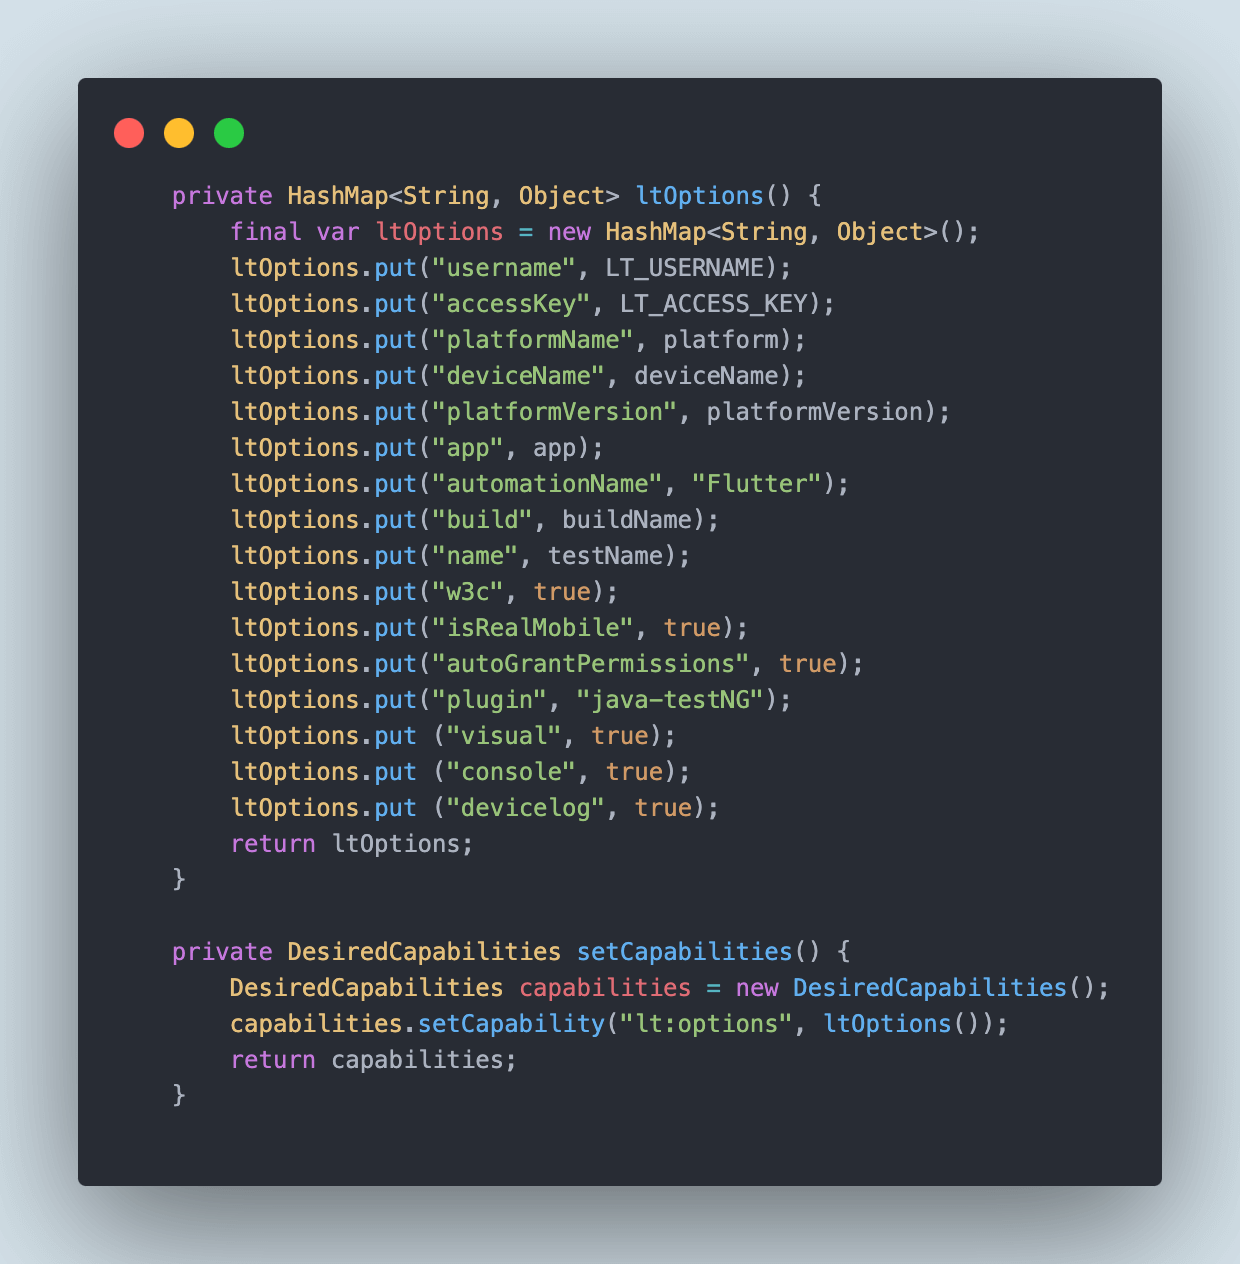
A separate ltOptions() method has been created to allow us to set all the LambdaTest capabilities for running the test on real Android devices. We need to provide the capabilities for automationName with the value “Flutter”. This particular capability setting needs to be provided for Flutter apps only.
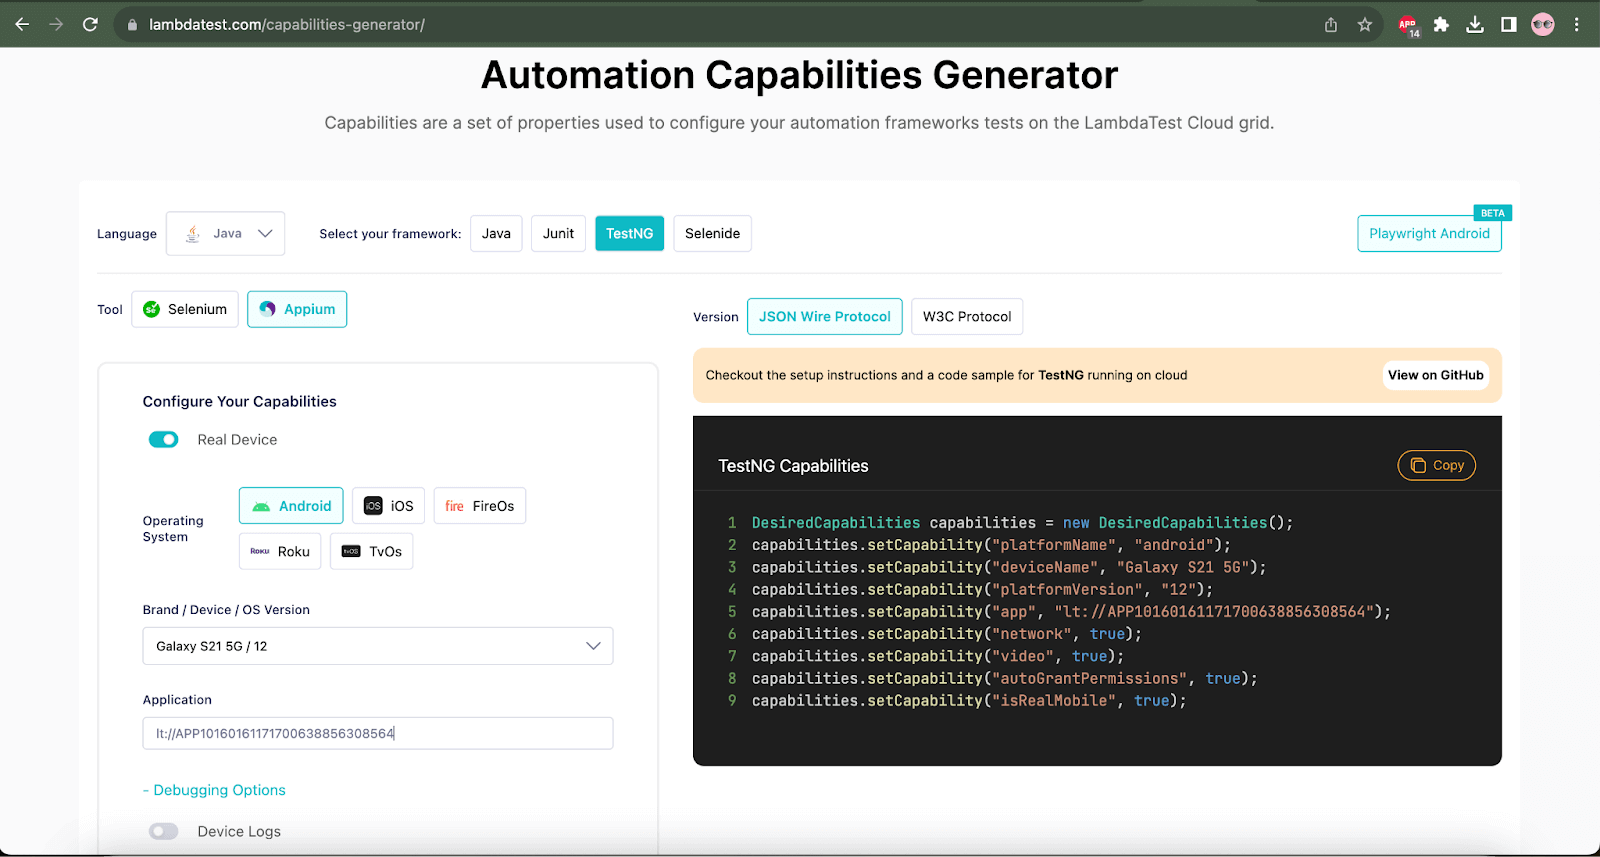
These capabilities can easily be found on the LambdaTest Capabilities Generator, which generates the code while you set the desired capabilities from the UI.
You may notice that there are variables set for the following values in the ltOptions() method:
- LT_USERNAME
- LT_ACCESS_KEY
- Platform
- Platform Version
- Device Name
- Test Name
- Build Name
- App URL
All these values will be set using the testng.xml file hence the respective variables have been set here. This allows us to keep the platform and device details dynamic in the code and manage it using the testng.xml to run the test on different platform and device combinations.
@Builder annotation has been placed over the AndroidDriverManager class. It is an annotation from the Lombok library, and it will help set the platform, version, device, etc. details in builder pattern format.
Once the Android Driver and the desired capabilities are set. Next, we must find the mobile elements to interact with them and run the automation test.
Page Object Model (POM) is used in this project as it helps the code maintainability, readability, and reusability. Page Object Model implementation will create separate classes to maintain the Login and Catalog pages.
The LoginPage class will handle all the Page Objects of the Login page.
The mobile elements for the Username and Password fields are returned by the userNameField() and passwordField() methods using the byValuKey() method of Appium Flutter Finder.
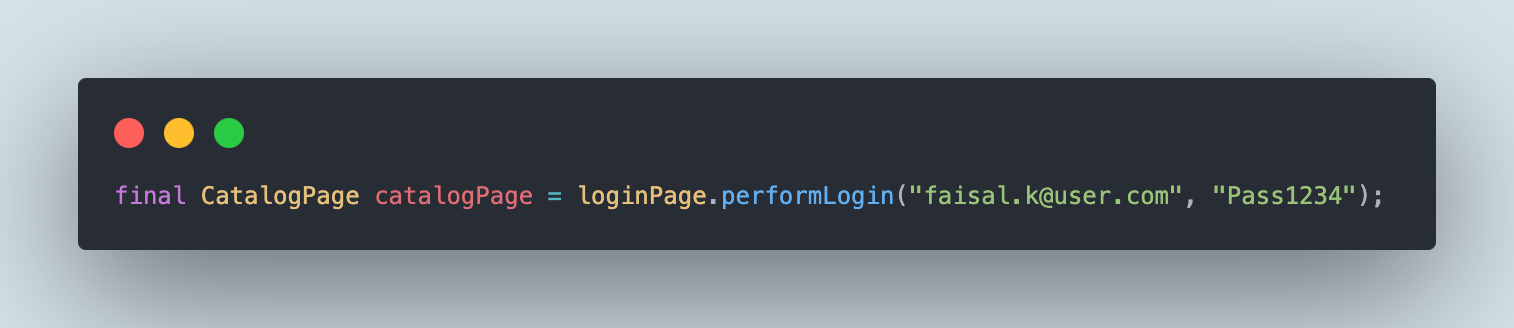
Likewise, the mobile element for the ENTER button is returned by the enterBtn() method. The performLogin() method will help interact with the Username and Password fields by entering the respective values in the field and clicking the ENTER button to perform the login action.
An instance of the CatalogPage class is returned by the performLogin() method, as the app will move to the Catalog page after login.
The CatalogPage class will take care of all the Page Objects of the Catalog page.
The title of the Catalog page will be located by the pageTitle() method using the byText() method of Appium Flutter Finder and will return its text in String format.
Setting up the Base Test
Now, verify the scenario discussed in the earlier section by writing the test. The first step is to create a BaseAndroidTest class that will initialize the Android Driver and set the respective desired capabilities to run the tests on real Android Device; finally, it will gracefully quit the driver after the tests are run.
The setupTest() method in the BaseAndroidTest class will run before any test is invoked. It will instantiate the AndroidDriverManager class and supply the build name, test name, application URL, platform name, platform version, and device name capabilities using the @Parameters annotation in TestNG from the testng.xml file and finally will create a new instance of the Android Driver using the createAndroidDriver() method.
Once all the tests are run, the tearDown() method will gracefully quit the driver.
Writing the Automation Test
Finally, in the last section of this blog on using Appium Flutter Driver with Java, we will write the test to verify the working of the Android Flutter application. As discussed in the earlier section of this blog, we need to verify the working of the Android Flutter application by performing login by entering Username and Password and clicking on the ENTER button.
Next, we must verify that the Catalog page is titled “Catalog.”
FlutterSampleAndroidAppTests class that extends the BaseAndroidTests class, is created to write the Android automation tests. The BaseAndroidTests class is extended so we can inherit the instance of Android Driver from it.
The testProviderShopperApp() method performs all the actions to test the app. The LoginPage class is instantiated first and has the Android Driver instance passed as a Constructor parameter.
As the performLogin() method from the LoginPage class returns a new instance of the CatalogPage class, hence the following statement makes sense:
After the user logs in the app, the title of the Catalog page – “Catalog” is verified using the assertEquals() method of TestNG.
Test Execution using TestNG
The testng.xml file must be placed in the project’s root folder. The parameters test name, build name, platform name, platform version, device name, and App URL must be updated in the file.
This test will run on the LambdaTest cloud grid on Android 13 –Samsung Galaxy S21 5G real device.
We need to add the following values to run the tests on the LambdaTest cloud grid –
- LambdaTest Username
- LambdaTest Access Key
These values can be passed using the Run Configuration window in the IDE as
-DLT_USERNAME =
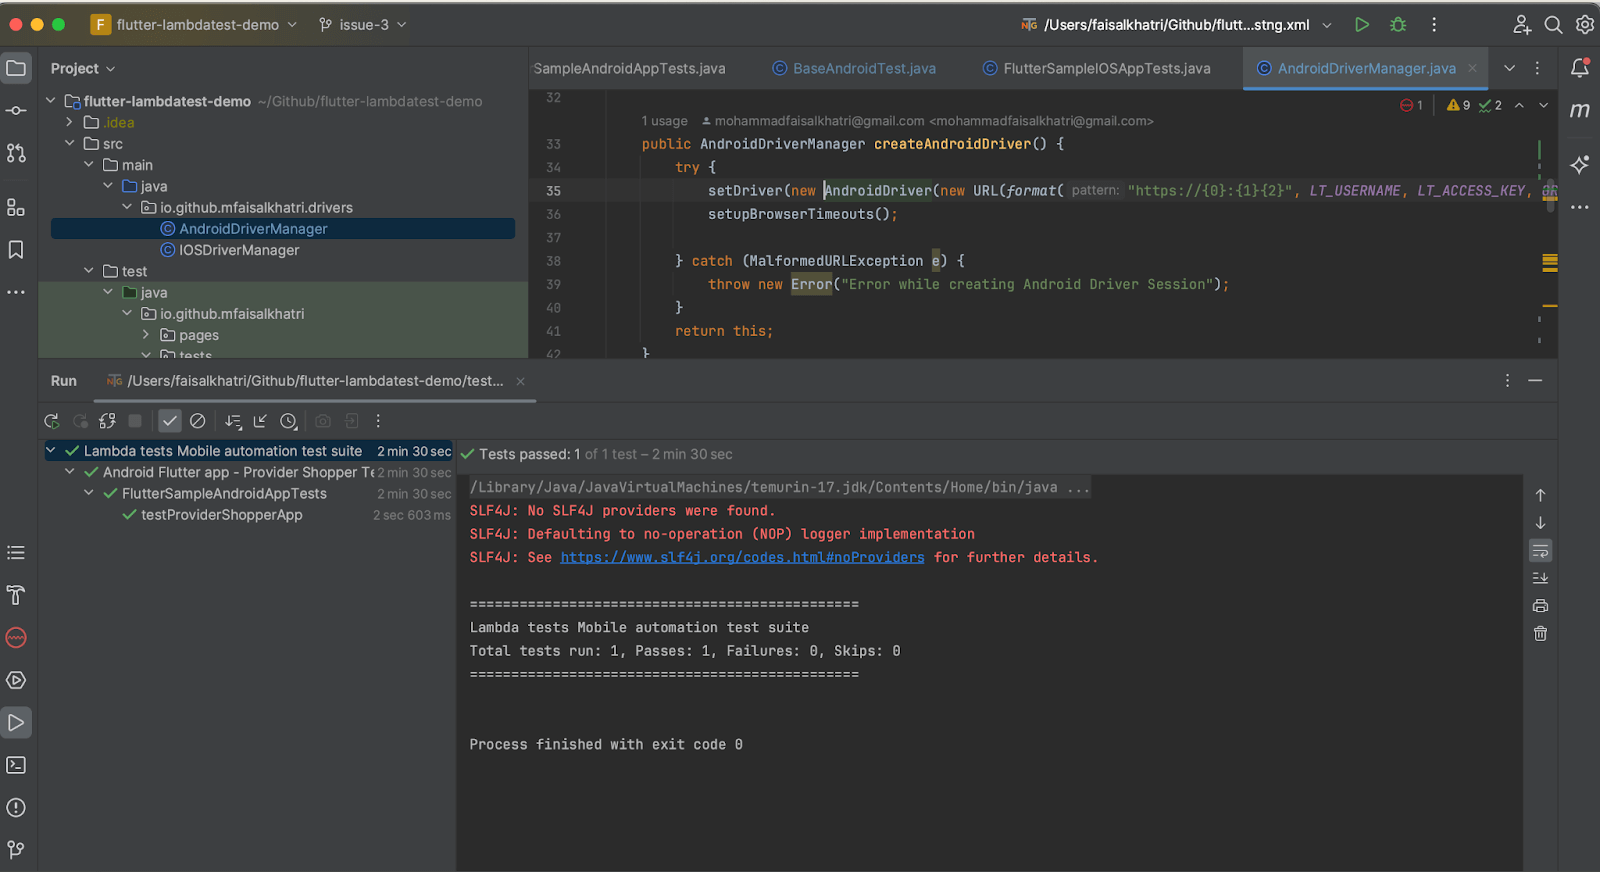
To run the test using IntelliJ, right-click on the testng.xml file and select the option Run ‘../testng.xml’.
Below is the screenshot of the test run using IntelliJ.
All the test execution can be viewed on the LambdaTest Dashboard, which provides all the minute details about the test execution.
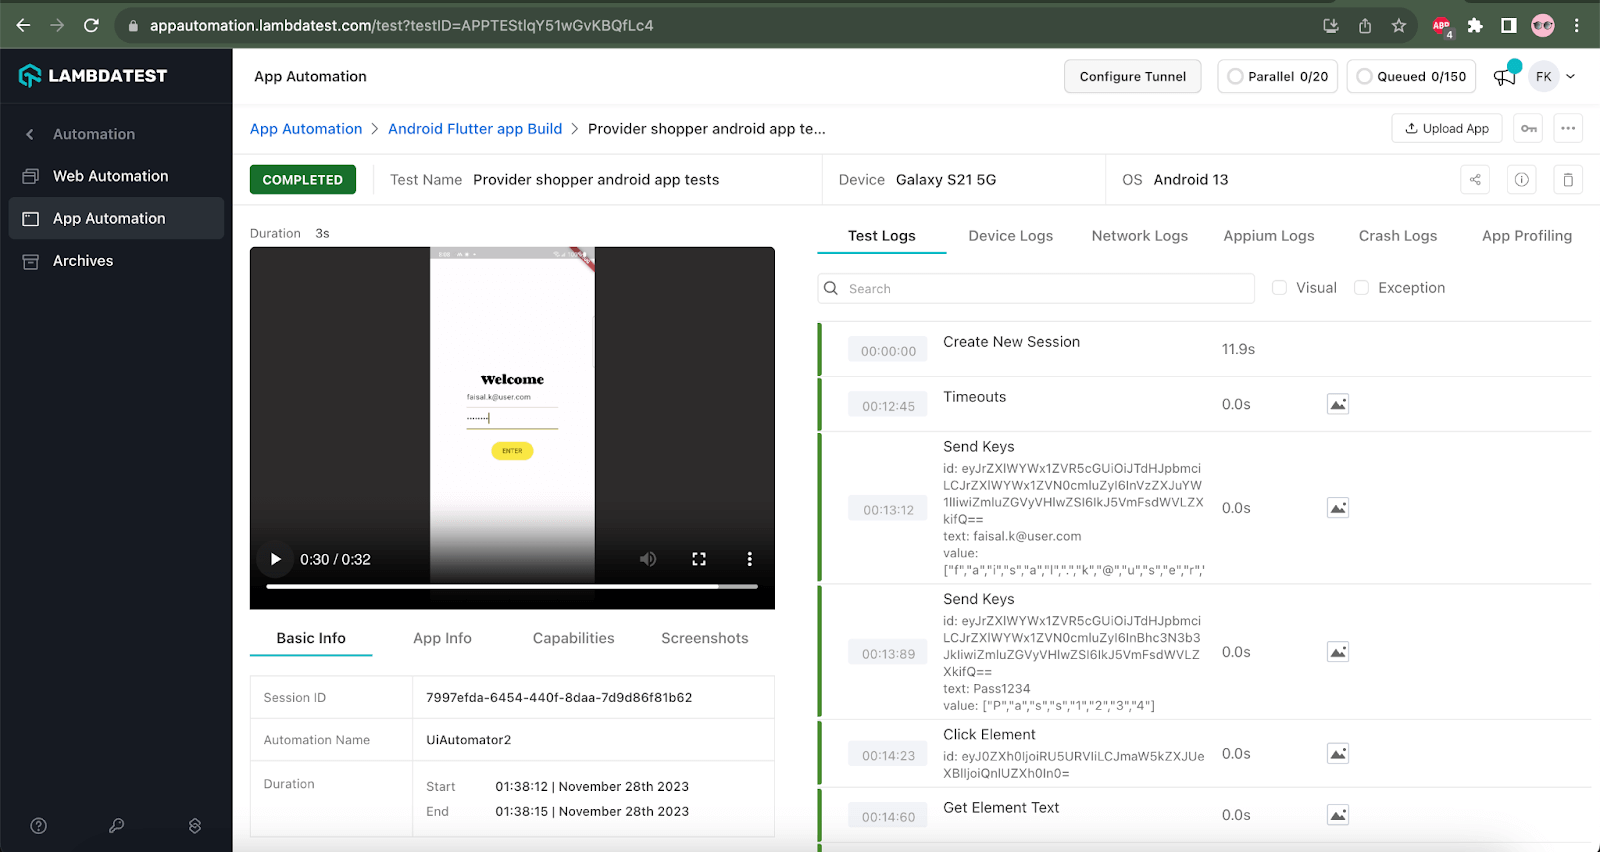
Details like Video recordings, Screenshots, Appium logs, Device logs, OS name, OS version, Duration of test execution, etc., can be viewed in the build details screen by clicking the test session link on the dashboard page.
If you are a developer or tester looking to elevate your Appium automation skills, you can opt for the Appium 101 certification by LambdaTest! This comprehensive certification program allows you to use your Appium skills, covering essential concepts and best practices to automate real-world scenarios.

Summary
There are multiple options of test automation frameworks that can be used to automate the Native applications. Nevertheless, Flutter applications present some limitations in this context. When it comes to identifying mobile elements in Native applications, the Appium Inspector tool proves useful, eliminating the necessity of delving into the source code of the applications. However, the Appium Inspector tool is ineffective for Flutter applications, requiring direct access to the source code. In this scenario, the Flutter Widget Inspector becomes crucial for locating the Flutter mobile elements.
Comparatively, automating the native application is much easier as we don’t need to know the programming language in which the native application is built. However, for Flutter, the tester needs to have some basic understanding of Dart programming language to configure and set up the Flutter app project for compiling and generating the Android and iOS builds.
The existing Appium Drivers, like UIAutomator, etc., don’t come in handy for the Flutter application. We need to have the Appium Flutter Driver to automate the Flutter application. Similarly, a separate Appium Flutter Finder library is required to locate the mobile elements, as the existing Appium libraries don’t work with Flutter.
I hope this blog helps you write automated tests for the Android Flutter application by saving time.
Happy Testing!
Frequently Asked Questions (FAQs)
What is a Flutter driver?
In Flutter, a “driver” refers to a testing tool or component that allows for the automation and interaction with Flutter applications during testing. The Flutter driver provides a way to perform end-to-end (E2E) testing on Flutter apps by simulating user interactions and validating the app’s behavior.
The Flutter driver works with testing frameworks like the Flutter test framework and can be utilized for unit and integration testing. It enables developers and testers to write test scripts that interact with the widgets and elements of a Flutter app, checking whether the app responds correctly to various inputs and scenarios.
What is the difference between Appium and Flutter?
Appium and Flutter serve distinct roles in mobile application development and testing.
Appium is an open-source automation tool designed to facilitate testing native, hybrid, and mobile web applications. It operates as a versatile solution, offering cross-platform support for testing on Android and iOS. Appium utilizes the Selenium WebDriver framework, providing a unified API for interacting with mobile applications across different platforms. Its primary focus is test automation, covering various testing levels, including unit, integration, and end-to-end testing.
On the other hand, Flutter is an open-source UI software development toolkit created by Google. Unlike Appium, Flutter is not a testing tool but a framework for building natively compiled mobile, web, and desktop applications from a single codebase. Flutter is known for its ability to create visually consistent and appealing user interfaces across different platforms. While Appium and Flutter can be used in conjunction for end-to-end testing of Flutter applications, they serve different purposes, with Appium dedicated to automation testing and Flutter focused on UI development.


Author’s Profile
Faisal Khatri
Faisal is a Software Testing Professional having 14+ years of experience in automation as well as manual testing. He is a QA, freelancer, blogger and open source contributor. He loves learning new tools and technologies and sharing his experience by writing blogs.
Blogs: 40
Got Questions? Drop them on LambdaTest Community. Visit now


