Cypress Best Practices For Test Automation [2024]
Dawson
Posted On: March 1, 2024
![]() 75087 Views
75087 Views
![]() 21 Min Read
21 Min Read
Cypress is an amazing framework for testing your frontend applications. However, there are mistakes that you can make which can cause you to slow down your development and testing processes. You could face challenges that are difficult to surpass, like handling authentication and dealing with web servers, or even worse, dealing with third-party authentication providers, etc.
In this blog on Cypress best practices, I will show you the best practices of Cypress automation and the common mistakes people make when writing the test code while performing Cypress E2E testing. I will also show you how to avoid these mistakes to make your development process faster, free from bugs, and constant code refactoring.
Here are the key learning points from the blog:
- How to model your tests based on a real application?
- How do you write effective tests in isolation?
- Freeing yourself from page objects
- Choosing an effective testing strategy for logging in to your application
- How to leverage direct access to its state?
Cypress is amazing overall, but if you don’t do it the right way and don’t follow the Cypress best practices, the performance of your tests will decrease drastically, you will introduce unnecessary errors, and your test code will be unreliable and flaky.
For example, your code may work today and break tomorrow after a third-party provider adds some changes to their website.
This blog will teach you the Cypress best practices to never make such mistakes and write reliable, high-quality test codes while performing Cypress testing.
TABLE OF CONTENTS
- What is Cypress?
- Cypress best practices for testing
- Login programmatically
- Choosing best-suited locators
- Assigning Return Values
- Having test isolation
- Creating small tests with a single assertion
- Unnecessary Waits
- Web Servers
- Using a global baseUrl
- Visiting external websites
- Using after or afterEach hooks
- Bonus Tip: Use Cloud Cypress Grid to test at scale
- Frequently Asked Questions (FAQs)
What is Cypress?
Cypress is also widely used for E2E (end to end) testing, so you don’t have to separate your tests and write your front-end, back-end, and database tests separately. Instead, you can replicate real user scenarios and use Cypress for end-to-end testing.
According to the State of JS 2022 survey, Cypress is the sixth most popular testing framework, showing that many developers and QA engineers are switching to the Cypress test automation framework.
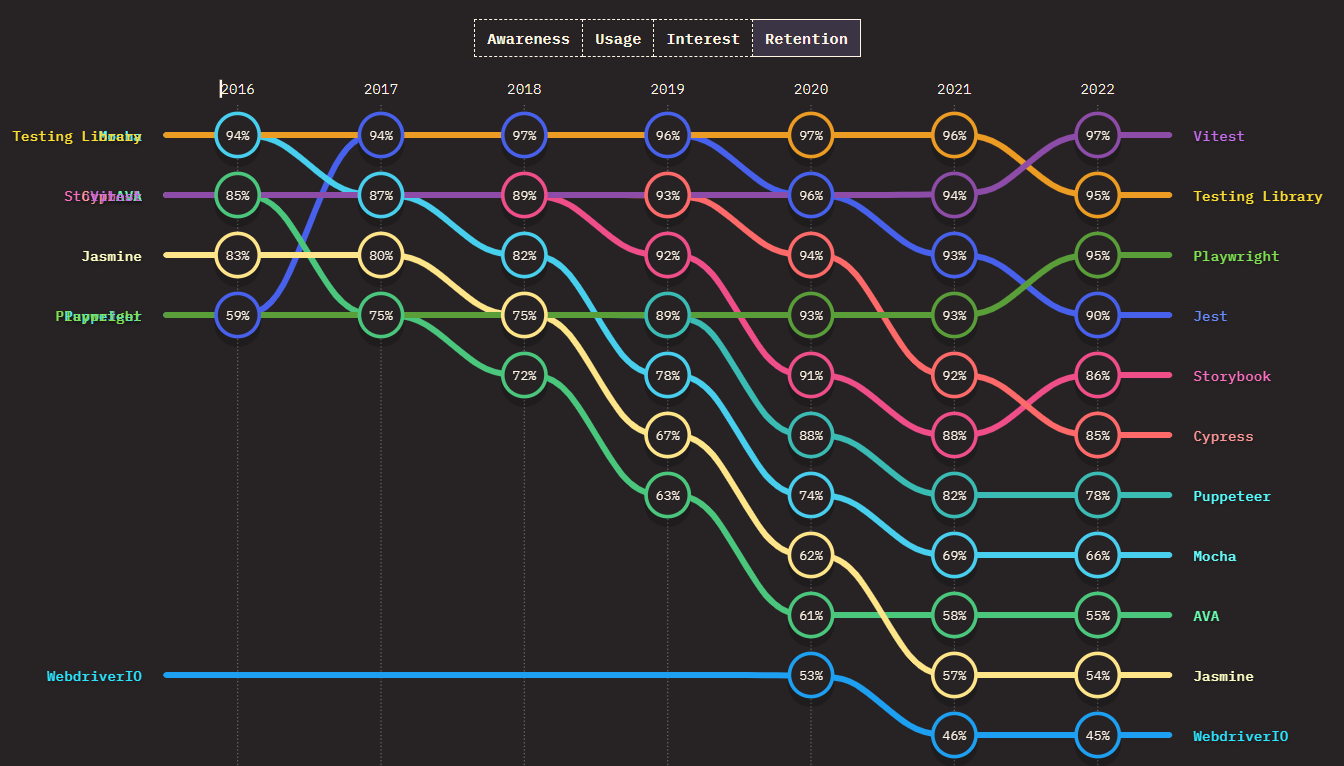
Though Cypress is a relatively new kid on the block; it has quickly established its position as the test automation framework of choice for JavaScript applications, as evident from the number of Forks (3.1K) and Stars (45.9K) on GitHub for the project. Cypress’ popularity can be attributed to some handy features such as a runtime inspector, time travel debugging, an ability to run tests in parallel, and plugins.
The ever-increasing downloads for Cypress speak a lot about the popularity of this open-source test automation framework.
Moreover, the Cypress Community is a thriving environment that features plenty of learning opportunities. It is well-moderated and provides you with access to top minds in software testing and web development. Apart from the active Cypress community, there are Cypress Ambassadors that you can use to learn from. Cypress Ambassadors are experienced developers and engineers that have created amazing applications using Cypress.
As compared to other testing frameworks like Selenium, Cypress is picking up pace. If you are coming from a Selenium background and intrigued to know more about the Cypress automation tool, you can check out the Selenium vs Cypress comparison.
Cypress best practices for testing
One thing that is fondly mentioned in automation testing is “No amount of bad code can be fixed with automation.” What this essentially means is that the maximum ROI from test automation can be attained if we follow the best practices of the framework that is being used to write automation tests.
As per my experience with Cypress UI testing, here are some of the Cypres best practices to avoid Anti-patterns in Cypress that should be leveraged to come up with top-notch automation tests:
Login programmatically
| Anti-Pattern: Using the UI to log in Best Practice: Programmatically log into the application and widely use the application’s state |
A very common thing people tend to do when it comes to testing web pages that require authentication is logging in through the UI and then redirecting to the page that needs testing.
For example:
|
1 2 3 4 5 6 7 8 |
describe("Testing protected routes", () => { beforeEach(() => { cy.visit("/login") cy.get('[data-cy="email"]').type("jon@example.com") cy.get('[data-cy="password"]').type("password") cy.get('[data-cy="submit"]').click() }) }) |
This gets your job done. But the problem with this is that this uses your application UI for authentication, and after the authentication is done, it redirects to the page that you want.
This also means the login page must work before any other specific page you want to test. This style of writing tests is not in isolation, which is not among Cypess best practices.
Let’s say you want to test the settings page. To do that, you log in and introduce the login page, which means you have failed the test in isolation. This will also be extremely time-consuming and counterproductive if you have hundreds of pages. If the process of logging in and redirecting to the desired page takes 1.0 seconds, it will increase the testing time by 100 seconds if you have a hundred pages.
The better approach for this is to log in programmatically. What does that mean?
Let’s first see how authentication happens when someone logs in. Most of the time, the user sends an email and password through a POST request to the backend server, and the server will send back the user data and a token to the client.
The client saves that token in the browser’s local storage and sends it in the authorization header whenever another request is sent to the backend. This way, the backend can identify which user has sent the request.
To sign in programmatically, we need to use another Cypress command called Cypress request cy.request(). The method makes HTTP requests outside the constraints of the browser. It’s not bound by CORS or any other security restrictions.
Let me touch base on what is CORS? CORS stands for Cross-Origin Resource Sharing. It is an HTTP header-based mechanism that helps servers indicate the origins in which the browsers send the request. Most servers only allow requests from specific trusted origins.
Coming back to cy.request(), the awesome thing about cy.request() is that it uses the browser’s user agent and cookie store, so it behaves exactly as the request did come from the browser, but it is not bound by the restrictions.
In a nutshell, the difference between cy.request() and cy.visit() is that cy.visit() redirects and uses the browser to visit the indicated URL, which means when you visit a URL with cy.visit() it will open up in the browser and downloads all the assets of the page and runs all the JavaScript code.
On the other hand, cy.request() only sends HTTP requests to a URL; you can not see it visually, and it does not download any website assets or run any JavaScript code.
What we can do now is send a POST request to our backend server with the email and password in the request body using cy.request(), and after we get back the response, we will save the token in our browser’s local storage.
|
1 2 3 4 5 6 7 8 9 10 |
describe("Testing protected routes", () => { beforeEach(() => { cy.request("http://localhost:3000/api/auth/login", { email: "jon@example.com", password: "password", }).then((r) => { window.localStorage.setItem("token", r.body.token) }) }) }) |
This sends a request every time a particular page is being tested.
One of Cypress best practices is to build a custom command for our login code.
|
1 2 3 4 5 6 7 8 |
Cypress.Commands.add("login", (email, password) => { cy.request("http://localhost:3000/api/auth/login", { email, password, }).then((r) => { window.localStorage.setItem("token", r.body.token) }) }) |
And re-use our custom command in our test codes.
|
1 2 3 4 5 |
describe("Testing protected routes", () => { beforeEach(() => { cy.login("jon@example.com", "password") }) }) |
Now, this is a much better practice and much faster than logging in using the UI. It saves you a lot of time; it’s more maintainable and reliable since we are not relying on selectors that could change during development.
Watch this video to learn how Cypress can be used to automate accessibility testing.
Choosing best-suited locators
| Anti-Pattern: Using selectors that are subject to change Best Practice: Use data-* attributes to provide context to indicate which selectors are used for testing |
One of the most common mistakes in writing tests is using selectors that are too brittle and subject to change. These include selectors coupled with CSS styling and JavaScript event listeners.
For example, let’s use LambdaTest’s eCommerce Playground to run a test using brittle selectors (not recommended)
|
1 2 3 4 5 6 |
describe("Testing home page", () => { it("should go to product page", () => { cy.visit("<https://ecommerce-playground.lambdatest.io/>") cy.get("#mz-product-listing-image-97213254-0-1").click() }) }) |
In this example, we want to click the first element of the “Deals of the day” slider, the problem with the code above is that it is using the element id to click it.
This will work (for now), but more products will be added to the slider in the future. It is not a guarantee that this product will be there, so Cypress can not find an element with the given id, and the test will fail. To learn more about finding elements in Cypress, you can read this blog on finding HTML elements using Cypress locators.
You can use Cypress best practices, something like data-cy="first-slider-item" as the element attribute and use cy.get('[data-cy="first-slider-item"]') in Cypress to get access to the element.
Now it is a guarantee that the code will always run no matter if the id changes or the styling of the element changes.
You should refactor your code to this:
|
1 2 3 4 5 6 7 |
describe("Testing home page", () => { it("should go to product page", () => { cy.visit("https://ecommerce-playground.lambdatest.io/") cy.get('[data-cy="first-slider-item"]').click() }) }) |
The problem with using too generic selectors is that it might work at first as you don’t have a very complicated UI, but you could easily break your selectors as you expand and add more features in the application.
This way you might introduce broken selectors and unnecessary failed tests that should actually be considered as passed tests.
For example, let’s say you want to select an element button and click it. Here are some ways that you could do it and why you should use them or not:
- cy.get(‘button’).click(): This is too generic, there might be more than one button in the page or you might add more buttons in the future.
- cy.get(‘.btn.btn-primary’).click(): This one is also subject to change. You might want to change the classes to update the styling of the button in the future.
- cy.get(‘#main’).click(): Better but not the best since it is linked to CSS Styling and JavaScript event listeners.
- cy.get(‘[name=submission]’).click(): Coupled to the name attribute, which has HTML semantics.
- cy.contains(‘Submit’).click(): This is much better, but this is coupled with the HTML elements content. It depends if you really want the button to contain “Submit”. If you want the test to fail if it doesn’t contain “Submit”, then you should use it.
- cy.get(‘[data-cy=submit]’).click(): Best practice, not subjected to any change in any way possible.
| Recommended | Not recommended |
| ✅ data-cy | ❌ class |
| ✅ data-test | ❌ id |
| ✅ data-testid | ❌ name |
Using data-cy, data-test or data-testid makes it clear to everyone that this element is used directly by the test code.
Code example:
|
1 2 3 4 5 6 7 |
// cypress/support/commands.ts Cypress.Commands.add("getBySelector", (selector, ...args) => { return cy.get(`[data-test=${selector}]`, ...args) }) Cypress.Commands.add("getBySelectorLike", (selector, ...args) => { return cy.get(`[data-test*=${selector}]`, ...args) }) |
- getBySelector yields elements with a data-test attribute that match a specified selector.
- getBySelectorLike yields elements with a data-test attribute that contains a specified selector.
Writing the types for TypeScript:
|
1 2 3 4 5 6 7 8 9 10 11 12 13 14 15 |
declare global { namespace Cypress { interface Chainable { getBySel: ( selector: string, ...args: Partial<Loggable & Timeoutable & Withinable & Shadow>[] ) => Chainable<any> getBySelLike: ( selector: string, ...args: Partial<Loggable & Timeoutable & Withinable & Shadow>[] ) => Chainable<any> } } } |
Assigning Return Values
| Anti-Pattern: Assigning return values of Cypress commands Best Practice: Using closures and aliases |
Cypress does not run synchronously, which means that you can not ever assign the return value of any Cypress command.
Do not assign or work with return values of any Cypress command; commands are enqueued and run asynchronously. There is no guarantee that the behavior of the tests will be the same if they are dependent on the return values.
This is a common mistake that people mostly make:
|
1 2 3 4 5 |
// this won't work // do not write your code like this const button = cy.get('button') const form = cy.get('form') button.click() |
Since commands are enqueued and run asynchronously, this code does not work. Do not ever assign any value to Cypress commands.
But don’t worry…
Don’t panic yet, Cypress has provided us with a few other techniques that we can use to get the values of any selected element.
How to access the return values of any Cypress command?
There are some ways that you could access the return values of any Cypress command:
- Using Closures
- Using Variables
- Using Aliases
Closures
If you’ve worked with JavaScript enough, you definitely are quite familiar with JavaScript promises and how to work with them.
You can access the value that each Cypress command yields using the .then() command.
Example:
Let’s use this simple form demo to run a simple test using closures. Basically, we want to grab a text from a random element from the DOM and type that element in an input which will also display the text in a different div element.
This is just a simple example of using closures in our code.
|
1 2 3 4 5 6 7 8 9 10 11 12 13 14 15 16 17 18 |
it("should be equal", () => { cy.visit("https://www.lambdatest.com/selenium-playground/simple-form-demo") cy.get("h2").then(($h2) => { const text = $h2.text() // gets the text in the p tag cy.get("input").first().type(text) // click the button that will show the input cy.get("#showInput").click() // get the div which contains the message // using another closure to get the text cy.get("#message").then((message) => { expect(message.text()).to.equal(text) }) }) }) |
As you can see we are using .then() after we are getting the element h2 we also use .text() which can only be accessed on the returned element, which is $h2 in this case. This will return the text value that is inside the first h2 element of the DOM.
After we get the text of the first h2 element, we want to type that text inside the first input element and click the button to show it on the other div. We also assert that the text in the message should be equal to the text in the first h2.

As you can see, both texts are equal, that’s why our test passes.

Variables
You will not be using variables in most of your code or you will be hardly using them, but variables also have their own use cases and are sometimes important to use.
If your application’s state changes throughout running the test codes, then you might want to use variables to compare your previous state value to the next state value.
Example:
Let’s write a simple HTML code that contains a span that holds a state value of a counter and a button that increments the counter.
|
1 2 3 4 5 6 7 8 9 10 11 12 |
<button>increment</button> counter = <span id="num">0</span> <script> var counter = 0 document.getElementById("num").innerHTML = counter document .getElementsByTagName("button")[0] .addEventListener("click", function () { counter++ document.getElementById("num").innerHTML = counter }) </script> |
We want to compare the previous state and the next state with Cypress and make an assertion to make sure the value is incremented each time the button is clicked.
|
1 2 3 4 5 6 7 8 9 10 11 |
cy.get("#num").then(($span) => { // the current number const num1 = parseInt($span.text()) cy.get("button") .click() .then(() => { // the number after the state updates const num2 = parseInt($span.text()) expect(num2).to.eq(num1 + 1) }) }) |
As you can see we first get the value in the span with .text() and click the button to increment it, finally compare the new value to be equal with the old value +1.
Aliases
Sometimes you want to re-use the return values of the Cypress commands that you run inside the hooks like before and beforeEach.
Using .then() certainly won’t help with that.
|
1 2 3 4 5 6 7 8 9 10 |
beforeEach(() => { cy.get("button").then(($btn) => { const text = $btn.text() }) }) it("does not have access to text", () => { // how do we get access to text ? // .then() is not useful in this scenario. }) |
You can share the context of any value that you want by using the .as() command.
The .as() commands lets you assign an alias for later use; it yields the same subject it was given from the previous command.
You can then access that alias with this.alias or cy.get(‘@alias’) with a @ in the beginning.
|
1 2 3 4 5 6 7 8 |
beforeEach(() => { // alias the $btn.text() as 'text' cy.get("button").invoke("text").as("text") }) it("has access to text", function () { expect(this.text).to.equal("Click me") }) |
Having test isolation
| Anti-Pattern: Having tests rely on each-other Best Practice: Tests should always be able to be run independently from any other test |
Let’s say you want to test if a particular input exists, fill in the text input, and then submit the form.
This includes three tests. Here is how most people do it, which is NOT the Cypress best practices and you should avoid doing this:
|
1 2 3 4 5 6 7 8 9 10 11 12 13 14 15 16 17 18 |
describe("Texts should be equal", () => { it("should visit lambdatest form demo", () => { cy.visit("https://www.lambdatest.com/selenium-playground/simple-form-demo") }) it("should find the input", () => { cy.get("#user-message").should("exist") }) it("should type in the input", () => { cy.get("#user-message").type("Hello World") }) it("should click the button", () => { cy.get("#showInput").click() }) it("should show the message", () => { cy.get("#message").should("contain", "Hello World") }) }) |
What is wrong with this code? Why is this a bad idea?
This approach to testing your code is depending on the previous state of the application, for example, the step of .should("contain", "Hello World") depends on the previous step of clicking the button and this also depends on the previous state of typing in the input.
These steps obviously depend on each other and fail completely in isolation, which is essential in writing your tests.
Instead, you should combine all of these steps into one test.
Here is the recommended way to do it:
|
1 2 3 4 5 6 7 8 9 10 11 12 13 |
describe("Texts should be equal", () => { it("should fill in the form and show the message", () => { cy.visit("https://www.lambdatest.com/selenium-playground/simple-form-demo") cy.get("#user-message").should("exist") cy.get("#user-message").type("Hello World") cy.get("#showInput").click() cy.get("#message").should("contain", "Hello World") }) }) |
If you think you need to run some other tests differently, it’s a good idea to share some of the code by using beforeEach.
The beforeEach hook runs the code inside of it before running any tests.
|
1 2 3 4 5 6 7 8 9 10 11 12 |
describe("Testing login page ...", () => { beforeEach(() => { cy.visit("/login") }) it("test 1", () => { // ... }) it("test 2", () => { // ... }) }) |
For example in this code, Cypress will visit the login page before running any of the codes inside the it blocks.
Creating small tests with a single assertion
| Anti-Pattern: Creating different tests with a single assertion for the same element Best Practice: Adding multiple assertions in the same test |
Cypress is different and not the same as running unit tests, it runs a series of asynchronous lifecycle events that reset the state between tests.
This means writing single assertions in one test will make your tests run very slowly and cause really bad performance.
Adding multiple assertions is much faster than creating different tests; therefore, don’t be afraid to add multiple assertions in one test.
What if you want to know which tests have failed? Don’t you need to write different titles for each test? The answer is NO. Since you will be able to see “visually” which tests have failed, you don’t need to write every single assertion in a different test, you can easily create multiple assertions in one test.
As per Cypress, they consider 30+ commands in Cypress tests to be pretty common and normal.
This is a simple example of the correct usage of writing multiple assertions.
|
1 2 3 4 5 6 7 8 9 10 11 12 13 |
describe("Testing login page", () => { it("should type and validate inputs", () => { cy.visit( "https://ecommerce-playground.lambdatest.io/index.php?route=account/login" ) cy.get("#input-email") .type("jon@doe.com") .should("have.value", "jon@doe.com") .and("include.value", "@") .and("not.have.value", "jon@doe") }) }) |
Unnecessary Waits
| Anti-Pattern: Waiting for an arbitrary time period Best Practice: Not using cy.wait() for a large portion of your tests |
In Cypress, you almost never need to use cy.wait() an arbitrary number for anything. Cypress users seem to do this very often, but fortunately, there are better ways to do this.
You should never use cy.wait() with any of the following commands:
- cy.request()
- cy.visit()
- cy.get()
The command cy.request() will not resolve until it receives the response from the server, so adding an arbitrary waiting time is not necessary at all.
This is a great feature of Cypress and one of the Cypress best practices. If you set an arbitrary number of 2 seconds for a request and the request takes 0.1 seconds, you will slow down the testing process by 20 times.
Also, if you wait for 1 second and the request takes 2 seconds now, you get an error because the request is not resolved yet. So Cypress made this pretty easy, and you can use cy.request() without worrying about waiting for it to resolve.
The same is true for cy.visit(). It will only resolve when every single asset has been loaded, including JS and CSS files.
Web Servers
| Anti-Pattern: Starting a web server using Cypress commands cy.exec() and cy.task() Best Practice: Start a web server before running Cypress |
Every time you run cy.exec() and cy.task(), the process must eventually exit. If not, Cypress will not continue any other commands.
If you start a server with Cypress, you will introduce many problems because:
- You have to background the process
- No access via terminal
- No valid access to logs
- Every time your tests run, you’d have to work out the complexity around starting an already running web server
- Port conflicts
Using the after() hook could solve your problem and shut down the server, but the after() hook only runs after the test is completed. Also, it is not guaranteed that the after() hook will run every single time!
Since you can always restart/refresh in Cypress, then the code in the after hook will not always run.
What should you do instead?
You should instead start your server before running the Cypress tests and shut it down whenever it ends.
We recommend using the wait-on module
|
1 |
npm start & wait-on http://localhost:8080 |
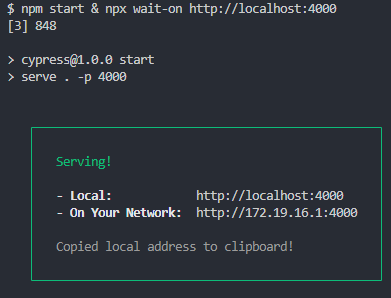
Then run your tests:

Using a global baseUrl
| Anti-Pattern: Using cy.visit() without a baseUrl Best Practice: Set a baseUrl in your cypress.json |
Setting up a global baseUrl saves you from hard-coding the URL every time you use one of the Cypress commands cy.request() and cy.visit().
Also, if you do not set up a global baseUrl, Cypress will automatically go to https://localhost + a random port, which will show an error. By having a baseUrl configured, you save yourself from seeing this error when cypress first opens up.
If you haven’t configured a baseUrl in your cypress.json, here is how you should re-write your code:
let’s say you have visited the login page:
|
1 2 3 4 5 6 7 8 9 |
cy.visit("http://localhost:3000/login") Change it to: cy.visit("/login") cypress.json { ... "baseUrl": "http://localhost:3000" ... } |
Visiting external websites
| Anti-Pattern: Visiting 3rd party websites Best Practice: Only testing what you control and using cy.request() with 3rd party APIs |
You should always avoid using cy.visit() to visit any external website and avoid interacting with the UI at all costs.
Why shouldn’t you ever use cy.visit() and the UI to interact with third-party websites and servers?
- It takes a lot of time and slows you down.
- The website might change without you knowing about it.
- Their website could be having issues.
- They might want to block you because of automation.
- They might be running A/B campaigns.
Testing logging in with OAuth
Instead of using cy.visit here are some ways you can handle logging in to third-party providers:
- Use stub
You can stub out the OAuth provider. The reason to use this is to trick your application into believing the OAuth provider has sent back the token to the application.
If you must get a real token, it’s recommended to use cy.request if the provider’s APIs change less frequently; even if they do, you will be notified of the changes.
Using after or afterEach hooks
| Anti-Pattern: Using after or afterEach hooks to clean up the state Best Practice: Cleaning up the state before running the tests |
We see people write their state clean-ups right after their test ends. This could cause multiple problems, including introducing unnecessary failing tests and slowing down your testing performance.
Here is an example of how most beginners tend to do it, which is not recommended:
|
1 2 3 4 5 6 7 |
afterEach(()=> { cy.cleanDb() }) it('should add a new user', ...) it("should some other stuff", ...) it('should do something else', ...) |
While this code seems to be fine, it is actually not, because it is not a guarantee that any code inside of the afterEach hook will run at all. This could leave you with an unwanted state in your application.
Why is afterEach not a guarantee to run?
Let’s say you refresh your browser in the middle of the test, this will restart your test instantly without running any code inside the afterEach hook, leaving you with an unwanted state.
So, the next time you start your testing process, you will encounter many errors and failed tests, because of the old state that the previous test created when you refreshed/closed the test.
Let’s look at another code example that most people tend to write, which is also not recommended
|
1 2 3 4 5 6 7 8 9 10 11 |
beforeEach(() => { cy.login() }) afterEach(() => { cy.logout() }) it('some', ...) it('more', ...) it('tests', ...) |
This code will log in and log out the user for every test, which is sometimes unnecessary.
Cypress leaves you with the same state that the previous test leaves behind. It’s of the Cypress best practices to always take advantage of this state and write your tests based on this.
We don’t have to worry about debugging later because debugging in Cypress is unlike any other test library. It has an unmatched debuggability that helps you write your tests in this style.
Want to make your life of testing easy and fuss-free while debugging? Try LT Debug Chrome extension!
What should you do instead?
Avoid using afterEach and after as much as you can. This way you can leverage the state of the previous tests and run your tests much faster and much more performant.
If you want to clean the state, do it before starting the test, meaning, put it in the beforeEach block. This way, you will always ensure you are starting your test in a clean and untouched state.
Bonus Tip: Use Cloud Cypress Grid to test at scale
One of the disadvantages of Cypress is that you cannot use Cypress to drive two browsers simultaneously. This is where a cloud Cypress Grid can be hugely beneficial as it helps you run parallel tests to test at a large scale.
AI-powered test orchestration and execution platform like LambdaTest allow you to perform Cypress testing at scale. LambdaTest allows you to perform automated cross browser testing on an online browser farm of 40+ browsers and operating systems to expedite the test execution in a scalable way. Moreover, it increases the test coverage with better product quality.
You can also Subscribe to the LambdaTest YouTube Channel and stay updated with the latest tutorials around automated browser testing, Selenium testing, CI/CD, and more.
In this example, I will show you how to run parallel Cypress browsers using LambdaTest. We will use LambdaTest’s eCommerce Playground to visit the registration page and create an assertion.
|
1 2 3 4 |
// /cypress.json { "baseUrl": "https://ecommerce-playground.lambdatest.io" } |
|
1 2 3 4 5 6 7 8 |
// /cypress/integration/test.spec.ts describe("Testing register page", () => { it("should find a text", () => { cy.visit("/index.php?route=account/register") cy.contains("Register Account").should("exist") }) }) |
To run your Cypress test on LambdaTest, install the LambdaTest Cypress CLI using the following command:
npm install -g lambdatest-cypress-cli
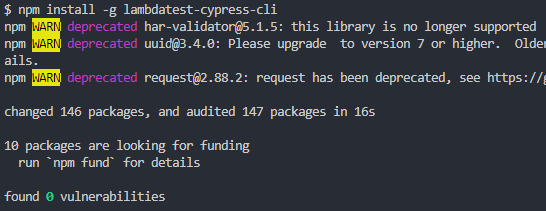 Cypress test on LambdaTest ” width=”546″ height=”211″ class=”aligncenter size-full wp-image-30582″ />
Setup configurations on which you want to run your test – Once you have installed the lambdatest-cypress CLI, now you need to set up the configuration. You can do that using the following command:
lambdatest-cypress init
This will put the configurations inside lambdatest-config.json.
If you are using TypeScript, don’t forget to add typescript with the specified version in the npm dependencies.
|
1 2 3 4 |
"npm_dependencies": { "cypress": "9.0.0", "typescript": "^4.7.2" // don't forget to add this line } |
This is an example of the LambdaTest configuration file. Don’t forget to update the Username and Access Key with valid credentials. You can find the same in the LambdaTest Profile Section once you log on to LambdaTest.
As shown in the browsers array, we have specified two browsers with the specified operating systems.
And we have also specified the value of the parallel to be 5, which means LambdaTest will automatically run these tests in different browsers with a maximum of 5 parallel tests.
Now it’s time to run the Cypress UI automation test in LambdaTest. Use the following command for that:
lambdatest-cypress run
This will automatically upload your tests to the secure LambdaTest Cypress Grid and help you perform Cypress parallel testing.
Visit the Web Automation Dashboard to view the status of the tests.
You will be able to see your tests there and see the logs and videos recorded during the tests.
You can further deepen your knowledge with this webinar on Cypress, which will help you perform scalable and reliable cross browser testing with Cypress.
If you are a developer or a tester and want to take your Cypress expertise to the next level, you can take this Cypress 101 certification and stay one step ahead.
Conclusion
Cypress is a great testing framework if appropriately used, followed by the best practices.
Following some of the Cypress best practices could be irritating or somewhat difficult to implement. But they will definitely pay off in the long run and save you a lot of time while performing Cypress E2E testing. If not, you will introduce errors and failed tests and slow down the process.
Following these Cypress best practices will make your tests much more performant, giving you a seamless testing experience without introducing errors or failures in the future.
Do check out the detailed Cypress tutorial if you want to explore the immense number of features Cypress offers.
Frequently Asked Questions (FAQs)
How do you write a good test in Cypress?
When writing a test in Cypress, there are a few things to remember. First, tests written in Cypress have access to the same features as tests written in JavaScript. This means you can use any Cypress command and assertion in your tests written in TypeScript. Second, the write-only API is the easiest way to write tests in Cypress. The read-only API is still available if you need it but is not recommended for most testers and developers.
Where do you put Cypress test?
By default, test files are located in cypress/e2e. However, this can be configured to a different directory.
Is Cypress A BDD?
Cypress is a Node.js-based BDD/TDD web application framework for testing APIs, websites, web apps, and software in general. It provides valuable data like screenshots, logging, and location directly to your tests from the browser.
Got Questions? Drop them on LambdaTest Community. Visit now


