
How to Use @FindBy Annotation in Selenium Java
Faisal Khatri
Posted On: October 31, 2023
![]() 126776 Views
126776 Views
![]() 30 Min Read
30 Min Read
Code maintenance and duplication are two common challenges that software teams often face, resulting in reduced performance and reliability. It also makes the code more complex, tightly coupled, and less flexible for refactoring. With all these problems, adding new lines of code to the software becomes quite tricky as we need to think of a logic to fit those lines within the code.
In automation test suites as well, we all face the same problem. The code becomes too complex and bulky. Even for adding a simple test for new functionality, we need to think twice and find a solution for checking which part of the code needs to be updated so it doesn’t hamper the existing working of the test suite. Sometimes, we have to repeat the same line of code multiple times because it is how the automation framework was designed to work.
Today, there are multiple automation test frameworks that help teams to automate tests and help in delivering quality software. Selenium WebDriver is a popular web automation framework that helps automate the tests for popular modern browsers like Google Chrome, Mozilla Firefox, Microsoft Edge, Safari, etc. To learn more about Selenium WebDriver, check out this guide on What is Selenium?
Writing automated tests using Selenium WebDriver is easy and simple. However, software testing teams face a bigger challenge: keeping the test implementation separate from the web page elements used in the tests.
Page Object Model, also called POM, is a popular design pattern in Selenium WebDriver that creates a page object repository to store WebElements separately in different classes to keep the tests clean and more readable.
Design patterns help us overcome industry-standard approaches to solving a recurring problem and help us save time once we sensibly use the design pattern. Design patterns speed up development and are known to fix the problems before they are known in the implementation process. It also facilitates code maintenance, helps us avoid code duplication, and facilitates code readability.
Page Factory Model is another popular design pattern in Selenium. It is considered an Optimized Page Object Model that uses the PageFactory class in Selenium.
In this blog on using @FindBy annotation in Selenium, which is part of the Page Factory Model in Selenium WebDriver, we will also learn how to use @FindBys, @FindAll, and @CacheLookup annotations in Selenium Java.
If you’re looking to improve your Selenium interview skills, check out our curated list of Selenium interview questions and answers.
TABLE OF CONTENTS
- What is Page Factory in Selenium WebDriver?
- Using @FindBy annotation in Selenium WebDriver
- Using @CacheLookup annotation in Selenium WebDriver
- Using @FindBys annotation in Selenium WebDriver
- Using @FindAll annotation in Selenium WebDriver
- Which Exception is thrown if the WebElement is not found?
- Demonstration: Locating elements and writing web automation tests
- Food for Thought 💡
- Final Thoughts
- Frequently Asked Questions (FAQs)
What is Page Factory in Selenium WebDriver?
Page Factory is a way of implementing the Page Object Model that uses the PageFactory class. By using the PageFactory class in Selenium, testers can interact with web elements, making it robust with enhanced efficiency and simplicity in using Page Objects.
The following image shows the difference between the Page Object and Page Factory Model:
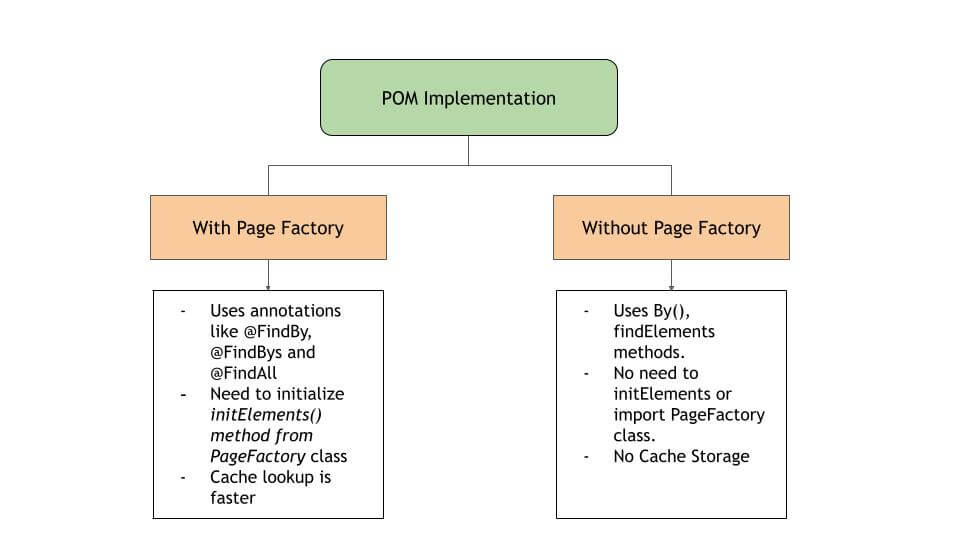
To use the Page Factory Model, we need annotations like @FindBy, @FindBys, and @FindAll for locating WebElement in the Page Object class. Next, we need to initialize the Page Object class using the initElements() method from the PageFactory class.
Let’s learn how to use the @FindBy, @FindBys, and @FindAll annotations to use the Page Factory Model efficiently.
Using @FindBy annotation in Selenium WebDriver
@FindBy annotation marks a field on the Page Object for locating the WebElement or a list of WebElements. It is used in coordination with the PageFactory class that allows users to easily and quickly create Page Objects.
There are two different implementation ways for using @FindBy annotation.
- Using “How” and “Using” Strings
- Passing Locator Strategy
Using “How” and “Using” Strings
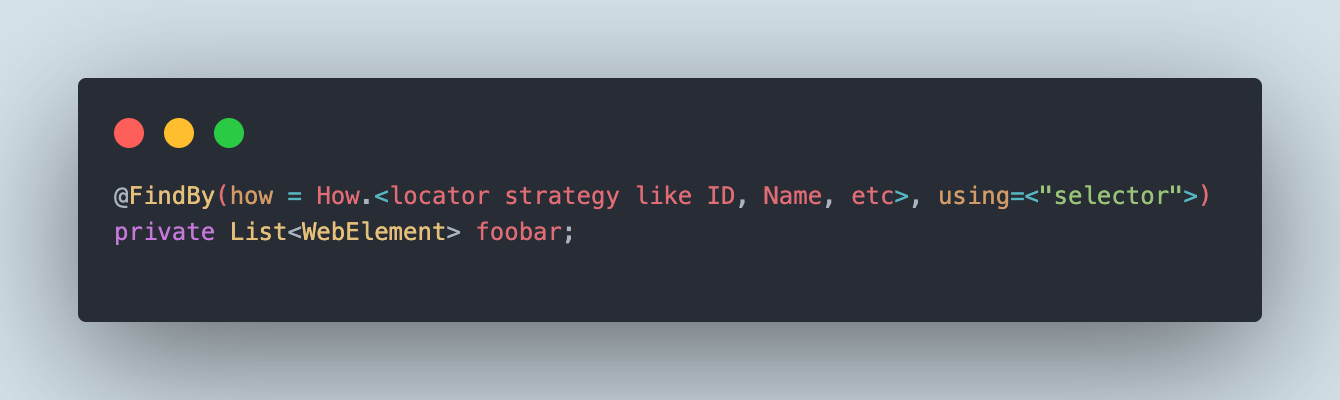
The first way to implement @FindBy annotation is by using the “how” and “using” strings as parameters to the annotation by declaring a WebElement variable. The values in the parameter can be supplied as follows –
- “how” – With the “how” enum in this parameter, you have the flexibility to utilize any of the following locator strategies:
- ID
- Name
- ClassName
- LinkText
- PartialLinkTex
- TagName
- CSS
- XPath
- ID or Name
- “using” – In this parameter, the actual selector needs to be supplied as per the locator strategy selected in the “how” parameter.
For example, we can pass the locator strategy like How.ID or How.CSS
The following example usage will provide a detailed explanation of how to use @FindBy annotation practically in the code.
The syntax for using @FindBy annotation [Passing How enum]:
![@FindBy annotation [Passing How enum]:](https://www.lambdatest.com/blog/wp-content/uploads/2023/10/unnamed-2023-10-31T175500.369.png)
Demo: @FindBy using How enum
Let’s take an example of the Simple Form Demo screen on LambdaTest’s Selenium Playground website and locate the “Enter Message” field.
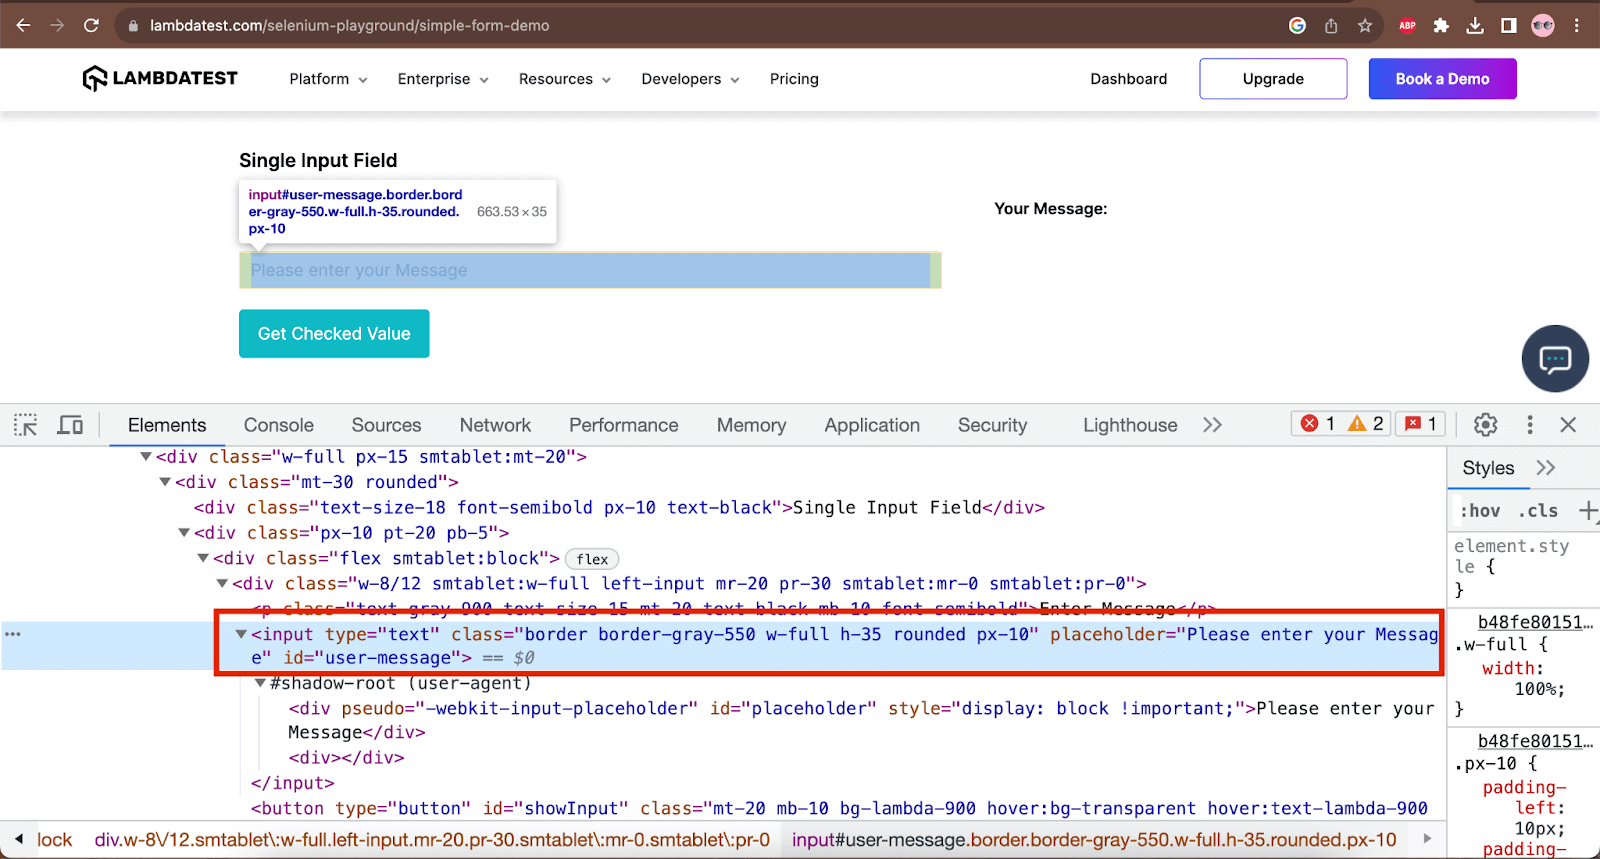
In this screen for the Enter Message field, we can use the ID locator – “user-message” as a selector to locate the field. So, to use it in the code with @FindBy annotation, we can write it as follows:
|
1 2 |
@FindBy(how = How.ID, using="user-message") private WebElement enterMessageField; |
Once we have defined the WebElement, we can directly use it in the methods to act on the element. The following lines of code show how to interact with the WebElement defined using @FindBy annotation:
|
1 2 3 |
public void enterMessage() { this.enterMessageField.sendKeys("This is a test message"); } |
However, to make this work, we need to initialize the initElements() method of the PageFactory class. intiElements() is a static method in the Page Factory class of Selenium that is used to initialize all web elements located by @FindBy annotation. It can be done in every Page Object class where we want to use the @FindBy annotation.
|
1 2 3 4 |
public SimpleFormPage(final WebDriver driver) { this.driver = driver; PageFactory.initElements(driver, this); } |
We will be initializing the initElements() method in the constructor of the SimpleFormPage class that holds all the page objects for the Simple Form page. Similarly, the initElements() method will have to be initialized in other Page Object classes as well.
Let’s now learn the other way of implementing @FindBy annotation.
Passing Locator Strategy
The second way to implement @FindBy annotation is to directly pass on the locator strategy and its respective selector as a parameter to the annotation by declaring a WebElement variable.
The syntax for using @FindBy annotation [passing locator strategy]:
![The syntax for using @FindBy annotation [passing locator strategy]:](https://www.lambdatest.com/blog/wp-content/uploads/2023/10/unnamed-2023-10-31T180539.072.png)
Any locator strategy values can be passed in the parameter:
- ID
- Name
- ClassName
- LinkText
- PartialLinkText
- TagName
- CSS
- XPath
The above-mentioned locator strategy values are case-sensitive and must be used in small letters only.
Demo: @FindBy by directly passing the locator strategy
Let’s take an example of the Simple Form Demo screen on LambdaTest’s Selenium Playground website and locate the “Get Checked Value” button.
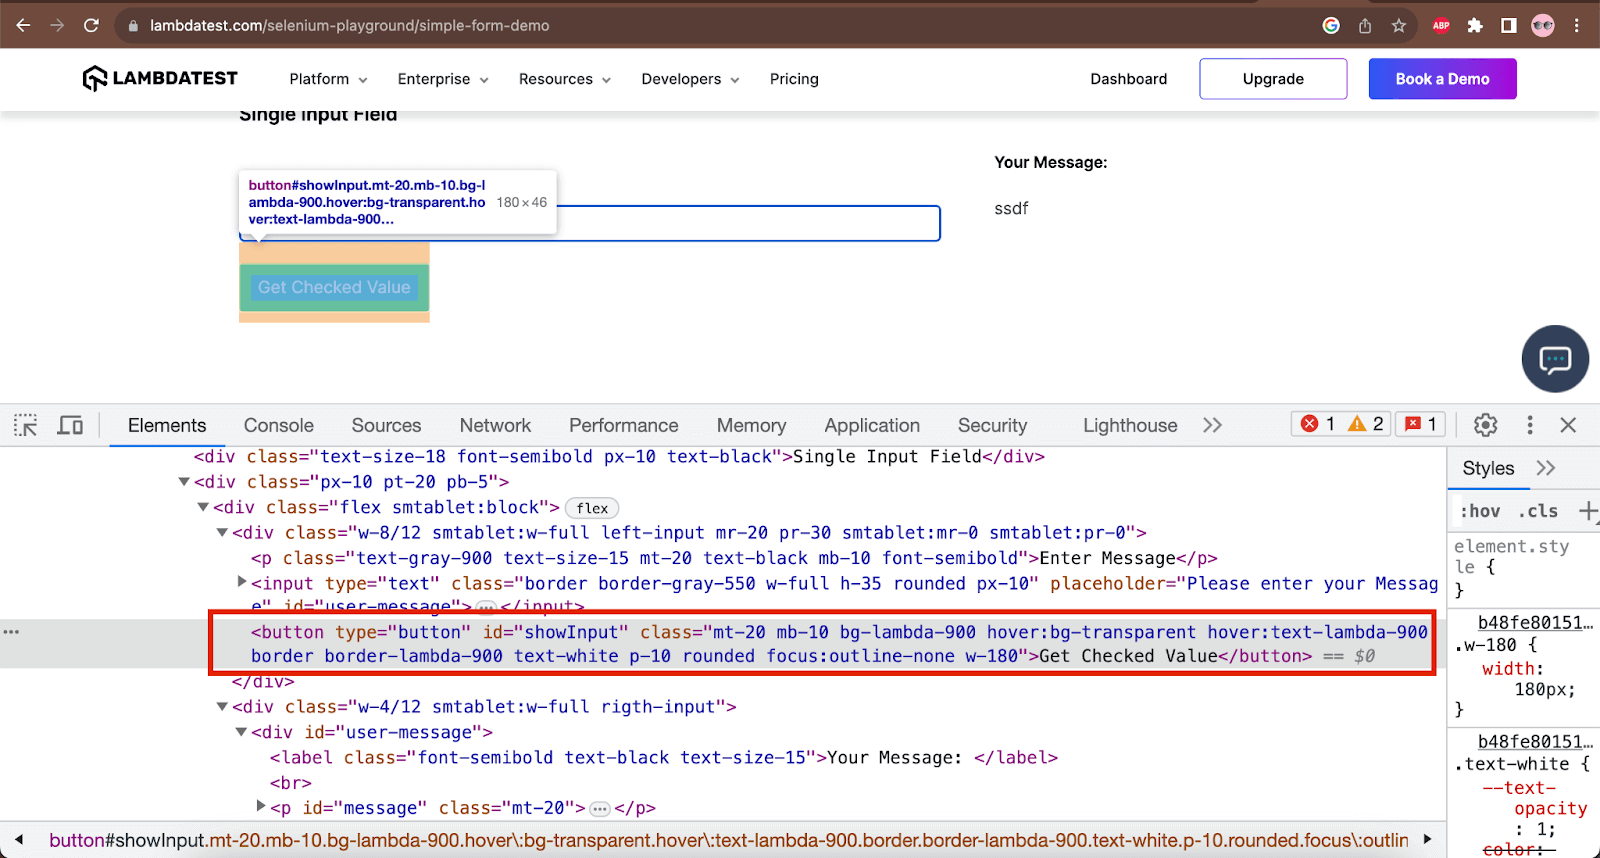
As per the DOM of the page, we can use the id – “showInput” as a selector for locating the Get Checked Value button. Let’s do this by using the @FindBy annotation and writing the following code:
|
1 2 |
@FindBy(id = "showInput") private WebElement getCheckedValueBtn; |
Similarly, we can use other locator strategies like name, CSS, XPath, etc.
Once we have defined the WebElement variable for locating the WebElement using @FindBy, we can directly use it to perform interaction with the button.
|
1 2 3 |
public void clickButton() { this.getCheckedValueBtn.click(); } |
Don’t forget to initialize the intiElements() method from the PageFactory class to make the annotation work.
Using @FindBy annotation for finding multiple WebElements:
@FindBy annotation can also be used to return a list of WebElements if we want a list of elements to be returned using a single selector. We must define the variable that returns List<WebElement> using @FindBy annotation.
We can use either of the implementations as we discussed above for returning a list of WebElements using @FindBy.
The syntax for returning a list of WebElements using Implementation 1:
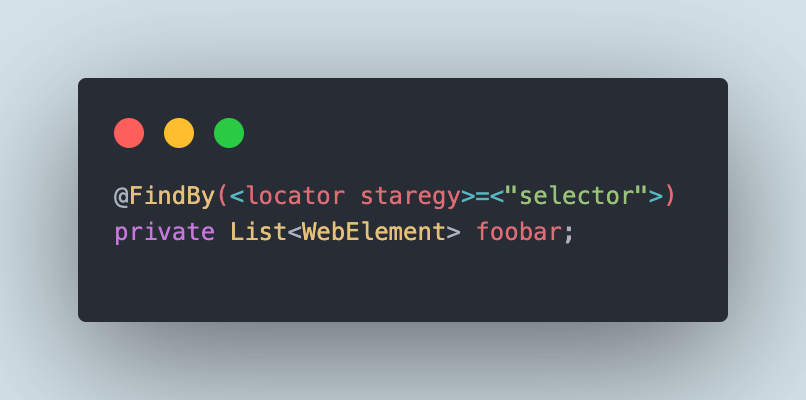
The syntax for returning a list of WebElements using locator strategy in @FindBy annotation:
For better understanding, let’s check out a practical implementation example for returning a list of WebElements.
Demo: @FindBy by directly passing locator strategy for finding multiple WebElements
Let’s take an example of the LambdaTest Selenium Playground website and check the total number of menu options on the main page.
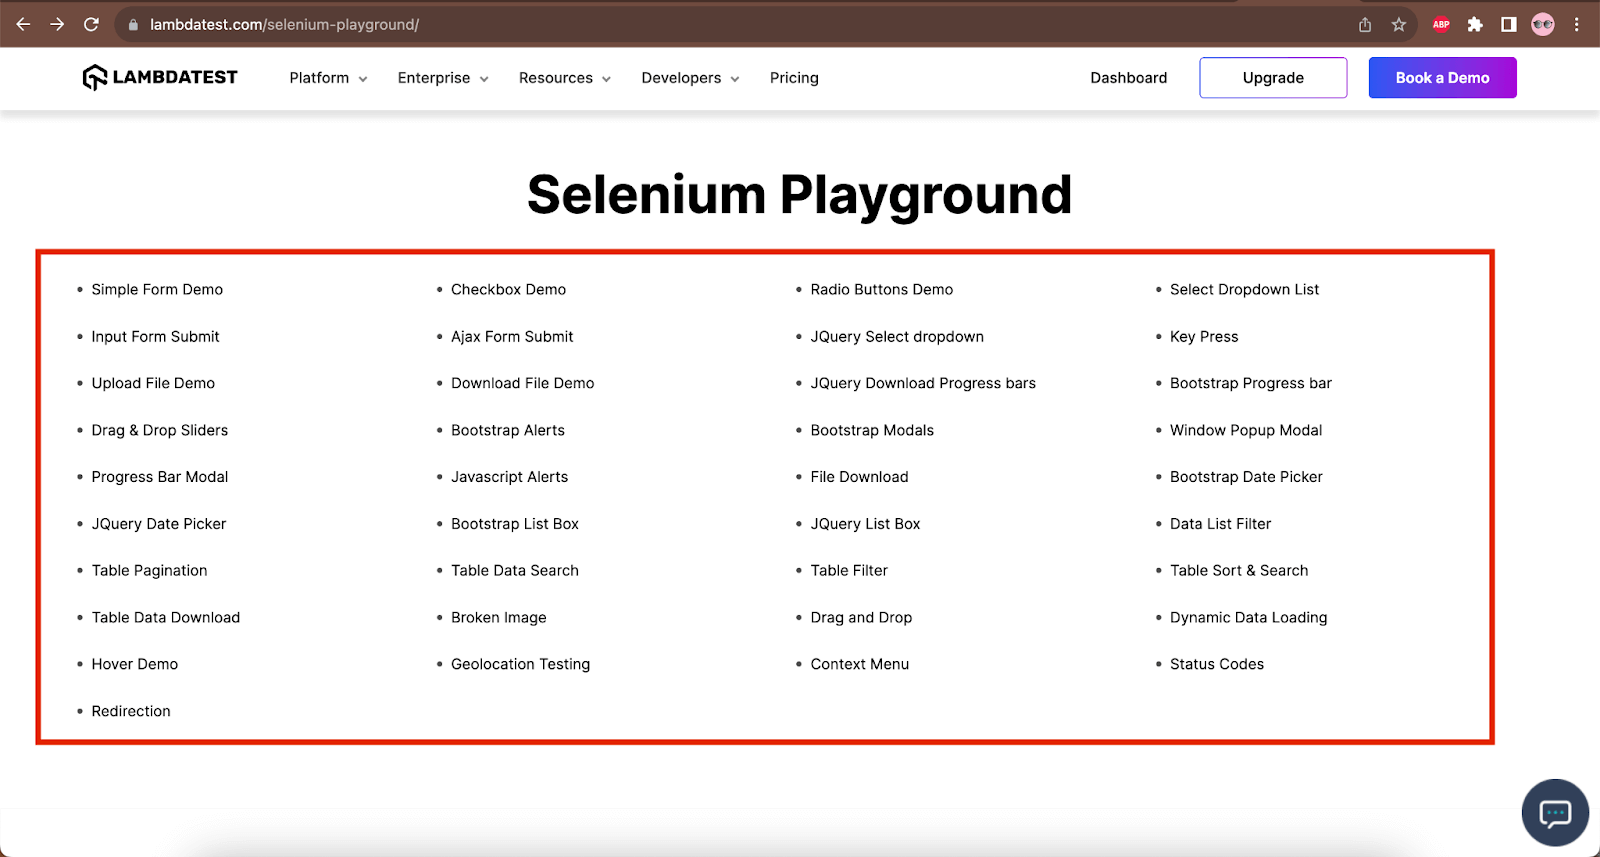
There are a total of 37 menus displayed on this page. Let’s locate all these menus and return their list using a @FindBy annotation with the CSS Selector locator strategy in Selenium.
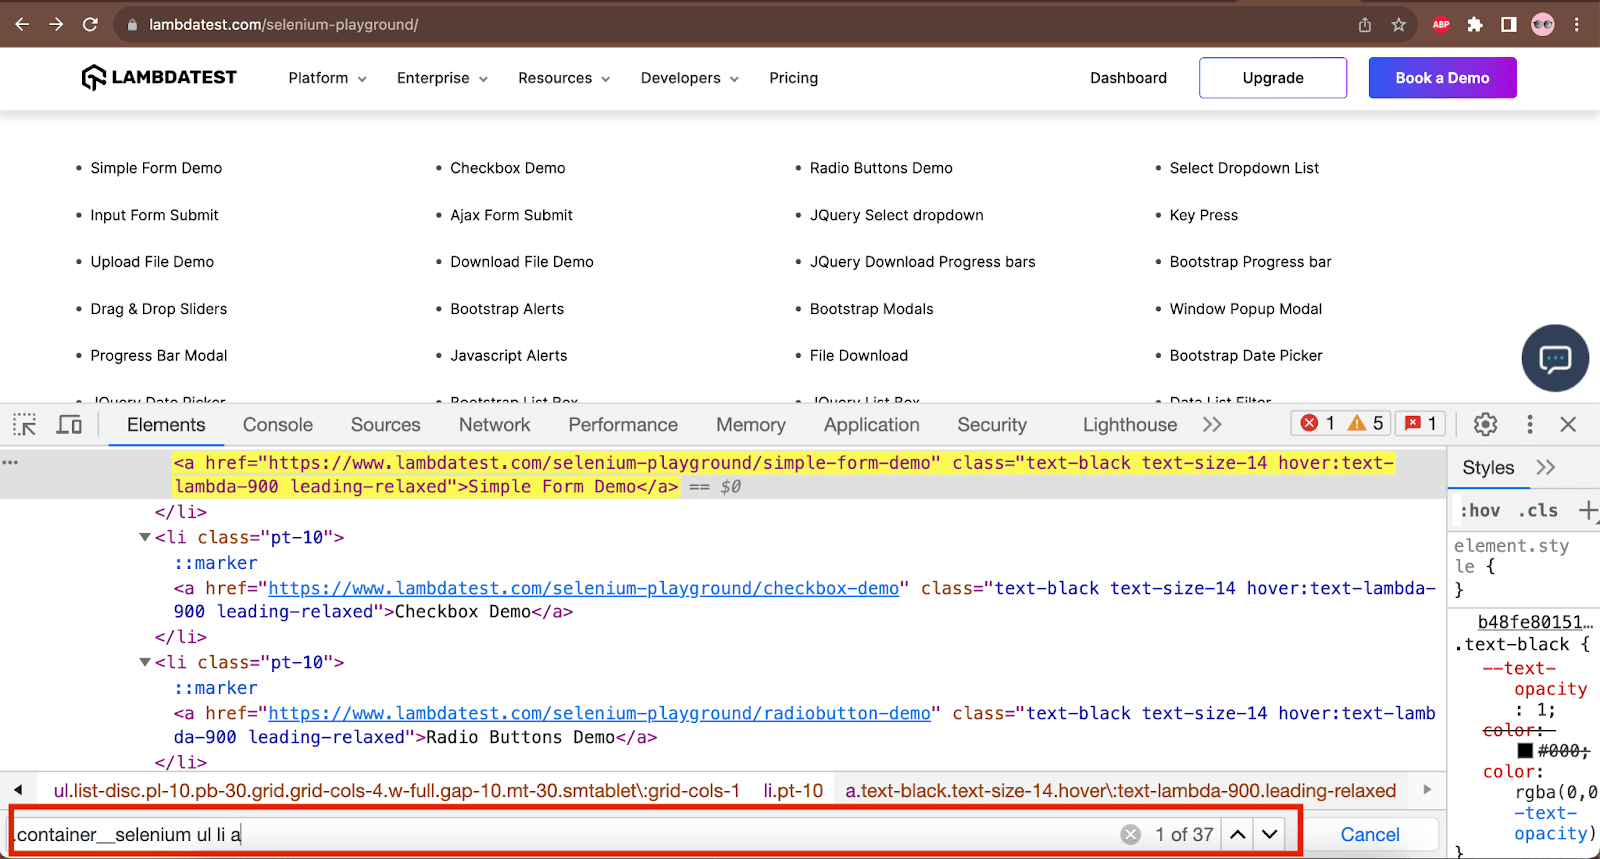
The CSS Selector “.container__selenium ul li a” can be used to return a list of WebElements for the menus. Let’s use this selector with @FindBy annotation.
|
1 2 |
@FindBy(css = ".container__selenium ul li a") private List<WebElement> menus; |
List of menus can also be returned using the How enum in @FindBy annotation as follows:
|
1 2 |
@FindBy(how = How.CSS, using =".container__selenium ul li a") private List<WebElement> menus; |
The following method will return the size of the list that can be used in the test to verify that the list has 37 items in it.
|
1 2 3 |
public int menuListSize () { return this.menus.size(); } |
Following is the Test to check the total number of menus in the menus list.
|
1 2 3 4 5 6 7 8 |
public class SeleniumPlaygroundTests extends BaseTest { @Test public void testMenus() { this.driverManager.getDriver().get("https://www.lambdatest.com/selenium-playground/"); final var mainPage = new MainPage(this.driverManager.getDriver()); assertEquals(mainPage.menuListSize(), 37); } |
Following screenshot of the test execution from IntelliJ shows that the tests executed successfully.
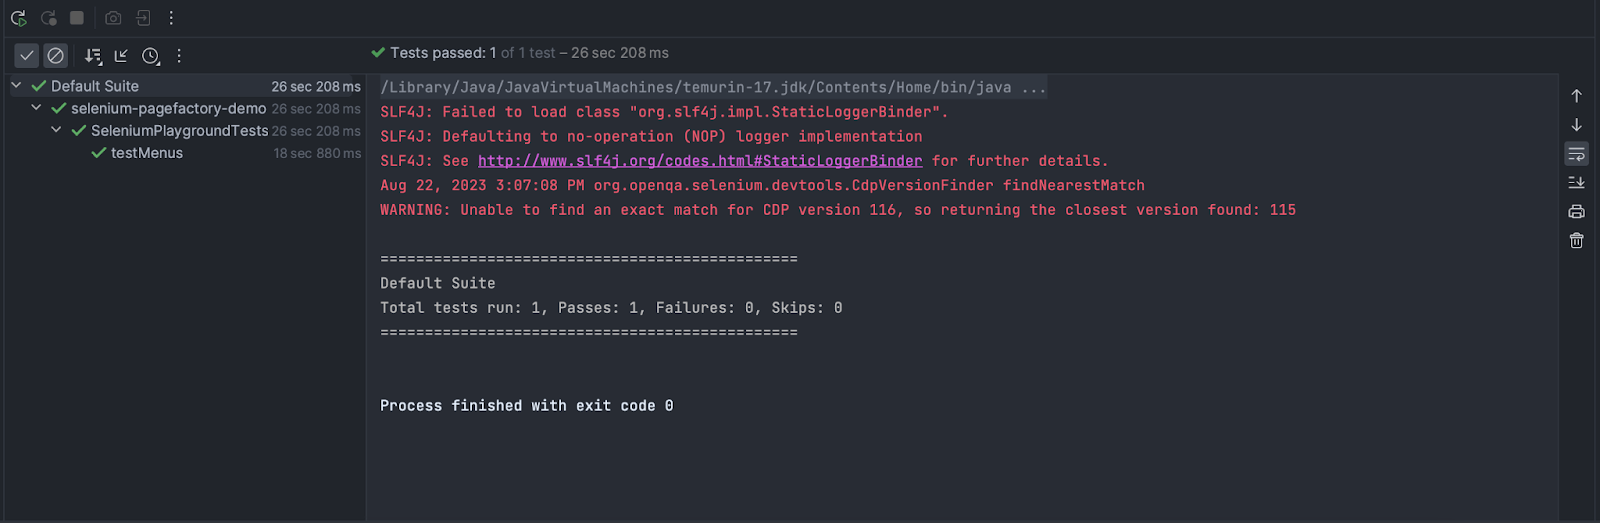
This confirms that the list of menus has 37 items in it, and the @FindBy annotation we used to return a list of menu WebElements works perfectly fine.
This confirms that the list of menus has 37 items in it, and the @FindBy annotation we used to return a list of menu WebElements works perfectly fine.
Using @CacheLookup annotation in Selenium WebDriver
@CacheLookup annotation helps to cache the WebElement. When this annotation is applied over a WebElement, Selenium WebDriver keeps the cache of the WebElement instead of searching for it every time from the WebPage when the test is run. This helps in saving test execution time.
When to use @CacheLookup?
It is beneficial to use @CacheLookup annotation on the WebElements, which does not change when on the web page once it is loaded. The test speed and performance can be improved by using this annotation on the static elements on the web page.
When not to use @CacheLookup?
It is not recommended to use the @CacheLookup annotation for the WebElements that are dynamic and keep changing every time the page loads. Dynamic elements refer to the WebElement like Timer text that keeps changing every second. Another example would be a capital market website that shows the price of the stocks that keeps on changing every second or minute as per the stock trading. For such WebElements, if @CacheLookup annotation is used, we may get a Stale Element Exception.
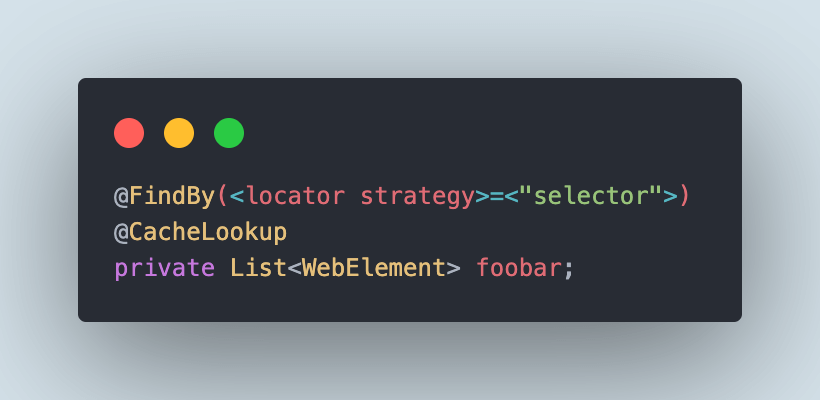
The syntax for using @CacheLookup annotation:
Demo: @CacheLookup annotation
The following test scenario will be used to check out the working of the @CacheLookup annotation. We will run the test using the @CacheLookup annotation and run the same test by removing the @CacheLookup annotation. Next, we will check the performance by comparing the test execution time.
The following test scenario will be used to demo the working of @CacheLookup annotation, where the performance will be checked by running the tests after using @CacheLookup annotation over WebElements and removing them.
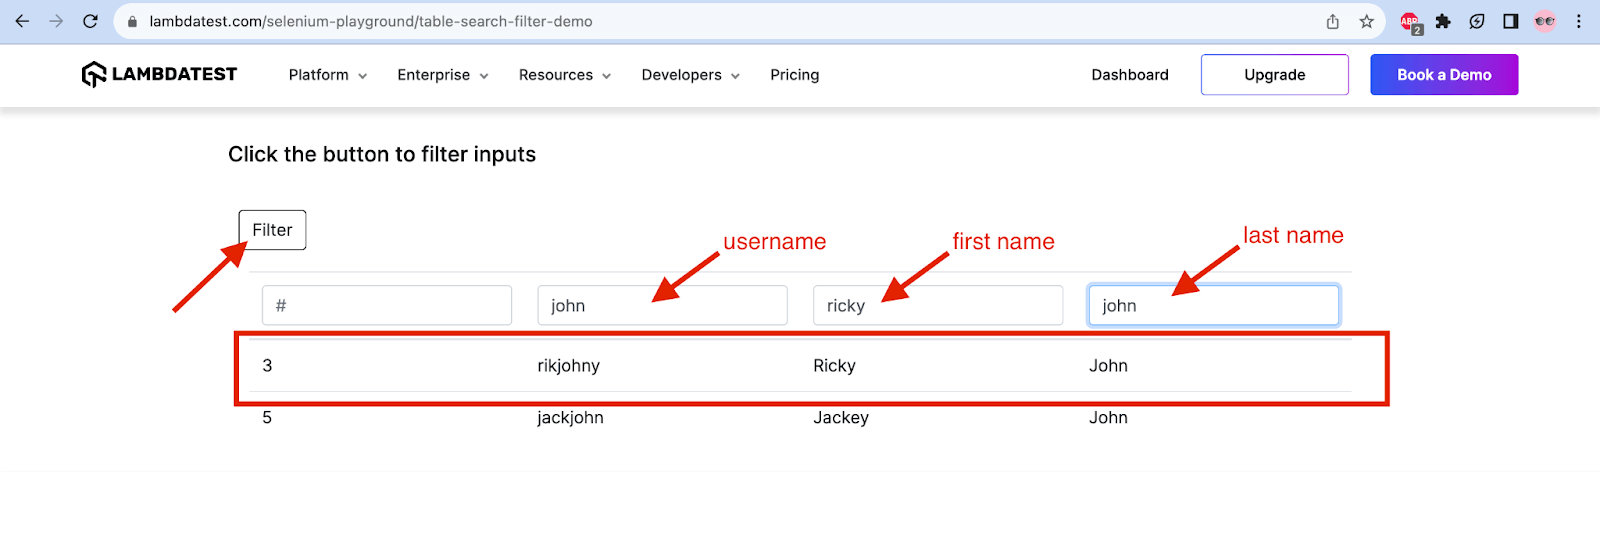
Test Scenario
|
We will be using the @FindBy annotation, as we discussed in the earlier section, to locate the button and the fields.
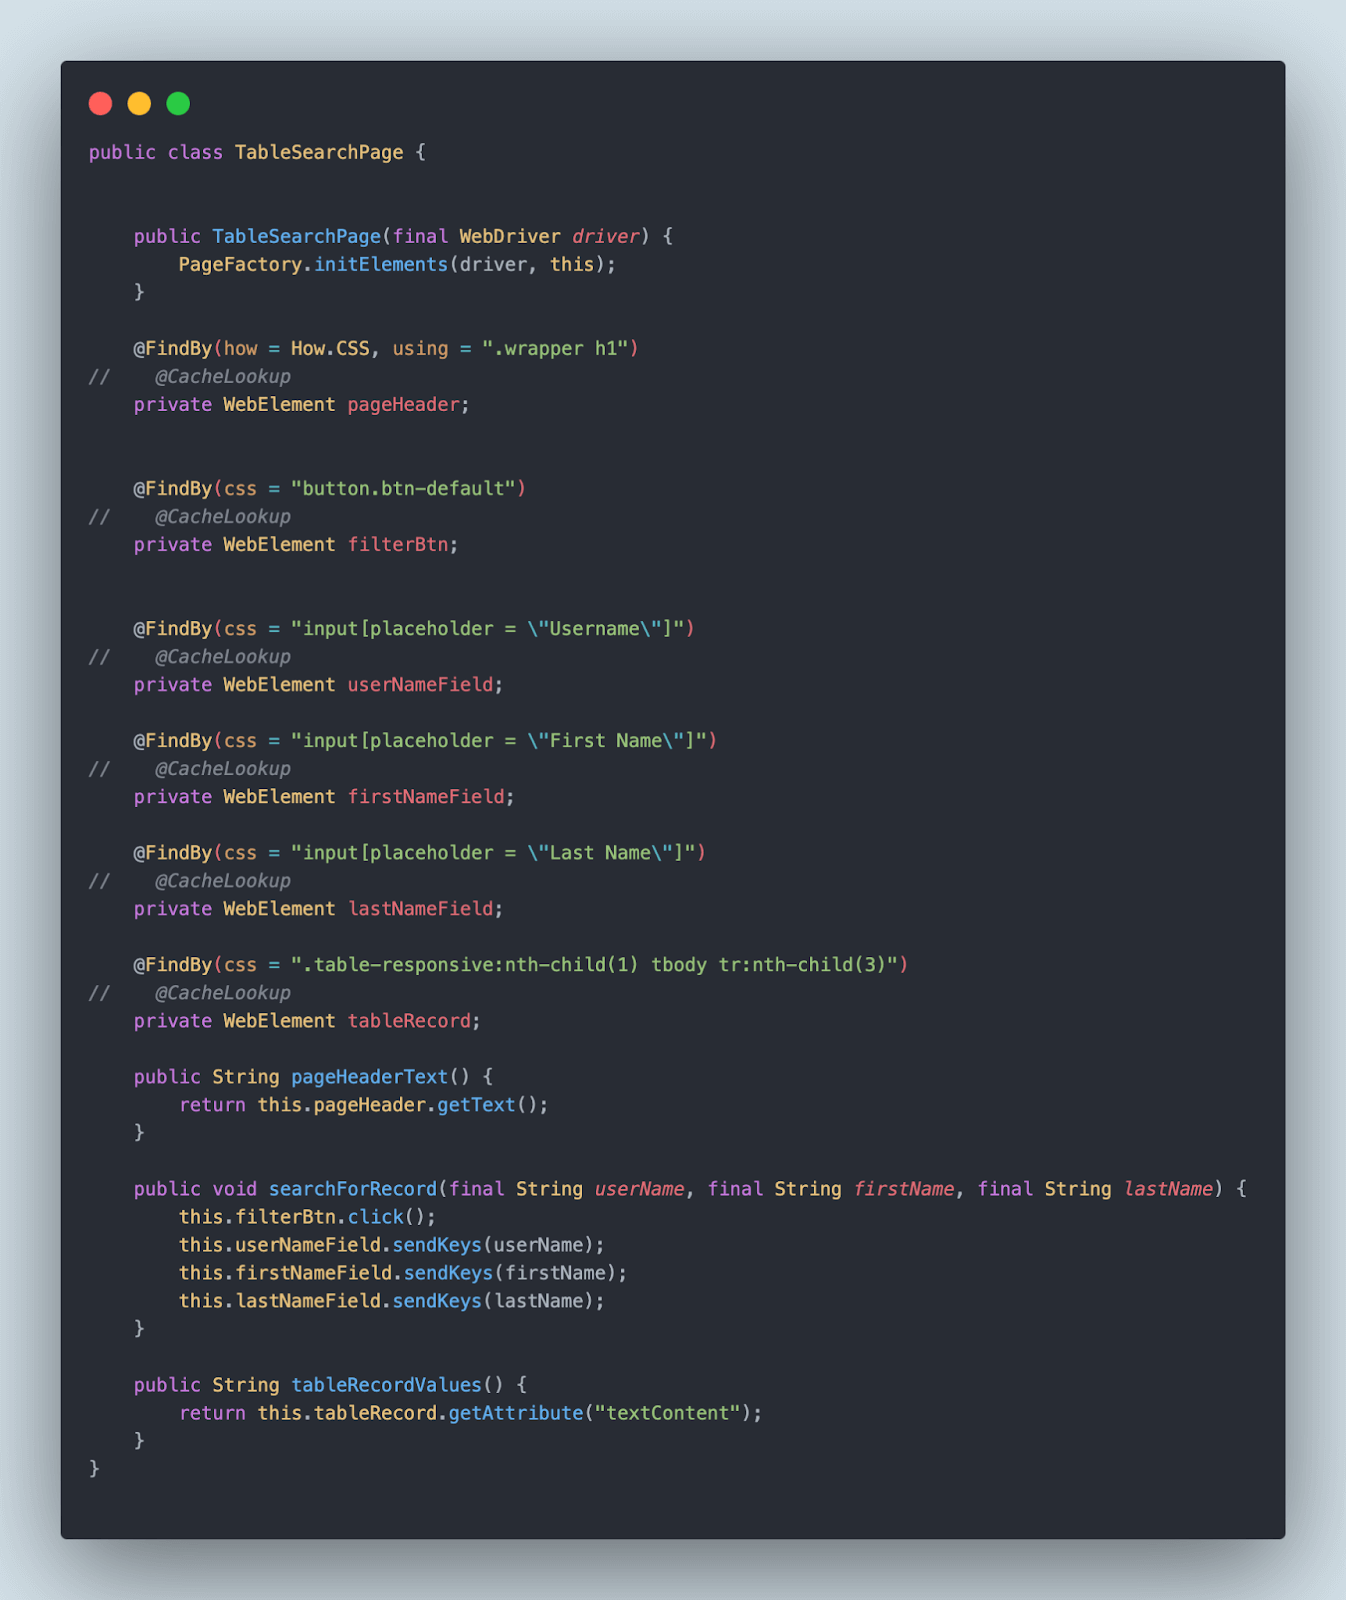
The following class is created for housing all the WebElements on the Table Search page.
Filename: TableSearchPage

We will be caching every WebElement that we need to interact on this page. The following table shows the variable names used for the respective fields using the @FindBy annotation and @CacheLookup annotation to cache the WebElement.
| Field Name on the Web page | Variable Name in the TableSearch class for the WebElement |
|---|---|
| Page Header | pageHeader |
| First Name field | firstNameField |
| Last Name field | lastNameField |
| User Name field | userNameField |
| Table Row retrieved after applying filter | tableRecord |
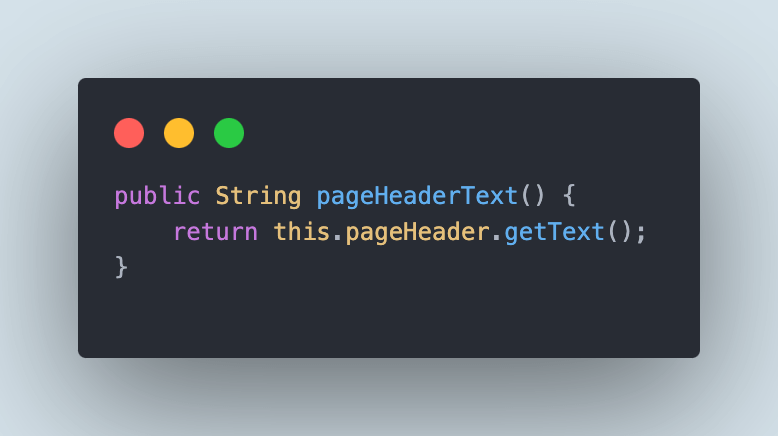
The pageHeaderText() method will return the text value of the page header that will be used in the test for assertion.
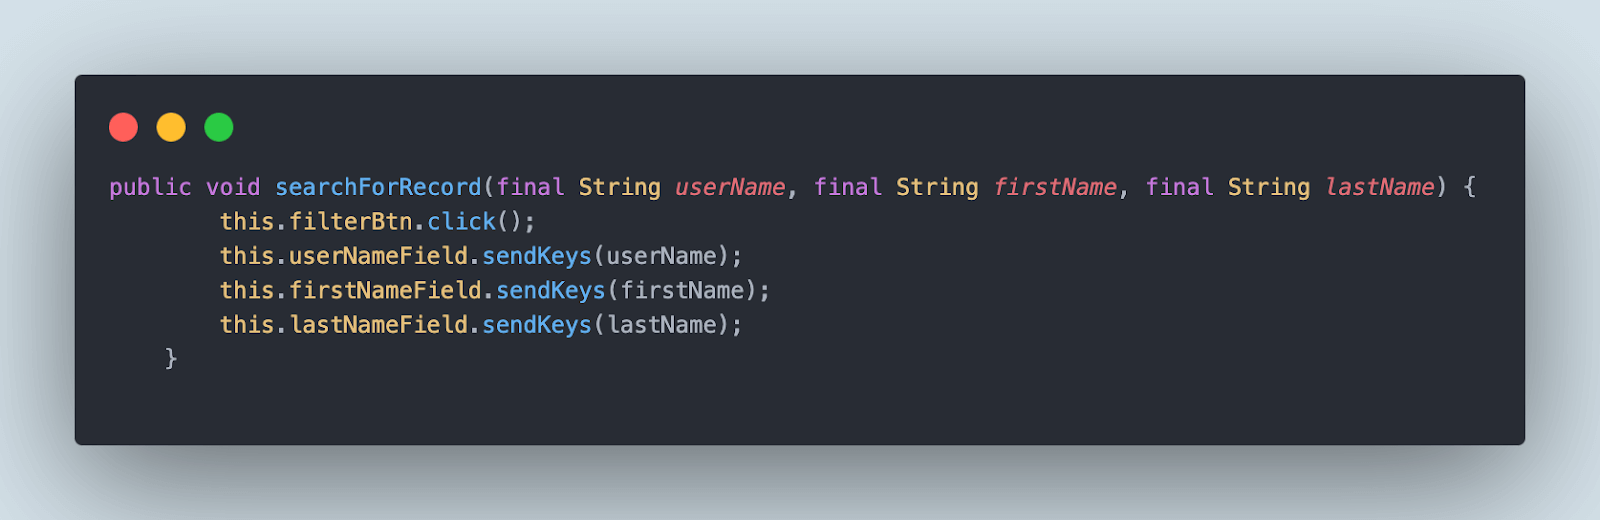
The searchForRecord() method will click on the Filter button and allow entering values in the Username, First Name, and Last Name fields.
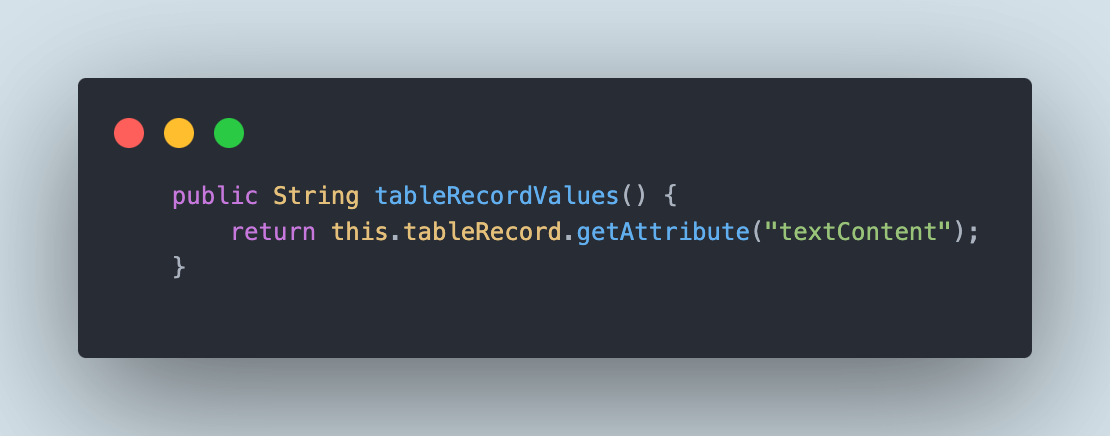
Next, we need to get the text of the record that is fetched after applying the filter. The tableRecordValues() method will fetch the text of the record that will be retrieved after applying the filter values.
Let’s now move ahead and write the test where we will navigate to the Table Search page, perform the assertion for the page header text, retrieve the table record after applying a filter, and print the record fetched.
The testTableSearch() method is created for verifying the test scenario.
Filename: SeleniumPlaygroundTests
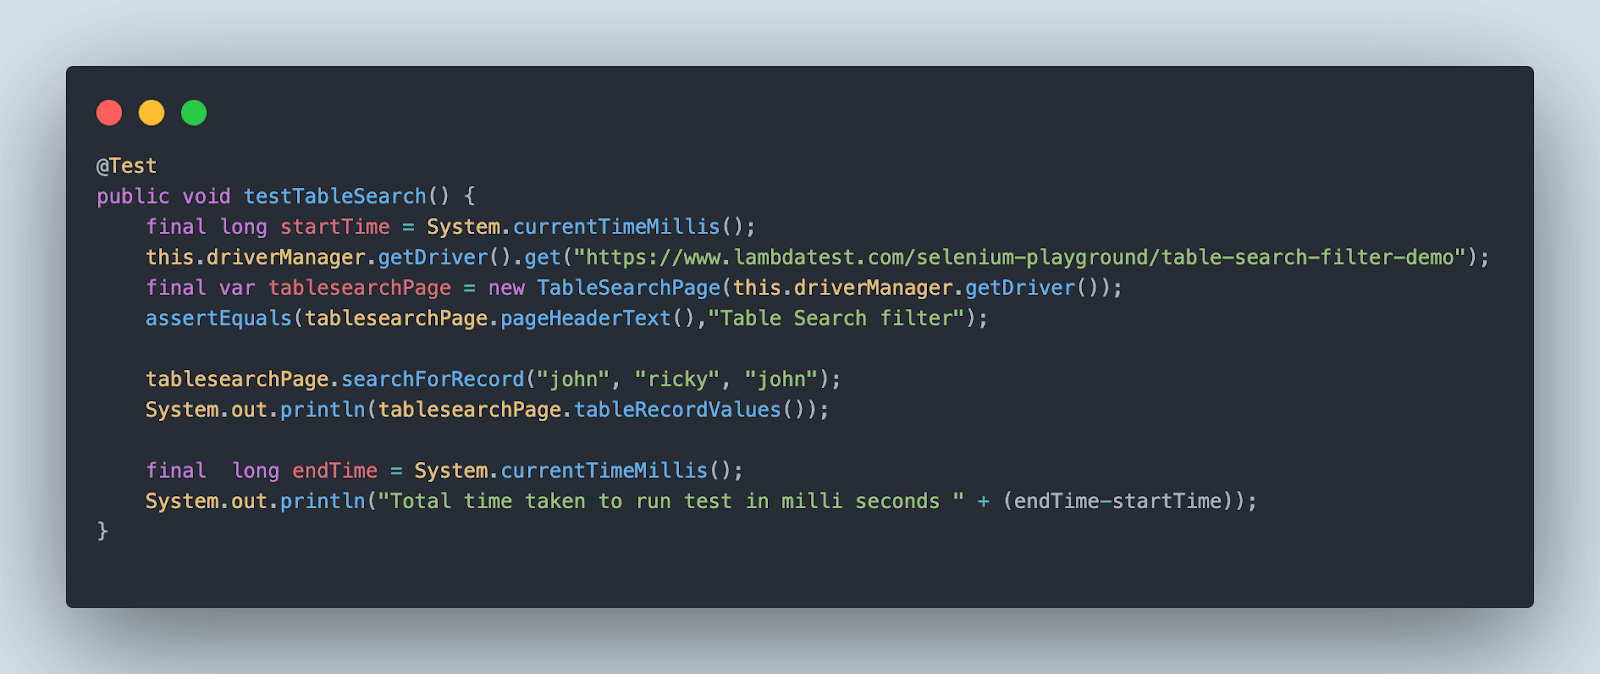
Note: I have declared two variables, startTime and endTime, to demo the test execution time in milliseconds.
Test Execution
We will be running the test twice and record the time taken to run the test. The first run will be using the @CacheLookup annotation, and the second will be without using the @CacheLookup annotation. This will help us compare the test execution time with and without cache.
Test Execution with @CacheLookup annotation
Here is the screenshot of the test execution using the testng.xml file with @CacheLookup annotation.
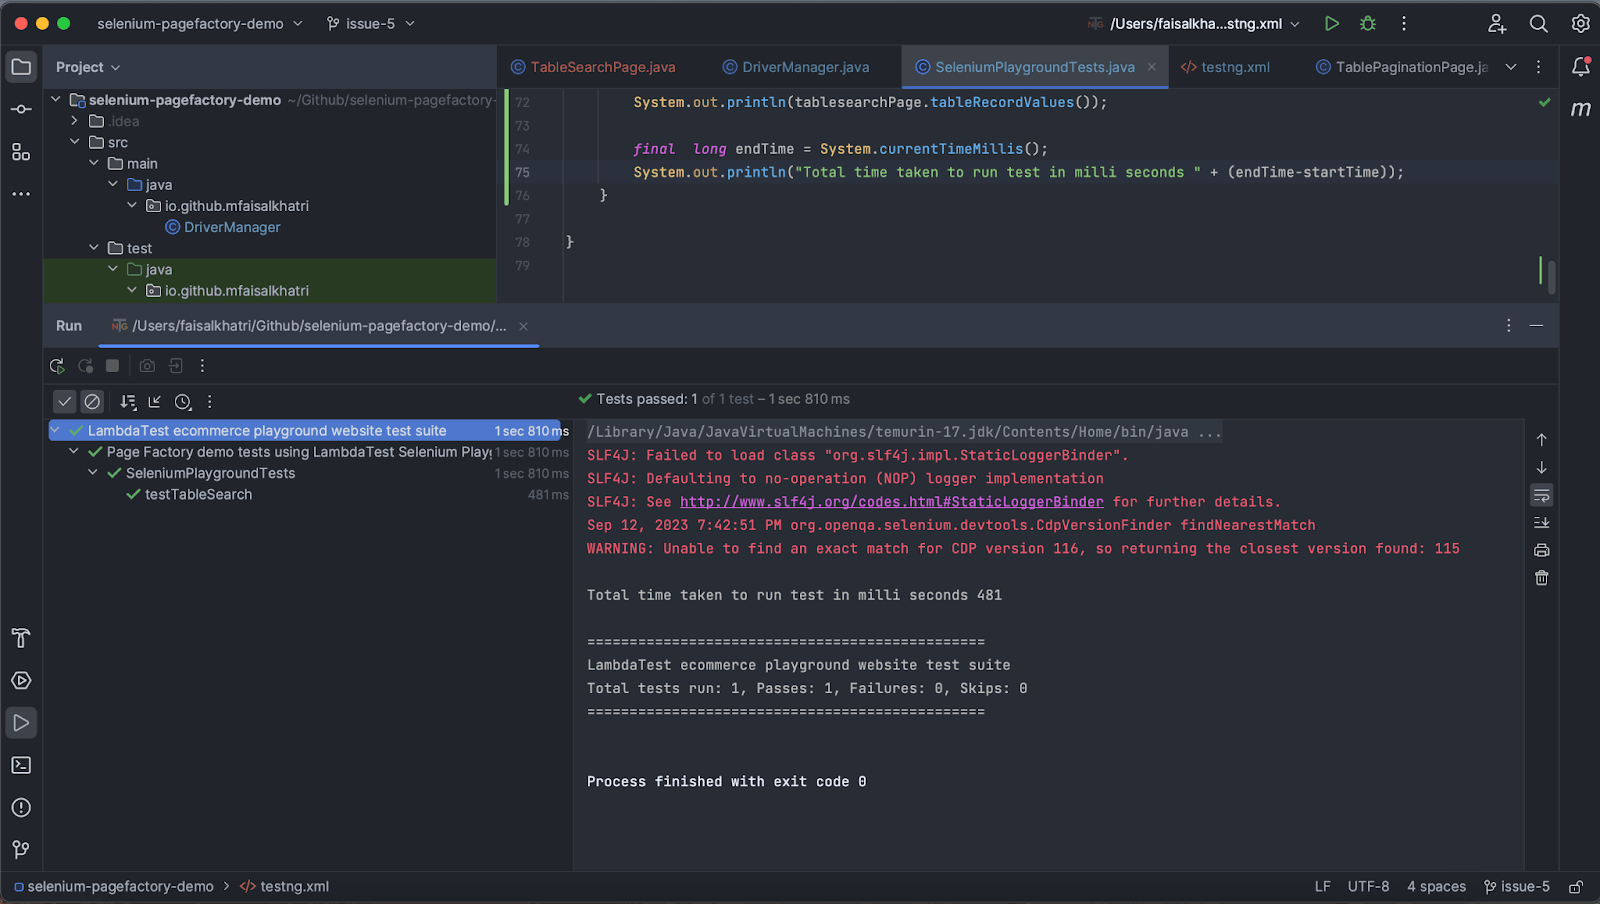
We can see that it took 481 milliseconds to run the tests.
Test Execution without @CacheLookup annotation
Before we execute the tests, let’s comment out all the @CacheLookup annotations in the TableSearchPage class.
Let’s execute the test again and check the time taken to execute the test.
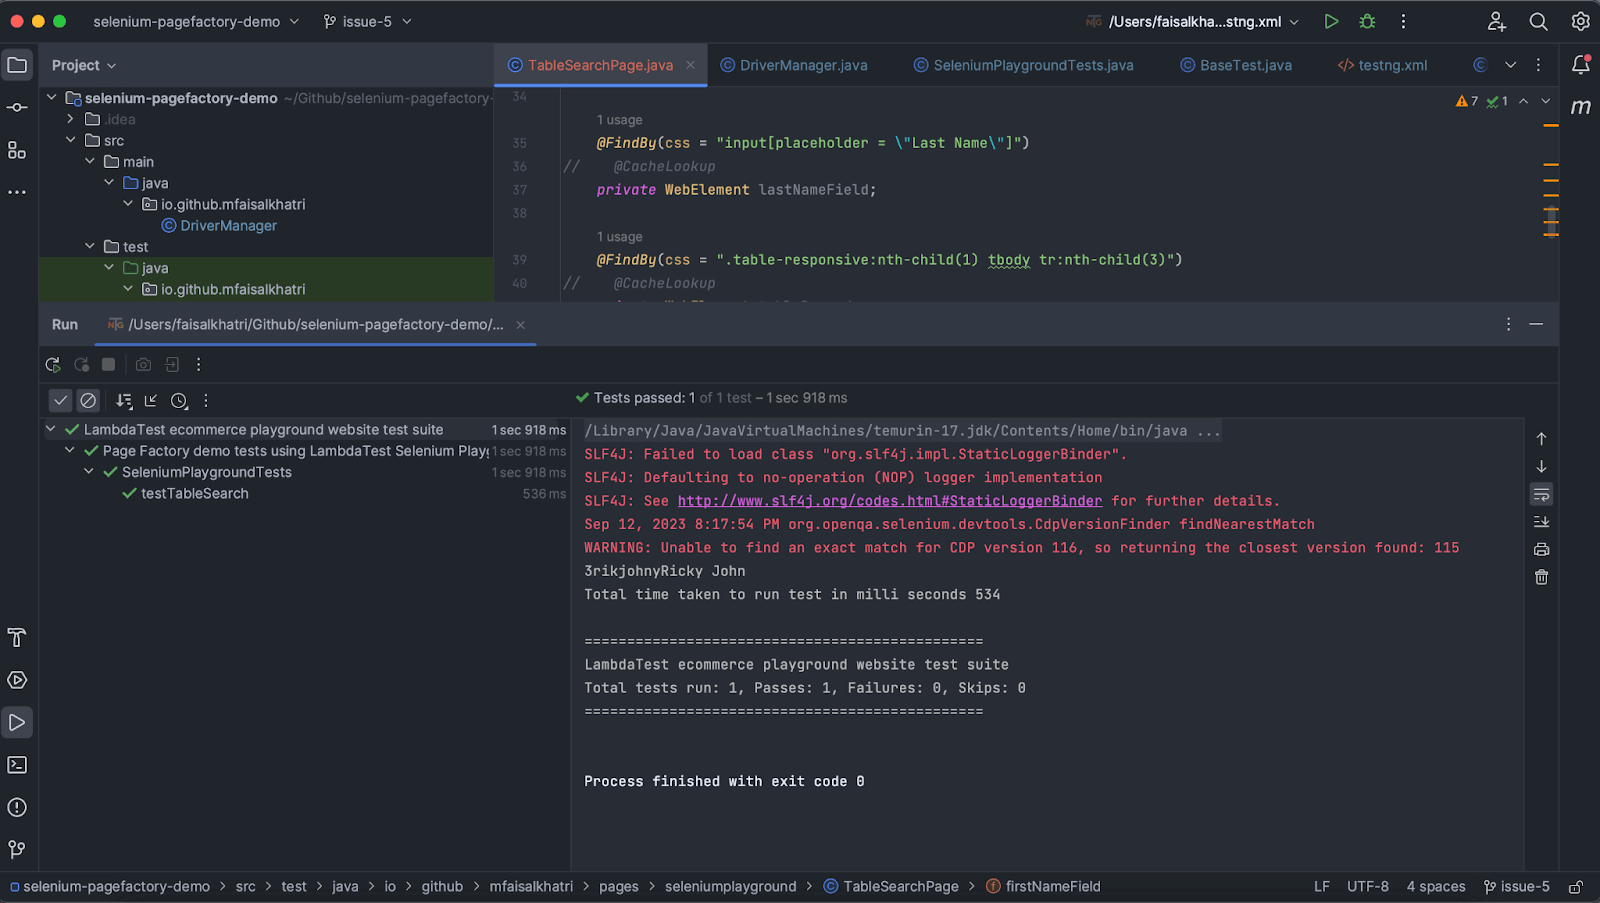
It can be seen that it took 534 milliseconds to run the test. So, if we compare the time taken to run the test with and without using @CacheLookup annotation, it appears to be a difference of 53 milliseconds. As the test scenario was pretty straightforward, hence it is a steep difference here. However, if we take a complex scenario, it can be a major difference in seconds or minutes as well.
From this, we can conclude that using @CacheLookup annotation can save the test execution time, eventually helping us in quicker builds.
Using @FindBys annotation in Selenium WebDriver
@FindBys annotation is used to locate a WebElement or list of WebElements with more than one selector. The condition in using @FindBys is that all of the selectors given in the @FindBys should match the respective WebElement(s) criteria.
It is an “AND” condition between all the selectors given in the annotation. This is helpful in cases where we don’t have a unique locator for the WebElement that we need to interact with on the web page.
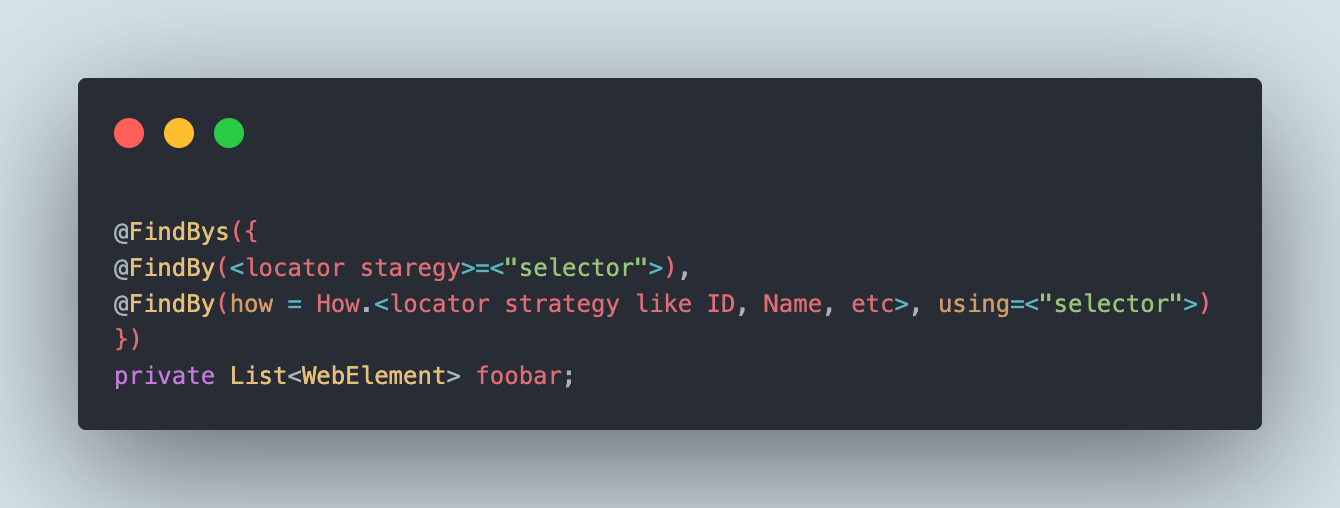
The syntax for using @FindBys annotation:
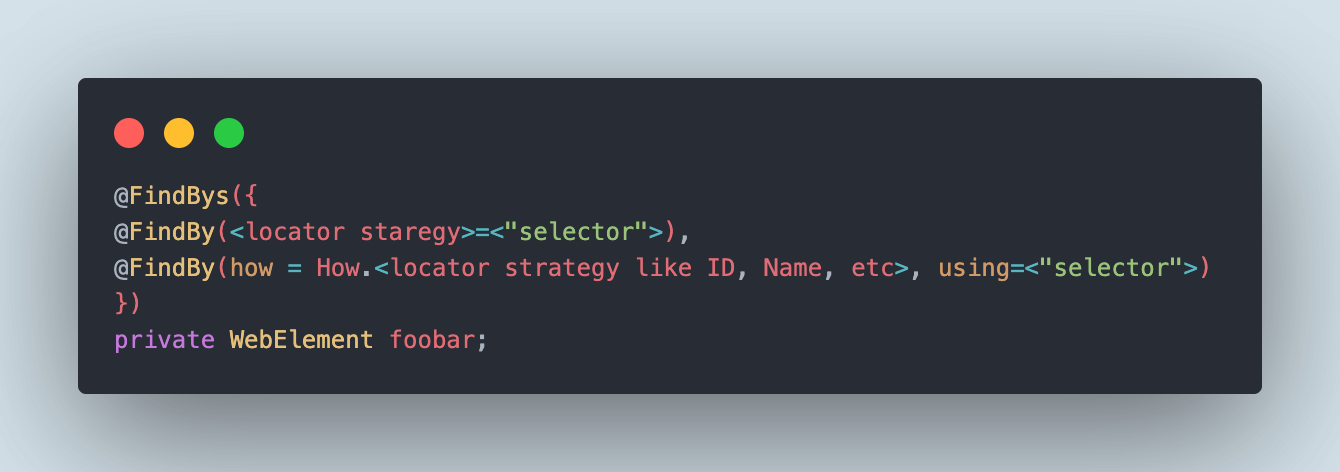
To implement @FindBys, we must pass on the multiple @FindBy statements as parameters and declare the WebElement or List< WebElement > variable.
It should be noted that @FindBy annotation can be used either by providing the How enum or by supplying the locator strategy directly. In the screenshot above, both ways have been shown to use the @FindBy while using the @FindBys annotation.
However, one more thing to note while using @FindBys annotations is that we need to provide the locators considering the parent-child relationship, using the attributes within the HTML tag won’t work with @FindBys annotation. The following example implementation will help in understanding in detail.
Implementation Example
Let’s take an example of the Radio button demo page on LambdaTest’s Selenium Playground website.
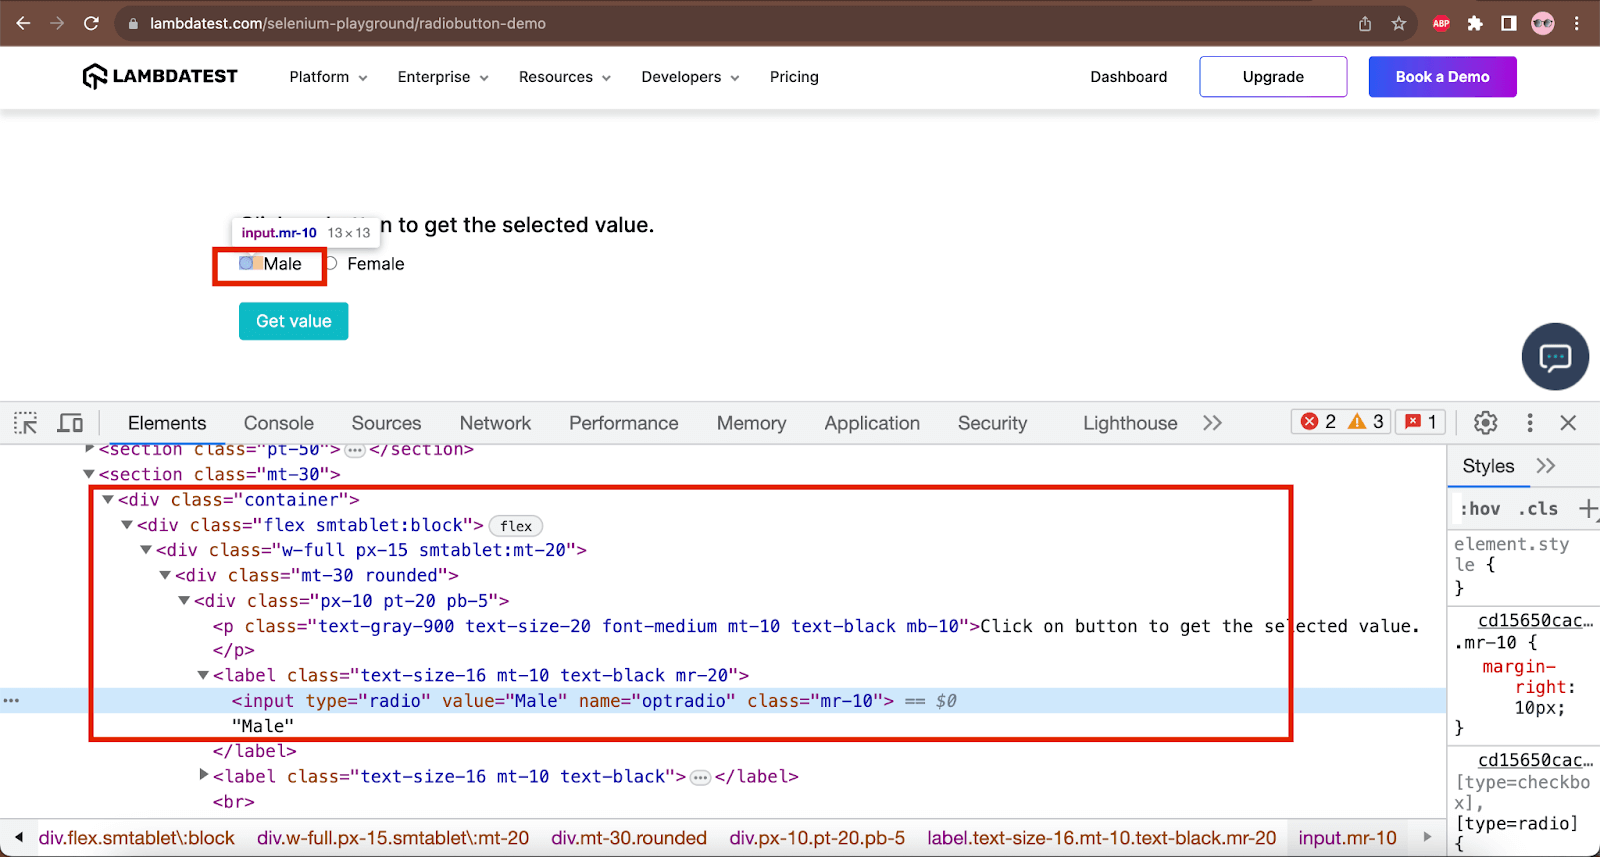
On this page, we will be locating the “Male” radio button by using the @FindBys annotation.
As we can see in the DOM, the class name “container” is the parent of the input tag with type, value, and name attributes for the Male radio button field. Similarly, if we check out the “Female” radio button, it also has the same hierarchy.
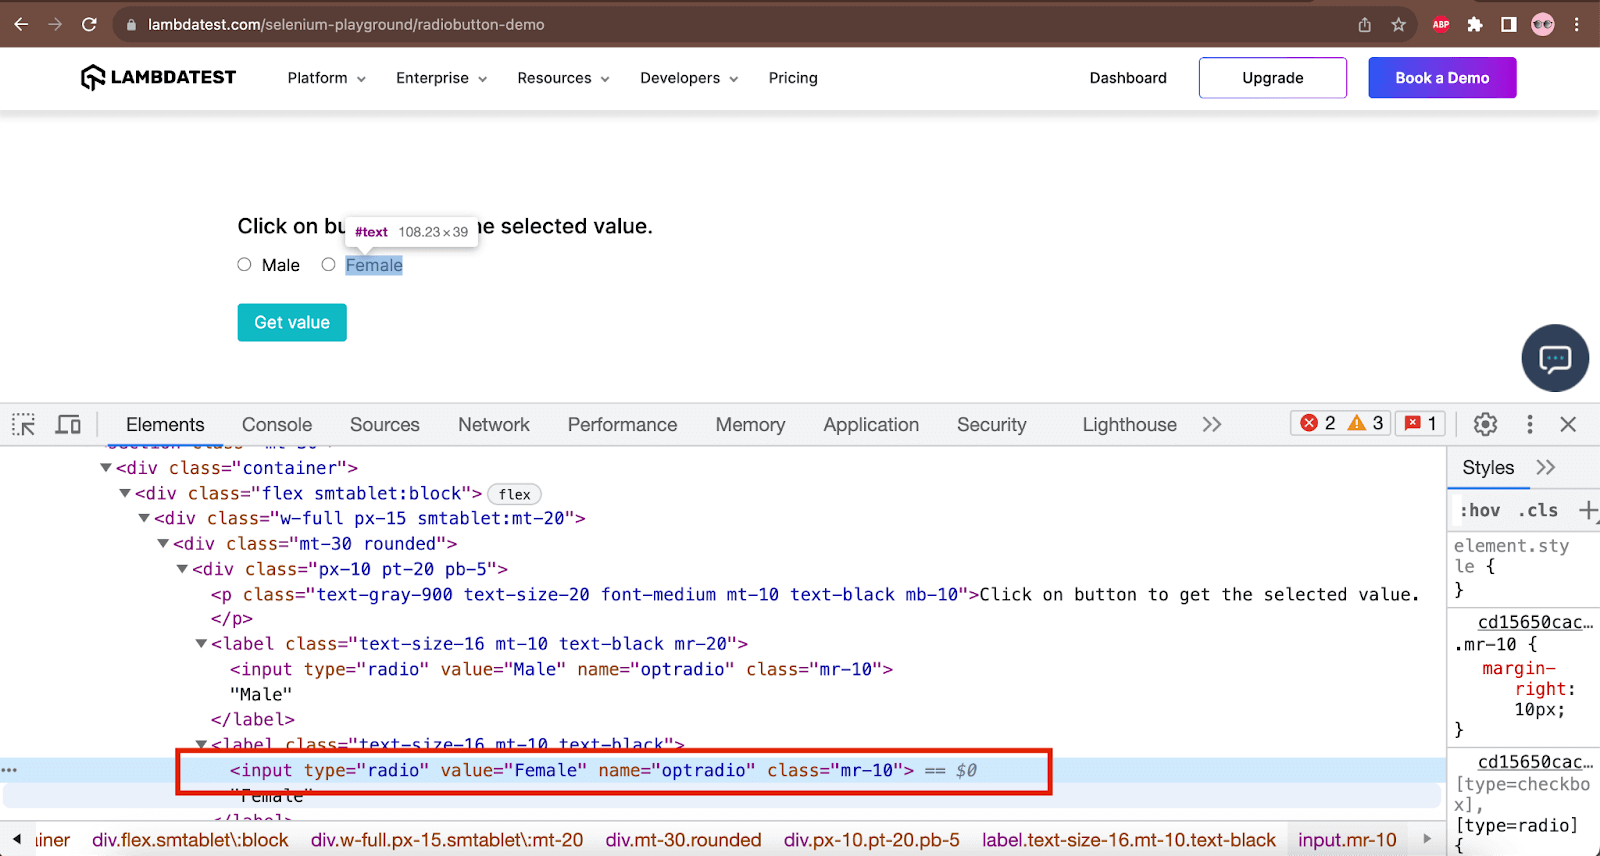
Even the name attribute is the same for both the radio buttons. The only difference in selector between Male and Female radio buttons is the value attribute, i.e., value=”Male” for Male radio button and value = “Female” for Female radio button.
As the locator is not unique here, we can follow the parent-child relation approach to locate the element by locating the parent first and then approaching to find the child element using the respective locators.
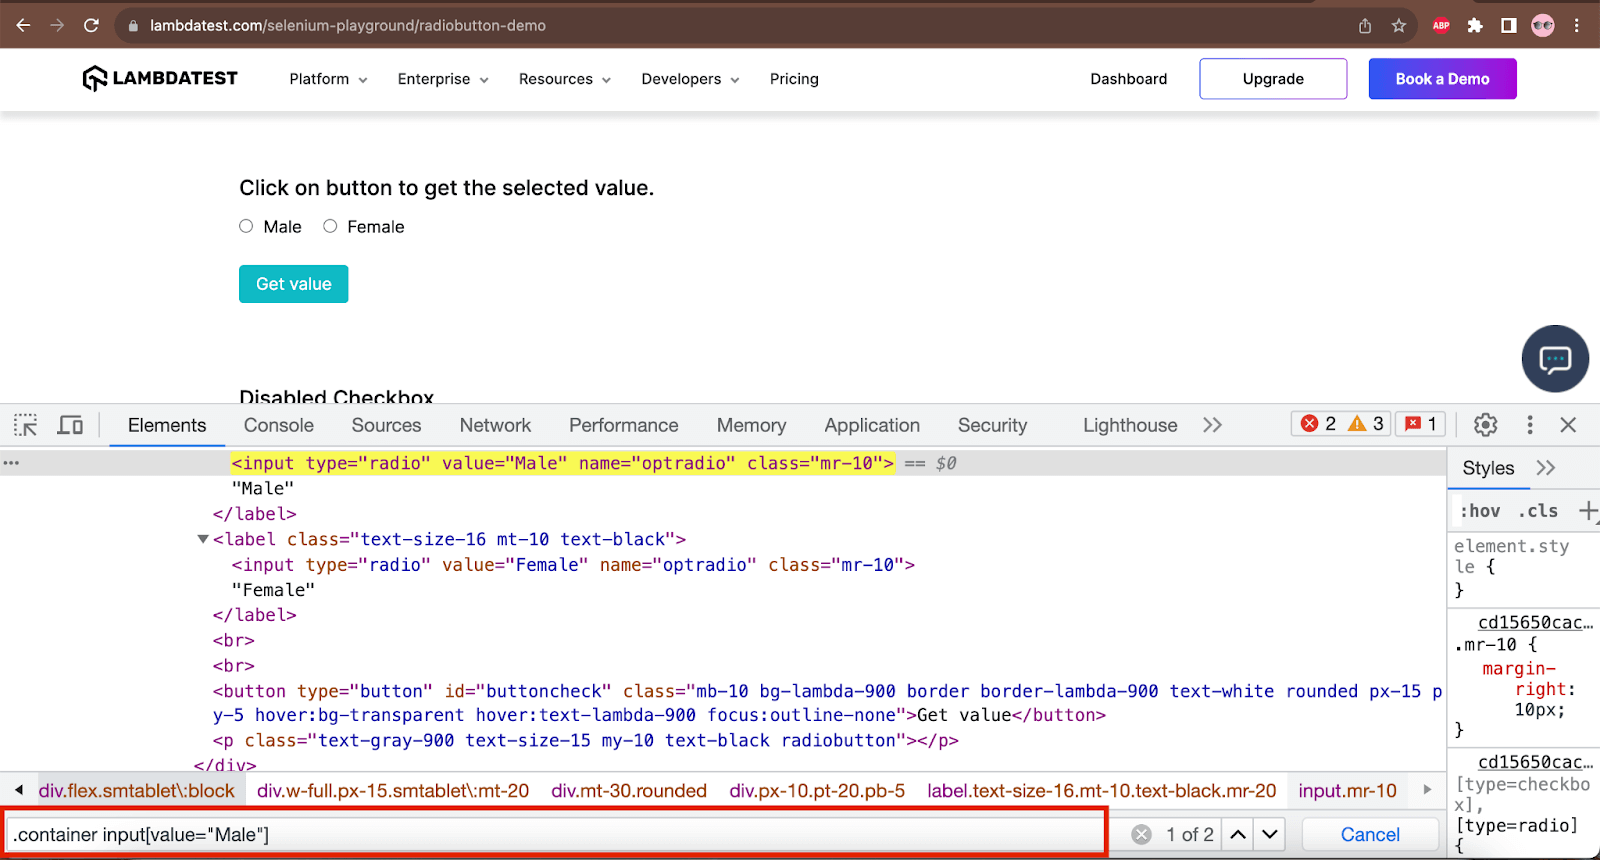
The following lines of code will help us locate the Male radio button using the @FindBys annotation in Selenium:
|
1 2 3 4 5 |
@FindBys({ @FindBy(how = How.CLASS_NAME, using = "container"), @FindBy(css = "input[value=\"Male\"]") }) private WebElement maleRadioBtn; |
Using the @FindBys annotation, first the parent WebElement with class name i.e. “container” is located and then the child element using the input tag with value attribute “Male” is used to finally locate the WebElement for Male radio button.
Similarly, @FindBys can locate multiple WebElements on the web page. The only change required is instead of WebElement we need to pass List<WebElement> as show in the image below:
Demo: @FindBys annotation
Let’s take an example of the Table Pagination demo page on LambdaTest’s Selenium Playground website. On this page, let’s locate the total number of columns in the table using the @FindBys annotation.
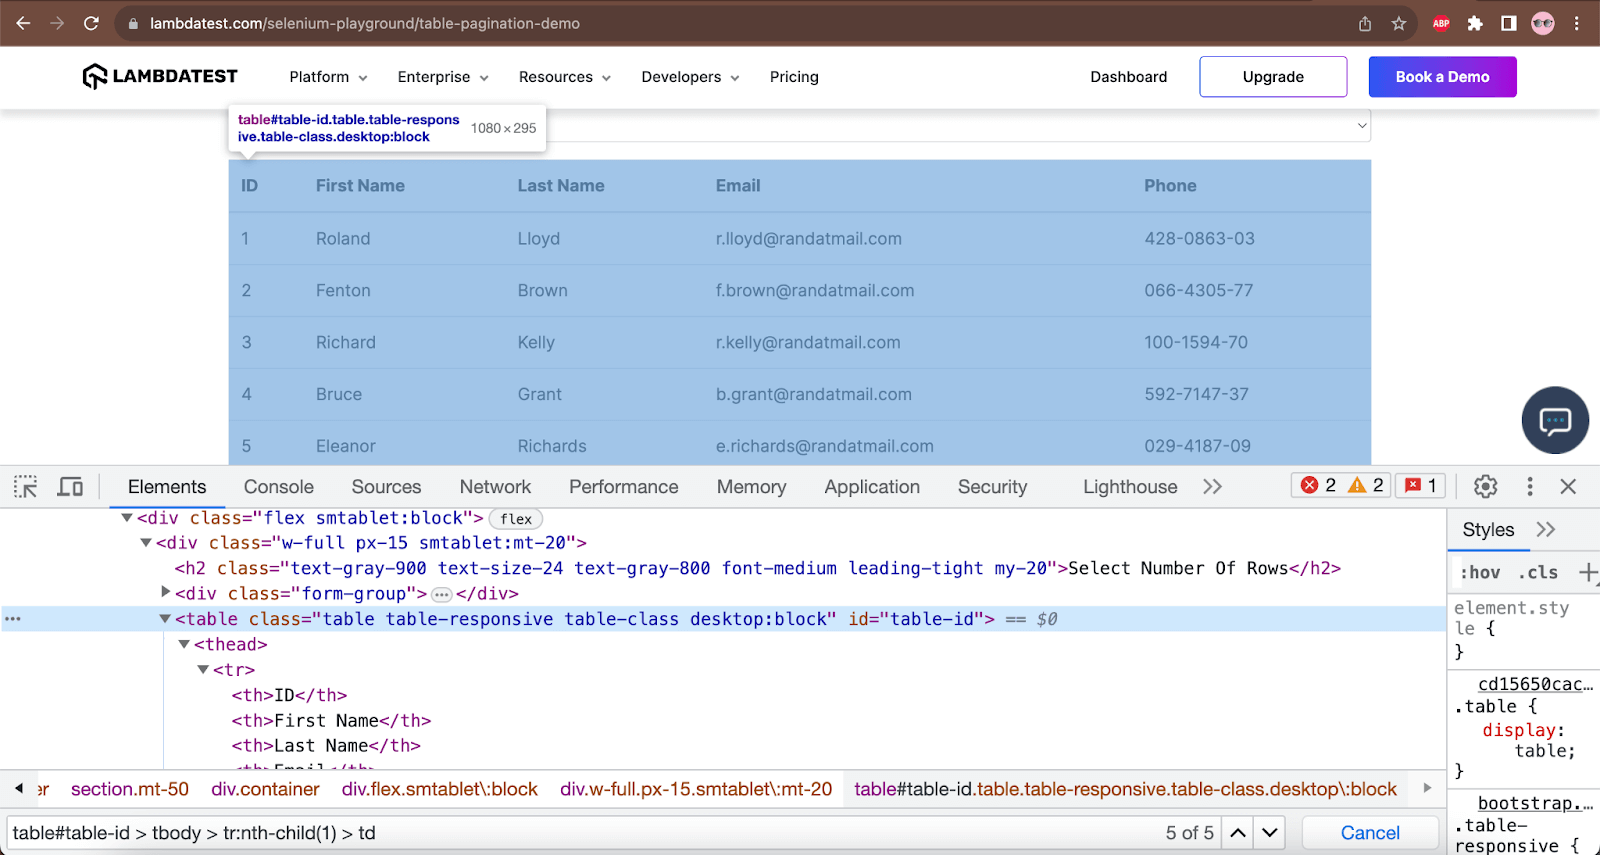
As we can see in the DOM, the parent WebElement for the table is its id – “table-id”. We can use it for locating the complete table. Now, to find the number of columns, it can be easily done by finding the column headers and returning their size.
The column headers of the table can be located using the CSS Selector – “thead > tr > th” Using @FindBys annotation, we can return list of WebElements for the column headers as follows:
|
1 2 3 4 |
@FindBy(how = How.ID, using = "table-id"), @FindBy(css = "thead > tr > th") }) private List<WebElement> tableColumns; |
The above code will return a list of WebElements for table columns. We can use the size() method to get the number of columns and use it in the test to perform assertions.
Having learned about @FindBys annotation in detail, let’s check which exception is thrown by @FindBys annotation if the WebElement is not found.
Using @FindAll annotation in Selenium WebDriver
@FindAll annotation is used to locate a WebElement or list of WebElements with more than one selector. While using @FindAll, it should be noted that either of the Selectors used should be matching to locate the respective WebElement(s).
It is an “OR” condition between all the selectors given in the annotation. @FindAll uses multiple @FindBy annotation statements in the parameter to locate the WebElements.
Using @FindAll, we can provide two or more different selectors for a WebElement, so in case the first locator doesn’t work, it will check the second. So, eventually, the idea is to make the test less flaky by providing more than one locator for a field that doesn’t have a unique locator.
The syntax for using @FindAll annotation:
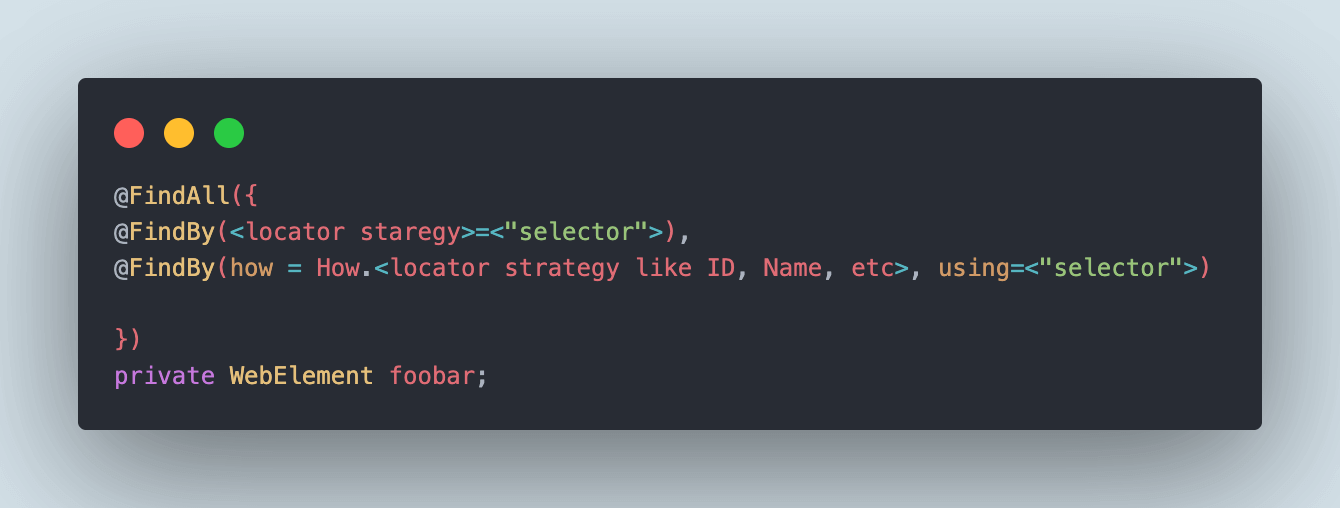
@FindAll can be implemented by passing on multiple @FindBy statements in the annotation parameter and declaring the WebElement or the list of WebElements variables. Note that the @FindBy statement can be supplied using either of the two implementations, as we discussed in the earlier section of this blog. If you take a look at the syntax image, you will find that both of the implementation ways are shown with two @FindBy statements.
Demo: @FindAll annotation
Let’s take an example of the Ajax Form Submit Demo page on LambdaTest’s Selenium Playground website.
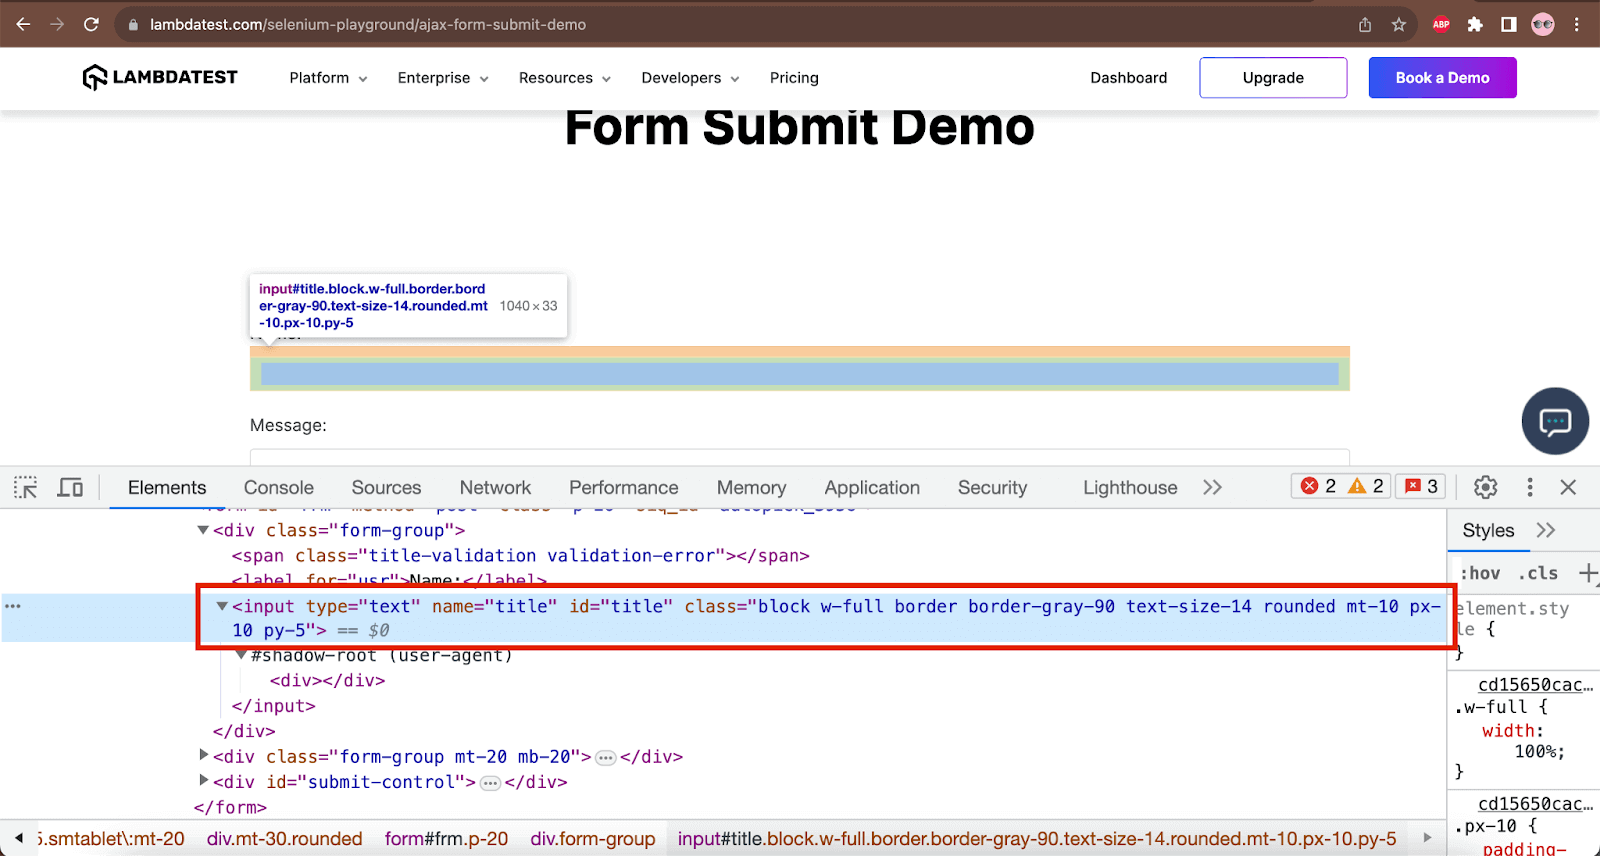
On this page, we will locate the Name field using two different locator strategies with @FindAll annotation.
In the DOM, we can see that two attributes can be used to locate the Name field, the first is using id – “title” and the second is using name – “title”.
The following lines of code will help us locate the Name field using the @FindAll annotation:
|
1 2 3 4 5 |
@FindAll({ @FindBy(id = "title"), @FindBy(name = "title") }) private WebElement nameField; |
Using the @FindAll annotation id as well as name locator strategies are passed as a parameter with the @FindBy annotation. When the code is executed, it will first try to locate the nameField WebElement using the ID. If it is not found, it will try locating it using the Name strategy. The point to note here is that at least one criteria provided to locate the element should match.
Similarly, we can locate a list of WebElements using @FindAll annotation. The only change required will be the declaration. Instead of the WebElement, we must define it as List< WebElement >.
Here is the example code for returning a list of WebElements using @FindAll annotation from the Status Codes page of LambdaTest’s Selenium Playground Website.
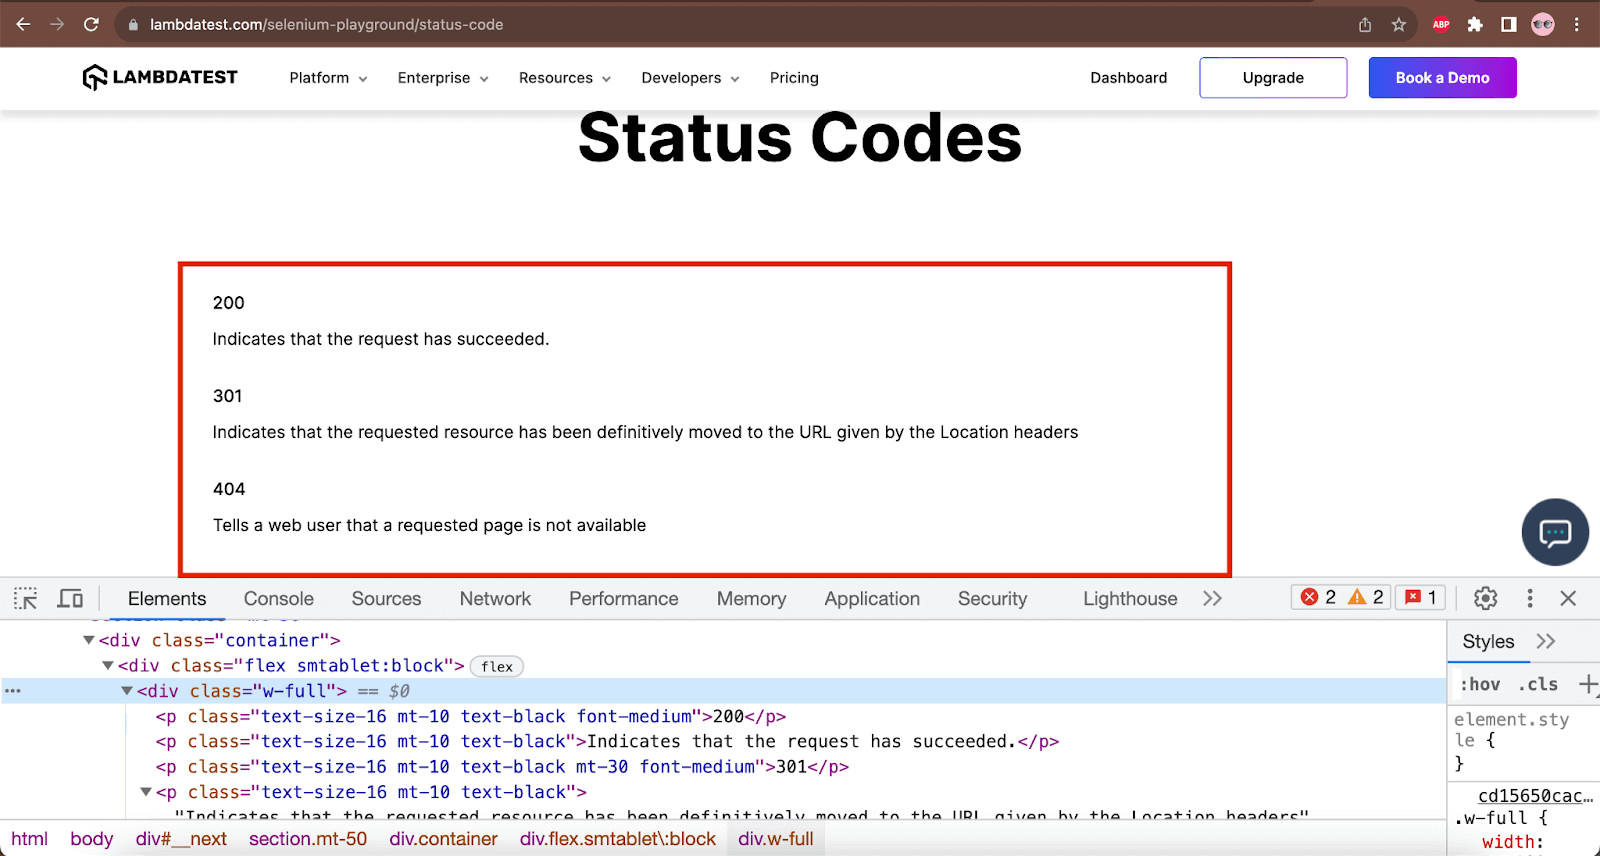
The following code will help in returning the list of WebElements using @FindAll annotation
|
1 2 3 4 5 6 |
@FindAll({ @FindBy(how = How.CSS, using = "#__next > section.mt-50 > div > div > div > p"), @FindBy(css = ".container .w-full > p") }) private List<WebElement> statusCodeDetails; |
We can make use of the size() method from the List interface to check for the number of elements present in the statusCodeDetails list.
|
1 2 3 |
public int getStatusCodes () { return this.statusCodeDetails.size(); } |
The getStatusCodes() method will return the total number of WebElements present in the statusCodeDetails list.
Which Exception is thrown if the WebElement is not found?
Navigating the intricacies of web element identification in test automation is vital for a robust and reliable testing framework. One aspect is understanding the exceptions that may arise when using annotations like @FindAll, @FindBy, and @FindBys. In this section, we delve into a specific question: what happens when the WebElement is not found using these annotations?
Let’s explore the exceptions that come into play when your automation testing script encounters this situation and how you can handle them effectively.
WebElement not found using @FindAll annotation
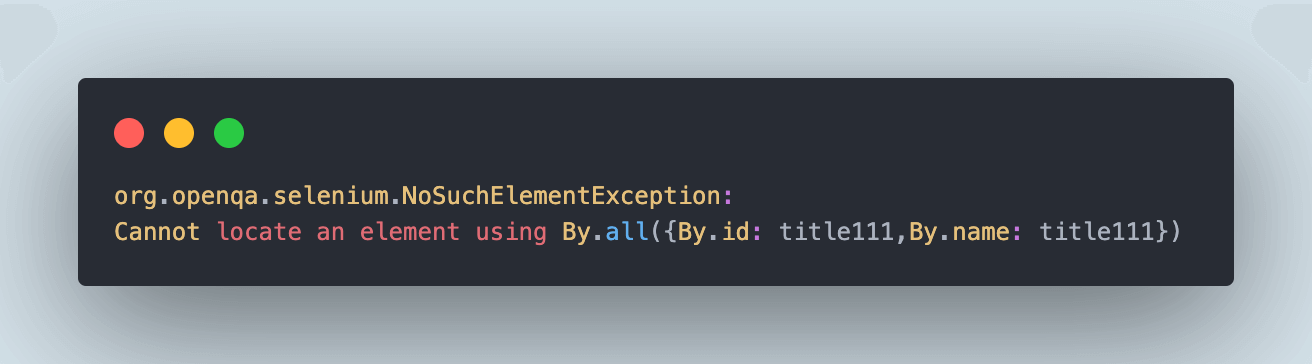
If the WebElement is not found using the @FindAll annotation, NoSuchElementException is thrown with appropriate logs.
Here is the screenshot of the NoSuchElementException thrown while searching for the incorrect selector for locating the Status Codes text on the Status Codes Demo page on LambdaTest’s Selenium Playground website.
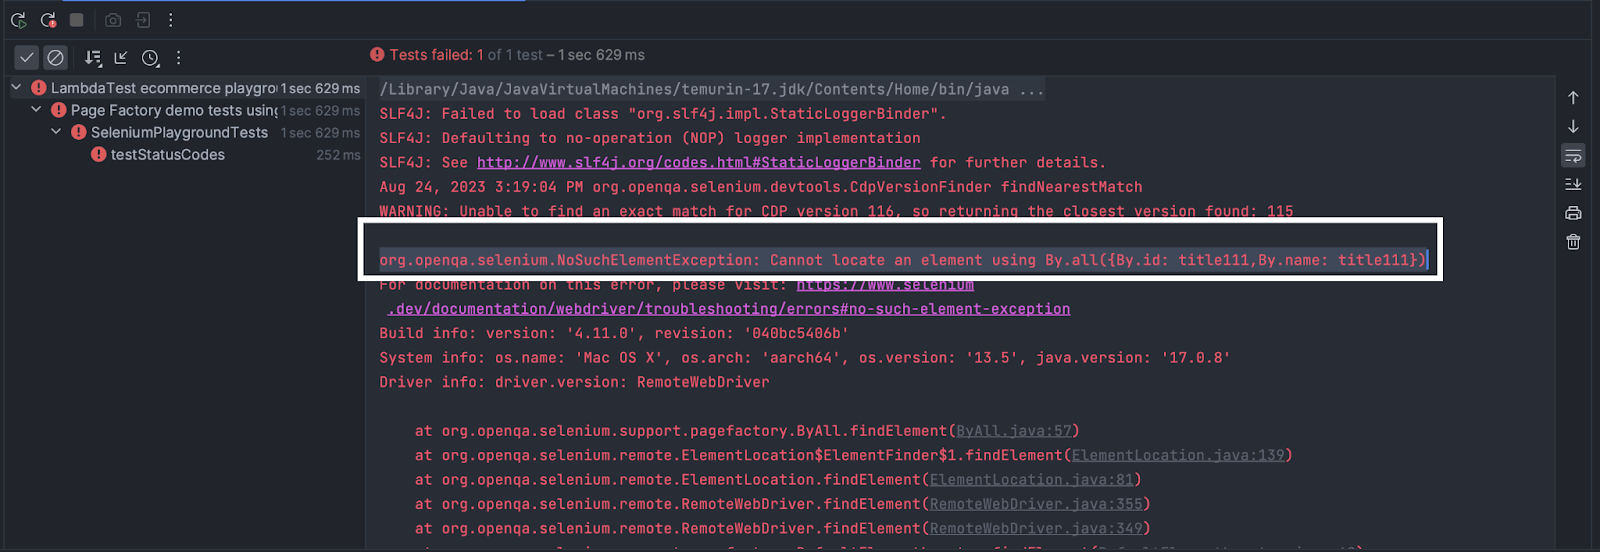
In the logs, it can be seen that Selenium WebDriver tried finding the elements by using the @FindAll annotation.
WebElement not found using @FindBys annotation
NoSuchElementException is thrown with appropriate logs if the WebElement is not found using the @FindBys annotation.
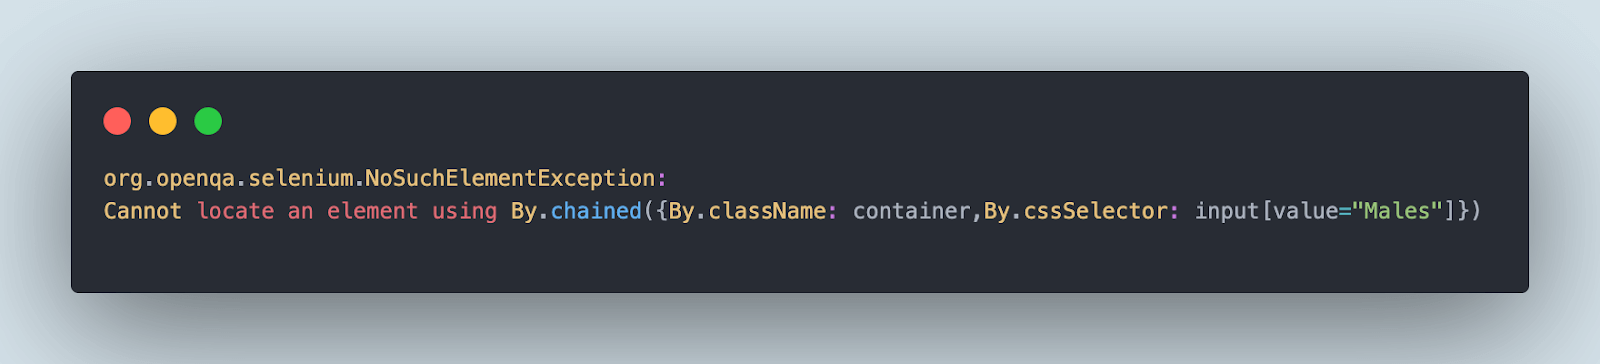
Following is the screenshot of the NoSuchElementException thrown while searching for the incorrect selector for locating the Male radio button on the Radio button demo page.
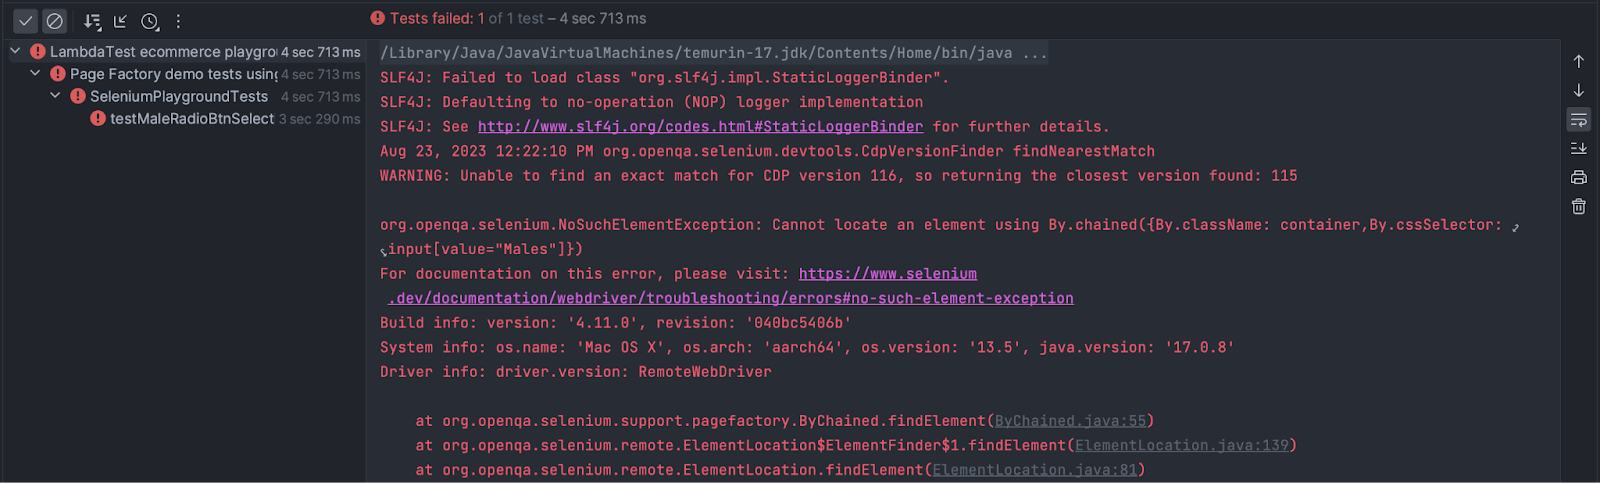
In the logs, it can be seen that Selenium tried finding the elements by chaining the locators provided in the @FindBys annotation.
WebElement not found using @FindBy annotation
If Selenium WebDriver cannot locate a WebElement using the @FindBy annotation, it throws NoSuchElementException. It details the selector for locating the element in the log that can help us investigate the failure.
Following is the screenshot of the NoSuchElementException that was thrown while searching for an incorrect selector provided:

Let’s move towards demonstration by automating a test scenario from LambdaTest’s eCommerce website using the @FindBy, @FindBys, and @FindAll annotations.
 Note
NoteRun your Selenium Java tests on the cloud grid. Try LambdaTest Today!
Demonstration: Locating elements and writing web automation tests
Before we get into writing the test automation scripts, let me share the details of the tools used to demo the test scenarios for using @FindBy, @FindBys, and @FindAll annotations.
|
Project Setup
Let’s create a Maven project and update the dependencies for Selenium WebDriver and TestNG in the pom.xml. Simultaneously, update the maven-surefire and maven-compiler plugins in it.
Test Scenario
|
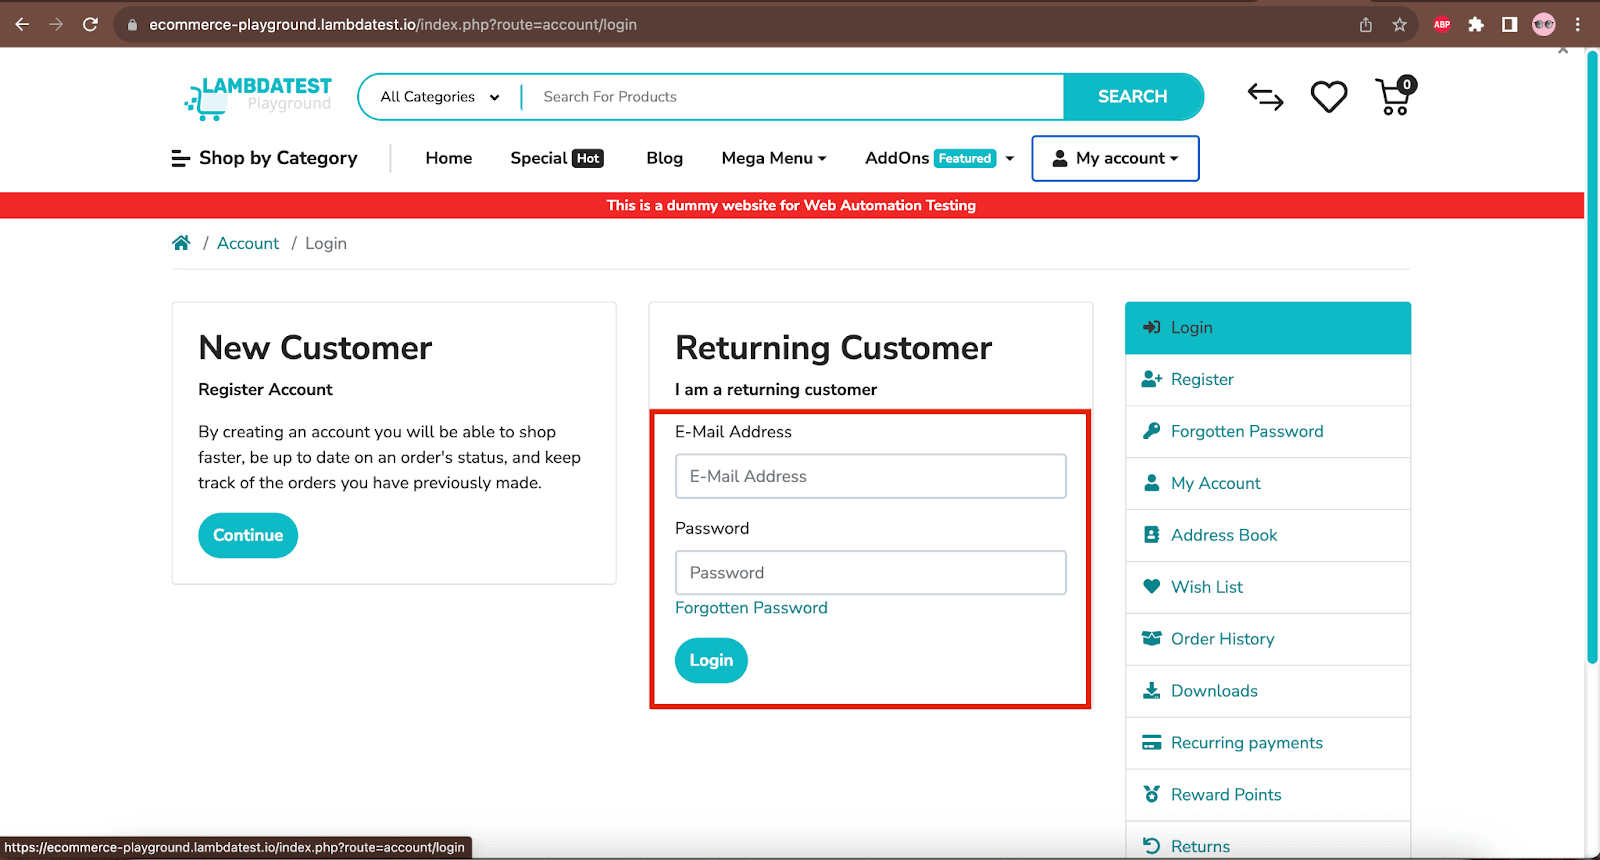
The login screen of LambdaTest’s eCommerce Website
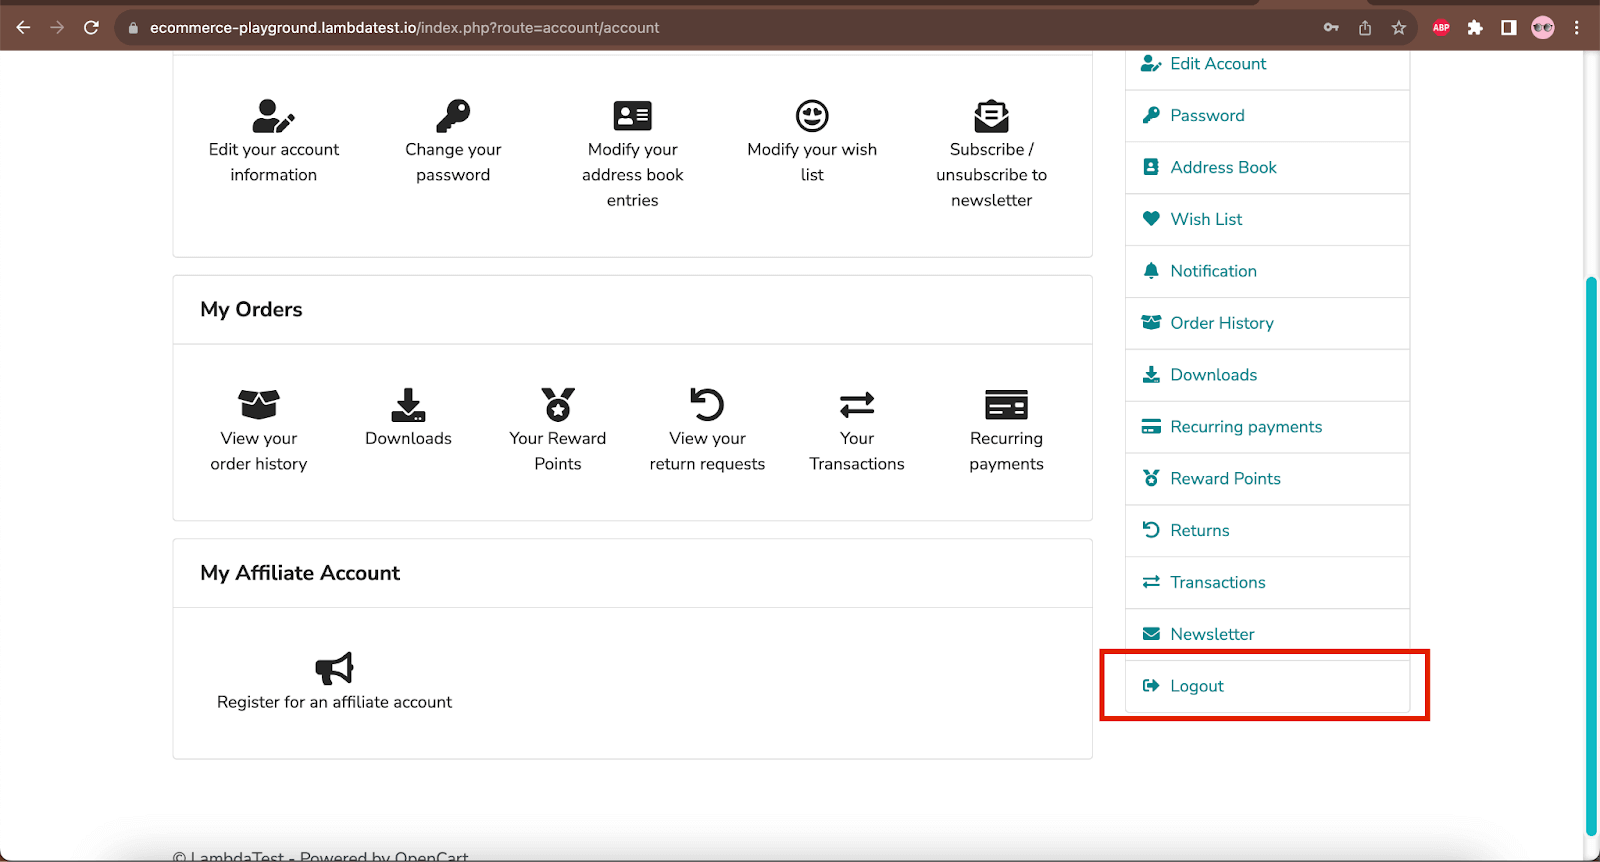
Page displayed after successful Login with the Logout link
Implementation
Before we begin writing the code, let’s first find the selectors for the fields on the Login Page. The first field is the E-Mail Address field. Let’s check out the DOM of the web page to find the selectors for this field.
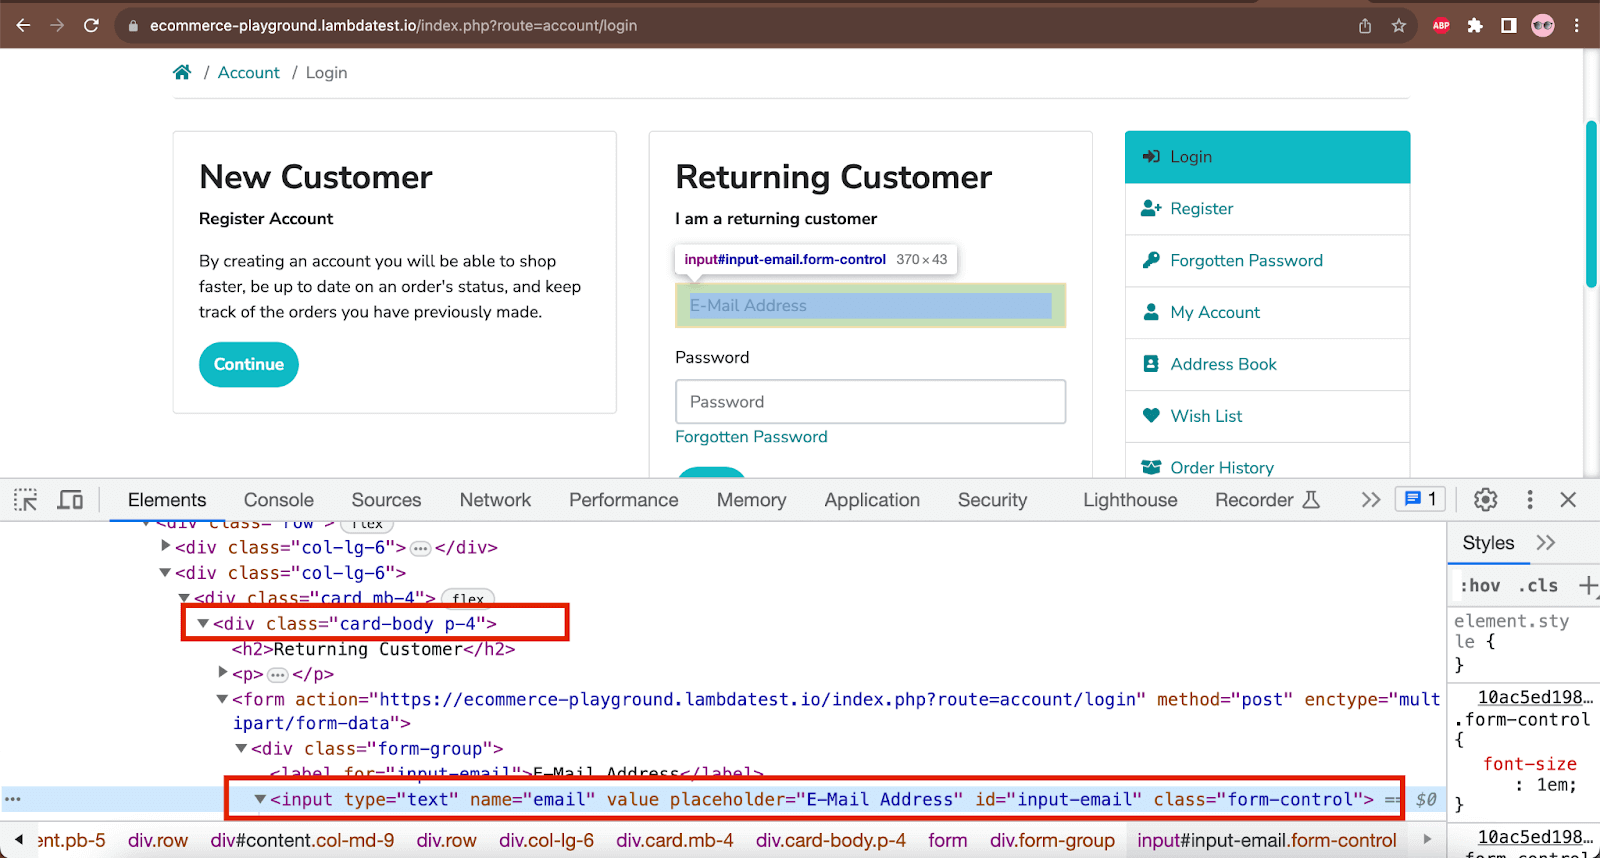
All the selectors for the Login Page fields will be declared in the LoginPage class.
We can see that the parent locator for this field is className = “card-body” and name attribute – “email” as well as ID attribute “input-email” can be used as the target locator. We will be using the @FindBys annotation to locate this field.
Below is the WebElement variable emailAddressField declared inside the LoginPage class.
|
1 2 3 4 5 |
@FindBys({ @FindBy(how = How.CLASS_NAME, using = "card-body"), @FindBy(how = How.NAME, using = "email") }) private WebElement emailAddressField; |
Next, let’s locate the Password field.
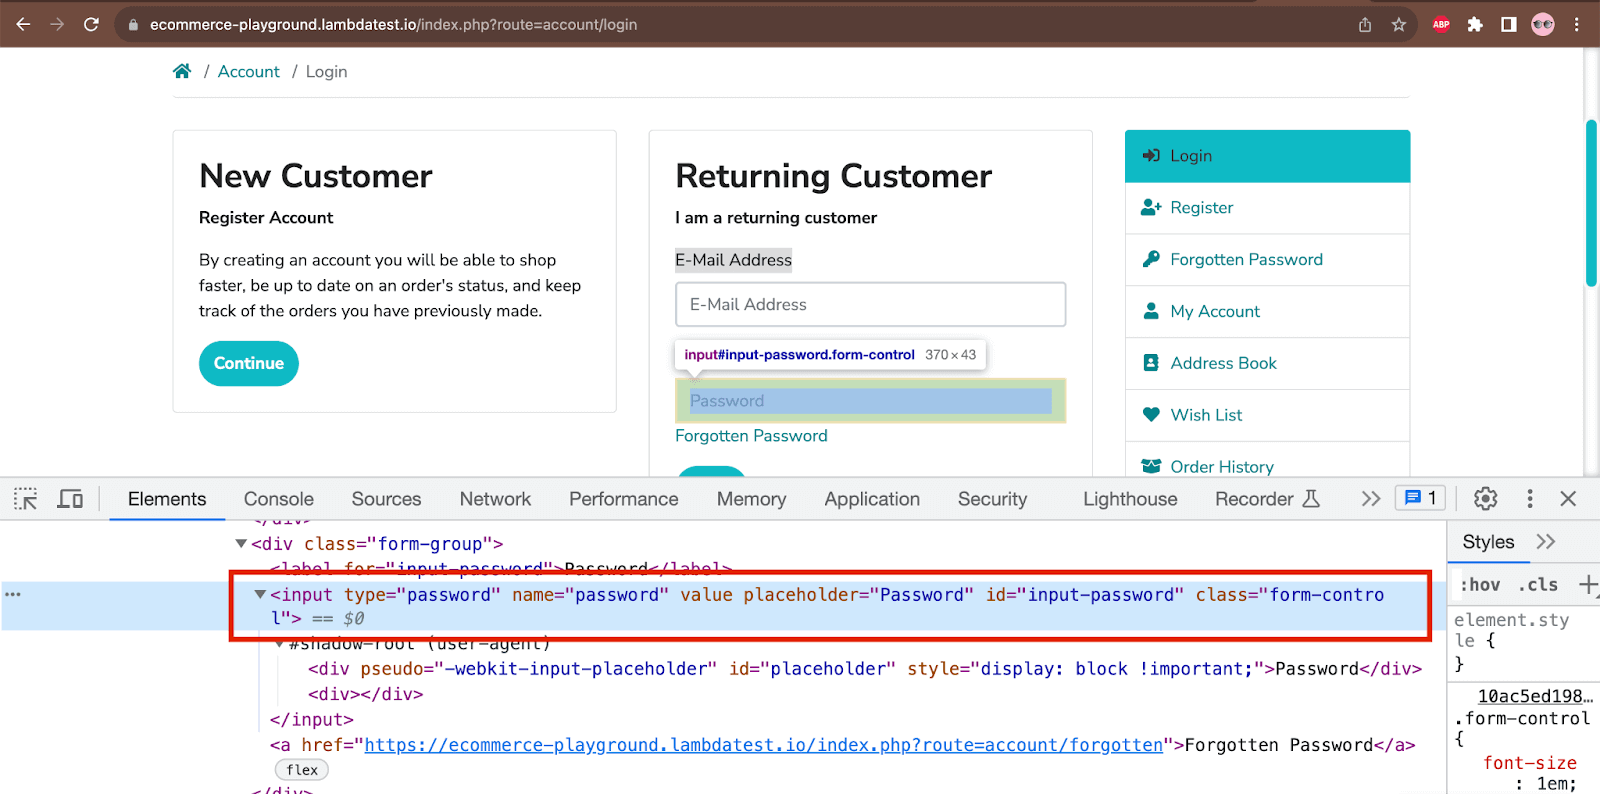
In the DOM, it can be seen that locator strategies like ID – “input-password” and NAME – “password” can be used to locate the Password field.
Below is the WebElement variable passwordField declared inside the LoginPage class that will help locate the Password field.
|
1 2 |
@FindBy(how = How.NAME, using = "password" ) private WebElement passwordField; |
Next, let’s locate the Login button.
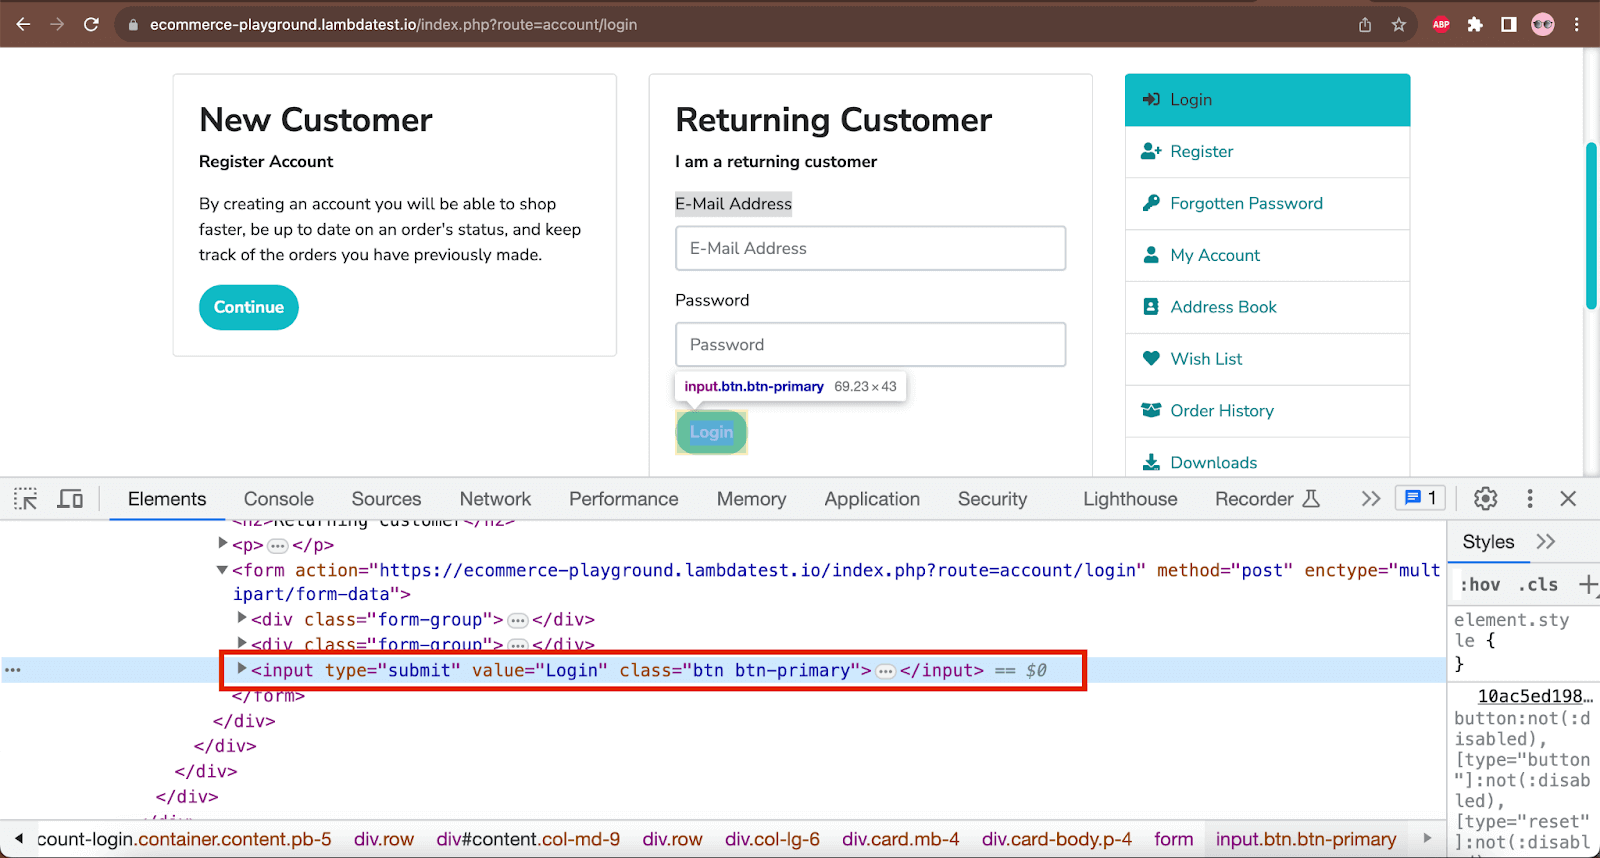
It is pretty simple to locate the Login button, we can make use of CSS Selector – “input[type=”submit”].
Below is the WebElement variable loginBtn declared inside the LoginPage class to locate the Login button using the @FindBy annotation.
|
1 2 |
@FindBy (css = "input[type=\"submit\"]") private WebElement loginBtn; |
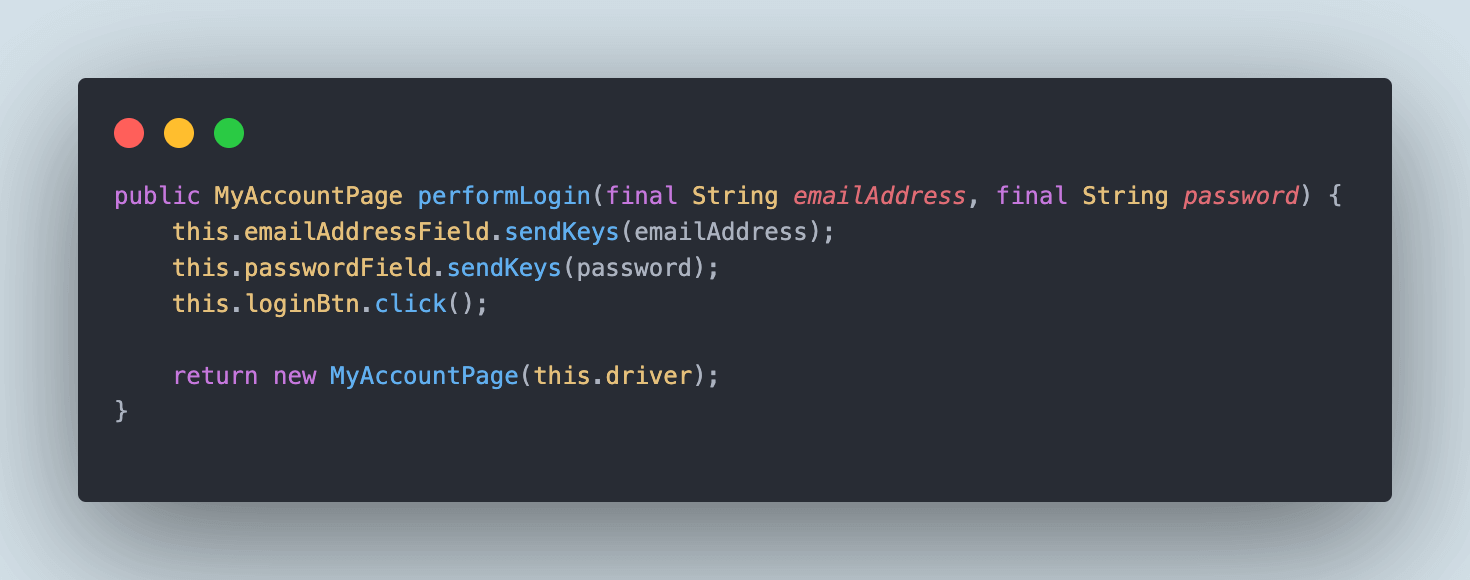
Let’s now create a new method named performLogin() inside the LoginPage class, that will perform the interaction with the E-Mail Address, Password fields, and Login button by entering the respective credentials in the fields to login in the website.
|
1 2 3 4 5 6 7 |
public MyAccountPage performLogin(final String emailAddress, final String password) { this.emailAddressField.sendKeys(emailAddress); this.passwordField.sendKeys(password); this.loginBtn.click(); return new MyAccountPage(this.driver); } |
The performLogin() method consumes two parameters called emailAddress and Password that will be supplied from the test to perform login, and it will return a new instance of the MyAccountPage class. The new instance of the MyAccountPage class is returned from this method as, after success, the website will take us to the My Account Page.
We have declared the WebElement variables and a method to perform login. Now, it is time to use the initElements() method from the PageFactory class of Selenium so the annotations work seamlessly. We will call the initElement() method in the Constructor of the LoginPage class.
|
1 2 3 4 5 |
private final WebDriver driver; public LoginPage(final WebDriver driver) { this.driver = driver; PageFactory.initElements(driver, this); } |
Below is the final version of the LoginPage class after all the variables, methods, and constructors are added to it.
Once the login step is complete, the My Account page will be displayed. To verify this step, let’s locate the title of the page that is “My Account”.

We can make use of the CSS Selector – “#content > div:nth-child(1) h2” to locate the title – “My Account”.
The following myAccountTitle variable declared inside the MyAccountPage class will locate the title using the @FindBy annotation.
|
1 2 3 |
@FindBy(css = "#content > div:nth-child(1) h2") @CacheLookup private WebElement myAccountTitle; |
@CacheLookup annotation is used for this variable to store this WebElement in the cache so when we run the test next time, it will take the WebElement from the cache instead of searching for it on the web page. This will help in saving the execution time.
|
1 2 3 |
public String getMyAccountPageTitle() { return this.myAccountTitle.getText(); } |
The getMyAccountPageTitle() will return the text from the WebElement myAccountTitle in String format that will help us in performing assertion for the title in the test.
The next step that we need to take care of is to locate the Logout link that will be displayed after the successful login on the My Account page.
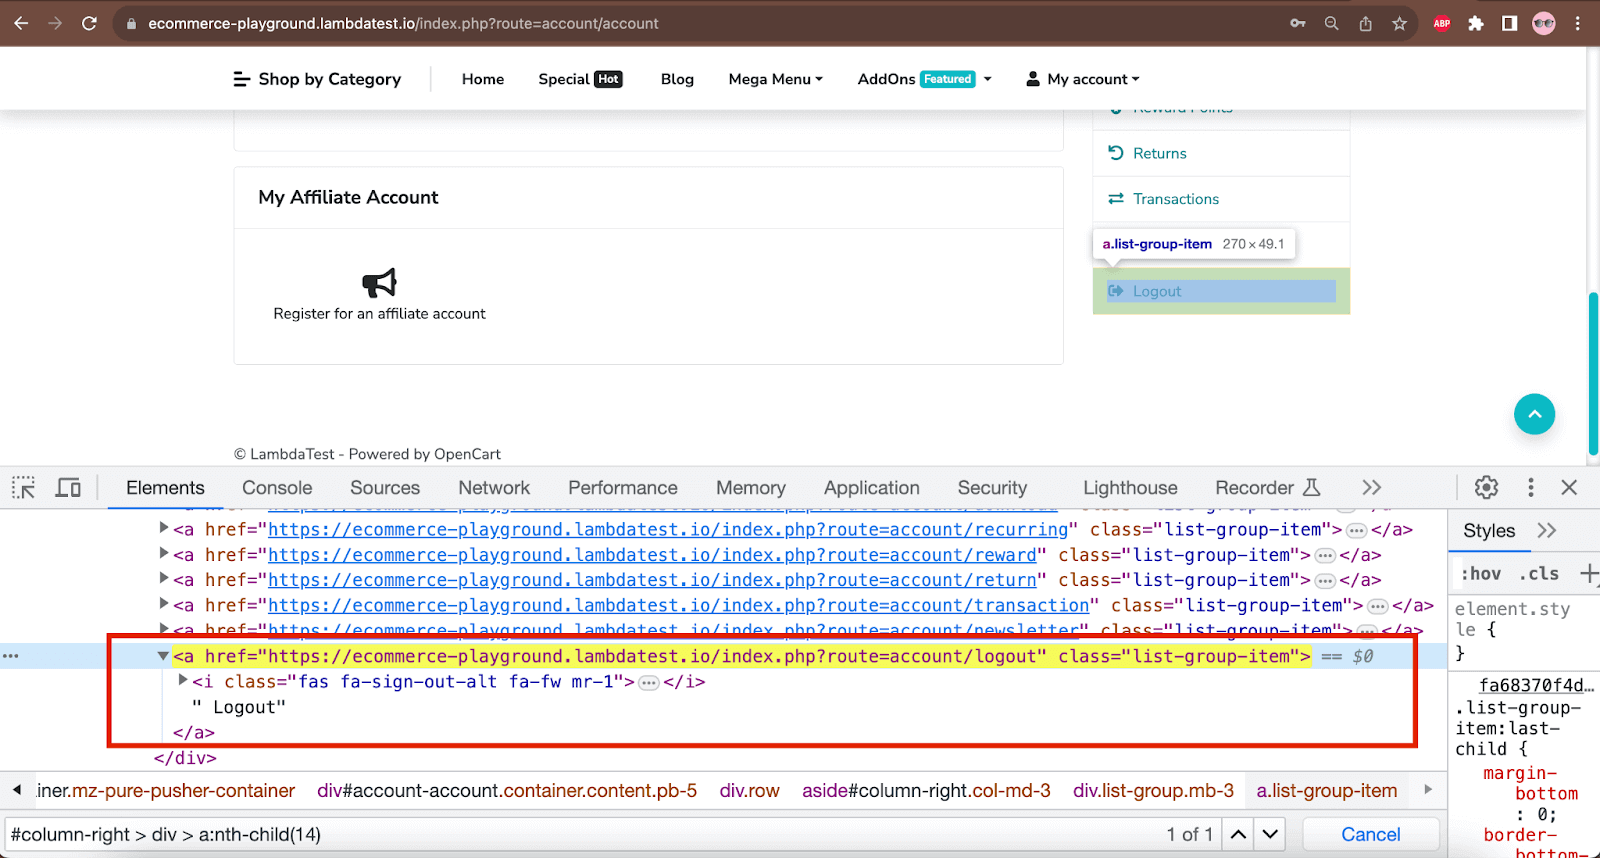
There are two ways to locate this Logout link, one is using the LinkText locator strategy, and the second is using the CSS Selector locator strategy where we use the Selector – “#column-right > div > a:nth-child(14)”. Let’s use the @FindAll annotation and add these locator strategies to locate the link.
Below is the WebElement variable logoutLink declared to locate the link using @FindAll annotation.
|
1 2 3 4 5 |
@FindAll({ @FindBy(how = How.LINK_TEXT, using = "Logout"), @FindBy(how = How.CSS, using = "#column-right > div > a:nth-child(14)") }) private WebElement logoutLink; |
A new method name logoutFromECommercePlayground() is created in the MyAccount Page that will interact with the logout link by performing a click on it.
|
1 2 3 |
public void logoutFromEcommercePlayground() { this.logoutLink.click(); } |
We will be calling the initElements() method from the PageFactory class in the constructor of the MyAccountPage class like we did in the LoginPage class.
With the implementation of the Logout step, we have completed the part of writing the Page objects. Now, let’s write the test.
The first statement in the testLogin() method navigates to the LambdaTest eCommerce website. Next, the LoginPage class is instantiated, where we pass on the WebDriver instance using the drivermanager class’ getDriver() method.
The LambdaTestPlayGroundTests class is extended by the BaseTest class that takes care of the WebDriver initialization and teardown using the DriverManager class.
The DriverManager class takes care of all the setup and configuration of the WebDriver interface. As we must run the tests in the LambdaTest cloud grid, the createChromeDriverInCloud() method from the DriverManager class will help us start a session.
LambdaTest is an AI-powered test orchestration and execution platform for Selenium testing with Java that offers automated testing on many browsers and operating systems. It enables parallel testing, local testing, and integration with popular Java testing frameworks like TestNG, JUnit, etc.
It supports online Selenium Grid for scalable testing and provides features such as automated screenshot capture, video recording, network simulation, and seamless integration with CI/CD pipelines, making it a comprehensive platform for developers to ensure their web applications function reliably across diverse environments.
You can also have a detailed look at this tutorial to start automation testing on LambdaTest.
Subscribe to the LambdaTest YouTube Channel for software testing tutorials around Selenium, Playwright testing, and more.

These desired capabilities in the createChromeDriverInCloud() method can be easily copied using LambdaTest’s Capabilities Generator.
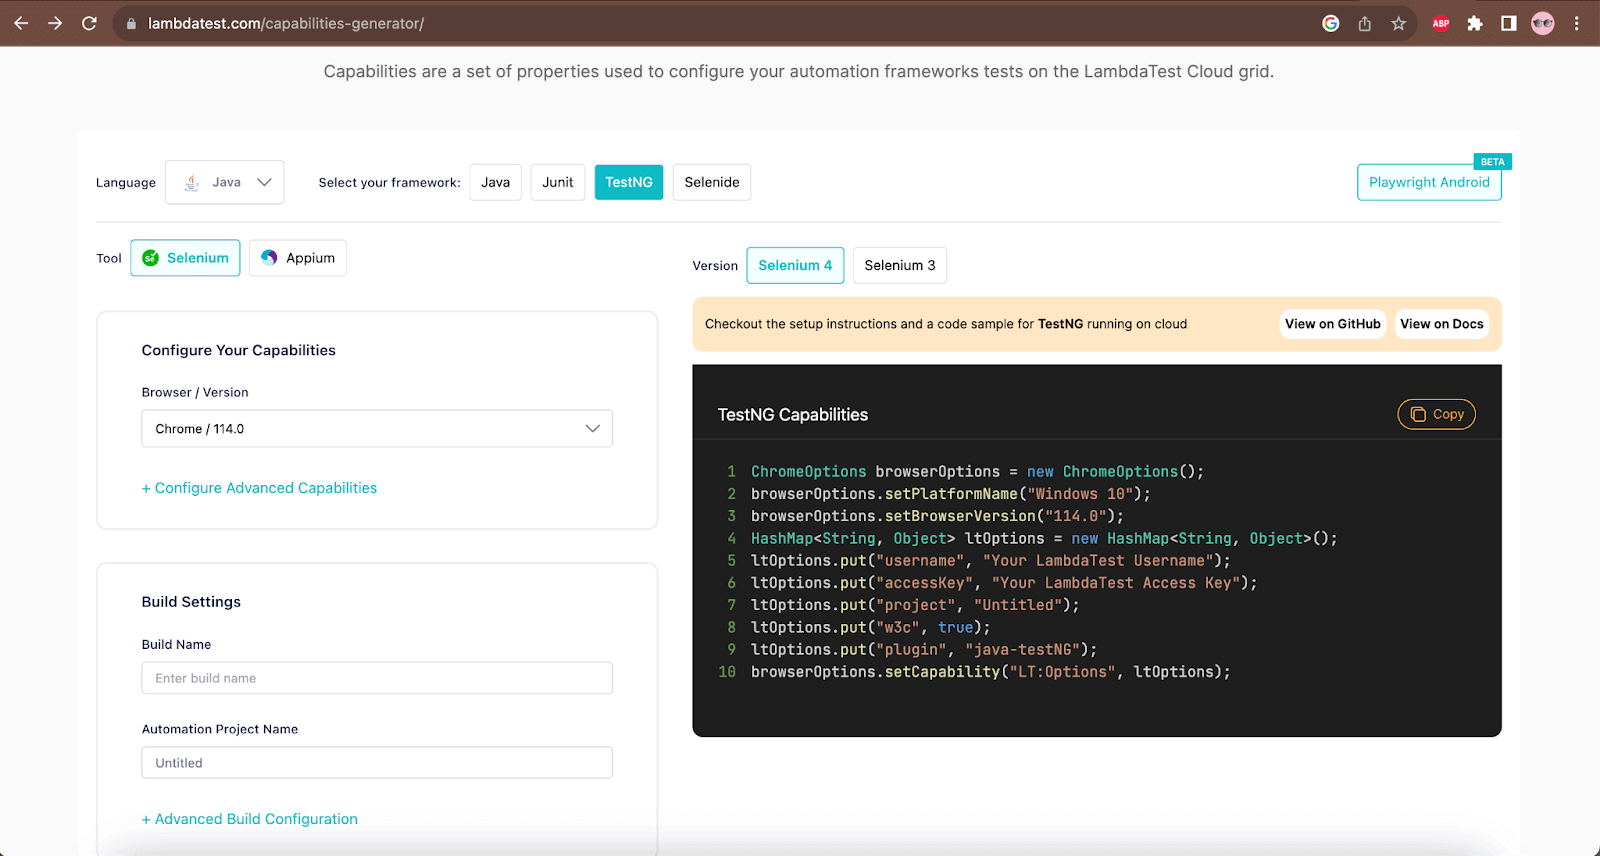
Coming back to the tests, next, we need to perform the login by calling the performLogin() method from the LoginPage class and passing on the email address and password in the respective fields.
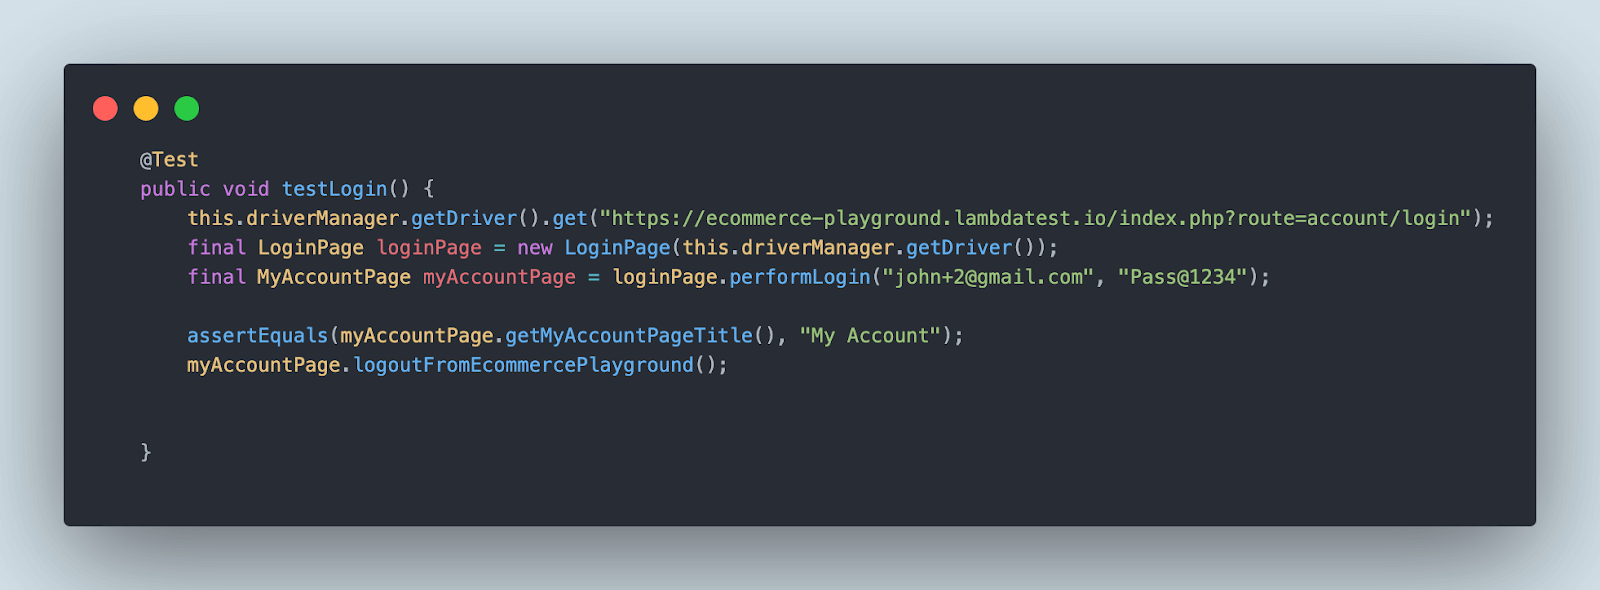
The performLogin() method already returns a new instance of the MyAccountPage class; we don’t need to instantiate the MyAccountPage class in the test method explicitly.
After successful login, the next statement of code will perform the assertion to check that the My Account page title is “My Account”. Finally, it will locate the Logout link and click on it. With this, the test scenario is marked complete.
Test Execution
The following testng.xml file is created that will help us in executing the test using TestNG.
|
1 2 3 4 5 6 7 8 9 10 11 12 13 |
<?xml version="1.0" encoding="UTF-8"?> <!DOCTYPE suite SYSTEM "http://testng.org/testng-1.0.dtd"> <suite name="LambdaTest ecommerce playground website test suite "> <test name="Page Factory demo tests using LambdaTest ECommerce Playground"> <classes> <class name="io.github.mfaisalkhatri.tests.LambdaTestEcommercePlaygroundTests"> <methods> <include name="testLogin"/> </methods> </class> </classes> </test> <!-- Test --> </suite> <!-- Suite --> |
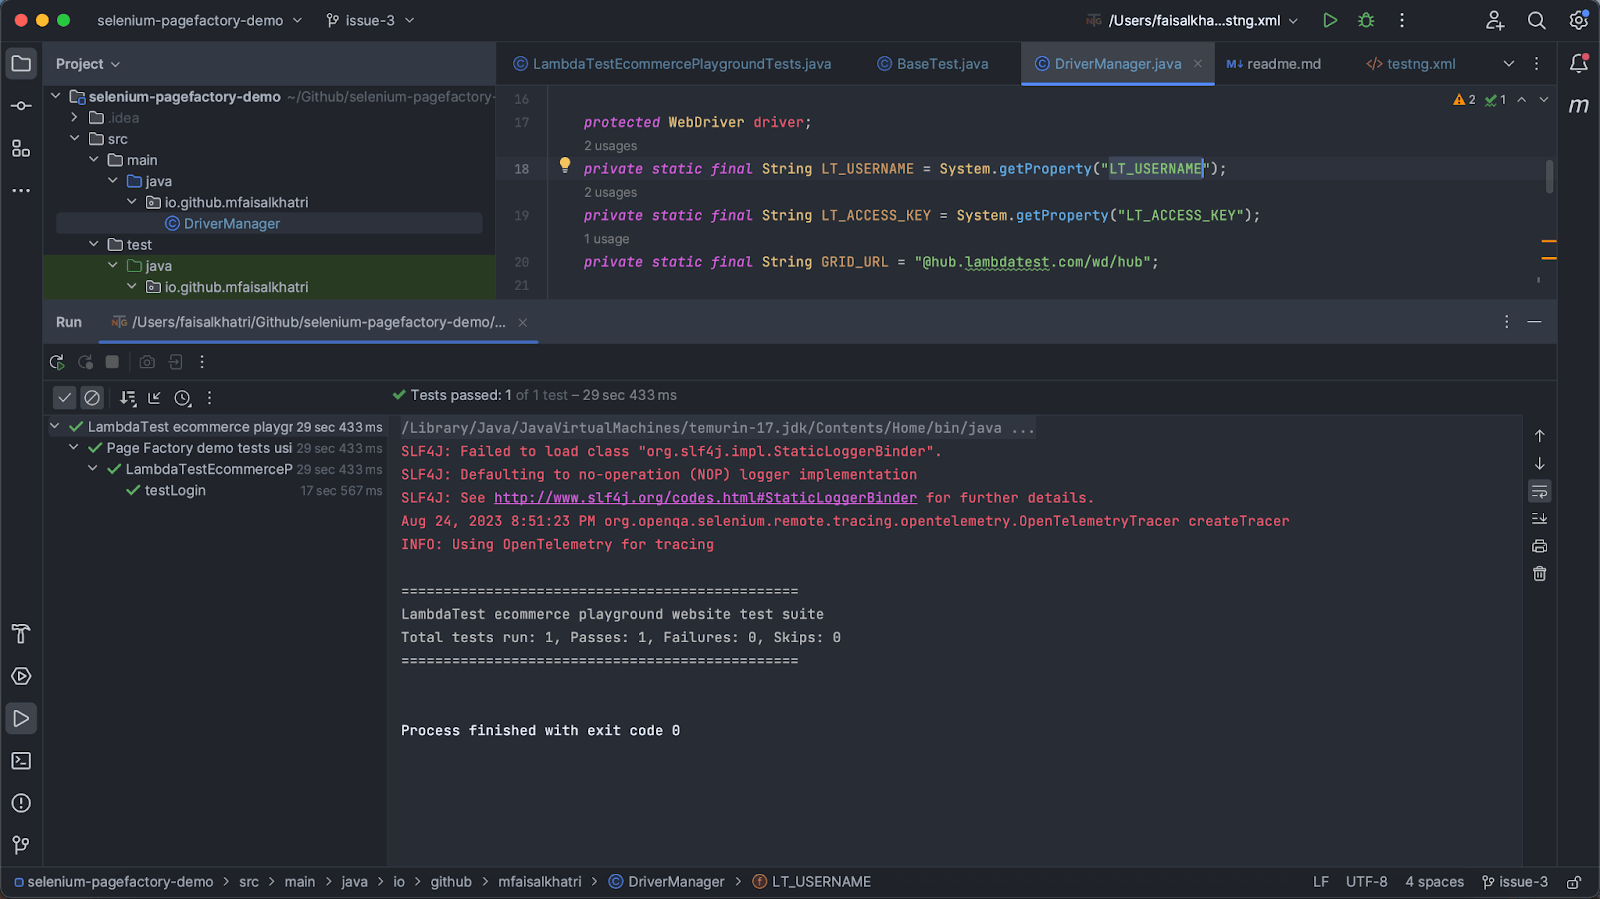
As we need to execute the tests on LambdaTest Cloud grid we need to provide the following secret values in the Edit Configuration window in the IDE as follows. These values can be found in the Password & Security section after logging in to the LambdaTest website.
- -DLT_USERNAME=< LambdaTest Username >
- -DLT_ACCESS_KEY=< LambdaTest Access Key >
To execute the tests, right click on the testng.xml file and select the option “Run ‘…/testng.xml’”.
Below is the screenshot of the tests run from IntelliJ.
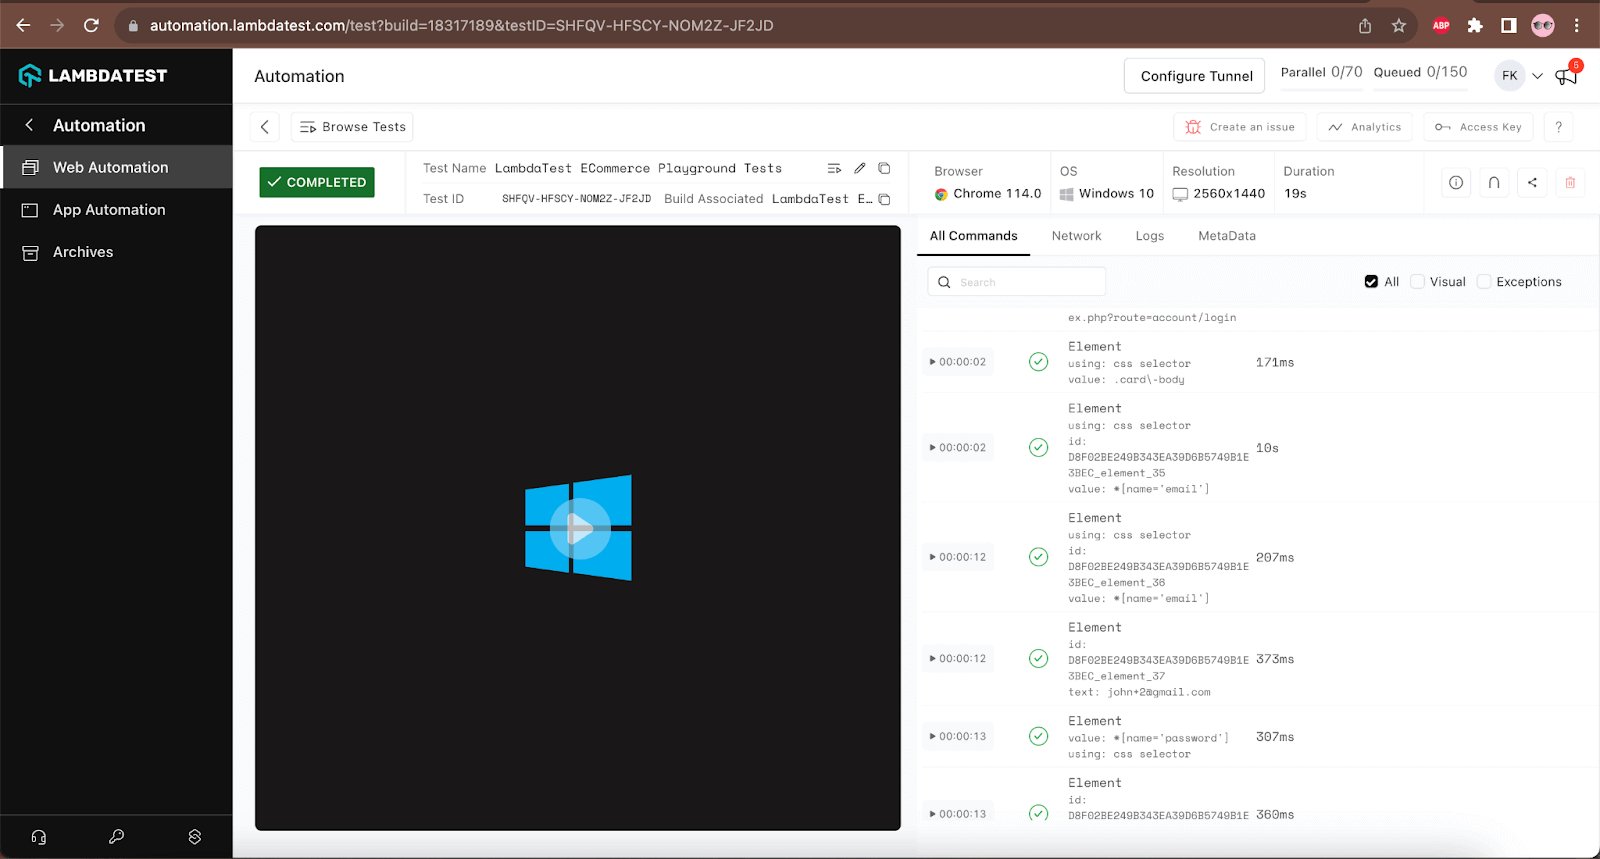
We can check the test execution details in the LambdaTest Dashboard, which shows the granular details of the test, like OS, browser name, version, and logs.
Food for Thought 💡
As per my experience, the Page Object Model offers more leverage than the Page Factory Model. In Page Factory, we can only define a WebElement or List < WebElements >; hence, it restricts the usage of the By class of Selenium WebDriver. This can restrict us from using different Expected Conditions while using Explicit Wait.
Final Thoughts
@FindBy, @FindBys, and @FindAll annotations can be used to implement Page Factory Model in Selenium WebDriver. These are quite neat and clear annotations as we don’t have to use the findElement/findElements method to search for a webelement. Also, we can use the @CacheLookup annotation, which allows us to save the WebElement in the cache so that when the tests run next time, the WebElement is fetched from the cache, thus saving time. However, we need to call the intiElements() method from the PageFactory class in every page object class; otherwise, these annotations won’t work.
The Page Factory Model has advantages and disadvantages; we can check out what suits us the best and move forward to use the model in the automation suite.
Frequently Asked Questions (FAQs)
What is the use of @FindBy annotation?
The “@FindBy” annotation is a commonly used annotation in test automation frameworks, particularly in the context of Selenium and other similar tools. When you apply the “@FindBy” annotation to a class member variable (usually a WebElement), you can specify the criteria for locating the web element on the web page, such as by using attributes like “id”, “name”, “xpath”, “css”, and more. This annotation lets you declaratively specify how to locate and interact with web elements, making your test automation code more readable and maintainable.
What is FindBy in Selenium?
@FindBy in Selenium simplifies the process of finding and interacting with web elements, which is a fundamental aspect of test automation. It enhances the efficiency and maintainability of your test scripts.
What annotations are used to find WebElement in Selenium?
In Selenium, various annotations are used to find and locate web elements on a web page. These annotations are typically used in conjunction with the Page Object Model (POM) to simplify and organize the test automation code. The common annotations for locating web elements include:
- @FindBy: This annotation is used to locate web elements on a web page by specifying various criteria such as “id,” “name,” “xpath,” “css,” and more.
- @FindAll: This annotation is used to find a group of web elements that match one or more criteria specified in the “FindBys” and “FindAll” annotations.
- @FindBys: This annotation combines multiple criteria to locate a web element. It is often used in conjunction with the “@FindAll” annotation.
- @FindByAll: While not a standard Selenium annotation, it can be created as a custom annotation to combine multiple criteria for locating web elements.
These annotations simplify the process of finding and interacting with web elements, enhancing the maintainability and readability of your test automation code.


Author’s Profile
Faisal Khatri
Faisal is a Software Testing Professional having 14+ years of experience in automation as well as manual testing. He is a QA, freelancer, blogger and open source contributor. He loves learning new tools and technologies and sharing his experience by writing blogs.
Blogs: 40
Got Questions? Drop them on LambdaTest Community. Visit now


