- Automation
- Home
- /
- Learning Hub
- /
- How To Retry Failed Tests Using IRetryAnalyzer In TestNG
- -
- April 15, 2024
How To Retry Failed Tests Using IRetryAnalyzer In TestNG
Learn to implement IRetryAnalyzer in TestNG for retrying failed tests and how this retry logic helps deal with flaky tests
OVERVIEW
TestNG is a popular Java-based testing framework used to write and execute unit, integration, and functional tests. One of the key features of TestNG is the ability to retry failed tests, which can be useful when dealing with flaky tests or unstable environments.
Though there are different ways to retry failed tests, some commonly used approaches include @Test annotation, IAnnotationTransformer interface, and IRetryAnalyzer interface in TestNG.
In this TestNG tutorial, we will learn how to use the IRetryAnalyzer interface to retry failed tests. We will provide examples of how to implement this interface and how to use it in the test code. By the end of this blog, you will understand how to use IRetryAnalyzer in TestNG to retry failed tests while performing Selenium automation testing with TestNG.
Why Retry Failed Tests?
There are scenarios where you might have to re-run tests manually to make the tests and pipeline succeed and take the builds to the next level.
These intermittent issues could include:
- The environment is down.
- The environment is flaky due to a buggy deployment.
- The third-party API is down.
- The browser becomes unresponsive while tests are running.
- An unwanted pop-up appears in the window, which is intermittent and cannot be located to handle in a test.
- The browser on which we want to run the tests on the cloud platform is busy and couldn’t be made available to run the tests.
There might be some more intermittent issues other than those listed above, such as WebElement not being found and the code displaying different exceptions in Selenium, which can cause the tests to fail. In these situations, simply re-running the same tests would suffice to make it pass.
So, in this case, IRetryAnalyzer - the retry functionality of TestNG comes to the rescue. This is one of the best and most frequently used functionalities.
What is IRetryAnalyzer in TestNG?
IRetryAnalyzer in TestNG is an interface that allows for retrying failed tests. Its retry() method returns true to indicate that a test should be retried and re-executed or false if the test should not be retried.
This feature is particularly useful for handling irregular test failures. Instead of manually re-running failed tests, TestNG can automatically retry them before marking them as failed. This can be beneficial when tests fail occasionally due to external factors.
There are two ways to retry tests using TestNG:
- Using the retryAnalyzer attribute in the @Test annotation
- Using Retry class with IAnnotationTransformer interface
In this blog on using IRetryAnalyzer in TestNG, we will learn and try both ways to implement this feature.
Before implementing the IRetryAnalyzer feature, follow the video tutorial to learn TestNG in detail.
Let's start learning about the first method, which involves using the retryAnalyzer attribute in the @Test annotation in TestNG
How to Retry Failed Tests Using The @Test Annotation?
In this section on IRetryAnalyzer in TestNG, we must create a new class that implements the IRetryAnalyzer interface to implement the Retry Analyzer feature in TestNG. Once this class is bound to a test, TestNG will invoke the retry analyzer to determine if a failed test should be retried.
Here is the code for implementing the IRetryAnalyzer in a class:
Filename: Retry
package io.github.mfaisalkhatri.listeners;
import org.apache.logging.log4j.LogManager;
import org.apache.logging.log4j.Logger;
import org.testng.IRetryAnalyzer;
import org.testng.ITestResult;
public class Retry implements IRetryAnalyzer {
private static final Logger LOG    = LogManager.getLogger ("Retry.class");
   private static final int    maxTry = 3;
   private              int    count  = 0;
 @Override
public boolean retry (final ITestResult iTestResult) {
       if (!iTestResult.isSuccess ()) {
           if (this.count < maxTry) {
               LOG.info ("Retrying test " + iTestResult.getName () + " with status " + getResultStatusName (
                   iTestResult.getStatus ()) + " for the " + (this.count + 1) + " time(s).");
               this.count++;
               return true;
           }
       }
       return false;
 }
 public String getResultStatusName (final int status) {
       String resultName = null;
       if (status == 1) {
           resultName = "SUCCESS";
       }
       if (status == 2) {
           resultName = "FAILURE";
       }
       if (status == 3) {
           resultName = "SKIP";
       }
       return resultName;
   }
}
Let’s proceed with the explanation. As mentioned, we implemented the IRetryAnalyzer using the @Test annotation in TestNG by creating a new class. In this example, we have created a class named Retry.
We have defined two variables, int maxTry and int count, where
- maxTry: The maxTry variable is dynamic and can be adjusted as needed. Here, it's set to three to rerun the tests three times before marking them as failed. However, you can set it to any value based on your requirements.
- count: The count variable tracks the number of retries for a test.
- retry(): Next, we override the retry() method from the IRetryAnalyzer interface and implement it accordingly. This method takes an ITestResult parameter and returns a boolean value (true or false) indicating whether the test should be retried.
- The conditional statement within retry(): Within the retry() method, we set a condition to check if the test result is not successful (i.e., it fails) and if the value of the count variable is less than the maxTry variable. If the condition is met, we print a message to the console: “Retrying test <testname> with status <testresult> (Success/Fail/Skip) for <count> times.” The placeholders in the message are replaced with actual values generated at runtime.
- <testname> : This placeholder will print the test result name using the ITestResult interface’s getName() method.
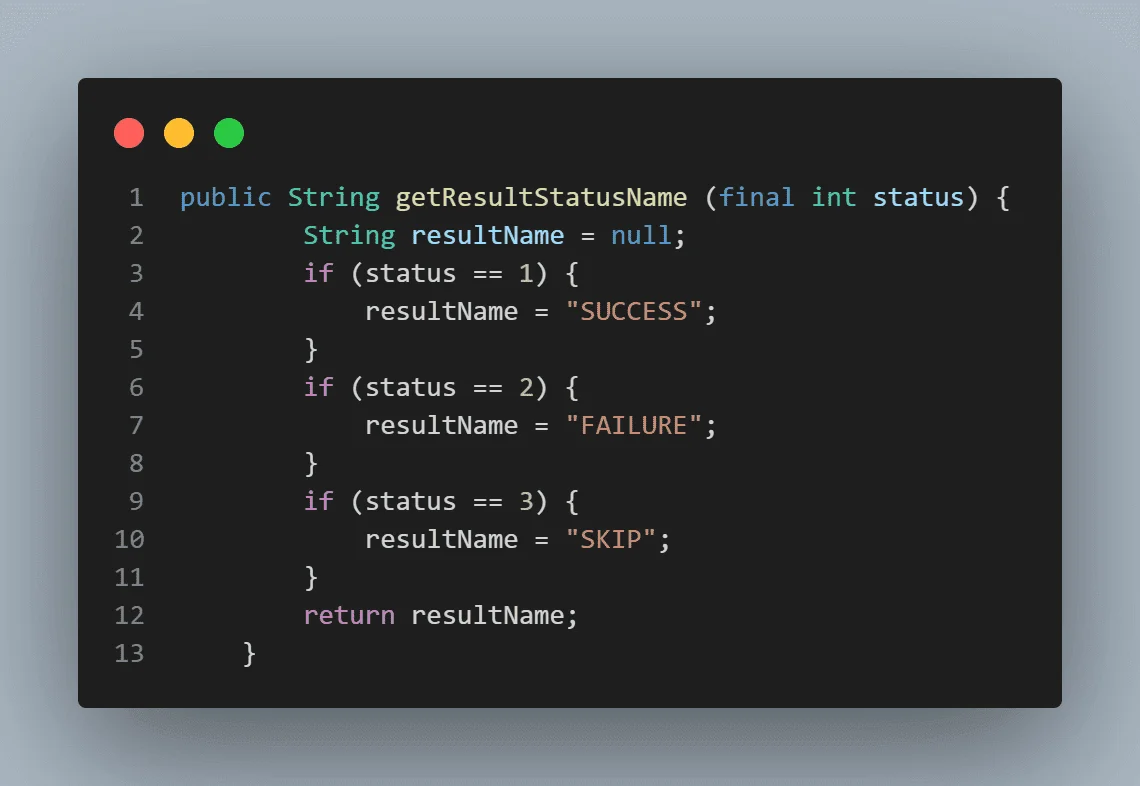
- <testresult>: This placeholder in the message will print the test result. Since the ITestResult interface does not have a method to retrieve the test name directly, we have created a method called getResultStatusName(). This method takes the test status (returned by the getStatus() method of the ITestResult interface with values like 1, 2, 3). It provides the corresponding result status of “SUCCESS,” “FAILURE,” or “SKIP” based on the condition set in the getResultStatusName() method for the returned status values.
- <count>: This placeholder will print the value incremented in the count variable.
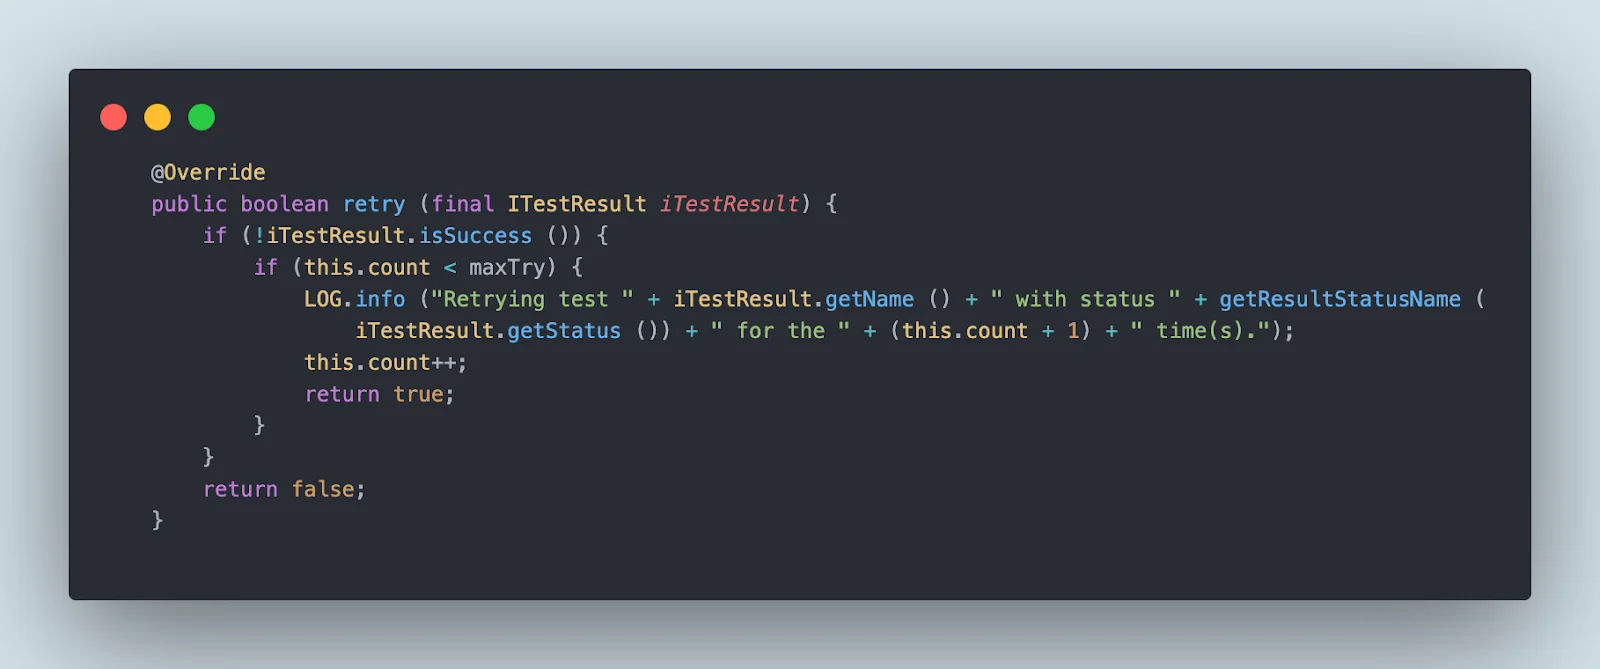
The retry() method is implemented from the IRetryAnalyzer interface in the Retry class. When invoked, this method returns true if the test fails (indicating that it should be retried) or false if it passes. The @Override annotation indicates that this method overrides a superclass method, ensuring correct method overriding.
Next, let's understand how to use the retry analyzer in the @Test annotation.
@Test (retryAnalyzer = Retry.class)
    public void test() {
    }
It is simple to use. We need to pass the class name after setting the retryAnalyzer attribute, as shown in the code snippet above. When we run the test, and it fails, TestNG will retry it three times (as we set the maxTry variable to three) before marking the test result as failed.
Note : Retry failed tests in TestNG using the IRetryAnalyzer interface and enhance your Selenium automation testing skills. Try LambdaTest Now!
Having learned the first method of implementing the IRetryAnalyzer feature, let’s learn the other way of using the Retry class with the IAnnotationTransformer interface in detail below.
How to Retry Failed Tests Using The IAnnotationTransformer Interface?
To utilize the IRetryAnalyzer, we first create a new class and implement the IAnnotationTransformer interface. In this case, we have named the class RetryListener and implemented the interface.
package io.github.mfaisalkhatri.listeners;
import java.lang.reflect.Constructor;
import java.lang.reflect.Method;
import org.testng.IAnnotationTransformer;
import org.testng.annotations.ITestAnnotation;
public class RetryListener implements IAnnotationTransformer {
@Override
  public void transform (final ITestAnnotation annotation, final Class testClass, final Constructor testConstructor,
  final Method testMethod) {
  annotation.setRetryAnalyzer (Retry.class);
  }
}
We can directly pass the Retry class, created in the previous section of this tutorial on IRetryAnalyzer in TestNG, to the setRetryAnalyzer method parameter, and the transform() method is called for every test during the test run.
To make the code work, we will create a testng.xml file and pass the RetryListener class to it.
Filename: testng.xml
<?xml version="1.0" encoding="UTF-8"?>
<!DOCTYPE suite SYSTEM "http://testng.org/testng-1.0.dtd">
    <suite name="Demo Test Suite ">
        <listeners>
        <listener class-name="RetryListener"/>
        </listeners>
    <test name="Retry failed tests ">
    <parameter name="browser" value="chrome"/>
    <classes>
        <class name="demo.tests.retrytests.RetryFailedTests">
        <methods>
            <include name="testOne"/>
            <include name="testTwo"/>
        </methods>
    </class>
    </classes>
    </test> <!-- Test -->
    </suite> <!-- Suite -->
The Listener class should be placed between the <listeners> </listeners> tags. The important thing to note here is that this Listener will be applied to all the tests available in the test class.
How to Use The IRetryAnalyzer Interface in TestNG?
In this section of the blog on IRetryAnalyzer, we will demonstrate how to use the IRetryAnalyzer in TestNG to retry failed tests. This involves creating a class that implements the IRetryAnalyzer interface, overriding the retry() method, and using the @Test annotation's retryAnalyzer attribute to specify the retry logic for a particular test or suite of tests.
Before writing the test, we must identify the prerequisites needed, such as the programming language, automation testing tool, test runner, and more, to implement the IRetryAnalyzer approach.
The following is the set of tools needed to start writing the code.
- Programming Language: Java (17)
- Web Automation Tool: Selenium WebDriver (4.18.1)
- Test Runner: TestNG (7.9.0)
- Demo Site: We will use the LambdaTest eCommerce Playground to execute the tests and implement IRetryAnalyzer in TestNG. This website facilitates an end-to-end demo business flow, including user registration, adding and checking out products, and confirming the order.

As the prerequisites for using IRetryAnalyzer in TestNG are set, we will define the test scenario and write the test cases accordingly.
Test Scenario
The test scenario below involves visiting the website defined in the prerequisites, navigating to the login screen, and performing other actions.
|
As per the defined test scenario, we will implement the code below.
Code Implementation
In this section, we will learn how to use IRetryAnalyzer in TestNG. We will create a class that implements the interface, overrides the retry() method to define the retry logic, and then use @Test annotation's retryAnalyzer attribute. First, we will create a POM file to help you add the necessary dependencies and libraries.
<?xml version="1.0" encoding="UTF-8"?>
<project xmlns:xsi="http://www.w3.org/2001/XMLSchema-instance" xmlns="http://maven.apache.org/POM/4.0.0"
xsi:schemaLocation="http://maven.apache.org/POM/4.0.0 http://maven.apache.org/xsd/maven-4.0.0.xsd">
<modelVersion>4.0.0</modelVersion>


<groupId>io.github.mfaisalkhatri</groupId>
<artifactId>selenium4poc</artifactId>
<version>1.0-SNAPSHOT</version>


<name>selenium4poc</name>
<url>https://mfaisalkhatri.github.io</url>


<properties>
    <project.build.sourceEncoding>UTF-8</project.build.sourceEncoding>
    <selenium.java.version>4.18.1</selenium.java.version>
    <testng.version>7.9.0</testng.version>
    <webdrivermanager.version>5.7.0</webdrivermanager.version>
    </properties>
<dependencies>
<!--https://mvnrepository.com/artifact/org.seleniumhq.selenium/selenium-java -->
<dependency>
    <groupId>org.seleniumhq.selenium</groupId>
    <artifactId>selenium-java</artifactId>
    <version>${selenium.java.version}</version>
</dependency>
<!-- https://mvnrepository.com/artifact/org.testng/testng -->
<dependency>
    <groupId>org.testng</groupId>
    <artifactId>testng</artifactId>
    <version>${testng.version}</version>
    <scope>test</scope>
</dependency>
<dependency>
    <groupId>io.github.bonigarcia</groupId>
    <artifactId>webdrivermanager</artifactId>
    <version>${webdrivermanager.version}</version>
<exclusions>
    <exclusion>
            <groupId>com.google.guava</groupId>
            <artifactId>guava</artifactId>
        </exclusion>
    </exclusions>
</dependency>
</dependencies>ange
Now that we have defined the dependencies in the pom.xml file, we must create a file that contains the code to invoke the necessary drivers.
In this code example, we are using Selenium RemoteWebDriver, which is typically used when running tests on cloud-based platforms like LambdaTest. We will use the LambdaTest platform to run the test for this demonstration.
LambdaTest is an AI-powered test orchestration and execution platform that lets you run manual and automated tests at scale with over 3000+ real devices, browsers, and OS combinations. It offers a convenient solution for performing cross-browser testing. It allows testing across various browsers and operating systems without maintaining a large in-house test infrastructure of physical devices or virtual machines.
With LambdaTest’s cloud Selenium Grid, you can use any automation testing framework such as Selenium, Cypress, or Playwright to perform parallel testing Using TestNG.
You can follow the LambdaTest YouTube Channel and stay updated with the latest tutorials around Selenium testing, Cypress testing, CI/CD tools, and more.
Below is the code snippet for the DriverManager class, where we set the drivers and add the generated desired capabilities to ensure the tests run successfully on the LambdaTest platform.
 public class DriverManager {
  private static final ThreadLocal<WebDriver > DRIVER = new ThreadLocal<> ();
  private static final String GRID_URL = "@hub.lambdatest.com/wd/hub";
  private static final Logger LOG = LogManager.getLogger ("DriverManager.class");
  private static final String LT_ACCESS_KEY = System.getProperty ("LT_ACCESS_KEY");
  private static final String LT_USERNAME = System.getProperty ("LT_USERNAME");


  public static void createDriver (final Browsers browser) {
    setupChromeInLambdaTest ();
    setupBrowserTimeouts ();
  }
  public static WebDriver getDriver () {
    return DriverManager.DRIVER.get ();
  }
  public static void quitDriver () {
    if (null != DRIVER.get ()) {
      LOG.info ("Closing the driver...");
      getDriver ().quit ();
      DRIVER.remove ();
    }
  }
  private static void setDriver (final WebDriver driver) {
    DriverManager.DRIVER.set (driver);
  }
  private static void setupBrowserTimeouts () {
    LOG.info ("Setting Browser Timeouts....");
    getDriver ().manage ()
    .timeouts ()
    .implicitlyWait (Duration.ofSeconds (30));
    getDriver ().manage ()
    .timeouts ()
    .pageLoadTimeout (Duration.ofSeconds (30));
    getDriver ().manage ()
    .timeouts ()
    .scriptTimeout (Duration.ofSeconds (30));
  }


  private static void setupChromeInLambdaTest () {
    final ChromeOptions browserOptions = new ChromeOptions ();
    browserOptions.setPlatformName ("Windows 10");
    browserOptions.setBrowserVersion ("latest");
    final HashMap<String, Object> ltOptions = new HashMap<> ();
    ltOptions.put ("resolution", "2560x1440");
    ltOptions.put ("selenium_version", "4.0.0");
    ltOptions.put ("build", "LambdaTest ECommerce Playground Build");
    ltOptions.put ("name", "End to End LambdaTest ECommerce Playground Tests");
    ltOptions.put ("w3c", true);
    ltOptions.put ("plugin", "java-testNG");
    browserOptions.setCapability ("LT:Options", ltOptions);
  try {
    setDriver (
    new RemoteWebDriver (new URL (format ("https://{0}:{1}{2}", LT_USERNAME, LT_ACCESS_KEY, GRID_URL)),
    browserOptions));
    } catch (final MalformedURLException e) {
    LOG.error ("Error setting up Chrome browser in LambdaTest", e);
    }
  }
}
Now that we have configured the DriverManager file, in the below section we will be running the test.
Test 1: Navigating the user to the login screen
In this test, we will be navigating to the home screen of the website by hitting the website URL, and after that, we will hover the mouse over the “My account” menu.

From the My account dropdown, click the Login link, which will navigate you to the login page.

On the login page, you will be asked to enter your account credentials to log into the website, as shown below.
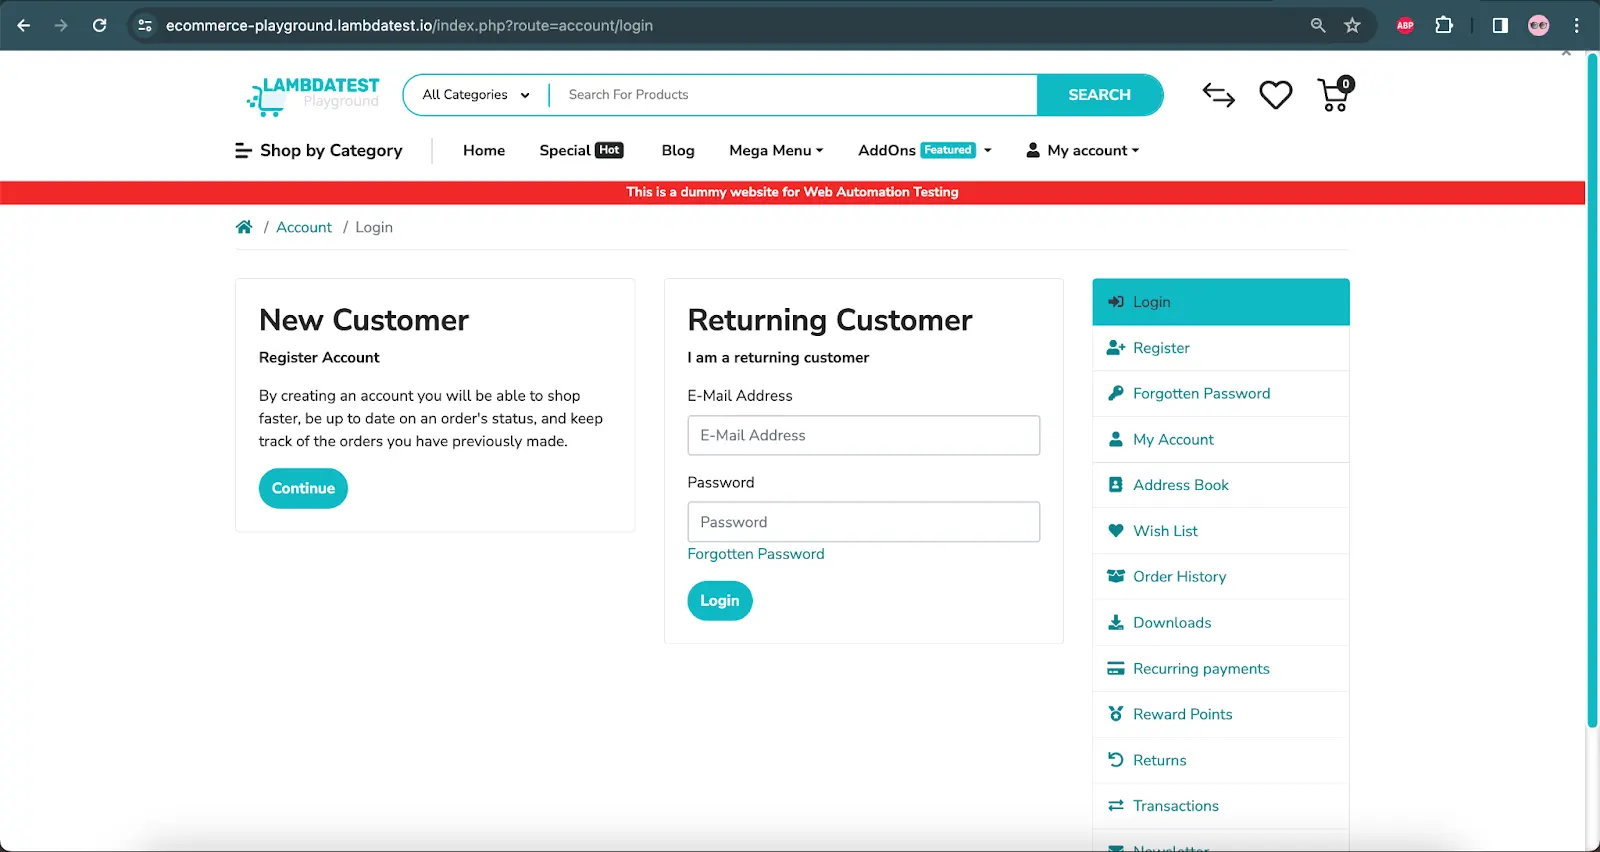
Here, intentionally, the expected text is updated to “Returning Customers,” so the test fails, and we will be able to check the retry feature.
Also, as mentioned here, failed tests will be retried using the retryAnalyzer attribute in the @Test annotation.
package io.github.mfaisal, the expected text is updated tostatic io.github.mfaisalkhatri.drivers.DriverManager.getDriver;
import static org.testng.Assert.assertEquals;


import io.github.mfaisalkhatri.listeners.Retry;
import io.github.mfaisalkhatri.pages.lambdatestecommerce.HomePage;
import io.github.mfaisalkhatri.pages.lambdatestecommerce.LoginPage;
import io.github.mfaisalkhatri.pages.lambdatestecommerce.SearchResultPage;
import io.github.mfaisalkhatri.tests.base.BaseSuiteSetup;
import org.testng.annotations.BeforeClass;
import org.testng.annotations.Test;


public class RetryFailedTests extends BaseSuiteSetup {


private HomePage homePage;


@BeforeClass
  public void setupTests () {
  final String website = "https://ecommerce-playground.lambdatest.io/";
  getDriver ().get (website);
  this.homePage = new HomePage ();
}


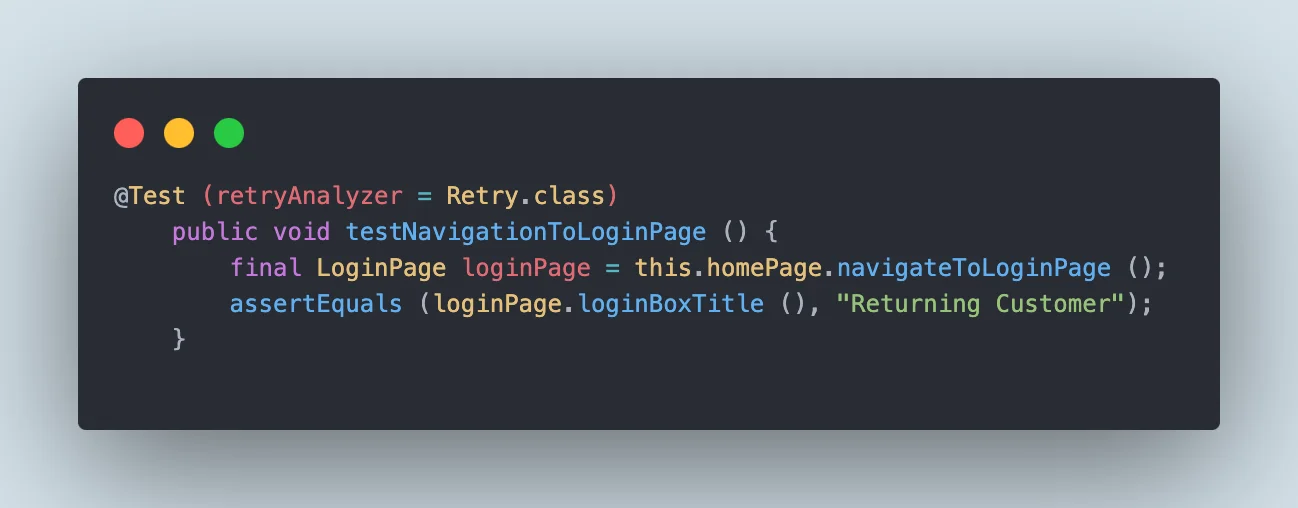
@Test (retryAnalyzer = Retry.class)
  public void testNavigationToLoginPage () {
  final LoginPage loginPage = this.homePage.navigateToLoginPage ();
  assertEquals (loginPage.loginBoxTitle (), "Returning Customesr");
  }
}
The test is straightforward. We have created a navigateToLoginPage() method that performs all the actions outlined in the test strategy. It visits the website, clicks on the My account dropdown, clicks the Login option, and navigates the user to the login page.
We used the retryAnalyzer attribute in the @Test annotation and assigned the Retry class.
Here is the navigateToLoginPage() method and its respective dependent methods, which perform the test actions for us:
 public class HomePage {
public LoginPage navigateToLoginPage () {
 openMyAccountMenu ().loginLink ()
  .click ();
  return new LoginPage ();
}
private HomePage openMyAccountMenu () {
  getDriver ().findElement (By.linkText ("My account"))
  .click ();
  return this;
}
private WebElement loginLink () {
return getDriver ().findElement (By.linkText ("Login"));
  }
}
The openMyAccountMenu() method will find the link for the “My account” menu on the home page and click on it. After that, it will look for the Login link and click on it, eventually taking us to the login page.
public class LoginPage {
public String loginBoxTitle () {
  return getDriver ().findElement (By.cssSelector ("div:nth-child(2) > div > div > h2"))
  .getText ();
  }
}
Once the login page is loaded, we will find the title of the login box -> “Returning Customer” as displayed in the screenshot below, and verify the context/text in the test:
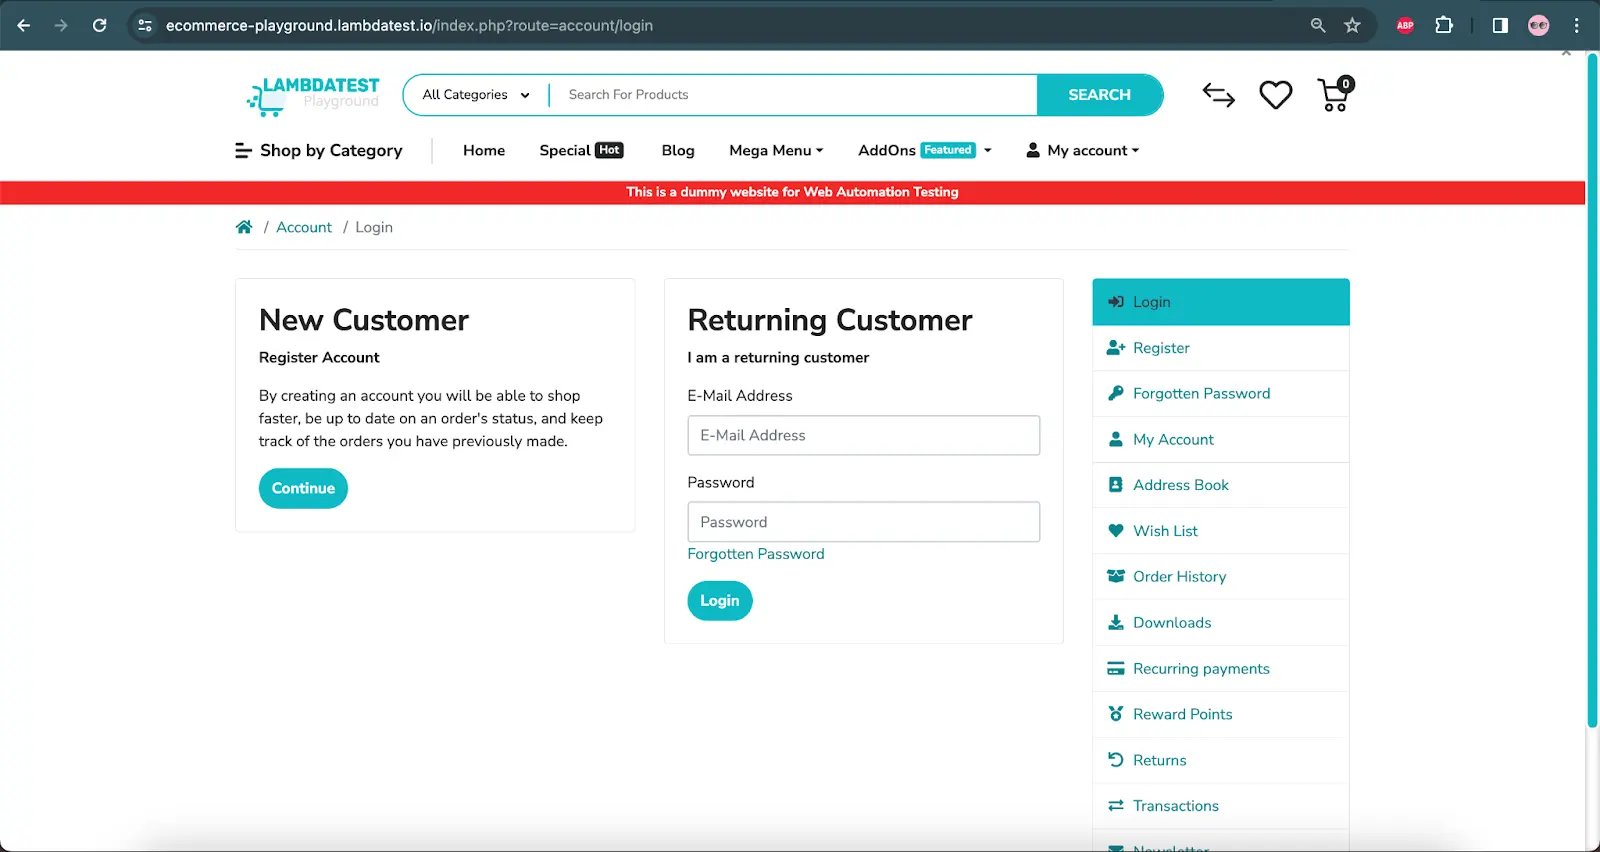
The actual title of the Box is “Returning Customer”; however, it is updated as “Returning Customers” to fail the test and see if it is retried three times per the configuration we have set.
We have seen the code implementation of the first test, where we successfully navigated to the user login page, verified the context/text on the website, and checked if the IRetryAnalyzer in TestNG worked correctly in displaying the failed tests.
In the section below, we will learn how to implement the second method, where we try to search for a product from the same websites used in Test 1.
Test 2: Searching for a product
In this test, we will navigate to the website's home page by entering the URL. Then, we will enter the search text as “Canon EOS 5D.” Once the search results appear on the result page, we will check the first product's title to match the search text we provided.
package io.github.mfaisalkhatri.tests.retrytests;


import static io.github.mfaisalkhatri.drivers.DriverManager.getDriver;
import static org.testng.Assert.assertEquals;


import io.github.mfaisalkhatri.listeners.Retry;
import io.github.mfaisalkhatri.pages.lambdatestecommerce.HomePage;
import io.github.mfaisalkhatri.pages.lambdatestecommerce.LoginPage;
import io.github.mfaisalkhatri.pages.lambdatestecommerce.SearchResultPage;
import io.github.mfaisalkhatri.tests.base.BaseSuiteSetup;
import org.testng.annotations.BeforeClass;
import org.testng.annotations.Test;


public class RetryFailedTests extends BaseSuiteSetup {


private HomePage homePage;


@BeforeClass
  public void setupTests () {
    final String website = "https://ecommerce-playground.lambdatest.io/";
    getDriver ().get (website);
  this.homePage = new HomePage ();
}


@Test
  public void testSearchProduct () {
    final String productName = "Canon EOS 5D";
    final SearchResultPage searchResultPage = this.homePage.searchProduct (productName);
    assertEquals (searchResultPage.pageHeader (), "Search - " + productName);
    assertEquals (searchResultPage.getFirstSearchResultText (), "Canon eos 5D");
  }
}
In this test, it is important to note the last assert statement where we intentionally set the expected search text to “Canon eos 5D” to fail the test. The searchProduct(productName) method will execute the necessary actions to search for the product from the home page and return a new instance of the SearchResultPage().
public class HomePage {


public SearchResultPage searchProduct (final String productName) {
    enterText (searchBox (), productName);
    searchButton ().click ();
    return new SearchResultPage ();
}
private WebElement searchBox () {
    return getDriver ().findElement (By.name ("search"));
}
private WebElement searchButton () {
    return getDriver ().findElement (By.cssSelector (".search-button"));
  }
}
Now that we have the two test scripts ready, we need to create a test runner file to configure and execute the tests. This file will include settings for the browser, browser version, and operating system.
In the below section, we will create a test runner file that will help us execute the test scripts on LambdaTest.
Running the Tests
In this section, we will run the test for the two approaches mentioned in this blog.
- Retrying Failed Tests Using The @Test Annotation.
- Retrying Failed Tests Using The IAnnotationTransformer Interface.
Running test for the first approach: Retrying Failed Tests Using The @Test Annotation.
As mentioned, we will demonstrate two different ways to retry tests.
First, we will demonstrate the retryAnalyzer attribute in the @Test annotation. Therefore, we will not include the Listener class in the testng.xml file for this demo.
We will run the tests on the LambdaTest cloud platform using the Chrome browser and TestNG in Selenium. To do this, we need to create a testng.xml file. Then, we can run the tests by right-clicking on the file and selecting "Run '...\testng.xml'".
Before running the tests, we must add the LambdaTest username and access key in the Run Configurations. This is because we are reading the username and access key from System Properties. To add these values, follow the steps below:
- Go to the Run Configurations in your IDE.
- Find the configuration for running your test suite or individual test case.
- Add System Properties with their respective values:
- LT_USERNAME: Your LambdaTest username
- LT_ACCESS_KEY: Your LambdaTest access key
- Save the configuration.
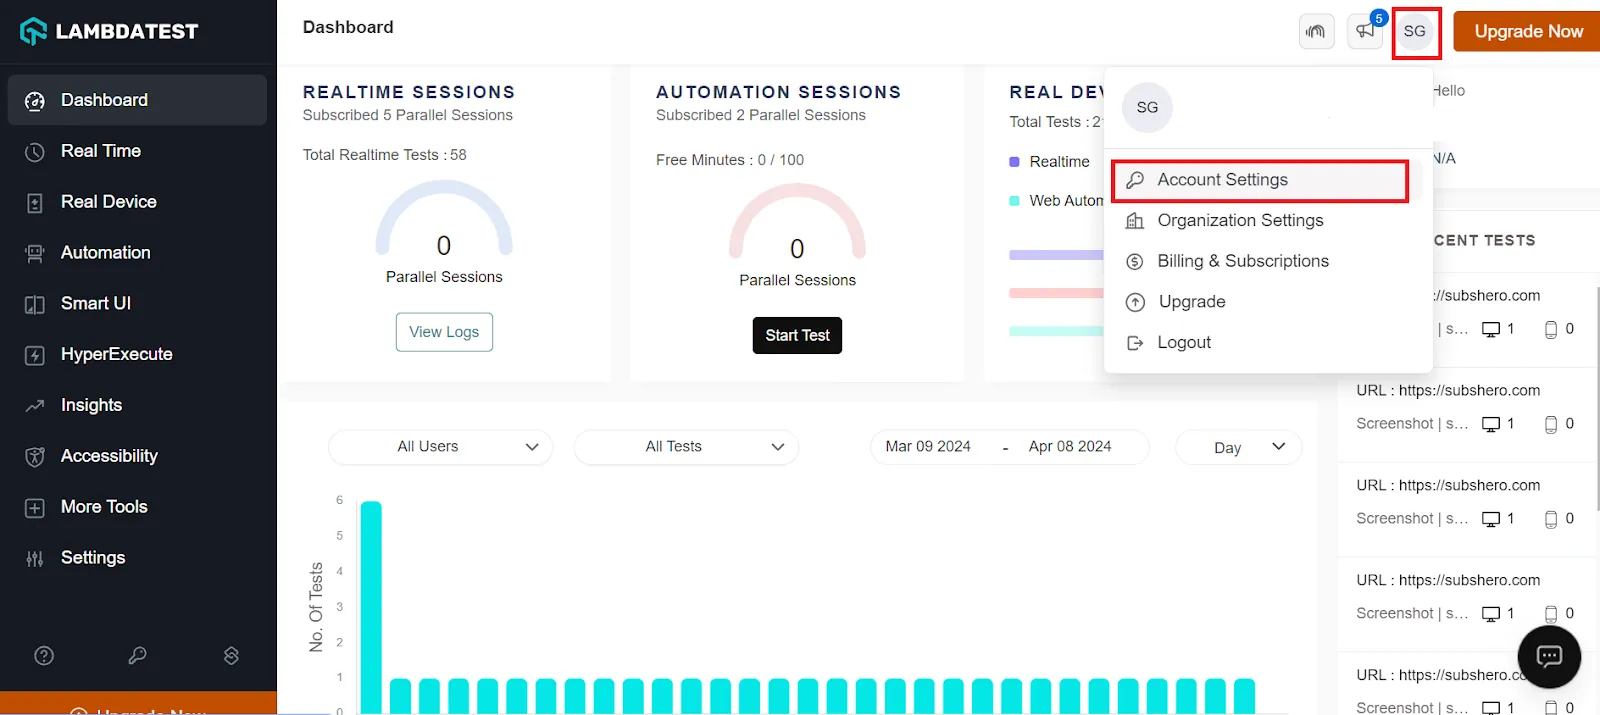
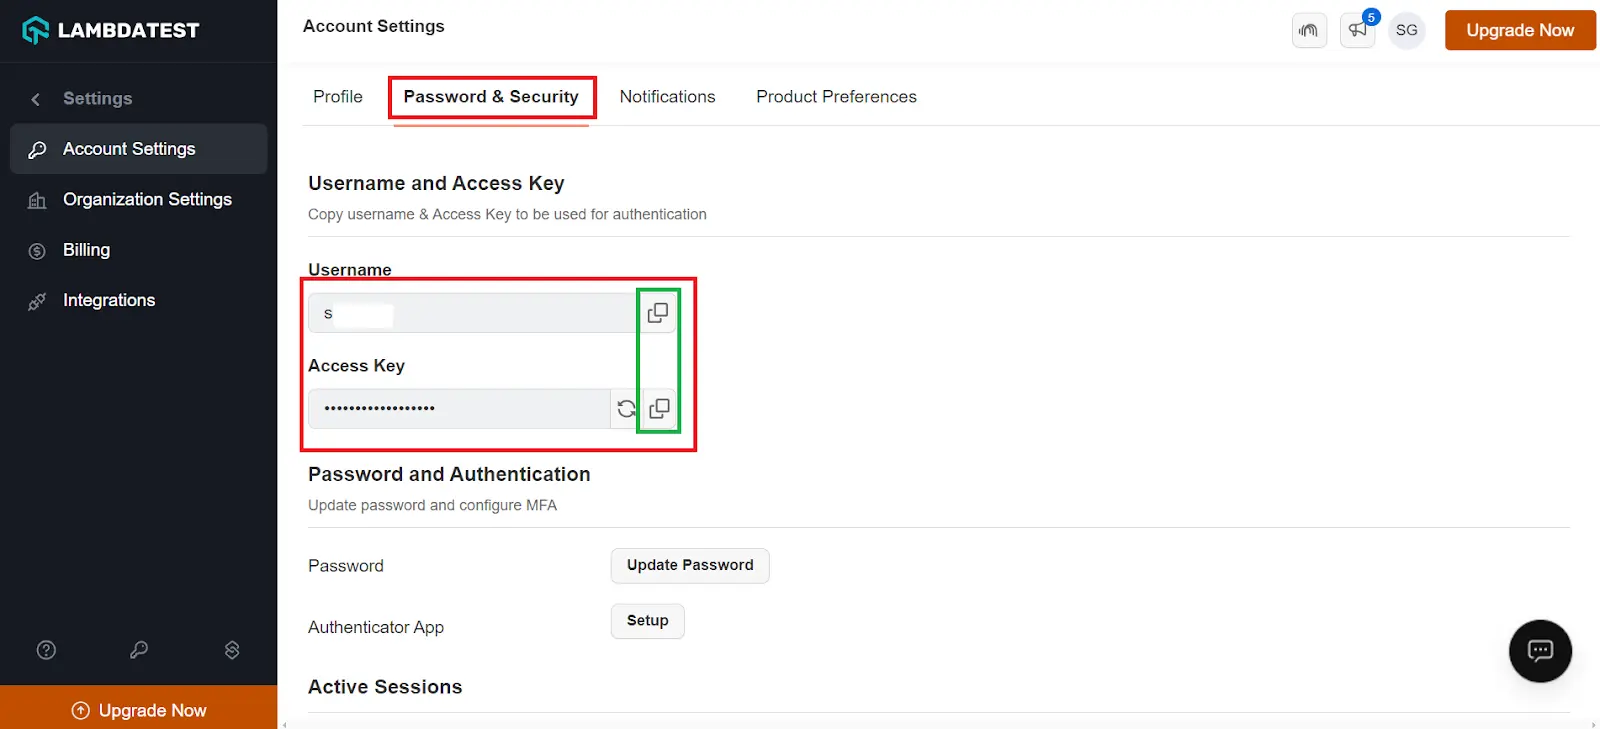
To get the username and access key from the LambdaTest platform, you must follow some generic steps as given below.
- Create an account on LambdaTest.
- Click on Profile photo from the drop-down menu and click Account Settings.
- Click the Password & Security tab to copy your username and access key.
Now that you have the LambdaTest credentials, we will run the tests by adding details in the testng-retry-tests.xml file.
<?xml version="1.0" encoding="UTF-8"?>
    <!DOCTYPE suite SYSTEM "http://testng.org/testng-1.0.dtd">
        <suite name="LambdaTest ecommerce playground website test suite ">
            <test name="Search Product tests ">
    <parameter name="browser" value="remote_chrome_lambdatest"/>
    <classes>
        <class name="io.github.mfaisalkhatri.tests.retrytests.RetryFailedTests">
            <methods>
                <include name="testSearchProduct"/>
                <include name="testNavigationToLoginPage"/>
            </methods>
        </class>
    </classes>
    </test> <!-- Test -->
</suite> <!-- Suite -->
Here is the screenshot of the test run using IntelliJ IDE.
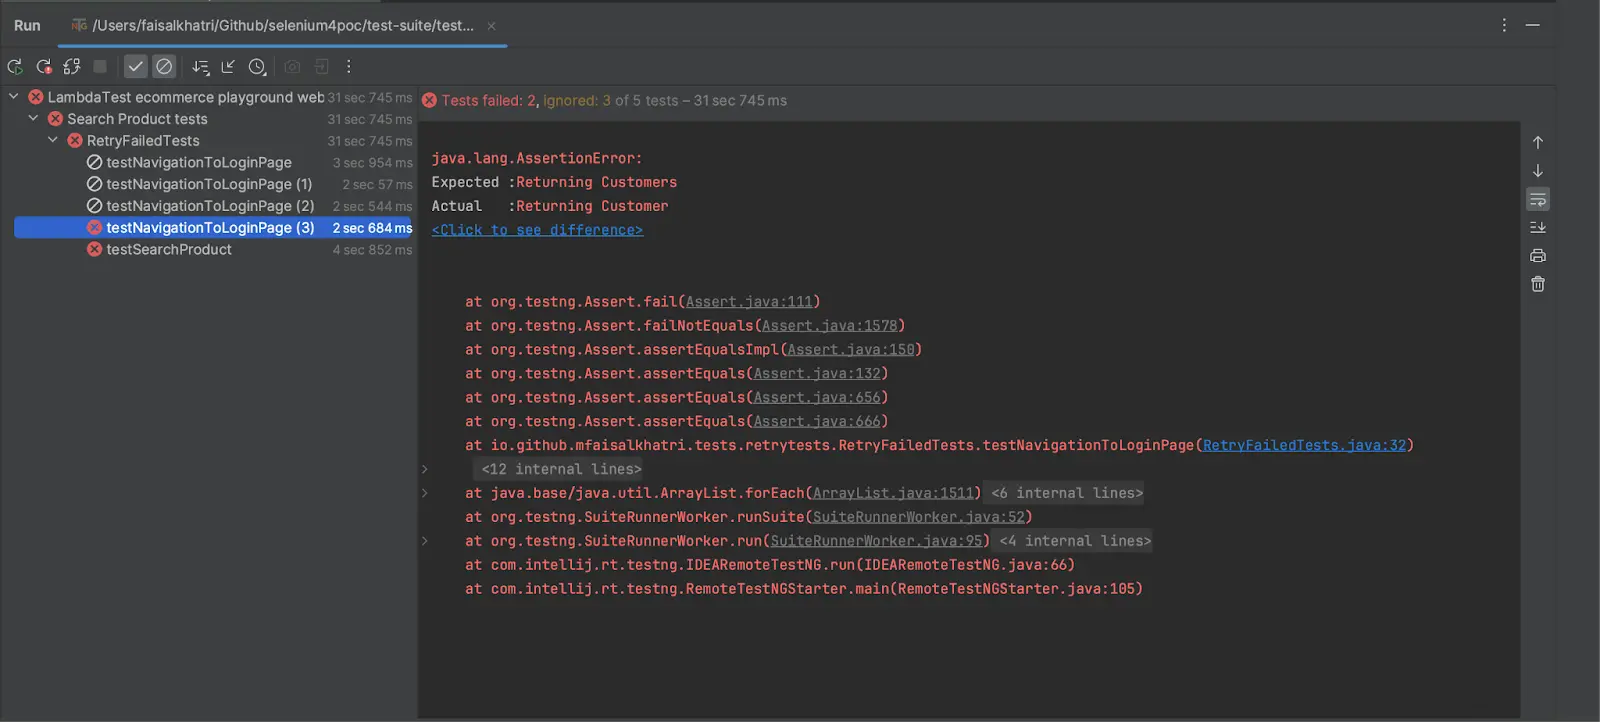
The test testNavigationToLoginPage() method was retried three times before being marked as failed. In the test result section of the console, check the line that mentions the total test runs. It shows the word Retries with a value of three, indicating that the test was retried three times as configured by the maxTry variable.
It's important to note that only testNavigationToLoginPage() provided the retryAnalyzer attribute in the @Test annotation, which was retried by TestNG.
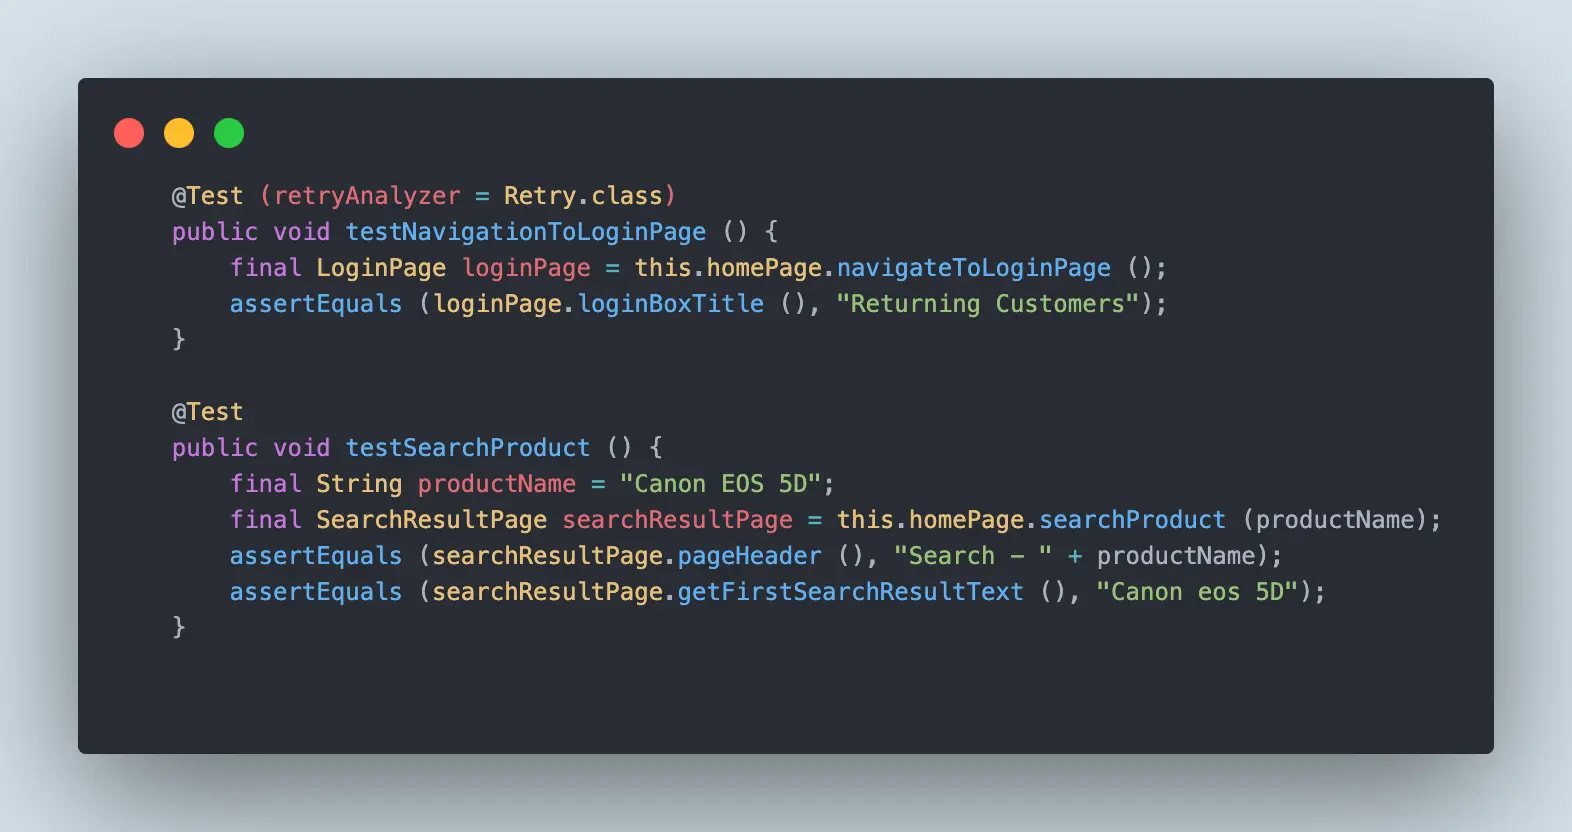
Running test for the second approach: Retrying Failed Tests Using The IAnnotationTransformer Interface.
We have already implemented the ITestAnnotationTransformer and set it using the RetryListener class. Now, we need to include the Listener class in the testng.xml file, and we should be ready.

In the test runner file testng-retry-test.xml, we will add the RetryListener class, as shown in the code below.
<?xml version="1.0" encoding="UTF-8"?>
<!DOCTYPE suite SYSTEM "http://testng.org/testng-1.0.dtd">
<suite name="LambdaTest ecommerce playground website test suite ">
       <listeners>
           <listener class-name="io.github.mfaisalkhatri.listeners.RetryListener"/>
       </listeners>
   <test name="Search Product tests ">
       <parameter name="browser" value="remote_chrome_lambdatest"/>
       <classes>
           <class name="io.github.mfaisalkhatri.tests.retrytests.RetryFailedTests">
               <methods>
                   <include name="testSearchProduct"/>
                   <include name="testNavigationToLoginPage"/>
               </methods>
           </class>
       </classes>
   </test> <!-- Test -->
</suite> <!-- Suite -->
Here is the screenshot of the test script:
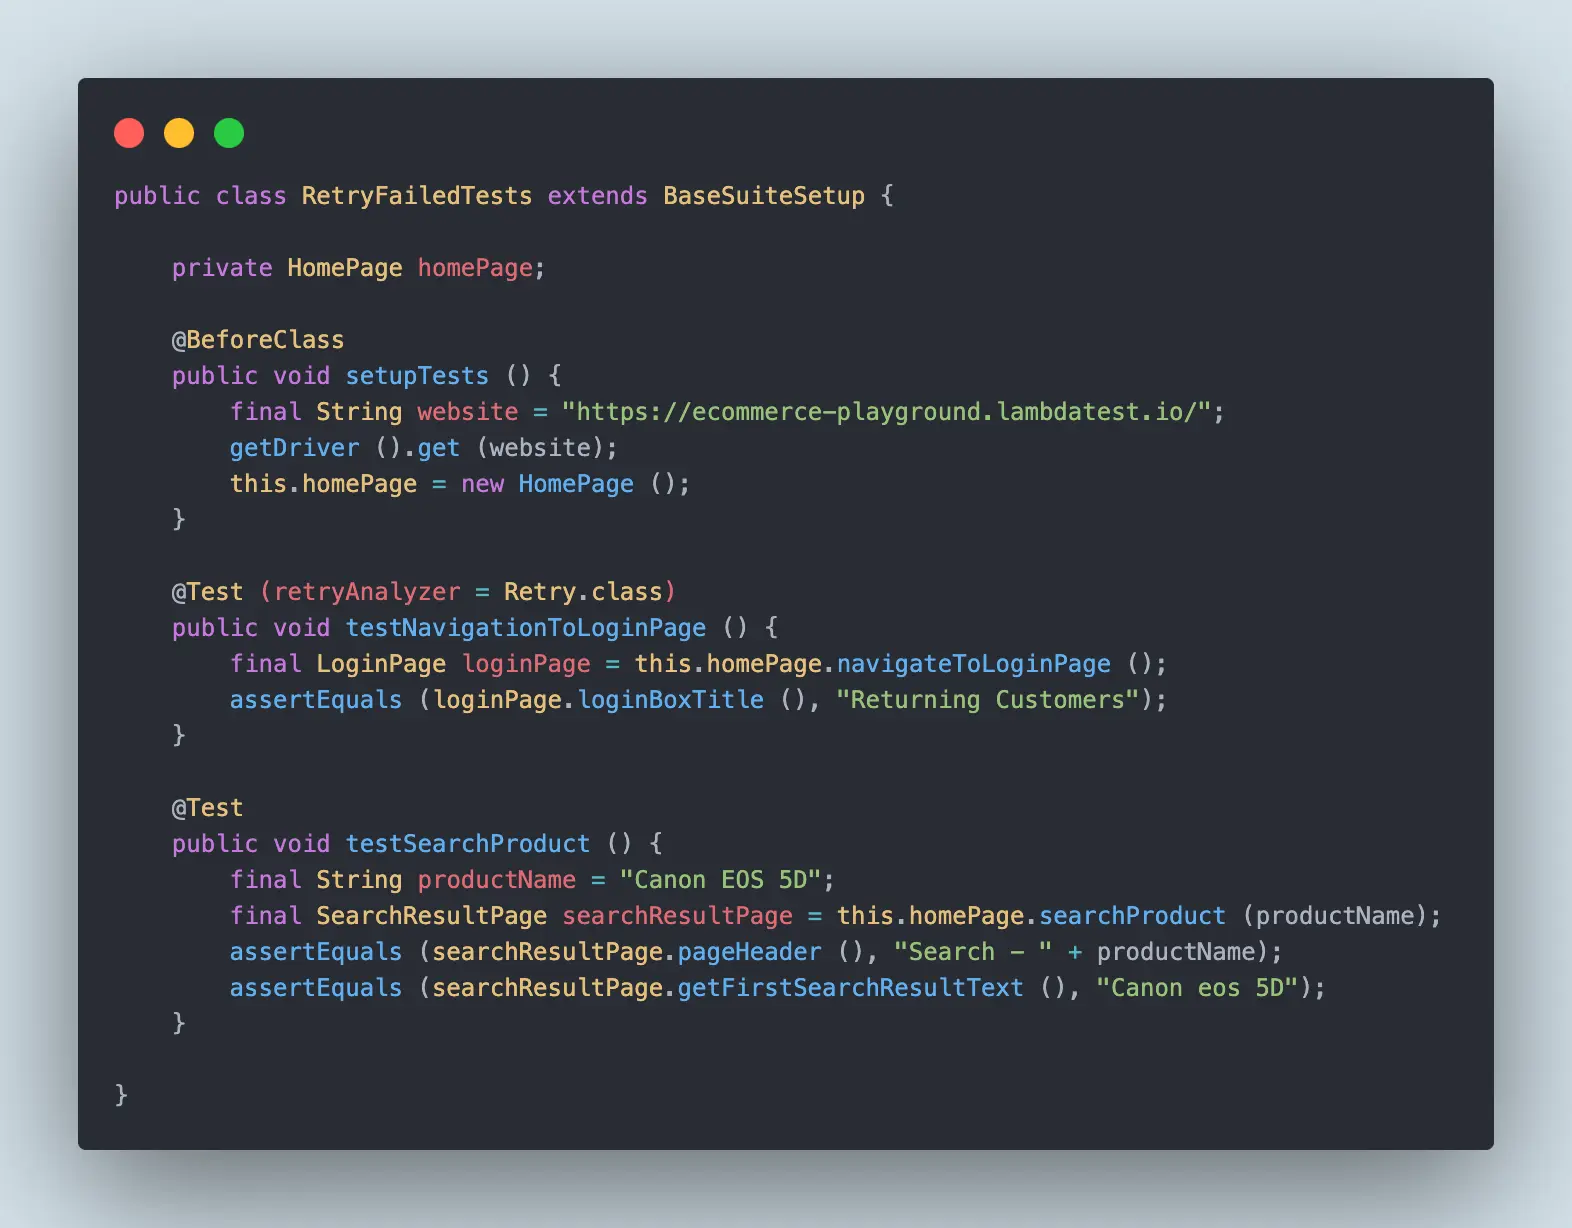
Let's run the test using testng-retry-test.xml again.
Results:
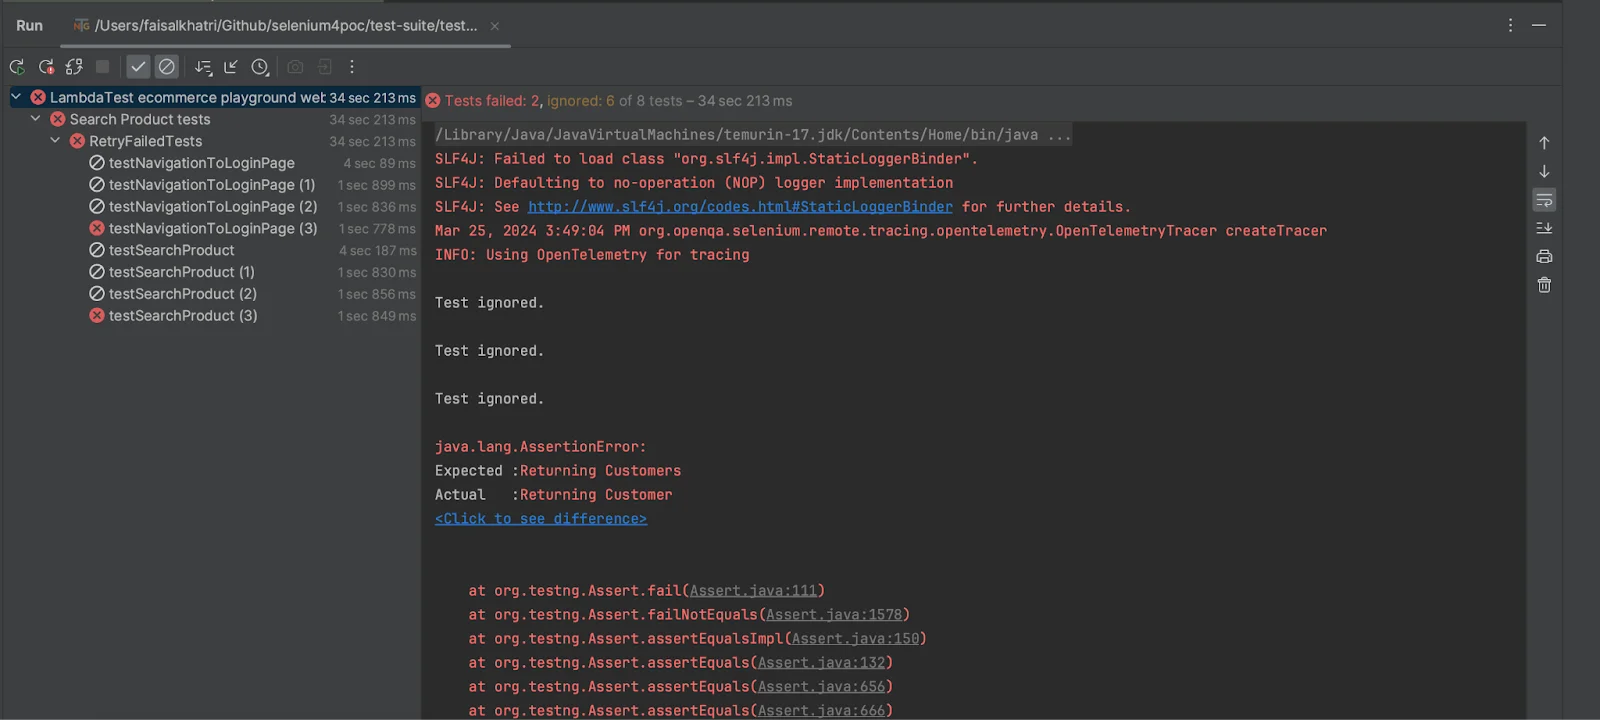
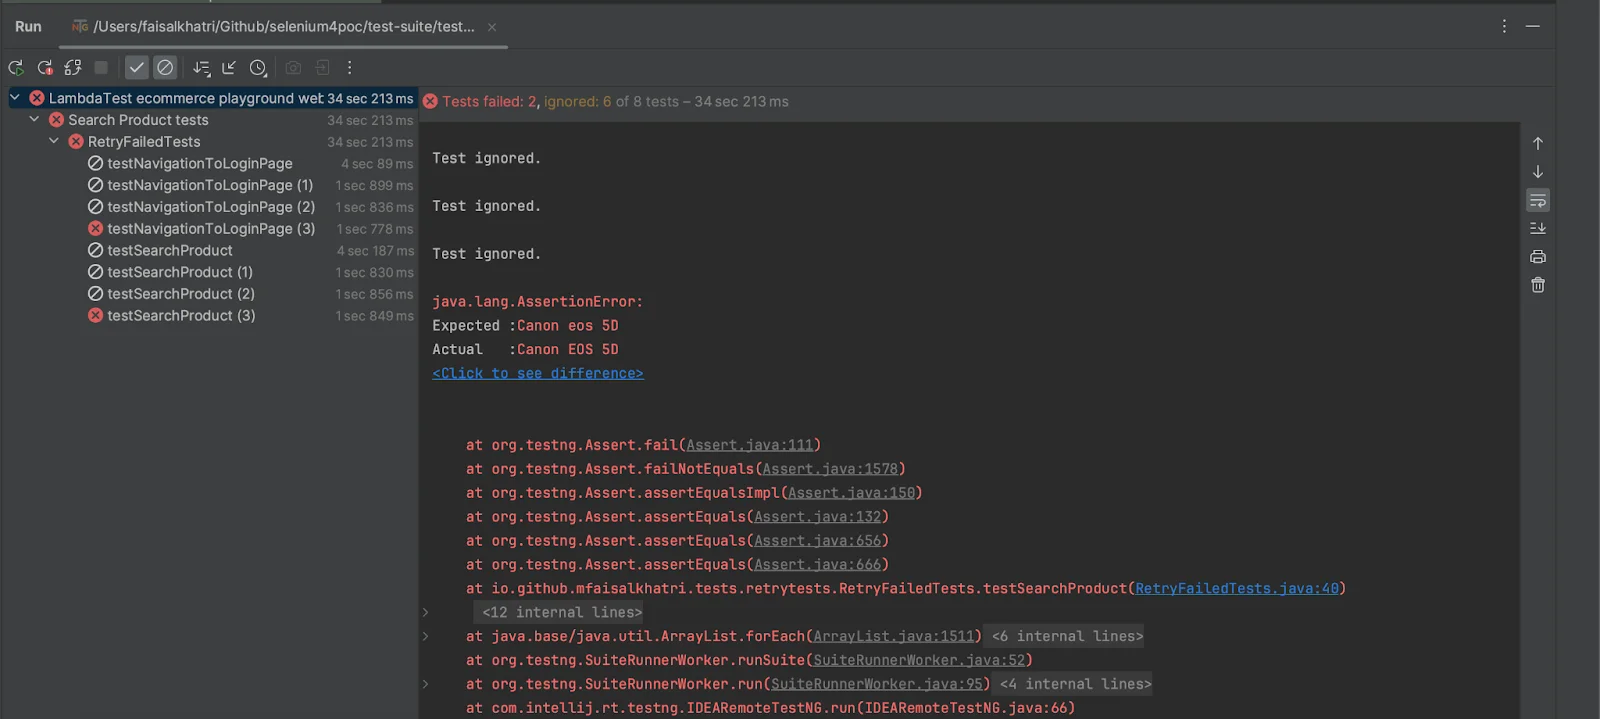
In the test class, we had two tests, and both of them were retried three times by TestNG because we updated the Listener class in the testng.xml file. Even though we had set the retryAnalyzer attribute for only one test in the class, both tests were retried on failure. Therefore, once you implement the ITestAnnotationTransformer interface and update the Listener class in the testng.xml file, all failed tests in the class will be retried automatically according to the retry configuration set.
What happens when one test passes and the other fails in the same test class?
When one test passes and the other fails in the same test class, TestNG will retry only the failed test. In this case, if testNavigationToLoginPage() passes and testSearchProduct() fails, TestNG will retry testSearchProduct() according to the retry configuration set for that specific test.
Here, the expectation is that only the failed test should be retried three times.
Re-run the test suite by right-clicking on the testng.xml file.
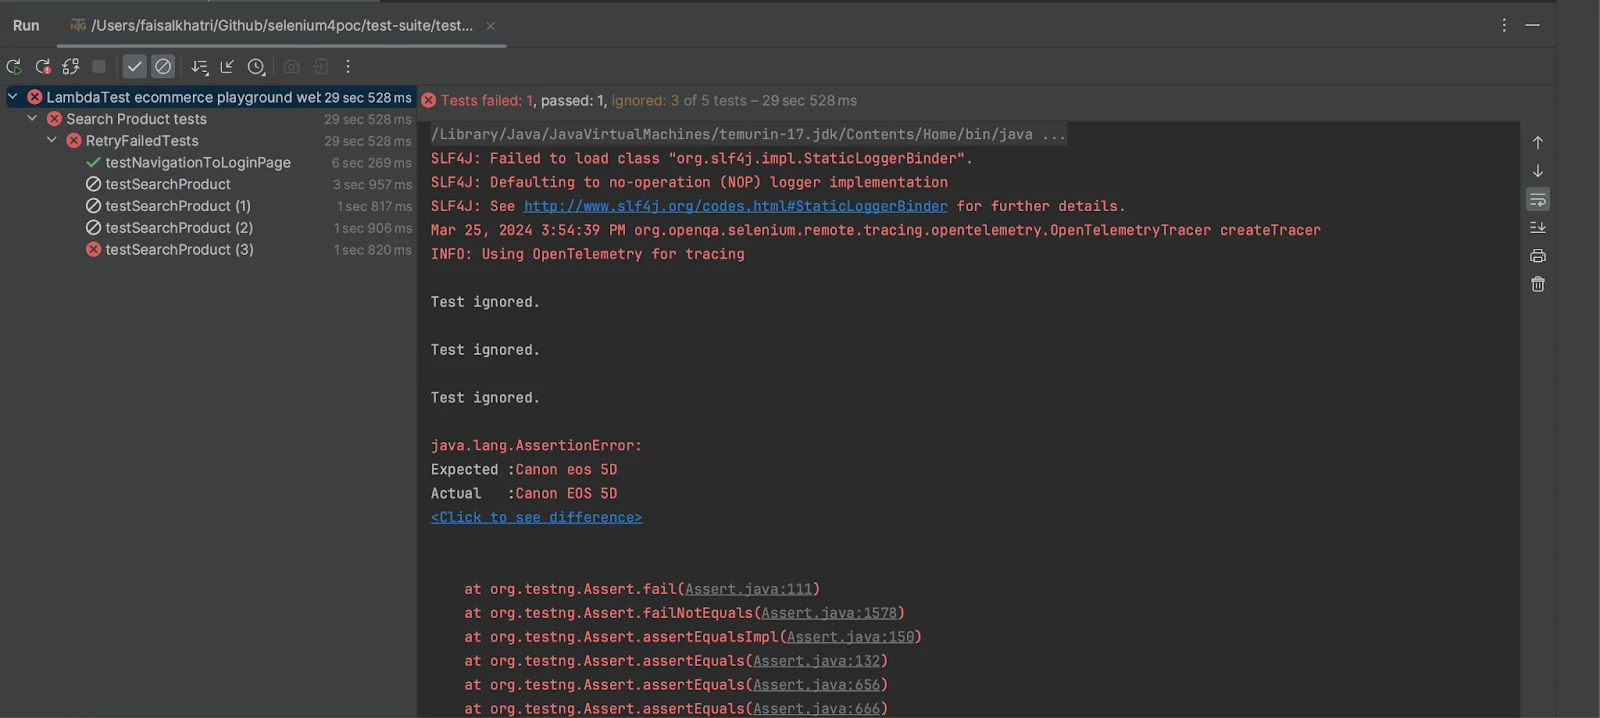
We observe that only the failed test was retried three times, while the test that passed ran only once. If you navigate to the project’s root folder and check the test-output folder, you will notice a file named testng-failed.xml that contains information about the failed test.
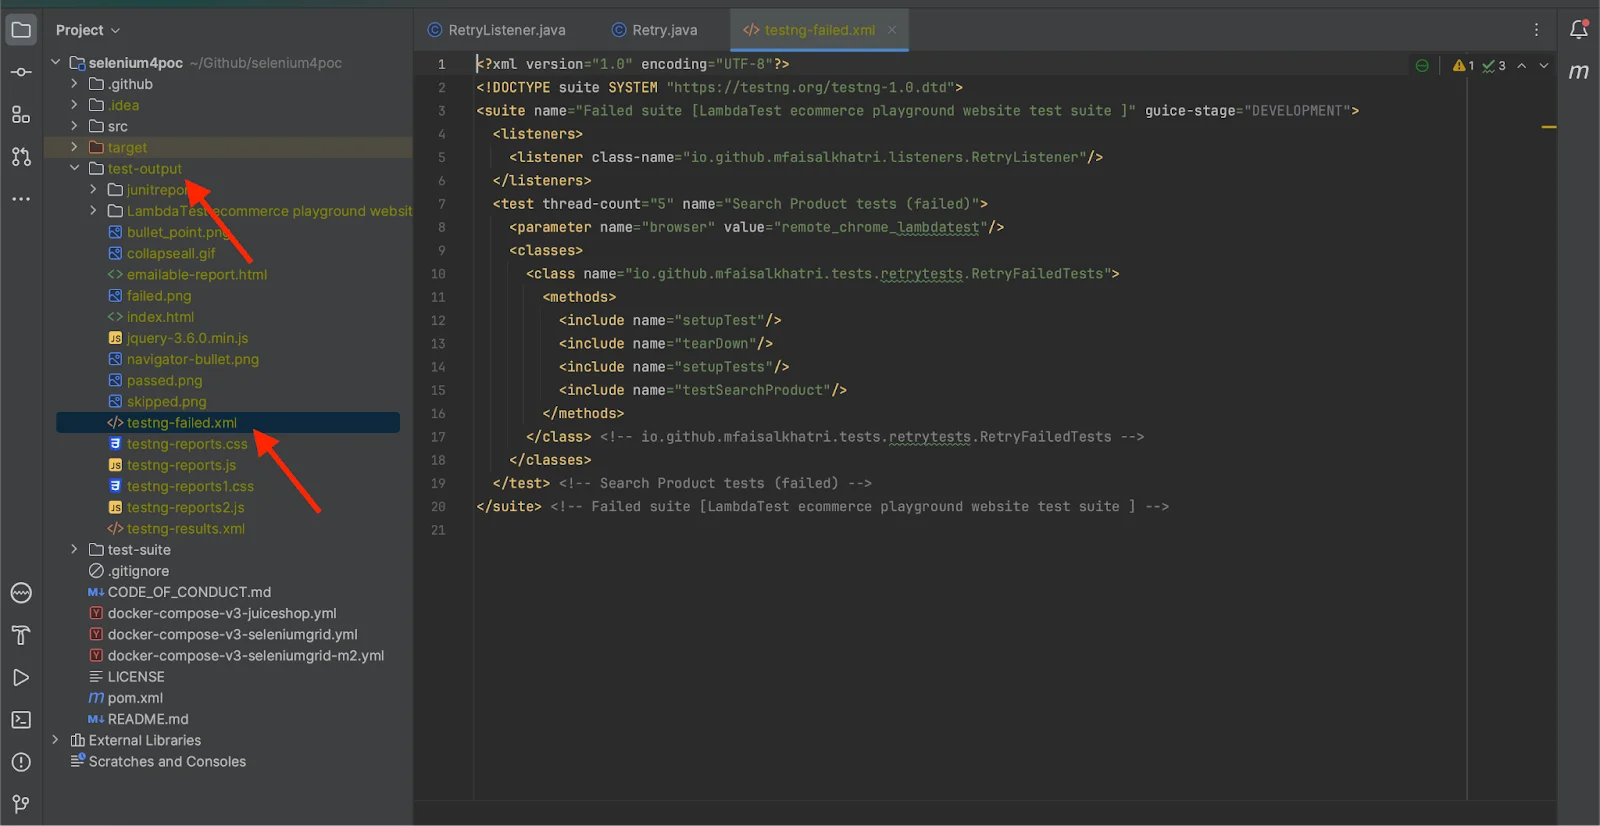
This is how the contents of the testng-failed.xml file look. It holds the information about the failed test, indicating that the SearchProduct() test failed:
<?xml version="1.0" encoding="UTF-8"?>
<!DOCTYPE suite SYSTEM "https://testng.org/testng-1.0.dtd">
<suite name="Failed suite [LambdaTest ecommerce playground website test suite ]" guice-stage="DEVELOPMENT">
  <listeners>
    <listener class-name="io.github.mfaisalkhatri.listeners.RetryListener"/>
  </listeners>
  <test thread-count="5" name="Search Product tests (failed)">
    <parameter name="browser" value="remote_chrome_lambdatest"/>
    <classes>
      <class name="io.github.mfaisalkhatri.tests.retrytests.RetryFailedTests">
        <methods>
          <include name="setupTest"/>
          <include name="tearDown"/>
          <include name="setupTests"/>
          <include name="testSearchProduct"/>
        </methods>
      </class> <!-- io.github.mfaisalkhatri.tests.retrytests.RetryFailedTests -->
    </classes>
  </test> <!-- Search Product tests (failed) -->
</suite> <!-- Failed suite [LambdaTest ecommerce playground website test suite ] -->
Once the tests are run successfully, we can look at the LambdaTest Dashboard and view all the video recordings, screenshots, device logs, test logs, and more test details.
For a more detailed understanding of your test suite results, you can utilize LambdaTest Test Analytics to gain deeper insights. These insights include a summary of your tests, categorization of browsers, trends in test results, the ratio of passed to failed tests, and more.
Test Analytics is an AI-powered test observability platform that provides essential information about your tests. This includes identifying inconsistencies in test results, categorizing tests based on their status and environments, and offering valuable insights to improve your testing process.
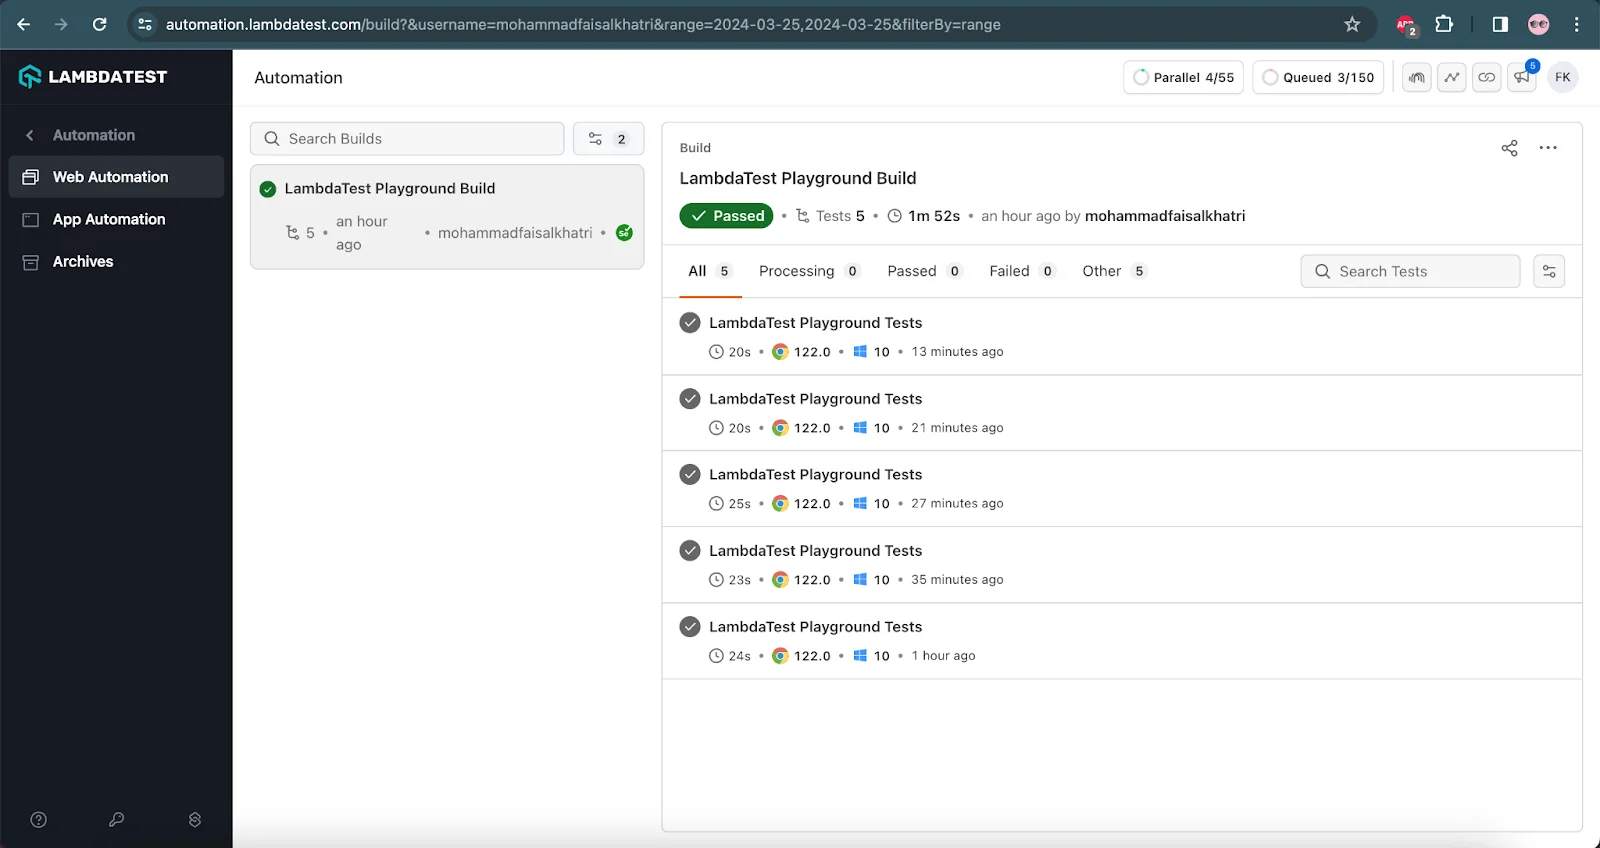
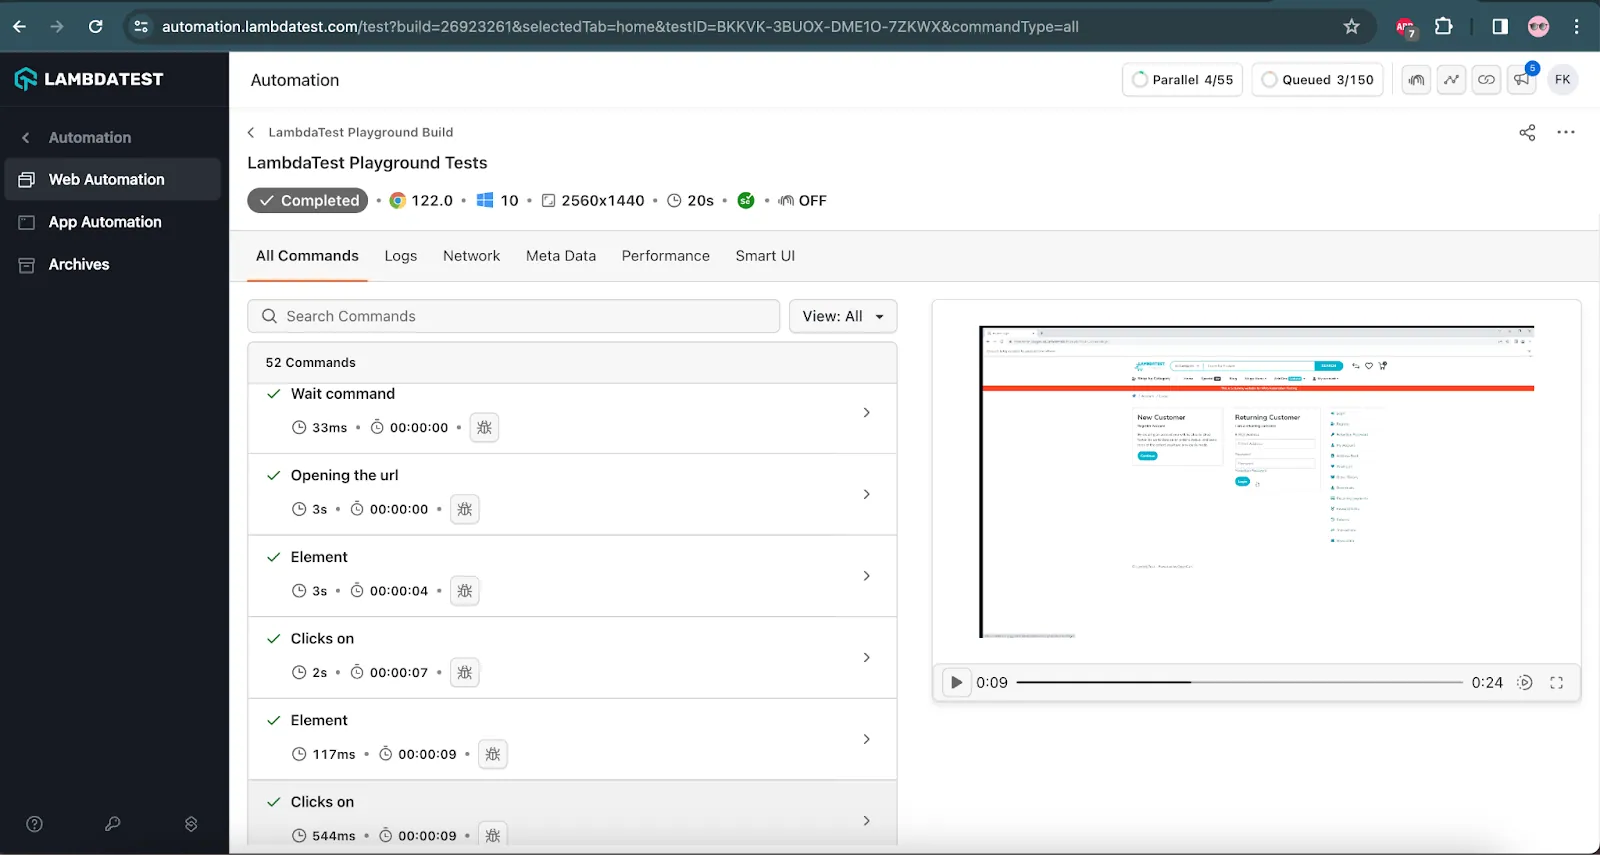
The screenshots below display the build details and the executed tests. Each test includes the test name, browser name, browser version, operating system (OS) name, OS version, and screen resolution. Additionally, the test report includes videos of the tests, providing a visual representation of how the tests were executed on the device.
Conclusion
In this blog on IRetryAnalyzer in TestNG, we learned two approaches to retry failed tests automatically: using the retryAnalyzer attribute in the @Test annotation and implementing the IAnnotationTransformer interface of TestNG.
We also learned how to implement the IRetryAnalyzer feature through example codes, demonstrating how to handle failed test cases and retry them to ensure more robust test execution.
Hope you were able to grasp the concept of failed test re-run and how to implement the IRetryAnalyzer feature when using TestNG as your automation testing framework.
Happy Testing!
On this page
Frequently asked questions
- General
- Create an XML file that includes the names of the test methods you want to rerun.
- Use the <methods> tag to specify the test methods you want to rerun.
- Use the <class>tag to specify the name of the class that contains the test methods.
- Use the <include> tag to include the test methods you want to rerun.
- Use the <groups> tag to specify the groups of test methods that you want to rerun.
- Use the <run> tag to specify the name of the testng.xml file you want to use to rerun the test methods.
Did you find this page helpful?
More Hubs
Try LambdaTest Now !!
Get 100 minutes of automation test minutes FREE!!


