How To Automate Using TestNG In Selenium
Vipul Gupta
Posted On: January 24, 2024
![]() 619868 Views
619868 Views
![]() 41 Min Read
41 Min Read
This article is a part of our Content Hub. For more in-depth resources, check out our content hub on TestNG.
Automation testing is vital for quick, accurate, and repetitive testing. It speeds up testing, improves accuracy, and reduces manual effort. Detecting and fixing issues early enhances software quality.
However, finding an automation testing tool that works efficiently with easy-to-use features is challenging. Though various tools are available, including Selenium, Cypress, Playwright, etc., the criteria for selecting the tool depend upon your project requirements.
Selenium stands out among various automation testing tools due to its Java support. Teaming it with Java-based testing frameworks like TestNG boosts its capabilities for effective test automation. TestNG is easy to use, offers extensive reporting, and supports parallel testing, making it a top choice. Its compatibility with Selenium WebDriver and Java makes it a powerful tool for developers and organizations, ensuring efficient testing processes.
In this guide on TestNG in Selenium, we will delve into different aspects of TestNG, covering its methods, annotations, types, and attributes. Additionally, we will explore initiating work with TestNG in Selenium by setting up the framework locally and If you are preparing for an interview you can learn more through TestNG interview questions.
Let’s get started.
TABLE OF CONTENTS
- What is the TestNG Framework?
- Why use TestNG with Selenium?
- Advantages of TestNG
- Installation and Setup of TestNG in Selenium
- TestNG Annotations and Attributes
- TestNG Priorities
- DataProviders in TestNG
- TestNG Assertions
- Demonstration: Using TestNG in Selenium
- TestNG Reports Generation in Selenium
- Frequently Asked Questions (FAQs)
What is the TestNG Framework?
TestNG, where NG stands for Next Generation, is a testing framework developed by Cedric Beust. It is an open-source automation testing framework built on the capabilities of JUnit and NUnit. The robust framework provides awesome features like TestNG annotations, grouping, parameterizations, etc. that help keep tests well-structured and easy to maintain.
The TestNG framework is designed to simplify a broad range of testing needs, from unit testing (testing a class in isolation of the others) to integration testing (testing entire systems made of several classes, several packages and even several external frameworks, such as application servers).
Features of TestNG:
- Provides HTML Reports in an efficient, easy-to-read format, thus catering to WebDriver’s limitation in generating such reports.
- Supports grouping multiple test cases to be executed whenever that particular group is invoked.
- Prioritizes test cases to decide which test case must be executed first.
- Provides the ability to execute only the failed cases with the help of testng-failed.xml.
- Supports cross browser testing, data parameterization, and parallel testing.
- Provides annotations, which help control the execution sequence in automation script without a static main method.
- Handles uncaught exceptions inherently, thus preventing sudden test termination.
Watch this video to gain all the essential knowledge needed to get started with TestNG in Selenium.
Why use TestNG with Selenium?
TestNG is widely used with Selenium for web-based automation testing. It enhances the capabilities of Selenium by providing a robust and flexible testing framework, making it easier to manage, organize, and execute automated tests.
Using TestNG with Selenium, we can:
- Produce in-depth HTML reports that include detailed information about test execution. This includes the number of test cases run and which tests passed, failed, or were skipped. Additionally, include stack traces and other relevant information in the reports.
- Define, manage, and control the flow of Selenium tests using annotations. For test methods, setup methods, and teardown methods, respectively, different annotations such as @Test, @BeforeTest, and @AfterTest can be used.
- Group test cases using the groups attribute and testng.xml. This can be useful for running specific cases, organizing them based on functionality and priority, or any other criteria.
- Execute the same test case multiple times without needing loops using the invocation count attribute of the @Test annotation.
- Perform parallel execution and cross-browser testing. This is essential in test automation, especially when dealing with many test cases, as it can save time and allow tests to be executed on multiple browsers simultaneously.
Advantages of TestNG in Selenium
Although TestNG is built on the capabilities of JUnit, it is much more advanced and powerful in automation frameworks. It has many advantages over JUnit, making it a superior choice for developers to use this testing framework. Here are a few of the advantages of TestNG in Selenium over JUnit.
- Rich in Annotations
- Parallel Execution Support
- Flexible Test Execution and Configuration
- Parameterization and Data-driven testing
- Enhanced Reporting
- Support for Soft Asserts
Compared to JUnit, TestNG in Selenium provides a more extensive set of annotations. These annotations, such as @BeforeSuite, @AfterSuite, @BeforeTest, @AfterTest, @BeforeGroups, @AfterGroups, @BeforeClass, and @AfterClass, offer more flexibility and functionality. They allow users to define the test execution flow with greater control and granularity.
TestNG’s built-in parallel execution support lets you run tests in parallel across multiple threads, classes, or test suites. This can significantly reduce overall test execution time.
TestNG offers more flexibility in configuring test execution through XML files, in addition to the groups attribute of the @Test annotation. This allows for the categorization of test cases and selective execution. On the other hand, JUnit does not support XML-based execution configurations and relies solely on annotations.
TestNG in Selenium also supports test prioritization and the ability to specify test dependencies between test cases, which are not supported in all versions of JUnit.
TestNG in Selenium supports parameterization and data-driven testing. The @DataProvider annotation allows you to pass different data sets to the same test for execution. This is unavailable in JUnit, requiring additional code to support data-driven testing.
To learn more about it, go through this blog on parameterization in TestNG for Selenium automation testing.
TestNG in Selenium generates HTML reports with more detailed information about test execution, including test results, failures, and errors. JUnit, on the other hand, generates simpler text-based reports.
Unlike JUnit, which uses hard assertions that halt test execution after the first failure, TestNG in Selenium also supports soft assertions. Using the SoftAssert class, TestNG allows the performance of multiple assertions in a test execution, collecting all the passed and failed results and only marking the case as failed in the end, listing all the failures.
 Note
NoteTake your automation testing to the next level with TestNG in Selenium. Try LambdaTest Today!
Now that we have learned about TestNG and its advantages, let’s dive deeper into understanding TestNG in Selenium by installing the required dependencies.
Installation and Setup of TestNG in Selenium
Having understood the features of TestNG in Selenium, the next step is to learn how to set it up on the system before diving deep into practical demonstrations. In this tutorial on TestNG in Selenium, I will cover the installation process for two of the most commonly used Integrated Development Environments (IDEs) – Eclipse and IntelliJ.
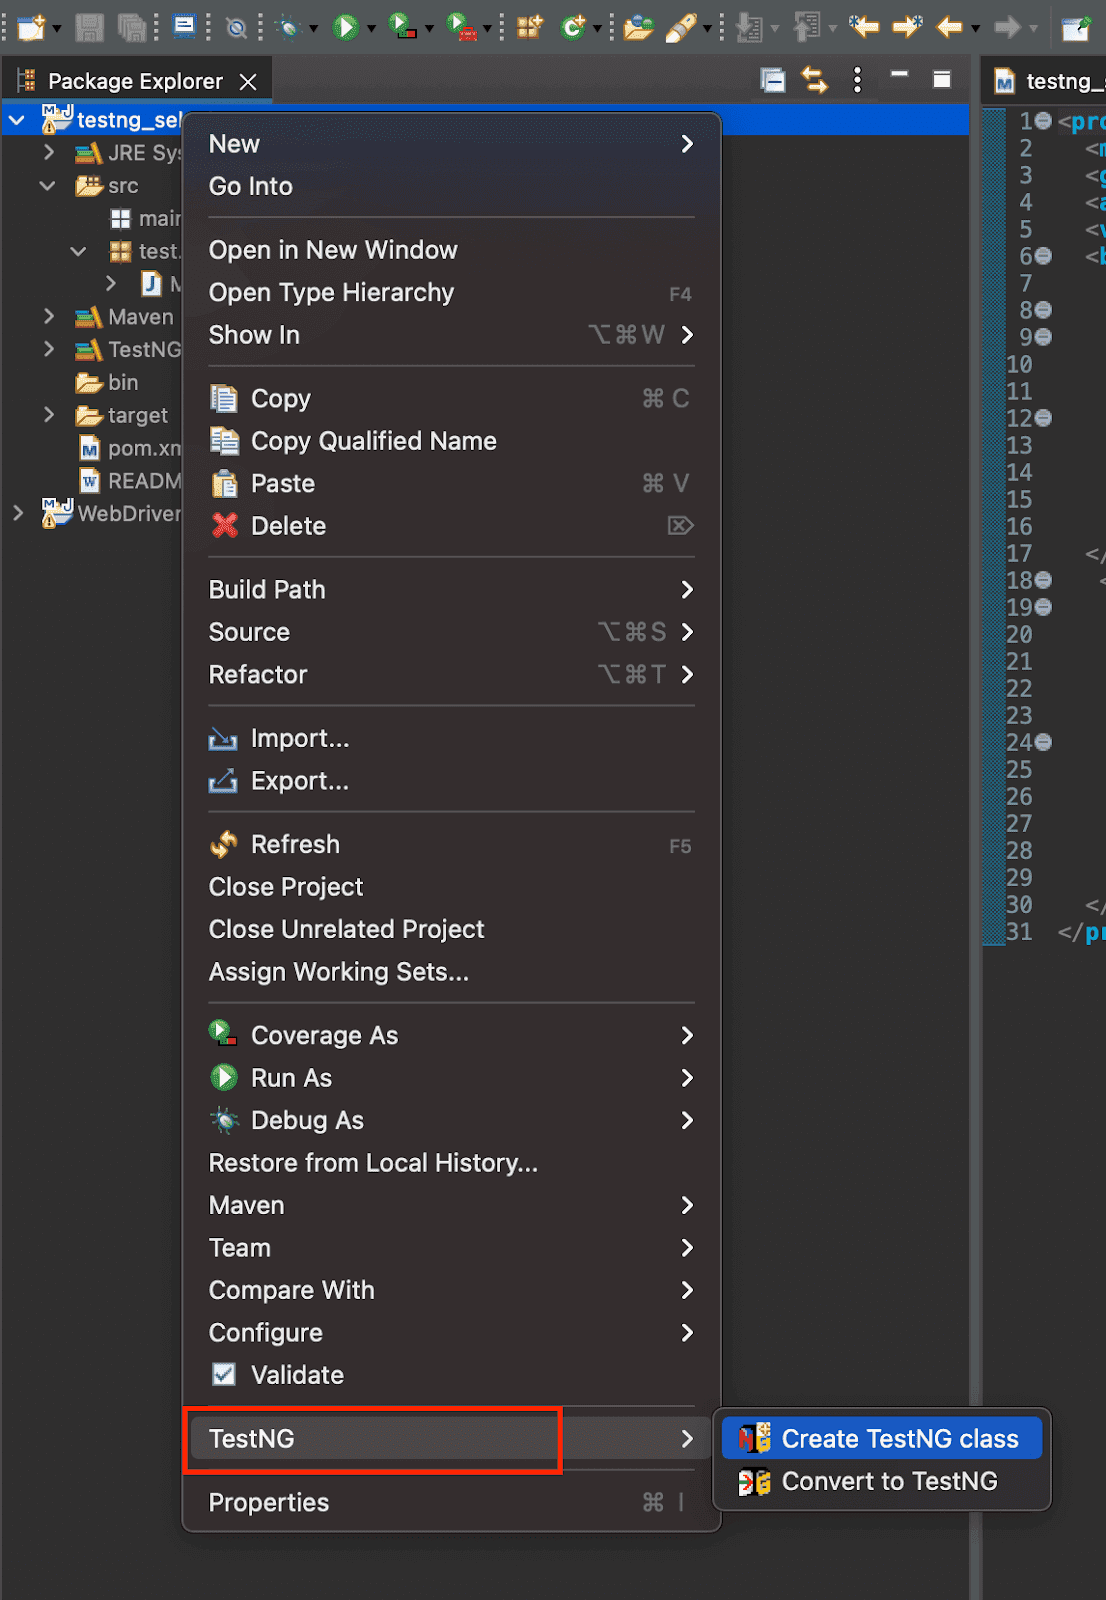
How to install TestNG in Eclipse?
To install TestNG in Eclipse, download and install Eclipse IDE on your system.
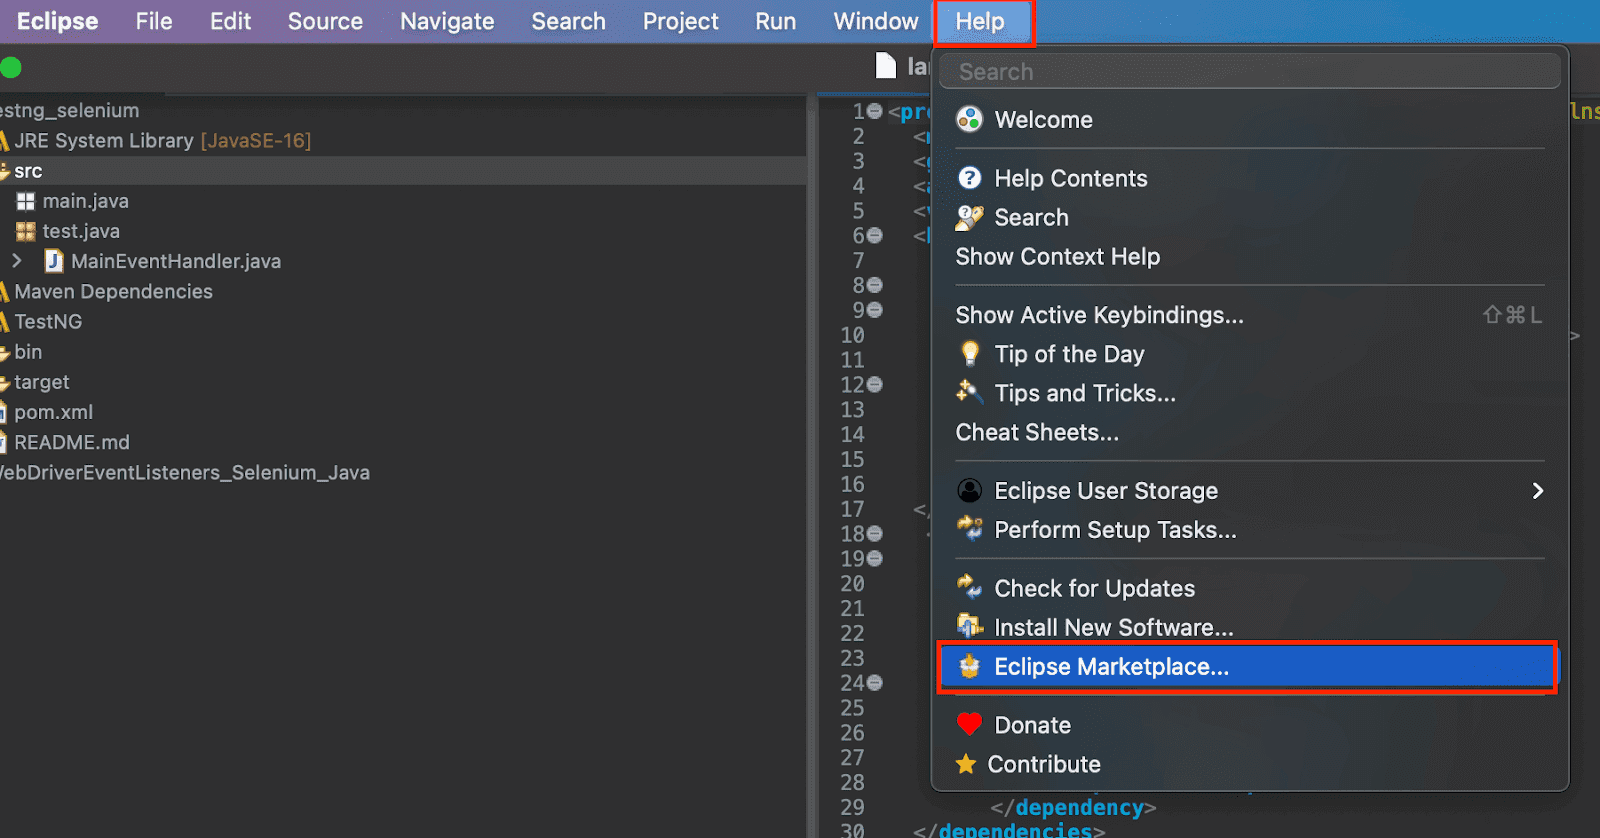
Step 1: Launch Eclipse, click Help, and select Eclipse Marketplace.
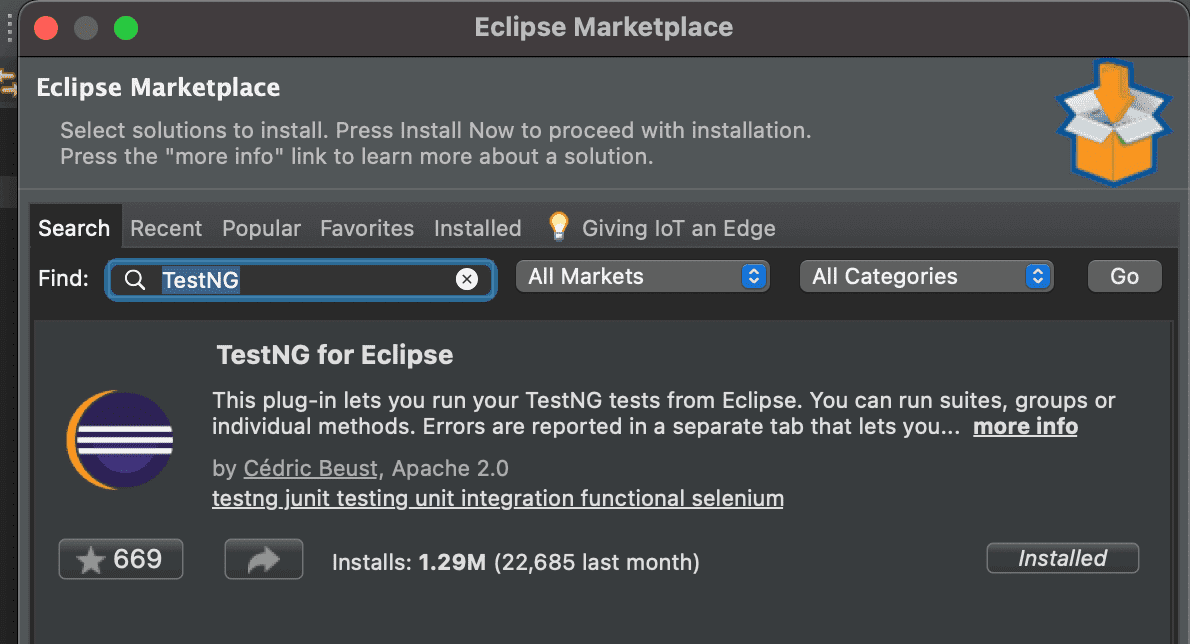
Step 2: Go to the Search tab and find TestNG inside the Eclipse Marketplace window. If it is already installed, you will see the Installed button, and there is no need to continue with these steps; otherwise, it will say Install. Click Install in such a case.
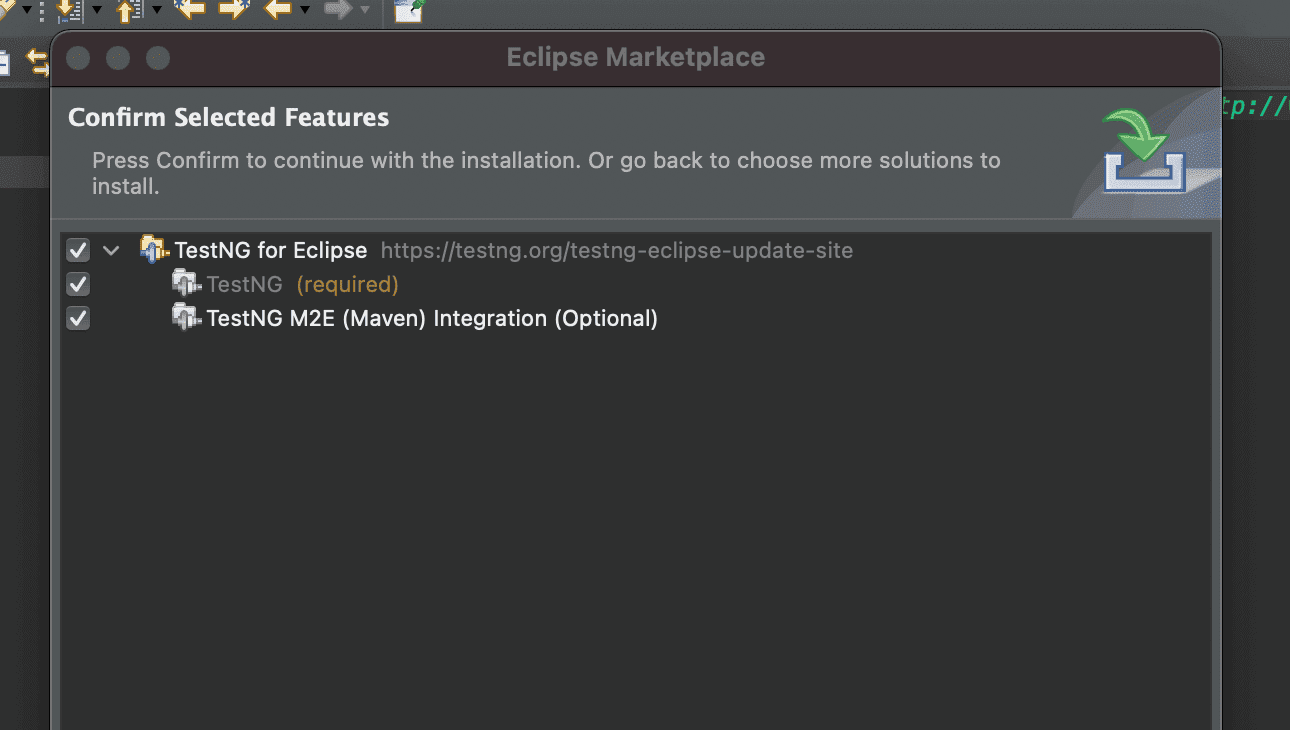
Step 3: On the consecutive window, check the TestNG checkbox and click Confirm.
Step 4: It is recommended to restart Eclipse after the installation is completed for changes to take effect correctly.
Step 5: After restarting, verify the installation by right-clicking on any project and checking if the TestNG menu is visible to create a TestNG class.
How to install TestNG in IntelliJ?
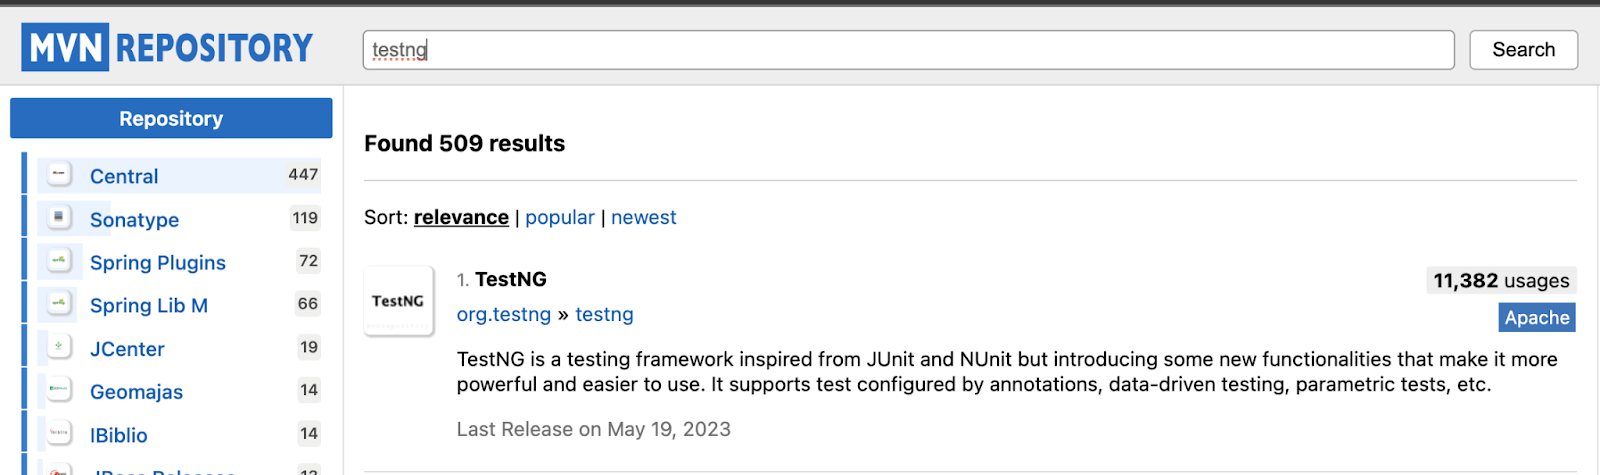
In this section of the TestNG in Selenium tutorial, I will guide you through installing IntelliJ. The installation involves downloading the TestNG JAR file from the Maven Repositories website and incorporating it into your IntelliJ project. This step is crucial for using TestNG’s powerful features in your Selenium automation testing within the IntelliJ IDE.
Before adding the JAR, ensure that IntelliJ is installed on your system. If not, you can download IntelliJ by visiting the JetBrains. Having IntelliJ installed is a prerequisite for seamlessly integrating TestNG into your development environment and setting up TestNG in Selenium using IntelliJ.
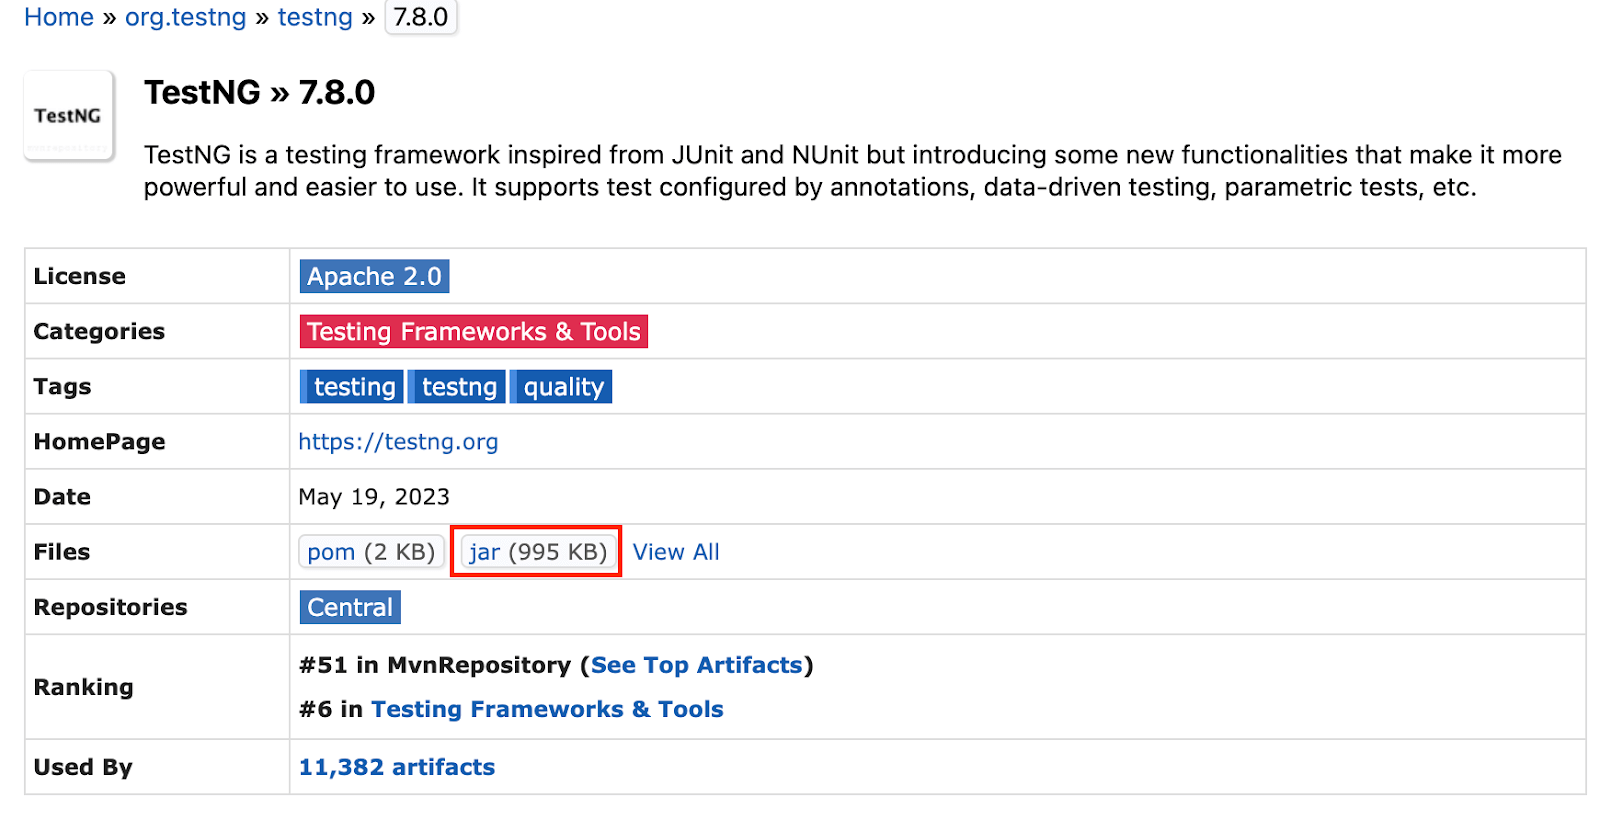
Step 1: Visit Maven Repositories, search for TestNG, and select the latest, most used version (i.e., 7.8.0). In this tutorial on TestNG in Selenium, we will use the same TestNG version. Hence, the POM file I will use for demonstration will have traces of TestNG 7.8.0.
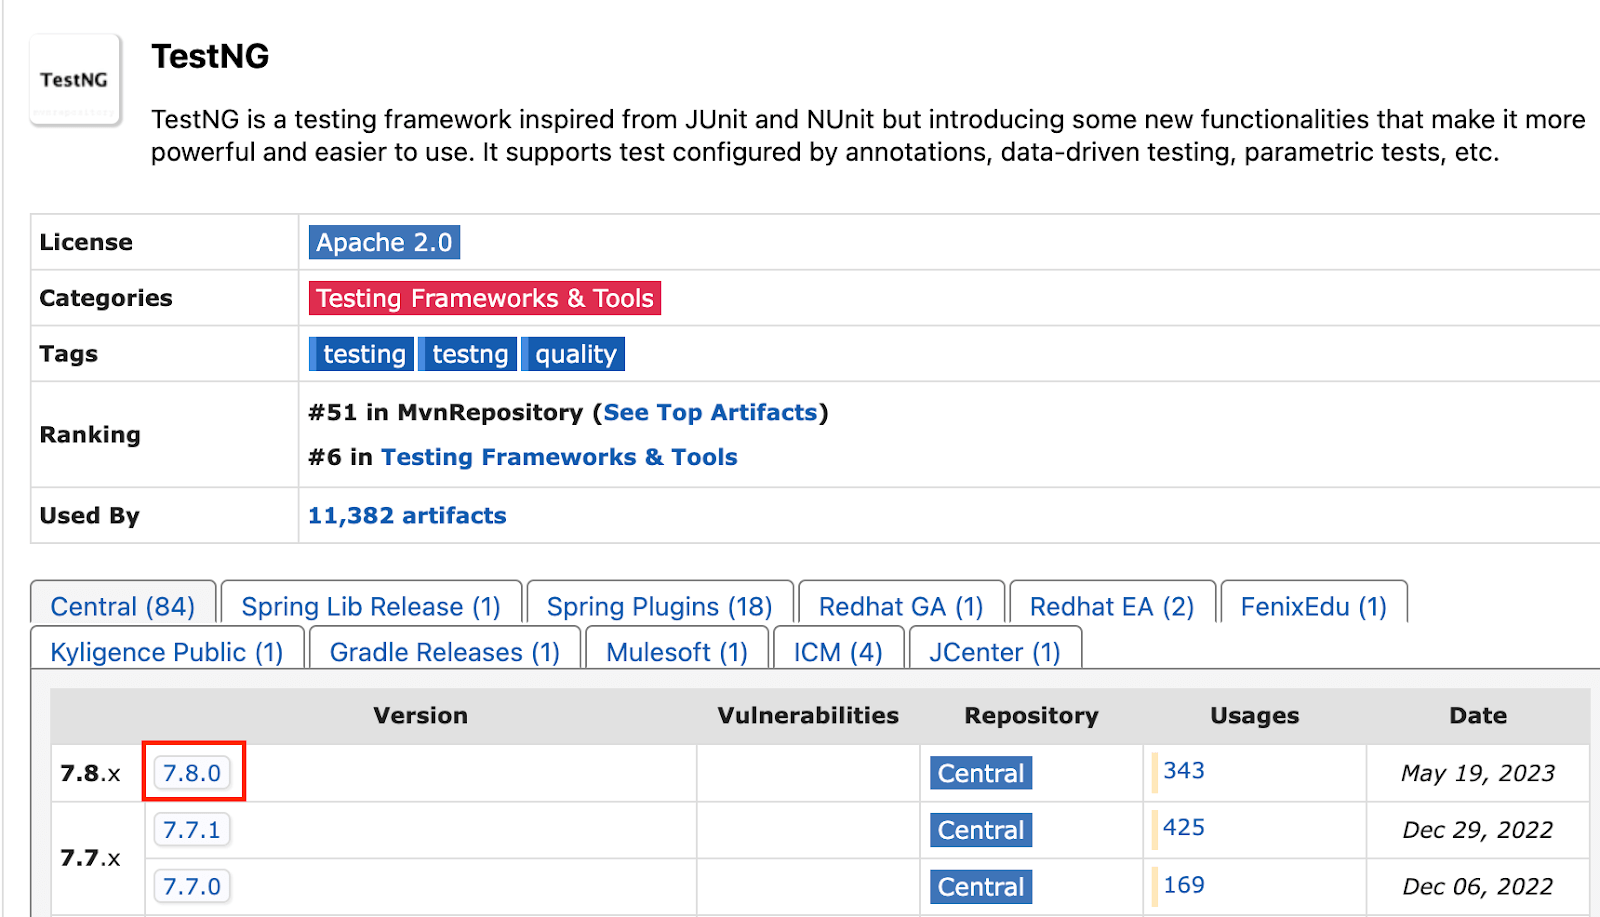
Step 2: Select and download the jar file. We will be adding this jar to IntelliJ.
Step 3: Launch IntelliJ, open the File menu, and select Project Structure.
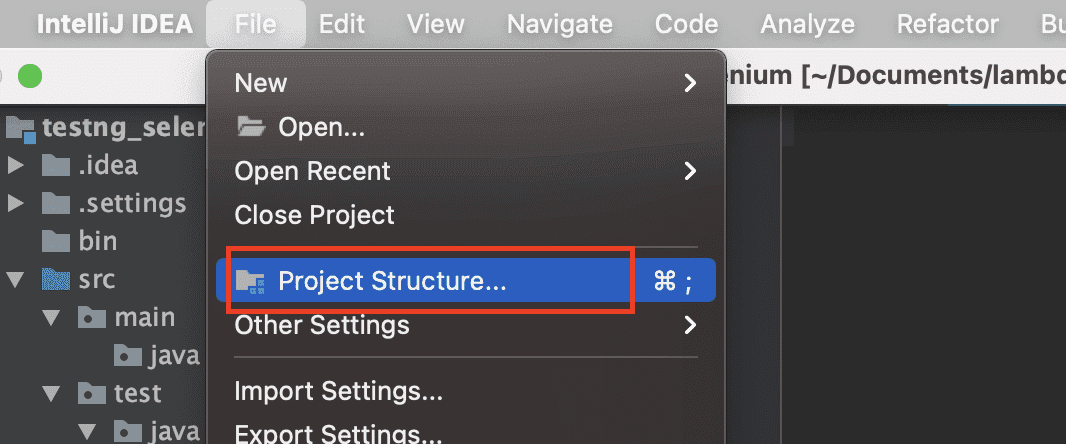
Step 4: Open the Modules panel, go to the Dependencies tab, click + sign, and choose JARs or directories.

Step 5: Navigate to the path where we have the downloaded jar from previous steps and select it.
Step 6: It would appear on the list of dependencies. Just check it and click the Apply button, followed by the OK button.

With this, we have completed the installation process on IntelliJ and Eclipse. Let’s set up the project in one of the IDEs. In this case, we will be using Eclipse as the IDE, but feel free to use any IDE that is already installed on your system. The following steps will guide you through configuring the project to use the capabilities of TestNG in Selenium for automation testing.
Project Setup in Eclipse
In this section of the TestNG in Selenium tutorial, we will learn how to create a TestNG project in Eclipse. However, if you are more comfortable using IntelliJ, feel free to proceed with it. The steps mentioned will be the same regardless of the IDE used. Let’s create the project structure and add a test class to verify whether it is executed as a TestNG Run.
We will maintain the same project structure as discussed earlier, and each time we want to practice something, we’ll add a new class file to execute and analyze the output. This approach will help you systematically build and expand your project using TestNG in Selenium.
Follow the steps before setting up TestNG in Selenium for your project.
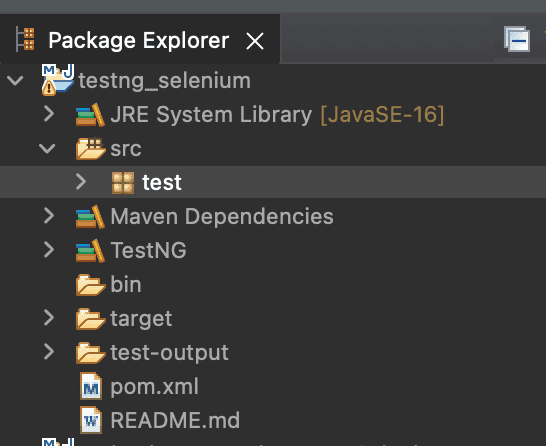
Step 1: Create a Maven project in Eclipse and name it testng_selenium.
Step 2: Update the pom.xml to have Selenium and TestNG dependencies. POM, short for Page Object Model, is an XML file that makes the basic fundamental unit of Maven. It stores the information about the project, like version, description, etc., and contains configuration details like dependencies, which Maven uses to build the project and make our scripts work.
Step 3: Create a package and name it a test. This package will contain all the test class files.
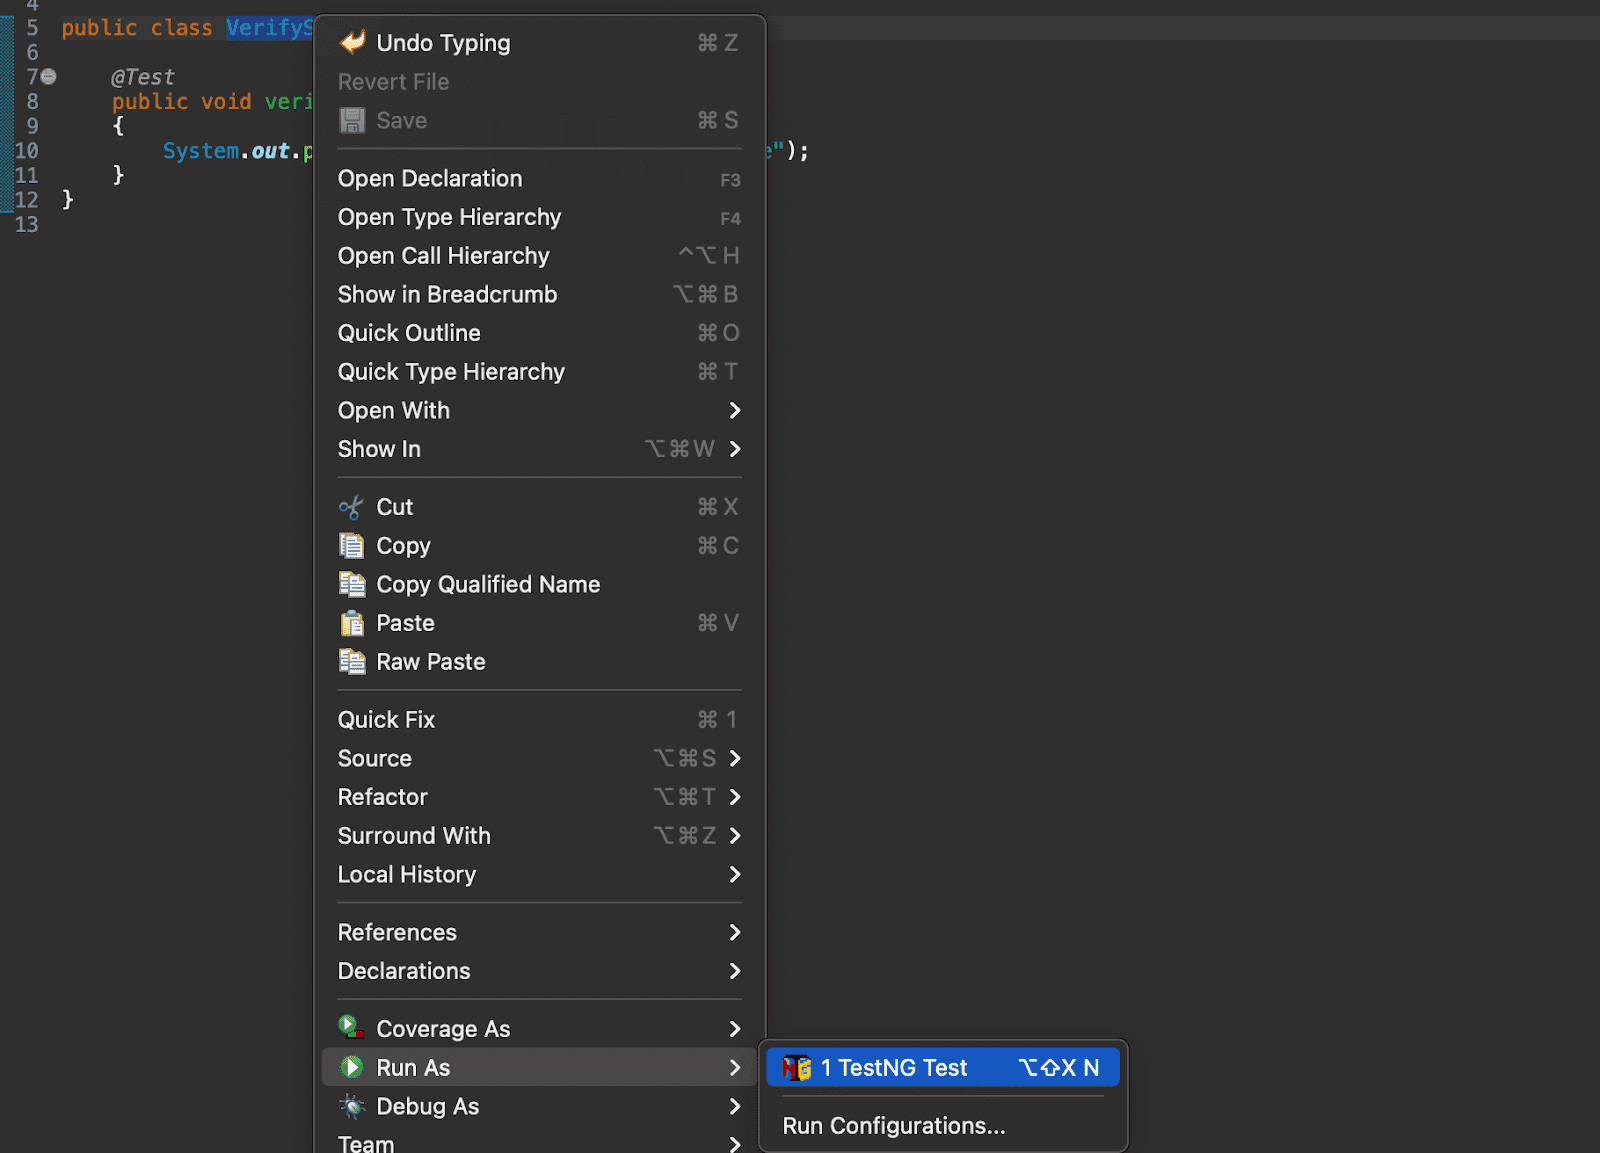
Step 4: Inside this package, add a new class, VerifySetup, add the following code, and save it.
Step 5: Now execute this as a TestNG test to verify the setup. For this, select the class name, right-click on it, select Run As, and then click on TestNG Test.
Upon successful execution, the output should look like the below. This verifies our TestNG setup, and the same step can be done to execute more classes we add in this tutorial.

With the output above, we confirm that the project setup was successful. Now, let us move forward in understanding the other attributes and TestNG annotations that will help make the automation easier.
TestNG Annotations and Attributes
Annotations in programming typically refer to notes or comments within code that provide additional information or instructions. Similarly, TestNG annotations are crucial in Selenium automation testing by assigning meaning and controlling the execution flow of test scripts.
While using TestNG in Selenium, annotations are predefined keywords that play a vital role in shaping the behavior of functions within the test script. It’s essential to note that any test not annotated in TestNG will be ignored during test execution. Therefore, including the required annotations for test cases is mandatory to ensure proper test execution.
Here’s an example to illustrate this concept.
As you can see, in the above example, we have added two test cases, one with @Test annotation and one without it. So, the expectation is that only the one with annotation is executed, and another is skipped. Let’s execute the class and verify this.
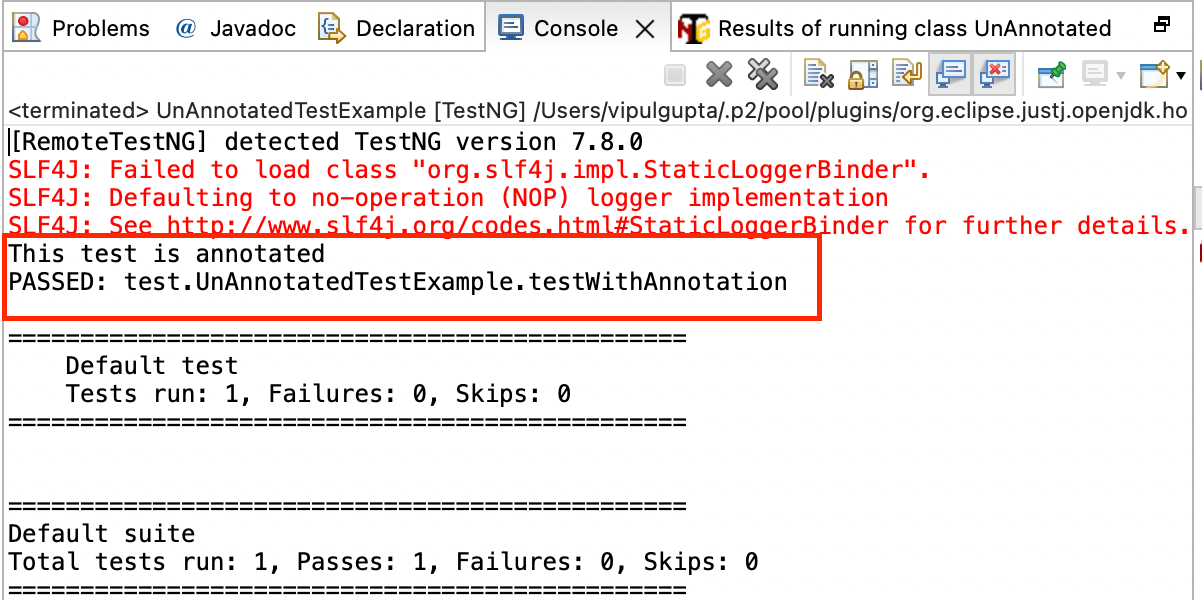
The output shows that only the test case with the annotation was executed. Additionally, it’s noteworthy that the TestNG test run summary in the output displays the total number of test cases as 1. This is because TestNG determines the number of test cases based on the presence of the @Test annotation, and in this case, we had only one annotated test case in the file.
TestNG annotations not only control test execution but also provide relevant information about the method, class, or test suite with which they are associated. These annotations are identified by the @ prefix. In this tutorial on using TestNG in Selenium, let’s explore these annotations individually and understand how they are crucial in structuring and executing Selenium test scripts.
Types of Annotations
TestNG currently supports ten types of annotations, each serving a specific purpose in the automation testing framework. These annotations play a crucial role in organizing, sequencing, and controlling the flow of test execution. In this section of the TestNG in Selenium tutorial, we will delve into each annotation type, exploring how they enhance the structure and functionality of Selenium test scripts.
@Test
The @Test annotation is one of the most important annotations in TestNG, as it encapsulates the actual test case logic and triggers the automation run. This annotation is where you define the specific steps and verifications for your test scenarios. It is accompanied by attributes that facilitate various use cases, offering flexibility and customization options.
|
1 2 3 4 5 |
@Test public void testAnnotation() { //Write your test case logic here. } |
@BeforeTest
The @BeforeTest annotation is executed before running any test method annotated with @Test in a class. One practical example of using this annotation is to maximize the browser window for the test cases within that class. It ensures that the specified setup actions are performed consistently before the execution of any test method, contributing to your Selenium test suite’s overall reliability and uniformity.
|
1 2 3 4 5 |
@BeforeTest public void browserSetup() { //Code to maximize the browser } |
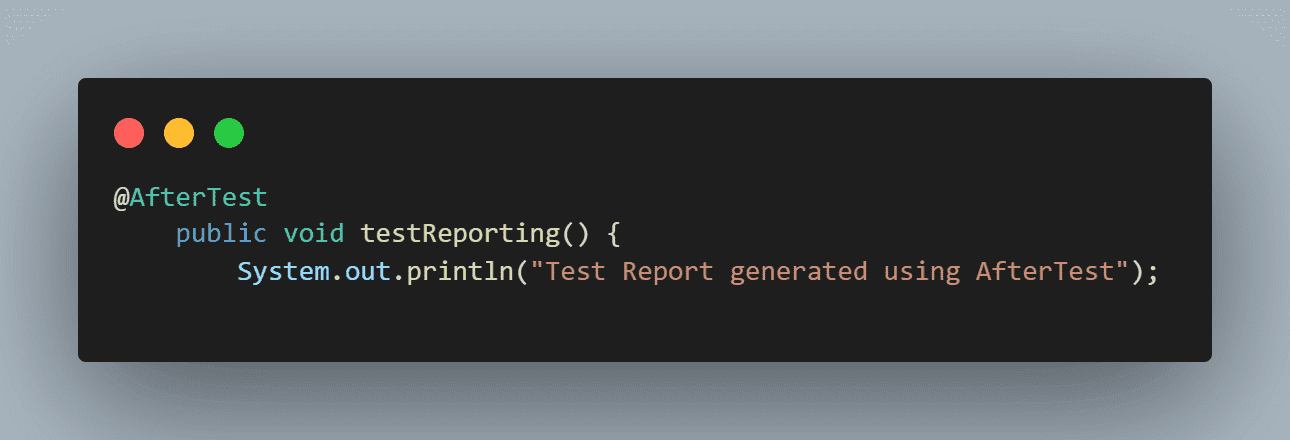
@AfterTest
The @AfterTest annotation is executed after all the test cases in a class are executed. An example use case for this annotation is implementing a method that compiles a test run report after all tests have been run. It allows you to perform cleanup activities or generate summary reports once the entire suite of tests in a class has been executed.
The @AfterTest annotation provides a convenient hook for executing tasks at the end of a test suite, ensuring a well-organized and comprehensive testing process.
|
1 2 3 4 5 |
@AfterTest public void compileReport() { //code to compile a report } |
@BeforeMethod
The @BeforeMethod annotation is executed before every test method, meaning it runs before each method annotated with @Test in the class. For instance, if you have test cases to verify functionality on a dashboard that appears after login, you can utilize the @BeforeMethod annotation to write login steps just once in a method.
This method is then called automatically before the execution of every test case, helping to avoid redundancy in your code and ensuring that common setup steps are consistently performed before each test method. This approach enhances code maintainability and reduces duplication in your Selenium test suite.
|
1 2 3 4 5 |
@BeforeMethod public void doLogin() { //code to do login } |
@AfterMethod
The @AfterMethod annotation is executed after every test method, meaning it runs after each method annotated with @Test in the class. Building upon the previous example, suppose you must log out after every test case.
In this scenario, the @AfterMethod annotation proves useful. By utilizing this annotation, you can define a method containing the logout steps, which will be automatically executed after each test method.
This ensures proper cleanup or teardown actions after executing each test case, contributing to a more robust and maintainable Selenium test suite.
|
1 2 3 4 5 |
@AfterMethod public void doLogout() { //code to do logout } |
@BeforeClass
The @BeforeClass annotation is executed before the first test method with @Test annotation in the class is executed. In practical terms, this annotation can be used to perform setup tasks that are common to the entire class of test methods.
For instance, it can be employed to navigate to a specific URL before executing any test method within the class. It ensures that the initial setup steps are executed only once before the commencement of any test methods, optimizing the efficiency and organization of your Selenium test suite.
|
1 2 3 4 5 |
@BeforeClass public void navigateUrl() { //code to navigate to URL } |
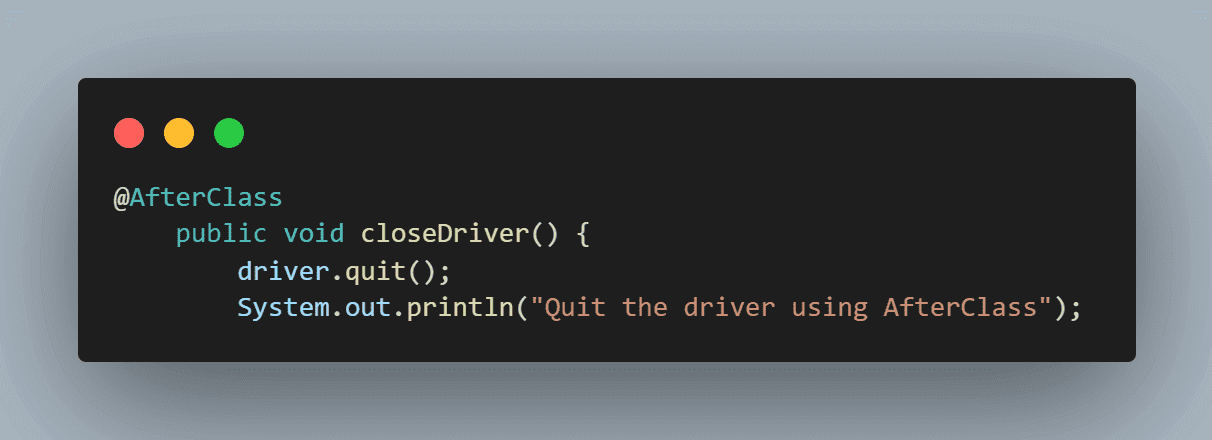
@AfterClass
The @AfterClass annotation is executed after the last @Test method in the class. It’s commonly used for cleanup tasks, such as closing the driver after the entire automation run. It ensures that cleanup actions are performed once after executing all test methods in the class, simplifying the organization of your Selenium test suite.
|
1 2 3 4 5 |
@AfterClass public void closeDriver() { //code to close the driver } |
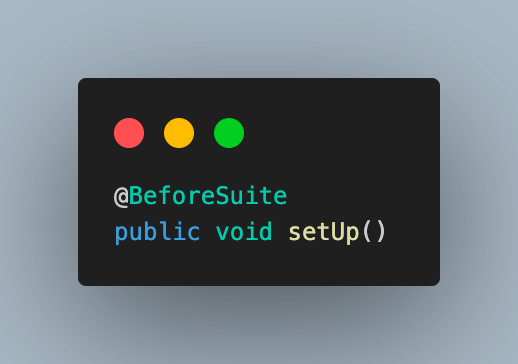
@BeforeSuite
The @BeforeSuite annotation is the entry point for any automation script execution in TestNG in Selenium. A method with this annotation is executed before any test in all the classes within that suite. It’s commonly used for performing generic setup steps for the entire suite, such as initializing the WebDriver. It ensures that common setup tasks are executed only once at the beginning of the test suite, streamlining the initialization process for your Selenium automation.
|
1 2 3 4 5 |
@BeforeSuite public void initializeDriver() { //code to initialize the driver } |
@AfterSuite
The @AfterSuite annotation in TestNG is the last to be executed after all test methods of all the classes within the suite have been executed. A method with this annotation is typically used for cleanup activities, such as closing active driver sessions.
It ensures that cleanup tasks are performed once, at the end of the entire suite execution, making it a suitable place for finalizing resources and ensuring a clean state after running the entire set of tests in your Selenium suite.
|
1 2 3 4 5 |
@AfterSuite public void cleanUp() { //code to close all sessions } |
@BeforeGroups
The @BeforeGroups annotation in TestNG is used to perform setup tasks before the execution of the first test case belonging to a specific group. TestNG allows grouping tests with similar functionalities using the group attribute of the @Test annotation. This feature is particularly useful when executing only a particular test case type.
To use @BeforeGroups, you specify the group name inside brackets next to the annotation, and the associated method is executed before the first test case in that group is executed. This allows you to define specific setup steps for related test cases.
|
1 2 3 4 5 |
@BeforeGroups("groupName") public void startGroupExecution() { //code to execute before particular group test cases. } |
@AfterGroups
The @AfterGroups annotation in TestNG is executed after all the test cases of a specific group have been executed. This annotation provides a way to define cleanup or teardown tasks that should occur after executing all the test cases within a particular group. It is useful for ensuring that cleanup actions are performed once after the entire set of tests in a specific group has been executed, contributing to the overall reliability and maintainability of your Selenium test suite.
|
1 2 3 4 5 |
@AfterGroups("groupName") public void stopGroupExecution() { //code to execute after particular group test cases. } |
With this, we have covered all the annotations used while using TestNG in Selenium. These annotations are highly versatile and easy to learn, as there are no strict rules on which annotation to use with a particular method. Testers can utilize them at their discretion based on their understanding and requirements.
The ease of parametrization is a significant advantage, allowing for creating groups and facilitating other tasks seamlessly. TestNG’s annotations are strongly typed, which helps save time by highlighting errors during implementation. This ensures a more robust and error-resistant test script.
Additionally, using TestNG in Selenium saves time and effort by eliminating the need to extend classes to define the execution order, a feature not found in JUnit. This flexibility and efficiency make TestNG a powerful choice for Selenium automation testing, providing a rich set of features to enhance test structure, organization, and execution.
Watch this video to learn about the TestNG annotations and how they help improve the code’s structure and readability.
Hierarchy of Annotations
TestNG annotations follow a predefined execution hierarchy, ensuring a structured and organized flow of source code execution. These annotations are executed in the following order:
|
1 |
@BeforeSuite -> @BeforeTest -> @BeforeClass -> @BeforeMethod -> @Test -> @AfterMethod -> @AfterClass -> @AfterTest -> @AfterSuite |
Let us have a look at the following code example to demonstrate the hierarchy better.
Upon execution, this is how the output for this code snippet would be, where all the methods get executed as per the hierarchy of the annotations.
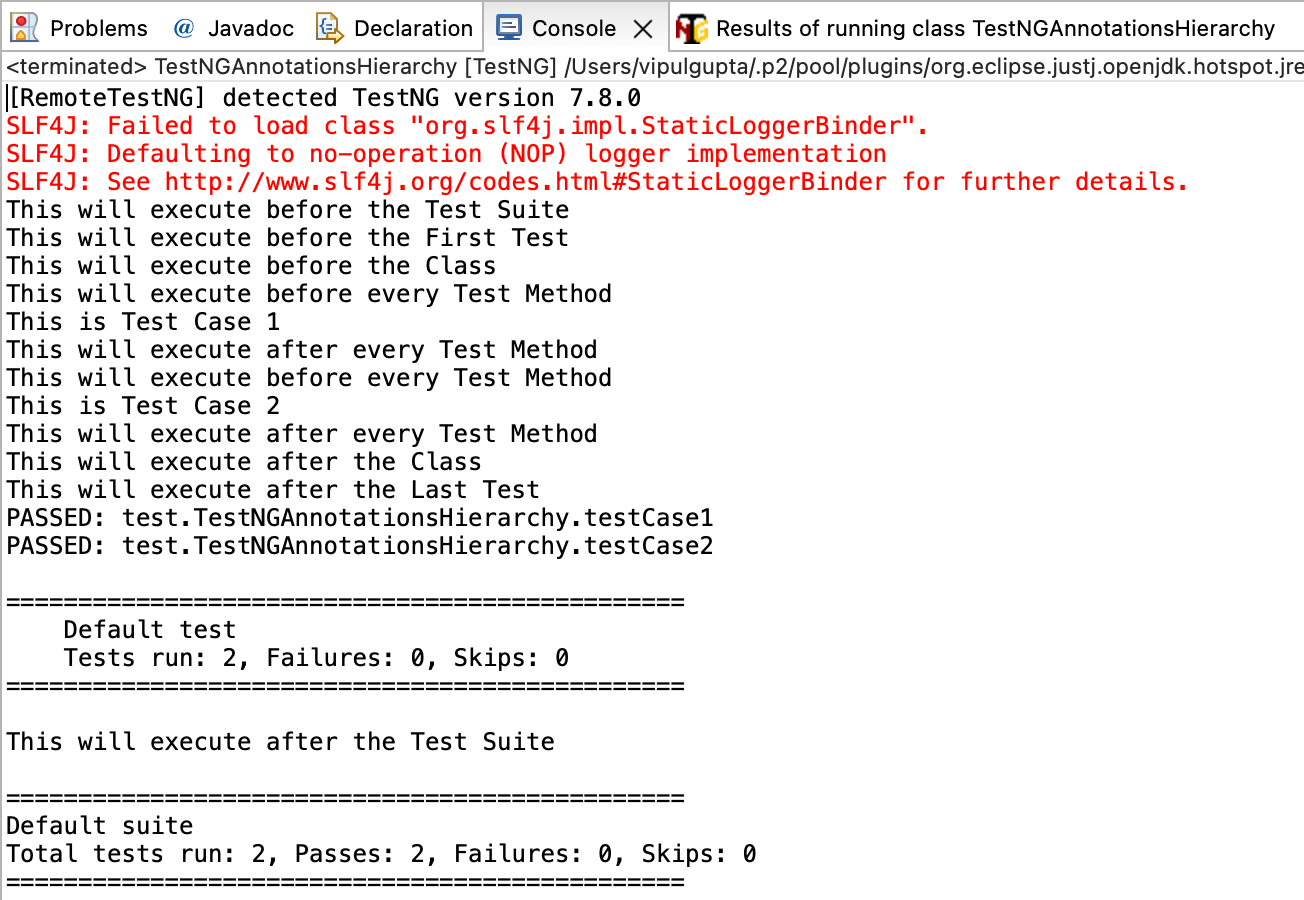
Looking at this code example and the output, it is evident that TestNG diligently sticks to the defined execution order for annotations.
Observing this example, one might wonder how the two @Test methods decide which to execute first. It is addressed through test case priority while using TestNG in Selenium. The later section of this TestNG in Selenium tutorial will delve into this aspect, providing insights into how test case priority is managed within TestNG to control the execution sequence of multiple test methods.
TestNG Attributes
Like a method in Java, TestNG annotations come with attributes that enhance the definition of our tests and provide additional information about the test script during Selenium automation testing with TestNG. These attributes include.
- description: Allows you to provide a description or additional information about the test method.
- groups: This attribute facilitates grouping test cases with similar functionalities under a common group by assigning them a group name. It is highly useful when a user wants to execute test cases belonging to a particular group or exclude test cases of a specific group from execution. By using the groups attribute, testers can organize and execute tests based on their functionality, making it a valuable tool for managing and executing targeted subsets of test cases during automation testing with TestNG in Selenium.
- dependsOnMethods: The test having this attribute is only executed if the dependent test method passes. If it fails or is not executed, then the test with this attribute is skipped from execution.
- alwaysRun: It ensures that this test method always runs and is not dependent on the result of the methods it depends upon.
- dataProvider: This attribute is used when we want to run a test case on a particular data set (e.g., running the same test case on different browsers). This attribute provides the data to the test case for which it is used with the help of another method annotated with @DataProvider annotation of TestNG.
- enabled: This attribute is helpful when we want to skip executing a particular test case. It helps to do so by setting the value to false.
- timeOut: This attribute defines the max execution time for a test case. In other words, the test case should be completed in the given time, which is given in milliseconds, or the test execution would be terminated, and the case would be marked as failed with timeout exception org.testng.internal.thread.ThreadTimeoutException.
- invocationCount: This attribute is used when we want to execute the test case in a loop for a given number of times.
- invocationTimeOut: This attribute is combined with the invocationCount attribute. This attribute defines the timeframe within which the test should execute for a given number of times.
- expectedExceptions: This attribute helps to handle the exceptions that the test method is expected to throw. If the test method throws the exception set on the attribute, then the test case passes, and for any other unhandled exception, the test method fails.
- priority: This attribute is used to define the order of execution by assigning priorities to the test cases. A test method with lower priority is always executed first.
|
1 |
@Test(description = "this is the definition of the test") |
|
1 |
@Test(groups = "DashboardCases") |
|
1 |
@Test(dependsOnMethods = "LoginFunctionality") |
|
1 |
@Test(alwaysRun = true) |
|
1 |
@Test(dataProvider = "CrossBrowserTesting") |
We will learn more about @DataProvider in further sections of this TestNG in Selenium guide.
|
1 |
@Test(enabled = false) |
|
1 |
@Test(timeOut = 5000) |
Learn more about handling different types of exceptions in Selenium through this blog on common Selenium exceptions and get valuable insights.
|
1 |
@Test(invocationCount = 3) |
|
1 |
@Test(invocationCount = 3, invocationTimeOut = 20) |
The above code will execute the case 3 times in 20 milliseconds.
|
1 |
@Test(expectedExceptions = {ArithmeticException.class}) |
|
1 |
@Test(priority=1), @Test(priority=2) |
In this case, the test with priority 1 is executed first, followed by the test with priority 2.
Consider the below code example to understand attribute implementation.
Result:

TestNG Priorities
As mentioned earlier in this TestNG in Selenium tutorial, test case execution is influenced by the priority assigned to test cases. However, if no priority is explicitly assigned, TestNG defaults to executing test cases alphabetically. Without specified priorities, the execution order is determined by the alphabetical order of the test method names.
For example, in the following code snippet, aTest would be executed before bTest based on their alphabetical order.
|
1 2 3 4 5 6 7 |
@Test public void aTest() {} @Test public void bTest() {} |
Now, let’s consider a scenario where we want to execute bTest first. In such cases, the priority attribute in TestNG is utilized. We can achieve this by assigning a lower priority to the test we want to execute first. Priorities in TestNG can be assigned starting from 0, where lower priority cases are executed first.
|
1 2 3 4 5 6 7 |
@Test(priority = 2) public void aTest() {} @Test(priority = 1) public void bTest() {} |
In this case, bTest will be executed before aTest. The next question arises: What if the same priority is assigned to both test cases?
When the same priority is assigned to multiple test cases, TestNG does not guarantee a specific execution order. In such situations, test cases with the same priority may be executed alphabetically based on their method names. Therefore, it’s essential to avoid relying on the order of test cases with identical priorities and consider alternative approaches if a specific execution order is crucial for your test scenarios. Let us understand this with a simple example below.
|
1 2 3 4 5 6 7 |
@Test(priority = 1) public void aTest() {} @Test(priority = 1) public void bTest() {} |
| @Test(priority = 1) |
| public void aTest() |
| {} |
| @Test(priority = 1) |
| public void bTest() |
| {} |
In such a case, TestNG runs the test cases with the same priority in alphabetical order. Therefore, aTest will be executed before bTest.
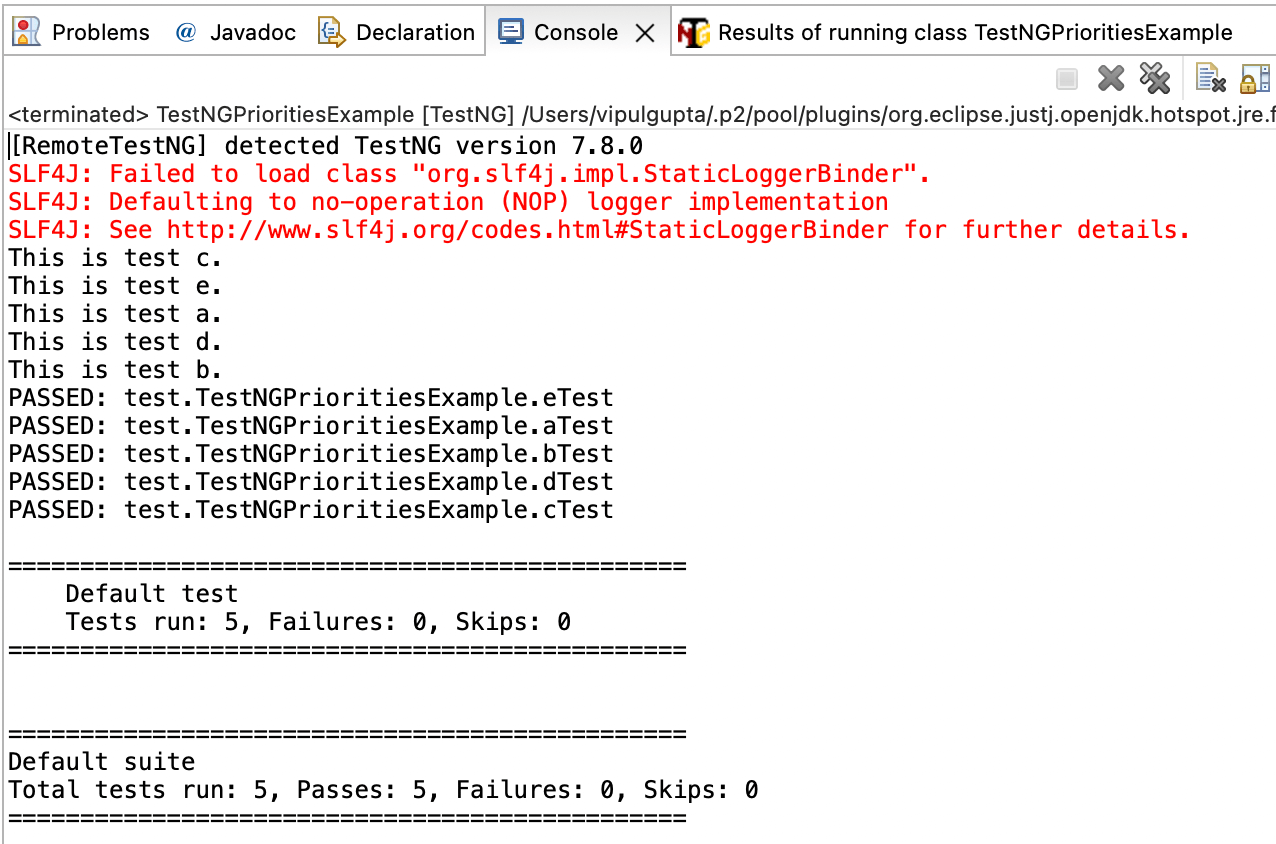
Another scenario could be that the test class file is a combination of test cases with and without priority like below
In such a case, TestNG, by default, assigns a priority of 0 to test cases that do not have the priority attribute. These cases are executed alphabetically, followed by others based on their priorities. So, the output for the above code would be.
Result:
This is all about priorities, and these would be highly beneficial to use in any automation script while working with TestNG in Selenium. To learn more about the test case priority, go through our earlier blog on prioritizing tests with TestNG in Selenium.
This overview covers the priorities in TestNG, which proves highly beneficial when designing and organizing automation scripts with TestNG in Selenium. Priorities allow you to control the order in which test cases are executed, providing flexibility and customization in your test suite. Exploring the various test case priorities will empower you to structure and manage your Selenium test suites effectively, ensuring optimal execution based on your specific requirements.
As we learned about the attributes in TestNG, we came across data providers, which we will cover in detail in the following section.
DataProviders in TestNG
DataProviders in TestNG are an integral part of the built-in TestNG data-driven testing approach. They are used to pass various values to the same TestNG test class through the @DataProvider annotation
DataProviders enable the creation of data-driven tests where the same test logic can be executed with different input data sets. By leveraging DataProviders, you can enhance the versatility of your tests and ensure thorough coverage of different scenarios, contributing to a more comprehensive and effective testing strategy in your TestNG-based Selenium automation. Let us understand the DataProvider annotation with a sample below.
TestNG DataProvider sample:
|
1 2 3 4 |
@DataProvider(name = "dataProvider_name") public Object[][] dataProviderMethod() { return new Object[][] {<values>}; } |
The @DataProvider annotation consists of only one attribute, which is the name attribute, and it is always of type String. If the name is not explicitly provided, the method’s name becomes the data provider name by default, such as dataProviderMethod.
A DataProvider method in TestNG always returns a 2-D list of objects. The test method associated with this data provider executes using a data-driven approach on each passed argument.
Let’s consider an example of a simple cross-browser code where we want to navigate to a website on Chrome and Firefox browsers using TestNG DataProvider.
In the provided code, we have implemented a DataProvider named browserProvider, passing two values: Chrome and Firefox. These values are then passed to the test method testCrossBrowser using the parameter browserName, and the test case is executed sequentially on both browsers.
This example illustrates a classic implementation of cross-browser testing, where the same script is executed on multiple browsers using TestNG DataProvider.
The expected output of executing the above code would be.
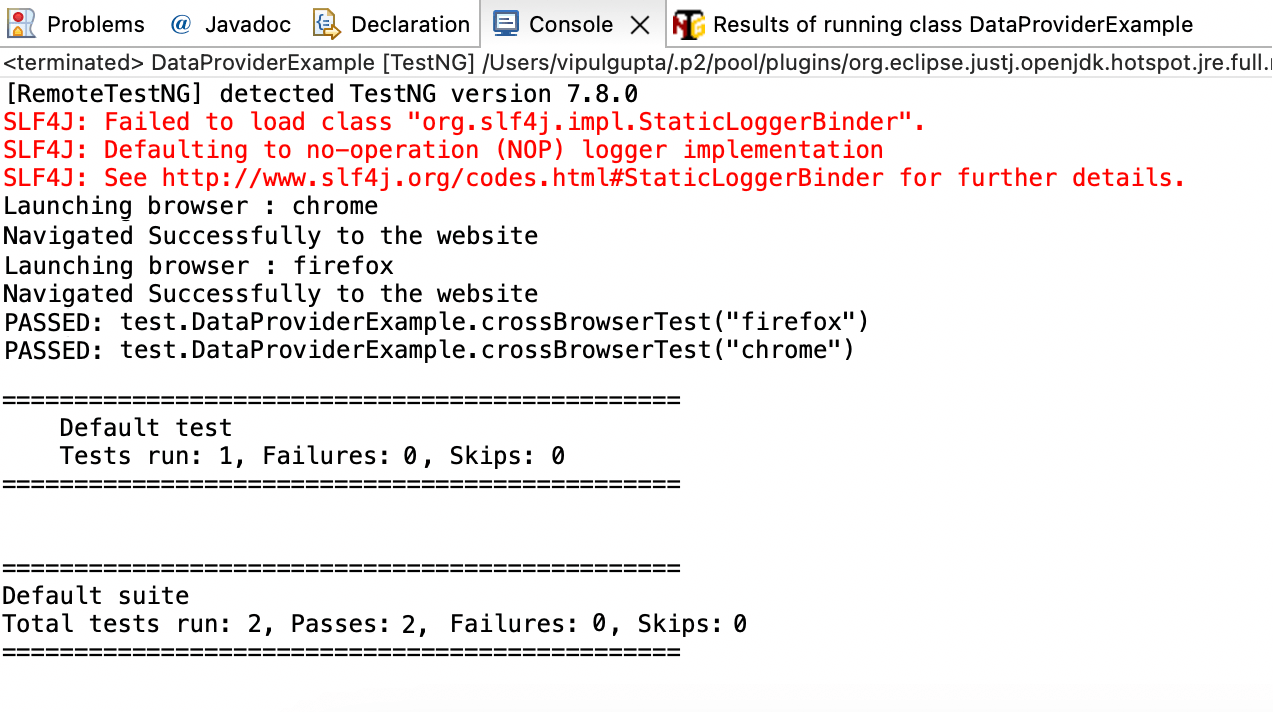
One thing to note here is that, despite having only one method annotated with @Test, the execution shows two test cases being executed. This is because we passed two different values to the test case using the DataProvider, and hence, TestNG treats it as two separate test cases. The differentiation in test data leads to TestNG considering each data set as an individual test case, demonstrating the versatility of the data-driven approach facilitated by DataProviders.
TestNG Assertions
Assertions in TestNG provide a mechanism to verify if the actual and expected results of the test case execution match, determining the outcome of the test case—whether it is a pass or fail. They are extensively used to validate results in any TestNG script for Selenium.
An example of TestNG assertions could be validating the username on the dashboard after a user logs into a website.
The syntax for TestNG assert:
|
1 |
Assert.Method(actual, expected, message) |
- actual: the actual value fetched from the test case as a part of the execution.
- expected: the expected value we want to compare with the actual value.
- message: string message to be displayed in case of assert failure.
Types of TestNG Asserts
- Hard Assert: These are the default assertions while working with TestNG in Selenium. These assertions stop the test case execution when any assert fails and subsequent statements are not executed/validated. These are used when subsequent steps in the test cases are not to be executed when a particular step assertion fails.
- Soft Assert: These are the opposite of hard asserts. In the case of soft assert, the test case execution of subsequent steps continues even if some assert fails in between. These are used when we want to continue the execution and see the results for all steps, even if a few fail in between. To use soft asserts, org.testng.asserts.SoftAssert package needs to be included.
The most commonly used TestNG asserts are:
- assertTrue: This assertion verifies whether the given condition is true. If false, it will fail the test case.
- assertFalse: This assertion verifies whether the given condition is false. If true, it will fail the test case.
- assertEquals: This assertion verifies if the actual and expected are a match. If they match, it passes the test case; otherwise, it fails.
- assertNotEquals: This assertion verifies if the actual and expected are not a match. If they match, the test case fails. Otherwise, it passes.
|
1 |
Assert.assertTrue(condition, message); |
|
1 |
Assert.assertFalse(condition, message); |
|
1 |
Assert.assertEquals(actual, expected, message); |
|
1 |
Assert.assertNotEquals(actual, expected, message); |
Watch this video to learn what are TestNG assertions, the different types of TestNG assertions, and how you can use them while performing automation testing with TestNG in Selenium.
Demonstration: Using TestNG in Selenium
By now, this TestNG in Selenium tutorial has covered almost all the main features of the TestNG framework that you would need to write your first Java automation script. The following code example will combine all the annotations, attributes, priorities, data providers, and assertions we have learned.
The following test scenario will be executed by this code (to print and verify the sum of 2 numbers)
Test Scenario:
|
In addition to this test case, we will add two more test cases with priority to showcase the usage, along with one of them having an invocationCount attribute to show the case getting executed multiple times as per priority.

In the provided code, you can observe the integration of various TestNG features such as annotations, DataProviders, assertions, priorities, and attributes. This code exemplifies how these elements can be effectively combined while working with automation scripts for TestNG in Selenium, showcasing their cohesive use to maximize the potential of the testing framework.
In this TestNG in Selenium tutorial, a Selenium RemoteWebDriver instance has been created, emphasizing the optimal utilization of TestNG with a cloud Selenium Grid. Using Selenium Grid, specifically a cloud Grid service like LambdaTest, offers several advantages. These include the ability to execute multiple test cases across various browsers and operating systems, ensuring thorough cross-browser testing. Additionally, a cloud Selenium Grid provides advantages in terms of speed, scalability, and enhanced debugging and troubleshooting support.
In the above code example, execution is intended to run on LambdaTest, a Selenium Cloud Grid, demonstrating the seamless integration of TestNG with cloud testing platforms for efficient and scalable cross-browser testing.
LambdaTest is an AI-powered test orchestration and execution platform that lets you run manual and automated tests at scale with over 3000+ real devices, browsers, and OS combinations. Like other automation testing tools, LambdaTest provides interactive reporting dashboards for results analysis, various logs, and integrations with the best CI/CD tools, project management tools, etc.
Code Walkthrough:
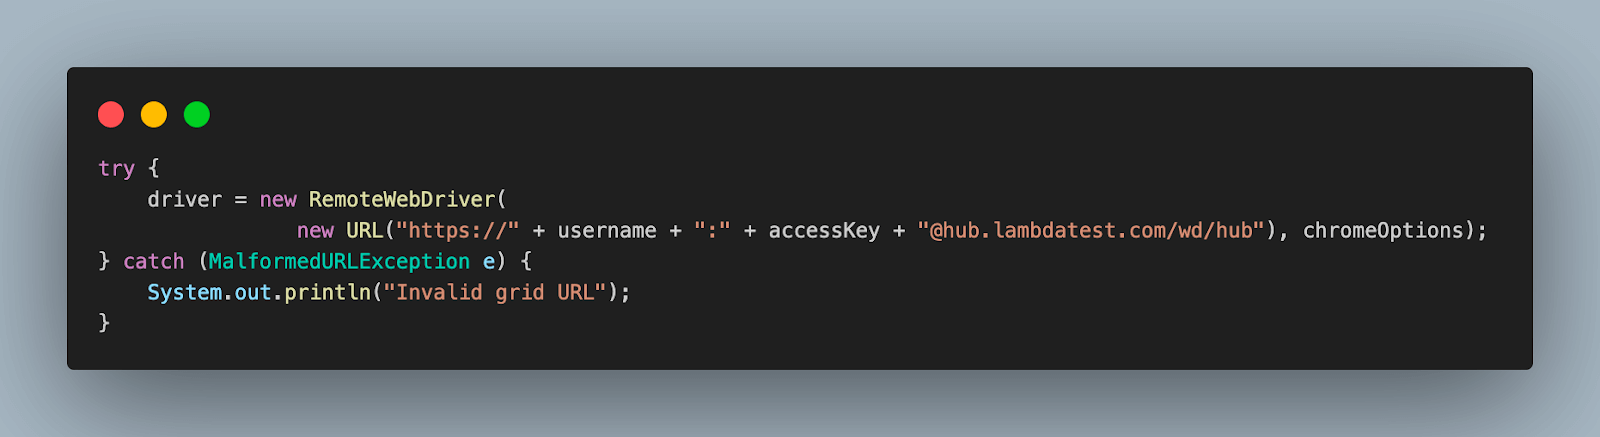
Step 1. Create an instance of RemoteWebDriver, which will execute the code on the LambdaTest cloud grid.
Step 2. Navigate to the LambdaTest Account Settings > Password & Security section to fetch the username and access key once you create your account. These will be used to make a connection to the LambdaTest grid.

Using the following commands, You can configure the username and access key as environment variables and directly fetch them in code.
For macOS and Linux:
|
1 2 |
export LT_USERNAME=LT_USERNAME export LT_ACCESS_KEY=LT_ACCESS_KEY |
For Windows:
|
1 2 |
set LT_USERNAME=LT_USERNAME set LT_ACCESS_KEY=LT_ACCESS_KEY |
Step 3. Add the first method as setUp() and annotate it with @BeforeSuite. LambdaTest browser capabilities are set inside this method, and a remote grid is launched to execute the run.
In this TestNG in Selenium guide, we have used Selenium 4, which supports the ChromeOptions class. This function creates an object to define browser properties like browser version, OS version, etc.

It also accepts the variables required for LambdaTest execution as a capability using a HashMap. These variables are used to set values like build, name, or any other browser property, which will help to identify the run on the LambdaTest Automation Dashboard or modify behavior.
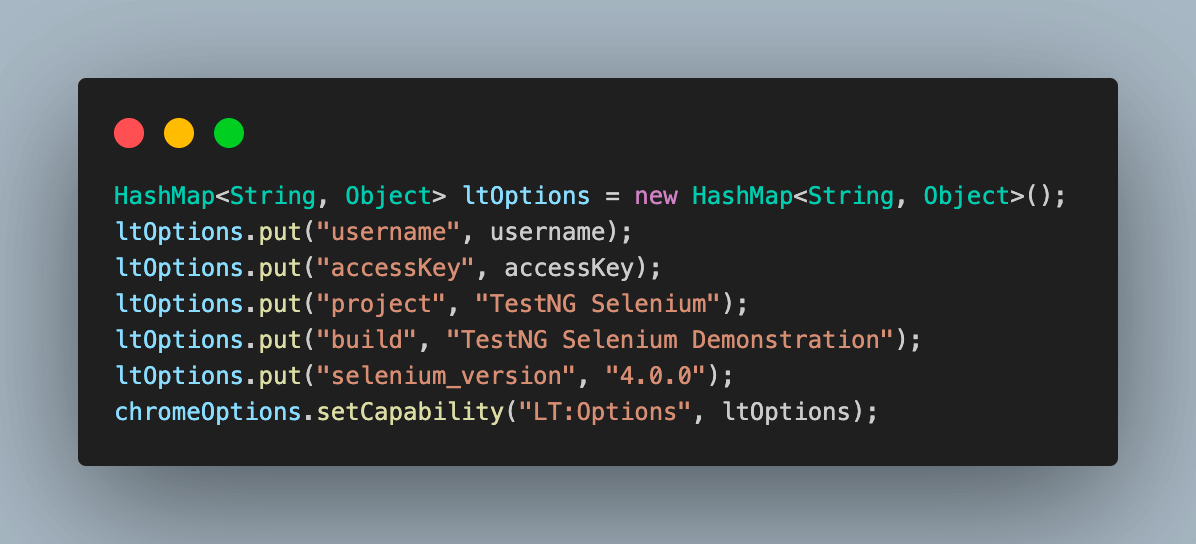
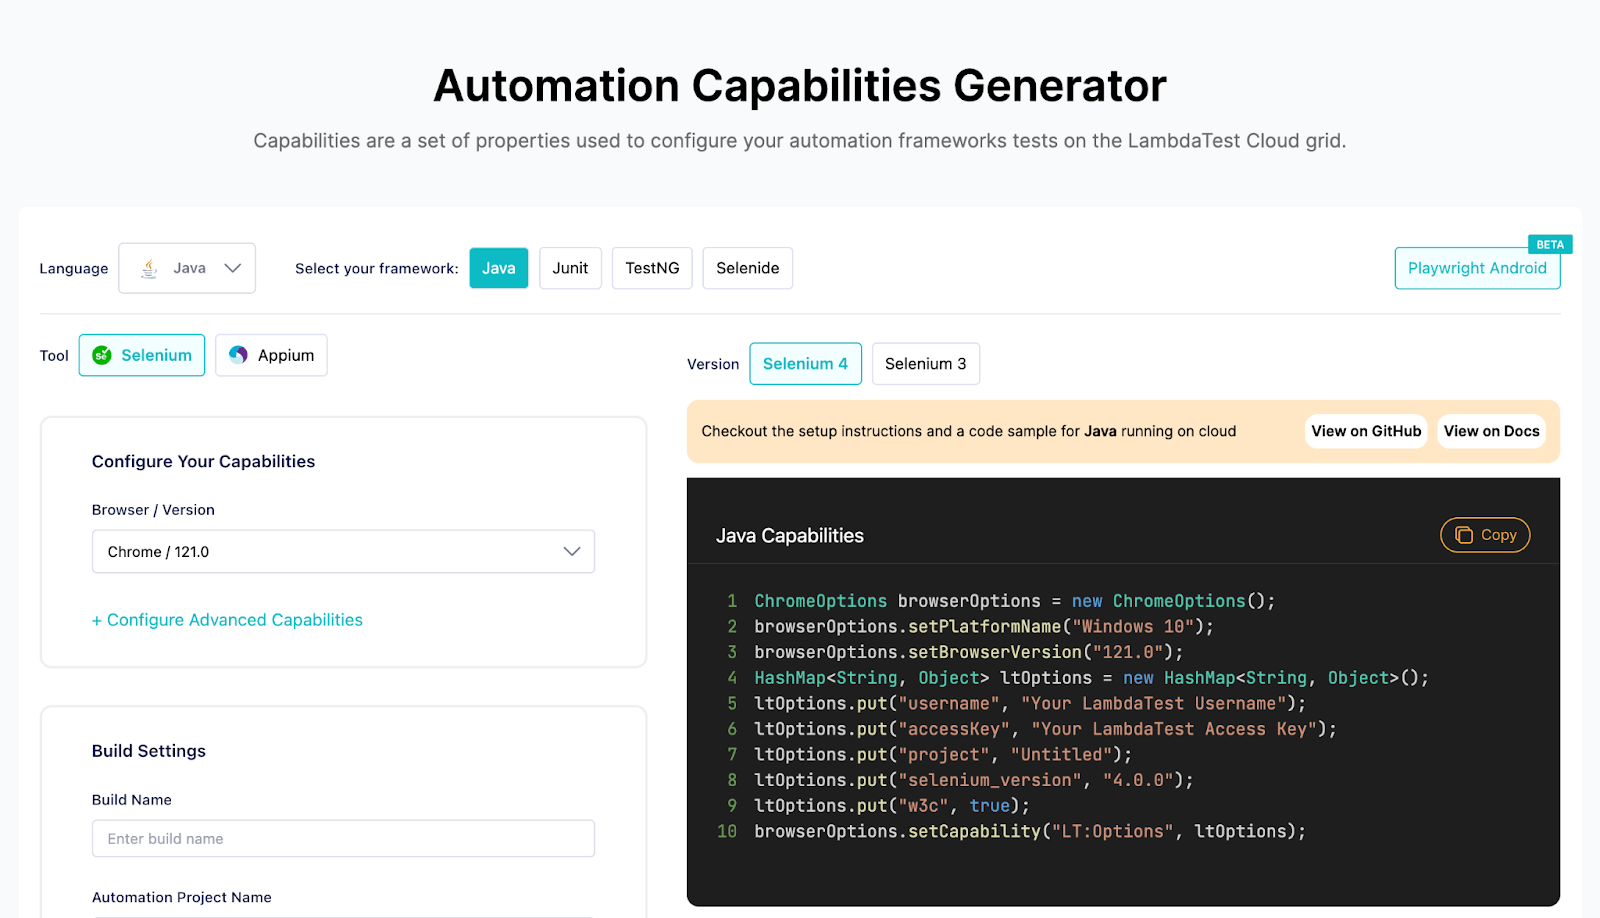
We can also fetch the required browser capabilities to use the LambdaTest platform by navigating to their Automation Capabilities Generator. This helps by offering ready-to-use code for setting up browser capabilities that can be used in execution.
Finally, we use the instance of RemoteWebDriver created initially to connect to the LambdaTest Cloud grid using the chromeOptions, and your LambdaTest credentials.
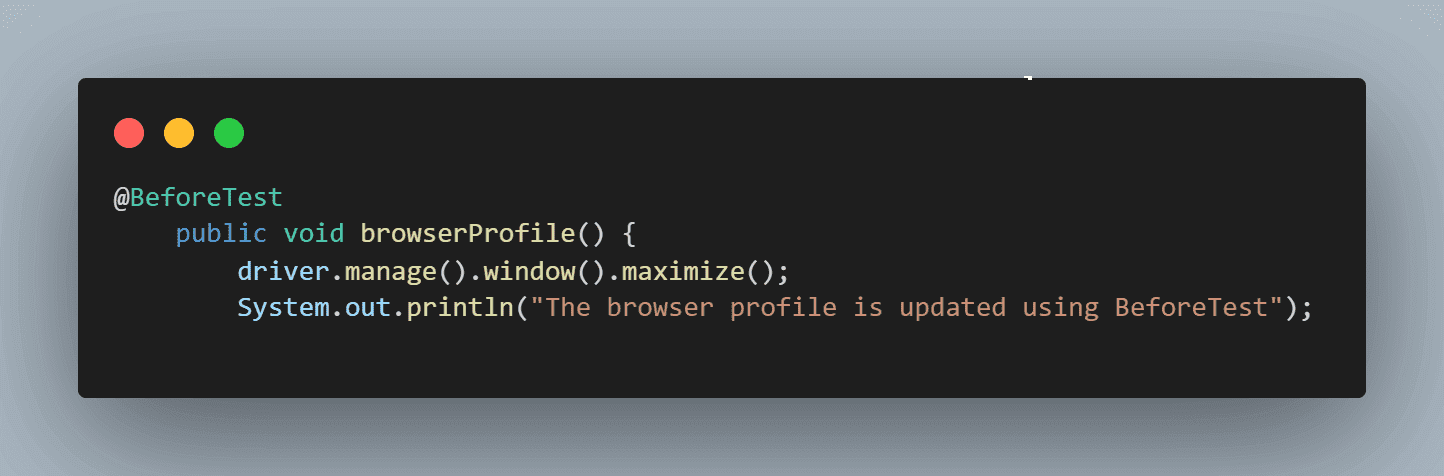
Step 4. Add a new method browserProfile(), and annotate with @BeforeTest. This will help execute the step to maximize the browser window once launched.
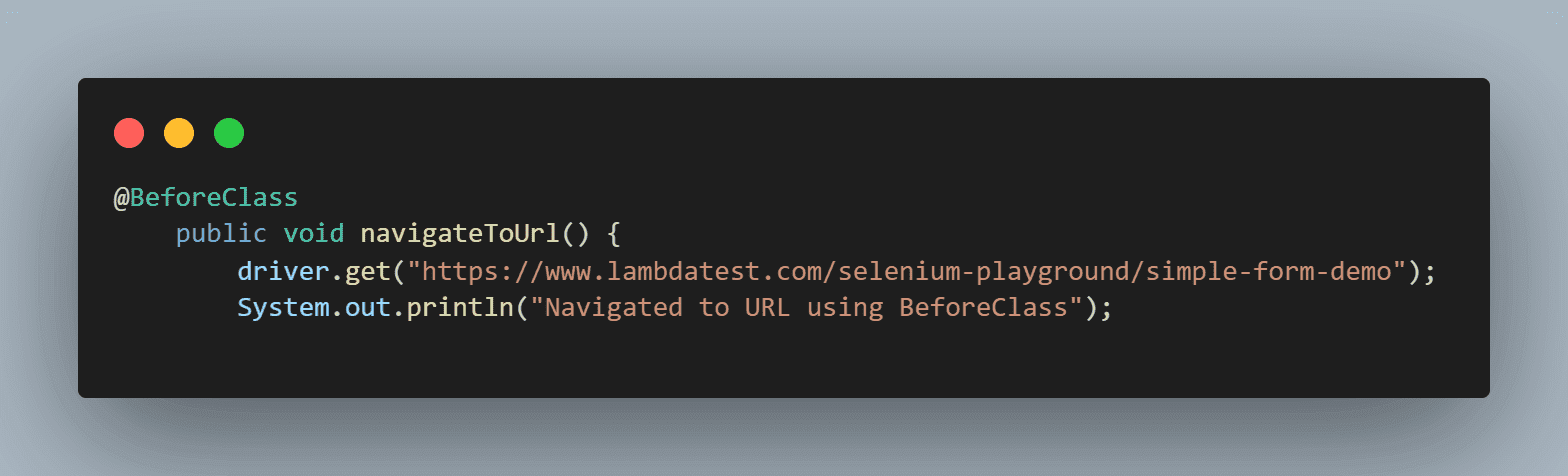
Step 5. We have used the navigateToUrl() method to open the website on which the test would be executed. This method is annotated with @BeforeClass to execute it accordingly.
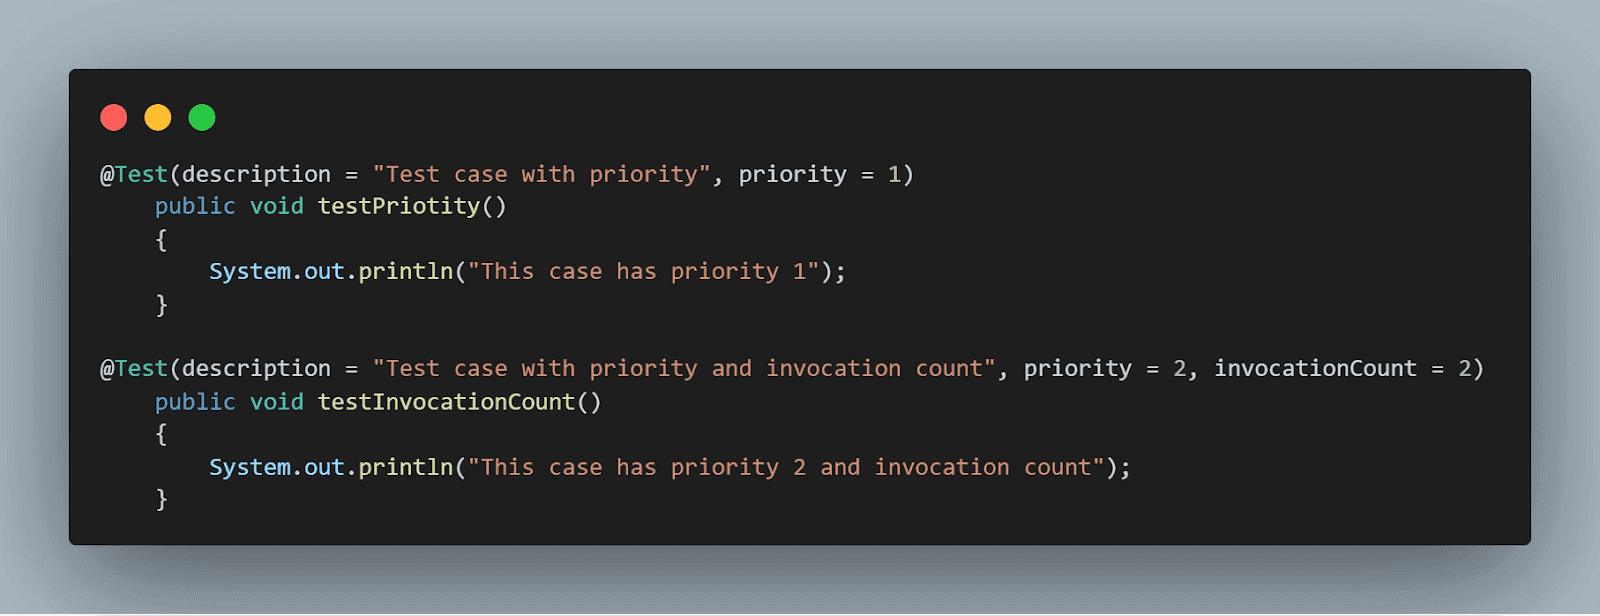
Step 6. Next, we have added two test cases that will run locally only to showcase the usage of priority and invocationCount usage, namely testPriotity() and testInvocationCount().
Step 7. Next, add a DataProvider and name it as sanityTestDataProvider(). This provides two sets of test data on which the next test method would be executed, of which one should pass, and the other should fail, as already stated in the test scenario.
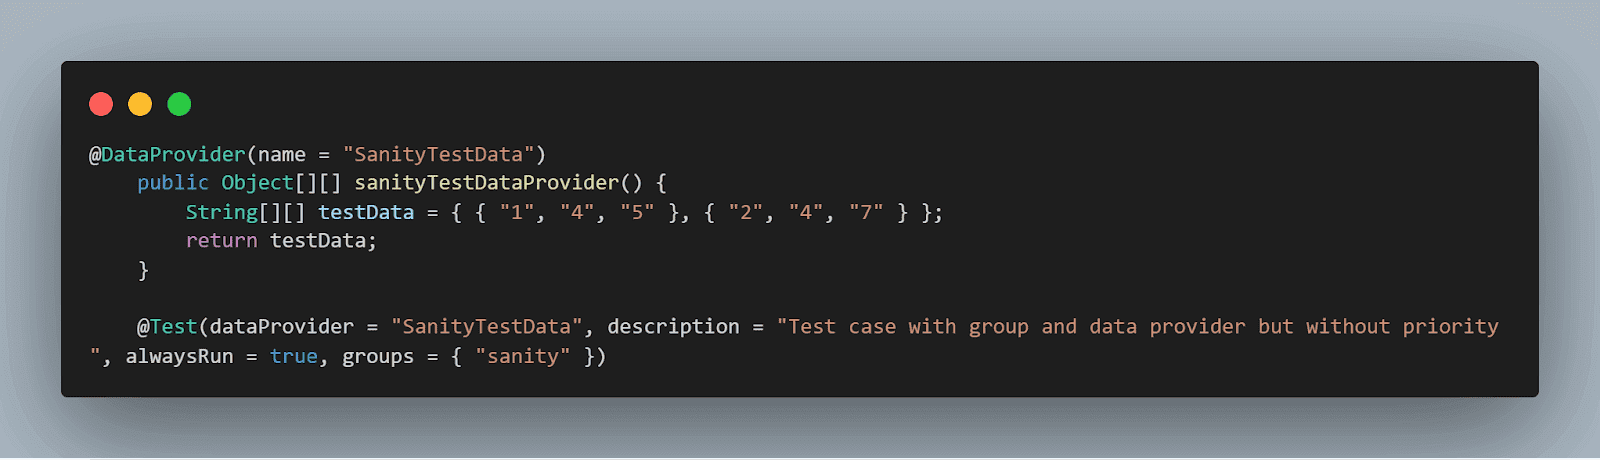
Step 8. Add a test case method testSumOfTwoValues(). It takes test data input from the DataProvider created in the previous step. This method is executed once for each type of test data and helps to decide whether it is a pass or fail using assert.

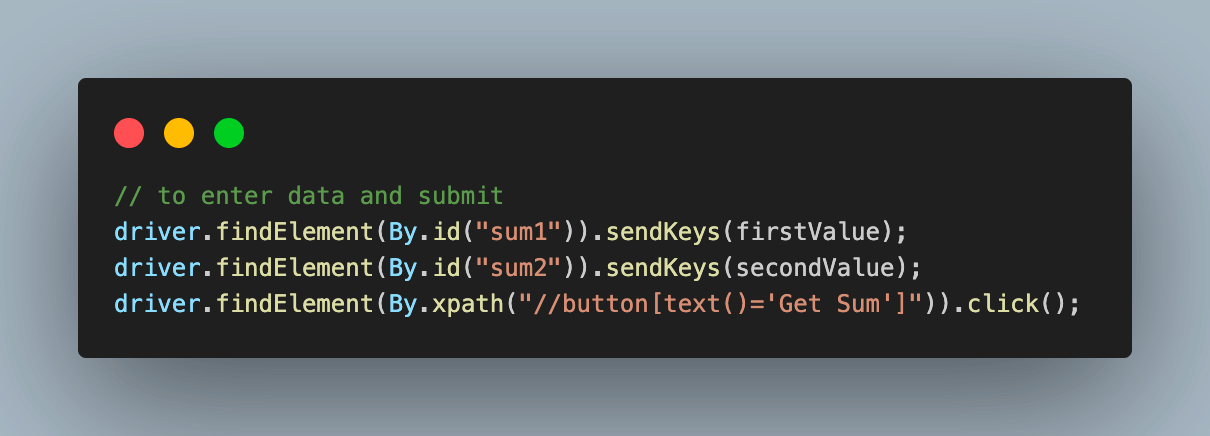
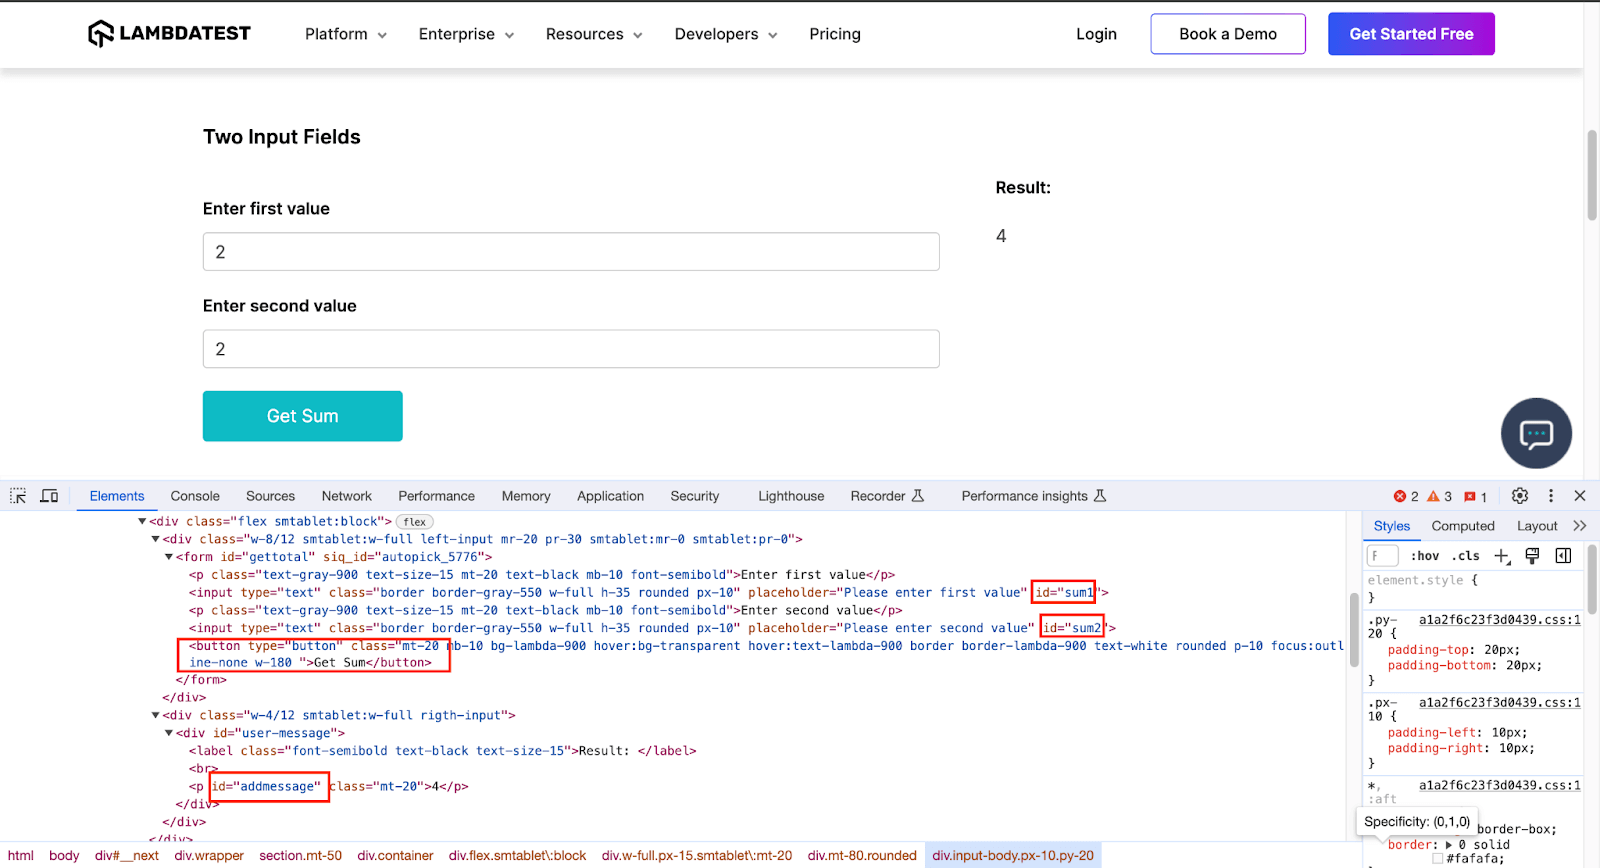
Step 9. Enter the values and click on the button to get the results.
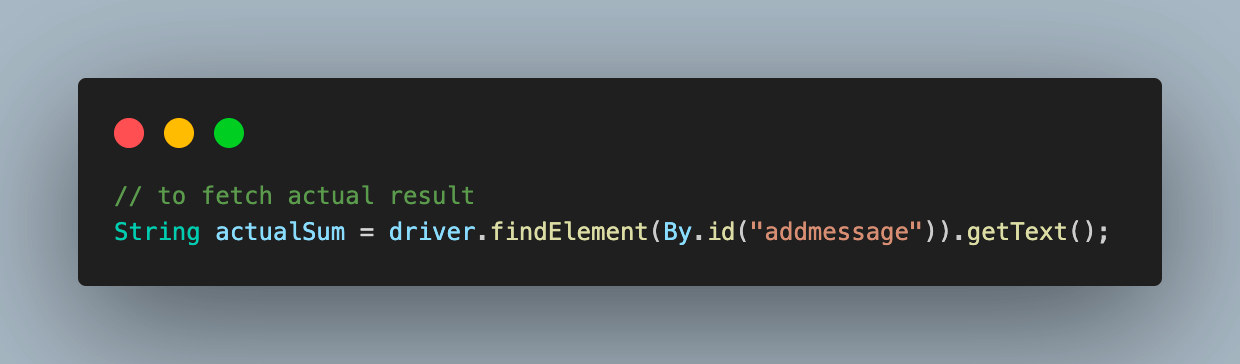
Step 10. Next, to fetch the result of execution, we use the getText() method with the identifier and store it as a String.
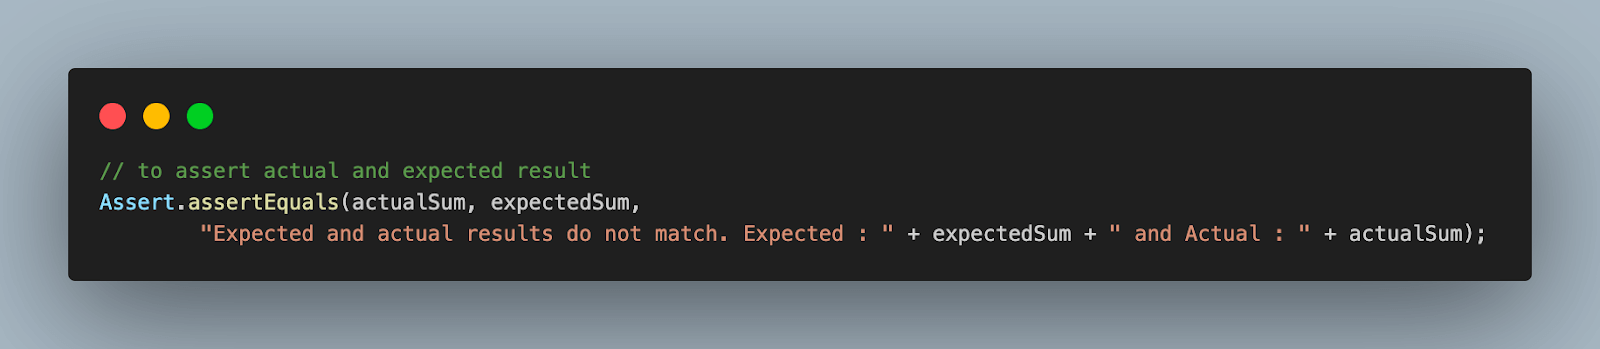
Step 11. Implement assertEquals() to compare the results and print a message if there is a mismatch.
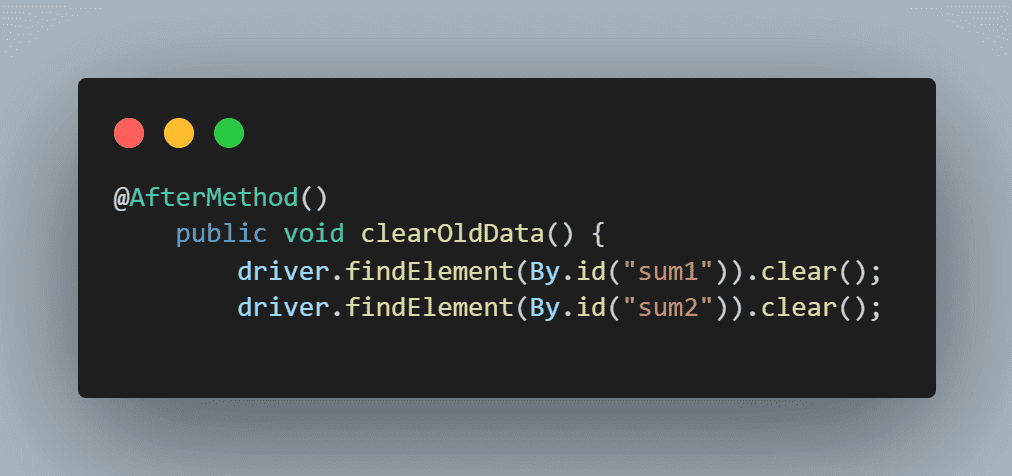
Step 12. The clearOldData() function helps to clear the data filled in the input text boxes as a part of previous test execution. Annotate it with @AfterMethod to execute after each test execution.
Step 13. To close the WebDriver instance after each execution, the closeDriver() method is added with @AfterClass annotation.
Step 14. Lastly, add a method testReporting() to signify the completion of the executed test run and provide the tester with a message that the test report is ready to be analyzed.
The two most important parts of the sample code above are the DataProvider method and the main test method.
The above helps to find the web elements and enter data in the input boxes by clicking the button. To fetch web element locators, we navigate to the page, right-click, and then Inspect to find the locators as desired by any strategy like ID, XPath, CSS, etc.
This Selenium testing tutorial will help beginners interact with web elements in Selenium WebDriver.
You can Subscribe to the LambdaTest YouTube Channel and stay updated with the latest Selenium testing, Cypress testing, Playwright testing, and more tutorials.
Having understood the sample code, execute the class as a TestNG test to get output.
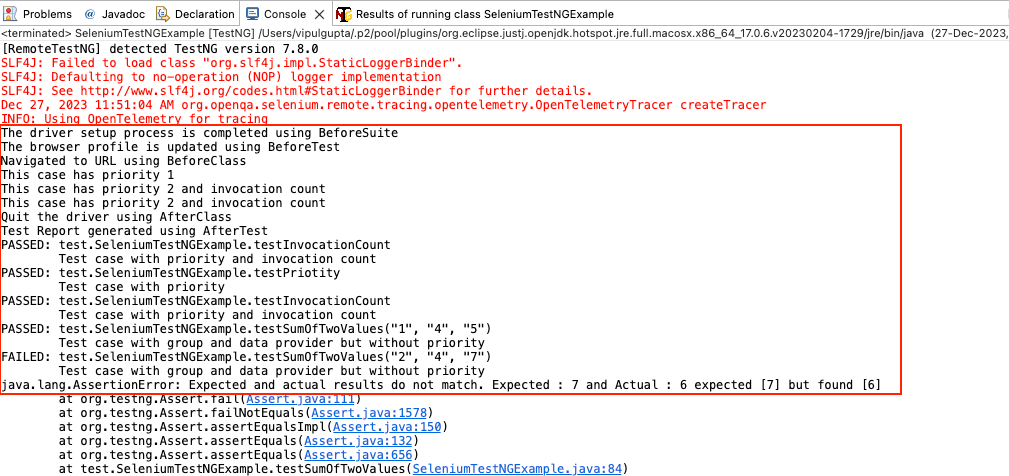
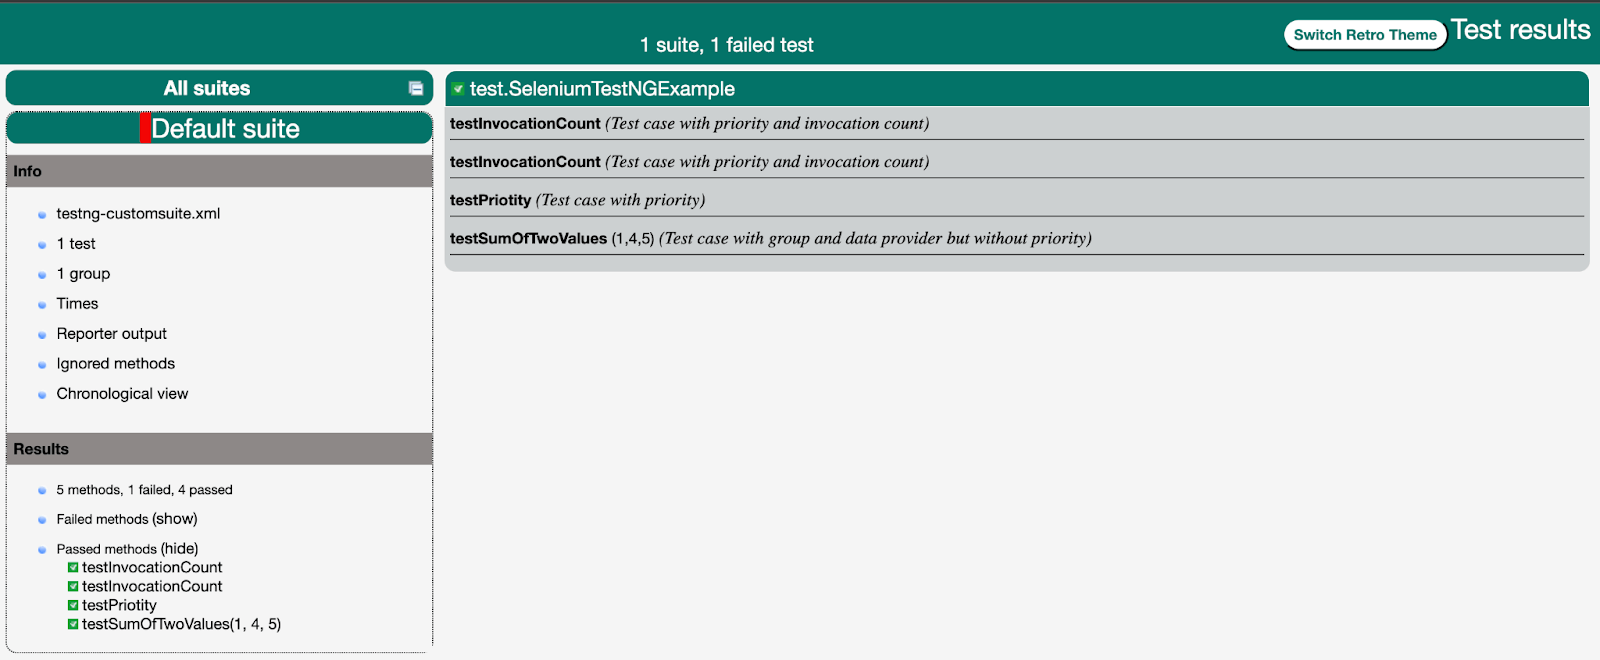
In these screenshots, we can see the test case gets executed as per priority, and the one with an invocation count of 2 gets executed two times.
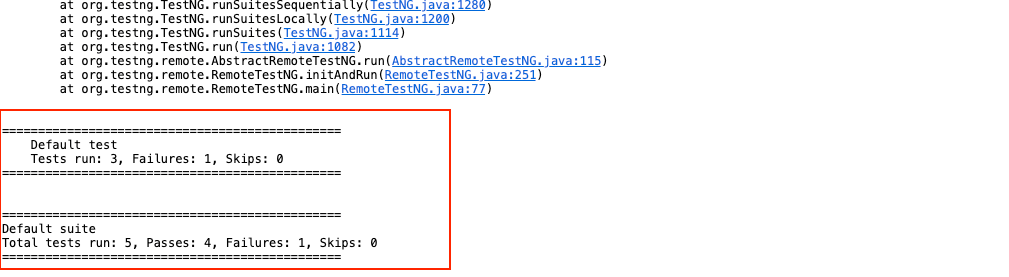
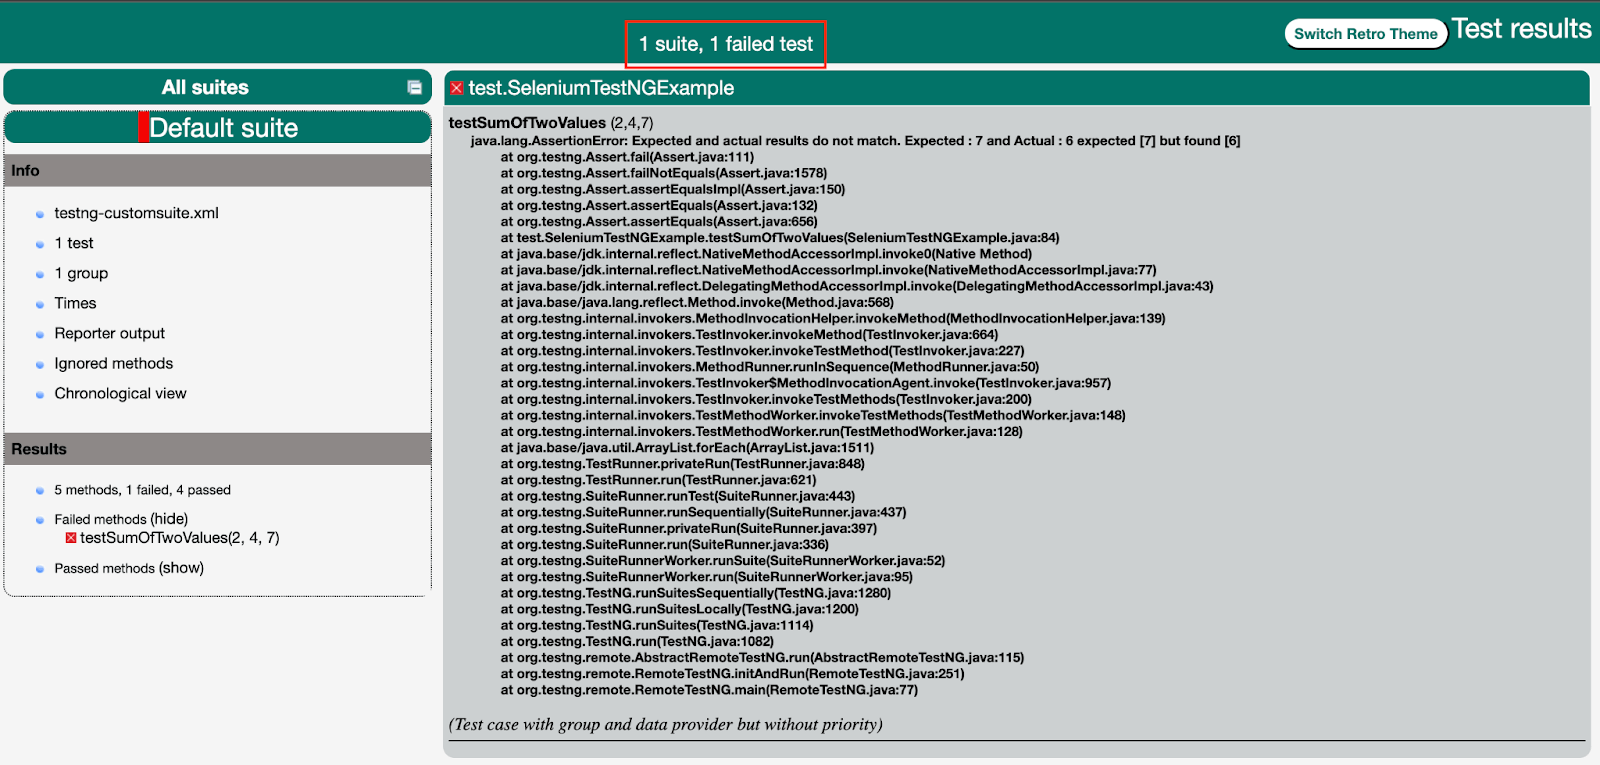
You can see that Default test numbers show total Tests run: 3 since we have three @Test annotated test cases in the class, of which 1 has failures and hence Failures: 1.
However, the Default suite section shows the actual number of test cases along with the actual passed and failed number of cases.
Total tests run 5 -> testPriotity() executed 1 time + testInvocationCount() executed 2 times + testSumOfTwoValues() executed once for each data set (total 2 times) -> 1 + 2 + 2 = 5
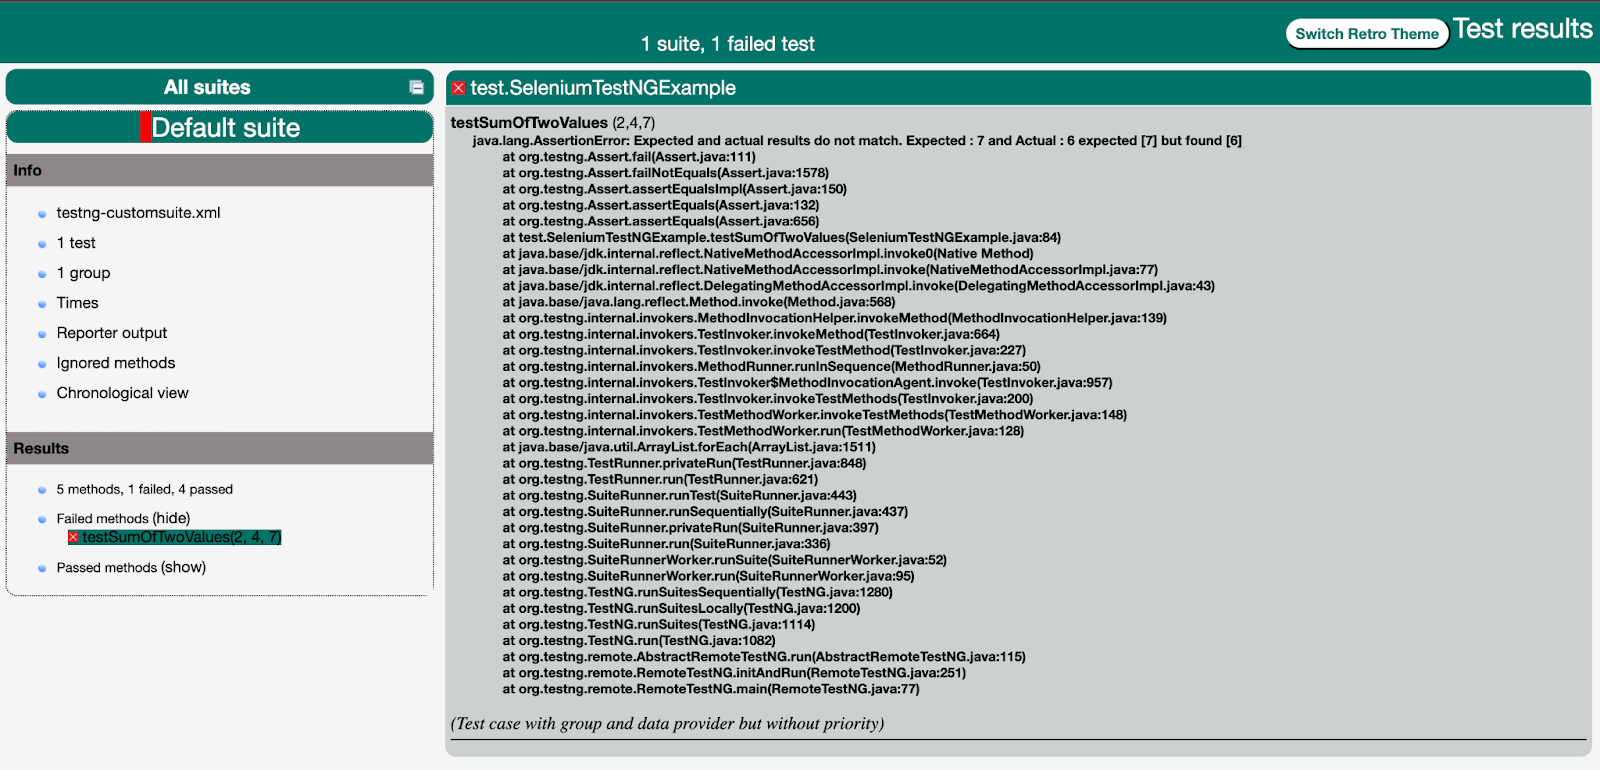
For the failed test case, the log shows the message we added on the assert to appear in case of failure: Expected and actual results do not match. Expected: 7 and Actual: 6
Also, we can log in to the LambdaTest Dashboard to check the execution results for the automation script we have executed under the Automation > Web Automation tab.
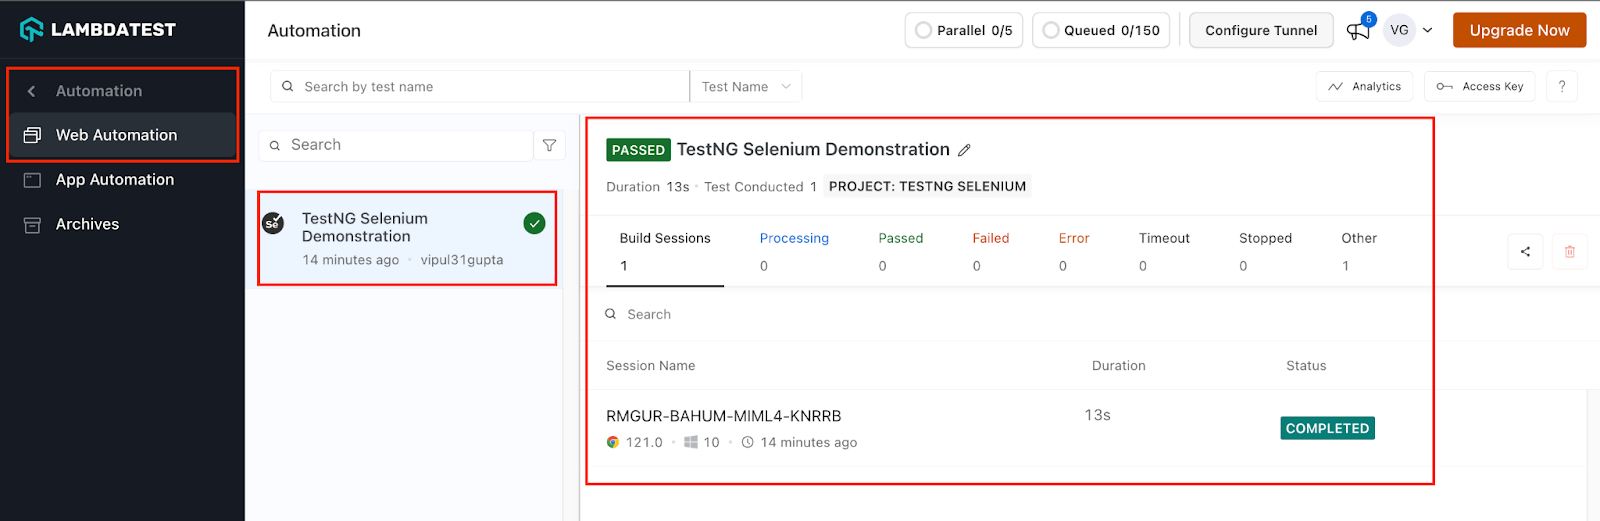
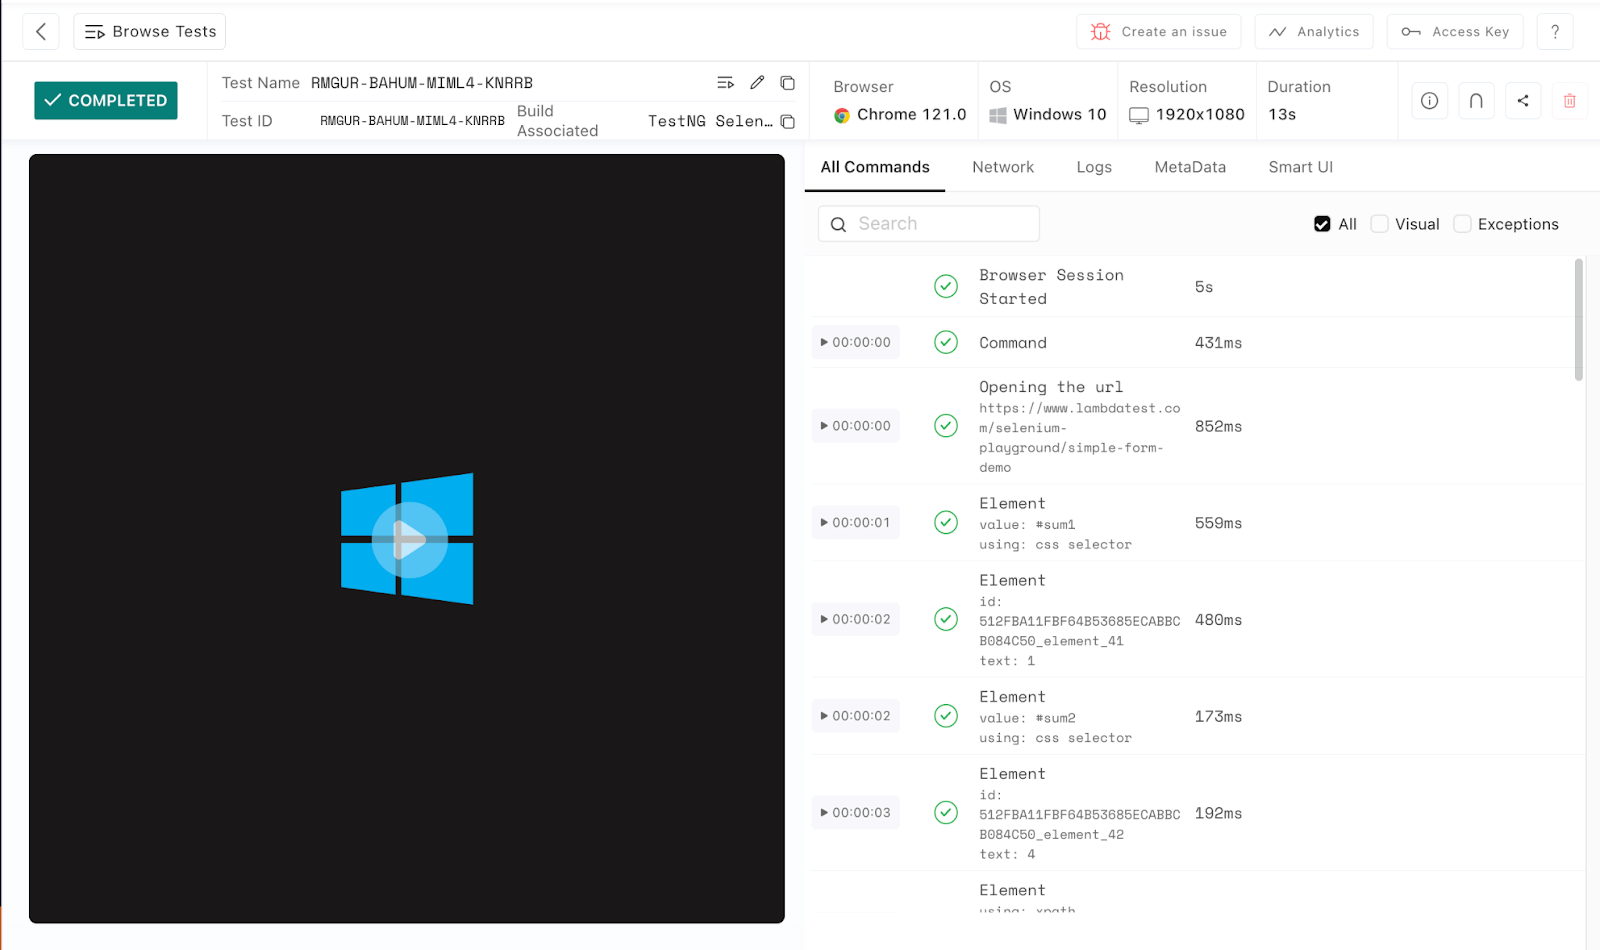
You can see more detailed logs and reporting for this run by clicking on the recent test run.
In addition to the Automation Logs and related info, the LambdaTest Dashboard now provides users with more detailed analytical views and data about test case execution and associated trends in graphical representation through the LambdaTest Analytics Dashboard available under the Insights > Analytics Tab.
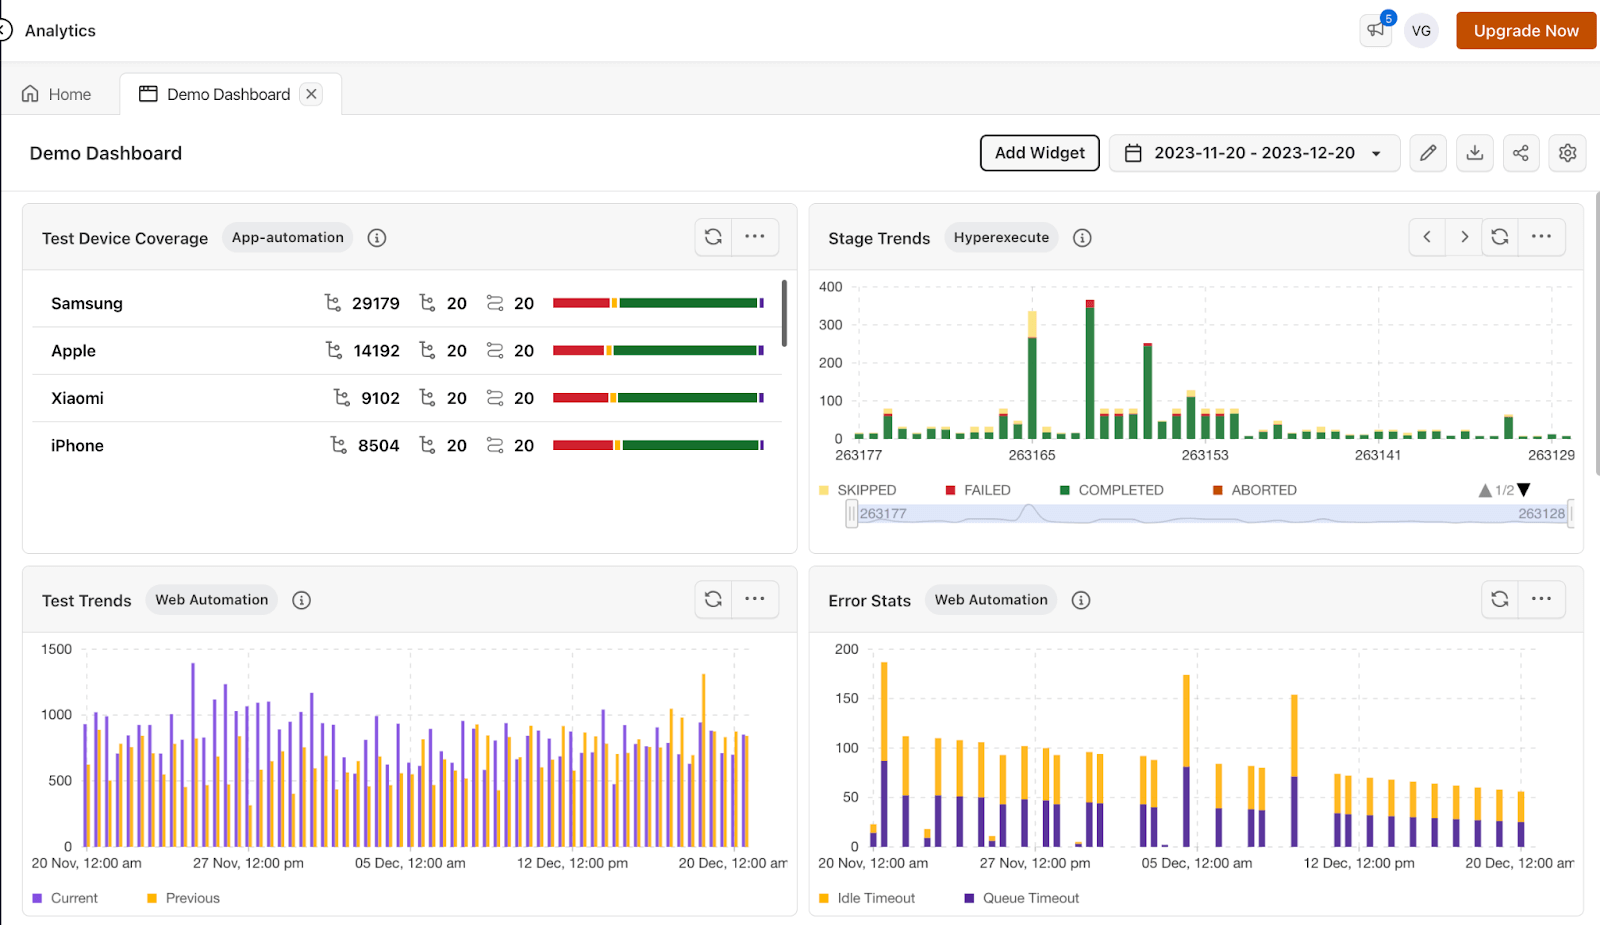
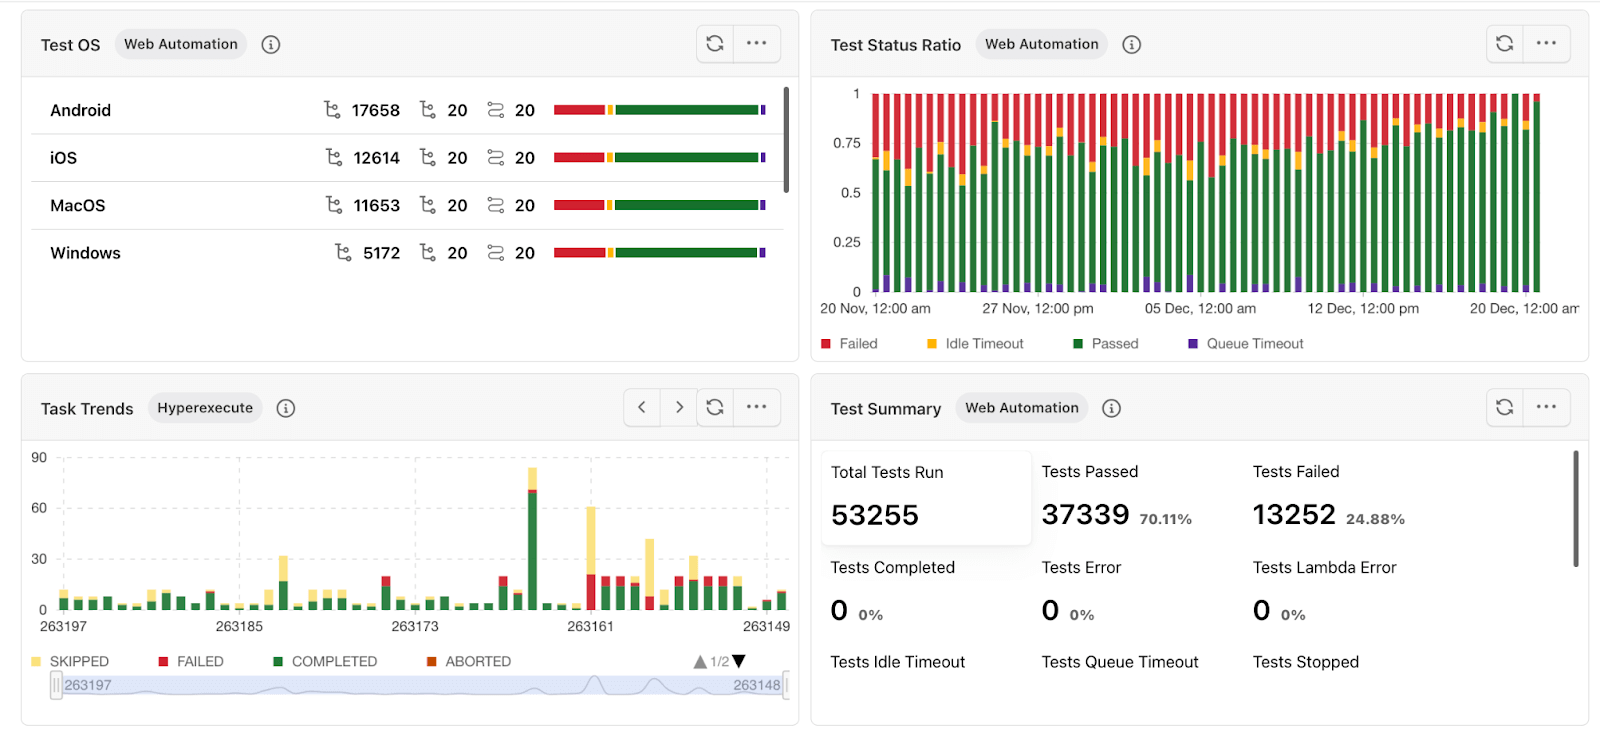
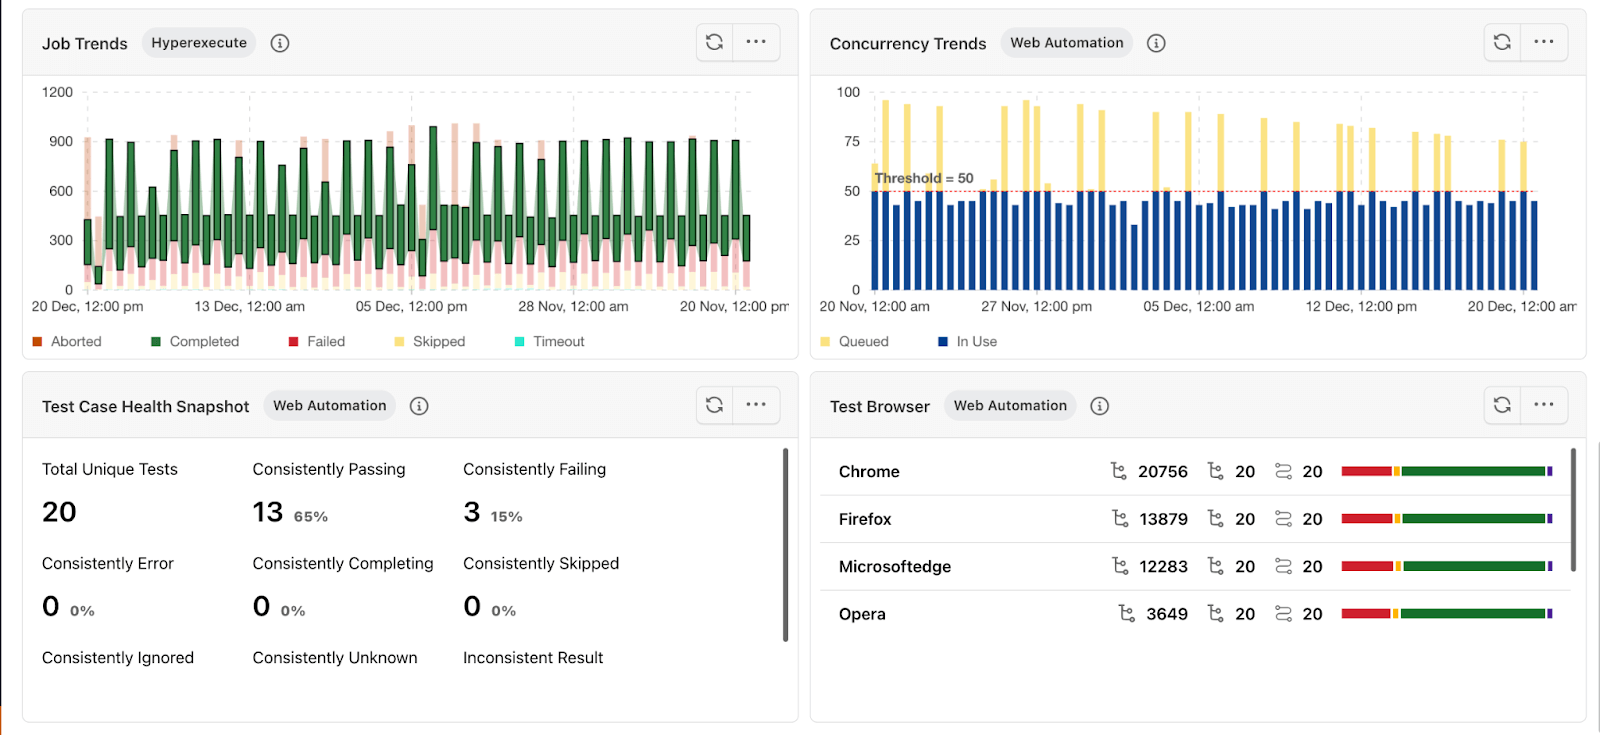
Analytics allows you to analyze test trends, resource utilization, error stats, and other useful QA metrics.
TestNG Reports Generation in Selenium
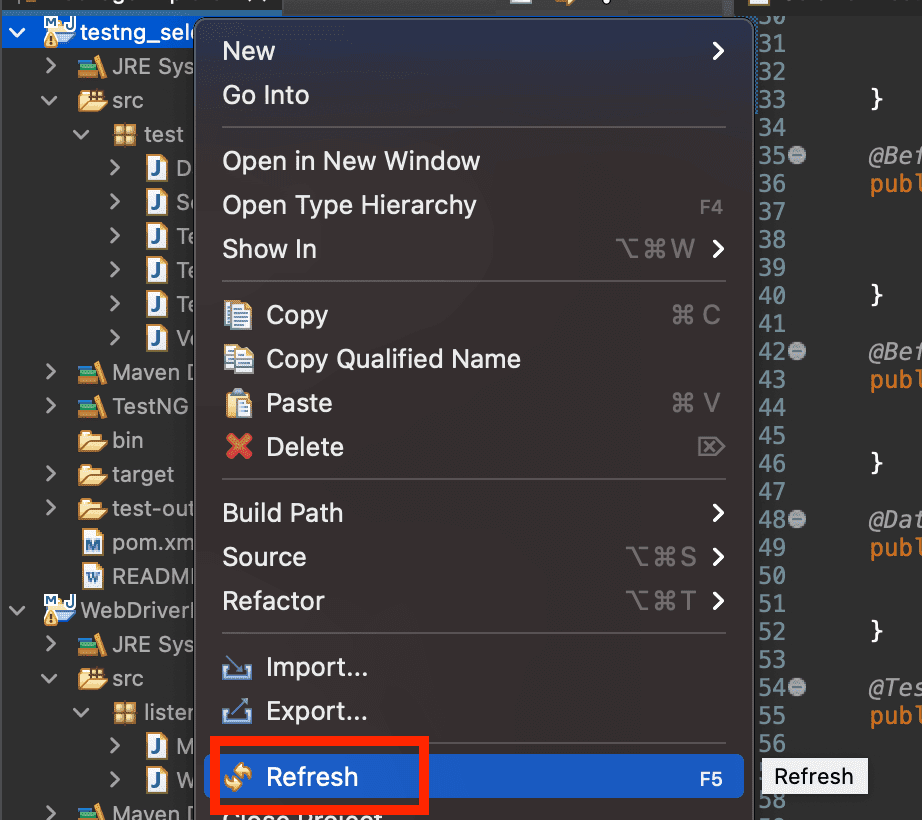
The same results can be analyzed in a more formatted way with the help of HTML reports generated by TestNG. To access the same, refresh your project by right-clicking on the project name. This is advised to update the report to the latest run.
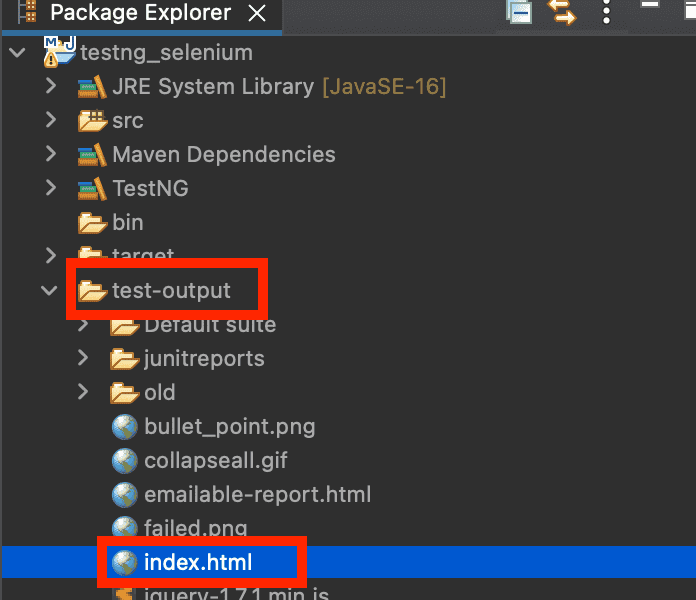
Next, navigate to the test-output folder and open the index.html file. This is the default format report for the TestNG run.
Selecting the test from the Info section shows the number of classes executed and the number of failed tests.
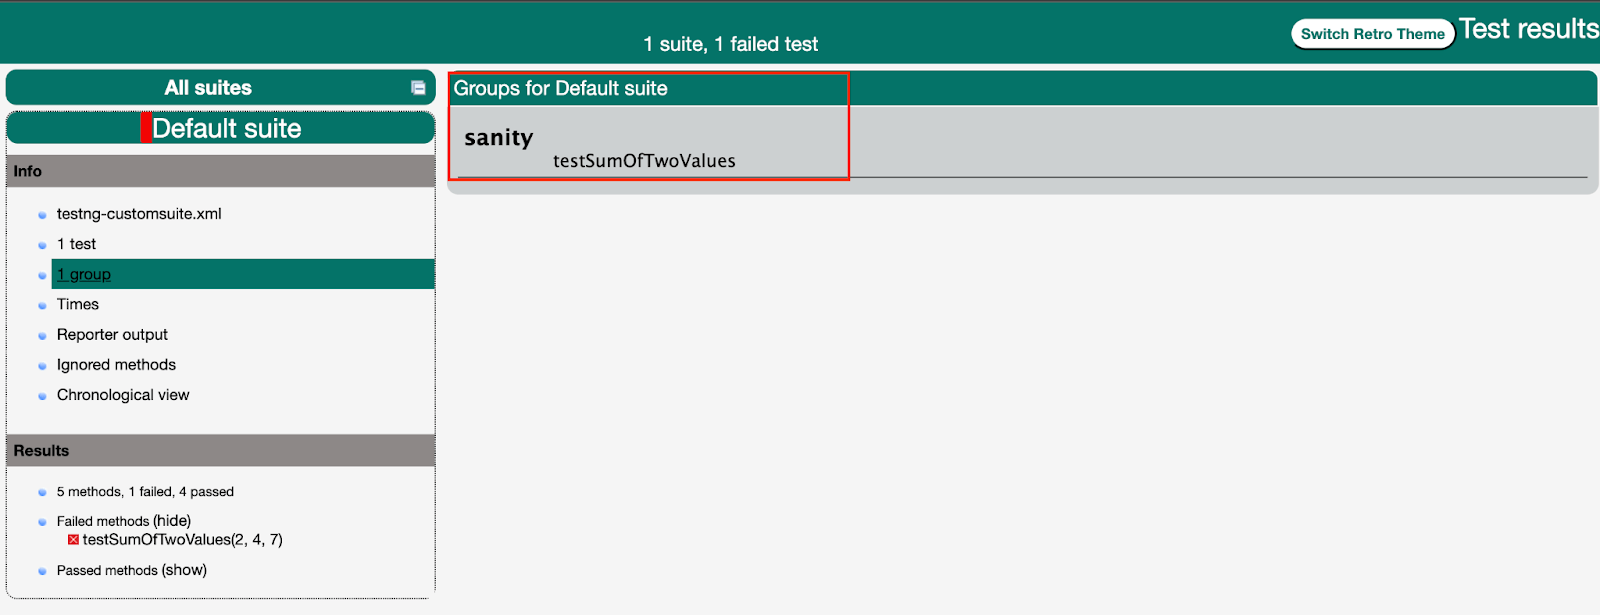
Selecting the group section shows the group’s name and the test case methods executed as a part of it.
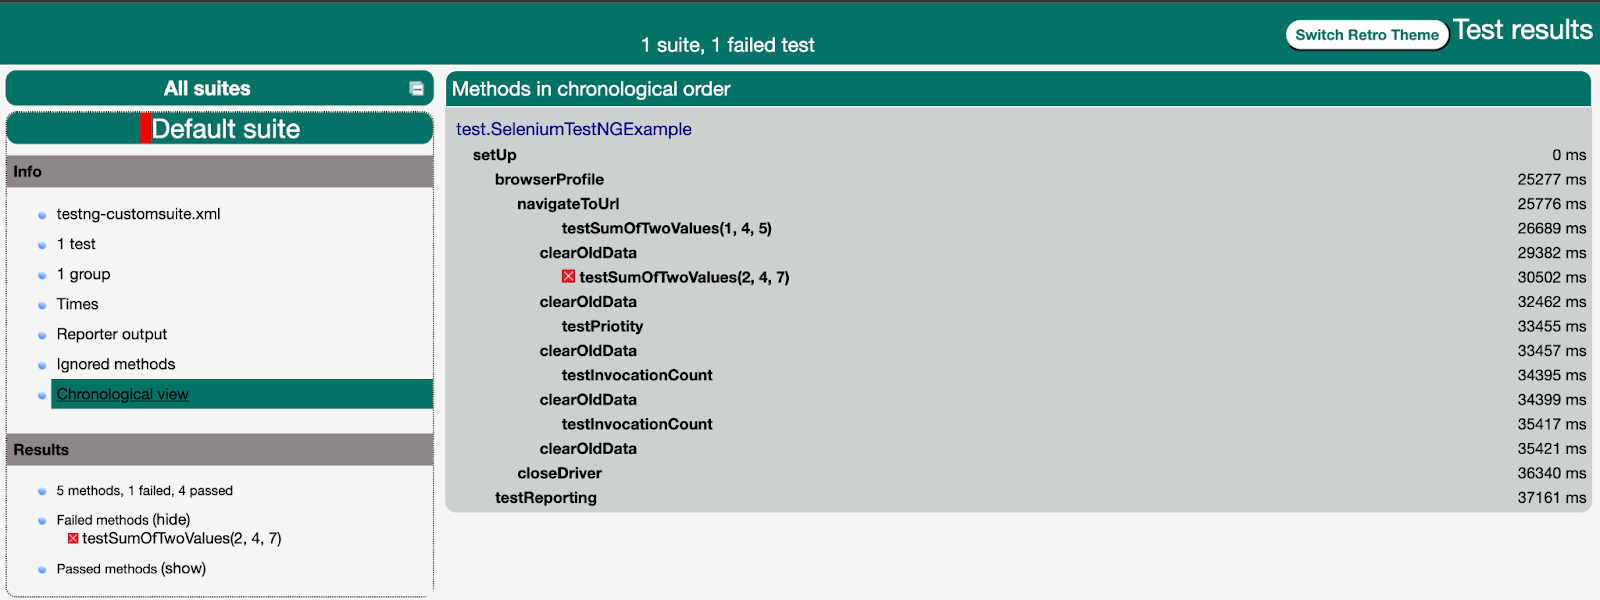
Chronological View shows the order in which all the methods in the class were executed, along with the time taken by each function on each step.
Last and most important is the Results section, which shows the complete details of the executed cases with proper exceptions/assert failures in case of failed test cases. We can hide/show only passed or failed test cases using this section as required.
Expand your knowledge of TestNG reporter logs to gain detailed insights into the reporting capabilities of TestNG in Selenium. Refer to the TestNG Reporter Logs in the Selenium guide for a comprehensive understanding. This guide helps you enhance your skills in analyzing and interpreting test results, contributing to more informed decision-making in your Selenium automation testing efforts.
If you are a test automation expert and want to demonstrate your proficiency using TestNG in Selenium, you can earn this TestNG certification offered by LambdaTest for FREE.
Conclusion
With this TestNG in Selenium tutorial, we can easily conclude that using TestNG in Selenium makes the tests more structured and easy to maintain. Moreover, with the support of its additional features like reporting, DataProviders, more robust annotations, etc., over its predecessors, TestNG makes the automation testing experience user-friendly. Having said that, it is time for you to get started with your first TestNG in Selenium automation project, and remember to use the annotations wisely as they are to make life easier.
Happy Testing!!
Frequently Asked Questions (FAQs)
What is TestNG? How is it different from Selenium?
TestNG is a free and open-source automation testing framework designed for ease of use and integration. It allows testers to configure and control the test execution for any framework and provides support for a number of annotations.
Selenium, on the other hand, is an automation tool to test and automate web-based applications specifically.
What are the different ways to execute a TestNG test?
TestNG tests can be executed in various ways:
Using IDE Integration: Run tests directly from IDEs like Eclipse or IntelliJ.
TestNG XML Configuration: Define test configurations in a testng.xml file.
Command Line: Execute tests using the TestNG command-line interface.
What languages are supported by TestNG, JUnit, and NUnit?
- TestNG: Primarily supports JAVA, but also has limited support for Kotlin and Groovy
- JUnit: Mainly JAVA but other JVM languages with JUnit 4 and 5 versions
- NUnit: Specifically designed for the .NET platform and is used with languages like C# and VB.NET.
What is the order of execution of annotations in TestNG?
TestNG annotations are executed in the below order.
@BeforeSuite -> @BeforeTest -> @BeforeClass -> @BeforeMethod -> @Test -> @AfterMethod -> @AfterClass -> @AfterTest -> @AfterSuite
Does TestNG support zero priority?
By default, TestNG assigns a priority of 0 to cases it is not defined. These cases are executed in alphabetical order, with cases that have no priority.
Does TestNG support negative priority?
Yes, it supports negative values like -1 for priority. The case with negative priority is executed first because it follows the principle of executing the case with the least value first by assigning it a higher priority. So, a case with priority = -2 is executed first, then a case with priority = -1, then a case with no priority, then a case with priority = 1, and so on.
Does TestNG support parallel execution?
Yes, TestNG supports parallel execution using parallel attributes in the testng.xml. You can set its value to methods or classes to execute test methods or test classes parallelly.
Which build and continuous integration tools and reporting frameworks are supported by TestNG?
TestNG supports several tools and frameworks, including
- Build tools: Maven, Gradle
- Continuous Integration (CI) tools: Jenkins, TeamCity, GitLab CI, and Bamboo
- Reporting frameworks: Allure, Extent reports, ReportNG.


Author’s Profile
Vipul Gupta
Vipul Gupta is a passionate Quality Engineer with 6+ years of experience and keen interest in automation testing of Web and API based applications. He is having experience in designing and maintaining various automation frameworks. Currently working as Sr. SDET, he enjoys reading and learning about new test practices and frameworks.
Blogs: 23
Got Questions? Drop them on LambdaTest Community. Visit now