
How to Handle ElementClickInterceptedException in Selenium Java
Faisal Khatri
Posted On: September 18, 2023
![]() 155256 Views
155256 Views
![]() 25 Min Read
25 Min Read
Selenium is one of the most popular automation testing frameworks organizations use to automate their websites. With Selenium’s 4.0.0 release, multiple breaking changes have been introduced, like WC standardization, Selenium Manager, Chrome DevTools, etc.
With all these features, it has made the test automation engineer’s life easy by removing the complexities like adding executable driver’s path for browser drivers, browser compatibility issues, etc., and helping them to write the automated tests faster and more comfortably.
When it comes to test automation, automation engineers (count me in too :)) often struggle through a common problem, i.e., getting exceptions when running the tests. There are different exceptions in Selenium that test (or automation) engineers come across when performing test automation. Some common exceptions are NoSuchElementException, TimeoutException, SessionNotCreatedException, StaleElementReferenceException, ElementClickInterceptedException, etc.
In this Selenium Java tutorial, we will discuss the nitty-gritty of ElementClickInterceptedException in Selenium and ways to mitigate the exception. If you are preparing for an interview you can learn more through Selenium interview questions.
So, let’s get started.
TABLE OF CONTENTS
Also, Check out this tutorial to Unlock the solution to handling the “ElementClickInterceptedException” in Selenium Java
What is an ElementClickInterceptedException?
ElementClickInterceptedException occurs when the click command cannot be executed on the WebElement as it is not clickable. This exception typically occurs when another WebElement overlaps the WebElement that somehow receives the click.
As we use the Java programming language in this blog, the exception name ElementClickInterceptedException is used here. It might change in the case of other programming languages as below –
| Programming Language | Exception Name |
|---|---|
| Java | ElementClickInterceptedException |
| C# | OpenQA.Selenium.ElementClickInterceptedException |
| Ruby | ERROR: element click intercepted |
| Python | selenium.common.exceptions.ElementClickInterceptedException |
| JavaScript | WebDriverError: element click intercepted: |
The following exception log is printed in the console when ElementClickInterceptedException is thrown using Selenium with Java:

The logs show that instead of the actual element on which the click command was called, it was not clickable as some other element covered it; hence, the exception was thrown.
Different reasons can cause the ElementClickInterceptedException in Selenium. Let’s learn about them in the next section.
What are the causes of ElementClickInterceptedException?
The following are the major causes that can lead to ElementClickInterceptedException thrown by Selenium WebDriver:
- WebElements overlap each other
- WebElement is disabled
- WebElement is not visible or not available in the DOM currently at the time when the click command was executed. This can happen due to a slow Internet connection, and the automation scripts are executed while the web page is not loaded.
Let’s discuss these causes in detail one by one.
Cause 1: WebElements overlapping with each other
Overlapping elements on the webpage can cause problems in running test automation scripts. When interactions are done with such elements, we often receive different exceptions based on the interactions performed. However, if we try to click on the element, an ElementClickInterceptedException will be thrown.
Here is an example of the web page from the UITestingPlayground website that has the name field overlapped with some other WebElement.
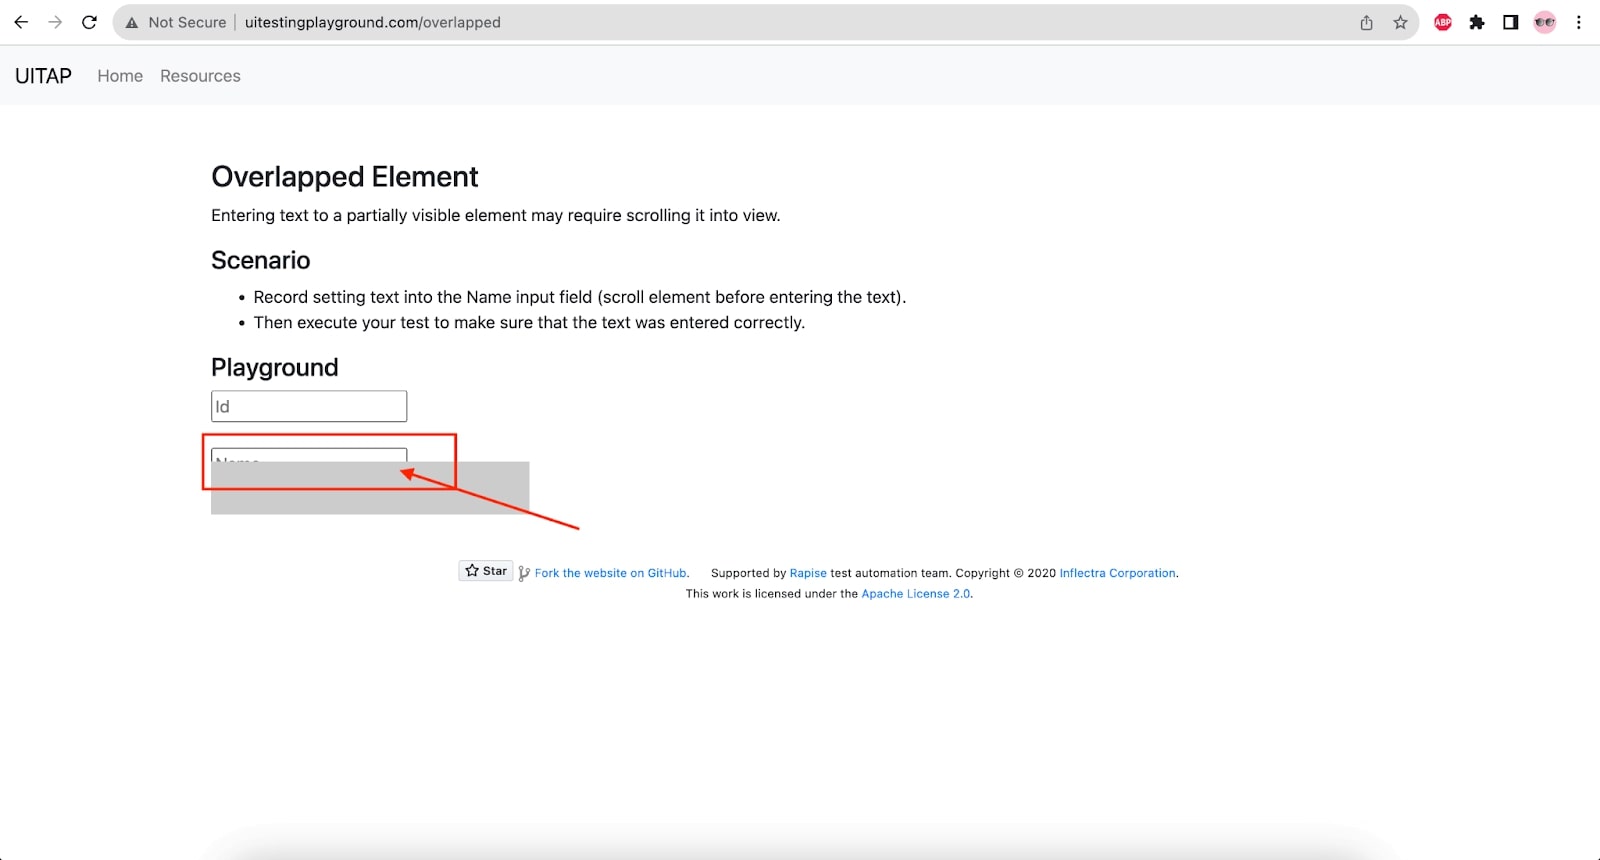
So, ideally, to interact with the name field, we will have to scroll to get the name field into view and then perform the interaction on it to handle the ElementClickInterceptedException in Selenium.
Cause 2: WebElement is disabled
Another reason for getting the ElementClickInterceptedException in Selenium is that the WebElement might be disabled, and Selenium may not be able to perform clicks as desired through the automation script.
This may happen in scenarios like filling up the user registration form on the website, where the Submit button remains disabled unless all the mandatory fields are filled up correctly. So, in case the Submit button is clicked while it is still disabled, Selenium WebDriver might throw an ElementClickInterceptedException.
Cause 3: WebElement was not visible when the click command was executed
When the tests are executed using test automation scripts, web page load time should also be considered. As the automation scripts continue to execute line by line, once the first line is executed, the program moves to the next line.
Consider an example of an eCommerce website with multiple JavaScript codes running on the web page.
We locate a product and click the Add to Cart button next to it as a part of our test scenario. There is a higher chance of getting an ElementClickInterceptedException as the webpage is not completely loaded, and we are trying to click on a WebElement that is currently not visible in DOM.
Having learned about the causes for ElementClickInterceptedException in Selenium, let’s now proceed and check out the multiple ways to handle the exception and run our Selenium test automation scripts hassle-free.
How to handle ElementClickInterceptedException in Selenium?
Before we write the test automation scripts, it would be good to share the details of the tools used in this blog to demo the solutions for handling the ElementClickInterceptedException in Selenium.
- Programming Language – Java 17
- Web Automation tool – Selenium WebDriver – version – 4.10.0
- Build Tool – Maven
- Test Runner – TestNG
- Cloud Platform to run web automation tests – LambdaTest
Project Setup
The Maven project has been created, and the respective dependencies for TestNG and Selenium WebDriver have been updated in the pom.xml. The build and plugins section in the pom.xml are updated with the maven-sure-fire and maven-compiler plugins to execute the tests using the command line interface. We will use different test scenarios in this project to demo how to handle the ElementClickInterceptedException in Selenium.

For better maintainability and re-using the page objects, the Page Object Model (POM) has been used in this project. It helps remove code duplication and separate the page objects from the tests, thus helping write cleaner automation tests.
In this section, we will be going through multiple solutions that can be used to handle the ElementClickInterceptedException in Selenium. We will use a couple of websites to demo the solution.
Solution 1: Using Explicit Waits in Selenium WebDriver
Performing click action on the WebElement that did not get loaded properly on the web page is one of the causes that might lead to ElementClickInterceptedException in Selenium. To resolve this, we can use the Explicit Waits in Selenium WebDriver.
We can use the ExpectedConditions like elementToBeClickable to be sure that the WebElement we are clicking is clickable. We may also use the invisibilityOfElementLocated method. This comes in handy in case WebElements like notifications or snack bars overlap.
Test Scenario
- Navigate to the OWASP Juice Shop website.
- Open the Login Page.
- Login to the website using valid credentials.
- Perform assertion for successful login by checking that the Logout link is displayed.
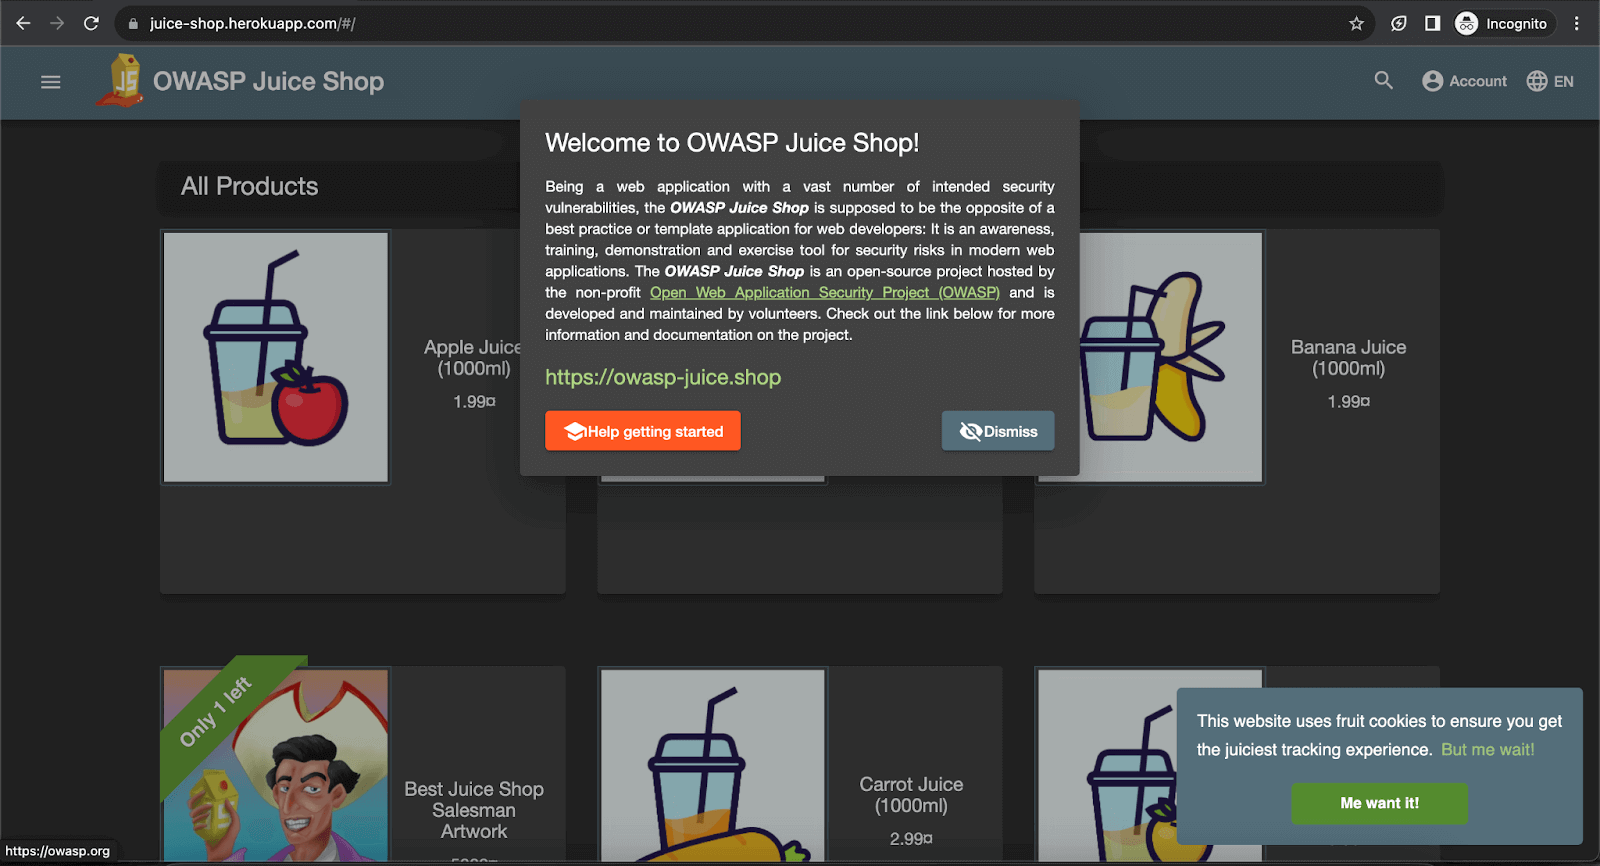

In this scenario, when we try to click on the Login button on the login page after entering valid credentials, it throws ElementClickInterceptedException as the login button is overlapped by the language notification snack bar.
Implementation
In this scenario, we will first navigate to the Homepage of the OWASP Juice Shop website and close all the pop-up messages so we can smoothly run our automation tests.
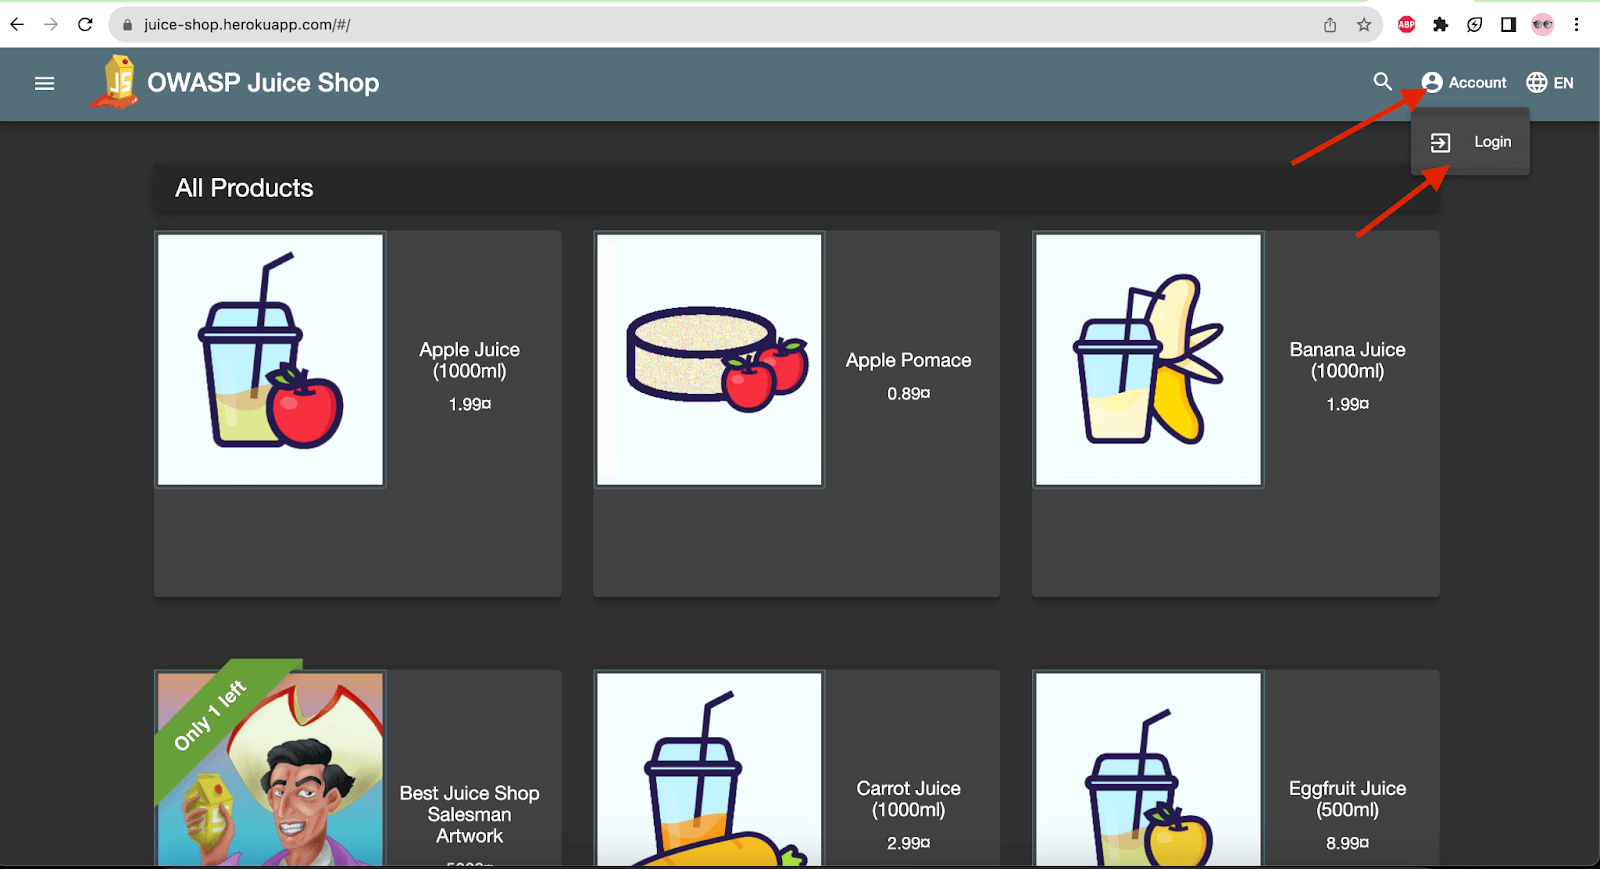
Next, we need to locate and click on the Account link to open it and locate the Login link. We will be navigated to the Login Page by clicking the Login link.
The following is the code from the HomePage class.
|
1 2 3 4 5 6 7 8 9 10 11 12 13 14 15 16 17 18 19 20 21 22 23 24 25 26 27 28 29 30 31 32 33 34 35 |
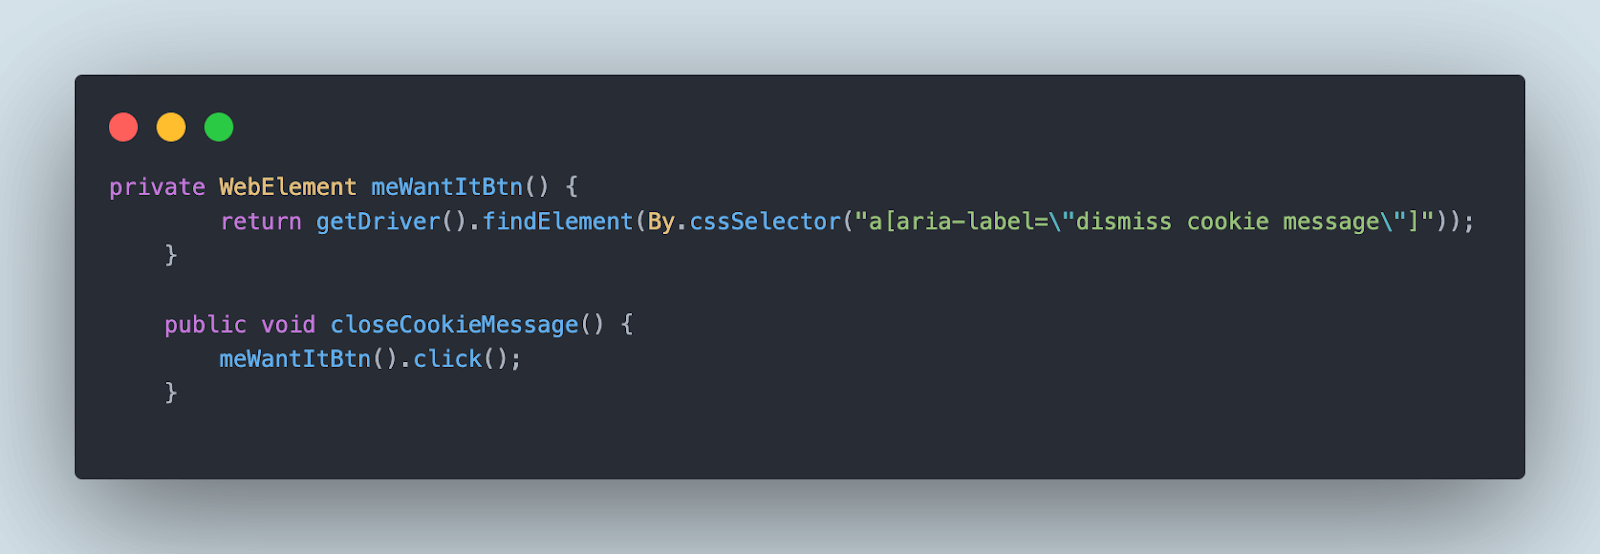
public class HomePage { private WebElement dismissBtn() { return getDriver().findElement(By.cssSelector("button[aria-label=\"Close Welcome Banner\"]")); } public void closeBanner() { dismissBtn().click(); } private WebElement meWantItBtn() { return getDriver().findElement(By.cssSelector("a[aria-label=\"dismiss cookie message\"]")); } public void closeCookieMessage() { meWantItBtn().click(); } protected WebElement accountLink() { return getDriver().findElement(By.id("navbarAccount")); } private WebElement loginLink() { return getDriver().findElement(By.id("navbarLoginButton")); } public LoginPage navigateToLoginPage() { closeBanner(); closeCookieMessage(); accountLink().click(); loginLink().click(); return new LoginPage(); } } |
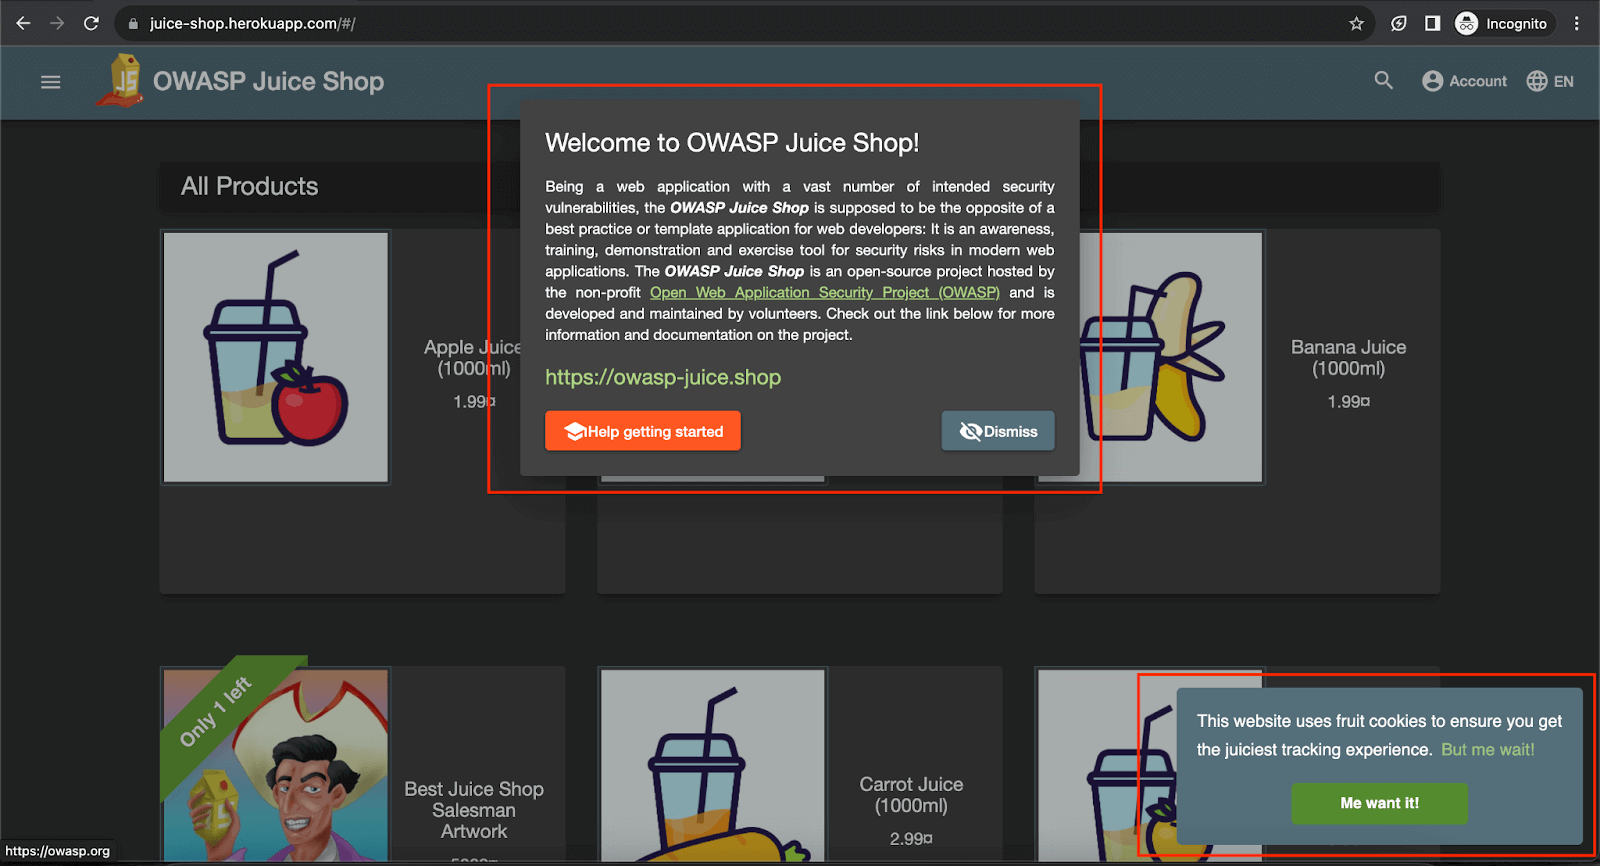
The following are two pop-up messages appearing on the website’s Home page that need to be handled first before moving ahead to the Login page. You can learn more about it through this blog on handling pop-ups in Selenium.
Let’s search for the selectors of the Dismiss button in the DOM using Chrome browser’s Developer Tools.
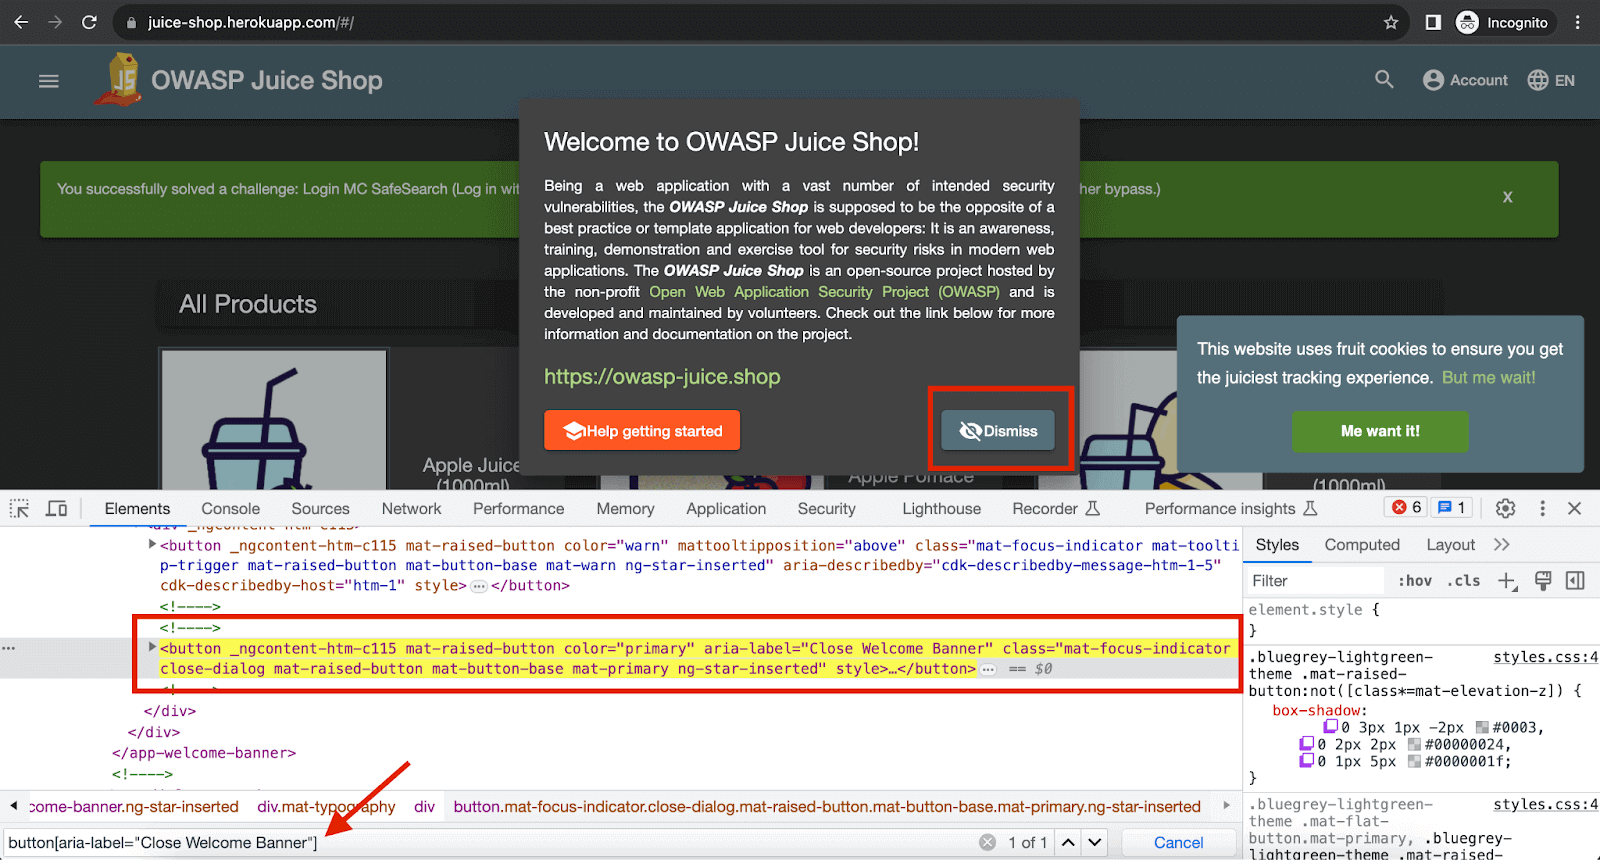
Once we inspect the Dismiss button in the Developer Tools, it takes us to the HTML tag button where the label is “Close Welcome Banner”. We can use this as the Selector for locating the Dismiss button. You can learn more about different locator strategies through this tutorial on locators in Selenium.
We will be using the CSS Selector locator strategy to locate the Dismiss button, and the Selector will be “button[aria-label=”CloseWelcome Banner”]”. Similarly, we can use the Developer Tools window to find other WebElements on this website; we can use the Developer Tools window.
To handle the first popup, i.e., Welcome pop-up, the dismissBtn() method is created in the HomePage class that locates the Dismiss button. The closeBanner() method clicks on the Dismiss button.
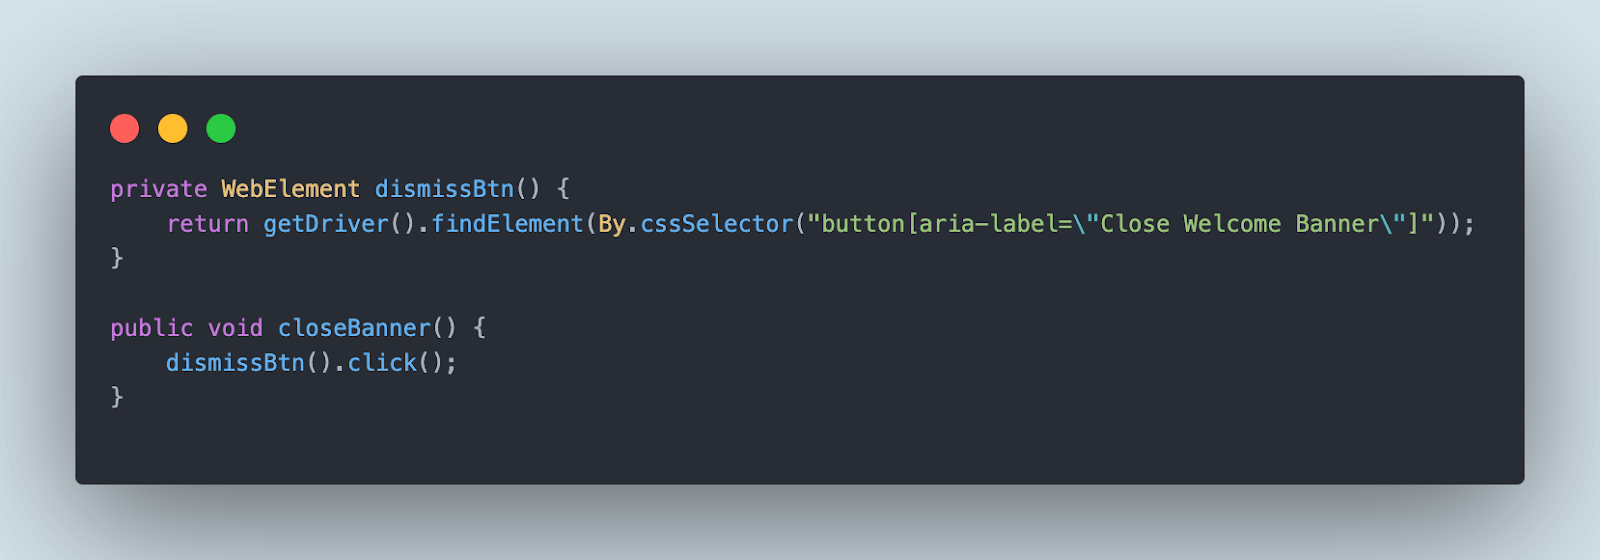
To handle the next pop-up displayed on the screen’s right-hand corner, the meWantItBtn() method is created in the HomePage class that locates the Me Want it! button, and the closeCookieMessage() method clicks on Me Want it! button.
Next, we move to the Account Link, open it, and click the Login link to navigate to the Login page. The accountLink() and loginLink() methods locate the WebElements for Account Link and Login Link.
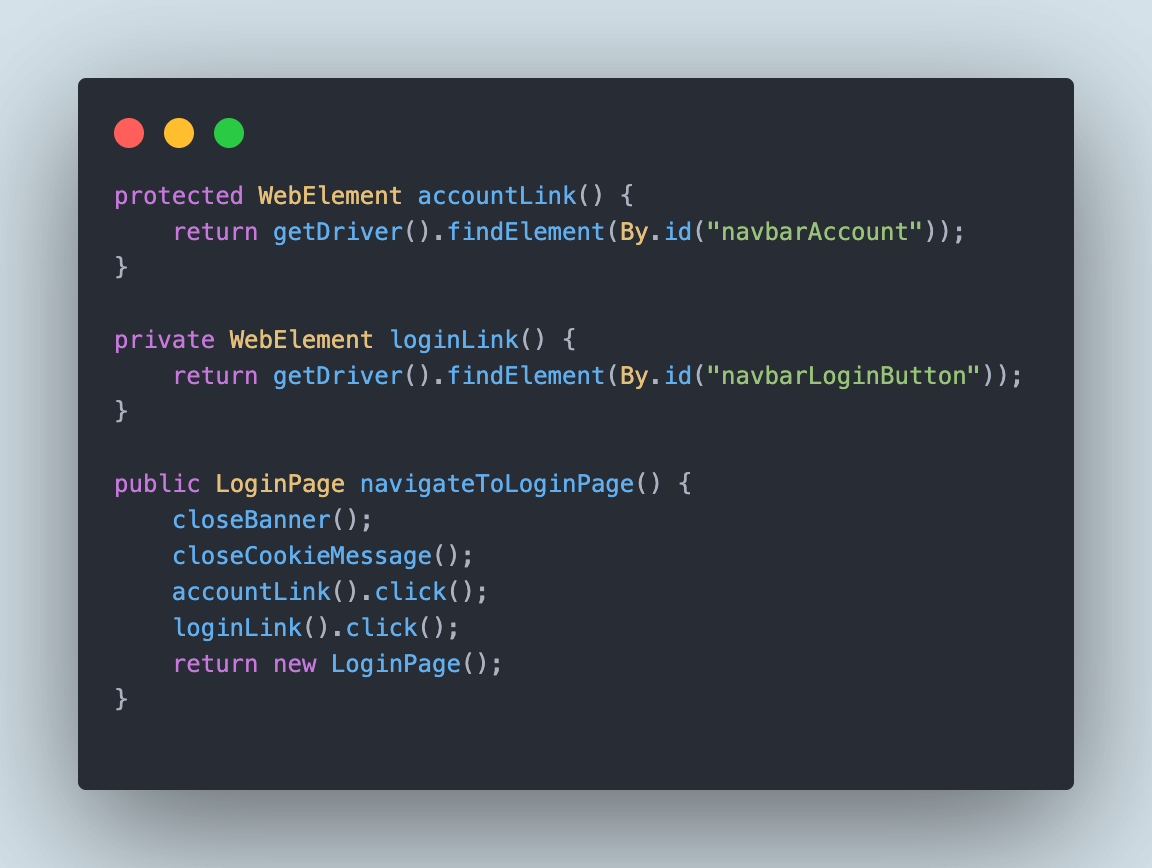
The navigateToLoginPage() method performs the actions for closing the banner. The cookie message clicks on the Account and Login links and finally returns a new instance of the LoginPage class.
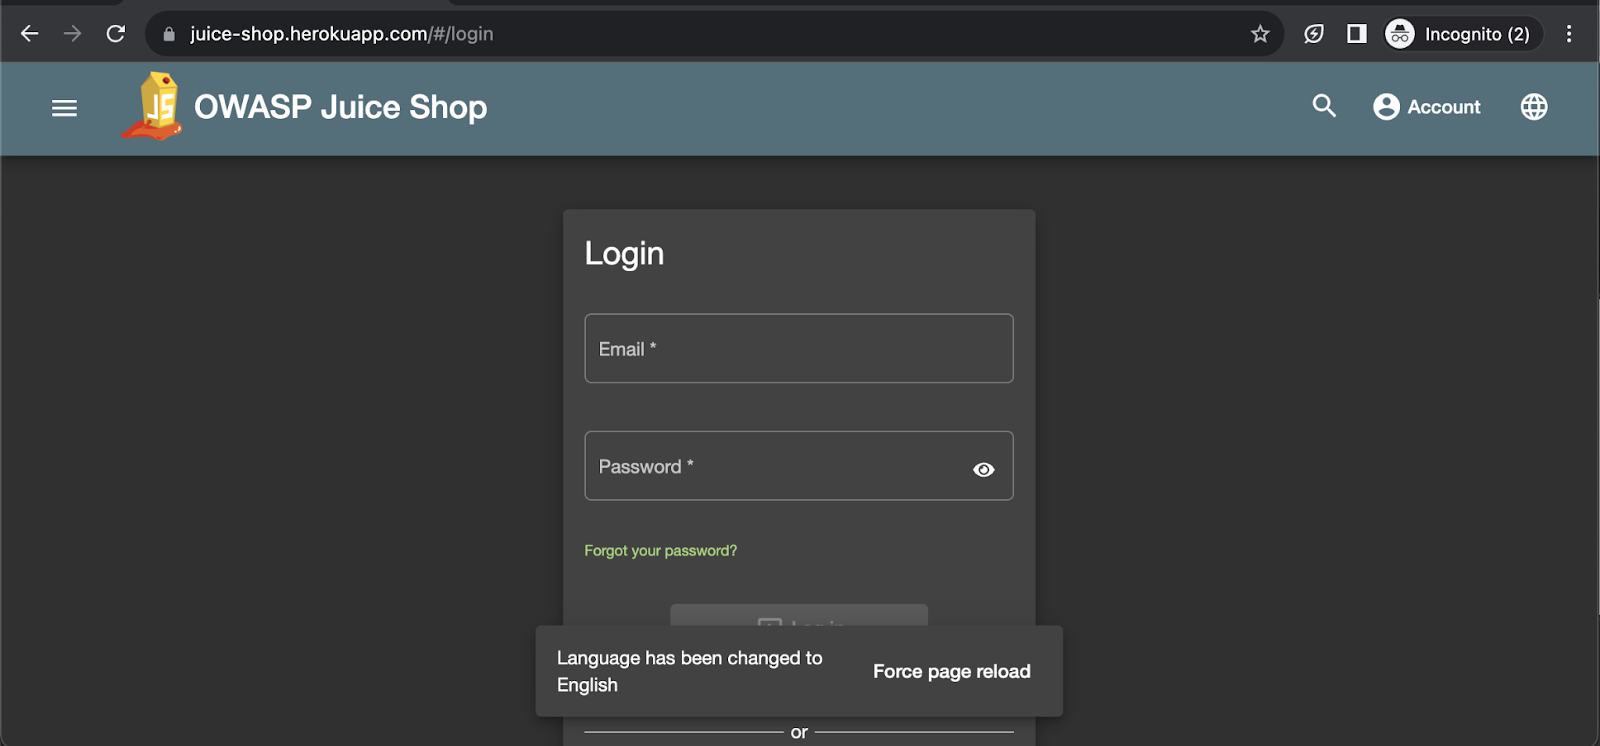
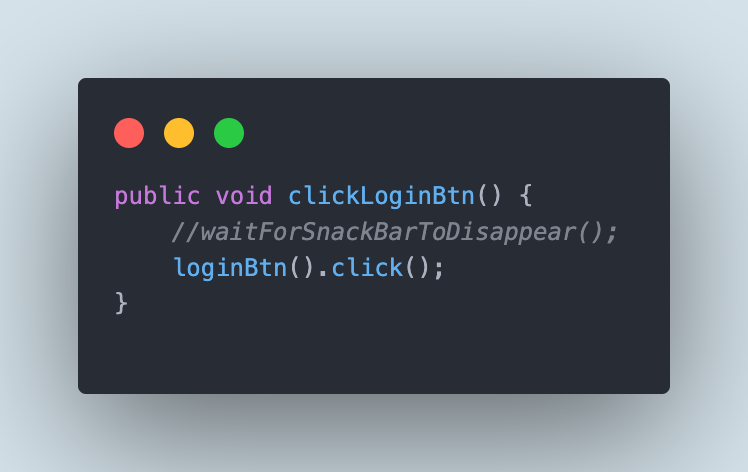
On the Login page, as the language notification snackbar is displayed that overlaps the Login button, we need to wait for the notification to disappear so we can move ahead and click on the button and avoid the ElementClickInterceptedException.
The following code is from the LoginPage class that handles the login actions.
|
1 2 3 4 5 6 7 8 9 10 11 12 13 14 15 16 17 18 19 20 21 22 23 24 25 26 27 28 29 30 31 32 33 34 35 36 37 38 39 40 41 42 43 44 45 46 |
public class LoginPage { private final HomePage homePage; public LoginPage() { this.homePage = new HomePage(); } private WebElement emailField() { return getDriver().findElement(By.id("email")); } private WebElement passwordField() { return getDriver().findElement(By.id("password")); } private WebElement loginBtn() { return getDriver().findElement(By.id("loginButton")); } private void waitForSnackBarToDisappear() { final WebDriverWait wait = new WebDriverWait(getDriver(), Duration.ofSeconds(10)); wait.until(ExpectedConditions.invisibilityOfElementLocated(By.cssSelector(".mat-simple-snack-bar-content"))); } public ProductPage login(final String email, final String password) { emailField().sendKeys(email); passwordField().sendKeys(password); clickLoginBtn(); return new ProductPage(); } public boolean checkLogoutLinkIsDisplayed() { openAccountMenu(); return getDriver().findElement(By.id("navbarLogoutButton")).isDisplayed(); } public void openAccountMenu () { this.homePage.accountLink().click(); } public void clickLoginBtn() { waitForSnackBarToDisappear(); loginBtn().click(); } } |
The invisibilityOfElementLocated() method from the ExpectedConditions class is used here to wait till the time the WebElement for the snackbar notification disappears so we can click on the Login button.
The waitForSnackBarToDisappear() method implements the logic discussed.
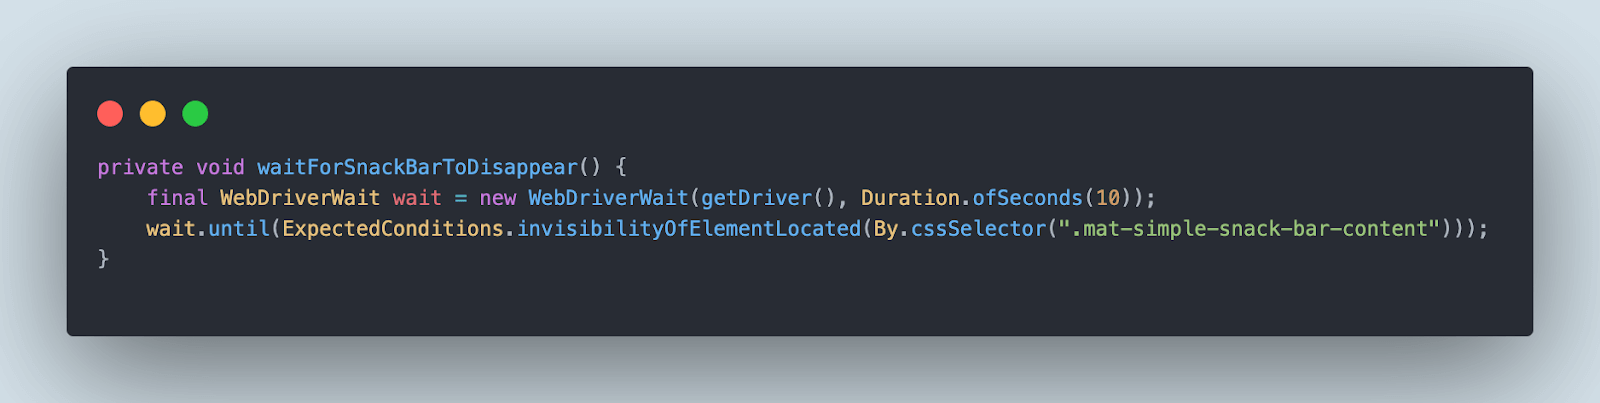
This waitForSnackBarToDisappear() method is called before the Login button is clicked using the clickLoginBtn() method.
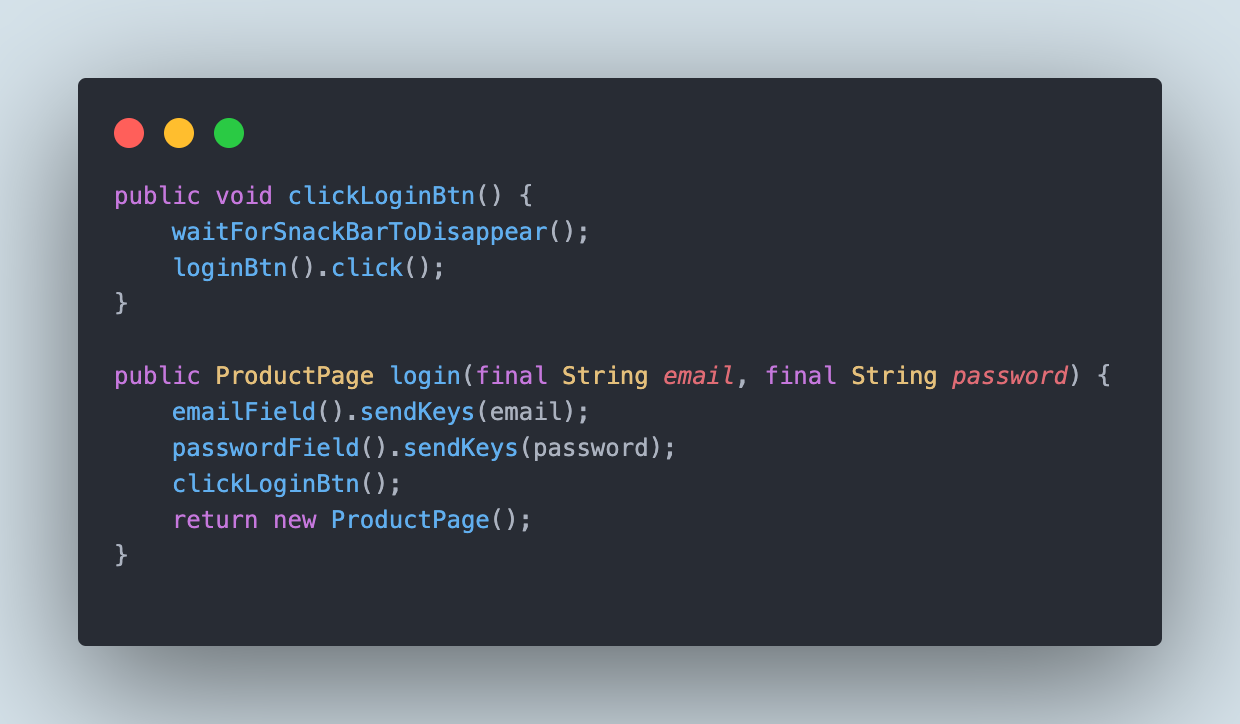
Finally, the login() method is created to perform actions of entering values in email and password fields and clicking on the Login button.
Let’s write the test now and check out the actual working of the scenario. Here is the test method that is available in the JuiceShopTests class.
|
1 2 3 4 5 6 7 8 9 |
private ProductPage productPage; @Test public void testLogin() { getDriver().get("https://juice-shop.herokuapp.com/#/"); final var loginPage = new HomePage().navigateToLoginPage(); this.productPage = loginPage.login("demo+1@gmail.com", "Juice@1234"); assertTrue(loginPage.checkLogoutLinkIsDisplayed()); } |
In this test, we perform the steps to navigate to the OWASP Juice Shop website and call the navigateToLoginPage() method that will open the Login page after which the login() method will be called that has valid credentials as the parameters to login into the website.
Finally, the assertion is performed to check that the Logout link is displayed; this completes the login test.
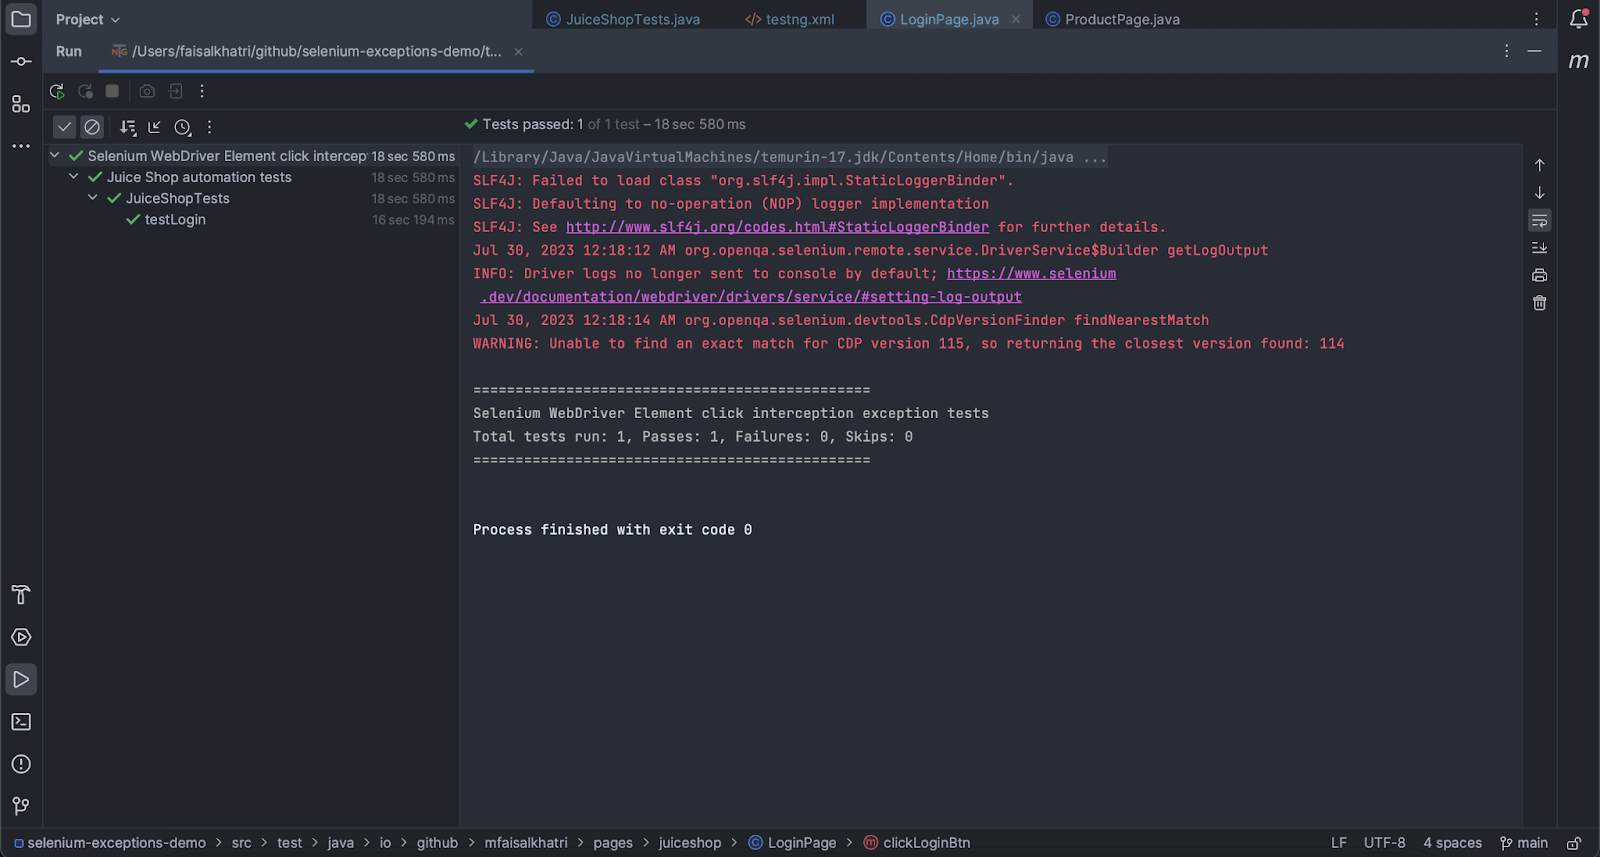
Test Execution
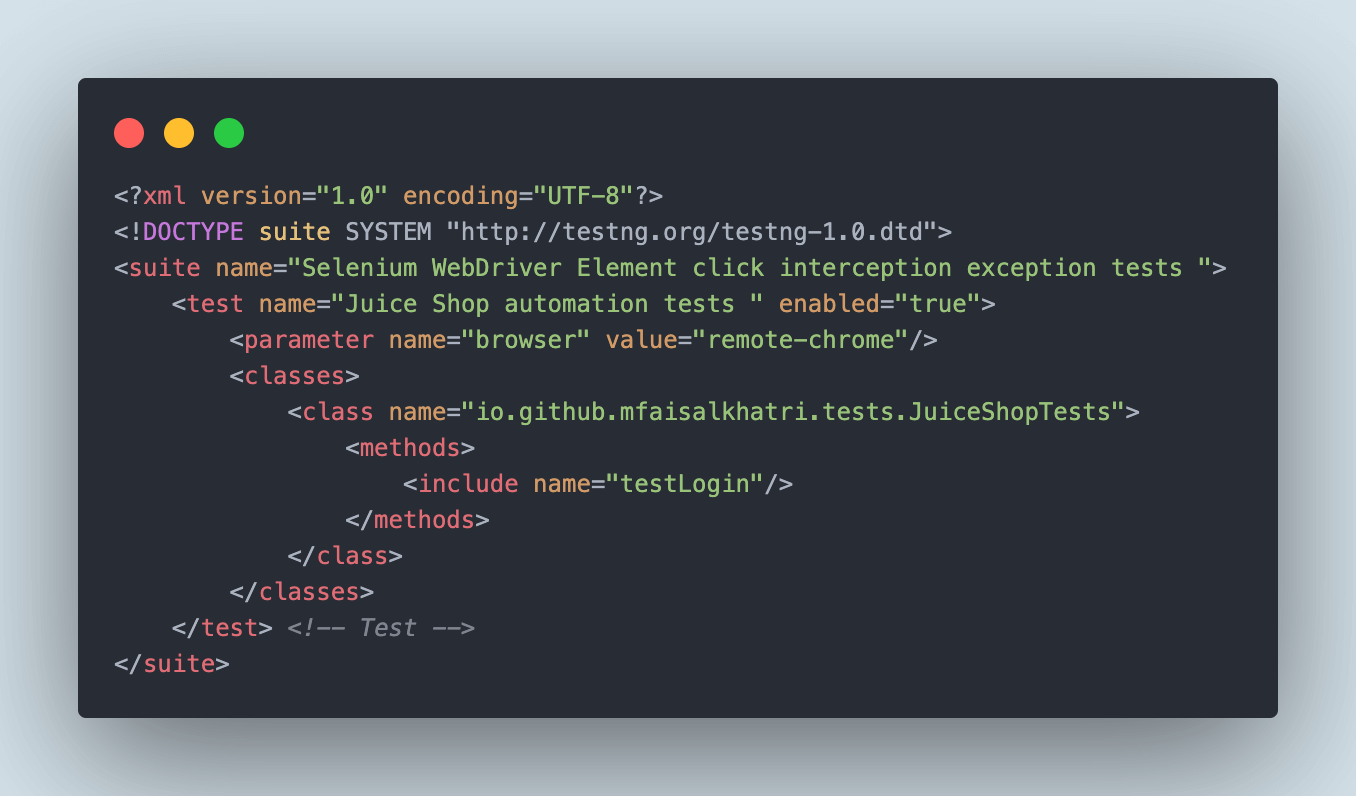
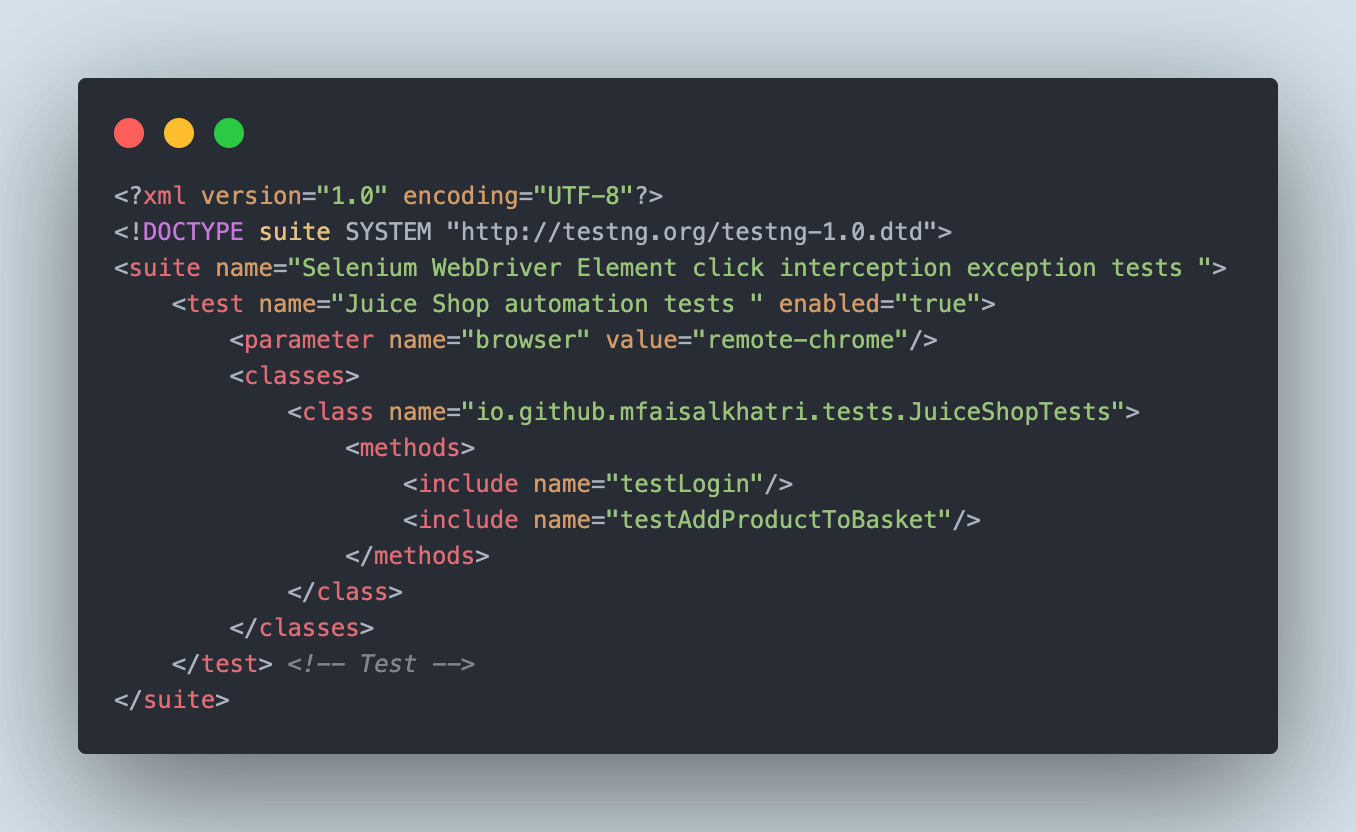
To run the test, right-click on the testng.xml and select the option Run …/testng.xml.
Below is the screenshot from the testng.xml file.
Before executing the test, it’s a good idea to check the ElementClickInterceptedException. To do this, let’s temporarily disable the waitForSnackBarToDisappear() method within the clickLoginBtn() method.
Here is the test execution result that shows the ElementClickInterceptedException in Selenium was thrown, and the test failed.

Now, let’s uncomment the waitForSnackBarToDisappear() method in the clickLoginBtn() method and rerun the test.
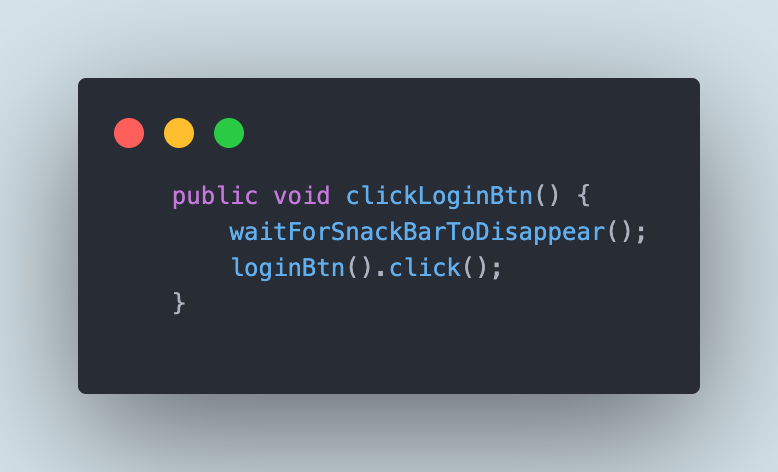
ElementClickInterceptedException in Selenium was handled successfully, and the tests passed.
Solution 2: Locate the overlay WebElement and click on it
The second solution we can try to handle the ElementClickInterceptedException in Selenium is locating the overlay WebElement and clicking on it. Then, perform the next steps to click on the required WebElement.
Test Scenario
-
- Navigate to the OWASP Juice Shop website.
- Login to the website.
- From the product page, add a product to the cart.
- Check that the cart shows “1” product added to it
.
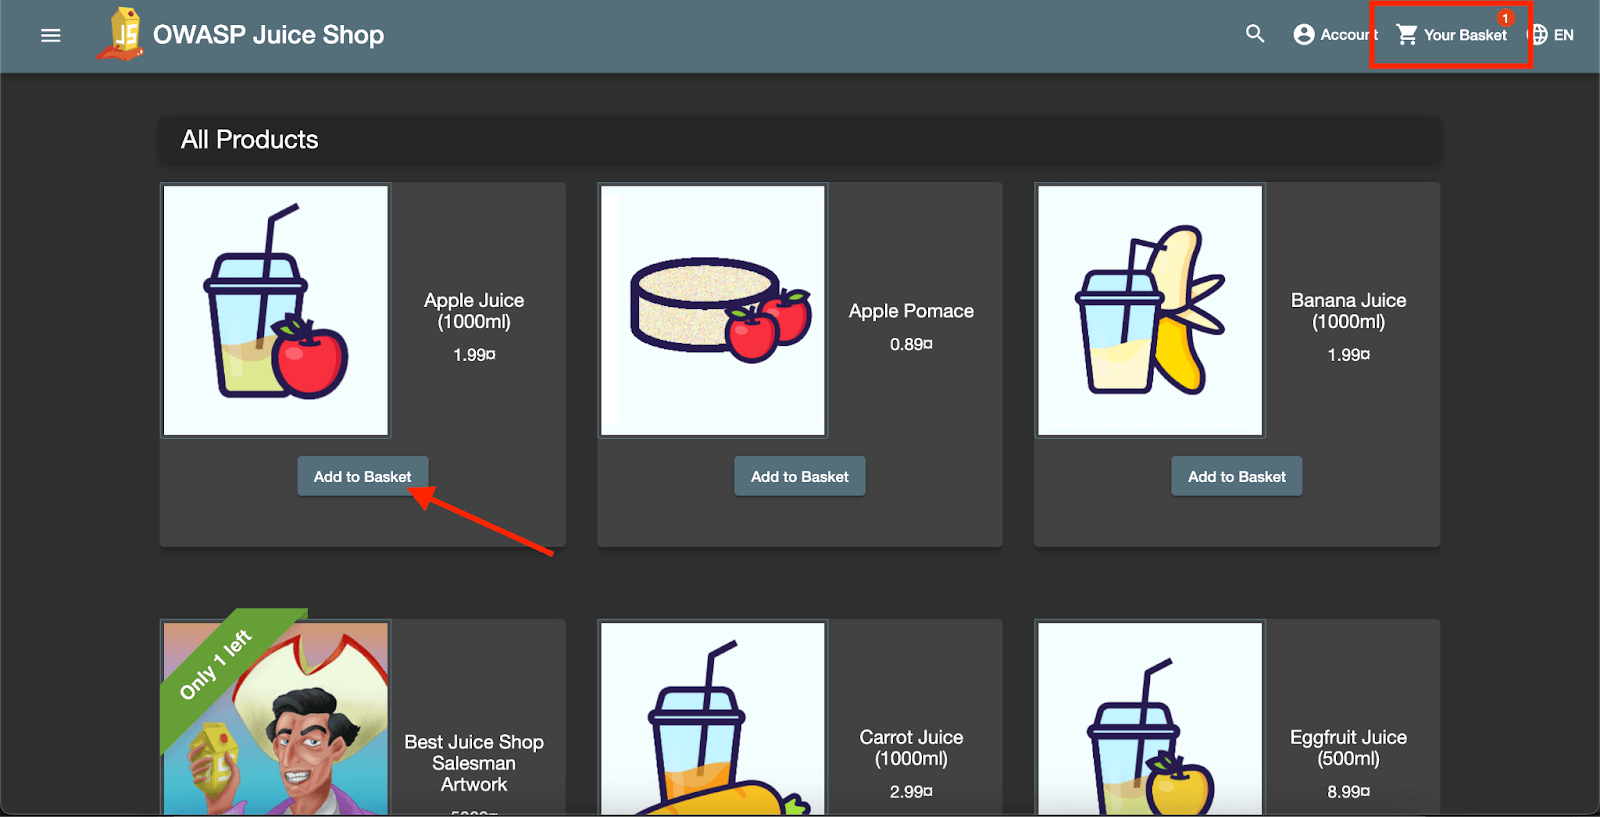
In this scenario, as soon as the product page is loaded after successful login, it is overlapped with an overlay screen that intercepts the click on the Add to Basket button on the page, and an ElementClickInterceptedException in Selenium is thrown.
Implementation
As we already discussed the login in Scenario 1, we will not be going into details for login again here. We will focus on the last 2 steps in this scenario: adding a product to the cart and checking that the cart shows “1” product added.
The following code is written in the ProductPage class that helps locate the WebElements and perform interactions on it.
|
1 2 3 4 5 6 7 8 9 10 11 12 13 14 15 16 17 18 19 |
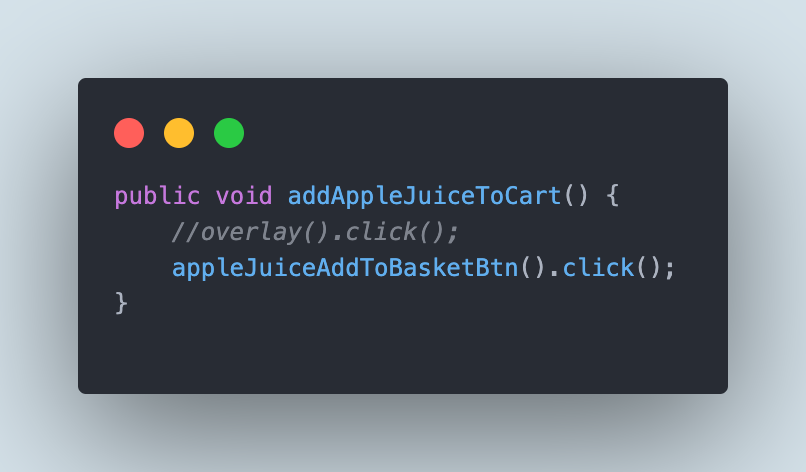
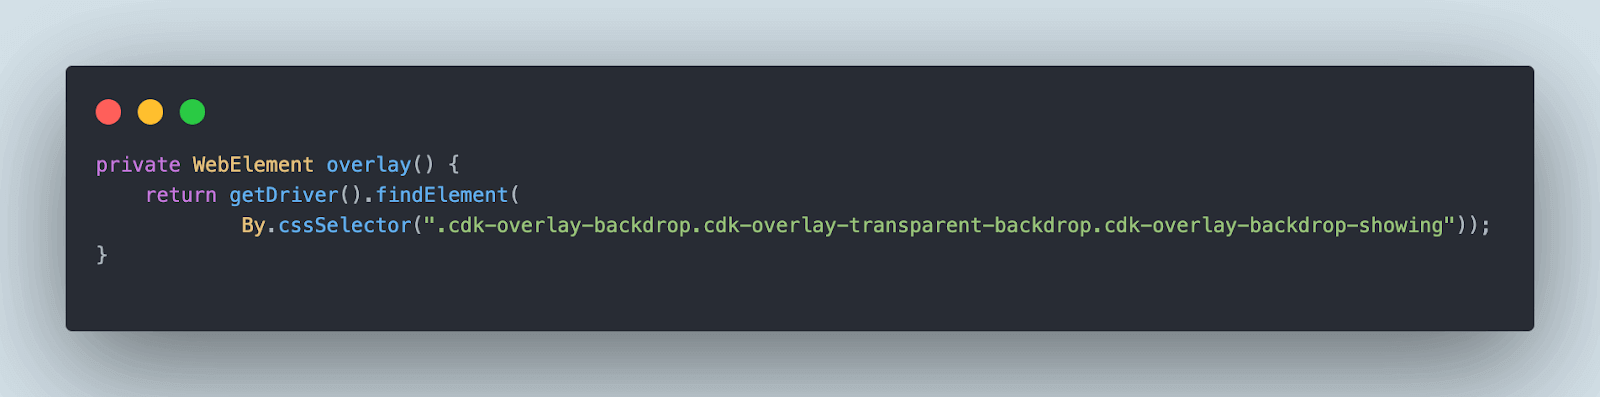
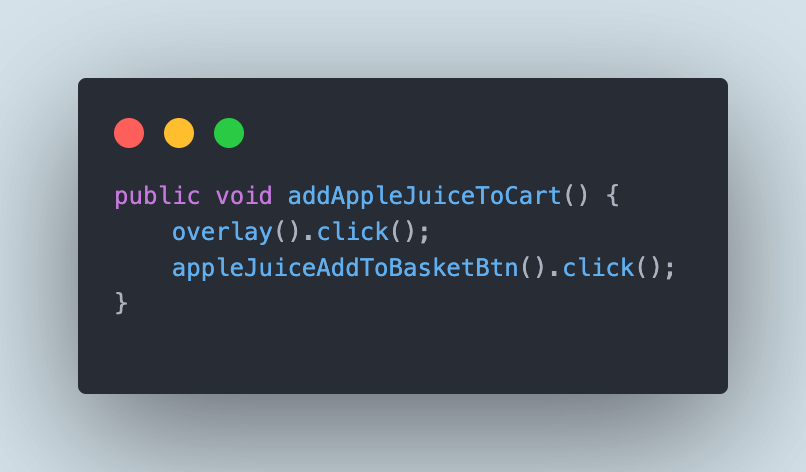
public class ProductPage { private WebElement appleJuiceAddToBasketBtn() { return getDriver().findElement(By.cssSelector("mat-grid-tile:nth-child(1) > div > mat-card > div:nth-child(2) > button")); } private WebElement overlay() { return getDriver().findElement( By.cssSelector(".cdk-overlay-backdrop.cdk-overlay-transparent-backdrop.cdk-overlay-backdrop-showing")); } public void addAppleJuiceToCart() { overlay().click(); appleJuiceAddToBasketBtn().click(); } public String itemsInBasket() { return getDriver().findElement(By.cssSelector("span.warn-notification")).getAttribute("innerText"); } } |
overlay() method locates and returns the WebElement for the overlay screen and is called in the addAppleJuiceToCart() method.
itemsInBasket() method returns the value of the items in the cart WebElement in the string format that will help us perform assertion.
Here is the test method testAddProductToBasket() available in the JuiceShopTests class.
We have already covered the login step in Scenario 1. This Scenario 2 test will run after the Scenario 1 test, and the test order will be handled in testng.xml.
|
1 2 3 4 5 |
@Test public void testAddProductToBasket() { this.productPage.addAppleJuiceToCart(); assertEquals(this.productPage.itemsInBasket(), "1 "); } |
Test Execution
Here is the screenshot of the testng.xml file that will be used to run the test.
Before running the tests, let’s comment out the statement where we are locating the overlay screen and clicking on it to replicate the ElementClickInterceptedException in Selenium.
The screenshot below shows the test execution result with the ElementClickInterceptedException.
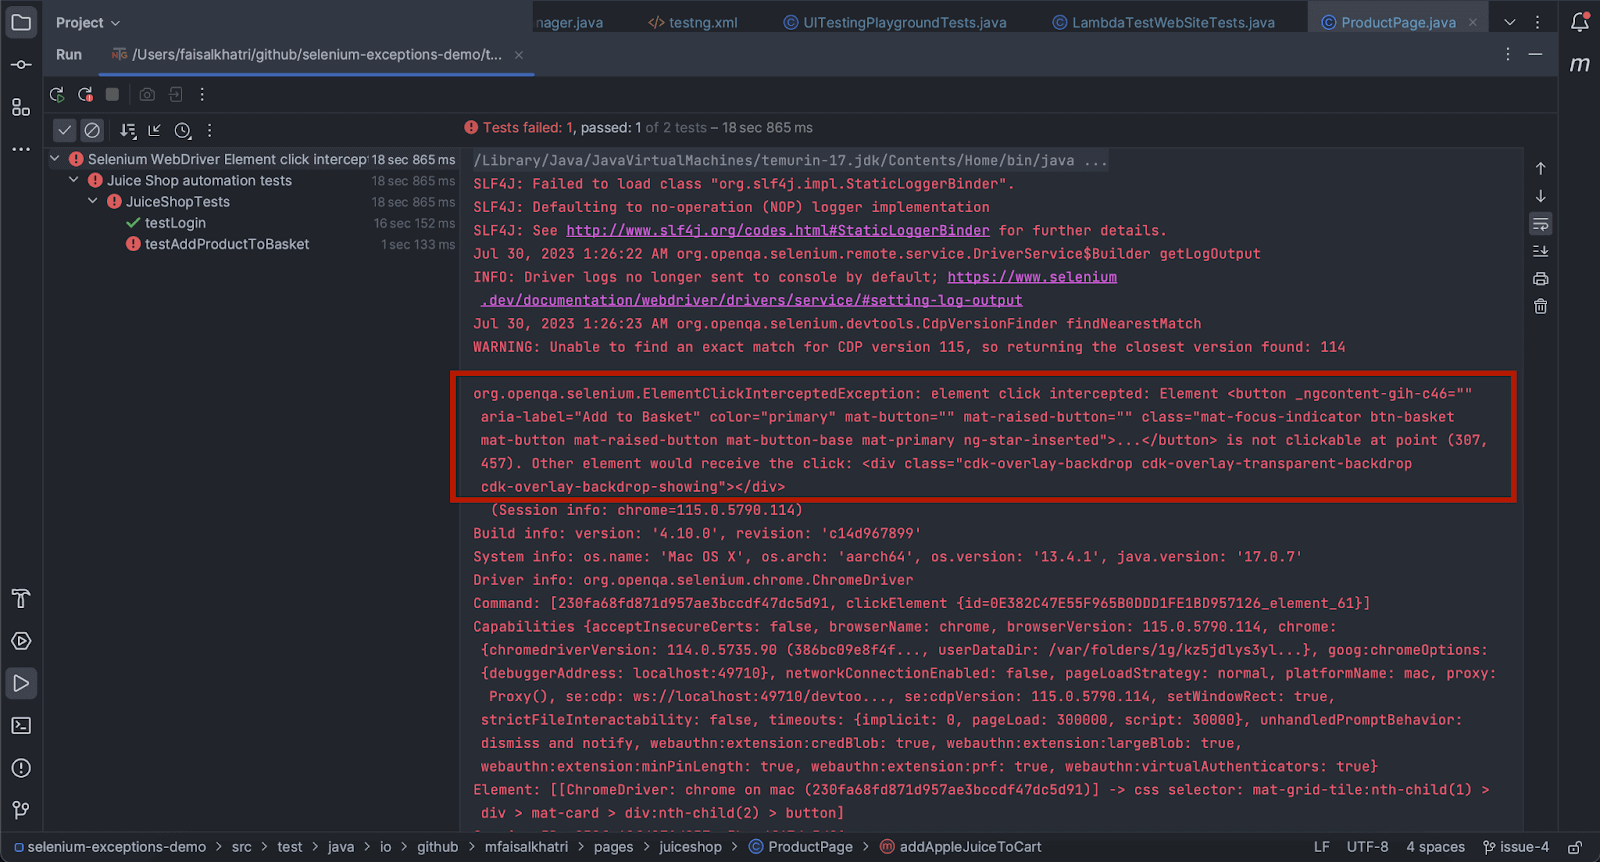
If you check the logs closely, you will notice that it provides us with the WebElement locator for the overlay screen. This can be used directly to locate and click on the overlay screen WebElement.
Let’s uncomment the statement that clicks on the overlay WebElement and handles the ElementClickInterceptedException in Selenium.
Let’s re-run the test and check the output.
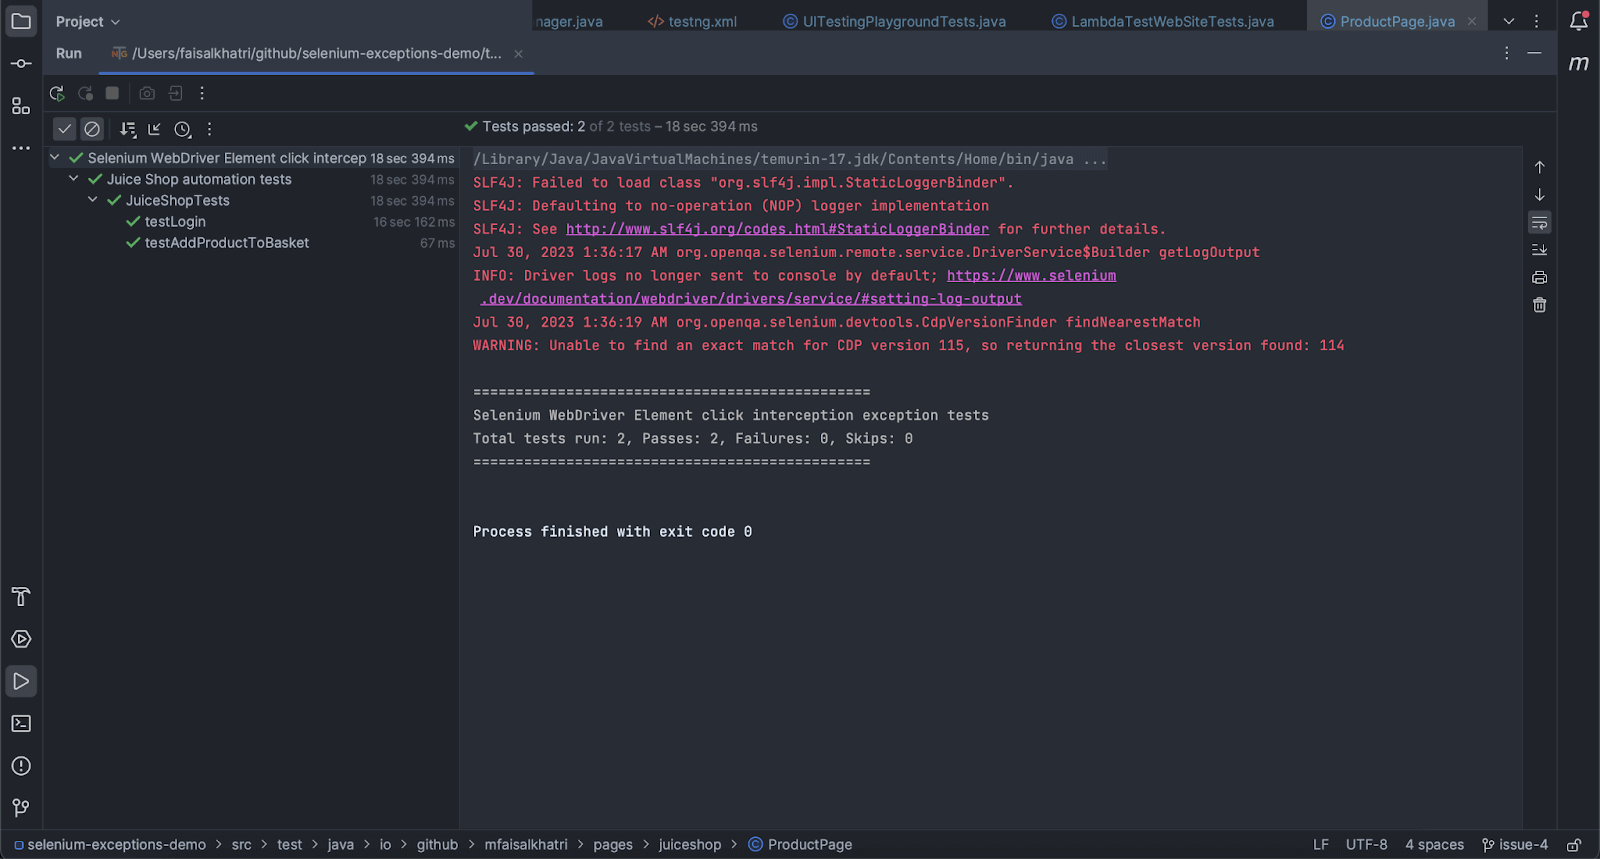
The tests passed successfully using the solution where we clicked the overlay screen before clicking the Add to Basket button.
Solution 3: Clicking on the WebElement using JavaScriptExecutor
The third solution for handling the ElementClickInterceptedException in Selenium is using the JavaScriptExecutor to click on the WebElement. This is recommended in case the first two solutions don’t work. We can use this solution to directly click on the WebElement if we need a simple workaround.
Test Scenario
|
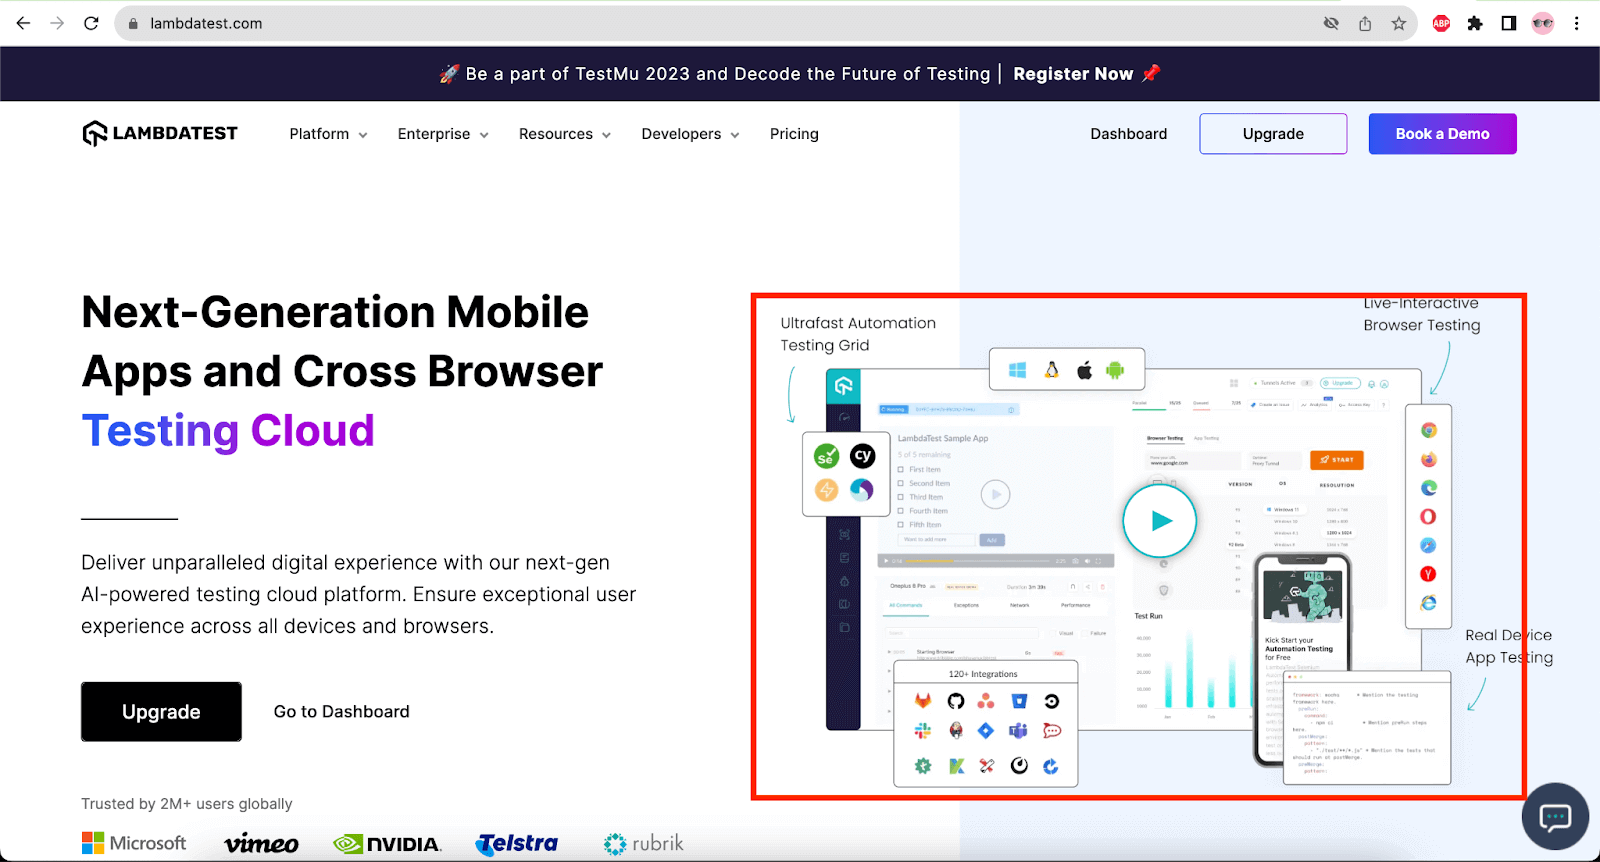
In this scenario, if we try to click on the video directly by clicking on it, it throws an ElementClickInterceptedException. So, we will be using the JavaScriptExecutor and handling it.
Implementation
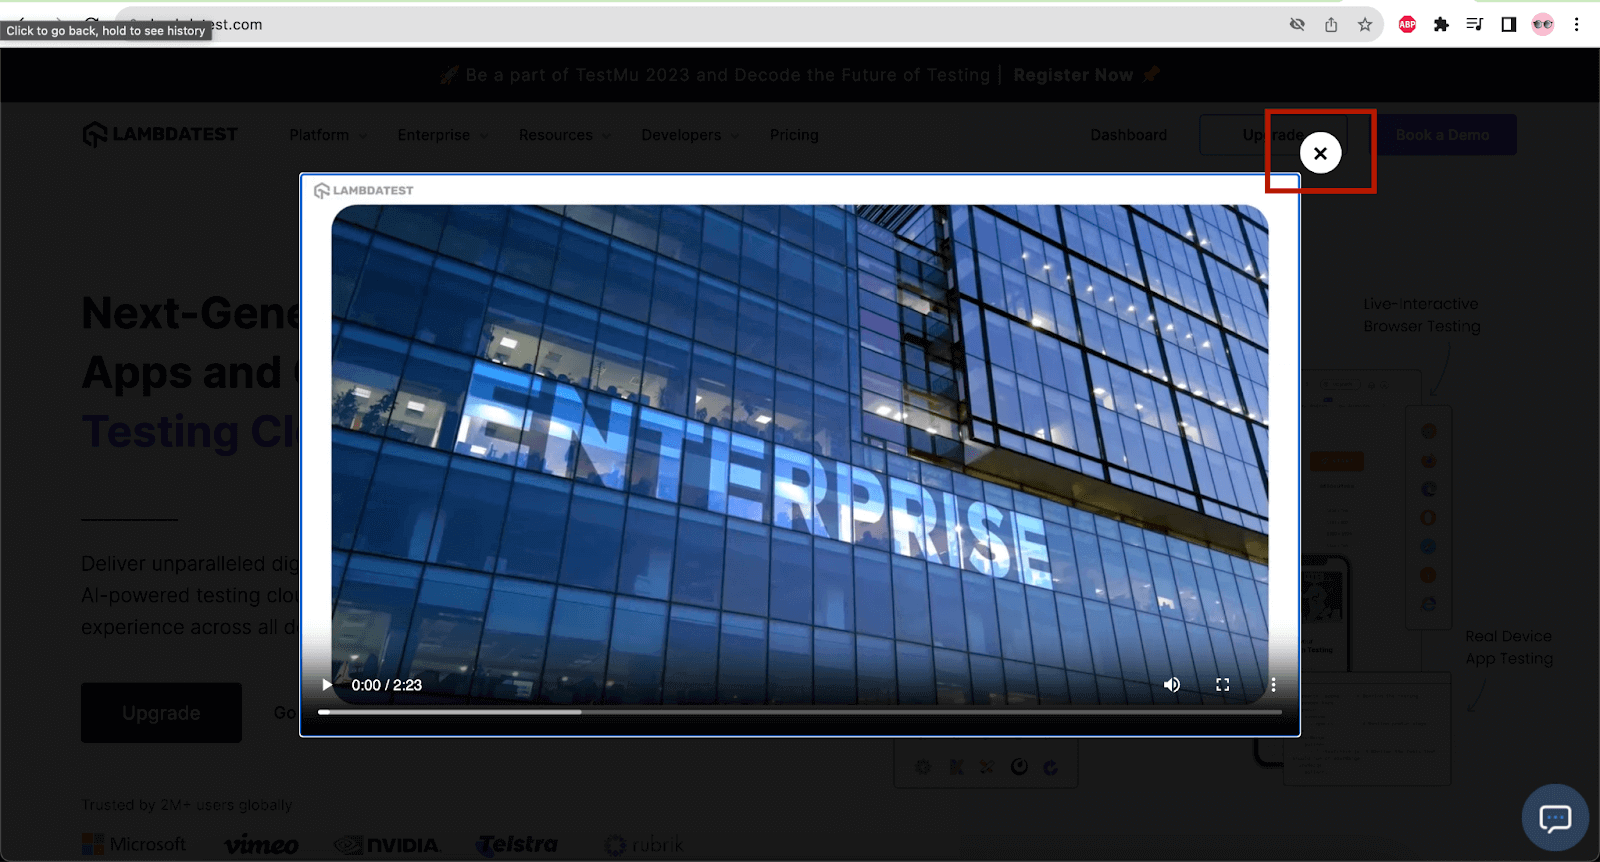
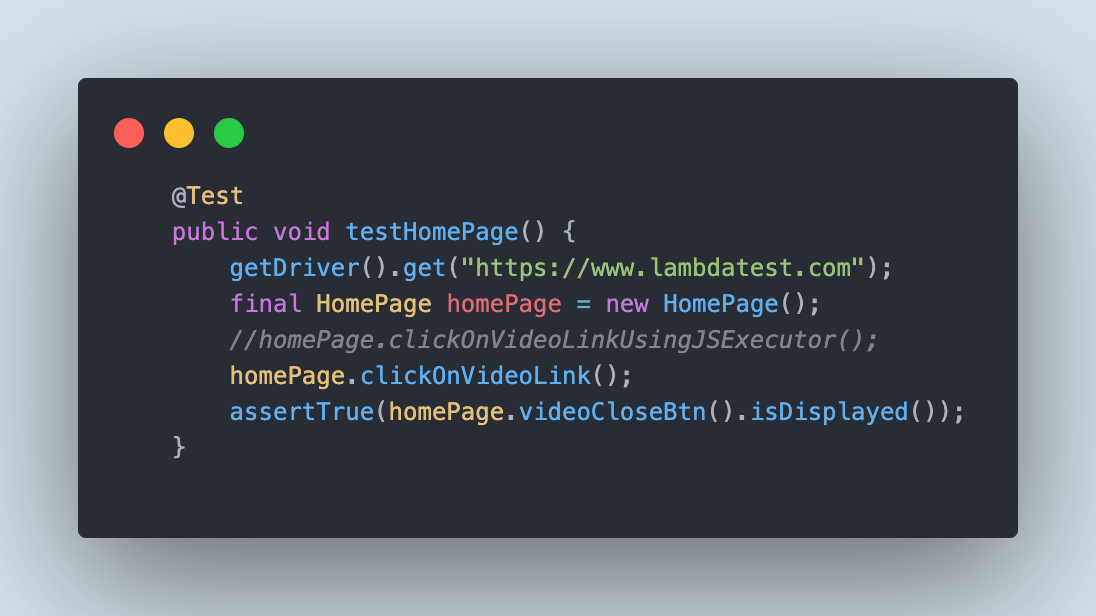
The implementation of this scenario is quite easy. We will navigate to the Home page, locate the web element for the video, and click on it.
Finally, the assertion will be performed to check that the close button is displayed on the video player.
The below code is from the HomePage class created that takes care of the page objects and their respective interactions.
|
1 2 3 4 5 6 7 8 9 10 11 12 13 14 15 16 17 18 19 20 21 |
public class HomePage { private WebElement videoLink() { return getDriver().findElement(By.cssSelector("div > div:nth-child(1) > span > picture > img")); } public void clickOnVideoLink() { videoLink().click(); } public void clickOnVideoLinkUsingJSExecutor() { final JavascriptExecutor executor = (JavascriptExecutor) getDriver(); executor.executeScript("arguments[0].click();", videoLink()); } public WebElement videoCloseBtn() { final WebDriverWait wait = new WebDriverWait(getDriver(), Duration.ofSeconds(20)); return wait.until(ExpectedConditions.elementToBeClickable(By.cssSelector(".popup span.close"))); } } |
The videoLink() method locates the video link on the Home page. The clickOnVideoLinkUsingJSExecutor() method performs click on the link using JavaScriptExecutor, and the clickOnVideoLink() method uses the native click method to perform click on the video link.
videoCloseBtn() method returns the WebElement for Close button on the video player. This method will be further used in tests to write assertions to check that the button is displayed.
The test code is written for testing the working of this scenario.
|
1 2 3 4 5 6 7 |
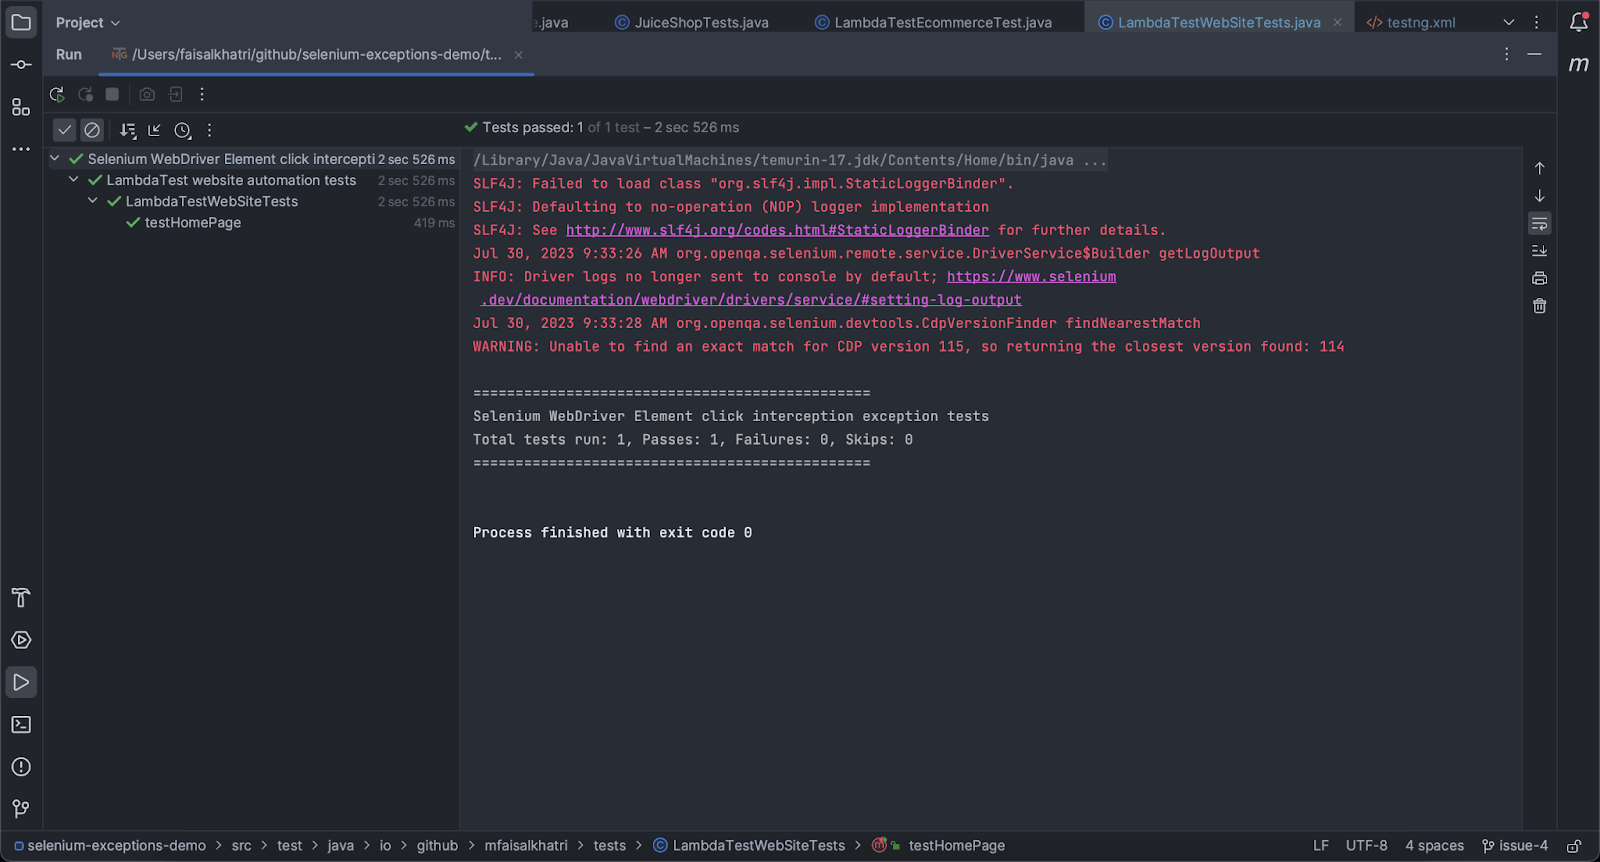
@Test public void testHomePage() { getDriver().get("https://www.lambdatest.com"); final HomePage homePage = new HomePage(); homePage.clickOnVideoLinkUsingJSExecutor(); assertTrue(homePage.videoCloseBtn().isDisplayed()); } |
The test is straightforward; it will first navigate to the LambdaTest’s official website, click on the video link and perform an assertion to check that the close button is displayed.
Test Execution
The following test block in testng.xml will execute this scenario for us.
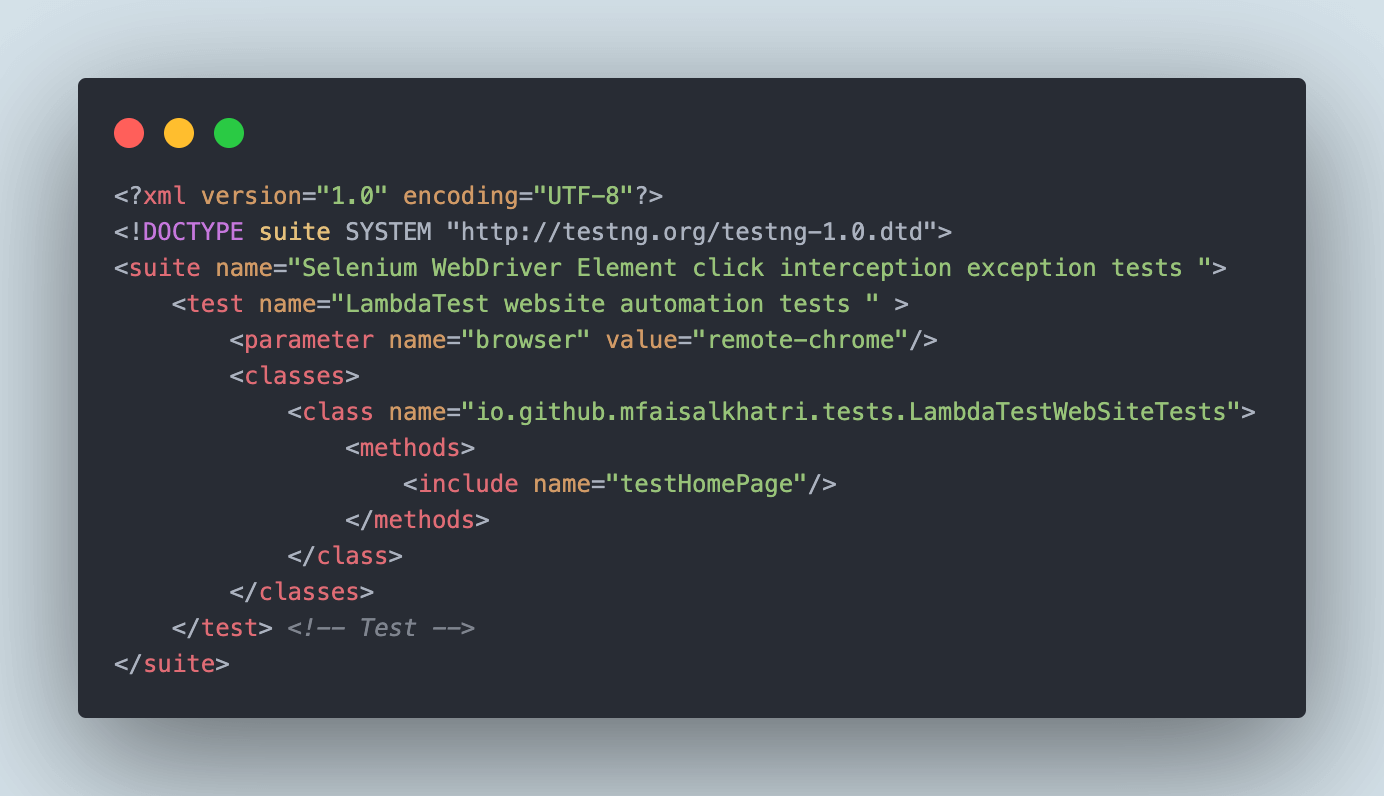
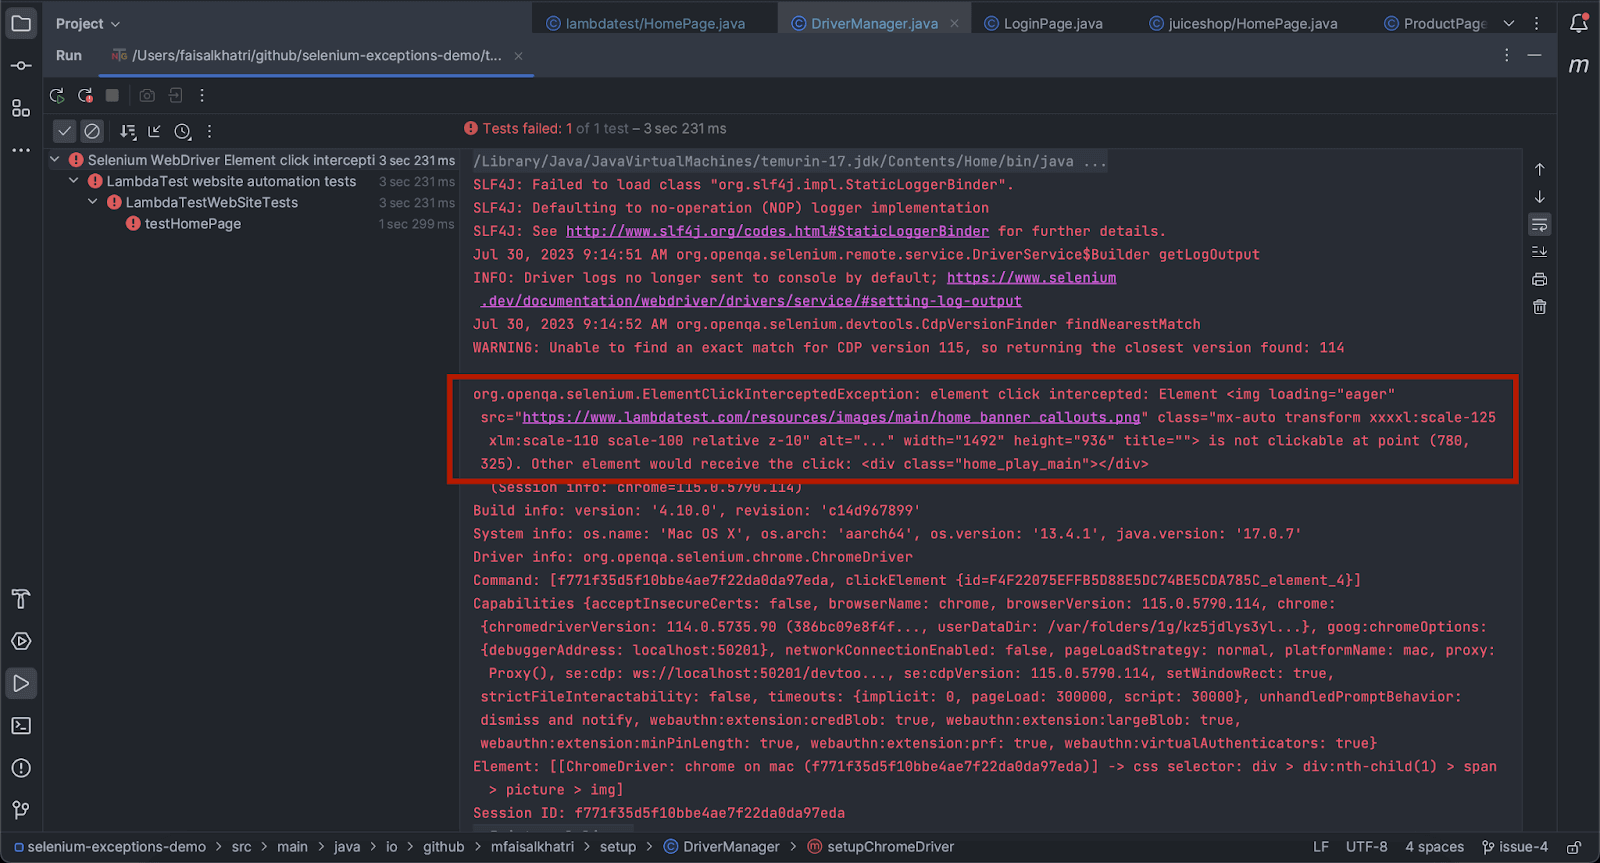
Let’s first recreate the case where ElementClickInterceptedException in Selenium is thrown when the video is clicked on the Home page without using the JavaScriptExecutor.
We will comment on the statement that executes the script to click with JavaScriptExecutor and perform a normal click on the video.
The following is the output of the test execution that shows that the ElementClickInterceptedException in Selenium was thrown while trying to click on the video.
Now, let’s replace the homepage.clickOnVideoLink() method with the homePage.clickOnVideoLinkUsingJsExecutor() and re-run the test.
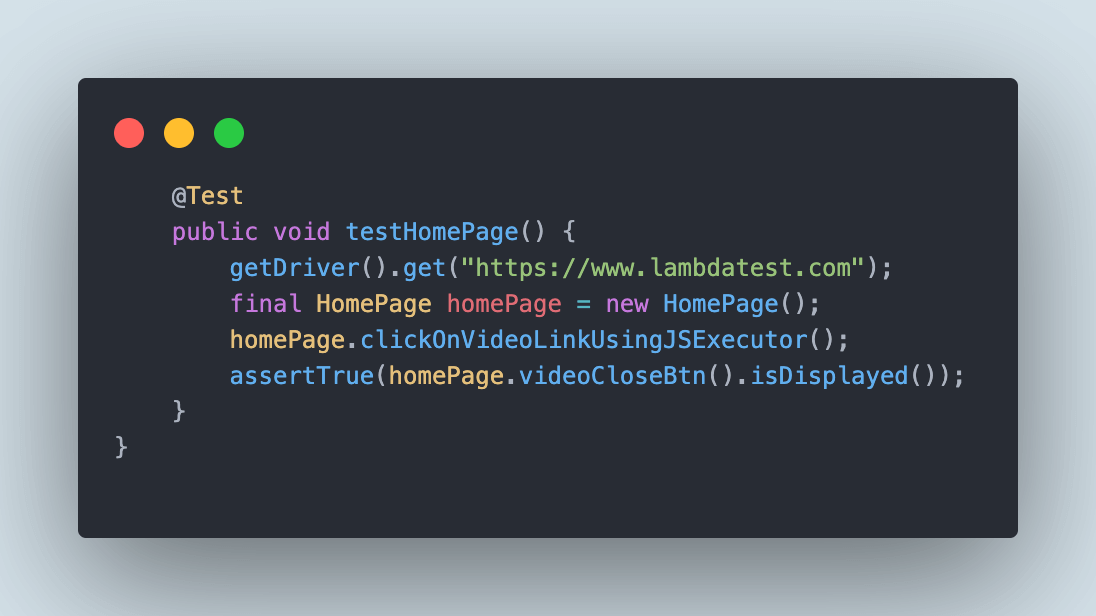
Using JavaScriptExecutor, the ElementClickInterceptedException in Selenium was handled successfully, and the tests passed.
Solution 4: Scrolling into the View using JavaScriptExecutor before clicking on the WebElement
The fourth solution that can be used for handling the exception is scrolling into the view. Hence, the WebElement is visible on the window and can be clicked. Using this solution, we will first scroll the web page to the point where the element is clearly visible on the page and then perform a click on it.
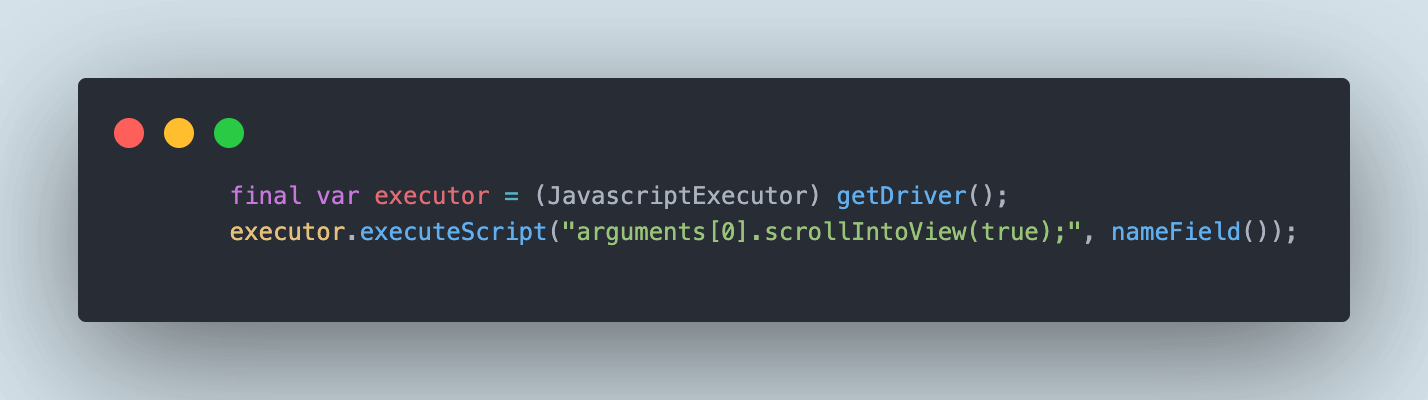
This can be done using the JavaScriptExecutor only; the only change is the argument that we pass in the executeScript() method to execute the JavaScript. Here, we will be passing the scrollIntoView() argument.
Test Scenario
|
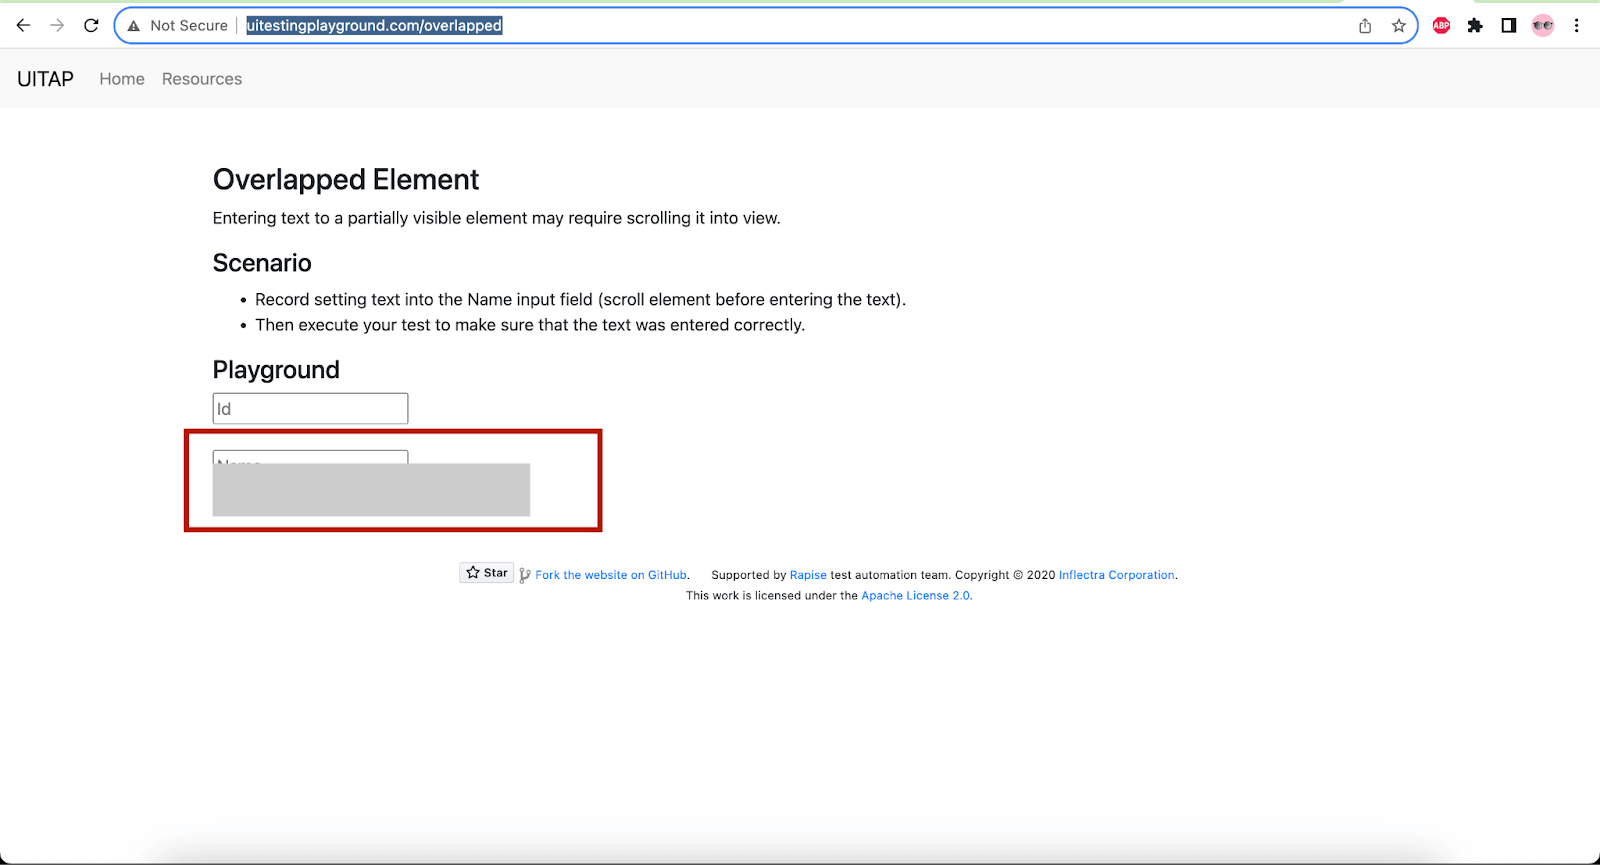
In this website, the Name field is overlapped by another WebElement, so if we try to click to type some value in the field, it will throw an ElementClickInterceptedException in Selenium.
Implementation
In this scenario, we will navigate the UITestingPlayground website’s Overlapped Element web page. Next, we will scroll into view using JavaScriptExecutor and then type the value in the Name field.
Finally, assertion will be performed to check the value entered in the Name field.
The below code is available in the OverLapElementPage class.
|
1 2 3 4 5 6 7 8 9 10 11 12 13 14 15 16 17 18 19 20 21 22 23 |
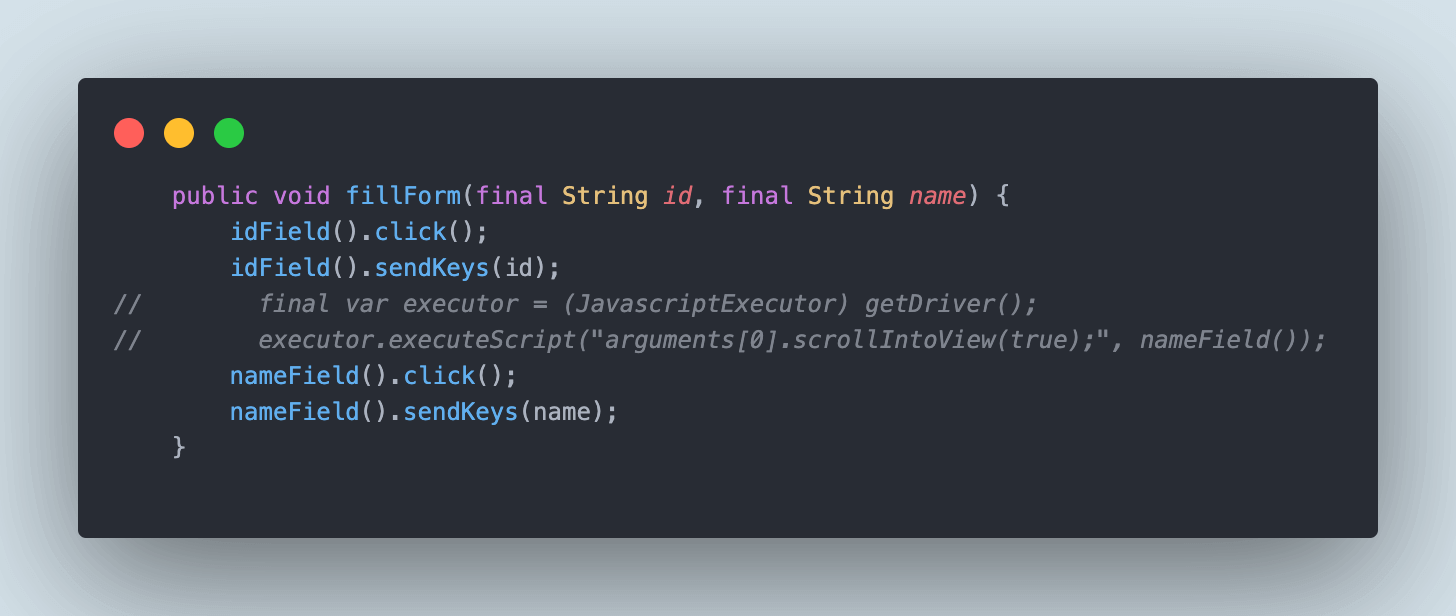
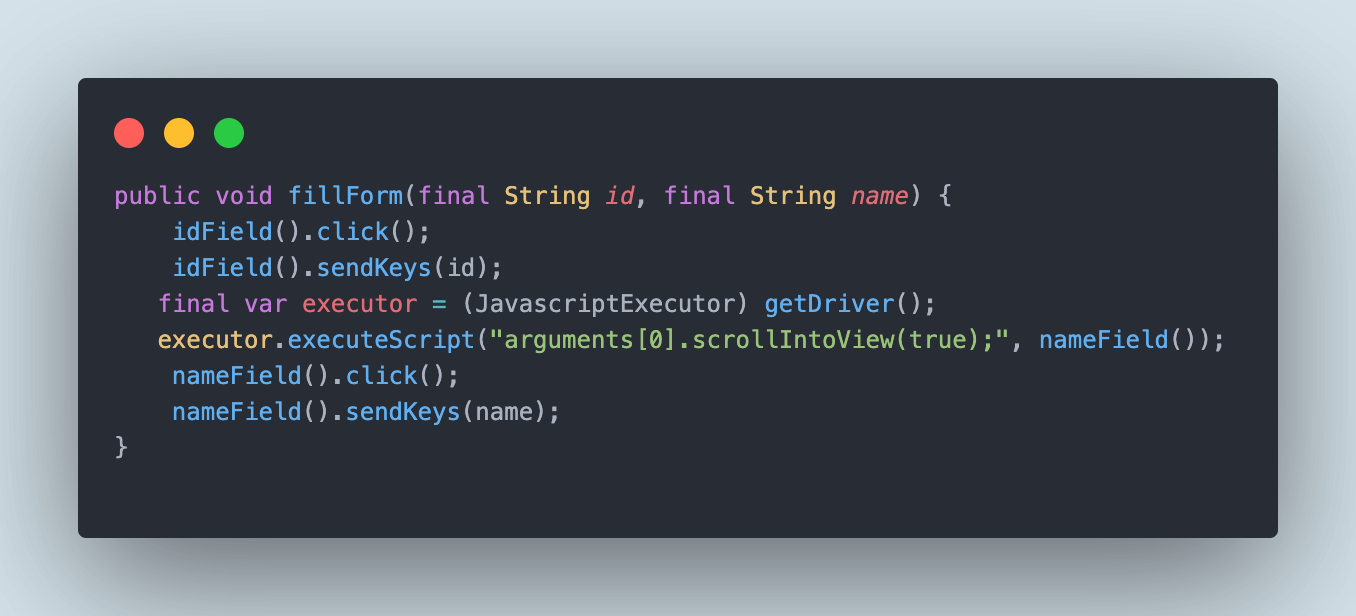
public class OverLapElementPage { private WebElement idField() { return getDriver().findElement(By.id("id")); } private WebElement nameField() { return getDriver().findElement(By.id("name")); } public void fillForm(final String id, final String name) { idField().click(); idField().sendKeys(id); final var executor = (JavascriptExecutor) getDriver(); executor.executeScript("arguments[0].scrollIntoView(true);", nameField()); nameField().click(); nameField().sendKeys(name); } public String textInNameField() { return nameField().getAttribute("value"); } } |
The idField() and nameField() methods locate and return the WebElements for the Id and the Name fields, respectively. Using the fillForm() method, we can click on the Id and Name fields and type values in them. However, before we click on the Name field, we will use the JavaScriptExecutor to scroll into view.
The following line of code will help scroll to the web page to the point where the Name field is visible in the viewport.
Below is the test written for this scenario. It is available in the UITestingPlaygroundTests class
|
1 2 3 4 5 6 7 8 9 10 11 12 13 14 15 |
public class UITestingPlaygroundTests extends BaseTest{ @Test public void testOverLappingElement() { getDriver().get("http://www.uitestingplayground.com/overlapped"); final var overLapElementPage = new OverLapElementPage(); final String id = "ID7763"; final String name = "Faisal K"; overLapElementPage.fillForm(id, name); assertEquals(overLapElementPage.textInNameField(), name); } } |
The first statement of code in the test navigates to the UITestingPlayground website’s Overlapped element page. Next, we call the fillForm() method from the OverLapElementPage class to fill values in the Id and Name fields.
Finally, assertion is performed to check the values typed in the Name field.
Test Execution
The following test block is added in the testng.xml to execute the tests for this scenario.
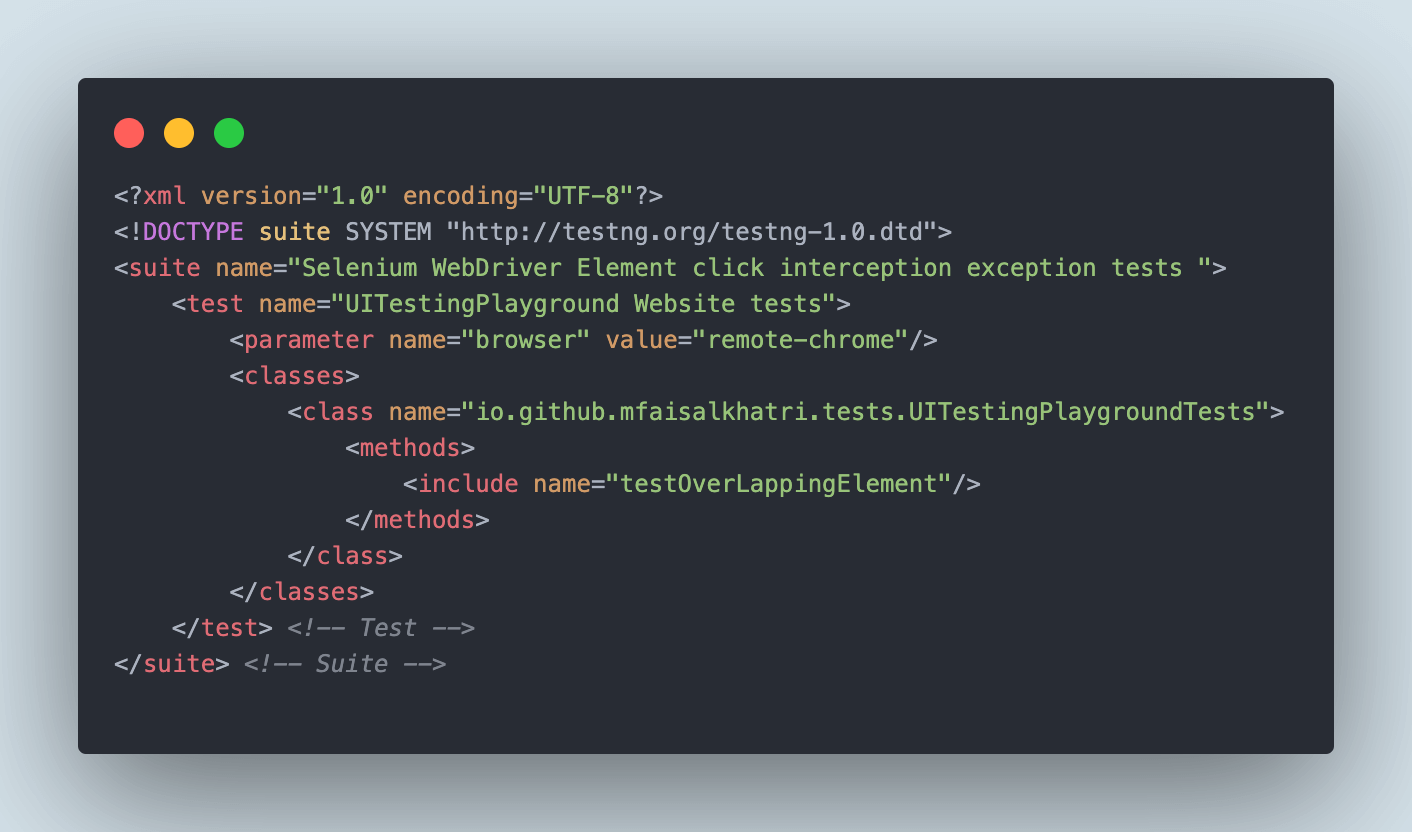
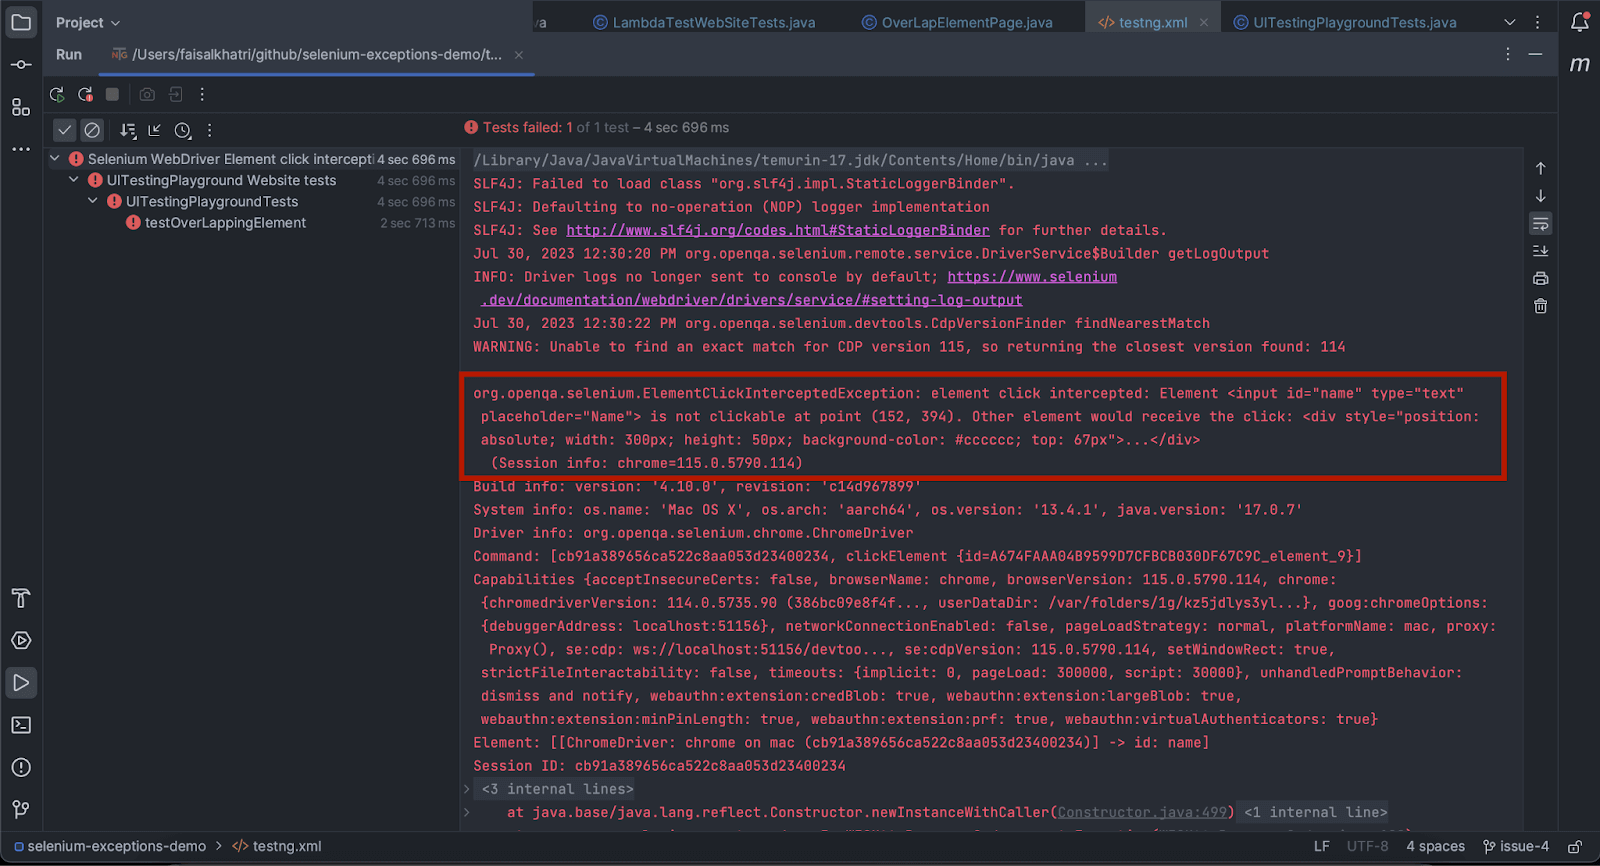
Let’s first replicate the ElementClickInterceptedException thrown due to the Name field getting overlapped with another WebElement. To do so, we must comment out the JavaScriptExecutor statement in the fillForm() method.
On executing the test, the ElementClickInterceptedException in Selenium is thrown, as seen in the logs.
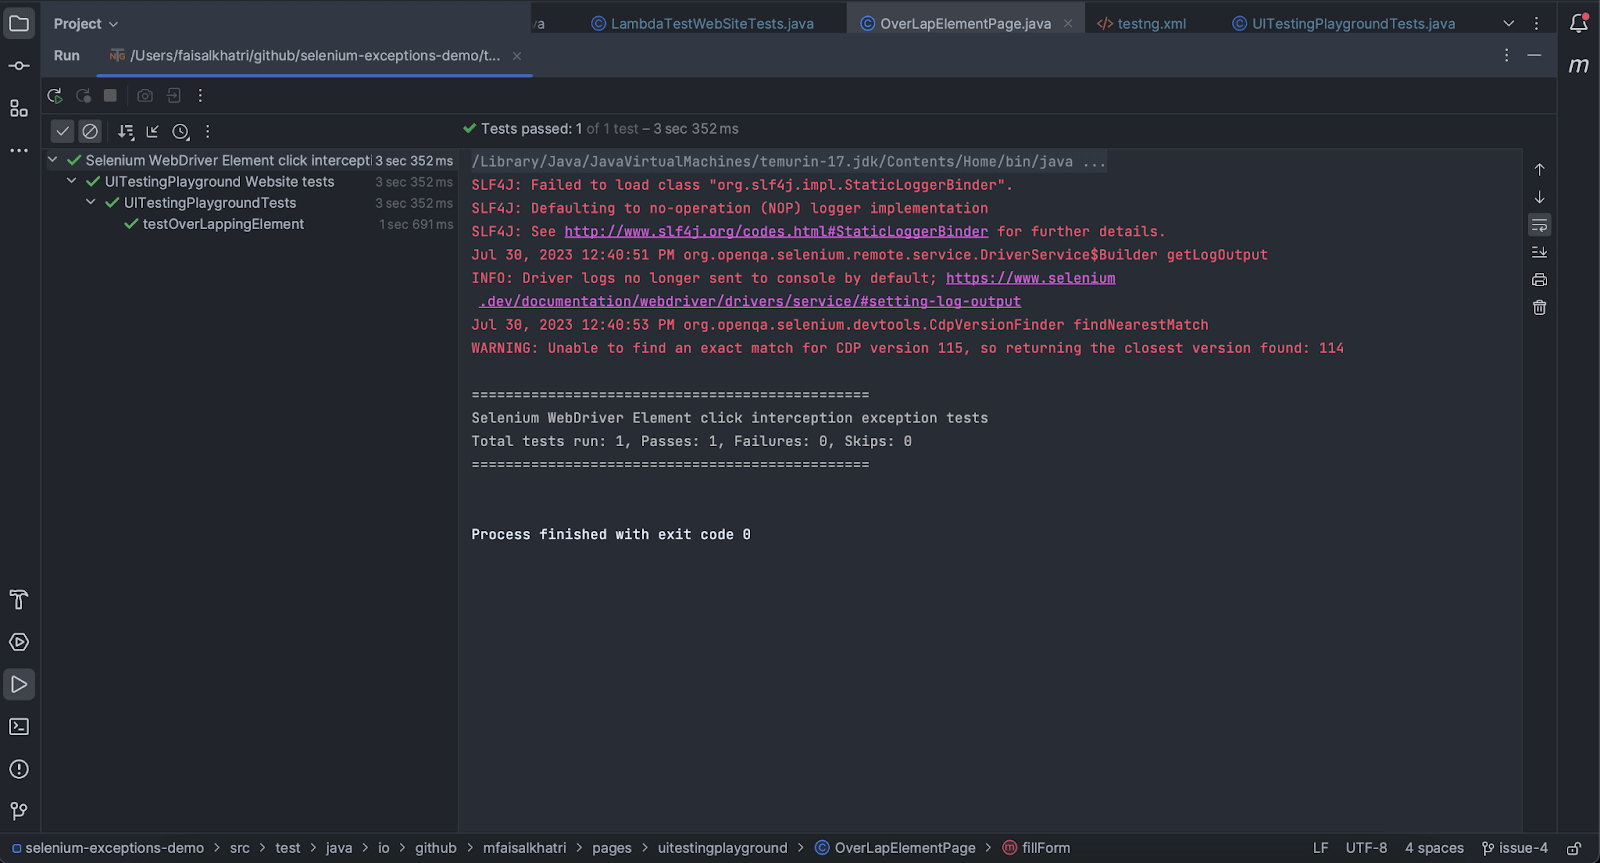
Let’s uncomment the JavaScriptExecutor statement in the fillForm() method and rerun the test.
Using the scrollintoView argument in JavaScriptExecutor works perfectly fine handling the ElementClickInterceptedException, and the tests pass.
Solution 5: Using the Actions class of Selenium WebDriver
The next solution we will discuss for handling the ElementClickInterceptedException is using the Selenium WebDriver’s Actions class.
The primary reason for ElementClickInterceptedException in Selenium is that the respective element that needs to be clicked is either overlapped by another element or an overlay screen. So, using the Actions class’s movetoElement() method, we can move the focus to the required WebElement and then perform a click on it.
Test Scenario
|
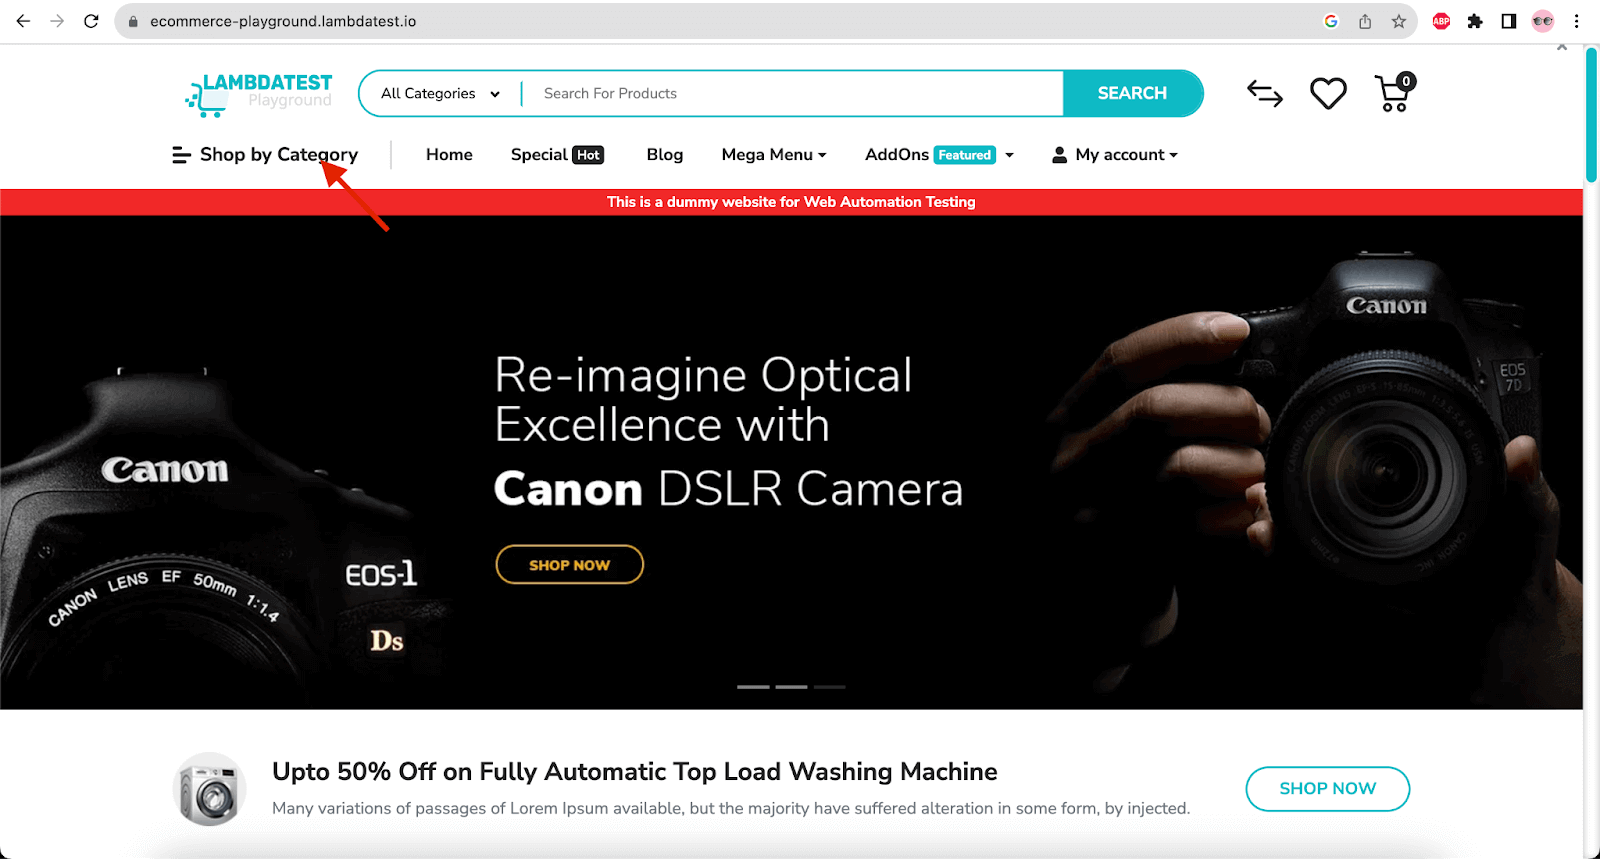
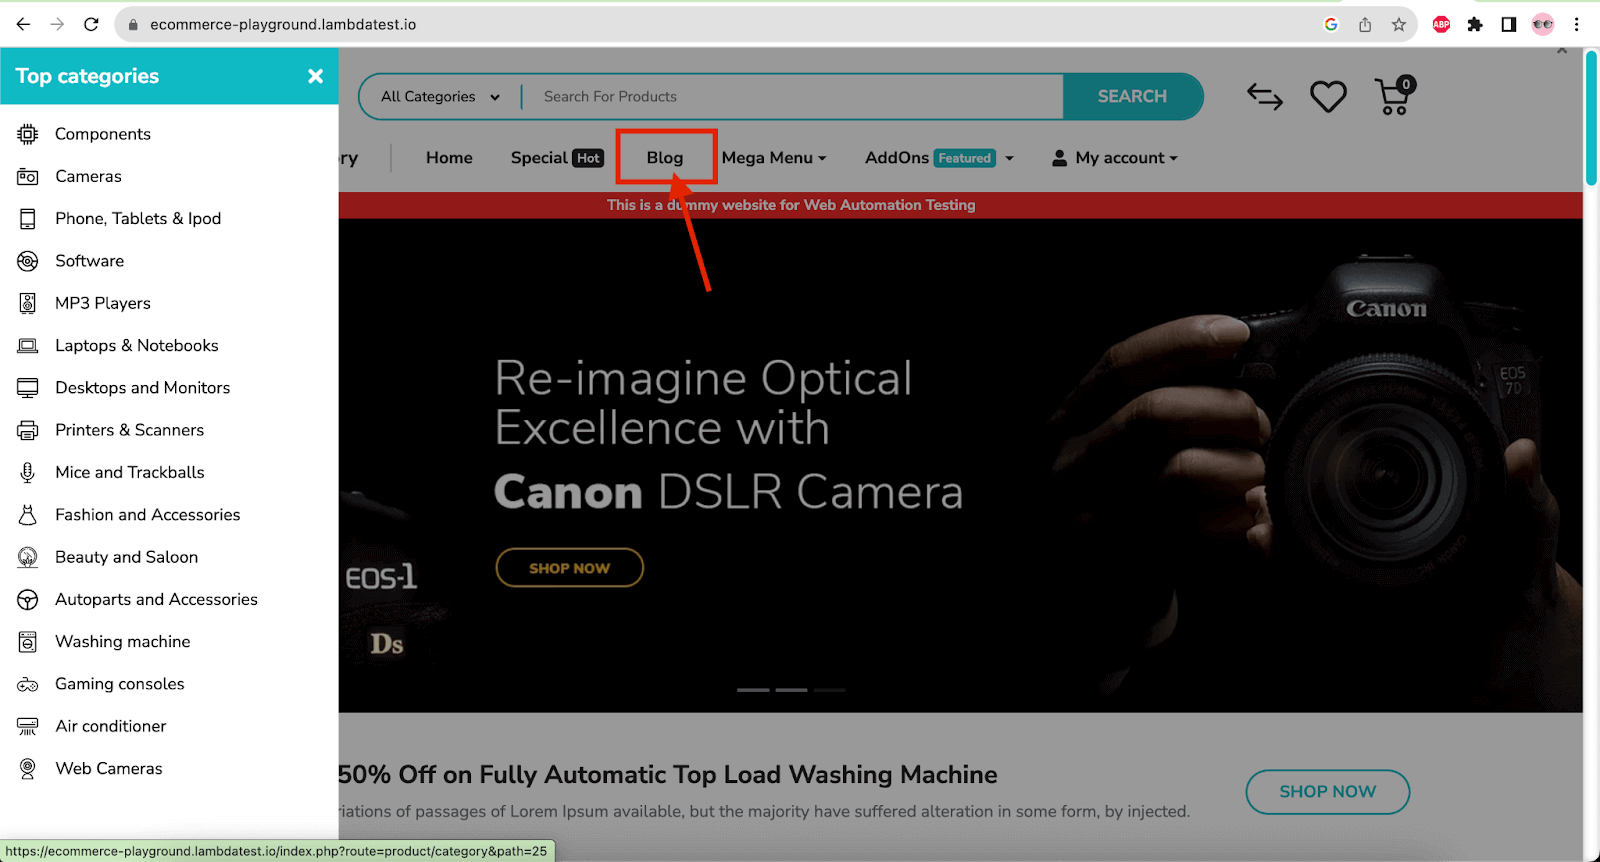
In this scenario, after opening the Shop by Category side menu, when we try to click on the Blog main menu, it throws the ElementClickInterceptedException in Selenium. This exception is thrown as the Shop by Category menu overlaps the screen.
Implementation
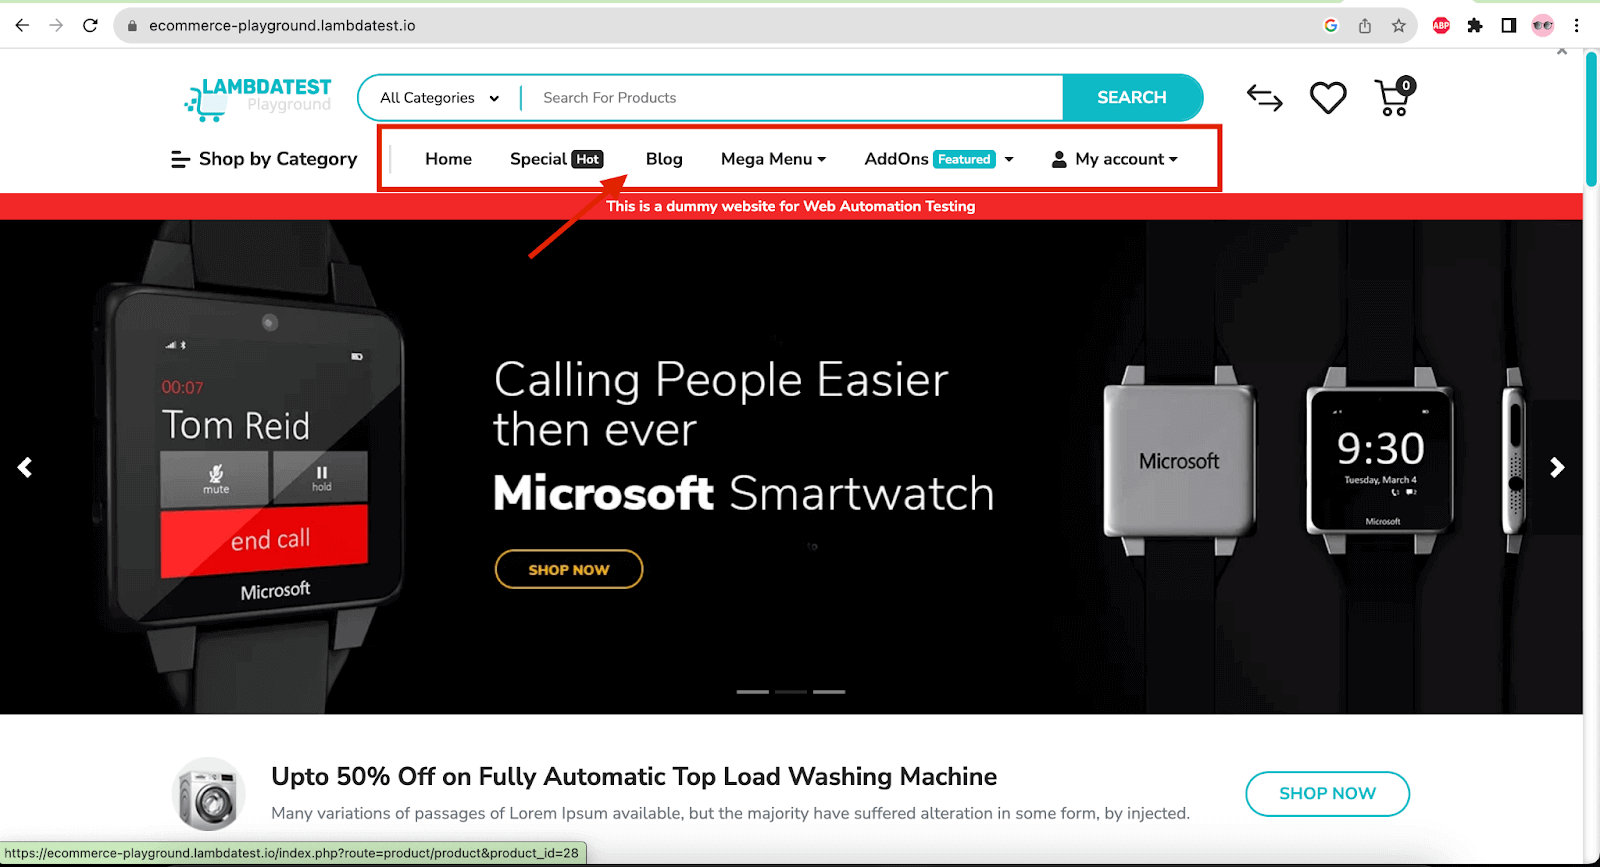
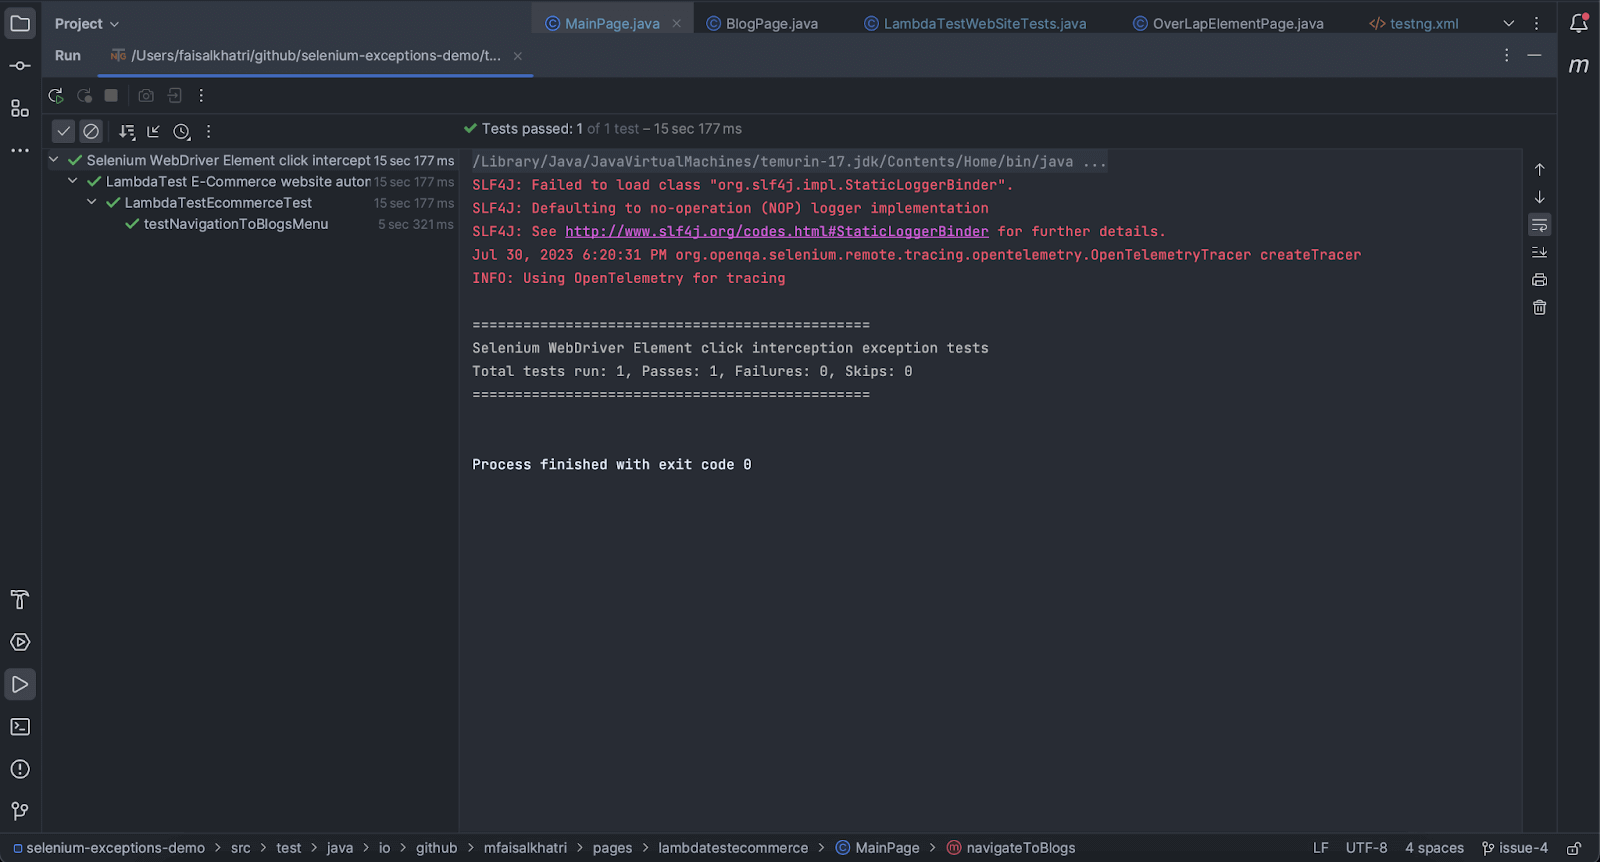
In this scenario, we will first navigate to the LambdaTest eCommerce demo website and click on the Shop by Category side menu link. Once it opens, we will click on the Blogs menu.
The following code is available in the MainPage class.
|
1 2 3 4 5 6 7 8 9 10 11 12 13 14 15 16 17 18 19 20 21 22 23 |
public class MainPage { private WebElement shopByCategoryLink() { return getDriver().findElement(By.linkText("Shop by Category")); } public void openShopByCategoryMenu() { shopByCategoryLink().click(); } private WebElement menuBar() { return getDriver().findElement(By.cssSelector(".entry-section div.navbar-collapse")); } private WebElement blogLink() { return getDriver().findElement(By.linkText("Blog")); } public BlogPage navigateToBlogs() { final Actions actions = new Actions(getDriver()); actions.moveToElement(menuBar()).click().build().perform(); blogLink().click(); return new BlogPage(); } } |
shopByCateogryLink() method locates and returns the WebElement for the menu link. ShopByCategoryMenu() method performs the click on the Shop by Category menu.
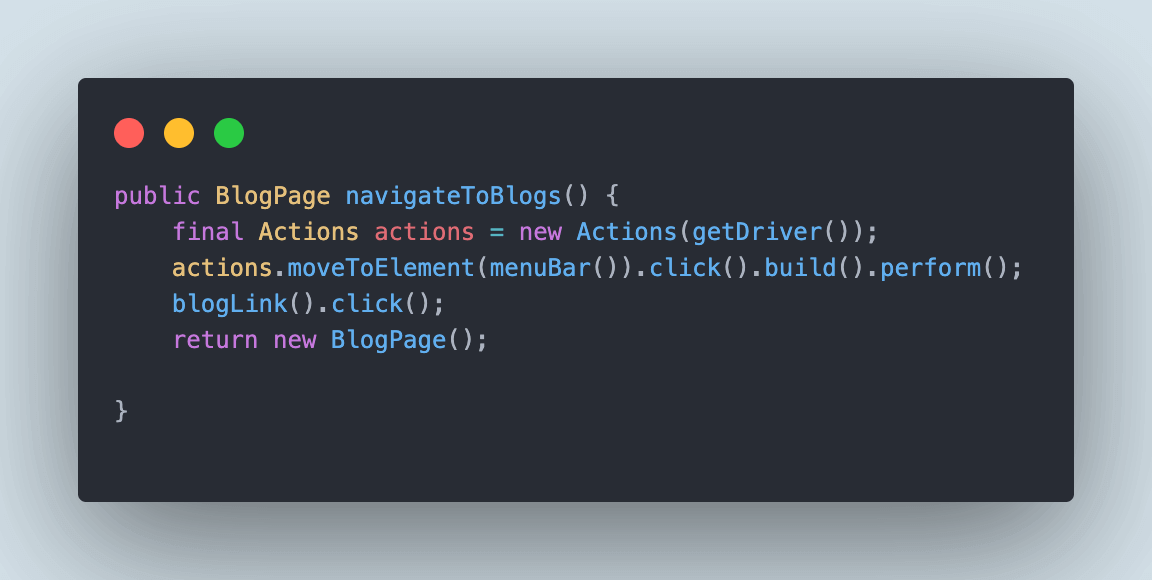
The navigateToBlogs() method will help in clicking the Blog menu. The moveToElement() method of the Actions class is used to move the focus to the menu bar so the overlay screen can be removed and we can click on the Blog menu link.
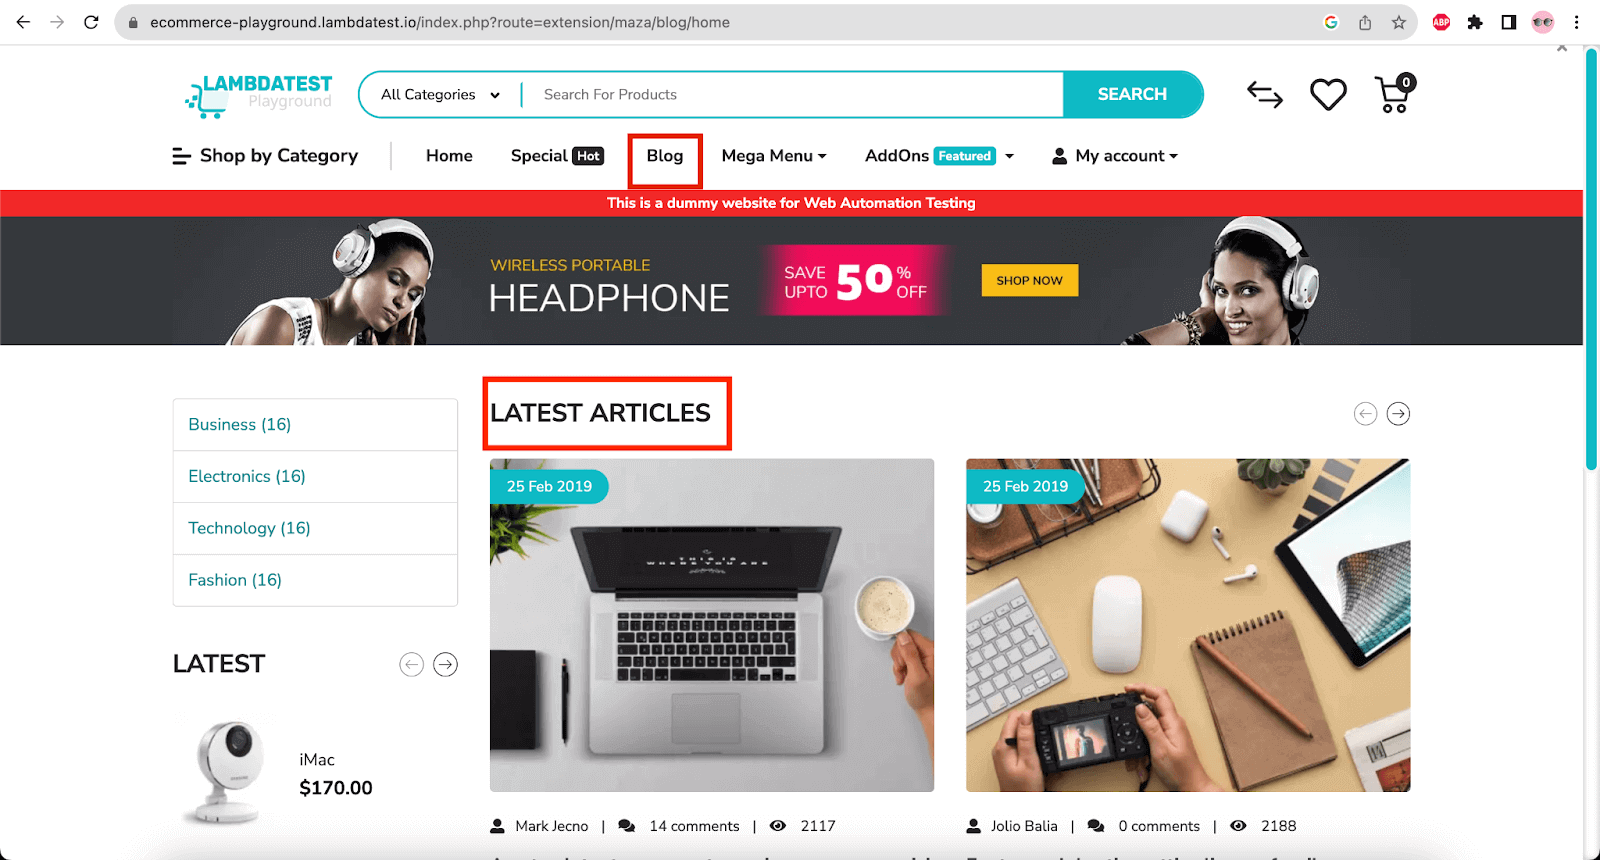
To perform the assertion, we will be checking – “LATEST ARTICLES” in the page header on the Blog page.
The BlogPage class has been created to locate the WebElement for the page header.
|
1 2 3 4 5 6 |
public class BlogPage { public String pageHeader () { return getDriver().findElement(By.cssSelector(".entry-section div.mz-tab-listing-header h3")).getText(); } } |
The pageHeader() method locates the page header WebElement of a Blog page and returns its text in string format.
The following automated test in the LambdaTestEcommerceTest class will help check the scenario with assertion.
|
1 2 3 4 5 6 7 8 9 10 11 |
public class LambdaTestEcommerceTest extends BaseTest{ @Test public void testNavigationToBlogsMenu() { getDriver().get("https://ecommerce-playground.lambdatest.io/"); final var mainPage = new MainPage(); mainPage.openShopByCategoryMenu(); final var blogPage = mainPage.navigateToBlogs(); assertEquals(blogPage.pageHeader(), "LATEST ARTICLES"); } } |
The test is simple to understand. We first navigate to the LambdaTest eCommerce website, open the Shop by Category menu, and then navigate to the Blog page by clicking the Blog menu.
Finally, the assertion is performed to check that the page header is “LATEST ARTICLES”.
Test Execution
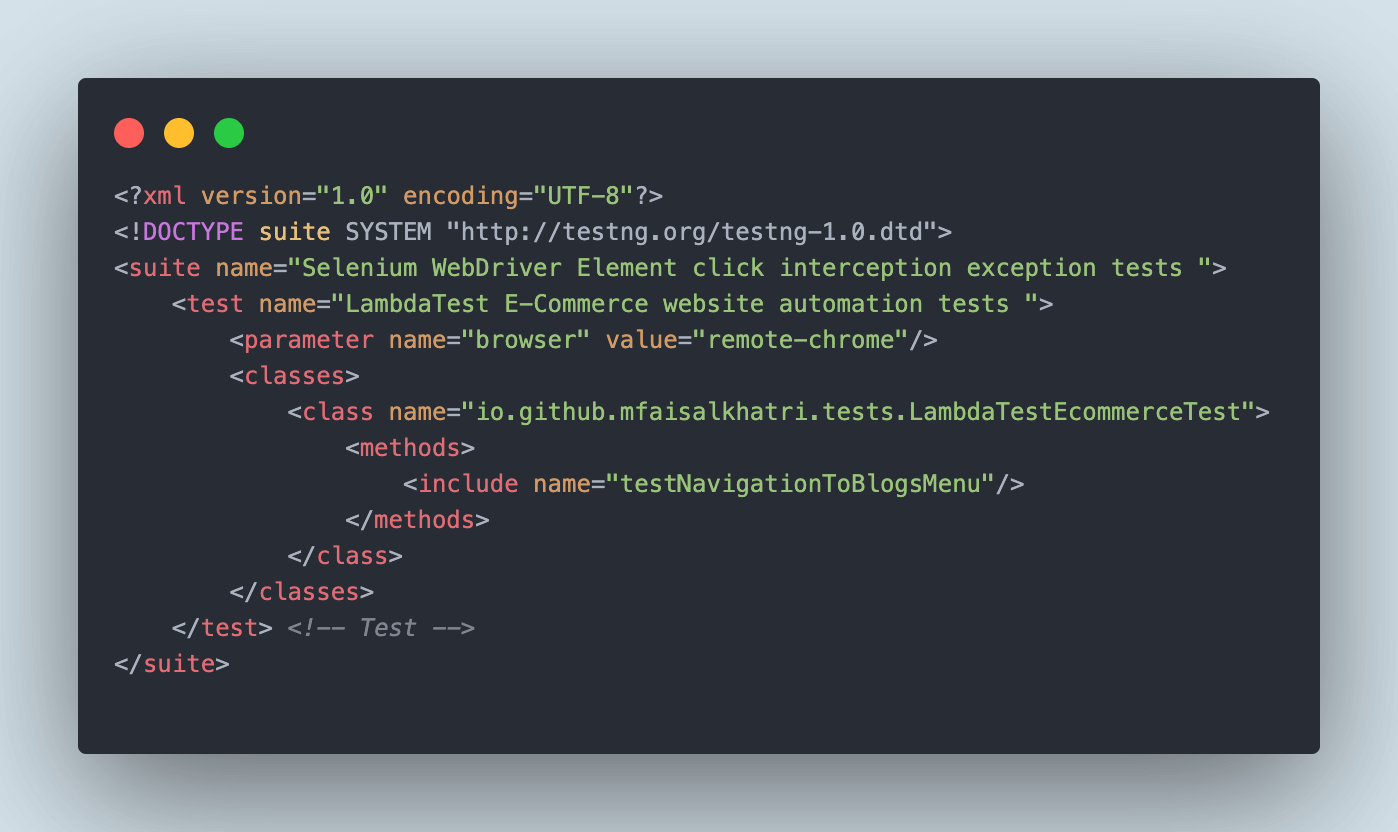
The following test block is added in the testng.xml to execute the tests for this scenario
Let’s first try to execute the test by clicking on the Blog menu link directly without using the Actions class.
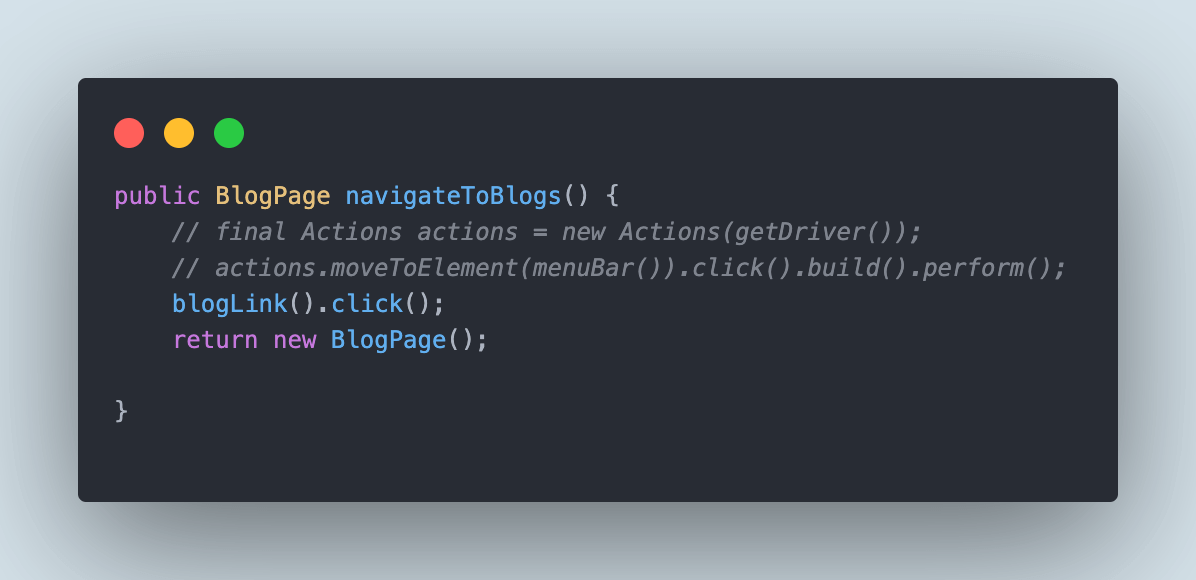
To do so, we will comment on the statements of code we wrote for using the moveToElement() method from Actions class, in the navigateToBlogs() method.
Let’s run the test and check the output.
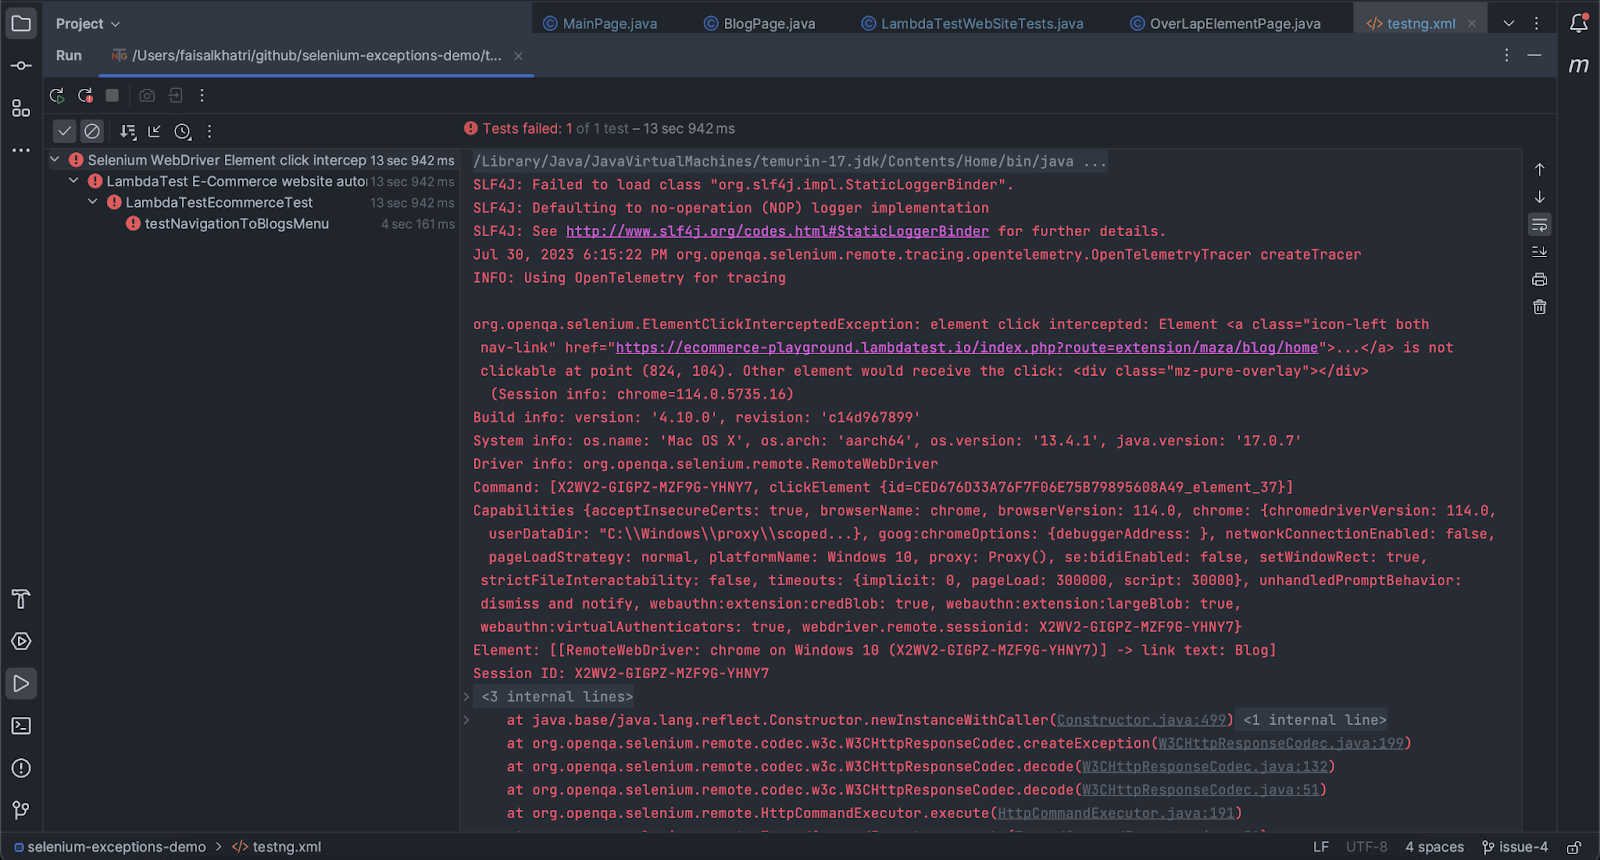
We can see the test failing after throwing an ElementClickInterceptedException.
Let’s re-run the test by uncommenting the moveToElement() method statement of the Actions class so it handles the ElementClickInterceptedException in Selenium.
Here is the output of the test running successfully.
Solution 6: Setting custom resolution for the browser
The next solution is simple: maximizing the browser after we create the WebDriver instance. We can also set the custom window resolution for the browser in case we don’t want to run the tests by maximizing the browser window.
As per Selenium Best Practices, it is advisable to maximize the window or use a custom window size that opens the window with wide mode for a uniform automation experience and to avoid elements overlapping issues related to ElementClickInterceptedException.
Going through all the previous solutions, it can be noted that ideally, the WebElements overlap or are not in the viewport. Hence, the ElementClickInterceptedException in Selenium is thrown while we try to click on the WebElement.
So, by maximizing or resizing the window to a custom resolution, we can get a better window view where all elements are ideally visible, locatable, and can be clicked easily.
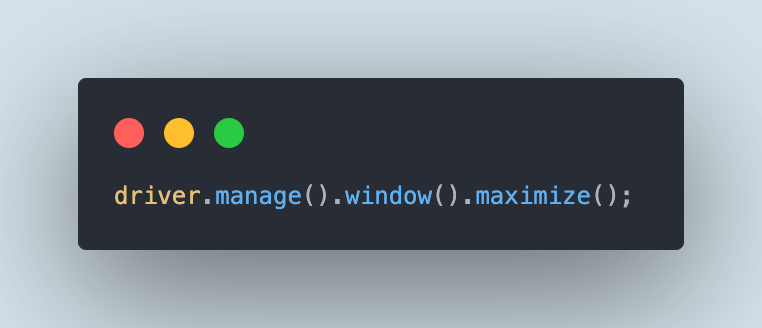
Maximizing the browser window
The following line of code can be used to maximize the browser
Customizing the browser screen resolution
There are two ways in which we can customize the resolution before we start running our automation tests.
- Customizing the window size by adding arguments using the BrowserOptions class
- Customizing the window size in a cloud grid like LambdaTest
Resizing the browser window using Browser Options
The respective class of browser options can be used to add arguments and resize the window. For example, we can resize the window of Chrome browser using the ChromeOptions class as follows:
|
1 2 3 4 5 6 7 8 |
private static void setupChromeDriver () { final ChromeOptions options = new ChromeOptions (); options.addArguments ("--no-sandbox"); options.addArguments ("--disable-dev-shm-usage"); options.addArguments ("--window-size=1050,650"); driver = new ChromeDriver(options); driver.manage().window().maximize(); } |
The value for the screen resolution can be passed in the argument “–window-size= < resolution in x,y format > ”:
Likewise, the same arguments can be used with FirefoxOptions and EdgeOptions classes as well for resizing the window in Firefox and Edge browsers respectively.
Resizing the browser window in LambdaTest Cloud Grid
LambdaTest is an AI-powered test orchestration and execution that allows you to perform manual and automation testing on over 3000+ real browsers, devices, and platforms. It provides a reliable and scalable cloud grid to conduct Java automation testing at scale.
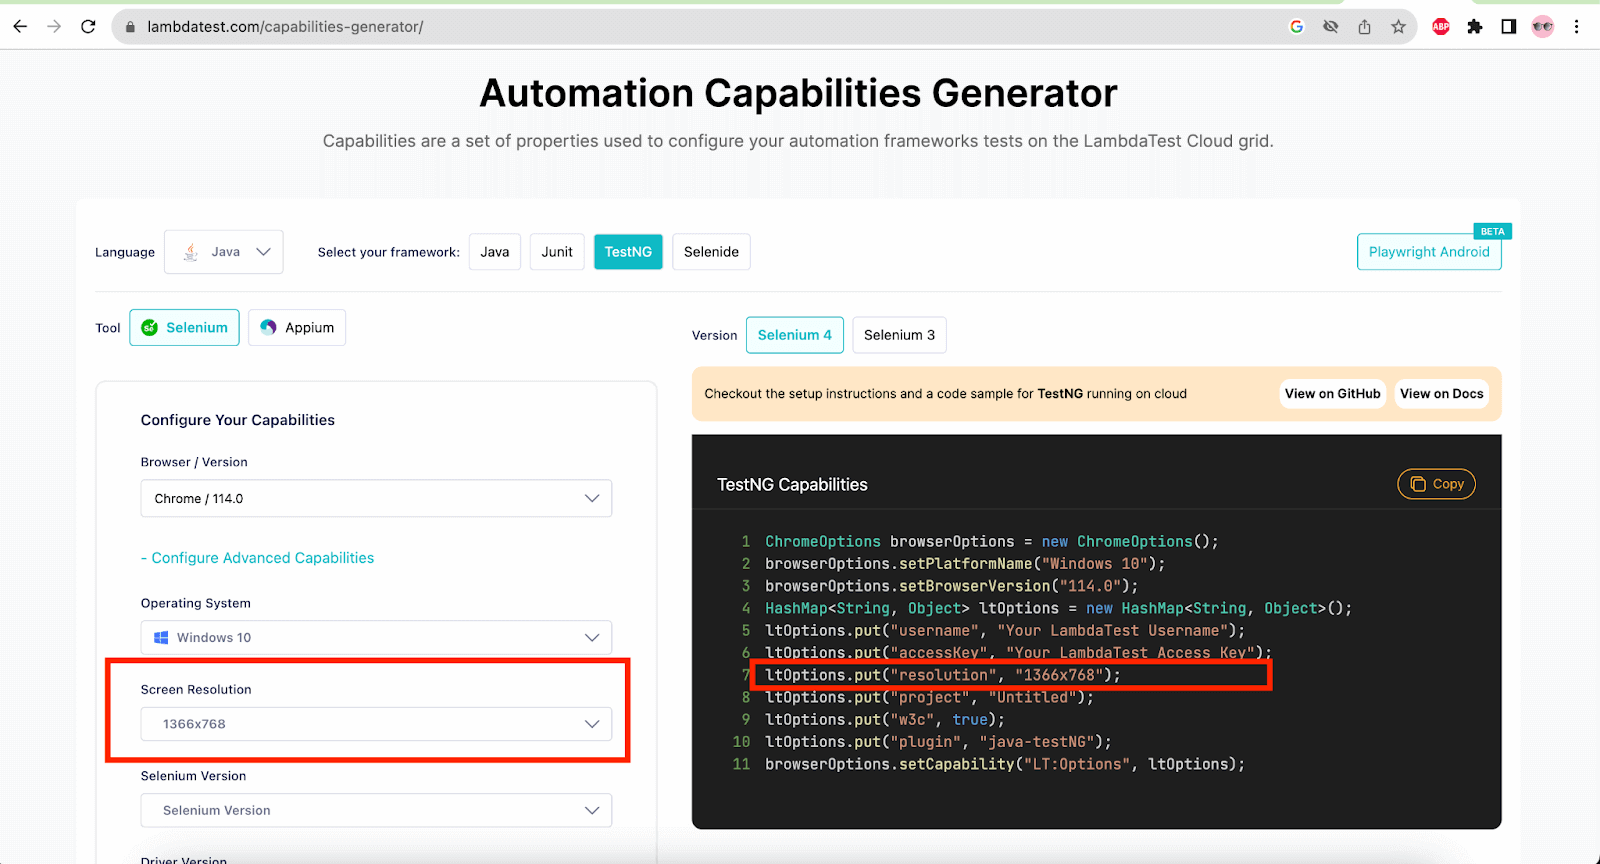
For Selenium Java testing, it provides the LambdaTest Capabilities Generator website that helps set all the capabilities using GUI. The code can be copied and used in the test configuration and setup.
You can follow the LambdaTest YouTube Channel and stay updated with the latest tutorials around Selenium testing, Cypress testing, CI/CD, and more.
To set the capabilities for screen resolution using the capabilities generator website, we need to click on Configure Advanced Capabilities >> Screen Resolution and select the desired screen resolution as required.
Once we select the resolution, the code is autogenerated and can be copied and pasted into the test automation scripts.
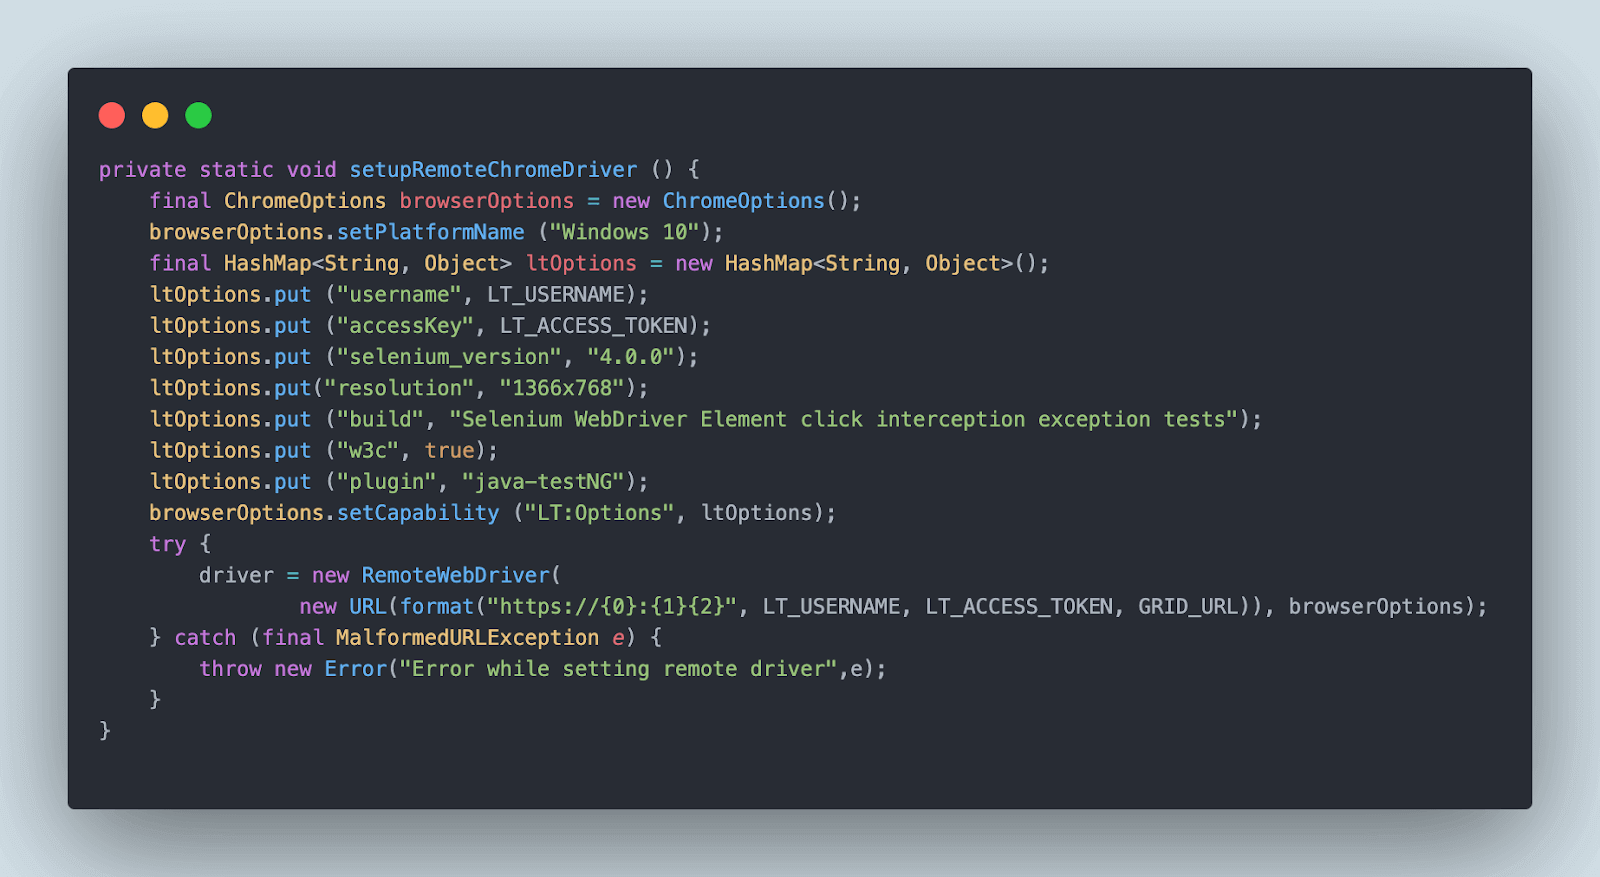
These capabilities are set in the DriverManager class in the setupRemoteDriver() method.
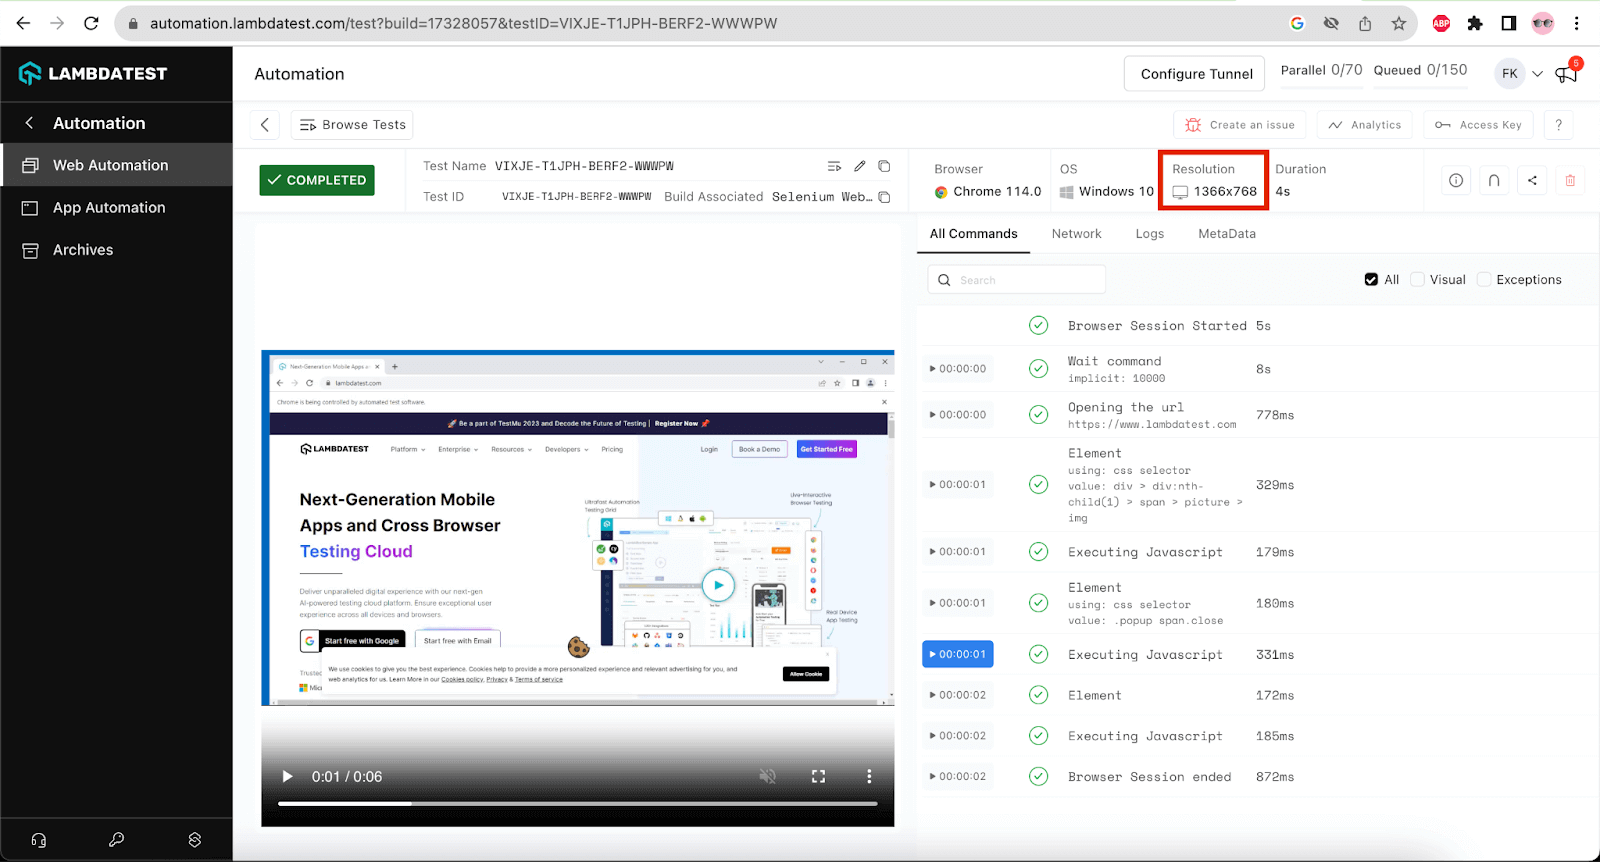
On executing the tests on the LambdaTest Cloud grid, we can check out the resolution details on the LambdaTest Automation Dashboard.
Solution 7: Using Thread.sleep() to debug the Exception
Thread.sleep() is a kind of hard wait hence, it is not a recommended solution to be used in the test automation. However, when required we can use the Thread.sleep() method to debug the issue to check if waiting for a certain amount of time does make the automation test work successfully and allows clicking on the WebElement.
If the WebElement is clickable ideally after applying Thread.sleep(), we may move to some of the ideal solutions that we discussed above.
Which solution to choose for handling ElementClickInterceptedException?
We discussed around 7 solutions to help us handle the ElementClickInterceptedException in Selenium. We should try using the maximize window or setting it in custom size so it opens in wide mode. This can help handle the overlapping elements quickly.
If maximizing the window does not work, we can apply the Explicit Wait on the element, wait for the element to be clickable, and then perform a click on it.
Ideally, JavaScriptExecutor should work as an ideal solution using click or scroll to view arguments.
Thread.sleep() is not a recommended solution to be used. However, we can use it for debugging purposes.
Final Thoughts
The primary reason that may lead to the ElementClickInterceptedException in Selenium is that the WebElement required to be clicked may overlap with some other element. We discussed multiple solutions to handle this exception. The simplest solution we can try firsthand is to maximize the browser window or set a custom size that may make all the WebElements visible and interactable. However, if that still doesn’t work, we can try the other solutions discussed in this blog.
Happy Testing!
Frequently Asked Questions (FAQs)
What is the solution for element click intercepted in Selenium?
When you encounter the “ElementClickInterceptedException” in Selenium, the element you’re trying to click is hidden or overlapped by another element on the web page. To address this issue, consider the following solutions:
- Wait for Element to Be Clickable: Use an explicit wait to ensure the element you want to click is ready and clickable. You can use the ExpectedConditions class to wait for the element to be clickable.
- Scroll into View: If the element is not in the viewport, scroll it into view using JavaScript before clicking it.
- Use Actions Class: Try using the Actions class in Selenium to perform the click action. This class allows you to simulate complex user interactions and may bypass certain issues.
How to fix the time-out exception in Selenium?
The TimeOut Exception in Selenium primarily arises when a specific condition is not fulfilled within the allocated time frame. One approach to effectively address timeout exceptions is to fine-tune the waiting duration in alignment with the application’s behavior. By doing so, you can ensure that the web page fully loads and all web elements become visible, mitigating the occurrence of timeouts.


Author’s Profile
Faisal Khatri
Faisal is a Software Testing Professional having 14+ years of experience in automation as well as manual testing. He is a QA, freelancer, blogger and open source contributor. He loves learning new tools and technologies and sharing his experience by writing blogs.
Blogs: 40
Got Questions? Drop them on LambdaTest Community. Visit now


