
What is Monkey Patching in Python: A Complete Tutorial With Examples
Paulo Oliveira
Posted On: August 7, 2023
![]() 194129 Views
194129 Views
![]() 39 Min Read
39 Min Read
In the world of software testing, where the pursuit of efficient and reliable test automation is paramount, developers and testers often encounter challenges when working with existing codebases or third-party libraries. Modifying the behavior of these components without changing their source code can be daunting. For example, if you need to change a library function that you do not have access to the source code, you can do it using Monkey Patching.
Monkey Patching, a dynamic technique in Python, allows developers and quality assurance engineers (QAEs) to make runtime modifications to classes, objects, or even built-in modules. With its ability to address common pain points in test automation, Monkey Patching in Python has become an invaluable tool in the arsenal of testers and developers.
One of the main problems that Monkey Patching solves in test automation is the need for flexibility and adaptability when working with external libraries or frameworks. When utilizing popular automation testing tools such as Selenium for web testing, QAEs often encounter situations requiring additional functionalities or modifications to suit their specific test scenarios.
Monkey Patching allows testers to augment existing functionality, add custom methods, or even modify the behavior of Selenium WebDriver on the fly without having to modify the original source code. For example, if you need some special behavior when clicking on a button, you can use Monkey Patching to change Click function behavior to implement your desired behavior. This empowers testers to tailor automation workflows to their precise requirements, leading to more robust and efficient test suites.
In this Selenium Python tutorial, we will deep dive into Monkey Patching in Python using Selenium, which can help test automation professionals overcome the limitations imposed by external dependencies and achieve greater control and customization, resulting in improved test coverage and higher confidence in the quality of their software applications.
Let’s move on! Stay tuned!
TABLE OF CONTENTS
- What is Monkey Patching?
- Understanding Python Objects and Classes
- Essential Concepts of Monkey Patching in Python
- Monkey Patching Techniques
- Real-World Examples of Monkey Patching
- Monkey Patching vs. Inheritance and Decorators
- Monkey Patching Best Practices
- Parallel Testing using Monkey Patching
- Conclusion
- Frequently Asked Questions (FAQs)
What is Monkey Patching?
Monkey Patching introduces a dynamic technique that developers and QAEs can employ to modify the behavior of existing classes, objects, or modules during runtime, without making any direct change to their source code. This approach enables a remarkable level of flexibility and adaptability, empowering them to extend the functionalities of pre-existing components, fix bugs, and customize behaviors to cater to specific requirements.
It involves the dynamic addition, modification, or replacement of attributes, methods, or functions within existing objects at runtime. This entails the ability to manipulate the behavior of an object or a module without directly accessing or modifying its source code.
The term “Monkey Patching” derives its name from the idea of making spontaneous changes to the code, allowing them to experiment with modifications on the fly without adhering to traditional inheritance or modifying the original codebase. For example, imagine that there is a library called test_automation_metrics that provides some metrics for automated tests. If you need to implement a new metric called test_duration_by_endpoint, you can do it without needing to change the library itself.
Advantages and Shortcomings of Monkey Patching
When it comes to Monkey Patching in Python, there are some advantages and shortcomings to consider. Here are some benefits:
- Enhanced Functionality
- Bug Fixes and Missing Features
- Code Reusability
Monkey Patching allows developers and QAEs to extend the functionality of existing codebases without directly modifying them. This enables swift prototyping and experimentation with new features or modifications, leading to faster iterations and reduced development time.
Monkey Patching is valuable when fixing bugs or adding missing features in third-party libraries or modules. It provides a way to address issues in code that may no longer be actively maintained or where direct modification is impractical.
By leveraging Monkey Patching, they can adapt existing code to specific use cases, optimizing code reuse. This reduces the need for redundant code segments and promotes a more efficient development process.
Despite the benefits of using Monkey Patching, here are some of the shortcomings:
- Unintended Side Effects
- Testing Complexity
Monkey Patching introduces the risk of unintended side effects or conflicts due to the dynamic modification of existing code at runtime. This can make the codebase harder to understand, affecting maintainability, readability, and debugging efforts.
The patched behavior may not be readily apparent within the original codebase, making it more challenging to test and verify the correctness of the modified code.
In summary, Monkey Patching offers advantages such as enhanced functionality, bug fixes, and code reusability. However, it also introduces challenges related to unintended side effects and testing complexity. By understanding and carefully considering these advantages and shortcomings, developers and QAEs can make good decisions about when and how to apply Monkey Patching effectively in their projects.
Understanding Python Objects and Classes
Python, as an object-oriented programming language, revolves around the core principles of objects and classes. To fully comprehend the significance of Monkey Patching in Python, it is imperative to grasp these foundational concepts.
Objects and Instances
In Python, an object denotes an instance of a class. Objects serve as the embodiment of data and behavior, allowing developers to model real-world entities or abstract concepts within their code. Each object is associated with a specific class, which serves as a blueprint or template outlining the attributes and methods the object possesses.
Creating an object from a class results in an instance. Multiple instances can be generated from a single class, each representing a distinct entity with its attribute values.
For instance, in the context of test automation, consider a class called “TestSuite.” By instantiating multiple test suite objects, developers can represent individual test suites, each characterized by unique properties such as test cases, test data, and configurations.
These test suite objects serve as a means to organize and execute tests, allowing for efficient and systematic testing of software applications.
|
1 2 3 4 5 6 7 8 9 10 11 12 13 14 15 16 17 18 19 20 21 22 23 24 25 26 27 28 29 30 31 32 33 34 35 36 37 |
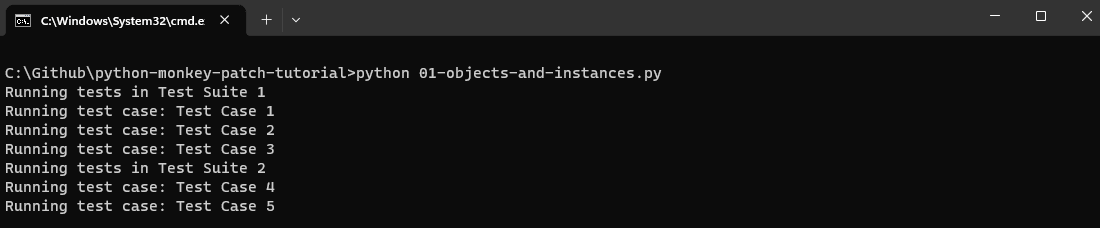
class TestSuite: def __init__(self, name, test_cases, test_data, configuration): self.name = name self.test_cases = test_cases self.test_data = test_data self.configuration = configuration def run_tests(self): # Logic to execute the test cases in the test suite print("Running tests in", self.name) for test_case in self.test_cases: print("Running test case:", test_case) # Execute the test using the data and configuration # Example of creating test suite objects # Test Suite 1 test_cases_1 = ["Test Case 1", "Test Case 2", "Test Case 3"] test_data_1 = {"input": "data1", "expected_output": "result1"} configuration_1 = {"timeout": 10, "retries": 3} suite_1 = TestSuite("Test Suite 1", test_cases_1, test_data_1, configuration_1) # Test Suite 2 test_cases_2 = ["Test Case 4", "Test Case 5"] test_data_2 = {"input": "data2", "expected_output": "result2"} configuration_2 = {"timeout": 5, "retries": 2} suite_2 = TestSuite("Test Suite 2", test_cases_2, test_data_2, configuration_2) # Running the test suites suite_1.run_tests() suite_2.run_tests() |
In the above code, the TestSuite class represents a test suite object. It has an __init__ method that initializes the test suite with a name, a list of test cases, test data, and configuration. The class also includes a run_tests method that simulates the execution of the test cases within the test suite.
The example demonstrates the creation of two test suite objects, suite_1 and suite_2, with different sets of test cases, test data, and configurations. The run_tests method is then called on each test suite object to execute the respective test cases.
Classes and Inheritance
In Python, a class represents a blueprint defining the structure and behavior of objects. It encapsulates attributes (variables) and methods (functions) that outline the characteristics and actions associated with the objects instantiated from the class. Classes provide a means to organize and structure code by encapsulating related data and functionality.
Inheritance, a powerful feature of object-oriented programming, allows classes to inherit attributes and methods from other classes. It facilitates code reuse and establishes a hierarchical relationship among classes. In Python, a class can inherit from another class, known as the base or parent class. The class inherited from the parent class is referred to as the derived or child class. By inheriting the attributes and methods of the parent class, the derived class gains the ability to extend and specialize the behavior defined in the parent class.
Inheritance enables the creation of specialized classes that inherit and augment the behavior inherited from more general classes.
Understanding inheritance is key in many oops interview questions. It helps illustrate how object-oriented principles are applied in real-world scenarios, such as test automation frameworks.
For instance, in the context of test automation, consider a base class named TestSuite and derived classes such as RegressionTestSuite, SmokeTestSuite, and PerformanceTestSuite. The base class, TestSuite, encapsulates the common attributes and methods required for executing test suites.
On the other hand, the derived classes inherit these common functionalities from the base class while introducing unique behaviors tailored to specific tests.
In this scenario, the RegressionTestSuite class can inherit the attributes and methods from the TestSuite base class, enabling it to execute regression tests that focus on verifying the overall system functionality after changes or updates. Similarly, the SmokeTestSuite class can inherit the base class and implement behaviors specifically designed for quick, high-level tests to identify critical issues. Additionally, the PerformanceTestSuite class can inherit the base class and introduce functionalities for conducting performance tests to evaluate the system’s response and stability under varying loads.
|
1 2 3 4 5 6 7 8 9 10 11 12 13 14 15 16 17 18 19 20 21 22 23 24 25 26 27 28 29 30 31 32 33 34 35 36 |
class TestSuite: def __init__(self, name): self.name = name def run_tests(self): print("Running tests in", self.name) class RegressionTestSuite(TestSuite): def run_tests(self): print("Running regression tests in", self.name) # Additional regression test logic class SmokeTestSuite(TestSuite): def run_tests(self): print("Running smoke tests in", self.name) # Additional smoke test logic class PerformanceTestSuite(TestSuite): def run_tests(self): print("Running performance tests in", self.name) # Additional performance test logic # Example of creating objects and using functions regression_suite = RegressionTestSuite("Regression Test Suite") smoke_suite = SmokeTestSuite("Smoke Test Suite") performance_suite = PerformanceTestSuite("Performance Test Suite") regression_suite.run_tests() smoke_suite.run_tests() performance_suite.run_tests() |
In the above code, the TestSuite class serves as the base class, while the RegressionTestSuite, SmokeTestSuite, and PerformanceTestSuite classes are derived classes inherited from the base class. Each derived class overrides the run_tests method to provide its specific implementation.
In the example, we create objects of each class: regression_suite, smoke_suite, and performance_suite. When you call the run_tests method on each object, the appropriate implementation from the corresponding derived class is executed. This demonstrates the use of inheritance, where the derived classes inherit the common run_tests method from the base class but provide their specialized behavior.

Method Resolution Order (MRO)
Method Resolution Order (MRO) in Python governs the sequence in which methods are resolved and invoked in the presence of inheritance. When a method is called on an object, Python searches for it by traversing through the object’s class and progressing up the inheritance hierarchy until it finds the method or reaches the topmost parent class.
Python determines the MRO using the C3 linearization algorithm, which establishes a consistent and predictable order for method resolution. Developers can access the MRO order by utilizing the __mro__ attribute on a class or employing the mro() method.
Understanding the MRO plays a pivotal role in the application of Monkey Patching as it guides the placement of patched methods within the method resolution order. Monkey Patching allows you to add, modify, or replace methods at runtime dynamically. The MRO ensures that the appropriate method is invoked when an object calls a method.
|
1 2 3 4 5 6 7 8 9 10 11 12 13 14 15 16 17 18 19 |
class BaseTest: def run_test(self): print("Running base test") class WebTest(BaseTest): def run_test(self): print("Running web test") class MobileTest(BaseTest): def run_test(self): print("Running mobile test") class HybridTest(WebTest, MobileTest): pass # Creating an object of HybridTest test = HybridTest() # Calling the run_test method test.run_test() # Accessing the MRO print(HybridTest.__mro__) |
In the above code, we have a base class called BaseTest with a method run_test(). We then define two derived classes, WebTest and MobileTest, which override the run_test() method with their implementations. Finally, we create a third derived class, HybridTest, which inherits from both WebTest and MobileTest without implementing its version of run_test().
When we create an object test of HybridTest and call the run_test() method on it, Python follows the MRO to determine which implementation of run_test() should be invoked. In this case, the MRO is [HybridTest, WebTest, MobileTest, BaseTest, object], and Python resolves the method in the order from left to right. Hence, the output will be:

Additionally, you can access the MRO by accessing the __mro__ attribute on the class, as demonstrated in the code. This allows developers to understand the order in which methods will be resolved when dealing with multiple inheritance scenarios in the context of test automation.
The output (<class ‘__main__.HybridTest’>, <class ‘__main__.WebTest’>, <class ‘__main__.MobileTest’>, <class ‘__main__.BaseTest’>, <class ‘object’>) represents the Method Resolution Order (MRO) for the HybridTest class.
In the MRO, the classes are listed in the order in which they will be searched for a method when it is called on an instance of HybridTest. Let’s break down the MRO:
- <class ‘__main__.HybridTest’>: This is the class itself, HybridTest, which is the starting point of the MRO. It is the first class to be searched for the method.
- <class ‘__main__.WebTest’>: This is the first parent class of HybridTest in the inheritance hierarchy. When a method is not found in HybridTest, Python will look for it in WebTest next.
- <class ‘__main__.MobileTest’>: This is the second parent class of HybridTest. If the method is not found in WebTest, Python will continue the search in MobileTest.
- <class ‘__main__.BaseTest’>: This is the next parent class in the hierarchy. If the method is not found in MobileTest, Python will look for it in BaseTest.
- <class ‘object’>: This is the ultimate parent class in Python and is always at the end of the MRO. If the method is not found in any previous classes, Python will search for it in the object class.
So, when you call a method on an instance of HybridTest, Python will first look for it in HybridTest. If it is not found, it will search in WebTest, then MobileTest, BaseTest, and finally object if necessary.
By gaining a profound understanding of Python’s object-oriented concepts, including objects, instances, classes, inheritance, and method resolution order, developers and QAEs can establish a solid foundation for effectively employing Monkey Patching techniques. These concepts provide the necessary groundwork for modifying and extending the behavior of Python objects, enabling developers to adapt and enhance existing code to suit specific requirements.
Essential Concepts of Monkey Patching in Python
In this section, we will delve into the essential concepts of Monkey Patching in Python, understanding its underlying mechanics, best practices, and its implications on code maintainability and reliability.
Modifying Existing Classes and Objects
One of the primary use cases of Monkey Patching in Python is modifying existing classes and objects to suit specific testing needs. Let’s consider an example where you have a base test suite class called TestSuite that provides a common set of methods for running tests. However, we want to extend this class to add custom functionality specific to regression tests.
In the above example, we have a base TestSuite class with a run_tests() method that prints a generic message. To modify this behavior for regression tests, we define a derived class called RegressionTestSuite that inherits from TestSuite and overrides the run_tests() method. Within the overridden method, we add the specific regression test logic.
|
1 2 3 4 5 6 7 8 9 |
class TestSuite: def run_tests(self): print("Running tests in the base TestSuite") # Derived class: RegressionTestSuite class RegressionTestSuite(TestSuite): def run_tests(self): print("Running regression tests") |
By using Monkey Patching in Python, you can make these modifications at runtime without altering the source code. This allows you to tailor the behavior of the TestSuite class for regression testing while maintaining the flexibility to use the original TestSuite implementation for other types of tests.
Extending Functionality
Another aspect of Monkey Patching in Python is the ability to extend the functionality of existing classes and objects. This allows you to dynamically add new methods or attributes to support our testing requirements better. Let’s continue with our previous example and add a new method to the RegressionTestSuite class.
|
1 2 3 |
def new_regression_test_method(self): print("Executing new regression test method") RegressionTestSuite.new_method = new_regression_test_method |
In the above code, we define a new function called new_regression_test_method() that represents the additional functionality we want to introduce to the RegressionTestSuite class. We then assign this function to the new_method attribute of the RegressionTestSuite class. This effectively extends the functionality of the class by adding a new method.
Now, when we instantiate a RegressionTestSuite object, we can call this new method alongside the existing methods inherited from the base class.
|
1 2 3 |
regression_suite = RegressionTestSuite() regression_suite.run_tests() # Existing overridden method regression_suite.new_method() # Newly added method |
By leveraging Monkey Patching, you can seamlessly introduce new functionality to existing classes, enabling you to tailor our test suites to specific requirements without modifying the original class definition. This flexibility enhances code reuse and promotes a more modular and maintainable test automation framework.
Monkey Patching Techniques
Monkey Patching, as we have discussed, offers developers and QAEs the ability to modify or extend classes and objects at runtime. In this section, we will delve into specific techniques of Monkey Patching in Python and explore their applications in test automation. We will cover attribute overriding, method overriding, and patching built-in classes and objects.
Attribute Overriding
Attribute overriding involves dynamically modifying the attributes of a class or object. This technique allows you to change the values of existing attributes or add new attributes to customize the behavior of the class or object.
In the context of test automation, attribute overriding can be beneficial when you want to modify the behavior of test cases or test suites dynamically. Let’s consider an example where you have a base test case class called BaseTestCase with a common attribute named timeout. However, we want to override this attribute for specific test cases that require a longer timeout, for example, when rendering a huge amount of data on the screen.
|
1 2 3 4 5 6 7 8 9 10 11 |
class BaseTestCase: timeout = 10 # Common timeout value for test cases # Derived class: CustomTestCase class CustomTestCase(BaseTestCase): pass # Monkey patching: Attribute overriding CustomTestCase.timeout = 20 # Override timeout for specific test cases |
In this example, we derive a class CustomTestCase from BaseTestCase. By utilizing Monkey Patching, we override the timeout attribute of CustomTestCase to assign a different value. This allows us to customize the timeout value for specific test cases without modifying the original class.
Method Overriding
Method overriding involves modifying the behavior of a method in a class or object. This technique enables you to replace the implementation of a method with customized logic.
In the realm of test automation, method overriding can be useful when you want to modify or extend the functionality of test cases or test suites. Let’s consider a scenario with a base test case class called BaseTestCase with a common method named run_test(). However, we want to override this method for specific test cases that require additional setup or teardown steps.
|
1 2 3 4 5 6 7 8 9 10 11 12 13 14 15 16 17 18 19 20 21 22 23 24 25 26 27 28 29 30 31 32 33 34 |
from selenium import webdriver # Base test case class class BaseTestCase: def run_test(self): # Instantiate WebDriver driver = webdriver.Chrome() # Common test execution logic driver.get("https://www.example.com") # Close the browser driver.quit() # Derived class: CustomTestCase class CustomTestCase(BaseTestCase): def run_test(self): # Additional setup steps driver = webdriver.Chrome() driver.maximize_window() # Call base class method super().run_test() # Additional teardown steps driver.close() |
In this example, the CustomTestCase class inherits from BaseTestCase. By utilizing method overriding through Monkey Patching, we override the run_test() method of CustomTestCase to introduce additional setup and teardown steps. This allows us to customize the behavior of specific test cases while preserving the original logic defined in the base class.
Patching Built-in Classes and Objects
Monkey Patching in Python is not limited to user-defined classes and objects; it can also be applied to modify the behavior of built-in classes and objects in Python. This capability provides immense flexibility and allows you to extend the functionality of existing built-in classes or objects to suit our testing needs.
Consider a scenario where you are automating web testing using Python and Selenium. You may encounter situations where you want to customize or enhance the behavior of Selenium classes or objects. Monkey Patching allows you to achieve this without modifying the original Selenium source code.
For example, let’s say you want to add a custom method named highlight_element() to the Selenium WebElement class, which highlights the web element on the page for better visibility during test execution. You can achieve this through Monkey Patching:
|
1 2 3 4 5 6 7 8 9 |
from selenium.webdriver.remote.webelement import WebElement # Monkey patching: Adding a custom method to the WebElement class def highlight_element(self): self._execute_script("arguments[0].style.border='2px solid red';", self) WebElement.highlight_element = highlight_element |
In this example, we import the WebElement class from the
selenium.webdriver.remote.webelement module. By utilizing Monkey Patching, we add a custom method named highlight_element() to the WebElement class, which modifies the element’s border style to highlight it on the web page.
This technique of Monkey Patching built-in classes or objects allows us to extend the functionality of existing libraries or frameworks to fulfill specific testing requirements without the need for direct modification or forking of the source code.
In conclusion, Monkey Patching in Python provides powerful techniques for modifying or extending classes and objects dynamically at runtime. In the context of test automation, it offers flexibility and customization options to tailor the behavior of test cases, test suites, or even built-in classes and objects.
By understanding and leveraging the concepts of attribute overriding, method overriding, and patching built-in classes and objects, developers, and testers can effectively harness the potential of Monkey Patching in Python to enhance their test automation frameworks and achieve more efficient and customized testing.
Real-World Examples of Monkey Patching
Monkey Patching in Python is a versatile technique with numerous practical applications in various domains. In this section, you will explore the real-world use cases of Monkey Patching, focusing on its applications in the context of test automation, patching third-party libraries, extending the Python Standard Library, and implementing custom Monkey Patching examples.
Monkey Patching for Test Automation
Monkey Patching plays a significant role in test automation, offering valuable opportunities to customize and enhance automation testing frameworks and tools. Let’s delve into some examples:
Test Data Customization
Monkey Patching in Python allows you to modify data generation functions or classes within testing frameworks. This customization ensures that the generated test data meets specific constraints or conditions for testing different scenarios.
For instance, let’s consider a scenario where a testing framework generates random email addresses for test cases.
|
1 2 3 4 5 6 7 8 9 |
import random import string def generate_email(): username_length = random.randint(5, 10) username = ''.join(random.choices(string.ascii_lowercase, k=username_length)) domain = random.choice(['example.com', 'test.com', 'sample.com']) return f"{username}@{domain}" |
The generate_email function generates a random email address by randomly selecting a username of a random length between 5 and 10 characters from lowercase alphabets and a domain from a predefined list. The generated email address is then returned as a string.
However, we want to ensure that the generated email addresses are from a specific domain for a particular set of tests. You can achieve this by Monkey Patching the data generation function to override the domain part of the email address with the desired domain. Here’s a Python code example:
|
1 2 3 4 5 6 |
def generate_custom_email(): email = generate_email() # Modify the domain part of the email address custom_email = email.replace('@example.com', '@customdomain.com') print(custom_email) return custom_email |
You can use the generate_email() function in your code to provide the update in the implementation. Then, in your automation code, you can do just this:
|
1 2 3 |
import random_email_generator # Call the modified generate_custom_email function random_email_generator.generate_custom_email() |
Now, whenever the testing framework generates an email address, it will use our custom function, ensuring that the generated email addresses have the desired domain.
Enhanced Test Reporting
By patching reporting functions or classes, you can customize the format, content, or destination of test reports based on project requirements. This flexibility enables you to generate reports in different formats or integrate them with external systems.
Let’s say you have a testing framework that generates HTML reports by default, but you want to generate reports in a PDF format. You can achieve this by Monkey Patching the reporting function to use a PDF generation library. Here’s a Python code example using the reporting module:
|
1 2 3 4 5 6 7 8 9 10 11 12 13 14 |
#reporting and pdf_generator are fictitious libraries for didactic purposes import reporting from pdf_generator import generate_pdf_report def generate_pdf_report_custom(): # Generate the PDF report using a PDF generation library data = reporting.get_test_results() complete_data = reporting.addToHistoric(data) generate_pdf_report(complete_data, 'custom_report.pdf') # Monkey patch the reporting function reporting.generate_report = generate_pdf_report_custom |
Now when the testing framework generates a test report, it will invoke our custom function, which generates a PDF report instead of the default HTML report.
Framework Extensions
Monkey Patching in Python enables you to extend the functionality of existing test frameworks. By patching test case classes or test runner classes, you can introduce additional features, specialized assertions, or custom execution logic tailored to project-specific needs.
Let’s consider a scenario where you have a test framework that lacks a specific assertion for verifying the presence of an element on a web page. You can use Monkey Patching in Python to add this assertion to the framework. Here’s a Python code example:
|
1 2 3 4 5 6 7 8 9 10 11 |
#test_framework is a fictitious library for didactic purposes import test_framework def assert_element_present(self, locator): if not self.is_element_present(locator): raise AssertionError(f"Element {locator} is not present on the page") # Monkey patch the test case class test_framework.TestCase.assert_element_present = assert_element_present |
Now, all test cases derived from the TestCase class in the test_framework will have the assert_element_present method available for verifying the presence of elements on web pages.
These examples demonstrate how Monkey Patching in Python empowers test automation engineers to adapt their testing frameworks and tools to the unique demands of their projects.
Patching Third-Party Libraries
Monkey Patching in Python also finds significant applications in patching third-party libraries, such as Selenium, Requests, and pytest. When working with external libraries or frameworks, there are instances where customization or bug fixes are necessary. However, directly modifying library code is often impractical. In such cases, Monkey Patching provides an elegant solution.
By dynamically modifying the behavior of third-party library classes or functions, you can extend or fix functionalities without altering the library’s source code directly. This approach enables you to temporarily overcome limitations or bugs in the library and adapt it to our specific needs.
Example:
Consider a scenario where an API testing library exhibits a bug in handling response headers. Instead of waiting for an official update or maintaining a separate library fork, you can temporarily apply Monkey Patching to address the issue. You can fix the bug until an official fix becomes available by patching the library’s response handling functions.
Patching Python Standard Library
Monkey Patching in Python can also be employed to modify or extend the behavior of the Python Standard Library itself. The Python Standard Library offers vast modules and functionalities for diverse purposes. However, there are situations where customization or enhancement of certain standard library modules becomes necessary to fulfill specific requirements.
One common use case involves patching the logging module. Although the logging module provides extensive logging capabilities, its default behavior may not align with project-specific logging requirements. Monkey Patching in Python allows us to modify the logging module’s behavior, such as altering the log message format, redirecting logs to different destinations, or introducing additional log levels.
Patching the Python Standard Library requires careful consideration, as it can impact the behavior of other modules or third-party libraries that depend on standard library modules. Thorough testing and documentation are crucial when applying Monkey Patching to the Python Standard Library.
In conclusion, Monkey Patching in Python is a versatile technique with practical applications in real-world scenarios. Whether it is customizing test automation frameworks, patching third-party libraries, extending the Python Standard Library, or implementing custom modifications, Monkey Patching offers flexibility and adaptability. However, it should be used responsibly, carefully considering its impact on code readability, maintainability, and compatibility.
With a solid understanding of its applications and limitations, developers and QAEs can leverage Monkey Patching in Python effectively to tailor their code and achieve desired outcomes.
Monkey Patching vs. Inheritance and Decorators
When it comes to extending and customizing code in Python, developers and QAEs have multiple techniques at their disposal. Monkey Patching, Inheritance, and Decorators are among the most powerful tools. While each method serves the purpose of modifying code, they differ in their approach and application.
Let’s delve into the distinctions and explore their respective use cases.
Comparing Monkey Patching with Inheritance
Inheritance is a cornerstone of object-oriented programming. It allows classes to inherit attributes and methods from their parent classes, creating a hierarchical structure. This approach promotes code reusability and encourages a structured approach to code organization. Inheritance is ideal when the goal is to build upon an existing class, extending its functionality while maintaining a clear and organized codebase.
On the other hand, Monkey Patching takes a different approach. It involves dynamically modifying existing code at runtime, enabling developers and QAEs to add, modify, or replace attributes or methods of classes or objects. Monkey Patching in Python offers flexibility and agility, allowing on-the-fly changes without creating new classes or directly modifying the source code. It is particularly useful for making temporary or localized modifications to existing code.
The choice between Monkey Patching and Inheritance depends on the specific requirements and constraints of the project. Inheritance shines when the goal is to establish a hierarchical relationship between classes and maintain a structured codebase. It promotes code clarity and maintainability, making it easier to understand and extend.
On the other hand, Monkey Patching in Python is suitable for situations where localized modifications or quick fixes are needed. It offers the flexibility to modify code behavior dynamically, making it well-suited for ad-hoc changes or addressing specific issues without extensive code restructuring. However, it’s important to exercise caution with Monkey Patching as it can introduce complexity and make code harder to debug.
Let’s look at the code sample below, which shows the difference between Inheritance and Monkey Patching.
|
1 2 3 4 5 6 7 8 9 10 11 12 13 14 15 16 17 18 19 20 21 22 23 24 25 26 27 |
# Base test class class BaseTest: def run_test(self): print("Running base test...") # Derived test class inheriting from BaseTest class SmokeTest(BaseTest): def run_test(self): print("Running smoke test...") # Monkey patching the BaseTest class def monkey_patch_run_test(self): print("Monkey patch run test") BaseTest.run_test = monkey_patch_run_test # Creating instances and running tests base_test = BaseTest() smoke_test = SmokeTest() base_test.run_test() # Output: Monkey patch run test smoke_test.run_test() # Output: Running smoke test... |
In this code, we have a base test class called BaseTest and a derived test class called SmokeTest. The BaseTest class has a run_test method that represents a generic test execution. The SmokeTest class inherits from BaseTest and overrides the run_test method to perform smoke testing specific actions.
We then perform Monkey Patching by defining a new function monkey_patch_run_test, and assigning it to the run_test attribute of the BaseTest class. This modifies the behavior of the BaseTest class at runtime. As a result, when we create an instance of BaseTest and invoke the run_test method, it now executes the monkey_patch_run_test instead of the original implementation.
The code also demonstrates that the derived class SmokeTest remains unaffected by the monkey patching. It still implements the run_test method, showcasing the contrast between Monkey Patching and Inheritance.
When executing this code, we get the below result:

Comparing Monkey Patching with Decorators
Another popular technique in Python is Decorators. Decorators allow the modification or extension of functions or classes by wrapping them with additional functionality. Unlike Monkey Patching, Decorators do not directly modify existing code; instead, they provide a way to augment the behavior of functions or classes.
Decorators are particularly useful when modifications must be consistently applied across multiple functions or classes. They promote code reuse and separation of concerns by allowing developers to encapsulate cross-cutting concerns in reusable decorators. Decorators enhance code readability and maintainability by providing a modular approach to code customization.
Monkey Patching in Python, on the other hand, is more suitable when modifications are specific to individual functions or classes and do not require a global application. It allows for quick and localized changes without the need to modify the source code. However, it’s important to use Monkey Patching judiciously to avoid introducing unnecessary complexity and potential conflicts.
Let’s look at the code sample below, where the difference between Decorators and Monkey Patching is shown.
|
1 2 3 4 5 6 7 8 9 10 11 12 13 14 15 16 17 18 19 20 21 22 23 24 25 26 27 28 |
# Decorator function for test logging def log_test(func): def wrapper(): print("Logging test...") return func() return wrapper # Test function with decorator @log_test def perform_test(): print("Performing test...") # Running the original test perform_test() # Output: Logging test... Performing test... # Monkey patching a test function def monkey_patch_test(): print("Monkey patch test") perform_test = monkey_patch_test # Running the modified test perform_test() # Output: Monkey patch test |
In this code, we define a Decorator function called log_test that wraps a test function with logging functionality. We apply the Decorator to the perform_test function using the @ syntax. The perform_test function is modified to include test logging actions.
When you run perform_test(), it executes the code inside the log_test decorator and the code inside the perform_test() itself.
In contrast to Decorators, we demonstrate Monkey Patching in Python by defining a new function monkey_patch_test, and assigning it to the perform_test variable. This dynamically modifies the behavior of the perform_test function.
When you run perform_test(), it executes the Monkey Patch function instead of the original implementation. This highlights the difference between Decorators, which provide a clean and reusable way to modify test functions, and Monkey Patching, which allows for direct and localized changes to existing test code.
When executing this code, we get the below result:

Choosing the Right Approach
Choosing the right approach—Monkey Patching, Inheritance, or Decorators—depends on several factors. Consider the following points to make an informed decision:
- Code Structure
- Reusability
- Dynamic Modifications
If the goal is to build upon an existing class or establish a structured hierarchy, inheritance is a suitable choice. It provides a clear and organized approach to code organization.
If modifications need to be consistently applied across multiple functions or classes, decorators offer a reusable and modular solution. They promote code reuse and encapsulate cross-cutting concerns effectively.
If the modifications are temporary, localized, or require runtime changes, Monkey Patching in Python provides the flexibility to modify code behavior on-the-fly. For example, if you need a third-party library to have different behavior depending on your software flow, Monkey Patching is the best choice for being used.
Monkey Patching, Inheritance, and Decorators are powerful techniques in Python that allow for code customization and extension. Each approach has its strengths and weaknesses, and choosing the right one depends on the specific requirements and constraints of the project. By carefully considering factors such as code structure, reusability, dynamic modifications, and maintainability, you can make informed decisions to achieve code flexibility and maintainable solutions.
Monkey Patching Best Practices
When it comes to Monkey Patching, understanding the limitations and risks involved is crucial. While Monkey Patching in Python provides the flexibility to modify code at runtime, it can introduce complexities and potential issues if not approached carefully. In this section, we will explore some best practices to help ensure the effective and safe use of Monkey Patching in Python
Limitations and Risks
Before diving into Monkey Patching in Python best practices, it is important to be aware of its limitations and the risks it poses. Here are a few key considerations:
- Compatibility Concerns
- Maintenance Challenges
- Testing Complexity
- Dependency Management
- Unintended Side Effects
Monkey Patching in Python relies on internal details of the code being patched. Changes to the original codebase can break the patched functionality, leading to compatibility issues. It is crucial to thoroughly understand the codebase and consider the implications of the patches to ensure compatibility.
Monkey Patching in Python can make codebases harder to maintain. Dynamic changes introduced through patching can decrease code readability and complicate debugging. It is advisable to document and communicate the presence of Monkey Patches to facilitate collaboration among developers.
Testing Monkey-Patched code can be more challenging. Since the patched behavior may not be evident in the original codebase, comprehensive test coverage is essential. Additionally, it is important to test the patched functionality to avoid introducing new bugs thoroughly.
Monkey Patching in Python can introduce dependencies on specific versions or implementations of libraries or frameworks. This can result in compatibility issues when upgrading or switching dependencies. Careful management and documentation of these dependencies are necessary to prevent future complications.
Modifying code dynamically through Monkey Patching can lead to unintended side effects or conflicts. Changes in object behavior can cause unexpected issues in other parts of the codebase. Extensive testing and validation of the patched functionality are crucial to minimize the risk of unintended consequences.
Guidelines for Effective Monkey Patching
To ensure the effective and safe use of Monkey Patching in Python, consider the following guidelines:
- Deep Understanding
- Documentation and Communication
- Comprehensive Testing
- Scoped Patches
- Consider Alternatives
- Version Control
- Stay Updated
Gain a thorough understanding of the codebase and its internal structure. This knowledge will help you identify suitable areas for Monkey Patching in Python and reduce the chances of compatibility problems.
Document your Monkey Patching implementations, including the reasons behind the patches and any dependencies introduced. Communicate these changes to the development team to facilitate understanding and collaboration.
Invest in comprehensive testing to validate the functionality introduced through Monkey Patching in Python. Create specific test cases to cover the patched behavior and ensure that the patches do not introduce new bugs. Automated testing frameworks can streamline the testing process and provide consistent results.
Limit the scope of your patches to specific areas of the codebase. Avoid making broad changes that can increase the risk of unintended side effects. Focused patches are easier to track and maintain.
Before resorting to Monkey Patching in Python, explore alternative approaches such as inheritance or decorators. These techniques might offer cleaner and more maintainable solutions in certain scenarios.
Utilize version control systems to track and manage changes made through Monkey Patching in Python. This allows for easy reversion or tracking of modifications if issues arise.
Keep an eye on updates and changes in the codebase or libraries/frameworks being patched. Regularly check for official updates or fixes that might render your patches unnecessary. Evaluate whether the patches can be replaced or removed once official solutions become available.
By following these best practices, you can effectively utilize Monkey Patching in Python while minimizing risks and maintaining a stable and maintainable codebase.
Parallel Testing using Monkey Patching
Parallelizing automation testing using Monkey Patching is a valuable approach that can significantly enhance test execution speed and efficiency. By combining the power of parallelism with the flexibility of Monkey Patching, testers can achieve faster results and maximize their testing capabilities.
In this section, we will explore how to perform Selenium automation testing in parallel using Monkey Patching in Python. Parallel testing allows us to run multiple test cases simultaneously, reducing the overall testing time and increasing efficiency.
The demonstration will be done on a cloud-based grid like LambdaTest, an AI-powered test orchestration and execution platform that helps developers and testers to perform Python automation testing of their websites or web applications on over 3000+ real browsers and operating system combinations. While performing testing on LambdaTest, you can run your automated tests in parallel across multiple browsers and OS combinations, reducing the overall test execution cycles.
Don’t miss out on thе latеst tutorials on automation tеsting! Subscribe to thе LambdaTеst YouTubе Channеl for tutorials on Sеlеnium tеsting, Playwright testing, and more.
Visit our documentation to get started with Selenium Python testing
To perform Selenium Python testing on the LambdaTest cloud grid, you need to use the capabilities to configure the environment where the test will run. In this tutorial on Monkey Patching in Python, we will run the tests with the following characteristics:
Environment 1
- Browser: Chrome
- OS: Windows 11
Environment 2
- Browser: Firefox
- OS: macOS Ventura
We are going to execute the below test scenario:
Test Scenario
|
Setting up the Environment
Before diving into parallel testing, you must ensure your testing environment is properly set up. Here are the essential steps that you need.
To start our coding, you need to proceed with the following steps to prepare the environment.
Step 1: Download and Install Python
Begin by installing Python, if not already installed, from the official Python website https://www.python.org.
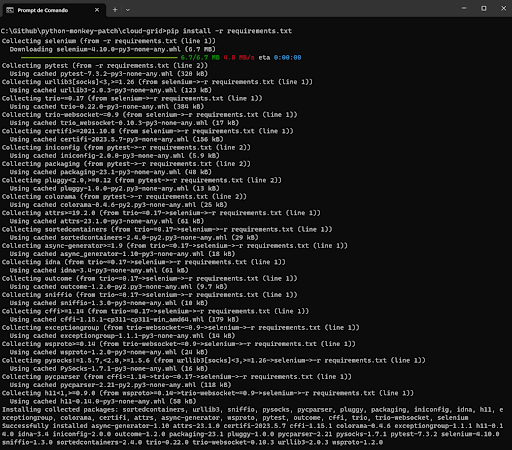
Step 2: Install Selenium and pytest libraries
Once Python is installed, use the Python package manager, pip, to install Selenium and pytest just running the following command:
|
1 |
pip install -r requirements.txt |
Requirements.txt contains the dependencies that you want to install.

After running, you can see the below output:
Step 3: Download and Install Visual Studio Code
Visual Studio Code (VSC) will be the IDE we will use in this tutorial on Monkey Patching in Python. However, you are free to use your preferable IDE!
Step 4: Configure pytest in Visual Studio Code
To finish the configuration, you need to tell Visual Studio Code that pytest will be your test runner. You can do this by following the below instructions:
- Create a folder for your project (in our example python-headless-browser).
- Open the project folder in Visual Studio Code.
- Open the command palette (menu View > Command Palette), and type “Configure Tests”.
- Select pytest as the test framework.
- Select the root directory option.
Now, you are ready to start!
You need also to prepare the LambdaTest capabilities code to be inserted in our test script.
You can generate the capabilities code from the LambdaTest Capabilities Generator.
Then, you should get the “Username” and “Access Token” from your account in your LambdaTest Profile Section and set it as an environment variable.
With the environment set up, you can proceed to the implementation of parallel testing using headless browsers.
Implementation of Parallel Testing on LambdaTest
Implementation
|
1 2 3 4 5 6 7 8 9 10 11 12 13 14 15 16 17 18 19 20 21 22 23 24 25 26 27 28 29 30 31 32 33 34 35 36 37 38 39 40 41 42 43 44 45 46 47 48 49 50 51 52 53 54 55 56 57 58 59 60 61 62 63 64 65 66 67 68 69 70 71 72 73 74 75 76 77 78 79 80 81 82 83 84 85 86 87 88 89 90 91 92 93 94 95 96 97 98 99 100 101 102 |
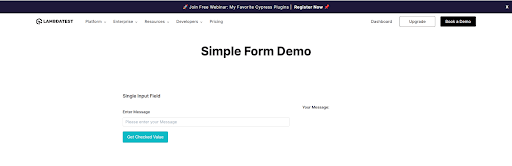
from selenium import webdriver from selenium.webdriver.common.by import By from selenium.webdriver.remote.webelement import WebElement import pytest import os from time import sleep import datetime @pytest.fixture(params=["chrome-Windows11", "firefox-macOSVentura"],scope="class") def driver(request): username = os.getenv("LT_USERNAME") accessToken = os.getenv("LT_ACCESS_KEY") gridUrl = "hub.lambdatest.com/wd/hub" if request.param == "chrome-Windows11": web_driver = webdriver.ChromeOptions() platform = "Windows 11" if request.param == "firefox-macOSVentura": web_driver = webdriver.FirefoxOptions() platform = "MacOS Ventura" lt_options = { "user": username, "accessKey": accessToken, "build": "monkey patching build", "name": "monkey patching test", "platformName": platform, "w3c": True, "browserName": "Chrome", "browserVersion": "latest", "selenium_version": "4.8.0", } options = web_driver options.set_capability('LT:Options', lt_options) url = "https://"+username+":"+accessToken+"@"+gridUrl driver = webdriver.Remote( command_executor=url, options=options ) yield driver driver.quit def custom_click(self): # Perform additional actions before clicking # Get time (Before profiling) st_time = datetime.datetime.now() sleep(10) # Get time (After profiling) en_time = datetime.datetime.now() # Calculate the time difference time_diff = en_time - st_time # Convert the time difference to seconds elapsed_time = time_diff.total_seconds() print("\nSleep in Monkey Patching: ", elapsed_time) # Call the original click() method self._original_click() # Patching the WebElement class with the custom_click() method WebElement._original_click = WebElement.click WebElement.click = custom_click def test_simple_demo_form(driver): # Load a webpage driver.get("https://www.lambdatest.com/selenium-playground/simple-form-demo") # Find an input element by its ID and enter text input_element = driver.find_element(By.ID, "user-message") input_element.send_keys("This is a monkey patching text!") # Find an element by its ID and click on it element = driver.find_element(By.ID, "showInput") element.click() # Find an element by its ID and extract its text element = driver.find_element(By.ID, "message") assert element.text == "This is a monkey patching text!" |
Code-Walkthrough
Let’s explore a practical example demonstrating the combination of parallel testing and Monkey Patching in Python for performing Selenium automation testing. We’ll utilize the popular pytest framework for organizing and executing our tests.
In our code, we start by importing the necessary modules and defining the pytest fixture called driver using the pytest.fixture decorator. This fixture is responsible for initializing the Selenium WebDriver based on the specified browser and platform configurations. By parameterizing the driver fixture, you can run tests in parallel on different combinations of browsers and platforms. You can learn more about it through this blog on parameterization in pytest.

Inside the driver fixture, we set up the LambdaTest credentials and configure the WebDriver options based on the chosen browser-platform combination. We then create a remote WebDriver instance using the LambdaTest URL and the configured options. The driver fixture is then yielded, allowing the test function to utilize the WebDriver. After the test is completed, the driver.quit method is called to close the WebDriver session gracefully.

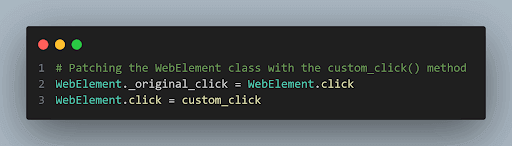
To showcase Monkey Patching, we define a custom method called custom_click(). This method allows us to add additional actions before invoking the original click() method of the WebElement class.
In our example, we get the timestamp, do a sleep delay of 10 seconds, get the timestamp again, and calculate and print the difference between the timestamps, which is the sleep time in Monkey Patching, before the actual click action.
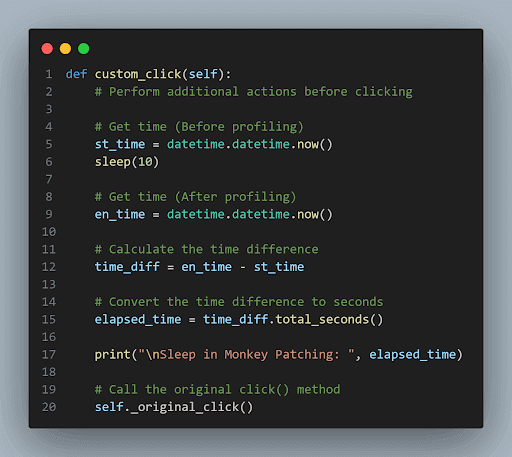
We then patch the click() method of the WebElement class by assigning our custom_click() method to it. This effectively overrides the default behavior of the click() method with our customized actions.
Finally, we define a test function called test_simple_demo_form that demonstrates the usage of the Monkey Patched click() method. Inside this function, we navigate to a webpage, interact with elements, and perform assertions to validate the expected results.
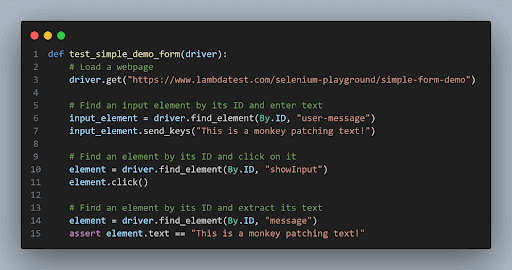
In the above code snippets, we use the get() method to access the webpage we are going to test, then we use the find_element() method in Selenium to locate elements on the page. These methods allow us to find elements using different strategies, such as by ID, Name, Class Name, CSS Selector, and more. Once you have a reference to an element, you can interact with it using the click() or send_keys() method in Selenium.
For our sample, we will use three components on the page: the message field to type, the button to click, and the message on the right side to check if it was correctly set.

For the message field, after locating the element, we want to type inside it using the send_keys() method. Then we will use the click() method for the button element and the .text to extract the text from the message element.
You can run the entire code using the below command:
|
1 |
pytest -s |
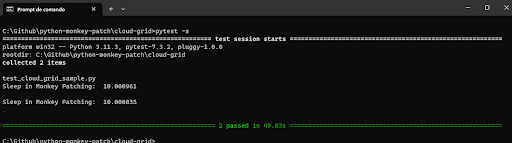

The –s flag allows the timestamps to be printed in the console.
Are you a developer or a tester looking to become a proficient Python automation tester? Worry not! You can do that by enrolling in the Selenium Python 101 certification program. This certification will enhance your Python skills and equip you with a solid foundation to effectively use Selenium Python in testing projects, allowing you to excel in your automation testing career.
Conclusion
In this Selenium pytest tutorial, we have explored the concept of Monkey Patching in Python and its various applications. Monkey Patching in Python provides developers and QAEs with a powerful tool to modify code at runtime, allowing for customization, bug fixing, and extending functionality. However, it is important to approach Monkey Patching in Python cautiously and adhere to best practices to avoid potential risks and limitations.
Monkey Patching in Python is a powerful technique that should be approached with care and consideration. When used appropriately and following best practices, it can be a valuable tool in a developer’s and QAE`s arsenal. Monkey Patching in Python offers the flexibility to modify code dynamically and tailor it to specific requirements. By understanding its limitations, documenting changes, and conducting thorough testing, you can harness the potential of Monkey Patching in Python effectively and contribute to the overall success of your projects.
Do checkout complete guides on python basics, software testing metrics, webdriverio appium and more. We also have a comprehensive library of software testing questions, where we cover generic questions like what is bdd testing, what is an iframe, and more. We also support legacy browsers and OS, like you can test on internet explorer or you can test on macOS Mountain lion and more. You can also test screen orientation and perform selenium automation testing with gauge framework
Frequently Asked Questions (FAQs)
What is monkey patching in programming?
Monkey patching in programming refers to the practice of dynamically modifying or extending the code behavior at runtime, typically during the execution of a program. It allows developers to alter the behavior of functions, methods, or classes without changing the source code.
What is monkey patch in pytest?
In pytest, a “monkey patch” refers to the ability to modify or replace objects, functions, methods, or modules at runtime during testing. It is a powerful feature provided by pytest that allows testers to change the behavior of the code being tested temporarily.
What does @patch mean in Python?
In Python, @patch is a decorator provided by the unittest.mock module, which is a part of the Python standard library. It is commonly used for creating mock objects and patching functions or methods during testing.


Author’s Profile
Paulo Oliveira
Paulo is a Quality Assurance Engineer with more than 15 years of experience in Software Testing. He loves to automate tests for all kind of applications (both backend and frontend) in order to improve the team’s workflow, product quality, and customer satisfaction. Even though his main roles were hands-on testing applications, he also worked as QA Lead, planning and coordinating activities, as well as coaching and contributing to team member’s development. Sharing knowledge and mentoring people to achieve their goals make his eyes shine.
Blogs: 15
Got Questions? Drop them on LambdaTest Community. Visit now


