
How To Start Running Automated Tests With Selenium C#
Andreea Draniceanu
Posted On: June 17, 2022
![]() 181356 Views
181356 Views
![]() 12 Min Read
12 Min Read
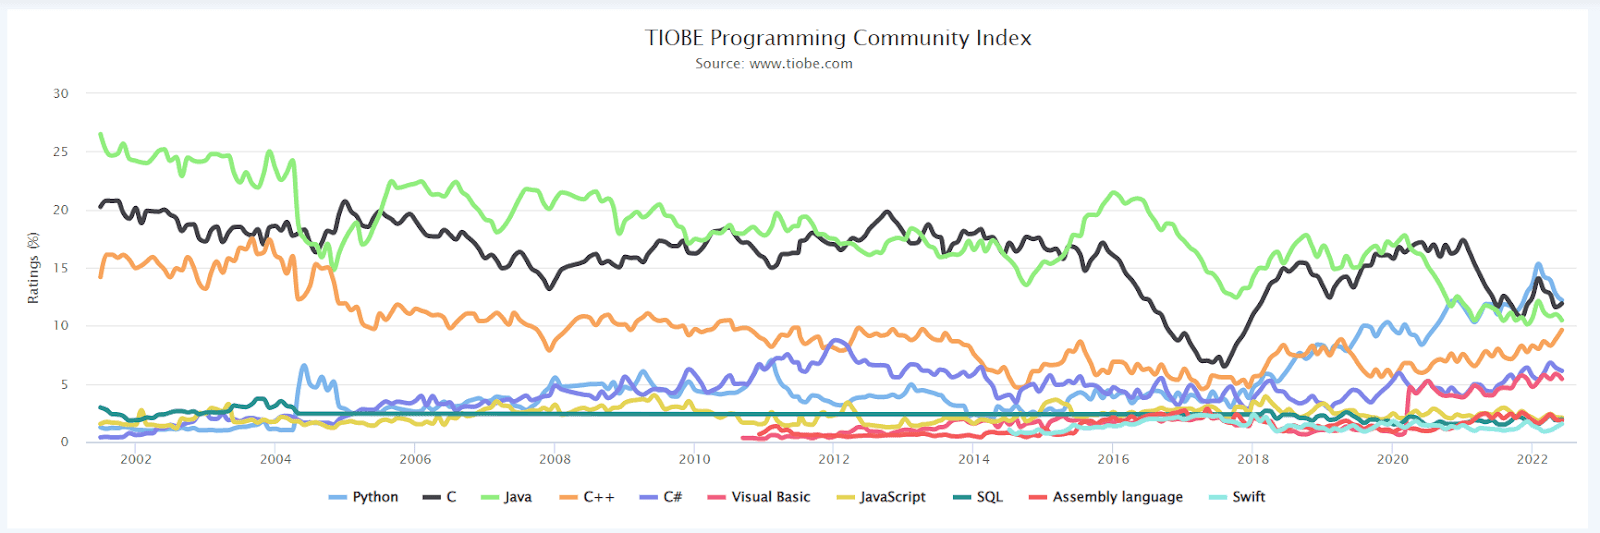
The Selenium framework itself is a set of different tools, but the most popular and the most useful to new and experienced testers alike is WebDriver. Selenium WebDriver is a free and open-source tool that allows you to interact with a website for web automation testing. It also supports popular programming languages like C#, Java, JavaScript, Python, Ruby, and PHP. As per reports, C# is just behind Python, C, Java, and C++ in terms of popularity. I’ve been working mostly with Selenium C# for some time, and I’ll tell you why.
If I’m just starting a project, I like to use the same language the development team uses for two main reasons:
- The test project can be integrated with the existing solution.
- The development team can help with improvements in the testing framework.
Selenium is my preferred and one of the best test automation frameworks since I can use the C# bindings for Selenium to write automated tests. At the time of writing this blog on C# Automation testing, the latest Selenium version available is 4.2.0, so I’ll be using that version for the following Selenium C# tutorial.
By the end of this Selenium with C# tutorial, you will be in a position to write automated tests that work seamlessly on local and cloud Selenium Grid. If you are preparing for an interview you can learn more through Selenium interview questions.
So let’s get started!
TABLE OF CONTENTS
- How to create a new Selenium C# project?
- How to run Selenium C# tests from Visual Studio?
- How to run your first Selenium C# test?
- Installing Selenium WebDriver using NuGet Package Manager
- Adding the Browser Driver
- Implementing Selenium C# test
- Selenium C# code walkthrough
- Running the Selenium C# test
- How to run Selenium C# tests on cloud Selenium Grid?
- Frequently Asked Questions (FAQs)
Before you get started, you need to have a code editor installed on your machine. For this Selenium C# tutorial, I’ll be using Visual Studio, but you can use any IDE you prefer for editing your code.
How to create a new Selenium C# project?
The steps to create a new project in Visual Studio are pretty straightforward. Please follow the below steps to create a new project in Selenium with C#.
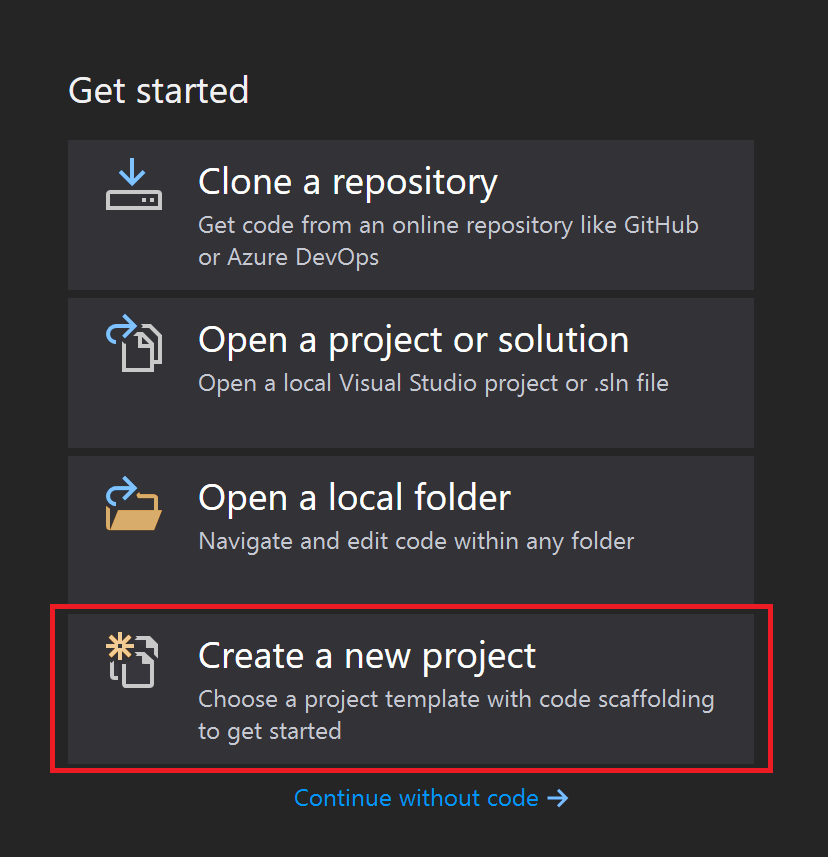
- Click “Create a new project” from the splash window:
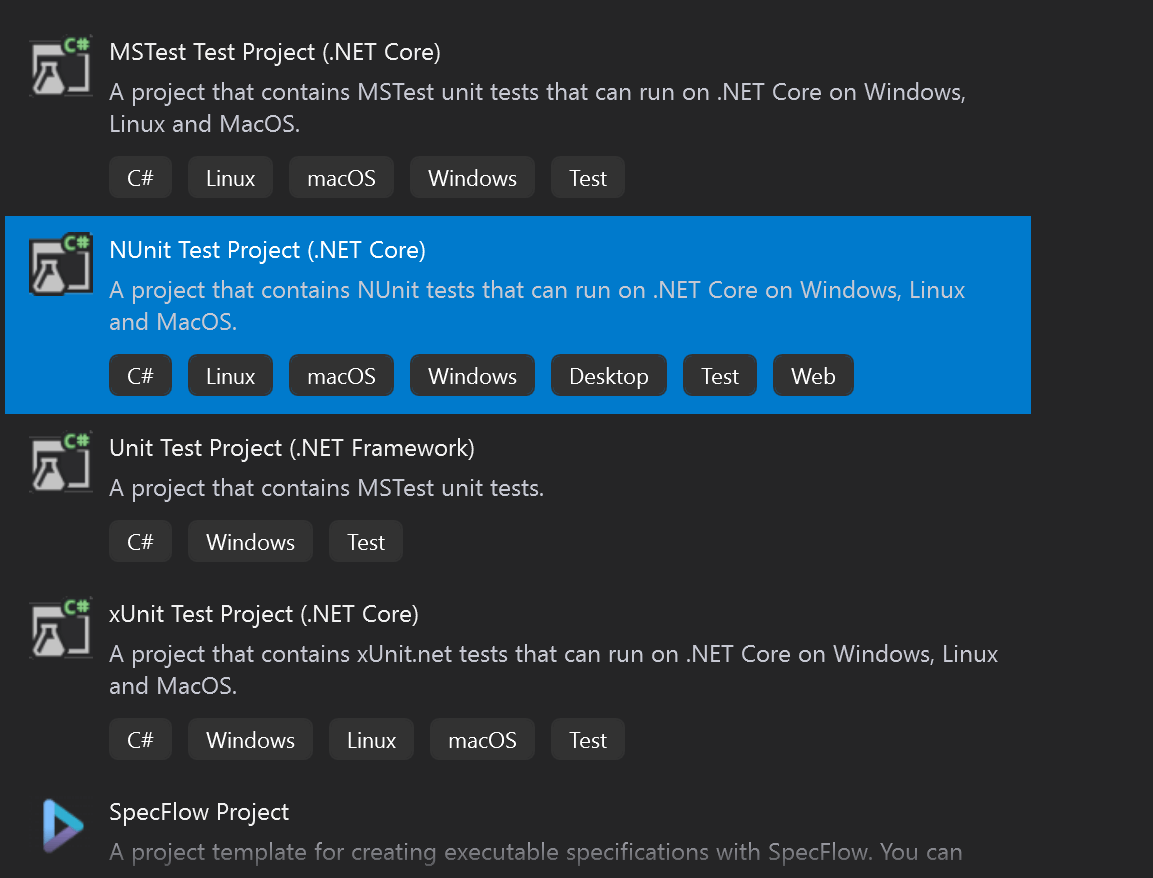
- Then select the type of project you want to use. We continue with the “NUnit Test Project” for .NET Core for this blog.
- Annotations – These are NUnit attributes (or tags) that tell the code how the methods implemented under it are interpreted. The syntax is the attribute name between square brackets. Some of the commonly used NUnit annotations, and the most used, in my experience, are:
- [SetUp]: marks a method that is executed before each test method
- [Test]: the attribute that marks a test method
- [TearDown]: the method implemented under TearDown will be executed after each test method
- [OneTimeSetUp]: an attribute used to indicate that the method will be called once before the tests run
- [OneTimeTearDown]: marks a method that will be executed after all the tests finish running
- [TestFixture]: marks a class that contains tests. Starting with NUnit 2.5, it has become optional – a class that contains tests (marked with the [Test] attribute) will be identified even without the TestFixture attribute.
- Assertions – Use NUnit assertions to validate if the test has the expected result. I usually stick to the “classic” assertions:
- Assert.IsTrue(): checks that a given condition is true.
- Assert.IsFalse(): checks that a given condition is false
- Assert.AreEqual(): checks that two given objects are equal
- Parallelization: Allows parallel execution in NUnit.
- Data-driven testing: Using parameterization in NUnit, we can run the same test using different datasets.
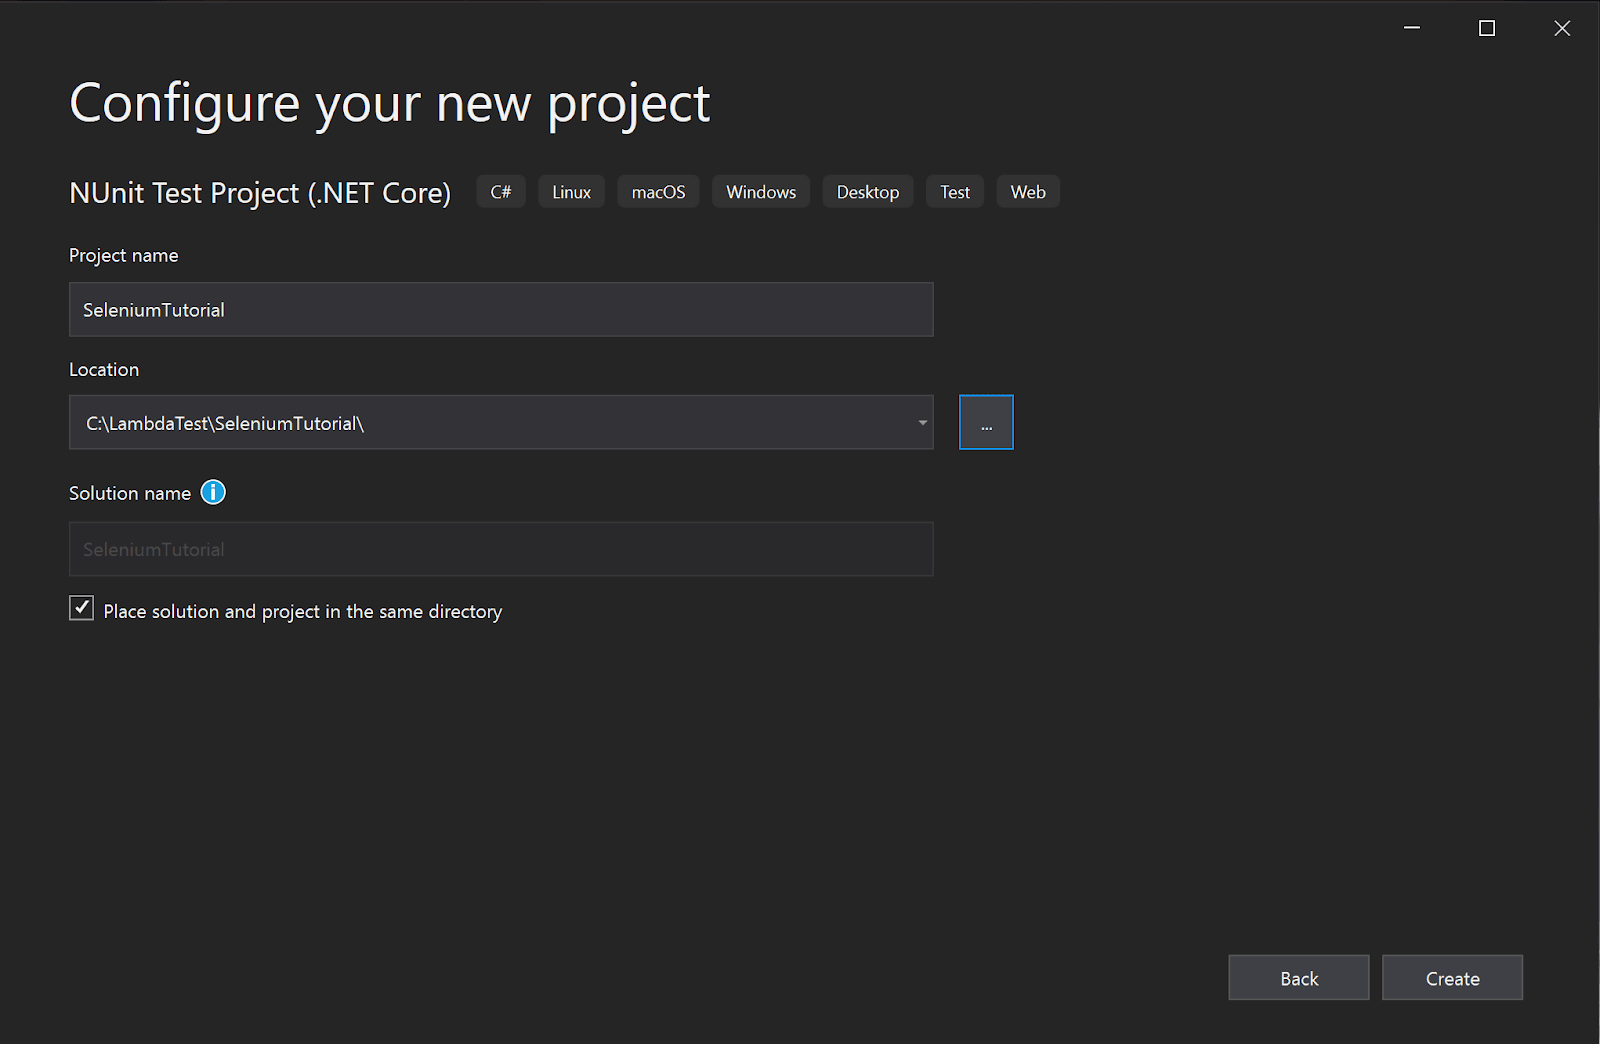
- Select a name and a location for it, and hit “Create”:
I’m using NUnit because it’s one of the most used frameworks to automate web testing and will help simplify our test writing process. You can go through this Selenium NUnit tutorial to learn more about setting up NUnit with Visual Studio. The latest version of NUnit is 3.13.3. Here are some of my favorite features of NUnit that help me in my Selenium C# projects:
Now that we got that out, let’s continue with our Selenium with C# project.
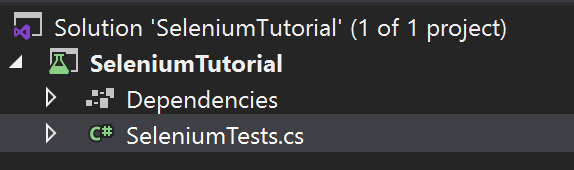
You’ll see that Visual Studio automatically created a test class called UnitTest1.cs:
|
1 2 3 4 5 6 7 8 9 10 11 12 13 14 15 16 17 18 |
using NUnit.Framework; namespace NUnitTestProject1 { public class Tests { [SetUp] public void Setup() { } [Test] public void Test1() { Assert.Pass(); } } } |

How to run Selenium C# tests from Visual Studio?
If you want to see and run the tests in the solution, you need to follow the below steps:
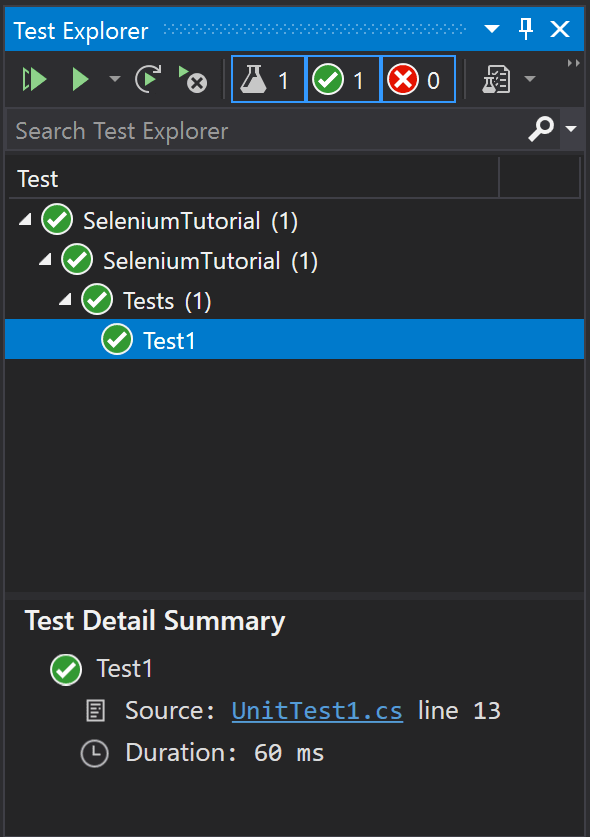
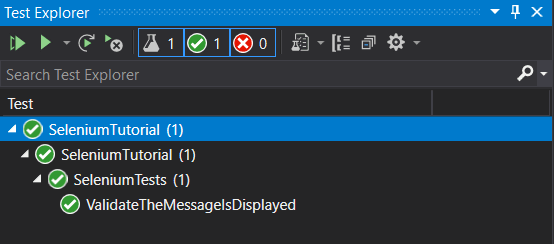
- Open the Test Explorer (if it’s not already opened). You can do that from the View menu → Test Explorer. In this panel, you can see all available tests, grouped by project and test.
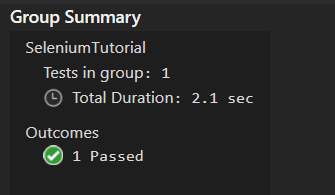
- Currently, we only have the one that VS has created for us, but we can right-click on it (or any tree in the node) and run it. We’ll see that it passes and the time it took for the test to run:
Now let’s move on and see how to write our own Selenium WebDriver automated tests.
How to run your first Selenium C# test?
It’s time for some action 🙂 Now that I have covered the essentials of Selenium with C#, let’s run a simple automation test with Selenium C# that uses the NUnit framework.
Test Scenario
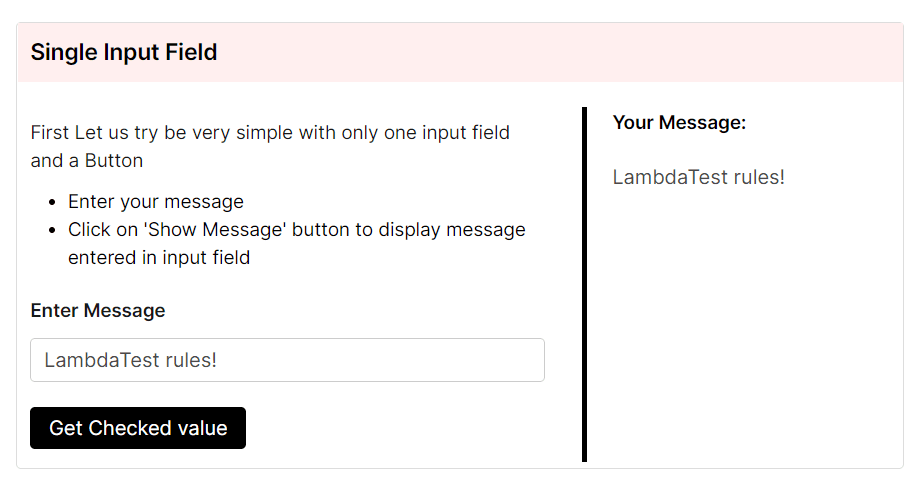
I’ll use a simple scenario to illustrate how to automate some basic steps using Selenium with C#. Here are the steps I want my test to execute:
- Navigate to the https://www.lambdatest.com/selenium-playground/simple-form-demo web page.
- Enter a text in the “Enter Message” input field.
- Click “Get Checked value”.
Validate that the message is displayed.
Simple, right? Let’s go!
You can also Subscribe to the LambdaTest YouTube Channel and stay updated with the latest tutorials around automated browser testing, Selenium testing, CI/CD, and more.
Installing Selenium WebDriver using NuGet Package Manager
Before we start interacting with the browser, the web pages, and the WebElements in the DOM, we have to prepare our project.
For this, we need to add the Selenium.WebDriver NuGet package, which allows the test code to interact with the WebElements on the page using methods that are a part of the package. To add a NuGet package to the project, please follow the below-mentioned steps:
- Right-click on the project name in the Solution Explorer → Select “Manage NuGet packages…”:

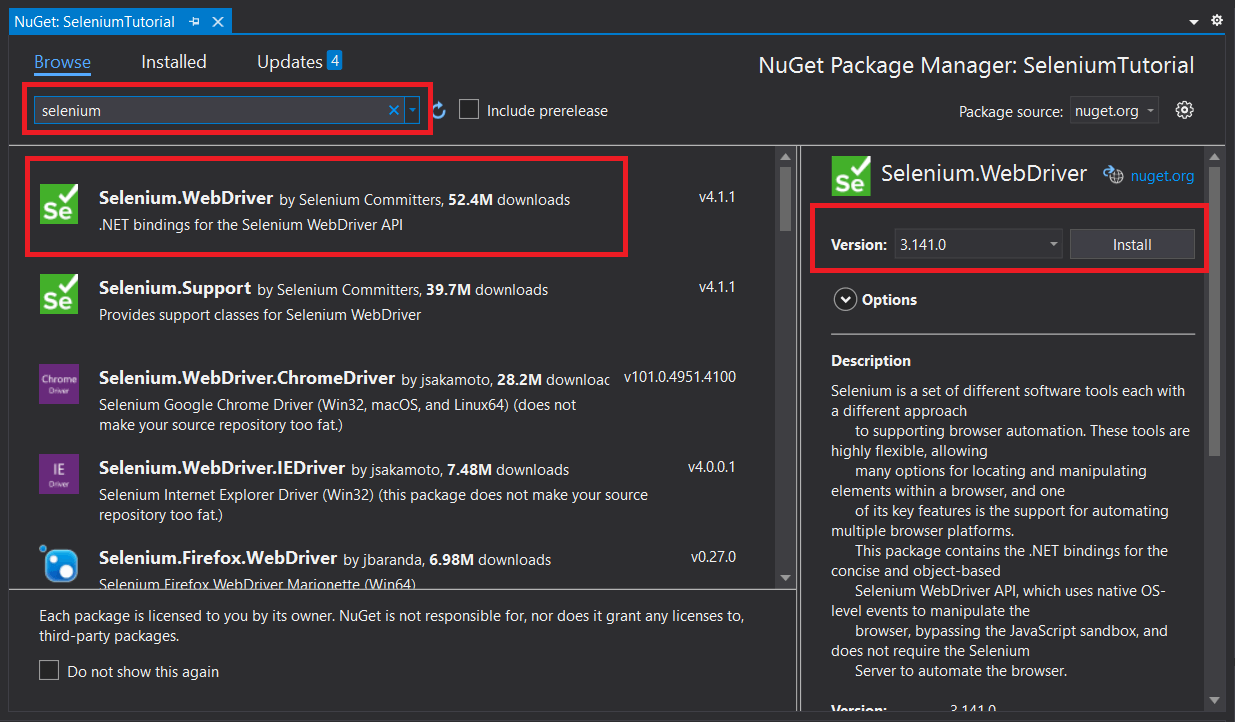
This will open the NuGet packages panel, where you can see the packages already installed on your project and add more. - In the Browse tab, search for “selenium”, and select Selenium.WebDriver from the results. From the details panel on the right-hand side, choose an option from the Version drop-down, then click Install. I’ll be using Selenium version 3.141.0 for this Selenium C# tutorial:
Alternatively, you can install NuGet packages from the command line by running this command in the project location:
dotnet add package Selenium.WebDriver --version 3.141.0
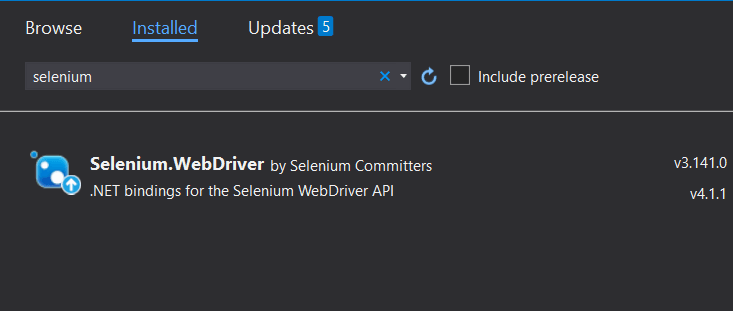
Now, if you go to the Installed tab, you will see that Selenium.WebDriver is added to the list of installed packages:
Note: You might need to use Selenium WebDriver commands to automate various browser actions. You can refer to our earlier article on Selenium WebDriver Commands in NUnit to learn more about it, which might come in handy while performing automated UI testing with Selenium C#.
Adding the Browser Driver
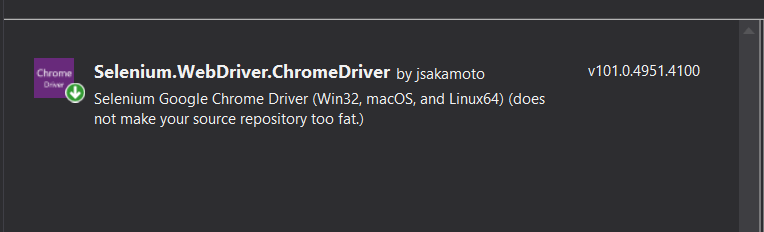
Another thing we need to set up before we start writing the test is to add a browser driver. I’ll be performing a test on Chrome browser for now, so I need to add ChromeDriver. It can also be added as a NuGet package, so follow the same steps as before to add Selenium.WebDriver.ChromeDriver.
One thing to make sure of here – install the same driver version as the browser you have installed on your machine. For example, I have Chrome 101.0.4951.67, so I need to install the same driver version:
You can check the browser version from Help → About Google Chrome.
You can use the browser of your choice, and you can add the drivers the same way, for example, Selenium.WebDriver.MSEdgeDriver (for Microsoft Edge), Selenium.WebDriver.GeckoDriver (for Mozilla Firefox).
Implementing Selenium C# test
Now, we should be ready to start our Selenium C# test. Let’s use the previously created class, but rename it to something meaningful:
And here is the Selenium C# test for the mentioned scenario:
Selenium C# code walkthrough
The used packages are added at the beginning of the test class:
|
1 2 3 |
using NUnit.Framework; using OpenQA.Selenium; using OpenQA.Selenium.Chrome; |
Then, we need to create a new instance of the IWebDriver:
|
1 |
private IWebDriver driver; |
As a precondition to the test, we need to start the browser. I did this in the SetUp method because it’s something that will be used in all future tests, so here is where I instantiate the driver:
|
1 2 3 4 5 |
[SetUp] public void Setup() { driver = new ChromeDriver(); } |
Next, there is our actual test. I used the previously mentioned [Test] attribute from NUnit, and inside the test method, the test steps:
To navigate to a specific URL, Selenium with C# uses the method Navigate().GoToUrl(), with the URL, passed as a string parameter:
|
1 |
driver.Navigate().GoToUrl("https://www.lambdatest.com/selenium-playground/simple-form-demo"); |
Then, we need to interact with three WebElements on the page, which means we need to locate these elements. For this, we have the FindElement() and FindElements() methods in Selenium WebDriver. The FindElement() method returns a web element object, while the FindElements() returns a list of web elements. For the purpose of our test, FindElement() will do the job.
|
1 |
driver.FindElement(By.Locator("Value")); |
- The FindElement() method takes a By method parameter and returns the first element that matches that method.
- The By class provides the mechanism to find the elements on our web page.
- The locator is the strategy used to identify the element.
- ID – ID locator in Selenium uses the ID attribute of the element
- Name – Name locator in Selenium uses the Name attribute of the element
- LinkText and PartialLinkText – LinkText and PartialLinkText locators in Selenium applies to link elements
- ClassName – ClassName locator in Selenium uses the Class attribute of the element
- TagName – TagName locator in Selenium uses a tag name to identify the attribute
- CssSelector – CssSelector locator in Selenium combines an element selector and a selector value to find the web element.
- XPath – XPath locator in Selenium uses the HTML DOM structure to locate any element in a web page
- The Value is the string value of that attribute.
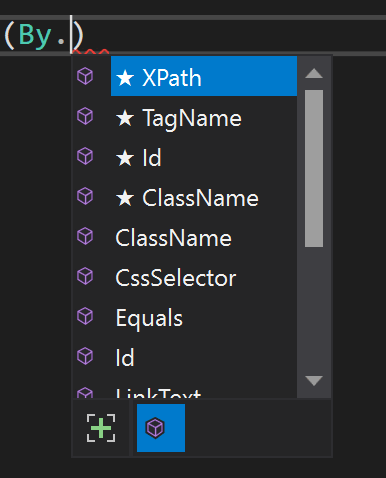
There are several Selenium locators strategies that we can use to identify the web elements based on their attributes:
You can refer to this Selenium locators cheat sheet to quickly navigate through all the Selenium locators with their easy-to-use syntax.
When using FindElement(), it’s a good practice to create a unique locator; otherwise, your test might interact with a different element than the intended one. You can use Chrome’s Developer Tools to find the best locator strategy for each element.
You can right-click on a WebElement on the page and select Inspect. This will open the Elements tab of the Developer Tools, where you can see the element’s information. Here is the code for the input text:
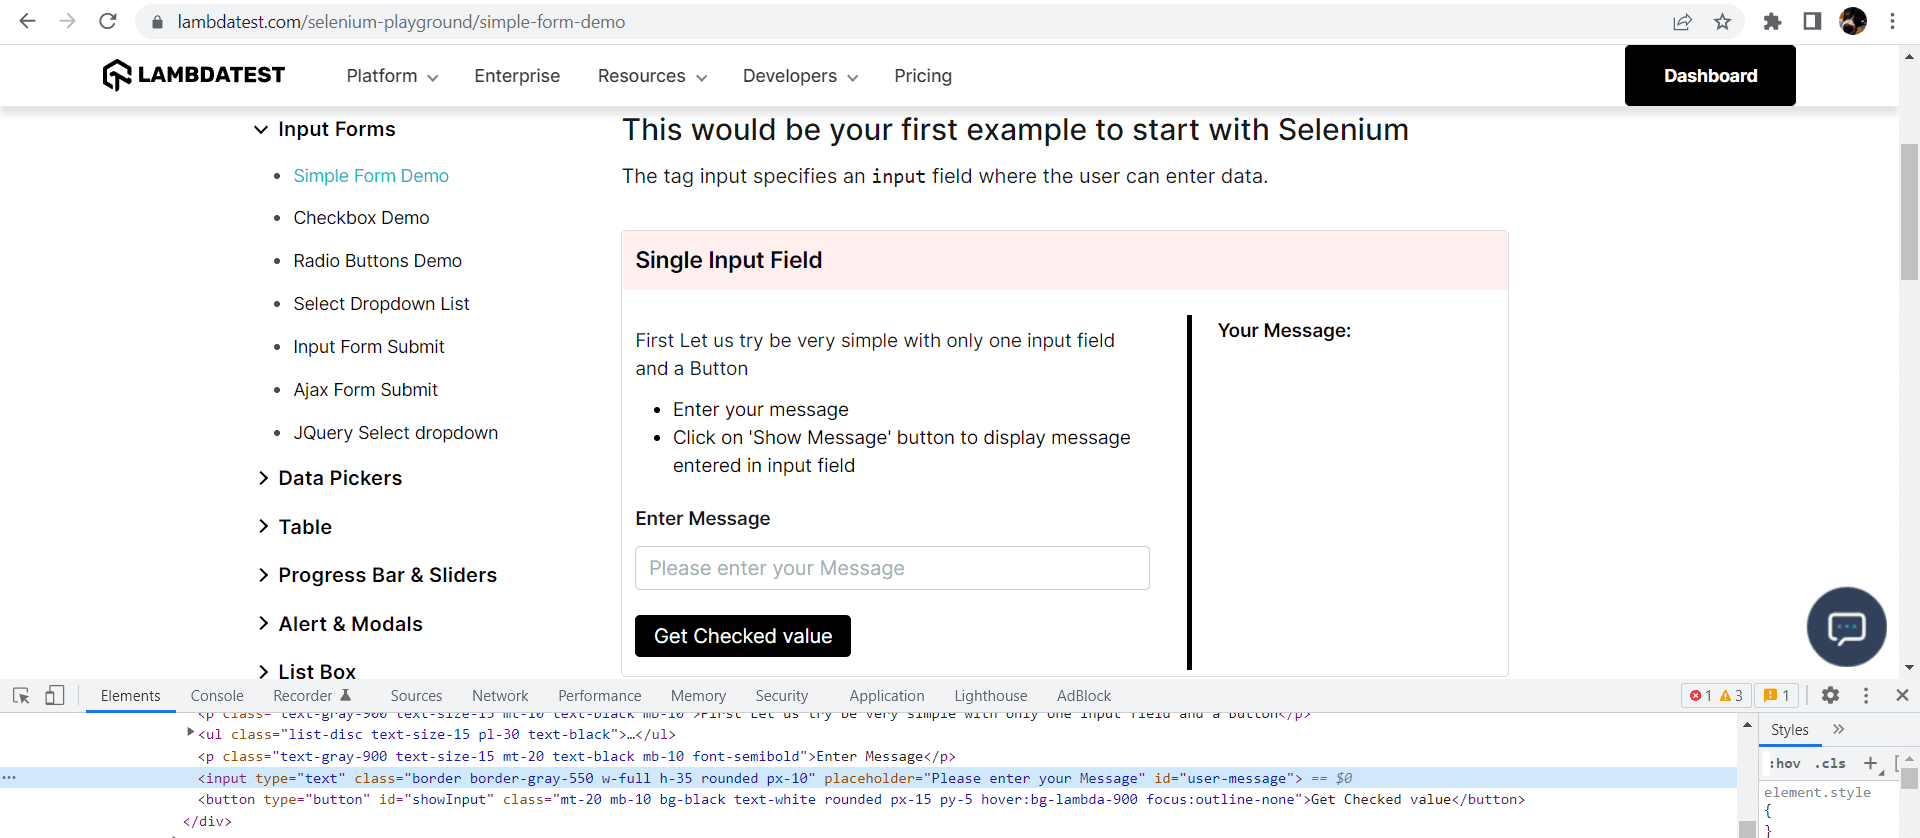
The recommended locator is Id because it’s usually faster. Luckily, we have unique Ids on all the elements we need, so we can use them going forward. The SendKeys() method in Selenium C# is used to enter text in input fields. It takes a string parameter:
|
1 |
driver.FindElement(By.Id("user-message")).SendKeys("LambdaTest rules"); |
The Click() method is used to simulate the mouse click:
|
1 |
driver.FindElement(By.Id("showInput")).Click(); |
The Text is a string attribute that represents the inner value of the web element, and we use the Assert.IsTrue() method to validate that the message has the message we expect. I also like my test to display a message if it fails, making it easier to debug:
|
1 |
Assert.IsTrue(driver.FindElement(By.Id("message")).Text.Equals("LambdaTest rules"), "The expected message was not displayed."); |
To close the browser at the end of the test, use the TearDown attribute and this method:
|
1 2 3 4 5 |
[TearDown] public void TearDown() { driver.Quit(); } |
There are two similar methods in Selenium WebDriver:
- The Close() method, which closes the current window.
- The Quit() method, which closes all windows associated with the driver.
For the TearDown, I prefer the second one in case some of the tests open additional windows (remember that the TearDown method runs after each test).
Want to make your life of testing easy and fuss-free while debugging? Try LT Debug Chrome extension!
Running the Selenium C# test
Now that the test is ready, you can build the project (right-click on the project name and select Build or use the Ctrl+B shortcut) and run the test locally. The test will be visible in the Test Explorer:
From here, you can run it just like you did the previous test. If everything goes well, you will see a browser window open up, navigate the web page, enter the text, and click the button. The test will pass, and close the browser window at the end.
How to run Selenium C# tests on cloud Selenium Grid?
What if you want to run the automated tests cross-platform or cross-browser? Or using a setup different from your own machine? These situations will likely happen quite often because we want our applications to work for all our users, and they will have various configurations set up on their computers.
The solution for this is porting the existing Selenium C# tests to a cloud-based Selenium Grid like LambdaTest. Cloud-based cross browser testing platforms like LambdaTest provides an online device farm of 3000+ browsers and operating systems to perform Selenium C# testing at scale. Here’s a glimpse of the LambdaTest cloud Selenium Grid:
The best part is that not much porting effort is involved in porting the existing tests from the local Selenium Grid to the LambdaTest cloud grid.
Here’s is my version of the code, updated to run the tests in LambdaTest Grid:
Implementation:
Code Walkthrough:
Again, we have the packages are added:
|
1 2 3 4 5 |
using NUnit.Framework; using OpenQA.Selenium; using OpenQA.Selenium.Remote; using System; using System.Threading; |
Next, we declare our variables:
|
1 2 3 4 |
private static IWebDriver driver; public static string gridURL = "@hub.lambdatest.com/wd/hub"; public static string LT_USERNAME = "LT_USERNAME"; // Add your LamdaTest username here public static string LT_ACCESS_KEY = "LT_ACCESS_KEY"; // Add your LamdaTest access key here |
When using LambdaTest, you need to make sure you use your username and access key. You can find them on your LambdaTest Profile Section. A good idea is to store them as environment variables and read them from there. This way, in case any of the values change, you only need to update them in one place.
The biggest change, as you can see, is in the Setup:
|
1 2 3 4 5 6 7 8 9 10 11 12 13 14 |
[SetUp] public void Setup() { var desiredCapabilities = new DesiredCapabilities(); desiredCapabilities.SetCapability("browserName", "Chrome"); desiredCapabilities.SetCapability("platform", "Windows 11"); desiredCapabilities.SetCapability("version", "101.0"); desiredCapabilities.SetCapability("screenResolution", "1280x800"); desiredCapabilities.SetCapability("user", LT_USERNAME); desiredCapabilities.SetCapability("accessKey", LT_ACCESS_KEY); desiredCapabilities.SetCapability("build", "Selenium C-Sharp"); desiredCapabilities.SetCapability("name", "Selenium Test"); driver = new RemoteWebDriver(new Uri("https://" + LT_USERNAME + ":" + LT_ACCESS_KEY + gridURL), desiredCapabilities, TimeSpan.FromSeconds(600)); } |
DesiredCapabilities is a Selenium class used to configure browser attributes for cross-browser testing. You can use LambdaTest Capabilities Generator to create your desired setup:

The test has remained unchanged, I am still testing the same scenario:
|
1 2 3 4 5 6 7 8 |
[Test] public void ValidateTheMessageIsDisplayed() { driver.Navigate().GoToUrl("https://www.lambdatest.com/selenium-playground/simple-form-demo"); driver.FindElement(By.Id("user-message")).SendKeys("LambdaTest rules"); driver.FindElement(By.Id("showInput")).Click(); Assert.IsTrue(driver.FindElement(By.Id("message")).Text.Equals("LambdaTest rules"), "The expected message was not displayed."); } |
And in the teardown, I only added a short sleep so the browser doesn’t close too quickly, and I see in the recording what happened:
|
1 2 3 4 5 6 |
[TearDown] public void TearDown() { Thread.Sleep(3000); driver.Quit(); } |
Executing Selenium C# tests on Cloud
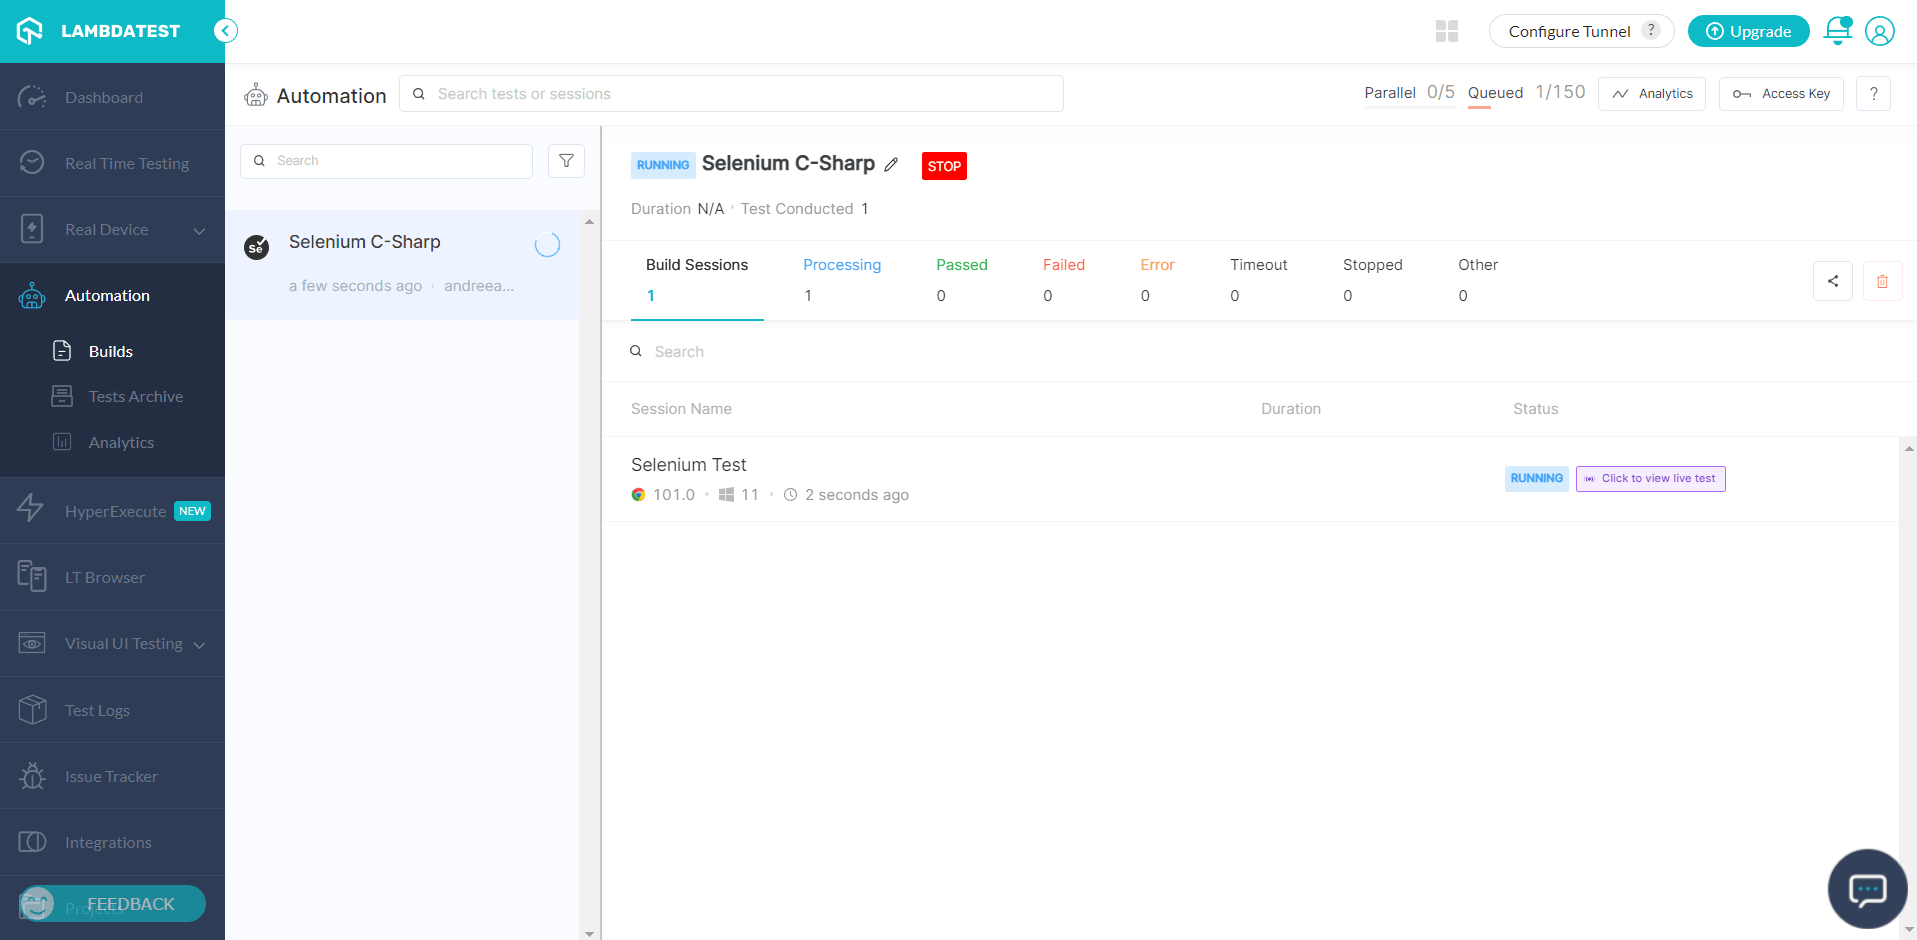
Now run the test, the same as before, from Visual Studio. This time the browser will not open locally. But if you connect to your LambdaTest account, you will see in the LambdaTest Automation Tab that the test is running:
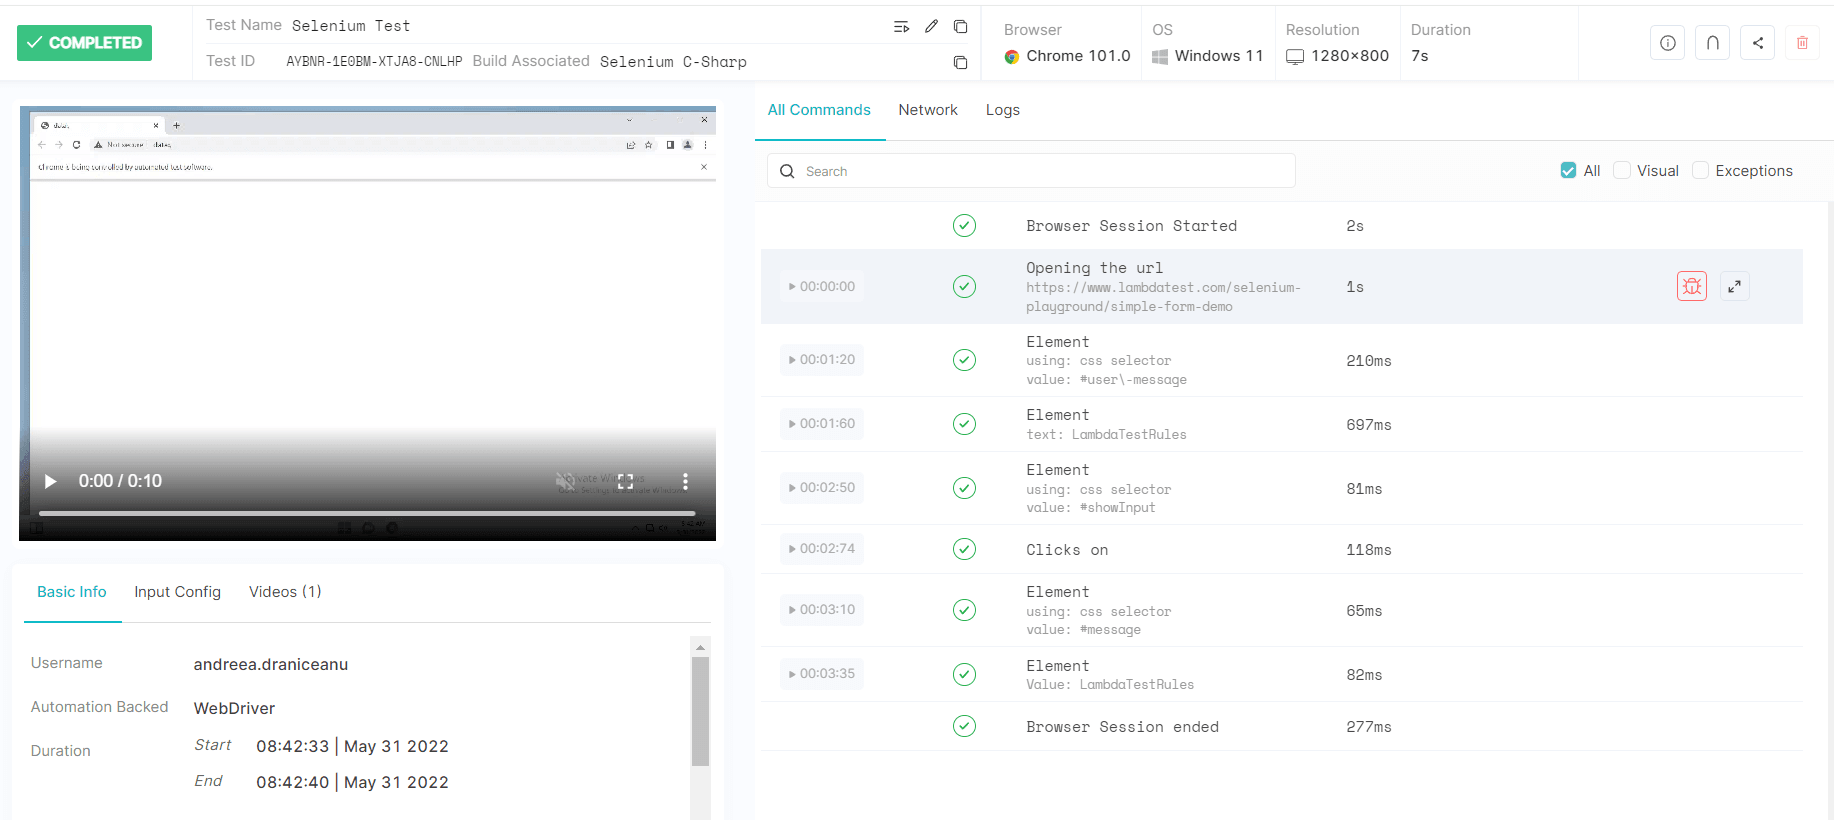
This is a fairly simple test, so it will finish fast, the same as it did on the local machine. But this time you can also see a recording of the test execution. I find this particularly helpful if the test fails and you want to see why. But I personally like to see the passed tests, too, because I want to make sure that the intended actions have been correctly executed, so I avoid false positives.
You can use the right-hand panel to navigate to a specific step and see what happened there:
Of course, you can use multiple setups to validate the scenario on multiple configurations, and, as the project grows, you can take advantage of the ability to run tests in parallel.
You can navigate to the LambdaTest Analytics Dashboard to use advanced features for analyzing the performance of your tests. From the Test Summary section, you can see all test results, along with their status and the total number of tests passed or failed. From the Test Overview section, you can see the snapshots of recently executed test runs.
If you are a developer or a tester and want to master the fundamentals of Selenium automation testing with C#, you can take the Selenium C# 101 certification to prove your credibility as a tester.
Here’s a short glimpse of the Selenium C# 101 certification from LambdaTest:
Conclusion
Using Selenium with C# and NUnit can be a great choice if you are just getting started with test automation. In this Selenium C# tutorial, we covered the main steps for getting started with a test automation project, from selecting the testing framework to identifying the WebElements, interacting with them, and adding validations. We’ve also seen how to run the tests remotely on a different setup and see the results and the recording.
Frequently Asked Questions (FAQs)
Can you use Selenium with C#?
C# is another programming language that also supports binding with Selenium. And this language binding will be updated along with the java program.
Which is better Selenium with Java or C#?
Developers have plenty of choices when it comes to programming languages. However, Java is always the first choice because of its large support available online.
What is framework in Selenium C#?
The Selenium framework is an open-source library that supports automated web testing. You can write test scripts in a wide variety of programming languages, including C#.


Author’s Profile
Andreea Draniceanu
I’m a software QA engineer based in Romania. I’ve been in the software industry for over 10 years. My current focus is UI test automation with C#, but I love exploring all QA-related areas and sharing my knowledge.
Blogs: 13
Got Questions? Drop them on LambdaTest Community. Visit now


