Scale Your Automation Testing with AI
Run end-to-end parallel tests & reduce test execution time by 5x
Generate tests scripts using natural language with KaneAI
Accelerate your testing process with Autoheal, SmartWait & RCA
- Automation
- Home
- /
- Learning Hub
- /
- Cypress Cucumber Preprocessor
How to Use the Cypress Cucumber Preprocessor Plugin for Test Automation
Learn to use the Cypress Cucumber Preprocessor for test automation. Explore installation, step definitions, data-driven testing, hooks, and reporting.
Last Modified on: December 4, 2025
- Share:
The Cypress Cucumber Preprocessor plugin is an open-source Cypress plugin that helps you harness the potential of Gherkin-style syntax with Cypress.
Though there is no built-in Gherkin support in Cypress, the Cypress Cucumber brings the best of Cypress and Cucumber for QA engineers and non-technical personnel to implement tests in a human-readable syntax.
This plugin can come in handy for Cypress users who intend to create tests that are normally implemented as behavior scenarios. Such an approach not only helps in testing the functional aspects of the product but also serves as a running documentation of the nuances of the product.
Overview
What Is Cypress Cucumber Preprocessor?
The Cypress Cucumber Preprocessor lets you write readable, business-friendly test scenarios and reuse step definitions across feature files, enabling faster, maintainable Cypress test automation with easier reporting and analysis.
What Are the Steps to Install the Cypress Cucumber Preprocessor?
Cypress Cucumber Preprocessor simplifies BDD-style Cypress test automation by enabling Gherkin feature integration and streamlined step execution. Follow these steps to properly install and configure the plugin for efficient, maintainable Cypress test automation.
- Install NodeJS & npm: Ensure NodeJS and npm are installed. Verify with ode --version.
- Install Cypress: Run npm install cypress --save-dev and verify installation with npx cypress --version.
- Install Cypress Cucumber Preprocessor: Run npm install --save-dev @badeball/cypress-cucumber-preprocessor and verify using npm ls @badeball/cypress-cucumber-preprocessor.
- Install esbuild: Run npm install --save-dev @bahmutov/cypress-esbuild-preprocessor and verify with npm ls @bahmutov/cypress-esbuild-preprocessor.
- Configure Cypress: After plugin installation, configure Cypress to use all installed plugins effectively.
How to Run Cypress Cucumber Preprocessor?
Cypress test automation becomes more readable and maintainable when combined with Gherkin-style feature files this approach allows even non-technical stakeholders to understand test scenarios clearly.
- Feature Files and Step Definitions: Organize feature files and step definitions logically for clarity and easy collaboration across teams.
- Parameterization in Cypress: Use parameters in steps to avoid repetitive scenarios, making test automation flexible and efficient.
- Data Driven Testing in Cypress: Separate data from logic to execute tests multiple times with different inputs, improving coverage quickly.
- Fixtures in Cypress: Load external JSON or CSV files to supply test data dynamically, reducing hardcoding and improving maintainability.
- Hooks in Cypress Implement hooks to handle setup, teardown, and repetitive tasks automatically, enhancing execution flow and reducing redundancy.
- Reporting in Cypress: Generate readable reports from test runs to analyze results efficiently, track failures, and improve future automation cycles.
Can Cypress-Cucumber Handle API Testing Alongside UI Testing Efficiently?
Yes. Cypress supports API calls via cy.request(), and these can be integrated into Cucumber steps. Combining API and UI testing in the same scenarios enables end-to-end validation of workflows.
What Is Cypress Cucumber Preprocessor?
The Cypress Cucumber Preprocessor plugin bridges the gap between Cucumber, the popular Behavior Driven Development (BDD) framework, and Cypress, thereby facilitating BDD with the Cypress framework.
With this plugin in place, different project stakeholders have the flexibility to create feature files that define test scenarios, which you can then use along with step definitions for Cypress tests.
Note: Run your Cypress tests at scale across 3000+ browsers and OS combinations. Try LambdaTest Now!
How Cypress Cucumber Preprocessor Work?
Step definitions of the respective scenarios (or scenario outlines) can be implemented in Cypress-supported languages, i.e., JavaScript or TypeScript.
Finally, the tests can be executed using the Cypress test runner (for local execution).
If you are new to Gherkin, Cucumber, or BDD, you can check out this detailed Cucumber testing guide that deep dives into the essentials of the framework.
Here’s how a typical feature file looks when executed using Cypress with the Cucumber Preprocessor plugin:
Feature: Search for iPhone on LambdaTest ECommerce Playground
Background: Navigate to LambdaTest ECommerce Playground
     Given I navigate to LambdaTest ECommerce Playground
Scenario: Search for iPhone and validate results
     When I enter "iPhone" in the search box
     And I click on the search button
     Then I should see search results related to "iPhone"
     And the page title should contain "iPhone"
How to Install and Configure the Cypress Cucumber Preprocessor?
Before you start writing Gherkin test cases with Cypress, you need to install and configure the Cypress Cucumber Preprocessor plugin, for which you need to follow the given steps below:
- Install NodeJS and npm: First of all, you should have NodeJS and npm installed on your machine. In case you do not have them, you can download and install them from the NodeJS official website.
Run the command given below to verify the installation.
node --versionnpm install cypress --save-devRun the following command to verify the Cypress installation.
npx cypress --versionnpm install --save-dev @badeball/cypress-cucumber-preprocessorOnce you have installed the plugin, run the following command given below to verify and confirm if the plugin is installation.
npm ls @badeball/cypress-cucumber-preprocessorRun the following command to verify the Cypress installation.
npm install --save-dev @bahmutov/cypress-esbuild-preprocessor Once you have installed the plugin, run the following command given below to verify its installation status, respectively.
npm ls @bahmutov/cypress-esbuild-preprocessorThe Purpose of cypress-esbuild-preprocessor is to bundle the Cypress specs using esbuild so that the Cypress framework can further execute the step definitions (implemented in .js/.ts format).
Here is the cypress.config.js configuration file that is located in the root project directory.
const { defineConfig } = require("cypress");
const createBundler = require("@bahmutov/cypress-esbuild-preprocessor");
const { addCucumberPreprocessorPlugin } = require("@badeball/cypress-cucumber-preprocessor");
const { createEsbuildPlugin } = require("@badeball/cypress-cucumber-preprocessor/esbuild");


module.exports = defineConfig({
 e2e:
 {
   specPattern: "**/cypress/e2e/scenarios/*.feature",
   async setupNodeEvents(on, config) {
     await addCucumberPreprocessorPlugin(on, config);
     on(
       "file:preprocessor",
       createBundler({
         plugins: [createEsbuildPlugin(config)],
       })
     );
     return config;
   },
   viewportHeight: 768,
   viewportWidth: 1024,
   video: true,
   experimentalSessionAndOrigin: false,
   experimentalWebKitSupport: true,
  },
});

Code Walkthrough:
The above configuration file is in JavaScript, and the same can also be converted to TypeScript
- Import esbuild Preprocessor: To get started, you first import the esbuild-based file preprocessor that Cypress would require to preprocess the files before actually executing them.
- Import Cucumber Preprocessor Setup: Next, you import the setup function for the Cucumber preprocessor plugin from @badeball/cypress-cucumber-preprocessor. The plugin helps in writing .feature files, which are then executed by the Cypress framework.
- Export Cypress config: Next, you export a config object to the Cypress framework. The e2e key configures settings for end-to-end testing with Cypress. The specpattern, which is set to cypress/e2e/scenarios/*.feature, tells Cypress where to look for the .feature files.
- Setup Node Events: The setupNodeEvents() method helps hook into Node events of Cypress (i.e., register plugins, preprocessors, etc.). The addCucumberPreprocessorPlugin() method helps set up the Cucumber preprocessor by adding hooks to handle .feature files. The updated config is returned at the end.
Shown below is the esbuild plugin that understands .feature files. It lets esbuild handle Gherkin and TypeScript syntax properly when bundling test code.

Configuration of the Cucumber preprocessor plugin and aspects related to report generation (.json & .html formats) are all handled in cypress-cucumber-preprocessor.config.js, which will be discovered further in this blog.
How to Map Gherkin Feature Files to Step Definitions?
The Cypress Cucumber Preprocessor plugin parses .feature files that use the Gherkin syntax and maps them to the respective step definitions.
Starting with Cypress v10+ (and above), the officially maintained Cypress Cucumber preprocessor is @badeball/cypress-cucumber-preprocessor.
The step definitions that are implemented in JavaScript or TypeScript are then executed inside Cypress.
- Create Feature File(s): Post the plugin installation, the initial step is to create test scenarios in .feature file(s).
Shown below is a sample .feature file where a search for LambdaTest is done on DuckDuckGo.
Feature: DuckDuckGo Search
 Scenario: Searching for LambdaTest on DuckDuckGo
   Given I open DuckDuckGo homepage
   When I search for "LambdaTest"
   Then The page url should contain "LambdaTest"
A recommended practice is to keep .feature files in a folder located in /cypress/e2e/<feature-folder>. Gherkin core features like Background, Scenario Outlines, DataTables, etc., can all be integrated within a feature file.
import { Given, When, Then } from "@badeball/cypress-cucumber-preprocessor";

Given("I open DuckDuckGo homepage", () => {
  cy.visit("https://www.duckduckgo.com");
});

When("I search for {string}", (searchTerm) => {
  cy.get('#searchbox_input').type(`${searchTerm}{enter}`);
  cy.wait(2000);
});

Then("The page url should contain {string}", (searchTerm) => {
  cy.url().should("include", `${searchTerm}`);
});
For improved maintainability and reusability, it is suggested to separate common step definitions from feature-specific ones.
In this example, you must store the common step definition file in the /cypress/e2e/common_step_defs folder. The Cypress Cucumber Preprocessor plugin loads all matching step definitions and maps them to Gherkin steps at runtime.
However, each Gherkin step translates to a Cypress command (e.g., cy.visit, cy.get, etc.).
How Can You Run Cypress Tests Using the Cypress Cucumber Preprocessor?
Now that your setup is ready and tests can run locally, let’s explore various aspects of the Cypress Cucumber Preprocessor plugin that help you write and organize your Cypress test automation effectively:
- Feature Files and Step Definitions
- Parameterizing Step Definitions
- Data-Driven Testing
- Grouping Tests
- Tagging Tests
- Using Hooks
- Reporting
The following websites are used for demonstrating the various features of the Cypress Cucumber Preprocessor plugin:
Feature Files and Step Definitions
A recommended practice is to have .feature files in one folder; in this case, they are placed in the cypress/e2e/scenarios folder.
Scenarios within a feature file are executed sequentially in the order in which they appear in the file. By default, the feature files are executed in alphabetical order based on their file names.

On similar lines, step definitions for every step in scenarios are placed in the cypress/e2e/step_defs folder. Step definitions for common steps are in the cypress/e2e/common_step_defs folder.
In this case, navigating to the LambdaTest E-Commerce Playground is the common step (or pre-requisite) for every test step.
Hence, that implementation is a part of the common step definition.
import { Given } from '@badeball/cypress-cucumber-preprocessor';
Given('I navigate to LambdaTest ECommerce Playground', () =>
{
 cy.visit('https://ecommerce-playground.lambdatest.io/');
});
Here is an example of a feature file and step definition.
Feature: Search for iPhone on LambdaTest ECommerce Playground
 Background: Navigate to LambdaTest ECommerce Playground
     Given I navigate to LambdaTest ECommerce Playground

 Scenario: Search for iPhone and validate results
     When I enter "iPhone" in the search box
     And I click on the search button
     Then I should see search results related to "iPhone"
     And the page title should contain "iPhone"
import { When, Then } from '@badeball/cypress-cucumber-preprocessor';


When("I search for {string}", (product) =>
{
 cy.get('[data-autocomplete="5"]').type(product);
 cy.wait(2000);
 cy.get('.type-text').first().click({ force: true });
});


Then('I should see search results for {string}', (searchTerm) =>
{
 cy.get('h1.h4').should('contain.text', searchTerm);
});


Then("The page url should contain {string}", (product) =>
{
 /* Replace space with + since the resultant URL needs it */
 /* https://ecommerce-playground.lambdatest.io/
 index.php?route=product%2Fsearch&search=macbook+air */
 /* https://ecommerce-playground.lambdatest.io/
 index.php?route=product%2Fsearch&search=Palm */
 const expectedQuery = product.replace(/ /g, "+");
 cy.url().should("include",  `${expectedQuery}`);
});
Code Walkthrough:
- Background Steps: The steps mentioned in the Background section are considered prerequisites for test execution. In this, navigation to the LambdaTest E-Commerce Playground is the prerequisite, post which the subsequent steps (in different scenarios) would be taken up for execution.
- Locate Search Box: The search box is located using the CSS Selector(i.e., [data-autocomplete="5"]), which is supplied to the cy.get() method in Cypress.
- Enter Product Information: The product information is entered in the located element by triggering the .type() command in Cypress.
- Force Click Option: The { force: true } option with the click command in Cypress will bypass its built-in actionability checks and attempt to perform the action on the element regardless of its state.
- Verify Resultant URL: Finally, you can check whether the resultant URL contains the search string (i.e., iPhone)!
You can also check out this guide on Cypress Tips & Tricks, which will help you write reliable and high-quality test code when performing Cypress testing.
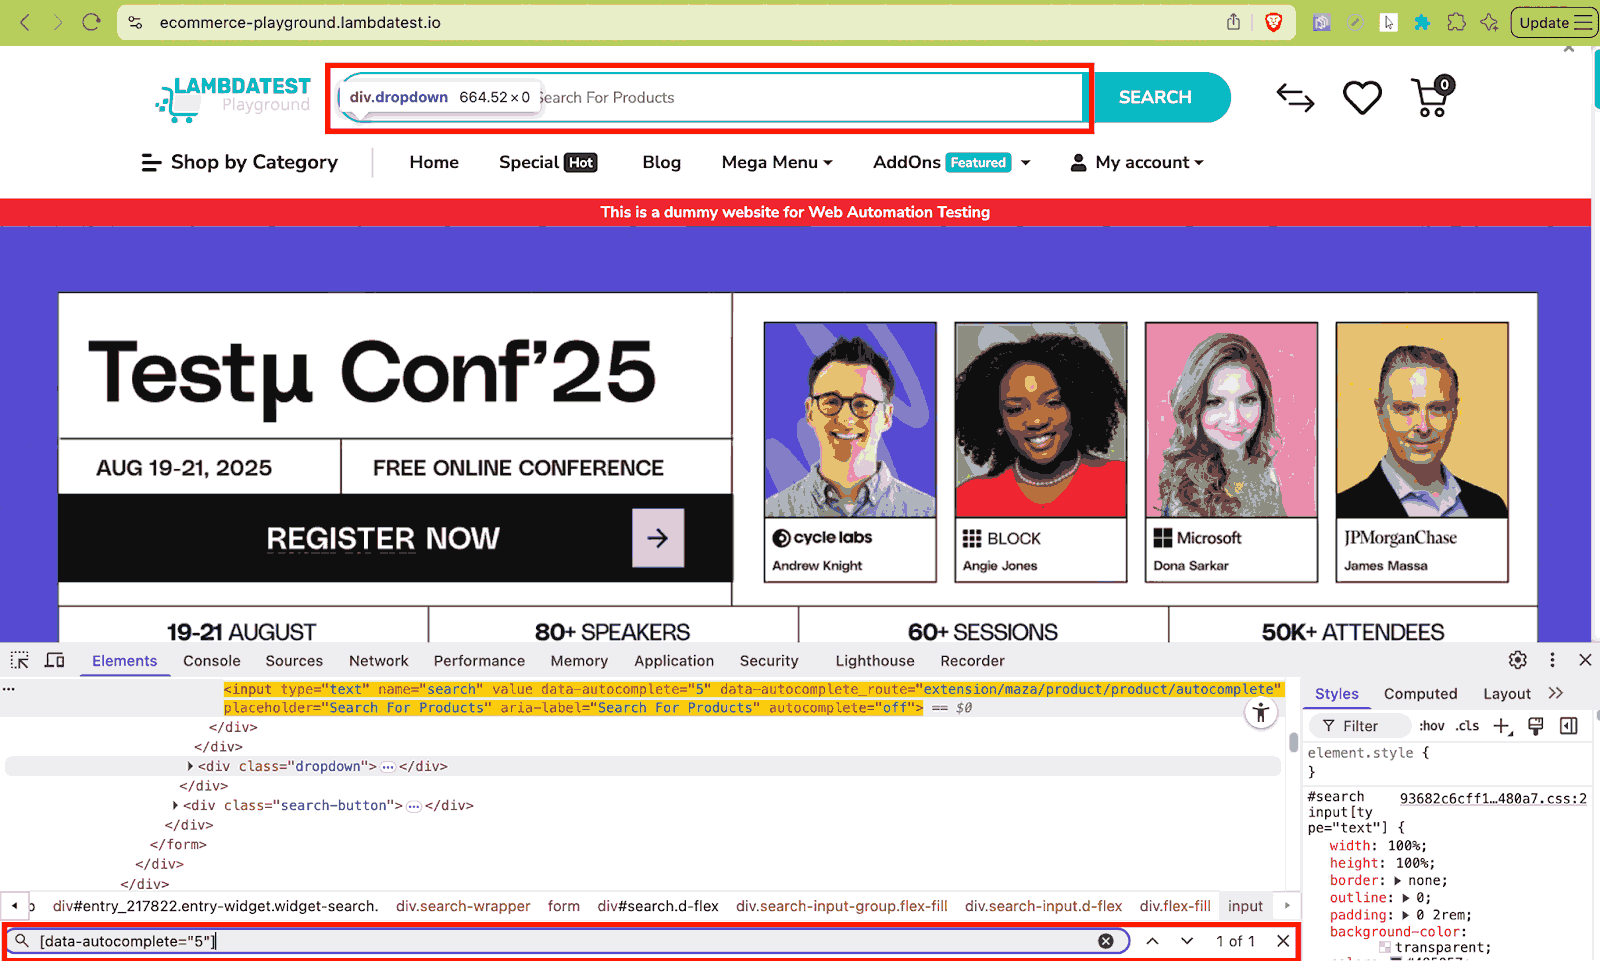
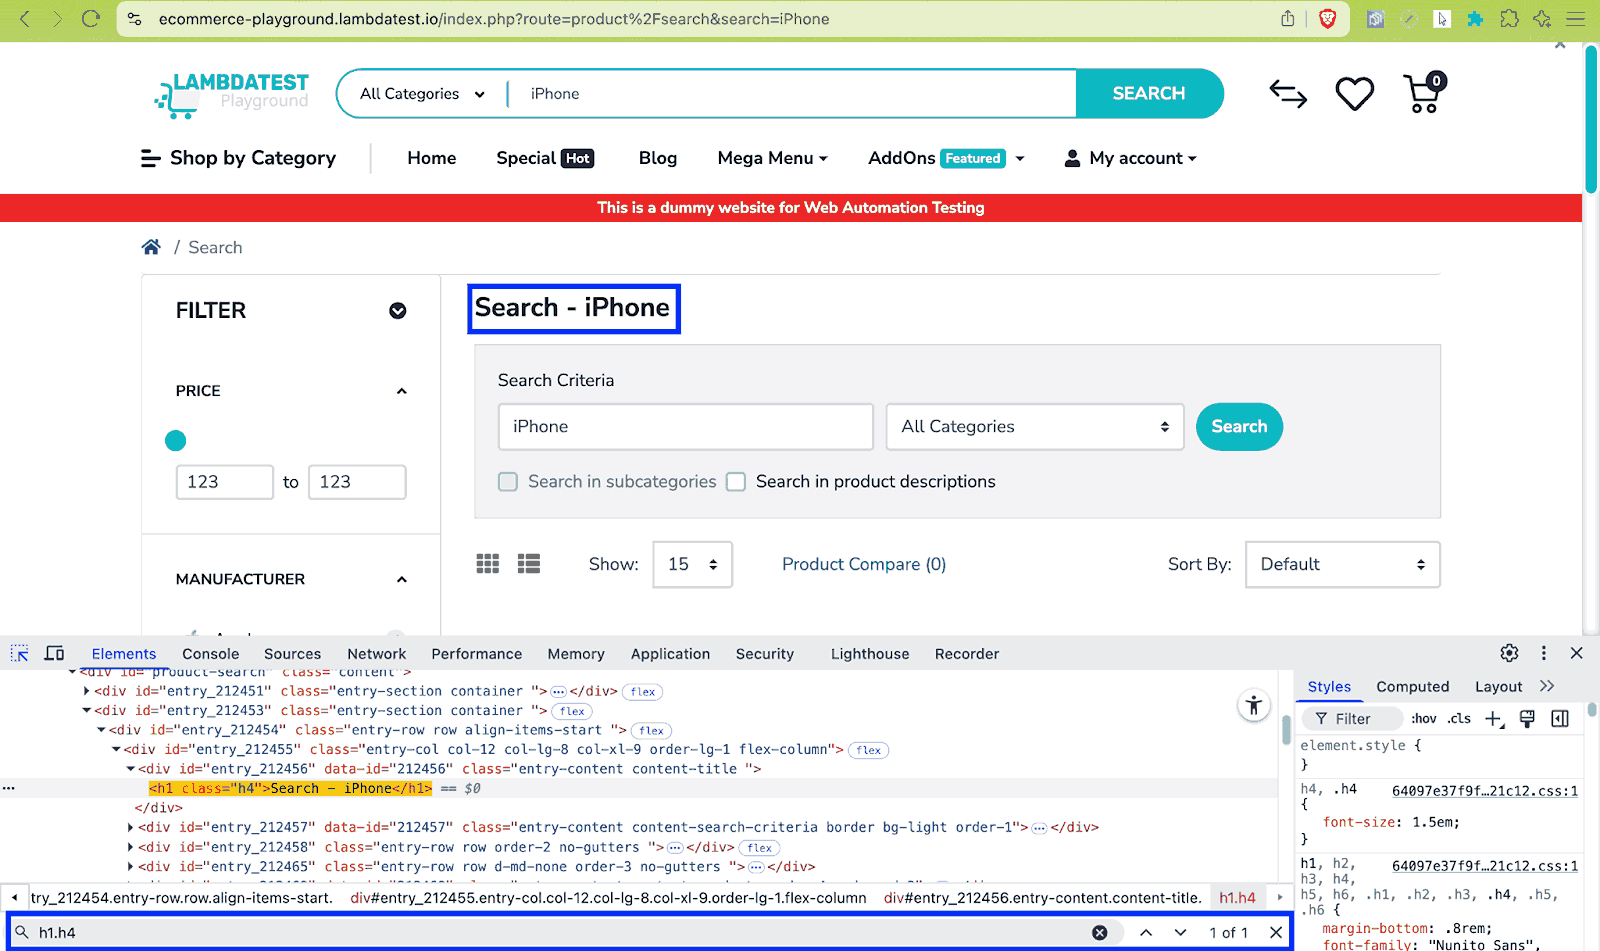
All the other scenarios and corresponding step definitions are placed in the cypress/e2e/scenarios and cypress/e2e/step_defs folders, respectively.
Parameterizing Step Definitions
Like normal functions, you can also parameterize scenarios for improved flexibility and reusability.
As seen in the earlier example, the input (or search term) in the scenario is parameterized so that it can handle different product inputs (e.g., Samsung, iPhone, etc.) in a seamless manner.
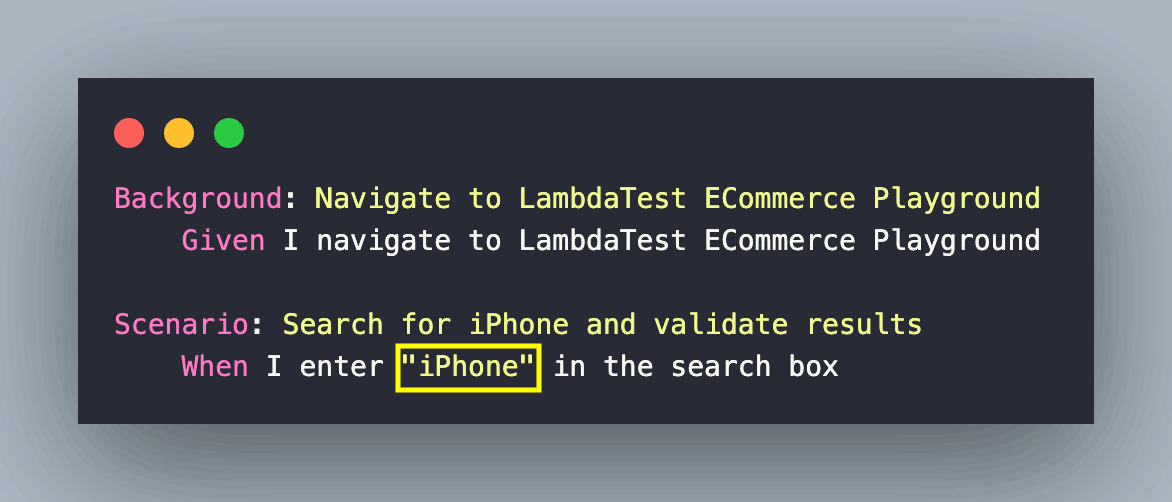
On similar lines, the corresponding step definition also takes an input parameter in the {string} format.
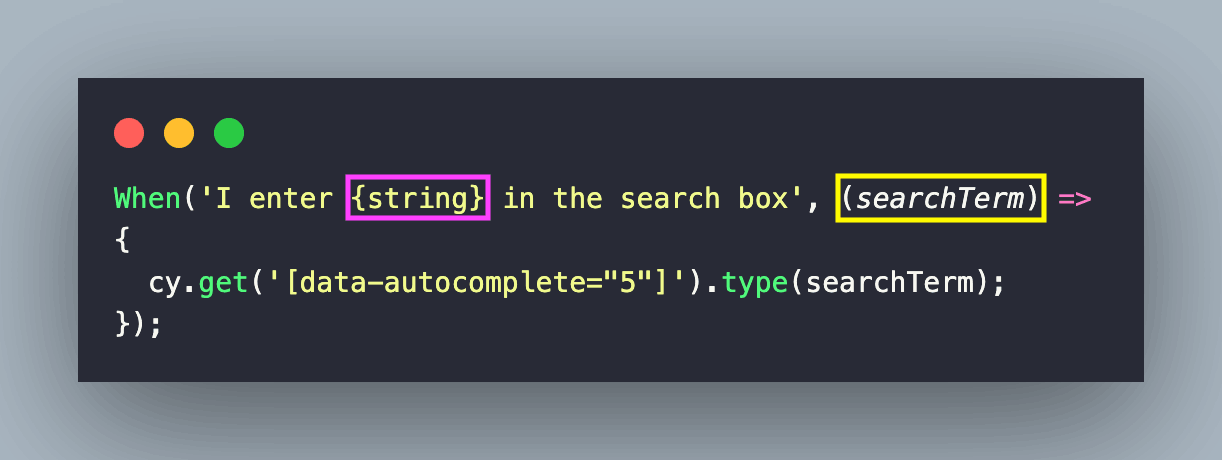
With parameterization, there is no need to edit multiple scenarios even if there is a change in the step definition.
Also, extending the scenario with new test data becomes very easy via parameterization. The same step definitions can be reused across different inputs and scenarios.
Data Driven Testing
Data Driven Testing (DDT) involves separating the test data from the test logic. This helps in executing the same tests multiple times against different datasets, user roles, and edge cases.
This helps in increasing the functional coverage while reducing code duplication and improving code maintainability. Data-driven testing in Cypress can be realized using arrays and fixtures (i.e., external files in JSON/CSV formats).
However, with Cypress BDD, Data-driven testing can be achieved using data tables. Data Table is a Gherkin feature that helps in passing structured input to the respective test scenarios.
With data tables, you can provide multiple inputs to a step (like test data) without actually duplicating the steps.
| username | himanshu.sheth@email.com|
| password | password |
There is a thin line of difference between Data Table and Examples in Gherkin, even though both serve nearly the same purpose.
Data Tables belong inside a step and are primarily used for passing structured data (lists, key-value pairs, objects) into that step.
On the other hand, Examples belong to a Scenario Outline and are used for executing the same scenario multiple times with different sets of data.
Here is a sample test scenario that demonstrates Data-driven testing using a Data Table in Cucumber Cypress:
@ToDoApp
Feature:  Handling Arrays with Cypress Cucumber
Scenario: Add items from datatable to the ToDo list
   When I create ToDo items with names
     | Python      |
     | Java        |
     | JavaScript  |
     | C#          |
   Then 4 ToDo items are visible
As seen above, the scenario step - When I create ToDo items with names is executed against the four entries in the Gherkin Data Tables (or single-column list).
Here is the corresponding step definition file:
const { Given, When, Then, Before } = require("@badeball/cypress-cucumber-preprocessor");
const todo_url = "http://todomvc.com/examples/react/dist/";
/* Replaced the above step with Before Hook */
/*
Given("I navigate to ToDo MVC App", () =>
{
 cy.visit(todo_url);
});
*/
Before({ tags: "@ToDoApp" }, () =>
{
 cy.visit(todo_url);
});
When("I create ToDo items with names", (dataTable) =>
{
 const items = dataTable.rawTable.flat();
 items.forEach((item) => {
   cy.get("#todo-input").type(`${item}{enter}`);
 });
});

Then("{int} ToDo items are visible", (expectedCount) =>
{
 /* document.querySelector('#root > main > ul > li') */
 cy.get('#root > main > ul li').then(($lis) =>
 {
   const actualCount = $lis.length;
   cy.log("Number of li items: ${actualCount}`");
   expect(actualCount).to.equal(expectedCount);
 });
});
As seen in the above step definition, the dataTable object is passed from the .feature file’s table.
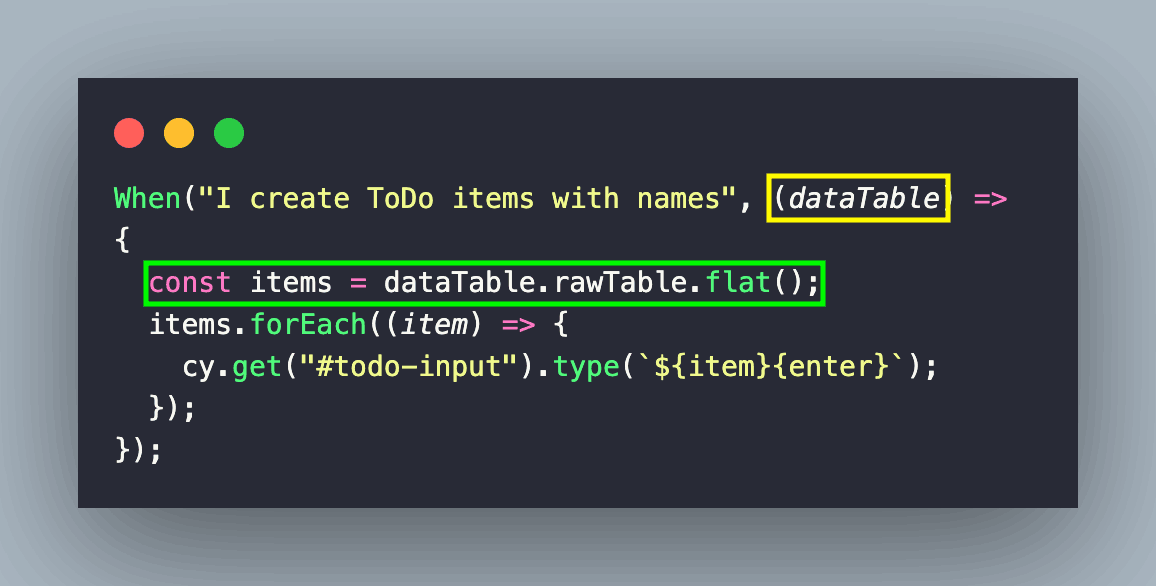
dataTable.rawTable returns the rows of the table as a 2D array, and the .flat() method converts the 2D array into a 1D array.
| Before .flat() | After .flat() |
|---|---|
| [ ["Python"], ["Java"], ["JavaScript"], ["C#"], ] | [ "Python", "Java", "JavaScript", "C#" ] |
Once you have the 1D array of items, you can loop through each item in the items array and add the item to the ToDo list.
Shown below is the status of the test execution on LambdaTest, which indicates that all four items have been added successfully to the ToDo list:
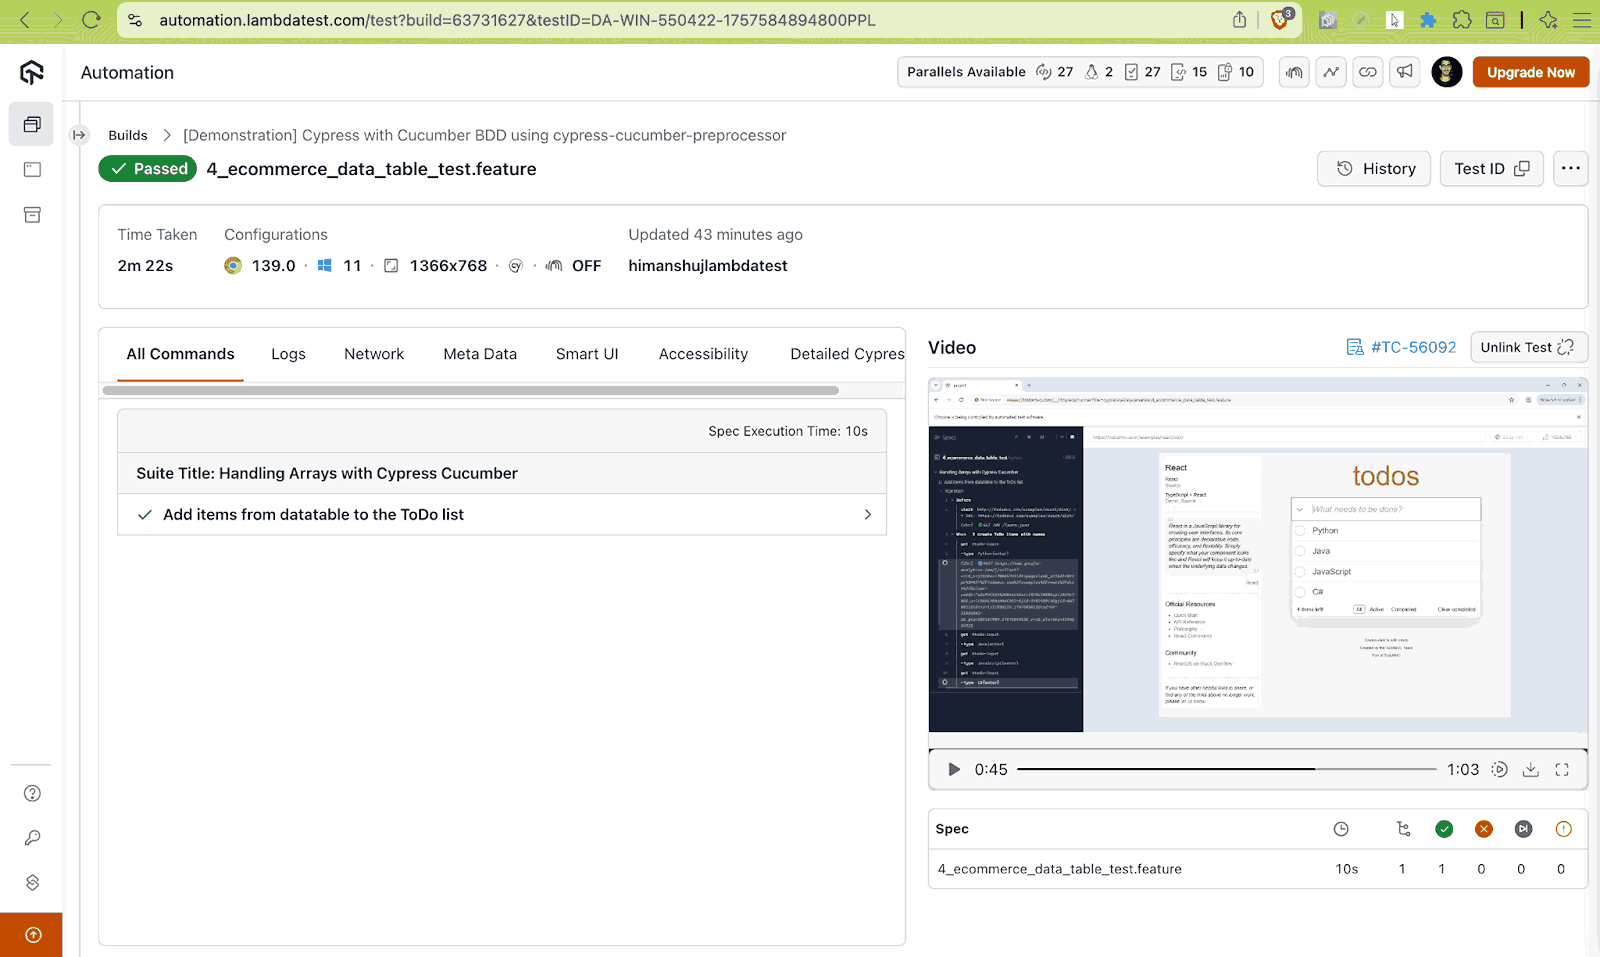
If you’re not using the Cypress Cucumber Preprocessor, you can still implement Data-driven testing using arrays to store different sets of test data. You can then iterate through the array using the forEach method to run the same test with multiple data sets.
Using Fixtures in Cypress
Fixtures are external files that are normally used for holding test data in the JSON format. The Cypress Cucumber preprocessor lets you load the fixture files, whose data can be used further in the tests.
Fixtures are external files, typically in JSON format, used to hold test data. With the Cypress Cucumber Preprocessor, you can load fixture files and use their data in your tests. Cypress expects fixture files to be placed in the cypress/fixtures directory. You can load them in step definitions using the cy.fixture() method.
For demonstration purposes, let's use AI in automation for converting the Data Driven Testing scenario to Cypress fixtures with the Cypress Cucumber preprocessor.
To do that, first, you must create a fixture file, cypress/fixtures/products.json
{
 "products": [
   "macbook air",
   "Samsung galaxy tab",
   "palm"
 ]
}
The respective .feature file that makes use of the inputs provided in the products.json fixture is shown below:
Feature: Data Driven Testing with Cypress Cucumber
 Background: Navigate to LambdaTest ECommerce Playground
   Given I navigate to LambdaTest ECommerce Playground
 Scenario: Search products from fixture file
   When I search for all products from "products.json"
Unlike the earlier case, where data was inputted via Scenario Outline with Examples, here, Cypress loads the JSON and loops over the array of products to perform a search on each of them.
The steps corresponding to the fixtures .feature file are located in ecommerce_fixtures_search.cy.js
import { Given, When, Then } from "@badeball/cypress-cucumber-preprocessor";
/* fixtures file is present in fixtures/products.json */
When("I search for all products from {string}", (fixtureFile) =>
{
 cy.fixture(fixtureFile).then((data) =>
 {
   data.products.forEach((product) =>
   {
       cy.log(product)
       cy.get('[data-autocomplete="5"]')
         .clear()
         .type(product);


     /* Click on the Search Button */
     cy.get('.type-text').first().click({ force: true });


     /* Validate the results */
     cy.get('h1.h4').should('contain.text', product);


     cy.title().then((title) =>
     {
           expect(title.toLowerCase()).to.include(product.toLowerCase());
     });
   });
 });
});
Code Walkthrough:
- cy.fixture(fixtureFile).then((data) => { ... }): This method loads the products.json fixture file. The data constitutes the JSON contents of the fixture.
- data.products.forEach((product) => { ... }): Iterate through each product in the JSON through this method and find the search input box ([data-autocomplete="5"]).
- cy.get(...).clear(): Each search iteration runs in the same browser session and the same input box is reused; hence, the search box contents are cleared [i.e., cy.get(...).clear()] after every search operation.
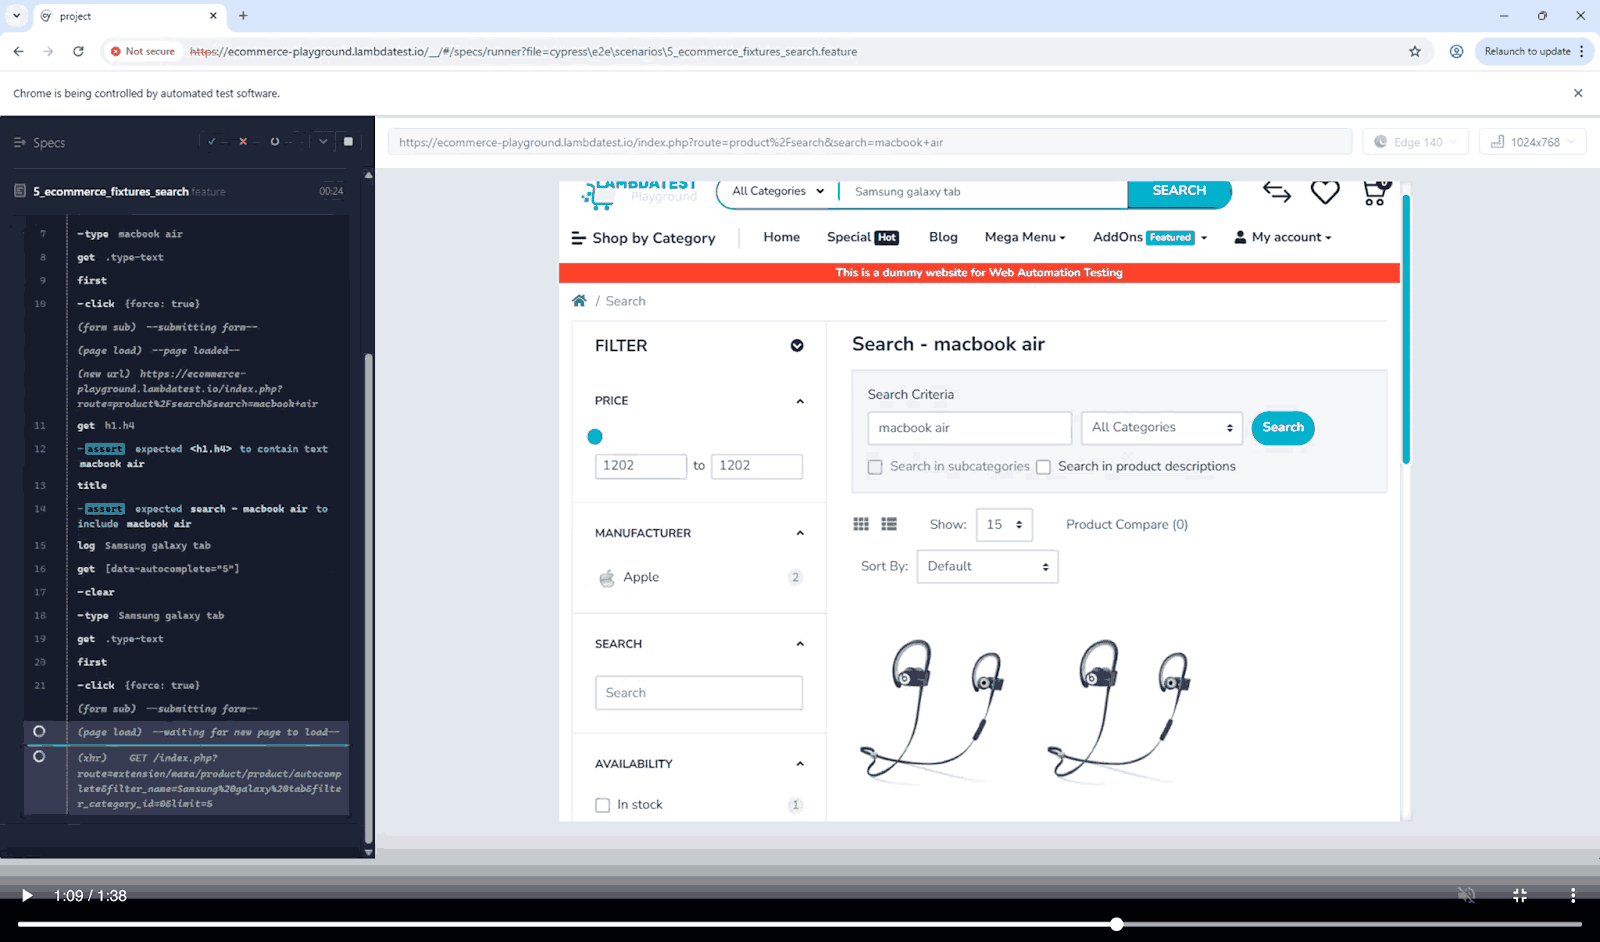
To summarize, fixtures in Cypress BDD make scenarios more dynamic, reusable, and maintainable without hardcoding values in feature files.
Using Hooks in Cypress
The Cypress Cucumber Preprocessor plugin also supports commonly used hooks, just like Mocha JS hooks, giving you extensive control over the test execution flow.
You can use hooks such as Before, BeforeEach, After, and ,AfterEach to set up preconditions, initialize test data, clean up after tests, or perform any repetitive tasks required for your scenarios.
| Hook | Description |
|---|---|
| Before | Runs before each scenario in the Feature file |
| After | Runs after each scenario in the Feature file |
| BeforeStep | Runs before each step in a Scenario |
| AfterStep | Runs after each step in a Scenario |
| BeforeAll | Runs once before all scenarios in the Test suite |
| AfterAll | Runs once after all scenarios in the Test suite |
All the Cypress hooks and their bindings are imported from the @badeball/cypress-cucumber-preprocessor plugin. The behavior and functionality of these Gherkin-friendly hooks are similar to that of the Mocha JS hooks.
Using Reusable Hooks in Cypress Cucumber:
There are numerous ways to add hooks in the Cypress Cucumber Preprocessor plugin, and the choice purely depends on the overall requirements and project structure.
- Implement Hooks in a Dedicated File: It is recommended to implement the hook in a dedicated .js/.ts file (e.g., cypress/hooks/hooks.js).
- Import the Dedicated Hook File or Step Definition File: The hook file needs to be imported in the configuration file and/or explicitly in the step definition file using a relative path.
- Mandatory Import Condition: Importing the hooks file in the step definition is mandatory if the hooks file is not present in the folder that contains the step definitions.
e2e:
 {
   specPattern: "**/cypress/e2e/scenarios/6_ecommerce_hooks.feature",
   stepDefinitions: [
     "cypress/e2e/step_defs/**/*.{js,ts}",
     "cypress/hooks/**/*.{js,ts}"
   ],
Shown below is a Cypress Cucumber hook that will run for scenarios that are tagged with the @ToDoHookApp tag.
import { Before } from "@badeball/cypress-cucumber-preprocessor";
/* This is triggered before the execution of each scenario in a feature file */
/* It also matches the tag - @ToDoHookApp */
Before({ tags: "@ToDoHookApp" }, () => {
 cy.log("✅ Hook triggered: Visiting ToDoMVC app");
 cy.visit("http://todomvc.com/examples/react/dist/");
});
This tagged hook is triggered before the execution of a scenario in the feature file. This simple hook that is fired before every scenario simply opens the ToDo MVC Home Page.
Here is the .feature file, where all scenarios are tagged with @ToDoHookApp.
@ToDoHookApp
Feature:  Demonstration of Hooks in Cypress Cucumber Preprocessor
 Scenario: Add items from datatable to the ToDo list
   When Add ToDo items with automation frameworks
     | Selenium       |
     | Cypress        |
     | Playwright     |
     | Pyppeteer      |
   Then 4 automation frameworks are visible
The corresponding step definition uses the dataTable object for passing structured information from the feature into the step definition. The only change here is that the hooks file is imported using its relative path.
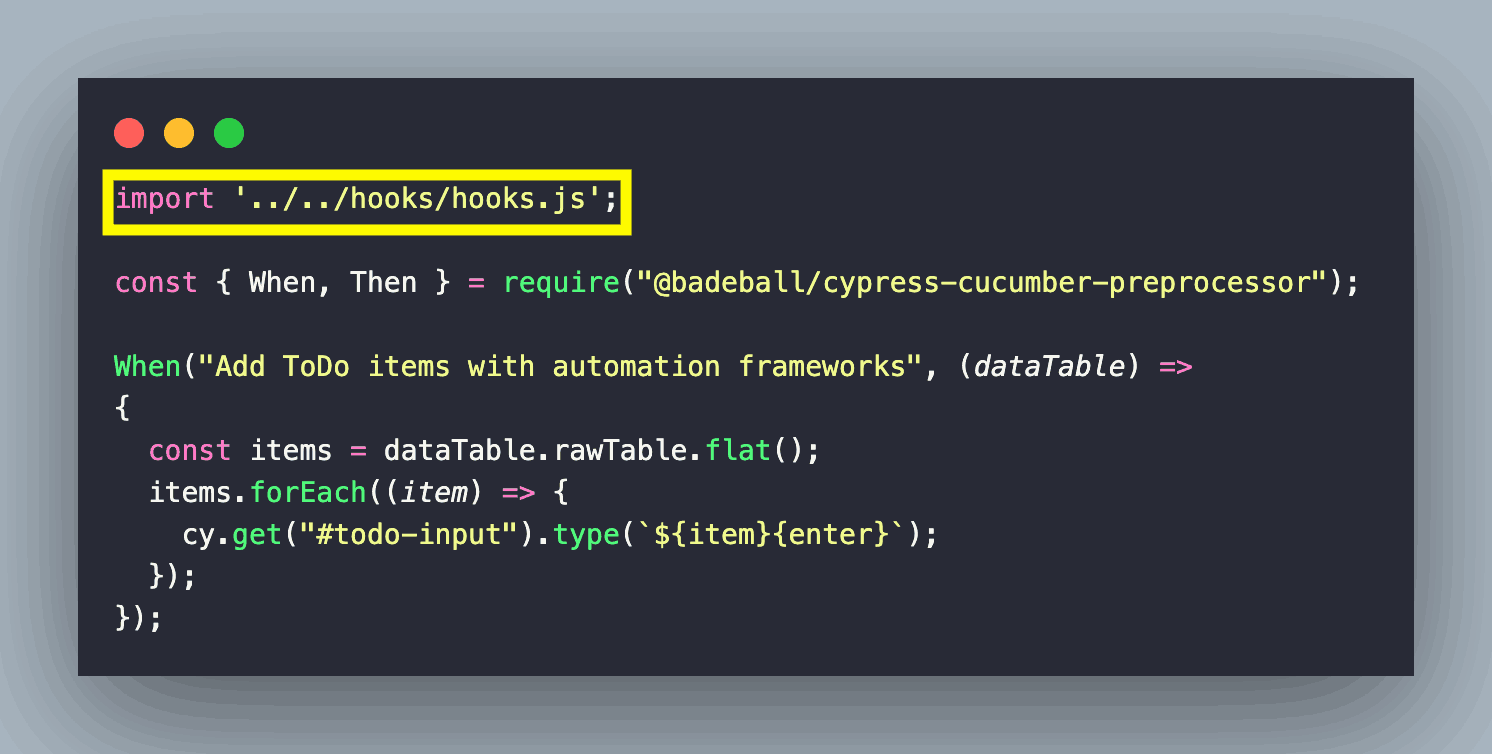
You can find the complete step definition in 6_ecommerce_hooks.steps.cy.js. Having centralized hooks (like hooks.js) that are separated from the test logic helps in improved maintainability of the hooks as well as the test code.
In case you have a less complex test setup or have fewer tests in the test suite, you could also opt for importing hooks directly into the step definition files.
Shown below is a sample feature file where all the scenarios in the .feature are tagged in the @ToDoApp group.
@ToDoApp
Feature:  Handling Arrays with Cypress Cucumber
 # @hjsblogger - Replaced this with the Before hook in the Step definition
 # Background: Navigate to ToDo MVC App
 #     Given I navigate to ToDo MVC App

 Scenario: Add items from datatable to the ToDo list
   When I create ToDo items with names
     | Python      |
     | Java        |
     | JavaScript  |
     | C#          |
   Then 4 ToDo items are visible
Since the scenarios (in the feature file) are tagged with @ToDoApp, you can also implement the tag-specific hooks in the feature file.
Here, the implementation under the Before hook is executed only for features or scenarios tagged with @ToDoApp.
const todo_url = "http://todomvc.com/examples/react/dist/";

/* Replaced the above step with Before Hook */
/*
Given("I navigate to ToDo MVC App", () =>
{
 cy.visit(todo_url);
});
*/

Before({ tags: "@ToDoApp" }, () =>
{
 cy.visit(todo_url);
});
To summarize, having a centralized hooks.js (kept alongside step definitions) is ideal for large-scale projects.
It helps improve hook maintainability, test readability, and reduces duplication of setup logic across multiple step definition files.
Tag-specific hooks are ideal if you want to limit hooks to only run on tagged scenarios and realize selective setup/teardown.
Reporting in Cypress
Reporting is not only an integral part of the test execution cycle, but it also plays a vital role when performing continuous testing via integration with the CI/CD pipelines.
The Cypress Cucumber Preprocessor also provides support for popular reporting formats like HTML, JSON, and messages (ndjson).
HTML reports in the plugin are powered by @cucumber/html-formatter. This can be enabled by setting the html.enabled property to true. On similar lines, JSON reports in the plugin can be enabled by setting the json.enabled property to true.
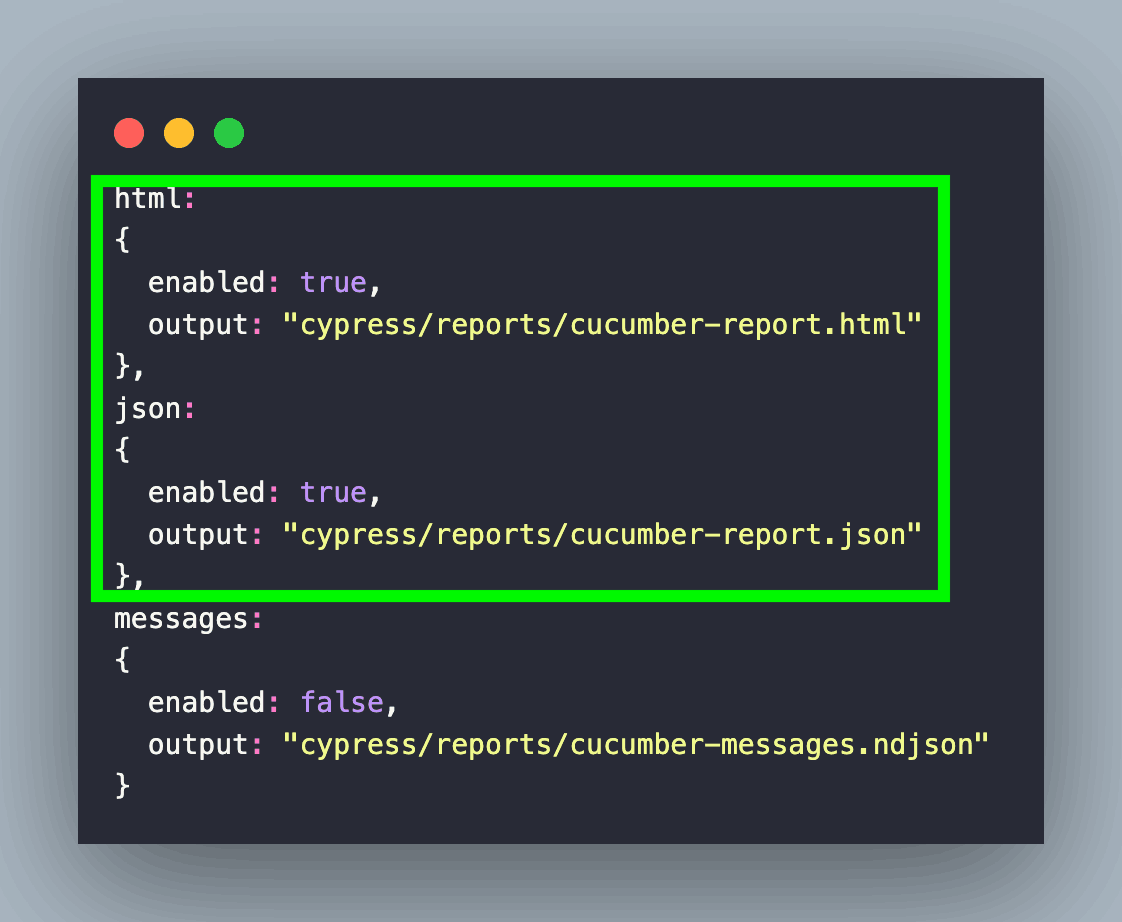
A preferred approach to manage and configure reporting with the plugin is through the cypress-cucumber-preprocessor.config.js file.
Hence, you have enabled reporting in HTML and JSON formats in cypress-cucumber-preprocessor.config.js only for local Cypress test execution (i.e. when EXEC_PLATFORM is set to true).
const isLocal = process.env.EXEC_PLATFORM === "local";
module.exports = {
 html: {
   enabled: isLocal,
   output: "cypress/reports/cucumber-report.html"
 },
 json: {
   enabled: isLocal,
   output: "cypress/reports/cucumber-report.json"
 },
 messages: {
   enabled: false,
   output: "cypress/reports/cucumber-messages.ndjson"
 },
 stepDefinitions: [
   "cypress/e2e/step_defs/*.{js,ts}",
   "cypress/e2e/common_step_defs/*.{js,ts}"
 ]
};
Shown below is the detailed HTML report generated via the Cypress Cucumber Preprocessor plugin. You can also narrow down the results at the scenario and feature level.
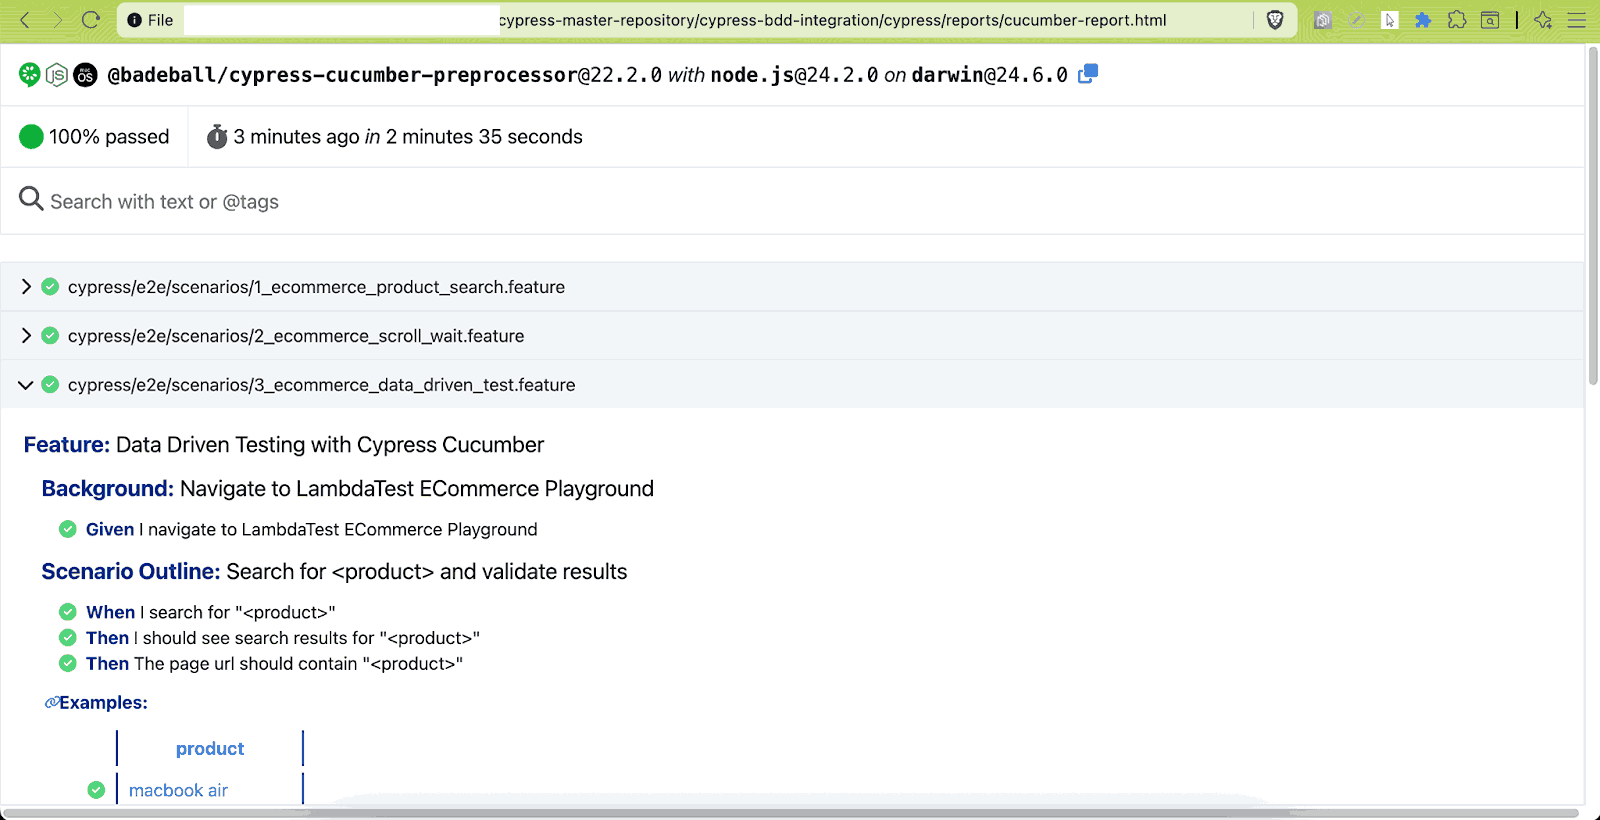
The reporting option also provides the flexibility to filter results based on tags.
For example, the report below shows results filtered by the tag @ToDoApp.
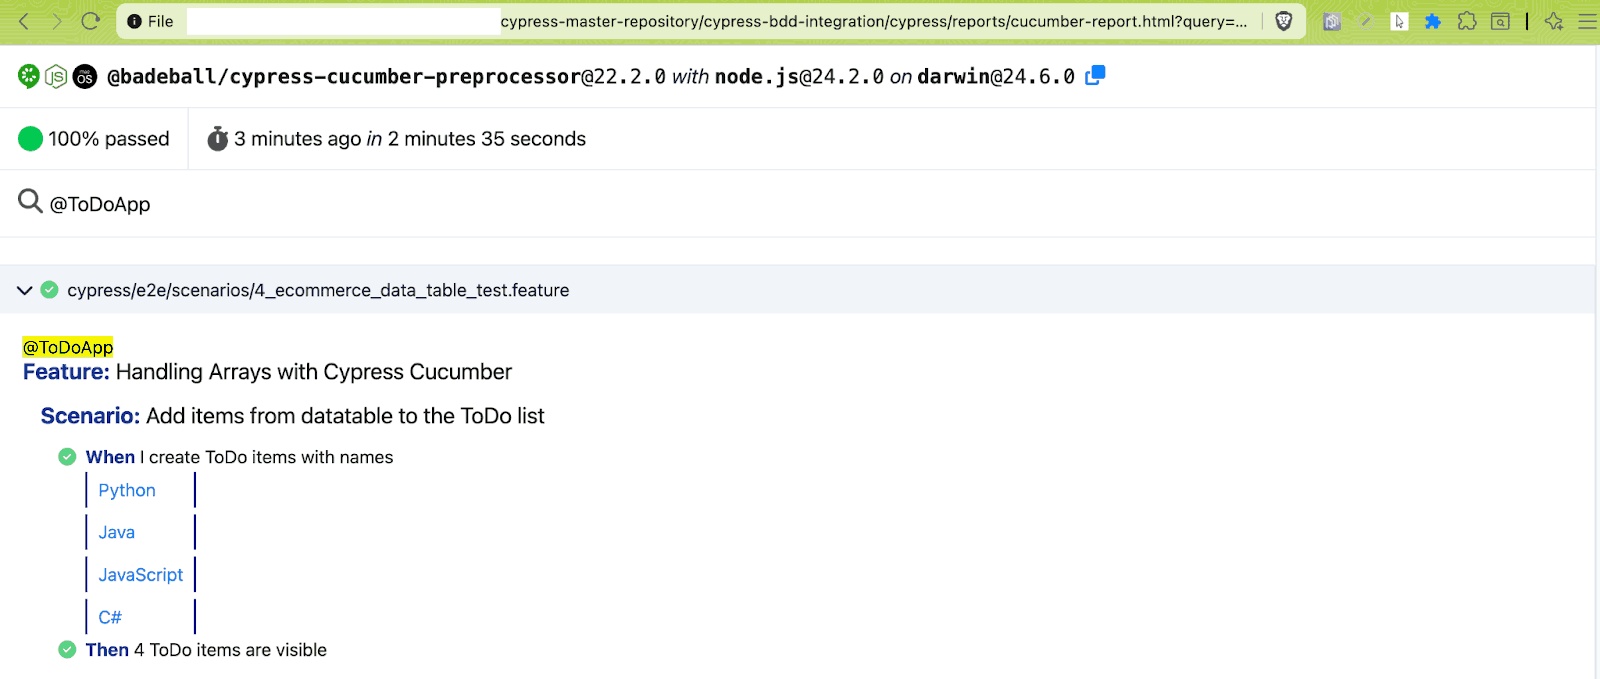
Here is a sample report with results provided in the JSON format:
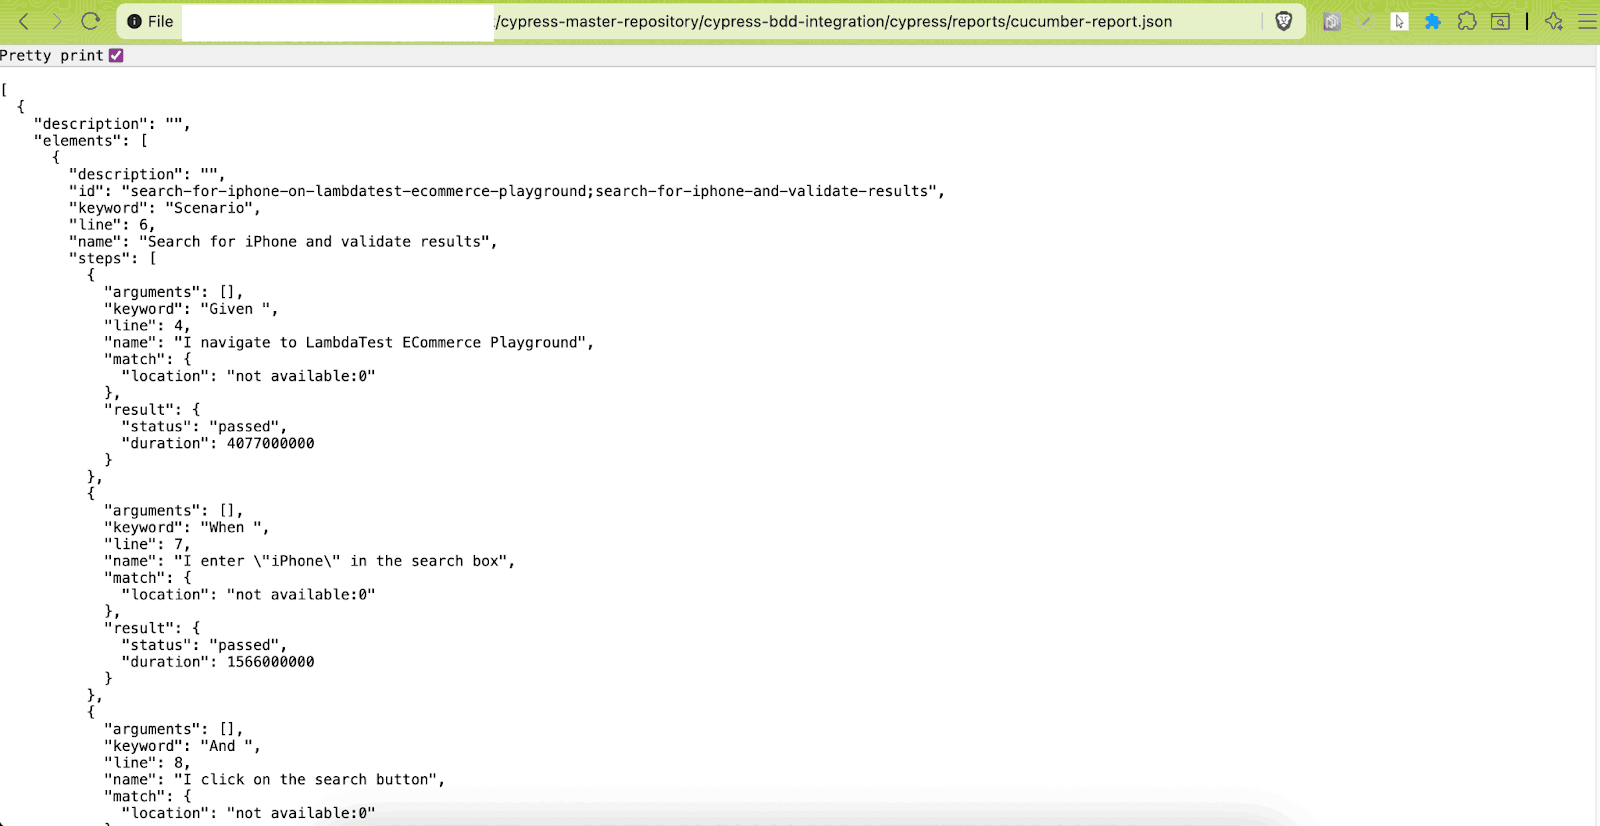
You need not explicitly configure reporting when Cypress tests are running on the LambdaTest cloud. This is because Cypress on LambdaTest already offers the generation of detailed Cypress reports.
You can also leverage the LambdaTest Test Observability (or Test Insights) to gain deeper insights into your test suite (e.g., trends over time, tag-based filtering, flakiness detection, etc.).
Running Cypress Cucumber Preprocessor Plugin Tests at Scale
Running Cypress tests locally can be limited by system resources, browser versions, and operating system availability, making large-scale testing challenging.
Using a cloud-based platform overcomes these limitations by providing parallel execution, cross-browser testing, and access to multiple OS/browser combinations effortlessly.
One such platform is LambdaTest, which allows you to run Cypress testing across 3,000+ browser and OS combinations, ensuring faster and more reliable results while keeping your setup simple.
You can leverage the LambdaTest Cypress CLI to run Cypress tests on the LambdaTest cloud grid efficiently.
To get started, follow the steps below:
- Export Environment Variables: Set LT_USERNAME and LT_ACCESS_KEY by adding them to the Makefile.
- Install Make: run make install (which runs npm install under the hood) to install the packages required for running the tests.
- Run tests on Cypress local: Set the EXEC_PLATFORM environment variable to local and then run the command make cypress-bdd-integration-parallel-local to run the feature files in parallel.
- Run tests on Cypress Cloud: Trigger the command make cypress-bdd-integration-cloud to run the Cypress Cucumber Preprocessor tests on LambdaTest.
- Set EXEC_PLATFORM Environment Variable: The command will set the EXEC_PLATFORM environment variable to cloud and kick-start the execution on the LambdaTest.

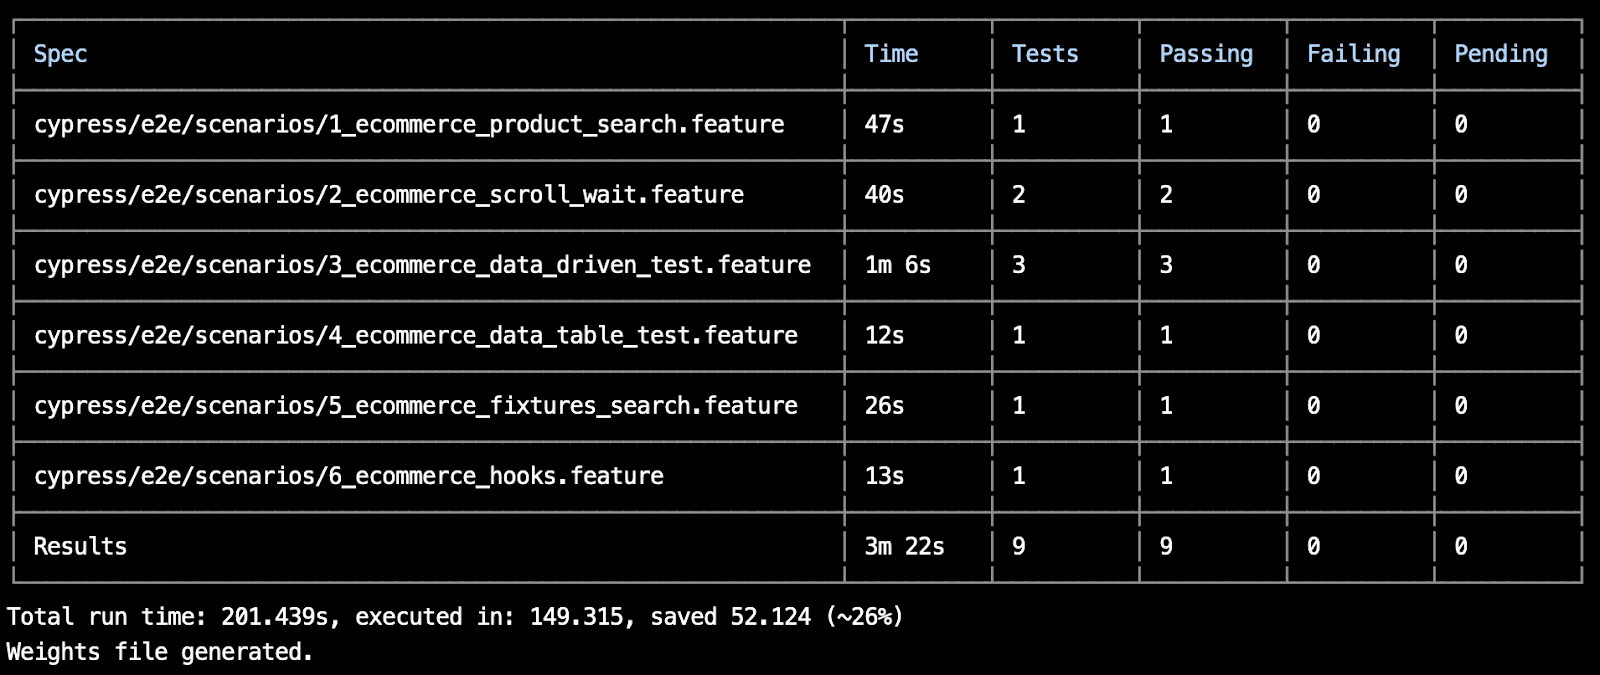

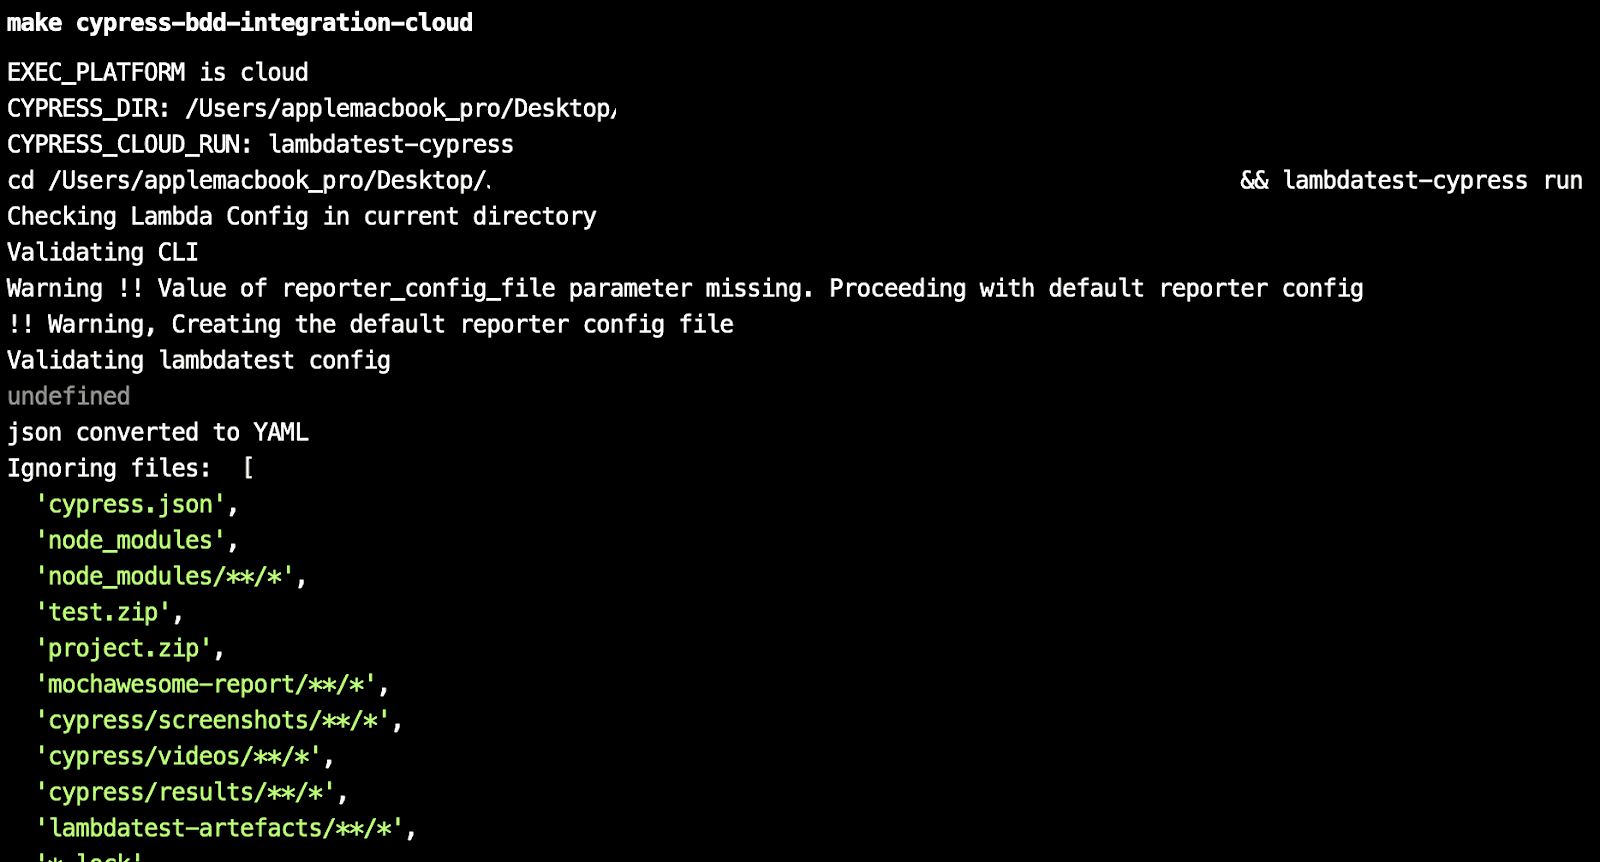
Test Execution:
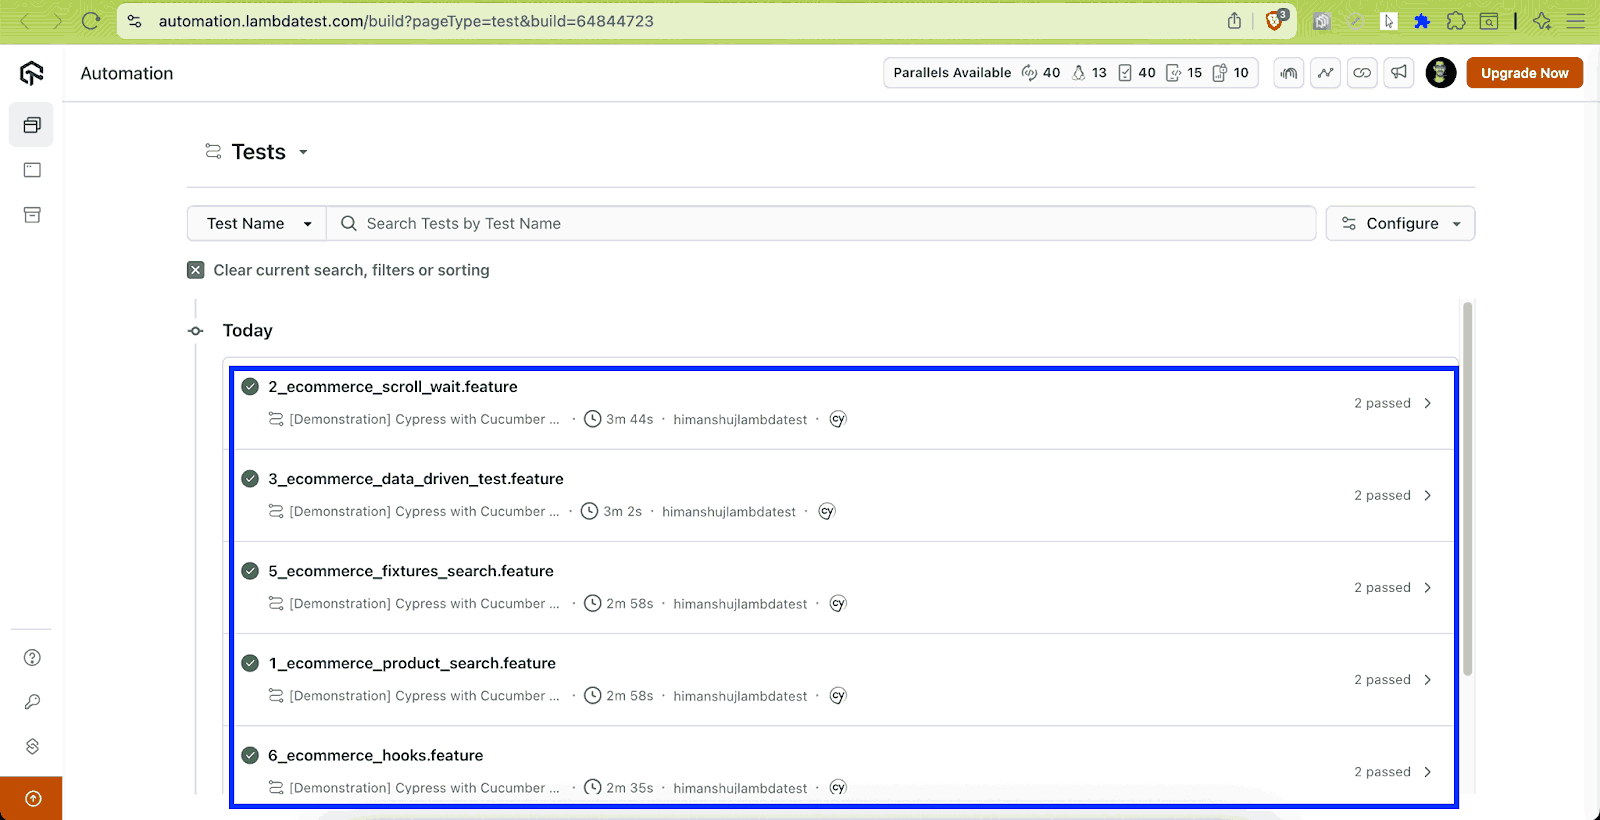
You can check the status of test execution by navigating to the LambdaTest Automation Dashboard.
Click on the Build and respective tests in the suite to monitor their status.
As seen below, all the scenarios in the six feature files were successfully executed in parallel across the two browser+OS combinations mentioned in lambdatest-config.json.
To get started with Cypress automation testing you can check out this support documentation on Getting Started With Cypress Testing in case you want a quick refresher on Cypress execution on the cloud grid.
Best Practices for Cypress Cucumber Preprocessor Plugin
Here are some of the commonly used Cypress best practices that need to be followed when using the Cypress Cucumber Preprocessor plugin for BDD test development:
Write Independent Scenarios
Just like autonomous test case design is considered one of the best Selenium best practices, independent scenario design is extremely important in Behavior Driven Development (BDD).
Consider designing scenarios that have minimal (or zero) dependencies on each other. Independent scenario design helps in reducing test flakiness and also helps with reliable parallel testing.
Meticulously Organize Features, Hooks, and Step Definitions
It’s recommended to keep the .feature files in a separate folder (e.g., cypress/e2e/features). Following this fixed naming convention helps in isolating and identifying scenarios.
Step definitions corresponding to the respective scenarios should also mirror a similar directory structure (e.g., cypress/e2e/step_defs). In case there are common step definitions, you could keep them in a separate file or a separate folder (e.g., cypress/e2e/common_step_defs).
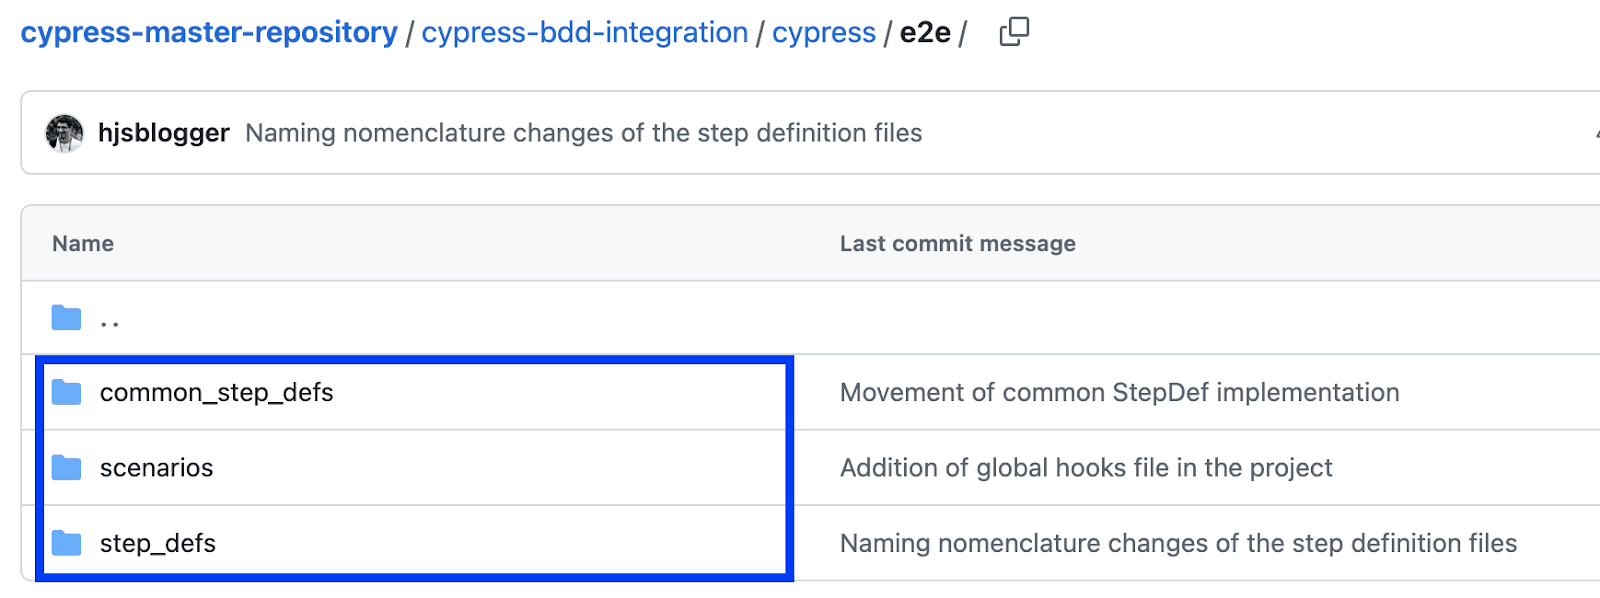
Having common step definitions helps in reducing code duplication and improving maintenance of the definitions.
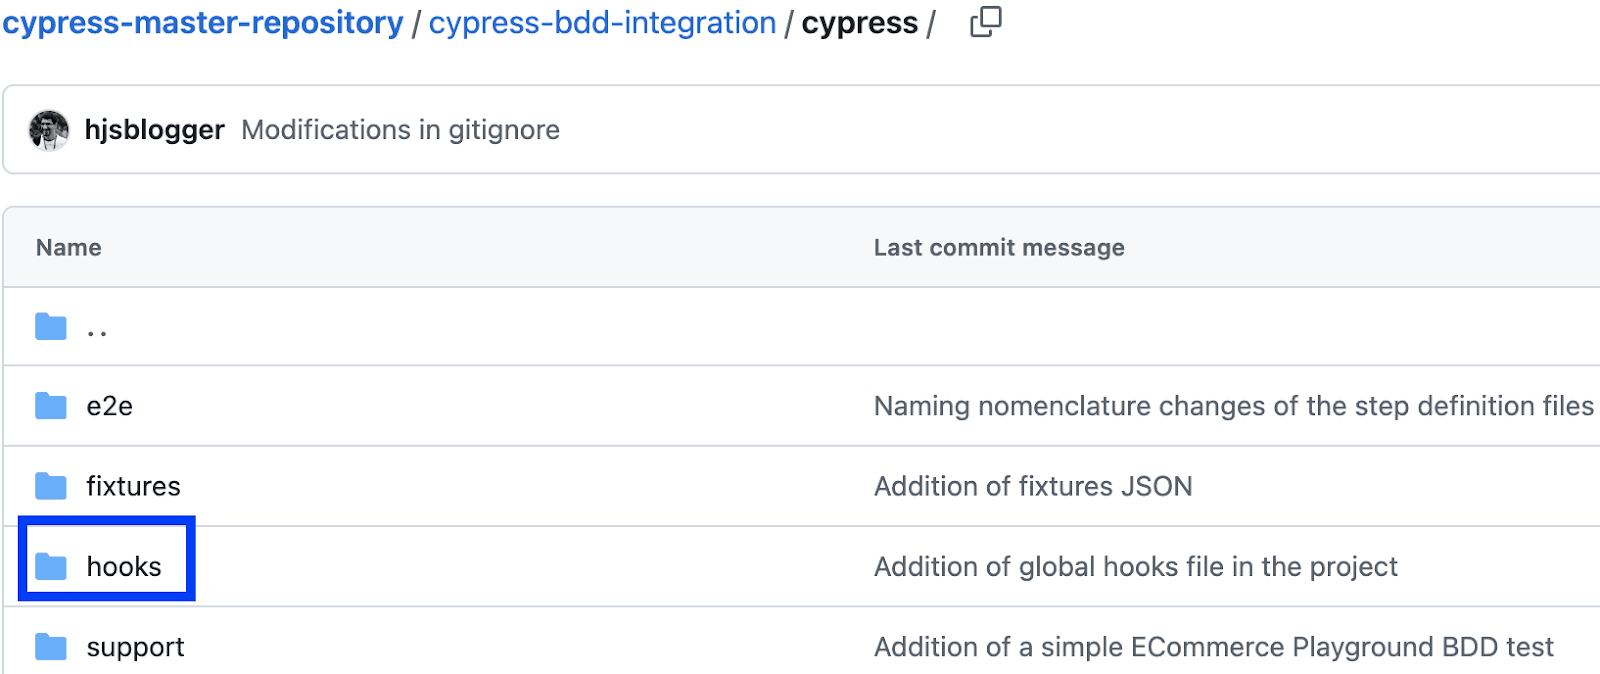
Also, consider using centralized hooks (e.g., cypress/hooks/hooks.js) for better long-term maintenance of the hooks.
Use Tags For Improved Test Management
There are certain scenarios that you might want to run selectively. For example, some scenarios might qualify for execution in smoke testing, some for regression testing, and so on.
This is where scenario/feature-based tags (e.g., @Smoke, @Regression, @ToDoApp, etc.) can help in executing only a certain scenario/feature subset of the entire suite. All of this is instrumental in realizing smarter test management at a large scale!
Use Fixtures For Better Test Data Management
In case parameterization at the feature/scenario level does not meet your requirements, consider using fixtures, whereby you can externalize the test data for improved test data management. You have already covered the usage of JSON fixtures for managing test data in a more structured manner.
If feasible, you could also make use of external APIs for fetching test data in a dynamic fashion. In a nutshell, fixtures in Cypress BDD help manage test data efficiently, improving scalability and maintainability in projects.
Over and above, you should consider using appropriate design patterns for abstracting selectors and business logic into page objects. Lastly, you can make the most of Cypress and Cucumber Preprocessor plugin by running tests on cloud platforms since it helps in better parallelization and faster test execution across a range of browser and platform combinations.
Conclusion
The Cypress Cucumber Preprocessor plugin aims to provide a superior developer experience and behavior similar to that of Cucumber with Cypress. It lets you leverage the benefits of BDD and Cypress testing through scenarios and feature files.
Fixtures, tagging, Data-driven testing, test parameterization, and parallel execution (at scenario-level) are some of the salient benefits of using the Cypress Cucumber Preprocessor plugin.
Citations
- Cypress Cucumber Preprocessor HTML Reports: https://github.com/badeball/cypress-cucumber-preprocessor/blob/master/docs/html-report.md
- Cypress Cucumber Preprocessor JSON Reports: https://github.com/badeball/cypress-cucumber-preprocessor/blob/master/docs/json-report.md
- Test Scenarios and Steps: https://filiphric.com/cucumber-in-cypress-a-step-by-step-guide#test-scenarios-and-steps
- GitHub - Cypress esbuild Preprocessor: https://github.com/bahmutov/cypress-esbuild-preprocessor
On This Page
Frequently Asked Questions (FAQs)
Did you find this page helpful?
More Related Hubs

Start your journey with LambdaTest
Get 100 minutes of automation test minutes FREE!!


