
How To Execute JavaScript In Selenium Python
Idowu (Paul) Omisola
Posted On: December 12, 2023
![]() 237248 Views
237248 Views
![]() 29 Min Read
29 Min Read
Directly accessing the DOM through JavaScript gives you the upper hand in testing dynamic websites. As an automation testing engineer, you are automating the testing of a dynamic web application, and you encounter a scenario where Selenium’s standard methods fall short. This is where JavaScript execution with Selenium can become a powerful combination in your testing arsenal. While it is not always the first choice for automation, it becomes indispensable when you need fine-grained control and precision over the dynamic nature of the DOM.
Executing JavaScript with Selenium is sometimes unavoidable when automating complex web actions like CSS restyling, CSS animations, CSS scrolling, and state modifications, among many others.
In this Selenium Python tutorial, you will learn how to execute JavaScript in Selenium Python while performing automation testing. If you are preparing for an interview you can learn more through Selenium interview questions.
TABLE OF CONTENTS
- Why use the JavaScriptExecutor in Selenium?
- The execute_script and execute_async_script method
- Pros of executing JavaScript with Selenium
- Cons of executing JavaScript with Selenium
- Getting started with JavaScript execution with Selenium
- Executing JavaScript in Selenium Python
- Conclusion
- Frequently Asked Questions (FAQs)
Why use the JavaScriptExecutor in Selenium?
Since JavaScript is a client-side scripting language, using it with Selenium allows you to manipulate web elements and add custom behavior during automation testing. Although the recommended way to automate a website is through the Selenium standard method, some scenarios highlighted below might require using the JavaScriptExecutor with Selenium.
Lazy loading
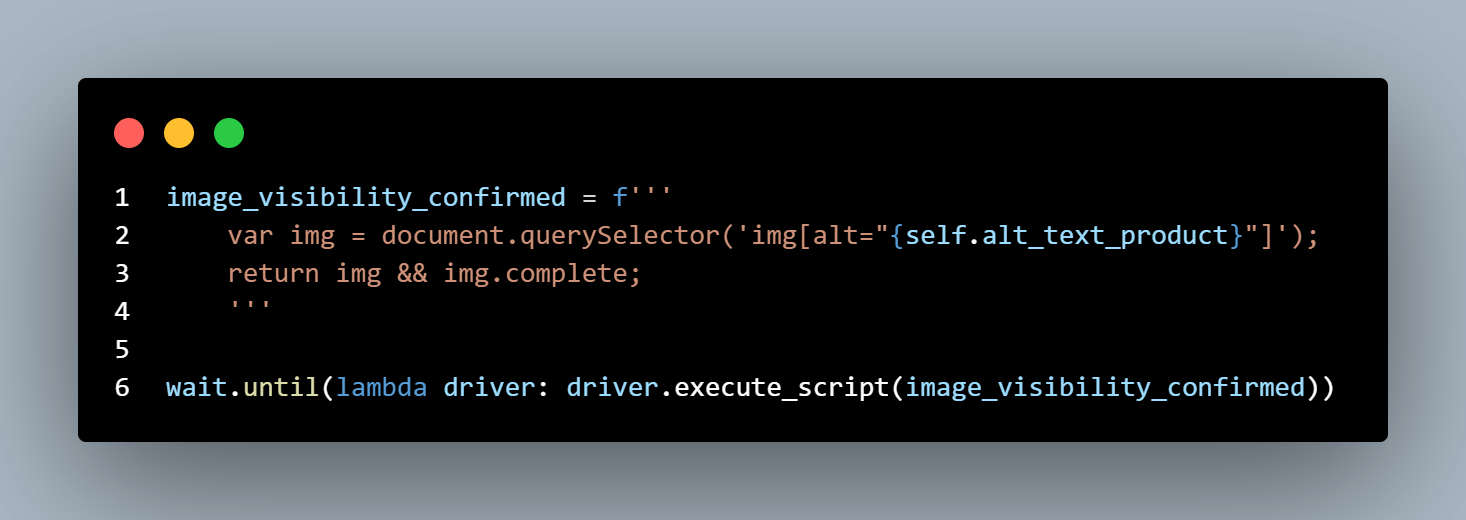
Although you can wait for lazy-loaded content with Selenium’s Explicit wait, you can add JavaScript to check if the lazy-loaded content has loaded before scrolling to its position and proceeding to the other test steps.
The screenshot below is a simple example that demonstrates this scenario. The test uses JavaScript to check if the image element has loaded to confirm its visibility. Then, I passed this into an explicit wait method to pause test execution until the lazy-loaded image becomes visible within the DOM. I demonstrated this using the LambdaTest eCommerce Playground.
Scrolling on a web page
Apart from the ActionChains, JavaScriptExecutor offers flexible ways to scroll vertically or horizontally on a web page. For instance, executing JavaScript with Selenium is helpful when automating animated smooth scrolling or scrolling to a specific element in the DOM.
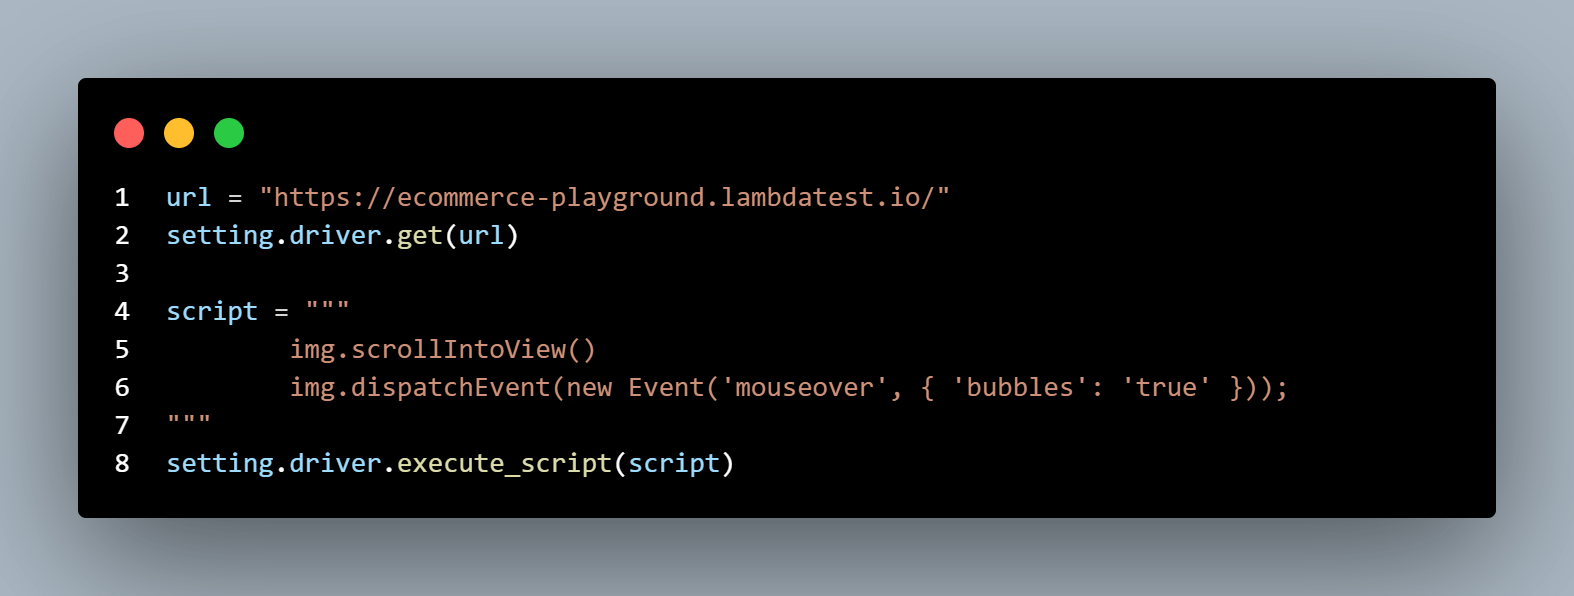
Below is an example using JavaScript’s scrollIntoView property on LambdaTest eCommerce playground. This test scrolls to the specified image and hovers over it to expose more elements.
Simulating a custom wait function
While Selenium’s Explicit wait remains the best way to pause for elements to load, JavaScript offers more flexibility, allowing you to customize DOM accessibility. Thus, you can interact better with the website from a user’s perspective.
The example below uses the setInterval property to simulate a wait scenario for an asynchronously loaded element. I used the execute_async_script method in this case.
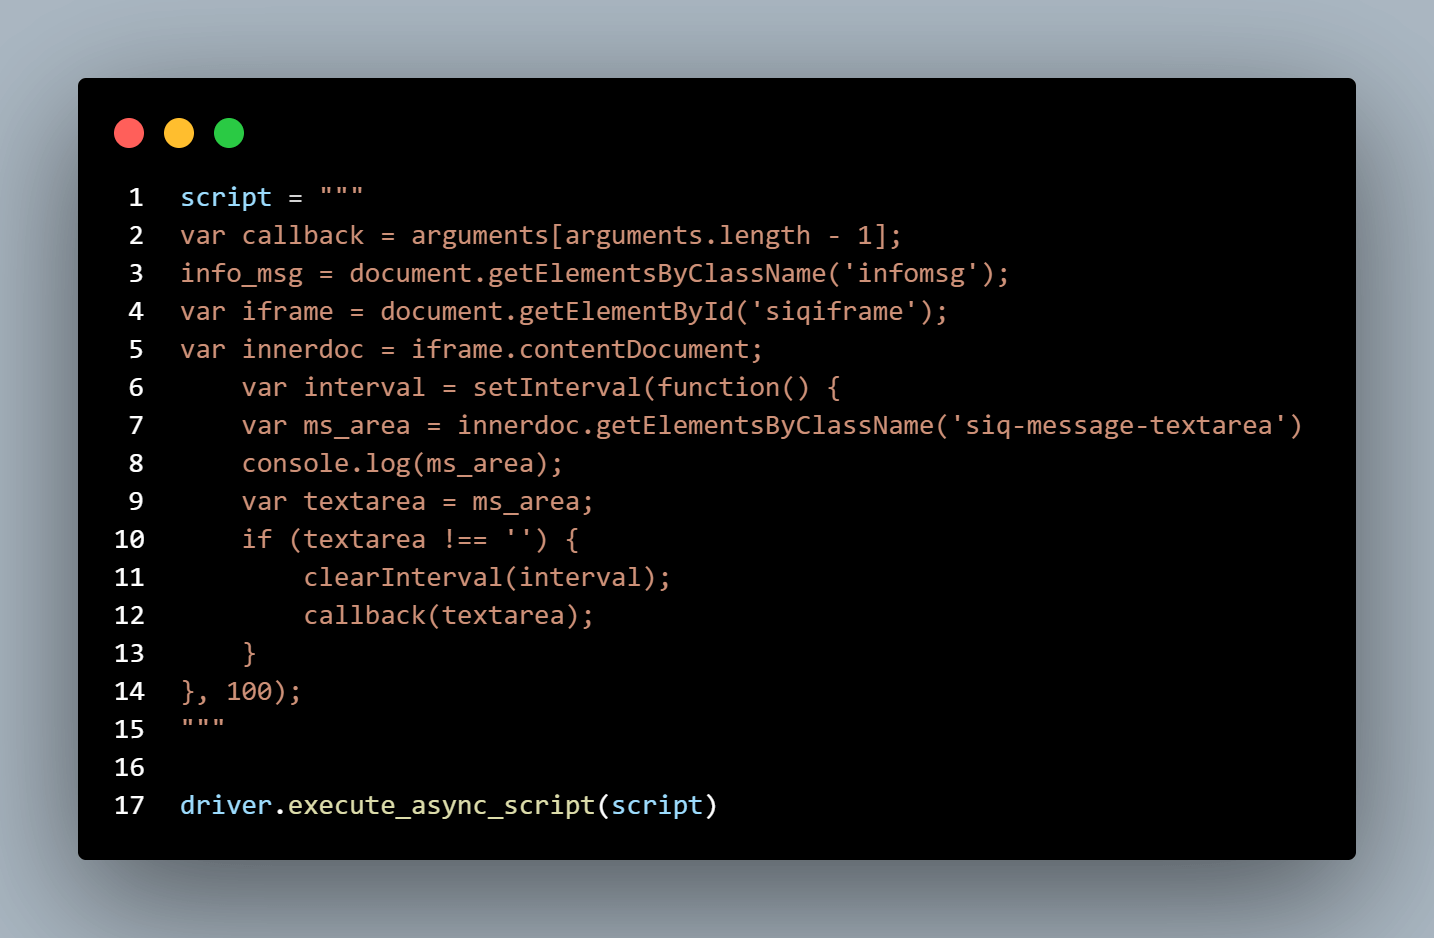
The setInterval property executes the DOM access repeatedly at the specified timeout interval to wait for the element to load. Once the web element returns a value and is not null anymore, it clears the time interval using the clearInterval property.
However, unless it becomes unavoidable, it is always best to choose Selenium’s explicit wait over writing a custom wait function with JavaScript. The wait function in JavaScript may pose complexity and inconsistency challenges across various browsers, leading to difficulties in debugging and maintaining the test code.
Element creation
Executing JavaScript in Selenium with Python can be necessary when you need to make temporary changes to element attributes or check changes in the UI by changing the styling. For example, the following code replaces the existing class name with a new one. Once changed, I could access the element via the new attribute during automation.
Automating Shadow DOM
JavaScript execution in Selenium offers an easy way to interact with Shadow DOM. Shadow DOMs act as encapsulated HTML within a separate DOM tree, which can sometimes be nested, making it challenging to access their elements through standard Selenium WebDriver methods.
However, using JavaScript provides greater control over the DOM, allowing you to access and manipulate shadow DOM elements.
The execute_script and execute_async_script method
The execute_script and execute_async_script are Selenium’s built-in methods for running JavaScript in Python via Selenium. Both act as an interface between Python and JavaScript, allowing you to interact synchronously or asynchronously with the DOM during automation testing using pure JavaScript.
Since the option to use JavaScript is available in Selenium, you can introduce JavaScript into your test regardless of the programming language.
What is the execute_script method?
The execute_script is a JavaScript interfacing method in Selenium that executes synchronous JavaScript within the browser instance. You can use this method by calling it from the driver instance as shown:
|
1 2 |
script = """const img = document.querySelector(selector);""" driver.execute_script(script) |
What is the execute_async_script method?
The execute_async_script method provides an interface for executing asynchronous JavaScript in Selenium. It provides an avenue for synchronizing the test automation with asynchronous events. Below is a general syntax for the execute_async_script method:
|
1 2 |
script = """some asynchronous actions""" driver.execute_async_script(script) |
Since these methods only serve as interfaces, you can write JavaScript as a string inside a Python variable and pass it into the execute_script method or execute_async_script method, as demonstrated above.
Pros of executing JavaScript with Selenium
Integrating JavaScript into Selenium automation brings added versatility and effectiveness to the testing process. Executing JavaScript with Selenium during automation provides the following advantages.
Better DOM control
Executing JavaScript with Selenium during test automation allows you to customize web actions and alter web page elements to simulate users’ stories better. Overall, it lets you gain more control of the DOM during automation testing.
Fine-grained control over asynchronous events
Test automation with JavaScript execution in Selenium gives you more control over asynchronous web actions. It allows you to run Ajax actions seamlessly using the execute_async_script method.
This method synchronizes asynchronous events and lets you interact with dynamic content. For instance, using asynchronous JavaScript execution, you can wait for elements to appear, disappear, or change state before taking further actions.
Leverage the power of JavaScript with other programming languages
Since the execute_script and execute_async_script methods in Selenium involve using JavaScript as an interface client script, they help you run JavaScript regardless of the Selenium-binding programming language.
Whether automating with Python, Java, C, PHP, or any other programming language, JavaScript has powerful capabilities to interact with and manipulate the DOM, execute custom scripts, handle asynchronous operations, and achieve many dynamic interactions and behaviors within your web automation tests.
Helps automate more complex operations
Leveraging JavaScript with Selenium proves beneficial for executing intricate operations and directly interacting with the Document Object Model (DOM) in testing. This, in turn, enhances the test’s flexibility. Actions like element re-styling, attribute manipulation, alert simulation, hitting APIs, or interaction with shadow DOM are only possible with JavaScript execution in Selenium.
Cons of executing JavaScript with Selenium
While executing JavaScript with Selenium provides numerous advantages, it also has drawbacks. Testers must carefully weigh the benefits against these potential drawbacks to make informed decisions about incorporating JavaScript in Selenium automation.
Difficult to debug
The challenge in debugging hybrid code can increase the overall testing time, especially if the interfacing JavaScript is the cause of test failure. You have to switch between two programming languages to debug the faulty code.
Reduced readability
The automation test code becomes less readable since it combines two programming languages: JavaScript and the baseline testing language. This is unlike the WebDriver standard method, which doesn’t require third-party scripting.
For instance, I embedded JavaScript into Python using a multi-line string inside the script variable. This can be challenging to understand for someone without a knowledge of JavaScript.
Getting started with JavaScript execution with Selenium
Getting started with JavaScript execution in Selenium involves understanding how to harness the power of JavaScript within your Selenium test scripts. Here are the key steps to initiate this process:
Install dependencies
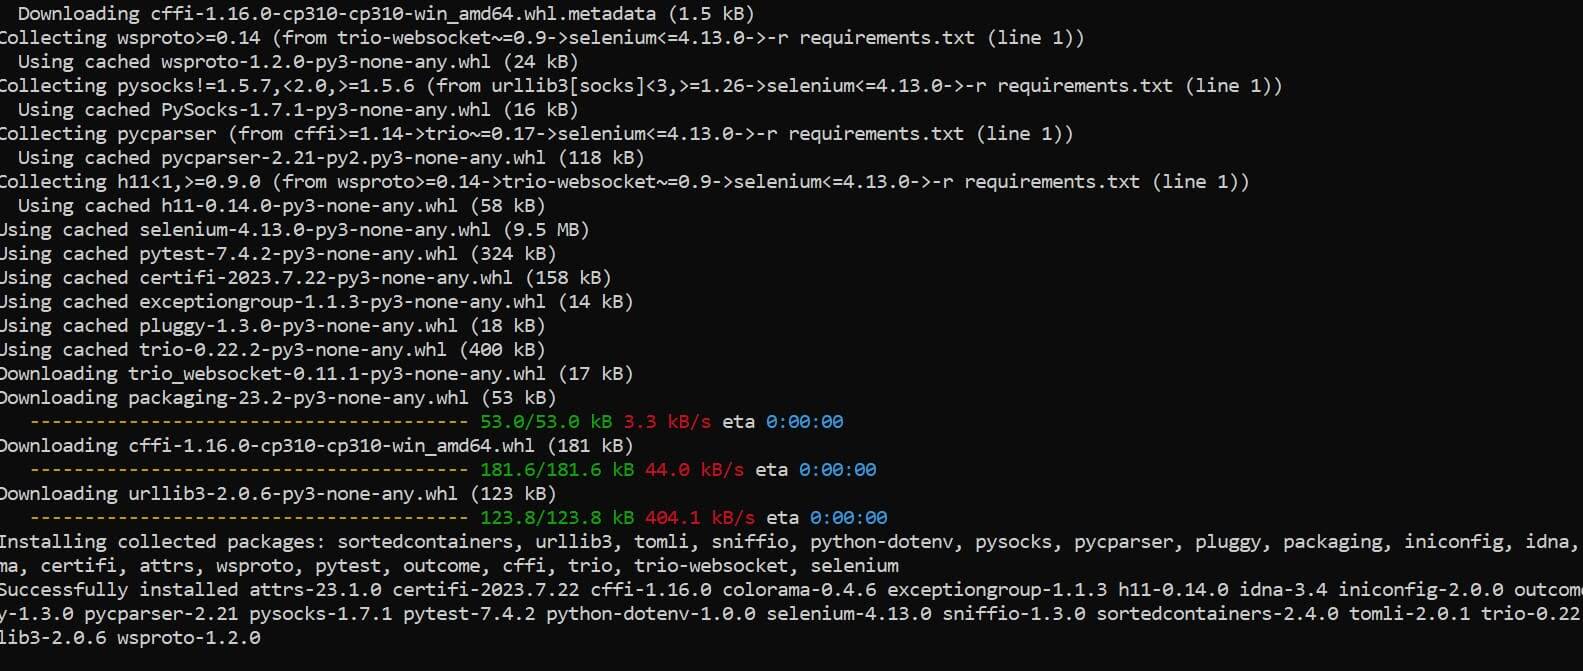
This blog uses Python 3.10.6 and Selenium 4.13.0. But you should be able to follow along with Python 3.6 and later. We will run the test cases using pytest, so you must also install pytest. You will also install the python-dotenv package to hide secret keys and passwords.
Open the CLI and create a new project folder. CD into your project root folder and create a new virtual environment by running the following command.
|
1 |
py -m venv env_name |
Run the following code to activate the new virtual environment.
|
1 |
.\env_name\Scripts\activate |
Ensure that you replace env_name with your virtual environment’s name.
To install the dependencies, create a new requirements.txt file in your project root folder and paste the dependencies as shown.
Run the following code to install the requirements in the virtual environment:
|
1 |
pip install -r requirements.txt |
The installation command runs as shown below.
Implementation
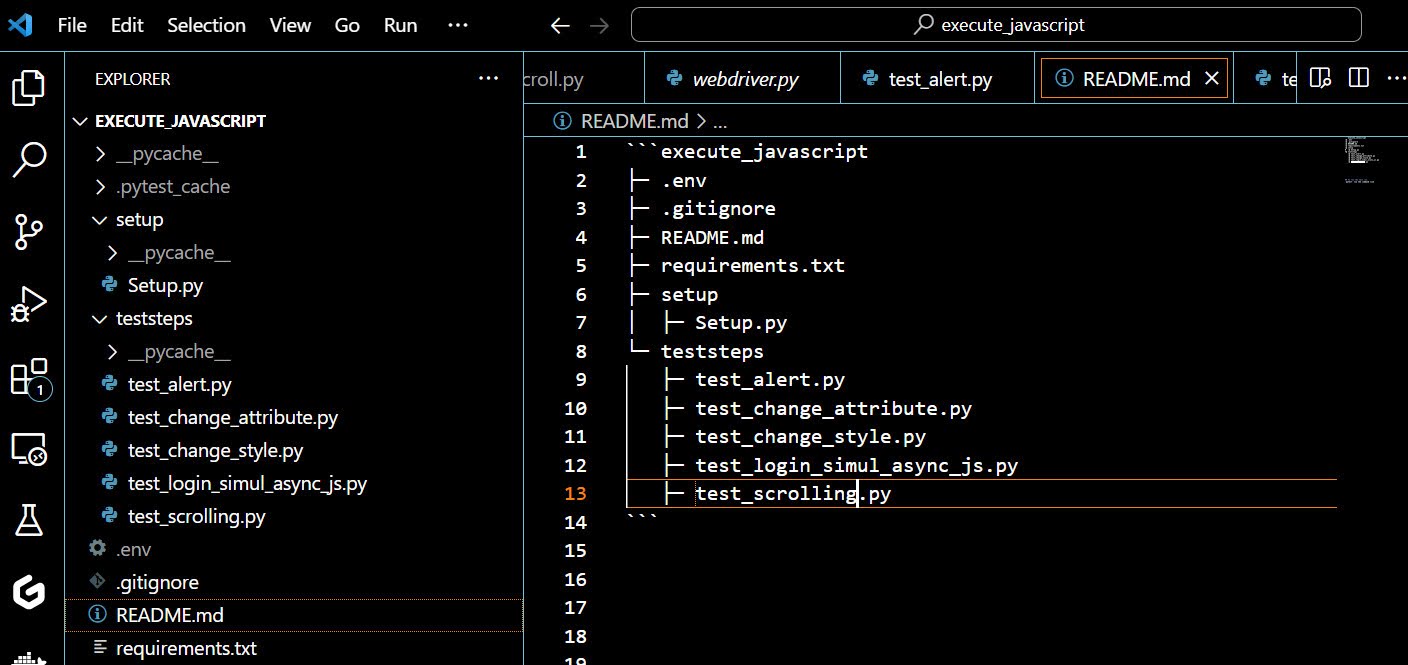
I have used VS Code on a Windows machine to structure the examples in this test suite. Each Python file in the teststeps folder represents an example use case of executing JavaScript with Selenium in Python. We will discuss these examples in the following sections.
The driver setups for the whole test suite are inside the setup folder. The Setup.py file contains the setup for the entire test suite. It includes settings for the local browser instance and the cloud grid.
Below is the entire project structure inside VS Code.
Executing JavaScript in Selenium Python
In this Python tutorial, we will now consider some practical ways to execute JavaScript in Selenium Python during automation testing.
But before we begin, let’s set up a general setting for the test suite. We will maintain a hybrid testing format that allows us to switch between local and cloud environments like LambdaTest (details later).
LambdaTest is an AI-based test execution and orchestration platform that offers over 3000 real browsers and operating systems to help you automate executing JavaScript in Selenium Python.
Subscribe to the LambdaTest YouTube Channel and stay updated with the latest tutorials around automated testing, Selenium testing, and more.
So start by obtaining your LambdaTest username and access key before you make the changes. To do this:
- Go to your LambdaTest build directory.
- Click Access Key at the top-right.
- Copy your Username and Access Key from the popup modal.
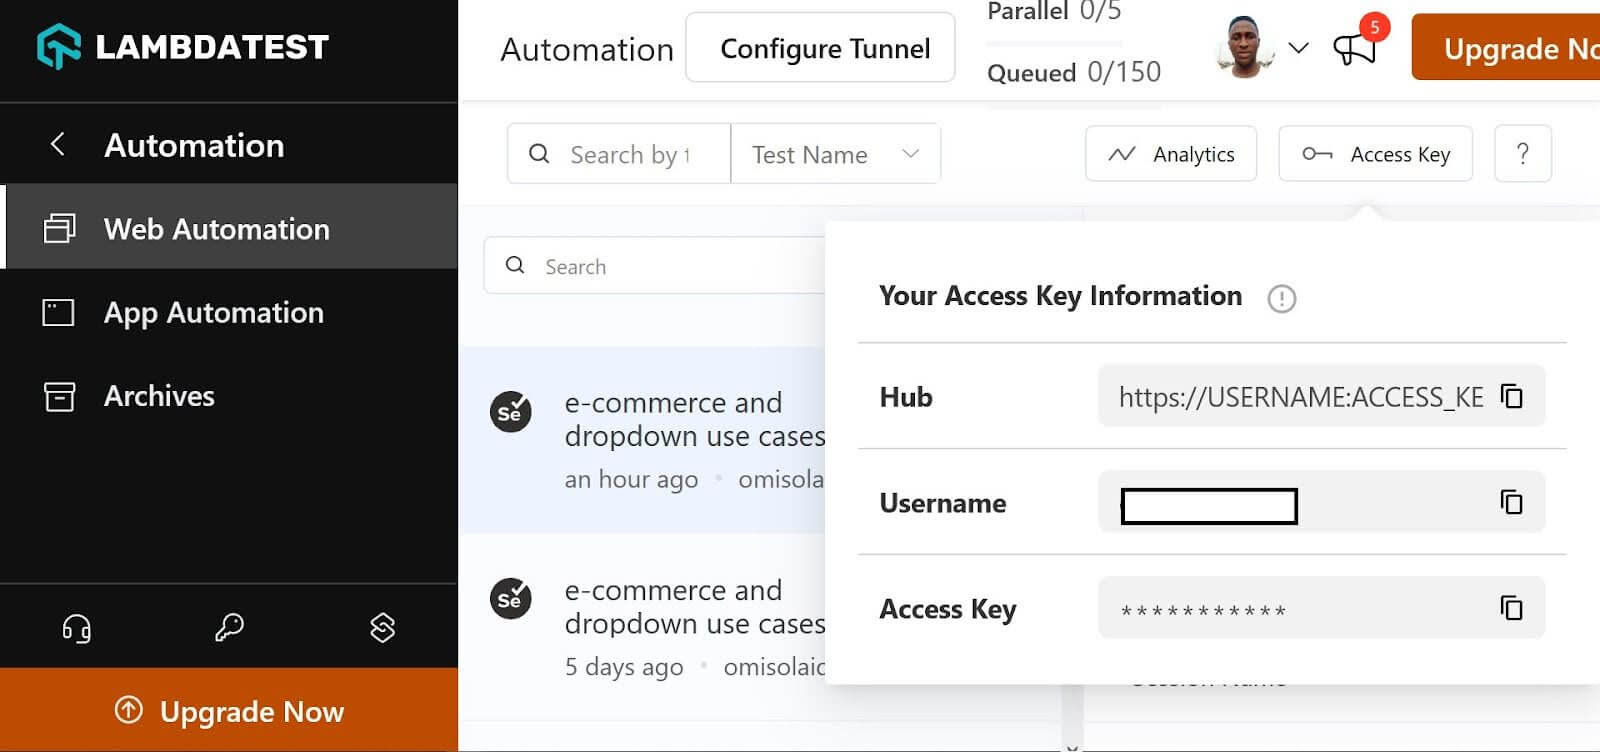
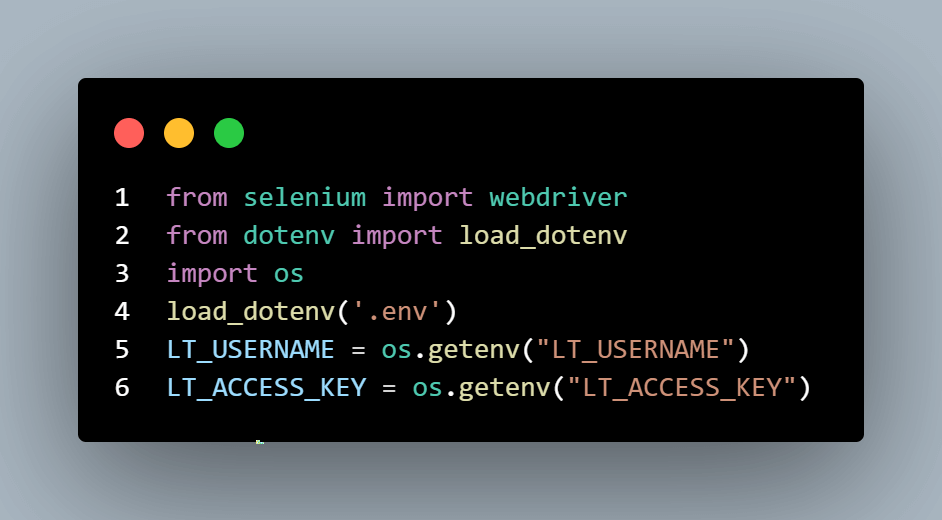
Ensure you secure your LambdaTest Username and Access Key inside the .env file. You will obtain them using the dotenv package in the Setup file.
Set up a Selenium WebDriver class in a setup.py file, as shown in the following snippet. You will inject this into subsequent test files. Make a new folder called setup in your test suite directory, and create a new setup.py file in this folder.

I partitioned the setup code into conditions since I wanted to be able to switch between executing the test locally and on the cloud Selenium Grid. I obtained the execution platform string (EXEC_PLATFORM) from the environment variable. I only need to change it to cloud or local in the environment variable file to switch platforms.
If the EXEC_PLATFORM reads the cloud string, the test suite runs on the LambdaTest cloud grid using the cloud capabilities.
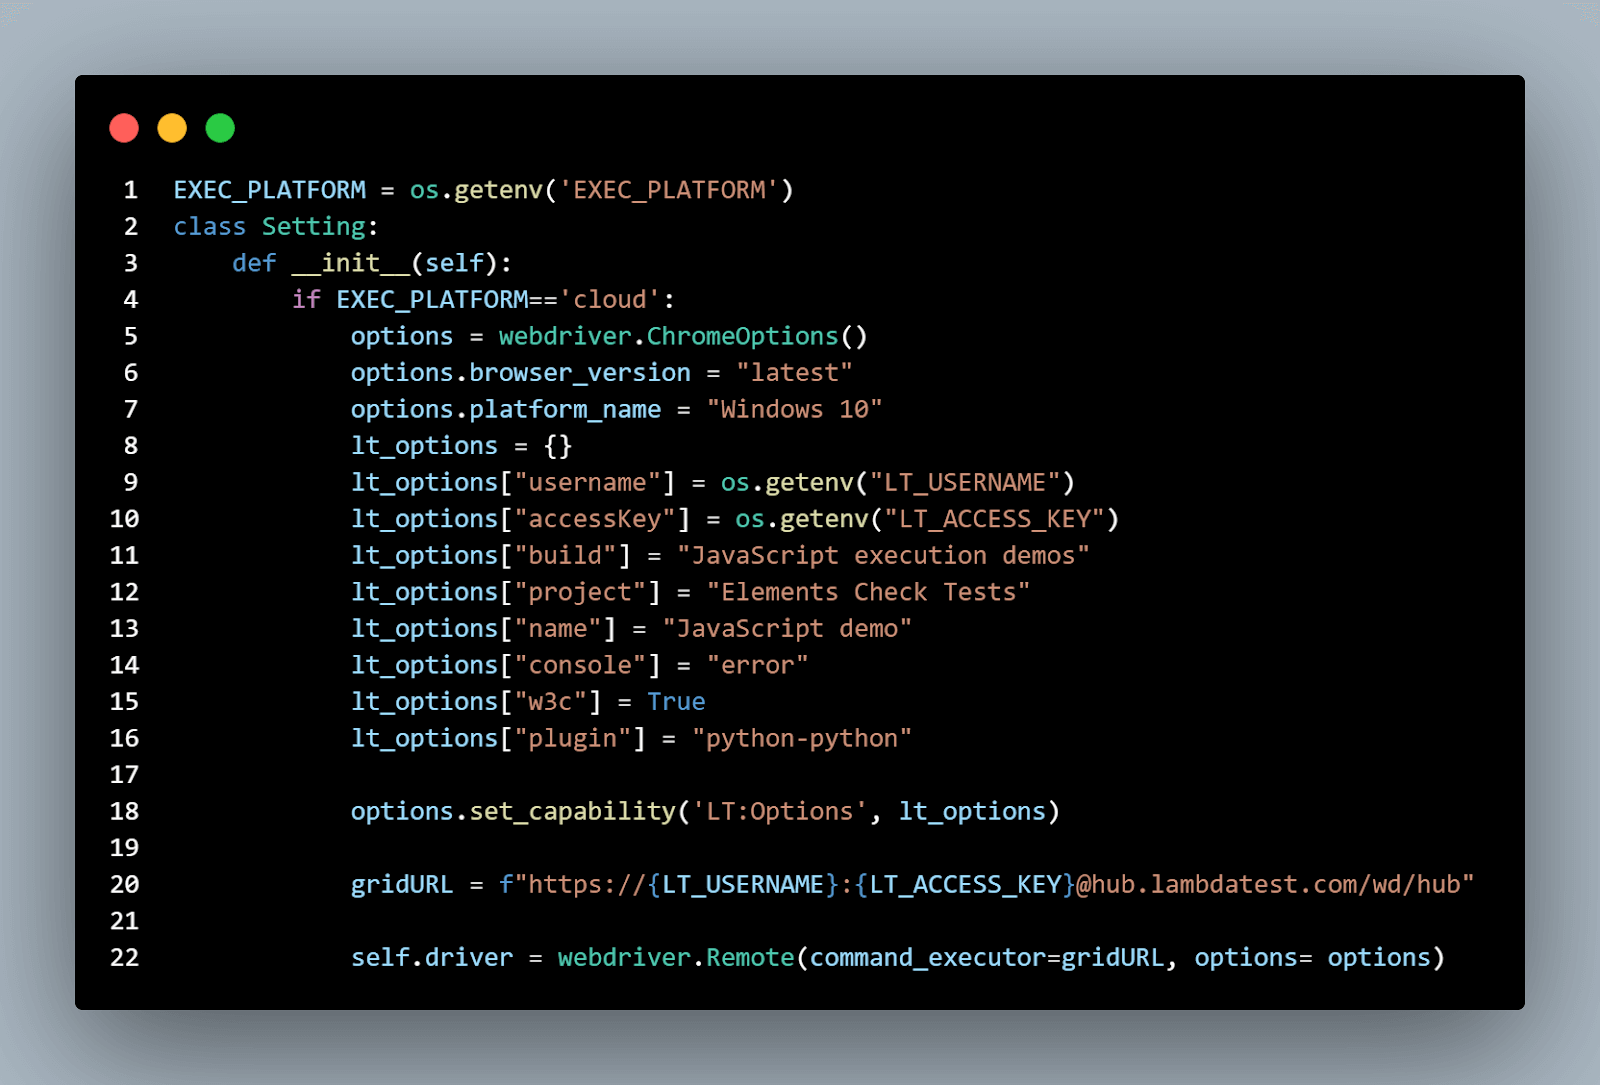
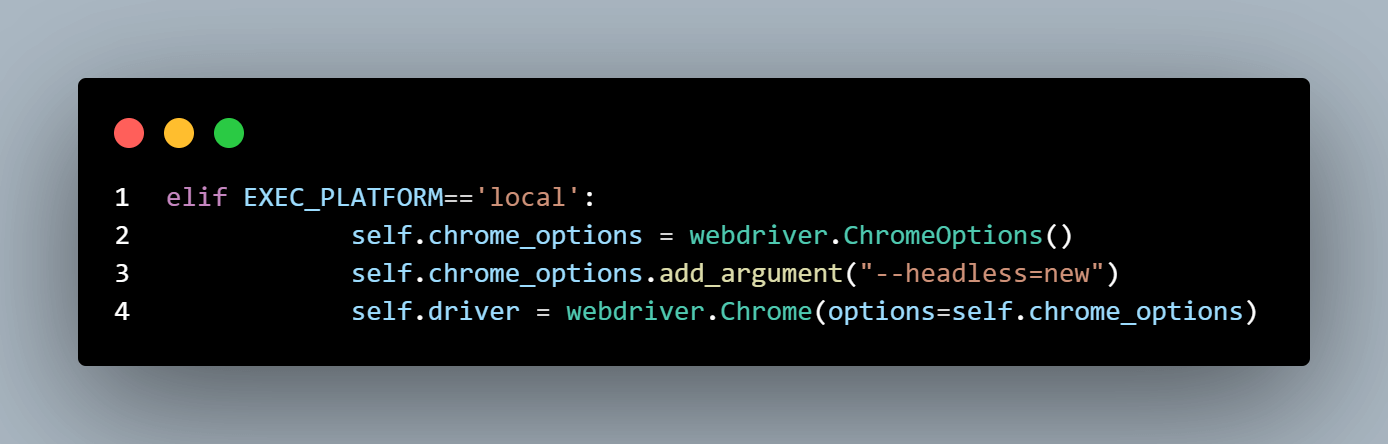
Otherwise, if it reads local, the test suite executes locally using the local Chrome driver.
Let’s have a more thorough code walkthrough.
First, we import the WebDriver and dotenv packages. Then, we instantiate the load_dotenv class to read variables from the .env file. The os package allows you to call your Selenium Grid username and access key strings from the .env file using the os.getenv method.
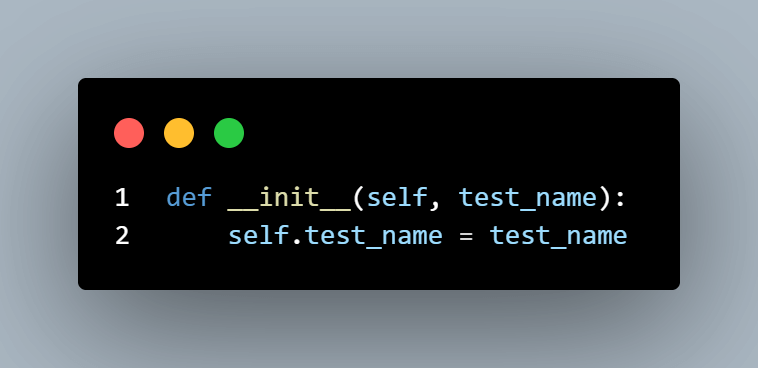
The Setting class takes up a test_name in its initialization function (__init__). Thus, since we will use the Setting class in each test case, we can instantiate it with a test name. This helps us name each test case separately during execution.
Next, we specify the test suite capabilities. This lets you set up a predefined test environment, including browser choice (ChromeOptions in this case), platform type, build, and test name, among many others.
Then, we obtain the test capabilities from the LambdaTest Capabilities Generator. I have included this in the setup file, as shown. LT_USERNAME and LT_ACCESS_KEY are the grid username and the access key obtained from your dashboard earlier.
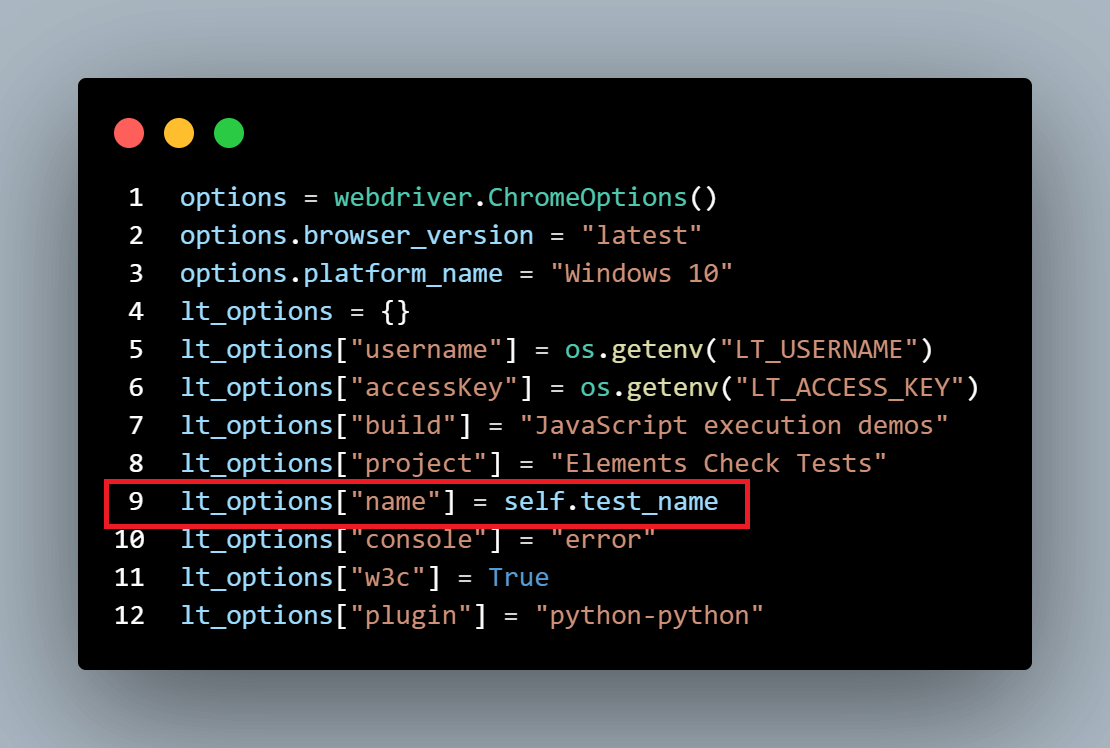
See the highlighted line in the above code; lt_options[“name”] points to the instantiating attribute (self.test_name). This means the Setting instance accepts a string, which is the name of a particular test case.
The following code line configures the driver to use the specified browser option (ChromeOptions) in the cloud grid.
![lt_options[“name”]](https://www.lambdatest.com/blog/wp-content/uploads/2023/12/unnamed-2023-12-12T155339.662.png)
We declare the Selenium cloud grid URL. Adding your access key and username allows the grid to authorize your driver instance while accessing the grid.
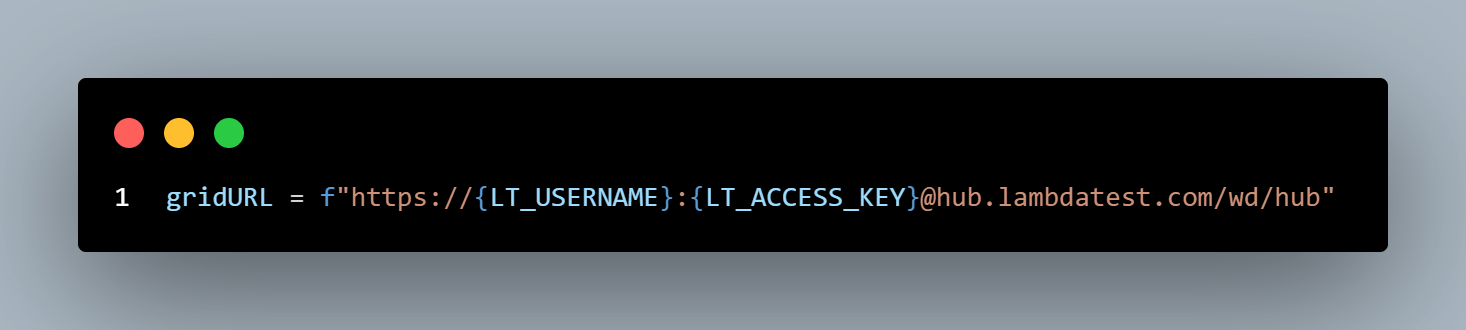
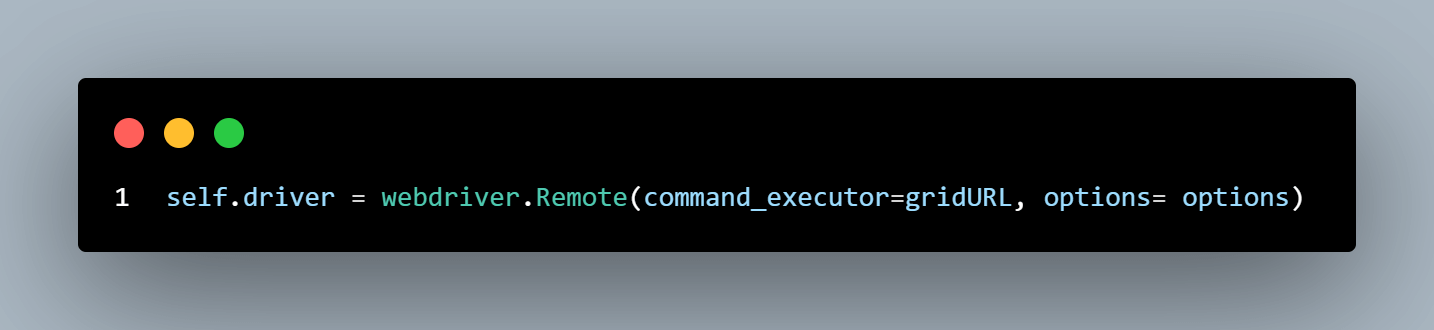
We then instantiate the remote WebDriver, which accepts the gridURL and the browser options.
Next is the local browser instance setup, which gets triggered while executing the test locally. Unlike the cloud execution option, this doesn’t require special capabilities; it uses the local Chrome driver. We’ve used Chrome driver version 119.0.6029.0 in this blog.
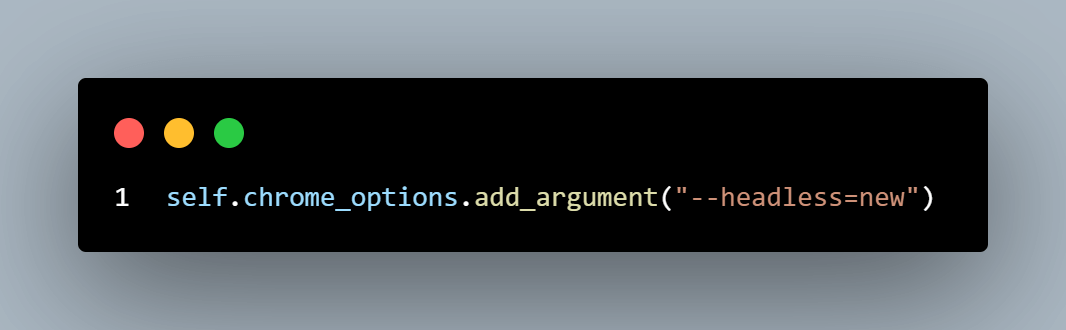
First, we instantiate the ChromeOptions class. This isn’t essential in all cases. But we added it since we might want to add driver instance options like headless mode.
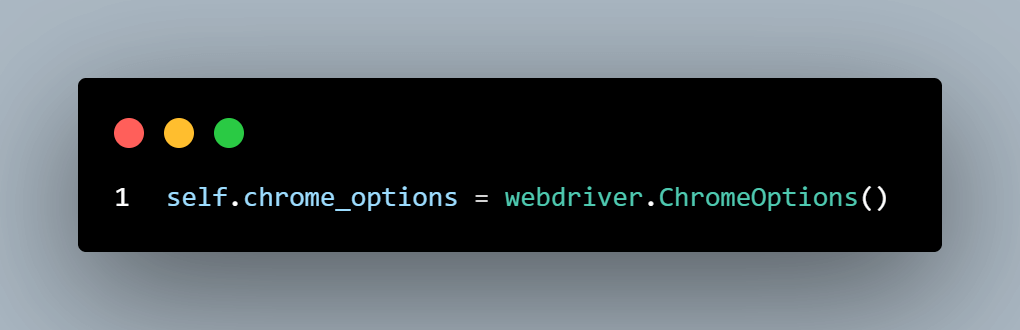
Declaring the ChromeOptions as done above allows you to add more granularity with optional arguments. In this case, we’re running the browser instance in headless mode to prevent the actual browser from spinning up.
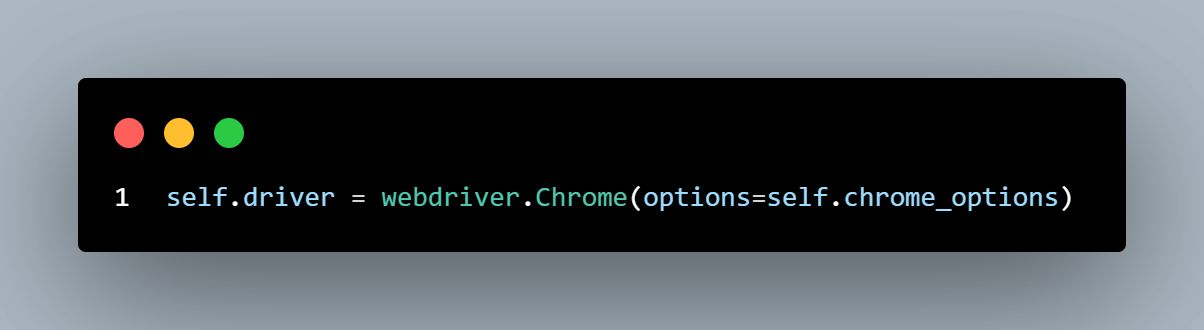
Next, we set up the driver attribute by adding this option to the Chrome browser instance.
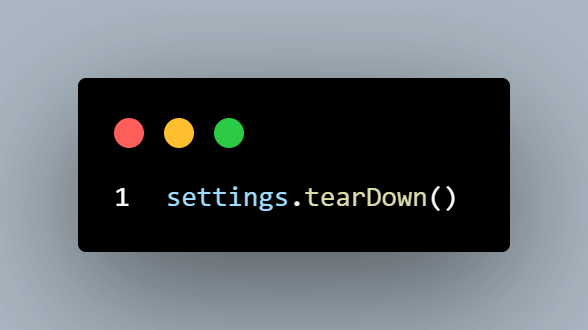
Finally, the Setting class declares the setUp and tearDown methods for the entire test suite. The setUp method uses implicit wait to pause for the DOM elements to load before maximizing the browser window. The tearDown method cleans up the test environment and quits the browser once the driver completes the automation.

Let us proceed with the use cases for JavaScript execution in Selenium with Python.
 Note
NoteExecute JavaScript in Selenium Python on the cloud. Try LambdaTest Today!
Responsive scrolling to an element using execute_script
JavaScript allows you to run custom scripts to define the position you want to scroll to on a web page. Responsive scrolling can also be helpful while dealing with lazy-loaded images. This is because scrolling down a web page triggers the appearance of lazy-loaded images.
While JavaScript’s scrollIntoView scrolls an element into the viewport, you can scroll to a specific position within the DOM using the scrollTo method. The scrollTo property is handy if you are unaware of the element you want to scroll to. The scrollIntoView method is better than continuously scrolling using the viewport height, as it is more specific and goes straight to the specified element.
Look at the example below using LambdaTest eCommerce Playground.
Here are the test cases:
Test Case 1
|
Test Case 2
|
To begin, let’s inspect the web page element. In the Chrome browser, right-click on an image element and select Inspect:
The code below demonstrates how to scroll to the specified element using Selenium’s execute_script in Python.
The test starts by constructing the path to the parent directory of the currently executed script and allows us to use custom test modules.
Next is the instantiation of the Setting class with the appropriate test name, followed by the setUp method from the Setting class; this maximizes the browser window. Since this class contains two test cases, we want them to share a similar setup. So, we call the setUp method before initiating any test cases.
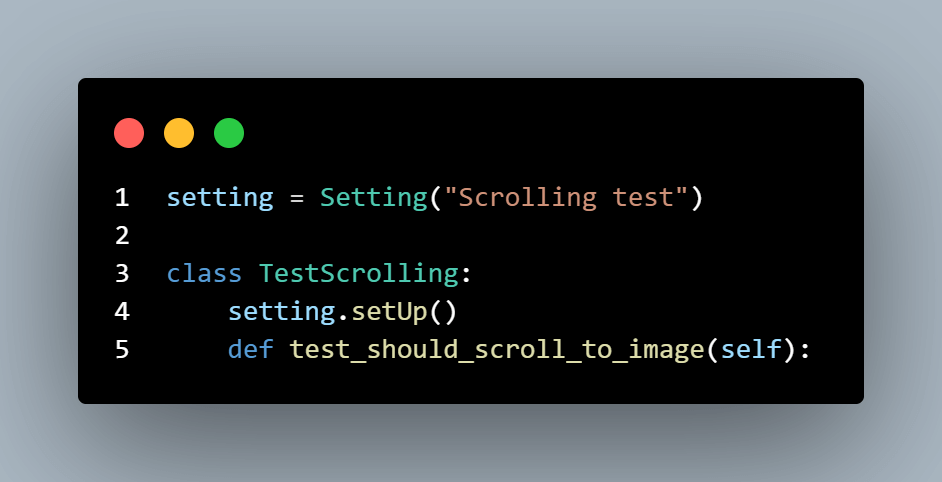
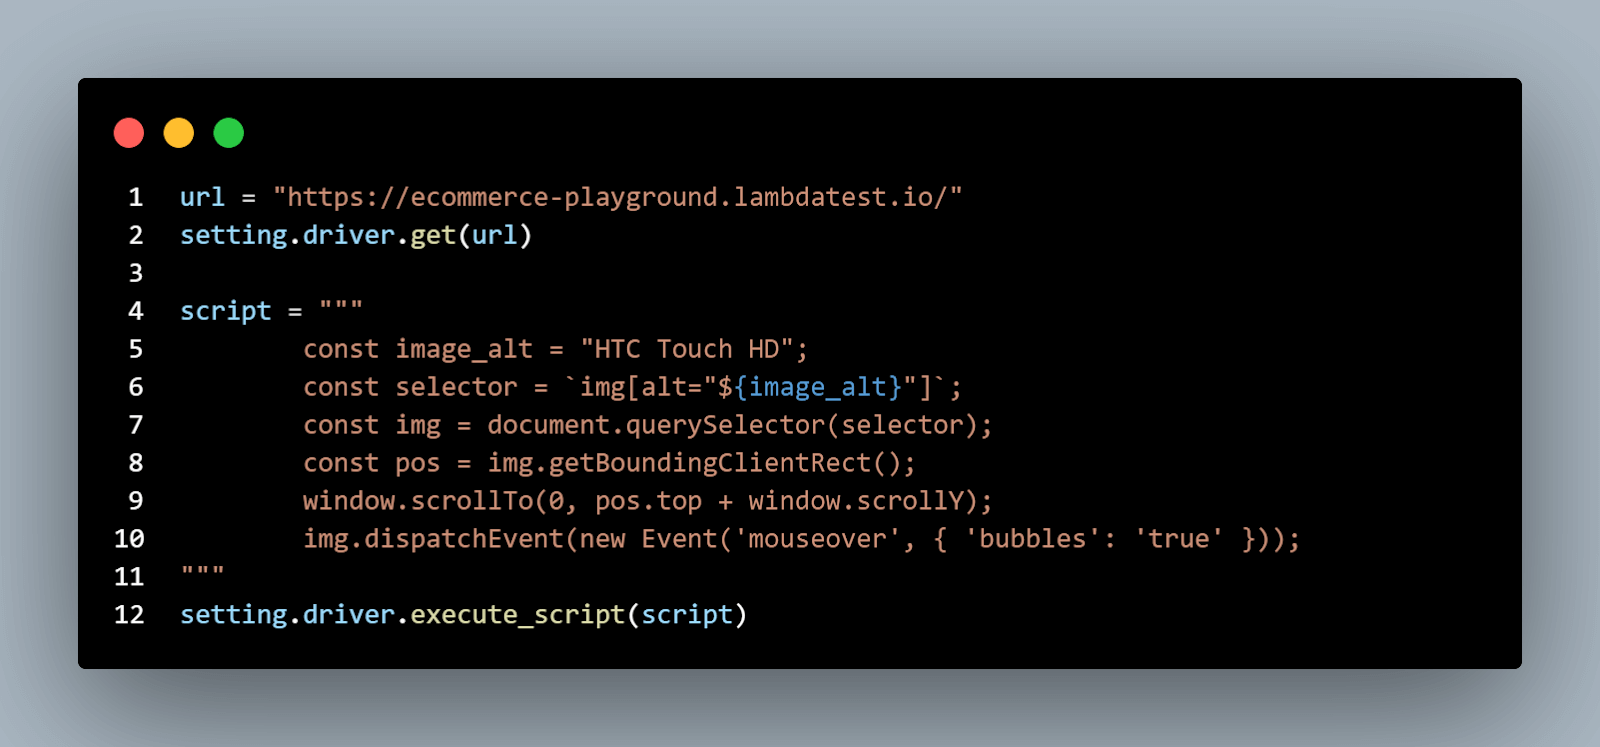
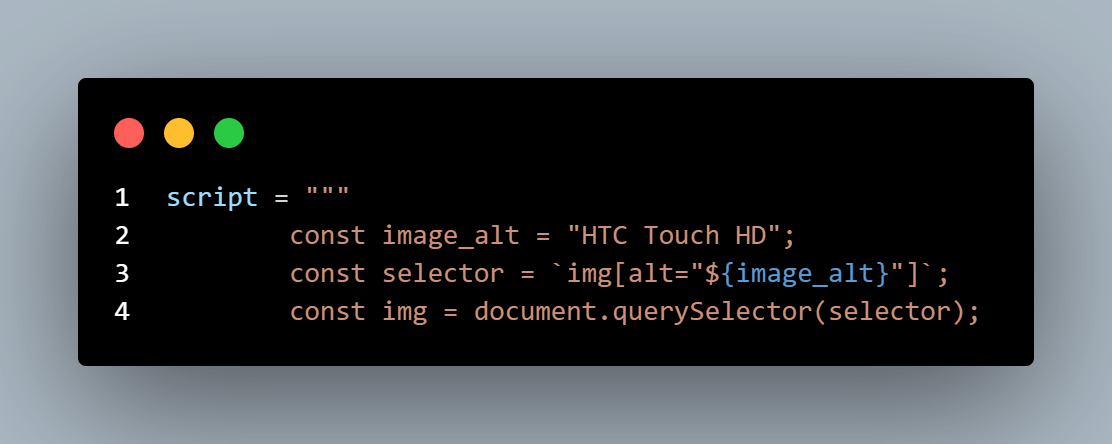
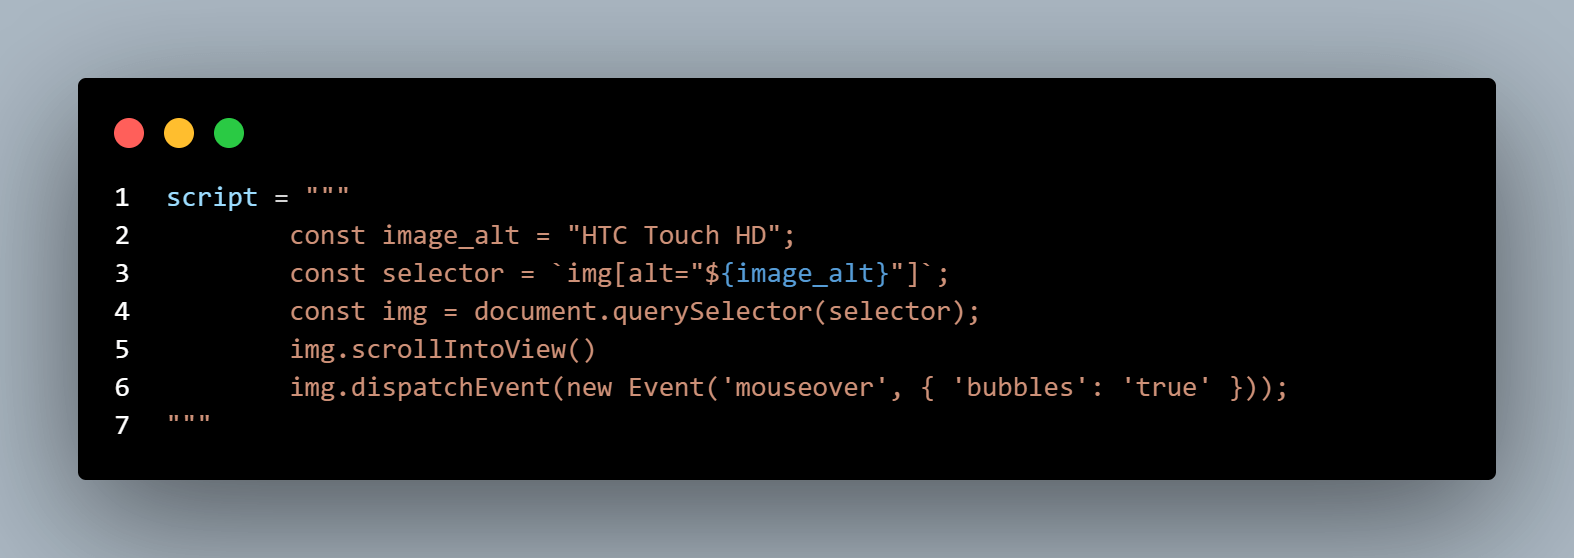
After visiting the URL, insert the JavaScript into the script variable as a string (like a multi-line comment). JavaScript first retrieves the target image element using its alt text. The querySelector is the choice since the script retrieves the image element using an alt attribute.

The retrieval is demonstrated in the code block below.
Once retrieved, use the getBoundingClientRect() to get the image size and position relative to the viewport. The script then uses the window.scrollTo() method to scroll to the image position; this accepts an X and Y argument to specify the horizontal and vertical cursor movement, respectively.
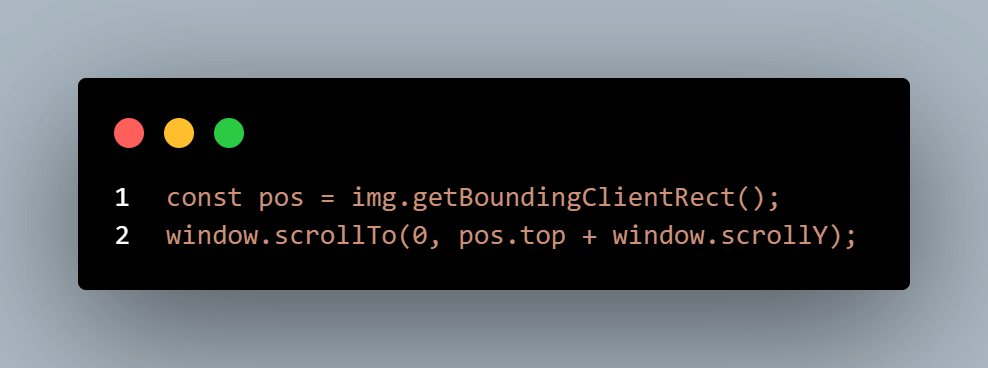
Since the aim is to scroll vertically across the web page to the image element, the X axis takes a zero value while the Y takes the actual image position relative to the page height. To avoid missing the element’s position—even if it changes, we programmatically retrieve the image element position (pos.top). As seen in the code, concatenating this with window.scrollY obtains the image position relative to the viewport.
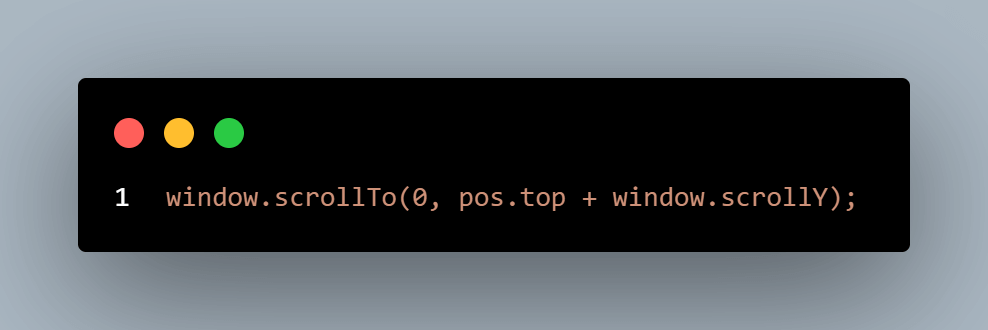
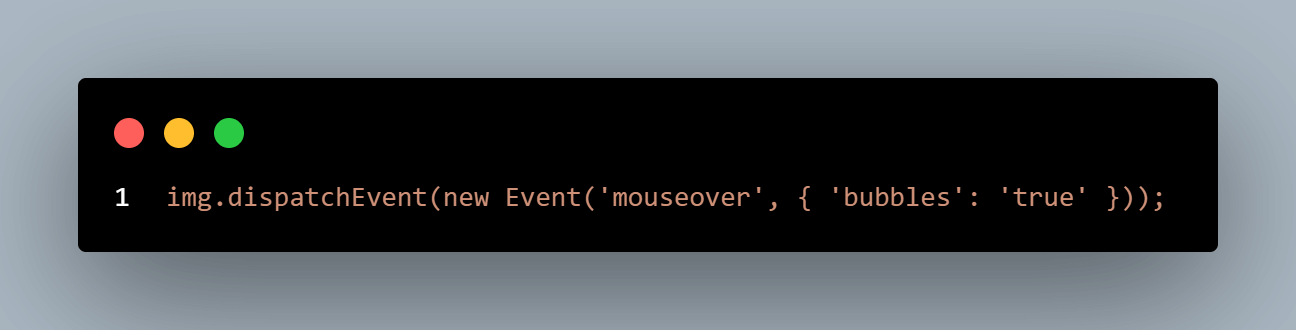
See the extracted line below for clarity.
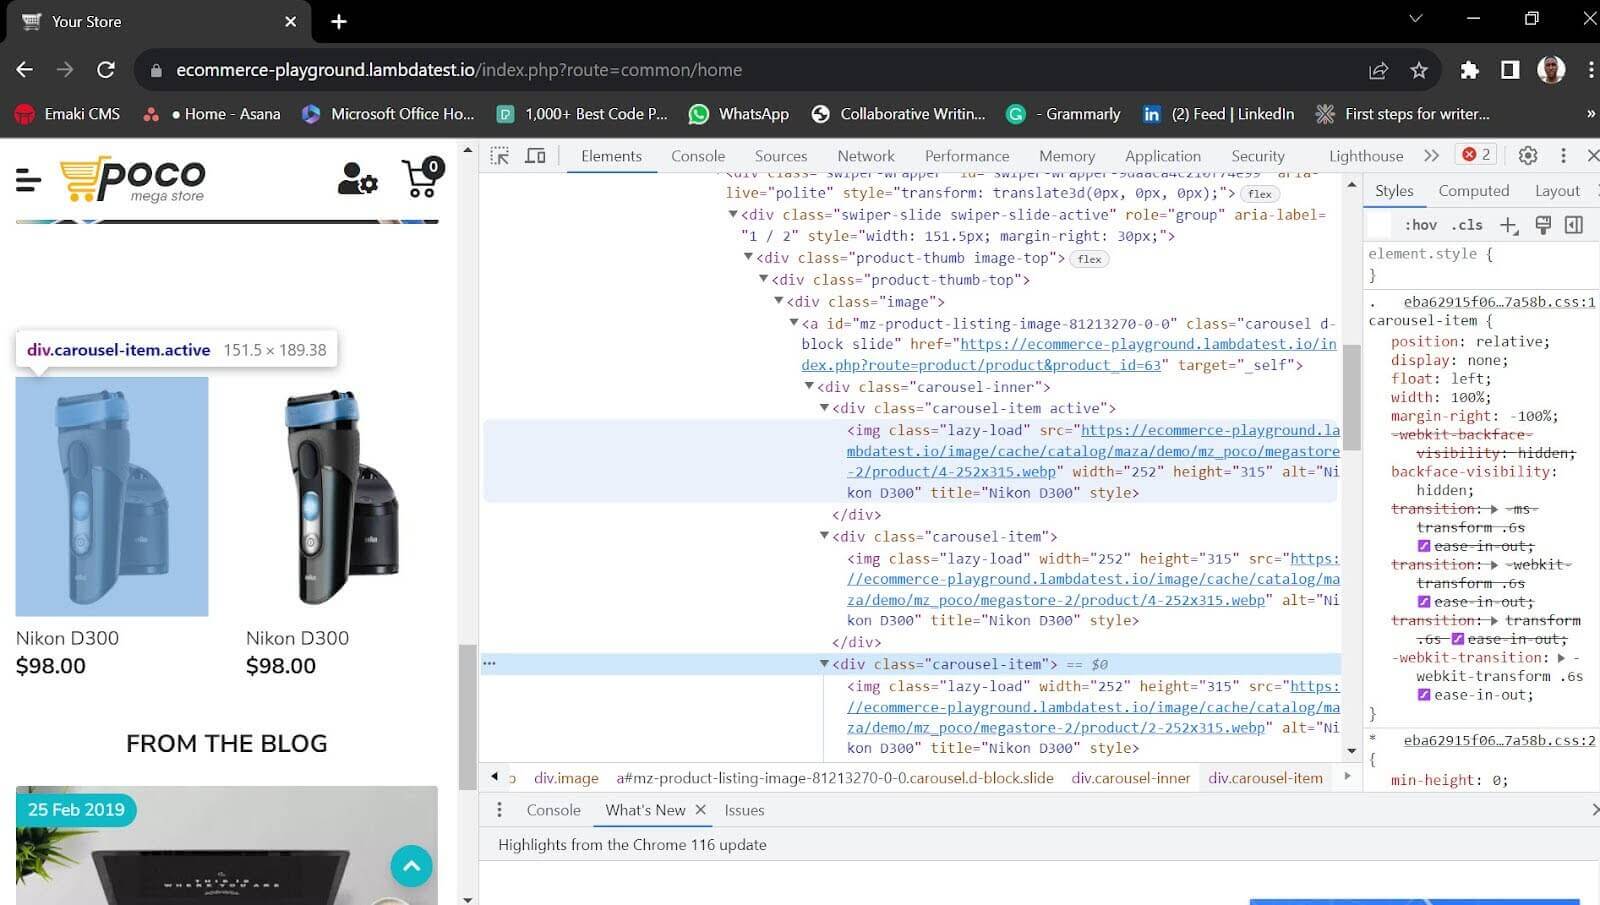
Next in the script is the line that hovers over the image element. The ‘bubbles’: ‘true’ parameter propagates the hover event from the child (img element) to the parent element; this is the image container (a div). Look at the element structure below to understand better.

We did this because we wanted the hover event to start on the parent element regardless.
However, the above is a more complex way to scroll using JavaScript with execute_script. The following test case (test_should_scroll_to_image_easy) achieves a similar result with only a few lines of script. It involves using the scrollIntoView() property rather than setting custom positions. Here’s the script variable modification in the new method:
Executing the script is straightforward. It only involves calling it inside the execute_script function.

The last step is to call the tearDown method from the Setting instance to clean the test environment and quit the driver.
Note: While the test features two setUp() methods, we needed only one tearDown() method. However, the tearDown() call must be inside the second test method (test_should_scroll_to_image_easy) to ensure the driver instance does not end before its execution.

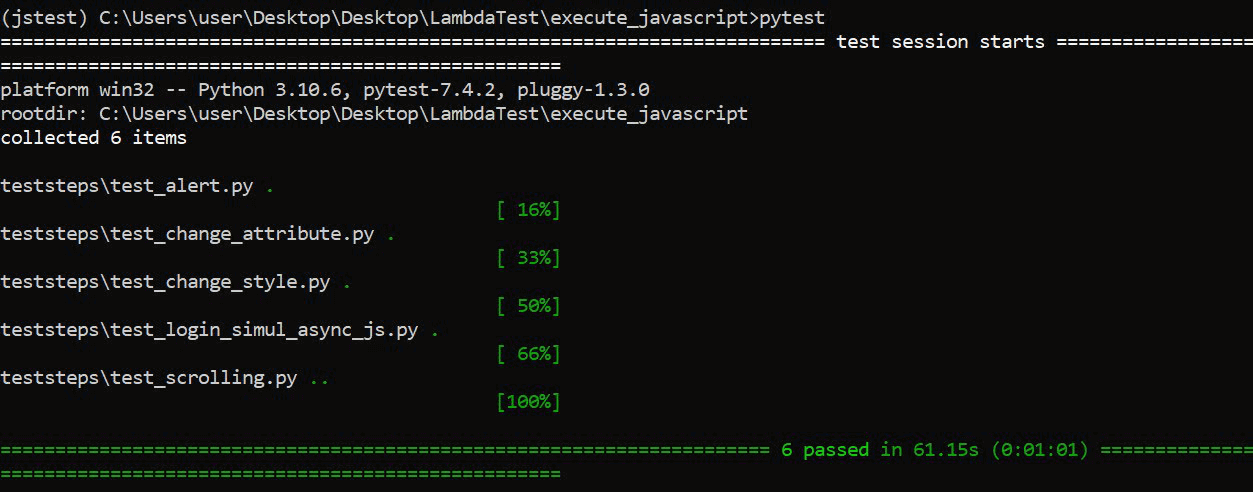
To run the test, open the command line to your project root folder and run the pytest command as shown below.
|
1 |
python test_scrolling.py |
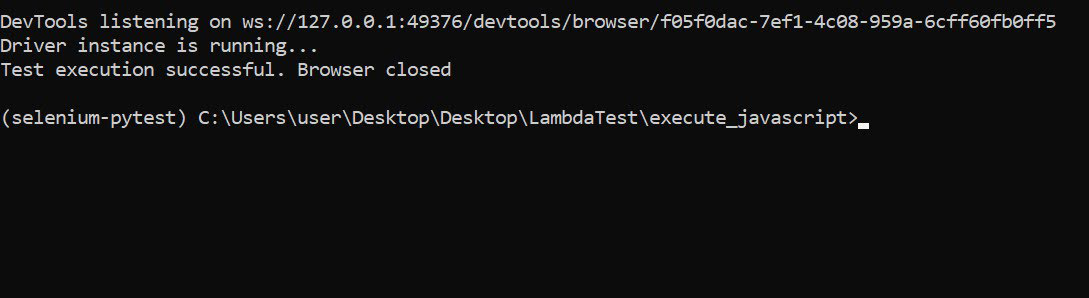
The test execution runs successfully in the console, returning the element’s height to the page viewport.
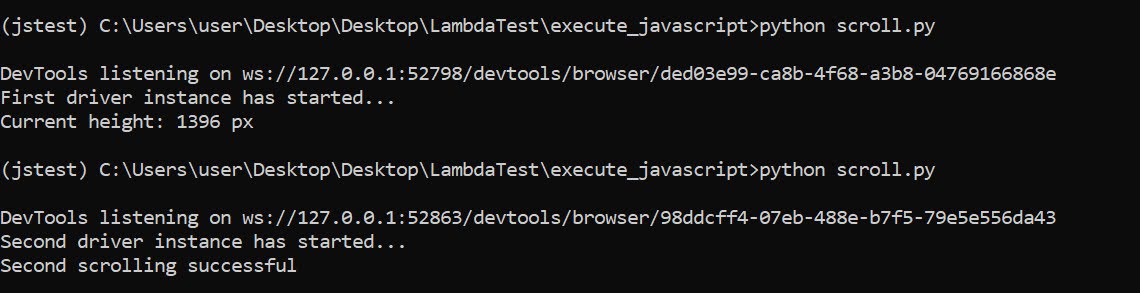
Here’s a visual output of the test demo:

Alert handling using execute_async_script
Alert simulation is another area where JavaScript can be valuable during Python automation testing with Selenium.
Test Scenario:
|
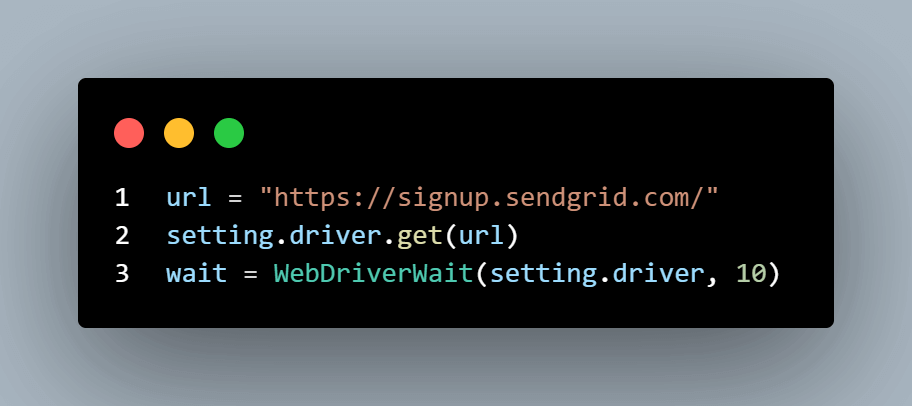
Let us demonstrate this simple scenario using the SendGrid signup page. Please note that the SendGrid signup page is an external site and is subject to future element modifications. Ensure you adjust your test accordingly.
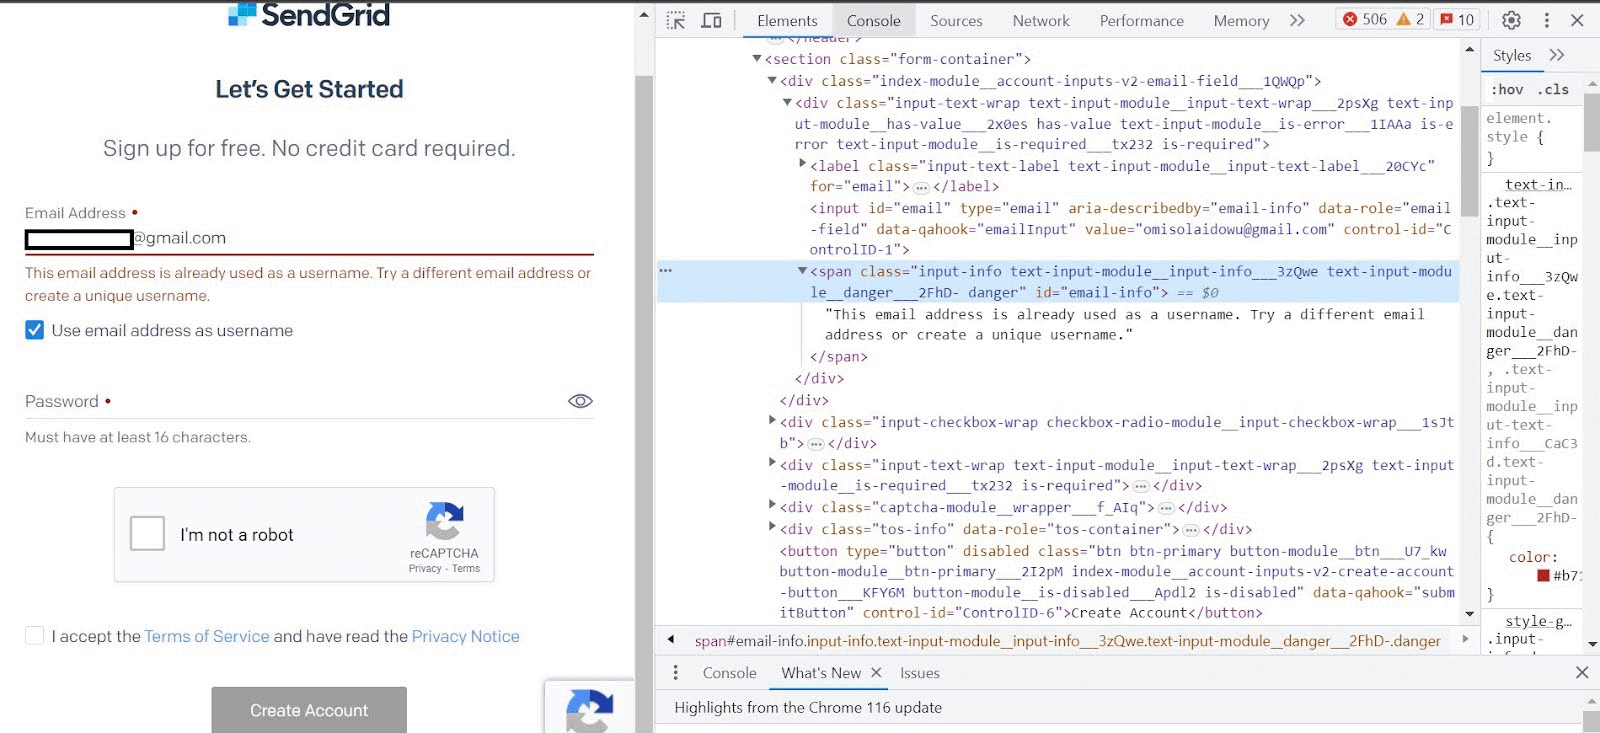
Start with the inspection of the target web page.

The email confirmation, an Ajax call, asynchronously displays the error message element during email field entry if the email already exists in the database, but Ajax triggers this error element only when the cursor focuses on the password field.
The code below replicates this description and triggers different alerts when:
- Ajax adds a new element if an email exists.
- And when the DOM structure remains the same if an email is not in the database.
Code Walkthrough
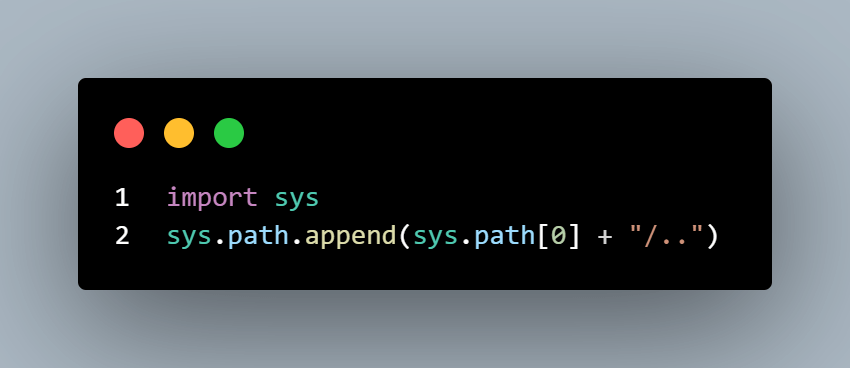
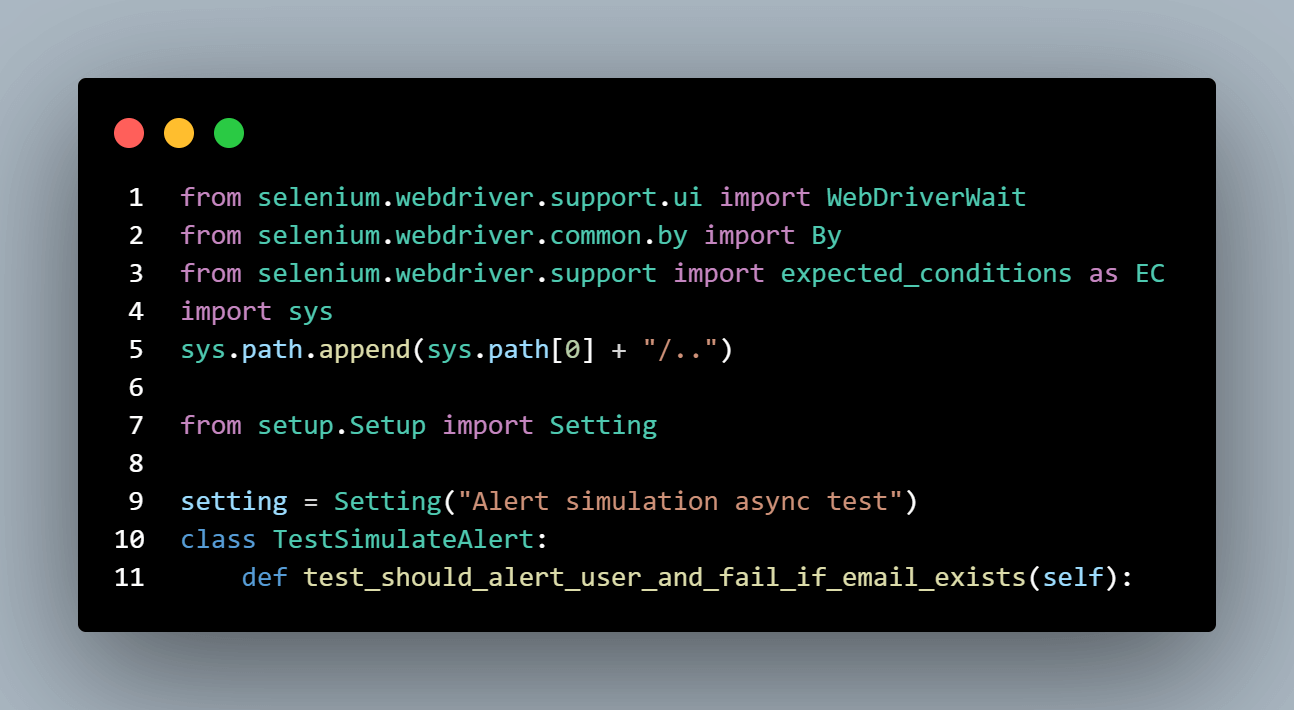
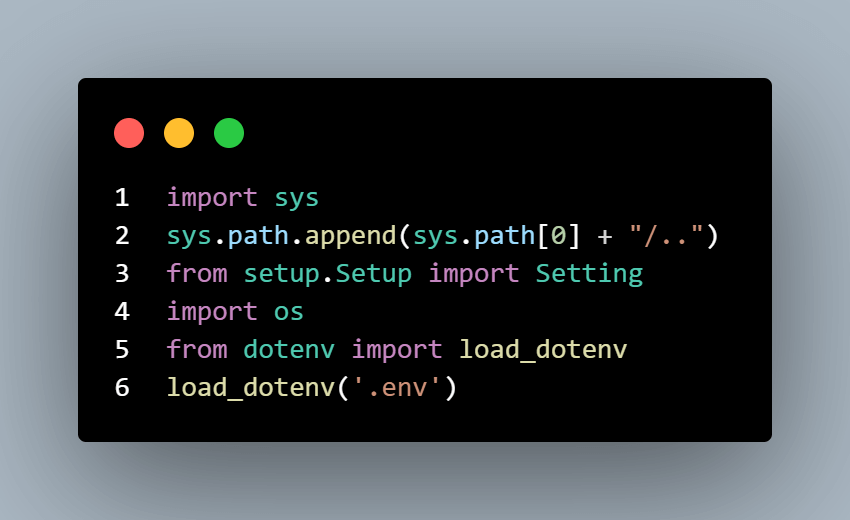
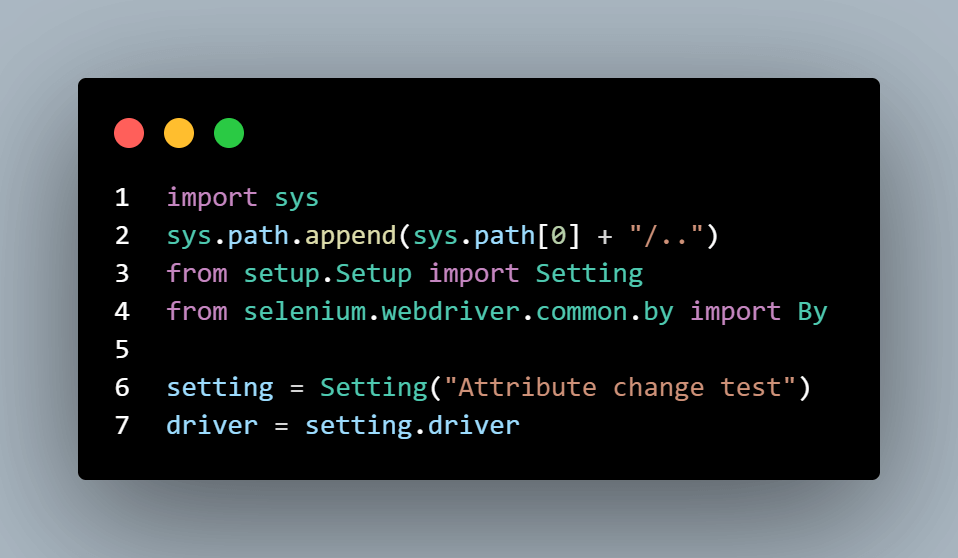
The code starts with an import of the Setting class, followed by other Selenium modules. However, we constructed the file path using the sys.append method before importing the Setting class from the setup module. This helps track the codebase project structure.
Next, we instantiate the Setting class with the test name for this case. Then, we set up the test environment inside the test method in the SimulatAlert class. We achieve this by calling the setUp method from the Setting class.
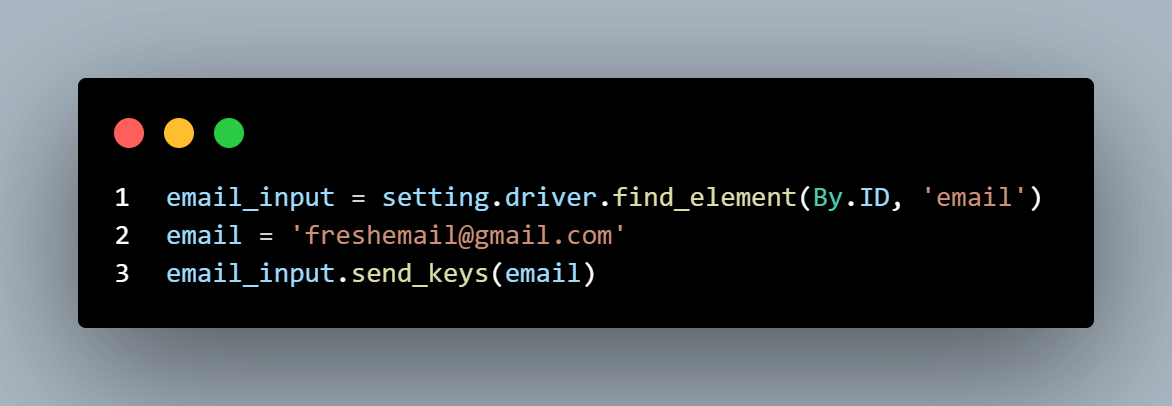
We visit the URL and declare a ten-second explicit wait time. Next, we obtain the email input element as shown.
Next, obtain the email input element and enter an email address into this field. Let’s quickly see this via the inspection tool.
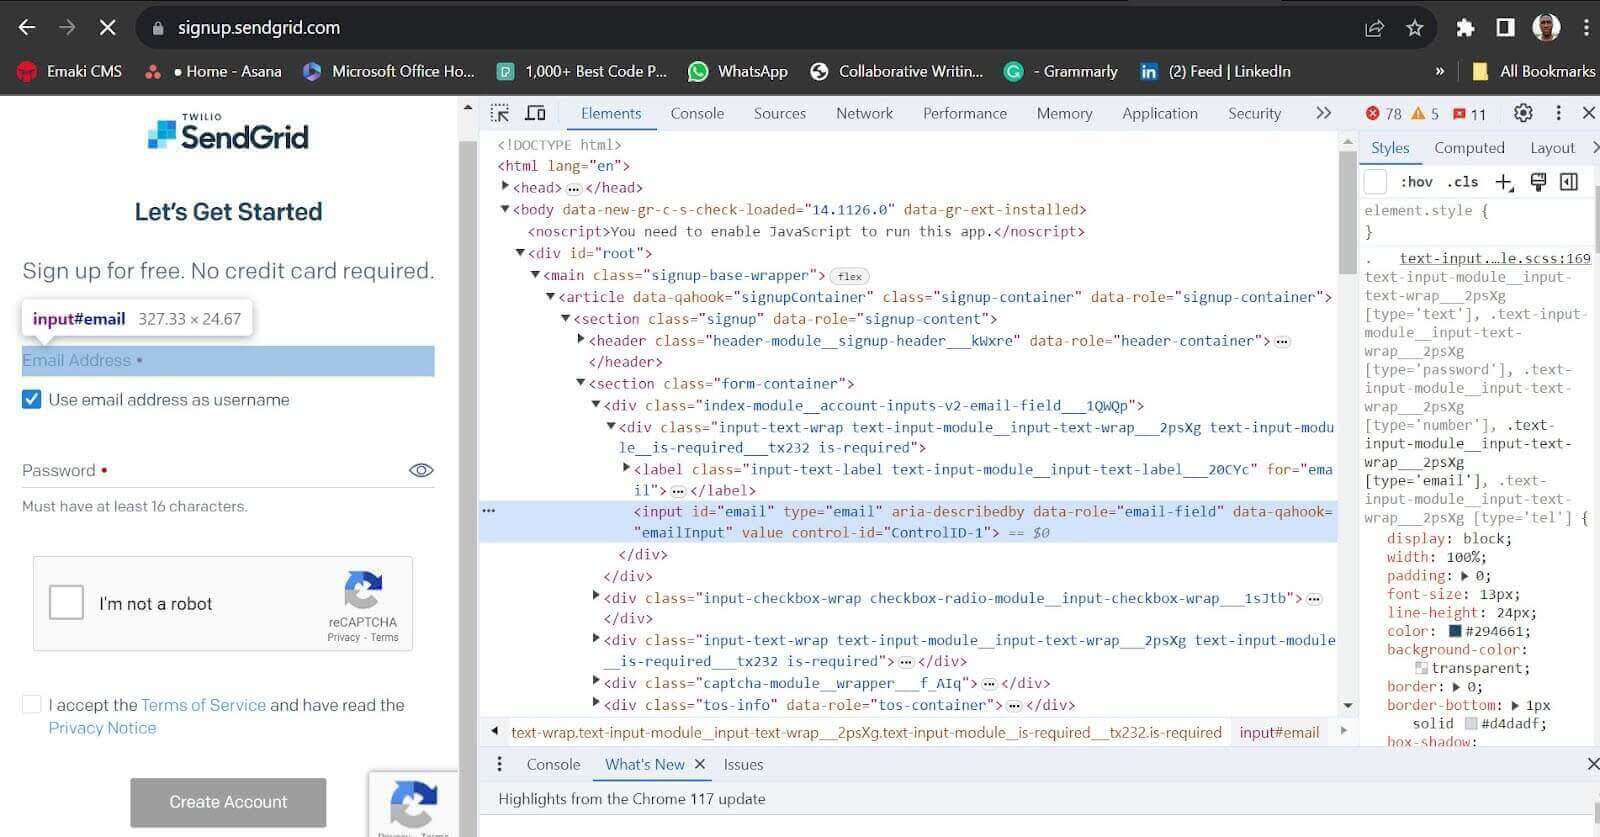
The code below obtains the email field by its document ID.
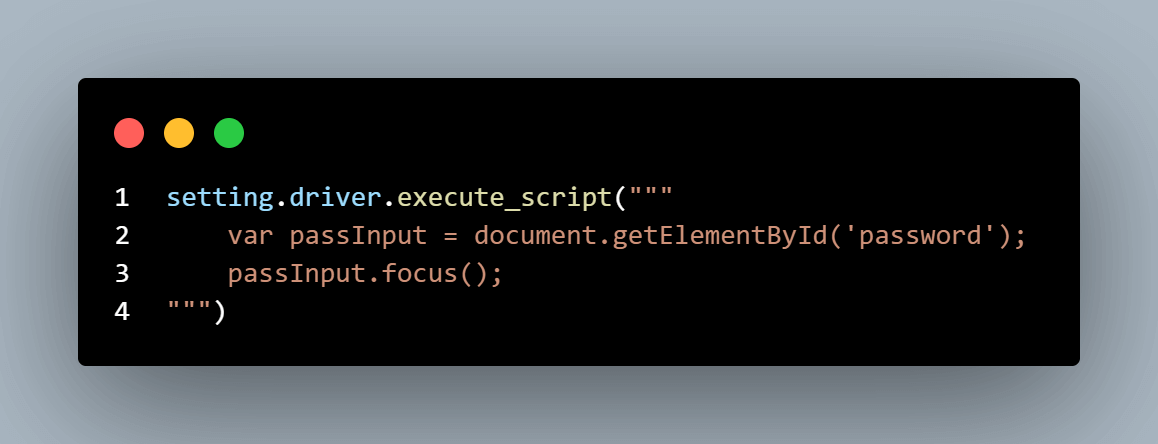
As mentioned, Ajax is only triggered when the cursor blinks in the password field. The following code focuses the cursor on the password field. This is so that Ajax can trigger the asynchronous database check.
The test waits for the error message to be available. We have used the try/except block to ensure a free pass if Selenium cannot locate the element. That prevents a timeout failure if the email address exists. I wanted to control what happens when the email address already exists during sign-up.
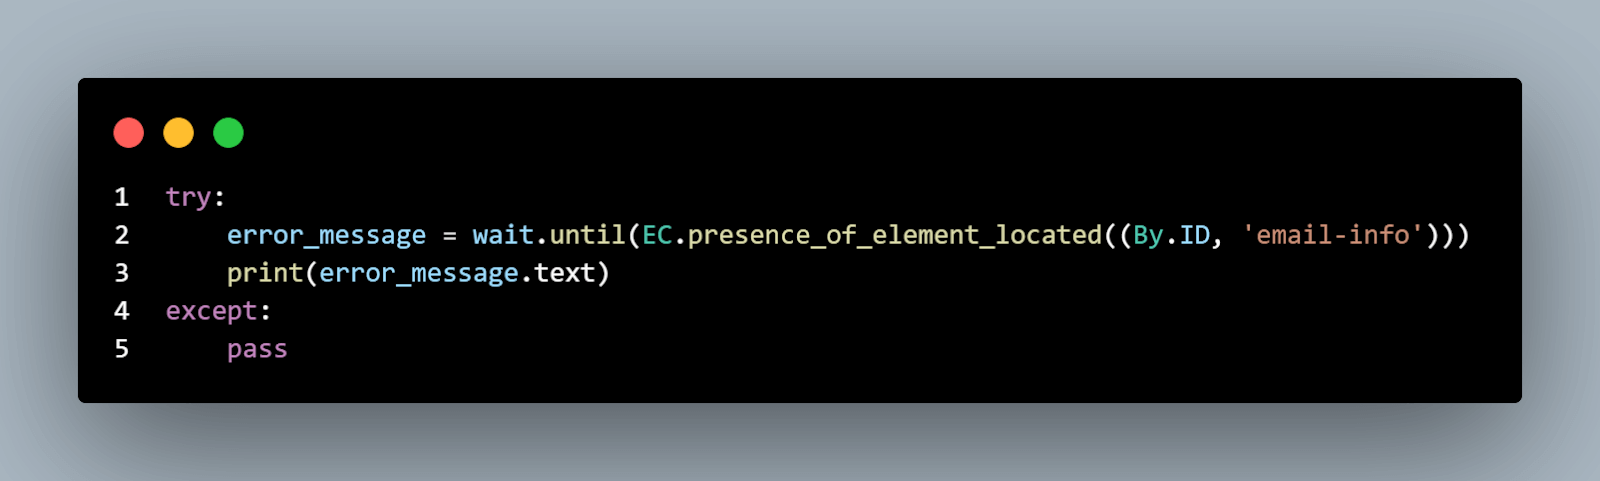
The following code block uses JavaScript to simulate an alert if the error info element is missing. First, we obtain the error message element (error_message_element) and declare a callback variable for the function arguments. The arguments.length property determines the number of arguments passed to the function. In this context, it accesses the last argument, the callback function.
Next, we pass the alert logic into an interval function. This function checks if the error element is present and throws an alert containing the error text (retrieved with the error_message_element.innerText property). The clearInterval property stops the interval once each condition is met.
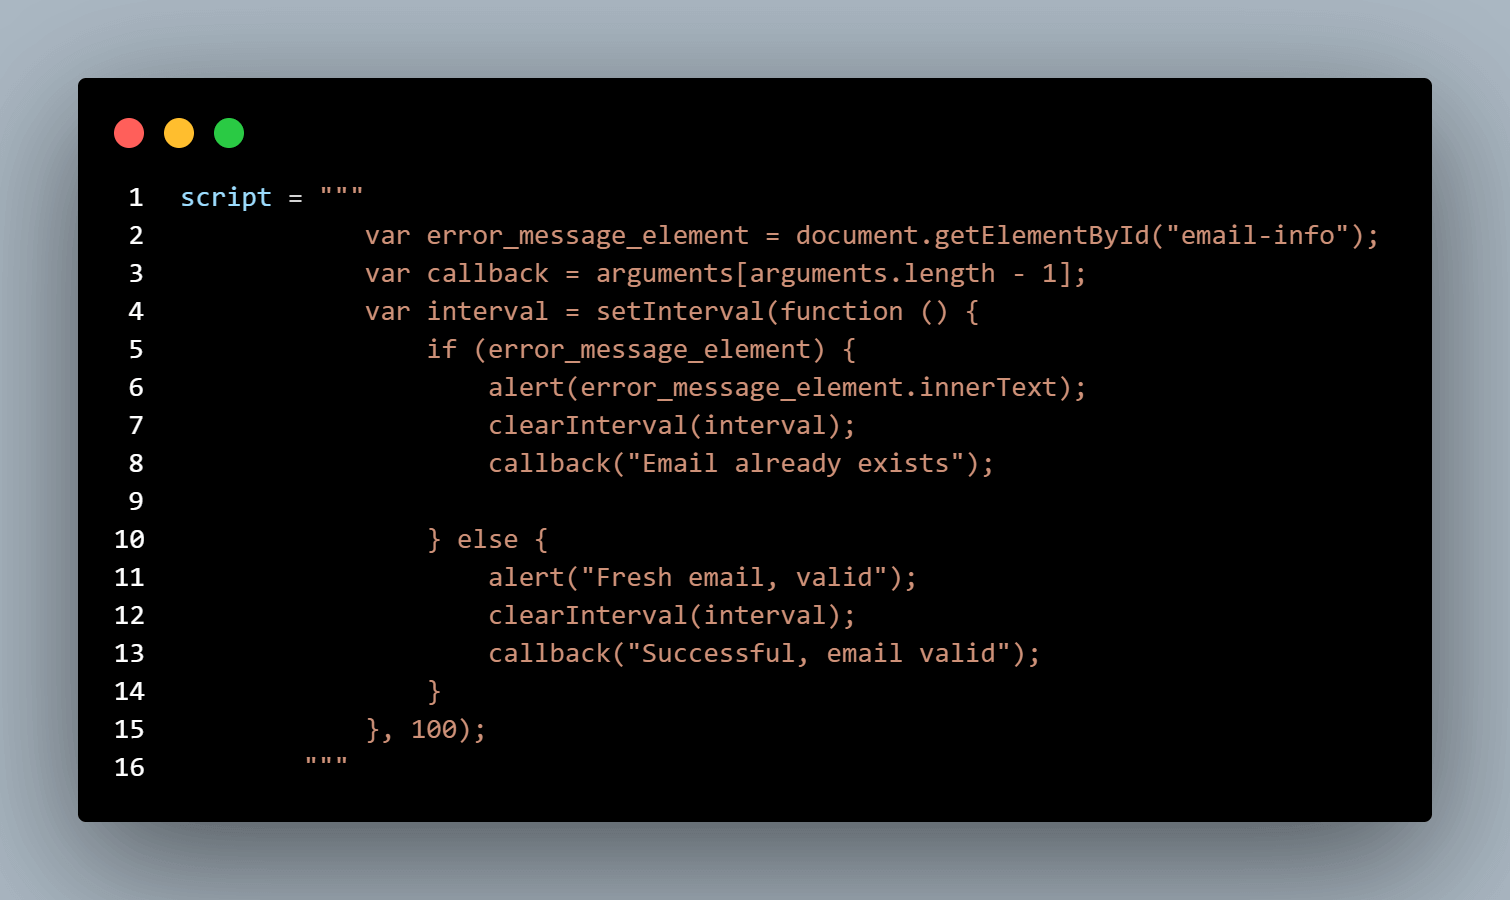
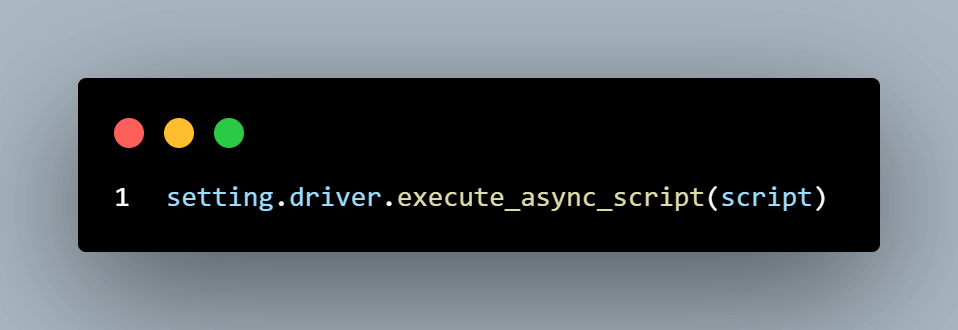
Since this is an asynchronous action and involves setting intervals, we execute JavaScript in Selenium Python using the execute_async_script method. Using execute_script still works, though. However, it blocks other events in the function—so the automation may not achieve the desired result.
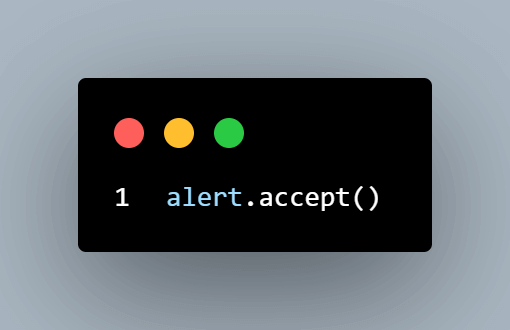
Waiting for the alert box after executing the asynchronous script ensures that the alert is visible before trying to resolve it. So, we pass the alert message into an explicit wait. You could still use the driver.switch_to.alert attribute to track the alert box without waiting. It is preferable to use an explicit wait as it can track and wait for the alert element simultaneously.
Here is the overall test logic: if an email address already exists, the browser displays an alert containing the Ajax error message. Otherwise, it throws a custom alert as written in the else statement in the script.
Since we have simulated an alert in the script, we need to use the accept method in Selenium to resolve it. See the demonstration below.
The last step is to end the test and quit the driver instance.

To execute the test, CD into your project root folder via the CLI and run:
|
1 |
pytest |
The test runs in the console, as seen.
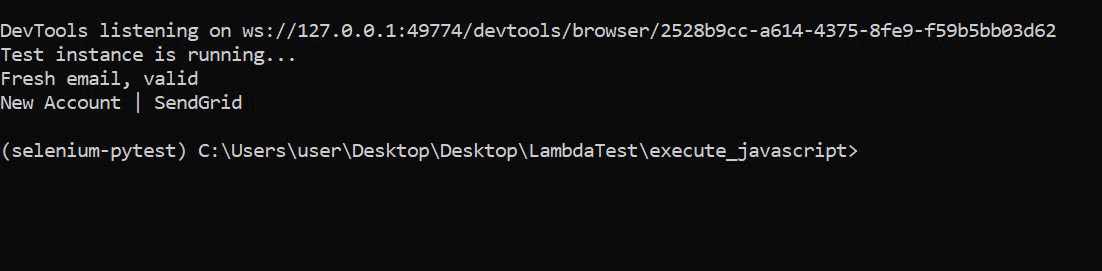
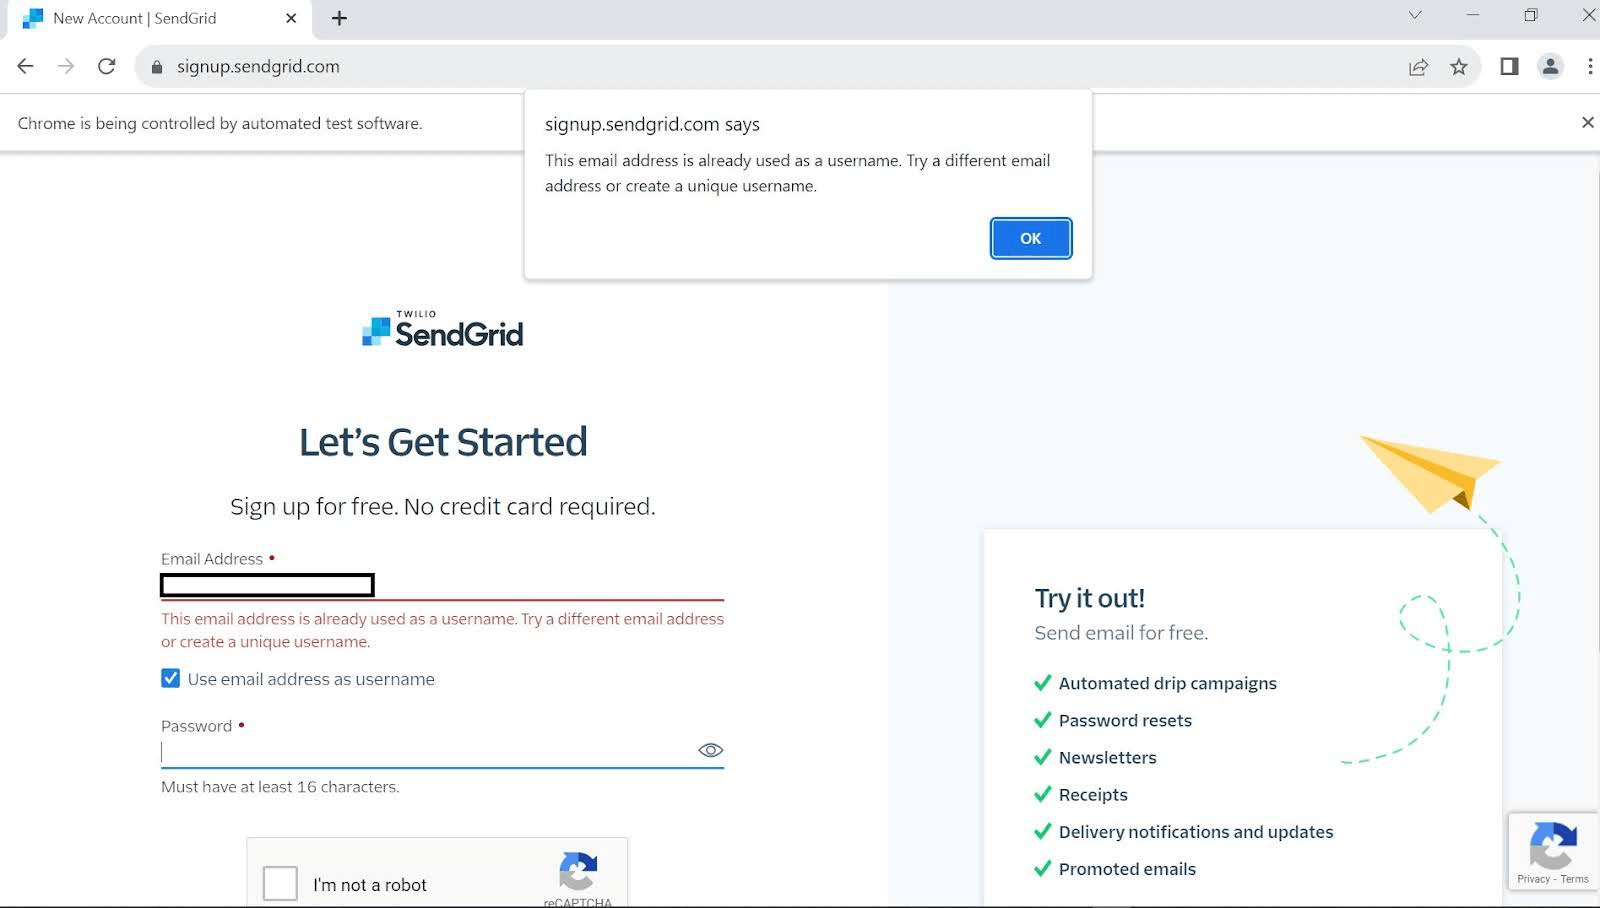
Below is the automated Chrome browser execution, showing the alert message for an already registered email address.
Automating an asynchronous login action using execute_async_script
JavaScript execution with Selenium in Python also lets you simulate asynchronous tasks. Executing asynchronous tasks involves the use of execute_async_script instead of the execute_script method.
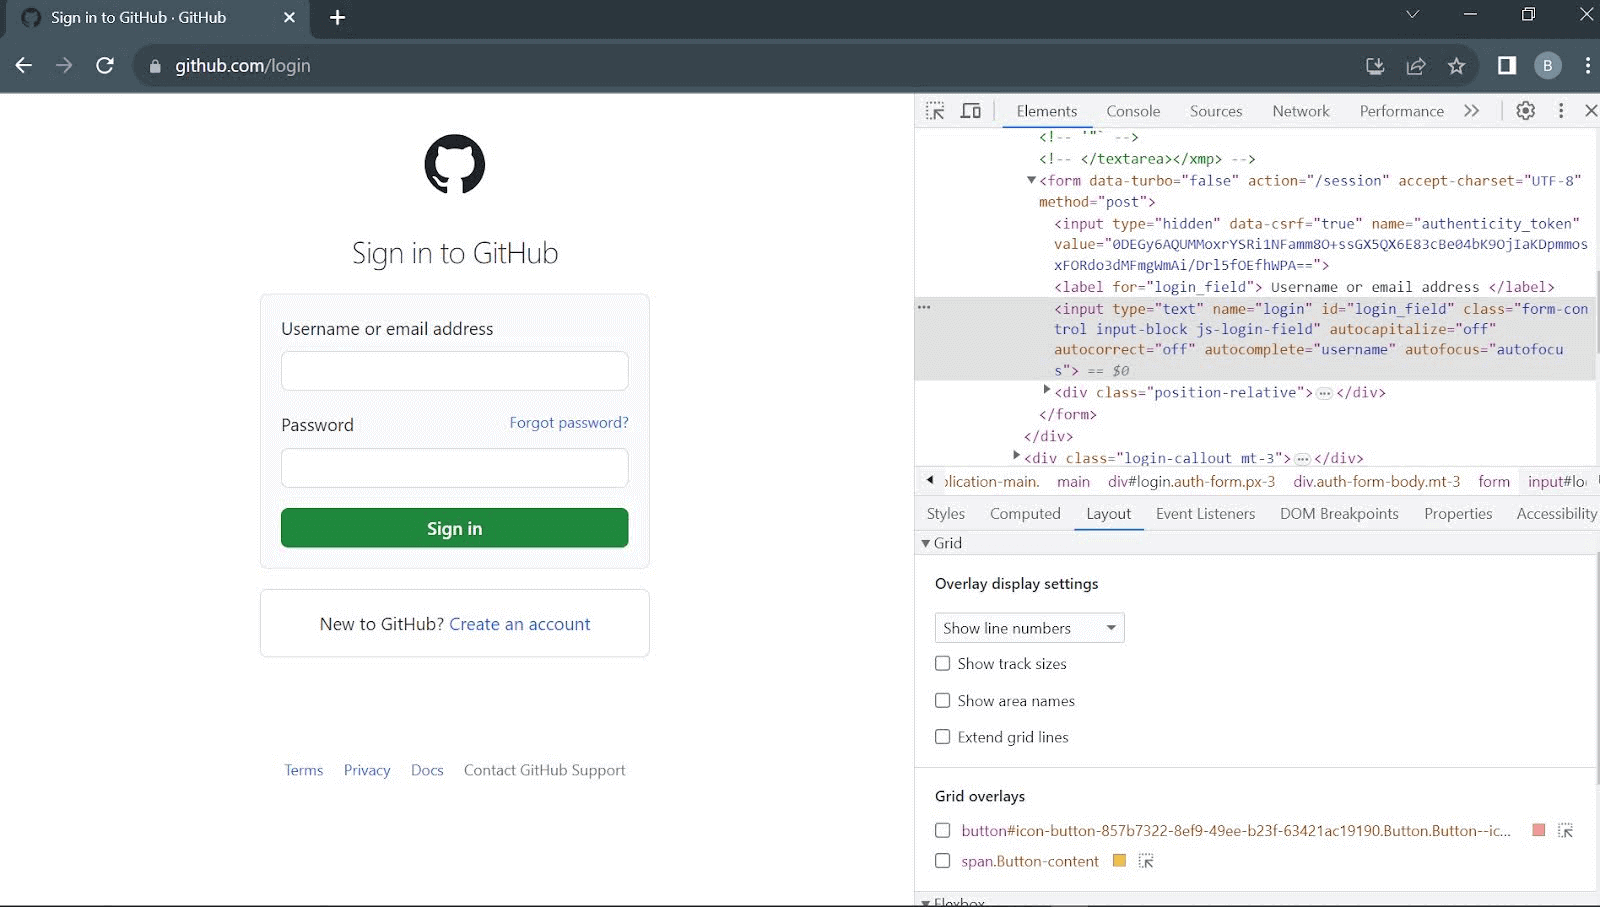
For instance, this can be an asynchronous credential validation during a login action. Consider the following login example using the GitHub login page.
But before we begin, here is an element inspection overview of the target web page.
Test Case:
|
However, note that the demonstrated code might need changes if there is a change in the UI of GitHub. This is because the element attributes might change during UI updates, resulting in test failure due to missing web elements.
Look at the code demo below.
The above code demonstrates an exclusive use of asynchronous JavaScript during test automation.
Code Walkthrough
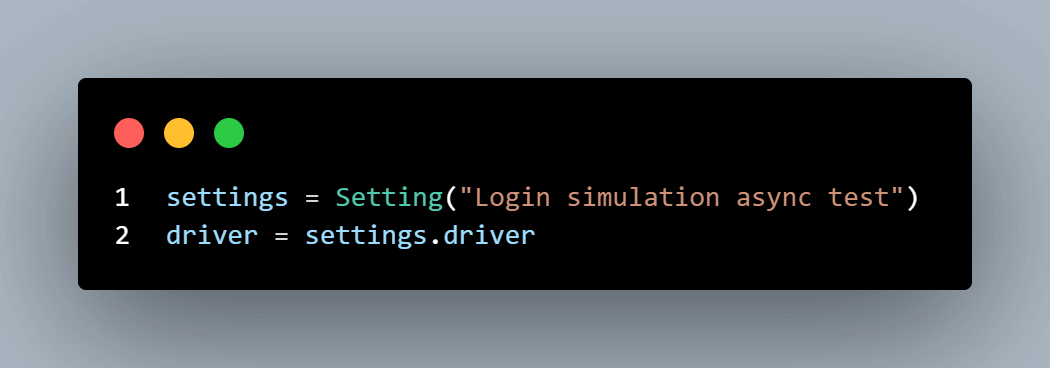
The test starts with importing the necessary modules, notably the Setting class and the dotenv module for masking secret credentials.
Next, we instantiate the Setting class with the test name (Login simulation async test). The driver variable is the driver attribute from the Setting class.
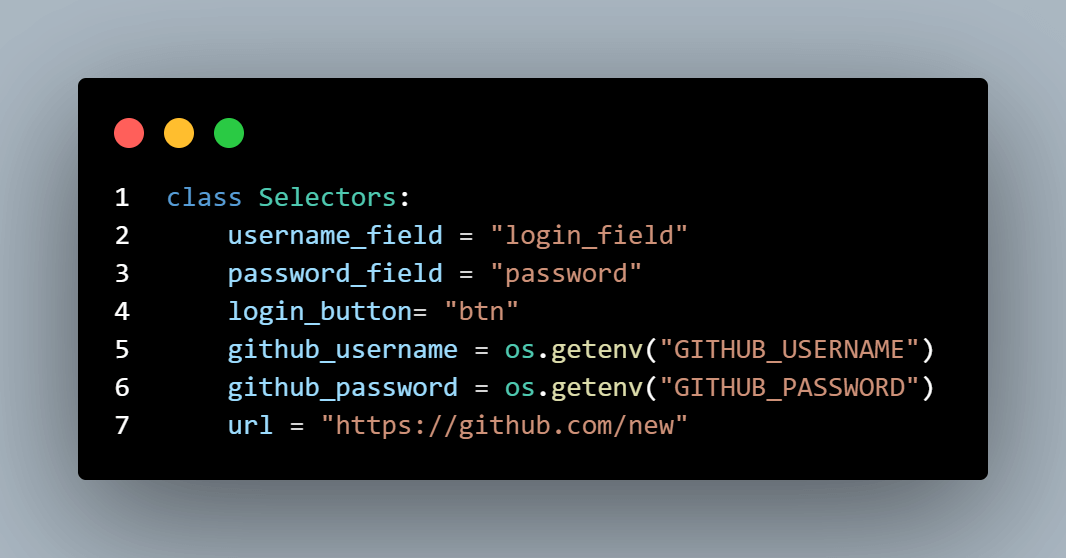
I created the Selectors class to follow the Python Page Object Model design. This separates the page objects from the test class. Since this is a GitHub login automation, I’ve hidden my GitHub credentials in the .env file, as shown.
The test class (TestCredentials) inherits this class. So it can use its attributes in the test_credentials method. The test method starts with the setup and the target web page opening.
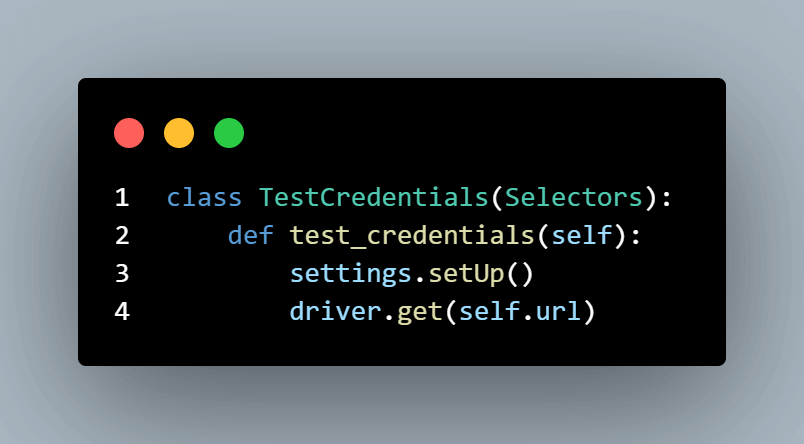
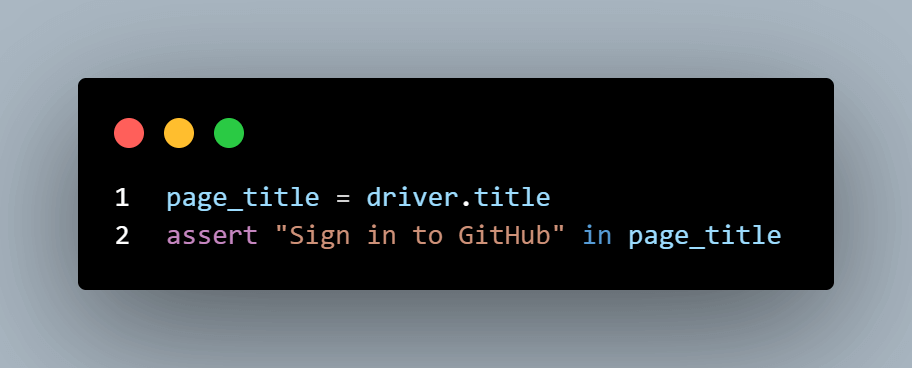
The following step confirms if the driver has opened the web page.
Next, we fill the username and password fields with the correct credentials loaded from the .env file.
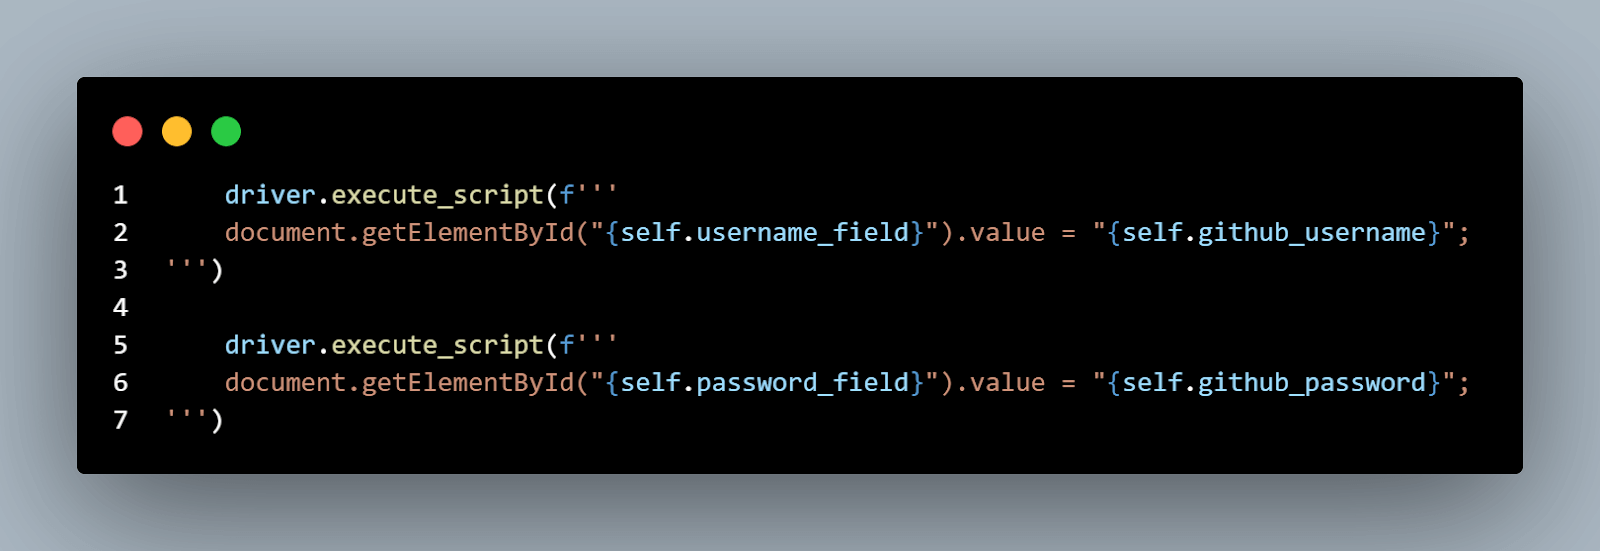
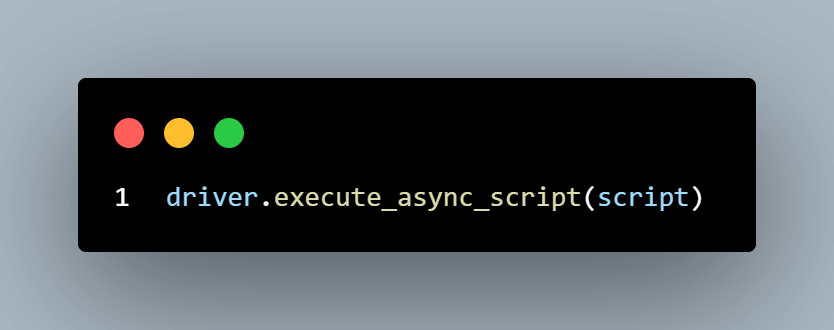
Then, we write a custom asynchronous credential validation code using the execute_async_script method in a multiline Python string. We could also execute JavaScript in Selenium Python using execute_script. The former is best for handling asynchronous timeouts to avoid blocking the UI during test execution.
The code starts with a callback that gets executed once the asynchronous task is completed. Much of the task is inside the timeout function. It checks if the credentials retrieved from the HTML input fields match the predefined values (self.github_username and self.github_password). Whether or not the credentials match, the script creates an alert to confirm login success or failure.
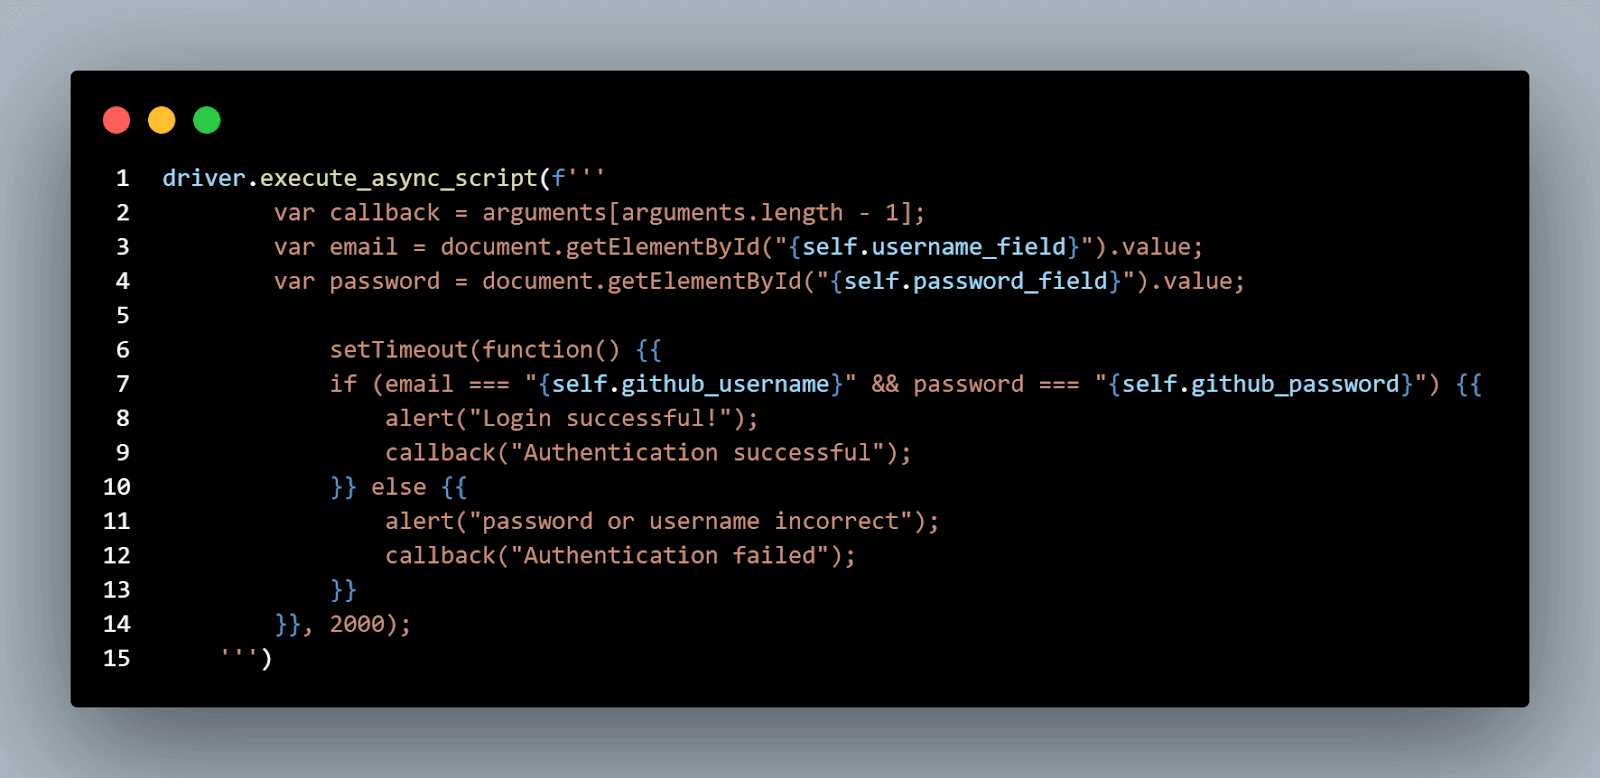
We pass this script variable into the execute_async_script method to trigger an asynchronous execution.
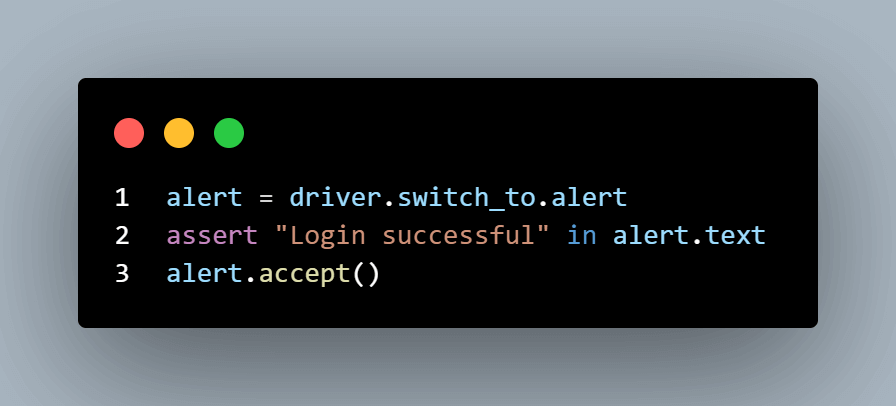
The code block below retrieves the alert and asserts if the alert text contains the specified message (Login successful). Thus, the test fails if the success message is missing from the alert text. If the assert statement is valid, the test resolves the alert using the accept method.
Provided the credentials are valid, the following code block obtains the login button element and performs the login action using JavaScript.

The tearDown method ends the test session and closes the driver instance.
To run the code, open the command line to your project root folder and run the following command:
|
1 |
pytest |
The code runs as shown:
Changing the style of an element using execute_script
You can also use JavaScript with Selenium in Python to tweak the style of an element. For instance, you can enable a disabled web element to perform specific actions. While this is not typical user behavior, it helps validate whether the disabled web element will work as expected when active.
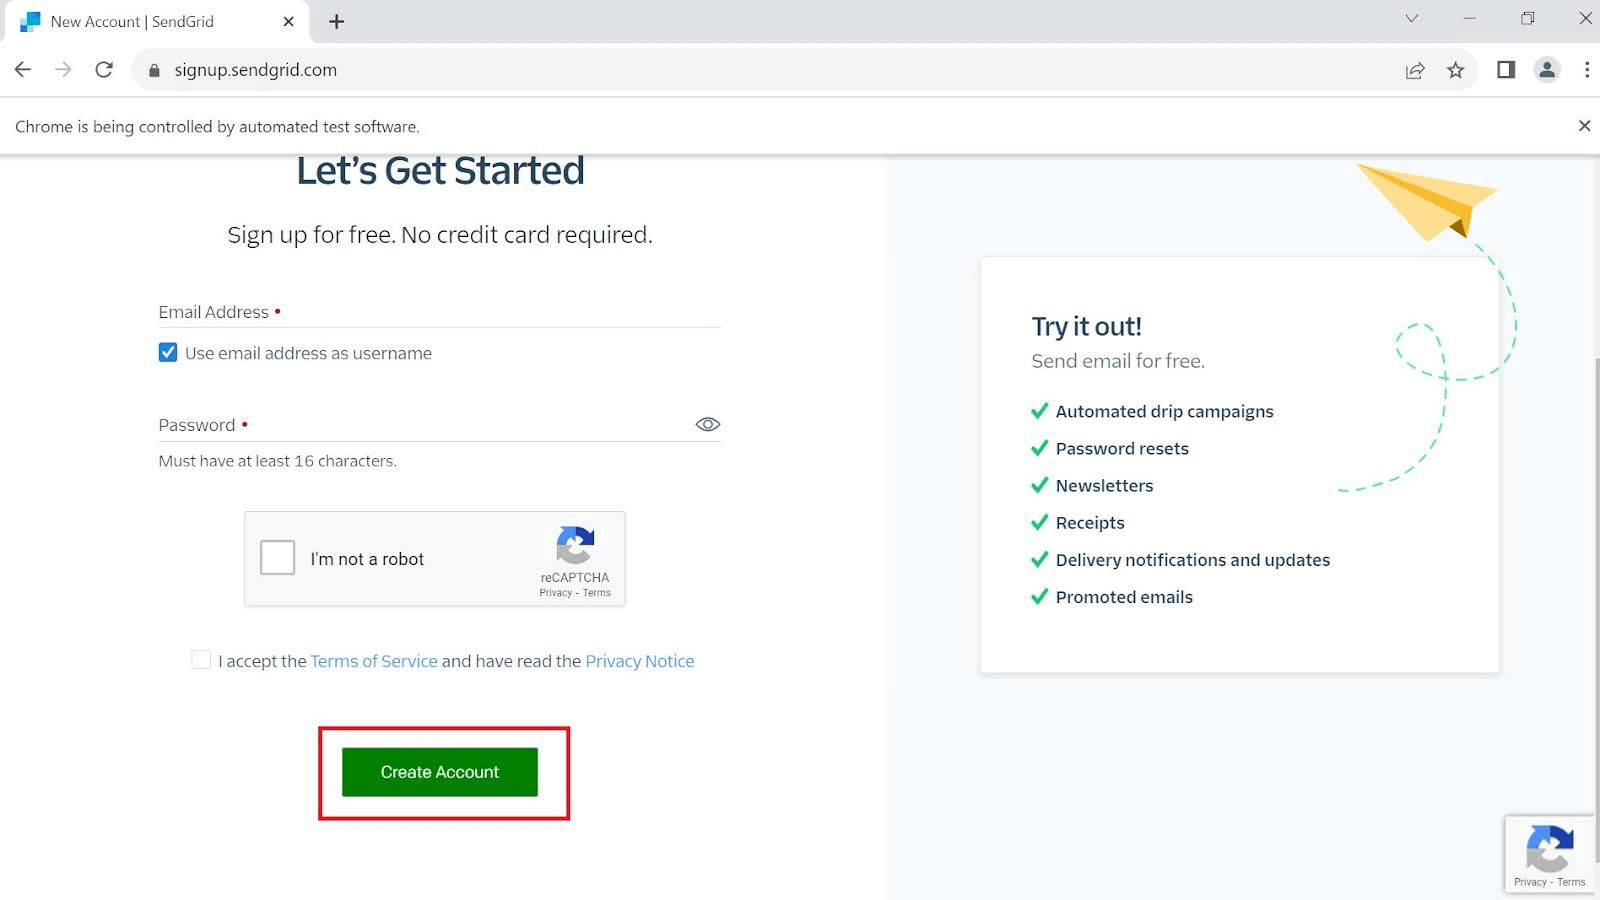
Let us take the described example further with the following code. We will also use the SendGrid sign up page for this demo. Please note that the SendGrid attribute may change eventually, and I have no control over it. So, adjust the test accordingly to your specific scenario.
Before we begin, look at the test case below.
Test Case:
|
As a best practice, let us first inspect the target web page.
The code below demonstrates how to tweak the CSS property of an element using JavaScript execution with Selenium in Python.
After importing the Setting class from the setup module and creating an instance of the Setting class as setting, the test starts with the setup method as expected.

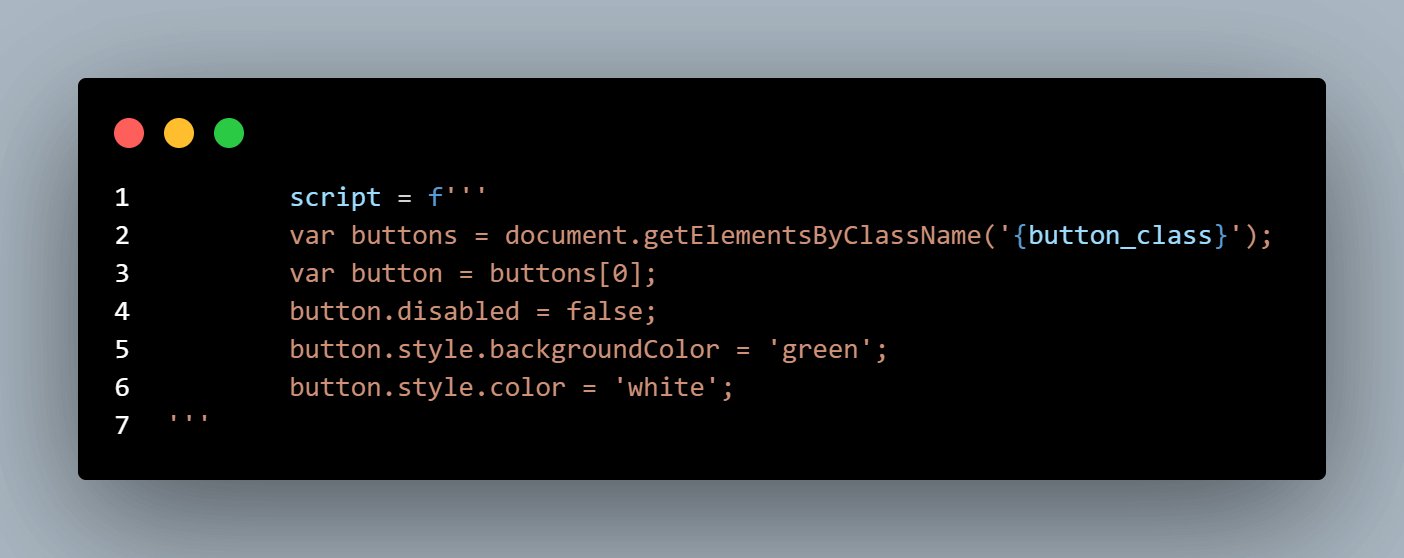
Once we obtain the target URL and the disabled button class name, we write the script in Python’s multiline string. The code below activates and enables the disabled login button, making it clickable.
You can further the test by entering your credentials and clicking the enabled button.
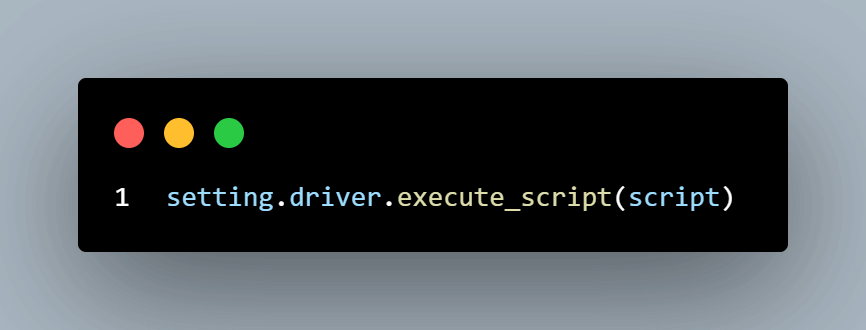
Next, we execute the script using the exexute_script method.
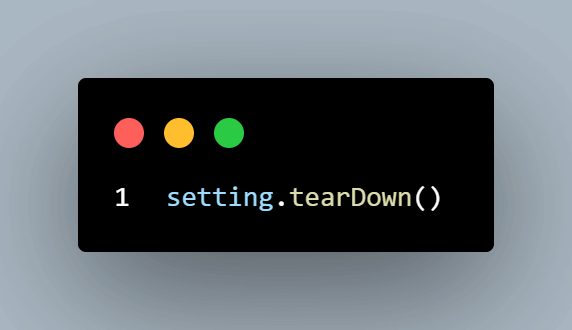
Finally, we call the tearDown function to quit the driver and end the test.
CD into your project root folder via the command, and type the pytest command to execute JavaScript in Selenium Python.
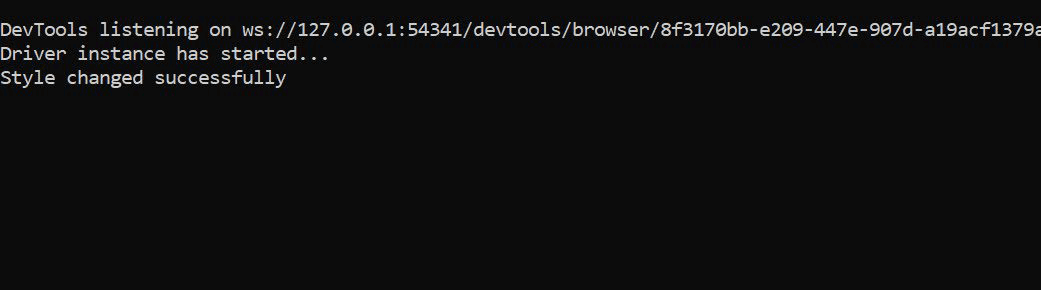
The test runs in the command line, as shown.
Here is the execution demo in the automated browser instance:
Changing element attribute using execute_script
Changing the element attribute is a common action in JavaScript. You can simulate the same during test automation. This can be helpful while testing different edge cases like tweaking functionalities or updating content without a page refresh.
Let us use the LambdaTest eCommerce Playground to demonstrate this use case.
Test Case:
|
Let us inspect the product element first.
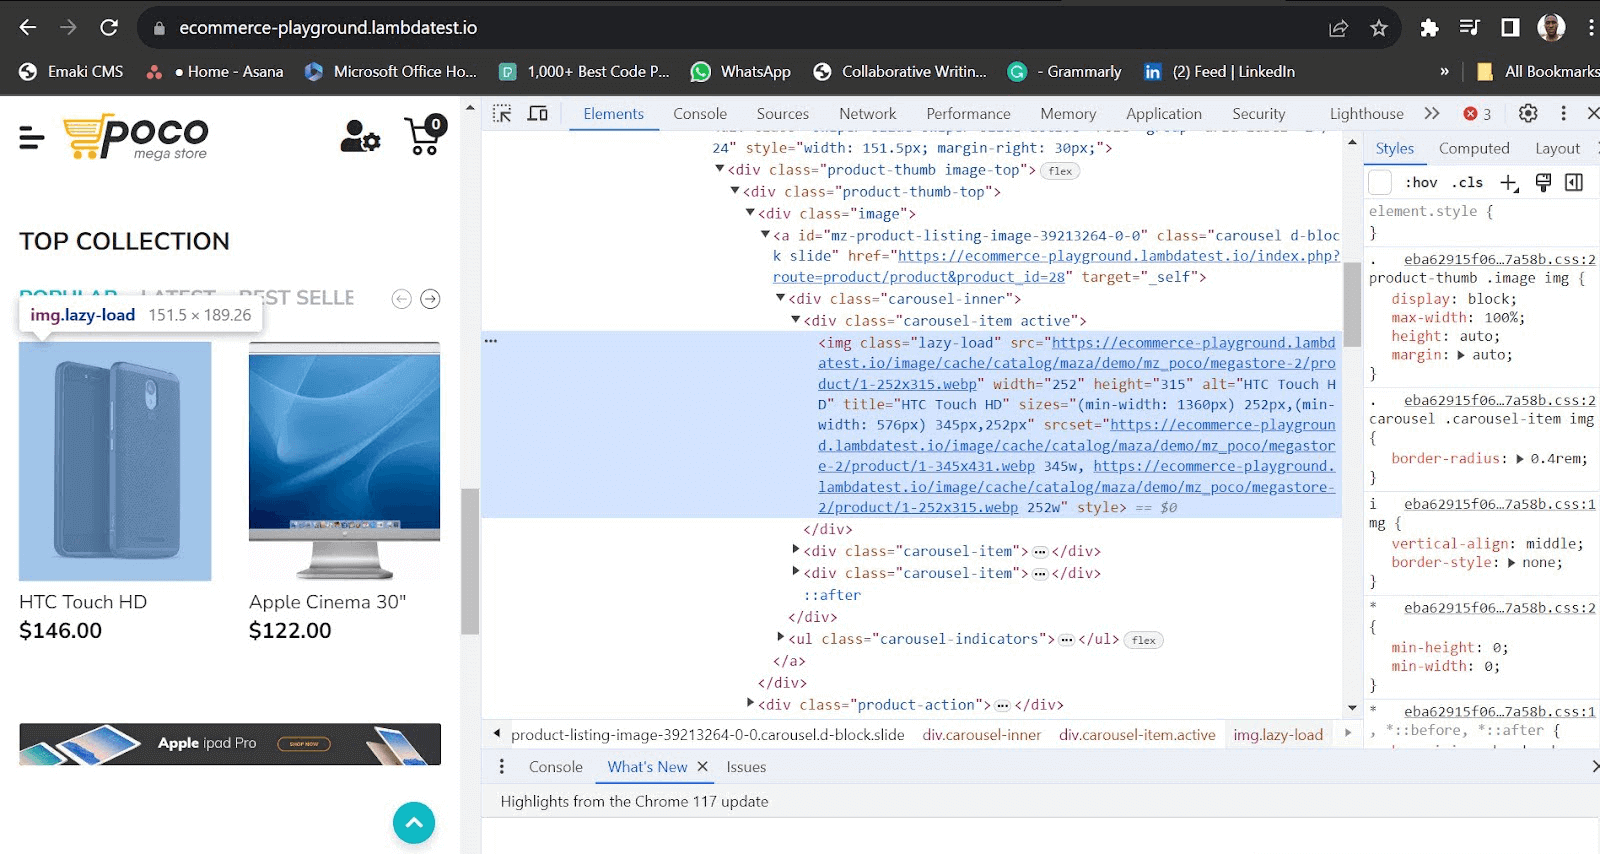
The element’s original class name is lazy-load. Before proceeding to the test script, let us change this directly by writing JavaScript in the console.
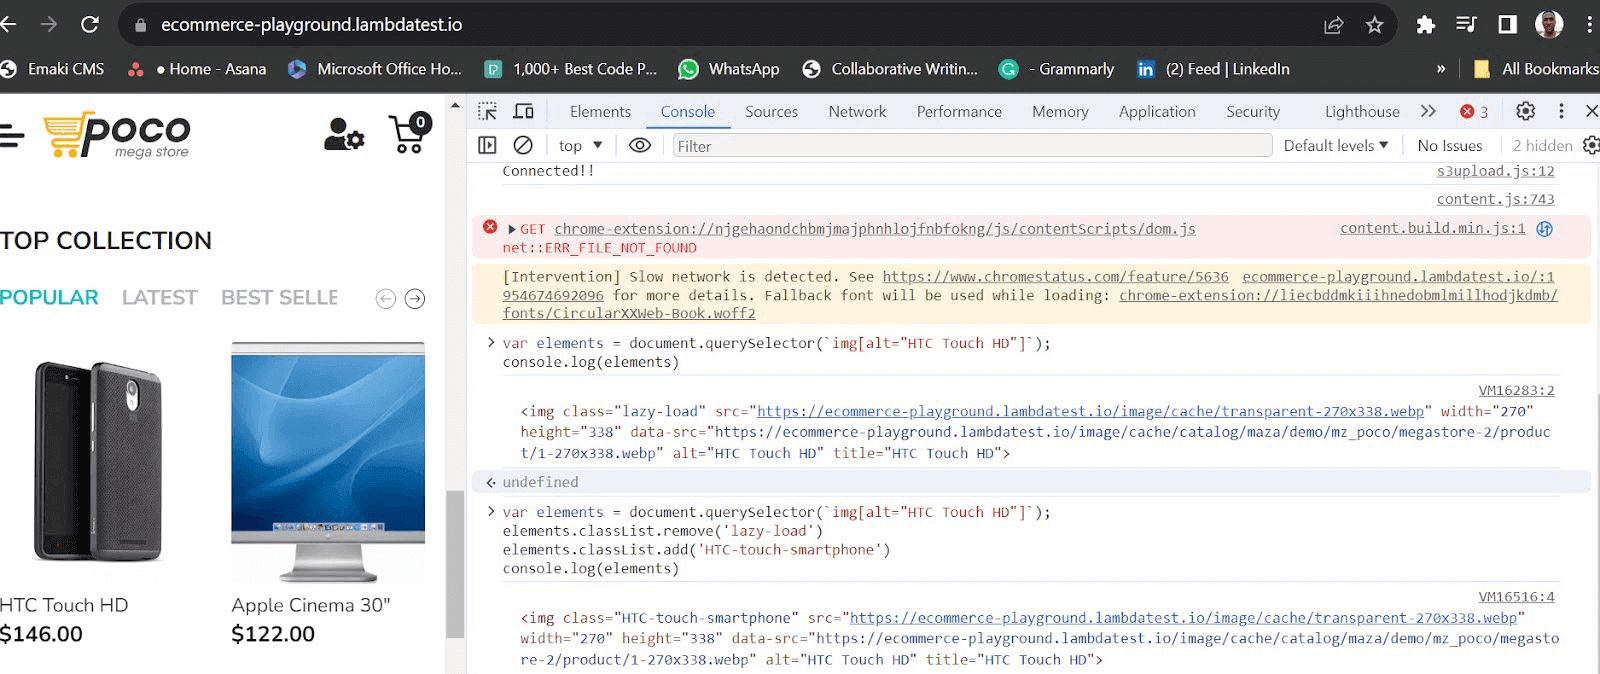
We’ve used the querySelector to get the element’s alt attribute. Logging the selector before attribute modification displays the original element.

Once the attribute changes in the final script, it shows the target element with its modified attribute.

Now, let us replicate this in the test script.
Code Walkthrough
After importing the necessary modules, we instantiate the Setting class with a string representing the test name. We also specified the driver variable by calling its attribute from the Setting instance.
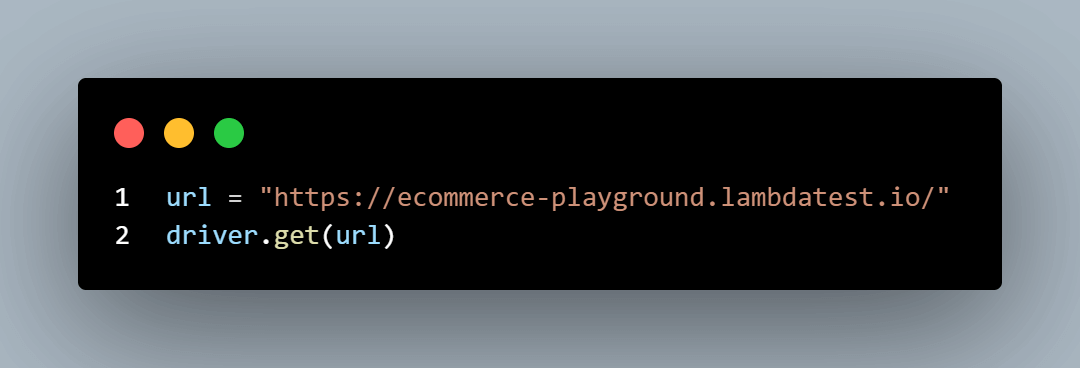
Next, we visit the e-commerce website by obtaining the url parameter.
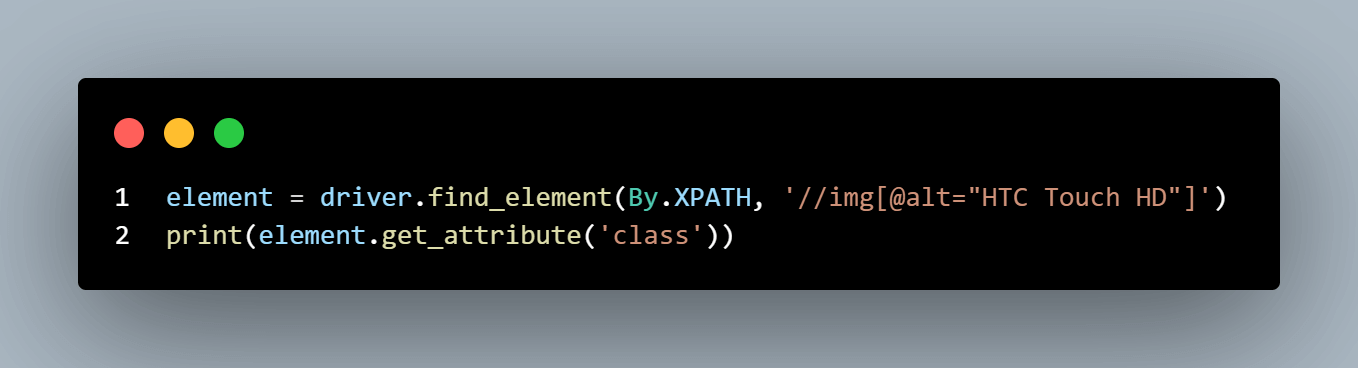
Then, we print the original class attribute to see what it was before changing it.
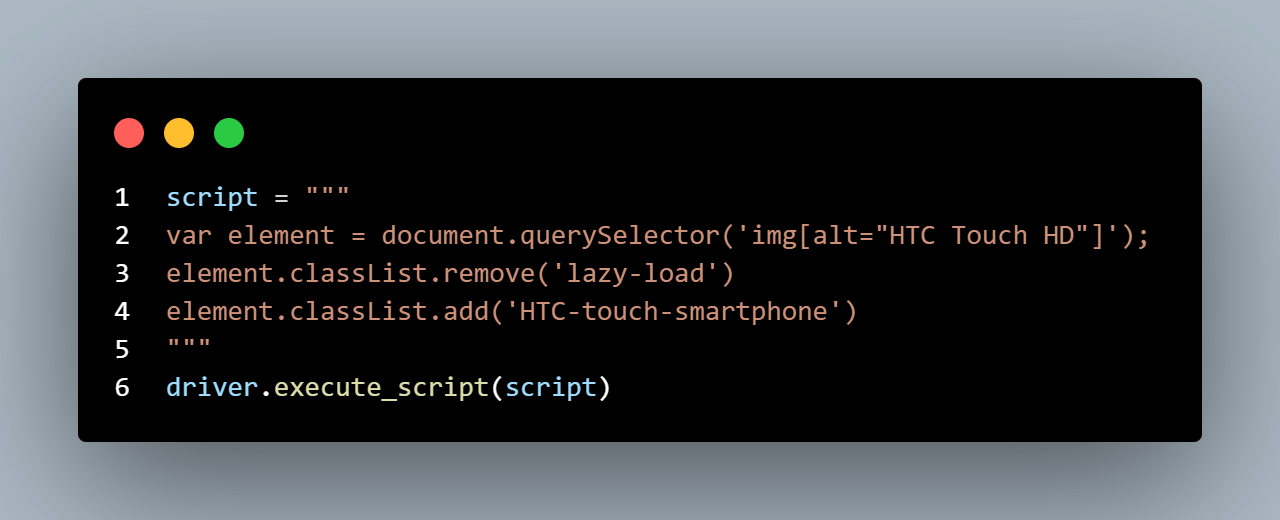
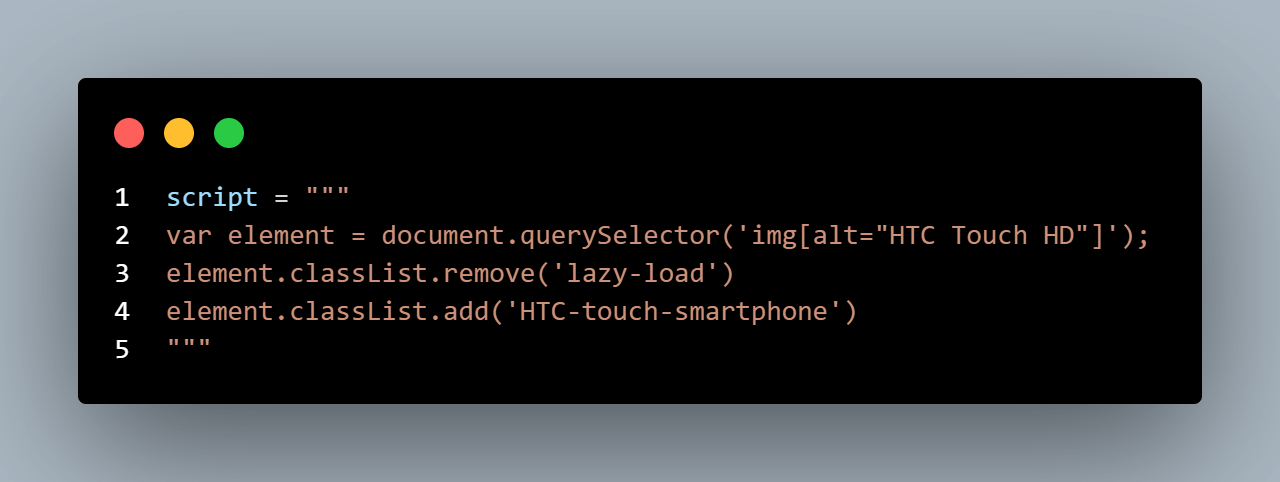
The script below changes the document attribute. The element variable in the script obtains the image element using its alt attribute. We used the querySelector, not the class name because many elements share a similar class name (lazy-load). Next, we remove the original class name using the classList.remove property of JavaScript. Then, we set a new one using classList.add.
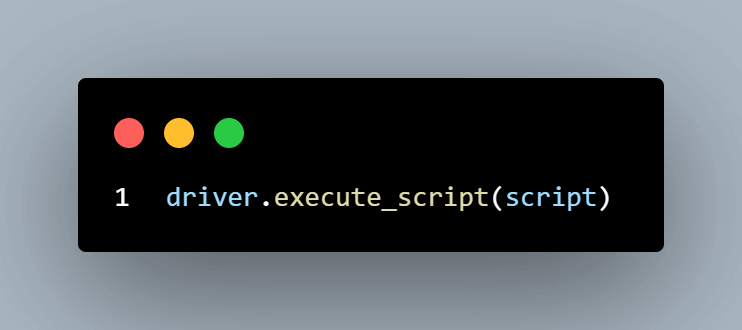
We must execute the script before printing the new attribute.
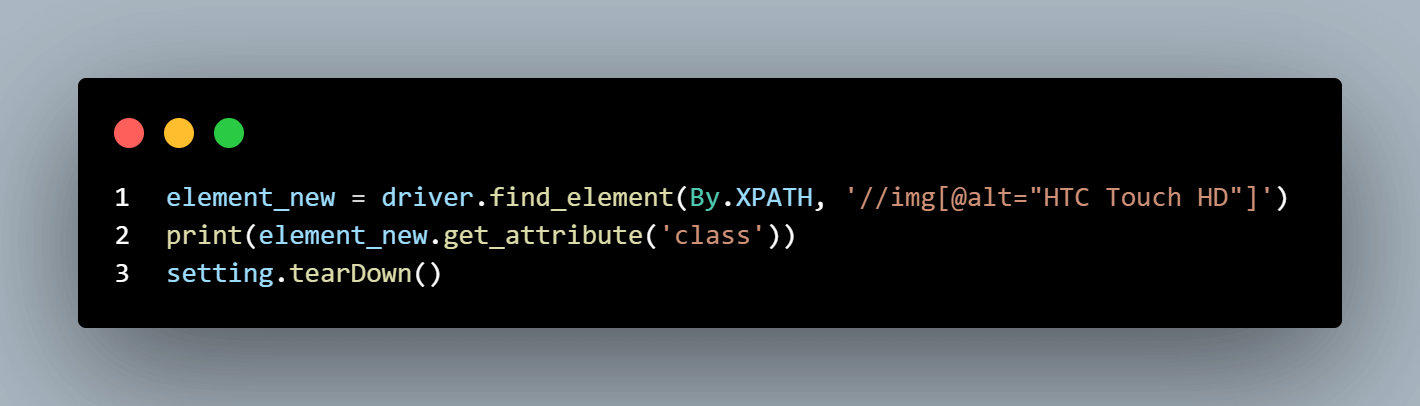
To confirm that the attribute has changed successfully, we obtain the new element (element_new) and print it as shown.
Executing the test locally via the console displays the following output, including the original class name and the new one:

Since all test files are in the same folder, you can execute JavaScript in Selenium Python in a queue using pytest. To do this, open the command line to your project root folder and run the following command.
|
1 |
pytest |
The test runs via the command line, as shown.
Each test demo runs successfully on the cloud grid, as shown below.
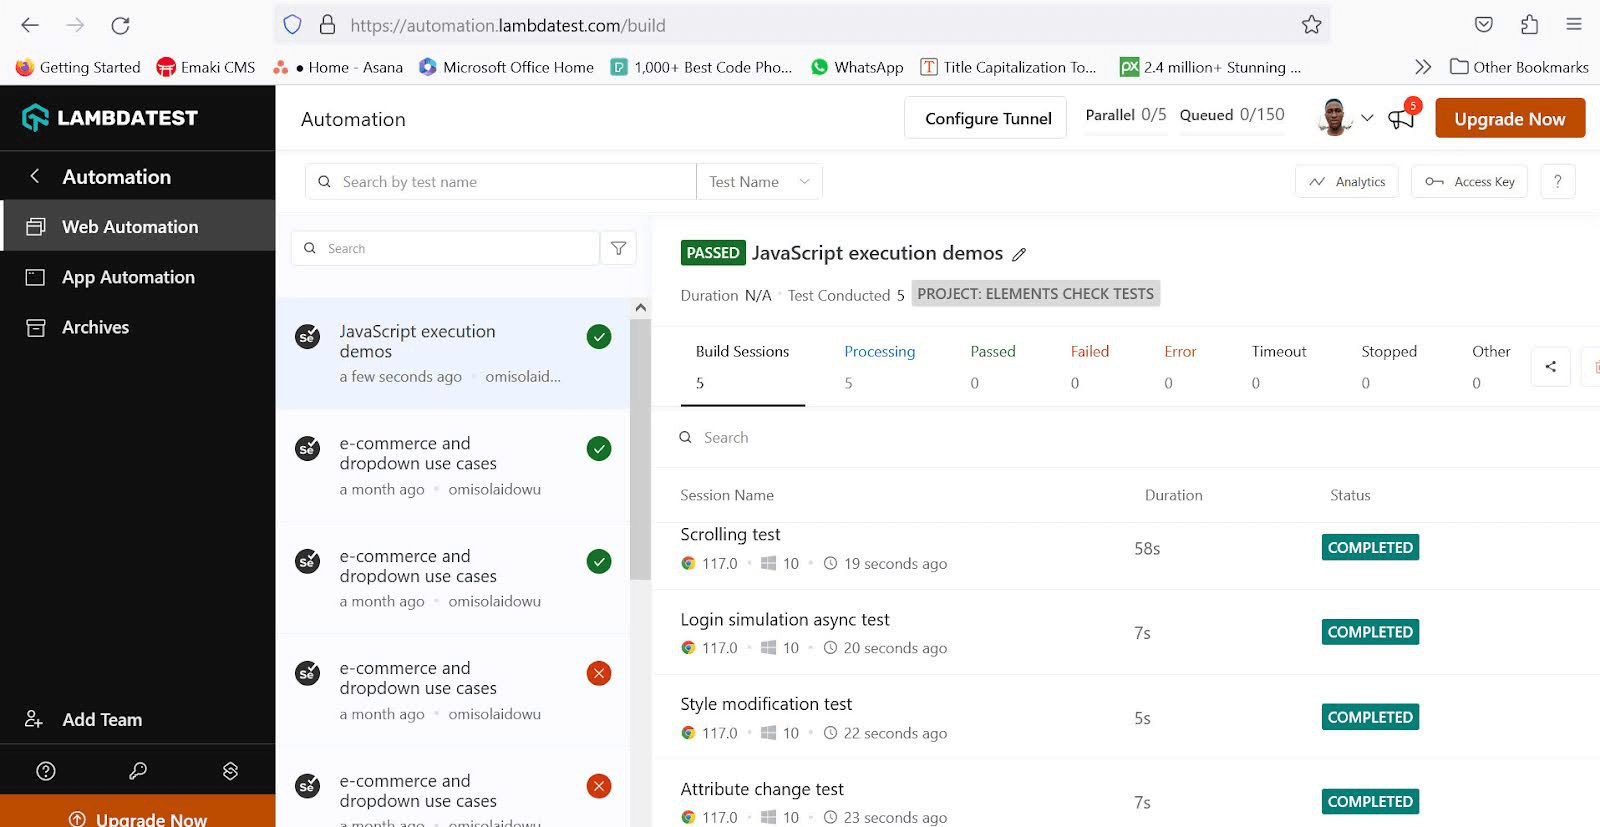
As seen in the execution screenshot above, each test in the queue has a unique name, which is set by instantiating the Setting class with a desired name in each test file.
Conclusion
In this Selenium Python testing tutorial, you’ve witnessed various ways to execute JavaScript in Selenium Python. Although executing JavaScript in Selenium Python is not the preferred test automation method, it is beneficial in specific situations. JavaScript becomes essential for intricate scenarios like gesture and animation simulations, asynchronous interactions, responsive scrolling, and more. However, exercise caution not to rely on JavaScript if the desired action can be achieved through standard WebDriver methods.
Frequently Asked Questions (FAQs)
How do you execute a JavaScript script?
Selenium utilizes the execute_script method to run JavaScript commands, passing them as arguments. Certain actions, such as scrolling down a page, may not be directly achievable through Selenium methods but are made possible with the assistance of the Javascript Executor.
Can Selenium code execute JavaScript directly?
Yes, Selenium can execute JavaScript code directly using the executeScript method provided by the JavascriptExecutor interface. This allows Selenium scripts to interact with and manipulate a web page’s Document Object Model (DOM) using JavaScript commands. The executeScript method takes a JavaScript code snippet as a string and executes it within the context of the current browser window. This capability is particularly useful for handling dynamic elements, asynchronous operations, and other scenarios that may not be easily achievable with standard Selenium commands.


Author’s Profile
Idowu (Paul) Omisola
Idowu is a self-taught programmer, coding YouTuber, and technical writer with a penchant for teaching. He started his coding career in 2018 but combined it with technical writing a year later and has never looked back. He has worked for a couple of websites over the years, and you'll find some of his coding guides on popular websites like MUO. He loves discussing software structure and coding topics in Python, JavaScript, Golang, and TypeScript. And when it comes to software testing, he's a fan of Playwright and Selenium.
Blogs: 6
Got Questions? Drop them on LambdaTest Community. Visit now


