
How To Perform React Native Testing Using Appium
Faisal Khatri
Posted On: April 12, 2024
![]() 216700 Views
216700 Views
![]() 30 Min Read
30 Min Read
With the technology emerging so fast, mobile apps have captured most of the industry market. Every organization is focused on creating a new app for their business platform, and the React Native framework is trending in developing mobile apps.
Performing React Native testing on apps like Facebook, Instagram, Discord, Flipkart, Oculus, and more apps built using the React Native framework can help ensure their functionality, usability, and performance across different devices and platforms. React Native testing helps identify and fix bugs early in the development cycle, which helps provide higher-quality apps with better user experiences.
In this blog, we will learn the fundamentals of the React Native framework, its features, and the challenges faced by native apps compared to web apps. We will also learn how React Native testing can help overcome these challenges. Additionally, we will learn how to perform React Native testing using manual and automation testing approaches for apps on Android and iOS devices.
So, let’s get started!
TABLE OF CONTENTS
What is React Native Framework?
As everyone knows, the mobile industry has taken over the world and is the fastest-emerging industry in terms of technology and business. According to the statistics provided by StatCounter for the mobile vendor share market, Apple tops the list with 28.46%, while Samsung is in the second position with 23.86%, followed by Xiaomi with 11.58%.

With rapid technological advancements, mobile apps dominate the industry, prompting organizations to prioritize the React Native framework for app development.
React Native is a versatile open-source JavaScript framework created by Facebook for building applications across various platforms such as iOS, Android, and the web. It is an extension of React, bringing advantages to mobile app development.
Facebook developed both ReactJS (for the web) and React Native. It originated as a Hackathon project to address the challenge of maintaining two separate codebases for their app, which led to duplicated work and inconsistent solutions. React Native was conceived as a solution to this problem.
This framework leverages JavaScript to render the app’s user interface using native-OS views. It allows developers to use OS-native languages like Swift and Objective-C for iOS and Java and Kotlin for Android to implement more complex features. This approach ensures high performance and a native look and feel for the apps built with React Native.
Following are some of the essential features of the React Native framework:
- Open Source.
- Huge Community Support.
- Backed by Facebook.
- Maximum code reuse helps save on costs and time.
- Good Performance for Mobile Apps.
With 23.8k Fork and 115k Star on GitHub, as well as the weekly download stats, you can gauge the popularity of the React Native framework.
There are a lot more features of the framework. However, a few important ones are highlighted here.
- Cross-Platform: It excels in creating apps that work seamlessly on Android and iOS. Developers can use a single codebase, eliminating the need to maintain two separate codebases and making development more efficient.
- Native-like Performance: It compiles to true native components, unlike hybrid frameworks. This approach ensures that your app delivers the expected performance and responsiveness, including smooth animations, fast load times, and a responsive user interface comparable to fully native applications.
- Reusable Components: It promotes modularity by breaking the user interface into reusable components. These components can be used across different app parts, creating a more organized and maintainable codebase.
- Hot Reloading Magic: Its hot reloading feature allows developers to see changes instantly without rebuilding the app each time a modification is made. This significantly reduces iteration times during development.
- Declarative Syntax: It uses declarative syntax to build React’s concepts for the web. Developers describe how the UI should look based on the app’s current state, simplifying development and improving code readability.
- Access to Native Modules: It allows integration of custom native modules when your app needs to access native device functionality unavailable through JavaScript alone. This capability enables you to create bridges between JavaScript and native code.
- Mobile App Development and Testing: It’s important to create mobile apps from a business perspective; however, equally crucial is testing them to avoid releasing any buggy apps to end-users.
- Mobile App Quality: It ensures quality is the key consideration while testing the apps to meet user expectations and maintain a competitive edge.
- Thorough Testing Approach: It checks for all possible permutations and combinations, ensuring no loopholes are left open during React testing.
- Functional and Non-Functional Testing: It includes performance and security testing, both important aspects of mobile app testing to ensure app reliability and user satisfaction.
Testing native apps can be complex, especially when dealing with intricate test scenarios. However, you can leverage KaneAI by LambdaTest can significantly ease this process. As an AI-driven test assistant, KaneAI allows you to author, manage, and debug tests apps using natural language commands.
KaneAI is an AI test assistant designed with industry-first features for test authoring, management, and debugging, tailored specifically for high speed quality engineering teams. Built from the ground up, KaneAI empowers users to create and refine complex test cases using natural language, dramatically reducing the time and expertise needed to begin test automation.
Challenges With Native Apps Compared To Web
Native applications provide users with enhanced security, improved performance, access to mobile device features, offline accessibility, and a rich user experience with runtime push notifications. However, native apps have limitations such as a high cost of development, dependency on app stores, and limited reach based on the platform for which the native application is developed.
Due to the smaller screens of mobile devices compared to desktops, designing the entire user experience for native mobile applications is more challenging than for desktops. During the development of a native mobile application, all the apk/ipa files must be recompiled and built to test code changes, whereas, in web applications, changes can be viewed simply by refreshing the web page.
Similarly, testing multiple user journeys in native mobile applications is much slower than web applications, as additional steps are required for native mobile apps, such as installing the application, configuring mobile test automation, and then running the tests. In contrast, running web application tests is much faster, as users can simply navigate to the website and start interacting with the web elements to check the application’s stability.
To resolve these challenges, it is important to implement effective testing strategies to ensure the quality and performance of native mobile applications. With React Native testing, you can resolve the challenges faced by native apps compared to web applications by ensuring consistency, performance, usability, and compatibility across various devices and operating systems.
You can also learn more about it through this blob on React end-to-end-testing.
 Note
NoteOver the challenges of testing mobile apps over various platforms and devices. Try LambdaTest Today!
How to Test React Native Apps?
In this section on React Native testing for Android and iOS apps, we will learn different approaches to performing React Native testing. There are two primary methods for testing a mobile app:
- Manual Testing
- Automated testing
Manual Testing: Performing React Native testing manually on Android and iOS apps is straightforward but time-consuming and requires significant effort, especially when repetitive tasks are involved for each build. Functional validation, UI/UX checks, and regression testing of previously built code are essential for every new build. Maintaining a mobile app testing checklist is advisable for efficient and thorough React Native testing.
However, it’s recommended that manual exploratory checks be conducted towards the end of the testing cycle. After all other React Native tests have passed, it helps perform sanity testing of well-developed features.
Automation Testing: To enhance the capabilities of manual testing, performing automation testing to test React Native apps is a highly efficient solution; it saves time and costs and allows the ability to document test cases and scenarios.
With automation testing, you write test scripts once and can run them multiple times across different devices and operating systems. With this, you can ensure consistent and reliable results, and it also allows for a faster feedback process to enhance the software release cycle and help developers and testers identify bugs and fix them early in the software development process.
Before performing React Native testing on Android and iOS, let us learn about the Appium framework to help you perform mobile automation testing.
How to Set up Appium for React Native Testing?
In this section, we will learn about Appium and the essential supporting software needed to start performing React Native testing using Appium.
What is Appium?
Appium is a popular open-source mobile app testing framework that automates Android, iOS, and Windows tests. It integrates seamlessly with React Native apps, allows you to perform React Native testing for mobile apps, mobile web, and hybrid apps, and executes test cases using the WebDriver interface. Appium supports multiple programming languages, including Java, JavaScript, C#, Python, PHP, and Ruby.
It also provides ways to run tests on real device clouds, emulators, and simulators through its architecture and capabilities.
Some of the ways are :
- It can connect to hosted real devices and cloud services, such as LambdaTest. It uses the WebDriver protocol to communicate with these devices over the Internet, allowing testers to run their tests on a wide range of real devices without buying physical devices.
- It uses the native automation frameworks provided by the respective platforms. For Android, it uses UiAutomator2 or Espresso, and for iOS, it uses XCUITest. It allows for comprehensive testing of mobile applications across different platforms and devices.
Setting up Appium for React Native testing is an important step that will help ensure the quality and reliability of your mobile applications. With the correct setup, performing Appium testing for React Native apps becomes easy.
Following a few simple steps, you can create a robust testing environment that streamlines your testing process and helps you deliver high-quality apps to your users.
Along with the Appium framework, other prerequisites are needed to support writing and running React Native tests using Appium for Android and iOS. It is essential to locate elements to navigate through the tests effectively. We must have Appium Inspector and Appium Desktop installed on the local machine to achieve this.
What is Appium Inspector?
Appium Inspector is a tool designed for mobile application testing and development, specifically for automating mobile apps on various platforms like iOS, Android, and Windows using the Appium framework. It functions primarily as a Graphical User Interface (GUI) tool, helping create and inspect automation scripts for mobile apps. Appium Inspector visually represents the app’s user interface, allowing testers to interact with app elements and inspect their properties.
It is a GUI-based mobile element locating tool essential for automation engineers. This tool simplifies locating elements quickly, which is crucial for test automation.
Steps to install Appium Inspector:
- Navigate to the Appium-inspector download page.
- Download the binary using your operating system. So, if you are on macOS, download the file with extension *.dmg. If you are a Windows user, download the *.exe file.
- Once the respective file is downloaded, double-click on it to run and follow the steps guided by the application. You should be able to install the Appium Inspector app successfully.
What is Appium Server?
The Appium Server is a critical component of the Appium architecture, serving as the foundation for using any Appium client libraries. This server, built on NodeJS, fully manages the Appium session established with the device and is essential for running Appium tests.
With the introduction of Appium 2.0, the Appium Drivers and Plugins have separated from the Appium Server. This separation necessitates the separate installation of the Drivers and plugins, enhancing modularity and flexibility in the Appium ecosystem.
Check out the Appium 2 migration guide that provides a detailed view of the new features, commands, and the breaking changes that have taken place in Appium 2.0.
To start the Appium Server locally, we must run the following command from the terminal.
|
1 |
appium server |
This command, “appium server,” will start the Appium Server with all the available Appium drivers.
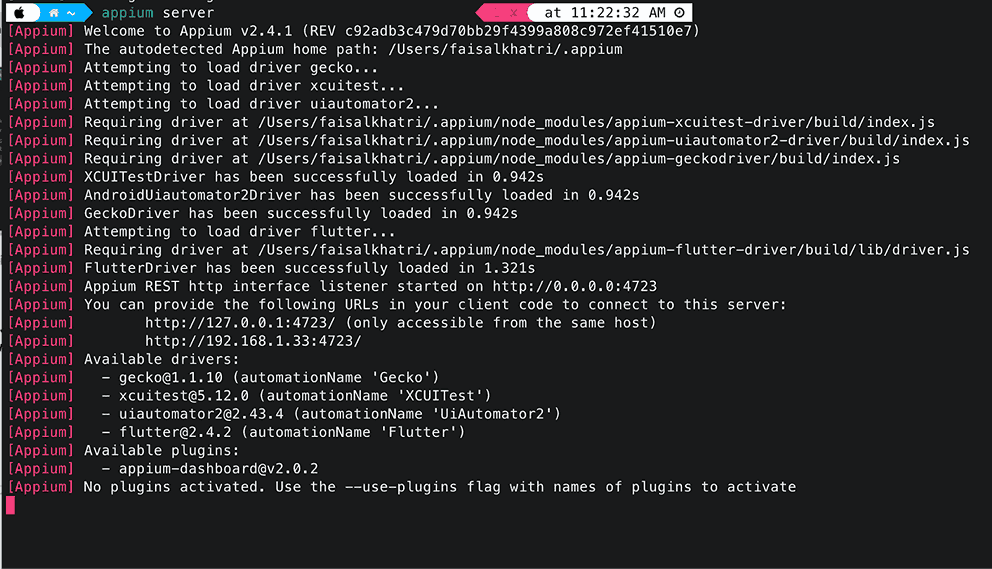
Your Appium Server is up and running. It is important always to start your server when performing React Native testing for mobile apps.
Watch this complete video tutorial on installing Appium and automating Android apps using Appium, get detailed practical insights, and start your mobile app testing journey.
Note: Previously, using Appium Desktop, a GUI-based interface, the user could start the Appium Server. However, it is currently deprecated; hence, it is not recommended that the Appium Desktop be used.
Now that we have the Appium pre-requisite, we will learn how to write and perform React Native testing for apps using Appium in the section below.
Performing React Native Testing on the Cloud
In this section of the blog, we will use the following demo apps to perform React Native testing on Android and iOS on the LambdaTest cloud platform.
LambdaTest is an AI-powered test orchestration and execution platform that lets you run manual and automated tests at scale with over 3000+ real devices, browsers, and OS combinations. It offers a cloud-based Appium grid for cross-browser and cross-device testing on an online device farm.
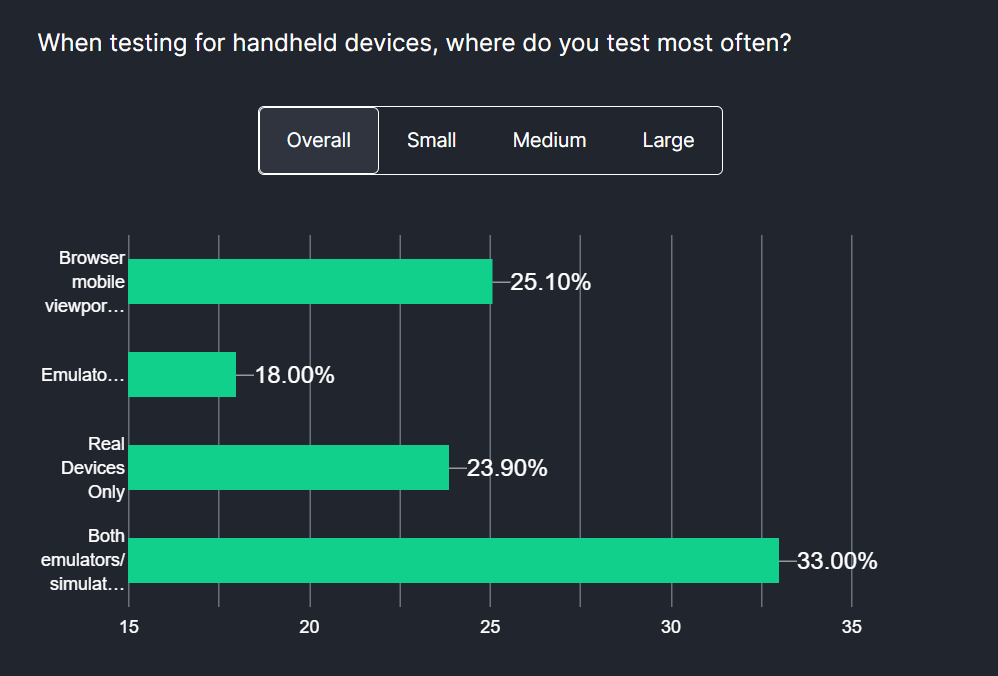
According to the Future Of Quality Assurance Survey, 33% of organizations utilize emulators/simulators and real devices to test handheld devices. However, 25% of companies still rely solely on browser mobile viewports for app testing, which can lead to a higher risk of missing device-specific bugs.
In this blog on React Native testing, we will utilize the real device cloud offered by LambdaTest to perform manual and automated React Native testing.
How to Perform React Native Testing Manually on LambdaTest?
To get started with the platform to perform React Native testing of mobile apps for Android and iOS, we must follow the steps below.
Step 1: Create a LambdaTest account.
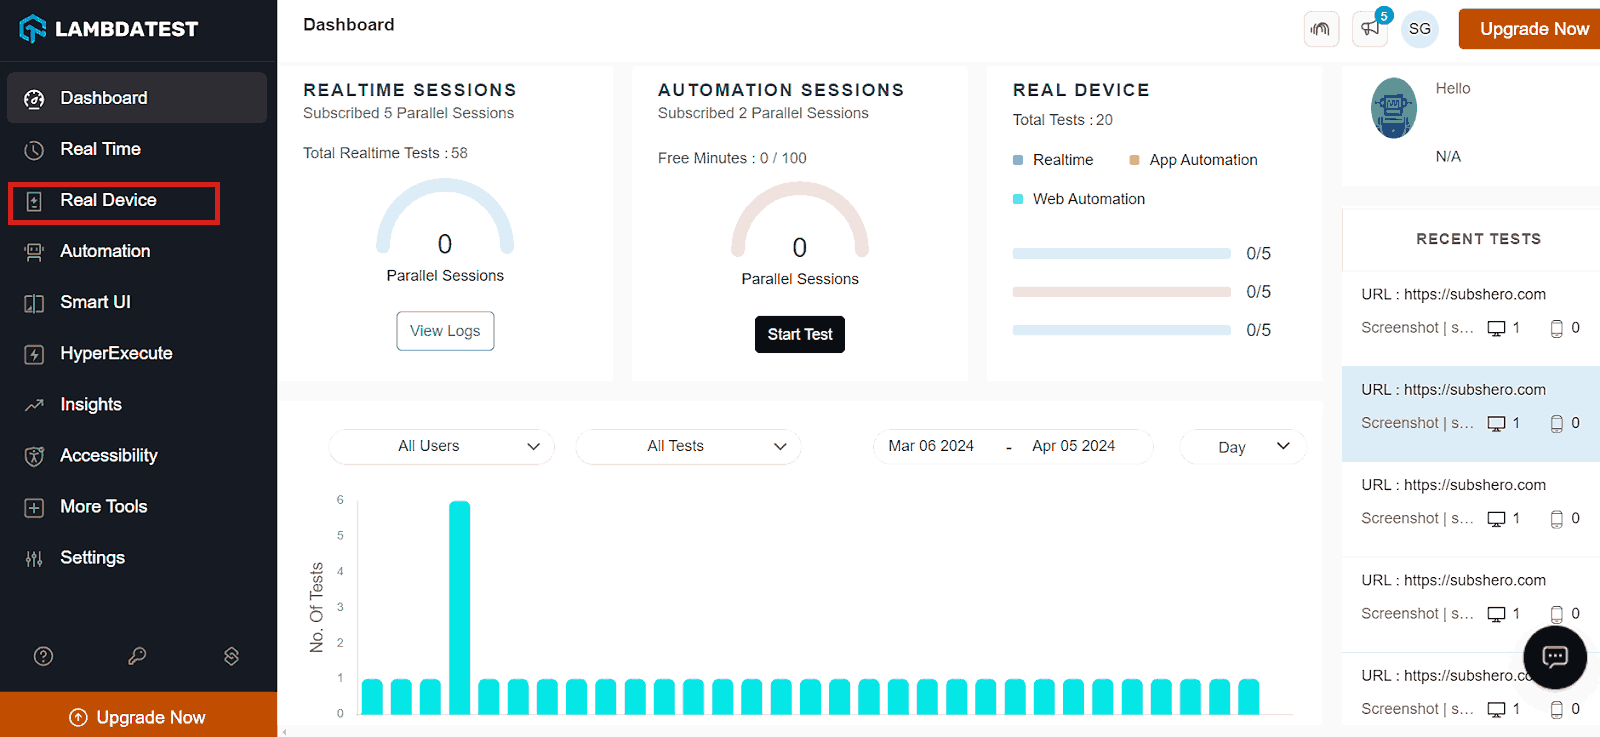
Step 2: Click on the Real Device option from the left menu.
Step 3: Click on App Testing from the left menu option, then click on the operating system and click on the Upload button.
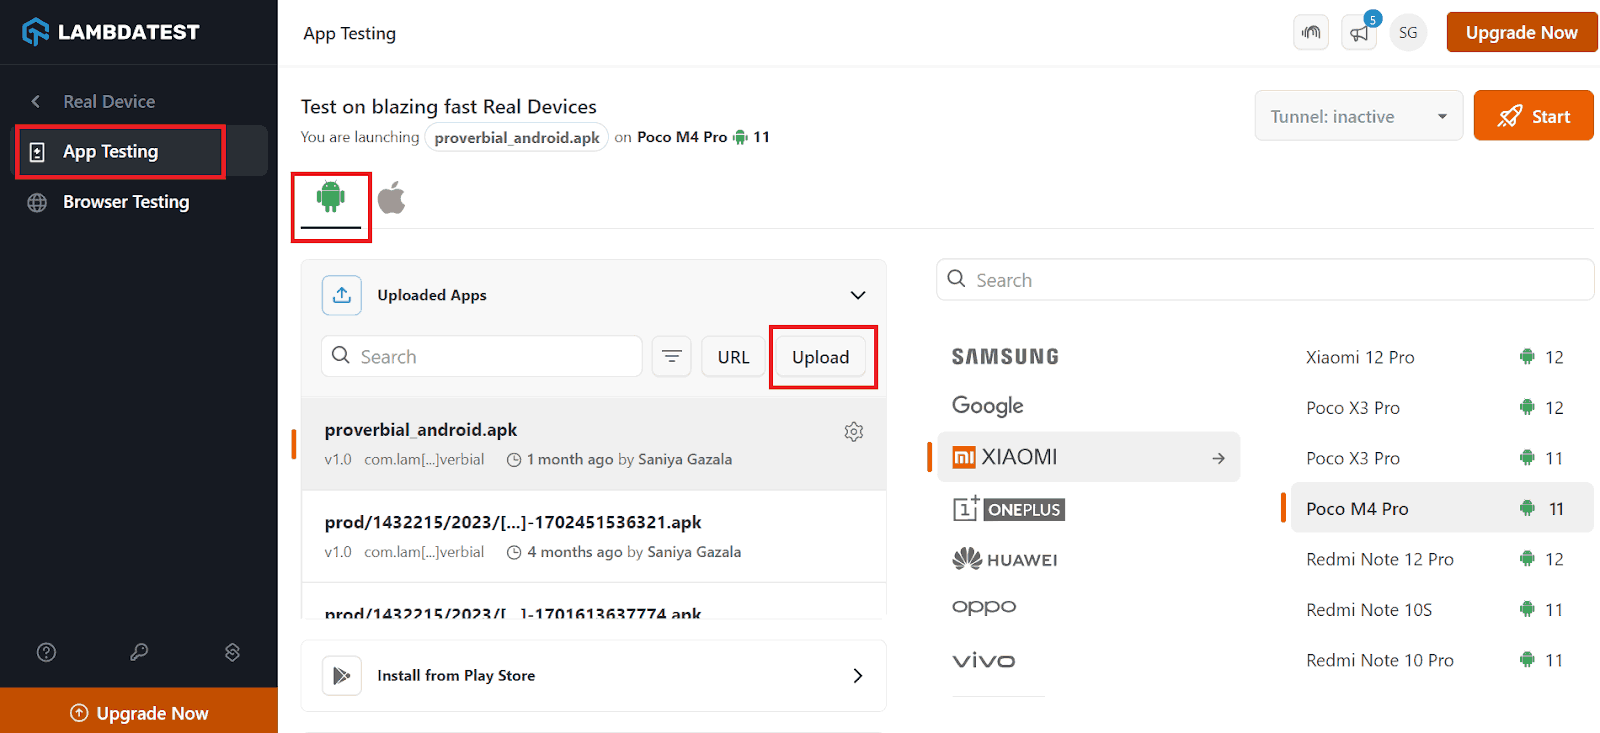
For demonstration, I will use Android as the operating system and upload a .apk file by browsing or uploading the file from my local PC.
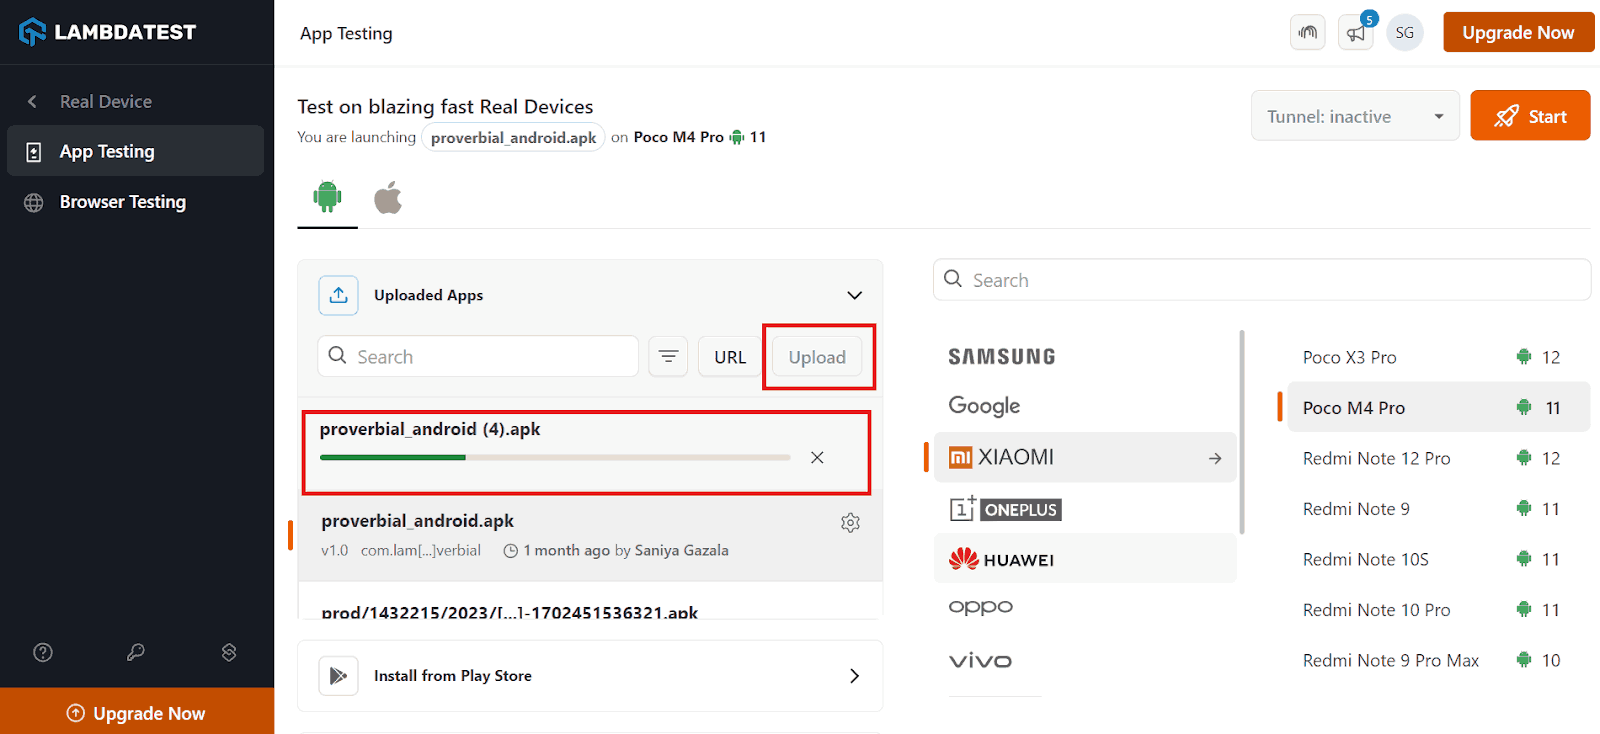
Step 4: Once you have uploaded the file, select the device and model and click Start.

Your device is launched in a cloud environment based on the configuration and app upload.
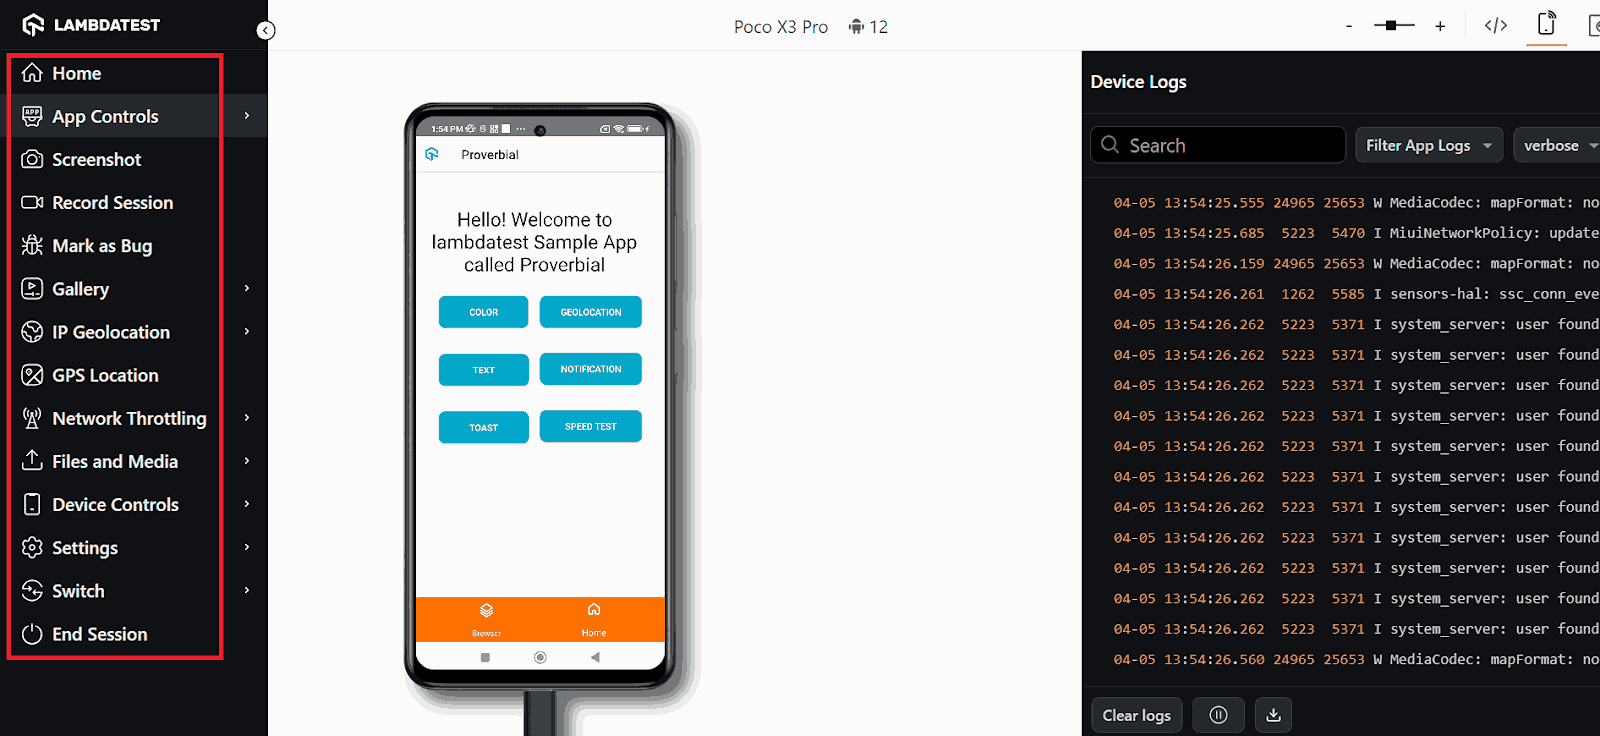
You can use the options on the left side of the menu to test your app manually.
In the below section, we will learn how to automate React Native testing.
How to Automate React Native Testing on LambdaTest?
Using LambdaTest to automate React Native testing allows you to effectively test mobile applications across a wide range of real devices and operating systems. With this platform, you can easily automate the testing process, ensuring comprehensive test coverage and reliable results.
Let’s learn the mobile app testing strategy for the Proverbial app and focus on what and how we automate it. This app opens with a home page with a welcome message and some buttons.
Below is the test scenario we will follow to perform React Native testing.
Test Scenario
|
Before we start writing the test based on the defined test scenario above, we must set up the testing environment and install some required libraries to perform the React Native testing.
Test Environment Setup
This section will define the tools, frameworks, operating systems, and other details needed for the testing process.
Below is the list of frameworks/tools, Appium server, programming language, and more.
- Programming Language: Java
- Web Automation Tool: Appium (Server Version 2.5.1, Appium Java client – 9.2.2)
- Test Runner: TestNG
- Build Tool: Maven
- Cloud Platform: LambdaTest
Now that the test environment is defined, we will add dependencies or libraries to the pom.xml file. This file integrates all the required dependencies to perform React Native testing for mobile apps.
Code Implementation
As discussed earlier, this project has been created using Maven. TestNG is used as a test runner. Once the project is created, we must add the dependency for Appium and lombok in the pom.xml file.
Versions of the dependencies are set in a separate properties block. It is done for maintainability, so if we need to update the versions, we can do it easily without searching throughout the pom.xml file.
Page Object Model
In the Page Object Model (POM), a class is created for every web page, and it contains all the related elements (such as buttons, text fields, etc.) of that page, as well as the relevant action methods (such as clicking a button, entering text, etc.). This separation of concerns helps keep the page objects separate from the test code, improving maintainability and readability.
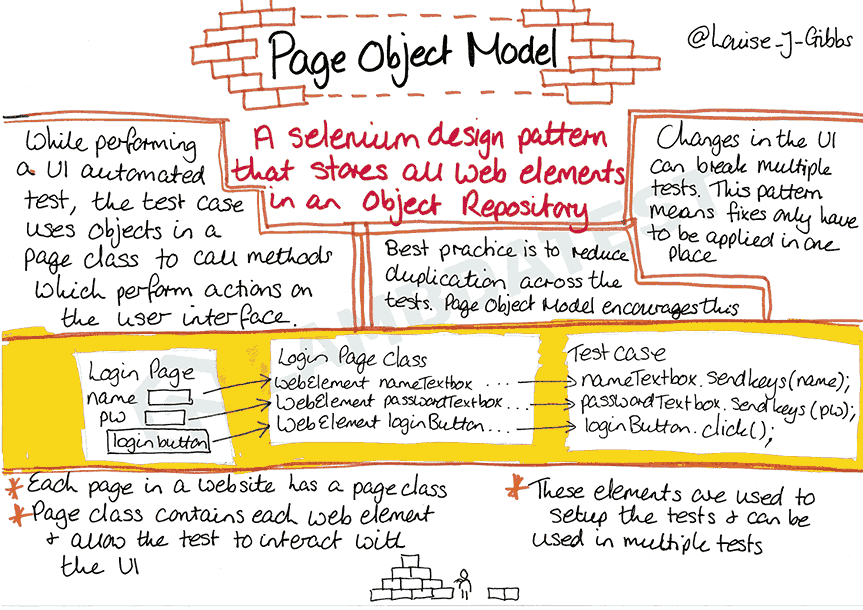
In this blog on how to perform React Native testing on Android and iOS, we will be creating four different classes for all four different pages, namely, HomePage, GeoLocationPage, SpeedTestPage, and BrowserPage where specific locators of their respective pages will be stored, and we would be calling these locators in the tests to check the application.
Below, we will create Android and iOS classes for each action point mentioned in the test scenario above.
HomePage Classes
First, let’s locate the elements for the required components on Android and iOS, enabling us to execute the tests.
|
1 2 3 4 5 6 7 8 9 10 11 12 13 14 15 16 17 18 19 20 21 22 23 24 25 26 27 28 29 30 31 32 33 34 35 36 37 38 39 40 41 42 43 44 45 46 47 48 49 50 51 52 53 54 55 56 57 58 59 60 61 62 63 64 65 |
public class HomePage { AndroidDriverManager driverManager; WebDriverWait wait; public HomePage (final AndroidDriverManager driverManager) { this.driverManager = driverManager; wait = new WebDriverWait (driverManager.getDriver (), Duration.ofSeconds (20)); } public WebElement textBtn () { return driverManager.getDriver () .findElement (AppiumBy.id ("Text")); } public String getText () { return driverManager.getDriver () .findElement (AppiumBy.id ("Textbox")) .getText (); } public WebElement notificationBtn () { return driverManager.getDriver () .findElement (AppiumBy.id ("notification")); } public WebElement notificationBar () { return driverManager.getDriver () .findElement (AppiumBy.id ("action_bar")); } public WebElement toastBtn () { return driverManager.getDriver () .findElement (AppiumBy.id ("toast")); } public String toastMessage () { return wait.until (ExpectedConditions.presenceOfElementLocated (AppiumBy.xpath ("//android.widget.Toast[1]"))) .getText (); } public WebElement geoLocationBtn () { return driverManager.getDriver () .findElement (AppiumBy.id ("geoLocation")); } public WebElement speedTestBtn () { return driverManager.getDriver () .findElement (AppiumBy.id ("speedTest")); } public WebElement browserMenu () { return driverManager.getDriver () .findElement (AppiumBy.accessibilityId ("Browser")); } public void openMenu () { driverManager.getDriver ().findElement (AppiumBy.accessibilityId ("drawer open")).click (); } public void clickPushNotificationMenu () { driverManager.getDriver ().findElement (AppiumBy.id ("pushNotification")).click (); } } |
|
1 2 3 4 5 6 7 8 9 10 11 12 13 14 15 16 17 18 19 20 21 22 23 24 25 26 27 28 29 30 31 32 33 34 35 36 37 38 39 40 41 42 43 44 45 46 47 48 49 50 51 52 53 54 55 56 57 58 |
public class HomePage { private final IOSDriverManager iosDriverManager; private final WebDriverWait wait; public HomePage (final IOSDriverManager iosDriverManager) { this.iosDriverManager = iosDriverManager; this.wait = new WebDriverWait (iosDriverManager.getDriver (), Duration.ofSeconds (20)); } public WebElement textBtn () { return this.iosDriverManager.getDriver () .findElement (AppiumBy.accessibilityId ("Text")); } public String getText () { return this.iosDriverManager.getDriver () .findElement (AppiumBy.accessibilityId ("Textbox")) .getText (); } public WebElement notificationBtn () { return this.iosDriverManager.getDriver () .findElement (AppiumBy.accessibilityId ("notification")); } public WebElement notificationBar () { return this.wait.until ( ExpectedConditions.presenceOfElementLocated (AppiumBy.accessibilityId ("NotificationShortLookView"))); } public WebElement toastBtn () { return this.iosDriverManager.getDriver () .findElement (AppiumBy.accessibilityId ("toast")); } public String toastMessage () { return this.wait.until (ExpectedConditions.presenceOfElementLocated ( AppiumBy.xpath ("//*[contains(@label, 'Toast should be visible')]"))) .getText (); } public WebElement geoLocationBtn () { return this.iosDriverManager.getDriver () .findElement (AppiumBy.accessibilityId ("geoLocation")); } public WebElement speedTestBtn () { return this.iosDriverManager.getDriver () .findElement (AppiumBy.accessibilityId ("speedTest")); } public WebElement browserMenu () { return this.iosDriverManager.getDriver () .findElement (AppiumBy.accessibilityId ("Browser")); } } |
From the code, it is clear that all the elements on the HomePage on Android were located using the id locator strategy in most cases. In contrast, accessibilityId was used for the browser menu. On iOS, accessibilityId was used to locate all the elements.
GeoLocationPage Classes
Here, we will identify the Android and iOS mobile applications WebElements on the GeoLocationPage.
|
1 2 3 4 5 6 7 8 9 10 11 12 13 14 15 16 17 18 19 20 21 |
public class GeoLocationPage { private final AndroidDriverManager driverManager; private final WebDriverWait wait; public GeoLocationPage (final AndroidDriverManager driverManager) { this.driverManager = driverManager; this.wait = new WebDriverWait (driverManager.getDriver (), Duration.ofSeconds (30)); } public WebElement content () { return this.wait.until (ExpectedConditions.presenceOfElementLocated (AppiumBy.id ("android:id/content"))); } public void navigateToHomePage () { this.driverManager.getDriver () .navigate () .back (); } } |
|
1 2 3 4 5 6 7 8 9 10 11 12 13 14 15 16 17 18 19 20 21 22 23 24 |
public class GeoLocationPage { private final IOSDriverManager iosDriverManager; private final WebDriverWait wait; public GeoLocationPage (final IOSDriverManager iosDriverManager) { this.iosDriverManager = iosDriverManager; this.wait = new WebDriverWait (iosDriverManager.getDriver (), Duration.ofSeconds (30)); } public WebElement banner () { return this.wait.until (ExpectedConditions.presenceOfElementLocated (AppiumBy.accessibilityId ("banner"))); } public WebElement backBtn () { return this.iosDriverManager.getDriver () .findElement (AppiumBy.accessibilityId ("Back")); } public void navigateToHomePage () { clickOn (backBtn ()); } } |
Similar to the approach on the HomePage, a locator for checking the content was found using the Id locator strategy for Android. For iOS, accessibilityId was used to locate the banner.
It’s important to note the navigateToHomePage() method, which was created to take the user back to the HomePage once the required actions are completed for the tests on Android. For iOS, a back button is available in the app, so it was located using accessibilityId, and a click was performed to navigate to the HomePage.
SpeedTestPage Classes
Here, we will identify the WebElements on the SpeedTestPage for Android and iOS.
|
1 2 3 4 5 6 7 8 9 10 11 12 13 14 15 16 17 18 19 20 |
public class SpeedTestPage { private final AndroidDriverManager driverManager; public SpeedTestPage (final AndroidDriverManager driverManager) { this.driverManager = driverManager; } public WebElement headerText () { return this.driverManager.getDriver () .findElement (AppiumBy.accessibilityId ("Speedtest")); } public void navigateToHomePage () { this.driverManager.getDriver () .navigate () .back (); } } |
|
1 2 3 4 5 6 7 8 9 10 11 12 13 14 15 16 17 18 19 20 |
public class SpeedTestPage { private final IOSDriverManager iosDriverManager; public SpeedTestPage (final IOSDriverManager iosDriverManager) { this.iosDriverManager = iosDriverManager; } public String headerText () { return this.iosDriverManager.getDriver () .findElement (AppiumBy.iOSClassChain ("**/XCUIElementTypeImage[`label == \"Speedtest\"`]")) .getText (); } public void navigateToHomePage () { this.iosDriverManager.getDriver () .navigate () .back (); } } |
The code for the SpeedTestPage for Android is self-explanatory. The iOSClassChain locator strategy was used to locate the Speedtest label for locating elements on iOS.
BrowserPage Classes
Here, we will identify the WebElements on the BrowserPage for Android and iOS mobile applications.
|
1 2 3 4 5 6 7 8 9 10 11 12 13 14 15 16 17 18 19 20 21 22 23 24 25 26 27 28 29 30 31 32 33 34 35 36 37 38 |
public class BrowserPage { private AndroidDriverManager driverManager; public BrowserPage (final AndroidDriverManager driverManager) { this.driverManager = driverManager; } public WebElement searchBox () { return driverManager.getDriver () .findElement (AppiumBy.id ("url")); } public void searchFor (String url) { searchBox ().sendKeys (url); clickOn (findBtn ()); waitForsomeTime (); } public WebElement findBtn () { return driverManager.getDriver () .findElement (AppiumBy.id ("find")); } public void navigateToHomePage () { driverManager.getDriver () .navigate () .back (); } } |
The WebElements for searchBox() and findBtn() on the BrowsePage on the Android app were located using the id locator. The searchFor() method is created to search for and navigate to the URL.
|
1 2 3 4 5 6 7 8 9 10 11 12 13 14 15 16 17 18 19 20 21 22 23 24 25 26 27 28 29 30 31 32 33 34 35 36 37 38 |
public class BrowserPage { private final IOSDriverManager iosDriverManager; public BrowserPage (final IOSDriverManager iosDriverManager) { this.iosDriverManager = iosDriverManager; } public WebElement searchBox () { return this.iosDriverManager.getDriver () .findElement (AppiumBy.accessibilityId ("url")); } public void searchFor (String url) { searchBox ().sendKeys (url); clickOn (findBtn ()); waitForsomeTime (); } public WebElement findBtn () { return this.iosDriverManager.getDriver () .findElement (AppiumBy.accessibilityId ("Find")); } public void navigateToHomePage () { this.iosDriverManager.getDriver () .navigate () .back (); } } |
As we did for the Android app, the same thing is repeated in the iOS app class; the searchBox() and findBtn() buttons are located using the accessibilityId locator. The searchFor() method is created to navigate to a URL from the BrowserPage.
To learn more about it, you can follow this guide on Selenium locators to learn more about multiple locators. It provides detailed insights into various locators that allow you to interact with WebElements.
Watch this complete video tutorial to enhance your understanding of interacting with WebElements and strengthen your locator strategy.
BaseTest
In this section, let’s define the BaseTest classes that can be extended in the actual tests to avoid repeating the same configuration. Two separate BaseTest classes are created to instantiate the Android and iOS drivers.
As you can see, buildName, testName, app, platformName, version, and device are all captured as a part of @Parameters TestNG annotation, which will be set using the testng.xml file.
Next, the builder design pattern is used to build the instance for driverManager and pass the respective values accordingly so we can run tests on the desired configurations.
Let’s dive deep into the test automation strategy we defined earlier and start writing the tests.
Packages – Pages and Tests: Two packages were created for Android and iOS tests. Similarly, two packages are created for Android and iOS pages, as locators differ for both mobile applications.

Setting Up The Tests
With the page object classes and their respective locators set, we can now use those page classes to write tests and verify the scenarios discussed earlier as part of the test strategy.
|
1 2 3 4 5 6 7 8 9 10 11 12 13 14 15 16 |
public class AndroidTests extends BaseTest { private HomePage homePage; private BrowserPage browserPage; private GeoLocationPage geoLocationPage; private SpeedTestPage speedTestPage; @BeforeClass public void setupTest() { this.homePage = new HomePage(this.androidDriverManager); this.browserPage = new BrowserPage(this.androidDriverManager); this.geoLocationPage = new GeoLocationPage(this.androidDriverManager); this.speedTestPage = new SpeedTestPage(this.androidDriverManager); } } |
|
1 2 3 4 5 6 7 8 9 10 11 12 13 14 15 |
public class IOSTests extends BaseTest { private HomePage homePage; private GeoLocationPage geoLocationPage; private BrowserPage browserPage; private SpeedTestPage speedTestPage; @BeforeClass public void setupTest () { this.homePage = new HomePage (this.iosDriverManager); this.geoLocationPage = new GeoLocationPage (this.iosDriverManager); this.browserPage = new BrowserPage (this.iosDriverManager); this.speedTestPage = new SpeedTestPage (this.iosDriverManager); } } |
Code Walkthrough
Below is the working code used to implement the test strategy.
Welcome Text and Button Text Tests
- Open the App and check the welcome message – “Hello! Welcome to lambdatest Sample App called Proverbial” is displayed correctly.
- Click on the TEXT button and check that the text message “Proverbial” is displayed.
- Click the NOTIFICATION button to check that the notification is on top. Also, check that the notification appears correctly and click to close it.
- Click the TOAST button to check that the toast message is displayed at the bottom of the screen and verify its text “Toast should be visible”.
- Click the GEOLOCATION button to check that the app navigates successfully to the geolocation page. Once navigation to the geolocation page is successful, navigate back to the home page.
- Click the SPEED TEST button to verify the displayed banner by verifying the app navigates to the speed test page. After verification, navigate back to the home page.
- Click on the Browser menu at the screen’s bottom. Once the app navigates to the browser page, enter the text LambdaTest and click on the Find button to check if the website loads on the screen.
|
1 2 3 4 5 6 |
@Test public void textTests () { assertEquals (homePage.getText (), "Hello! Welcome to LambdaTest Sample App called Proverbial"); clickOn (homePage.textBtn ()); assertEquals (homePage.getText (), "Proverbial"); } |
|
1 2 3 4 5 6 |
@Test public void textTests () { assertEquals (homePage.getText (), "Hello! Welcome to LambdaTest Sample App called Proverbial"); clickOn (homePage.textBtn ()); assertEquals (homePage.getText (), "Proverbial"); } |
Notification Test
|
1 2 3 4 5 6 |
@Test public void notificationTest() { clickOn (homePage.notificationBtn ()); assertTrue (homePage.notificationBar ().isDisplayed ()); clickOn (homePage.notificationBar ()); } |
|
1 2 3 4 5 |
@Test public void notificationTest () { clickOn (homePage.notificationBtn ()); assertTrue (homePage.notificationBar().isDisplayed ()); } |
Toast Message Test
|
1 2 3 4 5 |
@Test public void toastMessageTest () { clickOn (homePage.toastBtn ()); assertEquals (homePage.toastMessage (), "Toast should be visible"); } |
|
1 2 3 4 |
@Test public void toastMessageTest () { clickOn (homePage.toastBtn ()); } |
Geolocation Test
|
1 2 3 4 5 6 |
@Test public void geoLocationTest () { clickOn (homePage.geoLocationBtn ()); assertTrue (geoLocationPage.content ().isDisplayed ()); geoLocationPage.navigateToHomePage (); } |
|
1 2 3 4 5 6 |
@Test public void geoLocationTest () { clickOn (homePage.geoLocationBtn ()); assertTrue (geoLocationPage.banner () .isDisplayed ()); geoLocationPage.navigateToHomePage (); } |
Speed Test Page Test
|
1 2 3 4 5 6 |
@Test public void speedTestPageTest () { clickOn (homePage.speedTestBtn ()); assertTrue (speedTestPage.headerText ().isDisplayed ()); speedTestPage.navigateToHomePage (); } |
|
1 2 3 4 5 6 |
@Test public void speedTestPageTest () { clickOn (homePage.speedTestBtn ()); assertEquals (speedTestPage.headerText (), "Speedtest"); speedTestPage.navigateToHomePage (); } |
The assertTrue() in Java is used in the Android tests to check if the SPEEDTEST header is displayed. It is because no locator was found that returned the text to be asserted. On the other hand, in iOS, a locator was available to locate the header text; hence, the assertEquals() method is used to verify the header text.
To learn more about assertTrue() in Java and various assertions in TestNG, watch the complete video tutorial to gain a comprehensive understanding and detailed explanations.
Browser Page Test
|
1 2 3 4 5 |
@Test public void browserTest () { clickOn (homePage.browserMenu ()); browserPage.searchFor ("https://lambdatest.com"); } |
|
1 2 3 4 5 |
@Test public void browserTest () { clickOn (homePage.browserMenu ()); browserPage.searchFor ("https://lambdatest.com"); } |
In this, both Android and iOS tests use the clickOn() function to click on the browser menu element on the home page. Additionally, they use the searchFor() function on the browser page object to search for https://lambdatest.com.
Now that we better understand the automation test script for performing React Native testing, we will learn how to automate React Native testing using LambdaTest in the section below.
Running React Native Test on LambdaTest
The first and most important step is to set up the drivers so they can be used to run the test. Here, two separate classes, AndroidDriverManager and IOSDriverManager, have been created to manage the Android and iOS drivers, respectively.
The following are prerequisites to run the tests on the LambdaTest platform:
| Field Name | Description |
|---|---|
| LambdaTest Username & Access Token | This value can be found in the LambdaTest Password & Security section after registration. |
| GRID URL | URL required to run tests on the LambdaTest platform. Value is: "@mobile-hub.LambdaTest.com/wd/hub" |
| Other important capabilities | Capabilities like Platform, Device, OS version, etc., are required to run the tests. |
Username, Access Token, and Grid URL are defined as constant(static final) values as these will not change anytime throughout the tests.
The Desired Capabilities are dynamic values set in the getLambdaTestOptions() method, which changes according to Android and iOS automation testing requirements. With the breaking changes in Appium 2.0, the UiAutomation2Options class is used for Android capabilities, and the XCUITestOptions class is used for iOS capabilities.
Capabilities Specific to LambdaTest
| Capabilities Name | Description | Value To Be Set |
|---|---|---|
| build | Used for setting the build name | Any String value can be set here |
| test | Used for setting the test name. | Any String value can be set here |
| isRealMobile | It should be set to true if you need to run the tests on a real device; otherwise, it is false. | “true” / ”false” |
| network | It should be set to true if you need to enable network logs. | “true” / ”false” |
| visual | It should be set to true if you need step-by-step screenshots of the test. | “true” / ”false” |
| console | Capture the browser logs at various steps in the test. | “true” / ”false” / “error”/ “warn” / “info” |
| devicelog | Capture the device logs | “true” / ”false” |
Capabilities specific to Appium (Mandatory for running the tests)
| Capabilities Name | Description | Values To Be Set |
|---|---|---|
| Platform Name | For setting the platform name | For mobile automation: ios, android |
| Platform Version | For setting the Platform Version. | OS version |
| Device Name | Set the device name on which tests should be run. | Device Name like “Galaxy S9 Plus” / “iPhone 11” |
| App | App URL is required to run the tests on a Cloud platform, and App Path should be provided to run the tests locally. | "“app_id” / “app_url” received in response once the app is uploaded using the respective cloud API. |
To obtain and generate the desired capabilities and app_url required for your test script from the LambdaTest platform, follow the steps below:
Step 1: Log in to the LambdaTest platform.
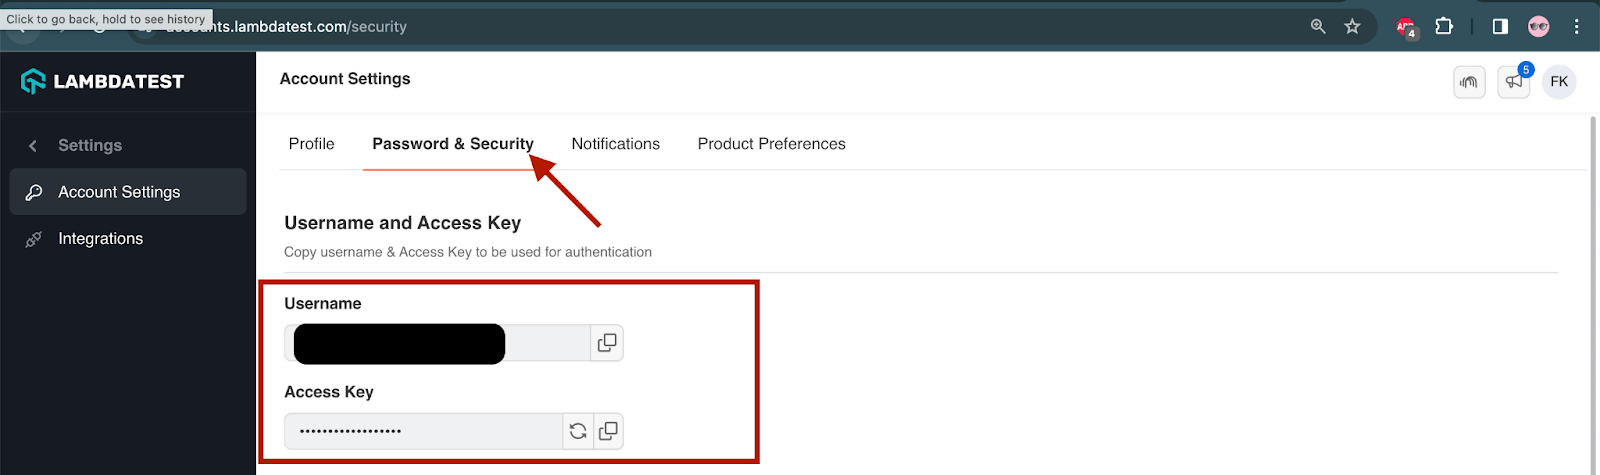
Step 2: To obtain your Username and Access Key, click on Account Settings in the profile section. Then, navigate to the Password & Security tab, where you can find your username and Access key.
To get the app_url from the LambdaTest, follow the steps below.
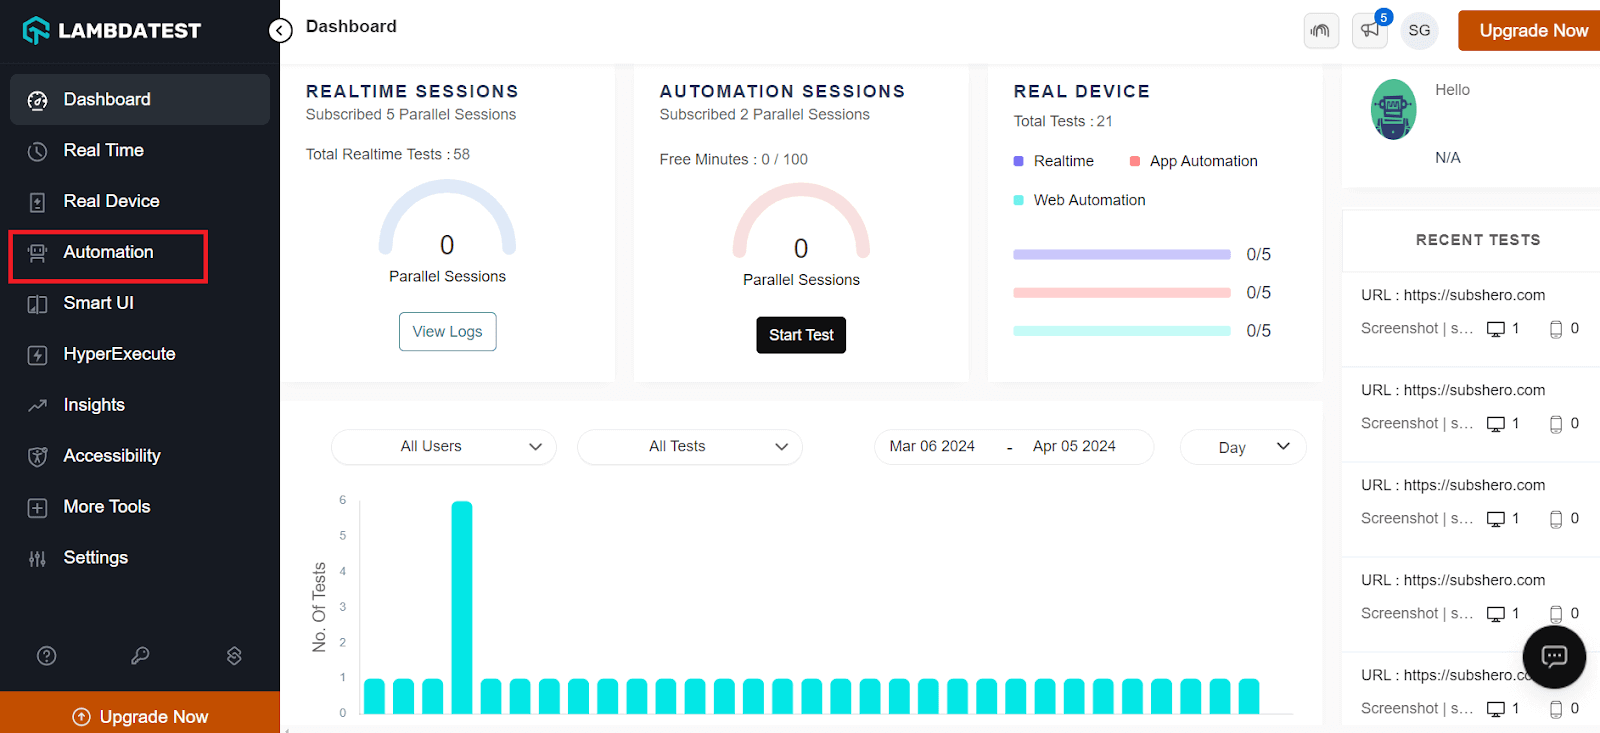
Step 3: From the dashboard, click the Automation option from the left menu.
Step 4: Click on the App Automation option from the left menu and click on the Upload App button.

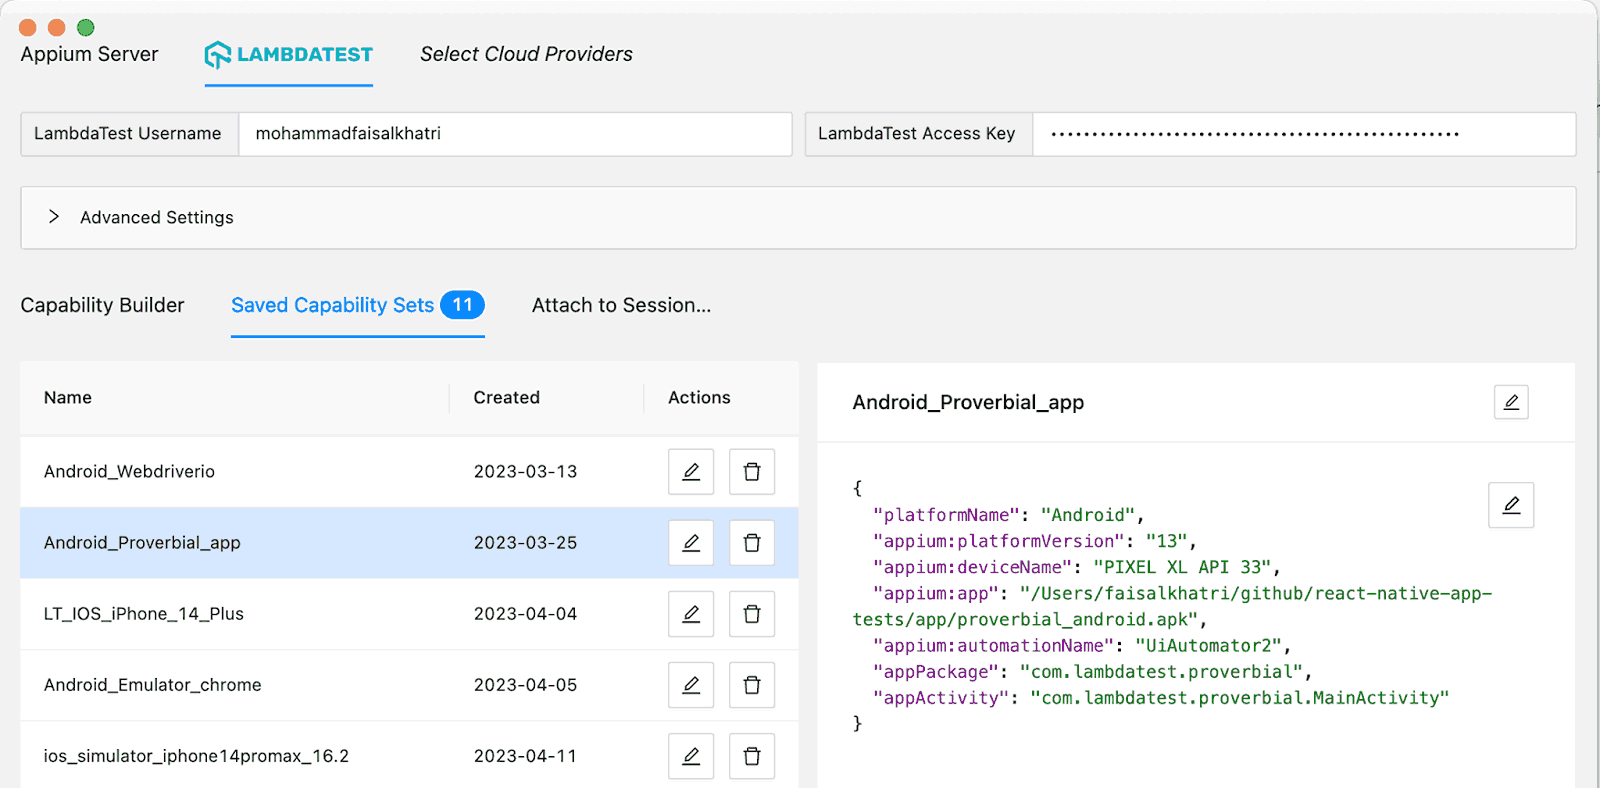
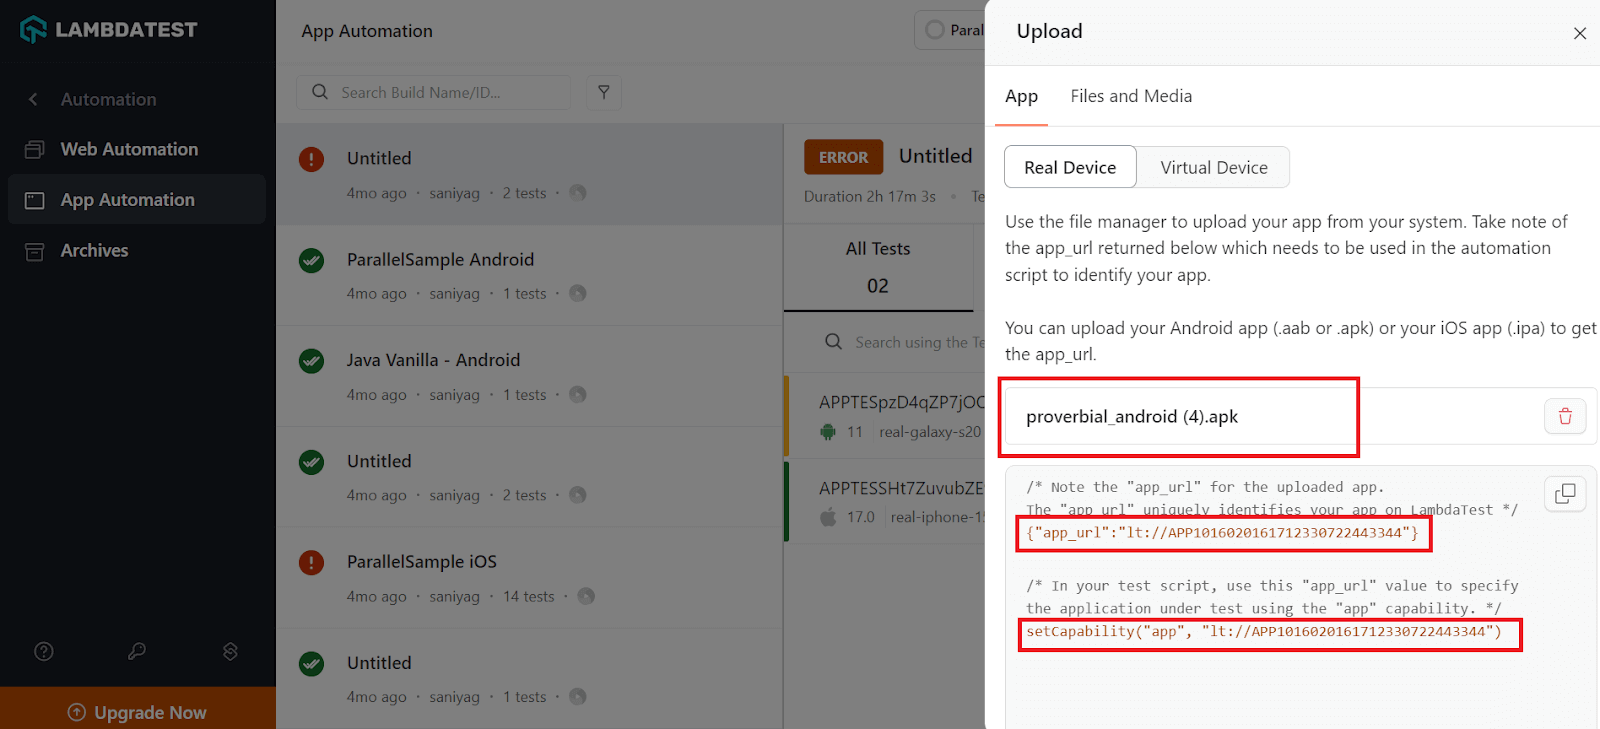
Step 5: Now, upload your .apk or .ipa file to the LambdaTest platform to generate an app_url. This app_url is unique each time you upload your .apk or .ipa file. Click on Real Device under the App tab and browse the file.

Step 6: Once the file is uploaded, you get the unique app_url and capabilities you must copy and add to your test script where you have defined the LambdaTest capabilities.
Now that we have obtained the Username, Access Key, and app_url from LambdaTest, copy these details and paste them into your test script.
|
1 2 3 4 5 6 7 8 9 10 11 12 13 14 15 16 17 18 19 20 21 22 23 24 25 26 27 28 29 30 31 32 33 34 35 36 37 38 39 40 41 42 43 44 45 46 47 48 49 50 51 52 53 54 55 56 57 58 59 60 61 62 63 64 65 66 67 68 69 70 71 |
@Builder public class AndroidDriverManager { private static final ThreadLocal<AndroidDriver> DRIVER = new ThreadLocal<>(); private String buildName; private String testName; private String platformName; private String platformVersion; private String deviceName; private String app; private static final String LT_USERNAME = System.getenv("LT_USERNAME"); private static final String LT_ACCESS_KEY = System.getenv("LT_ACCESS_KEY"); private static final String GRID_URL = "@mobile-hub.lambdatest.com/wd/hub"; @SneakyThrows public AndroidDriverManager createAndroidDriver() { DRIVER.set(new AndroidDriver(new URL(format("https://{0}:{1}{2}", LT_USERNAME, LT_ACCESS_KEY, GRID_URL)), uiAutomator2Options())); setupDriverTimeouts(); return this; } public AndroidDriver getDriver() { return DRIVER.get(); } public void quitDriver() { if (null != DRIVER.get()) { getDriver().quit(); DRIVER.remove(); } } private void setupDriverTimeouts() { getDriver().manage() .timeouts() .implicitlyWait(Duration.ofSeconds(30)); } private UiAutomator2Options uiAutomator2Options() { final UiAutomator2Options uiAutomator2Options = new UiAutomator2Options(); uiAutomator2Options .setAutoGrantPermissions(true) .withBrowserName("Chrome") .setCapability("lt:Options", getLambdaTestOptions()); return uiAutomator2Options; } private HashMap<String, Object> getLambdaTestOptions() { final HashMap<String, Object> ltOptions = new HashMap<>(); ltOptions.put("w3c", true); ltOptions.put("platformName", this.platformName); ltOptions.put("platformVersion", this.platformVersion); ltOptions.put("deviceName", this.deviceName); ltOptions.put("app", this.app); ltOptions.put("build", this.buildName); ltOptions.put("name", this.testName); ltOptions.put("autoGrantPermissions", true); ltOptions.put("isRealMobile", true); ltOptions.put("visual", true); ltOptions.put("console", true); ltOptions.put("devicelog", true); ltOptions.put("plugin", "java-testNG"); return ltOptions; } |
|
1 2 3 4 5 6 7 8 9 10 11 12 13 14 15 16 17 18 19 20 21 22 23 24 25 26 27 28 29 30 31 32 33 34 35 36 37 38 39 40 41 42 43 44 45 46 47 48 49 50 51 52 53 54 55 56 57 58 59 60 61 62 63 64 65 66 67 68 69 70 71 72 73 |
@Builder public class IOSDriverManager { private static final ThreadLocal<IOSDriver> DRIVER = new ThreadLocal<>(); private String buildName; private String testName; private String platformName; private String platformVersion; private String deviceName; private String app; private static final String LT_USERNAME = System.getenv("LT_USERNAME"); private static final String LT_ACCESS_KEY = System.getenv("LT_ACCESS_KEY"); private static final String GRID_URL = "@mobile-hub.lambdatest.com/wd/hub"; @SneakyThrows public IOSDriverManager createIOSDriver() { DRIVER.set(new IOSDriver(new URL(format("https://{0}:{1}{2}", LT_USERNAME, LT_ACCESS_KEY, GRID_URL)), xcuiTestOptions())); setupDriverTimeouts(); return this; } private XCUITestOptions xcuiTestOptions() { final XCUITestOptions xcuiTestOptions = new XCUITestOptions(); xcuiTestOptions .setAutoAcceptAlerts(true) .setAutoDismissAlerts(true) .withBrowserName("chrome") .setCapability("lt:Options", getLambdaTestOptions()); return xcuiTestOptions; } public IOSDriver getDriver() { return DRIVER.get(); } public void quitDriver() { if (null != DRIVER.get()) { getDriver().quit(); DRIVER.remove(); } } private void setupDriverTimeouts() { getDriver().manage() .timeouts() .implicitlyWait(Duration.ofSeconds(30)); } private HashMap<String, Object> getLambdaTestOptions() { final HashMap<String, Object> ltOptions = new HashMap<>(); ltOptions.put("w3c", true); ltOptions.put("platformName", this.platformName); ltOptions.put("platformVersion", this.platformVersion); ltOptions.put("deviceName", this.deviceName); ltOptions.put("app", this.app); ltOptions.put("build", this.buildName); ltOptions.put("name", this.testName); ltOptions.put("autoAcceptAlerts", true); ltOptions.put("autoDismissAlerts", true); ltOptions.put("isRealMobile", true); ltOptions.put("visual", true); ltOptions.put("console", true); ltOptions.put("devicelog", true); ltOptions.put("plugin", "java-testNG"); return ltOptions; } } |

The ThreadLocal class sets the drivers in the above code because it is thread-safe and works well when tests run in parallel. Using ThreadLocal ensures that two threads cannot see each other’s ThreadLocal variables, even if they set different values on the same ThreadLocal object.
An important note is that Lombok’s @Builder annotation is used in this class. This annotation allows us to build and obtain the desired capabilities details at runtime without passing the respective parameters in the method signature.
To learn more about performing real device testing using the LambdaTest platform, watch this complete video tutorial.
You can also subscribe to the LambdaTest YouTube Channel and stay updated with the latest tutorials around Selenium testing, Playwright testing, Cypress E2E testing, CI/CD tools, and more.
Note: Appium Server is not required to run locally if you want to locate the elements when using LambdaTest.
To run your test, you must add parameters for configurations like platform name, platform version, device name, app, build name, and test name can be set using the testng.xml file.
These tests will be run on the following real mobile devices on the LambdaTest platform.
| Platform Name | Platform Version | Device Name |
| Android | 13 | Samsung Galaxy S23 |
| IOS | 16 | iPhone 14 Pro |
One more thing to note is the efficient parallel testing feature. We run tests simultaneously on Android and iOS platforms by setting the values parallel =”tests” and thread-count =”2” inside the suite tag. It greatly accelerates the testing process.
|
1 2 3 4 5 6 7 8 9 10 11 12 13 14 15 16 17 18 19 20 21 22 23 24 25 26 27 28 29 30 31 32 33 34 35 36 37 38 39 40 41 42 43 44 |
<?xml version="1.0" encoding="UTF-8"?> <!DOCTYPE suite SYSTEM "http://testng.org/testng-1.0.dtd"> <suite name="LambdaTest Mobile automation test suite" parallel="tests" thread-count="2" > <test name="Proverbial app - Android Mobile Automation"> <parameter name="buildName" value="Android Build"/> <parameter name="testName" value="Proverbial app tests"/> <parameter name="app" value="lt://APP1016026231710500086926825"/> <parameter name="platformName" value="ANDROID"/> <parameter name="platformVersion" value="13"/> <parameter name="deviceName" value="Galaxy S23"/> <classes> <class name="io.github.mfaisalkhatri.mobileautomation.tests.android.AndroidTests"> <methods> <include name="textTests"/> <include name="notificationTest"/> <include name="toastMessageTest"/> <include name="geoLocationTest"/> <include name="speedTestPageTest"/> <include name="browserTest"/> </methods> </class> </classes> </test> <!-- Test --> <test name="Proverbial app - iOS Mobile Automation"> <parameter name="buildName" value="IOS Build"/> <parameter name="testName" value="Proverbial app tests"/> <parameter name="app" value="lt://APP1016026231710499882750475"/> <parameter name="platformName" value="IOS"/> <parameter name="platformVersion" value="16"/> <parameter name="deviceName" value="iPhone 14 Pro"/> <classes> <class name="io.github.mfaisalkhatri.mobileautomation.tests.ios.IOSTests"> <methods> <include name="textTests"/> <include name="notificationTest"/> <include name="toastMessageTest"/> <include name="geoLocationTest"/> <include name="speedTestPageTest"/> <include name="browserTest"/> </methods> </class> </classes> </test> <!-- Test --> </suite> <!-- Suite --> |
Trigger the following command on the terminal to run the tests using Maven:
|
1 |
mvn clean install -DLT_USERNAME=<LambdaTest username> -DLT_ACCESS_KEY=<LambdaTest Access Key> |
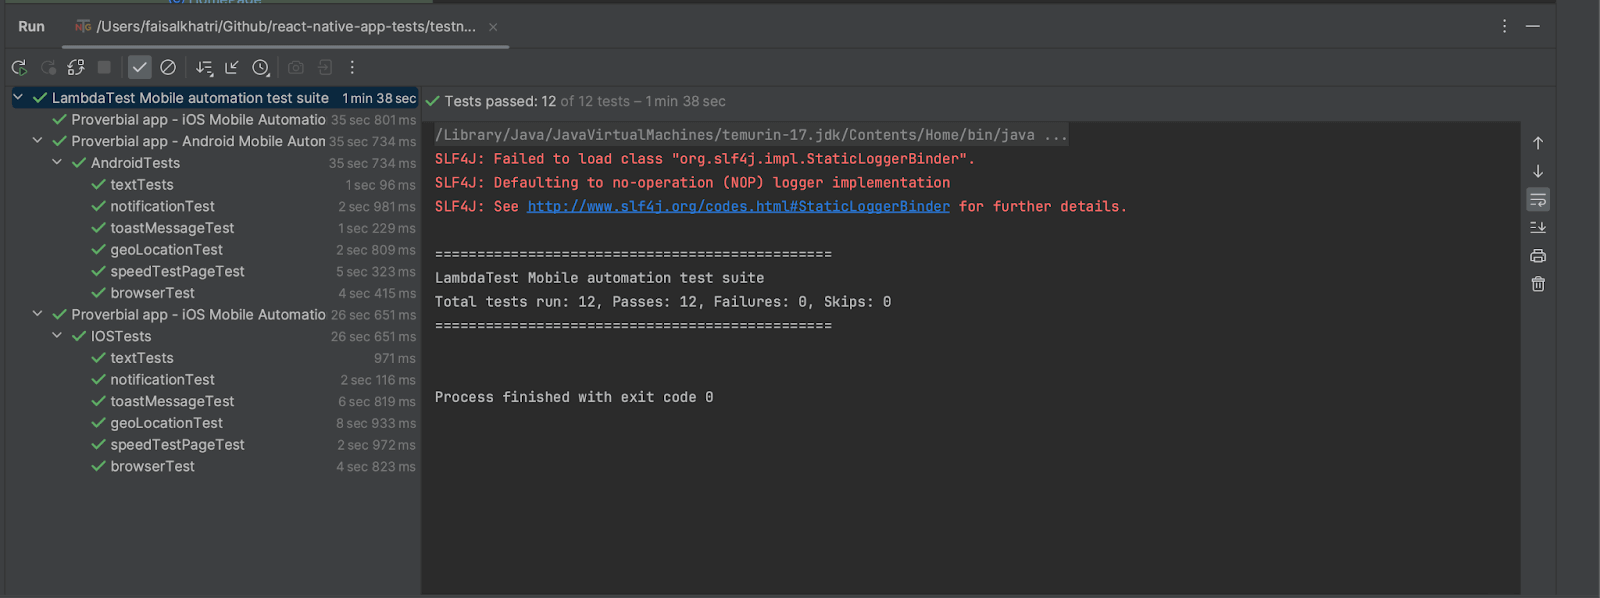
Test Execution
Following is the screenshot from IntelliJ, which shows the execution status of the tests:
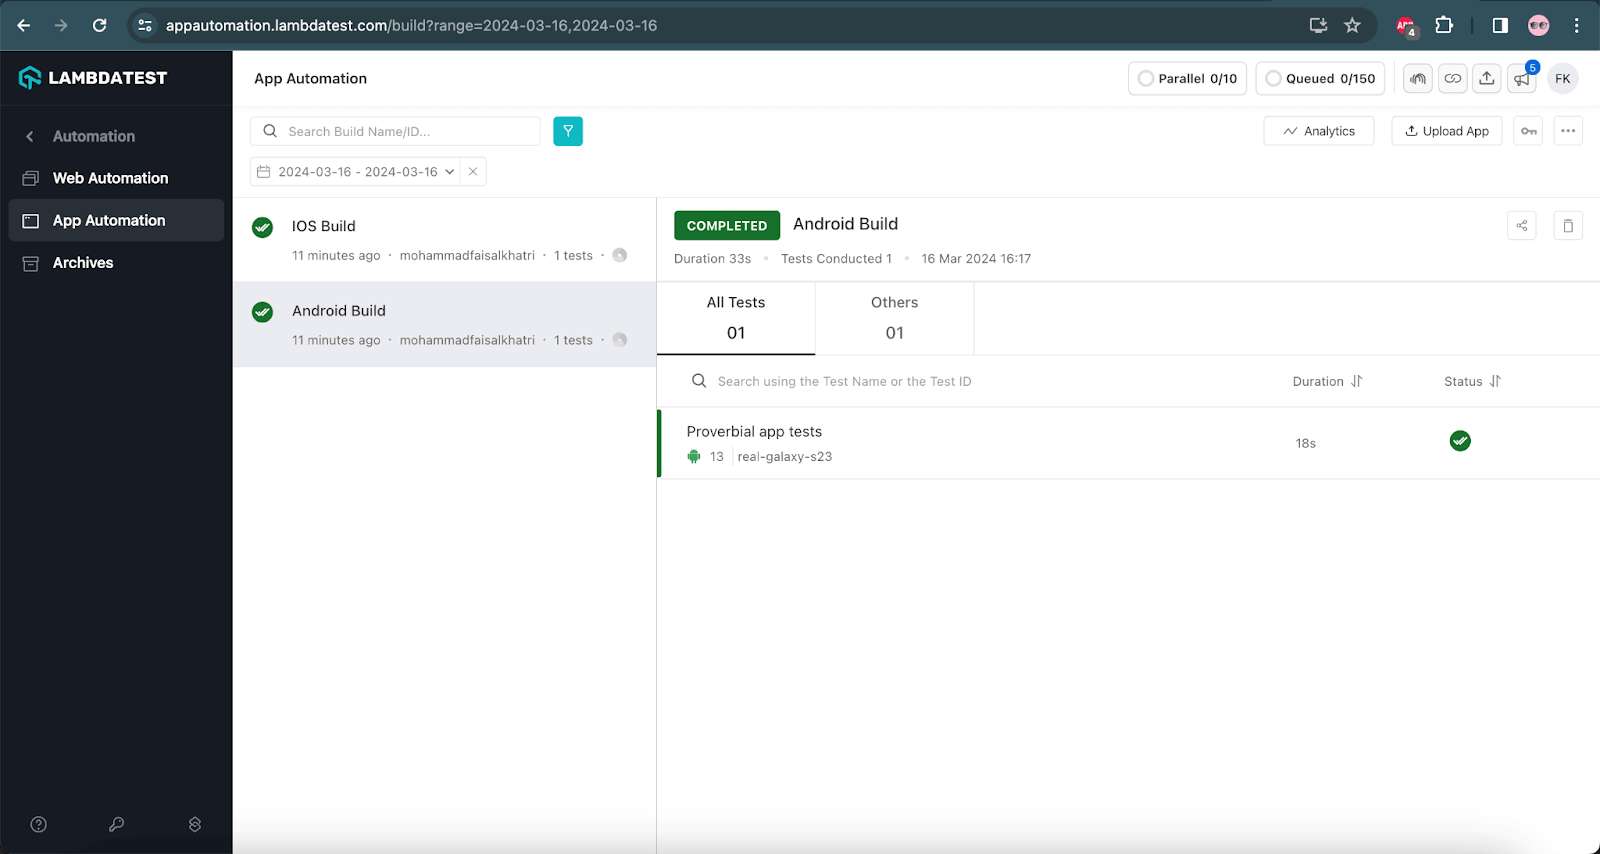
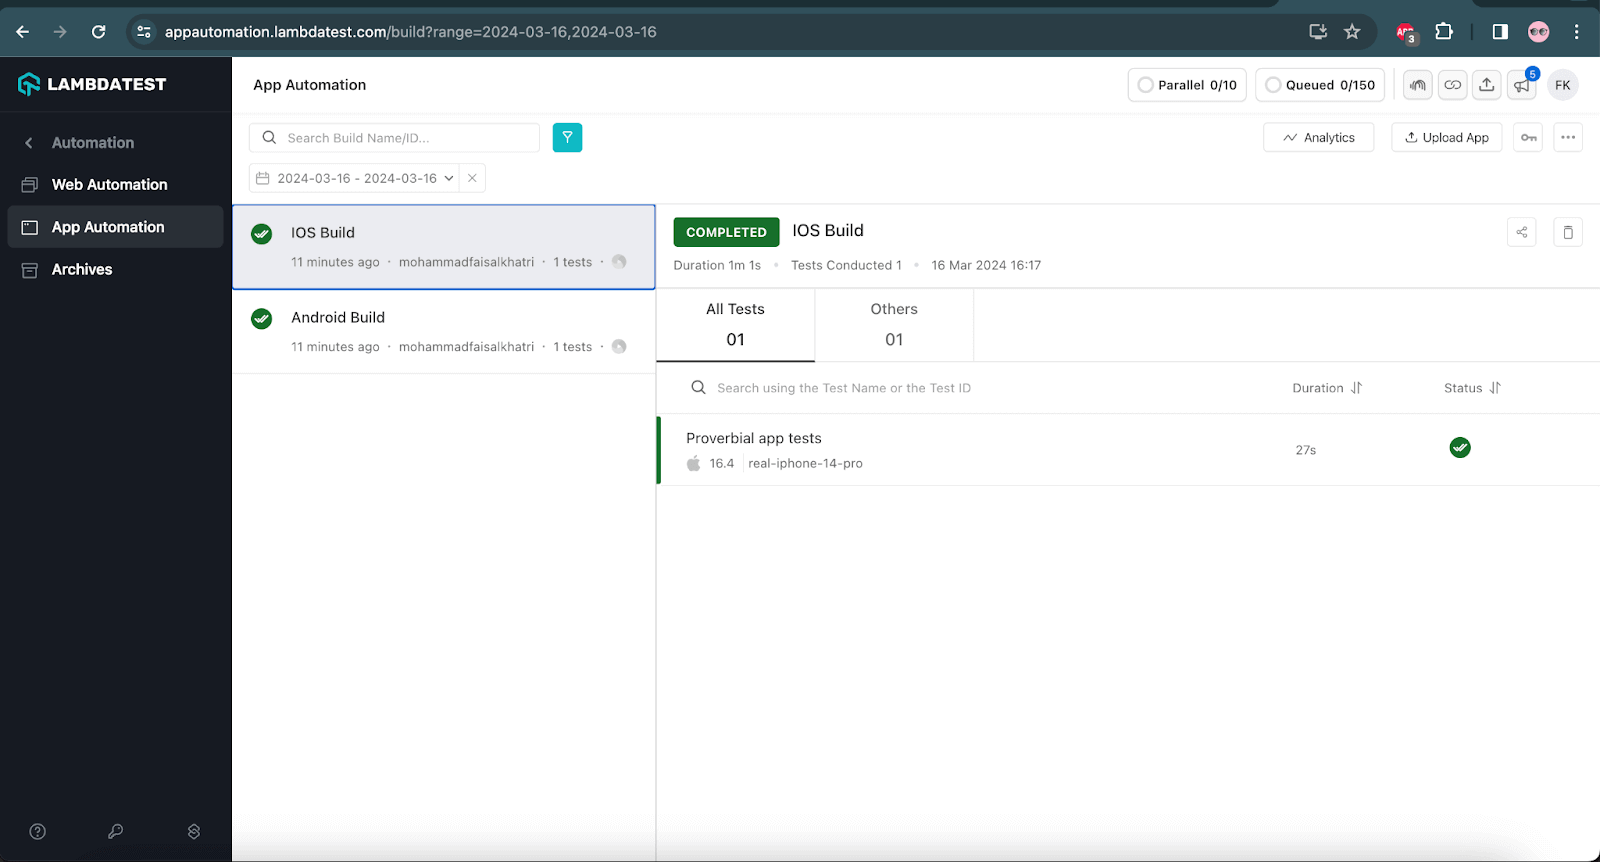
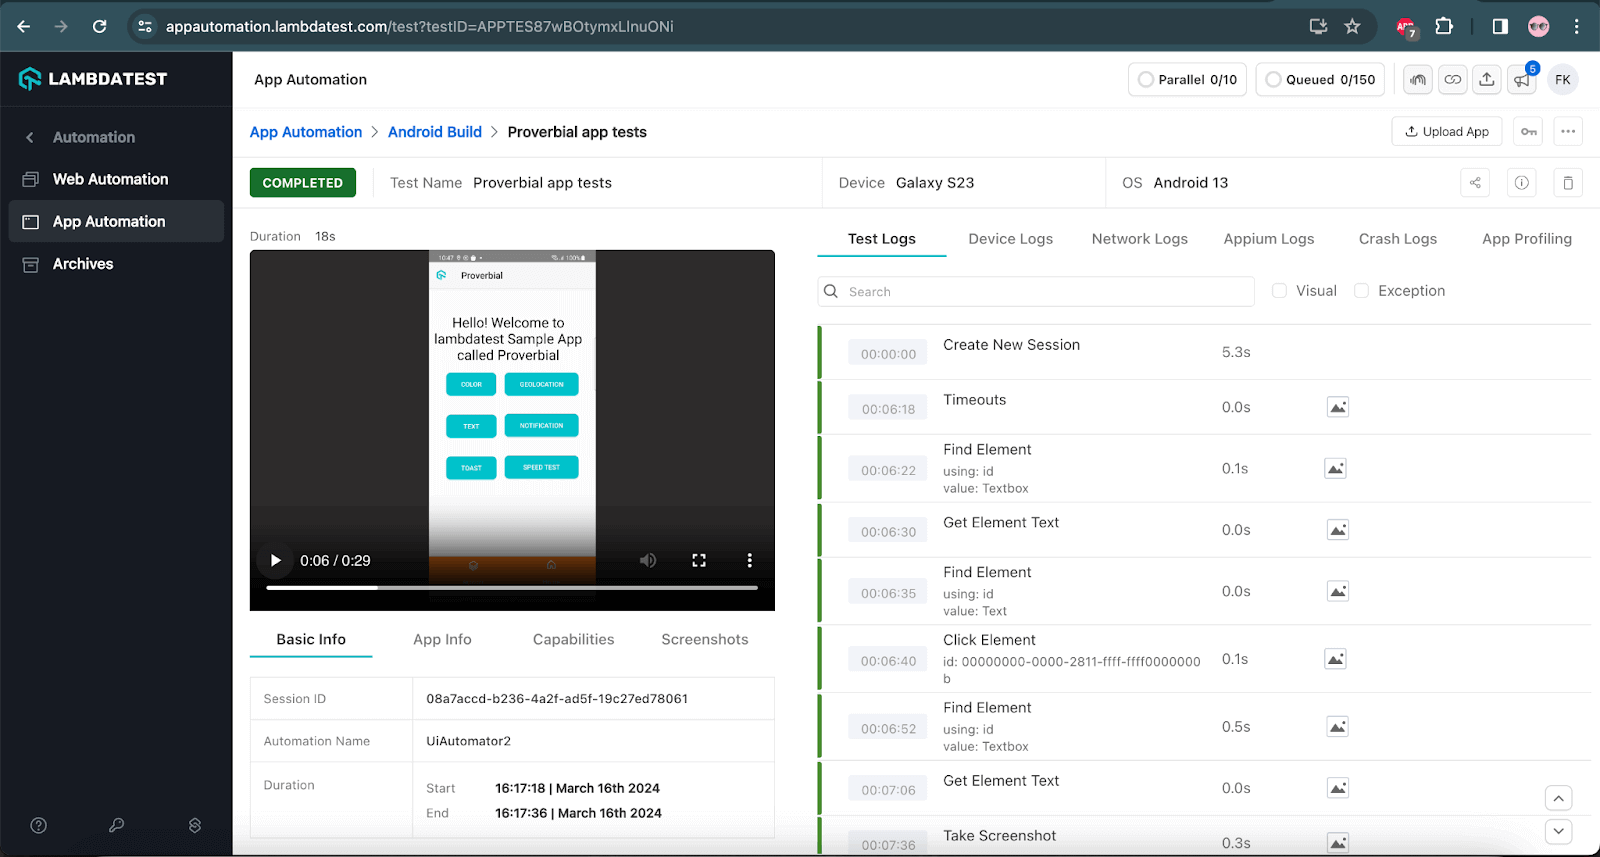
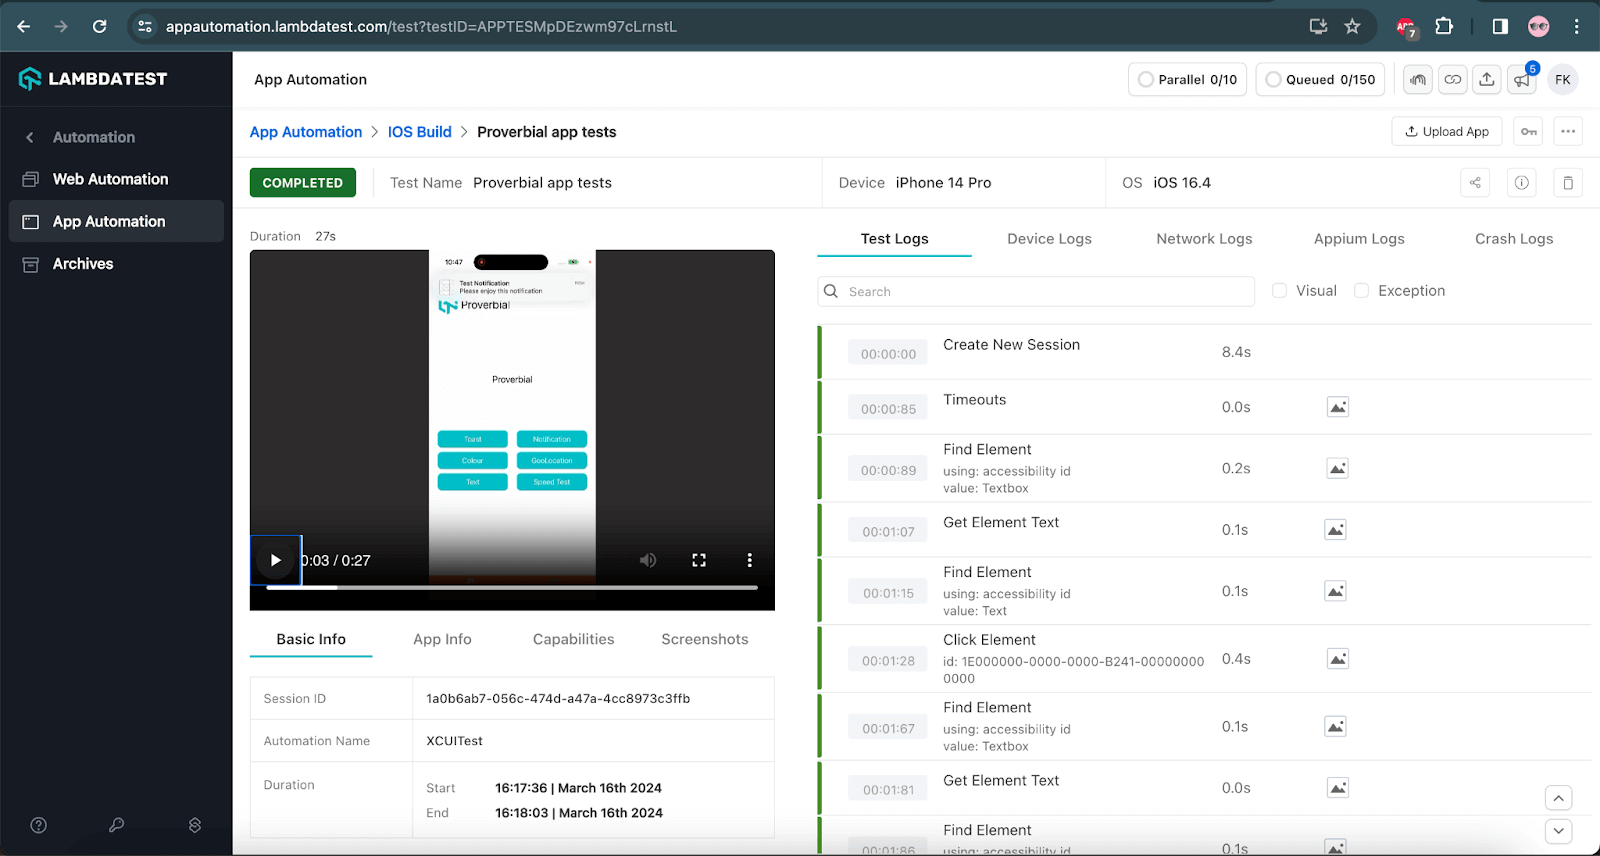
Once the tests are run successfully, we can check out the LambdaTest Dashboard and view all the video recordings, screenshots, device logs, and step-by-step granular details of the test run. Check the results below, which will give you a fair idea of what the dashboard for automated app tests looks like.
Conclusion
In this React Native testing tutorial, we learned how to perform tests on React Native apps for both Android and iOS. You can also perform React Native visual testing on the cloud. The test strategy was discussed, and the elements were used using Appium Inspector. Finally, we were able to write the code using Java with Appium for React Native apps to test on Android devices and test on iOS devices. Finally, we ran the tests on the LambdaTest platform, which executed the tests fast and gave us good insights with video recordings, screenshots, and different logs about the tests. Learn to implement.
Happy Testing!
Frequently Asked Questions (FAQs)
Does the React Native app work on iOS and Android?
React Native is a great solution to build user interfaces. It combines the best parts of native development (iOS, Android) and React, a leading JavaScript library for building user interfaces.
Is React Native the same for Android and iOS?
You have made a smart choice by choosing React Native to build your app. React Native will help you build apps faster while saving you the trouble of re-coding and re-tooling to make the same app work right on iOS and Android.
Does Appium support React Native?
Appium is a classic, widespread mobile application testing framework. React Native is not the only exception; it also provides efficient testing for Android and iOS applications, which makes the framework a universal option for all developers.
What is ReactJS vs ReactJS native?
ReactJS is for crafting web app interfaces that function in web browsers. In contrast, React Native fashions cross-platform mobile apps for both iOS and Android devices, catering to the native user experience on each platform.
What language is React Native?
React Native is a JavaScript framework used to create mobile apps that render natively on iOS and Android devices. It builds on React, Facebook’s JavaScript library, to make user interfaces and tailor them to mobile platforms rather than browsers.


Author’s Profile
Faisal Khatri
Faisal is a Software Testing Professional having 14+ years of experience in automation as well as manual testing. He is a QA, freelancer, blogger and open source contributor. He loves learning new tools and technologies and sharing his experience by writing blogs.
Blogs: 40
Got Questions? Drop them on LambdaTest Community. Visit now


