How To Automate Desktops Apps Using WinAppDriver
Himanshu Sheth
Posted On: December 16, 2022
38 Min


Modern-day software applications can be accessed in numerous ways. You can install them on desktops and smartphones or directly launch them on web browsers. Many people think that the Desktop is legacy, but that’s not the case, as each of us uses numerous desktop applications daily.
Despite the influx of web and mobile applications, most businesses still rely on desktop applications to run their critical business processes. This is where desktop application testing can play a huge role in ensuring that applications work as expected on the platform on which they are installed.
Now, let’s consider the situation from the perspective of an automation tester. Can you imagine using the IDE (Integrated Development Environment) on a mobile phone?😀 Well, I can feel your pain! However, a number of apps (e.g., communication tools like Slack, Teams, etc.) are available in desktop and mobile variants. This two-pronged approach provides much-needed convenience in the hands of the users.
As per a survey, the global remote desktop software market is expected to grow from $2.27 billion in 2022 to $7.22 billion by 2029, with an estimated CAGR of 18.0 percent during the forecast period. This is due to the major overhaul of user interface designs, the upgradation of systems, and the demand for more complex applications.
However, testing these desktop applications poses various challenges since they operate in complex and sensitive computer environments. Be it desktops or mobiles, developers and testers cannot part ways with innumerable browser & platform compatibility issues that follow along during product development! The complexity of testing grows multifold owing to the varied hardware and software configurations.
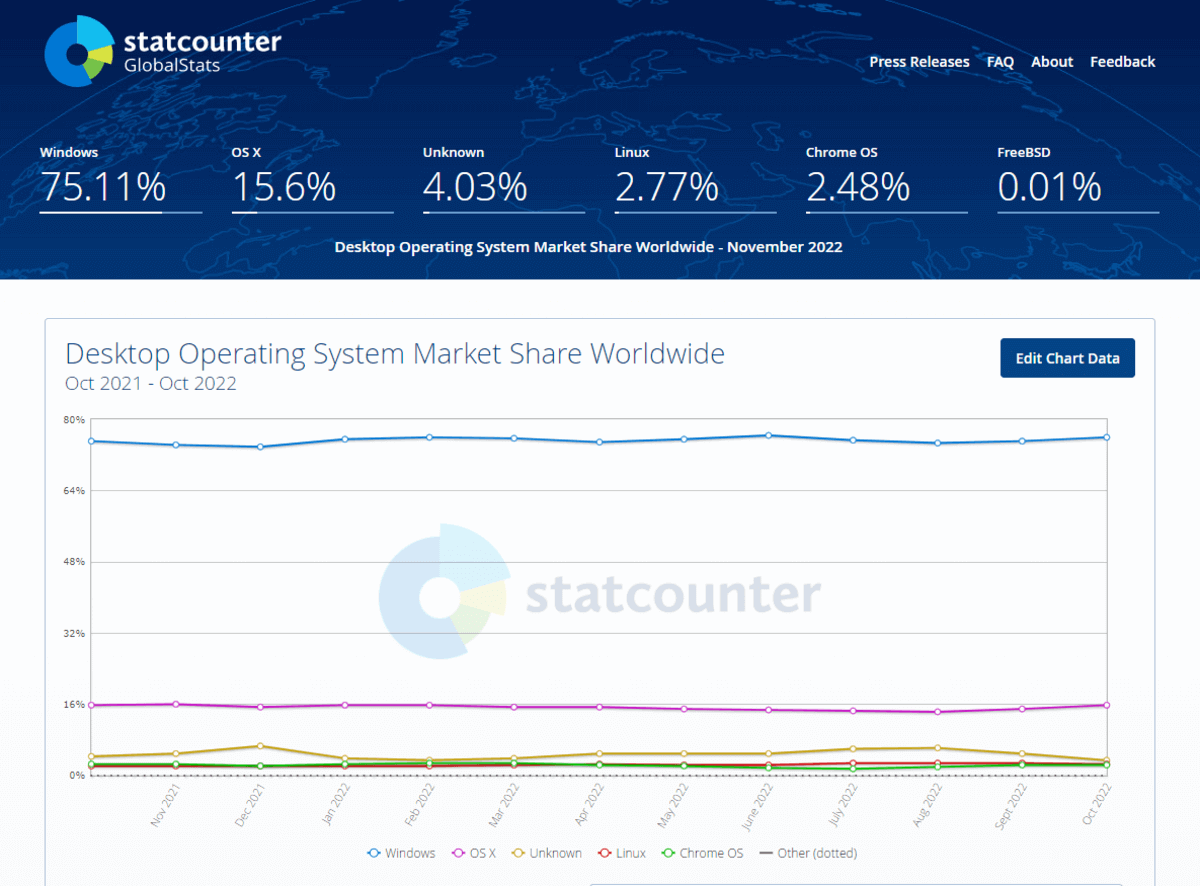
At the time of writing this blog, Windows held close to 75.93 percent market share in the desktop OS market. Though Windows OS leads the race, it is recommended to test on other platforms (e.g., macOS) that are supported by the application.
It goes without saying that manual testing of desktop applications is not a scalable and reliable approach to verifying their features & functionalities. If not manual testing, can we use existing front-end test automation frameworks like Selenium, Appium, etc., to give wings to automated testing of desktop apps? The answer is ‘BIG YES’! While mobile app testing frameworks like Appium is used to automate mobile app testing for Android, iOS, and Windows, it also provides a WebDriver server named WinAppDriver (Windows Application Driver) that catalyzes automated testing of desktop applications.
The learnings of this blog will be useful in leveraging WinAppDriver in Appium to test desktop applications reliably. Let’s get started.
Note: I have used tools and frameworks interchangeably during the blog.
TABLE OF CONTENTS
- What is Desktop App Automation?
- How to select Automation Tools for Desktop Testing?
- Tools for Desktop App Automation Testing
- WinAppDriver and Appium
- How to Install and Run WinAppDriver?
- Locators in WinAppDriver
- Inspecting Elements for Windows Desktop Application Automation
- Demonstration: Desktop Application Testing using WinAppDriver
- Desktop Application Testing on Remote Grid
- Demonstration: Desktop Application Testing on Remote Grid
What is Desktop App Automation?
A desktop application is a standalone software program that runs locally on a machine or workstation. Akin to any other form of application, desktop applications (e.g., Notepad, IDEs, AV players, etc.) are also developed to perform specific tasks.
The performance largely depends on the underlying hardware configuration of the machine on which you have installed the application. I can see a lot of heads nodding in agreement when I mentioned the term performance 😀
In a nutshell, desktop applications must also be tested from a functional and non-functional standpoint. When testing, you need to consider its performance, scalability, reliability, and functionality so that a fully-functional and reliable application is shipped to the market. This is where the role of desktop app automation comes into play.
Here is a one-liner definition of desktop automation testing:
Desktop automation testing is the practice of using automated testing tools and frameworks for verifying the functionality, usability, accessibility, compatibility, and other critical aspects of the application. It ensures that the application functionalities do not break whenever any changes in the environment (or infrastructure) exist.
The interaction between different components within the application and its interaction with the host environment are tested as a part of the desktop application testing strategy. It is recommended to perform installation and uninstallation tests to cover the desktop app testing requirements. You can read more about it by going through our earlier blog on the key benefits of automated software testing.
How to select Automation Tools for Desktop Testing?
Though there are significant differences between web application testing and desktop application testing, the factors considered for choosing the best-suited framework (or tool) remain the same. The scale and complexity of the test suites are expected to increase exponentially as more features make their way into the application.
Keeping the scale and complexity at the forefront, it’s essential to consider a test infrastructure that is highly secure, scalable, and reliable for running desktop application tests. At the end of it, you would want the desktop automation tests to be triggered in a CI pipeline so that a top-quality product makes it to production. Hence, costs (one-time & recursive) and integration with CI tools are the two major factors that should be considered. This is where the concept of cloud testing comes into the picture.
Here are some parameters that must be considered when shortlisting desktop application testing tools (or frameworks):
Technical complexity
No one would use a tool with a steep learning curve. Choosing such a tool can be an absolute bummer for your team.
Hence, you need to choose a tool where your team can get started from the word go. 🚀Porting existing test suites (or test cases) must not involve severe code changes since it will negatively impact the ROI on test automation.
Infrastructure costs
Building and scaling an in-house testing infrastructure requires a significant amount of one-time and recursive investments. This is where cloud-based desktop application testing can come in handy, as your team needs to only focus on implementing the tests!
When selecting the tool, you should look into the technical requirements of the same. You can get the best ROI from the tool if it supports integration with various tools in categories like CI/CD, codeless automation, report management, and more.
For instance, WinAppDriver – an open-source service that supports Selenium-like automated UI testing on Windows applications, can be used for testing at scale on cloud automation platforms like LambdaTest.
Support for programming languages
Most open-source test automation frameworks like Selenium, Appium, etc. support a range of programming languages like Java, Ruby, Python, PHP, and more.
The support for a range of programming languages provides you an option to leverage the existing skills of the team members. This also shortens the learning curve since the tests can be implemented using a programming language with which the team members are comfortable.
Customer support and developer documentation
It goes without saying that support and documentation are the guiding pillars of any developer-focused product. The same principle applies to any automation testing tool (or framework).
Top-notch documentation aids in minimizing the time required to get acquainted with the tool. On similar lines, top-notch customer support helps the users in expediting their technical journey with the corresponding tool.
Tools for Desktop App Automation Testing
Here are some of the most popular desktop automation testing tools available in the market:
- WinAppDriver
- Winium
- Tricentis Tosca
- Micro Focus UFT
- SikuliX
While a plethora of tools like Winium, Tricentis Tosca, Micro Focus UFT, and SikuliX exist for desktop automation, there is still a certain level of friction when it comes to adopting them. Generating tests using WinAppDriver requires a shallow learning curve since it’s more or less a Selenium-like test.
In case you have hands-on expertise with popular frameworks like Selenium and/or Appium, it is recommended to opt for WinAppDriver over other tools. I will discuss the what and why of WinAppDriver in the subsequent sections of this blog.
What is WinAppDriver?
Started by Microsoft, WinAppDriver is an open-source framework for desktop application testing. WinAppDriver can be loosely considered as a WebDriver-API like UI testing framework. Like Selenium, WinAppDriver consists of libraries that can be integrated into a test runner that supports Appium. For example, you can create and run WinAppDriver test scripts with C# testing frameworks like MSTest, xUnit, etc., from Visual Studio.
It is an Appium-compatible server that supports testing of the following categories of applications:
- Universal Windows Platform (UWP)
- Windows Presentation Foundation (UPF)
- Windows Forms (WinForms)
- Classic Windows applications
As stated in WinAppDriver official FAQ, WinAppDriver virtually supports all Windows 10 applications. Though the official documentation only mentions Windows 10 applications, I successfully managed to use WinAppDriver to automate a desktop application installed on a Windows 11 machine!
When writing this blog, WinAppDriver has 3k stars and 1.3k forks. The latest version of WinAppDriver is 1.2.1. The complete WinAppDriver code is not open-source; only the tests, samples, and related tools are open-source. You can find more details about the project on GitHub.
With Appium’s WinAppDriver, developers can easily customize their preferred programming language and test runner. They can even reuse their test scripts irrespective of whether the application runs on Android or iOS. Since Appium uses the WebDriver protocol, developers also get flexibility when authoring tests.
If you have experience working with Selenium and/or Appium, you will find automated testing with WinAppDriver a breezy task 🙂
Why choose WinAppDriver for Windows App Testing?
Though there are a host of other tools for realizing desktop application automation, WinAppDriver stands apart from the lot for several reasons.
One pointer that weighs heavily in favor of WinAppDriver is the ease with which you can use it if you have familiarity with Selenium and Appium frameworks. It simply flattens the learning curve by a huge margin.
Needless to mention, you can write test cases in popular Selenium-supported programming languages like Java, C#, Python, and more.
Here are some of the other reasons for opting for WinAppDriver for Windows desktop application automation:
- Open-source
- Usage of the widely used WebDriver protocol
- Support for integration with best CI/CD tools like Jenkins, GitLab, and more
- Familiar locator strategies that are used in automation with Selenium and Appium
On the whole, you can leverage existing methods like findElement, findElements, sendKeys in Selenium, etc. and design patterns like Page Object Model (POM) for automating desktop application testing.
Also Read: Page Factory in Selenium
WinAppDriver and Appium
For starters, Appium is an open-source test automation framework through which you can automate testing of different types of applications (i.e., web, hybrid, and native). You can refer to the detailed Appium testing tutorial to get more insights into the Appium framework.
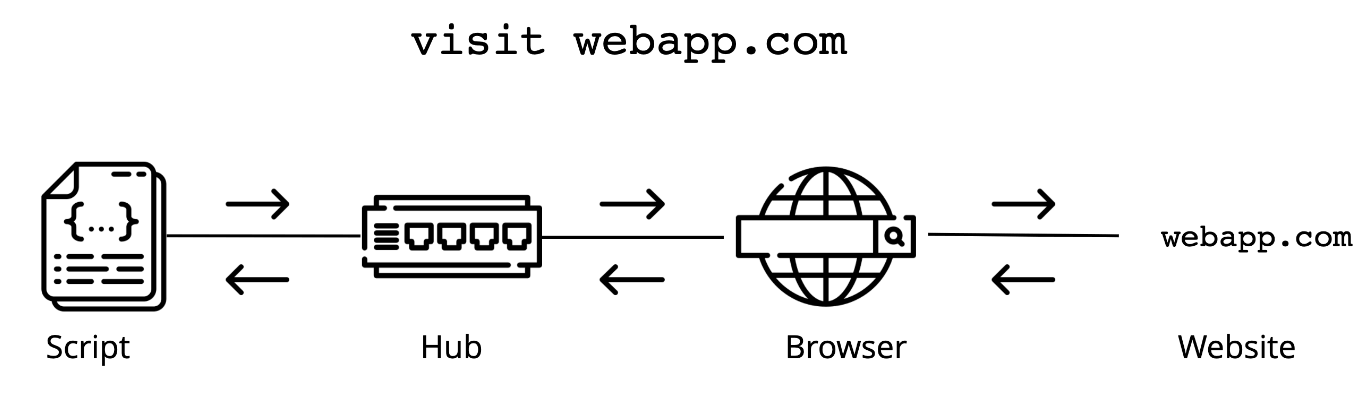
Though WinAppDriver operates in standalone mode, it also serves as a plugin for the Appium framework. As seen in the image below, Appium is a RESTful server that accepts incoming commands (test execution requests) from the script on the client machine and forwards them to WinAppDriver.
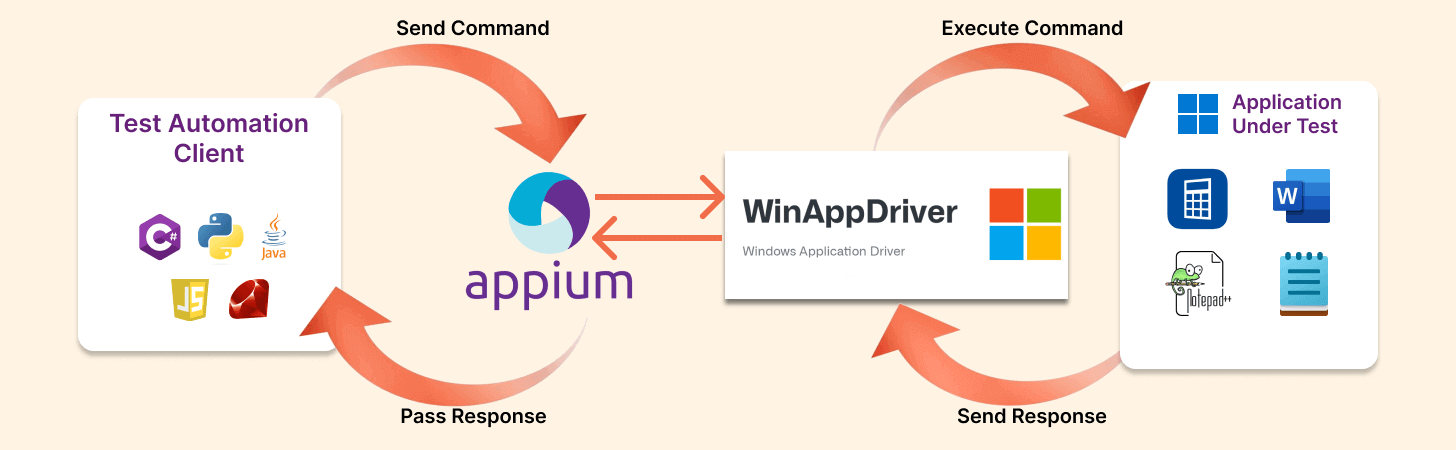
In simple terms, WinAppDriver enables Appium through the new APIs added as a part of Windows 10 (Home & Pro) and Windows Server 2016. Since I could use WinAppDriver on Windows 11 Pro, the APIs are also a part of that OS version!
I will dive deeper into the association between WinAppDriver and Appium in the demo section of this blog.
How to Install and Run WinAppDriver?
Now that I have touched upon the essentials of WinAppDriver, let’s look at how to install and use WinAppDriver for automated desktop application testing. When writing this blog, WinAppDriver was only available for Windows OS.
Any further reference to OS or Platform refers to Windows OS only. Installation of WinAppDriver.exe on the client machine is straightforward. Follow the steps below:
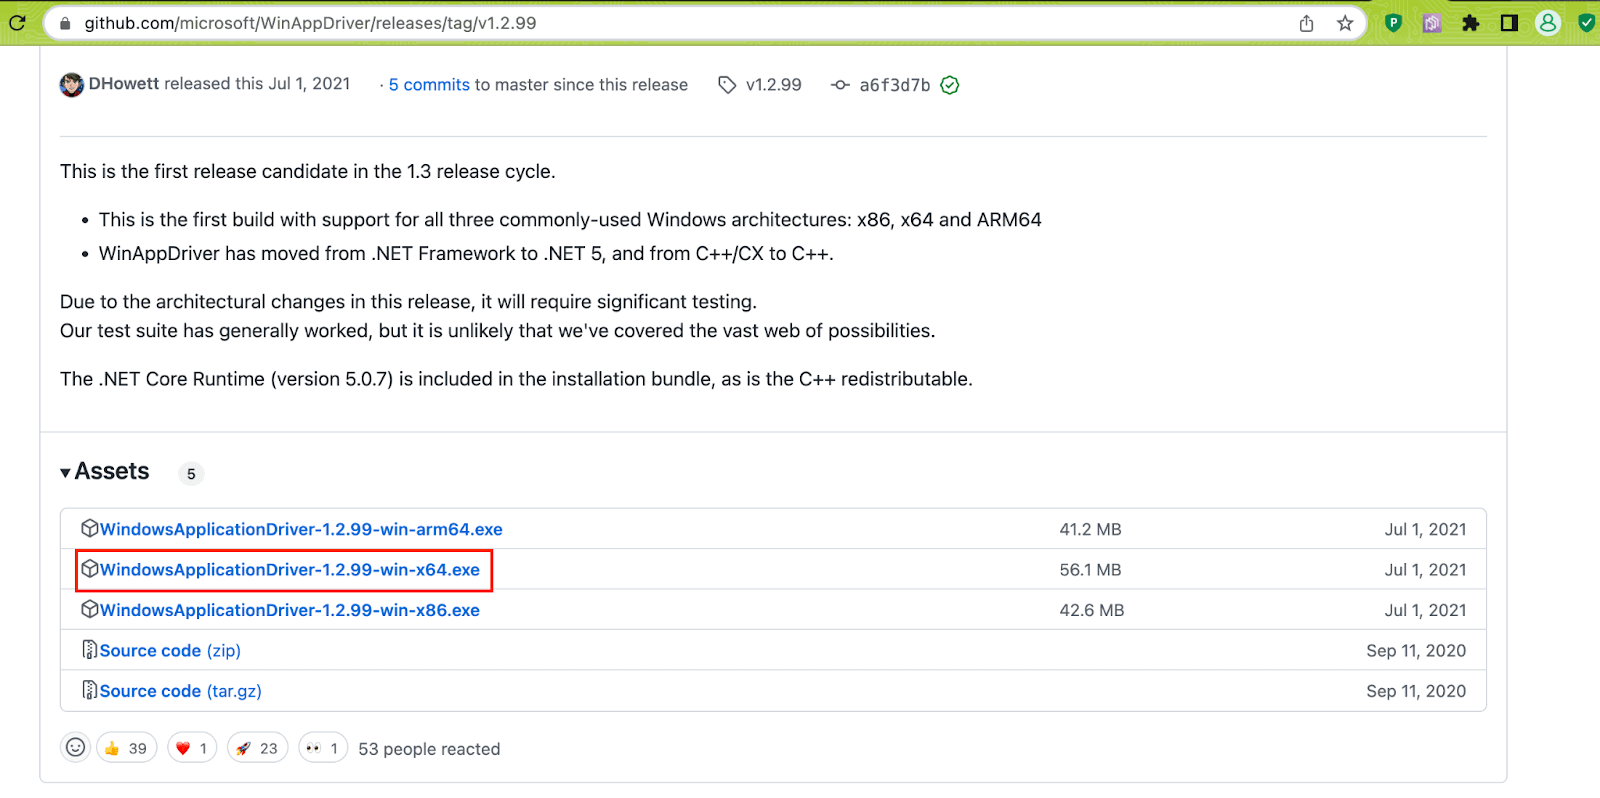
Download WinAppDriver
Download the latest version of WinAppDriver from the official WinAppDriver GitHub page. At the time of writing this blog, the stable version was v1.2.1. However, I have used v1.3 Release Candidate 1 (1.2.99). The v1.3 RC candidate supports major architectures – x64, x86, and ARM64.
To know the machine architecture, go to System Information on your Windows machine. As seen below, I am using Windows 10 OS on a machine with x64 architecture.
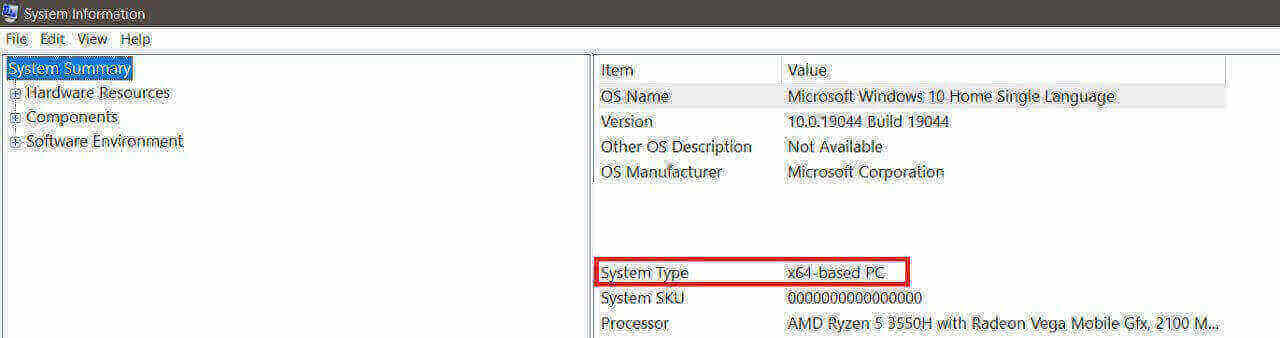
Hence, I downloaded the WinAppDriver 1.2.99 for the win-x64 architecture.
Run WinAppDriver Installer
Double-click on the downloaded installer to install WinAppDriver on your machine.
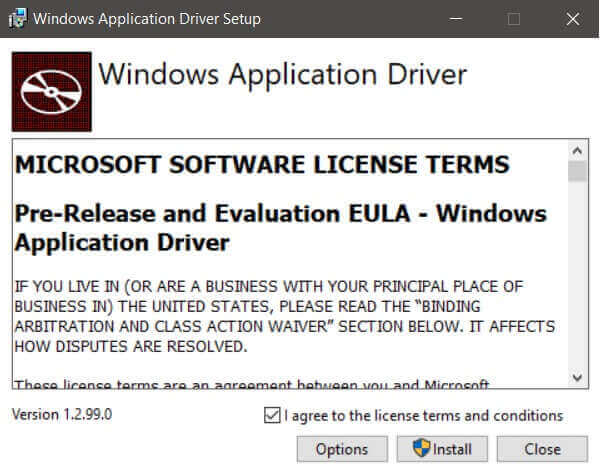
There is no need to restart the machine! Once we enable the “Developer Mode” on the machine, we can use the capabilities offered by WinAppDriver for locating elements and automating interactions with the said elements.
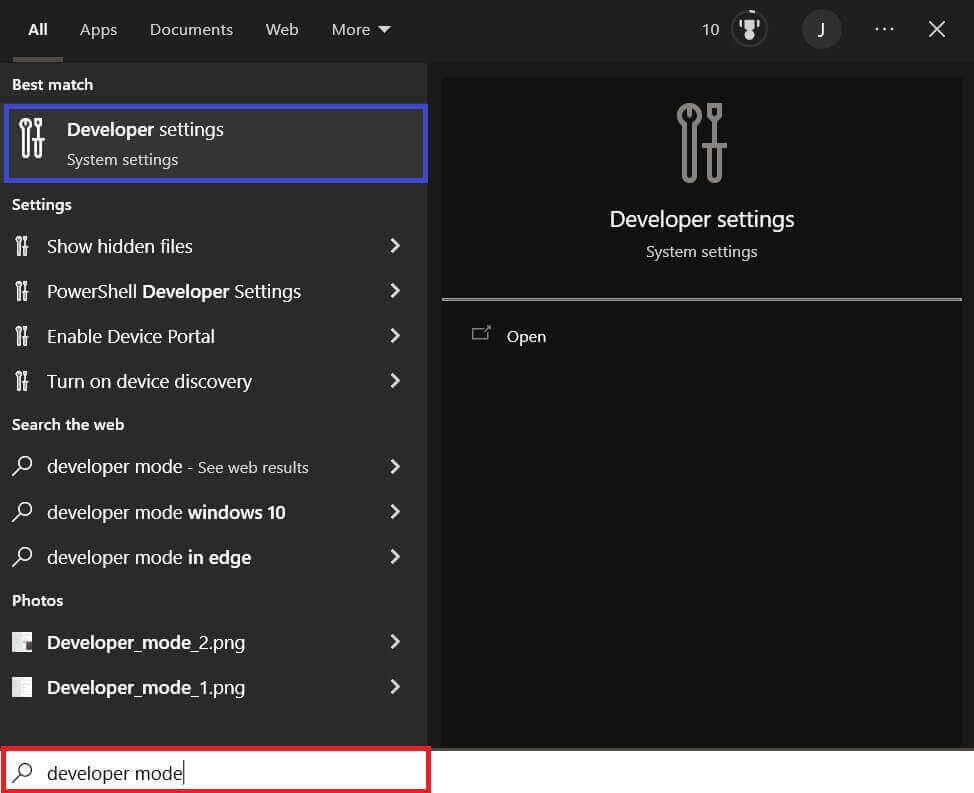
Enable “Developer Mode”
Perform the following steps to enable the Developer Mode on the machine. It is important to note that the below-mentioned steps are for Windows 10. The steps might differ in case you are using a Windows 11 machine.
Type Developer Mode in the search bar, and click on Developer Settings.
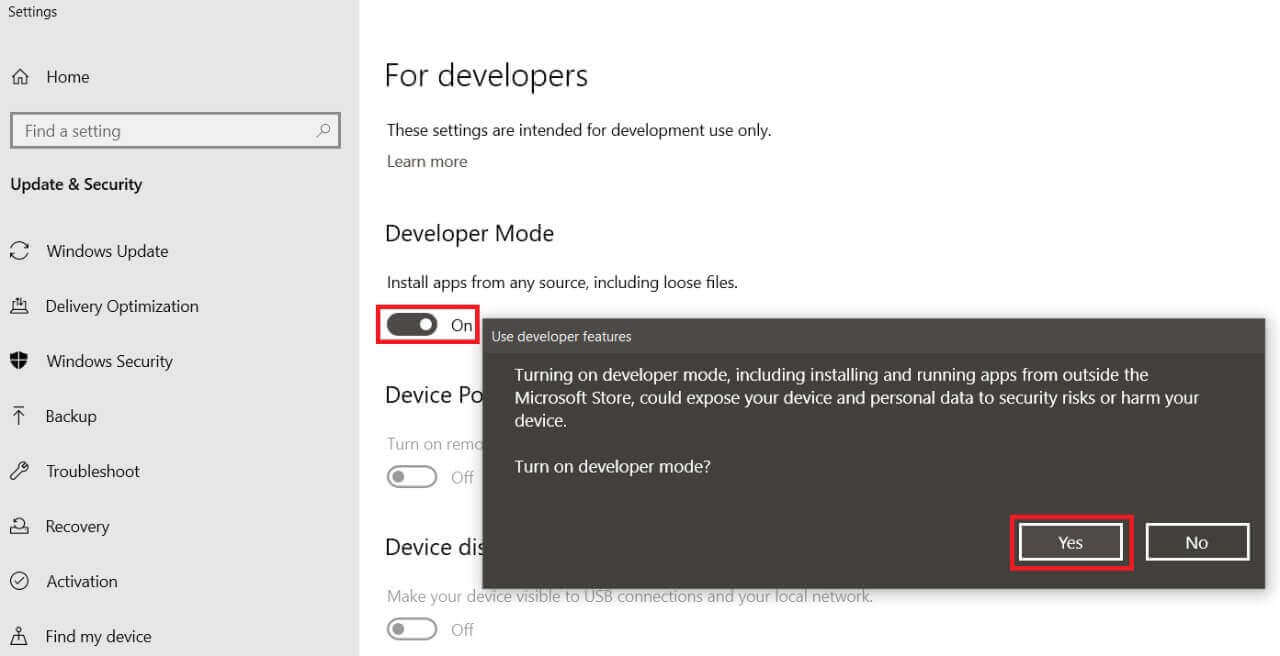
Toggle the entry located under the Developer Mode field. Click on Yes to use the developer features on the machine. This is required since the tools provided by the WinAppDriver team need to access the details of the app elements that are open on the machine.
Start WinAppDriver
The installed WinAppDriver.exe needs to be started manually so it can listen to the incoming requests on the default IP address and port (127.0.0.1:4723). WinAppDriver.exe might be installed in either of the following directories:
- C:\Program Files (x86)\Windows Application Driver
- C:\Program Files\Windows Application Driver
In case the default port (i.e., 4723) is in use, run the following commands as an administrator on the terminal (or command prompt).
WinAppDriver.exe 4727
WinAppDriver.exe 10.0.0.10 4725
WinAppDriver.exe 10.0.0.10 4723/wd/hub
Open the terminal and start the WinAppDriver so that it can start listening to the incoming requests on the designated port number. As seen below, it is listening on port number 4723.

Akin to web locators in Selenium that help locate WebElements in the DOM, object properties of the desired Windows application must be identified using the appropriate tools provided by the Windows Application Driver team.
Locators in WinAppDriver
Like Selenium, elements in WinAppDriver can also be located using identifiable properties like:
- XPath
- className
- Id
- AccessibilityID and more
In case you are not familiar with Selenium locators, do check out the detailed blog that walks you through the different types of locators in Selenium WebDriver.
Here is the list of locators supported by WinAppDriver:
| Client API | Locator Strategy |
| findElementByAccessibilityId | Accessibility Id |
| findElementByClassName | Class Name |
| findElementById | id |
| findElementByName | Name |
| findElementByTagName | Tag Name |
Since there are significant differences between Desktop Apps and Web Apps, some locators like linkText, partialLinkText, etc. might not be used for desktop application testing.
Inspecting Elements for Windows Desktop Application Automation
Selenium WebDriver supported findElement and findElements methods can be used in conjunction with the respective locators for interacting with the elements in the Windows Desktop Application.
Here are some of the tools that help identify the properties of the elements in the application:
WinAppDriver UI Recorder (WAD UIRecorder)
UI Recorder generates the XPath of the element by inspecting the same. The source code of UI Recorder is available on GitHub. As seen in the image below,
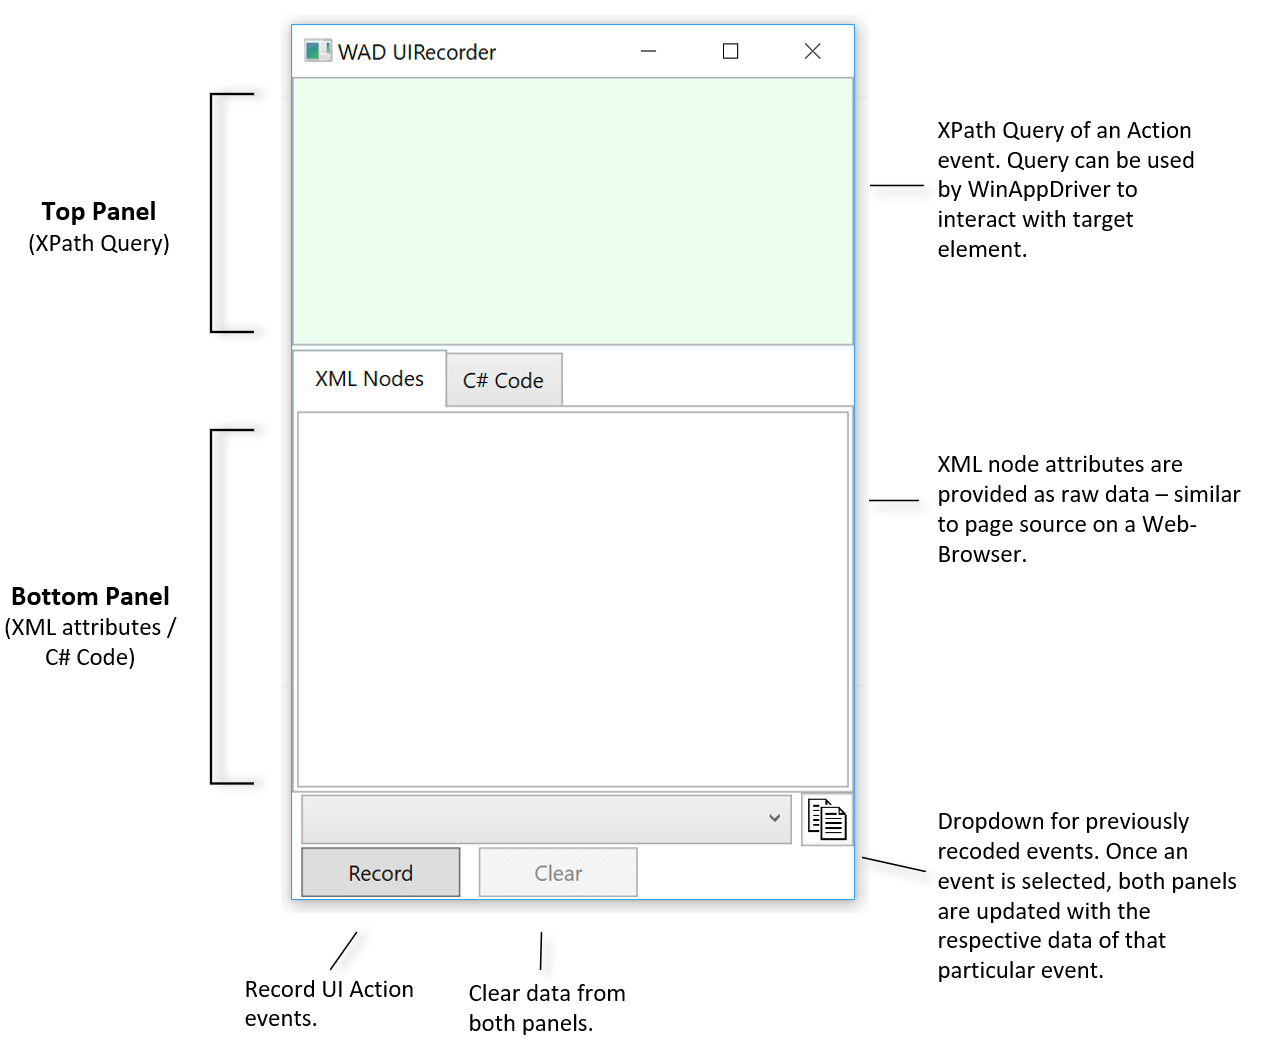
The tool can capture both keyboard as well as mouse interactions. It can generate XPath expressions of UI elements and C# code from recorded UI input events.
In order to capture the XPath of the element, download the WinAppDriverUIRecorder.zip and extract it to your machine. Double-click on WinAppDriverUiRecorder.exe. To derive the XPath of the desired element, click on the Record button in the tool. Once the recording is live, both the panels are updated dynamically with UI information based on the UI actions taking place in the application.
As seen below, the top panel shows the XPath of the currently highlighted element, whereas the bottom panel provides the raw XML information of the same element.

The C# Code tab provides the C# generated code that can be readily used in the WinAppDriver test code. This feature can be loosely compared to the Code Export Feature in Selenium IDE. The only difference is that the IDE supports code export in many languages (e.g., Python, Java, etc.) apart from C#.
As testers, we know how extensive usage of XPath for dynamic pages could lead to flaky test suites. For the demo, I would use Inspect.exe – a tool that comes with the Microsoft SDK.
Inspect.exe
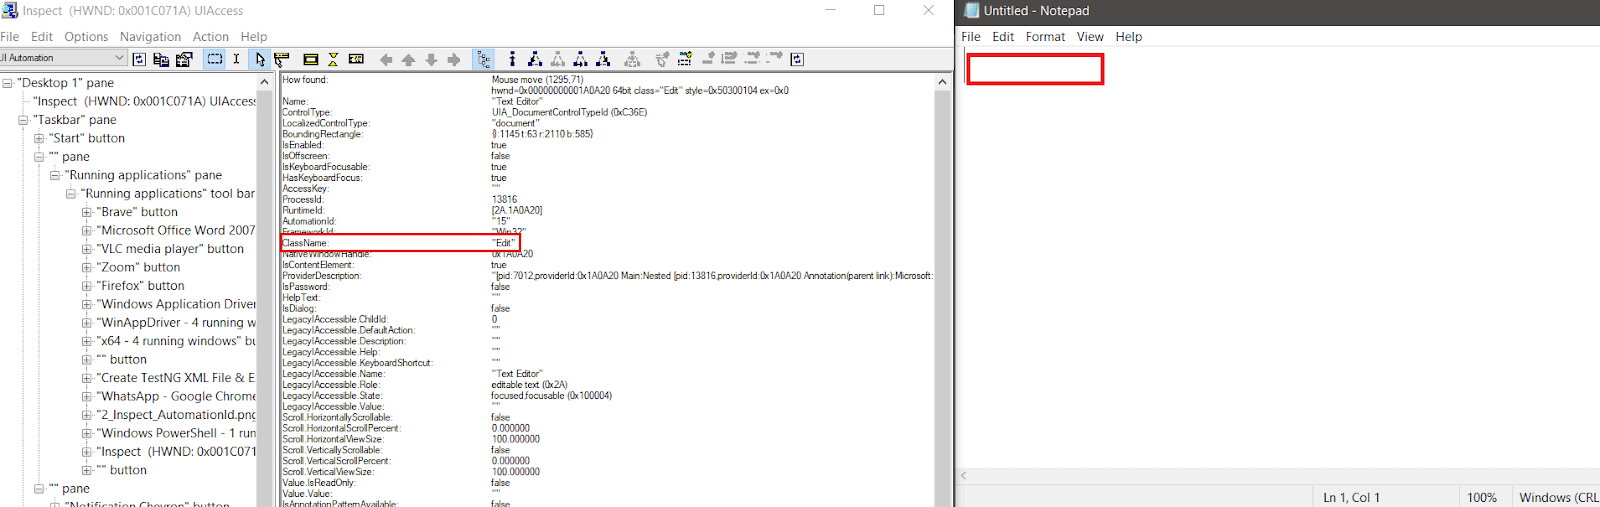
Inspect.exe (or Inspect) tool that can help you view the accessibility data of any element that is under focus. Though Inspect.exe is now a legacy tool, as per the official announcement by Microsoft, it is still a super-useful tool for viewing Microsoft UI automation properties and control patterns. This also includes viewing the Microsoft Active Accessibility (MSAA) properties.
Unlike the WAD UIRecorder, which only provides the XPath of the element, Inspect.exe helps locate elements using popular properties like AccessibilityID, Name, ClassName, and more.
Microsoft recommends using Accessibility Insights instead of Inspect.exe since this free & open-source tool is available for Windows, Web, and Android. Below is a screenshot of Accessibility Insights on my Windows 10 machine:
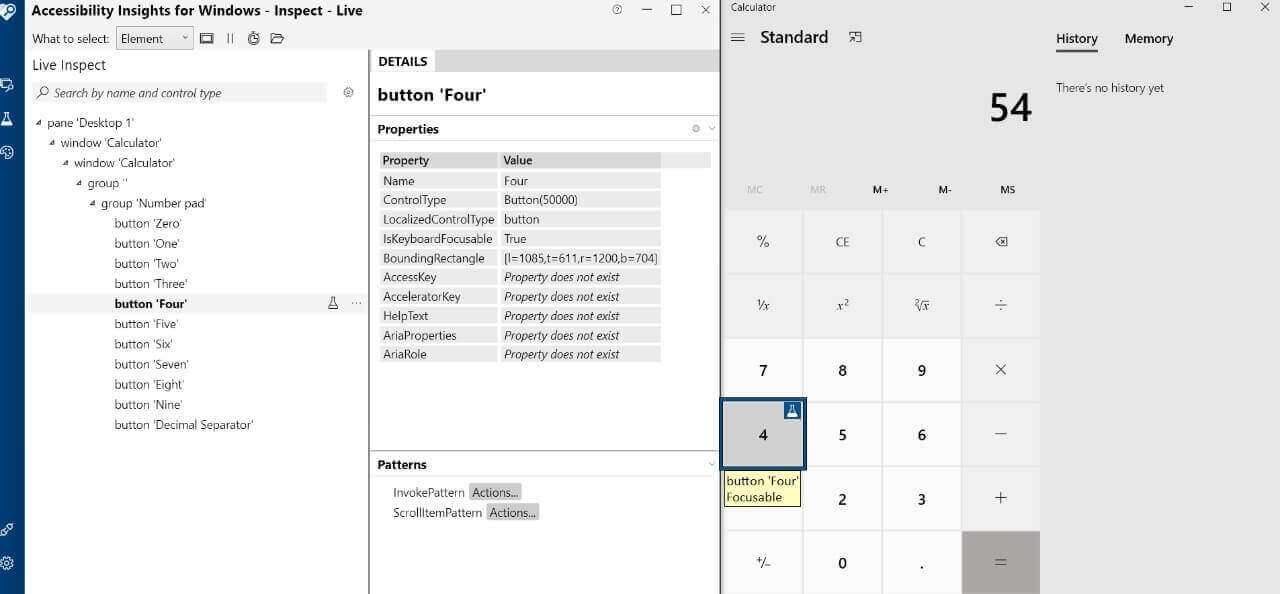
Since I faced some lag issues when using Accessibility Insights on my machine, I used Inspect.exe for the demo.
Follow the below-mentioned steps for installing Inspect.exe on a Windows machine:
Step 1
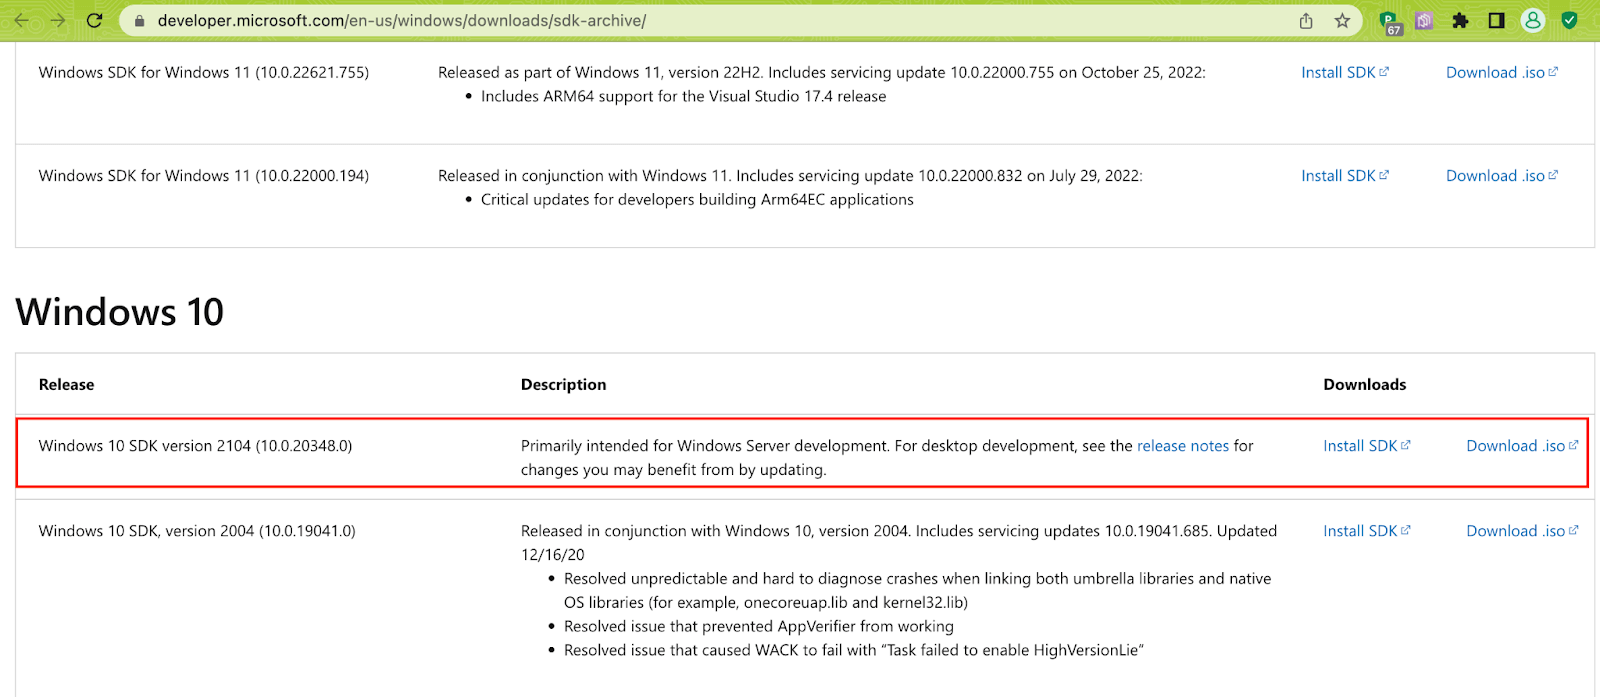
Visit Windows SDK and download & install the SDK installer. The SDK is available for installation on Windows 11 (version 22H2) and other legacy versions (including Windows 10).
The SDK can be used for building Universal Windows Platform (UWP) and Win32 applications. Here are the latest Windows SDK versions when writing this blog:
| Platform (or OS) | SDK Version | Download Link |
| Windows 11 | 10.0.22621.755 | https://go.microsoft.com/fwlink/p/?linkid=2196241 |
| Windows 10 | 10.0.20348.0 | https://go.microsoft.com/fwlink/?linkid=2164145 |
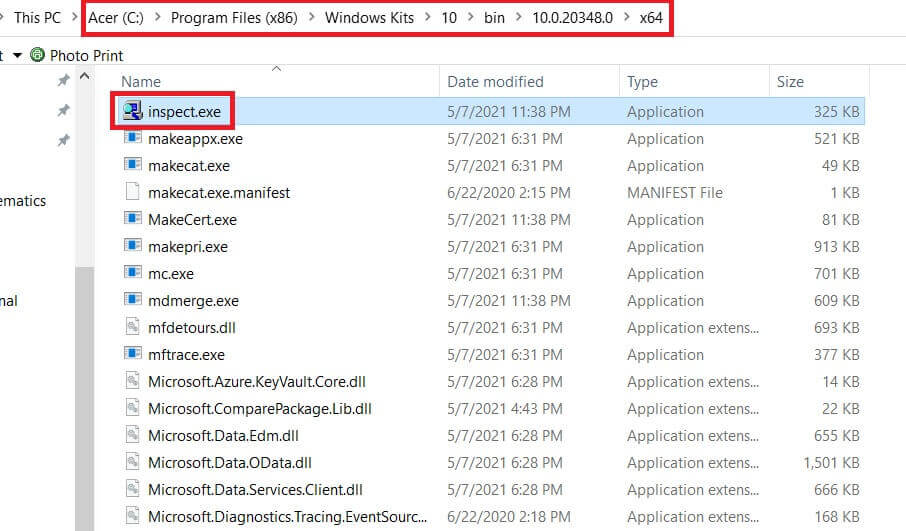
In case you are using outdated Windows versions (e.g., version 8.1, 8.0), you can still use Inspect.exe on the machine by downloading the SDK from Windows SDK and emulator archive. Since I am using Windows 10, I will install the Windows 10 SDK version 2104 (10.0.20348.0) release on my machine.
Below are some steps from the installation process:
In my case, the SDK will be installed in C:\Program Files (x86)\Windows Kits\10.
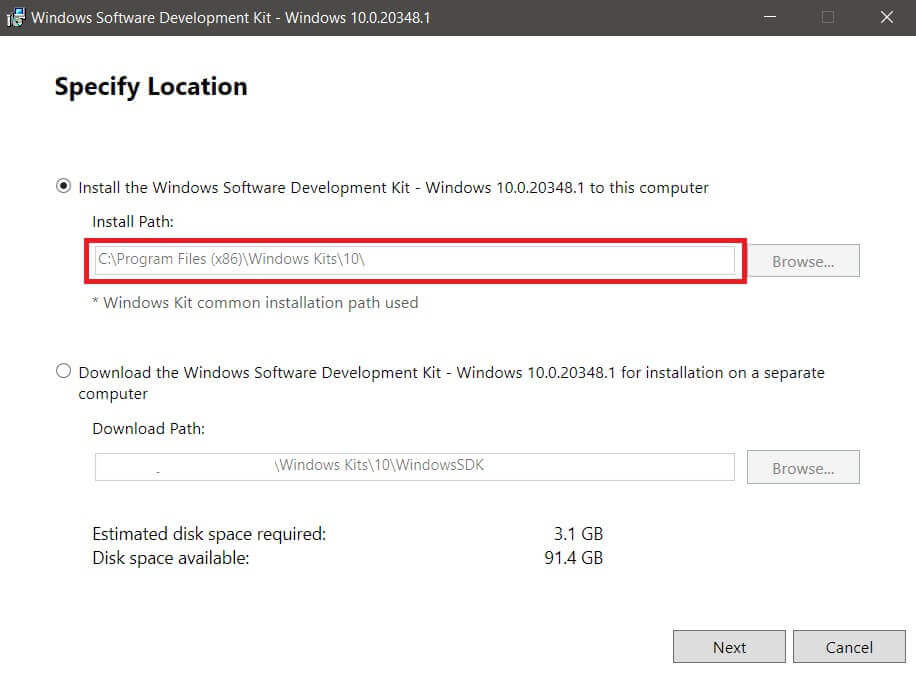
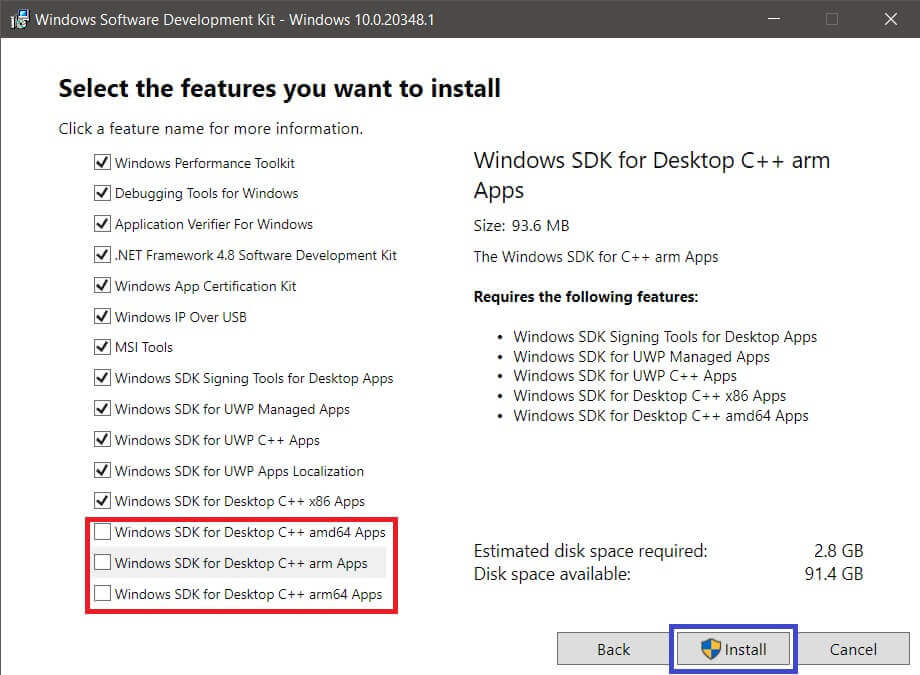
I have unchecked the arm64 architecture-related options since the installation is performed on an x64 machine.
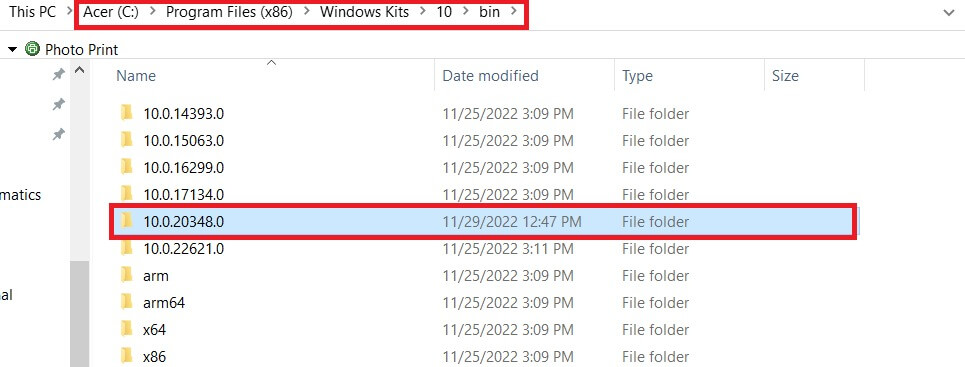
As shown below, Inspect.exe is installed in the C:\Program Files (x86)\Windows Kits\10\bin\10.0.20348.0\x64 folder.

Step 2
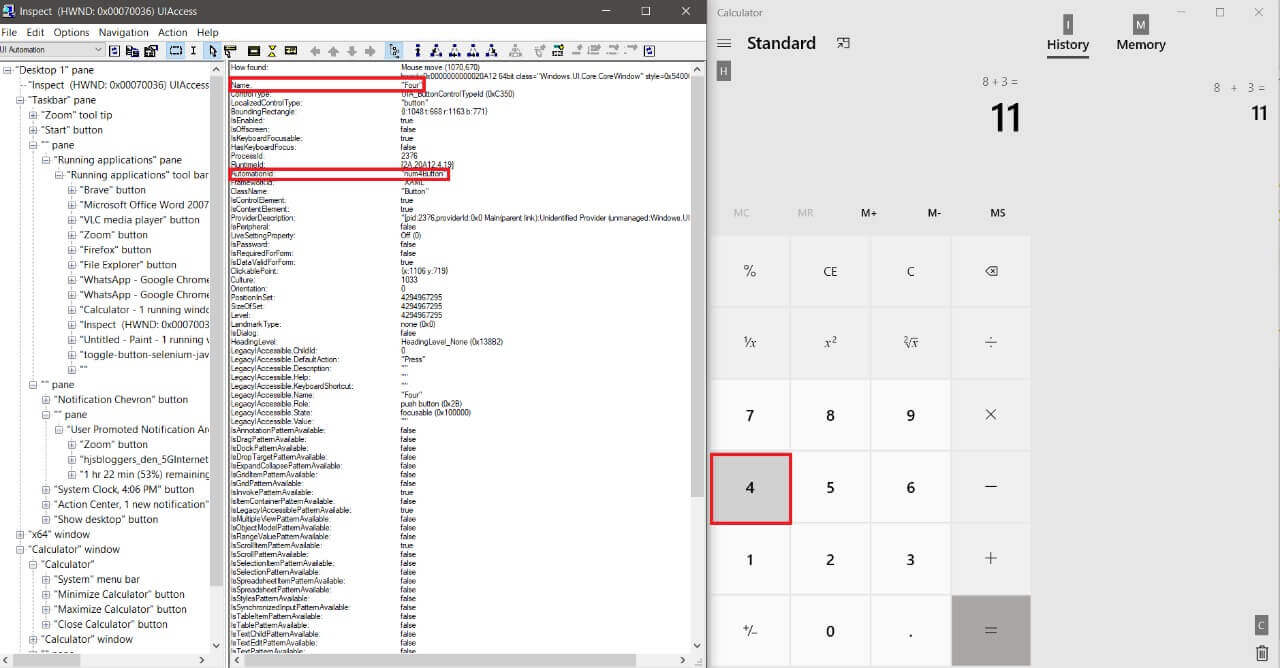
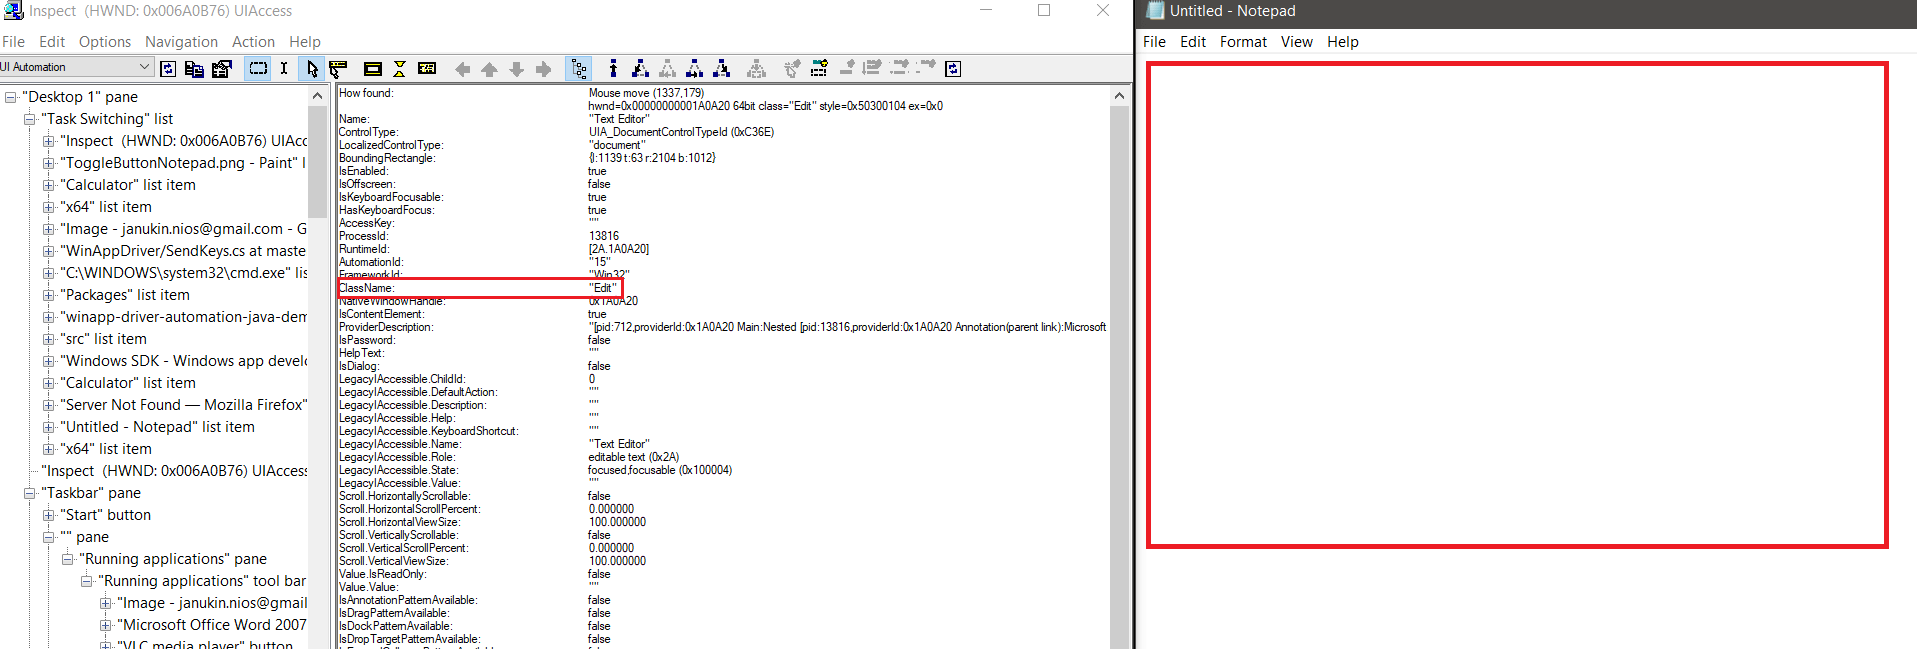
Now that Inspect.exe is installed, let’s inspect the elements present on a Windows application. Run the application (e.g., Calculator) and Inspect.exe, each with 50 percent screen occupancy. This gives better visibility about the properties.
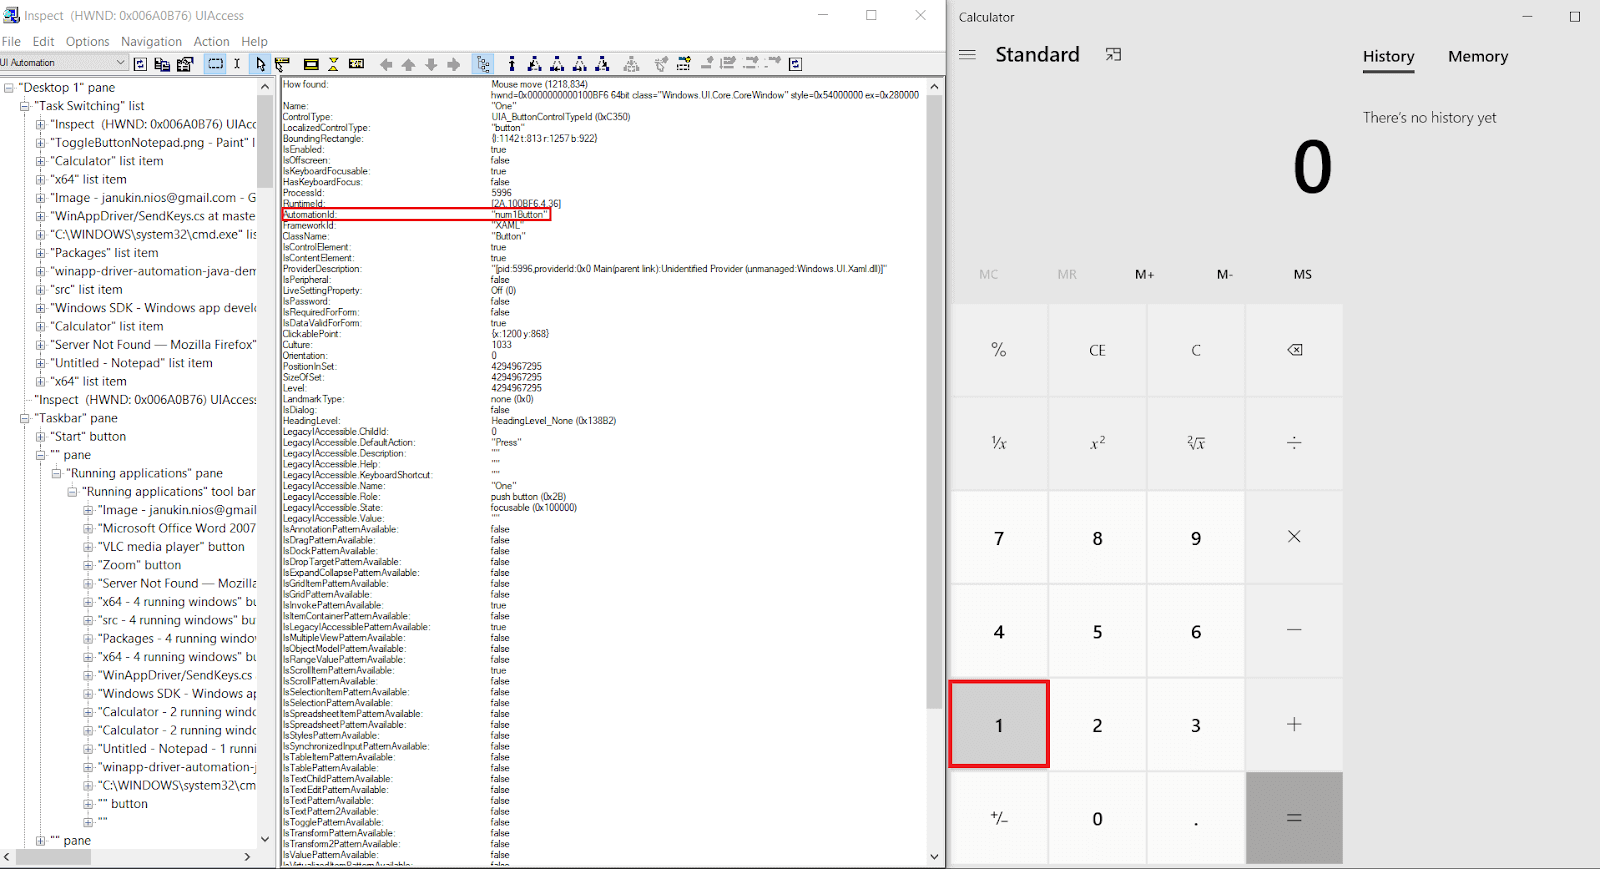
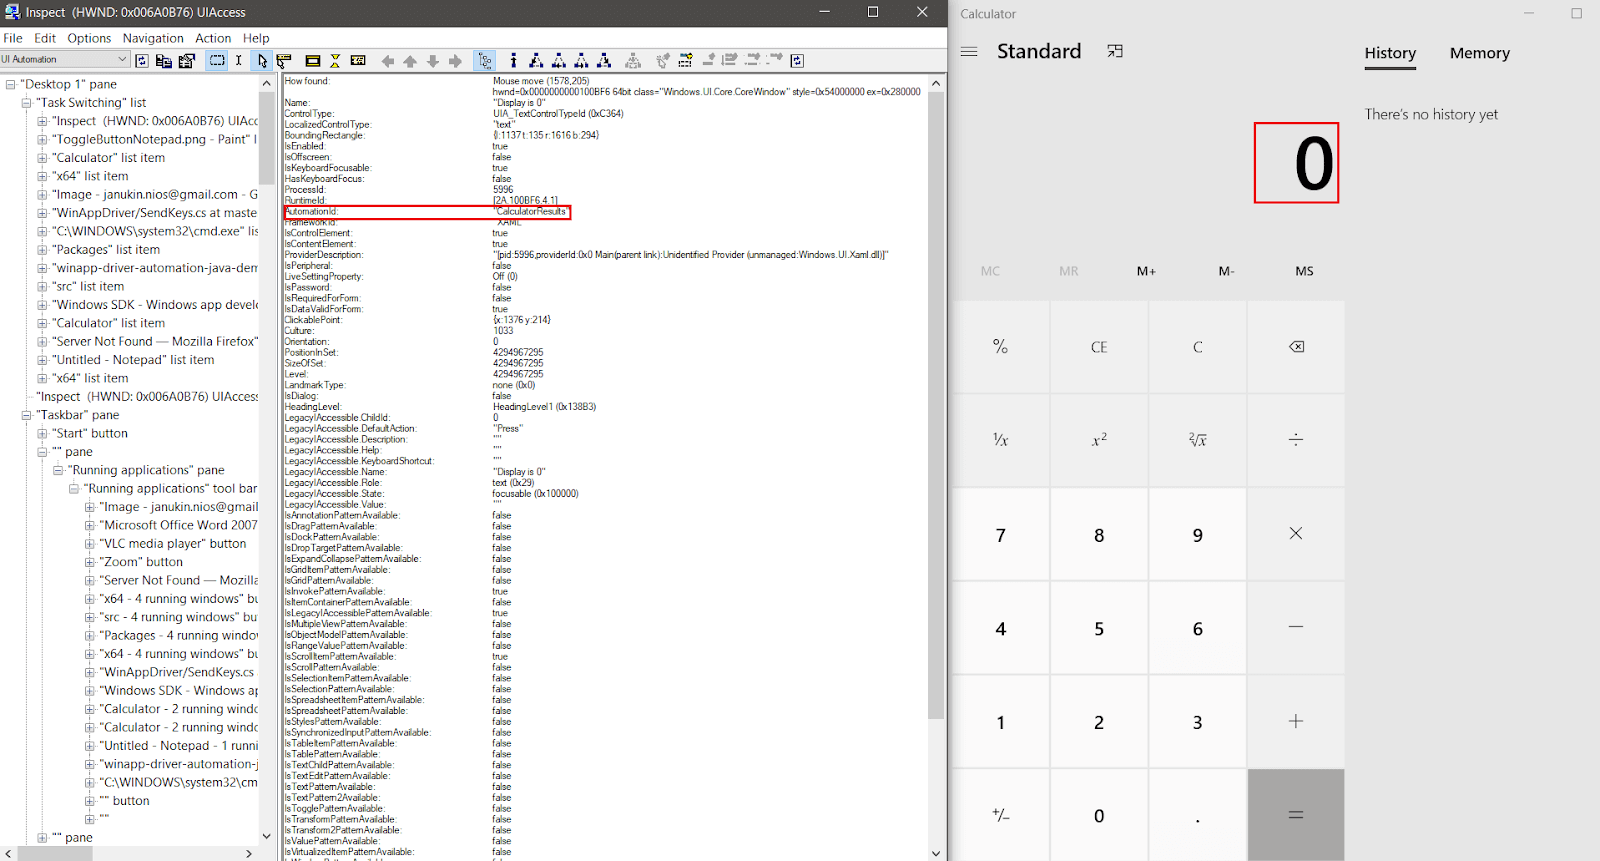
Hover over the element (or control) whose property needs to be read by Inspect.exe. As shown below, the AutomationId property is num4Button, and the Name property is Four.
Here is the list of attributes matched by Inspect.exe for the Calculator application (in Windows):
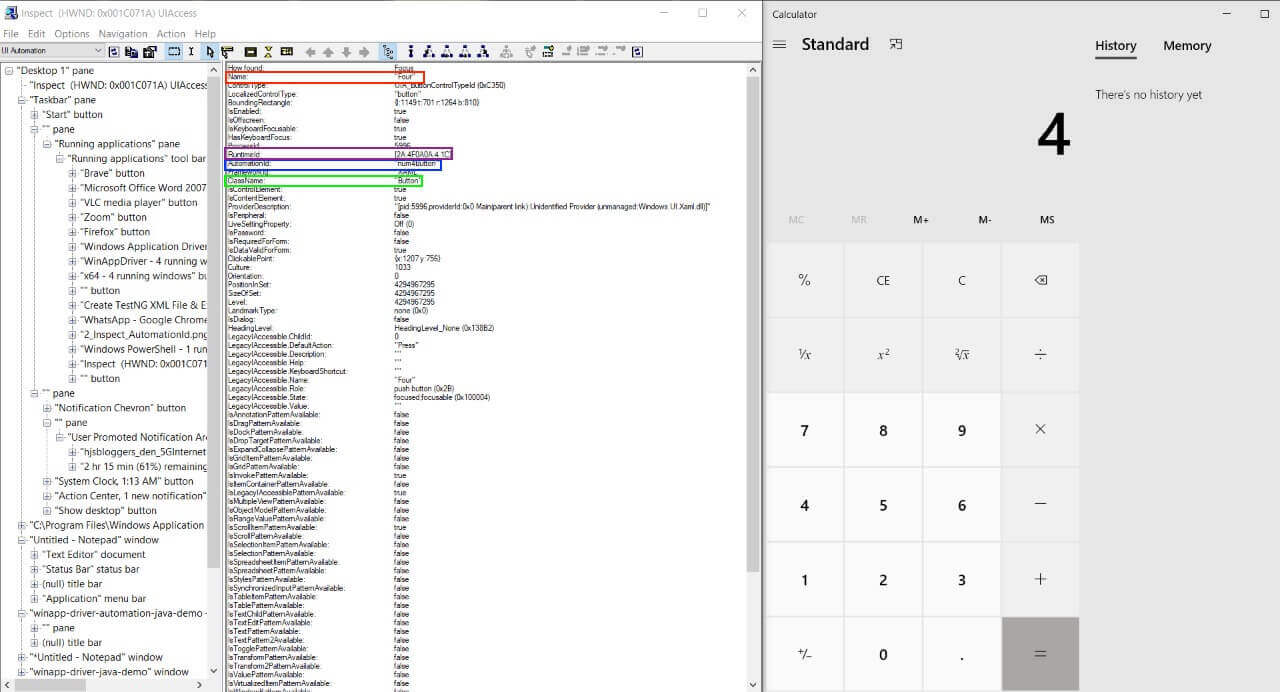
The same steps are repeated for inspecting elements on the Classic Calculator application. Here are the common attributes (or properties) that can be used for finding elements on desktop applications:
| Client API | Locator Strategy | Attribute in Inspect.exe |
| findElementByAccessibilityId | Accessibility Id | automationID (e.g., num4Button) |
| findElementByClassName | Class Name | ClassName (e.g., Button) |
| findElementById | id | RunetimeId in decimal (e.g., 2A. 4F0A0A 4. 1C] |
| findElementByName | Name | Name (e.g., Four) |
| findElementByTagName | Tag Name | Localized control type in upper case |
Like Selenium, tests using WinAppDriver can also be written using popular Selenium-supported programming languages like Java, C#, Python, etc. In this demo, I am using Java with the TestNG framework. If you are new to TestNG, you can refer to the detailed Java TestNG tutorial series that deep dive into concepts like parameterization, parallel execution, annotations, and more.
In the snippets shown below, driver is an instance of WinAppDriver:
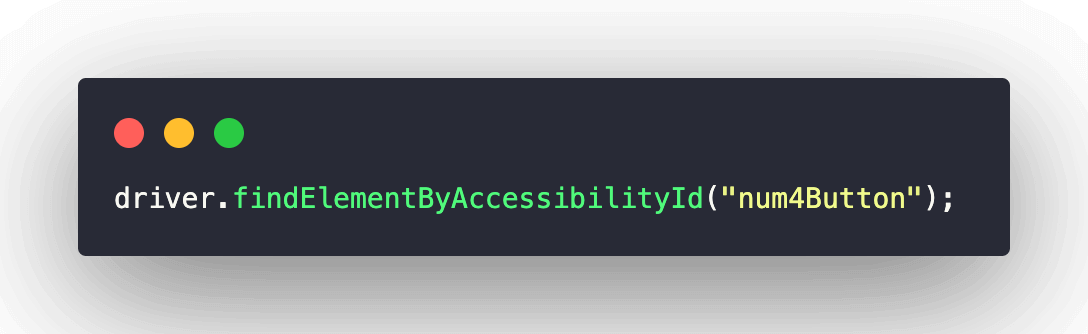
- Locating element using AccessibilityId
- Locating element using Name
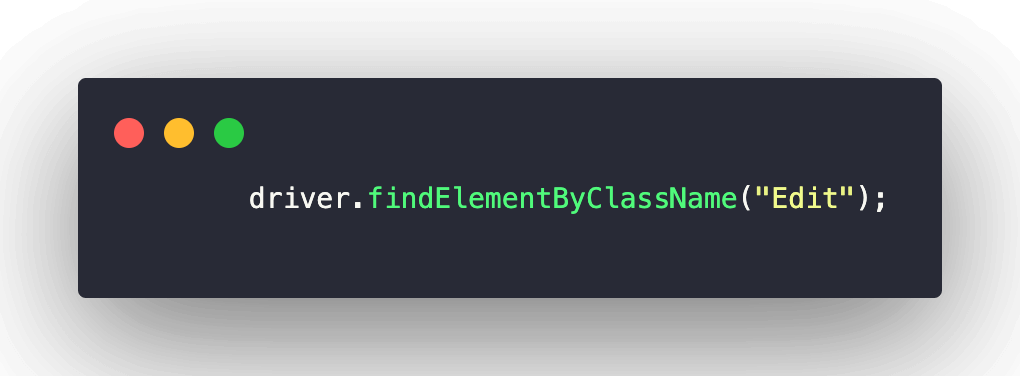
- Locating element using ClassName

In the Calculator application, most of the elements did not have the ClassName property. Hence, I used the Notepad application where the TextArea has the Edit property.
With most of the applications (e.g., IDE, MSWord, Notepad, etc.), the most preferred locators were Name, ClassName, and AccessibilityID. Like Selenium tests, it is recommended to opt for a unique locator for the element. For example, the ClassName in the calculator example is “Button” for all the buttons. Hence, I chose the Name locator over ClassName.
WAD UIRecorder is better if you plan to use XPath to locate the elements. Akin to Selenium best practices, it is better to choose (if possible) other locators over XPath since lengthy XPaths can be error-prone and also impose unwanted rigidity.
Apart from the above-mentioned tools, you can also try out Spy++ in case you are planning to use WinAppDriver with C#. For my demo, I would be using Inspect.exe for locating elements in the Windows Application.
Demonstration: Desktop Application Testing using WinAppDriver
The demonstration is performed using the TestNG framework. Interactions on elements in Notepad, Classic Calculator, and Calculator (latest) applications are automated using WinAppDriver. The elements are located using Inspect.exe.
Clone the Windows Application Testing Demo (Local) GitHub repository to follow the steps mentioned further in the blog.

Pre-Requisites
- WinAppDriver is installed in the Windows Machine. In my machine, the driver is installed in C:\Program Files\Windows Application Driver. By default, it starts listening to the incoming requests on port 4723 (IP: 127.0.0.1)
- Inspect.exe for locating elements in the applications. The steps for downloading and installing the same are mentioned earlier. In my machine, the driver is installed in C:\Program Files (x86)\Windows Kits\10\bin\10.0.20348.0\x64.
- IDE (IntelliJ/Eclipse) for implementation and project creation. Though I am using IntelliJ IDEA, you can use an IDE of your choice (e.g., Eclipse).

In case you are getting started with IntelliJ or Eclipse for Java development, make sure to check out our blogs that help you with the following:
- Configure Selenium with IntelliJ
- Configure Selenium with Eclipse
Test Scenarios (Calculator Application)
Test Scenario – 1
- Launch the Calculator application.
- Locate the TogglePane button.
- Click on the pane and navigate to the Standard item in the menu.
Test Scenario – 2
- Locate and click on the number – 1.
- Locate and click on the number – 9.
- Locate and click on the Addition (+) button.
- Locate and click on the Equals (=) button.
- Assert if the computed result is not equal to the expected result.
Test Scenarios (Notepad Application)
Test Scenario – 1
- Launch the Notepad application.
- Locate the Edit button.
- Enter This is a demo of WinAppDriver in the text area.
Test Scenario – 2
- Enter Control + A in the text area.
- Delete the selected text.
- Assert if the text area is not empty
.
Test Scenario – 3
- Enter WinAppDriver Demo in the text area.
- Copy and paste the content entered in the earlier step 3 times.
- Maximize the window.
Test Scenario – 4
- Send Control + S key combination.
- Enter the path where the file will be saved (e.g., C:\Himanshu\WinAppDriverDemo.txt)
Test Scenarios (Classic Calculator Application)
Test Scenario – 1
- Launch the Classic Calculator application.
- Click on View.
- Click on the menu item Digit grouping.
Test Scenario – 2
- Launch the Classic Calculator application.
- Click on View → Worksheets → Fuel economy (mpg).
Test Scenario – 3
- Locate and click on the number – 1
- Locate and click on the number – 8
- Locate and click on the Add (+) button.
- Locate and click on the Equals (=) button.
- Assert if the computed result is not equal to the expected result.
Project Setup
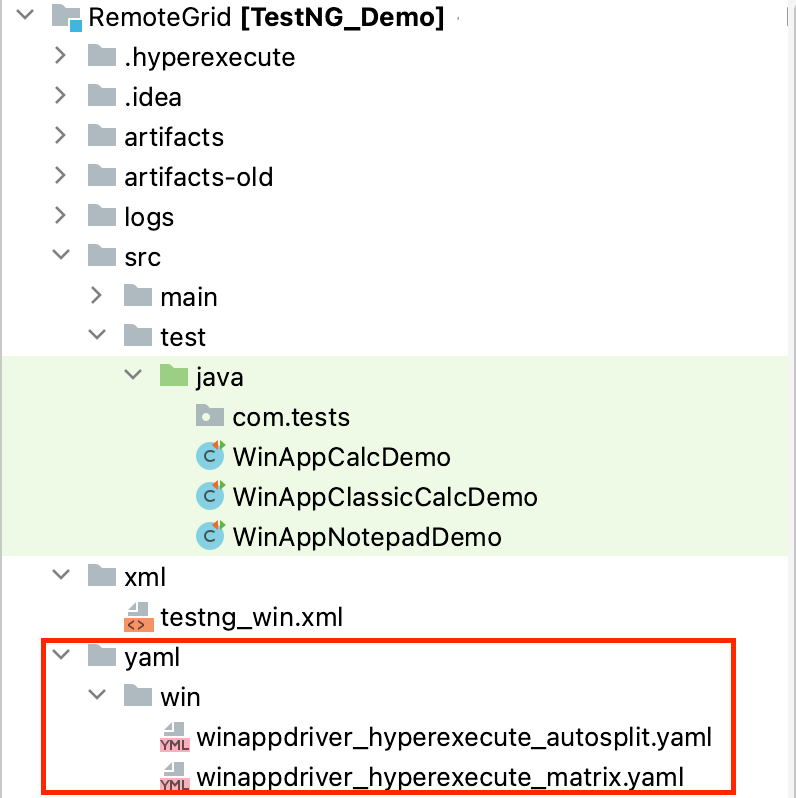
Shown below is the directory structure:
To get started, I have created two packages – com.windriver under src/main/java and com.tests under src/test/java
- com.windriver – Contains file that starts the WinAppDriver.exe located in the local machine in a programmatic manner.
- com.tests – Includes the test implementation for automating interactions with the elements in Notepad, Classic Calculator, and Calculator (latest) applications.
For demonstration purposes, I have used Selenium 3.141.59 and the TestNG automation framework in Java. The logic shown in the demo can be easily replicated to work with other Selenium-supported languages and frameworks (e.g., Pytest, xUnit, NUnit, etc.).
Implementation
Before we kick start the implementation, let’s add the required project dependencies in the project POM file.
Though the implementation is making use of Selenium 3.141.59, the test logic should work without any changes with Selenium 4 as well.
Instantiation of WinAppDriver
Rather than starting WinAppDriver.exe from the machine manually, it is better to instantiate WinAppDriver programmatically. Once the tests are completed, close the WinAppDriver and also release resources used by Selenium WebDriver.
Code Walkthrough
Step 1
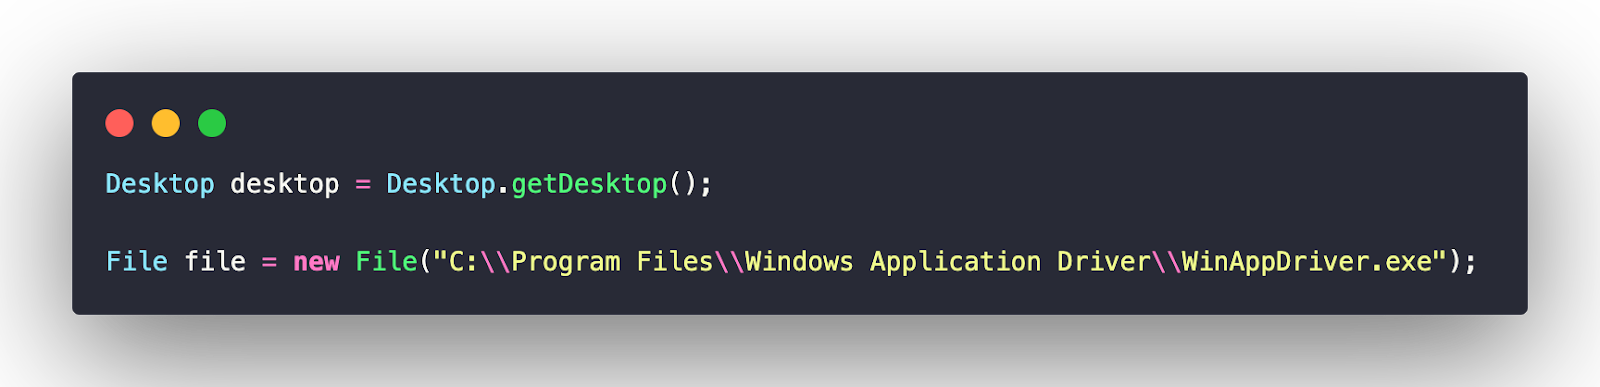
The getDesktop() method of the Desktop class returns the desktop instance. This instance will be used to open the WinAppDriver.exe from the machine. In my case, the WinAppDriver.exe is installed in C:\Program Files\Windows Application Driver.
Step 2
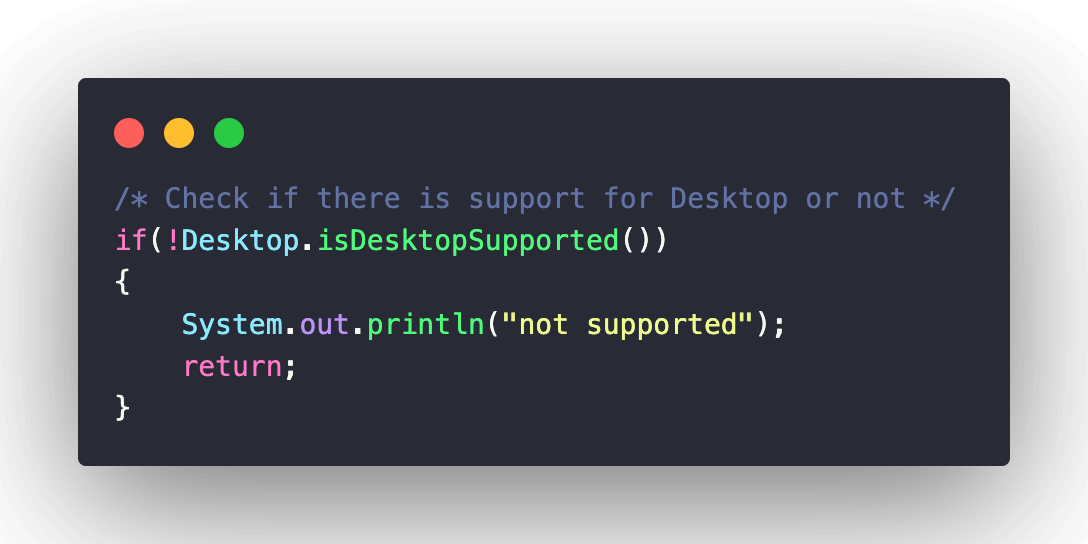
The isDesktopSupported() method of the Desktop class is used to check if the platform supports Desktop or not.
Step 3
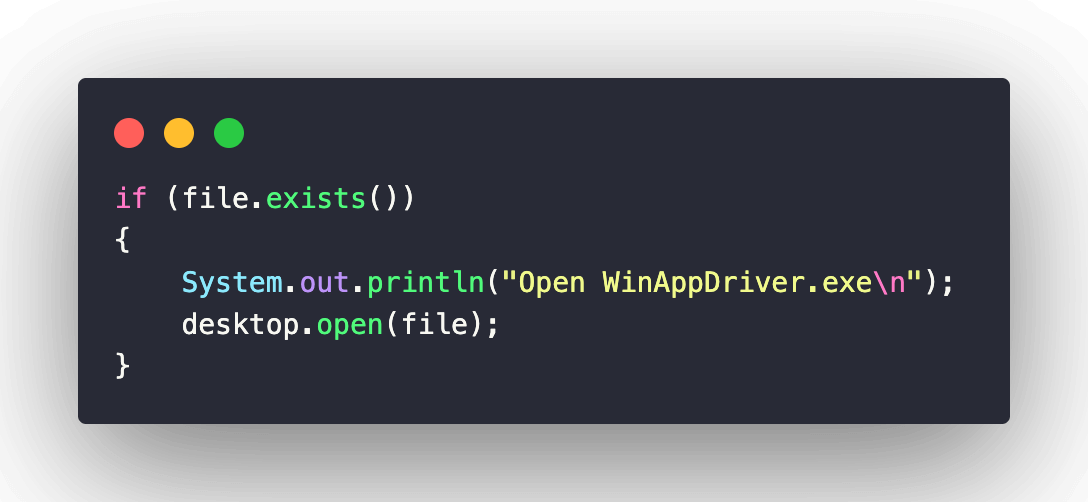
Open the WinAppDriver.exe executable using the open() method of the Desktop class. In case the file is not available in the desired location, an exception is raised, and the error StackTrace is printed on the terminal.
Step 4
In the stop() method, the taskkill command in Windows is used for killing (or stopping) the process associated with WinAppDriver.exe by supplying the PID (Process ID) to the ProcessBuilder() method.
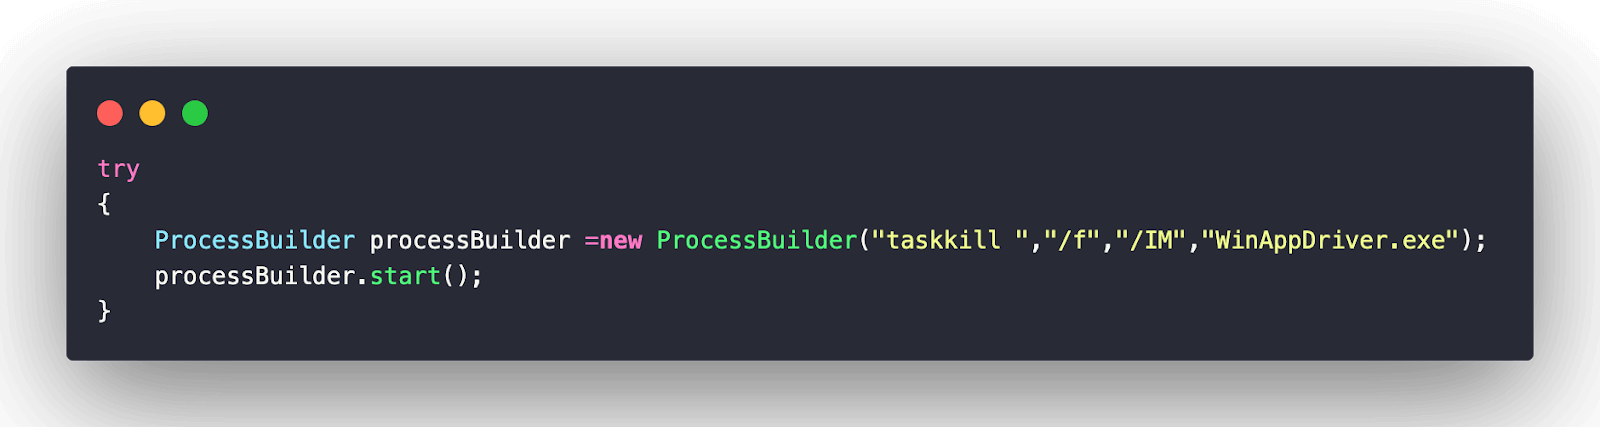
The stop() method will be triggered in the last scenario, where the resources held by the instance of Selenium WebDriver are also released.
Implementation – Calculator Application
Aligned to the two test scenarios, we created two test methods test_mouse_interactions() and button_click_interactions(), where the respective tests are performed.
Code Walkthrough
Step 1
Import the required packages (or classes) at the beginning of the implementation. Since we are performing desktop application testing, we specifically import the following classes:
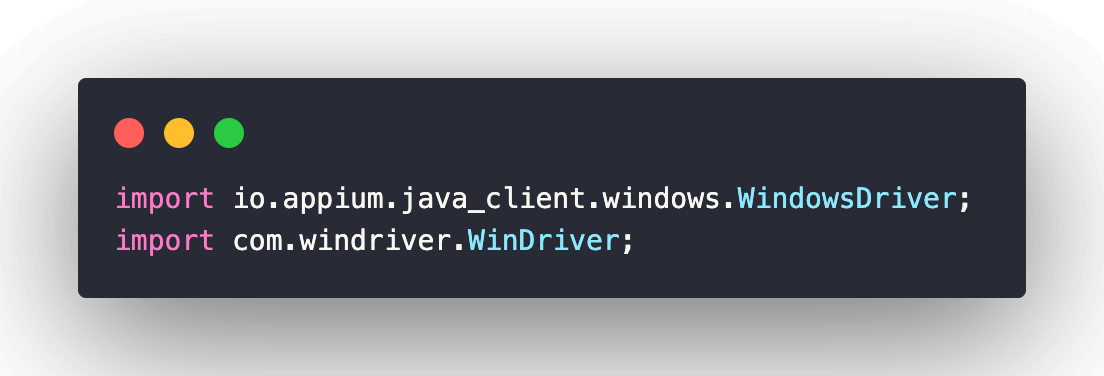
The WindowsDriver class from io.appium.java_client.windows package is imported so that an instance of WindowsDriver can be created in the method implemented under the @BeforeTest annotation.
Step 2
The WinDriver class in the package com.windriver created in the previous section is also imported so that we can instantiate WinAppDriver.exe via code.
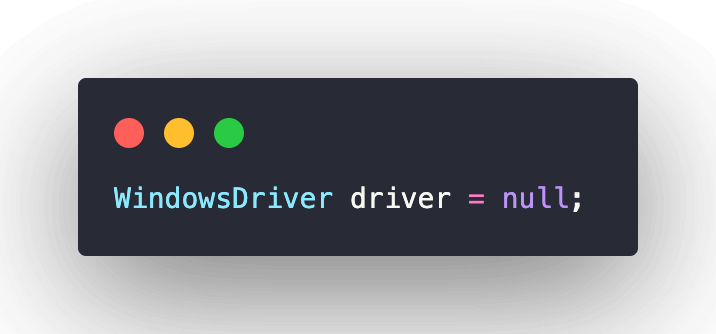
Since we are automating desktop applications (i.e., Calculator) in this case, we create an instance of WindowsDriver (like it is done in the case of running Selenium/Appium tests). The instance is named driver.
Step 3
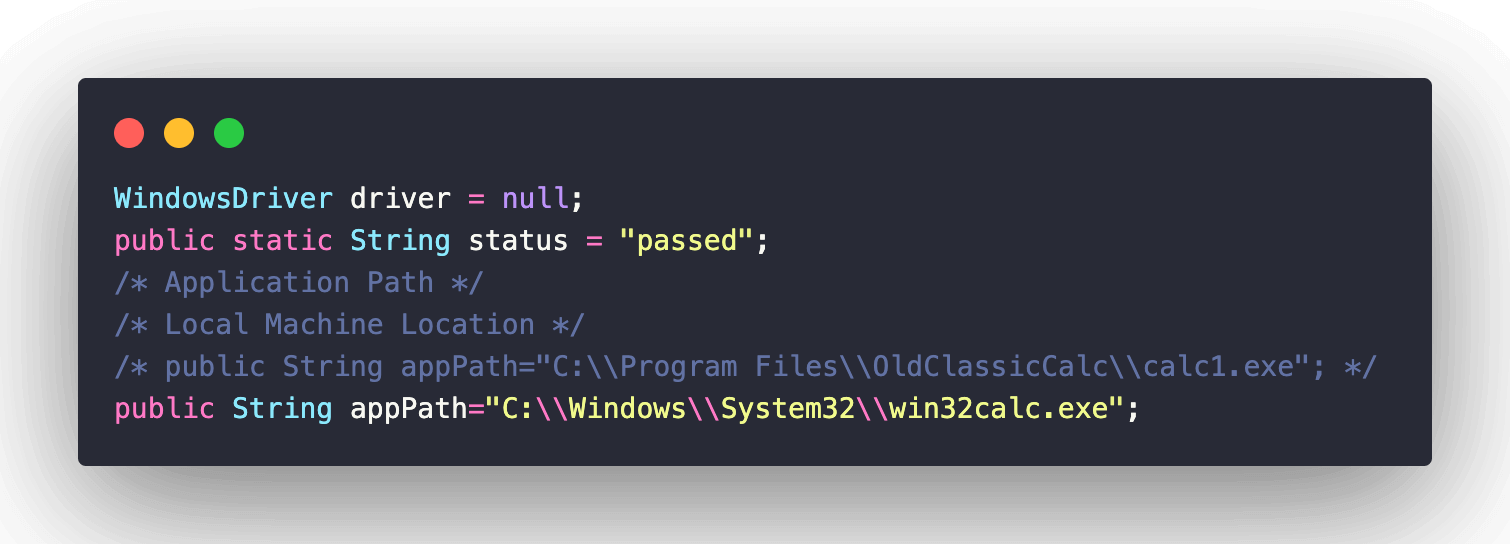
The next step is to provide the path to the Calculator application. There are a couple of ways in which you can find the application path. First option is by navigating to the C:\
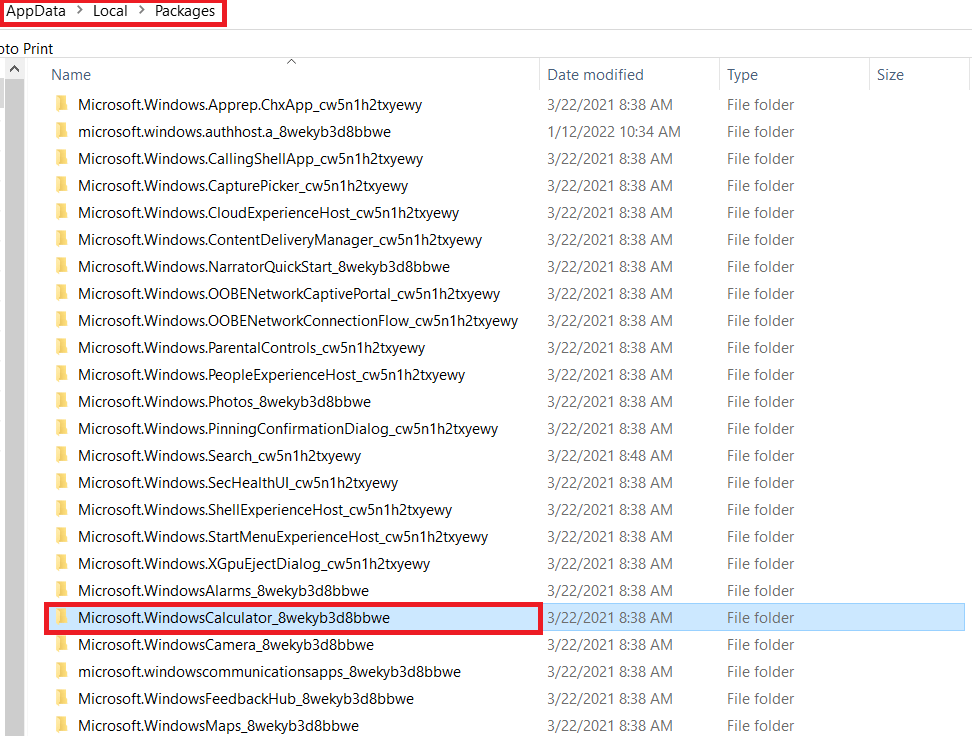
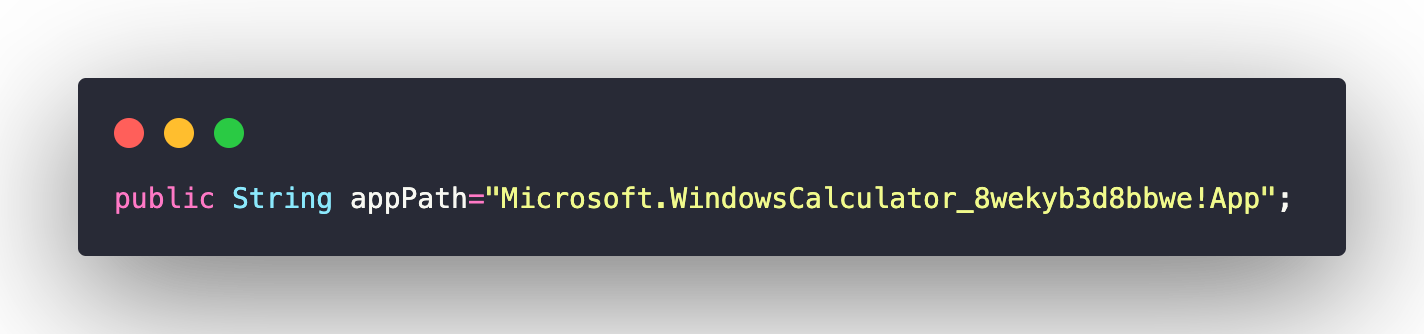
The commandexplorer shell:AppsFolder\Microsoft.WindowsCalculator_8wekyb3d8bbwe!App,when run on the terminal, also opens up the Calculator application.

Hence, Microsoft.WindowsCalculator_8wekyb3d8bbwe!App is used in the source code so that WinAppDriver.exe can open Calculator on the machine.
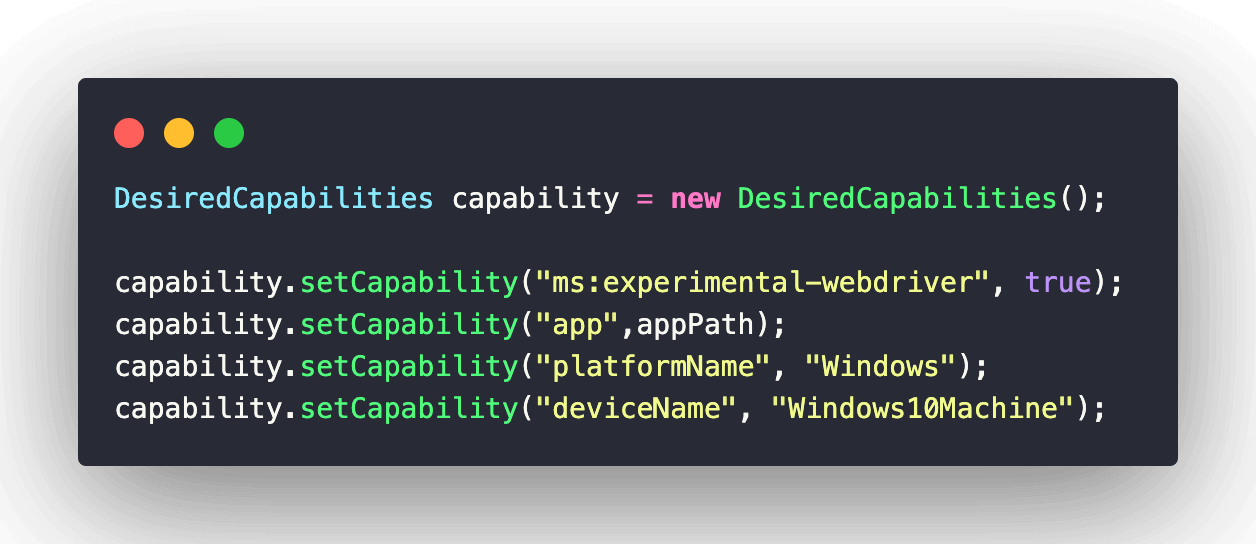
Step 4
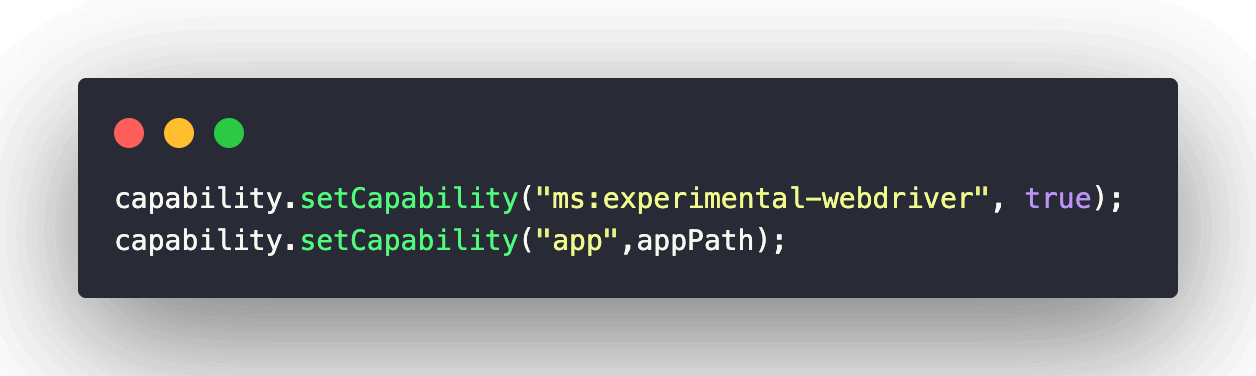
The next step is to set the desired capabilities. Here is the usage of each capability:
- ms:experimental-webdriver – Enables the experimental features and optimizations. Since the release of v1.2.1, the capability has provided performance improvements with XPath and improved handling of elements.
- app – Path to the AUT (Application Under Test)
- platformName – Platform on which the test is performed (i.e., Windows)
- deviceName – Device used for testing. This is an Appium capability, which is currently set to Windows10Machine.
The ms:waitForAppLaunch capability enables WinAppDriver to wait for a defined amount of time (in seconds) after the initiation of the app launch before attaching the application session. By default, it is 50 seconds.
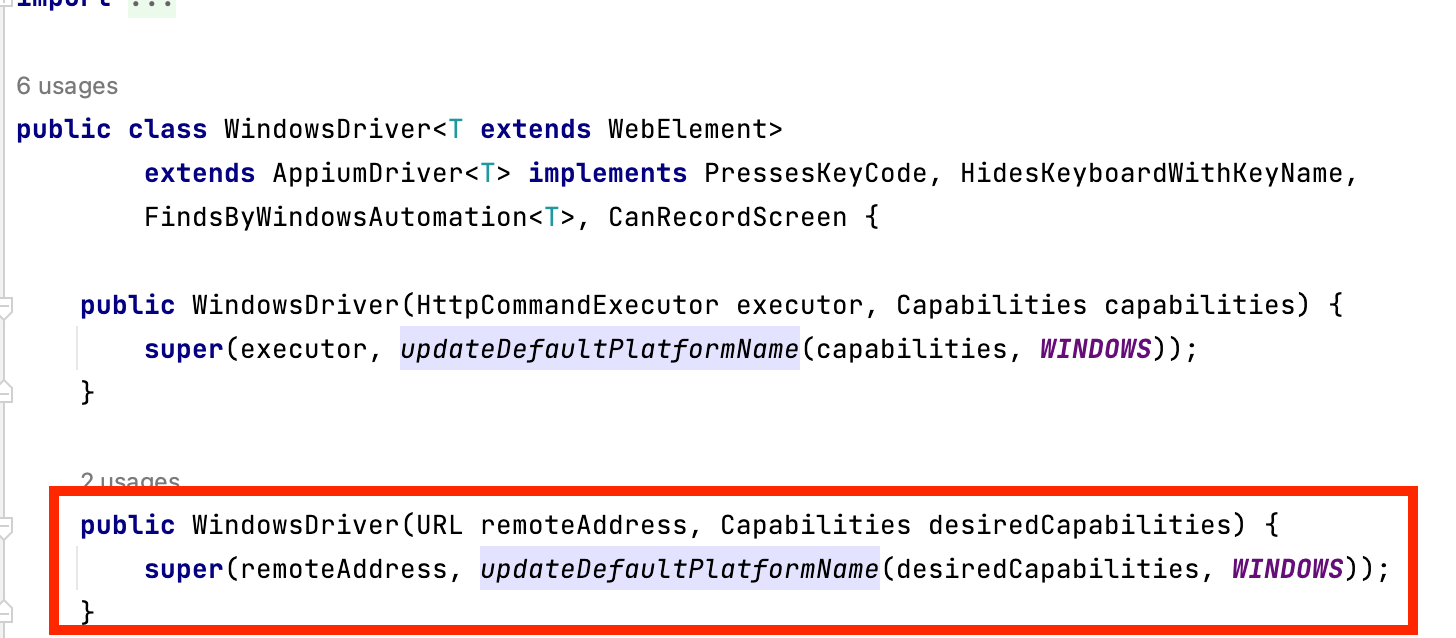
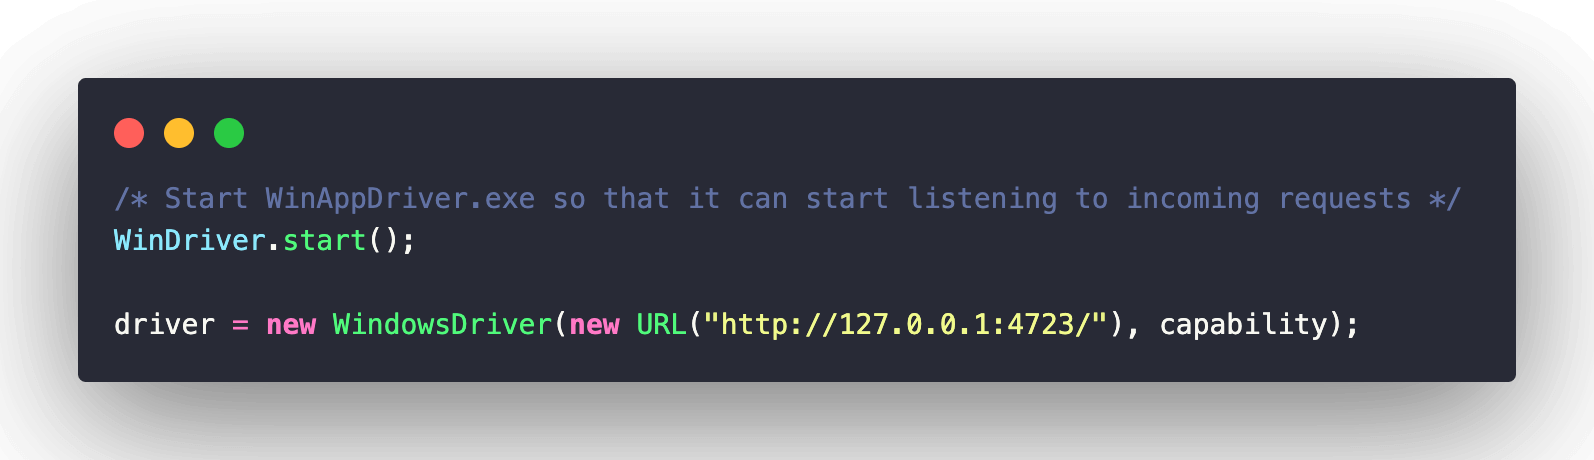
Next is to instantiate the WinAppDriver.exe to start listening to incoming requests. Create an object (i.e., driver) of WindowsDriver that takes two arguments:
- remoteAddress – Combination of Address & Port-number on which the WinAppDriver.exe is listening to the requests (i.e., http://127.0.0.1:4723).
- desiredCapabilities – Instance of DesiredCapabilities class that comprises key-value pairs combination.
With the capabilities set, it’s time to use them in the tests! In the file, there are two test methods that are in line with the test scenarios mentioned earlier in the blog.
Test Method 1: test_mouse_interactions()
Step 1
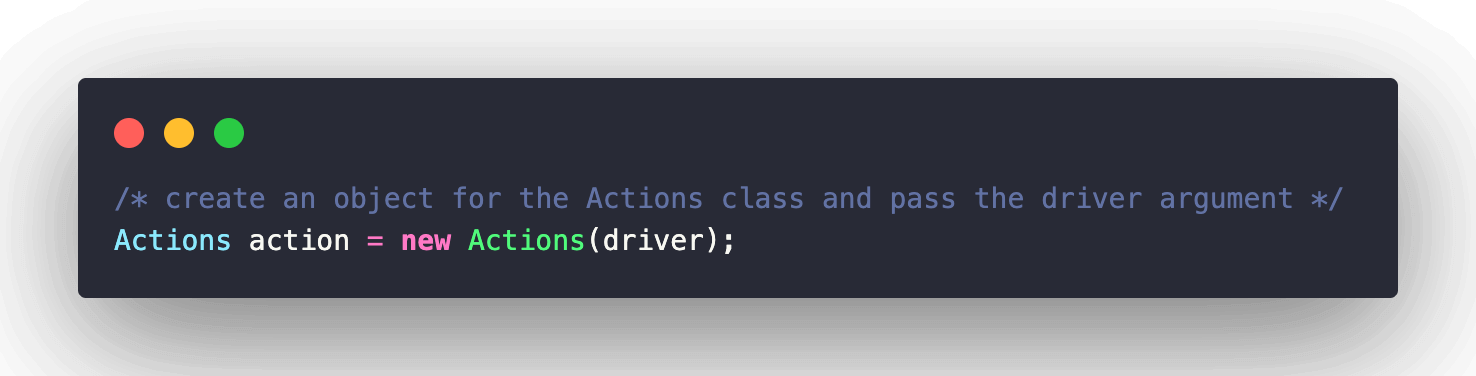
The methods in the Actions class are used for automating interactions with the elements of the application.
To use the methods provided by the Actions class in Selenium, we need to create an object of this class and pass the instance of WindowsDriver as an argument.
Step 2
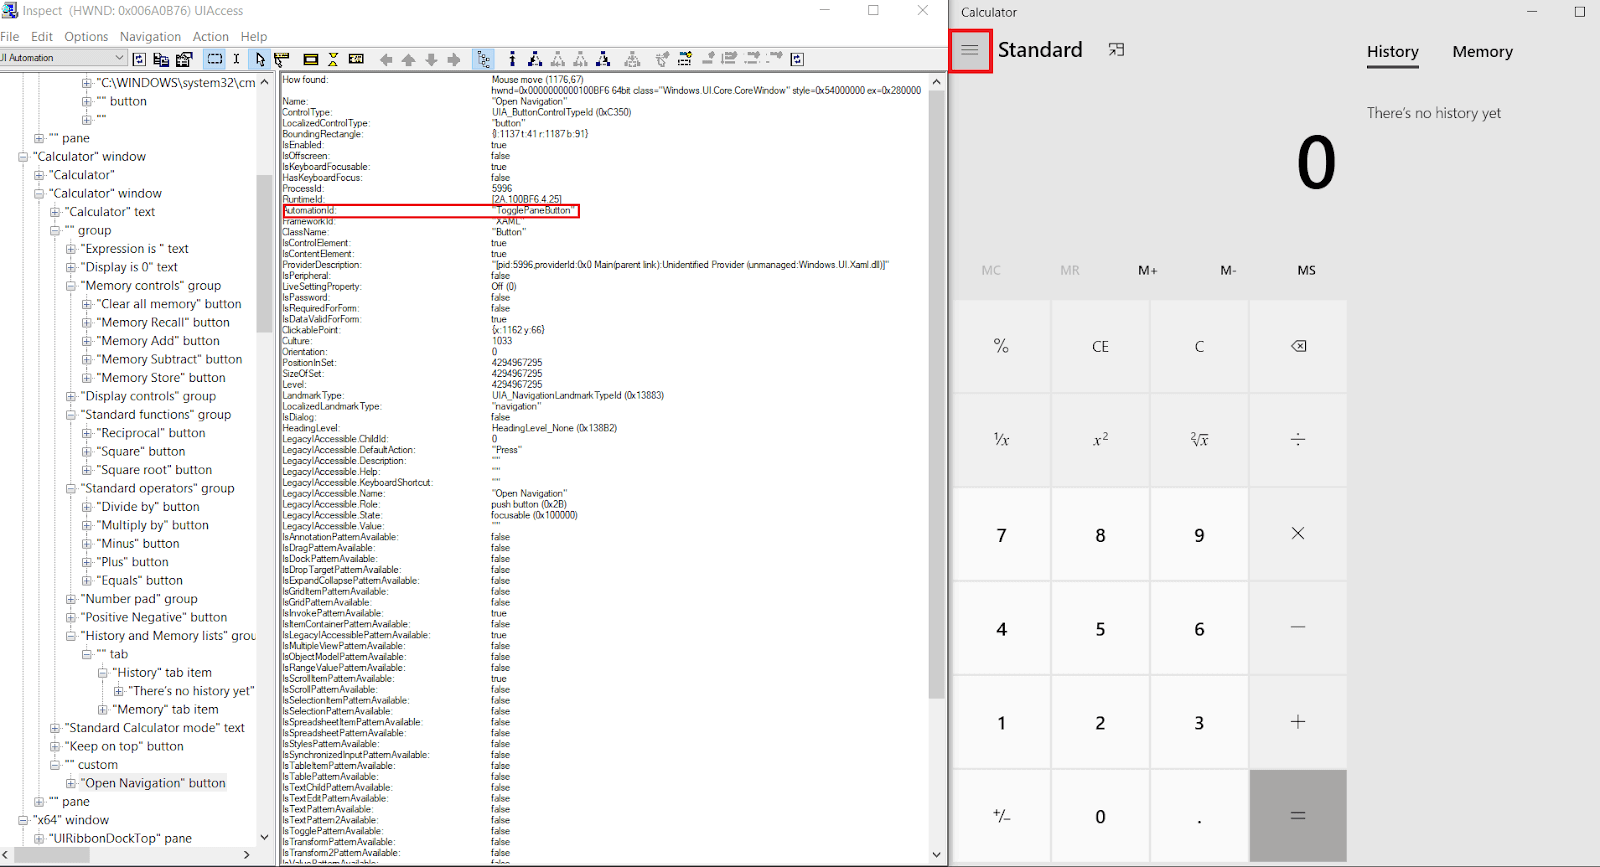
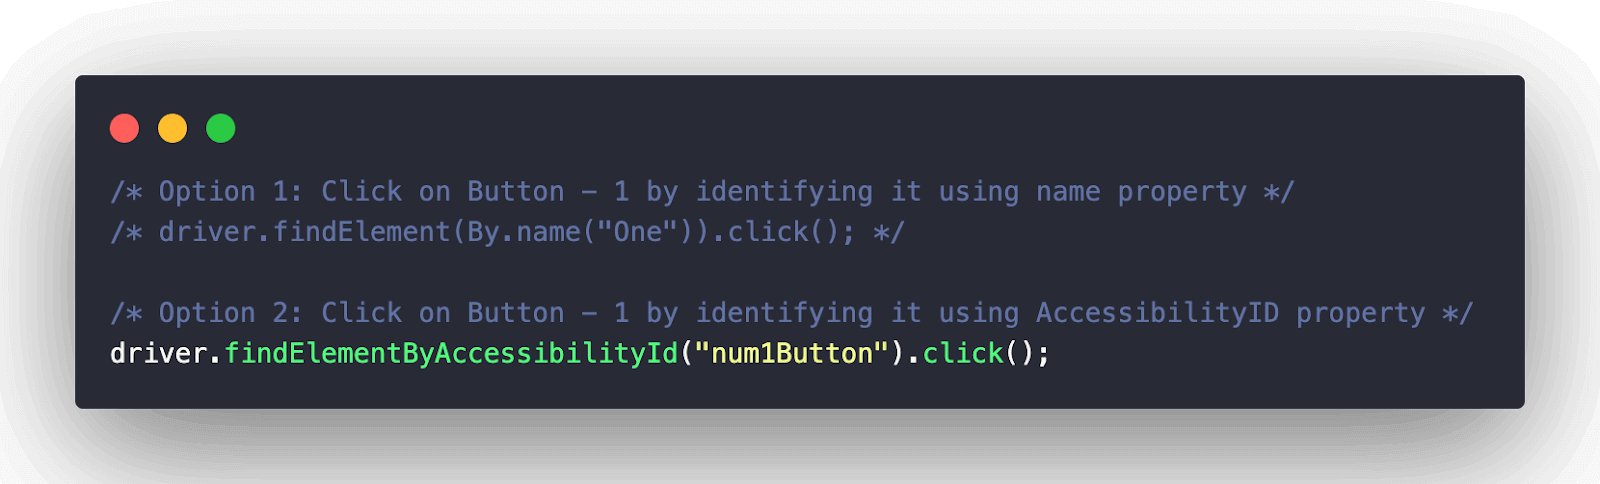
The object (i.e., action) created in the previous step is used to perform actions. The Toggle Pane Button in the calculator application is located using findElementByAccessibilityId method of WindowsDriver class. The AccessibilityID was read using the Inspect.exe.
Once the element is located, a mouse click action in Selenium is performed on the same. The perform() method in the Actions class performs (or triggers) the series of actions defined so far. In this case, it performs only a single action (i.e., click).

Step 3
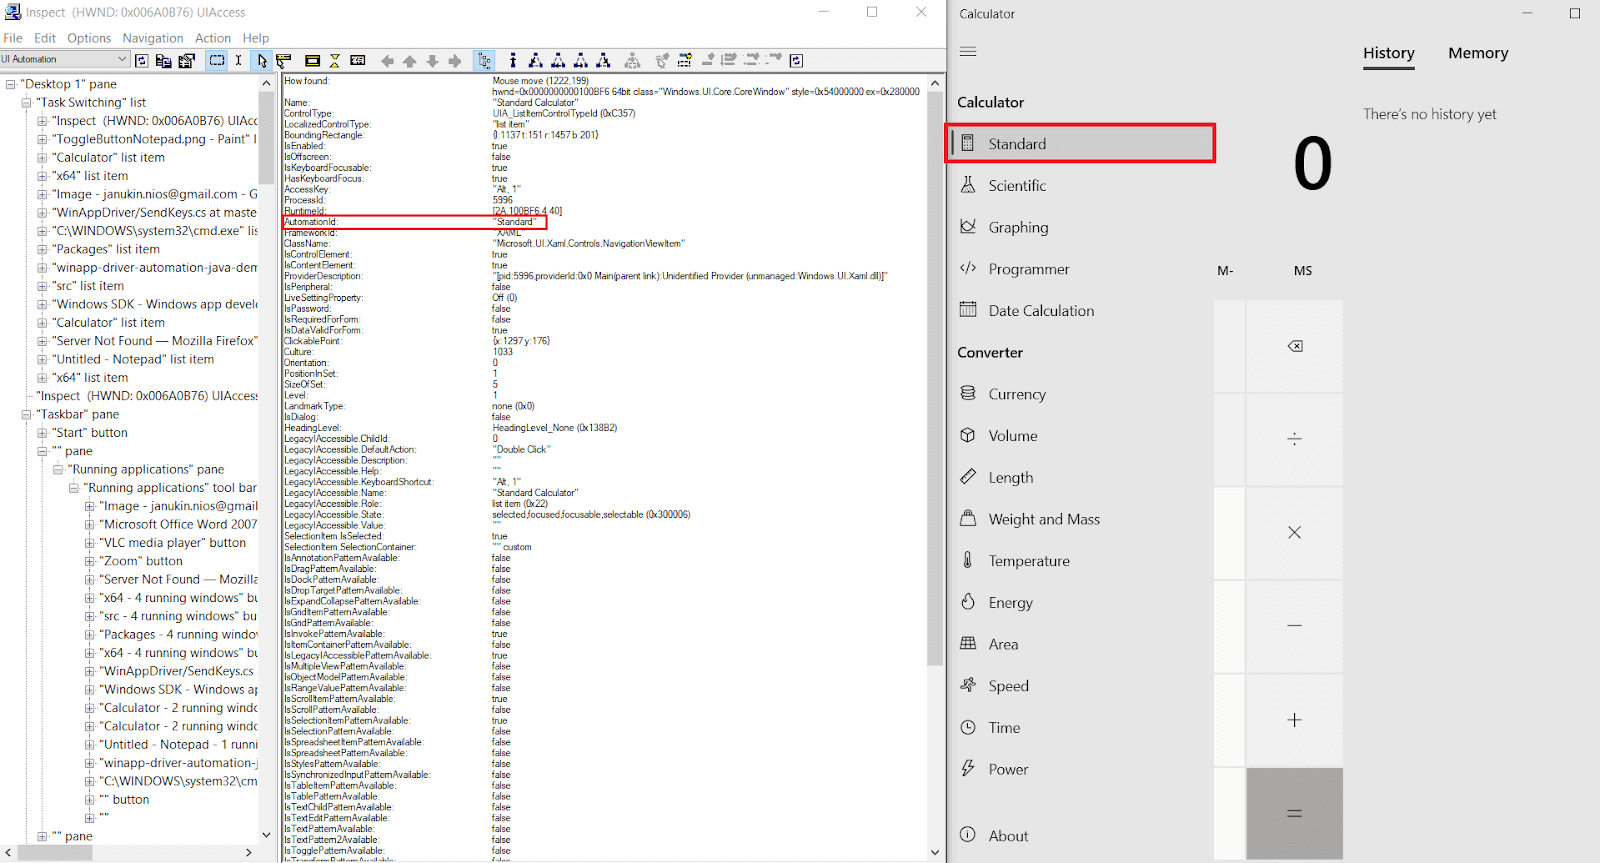
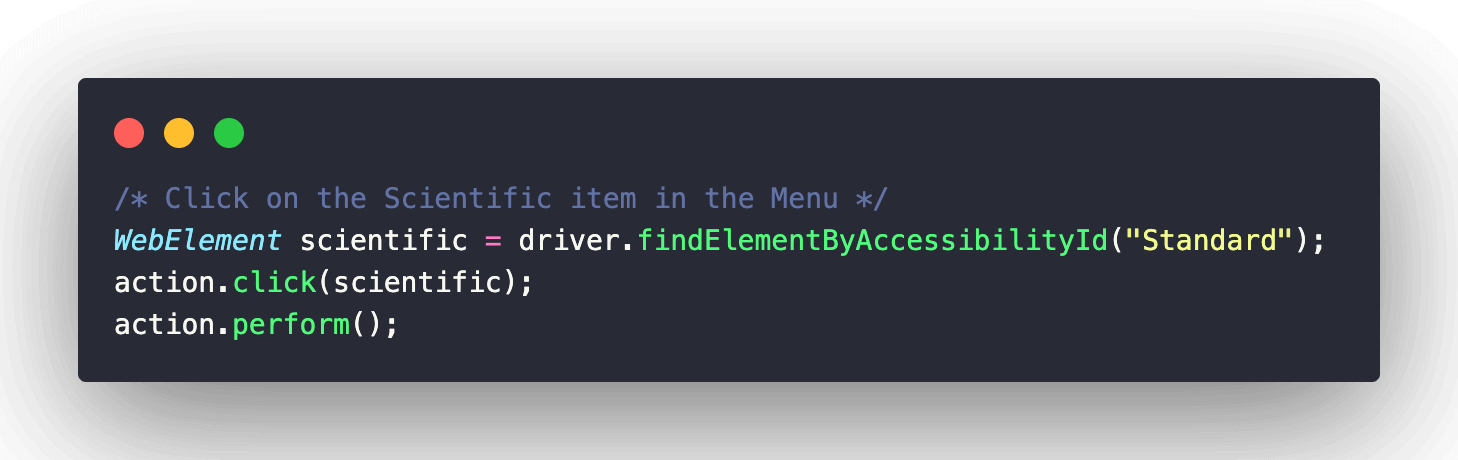
The same steps are repeated for locating the menu-item labeled Standard in the menu that was clicked in step (2). There was also an option to locate the same element using the Name locator. Clicking on the menu item closes the menu.
Test Method 2: button_click_interactions()
Step 1
Button ‘1’ on the Calculator is located using the AccessibilityID. Apart from AccessibilityID, every button in the Calculator application has a unique Name property. Hence, either of them can be used to locate the element.
Step 2
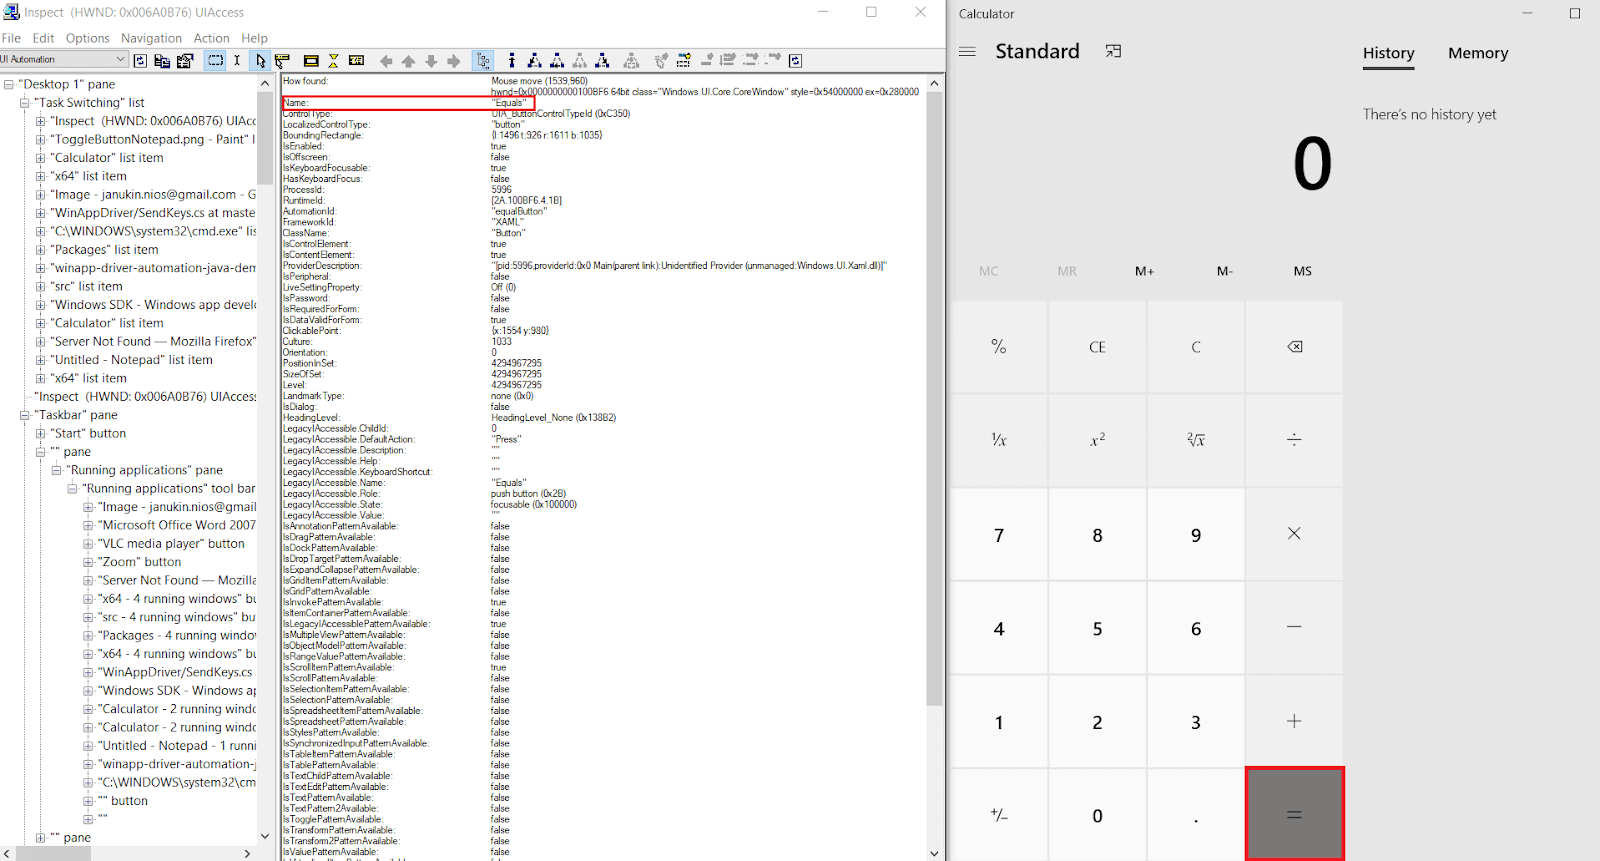
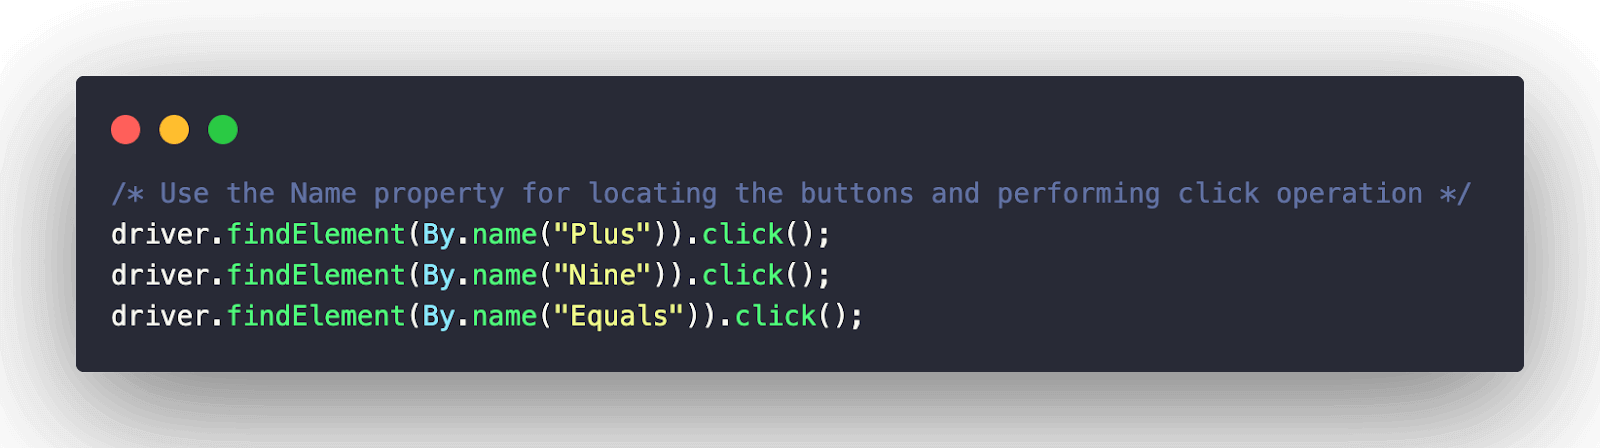
Like the earlier step, the Plus, Nine, and Equals buttons are located using the Name locator.
Once the elements in Steps (1) and (2) are located, a click action in Selenium triggers the addition operation.
Step 3
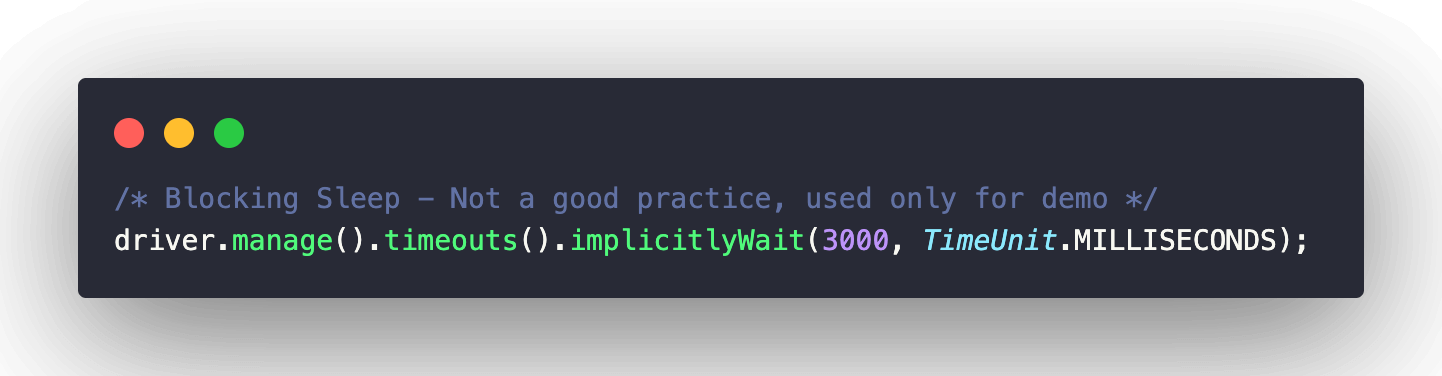
An implicit wait of 3 seconds is added for the purpose of testing. However, in an ideal scenario, it is recommended to use explicit wait in Selenium since it waits on a condition. If the condition for the explicit wait is satisfied, the wait is exited and the execution proceeds further.
Step 4
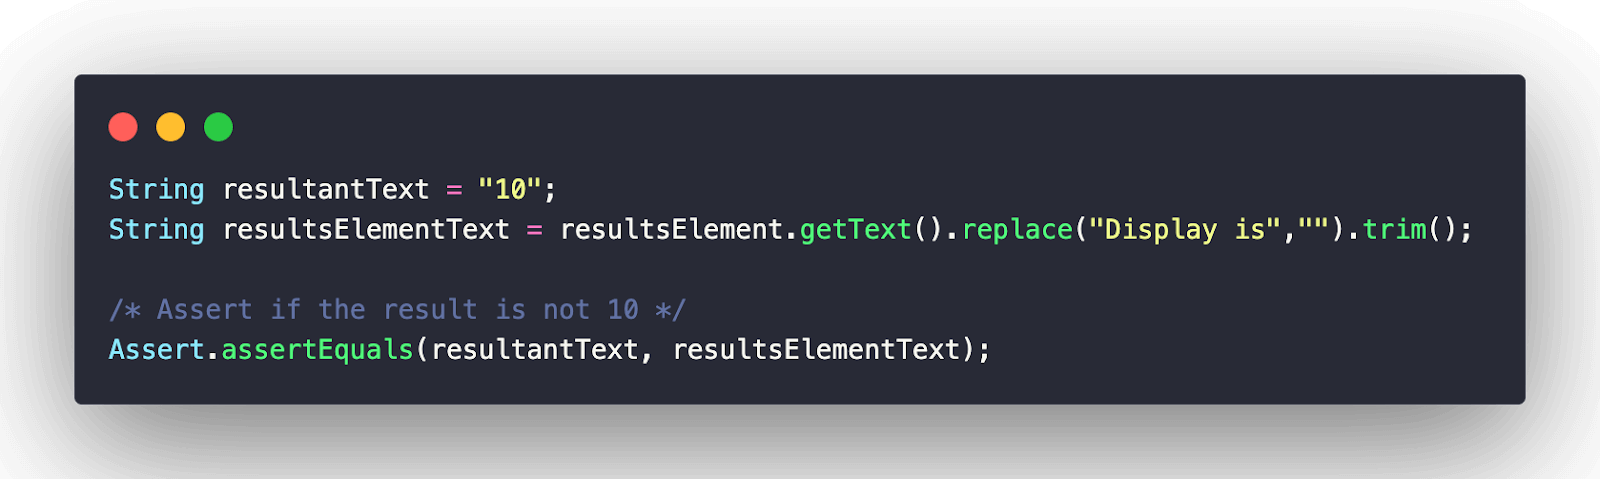
Now that the computation is done, we compare the expected result with the computed result. The element CalculatorResults is located using AccessibilityID since the other properties for it are not unique.

Step 5
getText in Selenium is used for reading the text of the element (i.e., CalculatorResults) located in the earlier step. Assert is raised if the fetched result does not match the expected result.
Implementation – Notepad Application
Aligned to the four test scenarios, we created the following test methods:
- test_add_content()
- test_delete_content()
- test_copy_paste()
- test_save_file()
I have drawn some inspiration from SendKeys tests by WinAppDriver team for devising test scenarios for a Notepad application.
Majority of the steps covered during the walkthrough of Calculator application testing are also applicable here as well. Here are some steps that will be further useful for desktop application testing:
Step 1
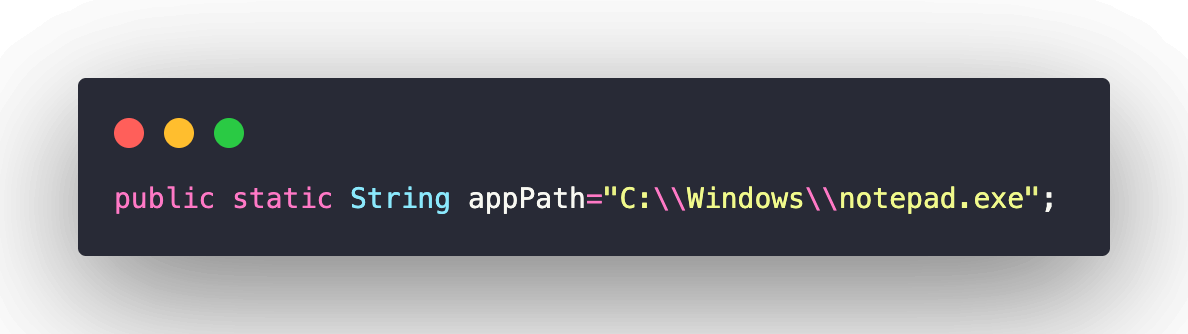
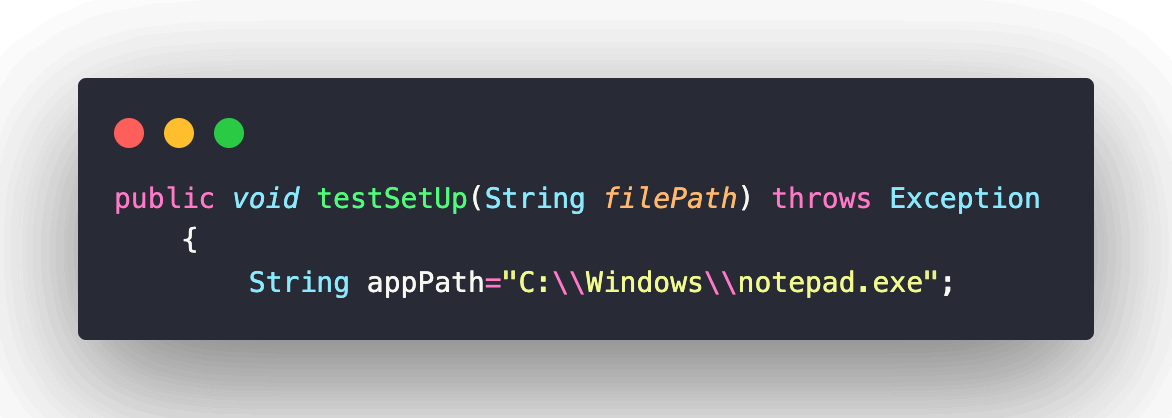
Like the Calculator example, we first provide the path of the Notepad app (i.e., C:\\Windows\\Notepad.exe) to the app capability.
Step 2
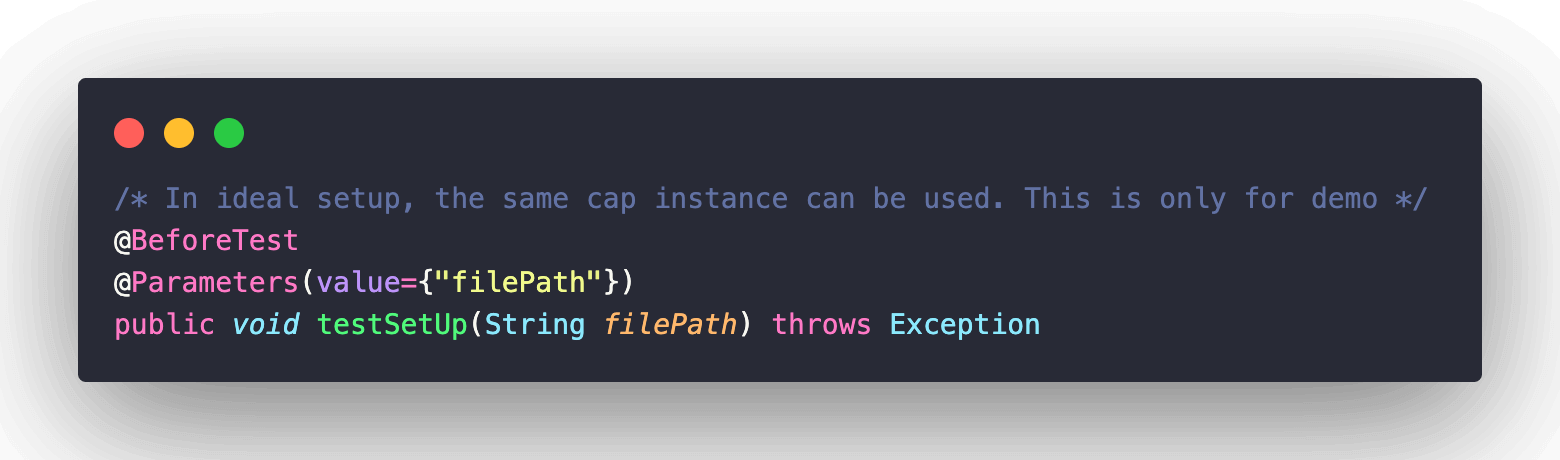
Since the WinAppDriver.exe was already invoked in the previous test, only a new instance of WindowsDriver (i.e., driver) is created in the method implemented under the @BeforeTest annotation. Please refer to the annotations in TestNG blog in case you need a quick recap of annotations.
Since we would be saving the text file at the end of the test case, the desired file path (e.g., C:\Himanshu\WinAppDriverDemo.txt) declared in testng.xml is taken as an input parameter by the @Parameters annotation.
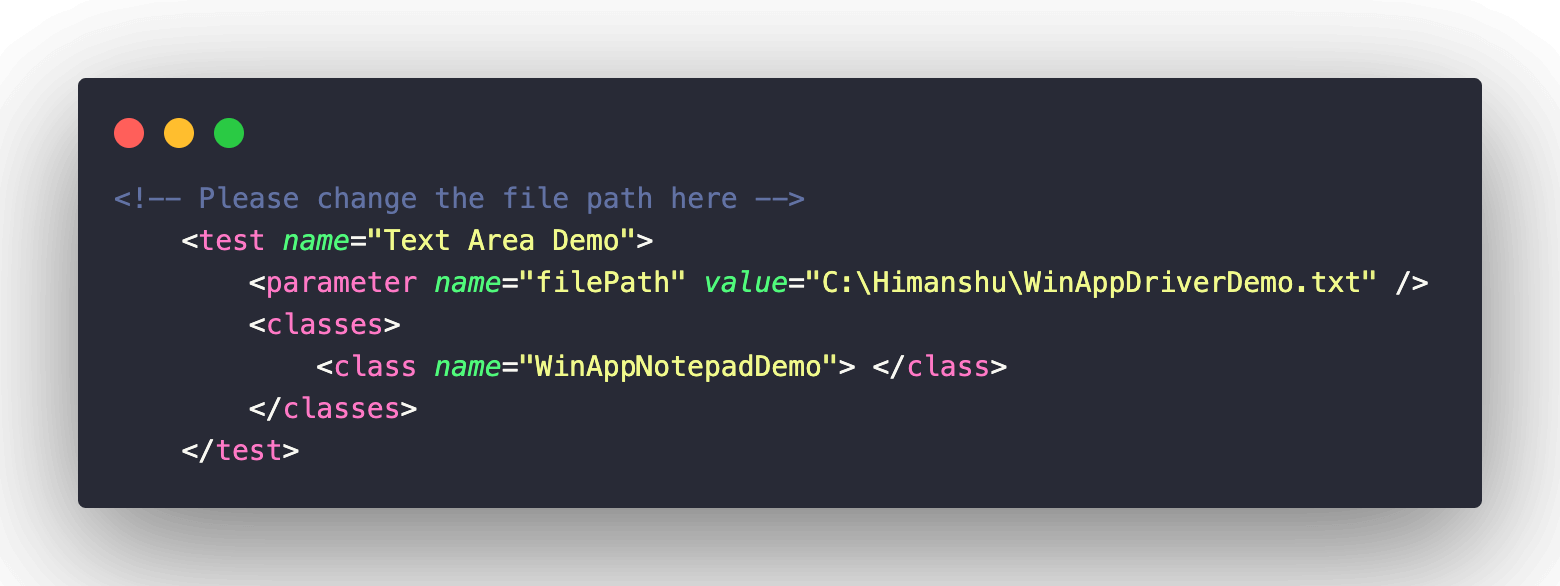
Parameterization in TestNG is one of the ideal ways to pass input parameters to the test methods implemented under the @Test annotation.
Since almost all the steps use the same Selenium WebDriver APIs, we would cover common things in one shot.
Step 3
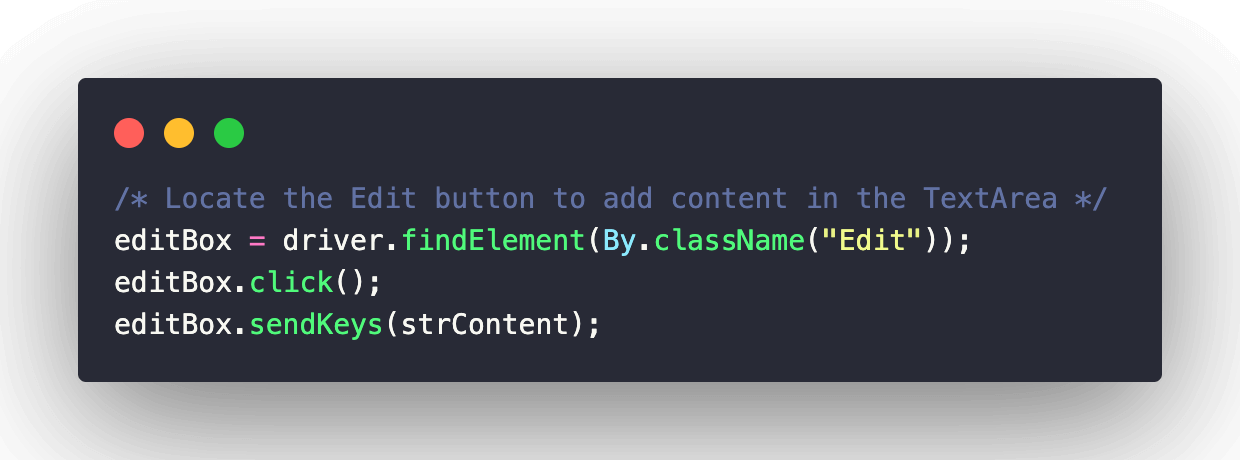
The very first step is to locate the Text Area in the Notepad application. This is done by using the className locator.
The click method is applied on the element to bring the element under focus. Post that, the sendKeys() method is used for adding the content. This is a demo of WinAppDriver in the text area.
Step 4
In the test_delete_content() test case, a new object of the Actions class is created. Post that, the key combination of (CONTROL + a) is sent using the sendKeys method of Actions class.
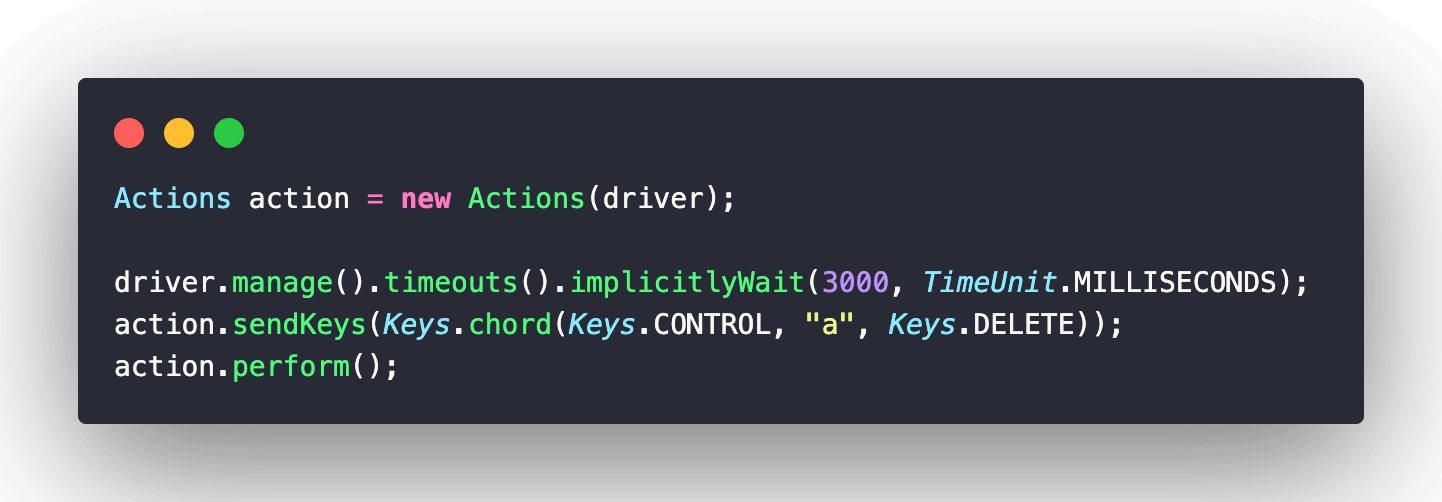
Please note that the keys.chord() method is leveraged since CTRL + A keys (i.e., Select All) have to be pressed simultaneously. At the end of every test, an assert is raised if the execution result does not match the expected result.
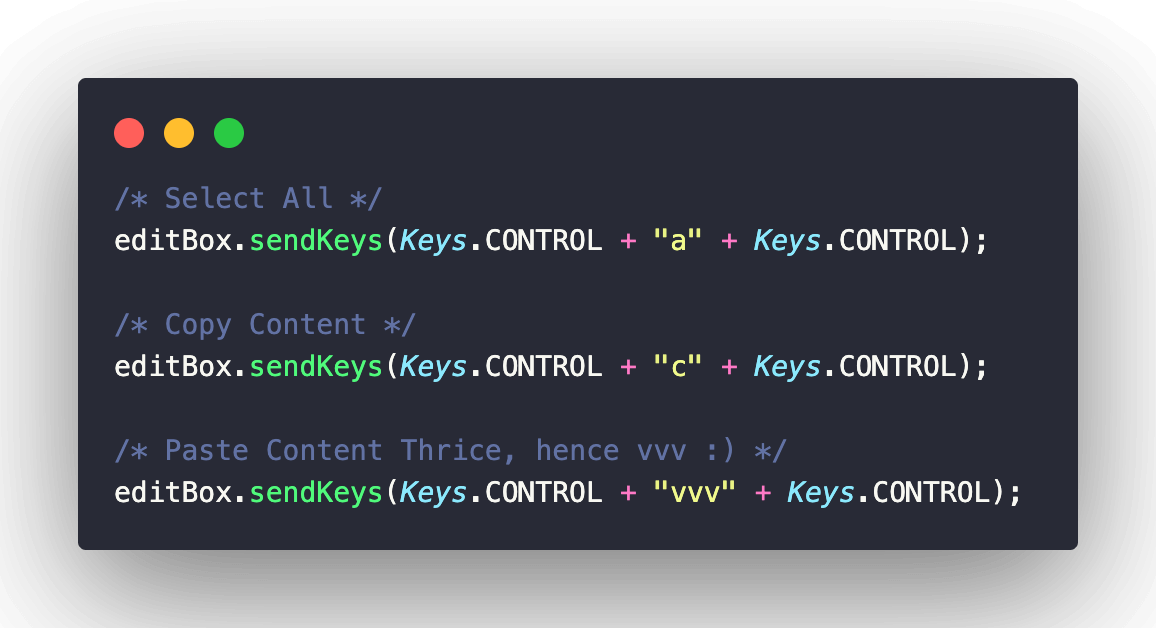
Similar steps are repeated in the test_copy_paste() test case. The only difference is that the text ‘WinAppDriver Demo’ is first added in Notepad’s Text Area.
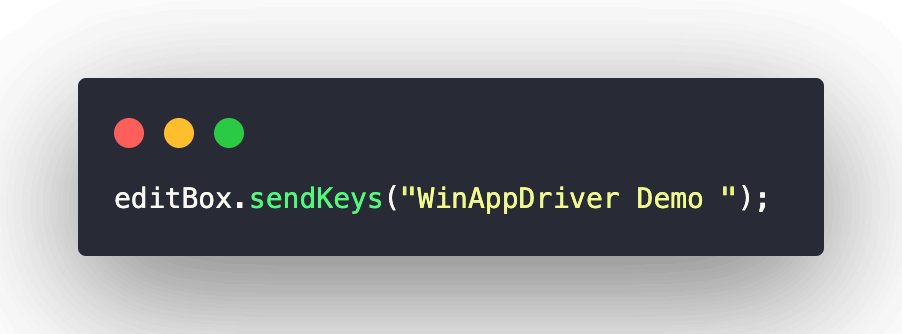
Once added, the entire content in Notepad is selected using CTRL + A, copied using CTRL + C, and pasted thrice in the Text Area. After the execution of this test, the content in Notepad will be ‘WinAppDriver Demo WinAppDriver Demo WinAppDriver Demo’.
Step 5
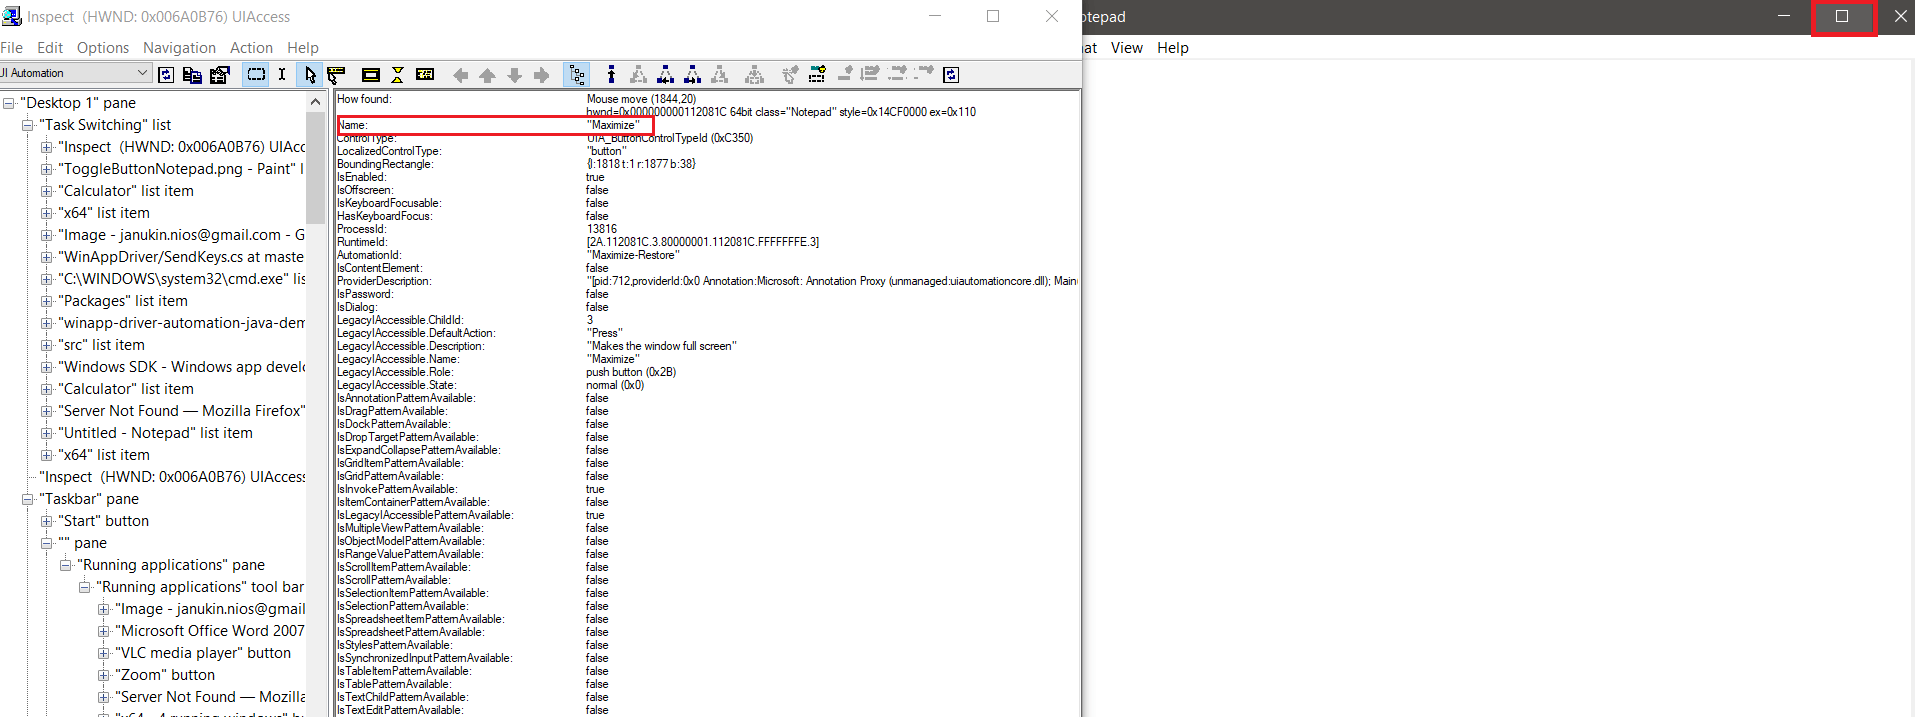
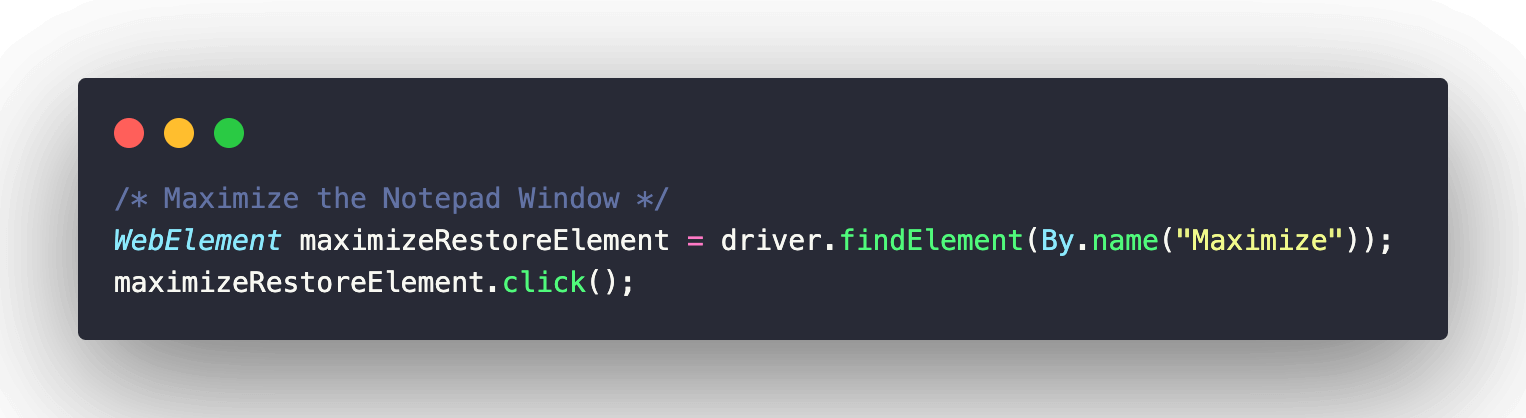
Before saving the file, we maximize Notepad by locating the Maximize button using the findElement method. In case of this, we made use of the Name locator.
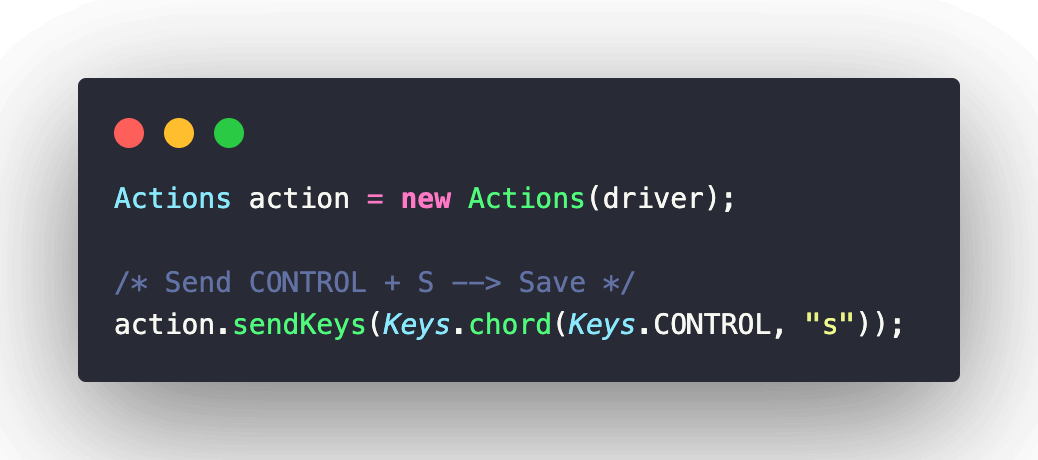
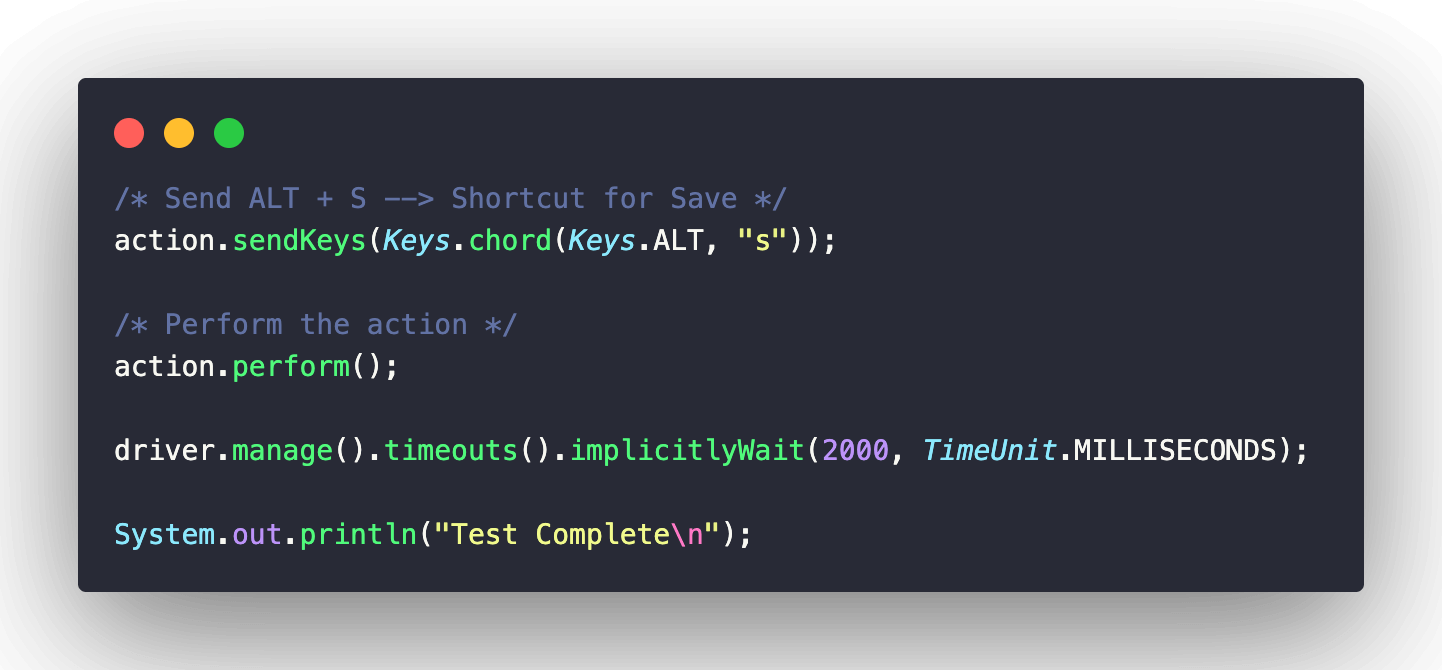
Step 6 (Saving File)
This is where things become a bit more interesting. 😀First, create an object of the Actions class. Since the shortcut of File Save is CTRL + S, we pass the same key combination to the sendKeys() method so that it opens up the “Save As” dialog box.
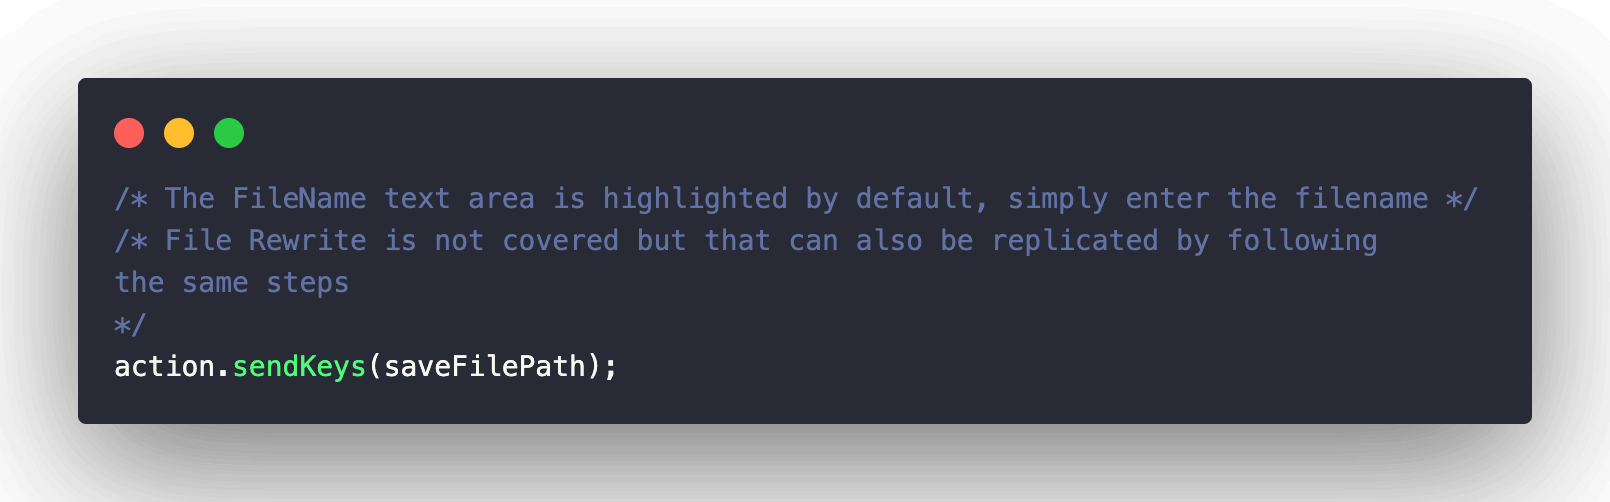
Once the dialog box is open, enter the desired destination (e.g., C:\Himanshu\WinAppDriverDemo.txt) where you intend to save the file. This is because the FileName Text Area is highlighted by default by Windows.
The shortcut for pressing Save in the Save As dialog box in Windows is CONTROL + S. Hence, the same key combination is again passed via the sendKeys() method. Now, it’s time to run the chain of actions that we built so far using the perform() method of the Actions class.
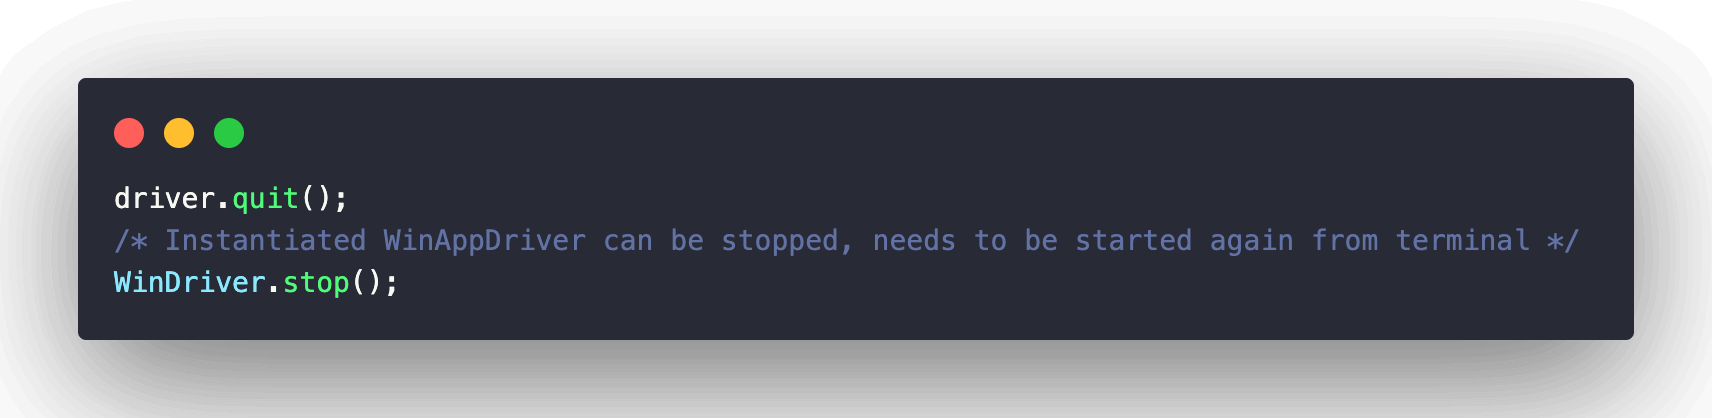
Now that all the tests are complete, the quit() method of WindowsDriver is used for resetting the driver object that we created during the setUp phase. The instantiated WinAppDriver.exe is also stopped by triggering the stop() method of WinDriver (that is part of com.WinDriver package).
Implementation – Classic Calculator Application
Majority of the steps covered during the walkthrough of Calculator and Notepad application testing are also applicable here as well. Hence, I am skipping the walkthrough section of this use case!
Execution
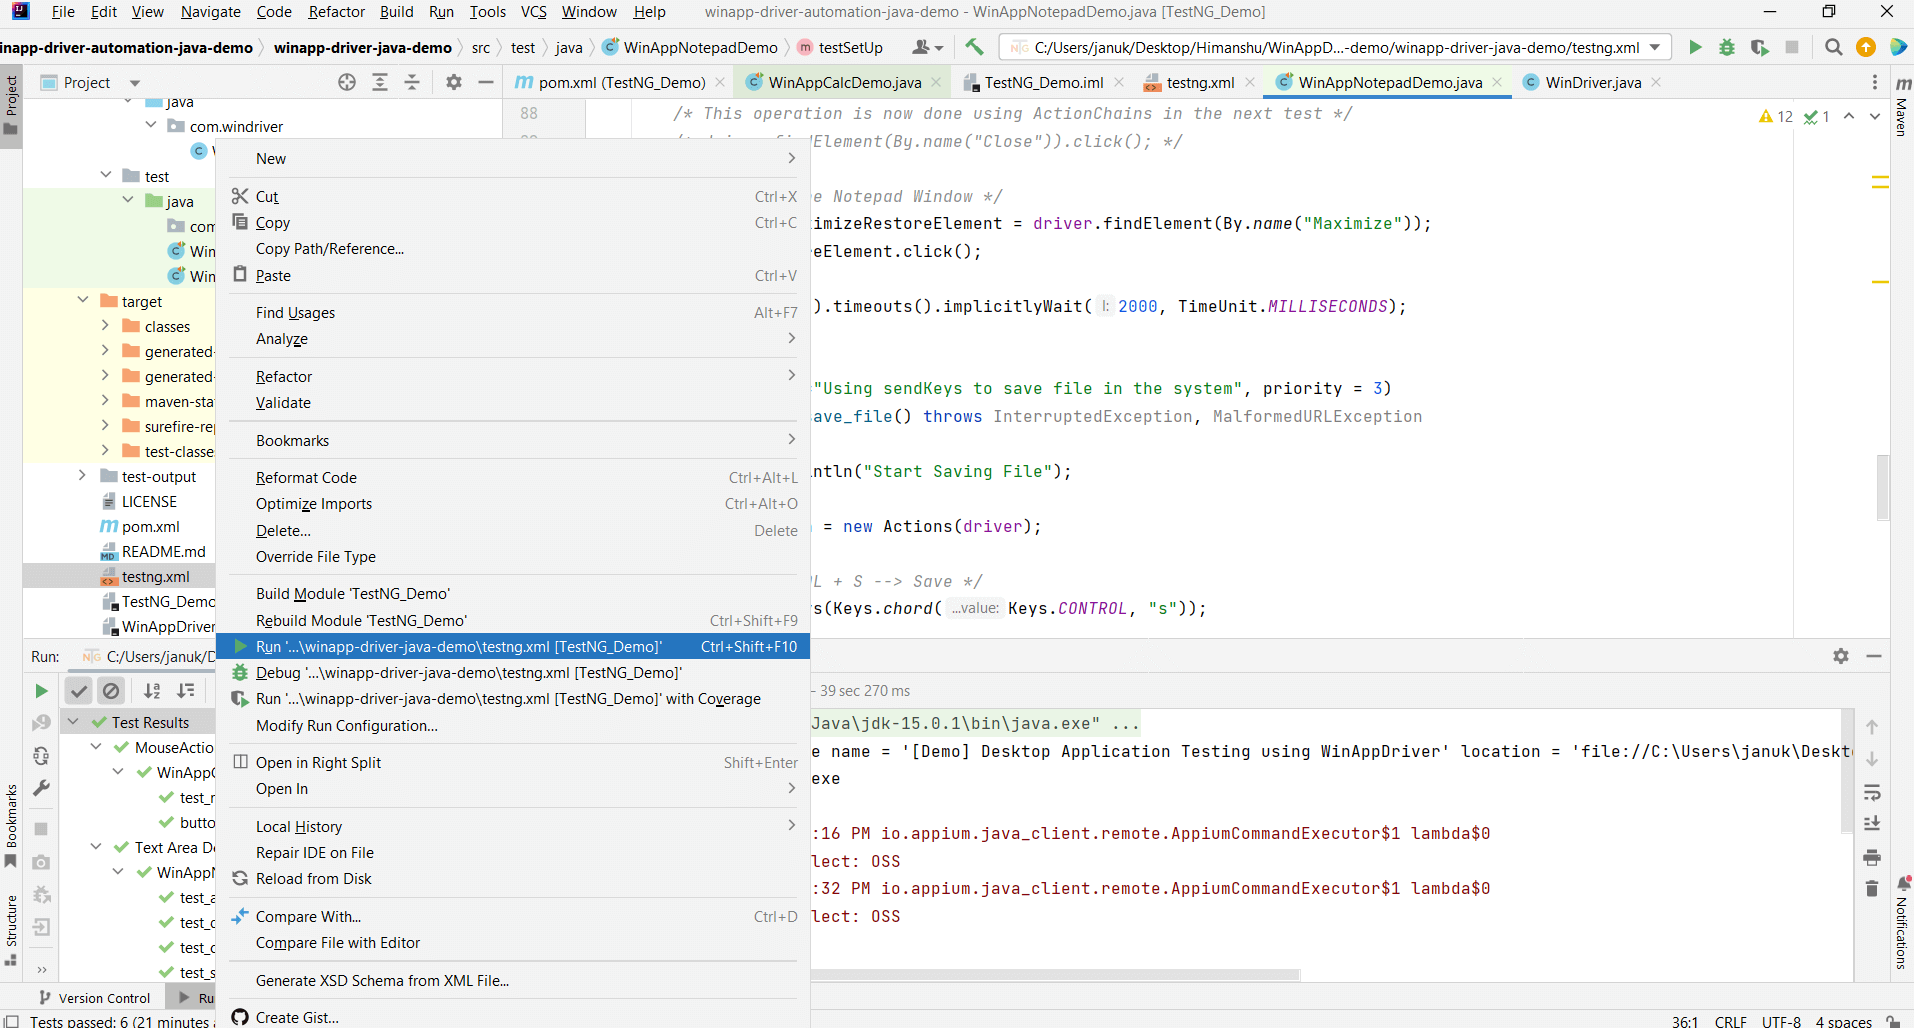
You can trigger the tests either via the IntelliJ IDE or using the mvn CLI commands. In order to run the tests using the CLI, simply navigate to the project folder and provide the mvn test command.
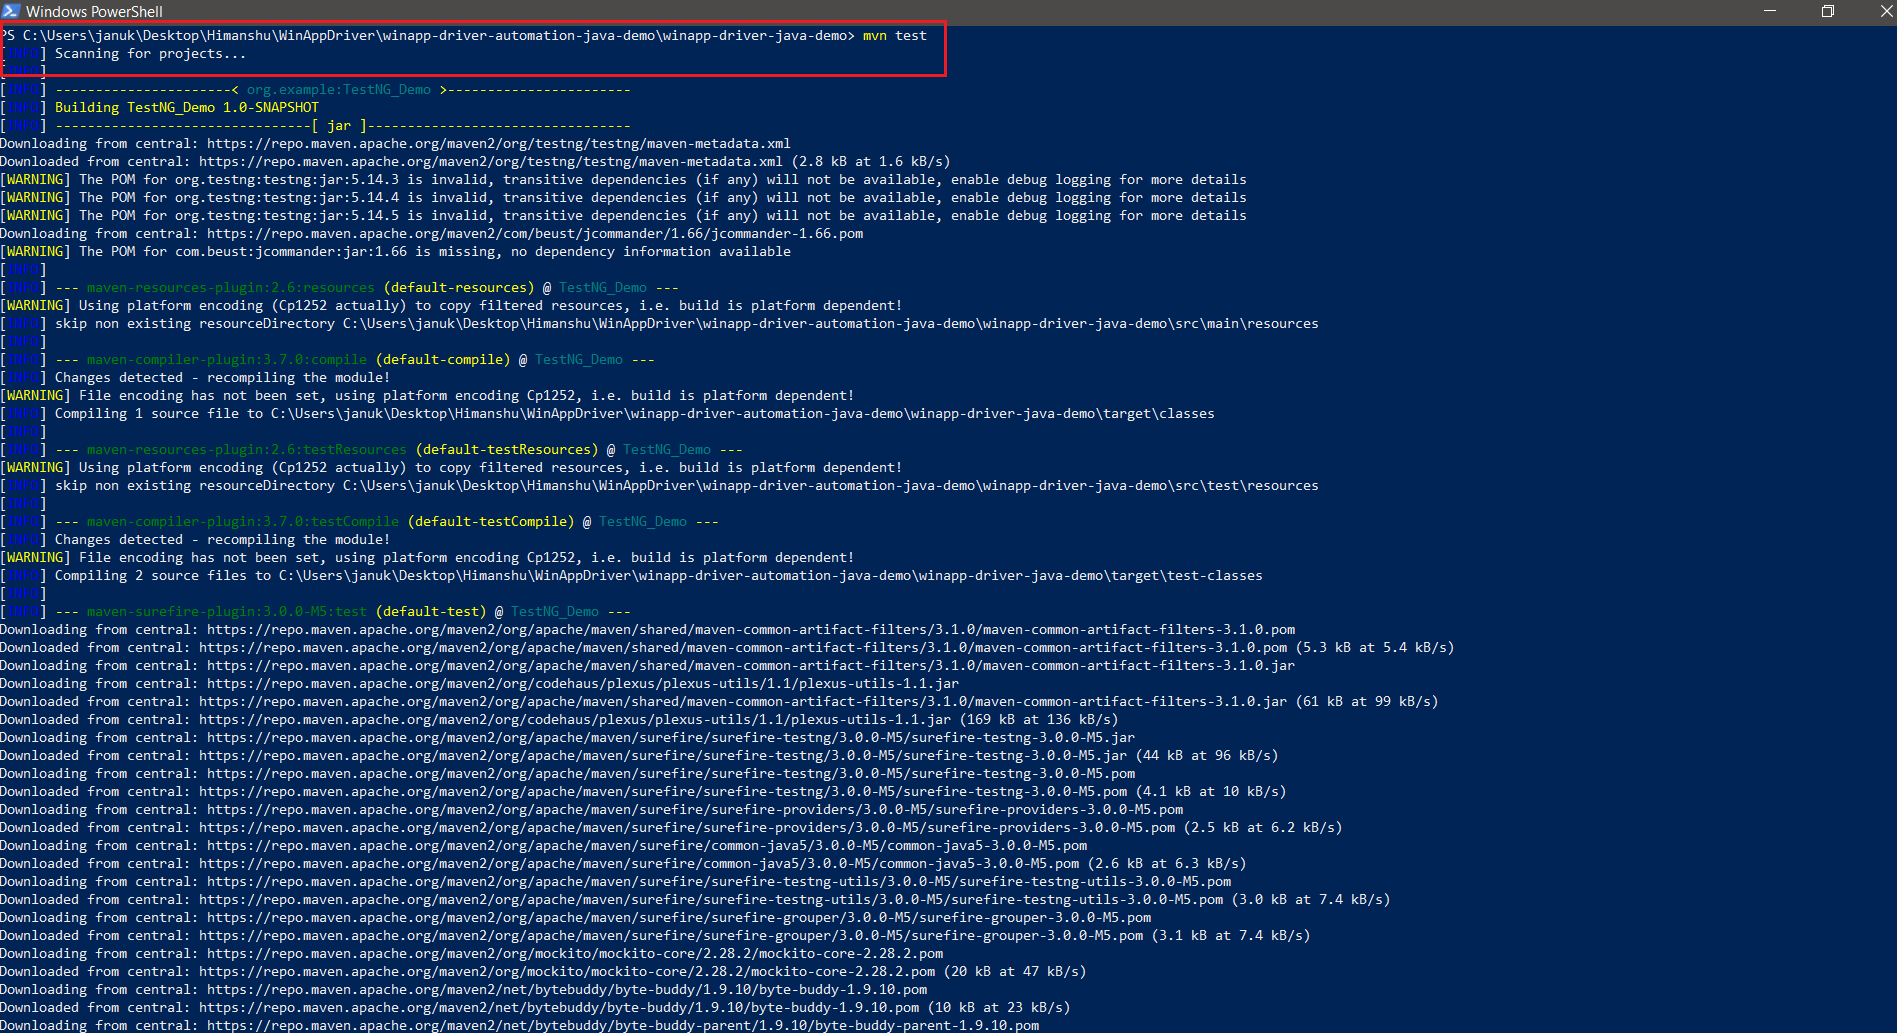
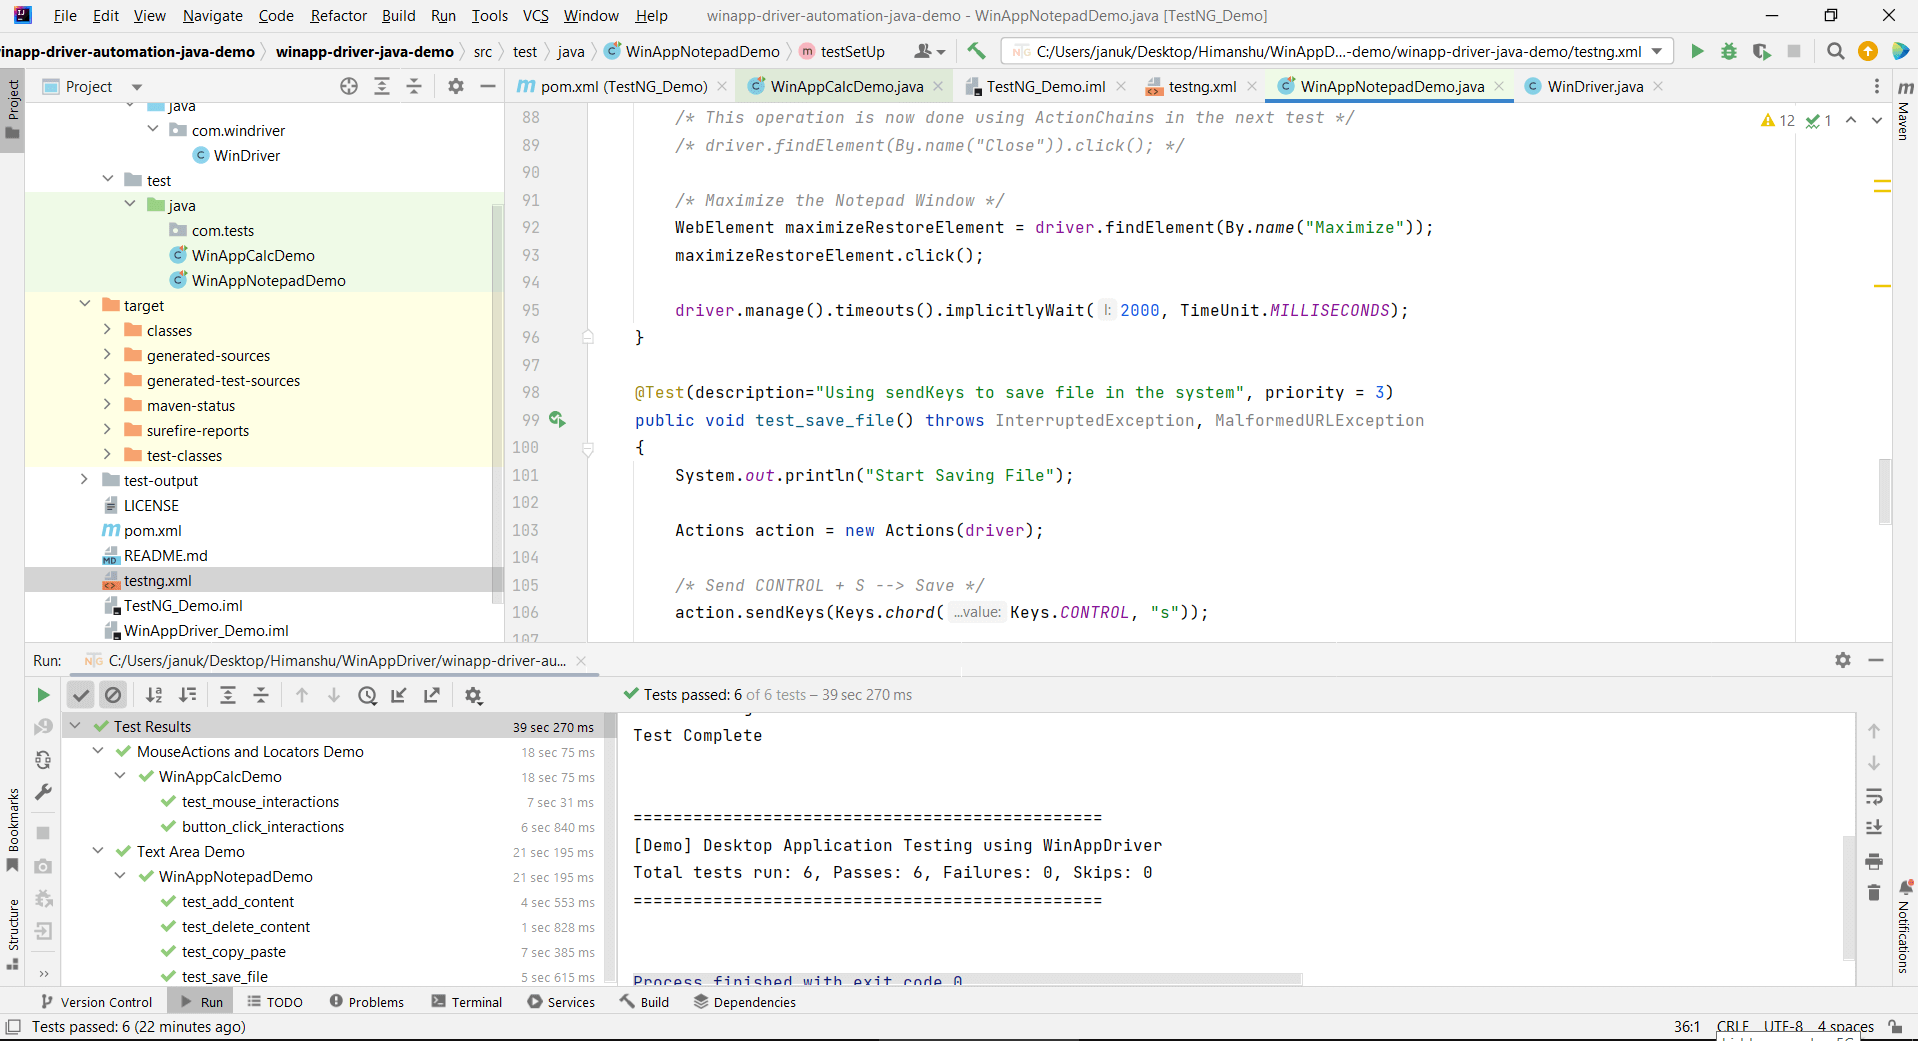
I triggered the tests using the IDE. As seen below, the test execution was successful 🙂
Though I have demonstrated desktop application automation using Notepad and Calculator applications, the complexity of the test suite might grow for your application. Hence, some of the Selenium best practices, like choosing the best suited locator, adopting Page Object Model (POM) in Selenium for better code scalability and maintainability, using the right kind of waits (i.e., Explicit waits), etc., still apply when automating desktop applications.
Lastly, the FAQ of Microsoft WinAppDriver is packed with a lot of useful information, do refer to it before trying your hands on desktop application automation 🙂
Desktop Application Testing on Remote Grid
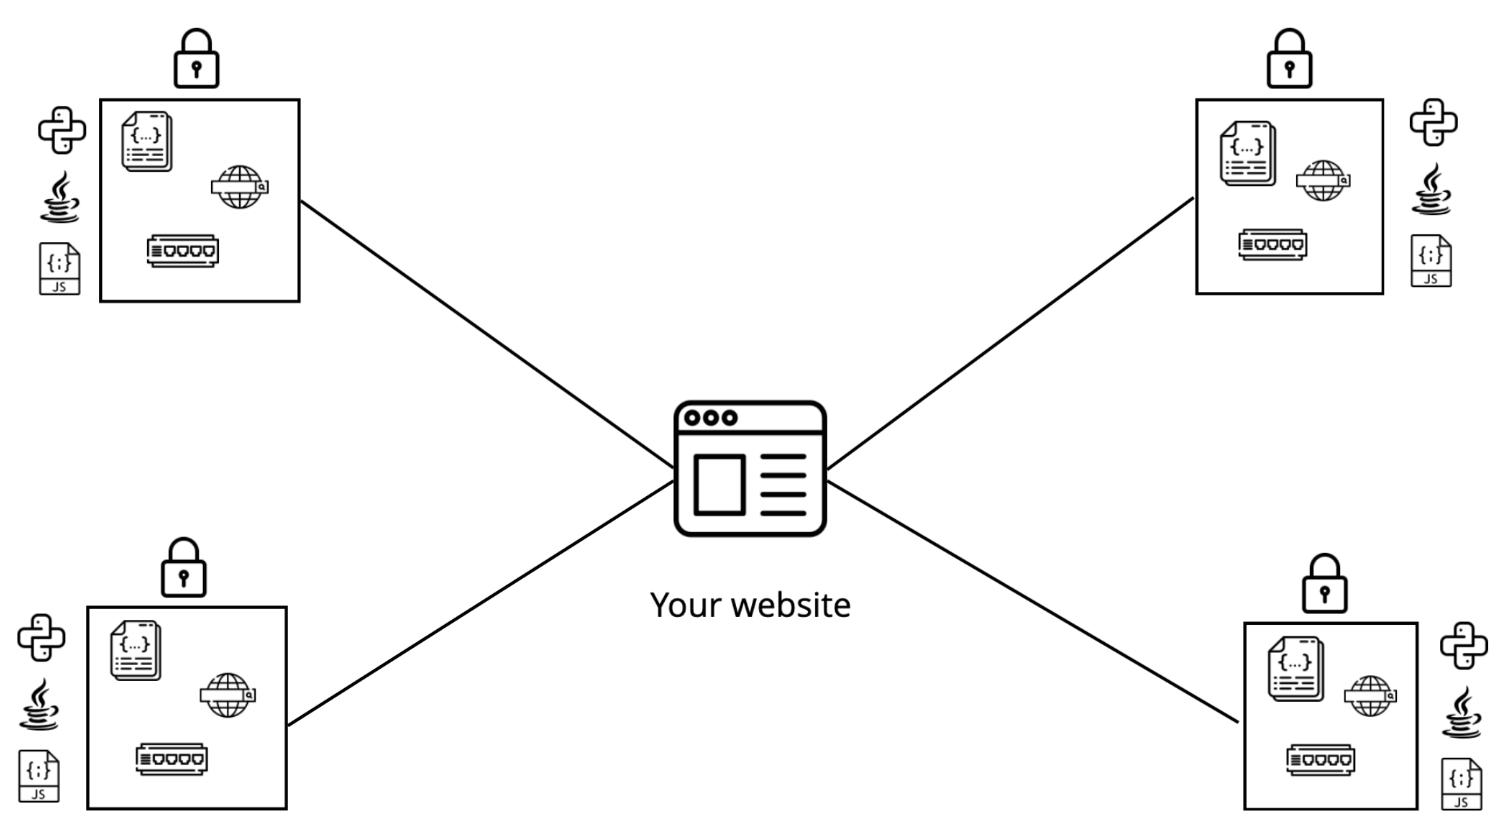
Though desktop application testing on a local machine works like a charm, it is not a scalable approach. The tests I have showcased in the blog were executed on a Windows 10 machine, but I would need another machine if the same tests (with relevant changes) have to be executed on Windows 11.
Secondly, I had to go through the hassles of installing WinAppDriver on the machine! All the shortcomings that come with local grids (e.g., Selenium/Appium/Cypress) are also applicable when testing desktop applications.
The benefits of cloud testing are also relevant for desktop application testing. 🙂In this section, I will port the following tests to run on the HyperExecute Grid on LambdaTest.
What is HyperExecute?
HyperExecute is a smart test orchestration platform to run end-to-end tests at the fastest speed possible. HyperExecute lets you achieve an accelerated TTM (Time to Market) by providing a test infrastructure that offers optimal speed, test orchestration, and detailed execution logs.
The overall experience helps teams test code and fix issues much faster. HyperExecute is configured using a YAML file. Instead of moving the Hub close to you, HyperExecute brings the test scripts close to the Hub!
You can subscribe to the LambdaTest YouTube Channel to stay updated with the latest tutorials on Playwright browser testing, Cypress testing, and more.
Here is a diagrammatic representation of how tests are run using traditional solutions:
This is how tests are executed and orchestrated on HyperExecute grid:
Though the above image refers to a website (or web application), the same execution and orchestration principles also apply when automating desktop applications. For further reference, I recommend you to look at the support document that deep dives into the differences between HyperExecute and Traditional Grids.
Since explaining all the features of HyperExecute is beyond the scope of this blog, I recommend you to refer to the following links for more information:
- Key Reasons Of Building HyperExecute
- HyperExecute – Salient Features
- HyperExecute – Getting Started Guide
- HyperExecute – Deep dive into YAML
Demonstration: Desktop Application Testing on Remote Grid
For demonstration, I would be automating interactions on the following applications:
- Calculator (Classic)
- Notepad
Since the tests are run on HyperExecute grid, you might need to change the AppPath (Classic Calculator, Notepad) since the respective applications might be installed on different locations in HyperExecute.
Clone the Windows Application Testing Demo (HyperExecute) GitHub repository to follow along the steps mentioned further in the blog.
Pre-Requisites
- Since the tests will be executing on HyperExecute Grid, you would need to have an account on HyperExecute
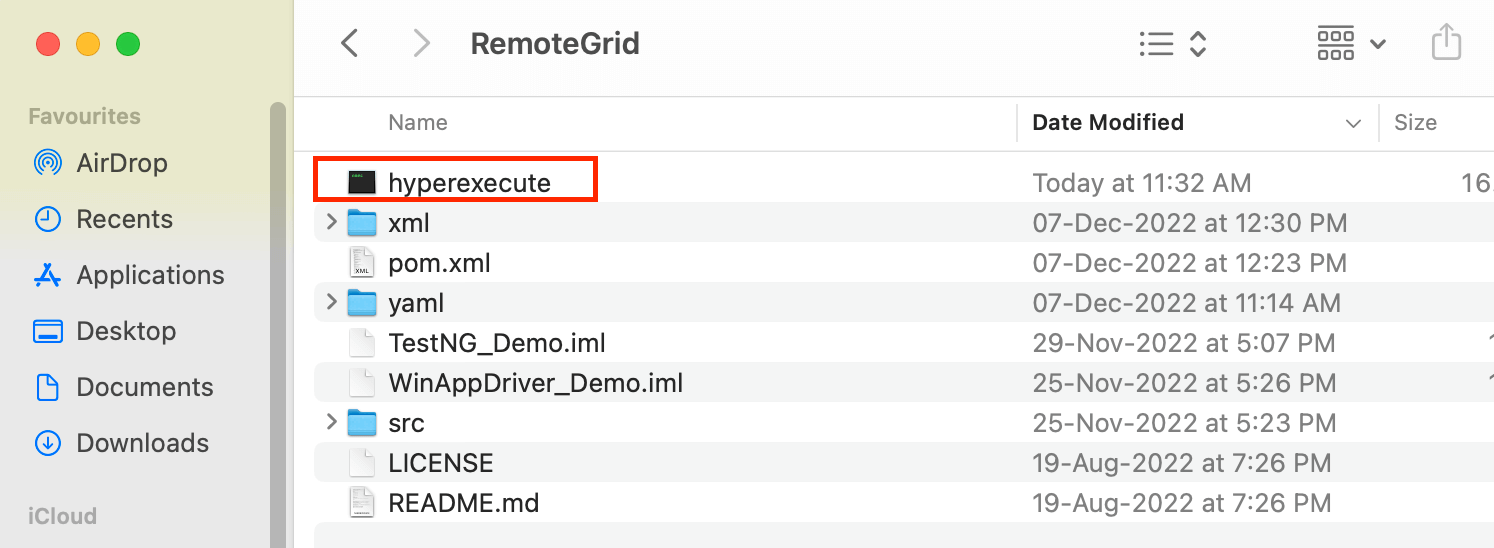
- Once you have created an account and cloned the repo (shown above), please download the HyperExecute CLI:
Place the same in the project’s root folder and provide execution (i.e., +x) permission to the executable.
Test Scenarios (Classic Calculator Application)
The test scenarios for the Classic Calculator application remain unchanged, however I have added them here for better clarity.
Test Scenario – 1
- Launch the Classic Calculator application.
- Click on View.
- Click on the menu item Digit grouping.
Test Scenario – 2
- Launch the Classic Calculator application.
- Click on View → Worksheets → Fuel economy (mpg).
Test Scenario – 3
- Locate and click on the number – 1.
- Locate and click on the number – 8.
- Locate and click on the Add (+) button.
- Locate and click on the Equals (=) button.
- Assert if the computed result is not equal to the expected result.
Test Scenarios (Notepad Application)
The test scenarios for the Notepad application also remain unchanged, however I have added them here for better clarity.
Test Scenario – 1
- Launch the Notepad application.
- Locate the Edit button.
- Enter This is a demo of WinAppDriver in the text area.
Test Scenario – 2
- Enter Control + A in the text area.
- Delete the selected text.
- Assert if the text area is not empty.
Test Scenario – 3
- Enter the WinAppDriver Demo in the text area.
- Copy and paste the content entered in the earlier step 3 times.
- Maximize the window.
Test Scenario – 4
- Send Control + S key combination.
- Enter the path where the file will be saved (e.g., D:\WinAppDriverDemo.txt)
Implementation
Apart from the path of the respective applications, there is not a single line of change in the code logic of the tests.
| Application | Path: Local Machine | Path: HyperExecute Grid |
|---|---|---|
| Notepad | C:\Windows\notepad.exe | C:\Windows\notepad.exe |
| Calculator (Classic) | C:\Program Files\OldClassicCalc\calc1.exe | C:\Windows\System32\win32calc.exe |
As mentioned earlier, HyperExecute supports orchestration using two modes:
- Smart Auto Split
- Matrix Multiplexing
Hence, I have created separate YAML files for each mechanism in the < project >/yaml/win folder.
Test Execution using Auto Split
Auto-test split (or auto split) workflow comes in handy when running tests at predefined concurrency and distributing the tests over the available infrastructure.
Concurrency can be on any level (e.g., file, module, test suite, test, scenario, etc.). It is up to the user to decide the level at which they want to split the tests. Further information about auto-splitting is available in the official documentation on smart auto test splitting
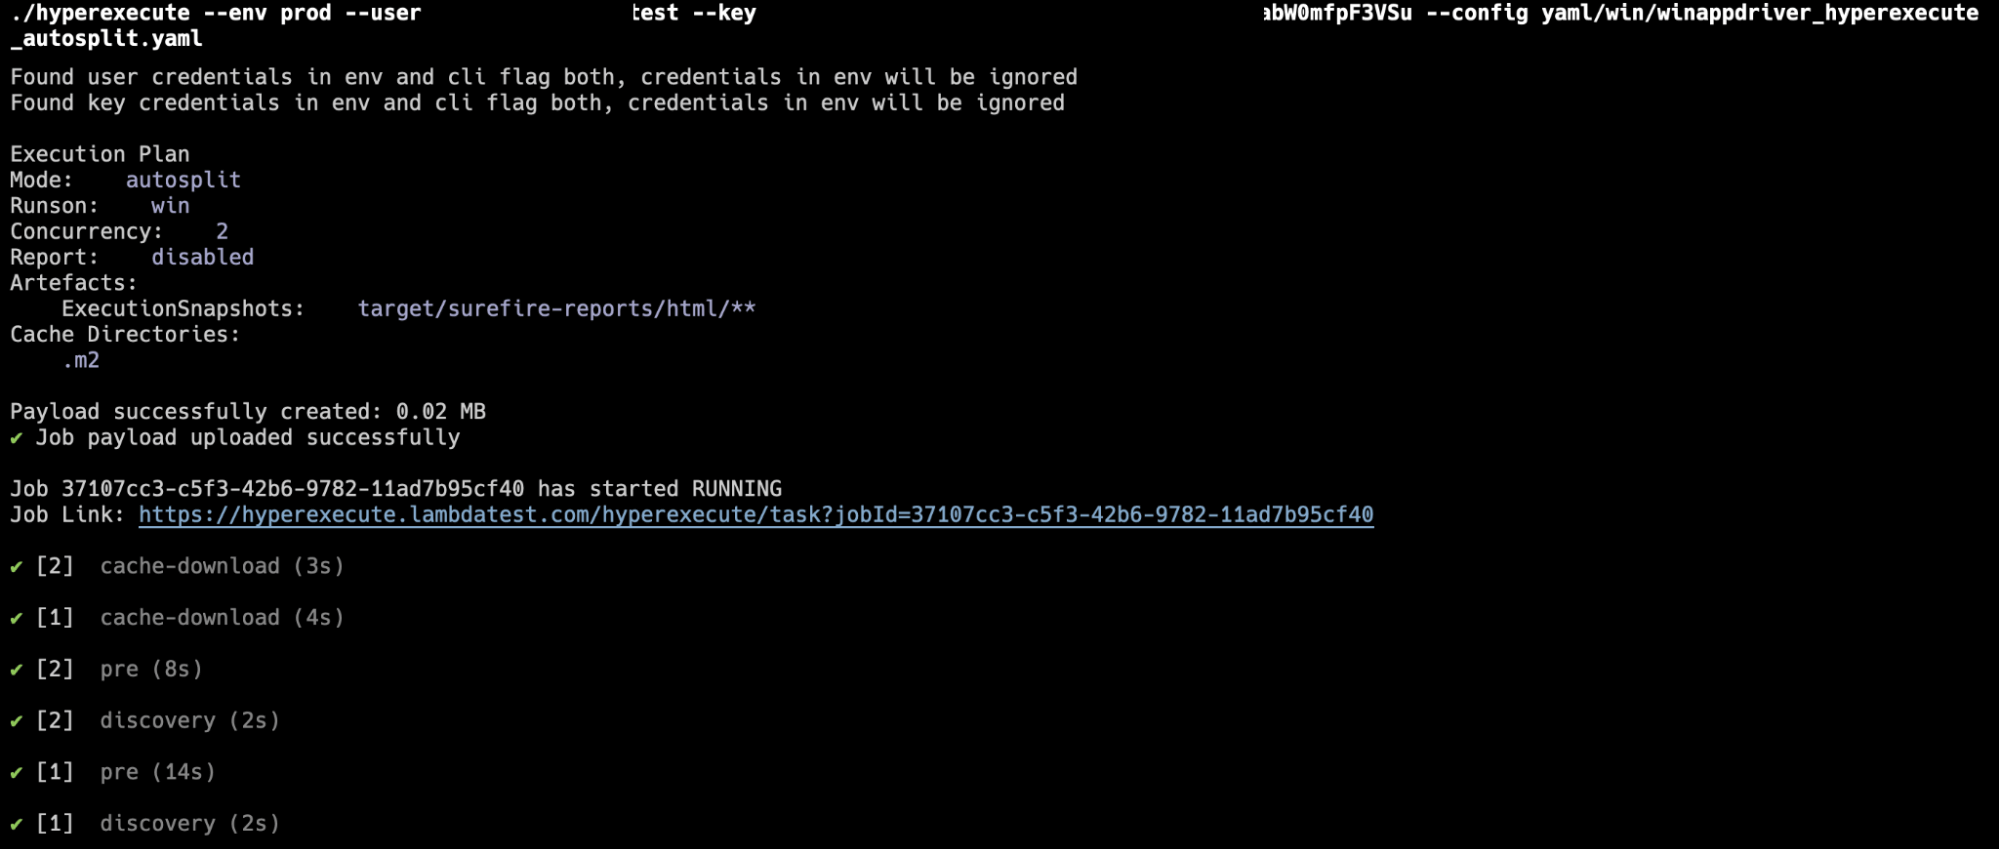
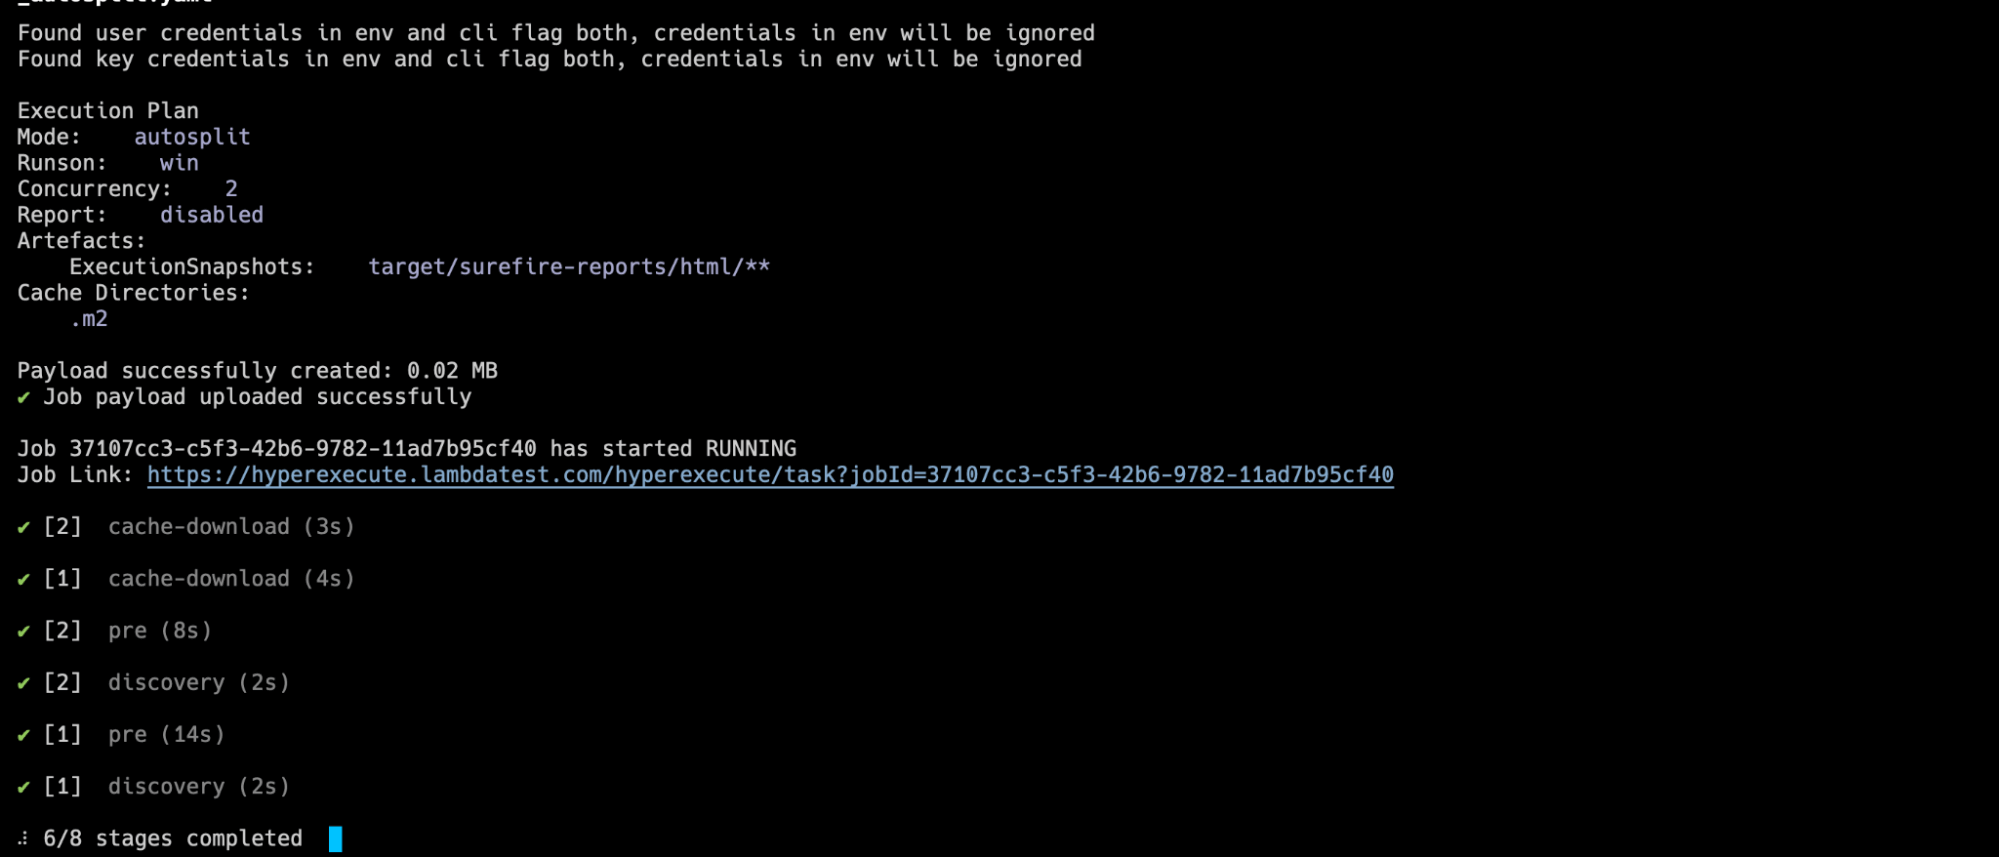
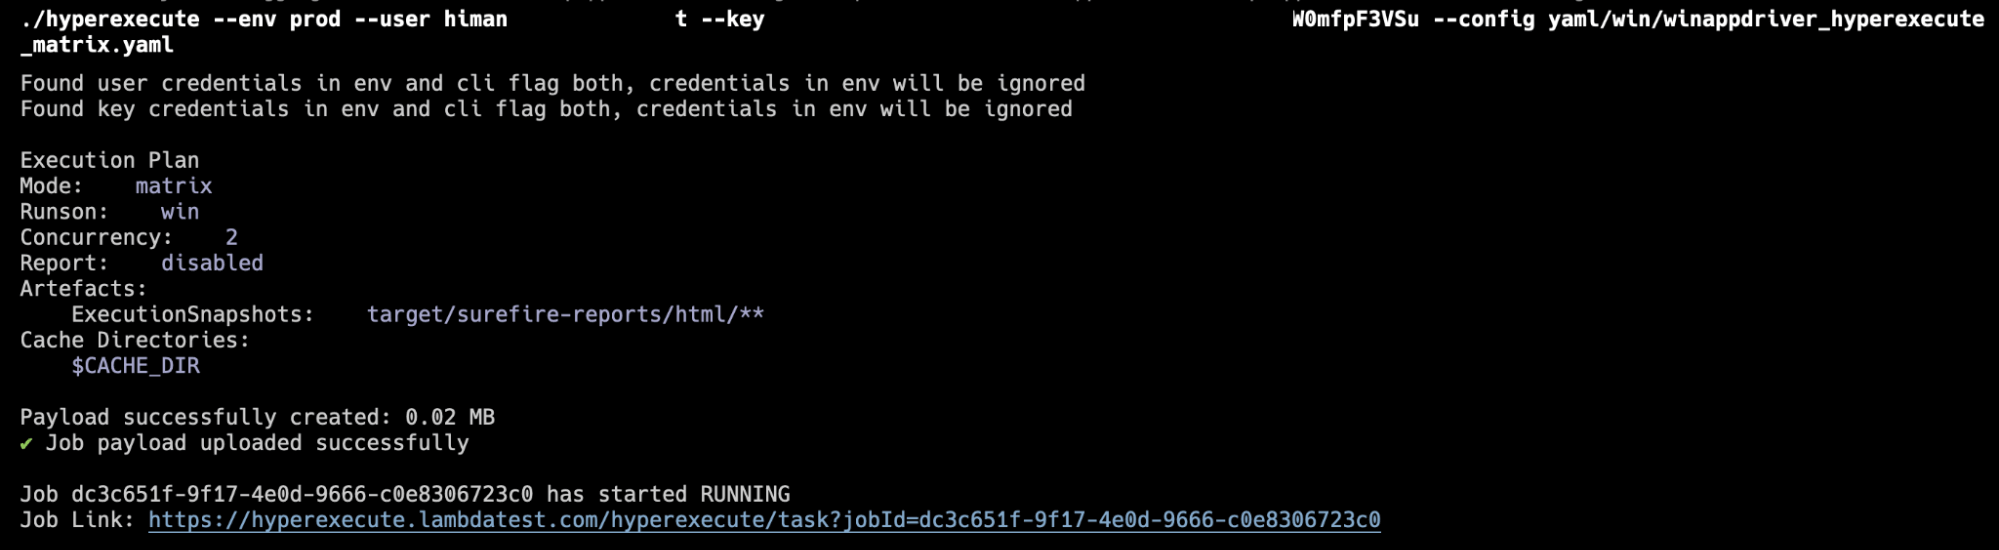
The YAML file located in yaml/winappdriver_hyperexecute_autosplit.xml fetches the tests from xml/testng_win.xml. Running the testDiscovery command on the terminal gives the following output:

Here is the complete Autosplit YAML file:
The keys used in the auto split and matrix YAML(s) serve the same purpose. Explaining the internals of YAML is beyond the scope of this blog, hence I recommend you to look at HyperExecute YAML Internals for more information.
Trigger the following command on the terminal to orchestrate and run the tests in parallel using auto split mode:

Shown below is the execution snapshot where the tests are orchestrated in the auto split mode:
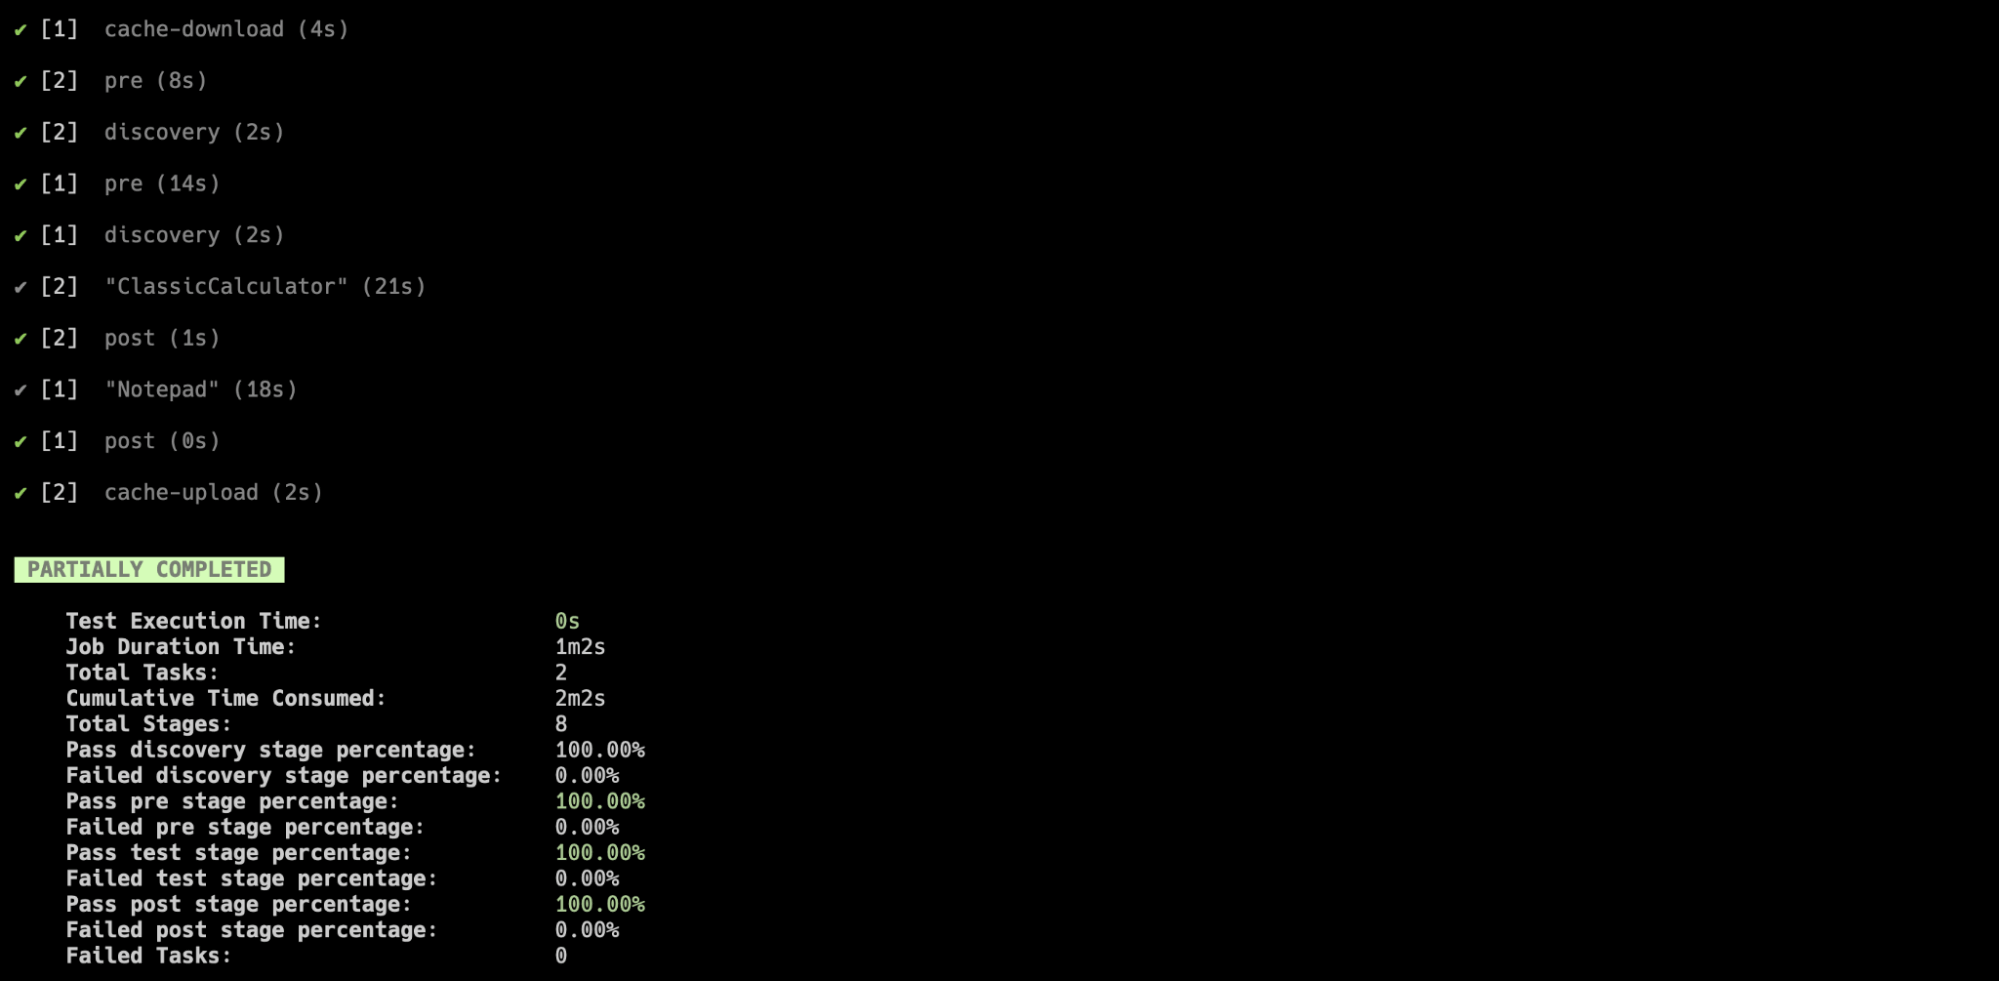
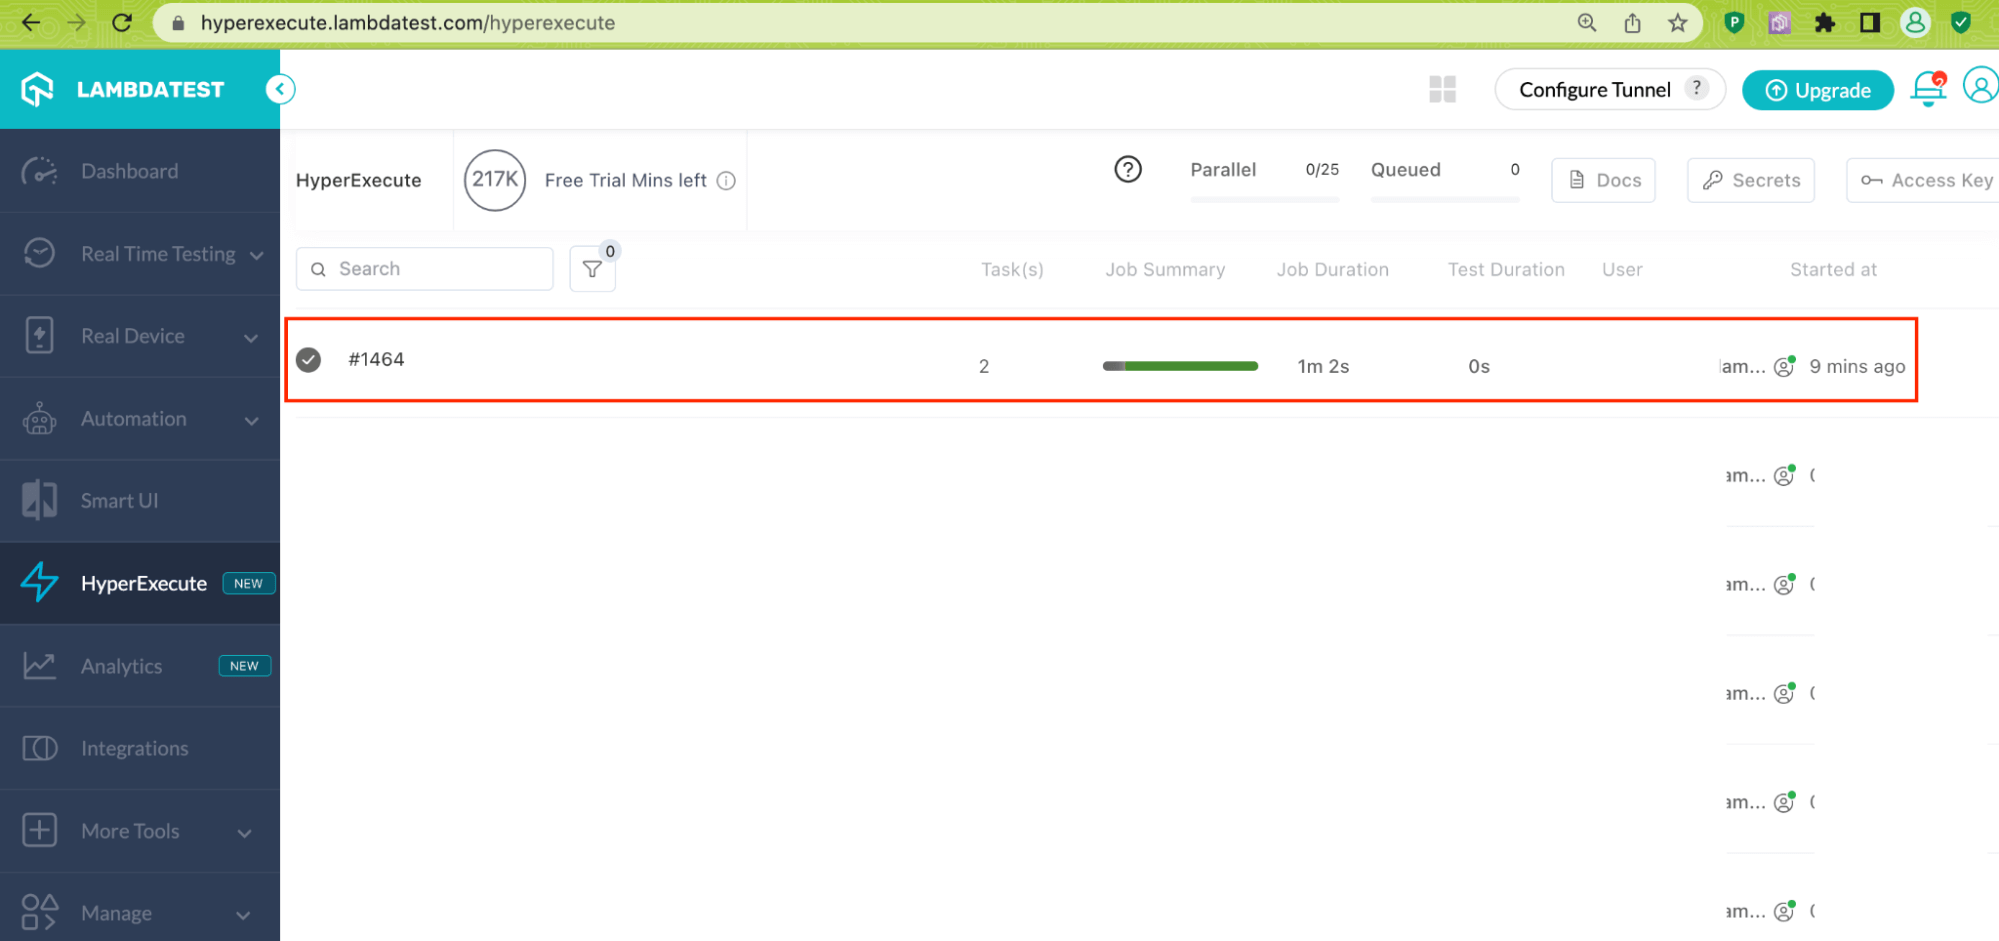
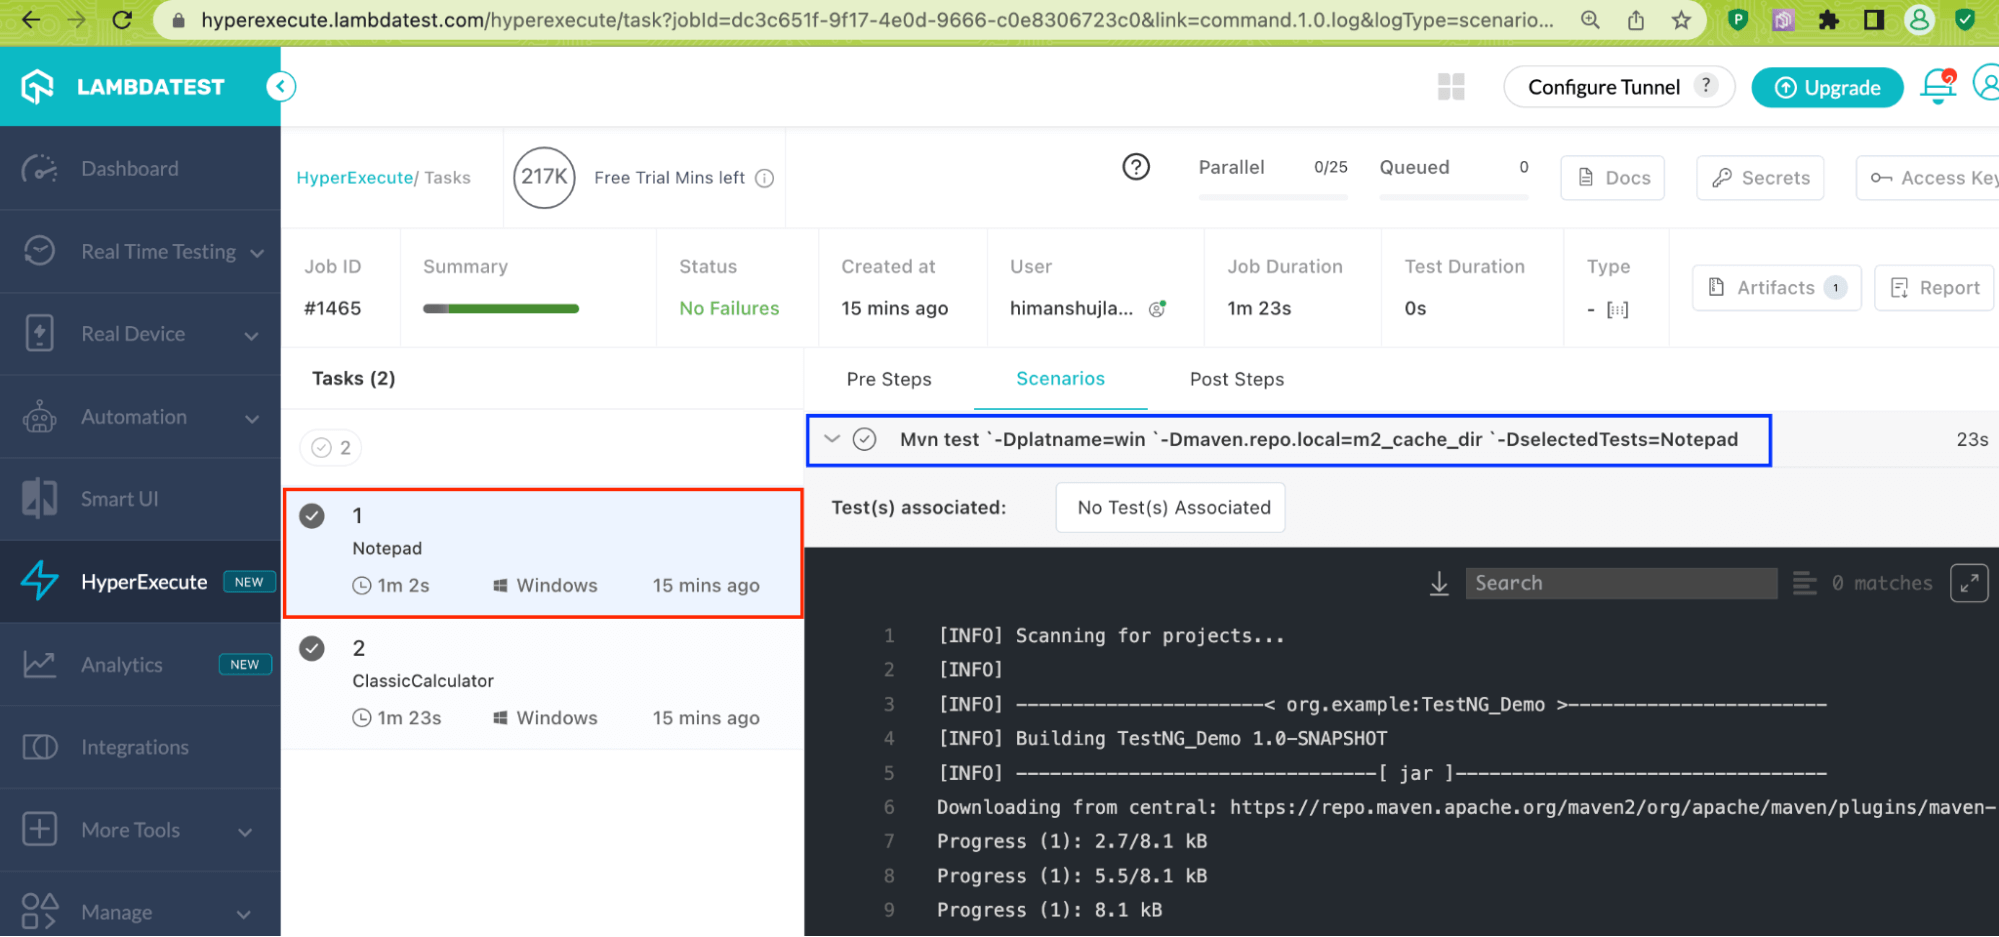
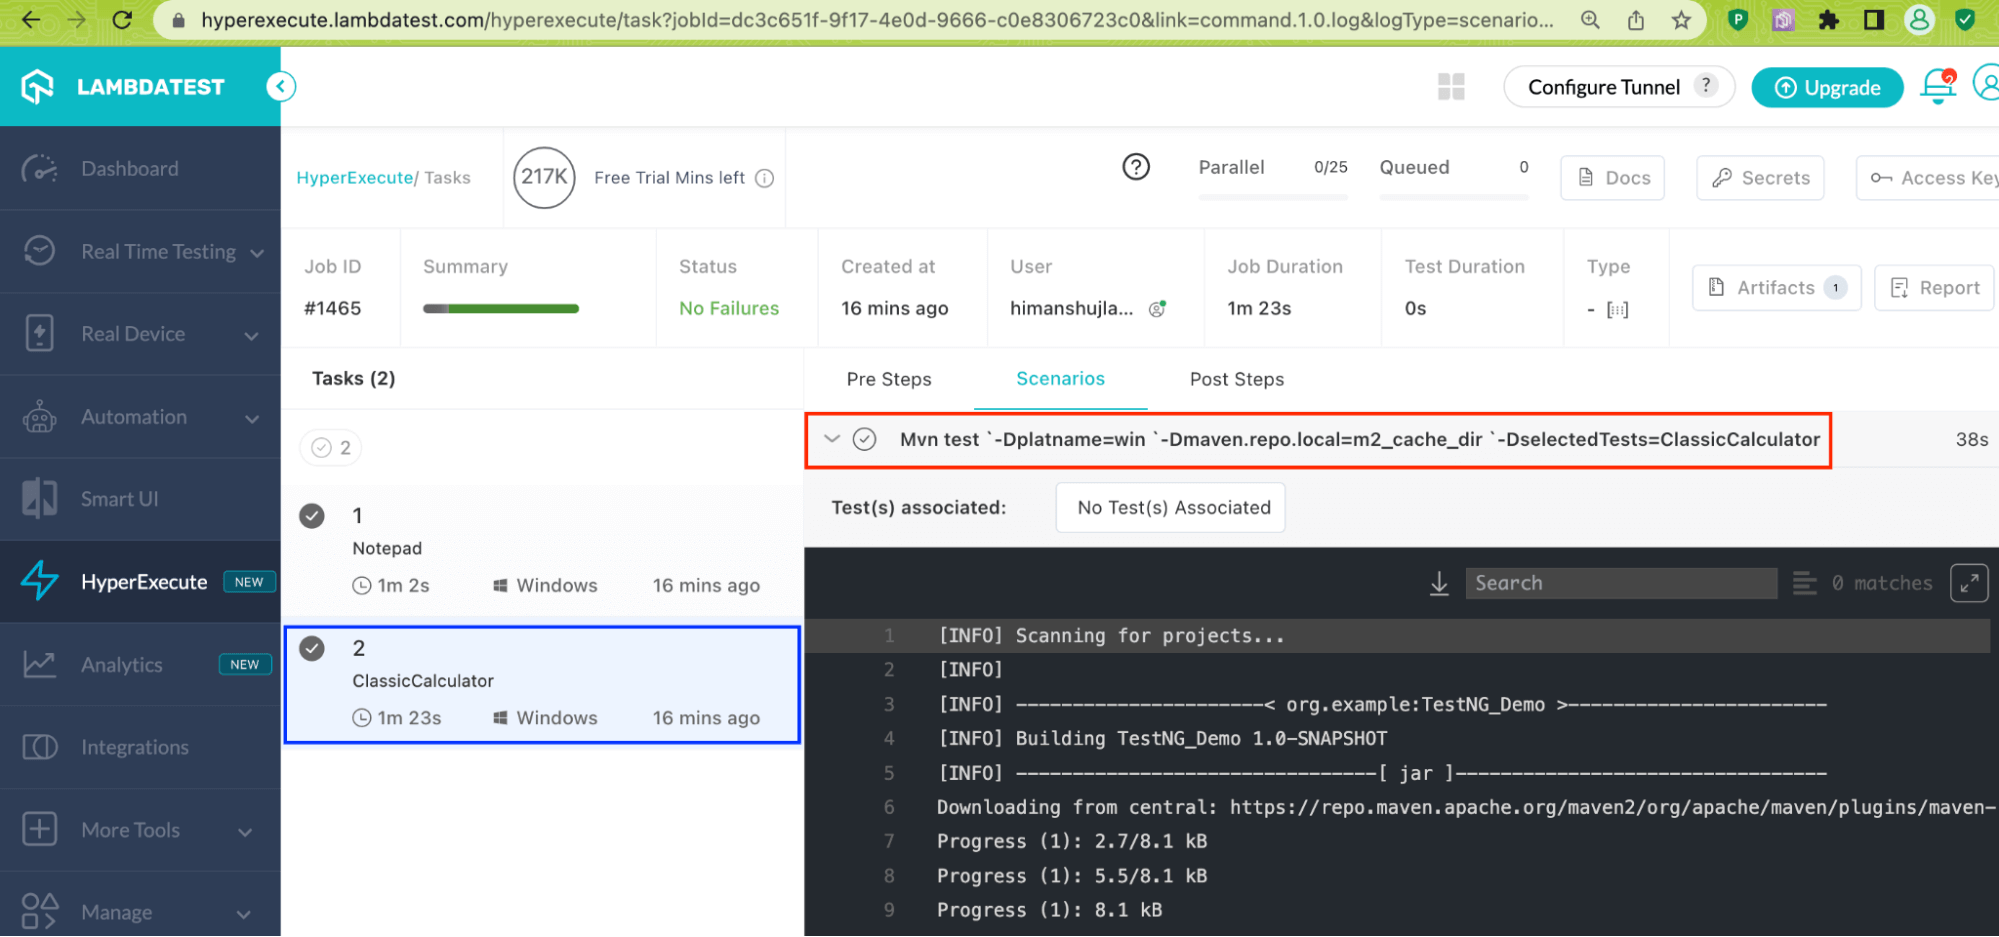
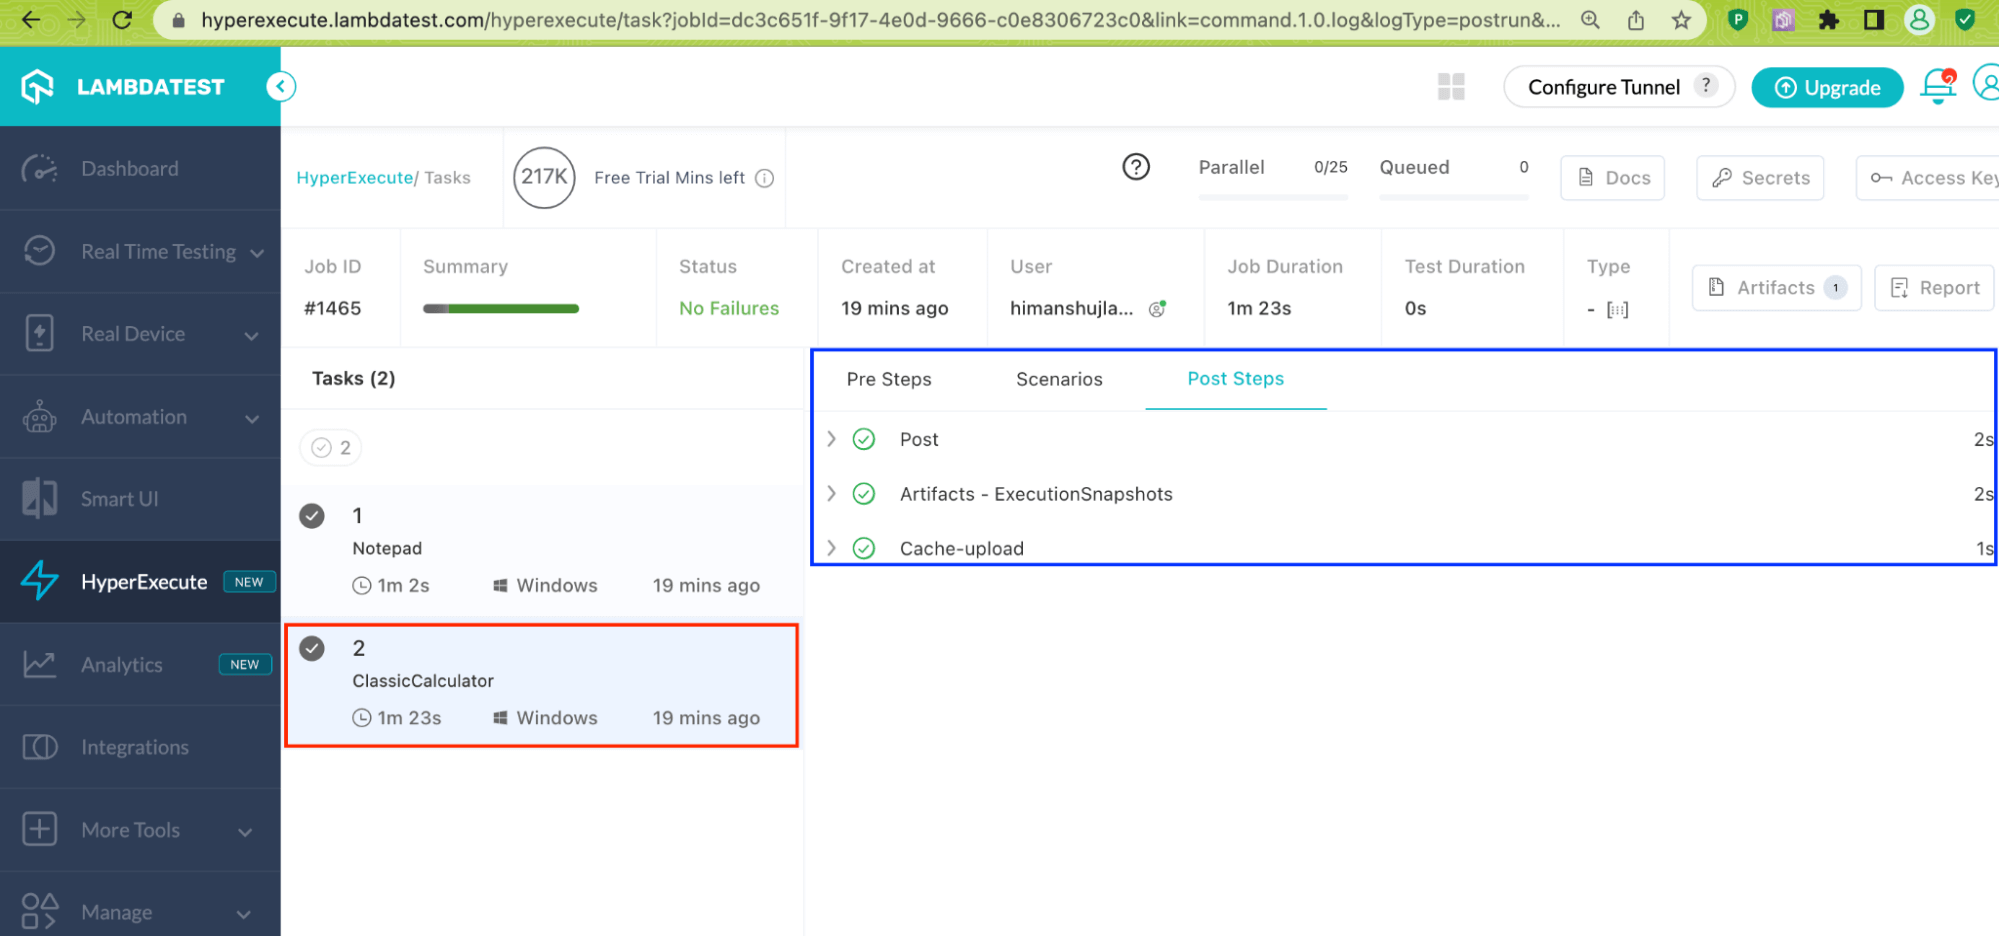
You can see the status of the execution in the HyperExecute Dashboard. As seen below, the tests were executed successfully.
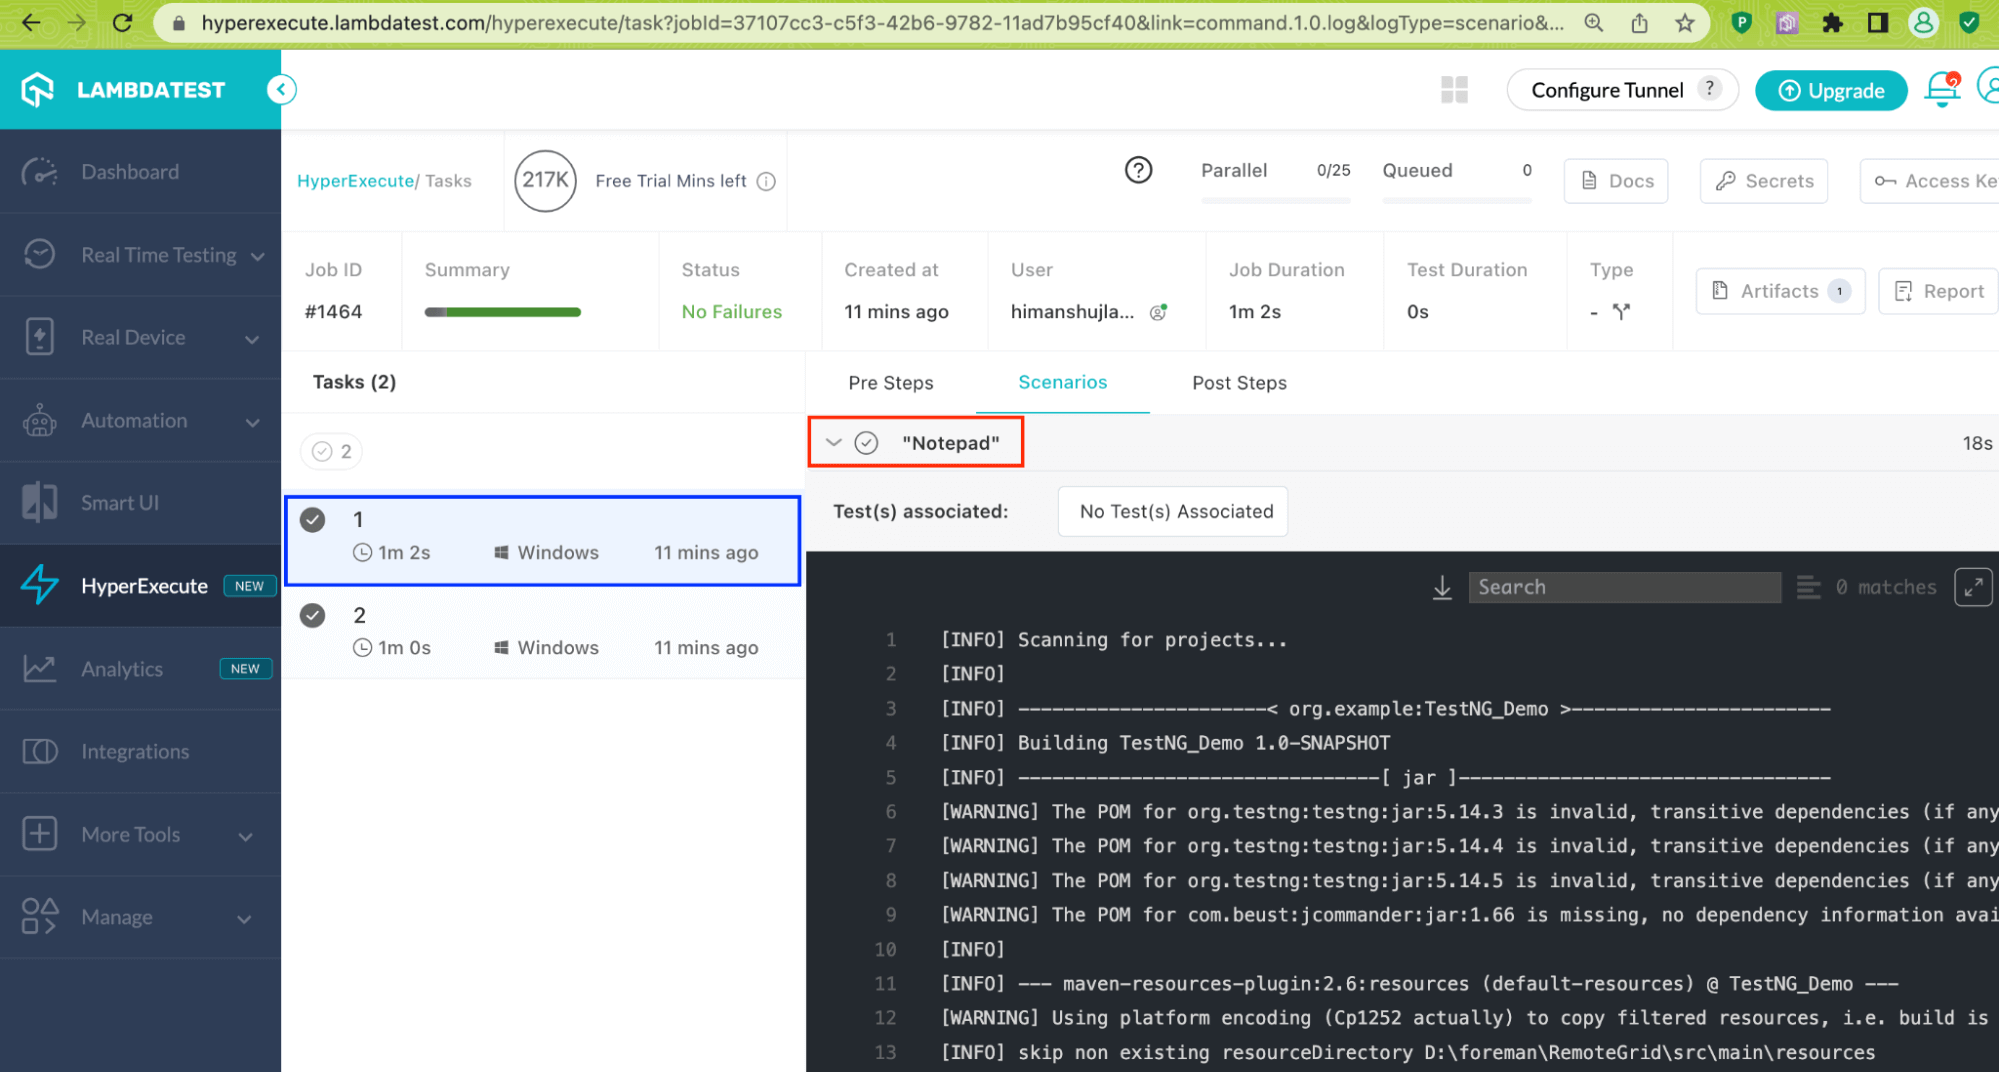
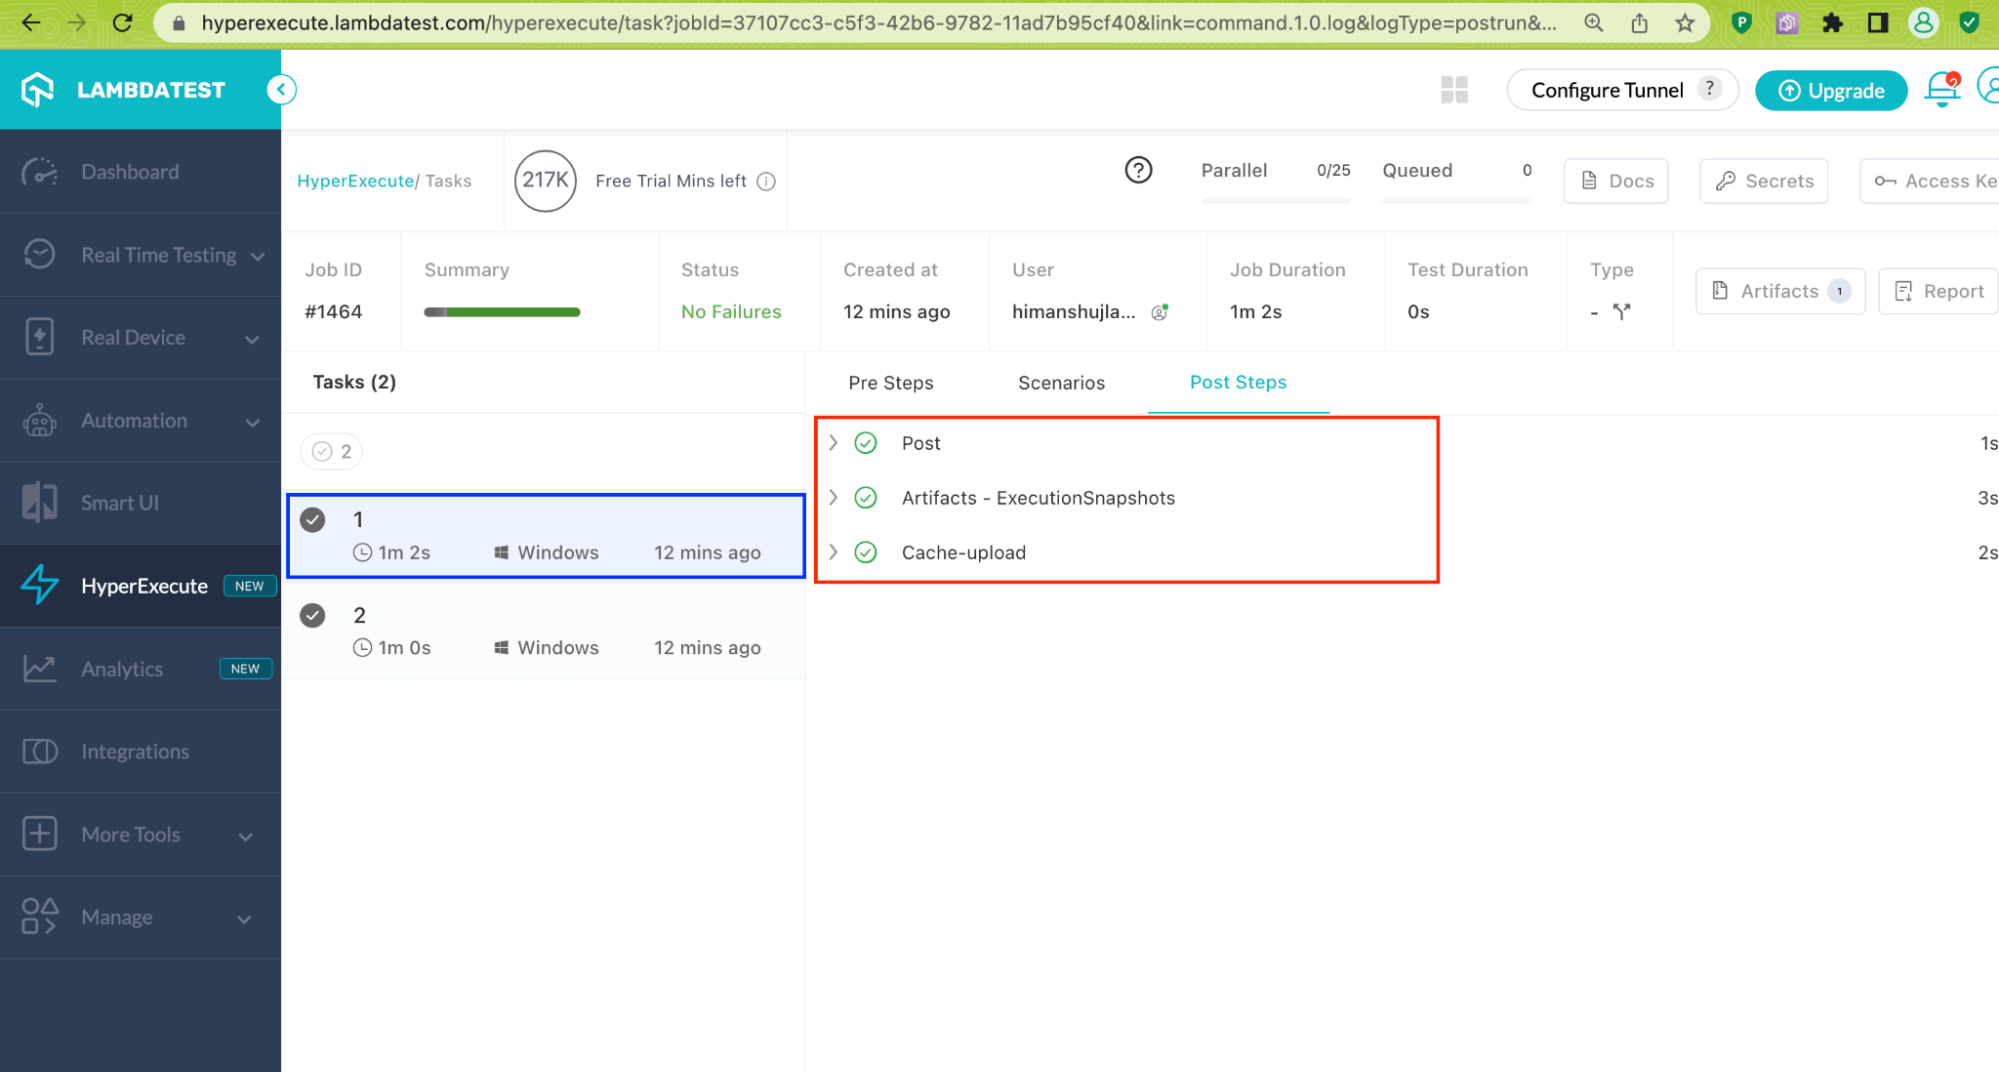
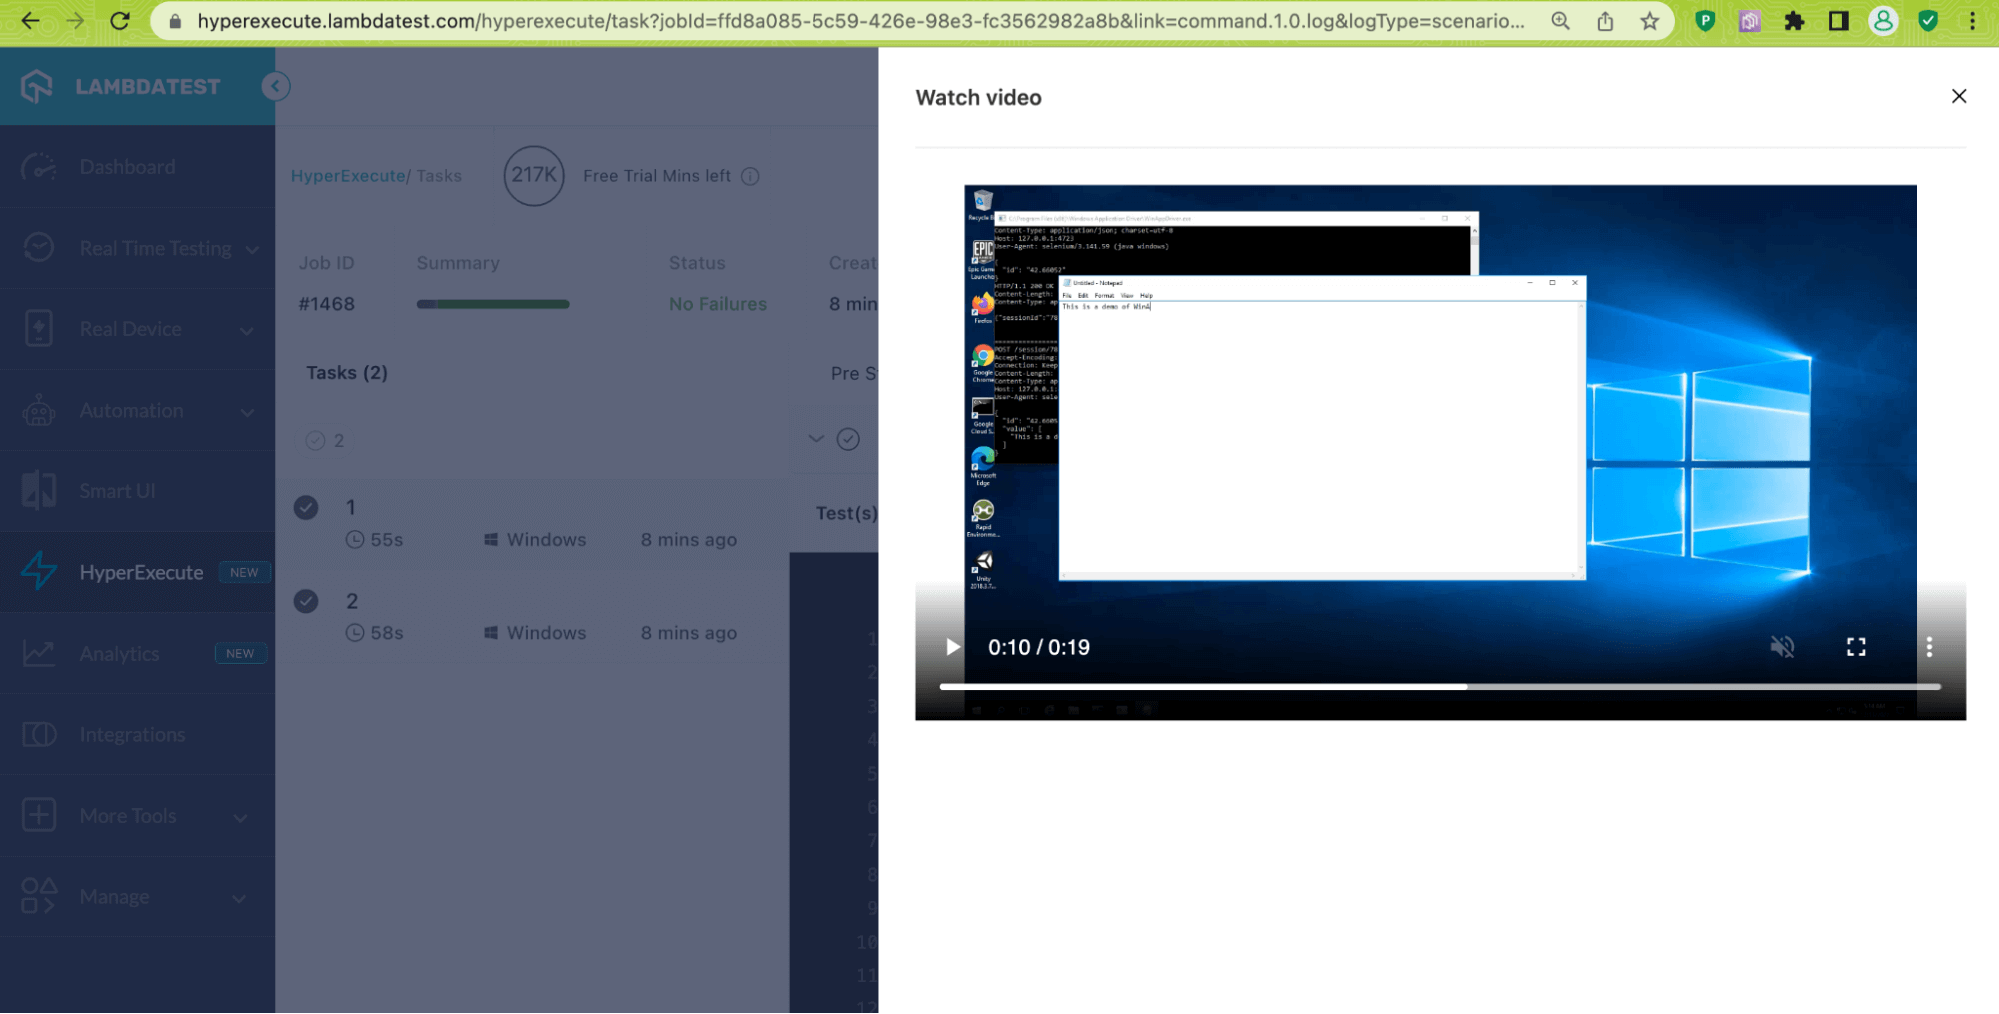
For each test scenario, a video showing the interactions being done on the elements in the application is generated. Simply click on Watch Video to see the test execution in action.
Test Execution using Matrix Multiplexing
Matrix-based build multiplexing is useful for running similar test cases over various combinations. For example, an environment combination could be a browser & OS combination on which cross browser tests must be performed. It is not only limited to browser & OS combinations, matrix-based multiplexing can be used for custom params like files, folders, tags, features, scenarios, input values, etc.
Consider a scenario where the matrix calculation results in 10 different tasks (or test combinations). In such a case, 10 different VMs will be parallely spawned, and all the tasks (or tests) will be run in parallel on the respective VM. Further information about auto-splitting is available in the official documentation on matrix multiplexing.
The YAML file located in yaml/winappdriver_hyperexecute_matrix.xml consists of tests that are added in a matrix.
|
1 2 3 4 5 |
matrix: tests: ["Notepad", "ClassicCalculator"] ......... testSuites: - mvn test `-Dplatname=win `-Dmaven.repo.local=m2_cache_dir `-DselectedTests=$tests |
Here is the complete Matrix YAML file:
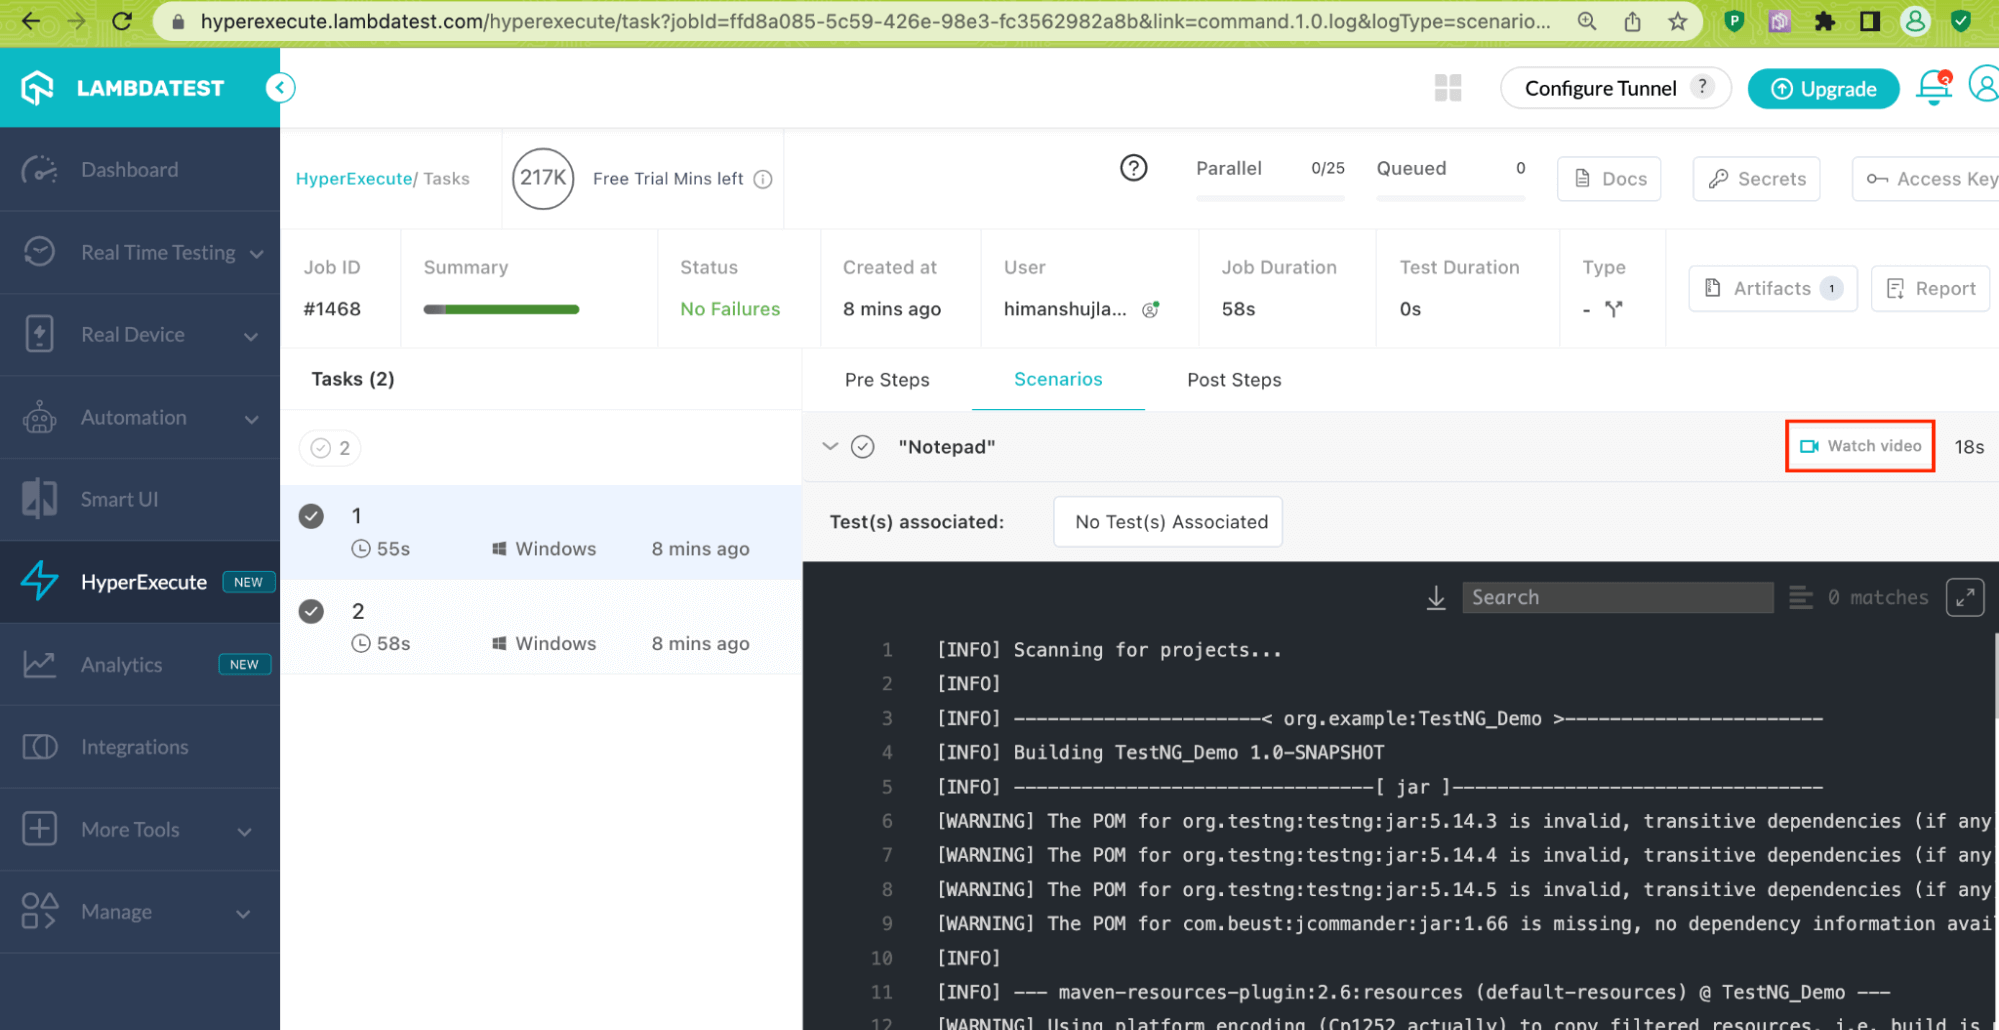
Since the concurrency is set to 2, both tests will be run independently. Shown below are some of the matrix execution screenshots that indicate that test methods in Notepad and ClassicCalculator executed in parallel on HyperExecute grid:
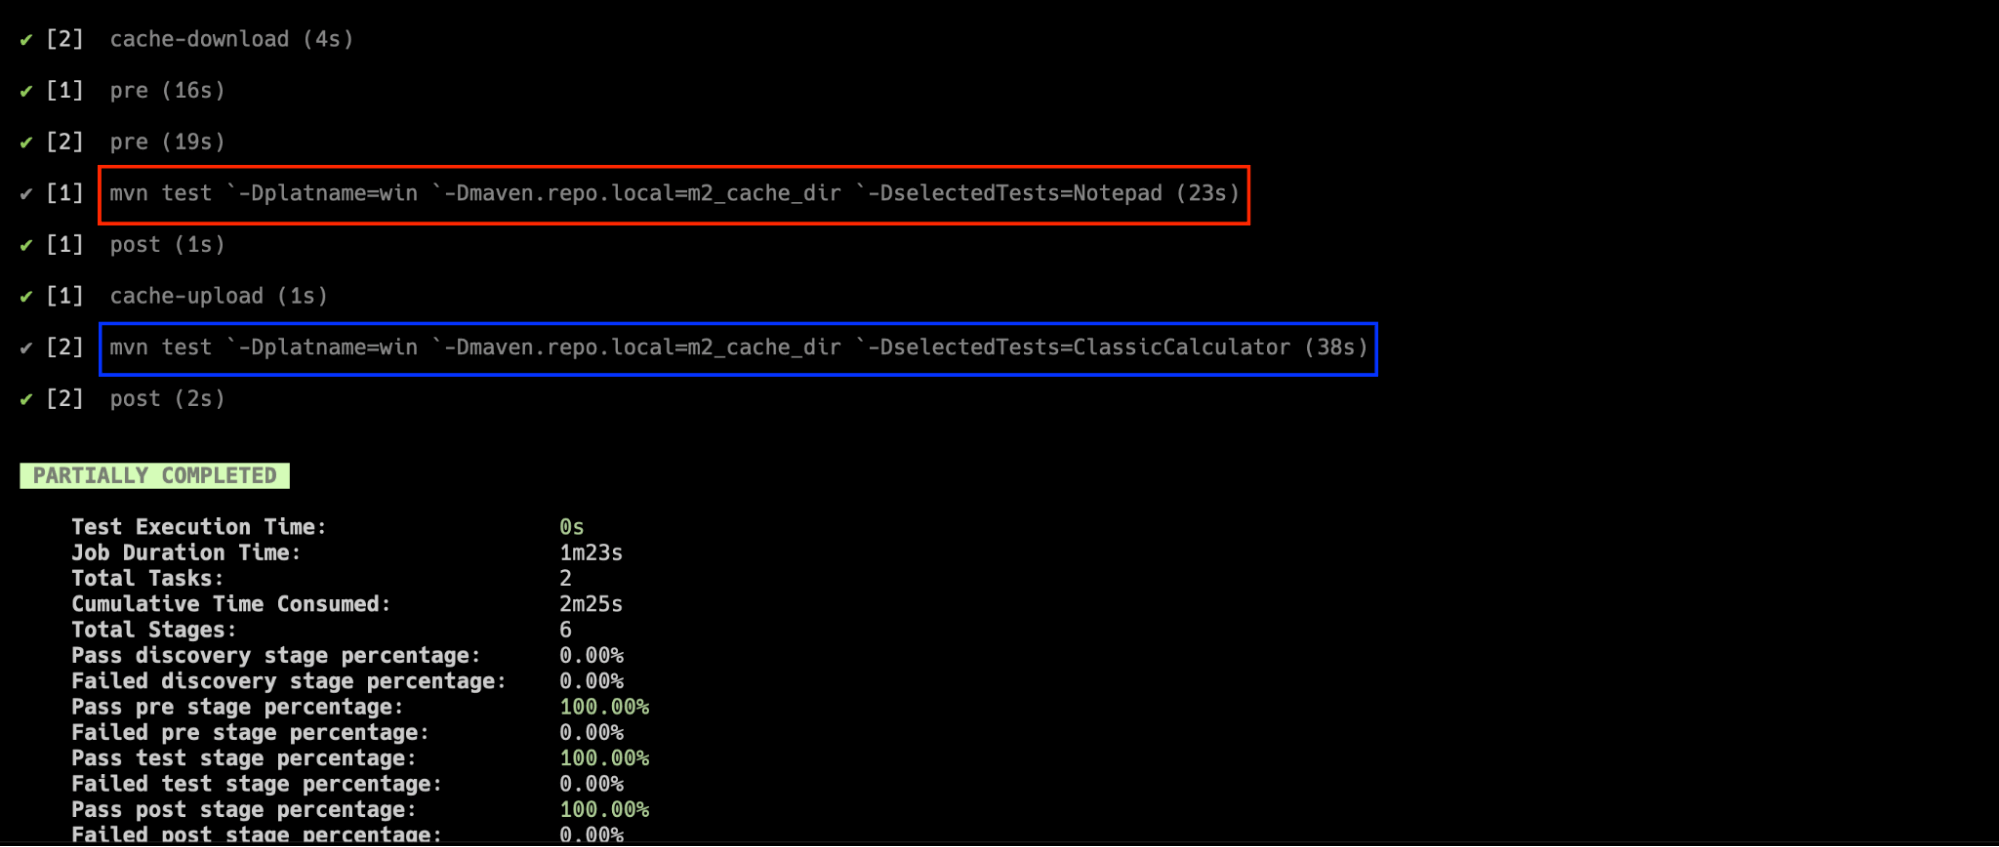
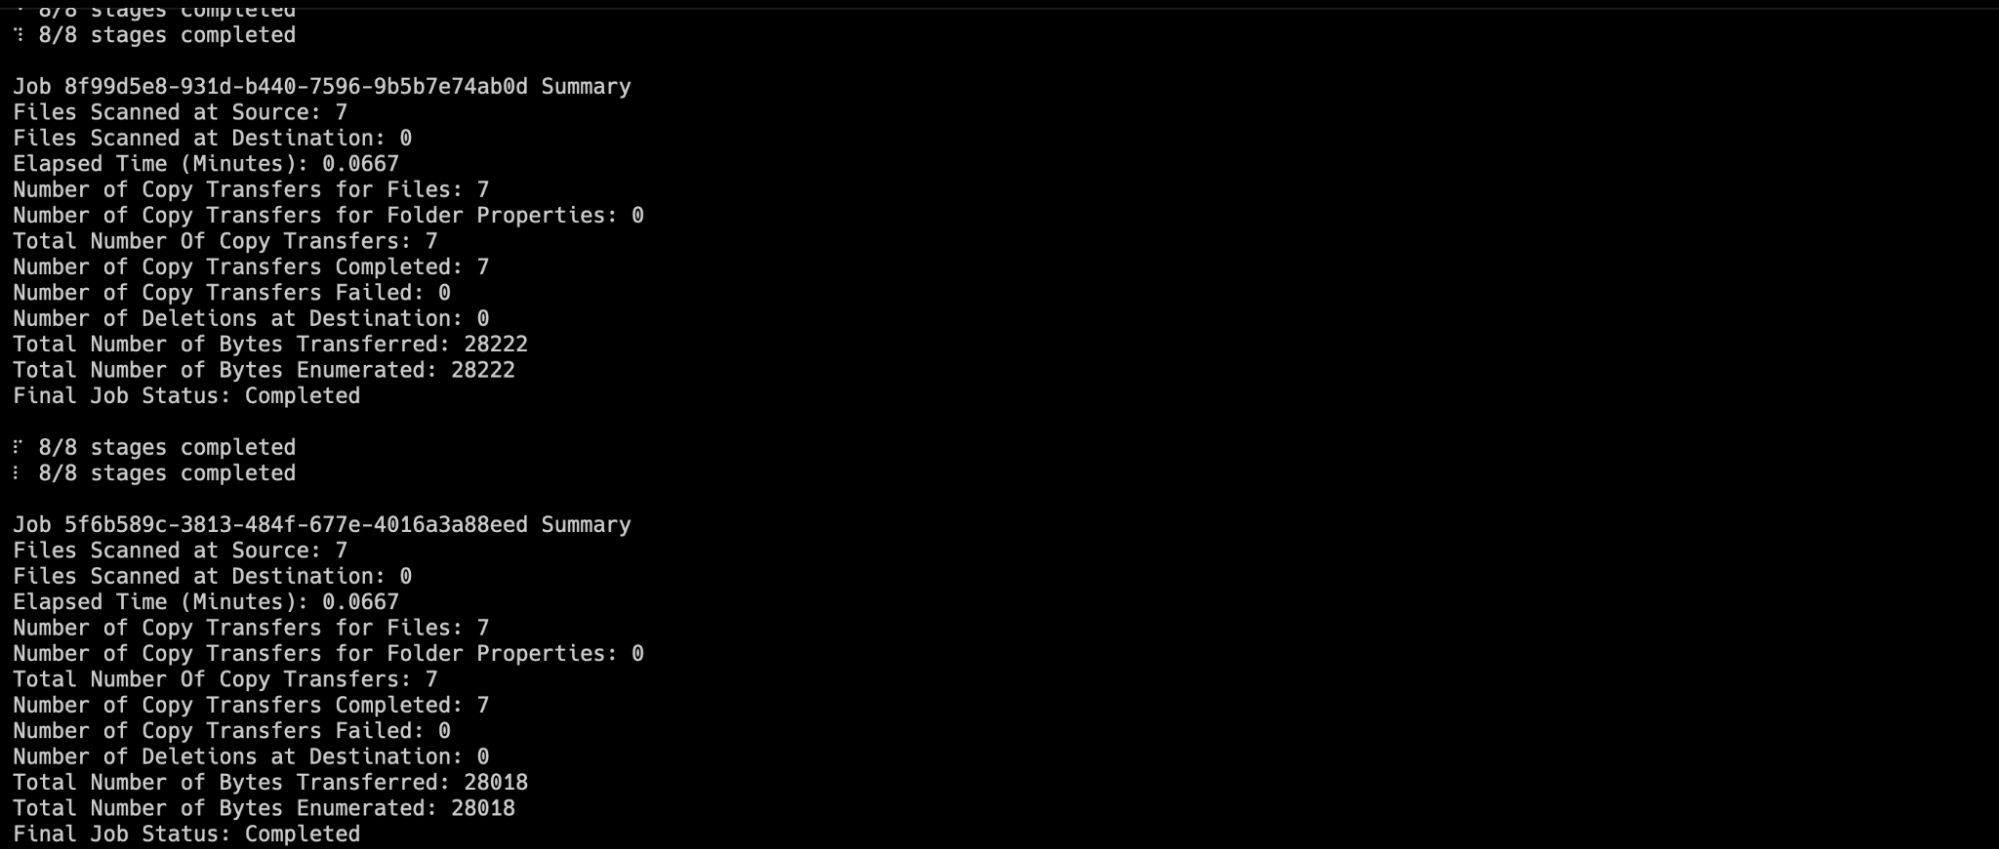
You can see the status of the execution in the HyperExecute Dashboard. As seen below, the tests were executed successfully.
For each test scenario, a video showing the interactions being done on the elements in the application is generated. Simply click on Watch Video to see the test execution in action.


It’s A Wrap
First of all, thanks for reaching this far! I tried my level best to cover all the major aspects of automating desktop applications. In case you are familiar with Selenium and Appium, you will witness less hurdles with the automation.
If you are an Appium user, it is better to opt for Appium Inspector over Inspect.exe or Microsoft Accessibility Insights. Do share your experience if you have tried out automating desktop applications on Windows 11, would love to hear from you 🚀
Lastly, feel free to fork the repo and submit changes so that the repo becomes much more useful for the community!
Author
Himanshu Sheth is the Director of Marketing (Technical Content) at LambdaTest, with over 8 years of hands-on experience in Selenium, Cypress, and other test automation frameworks. He has authored more than 130 technical blogs for LambdaTest, covering software testing, automation strategy, and CI/CD. At LambdaTest, he leads the technical content efforts across blogs, YouTube, and social media, while closely collaborating with contributors to enhance content quality and product feedback loops. He has done his graduation with a B.E. in Computer Engineering from Mumbai University. Before LambdaTest, Himanshu led engineering teams in embedded software domains at companies like Samsung Research, Motorola, and NXP Semiconductors. He is a core member of DZone and has been a speaker at several unconferences focused on technical writing and software quality.
Blogs: 131