Cypress Component Testing: A Complete Tutorial
Chosen Vincent
Posted On: August 28, 2025
16 Min


Cypress has become a popular choice for front-end developers, especially when it comes to building modern web applications. Cypress component testing provides a way to test individual modules of your user interface. This ensures that components behave as expected throughout development.
Overview
Cypress component testing involves testing individual UI components like buttons, forms, or widgets in isolation, directly in the browser. It helps verify how components behave under different states without needing to launch the entire application.
Importance of Cypress Component Testing
- Early Bug Detection: Identifies issues in isolated components before they spread into larger workflows.
- Faster Development Feedback: Lightweight tests run quickly, giving developers immediate insights during coding.
- Improved UI Reliability: Ensures components handle state, props, and interactions consistently.
- Enhanced Debugging: Simplifies troubleshooting by focusing only on the component under test.
- Wider Test Coverage: Complements integration and end-to-end tests for a balanced, layered testing strategy.
Best Practices for Cypress Component Testing
- Isolate Components: Test components independently without relying on external services or unnecessary dependencies.
- Use beforeEach for Setup: Reset component state before every test to avoid data leakage across runs.
- Mock External APIs: Replace network calls with mocks or stubs to keep tests fast and predictable.
- Test Edge Cases: Cover different states such as missing props, invalid data, and error boundaries to ensure component robustness.
- Leverage Cypress Debugging Tools: Use the Cypress Test Runner and browser console to quickly identify and fix issues.
Chapters
- What Is Cypress
- Installing Cypress
- Writing First Cypress Test
- Cypress CLI and Test Runner
- Cypress in Headless Mode
- Find Broken Links Using Cypress
- Check if an Element Exists in Cypress
- Cypress for File Upload and Download
- Fill and Submit Forms in Cypress
- Find HTML Elements Using Cypress Locators
- Touch and Mouse Events in Cypress
- Cypress Page Object Model
- Shadow DOM in Cypress
- Cypress Viewport
- iFrames in Cypress
- Cypress Component Testing
- Cypress API Testing
- Cypress run Command
- Cypress .should() Command
- Cypress scrollIntoView() Command
- Cypress select() Command
- Cypress Testing Library
- Cypress With GitHub Actions
- Run Cypress With Jenkins
- Run Cypress Tests in Azure DevOps
- Cypress Intercept
- Exception Handling in Cypress
- Cypress App Actions
- Cypress With Docker
- Cypress Debugging
- Cypress Logs
- Cypress Accessibility Testing
- Anti-Patterns in Cypress
- Cypress Visual Regression Testing
- Cypress React Native App Testing
- Cypress Performance Testing
- Cypress Studio
- Cypress Code Coverage
- Cypress Cucumber Preprocessor Plugin
- Cypress Best Practices
- Cypress Tips And Tricks
What Is Component Testing With Cypress?
Component testing in Cypress is a technique to verify if an individual part of a user interface, like a button or form, works on its own. With Cypress, you can run these tests right in the browser to see exactly how your component behaves in different conditions without the need to start the whole web application.
The main difference between Cypress component testing and Cypress end-to-end testing is their scope. Component testing focuses mainly on a single UI element in isolation whereas E2E testing covers the entire application workflow.
Getting Started With Cypress Component Testing
Let’s dive into Cypress component testing using a real-world example. I cloned a section on the Write for Us page from the LambdaTest website with React and SASS.
You can either use this project to follow along, or you can use any existing React project. You’ll still get the same result. All you have to do is follow the steps accordingly.
If you want to use the project, clone this Cypress Component Testing GitHub repository.
Prerequisites
To follow along with this Cypress component testing tutorial, make sure to:
- Install Node.js.
- Have npm or yarn as your package manager.
 Note
NoteRun Cypress component tests across 50+ browser versions. Try LambdaTest Today!
Set Up React Project for Component Testing
Before configuring Cypress for component testing, you need a project to work with.
Note: If you already have a React project, you can skip to the next section.
1. Create a React App
Use Vite for a rapid, modern development experience. Open your terminal and run:
|
1 |
npm create vite@latest <project-directory-name> |
This command will launch an interactive setup where you:
- Enter a name for your project
- Select a framework (choose React)
- Pick a language (select JavaScript, unless you prefer TypeScript)
2. Move Into Your Work Directory and Install Dependencies
Run the below command to move into your work directory and install the dependencies:
|
1 2 |
cd <project-directory-name> npm install |
3. Add SASS for Styling (Optional)
Run the below command to install SASS:
|
1 |
npm install sass |
4. Folder structure
This is how a folder structure looks like:
|
1 2 3 4 5 6 7 8 9 10 11 12 13 14 15 16 |
cypress-component-testing/ ├── node_modules/ ├── public/ ├── src/ │ ├── assets/ │ ├── components/ │ │ └── Form.jsx │ │ └── Navbar.jsx │ │ └── SubmitBlog.jsx │ │ └── SubmitBlogContent.jsx │ ├── App.jsx │ ├── App.scss │ └── main.jsx ├── package.json ├── vite.config.js └── README.md |
Yours might look different, maybe due to folder name, file name, or how you created your app, but in the end, you’ll still achieve the same result if you follow up.
Our main focus in this Cypress tutorial will be on the <Form /> component. We’ll use Cypress to test the input fields, checking their placeholders and ensuring they accept user input.
5. Add your React component
Here’s what App.jsx file looks like:
|
1 2 3 4 5 6 7 8 9 10 11 12 13 |
import Navbar from './components/Navbar/Navbar'; import SubmitBlog from './components/SubmitBlog/SubmitBlog'; function App() { return ( <> <Navbar /> <SubmitBlog /> </> ) } export default App |
This is not our main focus, but it’s good that you see the code in each file down to the very one we’re testing, especially if you want to practice with this same code example.
In the App.tsx component, we have <Navbar /> and <SubmitBlog />. However, we’re more concerned with the <SubmitBlog /> component, which contains a form we’ll be working with.
|
1 2 3 4 5 6 7 8 9 10 11 12 13 |
import Navbar from './components/Navbar/Navbar'; import SubmitBlog from './components/SubmitBlog/SubmitBlog'; function App() { return ( <> <Navbar /> <SubmitBlog /> </> ) } export default App |
The SubmitBlog component contains SubmitBlogContent and Form. The SubmitBlogContent component is an image and title for the section. Finally, here’s the Form.jsx code we want to test:
|
1 2 3 4 5 6 7 8 9 10 11 12 13 14 15 16 17 18 19 20 21 22 23 24 25 26 27 28 29 |
export default function Form() { return ( <form className={styles.submitBlogForm} onSubmit={(e) => {e.preventDefault();}}> <div className={styles.nameFields}> <input type="text" placeholder="First Name*" required /> <input type="text" placeholder="Last Name*" required /> </div> <input type="email" placeholder="Email*" required /> <input type="text" placeholder="Designation*" required /> <div className={styles.contactFields}> <select name="" id="" className={styles.countrySelect} required> <option value="">Nigeria (+234)</option> <option value="">USA (+1)</option> <option value="">UK (+44)</option> <option value="">Algeria (+213)</option> </select> <input type="number" placeholder="Phone Number*" required /> </div> <input type="text" placeholder="Social Media Profile (LinkedIn/Twitter)*" required /> <textarea placeholder="Provide Work Samples"></textarea> <button>Submit</button> </form> ) } |

Here’s the styling:
|
1 2 3 4 5 6 7 8 9 10 11 12 13 14 15 16 17 18 19 20 21 22 23 24 25 26 27 28 29 30 31 32 33 34 35 36 37 38 39 40 41 42 43 44 45 46 47 48 49 50 51 52 53 54 55 56 57 58 59 60 61 62 63 64 65 66 67 68 69 70 71 72 73 74 75 76 77 78 79 80 81 82 83 84 85 86 87 |
.submitBlogForm { display: flex; flex-direction: column; gap: 10px; background-color: #fff; border-radius: 8px; padding: 20px; input { padding: 15px 10px; font-size: 16px; width: 100%; border: none; background-color: transparent; border-bottom: 1px solid #ccc; &:focus { outline: none; } &::placeholder { font-size: 14px; } } textarea { padding: 15px 10px; font-size: 14px; width: 100%; height: 100px; background-color: transparent; border: 1px solid #ccc; &:focus { outline: none; } &::placeholder { font-size: 14px; } } .nameFields { display: flex; gap: 20px; input { flex: 1; border-bottom: 1px solid #ccc; } } .contactFields { display: flex; gap: 20px; input { flex: 1; border-bottom: 1px solid #ccc; } .countrySelect { width: 30%; padding: 15px 10px; font-size: 14px; border: none; background-color: transparent; border-bottom: 1px solid #ccc; &:focus { outline: none; } } } button { padding: 15px; background-color: transparent; border: 1px solid black; border-radius: 5px; cursor: pointer; width: 150px; color: #333; margin: 0 auto; margin-top: 20px; } } |
Configure Cypress for Component Testing
Now that we have a working React project, the next step is to set up Cypress for component testing. Cypress allows you to test individual components of your application, which makes it easier to identify UI bugs early in development.
1. Install Cypress
First, install Cypress as a development dependency:
|
1 |
npm install cypress --save-dev |
2. Open Cypress
Once installed, launch Cypress using:
|
1 |
npx cypress open |
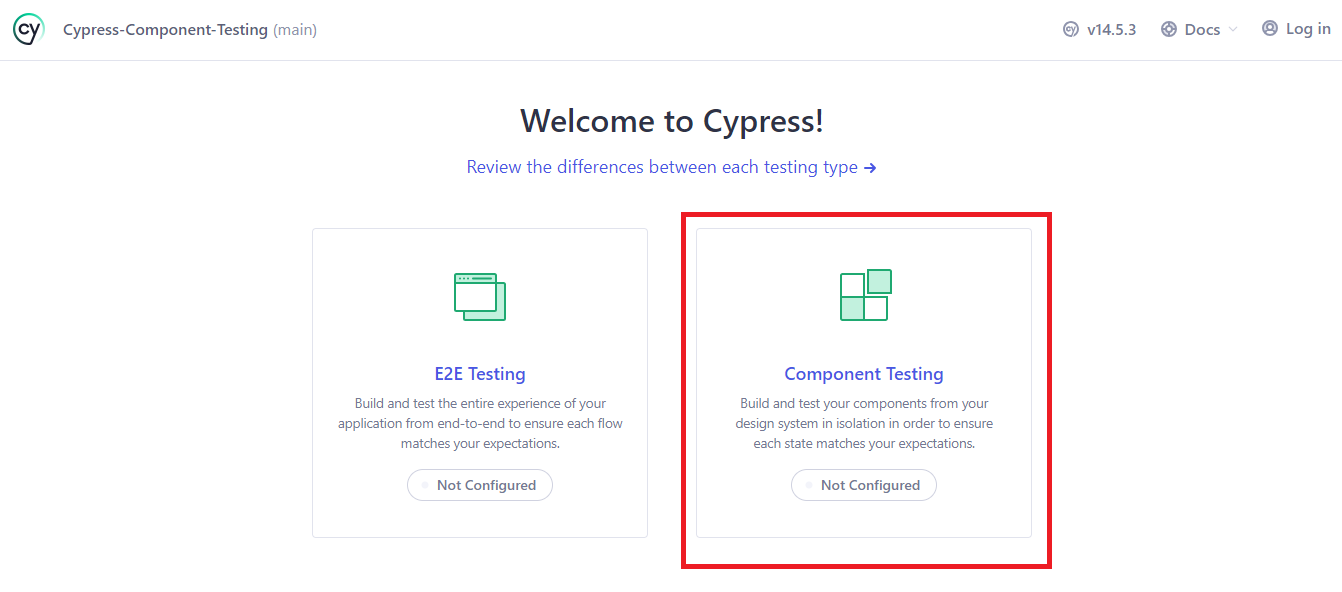
This command opens the Cypress App (Test Runner). You’ll be prompted to choose the type of testing:
- End-to-End (E2E) Testing
- Component Testing
For this tutorial, select Component Testing.
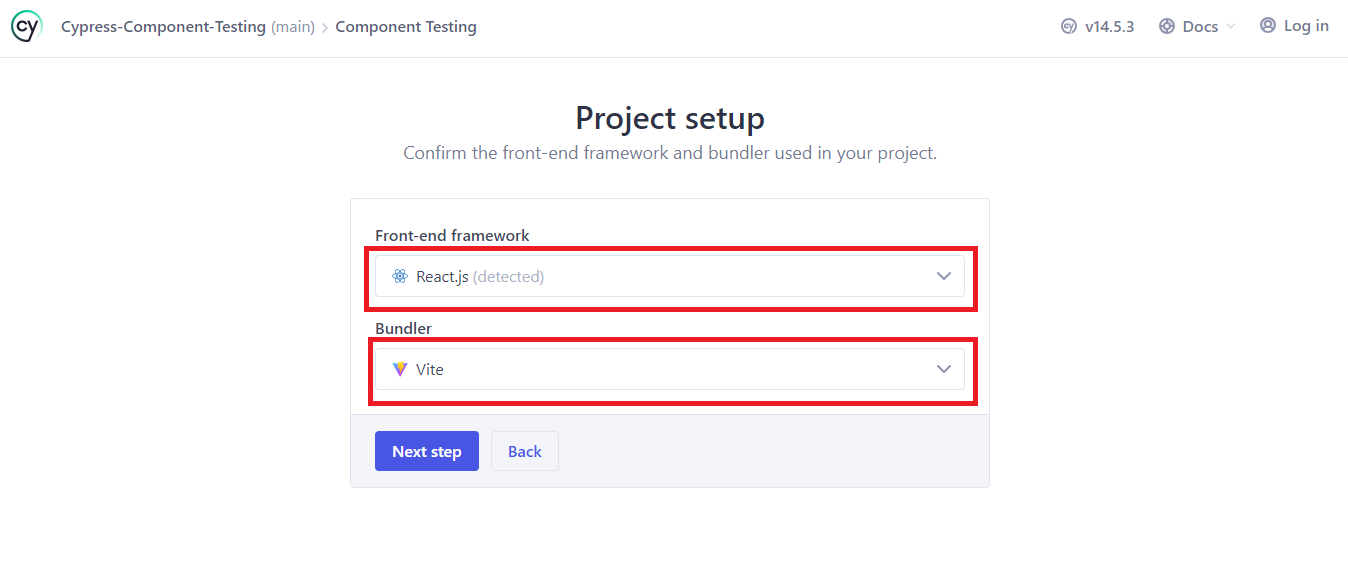
3. Configure Framework and Bundler
After selecting component testing, Cypress will ask you to configure your setup:
- Framework: React
- Bundler: Vite
This ensures Vite is available as a dev dependency for Cypress to use internally.
4. Verify Vite Installation
Check your package.json file in the devDependencies section. If Vite is missing, install it:
|
1 |
npm install -D vite |
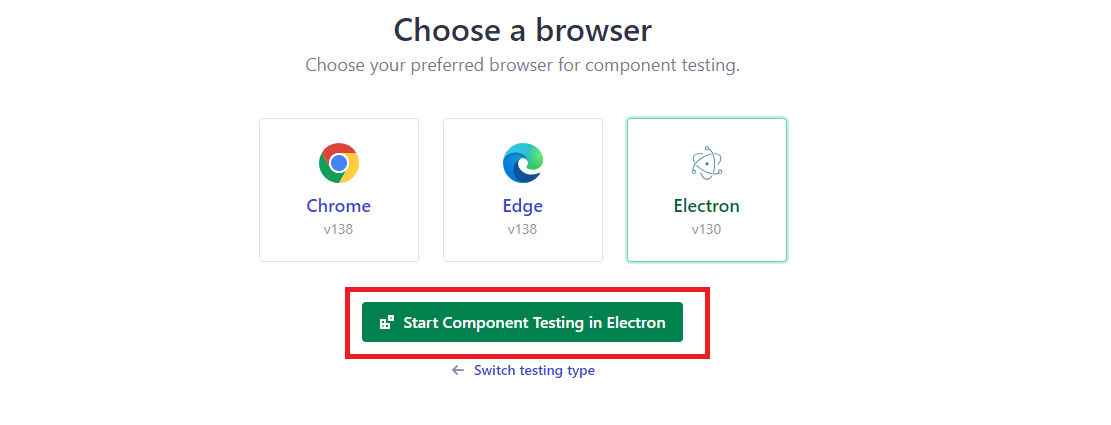
5. Finalize Setup in Cypress
Click “Continue” in the Cypress app.

Select your preferred browser (I am using Electron), and then click “Start Component Testing in Electron”.
Write Component Tests
We’ll write a Cypress component test to check:
- The form renders correctly.
- All input fields exist.
- You can type into the input fields and submit the form.
First, add data-cy attributes to the form elements in the Form.jsx file:
|
1 2 |
<input type="text" placeholder="First Name*" required data-cy="first-name" /> <input type="text" placeholder="Last Name*" required data-cy="last-name" /> |
1. Create the Test File
Inside the cypress folder:
|
1 2 3 |
cypress/ └── component/ └── Form.cy.jsx |
2. Write the test
|
1 2 3 4 5 6 7 8 9 10 11 12 13 14 15 16 17 18 19 20 21 22 23 24 25 26 27 28 29 30 31 32 33 34 |
import React from 'react'; import Form from '../../src/components/Form/Form'; import '../../src/components/Form/Form.module.scss'; describe('Form component', () => { beforeEach(() => { cy.mount(<Form />); }); it('renders all required fields', () => { cy.get('[data-cy="first-name"]').should('exist'); cy.get('[data-cy="last-name"]').should('exist'); cy.get('[data-cy="email"]').should('exist'); cy.get('[data-cy="designation"]').should('exist'); cy.get('[data-cy="country"]').should('exist'); cy.get('[data-cy="phone"]').should('exist'); cy.get('[data-cy="social"]').should('exist'); cy.get('[data-cy="samples"]').should('exist'); }); it('Fills and submit form', () => { cy.get('[data-cy="first-name"]').type('Chosen'); cy.get('[data-cy="last-name"]').type('Vincent'); cy.get('[data-cy="email"]').type('chosen@example.com'); cy.get('[data-cy="designation"]').type('Software Engineer'); cy.get('[data-cy="country"]').select('nigeria'); cy.get('[data-cy="phone"]').type('1234567890'); cy.get('[data-cy="social"]').type('https://www.linkedin.com/in/chosenvincent1/'); cy.get('[data-cy="samples"]').type('https://www.lambdatest.com/blog/smooth-scroll-in-css/'); cy.get('[data-cy="submit"]').should('exist').click(); }); }); |
Key Notes:
- Use describe to group tests and it to define test cases.
- Import React and the component explicitly.
- Use cy.mount() to render the component in the Cypress Test Runner.
Run Cypress Component Tests
Start Cypress in component testing mode:
|
1 |
npx cypress open --component |
Or use:
|
1 |
npx cypress open |
Then click the Form.cy.jsx file to run the test. Cypress will render the form and execute all assertions in real-time.

How to Run Cypress Component Tests on Cloud?
Running Cypress component tests locally works well, but for larger test suites, team collaboration, or CI integration, running tests on the cloud is better. We’ll use HyperExecute, an end-to-end test orchestration platform from LambdaTest.
Clone React Project
We’ll use a simple React project from the Cypress GitHub Repository, specifically the “react-webpack5-js” example.
- Clone the repository to your local machine.
- Navigate to the react-webpack5-js folder.
Running Test on HyperExecute
HyperExecute provides a pre-configured environment for faster testing. It supports Cypress, Selenium, Playwright, Appium, and multiple languages like Python, Java, C#, PHP, and Go.
1. Create a folder and YAML file
Create a folder in your project root, and inside it, create matrix.yml with the following configuration:
|
1 2 3 4 5 6 7 8 9 10 11 12 13 14 15 16 17 18 19 20 21 22 23 24 25 26 |
--- version: 0.1 runson: ${matrix.os} cypress: true cypressOps: Build: "[Matrix] Cypress Component Testing" Tags: ["HYP-Cypress", "macOS", "Matrix", "Accessibility"] BuildTags: ["HYP-Cypress-v10"] pre: - npm install - npm install cypress --save-dev - npm i lambdatest-cypress-cli matrix: os: [linux] browser: ["chrome"] files: ["Welcome.cy.js", "LoginForm.cy.js", "InputField.cy.js", "Button.cy.js"] parallelism: 5 testSuites: - npx cypress run --component --spec ./src/components/$files --browser=$browser --headed --config video=true jobLabel: [cypress-v10, mac, matrix] |
2. Download and Add HyperExecute CLI
Download the HyperExecute CLI for your OS and place it in your project root. It reads the YAML configuration and uses your LambdaTest credentials.
3. Upload and Run Your Tests
Run this command in your terminal to upload and run your tests on HyperExecute:
|
1 |
./hyperexecute --config yaml/matrix.yml --force-clean-artifacts --download-artifacts --user <user_name> --key <access_key> |
Replace <user_name> and <access_key> with your LambdaTest credentials.
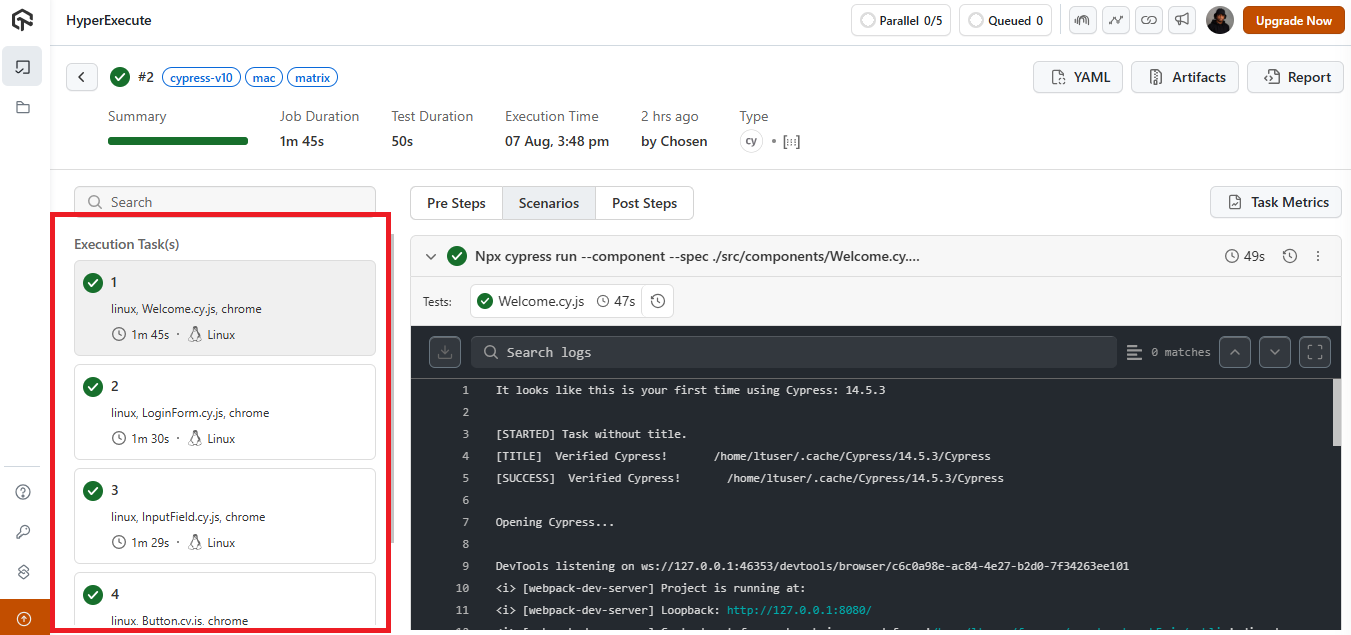
4. View Your Tests on HyperExecute Dashboard
Navigate to HyperExecute, and click your test to view execution tasks and logs.
Best Practices for Cypress Component Testing
To effectively carry out component testing with Cypress, you need to follow some best practices. They will make your tests reliable, readable, and easy to maintain:
- Use data-* Attributes for Targeting Elements: Avoid using class names or tag selectors like input, .btn, or .form-control in your tests.
- Keep Tests Focused and Isolated: Test one component at a time. Each test should focus on a particular feature or behavior.
- Reset State Between Tests: Use beforeEach() to mount the component fresh each time.
- Test Both Visual and Interactive Behavior: Don’t just check if the component renders. Interact with it like a real user would. Type into fields, click buttons, and assert the outcome.
- Optimize Tests for Speed: Component tests should run quickly. Avoid unnecessary delays, timers, or complex setups that slow them down. If you need to mock data or props, do it efficiently.
- Use Meaningful Descriptions: Your test names should describe what is being tested, not how it’s done. Think of them like user stories.
They are too generic and are more likely to change during code refactoring. Instead, use custom attributes like data-cy or data-testid. They are more stable and specifically meant for testing.
Avoid testing too many things in a single test block. Isolating your test makes it easier to identify where something is going wrong.
|
1 2 3 4 5 |
// Good it('shows validation error for empty email', () => { ... }); // Bad it('renders, fills form, validates fields, submits, and checks success message', () => { ... }); |
|
1 2 3 |
beforeEach(() => { cy.mount(<Form />); }); |
|
1 2 3 4 5 |
// Good it('displays an error when email is empty'); // Bad it('checks if email input works'); |
Troubleshooting Tips for Cypress Component Tests
One way or the other, issues will come up when writing or running Cypress component tests. Here are some common issues and how to troubleshoot them.
- Component Doesn’t Render in the Test Runner: Sometimes you might want to run your test, but nothing shows up. This can be because the component is missing or the test fails immediately.
- You forgot to call cy.mount()
- You’re missing a required prop
- The component has runtime errors
- Styling Looks Broken: Your component might render perfectly, but it looks weird, maybe because it’s missing some styles or has the wrong layout. This happens a lot when you forget to import the component’s styling file.
- State Persists Between Tests: When one test affects another, like data from a previous test showing up in the next one, use beforeEach() to reset the component before each test:
- Props Not Working as Expected: When you pass props but the component doesn’t behave the way it does in the actual app, it could be because props are missing or misconfigured, or you’re not mocking external dependencies (like APIs).
- JSX Won’t Compile or Test File Crashes: You see a build error or a test file fails to load when using JSX. This can be because the file extension is .js instead of .jsx, or you forgot to import React (if your config requires it).
Possible causes include:
Make sure the component is mounted correctly, and if it requires props, pass them.
|
1 |
cy.mount(<UserCard user={prop} />); |
Also, check the browser console in the Cypress Test Runner for any React errors.
Always import styles manually in your test file.
|
1 |
import '../../src/components/Form/Form.module.scss'; |
If you’re using CSS modules or SCSS, make sure your build tool (like Vite or Webpack) is configured to handle them in Cypress.
|
1 2 3 |
beforeEach(() => { cy.mount(<Form />); }); |
Also, avoid using .only and .skip except when you’re debugging.
Make sure you’re passing all required props in cy.mount().
To fix this, use the .cy.jsx extension.
|
1 |
Form.cy.jsx |
And import React in your test file:
|
1 |
import React from 'react'; |
Conclusion
Cypress component testing bridges the gap between isolated unit tests and full end-to-end scenarios, giving developers confidence that their UI behaves as expected. By setting up the environment properly, following best practices, and organizing tests effectively, you ensure faster feedback and fewer regressions. Leveraging cloud platforms further enhances Cypress testing with scalability, and parallel execution, making the workflow efficient for modern teams.
Frequently Asked Questions (FAQs)
Why does my Cypress component not render in the Test Runner?
This usually happens when the component is not mounted correctly, missing required props, or encountering runtime errors. Always verify that you are calling cy.mount(), passing necessary props, and checking the browser console for related React errors.
How do I fix broken styling in Cypress component tests?
Broken styling occurs when component styles are not imported into the test file. Ensure you import the correct CSS or SCSS modules manually. Also confirm that your bundler, such as Vite or Webpack, is properly configured to handle styling within Cypress tests.
Why does state persist between my Cypress component tests?
Persistent state occurs when tests are not properly isolated. Use beforeEach() to reset and remount components before each test execution. This ensures clean, independent runs. Avoid relying on .only or .skip excessively, as they can mask cross-test contamination issues.
Why are my props not working correctly in Cypress component tests?
Props may not behave as expected if required values are missing, incorrectly structured, or external dependencies are not mocked. Verify that all necessary props are provided during cy.mount(). Consider stubbing API responses or mocking external modules to align the test environment.
What should I do if JSX fails to compile in Cypress?
Compilation issues often result from using the wrong file extension or missing imports. Cypress expects test files with .cy.jsx extensions. Additionally, ensure React is properly imported at the top of the test file to prevent runtime or syntax errors.
How do I handle external API calls in component testing?
When components rely on APIs, tests can fail without proper mocking. Use cy.intercept() or stub network requests to control responses and ensure predictable behavior. This avoids flakiness caused by external systems and isolates component logic for consistent validation during tests.
Why are my Cypress component tests running slowly?
Slow execution may be caused by excessive re-renders, large component trees, or unnecessary setup within tests. Optimize performance by mocking heavy dependencies, limiting test scope, and reusing setup code. Ensure that only essential logic and UI elements are included per test.
How can I debug failing Cypress component tests effectively?
Enable debugging by inspecting the DOM through Cypress’s Test Runner, checking the browser console, and adding cy.log() for clarity. You can also use cy.pause() to halt execution mid-test and interact with the component to identify root causes of failures.
Citations
- Cypress Component Testing: https://docs.cypress.io/app/component-testing/get-started
Author
Chosen is a dedicated software developer, technical writer, and educator. He loves studying, researching, and, most importantly, sharing his extensive knowledge with others. He is also a blockchain enthusiast who is interested in the world of decentralized possibilities. Aside from coding, he enjoys chess and positively discusses technologies.
Blogs: 3