
How To Press Enter Without WebElement In Selenium Python
Idowu (Paul) Omisola
Posted On: July 21, 2023
![]() 97996 Views
97996 Views
![]() 25 Min Read
25 Min Read
The Selenium WebDriver is an indispensable testing framework with many interactive features for automating web actions. However, the standard WebDriver methods of interacting with a web page may sometimes need to be revised to test specific features.
For instance, a web page that renders content asynchronously or dynamically may not arrange responses in order. Hence, using the WebDriver directly without a wrapper might be inefficient in interacting successfully with its web elements during automation testing.
Your test scenario might also involve automating interactions such as mouse clicks, keyboard actions, and animated gestures sometimes. Leveraging the WebDriver’s execute_script method helps in such cases. And if your test needs to perform low-level gestures like dragging and dropping, Selenium’s ActionChains class also comes in handy as a wrapper class to aid such actions.
Selenium’s ActionChains and execute_script are handy for automating a website’s response to keyboard and mouse actions and animated cursor gestures.
In this blog, I’ll show you how to press enter without WebElement in Selenium Python using ActionChains and execute_script. If you are preparing for an interview you can learn more through Selenium interview questions.
TABLE OF CONTENTS
What are ActionChains in Selenium?
ActionChains is a built-in class in Selenium for automating low-level interaction with the DOM. It arranges actions in a queue and features mouse actions, including click events, cursor, and touch gestures. It also supports keyboard simulations for pressing the keypads. Thus, it provides ways to interact with a web page like a regular user.
Although Selenium’s ActionChains queues actions sequentially in order of programmatic arrangement, it fires them at once when executed. Hence, unlike the conventional WebDriver method, the success of the entire test step depends on each action step. Once a step fails, it invalidates the whole.
You might navigate a web page without using CSS Selectors in ActionChains. But this may be time-consuming and confusing.
ActionChains are typically easier to use if a web page handles only one action, such as filling out a focused form with a blinking cursor. Overall, ActionChains is intuitive and sensitive to component actions.
The action.send_keys(data) method; for example, automatically locates a focused form field to insert the specified information:
|
1 2 3 4 |
from selenium.webdriver import Keys, ActionChains action = ActionChains() data = "omisola" action.send_keys(data).perform() |
For instance, automating a search query on a web page that loads only a search box with a blinking cursor requires the following actions:
- Inputting the search term using the send_keys method.
- Press the Enter key to submit the search query.
However, web interaction using the ActionChains can be complex when automating several steps that involve moving between elements to execute several actions, including clicks, gestures, sending keys, and pressing the Tab and Enter keys, among many others.
In the next section of this blog on how to press enter without WebElement in Selenium Python, we will explore pros and cons of ActionChains.
 Note
NoteRun your Python automation scripts in parallel. Try LambdaTest Today!
Pros of the ActionChains
Here’s why the ActionChains class is handy for testing a website:
- The ActionChains object stores automated actions in a queue to execute them sequentially in order of programmatic arrangement. This is helpful when you need to perform a large sequence of actions at a go.
- It includes mouse functionality, such as clicking and performing gestures for drag-and-drop actions.
- It simulates human keyboard actions like Tab, Shift, Enter, Ctrl, PgUp, and PgDn, among others, to navigate to any position within the DOM.
Cons of the ActionChains
Although the ActionChains class lets you test a website using an array of actions, it has some shortcomings:
- Test steps depend on each other since actions are in a chain queue. Thus, once a step fails, it invalidates the entire chain, causing the test to fail without clarity about the point of failure.
- ActionChains can be hard to debug since it’s hard to tell which step in the chain causes the error.
Let’s consider some use cases of each approach before we discuss how to press enter without WebElement in Selenium Python. However, we need to first inspect the web elements:
ActionChains example use cases
In this blog section on how to press enter without WebElement in Selenium Python, shown below are the snippets of basic usage examples of ActionChains:
How to create an ActionChains object:
|
1 2 |
from selenium.webdriver import Keys, ActionChains action = ActionChains() |
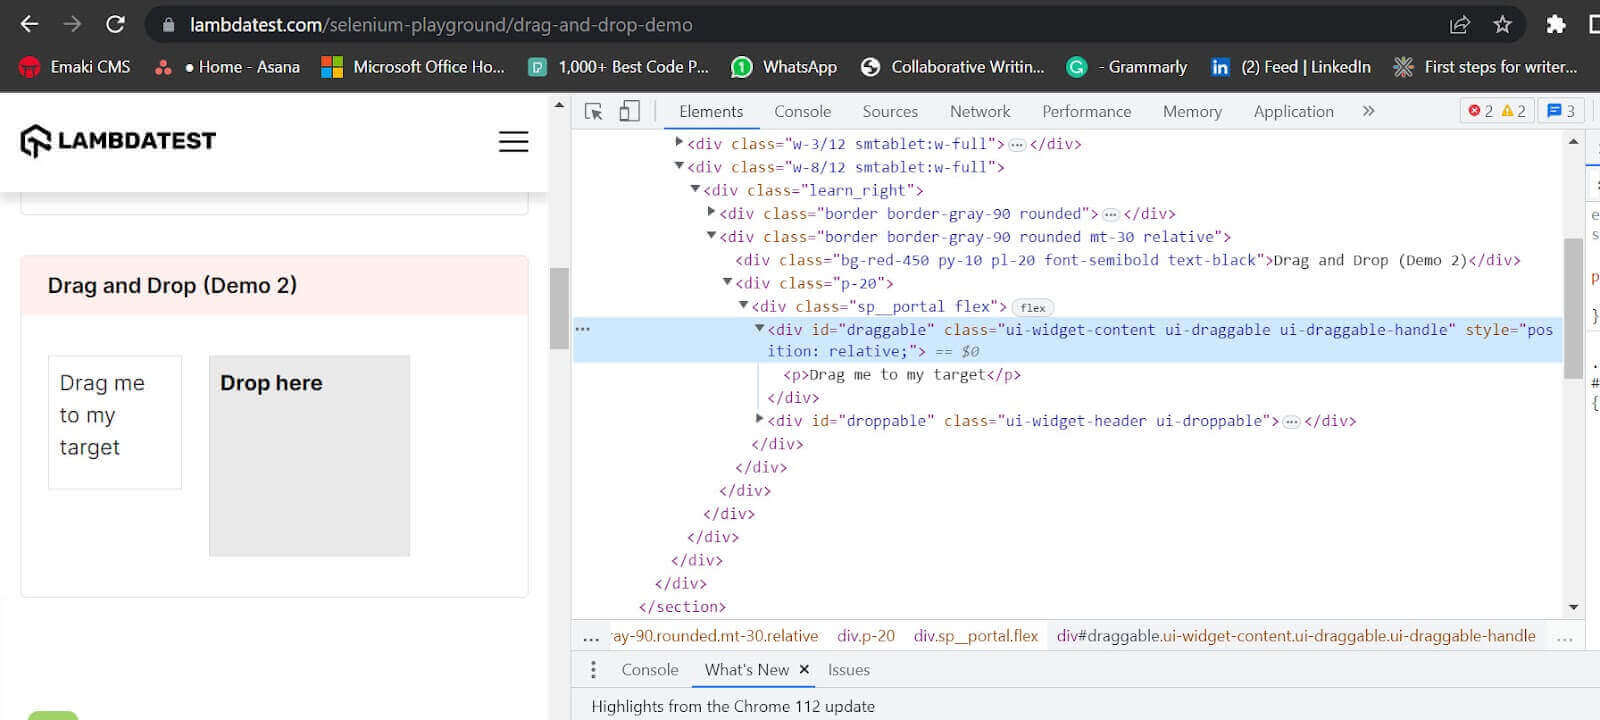
- Drag and drop an element using the ActionChains.
1234567from selenium.webdriver import Keys, ActionChainsaction = ActionChains()driver = webdriver.Chrome()driver.get("https://www.lambdatest.com/selenium-playground/drag-and-drop-demo")draggable = driver.find_element(By.ID, "draggable")dropZone = driver.find_element(By.ID, "droppable")action.drag_and_drop(draggable, dropZone).perform() - Drag and drop to a specific location using xoffset and yoffset in ActionChains.
xoffset is an integer defining the pixel distance for left and right positions across the web page, while yoffset is an integer defining the pixel distance for vertical (up and down) movement across the web page.
The example below holds down the right mouse pad to drag the draggable to 150 pixels to the right and releases the mouse at the specified position to drop the held item:
12345from selenium.webdriver import Keys, ActionChainsaction = ActionChains()driver = webdriver.Chrome()draggable = driver.find_element(By.ID, "draggable")action.drag_and_drop_by_offset(draggable, 150, 0).perform() - Perform a click event using ActionChains.
12345from selenium.webdriver import Keys, ActionChainsaction = ActionChains()driver = webdriver.Chrome()element = driver.find_element(By.LINK_TEXT, "LambdaTest")action.click(element).perform()
- Double-click an element in ActionChains.
12345from selenium.webdriver import Keys, ActionChainsaction = ActionChains()driver = webdriver.Chrome()element = driver.find_element(By.LINK_TEXT, "LambdaTest")action.double_click(element).perform()
- Right-click an element in ActionChains (context-click).
12345from selenium.webdriver import Keys, ActionChainsaction = ActionChains()driver = webdriver.Chrome()element = driver.find_element(By.LINK_TEXT, "LambdaTest")action.context_click(element).perform()
- Click and hold an element.
12345from selenium.webdriver import Keys, ActionChainsaction = ActionChains()driver = webdriver.Chrome()element = driver.find_element(By.LINK_TEXT, "LambdaTest")action.click_and_hold(element).perform()
- Send keys and press the Enter key using the ActionChains.
Web page: https://www.lambdatest.com/selenium-playground/simple-form-demo.
Web page inspection:
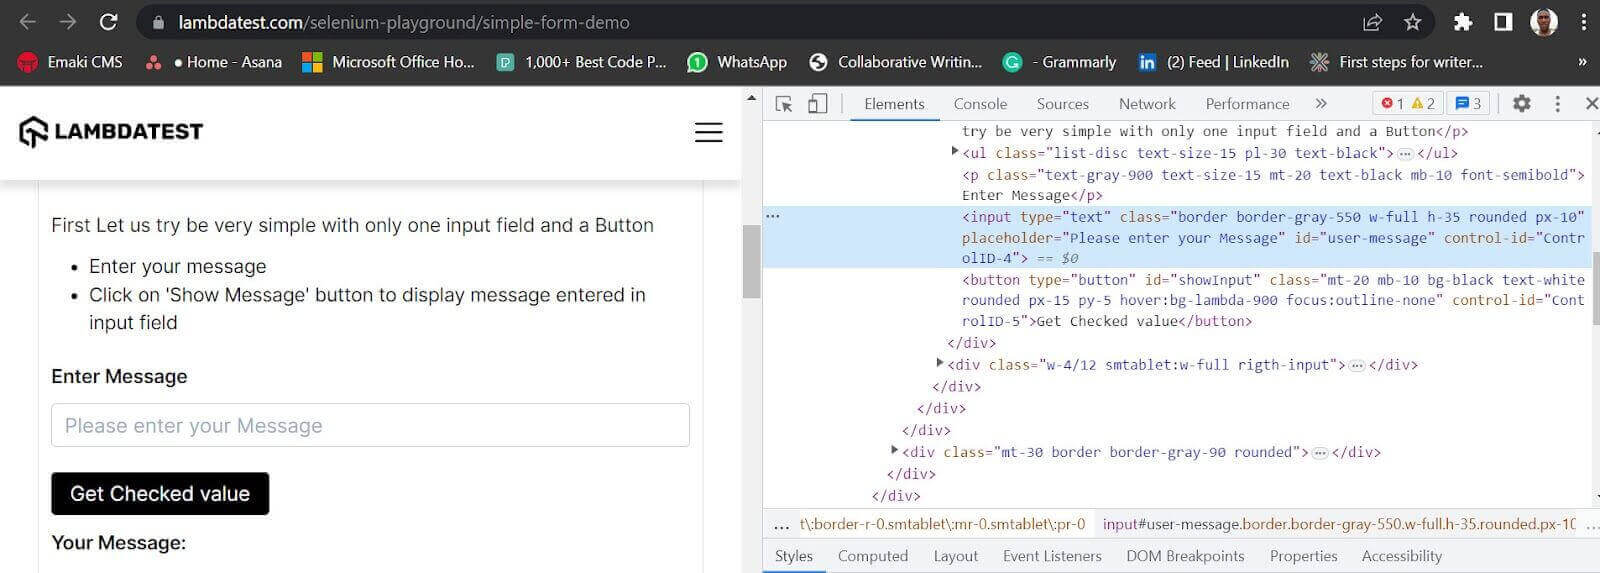 1234567from selenium.webdriver import Keys, ActionChainsaction = ActionChains()driver = webdriver.Chrome()driver.get("https://www.lambdatest.com/selenium-playground/simple-form-demo")password = driver.find_elemnt(By.ID, "user-message")action.send_keys(password)action.send_keys(Keys.ENTER).perform()
 - Press the Tab key using the ActionChains.
123456from selenium.webdriver import Keys, ActionChainsaction = ActionChains()driver = webdriver.Chrome()password = driver.find_elemnt(By.ID, "user-message")action.send_keys(password)action.send_keys(Keys.TAB).perform()
- Perform an action on key-up or key-down in ActionChains.
1action.key_down(Keys.CONTROL).send_keys('Idowu').key_up(Keys.CONTROL).perform()
- Move to a specific element:
12345from selenium.webdriver import Keys, ActionChainsaction = ActionChains()driver = webdriver.Chrome()inputform = driver.find_element(By.ID, "user-message")action.move_to_element(inputform)
- Move the mouse relative to an element by offset.
12345from selenium.webdriver import Keys, ActionChainsaction = ActionChains()driver = webdriver.Chrome()inputform = driver.find_element(By.ID, "user-message")action.move_to_element_with_offset(inputform, 100, 200).perform()
- Move the mouse to a specific location by offset.
1action.move_by_offset(100, 200)
What is the execute_script method in Selenium?
The execute_script is a Selenium WebDriver method that allows the execution of JavaScript events and actions in the current window. It involves embedding pure JavaScript as a string into Python to modify the DOM.
While the execute_script method makes automation testing more flexible with browser API access, it’s easier with a knowledge of JavaScript.
Since it’s JavaScript, if you don’t want to use Selenium locators, you can use JavaScript’s document queries like getElementById or getElementByClassName to get web elements.
For example, the conventional locator takes the following form for locating an element by its ID:
|
1 |
element = driver.find_element(By.ID, element_id) |
However, the execute_script method takes the following form:
|
1 |
element = driver.execute_script("document.getElementById('user-message');") |
In this blog on how to press enter without WebElement in Selenium Python, we’ll combine JavaScript’s querySelector and the XPath methods to interact with the web page elements.
Pros of the execute_script method
Here’s why you want to use the execute_script method:
- Since JavaScript has access to browser APIs, the execute_script method allows you to manipulate the DOM directly. For instance, you can leverage the embedded JavaScript to scroll to a particular position on a web page, insert an element into the DOM, get the website’s domain name, or even refresh the browser.
- It’s also suitable for testing applications and websites that render content asynchronously and dynamically.
- Since all modern browsers support JavaScript, the execute_script method can confer better cross-browser compatibility, as you can use JavaScript to tweak events to suit the test browser.
Cons of execute_script method
- JavaScript is the language of the web. So using this automation method can introduce vulnerabilities to a website.
- JavaScript embedding can be hard to read, especially if you’re from a Python background with little or no knowledge of JavaScript.
execute_script example use cases
This section on press enter without WebElement in Selenium Python discusses some applications of the execute_script method:
Here’s the basic syntax of execute_script:
|
1 |
driver.execute_script(script) |
- Spin up an alert browser window using execute_script:
1driver.execute_script("alert('this is a test');") - Type a text into an input field:
12driver.get("https://www.lambdatest.com/selenium-playground/checkbox-demo")driver.execute_script("document.getElementById('user-message').value='Idowu paul';") - Click an element (e.g., a button):
12button = driver.execute_script("return document.getElementById('showInput');")driver.execute_script("arguments[0].click()", button) - Handle a checkbox using Boolean:
12driver.get("https://www.lambdatest.com/selenium-playground/checkbox-demo")driver.execute_script("document.getElementById('isAgeSelected').checked=true;") - Get the domain name of a website:
12domain_name = str(driver.execute_script("return document.domain;"))print(domain_name) - Create a new element in the DOM:
12driver.execute_script("var element=document.createElement('newButton');"+"document.body.appendChild(element);") - Refresh a web page using execute_script in Selenium WebDriver:
12driver.get("https://www.lambdatest.com/selenium-playground/checkbox-demo")driver.execute_script("history.go(0)") - Get the height and width of a web page:
12345driver.get("https://www.lambdatest.com/selenium-playground/checkbox-demo")page_height = str(driver.execute_script("return window.innerHeight;"))page_width = str(driver.execute_script("return window.innerWidth;"))print(page_height)print(page_width)
To learn more about it, you can go through our earlier blog on handling checkboxes in Selenium.
Demonstration: Using ActionChains and execute_script
In this section of our tutorial on press enter with WebElements in Selenium Python, I’ll demonstrate the test cases using the ActionChains class and the execute_script method in different code files. Both are a part of Selenium. So you don’t need to install them separately once you install Selenium.
We’ll also use the Selenium pytest module for the test execution.
Our test website is LambdaTest’s eCommerce playground.
Initially, we will showcase the process of navigating the registration page using Selenium’s ActionChains in a sequential manner. After understanding the functioning of the previous demonstration, we will proceed to repeat the test utilizing the execute_script method from Selenium WebDriver.
So this blog on how to press enter without WebElement in Selenium Python assumes you’ve already installed Python on your local machine. Our test cases in this blog use Python 3.10. You can follow pretty well using earlier versions, though.
We’ll also use VSCode for our test suite development in this blog on press enter without WebElement in Selenium Python. But you can stick to an IDE that works best for you.
Don’t miss out on thе latеst tutorials on automation tеsting! Subscribe to thе LambdaTеst YouTubе Channеl for tutorials on Sеlеnium tеsting, Playwright testing, and more
Install Dependencies
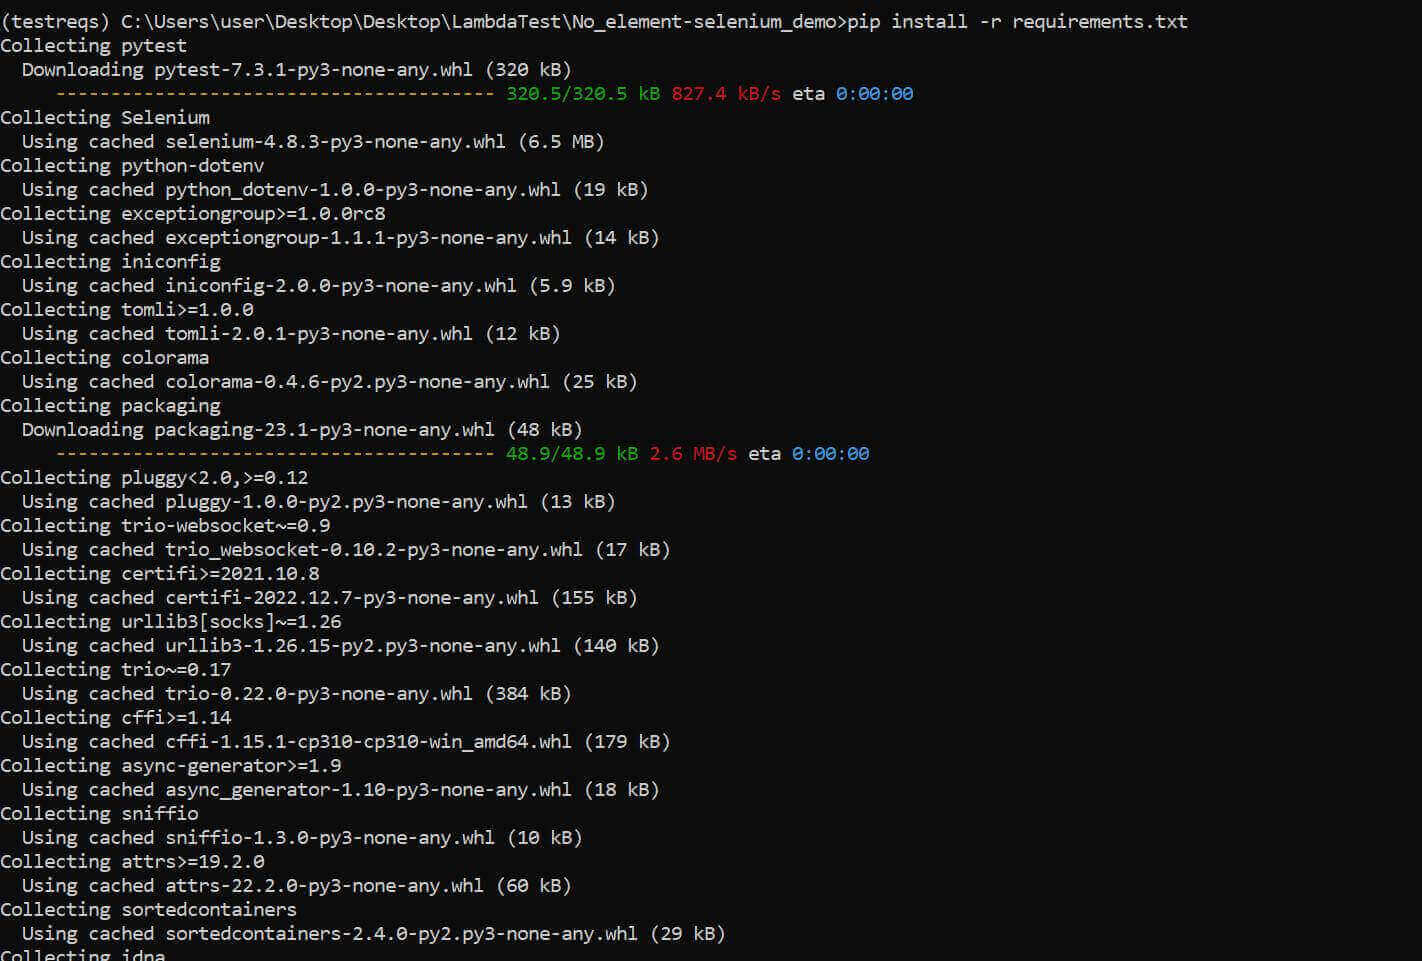
To set the ground for this automation testing, you must first install Selenium and pytest in your Python virtual environment. We’ll also mask dependencies using the environment variable (.env file). So you might want to include python-dotenv in your dependencies list.
Create a requirements.txt file in your project root directory and list the following packages:
Next, run the following in your command line to install the listed packages:
|
1 |
pip install -r requirements.txt |
The dependencies install as shown:
Set up a pytest Configuration file
This blog section on press enter without WebElement in Selenium Python, we will see how to set up a pytest configuration file.
While it’s not a requirement, a pytest configuration file (pytest.ini) allows you to define more behaviors for your test environment. For instance, you can use this file to declare how you want your test to log results in the terminal or inside a log file.
This file executes before other test files since it contains the test configurations and resides in the root directory.
In this case, we’ll ignore deprecation warnings using the pytest.ini file:
The pytest.ini file has other configuration options besides ignoring deprecation warnings. But note that it doesn’t work without the [pytest] entry point – as written above.
For instance, among other settings, you can use it to configure the command-line outputs and custom-exit test execution once the test fails n times. You can also use it to point to your settings file while testing websites developed with complex web frameworks like Django locally. You can learn more about it through this tutorial on pytest Django.
Here are a few more configuration options for pytest.ini:
- Console_output_style= progress (default), classic, or count. Specify any of these options to customize how Pytest displays results. For example, while progress loads test results using percentages, count displays the number of tests executed.
- faulthandler_timeout = 10; exits the test after a 10-second timeout.
- log_auto_indent = Boolean; choose whether to allow auto-indentation of CLI logs.
- log_cli = Boolean; specify whether or not you want to see execution logs during test executions.
- log_file = log/log FileName.txt; write test logs into a file in your project root directory.
- log_file_date_format = %Y-%m-%d %H:%M:%S; append test time and date to log files.
- log_level = INFO; specify the log type.
Project Structure
This section on press enter without WebElement in Selenium Python shows the entire test suite structure:
|
1 2 3 4 5 6 7 8 9 10 11 12 |
test_directory ├─ .gitignore ├─ pytest.ini ├─ README.md ├─ settings │ └─ Setup.py ├─ suites │ ├─ test_reg_action_chain.py │ └─ test_reg_js_action.py └─ webactions ├─ javaScript_web_actions.py └─ action_chain_web_actions.py |
File descriptions:
- settings/Setup.py : It contains the setup class for the entire test suite. All test demos share this setup.
- suites/test_reg_action_chain.py : Contains the ActionChain test demo. When executed, it runs the test using the ActionChain class.
- suites/test_reg_js_action.py : Holds the test execution class for the JavaScript web actions (execute_script).
- webactions/javascript_web_actions.py : This file contains the web page locator and the web action classes. We import and use it inside the suites/test_reg_js_action.py file.
- webactions/action_chain_web_action.py : Test suite web actions and locators that use the ActionChain are in this file. We import it into suites/test_reg_action_chain.py to use its class attributes and methods.
General Test Setup:
Here’s the setup code for the test suite.
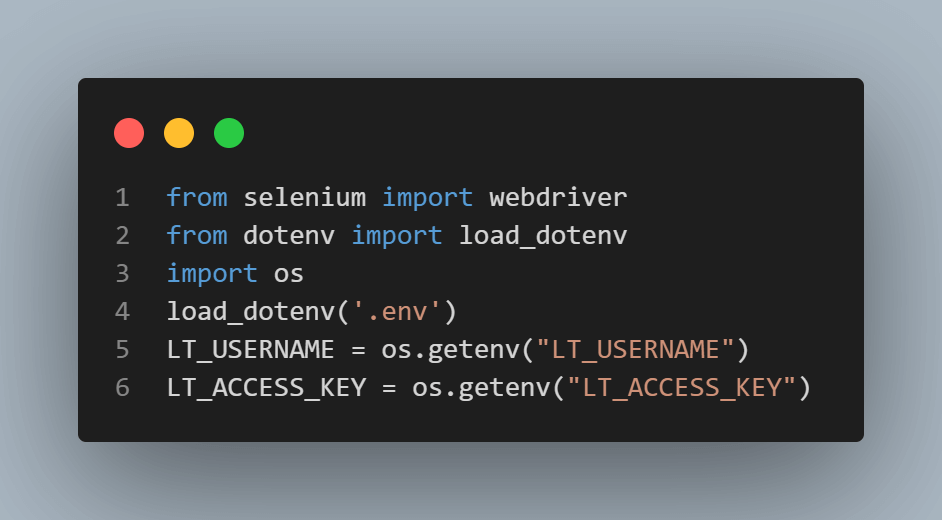
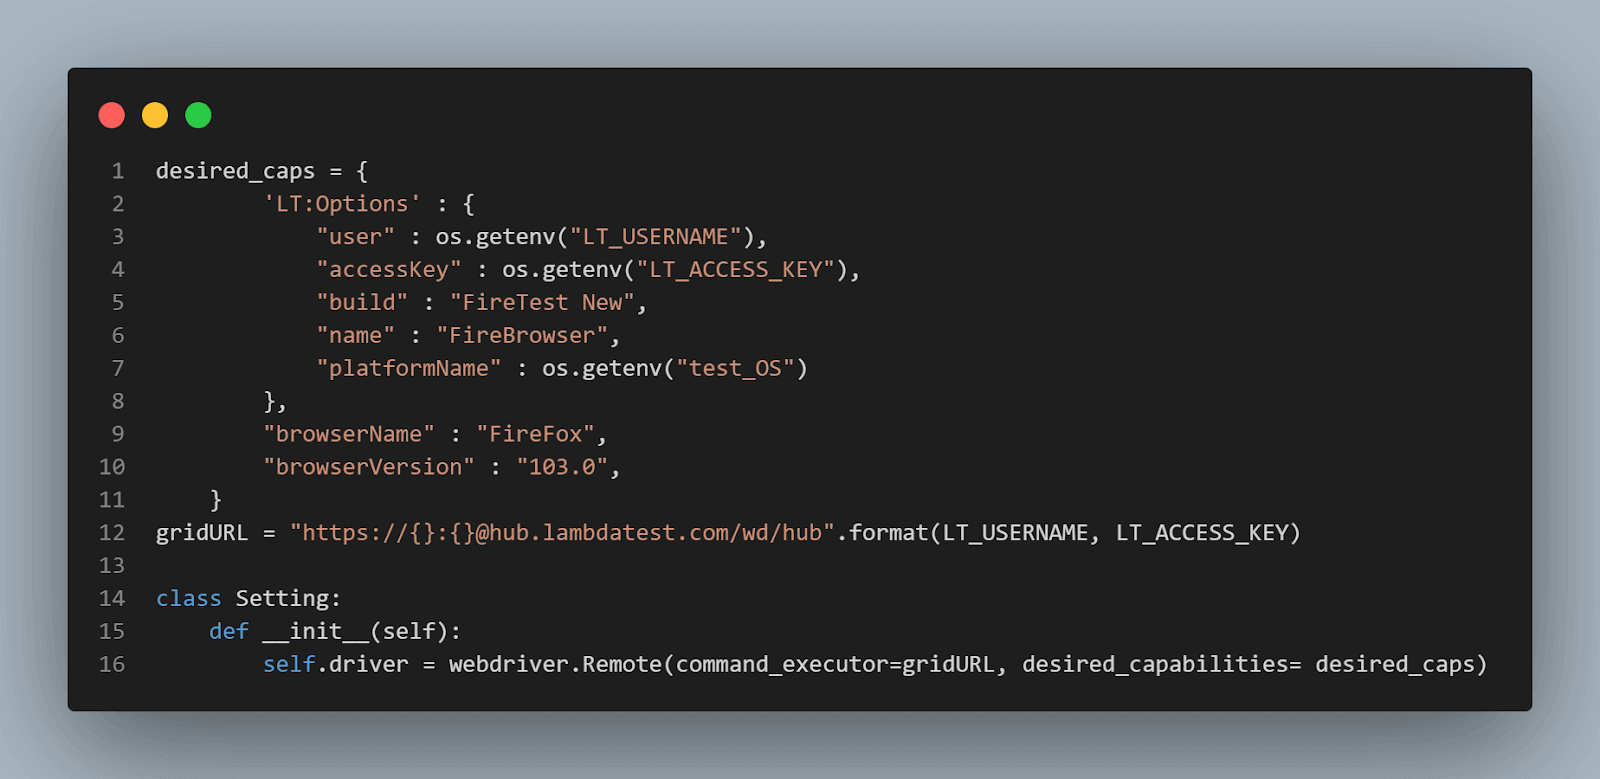
The above code is the Settings class for the test suite. You start by importing the required libraries and loading your grid username and access key from the environment variable file using the dotenv package.
To obtain your grid username and access key, head over to your LambdaTest Dashboard’s Builds directory. Click the Access Key button at the top right to reveal your grid details.
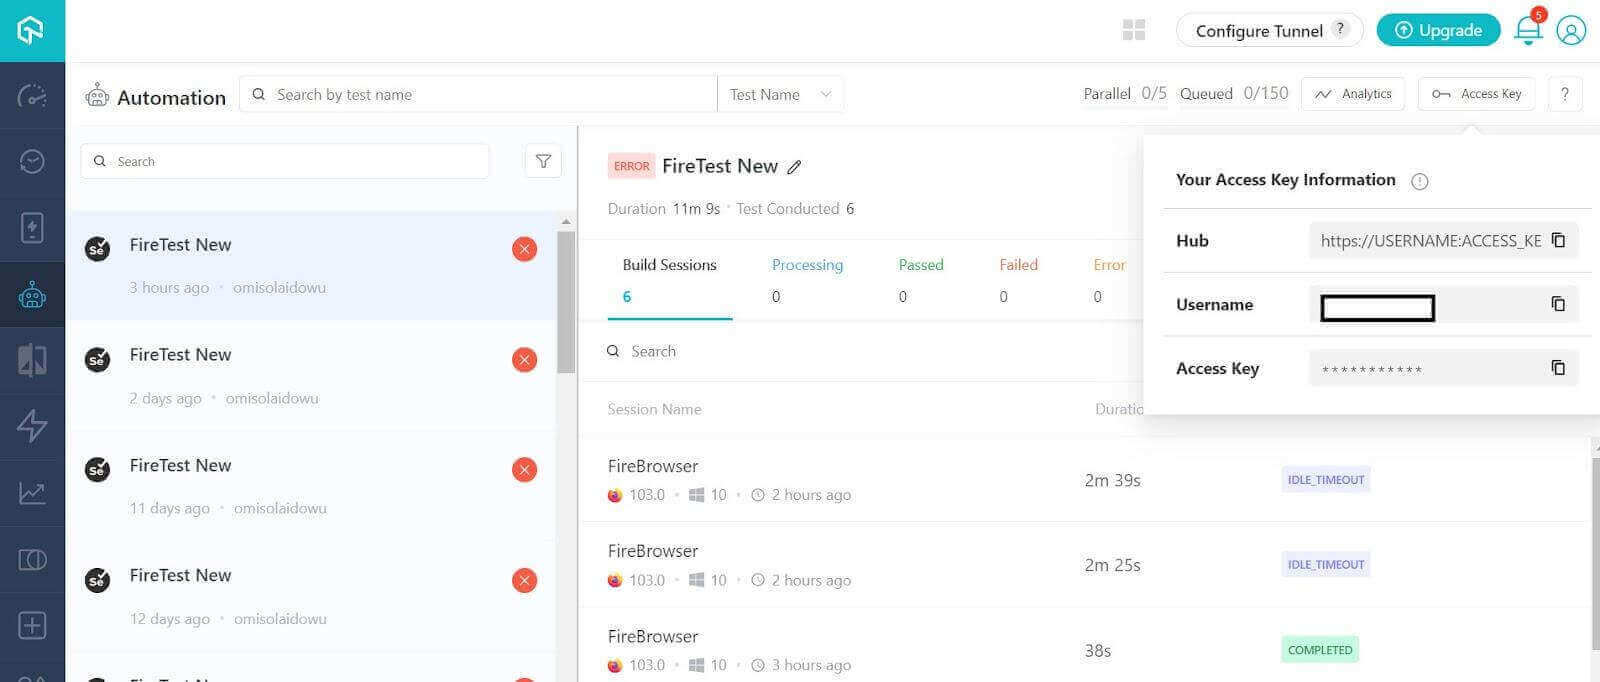
The Settings class starts with the driver attribute. The driver attribute connects to the remote grid using the webdriver.Remote method; this accepts the gridURL variable and the desired_capabilities dictionary as the test executor and test capability settings, respectively.
In this blog on press enter without WebElement in Selenium Python, we will generate the test capabilities from the LambdaTest Automation Capability Generator as done in this test demo.
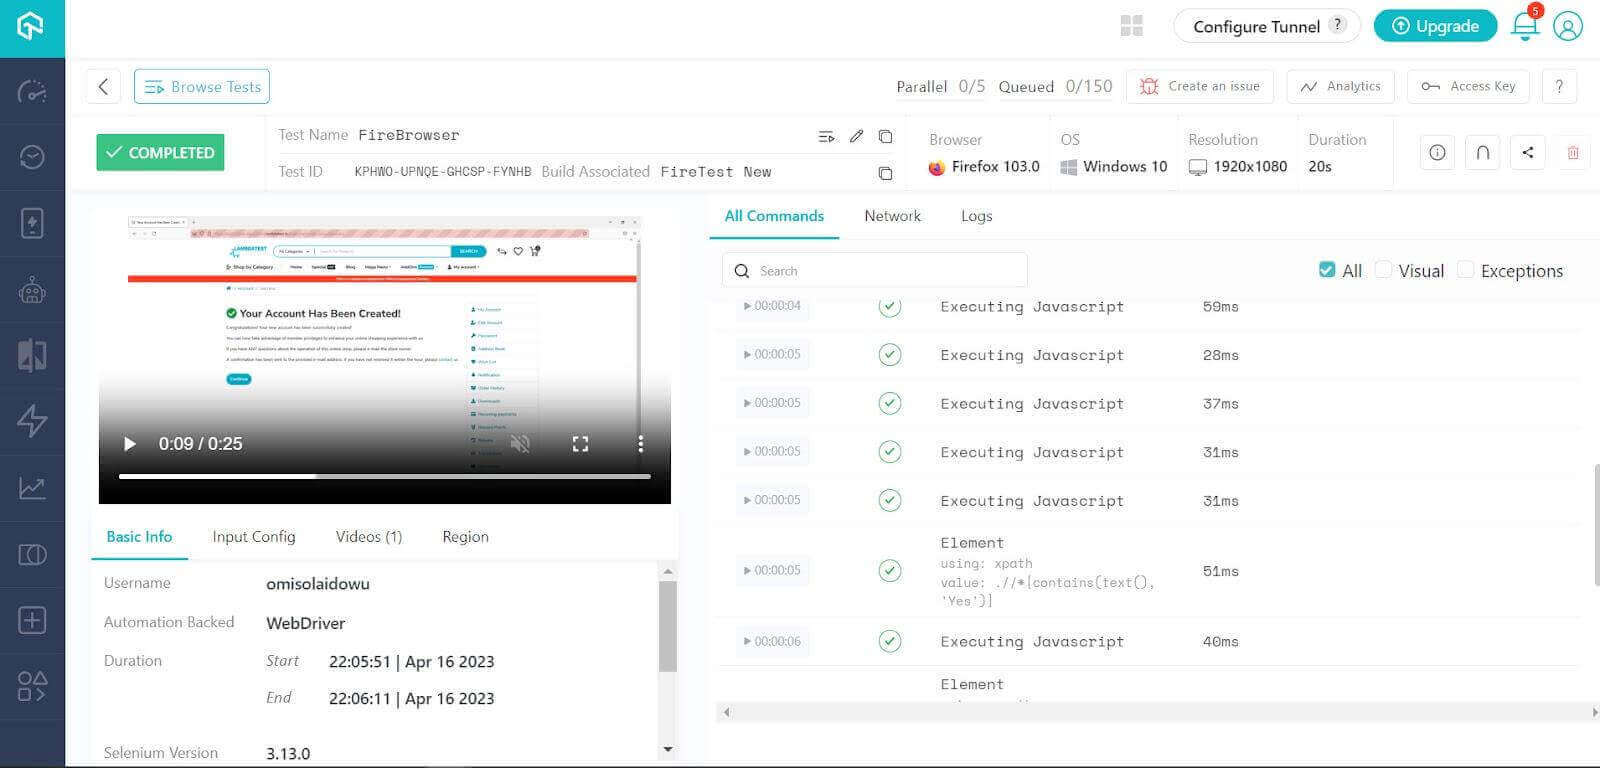
We used Firefox version 103.0 as the test browser in this demo. The chosen OS platform is Windows 10 (loaded from the .env file as shown below).
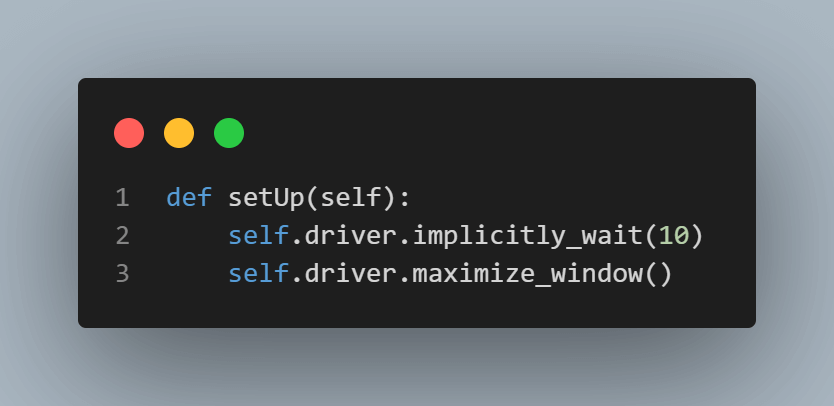
The setUp method pauses the driver implicitly for DOM elements to load. It then maximizes the window once it loads.
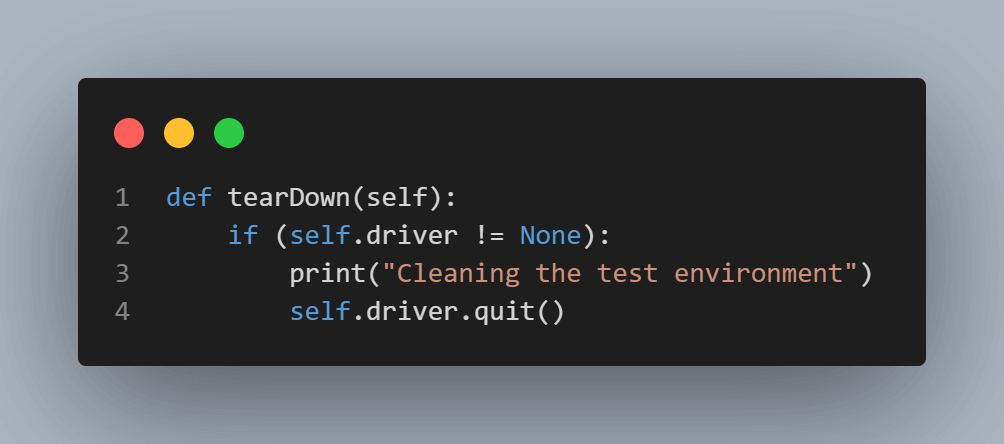
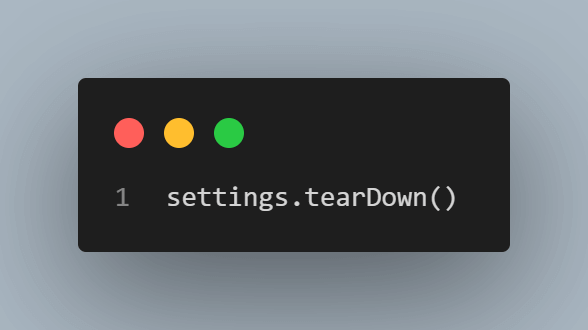
The tearDown method cleans up the test environment and quits the browser after each test.
We only need one setup file since the entire test suite shares the Settings class.
As mentioned earlier, I’ll start the test demonstration using Selenium’s ActionChains. Then I’ll show you how to run similar test steps using the JavaScript (execute_script) method.
So let’s get started with the demonstrations in the following sections.
Testing with Selenium’s ActionChains
This section on press enter without WebElement in Selenium Python details the test demonstration using the ActionChains class.
We’ll start with the web actions (webactions/action_chain_web_action.py), which we’ll then import and use inside the ActionChains test runner (suites/test_reg_action_chain.py)
Let’s look at our test scenario before we begin:
- Open the test website.
- Press the Tab key until the mouse points to the first input field.
- Fill the input fields sequentially with data.
- Press the terms and conditions checkbox.
- Submit the registration form.
- Check for a successful registration by taking the title of the following web page.
While you’ll typically write ActionChains in sequence, I separated each into methods to make it more readable, reusable, and callable while executing the test runner.
Since our test needs to send data and locate elements in an action chain, we start by importing Keys, ActionChains, and By from Selenium.

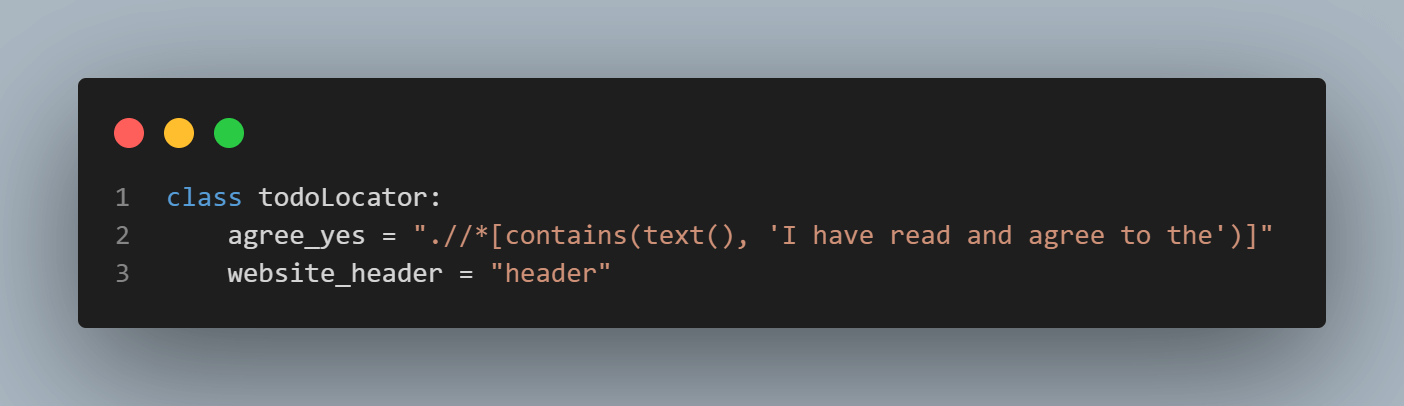
The locator class (todoLocator) only defines the website header element and the terms agreement checkbox.
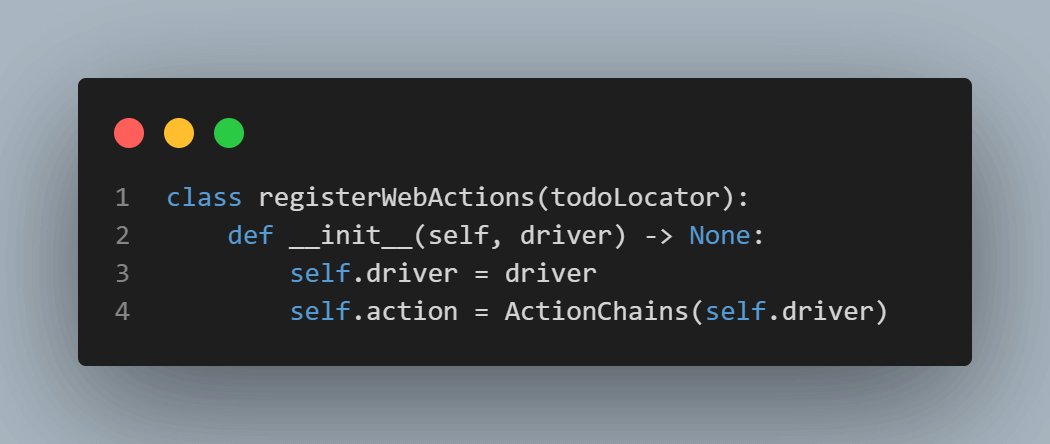
The registration WebAction class (registerWebActions) inherits the locator class to use its attributes. It then initializes with the WebDriver; we’ll derive this from the Settings class while instantiating this object inside the test runner file.
Next is the declaration of the driver and the action attributes; these are the driver and the ActionChains, respectively.
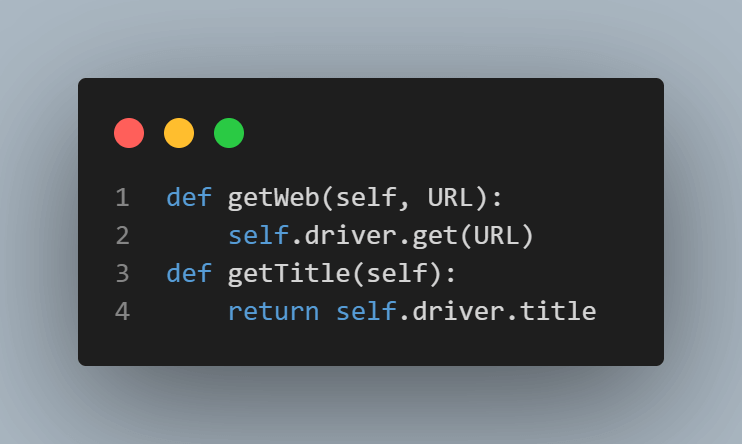
Next are the methods for launching the web page URL and getting its title.
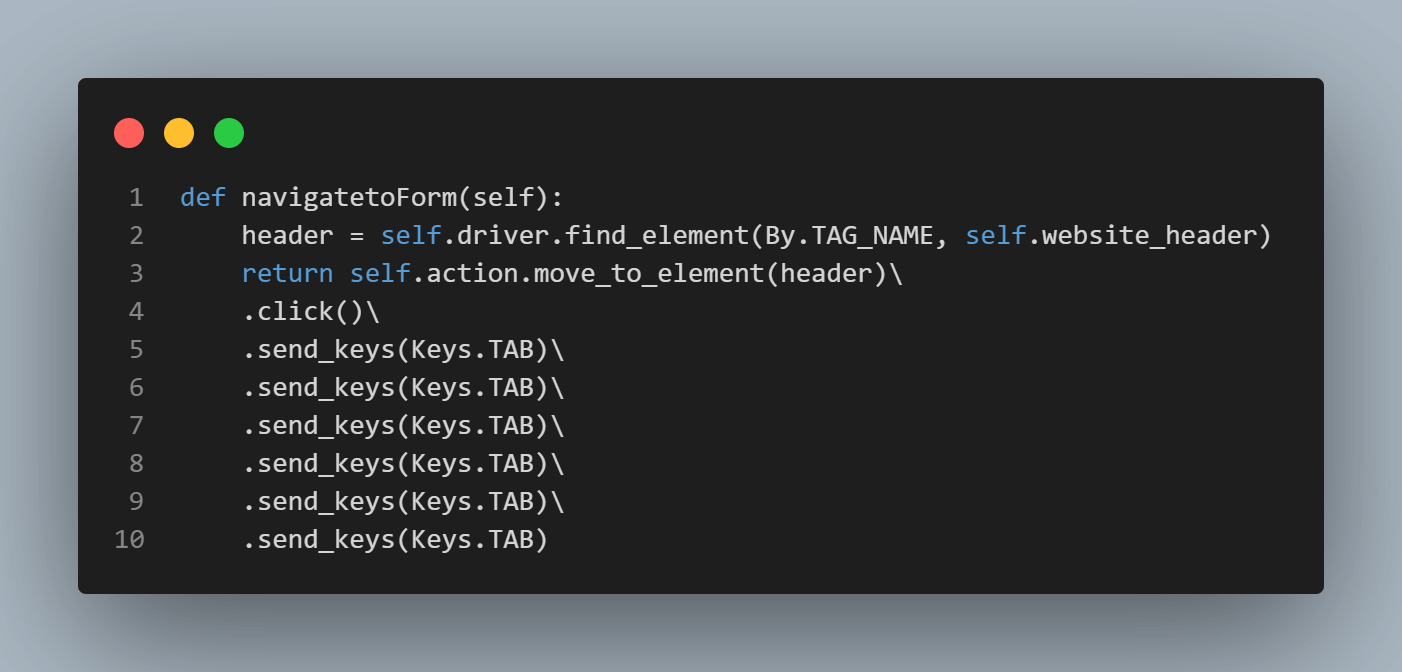
The header element is easy to locate since most web pages have one. I included it in the locator earlier because I wanted to start tabbing from the header element, and the test needs to click a blank point on the header to begin tabbing from there.
This allows you to count the number of times your test needs to press the Tab key to point the mouse to the first form field.
Think of this as navigating a web page using your keyboard without the mouse; you might need to press the Tab key a few times to get to a particular location. We applied a similar concept to mimic a user’s interaction with a web page.
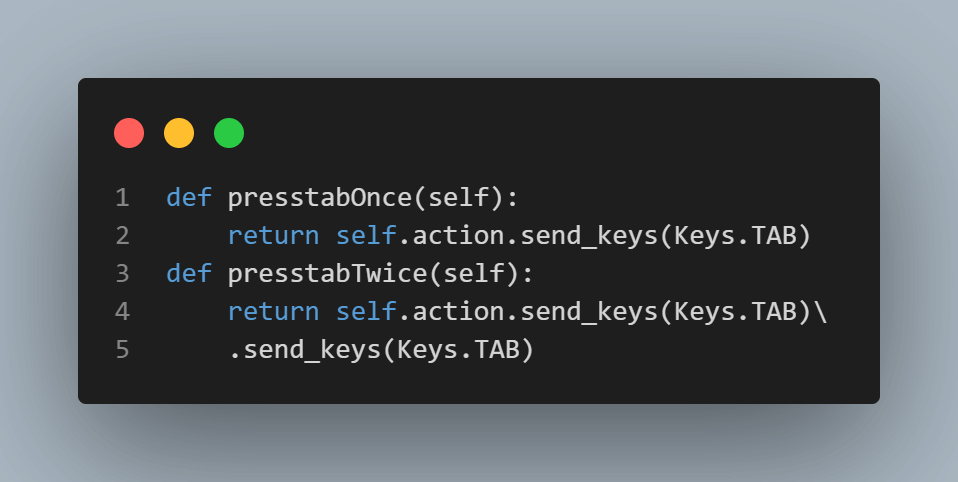
In our case, the test clicks the header elements and presses the Tab Key six times before reaching the first input field.
We’ll also intermittently press the Tab key once or twice in some places. So next, we define methods for pressing Tab once and twice. These are handy while executing these actions inside the test runner file (suites/test_reg_action_chain.py).
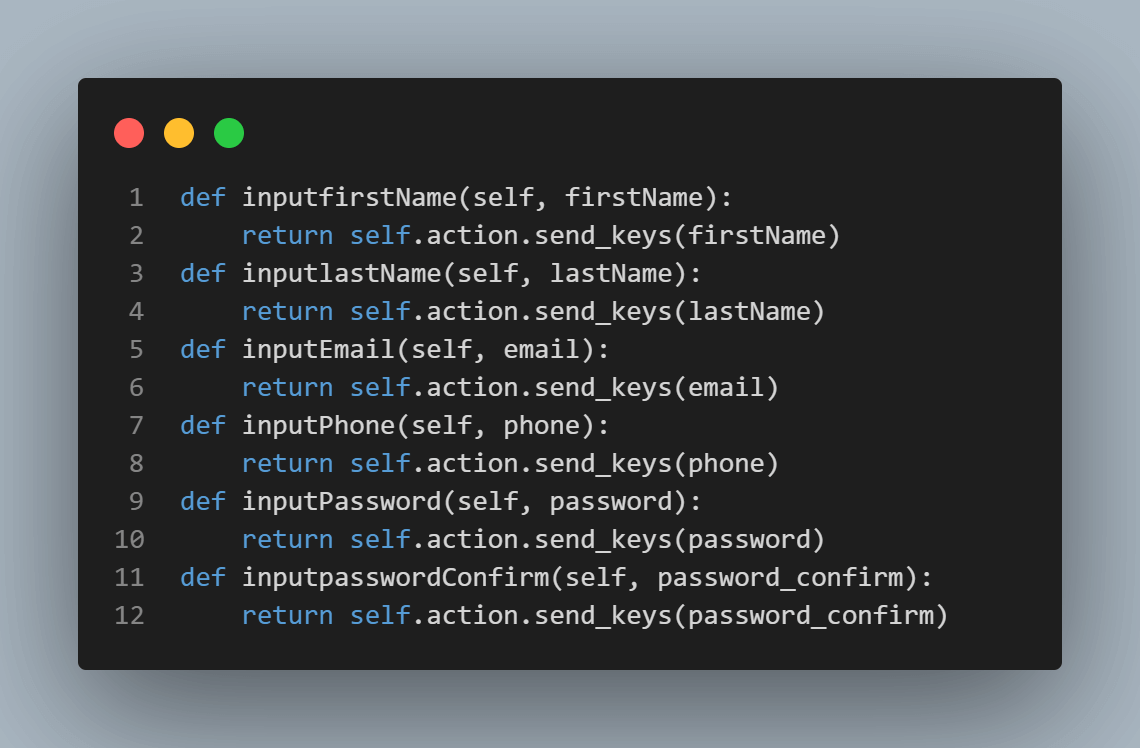
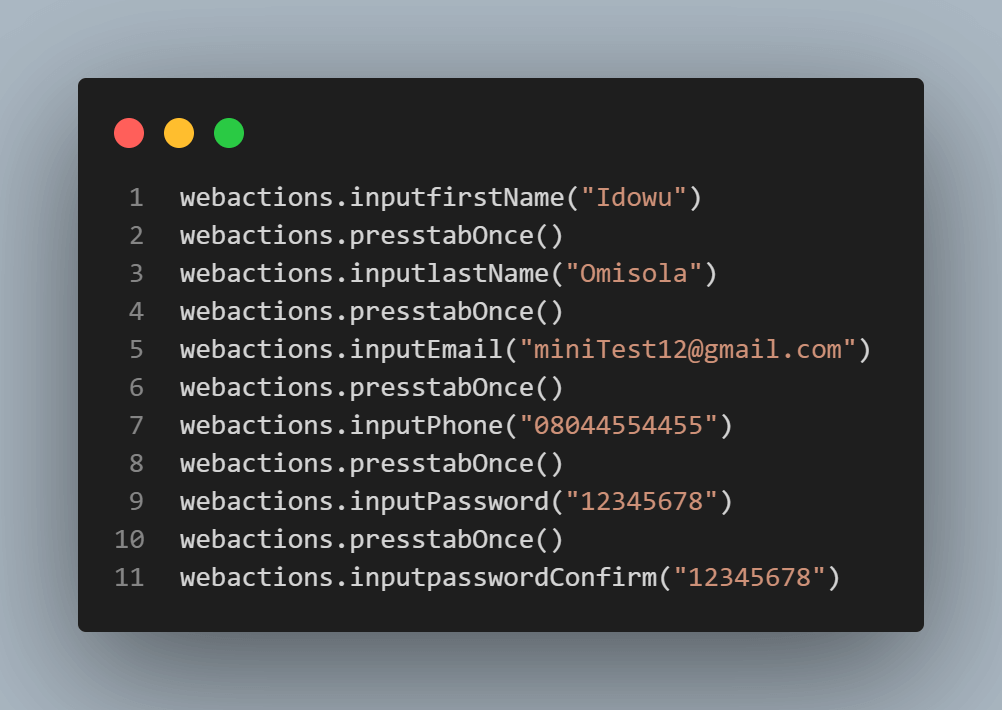
Next, we define functions for entering the user’s details into the form fields. As mentioned earlier, Selenium executes ActionChains sequentially. So Under the hood, each class method is a sequence of the previous one.
As for the terms and agreement checkbox—it needs a click action before you can submit a registration form—so we located that previously using its text content parameter with the XPath method inside the todoLocator class. Locating a web element this way doesn’t require a CSS locator since XPath finds it by the specified text.
However, multiple elements with the exact text content on the same web page can limit this method. But you can leverage XPath’s node (nth) feature to solve this problem.
Here’s how we call an action on the agreement checkbox:
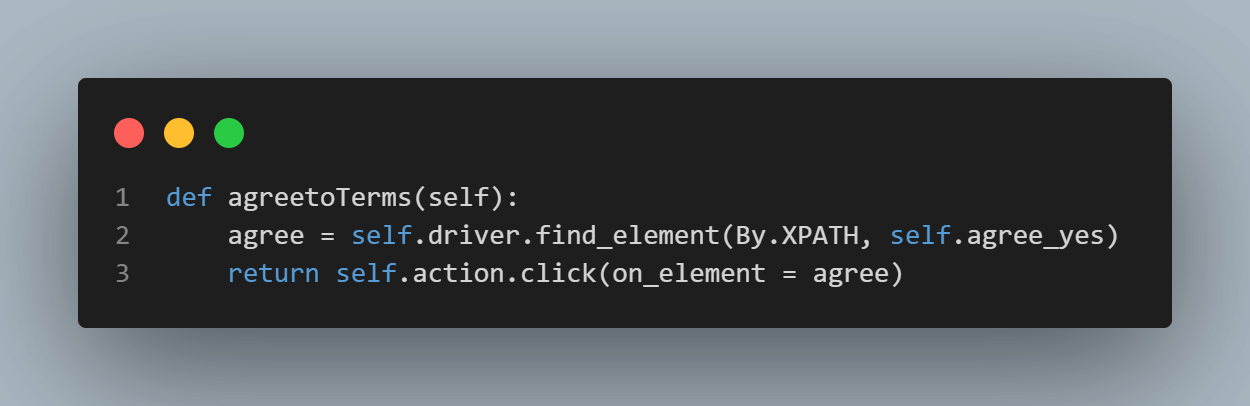
The self.agree_yes attribute comes from the inherited locator class (todoLocator).
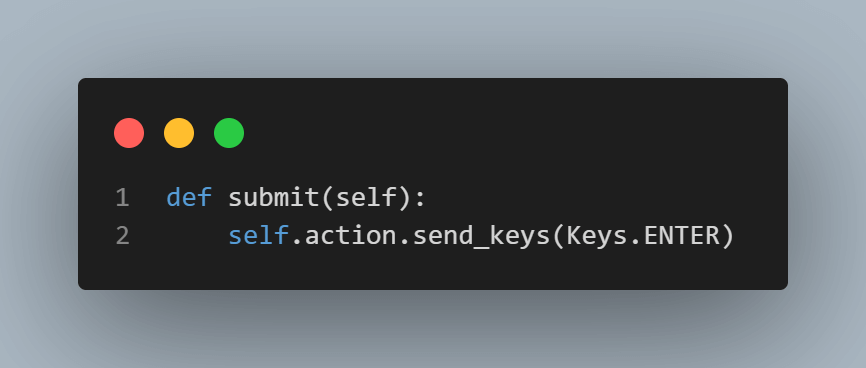
The form-filling actions end with the submit method for submitting the form. This only involves pressing the Enter key (Keys.Enter).
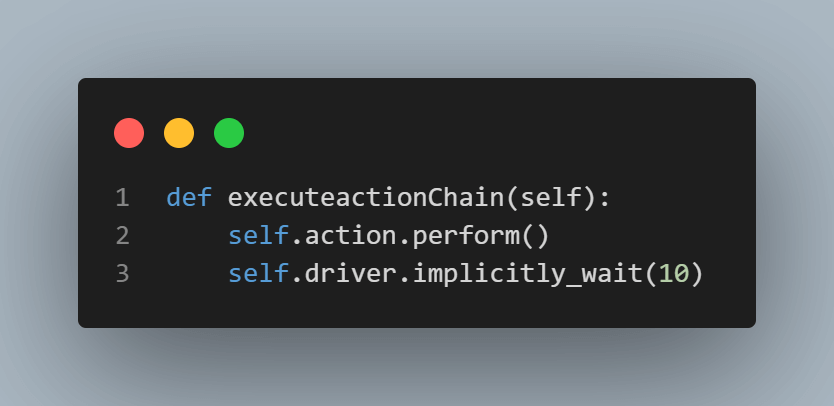
Finally, we define the action execution method (executeactionChain) to perform the declared actions inside an action chain. We achieve this using ActionChains’ action.perform method.
The implicitly_wait method is only a desired test property, not a requirement. It pauses the browser window for 10 seconds before exiting the test. You can remove it if you don’t want a pause after the test execution.
The code above executes the web action chains when you run the pytest command via the terminal.
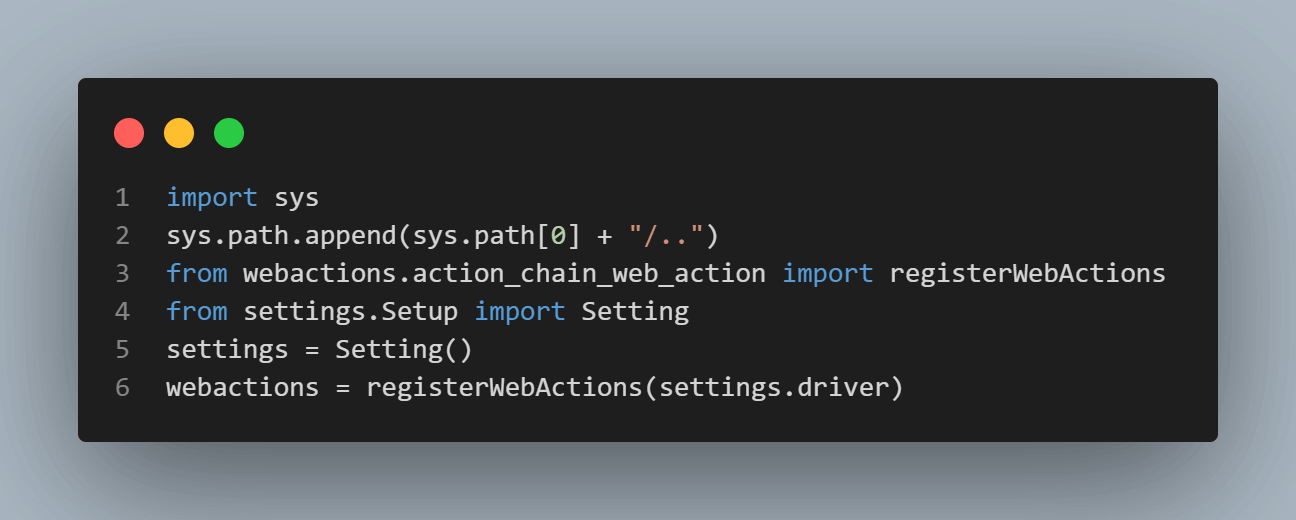
First, we import the sys module and use this to append to the module system paths. Then we import the registerWebActions class from the action_chain_web_action.pymodule. We instantiate this as webactions using the driver attribute from the settings object; this allows the WebDriver to act on the test website as declared in the ActionChains.
We also import Setting from the setup module (instantiated as settings).
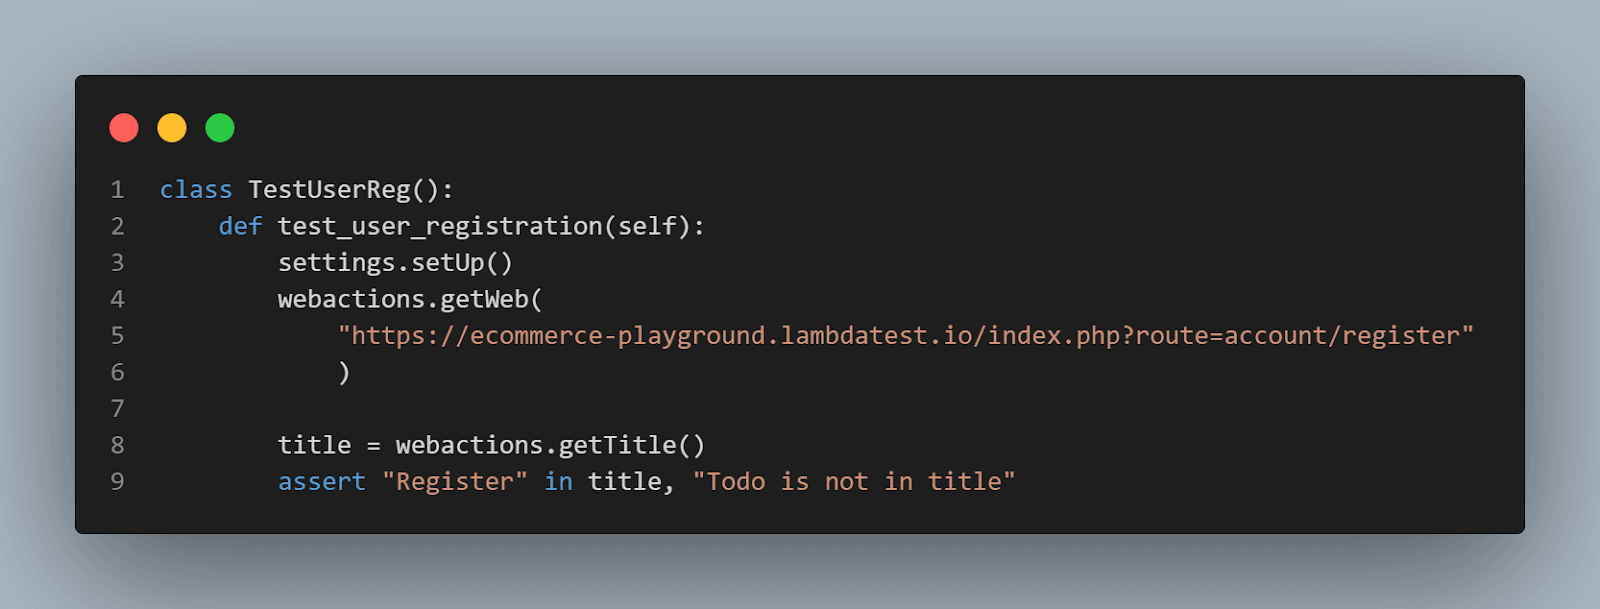
The TestUserReg class has only one method, test_user_registration, that executes the web action methods from the registerWebActions class.
We call the setUp method to set up the test environment and maximize the browser window. As a convention, the test starts by launching the test website.
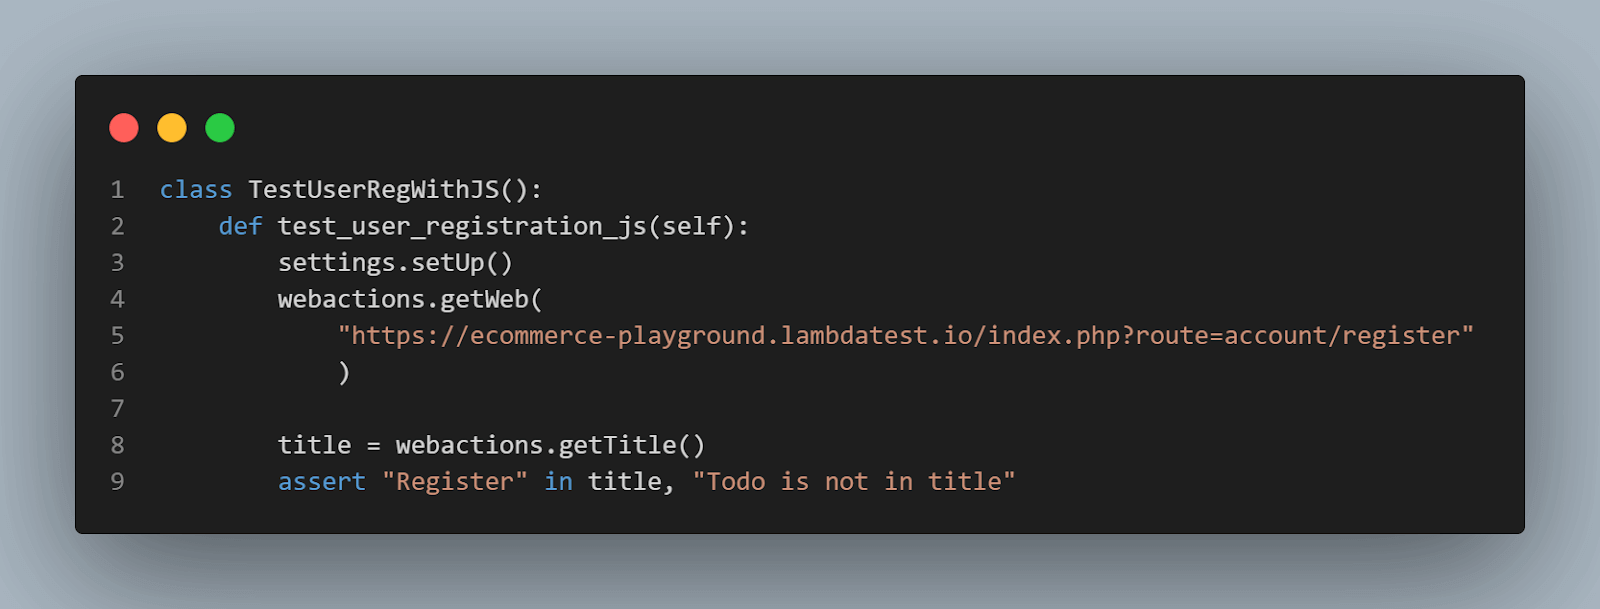
Then we get the web page title using the getTitle method of the webactions object and assert if “Register” is in the title text.
Next are the test steps execution:
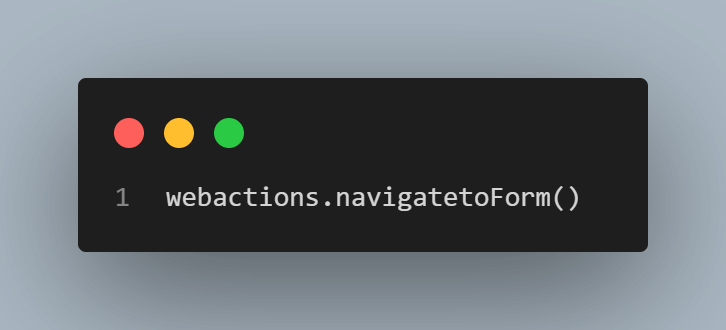
Step 1: Our test navigates to the first form field.
Step 2: Fill the form fields and press the Tab key once after filling each input field.
I maintained the default subscription option, which is No. So there was no need to click that since I didn’t want to subscribe. You might need to write methods to use the Left and Right keys within the action chain class to switch between Yes and No if you want your test to “Subscribe to Newsletter.”
Hence, the test presses Tab twice to skip that option and jump to the “I have read and agree to the Privacy Policy” checkbox, which requires a click action.
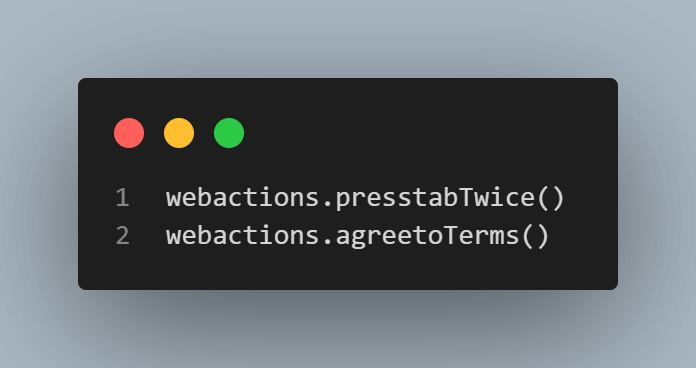
Step 3: “Privacy Policy” is in a separate element. So our test presses Tab twice once more to point the mouse to the Submit button. It then presses the Enter key to submit the registration form and executes this action chain by calling the executeactionChain method.

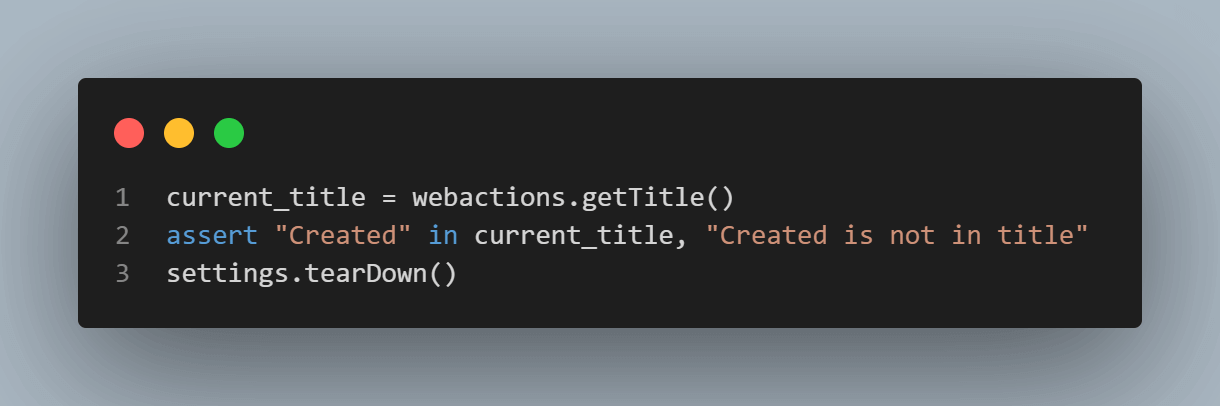
Finally, we get the current URL and assert if “Created” is in its title text to confirm whether or not our test successfully registered a user. Then we call the tearDown method of the Settings class to clean up the test environment and exit the test.
Execution of the ActionChains
Go to your project root directory and run the pytest command:
|
1 |
pytest |
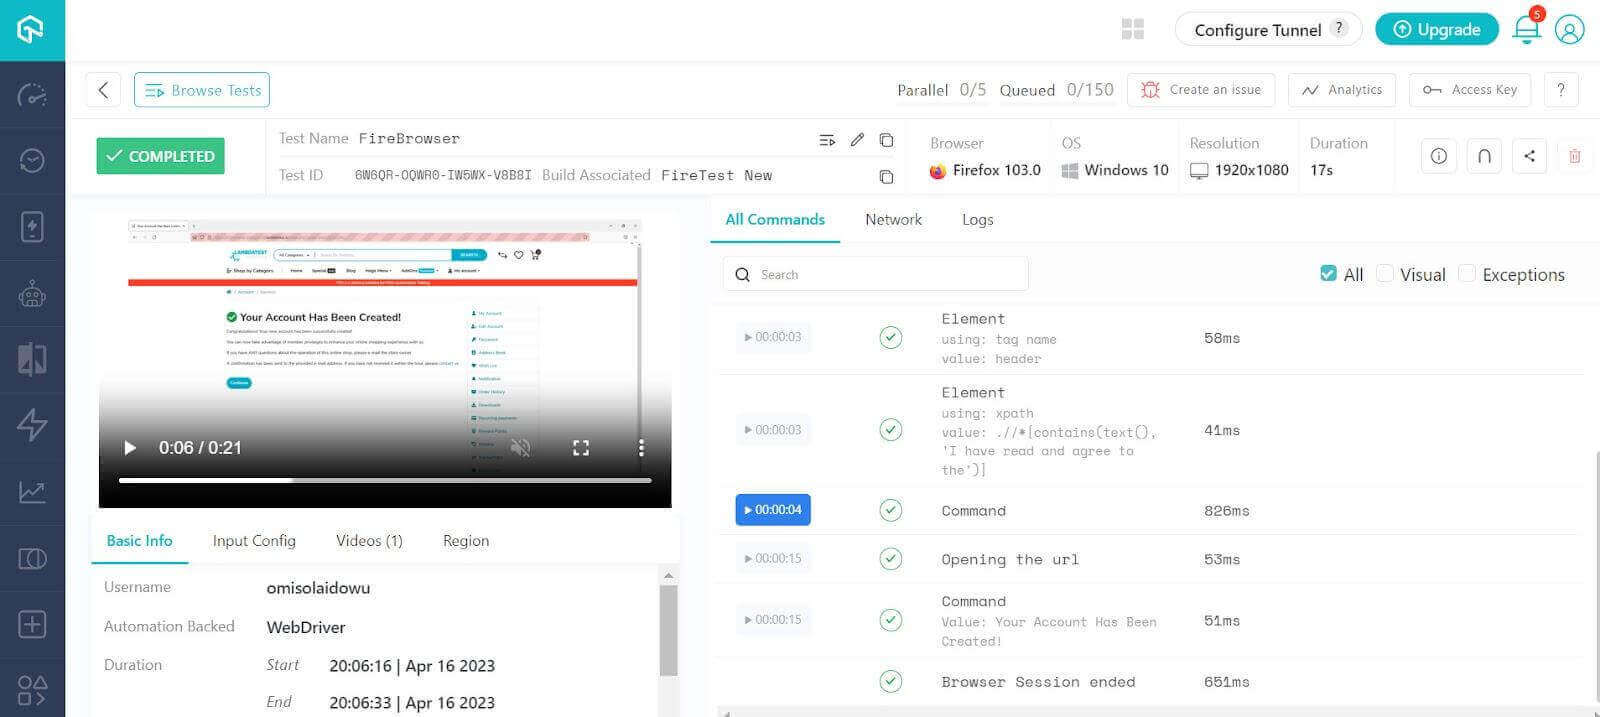
Here’s the test execution on the command line:

Our test also runs successfully on the cloud grid as shown below. Here we are using a cloud grid offered by the LambdaTest platform.
LambdaTest is a digital experience testing platform that enables developers and QA engineers to perform Selenium Python testing on over 3000+ real browsers and OS combinations. LambdaTest provides support for different Python testing frameworks to Python automation testing. In addition, you can parallelize your test execution to expedite software release cycles.
Visit our documentation to get started with Selenium Python testing
Using Selenium’s JavaScript Executor (execute_script)
In this section of this blog on press enter without WebElement in Selenium Python, now let’s see how to navigate the same web page using JavaScript embedding (execute_script method).
Let’s start with our test scenario
- Open the registration page (test website).
- Fill in the registration form fields using JavaScript actions (execute_script).
- Click the terms and agreement checkbox using JavaScript’s click event.
- Click the submit button using JavaScript’s click event.
- Take the title on the following page to check for successful registration.
|
|
The above code defines the web actions for JavaScript embedding demonstration. It starts with the todoLocator class, whose attributes are the web element locators. However, these locators don’t require web element inspection, as they’re visibly definitive.
Although we don’t know the underlying DOM structure, we know they’re input fields with placeholders.
Thankfully, we can get these input elements using their placeholders with JavaScript’s querySelector. You’ll see how that works down the line.
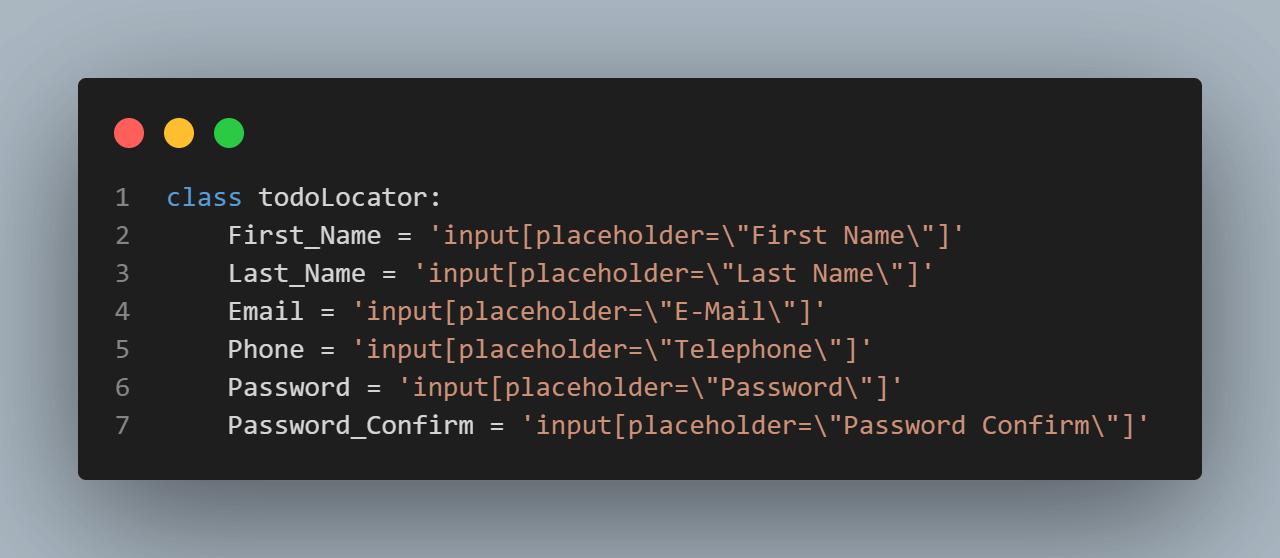
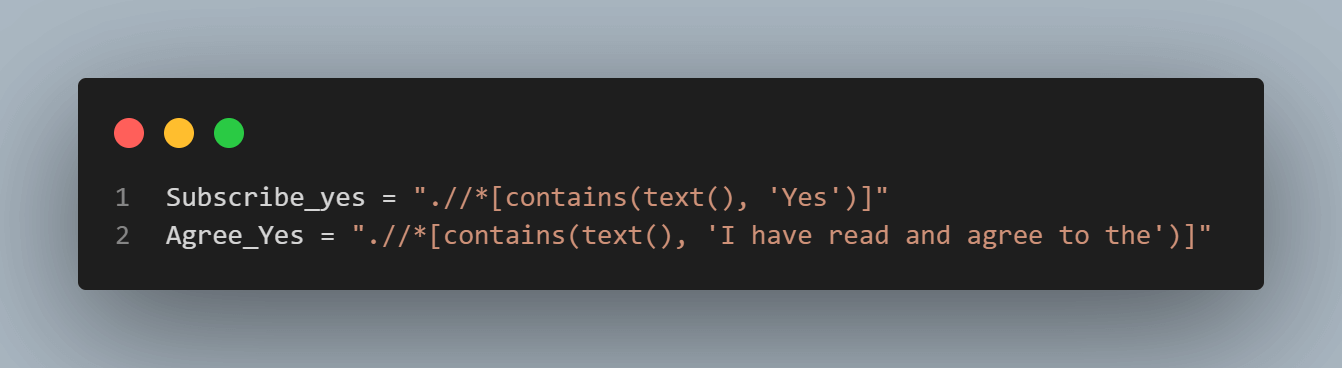
We trace the “Subscribe” option and the terms checkbox by their peculiar text content using the XPath method since we’ve assumed that we don’t know anything about their elements.
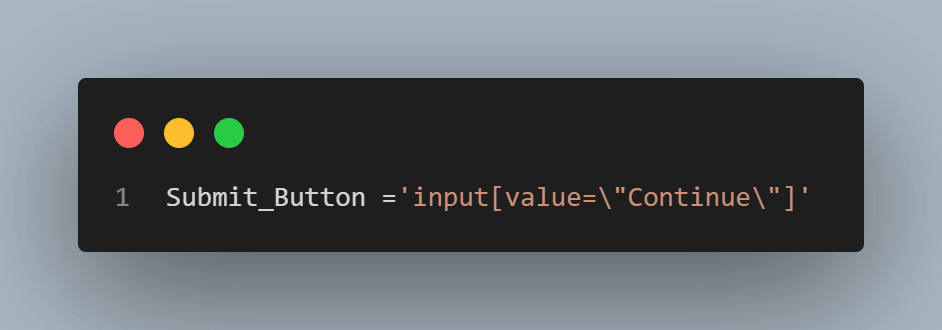
For the Submit input, I wasn’t sure at first whether it was a button or an input tag. But it works with the input tag. So sticking to locating an input with a text that says, “Continue” using XPath works.
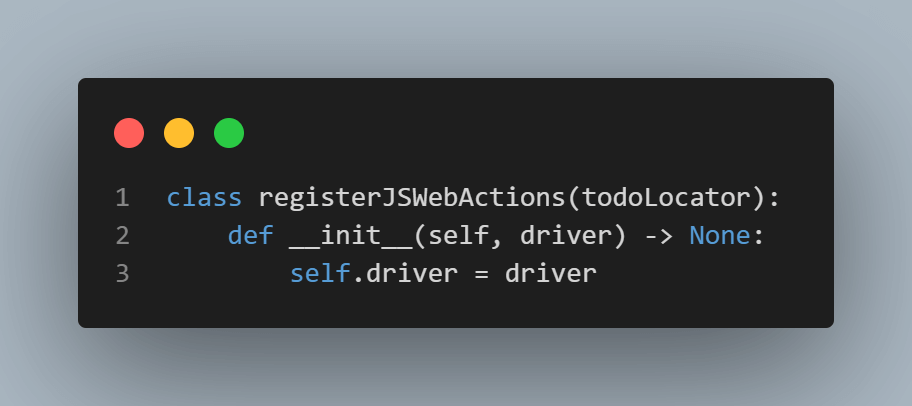
As we did earlier for the ActionChains, the registerJSWebActions class inherits the todoLocators class and its attributes and initializes with the WebDriver.
As mentioned, we’ll use JavaScript’s querySelector to pick on web elements rather than CSS Selector.
This takes the following form:
|
1 |
document.querySelector(element) |
Thus, a typical input field as used in our test looks like this:
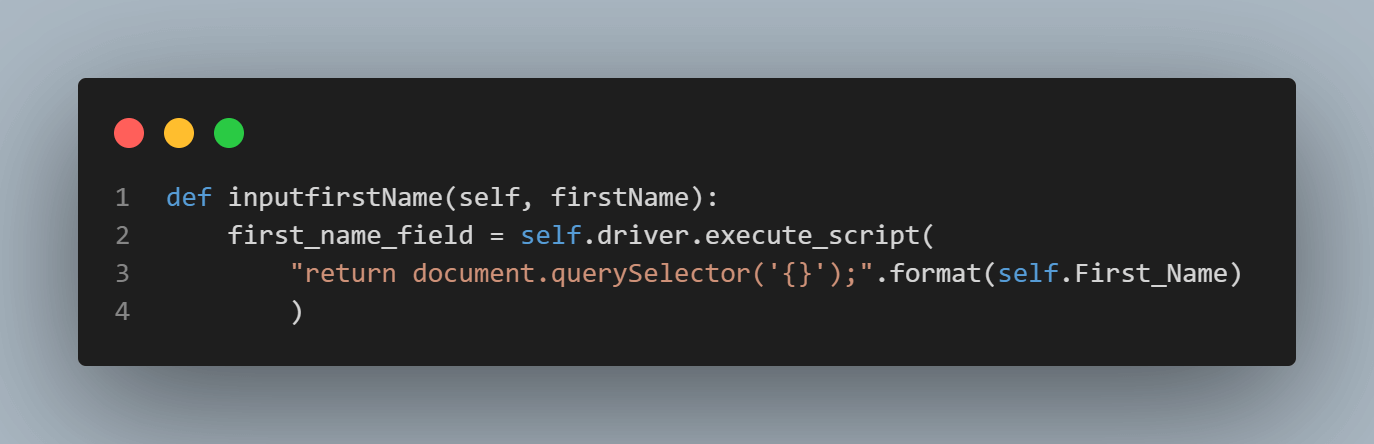
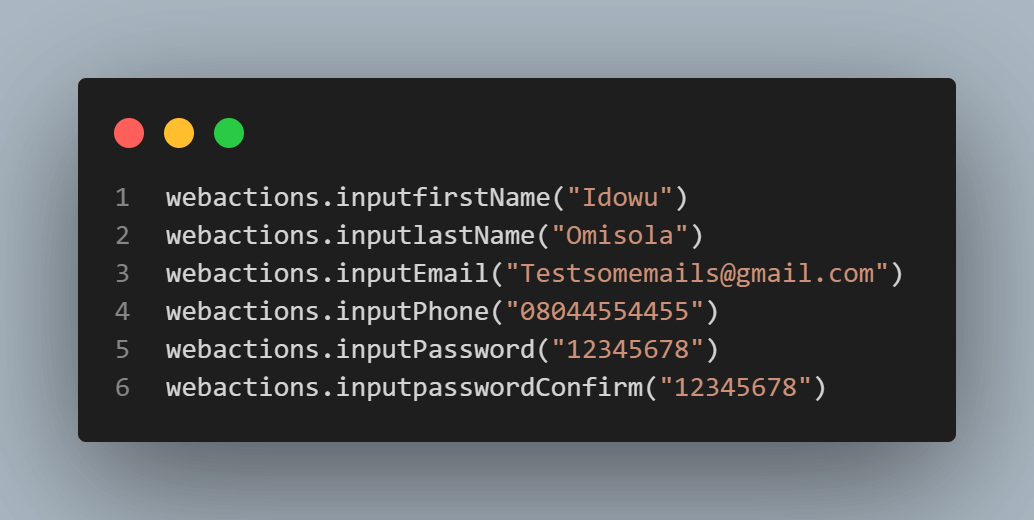
The first_name_field variable defines the First Name input element grabbed using the querySelector. Since the embedded JavaScript is a string, we insert the First_Name attribute (inherited from todoLocator class) using Python’s string format method.
The returned code line within this method uses JavaScript to write the required data (firstName) into the form field accordingly.
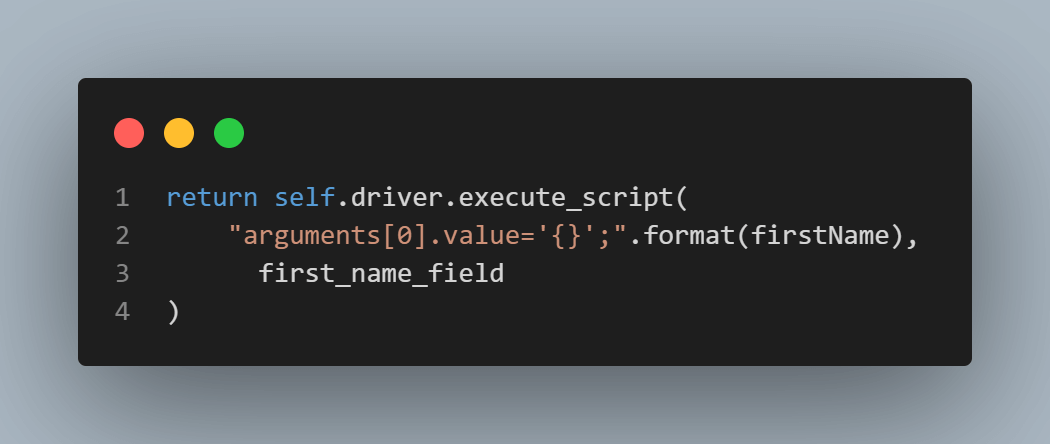
This is the convention for the other input actions.
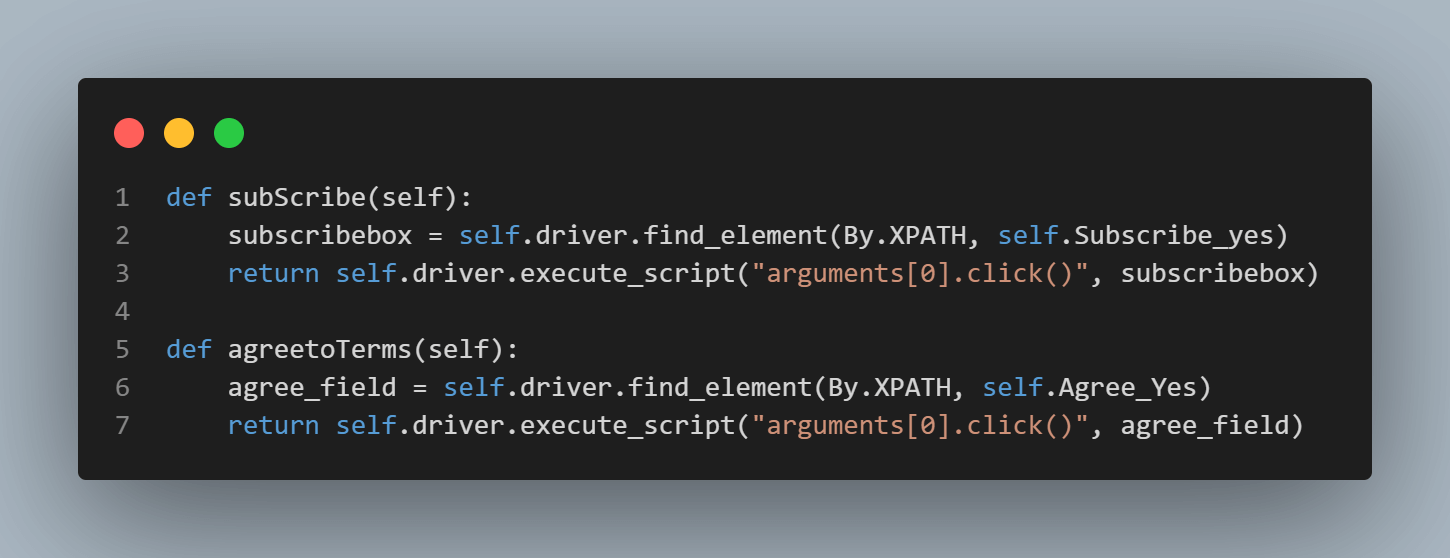
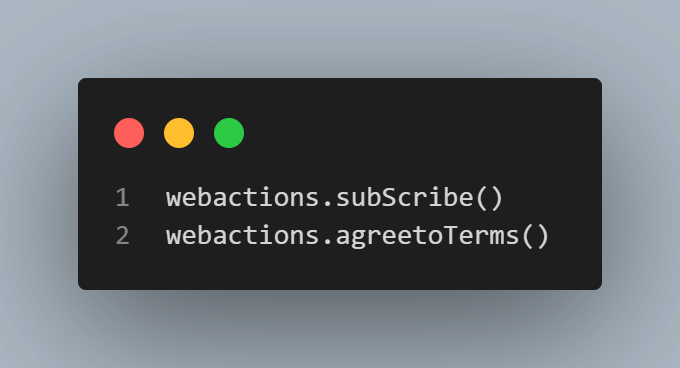
However, the subscribe and agreetoTerms methods use XPath to locate web elements based on specified text content. These require click action. So JavaScript does that for us.
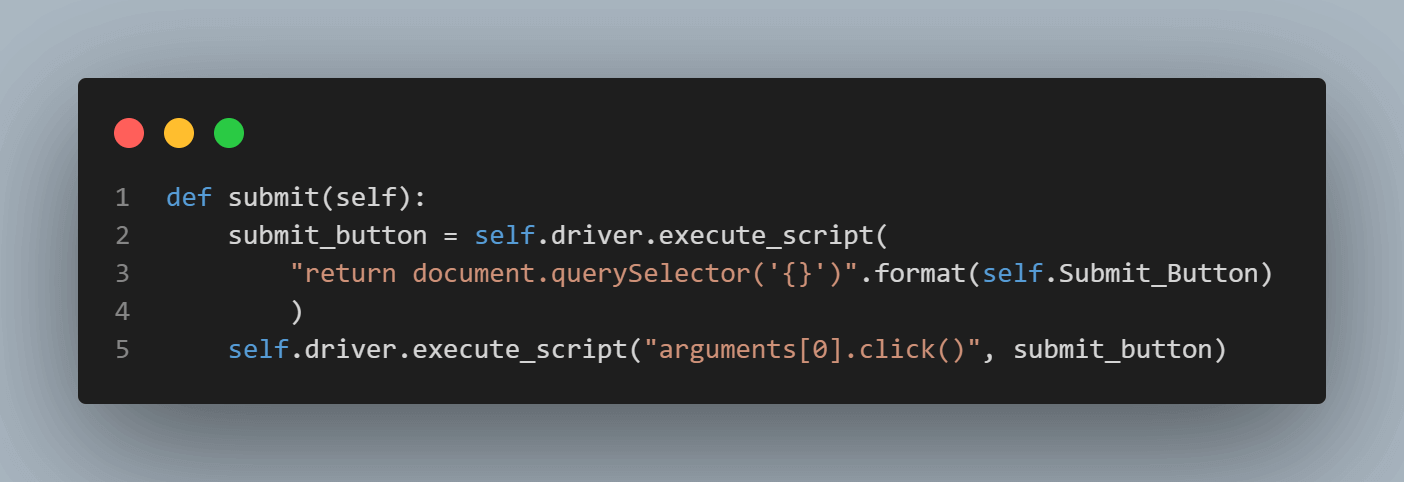
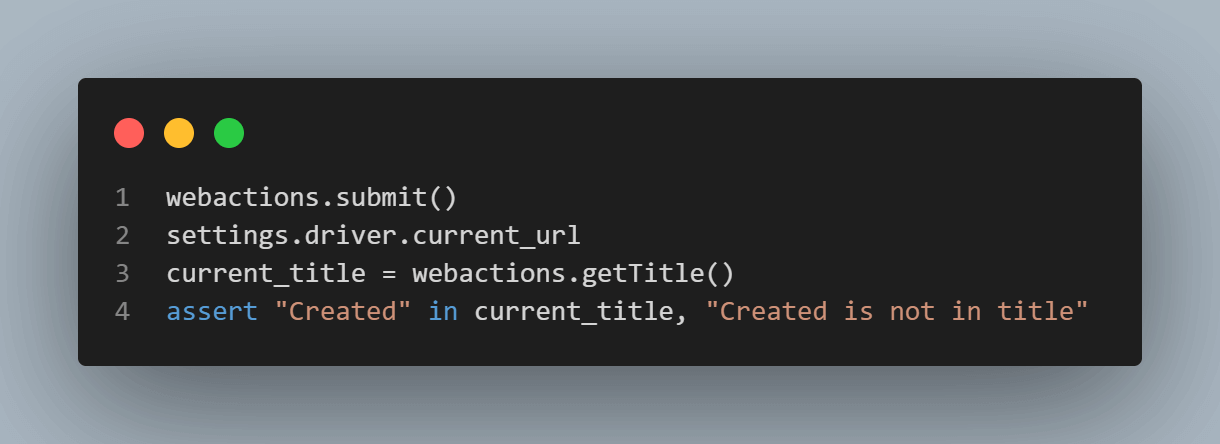
Finally, the test locates the Submit input button using the querySelector and submits the registration form using JavaScript’s click action.
The above code executes the JavaScript web actions written earlier. First, we import the registerJSWebActions and Setting from their respective modules.
We then instantiate the Setting class as settings. We instantiate the registerJSWebActions class as WebActions using the driver attribute from the settings object.

The TestUserRegWithJS class holds the test execution method (test_user_registration_js).
Step 1: This starts with the test setup, website launching, and title grab with an assertion to check if the browser agent has loaded the test website successfully.
This is similar to the action chain option code.
Step 2: Next, we call the input actions as shown below:
Step 3: Click the Subscribe and Terms agreement buttons:
Step 4: Finally, click the Submit button, get the next page title, and assert whether or not the test registered the user successfully.
Step 5: Quit the browser and end the test by calling the tearDown method from the Setting class:
JavaScript (execute_script) Demo Execution
To execute the JavaScript demonstration for navigating the web without an element, cd into your project root folder from the command line and run the pytest command:
|
1 |
pytest |
Provided the registered email address is unique, the test runs successfully, as seen via the command line:

Our demo also runs successfully on the cloud grid, as shown below:
NoteRun Python tests across 3000+ browsers & devices.Try LambdaTest Today!
Also Read: Selenium PHP Tutorial: A Comprehensive Guide, with Examples & Best Practices
You can get creative with your automation testing
No cap fits it all when navigating a web page without specifying elements. While the options we’ve considered may save time in some cases, they could also be daunting for testing complex websites or executing end-to-end testing.
If web elements are available, testing a website without inspecting its DOM for CSS Selectors isn’t a best practice. It could be costly, time-consuming, and confusing. However, such a situation might cross your way as a tester. Improvise your way with the test website—regardless of the odds.
As you’ve seen in our test demos, the ActionChains class and the execute_script methods are handy to navigate a website and press enter without WebElement in Selenium Python.
We had to go through some logical trials to navigate the test web page and complete the automation testing.
Frequently Asked Questions (FAQs)
What is the command for Enter text in Selenium?
In Selenium, the command for entering text into an input field is the send_keys() method. Here’s an example of how to use it:
|
1 2 |
element = driver.find_element_by_id("myInput") element.send_keys("Hello, World!") |
In this example, driver refers to the WebDriver instance, and find_element_by_id(“myInput”) is used to locate the input field element on the webpage. The send_keys() method is then called on the element to enter the desired text, which in this case is “Hello, World!”.
You can replace “myInput” with the appropriate locator method (find_element_by_name, find_element_by_xpath, find_element_by_css_selector, etc.) based on how you want to locate the element.
After using send_keys() to enter the text, you can interact with other elements or simulate additional actions as needed.


Author’s Profile
Idowu (Paul) Omisola
Idowu is a self-taught programmer, coding YouTuber, and technical writer with a penchant for teaching. He started his coding career in 2018 but combined it with technical writing a year later and has never looked back. He has worked for a couple of websites over the years, and you'll find some of his coding guides on popular websites like MUO. He loves discussing software structure and coding topics in Python, JavaScript, Golang, and TypeScript. And when it comes to software testing, he's a fan of Playwright and Selenium.
Blogs: 6
Got Questions? Drop them on LambdaTest Community. Visit now


